oi - deutsche telekom · ip netpackage t-octopus f 900 t-octophon f display module ip operating...
TRANSCRIPT
==!"§==Com=
T-Octopus F 200/400/600/650IP NetpackageT-Octopus F 900T-Octophon F display module IPOperating Instructions

About this User Manual
2
About this User ManualThis User Manual describes the use of the T-Octophon F display module IP on the T-Octophon F31/41 IP / T-Octophon F41 IP SL.All functions you can use with the T-Octophon F display module IP are described. You may find that some func-tions you wish to use are not available on your T-Octophon F display module IP. This may be due to one of the following reasons:• The function has not been configured for your device - please contact your service personnel.• Your communication platform does not support this function - please contact your service personnel.
Important Notes
The information provided in this document contains merely general descriptions or characteristics of perfor-mance which in case of actual use do not always apply as described or which may change as a result of further development of the products.An obligation to provide the respective characteristics shall only exist if expressly agreed in the terms of contract.
The device must not come into contact with abrasive liquids or liquids which are liable to discolor it, such as tea, coffee, fruit juices or soft drinks.
Labels
Never operate the telephone in an environment where there is a risk of explosion.
Never open the telephone set or an add-on unit. If any problems arise, contact your service per-sonnel.
Only use original accessories. The use of other manufacturers’ accessories may be dangerous and will render the warranty and approval null and void.
The CE symbol certifies compliance of this equipment with the EU and UL directives.
This device has been manufactured in accordance under a certified environmental manage-ment system (ISO 14001). This process ensures that energy consumption and the use of pri-mary raw materials are kept to a minimum, thus reducing waste production.
Contents
Content
About this User Manual . . . . . . . . . . . . . . . . . . . . . . . . . . . 2Important Notes . . . . . . . . . . . . . . . . . . . . . . . . . . . . . . . . . . . . . . . . . . . . . . . . . . . . . . . . . . . . . . . . . . 2Labels . . . . . . . . . . . . . . . . . . . . . . . . . . . . . . . . . . . . . . . . . . . . . . . . . . . . . . . . . . . . . . . . . . . . . . . . . . . 2
Basics of operation . . . . . . . . . . . . . . . . . . . . . . . . . . . . . . . 5Operation range of T-Octophon F display module IP . . . . . . . . . . . . . . . . . . . . . . . . . . . . . . . . . . 5Guidance for reading the operating instructions. . . . . . . . . . . . . . . . . . . . . . . . . . . . . . . . . . . . . . 6
Instructions for intuitive operation . . . . . . . . . . . . . . . . . . . . . . . . . . . . . . . . . . . . . . . . . . . . . . 6Display with touch screen functionality . . . . . . . . . . . . . . . . . . . . . . . . . . . . . . . . . . . . . . . . . . . . . . 7
Overview . . . . . . . . . . . . . . . . . . . . . . . . . . . . . . . . . . . . . . . . . . . . . . . . . . . . . . . . . . . . . . . . . . . . 7Operating the display . . . . . . . . . . . . . . . . . . . . . . . . . . . . . . . . . . . . . . . . . . . . . . . . . . . . . . . . . 7Start page . . . . . . . . . . . . . . . . . . . . . . . . . . . . . . . . . . . . . . . . . . . . . . . . . . . . . . . . . . . . . . . . . . . 8System and application bar . . . . . . . . . . . . . . . . . . . . . . . . . . . . . . . . . . . . . . . . . . . . . . . . . . . . 9Dialog messages . . . . . . . . . . . . . . . . . . . . . . . . . . . . . . . . . . . . . . . . . . . . . . . . . . . . . . . . . . . . 10Display keyboard . . . . . . . . . . . . . . . . . . . . . . . . . . . . . . . . . . . . . . . . . . . . . . . . . . . . . . . . . . . . 10Screen Lock . . . . . . . . . . . . . . . . . . . . . . . . . . . . . . . . . . . . . . . . . . . . . . . . . . . . . . . . . . . . . . . . 12
Make a call . . . . . . . . . . . . . . . . . . . . . . . . . . . . . . . . . . . . . .13Dial from personal telephone directory . . . . . . . . . . . . . . . . . . . . . . . . . . . . . . . . . . . . . . . . . . . . 13Dial from company telephone directory . . . . . . . . . . . . . . . . . . . . . . . . . . . . . . . . . . . . . . . . . . . . 15Speed Dial . . . . . . . . . . . . . . . . . . . . . . . . . . . . . . . . . . . . . . . . . . . . . . . . . . . . . . . . . . . . . . . . . . . . . . 16Voice Dialling . . . . . . . . . . . . . . . . . . . . . . . . . . . . . . . . . . . . . . . . . . . . . . . . . . . . . . . . . . . . . . . . . . . 17
Use of PC mouse and keyboard . . . . . . . . . . . . . . . . . . .18Prerequisites . . . . . . . . . . . . . . . . . . . . . . . . . . . . . . . . . . . . . . . . . . . . . . . . . . . . . . . . . . . . . . . . . . . . 18Activating the user interface . . . . . . . . . . . . . . . . . . . . . . . . . . . . . . . . . . . . . . . . . . . . . . . . . . . . . 18Operation. . . . . . . . . . . . . . . . . . . . . . . . . . . . . . . . . . . . . . . . . . . . . . . . . . . . . . . . . . . . . . . . . . . . . . 20
3

Applications. . . . . . . . . . . . . . . . . . . . . . . . . . . . . . . . . . . . 21Personal telephone directory . . . . . . . . . . . . . . . . . . . . . . . . . . . . . . . . . . . . . . . . . . . . . . . . . . . . . 21
Set up entry . . . . . . . . . . . . . . . . . . . . . . . . . . . . . . . . . . . . . . . . . . . . . . . . . . . . . . . . . . . . . . . . 22Adding VoiceDial to an entry . . . . . . . . . . . . . . . . . . . . . . . . . . . . . . . . . . . . . . . . . . . . . . . . . 25View entry . . . . . . . . . . . . . . . . . . . . . . . . . . . . . . . . . . . . . . . . . . . . . . . . . . . . . . . . . . . . . . . . . . 26Change entry . . . . . . . . . . . . . . . . . . . . . . . . . . . . . . . . . . . . . . . . . . . . . . . . . . . . . . . . . . . . . . . 27Delete entry . . . . . . . . . . . . . . . . . . . . . . . . . . . . . . . . . . . . . . . . . . . . . . . . . . . . . . . . . . . . . . . . 27Delete all entries . . . . . . . . . . . . . . . . . . . . . . . . . . . . . . . . . . . . . . . . . . . . . . . . . . . . . . . . . . . . 27Transferring the personal telephone directory . . . . . . . . . . . . . . . . . . . . . . . . . . . . . . . . . . 28
Company telephone directory . . . . . . . . . . . . . . . . . . . . . . . . . . . . . . . . . . . . . . . . . . . . . . . . . . . . 36Search results . . . . . . . . . . . . . . . . . . . . . . . . . . . . . . . . . . . . . . . . . . . . . . . . . . . . . . . . . . . . . . 38
Using Java midlets. . . . . . . . . . . . . . . . . . . . . . . . . . . . . . . . . . . . . . . . . . . . . . . . . . . . . . . . . . . . . . . 39General operation . . . . . . . . . . . . . . . . . . . . . . . . . . . . . . . . . . . . . . . . . . . . . . . . . . . . . . . . . . . 39Example Application: Speed Dial List . . . . . . . . . . . . . . . . . . . . . . . . . . . . . . . . . . . . . . . . . . 42
WAP browser . . . . . . . . . . . . . . . . . . . . . . . . . . . . . . . . . . . . . . . . . . . . . . . . . . . . . . . . . . . . . . . . . . . 46Load any pages . . . . . . . . . . . . . . . . . . . . . . . . . . . . . . . . . . . . . . . . . . . . . . . . . . . . . . . . . . . . . 47Favorites . . . . . . . . . . . . . . . . . . . . . . . . . . . . . . . . . . . . . . . . . . . . . . . . . . . . . . . . . . . . . . . . . . . 47Configuration . . . . . . . . . . . . . . . . . . . . . . . . . . . . . . . . . . . . . . . . . . . . . . . . . . . . . . . . . . . . . . . 49
Display. . . . . . . . . . . . . . . . . . . . . . . . . . . . . . . . . . . . . . . . . . . . . . . . . . . . . . . . . . . . . . . . . . . . . . . . . 50Contrast, Illumination and Calibration of the Display. . . . . . . . . . . . . . . . . . . . . . . . . . . . . 51Screen Lock . . . . . . . . . . . . . . . . . . . . . . . . . . . . . . . . . . . . . . . . . . . . . . . . . . . . . . . . . . . . . . . . 52Change Password. . . . . . . . . . . . . . . . . . . . . . . . . . . . . . . . . . . . . . . . . . . . . . . . . . . . . . . . . . . 53
Voice dialling . . . . . . . . . . . . . . . . . . . . . . . . . . . . . . . . . . . . . . . . . . . . . . . . . . . . . . . . . . . . . . . . . . . 54Online help . . . . . . . . . . . . . . . . . . . . . . . . . . . . . . . . . . . . . . . . . . . . . . . . . . . . . . . . . . . . . . . . . . . . . 54
Index . . . . . . . . . . . . . . . . . . . . . . . . . . . . . . . . . . . . . . . . . . 55
4

Basics of operation
Basics of operationThe T-Octophon F display module IP is used as an add-on with the T-Octophon F31/41 IP / T-Octophon F41 IP SL. On one hand, it supports you while telephoning with the T-Octophon telephone.On the other, it offers several other functions that you can use intuitively and effectively to perform different tasks.
The functions described here are related exclusively to the operation of the T-Octophon F display module IP. You will find the description of the T-Octophon telephone functions in the operating instructions of the according tele-phones.
Operation range of T-Octophon F display module IP
Different applications with graphical representations such as for instance, the personal telephone directory, a WAP browser etc., assist you in your work. You can work with several applications simultaneously (multi-tasking), without having to quit individual interfaces.You will find a precise description of the individual applications further down in the document.
Backlight, tilt-able graphics display with touch screen functionality 240 x 320 Pixel page 7
Key to open/close the context menu
Key to activate a function
Navigation keys
Speech dialling key page 54
5
Basics of operation
Guidance for reading the operating instructions
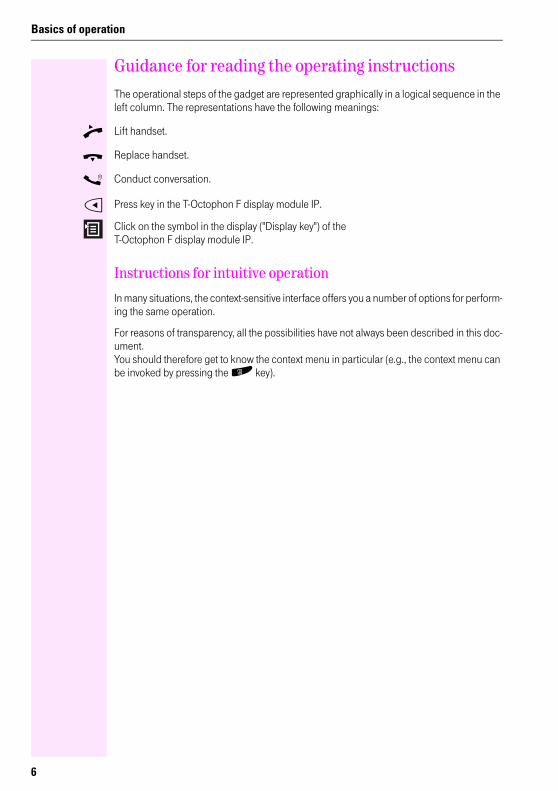
The operational steps of the gadget are represented graphically in a logical sequence in the left column. The representations have the following meanings:
n Lift handset.
t Replace handset.
s Conduct conversation.
C Press key in the T-Octophon F display module IP.
Click on the symbol in the display ("Display key") of theT-Octophon F display module IP.
Instructions for intuitive operation
In many situations, the context-sensitive interface offers you a number of options for perform-ing the same operation.
For reasons of transparency, all the possibilities have not always been described in this doc-ument.You should therefore get to know the context menu in particular (e.g., the context menu can be invoked by pressing the H key).
6

Basics of operation
Display with touch screen functionality
Besides the navigation and selection keys page 5, you can operate theT-Octophon F display module IP with the help of the large graphics display supporting touch screen functionality.
Overview
Operating the display
A plastic pen was delivered along with your T-Octophon F display module IP. You can select functions on the display by pressing the tip of the pen lightly on the display surface ("click") or move graphics content such as scroll bars ("pull").
Alternatively, you can also operate the display with other objects similar to the pen that do not damage the display surface. It is also possible to operate the display with your finger (finger nail).
You can configure screen locking ( Page 12) on your T-Octophon F display module IP. Once this function is activated,a lock icon will be displayed for every password-protected application. To start such applications, you must enter a password.You can choose the password yourself Page 53.
ENB
Application bar page 9
?Applications
Select
System bar page 9
Use area e.g., for menus, lists, message windows etc.If the content is too large, a scroll bar is dis-played at the right and bottom edge.This shows how the start page Page 8 might look with screen lock activated
Page 12.
LDAP Browser
Display Programs Voice
7
Basics of operation
Start page
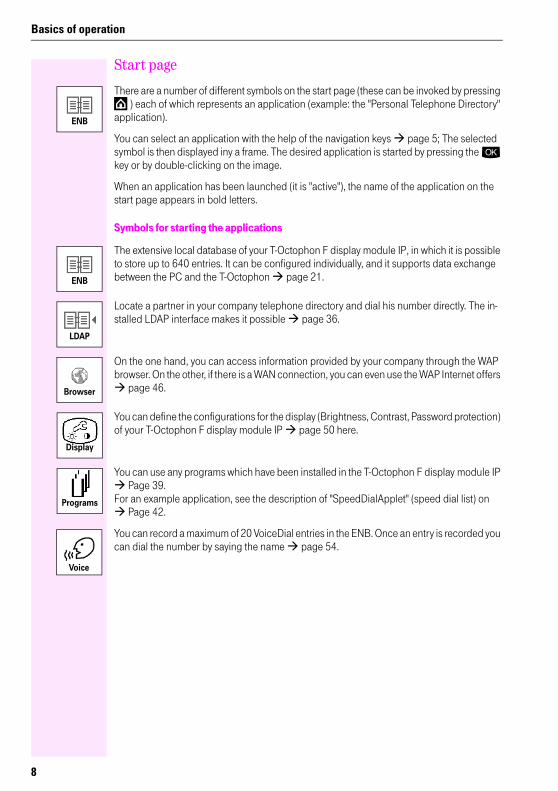
There are a number of different symbols on the start page (these can be invoked by pressing ) each of which represents an application (example: the "Personal Telephone Directory"
application).
You can select an application with the help of the navigation keys page 5; The selected symbol is then displayed iny a frame. The desired application is started by pressing the: key or by double-clicking on the image.
When an application has been launched (it is "active"), the name of the application on the start page appears in bold letters.
Symbols for starting the applications
The extensive local database of your T-Octophon F display module IP, in which it is possible to store up to 640 entries. It can be configured individually, and it supports data exchange between the PC and the T-Octophon page 21.
Locate a partner in your company telephone directory and dial his number directly. The in-stalled LDAP interface makes it possible page 36.
On the one hand, you can access information provided by your company through the WAP browser. On the other, if there is a WAN connection, you can even use the WAP Internet offers
page 46.
You can define the configurations for the display (Brightness, Contrast, Password protection) of your T-Octophon F display module IP page 50 here.
You can use any programs which have been installed in the T-Octophon F display module IP Page 39.
For an example application, see the description of "SpeedDialApplet" (speed dial list) on Page 42.
You can record a maximum of 20 VoiceDial entries in the ENB. Once an entry is recorded you can dial the number by saying the name page 54.
ENB
ENB
LDAP
Browser
Display
Programs
Voice
8
Basics of operation
System and application bar
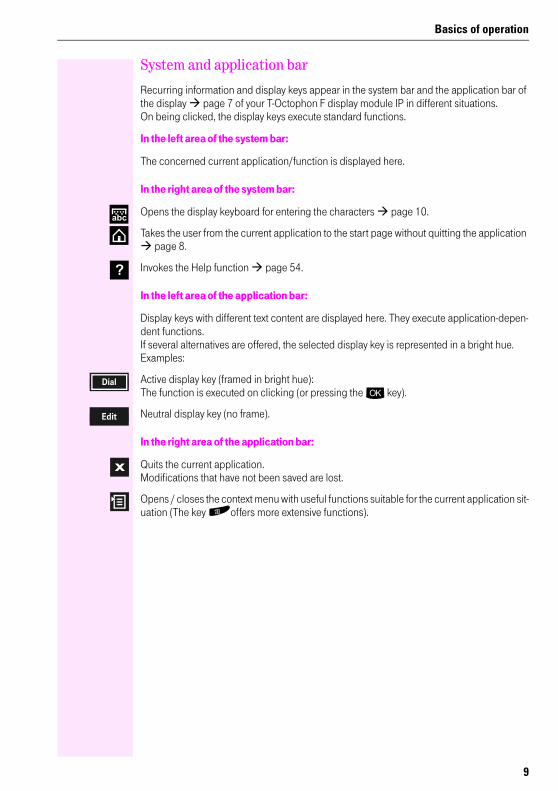
Recurring information and display keys appear in the system bar and the application bar of the display page 7 of your T-Octophon F display module IP in different situations. On being clicked, the display keys execute standard functions.
In the left area of the system bar:
The concerned current application/function is displayed here.
In the right area of the system bar:
Opens the display keyboard for entering the characters page 10.
Takes the user from the current application to the start page without quitting the application page 8.
Invokes the Help function page 54.
In the left area of the application bar:
Display keys with different text content are displayed here. They execute application-depen-dent functions.If several alternatives are offered, the selected display key is represented in a bright hue. Examples:
Active display key (framed in bright hue):The function is executed on clicking (or pressing the: key).
Neutral display key (no frame).
In the right area of the application bar:
Quits the current application. Modifications that have not been saved are lost.
Opens / closes the context menu with useful functions suitable for the current application sit-uation (The key Hoffers more extensive functions).
abc
?
Dial
Edit
x
9

Basics of operation
Dialog messages
In different situations, the T-Octophon F display module IP expects the user to confirm an in-formation item in a dialog window. Depending on the content, the buttons "OK", "Yes", "No" and "Cancel" are available for use.
Answer the question by clicking on one of the two buttons.
Confirm the warning message. It appears for instance, as a safety query when you delete telephone directory entries.
An error has taken place. Try to resolve the error described in the message. If you have ques-tions, please contact the competent authority or staff.
Read the Info message. It appears for instance, during a data transmission operation.
Display keyboard
You can invoke a keyboard in the display to input text, numbers and special characters.
Open the display keyboard.
The keyboard is displayed at the display:abc
Home
C
?First Name:
x
Text
Done
1 2 3 4 5 6 7 8 9 0q w e r t z u i o p ^a s d f g h j k l ~ "z x c v - _ \b n m: / . @
End1#$ ?§åDel
Field name and input field in an appli-cation, e.g. "ENB".
10

Basics of operation
e. g. Enter alphanumeric characters and symbols.
Switch to diacritical marks. The option for entering characters, such as " è ", is active when the relevant softkeys appear on the touchscreen (e.g. " e " is displayed as " è ") and by the inversion of the switching soft-key (softkey is black).
In addition to the alphabetical softkeys, the following softkeys are available:
or Shift to upper case.
or Shift to lower case.
Shift to the first alternative key assignment (e.g. numeric characters, punctuation marks, brackets).
Shift to the second alternative key assignment (e.g. currency symbols).
Place the cursor at the beginning of the line.
Delete characters to the left of the cursor one by one.
Delete characters to the right of the cursor one by one.
Move the cursor to the end of the line.
Move the cursor to the left/right.
Hide the touchscreen keypad and accept the new or modified text in the input field.
a bc
~ "
ABC
abc
1#$
?§å
Home
Del
End
Done
11
Basics of operation
Screen Lock
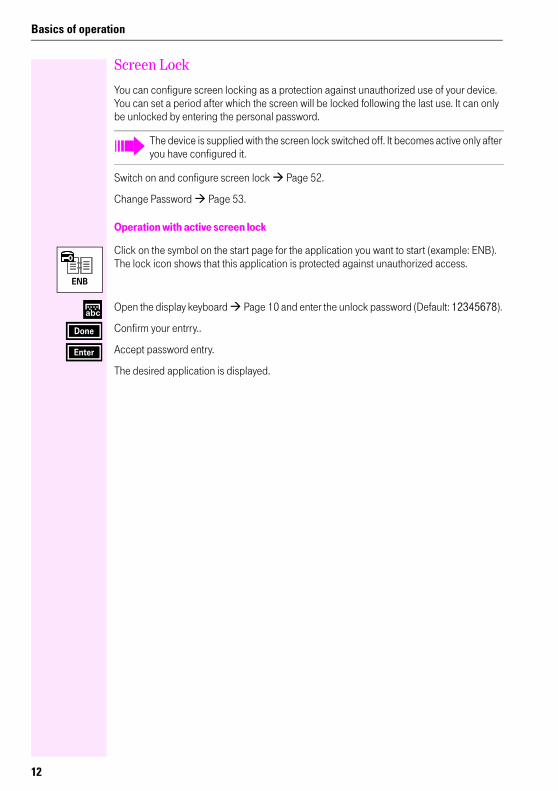
You can configure screen locking as a protection against unauthorized use of your device. You can set a period after which the screen will be locked following the last use. It can only be unlocked by entering the personal password.
Switch on and configure screen lock Page 52.
Change Password Page 53.
Operation with active screen lock
Click on the symbol on the start page for the application you want to start (example: ENB). The lock icon shows that this application is protected against unauthorized access.
Open the display keyboard Page 10 and enter the unlock password (Default: 12345678).
Confirm your entrry..
Accept password entry.
The desired application is displayed.
The device is supplied with the screen lock switched off. It becomes active only after you have configured it.
ENB
abc
Done
Enter
12
Make a call
Step by Step
Make a call
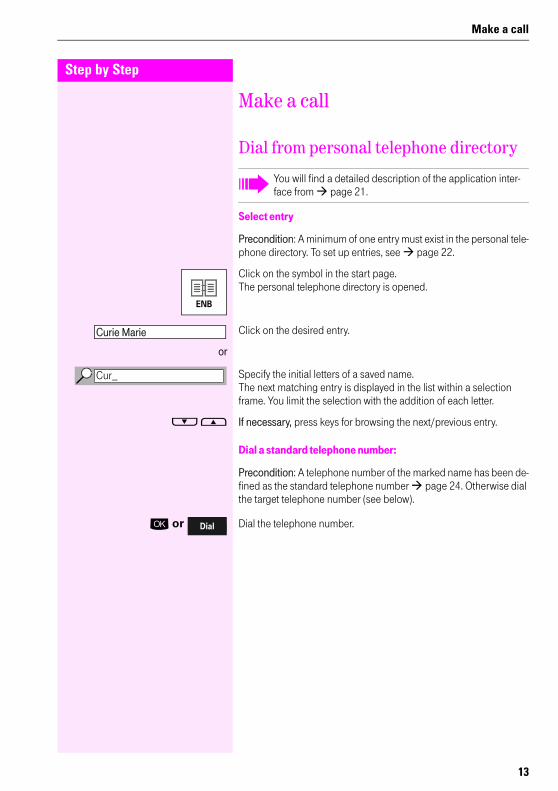
Dial from personal telephone directory
Select entry
Precondition: A minimum of one entry must exist in the personal tele-phone directory. To set up entries, see page 22.
Click on the symbol in the start page.The personal telephone directory is opened.
Click on the desired entry.
or
Specify the initial letters of a saved name.The next matching entry is displayed in the list within a selection frame. You limit the selection with the addition of each letter.
F E If necessary, press keys for browsing the next/previous entry.
Dial a standard telephone number:
Precondition: A telephone number of the marked name has been de-fined as the standard telephone number page 24. Otherwise dial the target telephone number (see below).
: or Dial the telephone number.
You will find a detailed description of the application inter-face from page 21.
ENB
Curie Marie
Cur_
Dial
13

Step by Step
Make a call
Dial selected telephone number:
Precondition: One entry in the telephone directory list is marked.
Click on the menu option.
or
H Open the context menu and select "View".
The "Numbers" register is opened
Click on the desired entry.
or
F E Press to browse through the next/previous entry.
: or Dial the marked telephone number.
or
H Open the context menu and select "Dial".
Select a desired telephone number if you wish to dial a num-ber that is not the standard telephone number.
View
Business: 4989123456
Dial
The assignment of the standard telephone number is not changed.
14
Make a call
Step by Step
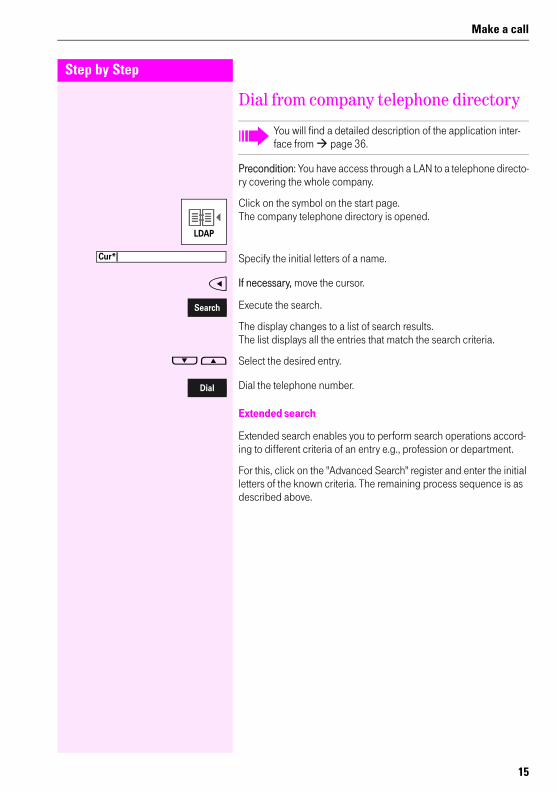
Dial from company telephone directory
Precondition: You have access through a LAN to a telephone directo-ry covering the whole company.
Click on the symbol on the start page.The company telephone directory is opened.
Specify the initial letters of a name.
C If necessary, move the cursor.
Execute the search.
The display changes to a list of search results.The list displays all the entries that match the search criteria.
F E Select the desired entry.
Dial the telephone number.
Extended search
Extended search enables you to perform search operations accord-ing to different criteria of an entry e.g., profession or department.
For this, click on the "Advanced Search" register and enter the initial letters of the known criteria. The remaining process sequence is as described above.
You will find a detailed description of the application inter-face from page 36.
LDAP
Cur*|
Search
Dial
15

Step by Step
Make a call
Speed Dial
Precondition: The midlet "Speed Dial Applet" and there is at least one entry in the Speed dial list.Create new entries, see Page 43.
Double-click on the symbol on the start page Page 8 to start the application.
Select "Speed Dial Applet".
Start program.
Make sure that Edit mode is switched off ("Edit Mode" is not indicated in the title bar).
Dialling starts immediately as soon as a field is selected.
You will find a detailed description of the application inter-face from Page 42.
Programs
Run
first entry
16

Make a call
Step by Step
Voice Dialling
Dial numbers by just saying a name.
Precondition: ENB entries must have added VoiceDial page 25.
n Lift handset.or
Press key.
I Press VoiceDial key in Display Module.
The display changes to Voice Recognition mode.
w Wait for signal tone.
s Say the name of the person you want to call.
The number will be dialled. The display changes to the start page.
VoiceDial unsuccessful
If the name is spoken with a different intonation or more softly than in the recording, a message will appear in the display telling you to try again.
Press display key.
w Wait for signal tone.
s Repeat the name of the person you wish to call.
The number will be dialled. The display changes to the start page.
Observe the instructions shown in the display while dialling!
Speaker
Try Again
17

Step by Step
Use of PC mouse and keyboard
Use of PC mouse and keyboardYou can enter characters or move around in the T-Octophon F display module IP menu using the mouse and the key-board of your PC via a special user interface.
Prerequisites• The PC and the T-Octophon F display module IP must be con-
nected to the same LAN and configured correctly.If you have any queries concerning connection or configuration, please consult your service personnel).
• The program "PCUserClient.exe" must be installed on your PC.You can download this program from the Internet atwww.siemens.com/hipath.
Activating the user interface
After starting the program "PCUserClient.exe" on your PC, a dialogue box will come up with which you can set up a connection to the T-Octophon F display module IP via the LAN.
Enter one of the required values or addresses, e.g. the IP address of the T-Octophon F display module IP (obtainable from your service personnel) and click "OK".
18
Use of PC mouse and keyboard
Step by Step
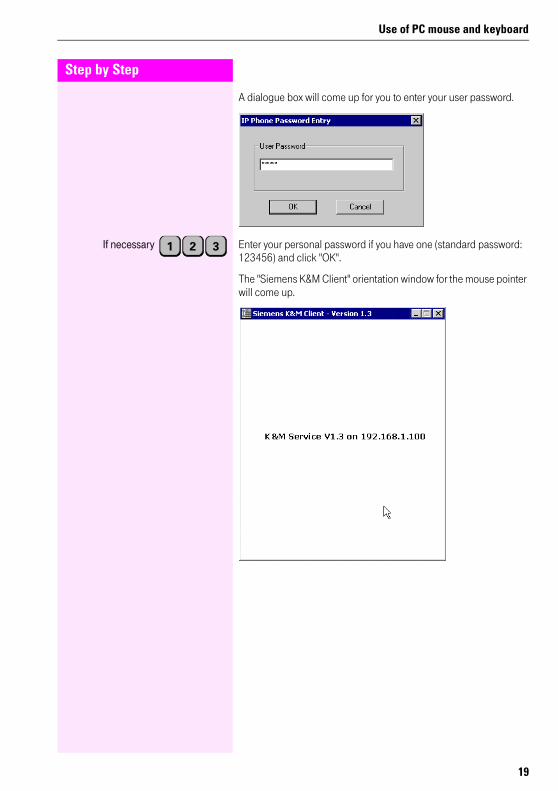
A dialogue box will come up for you to enter your user password.
If necessary Enter your personal password if you have one (standard password: 123456) and click "OK".
The "Siemens K&M Client" orientation window for the mouse pointer will come up.
2 31
19
Step by Step
Use of PC mouse and keyboard
Operation
The following functions are available:• Input from the PC keyboard will be transferred to the
T-Octophon F display module IP if the client window is active (program in the "foreground").
• The mouse pointer of the PC can be seen in the display of the T-Octophon F display module IP when the mouse pointer moves in the client window.This functionality is comparable to operation using a plastic pen directly on the display, see Page 7.Right clicking on the client window will fix the mouse pointer; e.g. in order to work temporarily with other PC applications. To unfix it, right click on the window again.
Quitting the client window closes the "PCUserClient.exe" program.
If the LAN connection to the T-Octophon F display module IP is lost during the runtime of the client window, a message will come up and the program will be closed.
To continue operation from a PC after reestablishing the con-nection, you will need to restart the "PCUserClient.exe" pro-gram.
20
Applications
Step by Step
Applications
Personal telephone directory
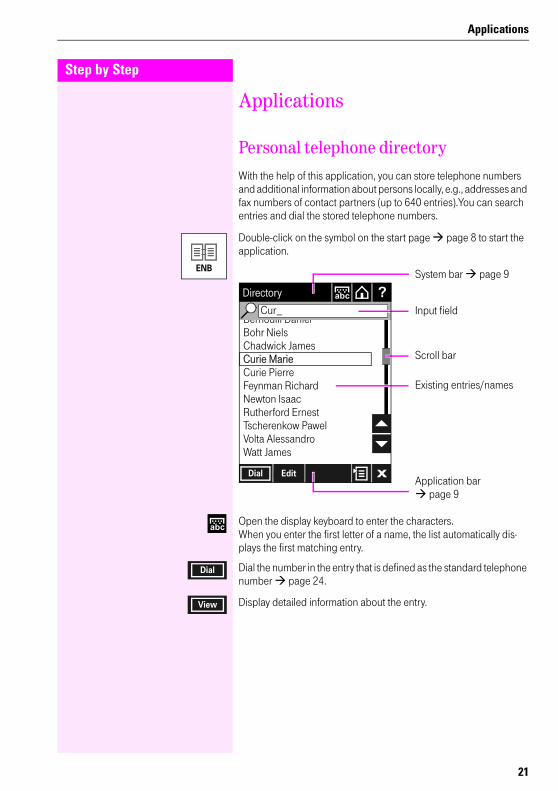
With the help of this application, you can store telephone numbers and additional information about persons locally, e.g., addresses and fax numbers of contact partners (up to 640 entries).You can search entries and dial the stored telephone numbers.
Double-click on the symbol on the start page page 8 to start the application.
Open the display keyboard to enter the characters.When you enter the first letter of a name, the list automatically dis-plays the first matching entry.
Dial the number in the entry that is defined as the standard telephone number page 24.
Display detailed information about the entry.
ENB
C
Bernoulli DanielBohr NielsChadwick JamesCurie MarieCurie PierreFeynman RichardNewton IsaacRutherford ErnestTscherenkow PawelVolta AlessandroWatt James
?Directory abc
x
Cur_ Input field
Existing entries/names
Scroll bar
System bar page 9
Application barpage 9
i
EditDial
abc
Dial
View
21
Step by Step
Applications
In this view, the context menu offers the following:• Edit: Opens the entry in the editor page 27.• New Entry: Opens the editor for setting up a new entry
page 22.• Delete Entry: Deletes thes currently selected entry page 27.• Delete All: Deletes all entries in the personal telephone directory
page 27.• Import: Imports data from the PC into the
T-Octophon F display module IP page 28.• Export: Exports (backs up) data from the
T-Octophon F display module IP to a PC page 29.• VoiceDial-Add: Add VoiceDial page 25
Set up entry
Double-click on the symbol.The telephone directory list page 21 15 is displayed.
or H open the context menu and select "New Entry" to set up a new entry.
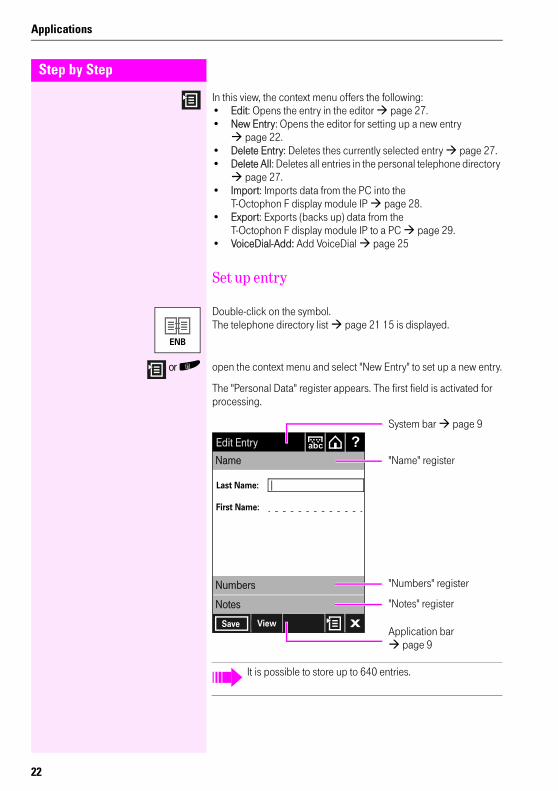
The "Personal Data" register appears. The first field is activated for processing.
ENB
It is possible to store up to 640 entries.
C
Last Name: |
Numbers
Notes
?Edit Entry abc
x
"Name" register
System bar page 9
Application barpage 9
"Notes" register
Name
"Numbers" register
First Name:
Save View
22
Applications
Step by Step
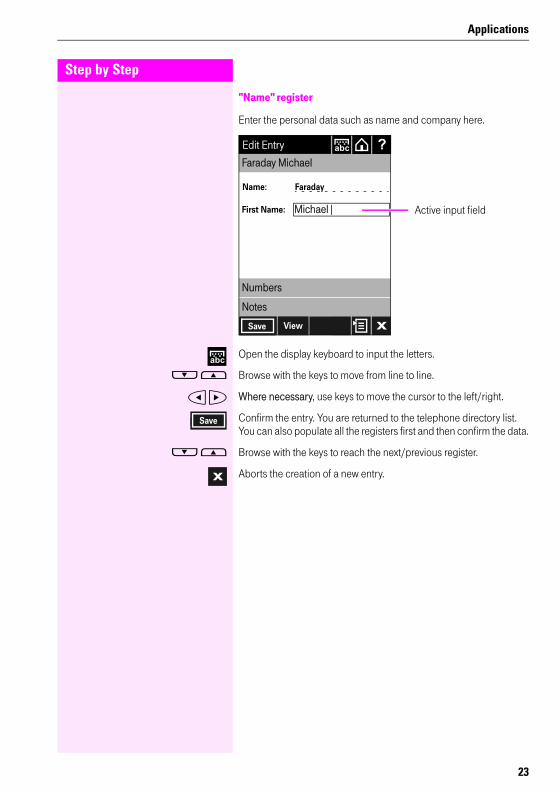
"Name" register
Enter the personal data such as name and company here.
Open the display keyboard to input the letters.
F E Browse with the keys to move from line to line.
C D Where necessary, use keys to move the cursor to the left/right.
Confirm the entry. You are returned to the telephone directory list.You can also populate all the registers first and then confirm the data.
F E Browse with the keys to reach the next/previous register.
Aborts the creation of a new entry.
First Name: Michael|
C x
Numbers
Notes
?Edit Entry abc
Active input field
Faraday Michael
FaradayName:
Save View
abc
Save
x
23
Step by Step
Applications
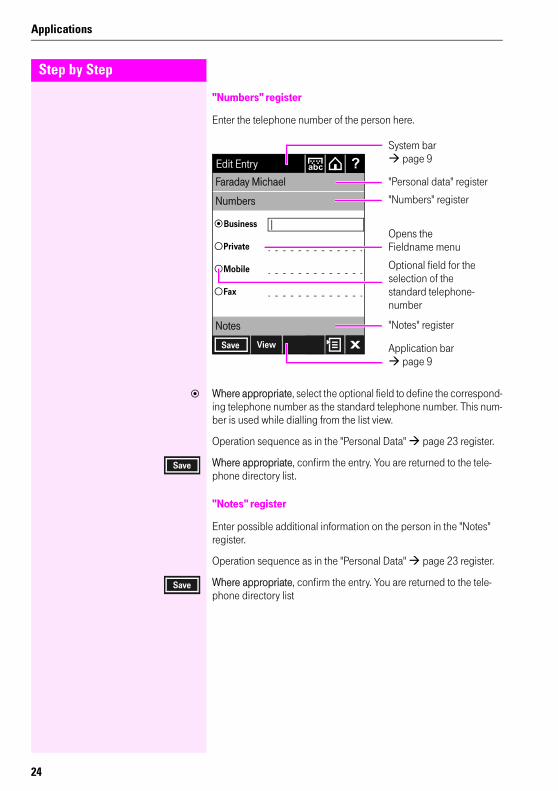
"Numbers" register
Enter the telephone number of the person here.
Where appropriate, select the optional field to define the correspond-ing telephone number as the standard telephone number. This num-ber is used while dialling from the list view.
Operation sequence as in the "Personal Data" page 23 register.
Where appropriate, confirm the entry. You are returned to the tele-phone directory list.
"Notes" register
Enter possible additional information on the person in the "Notes" register.
Operation sequence as in the "Personal Data" page 23 register.
Where appropriate, confirm the entry. You are returned to the tele-phone directory list
Save C
Business
View
|
Numbers
Notes
?Edit Entry abc
x
"Personal data" register
System barpage 9
Application barpage 9
"Notes" register
Faraday Michael
"Numbers" register
Private
Fax
Mobile Optional field for the selection of thestandard telephone-number
Opens theFieldname menu
Save
Save
24
Applications
Step by Step
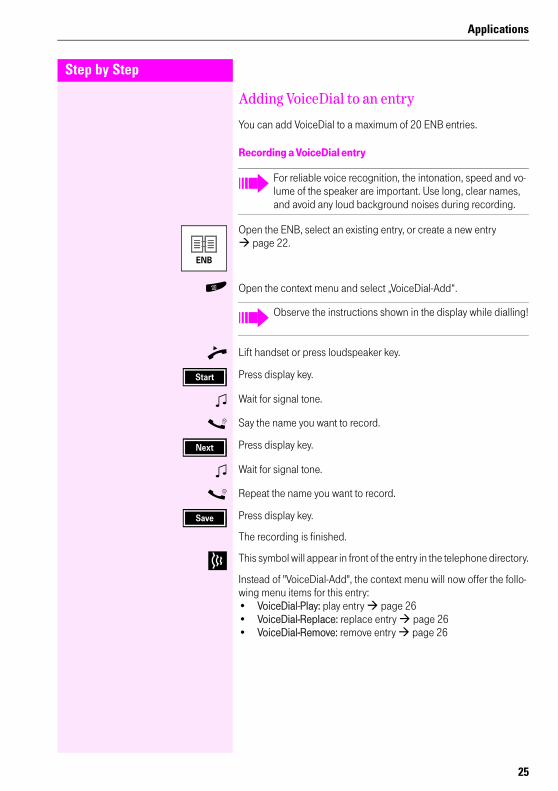
Adding VoiceDial to an entry
You can add VoiceDial to a maximum of 20 ENB entries.
Recording a VoiceDial entry
Open the ENB, select an existing entry, or create a new entry page 22.
H Open the context menu and select „VoiceDial-Add“.
n Lift handset or press loudspeaker key.
Press display key.
w Wait for signal tone.
s Say the name you want to record.
Press display key.
w Wait for signal tone.
s Repeat the name you want to record.
Press display key.
The recording is finished.
This symbol will appear in front of the entry in the telephone directory.
Instead of "VoiceDial-Add", the context menu will now offer the follo-wing menu items for this entry:• VoiceDial-Play: play entry page 26• VoiceDial-Replace: replace entry page 26• VoiceDial-Remove: remove entry page 26
For reliable voice recognition, the intonation, speed and vo-lume of the speaker are important. Use long, clear names, and avoid any loud background noises during recording.
ENB
Observe the instructions shown in the display while dialling!
Start
Next
Save
25

Step by Step
Applications
Playing a VoiceDial entry
Precondition: An ENB entry with a VoiceDial recording is marked.
or H Open context menu and select "VoiceDial-Play".
w The recording belonging to the entry will be played.
Replacing a VoiceDial entry
Precondition: An ENB entry with a VoiceDial recording is marked.
or H Open context menu and select "VoiceDial-Replace".
The display changes to "Voice Training" mode and you can replace the existing recording.
or
Press display key to abort the new recording and keep the existing re-cording.
Removing a VoiceDial entry
Precondition: An ENB entry with a VoiceDial recording is marked.
or H Open context menu and select "VoiceDial-Remove".
The recording will be deleted without confirmation. The entry in the telephone directory will be kept.
View entry
Double click on the symbol.The telephone directory list page 21 appears.
Select the entry (by inputting letters or by scrolling).
Click on the display key to display detailed information on this entry.
Cancel
x
ENB
View
26
Applications
Step by Step
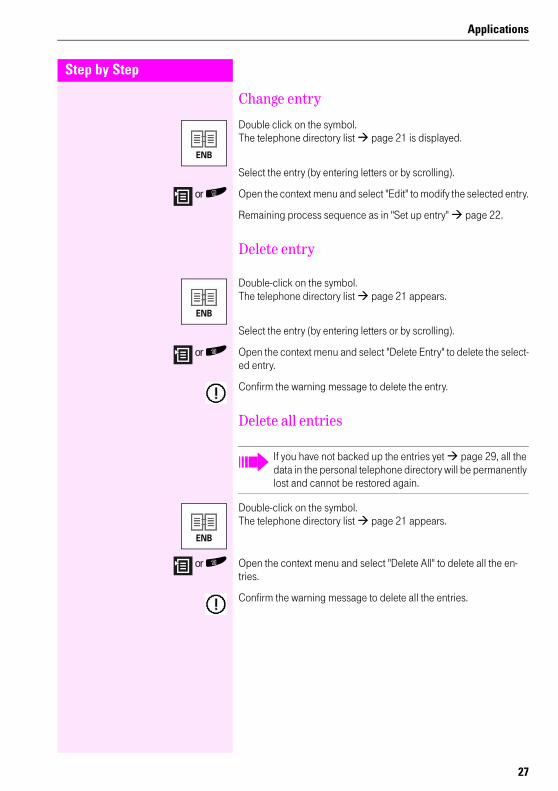
Change entry
Double click on the symbol.The telephone directory list page 21 is displayed.
Select the entry (by entering letters or by scrolling).
or H Open the context menu and select "Edit" to modify the selected entry.
Remaining process sequence as in "Set up entry" page 22.
Delete entry
Double-click on the symbol.The telephone directory list page 21 appears.
Select the entry (by entering letters or by scrolling).
or H Open the context menu and select "Delete Entry" to delete the select-ed entry.
Confirm the warning message to delete the entry.
Delete all entries
Double-click on the symbol.The telephone directory list page 21 appears.
or H Open the context menu and select "Delete All" to delete all the en-tries.
Confirm the warning message to delete all the entries.
ENB
ENB
If you have not backed up the entries yet page 29, all the data in the personal telephone directory will be permanently lost and cannot be restored again.
ENB
27

Step by Step
Applications
Transferring the personal telephone directory
The system supports the function of data import so that you can make use of extensive telephone directory data e.g., in the Microsoft Outlook address book. Moreover, you can also export the data in your personal telephone book and use it elsewhere, or use the data for backup purposes.
Importing data
Precondition: There is an import file in "CSV" format on a correctly configured FTP server.
Double-click on the symbol.The telephone directory list page 21 appears.
or H Open the context menu and select "Import". The "Import 1/2" dialog along with the "FTP Parameters" register is opened.
If necessary, enter the required parameters of the FTP server, if this has not already been done earlier (ask your service personnel):• FTP Server• FTP User ID• FTP User Password• FTP User Account Name
The "Import 2/2" dialog with the "File Details" register is opened.
Enter the filename and the path of the import file.
Start the data transfer.
If the fieldnames of the import file match the corresponding field-names of the personal telephone directory, the file is imported and converted automatically.
After the successful data transfer, the file is opened as the current telephone directory list.
Short description of how to export contact data from Outlook 2000 page 30.
In the same way you can utilize the data saved in the telepho-ne directories of your T-Octophon F 50 and Octophon 28 by using the export features provided for these devices.
ENB
abc
After the transferred data has been entered once, it appears as standard entries during re-import.
Next
abc
Import
28
Applications
Step by Step
Exporting data
Precondition: A correctly configured FTP server is available.
Double click on the symbol.The telephone directory list page 21 appears.
Open the context menu and select "Export".
The "Export 1/2" dialog with the "FTP Parameters" register opens.
If necessary Enter the required parameters of the FTP server if this has not already been done (ask your service personnel):• FTP Server• FTP User ID• FTP User Password• FTP User Account Name
The "Export 2/2" dialog with the "File details" is opened.
Enter the filename and the path for the export operation.
Start the file transfer.
After the successful transfer, the display changes to the telephone di-rectory list.
ENB
abc
After the transferred data has been entered once, it appears as standard entries during re-export.
Next
abc
Export
29
Step by Step
Applications
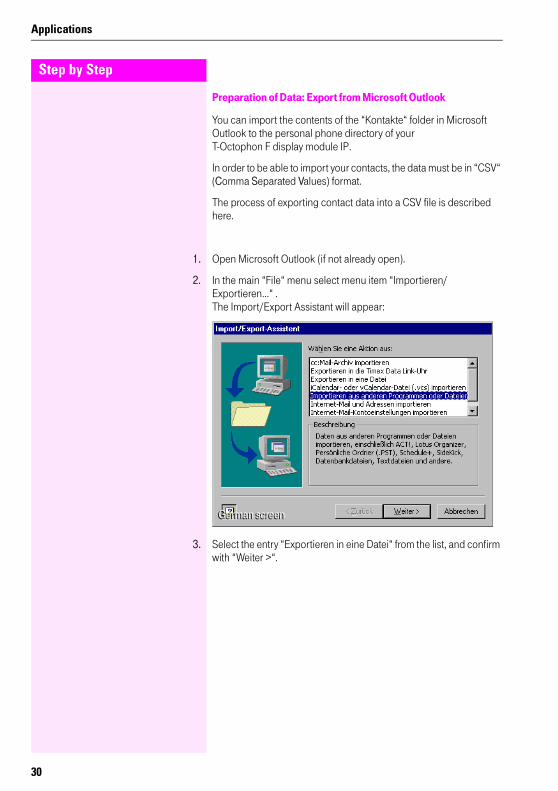
Preparation of Data: Export from Microsoft Outlook
You can import the contents of the “Kontakte“ folder in Microsoft Outlook to the personal phone directory of your T-Octophon F display module IP.
In order to be able to import your contacts, the data must be in “CSV“ (Comma Separated Values) format.
The process of exporting contact data into a CSV file is described here.
1. Open Microsoft Outlook (if not already open).
2. In the main “File“ menu select menu item “Importieren/Exportieren...“ . The Import/Export Assistant will appear:
3. Select the entry “Exportieren in eine Datei“ from the list, and confirm with “Weiter >“.
German screenGerman screen
30
Applications
Step by Step
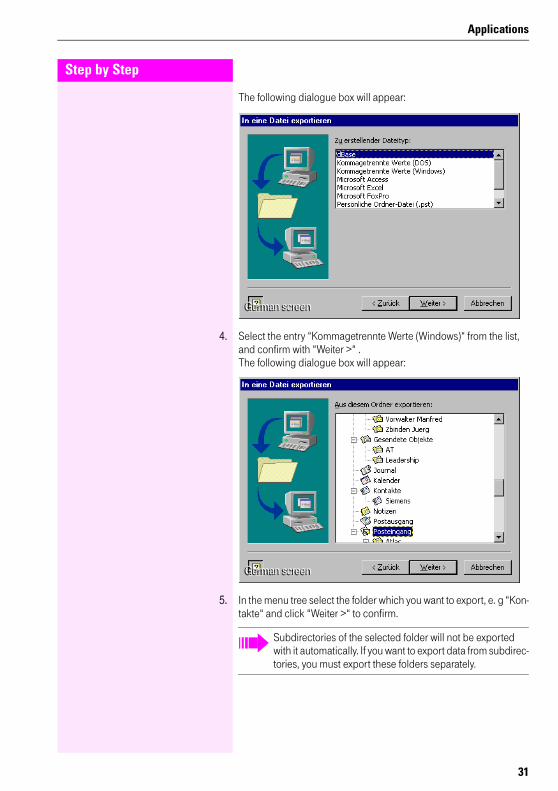
The following dialogue box will appear:
4. Select the entry “Kommagetrennte Werte (Windows)“ from the list, and confirm with “Weiter >“ .The following dialogue box will appear:
5. In the menu tree select the folder which you want to export, e. g “Kon-takte“ and click “Weiter >“ to confirm.
German screenGerman screen
German screenGerman screen
Subdirectories of the selected folder will not be exported with it automatically. If you want to export data from subdirec-tories, you must export these folders separately.
31

Step by Step
Applications
The following dialogue box will appear:
6. Make any necessary alterations to the path and the name of the CSV file. Change the path manually or click “Durchsuchen“ to select the destination folder.When the path is correct, click “Weiter >“ to confirm.The following dialogue box will appear:
7. Click “Felder zuordnen ...“ to configure the export format.
German screenGerman screen
German screenGerman screen
32

Applications
Step by Step
The following dialogue box will appear:
8. Click “Zuordnung löschen“ to unassign the standard assignment.
9. Holding the mouse button down, drag the fields you want to transfer to the personal phone directory of your T-Octophon F display module IP from the Outlook window into the CSV window.
A maximum of 8 fields can be transferred to the personal directory, and fields 2 to 5 must be phone numbers. If more than 8 fields are ex-ported, this will lead to errors in transferring the data. The order in the CSV window will be the order used in the personal directory.
Scroll through entries Outlook list CSV list
German screenGerman screen
33

Step by Step
Applications
The following table shows an example of the assignment structure in Microsoft Outlook and the corresponding structure in the personal di-rectory.
When you have transferred the desired fields, you can carry out changes in the CSV list as follows:• You can change the term used to indicate a particular field in
T-Octophon F display module IP. To do this, select an entry in the “Feld“ column in the CSV window and click on the entry again. You can now change the term.
• You can correct the order of the entries. To do this, click on an en-try in the “Feld“ column in the CSV window and drag the entry up or down while holding the mouse button down.
• To delete an entry in the CSV window, select it and press the “En-tf“ button on your PC keyboard.
To make this clearer, the chart below shows the assignment of the data during export and the subsequent result in the personal directo-ry of your T-Octophon F display module IP:
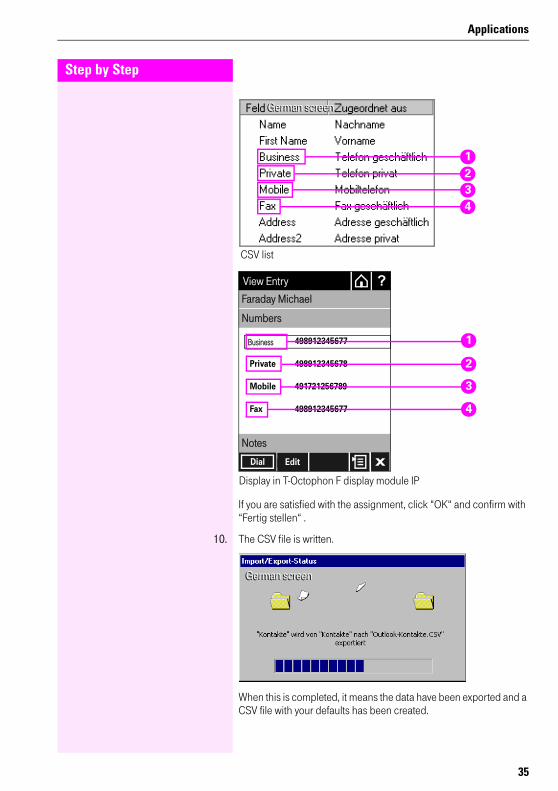
Item Outlook-list Personal directory
1 Name Name
2 First Name First Name
3 Office (default) Business
4 Private Private
5 Mobile Mobile
6 Fax No. Fax
34
Applications
Step by Step
If you are satisfied with the assignment, click “OK“ and confirm with “Fertig stellen“ .
10. The CSV file is written.
When this is completed, it means the data have been exported and a CSV file with your defaults has been created.
German screenGerman screen
CSV list
1234
Display in T-Octophon F display module IP
Edit
Business
498912345678
Numbers
Notes
Faraday Michael
Private
498912345677Fax
491721256789Mobile
?View Entry
498912345677
x
1
4
2
3
Dial
German screenGerman screen
35
Step by Step
Applications
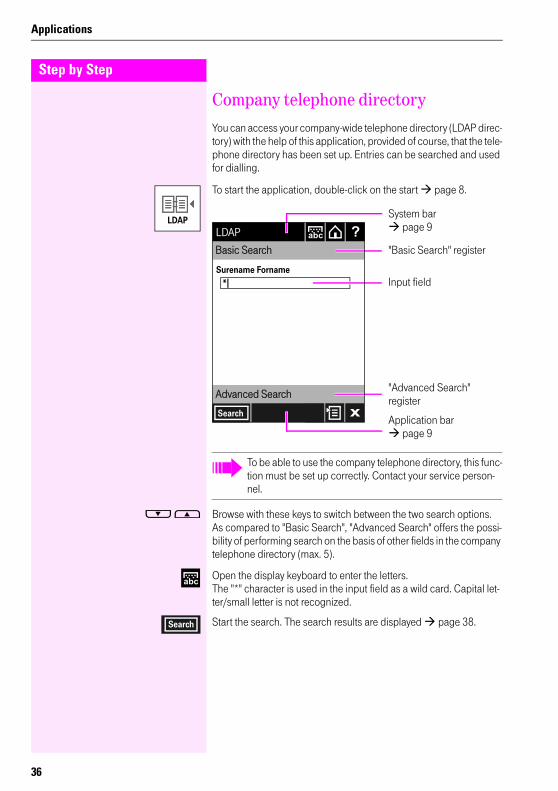
Company telephone directory
You can access your company-wide telephone directory (LDAP direc-tory) with the help of this application, provided of course, that the tele-phone directory has been set up. Entries can be searched and used for dialling.
To start the application, double-click on the start page 8.
F E Browse with these keys to switch between the two search options.As compared to "Basic Search", "Advanced Search" offers the possi-bility of performing search on the basis of other fields in the company telephone directory (max. 5).
Open the display keyboard to enter the letters. The "*" character is used in the input field as a wild card. Capital let-ter/small letter is not recognized.
Start the search. The search results are displayed page 38.
LDAP
To be able to use the company telephone directory, this func-tion must be set up correctly. Contact your service person-nel.
CAdvanced Search
?LDAP abc
"Basic Search" register
Input field
System barpage 9
Application barpage 9
"Advanced Search"register
Basic Search
Surename Forname*|
C xSearch
abc
Search
36
Applications
Step by Step
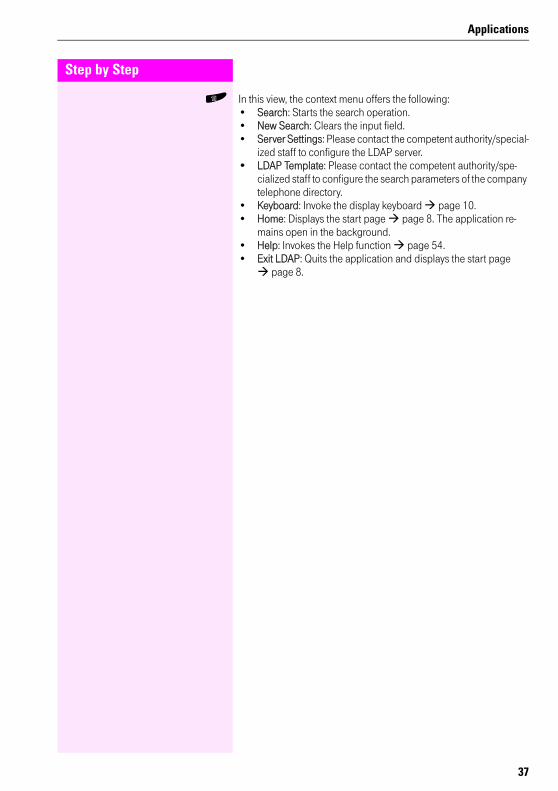
H In this view, the context menu offers the following:• Search: Starts the search operation.• New Search: Clears the input field.• Server Settings: Please contact the competent authority/special-
ized staff to configure the LDAP server.• LDAP Template: Please contact the competent authority/spe-
cialized staff to configure the search parameters of the company telephone directory.
• Keyboard: Invoke the display keyboard page 10.• Home: Displays the start page page 8. The application re-
mains open in the background.• Help: Invokes the Help function page 54.• Exit LDAP: Quits the application and displays the start page
page 8.
37
Step by Step
Applications
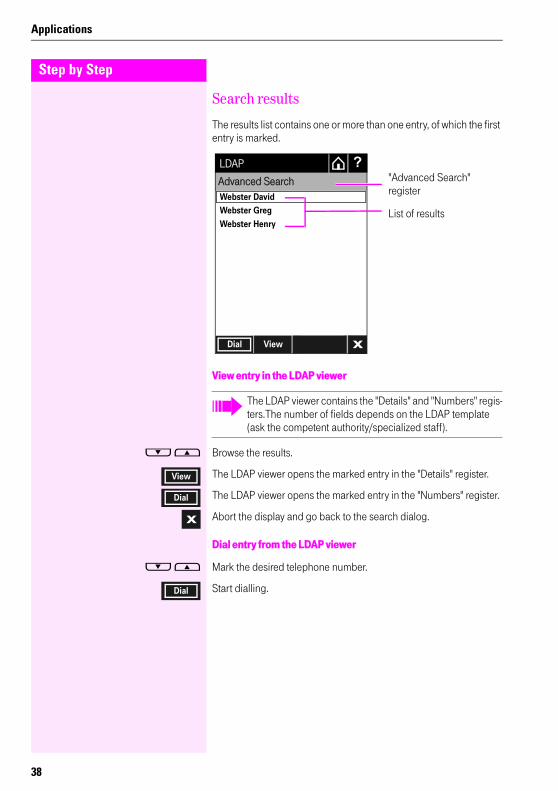
Search results
The results list contains one or more than one entry, of which the first entry is marked.
View entry in the LDAP viewer
F E Browse the results.
The LDAP viewer opens the marked entry in the "Details" register.
The LDAP viewer opens the marked entry in the "Numbers" register.
Abort the display and go back to the search dialog.
Dial entry from the LDAP viewer
F E Mark the desired telephone number.
Start dialling.
The LDAP viewer contains the "Details" and "Numbers" regis-ters.The number of fields depends on the LDAP template (ask the competent authority/specialized staff).
?LDAP
x
Advanced SearchWebster David
Dial View
Webster Greg
Webster Henry
"Advanced Search"register
List of results
View
Dial
x
Dial
38
Applications
Step by Step
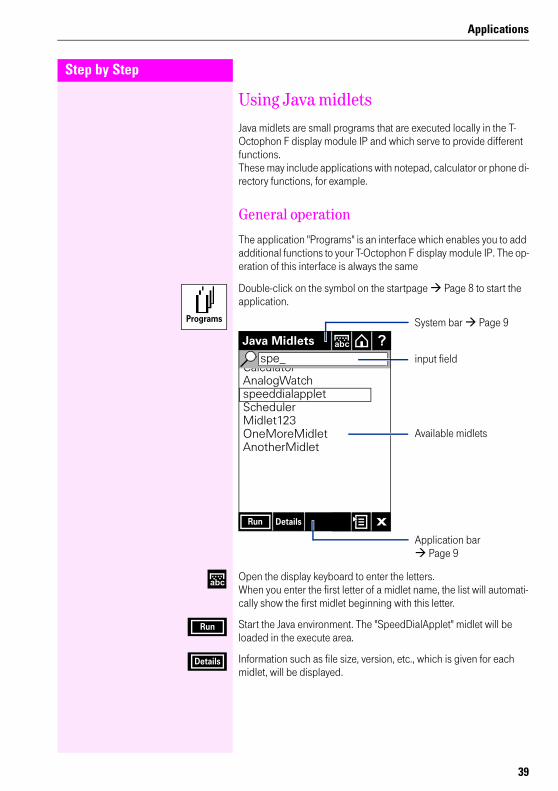
Using Java midlets
Java midlets are small programs that are executed locally in the T-Octophon F display module IP and which serve to provide different functions.These may include applications with notepad, calculator or phone di-rectory functions, for example.
General operation
The application "Programs" is an interface which enables you to add additional functions to your T-Octophon F display module IP. The op-eration of this interface is always the same
Double-click on the symbol on the startpage Page 8 to start the application.
Open the display keyboard to enter the letters. When you enter the first letter of a midlet name, the list will automati-cally show the first midlet beginning with this letter.
Start the Java environment. The "SpeedDialApplet" midlet will be loaded in the execute area.
Information such as file size, version, etc., which is given for each midlet, will be displayed.
Programs
C
CalculatorAnalogWatchspeeddialappletSchedulerMidlet123OneMoreMidletAnotherMidlet
?Java Midlets abc
x
spe_ input field
Available midlets
System bar Page 9
Application bar Page 9
DetailsRun
abc
Run
Details
39
Step by Step
Applications
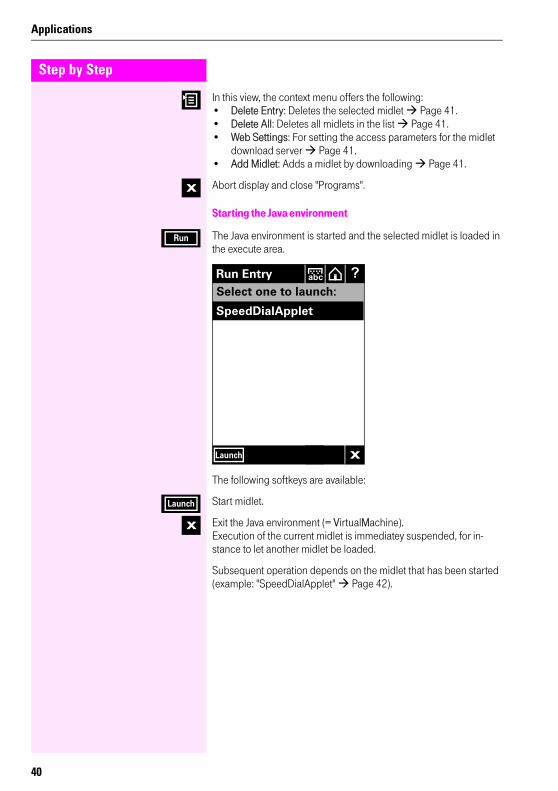
In this view, the context menu offers the following:• Delete Entry: Deletes the selected midlet Page 41.• Delete All: Deletes all midlets in the list Page 41.• Web Settings: For setting the access parameters for the midlet
download server Page 41.• Add Midlet: Adds a midlet by downloading Page 41.
Abort display and close "Programs".
Starting the Java environment
The Java environment is started and the selected midlet is loaded in the execute area.
The following softkeys are available:
Start midlet.
Exit the Java environment (= VirtualMachine).Execution of the current midlet is immediatey suspended, for in-stance to let another midlet be loaded.
Subsequent operation depends on the midlet that has been started (example: "SpeedDialApplet" Page 42).
x
Run
?Run Entry abc
x
Select one to launch:
SpeedDialApplet
Launch
Launch
x
40
Applications
Step by Step
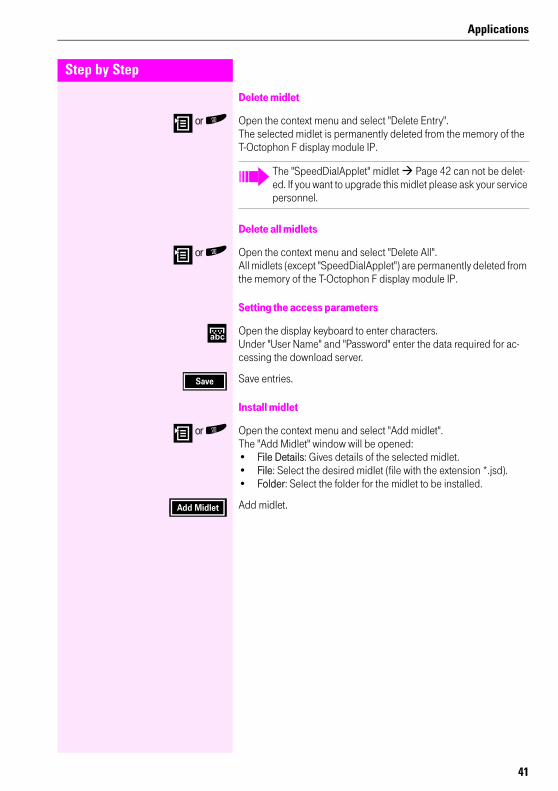
Delete midlet
or H Open the context menu and select "Delete Entry".The selected midlet is permanently deleted from the memory of the T-Octophon F display module IP.
Delete all midlets
or H Open the context menu and select "Delete All".All midlets (except "SpeedDialApplet") are permanently deleted from the memory of the T-Octophon F display module IP.
Setting the access parameters
Open the display keyboard to enter characters.Under "User Name" and "Password" enter the data required for ac-cessing the download server.
Save entries.
Install midlet
or H Open the context menu and select "Add midlet".The "Add Midlet" window will be opened:• File Details: Gives details of the selected midlet.• File: Select the desired midlet (file with the extension *.jsd).• Folder: Select the folder for the midlet to be installed.
Add midlet.
The "SpeedDialApplet" midlet Page 42 can not be delet-ed. If you want to upgrade this midlet please ask your service personnel.
abc
Save
Add Midlet
41

Step by Step
Applications
Example Application: Speed Dial List
Installed in your T-Octophon F display module IP is an example appli-cation for creating and selecting speed dial entries (if not, please ask your service personnel).
Double-click on the symbol on the startpage Page 8 to start the application.
There you will find a line with the "SpeedDialApplet" midlet. You will need to select it if there are also other items.
Start the Java environment.The "SpeedDialApplet" midlet will be loaded in the execute area. You can now create entries Page 43.
Shows details of the selected midlet.
The midlet shown here can deviate from the version installed on your T-Octophon F display module IP.
Programs
C
CalculatorAnalogWatchspeeddialappletSchedulerMidlet123OneMoreMidletAnotherMidlet
?Java Midlets abc
x
spe_
DetailsRun
Run
Details
42
Applications
Step by Step
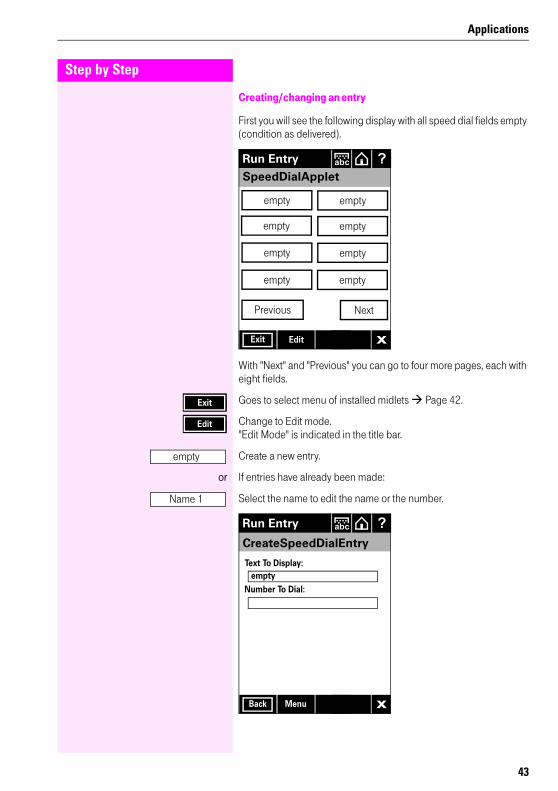
Creating/changing an entry
First you will see the following display with all speed dial fields empty (condition as delivered).
With "Next" and "Previous" you can go to four more pages, each with eight fields.
Goes to select menu of installed midlets Page 42.
Change to Edit mode."Edit Mode" is indicated in the title bar.
Create a new entry.
or If entries have already been made:
Select the name to edit the name or the number.
C
?Run Entry abc
x
SpeedDialApplet
Exit Edit
empty
Previous Next
empty
empty
empty
empty empty
empty empty
Exit
Edit
empty
Name 1
C
?Run Entry abc
x
CreateSpeedDialEntry
Back Menu
Text To Display:
Number To Dial:
empty
43

Step by Step
Applications
Open the display keyboard.Under "Text To Display" enter a Name, which will displayed at the call number (max. 11 characters; enter characters Page 10).
Under "Number To Dial" enter a dialable call number, which you would like to call by speed dial field.
Open the register "Select Action".
Save entries.
Import an entry from the Personal directory
Precondition: There are already entries in your Personal directory Page 22.
Start the "SpeedDialApplet" midlet Page 42 and activate the Edit Mode.
Select any field to import an entry. The "CreateSpeedDialEntry" page will be opened and the name and number of the entry will be dis-played.
Select "Menu".Open the register "Select Action" and select "Import".The register "Select directory entry" is shown.
abc
abc
Menu
C
?Run Entry abc
x
Select Action
Back
ImportSaveDelete
Save
empty
Menu
44
Applications
Step by Step
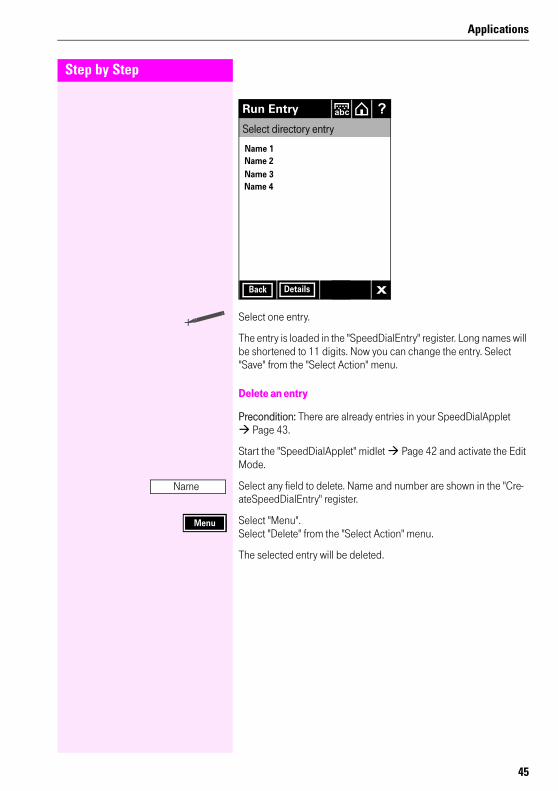
Select one entry.
The entry is loaded in the "SpeedDialEntry" register. Long names will be shortened to 11 digits. Now you can change the entry. Select "Save" from the "Select Action" menu.
Delete an entry
Precondition: There are already entries in your SpeedDialApplet Page 43.
Start the "SpeedDialApplet" midlet Page 42 and activate the Edit Mode.
Select any field to delete. Name and number are shown in the "Cre-ateSpeedDialEntry" register.
Select "Menu".Select "Delete" from the "Select Action" menu.
The selected entry will be deleted.
C
?Run Entry abc
x
Select directory entry
Back
Name 1Name 2Name 3Name 4
Details
Name
Menu
45
Step by Step
Applications
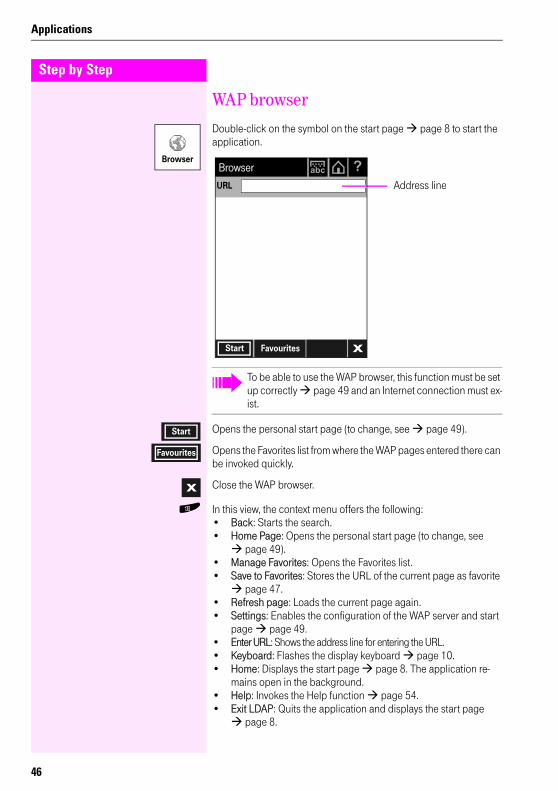
WAP browser
Double-click on the symbol on the start page page 8 to start the application.
Opens the personal start page (to change, see page 49).
Opens the Favorites list from where the WAP pages entered there can be invoked quickly.
Close the WAP browser.
H In this view, the context menu offers the following:• Back: Starts the search.• Home Page: Opens the personal start page (to change, see
page 49).• Manage Favorites: Opens the Favorites list.• Save to Favorites: Stores the URL of the current page as favorite
page 47.• Refresh page: Loads the current page again.• Settings: Enables the configuration of the WAP server and start
page page 49.• Enter URL: Shows the address line for entering the URL.• Keyboard: Flashes the display keyboard page 10.• Home: Displays the start page page 8. The application re-
mains open in the background.• Help: Invokes the Help function page 54.• Exit LDAP: Quits the application and displays the start page
page 8.
Browser
To be able to use the WAP browser, this function must be set up correctly page 49 and an Internet connection must ex-ist.
?Browser
xStart Favourites
Address lineabc
URL
Start
Favourites
x
46

Applications
Step by Step
Load any pages
Double-click on the symbol on the start page page 8 to start the application.
Input the URL in the address line.
Confirm to load the page. The page header appears in the system bar. If the content is large, scroll bars are displayed at the right and the bottom.
Opens the concerned previous displayed page (move back in the navigation history).
Favorites
Double click on the symbol on the start page page 8 to start the application.
Save the favorites
H Open the context menu and select "Save to Favorites".
Open the display keyboard to input letters.
F E Browse with the keys to move from one input field to another.
C D If necessary use keys to move the cursor to the left or right.
Confirm changes. You are taken to the Favorites list.
Browser
abc
Go
Back
Browser
C
?Save Favourite abc
Input field for favorites nam
Name
Favorite 1
URLhttp://wap.wapcontent.com/index.wml Input field for URL
CC xSave Cancel
abc
Save
47
Step by Step
Applications
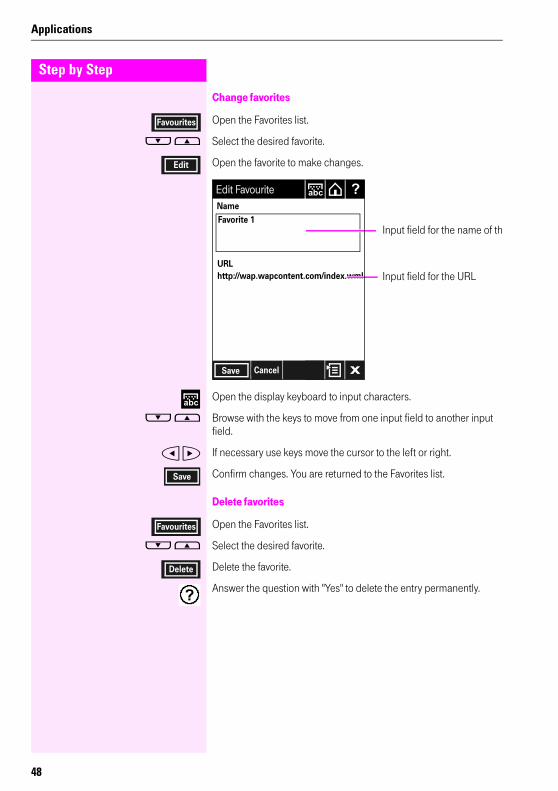
Change favorites
Open the Favorites list.
F E Select the desired favorite.
Open the favorite to make changes.
Open the display keyboard to input characters.
F E Browse with the keys to move from one input field to another input field.
C D If necessary use keys move the cursor to the left or right.
Confirm changes. You are returned to the Favorites list.
Delete favorites
Open the Favorites list.
F E Select the desired favorite.
Delete the favorite.
Answer the question with "Yes" to delete the entry permanently.
Favourites
Edit
C
?Edit Favourite abc
Input field for the name of th
Name
Favorite 1
URLhttp://wap.wapcontent.com/index.wml Input field for the URL
CC xSave Cancel
abc
Save
Favourites
Delete
48
Applications
Step by Step
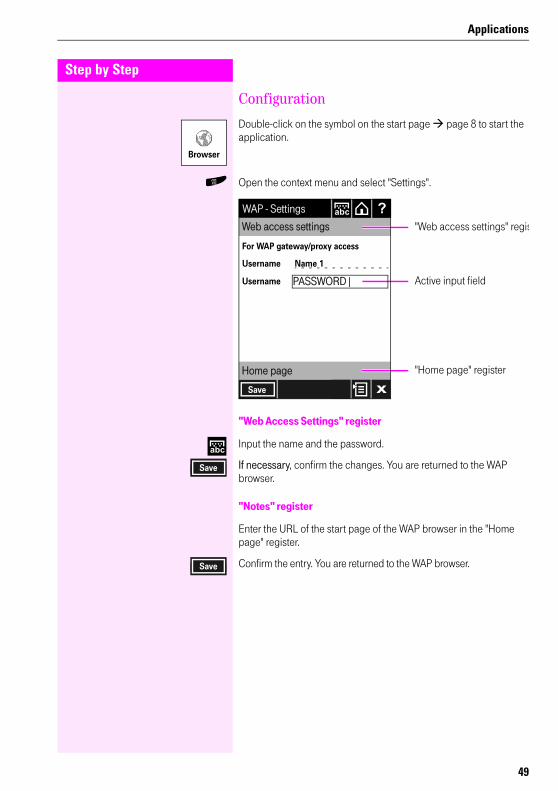
Configuration
Double-click on the symbol on the start page page 8 to start the application.
H Open the context menu and select "Settings".
"Web Access Settings" register
Input the name and the password.
If necessary, confirm the changes. You are returned to the WAP browser.
"Notes" register
Enter the URL of the start page of the WAP browser in the "Home page" register.
Confirm the entry. You are returned to the WAP browser.
Browser
CHome page
?WAP - Settings abc
"Web access settings" regis
Active input field
"Home page" register
Web access settings
C xSave
Name 1Username
For WAP gateway/proxy access
Username PASSWORD|
abc
Save
Save
49
Step by Step
Applications
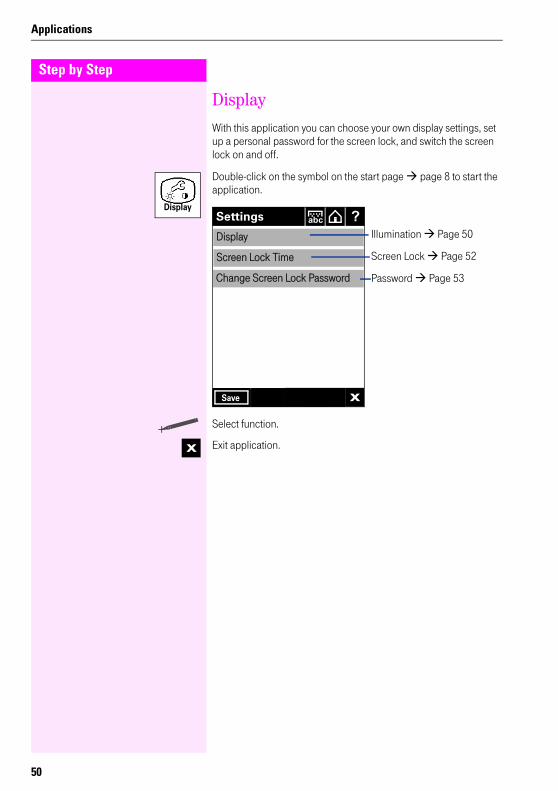
Display
With this application you can choose your own display settings, set up a personal password for the screen lock, and switch the screen lock on and off.
Double-click on the symbol on the start page page 8 to start the application.
Select function.
Exit application.
Display?Settings abc
CSave x
Display
Screen Lock Time
Change Screen Lock Password
Illumination Page 50
Screen Lock Page 52
Password Page 53
x
50
Applications
Step by Step
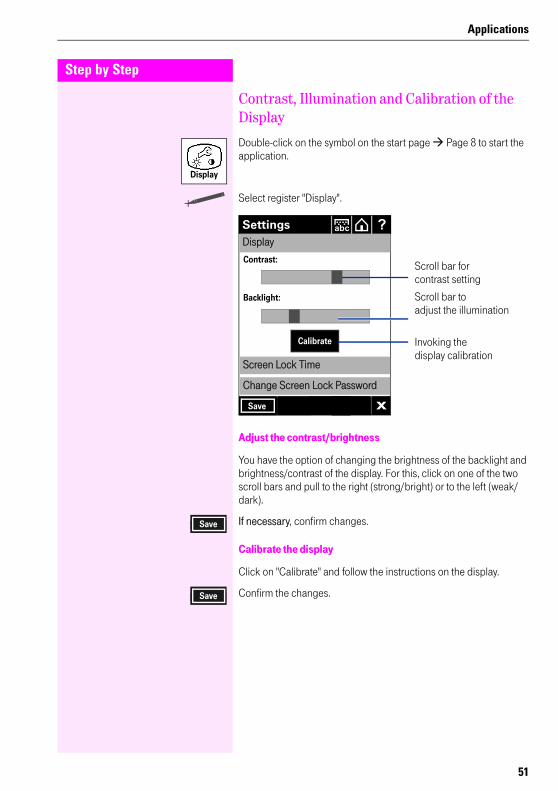
Contrast, Illumination and Calibration of the Display
Double-click on the symbol on the start page Page 8 to start the application.
Select register "Display".
Adjust the contrast/brightness
You have the option of changing the brightness of the backlight and brightness/contrast of the display. For this, click on one of the two scroll bars and pull to the right (strong/bright) or to the left (weak/dark).
If necessary, confirm changes.
Calibrate the display
Click on "Calibrate" and follow the instructions on the display.
Confirm the changes.
Display
?Settings abc
Contrast:
CCSave
Scroll bar forcontrast setting
Backlight:
Calibrate
Scroll bar toadjust the illumination
Invoking thedisplay calibration
x
Screen Lock Time
Change Screen Lock Password
Display
Save
Save
51

Step by Step
Applications
Screen Lock
Double-click on the symbol on the start page Page 8 to start the application.
Select register "Screen Lock Time".
Deactivate Screen Lock
Select "Screen Lock Disabled".
Confirm the change.
Activate Screen Lock
Select the time period after which you wish the screen lock to be-come active.
Confirm the change.
Display
15 minutes
?Settings abc
Save x
Display
Deactivate Screen Lock
ActivateScreen Lock
Screen Lock Disabled
30 seconds
1 minute
2 minutes
5 minutes
10 minutes
Screen Lock Time
Change Screen Lock Password
Save
Save
52
Applications
Step by Step
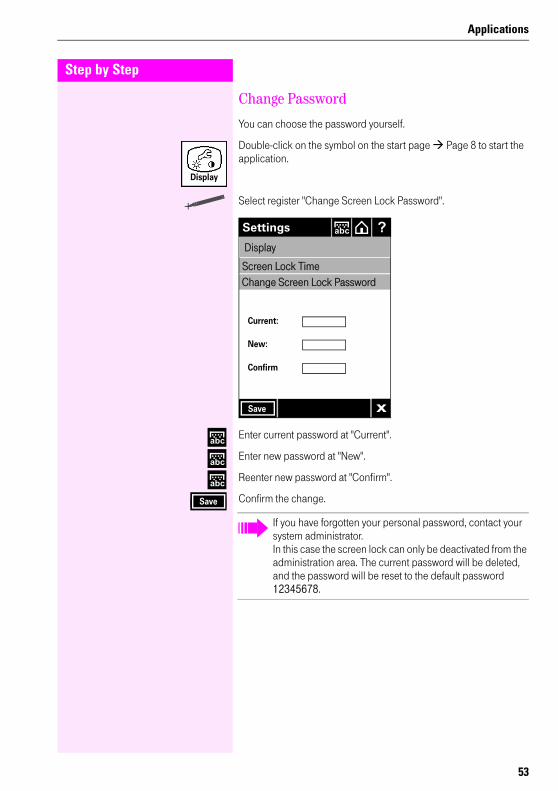
Change Password
You can choose the password yourself.
Double-click on the symbol on the start page Page 8 to start the application.
Select register "Change Screen Lock Password".
Enter current password at "Current".
Enter new password at "New".
Reenter new password at "Confirm".
Confirm the change.
Display
Screen Lock TimeChange Screen Lock Password
?Settings abc
Save x
Display
Current:
New:
Confirm
abc
abc
abc
Save
If you have forgotten your personal password, contact your system administrator.In this case the screen lock can only be deactivated from the administration area. The current password will be deleted, and the password will be reset to the default password 12345678.
53
Step by Step
Applications
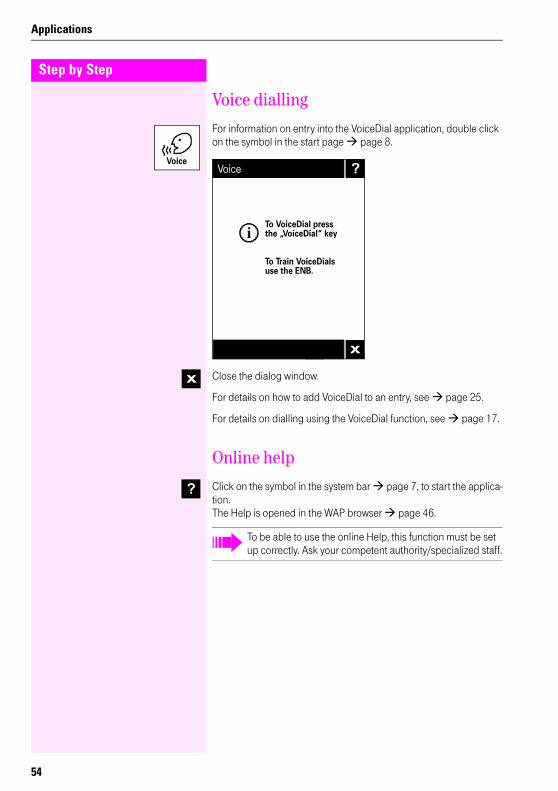
Voice dialling
For information on entry into the VoiceDial application, double click on the symbol in the start page page 8.
Close the dialog window.
For details on how to add VoiceDial to an entry, see page 25.
For details on dialling using the VoiceDial function, see page 17.
Online help
Click on the symbol in the system bar page 7, to start the applica-tion.The Help is opened in the WAP browser page 46.
Voice
C
?Voice
CC x
To VoiceDial pressthe „VoiceDial“ key
To Train VoiceDialsuse the ENB.
x
?
To be able to use the online Help, this function must be set up correctly. Ask your competent authority/specialized staff.
54
Index
Index
AAdjust backlight ............................................... 50Application bar .................................................. 9Application symbols ........................................... 8
BBrowser ........................................................... 46
CCalibrate Display .............................................. 51CE-Reference Numbers/tags ............................... 2Company telephone directory .......................15, 36
List of search results ..................................... 38Search entry ................................................. 36
Contrast .......................................................... 51
DDialog messages .............................................. 10Display .............................................................. 7Display contrast setting ..................................... 50Display keyboard .............................................. 10Display, calibrate .............................................. 50
EENB ...........................................................13, 21Exporting
from Microsoft Outlook ................................. 30
HHelp function ................................................... 54
IIllumination ...................................................... 51
JJava-Midlets ..................................................... 39
LLDAP .........................................................15, 36
Search results .............................................. 38
MMessages ........................................................ 10Midlets ............................................................ 39
NNavigation keys .................................................. 5
OOnline Help ...................................................... 54Operating instructions ......................................... 2Operation range ................................................. 5Operation steps .................................................. 6Operation, intuitive ............................................. 6
PPassword protection ....................................52, 53Personal directory
Import entry in speed dial list ......................... 44Personal password
Entering ....................................................... 53Forgotten ..................................................... 53
Personal telephone directory ........................13, 21Adding VoiceDial to an entry .......................... 25Change entry ............................................... 27Delete entry .................................................. 27Set up entry .................................................. 22View entry .................................................... 26
RRecording ....................................................... 25Recording a VoiceDial entry .............................. 25
55

Index
SScreen Lock .................................................... 12
Activate, deactivate ....................................... 52Change password ........................................ 53Operation .................................................... 12Set time ....................................................... 52Timeout ....................................................... 52
SettingsCalibrate Display .......................................... 51Contrast ...................................................... 51Illumination .................................................. 51
Speed Dial ....................................................... 16Speed Dial List ................................................. 42Start page .......................................................... 8Start symbols ..................................................... 8Symbol explanations .......................................... 6Symbols ............................................................ 6System bar ........................................................ 9
VVoice Dialling ................................................... 17VoiceDial
"Try again" message ..................................... 17play ............................................................. 26record ......................................................... 25remove ........................................................ 26replace, rerecord .......................................... 26start symbol ................................................. 54
WWAP browser ................................................... 46
Configuration ............................................... 49Favorites ...................................................... 47
56


Issued by:Deutsche Telekom AG
Right of modification reserved.Reference number: A31003-E8500-X900-2-7619SW version: 5.0Status: 12/2004Printed on environmentally compatible recycled paper.
The equipment referred to in these instructions conforms with the requirements of the EU directive:1999/5/EG - Directive on radio equipment and telecommunications terminal equipment and mutual recognition of conformity.Compliance with the above directive is confirmed by the CE marking affixed to the equipment.
The declaration of conformity can be viewed at:Deutsche Telekom AGGeschäftsbereich EndgeräteCE-Testlab SteinfurtSonnenschein 3848565 SteinfurtTel: 02551 10 612Mail: [email protected]
Important telephone numbers
For problems:
For questions regarding sales:
Upon delivery of the equipment, please enter telephone numbers!