ok start stop ebs12 11i
TRANSCRIPT

Oracle 11i
E-Business Suite
Administration
Version 11i.1.1
Writer
By
Muhammad Waseem Chaudhry
Web Site http://www.oraclezones.com
Author: Muhammad Waseem Chaudhry Site: http://oraclezones.com
Oracle 11i E-Business Suite –Administration Page 2 of 146
Preface This document is designed to provide a comprehensive introduction to learn the Oracle 11i
E-Business Suite. I have written this document to be primarily focused on that populace who
are interested to learn Oracle 11i Apps DBA, which is taught as a preliminary oracle database
course in same field. This document contains many exercises, which are divided between
reinforcement exercises and learning.
The topics covered in this document are taken from an Oracle Metalink, strongly I refer to basic
oracle recommended books.
This document comes accompanied by an extensive Web site:
http://oraclezones.com
This Web site includes an extensive collection of educational aids that augment the topics of this document. Specifically for interesting populace I include:
Presentation handouts for most topics in this book
A database of hints on selected assignments
Interactive applets that animate fundamental Oracle Apps DBA
I feel that the hint Oracle 11i E-Business Suite should be of particular interest, particularly for
creativity problems that can be quite challenging for some students.
Please send your comments on website www.oraclezones.com or directly send e-mail to me on
below e-mails address
This document including the following topics:
Author: Muhammad Waseem Chaudhry Site: http://oraclezones.com
Oracle 11i E-Business Suite –Administration Page 3 of 146
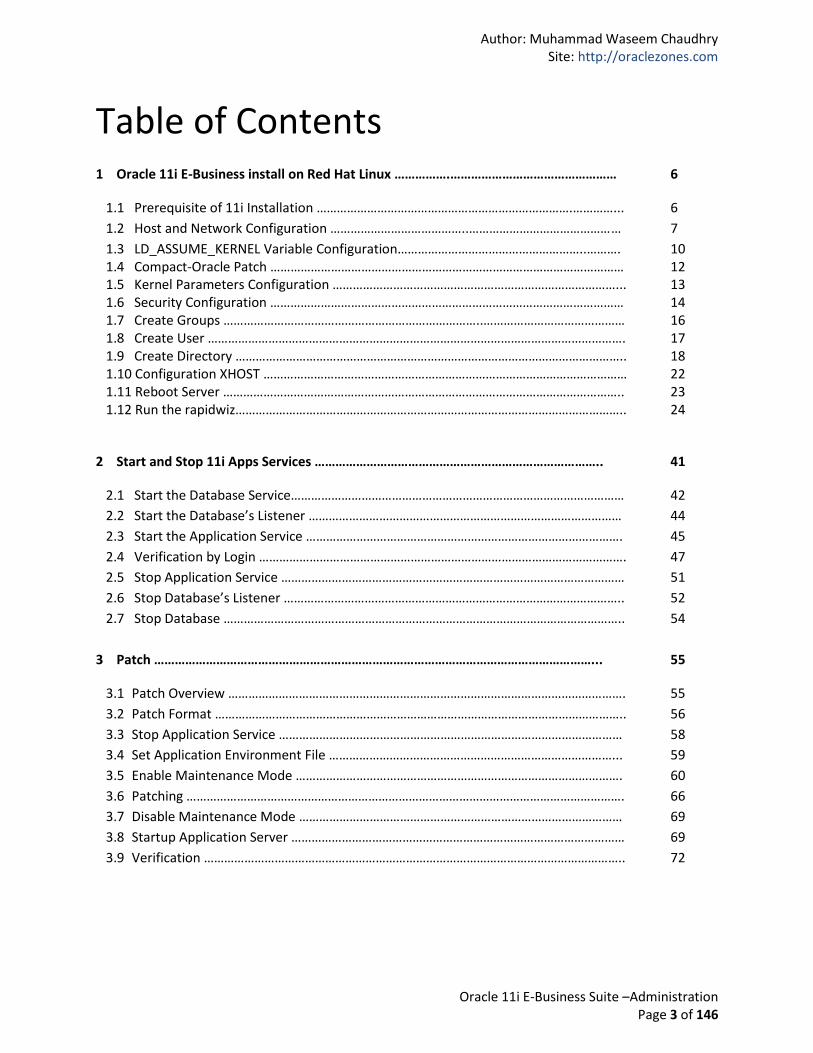
Table of Contents
1 Oracle 11i E-Business install on Red Hat Linux …………….………………………………………… 6
1.1 Prerequisite of 11i Installation ………………………………………………………………….…………... 6
1.2 Host and Network Configuration …………………………………..…………………………………… … 7
1.3 LD_ASSUME_KERNEL Variable Configuration………………………………………………..………. 10 1.4 Compact-Oracle Patch …………………………………………………………………………………………… 12 1.5 Kernel Parameters Configuration …………………………………………………………………………... 13 1.6 Security Configuration …………………………………………………………………………………………… 14 1.7 Create Groups …………………………………………………………………..…………………………………… 16 1.8 Create User ……………………………………………………………………………………………………………. 17 1.9 Create Directory …………………………………………………………………………………………………….. 18 1.10 Configuration XHOST ……………………………………………………………………………………………… 22 1.11 Reboot Server ……………………………………………………………………………………………………….. 23 1.12 Run the rapidwiz…………………………………………………………………………………………………….. 24
2 Start and Stop 11i Apps Services ……………………………………………………………………….. 41
2.1 Start the Database Service……………………………………………………………………………………… 42
2.2 Start the Database’s Listener ………………………………………………………………………………… 44
2.3 Start the Application Service …………………………………………………………………………………. 45
2.4 Verification by Login ………………………………………………………………………………………………. 47
2.5 Stop Application Service ………………………………………………………………………………………… 51
2.6 Stop Database’s Listener ……………………………………………………………………………………….. 52
2.7 Stop Database ……………………………………………………………………………………………………….. 54
3 Patch ………………………………………………………………………………………………………………... 55
3.1 Patch Overview ………………………………………………………………………………………………………. 55
3.2 Patch Format ………………………………………………………………………………………………………….. 56
3.3 Stop Application Service ………………………………………………………………………………………… 58
3.4 Set Application Environment File …………………………………………………………………………... 59
3.5 Enable Maintenance Mode ……………………………………………………………………………………. 60
3.6 Patching …………………………………………………………………………………………………………………. 66
3.7 Disable Maintenance Mode …………………………………………………………………………………… 69
3.8 Startup Application Server ……………………………………………………………………………………… 69
3.9 Verification …………………………………………………………………………………………………………….. 72

Author: Muhammad Waseem Chaudhry Site: http://oraclezones.com
Oracle 11i E-Business Suite –Administration Page 4 of 146
4 Backup …………………………………………………………………………………………………………….. 76
4.1 Backup Overview …………………………………………………………………………………………………… 76
4.2 Set Database Environment File………………………………………………………………………………. 77
4.3 Archive Mode ………………………………………………………………………………………………………… 78
4.4 Recovery Manager ………………………………………………………………………………………………… 80
4.5 RMAN Setting ………………………………………………………………………………………………………… 81
4.5 Backup ……………………………………………………………………………………………………………………. 83
5 Recovery (RMAN)…………………………………………………….……………………………………….. 84
5.1 Set Database Environment File………………………………………………………………………………. 85
5.2 Recovery Manager Overview ………………………………………………………………………………… 86
5.3 Recover Database ………………………………………………………………………………………………….. 87
6 Application Desktop Integration…………………………………………………………………………. 89
6.1 ADI Overview …………………………………………………………………………………………………………. 89
6.2 ADI Installation ……………………………………………………………………………………………………….. 90
6.3 TNS File …………………………………………………………………………………………………………………… 101
6.4 Add Database Entry …………………..…………………………………………………………………………… 103
7 Report Integration ……………………..…………………………………………………………………….. 108
7.1 Report Manager Architecture………………………………………………………………………………… 108
7.2 Design Report …………………………………………………………………………………………………………. 110
7.3 Create Executable ………………………………………………………………………………………………….. 112
7.4 Create Concurrent Program …………………………………………………………………………………… 114
7.5 Register with Request Group …………………………………………………………………………………. 115
8 Form Personalization ……………………..…………………………………………………………………… 117
8.1 Personalization in Invoice ………………………………………………………………………………………. 117
8.2 Verification ……………………………………………………………………………………………………………… 125
9 Menus, Responsibility and User ……………………..…………………………………………………… 126
9.1 Create Menu ………………………………………………………………………………………………………….. 127
9.2 Create Responsibility ……………………………………………………………………………………………… 130
9.3 Create User ……………………………………………………………………………………………………………. 132
9.4 Add Responsibility ………………………………………………………………………………………………….. 133

Author: Muhammad Waseem Chaudhry Site: http://oraclezones.com
Oracle 11i E-Business Suite –Administration Page 5 of 146
10 FNDCPASS ……………………………. ……………………..…………………………………………………… 134
10.1 FNDCPASS Overview ……………………………………………………………………………………………… 134
10.2 Stop Application Service …………………………………………………………………………………………. 135
10.3 Set Application’s Environment File ………………………………………………………………………… 136
10.4 FNDCPASS ………………………………………………………………………………………………………….…… 136
10.5 AutoConfig ……………………………………………………………………………………………………………… 138
10.6 Startup Application Server………………………………………………………………………………………. 139
10.7 Verification (by Request)………………………………………………………………………………………… 140
11 Display Customize Setting ……. ……………………..…………………………………………………… 141
11.1 Investigation ………………..…………………………………………………………………………………………. 142
11.2 Configure GDM File ……………………………………………………………………………………………….. 142
11.3 Restart GDM Service ……………………………………………………………………………………………… 142
11.4 XHOST …………………………………………………………………………………………………………………….. 143
11.5 Auto Login ………………………………………………………………………………………………………………. 145
Author: Muhammad Waseem Chaudhry Site: http://oraclezones.com
Oracle 11i E-Business Suite –Administration Page 6 of 146
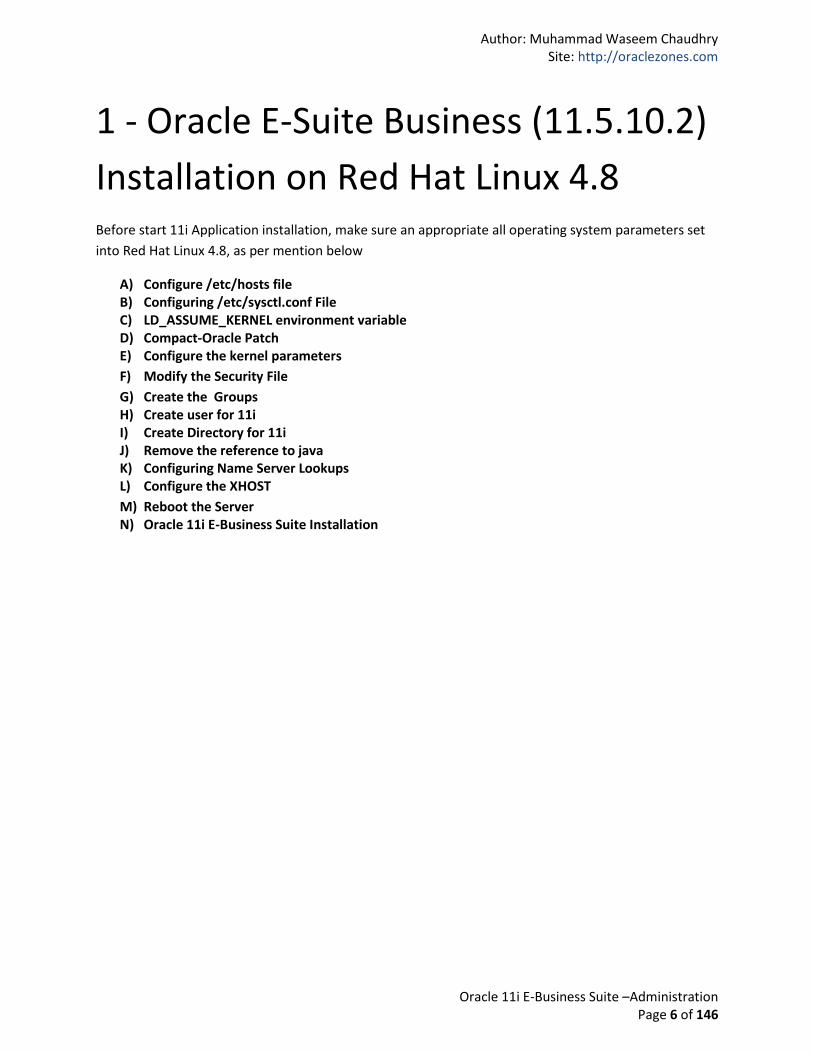
1 - Oracle E-Suite Business (11.5.10.2)
Installation on Red Hat Linux 4.8 Before start 11i Application installation, make sure an appropriate all operating system parameters set
into Red Hat Linux 4.8, as per mention below
A) Configure /etc/hosts file B) Configuring /etc/sysctl.conf File C) LD_ASSUME_KERNEL environment variable D) Compact-Oracle Patch E) Configure the kernel parameters
F) Modify the Security File
G) Create the Groups H) Create user for 11i I) Create Directory for 11i J) Remove the reference to java K) Configuring Name Server Lookups L) Configure the XHOST
M) Reboot the Server N) Oracle 11i E-Business Suite Installation
Author: Muhammad Waseem Chaudhry Site: http://oraclezones.com
Oracle 11i E-Business Suite –Administration Page 7 of 146
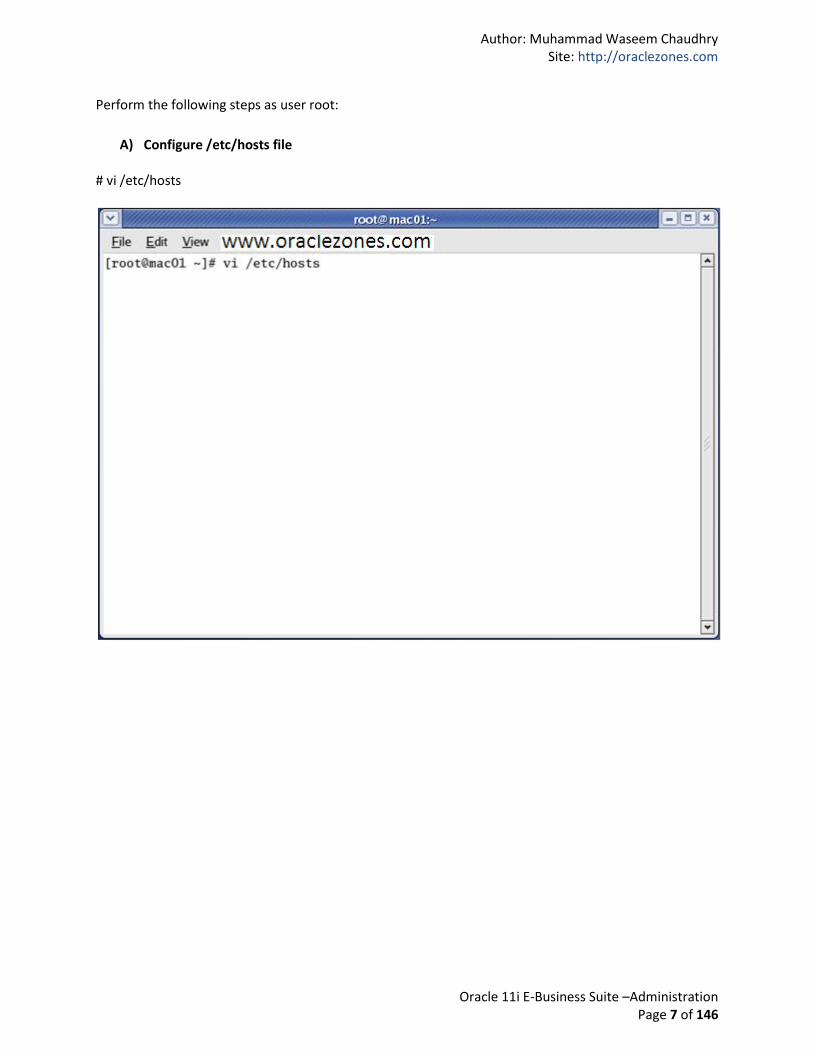
Perform the following steps as user root:
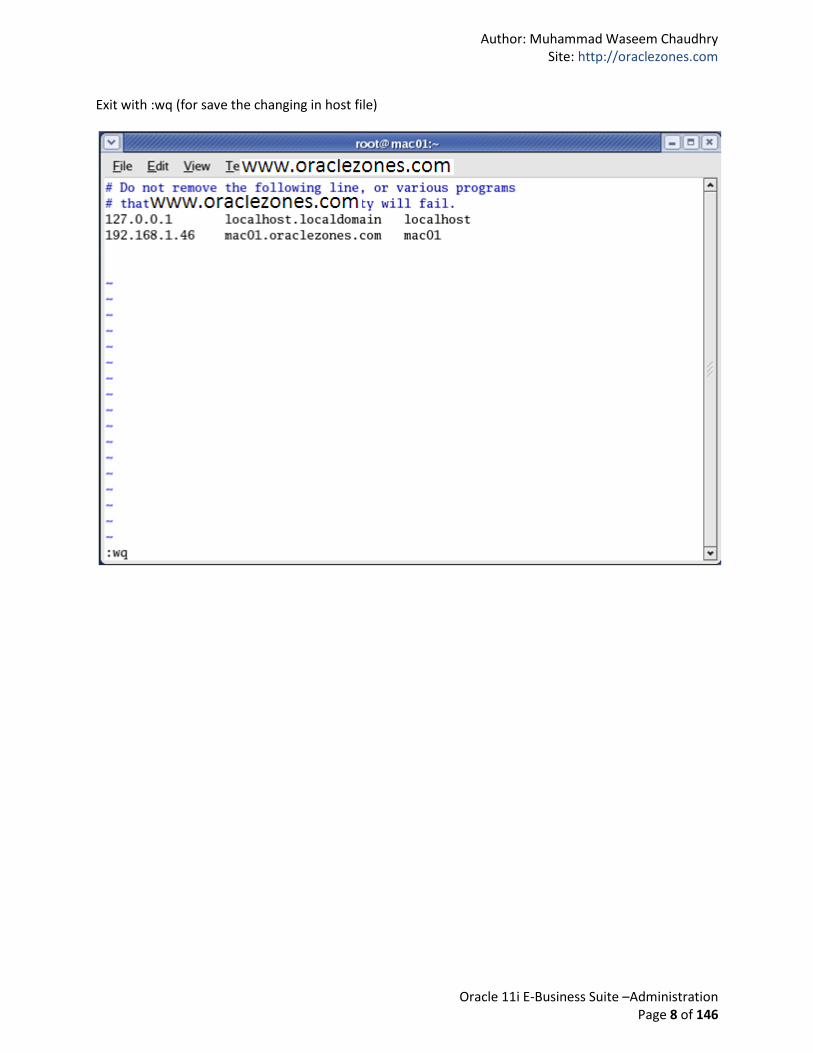
A) Configure /etc/hosts file # vi /etc/hosts
Author: Muhammad Waseem Chaudhry Site: http://oraclezones.com
Oracle 11i E-Business Suite –Administration Page 8 of 146
Exit with :wq (for save the changing in host file)
Author: Muhammad Waseem Chaudhry Site: http://oraclezones.com
Oracle 11i E-Business Suite –Administration Page 9 of 146
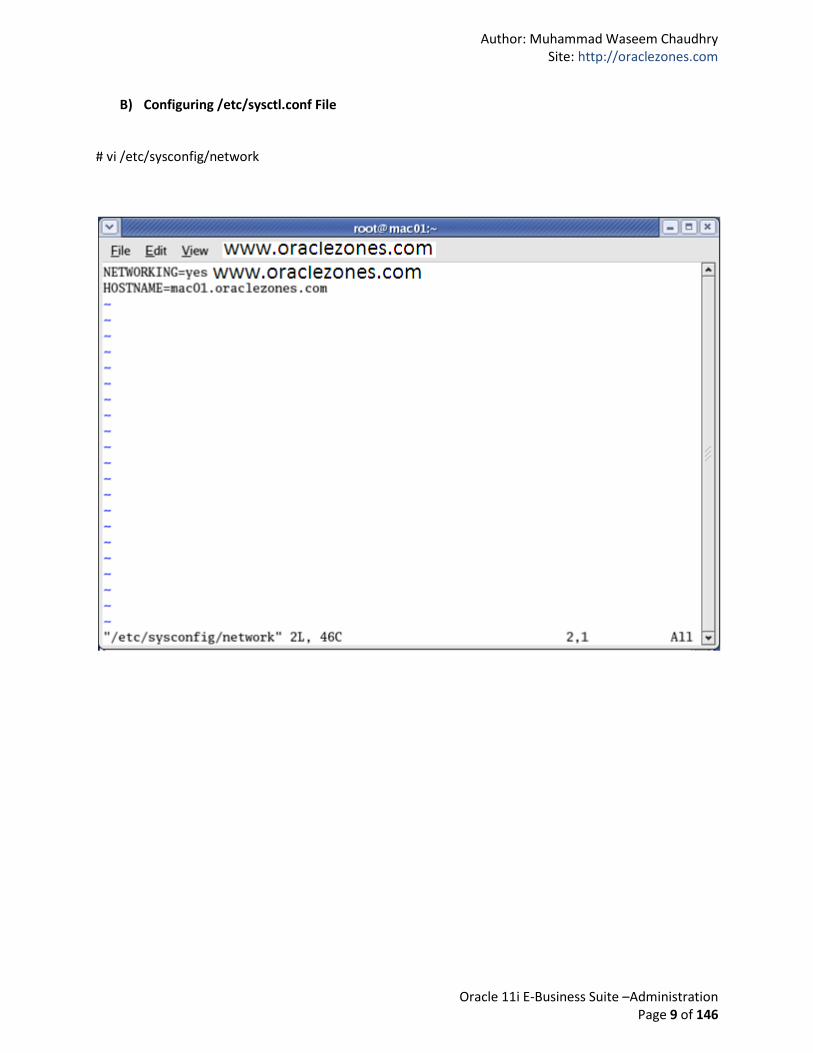
B) Configuring /etc/sysctl.conf File
# vi /etc/sysconfig/network

Author: Muhammad Waseem Chaudhry Site: http://oraclezones.com
Oracle 11i E-Business Suite –Administration Page 10 of 146
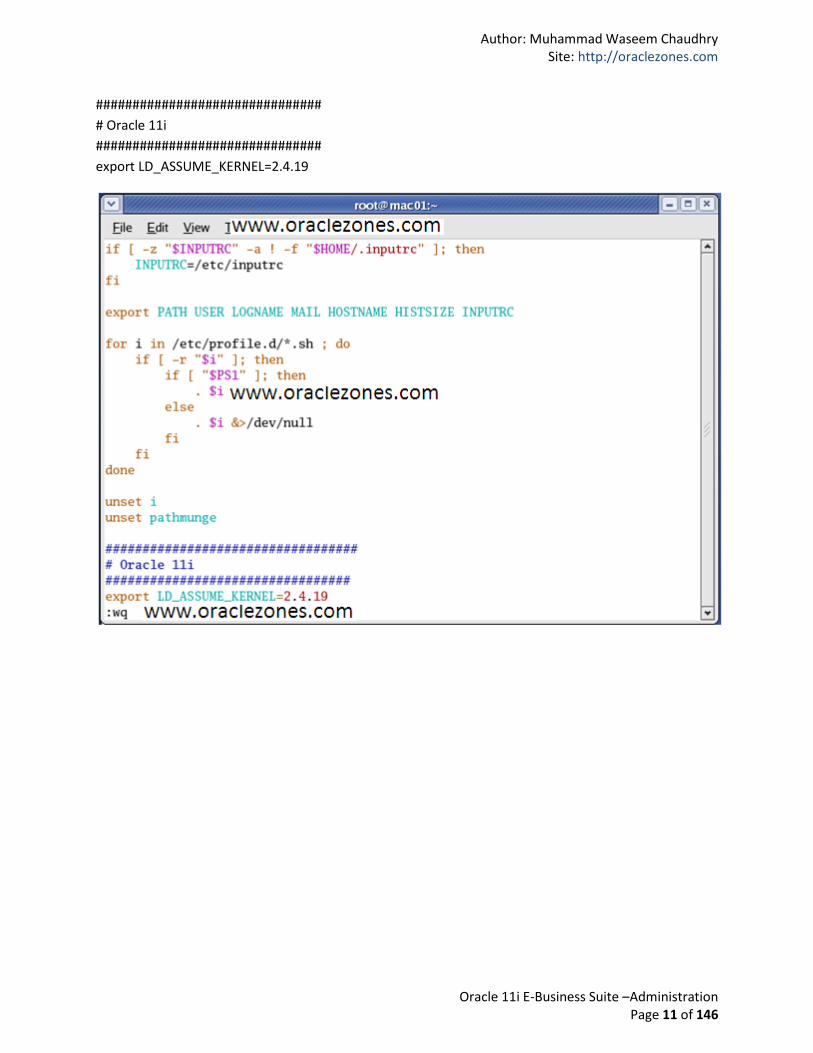
C) LD_ASSUME_KERNEL environment variable You must make the setting permanent by entering it in the system's global shell initialization file.
# vi /etc/profile
Author: Muhammad Waseem Chaudhry Site: http://oraclezones.com
Oracle 11i E-Business Suite –Administration Page 11 of 146
###############################
# Oracle 11i
###############################
export LD_ASSUME_KERNEL=2.4.19
Author: Muhammad Waseem Chaudhry Site: http://oraclezones.com
Oracle 11i E-Business Suite –Administration Page 12 of 146
D) Compact-Oracle Patch
To install the compat-oracle-rhel4 and compat-libcwait packages you have to download the patch
4198954 from http://metalink.oracle.com. Make sure to select the Linux x86 platform. To unzip the
downloaded p4198954_21_LINUX.zip file, run:
$ unzip p4198954_21_LINUX.zip
Note that the compat-oracle-rhel4 and compat-libcwait packages require the xorg-x11-deprecated-libs
and xorg-x11-deprecated-libs-devel packages, see above. To install the two RPMs from the 4198954
patch, run:
# rpm -Uvh compat-oracle-rhel4-1.0-5.i386.rpm
# rpm -Uvh compat-lobcwait-rhel4-1.0-5.i386.rpm
Author: Muhammad Waseem Chaudhry Site: http://oraclezones.com
Oracle 11i E-Business Suite –Administration Page 13 of 146
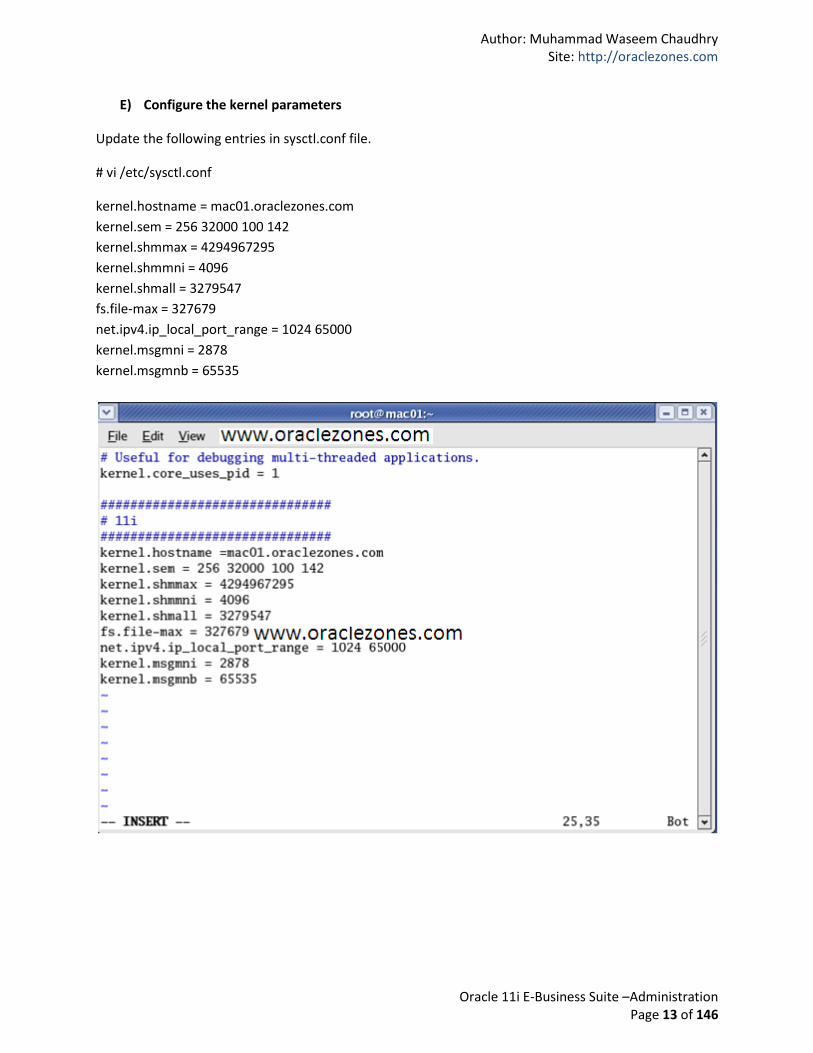
E) Configure the kernel parameters
Update the following entries in sysctl.conf file.
# vi /etc/sysctl.conf
kernel.hostname = mac01.oraclezones.com
kernel.sem = 256 32000 100 142
kernel.shmmax = 4294967295
kernel.shmmni = 4096
kernel.shmall = 3279547
fs.file-max = 327679
net.ipv4.ip_local_port_range = 1024 65000
kernel.msgmni = 2878
kernel.msgmnb = 65535
Author: Muhammad Waseem Chaudhry Site: http://oraclezones.com
Oracle 11i E-Business Suite –Administration Page 14 of 146
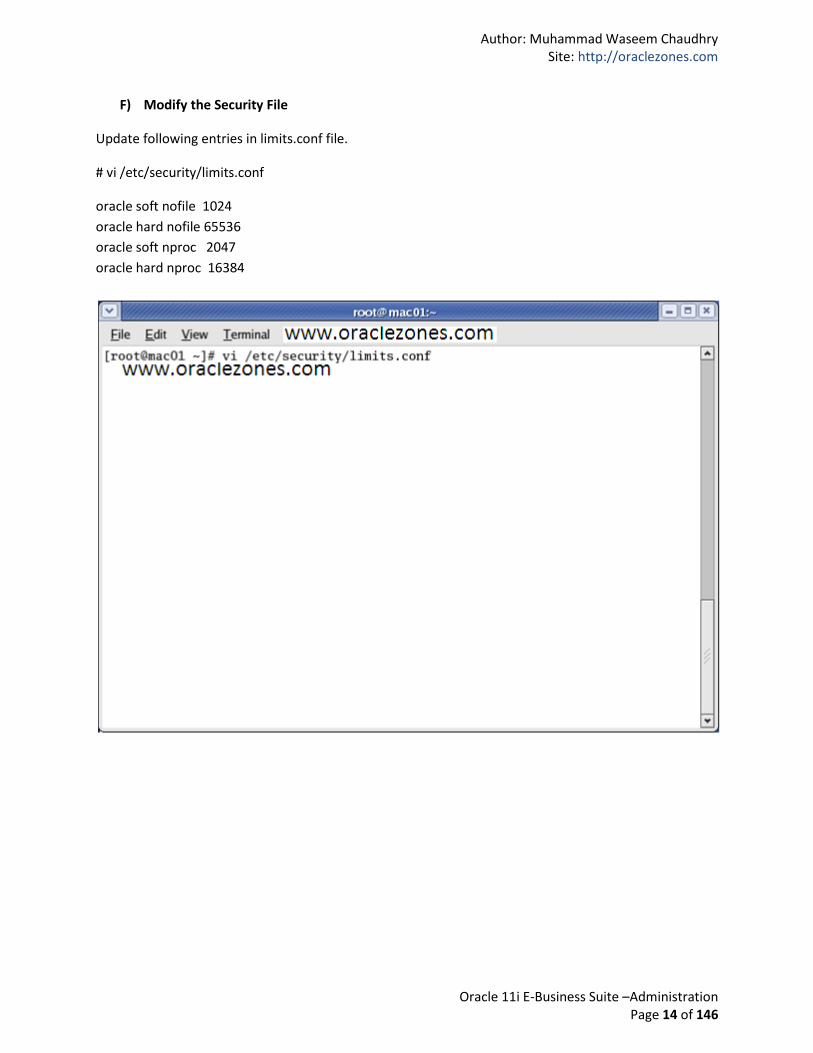
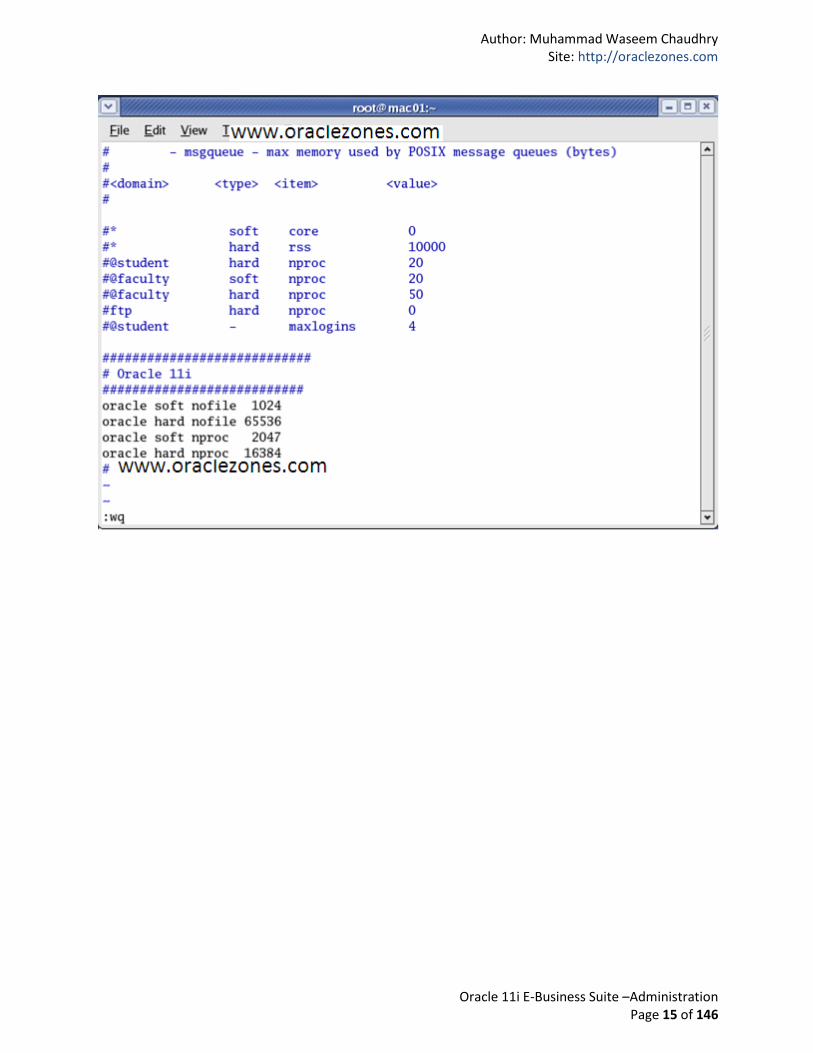
F) Modify the Security File
Update following entries in limits.conf file.
# vi /etc/security/limits.conf
oracle soft nofile 1024
oracle hard nofile 65536
oracle soft nproc 2047
oracle hard nproc 16384
Author: Muhammad Waseem Chaudhry Site: http://oraclezones.com
Oracle 11i E-Business Suite –Administration Page 15 of 146
Author: Muhammad Waseem Chaudhry Site: http://oraclezones.com
Oracle 11i E-Business Suite –Administration Page 16 of 146
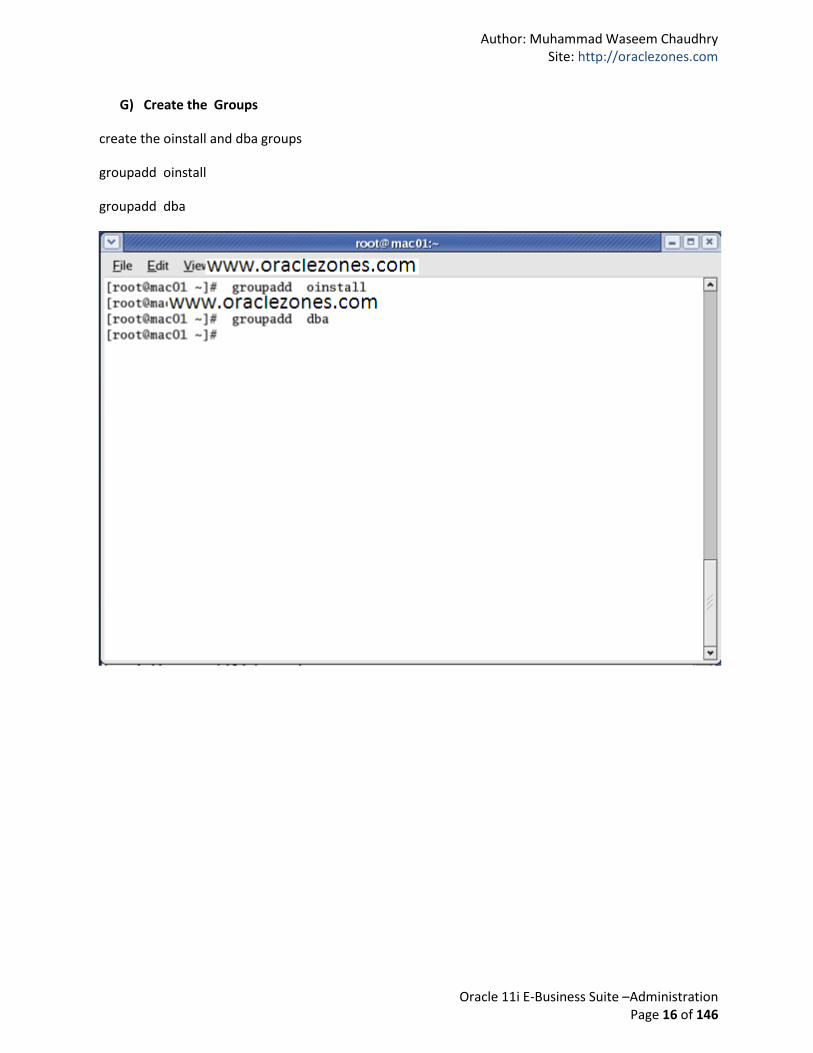
G) Create the Groups
create the oinstall and dba groups
groupadd oinstall
groupadd dba
Author: Muhammad Waseem Chaudhry Site: http://oraclezones.com
Oracle 11i E-Business Suite –Administration Page 17 of 146
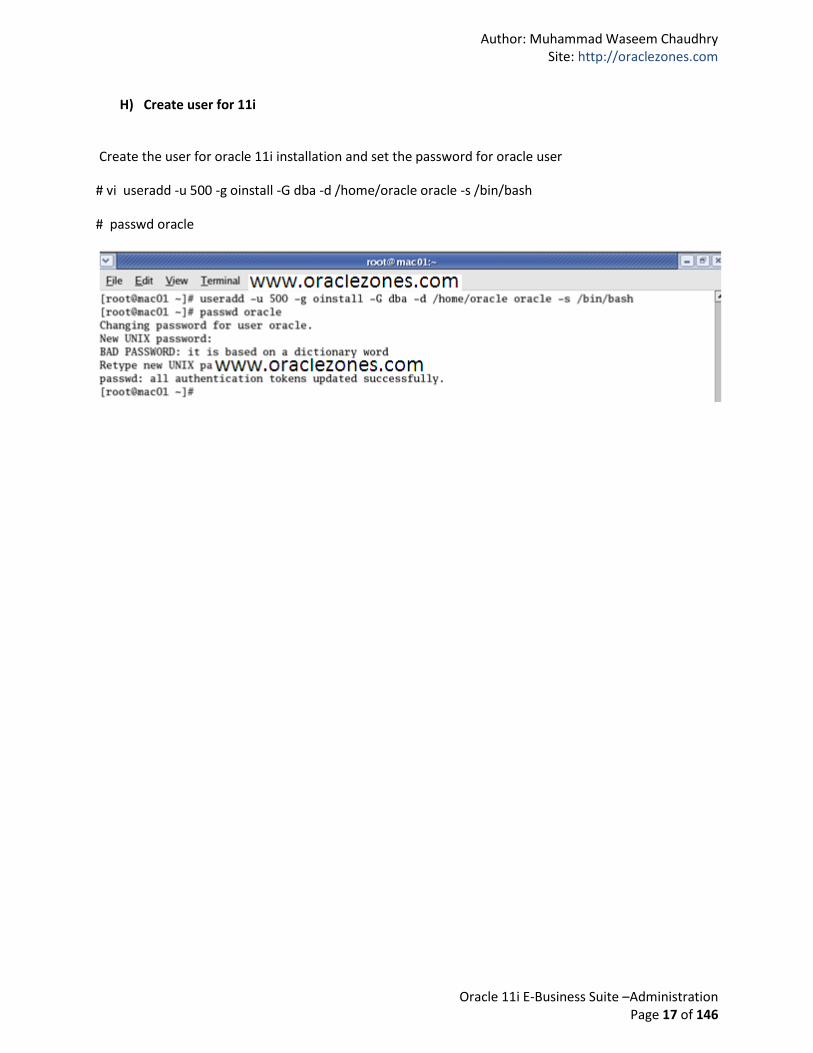
H) Create user for 11i
Create the user for oracle 11i installation and set the password for oracle user
# vi useradd -u 500 -g oinstall -G dba -d /home/oracle oracle -s /bin/bash
# passwd oracle
Author: Muhammad Waseem Chaudhry Site: http://oraclezones.com
Oracle 11i E-Business Suite –Administration Page 18 of 146
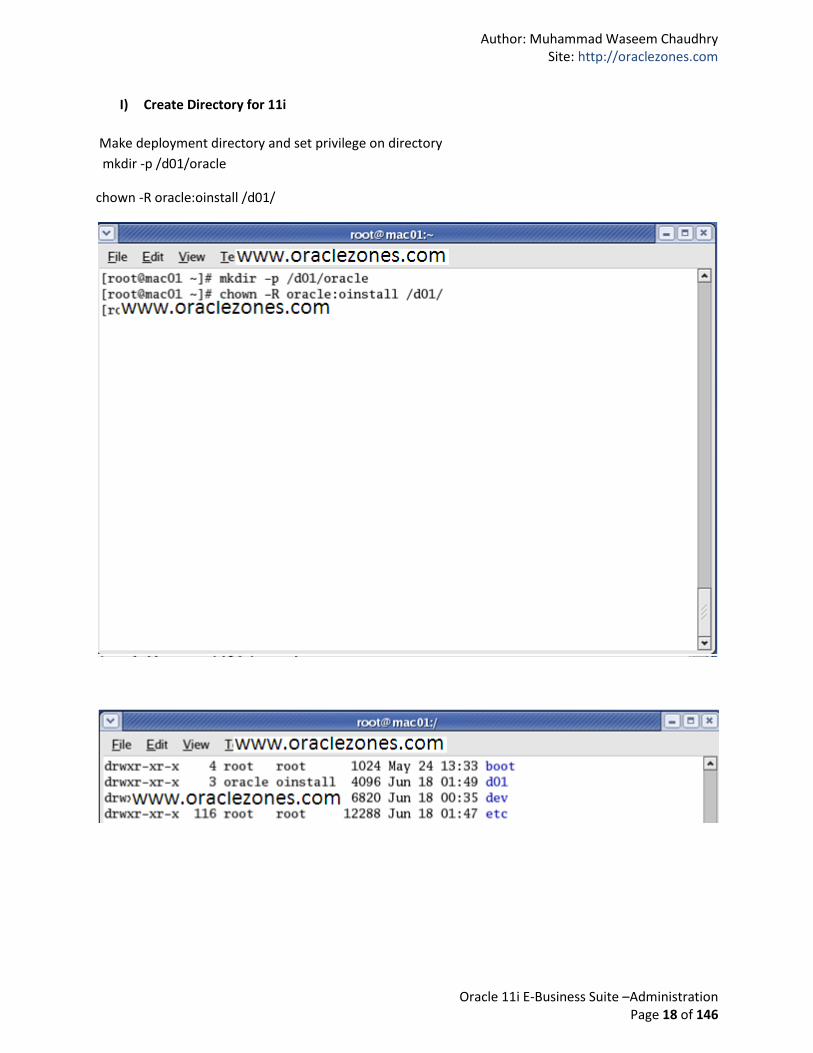
I) Create Directory for 11i
Make deployment directory and set privilege on directory
mkdir -p /d01/oracle
chown -R oracle:oinstall /d01/
Author: Muhammad Waseem Chaudhry Site: http://oraclezones.com
Oracle 11i E-Business Suite –Administration Page 19 of 146
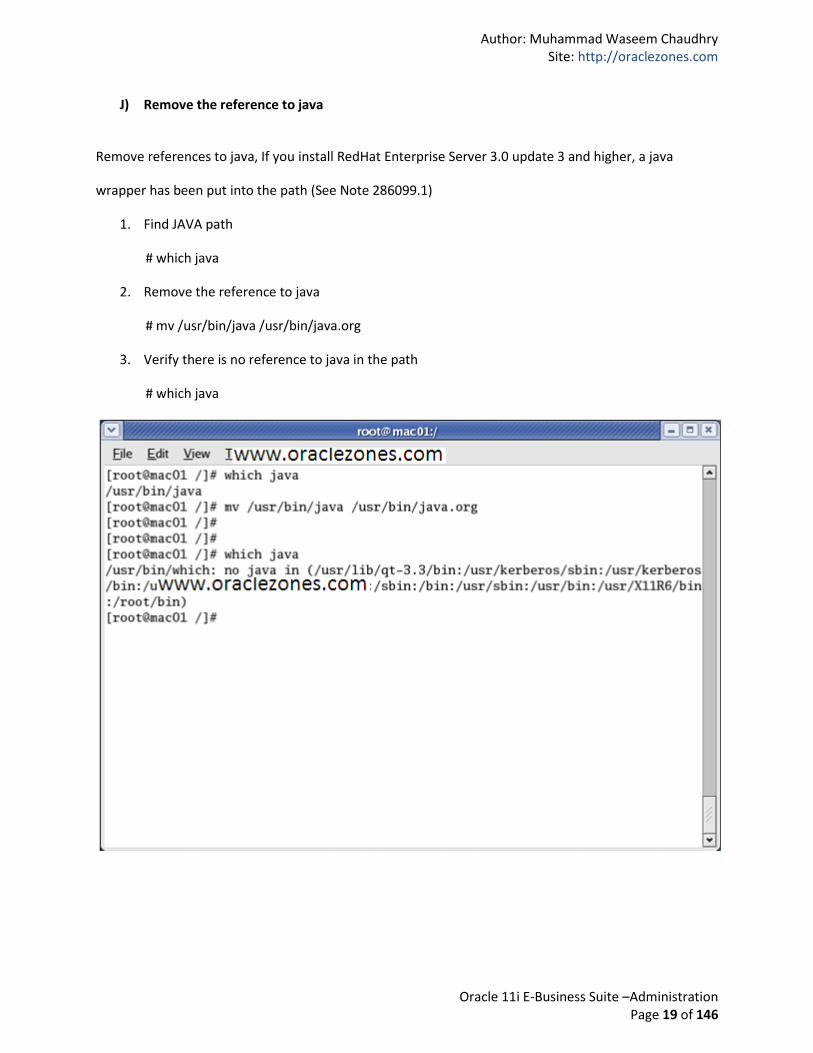
J) Remove the reference to java
Remove references to java, If you install RedHat Enterprise Server 3.0 update 3 and higher, a java
wrapper has been put into the path (See Note 286099.1)
1. Find JAVA path
# which java
2. Remove the reference to java
# mv /usr/bin/java /usr/bin/java.org
3. Verify there is no reference to java in the path
# which java
Author: Muhammad Waseem Chaudhry Site: http://oraclezones.com
Oracle 11i E-Business Suite –Administration Page 20 of 146
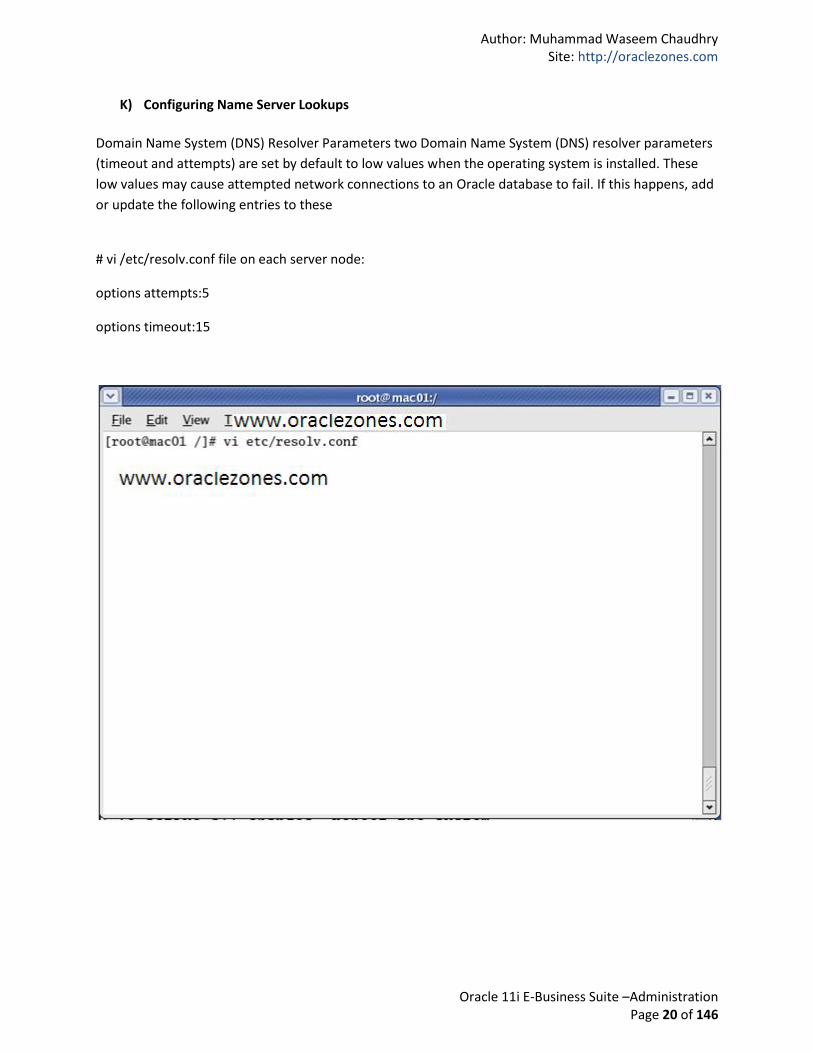
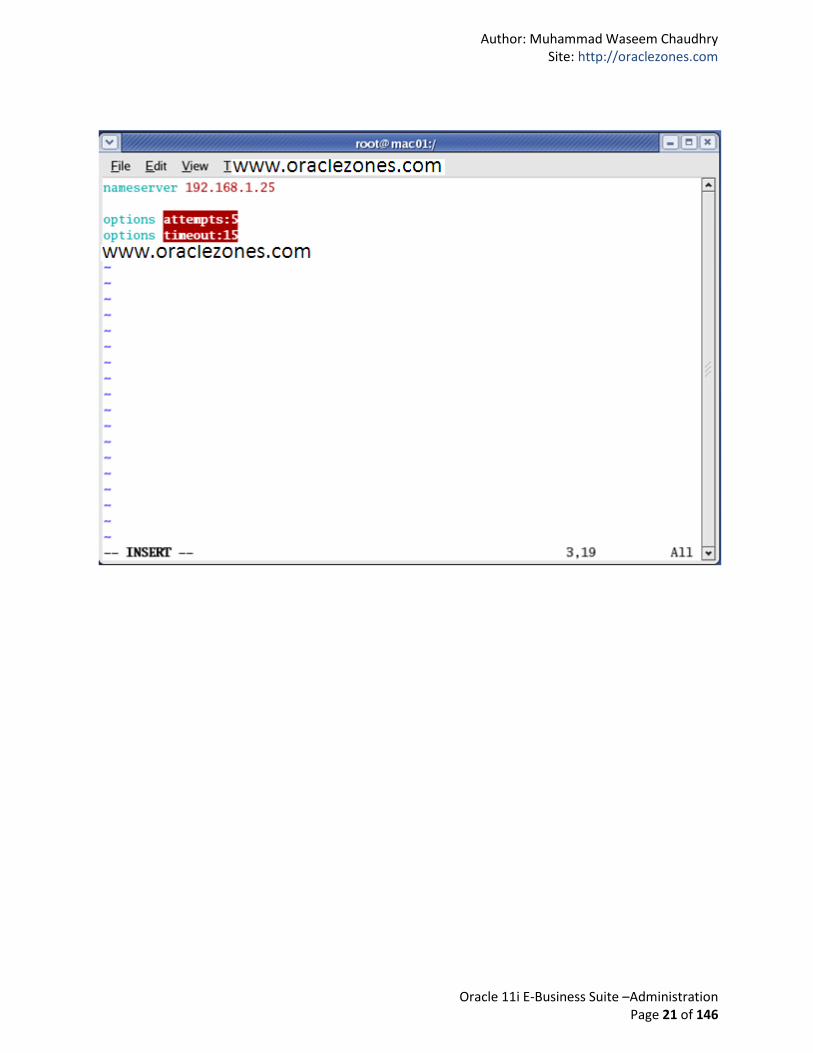
K) Configuring Name Server Lookups
Domain Name System (DNS) Resolver Parameters two Domain Name System (DNS) resolver parameters
(timeout and attempts) are set by default to low values when the operating system is installed. These
low values may cause attempted network connections to an Oracle database to fail. If this happens, add
or update the following entries to these
# vi /etc/resolv.conf file on each server node:
options attempts:5
options timeout:15
Author: Muhammad Waseem Chaudhry Site: http://oraclezones.com
Oracle 11i E-Business Suite –Administration Page 21 of 146
Author: Muhammad Waseem Chaudhry Site: http://oraclezones.com
Oracle 11i E-Business Suite –Administration Page 22 of 146
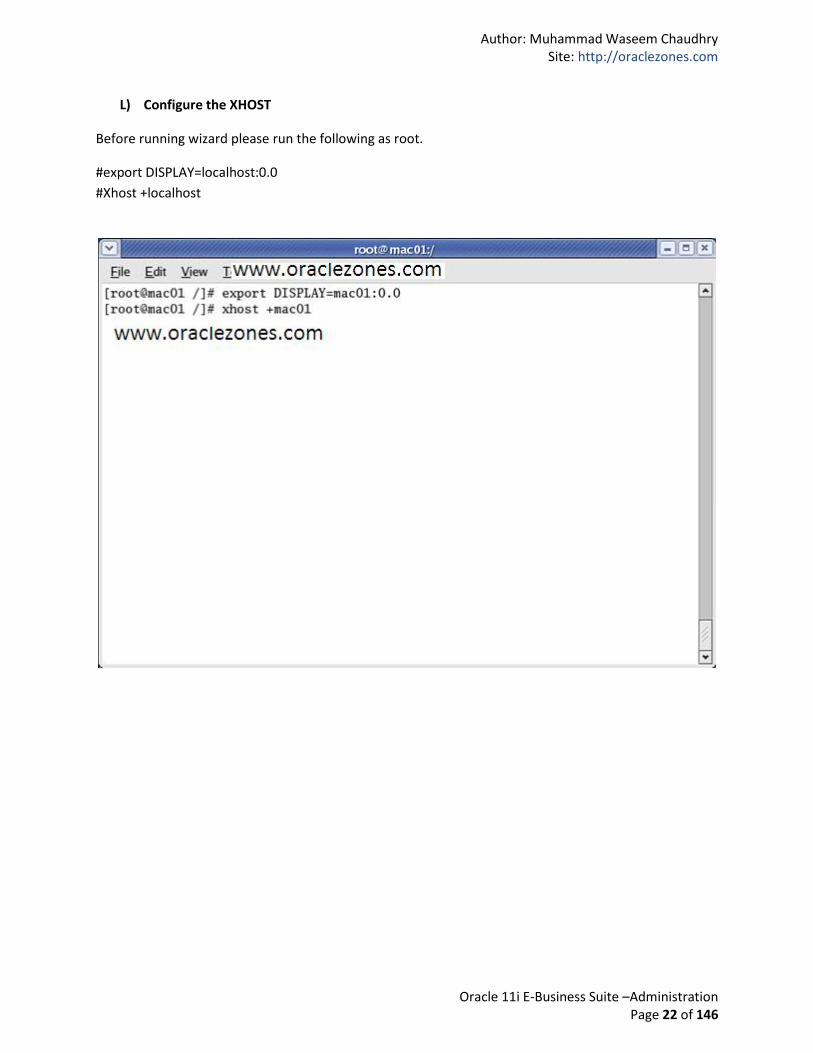
L) Configure the XHOST
Before running wizard please run the following as root.
#export DISPLAY=localhost:0.0
#Xhost +localhost
Author: Muhammad Waseem Chaudhry Site: http://oraclezones.com
Oracle 11i E-Business Suite –Administration Page 23 of 146
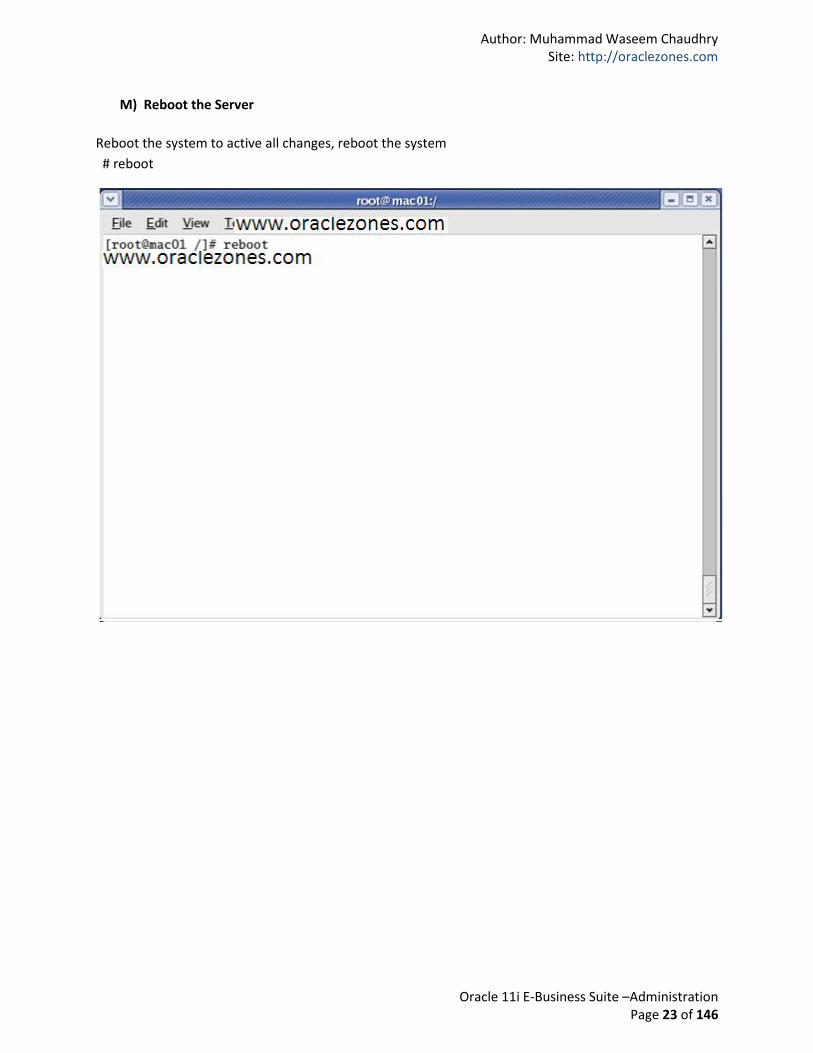
M) Reboot the Server
Reboot the system to active all changes, reboot the system
# reboot
Author: Muhammad Waseem Chaudhry Site: http://oraclezones.com
Oracle 11i E-Business Suite –Administration Page 24 of 146
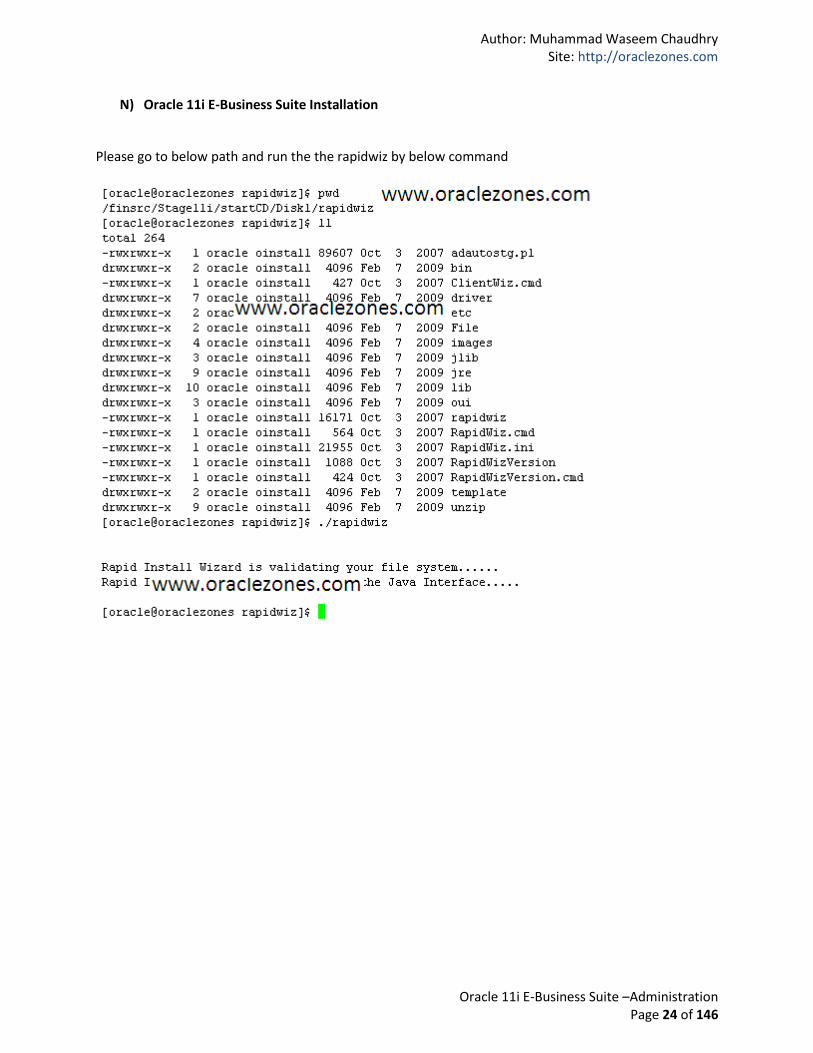
N) Oracle 11i E-Business Suite Installation
Please go to below path and run the the rapidwiz by below command
Author: Muhammad Waseem Chaudhry Site: http://oraclezones.com
Oracle 11i E-Business Suite –Administration Page 25 of 146
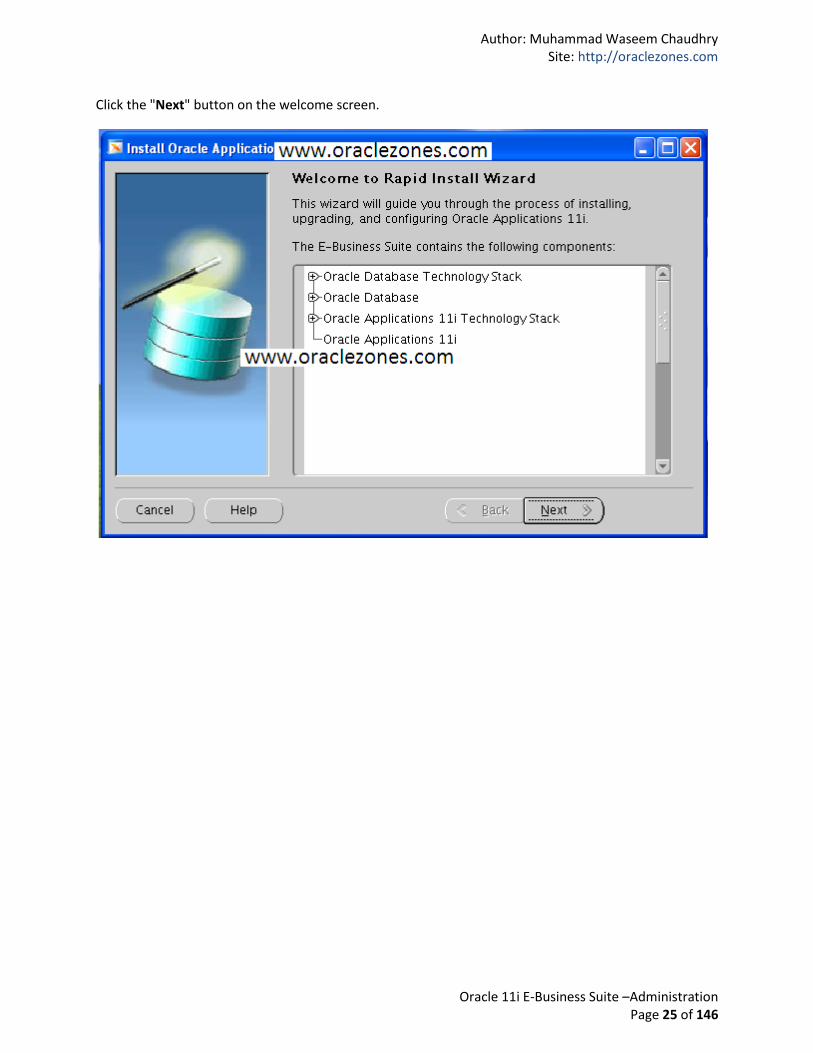
Click the "Next" button on the welcome screen.
Author: Muhammad Waseem Chaudhry Site: http://oraclezones.com
Oracle 11i E-Business Suite –Administration Page 26 of 146
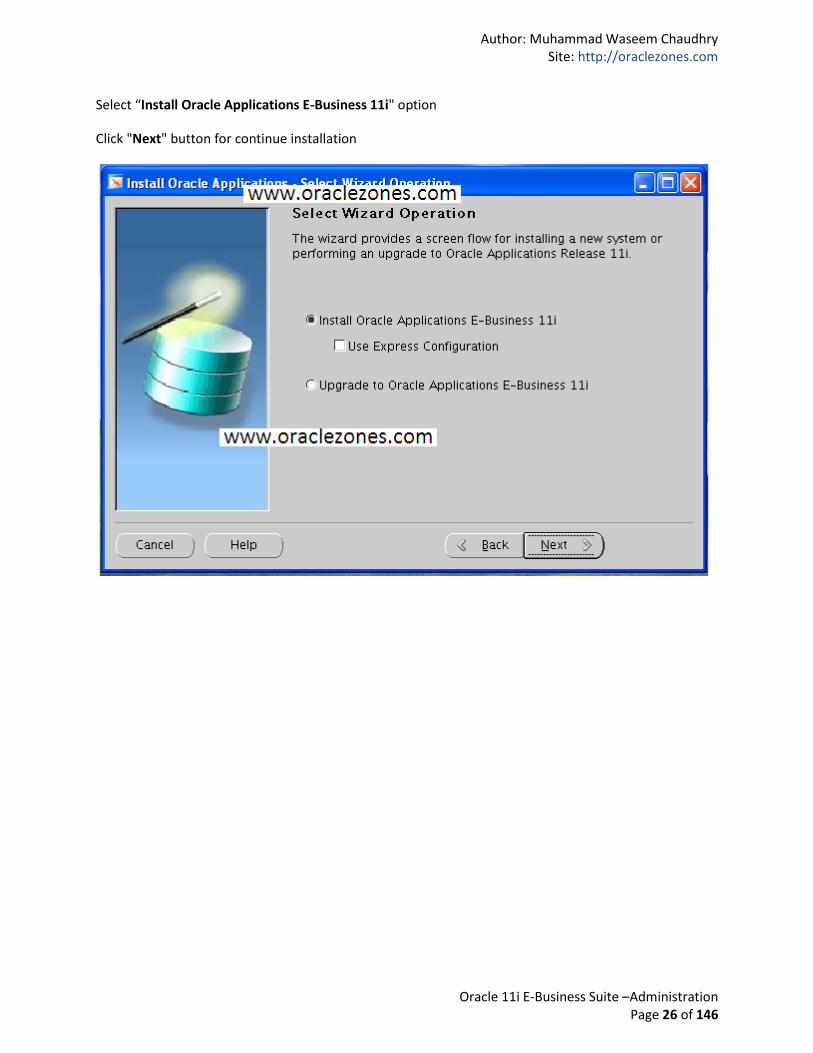
Select “Install Oracle Applications E-Business 11i" option
Click "Next" button for continue installation

Author: Muhammad Waseem Chaudhry Site: http://oraclezones.com
Oracle 11i E-Business Suite –Administration Page 27 of 146
Select the "No" option,
Click the "Next" button.
Author: Muhammad Waseem Chaudhry Site: http://oraclezones.com
Oracle 11i E-Business Suite –Administration Page 28 of 146
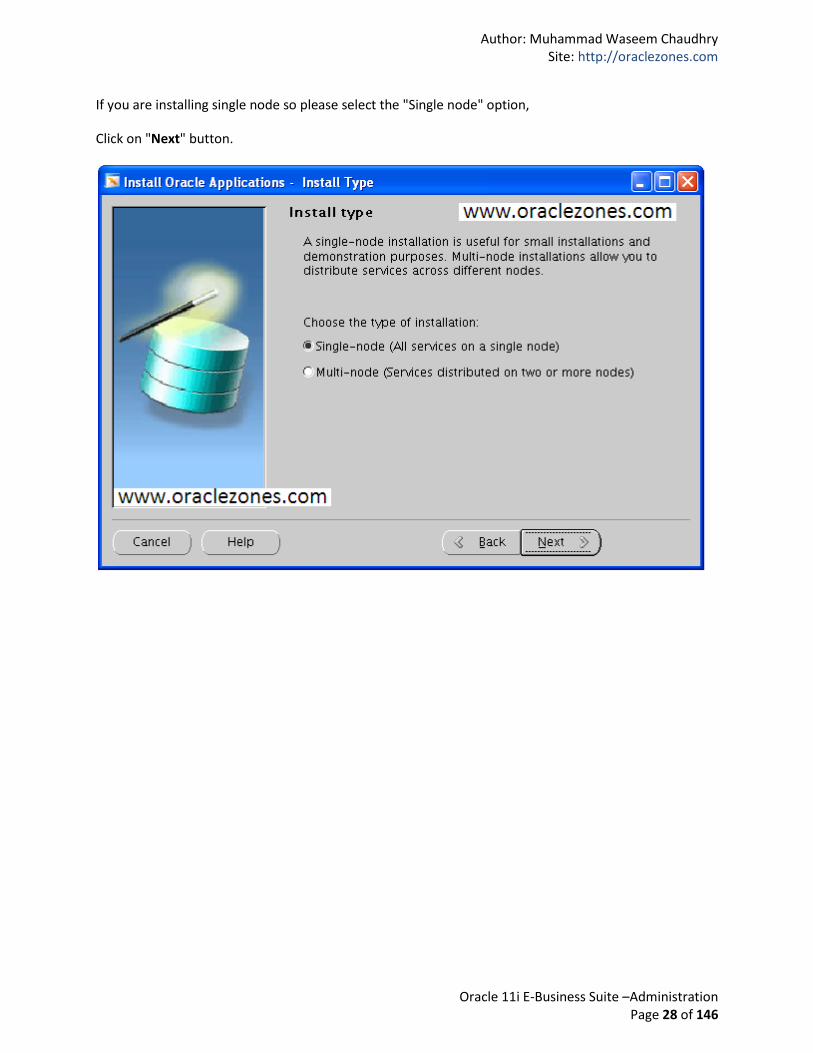
If you are installing single node so please select the "Single node" option,
Click on "Next" button.
Author: Muhammad Waseem Chaudhry Site: http://oraclezones.com
Oracle 11i E-Business Suite –Administration Page 29 of 146
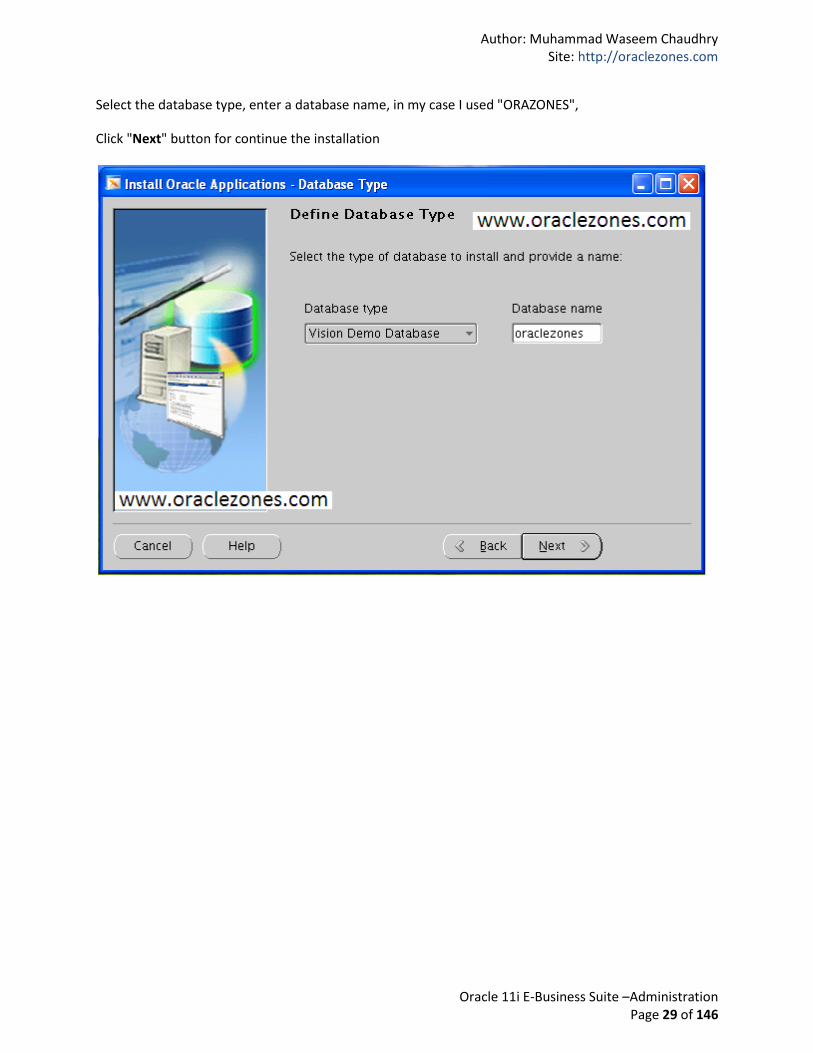
Select the database type, enter a database name, in my case I used "ORAZONES",
Click "Next" button for continue the installation
Author: Muhammad Waseem Chaudhry Site: http://oraclezones.com
Oracle 11i E-Business Suite –Administration Page 30 of 146
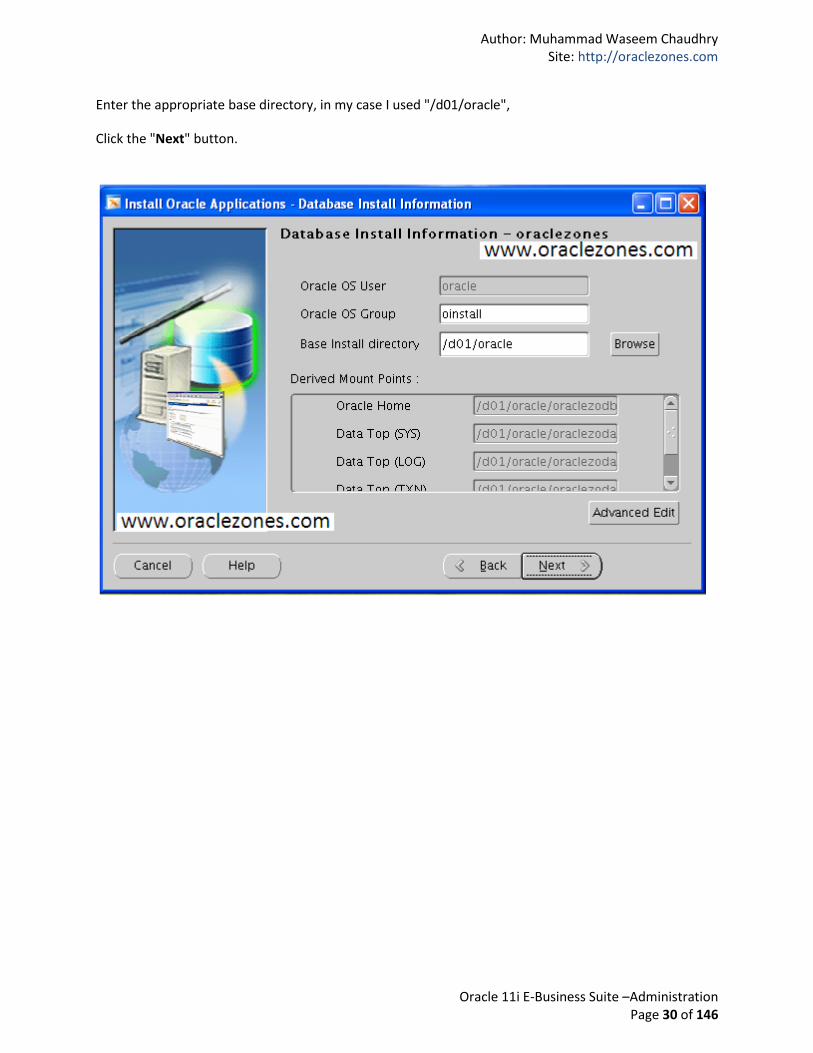
Enter the appropriate base directory, in my case I used "/d01/oracle",
Click the "Next" button.
Author: Muhammad Waseem Chaudhry Site: http://oraclezones.com
Oracle 11i E-Business Suite –Administration Page 31 of 146
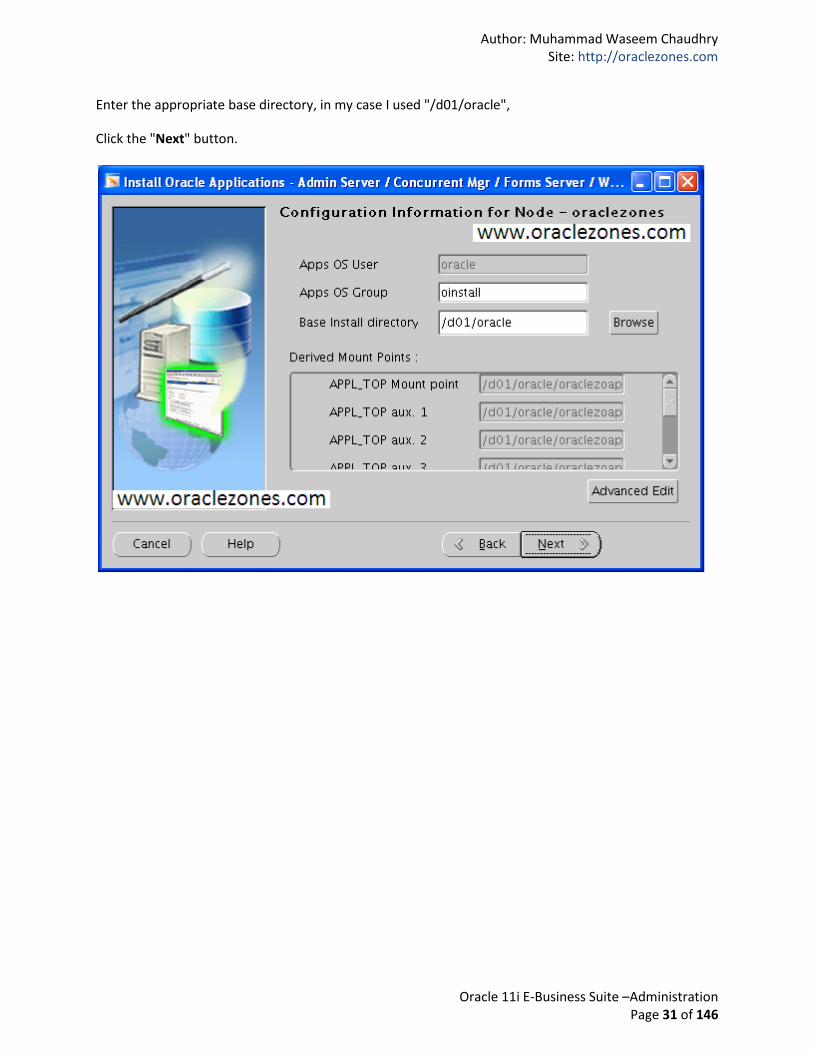
Enter the appropriate base directory, in my case I used "/d01/oracle",
Click the "Next" button.
Author: Muhammad Waseem Chaudhry Site: http://oraclezones.com
Oracle 11i E-Business Suite –Administration Page 32 of 146
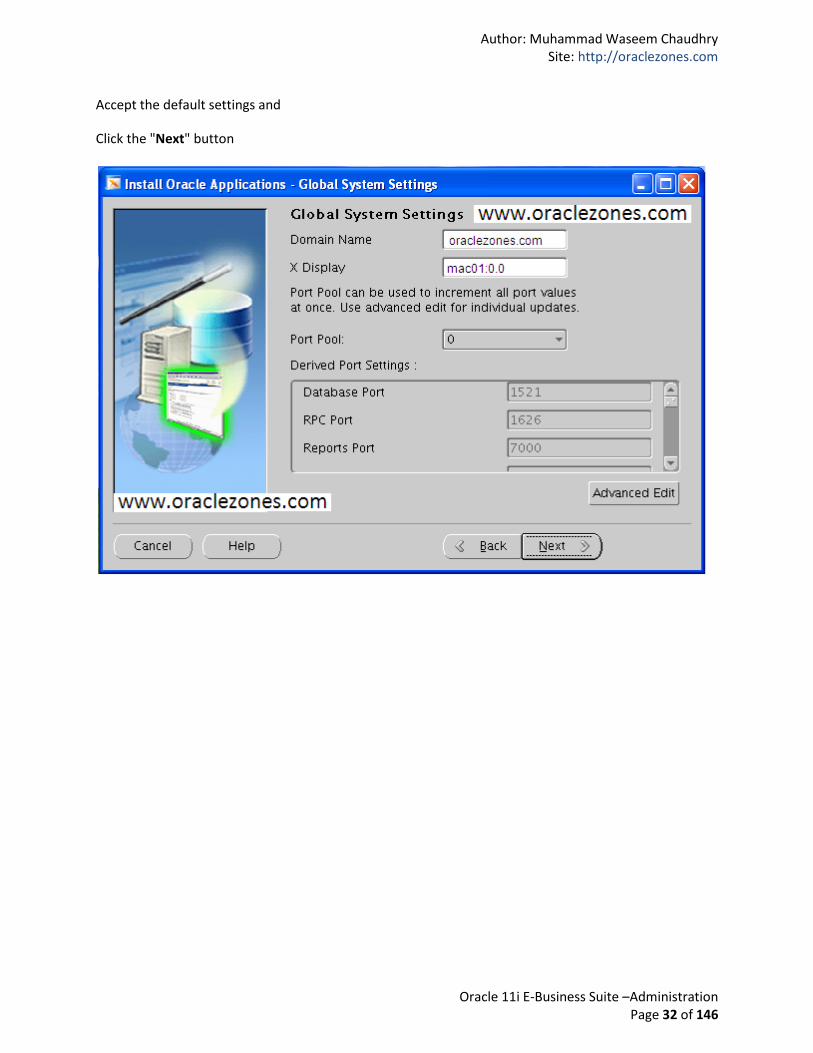
Accept the default settings and
Click the "Next" button
Author: Muhammad Waseem Chaudhry Site: http://oraclezones.com
Oracle 11i E-Business Suite –Administration Page 33 of 146
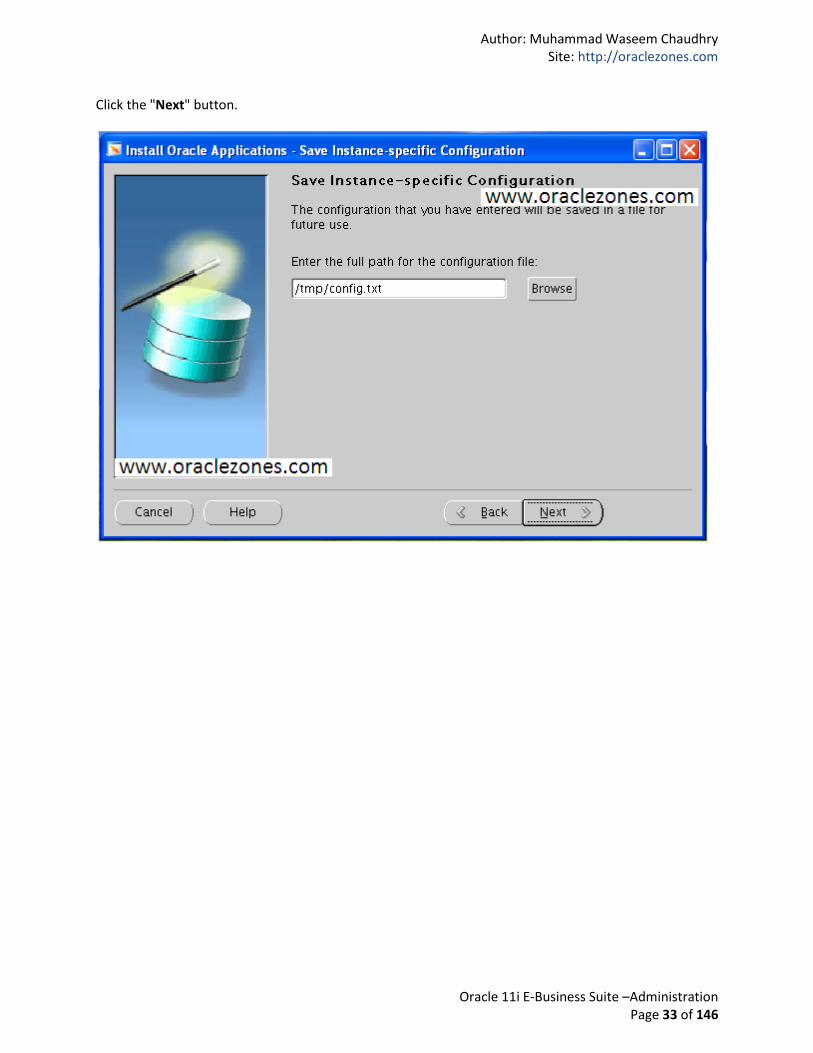
Click the "Next" button.

Author: Muhammad Waseem Chaudhry Site: http://oraclezones.com
Oracle 11i E-Business Suite –Administration Page 34 of 146
Wait for the system’s parameters checks to complete.

Author: Muhammad Waseem Chaudhry Site: http://oraclezones.com
Oracle 11i E-Business Suite –Administration Page 35 of 146
The system’s parameters checks were completed successfully,
Click the "Next" button for installation
Author: Muhammad Waseem Chaudhry Site: http://oraclezones.com
Oracle 11i E-Business Suite –Administration Page 36 of 146
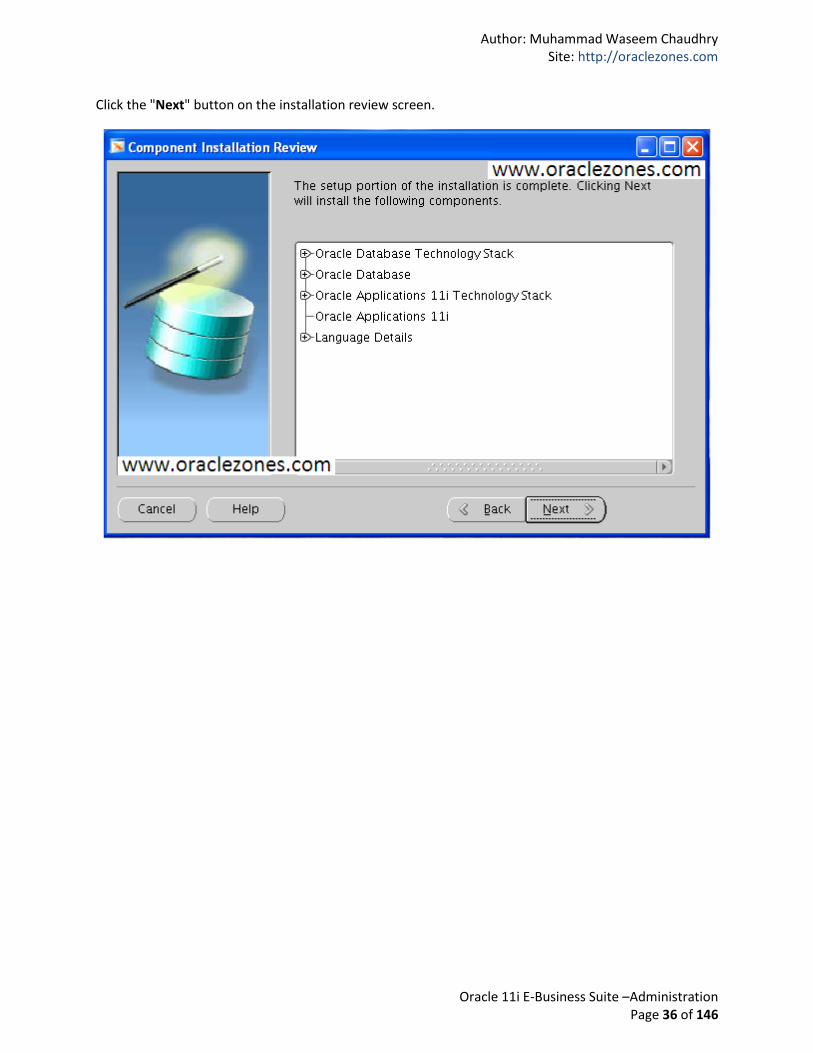
Click the "Next" button on the installation review screen.
Author: Muhammad Waseem Chaudhry Site: http://oraclezones.com
Oracle 11i E-Business Suite –Administration Page 37 of 146
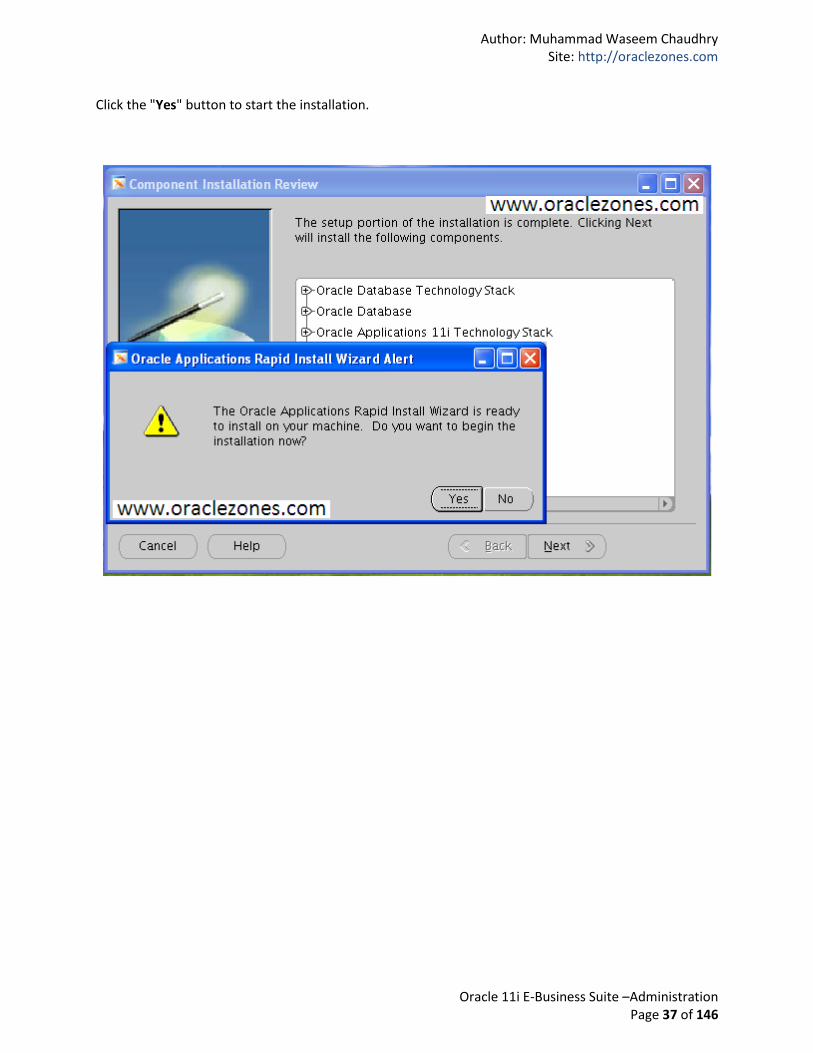
Click the "Yes" button to start the installation.

Author: Muhammad Waseem Chaudhry Site: http://oraclezones.com
Oracle 11i E-Business Suite –Administration Page 38 of 146
Wait while the installation takes complete.

Author: Muhammad Waseem Chaudhry Site: http://oraclezones.com
Oracle 11i E-Business Suite –Administration Page 39 of 146
The post-install checks are successful,
Click the "Next" button
Author: Muhammad Waseem Chaudhry Site: http://oraclezones.com
Oracle 11i E-Business Suite –Administration Page 40 of 146
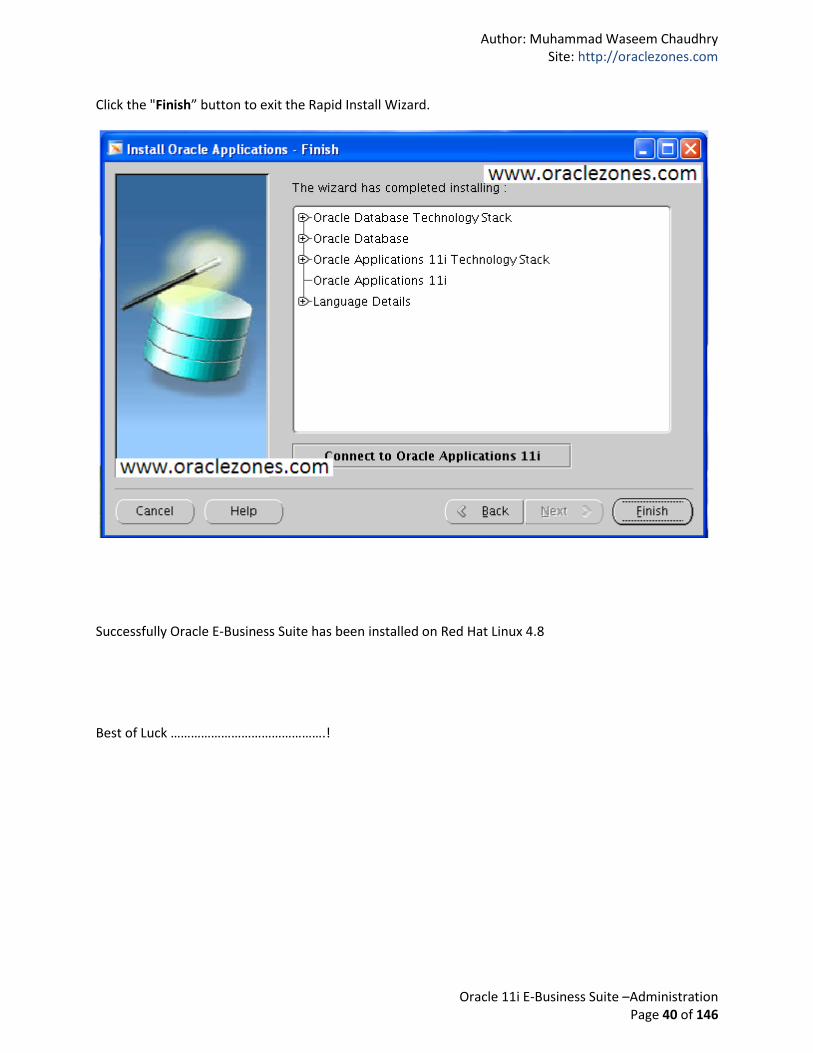
Click the "Finish” button to exit the Rapid Install Wizard.
Successfully Oracle E-Business Suite has been installed on Red Hat Linux 4.8
Best of Luck ……………………………………….!
Author: Muhammad Waseem Chaudhry Site: http://oraclezones.com
Oracle 11i E-Business Suite –Administration Page 41 of 146
2 - Start and Stop 11i Apps Services Execute the following scripts in the sequence for start application, follow to snapshot
Satrtup 11i E-Business Suite’ Services
A) Startup the Database
B) Startup the Database’s Listener
C) Startup Application’s Services
D) Login Page
Stop 11i E-Business Suite’s Services
A) Stop Application’s Services
B) Stop Database’s Listener
C) Stop Database
Author: Muhammad Waseem Chaudhry Site: http://oraclezones.com
Oracle 11i E-Business Suite –Administration Page 42 of 146
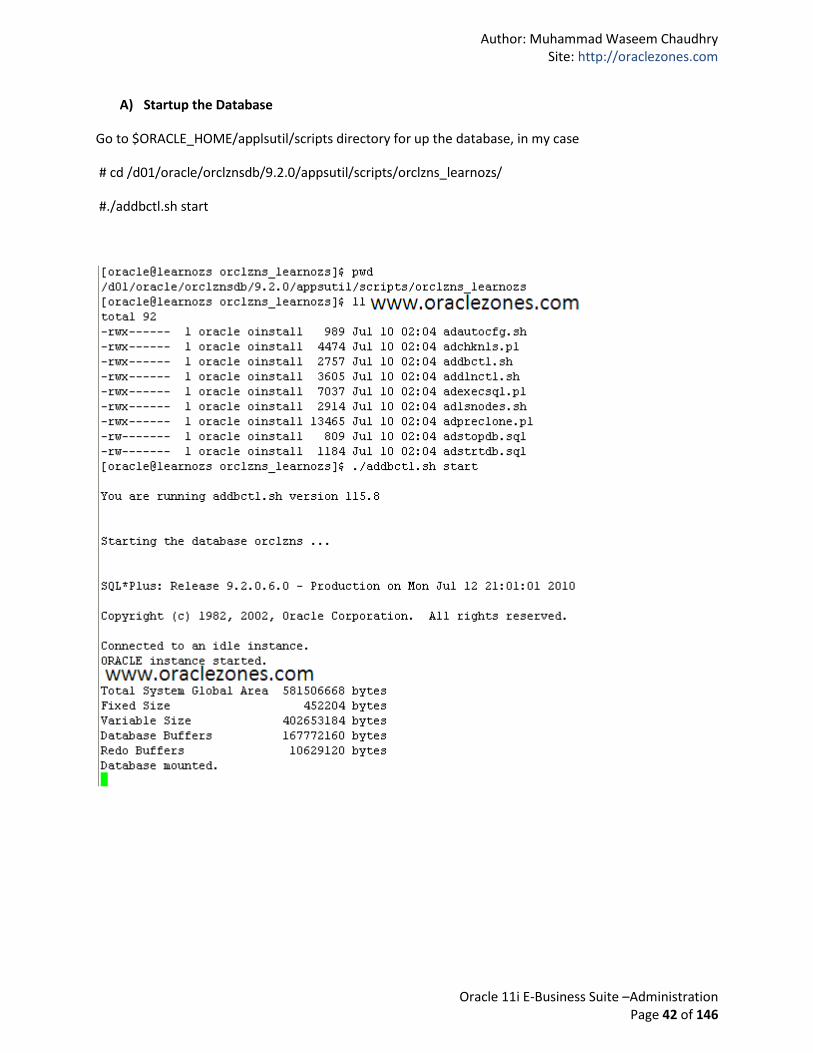
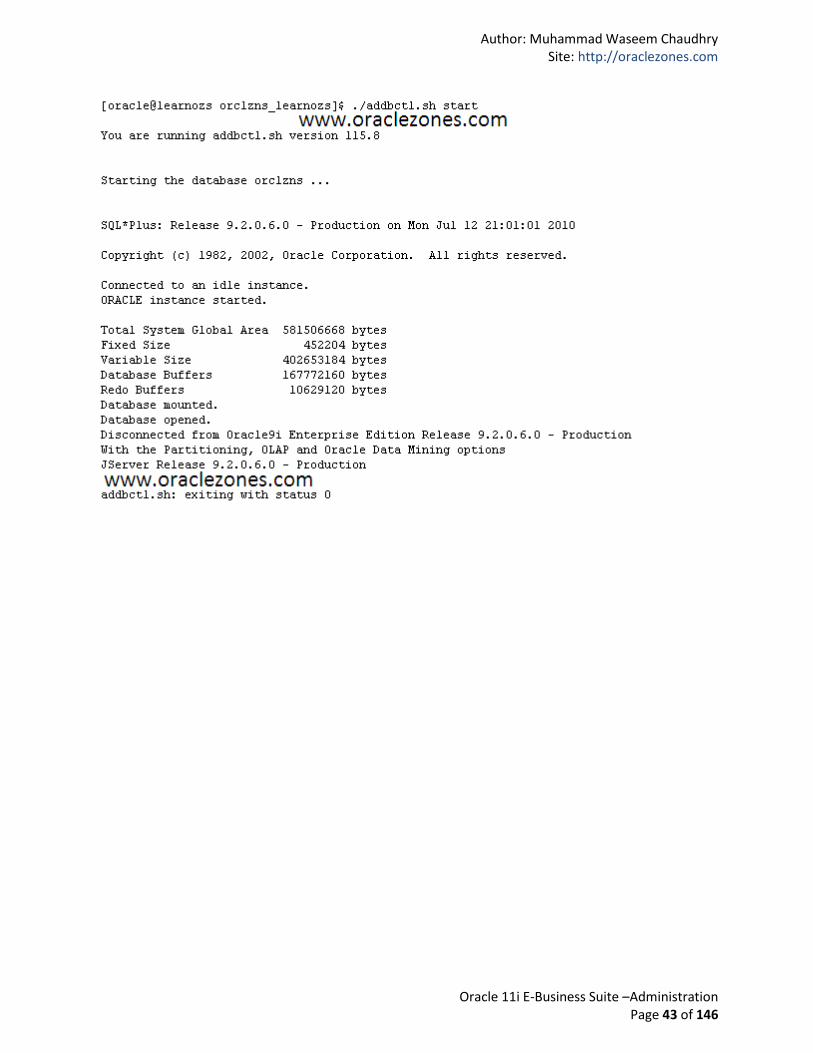
A) Startup the Database
Go to $ORACLE_HOME/applsutil/scripts directory for up the database, in my case
# cd /d01/oracle/orclznsdb/9.2.0/appsutil/scripts/orclzns_learnozs/
#./addbctl.sh start
Author: Muhammad Waseem Chaudhry Site: http://oraclezones.com
Oracle 11i E-Business Suite –Administration Page 43 of 146

Author: Muhammad Waseem Chaudhry Site: http://oraclezones.com
Oracle 11i E-Business Suite –Administration Page 44 of 146
B) Start up the Database’s Listener
Where you have database up, in same directory you will find listener script, in my case
# cd /d01/oracle/orclznsdb/9.2.0/appsutil/scripts/orclzns_learnozs
# ./addlnctl.sh start ORAZONES
Author: Muhammad Waseem Chaudhry Site: http://oraclezones.com
Oracle 11i E-Business Suite –Administration Page 45 of 146
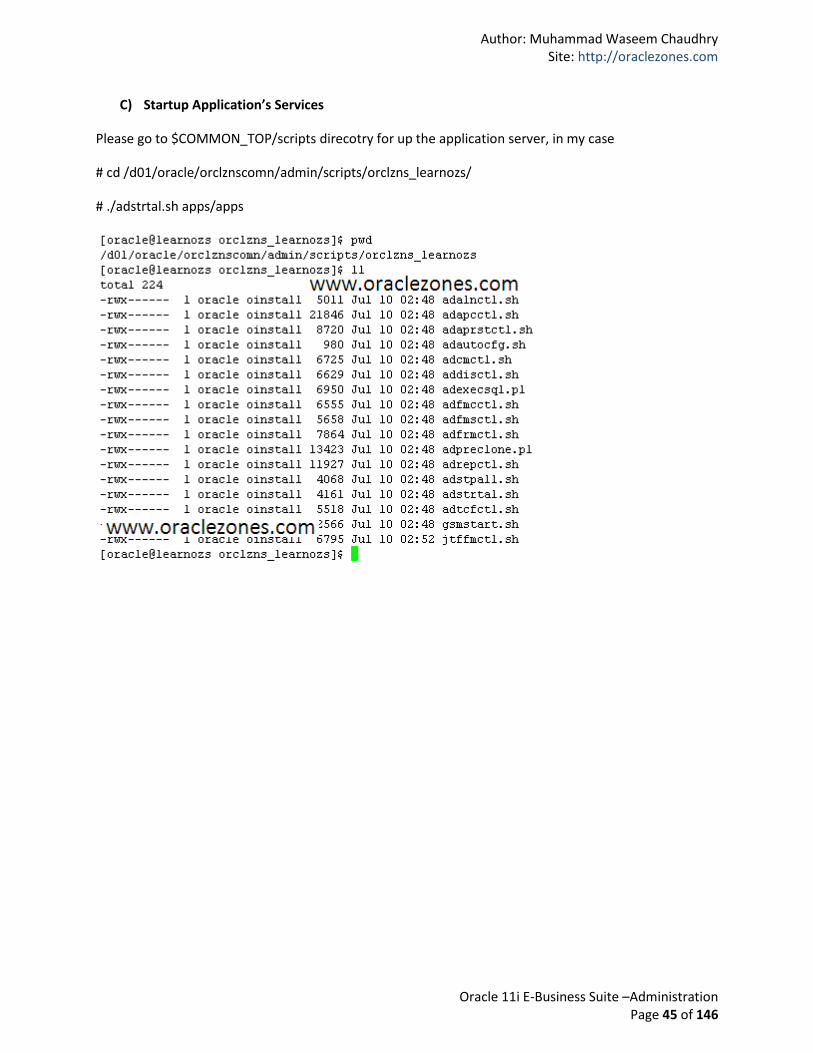
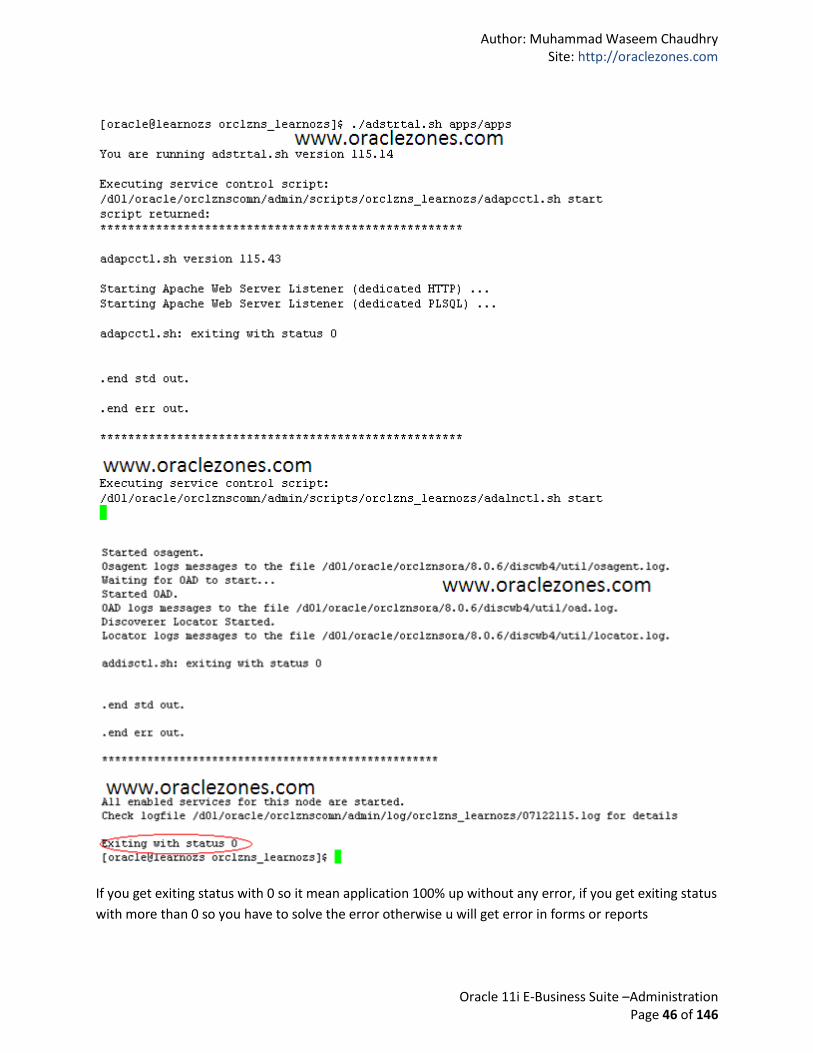
C) Startup Application’s Services
Please go to $COMMON_TOP/scripts direcotry for up the application server, in my case
# cd /d01/oracle/orclznscomn/admin/scripts/orclzns_learnozs/
# ./adstrtal.sh apps/apps
Author: Muhammad Waseem Chaudhry Site: http://oraclezones.com
Oracle 11i E-Business Suite –Administration Page 46 of 146
If you get exiting status with 0 so it mean application 100% up without any error, if you get exiting status
with more than 0 so you have to solve the error otherwise u will get error in forms or reports
Author: Muhammad Waseem Chaudhry Site: http://oraclezones.com
Oracle 11i E-Business Suite –Administration Page 47 of 146
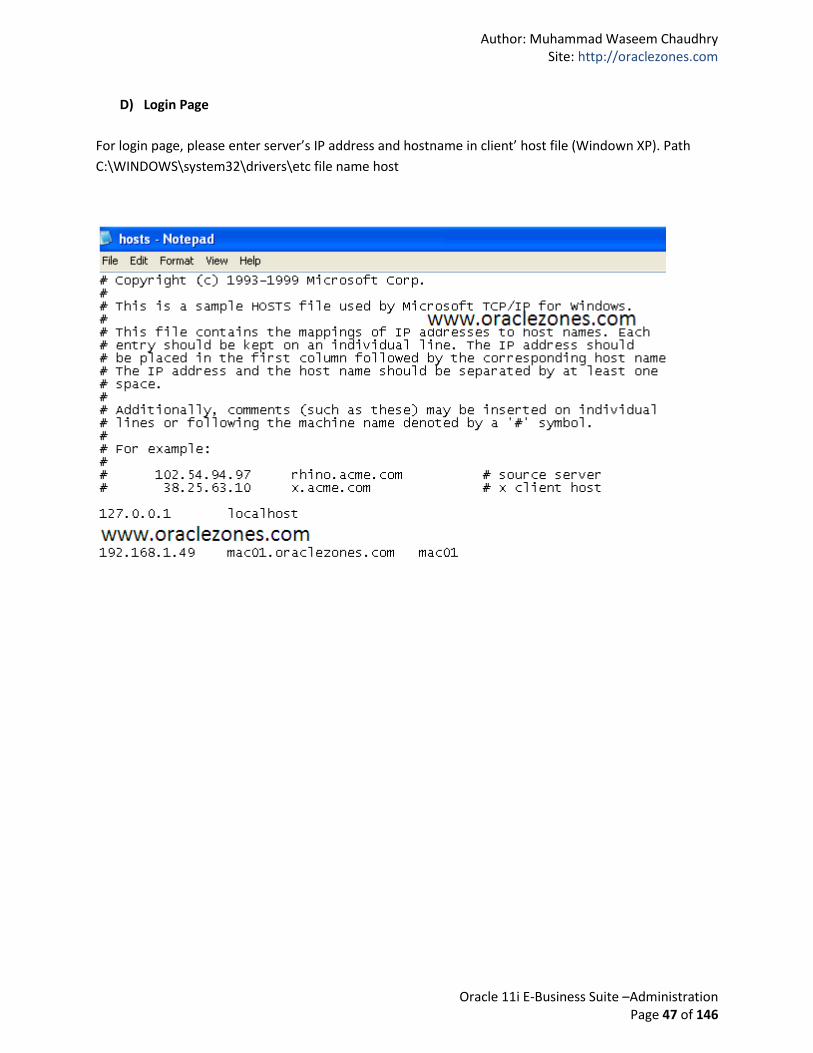
D) Login Page
For login page, please enter server’s IP address and hostname in client’ host file (Windown XP). Path
C:\WINDOWS\system32\drivers\etc file name host
Author: Muhammad Waseem Chaudhry Site: http://oraclezones.com
Oracle 11i E-Business Suite –Administration Page 48 of 146
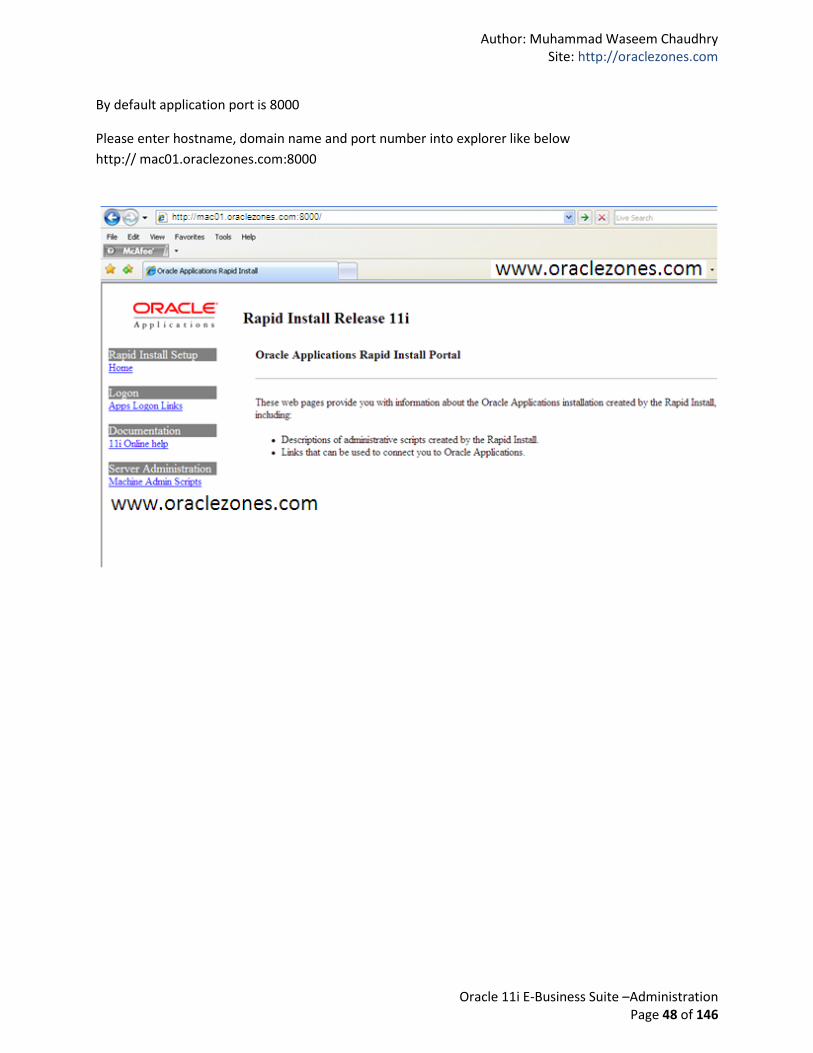
By default application port is 8000
Please enter hostname, domain name and port number into explorer like below
http:// mac01.oraclezones.com:8000
Author: Muhammad Waseem Chaudhry Site: http://oraclezones.com
Oracle 11i E-Business Suite –Administration Page 49 of 146
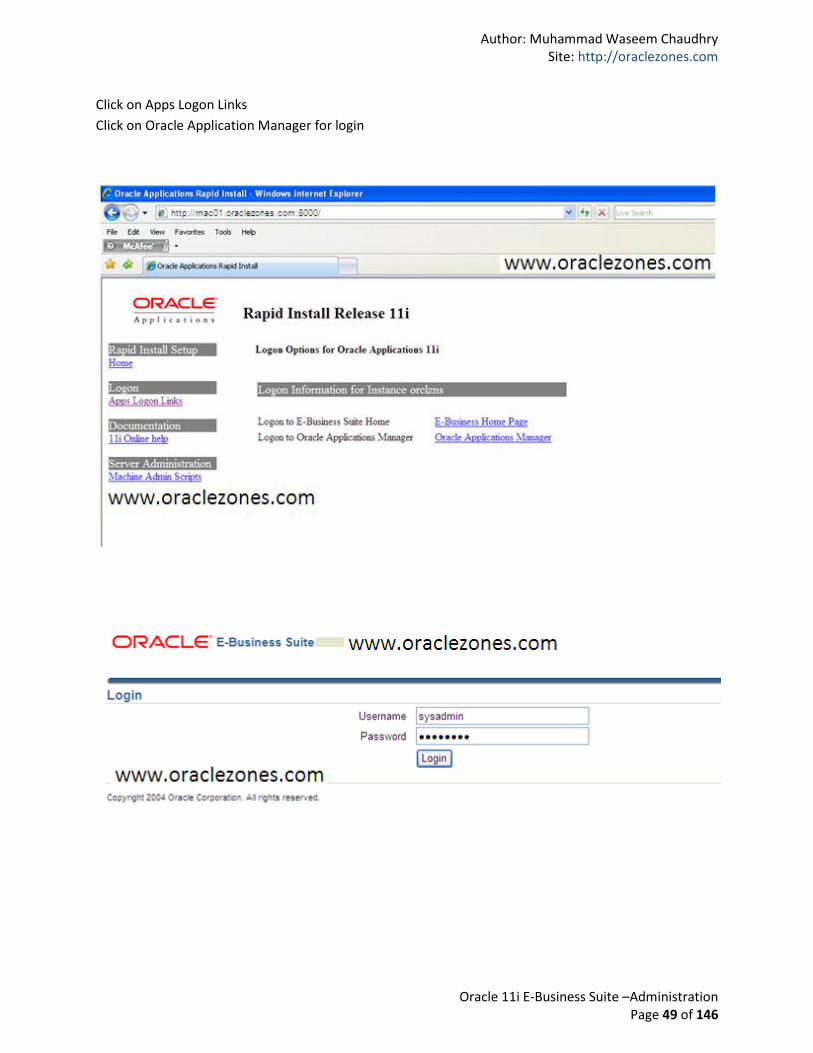
Click on Apps Logon Links
Click on Oracle Application Manager for login

Author: Muhammad Waseem Chaudhry Site: http://oraclezones.com
Oracle 11i E-Business Suite –Administration Page 50 of 146
For make sure/conformation Database, Admin, Concurrent, Forms and Web Servers is up and working
properly
Click on Concurrent Processing and make sure concurrent’s all components are working properly
Author: Muhammad Waseem Chaudhry Site: http://oraclezones.com
Oracle 11i E-Business Suite –Administration Page 51 of 146
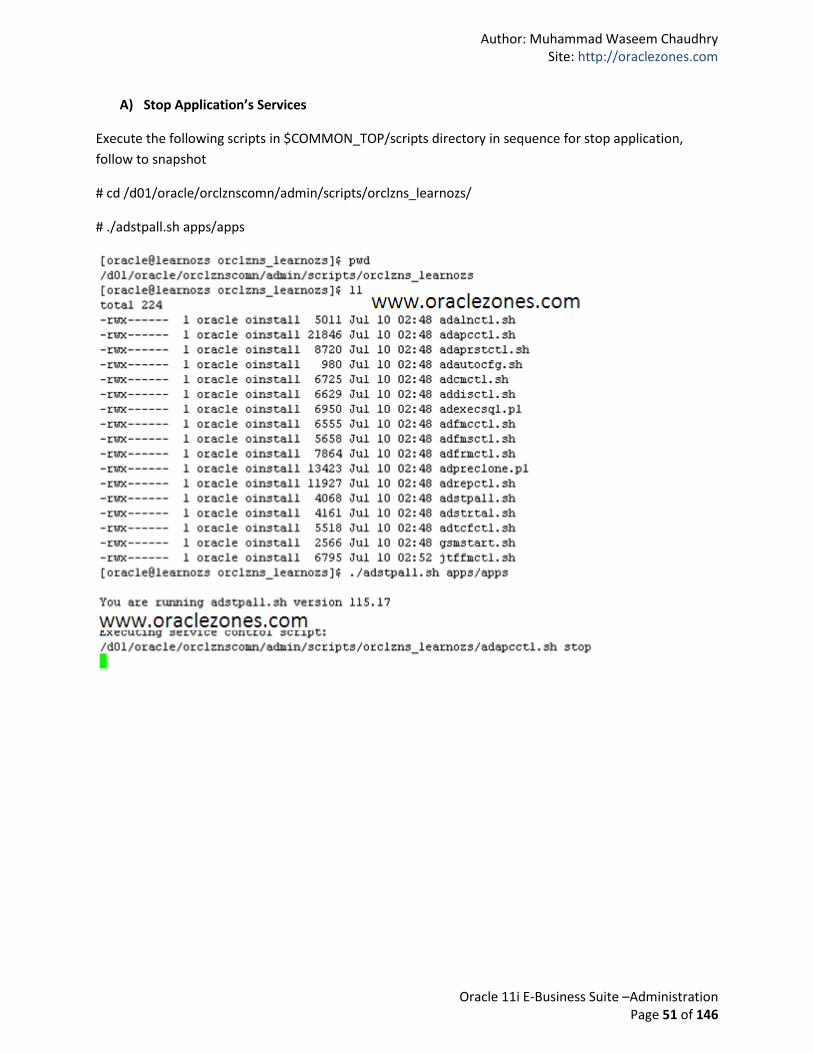
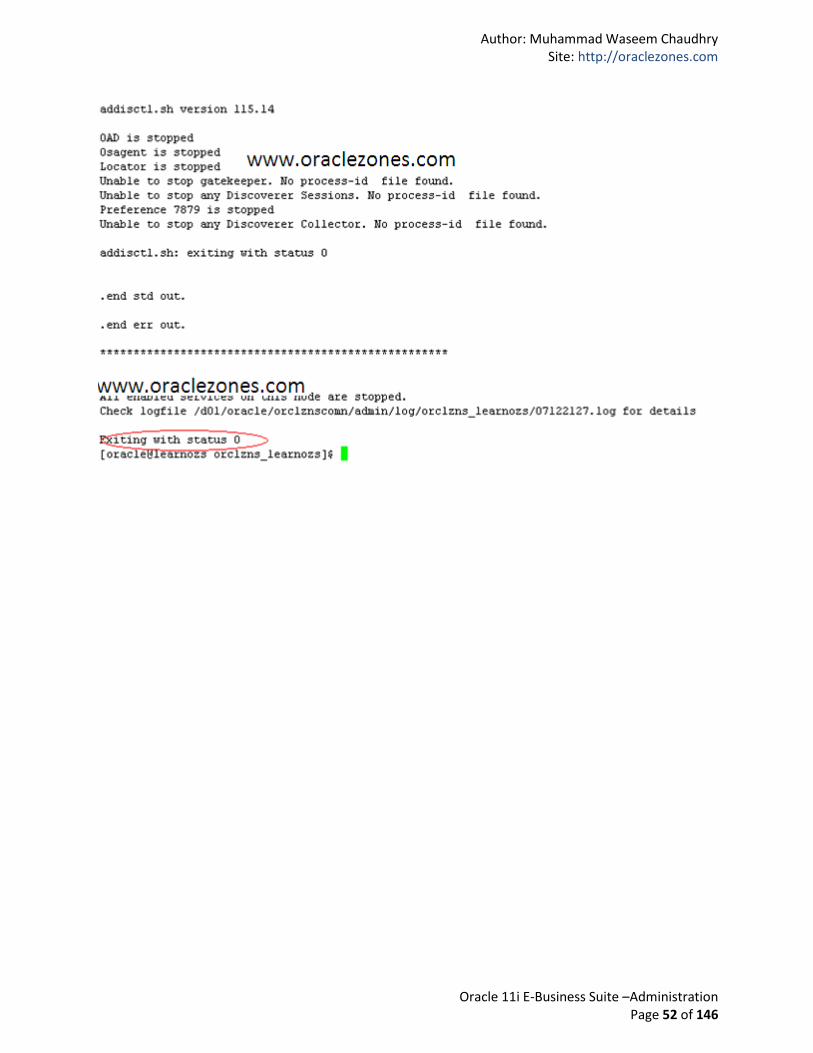
A) Stop Application’s Services
Execute the following scripts in $COMMON_TOP/scripts directory in sequence for stop application,
follow to snapshot
# cd /d01/oracle/orclznscomn/admin/scripts/orclzns_learnozs/
# ./adstpall.sh apps/apps
Author: Muhammad Waseem Chaudhry Site: http://oraclezones.com
Oracle 11i E-Business Suite –Administration Page 52 of 146
Author: Muhammad Waseem Chaudhry Site: http://oraclezones.com
Oracle 11i E-Business Suite –Administration Page 53 of 146
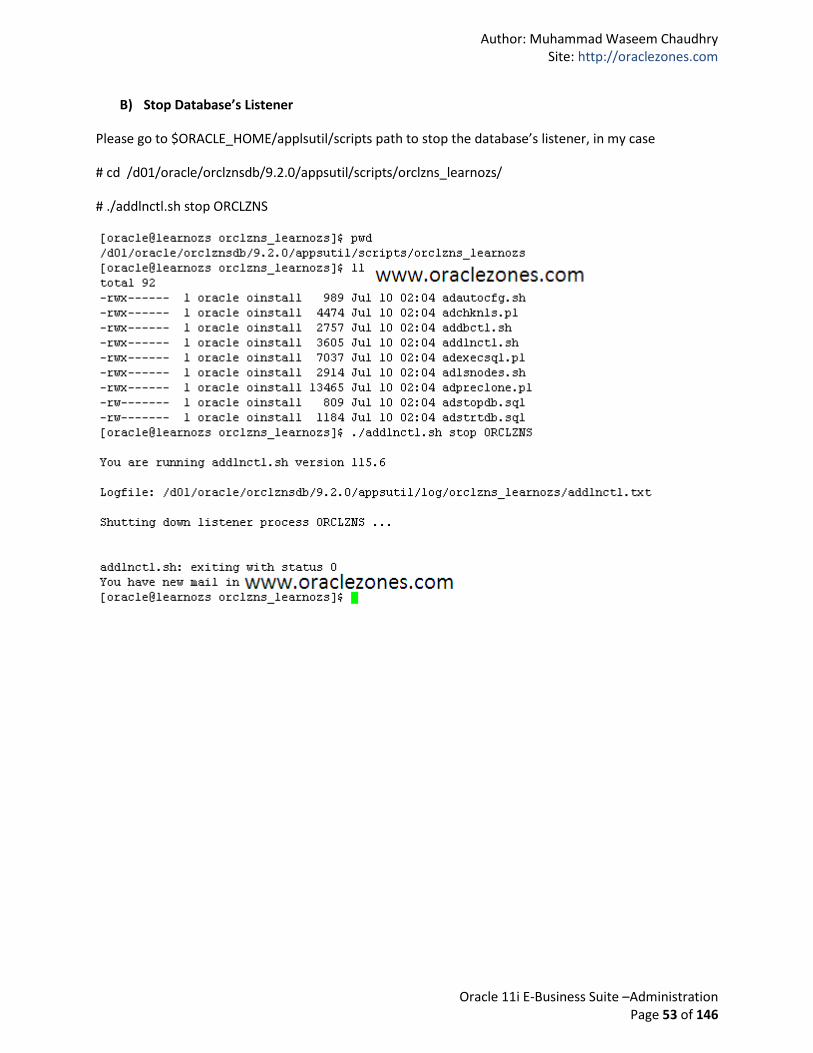
B) Stop Database’s Listener
Please go to $ORACLE_HOME/applsutil/scripts path to stop the database’s listener, in my case
# cd /d01/oracle/orclznsdb/9.2.0/appsutil/scripts/orclzns_learnozs/
# ./addlnctl.sh stop ORCLZNS
Author: Muhammad Waseem Chaudhry Site: http://oraclezones.com
Oracle 11i E-Business Suite –Administration Page 54 of 146
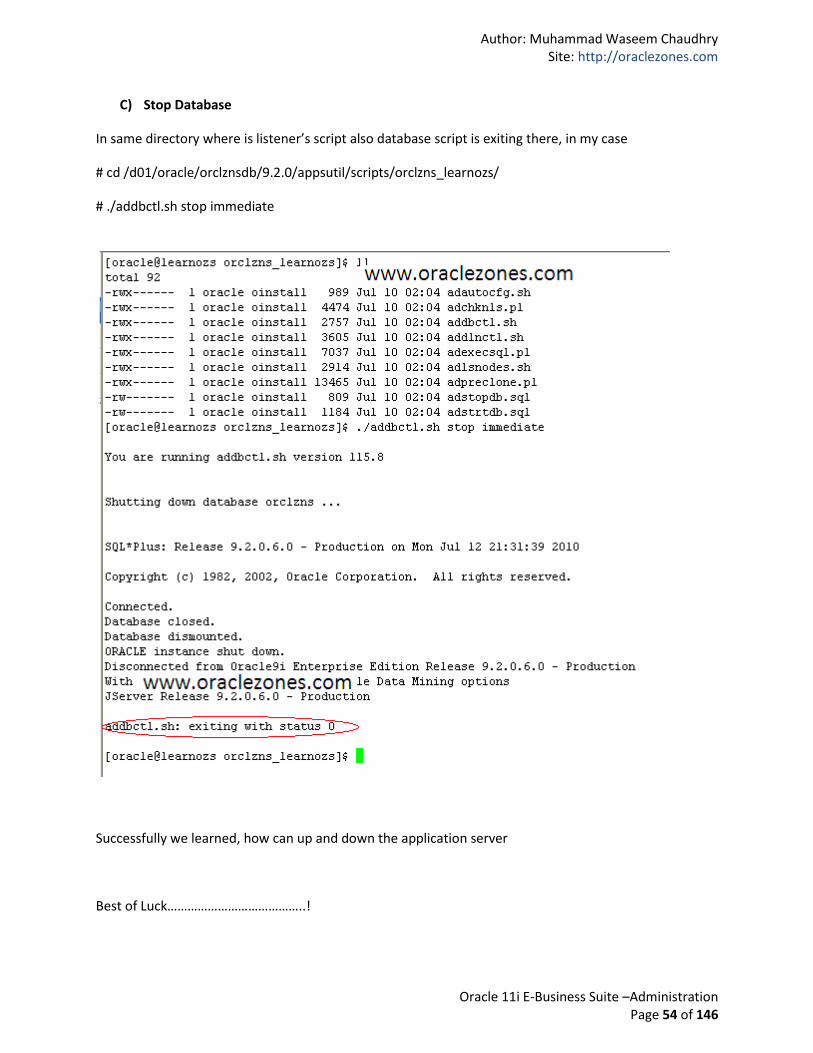
C) Stop Database
In same directory where is listener’s script also database script is exiting there, in my case
# cd /d01/oracle/orclznsdb/9.2.0/appsutil/scripts/orclzns_learnozs/
# ./addbctl.sh stop immediate
Successfully we learned, how can up and down the application server
Best of Luck…………………………………..!

Author: Muhammad Waseem Chaudhry Site: http://oraclezones.com
Oracle 11i E-Business Suite –Administration Page 55 of 146
3 - Patch Patch is one of Jobs Apps DBA perform very frequently, so you should be clear with patch basics
first including terminology. As for Database patch you apply using opatch, similarly for Apps patch you
will use adpatch. Utility & executables related to patching fall under product AD also called as
application dba product. I will walk you through oracle apps 11i patching with series of questions which
will help you in understand oracle apps 11i patching.
What is patch?
Patch is program (set of instructions) to fix a particular problem or enhance/ add a particular feature in
existing program/product/software.
Patch Types
There are several types of patches that you may be asked to apply to your Oracle Applications system.
They are described in the following table.
Patch Type Description
Bug fix Fixes an existing issue.
New feature Adds new functionality.
Interoperability Contains Oracle Applications files and database objects to make the
current version of Oracle Applications compatible with a newer version
of the database or a technology stack component. For example, to
enable an Oracle 10g database to work with Oracle Applications Release
11.5.10.
Diagnostic Released specifically to determine the source of an issue. A diagnostic
patch does not contain fixes.
Translation Contains Oracle Applications files that have been translated from English
to another language. A translation patch may also execute tasks to load
or update data in the database.
Upgrade Fixes a problem with, or improves the performance of, from a previous
major release, such as 10.7 or 11.0.
Author: Muhammad Waseem Chaudhry Site: http://oraclezones.com
Oracle 11i E-Business Suite –Administration Page 56 of 146
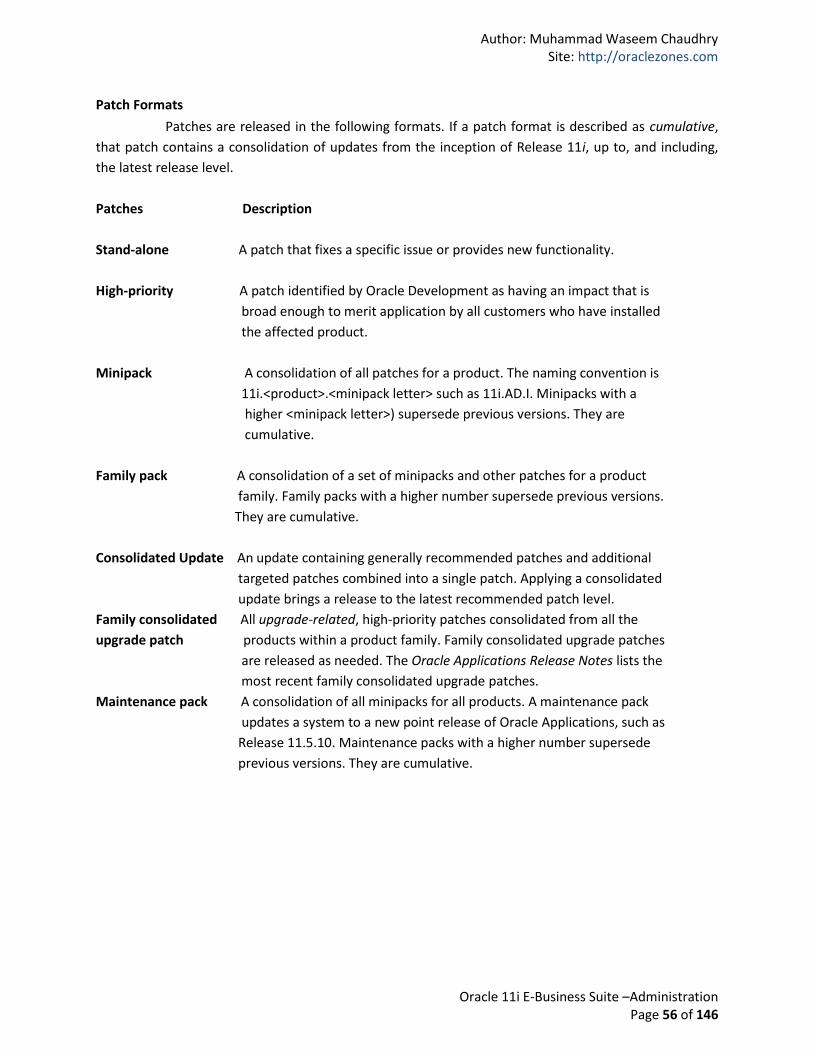
Patch Formats
Patches are released in the following formats. If a patch format is described as cumulative,
that patch contains a consolidation of updates from the inception of Release 11i, up to, and including,
the latest release level.
Patches Description
Stand-alone A patch that fixes a specific issue or provides new functionality.
High-priority A patch identified by Oracle Development as having an impact that is
broad enough to merit application by all customers who have installed
the affected product.
Minipack A consolidation of all patches for a product. The naming convention is
11i.<product>.<minipack letter> such as 11i.AD.I. Minipacks with a
higher <minipack letter>) supersede previous versions. They are
cumulative.
Family pack A consolidation of a set of minipacks and other patches for a product
family. Family packs with a higher number supersede previous versions.
They are cumulative.
Consolidated Update An update containing generally recommended patches and additional
targeted patches combined into a single patch. Applying a consolidated
update brings a release to the latest recommended patch level.
Family consolidated All upgrade-related, high-priority patches consolidated from all the
upgrade patch products within a product family. Family consolidated upgrade patches
are released as needed. The Oracle Applications Release Notes lists the
most recent family consolidated upgrade patches.
Maintenance pack A consolidation of all minipacks for all products. A maintenance pack
updates a system to a new point release of Oracle Applications, such as
Release 11.5.10. Maintenance packs with a higher number supersede
previous versions. They are cumulative.
Author: Muhammad Waseem Chaudhry Site: http://oraclezones.com
Oracle 11i E-Business Suite –Administration Page 57 of 146
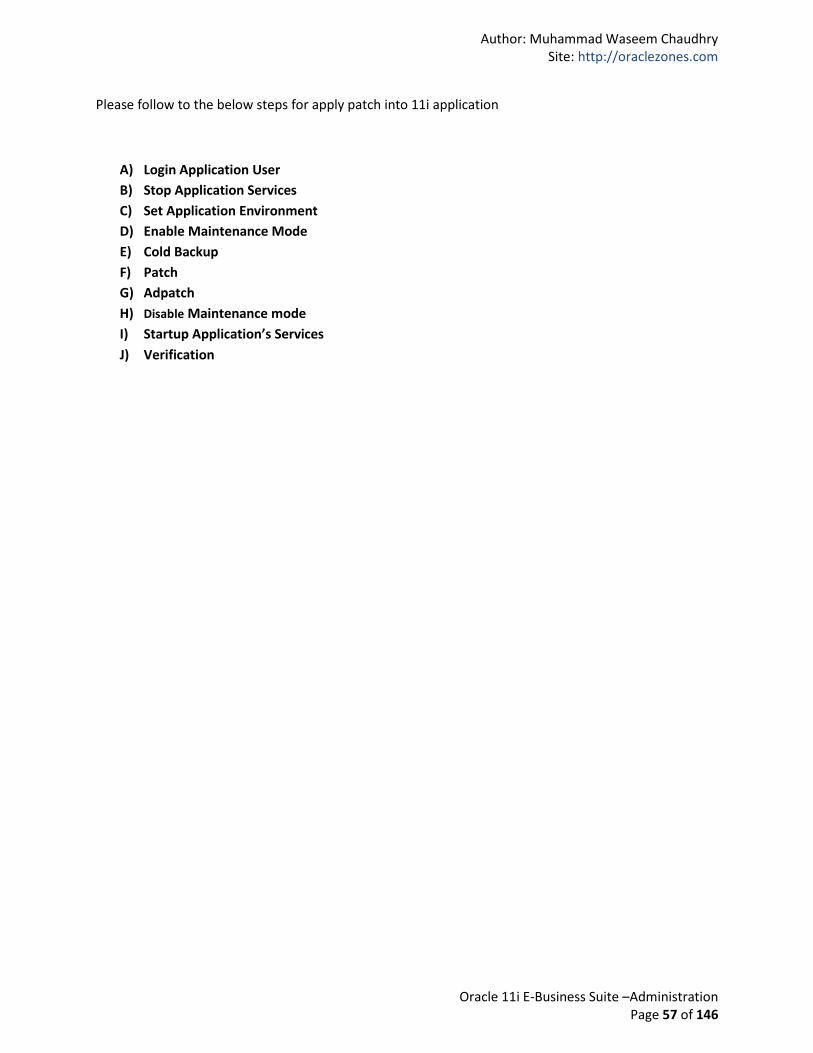
Please follow to the below steps for apply patch into 11i application
A) Login Application User
B) Stop Application Services
C) Set Application Environment
D) Enable Maintenance Mode
E) Cold Backup
F) Patch
G) Adpatch
H) Disable Maintenance mode
I) Startup Application’s Services
J) Verification
Author: Muhammad Waseem Chaudhry Site: http://oraclezones.com
Oracle 11i E-Business Suite –Administration Page 58 of 146
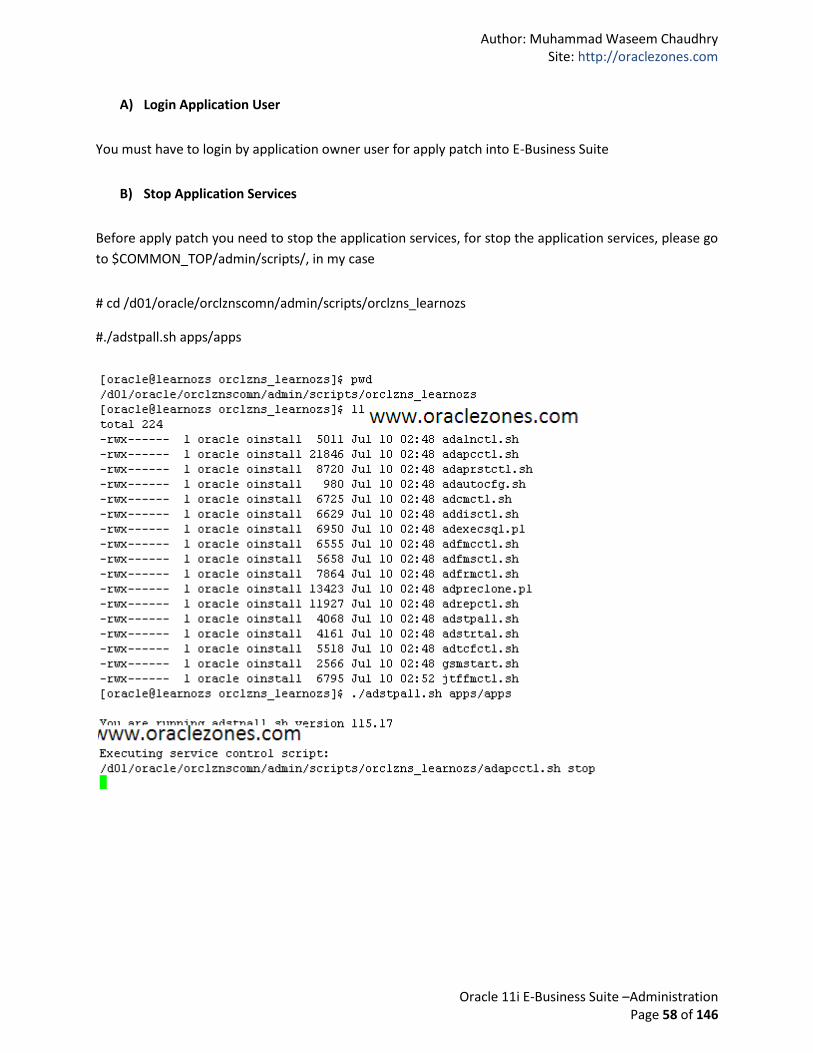
A) Login Application User
You must have to login by application owner user for apply patch into E-Business Suite
B) Stop Application Services
Before apply patch you need to stop the application services, for stop the application services, please go
to $COMMON_TOP/admin/scripts/, in my case
# cd /d01/oracle/orclznscomn/admin/scripts/orclzns_learnozs
#./adstpall.sh apps/apps
Author: Muhammad Waseem Chaudhry Site: http://oraclezones.com
Oracle 11i E-Business Suite –Administration Page 59 of 146
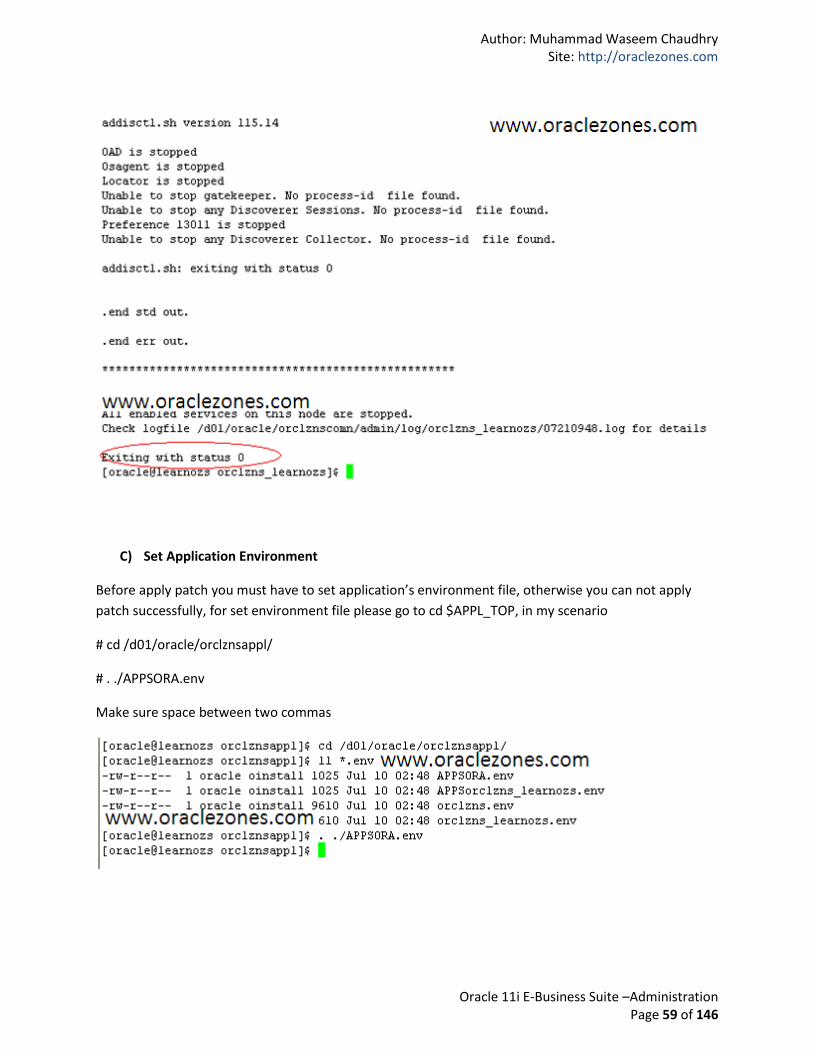
C) Set Application Environment
Before apply patch you must have to set application’s environment file, otherwise you can not apply
patch successfully, for set environment file please go to cd $APPL_TOP, in my scenario
# cd /d01/oracle/orclznsappl/
# . ./APPSORA.env
Make sure space between two commas
Author: Muhammad Waseem Chaudhry Site: http://oraclezones.com
Oracle 11i E-Business Suite –Administration Page 60 of 146
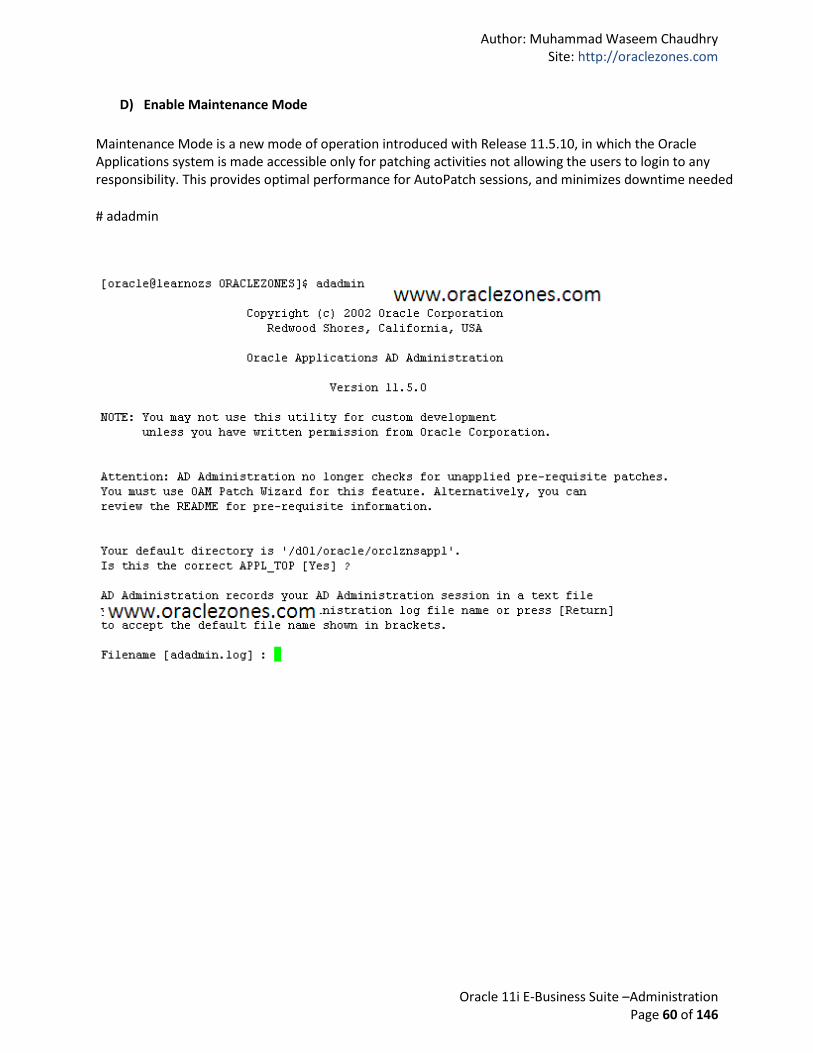
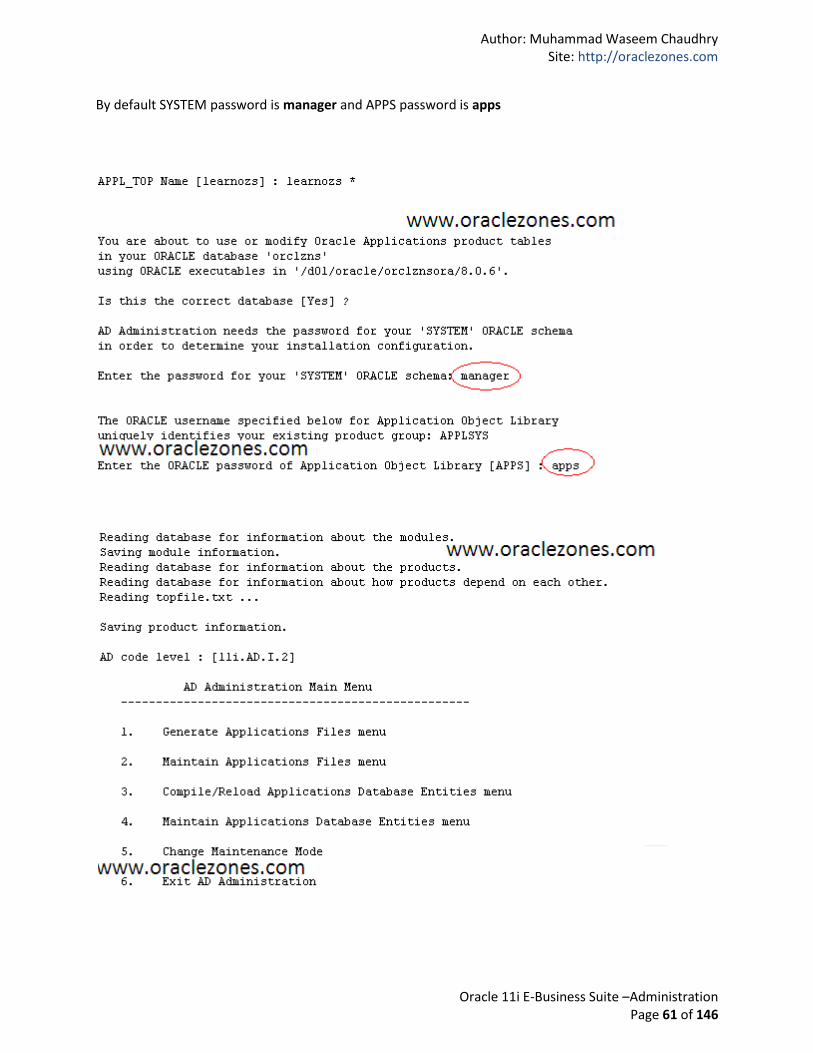
D) Enable Maintenance Mode
Maintenance Mode is a new mode of operation introduced with Release 11.5.10, in which the Oracle Applications system is made accessible only for patching activities not allowing the users to login to any responsibility. This provides optimal performance for AutoPatch sessions, and minimizes downtime needed
# adadmin
Author: Muhammad Waseem Chaudhry Site: http://oraclezones.com
Oracle 11i E-Business Suite –Administration Page 61 of 146
By default SYSTEM password is manager and APPS password is apps
Author: Muhammad Waseem Chaudhry Site: http://oraclezones.com
Oracle 11i E-Business Suite –Administration Page 62 of 146
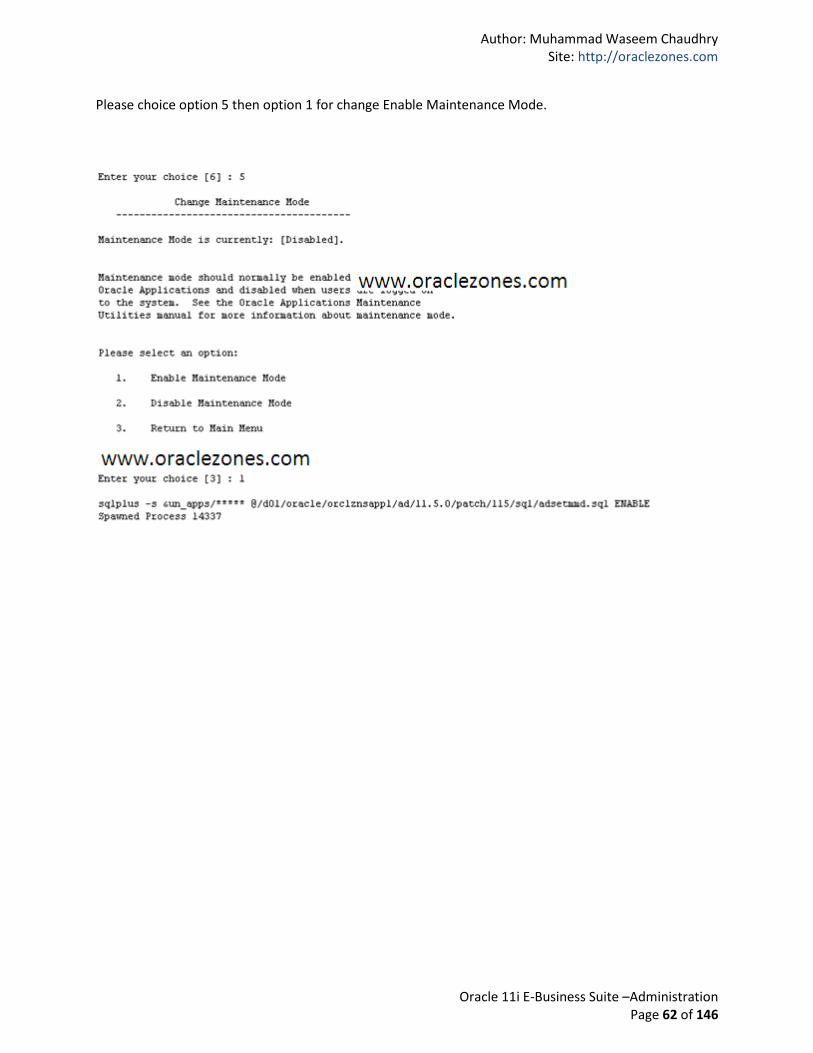
Please choice option 5 then option 1 for change Enable Maintenance Mode.

Author: Muhammad Waseem Chaudhry Site: http://oraclezones.com
Oracle 11i E-Business Suite –Administration Page 63 of 146
Press 3 then press 6 for exit from adadmin utility.
Author: Muhammad Waseem Chaudhry Site: http://oraclezones.com
Oracle 11i E-Business Suite –Administration Page 64 of 146
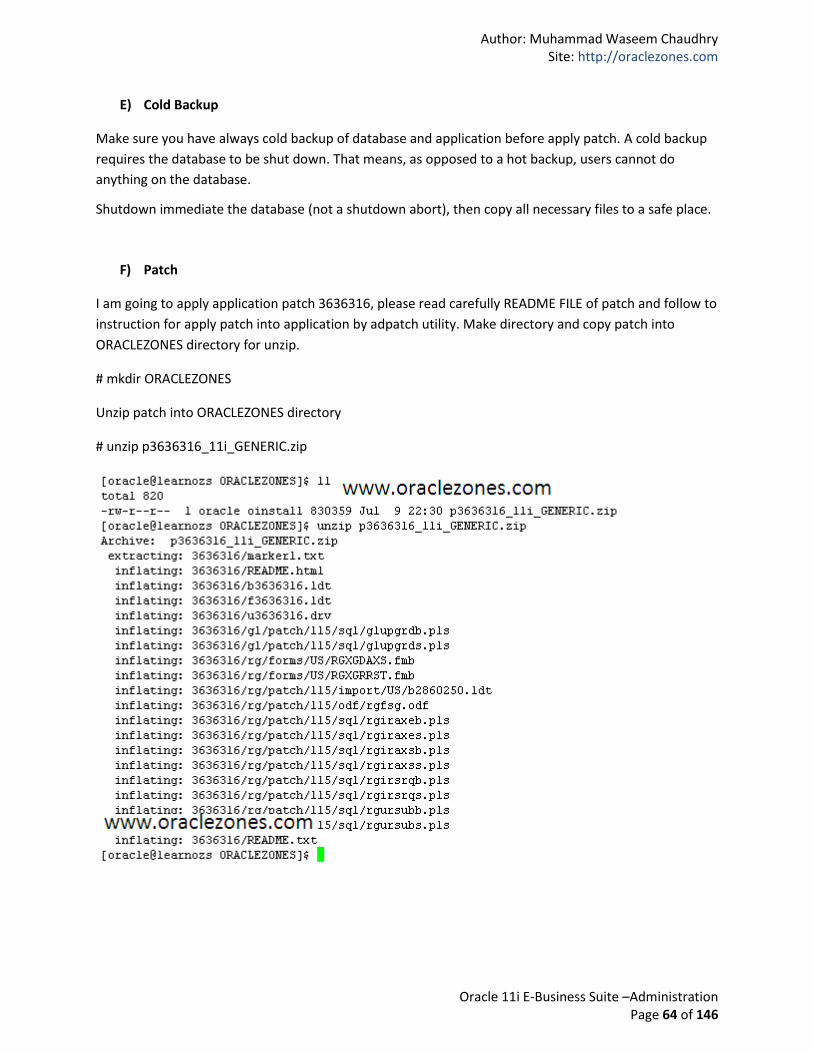
E) Cold Backup
Make sure you have always cold backup of database and application before apply patch. A cold backup
requires the database to be shut down. That means, as opposed to a hot backup, users cannot do
anything on the database.
Shutdown immediate the database (not a shutdown abort), then copy all necessary files to a safe place.
F) Patch
I am going to apply application patch 3636316, please read carefully README FILE of patch and follow to
instruction for apply patch into application by adpatch utility. Make directory and copy patch into
ORACLEZONES directory for unzip.
# mkdir ORACLEZONES
Unzip patch into ORACLEZONES directory
# unzip p3636316_11i_GENERIC.zip

Author: Muhammad Waseem Chaudhry Site: http://oraclezones.com
Oracle 11i E-Business Suite –Administration Page 65 of 146
After unzip, automatically created one directory by name of patch
Go to that directory by cd 3636316
# cd 3636316
Author: Muhammad Waseem Chaudhry Site: http://oraclezones.com
Oracle 11i E-Business Suite –Administration Page 66 of 146
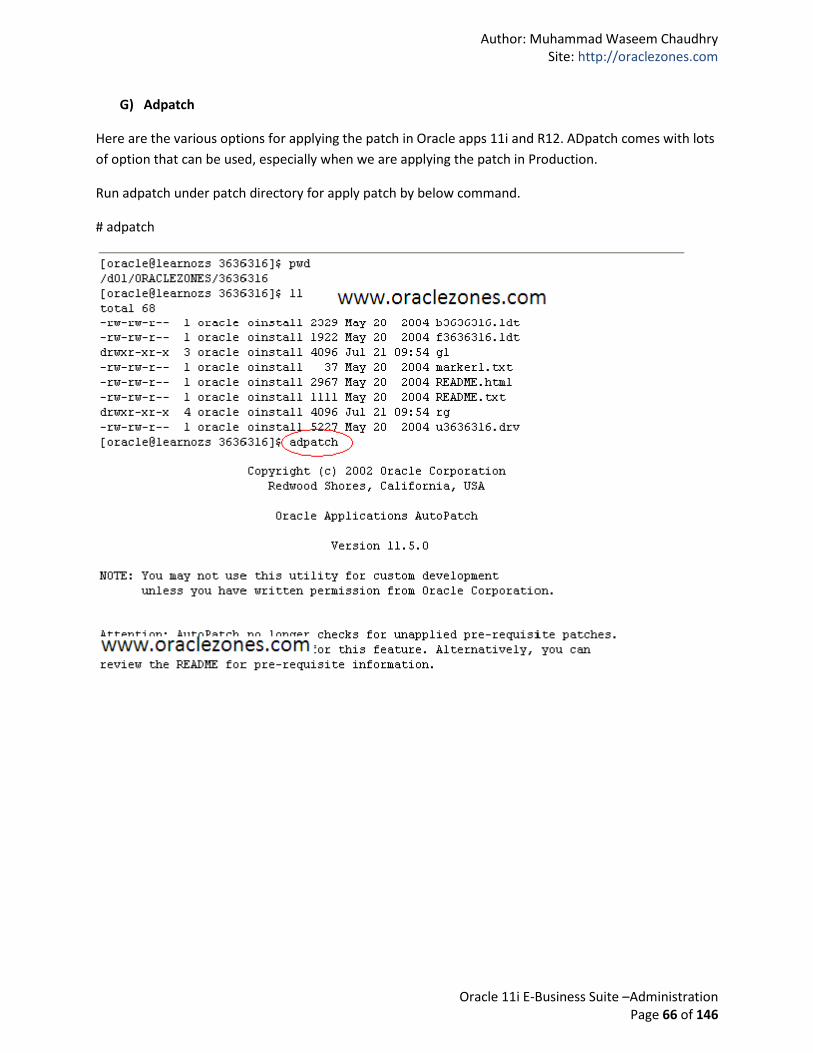
G) Adpatch
Here are the various options for applying the patch in Oracle apps 11i and R12. ADpatch comes with lots
of option that can be used, especially when we are applying the patch in Production.
Run adpatch under patch directory for apply patch by below command.
# adpatch

Author: Muhammad Waseem Chaudhry Site: http://oraclezones.com
Oracle 11i E-Business Suite –Administration Page 67 of 146
By default SYSTEM password is manager and APPS password if apps
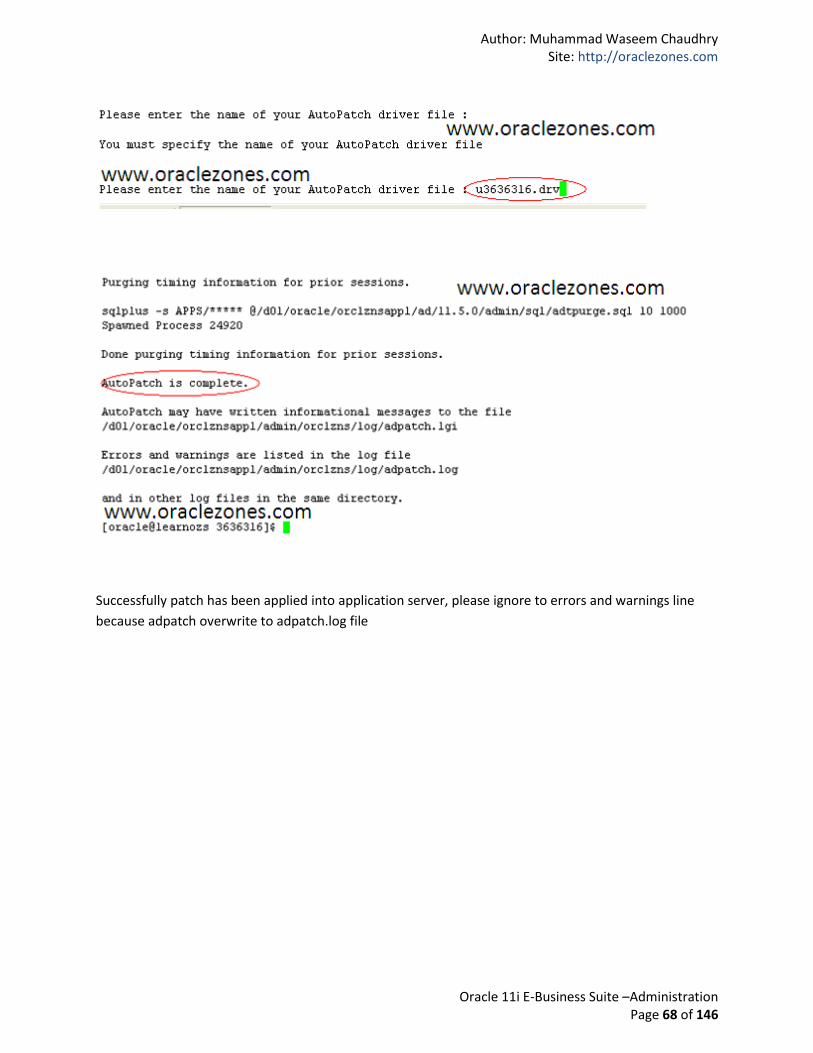
After write u3636316.drv, just press enter because unified patch will handle itself
Author: Muhammad Waseem Chaudhry Site: http://oraclezones.com
Oracle 11i E-Business Suite –Administration Page 68 of 146
Successfully patch has been applied into application server, please ignore to errors and warnings line
because adpatch overwrite to adpatch.log file
Author: Muhammad Waseem Chaudhry Site: http://oraclezones.com
Oracle 11i E-Business Suite –Administration Page 69 of 146
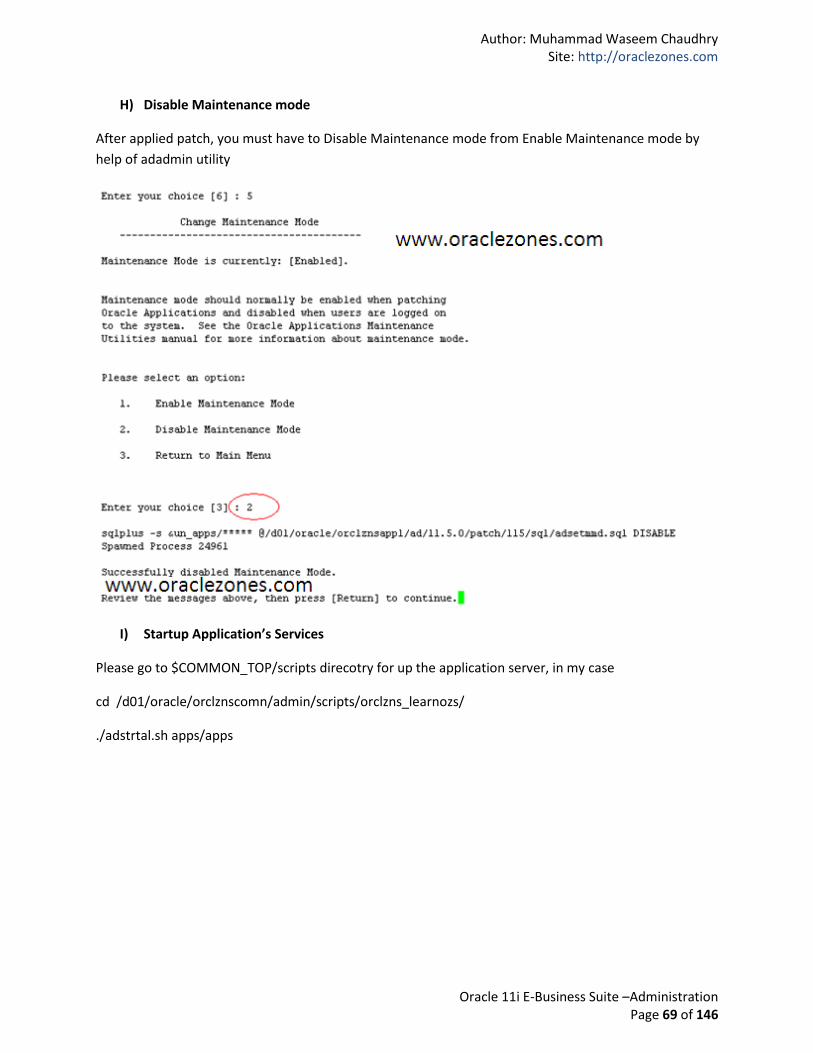
H) Disable Maintenance mode
After applied patch, you must have to Disable Maintenance mode from Enable Maintenance mode by
help of adadmin utility
I) Startup Application’s Services
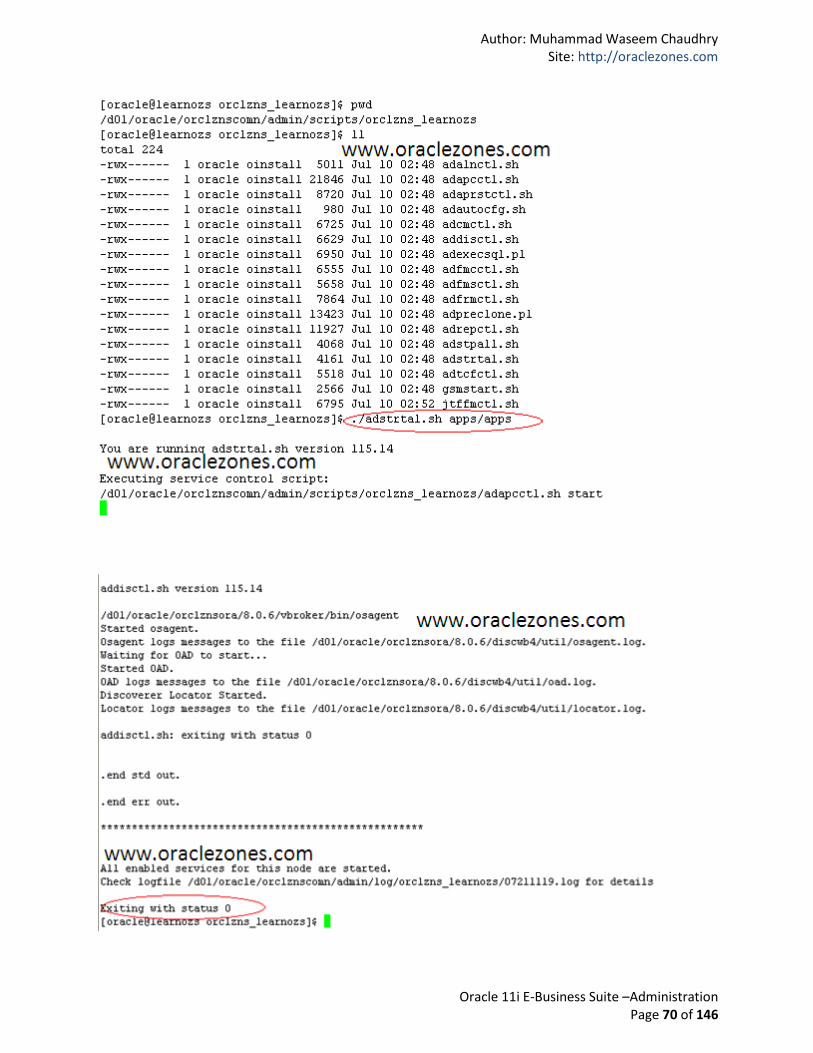
Please go to $COMMON_TOP/scripts direcotry for up the application server, in my case
cd /d01/oracle/orclznscomn/admin/scripts/orclzns_learnozs/
./adstrtal.sh apps/apps
Author: Muhammad Waseem Chaudhry Site: http://oraclezones.com
Oracle 11i E-Business Suite –Administration Page 70 of 146
Author: Muhammad Waseem Chaudhry Site: http://oraclezones.com
Oracle 11i E-Business Suite –Administration Page 71 of 146
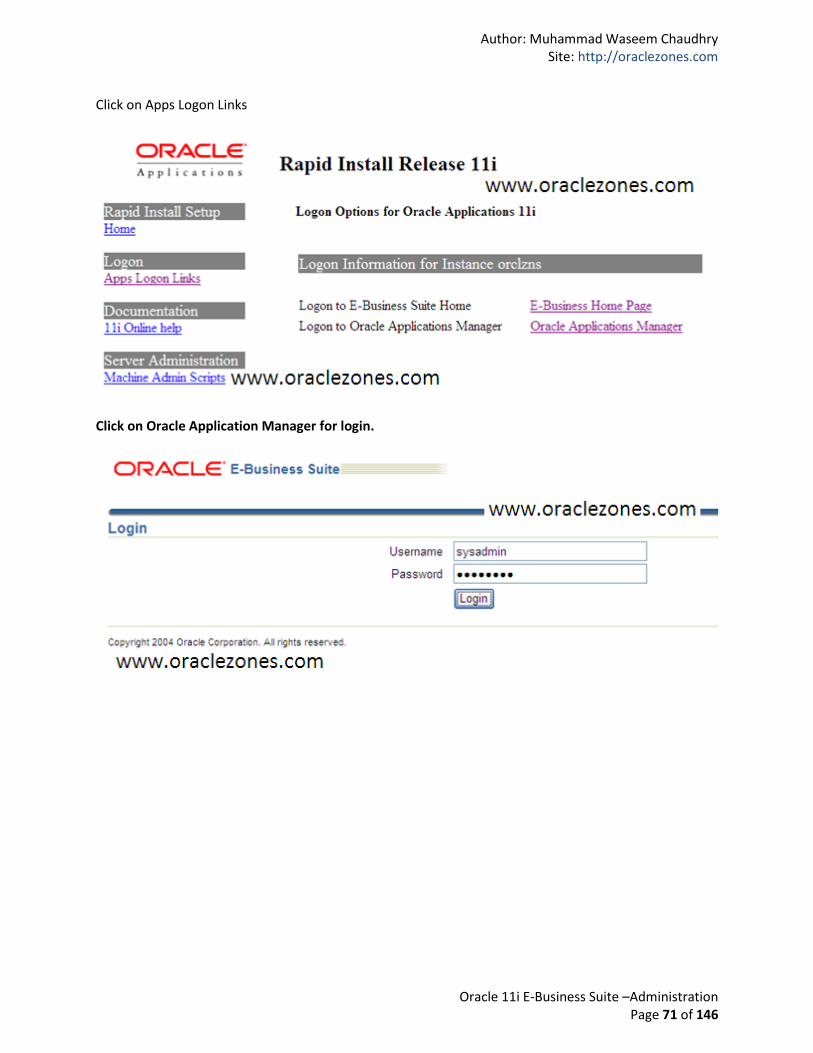
Click on Apps Logon Links
Click on Oracle Application Manager for login.

Author: Muhammad Waseem Chaudhry Site: http://oraclezones.com
Oracle 11i E-Business Suite –Administration Page 72 of 146
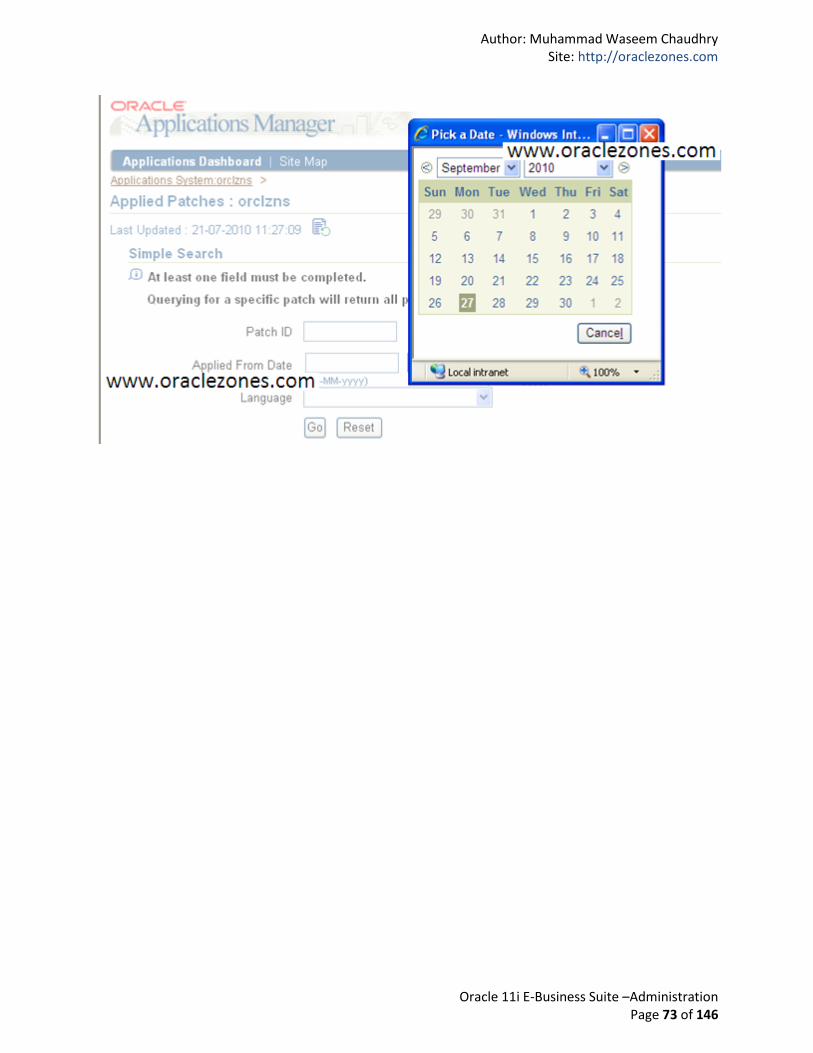
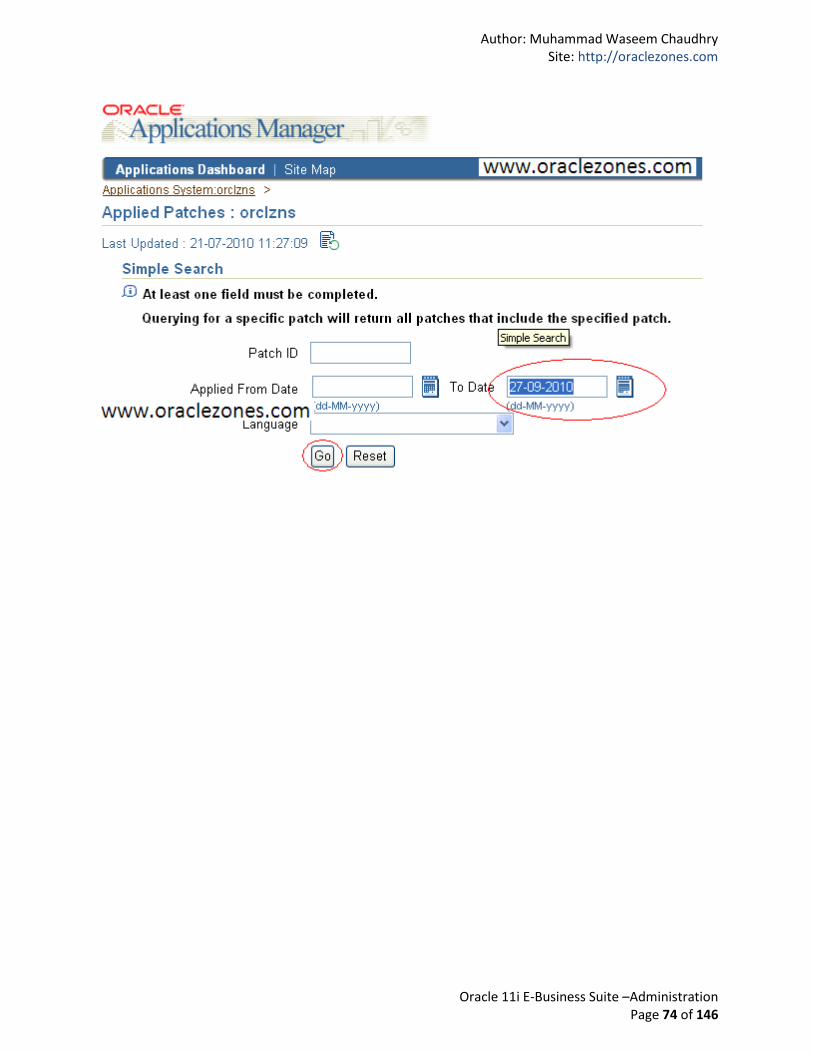
J) Verification
For make sure Database, Admin, Concurrent, Forms and Web Servers is up and working properly
Select Applied Patches option on OAM patch and press go button, search patch by patch number or by
date.
Author: Muhammad Waseem Chaudhry Site: http://oraclezones.com
Oracle 11i E-Business Suite –Administration Page 73 of 146
Author: Muhammad Waseem Chaudhry Site: http://oraclezones.com
Oracle 11i E-Business Suite –Administration Page 74 of 146

Author: Muhammad Waseem Chaudhry Site: http://oraclezones.com
Oracle 11i E-Business Suite –Administration Page 75 of 146
Successfully patch has been applied into 11i E-Business
Best of Luck ……………………………………………!
Author: Muhammad Waseem Chaudhry Site: http://oraclezones.com
Oracle 11i E-Business Suite –Administration Page 76 of 146
4 - Backup In order to facilitate troubleshooting we maintain a test environment which is a nightly copy of our 11i
production environment. Since this environment is usually used to learn/test data fixes it has to be as up
to date as possible. To perform the database refresh we use rman's duplicate feature.
The goal of this article isn't just to provide the entire set of scripts and send you on your way. I think it’s
safe to say that most EBS environments aren't identical, so it’s not like you could take them and execute
with no issues. Instead I’ll highlight the steps we follow and some of the key scripts.
A) Login Database User
B) Set Database Environment
C) Archive Mode
D) Recovery Manager (RMAN)
E) RMAN Sitting
Author: Muhammad Waseem Chaudhry Site: http://oraclezones.com
Oracle 11i E-Business Suite –Administration Page 77 of 146
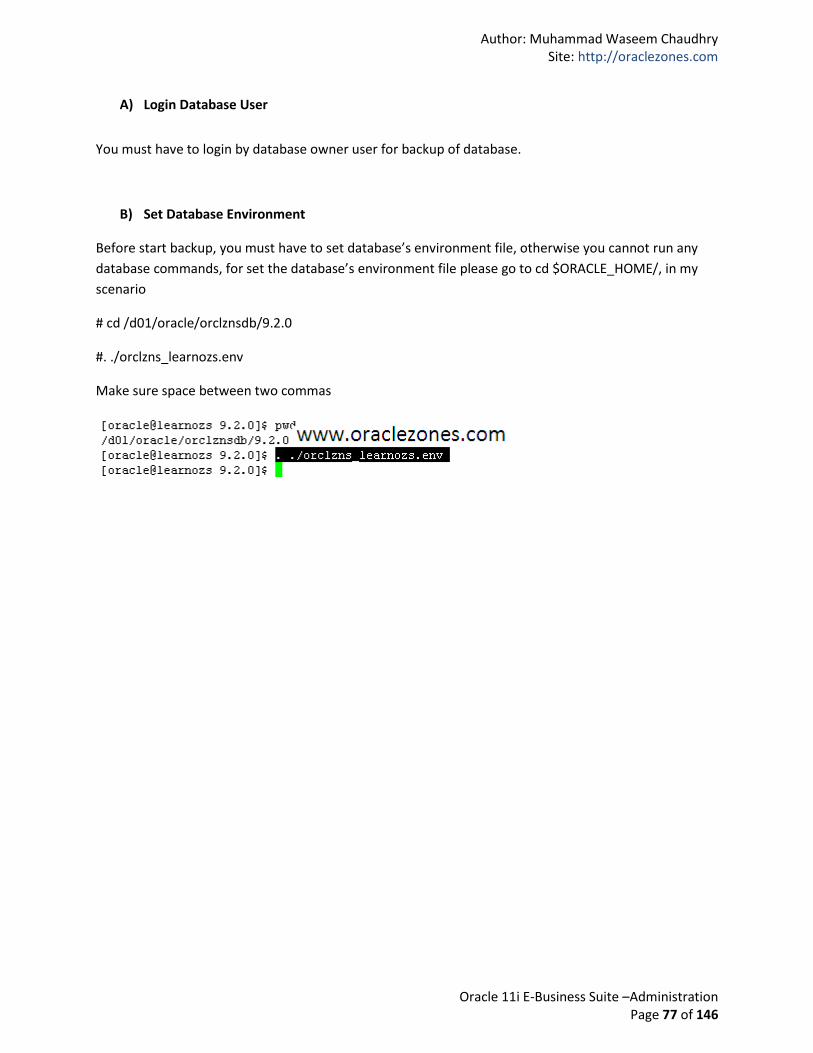
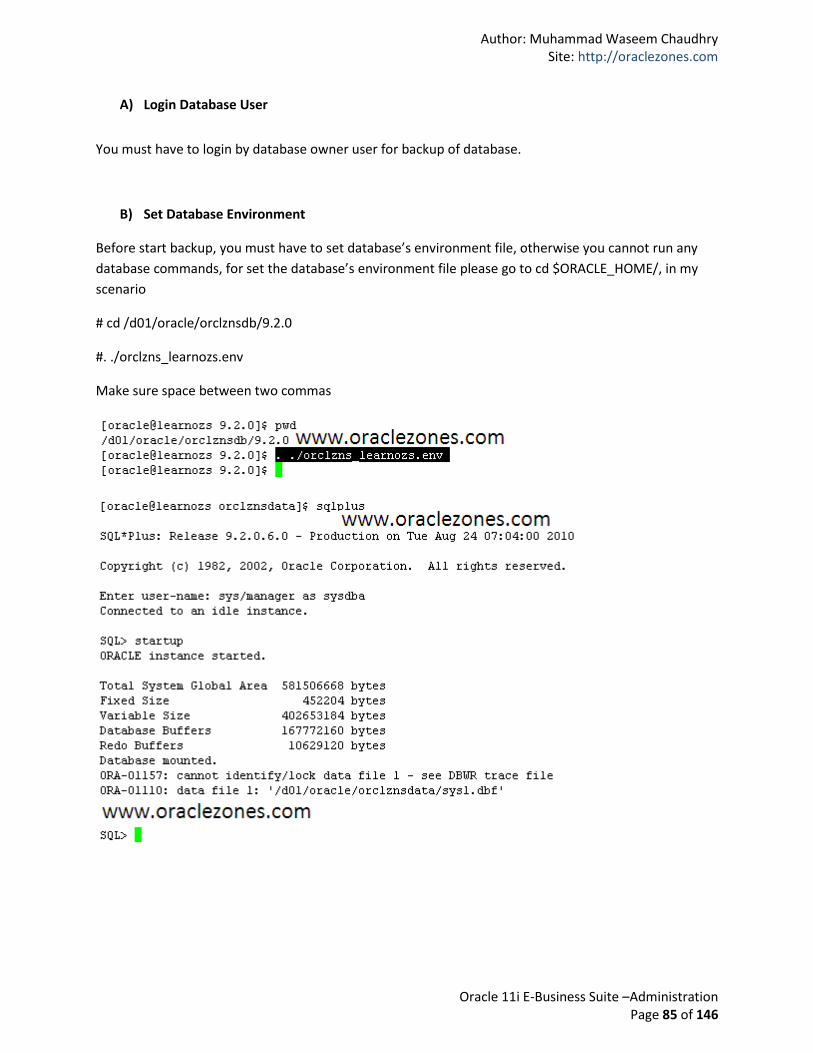
A) Login Database User
You must have to login by database owner user for backup of database.
B) Set Database Environment
Before start backup, you must have to set database’s environment file, otherwise you cannot run any
database commands, for set the database’s environment file please go to cd $ORACLE_HOME/, in my
scenario
# cd /d01/oracle/orclznsdb/9.2.0
#. ./orclzns_learnozs.env
Make sure space between two commas

Author: Muhammad Waseem Chaudhry Site: http://oraclezones.com
Oracle 11i E-Business Suite –Administration Page 78 of 146
C) Archive Mode
To check, database is in which archivelog mode, if database is in archive mode so we will move to next
steps, if database is not in archive mode so we must have to enable archive mode.
SQL> select log_mode from v$database;
SQL> shutdown immediate;

Author: Muhammad Waseem Chaudhry Site: http://oraclezones.com
Oracle 11i E-Business Suite –Administration Page 79 of 146
SQL> startup mount
SQL> alter database archivelog;
SQL> ARCHIVE LOG START;
SQL> alter database open;
Author: Muhammad Waseem Chaudhry Site: http://oraclezones.com
Oracle 11i E-Business Suite –Administration Page 80 of 146
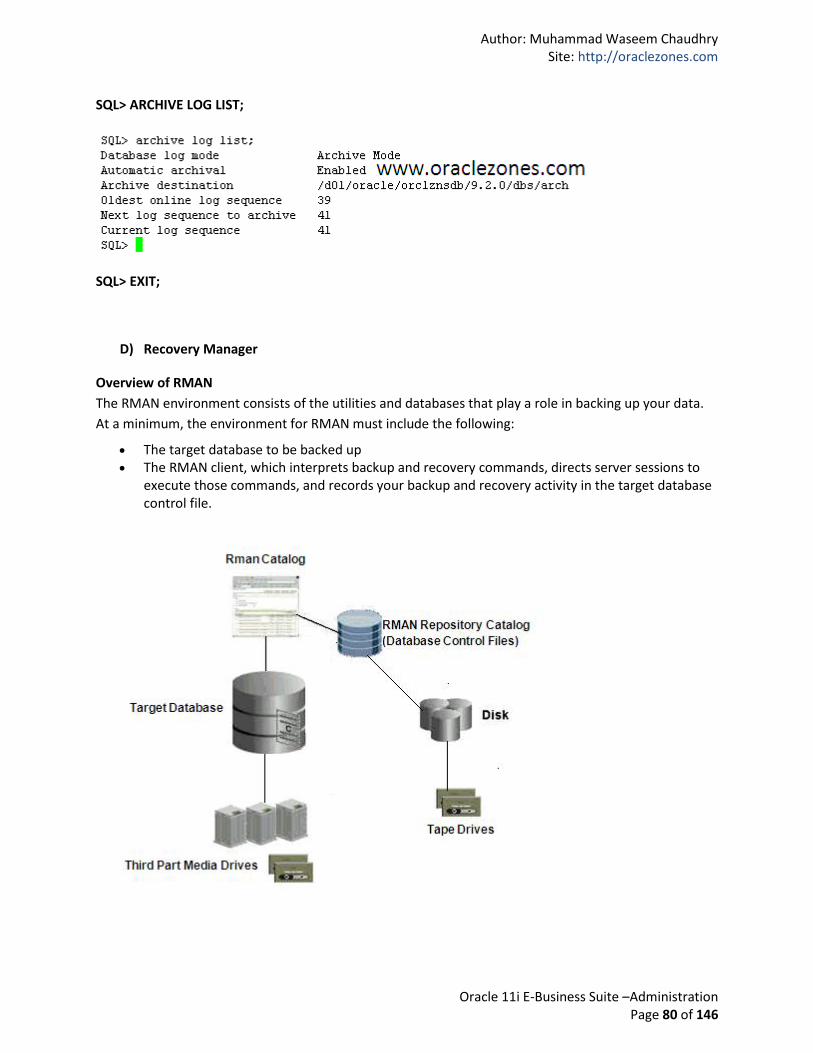
SQL> ARCHIVE LOG LIST;
SQL> EXIT;
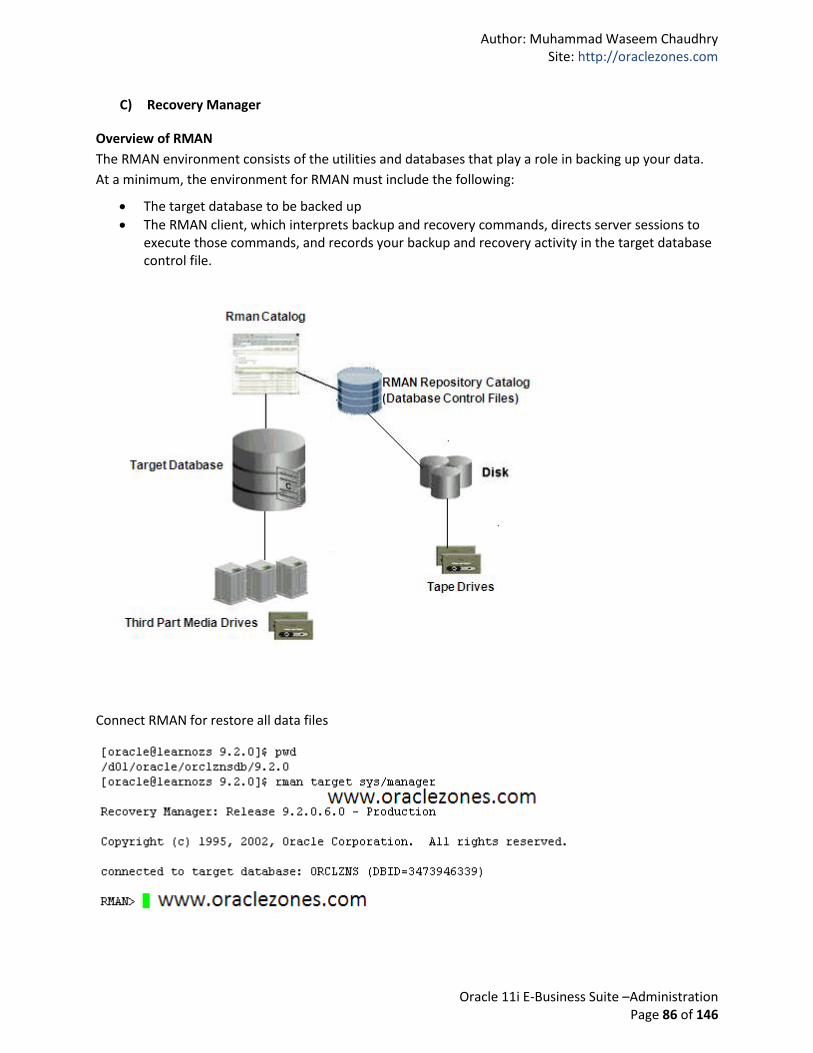
D) Recovery Manager
Overview of RMAN
The RMAN environment consists of the utilities and databases that play a role in backing up your data.
At a minimum, the environment for RMAN must include the following:
The target database to be backed up The RMAN client, which interprets backup and recovery commands, directs server sessions to
execute those commands, and records your backup and recovery activity in the target database control file.

Author: Muhammad Waseem Chaudhry Site: http://oraclezones.com
Oracle 11i E-Business Suite –Administration Page 81 of 146
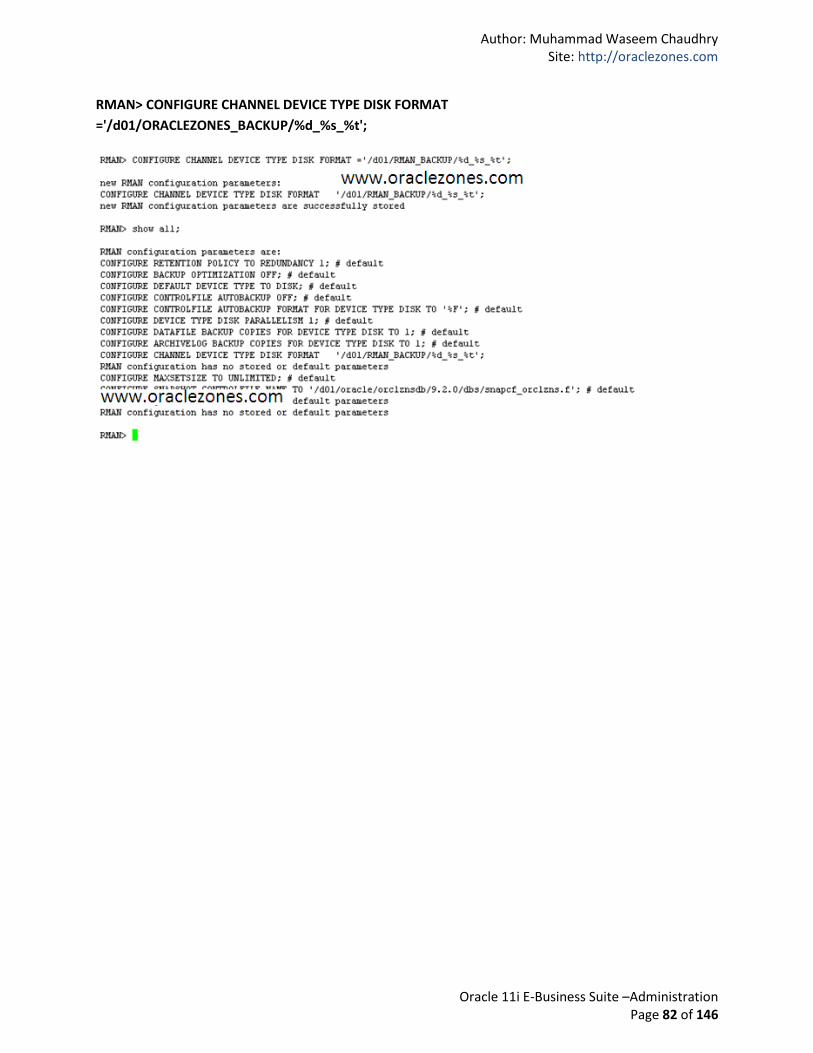
E) RMAN Setting
To learn about RMAN’s setting so please go to RMAN Menu in this website, there you will be learn
about RMAN catalog step by step regarding Back and Recovery.
To check the RMAN setting execute below command in RMAN;
RMAN> show all;
Author: Muhammad Waseem Chaudhry Site: http://oraclezones.com
Oracle 11i E-Business Suite –Administration Page 82 of 146
RMAN> CONFIGURE CHANNEL DEVICE TYPE DISK FORMAT
='/d01/ORACLEZONES_BACKUP/%d_%s_%t';
Author: Muhammad Waseem Chaudhry Site: http://oraclezones.com
Oracle 11i E-Business Suite –Administration Page 83 of 146
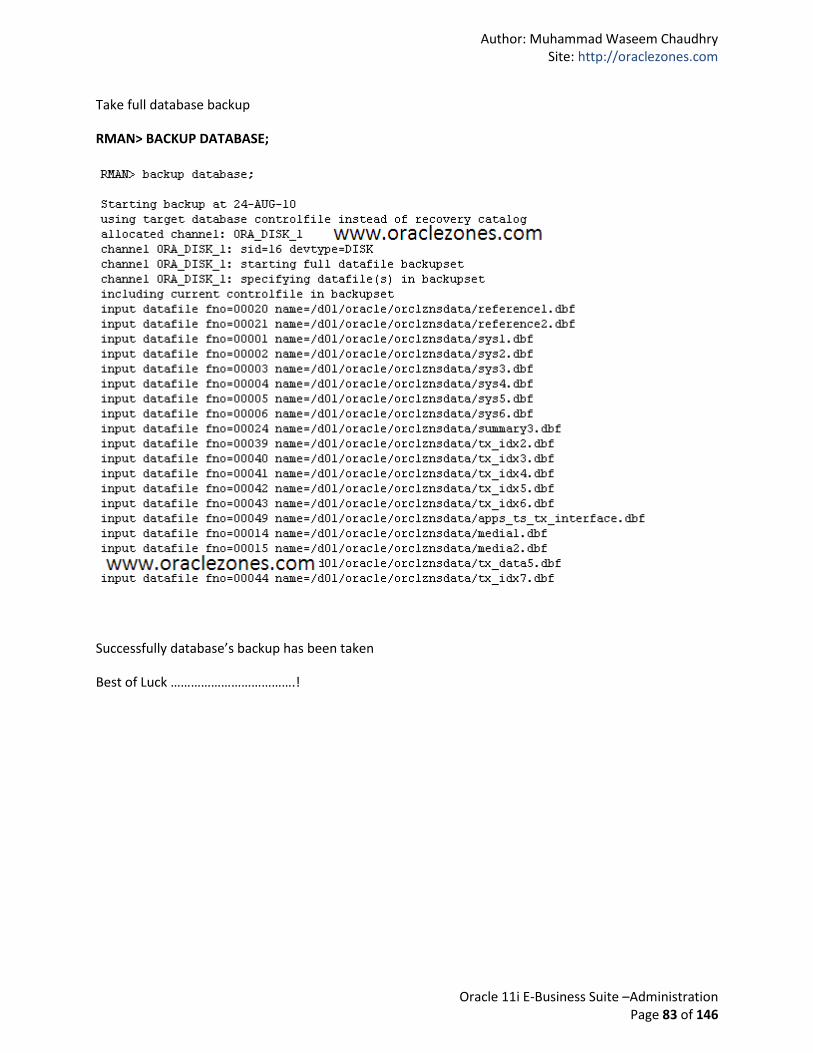
Take full database backup
RMAN> BACKUP DATABASE;
Successfully database’s backup has been taken
Best of Luck ……………………………….!
Author: Muhammad Waseem Chaudhry Site: http://oraclezones.com
Oracle 11i E-Business Suite –Administration Page 84 of 146
5 - Recovery For learning point of view I have shutdown database and deleted all data files from original path, and
learn how we can restore all data files from backup with help of RMAN. If you want more learning about
Backup and Recovery so please go to RMAN Menu in this website.
A) Login Database User
B) Set Database Environment
C) Recover Manager (RMAN)
D) Recover Database
Author: Muhammad Waseem Chaudhry Site: http://oraclezones.com
Oracle 11i E-Business Suite –Administration Page 85 of 146
A) Login Database User
You must have to login by database owner user for backup of database.
B) Set Database Environment
Before start backup, you must have to set database’s environment file, otherwise you cannot run any
database commands, for set the database’s environment file please go to cd $ORACLE_HOME/, in my
scenario
# cd /d01/oracle/orclznsdb/9.2.0
#. ./orclzns_learnozs.env
Make sure space between two commas
Author: Muhammad Waseem Chaudhry Site: http://oraclezones.com
Oracle 11i E-Business Suite –Administration Page 86 of 146
C) Recovery Manager
Overview of RMAN
The RMAN environment consists of the utilities and databases that play a role in backing up your data.
At a minimum, the environment for RMAN must include the following:
The target database to be backed up
The RMAN client, which interprets backup and recovery commands, directs server sessions to execute those commands, and records your backup and recovery activity in the target database control file.
Connect RMAN for restore all data files
Author: Muhammad Waseem Chaudhry Site: http://oraclezones.com
Oracle 11i E-Business Suite –Administration Page 87 of 146
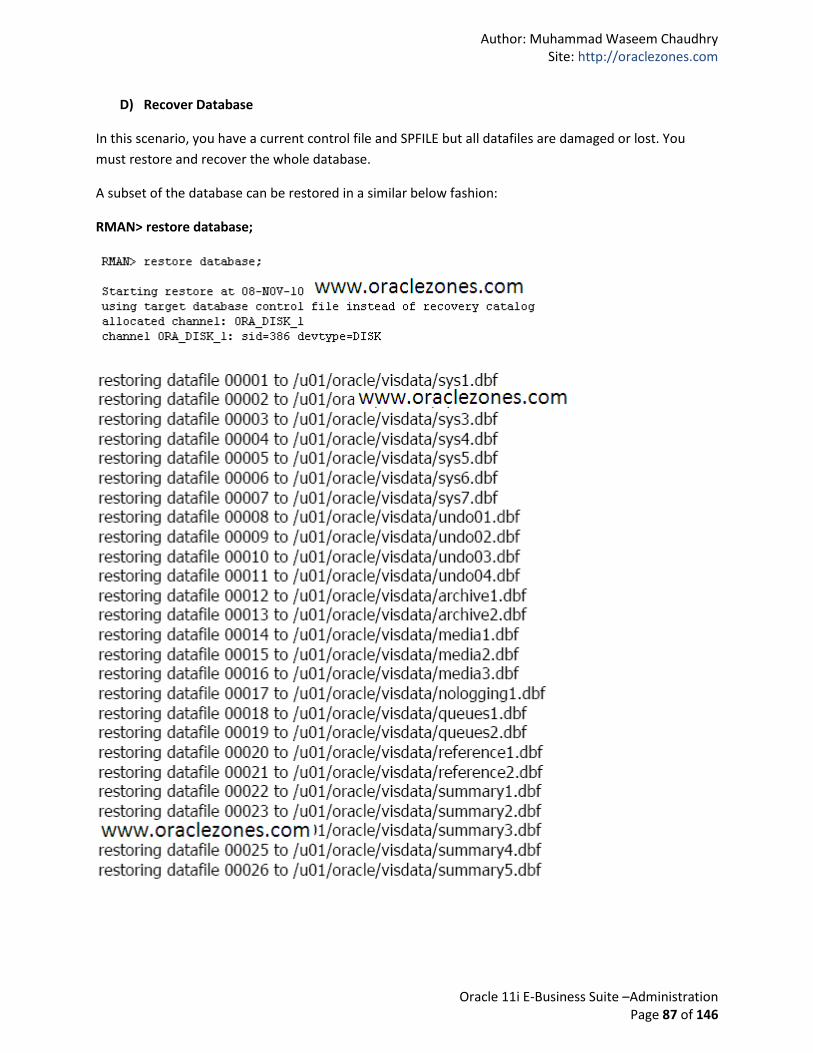
D) Recover Database
In this scenario, you have a current control file and SPFILE but all datafiles are damaged or lost. You
must restore and recover the whole database.
A subset of the database can be restored in a similar below fashion:
RMAN> restore database;
Author: Muhammad Waseem Chaudhry Site: http://oraclezones.com
Oracle 11i E-Business Suite –Administration Page 88 of 146
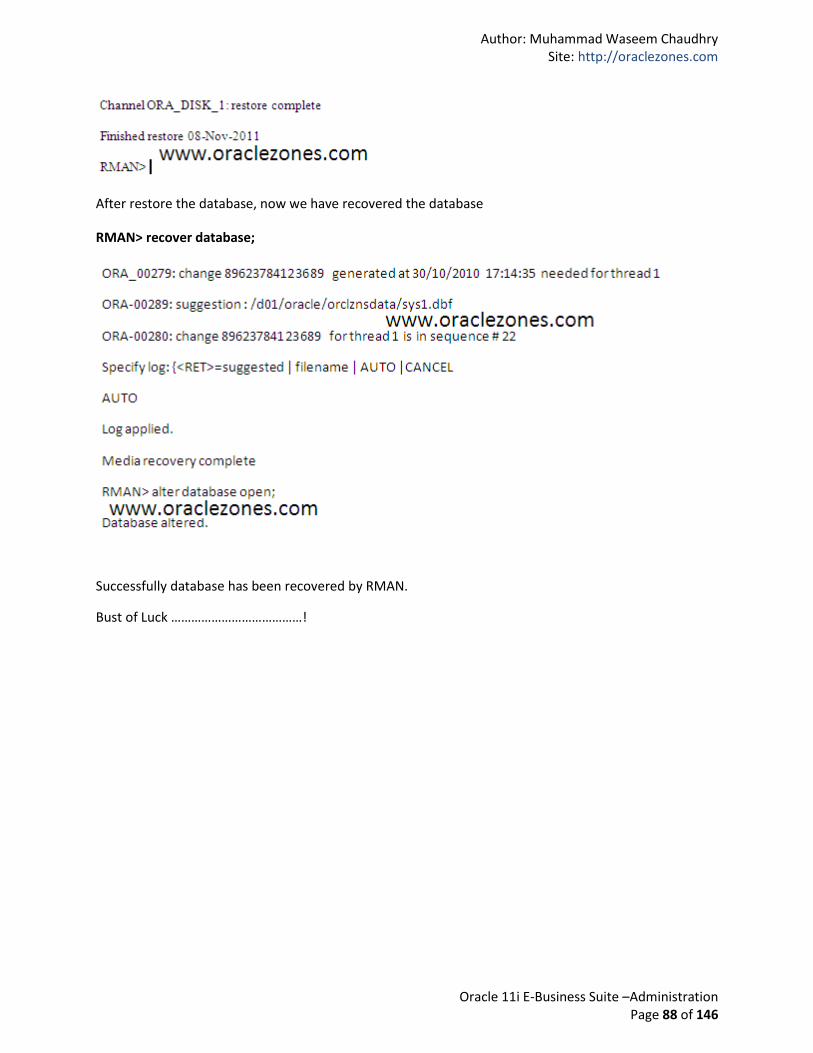
After restore the database, now we have recovered the database
RMAN> recover database;
Successfully database has been recovered by RMAN.
Bust of Luck …………………………………!
Author: Muhammad Waseem Chaudhry Site: http://oraclezones.com
Oracle 11i E-Business Suite –Administration Page 89 of 146
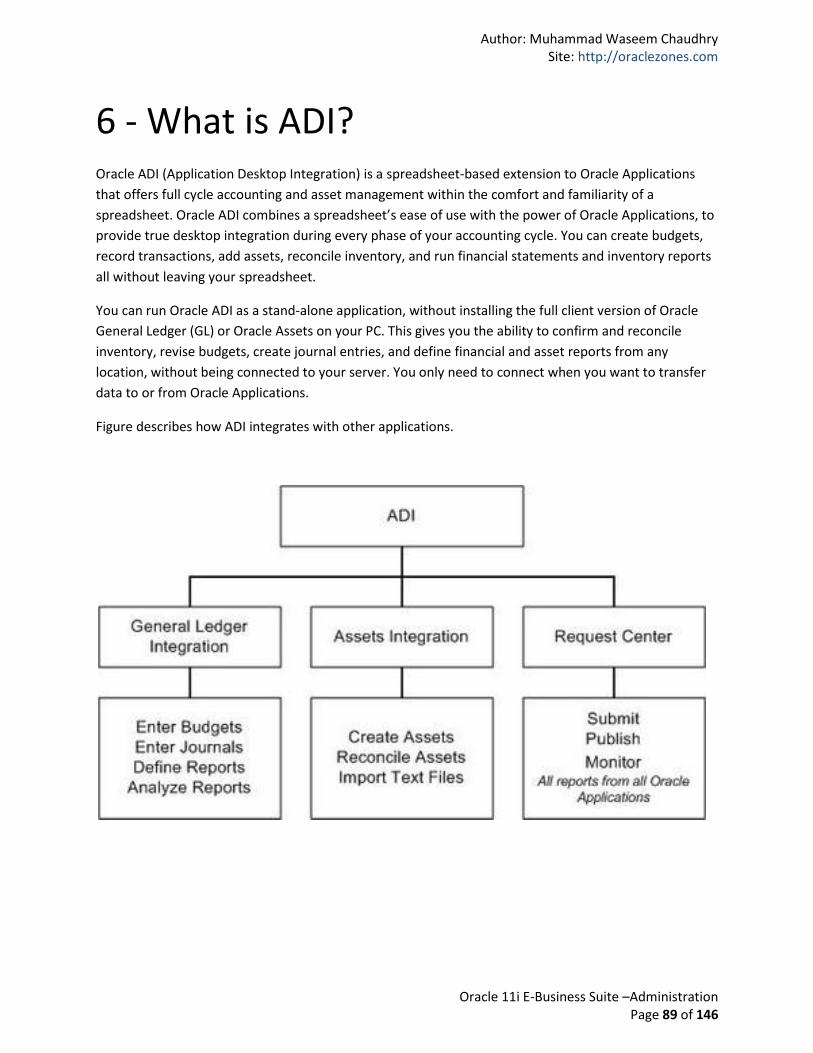
6 - What is ADI? Oracle ADI (Application Desktop Integration) is a spreadsheet-based extension to Oracle Applications
that offers full cycle accounting and asset management within the comfort and familiarity of a
spreadsheet. Oracle ADI combines a spreadsheet’s ease of use with the power of Oracle Applications, to
provide true desktop integration during every phase of your accounting cycle. You can create budgets,
record transactions, add assets, reconcile inventory, and run financial statements and inventory reports
all without leaving your spreadsheet.
You can run Oracle ADI as a stand-alone application, without installing the full client version of Oracle
General Ledger (GL) or Oracle Assets on your PC. This gives you the ability to confirm and reconcile
inventory, revise budgets, create journal entries, and define financial and asset reports from any
location, without being connected to your server. You only need to connect when you want to transfer
data to or from Oracle Applications.
Figure describes how ADI integrates with other applications.
Author: Muhammad Waseem Chaudhry Site: http://oraclezones.com
Oracle 11i E-Business Suite –Administration Page 90 of 146
A) Download ADI and Install
B) Reboot
C) Modify TNSNAMES.ORA files
D) Add Database Entry
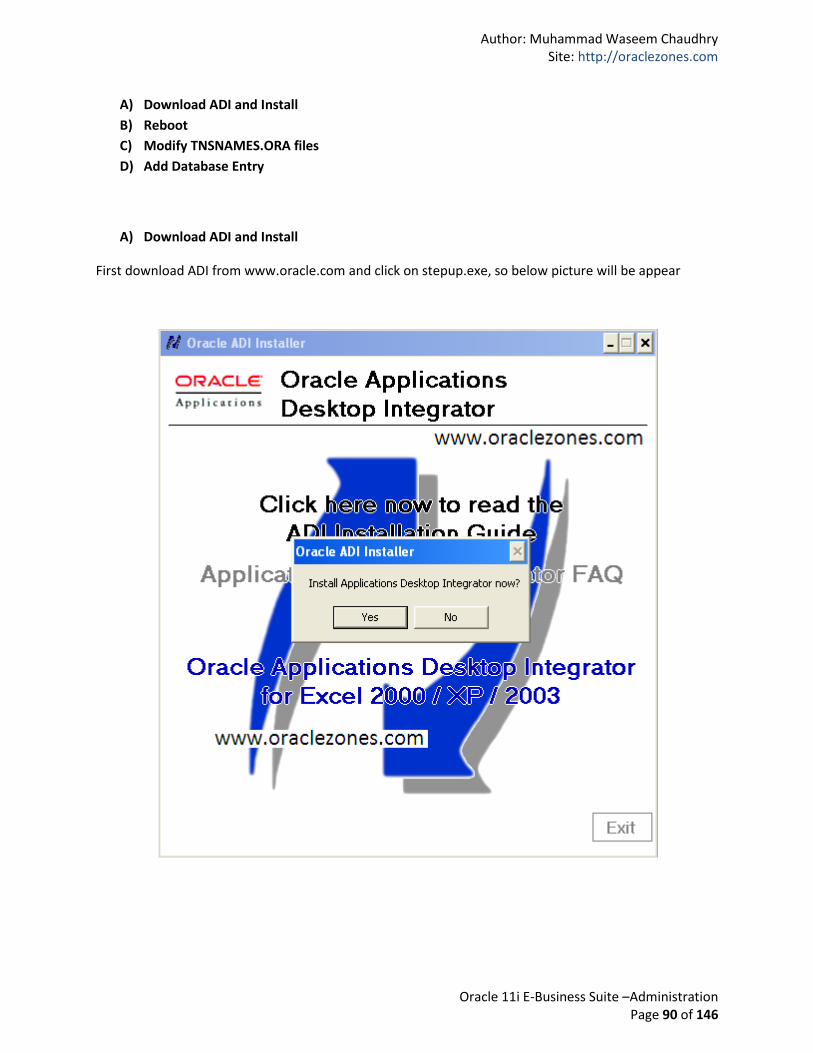
A) Download ADI and Install
First download ADI from www.oracle.com and click on stepup.exe, so below picture will be appear

Author: Muhammad Waseem Chaudhry Site: http://oraclezones.com
Oracle 11i E-Business Suite –Administration Page 91 of 146
Please mention company name in Company Name flex field, and select English language
Author: Muhammad Waseem Chaudhry Site: http://oraclezones.com
Oracle 11i E-Business Suite –Administration Page 92 of 146
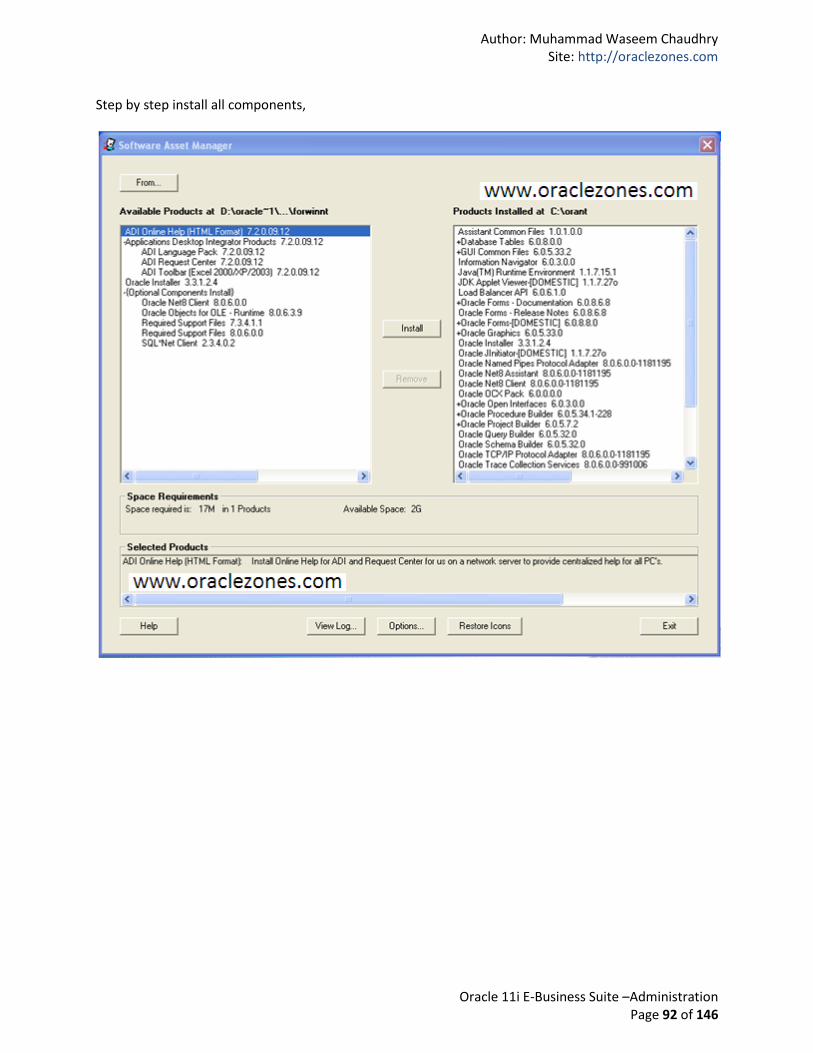
Step by step install all components,
Author: Muhammad Waseem Chaudhry Site: http://oraclezones.com
Oracle 11i E-Business Suite –Administration Page 93 of 146
Author: Muhammad Waseem Chaudhry Site: http://oraclezones.com
Oracle 11i E-Business Suite –Administration Page 94 of 146
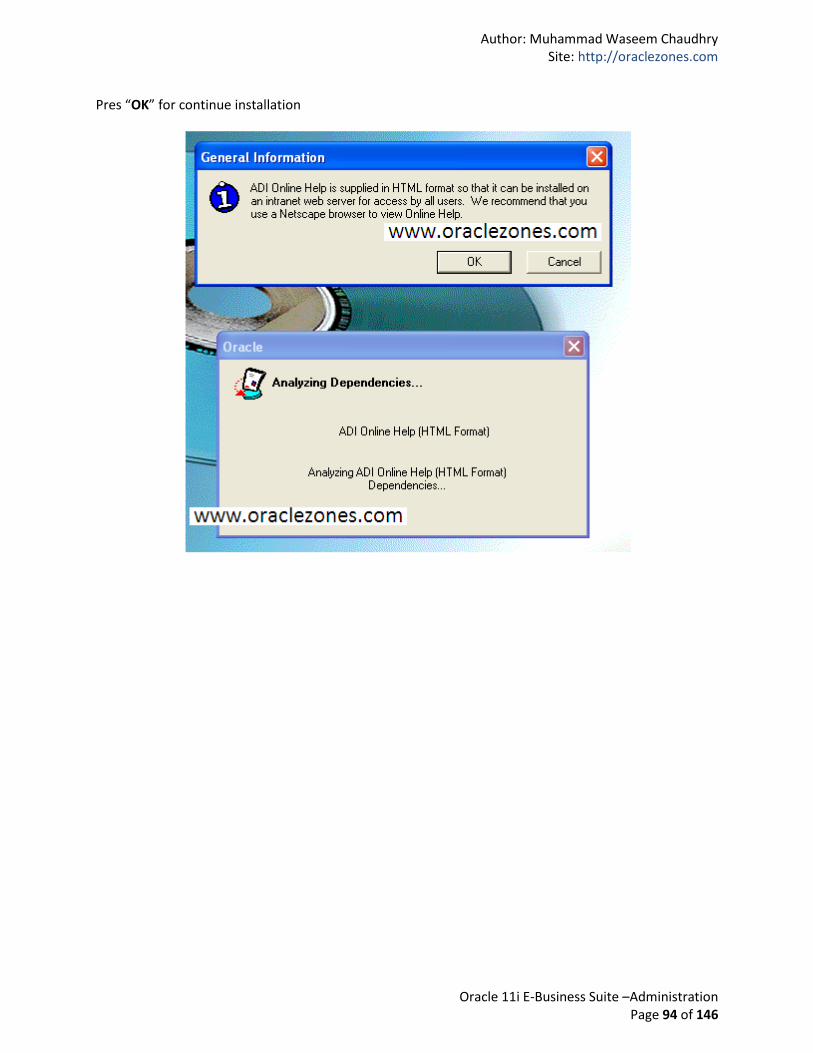
Pres “OK” for continue installation
Author: Muhammad Waseem Chaudhry Site: http://oraclezones.com
Oracle 11i E-Business Suite –Administration Page 95 of 146
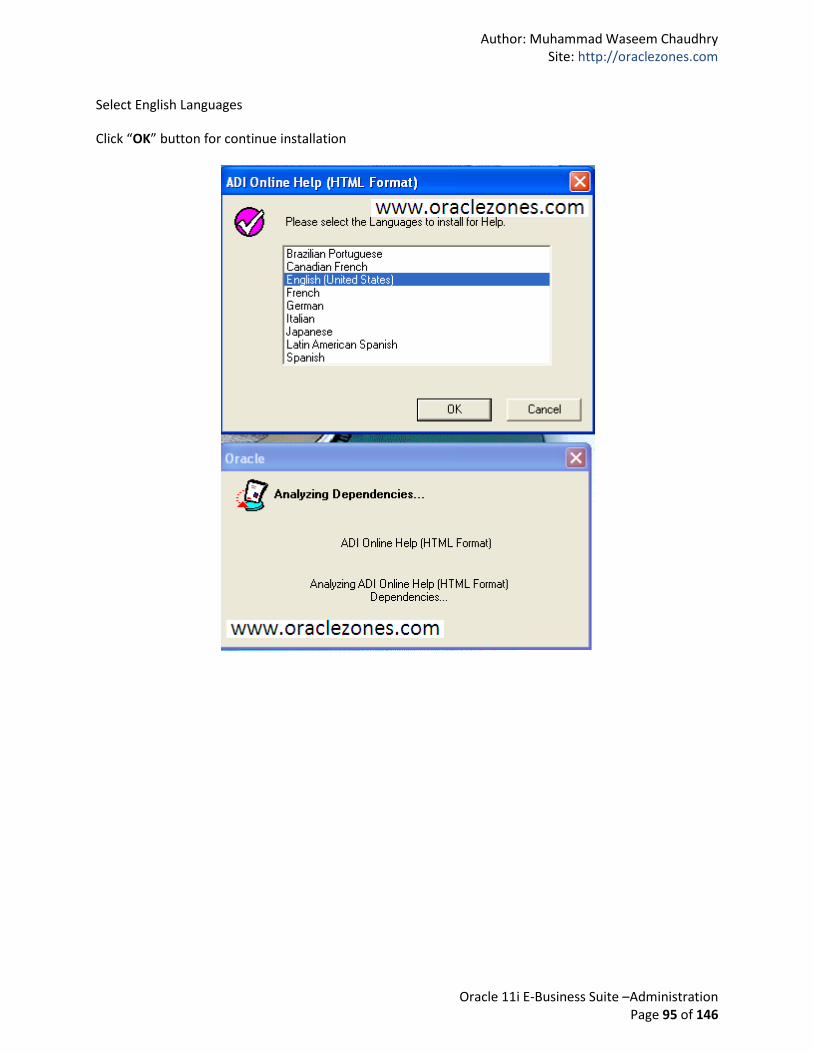
Select English Languages
Click “OK” button for continue installation

Author: Muhammad Waseem Chaudhry Site: http://oraclezones.com
Oracle 11i E-Business Suite –Administration Page 96 of 146
Author: Muhammad Waseem Chaudhry Site: http://oraclezones.com
Oracle 11i E-Business Suite –Administration Page 97 of 146
Author: Muhammad Waseem Chaudhry Site: http://oraclezones.com
Oracle 11i E-Business Suite –Administration Page 98 of 146
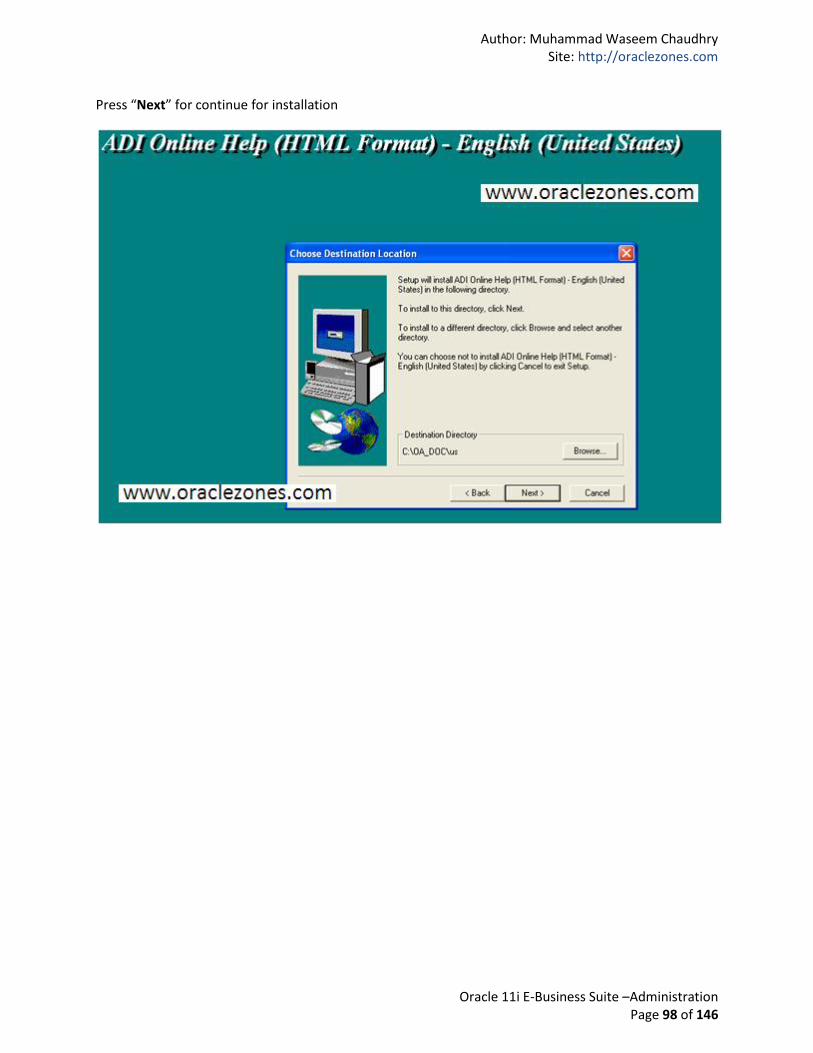
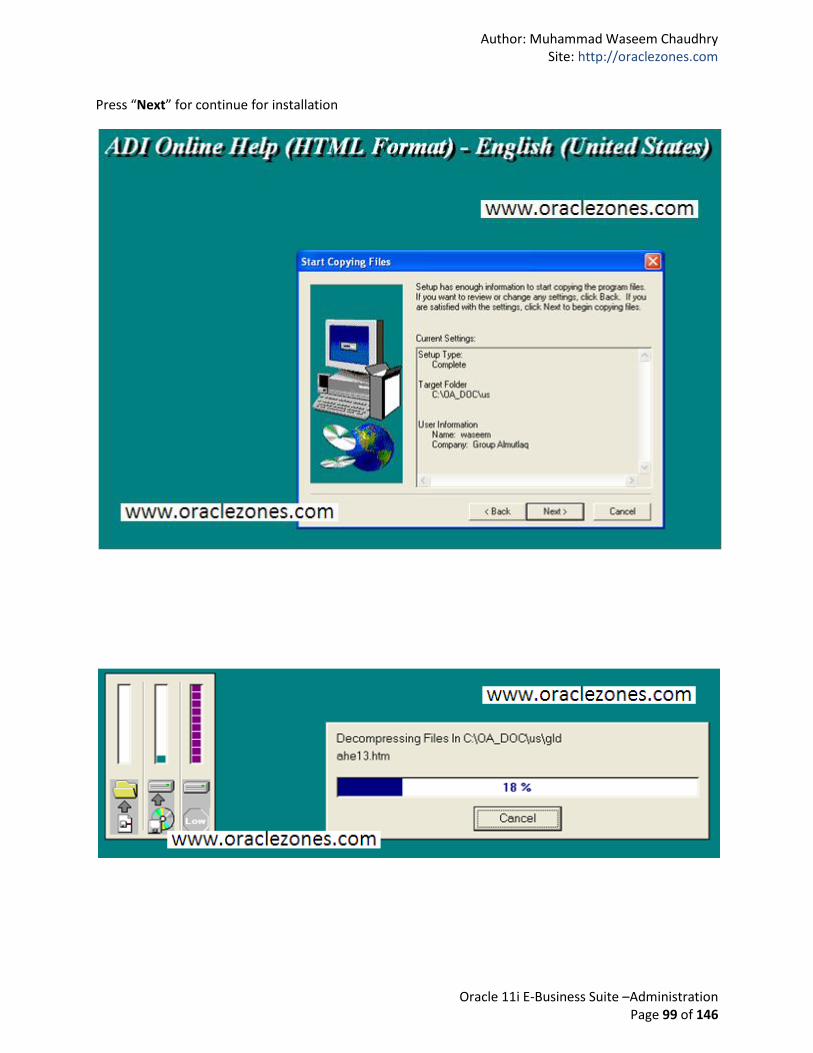
Press “Next” for continue for installation
Author: Muhammad Waseem Chaudhry Site: http://oraclezones.com
Oracle 11i E-Business Suite –Administration Page 99 of 146
Press “Next” for continue for installation
Author: Muhammad Waseem Chaudhry Site: http://oraclezones.com
Oracle 11i E-Business Suite –Administration Page 100 of 146
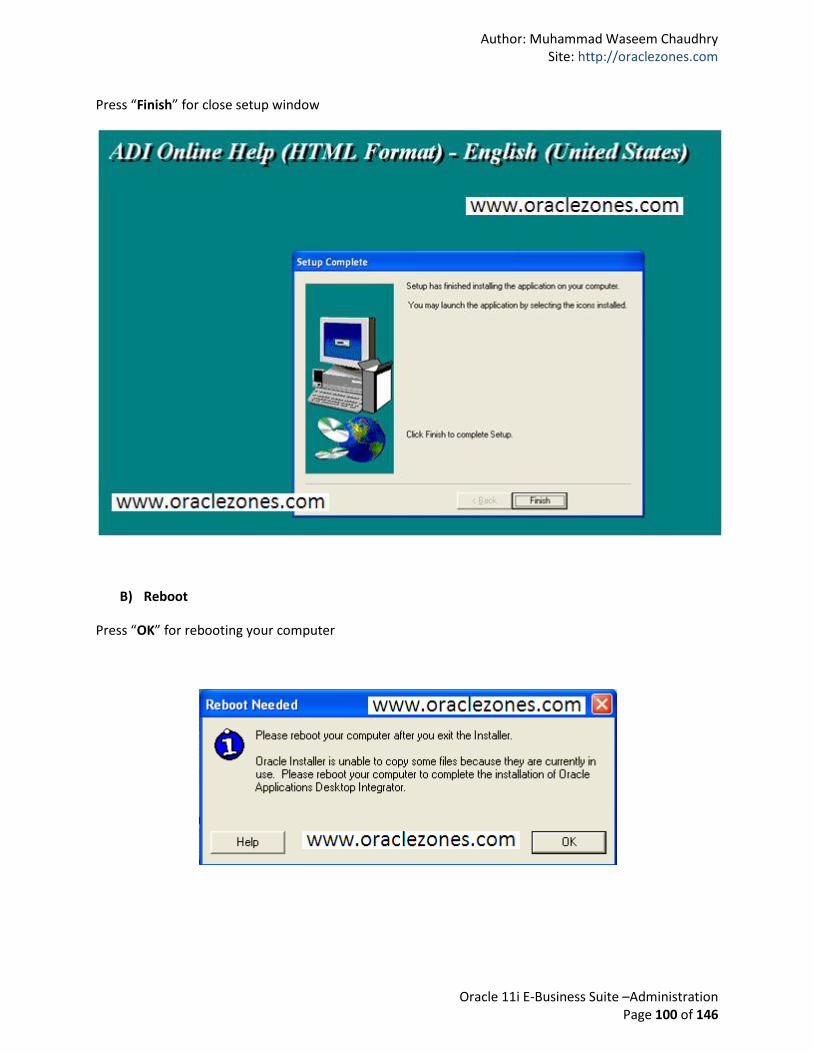
Press “Finish” for close setup window
B) Reboot
Press “OK” for rebooting your computer
Author: Muhammad Waseem Chaudhry Site: http://oraclezones.com
Oracle 11i E-Business Suite –Administration Page 101 of 146
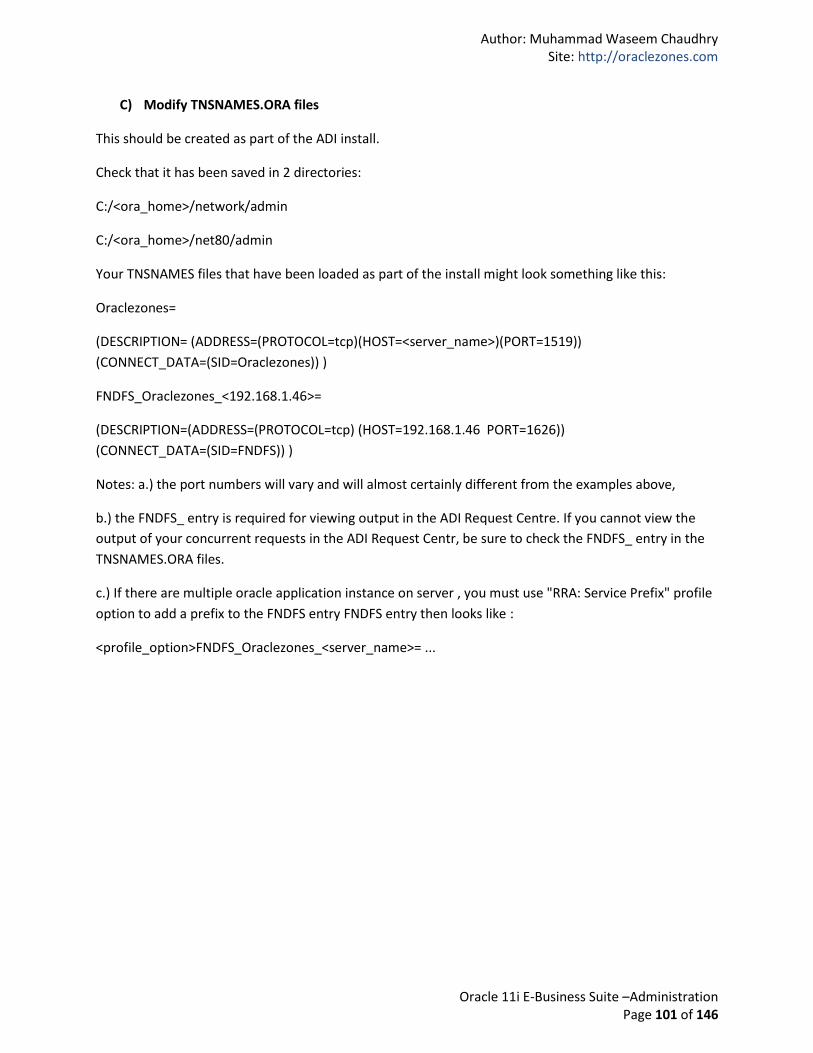
C) Modify TNSNAMES.ORA files
This should be created as part of the ADI install.
Check that it has been saved in 2 directories:
C:/<ora_home>/network/admin
C:/<ora_home>/net80/admin
Your TNSNAMES files that have been loaded as part of the install might look something like this:
Oraclezones=
(DESCRIPTION= (ADDRESS=(PROTOCOL=tcp)(HOST=<server_name>)(PORT=1519))
(CONNECT_DATA=(SID=Oraclezones)) )
FNDFS_Oraclezones_<192.168.1.46>=
(DESCRIPTION=(ADDRESS=(PROTOCOL=tcp) (HOST=192.168.1.46 PORT=1626))
(CONNECT_DATA=(SID=FNDFS)) )
Notes: a.) the port numbers will vary and will almost certainly different from the examples above,
b.) the FNDFS_ entry is required for viewing output in the ADI Request Centre. If you cannot view the
output of your concurrent requests in the ADI Request Centr, be sure to check the FNDFS_ entry in the
TNSNAMES.ORA files.
c.) If there are multiple oracle application instance on server , you must use "RRA: Service Prefix" profile
option to add a prefix to the FNDFS entry FNDFS entry then looks like :
<profile_option>FNDFS_Oraclezones_<server_name>= ...
Author: Muhammad Waseem Chaudhry Site: http://oraclezones.com
Oracle 11i E-Business Suite –Administration Page 102 of 146
Author: Muhammad Waseem Chaudhry Site: http://oraclezones.com
Oracle 11i E-Business Suite –Administration Page 103 of 146
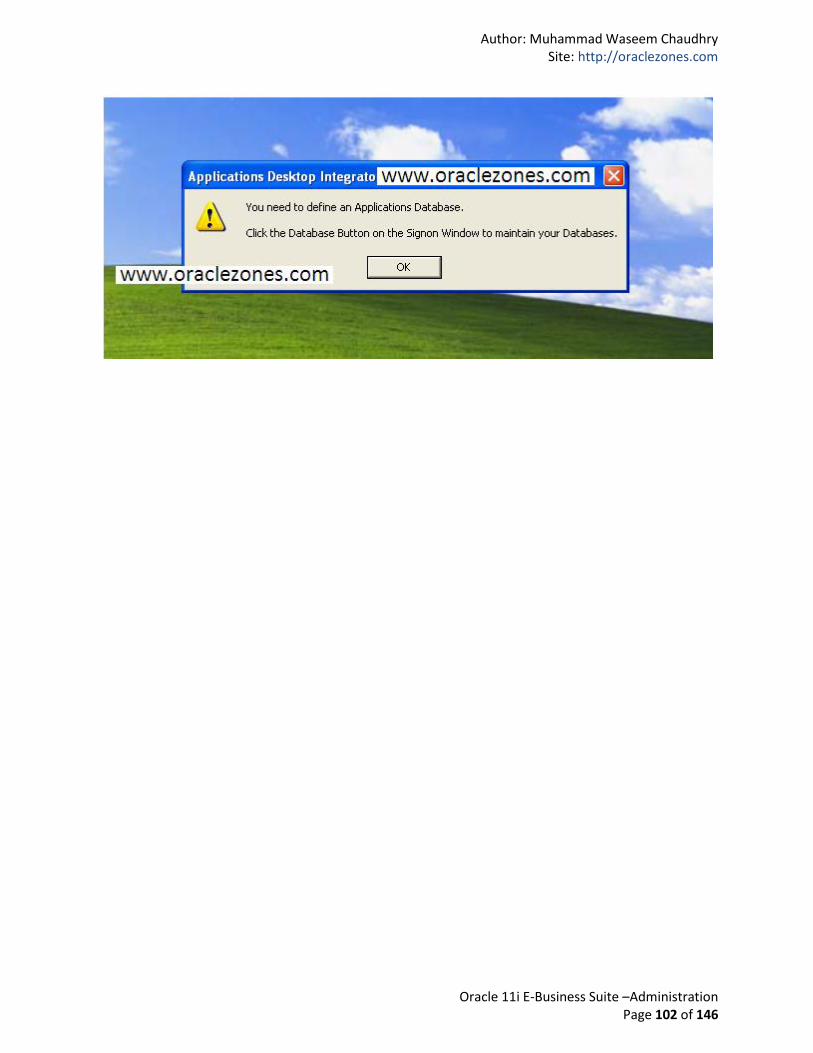
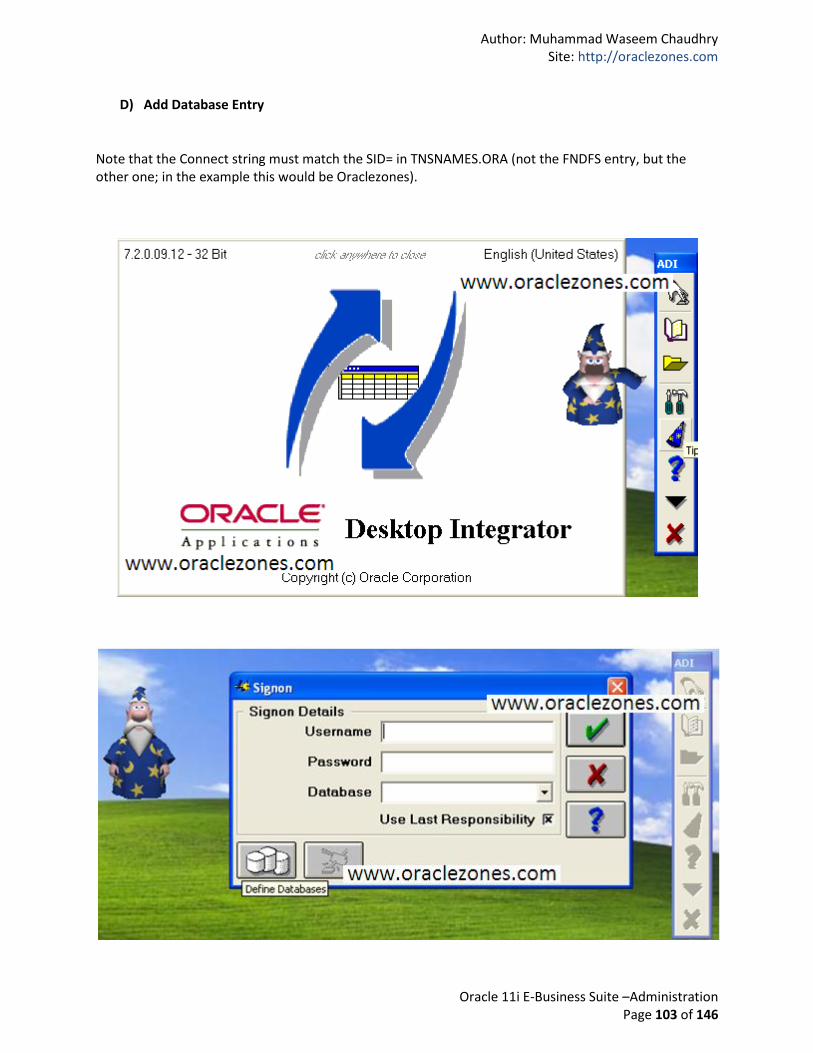
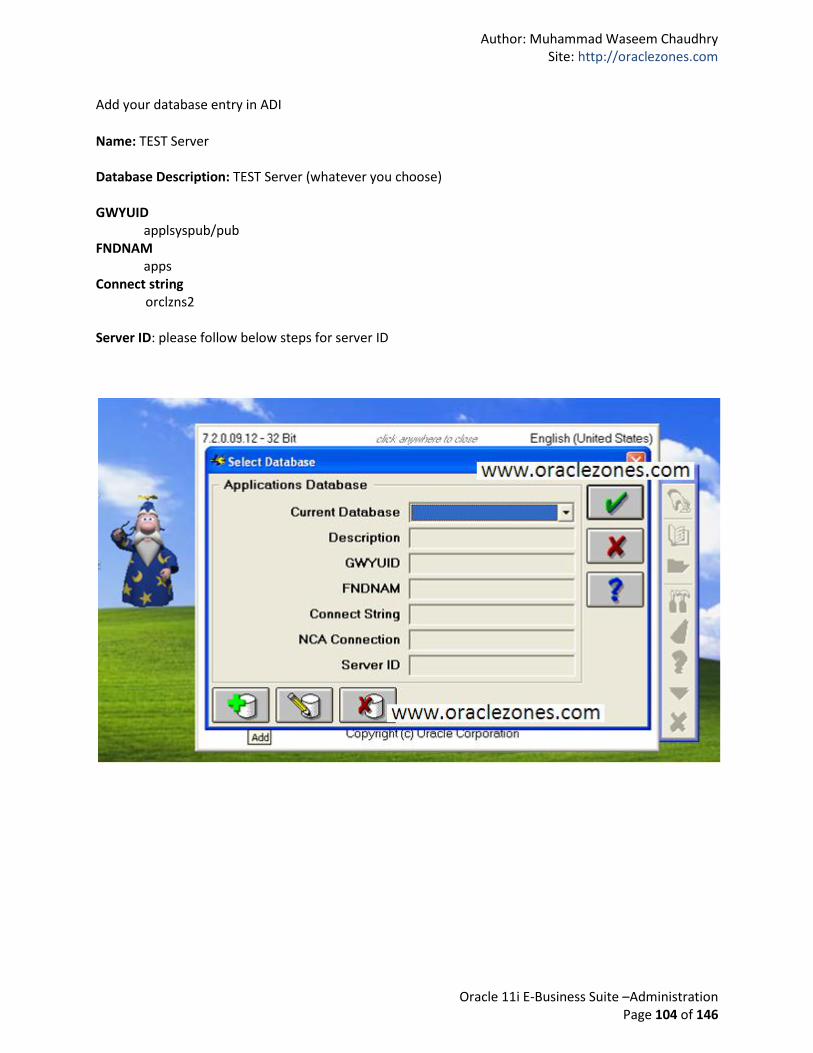
D) Add Database Entry
Note that the Connect string must match the SID= in TNSNAMES.ORA (not the FNDFS entry, but the other one; in the example this would be Oraclezones).
Author: Muhammad Waseem Chaudhry Site: http://oraclezones.com
Oracle 11i E-Business Suite –Administration Page 104 of 146
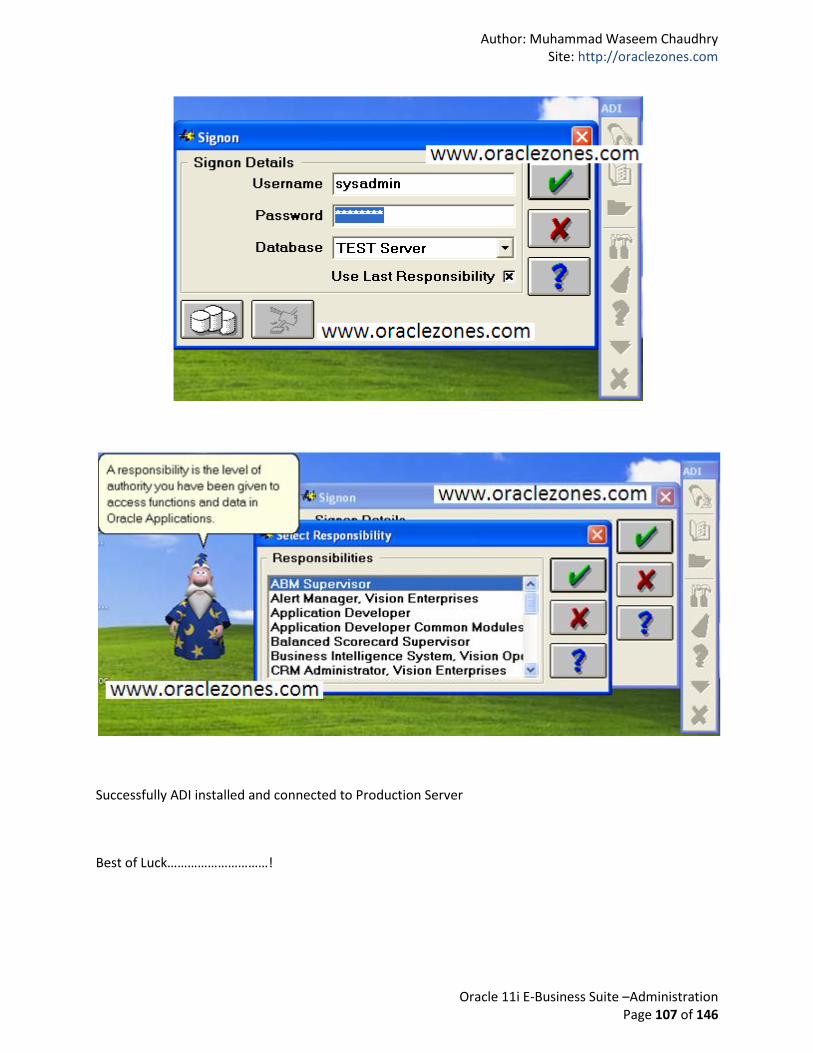
Add your database entry in ADI
Name: TEST Server Database Description: TEST Server (whatever you choose) GWYUID
applsyspub/pub FNDNAM
apps Connect string orclzns2 Server ID: please follow below steps for server ID
Author: Muhammad Waseem Chaudhry Site: http://oraclezones.com
Oracle 11i E-Business Suite –Administration Page 105 of 146
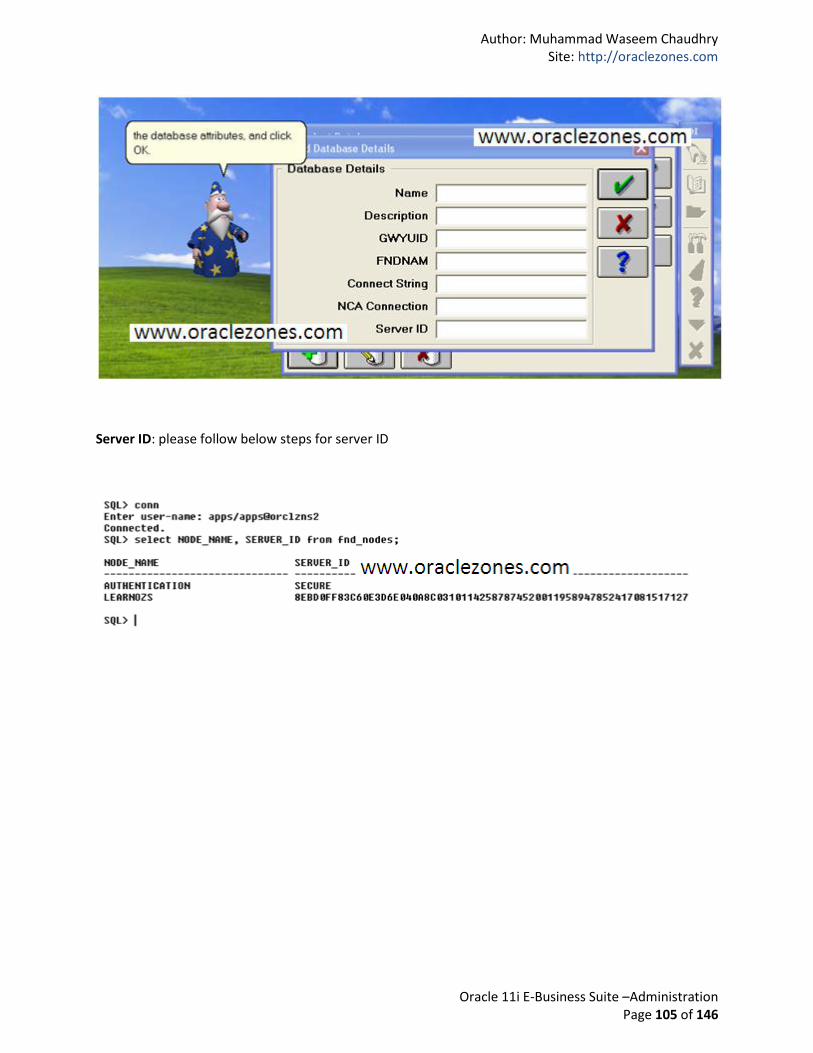
Server ID: please follow below steps for server ID
Author: Muhammad Waseem Chaudhry Site: http://oraclezones.com
Oracle 11i E-Business Suite –Administration Page 106 of 146
Author: Muhammad Waseem Chaudhry Site: http://oraclezones.com
Oracle 11i E-Business Suite –Administration Page 107 of 146
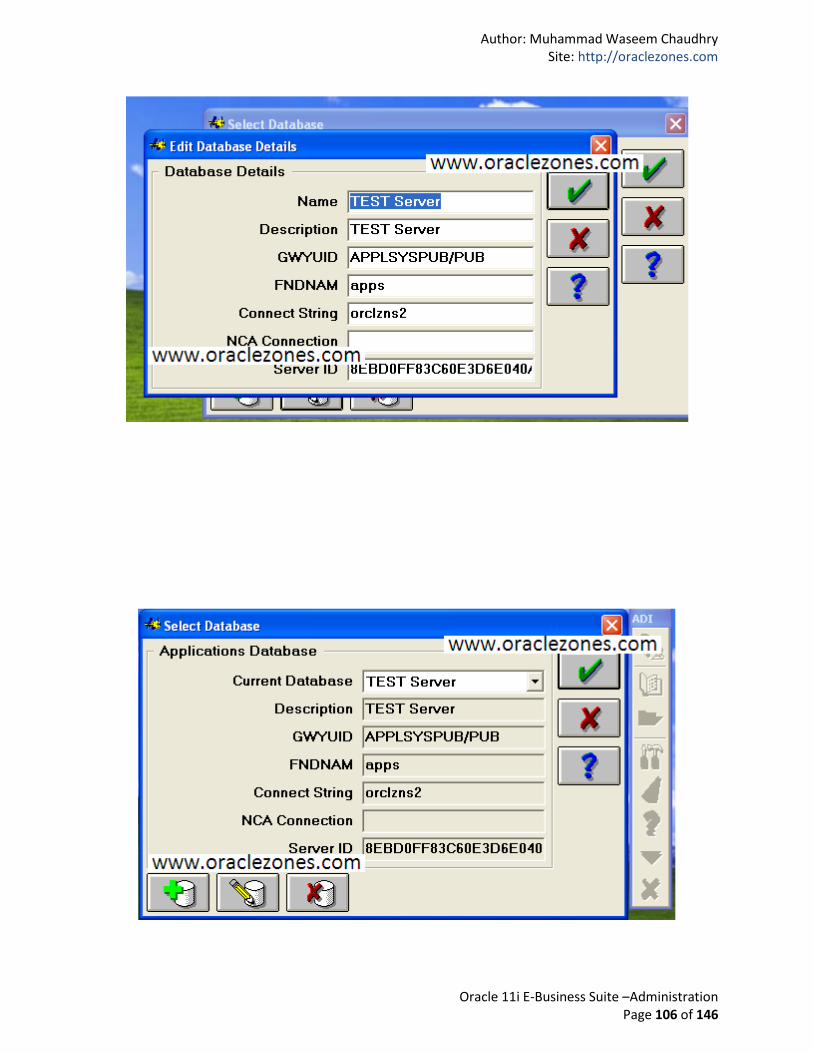
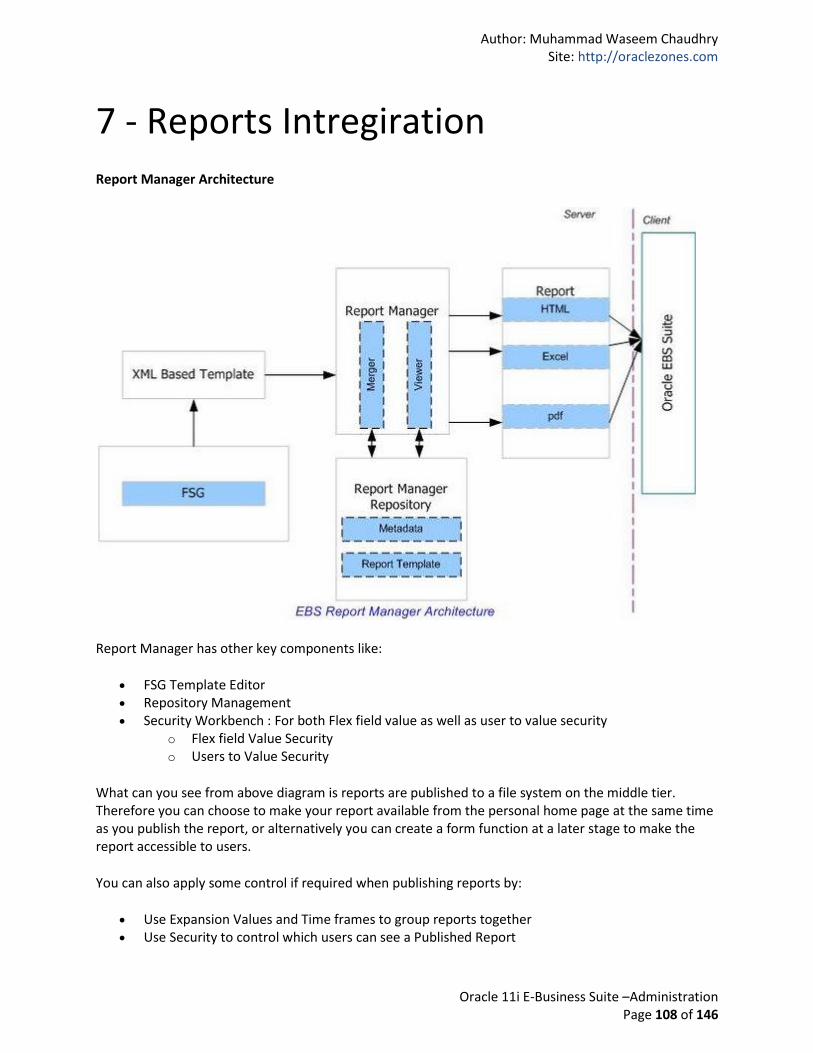
Successfully ADI installed and connected to Production Server
Best of Luck…………………………!
Author: Muhammad Waseem Chaudhry Site: http://oraclezones.com
Oracle 11i E-Business Suite –Administration Page 108 of 146
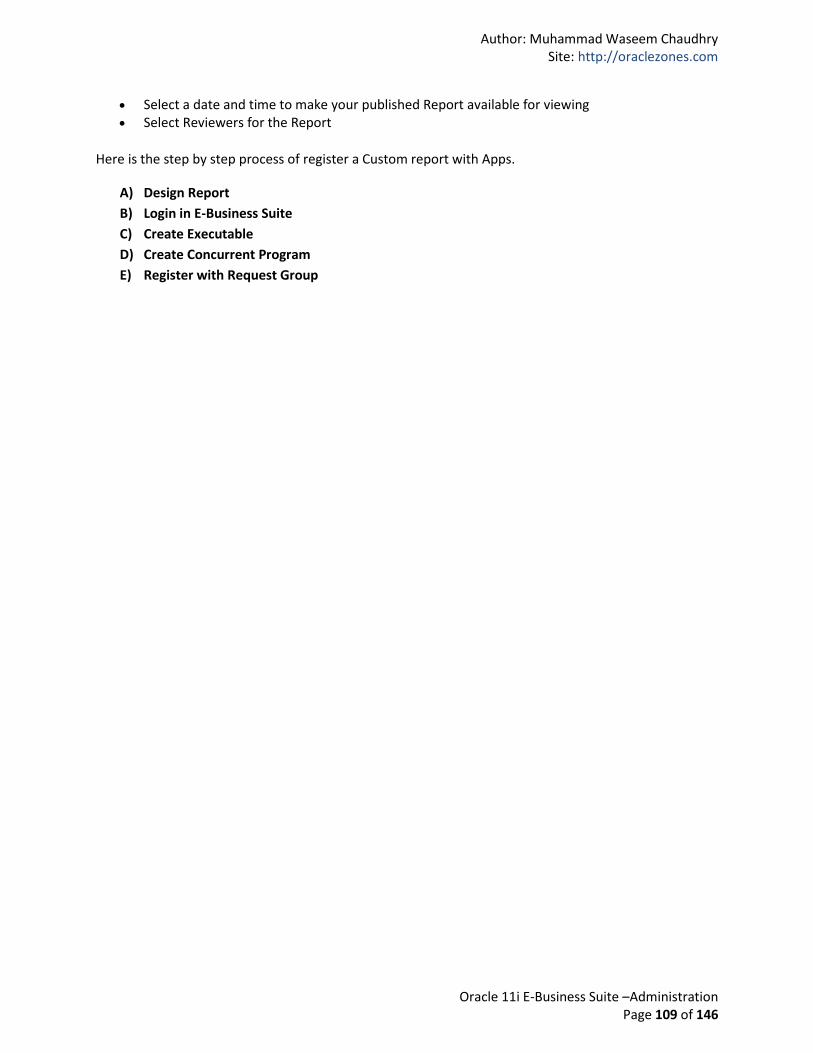
7 - Reports Intregiration
Report Manager Architecture
Report Manager has other key components like:
FSG Template Editor Repository Management Security Workbench : For both Flex field value as well as user to value security
o Flex field Value Security o Users to Value Security
What can you see from above diagram is reports are published to a file system on the middle tier. Therefore you can choose to make your report available from the personal home page at the same time as you publish the report, or alternatively you can create a form function at a later stage to make the report accessible to users.
You can also apply some control if required when publishing reports by:
Use Expansion Values and Time frames to group reports together Use Security to control which users can see a Published Report
Author: Muhammad Waseem Chaudhry Site: http://oraclezones.com
Oracle 11i E-Business Suite –Administration Page 109 of 146
Select a date and time to make your published Report available for viewing Select Reviewers for the Report
Here is the step by step process of register a Custom report with Apps.
A) Design Report
B) Login in E-Business Suite
C) Create Executable
D) Create Concurrent Program
E) Register with Request Group
Author: Muhammad Waseem Chaudhry Site: http://oraclezones.com
Oracle 11i E-Business Suite –Administration Page 110 of 146
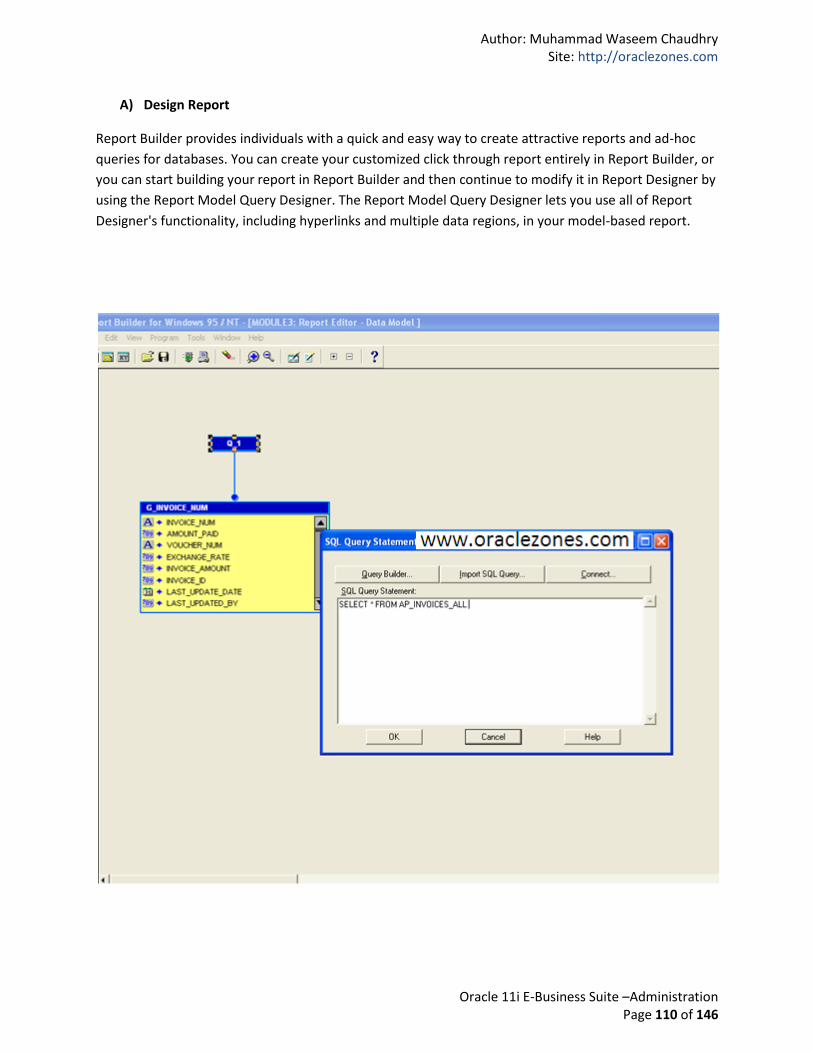
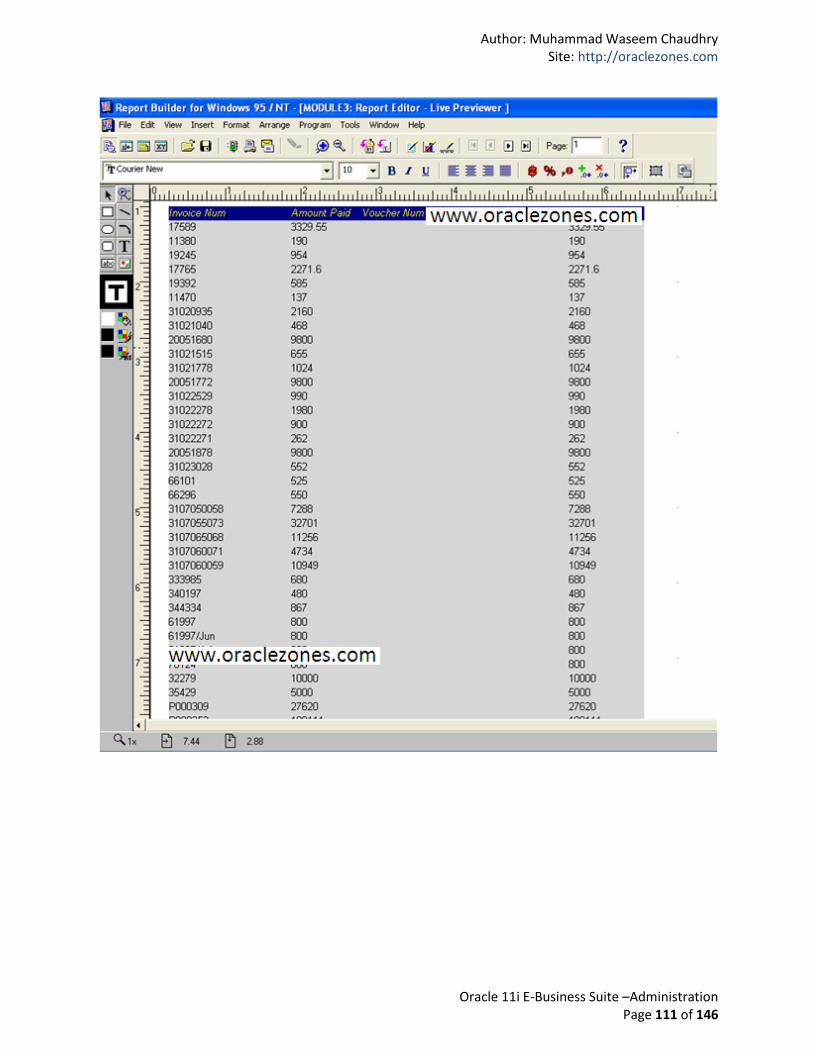
A) Design Report
Report Builder provides individuals with a quick and easy way to create attractive reports and ad-hoc
queries for databases. You can create your customized click through report entirely in Report Builder, or
you can start building your report in Report Builder and then continue to modify it in Report Designer by
using the Report Model Query Designer. The Report Model Query Designer lets you use all of Report
Designer's functionality, including hyperlinks and multiple data regions, in your model-based report.
Author: Muhammad Waseem Chaudhry Site: http://oraclezones.com
Oracle 11i E-Business Suite –Administration Page 111 of 146
Author: Muhammad Waseem Chaudhry Site: http://oraclezones.com
Oracle 11i E-Business Suite –Administration Page 112 of 146
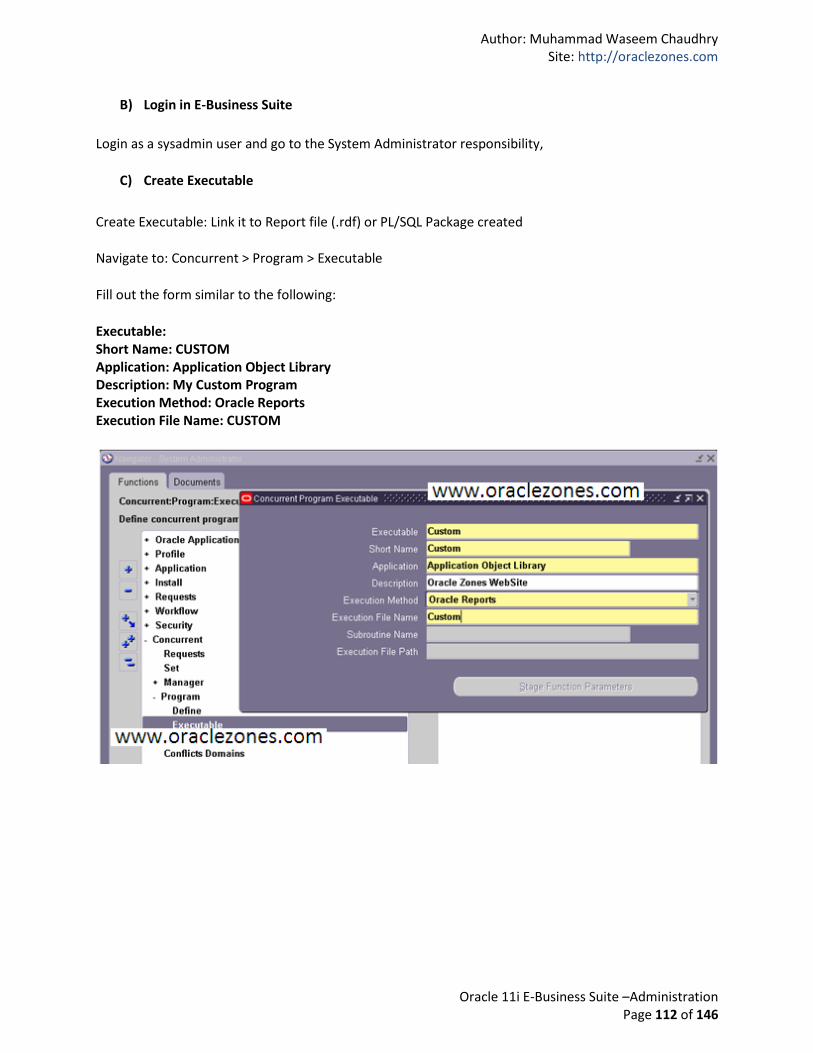
B) Login in E-Business Suite
Login as a sysadmin user and go to the System Administrator responsibility,
C) Create Executable
Create Executable: Link it to Report file (.rdf) or PL/SQL Package created
Navigate to: Concurrent > Program > Executable
Fill out the form similar to the following:
Executable: Short Name: CUSTOM Application: Application Object Library Description: My Custom Program Execution Method: Oracle Reports Execution File Name: CUSTOM
Author: Muhammad Waseem Chaudhry Site: http://oraclezones.com
Oracle 11i E-Business Suite –Administration Page 113 of 146
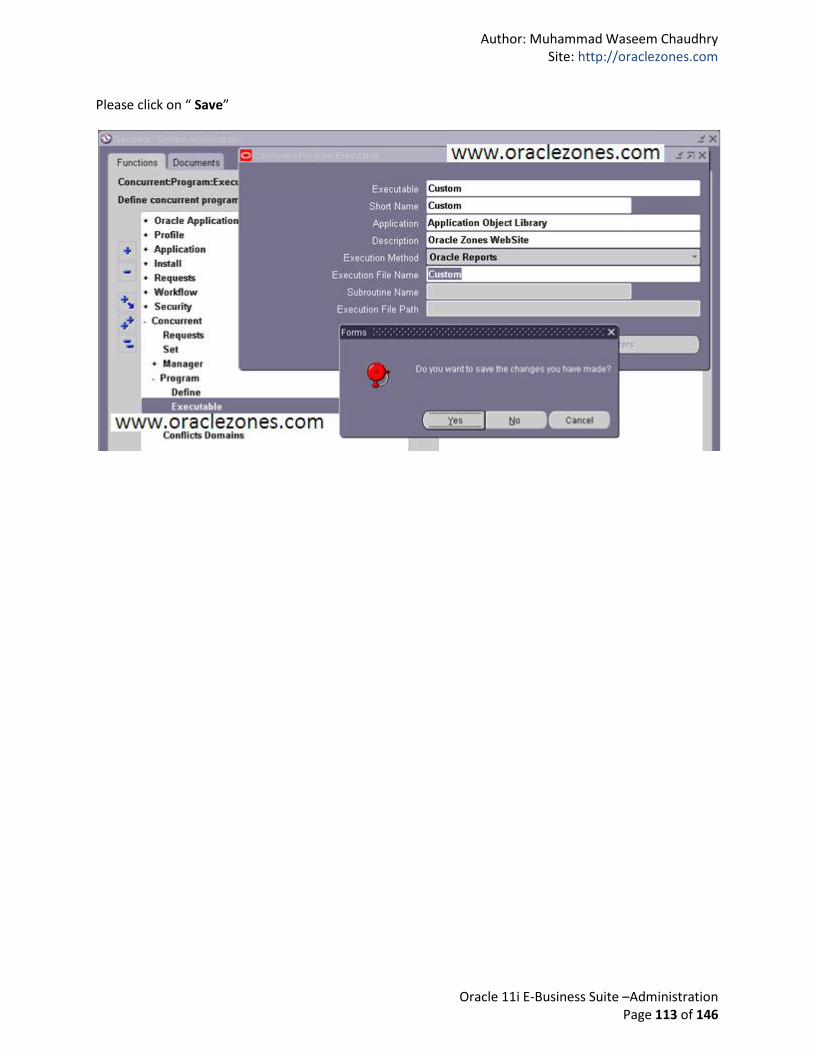
Please click on “ Save”
Author: Muhammad Waseem Chaudhry Site: http://oraclezones.com
Oracle 11i E-Business Suite –Administration Page 114 of 146
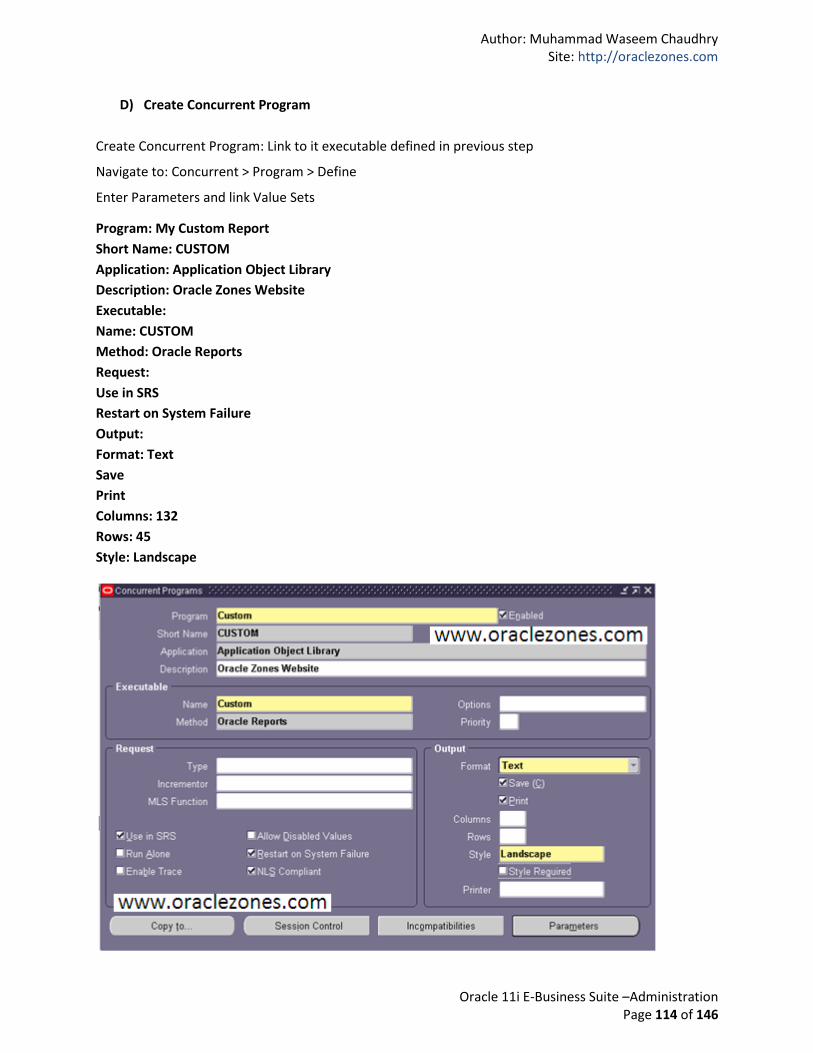
D) Create Concurrent Program
Create Concurrent Program: Link to it executable defined in previous step
Navigate to: Concurrent > Program > Define
Enter Parameters and link Value Sets
Program: My Custom Report
Short Name: CUSTOM
Application: Application Object Library
Description: Oracle Zones Website
Executable:
Name: CUSTOM
Method: Oracle Reports
Request:
Use in SRS
Restart on System Failure
Output:
Format: Text
Save
Columns: 132
Rows: 45
Style: Landscape

Author: Muhammad Waseem Chaudhry Site: http://oraclezones.com
Oracle 11i E-Business Suite –Administration Page 115 of 146
Please “Save”
E) Register with Request Group
Assign the registered Concurrent Program to a request group
Locate the Request Group name.
Navigate to Security > Responsibility > Request

Author: Muhammad Waseem Chaudhry Site: http://oraclezones.com
Oracle 11i E-Business Suite –Administration Page 116 of 146
Add the report under the “Requests” frame as a Program; the report can queried using the Query> Find menu option or by clicking the Flashlight button on the Toolbar.
The report can now be run via the responsibility associated with the request group.
Successfully report has been registered with request group
Best of Luck………………………………………..!
Author: Muhammad Waseem Chaudhry Site: http://oraclezones.com
Oracle 11i E-Business Suite –Administration Page 117 of 146
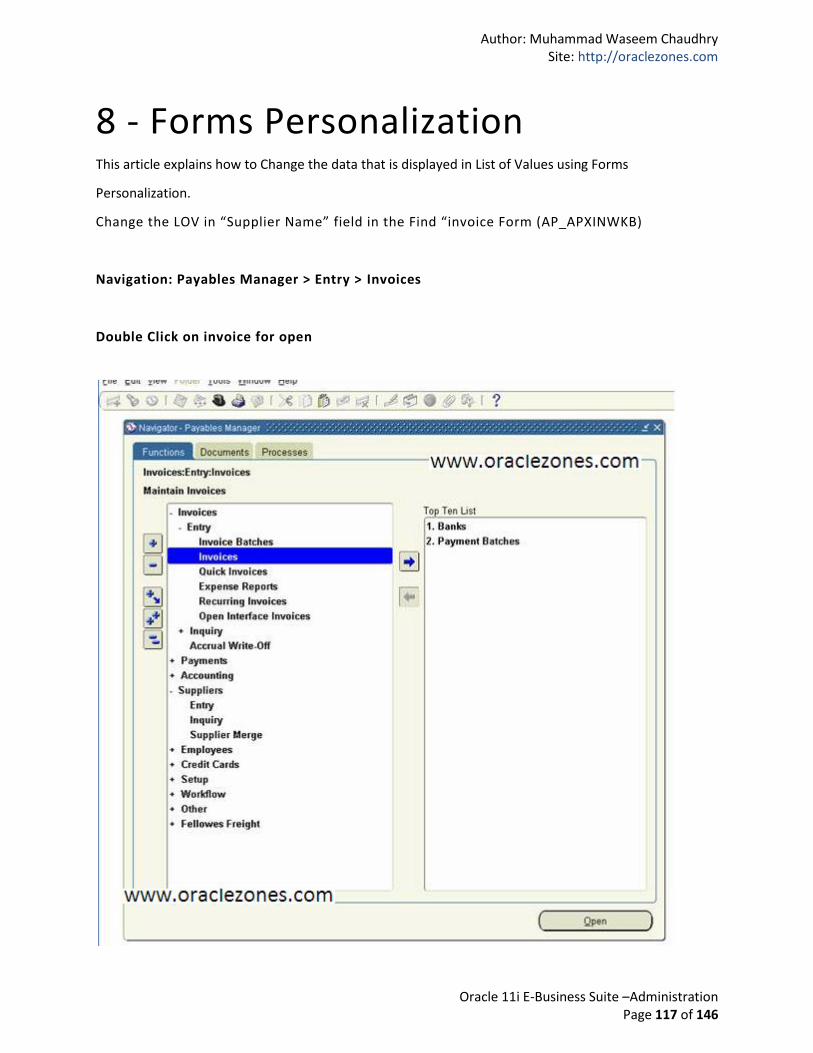
8 - Forms Personalization This article explains how to Change the data that is displayed in List of Values using Forms
Personalization.
Change the LOV in “Supplier Name” field in the Find “invoice Form (AP_APXINWKB)
Navigation: Payables Manager > Entry > Invoices
Double Click on invoice for open
Author: Muhammad Waseem Chaudhry Site: http://oraclezones.com
Oracle 11i E-Business Suite –Administration Page 118 of 146
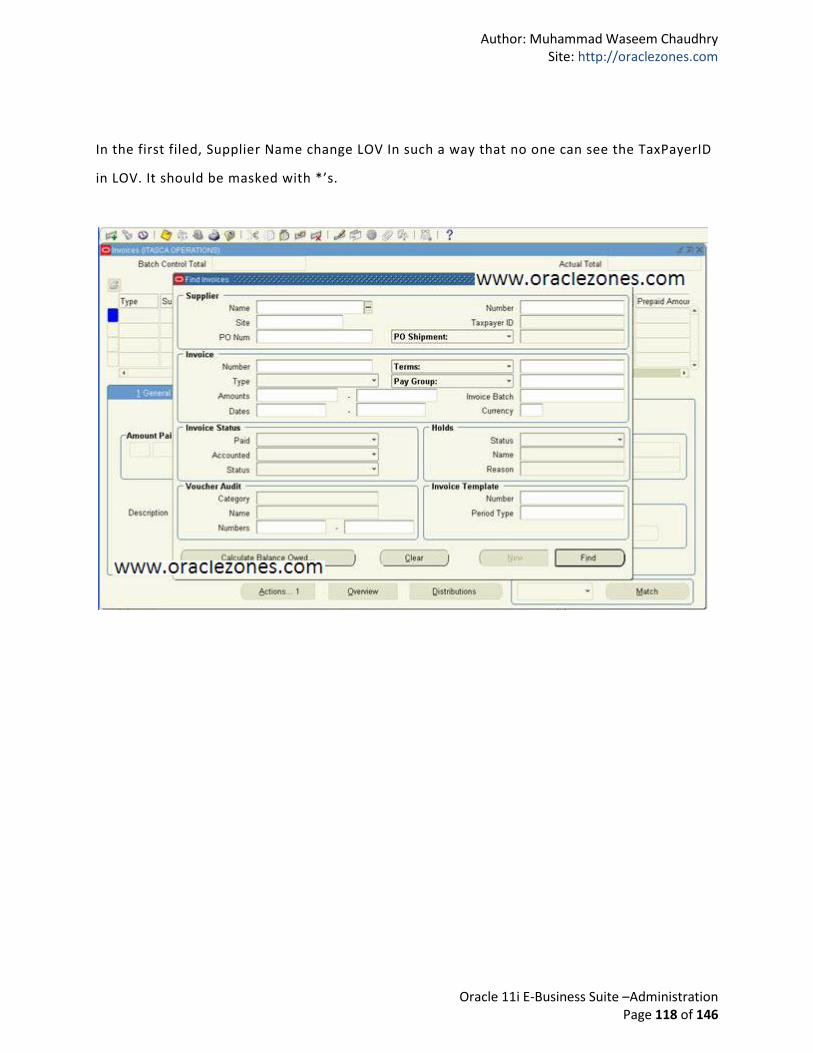
In the first filed, Supplier Name change LOV In such a way that no one can see the TaxPayerID
in LOV. It should be masked with *’s.

Author: Muhammad Waseem Chaudhry Site: http://oraclezones.com
Oracle 11i E-Business Suite –Administration Page 119 of 146
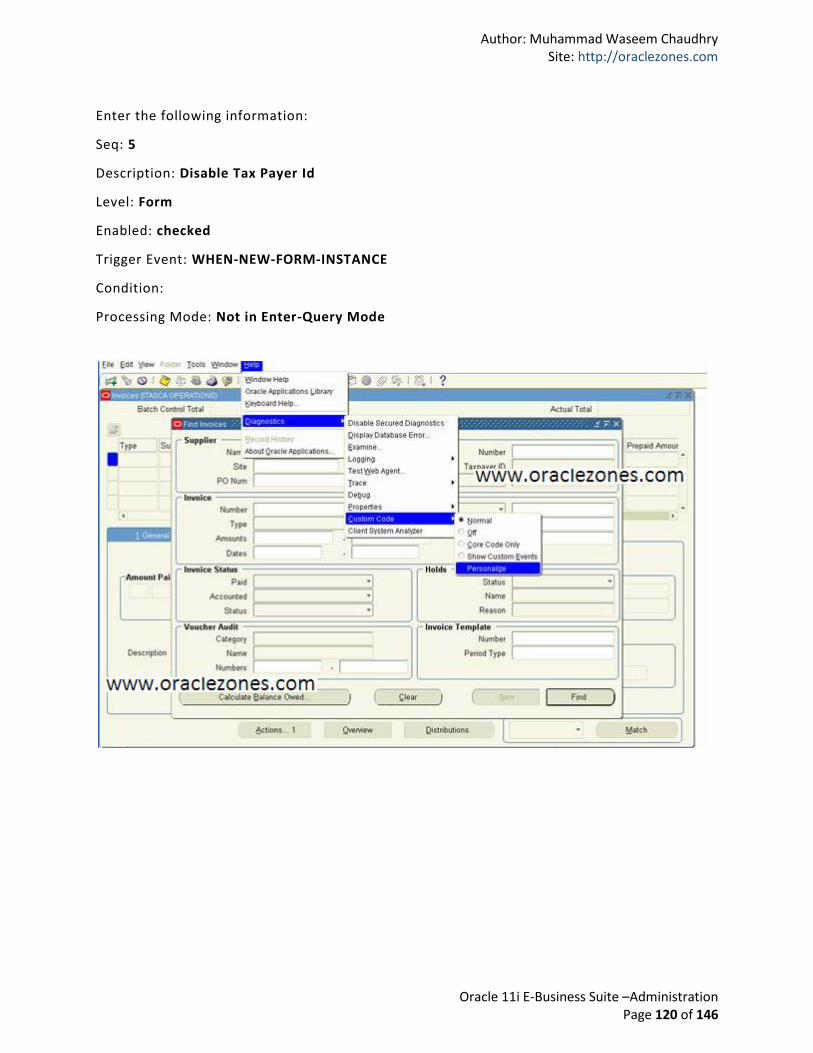
Navigation: Help Menu >> Diagnostics >> Custom Code >> Personalize
Author: Muhammad Waseem Chaudhry Site: http://oraclezones.com
Oracle 11i E-Business Suite –Administration Page 120 of 146
Enter the following information:
Seq: 5
Description: Disable Tax Payer Id
Level: Form
Enabled: checked
Trigger Event: WHEN-NEW-FORM-INSTANCE
Condition:
Processing Mode: Not in Enter-Query Mode

Author: Muhammad Waseem Chaudhry Site: http://oraclezones.com
Oracle 11i E-Business Suite –Administration Page 121 of 146
Click on Actions and enter the following.
Seq: 10
Type: Builtin
Language: all
Builtin type: Create Record Group from Query
Argument: Paste your new SQL statement here. In this case it would be
SELECT vendor_name, vendor_number,
DECODE (active_flag, 'Y', 'Yes', 'N', 'No', 'Yes') active , '***' num_1099,vat_registration_num,
vendor_id, '', '', '', '', hold_all_Payments _flag
FROM po_vendors_ap_v
WHERE num_active_pay_sites > 0 OR num_inactive_pay_sites > 0
ORDER BY UPPER (vendor_name)
Group Name: ERP_SCHOOLS_ALL_VENDORS_NAME
Author: Muhammad Waseem Chaudhry Site: http://oraclezones.com
Oracle 11i E-Business Suite –Administration Page 122 of 146
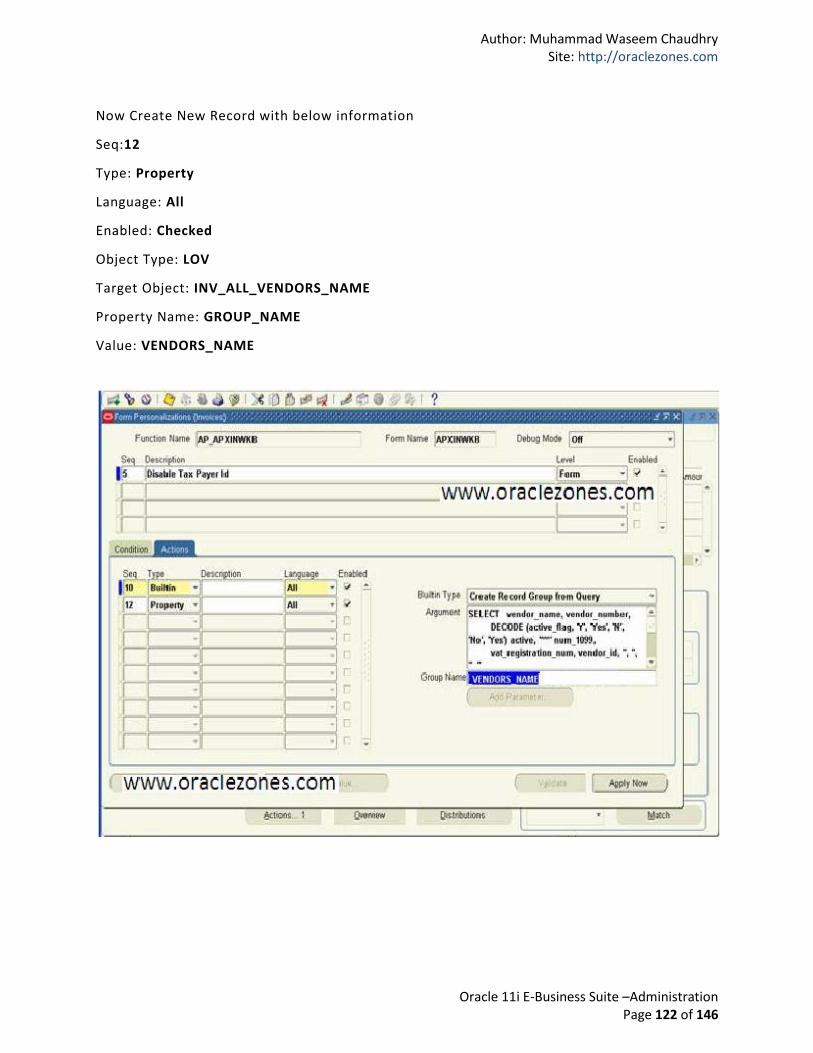
Now Create New Record with below information
Seq:12
Type: Property
Language: All
Enabled: Checked
Object Type: LOV
Target Object: INV_ALL_VENDORS_NAME
Property Name: GROUP_NAME
Value: VENDORS_NAME
Author: Muhammad Waseem Chaudhry Site: http://oraclezones.com
Oracle 11i E-Business Suite –Administration Page 123 of 146
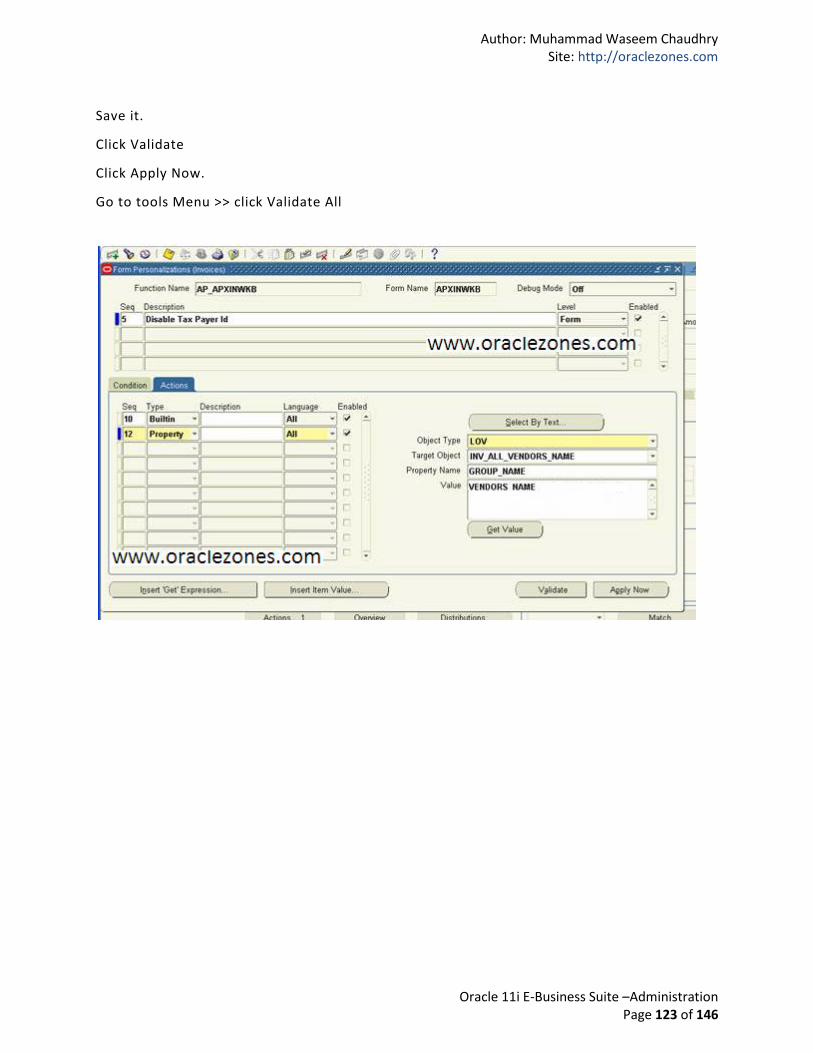
Save it.
Click Validate
Click Apply Now.
Go to tools Menu >> click Validate All
Author: Muhammad Waseem Chaudhry Site: http://oraclezones.com
Oracle 11i E-Business Suite –Administration Page 124 of 146
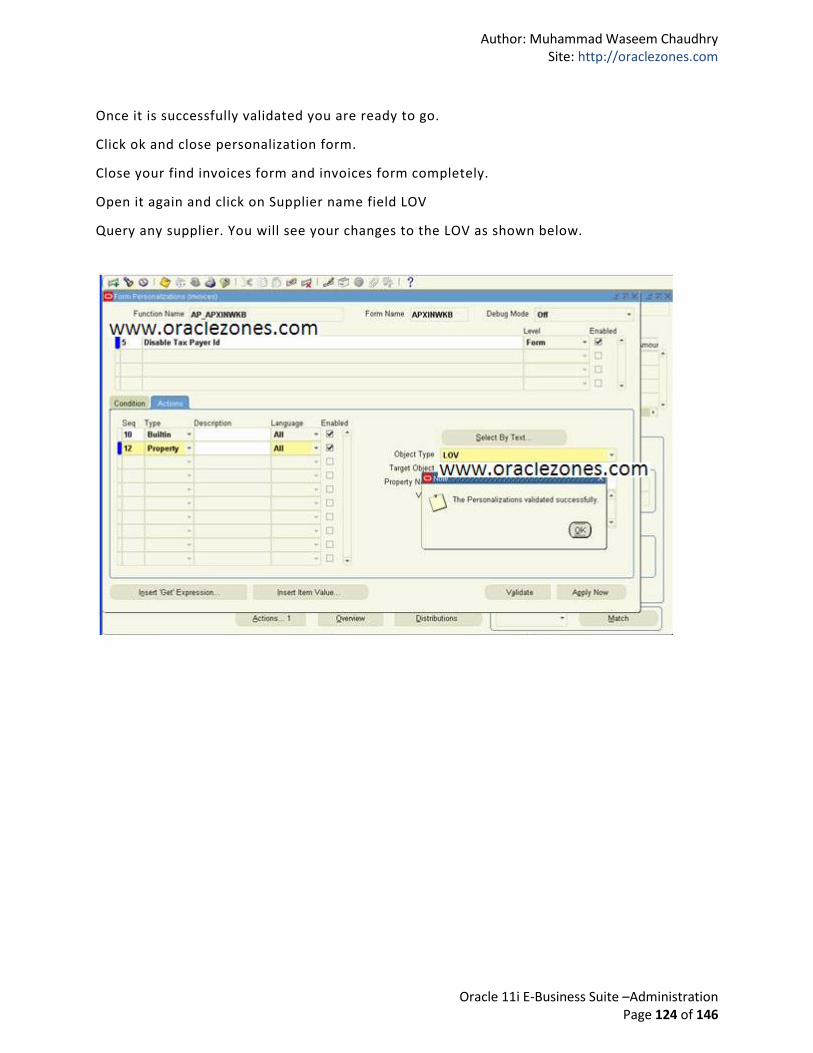
Once it is successfully validated you are ready to go.
Click ok and close personalization form.
Close your find invoices form and invoices form completely.
Open it again and click on Supplier name field LOV
Query any supplier. You will see your changes to the LOV as shown below.

Author: Muhammad Waseem Chaudhry Site: http://oraclezones.com
Oracle 11i E-Business Suite –Administration Page 125 of 146
Now Taxpayer ID is shown as ***** instead of number
Successfully form personalization has been done
Best of Luck …………………………………!

Author: Muhammad Waseem Chaudhry Site: http://oraclezones.com
Oracle 11i E-Business Suite –Administration Page 126 of 146
9 - Menu, Responsibilities and User This allows you to segregate your custom written files from the standard seeded functionality that
Oracle Applications provide.
Customizations can therefore be preserved when applying patches, upgrades or implementation to your
environment.
A) Create Menu
B) Create Responsibility
C) Create User
D) Add Responsibility
Author: Muhammad Waseem Chaudhry Site: http://oraclezones.com
Oracle 11i E-Business Suite –Administration Page 127 of 146
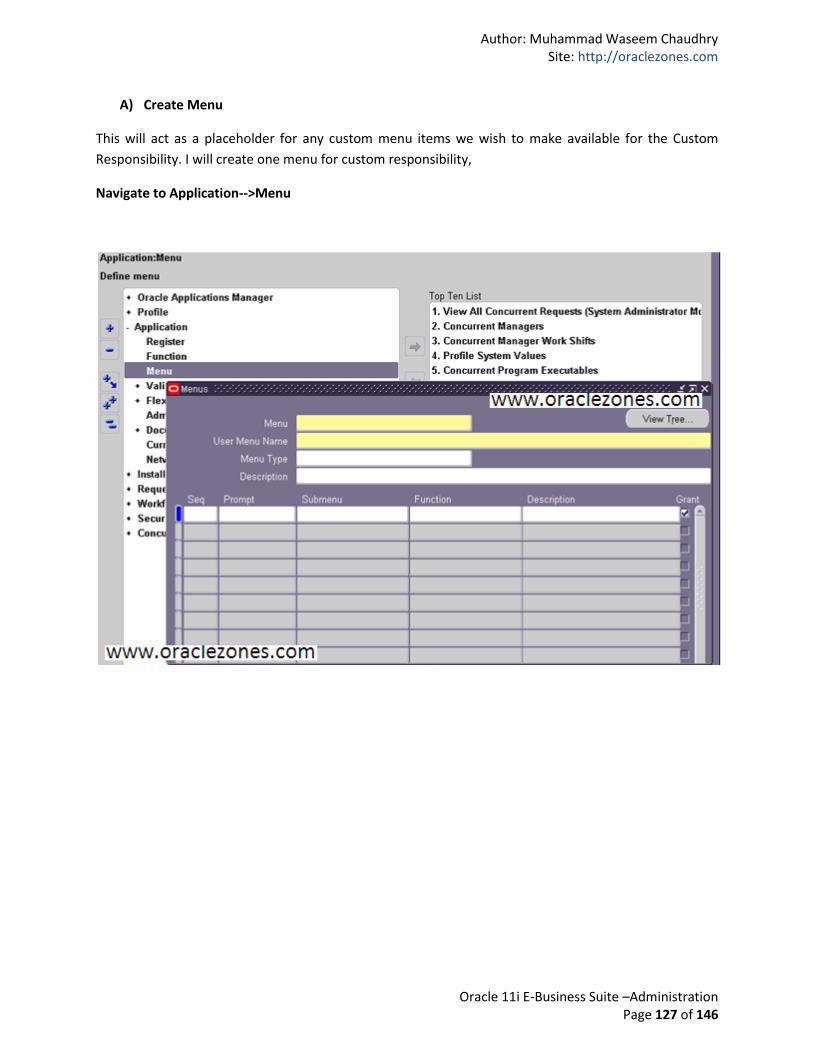
A) Create Menu
This will act as a placeholder for any custom menu items we wish to make available for the Custom
Responsibility. I will create one menu for custom responsibility,
Navigate to Application-->Menu
Author: Muhammad Waseem Chaudhry Site: http://oraclezones.com
Oracle 11i E-Business Suite –Administration Page 128 of 146
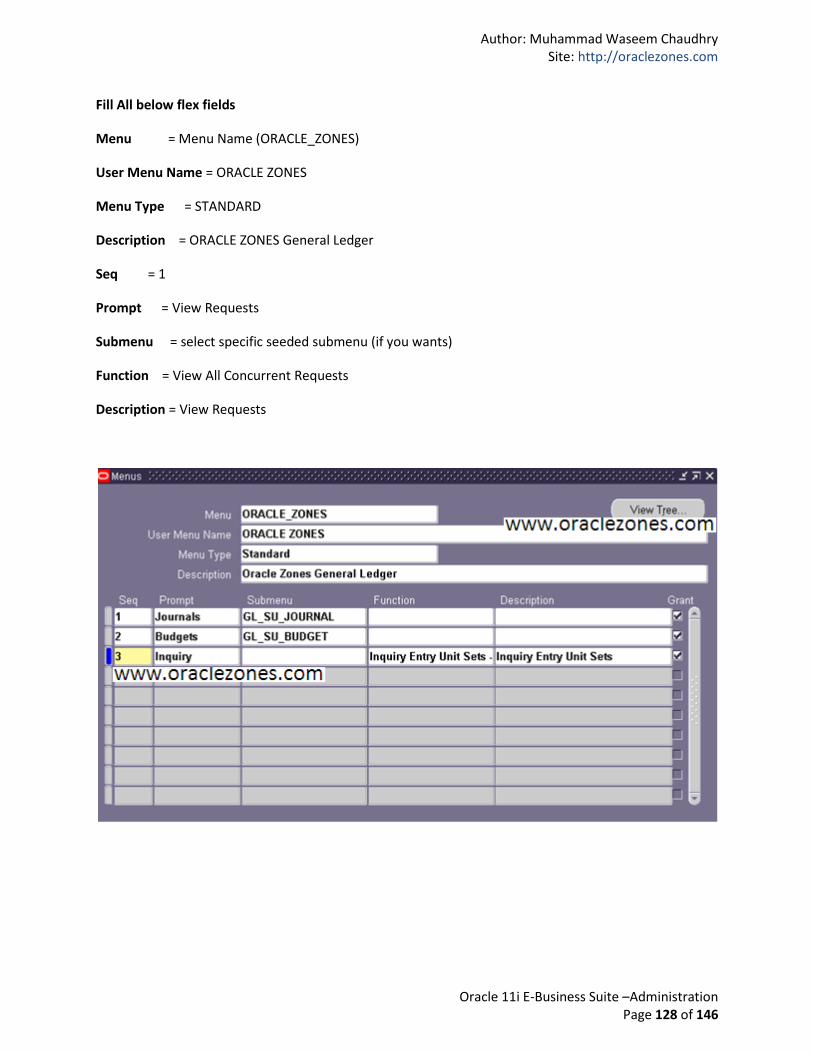
Fill All below flex fields
Menu = Menu Name (ORACLE_ZONES)
User Menu Name = ORACLE ZONES
Menu Type = STANDARD
Description = ORACLE ZONES General Ledger
Seq = 1
Prompt = View Requests
Submenu = select specific seeded submenu (if you wants)
Function = View All Concurrent Requests
Description = View Requests
Author: Muhammad Waseem Chaudhry Site: http://oraclezones.com
Oracle 11i E-Business Suite –Administration Page 129 of 146
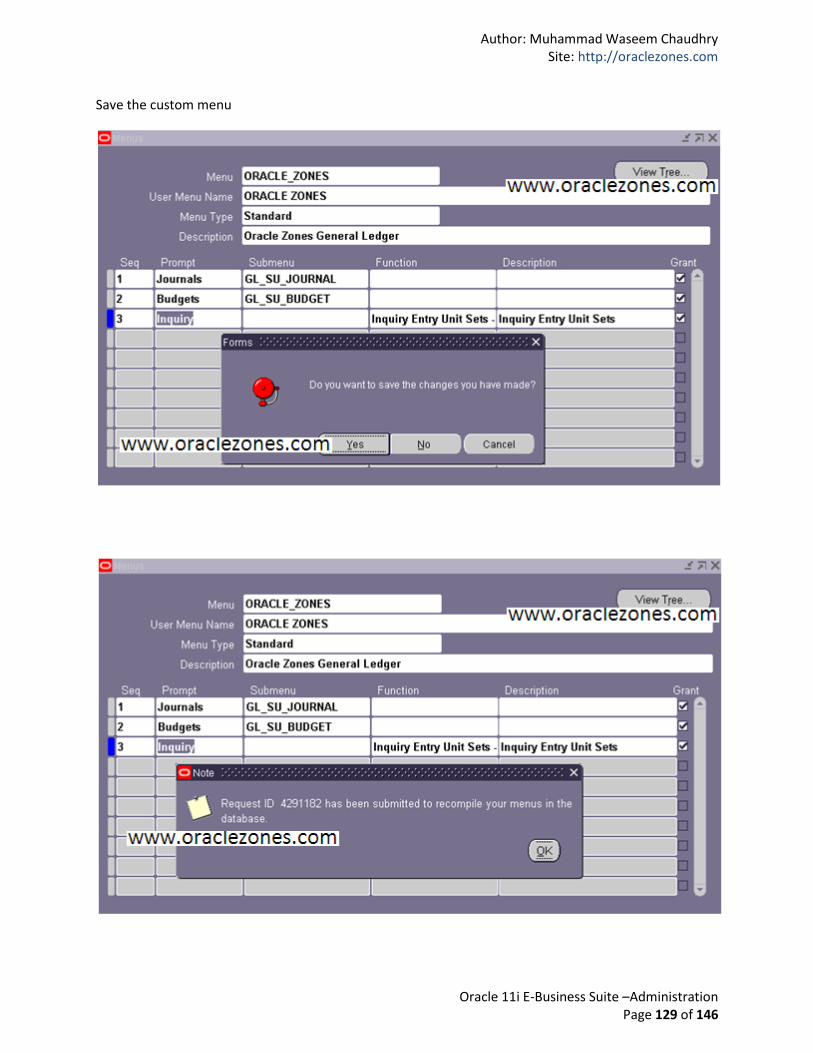
Save the custom menu
Author: Muhammad Waseem Chaudhry Site: http://oraclezones.com
Oracle 11i E-Business Suite –Administration Page 130 of 146
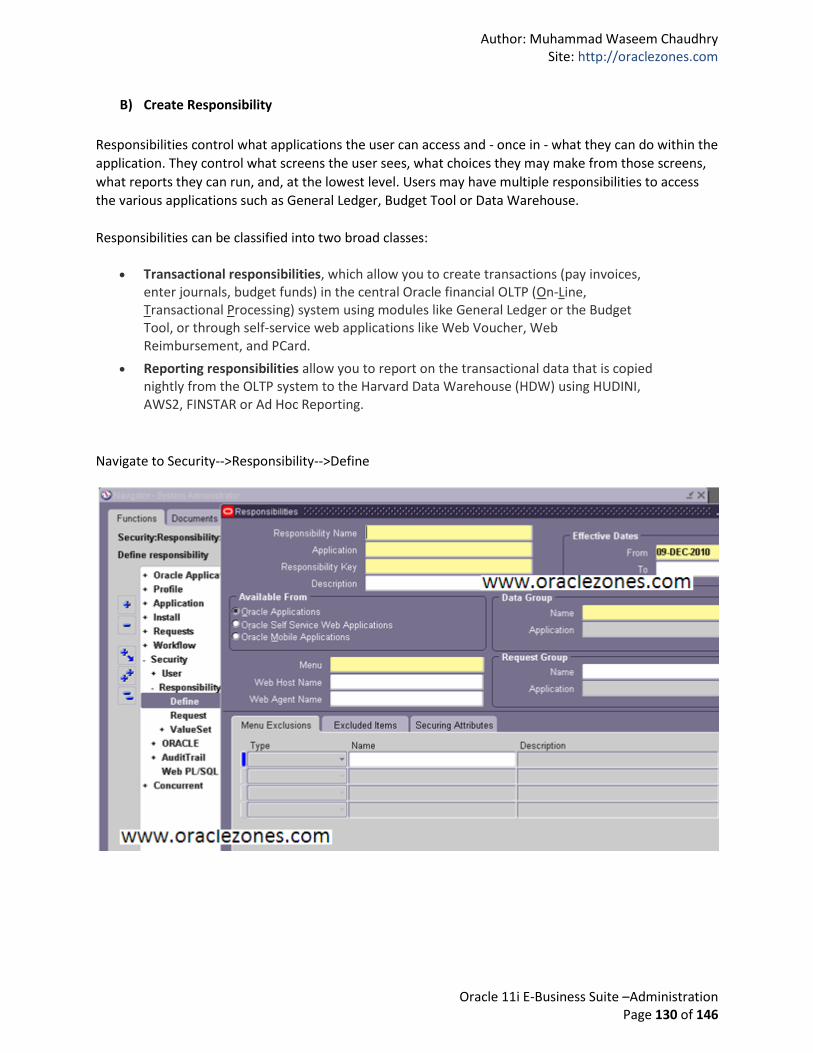
B) Create Responsibility
Responsibilities control what applications the user can access and - once in - what they can do within the
application. They control what screens the user sees, what choices they may make from those screens,
what reports they can run, and, at the lowest level. Users may have multiple responsibilities to access
the various applications such as General Ledger, Budget Tool or Data Warehouse.
Responsibilities can be classified into two broad classes:
Transactional responsibilities, which allow you to create transactions (pay invoices, enter journals, budget funds) in the central Oracle financial OLTP (On-Line, Transactional Processing) system using modules like General Ledger or the Budget Tool, or through self-service web applications like Web Voucher, Web Reimbursement, and PCard.
Reporting responsibilities allow you to report on the transactional data that is copied nightly from the OLTP system to the Harvard Data Warehouse (HDW) using HUDINI, AWS2, FINSTAR or Ad Hoc Reporting.
Navigate to Security-->Responsibility-->Define
Author: Muhammad Waseem Chaudhry Site: http://oraclezones.com
Oracle 11i E-Business Suite –Administration Page 131 of 146
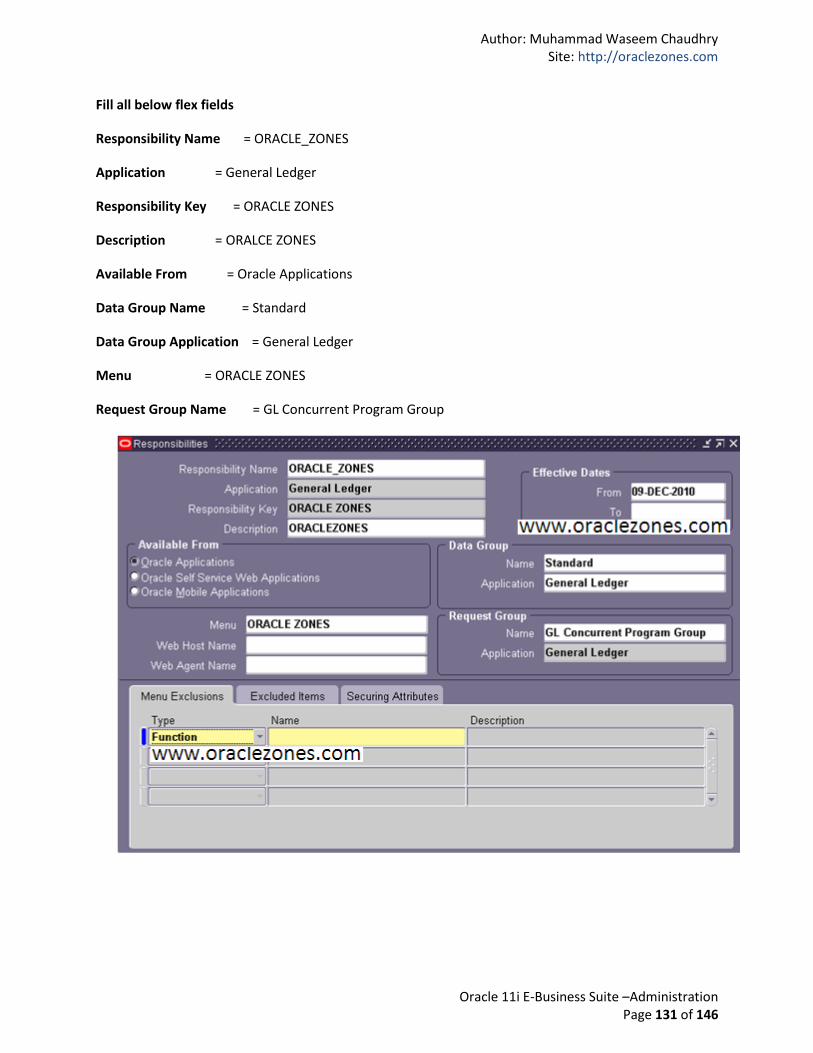
Fill all below flex fields
Responsibility Name = ORACLE_ZONES
Application = General Ledger
Responsibility Key = ORACLE ZONES
Description = ORALCE ZONES
Available From = Oracle Applications
Data Group Name = Standard
Data Group Application = General Ledger
Menu = ORACLE ZONES
Request Group Name = GL Concurrent Program Group
Author: Muhammad Waseem Chaudhry Site: http://oraclezones.com
Oracle 11i E-Business Suite –Administration Page 132 of 146
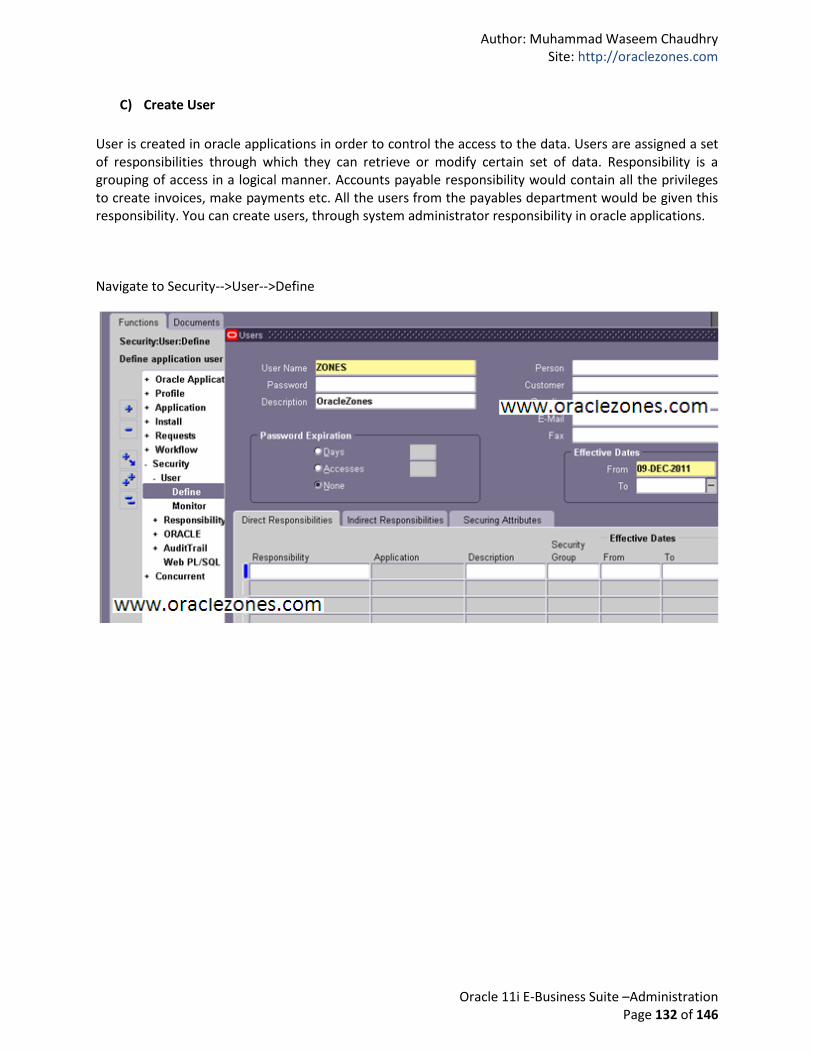
C) Create User
User is created in oracle applications in order to control the access to the data. Users are assigned a set of responsibilities through which they can retrieve or modify certain set of data. Responsibility is a grouping of access in a logical manner. Accounts payable responsibility would contain all the privileges to create invoices, make payments etc. All the users from the payables department would be given this responsibility. You can create users, through system administrator responsibility in oracle applications.
Navigate to Security-->User-->Define
Author: Muhammad Waseem Chaudhry Site: http://oraclezones.com
Oracle 11i E-Business Suite –Administration Page 133 of 146
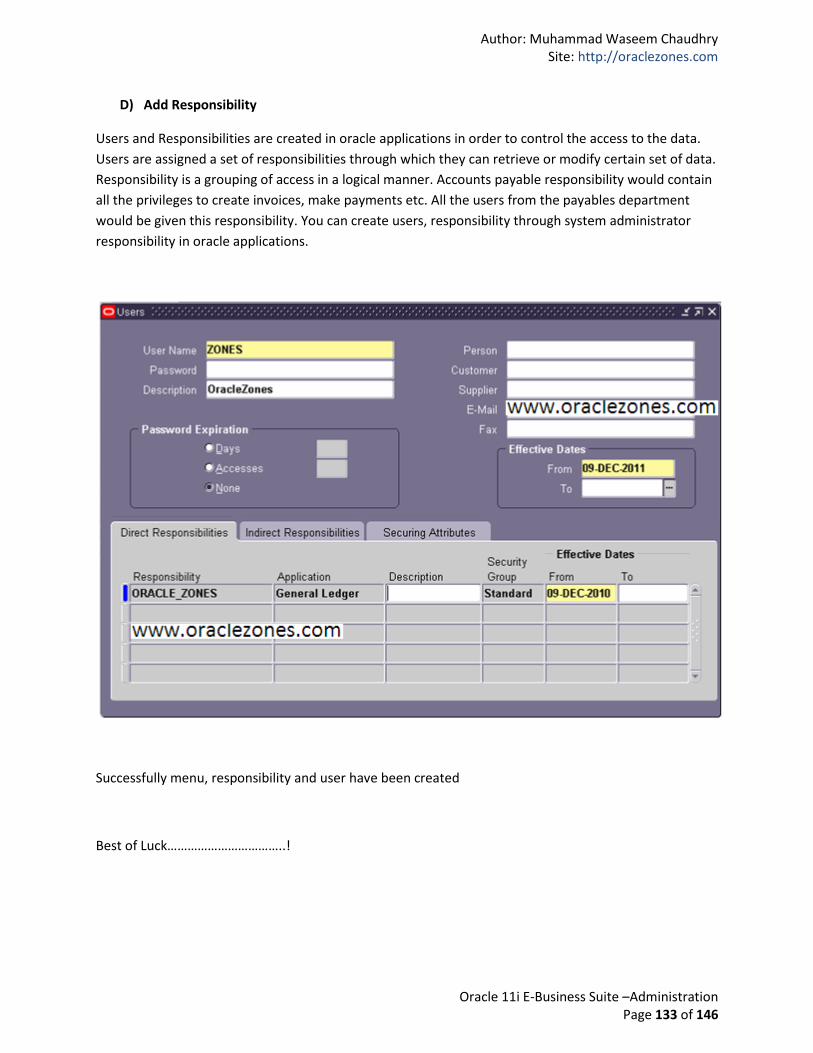
D) Add Responsibility
Users and Responsibilities are created in oracle applications in order to control the access to the data.
Users are assigned a set of responsibilities through which they can retrieve or modify certain set of data.
Responsibility is a grouping of access in a logical manner. Accounts payable responsibility would contain
all the privileges to create invoices, make payments etc. All the users from the payables department
would be given this responsibility. You can create users, responsibility through system administrator
responsibility in oracle applications.
Successfully menu, responsibility and user have been created
Best of Luck……………………………..!

Author: Muhammad Waseem Chaudhry Site: http://oraclezones.com
Oracle 11i E-Business Suite –Administration Page 134 of 146
10 - FNDCPASS FNDCPASS is an EBS tool to change passwords of database schema’s within the Oracle EBS. For example,
you can change the APPS password using FNDCPASS. FNDCPASS can also be used to change the
password of an application user (like sysadmin, GL etc).
FNDCPASS changes
Oracle Applications Database System Users (APPS, APPLSYS) Oracle Applications Product Schema Passwords (GL, AR, AP, etc,) Oracle Applications End User Account Passwords (SYSADMIN, OPERATIONS etc)
Note: the utility, FNDCPASS, cannot be used for changing the database SYSTEM and SYS users. Only users that are registered in FND Meta data tables need to be changed using FNDCPASS. Normally, the APPS database user password and APPLSYS password need to be the same. When changing the APPLSYS password using FNDCPASS, the APPS password is also changed.
Example:
$ FNDCPASS apps/apps 0 Y system/manager SYSTEM APPLSYS ORACLEZONES
$ FNDCPASS apps/apps 0 Y system/manager ORACLE GL ORACLEZONES
$ FNDCPASS apps/apps 0 Y system/manager DISCO ORACLEZONES
A) Login Application User
B) Stop Application Services
C) Set Application Environment
D) FNDCPASS
E) AutoConfig
F) Startup Application’s Services
G) Request
Author: Muhammad Waseem Chaudhry Site: http://oraclezones.com
Oracle 11i E-Business Suite –Administration Page 135 of 146
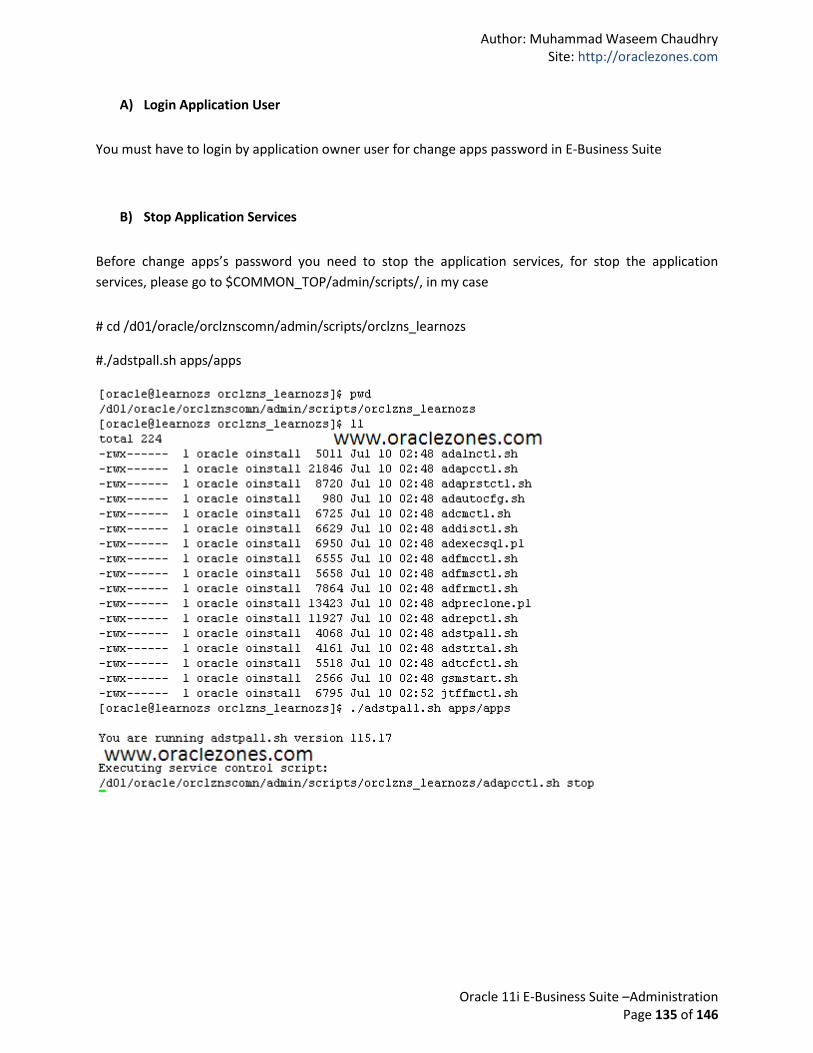
A) Login Application User
You must have to login by application owner user for change apps password in E-Business Suite
B) Stop Application Services
Before change apps’s password you need to stop the application services, for stop the application
services, please go to $COMMON_TOP/admin/scripts/, in my case
# cd /d01/oracle/orclznscomn/admin/scripts/orclzns_learnozs
#./adstpall.sh apps/apps
Author: Muhammad Waseem Chaudhry Site: http://oraclezones.com
Oracle 11i E-Business Suite –Administration Page 136 of 146
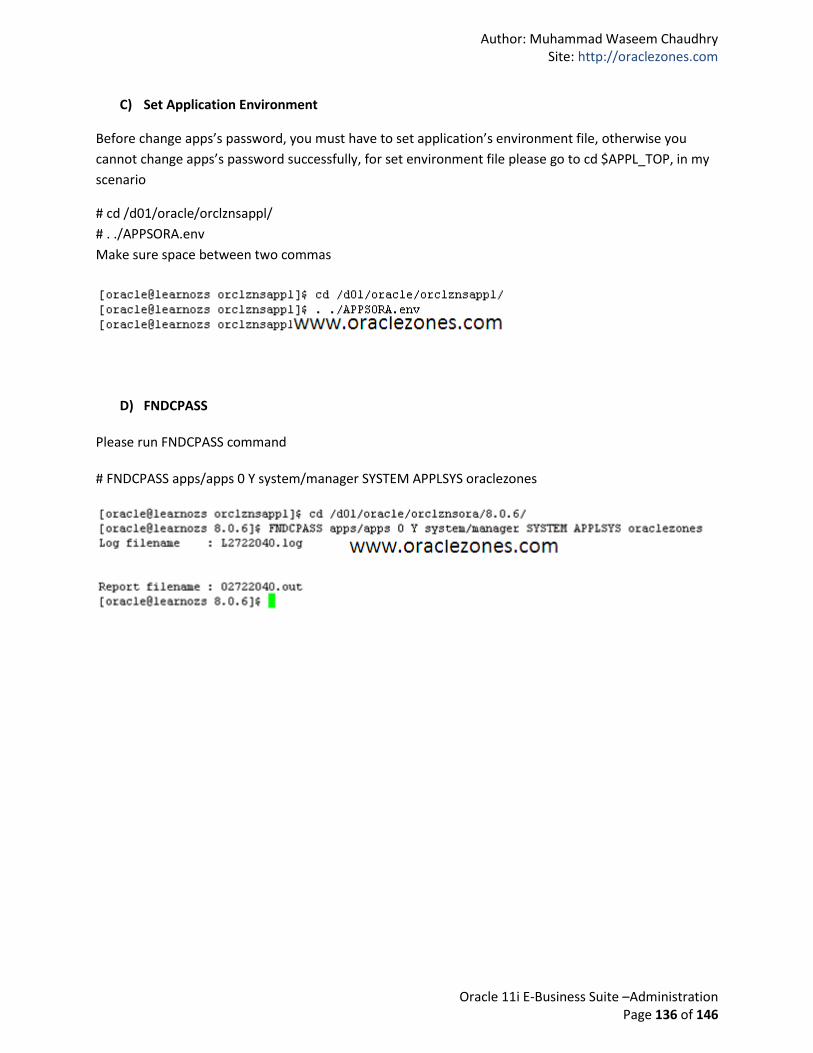
C) Set Application Environment
Before change apps’s password, you must have to set application’s environment file, otherwise you
cannot change apps’s password successfully, for set environment file please go to cd $APPL_TOP, in my
scenario
# cd /d01/oracle/orclznsappl/
# . ./APPSORA.env
Make sure space between two commas
D) FNDCPASS
Please run FNDCPASS command
# FNDCPASS apps/apps 0 Y system/manager SYSTEM APPLSYS oraclezones
Author: Muhammad Waseem Chaudhry Site: http://oraclezones.com
Oracle 11i E-Business Suite –Administration Page 137 of 146
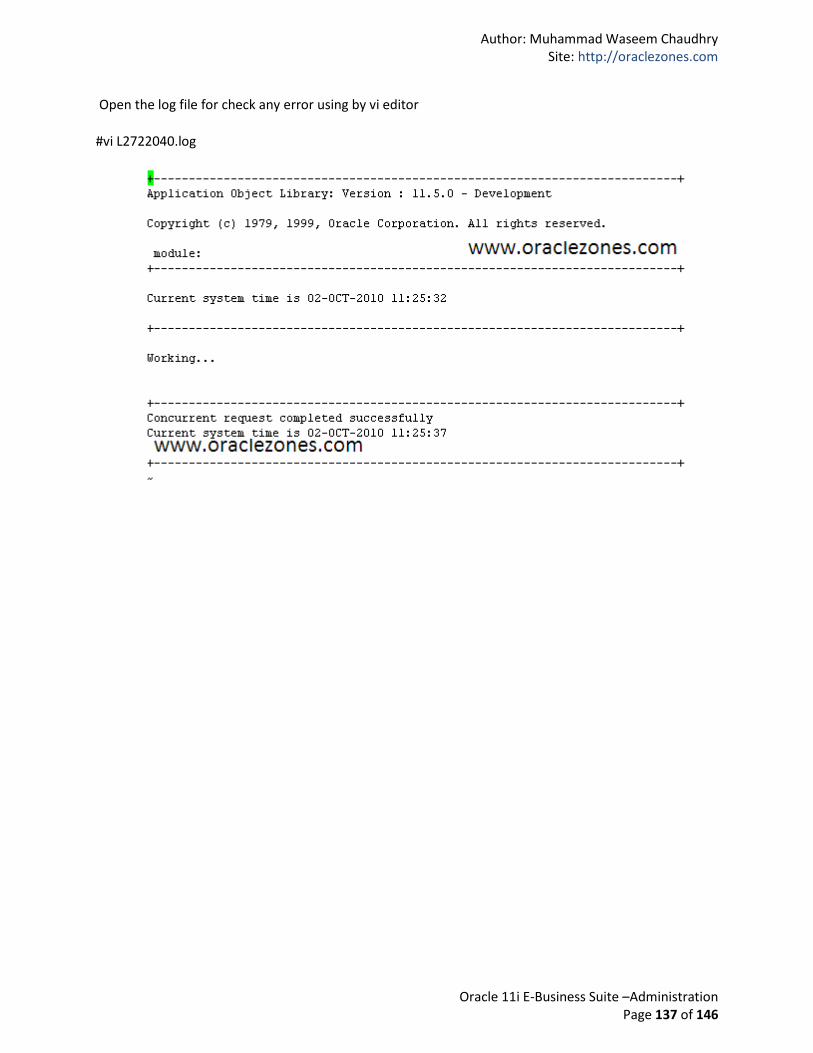
Open the log file for check any error using by vi editor
#vi L2722040.log
Author: Muhammad Waseem Chaudhry Site: http://oraclezones.com
Oracle 11i E-Business Suite –Administration Page 138 of 146
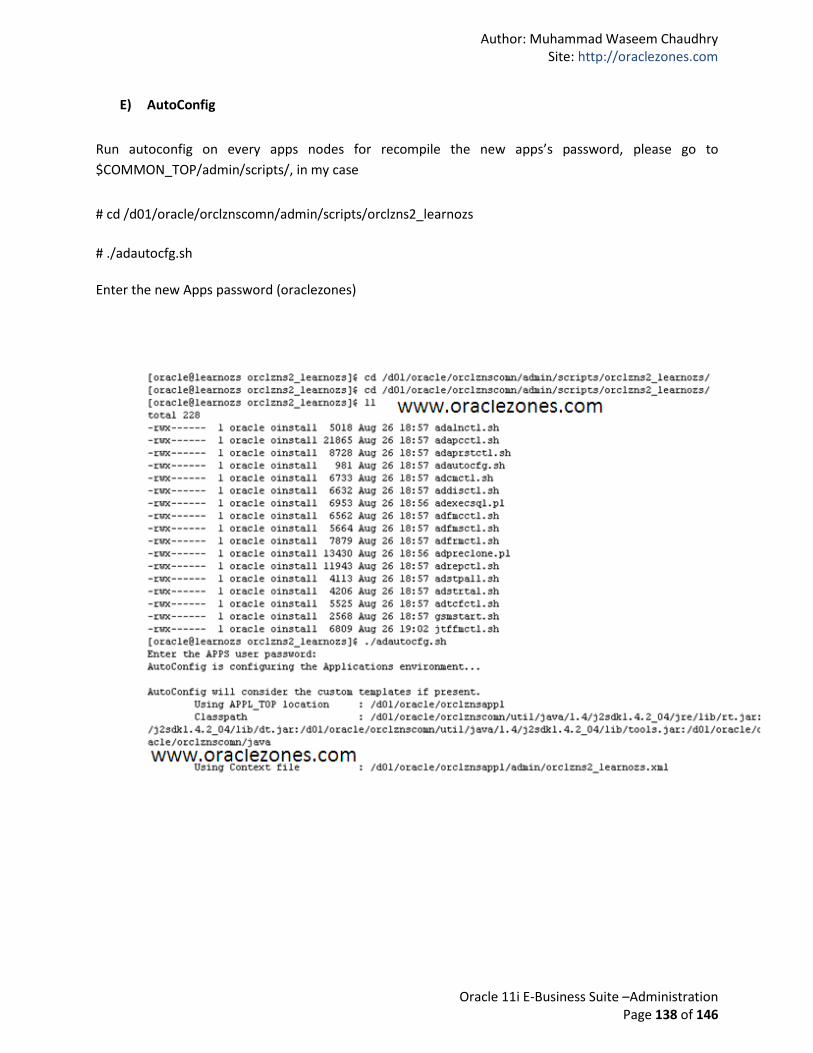
E) AutoConfig
Run autoconfig on every apps nodes for recompile the new apps’s password, please go to
$COMMON_TOP/admin/scripts/, in my case
# cd /d01/oracle/orclznscomn/admin/scripts/orclzns2_learnozs
# ./adautocfg.sh
Enter the new Apps password (oraclezones)
Author: Muhammad Waseem Chaudhry Site: http://oraclezones.com
Oracle 11i E-Business Suite –Administration Page 139 of 146
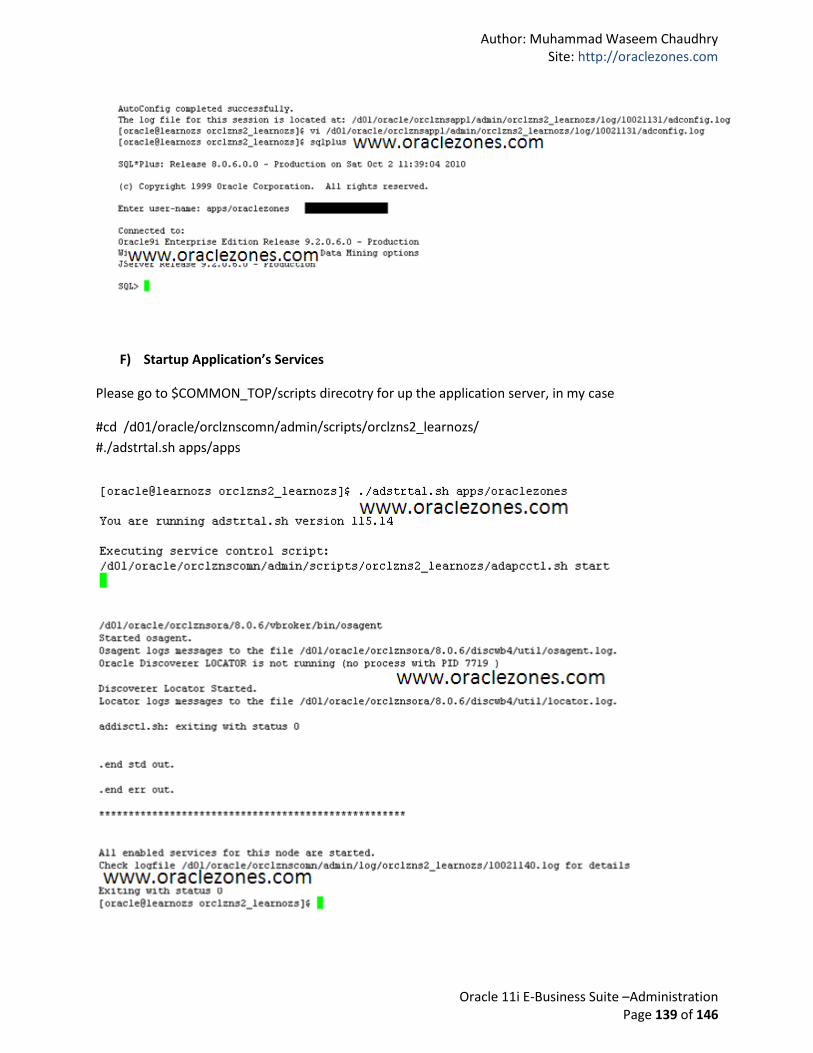
F) Startup Application’s Services
Please go to $COMMON_TOP/scripts direcotry for up the application server, in my case
#cd /d01/oracle/orclznscomn/admin/scripts/orclzns2_learnozs/
#./adstrtal.sh apps/apps
Author: Muhammad Waseem Chaudhry Site: http://oraclezones.com
Oracle 11i E-Business Suite –Administration Page 140 of 146
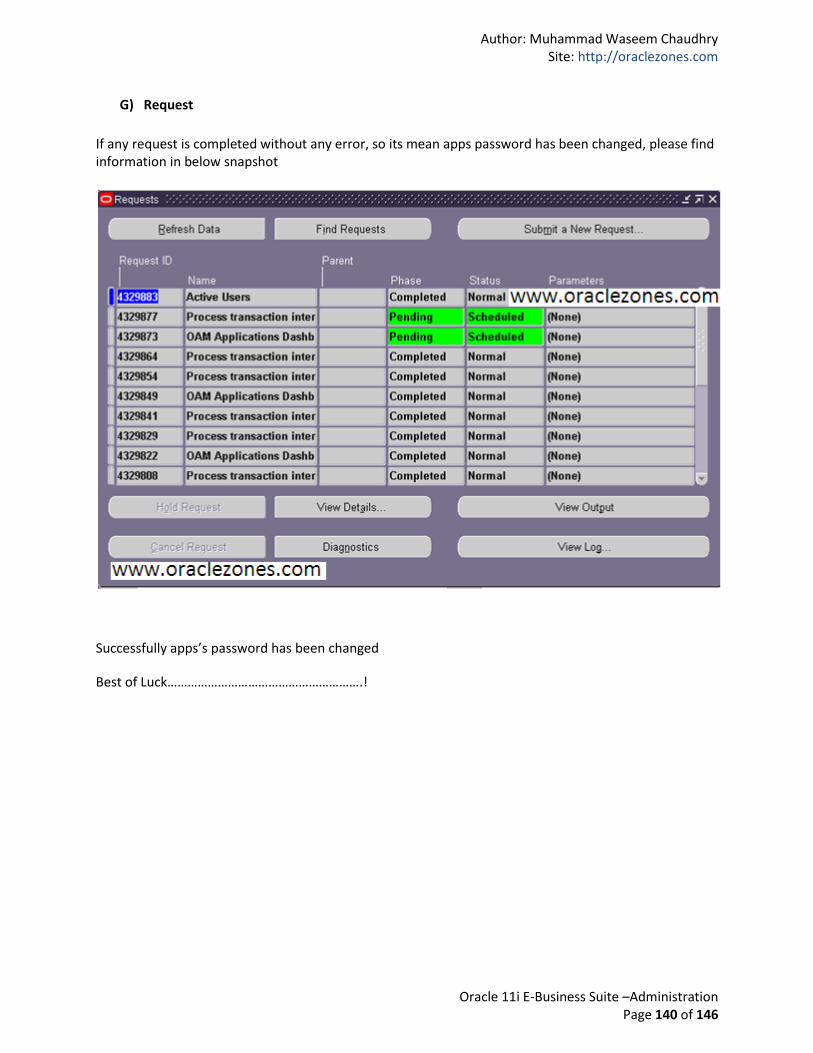
G) Request
If any request is completed without any error, so its mean apps password has been changed, please find information in below snapshot
Successfully apps’s password has been changed
Best of Luck………………………………………………….!

Author: Muhammad Waseem Chaudhry Site: http://oraclezones.com
Oracle 11i E-Business Suite –Administration Page 141 of 146
11 -Display Customize Reports Setting REP-3000: Internal error starting Oracle Toolkit
The problem occurs when we try to run concurrent manager with bitmap output format (PDF or
PostScript). The problem causing by the server don’t allow for x remote connection.
Please follow below steps
A) Investigation
B) Configure gdm.conf file
C) Restart gmd services
D) Xhost
E) Auto Login
Author: Muhammad Waseem Chaudhry Site: http://oraclezones.com
Oracle 11i E-Business Suite –Administration Page 142 of 146
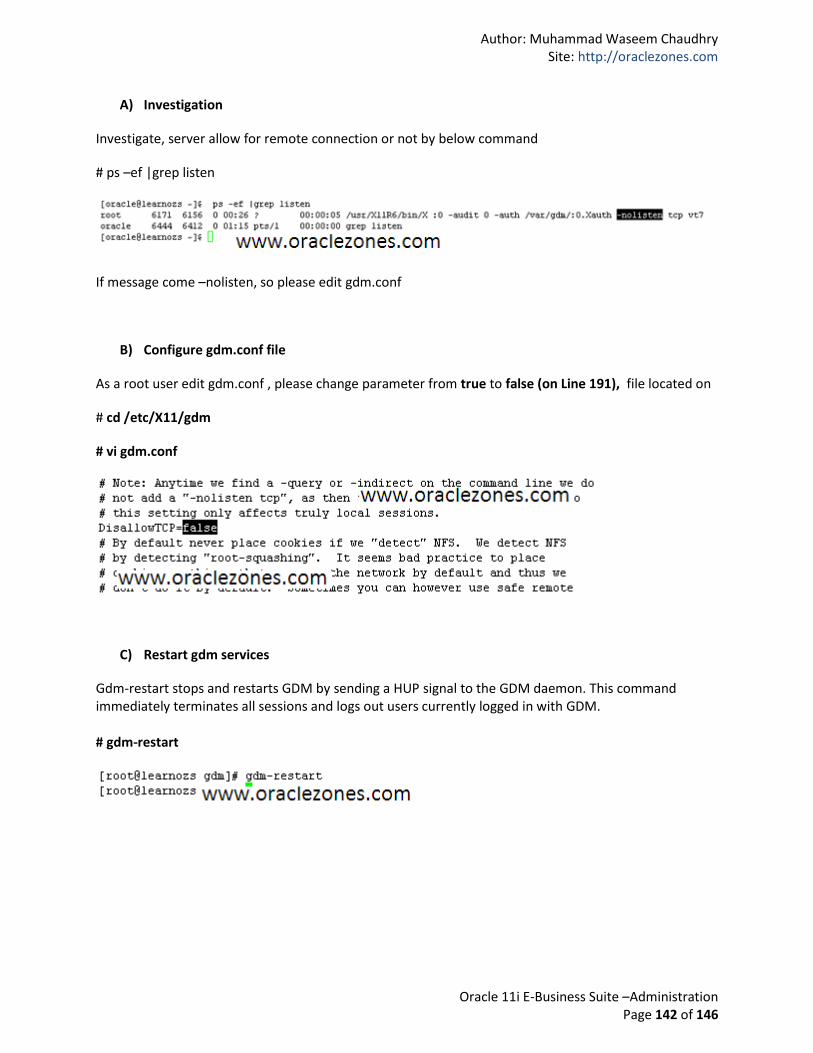
A) Investigation
Investigate, server allow for remote connection or not by below command
# ps –ef |grep listen
If message come –nolisten, so please edit gdm.conf
B) Configure gdm.conf file
As a root user edit gdm.conf , please change parameter from true to false (on Line 191), file located on
# cd /etc/X11/gdm
# vi gdm.conf
C) Restart gdm services
Gdm-restart stops and restarts GDM by sending a HUP signal to the GDM daemon. This command immediately terminates all sessions and logs out users currently logged in with GDM. # gdm-restart
Author: Muhammad Waseem Chaudhry Site: http://oraclezones.com
Oracle 11i E-Business Suite –Administration Page 143 of 146
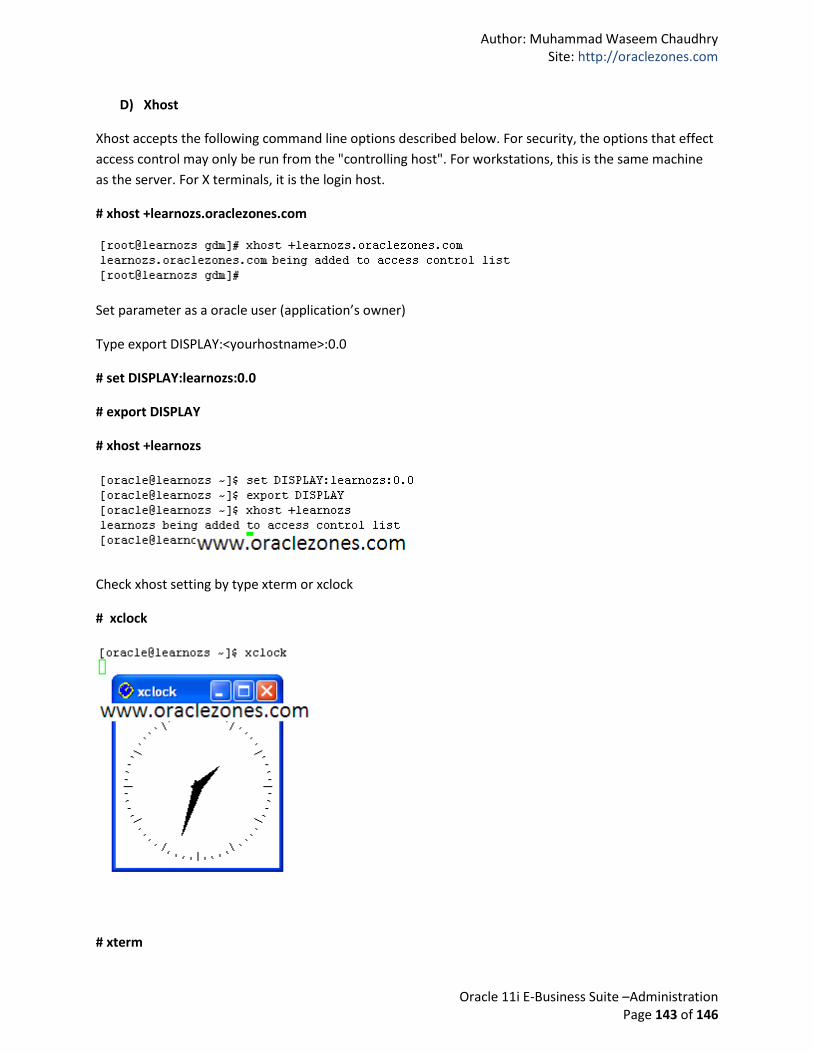
D) Xhost
Xhost accepts the following command line options described below. For security, the options that effect
access control may only be run from the "controlling host". For workstations, this is the same machine
as the server. For X terminals, it is the login host.
# xhost +learnozs.oraclezones.com
Set parameter as a oracle user (application’s owner)
Type export DISPLAY:<yourhostname>:0.0
# set DISPLAY:learnozs:0.0
# export DISPLAY
# xhost +learnozs
Check xhost setting by type xterm or xclock
# xclock
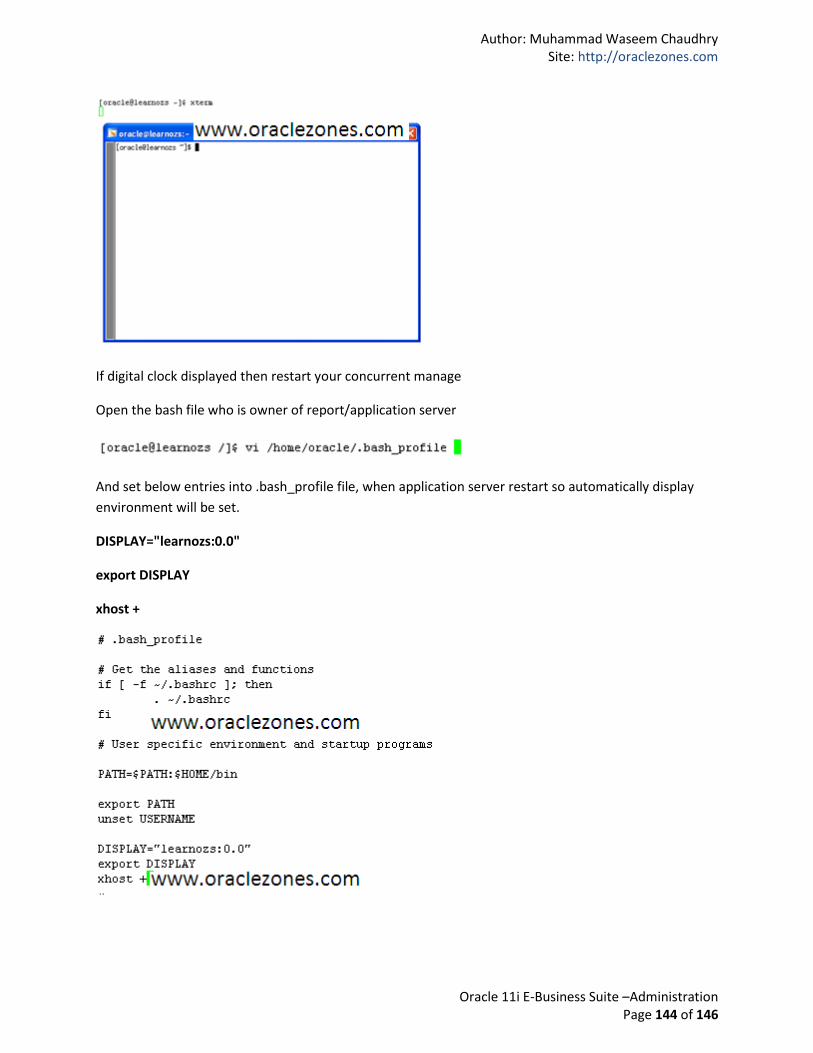
# xterm
Author: Muhammad Waseem Chaudhry Site: http://oraclezones.com
Oracle 11i E-Business Suite –Administration Page 144 of 146
If digital clock displayed then restart your concurrent manage
Open the bash file who is owner of report/application server
And set below entries into .bash_profile file, when application server restart so automatically display
environment will be set.
DISPLAY="learnozs:0.0"
export DISPLAY
xhost +
Author: Muhammad Waseem Chaudhry Site: http://oraclezones.com
Oracle 11i E-Business Suite –Administration Page 145 of 146
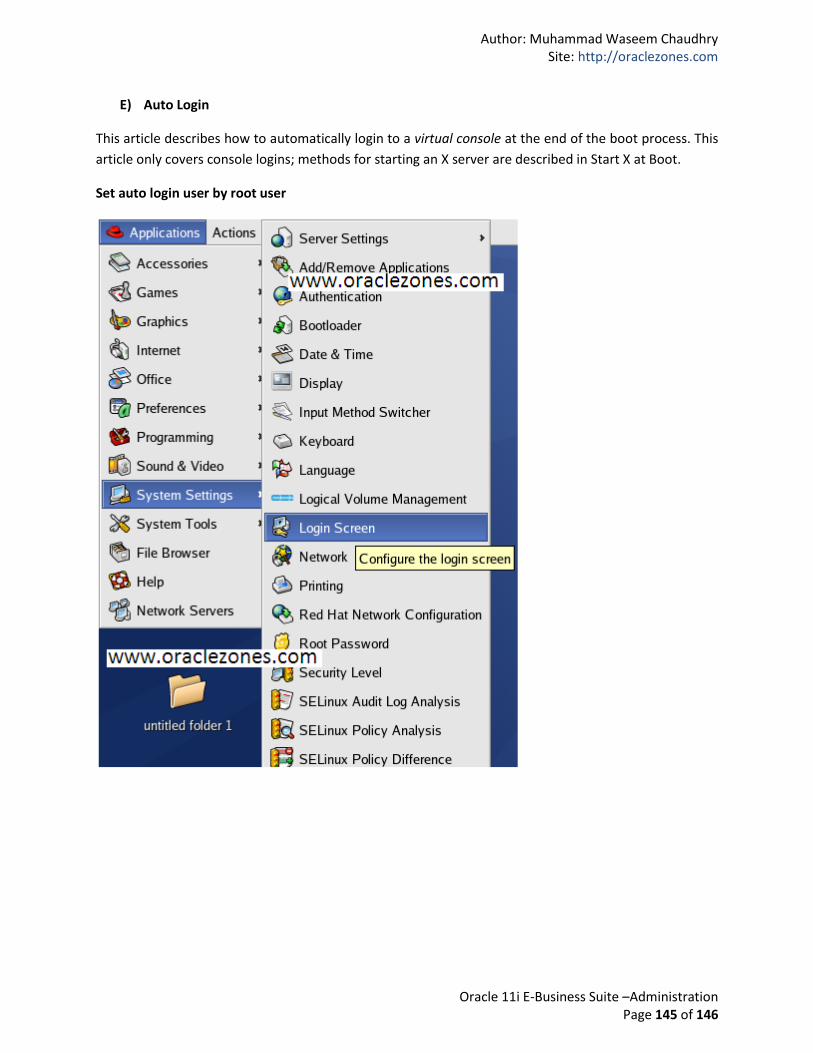
E) Auto Login
This article describes how to automatically login to a virtual console at the end of the boot process. This
article only covers console logins; methods for starting an X server are described in Start X at Boot.
Set auto login user by root user

Author: Muhammad Waseem Chaudhry Site: http://oraclezones.com
Oracle 11i E-Business Suite –Administration Page 146 of 146
Please enter application owner/user detail, when system restarts so automatically user will be login and
set DISPLAY SETTING for customize reports.
Successfully X server has been configured
Best of Luck………………..!