on-premises hyper-v site to azure protection with hyper-v ... · | susantha silva on-premises...
TRANSCRIPT

http://slvirtualguy.com | Susantha Silva
On-premises Hyper-V site to Azure protection with Hyper-V replication
Disaster recovery is something we pray never to happen but unavoidable in certain
situations. Every business organization regardless of their size need to plan for a
disaster recovery plan to protect their key business assets. In this articles we’re look
into how Azure Disaster Recovery (Cloud based DR) can be used to protect critical
business applications systems.
With recent updates there are several methods we can use Azure Site Recovery (ASR)
to protect our on premise systems,
1. On-premises Hyper-V site to Azure protection with Hyper-V replication — Orchestrate
replication, failover, and recovery from an on-premises site with one or more Hyper-V
servers but without System Center VMM. Virtual machine data is replicated from a source
Hyper-V host server to Azure.
2. On-premises VMM site to on-premises VMM site protection with Hyper-V
replication — Orchestrate replication, failover, and recovery between on-premises VMM
sites. Virtual machine data is replicated from a source Hyper-V host server to a target
host server.
3. On-premises VMM site to on-premises VMM site protection with SAN replication—
Orchestrates end-to-end replication, failover, and recovery using storage array-based
replication between SAN devices that host virtual machine data in source and target on-
premises sites.
4. On-premises VMM site to Azure protection — Orchestrate replication, failover, and
recovery between an on-premises VMM site and Azure. Replicated virtual machine data
is stored in Azure storage.
5. On-premises VMWare site to on-premises VMWare site with InMage — InMage Scout
is a recent Microsoft acquisition that provides real-time replication between on-premises
VMWare sites. Right now InMage is available as a separate product that’s obtained via
a subscription to the Azure Site Recovery service.
http://slvirtualguy.com | Susantha Silva
Option 1 will be covered on this article. Most of the SMB business cannot afford to have
SCVMM software but still need DR solution. Apart from that we didn’t forget our
VMware fan base who need affordable DR solution. With the acquisition of the Inmage
software company now Microsoft protect VMware environments as well.
To enable HYPER-V host to protect VM’s on Azure cloud we need to do few more steps
earlier. High level steps are as follows,
Step 1: Create a vault—Create an Azure Site Recovery vault.
Step 2: Create a Hyper-V site—Create a Hyper-V site as a logical container for all the
Hyper-V servers that contain virtual machines you want to protect.
Step 3: Prepare Hyper-V servers—Generate a registration key and download the
Provider setup file. You run the file on each Hyper-V server in the site and select the
key to register the server in the vault.
Step 4: Prepare resources—Create an Azure storage account to store replicated virtual
machines.
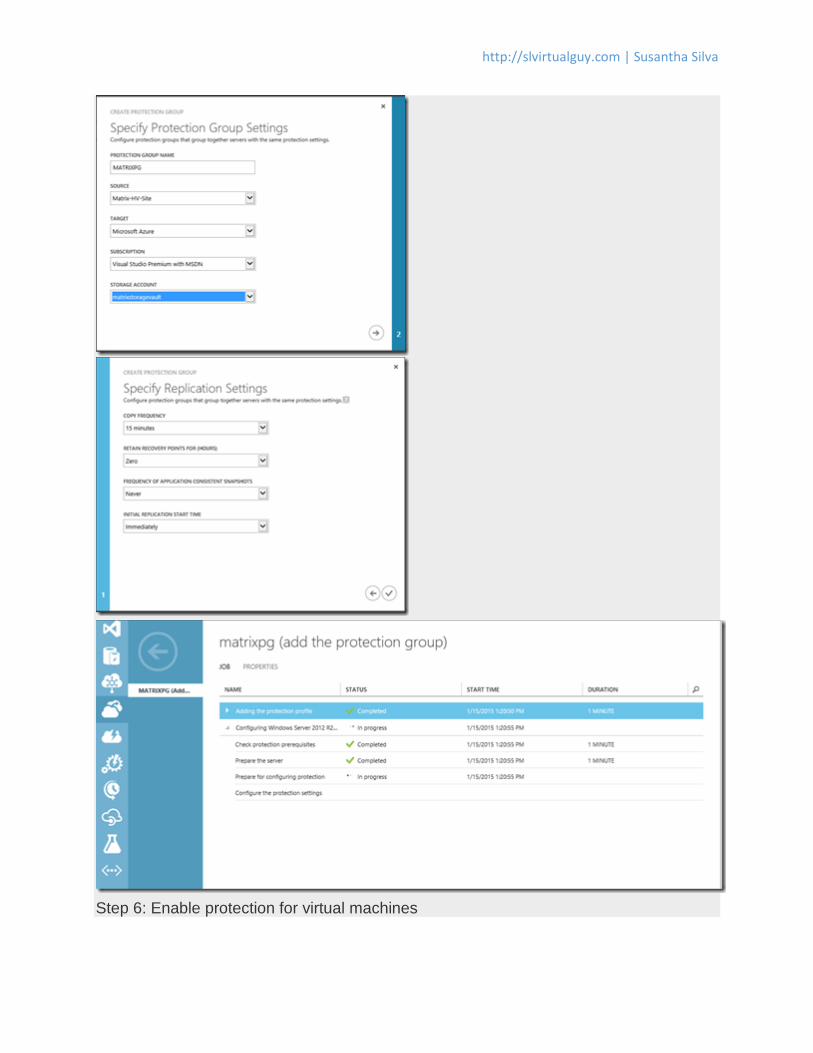
Step 5: Create and configure protection groups—Create a protection group and apply
protection settings to it. The protection settings will be applied to every virtual machine
you add to the group.
Step 6: Enable protection for virtual machines—Enable protection for virtual machines
by adding them to a protection group.
Step 7: Test the deployment—Run a test failover for a virtual machine.
Step 1 – Create a vault,
Sign in to the Azure Management Portal –> Expand Data Services, expand Recovery
Services, and click Site Recovery Vault –> Click Create New and then click Quick
Create –>In Name field enter a friendly name to identify the vault (in my case
matrixvault) –>In Region select the geographic region for the vault –> Click Create

http://slvirtualguy.com | Susantha Silva
vault
Step 2: Create a Hyper-V site,
In the Recovery Services page, click the vault to open the Quick Start page–>In the
dropdown list, select Between an on-premises Hyper-V site and Azure –> In Create a
Hyper-V Site click Create Hyper-V site. Specify a site name and save.

http://slvirtualguy.com | Susantha Silva
Step 3: Prepare Hyper-V servers,
In Prepare Hyper-V servers, click Download a registration key file –> On the Download
Registration Key page, click Download next to the site –> Click Download the Provider
to obtain the latest version

http://slvirtualguy.com | Susantha Silva
In the last picture you can see two files has been installed. Their function is as follows,
Azure Site Recovery Provider—Handles communication and orchestration between the
Hyper-V server and the Azure Site Recovery portal.
Azure Recovery Services Agent—Handles data transport between virtual machines
running on the source Hyper-V server and Azure storage.

http://slvirtualguy.com | Susantha Silva
On the Vault Settings page, click Browse to select the key file. Specify the Azure Site
Recovery subscription, the vault name, and the Hyper-V site to which the Hyper-V
server belongs.

http://slvirtualguy.com | Susantha Silva

http://slvirtualguy.com | Susantha Silva
Step 4: Prepare resources – You need to have a storage account in Azure if not you
can go ahead and create a one. Make sure the storage account having geo-replication

http://slvirtualguy.com | Susantha Silva
enabled.
I also make sure there will be a dedicated virtual network created as well.
Step 5: Create and configure protection groups
Protection groups group the virtual machines togerhter and apply same protection
settings. You apply protection settings to a protection group, and those settings are
applied to all virtual machines that you add to the group.
http://slvirtualguy.com | Susantha Silva
Step 6: Enable protection for virtual machines

http://slvirtualguy.com | Susantha Silva
Now its time to select which VM’s you need to protect from your HYPER-V host.
ASR will start checking VM compatibility to be exported to the Azure side.

http://slvirtualguy.com | Susantha Silva
Now lets jump into the HYPER-V MMC console and check the VM replication status,
Depending on your internet connection speed VM replication time can be vary.
Step 7: Test the deployment
Now it’s time to test the VM failover to Azure side. To do that we need to we need to run
a test failover for the protected virtual machine.
Protected Items –> Protection Groups –> protectiongroup_name –> Virtual Machines
(select the virtual machine you want to fail over) –> and click Test Failover.

http://slvirtualguy.com | Susantha Silva
You can put the test VM into production virtual network in Azure or start the VM without
a virtual network. In my case I’ll put into my production virtual network.

http://slvirtualguy.com | Susantha Silva
Now series of actions will be carried out in orderly manner. Once that completed we will
get our VM in Azure side active. In any case you’ll encounter any issues in this tasks
you can get a detail report from the bottom of the Azure portal. This is useful for
troubleshooting purpose.
Now VM creation is completed. We have to go and test the VM up and running properly.
If things are ok once we confirm VM will be removed from the ASR since our ASR test is
success.

http://slvirtualguy.com | Susantha Silva
Now ASR will remove the temporary test VM from the environment,
Some of our VM’s can be very large and replication via internet not feasible. In that
situation you can courier the data to Microsoft Azure data center. Microsoft introduce a
service called as “Microsoft Azure Import/Export service” You can find more information
about that here.
If you have any questions or need clarifications you can reach me via