onecommand nic teaming and vlan manager - …€¦ · onecommand nic teaming and vlan manager user...
TRANSCRIPT
OneCommand NIC Teaming and VLAN
Manager Version 2.6
Windows Server 2008
Windows Server 2008 R2
User Manual
Emulex Connects™P007631-01A Rev. A Servers, Storage and People
™
Copyright © 2003-2012 Emulex. All rights reserved worldwide. No part of this document may be reproduced by any means or translated to any electronic medium without the prior written consent of Emulex.
Information furnished by Emulex is believed to be accurate and reliable. However, no responsibility is assumed by Emulex for its use; or for any infringements of patents or other rights of third parties which may result from its use. No license is granted by implication or otherwise under any patent, copyright or related rights of Emulex.
Emulex, the Emulex logo, AutoPilot Installer, AutoPilot Manager, BlockGuard, Connectivity Continuum, Convergenomics, Emulex Connect, Emulex Secure, EZPilot, FibreSpy, HBAnyware, InSpeed, LightPulse, MultiPulse, OneCommand, OneConnect, One Network. One Company., SBOD, SLI, and VEngine are trademarks of Emulex. All other brand or product names referenced herein are trademarks or registered trademarks of their respective companies or organizations.
Emulex provides this manual “as is” without any warranty of any kind, either expressed or implied, including but not limited to the implied warranties of merchantability or fitness for a particular purpose. Emulex may make improvements and changes to the product described in this manual at any time and without any notice. Emulex assumes no responsibility for its use, nor for any infringements of patents or other rights of third parties that may result. Periodic changes are made to information contained herein; although these changes will be incorporated into new editions of this manual, Emulex disclaims any undertaking to give notice of such changes.
US patent notice is given for one or more of the following: 6226680, 6247060, 6334153, 6389479, 6393487, 6427171, 6427173, 6434620, 6591302, 6658480, 6697868, 6751665, 6757746, 6941386, 6965941, 6687758, 7042898, 7133940, 7124205, 7089326, 6938092, 6996070.
Emulex, 3333 Susan StreetCosta Mesa, CA 92626
OneCommand NIC Teaming and VLAN Manager User Manual Page ii

Table of Contents
Overview ................................................................................................................. 1
Supported Operating Systems .......................................................................... 2Why Teaming?................................................................................................... 2Terminology ....................................................................................................... 2Failover (FO) ..................................................................................................... 3Load Balancing.................................................................................................. 3
Smart Load Balancing [(SLB) Team Load Balancing].................................. 3Switch-Controlled Teaming (Link Aggregation Control Protocol [LACP]) ..... 4
Installing and Uninstalling the OneCommand NIC Teaming Driver, and the NIC Teaming and VLAN Manager............................................................................ 5
Attended Installation.......................................................................................... 5Prerequisites ............................................................................................... 5Procedure ................................................................................................... 5
Unattended Installation...................................................................................... 5Prerequisites ............................................................................................... 5Procedure ................................................................................................... 5
Updating the OneCommand NIC Teaming Driver, and the NIC Teaming and VLAN Manager ..................................................................... 6Uninstalling the OneCommand NIC Teaming Driver, and the NIC Teaming and VLAN Manager ..................................................................... 6
Starting the OneCommand NIC Teaming and VLAN Manager................................. 6
Using the OneCommand NIC Teaming and VLAN Manager ................................... 7
Creating, Configuring and Removing Teams ..................................................... 7Creating and Configuring a Team................................................................ 7Removing a Team ..................................................................................... 10Primary and Secondary Adapters ............................................................. 11Removing an Adapter during Team Creation............................................. 11
Configuring a VLAN for an Adapter ................................................................. 12Removing a VLAN during VLAN Configuration ......................................... 13OneCommand NIC Teaming and VLAN Manager Configuration Display ................................................................................ 13
Using Teamed Adapters in Hyper-V....................................................................... 14
Exporting a Team Without a VLAN to a Virtual Machine .................................. 14Deleting Hyper-V Teams.................................................................................. 20
Removing an Adapter from the Virtual Machine ........................................ 20Deleting the Adapter from the Virtual Network Manager ........................... 22Removing the Team Using the OneConnect NIC Teaming Manager ......... 23Disabling the Microsoft Virtual Network Switch Protocol for an Adapter .... 23
OneCommand NIC Teaming Driver Command Line Interface................................ 25
Introduction ..................................................................................................... 25Syntax Rules ................................................................................................... 25Error Codes..................................................................................................... 26The Command Reference ............................................................................... 31
Help .......................................................................................................... 31Backing Up the NIC Teaming Configuration .............................................. 32Restoring the NIC Teaming Configuration ................................................. 32Showing NIC Teaming and VLAN Configurations...................................... 33Showing Aliases........................................................................................ 34Show Teams ............................................................................................. 34Showing VLAN Adapters........................................................................... 35Showing Free Adapters............................................................................. 35
OneCommand NIC Teaming and VLAN Manager User Manual Page iii
Table of Contents
Showing Team or Adapter Details ............................................................. 36Showing VLAN IDs.................................................................................... 37Creating a Team........................................................................................ 37Deleting a Team ........................................................................................ 38Adding a VLAN ......................................................................................... 39Deleting a VLAN ....................................................................................... 40
Appendix A. Load Balancing Use Cases ............................................................... 41
Perceived Port Load .............................................................................................. 41
When to Use ................................................................................................... 41When Not to Use ............................................................................................. 41
Destination MAC.................................................................................................... 41
When to Use ................................................................................................... 41When Not to Use ............................................................................................. 41
Destination IP ........................................................................................................ 42
When to Use ................................................................................................... 42When Not to Use ............................................................................................. 42
OneCommand NIC Teaming and VLAN Manager User Manual Page iv
Overview
The Emulex OneCommand™ Network Interface Card (NIC) Teaming and Virtual Local Area Network (VLAN) manager provides the ability to team two or more NIC/vNIC ports. It also allows you to add one or more VLANs over a team or over a NIC/vNIC.
A VLAN is a network of computers that behave as if they are connected to the same wire even though they may actually be physically located on different segments of a Local Area Network (LAN). VLANs are configured through software rather than hardware, which make them extremely flexible. One advantage of a VLAN is that when a computer is physically moved to another location, it can stay on the same VLAN without any hardware reconfiguration.
To increase throughput and bandwidth, and to increase link availability, you can configure multiple network interfaces on one or more ethernet ports to appear to the network as a single interface. This is referred to as Network Interface Card (NIC) teaming, or multi-link trunking.
The Windows NIC Teaming and VLAN Manager supports:
• vNIC teaming
• Switch-controlled teaming (Link Aggregation Control Protocol [LACP])
• Switch independent teaming types
• Failover (FO)
• Smart load balancing (SLB)
• TX/RX load balancing
• TCP/IP load balancing
• Non-TCP/IP TX load balancing
• Media Access Control (MAC) address load balancing
• Dynamic link aggregation
• Auto Failback
• Hashing
• Perceived Port Load
• Destination IP hashing
• Destination MAC hashing (DAMAC)
• Backup/Restore of teaming configurations
Note: There are restrictions with using VLANs and universal multichannel (UMC) together, and with using LACP and UMC together. See the Windows driver manual for more information.
OneCommand NIC Teaming and VLAN Manager User Manual Page 1

Supported Operating Systems
The Windows NIC Teaming and VLAN Manager supports the following Windows Server 2008 operating systems:
• Windows Server 2008 x86 SP2
• Windows Server 2008 x64 SP2
• Windows Server 2008 x64 R2
• Windows Server 2008 x64 R2 SP1
• Windows Server 2008 x64 R2 with Hyper-V
• Windows Server 2008 x64 R2 SP1 with Hyper V
Why Teaming?
NIC teaming allows you to group multiple NICs as a single virtual device. Depending on the teaming type, one or more interfaces can be active. When you combine multiple NICs this way, the group is a team. NIC teaming has several advantages.
• Increased bandwidth - Two or more network interfaces are combined to share the load, thus increasing bandwidth.
• Load balancing - Link aggregation enables distribution of processing and communication across multiple links.
• Higher link availability - Prevents a single link failure from disturbing traffic flow.
Teaming Types
There are different types of teaming:
• Switch independent
• Failover - If configured for fault tolerance, the system provides only failover.
• Smart load balancing - If configured for load balancing, failover is included.
• Switch dependent
• Link Aggregation Control Protocol (LACP)
Terminology
• Team - A group of unbound adapters working together and presented as a single adapter to applications.
• VLAN - A Virtual LAN allows computers or virtual machines (hypervisor guests) to act as if they are connected by a private, directly connected network. You can assign VLANs to teams or individual adapters.
• VLAN Bound adapter - A single adapter to which you assigned VLANs. This adapter cannot be part of a team. These are also called VLAN adapters.
• Available adapter - An adapter that is not a member of a team and has no assigned VLANs. This adapter is also called a free adapter.
Note: Hyper-V environments support failover teams only (load balancing, LACP, and VLAN are not supported).
OneCommand NIC Teaming and VLAN Manager User Manual Page 2
Failover (FO)
A failover team consists of two members; a primary and a secondary member. Only one member is active at a time. When a team is created, the primary member is active and the secondary member is passive, but only one member is active at a time. When the primary team member disconnects (due to link down, link disabled or any other reason) the failover mechanism selects the secondary team member (which is in a link up state) and traffic continues.
When a previously failed primary team member reports a link up state, failback to the primary member occurs only if the team was created with Auto Failback enabled.
For teams created with AutoFailback disabled, traffic will continue on the secondary adapter. By default all the team members use the same MAC address, the MAC address of the primary team member.
Load Balancing
Smart Load Balancing [(SLB) Team Load Balancing]
Team load balancing provide both load balancing and fault tolerance. Team load balancing works with any Ethernet switch and does not require any switch configuration. The team advertises multiple MAC addresses and one or more IP addresses. The virtual team adapter selects the team MAC address from the list of load balancing members. When the server receives an address resolution protocol (ARP) request, the software-networking stack always sends an ARP reply with the team MAC address. To begin the load balancing process, the OneCommand NIC Teaming and VLAN Manager modifies this ARP reply by changing the source MAC address to match one of the physical adapters.
Load balancing enables both transmit and receive load balancing based on load balancing function to maintain in-order delivery of frames.
Transmit load balancing is achieved by creating a hashing table using the hashing algorithm based on load distribution type. When the virtual teaming adapter selects a physical adapter (or port) to carry all the frames to the destination, the unique MAC address of the physical adapter is included in the frame, and not the team MAC address. This is required to comply with the IEEE 802.3 standard. If two adapters transmit using the same MAC address, a duplicate MAC address situation would occur that the switch could not handle.
Receive load balancing is achieved through an intermediate driver by sending gratuitous ARPs on a client by client basis using the unicast address of each client as the destination address of the ARP request (also known as a directed ARP). This is client load balancing and not traffic load balancing. When the intermediate driver detects a significant load imbalance between the physical adapters in an LB team, it generates gratuitous ARPs in an effort to redistribute incoming frames. The intermediate driver does not answer ARP Requests; only the software protocol stack provides the required ARP reply. It is important to understand that receive load balancing is a function of the number of clients that are connecting to the server via the team interface.
Receive load balancing attempts to load balance incoming traffic for client machines across physical ports in the team. It uses a modified gratuitous ARP to advertise a different MAC address for the team IP address in the sender physical and protocol address. The gratuitous ARP is unicast with the MAC and IP address of a client machine in the target physical and protocol address respectively. This causes the target client to refresh its ARP cache with a new MAC address map to the team IP address. This has the potential to direct the received traffic to a different adapter than learned from the transmission. Gratuitous ARPs are not broadcast because this would cause all clients to send their traffic to the same port. As a result, the benefits achieved through client load balancing would be eliminated, and could cause out of order frame delivery. This receive load balancing scheme works as long as all clients and the teamed server are on the same subnet or broadcast domain.
OneCommand NIC Teaming and VLAN Manager User Manual Page 3
When the clients and the server are on different subnets, and incoming traffic has to traverse a router, the received traffic destined for the server is not load balanced. The physical adapter that the intermediate driver has selected to carry the IP flow carries all of the traffic. When the router needs to send a frame to the team IP address, it broadcasts an ARP request (if not in the ARP cache). The server software stack generates an ARP reply with the team MAC address, but the intermediate driver modifies the ARP reply and sends it over a particular physical adapter, establishing the flow for that session over the particular physical adapter. The reason is that ARP is not a routable protocol. It does not have an IP header and therefore is not sent to the router or default gateway. ARP is only a local subnet protocol. In addition, since the gratuitous ARP is not a broadcast packet, the router does not process it and does not refresh its own ARP cache.
The only way that the router would process an ARP intended for another network device is if the router has proxy ARP enabled and the host has no default gateway. This is very rare and not recommended for most applications.
Transmitted traffic through a router is load balanced and is based on the source and destination IP address and TCP/UDP port number. Since routers do not alter the source and destination IP address, the load balancing algorithm works as intended.
Switch-Controlled Teaming (Link Aggregation Control Protocol [LACP])
IEEE 802.3ad LACP is similar to link aggregation static mode except that it uses the LACP to negotiate the ports that make up the team. The LACP must be enabled at both the server and the switch for the team to operate. If LACP is not available at both ends of the link, 802.3ad provides a manual aggregation that only requires both ends of the link to be in a link up state.
Because manual aggregation provides for the activation of a member link without performing the LACP message exchanges, it is not as reliable and robust as an LACP negotiated link. LACP automatically determines which member links can be aggregated and then aggregates them. It provides for the controlled addition and removal of physical links for the link aggregation so that no frames are lost or duplicated. The removal of aggregate link members is provided by the marker protocol that can be optionally enabled for LACP-enabled aggregate links.
The link aggregation group advertises a single MAC address for all the ports in the team. The MAC address of the team/aggregator can be the MAC addresses of one of the NICs in the group. The LACP and marker protocols use a multicast destination address.
The link aggregation control function determines which links may be aggregated. It then binds the ports to an aggregator function in the system and monitors conditions to determine if a change in the aggregation group is required. Link aggregation combines the individual capacity of multiple links to form a high performance virtual link. The failure or replacement of a link in an LACP trunk does not cause loss of connectivity. The traffic fails over to the remaining links in the trunk.
OneCommand NIC Teaming and VLAN Manager User Manual Page 4
Installing and Uninstalling the OneCommand NIC Teaming Driver, and the NIC Teaming and VLAN ManagerThere are two ways to install the OneCommand NIC Teaming driver, and the NIC Teaming and VLAN Manager:
• Attended installation using the GUI.
• Unattended installation using the command line.
Attended Installation
Prerequisites
The Microsoft .NET Framework 3.5 must be installed before you can install the OneCommand NIC Teaming driver, and the NIC Teaming and VLAN Manager. If a Microsoft .NET Framework version higher than 3.5 is already installed, Microsoft .NET Framework 3.5 must be installed as well.
Procedure
To perform an attended installation:
1. From the Emulex website, download the elxdrvr-nic-teaming-<version>.exe to your system. The installer is an executable file that self-extracts and copies the following software onto your system:
• NIC Teaming driver
• NIC Teaming and VLAN Manager
• NIC Teaming and VLAN Manager utilities
2. Navigate to the system directory to which you downloaded the file and double click the elxdrvr-nic-teaming-<version>.exe file.
Unattended Installation
An unattended driver installation (a quiet or silent installation) requires no user input. This is useful for performing an installation remotely from a command script, or when you want to make sure a custom configuration is not changed by a user during installation.
Prerequisites
Microsoft .NET Framework 3.5 must be installed before you can install the OneCommand NIC Teaming driver and NIC Teaming and VLAN Manager. If a Microsoft .NET Framework version higher than 3.5 is already installed, Microsoft .NET Framework 3.5 must be installed as well.
Procedure
To perform an unattended installation:
1. From the Emulex website, download the elxdrvr-nic-teaming-<version>.exe file to your system.
The kit is activated with the optional switch /q or /q2. The /q switch displays progress reports.
The /q2 switch does not display progress report.
OneCommand NIC Teaming and VLAN Manager User Manual Page 5
2. Run the driver kit installer with the optional switch.
For example, use the following command: elxdrvr-nic-teaming-<version>.exe /q2
Updating the OneCommand NIC Teaming Driver, and the NIC Teaming and VLAN Manager
To update the NIC Teaming driver, and the NIC Teaming and VLAN Manager while preserving the existing configuration (including the IP address):
1. From the Emulex website, download the latest file named elxdrvr-nic-teaming-<version>.exe to your system.
2. Double click the elxdrvr-nic-teaming-<version>.exe.
Uninstalling the OneCommand NIC Teaming Driver, and the NIC Teaming and VLAN Manager
To uninstall the NIC Teaming package:
1. Use the Programs and Features Control Panel on all Windows Server 2008 operating systems.
• For Windows Server 2008 & Windows Server 2008 R2, select Start>Control Panel>Programs>Uninstall a Program.
Starting the OneCommand NIC Teaming and VLAN Manager To start the OneCommand NIC Teaming and VLAN Manager, click the OC NIC Teaming Manager from your desktop start menu.
WARNING: Use the Emulex-provided kit to update the NIC Teaming and VLAN Manager. Do not use a previous version of the driver utilities to update the OneCommand NIC Teaming driver and NIC Teaming and VLAN Manager. If you do, unpredictable results will occur.
Note: Do not update the NIC Teaming driver and NIC Teaming and VLAN Manager while I/O traffic is running. If you do, unpredictable results will occur.
WARNING: Use the Emulex-provided kit to uninstall the driver. Do not use a previous version of the driver utilities to uninstall the OneCommand NIC Teaming driver and NIC Teaming and VLAN Manager. If you do, unpredictable results will occur.
Caution: Uninstalling the NIC Teaming package will remove all existing teams and VLANs.
OneCommand NIC Teaming and VLAN Manager User Manual Page 6
Using the OneCommand NIC Teaming and VLAN Manager
Creating, Configuring and Removing Teams
A team of adapters functions as a single virtual network interface and appears the same as non-teamed adapters to other network devices. A protocol address such as an IP address is usually assigned to the physical adapter. However, when the OneCommand NIC Teaming and VLAN Manager is installed, the protocol address is assigned to the team adapter and not to the physical adapters that make up the team.
Creating and Configuring a Team
To create and configure a team:
1. From the Start menu click All Programs>Emulex>OneCommand Teaming and VLAN Manager to start the application. The OneCommand NIC Teaming and VLAN Manager dialog box is displayed.
Note: For Windows Server 2008 x64 R2 and Windows Server 2008 x64 R2 with Hyper-V, TCP/IP offload engine (TOE) technology is enabled.
Note: Do not configure VLANs on adapters used with NIC teaming.
Note: The NIC Teaming and VLAN Manager supports multi-vendor teams. Each team in a multi-vendor environment must include at least one Emulex adapter.
• Emulex has tested the NIC Teaming and VLAN Manager with Intel (x520) and Broadcom (Netextreme II) adapters.
Note: NICs shown as members of the same port by OneCommand Manager should not be included on the same team.
Note: SLB, LACP and 802.3ad teams will not function properly using adapters with TCP offload enabled. Disable these setting before creating teams.
Caution: Creating a team may take several minutes. Prematurely cancelling this operation may result in the partial creation or deletion of a team or VLAN. Such an act may also lead to future teaming issues or even system instability.
Note: If you use static IP addresses (non-DHCP), you must assign IP addresses to any teams and VLANs that you create.
OneCommand NIC Teaming and VLAN Manager User Manual Page 7
.
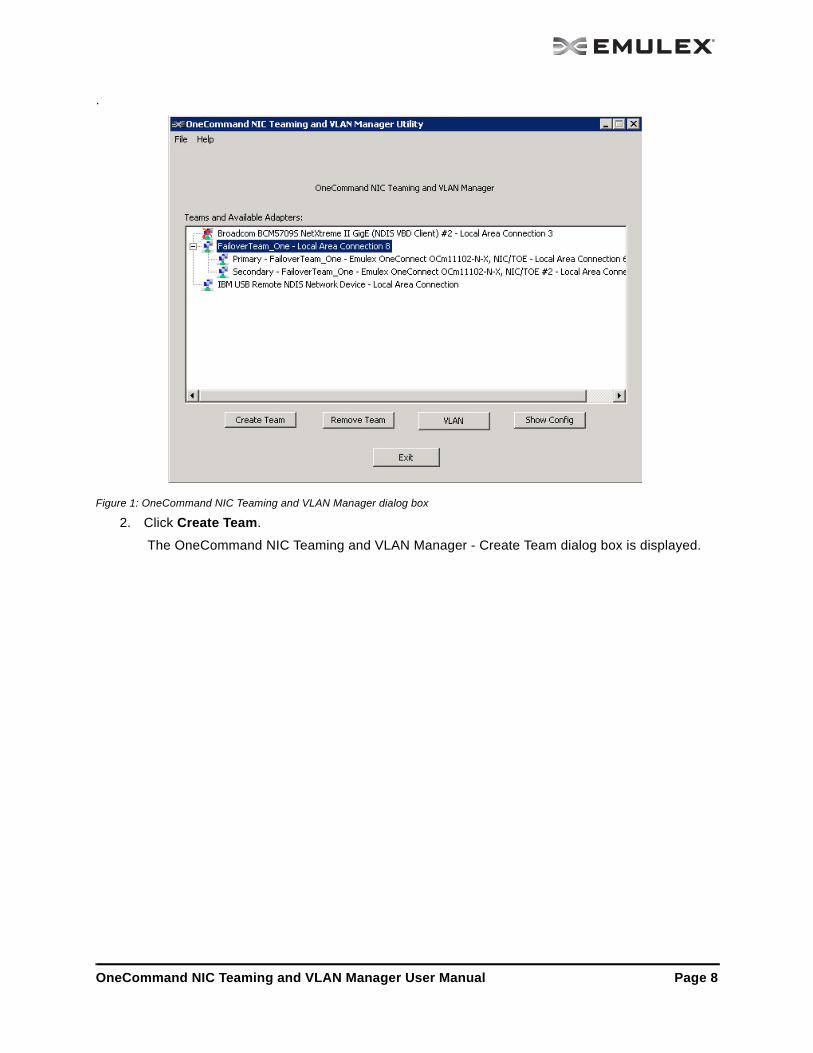
Figure 1: OneCommand NIC Teaming and VLAN Manager dialog box
2. Click Create Team.
The OneCommand NIC Teaming and VLAN Manager - Create Team dialog box is displayed.
OneCommand NIC Teaming and VLAN Manager User Manual Page 8
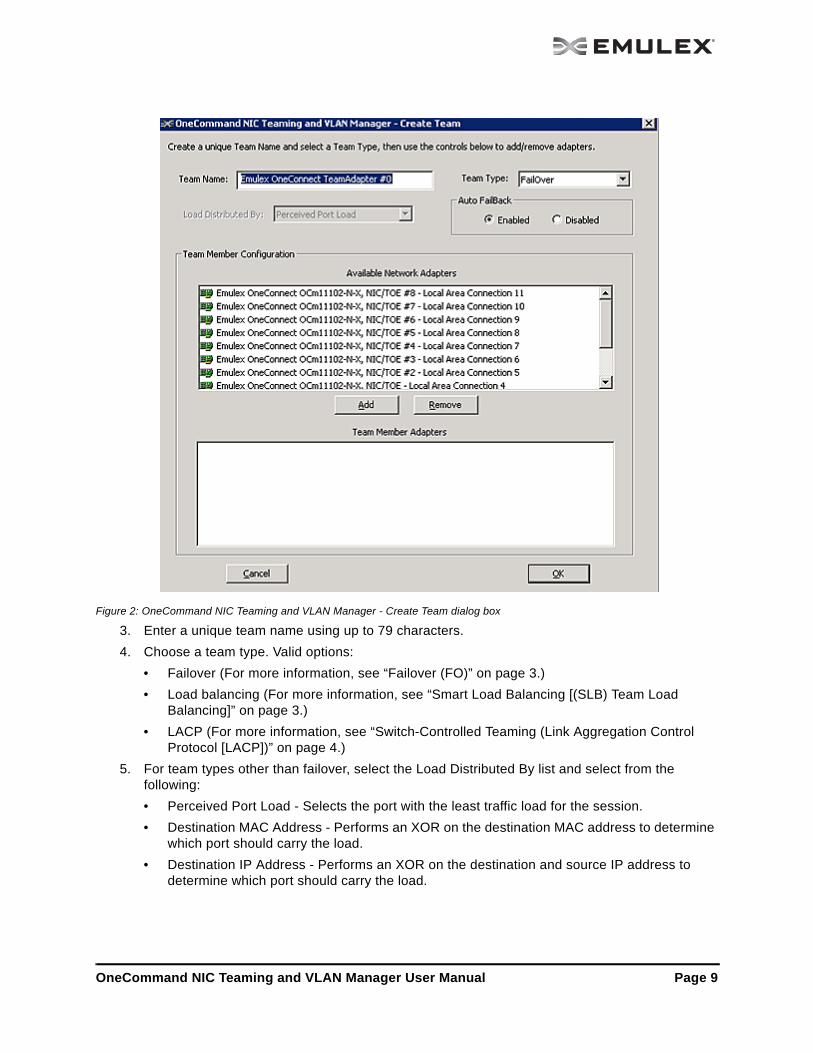
Figure 2: OneCommand NIC Teaming and VLAN Manager - Create Team dialog box
3. Enter a unique team name using up to 79 characters.
4. Choose a team type. Valid options:
• Failover (For more information, see “Failover (FO)” on page 3.)
• Load balancing (For more information, see “Smart Load Balancing [(SLB) Team Load Balancing]” on page 3.)
• LACP (For more information, see “Switch-Controlled Teaming (Link Aggregation Control Protocol [LACP])” on page 4.)
5. For team types other than failover, select the Load Distributed By list and select from the following:
• Perceived Port Load - Selects the port with the least traffic load for the session.
• Destination MAC Address - Performs an XOR on the destination MAC address to determine which port should carry the load.
• Destination IP Address - Performs an XOR on the destination and source IP address to determine which port should carry the load.
OneCommand NIC Teaming and VLAN Manager User Manual Page 9
6. When the team type selected is Failover, choose an AutoFailback mode of Enabled or Disabled.
7. The Available Network Adapters area lists adapters that are not members of any team or any VLAN bound adapter. To add an adapter to the team, select the adapter from the Available Network Adapters list and click Add. The adapter appears in the Team Member Adapters list. Repeat for each desired adapter in the team.
The Team Member Adapters area lists adapters that are members of the team.
8. Click OK to return to OneCommand NIC Teaming and VLAN Manager dialog box.
Removing a Team
To remove a team:
1. From the Start menu click All Programs>Emulex>OneCommand Teaming and VLAN Manager to start the application. The OneCommand NIC Teaming and VLAN Manager dialog box is displayed.
2. Highlight the team that you want to remove.
Note: If you are creating a failover team when one already exists, you must reboot the system before the newly created failover team is capable of failing over. You can continue to create additional teams before rebooting however.
Note: NICs shown as members of the same port by OneCommand Manager should not be included on the same team.
Note: In Windows Server 2008 systems, a down arrow represents a disabled adapter. You cannot add a disabled adapter to a team. A warning message is displayed if you attempt to do so.
Note: In the Create Team dialog box, expand the team that you are removing and note the names of the adapters. This information is helpful in subsequent procedures, such as Deleting Hyper-V Teams.
OneCommand NIC Teaming and VLAN Manager User Manual Page 10

.
Figure 3: OneCommand NIC Teaming and VLAN Manager Utility dialog box
3. Click Remove Team and follow the prompts.
Primary and Secondary Adapters
• To change the primary adapter of an existing team, delete the team and recreate the team.
• To change the primary adapter while creating a team, remove all adapters and add the first adapter that you would want to be the primary adapter.
Removing an Adapter during Team Creation
To remove an adapter during team creation:
1. On the OneCommand NIC Teaming and VLAN Manager - Create Team dialog box (Figure 2 on page 9), select the adapter to remove from Team Member Adapters area.
2. Click Remove. The adapter is removed from the Team Member Adapters area.
3. Click OK to accept the changes and return to the OneCommand NIC Teaming and VLAN Manager dialog box.
4. Click Exit to close the OneCommand NIC Teaming and VLAN Manager dialog box.
Note: Every team must include at least one Emulex adapter as a primary adapter.
OneCommand NIC Teaming and VLAN Manager User Manual Page 11
Configuring a VLAN for an Adapter
To configure a VLAN for a physical or team adapter:
1. On the NIC Teaming and VLAN Manager dialog box (Figure 1 on page 8), select the physical (PNIC), virtual (VNIC) or a team adapter in Available Adapters to which you want to add a VLAN.
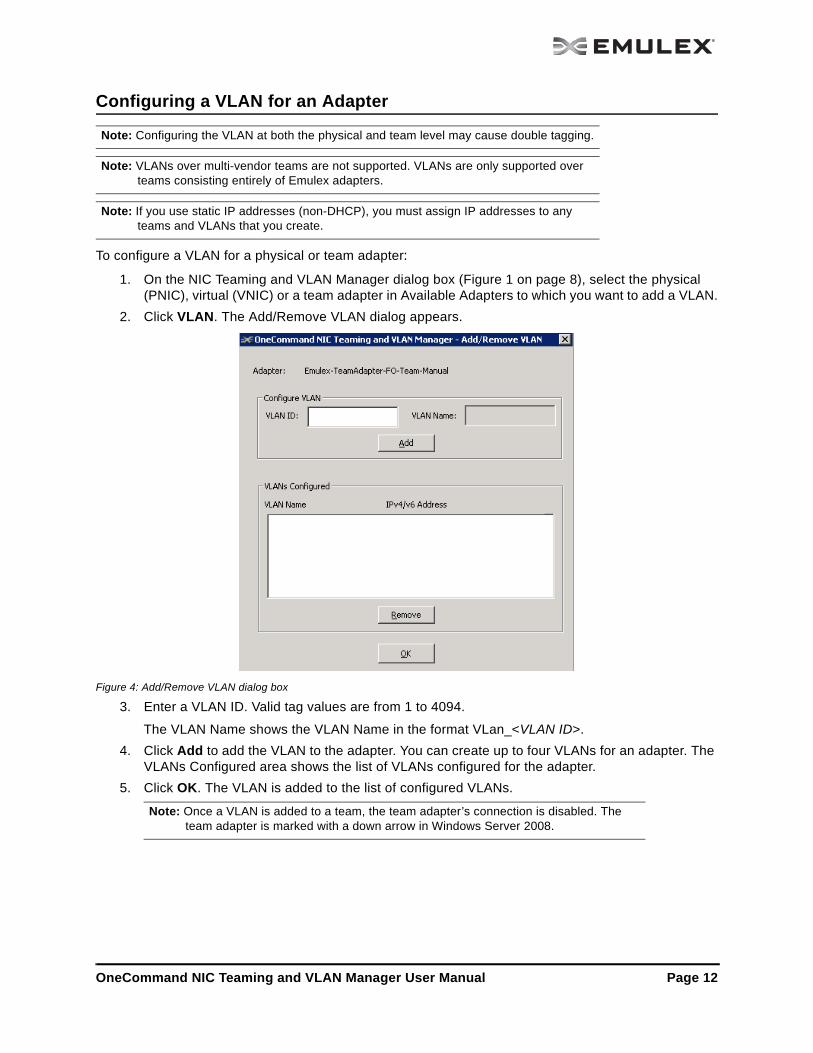
2. Click VLAN. The Add/Remove VLAN dialog appears.
Figure 4: Add/Remove VLAN dialog box
3. Enter a VLAN ID. Valid tag values are from 1 to 4094.
The VLAN Name shows the VLAN Name in the format VLan_<VLAN ID>.
4. Click Add to add the VLAN to the adapter. You can create up to four VLANs for an adapter. The VLANs Configured area shows the list of VLANs configured for the adapter.
5. Click OK. The VLAN is added to the list of configured VLANs.
Note: Configuring the VLAN at both the physical and team level may cause double tagging.
Note: VLANs over multi-vendor teams are not supported. VLANs are only supported over teams consisting entirely of Emulex adapters.
Note: If you use static IP addresses (non-DHCP), you must assign IP addresses to any teams and VLANs that you create.
Note: Once a VLAN is added to a team, the team adapter’s connection is disabled. The team adapter is marked with a down arrow in Windows Server 2008.
OneCommand NIC Teaming and VLAN Manager User Manual Page 12
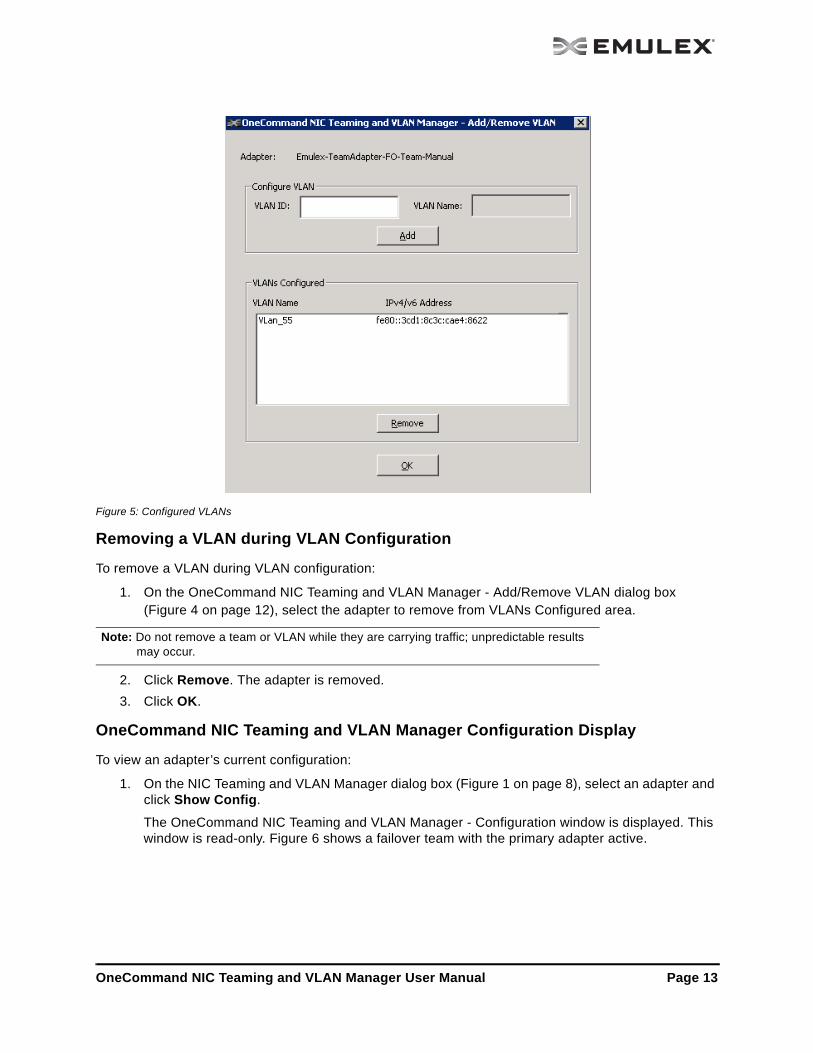
Figure 5: Configured VLANs
Removing a VLAN during VLAN Configuration
To remove a VLAN during VLAN configuration:
1. On the OneCommand NIC Teaming and VLAN Manager - Add/Remove VLAN dialog box(Figure 4 on page 12), select the adapter to remove from VLANs Configured area.
2. Click Remove. The adapter is removed.
3. Click OK.
OneCommand NIC Teaming and VLAN Manager Configuration Display
To view an adapter’s current configuration:
1. On the NIC Teaming and VLAN Manager dialog box (Figure 1 on page 8), select an adapter and click Show Config.
The OneCommand NIC Teaming and VLAN Manager - Configuration window is displayed. This window is read-only. Figure 6 shows a failover team with the primary adapter active.
Note: Do not remove a team or VLAN while they are carrying traffic; unpredictable results may occur.
OneCommand NIC Teaming and VLAN Manager User Manual Page 13
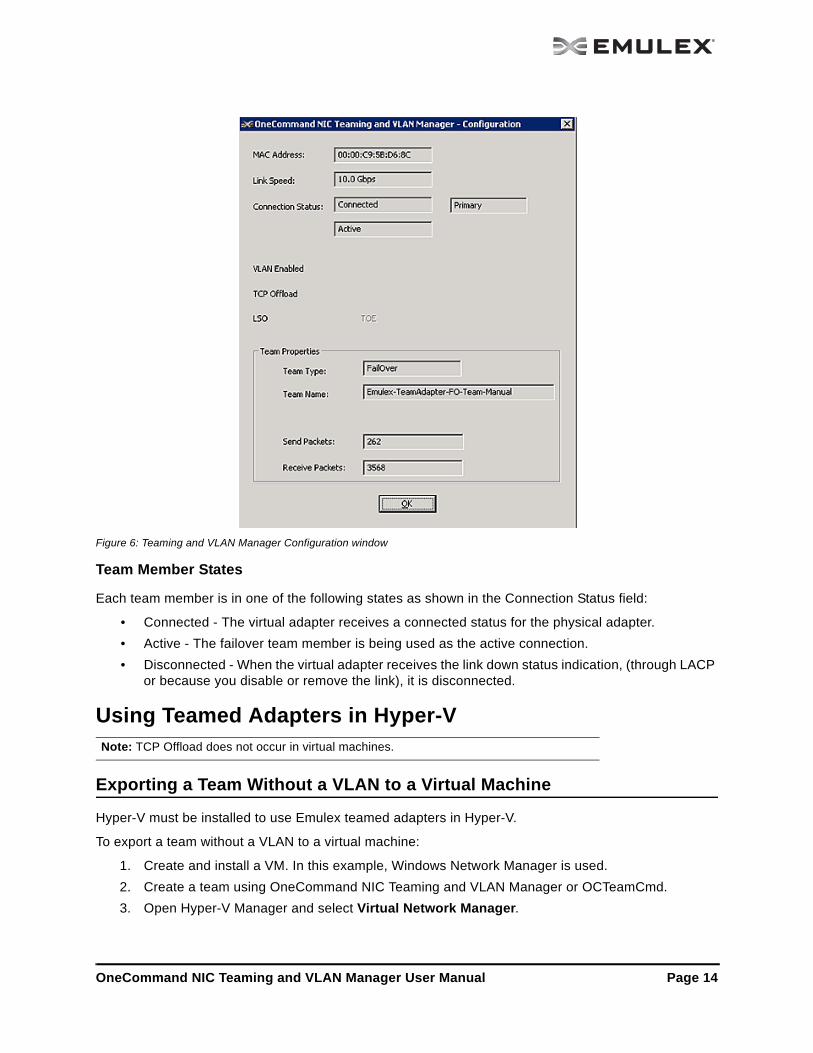
Figure 6: Teaming and VLAN Manager Configuration window
Team Member States
Each team member is in one of the following states as shown in the Connection Status field:
• Connected - The virtual adapter receives a connected status for the physical adapter.
• Active - The failover team member is being used as the active connection.
• Disconnected - When the virtual adapter receives the link down status indication, (through LACP or because you disable or remove the link), it is disconnected.
Using Teamed Adapters in Hyper-V
Exporting a Team Without a VLAN to a Virtual Machine
Hyper-V must be installed to use Emulex teamed adapters in Hyper-V.
To export a team without a VLAN to a virtual machine:
1. Create and install a VM. In this example, Windows Network Manager is used.
2. Create a team using OneCommand NIC Teaming and VLAN Manager or OCTeamCmd.
3. Open Hyper-V Manager and select Virtual Network Manager.
Note: TCP Offload does not occur in virtual machines.
OneCommand NIC Teaming and VLAN Manager User Manual Page 14
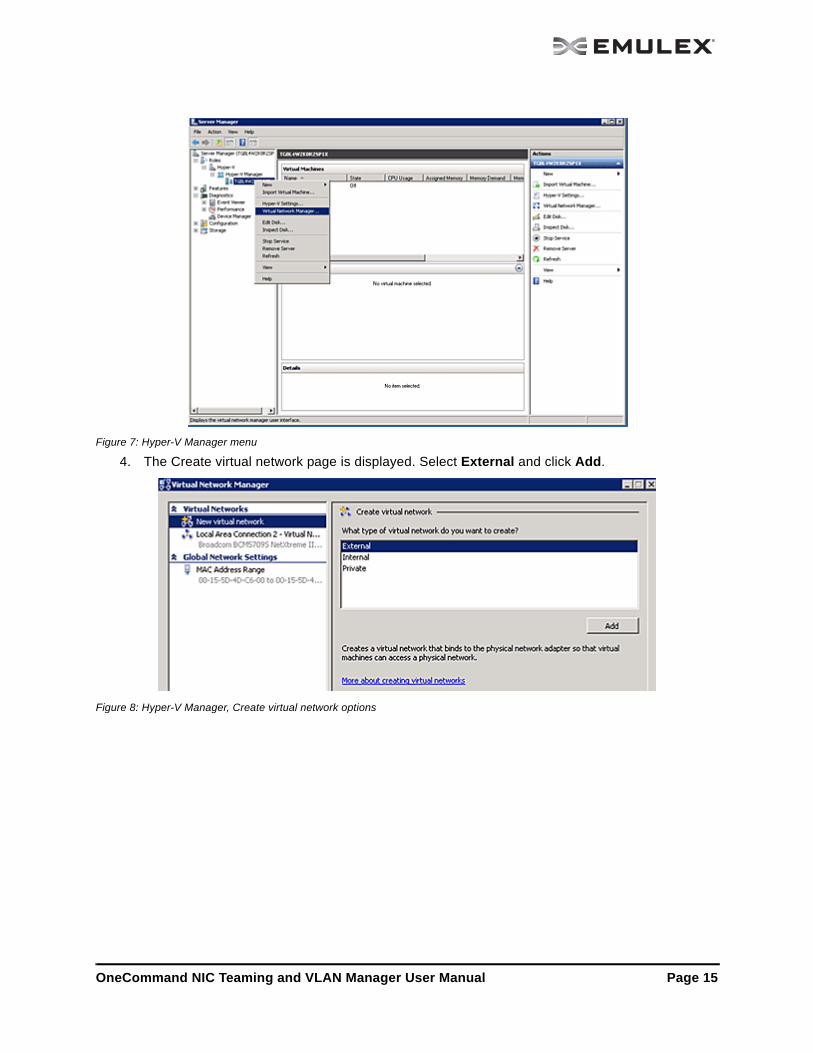
Figure 7: Hyper-V Manager menu
4. The Create virtual network page is displayed. Select External and click Add.
Figure 8: Hyper-V Manager, Create virtual network options
OneCommand NIC Teaming and VLAN Manager User Manual Page 15
The New Virtual Network page is displayed.
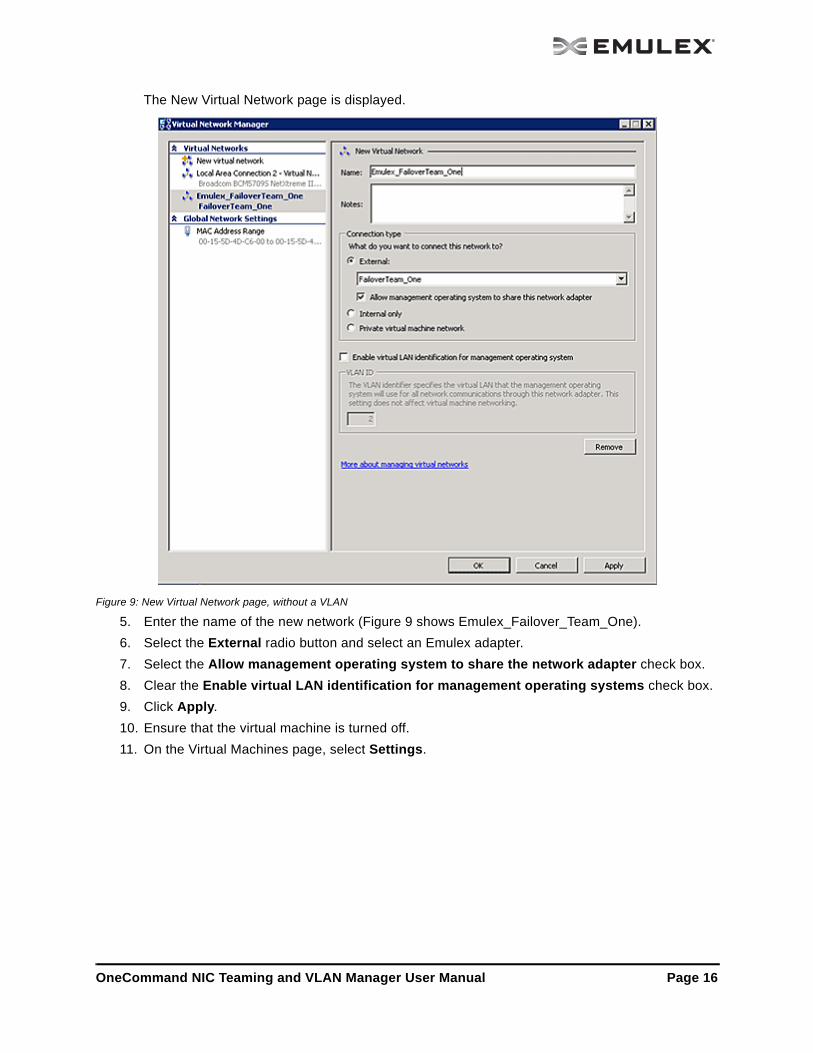
Figure 9: New Virtual Network page, without a VLAN
5. Enter the name of the new network (Figure 9 shows Emulex_Failover_Team_One).
6. Select the External radio button and select an Emulex adapter.
7. Select the Allow management operating system to share the network adapter check box.
8. Clear the Enable virtual LAN identification for management operating systems check box.
9. Click Apply.
10. Ensure that the virtual machine is turned off.
11. On the Virtual Machines page, select Settings.
OneCommand NIC Teaming and VLAN Manager User Manual Page 16
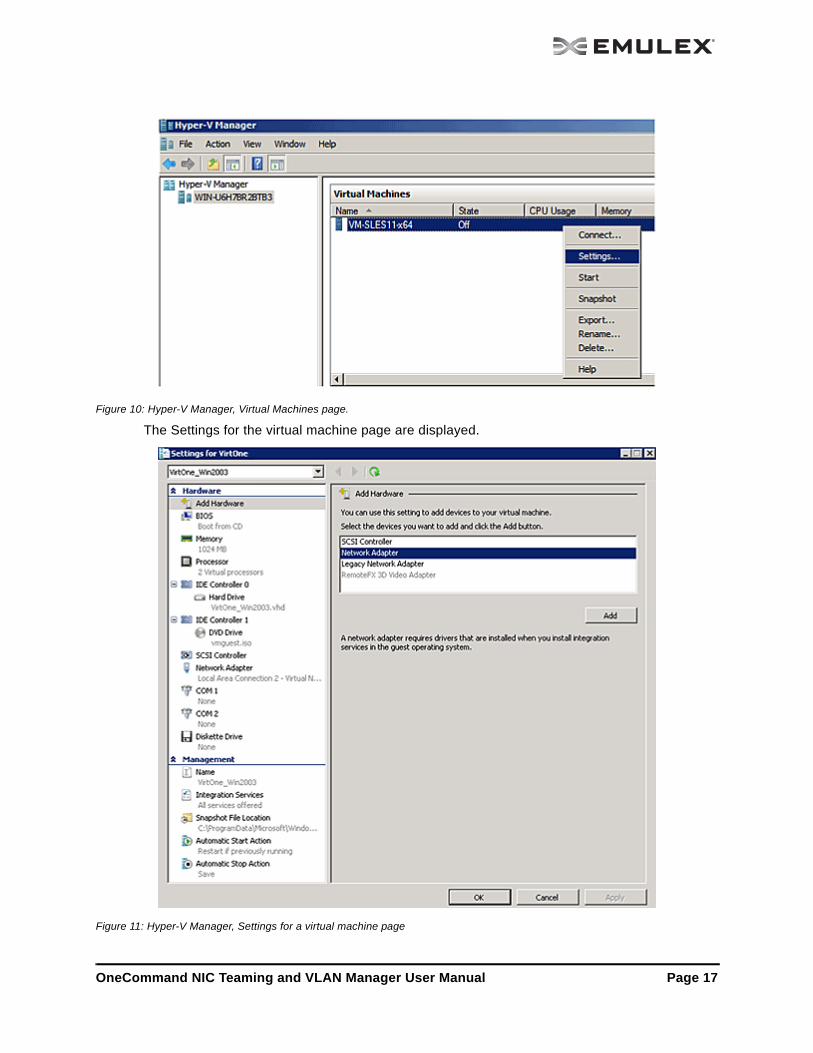
Figure 10: Hyper-V Manager, Virtual Machines page.
The Settings for the virtual machine page are displayed.
Figure 11: Hyper-V Manager, Settings for a virtual machine page
OneCommand NIC Teaming and VLAN Manager User Manual Page 17
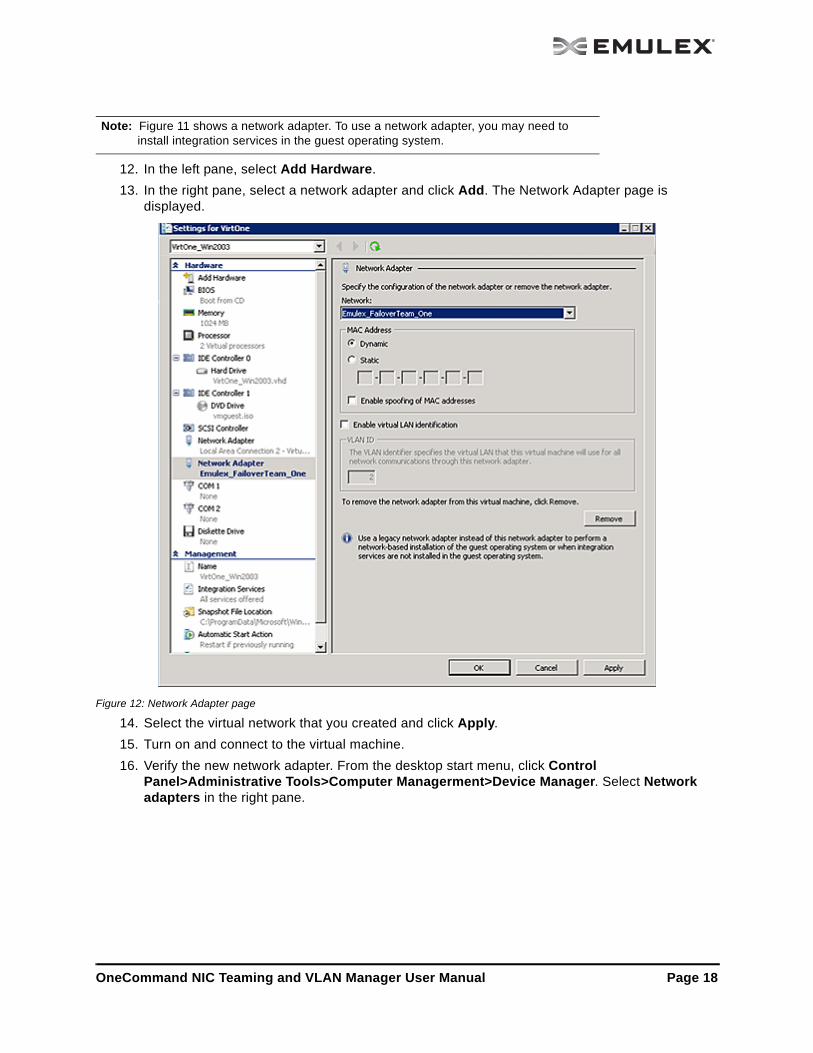
12. In the left pane, select Add Hardware.
13. In the right pane, select a network adapter and click Add. The Network Adapter page is displayed.
Figure 12: Network Adapter page
14. Select the virtual network that you created and click Apply.
15. Turn on and connect to the virtual machine.
16. Verify the new network adapter. From the desktop start menu, click Control Panel>Administrative Tools>Computer Managerment>Device Manager. Select Network adapters in the right pane.
Note: Figure 11 shows a network adapter. To use a network adapter, you may need to install integration services in the guest operating system.
OneCommand NIC Teaming and VLAN Manager User Manual Page 18

Figure 13: Device Manager in the Computer Management window
17. Check the network connections. From the command prompt, enter <ipconfig>. A new network connection/adapter appears in the virtual machine.
Figure 14: Network Connection information
OneCommand NIC Teaming and VLAN Manager User Manual Page 19

Deleting Hyper-V Teams
When deleting a team that was configured in a virtual machine, you must complete the following procedures:
1. Remove the adapter from the virtual machine.(See “Removing an Adapter from the Virtual Machine” on page 20
2. Remove the team from the Virtual Network Manager. (See “Deleting the Adapter from the Virtual Network Manager” on page 22)
3. Remove the team using the OneConnect NIC Teaming Manager. (See “Removing the Team Using the OneConnect NIC Teaming Manager” on page 23)
4. Disable the Microsoft Virtual Network Switch Protocol for each adapter in the deleted team. (See “Disabling the Microsoft Virtual Network Switch Protocol for an Adapter” on page 23)
Removing an Adapter from the Virtual Machine
1. Open Hyper-V Manager.
2. Ensure that the virtual machine is turned off.
3. In the Results pane, under Virtual Machines, right-click the name of the virtual machine and click Settings.
Figure 15: Hyper-V Manager, Virtual Machines page.
OneCommand NIC Teaming and VLAN Manager User Manual Page 20
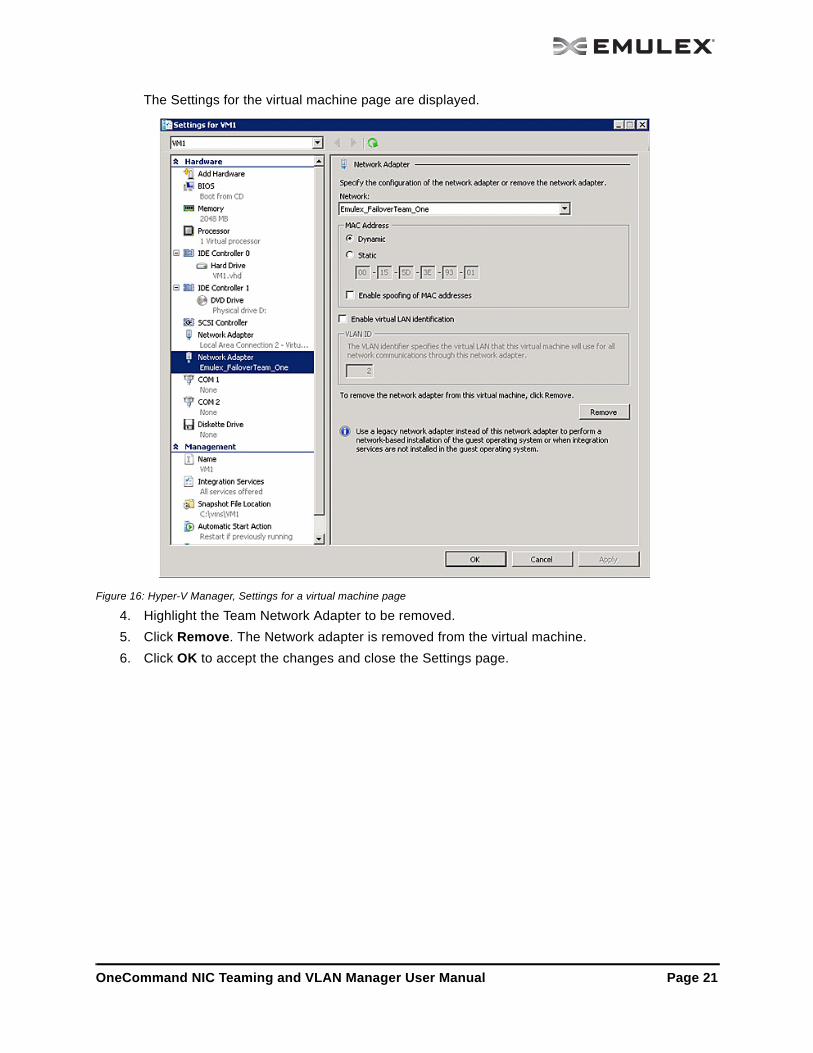
The Settings for the virtual machine page are displayed.
Figure 16: Hyper-V Manager, Settings for a virtual machine page
4. Highlight the Team Network Adapter to be removed.
5. Click Remove. The Network adapter is removed from the virtual machine.
6. Click OK to accept the changes and close the Settings page.
OneCommand NIC Teaming and VLAN Manager User Manual Page 21

Deleting the Adapter from the Virtual Network Manager
1. Open Hyper-V Manager and select the virtualization server in the console tree,
2. Right-click and select Virtual Network Manager from the context menu.
Figure 17: Hyper-V Manager menu
OneCommand NIC Teaming and VLAN Manager User Manual Page 22

3. The Virtual Network Manager opens.
Figure 18: Virtual Network Manager dialog box, Virtual Network Properties page.
4. Highlight the team virtual network.
5. Click Remove and follow the prompts.
Removing the Team Using the OneConnect NIC Teaming Manager
See “Removing a Team” on page 10
Disabling the Microsoft Virtual Network Switch Protocol for an Adapter
1. Open the Network Connections window.
2. Select the adapter that was a member of the removed team, right-click and select Properties from the context menu.
3. The Network Adapter Properties dialog box opens.
OneCommand NIC Teaming and VLAN Manager User Manual Page 23
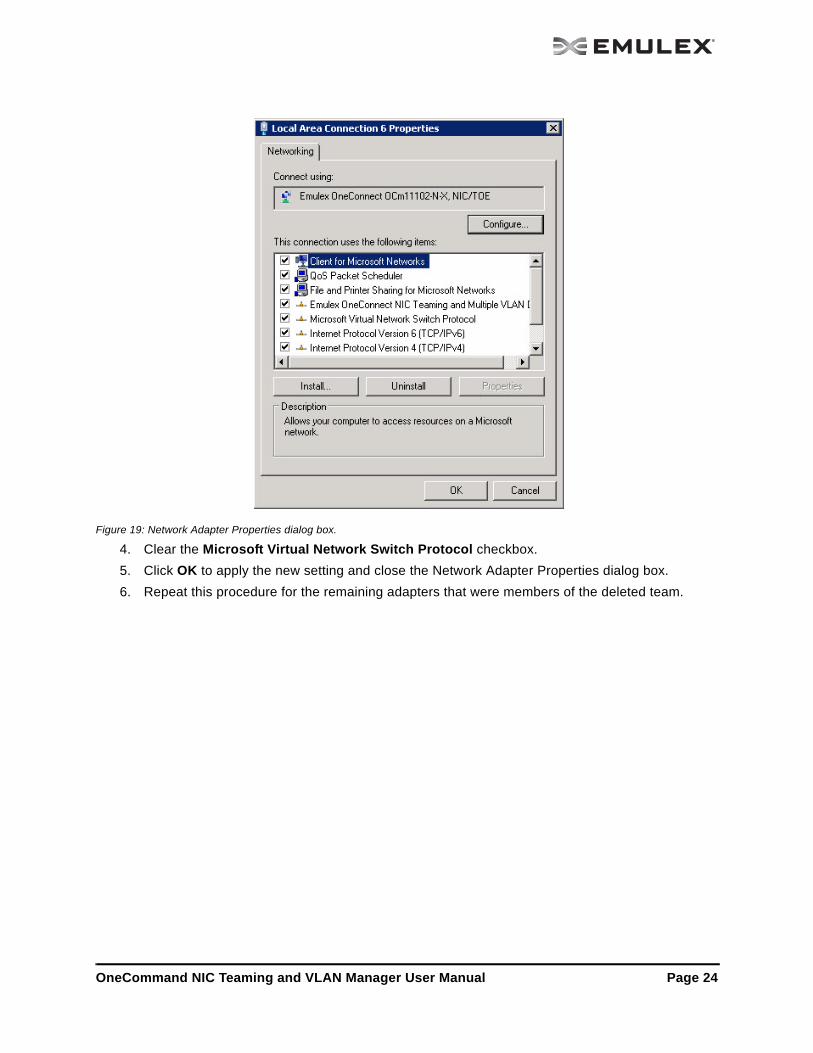
Figure 19: Network Adapter Properties dialog box.
4. Clear the Microsoft Virtual Network Switch Protocol checkbox.
5. Click OK to apply the new setting and close the Network Adapter Properties dialog box.
6. Repeat this procedure for the remaining adapters that were members of the deleted team.
OneCommand NIC Teaming and VLAN Manager User Manual Page 24
OneCommand NIC Teaming Driver Command Line Interface
Introduction
The OneCommand™ NIC Teaming Driver Command Line Interface (OCTeamCmd) is a companion to the OneCommand NIC Teaming and VLAN Manager. Use the OCTeamCmd in scripted operations from within shell scripts or batch files.
Each time you run this application from the command line, a single operation is performed. The first parameter of this command is the requested operation. When the specified operation is completed, the command prompt is displayed. Some of the OCTeamCmd commands require one or more additional parameters that specify the nature of the command.
Adapter Aliases and Team Identification
Adapters are identified within Windows by using the adapter name.
The OCTeamCmd also uses aliases to identify physical adapters. Adapter aliases are assigned by the OCTeamCmd as adapters are discovered and take the form of 'nicX' where 'X' is a unique integer. Adapter aliases, once assigned, exist for as long as the adapter's GUID does not change. Any events that cause Windows to treat an existing adapter as if it is newly installed, causes a new alias to be assigned to that adapter the next time a OCTeamCmd command is executed.
Network Connection Names
Windows assigns each adapter and team a Network Connection Name. In most versions of Windows the name defaults to the form of 'Local Area Connection N'.
To view the Network Connection Name from the desktop:
1. Select: All Programs>My Network Places.
2. Right click on the adapter and click Properties. The Network Connection Name is labeled by the operating system in a format similar to Local Area Connection #N.
3. You can rename these network connections with the tools provided by the operating system. You can also use the Network Connection Name as an alias when identifying adapters or teams in OCTeamCmd commands. If the name contains spaces, enclose the entire name in double quotes.
Syntax Rules
• Key words - Key words determine which command to execute, but do not specify any command parameters. Keywords are shown in plain text.
• Mandatory items - Angle brackets represent mandatory, but variable items. For example, <filename> is a place in a command where you must supply a filename.
• Optional items - Curly brackets represent optional items. For example, 'octeamcmd help {command name}' shows that the help command can accept a command name as an optional parameter.
Note: Do not configure VLANs on adapters used with NIC teaming.
Note: Network Connection Names are not stored by the OCTeamCmd. They are maintained by Windows.
OneCommand NIC Teaming and VLAN Manager User Manual Page 25
• List of choices - If a command parameter may be one of several items, those items are separated by a vertical bar '|'. For example, 'blue | green | red' indicates that you may use 'blue', 'green' or 'red'. When selection from a list is mandatory, the entire list is enclosed in angle brackets. A list of optional items would be enclosed in curly brackets.
• Team-id - Where a team name is placed in a command.
• Adapter-id - Where an adapter alias is placed in a command.
• Adapter-list - Where a list of adapter aliases are placed in a command. Aliases in a list are separated by one or more spaces.
• Network Manager - Also known as the Network Connection Name.
• Hash - Shows where a hashing algorithm is specified in a command. For a list of supported hashing algorithms, see Table 2 on page 38.
• VLAN-id - This number represents the VLAN tag.
• VLAN alias -The name that represents a VLAN that is automatically generated when a VLAN is created. The name takes the form of "VLan_n" where n is the VLAN's VLAN-id.
Error Codes
Table 1: OneCommand NIC Teaming Driver and Command Line Utility Error Codes
Hexadecimal Error CodeSigned Decimal Value
Unsigned Decimal Value
Description
0x00000000 0 No errors.
0x8F000001 -1895825407 2399141889 The OneCommand NIC Teaming and VLAN Manager is running. The OneCommand NIC Teaming and VLAN Manager and the OCTeamCmd utility cannot run at the same time.
0x8F000002 -1895825406 2399141890 The OneCommand NIC Teaming and VLAN Manager Uninstaller is running. The OneCommand NIC Teaming and VLAN Manager Uninstaller and the OCTeamCmd utility cannot run at the same time.
0x8F000003 -1895825405 2399141891 The OneCommand NIC Teaming and VLAN Manager Update utility is running. The OneCommand NIC Teaming and VLAN Manager Update utility and the OCTeamCmd utility cannot run at the same time.
0x8F000004 -1895825404 2399141892 Another copy of the OCTeamCmd utility is running, only one can run at a time.
0x8F000005 -1895825403 2399141893 Initialization of Windows Common Controls failed.
0x8F000006 -1895825402 2399141894 The OneCommand NIC Teaming and VLAN Manager is not installed. Presence of the driver is required for OCTeamCmd utility operation.
0x8F000007 -1895825401 2399141895 A file with this name already exists. Backup files must have unique names.
0x8F000008 -1895825400 2399141896 The file cannot be found.
OneCommand NIC Teaming and VLAN Manager User Manual Page 26
0x8F000009 -1895825399 2399141897 There are too many arguments specified on the command line.
0x8F00000A -1895825398 2399141898 The command is not recognized.
0x8F00000B -1895825397 2399141899 The specified directory cannot be found.
0x8F00000C -1895825396 2399141900 Windows does not allow the file to open.
0x8F00000D -1895825395 2399141901 The backup file has been corrupted.
0x8F00000E -1895825394 2399141902 The number of NICs has changed since the backup was made.
0x8F00000F -1895825393 2399141903 A different and unexpected NIC is found in the PCI slot
0x8F000010 -1895825392 2399141904 A PCI slot does not contain the expected NIC.
0x8F000011 -1895825391 2399141905 Backup file creation failed.
0x8F000012 -1895825390 2399141906 Restoration failed.
0x8F000013 -1895825389 2399141907 No teams exist on the system.
0x8F000014 -1895825388 2399141908 There is an invalid number of command arguments.
0x8F000015 -1895825387 2399141909 Required data is not found on the command line.
0x8F000016 -1895825386 2399141910 The team type is not provided
0x8F000017 -1895825385 2399141911 An invalid hash value is specified.
0x8F000018 -1895825384 2399141912 The provided number of members did not fall in the required range for the requested team type.
0x8F000019 -1895825383 2399141913 The adapter ID is invalid.
0x8F00001A -1895825382 2399141914 The team-ID is either missing or invalid.
0x8F00001B -1895825381 2399141915 The team-ID exceeds the maximum string length of 39 characters.
0x8F00001C -1895825380 2399141916 The team-ID/adapter-ID is invalid or missing.
0x8F00001D -1895825379 2399141917 The team-ID/adapter-ID is not found.
0x8F00001E -1895825378 2399141918 The VLAN value or ID is invalid.
0x8F00001F -1895825377 2399141919 The hash value may be invalid or the internal structure may need to be updated.
0x8F000020 -1895825376 2399141920 The team type may be invalid or the internal structure may need to be updated.
0x8F000021 -1895825375 2399141921 Failure to retrieve the list of free adapters on the system.
0x8F000022 -1895825374 2399141922 Failure to retrieve the list of bound adapters on the system.
Table 1: OneCommand NIC Teaming Driver and Command Line Utility Error Codes (Continued)
Hexadecimal Error CodeSigned Decimal Value
Unsigned Decimal Value
Description
OneCommand NIC Teaming and VLAN Manager User Manual Page 27
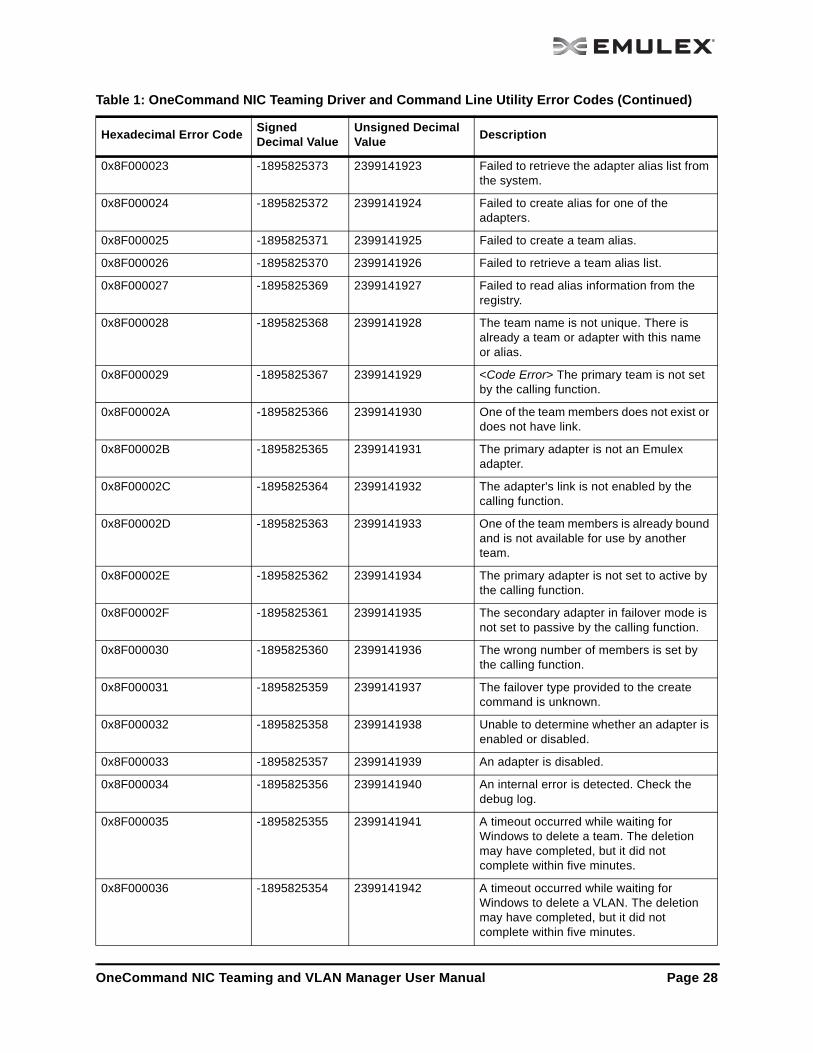
0x8F000023 -1895825373 2399141923 Failed to retrieve the adapter alias list from the system.
0x8F000024 -1895825372 2399141924 Failed to create alias for one of the adapters.
0x8F000025 -1895825371 2399141925 Failed to create a team alias.
0x8F000026 -1895825370 2399141926 Failed to retrieve a team alias list.
0x8F000027 -1895825369 2399141927 Failed to read alias information from the registry.
0x8F000028 -1895825368 2399141928 The team name is not unique. There is already a team or adapter with this name or alias.
0x8F000029 -1895825367 2399141929 <Code Error> The primary team is not set by the calling function.
0x8F00002A -1895825366 2399141930 One of the team members does not exist or does not have link.
0x8F00002B -1895825365 2399141931 The primary adapter is not an Emulex adapter.
0x8F00002C -1895825364 2399141932 The adapter's link is not enabled by the calling function.
0x8F00002D -1895825363 2399141933 One of the team members is already bound and is not available for use by another team.
0x8F00002E -1895825362 2399141934 The primary adapter is not set to active by the calling function.
0x8F00002F -1895825361 2399141935 The secondary adapter in failover mode is not set to passive by the calling function.
0x8F000030 -1895825360 2399141936 The wrong number of members is set by the calling function.
0x8F000031 -1895825359 2399141937 The failover type provided to the create command is unknown.
0x8F000032 -1895825358 2399141938 Unable to determine whether an adapter is enabled or disabled.
0x8F000033 -1895825357 2399141939 An adapter is disabled.
0x8F000034 -1895825356 2399141940 An internal error is detected. Check the debug log.
0x8F000035 -1895825355 2399141941 A timeout occurred while waiting for Windows to delete a team. The deletion may have completed, but it did not complete within five minutes.
0x8F000036 -1895825354 2399141942 A timeout occurred while waiting for Windows to delete a VLAN. The deletion may have completed, but it did not complete within five minutes.
Table 1: OneCommand NIC Teaming Driver and Command Line Utility Error Codes (Continued)
Hexadecimal Error CodeSigned Decimal Value
Unsigned Decimal Value
Description
OneCommand NIC Teaming and VLAN Manager User Manual Page 28
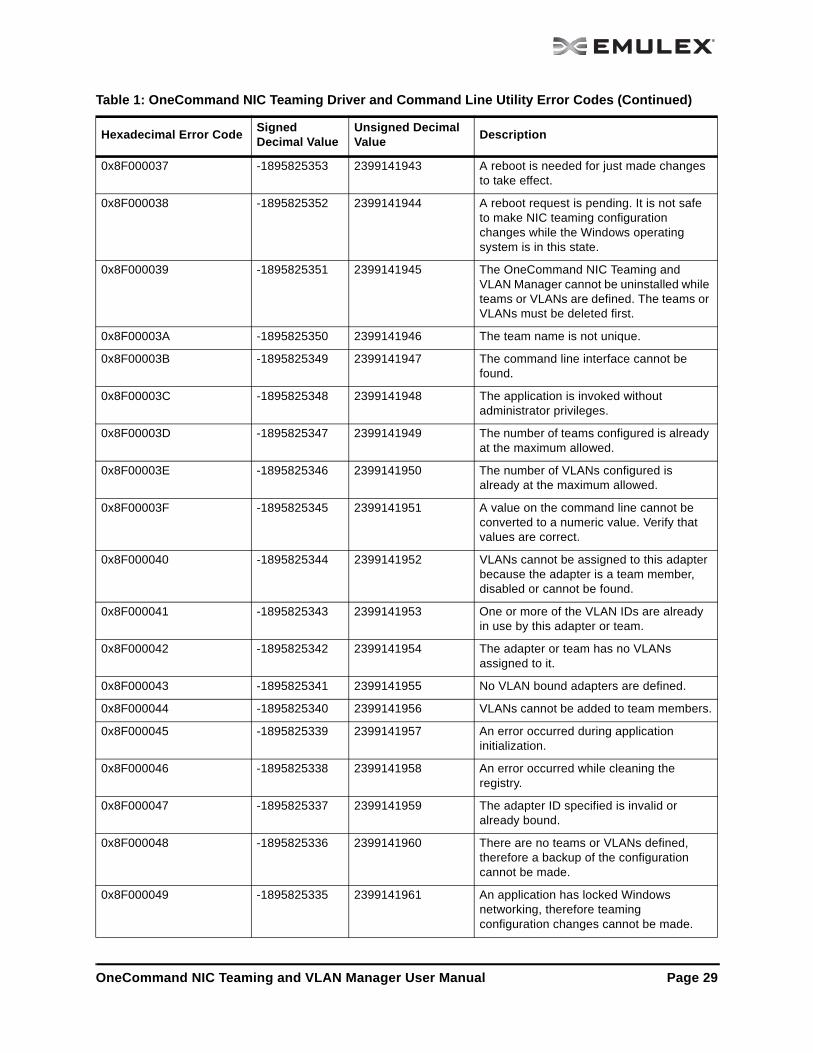
0x8F000037 -1895825353 2399141943 A reboot is needed for just made changes to take effect.
0x8F000038 -1895825352 2399141944 A reboot request is pending. It is not safe to make NIC teaming configuration changes while the Windows operating system is in this state.
0x8F000039 -1895825351 2399141945 The OneCommand NIC Teaming and VLAN Manager cannot be uninstalled while teams or VLANs are defined. The teams or VLANs must be deleted first.
0x8F00003A -1895825350 2399141946 The team name is not unique.
0x8F00003B -1895825349 2399141947 The command line interface cannot be found.
0x8F00003C -1895825348 2399141948 The application is invoked without administrator privileges.
0x8F00003D -1895825347 2399141949 The number of teams configured is already at the maximum allowed.
0x8F00003E -1895825346 2399141950 The number of VLANs configured is already at the maximum allowed.
0x8F00003F -1895825345 2399141951 A value on the command line cannot be converted to a numeric value. Verify that values are correct.
0x8F000040 -1895825344 2399141952 VLANs cannot be assigned to this adapter because the adapter is a team member, disabled or cannot be found.
0x8F000041 -1895825343 2399141953 One or more of the VLAN IDs are already in use by this adapter or team.
0x8F000042 -1895825342 2399141954 The adapter or team has no VLANs assigned to it.
0x8F000043 -1895825341 2399141955 No VLAN bound adapters are defined.
0x8F000044 -1895825340 2399141956 VLANs cannot be added to team members.
0x8F000045 -1895825339 2399141957 An error occurred during application initialization.
0x8F000046 -1895825338 2399141958 An error occurred while cleaning the registry.
0x8F000047 -1895825337 2399141959 The adapter ID specified is invalid or already bound.
0x8F000048 -1895825336 2399141960 There are no teams or VLANs defined,therefore a backup of the configuration cannot be made.
0x8F000049 -1895825335 2399141961 An application has locked Windows networking, therefore teaming configuration changes cannot be made.
Table 1: OneCommand NIC Teaming Driver and Command Line Utility Error Codes (Continued)
Hexadecimal Error CodeSigned Decimal Value
Unsigned Decimal Value
Description
OneCommand NIC Teaming and VLAN Manager User Manual Page 29
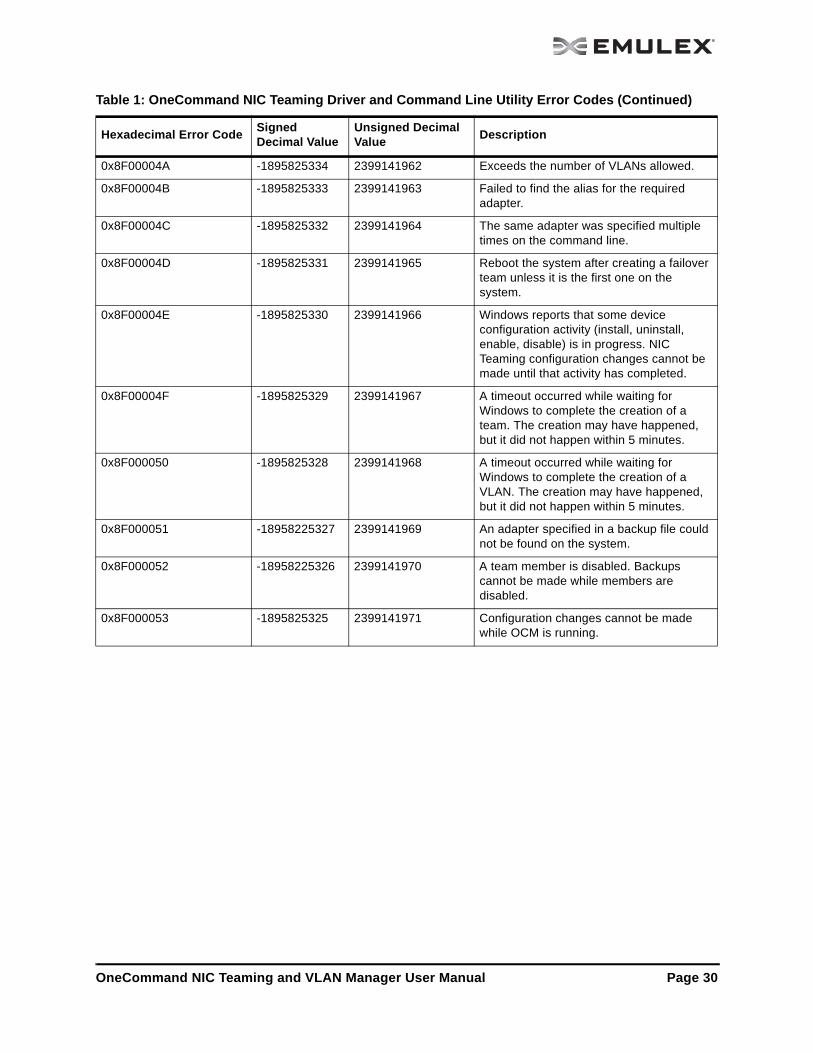
0x8F00004A -1895825334 2399141962 Exceeds the number of VLANs allowed.
0x8F00004B -1895825333 2399141963 Failed to find the alias for the required adapter.
0x8F00004C -1895825332 2399141964 The same adapter was specified multiple times on the command line.
0x8F00004D -1895825331 2399141965 Reboot the system after creating a failover team unless it is the first one on the system.
0x8F00004E -1895825330 2399141966 Windows reports that some device configuration activity (install, uninstall, enable, disable) is in progress. NIC Teaming configuration changes cannot be made until that activity has completed.
0x8F00004F -1895825329 2399141967 A timeout occurred while waiting for Windows to complete the creation of a team. The creation may have happened, but it did not happen within 5 minutes.
0x8F000050 -1895825328 2399141968 A timeout occurred while waiting for Windows to complete the creation of a VLAN. The creation may have happened, but it did not happen within 5 minutes.
0x8F000051 -18958225327 2399141969 An adapter specified in a backup file could not be found on the system.
0x8F000052 -18958225326 2399141970 A team member is disabled. Backups cannot be made while members are disabled.
0x8F000053 -1895825325 2399141971 Configuration changes cannot be made while OCM is running.
Table 1: OneCommand NIC Teaming Driver and Command Line Utility Error Codes (Continued)
Hexadecimal Error CodeSigned Decimal Value
Unsigned Decimal Value
Description
OneCommand NIC Teaming and VLAN Manager User Manual Page 30
The Command Reference
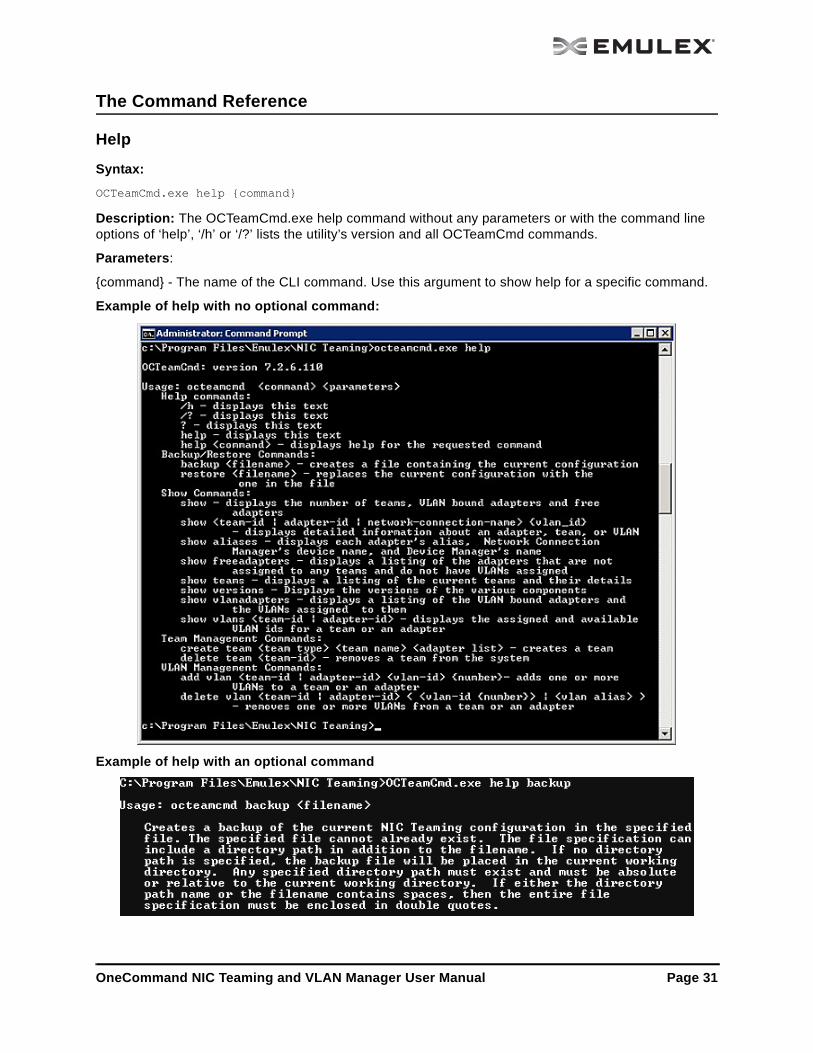
Help
Syntax:
OCTeamCmd.exe help {command}
Description: The OCTeamCmd.exe help command without any parameters or with the command line options of ‘help’, ‘/h’ or ‘/?’ lists the utility’s version and all OCTeamCmd commands.
Parameters:
{command} - The name of the CLI command. Use this argument to show help for a specific command.
Example of help with no optional command:
Example of help with an optional command
OneCommand NIC Teaming and VLAN Manager User Manual Page 31
Backing Up the NIC Teaming Configuration
Syntax:
OCTeamCmd.exe backup <filename>
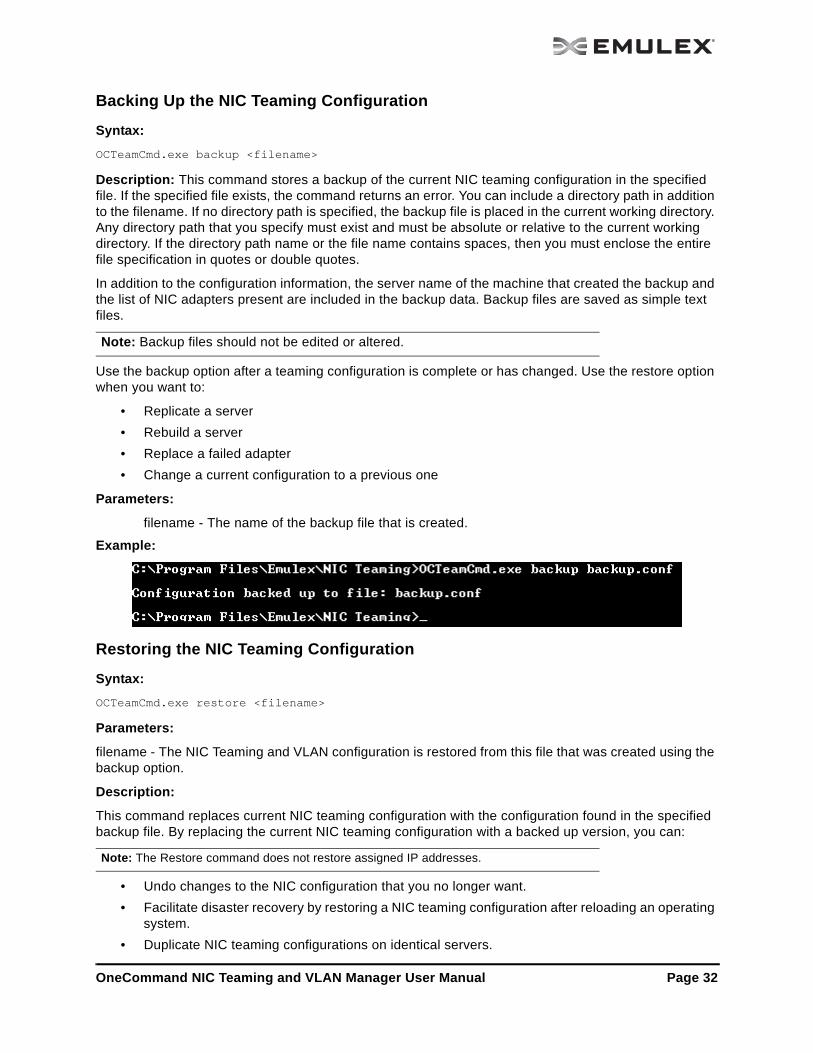
Description: This command stores a backup of the current NIC teaming configuration in the specified file. If the specified file exists, the command returns an error. You can include a directory path in addition to the filename. If no directory path is specified, the backup file is placed in the current working directory. Any directory path that you specify must exist and must be absolute or relative to the current working directory. If the directory path name or the file name contains spaces, then you must enclose the entire file specification in quotes or double quotes.
In addition to the configuration information, the server name of the machine that created the backup and the list of NIC adapters present are included in the backup data. Backup files are saved as simple text files.
Use the backup option after a teaming configuration is complete or has changed. Use the restore option when you want to:
• Replicate a server
• Rebuild a server
• Replace a failed adapter
• Change a current configuration to a previous one
Parameters:
filename - The name of the backup file that is created.
Example:
Restoring the NIC Teaming Configuration
Syntax:
OCTeamCmd.exe restore <filename>
Parameters:
filename - The NIC Teaming and VLAN configuration is restored from this file that was created using the backup option.
Description:
This command replaces current NIC teaming configuration with the configuration found in the specified backup file. By replacing the current NIC teaming configuration with a backed up version, you can:
• Undo changes to the NIC configuration that you no longer want.
• Facilitate disaster recovery by restoring a NIC teaming configuration after reloading an operating system.
• Duplicate NIC teaming configurations on identical servers.
Note: Backup files should not be edited or altered.
Note: The Restore command does not restore assigned IP addresses.
OneCommand NIC Teaming and VLAN Manager User Manual Page 32
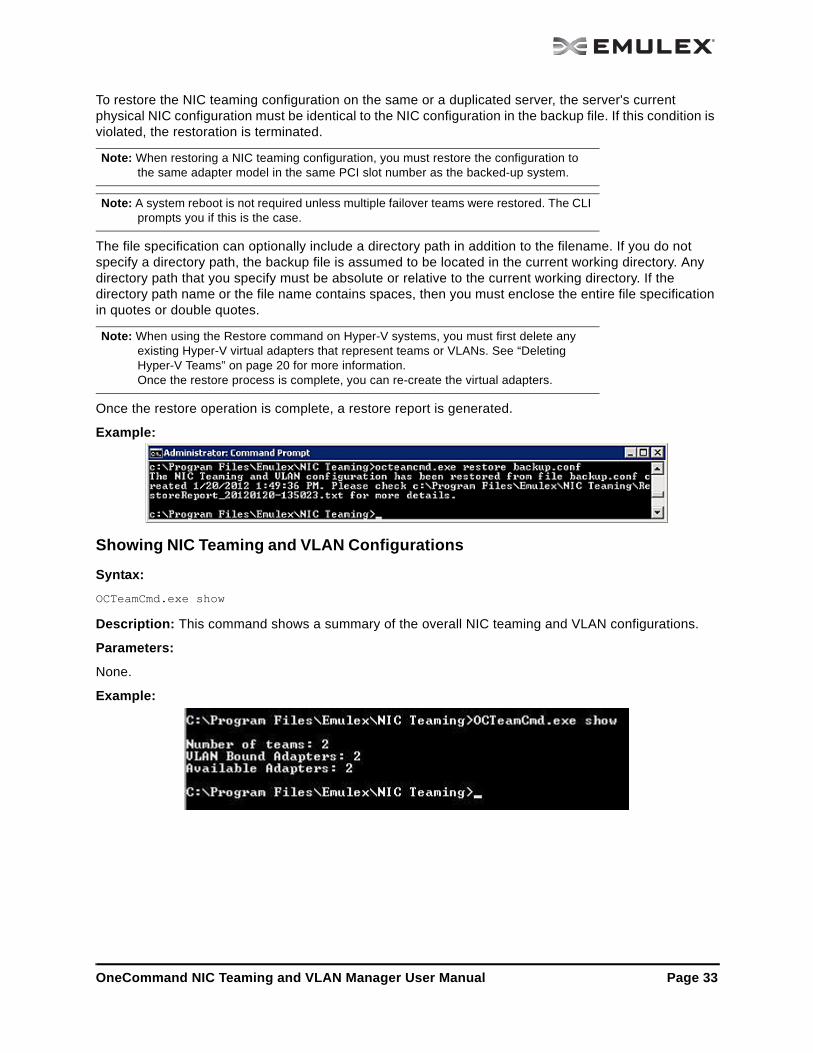
To restore the NIC teaming configuration on the same or a duplicated server, the server's current physical NIC configuration must be identical to the NIC configuration in the backup file. If this condition is violated, the restoration is terminated.
The file specification can optionally include a directory path in addition to the filename. If you do not specify a directory path, the backup file is assumed to be located in the current working directory. Any directory path that you specify must be absolute or relative to the current working directory. If the directory path name or the file name contains spaces, then you must enclose the entire file specification in quotes or double quotes.
Once the restore operation is complete, a restore report is generated.
Example:
Showing NIC Teaming and VLAN Configurations
Syntax:
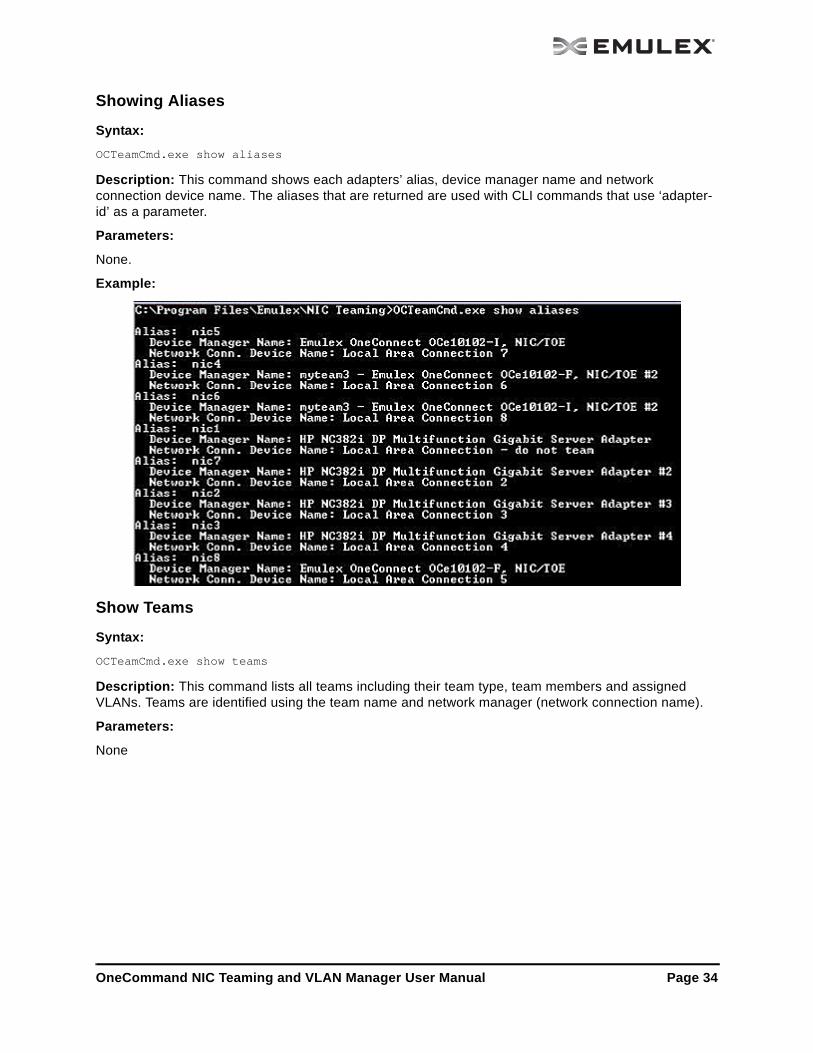
OCTeamCmd.exe show
Description: This command shows a summary of the overall NIC teaming and VLAN configurations.
Parameters:
None.
Example:
Note: When restoring a NIC teaming configuration, you must restore the configuration to the same adapter model in the same PCI slot number as the backed-up system.
Note: A system reboot is not required unless multiple failover teams were restored. The CLI prompts you if this is the case.
Note: When using the Restore command on Hyper-V systems, you must first delete any existing Hyper-V virtual adapters that represent teams or VLANs. See “Deleting Hyper-V Teams” on page 20 for more information. Once the restore process is complete, you can re-create the virtual adapters.
OneCommand NIC Teaming and VLAN Manager User Manual Page 33
Showing Aliases
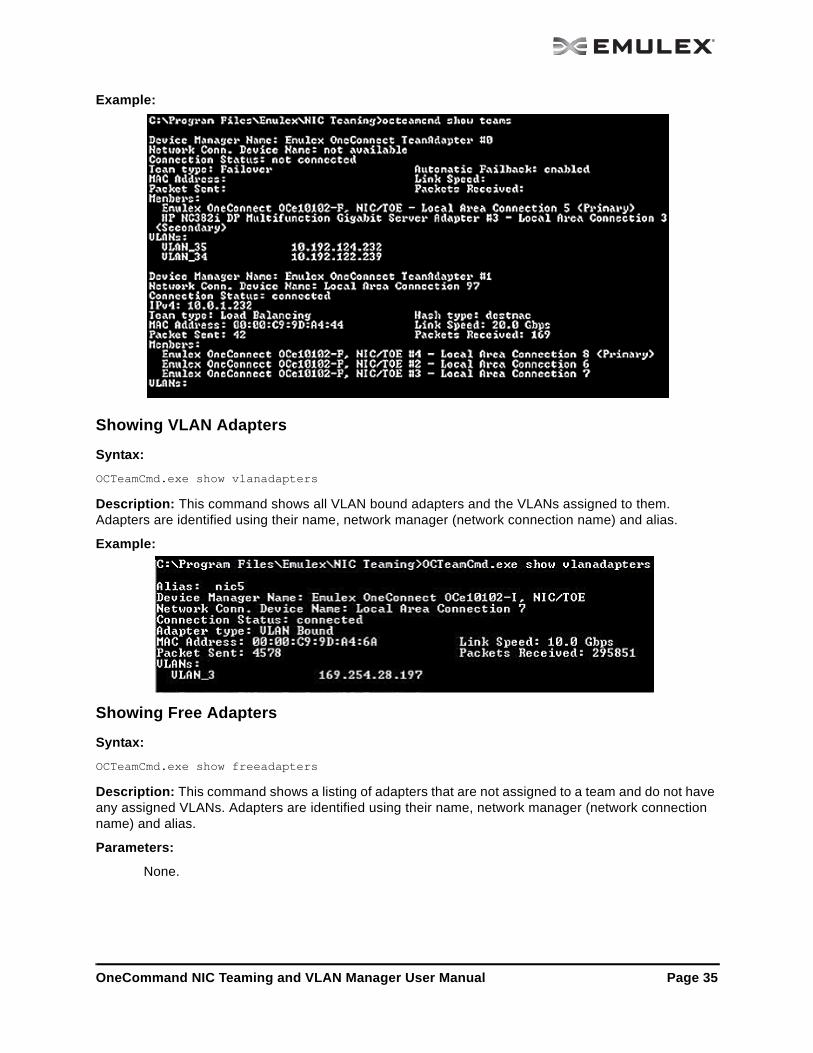
Syntax:
OCTeamCmd.exe show aliases
Description: This command shows each adapters’ alias, device manager name and network connection device name. The aliases that are returned are used with CLI commands that use ‘adapter-id’ as a parameter.
Parameters:
None.
Example:
Show Teams
Syntax:
OCTeamCmd.exe show teams
Description: This command lists all teams including their team type, team members and assigned VLANs. Teams are identified using the team name and network manager (network connection name).
Parameters:
None
OneCommand NIC Teaming and VLAN Manager User Manual Page 34
Example:
Showing VLAN Adapters
Syntax:
OCTeamCmd.exe show vlanadapters
Description: This command shows all VLAN bound adapters and the VLANs assigned to them. Adapters are identified using their name, network manager (network connection name) and alias.
Example:
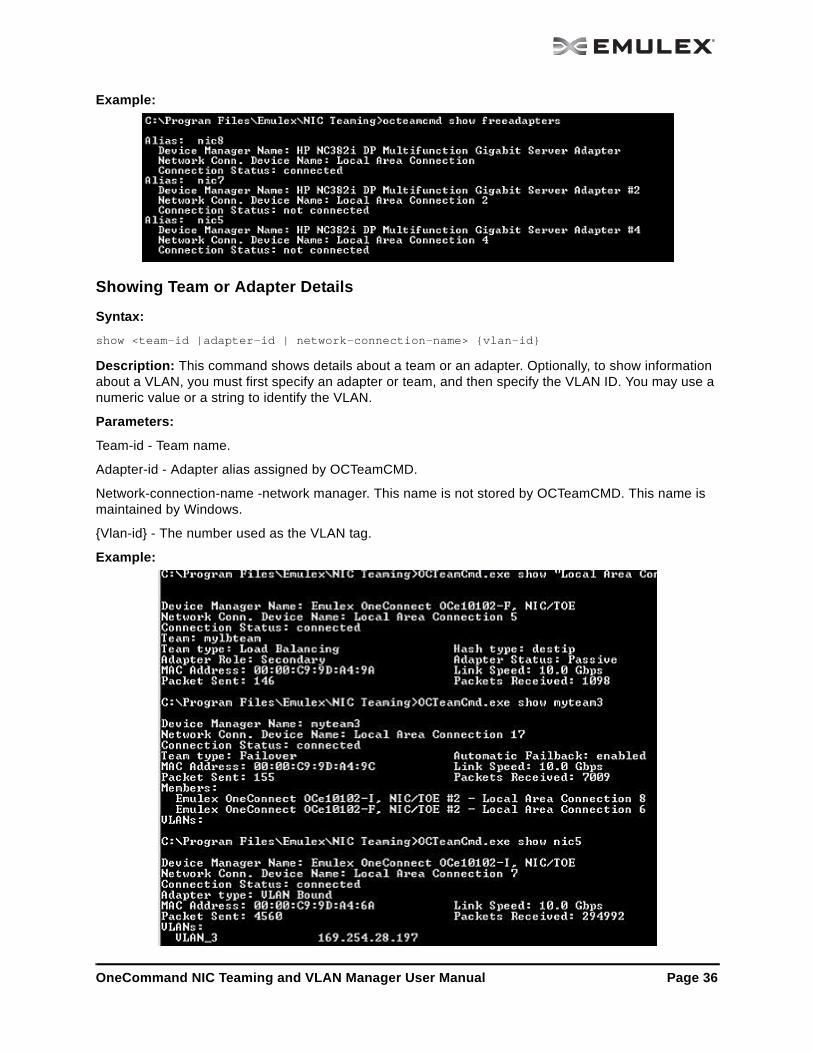
Showing Free Adapters
Syntax:
OCTeamCmd.exe show freeadapters
Description: This command shows a listing of adapters that are not assigned to a team and do not have any assigned VLANs. Adapters are identified using their name, network manager (network connection name) and alias.
Parameters:
None.
OneCommand NIC Teaming and VLAN Manager User Manual Page 35
Example:
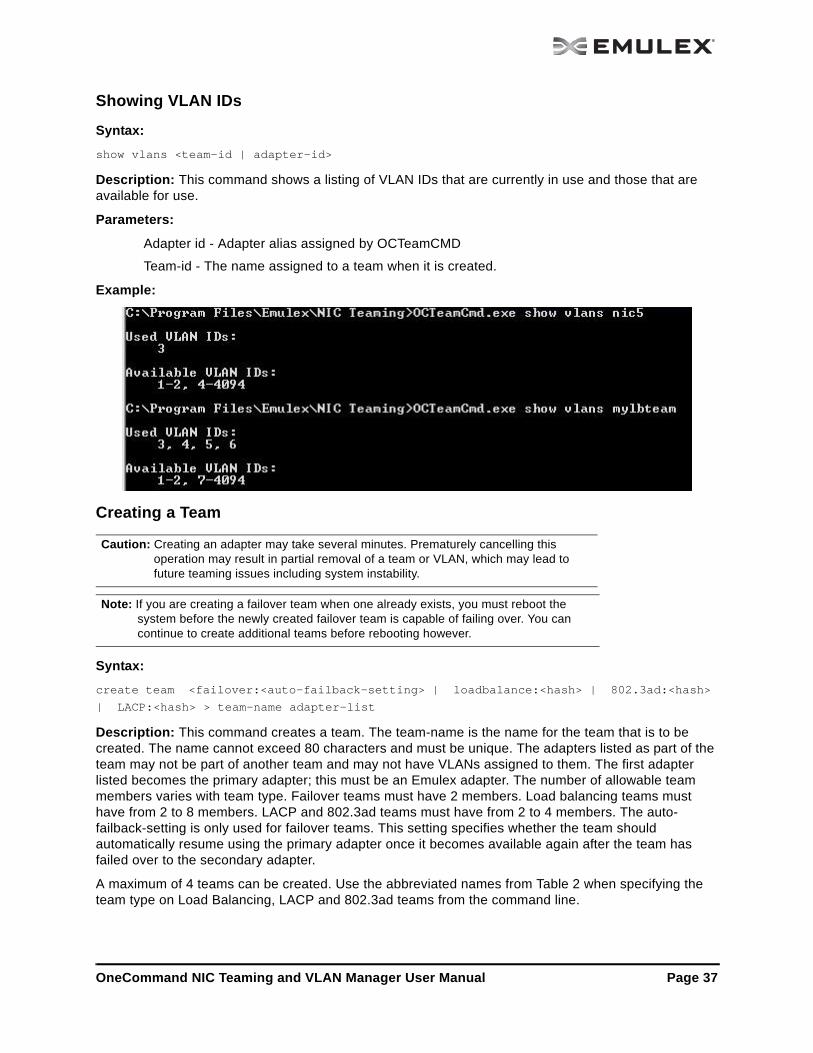
Showing Team or Adapter Details
Syntax:
show <team-id |adapter-id | network-connection-name> {vlan-id}
Description: This command shows details about a team or an adapter. Optionally, to show information about a VLAN, you must first specify an adapter or team, and then specify the VLAN ID. You may use a numeric value or a string to identify the VLAN.
Parameters:
Team-id - Team name.
Adapter-id - Adapter alias assigned by OCTeamCMD.
Network-connection-name -network manager. This name is not stored by OCTeamCMD. This name is maintained by Windows.
{Vlan-id} - The number used as the VLAN tag.
Example:
OneCommand NIC Teaming and VLAN Manager User Manual Page 36
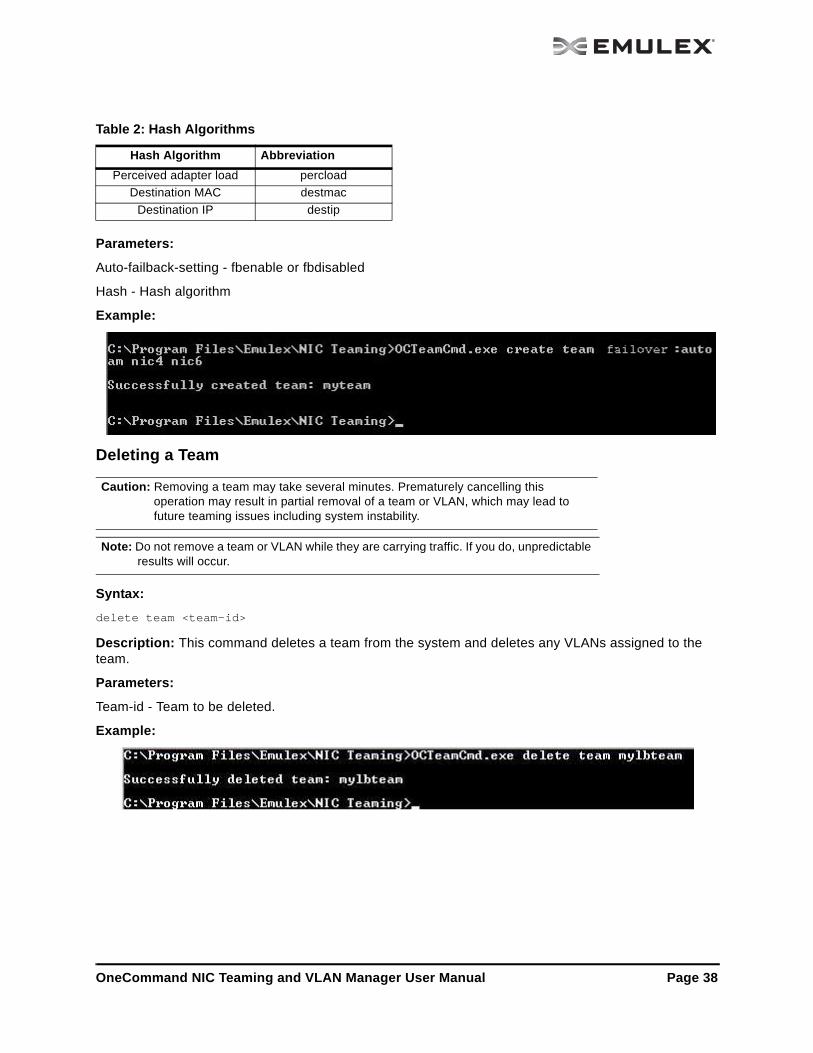
Showing VLAN IDs
Syntax:
show vlans <team-id | adapter-id>
Description: This command shows a listing of VLAN IDs that are currently in use and those that are available for use.
Parameters:
Adapter id - Adapter alias assigned by OCTeamCMD
Team-id - The name assigned to a team when it is created.
Example:
Creating a Team
Syntax:
create team <failover:<auto-failback-setting> | loadbalance:<hash> | 802.3ad:<hash>
| LACP:<hash> > team-name adapter-list
Description: This command creates a team. The team-name is the name for the team that is to be created. The name cannot exceed 80 characters and must be unique. The adapters listed as part of the team may not be part of another team and may not have VLANs assigned to them. The first adapter listed becomes the primary adapter; this must be an Emulex adapter. The number of allowable team members varies with team type. Failover teams must have 2 members. Load balancing teams must have from 2 to 8 members. LACP and 802.3ad teams must have from 2 to 4 members. The auto-failback-setting is only used for failover teams. This setting specifies whether the team should automatically resume using the primary adapter once it becomes available again after the team has failed over to the secondary adapter.
A maximum of 4 teams can be created. Use the abbreviated names from Table 2 when specifying the team type on Load Balancing, LACP and 802.3ad teams from the command line.
Caution: Creating an adapter may take several minutes. Prematurely cancelling this operation may result in partial removal of a team or VLAN, which may lead to future teaming issues including system instability.
Note: If you are creating a failover team when one already exists, you must reboot the system before the newly created failover team is capable of failing over. You can continue to create additional teams before rebooting however.
OneCommand NIC Teaming and VLAN Manager User Manual Page 37
Parameters:
Auto-failback-setting - fbenable or fbdisabled
Hash - Hash algorithm
Example:
Deleting a Team
Syntax:
delete team <team-id>
Description: This command deletes a team from the system and deletes any VLANs assigned to the team.
Parameters:
Team-id - Team to be deleted.
Example:
Table 2: Hash Algorithms
Hash Algorithm Abbreviation
Perceived adapter load percload
Destination MAC destmac
Destination IP destip
Caution: Removing a team may take several minutes. Prematurely cancelling this operation may result in partial removal of a team or VLAN, which may lead to future teaming issues including system instability.
Note: Do not remove a team or VLAN while they are carrying traffic. If you do, unpredictable results will occur.
OneCommand NIC Teaming and VLAN Manager User Manual Page 38
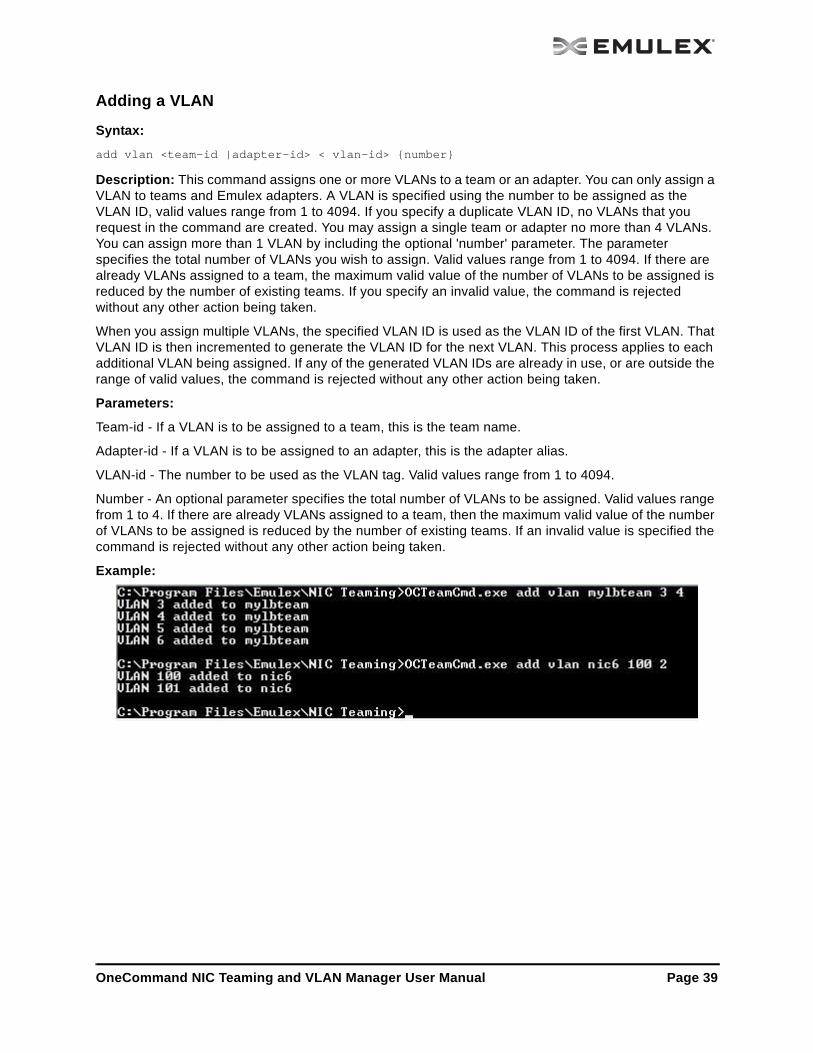
Adding a VLAN
Syntax:
add vlan <team-id |adapter-id> < vlan-id> {number}
Description: This command assigns one or more VLANs to a team or an adapter. You can only assign a VLAN to teams and Emulex adapters. A VLAN is specified using the number to be assigned as the VLAN ID, valid values range from 1 to 4094. If you specify a duplicate VLAN ID, no VLANs that you request in the command are created. You may assign a single team or adapter no more than 4 VLANs. You can assign more than 1 VLAN by including the optional 'number' parameter. The parameter specifies the total number of VLANs you wish to assign. Valid values range from 1 to 4094. If there are already VLANs assigned to a team, the maximum valid value of the number of VLANs to be assigned is reduced by the number of existing teams. If you specify an invalid value, the command is rejected without any other action being taken.
When you assign multiple VLANs, the specified VLAN ID is used as the VLAN ID of the first VLAN. That VLAN ID is then incremented to generate the VLAN ID for the next VLAN. This process applies to each additional VLAN being assigned. If any of the generated VLAN IDs are already in use, or are outside the range of valid values, the command is rejected without any other action being taken.
Parameters:
Team-id - If a VLAN is to be assigned to a team, this is the team name.
Adapter-id - If a VLAN is to be assigned to an adapter, this is the adapter alias.
VLAN-id - The number to be used as the VLAN tag. Valid values range from 1 to 4094.
Number - An optional parameter specifies the total number of VLANs to be assigned. Valid values range from 1 to 4. If there are already VLANs assigned to a team, then the maximum valid value of the number of VLANs to be assigned is reduced by the number of existing teams. If an invalid value is specified the command is rejected without any other action being taken.
Example:
OneCommand NIC Teaming and VLAN Manager User Manual Page 39

Deleting a VLAN
Syntax:
delete vlan <team-id|adapter-id> << vlan-id> {number}>
Description: This command deletes one or more VLANs from a team or an adapter. You must specify the VLAN with its VLAN ID. Additionally, if the VLAN to be deleted belongs to a team, you must specify the team, and if the VLAN is assigned to an adapter, you must specify the adapter id. Optionally, you can delete multiple VLANs by following the VLAN ID with the number of VLANs to be deleted.
If you are deleting multiple VLANs, the specified VLAN ID is used as the VLAN ID of the first VLAN to delete. The VLAN IDs of the other VLANs to be deleted must sequentially follow the VLAN ID of the first VLAN. If any of these VLANs do not exist, then no VLANs specified in the command are deleted.
Single VLANs may also be deleted by specifying their VLAN ID without the optional number of VLANs to delete.
Parameters:
Team-id - Team to which a VLAN to be deleted belongs,
Adapter-id - Adapter alias of the VLAN to be deleted from an adapter.
VLAN-id - VLAN tag.
Number - An optional parameter specifies the total number of VLANs to be deleted. Valid values range from 1 to 4.
Example:
Note: Do not remove a team or VLAN while they are carrying traffic. Doing so may produce unpredictable results.
OneCommand NIC Teaming and VLAN Manager User Manual Page 40
APPENDIX A Load Balancing Use Cases
Perceived Port LoadThis method automatically distributes TCP/IP traffic across team member channels by examining traffic load history patterns.
When to Use
Favorable types of traffic patterns for this balancing method include web traffic (HTTP, HTTPS) and e-mail traffic (SMTP, POP3). New TCP/IP connections are assigned to the more lightly loaded member channel links to balance traffic loading across all members over time. Only TCP/IP traffic is balanced and distributed (other non-connection oriented traffic, such as UDP/IP), and non-IP traffic (such as IPX/SPX and others) is assigned to a single default team member and is not balanced. Once a connection is opened and assigned to a member link, that TCP/IP connection's traffic is never moved to a new link without regard to the out-of-balance level the overall team might be experiencing. There must be a consistent stream of new TCP/IP connections (and typically a consistent stream of terminated TCP/IP connections which have finished work) for this traffic balancing method to perform well. This type of process works well for servers that process a lot of small transactional operations that start and then end individual TCP/IP connections for each transaction. Some database protocols involve new connections for each query; these also work well with this method.
When Not to Use
Connections that are very long lived or which are not TCP/IP based are a poor fit with this choice of balancing technique. Examples of long-lived connections are most TCP/IP storage traffic such as NFS (Unix/Linux, others), CIFS (Windows), and iSCSI (widespread usage).
Destination MAC This method is team member channel selection (hashing) based on the destination MAC address.
When to Use
Use this method when the local system is the server and the server communicates through a NIC team to a switch, and then to many other systems on the local subnet (typically many client, laptop or desktop systems). To be effective, the remote systems must be located on the same IP address subnet as the server team is located. Use this method only when the server system communicates with many clients (or other servers) on the local subnet. Only systems that are on the local subnet have highly variant destination MAC addresses in Ethernet frames sent from the server system NIC team to those systems.
When Not to Use
If the client, laptop or desktop systems are located on different IP subnets and IP routing is required to reach them (from the server), this method is typically not a good fit. When the Ethernet frames sent from the server system's NIC team to the IP router (often a single gateway) all have the same constant destination MAC address (that of the IP router), this method does not distribute traffic well. When all of
OneCommand NIC Teaming and VLAN Manager User Manual Page 41
the packets in all of the TCP/IP have the same destination MAC address (of the IP router), they all hash to the same member (individual link) of the NIC team, and all of the traffic has to travel on one link instead of being distributed to across many links.
Destination IP This method is team member channel selection (hashing) based on the destination IP address.
When to Use
Use this method in these two situations:
• When a server communicates with many client systems (or peer servers) that are on the local IP subnet (they have the same subnet as the server). In this case, the Destination IP address varies for each client, and a good distribution of load based on varying IP addresses results between the server and the network switch.
• When the local server communicates with many client systems (or peer servers) that are located on different IP subnets. Non-local (different subnet) or local IP addresses give a good distribution with this method when the IP addresses have good variation across the group. IP address assignments are often not in the control of the administrator setting up a NIC team, therefore the best way to guarantee a good distribution is when the group of client systems is large, and there is good random variation in their IP address assignments.
When Not to Use
This method is a poor fit when you have communication between only a few clients (or peer servers) and the server, as there is insufficient variation in the set of destination IP addresses because there are few partners for IP traffic.
OneCommand NIC Teaming and VLAN Manager User Manual Page 42