onedrive for business quick reference - customguide · onedrive for business quick reference card...
TRANSCRIPT
Your Organization’s Name Here Add your own message, logo, and contact information! To learn more, contact [email protected] | 612.871.5004
Ó 2018 CustomGuide, Inc.
Microsoft®
OneDrive for Business Quick Reference Card
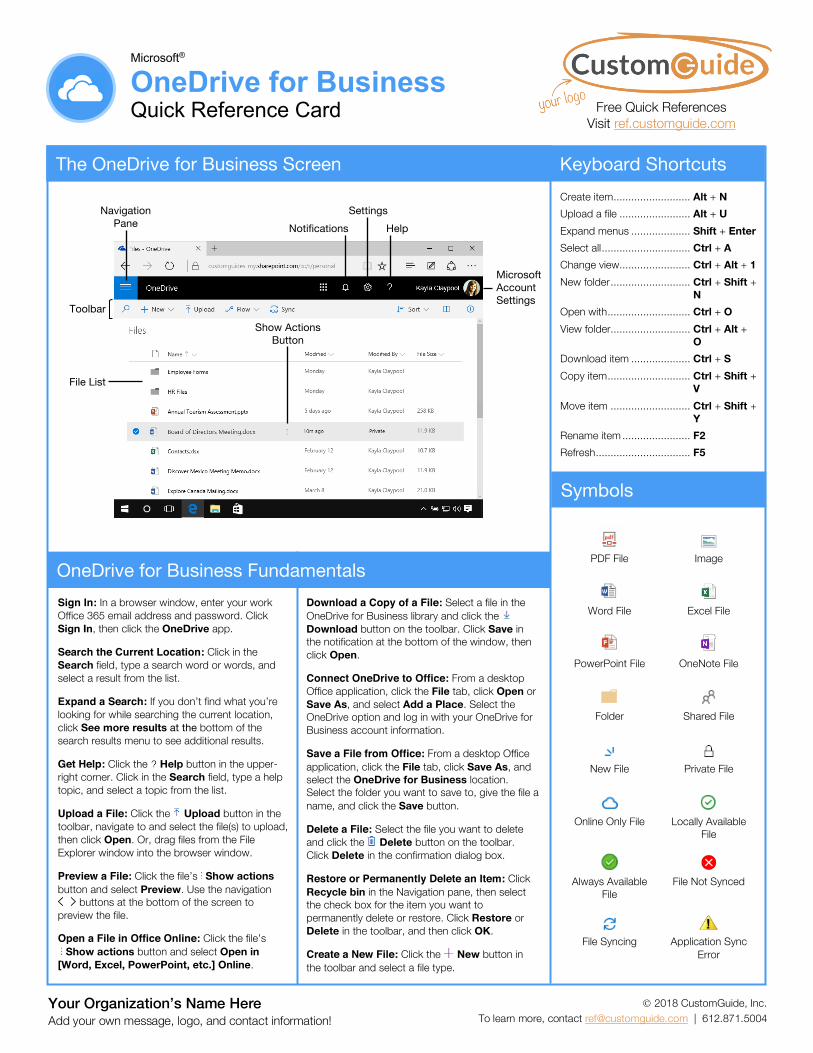
The OneDrive for Business Screen
Sign In: In a browser window, enter your work Office 365 email address and password. Click Sign In, then click the OneDrive app.
Search the Current Location: Click in the Search field, type a search word or words, and select a result from the list.
Expand a Search: If you don’t find what you’re looking for while searching the current location, click See more results at the bottom of the search results menu to see additional results.
Get Help: Click the Help button in the upper-right corner. Click in the Search field, type a help topic, and select a topic from the list.
Upload a File: Click the Upload button in the toolbar, navigate to and select the file(s) to upload, then click Open. Or, drag files from the File Explorer window into the browser window.
Preview a File: Click the file’s Show actions button and select Preview. Use the navigation
buttons at the bottom of the screen to preview the file.
Open a File in Office Online: Click the file’s Show actions button and select Open in
[Word, Excel, PowerPoint, etc.] Online.
Download a Copy of a File: Select a file in the OneDrive for Business library and click the Download button on the toolbar. Click Save in the notification at the bottom of the window, then click Open.
Connect OneDrive to Office: From a desktop Office application, click the File tab, click Open or Save As, and select Add a Place. Select the OneDrive option and log in with your OneDrive for Business account information.
Save a File from Office: From a desktop Office application, click the File tab, click Save As, and select the OneDrive for Business location. Select the folder you want to save to, give the file a name, and click the Save button.
Delete a File: Select the file you want to delete and click the Delete button on the toolbar. Click Delete in the confirmation dialog box.
Restore or Permanently Delete an Item: Click Recycle bin in the Navigation pane, then select the check box for the item you want to permanently delete or restore. Click Restore or Delete in the toolbar, and then click OK.
Create a New File: Click the New button in the toolbar and select a file type.
Create item .......................... Alt + N Upload a file ........................ Alt + U Expand menus .................... Shift + Enter Select all .............................. Ctrl + A Change view ........................ Ctrl + Alt + 1 New folder ........................... Ctrl + Shift +
N Open with ............................ Ctrl + O View folder ........................... Ctrl + Alt +
O Download item .................... Ctrl + S Copy item ............................ Ctrl + Shift +
V Move item ........................... Ctrl + Shift +
Y Rename item ....................... F2 Refresh ................................ F5
PDF File Image
Word File Excel File
PowerPoint File OneNote File
Folder Shared File
New File Private File
Online Only File Locally Available File
Always Available File
File Not Synced
File Syncing Application Sync Error
Keyboard Shortcuts
Free Quick References Visit ref.customguide.com
Notifications Settings
Help
Hel
Microsoft Account Settings
Toolbar
Navigation Pane
File List
Symbols
OneDrive for Business Fundamentals
Show Actions Button
Hel
Ó 2018 CustomGuide, Inc.
Manage Files Create a Folder: Click the New button on the toolbar and select New Folder. Enter a name for the folder, then click Create.
Move Files to a Folder: Click and drag the files into the folder.
Upload Files to a Folder: Open the folder, click the Upload button, then navigate to and select a file. Click Open.
View File Properties: Select a file, click the file’s Show actions button, then select Details. From here, you can see who has access to the file and view recent activity. Click More details to see additional file information.
Check Version History: Select a file, click the file’s Show actions button, then select Version history. Use the Version History pane to open, restore, or delete a version.
Sort and Filter Files: Click a column header and select a sort order, or select a filter criteria.
Change Views: Click the View options button in the toolbar and select a view option.
Set Up PC Sync: Click the Sync button on the toolbar, then click Yes to switch to the OneDrive app. Select the folder(s) you want to sync to your PC and click Start sync. Click the OneDrive for Business icon in your computer’s system tray to view the folders synced to your PC.
Pause Syncing: Right-click the OneDrive for Business icon in the system tray at the bottom of your screen, select Pause syncing, then select how long you wish to pause the sync. To resume syncing, right-click the icon again and select Resume syncing.
Stop Syncing: Right-click the OneDrive for Business icon in the system tray at the bottom of your screen, then select Settings. In the Account tab, click Unlink this PC, then click the Unlink Account button. The folder will permanently stop syncing; locally available files will remain on your computer while online only files will be removed.
Work Offline: If you’ve synced your OneDrive for Business with your PC, you can easily access files while not online. Double-click the OneDrive for Business icon in the system tray to view and open the files. Once an internet connection is restored, the files will sync to the online location.
Share Files
Share a Folder: Select a folder, then click the Share button in the toolbar. Set a permission level for the folder, enter the names or email addresses of the people you’d like to share with, and add a message (optional). When you’re done, click Send.
Open the Shared with Everyone Folder: Click Files in the Navigation pane, then click the Shared with Everyone folder. Everything in this folder will automatically be shared with everyone in your organization. Click and drag files and folders into this folder to quickly share them with everyone.
View Only Shared Files: Click Shared in the Navigation pane. At the top of the page, click Shared with me to see the files that have been shared with you by others in your organization. Click Shared by me to see all the files you have shared with others.
Share a File: Select a file, then click the Share button in the toolbar. Set a permission level for the file, enter the names or email addresses of the people you’d like to share with, and add a message (optional). When you’re done, click Send.
See Who a File is Shared With: Click a file’s Show actions button, then select Details. See who the file is shared with under the Has Access heading.
Email a Link: Click a file’s Show actions button, then select Share. Click Outlook to create a new email in Outlook that’s populated with a link to the file.
Copy a Link to the File: Select a file and click the Copy Link button in the toolbar. Click the Copy button. Paste the link into any application, email message, or instant message, etc. to share it with others.
Co-Author a File: Open a file at the same time as another person. Any users in the file are listed at the top-right corner. Click a user’s name to see what they are currently editing. Any updates are saved and synced automatically.
Access OneDrive for Business Settings: Click the Settings icon at the upper-right corner of the window. The Settings pane displays a Search field, a link to site settings, theme and notification settings, in addition to other OneDrive for Business settings.
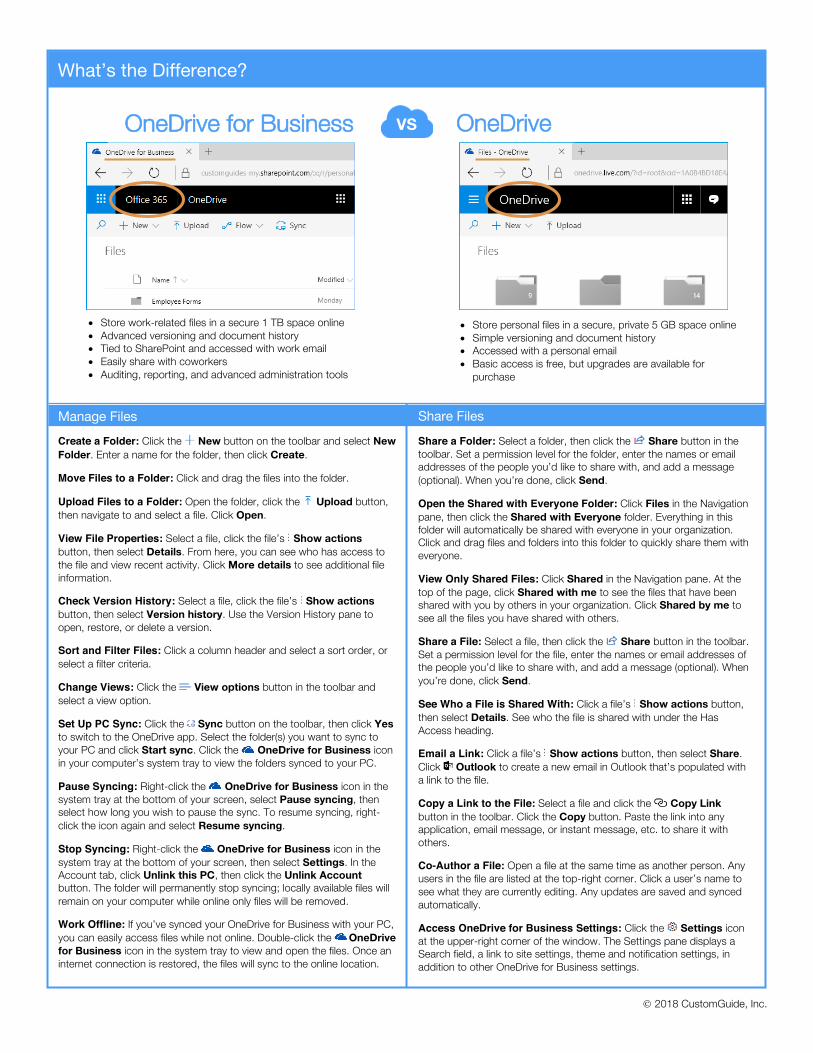
What’s the Difference?
VS OneDrive OneDrive for Business
• Store personal files in a secure, private 5 GB space online• Simple versioning and document history• Accessed with a personal email• Basic access is free, but upgrades are available for
purchase
• Store work-related files in a secure 1 TB space online• Advanced versioning and document history• Tied to SharePoint and accessed with work email• Easily share with coworkers• Auditing, reporting, and advanced administration tools
Contact Us! [email protected] 612.871.5004
Get More Free Quick References! Visit ref.customguide.com to download.
Office 365 Access
Excel
Office 365
OneNote
Outlook
PowerPoint
Teams
Word
G Suite Classroom
G Suite
Gmail
Google Calendar
Google Docs
Google Drive
Google Sheets
Google Slides
OS
Mac OS
Windows 10
Productivity
Digital Literacy
Salesforce
Soft Skills
Business Writing
Email Etiquette
Manage Meetings
Presentations
Security Basics
SMART Goals
+ more, including Spanish versions
Loved by Learners, Trusted by Trainers Please consider our other training products!
Interactive eLearning Get hands-on training with bite-sized tutorials that recreate the experience of using actual software. SCORM-compatible lessons.
Customizable Courseware Why write training materials when we’ve done it for you? Training manuals with unlimited printing rights!
Over 3,000 Organizations Rely on CustomGuide
The toughest part [in training] is creating the material, which CustomGuide has done for us. Employees have found the courses easy to follow and, most importantly, they were able to use what they learned immediately. “