online inventory user’s guide - us foods - us... · online inventory . user’s guide . ... •...
TRANSCRIPT

Online Inventory User’s Guide November 2014
A Taste of What’s Cooking at US Foods

Customer Management User’s Guide
Table of Contents USFOOD.COM INVENTORY OVERVIEW ............................................................................................................. 3 USFOOD.COM INVENTORY REPORTS* ............................................................................................................. 3
BEFORE YOU BEGIN ............................................................................................................................................ 5
IMPORTANT - READ BEFORE STARTING ................................................................................................................... 6 Inventory specific data elements .................................................................................................................... 6 Inventory reports are linked to lists ................................................................................................................. 7
NEW - UPLOADING AN INVENTORY WORKSHEET .......................................................................................... 8 CREATE AN INVENTORY ................................................................................................................................... 13
OVERVIEW .......................................................................................................................................................... 13 STEP 1 - SELECT A SHOPPING LIST TO RECORD INVENTORY .................................................................................. 14 STEP 2 - UPDATE THE SELECTED SHOPPING LIST WITH ALL ITEMS TO BE INVENTORIED OR CREATE A NEW LIST ......... 15 STEP 3 - UPDATE INVENTORY UNITS (OPTIONAL) ................................................................................................... 16 STEP 4 – CREATE AND ASSIGN GL CODES ........................................................................................................... 17 STEP 5 - PRINT A WORKSHEET TO RECORD THE INVENTORY .................................................................................. 19 STEP 6 - RECORD THE INVENTORY ....................................................................................................................... 21 STEP 7 - ENTER THE RECORDED INVENTORY ........................................................................................................ 22 STEP 8 - PRINT THE INVENTORY COST REPORT .................................................................................................... 24
Sample Printed Inventory Cost Report ......................................................................................................... 25 STEP 9 - PRINT THE INVENTORY COST COMPARISON REPORT ............................................................................... 26
Sample Inventory Cost Comparison Report ................................................................................................. 27
APPENDIX ............................................................................................................................................................ 28
INVENTORY PRE-WORK........................................................................................................................................ 28 Step 1: Pre-work - Create GL Codes (optional) ........................................................................................... 28 Step 2: Pre-work - Copy a new list to record inventory ................................................................................ 30 Create a new list from scratch to record inventory ....................................................................................... 31 Step 3: Pre-work - Assign GL Codes (optional) ........................................................................................... 34
ADDING PRODUCTS TO A LIST .............................................................................................................................. 39 Add new products by using Search .............................................................................................................. 39 Add new products using Edit Group ............................................................................................................. 41
ADDING NON USF PRODUCTS ............................................................................................................................. 43 ADDING PAR LEVELS ........................................................................................................................................... 45 INVENTORY WORKSHEET ..................................................................................................................................... 47
Inventory Worksheet - PDF version ............................................................................................................. 47 Inventory Worksheet – CSV Version ............................................................................................................ 49
INVENTORY COST REPORTS ................................................................................................................................ 50 CREATING A REPORT .......................................................................................................................................... 51
Inventory Cost – Description Ascending ...................................................................................................... 52 Inventory Cost – Extended Value – Descending .......................................................................................... 52 Inventory Cost – GL# with Subtotal Detail - Ascending ............................................................................... 53 Inventory Cost – GL# without Subtotal Detail – Ascending.......................................................................... 53 Inventory Cost Comparison – All Products .................................................................................................. 55 Inventory Cost Comparison – Changes Only ............................................................................................... 55 Inventory Cost Report – Summary ............................................................................................................... 56
INDEX ................................................................................................................................................................... 57
For the exclusive use of US Foods customers and employees Page 2 of 58

Customer Management User’s Guide
USFood.com Inventory Overview
• Real time costing of all recorded US Foods products • Supports non-US Foods products • Compare costs between recorded inventories • Generate orders automatically based on pre-established par values. These orders can
be reviewed and modified prior to submission. • Identify high cost products within your inventory. • Identify and reduce ordering levels for over-stocked items. • Compare pricing of current inventories to past inventories. • Create general ledger reports for your company's accounting department.
USFood.com Inventory Reports* Inventory Worksheet
• Print any shopping list in this format. Use multiple columns to record inventory or order
Inventory Cost:
• Description - Ascending • Extended Value – Descending • GL# with Subtotal Detail • GL# without Subtotal Detail • Line # - Ascending • Product # - Ascending
Inventory Cost Comparison
Select separate dates for the same inventory list. Compare:
• All products • Price changes only
Sort by: • Percent price change – descending
USFood.com Inventory Future Enhancements
• Total food cost - The inventory system does not yet calculate total food cost by comparing starting inventory, total purchases and ending inventory.
• Integration with MPP – Non-USF products in the inventory system are not yet integrated with Menu ProfitBuilder Pro.
• Product specific GL codes – Today, when a product is GL coded, the GL code is associated to the list it is on, not the specific product. If the product is added to another list, you must reselect the GL code.
For the exclusive use of US Foods customers and employees Page 3 of 58

Customer Management User’s Guide
• Reporting linked to lists – Today, if you delete a list, all inventory reports associated with that list will also be deleted. In the future, inventory reports will not be linked to the list that created them.
For the exclusive use of US Foods customers and employees Page 4 of 58

Customer Management User’s Guide
Before you begin If this is your first time:
1. Create a new list to be used to record inventory 2. Create GL Codes (optional) 3. Assign GL Codes (optional) 4. Edit inventory units (optional) 5. Create vendors (optional) 6. Create non-US Foods products (optional)
If you are a returning user:
1. Select a list to be used to record inventory 2. Delete products no longer being inventoried. 3. Add new products since last inventory. 4. Update all new products:
• Add GL Codes (if used) • Edit inventory units
5. Make sure all products to be inventoried are on the selected Shopping List. Important: You cannot add additional products to the list once you click on “Lists” and then “Create Inventory”. Make absolutely sure all products are on the list before you create the inventory.
For the exclusive use of US Foods customers and employees Page 5 of 58

Customer Management User’s Guide
Important - Read before starting
Inventory specific data elements Inventory specific data elements are:
• GL codes • Inventory units • Price overrides • Par Levels • Non USF products
These data elements are part of the Inventory List. They are not attached to the in the individual product number. If a new list is created from scratch, the inventory data elements must be re-entered for each product. To avoid re-entering this information when a new list is created, copy the original list with the inventory specific data elements. Edit the copied list as needed.
For the exclusive use of US Foods customers and employees Page 6 of 58

Customer Management User’s Guide
Inventory reports are linked to lists Inventories are linked to the list that created them.
For the exclusive use of US Foods customers and employees Page 7 of 58

Customer Management User’s Guide
New - Uploading an Inventory Worksheet Users now have the ability to upload inventory data elements for any list of products that will be used to take inventory. The downloaded CSV version of Inventory Worksheet acts as a template to upload the data.
Note – The upload process supports the upload of USF products only. Non-USF products cannot be uploaded using this process.
Process overview
• Select and download an existing list to use as a template • Edit list with new products, sort order, update or add par levels, GL codes, inventory
units and price overrides • Upload new Inventory Worksheet
Process details A. Select and download an existing list to use as a template
1. From the Lists menu, select Inventory Worksheet 2. Select the list to use as a template
3. Select Options: By Group “All” 4. Select Report Format: CSV Report 5. Click on “Create Report”
For the exclusive use of US Foods customers and employees Page 8 of 58

Customer Management User’s Guide
B. Edit list with new products, sort order, update or add par levels, GL codes, inventory units and price overrides
1. Inventory Worksheet / Customer - The upload process will ignore the list name and
customer info. You do not need to delete or make any changes to this information. 2. Group – The upload process will upload the group name assigned to the product.
Group names are limited to 25 characters and cannot contain the following characters: #$%^&* . The upload process will group all of the products with the same group name in sequential order even if they are out of order in the upload file.
3. Add/delete products – add new products or delete products from the worksheet. When adding products, only the group and product number are required.
4. Line number – not required for upload. The worksheet will be uploaded by group and in the same order as the product appears in the list. The line number does not affect the upload order.
5. Status # – information is ignored in this column 6. Description – information is ignored in this column 7. Par Levels – information is optional 8. Brand – information is ignored 9. Reference – information is optional. Use this field for a product notes or reference
number. 10. Pack size – information is ignored
For the exclusive use of US Foods customers and employees Page 9 of 58

Customer Management User’s Guide
11. Last Buy - information is ignored 12. On Hand - information is ignored
13. $Full – Delete the pricing in this column. Any price uploaded will set the pricing flag to price override.
14. $Part – Delete the pricing in this column. 15. Units / Full – these are the inventory units. This data can be edited to reflect the
customers inventory units. Format is number of units / unit description. Example: 6/pies
16. GL – Enter the product GL code. The GL codes must first be setup on the site using the Lists>Manage General Ledger function. Enter the GL # in this column – not the GL Account Name.
17. Vendor – Information in this column is ignored. At this point in time, non-usf products cannot be uploaded. An enhancement will be made to the system in Q1 2015 to enable this function.
For the exclusive use of US Foods customers and employees Page 10 of 58

Customer Management User’s Guide
C. Upload the new Inventory Worksheet
1. Click on Lists>Upload List. The Upload List pop-up will appear.
2. List name - Enter a unique name for the list 3. Select File Type – Select Inventory Worksheet 4. Select File – Click browse to navigate to the Inventory Worksheet file to upload 5. Click on begin upload. 6. After the list uploads, a message will appear:
7. If the upload is successful, it will note the number of groups and products added. Click
on the list name to view the list online.
For the exclusive use of US Foods customers and employees Page 11 of 58

Customer Management User’s Guide
8. If you have invalid characters in the group name, you will see the following message:
9. If you upload an invalid product number, you will see a detailed message:
For the exclusive use of US Foods customers and employees Page 12 of 58

Customer Management User’s Guide
Create an Inventory
Overview
1. Select a Shopping List to record inventory 2. Update the selected Shopping List with all items to be inventoried or create a new list. 3. Update Inventory Units (optional) 4. Create and assign GL codes (optional) 5. Print an inventory worksheet to record the inventory by clicking on Lists>Inventory Worksheet 6. Use the worksheet to record the inventory 7. Enter the recorded inventory. Only one inventory per list can be entered on a given date.
Note: Once you begin entering the inventory, you cannot add products to the shopping list. Make sure all products are on the selected Shopping List.
8. Print the Inventory Cost report 9. Print an Inventory Cost Comparison report to compare price changes for inventories recorded on
different days.
For the exclusive use of US Foods customers and employees Page 13 of 58
Customer Management User’s Guide
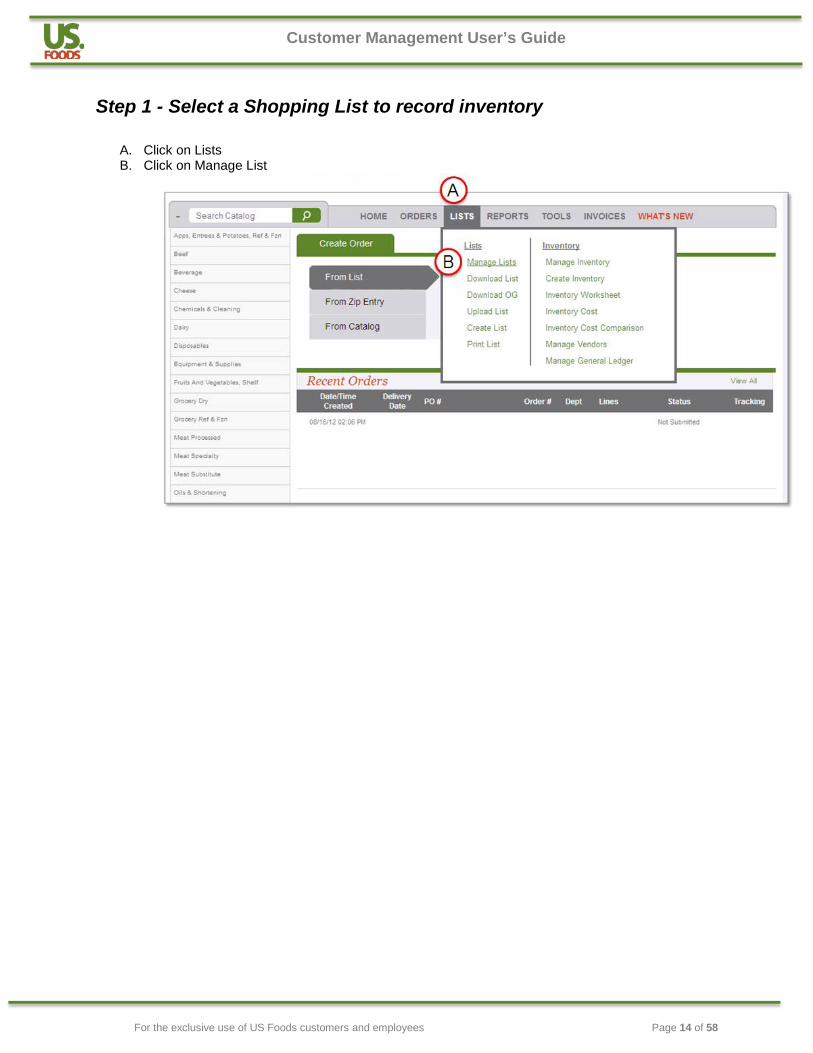
Step 1 - Select a Shopping List to record inventory
A. Click on Lists B. Click on Manage List
For the exclusive use of US Foods customers and employees Page 14 of 58

Customer Management User’s Guide
Step 2 - Update the selected Shopping List with all items to be inventoried or create a new list
A. Add new products by using search or B. Click on Edit Group to add USF and Non-USF products
(see Appendix for details)
For the exclusive use of US Foods customers and employees Page 15 of 58

Customer Management User’s Guide
Step 3 - Update inventory units (optional) Inventory Units can be edited based on how you want to count units of a product.
A. To update and inventory unit, click on the product number to access the Product Detail screen.
B. Click on the Inventory tab.
C. Enter the new “Inventory Unit Desc” and the desired number of units/case.
D. Click “Save” then close the window
In this example, the original inventory units were “1 case”. They were updated to “6 pies per case”.
For the exclusive use of US Foods customers and employees Page 16 of 58

Customer Management User’s Guide
Step 4 – Create and Assign GL Codes
For the exclusive use of US Foods customers and employees Page 17 of 58

Customer Management User’s Guide
For the exclusive use of US Foods customers and employees Page 18 of 58
Customer Management User’s Guide
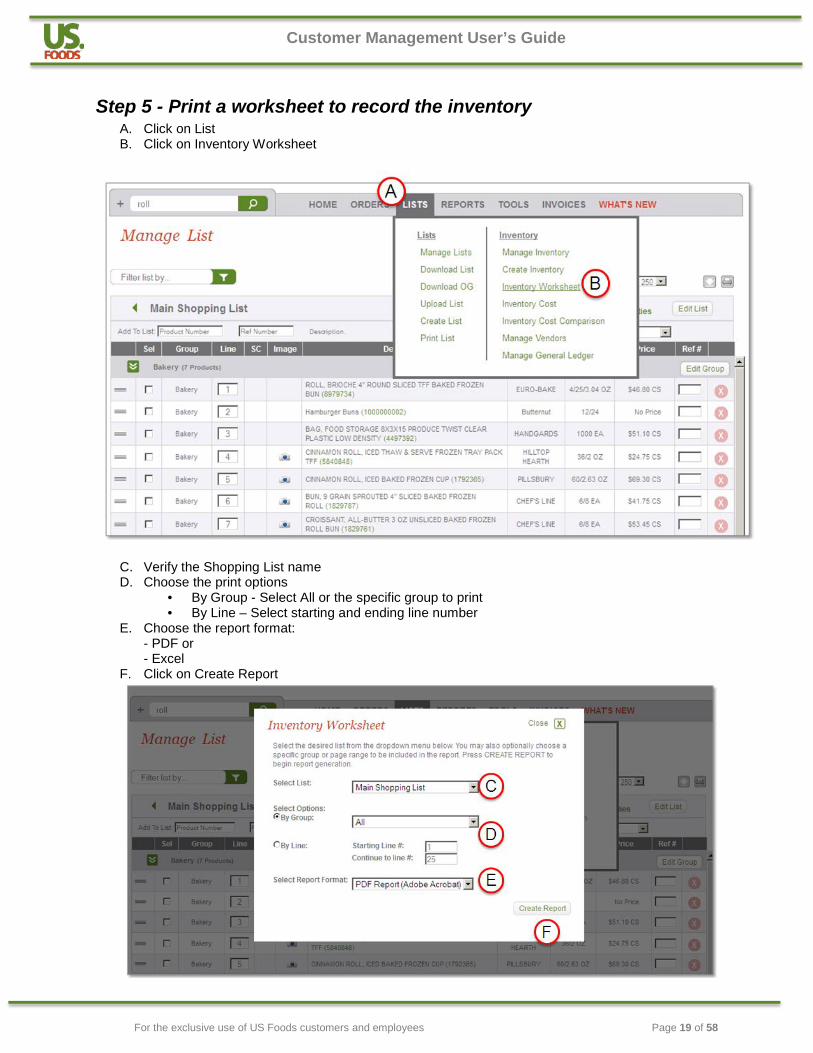
Step 5 - Print a worksheet to record the inventory A. Click on List B. Click on Inventory Worksheet
C. Verify the Shopping List name D. Choose the print options
• By Group - Select All or the specific group to print • By Line – Select starting and ending line number
E. Choose the report format: - PDF or - Excel
F. Click on Create Report
For the exclusive use of US Foods customers and employees Page 19 of 58

Customer Management User’s Guide
G. Once the worksheet appears, click on File from the main browser menu H. Click on Print I. Use the worksheet to record the inventory
For the exclusive use of US Foods customers and employees Page 20 of 58

Customer Management User’s Guide
Step 6 - Record the inventory Use the Inventory Worksheet to record the inventory
If you have a wifi signal and a tablet, record the inventory directly into the system.
For the exclusive use of US Foods customers and employees Page 21 of 58

Customer Management User’s Guide
Step 7 - Enter the recorded inventory
A. From the home page, click on Lists B. Click on Create Inventory
C. If there is more than one customer number attached to the user ID, verify the correct
customer and department is selected D. Select the Shopping List used to create the Inventory Worksheet E. Select the date of the inventory. Note: only one inventory per date per list can be
entered F. Click Create
For the exclusive use of US Foods customers and employees Page 22 of 58

Customer Management User’s Guide
G. Once you click Create, the Manage Inventories page will appear H. Open the selected inventory by clicking on the double arrows
I. Before entering the inventory, scroll to the bottom of the screen and click on Get Price. The current USF pricing will be pulled into the inventory.
J. Make needed adjustments to Non-USF products K. Enter full cases in the Case column L. Enter partials and catch weights in the Inv Unit column M. The system automatically saves your work so there is no Save button. N. Complete entering all inventory counts
For the exclusive use of US Foods customers and employees Page 23 of 58

Customer Management User’s Guide
Step 8 - Print the Inventory Cost Report
A. Click on Lists B. Click on Inventory Cost.
C. Select the date D. Select the inventory name or print all inventories recorded on the selected date E. Choose the Report Format: F. PDF or G. Excel H. Choose the desired Sort By option I. Click on Create Report
For the exclusive use of US Foods customers and employees Page 24 of 58

Customer Management User’s Guide
Sample Printed Inventory Cost Report
For the exclusive use of US Foods customers and employees Page 25 of 58

Customer Management User’s Guide
Step 9 - Print the Inventory Cost Comparison Report
A. Click on Lists B. Click on Inventory Cost Comparison.
C. Select the Inventory to compare D. Select the dates to compare E. Choose the Report Format: F. PDF or G. Excel H. Choose the products to include I. Choose the sort option J. Click on Create Report
For the exclusive use of US Foods customers and employees Page 26 of 58

Customer Management User’s Guide
Sample Inventory Cost Comparison Report
For the exclusive use of US Foods customers and employees Page 27 of 58

Customer Management User’s Guide
Appendix
Inventory Pre-work
Step 1: Pre-work - Create GL Codes (optional)
A. From the Lists menu, click on Manage General Ledger.
B. Click on the New General Ledger link.
For the exclusive use of US Foods customers and employees Page 28 of 58

Customer Management User’s Guide
C. Enter the GL # and Account Name. D. Click on Save to Current Location Only. E. Choose Save to All Locations if you want all assign the new GL codes to all
customer numbers attached to your user ID.
E. Select Yes to confirm and continue.
Repeat process until all GL Codes and Account Names have been entered.
For the exclusive use of US Foods customers and employees Page 29 of 58

Customer Management User’s Guide
Step 2: Pre-work - Copy a new list to record inventory The easiest way to create a list to be used for inventory is to copy your order guide.
A. From the Lists menu, click on Manage Lists.
B. Click on the Options button on the Order Guide and select Copy.
C. Enter a name for the list.
D. Click on Copy.
A
B
C
D
For the exclusive use of US Foods customers and employees Page 30 of 58

Customer Management User’s Guide
Create a new list from scratch to record inventory You can create a list from scratch by entering the needed product numbers.
A. From the Lists menu, click on Create List.
B. Enter the name of the new list. C. Click on Create.
A
For the exclusive use of US Foods customers and employees Page 31 of 58

Customer Management User’s Guide
Add groups to the list
A. Click on Edit List.
B. Select New Group.
C. Enter name of new group. D. Click on Create Group.
E. Repeat process until all groups are entered. F. To add products to the groups click on Edit Group G. Select Add Products. H.
For the exclusive use of US Foods customers and employees Page 32 of 58

Customer Management User’s Guide
Add products to the group
A. To add products to the groups click on Edit Group. B. Select Add Products.
C. Enter product numbers. Product description will appear after enter key is pressed. D. After the first 5 products are entered the screen will open a new field. E. Click on Add or Add Products to add products to the group and close the window.
For the exclusive use of US Foods customers and employees Page 33 of 58

Customer Management User’s Guide
Step 3: Pre-work - Assign GL Codes (optional) Make sure GL codes have been setup prior to this step (see page 28).
A. Select products to assign GL code to. B. Click on Assign to Selected. C. Select the desired GL code from the drop down. D. Click on Apply Changes.
For the exclusive use of US Foods customers and employees Page 34 of 58
Customer Management User’s Guide
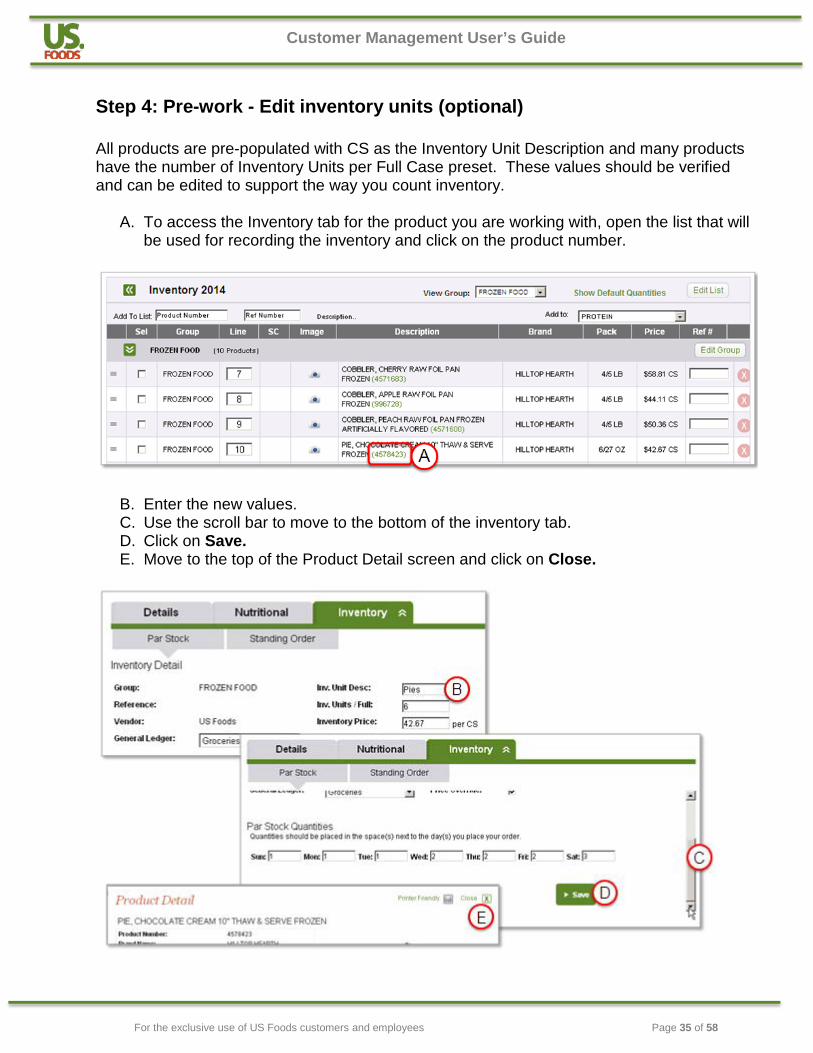
Step 4: Pre-work - Edit inventory units (optional) All products are pre-populated with CS as the Inventory Unit Description and many products have the number of Inventory Units per Full Case preset. These values should be verified and can be edited to support the way you count inventory.
A. To access the Inventory tab for the product you are working with, open the list that will be used for recording the inventory and click on the product number.
B. Enter the new values. C. Use the scroll bar to move to the bottom of the inventory tab. D. Click on Save. E. Move to the top of the Product Detail screen and click on Close.
For the exclusive use of US Foods customers and employees Page 35 of 58

Customer Management User’s Guide
Step 5: Pre-work - Create vendors for non-USF products (optional)
A. From the Lists menu, click on Manage Vendors. B. Enter the vendor information. (required information is noted by the red asterisk.)
C. Use the scroll bar to move to the bottom of the Vendor setup page. D. Click on Save to Current Location Only. E. Choose Save to All Locations if you want all assign the new Vendor to all customer
numbers attached to your user ID. F. Select Yes to confirm and continue.
For the exclusive use of US Foods customers and employees Page 36 of 58

Customer Management User’s Guide
Step 6: Pre-work - Create non-USF products (optional)
A. From the Lists menu, click on Manage Lists. B. Click on Edit Group. C. Click on Add Non-US Food Product
D. The new non-US Foods product will appear at the bottom of the group. E. Click on the product number to add details.
For the exclusive use of US Foods customers and employees Page 37 of 58
Customer Management User’s Guide
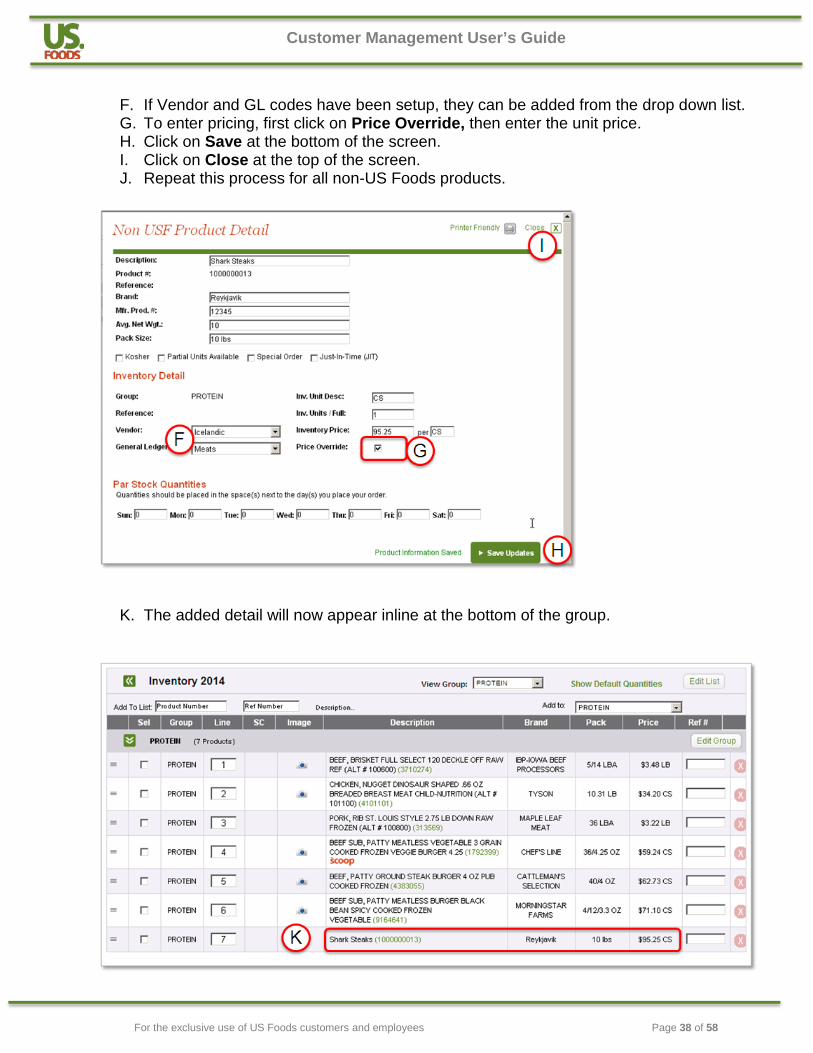
F. If Vendor and GL codes have been setup, they can be added from the drop down list. G. To enter pricing, first click on Price Override, then enter the unit price. H. Click on Save at the bottom of the screen. I. Click on Close at the top of the screen. J. Repeat this process for all non-US Foods products.
K. The added detail will now appear inline at the bottom of the group.
For the exclusive use of US Foods customers and employees Page 38 of 58

Customer Management User’s Guide
Adding Products to a List
Add new products by using Search
1. From the Lists menu, click on Manage Lists.
2. Click on the double green arrows to open the list.
3. Enter the search criteria in the search field. 4. Click the magnifying glass or press Enter.
For the exclusive use of US Foods customers and employees Page 39 of 58

Customer Management User’s Guide
5. Click on Filter Results By 6. Select Recently Purchased 7. Select products to add to list 8. Select the List Group 9. Click on Add Items to List
For the exclusive use of US Foods customers and employees Page 40 of 58

Customer Management User’s Guide
Add new products using Edit Group
1. From the Lists menu, click on Manage Lists.
2. Click on the double green arrows to open the list.
3. To add products to a group, click on Edit Group 4. Select Add Products.
For the exclusive use of US Foods customers and employees Page 41 of 58

Customer Management User’s Guide
5. Enter product numbers. Product description will appear after the enter key is pressed. 6. After the first 5 products are entered the screen will open a new field. 7. Click on Add or Add Products to add products to the group and close the window.
For the exclusive use of US Foods customers and employees Page 42 of 58

Customer Management User’s Guide
Adding Non USF Products
A. From the Lists menu, click on Manage Lists. B. Click on Edit Group. C. Click on Add Non-US Food Product
D. The new non-US Foods product will appear at the bottom of the group. E. Click on the product number to add details.
For the exclusive use of US Foods customers and employees Page 43 of 58

Customer Management User’s Guide
F. If Vendor and GL codes have been setup, they can be added from the drop down list. G. To enter pricing, first click on Price Override, then enter the price. H. Click on Save at the bottom of the screen. I. Click on Close at the top of the screen. J. Repeat this process for all non-US Foods products.
For the exclusive use of US Foods customers and employees Page 44 of 58

Customer Management User’s Guide
Adding Par Levels Par levels can be added for products on the shopping / inventory list. The par levels will print on the Order Guide or Shopping list when selected from the order entry screen. They will also appear on the Inventory Worksheet. When an inventory is entered, the system can “suggest” an order based on the par values.
A. From the Lists menu, click on Manage Lists. B. Double click on the green arrows in front of the list you will be editing.
C. To access the Inventory tab for the product, click on the product number.
For the exclusive use of US Foods customers and employees Page 45 of 58

Customer Management User’s Guide
D. Use the scroll bar to move to the bottom of the inventory tab. E. Enter the par levels for selected order days and click Save. F. Move to the top of the Product Detail screen and click on Close. G. Repeat this process for all products on the list.
Important!! Par levels are attached to the list – not the product number. If a new list is created from scratch, the par levels must be re-entered for each product. To avoid re-entering this information when a new list is created, copy the original list with the par levels and then edit the new list as needed.
For the exclusive use of US Foods customers and employees Page 46 of 58

Customer Management User’s Guide
Inventory Worksheet
• The inventory worksheet can be displayed in either PDF or Excel CSV formats • PDF is the recommended format for printing
Inventory Worksheet - PDF version
For the exclusive use of US Foods customers and employees Page 47 of 58

Customer Management User’s Guide
For the exclusive use of US Foods customers and employees Page 48 of 58

Customer Management User’s Guide
Inventory Worksheet – CSV Version
For the exclusive use of US Foods customers and employees Page 49 of 58

Customer Management User’s Guide
Inventory Cost Reports
• Calculates the cost of your current inventory on-hand. • Information can be displayed/printed in a variety of ways:
General Ledger with Subtotal Detail
• Categorized by your general ledger categories with products listed below each general ledger
General Ledger without Subtotal Detail • Summarized by your General Ledger categories with no products listed
Product Description • Alphabetized by product description
Extended Value
• Sorted in descending dollar order Line Number
• Sorted in the same order as the Inventory Worksheet Product Number
• Sorted in ascending product number order
For the exclusive use of US Foods customers and employees Page 50 of 58

Customer Management User’s Guide
Creating a Report
A. Click on Inventory Cost B. Select report options
B
A
For the exclusive use of US Foods customers and employees Page 51 of 58

Customer Management User’s Guide
Inventory Cost – Description Ascending
Inventory Cost – Extended Value – Descending
For the exclusive use of US Foods customers and employees Page 52 of 58

Customer Management User’s Guide
Inventory Cost – GL# with Subtotal Detail - Ascending
Inventory Cost – GL# without Subtotal Detail – Ascending
For the exclusive use of US Foods customers and employees Page 53 of 58

Customer Management User’s Guide
Inventory Cost Comparison Report
• This report compares the pricing of items within the current inventory to a previous inventory. You may choose to display only those items that have changed in price.
A. Click on Inventory Cost B. Select report options
A B
For the exclusive use of US Foods customers and employees Page 54 of 58

Customer Management User’s Guide
Inventory Cost Comparison – All Products
Inventory Cost Comparison – Changes Only
For the exclusive use of US Foods customers and employees Page 55 of 58

Customer Management User’s Guide
Inventory Cost Report – Summary
For the exclusive use of US Foods customers and employees Page 56 of 58

Customer Management User’s Guide
Index
C Customer Care Application, 5, 9, 10, 11, 12 Customer Product Numbers, 4, 105 Customer Setup, 2, 5, 6
D Double spaced invoice, 6 Dual Access, 3, 5, 76
I Invoice Class Recap, 6
L LIC Based Inventory, 3, 5, 76
M Manager Ordering Approval, 5
P Print Marketing Message, 6 Print Order Guide Price, 6 Print Price on Invoice, 6
R Restricted to Master Shopping List, 3, 5, 76
S SOA Order Guide System, 5 Substitutions, 6
T Tandem, 5, 6, 7, 8, 9, 43, 77, 78
U User ID, 107 USFood.com, 3, 4, 5, 6, 7, 9, 10, 11, 12, 13, 18, 19, 20, 21, 35,
36, 37, 87, 90, 92, 100, 101
For the exclusive use of US Foods customers and employees Page 57 of 58

Customer Management User’s Guide
C
For the exclusive use of US Foods customers and employees Page 58 of 58