online testing - assessments | houghton mifflin … – ping (icmp) is the quickest and easiest way...
TRANSCRIPT

Washington2010-2011
www.achievedata.com/renton)
For DataDirector assistance:
Customer Support: 1-877-993-2633Email: [email protected]
District DataDirector Contact: ________________________________________
E-mail address: ______________________________________
Phone number: ______________________________________
Online TestingFor the DataDirector Campus Implementation Team
Deborah Thomas-Cox [email protected] 915-309-5024

Data Director Online Testing Agenda
5 min Introduction: Must have Online testing activated in your district for features to work Log into www.achievedata.com/datadirector 10 min Creating a test using the Item Bank Create an assessment using the Item Bank Exam Summary Exam Set Up Search for Items Select Items Edit Exams 10 min Assign the Test Online Online Testing Functionality Set Testing Windows Set Test Duration Randomizing Test questions Discuss Individual Student Login Keys for rostered and unrostered students Time frame 10 min Administering the Test Go to http://Achievedata.com/yourusersitename/test Discuss Online features Students can change size of text Highlight Strike Thru Add comments Students can review response and click back to missed questions Proctor Monitoring available 10 min Online Testing FAQ’s FAQ powerpoint Online testing questionnaire for readiness

Online Testing (OT): Readiness Questions
LOGISTICS
How fast is your network? Is it able to handle many users simultaneously using theInternet?
What kind of exams (ex: district required exams) are you planning on using with OT?
How will the printing and disseminating of the student keys be handled?
Who will be the district lead, responsible for managing the online exams?
Will the district pilot at a particular school site? If so, who will be the site lead?
What is your initial roll out plan including preparing for OT, creation of exams, anddeployment? When is your assessment window (dates)?
TRAINING
Which teachers will be piloting OT? (Suggestion: advanced teachers)
How will teachers be trained? Who will be conducting the training?
CONTINGENCY PLANSWhat contingency plans will be set up in case your network is down on a testing date?
Will test booklets and answer sheets be printed in case of network or internet failure?
Are the tests that will be used with the OT already built?
Your Account Manager would be happy to assist you with training preparation or delivery.

General Network Guidelines and Recommendations
1. Overview There are a number of factors that come into play that impact performance during communication between an end-users browser and the GMRT hosted web application. They can range from applications running locally on the end-users desktop to a saturated network connection within a district network. Through working with various schools and districts with connectivity issues over the years, we’ve established a list of common causes, recommendations, and workarounds.
2. General Guidelines
a. Ensure Available Bandwidth – Ensure this is always available bandwidth at all network links (switches, routers, firewalls, etc) between the client and the Internet. The amount of available bandwidth depends greatly on the number of students simultaneously testing, but a good rule of thumb is 56Kbps per student. Therefore a class of 30 students should have roughly a T1 available.
b. Allow Secure and Non-secure HTTP Traffic – Most Internet users both HTTP and HTTPS to transmit and receive data. Ensure that any in-line devices such as proxy server or application level firewall allow for both types of HTTP traffic.
c. Limit Desktop Security Software – If possible, limit the amount of security software installed on the local desktops, or standardize on a set of tools that are used to protect the workstation. Environments without standards in this area, tend to cause challenges in troubleshooting connectivity problems.
d. Adhere to Compatibility Guidelines – Unsupported workstation or browser versions can manifest themselves in ways that appear to be connectivity related. By ensuring the OS/browser combination is in the support matrix, it eliminates a possible variable to unexpected behavior.
e. Ensure Low Latency – Along with bandwidth, having a low round trip time to the Internet is important for application stability. High latency within the network can cause delay in navigation and at times cause packets to timeout. This is typically not a problem as long as there’s available bandwidth. It can also occur when an in-line device experiences high CPU utilization.
f. Avoid Hubs – Situations where a computer lab is connected via hub, have shown to cause delays in using the application due to a high number of collisions. It’s recommended to use a switched network between the workstation and the Internet.
g. Virus-Spyware-Malware Protection – Ensure workstations and other network resources are protected from viruses by utilizing third-party virus-spyware-malware scanning software and ensuring computer patches are up-to-date. Virus activity can cause a number of network problems and impact browser and workstation stability.
3. Recommendations for Saturated Networks
a. Prioritize Bandwidth – In situations where a saturated network link exists
between the client and the Internet, it’s recommended that a higher priority be given to GMRT traffic at the saturated link. This ensures GMRT traffic is able to pass through and minimizes the chances of the packets getting dropped and sessions timing out.

b. Proxy Cache – Depending on how severe the congestion is, it may help by adding a proxy server to store a portion of the static content closer to the end-user and avoid multiple requests to the same data.
c. Limit Non-Essential Traffic – If possible, when possible care can be taken to limit non-essential Internet usage during known testing windows. We’ve seen instances where a classroom of lab free-time can cause an extreme amount of bandwidth usage.
d. Move Testing Windows – If prioritization is not available the only option may be to move the testing window to times when the congestion is lower.
4. Troubleshooting
a. Bandwidth – To test for available bandwidth, there are two ways to go about it. If a technician has visibility into the WAN, they most likely will have graphs and tools to view circuit utilization both real-time and historical. However, if the technician doesn’t have access to key WAN links, passive monitoring can be done with free “speed test” utilities such as those from www.speakeasy.net.
b. Latency – Ping (ICMP) is the quickest and easiest way to test for network latency. To test response time to the GMRT application, you can ping www.georgiaoas.org. If the response time is slow (100ms or higher) you can traceroute to www.georgiaoas.org to get a list of network hops between the client and the application. By running ping tests to each of these hops, you can narrow down the link causing the delay.
c. 502/504 Bad Gateway – In environments where a proxy server is used, it’s common to see a response to the browser with a 502/504 Bad Gateway Error when the proxy server is having difficulty reaching the server. In almost every case this has been caused by bandwidth saturation to the Internet, or a device between the proxy and the Internet blocking the traffic.
d. Missing Graphics or Partial Pages – If the client sees either of these conditions, it could be indicative of a network connection problem. If only one computer in the lab is seeing this problem, it could be related to an unsupported browser/OS configuration or a virus.
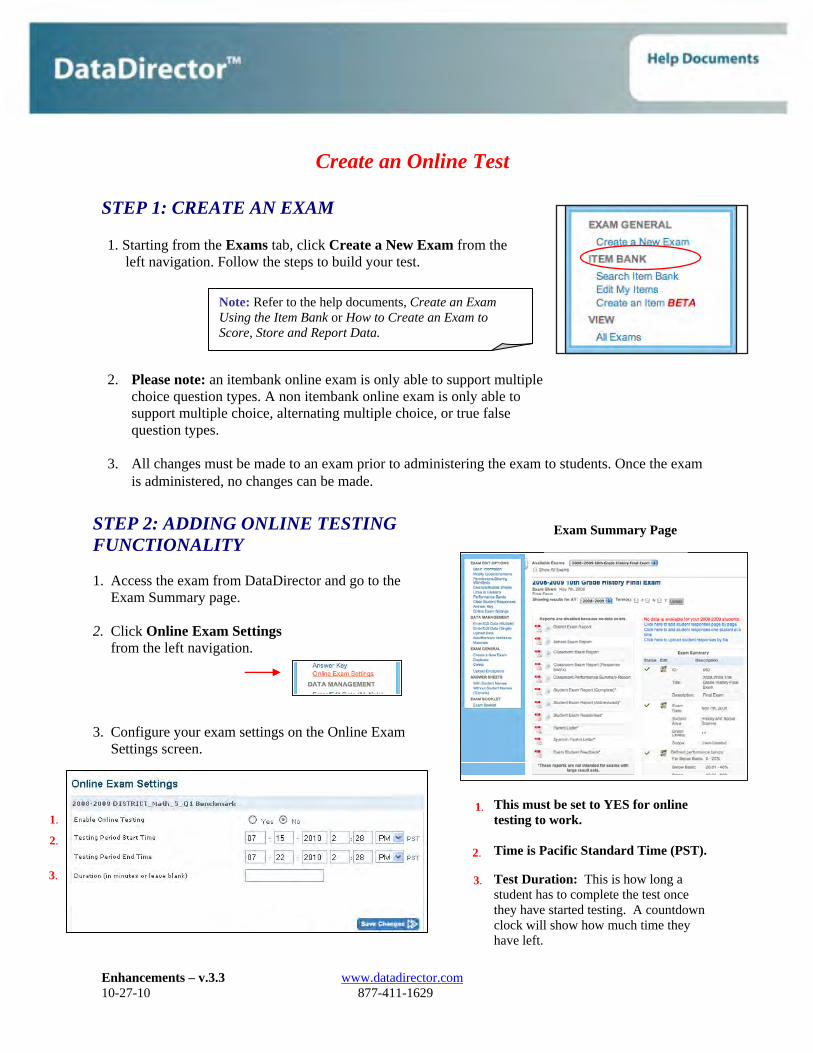
STEP 1: CREATE AN EXAM
1. Starting from the Exams tab, click Create a New Exam from the left navigation. Follow the steps to build your test.
Create an Online Test
Note: Refer to the help documents, Create an Exam Using the Item Bank or How to Create an Exam to Score, Store and Report Data.
2. Please note: an itembank online exam is only able to support multiple choice question types. A non itembank online exam is only able to support multiple choice, alternating multiple choice, or true false question types.
3. All changes must be made to an exam prior to administering the exam to students. Once the exam is administered, no changes can be made.
STEP 2: ADDING ONLINE TESTING FUNCTIONALITY
1. Access the exam from DataDirector and go to the Exam Summary page.
2. Click Online Exam Settingsfrom the left navigation.
3. Configure your exam settings on the Online Exam Settings screen.
Exam Summary Page
3.
2.
1. This must be set to YES for online testing to work.
Time is Pacific Standard Time (PST).
Test Duration: This is how long a student has to complete the test once they have started testing. A countdown clock will show how much time they have left.
1.
2.
3.
Enhancements – v.3.3 www.datadirector.com 110-27-10 877-411-1629

STEP 3: ADD STUDENTS
1. Click Add Students in the left navigation to add students
2. Choose the class from the Continue to the Next Step drop-down menu.
3. On the next screen you will select the class roster. This will display the students you have created keys for. You can download the list in Excel or as a PDF.
a. If you need to add additonal students to the list, click Add Rostered Students for students who are rostereed to you in DataDirector.
b. If you need a key created for students not yet rostered to you in DataDirector, you can create a key by clicking Add Unrostered Student and entering their full name.
c. To revisit student test keys, click Manage Students & Keys.
4. Select ALL students.5. Enter the Window Start Time and
Window Duration. a. This sets the time that students may
log into the testing site to begin their test.6. Click SAVE.
Enhancements – v.3.3 www.datadirector.com 210-27-10 877-411-1629

STEP 4: ADMINSTERING THE TEST
1. During the testing window opening time, have students login to: www.achievedata.com/yourdistrict/test.The begining of the web address should be the same as the address used when logging into DataDirector.
2. Have students enter their test key and click Go.
3. The next screen prompts the sudents to confirm their name and the test they are taking. After chosing Yes, they should click the OK button.
Students will be prompted to take an introductory tutorial. The introductory tutorial will teach students to use features such as the highlighter, strikethrough, and notes. It will also teach them how to jump to a question, mark a question, and review their answers. Once students have completed the tutorial, they may click ExitSection and begin their test
Enhancements – v.3.3 www.datadirector.com 310-27-10 877-411-1629
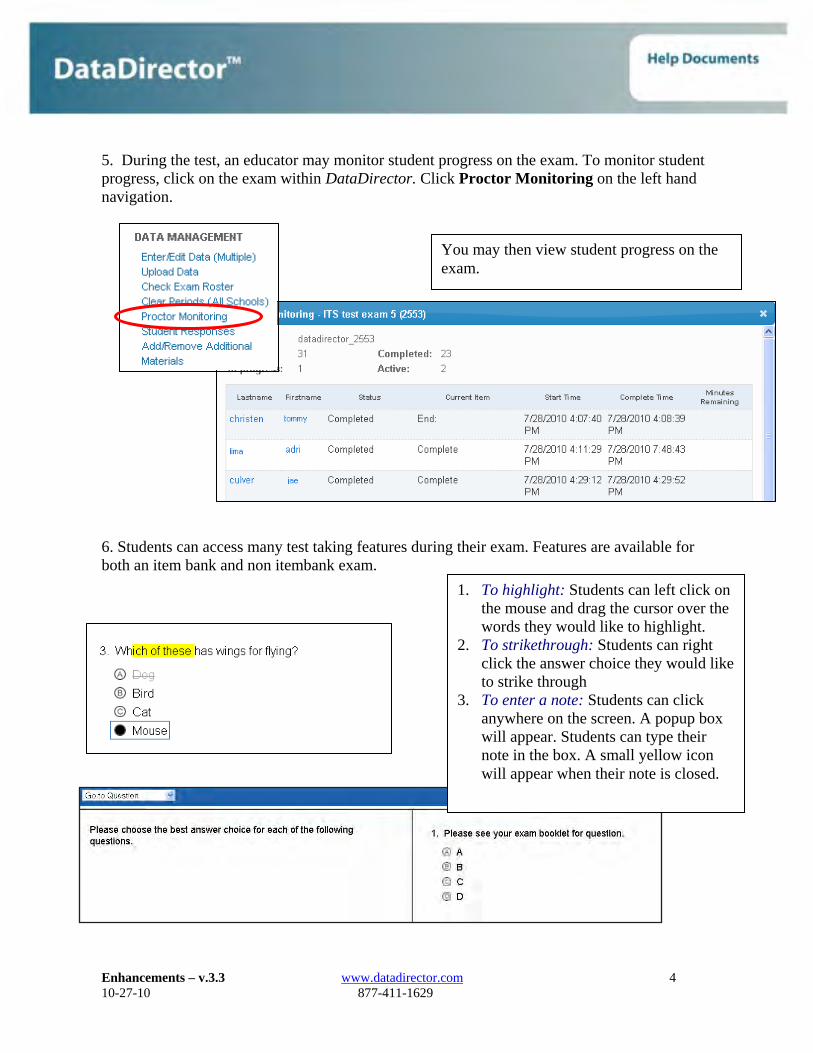
5. During the test, an educator may monitor student progress on the exam. To monitor student progress, click on the exam within DataDirector. Click Proctor Monitoring on the left hand navigation.
Enhancements – v.3.3 www.datadirector.com 410-27-10 877-411-1629
You may then view student progress on the exam.
6. Students can access many test taking features during their exam. Features are available for both an item bank and non itembank exam.
1. To highlight: Students can left click on the mouse and drag the cursor over the words they would like to highlight.
2. To strikethrough: Students can right click the answer choice they would like to strike through
3. To enter a note: Students can click anywhere on the screen. A popup box will appear. Students can type their note in the box. A small yellow icon will appear when their note is closed.

Online Testing-Student Directions www.datadirector.com 1 Rev. 12/08 877-993-2633
Online Testing – Student Directions
STEP 1: LOGGING IN
1. During the testing window time period, login to: www.achievedata.com/___________/test.
1. Enter the test key you received from your teacher and
click Go. The key is a combination of 7 letters and numbers.
3. The next screen shows your name and the test you are taking. Answer each question and click the OK button.

2
These buttons make the text size larger or smaller.
These buttons allows you to jump from question to question.
Choosing the Star button allows you to “flag” a question so you know which questions you skip or want to review. The Review button lets you
view the question numbers and answers you’ve entered.
Click Next to go to the next question.
When reviewing answers, click on the question number to go back to the question and make changes.
Any question that was “Starred” will appear in the Question Review screen with a Star icon. After you enter an answer, the star will remain.
STEP 3: REVIEWING YOUR ANSWERS
1. Answer each question. You may select only one answer for each question.
Online Testing-Student Directions www.datadirector.com 3 Rev. 12/08 877-993-2633
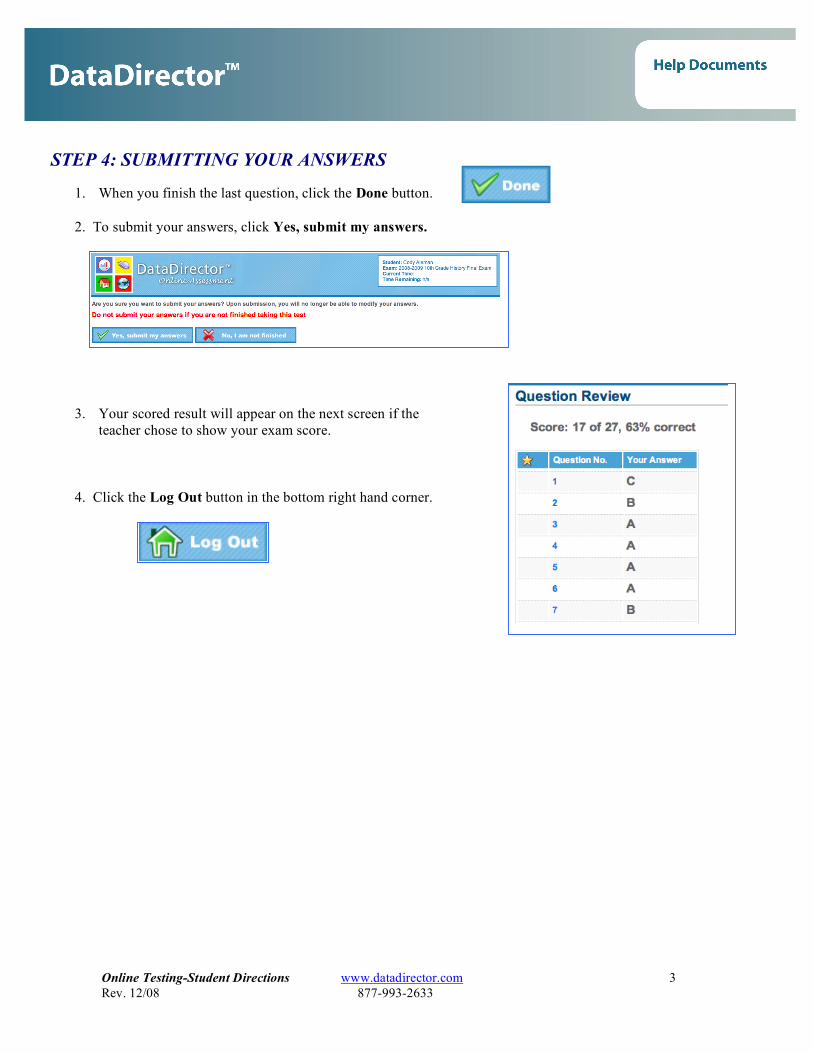
3. Your scored result will appear on the next screen if the
teacher chose to show your exam score. 4. Click the Log Out button in the bottom right hand corner.
STEP 4: SUBMITTING YOUR ANSWERS
1. When you finish the last question, click the Done button. 2. To submit your answers, click Yes, submit my answers.

Online Testing FAQs www.datadirector.com 1 12-16-10 877-411-1629
EXAMS
A. I have a student who is not on my list, but needs to take the test. How can I get him or her a login key?
1. Login to DataDirector. 2. Click on the Exams tab. 3. Locate the title of the exam and click on it.
4. At the bottom of the screen, click the next to Online Exam has been configured. 5. In the left navigation bar, click, Add Unrostered Student. 6. Type the student’s name in the box provided and click, Save. 7. In the left navigation bar click, Manage Students and Keys. 8. Locate the new student toward the top of the student list and give the student his or her newly
generated test key.
9. Once the student has been rostered in DataDirector, return to the exam and click the next to Online Exam has been configured.
10. In the left navigation bar click, Manage Students and Keys. 11. Locate the student’s new record (usually toward the top of the student list) and click the to
the left of the student’s name. 12. Enter the student’s ID number twice in the fields provided and click Save. You can identify the
student’s ID number by going into the Students tab and finding the student, then clicking on the student’s name. The ID number is at the top right of the pop-up window.
B. There is a student who clicked all the way through the test and exited before answering all the questions. How do I get that student back in the system to re-take the test?
1. Note the student’s name and the ID number of the test. 2. Call or email the DataDirector Help Desk at (877)993-2633 or [email protected]. Inform
then of the student’s name and the test ID, and they will “unlock” the exam again for that student.
*Note: When the student logs in again, he or she will be on question 1 of the test. But if any questions were previously answered, they will already be selected. Have the student use the drop-down menu at the top left of the page to return to the question where he or she left off.
C. A student answered many of the questions on the test, then somehow logged out. How do I get the
student back in and catch them up?
1. Note the student’s name and the ID number of the test.
Online Testing FAQ’s

Online Testing FAQs www.datadirector.com 2 12-16-10 877-411-1629
2. Call or email the DataDirector Help Desk at (877)993-2633 or [email protected]. Inform then of the student’s name and the test ID, and they will “unlock” the exam again for that student.
*Note: When the student logs in again, he or she will be on question 1 of the test. But if any questions were previously answered, they will already be selected. Have the student use the drop-down menu at the top left of the page to return to the question where he or she left off.
D. A gray box comes up for the student that says something about an internet connection disruption. What does the student do?
1. Have the student click OK to get back to where he or she was on the test. 2. If the student clicks Cancel, have the student log into the test again, and the test will pick up
right where the student left off
E. My students cannot log in. Once they enter their test key, they get a message that states, “This key has not been permitted access at this time”.
1. Login to DataDirector. 2. Click on the Exams tab. 3. Locate the title of the exam and click on it.
4. At the bottom of the screen, click the for Online Exam has been configured. 5. In the left navigation bar click, Manage Students and Keys. 6. Check the login time for the students. Has the time expired? 7. To update the login time, check the boxes to the left of the student names. To select all students
at once, click All at the top of the list. 8. Change the login window start time to an appropriate time for the test. 9. Change the Duration to an appropriate length of time it will take students to log in (in minutes).
If some students have already completed the test, you will not be able to change the duration. 10. Click Save. 11. Have the students try to login again.
F. My students cannot log in. Once they enter their test key, they get a message that states “Your test key is invalid. Please try again or seek help from an administrator”.
1. Login to DataDirector. 2. Click on the Exams tab. 3. Locate the title of the exam and click on it.
4. At the bottom of the screen, click the for Online Exam has been configured. 5. In the left navigation bar click, Manage Students and Keys. 6. Spot-check the test keys with the ones the students have. Are they the same? 7. If not, click on the green Excel icon to download the accurate keys in Excel. Enlarge the test
keys and hand them out to the students.
Online Testing FAQs www.datadirector.com 3 12-16-10 877-411-1629
G. My students have to scroll A LOT to see the items (including to the right and left).
1. Minimize the internet screen by clicking the minimize button in the top right corner of the
internet screen. 2. Right-click on the desktop, and select Properties. 3. Click on the Settings tab. 4. Under Screen Resolution check the settings. Check to make sure the settings are at least 1024 x
768 pixels. If necessary, change the settings and click Apply. 5. Pull up the test to the main screen again by selecting it in the bottom bar
H. I cannot locate the student key that I printed up. How can I get it again?
1. Login to DataDirector. 2. Click on the Exams tab. 3. Locate the title of the exam and click on it.
4. At the bottom of the screen, click the for Online Exam has been configured. 5. In the left navigation bar click, Manage Students and Keys. 6. Click on the Excel icon at the top of the student list to re-export and print a new list of students
and test keys.
I. I want my students to see the maximum space on their screens. (Windows Operating System)
1. Open up the testing screen and have students log in. 2. Ask students to click the F11 button.
J. I am a site administrator for the test, and when I click Manage Students and Keys in an exam, I see
students who are not at my school entered by other site administrators who are not at my school.
1. Since you have access to all students at your school, DataDirector also gives you access to see test keys for students who might be at your school- unrostered students hand-entered by any user in the district. These will be managed by the user who created them. Ignore these records. After generating the Excel spreadsheet for the test keys, delete them.
Remember - when a student clicks the Review button at the top of the page, the Next button turns into Exit Section. If the student clicks that button, he is she will be logged out and unable to return to the test. Go through Questions B or C (according to the situation) to bring the student back into the test. The student must click Exit Section to return results to DataDirector.