ontap 9 netapp encryption power guide...ontap® 9 netapp® encryption power guide february 2017 |...
TRANSCRIPT


Contents
Deciding whether to use the NetApp Encryption Power Guide ............... 5Using NetApp Volume Encryption .............................................................. 6
NetApp Volume Encryption workflow ........................................................................ 7
Configuring NVE ........................................................................................................ 7
Determining whether your cluster version supports NVE .............................. 7
Installing the license ........................................................................................ 8
Enabling onboard key management ................................................................ 9
Encrypting volume data with NVE ........................................................................... 10
Enabling encryption on a new volume .......................................................... 10
Enabling encryption on an existing volume .................................................. 10
Managing NVE ......................................................................................................... 11
Unencrypting volume data ............................................................................ 12
Moving an encrypted volume ........................................................................ 12
Changing the encryption key for a volume ................................................... 13
Deleting an encrypted volume ....................................................................... 14
Changing the onboard key management passphrase ..................................... 14
Transitioning to onboard key management from external key
management ............................................................................................. 15
Backing up onboard key management information manually ....................... 16
Delegating authority to run the volume move command .............................. 16
NVE APIs .................................................................................................................. 17
Using NetApp Storage Encryption ............................................................ 18NetApp Storage Encryption workflow ...................................................................... 19
Configuring external key management ..................................................................... 19
Collecting network and security information ................................................ 20
Installing SSL certificates on the cluster ....................................................... 21
Connecting to external key management servers .......................................... 22
Creating authentication keys ......................................................................... 23
Assigning a data authentication key to SEDs ................................................ 24
Assigning a FIPS 140-2 authentication key to SEDs .................................... 25
Enabling cluster-wide FIPS-compliant mode for KMIP server
connections .............................................................................................. 26
Configuring onboard key management ..................................................................... 27
Enabling onboard key management .............................................................. 27
Viewing the keys generated by the Onboard Key Manager .......................... 28
Assigning a data authentication key to SEDs ................................................ 29
Assigning a FIPS 140-2 authentication key to SEDs .................................... 30
Managing NSE .......................................................................................................... 31
Replacing SSL certificates ............................................................................ 31
Restoring authentication keys ....................................................................... 32
Replacing an SED ......................................................................................... 33
Table of Contents | 3

Making data on an SED inaccessible ............................................................ 34
Returning SEDs to service when authentication keys are lost ...................... 39
Returning SEDs to unprotected mode ........................................................... 41
Deleting an external key manager connection .............................................. 41
Transitioning to external key management from onboard key
management ............................................................................................. 42
Transitioning to onboard key management from external key
management ............................................................................................. 42
Changing the onboard key management passphrase ..................................... 43
Backing up onboard key management information manually ....................... 44
Where to find additional information ....................................................... 45Copyright information ............................................................................... 46Trademark information ............................................................................. 47How to send comments about documentation and receive update
notifications ............................................................................................ 48Index ............................................................................................................. 49
4 | NetApp Encryption Power Guide

Deciding whether to use the NetApp EncryptionPower Guide
NetApp offers both software- and hardware-based encryption technologies for ensuring that data atrest cannot be read if the storage medium is repurposed, returned, misplaced, or stolen.
• Software-based NetApp Volume Encryption (NVE) supports data encryption one volume at atime.
• Hardware-based NetApp Storage Encryption (NSE) supports full-disk encryption (FDE).
You should use this guide if you want to work with encryption in the following way:
• You want to use best practices, not explore every available option.
• You do not want to read a lot of conceptual background.
• You want to use the ONTAP command-line interface (CLI), not OnCommand System Manager oran automated scripting tool.
The encyption technologies are not supported by System Manager.
If this guide is not suitable for your situation, you should see the following documentation instead:
• ONTAP 9 commands
• NetApp Documentation: OnCommand Workflow Automation (current releases)
5

Using NetApp Volume Encryption
NetApp Volume Encryption (NVE) is a software-based technology for encrypting data at rest onevolume at a time. An encryption key accessible only to the storage system ensures that volume datacannot be read if the underlying device is repurposed, returned, misplaced, or stolen.
Understanding NVE
Both data, including Snapshot copies, and metadata are encrypted. Access to the data is given by aunique XTS-AES-256 key, one per volume. An Onboard Key Manager secures the keys on the samesystem with your data.
You can enable encryption on an existing volume (using the volume move command) or on a newvolume (using the volume create command). NVE supports the full range of storage efficiencyfeatures, including deduplication and compression.
You can use NVE on any type of aggregate (HDD, SSD, hybrid, array LUN), with any RAID type,and in any supported ONTAP implementation, including ONTAP Select. You can also use NVE withNetApp Storage Encryption (NSE) to “double encrypt” data on NSE drives, provided that you use theNSE Onboard Key Manager option.
Support details
The following table shows NVE support details.
Resource or feature Support details
Platforms AES-NI offload capability required: FAS 2620, FAS 2650, FAS 6290,FAS 80xx, FAS 8200, FAS 9000, AFF A200, AFF A300, AFF A700, orAFF A700S.
ONTAP All ONTAP implementations, except ONTAP Cloud.
Devices HDD, SSD, hybrid, array LUN.
RAID RAID0, RAID4, RAID-DP, RAID-TEC.
Volumes Data volumes only. You cannot encrypt data on a root volume, an SVMroot volume, or a MetroCluster metadata volume.
Storage efficiency Deduplication, compression, compaction, FlexClone. Clones use the samekey as the parent, even after splitting the clone from the parent. You arewarned to rekey the split clone.
Replication • For SnapMirror and SnapVault, the destination volume must have beenenabled for encryption.
• For MetroCluster configurations, keys and passphrases are replicatedto the partner site by the configuration replication service (CRS).
Compliance SnapLock is not supported.
FlexGroups FlexGroups are not supported.
7-Mode transition Integration with the 7-Mode Transition Tool is not supported. Transitionan existing volume as you would currently, then use volume move toenable encryption on the volume.
6

NetApp Volume Encryption workflowYou must install the NVE license and enable onboard key management before you can enable volumeencryption. You can enable encryption on a new volume or on an existing volume.
Configuring NVEYou must install the NVE license and enable onboard key management before you can encrypt datawith NVE. Before installing the license, you should determine whether your ONTAP versionsupports NVE.
Steps
1. Determining whether your cluster version supports NVE on page 7
2. Installing the license on page 8
3. Enabling onboard key management on page 9
Determining whether your cluster version supports NVE
You should determine whether your cluster version supports NVE before you install the license. Youcan use the version command to determine the cluster version.
About this task
The cluster version is the lowest version of ONTAP running on any node in the cluster.
Step
1. Determine whether your cluster version supports NVE:
version -v
Using NetApp Volume Encryption | 7

NVE is not supported if the command output displays the text “no-DARE” (for “no Data At RestEncryption”).
Example
The following command determines whether NVE is supported on cluster1.
cluster1::> version -vNetApp Release 9.1.0: Tue May 10 19:30:23 UTC 2016 <1no-DARE>
The text “1no-DARE” in the command output indicates that NVE is not supported on your clusterversion.
Installing the license
An NVE license entitles you to use the feature on all nodes in the cluster. You must install the licensebefore you can encrypt data with NVE.
Before you begin
You must be a cluster administrator to perform this task.
About this task
You should have received the NVE license key from your sales representative.
Steps
1. Install the NVE license for a node:
system license add -license-code license_key
Example
The following command installs the license with the key AAAAAAAAAAAAAAAAAAAAAAAAAAAA.
cluster1::> system license add -license-code AAAAAAAAAAAAAAAAAAAAAAAAAAAA
2. Verify that the license is installed by displaying all the licenses on the cluster:
system license show
For complete command syntax, see the man page for the command.
Example
The following command displays all the licenses on cluster1:
cluster1::> system license show
The NVE license package name is “VE”.
8 | NetApp Encryption Power Guide

Enabling onboard key management
The Onboard Key Manager secures the keys that the cluster uses to access encrypted data. You mustenable Onboard Key Manager on each cluster that accesses an encrypted volume or a self-encryptingdisk (SED).
Before you begin
• If you are using NSE with an external key management (KMIP) server, you must have deleted theexternal key manager database.
Transitioning to onboard key management from external key management on page 42
• You must be a cluster administrator to perform this task.
About this task
You must run this command each time you add a node to the cluster.
Steps
1. Start the key manager setup wizard:
security key-manager setup
Example
The following command starts the key manager setup wizard on cluster1:
cluster1::> security key-manager setupWelcome to the key manager setup wizard, which will lead you throughthe steps to add boot information.
Enter the following commands at any time"help" or "?" if you want to have a question clarified,"back" if you want to change your answers to previous questions, and"exit" if you want to quit the key manager setup wizard. Any changesyou made before typing "exit" will be applied.
Restart the key manager setup wizard with "security key-managersetup". To accept a default or omit a question, do not enter a value.
Would you like to use onboard key-management? {yes, no} [yes]: Enter the cluster-wide passphrase: <32..256 UTF8 characters long text>Reenter the cluster-wide passphrase: <32..256 UTF8 characters long text>
2. Enter yes at the prompt to configure onboard key management.
3. Enter a passphrase between 32 and 256 characters at the passphrase prompt.
4. Re-enter the passphrase at the passphrase confirmation prompt.
After you finish
Copy the passphrase to a secure location outside the storage system for future use.
All key management information is automatically backed up to the replicated database (RDB) for thecluster. You should also back up the information manually for use in case of a disaster.
Related tasks
Backing up onboard key management information manually on page 16
Using NetApp Volume Encryption | 9

Encrypting volume data with NVEYou can enable encryption on a new volume or on an existing volume. You must have installed theNVE license and enabled onboard key management before you can enable volume encryption.
Choices
• Enabling encryption on a new volume on page 10
• Enabling encryption on an existing volume on page 10
Enabling encryption on a new volume
You can use the volume create command to enable encryption on a new volume.
About this task
You cannot enable encryption on a SnapLock volume.
Steps
1. Create a new volume and enable encryption on the volume:
volume create -vserver SVM_name -volume volume_name -aggregateaggregate_name -encrypt true
For complete command syntax, see the man page for the command.
Example
The following command creates a volume named vol1 on aggr1 and enables encryption on thevolume:
cluster1::> volume create -vserver vs1 -volume vol1 -aggregate aggr1 -encrypt true
The Onboard Key Manager creates an encryption key for the volume. Any data you put on thevolume is encrypted.
2. Verify that the volume is enabled for encryption:
volume show -is-encrypted true
For complete command syntax, see the man page for the command.
Example
The following command displays the encrypted volumes on cluster1:
cluster1::> volume show -is-encrypted true
Enabling encryption on an existing volume
You can use the volume move start command to enable encryption on an existing volume. Youcan use the same aggregate or a different aggregate.
Before you begin
You must be a cluster administrator to perform this task, or an SVM administrator to whom thecluster administrator has delegated authority.
10 | NetApp Encryption Power Guide

Delegating authority to run the volume move command on page 16
About this task
You cannot enable encryption on a SnapLock volume.
Steps
1. Move an existing volume and enable encryption on the volume:
volume move start -vserver SVM_name -volume volume_name -destination-aggregate aggregate_name -encrypt-destination true|false
For complete command syntax, see the man page for the command.
Example
The following command moves an existing volume named vol1 to the destination aggregateaggr2 and enables encryption on the volume:
cluster1::> volume move start -vserver vs1 -volume vol1 -aggregate aggr2 -encrypt-destination true
The Onboard Key Manager creates an encryption key for the volume. The data on the volume isencrypted.
2. Verify that the volume is enabled for encryption:
volume show -is-encrypted true
For complete command syntax, see the man page for the command.
Example
The following command displays the encrypted volumes on cluster1:
cluster1::> volume show -is-encrypted true
Managing NVEYou can unencrypt volume data, move an encrypted volume, rekey an encrypted volume, and deletean encrypted volume. You can change the key management passphrase, and back up key managementinformation (including encrypted keys) manually.
Choices
• Unencrypting volume data on page 12
• Moving an encrypted volume on page 12
• Changing the encryption key for a volume on page 13
• Deleting an encrypted volume on page 14
• Changing the onboard key management passphrase on page 14
• Transitioning to onboard key management from external key management on page 15
• Backing up onboard key management information manually on page 16
• Delegating authority to run the volume move command on page 16
Using NetApp Volume Encryption | 11

Unencrypting volume data
You can use the volume move start command to unencrypt volume data.
Before you begin
You must be a cluster administrator to perform this task, or an SVM administrator to whom thecluster administrator has delegated authority.
Delegating authority to run the volume move command on page 16
Steps
1. Move an existing volume and unencrypt the data on the volume:
volume move start -vserver SVM_name -volume volume_name -destination-aggregate aggregate_name -encrypt-destination false
For complete command syntax, see the man page for the command.
Example
The following command moves an existing volume named vol1 to the destination aggregateaggr3 and unencrypts the data on the volume:
cluster1::> volume move start -vserver vs1 -volume vol1 -aggregate aggr3 -encrypt-destination false
The Onboard Key Manager deletes the encryption key for the volume. The data on the volume isunencrypted.
2. Verify that the volume is disabled for encryption:
volume show -encryption
For complete command syntax, see the man page for the command.
Example
The following command displays whether volumes on cluster1 are encrypted:
cluster1::> volume show -encryption
Moving an encrypted volume
You can use the volume move start command to move an encrypted volume. The moved volumecan reside on the same aggregate or a different aggregate.
Before you begin
You must be a cluster administrator to perform this task, or an SVM administrator to whom thecluster administrator has delegated authority.
Delegating authority to run the volume move command on page 16
About this task
The -encrypt-destination option for volume move start defaults to true for encryptedvolumes. Requiring you to specify explicitly that you do not want the destination volume to beencrypted ensures that you do not inadvertently unencrypt the data on the volume.
12 | NetApp Encryption Power Guide

Steps
1. Move an existing volume and leave the data on the volume encrypted:
volume move start -vserver SVM_name -volume volume_name -destination-aggregate aggregate_name
For complete command syntax, see the man page for the command.
Example
The following command moves an existing volume named vol1 to the destination aggregateaggr3 and leaves the data on the volume encrypted:
cluster1::> volume move start -vserver vs1 -volume vol1 -destination-aggregate aggr3
2. Verify that the volume is enabled for encryption:
volume show -is-encrypted true
For complete command syntax, see the man page for the command.
Example
The following command displays the encrypted volumes on cluster1:
cluster1::> volume show -is-encrypted true
Changing the encryption key for a volume
It is a security best practice to change the encryption key for a volume periodically. You can use thevolume move start command to change the encryption key. The moved volume can reside on thesame aggregate or a different aggregate.
Before you begin
You must be a cluster administrator to perform this task, or an SVM administrator to whom thecluster administrator has delegated authority.
Delegating authority to run the volume move command on page 16
Steps
1. Move an existing volume and change the encryption key:
volume move start -vserver SVM_name -volume volume_name -destination-aggregate aggregate_name -generate-destination-key true
For complete command syntax, see the man page for the command.
Example
The following command moves an existing volume named vol1 to the destination aggregateaggr2 and changes the encryption key:
cluster1::> volume move start -vserver vs1 -volume vol1 -destination-aggregate aggr2 -generate-destination-key true
The Onboard Key Manager creates a new encryption key for the volume. The data on the volumeremains encrypted.
Using NetApp Volume Encryption | 13

2. Verify that the volume is enabled for encryption:
volume show -is-encrypted true
For complete command syntax, see the man page for the command.
Example
The following command displays the encrypted volumes on cluster1:
cluster1::> volume show -is-encrypted true
Deleting an encrypted volume
You can use the volume delete command to delete an encrypted volume.
Before you begin
• You must be a cluster administrator to perform this task, or an SVM administrator to whom thecluster administrator has delegated authority.
Delegating authority to run the volume move command on page 16
• The volume must be offline.
Step
1. Delete an encrypted volume:
volume delete -vserver SVM_name -volume volume_name
For complete command syntax, see the man page for the command.
Example
The following command deletes an encrypted volume named vol1:
cluster1::> volume delete -vserver vs1 -volume vol1
Enter yes when you are prompted to confirm deletion.
The Onboard Key Manager deletes the encryption key for the volume after 24 hours.
After you finish
You can use the volume recovery-queue command to recover a deleted volume during theretention period after issuing the volume delete command:
volume recovery-queue SVM_name -volume volume_name
How to use the Volume Recovery feature
Changing the onboard key management passphrase
It is a security best practice to change the onboard key management passphrase periodically. You canuse the security key-manager update-passphrase command to change the onboard keymanagement passphrase.
Before you begin
• You must be a cluster administrator to perform this task.
14 | NetApp Encryption Power Guide

• Advanced privileges are required for this task.
Steps
1. Change to advanced privilege level:
set -privilege advanced
2. Change the onboard key management passphrase:
security key-manager update-passphrase
Example
The following command lets you change the key management passphrase for cluster1:
cluster1::> security key-manager update-passphraseWarning: This command will reconfigure the cluster passphrase foronboard key-management. Do you want to continue? {y|n}: Enter current passphrase: <32..256 UTF8 characters long text>Enter new passphrase: <32..256 UTF8 characters long text>Reenter the new passphrase: <32..256 UTF8 characters long text>
3. Enter y at the prompt to change the onboard key management passphrase.
4. Enter the current passphrase at the current passphrase prompt.
5. Enter the new passphrase at the new passphrase prompt.
6. Reenter the new passphrase at the passphrase confirmation prompt.
After you finish
You should copy the onboard key management passphrase to a secure location outside the storagesystem for future use.
You should back up key management information manually whenever you change the onboard keymanagement passphrase.
Backing up onboard key management information manually on page 16
Transitioning to onboard key management from external key management
If you are using NSE with external key management and want to switch to NVE, or if you are usingNSE with external key management and want to switch to NSE with onboard key management, youmust delete the external key management configuration before you can enable onboard keymanagement.
Before you begin
• You must have reset the authentication keys of all NSE disks to MSID (0x0).
Returning SEDs to unprotected mode on page 41
• You must have deleted all external key manager connections.
Deleting an external key manager connection on page 41
• You must be a cluster administrator to perform this task.
Step
1. Delete the external key management configuration for a cluster:
security key-manager delete-kmip-config
Using NetApp Volume Encryption | 15
Example
The following command deletes the external key management configuration for cluster1:
cluster1::> security key-manager delete-kmip-config
Backing up onboard key management information manually
You should back up onboard key management information manually whenever you change theOnboard Key Manager passphrase. You can use the security key-manager backup showcommand to display the key management backup information for the cluster. You can then copy thebackup information to a secure location outside the storage system.
Before you begin
You must be a cluster administrator to perform this task.
About this task
All key management information is automatically backed up to the replicated database (RDB) for thecluster. You should also back up key management information manually for use in case of a disaster.
Step
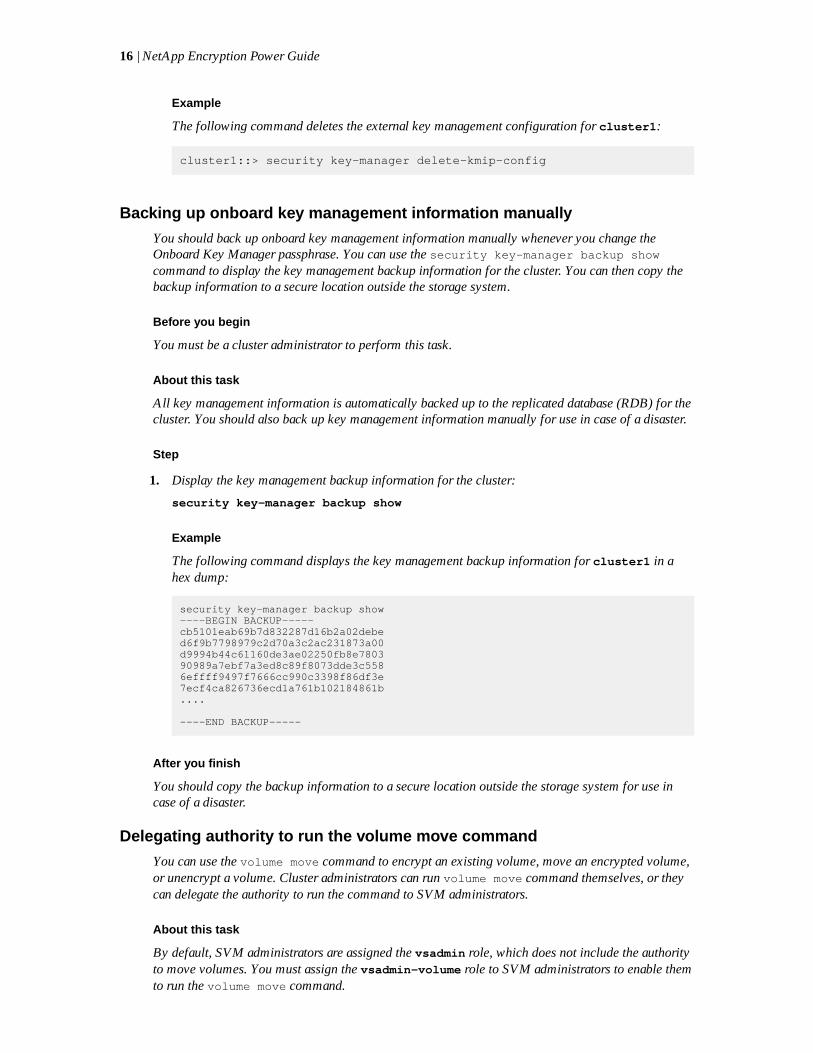
1. Display the key management backup information for the cluster:
security key-manager backup show
Example
The following command displays the key management backup information for cluster1 in ahex dump:
security key-manager backup show----BEGIN BACKUP-----cb5101eab69b7d832287d16b2a02debed6f9b7798979c2d70a3c2ac231873a00d9994b44c61160de3ae02250fb8e780390989a7ebf7a3ed8c89f8073dde3c5586effff9497f7666cc990c3398f86df3e7ecf4ca826736ecd1a761b102184861b....
----END BACKUP-----
After you finish
You should copy the backup information to a secure location outside the storage system for use incase of a disaster.
Delegating authority to run the volume move command
You can use the volume move command to encrypt an existing volume, move an encrypted volume,or unencrypt a volume. Cluster administrators can run volume move command themselves, or theycan delegate the authority to run the command to SVM administrators.
About this task
By default, SVM administrators are assigned the vsadmin role, which does not include the authorityto move volumes. You must assign the vsadmin-volume role to SVM administrators to enable themto run the volume move command.
16 | NetApp Encryption Power Guide

Step
1. Delegate authority to run the volume move command:
security login modify -vserver SVM_name -user-or-group-nameuser_or_group_name -application application -authmethodauthentication_method -role vsadmin-volume
For complete command syntax, see the man page for the command.
Example
The following command grants the SVM administrator authority to run the volume movecommand.
cluster1::>security login modify -vserver engData -user-or-group-name SVM-admin -application ssh -authmethod domain -role vsadmin-volume
NVE APIsYou can use Zephyr APIs to integrate with NVE functionality in scripts or workflow automation. TheAPIs use XML messaging over HTTP, HTTPS, and Windows DCE/RPC.
security-key-manager-backup-get
Display the Onboard Key Manager backup information.
security-key-manager-delete-keys
Delete the Onboard Key Manager configuration.
security-key-manager-delete-kmip-config
Delete an external key manager configuration.
security-key-manager-key-get-iter
Display the IDs for the NSE authentication key, the NSE FIPS authentication key, and the SVM keyencryption key. Each node should show the same sets of keys.
security-key-manager-setup
Enable the Onboard Key Manager.
security-key-manager-update-passphrase
Change the passphrase for the Onboard Key Manager.
volume-create
Create a volume and enable encryption on the volume.
volume-move-start
Move a volume and enable encryption on the volume. Also used to move an encrypted volume andunencrypt a volume.
Using NetApp Volume Encryption | 17

Using NetApp Storage Encryption
NetApp Storage Encryption (NSE) supports "self-encrypting" disks (SEDs) that encrypt data as it iswritten. The data cannot be read without an encryption key stored on the disk. The encryption key, inturn, is accessible only to an authenticated node.
Understanding NSE
On an I/O request, a node authenticates itself to an SED using an authentication key retrieved froman external key management server or Onboard Key Manager:
• The external key management server is a third-party system in your storage environment thatserves authentication keys to nodes using the Key Management Interoperability Protocol (KMIP).
• The Onboard Key Manager is a built-in tool that serves authentication keys to nodes from thesame storage system as your data.
NSE supports self-encrypting HDDs and SSDs. You can use NetApp Volume Encryption with NSEto “double encrypt” data on NSE drives, provided that you use the Onboard Key Manager.
When to use KMIP servers
Although it is less expensive and typically more convenient to use the onboard key manager, youshould set up KMIP servers if any of the following are true:
• Your encryption key management solution must comply with Federal Information ProcessingStandards (FIPS) 140-2 or the OASIS KMIP standard.
• You need a multi-cluster solution.
KMIP servers support multiple clusters with centralized management of encryption keys.
• Your business requires the added security of storing authentication keys on a system or in alocation different from the data.
KMIP servers stores authentication keys separately from your data.
Support details
The following table shows important NSE support details. See the Interoperability Matrix for thelatest information about supported KMIP servers, storage systems, and disk shelves.
Resource or feature Support details
MetroCluster NSE does not support MetroCluster.
Non-homogenousdisk sets
All disks for a node or HA pair must be self-encrypting. Conforming HApairs can coexist with non-conforming HA pairs in the same cluster.
10 Gb networkinterfaces
NSE does not support 10 Gb network interfaces for communications withexternal key management servers.
Ports forcommunication withthe key managementserver
You should use the network interface e0m for communication with keymanagement servers. Depending on the storage controller model, certainnetwork interfaces might not be available during the boot process forcommunication with key management servers.
Related information
NetApp Interoperability Matrix Tool
18

NetApp Storage Encryption workflowYou must configure key management services before the cluster can authenticate itself to the SED.You can use an external key management server or an onboard key manager.
Configuring external key managementYou can use external key management servers to authenticate cluster nodes to an SED. An externalkey management server is a third-party system in your storage environment that serves authenticationkeys to nodes using the Key Management Interoperability Protocol (KMIP).
Steps
1. Collecting network and security information on page 20
2. Installing SSL certificates on the cluster on page 21
3. Connecting to external key management servers on page 22
4. Creating authentication keys on page 23
Using NetApp Storage Encryption | 19
5. Assigning a data authentication key to SEDs on page 24
6. Assigning a FIPS 140-2 authentication key to SEDs on page 25
7. Enabling cluster-wide FIPS-compliant mode for KMIP server connections on page 26
Collecting network and security information
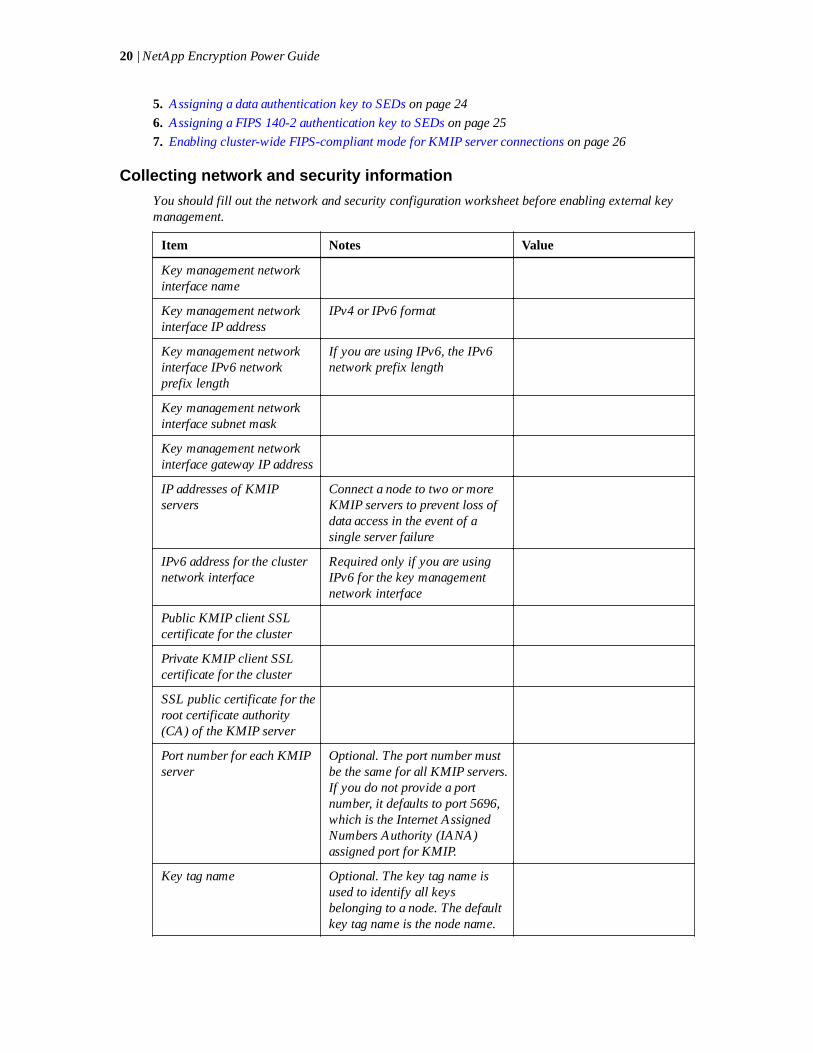
You should fill out the network and security configuration worksheet before enabling external keymanagement.
Item Notes Value
Key management networkinterface name
Key management networkinterface IP address
IPv4 or IPv6 format
Key management networkinterface IPv6 networkprefix length
If you are using IPv6, the IPv6network prefix length
Key management networkinterface subnet mask
Key management networkinterface gateway IP address
IP addresses of KMIPservers
Connect a node to two or moreKMIP servers to prevent loss ofdata access in the event of asingle server failure
IPv6 address for the clusternetwork interface
Required only if you are usingIPv6 for the key managementnetwork interface
Public KMIP client SSLcertificate for the cluster
Private KMIP client SSLcertificate for the cluster
SSL public certificate for theroot certificate authority(CA) of the KMIP server
Port number for each KMIPserver
Optional. The port number mustbe the same for all KMIP servers.If you do not provide a portnumber, it defaults to port 5696,which is the Internet AssignedNumbers Authority (IANA)assigned port for KMIP.
Key tag name Optional. The key tag name isused to identify all keysbelonging to a node. The defaultkey tag name is the node name.
20 | NetApp Encryption Power Guide

Related information
NetApp Technical Report 3954: NetApp Technical Report 3954: NetApp Storage EncryptionPreinstallation Requirements and Procedures for IBM Tivoli Lifetime Key Manager
NetApp Technical Report 4074: NetApp Technical Report 4074: NetApp Storage EncryptionPreinstallation Requirements and Procedures for SafeNet KeySecure
Installing SSL certificates on the cluster
The cluster and KMIP server use KMIP SSL certificates to verify each other's identity and establishan SSL connection. Before configuring the SSL connection with the KMIP server, you must installthe KMIP client SSL certificates for the cluster, and the SSL public certificate for the root certificateauthority (CA) of the KMIP server.
Before you begin
• The time must be synchronized on the server creating the certificates, the KMIP server, and thecluster.
• You must have obtained the public SSL KMIP client certificate (client.pem) for the cluster.
• You must have obtained the private SSL KMIP client certificate (client_private.pem) for thecluster.
The SSL KMIP client certificate must not be password-protected.
• You must have obtained the SSL public certificate for the root certificate authority (CA)(key_management_server_ipaddress_CA.pem) of the KMIP server.
Note: You can install the client and server certificates on the KMIP server before or after installingthe certificates on the cluster.
About this task
In an HA pair, both nodes must use the same public and private KMIP SSL certificates. If youconnect multiple HA pairs to the same KMIP server, all nodes in the HA pairs must use the samepublic and private KMIP SSL certificates.
Steps
1. Install the SSL KMIP client certificates for the cluster:
security certificate install -vserver admin_svm_name -type client -subtype kmip-cert
You are prompted to enter the SSL KMIP public and private certificates.
Example
cluster1::> security certificate install -vserver svm1 -type client -subtype kmip-cert
2. Install the SSL public certificate for the root certificate authority (CA) of the KMIP server:
security certificate install -vserver admin_svm_name -type server-ca -subtype kmip-cert -kmip-server-ip kmip_server_ipaddress
If you are using the same root CA for multiple KMIP servers with IPv4 addresses, enter thesubnet address that covers all KMIP server IP addresses. If the servers are on different networks,you can use the subnet address 0.0.0.0 as a wildcard.
If your KMIP servers use IPv6 addresses, you must use a separate root CA for each one.
You can connect up to four servers.
Using NetApp Storage Encryption | 21

Example
If your KMIP server IP addresses are 20.1.1.1, 20.1.1.2, and 20.1.1.3, and they all use the sameroot CA, add them at the same time by using the subnet address 20.1.0.0 instead:
cluster1::> security certificate install -vserver svm1 -type server-ca -subtype kmip-cert -kmip-server-ip 20.1.0.0
Connecting to external key management servers
A node authenticates itself to an SED using an authentication key retrieved from the KMIP server.You can connect up to four KMIP servers to the node. A minimum of two servers is recommendedfor redundancy and disaster recovery.
Before you begin
• All disks in the node or HA pair must be self-encrypting.
See the Interoperability Matrix for disks that support NSE.
• The KMIP SSL client and server certificates must have been installed.
• You must be a cluster administrator to perform this task.
About this task
Each node in an HA pair must be able to access the other's disks in the event of a takeover. For thatreason, you should configure key manager connectivity for each node in the pair.
Steps
1. Configure key manager connectivity for a node:
security key-manager setup -node node
node defaults to the current node.
The key manager setup wizard opens.
2. Enter the information you specified in the configuration worksheet:
• Select no when prompted to use onboard key management.
• Enter e0m as the network interface.
Example
clusterl::> security key-manager setup
Would you like to configure onboard key-management? {yes, no} [no]:Would you like to use KMIP server configuration? {yes, no} [yes]:
Enter the TCP port number for KMIP server [5696]:Enter the network interface [e0c]:Would you like to configure an IPv4 address? {yes, no} [yes]:
Enter the IP address: [20.1.1.1]:Enter the netmask: [255.255.1.1]:Enter the gateway: [20.1.1.5]:Would you like to configure an IPv6 address? {yes, no} [no]:
3. Repeat these steps for the partner node.
4. Add an additional KMIP server for redundancy:
security key-manager add -address key_management_server_ipaddress
22 | NetApp Encryption Power Guide

Example
clusterl::> security key-manager add -address 20.1.1.2
5. Verify that all configured KMIP servers are connected:
security key-manager show -status
For complete command syntax, see the man page.
Example
cluster1::> security key-manager show -status
Node Registered Key Manager Status---------------------- ---------------------- ---------------cluster1-01 20.1.1.1 availablecluster1-01 20.1.1.2 availablecluster1-02 20.1.1.1 availablecluster1-02 20.1.1.2 available
Related information
ONTAP 9 commands
NetApp Interoperability Matrix Tool
Creating authentication keys
You can use the security key-manager create-key command to create the authentication keysfor a node and store them on the configured KMIP servers.
Before you begin
You must be a cluster administrator to perform this task.
About this task
If your security setup requires you to use different keys for data authentication and FIPS 140-2authentication, you should create a separate key for each. If that is not the case, you can use the sameauthentication key for FIPS compliance that you use for data access.
When you create an authentication key for a node, the system automatically “restores” the key fromthe KMIP server and “pushes” it to its partner node. Each node can then use the same key to accessits own disks and to access its partner's disks in case of a takeover.
• This command is not supported when onboard key management is enabled.
• You receive a warning if the configured key management servers are already storing more than128 authentication keys.
You can use the key management server software to delete any unused keys, then run thecommand again.
Steps
1. Create the authentication key that the current node and its partner will use to access storage:
security key-manager create-key
For complete command syntax, see the man page for the command.
Note: The key ID displayed in the output is an identifier used to refer to the authentication key.It is not the actual authentication key or the data encryption key.
Using NetApp Storage Encryption | 23

Example
cluster1::> security key-manager create-key (security key-manager create-key)Verifying requirements...
Node: cluster1-01Creating authentication key...Authentication key creation successful.Key ID: F1CB30AFF1CB30B00101000000000000A68B167F92DD54196297159B5968923C
Node: cluster1-01Key manager restore operation initialized.Successfully restored key information.
Node: cluster1-02Key manager restore operation initialized.Successfully restored key information.
2. Verify that the authentication keys have been created:
security key-manager query
For complete command syntax, see the man page.
Example
cluster1::> security key-manager query
(security key-manager query)
Node: cluster1-01 Key Manager: 20.1.1.1 Count: 1
Key Tag Key ID Restored------------- ---------------------------------------------------------------- --------cluster1-01 F1CB30AFF1CB30B00101000000000000A68B167F92DD54196297159B5968923C yes
Node: cluster1-02 Key Manager: 20.1.1.1 Count: 1
Key Tag Key ID Restored------------- ---------------------------------------------------------------- --------cluster1-02 F1CB30AFF1CB30B00101000000000000A68B167F92DD54196297159B5968923C yes
Related information
ONTAP 9 commands
Assigning a data authentication key to SEDs
You can use the storage encryption disk modify command to assign a data authenticationkey to an SED. Cluster nodes use this key to access data on the SED.
Before you begin
You must be a cluster administrator to perform this task.
About this task
An SED is protected from unauthorized access only if the authentication key ID for the node is set toa value other than the SED's default manufacturer secure ID (MSID), which the system evaluates to0x0. When you assign an authentication key to an SED, the system changes the authentication key IDfor the node to a non-MSID value.
24 | NetApp Encryption Power Guide

Steps
1. Assign a data authentication key to SEDs:
storage encryption disk modify -disk disk_ID -data-key-id key_ID
For complete command syntax, see the man page for the command.
Note: You can use the security key-manager query command to view key IDs.
Example
cluster1::> storage encryption disk modify -disk 0.10.* -data-key-id F1CB30AFF1CB30B00101000000000000A68B167F92DD54196297159B5968923C
Info: Starting modify on 14 disks. View the status of the operation by using the storage encryption disk show-status command.
2. Verify that the authentication keys have been assigned:
storage encryption disk show
For complete command syntax, see the man page.
Example
cluster1::> storage encryption disk showDisk Mode Data Key ID----- ---- ---------------------------------------------------------------- 0.0.0 data F1CB30AFF1CB30B00101000000000000A68B167F92DD54196297159B5968923C 0.0.1 data F1CB30AFF1CB30B00101000000000000A68B167F92DD54196297159B5968923C [...]
Related information
ONTAP 9 commands
Assigning a FIPS 140-2 authentication key to SEDs
You can use the storage encryption disk modify command with the -fips-key-id optionto assign a FIPS 140-2 authentication key to an SED. Cluster nodes use this key for SED operationsother than data access, such as allowing firmware downloads.
Before you begin
The drive firmware must support FIPS 140-2 compliance. The Interoperability Matrix containsinformation about supported drive firmware versions.
About this task
Your security setup may require you to use different keys for data authentication and FIPS 140-2authentication. If that is not the case, you can use the same authentication key for FIPS compliancethat you use for data access.
Steps
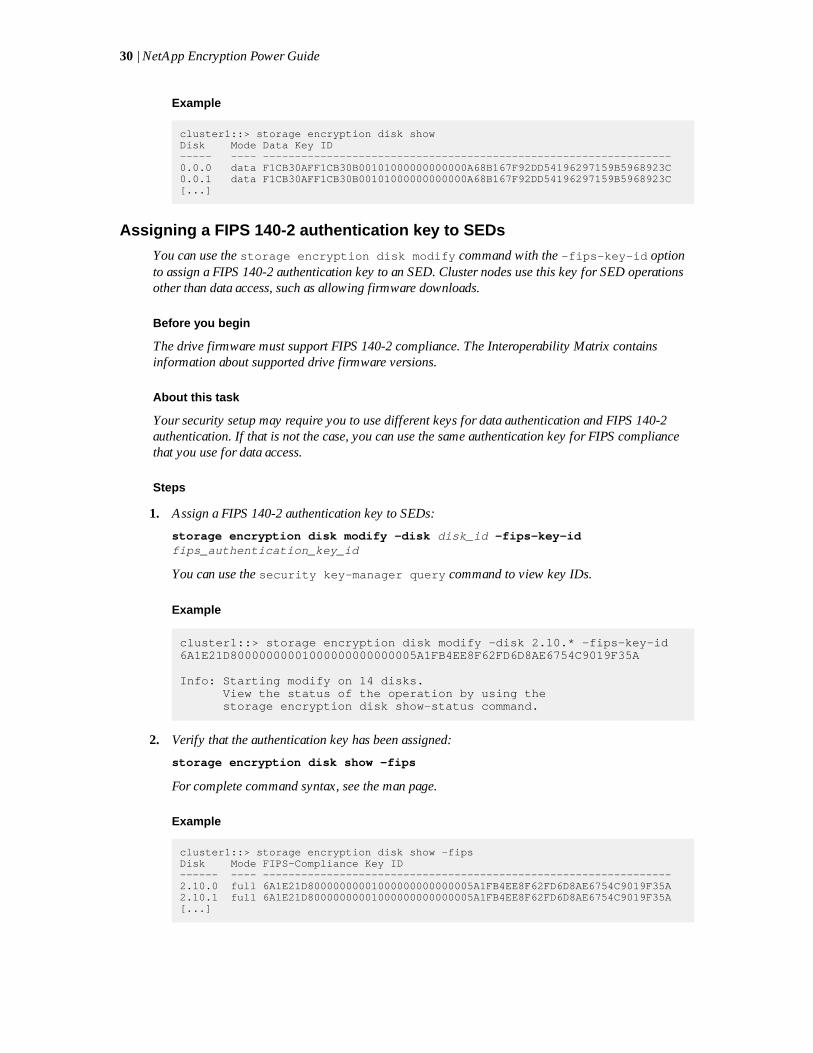
1. Assign a FIPS 140-2 authentication key to SEDs:
storage encryption disk modify -disk disk_id -fips-key-idfips_authentication_key_id
You can use the security key-manager query command to view key IDs.
Using NetApp Storage Encryption | 25

Example
cluster1::> storage encryption disk modify -disk 2.10.* -fips-key-id 6A1E21D80000000001000000000000005A1FB4EE8F62FD6D8AE6754C9019F35A
Info: Starting modify on 14 disks. View the status of the operation by using the storage encryption disk show-status command.
2. Verify that the authentication key has been assigned:
storage encryption disk show -fips
For complete command syntax, see the man page.
Example
cluster1::> storage encryption disk show -fipsDisk Mode FIPS-Compliance Key ID------ ---- ----------------------------------------------------------------2.10.0 full 6A1E21D80000000001000000000000005A1FB4EE8F62FD6D8AE6754C9019F35A 2.10.1 full 6A1E21D80000000001000000000000005A1FB4EE8F62FD6D8AE6754C9019F35A [...]
Related information
ONTAP 9 commands
NetApp Interoperability Matrix Tool
Enabling cluster-wide FIPS-compliant mode for KMIP server connections
You can use the security config modify command with the -is-fips-enabled option toenable cluster-wide FIPS-compliant mode for data in flight. Doing so forces the cluster to useOpenSSL in FIPS mode with TLS connections to KMIP servers.
Before you begin
All KMIP servers must support TLSv1.2. The system requires TLSv1.2 to complete the connectionto the KMIP server when cluster-wide FIPS-compliant mode is enabled.
About this task
When you enable cluster-wide FIPS-compliant mode, the cluster will automatically select only TLSprotocols. Cluster-wide FIPS-compliant mode is disabled by default.
You must reboot cluster nodes manually after modifying the cluster-wide security configuration.
Steps
1. Verify that TLSv1.2 is supported:
security config show -supported-protocols
For complete command syntax, see the man page.
Example
cluster1::> security config show Cluster Cluster SecurityInterface FIPS Mode Supported Protocols Supported Ciphers Config Ready--------- ---------- ----------------------- ----------------- ----------------SSL false TLSv1.2, TLSv1.1, TLSv1 ALL:!LOW: yes !aNULL:!EXP: !eNULL
26 | NetApp Encryption Power Guide

2. Enable cluster-wide FIPS-compliant mode:
security config modify -is-fips-enabled true -interface SSL
For complete command syntax, see the man page.
3. Reboot cluster nodes manually.
4. Verify that cluster-wide FIPS-compliant mode is enabled:
security config show
Example
cluster1::> security config show Cluster Cluster SecurityInterface FIPS Mode Supported Protocols Supported Ciphers Config Ready--------- ---------- ----------------------- ----------------- ----------------SSL true TLSv1.2, TLSv1.1 ALL:!LOW: yes !aNULL:!EXP: !eNULL:!RC4
Related information
ONTAP 9 commands
Configuring onboard key managementYou can use the Onboard Key Manager to authenticate cluster nodes to an SED. The Onboard KeyManager is a built-in tool that serves authentication keys to nodes from the same storage system asyour data.
Steps
1. Enabling onboard key management on page 27
2. Viewing the keys generated by the Onboard Key Manager on page 28
3. Assigning a data authentication key to SEDs on page 29
4. Assigning a FIPS 140-2 authentication key to SEDs on page 30
Enabling onboard key management
The Onboard Key Manager secures the keys that the cluster uses to access encrypted data. You mustenable Onboard Key Manager on each cluster that accesses an encrypted volume or a self-encryptingdisk (SED).
Before you begin
• If you are using NSE with an external key management (KMIP) server, you must have deleted theexternal key manager database.
Transitioning to onboard key management from external key management on page 42
• You must be a cluster administrator to perform this task.
About this task
You must run this command each time you add a node to the cluster.
Steps
1. Start the key manager setup wizard:
security key-manager setup
Using NetApp Storage Encryption | 27

Example
The following command starts the key manager setup wizard on cluster1:
cluster1::> security key-manager setupWelcome to the key manager setup wizard, which will lead you throughthe steps to add boot information.
Enter the following commands at any time"help" or "?" if you want to have a question clarified,"back" if you want to change your answers to previous questions, and"exit" if you want to quit the key manager setup wizard. Any changesyou made before typing "exit" will be applied.
Restart the key manager setup wizard with "security key-managersetup". To accept a default or omit a question, do not enter a value.
Would you like to use onboard key-management? {yes, no} [yes]: Enter the cluster-wide passphrase: <32..256 UTF8 characters long text>Reenter the cluster-wide passphrase: <32..256 UTF8 characters long text>
2. Enter yes at the prompt to configure onboard key management.
3. Enter a passphrase between 32 and 256 characters at the passphrase prompt.
4. Re-enter the passphrase at the passphrase confirmation prompt.
After you finish
Copy the passphrase to a secure location outside the storage system for future use.
All key management information is automatically backed up to the replicated database (RDB) for thecluster. You should also back up the information manually for use in case of a disaster.
Viewing the keys generated by the Onboard Key Manager
You can use the security key-manager key show command to view the authentication keysgenerated by the Onboard Key Manager. These are the keys you assign to SEDs for data and optionalFIPS 140-2 authentication.
Before you begin
You must be a cluster administrator to perform this task.
About this task
The Onboard Key Manager generates two keys, one for data authentication and one for FIPS 140-2authentication, in case your security setup requires you to use a different key for each. If that is notthe case, you can use the same authentication key for FIPS compliance that you use for data access.
The Onboard Key Manager automatically assigns the keys generated for the current node to itspartner node. Each node can then use the same key to access its own disks and to access its partner'sdisks in case of a takeover.
Step
1. View the authentication keys generated by the Onboard Key Manager:
security key-manager key show
For complete command syntax, see the man page.
Note: The key ID displayed in the output is an identifier used to refer to the authentication key.It is not the actual authentication key or the data encryption key.
28 | NetApp Encryption Power Guide

Example
cluster1::> security key-manager key show
Node: cluster1-01Key Store: onboardKey ID-----------------------------------------------------------------------------F1CB30AFF1CB30B00101000000000000A68B167F92DD54196297159B5968923C6A1E21D80000000001000000000000005A1FB4EE8F62FD6D8AE6754C9019F35A
Node: cluster1-02Key Store: onboardKey ID-----------------------------------------------------------------------------F1CB30AFF1CB30B00101000000000000A68B167F92DD54196297159B5968923C6A1E21D80000000001000000000000005A1FB4EE8F62FD6D8AE6754C9019F35A4 entries were displayed.
Assigning a data authentication key to SEDs
You can use the storage encryption disk modify command to assign a data authenticationkey to an SED. Cluster nodes use this key to access data on the SED.
Before you begin
You must be a cluster administrator to perform this task.
About this task
An SED is protected from unauthorized access only if the authentication key ID for the node is set toa value other than the SED's default manufacturer secure ID (MSID), which the system evaluates to0x0. When you assign an authentication key to an SED, the system changes the authentication key IDfor the node to a non-MSID value.
Steps
1. Assign a data authentication key to SEDs:
storage encryption disk modify -disk disk_ID -data-key-id key_ID
For complete command syntax, see the man page for the command.
Note: You can use the security key-manager query command to view key IDs.
Example
cluster1::> storage encryption disk modify -disk 0.10.* -data-key-id F1CB30AFF1CB30B00101000000000000A68B167F92DD54196297159B5968923C
Info: Starting modify on 14 disks. View the status of the operation by using the storage encryption disk show-status command.
2. Verify that the authentication keys have been assigned:
storage encryption disk show
For complete command syntax, see the man page.
Using NetApp Storage Encryption | 29
Example
cluster1::> storage encryption disk showDisk Mode Data Key ID----- ---- ---------------------------------------------------------------- 0.0.0 data F1CB30AFF1CB30B00101000000000000A68B167F92DD54196297159B5968923C 0.0.1 data F1CB30AFF1CB30B00101000000000000A68B167F92DD54196297159B5968923C [...]
Assigning a FIPS 140-2 authentication key to SEDs
You can use the storage encryption disk modify command with the -fips-key-id optionto assign a FIPS 140-2 authentication key to an SED. Cluster nodes use this key for SED operationsother than data access, such as allowing firmware downloads.
Before you begin
The drive firmware must support FIPS 140-2 compliance. The Interoperability Matrix containsinformation about supported drive firmware versions.
About this task
Your security setup may require you to use different keys for data authentication and FIPS 140-2authentication. If that is not the case, you can use the same authentication key for FIPS compliancethat you use for data access.
Steps
1. Assign a FIPS 140-2 authentication key to SEDs:
storage encryption disk modify -disk disk_id -fips-key-idfips_authentication_key_id
You can use the security key-manager query command to view key IDs.
Example
cluster1::> storage encryption disk modify -disk 2.10.* -fips-key-id 6A1E21D80000000001000000000000005A1FB4EE8F62FD6D8AE6754C9019F35A
Info: Starting modify on 14 disks. View the status of the operation by using the storage encryption disk show-status command.
2. Verify that the authentication key has been assigned:
storage encryption disk show -fips
For complete command syntax, see the man page.
Example
cluster1::> storage encryption disk show -fipsDisk Mode FIPS-Compliance Key ID------ ---- ----------------------------------------------------------------2.10.0 full 6A1E21D80000000001000000000000005A1FB4EE8F62FD6D8AE6754C9019F35A 2.10.1 full 6A1E21D80000000001000000000000005A1FB4EE8F62FD6D8AE6754C9019F35A [...]
30 | NetApp Encryption Power Guide

Managing NSEONTAP offers a rich set of services for managing SEDs. You can restore authentication keys, replaceSSL certificates, return SEDs to service when authentication keys are no longer available, and muchmore.
Choices
• Replacing SSL certificates on page 31
• Restoring authentication keys on page 32
• Replacing an SED on page 33
• Making data on an SED inaccessible on page 34
• Returning SEDs to service when authentication keys are lost on page 39
• Returning SEDs to unprotected mode on page 41
• Deleting an external key manager connection on page 41
• Transitioning to external key management from onboard key management on page 42
• Transitioning to onboard key management from external key management on page 42
• Changing the onboard key management passphrase on page 43
• Backing up onboard key management information manually on page 44
Replacing SSL certificates
All SSL certificates have an expiration date. You must update your certificates before they expire toprevent loss of access to SEDs.
Before you begin
• You must have obtained the replacement public and private certificates for the cluster.
• You must have obtained the replacement public certificate for the KMIP server.
Note: You can install the replacement client and server certificates on the KMIP server before orafter installing the certificates on the cluster.
Steps
1. Disable the connection to the KMIP server:
security key-manager delete -address key_management_server_ipaddress
Example
cluster1::> security key-manager delete -address 20.1.0.0
2. Delete the client certificates for the cluster:
security certificate delete -vserver admin_svm_name -common-namefqdn_or_custom_common_name -ca certificate_authority -type client -subtype kmip-cert
Example
cluster1::> security certificate delete -vserver vs0 -common-namewww.example.com -ca "Verisign Inc" -type client -subtype kmip-cert
3. Delete the KMIP server certificate:
Using NetApp Storage Encryption | 31

security certificate delete -vserver admin_svm_name -common-namefqdn_or_custom_common_name -ca certificate_authority -type server-ca -subtype kmip-cert
Example
cluster1::> security certificate delete -vserver vs0 -common-namewww.example.com -ca "Verisign Inc" -type server-ca -subtype kmip-cert
4. Install the replacement client and server certificates.
Installing SSL certificates on the cluster on page 21
5. Connect to the KMIP server.
Connecting to external key management servers on page 22
Restoring authentication keys
You can use the security key-manager restore command to manually restore authenticationkeys and “push” them to a different node. You might want to do this if you are adding a new node tothe cluster, or restarting a node that was down temporarily when you created the keys for its partner.
Before you begin
You must be a cluster administrator to perform this task.
About this task
When you create an authentication key for a node, the system automatically “restores” the key fromthe KMIP server and “pushes” it to its partner node. The partner can then use the key to access thenode's disks in the event of a takeover. The security key-manager restore command lets yourestore authentication keys manually, to any node in the cluster.
This command is not supported when onboard key management is enabled.
Step
1. Restore the current node's authentication keys and key IDs to a different node:
security key-manager restore -node node
node defaults to all nodes. For complete command syntax, see the man page for the command.
Example
cluster1::> security key-manager restore -node cluster1-02 (security key-manager restore)
Node: cluster1-02 Key Manager: 20.1.1.1 Count: 2
Key IDs ---------------------------------------------------------------- F1CB30AFF1CB30B00101000000000000A68B167F92DD54196297159B5968923C F1CB30AFF1CB30B00101000000000000CF0EFD81EA9F6324EA97B369351C56AC
Related information
ONTAP 9 commands
32 | NetApp Encryption Power Guide

Replacing an SED
You can replace an SED the same way you replace an ordinary disk. You must rekey the SED toenable NSE.
Before you begin
• You must know the key ID for the authentication key used by the SED.
• You must be a cluster administrator to perform this task.
Steps
1. Ensure that the disk has been marked as failed:
storage disk show -broken
For complete command syntax, see the man page.
Example
cluster1::> storage disk show -brokenOriginal Owner: cluster1-01 Checksum Compatibility: block Usable Physical Disk Outage Reason HA Shelf Bay Chan Pool Type RPM Size Size ------ ---- ------------ ---- --- ---- ------ ----- ----- ------- ------- 0.0.0 admin failed 0b 1 0 A Pool0 FCAL 10000 132.8GB 133.9GB 0.0.7 admin removed 0b 2 6 A Pool1 FCAL 10000 132.8GB 134.2GB[...]
2. Remove the failed disk and replace it with a new SED, following the instructions in the hardwareguide for your disk shelf model.
3. Assign ownership of the newly replaced SED:
storage disk assign -disk disk_name -owner node
For complete command syntax, see the man page.
Example
cluster1::> storage disk assign -disk 2.1.1 -owner cluster1-01
4. Confirm that the new disk has been assigned:
storage encryption disk show
For complete command syntax, see the man page.
Example
cluster1::> storage encryption disk showDisk Mode Data Key ID----- ---- ---------------------------------------------------------------- 0.0.0 data F1CB30AFF1CB30B00101000000000000A68B167F92DD54196297159B5968923C 0.0.1 data F1CB30AFF1CB30B00101000000000000A68B167F92DD54196297159B5968923C 1.10.0 data F1CB30AFF1CB30B00101000000000000CF0EFD81EA9F6324EA97B369351C56AC 1.10.1 data F1CB30AFF1CB30B00101000000000000CF0EFD81EA9F6324EA97B369351C56AC2.1.1 open 0x0 [...]
5. Assign the authentication keys to the SED.
Assigning a data authentication key to SEDs on page 24
Using NetApp Storage Encryption | 33

Related information
ONTAP 9 commands
Making data on an SED inaccessible
If you want to make data on an SED permanently inaccessible, but keep the SED’s unused spaceavailable for new data, you can sanitize the disk. If you want to make data permanently inaccessibleand you do not need to reuse the SED, you can destroy it.
• Disk sanitization
When you sanitize an SED, the system changes the disk encryption key to a new random value,resets the power-on lock state to false, and sets the key ID to the default manufacturer secure ID(MSID). Doing so renders the data on the disk inaccessible and impossible to retrieve. You canreuse sanitized disks as non-zeroed spare disks.
• Disk destroy
When you destroy an SED, the system sets the disk encryption key to an unknown random valueand locks the disk irreversibly. Doing so renders the disk permanently unusable and the data on itpermanently inaccessible.
You can sanitize or destroy individual SEDs, or all the SEDs for a node.
If you think an SED might need to be sanitized
Disk sanitization can be time-consuming. If you think an SED might need to be sanitized, followingsome simple guidelines will reduce the time it takes to complete the process:
• Make sure disk aggregates are no larger than necessary.
If aggregates are larger than needed, sanitization requires more time, disk space, and bandwidth.
• When you back up aggregates containing sensitive data, avoid backing them up to aggregates thatalso contain large amounts of nonsensitive data.
Doing so reduces the amount of time you will need to move the nonsensitive data beforesanitizing the SED containing the sensitive data.
Choices
• Sanitizing an SED on page 34
• Destroying an SED on page 36
• Emergency shredding of data on an SED on page 37
Sanitizing an SED
If you want to make data on an SED permanently inaccessible, but keep the SED’s unused spaceavailable for new data, you can use the storage encryption disk sanitize command tosanitize the SED.
Before you begin
You must be a cluster administrator to perform this task.
About this task
When you sanitize an SED, the system changes the disk encryption key to a new random value, resetsthe power-on lock state to false, and sets the authentication key ID to the default manufacturer secureID (MSID). Doing so renders the data on the disk inaccessible and impossible to retrieve. You canreuse sanitized disks as non-zeroed spare disks.
34 | NetApp Encryption Power Guide

Steps
1. Migrate any data that needs to be preserved to an aggregate for a different disk.
2. Delete the aggregate on the SED to be sanitized:
storage aggregate delete -aggregate aggregate_name
For complete command syntax, see the man page.
Example
cluster1::> storage aggregate delete -aggregate aggr1
3. Identify the disk ID for the SED to be sanitized:
storage encryption disk show
For complete command syntax, see the man page.
Example
cluster1::> storage encryption disk showDisk Mode Data Key ID----- ---- ---------------------------------------------------------------- 0.0.0 data F1CB30AFF1CB30B00101000000000000A68B167F92DD54196297159B5968923C 0.0.1 data F1CB30AFF1CB30B00101000000000000A68B167F92DD54196297159B5968923C 1.10.2 data F1CB30AFF1CB30B00101000000000000CF0EFD81EA9F6324EA97B369351C56AC[...]
4. Sanitize the disk:
storage encryption disk sanitize -disk disk_id
You can use this command to sanitize hot spare or broken disks only. To sanitize all disksregardless of type, use the -force-all-state option. For complete command syntax, see theman page.
Note: You are prompted to enter a confirmation phrase before continuing. Enter the phraseexactly as shown on the screen.
Example
cluster1::> storage encryption disk sanitize -disk 1.10.2
Warning: This operation will cryptographically sanitize 1 spare or broken self-encrypting disk on 1 node. To continue, enter sanitize disk :sanitize disk
Info: Starting sanitize on 1 disk. View the status of the operation using the storage encryption disk show-status command.
Related information
ONTAP 9 commands
Using NetApp Storage Encryption | 35

Destroying an SED
If you want to make SED data permanently inaccessible and you do not need to reuse the SED, youcan use the storage encryption disk destroy command to destroy the disk.
Before you begin
You must be a cluster administrator to perform this task.
About this task
When you destroy an SED, the system sets the disk encryption key to an unknown random value andlocks the disk irreversibly. Doing so renders the disk permanently unusable and the data on itpermanently inaccessible.
Steps
1. Migrate any data that needs to be preserved to an aggregate for a different disk.
2. Delete the aggregate on the SED to be destroyed:
storage aggregate delete -aggregate aggregate_name
For complete command syntax, see the man page.
Example
cluster1::> storage aggregate delete -aggregate aggr1
3. Identify the disk ID for the SED to be destroyed:
storage encryption disk show
For complete command syntax, see the man page.
Example
cluster1::> storage encryption disk showDisk Mode Data Key ID----- ---- ---------------------------------------------------------------- 0.0.0 data F1CB30AFF1CB30B00101000000000000A68B167F92DD54196297159B5968923C 0.0.1 data F1CB30AFF1CB30B00101000000000000A68B167F92DD54196297159B5968923C 1.10.2 data F1CB30AFF1CB30B00101000000000000CF0EFD81EA9F6324EA97B369351C56AC[...]
4. Destroy the disk:
storage encryption disk destroy -disk disk_id
For complete command syntax, see the man page.
Note: You are prompted to enter a confirmation phrase before continuing. Enter the phraseexactly as shown on the screen.
Example
cluster1::> storage encryption disk destroy -disk 1.10.2
Warning: This operation will cryptographically destroy 1 spare or broken self-encrypting disks on 1 node. You cannot reuse destroyed disks unless you revert them to their original state using the PSID value.
36 | NetApp Encryption Power Guide

To continue, enter destroy disk :destroy disk
Info: Starting destroy on 1 disk. View the status of the operation by using the "storage encryption disk show-status" command.
Related information
ONTAP 9 commands
Emergency shredding of data on an SED
In case of a security emergency, you can instantly prevent access to SEDs, even if power is notavailable to the storage system or the KMIP server.
Before you begin
• You must be using a KMIP server, and the KMIP server must be configured with an easilydestroyed authentication item (for example, a smart card or USB drive).
• You must be a cluster administrator to perform this task.
Step
1. Perform emergency shredding of data on an SED:
Using NetApp Storage Encryption | 37
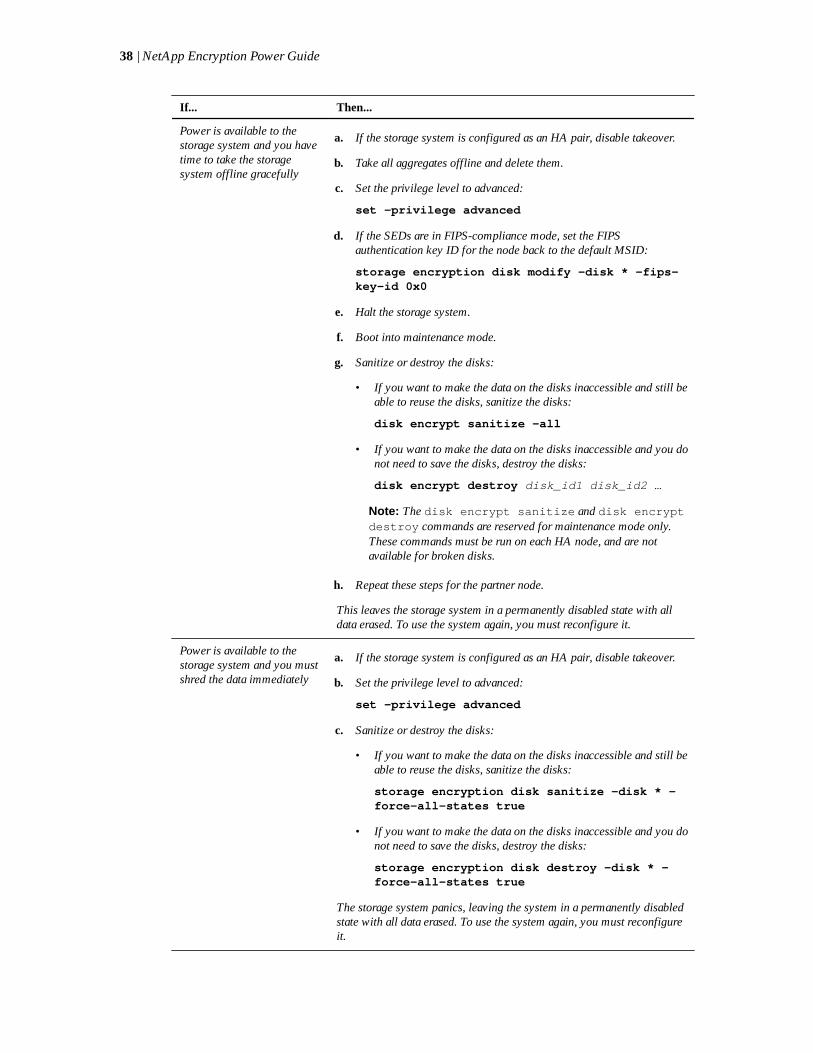
If... Then...
Power is available to thestorage system and you havetime to take the storagesystem offline gracefully
a. If the storage system is configured as an HA pair, disable takeover.
b. Take all aggregates offline and delete them.
c. Set the privilege level to advanced:
set -privilege advanced
d. If the SEDs are in FIPS-compliance mode, set the FIPSauthentication key ID for the node back to the default MSID:
storage encryption disk modify -disk * -fips-key-id 0x0
e. Halt the storage system.
f. Boot into maintenance mode.
g. Sanitize or destroy the disks:
• If you want to make the data on the disks inaccessible and still beable to reuse the disks, sanitize the disks:
disk encrypt sanitize -all
• If you want to make the data on the disks inaccessible and you donot need to save the disks, destroy the disks:
disk encrypt destroy disk_id1 disk_id2 …
Note: The disk encrypt sanitize and disk encryptdestroy commands are reserved for maintenance mode only.These commands must be run on each HA node, and are notavailable for broken disks.
h. Repeat these steps for the partner node.
This leaves the storage system in a permanently disabled state with alldata erased. To use the system again, you must reconfigure it.
Power is available to thestorage system and you mustshred the data immediately
a. If the storage system is configured as an HA pair, disable takeover.
b. Set the privilege level to advanced:
set -privilege advanced
c. Sanitize or destroy the disks:
• If you want to make the data on the disks inaccessible and still beable to reuse the disks, sanitize the disks:
storage encryption disk sanitize -disk * -force-all-states true
• If you want to make the data on the disks inaccessible and you donot need to save the disks, destroy the disks:
storage encryption disk destroy -disk * -force-all-states true
The storage system panics, leaving the system in a permanently disabledstate with all data erased. To use the system again, you must reconfigureit.
38 | NetApp Encryption Power Guide

If... Then...
Power is available to theKMIP server but not to thestorage system
a. Log in to the KMIP server.
b. Destroy all keys associated with the SEDs containing the data youwant to prevent access to.
This prevents access to disk encryption keys by the storage system.
Power is not available to theKMIP server or the storagesystem
Destroy the authentication item for the KMIP server (for example, thesmart card). This prevents access to disk encryption keys by the storagesystem.
For complete command syntax, see the man pages.
Related information
ONTAP 9 commands
Returning SEDs to service when authentication keys are lost
The system treats an SED as broken if you lose the authentication keys for it permanently and cannotretrieve them from the KMIP server. Although you cannot access or recover the data on the disk, youcan take steps to make the SED’s unused space available again for data.
Before you begin
You must be a cluster administrator to perform this task.
About this task
You should use this process only if you are certain that the authentication keys for the SED arepermanently lost and that you cannot recover them.
Step
1. Return SEDs to service:
Using NetApp Storage Encryption | 39

If the SEDS are... Use these steps...
Not in FIPS-compliancemode, or in FIPS-compliancemode and the FIPS key isavailable
a. Sanitize the broken disk:
storage encryption disk sanitize -disk disk_id
b. Set the privilege level to advanced:
set -privilege advanced
c. Unfail the sanitized disk:
storage disk unfail -spare true -disk disk_id
d. Check whether the disk has an owner:
storage disk show -disk disk_id
e. If the disk does not have an owner, assign one, then unfail the diskagain:
storage disk assign -owner node -disk disk_id
storage disk unfail -spare true -disk disk_id
f. Verify that the SED is now a spare and ready to be reused in anaggregate:
storage disk show -disk disk_id
In FIPS-compliance mode,the FIPS key is not available,and the SEDs have a PSIDprinted on the label
a. Obtain the SED's PSID from its disk label.
b. Set the privilege level to advanced:
set -privilege advanced
c. Reset the SED to its factory-configured settings:
storage encryption disk revert-to-original-state -disk disk_id -psiddisk_physical_secure_id
d. Unfail the sanitized disk:
storage disk unfail -spare true -disk disk_id
e. Check whether the disk has an owner:
storage disk show -disk disk_id
f. If the disk does not have an owner, assign one, then unfail the diskagain:
storage disk assign -owner node -disk disk_id
storage disk unfail -spare true -disk disk_id
g. Verify that the SED is now a spare and ready to be reused in anaggregate:
storage disk show -disk disk_id
For complete command syntax, see the man pages.
Related information
ONTAP 9 commands
40 | NetApp Encryption Power Guide

Returning SEDs to unprotected mode
An SED is protected from unauthorized access only if the authentication key ID for the node is set toa value other than the SED's default manufacturer secure ID (MSID), which the system evaluates to0x0. You can return an SED to unprotected mode by using the storage encryption diskmodify command to set the key ID to 0x0.
Before you begin
You must be a cluster administrator to perform this task.
Steps
1. Set the privilege level to advanced:
set -privilege advanced
2. If the SED is running in FIPS-compliance mode, set the FIPS authentication key ID for the nodeback to the default MSID:
storage encryption disk modify -disk disk_id -fips-key-id 0x0
You can use the security key-manager query command to view key IDs.
Example
cluster1::> storage encryption disk modify -disk 2.10.11 -fips-key-id 0x0
Info: Starting modify on 14 disks. View the status of the operation by using the storage encryption disk show-status command.
3. Set the data authentication key ID for the node back to the default MSID:
storage encryption disk modify -disk disk_id -data-key-id 0x0
You can use the security key-manager query command to view key IDs.
Example
cluster1::> storage encryption disk modify -disk 2.10.11 -data-key-id 0x0
Info: Starting modify on 14 disks. View the status of the operation by using the storage encryption disk show-status command.
Deleting an external key manager connection
You can disconnect a KMIP server from a node when you no longer need the server. You might betransitioning to volume encryption, for example, which supports onboard key management only.
Before you begin
You must be a cluster administrator to perform this task.
About this task
When you disconnect a KMIP server from one node in an HA pair, the system automaticallydisconnects the server from the partner node.
Using NetApp Storage Encryption | 41

Note: If you plan to continue using external key management after disconnecting a KMIP server,make sure another KMIP server is available to serve authentication keys.
Step
1. Disconnect a KMIP server from the current node:
security key-manager delete -address key_management_server_ipaddress
Example
cluster1::> security key-manager delete -address 10.233.1.198(security key-manager delete)
Node: cluster1-01Key manager 10.233.1.198 registration will be removed from service.Key manager registration successfully removed.
Node: cluster1-02Key manager 10.233.1.198 registration will be removed from service.Key manager registration successfully removed.
Transitioning to external key management from onboard key management
If you are using NVE and want to switch to NSE with external key management, or if you are usingNSE with onboard key management and want to switch to NSE with external key management, youmust delete the onboard key management configuration before you can enable external keymanagement.
Before you begin
• You must have reset the authentication keys of all NSE disks to MSID (0x0).
Returning SEDs to unprotected mode on page 41
• If you have been using NVE, you must have unencrypted all volumes.
Unencrypting volume data on page 12
• You must be a cluster administrator to perform this task.
Step
1. Delete the onboard key management configuration for a cluster:
security key-manager delete-key-database
Example
The following command deletes the onboard key management configuration for cluster1:
cluster1::> security key-manager delete-key-database
Transitioning to onboard key management from external key management
If you are using NSE with external key management and want to switch to NVE, or if you are usingNSE with external key management and want to switch to NSE with onboard key management, youmust delete the external key management configuration before you can enable onboard keymanagement.
Before you begin
• You must have reset the authentication keys of all NSE disks to MSID (0x0).
42 | NetApp Encryption Power Guide

Returning SEDs to unprotected mode on page 41
• You must have deleted all external key manager connections.
Deleting an external key manager connection on page 41
• You must be a cluster administrator to perform this task.
Step
1. Delete the external key management configuration for a cluster:
security key-manager delete-kmip-config
Example
The following command deletes the external key management configuration for cluster1:
cluster1::> security key-manager delete-kmip-config
Changing the onboard key management passphrase
It is a security best practice to change the onboard key management passphrase periodically. You canuse the security key-manager update-passphrase command to change the onboard keymanagement passphrase.
Before you begin
• You must be a cluster administrator to perform this task.
• Advanced privileges are required for this task.
Steps
1. Change to advanced privilege level:
set -privilege advanced
2. Change the onboard key management passphrase:
security key-manager update-passphrase
Example
The following command lets you change the key management passphrase for cluster1:
cluster1::> security key-manager update-passphraseWarning: This command will reconfigure the cluster passphrase foronboard key-management. Do you want to continue? {y|n}: Enter current passphrase: <32..256 UTF8 characters long text>Enter new passphrase: <32..256 UTF8 characters long text>Reenter the new passphrase: <32..256 UTF8 characters long text>
3. Enter y at the prompt to change the onboard key management passphrase.
4. Enter the current passphrase at the current passphrase prompt.
5. Enter the new passphrase at the new passphrase prompt.
6. Reenter the new passphrase at the passphrase confirmation prompt.
Using NetApp Storage Encryption | 43

After you finish
You should copy the onboard key management passphrase to a secure location outside the storagesystem for future use.
You should back up key management information manually whenever you change the onboard keymanagement passphrase.
Backing up onboard key management information manually on page 16
Backing up onboard key management information manually
You should back up onboard key management information manually whenever you change theOnboard Key Manager passphrase. You can use the security key-manager backup showcommand to display the key management backup information for the cluster. You can then copy thebackup information to a secure location outside the storage system.
Before you begin
You must be a cluster administrator to perform this task.
About this task
All key management information is automatically backed up to the replicated database (RDB) for thecluster. You should also back up key management information manually for use in case of a disaster.
Step
1. Display the key management backup information for the cluster:
security key-manager backup show
Example
The following command displays the key management backup information for cluster1 in ahex dump:
security key-manager backup show----BEGIN BACKUP-----cb5101eab69b7d832287d16b2a02debed6f9b7798979c2d70a3c2ac231873a00d9994b44c61160de3ae02250fb8e780390989a7ebf7a3ed8c89f8073dde3c5586effff9497f7666cc990c3398f86df3e7ecf4ca826736ecd1a761b102184861b....
----END BACKUP-----
After you finish
You should copy the backup information to a secure location outside the storage system for use incase of a disaster.
44 | NetApp Encryption Power Guide

Where to find additional information
You can learn more about the tasks described in this guide in NetApp's extensive documentationlibrary.
• Disk and aggregate managementDescribes how to manage physical storage in NetApp systems, including disks, aggregates, andRAID groups.
• Logical storage managementDescribes how to manage logical storage in NetApp systems, including FlexVol volumes,FlexClone volumes, FlexCache volumes, files, and LUNs.
• ONTAP 9 commandsDescribes encryption commands in reference format.
• NetApp Documentation: OnCommand Workflow Automation (current releases)Describes how to use the OnCommand Workflow Automation scripting tool to performencryption-related tasks.
45
Copyright information
Copyright © 1994–2017 NetApp, Inc. All rights reserved. Printed in the U.S.
No part of this document covered by copyright may be reproduced in any form or by any means—graphic, electronic, or mechanical, including photocopying, recording, taping, or storage in anelectronic retrieval system—without prior written permission of the copyright owner.
Software derived from copyrighted NetApp material is subject to the following license anddisclaimer:
THIS SOFTWARE IS PROVIDED BY NETAPP "AS IS" AND WITHOUT ANY EXPRESS ORIMPLIED WARRANTIES, INCLUDING, BUT NOT LIMITED TO, THE IMPLIEDWARRANTIES OF MERCHANTABILITY AND FITNESS FOR A PARTICULAR PURPOSE,WHICH ARE HEREBY DISCLAIMED. IN NO EVENT SHALL NETAPP BE LIABLE FOR ANYDIRECT, INDIRECT, INCIDENTAL, SPECIAL, EXEMPLARY, OR CONSEQUENTIALDAMAGES (INCLUDING, BUT NOT LIMITED TO, PROCUREMENT OF SUBSTITUTEGOODS OR SERVICES; LOSS OF USE, DATA, OR PROFITS; OR BUSINESS INTERRUPTION)HOWEVER CAUSED AND ON ANY THEORY OF LIABILITY, WHETHER IN CONTRACT,STRICT LIABILITY, OR TORT (INCLUDING NEGLIGENCE OR OTHERWISE) ARISING INANY WAY OUT OF THE USE OF THIS SOFTWARE, EVEN IF ADVISED OF THEPOSSIBILITY OF SUCH DAMAGE.
NetApp reserves the right to change any products described herein at any time, and without notice.NetApp assumes no responsibility or liability arising from the use of products described herein,except as expressly agreed to in writing by NetApp. The use or purchase of this product does notconvey a license under any patent rights, trademark rights, or any other intellectual property rights ofNetApp.
The product described in this manual may be protected by one or more U.S. patents, foreign patents,or pending applications.
RESTRICTED RIGHTS LEGEND: Use, duplication, or disclosure by the government is subject torestrictions as set forth in subparagraph (c)(1)(ii) of the Rights in Technical Data and ComputerSoftware clause at DFARS 252.277-7103 (October 1988) and FAR 52-227-19 (June 1987).
46

Trademark information
Active IQ, AltaVault, Arch Design, ASUP, AutoSupport, Campaign Express, Clustered Data ONTAP,Customer Fitness, Data ONTAP, DataMotion, Fitness, Flash Accel, Flash Cache, Flash Pool,FlexArray, FlexCache, FlexClone, FlexGroup, FlexPod, FlexScale, FlexShare, FlexVol, FPolicy,Fueled by SolidFire, GetSuccessful, Helix Design, LockVault, Manage ONTAP, MetroCluster,MultiStore, NetApp, NetApp Insight, OnCommand, ONTAP, ONTAPI, RAID DP, RAID-TEC,SANscreen, SANshare, SANtricity, SecureShare, Simplicity, Simulate ONTAP, Snap Creator,SnapCenter, SnapCopy, SnapDrive, SnapIntegrator, SnapLock, SnapManager, SnapMirror,SnapMover, SnapProtect, SnapRestore, Snapshot, SnapValidator, SnapVault, SolidFire, SolidFireHelix, StorageGRID, SyncMirror, Tech OnTap, Unbound Cloud, and WAFL and other names aretrademarks or registered trademarks of NetApp, Inc., in the United States, and/or other countries. Allother brands or products are trademarks or registered trademarks of their respective holders andshould be treated as such. A current list of NetApp trademarks is available on the web.
http://www.netapp.com/us/legal/netapptmlist.aspx
47

How to send comments about documentation andreceive update notifications
You can help us to improve the quality of our documentation by sending us your feedback. You canreceive automatic notification when production-level (GA/FCS) documentation is initially released orimportant changes are made to existing production-level documents.
If you have suggestions for improving this document, send us your comments by email.
To help us direct your comments to the correct division, include in the subject line the product name,version, and operating system.
If you want to be notified automatically when production-level documentation is released orimportant changes are made to existing production-level documents, follow Twitter account@NetAppDoc.
You can also contact us in the following ways:
• NetApp, Inc., 495 East Java Drive, Sunnyvale, CA 94089 U.S.
• Telephone: +1 (408) 822-6000
• Fax: +1 (408) 822-4501
• Support telephone: +1 (888) 463-8277
48

Index
7-Mode Transition Tooluse with NetApp Volume Encryption 6use with NVE 6
A
about this guidedeciding whether to use 5
APIsData ONTAP 17descriptions 17NetApp Volume Encryption 17NVE 17
audiencefor the guide 5
C
certificatesinstalling SSL, on cluster 21
certificates, SSLreplacing before expiration 31
cluster securityconfiguring self-encrypting disks for FIPS 140-2compliance 25, 30enabling cluster-wide FIPS-compliant mode 26
commentshow to send feedback about documentation 48
configurations, MetroClustersupport for Storage Encryption 18
configuringself-encrypting disks for FIPS 140-2 compliance 25,30
D
dataemergency shredding of on NetApp StorageEncryption disks 37methods for making it inaccessible on SEDs 34
destroyingNSE disks 36
disk, self-encryptinginformation to collect before configuring withexternal key management servers 20
disksdestroying NSEs 36
disks, NSEemergency shredding of data on 37sanitizing 34
disks, self-encryptingoverview of managing 31replacing 33
documentationadditional information about NetApp encryption 45additional information about NSE 45additional information about NVE 45
how to receive automatic notification of changes to48how to send feedback about 48
E
enablingcluster-wide FIPS-compliant mode 26encryption
changing the encryption key 13deleting an encrypted volume 14encrypting data at rest 6moving an encrypted volume 12unencrypting data at rest 12
encryption keysbacking up 16, 44
encryption, NetApp Volume Encryptionbacking up key management information manually16, 44changing the encryption key 13changing the key management passphrase 14, 43delegating authority to run the volume movecommand 16deleting an encrypted volume 14encrypting a new volume 10encrypting an existing volume 10moving an encrypted volume 12unencrypting volume data 12
encryption, NVEbacking up key management information manually16, 44changing the encryption key 13changing the key management passphrase 14, 43delegating authority to run the volume movecommand 16deleting an encrypted volume 14encrypting a new volume 10encrypting an existing volume 10moving an encrypted volume 12unencrypting volume data 12
expiration, SSL certificatesreplacing before 31
external key management serverdisabling 15, 42
external key management serversassigning authentication keys to SEDs 24, 29creating authentication keys 23deleting a connection 41disconnecting 41information to collect before configuring StorageEncryption with 20restoring authentication keys 32setting up 22
external key management, NetApp Storage Encryptiondeleting an onboard key management databaseconfiguration 42
Index | 49

F
feedbackhow to send comments about documentation 48
FIPS 140-2 complianceconfiguring self-encrypting disks for 25, 30
FIPS-compliant modeenabling cluster-wide 26
FlexGroupsuse with NetApp Volume Encryption 6use with NVE 6
I
informationhow to send feedback about improvingdocumentation 48
installingSSL certificates on cluster 21
K
key management passphrasechanging 14, 43setting initially 9, 27
key management servers, externalassigning authentication keys to SEDs 24, 29creating authentication keys 23restoring authentication keys 32setting up 22
key management setupworkflow 19
KMIP serverdisabling 15, 42
L
licenses, NetApp Volume Encryptioninstalling 8
licenses, NVEinstalling 8
M
managingself-encrypting disks, overview of 31
methodsfor making data on SEDs inaccessible 34
MetroClusteruse with NetApp Volume Encryption 6use with NVE 6
MetroCluster configurationssupport for Storage Encryption 18
MSIDsrekeying SEDs to 41
N
NetApp encryptionwhere to find additional information about 45
NetApp Storage Encryption
onboard key management database 42viewing keys generated by the Onboard KeyManager 28
NetApp Storage Encryption disksemergency shredding of data on 37
NetApp Volume EncryptionAPIs 17backing up key management information manually16, 44changing the encryption key 13changing the key management passphrase 14, 43delegating authority to run the volume movecommand 16deleting an encrypted volume 14deleting an external key manager configuration 15,42determining the ONTAP version 7enabling onboard key management 9, 27encrypting a new volume 10encrypting an existing volume 10installing the license 8moving an encrypted volume 12overview 6support details 6unencrypting volume data 12use with 7-Mode Transition Tool 6use with FlexGroups 5, 6use with MetroCluster 6use with SnapLock 6use with SnapLock configurations 5use with SnapMirror 6use with SnapVault 6workflow 7
NSEdeleting an onboard key management configuration42viewing keys generated by the Onboard KeyManager 28where to find additional information about 45
NSE diskssanitizing 34
NVEAPIs 17backing up key management information manually16, 44changing the encryption key 13changing the key management passphrase 14, 43delegating authority to run the volume movecommand 16deleting an encrypted volume 14deleting an external key manager configuration 15,42determining the ONTAP version 7enabling onboard key management 9, 27encrypting a new volume 10encrypting an existing volume 10installing the license 8moving an encrypted volume 12overview 6support details 6unencrypting volume data 12use with 7-Mode Transition Tool 6use with FlexGroups 5, 6
50 | NetApp Encryption Power Guide

use with MetroCluster 6use with SnapLock 6use with SnapLock configurations 5use with SnapMirror 6use with SnapVault 6where to find additional information about 45
NVE Encryptionworkflow 7
O
Onboard Key Managerdisabling 42enabling 9, 27viewing keys generated by the Onboard KeyManager 28
Onboard Key Manager, NetApp Storage Encryptionviewing keys generated by the Onboard KeyManager 28
Onboard Key Manager, NetApp Volume Encryptiondeleting an external key manager configuration 15,42enabling 9, 27
Onboard Key Manager, NVEdeleting an external key manager configuration 15,42enabling 9, 27viewing generated keys 28
P
power guideskey management setup workflow 19
Power Guidesrequirements for using this guide 5
R
rekeyingSEDs to MSID 41
replacingself-encrypting disks 33SSL certificates before expiration 31
returning SEDs to servicewhen authentication keys are no longer available 39
S
sanitizingNSE disks 34
securityenabling cluster-wide FIPS-compliant mode 26
SEDsmethods for making data inaccessible on 34returning to service when authentication keys are nolonger available 39returning to unprotected mode 41
self-encrypting diskinformation to collect before configuring withexternal key management servers 20
self-encrypting disksconfiguring for FIPS 140-2 compliance 25, 30
overview of managing 31replacing 33returning to service when authentication keys are nolonger available 39
servers, external key managementassigning authentication keys to SEDs 24, 29creating authentication keys 23deleting a connection 41disconnecting 41information to collect before configuring StorageEncryption with 20restoring authentication keys 32setting up 22
setting upexternal key management servers 22, 23
setting up key managementworkflow 19
SnapLockuse with NetApp Volume Encryption 6use with NVE 6
SnapMirroruse with NetApp Volume Encryption 6use with NVE 6
SnapVaultuse with NetApp Volume Encryption 6use with NVE 6
SSL certificatesinstalling on cluster 21replacing before expiration 31
Storage Encryptioninstalling SSL certificates on the cluster for 21support for 18
Storage Encryption with external key managementservers
information to collect before configuring 20suggestions
how to send feedback about documentation 48support for
Storage Encryption 18
T
Twitterhow to receive automatic notification ofdocumentation changes 48
U
unprotected modereturning SEDs to 41
V
versions, NetApp Volume Encryptiondetermining the ONTAP version 7
versions, NVEdetermining the ONTAP version 7
W
workflowskey management setup 19
Index | 51

NetApp Volume Encryption 7NVE 7
X
XTS-AES-256 keys 6
52 | NetApp Encryption Power Guide