open source labthe database system. ddl : data definition language (ddl) statements are used to...
TRANSCRIPT
Jawaharlal Nehru Engineering College
Laboratory Manual
OPEN SOURCE LAB
FOR
Second Year Students
(Information Technology)
Author JNEC, Aurangabad

FORWARD
It is my great pleasure to present this laboratory manual for Second year engineering students for
the subject of Open source lab.
As a student, many of you may be wondering with some of the questions in your mind regarding
the subject and exactly what has been tried is to answer through this manual.
As you may be aware that MGM has already been awarded with ISO 9000 certification and it is
our endurance to technically equip our students taking the advantage of the procedural aspects of
ISO 9000 Certification
Faculty members are also advised that covering these aspects in initial stage itself, will greatly
relived them in future as much of the load will be taken care by the enthusiasm energies of the
students once they are conceptually clear.
Dr. S. D. Deshmukh
Principal
Vision of JNEC
College seeks to be the engineering college of choice in Maharashtra that can provide the
best learning experience, the most productive learning community, and the most creative
learning environment in Engineering Education and will be recognized as one of the best
Engineering Colleges in India.
Mission of JNEC
To develop innovative engineers with human values, well equipped to solve complex
technical problems, address the needs of modern society and pursue lifelong learning, by
providing them competent, caring and committed faculty.
IT Vision:
IT department is committed to ensure the quality education to students‟ by providing
innovative resources & continuous up-gradation of the department. To achieve “Heights
of Excellence” in the world we strive to organize regular interaction with Industry and
Alumni.
IT Mission:
To impart core technical competency & knowledge in students through curriculum and
certification programs to fulfill the industry requirements which ultimately benefits
society at large.
Program Educational Objectives:
I. Preparation: To prepare students to excel in PG program or to succeed in Industry
/Technical profession through global, rigorous education.
II. Core Competence: To provide students with a solid foundation in mathematical,
scientific and engineering fundamentals required to solve engineering problems and
also to pursue higher studies.
III. Breadth: To train students with good scientific and engineering breadth so as to
comprehend, analyze, design and create novel product and solution for the real life
problems.
IV. Professionalism: To inculcate in students‟ professional and ethical attitude, effective
communication skills, team work skills, multi-disciplinary approach and an ability to
relate engineering issues to broader social context.
Learning Environment: To provide students with academic environment aware of excellence,
leadership, written ethical codes and guidelines and lifelong learning needed for successful
professional career.
LABORATORY MANUAL CONTENTS
This manual is intended for the Second year students of IT branch in the subject of Open source
lab. This manual typically contains practical/Lab Sessions related to open source software‟s like
PHP, MYSQL,APACHE,LINUX covering various aspects related the subject to enhanced
understanding.
We have made the efforts to cover various aspects of the subject covering Operating System
concepts and programming aspects will be complete in itself to make it meaningful, elaborative
understandable concepts and conceptual visualization.
Students are advised to thoroughly go through this manual rather than only topics mentioned in
the syllabus as practical aspects are the key to understanding and conceptual visualization of
theoretical aspects covered in the books.
Good Luck for your Enjoyable Laboratory Sessions.
Supriya Wanegaonkar
Asst. Prof.,IT dept

DOs and DON’Ts in Laboratory:
1. Make entry in the Log Book as soon as you enter the Laboratory.
2. All the students should sit according to their roll numbers starting from
their left to right.
3. All the students are supposed to enter the terminal number in the logbook.
4. Do not change the terminal on which you are working.
5. Strictly observe the instructions given by the teacher/Lab Instructor.
Instruction for Laboratory Teachers::
1. Submission related to whatever lab work has been completed should be
done during the next lab session. The immediate arrangements for printouts related to
submission on the day of practical assignments.
2. Students should be taught for taking the printouts under the observation
of Lab teacher.
3. The promptness of submission should be encouraged by way of marking
And evaluation patterns that will benefit the sincere students.

SUBJECT INDEX
1. Installation, configuration and testing of mysql and also study basic DDL,DML
commands.
2. To study aggregate functions in mysql.
3. To study concept of arrays and functions.
4. Create a Registration form using GET and POST method‟s of form.
5. Write a program in php to explain concept of cookies and sessions.
6. To write a PHP program for connecting with a database, creating a table and retrieving
the data.
7. To study the GCC & CC Compiler.
8. Linux Administration.
9. Use of text processing commands: GREP and CUT.
10. Mini Project

1. Installation, configuration and testing of mysql and also study basic DDL, DML
commands.
Aim: Installation, configuration and testing of mysql and also study
basic DDL,DML commands.
Theory:
What is DDL, DML?
Data Definition Language deals with database schemas and descriptions of how the data
should reside in the database, therefore language statements like CREATE TABLE or ALTER
TABLE belong to DDL. DML deals with data manipulation, and therefore includes most
common SQL statements such SELECT, INSERT, etc. Data Control Language includes
commands such as GRANT, and mostly concerns with rights, permissions and other controls of
the database system.
DDL :
Data Definition Language (DDL) statements are used to define the database structure or schema.
CREATE - to create objects in the database
ALTER - alters the structure of the database
DROP - delete objects from the database
TRUNCATE - remove all records from a table, including all spaces allocated for
the records are removed
COMMENT - add comments to the data dictionary
RENAME - rename an object
DML:
Data Manipulation Language (DML) statements are used for managing data within schema
objects.
SELECT - retrieve data from the a database
INSERT - insert data into a table
UPDATE - updates existing data within a table
DELETE - deletes all records from a table, the space for the records remain
MERGE - UPSERT operation (insert or update)
CALL - call a PL/SQL or Java subprogram
EXPLAIN PLAN - explain access path to data
LOCK TABLE - control concurrency

2. To study aggregate functions in mysql.
Aim: To study aggregate functions in mysql.
Theory:
Introduction to MySQL aggregate functions:
The data that you need is not always stored in the tables. However, you can get it by
performing the calculations of the stored data when you select it. For example, you cannot get
the total amount of each order by simply querying from the orderdetails table because
theorderdetails table stores only quantity and price of each item. You have to select the quantity
and price of item for each order and calculate the order‟s total. To perform such calculations in a
query, you use aggregate functions.
By definition, an aggregate function performs a calculation on a set of values and returns
a single value.
MySQL provides many aggregate functions
including AVG, COUNT, SUM, MIN , MAX, etc. An aggregate function ignores NULL values
when it performs calculation except for the COUNT function.
1. AVG function :
The AVG function calculates the average value of a set of values. It ignores NULL values in the
calculation.
Syntax
AVG(expression)
You can use the AVG function to calculate the average buy price of all products in
the products table by using the following query:
Example :
SELECT AVG(buyPrice) average_buy_price
FROM products;
2. COUNT function:
The COUNT function returns the number of the rows in a table. For example, you can
use the COUNTfunction to get the number of products in the products table as the following
query:
SELECT COUNT(*) AS Total
FROM products
The COUNT function has several forms such as COUNT(*) and COUNT(DISTINCT
expression).
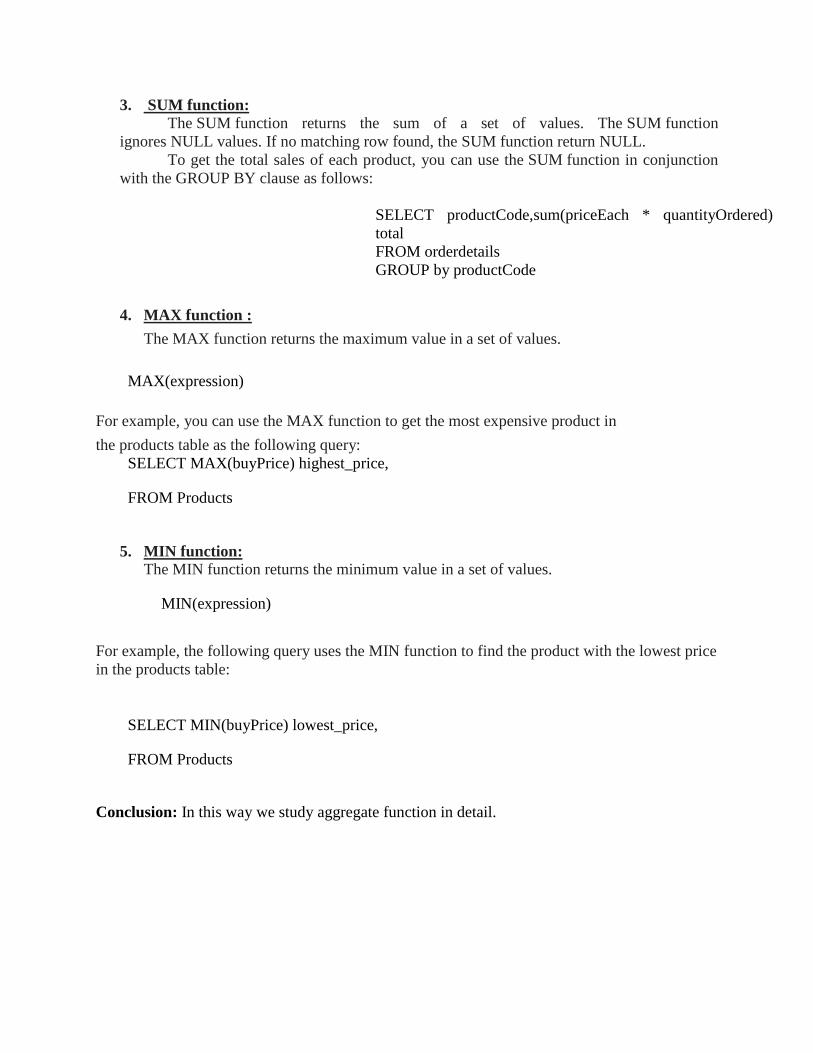
3. SUM function:
The SUM function returns the sum of a set of values. The SUM function
ignores NULL values. If no matching row found, the SUM function return NULL.
To get the total sales of each product, you can use the SUM function in conjunction
with the GROUP BY clause as follows:
SELECT productCode,sum(priceEach * quantityOrdered)
total
FROM orderdetails
GROUP by productCode
4. MAX function :
The MAX function returns the maximum value in a set of values.
MAX(expression)
For example, you can use the MAX function to get the most expensive product in
the products table as the following query:
SELECT MAX(buyPrice) highest_price,
FROM Products
5. MIN function:
The MIN function returns the minimum value in a set of values.
MIN(expression)
For example, the following query uses the MIN function to find the product with the lowest price
in the products table:
SELECT MIN(buyPrice) lowest_price,
FROM Products
Conclusion: In this way we study aggregate function in detail.

3. To study concept of arrays and functions.
Aim: To study concept of arrays and functions.
Theory:
What is an Array ?
A variable is a storage area holding a number or text. The problem is, a variable will hold only
one value.
An array is a special variable, which can store multiple values in one single variable.
If you have a list of items (a list of car names, for example), storing the cars in single variables
could look like this:
$cars1="Saab";
$cars2="Volvo";
$cars3="BMW";
However, what if you want to loop through the cars and find a specific one? And what if you had
not 3 cars, but 300?
The best solution here is to use an array!
An array can hold all your variable values under a single name. And you can access the values by
referring to the array name.
Each element in the array has its own index so that it can be easily accessed.
In PHP, there are three kind of arrays:
Numeric array - An array with a numeric index
Associative array - An array where each ID key is associated with a value
Multidimensional array - An array containing one or more arrays
1. Numeric Arrays
A numeric array stores each array element with a numeric index.
There are two methods to create a numeric array.
1. In the following example the index are automatically assigned (the index starts at 0):
$cars=array("Saab","Volvo","BMW","Toyota");
2. In the following example we assign the index manually:
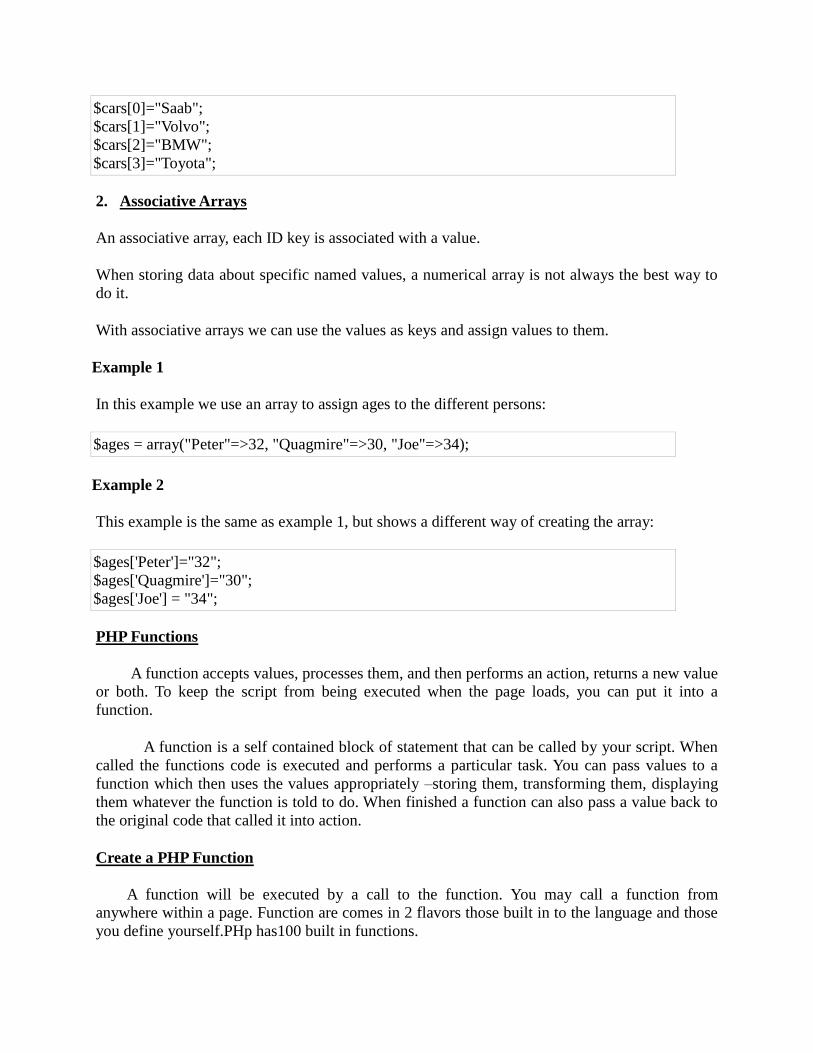
$cars[0]="Saab";
$cars[1]="Volvo";
$cars[2]="BMW";
$cars[3]="Toyota";
2. Associative Arrays
An associative array, each ID key is associated with a value.
When storing data about specific named values, a numerical array is not always the best way to
do it.
With associative arrays we can use the values as keys and assign values to them.
Example 1
In this example we use an array to assign ages to the different persons:
$ages = array("Peter"=>32, "Quagmire"=>30, "Joe"=>34);
Example 2
This example is the same as example 1, but shows a different way of creating the array:
$ages['Peter']="32";
$ages['Quagmire']="30";
$ages['Joe'] = "34";
PHP Functions
A function accepts values, processes them, and then performs an action, returns a new value
or both. To keep the script from being executed when the page loads, you can put it into a
function.
A function is a self contained block of statement that can be called by your script. When
called the functions code is executed and performs a particular task. You can pass values to a
function which then uses the values appropriately –storing them, transforming them, displaying
them whatever the function is told to do. When finished a function can also pass a value back to
the original code that called it into action.
Create a PHP Function
A function will be executed by a call to the function. You may call a function from
anywhere within a page. Function are comes in 2 flavors those built in to the language and those
you define yourself.PHp has100 built in functions.

For ex.
Srtoupper(“Hello web”);
This function automatically convert the given string into upeer case letter.
Syntax
for ex.
<?php
$num=-321;
$newnum=abs($num);
Echo $newnum;
//prints “321”
?>
PHP function guidelines:
Give the function a name that reflects what the function does
The function name can start with a letter or underscore (not a number)
PHP Functions - Adding parameters
To add more functionality to a function, we can add parameters. A parameter is just like a
variable.Parameters are specified after the function name, inside the parentheses.
FOR EX. Function that requires an argument
<?php
Fuction printBR($txt)
{ echo $txt.”<br>”;
}
printBR(“this is a line”);
printBR(“This is new line”);
?>
Output:
this is a line
this is a new line
function function Name(argument list)
{
code to be executed;
}

Returning values from user defined function:
It is possible to create functions that accept different values form the main program and
operate on those values to return different more pertinent results on each invocation .A function
can return a value using the return statement in conjunction with a value. The return statement
stops execution of the function and sends the value back to the calling code.
<?php
//define function
Function gettrianglearea($base,$height)
{
$area=$base*$height *0.5;
Return $area;
}
//invoke a function
Echo “the area of triangle is”.gettrianglearea(10,50);
?>
Defining Global and local variables
The variables used within a function are local that is the values assigned, and the
changes made to them are restricted to the functionspace alone.To use a variable from the main
variable name inside the function definition.
<?php
//define 2 variables
$itemcount=65;
$empcount=125;
//write function
Function addItem()
{
Global $itemcount;
$itemcount=$itemcount + 100;
}
Function addemployees()
{
$emcount=2000;
}
//return 65
Echo “initial no. of items:$itemcount”;
Additem();
//returns 165
Echo “items after additem():$itemcount”;
//returns 125
Echo “initial number of employyes:$empcount”;
?>
Conclusion: In this way we have studied how to create arrays and functions in php.
4. Create a Registration form using GET and POST method’s of form.
Aim: Create a registration form using GET and POST method‟s of form.
Theory:
Dealing with forms:
Forms are the best way of gathering data from visitors. Forms can be as small as login
form or as large as a membership subscription form asking for the lot of input obviously, bigger
the form the more information there is to process and greater the challenge.
<Form action=”some.action” method=”GET/POST”>
…..Form entities…
</form>
Two important elements move up this enclosure:
1. ACTION : The value passed to the keyboard action specifies which script should process at
the server side.
2. METHOD : The method specifies how the data captured by you will be sent to the script.
1. The get method sends all the form info embedded into the URL. This method is rarely
used due to various lang. and length restriction.
2. The post method send all of the form information in the request body. This method is
usually preferred over get.
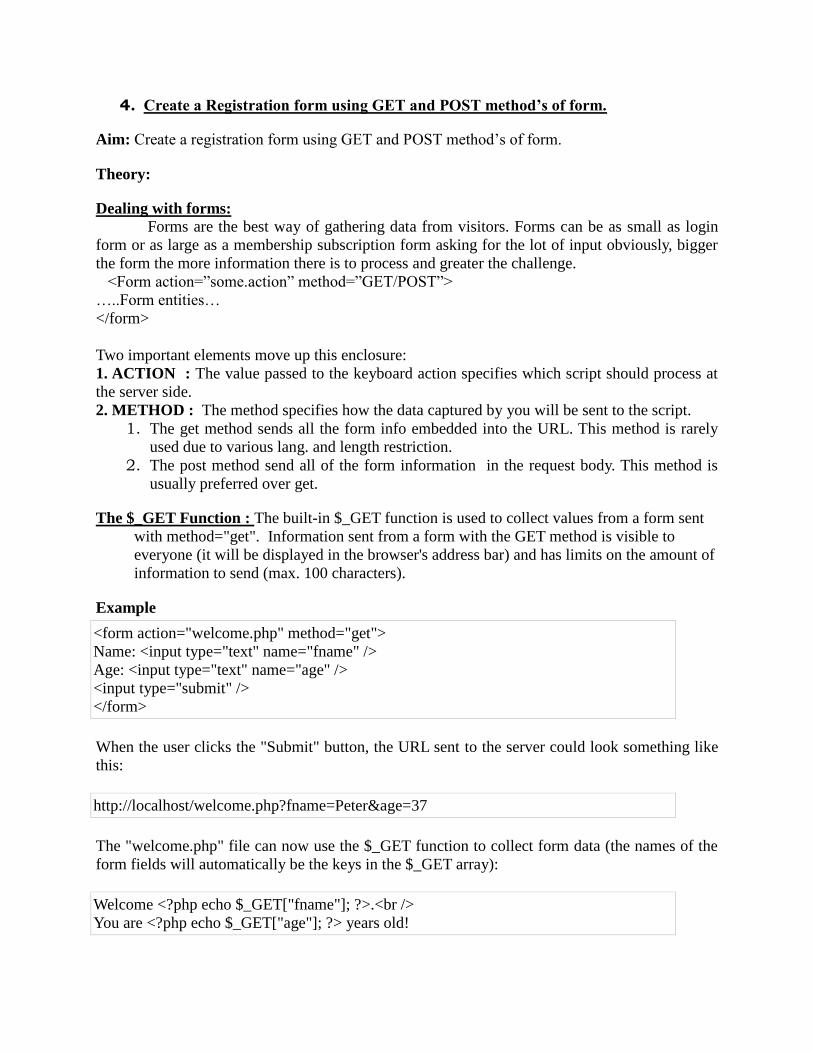
The $_GET Function : The built-in $_GET function is used to collect values from a form sent
with method="get". Information sent from a form with the GET method is visible to
everyone (it will be displayed in the browser's address bar) and has limits on the amount of
information to send (max. 100 characters).
Example
<form action="welcome.php" method="get">
Name: <input type="text" name="fname" />
Age: <input type="text" name="age" />
<input type="submit" />
</form>
When the user clicks the "Submit" button, the URL sent to the server could look something like
this:
http://localhost/welcome.php?fname=Peter&age=37
The "welcome.php" file can now use the $_GET function to collect form data (the names of the
form fields will automatically be the keys in the $_GET array):
Welcome <?php echo $_GET["fname"]; ?>.<br />
You are <?php echo $_GET["age"]; ?> years old!
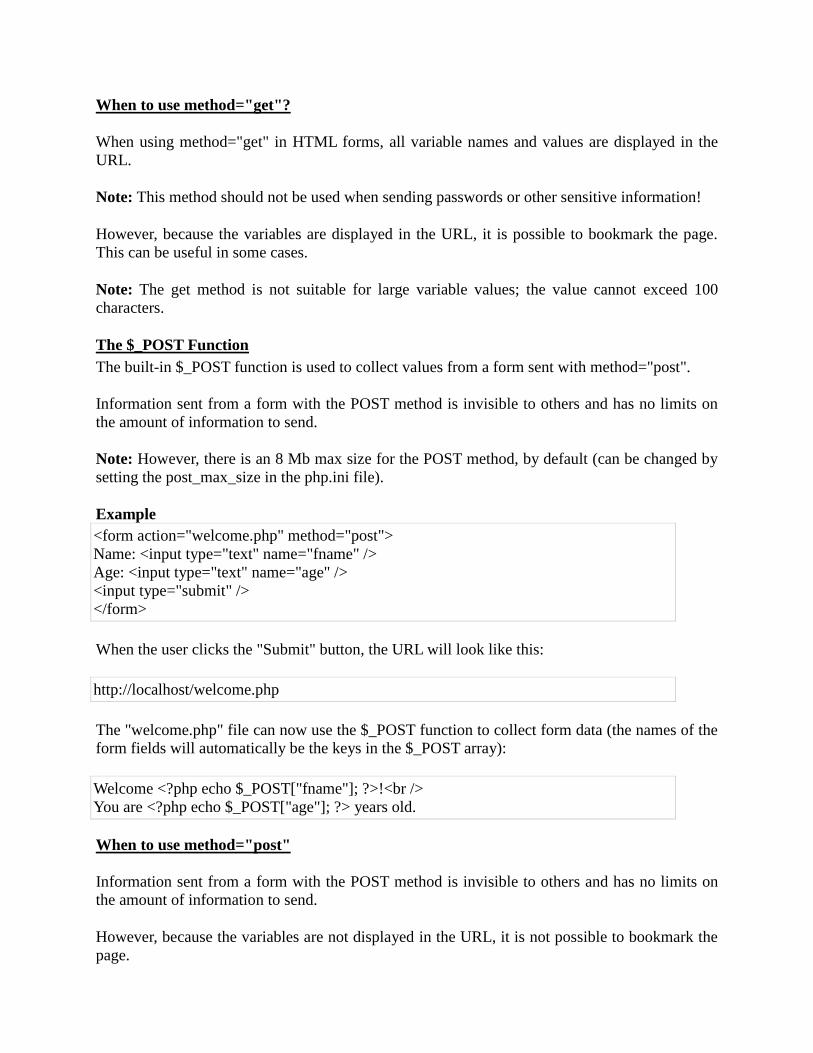
When to use method="get"?
When using method="get" in HTML forms, all variable names and values are displayed in the
URL.
Note: This method should not be used when sending passwords or other sensitive information!
However, because the variables are displayed in the URL, it is possible to bookmark the page.
This can be useful in some cases.
Note: The get method is not suitable for large variable values; the value cannot exceed 100
characters.
The $_POST Function
The built-in $_POST function is used to collect values from a form sent with method="post".
Information sent from a form with the POST method is invisible to others and has no limits on
the amount of information to send.
Note: However, there is an 8 Mb max size for the POST method, by default (can be changed by
setting the post_max_size in the php.ini file).
Example
<form action="welcome.php" method="post">
Name: <input type="text" name="fname" />
Age: <input type="text" name="age" />
<input type="submit" />
</form>
When the user clicks the "Submit" button, the URL will look like this:
http://localhost/welcome.php
The "welcome.php" file can now use the $_POST function to collect form data (the names of the
form fields will automatically be the keys in the $_POST array):
Welcome <?php echo $_POST["fname"]; ?>!<br />
You are <?php echo $_POST["age"]; ?> years old.
When to use method="post"
Information sent from a form with the POST method is invisible to others and has no limits on
the amount of information to send.
However, because the variables are not displayed in the URL, it is not possible to bookmark the
page.
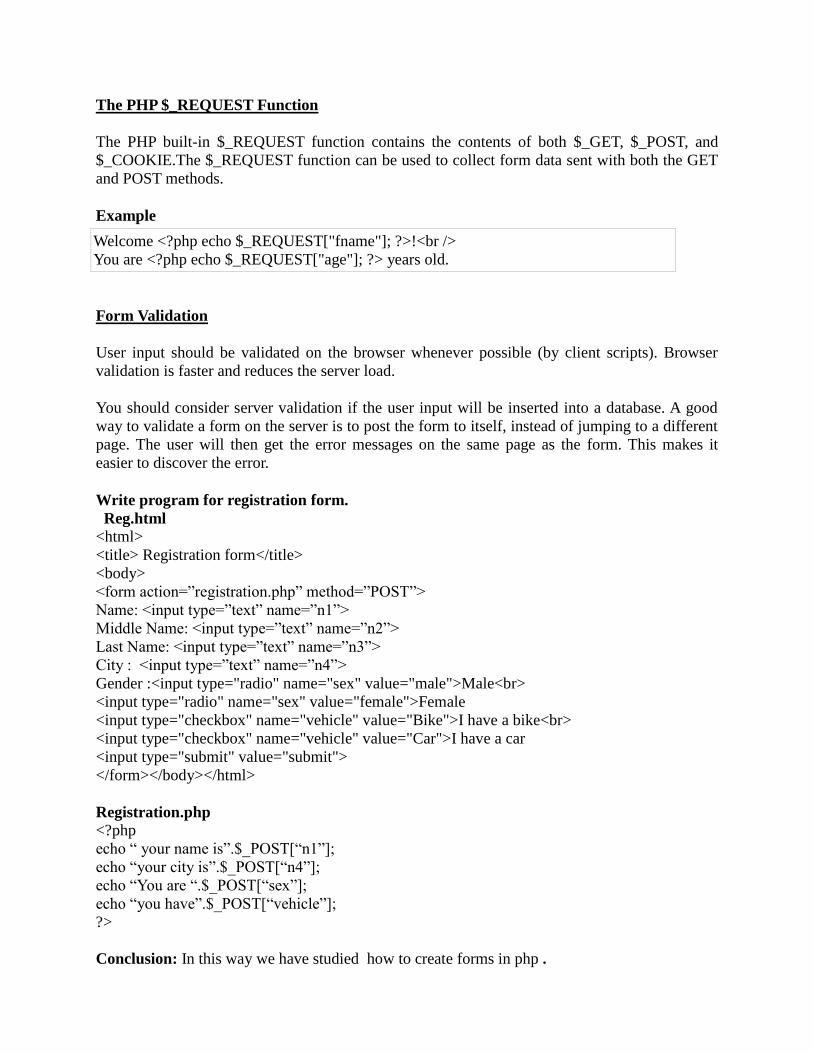
The PHP $_REQUEST Function
The PHP built-in $_REQUEST function contains the contents of both $_GET, $_POST, and
$_COOKIE.The $_REQUEST function can be used to collect form data sent with both the GET
and POST methods.
Example
Welcome <?php echo $_REQUEST["fname"]; ?>!<br />
You are <?php echo $_REQUEST["age"]; ?> years old.
Form Validation
User input should be validated on the browser whenever possible (by client scripts). Browser
validation is faster and reduces the server load.
You should consider server validation if the user input will be inserted into a database. A good
way to validate a form on the server is to post the form to itself, instead of jumping to a different
page. The user will then get the error messages on the same page as the form. This makes it
easier to discover the error.
Write program for registration form.
Reg.html
<html>
<title> Registration form</title>
<body>
<form action=”registration.php” method=”POST”>
Name: <input type=”text” name=”n1”>
Middle Name: <input type=”text” name=”n2”>
Last Name: <input type=”text” name=”n3”>
City : <input type=”text” name=”n4”>
Gender :<input type="radio" name="sex" value="male">Male<br>
<input type="radio" name="sex" value="female">Female
<input type="checkbox" name="vehicle" value="Bike">I have a bike<br>
<input type="checkbox" name="vehicle" value="Car">I have a car
<input type="submit" value="submit">
</form></body></html>
Registration.php
<?php
echo “ your name is”.$_POST[“n1”];
echo “your city is”.$_POST[“n4”];
echo “You are “.$_POST[“sex”];
echo “you have”.$_POST[“vehicle”];
?>
Conclusion: In this way we have studied how to create forms in php .

5. Write a program in php to explain concept of cookies and sessions.
Aim: Write a program in php to explain concept of cookies and sessions.
Theory:
Cookies:
You can most easily think of cookies as text files, which are saved to your computer. On the
request of a webserver, your browser creates such a file. After this happens, the webserver can
read and write content from and to this file. Although this seems like a dangerous feature – after
all, no one likes other people writing files to their computer, there are a few restrictions in place
to make this process as safe as possible.
Web servers can only access cookies which are set to their own domain. This domain is
set by the browser when a new cookie is requested by the web server, and can only be the
domain or a subdomain of the web server (the web server can choose a subdomain if it
wants to). This means that cookies which were set by, for example, google.com can‟t be
read by mozilla.com, and vice versa.
According to the HTTP protocol, cookies can‟t be larger than 4096 Bytes (4KB) each.
There is a limit to the number of cookies per domain. The number differs per browser,
however, the generally used limit is twenty cookies. This is to prevent a single domain
from hogging the disk space of the client.
There is a limit to the total number of cookies on the client‟s harddrive. This number also
differs per browser, but is usually limited to around three hundred cookies. When this
number is exceeded, an older cookie is deleted before a new one is created.
Cookies have an expiration date. This date is set so the browser can delete old cookies
when they are no longer needed by the webserver. If the expiration date is empty, the
cookie will be deleted when the connection with the server is closed. This occurs when
the site‟s window or tab is closed by the user, or when the user closes the entire browser.
These cookies, sometimes called session cookies, are mostly used for storing temporary
settings.
How to create cookie:
Cookies are transfered via the HTTP protocol. This is the protocol used by browsers to
retrieve and send files to the server. After a cookie has been requested, it is sent to the server
every time a new item on the web page is fetched by the browser. Below, we can see a snippet of
a server requesting a new cookie (this snippet is a part of a HTTP response).
Set-Cookie: Name=content data; expires=Fri, 31-Dec-
2010 23:59:59 GMT; path=/; domain=.example.net
1. Set-Cookie: is to let the browser know that the server would like to create a new cookie.
2. Name: is the name of the cookie. Each cookie in a domain must have a different name, so the
browser can keep all the cookies apart. After the name comes the =content data where „content
data‟ is the data which is to be contained in the cookie. This data can be a text string or a
number, and, as said, can be up to 4KB in size.

3. expires: is the command for the expiration date. The expiration date is in the “Wdy, DD-Mon-
YYYY HH:MM:SS GMT” format (Don‟t ask me why it was defined to this rediculous format,
because I don‟t know either. No user ever sees the expiration date, so why waste memory, hard
disc space, and bandwith on long dates?). Don‟t worry about it though, because most
programming languages have easy to use functions available to you. The browser automatically
deletes cookies with an expiration date in the past.
4. The domain and path require some deeper explanation. The domain is the domain in which
the cookie will be active. If the domain is „ads.google.com,‟ the cookie will only be sent to the
server of that domain, and if the domain is „google.com,‟ the cookie will be sent to any server of
any of the subdomains of Google, including google.com itself.
The path is the path of the domain to which the cookie is sent. This means that, if the
path is set to „/images/,‟ and the domain is set to „ads.google.com,‟ the cookie will only be sent
to the server if the browser requests a file from „ads.google.com/images/‟. If the path is set to „/‟,
the cookie will be sent to the server regardless of the location of the requested file on the server.
Example
You can also set the expiration time of the cookie in another way. It may be easier than using
seconds.
<?php
$expire=time()+60*60*24*30;
setcookie("user", "Alex Porter", $expire);
?>
<html>
.....
In the example above the expiration time is set to a month (60 sec * 60 min * 24 hours * 30
days).
How to Retrieve a Cookie Value?
The PHP $_COOKIE variable is used to retrieve a cookie value.
In the example below, we retrieve the value of the cookie named "user" and display it on a page:
<?php
// Print a cookie
echo $_COOKIE["user"];
// A way to view all cookies
print_r($_COOKIE);
?>

In the following example we use the isset() function to find out if a cookie has been set:
<html>
<body>
<?php
if (isset($_COOKIE["user"]))
echo "Welcome " . $_COOKIE["user"] . "!<br>";
else
echo "Welcome guest!<br>";
?>
</body>
</html>
How to Delete a Cookie?
When deleting a cookie you should assure that the expiration date is in the past.
Delete example:
<?php
// set the expiration date to one hour ago
setcookie("user", "", time()-3600);
?>
PHP Session:
A PHP session variable is used to store information about, or change settings for a user session.
Session variables hold information about one single user, and are available to all pages in one
application.
PHP Session Variables
When you are working with an application, you open it, do some changes and then you close it.
This is much like a Session. The computer knows who you are. It knows when you start the
application and when you end. But on the internet there is one problem: the web server does not
know who you are and what you do because the HTTP address doesn't maintain state.
A PHP session solves this problem by allowing you to store user information on the server for
later use (i.e. username, shopping items, etc). However, session information is temporary and
will be deleted after the user has left the website. If you need a permanent storage you may want
to store the data in a database.
Sessions work by creating a unique id (UID) for each visitor and store variables based on this
UID. The UID is either stored in a cookie or is propagated in the URL.

Starting a PHP Session
Before you can store user information in your PHP session, you must first start up the session.
Note: The session_start() function must appear BEFORE the <html> tag:
<?php session_start(); ?>
<html>
<body>
</body>
</html>
The code above will register the user's session with the server, allow you to start saving user
information, and assign a UID for that user's session.
Storing a Session Variable
The correct way to store and retrieve session variables is to use the PHP $_SESSION variable:
<?php
session_start();
// store session data
$_SESSION['views']=1;
?>
<html>
<body>
<?php
//retrieve session data
echo "Pageviews=". $_SESSION['views'];
?>
</body>
</html>
Output:
Pageviews=1
In the example below, we create a simple page-views counter. The isset() function checks if the
"views" variable has already been set. If "views" has been set, we can increment our counter. If
"views" doesn't exist, we create a "views" variable, and set it to 1:
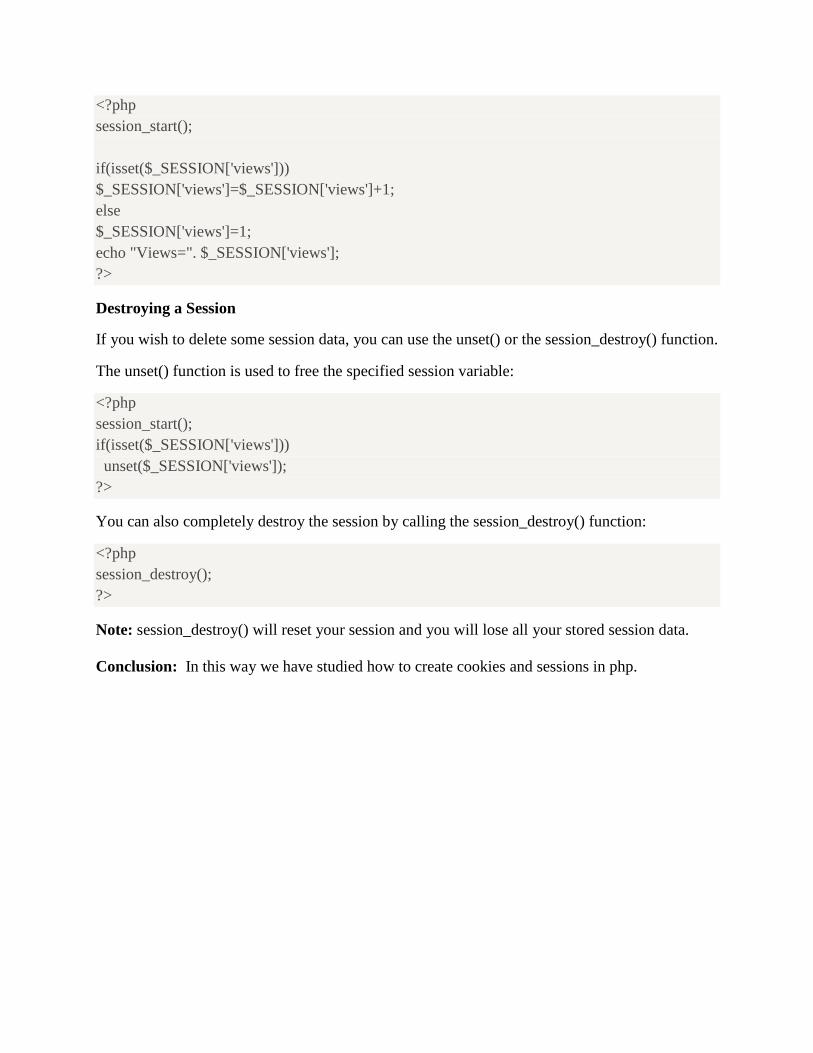
<?php
session_start();
if(isset($_SESSION['views']))
$_SESSION['views']=$_SESSION['views']+1;
else
$_SESSION['views']=1;
echo "Views=". $_SESSION['views'];
?>
Destroying a Session
If you wish to delete some session data, you can use the unset() or the session_destroy() function.
The unset() function is used to free the specified session variable:
<?php
session_start();
if(isset($_SESSION['views']))
unset($_SESSION['views']);
?>
You can also completely destroy the session by calling the session_destroy() function:
<?php
session_destroy();
?>
Note: session_destroy() will reset your session and you will lose all your stored session data.
Conclusion: In this way we have studied how to create cookies and sessions in php.
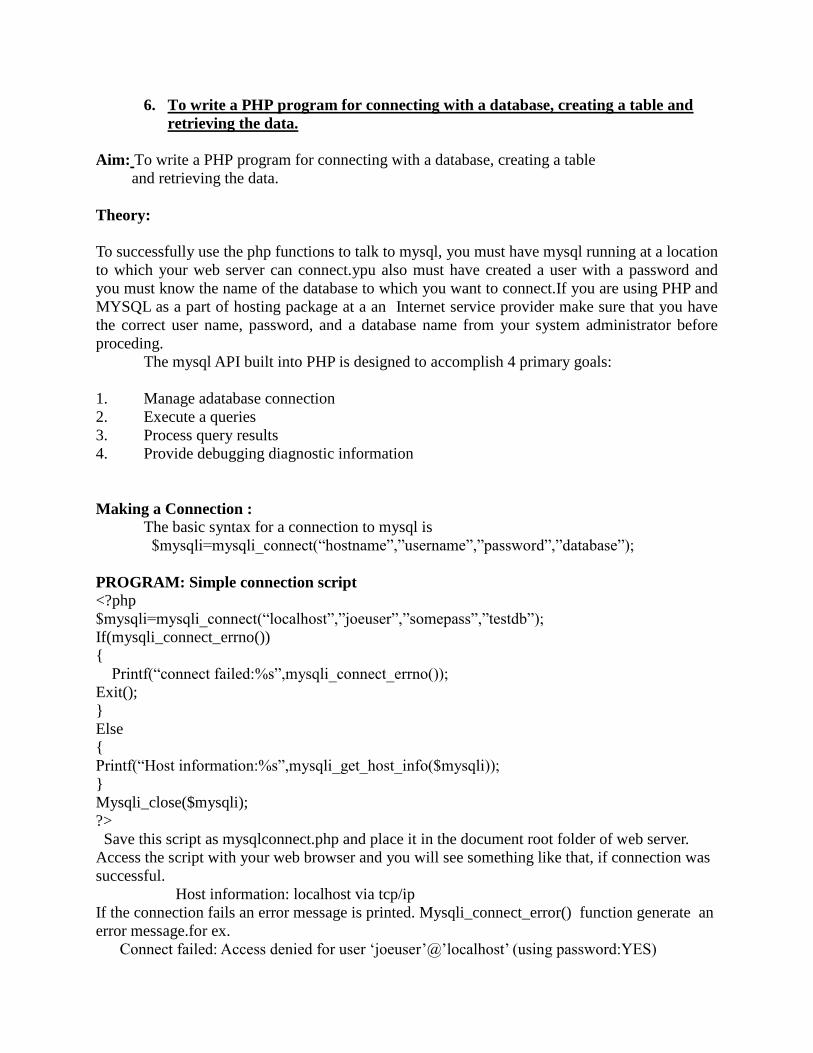
6. To write a PHP program for connecting with a database, creating a table and
retrieving the data.
Aim: To write a PHP program for connecting with a database, creating a table
and retrieving the data.
Theory:
To successfully use the php functions to talk to mysql, you must have mysql running at a location
to which your web server can connect.ypu also must have created a user with a password and
you must know the name of the database to which you want to connect.If you are using PHP and
MYSQL as a part of hosting package at a an Internet service provider make sure that you have
the correct user name, password, and a database name from your system administrator before
proceding.
The mysql API built into PHP is designed to accomplish 4 primary goals:
1. Manage adatabase connection
2. Execute a queries
3. Process query results
4. Provide debugging diagnostic information
Making a Connection :
The basic syntax for a connection to mysql is
$mysqli=mysqli_connect(“hostname”,”username”,”password”,”database”);
PROGRAM: Simple connection script
<?php
$mysqli=mysqli_connect(“localhost”,”joeuser”,”somepass”,”testdb”);
If(mysqli_connect_errno())
{
Printf(“connect failed:%s”,mysqli_connect_errno());
Exit();
}
Else
{
Printf(“Host information:%s”,mysqli_get_host_info($mysqli));
}
Mysqli_close($mysqli);
?>
Save this script as mysqlconnect.php and place it in the document root folder of web server.
Access the script with your web browser and you will see something like that, if connection was
successful.
Host information: localhost via tcp/ip
If the connection fails an error message is printed. Mysqli_connect_error() function generate an
error message.for ex.
Connect failed: Access denied for user „joeuser‟@‟localhost‟ (using password:YES)

Although the Conn. Closes when the script finishes its execution. It‟s a good idea to explicitly
close a connection by using mysqli_close()function.
Excuting a Queries :
The mysqli_query()function in the pHP is used to send your SQL query to MYSQL.In
your script first make the connection and then execute a query.for ex.
PROGRAM: Simple script to create a table
<?php
$myServer = "";
$myUser = "root";
$myPass = "";
$myDB = "d1";
//connection to the database
$dbhandle = mysql_connect($myServer, $myUser, $myPass)
or die("Couldn't connect to SQL Server on $myServer");
//select a database to work with
$selected = mysql_select_db($myDB, $dbhandle)
or die("Couldn't open database $myDB");
$query="create table jnec1(reg_no int,name varchar(10))";
$result=mysql_query($query);
if($result==true)
{ echo "table created successfully";
}
else{
echo "table not created";
}
mysql_close($dbhandle);
?>
Inserting Data with PHP :
You can easily insert data in to table by simply writing insert command.
PROGRAM: Simple script to insert a record
<?php
$myServer = "";
$myUser = "root";
$myPass = "";
$myDB = "d1";
//connection to the database
$dbhandle = mysql_connect($myServer, $myUser, $myPass)
or die("Couldn't connect to SQL Server on $myServer");
//select a database to work with
$selected = mysql_select_db($myDB, $dbhandle)
or die("Couldn't open database $myDB");
$query="insert into stud values('sss',5)";
$result=mysql_query($query);
if($result==true)
{
echo "Record inserted successfully";
}
else
{
echo "not inserted";
}
mysql_close($dbhandle);
?>
And suppose you want insert records from your form then you have to write down script for it
PROGRAM: An insert form
<html>
<title> Record insertion form</title>
<body>
<form action=”insert.php” method=”POST”>
First name<input type=”text” name=”n1” size=”30”>
Phone no<input type=”text” name=”n2” size=”30”>
<p><input type=”submit” name=”submit” value=”insert record”></p>
</form>
</body>
</html>
Save this file as ins.html and put it in the document root of your web server. Next create
insert.php script. The values entered in the form will replace the hard coded values in the sql
query with a variable called $_POST[“testfield”].
<?php
$myServer = "";
$myUser = "root";
$myPass = "";
$myDB = "d1";
//connection to the database
$dbhandle = mysql_connect($myServer, $myUser, $myPass)
or die("Couldn't connect to SQL Server on $myServer");
//select a database to work with
$selected = mysql_select_db($myDB, $dbhandle)
or die("Couldn't open database $myDB");
$query="insert into stud values('".$_POST["first"]."','".$_POST["phone"]."')";
$result=mysql_query($query);
if($result==true)
{
echo "Record inserted successfully";
}
else
{
echo "not inserted";
}
mysql_close($dbhandle);
?>
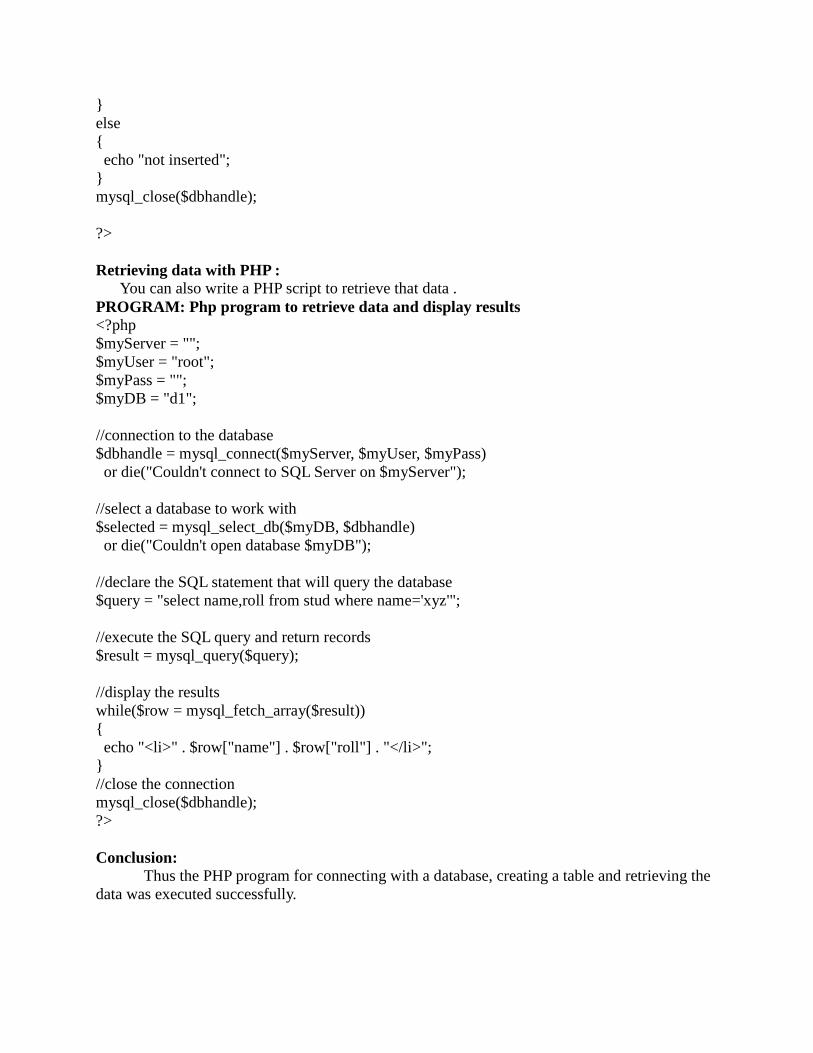
Retrieving data with PHP :
You can also write a PHP script to retrieve that data .
PROGRAM: Php program to retrieve data and display results
<?php
$myServer = "";
$myUser = "root";
$myPass = "";
$myDB = "d1";
//connection to the database
$dbhandle = mysql_connect($myServer, $myUser, $myPass)
or die("Couldn't connect to SQL Server on $myServer");
//select a database to work with
$selected = mysql_select_db($myDB, $dbhandle)
or die("Couldn't open database $myDB");
//declare the SQL statement that will query the database
$query = "select name,roll from stud where name='xyz'";
//execute the SQL query and return records
$result = mysql_query($query);
//display the results
while($row = mysql_fetch_array($result))
{
echo "<li>" . $row["name"] . $row["roll"] . "</li>";
}
//close the connection
mysql_close($dbhandle);
?>
Conclusion:
Thus the PHP program for connecting with a database, creating a table and retrieving the
data was executed successfully.

7. To study the GCC & CC Compiler.
Aim: To study the GCC and CC Compiler in linux.
Theory:
The GNU compiler collection (usually shortened to gcc) is a set of compiler produced for
various programming languages by the GNU project .GCC is a key component of the GNU tool
chain as well as being the official compiler of the GNU system. GCC has been adopted as the
standard compiler by most other modern UNIX like computer operating systems, including
linux, mac osx.
GCC has been ported to a wide variety of computer architectures & is widely deployed as
a tool in commercial, proprietary and closed source software developments environments.
USES : GCC is often compiler of choice for developing software that is required to
execute on a wide variety of hardware.Differences in a native compilers lead to difficulties in
developing code that will compile correctly on all the compilers and built scripts that will run for
all platforms. By using GCC the same parser is used for all platforms so, if the code compiles on
one character chances are high that it compiles on all.
GCC is now maintained by a varied group of programmers from around the world. It has
been ported to more kinds of processors and operating systems than any other compiler.
The standard compiler release 4.2 includes front ends for : C,C++(G++),java(GCI),
Ada(GMAI).
STRUCTURE:
GCC‟s external interface is generally standard for a Unix compiler. Users invoke a driver
program named gcc. Which interrupts command arguments, decides which language compilers
to use for each input file, runs the assembler on their output and then possibly runs the linker to
produce a compiler complete executable binary.
Each of the language compilers is a separate program that takes in source code &
produces assembly language.
DEBUGGING GCC PROGRAMS:
The primary tool for debugging GCC code is GNU debugger(GDB). Among more
specialized tools are grid for finding memory errors & leaks.
The GNU profiler (gprof) can be used to find out how much time is spent in which
routines and how often they are called, this requires compiling programs with special profiling
options.

PROGRAM: Simple program to find factorial of given number.
#include<stdio.h>
int main(){
int i=1,f=1,num;
printf("Enter a number: ");
scanf("%d",&num);
while(i<=num){
f=f*i;
i++;
}
printf("Factorial of %d is: %d",num,f);
return 0;
}
Sample output:
$gcc f.c (for compiling)
./a.out (to run)
Enter a number: 5
Factorial of 5 is: 120
Conclusion: IN this way we have studied the how to run c programs using
GCC compiler.

8. Linux Administration.
Aim:Linux Administration.
Theory:
Basic Linux Commands
• File Handling
• Text Processing
• System Administration
• Process Management
• Archival
• File Systems
Editor Commands
• Advanced Commands
Primary – man(manual) pages.
man <command> shows all information about the
command
<command> help shows the available options
for that command
1. File Handling Commands:
mkdir – make directories
Usage: mkdir [OPTION] DIRECTORY...
eg. mkdir prabhat
ls – list directory contents
Usage: ls [OPTION]... [FILE]...
eg. ls, ls l, ls prabhat
cd – changes directories
Usage: cd [DIRECTORY]
eg. cd prabhat
pwd print name of current working directory
Usage: pwd
vim – Vi Improved, a programmers text editor
Usage: vim [OPTION] [file]...
eg. vim file1.txt
cp – copy files and directories
Usage: cp [OPTION]... SOURCE DEST
eg. cp sample.txt sample_copy.txt
cp sample_copy.txt target_dir
mv – move (rename) files
Usage: mv [OPTION]... SOURCE DEST
eg. mv source.txt target_dir
mv old.txt new.txt
rm remove files or directories
Usage: rm [OPTION]... FILE...
eg. rm file1.txt , rm rf some_dir
find – search for files in a directory hierarchy
Usage: find [OPTION] [path] [pattern]
eg. find file1.txt, find name file1.txt
history – prints recently used commands
Usage: history
2. Text Processing Commands:
cat – concatenate files and print on the standard output
Usage: cat [OPTION] [FILE]...
eg. cat file1.txt file2.txt
cat n file1.txt
echo – display a line of text
Usage: echo [OPTION] [string] ...
eg. echo I love India
echo $HOME
grep print lines matching a pattern
Usage: grep [OPTION] PATTERN [FILE]...
eg. grep i apple sample.txt
wc print the number of newlines, words, and bytes in files
Usage: wc [OPTION]... [FILE]...
eg. wc file1.txt
wc L file1.txt
sort – sort lines of text files
Usage: sort [OPTION]... [FILE]...
eg. sort file1.txt
sort r file1.txt

3. System Administration
chmod – change file access permissions
Usage: chmod [OPTION] [MODE] [FILE]
eg. chmod 744 calculate.sh
chown – change file owner and group
Usage: chown [OPTION]... OWNER[:[GROUP]] FILE...
eg. chown remo myfile.txt
su – change user ID or become superuser
Usage: su [OPTION] [LOGIN]
eg. su remo, su
passwd – update a user‟s authentication tokens(s)
Usage: passwd [OPTION]
eg. Passwd
who – show who is logged on
Usage: who [OPTION]
eg. who , who b , who q
4. Process Management
ps – report a snapshot of the current processes
Usage: ps [OPTION]
eg. ps, ps el
kill – to kill a process(using signal mechanism)
Usage: kill [OPTION] pid
eg. kill 9 2275
5. Archival
tar – to archive a file
Usage: tar [OPTION] DEST SOURCE
eg. tar cvf /home/archive.tar /home/original
tar xvf /home/archive.tar
zip – package and compress (archive) files
Usage: zip [OPTION] DEST SOURSE
eg. zip original.zip original
unzip – list, test and extract compressed files in a ZIP archive
Usage: unzip filename
eg. unzip original.zip

6. File System
fdisk – partition manipulator
eg. sudo fdisk l
mount – mount a file system
Usage: mount t type device dir
eg. mount /dev/sda5 /media/target
umount – unmount file systems
Usage: umount [OPTIONS] dir | device...
eg. umount /media/target
7. Editor Commands
kate – KDE Advanced Text Editor
Usage: kate [options][file(s)]
eg. kate file1.txt file2.txt
vim – Vi Improved, a programmers text editor
Usage: vim [OPTION] [file]...
eg. vi hello.c
gedit A text Editor. Used to create and edit files.
Usage: gedit [OPTION] [FILE]...
eg. gedit
8. Advanced Commands:
reboot – reboot the system
Usage: reboot [OPTION]
eg. reboot
poweroff – power off the system
Usage: poweroff [OPTION]
eg. poweroff
Conclusion:In this way we have studied different linux commands.

9. Use of text processing commands: GREP and CUT.
Aim:Use of text processing commands:GREP and CUT
Theory:
CUT command:
Prints the selected parts of lines from each file to standard output
cut [option] ... [file] ...
Description
Cut out (that is, print) selected columns or fields from one or more files. The source file is not
changed. This is useful if you need quick access to a vertical slice of a file. By default, the slices
are delimited by a tab.
Frequently used options
-b list
Print bytes in list positions.
-c list
Print characters in list columns.
-d delim
Set field delimiter for -f.
-f list
Print list fields.
Examples
Show usernames (in the first colon-delimited field) from /etc/passwd:
$ cut -d: -f1 /etc/passwd
Show first column of /etc/passwd:
$ cut -c 1 /etc/passwd
Paste command:
Syntax
paste [options] files
Description
Paste together corresponding lines of one or more files into vertical columns.
Frequently used options
-d'n'
Separate columns with character n in place of the default tab.
-s
Merge lines from one file into a single line. When multiple files are specified,
their contents are placed on individual lines of output, one per file.
For the following three examples, file1 contains:
1
2
3
and file2 contains:
A
B
C
Example 1
A simple paste creates columns from each file in standard output:
$ paste file1 file2
1 A
2 B
3 C
GREP command:
The name grep means "general regular expression parser", but you can think of the grep
command as a "search" command for Unix and Linux systems: it's used to search for text strings
and more-complicated "regular expressions" within one or more files.
Searching for a text string in one file
This first grep command example searches for all occurrences of the text string 'fred' within the
"/etc/passwd" file. It will find and display all of the lines in this file that contain the text
string fred, including lines that contain usernames like "fred", and also other strings like "alfred":
grep 'fred' /etc/passwd
In a simple example like this, the quotes around the stringfred aren't necessary, but they are
needed if you're searching for a string that contains spaces, and will also be needed when you get
into using regular expressions (search patterns).
Searching for a string in multiple files
Our next grep command example searches for all occurrences of the text string joe within all
files of the current directory:
grep 'joe' *
The '*' wildcard matches all files in the current directory, and the grep output from this command
will show both (a) the matching filename and (b) all lines in all files that contain the string 'joe'.
As a quick note, instead of searching all file with the "*" wildcard, you can also use grep to
search all files in the current directory that end in the file extension ".txt", like this:
grep 'joe' *.txt
Using the Linux grep command to search for multiple patterns at one time (egrep)
You can use a different version of the grep command to search for multiple patterns at one time.
To do this, just use the "egrep" command instead of grep, like this:
egrep 'score|nation|liberty|equal' gettysburg-address.txt
This Unix egrep command searches the file named gettysburg-address.txt for the four strings
shown (score, nation, liberty, and equal). It returns any lines from the file that contain any of
those words.
I should also note that "egrep" stands for "extended grep", and as you can see, it lets you do
things like searching for multiple patterns at one time.

Searching for regular expressions (regex patterns) with grep
Of course the Linux grep command is much more powerful than this, and can handle very
powerful regular expressions (regex patterns). In a simple example, suppose you want to search
for the strings "Foo" or "Goo" in all files in the current directory. That grep command would be:
grep '[FG]oo' *
If you want to search for a sequence of three integers with grep you might use a command like
this:
grep '[0-9][0-9][0-9]' *
This next grep command searches for all occurrences of the text string fred within the
"/etc/passwd" file, but also requires that the "f" in the name "fred" be in the first column of each
record (that's what the caret character tells grep). Using this more-advanced search, a user named
"alfred" would not be matched, because the letter "a" will be in the first column.
grep '^fred' /etc/passwd
Regular expressions can get much, much more complicated (and powerful) than this.
Conclusion: In this way we studied the use of text processing commands in
linux.