opencv java tutorials documentation - read the … · 2 first java application with opencv9 ......
TRANSCRIPT

OpenCV Java Tutorials DocumentationRelease 1.0alpha
Luigi De Russis, Alberto Sacco
Aug 01, 2017

Contents
1 Installing OpenCV for Java 31.1 Introduction to OpenCV for Java. . . . . . . . . . . . . . . . . . . . . . . . . . . . . . . . . . . . . 31.2 Install the latest Java version. . . . . . . . . . . . . . . . . . . . . . . . . . . . . . . . . . . . . . . 31.3 Install the latest Eclispe version. . . . . . . . . . . . . . . . . . . . . . . . . . . . . . . . . . . . . . 31.4 Install Open CV 2.4.6 under Windows. . . . . . . . . . . . . . . . . . . . . . . . . . . . . . . . . . 31.5 Install Open CV 2.4.6 under Linux or Mac. . . . . . . . . . . . . . . . . . . . . . . . . . . . . . . . 41.6 Set up OpenCV for Java in Eclipse . . . . . . . . . . . . . . . . . . . . . . . . . . . . . . . . . . . 5
2 First Java Application with OpenCV 92.1 Introduction to a OpenCV application with Java . . . . . . . . . . . . . . . . . . . . . . . . . . . . 92.2 What we will do in this tutorial . . . . . . . . . . . . . . . . . . . . . . . . . . . . . . . . . . . . . 92.3 Create a New Project . . . . . . . . . . . . . . . . . . . . . . . . . . . . . . . . . . . . . . . . . . . 92.4 Add a User Library . . . . . . . . . . . . . . . . . . . . . . . . . . . . . . . . . . . . . . . . . . . . 102.5 Create a simple application . . . . . . . . . . . . . . . . . . . . . . . . . . . . . . . . . . . . . . . 11
3 First JavaFX Application with OpenCV 133.1 Introduction to a OpenCV application with JavaFX . . . . . . . . . . . . . . . . . . . . . . . . . . . 133.2 What we will do in this tutorial . . . . . . . . . . . . . . . . . . . . . . . . . . . . . . . . . . . . . 133.3 Our First Application in JavaFX . . . . . . . . . . . . . . . . . . . . . . . . . . . . . . . . . . . . . 133.4 Installing e(fx)clipse plugin and Scene Builder . . . . . . . . . . . . . . . . . . . . . . . . . . . . . 143.5 Working with Scene Builder . . . . . . . . . . . . . . . . . . . . . . . . . . . . . . . . . . . . . . . 163.6 Key concepts in JavaFX . . . . . . . . . . . . . . . . . . . . . . . . . . . . . . . . . . . . . . . . . 203.7 Managing GUI interactions with the Controller class . . . . . . . . . . . . . . . . . . . . . . . . . . 203.8 Video Capturing . . . . . . . . . . . . . . . . . . . . . . . . . . . . . . . . . . . . . . . . . . . . . 203.9 Source Code . . . . . . . . . . . . . . . . . . . . . . . . . . . . . . . . . . . . . . . . . . . . . . . 22
4 OpenCV Basics 274.1 What we will do in this tutorial . . . . . . . . . . . . . . . . . . . . . . . . . . . . . . . . . . . . . 274.2 Getting started . . . . . . . . . . . . . . . . . . . . . . . . . . . . . . . . . . . . . . . . . . . . . . 274.3 Color channel checkbox . . . . . . . . . . . . . . . . . . . . . . . . . . . . . . . . . . . . . . . . . 284.4 Load an Image and Add it to the Stream . . . . . . . . . . . . . . . . . . . . . . . . . . . . . . . . . 294.5 Calculate a Histogram . . . . . . . . . . . . . . . . . . . . . . . . . . . . . . . . . . . . . . . . . . 314.6 Draw the Histogram . . . . . . . . . . . . . . . . . . . . . . . . . . . . . . . . . . . . . . . . . . . 324.7 Source Code . . . . . . . . . . . . . . . . . . . . . . . . . . . . . . . . . . . . . . . . . . . . . . . 34
5 Camera Calibration 415.1 Goal . . . . . . . . . . . . . . . . . . . . . . . . . . . . . . . . . . . . . . . . . . . . . . . . . . . 41
i

5.2 What is the camera calibration? . . . . . . . . . . . . . . . . . . . . . . . . . . . . . . . . . . . . . 415.3 Calibration Pattern . . . . . . . . . . . . . . . . . . . . . . . . . . . . . . . . . . . . . . . . . . . . 415.4 What we will do in this tutorial . . . . . . . . . . . . . . . . . . . . . . . . . . . . . . . . . . . . . 425.5 Getting Started . . . . . . . . . . . . . . . . . . . . . . . . . . . . . . . . . . . . . . . . . . . . . . 425.6 Pattern Recognition . . . . . . . . . . . . . . . . . . . . . . . . . . . . . . . . . . . . . . . . . . . 445.7 Saving Data . . . . . . . . . . . . . . . . . . . . . . . . . . . . . . . . . . . . . . . . . . . . . . . . 465.8 Camera Calibration . . . . . . . . . . . . . . . . . . . . . . . . . . . . . . . . . . . . . . . . . . . . 465.9 Source Code . . . . . . . . . . . . . . . . . . . . . . . . . . . . . . . . . . . . . . . . . . . . . . . 47
6 Fourier Transform 576.1 Goal . . . . . . . . . . . . . . . . . . . . . . . . . . . . . . . . . . . . . . . . . . . . . . . . . . . 576.2 What is the Fourier Transform? . . . . . . . . . . . . . . . . . . . . . . . . . . . . . . . . . . . . . 576.3 What we will do in this tutorial . . . . . . . . . . . . . . . . . . . . . . . . . . . . . . . . . . . . . 576.4 Getting Started . . . . . . . . . . . . . . . . . . . . . . . . . . . . . . . . . . . . . . . . . . . . . . 586.5 Load the file . . . . . . . . . . . . . . . . . . . . . . . . . . . . . . . . . . . . . . . . . . . . . . . 586.6 Applying the DFT . . . . . . . . . . . . . . . . . . . . . . . . . . . . . . . . . . . . . . . . . . . . 596.7 Applying the iDFT . . . . . . . . . . . . . . . . . . . . . . . . . . . . . . . . . . . . . . . . . . . . 606.8 Analyzing the results . . . . . . . . . . . . . . . . . . . . . . . . . . . . . . . . . . . . . . . . . . . 606.9 Source Code . . . . . . . . . . . . . . . . . . . . . . . . . . . . . . . . . . . . . . . . . . . . . . . 62
7 Image Segmentation 697.1 Goal . . . . . . . . . . . . . . . . . . . . . . . . . . . . . . . . . . . . . . . . . . . . . . . . . . . 697.2 Canny edge detector . . . . . . . . . . . . . . . . . . . . . . . . . . . . . . . . . . . . . . . . . . . 697.3 Dilatation and Erosion . . . . . . . . . . . . . . . . . . . . . . . . . . . . . . . . . . . . . . . . . . 707.4 What we will do in this tutorial . . . . . . . . . . . . . . . . . . . . . . . . . . . . . . . . . . . . . 707.5 Getting Started . . . . . . . . . . . . . . . . . . . . . . . . . . . . . . . . . . . . . . . . . . . . . . 707.6 Using the Canny edge detection . . . . . . . . . . . . . . . . . . . . . . . . . . . . . . . . . . . . . 717.7 Canny Result . . . . . . . . . . . . . . . . . . . . . . . . . . . . . . . . . . . . . . . . . . . . . . . 727.8 Using the Background Removal . . . . . . . . . . . . . . . . . . . . . . . . . . . . . . . . . . . . . 727.9 Background Removal Result . . . . . . . . . . . . . . . . . . . . . . . . . . . . . . . . . . . . . . . 747.10 Source Code . . . . . . . . . . . . . . . . . . . . . . . . . . . . . . . . . . . . . . . . . . . . . . . 74
8 Face Recognition and Tracking 838.1 Goal . . . . . . . . . . . . . . . . . . . . . . . . . . . . . . . . . . . . . . . . . . . . . . . . . . . 838.2 Cascade Classifiers . . . . . . . . . . . . . . . . . . . . . . . . . . . . . . . . . . . . . . . . . . . . 838.3 What we will do in this tutorial . . . . . . . . . . . . . . . . . . . . . . . . . . . . . . . . . . . . . 838.4 Getting Started . . . . . . . . . . . . . . . . . . . . . . . . . . . . . . . . . . . . . . . . . . . . . . 848.5 Loading the Classifiers . . . . . . . . . . . . . . . . . . . . . . . . . . . . . . . . . . . . . . . . . . 848.6 Detection and Tracking . . . . . . . . . . . . . . . . . . . . . . . . . . . . . . . . . . . . . . . . . 858.7 Source Code . . . . . . . . . . . . . . . . . . . . . . . . . . . . . . . . . . . . . . . . . . . . . . . 87
9 Indices and tables 95
ii

OpenCV Java Tutorials Documentation, Release 1.0alpha
Contents:
Contents 1
OpenCV Java Tutorials Documentation, Release 1.0alpha
2 Contents

CHAPTER 1
Installing OpenCV for Java
Introduction to OpenCV for Java.
As of OpenCV 2.4.4, OpenCV supports desktop Java development. This tutorial will help you install OpenCV on yourdesktop SO.
Install the latest Java version.
Download the latest Java JDK at the Oracle link. Now you should be able to install the last Java JDK by open the filejust downloaded.
Install the latest Eclispe version.
Download the latest Eclipse version at the Eclipse Download page choosing the Eclipse IDE for JavaDevelopers version (suggested). Put the downloaded folder wherever you want to. You don’t need to installanything.
Install Open CV 2.4.6 under Windows.
First of all you should download the OpenCV library (version 2.4.6) from here. Once you get the folder opencvput in wherever you prefer. Now the only two things you will need are: the opencv-246.jar file locatedat \opencv\build\java and the dll library located at \opencv\build\java\x64 (for 64-bit systems) or\opencv\build\java\x86 (for 32-bit systems). If not present create a data folder under \opencv.
3

OpenCV Java Tutorials Documentation, Release 1.0alpha
Install Open CV 2.4.6 under Linux or Mac.
The following instructions are useful if you wan to compile OpenCV under Windows. As first step, if you don’t havethese already, download and install CMake and Apache Ant. Extract the downloaded OpenCV file in a location ofyour choice and open CMake ( cmake-gui ). Put the location of the extracted OpenCV library in the Where is thesource code field (e.g., /opencv2.4.6.1/) and put the destination directory of your build in the Where tobuild the binaries field (e.g., /opencv2.4.6.1/build), at last, check the Grouped and Advanced checkboxes.
Now press Configure and use the default compilers for Unix Makefiles. In the Ungrouped Entriesgroup, insert the path to the Apache Ant executable (e.g., /apacheant1.9.2/bin/ant). In the BUILD group,unselect: * BUILD_PERF_TESTS. * BUILD_SHARED_LIBRARY to make the Java bindings dynamic library all-sufficient. * BUILD_TESTS. * BUILD_opencv_python.
In the CMAKE group, set to Debug (or Release) the CMAKE_BUILD_TYPE In the JAVA group: insert theJava AWT include path (e.g., /usr/lib/jvm/java7oracle/include/) insert the Java include path (e.g.,/usr/lib/jvm/java7oracle/include/) insert the alternative Java include path (e.g., /usr/lib/jvm/java7oracle/include/linux) Once we have pressed Generate twice the CMake window should appearwith a white background. Now close CMake.
4 Chapter 1. Installing OpenCV for Java

OpenCV Java Tutorials Documentation, Release 1.0alpha
Now open the terminal , go to the build folder of OpenCV and build everything with the command: make-j8 (wait for the process to be completed...). If everything went well you should have opencv-246.jar andlibopencv_java246.so files in the /opencv-2.4.6.1/build/bin directory and the data folder in the/opencv-2.4.6.1/ directory.
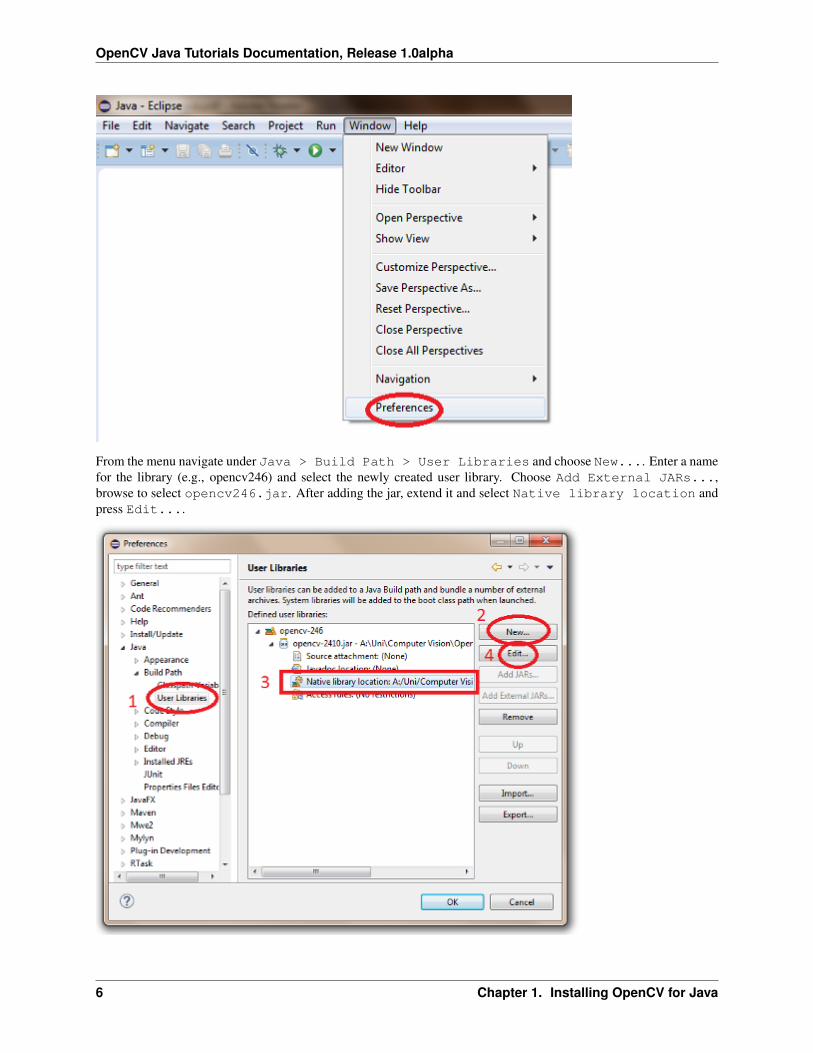
Set up OpenCV for Java in Eclipse
Open Eclipse and select a workspace of your choice. Create a User Library, ready to be used on all the next projects:go to Window > Preferences....
1.6. Set up OpenCV for Java in Eclipse 5
OpenCV Java Tutorials Documentation, Release 1.0alpha
From the menu navigate under Java > Build Path > User Libraries and choose New.... Enter a namefor the library (e.g., opencv246) and select the newly created user library. Choose Add External JARs...,browse to select opencv246.jar. After adding the jar, extend it and select Native library location andpress Edit....
6 Chapter 1. Installing OpenCV for Java

OpenCV Java Tutorials Documentation, Release 1.0alpha
Select External Folder... and browse to select the folder containing the OpenCV libraries (e.g.,C:\opencv\build\java\x64 under Windows).
1.6. Set up OpenCV for Java in Eclipse 7

OpenCV Java Tutorials Documentation, Release 1.0alpha
8 Chapter 1. Installing OpenCV for Java

CHAPTER 2
First Java Application with OpenCV
Note: We assume that by now you have already read the previous tutorials. If not, please check previous tutori-als at http://polito-java-opencv-tutorials.readthedocs.org/en/latest/index.html. You can also find the source code andresources at https://github.com/java-opencv/Polito-Java-OpenCV-Tutorials-Source-Code
Introduction to a OpenCV application with Java
This tutorial will guide you through the creation of a simple Java console application using the OpenCV library bymean of Eclipse.
What we will do in this tutorial
In this guide, we will:
• Create a new Java Project
• Add a User Library to the project
• Build and Run the application
Create a New Project
Open Eclipse and create a new Java project; open the File menu, go to New and click on Java Project.
9

OpenCV Java Tutorials Documentation, Release 1.0alpha
In the New Java Project dialog write the name of your project and click on Finish.
Add a User Library
If you followed the previous tutorial (Installing OpenCV for Java), you should already have the OpenCVlibrary set in your workspace’s user libraries, if not please check out the previous tutorial. Now you should be readyto add the library to your project. Inside Eclipse’s Package Explorer just right-click on your project’s folder andgo to Build Path --> Add Libraries....
Select User Libraries and click on Next, check the checkbox of the OpenCV library and click Finish.
10 Chapter 2. First Java Application with OpenCV

OpenCV Java Tutorials Documentation, Release 1.0alpha
Create a simple application
Now add a new Class to your project by right-clicking on your project’s folder and go to New --> Class. Write aname of your choice for both the package and the class then click on Finish. Now we are ready to write the code ofour first application. Let’s start by define the main method:
public class MyFirstApp {public static void main(String[] args){
System.loadLibrary(Core.NATIVE_LIBRARY_NAME);Mat mat = Mat.eye(3, 3, CvType.CV_8UC1);System.out.println("mat = " + mat.dump());
}}
First of all we need to load the Native Library previously set on our project.
System.loadLibrary(Core.NATIVE_LIBRARY_NAME);
Then we can define a new Mat.
Note: The class Mat represents an n-dimensional dense numerical single-channel or multi-channel array. It can beused to store real or complex-valued vectors and matrices, grayscale or color images, voxel volumes, vector fields,point clouds, tensors, histograms. For more details check out the OpenCV page.
Mat mat = Mat.eye(3, 3, CvType.CV_8UC1);
The Mat.eye represents a identity matrix, we set the dimensions of it (3x3) and the type of its elements.
As you can notice, if you leave the code just like this, you will get some error; this is due to the fact that eclipse can’tresolve some variables. You can locate your mouse cursor on the words that seem to be errors and wait for a dialog topop up and click on the voice Import.... If you do that for all the variables we have added to the code the followingrows:
import org.opencv.core.Core;import org.opencv.core.CvType;import org.opencv.core.Mat;
We can now try to build and run our application by clicking on the Run button. You should have the following output:
2.5. Create a simple application 11

OpenCV Java Tutorials Documentation, Release 1.0alpha
Here I put the whole source code:
package mypackage;
import org.opencv.core.Core;import org.opencv.core.CvType;import org.opencv.core.Mat;
public class MyFirstApp {public static void main(String[] args){
System.loadLibrary(Core.NATIVE_LIBRARY_NAME);Mat mat = Mat.eye(3, 3, CvType.CV_8UC1);System.out.println("mat = " + mat.dump());
}}
12 Chapter 2. First Java Application with OpenCV

CHAPTER 3
First JavaFX Application with OpenCV
Note: We assume that by now you have already read the previous tutorials. If not, please check previous tutori-als at http://polito-java-opencv-tutorials.readthedocs.org/en/latest/index.html. You can also find the source code andresources at https://github.com/java-opencv/Polito-Java-OpenCV-Tutorials-Source-Code
Introduction to a OpenCV application with JavaFX
This tutorial will guide you through the creation of a simple JavaFX gui application using the OpenCV library by meanof Eclipse.
What we will do in this tutorial
In this guide, we will:
• Install the e(fx)clipse plugin and (optional) Scene Builder.
• Work with Scene Builder.
• Write and Run our application.
Our First Application in JavaFX
Our application is going to capture a video stream from our webcam and it will display it on our gui. We will createthe gui with Scene Builder and it is going to have a button, which will allow us to stat and stop the stream and a simpleimage view container where we will put the stream frames.
13

OpenCV Java Tutorials Documentation, Release 1.0alpha
Installing e(fx)clipse plugin and Scene Builder
In Eclipse, install the e(fx)clipse plugin, by following the guide at http://www.eclipse.org/efxclipse/install.html#fortheambitious. If you choose not to install such a plugin, you have to create a traditional Java project and addjfxrt.jar (present in the JDK folder) to the project/library. Download and install the JavaFX SceneBuilder from http://www.oracle.com/technetwork/java/javafx/tools/index.html.
Now you can create a new JavaFX project. Go to File-->New-->Project... and select JavaFxproject....
Choose a name for your project and click Next.
14 Chapter 3. First JavaFX Application with OpenCV

OpenCV Java Tutorials Documentation, Release 1.0alpha
Now add your OpenCV user library to your project and click Next.
3.4. Installing e(fx)clipse plugin and Scene Builder 15

OpenCV Java Tutorials Documentation, Release 1.0alpha
Choose a name for your package, FXML file and Controller Class. The FXML file will contain the description of yourGUI in FXML language, the controller class will handle all the method and event which have to be called and managedwhen the user interacts with the GUI’s components.
Working with Scene Builder
If you have installed Scene Builder you can now right click on your FXML file in Eclipse and select Open withSceneBuilder. Scene Builder can help construct you gui by interacting with a graphic interface; this allowsyou to see a real time preview of your window and modify your components and their position just by editing thegraphic preview. Let’s take a look at what I’m talking about. At fist the FXML file will have just an AnchorPane. AnAnchorPane allows the edges of child nodes to be anchored to an offset from the anchorpane’s edges. If the anchorpanehas a border and/or padding set, the offsets will be measured from the inside edge of those insets. The anchorpanelays out each managed child regardless of the child’s visible property value; unmanaged children are ignored for alllayout calculations. You can go ahead and delete the anchorpane and add a BorderPane instaed. A BorderPane laysout children in top, left, right, bottom, and center positions.
16 Chapter 3. First JavaFX Application with OpenCV

OpenCV Java Tutorials Documentation, Release 1.0alpha
You can add a BorderPane by dragging from the Container menu a borderpane and then drop it in the Hierarchymenu. Now we can add the button that will allow us to start and stop the stream. Take a button component from theControls menu and drop it on the BOTTOM field of our BP. As we can see, on the right we will get three menus(Properties, Layout, Code) which are used to customize our selected component. For example we can change text ofour button in “Start Camera” in the Text field under the Propertiesmenu and the id of the button (e.g. “start_btn”)in the fx:id field under the Code menu.
3.5. Working with Scene Builder 17

OpenCV Java Tutorials Documentation, Release 1.0alpha
We are going to need the id of the button later, in order to edit the button properties from our Controller‘s methods.As you can see our button is too close to the edge of the windows, so we should add some bottom margin to it; to doso we can add this information in the Layout menu. In order to make the button work, we have to set the name of themethod (e.g. “startCamera”) that will execute the action we want to preform in the field OnAction under the Codemenu.
18 Chapter 3. First JavaFX Application with OpenCV

OpenCV Java Tutorials Documentation, Release 1.0alpha
Now, we shall add an ImageView component from the Controls menu into the CENTER field of our BP. Let’s alsoedit the id of the image view (e.g. “currentFrame”), and add some margin to it.
Finally we have to tell which Controller class will mange the GUI, we can do so by adding our controller class namein the Controller class field under the Controller menu located in the bottom left corner of the window.
We just created our first GUI by using Scene Builder, if you save the file and return to Eclipse you will notice thatsome FXML code has been generated automatically.
3.5. Working with Scene Builder 19

OpenCV Java Tutorials Documentation, Release 1.0alpha
Key concepts in JavaFX
The Stage is where the application will be displayed (e.g., a Windows’ window). A Scene is one container of Nodesthat compose one “page” of your application. A Node is an element in the Scene, with a visual appearance and aninteractive behavior. Nodes may be hierarchically nested . In the Main class we have to pass to the start function ourprimary stage:
public void start(Stage primaryStage)
and load the fxml file that will populate our stage, the root element of the scene and the controller class:
FXMLLoader loader = new FXMLLoader(getClass().getResource("MyFirstJFX.fxml"));BorderPane root = (BorderPane) loader.load();FXController controller = loader.getController();
Managing GUI interactions with the Controller class
For our application we need to do basically two thing: control the button push and the refreshment of the image view.To do so we have to create a reference between the gui components and a variable used in our controller class:
@FXMLprivate Button start_btn;@FXMLprivate ImageView currentFrame;
The @FXML tag means that we are linking our variable to an element of the fxml file and the value used to declare thevariable has to equal to the id set for that specific element.
The @FXML tag is used with the same meaning for the Actions set under the Code menu in a specific element.
for:
<Button fx:id="start_btn" mnemonicParsing="false" onAction="#startCamera" text="Start→˓Camera" BorderPane.alignment="CENTER">
we set:
@FXMLprotected void startCamera(ActionEvent event){ ...
Video Capturing
Essentially, all the functionalities required for video manipulation is integrated in the VideoCapture class.
private VideoCapture capture = new VideoCapture();
This on itself builds on the FFmpeg open source library. A video is composed of a succession of images, we refer tothese in the literature as frames. In case of a video file there is a frame rate specifying just how long is between twoframes. While for the video cameras usually there is a limit of just how many frames they can digitalize per second. Inour case we set as frame rate 30 frames per sec. To do so we initialize a timer that will open a background task every33 milliseconds.
20 Chapter 3. First JavaFX Application with OpenCV

OpenCV Java Tutorials Documentation, Release 1.0alpha
TimerTask frameGrabber = new TimerTask() { ... }this.timer = new Timer();this.timer.schedule(frameGrabber, 0, 33);
To check if the binding of the class to a video source was successful or not use the isOpened function:
if (this.capture.isOpened()){ ... }
Closing the video is automatic when the objects destructor is called. However, if you want to close it before this youneed to call its release function.
this.capture.release();
The frames of the video are just simple images. Therefore, we just need to extract them from the VideoCapture objectand put them inside a Mat one.
Mat frame = new Mat();
The video streams are sequential. You may get the frames one after another by the read or the overloaded >> operator.
this.capture.read(frame);
Now we are going to convert our image from BGR to Grayscale format. OpenCV has a really nice function to do thiskind of transformations:
Imgproc.cvtColor(frame, frame, Imgproc.COLOR_BGR2GRAY);
As you can see, cvtColor takes as arguments:
• a source image (frame)
• a destination image (frame), in which we will save the converted image.
• an additional parameter that indicates what kind of transformation will be performed. In this case we usevCV_BGR2GRAY (because of imread has BGR default channel order in case of color images).
Now in order to put the captured frame into the ImageView we need to convert the Mat in a Image. We first create abuffer to store the Mat.
MatOfByte buffer = new MatOfByte();
Then we can put the frame into the buffer by using the imencode function:
Highgui.imencode(".png", frame, buffer);
This encodes an image into a memory buffer. The function compresses the image and stores it in the memory bufferthat is resized to fit the result.
Note: cvEncodeImage returns single-row matrix of type CV_8UC1 that contains encoded image as array of bytes.
It takes three parameters:
• (”.png”) File extension that defines the output format.
• (frame) Image to be written.
• (buffer) Output buffer resized to fit the compressed image.
3.8. Video Capturing 21

OpenCV Java Tutorials Documentation, Release 1.0alpha
Once we filled the buffer we have to stream it into an Image by using ByteArrayInputStream:
new Image(new ByteArrayInputStream(buffer.toArray()));
Now we can put the new image in the ImageView. With Java 1.8 we cannot perform an update of a gui element in athread that differs from the main thread; so we need to get the new frame in a second thread and refresh our ImageViewin the main thread:
Image tmp = grabFrame();Platform.runLater(new Runnable() {
@Override public void run(){frameView.setImage(tmp);}});
Source Code
• Main.java
public class Main extends Application {@Overridepublic void start(Stage primaryStage) {
try {// load the FXML resourceFXMLLoader loader = new FXMLLoader(getClass().getResource(
→˓"MyFirstJFX.fxml"));// store the root element so that the controllers can use itBorderPane root = (BorderPane) loader.load();// create and style a sceneScene scene = new Scene(root);scene.getStylesheets().add(getClass().getResource(
→˓"application.css").toExternalForm());// create the stage with the given title and the previously
→˓created sceneprimaryStage.setTitle("JavaFX meets OpenCV");
22 Chapter 3. First JavaFX Application with OpenCV

OpenCV Java Tutorials Documentation, Release 1.0alpha
primaryStage.setScene(scene);// show the GUIprimaryStage.show();// set a reference of this class for its controllerFXController controller = loader.getController();controller.setRootElement(root);
} catch(Exception e) {e.printStackTrace();
}}
public static void main(String[] args) {// load the native OpenCV librarySystem.loadLibrary(Core.NATIVE_LIBRARY_NAME);launch(args);
}}
• FXController.java
public class FXController {
@FXMLprivate Button start_btn;@FXMLprivate ImageView currentFrame;
private Pane rootElement;private Timer timer;private VideoCapture capture = new VideoCapture();
@FXMLprotected void startCamera(ActionEvent event){
// check: the main class is accessible?if (this.rootElement != null){
// get the ImageView object for showing the video streamfinal ImageView frameView = currentFrame;// check if the capture stream is openedif (!this.capture.isOpened()){
// start the video capturethis.capture.open(0);// grab a frame every 33 ms (30 frames/sec)TimerTask frameGrabber = new TimerTask() {
@Overridepublic void run(){
Image tmp = grabFrame();Platform.runLater(new Runnable() {
@Overridepublic void run()
{frameView.setImage(tmp);
}});
3.9. Source Code 23

OpenCV Java Tutorials Documentation, Release 1.0alpha
}};this.timer = new Timer();//set the timer scheduling, this allow you to perform
→˓frameGrabber every 33ms;this.timer.schedule(frameGrabber, 0, 33);this.start_btn.setText("Stop Camera");
}else{
this.start_btn.setText("Start Camera");// stop the timerif (this.timer != null){
this.timer.cancel();this.timer = null;
}// release the camerathis.capture.release();// clear the image containerframeView.setImage(null);
}}
}
private Image grabFrame(){
//initImage imageToShow = null;Mat frame = new Mat();// check if the capture is openif (this.capture.isOpened()){
try{
// read the current framethis.capture.read(frame);// if the frame is not empty, process itif (!frame.empty()){
// convert the image to gray scaleImgproc.cvtColor(frame, frame, Imgproc.COLOR_
→˓BGR2GRAY);// convert the Mat object (OpenCV) to Image
→˓(JavaFX)imageToShow = mat2Image(frame);
}}catch (Exception e){
// log the errorSystem.err.println("ERROR: " + e.getMessage());
}}return imageToShow;
}
24 Chapter 3. First JavaFX Application with OpenCV

OpenCV Java Tutorials Documentation, Release 1.0alpha
private Image mat2Image(Mat frame){
// create a temporary bufferMatOfByte buffer = new MatOfByte();// encode the frame in the bufferHighgui.imencode(".png", frame, buffer);// build and return an Image created from the image encoded in the bufferreturn new Image(new ByteArrayInputStream(buffer.toArray()));
}
public void setRootElement(Pane root){
this.rootElement = root;}
}
• MyFirstJFX.fxml
<?xml version="1.0" encoding="UTF-8"?>
<?import java.lang.*?><?import javafx.geometry.*?><?import javafx.scene.control.*?><?import javafx.scene.image.*?><?import javafx.scene.layout.*?><?import javafx.scene.layout.BorderPane?><?import javafx.scene.image.ImageView?><?import javafx.scene.layout.HBox?><?import javafx.scene.control.Button?><?import javafx.geometry.Insets?>
<BorderPane maxHeight="-Infinity" maxWidth="-Infinity" minHeight="-Infinity" minWidth=→˓"-Infinity" prefHeight="400.0" prefWidth="600.0" xmlns="http://javafx.com/javafx/8"→˓xmlns:fx="http://javafx.com/fxml/1" fx:controller="application.FXController">
<bottom><Button fx:id="start_btn" mnemonicParsing="false" onAction="#startCamera" text=
→˓"Start Camera" BorderPane.alignment="CENTER"><BorderPane.margin>
<Insets bottom="10.0" /></BorderPane.margin></Button>
</bottom><center>
<ImageView fx:id="currentFrame" fitHeight="150.0" fitWidth="200.0" pickOnBounds=→˓"true" preserveRatio="true" BorderPane.alignment="CENTER">
<BorderPane.margin><Insets bottom="10.0" left="10.0" right="10.0" top="10.0" />
</BorderPane.margin></ImageView></center>
</BorderPane>
3.9. Source Code 25

OpenCV Java Tutorials Documentation, Release 1.0alpha
26 Chapter 3. First JavaFX Application with OpenCV

CHAPTER 4
OpenCV Basics
Note: We assume that by now you have already read the previous tutorials. If not, please check previous tutori-als at http://polito-java-opencv-tutorials.readthedocs.org/en/latest/index.html. You can also find the source code andresources at https://github.com/java-opencv/Polito-Java-OpenCV-Tutorials-Source-Code
What we will do in this tutorial
In this guide, we will:
• Create a basic checkbox interaction to alter the color of the video stream.
• Add a basic checkbox interaction to “alpha over” a logo to the video stream.
• Display the video stream histogram (both one and three channels).
Getting started
For this tutorial we can create a new JavaFX project and build a scene as the one realized in the previous one. So we’vegot a window with a border pane in witch:
• in the BOTTOM we have a button inside a HBox:
<HBox alignment="CENTER" ><padding>
<Insets top="25" right="25" bottom="25" left="25"/></padding><Button fx:id="button" alignment="center" text="Start camera" onAction="
→˓#startCamera" /></HBox>
• in the CENTRE we have a ImageView:
27

OpenCV Java Tutorials Documentation, Release 1.0alpha
<ImageView fx:id="currentFrame" />
Color channel checkbox
Let’s open our fxml file with Scene Builder and add to the RIGHT field of our BP a vertical box VBox. A VBoxlays out its children in a single vertical column. If the VBox has a border and/or padding set, then the contentswill be layed out within those insets. Also it will resize children (if resizable) to their preferred heights and uses itsfillWidth property to determine whether to resize their widths to fill its own width or keep their widths to theirpreferred (fillWidth defaults to true). A HBox works just like a VBox but it lays out its children horizontally insteadof vertically.
Now we can put inside the VBox a new checkbox, change its text to “Show in gray scale” and set a id (e.g. “grayscale”).
<CheckBox fx:id="grayscale" text="Show in gray scale" />
Let’s also add a title to this section by putting before our new checkbox, but still inside the VBox, a text and set its textas “Controls” (we can find the text element under the Shapes menu).
<Text text="Controls" />
In the Scene Builder we now have:
28 Chapter 4. OpenCV Basics

OpenCV Java Tutorials Documentation, Release 1.0alpha
The graphic interface is complete for the first task, now we need to work on the controller; in the previous tutorial wecould control the number of channels displayed on screen with the line (98):
Imgproc.cvtColor(frame, frame, Imgproc.COLOR_BGR2GRAY);
In order to control this conversion with the check box, we have to link the check box with a FXML variable:
@FXMLprivate CheckBox grayscale;
Now we can implement the control by adding a simple if condition which will perform the conversion only if ourcheck box is checked:
if (grayscale.isSelected()){Imgproc.cvtColor(frame, frame, Imgproc.COLOR_BGR2GRAY);
}
Load an Image and Add it to the Stream
The next step is to add another check box which, if checked, will trigger the display of an image over the camerastream. Let’s start by adding the image to the project; create a new folder in the root directory of your project andput the image in there. In my project I have a resources folder with a Poli.png image. Go back to Eclipseand refresh your project (you should have the new folder in it). Let’s open the fxml file with Scene Builder and adda new checkbox below the one that controls the stream colors; we have to set the text, the name of the method in theOnAction field and a id. In the code we will have for example:
<CheckBox fx:id="logoCheckBox" text="Show logo" onAction="#loadLogo" />
In the controller file we have to define a new variable associated with the checkbox, the method set on the OnActionfield and adapt the code so that it will display the logo when the checkbox is checked and the stream is on. Variable:
@FXMLprivate CheckBox logoCheckBox;
loadLogo metheod: In this method we are going to load the image whenever the logoCheckBox id selected(checked). In order to load the image we have to use a basic OpenCV function: imread. It return a Mat and takes thepath of the image and a flag (> 0 RGB image, =0 grayscale, <0 with the alpha channel).
@FXMLprotected void loadLogo(){
if (logoCheckBox.isSelected())this.logo = Highgui.imread("resources/Poli.png");
}
Adapt the code.
We are going to add some variants to the code in order to display our logo in a specific region of the stream. Thismeans that for each frame capture, before the image could be converted into 1 or 3 channels, we have to set a ROI(region of interest) in which we want to place the logo. Usually a ROI of an Image is a portion of it, we can define theroi as a Rect object. Rect is a template class for 2D rectangles, described by the following parameters:
• Coordinates of the top-left corner. This is a default interpretation of Rect.x and Rect.y in OpenCV. Though, inyour algorithms you may count x and y from the bottom-left corner.
• Rectangle width and height.
4.4. Load an Image and Add it to the Stream 29

OpenCV Java Tutorials Documentation, Release 1.0alpha
Rect roi = new Rect(frame.cols()-logo.cols(), frame.rows()-logo.rows(), logo.cols(),→˓logo.rows());
Then we have to take control of our Mat’s ROI, by doing so we are able to “add” our logo in the disired area of theframe defined by the ROI.
Mat imageROI = frame.submat(roi);
We had to make this operation because we can only “add” Mats with the same sizes; but how can we “add” two Mattogether? We have to keep in mind that our logo could have 4 channels (RGB + alpha). So we could use two functions:addWeighted or copyTo. The addWeighted function calculates the weighted sum of two arrays as follows:
dst(I)= saturate(src1(I) alpha + src2(I)* beta + gamma)*
where I is a multi-dimensional index of array elements. In case of multi-channel arrays, each channel is processedindependently. The function can be replaced with a matrix expression:
dst = src1*alpha + src2*beta + gamma
Note: Saturation is not applied when the output array has the depth CV_32S. You may even get result of an incorrectsign in the case of overflow.
Parameters:
• src1 first input array.
• alpha weight of the first array elements.
• src2 second input array of the same size and channel number as src1.
• beta weight of the second array elements.
• gamma scalar added to each sum.
• dst output array that has the same size and number of channels as the input arrays.
So we’ll have:
Core.addWeighted(imageROI, 1.0, logo, 0.7, 0.0, imageROI);
The second method (copyTo) simply copies a Mat into the other. We’ll have:
Mat mask = logo.clone();logo.copyTo(imageROI, mask);
Everything we have done so far to add the logo to the image has to perform only IF our checkbox is check and theimage loading process has ended successfully. So we have to add an if condition:
if (logoCheckBox.isSelected() && this.logo != null){
Rect roi = new Rect(frame.cols() - logo.cols(), frame.rows() - logo.rows(), logo.→˓cols(),logo.rows());
Mat imageROI = frame.submat(roi);// add the logo: method #1
Core.addWeighted(imageROI, 1.0, logo, 0.7, 0.0, imageROI);// add the logo: method #2// Mat mask = logo.clone();// logo.copyTo(imageROI, mask);
}
30 Chapter 4. OpenCV Basics
OpenCV Java Tutorials Documentation, Release 1.0alpha
Calculate a Histogram
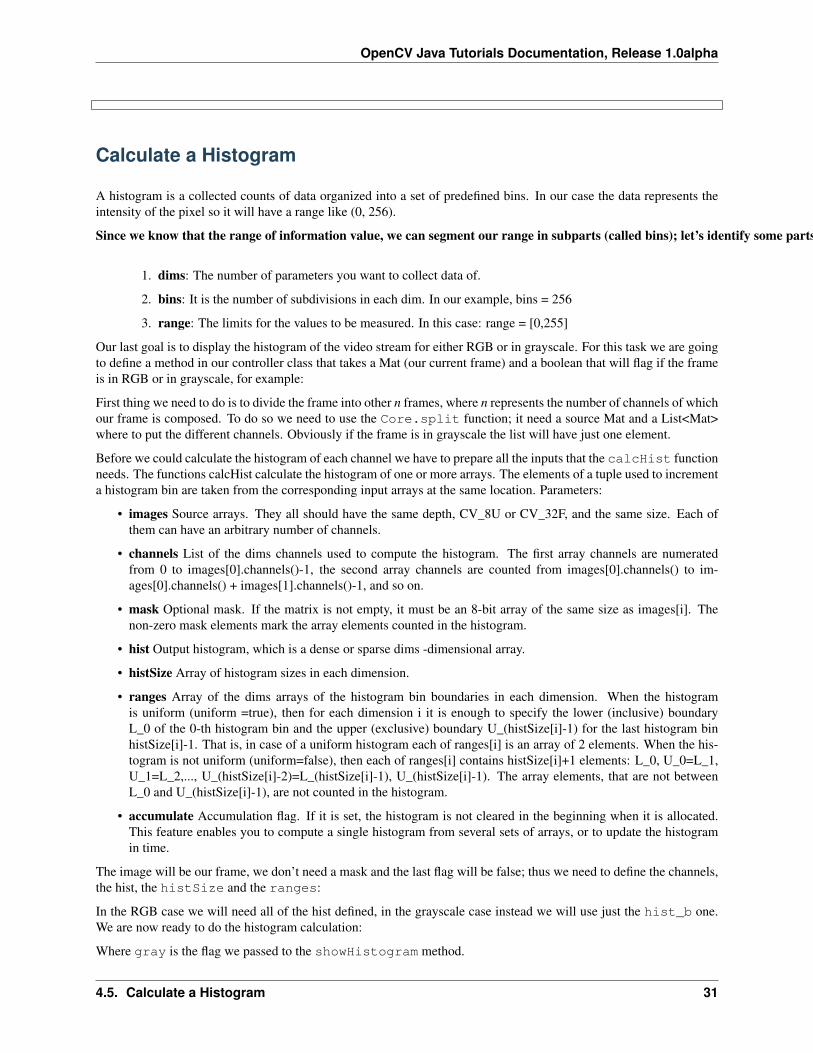
A histogram is a collected counts of data organized into a set of predefined bins. In our case the data represents theintensity of the pixel so it will have a range like (0, 256).
Since we know that the range of information value, we can segment our range in subparts (called bins); let’s identify some parts of the histogram:
1. dims: The number of parameters you want to collect data of.
2. bins: It is the number of subdivisions in each dim. In our example, bins = 256
3. range: The limits for the values to be measured. In this case: range = [0,255]
Our last goal is to display the histogram of the video stream for either RGB or in grayscale. For this task we are goingto define a method in our controller class that takes a Mat (our current frame) and a boolean that will flag if the frameis in RGB or in grayscale, for example:
First thing we need to do is to divide the frame into other n frames, where n represents the number of channels of whichour frame is composed. To do so we need to use the Core.split function; it need a source Mat and a List<Mat>where to put the different channels. Obviously if the frame is in grayscale the list will have just one element.
Before we could calculate the histogram of each channel we have to prepare all the inputs that the calcHist functionneeds. The functions calcHist calculate the histogram of one or more arrays. The elements of a tuple used to incrementa histogram bin are taken from the corresponding input arrays at the same location. Parameters:
• images Source arrays. They all should have the same depth, CV_8U or CV_32F, and the same size. Each ofthem can have an arbitrary number of channels.
• channels List of the dims channels used to compute the histogram. The first array channels are numeratedfrom 0 to images[0].channels()-1, the second array channels are counted from images[0].channels() to im-ages[0].channels() + images[1].channels()-1, and so on.
• mask Optional mask. If the matrix is not empty, it must be an 8-bit array of the same size as images[i]. Thenon-zero mask elements mark the array elements counted in the histogram.
• hist Output histogram, which is a dense or sparse dims -dimensional array.
• histSize Array of histogram sizes in each dimension.
• ranges Array of the dims arrays of the histogram bin boundaries in each dimension. When the histogramis uniform (uniform =true), then for each dimension i it is enough to specify the lower (inclusive) boundaryL_0 of the 0-th histogram bin and the upper (exclusive) boundary U_(histSize[i]-1) for the last histogram binhistSize[i]-1. That is, in case of a uniform histogram each of ranges[i] is an array of 2 elements. When the his-togram is not uniform (uniform=false), then each of ranges[i] contains histSize[i]+1 elements: L_0, U_0=L_1,U_1=L_2,..., U_(histSize[i]-2)=L_(histSize[i]-1), U_(histSize[i]-1). The array elements, that are not betweenL_0 and U_(histSize[i]-1), are not counted in the histogram.
• accumulate Accumulation flag. If it is set, the histogram is not cleared in the beginning when it is allocated.This feature enables you to compute a single histogram from several sets of arrays, or to update the histogramin time.
The image will be our frame, we don’t need a mask and the last flag will be false; thus we need to define the channels,the hist, the histSize and the ranges:
In the RGB case we will need all of the hist defined, in the grayscale case instead we will use just the hist_b one.We are now ready to do the histogram calculation:
Where gray is the flag we passed to the showHistogram method.
4.5. Calculate a Histogram 31

OpenCV Java Tutorials Documentation, Release 1.0alpha
Draw the Histogram
Next step is to draw the calculated histogram in our gui. Open the fxml file with Scene Builder and add an ImageViewabove the “Controls” text in the right of the BP and set its id:
<ImageView fx:id="histogram" />
Now back to the Controller class. Let’s add a global variable to control the just added image view:
@FXMLprivate ImageView histogram;
and continue to write the showHistogram method. First thing first, let’s create an image to display the histogram:
int hist_w = 150;int hist_h = 150;int bin_w = (int) Math.round(hist_w / histSize.get(0, 0)[0]);Mat histImage = new Mat(hist_h, hist_w, CvType.CV_8UC3, new Scalar(0, 0, 0));
before drawing, we first normalize the histogram so its values fall in the range indicated by the parameters entered:
Core.normalize(hist_b, hist_b, 0, histImage.rows(), Core.NORM_MINMAX, -1, new Mat());if (!gray){
Core.normalize(hist_g, hist_g, 0, histImage.rows(), Core.NORM_MINMAX, -1, new→˓Mat());
Core.normalize(hist_r, hist_r, 0, histImage.rows(), Core.NORM_MINMAX, -1, new→˓Mat());}
Now we can draw the histogram in our Mat:
for (int i = 1; i < histSize.get(0, 0)[0]; i++){Core.line(histImage, new Point(bin_w * (i - 1), hist_h - Math.round(hist_b.get(i -
→˓1, 0)[0])), new Point(bin_w * (i), hist_h - Math.round(hist_b.get(i, 0)[0])), new→˓Scalar(255, 0, 0), 2, 8, 0);
if (!gray){Core.line(histImage, new Point(bin_w * (i - 1), hist_h - Math.round(hist_g.
→˓get(i - 1, 0)[0])),new Point(bin_w * (i), hist_h - Math.round(hist_g.get(i, 0)[0])),→˓ new Scalar(0, 255, 0), 2, 8, 0);
Core.line(histImage, new Point(bin_w * (i - 1), hist_h - Math.round(hist_r.→˓get(i - 1, 0)[0])),Math.round(hist_r.get(i, 0)[0])), new Scalar(0, 0, 255), 2, 8,→˓0);
}}
Let’s convert the obtained Mat to an Image with our method mat2Image and update the ImageView with the returnedImage:
histo = mat2Image(histImage);Platform.runLater(new Runnable() {
@Overridepublic void run() {
histogram.setImage(histo);}
});
32 Chapter 4. OpenCV Basics

OpenCV Java Tutorials Documentation, Release 1.0alpha
4.6. Draw the Histogram 33

OpenCV Java Tutorials Documentation, Release 1.0alpha
Source Code
• Basics.java
public class Basics extends Application {@Overridepublic void start(Stage primaryStage) {
try{
// load the FXML resourceFXMLLoader loader = new FXMLLoader(getClass().getResource(
→˓"BasicsFX.fxml"));// store the root element so that the controllers can use itBorderPane rootElement = (BorderPane) loader.load();// create and style a sceneScene scene = new Scene(rootElement, 800, 600);scene.getStylesheets().add(getClass().getResource("application.css
→˓").toExternalForm());// create the stage with the given title and the previously
→˓created// sceneprimaryStage.setTitle("OpenCV Basics");primaryStage.setScene(scene);// show the GUIprimaryStage.show();
}catch (Exception e){
e.printStackTrace();}
}
public static void main(String[] args) {// load the native OpenCV librarySystem.loadLibrary(Core.NATIVE_LIBRARY_NAME);
launch(args);}
}
• BasicsController.java
public class BasicsController {// the FXML button
@FXMLprivate Button button;// the FXML grayscale checkbox@FXMLprivate CheckBox grayscale;// the FXML logo checkbox@FXMLprivate CheckBox logoCheckBox;// the FXML grayscale checkbox@FXMLprivate ImageView histogram;// the FXML area for showing the current frame@FXML
34 Chapter 4. OpenCV Basics

OpenCV Java Tutorials Documentation, Release 1.0alpha
private ImageView currentFrame;
// a timer for acquiring the video streamprivate Timer timer;// the OpenCV object that realizes the video captureprivate VideoCapture capture = new VideoCapture();// a flag to change the button behaviorprivate boolean cameraActive = false;// the logo to be loadedprivate Mat logo;private Image i,histo;
/*** The action triggered by pushing the button on the GUI
*/@FXMLprotected void startCamera(){
if (!this.cameraActive){
// start the video capturethis.capture.open(0);
// is the video stream available?if (this.capture.isOpened()){
this.cameraActive = true;
// grab a frame every 33 ms (30 frames/sec)TimerTask frameGrabber = new TimerTask() {
@Overridepublic void run(){
i = grabFrame();Platform.runLater(new Runnable() {
@Overridepublic void run() {
currentFrame.→˓setImage(i);
}});
}};this.timer = new Timer();this.timer.schedule(frameGrabber, 0, 33);
// update the button contentthis.button.setText("Stop Camera");
}else{
// log the errorSystem.err.println("Impossible to open the camera
→˓connection...");}
}else{
4.7. Source Code 35

OpenCV Java Tutorials Documentation, Release 1.0alpha
// the camera is not active at this pointthis.cameraActive = false;// update again the button contentthis.button.setText("Start Camera");// stop the timerif (this.timer != null){
this.timer.cancel();this.timer = null;
}// release the camerathis.capture.release();// clean the image areaPlatform.runLater(new Runnable() {
@Overridepublic void run() {
currentFrame.setImage(null);}
});}
}
/*** The action triggered by selecting/deselecting the logo checkbox
*/@FXMLprotected void loadLogo(){
if (logoCheckBox.isSelected()){
// read the logo only when the checkbox has been selectedthis.logo = Highgui.imread("resources/Poli.png");
}}
/*** Get a frame from the opened video stream (if any)
** @return the {@link Image} to show
*/private Image grabFrame(){
// init everythingImage imageToShow = null;Mat frame = new Mat();
// check if the capture is openif (this.capture.isOpened()){
try{
// read the current framethis.capture.read(frame);
// if the frame is not empty, process itif (!frame.empty()){
// add a logo...
36 Chapter 4. OpenCV Basics

OpenCV Java Tutorials Documentation, Release 1.0alpha
if (logoCheckBox.isSelected() && this.→˓logo != null)
{Rect roi = new Rect(frame.cols() -
→˓ logo.cols(), frame.rows() - logo.rows(), logo.cols(),logo.rows());Mat imageROI = frame.submat(roi);// add the logo: method #1Core.addWeighted(imageROI, 1.0,
→˓logo, 0.7, 0.0, imageROI);
// add the logo: method #2// Mat mask = logo.clone();// logo.copyTo(imageROI, mask);
}
// if the grayscale checkbox is selected,→˓convert the image
// (frame + logo) accordinglyif (grayscale.isSelected()){
Imgproc.cvtColor(frame, frame,→˓Imgproc.COLOR_BGR2GRAY);
}
// show the histogramthis.showHistogram(frame, grayscale.
→˓isSelected());
// convert the Mat object (OpenCV) to→˓Image (JavaFX)
imageToShow = mat2Image(frame);}
}catch (Exception e){
// log the (full) errorSystem.err.println("ERROR: " + e);
}}
return imageToShow;}
/*** Compute and show the histogram for the given {@link Mat} image
** @param frame
* the {@link Mat} image for which compute the histogram
* @param gray
* is a grayscale image?
*/private void showHistogram(Mat frame, boolean gray){
// split the frames in multiple imagesList<Mat> images = new ArrayList<Mat>();Core.split(frame, images);
4.7. Source Code 37

OpenCV Java Tutorials Documentation, Release 1.0alpha
// set the number of bins at 256MatOfInt histSize = new MatOfInt(256);// only one channelMatOfInt channels = new MatOfInt(0);// set the rangesMatOfFloat histRange = new MatOfFloat(0, 256);
// compute the histograms for the B, G and R componentsMat hist_b = new Mat();Mat hist_g = new Mat();Mat hist_r = new Mat();
// B component or gray imageImgproc.calcHist(images.subList(0, 1), channels, new Mat(), hist_
→˓b, histSize, histRange, false);
// G and R components (if the image is not in gray scale)if (!gray){
Imgproc.calcHist(images.subList(1, 2), channels, new→˓Mat(), hist_g, histSize, histRange, false);
Imgproc.calcHist(images.subList(2, 3), channels, new→˓Mat(), hist_r, histSize, histRange, false);
}
// draw the histogramint hist_w = 150; // width of the histogram imageint hist_h = 150; // height of the histogram imageint bin_w = (int) Math.round(hist_w / histSize.get(0, 0)[0]);
Mat histImage = new Mat(hist_h, hist_w, CvType.CV_8UC3, new→˓Scalar(0, 0, 0));
// normalize the result to [0, histImage.rows()]Core.normalize(hist_b, hist_b, 0, histImage.rows(), Core.NORM_
→˓MINMAX, -1, new Mat());
// for G and R componentsif (!gray){
Core.normalize(hist_g, hist_g, 0, histImage.rows(), Core.→˓NORM_MINMAX, -1, new Mat());
Core.normalize(hist_r, hist_r, 0, histImage.rows(), Core.→˓NORM_MINMAX, -1, new Mat());
}
// effectively draw the histogram(s)for (int i = 1; i < histSize.get(0, 0)[0]; i++){
// B component or gray imageCore.line(histImage, new Point(bin_w * (i - 1), hist_h -
→˓Math.round(hist_b.get(i - 1, 0)[0])), new Point(bin_w * (i), hist_h - Math.round(hist_b.
→˓get(i, 0)[0])), new Scalar(255, 0, 0), 2, 8, 0);// G and R components (if the image is not in gray scale)if (!gray){
Core.line(histImage, new Point(bin_w * (i - 1),→˓hist_h - Math.round(hist_g.get(i - 1, 0)[0])),
38 Chapter 4. OpenCV Basics

OpenCV Java Tutorials Documentation, Release 1.0alpha
new Point(bin_w * (i), hist_h -→˓Math.round(hist_g.get(i, 0)[0])), new Scalar(0, 255, 0), 2, 8,
0);Core.line(histImage, new Point(bin_w * (i - 1),
→˓hist_h - Math.round(hist_r.get(i - 1, 0)[0])),new Point(bin_w * (i), hist_h -
→˓Math.round(hist_r.get(i, 0)[0])), new Scalar(0, 0, 255), 2, 8,0);
}}
histo = mat2Image(histImage);
// display the wholePlatform.runLater(new Runnable() {
@Overridepublic void run() {
histogram.setImage(histo);}
});
}
/*** Convert a Mat object (OpenCV) in the corresponding Image for JavaFX
** @param frame
* the {@link Mat} representing the current frame
* @return the {@link Image} to show
*/private Image mat2Image(Mat frame){
// create a temporary bufferMatOfByte buffer = new MatOfByte();// encode the frame in the buffer, according to the PNG formatHighgui.imencode(".png", frame, buffer);// build and return an Image created from the image encoded in the// bufferreturn new Image(new ByteArrayInputStream(buffer.toArray()));
}}
• BasicsFX.fxml
<BorderPane xmlns:fx="http://javafx.com/fxml/1" fx:controller="application.→˓BasicsController">
<center><ImageView fx:id="currentFrame" />
</center><right>
<VBox alignment="CENTER_LEFT" spacing="10"><padding>
<Insets left="25" right="25"/></padding><ImageView fx:id="histogram" /><Text text="Controls" /><CheckBox fx:id="grayscale" text="Show in gray scale" /><CheckBox fx:id="logoCheckBox" text="Show logo" onAction="#loadLogo" />
4.7. Source Code 39

OpenCV Java Tutorials Documentation, Release 1.0alpha
</VBox></right><bottom>
<HBox alignment="CENTER" ><padding>
<Insets top="25" right="25" bottom="25" left="25"/></padding><Button fx:id="button" alignment="center" text="Start camera" onAction="
→˓#startCamera" /></HBox>
</bottom></BorderPane>
40 Chapter 4. OpenCV Basics

CHAPTER 5
Camera Calibration
Note: We assume that by now you have already read the previous tutorials. If not, please check previous tutori-als at http://polito-java-opencv-tutorials.readthedocs.org/en/latest/index.html. You can also find the source code andresources at https://github.com/java-opencv/Polito-Java-OpenCV-Tutorials-Source-Code
Goal
The goal of this tutorial is to learn how to calibrate a camera given a set of chessboard images.
What is the camera calibration?
The camera calibration is the process with which we can obtain the camera parameters such as intrinsic and extrinsicparameters, distortions and so on. The calibration of the camera is often necessary when the alignment between thelens and the optic sensors chip is not correct; the effect produced by this wrong alignment is usually more visible inlow quality cameras.
Calibration Pattern
As we said earlier we are going to need some sort of pattern that the program can recognize in order to make thecalibration work. The pattern that we are going to use is a chessboard image.
41

OpenCV Java Tutorials Documentation, Release 1.0alpha
The reason why we use this image is because there are some OpenCV functions that can recognize this pattern anddraw a scheme which highlights the intersections between each block. To make the calibration work you need to printthe chessboard image and show it to the cam; it is important to maintain the sheet still, better if stick to a surface. Inorder to make a good calibration, we need to have about 20 samples of the pattern taken from different angles anddistances.
What we will do in this tutorial
In this guide, we will:
• Create some TextEdit field to give some inputs to our program
• Recognize the pattern using some OpenCV functions
• Calibrate and show the video stream.
Getting Started
Create a new JavaFX project (e.g. “CameraCalibration”) with the usual OpenCV user library. Open Scene Builderand add a Border Pane with:
• on TOP we need to have the possibility to set the number of samples for the calibration, the number of horizontalcorners we have in the test image, the number of vertical corners we have in the test image and a button to updatethis data. To make things cleaner let’s put all these elements inside a HBox.
42 Chapter 5. Camera Calibration

OpenCV Java Tutorials Documentation, Release 1.0alpha
<HBox alignment="CENTER" spacing="10">
Let’s also add some labels before each text fields. Each text field is going to need an id, and let’s put a standard valuefor them already.
<Label text="Boards #" /><TextField fx:id="numBoards" text="20" maxWidth="50" /><Label text="Horizontal corners #" /><TextField fx:id="numHorCorners" text="9" maxWidth="50" /><Label text="Vertical corners #" /><TextField fx:id="numVertCorners" text="6" maxWidth="50" />
For the button instead, set the id and a method for the onAction field:
<Button fx:id="applyButton" alignment="center" text="Apply" onAction="#updateSettings→˓" />
• on the LEFT add an ImageView inside a VBox for the normal cam stream; set an id for it.
<ImageView fx:id="originalFrame" />
• on the RIGHT add an ImageView inside a VBox for the calibrated cam stream; set an id for it.
<ImageView fx:id="originalFrame" />
• in the BOTTOM add a start/stop cam stream button and a snapshot button inside a HBox; set an id and a actionmethod for each one.
<Button fx:id="cameraButton" alignment="center" text="Start camera" onAction="→˓#startCamera" disable="true" /><Button fx:id="snapshotButton" alignment="center" text="Take snapshot" onAction="→˓#takeSnapshot" disable="true" />
Your GUI will look something like this:
5.5. Getting Started 43

OpenCV Java Tutorials Documentation, Release 1.0alpha
Pattern Recognition
The calibration process consists on showing to the cam the chessboard pattern from different angles, depth and pointsof view. For each recognized pattern we need to track:
• some reference system’s 3D point where the chessboard is located (let’s assume that the Z axe is always 0):
for (int j = 0; j < numSquares; j++)obj.push_back(new MatOfPoint3f(new Point3(j / this.numCornersHor, j %
→˓this.numCornersVer, 0.0f)));
• the image’s 2D points (operation made by OpenCV with findChessboardCorners):
boolean found = Calib3d.findChessboardCorners(grayImage, boardSize,→˓imageCorners, Calib3d.CALIB_CB_ADAPTIVE_THRESH + Calib3d.CALIB_CB_→˓NORMALIZE_IMAGE + Calib3d.CALIB_CB_FAST_CHECK);
The findChessboardCorners function attempts to determine whether the input image is a view of the chessboardpattern and locate the internal chessboard corners. Its parameters are:
• image Source chessboard view. It must be an 8-bit grayscale or color image.
• patternSize Number of inner corners per a chessboard row and column
• corners Output array of detected corners.
• flags Various operation flags that can be zero or a combination of the following values:
– CV_CALIB_CB_ADAPTIVE_THRESH Use adaptive thresholding to convert the image to black andwhite, rather than a fixed threshold level (computed from the average image brightness).
– CV_CALIB_CB_NORMALIZE_IMAGE Normalize the image gamma with “equalizeHist” before ap-plying fixed or adaptive thresholding.
– CV_CALIB_CB_FILTER_QUADS Use additional criteria (like contour area, perimeter, square-likeshape) to filter out false quads extracted at the contour retrieval stage.
– CALIB_CB_FAST_CHECK Run a fast check on the image that looks for chessboard corners, andshortcut the call if none is found. This can drastically speed up the call in the degenerate conditionwhen no chessboard is observed.
Warning: Before doing the findChessboardCorners convert the image to gayscale and save the board sizeinto a Size variable:
Imgproc.cvtColor(frame, grayImage, Imgproc.COLOR_BGR2GRAY);Size boardSize = new Size(this.numCornersHor, this.numCornersVer);
If the recognition went well found should be true.
For square images the positions of the corners are only approximate. We may improve this by calling thecornerSubPix function. It will produce better calibration result.
TermCriteria term = new TermCriteria(TermCriteria.EPS | TermCriteria.MAX_ITER, 30, 0.→˓1);Imgproc.cornerSubPix(grayImage, imageCorners, new Size(11, 11), new Size(-1, -1),→˓term);
We can now highlight the found points on stream:
44 Chapter 5. Camera Calibration

OpenCV Java Tutorials Documentation, Release 1.0alpha
Calib3d.drawChessboardCorners(frame, boardSize, imageCorners, found);
The function draws individual chessboard corners detected either as red circles if the board was not found, or ascolored corners connected with lines if the board was found.
Its parameters are:
• image Destination image. It must be an 8-bit color image.
• patternSize Number of inner corners per a chessboard row and column.
• corners Array of detected corners, the output of findChessboardCorners.
• patternWasFound Parameter indicating whether the complete board was found or not. The return value offindChessboardCorners should be passed here.
Now we can activate the Snapshot button to save the data.
this.snapshotButton.setDisable(false);
5.6. Pattern Recognition 45

OpenCV Java Tutorials Documentation, Release 1.0alpha
We should take the set number of “snapshots” from different angles and depth, in order to make the calibration.
Note: We don’t actually save the image but just the data we need.
Saving Data
By clicking on the snapshot button we cal the takeSnapshot method. Here we need to save the data (2D and 3Dpoints) if we did not make enough sample:
this.imagePoints.add(imageCorners);this.objectPoints.add(obj);this.successes++;
Otherwise we can calibrate the camera.
Camera Calibration
For the camera calibration we should create initiate some needed variable and then call the actual calibration function:
46 Chapter 5. Camera Calibration

OpenCV Java Tutorials Documentation, Release 1.0alpha
List<Mat> rvecs = new ArrayList<>();List<Mat> tvecs = new ArrayList<>();intrinsic.put(0, 0, 1);intrinsic.put(1, 1, 1);
Calib3d.calibrateCamera(objectPoints, imagePoints, savedImage.size(), intrinsic,→˓distCoeffs, rvecs, tvecs);
The calibrateCamera function estimates the intrinsic camera parameters and extrinsic parameters for each of theviews. The algorithm is based on [Zhang2000] and [BouguetMCT]. The coordinates of 3D object points and theircorresponding 2D projections in each view must be specified. Its parameters are:
• objectPoints In the new interface it is a vector of vectors of calibration pattern points in the calibration patterncoordinate space. The outer vector contains as many elements as the number of the pattern views. The pointsare 3D, but since they are in a pattern coordinate system, then, if the rig is planar, it may make sense to put themodel to a XY coordinate plane so that Z-coordinate of each input object point is 0.
• imagePoints It is a vector of vectors of the projections of calibration pattern points.
• imageSize Size of the image used only to initialize the intrinsic camera matrix.
• cameraMatrix Output 3x3 floating-point camera matrix A = |fx 0 cx| |0 fy cy| |0 0 1|. IfCV_CALIB_USE_INTRINSIC_GUESS and/or CV_CALIB_FIX_ASPECT_RATIO are specified, some orall of fx, fy, cx, cy must be initialized before calling the function.
• distCoeffs Output vector of distortion coefficients of 4, 5, or 8 elements.
• rvecs Output vector of rotation vectors estimated for each pattern view. That is, each k-th rotation vector togetherwith the corresponding k-th translation vector.
• tvecs Output vector of translation vectors estimated for each pattern view.
We ran calibration and got camera’s matrix with the distortion coefficients we may want to correct the image usingundistort function:
if (this.isCalibrated){
// prepare the undistored imageMat undistored = new Mat();Imgproc.undistort(frame, undistored, intrinsic, distCoeffs);undistoredImage = mat2Image(undistored);
}
The undistort function transforms an image to compensate radial and tangential lens distortion.
Source Code
• CameraCalibration.java
public class CameraCalibration extends Application {@Overridepublic void start(Stage primaryStage) {
try {// load the FXML resourceFXMLLoader loader = new FXMLLoader(getClass().getResource("CC_FX.
→˓fxml"));// store the root element so that the controllers can use itBorderPane rootElement = (BorderPane) loader.load();
5.9. Source Code 47

OpenCV Java Tutorials Documentation, Release 1.0alpha
// set a whitesmoke backgroundrootElement.setStyle("-fx-background-color: whitesmoke;");// create and style a sceneScene scene = new Scene(rootElement, 800, 600);scene.getStylesheets().add(getClass().getResource("application.css
→˓").toExternalForm());// create the stage with the given title and the previously
→˓created// sceneprimaryStage.setTitle("Camera Calibration");primaryStage.setScene(scene);// init the controller variablesCC_Controller controller = loader.getController();controller.init();// show the GUIprimaryStage.show();
} catch(Exception e) {e.printStackTrace();
}}
public static void main(String[] args) {// load the native OpenCV librarySystem.loadLibrary(Core.NATIVE_LIBRARY_NAME);
launch(args);}
}
• CC_Controller.java
public class CC_Controller {// FXML buttons
@FXMLprivate Button cameraButton;@FXMLprivate Button applyButton;@FXMLprivate Button snapshotButton;// the FXML area for showing the current frame (before calibration)@FXMLprivate ImageView originalFrame;// the FXML area for showing the current frame (after calibration)@FXMLprivate ImageView calibratedFrame;// info related to the calibration process@FXMLprivate TextField numBoards;@FXMLprivate TextField numHorCorners;@FXMLprivate TextField numVertCorners;
// a timer for acquiring the video streamprivate Timer timer;// the OpenCV object that performs the video captureprivate VideoCapture capture;// a flag to change the button behavior
48 Chapter 5. Camera Calibration

OpenCV Java Tutorials Documentation, Release 1.0alpha
private boolean cameraActive;// the saved chessboard imageprivate Mat savedImage;// the calibrated camera frameprivate Image undistoredImage,CamStream;// various variables needed for the calibrationprivate List<Mat> imagePoints;private List<Mat> objectPoints;private MatOfPoint3f obj;private MatOfPoint2f imageCorners;private int boardsNumber;private int numCornersHor;private int numCornersVer;private int successes;private Mat intrinsic;private Mat distCoeffs;private boolean isCalibrated;
/*** Init all the (global) variables needed in the controller
*/protected void init(){
this.capture = new VideoCapture();this.cameraActive = false;this.obj = new MatOfPoint3f();this.imageCorners = new MatOfPoint2f();this.savedImage = new Mat();this.undistoredImage = null;this.imagePoints = new ArrayList<>();this.objectPoints = new ArrayList<>();this.intrinsic = new Mat(3, 3, CvType.CV_32FC1);this.distCoeffs = new Mat();this.successes = 0;this.isCalibrated = false;
}
/*** Store all the chessboard properties, update the UI and prepare other
* needed variables
*/@FXMLprotected void updateSettings(){
this.boardsNumber = Integer.parseInt(this.numBoards.getText());this.numCornersHor = Integer.parseInt(this.numHorCorners.
→˓getText());this.numCornersVer = Integer.parseInt(this.numVertCorners.
→˓getText());int numSquares = this.numCornersHor * this.numCornersVer;for (int j = 0; j < numSquares; j++)
obj.push_back(new MatOfPoint3f(new Point3(j / this.→˓numCornersHor, j % this.numCornersVer, 0.0f)));
this.cameraButton.setDisable(false);}
/*** The action triggered by pushing the button on the GUI
5.9. Source Code 49

OpenCV Java Tutorials Documentation, Release 1.0alpha
*/@FXMLprotected void startCamera(){
if (!this.cameraActive){
// start the video capturethis.capture.open(0);
// is the video stream available?if (this.capture.isOpened()){
this.cameraActive = true;
// grab a frame every 33 ms (30 frames/sec)TimerTask frameGrabber = new TimerTask() {
@Overridepublic void run(){
CamStream=grabFrame();// show the original framesPlatform.runLater(new Runnable() {
@Overridepublic void run() {
originalFrame.→˓setImage(CamStream);
// set fixed widthoriginalFrame.
→˓setFitWidth(380);// preserve image
→˓ratiooriginalFrame.
→˓setPreserveRatio(true);// show the
→˓original framescalibratedFrame.
→˓setImage(undistoredImage);// set fixed widthcalibratedFrame.
→˓setFitWidth(380);// preserve image
→˓ratiocalibratedFrame.
→˓setPreserveRatio(true);}
});
}};this.timer = new Timer();this.timer.schedule(frameGrabber, 0, 33);
// update the button contentthis.cameraButton.setText("Stop Camera");
}else{
// log the error
50 Chapter 5. Camera Calibration

OpenCV Java Tutorials Documentation, Release 1.0alpha
System.err.println("Impossible to open the camera→˓connection...");
}}else{
// the camera is not active at this pointthis.cameraActive = false;// update again the button contentthis.cameraButton.setText("Start Camera");// stop the timerif (this.timer != null){
this.timer.cancel();this.timer = null;
}// release the camerathis.capture.release();// clean the image areasoriginalFrame.setImage(null);calibratedFrame.setImage(null);
}}
/*** Get a frame from the opened video stream (if any)
** @return the {@link Image} to show
*/private Image grabFrame(){
// init everythingImage imageToShow = null;Mat frame = new Mat();
// check if the capture is openif (this.capture.isOpened()){
try{
// read the current framethis.capture.read(frame);
// if the frame is not empty, process itif (!frame.empty()){
// show the chessboard patternthis.findAndDrawPoints(frame);
if (this.isCalibrated){
// prepare the undistored imageMat undistored = new Mat();Imgproc.undistort(frame,
→˓undistored, intrinsic, distCoeffs);undistoredImage =
→˓mat2Image(undistored);}
5.9. Source Code 51

OpenCV Java Tutorials Documentation, Release 1.0alpha
// convert the Mat object (OpenCV) to→˓Image (JavaFX)
imageToShow = mat2Image(frame);}
}catch (Exception e){
// log the (full) errorSystem.err.print("ERROR");e.printStackTrace();
}}
return imageToShow;}
/*** Take a snapshot to be used for the calibration process
*/@FXMLprotected void takeSnapshot(){
if (this.successes < this.boardsNumber){
// save all the needed valuesthis.imagePoints.add(imageCorners);this.objectPoints.add(obj);this.successes++;
}
// reach the correct number of images needed for the calibrationif (this.successes == this.boardsNumber){
this.calibrateCamera();}
}
/*** Find and draws the points needed for the calibration on the chessboard
** @param frame
* the current frame
* @return the current number of successfully identified chessboards as an
* int
*/private void findAndDrawPoints(Mat frame){
// initMat grayImage = new Mat();
// I would perform this operation only before starting the→˓calibration
// processif (this.successes < this.boardsNumber){
// convert the frame in gray scale
52 Chapter 5. Camera Calibration

OpenCV Java Tutorials Documentation, Release 1.0alpha
Imgproc.cvtColor(frame, grayImage, Imgproc.COLOR_→˓BGR2GRAY);
// the size of the chessboardSize boardSize = new Size(this.numCornersHor, this.
→˓numCornersVer);// look for the inner chessboard cornersboolean found = Calib3d.findChessboardCorners(grayImage,
→˓boardSize, imageCorners,Calib3d.CALIB_CB_ADAPTIVE_THRESH +
→˓Calib3d.CALIB_CB_NORMALIZE_IMAGE + Calib3d.CALIB_CB_FAST_CHECK);// all the required corners have been found...if (found){
// optimizationTermCriteria term = new TermCriteria(TermCriteria.
→˓EPS | TermCriteria.MAX_ITER, 30, 0.1);Imgproc.cornerSubPix(grayImage, imageCorners, new
→˓Size(11, 11), new Size(-1, -1), term);// save the current frame for further elaborationsgrayImage.copyTo(this.savedImage);// show the chessboard inner corners on screenCalib3d.drawChessboardCorners(frame, boardSize,
→˓imageCorners, found);
// enable the option for taking a snapshotthis.snapshotButton.setDisable(false);
}else{
this.snapshotButton.setDisable(true);}
}}
/*** The effective camera calibration, to be performed once in the program
* execution
*/private void calibrateCamera(){
// init needed variables according to OpenCV docsList<Mat> rvecs = new ArrayList<>();List<Mat> tvecs = new ArrayList<>();intrinsic.put(0, 0, 1);intrinsic.put(1, 1, 1);// calibrate!Calib3d.calibrateCamera(objectPoints, imagePoints, savedImage.
→˓size(), intrinsic, distCoeffs, rvecs, tvecs);this.isCalibrated = true;
// you cannot take other snapshot, at this point...this.snapshotButton.setDisable(true);
}
/*** Convert a Mat object (OpenCV) in the corresponding Image for JavaFX
** @param frame
5.9. Source Code 53

OpenCV Java Tutorials Documentation, Release 1.0alpha
* the {@link Mat} representing the current frame
* @return the {@link Image} to show
*/private Image mat2Image(Mat frame){
// create a temporary bufferMatOfByte buffer = new MatOfByte();// encode the frame in the buffer, according to the PNG formatHighgui.imencode(".png", frame, buffer);// build and return an Image created from the image encoded in the// bufferreturn new Image(new ByteArrayInputStream(buffer.toArray()));
}}
• CC_FX.fxml
<BorderPane xmlns:fx="http://javafx.com/fxml/1" fx:controller="application.CC_→˓Controller">
<top><VBox>
<HBox alignment="CENTER" spacing="10"><padding>
<Insets top="10" bottom="10" /></padding><Label text="Boards #" /><TextField fx:id="numBoards" text="20" maxWidth="50" /><Label text="Horizontal corners #" /><TextField fx:id="numHorCorners" text="9" maxWidth="50" /><Label text="Vertical corners #" /><TextField fx:id="numVertCorners" text="6" maxWidth="50" /
→˓><Button fx:id="applyButton" alignment="center" text="Apply
→˓" onAction="#updateSettings" /></HBox><Separator />
</VBox></top><left>
<VBox alignment="CENTER"><padding>
<Insets right="10" left="10" /></padding><ImageView fx:id="originalFrame" />
</VBox></left><right>
<VBox alignment="CENTER"><padding>
<Insets right="10" left="10" /></padding><ImageView fx:id="calibratedFrame" />
</VBox></right><bottom>
<HBox alignment="CENTER"><padding>
<Insets top="25" right="25" bottom="25" left="25" />
54 Chapter 5. Camera Calibration

OpenCV Java Tutorials Documentation, Release 1.0alpha
</padding><Button fx:id="cameraButton" alignment="center" text="Start camera
→˓" onAction="#startCamera" disable="true" /><Button fx:id="snapshotButton" alignment="center" text="Take
→˓snapshot" onAction="#takeSnapshot" disable="true" /></HBox>
</bottom></BorderPane>
5.9. Source Code 55
OpenCV Java Tutorials Documentation, Release 1.0alpha
56 Chapter 5. Camera Calibration

CHAPTER 6
Fourier Transform
Note: We assume that by now you have already read the previous tutorials. If not, please check previous tutori-als at http://polito-java-opencv-tutorials.readthedocs.org/en/latest/index.html. You can also find the source code andresources at https://github.com/java-opencv/Polito-Java-OpenCV-Tutorials-Source-Code
Goal
In this tutorial we are going to create a JavaFX application where we can load a picture from our file system and applyto it the DFT and the inverse DFT.
What is the Fourier Transform?
The Fourier Transform will decompose an image into its sinus and cosines components. In other words, it willtransform an image from its spatial domain to its frequency domain. The result of the transformation is complexnumbers. Displaying this is possible either via a real image and a complex image or via a magnitude and a phaseimage. However, throughout the image processing algorithms only the magnitude image is interesting as this containsall the information we need about the images geometric structure. For this tutorial we are going to use basic gray scaleimage, whose values usually are between zero and 255. Therefore the Fourier Transform too needs to be of a discretetype resulting in a Discrete Fourier Transform (DFT). The DFT is the sampled Fourier Transform and therefore doesnot contain all frequencies forming an image, but only a set of samples which is large enough to fully describe thespatial domain image. The number of frequencies corresponds to the number of pixels in the spatial domain image,i.e. the image in the spatial and Fourier domain are of the same size.
What we will do in this tutorial
In this guide, we will:
57

OpenCV Java Tutorials Documentation, Release 1.0alpha
• Load an image from a file chooser.
• Apply the DFT to the loaded image and show it.
• Apply the iDFT to the transformed image and show it.
Getting Started
Let’s create a new JavaFX project. In Scene Builder set the windows element so that we have a Border Pane with:
• on the LEFT an ImageView to show the loaded picture:
<ImageView fx:id="originalImage" />
• on the RIGHT two ImageViews one over the other to display the DFT and the iDFT;
<ImageView fx:id="transformedImage" /><ImageView fx:id="antitransformedImage" />
• on the BOTTOM three buttons, the first one to load the picture, the second one to apply the DFT and show it,and the last one to apply the anti-transform and show it.
<Button alignment="center" text="Load Image" onAction="#loadImage"/><Button fx:id="transformButton" alignment="center" text="Apply transformation"→˓onAction="#transformImage" disable="true" /><Button fx:id="antitransformButton" alignment="center" text="Apply anti transformation→˓" onAction="#antitransformImage" disable="true" />
The gui will look something like this one:
Load the file
First of all you need to add to your project a folder resources with two files in it. One of them is a sine functionand the other one is a circular aperture. In the Controller file, in order to load the image to our program, we are goingto use a filechooser:
58 Chapter 6. Fourier Transform

OpenCV Java Tutorials Documentation, Release 1.0alpha
private FileChooser fileChooser;
When we click the load button we have to set the initial directory of the FC and open the dialog. The FC will returnthe selected file:
File file = new File("./resources/");this.fileChooser.setInitialDirectory(file);file = this.fileChooser.showOpenDialog(this.main.getStage());
Once we’ve loaded the file we have to make sure that it’s going to be in grayscale and display the image into the imageview:
this.image = Highgui.imread(file.getAbsolutePath(), Highgui.CV_LOAD_IMAGE_GRAYSCALE);this.originalImage.setImage(this.mat2Image(this.image));
Applying the DFT
First of all expand the image to an optimal size. The performance of a DFT is dependent of the image size. Ittends to be the fastest for image sizes that are multiple of the numbers two, three and five. Therefore, to achievemaximal performance it is generally a good idea to pad border values to the image to get a size with such traits. ThegetOptimalDFTSize() returns this optimal size and we can use the copyMakeBorder() function to expandthe borders of an image:
int addPixelRows = Core.getOptimalDFTSize(image.rows());int addPixelCols = Core.getOptimalDFTSize(image.cols());Imgproc.copyMakeBorder(image, padded, 0, addPixelRows - image.rows(), 0, addPixelCols→˓- image.cols(),Imgproc.BORDER_CONSTANT, Scalar.all(0));
The appended pixels are initialized with zero.
The result of the DFT is complex so we have to make place for both the complex and the real values. We store theseusually at least in a float format. Therefore we’ll convert our input image to this type and expand it with anotherchannel to hold the complex values:
padded.convertTo(padded, CvType.CV_32F);this.planes.add(padded);this.planes.add(Mat.zeros(padded.size(), CvType.CV_32F));Core.merge(this.planes, this.complexImage);
Now we can apply the DFT and then get the real and the imaginary part from the complex image:
Core.dft(this.complexImage, this.complexImage);Core.split(complexImage, newPlanes);Core.magnitude(newPlanes.get(0), newPlanes.get(1), mag);
Unfortunately the dynamic range of the Fourier coefficients is too large to be displayed on the screen. To use the grayscale values to for visualization we can transform our linear scale to a logarithmic one:
Core.add(mag, Scalar.all(1), mag);Core.log(mag, mag);
Remember, that at the first step, we expanded the image? Well, it’s time to throw away the newly introduced values.For visualization purposes we may also rearrange the quadrants of the result, so that the origin (zero, zero) correspondswith the image center:
6.6. Applying the DFT 59

OpenCV Java Tutorials Documentation, Release 1.0alpha
image = image.submat(new Rect(0, 0, image.cols() & -2, image.rows() & -2));int cx = image.cols() / 2;int cy = image.rows() / 2;
Mat q0 = new Mat(image, new Rect(0, 0, cx, cy));Mat q1 = new Mat(image, new Rect(cx, 0, cx, cy));Mat q2 = new Mat(image, new Rect(0, cy, cx, cy));Mat q3 = new Mat(image, new Rect(cx, cy, cx, cy));
Mat tmp = new Mat();q0.copyTo(tmp);q3.copyTo(q0);tmp.copyTo(q3);
q1.copyTo(tmp);q2.copyTo(q1);tmp.copyTo(q2);
Now we have to normalize our values by using the normalize() function in order to transform the matrix withfloat values into a viewable image form:
Core.normalize(mag, mag, 0, 255, Core.NORM_MINMAX);
The last step is to show the magnitude image in the ImageView:
this.transformedImage.setImage(this.mat2Image(magnitude));
Applying the iDFT
To apply the inverse DFT we simply use the idft() function, extract the real values from the complex image withthe split() function, and normalize the result with normalize():
Core.idft(this.complexImage, this.complexImage);Mat restoredImage = new Mat();Core.split(this.complexImage, this.planes);Core.normalize(this.planes.get(0), restoredImage, 0, 255, Core.NORM_MINMAX);
Finally we can show the result on the proper ImageView:
this.antitransformedImage.setImage(this.mat2Image(restoredImage));
Analyzing the results
• sinfunction.png
60 Chapter 6. Fourier Transform

OpenCV Java Tutorials Documentation, Release 1.0alpha
The image is a horizontal sine of 4 cycles. Notice that the DFT just has a single component, represented by 2 brightspots symmetrically placed about the center of the DFT image. The center of the image is the origin of the frequencycoordinate system. The x-axis runs left to right through the center and represents the horizontal component of fre-quency. The y-axis runs bottom to top through the center and represents the vertical component of frequency. Thereis a dot at the center that represents the (0,0) frequency term or average value of the image. Images usually havea large average value (like 128) and lots of low frequency information so FT images usually have a bright blob ofcomponents near the center. High frequencies in the horizontal direction will cause bright dots away from the centerin the horizontal direction.
• circle.png
6.8. Analyzing the results 61

OpenCV Java Tutorials Documentation, Release 1.0alpha
In this case we have a circular aperture, and what is the Fourier transform of a circular aperture? The diffraction diskand rings. A large aperture produces a compact transform, instead a small one produces a larger Airy pattern; thus thedisk is greater if aperture is smaller; according to Fourier properties, from the center to the middle of the first dark ringthe distance is (1.22 x N) / d; in this case N is the size of the image, and d is the diameter of the circle. An Airy disk isthe bright center of the diffraction pattern created from a circular aperture ideal optical system; nearly half of the lightis contained in a diameter of 1.02 x lamba x f_number.
Source Code
• FourierTransform.java
public class FourierTransform extends Application {// the main stageprivate Stage primaryStage;
@Overridepublic void start(Stage primaryStage) {
try{
// load the FXML resourceFXMLLoader loader = new FXMLLoader(getClass().getResource("FT_FX.
→˓fxml"));
62 Chapter 6. Fourier Transform

OpenCV Java Tutorials Documentation, Release 1.0alpha
BorderPane root = (BorderPane) loader.load();// set a whitesmoke backgroundroot.setStyle("-fx-background-color: whitesmoke;");Scene scene = new Scene(root, 800, 600);scene.getStylesheets().add(getClass().getResource("application.css
→˓").toExternalForm());// create the stage with the given title and the previously
→˓created scenethis.primaryStage = primaryStage;this.primaryStage.setTitle("Fourier Transform");this.primaryStage.setScene(scene);this.primaryStage.show();
// init the controllerFT_Controller controller = loader.getController();controller.setMainApp(this);controller.init();
}catch(Exception e) {
e.printStackTrace();}
}
/*** Get the main stage
** @return the stage
*/protected Stage getStage(){
return this.primaryStage;}
public static void main(String[] args) {// load the native OpenCV librarySystem.loadLibrary(Core.NATIVE_LIBRARY_NAME);
launch(args);}
}
• FT_Controller.java
public class FT_Controller {// images to show in the view@FXMLprivate ImageView originalImage;@FXMLprivate ImageView transformedImage;@FXMLprivate ImageView antitransformedImage;// a FXML button for performing the transformation@FXMLprivate Button transformButton;// a FXML button for performing the antitransformation@FXMLprivate Button antitransformButton;
6.9. Source Code 63

OpenCV Java Tutorials Documentation, Release 1.0alpha
// the main appprivate FourierTransform main;// the JavaFX file chooserprivate FileChooser fileChooser;// support variablesprivate Mat image;private List<Mat> planes;// the final complex imageprivate Mat complexImage;
/*** Init the needed variables
*/protected void init(){
this.fileChooser = new FileChooser();this.image = new Mat();this.planes = new ArrayList<>();this.complexImage = new Mat();
}
/*** Load an image from disk
*/@FXMLprotected void loadImage(){
// show the open dialog windowFile file = new File("./resources/");this.fileChooser.setInitialDirectory(file);file = this.fileChooser.showOpenDialog(this.main.getStage());if (file != null){
// read the image in gray scalethis.image = Highgui.imread(file.getAbsolutePath(),
→˓Highgui.CV_LOAD_IMAGE_GRAYSCALE);// show the imagethis.originalImage.setImage(this.mat2Image(this.image));// set a fixed widththis.originalImage.setFitWidth(250);// preserve image ratiothis.originalImage.setPreserveRatio(true);// update the UIthis.transformButton.setDisable(false);// empty the image planes if it is not the first image to
→˓be loadedif (!this.planes.isEmpty())
this.planes.clear();}
}
/*** The action triggered by pushing the button for apply the dft to the
* loaded image
*/@FXMLprotected void transformImage(){
64 Chapter 6. Fourier Transform

OpenCV Java Tutorials Documentation, Release 1.0alpha
// optimize the dimension of the loaded imageMat padded = this.optimizeImageDim(this.image);padded.convertTo(padded, CvType.CV_32F);// prepare the image planes to obtain the complex imagethis.planes.add(padded);this.planes.add(Mat.zeros(padded.size(), CvType.CV_32F));// prepare a complex image for performing the dftCore.merge(this.planes, this.complexImage);
// dftCore.dft(this.complexImage, this.complexImage);
// optimize the image resulting from the dft operationMat magnitude = this.createOptimizedMagnitude(this.complexImage);
// show the result of the transformation as an imagethis.transformedImage.setImage(this.mat2Image(magnitude));// set a fixed widththis.transformedImage.setFitWidth(250);// preserve image ratiothis.transformedImage.setPreserveRatio(true);
// enable the button for perform the antitransformationthis.antitransformButton.setDisable(false);
}
/*** Optimize the image dimensions
** @param image
* the {@link Mat} to optimize
* @return the image whose dimensions have been optimized
*/private Mat optimizeImageDim(Mat image){
// initMat padded = new Mat();// get the optimal rows size for dftint addPixelRows = Core.getOptimalDFTSize(image.rows());// get the optimal cols size for dftint addPixelCols = Core.getOptimalDFTSize(image.cols());// apply the optimal cols and rows size to the imageImgproc.copyMakeBorder(image, padded, 0, addPixelRows - image.
→˓rows(), 0, addPixelCols - image.cols(),Imgproc.BORDER_CONSTANT, Scalar.all(0));
return padded;}
/*** Optimize the magnitude of the complex image obtained from the DFT, to
* improve its visualization
** @param complexImage
* the complex image obtained from the DFT
* @return the optimized image
*/private Mat createOptimizedMagnitude(Mat complexImage){
6.9. Source Code 65

OpenCV Java Tutorials Documentation, Release 1.0alpha
// initList<Mat> newPlanes = new ArrayList<>();Mat mag = new Mat();// split the comples image in two planesCore.split(complexImage, newPlanes);// compute the magnitudeCore.magnitude(newPlanes.get(0), newPlanes.get(1), mag);
// move to a logarithmic scaleCore.add(mag, Scalar.all(1), mag);Core.log(mag, mag);// optionally reorder the 4 quadrants of the magnitude imagethis.shiftDFT(mag);// normalize the magnitude image for the visualization since both
→˓JavaFX// and OpenCV need images with value between 0 and 255Core.normalize(mag, mag, 0, 255, Core.NORM_MINMAX);
// you can also write on disk the resulting image...// Highgui.imwrite("../magnitude.png", mag);
return mag;}
/*** Reorder the 4 quadrants of the image representing the magnitude, after
* the DFT
** @param image
* the {@link Mat} object whose quadrants are to reorder
*/private void shiftDFT(Mat image){
image = image.submat(new Rect(0, 0, image.cols() & -2, image.→˓rows() & -2));
int cx = image.cols() / 2;int cy = image.rows() / 2;
Mat q0 = new Mat(image, new Rect(0, 0, cx, cy));Mat q1 = new Mat(image, new Rect(cx, 0, cx, cy));Mat q2 = new Mat(image, new Rect(0, cy, cx, cy));Mat q3 = new Mat(image, new Rect(cx, cy, cx, cy));
Mat tmp = new Mat();q0.copyTo(tmp);q3.copyTo(q0);tmp.copyTo(q3);
q1.copyTo(tmp);q2.copyTo(q1);tmp.copyTo(q2);
}
/*** The action triggered by pushing the button for apply the inverse dft to
* the loaded image
*/@FXML
66 Chapter 6. Fourier Transform

OpenCV Java Tutorials Documentation, Release 1.0alpha
protected void antitransformImage(){
Core.idft(this.complexImage, this.complexImage);
Mat restoredImage = new Mat();Core.split(this.complexImage, this.planes);Core.normalize(this.planes.get(0), restoredImage, 0, 255, Core.
→˓NORM_MINMAX);
this.antitransformedImage.setImage(this.mat2Image(restoredImage));// set a fixed widththis.antitransformedImage.setFitWidth(250);// preserve image ratiothis.antitransformedImage.setPreserveRatio(true);
}
/*** Set the main app (needed for the FileChooser modal window)
** @param mainApp
* the main app
*/public void setMainApp(FourierTransform mainApp){
this.main = mainApp;}
/*** Convert a Mat object (OpenCV) in the corresponding Image for JavaFX
** @param frame
* the {@link Mat} representing the current frame
* @return the {@link Image} to show
*/private Image mat2Image(Mat frame){
// create a temporary bufferMatOfByte buffer = new MatOfByte();// encode the frame in the buffer, according to the PNG formatHighgui.imencode(".png", frame, buffer);// build and return an Image created from the image encoded in the// bufferreturn new Image(new ByteArrayInputStream(buffer.toArray()));
}}
• FT_FX.fxml
<BorderPane xmlns:fx="http://javafx.com/fxml/1" fx:controller="application.FT_→˓Controller">
<left><VBox alignment="CENTER">
<padding><Insets right="10" left="10" />
</padding><ImageView fx:id="originalImage" />
</VBox></left>
6.9. Source Code 67

OpenCV Java Tutorials Documentation, Release 1.0alpha
<right><VBox alignment="CENTER" spacing="10">
<padding><Insets right="10" left="10" />
</padding><ImageView fx:id="transformedImage" /><ImageView fx:id="antitransformedImage" />
</VBox></right><bottom>
<HBox alignment="CENTER" spacing="10"><padding>
<Insets top="25" right="25" bottom="25" left="25" /></padding><Button alignment="center" text="Load Image" onAction="#loadImage
→˓"/><Button fx:id="transformButton" alignment="center" text="Apply
→˓transformation" onAction="#transformImage" disable="true" /><Button fx:id="antitransformButton" alignment="center" text=
→˓"Apply anti transformation" onAction="#antitransformImage" disable="true" /></HBox>
</bottom></BorderPane>
68 Chapter 6. Fourier Transform

CHAPTER 7
Image Segmentation
Note: We assume that by now you have already read the previous tutorials. If not, please check previous tutori-als at http://polito-java-opencv-tutorials.readthedocs.org/en/latest/index.html. You can also find the source code andresources at https://github.com/java-opencv/Polito-Java-OpenCV-Tutorials-Source-Code
Goal
In this tutorial we are going to create a JavaFX application where we can decide to apply to video stream captured fromour web cam either a Canny edge detector or a Background removal using the two basic morphological operations:dilatation and erosion.
Canny edge detector
The Canny edge detector is an edge detection operator that uses a multi-stage algorithm to detect a wide range ofedges in images. It was developed by John F. Canny in 1986.
Canny edge detection is a four step process:
1. A Gaussian blur is applied to clear any speckles and free the image of noise.
2. A gradient operator is applied for obtaining the gradients’ intensity and direction.
3. Non-maximum suppression determines if the pixel is a better candidate for an edge than its neighbors.
4. Hysteresis thresholding finds where edges begin and end.
The Canny algorithm contains a number of adjustable parameters, which can affect the computation time and effectiveness of the algorithm.
69

OpenCV Java Tutorials Documentation, Release 1.0alpha
• The size of the Gaussian filter: the smoothing filter used in the first stage directly affects the results of theCanny algorithm. Smaller filters cause less blurring, and allow detection of small, sharp lines. A largerfilter causes more blurring, smearing out the value of a given pixel over a larger area of the image.
• Thresholds: A threshold set too high can miss important information. On the other hand, a threshold settoo low will falsely identify irrelevant information (such as noise) as important. It is difficult to give ageneric threshold that works well on all images. No tried and tested approach to this problem yet exists.
For our purpose we are going to set the filter size to 3 and the threshold editable by a Slider.
Dilatation and Erosion
Dilation and erosion are the most basic morphological operations. Dilation adds pixels to the boundaries of objects inan image, while erosion removes pixels on object boundaries. The number of pixels added or removed from the objectsin an image depends on the size and shape of the structuring element used to process the image. In the morphologicaldilation and erosion operations, the state of any given pixel in the output image is determined by applying a rule to thecorresponding pixel and its neighbors in the input image. The rule used to process the pixels defines the operation asa dilation or an erosion.
Dilatation: the value of the output pixel is the maximum value of all the pixels in the input pixel’s neighborhood. Ina binary image, if any of the pixels is set to the value 1, the output pixel is set to 1.
Erosion: the value of the output pixel is the minimum value of all the pixels in the input pixel’s neighborhood. In abinary image, if any of the pixels is set to 0, the output pixel is set to 0.
What we will do in this tutorial
In this guide, we will:
• Add a checkbox and a Slider to select and control the Canny edge detector.
• Use the Canny edge function provided by OpenCV.
• Use the Dilatation and erosion functions provided by OpenCV.
• Create a background removal function.
Getting Started
Let’s create a new JavaFX project. In Scene Builder set the windows element so that we have a Border Pane with:
• on TOP a VBox containing two HBox, each one followed by a separator.
• In the first HBox we are goning to need a checkbox and a slider, the first one is to select the Canny e.d. mode andthe second one is going to be used to control the value of the threshold to be passed to the Canny e.d. function.
<CheckBox fx:id="canny" onAction="#cannySelected" text="Edge detection"/><Label text="Canny Threshold" /><Slider fx:id="threshold" disable="true" />
• In the second HBox we need two checkboxes, the first one to select the Backgrond removal mode and the secondone to say if we want to invert the algorithm (a sort of “foreground removal”).
70 Chapter 7. Image Segmentation

OpenCV Java Tutorials Documentation, Release 1.0alpha
<CheckBox fx:id="dilateErode" onAction="#dilateErodeSelected" text=→˓"Background removal"/><CheckBox fx:id="inverse" text="Invert" disable="true"/>
• in the CENTRE we are going to put an ImageView for the web cam stream.
<ImageView fx:id="originalFrame" />
• on the BOTTOM we can add the usual button to start/stop the stream
<Button fx:id="cameraButton" alignment="center" text="Start camera" onAction="→˓#startCamera" disable="true" />
The gui will look something like this one:
Using the Canny edge detection
If we selected the Canny checkbox we can perform the method doCanny.
if (this.canny.isSelected()){frame = this.doCanny(frame);
}
doCanny is a method that we define to execute the edge detection. First, we convert the image into a grayscale oneand blur it with a filter of kernel size 3:
Imgproc.cvtColor(frame, grayImage, Imgproc.COLOR_BGR2GRAY);Imgproc.blur(grayImage, detectedEdges, new Size(3, 3));
Second, we apply the OpenCV function Canny:
Imgproc.Canny(detectedEdges, detectedEdges, this.threshold.getValue(), this.threshold.→˓getValue() * 3, 3, false);
7.6. Using the Canny edge detection 71

OpenCV Java Tutorials Documentation, Release 1.0alpha
where the arguments are:
• detectedEdges: Source image, grayscale
• detectedEdges: Output of the detector (can be the same as the input)
• this.threshold.getValue(): The value entered by the user moving the Slider
• this.threshold.getValue() * 3: Set in the program as three times the lower threshold (follow-ing Canny’s recommendation)
• 3: The size of the Sobel kernel to be used internally
• false: a flag, indicating whether to use a more accurate calculation of the magnitude gradient.
Then we fill a dest image with zeros (meaning the image is completely black).
Mat dest = new Mat();Core.add(dest, Scalar.all(0), dest);
Finally, we will use the function copyTo to map only the areas of the image that are identified as edges (on a blackbackground).
frame.copyTo(dest, detectedEdges);
copyTo copies the src image onto dest. However, it will only copy the pixels in the locations where they havenon-zero values.
Canny Result
Using the Background Removal
If we seletced the background removal checkbox we can perform the method doBackgroundRemoval
else if (this.dilateErode.isSelected()){
frame = this.doBackgroundRemoval(frame);}
72 Chapter 7. Image Segmentation

OpenCV Java Tutorials Documentation, Release 1.0alpha
doBackgroundRemoval is a method that we define to execute the background removal.
Fisrt we need to convert the current frame in HVS:
hsvImg.create(frame.size(), CvType.CV_8U);Imgproc.cvtColor(frame, hsvImg, Imgproc.COLOR_BGR2HSV);Now let's split the three channels of the image:Core.split(hsvImg, hsvPlanes);
Calculate the Hue component mean value:
Imgproc.calcHist(hue, new MatOfInt(0), new Mat(), hist_hue, histSize, new→˓MatOfFloat(0, 179));for (int h = 0; h < 180; h++)
average += (hist_hue.get(h, 0)[0] * h);average = average / hsvImg.size().height / hsvImg.size().width;
If the background is uniform and fills most of the frame, its value should be close to mean just calculated. Then wecan use the mean as the threshold to separate the background from the foreground, depending on the invert chackboxwe need to perform a back(fore)ground removal:
if (this.inverse.isSelected())Imgproc.threshold(hsvPlanes.get(0), thresholdImg, threshValue, 179.0, Imgproc.
→˓THRESH_BINARY_INV);else
Imgproc.threshold(hsvPlanes.get(0), thresholdImg, threshValue, 179.0, Imgproc.→˓THRESH_BINARY);
Now we apply a low pass filter (blur) with a 5x5 kernel mask to enhance the result:
Imgproc.blur(thresholdImg, thresholdImg, new Size(5, 5));
Finally apply the dilatation then the erosion (closing) to the image:
Imgproc.dilate(thresholdImg, thresholdImg, new Mat(), new Point(-1, 1), 6);Imgproc.erode(thresholdImg, thresholdImg, new Mat(), new Point(-1, 1), 6);
The functions take these parameters:
• thresholdImg input image;
• thresholdImg output image of the same size and type as thresholdImg;
• new Mat() a kernel;
• new Point(-1, 1) position of the anchor within the element; default value ( -1, 1 ) means that theanchor is at the element center.
• 6 number of times the operation is applied.
After the closing we need to do a new binary threshold:
Imgproc.threshold(thresholdImg, thresholdImg, threshValue, 179.0, Imgproc.THRESH_→˓BINARY);
At last, we can apply the image we’ve just obtained as a mask to the original frame:
Mat foreground = new Mat(frame.size(), CvType.CV_8UC3, new Scalar(255, 255, 255));frame.copyTo(foreground, thresholdImg);
7.8. Using the Background Removal 73

OpenCV Java Tutorials Documentation, Release 1.0alpha
Background Removal Result
Source Code
• ImageSegmentation.java
public class ImageSegmentation extends Application {@Overridepublic void start(Stage primaryStage){
try{
// load the FXML resourceBorderPane root = (BorderPane) FXMLLoader.load(getClass().
→˓getResource("IS_FX.fxml"));// set a whitesmoke backgroundroot.setStyle("-fx-background-color: whitesmoke;");// create and style a sceneScene scene = new Scene(root, 800, 600);scene.getStylesheets().add(getClass().getResource("application.css
→˓").toExternalForm());
74 Chapter 7. Image Segmentation

OpenCV Java Tutorials Documentation, Release 1.0alpha
// create the stage with the given title and the previously→˓created
// sceneprimaryStage.setTitle("Image Segmentation");primaryStage.setScene(scene);// show the GUIprimaryStage.show();
}catch (Exception e){
e.printStackTrace();}
}
public static void main(String[] args){
// load the native OpenCV librarySystem.loadLibrary(Core.NATIVE_LIBRARY_NAME);
launch(args);}
}
• IS_Controller.java
public class IS_Controller {
// FXML buttons@FXMLprivate Button cameraButton;// the FXML area for showing the current frame@FXMLprivate ImageView originalFrame;// checkbox for enabling/disabling Canny@FXMLprivate CheckBox canny;// canny threshold value@FXMLprivate Slider threshold;// checkbox for enabling/disabling background removal@FXMLprivate CheckBox dilateErode;// inverse the threshold value for background removal@FXMLprivate CheckBox inverse;
// a timer for acquiring the video streamprivate Timer timer;// the OpenCV object that performs the video captureprivate VideoCapture capture = new VideoCapture();// a flag to change the button behaviorprivate boolean cameraActive;private Image CamStream;
/*** The action triggered by pushing the button on the GUI
*/@FXML
7.10. Source Code 75

OpenCV Java Tutorials Documentation, Release 1.0alpha
protected void startCamera(){
if (!this.cameraActive){
// disable setting checkboxesthis.canny.setDisable(true);this.dilateErode.setDisable(true);
// start the video capturethis.capture.open(0);
// is the video stream available?if (this.capture.isOpened()){
this.cameraActive = true;
// grab a frame every 33 ms (30 frames/sec)TimerTask frameGrabber = new TimerTask() {
@Overridepublic void run(){
CamStream = grabFrame();Platform.runLater(new Runnable() {
@Overridepublic void run() {
// show the original→˓frames
originalFrame.→˓setImage(CamStream);
// set fixed widthoriginalFrame.
→˓setFitWidth(600);// preserve image ratiooriginalFrame.
→˓setPreserveRatio(true);
}});
}};this.timer = new Timer();this.timer.schedule(frameGrabber, 0, 33);
// update the button contentthis.cameraButton.setText("Stop Camera");
}else{
// log the errorSystem.err.println("Failed to open the camera connection..
→˓.");}
}else{
// the camera is not active at this pointthis.cameraActive = false;
76 Chapter 7. Image Segmentation

OpenCV Java Tutorials Documentation, Release 1.0alpha
// update again the button contentthis.cameraButton.setText("Start Camera");// enable setting checkboxesthis.canny.setDisable(false);this.dilateErode.setDisable(false);
// stop the timerif (this.timer != null){
this.timer.cancel();this.timer = null;
}// release the camerathis.capture.release();// clean the image areaoriginalFrame.setImage(null);
}}
/*** Get a frame from the opened video stream (if any)
** @return the {@link Image} to show
*/private Image grabFrame(){
// init everythingImage imageToShow = null;Mat frame = new Mat();
// check if the capture is openif (this.capture.isOpened()){
try{
// read the current framethis.capture.read(frame);
// if the frame is not empty, process itif (!frame.empty()){
// handle edge detectionif (this.canny.isSelected()){
frame = this.doCanny(frame);}// foreground detectionelse if (this.dilateErode.isSelected()){
frame = this.doBackgroundRemoval(frame);}
// convert the Mat object (OpenCV) to Image→˓(JavaFX)
imageToShow = mat2Image(frame);}
}
7.10. Source Code 77

OpenCV Java Tutorials Documentation, Release 1.0alpha
catch (Exception e){
// log the (full) errorSystem.err.print("ERROR");e.printStackTrace();
}}
return imageToShow;}
/*** Perform the operations needed for removing a uniform background
** @param frame
* the current frame
* @return an image with only foreground objects
*/private Mat doBackgroundRemoval(Mat frame){
// initMat hsvImg = new Mat();List<Mat> hsvPlanes = new ArrayList<>();Mat thresholdImg = new Mat();
// threshold the image with the histogram average valuehsvImg.create(frame.size(), CvType.CV_8U);Imgproc.cvtColor(frame, hsvImg, Imgproc.COLOR_BGR2HSV);Core.split(hsvImg, hsvPlanes);
double threshValue = this.getHistAverage(hsvImg, hsvPlanes.get(0));
if (this.inverse.isSelected())Imgproc.threshold(hsvPlanes.get(0), thresholdImg, threshValue,
→˓179.0, Imgproc.THRESH_BINARY_INV);else
Imgproc.threshold(hsvPlanes.get(0), thresholdImg, threshValue,→˓179.0, Imgproc.THRESH_BINARY);
Imgproc.blur(thresholdImg, thresholdImg, new Size(5, 5));
// dilate to fill gaps, erode to smooth edgesImgproc.dilate(thresholdImg, thresholdImg, new Mat(), new Point(-1, 1),
→˓6);Imgproc.erode(thresholdImg, thresholdImg, new Mat(), new Point(-1, 1), 6);
Imgproc.threshold(thresholdImg, thresholdImg, threshValue, 179.0, Imgproc.→˓THRESH_BINARY);
// create the new imageMat foreground = new Mat(frame.size(), CvType.CV_8UC3, new Scalar(255,
→˓255, 255));frame.copyTo(foreground, thresholdImg);
return foreground;}
/**
78 Chapter 7. Image Segmentation

OpenCV Java Tutorials Documentation, Release 1.0alpha
* Get the average value of the histogram representing the image Hue
* component
** @param hsvImg
* the current frame in HSV
* @param hueValues
* the Hue component of the current frame
* @return the average value
*/private double getHistAverage(Mat hsvImg, Mat hueValues){
// initdouble average = 0.0;Mat hist_hue = new Mat();MatOfInt histSize = new MatOfInt(180);List<Mat> hue = new ArrayList<>();hue.add(hueValues);
// compute the histogramImgproc.calcHist(hue, new MatOfInt(0), new Mat(), hist_hue, histSize, new
→˓MatOfFloat(0, 179));
// get the average for each binfor (int h = 0; h < 180; h++){
average += (hist_hue.get(h, 0)[0] * h);}
return average = average / hsvImg.size().height / hsvImg.size().width;}
/*** Apply Canny
** @param frame
* the current frame
* @return an image elaborated with Canny
*/private Mat doCanny(Mat frame){
// initMat grayImage = new Mat();Mat detectedEdges = new Mat();
// convert to grayscaleImgproc.cvtColor(frame, grayImage, Imgproc.COLOR_BGR2GRAY);
// reduce noise with a 3x3 kernelImgproc.blur(grayImage, detectedEdges, new Size(3, 3));
// canny detector, with ratio of lower:upper threshold of 3:1Imgproc.Canny(detectedEdges, detectedEdges, this.threshold.getValue(),
→˓this.threshold.getValue() * 3, 3, false);
// using Canny's output as a mask, display the resultMat dest = new Mat();Core.add(dest, Scalar.all(0), dest);frame.copyTo(dest, detectedEdges);
7.10. Source Code 79

OpenCV Java Tutorials Documentation, Release 1.0alpha
return dest;}
/*** Action triggered when the Canny checkbox is selected
**/
@FXMLprotected void cannySelected(){
// check whether the other checkbox is selected and deselect itif (this.dilateErode.isSelected()){
this.dilateErode.setSelected(false);this.inverse.setDisable(true);
}
// enable the threshold sliderif (this.canny.isSelected())
this.threshold.setDisable(false);else
this.threshold.setDisable(true);
// now the capture can startthis.cameraButton.setDisable(false);
}
/*** Action triggered when the "background removal" checkbox is selected
*/@FXMLprotected void dilateErodeSelected(){
// check whether the canny checkbox is selected, deselect it and disable// its sliderif (this.canny.isSelected()){
this.canny.setSelected(false);this.threshold.setDisable(true);
}
if(this.dilateErode.isSelected())this.inverse.setDisable(false);
elsethis.inverse.setDisable(true);
// now the capture can startthis.cameraButton.setDisable(false);
}
/*** Convert a Mat object (OpenCV) in the corresponding Image for JavaFX
** @param frame
* the {@link Mat} representing the current frame
* @return the {@link Image} to show
*/
80 Chapter 7. Image Segmentation

OpenCV Java Tutorials Documentation, Release 1.0alpha
private Image mat2Image(Mat frame){
// create a temporary bufferMatOfByte buffer = new MatOfByte();// encode the frame in the buffer, according to the PNG formatHighgui.imencode(".png", frame, buffer);// build and return an Image created from the image encoded in the// bufferreturn new Image(new ByteArrayInputStream(buffer.toArray()));
}
}
• IS_FX.fxml
<BorderPane xmlns:fx="http://javafx.com/fxml/1" fx:controller="application.IS_→˓Controller">
<top><VBox>
<HBox alignment="CENTER" spacing="10"><padding>
<Insets top="10" bottom="10" /></padding><CheckBox fx:id="canny" onAction="#cannySelected" text=
→˓"Edge detection"/><Label text="Canny Threshold" /><Slider fx:id="threshold" disable="true" />
</HBox><Separator /><HBox alignment="CENTER" spacing="10">
<padding><Insets top="10" bottom="10" />
</padding><CheckBox fx:id="dilateErode" onAction="
→˓#dilateErodeSelected" text="Background removal"/><CheckBox fx:id="inverse" text="Invert" disable="true"/>
</HBox><Separator />
</VBox></top><center>
<VBox alignment="CENTER"><padding>
<Insets right="10" left="10" /></padding><ImageView fx:id="originalFrame" />
</VBox></center><bottom>
<HBox alignment="CENTER"><padding>
<Insets top="25" right="25" bottom="25" left="25" /></padding><Button fx:id="cameraButton" alignment="center" text="Start camera
→˓" onAction="#startCamera" disable="true" /></HBox>
</bottom></BorderPane>
7.10. Source Code 81

OpenCV Java Tutorials Documentation, Release 1.0alpha
82 Chapter 7. Image Segmentation

CHAPTER 8
Face Recognition and Tracking
Note: We assume that by now you have already read the previous tutorials. If not, please check previous tutori-als at http://polito-java-opencv-tutorials.readthedocs.org/en/latest/index.html. You can also find the source code andresources at https://github.com/java-opencv/Polito-Java-OpenCV-Tutorials-Source-Code
Goal
In this tutorial we are going to use well-known classifiers that have been already trained and distributed by OpenCVin order to detect and track a moving face into a video stream.
Cascade Classifiers
The object recognition process (in our case, faces) is usually efficient if it is based on the features take-over whichinclude additional information about the object class to be taken-over. In this tutorial we are going to use the Haar-likefeatures and the Local Binary Patterns (LBP) in order to encode the contrasts highlighted by the human face and itsspatial relations with the other objects present in the picture. Usually these features are extracted using a CascadeClassifier which has to be trained in order to recognize with precision different objects: the faces’ classification isgoing to be much different from the car’s classification.
What we will do in this tutorial
In this guide, we will:
• Insert a checkbox to select the Haar Classifier, detect and track a face, and draw a green rectangle aroundthe detected face.
83

OpenCV Java Tutorials Documentation, Release 1.0alpha
• Inesrt a checkbox to select the LBP Classifier, detect and track a face, and draw a green rectangle aroundthe detected face.
Getting Started
Let’s create a new JavaFX project. In Scene Builder set the windows element so that we have a Border Pane with:
• on TOP a VBox a HBox and a separator. In the HBox we are goning to need two checkboxes, the first one is toselect the Haar Classifier and the second one is to select the LBP Classifier.
<CheckBox fx:id="haarClassifier" onAction="#haarSelected" text="Haar→˓Classifier"/><CheckBox fx:id="lbpClassifier" onAction="#lbpSelected" text="LBP→˓Classifier"/>
• in the CENTRE we are going to put an ImageView for the web cam stream.
<ImageView fx:id="originalFrame" />
• on the BOTTOM we can add the usual button to start/stop the stream
<Button fx:id="cameraButton" alignment="center" text="Start camera"→˓onAction="#startCamera" disable="true" />
The gui will look something like this one:
Loading the Classifiers
First of all we need to add a folder resource to our project and put the classifiers in it. In order to use the classifierswe need to load them from the resource folder, so every time that we check one of the two checkboxes we will loadthe correct classifier. To do so, let’s implement the OnAction methods we already declared before:
• haarSelected inside this method we are going to load the disired Haar Classifier (e.g.haarcascade_frontalface.xml) as follows:
84 Chapter 8. Face Recognition and Tracking

OpenCV Java Tutorials Documentation, Release 1.0alpha
this.checkboxSelection("resources/lbpcascades/lbpcascade_frontalface_alt.xml→˓");...private void checkboxSelection(String... classifierPath){
// load the classifier(s)for (String xmlClassifier : classifierPath){
this.faceCascade.load(xmlClassifier);}
// now the capture can startthis.cameraButton.setDisable(false);
}
• lbpSelected for the LPB we can use the same method and change the path of the classifier to be loaded:
this.checkboxSelection("resources/lbpcascades/lbpcascade_frontalface.xml");
Detection and Tracking
Once we’ve loaded the classifiers we are ready to start the detection; we are going to implement the detection in thedetectAndDisplay method. First of all we need to convert the frame in grayscale and equalize the histogram toimprove the results:
Imgproc.cvtColor(frame, grayFrame, Imgproc.COLOR_BGR2GRAY);Imgproc.equalizeHist(grayFrame, grayFrame);
Then we have to set the minimum size of the face to be detected (this required is need in the actual detection function).Let’s set the minimum size as the 20% of the frame hieght:
if (this.absoluteFaceSize == 0){
int height = grayFrame.rows();if (Math.round(height * 0.2f) > 0){
this.absoluteFaceSize = Math.round(height * 0.2f);}
}
Now we can start the detection:
this.faceCascade.detectMultiScale(grayFrame, faces, 1.1, 2, 0 | Objdetect.CASCADE_→˓SCALE_IMAGE, new Size(this.absoluteFaceSize, this.absoluteFaceSize), new Size());
The detectMultiScale function detects objects of different sizes in the input image. The detected objects arereturned as a list of rectangles. The parameters are:
• image Matrix of the type CV_8U containing an image where objects are detected.
• objects Vector of rectangles where each rectangle contains the detected object.
• scaleFactor Parameter specifying how much the image size is reduced at each image scale.
• minNeighbors Parameter specifying how many neighbors each candidate rectangle should have to retain it.
8.6. Detection and Tracking 85

OpenCV Java Tutorials Documentation, Release 1.0alpha
• flags Parameter with the same meaning for an old cascade as in the function cvHaarDetectObjects. It is not usedfor a new cascade.
• minSize Minimum possible object size. Objects smaller than that are ignored.
• maxSize Maximum possible object size. Objects larger than that are ignored.
So the result of the detection is going to be in the objects parameter or in our case faces.
Let’s put this result in an array of Rects and draw them on the frame, by doing so we can display the detected face are:
Rect[] facesArray = faces.toArray();for (int i = 0; i < facesArray.length; i++)
Core.rectangle(frame, facesArray[i].tl(), facesArray[i].br(), new Scalar(0, 255,→˓0, 255), 3);
As you can see we selected the color green with a trasparent background: Scalar(0, 255, 0, 255). .tl()and .br() stand for top-left and bottom-right and they represents the two opposite vertexes. The last parameter justset the thickness of the rectangle’s border.
The tracking part can be implemented by calling the detectAndDisplay method for each frame.
86 Chapter 8. Face Recognition and Tracking

OpenCV Java Tutorials Documentation, Release 1.0alpha
Source Code
• FaceDetection.java
public class FaceDetection extends Application {@Overridepublic void start(Stage primaryStage){
try{
// load the FXML resourceFXMLLoader loader = new FXMLLoader(getClass().getResource("FD_FX.
→˓fxml"));BorderPane root = (BorderPane) loader.load();// set a whitesmoke backgroundroot.setStyle("-fx-background-color: whitesmoke;");// create and style a sceneScene scene = new Scene(root, 800, 600);scene.getStylesheets().add(getClass().getResource("application.css
→˓").toExternalForm());// create the stage with the given title and the previously
→˓created
8.7. Source Code 87

OpenCV Java Tutorials Documentation, Release 1.0alpha
// sceneprimaryStage.setTitle("Face Detection");primaryStage.setScene(scene);// show the GUIprimaryStage.show();
// init the controllerFD_Controller controller = loader.getController();controller.init();
}catch (Exception e){
e.printStackTrace();}
}
public static void main(String[] args){
// load the native OpenCV librarySystem.loadLibrary(Core.NATIVE_LIBRARY_NAME);
launch(args);}
}
• FD_Controller.java <https://github.com/java-opencv/Polito-Java-OpenCV-Tutorials-Source-Code/blob/master/Face%20Detection/src/application/FD_Controller.java>
public class FD_Controller {// FXML buttons@FXMLprivate Button cameraButton;// the FXML area for showing the current frame@FXMLprivate ImageView originalFrame;// checkbox for selecting the Haar Classifier@FXMLprivate CheckBox haarClassifier;// checkbox for selecting the LBP Classifier@FXMLprivate CheckBox lbpClassifier;
// a timer for acquiring the video streamprivate Timer timer;// the OpenCV object that performs the video captureprivate VideoCapture capture;// a flag to change the button behaviorprivate boolean cameraActive;// the face cascade classifier objectprivate CascadeClassifier faceCascade;// minimum face sizeprivate int absoluteFaceSize;private Image CamStream;
/*** Init the controller variables
*/protected void init()
88 Chapter 8. Face Recognition and Tracking

OpenCV Java Tutorials Documentation, Release 1.0alpha
{this.capture = new VideoCapture();this.faceCascade = new CascadeClassifier();this.absoluteFaceSize = 0;
}
/*** The action triggered by pushing the button on the GUI
*/@FXMLprotected void startCamera(){
if (!this.cameraActive){
// disable setting checkboxesthis.haarClassifier.setDisable(true);this.lbpClassifier.setDisable(true);
// start the video capturethis.capture.open(0);
// is the video stream available?if (this.capture.isOpened()){
this.cameraActive = true;
// grab a frame every 33 ms (30 frames/sec)TimerTask frameGrabber = new TimerTask() {
@Overridepublic void run(){
CamStream = grabFrame();Platform.runLater(new Runnable() {
@Overridepublic void run() {
// show the original→˓frames
originalFrame.→˓setImage(CamStream);
// set fixed widthoriginalFrame.
→˓setFitWidth(600);// preserve image ratiooriginalFrame.
→˓setPreserveRatio(true);
}});
}};this.timer = new Timer();this.timer.schedule(frameGrabber, 0, 33);
// update the button contentthis.cameraButton.setText("Stop Camera");
}else
8.7. Source Code 89

OpenCV Java Tutorials Documentation, Release 1.0alpha
{// log the errorSystem.err.println("Failed to open the camera connection..
→˓.");}
}else{
// the camera is not active at this pointthis.cameraActive = false;// update again the button contentthis.cameraButton.setText("Start Camera");// enable setting checkboxesthis.haarClassifier.setDisable(false);this.lbpClassifier.setDisable(false);
// stop the timerif (this.timer != null){
this.timer.cancel();this.timer = null;
}// release the camerathis.capture.release();// clean the image areaoriginalFrame.setImage(null);
}}
/*** Get a frame from the opened video stream (if any)
** @return the {@link Image} to show
*/private Image grabFrame(){
// init everythingImage imageToShow = null;Mat frame = new Mat();
// check if the capture is openif (this.capture.isOpened()){
try{
// read the current framethis.capture.read(frame);
// if the frame is not empty, process itif (!frame.empty()){
// face detectionthis.detectAndDisplay(frame);
// convert the Mat object (OpenCV) to Image→˓(JavaFX)
imageToShow = mat2Image(frame);}
90 Chapter 8. Face Recognition and Tracking

OpenCV Java Tutorials Documentation, Release 1.0alpha
}catch (Exception e){
// log the (full) errorSystem.err.print("ERROR");e.printStackTrace();
}}
return imageToShow;}
/*** Perform face detection and show a rectangle around the detected face.
** @param frame
* the current frame
*/private void detectAndDisplay(Mat frame){
// initMatOfRect faces = new MatOfRect();Mat grayFrame = new Mat();
// convert the frame in gray scaleImgproc.cvtColor(frame, grayFrame, Imgproc.COLOR_BGR2GRAY);// equalize the frame histogram to improve the resultImgproc.equalizeHist(grayFrame, grayFrame);
// compute minimum face size (20% of the frame height)if (this.absoluteFaceSize == 0){
int height = grayFrame.rows();if (Math.round(height * 0.2f) > 0){
this.absoluteFaceSize = Math.round(height * 0.2f);}
}
// detect facesthis.faceCascade.detectMultiScale(grayFrame, faces, 1.1, 2, 0 | Objdetect.
→˓CASCADE_SCALE_IMAGE, new Size(this.absoluteFaceSize, this.absoluteFaceSize), new
→˓Size());
// each rectangle in faces is a faceRect[] facesArray = faces.toArray();for (int i = 0; i < facesArray.length; i++)
Core.rectangle(frame, facesArray[i].tl(), facesArray[i].br(), new→˓Scalar(0, 255, 0, 255), 3);
}
/*** When the Haar checkbox is selected, deselect the other one and load the
* proper XML classifier
*
8.7. Source Code 91

OpenCV Java Tutorials Documentation, Release 1.0alpha
*/@FXMLprotected void haarSelected(){
// check whether the lpb checkbox is selected and deselect itif (this.lbpClassifier.isSelected())
this.lbpClassifier.setSelected(false);
this.checkboxSelection("resources/haarcascades/haarcascade_frontalface_→˓alt.xml");
}
/***When the LBP checkbox is selected, deselect the other one and load the
* proper XML classifier
*/@FXMLprotected void lbpSelected(){
// check whether the haar checkbox is selected and deselect itif (this.haarClassifier.isSelected())
this.haarClassifier.setSelected(false);
this.checkboxSelection("resources/lbpcascades/lbpcascade_frontalface.xml→˓");
}
/*** Common operation for both checkbox selections
** @param classifierPath
* the absolute path where the XML file representing a training
* set for a classifier is present
*/private void checkboxSelection(String... classifierPath){
// load the classifier(s)for (String xmlClassifier : classifierPath){
this.faceCascade.load(xmlClassifier);}
// now the capture can startthis.cameraButton.setDisable(false);
}
/*** Convert a Mat object (OpenCV) in the corresponding Image for JavaFX
** @param frame
* the {@link Mat} representing the current frame
* @return the {@link Image} to show
*/private Image mat2Image(Mat frame){
// create a temporary bufferMatOfByte buffer = new MatOfByte();
92 Chapter 8. Face Recognition and Tracking

OpenCV Java Tutorials Documentation, Release 1.0alpha
// encode the frame in the buffer, according to the PNG formatHighgui.imencode(".png", frame, buffer);// build and return an Image created from the image encoded in the// bufferreturn new Image(new ByteArrayInputStream(buffer.toArray()));
}}
• FD_FX.fxml
<BorderPane xmlns:fx="http://javafx.com/fxml/1" fx:controller="application.FD_→˓Controller">
<top><VBox>
<HBox alignment="CENTER" spacing="10"><padding>
<Insets top="10" bottom="10" /></padding><CheckBox fx:id="haarClassifier" onAction="#haarSelected"
→˓text="Haar Classifier"/><CheckBox fx:id="lbpClassifier" onAction="#lbpSelected"
→˓text="LBP Classifier"/></HBox><Separator />
</VBox></top><center>
<VBox alignment="CENTER"><padding>
<Insets right="10" left="10" /></padding><ImageView fx:id="originalFrame" />
</VBox></center><bottom>
<HBox alignment="CENTER"><padding>
<Insets top="25" right="25" bottom="25" left="25" /></padding><Button fx:id="cameraButton" alignment="center" text="Start camera
→˓" onAction="#startCamera" disable="true" /></HBox>
</bottom></BorderPane>
8.7. Source Code 93

OpenCV Java Tutorials Documentation, Release 1.0alpha
94 Chapter 8. Face Recognition and Tracking

CHAPTER 9
Indices and tables
• genindex
• modindex
• search
95