openstack cloud computing cookbook - packt publishing · openstack cloud computing cookbook ....
TRANSCRIPT
OpenStack Cloud Computing Cookbook
Second Edition
Kevin Jackson
Cody Bunch
Chapter No. 1
"Keystone OpenStack Identity Service"
In this package, you will find: A Biography of the author of the book
A preview chapter from the book, Chapter NO.1 "Keystone OpenStack Identity Service"
A synopsis of the book’s content
Information on where to buy this book
About the Author Kevin Jackson is married with three children. He is an experienced IT professional
working with small businesses to online enterprises. He has extensive experience of
various flavors of Linux and Unix. He works from home in Southport, UK, specializing
in OpenStack for Rackspace covering the International market for the Big Cloud
Solutions team. He can be found on . He also authored
the first edition of OpenStack Cloud Computing Cookbook, Packt Publishing.
I'd like to dedicate this book to my mum and dad who have had to deal
with a tough six months, and thank my wife, Charlene, for her
continued support through this second edition—it has been a bigger
piece of work than expected! I extend a special thank you as well to my
co-author, Cody Bunch, for helping the continued success of this book,
and the immense work the tech editors have done. I also want to thank
some great people in Rackspace and the OpenStack community that
always help keep things moving in the right direction: Florian Otel, Atul
Jha, Niki Acosta, Scott Sanchez, Jim Curry, as well as the folk at the
OpenStack Foundation—and a whole host of other people I've had the
pleasure to cross paths with—especially those that have helped me with
any issues such as Endre Karlson.
For More Information: www.packtpub.com/openstack-cloud-computing-cookbook-second-
edition/book
Cody Bunch is a Private Cloud Architect with Rackspace Hosting. He has been in the IT
industry for the last 15 years, during which time he's worked on SaaS, VoIP,
Virtualization, and now Cloud systems. He is the author of Automating vSphere 5 with
vCenter Orchestrator on VMware press. He also hosts a weekly OpenStack podcast
called the #vBrownBags, as well as blogs OpenStack related tips and tricks on
. He can also be found on twitter as
First and foremost, I would like to thank my wife, who after tolerating
me while I wrote the first book said "never again". As I told her about
the contract for this book, she greeted it with a smile, and continues to
be my first and best support.
I'd also like to thank Kevin for the opportunity to work on this edition
of the manuscript, even if I did sort of push him into it. I've learned an
awful lot about OpenStack and Open Source in general during the
writing that otherwise would not have happened.
Additionally, I'd be amiss if I didn't that my employer, Rackspace, for
granting me the time and flexibility needed to get this into the hands of
the community.
Finally, this is where I thank my parents, educators, and the small army
of folks who made the book possible.
For More Information: www.packtpub.com/openstack-cloud-computing-cookbook-second-
edition/book
OpenStack Cloud Computing Cookbook
Second Edition OpenStack is open source software for building public and private clouds. It is now a
global success and, is developed and supported by thousands of people around the
globe and backed by leading players in the cloud space today. This book is specifically
designed to quickly help you get up to speed with OpenStack and give you the
confidence and understanding to roll it out into your own datacenters. From test
installations of OpenStack running under VirtualBox to automated installation recipes
with Razor and Chef that help you scale out production environments, this book covers
a wide range of topics that help you install and configure a private cloud. This book
will show you:
► How to install and configure all the core components of OpenStack to run an
environment that can be managed and operated just like Rackspace, HP Cloud
Services, and other cloud environments
► How to master the complete private cloud stack, from scaling out Compute
resources to managing object storage services for highly redundant, highly
available storage
► Practical, real-world examples of each service built upon in each chapter,
allowing you to progress with the confidence that they will work in your
own environments
The OpenStack Cloud Computing Cookbook, Second Edition gives you clear, step-by-
step instructions to install and run your own private cloud successfully. It is full of
practical and applicable recipes that enable you to use the latest capabilities of OpenStack
and implement them.
What This Book Covers Chapter 1, Keystone OpenStack Identity Service, takes you through installation and
configuration of Keystone, which underpins all of the other OpenStack services.
Chapter 2, Starting OpenStack Image Service, teaches you how to install, configure, and
use the image service for use within an OpenStack environment.
Chapter 3, Starting OpenStack Compute, teaches you how to set up and use OpenStack
Compute with examples to get you started by running within a VirtualBox environment.
For More Information: www.packtpub.com/openstack-cloud-computing-cookbook-second-
edition/book
Chapter 4, Installing OpenStack Storage, teaches you how to configure and use
OpenStack Object Storage with examples showing this service running within a
VirtualBox environment.
Chapter 5, Using OpenStack Object Storage, teaches you how to use the storage service
for storing and retrieving fi les and objects.
Chapter 6, Administering OpenStack Object Storage, takes you through how to use tools
and techniques that can be used for running OpenStack Storage within datacenters.
Chapter 7, Starting OpenStack Block Storage, teaches you how to install and configure
the persistent block storage service for use by instances running in an OpenStack
Compute environment.
Chapter 8, OpenStack Networking, helps you install and configure OpenStack
Networking including Nova Network and Neutron.
Chapter 9, Using OpenStack Dashboard, teaches you how to install and use the Web
user interface to perform tasks such as creating users, modifying security groups, and
launching instances.
Chapter 10, Automating OpenStack Installations, takes you through setting up Razor and
Chef for installing OpenStack.
Chapter 11, Highly Available OpenStack, introduces you to tools and techniques for
making OpenStack services resilient and highly available.
Chapter 12, Troubleshooting, takes you through an understanding of the logs and where
to get help, when encountering issues while running an OpenStack environment.
Chapter 13, Monitoring, shows you how to install and configure various open source
tools for monitoring an OpenStack installation.
For More Information: www.packtpub.com/openstack-cloud-computing-cookbook-second-
edition/book
1Keystone OpenStack
Identity Service
In this chapter, we will cover:
Creating a sandbox environment using VirtualBox and Vagrant
Confi guring Ubuntu Cloud archive
Installing OpenStack Identity service
Creating tenants
Confi guring roles
Adding users
Defi ning service endpoints
Creating the service tenant and service users
IntroductionThe OpenStack Identity service, known as Keystone, provides services for authenticating and managing user accounts and role information for our OpenStack cloud environment. It is a crucial service that underpins the authentication and verifi cation between all of our OpenStack cloud services and is the fi rst service that needs to be installed within an OpenStack environment. Authentication with OpenStack Identity service sends back an authorization token that is passed between the services, once validated. This token is subsequently used as your authentication and verifi cation that you can proceed to use that service, such as OpenStack Storage and Compute. As such, confi guration of the OpenStack Identity service must be done fi rst and consists of creating appropriate roles for users and services, tenants, the user accounts, and the service API endpoints that make up our cloud infrastructure.
For More Information: www.packtpub.com/openstack-cloud-computing-cookbook-second-
edition/book
Keystone OpenStack Identity Service
6
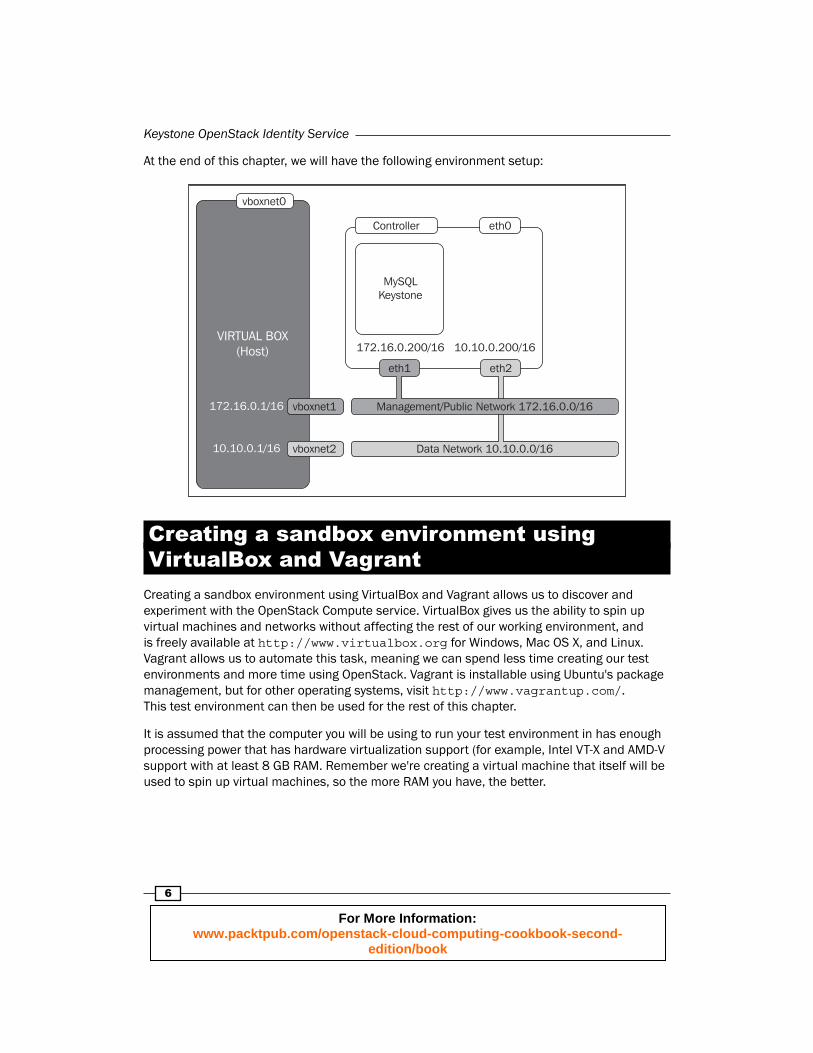
At the end of this chapter, we will have the following environment setup:
vboxnet0
eth0
172.16.0.200/16 10.10.0.200/16VIRTUAL BOX
(Host)
172.16.0.1/16
10.10.0.1/16
vboxnet1
vboxnet2
Controller
MySQLKeystone
eth1 eth2
Management/Public Network 172.16.0.0/16
Data Network 10.10.0.0/16
Creating a sandbox environment using VirtualBox and Vagrant
Creating a sandbox environment using VirtualBox and Vagrant allows us to discover and experiment with the OpenStack Compute service. VirtualBox gives us the ability to spin up virtual machines and networks without affecting the rest of our working environment, and is freely available at http://www.virtualbox.org for Windows, Mac OS X, and Linux. Vagrant allows us to automate this task, meaning we can spend less time creating our test environments and more time using OpenStack. Vagrant is installable using Ubuntu's package management, but for other operating systems, visit http://www.vagrantup.com/. This test environment can then be used for the rest of this chapter.
It is assumed that the computer you will be using to run your test environment in has enough processing power that has hardware virtualization support (for example, Intel VT-X and AMD-V support with at least 8 GB RAM. Remember we're creating a virtual machine that itself will be used to spin up virtual machines, so the more RAM you have, the better.
For More Information: www.packtpub.com/openstack-cloud-computing-cookbook-second-
edition/book
Chapter 1
7
Getting readyTo begin with, we must download VirtualBox from http://www.virtualbox.org/ and then follow the installation procedure once this has been downloaded.
We also need to download and install Vagrant, which will be covered in the later part.
The steps throughout the book assume the underlying operating system that will be used to install OpenStack on will be Ubuntu 12.04 LTS release. We don't need to download a Ubuntu 12.04 ISO as we use our Vagrant environment do this for us.
How to do it...To create our sandbox environment within VirtualBox, we will use Vagrant to defi ne a single virtual machine that allows us to run all of the OpenStack Compute services required to run cloud instances. This virtual machine, that we will refer to as the OpenStack Controller, will be confi gured with at least 2 GB RAM and 20 GB of hard drive space and have three network interfaces. Vagrant automatically sets up an interface on our virtual machine, that is, NAT (Network Address Translate), which allows our virtual machine to connect to the network outside of VirtualBox to download packages. This NAT interface is not mentioned in our Vagrantfile but will be visible on our virtual machine as eth0. We confi gure our fi rst interface for use in our OpenStack environment, which will be the public interface of our OpenStack Compute host, a second interface will be for our private network that OpenStack Compute uses for internal communication between different OpenStack Compute hosts, and a third interface will be used when we look at Neutron networking in Chapter 8, OpenStack Networking, as an external provider network.
Carry out the following steps to create a virtual machine with Vagrant that will be used to run OpenStack Compute services:
1. Install VirtualBox from http://www.virtualbox.org/. You will encounter issues if you are using the version shipped with Ubuntu 12.04 LTS.
The book was written using VirtualBox Version 4.2.16.
2. Install Vagrant from http://www.vagrantup.com/. You will encounter issues if you are using the version shipped with Ubuntu 12.04 LTS.
The book was written using Vagrant Version 1.2.7.
For More Information: www.packtpub.com/openstack-cloud-computing-cookbook-second-
edition/book
Keystone OpenStack Identity Service
8
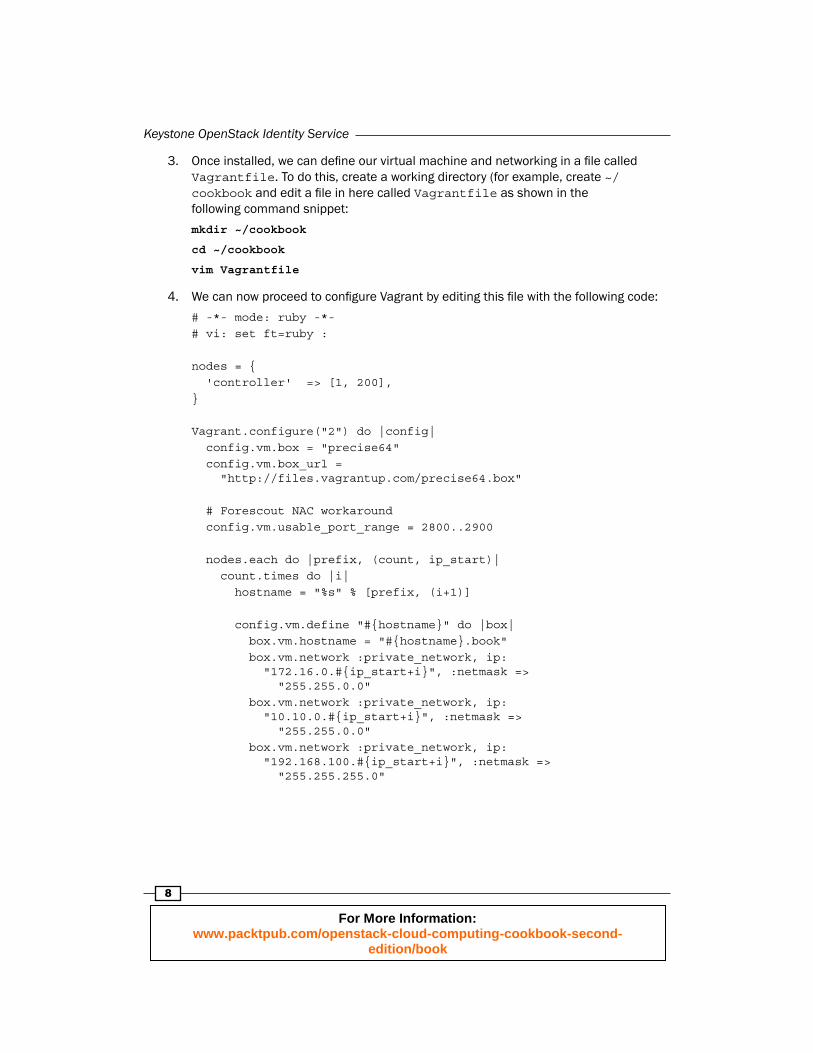
3. Once installed, we can defi ne our virtual machine and networking in a fi le called Vagrantfile. To do this, create a working directory (for example, create ~/cookbook and edit a fi le in here called Vagrantfile as shown in the following command snippet:
mkdir ~/cookbook
cd ~/cookbook
vim Vagrantfile
4. We can now proceed to confi gure Vagrant by editing this fi le with the following code:
# -*- mode: ruby -*-# vi: set ft=ruby :
nodes = { 'controller' => [1, 200],}
Vagrant.configure("2") do |config| config.vm.box = "precise64" config.vm.box_url = "http://files.vagrantup.com/precise64.box"
# Forescout NAC workaround config.vm.usable_port_range = 2800..2900
nodes.each do |prefix, (count, ip_start)| count.times do |i| hostname = "%s" % [prefix, (i+1)]
config.vm.define "#{hostname}" do |box| box.vm.hostname = "#{hostname}.book" box.vm.network :private_network, ip: "172.16.0.#{ip_start+i}", :netmask => "255.255.0.0" box.vm.network :private_network, ip: "10.10.0.#{ip_start+i}", :netmask => "255.255.0.0" box.vm.network :private_network, ip: "192.168.100.#{ip_start+i}", :netmask => "255.255.255.0"
For More Information: www.packtpub.com/openstack-cloud-computing-cookbook-second-
edition/book
Chapter 1
9
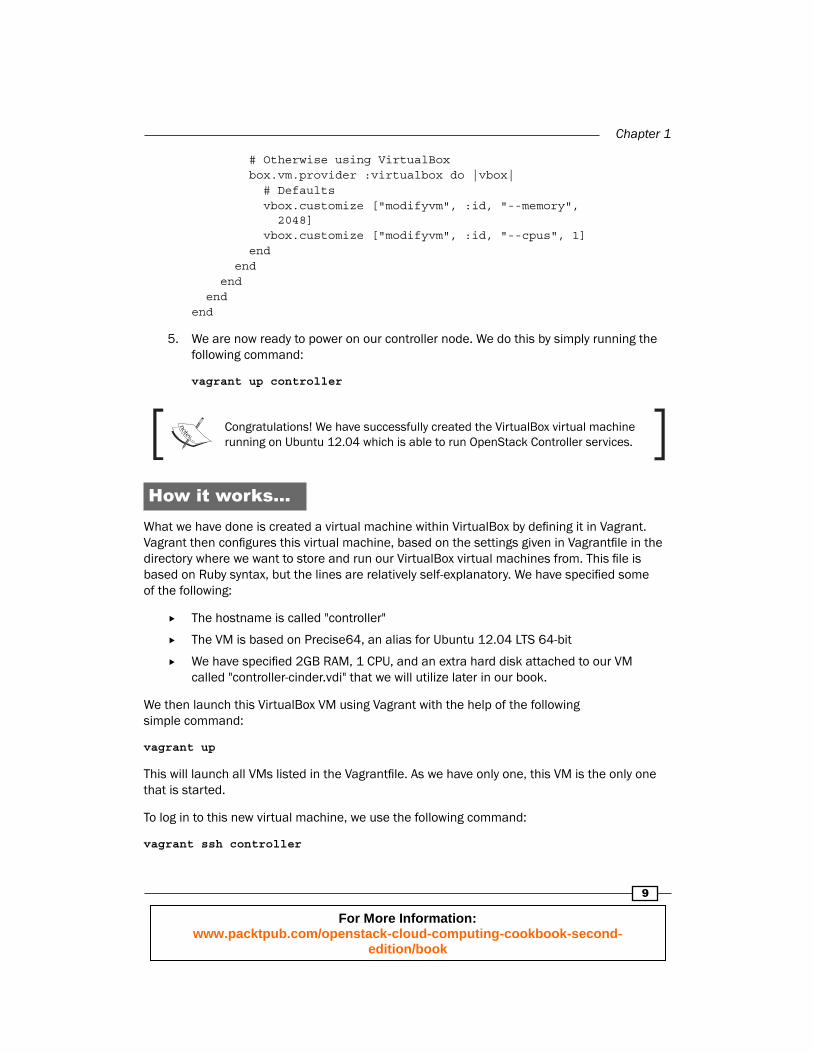
# Otherwise using VirtualBox box.vm.provider :virtualbox do |vbox| # Defaults vbox.customize ["modifyvm", :id, "--memory", 2048] vbox.customize ["modifyvm", :id, "--cpus", 1] end end end endend
5. We are now ready to power on our controller node. We do this by simply running the following command:
vagrant up controller
Congratulations! We have successfully created the VirtualBox virtual machine running on Ubuntu 12.04 which is able to run OpenStack Controller services.
How it works...What we have done is created a virtual machine within VirtualBox by defi ning it in Vagrant. Vagrant then confi gures this virtual machine, based on the settings given in Vagrantfi le in the directory where we want to store and run our VirtualBox virtual machines from. This fi le is based on Ruby syntax, but the lines are relatively self-explanatory. We have specifi ed some of the following:
The hostname is called "controller"
The VM is based on Precise64, an alias for Ubuntu 12.04 LTS 64-bit
We have specifi ed 2GB RAM, 1 CPU, and an extra hard disk attached to our VM called "controller-cinder.vdi" that we will utilize later in our book.
We then launch this VirtualBox VM using Vagrant with the help of the following simple command:
vagrant up
This will launch all VMs listed in the Vagrantfi le. As we have only one, this VM is the only one that is started.
To log in to this new virtual machine, we use the following command:
vagrant ssh controller
For More Information: www.packtpub.com/openstack-cloud-computing-cookbook-second-
edition/book
Keystone OpenStack Identity Service
10
There's more...You are not limited to Vagrant and VirtualBox for setting up a test environment. There are a number of virtualization products available that are suitable for trying OpenStack, for example, VMware Server, VMware Player, and VMware Fusion are equally suitable.
See also Chapter 10, Automating OpenStack Installations
Confi guring Ubuntu Cloud archiveUbuntu 12.04 LTS, the release used throughout this book, provides two repositories for installing OpenStack. The standard repository ships with the Essex release whereas a further supported repository is called the Ubuntu Cloud Archive provides access to the latest release (at time of writing), Grizzly. We will be performing an installation and confi guration of OpenStack Identity service (as well as the rest of the OpenStack services) with packages from the Ubuntu Cloud Archive to provide us with the Grizzly release of software.
Getting readyEnsure you're logged in to the nominated OpenStack Identity server or OpenStack Controller host where OpenStack Identity service will be installed that the rest of the OpenStack hosts will have access to.
How to do it...Carry out the following steps to confi gure Ubuntu 12.04 LTS to use the Ubuntu Cloud Archive:
1. To access the Ubuntu Cloud Archive repository, we add this to our apt sources as follows:
echo "deb http://ubuntu-cloud.archive.canonical.com/ubuntu \echo \"deb http://ubuntu-cloud.archive.canonical.com/ubuntu \ precise-proposed/grizzly main" \ | sudo tee /etc/apt/sources.list.d/folsom.list
2. Before we can use this, we need to ensure we have the Ubuntu Cloud Archive key. We add this as follows:
sudo apt-get update
sudo apt-get -y install ubuntu-cloud-keyring
For More Information: www.packtpub.com/openstack-cloud-computing-cookbook-second-
edition/book
Chapter 1
11
How it works...What we're doing here is adding an extra repository to our system that provides us with a tested set of packages of OpenStack that is fully supported on Ubuntu 12.04 LTS release. The packages in here will then be ones that will be used when we perform installation of OpenStack on our system.
There's more...More information about the Ubuntu Cloud Archive can be found by visiting the following address: https://wiki.ubuntu.com/ServerTeam/CloudArchive. This explains the release process and the ability to use latest releases of OpenStack—where new versions are released every 6 months—on a long term supported release of Ubuntu that gets released every 2 years.
Using an alternative releaseIf you wish to optionally deviate from stable releases, it is appropriate when you are helping to develop or debug OpenStack, or require functionality that is not available in the current release. To enable different releases, you add different Personal Package Archives (PPA) to your system. To view the OpenStack PPAs, visit http://wiki.openstack.org/PPAs. To use them, we fi rst install a pre-requisite tool that allows us to easily add PPAs to our system, as shown as follows:
sudo apt-get update
sudo apt-get -y install python-software-properties
To use a particular release of PPA, for example, Havana trunk testing, we issue the following command:
sudo add-apt-repository ppa:openstack-ubuntu-testing/havana-trunk-testing
sudo add-apt-repository ppa:openstack-ubuntu-testing/havana-trunk-testing
Installing OpenStack Identity serviceWe will be performing an installation and confi guration of OpenStack Identity service, known as Keystone, using the Ubuntu Cloud Archive. Once confi gured, connecting to our OpenStack cloud environment will be performed through our new OpenStack Identity service.
The backend datastore for our OpenStack Identity service will be a MySQL database.
For More Information: www.packtpub.com/openstack-cloud-computing-cookbook-second-
edition/book
Keystone OpenStack Identity Service
12
Getting readyTo ensure we're running the Ubuntu Cloud Archive, we must fi rst confi gure our Ubuntu 12.04 installation to use this service.
We will confi gure Keystone to use MySQL as the database backend, so this needs to be installed prior to installing Keystone. If MySQL is not installed, perform the following steps to install and confi gure MySQL:
MYSQL_ROOT_PASS=openstack
MYSQL_HOST=172.16.0.200
# To enable non-interactive installations of MySQL, set the following
echo "mysql-server-5.5 mysql-server/root_password password \
$MYSQL_ROOT_PASS" | sudo debconf-set-selections
echo "mysql-server-5.5 mysql-server/root_password_again password \
$MYSQL_ROOT_PASS" | sudo debconf-set-selections
echo "mysql-server-5.5 mysql-server/root_password seen true" \
| sudo debconf-set-selections
echo "mysql-server-5.5 mysql-server/root_password_again seen true" \
| sudo debconf-set-selections
export DEBIAN_FRONTEND=noninteractive
sudo apt-get update
sudo apt-get -q -y install mysql-server
sudo sed -i "s/^bind\-address.*/bind-address = ${MYSQL_HOST}/g" \
/etc/mysql/my.cnf
sudo service mysql restart
mysqladmin -uroot password ${MYSQL_ROOT_PASS}
mysql -u root --password=${MYSQL_ROOT_PASS} -h localhost \
-e "GRANT ALL ON *.* to root@\"localhost\" IDENTIFIED BY \"${MYSQL_ROOT_PASS}\" WITH GRANT OPTION;"
mysql -u root --password=${MYSQL_ROOT_PASS} -h localhost \
-e "GRANT ALL ON *.* to root@\"${MYSQL_HOST}\" IDENTIFIED BY \"${MYSQL_ROOT_PASS}\" WITH GRANT OPTION;"
For More Information: www.packtpub.com/openstack-cloud-computing-cookbook-second-
edition/book
Chapter 1
13
mysql -u root --password=${MYSQL_ROOT_PASS} -h localhost \
-e "GRANT ALL ON *.* to root@\"%\" IDENTIFIED BY \"${MYSQL_ROOT_PASS}\" WITH GRANT OPTION;"
mysqladmin -uroot -p${MYSQL_ROOT_PASS} flush-privileges
Next ensure that you're logged in to the nominated OpenStack Identity server or OpenStack Controller host where OpenStack Identity service will be installed and the rest of the OpenStack hosts will have access to.
To log on to our OpenStack Controller host that was created using Vagrant, issue the following command:
vagrant ssh controller
How to do it...Carry out the following instructions to install OpenStack Identity service:
1. Installation of OpenStack Identity service is done by specifying the keystone package in Ubuntu, and we do this as follows:
sudo apt-get update
sudo apt-get -y install keystone python-keyring
2. Once installed, we need to confi gure the backend database store, so we fi rst create the keystone database in MySQL. We do this as follows (where we have a user in MySQL called root, with password openstack, that is able to create databases):
MYSQL_ROOT_PASS=openstack
mysql -uroot -p$MYSQL_ROOT_PASS -e "CREATE DATABASE \
keystone;"
3. It is a good practice to create a user that is specifi c to our OpenStack Identity service, so we create this as follows:
MYSQL_KEYSTONE_PASS=openstack
mysql -uroot -p$MYSQL_ROOT_PASS -e "GRANT ALL PRIVILEGES \
ON keystone.* TO 'keystone'@'%';"
mysql -uroot -p$MYSQL_ROOT_PASS -e "SET PASSWORD FOR \
'keystone'@'%' = PASSWORD('$MYSQL_KEYSTONE_PASS');"
For More Information: www.packtpub.com/openstack-cloud-computing-cookbook-second-
edition/book
Keystone OpenStack Identity Service
14
4. We then need to confi gure OpenStack Identity service to use this database by editing the /etc/keystone/keystone.conf fi le, and then change the sql_connection line to match the database credentials. We do this as follows:
MYSQL_HOST=172.16.0.200
sudo sed -i "s#^connection.*#connection = \
mysql://keystone:[email protected]/keystone#" \
/etc/keystone/keystone.conf
5. A super-user admin token resides in the /etc/keystone/keystone.conf fi le. To confi gure this we do the following:
sudo sed -i "s/^# admin_token.*/admin_token = ADMIN" \
/etc/keystone/keystone.conf
6. As of the Grizzly release, Keystone supports PKI infrastructure to cryptographically sign the tokens. To disable this feature for now, we edit the /etc/keystone/keystone.conf fi le to use non-signed tokens as follows:
sudo sed -i "s/^#token_format.*/token_format = UUID" \
/etc/keystone/keystone.conf
7. We can now restart the keystone service:
sudo stop keystone
sudo start keystone
8. With Keystone started, we can now populate the keystone database with the required tables, by issuing the following command:
sudo keystone-manage db_sync
Congratulations! We now have the OpenStack Identity service installed and ready for use in our OpenStack environment.
How it works...A convenient way to install OpenStack Identity service ready for use in our OpenStack environment is by using the Ubuntu packages. Once installed, we confi gure our MySQL database server with a keystone database and set up the keystone.conf confi guration fi le to use this. After starting the Keystone service, running the keystone-manage db_sync command populates the keystone database with the appropriate tables ready for us to add in the required users, roles, and tenants required in our OpenStack environment.
For More Information: www.packtpub.com/openstack-cloud-computing-cookbook-second-
edition/book
Chapter 1
15
Creating tenantsA tenant in OpenStack is a project. Users can't be created without having a tenant assigned to them so these must be created fi rst. For this section, we will create a tenant for our users, called cookbook.
Getting readyTo begin with, ensure you're logged into our OpenStack Controller host—where OpenStack Identity service has been installed—or an appropriate Ubuntu client that has access to where OpenStack Identity service is installed.
To log on to our OpenStack Controller host that was created using Vagrant, issue the following command:
vagrant ssh controller
If the keystoneclient tool isn't available, this can be installed on an Ubuntu client—to manage our OpenStack Identity service—by issuing the following command:
sudo apt-get update
sudo apt-get -y install python-keystoneclient
Ensure that we have our environment set correctly to access our OpenStack environment for administrative purposes:
export ENDPOINT=1172.16.172.200
export SERVICE_TOKEN=ADMIN
export SERVICE_ENDPOINT=http://${ENDPOINT}:35357/v2.0
For More Information: www.packtpub.com/openstack-cloud-computing-cookbook-second-
edition/book
Keystone OpenStack Identity Service
16
How to do it...To create a tenant in our OpenStack environment, perform the following steps:
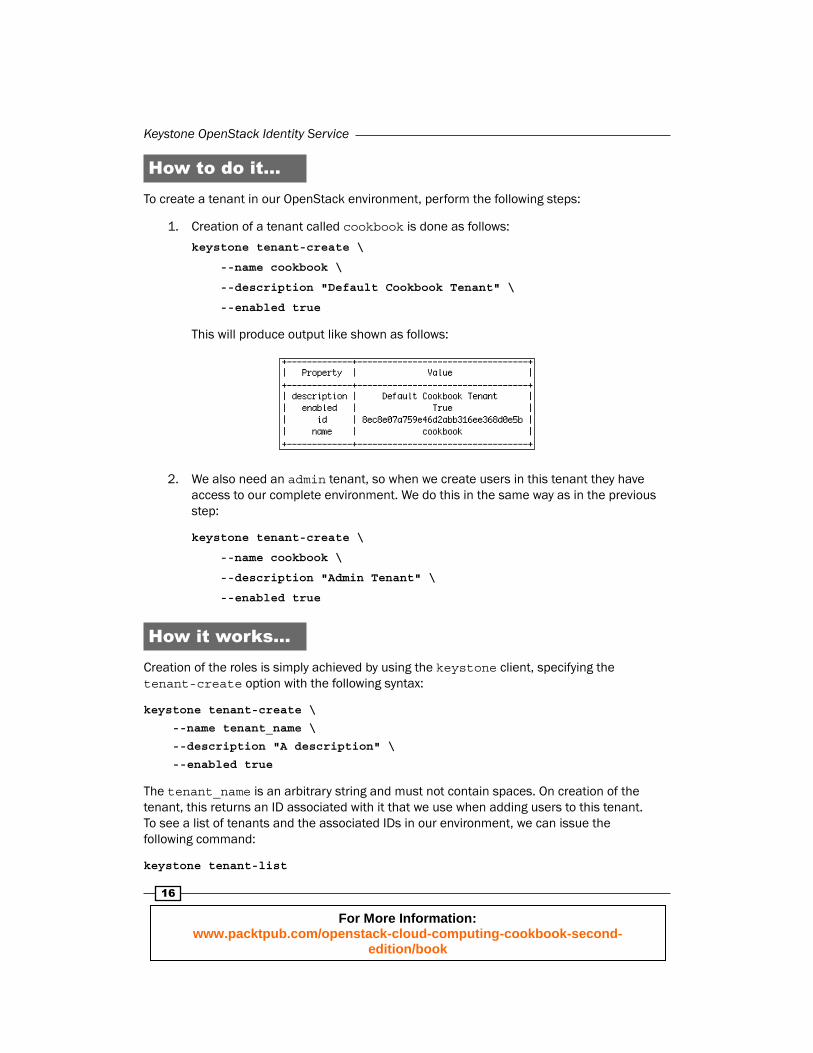
1. Creation of a tenant called cookbook is done as follows:
keystone tenant-create \
--name cookbook \
--description "Default Cookbook Tenant" \
--enabled true
This will produce output like shown as follows:
2. We also need an admin tenant, so when we create users in this tenant they have access to our complete environment. We do this in the same way as in the previous step:
keystone tenant-create \
--name cookbook \
--description "Admin Tenant" \
--enabled true
How it works...Creation of the roles is simply achieved by using the keystone client, specifying the tenant-create option with the following syntax:
keystone tenant-create \
--name tenant_name \
--description "A description" \
--enabled true
The tenant_name is an arbitrary string and must not contain spaces. On creation of the tenant, this returns an ID associated with it that we use when adding users to this tenant. To see a list of tenants and the associated IDs in our environment, we can issue the following command:
keystone tenant-list
For More Information: www.packtpub.com/openstack-cloud-computing-cookbook-second-
edition/book
Chapter 1
17
Confi guring rolesRoles are the permissions given to users within a tenant. Here we will confi gure two roles, an admin role that allows for administration of our environment and a Member role that is given to ordinary users who will be using the cloud environment.
Getting readyTo begin with, ensure that you're logged in to our OpenStack Controller host—where OpenStack Identity service has been installed—or an appropriate Ubuntu client that has access to where OpenStack Identity service is installed.
To log on to our OpenStack Controller host that was created using Vagrant, issue the following command:
vagrant ssh controller
If the keystoneclient tool isn't available, this can be installed on any Ubuntu client that has access to manage our OpenStack Identity service by issuing the following commands:
sudo apt-get update
sudo apt-get -y install python-keystoneclient
To confi gure the OpenStack Identity service, we use super-user privileges in the form of a permanently set admin token set in the /etc/keystone/keystone.conf fi le, along with setting the correct environment variables for this purpose as shown as follows:
export ENDPOINT=172.16.0.200
export SERVICE_TOKEN=ADMIN
export SERVICE_ENDPOINT=http://${ENDPOINT}:35357/v2.0
For More Information: www.packtpub.com/openstack-cloud-computing-cookbook-second-
edition/book
Keystone OpenStack Identity Service
18
How to do it...To create the required roles in our OpenStack environment, perform the following steps:
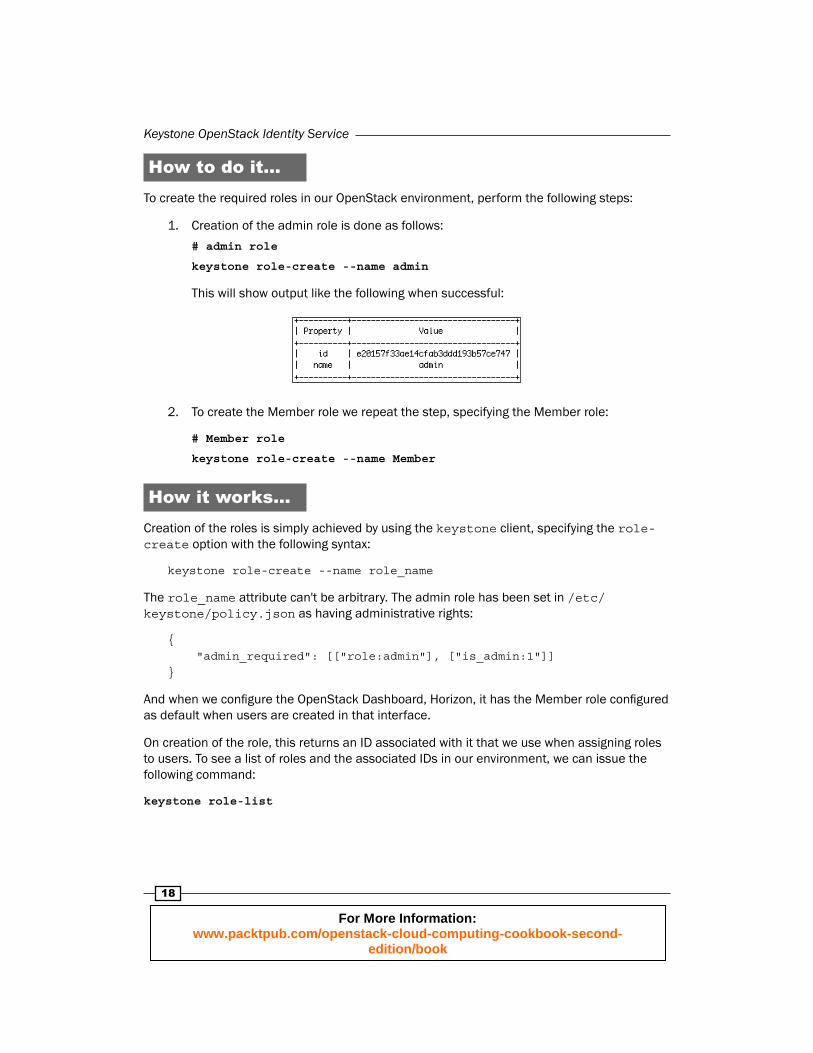
1. Creation of the admin role is done as follows:
# admin role
keystone role-create --name admin
This will show output like the following when successful:
2. To create the Member role we repeat the step, specifying the Member role:
# Member role
keystone role-create --name Member
How it works...Creation of the roles is simply achieved by using the keystone client, specifying the role-create option with the following syntax:
keystone role-create --name role_name
The role_name attribute can't be arbitrary. The admin role has been set in /etc/keystone/policy.json as having administrative rights:
{ "admin_required": [["role:admin"], ["is_admin:1"]]}
And when we confi gure the OpenStack Dashboard, Horizon, it has the Member role confi gured as default when users are created in that interface.
On creation of the role, this returns an ID associated with it that we use when assigning roles to users. To see a list of roles and the associated IDs in our environment, we can issue the following command:
keystone role-list
For More Information: www.packtpub.com/openstack-cloud-computing-cookbook-second-
edition/book
Chapter 1
19
Adding usersAdding users to OpenStack Identity service requires that the user have a tenant they can exist in, and have a role defi ned that can be assigned to them. For this section, we will create two users. The fi rst user will be named admin and will have the admin role assigned to them in the cookbook tenant. The second user will be named demo and will have the Member role assigned to them in the same cookbook tenant.
Getting readyTo begin with, ensure that you're logged in to our OpenStack Controller host—where OpenStack Identity service has been installed—or an appropriate Ubuntu client that has access to where OpenStack Identity service is installed.
To log on to our OpenStack Controller host that was created using Vagrant, issue the following command:
vagrant ssh controller
If the keystone client tool isn't available, this can be installed on an Ubuntu client—to manage our OpenStack Identity service—by issuing the following commands:
sudo apt-get update
sudo apt-get -y install python-keystoneclient
Ensure that we have our environment set correctly to access our OpenStack environment for administrative purposes:
export ENDPOINT=172.16.0.200
export SERVICE_TOKEN=ADMIN
export SERVICE_ENDPOINT=http://${ENDPOINT}:35357/v2.0
How to do it...To create the required users in our OpenStack environment, perform the following steps:
1. To create a user in the cookbook tenant, we fi rst need to get the cookbook tenant ID. To do this, issue the following command, which we conveniently store in a variable named TENANT_ID with the tenant-list option:
TENANT_ID=$(keystone tenant-list \
| awk '/\ cookbook\ / {print $2}')
For More Information: www.packtpub.com/openstack-cloud-computing-cookbook-second-
edition/book
Keystone OpenStack Identity Service
20
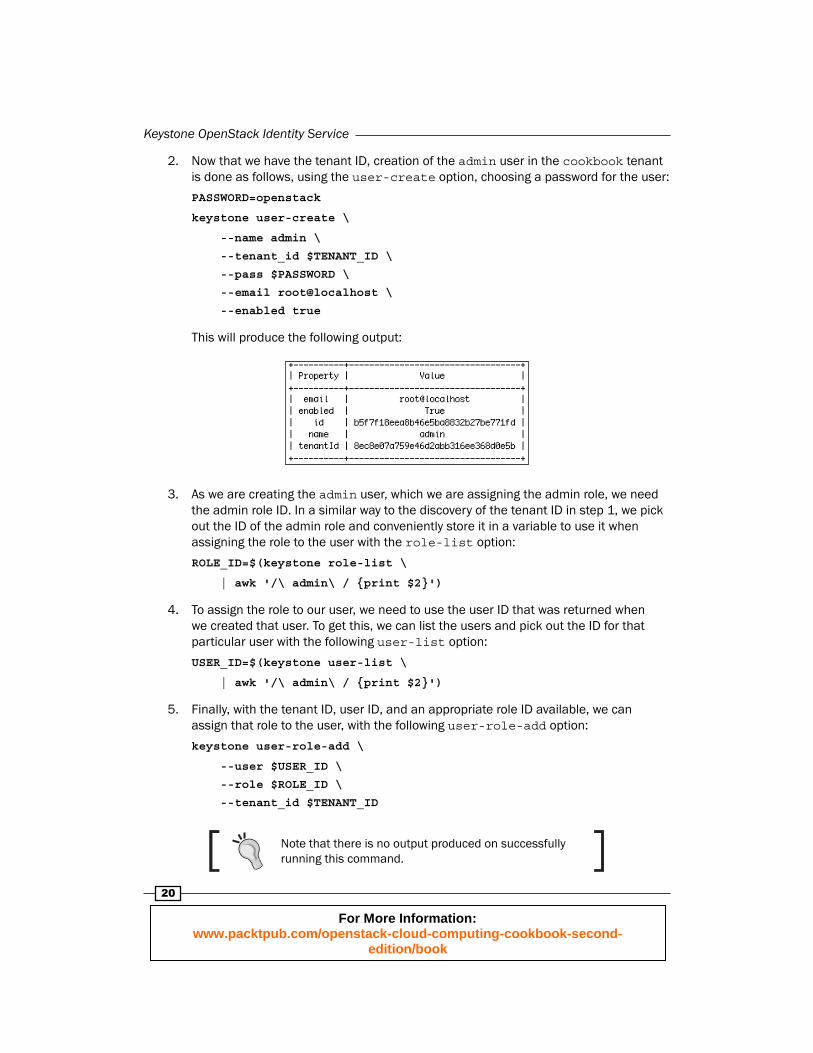
2. Now that we have the tenant ID, creation of the admin user in the cookbook tenant is done as follows, using the user-create option, choosing a password for the user:
PASSWORD=openstack
keystone user-create \
--name admin \
--tenant_id $TENANT_ID \
--pass $PASSWORD \
--email root@localhost \
--enabled true
This will produce the following output:
3. As we are creating the admin user, which we are assigning the admin role, we need the admin role ID. In a similar way to the discovery of the tenant ID in step 1, we pick out the ID of the admin role and conveniently store it in a variable to use it when assigning the role to the user with the role-list option:
ROLE_ID=$(keystone role-list \
| awk '/\ admin\ / {print $2}')
4. To assign the role to our user, we need to use the user ID that was returned when we created that user. To get this, we can list the users and pick out the ID for that particular user with the following user-list option:
USER_ID=$(keystone user-list \
| awk '/\ admin\ / {print $2}')
5. Finally, with the tenant ID, user ID, and an appropriate role ID available, we can assign that role to the user, with the following user-role-add option:
keystone user-role-add \
--user $USER_ID \
--role $ROLE_ID \
--tenant_id $TENANT_ID
Note that there is no output produced on successfully running this command.
For More Information: www.packtpub.com/openstack-cloud-computing-cookbook-second-
edition/book
Chapter 1
21
6. The admin user also needs to be in the admin tenant for us to be able to administer the complete environment. To do this we need to get the admin tenant ID and then repeat the previous step, using this new tenant ID, as follows:
ADMIN_TENANT_ID=$(keystone tenant-list \
| awk '/\ admin\ / {print $2}')
keystone user-role-add \
--user $USER_ID \
--role $ROLE_ID \
--tenant_id $ADMIN_TENANT_ID
7. To create the demo user in the cookbook tenant with the Member role assigned, we repeat the process as defi ned in steps 1 to 5:
# Get the cookbook tenant ID
TENANT_ID=$(keystone tenant-list \
| awk '/\ cookbook\ / {print $2}')
# Create the user
PASSWORD=openstack
keystone user-create \
--name demo \
--tenant_id $TENANT_ID \
--pass $PASSWORD \
--email demo@localhost \
--enabled true
# Get the Member role ID
ROLE_ID=$(keystone role-list \
| awk '/\ Member\ / {print $2}')
# Get the demo user ID
USER_ID=$(keystone user-list \
| awk '/\ demo\ / {print $2}')
# Assign the Member role to the demo user in cookbook
keystone user-role-add \
--user $USER_ID \
-–role $ROLE_ID \
--tenant_id $TENANT_ID
For More Information: www.packtpub.com/openstack-cloud-computing-cookbook-second-
edition/book
Keystone OpenStack Identity Service
22
How it works...Adding users in OpenStack Identity service requires that the tenant and roles for that user be created fi rst. Once these are available, in order to use the keystone command-line client, we need the IDs of the tenants and IDs of the roles that are to be assigned to the user in that tenant. Note that a user can be a member of many tenants and can have different roles assigned in each.
To create a user with the user-create option, the syntax is as follows:
keystone user-create \
--name user_name \
--tenant_id TENANT_ID \
--pass PASSWORD \
--email email_address \
--enabled true
The user_name attribute is an arbitrary name but cannot contain any spaces. A password attribute must be present. In the previous examples, these were set to openstack. The email_address attribute must also be present.
To assign a role to a user with the user-role-add option, the syntax is as follows:
keystone user-role-add \
--user USER_ID \
--role ROLE_ID \
--tenant_id TENANT_ID
This means we need to have the ID of the user, the ID of the role, and the ID of the tenant in order to assign roles to users. These IDs can be found using the following commands:
keystone tenant-list
keystone role-list
keystone user-list
For More Information: www.packtpub.com/openstack-cloud-computing-cookbook-second-
edition/book
Chapter 1
23
Defi ning service endpointsEach of the services in our cloud environment runs on a particular URL and port—these are the endpoint addresses for our services. When a client communicates with our OpenStack environment that runs OpenStack Identity service, it is this service that returns the endpoint URLs, which the user can then use in an OpenStack environment. To enable this feature, we must defi ne these endpoints. In a cloud environment though, we can defi ne multiple regions. Regions can be thought of as different datacenters, which would imply that they would have different URLs or IP addresses. Under OpenStack Identity service, we can defi ne these URL endpoints separately for each region. As we only have a single environment, we will reference this as RegionOne.
Getting readyTo begin with, ensure you're logged in to our OpenStack Controller host—where OpenStack Identity service has been installed—or an appropriate Ubuntu client that has access to where OpenStack Identity service is installed.
To log on to our OpenStack Controller host that was created using Vagrant, issue the following command:
vagrant ssh controller
If the keystone client tool isn't available, this can be installed on an Ubuntu client—to manage our OpenStack Identity service—by issuing the following commands:
sudo apt-get update
sudo apt-get -y install python-keystoneclient
Ensure that we have our environment set correctly to access our OpenStack environment for administrative purposes:
export ENDPOINT=172.16.0.200
export SERVICE_TOKEN=ADMIN
export SERVICE_ENDPOINT=http://${ENDPOINT}:35357/v2.0
For More Information: www.packtpub.com/openstack-cloud-computing-cookbook-second-
edition/book
Keystone OpenStack Identity Service
24
How to do it...Defi ning the services and service endpoints in OpenStack Identity service involves running the keystone client command to specify the different services and the URLs that they run from. Although we might not have all services currently running in our environment, we will be confi guring them within OpenStack Identity service for future use. To defi ne endpoints for services in our OpenStack environment, carry out the following steps:
1. We can now defi ne the actual services that OpenStack Identity service needs to know about in our environment:
# OpenStack Compute Nova API Endpoint
keystone service-create \
--name nova \
--type compute \
--description 'OpenStack Compute Service'
# OpenStack Compute EC2 API Endpoint
keystone service-create \
--name ec2 \
--type ec2 \
--description 'EC2 Service'
# Glance Image Service Endpoint
keystone service-create \
--name glance \
--type image \
--description 'OpenStack Image Service'
# Keystone Identity Service Endpoint
keystone service-create \
--name keystone \
--type identity \
--description 'OpenStack Identity Service'
#Cinder Block Storage Endpoint
keystone service-create \
--name volume \
--type volume \
--description 'Volume Service'
For More Information: www.packtpub.com/openstack-cloud-computing-cookbook-second-
edition/book
Chapter 1
25
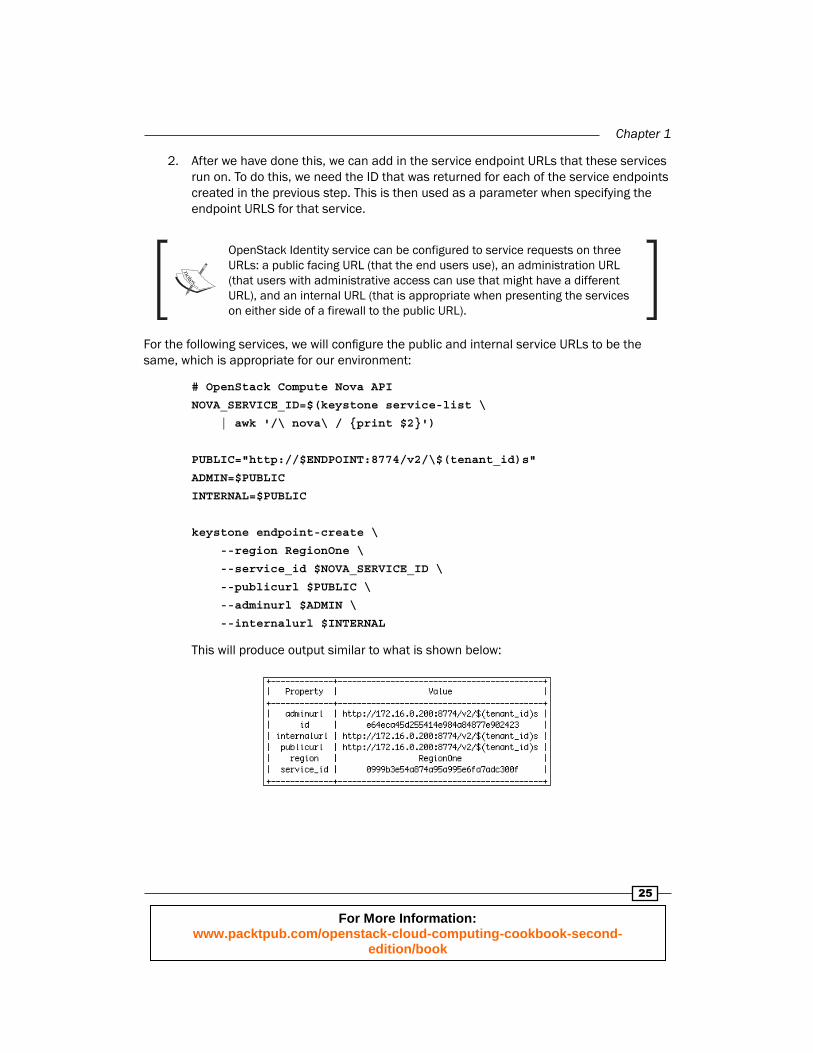
2. After we have done this, we can add in the service endpoint URLs that these services run on. To do this, we need the ID that was returned for each of the service endpoints created in the previous step. This is then used as a parameter when specifying the endpoint URLS for that service.
OpenStack Identity service can be configured to service requests on three URLs: a public facing URL (that the end users use), an administration URL (that users with administrative access can use that might have a different URL), and an internal URL (that is appropriate when presenting the services on either side of a firewall to the public URL).
For the following services, we will confi gure the public and internal service URLs to be the same, which is appropriate for our environment:
# OpenStack Compute Nova API
NOVA_SERVICE_ID=$(keystone service-list \
| awk '/\ nova\ / {print $2}')
PUBLIC="http://$ENDPOINT:8774/v2/\$(tenant_id)s"
ADMIN=$PUBLIC
INTERNAL=$PUBLIC
keystone endpoint-create \
--region RegionOne \
--service_id $NOVA_SERVICE_ID \
--publicurl $PUBLIC \
--adminurl $ADMIN \
--internalurl $INTERNAL
This will produce output similar to what is shown below:
For More Information: www.packtpub.com/openstack-cloud-computing-cookbook-second-
edition/book
Keystone OpenStack Identity Service
26
3. We continue to defi ne the rest of our service endpoints as shown in the following steps:
# OpenStack Compute EC2 API
EC2_SERVICE_ID=$(keystone service-list \
| awk '/\ ec2\ / {print $2}')
PUBLIC="http://$ENDPOINT:8773/services/Cloud"
ADMIN="http://$ENDPOINT:8773/services/Admin"
INTERNAL=$PUBLIC
keystone endpoint-create \
--region RegionOne \
--service_id $EC2_SERVICE_ID \
--publicurl $PUBLIC \
--adminurl $ADMIN \
--internalurl $INTERNAL
# Glance Image Service
GLANCE_SERVICE_ID=$(keystone service-list \
| awk '/\ glance\ / {print $2}')
PUBLIC="http://$ENDPOINT:9292/v1"
ADMIN=$PUBLIC
INTERNAL=$PUBLIC
keystone endpoint-create \
--region RegionOne \
--service_id $GLANCE_SERVICE_ID \
--publicurl $PUBLIC \
--adminurl $ADMIN \
--internalurl $INTERNAL
For More Information: www.packtpub.com/openstack-cloud-computing-cookbook-second-
edition/book
Chapter 1
27
# Keystone OpenStack Identity Service
KEYSTONE_SERVICE_ID=$(keystone service-list \
| awk '/\ keystone\ / {print $2}')
PUBLIC="http://$ENDPOINT:5000/v2.0"
ADMIN="http://$ENDPOINT:35357/v2.0"
INTERNAL=$PUBLIC
keystone endpoint-create \
--region RegionOne \
--service_id $KEYSTONE_SERVICE_ID \
--publicurl $PUBLIC \
--adminurl $ADMIN \
--internalurl $INTERNAL
#Cinder Block Storage ServiceService
CINDER_SERVICE_ID=$(keystone service-list \
| awk '/\ volume\ / {print $2}')
PUBLIC="http://$ENDPOINT:8776/v1/%(tenant_id)s"
ADMIN=$PUBLIC
INTERNAL=$PUBLIC
keystone endpoint-create \
--region RegionOne \
--service_id $CINDER_SERVICE_ID \
--publicurl $PUBLIC \
--adminurl $ADMIN \
--internalurl $INTERNAL
For More Information: www.packtpub.com/openstack-cloud-computing-cookbook-second-
edition/book
Keystone OpenStack Identity Service
28
How it works...Confi guring the services and endpoints within OpenStack Identity service is done with the keystone client command.
We fi rst add the service defi nitions, by using the keystone client and the service-create option with the following syntax:
keystone service-create \
--name service_name \
--type service_type \
--description 'description'
service_name is an arbitrary name or label defi ning our service of a particular type. We refer to the name when defi ning the endpoint to fetch the ID of the service.
The type option can be one of the following: compute, object-store, image-service, and identity-service. Note that we haven't confi gured the OpenStack Object Storage service (type object-store) or Cinder at this stage as these are covered in later recipes in the book.
The description fi eld is again an arbitrary fi eld describing the service.
Once we have added in our service defi nitions, we can tell OpenStack Identity service where those services run from, by defi ning the endpoints using the keystone client and the endpoint-create option, with the following syntax:
keystone endpoint-create \
--region region_name \
--service_id service_id \
--publicurl public_url \
-–adminurl admin_url \
--internalurl internal_url
Here service_id is the ID of the service when we created the service defi nitions in the fi rst step. The list of our services and IDs can be obtained by running the following command:
keystone service-list
As OpenStack is designed for global deployments, a region defi nes a physical datacenter or a geographical area that comprises of multiple connected datacenters. For our purpose, we defi ne just a single region—RegionOne. This is an arbitrary name that we can reference when specifying what runs in what datacenter/area and we carry this through to when we confi gure our client for use with these regions.
For More Information: www.packtpub.com/openstack-cloud-computing-cookbook-second-
edition/book
Chapter 1
29
All of our services can be confi gured to run on three different URLs, as follows, depending on how we want to confi gure our OpenStack cloud environment:
The public_url parameter is the URL that end users would connect on. In a public cloud environment, this would be a public URL that resolves to a public IP address.
The admin_url parameter is a restricted address for conducting administration. In a public deployment, you would keep this separate from the public_URL by presenting the service you are confi guring on a different, restricted URL. Some services have a different URI for the admin service, so this is confi gured using this attribute.
The internal_url parameter would be the IP or URL that existed only within the private local area network. The reason for this is that you are able to connect to services from your cloud environment internally without connecting over a public IP address space, which could incur data charges for traversing the Internet. It is also potentially more secure and less complex to do so.
Once the initial keystone database has been set up, after running the initial keystone-manage db_sync command on the OpenStack Identity service server, administration can be done remotely using the keystone client.
Creating the service tenant and service users
With the service endpoints created, we can now confi gure them so that our OpenStack services can utilize them. To do this, each service is confi gured with a username and password within a special service tenant. Confi guring each service to have their own username and password allows for greater security, troubleshooting and, auditing within our environment. For each service that uses OpenStack Identity service for authentication and authorization, we then specify these details in their relevant confi guration fi le, when setting up that service. Each service itself has to authenticate with keystone in order for it to be available within OpenStack. Confi guration of that service is then done using these credentials. For example, for glance we specify the following in /etc/glance/glance-registry-api.ini, when used with OpenStack Identity service, which matches what we created previously:
[filter:authtoken]
paste.filter_factory = keystone.middleware.auth_token:filter_factory
service_protocol = http
service_host = 172.16.0.200
service_port = 5000
For More Information: www.packtpub.com/openstack-cloud-computing-cookbook-second-
edition/book
Keystone OpenStack Identity Service
30
auth_host = 172.16.0.200
auth_port = 35357
auth_protocol = http
auth_uri = http://172.16.0.200:5000/
admin_tenant_name = service
admin_user = glance
admin_password = glance
Getting readyTo begin with, ensure you're logged in to our OpenStack Controller host—where OpenStack Identity service has been installed—or an appropriate Ubuntu client that has access to where OpenStack Identity service is installed.
To log on to our OpenStack Controller host that was created using Vagrant, issue the following command:
vagrant ssh controller
If the keystone client tool isn't available, this can be installed on an Ubuntu client to manage our OpenStack Identity service, by issuing the following command:
sudo apt-get update
sudo apt-get -y install python-keystoneclient
Ensure that we have our environment set correctly to access our OpenStack environment:
export ENDPOINT=1172.16.0.200
export SERVICE_TOKEN=ADMIN
export SERVICE_ENDPOINT=http://${ENDPOINT}:35357/v2.0
How to do it...To confi gure an appropriate service tenant, carry out the following steps:
1. Create the service tenant as follows:
keystone tenant-create \
--name service \
--description "Service Tenant" \
--enabled true
For More Information: www.packtpub.com/openstack-cloud-computing-cookbook-second-
edition/book
Chapter 1
31
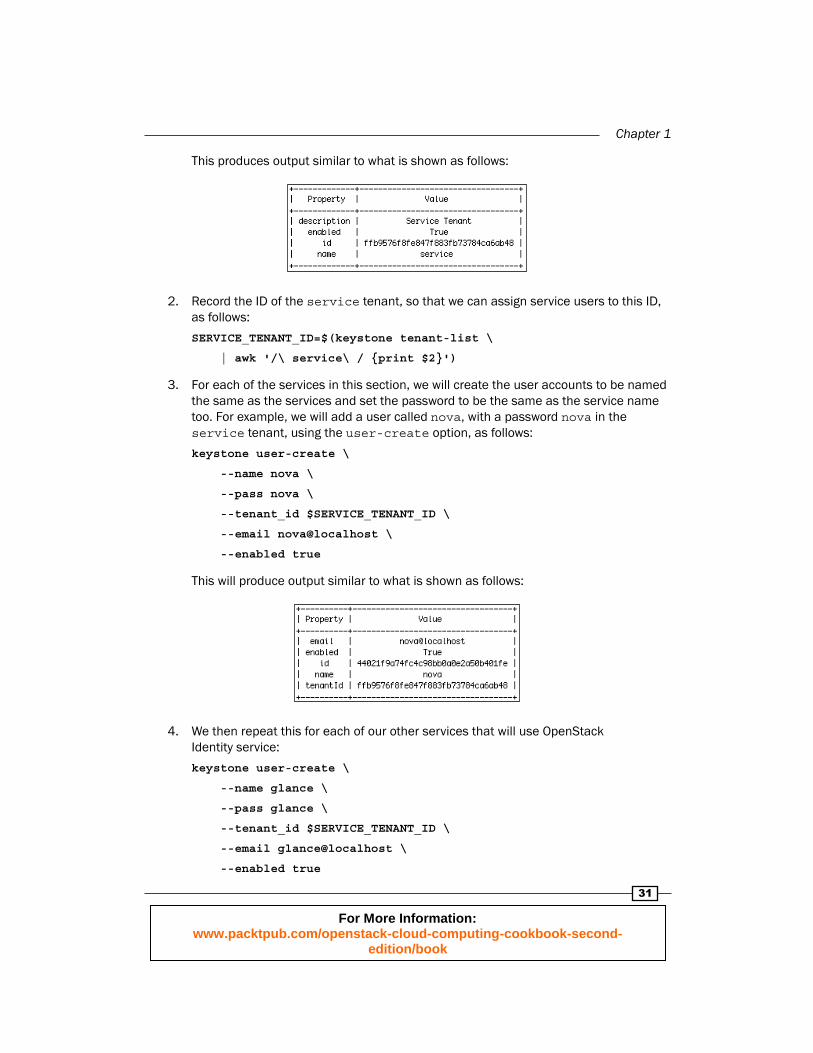
This produces output similar to what is shown as follows:
2. Record the ID of the service tenant, so that we can assign service users to this ID, as follows:
SERVICE_TENANT_ID=$(keystone tenant-list \
| awk '/\ service\ / {print $2}')
3. For each of the services in this section, we will create the user accounts to be named the same as the services and set the password to be the same as the service name too. For example, we will add a user called nova, with a password nova in the service tenant, using the user-create option, as follows:
keystone user-create \
--name nova \
--pass nova \
--tenant_id $SERVICE_TENANT_ID \
--email nova@localhost \
--enabled true
This will produce output similar to what is shown as follows:
4. We then repeat this for each of our other services that will use OpenStack Identity service:
keystone user-create \
--name glance \
--pass glance \
--tenant_id $SERVICE_TENANT_ID \
--email glance@localhost \
--enabled true
For More Information: www.packtpub.com/openstack-cloud-computing-cookbook-second-
edition/book
Keystone OpenStack Identity Service
32
keystone user-create \
--name keystone \
--pass keystone \
--tenant_id $SERVICE_TENANT_ID \
--emailkeystone@localhost \
--enabled true
keystone user-create \
--name cinder \
--pass cinder \
--tenant_id $SERVICE_TENANT_ID \
--email cinder@localhost \
--enabled true
5. We can now assign these users the admin role in the service tenant. To do this, we use the user-role-add option after retrieving the user ID of the nova user. For example, to add the admin role to the nova user in the service tenant, we do the following:
# Get the nova user id
NOVA_USER_ID=$(keystone user-list \
| awk '/\ nova\ / {print $2}')
# Get the admin role id
ADMIN_ROLE_ID=$(keystone role-list \
| awk '/\ admin\ / {print $2}')
# Assign the nova user the admin role in service tenant
keystone user-role-add \
--user $NOVA_USER_ID \
--role $ADMIN_ROLE_ID \
--tenant_id $SERVICE_TENANT_ID
For More Information: www.packtpub.com/openstack-cloud-computing-cookbook-second-
edition/book
Chapter 1
33
6. We then repeat this for our other service users, glance,keystone and cinder:
# Get the glance user id
GLANCE_USER_ID=$(keystone user-list \
| awk '/\ glance\ / {print $2}')
# Assign the glance user the admin role in service tenant
keystone user-role-add \
--user $GLANCE_USER_ID \
--role $ADMIN_ROLE_ID \
--tenant_id $SERVICE_TENANT_ID
# Get the keystone user id
KEYSTONE_USER_ID=$(keystone user-list \
| awk '/\ keystone\ / {print $2}')
# Assign the keystone user the admin role in service tenant
keystone user-role-add \
--user $KEYSTONE_USER_ID \
--role $ADMIN_ROLE_ID \
--tenant_id $SERVICE_TENANT_ID
# Get the cinder user id
CINDER_USER_ID=$(keystone user-list \
| awk '/\ cinder \ / {print $2}')
# Assign the cinder user the admin role in service tenant
keystone user-role-add \
--user $CINDER_USER_ID \
--role $ADMIN_ROLE_ID \
--tenant_id $SERVICE_TENANT_ID
How it works...Creation of the service tenant, populated with the services required to run OpenStack, is no different from creating any other users on our system that require the admin role. We create the usernames and passwords and ensure they exist in the service tenant with the admin role assigned to each user. We then use these credentials when confi guring the services to authenticate with OpenStack Identity service.
For More Information: www.packtpub.com/openstack-cloud-computing-cookbook-second-
edition/book
Where to buy this book You can buy OpenStack Cloud Computing Cookbook Second Edition from the Packt
Publishing website:
.
Free shipping to the US, UK, Europe and selected Asian countries. For more information, please
read our shipping policy.
Alternatively, you can buy the book from Amazon, BN.com, Computer Manuals and
most internet book retailers.
www.PacktPub.com
For More Information: www.packtpub.com/openstack-cloud-computing-cookbook-second-
edition/book