openstack compute administration manual - the acis...
TRANSCRIPT
OpenStack ComputeAdministration Manual
Feb. 3, 2011 Bexar release
ii
OpenStack Compute Administration ManualBexar release (02/03/11)Copyright © 2010, 2011 OpenStack LLC All rights reserved.
OpenStack Compute offers open source software for cloud administration and management for anyorganization. This manual provides guidance for installing, managing, and understanding the software thatruns OpenStack Compute.
Licensed under the Apache License, Version 2.0 (the "License"); you may not use this file except in compliance with the License. Youmay obtain a copy of the License at
http://www.apache.org/licenses/LICENSE-2.0
Unless required by applicable law or agreed to in writing, software distributed under the License is distributed on an "AS IS" BASIS,WITHOUT WARRANTIES OR CONDITIONS OF ANY KIND, either express or implied. See the License for the specific language governingpermissions and limitations under the License.
OpenStack ComputeAdministration Manual
Feb. 3, 2011 Bexar release
iii
Table of Contents1. Getting Started with OpenStack .................................................................................. 1
1.1. What is OpenStack? ......................................................................................... 11.2. Components of OpenStack ............................................................................... 11.3. Why Cloud? ..................................................................................................... 2
2. Introduction to OpenStack Compute ........................................................................... 42.1. Users and Projects ............................................................................................ 42.2. Images and Instances ....................................................................................... 52.3. System Architecture .......................................................................................... 52.4. Storage and OpenStack Compute ..................................................................... 6
3. Installing and Configuring OpenStack Compute ........................................................... 73.1. System Requirements ....................................................................................... 73.2. Installing OpenStack Compute on Ubuntu ........................................................ 7
3.2.1. Example Installation Architecture ........................................................... 83.2.2. Scripted Installation ............................................................................... 83.2.3. Manual Installation .............................................................................. 10
3.3. Configuring OpenStack Compute .................................................................... 123.3.1. Setting Flags in the nova.conf File ........................................................ 123.3.2. Set Up OpenStack Compute Environment on the Compute Node .......... 143.3.3. Create Certifications ............................................................................. 153.3.4. Enable Access to VMs on the Compute Node ....................................... 15
4. Networking ............................................................................................................... 164.1. Networking Options ....................................................................................... 164.2. Configuring Networking on the Compute Node .............................................. 17
4.2.1. Configuring Flat Networking ................................................................ 174.2.2. Configuring Flat DHCP Networking ...................................................... 184.2.3. Configuring VLAN Networking ............................................................. 184.2.4. Enabling Ping and SSH on VMs ............................................................ 19
5. Running OpenStack Compute .................................................................................... 205.1. Starting Images .............................................................................................. 215.2. Deleting Instances .......................................................................................... 215.3. Creating Custom Images ................................................................................. 215.4. Understanding the Compute Service Architecture ............................................ 225.5. Managing the Cloud ....................................................................................... 235.6. Managing Compute Users .............................................................................. 24
6. OpenStack Interfaces ................................................................................................. 266.1. System Requirements ...................................................................................... 266.2. Installation Steps ............................................................................................ 26
6.2.1. Get the source for both projects .......................................................... 266.2.2. (Optional) Build django-nova ............................................................... 276.2.3. Build and Configure Openstack-Dashboard ........................................... 276.2.4. Run the Server ..................................................................................... 28
7. OpenStack Compute Tutorials ................................................................................... 297.1. Running Your First Elastic Web Application on the Cloud ................................. 29
7.1.1. Part I: Setting Up the Cloud Infrastructure ............................................ 297.1.2. Part II: Getting Virtual Machines to Run the Virtual Servers ................... 327.1.3. Part III: Installing the Needed Software for the Web-Scale Scenario ........ 337.1.4. Running a Blog in the Cloud ................................................................ 34
8. Support and Troubleshooting .................................................................................... 35

OpenStack ComputeAdministration Manual
Feb. 3, 2011 Bexar release
iv
8.1. Community Support ....................................................................................... 358.2. Troubleshooting OpenStack Object Storage .................................................... 36
8.2.1. Handling Drive Failure .......................................................................... 368.2.2. Handling Server Failure ........................................................................ 378.2.3. Detecting Failed Drives ........................................................................ 37
8.3. Troubleshooting OpenStack Compute ............................................................. 378.3.1. Log files for OpenStack Compute ......................................................... 378.3.2. Common Errors and Fixes for OpenStack Compute ............................... 38

OpenStack ComputeAdministration Manual
Feb. 3, 2011 Bexar release
v
List of Tables3.1. Description of nova.conf flags (not comprehensive) ................................................ 12
OpenStack ComputeAdministration Manual
Feb. 3, 2011 Bexar release
1
1. Getting Started with OpenStackOpenStack is a collection of open source technology projects that provide open source cloudcomputing software that is massively scalable. OpenStack currently develops two projects:OpenStack Compute, which offers computing power through virtual machine and networkmanagement, and OpenStack Object Storage which is software for redundant, scalableobject storage capacity.
1.1. What is OpenStack?OpenStack offers open source software to build public and private clouds. OpenStack is acommunity and a project as well as a stack of open source software to help organizationsrun clouds for virtual computing or storage. OpenStack contains a collection of open sourceprojects that are community-maintained including OpenStack Compute (code-named Nova),OpenStack Object Storage (code-named Swift), and OpenStack Imaging Service (code-namedGlance). OpenStack provides an operating platform, or toolkit, for orchestrating clouds.
OpenStack is more easily defined once the concepts of cloud computing become apparent,but we are on a mission: to provide scalable, elastic cloud computing for both public andprivate clouds, large and small. At the heart of our mission is a pair of basic requirements:clouds must be simple to implement and massively scalable.
If you are new to OpenStack, you will undoubtedly have questions about installation,deployment, and usage. It can seem overwhelming at first. But don't fear, there are placesto get information to guide you and to help resolve any issues you may run into during theon-ramp process. Because the project is so new and constantly changing, be aware of therevision time for all information. If you are reading a document that is a few months oldand you feel that it isn't entirely accurate, then please let us know through the mailing list athttps://launchpad.net/~openstack so it can be updated or removed.
1.2. Components of OpenStackThere are currently three main components of OpenStack: Compute, Object Storage, andImaging Service. Let's look at each in turn.
OpenStack Compute is a cloud fabric controller, used to start up virtual instances for eithera user or a group. It's also used to configure networking for each instance or project thatcontains multiple instances for a particular project.
OpenStack Object Storage is a system to store objects in a massively scalable large capacitysystem with built-in redundancy and failover. Object Storage has a variety of applications,such as backing up or archiving data, serving graphics or videos (streaming data to a user’sbrowser), serving content with a Content Delivery Network (CDN), storing secondary ortertiary static data, developing new applications with data storage integration, storing datawhen predicting storage capacity is difficult, and creating the elasticity and flexibility of cloud-based storage for your web applications.
OpenStack Imaging Service is a lookup and retrieval system for virtual machine images. It canbe configured in three ways: using OpenStack Object Store to store images; using S3 storagedirectly; using S3 storage with Object Store as the intermediate for S3 access.
OpenStack ComputeAdministration Manual
Feb. 3, 2011 Bexar release
2
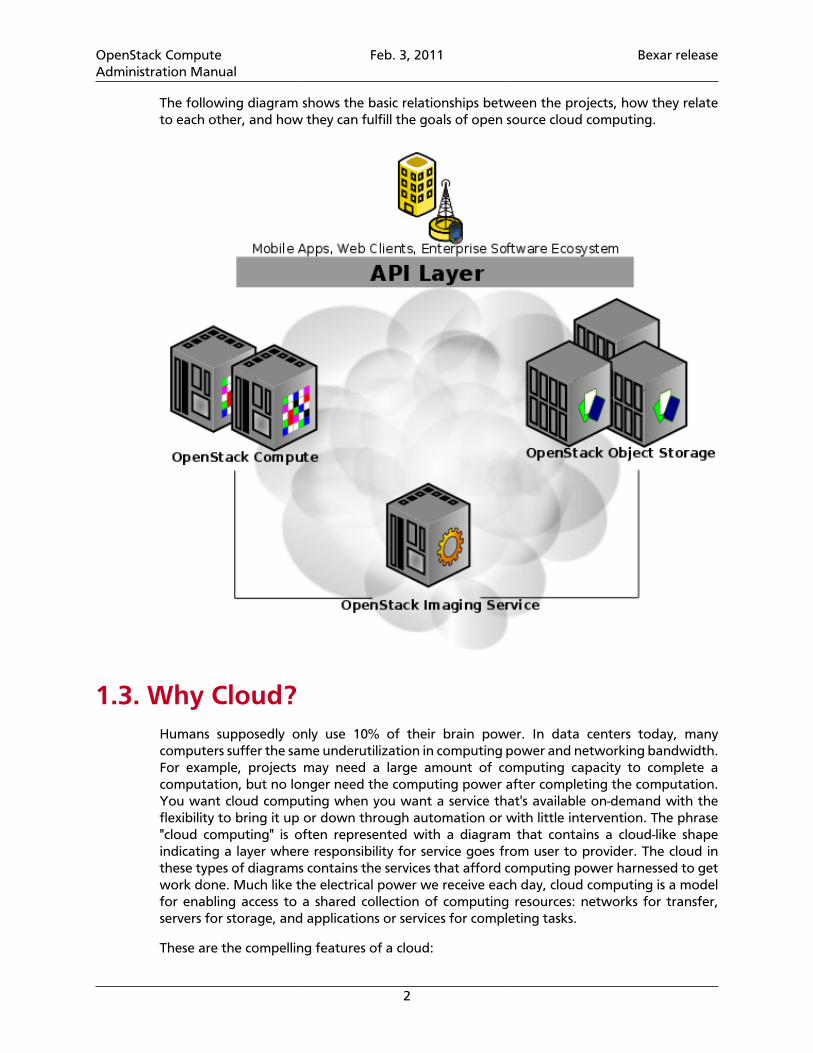
The following diagram shows the basic relationships between the projects, how they relateto each other, and how they can fulfill the goals of open source cloud computing.
1.3. Why Cloud?Humans supposedly only use 10% of their brain power. In data centers today, manycomputers suffer the same underutilization in computing power and networking bandwidth.For example, projects may need a large amount of computing capacity to complete acomputation, but no longer need the computing power after completing the computation.You want cloud computing when you want a service that's available on-demand with theflexibility to bring it up or down through automation or with little intervention. The phrase"cloud computing" is often represented with a diagram that contains a cloud-like shapeindicating a layer where responsibility for service goes from user to provider. The cloud inthese types of diagrams contains the services that afford computing power harnessed to getwork done. Much like the electrical power we receive each day, cloud computing is a modelfor enabling access to a shared collection of computing resources: networks for transfer,servers for storage, and applications or services for completing tasks.
These are the compelling features of a cloud:
OpenStack ComputeAdministration Manual
Feb. 3, 2011 Bexar release
3
• On-demand self-service: A cloud enables self-service. Users can provision servers andnetworks with little human intervention.
• Network access: Any computing capabilities are available over the network. Many differentdevices are allowed access through standardized mechanisms.
• Resource pooling: Clouds can serve multiple consumers according to demand.• Elasticity: Provisioning is rapid and scales out or in based on need.• Metered or measured service: Just like utilities that are paid for by the hour, clouds should
optimize resource use and control it for the level of service or type of servers such as storageor processing.
Cloud computing offers different service models depending on the capabilities a consumermay require. For a more detailed discussion of cloud computing's essential characteristics andits models of service and deployment, see http://csrc.nist.gov/groups/SNS/cloud-computing/, published by the US National Institute of Standards and Technology.
SaaS: Software as a Service. Provides the consumer the ability to use the software in a cloudenvironment, such as web-based email for example.
PaaS: Platform as a Service. Provides the consumer the ability to deploy applications througha programming language or tools supported by the cloud platform provider. An example ofplatform as a service is an Eclipse/Java programming platform provided with no downloadsrequired.
IaaS: Infrastructure as a Service. Provides infrastructure such as computer instances, networkconnections, and storage so that people can run any software or operating system.
When you hear terms such as public cloud or private cloud, these refer to the deploymentmodel for the cloud. A private cloud operates for a single organization, but can be managedon-premise or off-premise. A public cloud has an infrastructure that is available to the generalpublic or a large industry group and is likely owned by a cloud services company. The NIST alsodefines community cloud as shared by several organizations supporting a specific communitywith shared concerns.
A hybrid cloud can either be a deployment model, as a composition of both public and privateclouds, or a hybrid model for cloud computing may involve both virtual and physical servers.
What have people done with cloud computing? Cloud computing can help with large-scalecomputing needs or can lead consolidation efforts by virtualizing servers to make more useof existing hardware and potentially release old hardware from service. People also use cloudcomputing for collaboration because of the high availability through networked computers.Productivity suites for word processing, number crunching, and email communications, andmore are also available through cloud computing. Cloud computing also avails additionalstorage to the cloud user, avoiding the need for additional hard drives on your desktop andenabling access to huge data storage capacity online in the cloud.
OpenStack ComputeAdministration Manual
Feb. 3, 2011 Bexar release
4
2. Introduction to OpenStack ComputeOpenStack Compute gives you a tool to orchestrate a cloud, including running instances,managing networks, and controlling access to the cloud through users and projects. Theunderlying OpenStack open source project's name is Nova, and it provides the software thatcan control an Infrastructure as a Service (IaaS) cloud computing platform. It is similar in scopeto Amazon EC2 and Rackspace Cloud Servers. OpenStack Compute does not include anyvirtualization software; rather it defines drivers that interact with underlying virtualizationmechanisms that run on your host operating system, and exposes functionality over a web-based API.
2.1. Users and ProjectsThe OpenStack Compute system is designed to be used by many different cloud computingconsumers or customers, using standard role-based access assignments. Roles control theactions that a user is allowed to perform. For example, a user cannot allocate a public IPwithout the netadmin or admin role. A user's access to particular images is limited by project,but the access key and secret key are assigned per user. Key pairs granting access to aninstance are enabled per user, but quotas to control resource consumption across availablehardware resources are per project.
OpenStack Compute uses a rights management system that employs a Role-Based AccessControl (RBAC) model and supports the following five roles:
• Cloud Administrator (admin): Users of this class enjoy complete system access.
• IT Security (itsec): This role is limited to IT security personnel. It permits role holders toquarantine instances.
• Project Manager (projectmanager): The default for project owners, this role affords usersthe ability to add other users to a project, interact with project images, and launch andterminate instances.
• Network Administrator (netadmin): Users with this role are permitted to allocate andassign publicly accessible IP addresses as well as create and modify firewall rules.
• Developer (developer): This is a general purpose role that is assigned to users by default.
While the original EC2 API supports users, OpenStack Compute adds the concept of projects.Projects are isolated resource containers forming the principal organizational structure withinNova. They consist of a separate VLAN, volumes, instances, images, keys, and users. A usercan specify which project he or she wishes to use by appending :project_id to his or her accesskey. If no project is specified in the API request, Compute attempts to use a project with thesame id as the user.
For projects, quota controls are available to limit the:
• Number of volumes which may be created
• Total size of all volumes within a project as measured in GB
• Number of instances which may be launched

OpenStack ComputeAdministration Manual
Feb. 3, 2011 Bexar release
5
• Number of processor cores which may be allocated
• Publicly accessible IP addresses
2.2. Images and InstancesAn image is a file containing information about a virtual disk that completely replicatesall information about a working computer at a point in time including operating systeminformation and file system information. Compute can use certificate management fordecrypting bundled images. For now, Compute relies on using the euca2ools command-linetools distributed by the Eucalyptus Team for adding, bundling, and deleting images.
There are two methods for managing images. Images can be served through the OpenStackImaging Service, a project that is named Glance, or use the nova-objectstore service. Withan OpenStack Imaging Service server in place, the imaging service fetches the image on tothe host machine and then OpenStack Compute boots the image from the host machine. Toplace images into the service, you would use a ReST interface to stream them, and the service,in turn, streams that into a back end which could be S3, OpenStack Object Storage (which canuse an S3), or the local file system on the server where OpenStack Imaging Service is installed.
An instance is a running virtual machine within the cloud. An instance has a life cycle that iscontrolled by OpenStack Compute. Compute creates the instances and it is responsible forbuilding a disk image, launching it, reporting the state, attaching persistent storage, andterminating it. The types of virtualization standards that may be used with Compute include:
• KVM
• UML
• XEN
• Hyper-V
• QEMU
2.3. System ArchitectureOpenStack Compute consists of seven main components, with the cloud controllercomponent representing the global state and interacting with all other components. An APIServer acts as the web services front end for the cloud controller. The compute controllerprovides compute server resources, and the Object Store component provides storageservices. An auth manager provides authentication and authorization services. A volumecontroller provides fast and permanent block-level storage for the compute servers. Anetwork controller provides virtual networks to enable compute servers to interact with eachother and with the public network. A scheduler selects the most suitable compute controllerto host an instance.
OpenStack Compute is built on a shared-nothing, messaging-based architecture. All of themajor components include a compute controller, volume controller, network controller, andobject store can be run on multiple servers. A cloud controller communicates with the internalobject store via HTTP (Hyper Text Transfer Protocol), but it communicates with a scheduler,network controller, and volume controller via AMQP (Advanced Message Queue Protocol).
OpenStack ComputeAdministration Manual
Feb. 3, 2011 Bexar release
6
To avoid blocking each component while waiting for a response, OpenStack Compute usesasynchronous calls, with a call-back that gets triggered when a response is received.
To achieve the shared-nothing property with multiple copies of the same component,OpenStack Compute keeps all the cloud system state in a distributed data store. Updates tosystem state are written into this store, using atomic transactions when required. Requestsfor system state are read out of this store. In limited cases, the read results are cached withincontrollers for short periods of time (for example, the current list of system users.)
2.4. Storage and OpenStack ComputeA ‘volume’ is a detachable block storage device. You can think of it as a USB hard drive. Itcan only be attached to one instance at a time, so it does not work like a SAN. If you wish toexpose the same volume to multiple instances, you will have to use an NFS or SAMBA sharefrom an existing instance.
Every instance larger than m1.tiny starts with some local storage (up to 160GB for m1.xlarge).This storage is currently the second partition on the root drive.
OpenStack ComputeAdministration Manual
Feb. 3, 2011 Bexar release
7
3. Installing and Configuring OpenStackCompute
The OpenStack system has several key projects that are separate installations but can worktogether depending on your cloud needs: OpenStack Compute, OpenStack Object Storage,and OpenStack Image Store. You can install any of these projects separately and thenconfigure them either as standalone or connected entities.
3.1. System RequirementsHardware: OpenStack components are intended to run on standard hardware.
Operating System: OpenStack currently runs on Ubuntu and the large scale deploymentsrunning OpenStack run on Ubuntu 10.04 LTS, so deployment-level considerations tend tobe Ubuntu-centric. Community members are testing installations of OpenStack Computefor CentOS and RHEL and documenting their efforts on the OpenStack wiki atwiki.openstack.org. Be aware that CentOS 6 is the most viable option (not 5.5) due to nesteddependencies.
Networking: 1000 Mbps are suggested. For OpenStack Compute, networking is configuredon multi-node installations between the physical machines on a single subnet. For networkingbetween virtual machine instances, three network options are available: flat, DHCP, andVLAN.
Database: For OpenStack Compute, you need access to either a PostgreSQL or MySQLdatabase, or you can install it as part of the OpenStack Compute installation process.
Permissions: You can install OpenStack Compute either as root or as a user with sudopermissions if you configure the sudoers file to enable all the permissions.
3.2. Installing OpenStack Compute on UbuntuHow you go about installing OpenStack Compute depends on your goals for the installation.Here is a matrix of options for single computer installation. This guide specifically walksthrough a bare-metal installation with two nodes.
Single node installation on Ubuntu for development purposes from source code using a script- see http://wiki.openstack.org/NovaInstall/DevInstallScript.
Single node installation on Ubuntu for development and test purposes from a bleeding-edgepackage - see http://wiki.openstack.org/NovaInstall/DevPkgInstall.
Single node virtual machine installation containing a known version - see http://wiki.openstack.org/NovaVirtually.
Multiple node deployment using Puppet - see http://wiki.openstack.org/NovaInstall/NovaDeploymentTool.
OpenStack ComputeAdministration Manual
Feb. 3, 2011 Bexar release
8
You can install OpenStack Compute on multiple nodes to increase performance andavailability of the OpenStack Compute installation. This setup is based on an Ubuntu LucidLynx 10.04 installation with the latest updates.
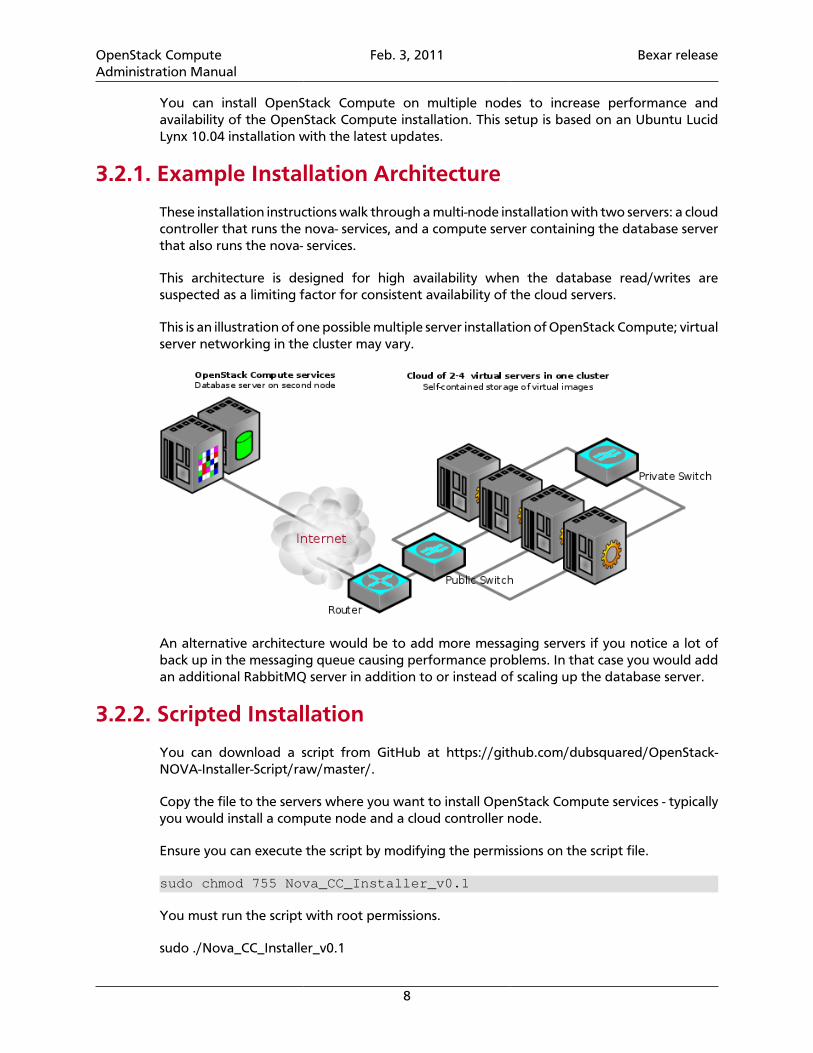
3.2.1. Example Installation Architecture
These installation instructions walk through a multi-node installation with two servers: a cloudcontroller that runs the nova- services, and a compute server containing the database serverthat also runs the nova- services.
This architecture is designed for high availability when the database read/writes aresuspected as a limiting factor for consistent availability of the cloud servers.
This is an illustration of one possible multiple server installation of OpenStack Compute; virtualserver networking in the cluster may vary.
An alternative architecture would be to add more messaging servers if you notice a lot ofback up in the messaging queue causing performance problems. In that case you would addan additional RabbitMQ server in addition to or instead of scaling up the database server.
3.2.2. Scripted Installation
You can download a script from GitHub at https://github.com/dubsquared/OpenStack-NOVA-Installer-Script/raw/master/.
Copy the file to the servers where you want to install OpenStack Compute services - typicallyyou would install a compute node and a cloud controller node.
Ensure you can execute the script by modifying the permissions on the script file.
sudo chmod 755 Nova_CC_Installer_v0.1
You must run the script with root permissions.
sudo ./Nova_CC_Installer_v0.1
OpenStack ComputeAdministration Manual
Feb. 3, 2011 Bexar release
9
The way this script is designed, you can have multiple servers for the cloud controller, themessaging service, and the database server, or run it all on one server.
These are the parameters you enter using the script:
• Enter the mySQL root password.
• Enter the S3 IP, or use the default address as the current server's IP address.
• Enter the RabbitMQ Host IP. Again, you can use the default to install it to the local server.RabbitMQ will be installed.
• Enter the Cloud Controller Host IP address.
• Enter the mySQL Host IP address.
The script uses all these values entered for the configuration information to create thenova.conf configuration file.
The script also walks you through creating a user and project. Enter a user name and projectname when prompted. Enter the network IP values you want to use with CIDR format, whichis a compact specification of an IP address.
Next the script generates credentials.
After configuring OpenStack Compute using the script, be sure to source the novarccredential file.
source /root/creds/novarc
Here is the final page of the scripted installation prior to installing all the packages:
Controller network range for ALL projects (normally x.x.x.x/12):10.0.0.0/12 Total amount of usable IPs for ALL projects:8 Step 4: Creating a project for Nova You will choose an admin for the project, and also name the project here. Also, you will build out the network configuration for the project. Nova project user name:admin Nova project name:project1 Desired network + CIDR for project (normally x.x.x.x/24):10.0.0.0/24 How many networks for project:4 How many available IPs per project network:2 At this point, you've entered all the information needed to finish deployment of your controller! Feel free to get some coffee, you have earned it!
OpenStack ComputeAdministration Manual
Feb. 3, 2011 Bexar release
10
Entering auto-pilot mode...
Now all the necessary nova services are started up and you can begin to issue nova-managecommands.
3.2.3. Manual Installation
The manual installation involves installing from packages on Ubuntu 10.04 or 10.10 as auser with root permission. Depending on your environment, you may need to prefix thesecommands with sudo.
This installation process walks through installing a cloud controller node and a compute node.The cloud controller node contains all the nova- services and runs the database server. Thecompute node runs all the nova- services. You only need one nova-network service runningin a multinode install.
3.2.3.1. Installing the Cloud Controller
First, set up pre-requisites to use the Nova PPA (Personal Packages Archive)provided through https://launchpad.net/~nova-core/+archive/trunk. The ‘python-software-properties’ package is a pre-requisite for setting up the nova package repository.
sudo apt-get install python-software-properties
sudo add-apt-repository ppa:nova-core/trunk
Run update with sudo apt-get update.
Install the messaging queue server, RabbitMQ.
sudo apt-get install -y rabbitmq-server
Now, install the Python dependencies.
sudo apt-get install -y python-greenlet python-mysqldb
Install the required nova- packages, and dependencies should be automatically installed.
sudo apt-get install -y nova-common nova-doc python-nova nova-apinova-network nova-objectstore nova-scheduler nova-compute
Install the supplemental tools such as euca2ools and unzip.
sudo apt-get install -y euca2ools unzip
3.2.3.1.1. Setting up the SQL Database (MySQL) on the Cloud Controller
You must use a SQLAlchemy-compatible database, such as mySQL or PostgreSQL. Thisexample shows mySQL.
First you can set environments with a "pre-seed" line to bypass all the installation prompts,running this as root:

OpenStack ComputeAdministration Manual
Feb. 3, 2011 Bexar release
11
bashMYSQL_PASS=novacat <<MYSQL_PRESEED | debconf-set-selectionsmysql-server-5.1 mysql-server/root_password password $MYSQL_PASSmysql-server-5.1 mysql-server/root_password_again password $MYSQL_PASSmysql-server-5.1 mysql-server/start_on_boot boolean trueMYSQL_PRESEED
Next, install MySQL with: sudo apt-get install -y mysql-server
Edit /etc/mysql/my.cnf to change ‘bind-address’ from localhost (127.0.0.1) to any (0.0.0.0)and restart the mysql service:
sudo sed -i 's/127.0.0.1/0.0.0.0/g' /etc/mysql/my.cnf sudo service mysql restart
To configure the MySQL database, create the nova database:
sudo mysql -uroot -p$MYSQL_PASS -e 'CREATE DATABASE nova;'
Update the DB to include user ‘root’@’%’ with super user privileges:
sudo mysql -uroot -p$MYSQL_PASS -e "GRANT ALL PRIVILEGES ON *.* TO 'root'@'%' WITH GRANT OPTION;"
Set mySQL root password:
sudo mysql -uroot -p$MYSQL_PASS -e "SET PASSWORD FOR 'root'@'%' = PASSWORD('$MYSQL_PASS');"
3.2.3.2. Installing the Compute Node
Install all the nova- packages and dependencies as you did for the Cloud Controller node. Onthis node, you must have nova-network installed and configured.
The Compute Node is where you configure the Compute network, the networking betweenyour instances. There are three options
If you use FlatManager as your network manager, there are some additional networkingchanges to ensure connectivity between your nodes and VMs. If you chose VlanManager orFlatDHCP, you may skip this section because they are set up for you automatically.
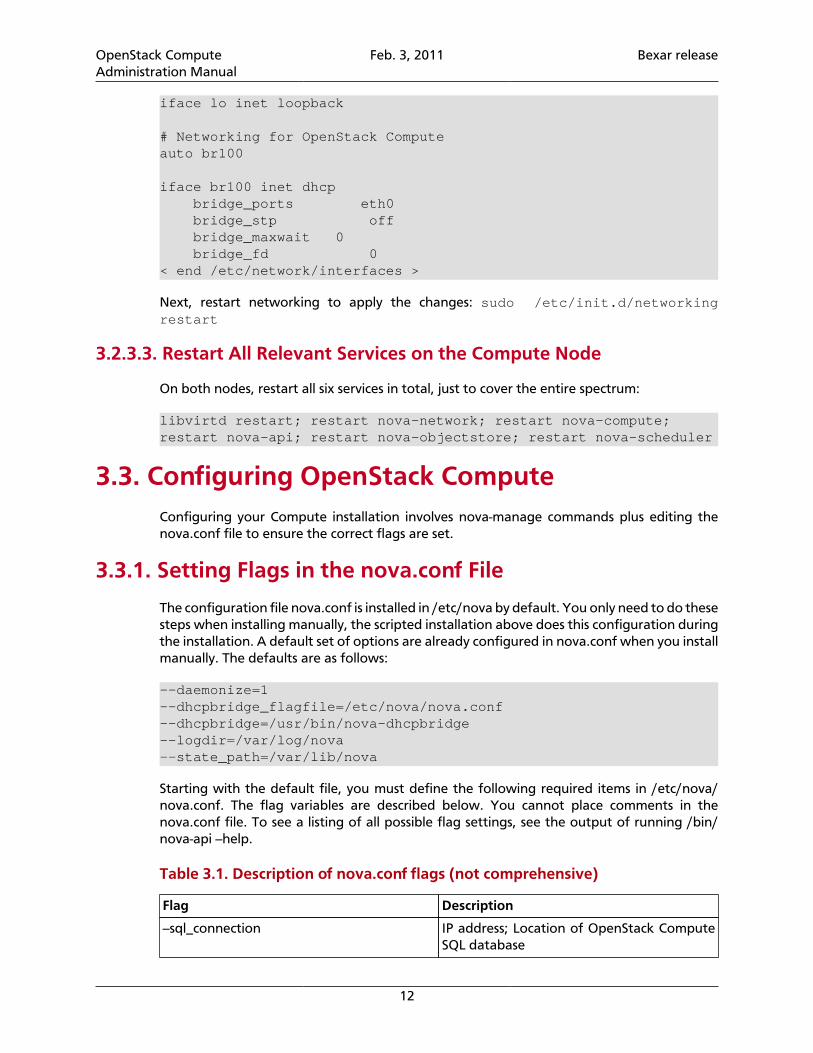
Compute defaults to a bridge device named ‘br100’. This needs to be created and somehowintegrated into your network. To keep things as simple as possible, have all the VM guests onthe same network as the VM hosts (the compute nodes). To do so, set the compute node’sexternal IP address to be on the bridge and add eth0 to that bridge. To do this, edit yournetwork interfaces configuration to look like the following example:
< begin /etc/network/interfaces > # The loopback network interface auto lo
OpenStack ComputeAdministration Manual
Feb. 3, 2011 Bexar release
12
iface lo inet loopback
# Networking for OpenStack Compute auto br100
iface br100 inet dhcp bridge_ports eth0 bridge_stp off bridge_maxwait 0 bridge_fd 0 < end /etc/network/interfaces >
Next, restart networking to apply the changes: sudo /etc/init.d/networkingrestart
3.2.3.3. Restart All Relevant Services on the Compute Node
On both nodes, restart all six services in total, just to cover the entire spectrum:
libvirtd restart; restart nova-network; restart nova-compute; restart nova-api; restart nova-objectstore; restart nova-scheduler
3.3. Configuring OpenStack ComputeConfiguring your Compute installation involves nova-manage commands plus editing thenova.conf file to ensure the correct flags are set.
3.3.1. Setting Flags in the nova.conf File
The configuration file nova.conf is installed in /etc/nova by default. You only need to do thesesteps when installing manually, the scripted installation above does this configuration duringthe installation. A default set of options are already configured in nova.conf when you installmanually. The defaults are as follows:
--daemonize=1 --dhcpbridge_flagfile=/etc/nova/nova.conf--dhcpbridge=/usr/bin/nova-dhcpbridge --logdir=/var/log/nova--state_path=/var/lib/nova
Starting with the default file, you must define the following required items in /etc/nova/nova.conf. The flag variables are described below. You cannot place comments in thenova.conf file. To see a listing of all possible flag settings, see the output of running /bin/nova-api --help.
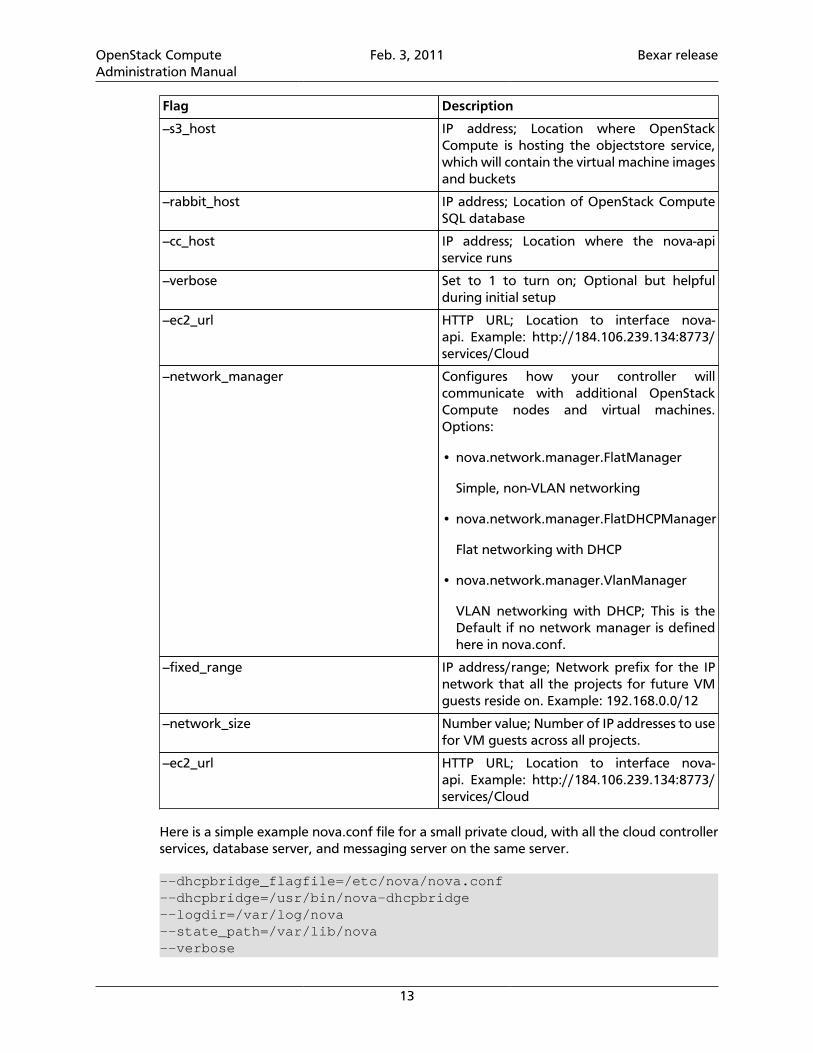
Table 3.1. Description of nova.conf flags (not comprehensive)
Flag Description
--sql_connection IP address; Location of OpenStack ComputeSQL database
OpenStack ComputeAdministration Manual
Feb. 3, 2011 Bexar release
13
Flag Description
--s3_host IP address; Location where OpenStackCompute is hosting the objectstore service,which will contain the virtual machine imagesand buckets
--rabbit_host IP address; Location of OpenStack ComputeSQL database
--cc_host IP address; Location where the nova-apiservice runs
--verbose Set to 1 to turn on; Optional but helpfulduring initial setup
--ec2_url HTTP URL; Location to interface nova-api. Example: http://184.106.239.134:8773/services/Cloud
--network_manager Configures how your controller willcommunicate with additional OpenStackCompute nodes and virtual machines.Options:
• nova.network.manager.FlatManager
Simple, non-VLAN networking
• nova.network.manager.FlatDHCPManager
Flat networking with DHCP
• nova.network.manager.VlanManager
VLAN networking with DHCP; This is theDefault if no network manager is definedhere in nova.conf.
--fixed_range IP address/range; Network prefix for the IPnetwork that all the projects for future VMguests reside on. Example: 192.168.0.0/12
--network_size Number value; Number of IP addresses to usefor VM guests across all projects.
--ec2_url HTTP URL; Location to interface nova-api. Example: http://184.106.239.134:8773/services/Cloud
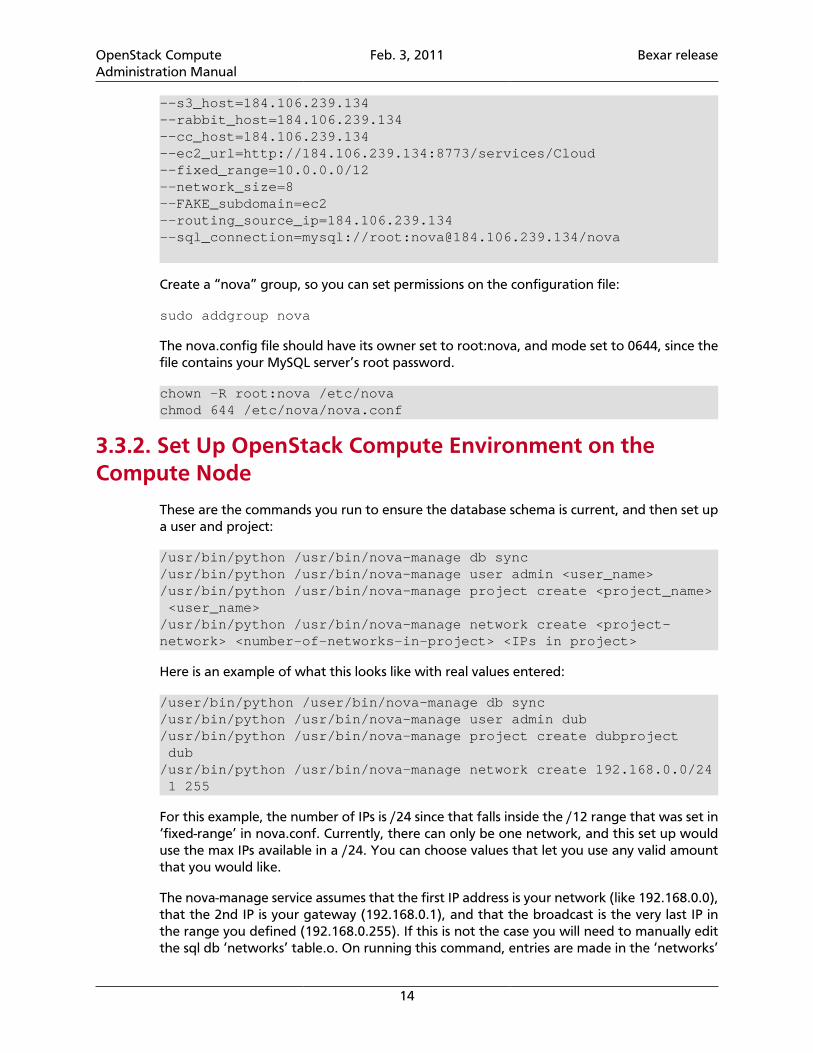
Here is a simple example nova.conf file for a small private cloud, with all the cloud controllerservices, database server, and messaging server on the same server.
--dhcpbridge_flagfile=/etc/nova/nova.conf--dhcpbridge=/usr/bin/nova-dhcpbridge--logdir=/var/log/nova--state_path=/var/lib/nova--verbose
OpenStack ComputeAdministration Manual
Feb. 3, 2011 Bexar release
14
--s3_host=184.106.239.134--rabbit_host=184.106.239.134--cc_host=184.106.239.134--ec2_url=http://184.106.239.134:8773/services/Cloud--fixed_range=10.0.0.0/12--network_size=8--FAKE_subdomain=ec2--routing_source_ip=184.106.239.134--sql_connection=mysql://root:[email protected]/nova
Create a “nova” group, so you can set permissions on the configuration file:
sudo addgroup nova
The nova.config file should have its owner set to root:nova, and mode set to 0644, since thefile contains your MySQL server’s root password.
chown -R root:nova /etc/nova chmod 644 /etc/nova/nova.conf
3.3.2. Set Up OpenStack Compute Environment on theCompute Node
These are the commands you run to ensure the database schema is current, and then set upa user and project:
/usr/bin/python /usr/bin/nova-manage db sync/usr/bin/python /usr/bin/nova-manage user admin <user_name>/usr/bin/python /usr/bin/nova-manage project create <project_name> <user_name> /usr/bin/python /usr/bin/nova-manage network create <project-network> <number-of-networks-in-project> <IPs in project>
Here is an example of what this looks like with real values entered:
/user/bin/python /user/bin/nova-manage db sync/usr/bin/python /usr/bin/nova-manage user admin dub /usr/bin/python /usr/bin/nova-manage project create dubproject dub /usr/bin/python /usr/bin/nova-manage network create 192.168.0.0/24 1 255
For this example, the number of IPs is /24 since that falls inside the /12 range that was set in‘fixed-range’ in nova.conf. Currently, there can only be one network, and this set up woulduse the max IPs available in a /24. You can choose values that let you use any valid amountthat you would like.
The nova-manage service assumes that the first IP address is your network (like 192.168.0.0),that the 2nd IP is your gateway (192.168.0.1), and that the broadcast is the very last IP inthe range you defined (192.168.0.255). If this is not the case you will need to manually editthe sql db ‘networks’ table.o. On running this command, entries are made in the ‘networks’
OpenStack ComputeAdministration Manual
Feb. 3, 2011 Bexar release
15
and ‘fixed_ips’ table. However, one of the networks listed in the ‘networks’ table needs to bemarked as bridge in order for the code to know that a bridge exists. The Network is markedas bridged automatically based on the type of network manager selected. This configurationis only necessary if you chose FlatManager as your network type.
3.3.3. Create Certifications
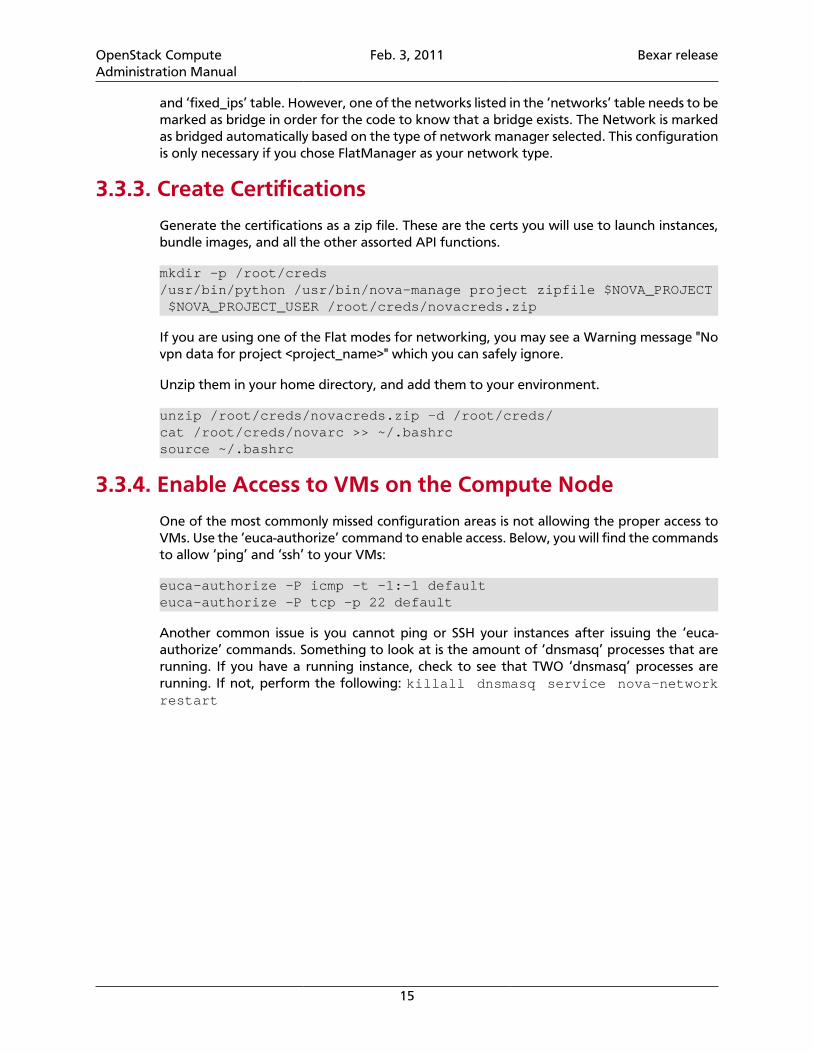
Generate the certifications as a zip file. These are the certs you will use to launch instances,bundle images, and all the other assorted API functions.
mkdir –p /root/creds /usr/bin/python /usr/bin/nova-manage project zipfile $NOVA_PROJECT $NOVA_PROJECT_USER /root/creds/novacreds.zip
If you are using one of the Flat modes for networking, you may see a Warning message "Novpn data for project <project_name>" which you can safely ignore.
Unzip them in your home directory, and add them to your environment.
unzip /root/creds/novacreds.zip -d /root/creds/ cat /root/creds/novarc >> ~/.bashrc source ~/.bashrc
3.3.4. Enable Access to VMs on the Compute Node
One of the most commonly missed configuration areas is not allowing the proper access toVMs. Use the ‘euca-authorize’ command to enable access. Below, you will find the commandsto allow ‘ping’ and ‘ssh’ to your VMs:
euca-authorize -P icmp -t -1:-1 default euca-authorize -P tcp -p 22 default
Another common issue is you cannot ping or SSH your instances after issuing the ‘euca-authorize’ commands. Something to look at is the amount of ‘dnsmasq’ processes that arerunning. If you have a running instance, check to see that TWO ‘dnsmasq’ processes arerunning. If not, perform the following: killall dnsmasq service nova-networkrestart
OpenStack ComputeAdministration Manual
Feb. 3, 2011 Bexar release
16
4. NetworkingBy understanding the available networking configuration options you can design the bestconfiguration for your OpenStack Compute instances.
4.1. Networking OptionsThis section offers a brief overview of each concept in networking for Compute.
In Compute, users organize their cloud resources in projects. A Compute project consists ofa number of VM instances created by a user. For each VM instance, Compute assigns to it aprivate IP address. (Currently, Nova only supports Linux bridge networking that allows thevirtual interfaces to connect to the outside network through the physical interface.)
The Network Controller provides virtual networks to enable compute servers to interact witheach other and with the public network.
Currently, Nova supports three kinds of networks, implemented in three “Network Manager”types respectively: Flat Network Manager, Flat DHCP Network Manager, and VLAN NetworkManager. The three kinds of networks can co-exist in a cloud system. However, since you can'tyet select the type of network for a given project, you cannot configure more than one typeof network in a given Compute installation.
Nova has a concept of Fixed IPs and Floating IPs. Fixed IPs are assigned to an instanceon creation and stay the same until the instance is explicitly terminated. Floating IPs areIP addresses that can be dynamically associated with an instance. This address can bedisassociated and associated with another instance at any time.
In Flat Mode, a network administrator specifies a subnet. The IP addresses for VM instancesare grabbed from the subnet, and then injected into the image on launch. Each instancereceives a fixed IP address from the pool of available addresses. A network administratormust configure the Linux networking bridge (named br100) both on the network controllerhosting the network and on the cloud controllers hosting the instances. All instances of thesystem are attached to the same bridge, configured manually by the network administrator.
Note
The configuration injection currently only works on Linux-style systems that keepnetworking configuration in /etc/network/interfaces.
In Flat DHCP Mode, you start a DHCP server to pass out IP addresses to VM instances fromthe specified subnet in addition to manually configuring the networking bridge. IP addressesfor VM instances are grabbed from a subnet specified by the network administrator. LikeFlat Mode, all instances are attached to a single bridge on the compute node. In additiona DHCP server is running to configure instances. In this mode, Compute does a bit moreconfiguration in that it attempts to bridge into an ethernet device (eth0 by default). It willalso run dnsmasq as a dhcpserver listening on this bridge. Instances receive their fixed IPs bydoing a dhcpdiscover.
In both flat modes, the network nodes do not act as a default gateway. Instances are givenpublic IP addresses. Compute nodes have iptables/ebtables entries created per project andinstance to protect against IP/MAC address spoofing and ARP poisoning.
OpenStack ComputeAdministration Manual
Feb. 3, 2011 Bexar release
17
VLAN Network Mode is the default mode for OpenStack Compute. In this mode, Computecreates a VLAN and bridge for each project. For multiple machine installation, the VLANNetwork Mode requires a switch that supports host-managed VLAN tagging. The project getsa range of private IPs that are only accessible from inside the VLAN. In order for a user toaccess the instances in their project, a special VPN instance (code named cloudpipe) needs tobe created. Compute generates a certificate and key for the user to access the VPN and startsthe VPN automatically. It provides a private network segment for each project's instancesthat can be accessed via a dedicated VPN connection from the Internet. In this mode, eachproject gets its own VLAN, Linux networking bridge, and subnet. The subnets are specifiedby the network administrator, and are assigned dynamically to a project when required. ADHCP Server is started for each VLAN to pass out IP addresses to VM instances from thesubnet assigned to the project. All instances belonging to one project are bridged into thesame VLAN for that project. OpenStack Compute creates the Linux networking bridges andVLANs when required.
4.2. Configuring Networking on the ComputeNode
To configure the Compute node's networking for the VM images, the overall steps are:
1. Set the --network-manager flag in nova.conf.
2. Use the nova-manage network create CIDR n n command to create the subnetthat the VMs reside on.
3. Integrate the bridge with your network.
By default, Compute uses the VLAN Network Mode. You choose the networking mode foryour virtual instances in the nova.conf file. Here are the three possible options:
• --network_manager = nova.network.manager.FlatManager
Simple, non-VLAN networking
• --network_manager = nova.network.manager.FlatDHCPManager
Flat networking with DHCP
• --network_manager = nova.network.manager.VlanManager
VLAN networking with DHCP. This is the Default if no network manager is defined innova.conf.
Use the "nova-manage network create 192.168.0.0/24 1 255" command to create the subnetthat your VMs will run on.
4.2.1. Configuring Flat Networking
Ensure that your nova.conf file contains the line:
--network_manager = nova.network.manager.FlatManager
OpenStack ComputeAdministration Manual
Feb. 3, 2011 Bexar release
18
Compute defaults to a bridge device named ‘br100’ which is stored in the Nova database, soyou can change the name of the bridge device by modifying the entry in the database.
Set the compute node's external IP address to be on the bridge and add eth0 to that bridge.To do this, edit your network interfaces configuration to look like the following example:
< begin /etc/network/interfaces > # The loopback network interface auto lo iface lo inet loopback
# Networking for OpenStack Compute auto br100
iface br100 inet dhcp bridge_ports eth0 bridge_stp off bridge_maxwait 0 bridge_fd 0 < end /etc/network/interfaces >
Next, restart networking to apply the changes: sudo /etc/init.d/networkingrestart
4.2.2. Configuring Flat DHCP Networking
FlatDHCP doesn't create VLANs, it creates a bridge. This bridge works just fine on a singlehost, but when there are multiple hosts, traffic needs a way to get out of the bridge onto aphysical interface. Be careful when setting up --flat_interface, if you specify an interface thatalready has an IP it will break and if this is the interface you are connecting through with SSH,you cannot fix it unless you have ipmi/console access.
If you have an unused interface on your hosts that has connectivity with no ip address, youcan simply tell FlatDHCP to bridge into the interface by specifying --flat_interface=<interface>in your flagfile. The network host will automatically add the gateway ip to this bridge. Youcan also add the interface to br100 manually and not set flat_interface. If this is the case foryou, edit your nova.conf file to contain the following lines:
--dhcpbridge_flagfile=/etc/nova/nova.conf--dhcpbridge=/usr/bin/nova-dhcpbridge--network_manager=nova.network.manager.FlatDHCPManager--flat_network_dhcp_start=10.0.0.2--flat_interface=eth2--flat_injected=False--public_interface=eth0
Integrate your network interfaces to match this configuration.
4.2.3. Configuring VLAN Networking
VLAN is the default networking mode for Compute, so if you have no --network_managerentry in your nova.conf file, you are set up for VLAN. You must integrate the bridge that
OpenStack ComputeAdministration Manual
Feb. 3, 2011 Bexar release
19
Compute creates with your network, and you need to have networking hardware thatsupports VLAN tagging.
Also, so that users can access the instances in their project, a special VPN instance (code namedcloudpipe) needs to be created. You can create the cloudpipe instance. The image is basicallyjust a Linux instance with openvpn installed. It needs a simple script to grab user data fromthe metadata server, b64 decode it into a zip file, and run the autorun.sh script from insidethe zip. The autorun script should configure and run openvpn to run using the data fromCompute.
For certificate management, it is also useful to have a cron script that will periodicallydownload the metadata and copy the new Certificate Revocation List (CRL). This will keeprevoked users from connecting and disconnects any users that are connected with revokedcertificates when their connection is re-negotiated (every hour). You set the --use_project_caflag in nova.conf for cloudpipes to work securely so that each project has its own CertificateAuthority (CA).
4.2.4. Enabling Ping and SSH on VMs
Be sure you enable access to your VMs by using the ‘euca-authorize’ command. Below, youwill find the commands to allow ‘ping’ and ‘ssh’ to your VMs:
euca-authorize -P icmp -t -1:-1 default euca-authorize -P tcp -p 22 default
If you still cannot ping or SSH your instances after issuing the ‘euca-authorize’ commands, lookat the number of ‘dnsmasq’ processes that are running. If you have a running instance, checkto see that TWO ‘dnsmasq’ processes are running. If not, perform the following: killalldnsmasq service nova-network restart
OpenStack ComputeAdministration Manual
Feb. 3, 2011 Bexar release
20
5. Running OpenStack ComputeBy understanding how the cloud controller and compute node interact with each other youcan administer the OpenStack Compute installation.
The OpenStack Compute cloud works via the interaction of a series of daemon processesnamed nova-* that reside persistently on the host machine or machines. These binaries canall run on the same machine or be spread out on multiple boxes in a large deployment. Theresponsibilities of Services, Managers, and Drivers, can be a bit confusing at first. Here is anoutline the division of responsibilities to make understanding the system a little bit easier.
Currently, Services are nova-api, nova-objectstore (which can be replaced with OpenStackImaging Service), nova-compute, nova-volume, and nova-network. Managers and Drivers arespecified by flags and loaded using utils.load_object(). Managers are responsible for a certainaspect of the system. It is a logical grouping of code relating to a portion of the system. Ingeneral other components should be using the manager to make changes to the componentsthat it is responsible for.
For example, other components that need to deal with volumes in some way, should do so bycalling methods on the VolumeManager instead of directly changing fields in the database.This allows us to keep all of the code relating to volumes in the same place.
• nova-api - The nova-api service receives xml requests and sends them to the rest of thesystem. It is a wsgi app that routes and authenticate requests. It supports the ec2 andopenstack apis. There is a nova-api.conf file created when you install Compute.
• nova-objectstore - The nova-objectstore service is an ultra simple file-based storage systemfor images that replicates most of the S3 API. It can be replaced with OpenStack ImagingService and a simple image manager or use OpenStack Object Storage as the virtualmachine image storage facility.
• nova-compute - The nova-compute service is responsible for managing virtual machines. Itloads a Service object which exposes the public methods on ComputeManager via rpc.
• nova-volume - The nova-volume service is responsible for managing attachable blockstorage devices. It loads a Service object which exposes the public methods onVolumeManager via rpc.
• nova-network - The nova-network service is responsible for managing floating and fixedIPs, DHCP, bridging and VLANs. It loads a Service object which exposes the public methodson one of the subclasses of NetworkManager. Different networking strategies are availableto the service by changing the network_manager flag to FlatManager, FlatDHCPManager,or VlanManager (default is VLAN if no other is specified):
$ nova-network --network_manager=nova.network.manager.FlatManager
OpenStack ComputeAdministration Manual
Feb. 3, 2011 Bexar release
21
5.1. Starting ImagesOnce you have an installation, you want to get images that you can use in your Computecloud. We've created a basic Ubuntu image for testing your installation. First you'll downloadthe image, then use uec-publish-tarball to publish it:
image="ubuntu1010-UEC-localuser-image.tar.gz"wget http://c0179148.cdn1.cloudfiles.rackspacecloud.com/ubuntu1010-UEC-localuser-image.tar.gzuec-publish-tarball $image [bucket-name] [hardware-arch]
Here's an example of what this command looks like with data:
uec-publish-tarball ubuntu1010-UEC-localuser-image.tar.gz dub-bucket x86_64
The command in return should output three references: emi, eri and eki. You need to use theemi value in the next section (for example, “ami-zqkyh9th″).
Step two is launching and connecting to the instance, which you do with tools from theEuca2ools on the command line.
One thing to note here, once you publish the tarball, it has to untar before you can launchan image from it. Using the 'euca-describe-images' command, wait until the state turns to"available" from "untarring.":
euca-describe-imageseuca-run-instances $emi -k mykey -t m1.tiny
The instance will go from “launching” to “running” in a short time, and you should be able toconnect via SSH using the 'ubuntu' account, with the password 'ubuntu': (replace $ipaddresswith the one you got from euca-describe-instances):
ssh ubuntu@$ipaddress
The 'ubuntu' user is part of the sudoers group, so you can escalate to 'root' via the followingcommand:
sudo -i
5.2. Deleting InstancesWhen you are done playing with an instance, you can tear the instance down using thefollowing command (replace $instanceid with the instance IDs from above or look it up witheuca-describe-instances):
euca-terminate-instances $instanceid
5.3. Creating Custom ImagesIf you want to create more images, they're built in a reproducible manner. Youcan build more images via code at https://code.launchpad.net/~smoser/+junk/ttylinux-
OpenStack ComputeAdministration Manual
Feb. 3, 2011 Bexar release
22
uec (or use bzr branch lp:~smoser/+junk/ttylinux-uec dirname). Ubuntu also providesdocumentation on creating images using vmbuilder at https://help.ubuntu.com/community/UEC/CreateYourImage.
5.4. Understanding the Compute ServiceArchitecture
These basic categories describe the service architecture and what's going on within the cloudcontroller.
API Server
At the heart of the cloud framework is an API Server. This API Server makes command andcontrol of the hypervisor, storage, and networking programmatically available to users inrealization of the definition of cloud computing.
The API endpoints are basic http web services which handle authentication, authorization,and basic command and control functions using various API interfaces under the Amazon,Rackspace, and related models. This enables API compatibility with multiple existing tool setscreated for interaction with offerings from other vendors. This broad compatibility preventsvendor lock-in.
Message Queue
A messaging queue brokers the interaction between compute nodes (processing), volumes(block storage), the networking controllers (software which controls network infrastructure),API endpoints, the scheduler (determines which physical hardware to allocate to a virtualresource), and similar components. Communication to and from the cloud controller is byHTTP requests through multiple API endpoints.
A typical message passing event begins with the API server receiving a request from auser. The API server authenticates the user and ensures that the user is permitted to issuethe subject command. Availability of objects implicated in the request is evaluated and, ifavailable, the request is routed to the queuing engine for the relevant workers. Workerscontinually listen to the queue based on their role, and occasionally their type hostname.When such listening produces a work request, the worker takes assignment of the taskand begins its execution. Upon completion, a response is dispatched to the queue which isreceived by the API server and relayed to the originating user. Database entries are queried,added, or removed as necessary throughout the process.
Compute Worker
Compute workers manage computing instances on host machines. Through the API,commands are dispatched to compute workers to:
• Run instances
• Terminate instances
• Reboot instances
OpenStack ComputeAdministration Manual
Feb. 3, 2011 Bexar release
23
• Attach volumes
• Detach volumes
• Get console output
Network Controller
The Network Controller manages the networking resources on host machines. The API serverdispatches commands through the message queue, which are subsequently processed byNetwork Controllers. Specific operations include:
• Allocate Fixed IP Addresses
• Configuring VLANs for projects
• Configuring networks for compute nodes
Volume Workers
Volume Workers interact with iSCSI storage to manage LVM-based instance volumes. Specificfunctions include:
• Create Volumes
• Delete Volumes
• Establish Compute volumes
Volumes may easily be transferred between instances, but may be attached to only a singleinstance at a time.
5.5. Managing the CloudThere are two main tools that a system administrator will find useful to manage their cloud;the nova-manage command or use Euca2ools command line commands.
The nova-manage command may only be run by users with admin privileges. Commands foreuca2ools can be used by all users, though specific commands may be restricted by Role BasedAccess Control.
Using the nova-manage command
The nova-manage command is used to perform many essential functions for administrationand ongoing maintenance of nova, such as user creation, vpn management, and much more.
The standard pattern for executing a nova-manage command is: nova-manage categorycommand [args]
For example, to obtain a list of all projects: nova-manage project list
Run without arguments to see a list of available command categories: nova-manage
OpenStack ComputeAdministration Manual
Feb. 3, 2011 Bexar release
24
Command categories are: user, project, role, shell, vpn, and floating.
You can also run with a category argument such as user to see a list of all commands in thatcategory: nova-manage user
5.6. Managing Compute UsersAccess to the Euca2ools (ec2) API is controlled by an access and secret key. The user’s accesskey needs to be included in the request, and the request must be signed with the secret key.Upon receipt of API requests, Compute will verify the signature and execute commands onbehalf of the user.
In order to begin using nova, you will need a to create a user. This can be easily accomplishedusing the user create or user admin commands in nova-manage. user create will create aregular user, whereas user admin will create an admin user. The syntax of the command isnova-manage user create username [access] [secret]. For example:
nova-manage user create john my-access-key a-super-secret-key
If you do not specify an access or secret key, a random uuid will be created automatically.
Credentials
Nova can generate a handy set of credentials for a user. These credentials include a CA forbundling images and a file for setting environment variables to be used by euca2ools. If youdon’t need to bundle images, just the environment script is required. You can export onewith the project environment command. The syntax of the command is nova-manage projectenvironment project_id user_id [filename]. If you don’t specify a filename, it will be exportedas novarc. After generating the file, you can simply source it in bash to add the variables toyour environment:
nova-manage project environment john_project john . novarc
If you do need to bundle images, you will need to get all of the credentials using projectzipfile. Note that zipfile will give you an error message if networks haven’t been created yet.Otherwise zipfile has the same syntax as environment, only the default file name is nova.zip.Example usage:
nova-manage project zipfile john_project john unzip nova.zip . novarc
Role Based Access Control
Roles control the API actions that a user is allowed to perform. For example, a user cannotallocate a public ip without the netadmin role. It is important to remember that a users defacto permissions in a project is the intersection of user (global) roles and project (local) roles.
OpenStack ComputeAdministration Manual
Feb. 3, 2011 Bexar release
25
So for john to have netadmin permissions in his project, he needs to separate roles specified.You can add roles with role add. The syntax is nova-manage role add user_id role [project_id].Let’s give john the netadmin role for his project:
nova-manage role add john netadmin nova-manage role add john netadmin john_project
Role-based access control (RBAC) is an approach to restricting system access to authorizedusers based on an individual’s role within an organization. Various employee functionsrequire certain levels of system access in order to be successful. These functions are mappedto defined roles and individuals are categorized accordingly. Since users are not assignedpermissions directly, but only acquire them through their role (or roles), management ofindividual user rights becomes a matter of assigning appropriate roles to the user. Thissimplifies common operations, such as adding a user, or changing a user’s department.
Nova’s rights management system employs the RBAC model and currently supports thefollowing five roles:
• Cloud Administrator. (admin) Users of this class enjoy complete system access.
• IT Security. (itsec) This role is limited to IT security personnel. It permits role holders toquarantine instances.
• Project Manager. (projectmanager)The default for project owners, this role affords usersthe ability to add other users to a project, interact with project images, and launch andterminate instances.
• Network Administrator. (netadmin) Users with this role are permitted to allocate andassign publicly accessible IP addresses as well as create and modify firewall rules.
• Developer. This is a general purpose role that is assigned to users by default.
RBAC management is exposed through the dashboard for simplified user management.
OpenStack ComputeAdministration Manual
Feb. 3, 2011 Bexar release
26
6. OpenStack InterfacesYou can use a dashboard interface with an OpenStack Compute installation with a web-basedconsole provided by the Openstack-Dashboard and Django-Nova projects. Together theyprovide a reference implementation of a Django site that provides web-based interactionswith the OpenStack Compute cloud controller. For more information about the Django-Nova project, please visit: http://launchpad.net/django-nova. These instructions are for atest deployment of an OpenStack Dashboard. They configure your dashboard to use asqlite3 database and the default Django server. To create a more robust, production-readyinstallation, you would configure this with an Apache web server and MySQL/Postgresdatabase.
6.1. System RequirementsYou should have a running OpenStack Compute installation with the EC2 API enabled.
The dashboard is installed on the node that is running nova-api and nova-compute.
You should know the URL of your nova-api instance.
You must know the credentials of a valid nova admin user, including the username, their EC2Access Key, and their EC2 Secret Key. These credentials are found in the novarc file createdwhen you created a nova project.
Python 2.6 is required, and these instructions have been tested with Ubuntu 10.10.
6.2. Installation StepsTo build a reference dashboard you must use the two projects together. Here are the overallsteps for building the dashboard.
1. Get the source for both django-nova and openstack-dashboard.
2. Optionally, build django-nova with the bootstrap script and build-out commands as shown.
3. Build and configure the openstack-dashboard.
4. Create the openstack-dashboard database with the syncdb command.
5. Run the server that starts the dashboard.
Before you begin, you must have bazaar installed. It's straightforward to install it with sudoapt-get install bzr.
Create a source directory to house both projects:
$ mkdir src$ cd src
6.2.1. Get the source for both projectsNext, get the source for the django-nova project, which is the reference implementation ofthe OpenStack Dashboard. This project contains the code for the website.

OpenStack ComputeAdministration Manual
Feb. 3, 2011 Bexar release
27
$ mkdir django-nova$ cd django-nova$ bzr init-repo .$ bzr branch lp:django-nova/trunk
If you see a message saying "You have not informed bzr of your Launchpad ID..." you canignore that if you do not want to make changes to the code for now.
You now have a directory named trunk containing the reference implementation.
Next, move up a directory and get the code for the Openstack-Dashboard project, whichprovides all the look and feel for the dashboard.
$ cd ..$ mkdir openstack-dashboard$ cd openstack-dashboard$ bzr init-repo .$ bzr branch lp:openstack-dashboard trunk
You now have a directory named trunk containing the dashboard application as well as codefor the look and feel.
6.2.2. (Optional) Build django-novaIf you want to develop upon or modify the inner workings of django-nova, you'll want to buildthis reference implementation. If not, proceed to building the OpenStack Dashboard itself.
Here is how you build the reference implementation that the dashboard uses:
$ cd ../django-nova/trunk$ python bootstrap.py$ bin/buildout
These two commands (bootstrap.py and buildout) install all the dependencies of django-nova.
Next we will create the virtualenv for local development. A tool is included in the openstack-dashboard project to create one for you. Switch to the /src/openstack-dashboard/trunkdirectory and then enter:
$ python tools/install_venv.py [path to django-nova/trunk]
If you find that virtualenv is not installed, you can use easy_install virtualenv toinstall it and then re-run the python command.
Now that the virtualenv is created, you need to configure your local environment. To do this,create a local_settings.py file in the local/ directory. There is a local_settings.py.example filethere that may be used as a template. You configure local_settings.py in the next section.
6.2.3. Build and Configure Openstack-DashboardNow you can configure the dashboard application. The first step in configuring theapplication is to create your local_settings.py file. An example is provided that you can copyto local_settings.py and then modify for your environment.
OpenStack ComputeAdministration Manual
Feb. 3, 2011 Bexar release
28
$ cd ../openstack-dashboard/trunk $ cd local $ cp local_settings.py.example local_settings.py $ vi local_settings.py
In the new copy of the local_settings.py file, change these important options:
• NOVA_DEFAULT_ENDPOINT : this needs to be set to nova-api instance URL from above.DO NOT KEEP THE DEFAULT as it contains a typo (localhoat instead of localhost). You canuse 'http://localhost:8773/services/Cloud' if you plan to view the dashboard on the samemachine as your nova-api.
• NOVA_ACCESS_KEY : this should be the EC2_ACCESS_KEY in your novarc file (whichincludes the project name).
• NOVA_SECRET_KEY : this should be the EC2_SECRET_KEY in your novarc file.
Now install the openstack-dashboard environment. This installs all the dependencies foropenstack-dashboard (including the django-nova from earlier).
$ sudo easy_install virtualenv$ python tools/install_venv.py ../../django-nova/trunk
This step takes some time since it downloads a number of dependencies.
Once the download completes, create the database and insert the credentials for your Novauser:
$ tools/with_venv.sh dashboard/manage.py syncdb
Midway through the script, you are asked, "You just installed Django's auth system, whichmeans you don't have any superusers defined. Would you like to create one now? (yes/no):"Answer Yes, and insert these values as shown:
Username (Leave blank to use 'root'): *ENTER YOUR NOVA_ADMIN-LEVEL_USERNAME FROM NOVARC*E-mail address: *ENTER YOUR EMAIL ADDRESS*Password: *MAKE UP A PASSWORD*Password (again): *REPEAT YOUR PASSWORD*
Once this configuration is complete, you should be returned to the prompt with no errors.If you get 403 errors, it probably means the user is undefined. Check the nova-api log filesfor specifics.
6.2.4. Run the Server
Now run the built-in server on a high port value so that you can validate the installation.
$ tools/with_venv.sh dashboard/manage.py runserver 0.0.0.0:8000
Make sure that your firewall isn't blocking TCP/8000 and just point your browser at this serveron port 8000. If you are running the server on the same machine as your browser, this wouldbe "http://localhost:8000".
OpenStack ComputeAdministration Manual
Feb. 3, 2011 Bexar release
29
7. OpenStack Compute TutorialsWe want OpenStack to make sense, and sometimes the best way to make sense of the cloudis to try out some basic ideas with cloud computing. Flexible, elastic, and scalable are a fewattributes of cloud computing, so these tutorials show various ways to use virtual computingor web-based storage with OpenStack components.
7.1. Running Your First Elastic Web Application onthe Cloud
In this OpenStack tutorial, we’ll walk through the creation of an elastic, scalable cloud runninga WordPress installation on a few virtual machines.
The tutorial assumes you have OpenStack Compute already installed on Ubuntu 10.04. Youcan tell OpenStack Compute is installed by running "sudo nova-manage service list" to ensureit is installed and the necessary services are running and ready. You should see a set of nova-services in a response. You should run the tutorial as a root user or a user with sudo access.
If you haven't installed OpenStack Compute yet, a scripted method is fast and offers a walk-through. Get the script from https://github.com/dubsquared/OpenStack-NOVA-Installer-Script.
We'll go through this tutorial in parts:
• Setting up a user, project, and network for this cloud.
• Getting images for your application servers.
• On the instances you spin up, installing Wordpress and its dependencies, the Memcachedplugin, and multiple memcache servers.
7.1.1. Part I: Setting Up the Cloud Infrastructure
In this part, we'll get the networking layer set up based on what we think most networkswould work like. We'll also create a user and a project to house our cloud and its network.Onward, brave cloud pioneers!
Configuring the network
Ideally on large OpenStack Compute deployments, each project is in a protected networksegment. Our project in this case is a LAMP stack running Wordpress with the Memcachedplugin for added database efficiency. So we need a public IP address for the Wordpress serverbut we can use flat networking for this. Here's how you set those network settings.
Usually networking is set in nova.conf, but VLAN-based networking with DHCP is the defaultsetting when no network manager is defined in nova.conf. To check this network setting,open your nova.conf, typically in /etc/nova/nova.conf and look for -network_manager. Thepossible options are:
OpenStack ComputeAdministration Manual
Feb. 3, 2011 Bexar release
30
• -network_manager=nova.network.manager.FlatManager for a simple, no-VLANnetworking type,
• -network_manager=nova.network.manager.FlatDHCPManager for flat networking withDHCP,
• -network_manager= nova.network.manager.VlanManager for the type of networking wewant for the tutorial.
Here is an example nova.conf for a single node installation of OpenStack Compute.
--network_manager=nova.network.manager.FlatManager--use_ipv6=false--dhcpbridge_flagfile=/etc/nova/nova.conf--dhcpbridge=nova-dhcpbridge--logdir=/var/log/nova--state_path=/var/lib/nova--verbose--s3_host=184.106.239.134--rabbit_host=184.106.239.134--cc_host=184.106.239.134--ec2_url=http://184.106.239.134:8773/services/Cloud--fixed_range=192.168.0.0/12--network_size=24--FAKE_subdomain=ec2--routing_source_ip=184.106.239.134--verbose--sql_connection=mysql://root:[email protected]/nova
Now that we know the networking configuration, let's set up the network for our project.
For this tutorial, we set a /24 network since that falls inside the /12 range that's set in ‘fixed-range’ in nova.conf. We probably won't use that many at first, but it's good to have the roomto scale.
Currently, there can only be one network set in nova.conf.
Note
The nova-manage service assumes that the first IP address is your network(like 192.168.0.0), that the 2nd IP is your gateway (192.168.0.1), and that thebroadcast is the very last IP in the range you defined (192.168.0.255). If this isnot the case you will need to manually edit the sql db ‘networks’ table.o but thatscenario shouldn't happen for this tutorial.
Run this command as root or sudo:
nova-manage network create 192.168.3.0/12 1 255
On running this command, entries are made in the ‘networks’ and ‘fixed_ips’ table in the novadatabase. However, one of the networks listed in the ‘networks’ table needs to be marked asbridge in order for the code to know that a bridge exists. The Network is marked as bridgedautomatically based on the type of network manager selected.
OpenStack ComputeAdministration Manual
Feb. 3, 2011 Bexar release
31
Next you want to integrate this network bridge, named br100, into your network. A bridgeconnects two Ethernet segments together.
Ensure the Database is Up-to-date
The first command you run using nova-manage is one called db sync, which ensures that yourdatabase is updated. You must run this as root.
nova-manage db sync
Creating a user
OpenStack Compute can run many projects for many users, so for our tutorial we'll create auser and project just for this scenario.
We control the actions a user can take through roles, such as admin for Administrator who hascomplete system access, itsec for IT Security, netadmin for Network Administrator, and so on.
In addition to these roles controlling access to the Eucalyptus API, credentials are suppliedand bundled by OpenStack compute in a zip file when you create a project. The user accessingthe cloud infrastructure through ec2 commands are given an access and secret key throughthe project itself. Let's create a user that has the access we want for this project.
To add an admin user named cloudypants, use:
nova-manage user admin cloudypants
Creating a project and related credentials
Next we'll create the project, which in turn gives you certifications in a zip file.
Enter this command to create a project named wpscales as the admin user, cloudypants, thatyou created above.
nova-manage project create wpscales cloudypants
Great, now you have a project that is set apart from teh rest of teh clouds you might controlwith OpenStack Compute. Now you need to give the user some credentials so they can runcommands for the instances with in that project's cloud.
These are the certs you will use to launch instances, bundle images, and all the other assortedAPI and command-line functions.
First, we'll create a directory that'll house these credentials, in this case in the root directory.You need to sudo here or save this to your own directory with 'mkdir -p ~/creds' so that thecredentials match the user and are stored in their home.
mkdir –p /root/creds
Now, run nova-manage to create a zip file for your project called wpscales with the usercloudypants (the admin user we created previously).
sudo nova-manage project zipfile wpscales cloudypants /root/creds/novacreds.zip
OpenStack ComputeAdministration Manual
Feb. 3, 2011 Bexar release
32
Next, you can unzip novacreds.zip in your home directory, and add these credentials to yourenvironment.
unzip /root/creds/novacreds.zip -d /root/creds/
Sending that information and sourcing it as part of your .bashrc file remembers thosecredentials for next time.
cat /root/creds/novarc >> ~/.bashrcsource ~/.bashrc
Okay, you've created the basic scaffolding for your cloud so that you can get some imagesand run instances. Onward to Part II!
7.1.2. Part II: Getting Virtual Machines to Run the VirtualServers
Understanding what you can do with cloud computing means you should have a grasp on theconcept of virtualization. With virtualization, you can run operating systems and applicationson virtual machines instead of physical computers. To use a virtual machine, you must havean image that contains all the information about which operating system to run, the userlogin and password, files stored on the system, and so on.
For this tutorial, we've created an image that you can download that allows the networkingyou need to run web applications and so forth. In order to use it with the OpenStack Computecloud, you download the image, then use uec-publish-tarball to publish it.
Here are the commands to get your virtual image. Be aware that the download of thecompressed file may take a few minutes.
image="ubuntu1010-UEC-localuser-image.tar.gz"wget http://c0179148.cdn1.cloudfiles.rackspacecloud.com/ubuntu1010-UEC-localuser-image.tar.gzuec-publish-tarball $image wpbucket x86_64
What you'll get in return from this command is three references: emi, eri and eki. These areacronyms - emi stands for eucalyptus machine image, eri stands for eucalyptus ramdisk image,and eki stands for eucalyptus kernal image. Amazon has similar references for their images- ami, ari, and aki.
You need to use the emi value when you run the instance. These look something like “ami-zqkyh9th″ - basically a unique identifier.
Okay, now that you have your image and it's published, realize that it has to be decompressedbefore you can launch an image from it. We can realize what state an image is in using the'euca-describe-instaces' command. Basically, run:
euca-describe-instances
and look for the state in the text that returns. You can also use euca-describe-images to ensurethe image is untarred. Wait until the state shows "available" so that you know the instancesis ready to roll.
OpenStack ComputeAdministration Manual
Feb. 3, 2011 Bexar release
33
7.1.3. Part III: Installing the Needed Software for the Web-Scale Scenario
Once that state is "available" you can enter this command, which will use your credentials tostart up the instance with the identifier you got by publishing the image.
emi=ami-zqkyh9theuca-run-instances $emi -k mykey -t m1.tiny
Now you can look at the state of the running instances by using euca-describe-instances again.The instance will go from “launching” to “running” in a short time, and you should be ableto connect via SSH. Look at the IP addresses so that you can connect to the instance onceit starts running.
Basically launch a terminal window from any computer, and enter:
ssh -i mykey [email protected]
On this particular image, the 'ubuntu' user has been set up as part of the sudoers group, soyou can escalate to 'root' via the following command:
sudo -i
On the first VM, install WordPress
Now, you can install WordPress. Create and then switch to a blog directory:
mkdir blogcd blog
Download WordPress directly to you by using wget:
wget http://wordpress.org/latest.tar.gz
Then unzip the package using:
tar -xzvf latest.tar.gz
The WordPress package will extract into a folder called wordpress in the same directory thatyou downloaded latest.tar.gz.
Next, enter "exit" and disconnect from this SSH session.
On a second VM, install MySQL
Next, SSH into another virtual machine and install MySQL and use these instructions to installthe WordPress database using the MySQL Client from a command line: Using the MySQLClient - Wordpress Codex.
On a third VM, install Memcache
Memcache makes Wordpress database reads and writers more efficient, so your virtualservers can go to work for you in a scalable manner. SSH to a third virtual machine and installMemcache:

OpenStack ComputeAdministration Manual
Feb. 3, 2011 Bexar release
34
apt-get install memcached
Configure the Wordpress Memcache plugin
From a web browser, point to the IP address of your Wordpress server. Download and installthe Memcache Plugin. Enter the IP address of your Memcache server.
7.1.4. Running a Blog in the Cloud
That's it! You're now running your blog on a cloud server in OpenStack Compute, and you'vescaled it horizontally using additional virtual images to run the database and Memcache. Nowif your blog gets a big boost of comments, you'll be ready for the extra reads-and-writes tothe database.
OpenStack ComputeAdministration Manual
Feb. 3, 2011 Bexar release
35
8. Support and TroubleshootingOnline resources aid in supporting OpenStack and the community members are willing andable to answer questions and help with bug suspicions. We are constantly improving andadding to the main features of OpenStack, but if you have any problems, do not hesitateto ask. Here are some ideas for supporting OpenStack and troubleshooting your existinginstallations.
8.1. Community SupportHere are some places you can locate others who want to help.
The Launchpad Answers area
During setup or testing, you may have questions about how to do something, or end up ina situation where you can't seem to get a feature to work correctly. One place to look forhelp is the Answers section on Launchpad. Launchpad is the "home" for the project codeand its developers and thus is a natural place to ask about the project. When visiting theAnswers section, it is usually good to at least scan over recently asked questions to see if yourquestion has already been answered. If that is not the case, then proceed to adding a newquestion. Besure you give a clear, concise summary in the title and provide as much detail aspossible in the description. Paste in your command output or stack traces, link to screenshots,and so on. The Launchpad Answers areas are available here - OpenStack Compute: https://answers.launchpad.net/nova OpenStack Object Storage: https://answers.launchpad.net/swift.
OpenStack mailing list
Posting your question or scenario to the OpenStack mailing list is a great way to get answersand insights. You can learn from and help others who may have the same scenario as you. Goto https://launchpad.net/~openstack and click "Subscribe to mailing list" or view the archivesat https://lists.launchpad.net/openstack/.
The OpenStack Wiki search
Considering that you are already in the wiki, this may seem obvious. However, there are manylayers of wiki content for OpenStack below the surface that an enterprising individual canlocate. The wiki search feature is very powerful in that it can do both searches by title andby content. If you are searching for specific information, say about "networking" or "api" fornova, you can find lots of content using the search feature. More is being added all the time,so be sure to check back often. You can find the search box in the upper right hand cornerof any OpenStack wiki page.
The Launchpad Bugs area
So you think you've found a bug. That's great! Seriously, it is. The OpenStack communityvalues your setup and testing efforts and wants your feedback. To log a bug you must have aLaunchpad account, so sign up at https://launchpad.net/+login if you do not already have a

OpenStack ComputeAdministration Manual
Feb. 3, 2011 Bexar release
36
Launchpad ID. You can view existing bugs and report your bug in the Launchpad Bugs area. Itis suggested that you first use the search facility to see if the bug you found has already beenreported (or even better, already fixed). If it still seems like your bug is new or unreportedthen it is time to fill out a bug report.
Some tips:
• Give a clear, concise summary!
• Provide as much detail as possible in the description. Paste in your command output orstack traces, link to screenshots, etc.
• Be sure to include what version of the software you are using. This is especially critical ifyou are using a development branch eg. "Austin release" vs lp:nova rev.396.
• Any deployment specific info is helpful as well. eg. Ubuntu 10.04, multi-node install.
The Launchpad Bugs areas are available here - OpenStack Compute: https://bugs.launchpad.net/nova OpenStack Object Storage: https://bugs.launchpad.net/swift
The OpenStack IRC channel
The OpenStack community lives and breathes in the #openstack IRC channel on the Freenodenetwork. You can come by to hang out, ask questions, or get immediate feedback forurgent and pressing issues. To get into the IRC channel you need to install an IRC clientor use a browser-based client by going to http://webchat.freenode.net/. You can also useColloquy (Mac OS X, http://colloquy.info/) or mIRC (Windows, http://www.mirc.com/) orXChat (Linux). When you are in the IRC channel and want to share code or command output,the generally accepted method is to use a Paste Bin, the OpenStack project has one at http://paste.openstack.org. Just paste your longer amounts of text or logs in the web form and youget a URL you can then paste into the channel. The OpenStack IRC channel is: #openstackon irc.freenode.net.
OpenStack Mailing Lists
A great way to keep track of what is going on with OpenStack or to ask questions andcommunicate with other users is to join the available mailing lists. You can sign up for thevarious OpenStack mailing lists here: http://wiki.openstack.org/MailingLists.
8.2. Troubleshooting OpenStack Object StorageFor OpenStack Object Storage, everything is logged in /var/log/syslog (or messages onsome distros). Several settings enable further customization of logging, such as log_name,log_facility, and log_level, within the object server configuration files.
8.2.1. Handling Drive Failure
In the event that a drive has failed, the first step is to make sure the drive is unmounted. Thiswill make it easier for OpenStack Object Storage to work around the failure until it has beenresolved. If the drive is going to be replaced immediately, then it is just best to replace thedrive, format it, remount it, and let replication fill it up.
OpenStack ComputeAdministration Manual
Feb. 3, 2011 Bexar release
37
If the drive can’t be replaced immediately, then it is best to leave it unmounted, and removethe drive from the ring. This will allow all the replicas that were on that drive to be replicatedelsewhere until the drive is replaced. Once the drive is replaced, it can be re-added to the ring.
8.2.2. Handling Server Failure
If a server is having hardware issues, it is a good idea to make sure the OpenStack ObjectStorage services are not running. This will allow OpenStack Object Storage to work aroundthe failure while you troubleshoot.
If the server just needs a reboot, or a small amount of work that should only last a couple ofhours, then it is probably best to let OpenStack Object Storage work around the failure andget the machine fixed and back online. When the machine comes back online, replication willmake sure that anything that is missing during the downtime will get updated.
If the server has more serious issues, then it is probably best to remove all of the server’sdevices from the ring. Once the server has been repaired and is back online, the server’sdevices can be added back into the ring. It is important that the devices are reformattedbefore putting them back into the ring as it is likely to be responsible for a different set ofpartitions than before.
8.2.3. Detecting Failed Drives
It has been our experience that when a drive is about to fail, error messages will spew into /var/log/kern.log. There is a script called swift-drive-audit that can be run via cron to watchfor bad drives. If errors are detected, it will unmount the bad drive, so that OpenStack ObjectStorage can work around it. The script takes a configuration file with the following settings:
[drive-audit] Option Default Description log_facility LOG_LOCAL0 Syslog log facility log_level INFO Log level device_dir /srv/node Directory devices are mounted under minutes 60 Number of minutes to look back in /var/log/kern.log error_limit 1 Number of errors to find before a device is unmounted
This script has only been tested on Ubuntu 10.04, so if you are using a different distro or OS,some care should be taken before using in production.
8.3. Troubleshooting OpenStack Compute
8.3.1. Log files for OpenStack Compute
Log files are stored in /var/log/nova and there is a log file for each service,for example nova-compute.log. You can format the log strings using flags for thenova.log module. The flags used to set format strings are: logging_context_format_stringand logging_default_format_string. If the log level is set to debug, you can alsospecify logging_debug_format_suffix to append extra formatting. For information about
OpenStack ComputeAdministration Manual
Feb. 3, 2011 Bexar release
38
what variables are available for the formatter see: http://docs.python.org/library/logging.html#formatter
You have two options for logging for OpenStack Compute based on configuration settings. Innova.conf, include the --logfile flag to enable logging. Alternatively you can set --use_syslog=1,and then the nova daemon logs to syslog.
8.3.2. Common Errors and Fixes for OpenStack Compute
The Launchpad Answers site offers a place to ask and answer questions, and you can alsomark questions as frequently asked questions. This section describes some errors people haveposted to Launchpad Answers and IRC. We are constantly fixing bugs, so online resources area great way to get the most up-to-date errors and fixes.
Credential errors, 401, 403 forbidden errors
A 403 forbidden error is caused by missing credentials. Through current installation methods,there are basically two ways to get the novarc file. The manual method requires getting itfrom within a project zipfile, and the scripted method just generates novarc out of the projectzip file and sources it for you. If you do the manual method through a zip file, then thefollowing novarc alone, you end up losing the creds that are tied to the user you created withnova-manage in the steps before.
When you run nova-api the first time, it generates the certificate authority information,including openssl.cnf. If it gets started out of order, you may not be able to create your zipfile. Once your CA information is available, you should be able to go back to nova-manageto create your zipfile.
You may also need to check your proxy settings to see if they are causing problems with thenovarc creation.
Instance errors
Sometimes a particular instance shows "pending" or you cannot SSH to it. Sometimes theimage itself is the problem. For example, when using flat manager networking, you do nothave a dhcp server, and an ami-tiny image doesn't support interface injection so you cannotconnect to it. The fix for this type of problem is to use an Ubuntu image, which shouldobtain an IP address correctly with FlatManager network settings. To troubleshoot otherpossible problems with an instance, such as one that stays in a spawning state, first checkyour instances directory for i-ze0bnh1q dir to make sure it has the following files:
• libvirt.xml
• disk
• disk-raw
• kernel
• ramdisk
• console.log (Once the instance actually starts you should see a console.log.)

OpenStack ComputeAdministration Manual
Feb. 3, 2011 Bexar release
39
Check the file sizes to see if they are reasonable. If any are missing/zero/very small then nova-compute has somehow not completed download of the images from objectstore.
Also check nova-compute.log for exceptions. Sometimes they don't show up in the consoleoutput.
Next, check the /var/log/libvirt/qemu/i-ze0bnh1q.log file to see if it exists and has any usefulerror messages in it.
Finally, from the instances/i-ze0bnh1q directory, try virsh create libvirt.xml andsee if you get an error there.