openstack vm cookbook 1 - docs.fortinet.com · #git clone -b stable/kilo #cd devstack...
TRANSCRIPT
FortiOS VM OpenStack CookbookFortiOS 5.4
Change Log
Date Change Description
January 18, 2017 Initial Release
FortiOS VM OpenStack CookbookFortinet Technologies Inc.
2
Table of Contents
Getting Started 6ComponentsOverview 6
DevStack Single-node Installation 7What's Next 7
Preparation 81. Create a host VM for DevStack 82. Install Ubuntu 14.04 on the VM 83. Install Git andOpenSSH. 8
Install DevStack 91. Create Devstack user 92. Download the DevStack Software (stable Kilo version) 93. Create the local.conf file 94. Take a Snapshot 105. Run stack.sh 106. Open theOpenStackDashboard 11What's Next? 11
About the FortiGate ML2 Plugin 12Initial FortiGate configuration: 12Adding Tenants 12
DevStack Multi-Node Installation with FGT ML2 Plugin 14Configuration 14What's Next 14
Preparation 151. Create a vSwitch for the Tenant Network 152. Create Two VMs (Controller Node, Compute Node) 153. Install Ubuntu 14.04 on the Controller and Compute VMs 154. Install Git andOpenSSH. Create a new user named stack. 155. Create a FortiGate VM 166. FortiGate VM basic configuration 167. Install the FortiGate License 168. Enable VDOMs 179. Test the Network Connectivity 17
Install DevStack and ML2 Plugin 181. Download theML2 Plugin 182. Download the DevStack Software (stable Liberty version) 183. Copy local.conf file to the Devstack folder 184. Modify the local.conf file 185. Take a Snapshot 19
6. Run stack.sh on the Controller Node 207. Run stack.sh on Compute Node 208. Open theOpenStackDashboard 209. Verify the Installation 21
Use Demo Scripts to Create Tenant Networks 221. Copy the scripts to stack/devstack 222. Set the Environment Variables 223. Run the demo_wrapper command 224. Run the demo command 235. View Results 23
Launch a Cirros Instance 241. Launch Instance Details tab 242. Networking tab 243. Ping the public network 254. Update FortiGate DNS setting 255. Manage Floating IP setting 26
FortiGate as Guest VM in OpenStack 27Run FortiGate as Guest VM in OpenStack 28
1. Download FortiGate and FortiManager VM Image Files 282. Prepare the DevStack Environment 283. Create Private Networks 294. Create Fortinet Access & Security Profile 295. Deploy a FortiGate-VM 306. Deploy a FortiManager VM 31
FortiGate-VMRegistration 337. Connect to FortiGate-VM 33
A. Enable forwarding on the FortiGate-VM 34B. Network Configuration Update 36C. DeployCirros VMs 36cirros-01: 37cirros-02: 37E. Create Firewall policies on FGT-VM 37
Using Cloud-init to Launch FortiGate as Guest VM 38Prerequisites 38
1. Create FortiGate initial configuration file 382. Edit the FGT initial configuration file. 383. Get the Image id and Network id 394. Run Nova Boot Command 395. Verify 39
Tenant Networks 40Configure External Network 41
1. Create the network 412. Create a subnetwork 41
Create the Tenant Network 441. Create the network 442. Create a subnetwork 443. Configure the Router 454. Allocate Floating IP 46
Heat Orchestration Templates (HOT) 48Basic Template 48Template Input Parameters 48Template Outputs 49Examples 49
Using Heat to configure FortiGate 51Steps: Using HEAT to configure FortiGate 52
1. Create the required files 522. Set the input parameters 523. Define the resources 534. Define the Outputs 53
Using Heat to instantiate a FOS-VM 55Steps: Using HEAT to instantiate a FOS-VM 56
1. Set the input parameters 562. Define the resources 563. Define the ftnt VM 574. Define the Floating IP Association 575. Define the Security Group 586. Define the Outputs 58
Getting Started
Components Overview
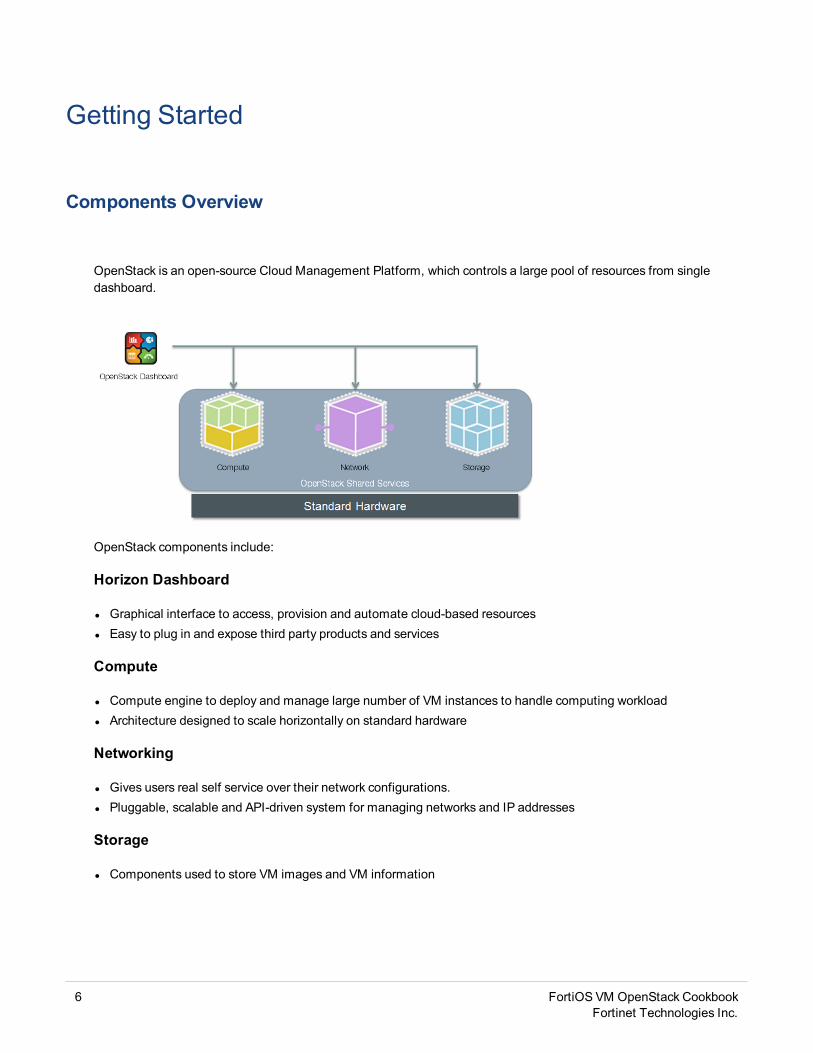
OpenStack is an open-source Cloud Management Platform, which controls a large pool of resources from singledashboard.
OpenStack components include:
Horizon Dashboard
l Graphical interface to access, provision and automate cloud-based resourcesl Easy to plug in and expose third party products and services
Compute
l Compute engine to deploy and manage large number of VM instances to handle computing workloadl Architecture designed to scale horizontally on standard hardware
Networking
l Gives users real self service over their network configurations.l Pluggable, scalable and API-driven system for managing networks and IP addresses
Storage
l Components used to store VM images and VM information
6 FortiOS VM OpenStack CookbookFortinet Technologies Inc.
DevStack Single-node Installation
OpenStack provides a simple installation script for DevStack (the development stack). The intent is thatOpenStack users and developers can easily and quickly install DevStack into a VM on a laptop.
The installation consists of the following steps:
l Preparation: Install Ubuntu OS l Install DevStack
What's Next
After the installation, you can run the following examples on your OpenStack:
"Tenant Networks" on page 40 - create a tenant network
"FortiGate as Guest VM in OpenStack" on page 27 - create a FortiGate VM to control traffic between tenant VMs
7 FortiOS VM OpenStack CookbookFortinet Technologies Inc.
Preparation
This example requires one VM running Ubuntu Linux and a FortiGate VM.
The following preparation steps are required:
1. Create a host VM for DevStack
If you are planning to instantiate a large number of VMs in your DevStack environment, make sure that you sizethe host VM or server appropriately. The following recommendations represent the minimum sizing numbers:
l Memory - 4 GBl CPU - 1 vCPUl Disk - 20-50 GBl vNICs - 2
2. Install Ubuntu 14.04 on the VM
Install Ubuntu 14.04-2 LTS server as a VM on your laptop.
Log in to the console, and configure two interfaces (eth0 for public network, eth1 for private network):
auto eth0iface eth0 inet staticaddress 172.16.2.135netmask 255.255.255.0gateway 172.16.2.2dns-nameservers 8.8.8.8auto eth1iface eth1 inet manualup ifconfig $IFACE 0.0.0.0 upup ip link set $IFACE promisc ondown ip link set $IFACE promisc offdown ifconfig $IFACE 0.0.0.0 down
3. Install Git and OpenSSH.
As the root user, install Git and OpenSSH:
#sudo su#apt-get update#apt-get install git openssh-server
8 FortiOS VM OpenStack CookbookFortinet Technologies Inc.
Install DevStack
The examples in this section assume the following Host VM port1 IP address:
Host VM: 172.16.2.135
To execute this set of instructions, log in as user “stack” . Unless otherwise specified, execute thecommands on both nodes (controller and compute).
1. Create Devstack user
Create a user named stackwith sudo privileges:
#groupadd stack#useradd -g stack -s /bin/bash -d /opt/stack -m stack#echo "stack ALL=(ALL) NOPASSWD: ALL" >> /etc/sudoer#passwd stack#exit
Switch to user stack for the remaining commands:
#su –l stack
2. Download the DevStack Software (stable Kilo version)
#git clone https://git.openstack.org/openstack-dev/devstack.git -b stable/kilo#cd devstack
3. Create the local.conf file
Create the local.conf file. DevStack uses this configuration file when it starts up.
#vi local.conf
Enter insert mode. Cut and paste the following content:
[[local|localrc]]PUBLIC_INTERFACE=eth1ADMIN_PASSWORD=fortinetMYSQL_PASSWORD=fortinetRABBIT_PASSWORD=fortinetSERVICE_PASSWORD=fortinetSERVICE_TOKEN=fortinet
disable_service n-netenable_service q-svcenable_service q-agt
9 FortiOS VM OpenStack CookbookFortinet Technologies Inc.
Install DevStack 4. Take a Snapshot
enable_service q-dhcpenable_service q-l3enable_service q-metaenable_service n-cauthenable_service neutronenable_service q-vpn
FIXED_RANGE=10.0.0.0/24FIXED_NETWORK_SIZE=256NETWORK_GATEWAY=10.0.0.1PRIVATE_SUBNET_NAME=privateAPUBLIC_SUBNET_NAME=public-subnetFLOATING_RANGE=172.16.125.0/24PUBLIC_NETWORK_GATEWAY=172.16.125.2
Q_USE_DEBUG_COMMAND=True
[[post-config|/$Q_PLUGIN_CONF_FILE]][ml2]extension_drivers = port_security
Enter :wq to save the file and quit the editor.
4. Take a Snapshot
We recommend that you take a snapshot of both VMs at this point. The snapshot provides a good recovery pointin the event that the stack.sh script runs into problems.
5. Run stack.sh
Run “stack.sh” under ~stack/devstack.
A successful installation displays the following information at the end of the output. Note the IP address for theDevStack dashboard (Horizon), and the demo user password.:
……………………This is your host ip: 172.16.2.135Horizon is now available at http://172.16.2.135/Keystone is serving at http://172.16.2.135:5000/The default users are: admin and demoThe password: fortinet2015-07-07 09:13:34.429 | stack.sh completed in 464 seconds.
Display the Ubuntu routing table, to see the routes that DevStack created:
openstack@ubuntu:~/devstack$ ip routedefault via 172.16.2.2 dev eth010.0.0.0/24 via 172.16.125.1 dev br-ex169.254.0.0/16 dev eth0 scope link metric 1000
FortiOS VM OpenStack CookbookFortinet Technologies Inc.
10
6. Open the OpenStack Dashboard Install DevStack
172.16.2.0/24 dev eth0 proto kernel scope link src 172.16.2.135172.16.125.0/24 dev br-ex proto kernel scope link src 172.16.125.2192.168.122.0/24 dev virbr0 proto kernel scope link src 192.168.122.1
6. Open the OpenStack Dashboard
You will be able to login to the OpenStack dashboard.
Navigate to https://<IP address of Controller node>
use ID: admin and password: secretsecret (the admin password that you set in local.conf)
The stack.sh script creates a demo project and one private network.
What's Next?
After the installation, you can run the following examples on your OpenStack:
"Tenant Networks" on page 40 - create a tenant network
"FortiGate as Guest VM in OpenStack" on page 27 - create a FortiGate VM to control traffic between tenant VMs
11 FortiOS VM OpenStack CookbookFortinet Technologies Inc.
About the FortiGate ML2 Plugin
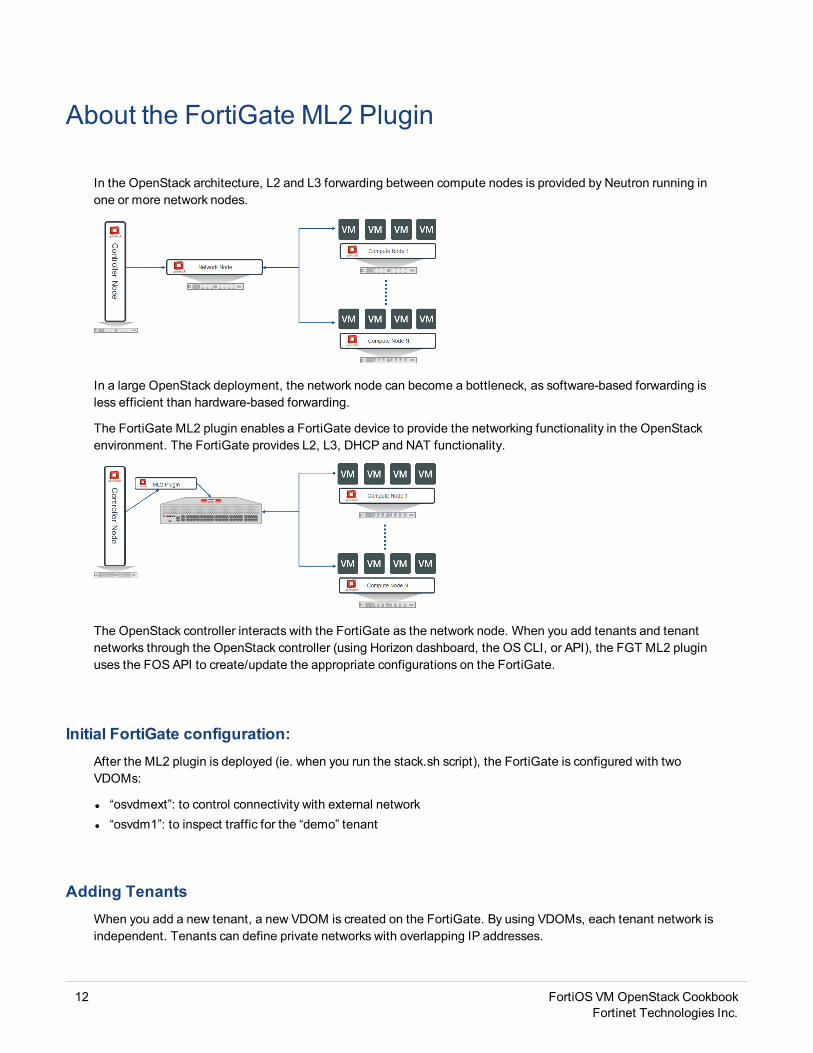
In the OpenStack architecture, L2 and L3 forwarding between compute nodes is provided by Neutron running inone or more network nodes.
In a large OpenStack deployment, the network node can become a bottleneck, as software-based forwarding isless efficient than hardware-based forwarding.
The FortiGate ML2 plugin enables a FortiGate device to provide the networking functionality in the OpenStackenvironment. The FortiGate provides L2, L3, DHCP and NAT functionality.
The OpenStack controller interacts with the FortiGate as the network node. When you add tenants and tenantnetworks through the OpenStack controller (using Horizon dashboard, the OS CLI, or API), the FGT ML2 pluginuses the FOS API to create/update the appropriate configurations on the FortiGate.
Initial FortiGate configuration:After the ML2 plugin is deployed (ie. when you run the stack.sh script), the FortiGate is configured with twoVDOMs:
l “osvdmext”: to control connectivity with external networkl “osvdm1”: to inspect traffic for the “demo” tenant
Adding TenantsWhen you add a new tenant, a new VDOM is created on the FortiGate. By using VDOMs, each tenant network isindependent. Tenants can define private networks with overlapping IP addresses.
12 FortiOS VM OpenStack CookbookFortinet Technologies Inc.
About the FortiGate ML2 Plugin What's Next?
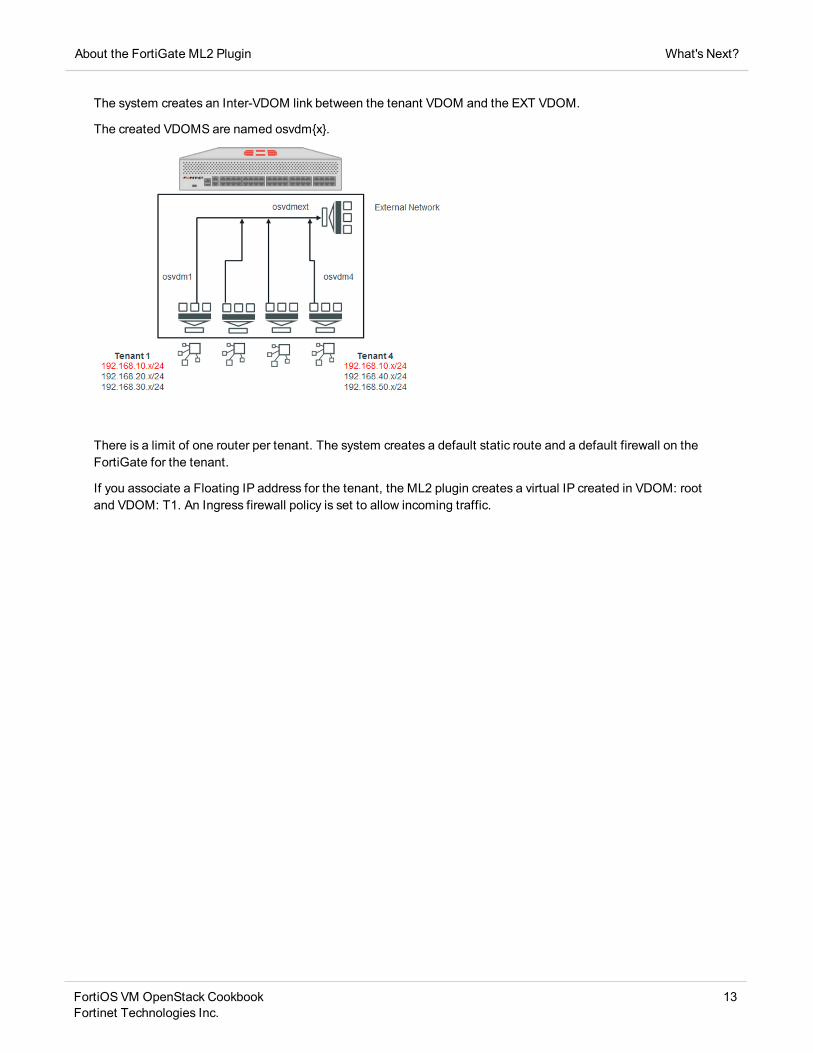
The system creates an Inter-VDOM link between the tenant VDOM and the EXT VDOM.
The created VDOMS are named osvdm{x}.
There is a limit of one router per tenant. The system creates a default static route and a default firewall on theFortiGate for the tenant.
If you associate a Floating IP address for the tenant, the ML2 plugin creates a virtual IP created in VDOM: rootand VDOM: T1. An Ingress firewall policy is set to allow incoming traffic.
FortiOS VM OpenStack CookbookFortinet Technologies Inc.
13
DevStack Multi-Node Installation with FGT ML2 Plugin
OpenStack provides a simple installation script for DevStack (the development stack). The intent is thatOpenStack users and developers can easily and quickly install DevStack into a VM on a laptop.
This example installs DevStack on two VM's (a controller node and a compute node), to create a simple multi-node OpenStack environment.
We also enable the FortiGate ML2 plugin. With this plugin, the FortiGate acts as the network node in theOpenStack environment.
In this example, we use a FortiGate VM. In a production network, the MSSP would use a FortiGate device.
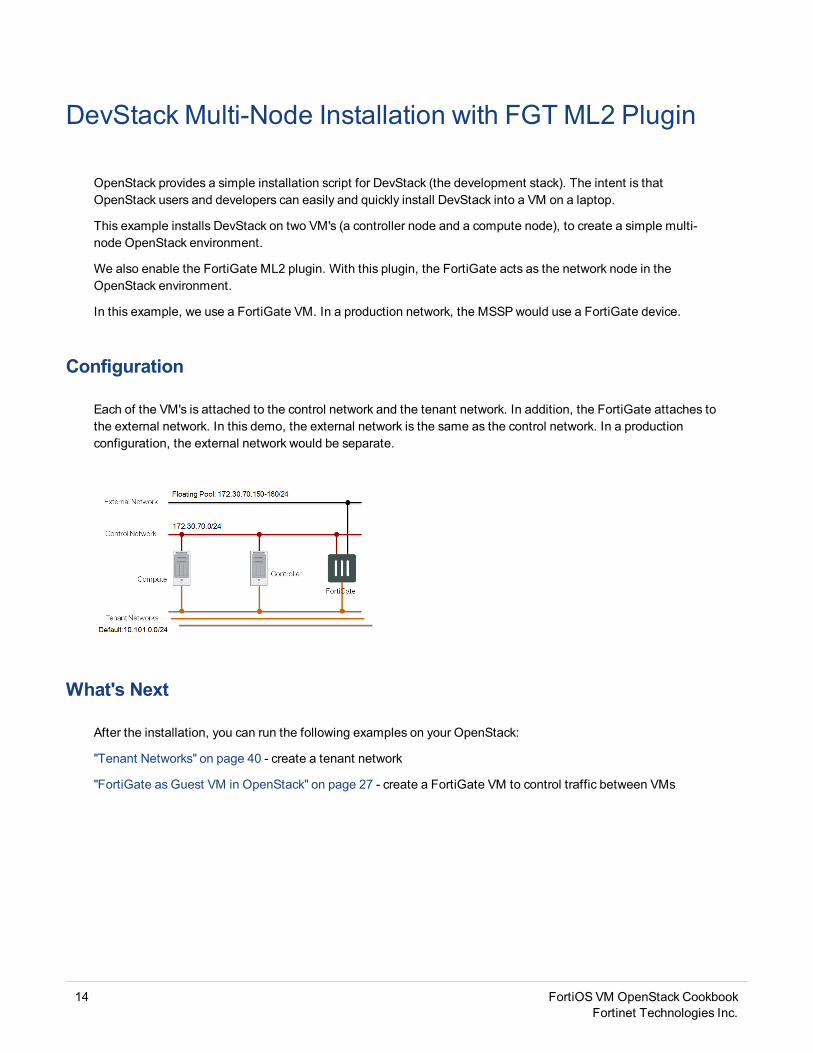
Configuration
Each of the VM's is attached to the control network and the tenant network. In addition, the FortiGate attaches tothe external network. In this demo, the external network is the same as the control network. In a productionconfiguration, the external network would be separate.
What's Next
After the installation, you can run the following examples on your OpenStack:
"Tenant Networks" on page 40 - create a tenant network
"FortiGate as Guest VM in OpenStack" on page 27 - create a FortiGate VM to control traffic between VMs
14 FortiOS VM OpenStack CookbookFortinet Technologies Inc.
Preparation
This example requires two VMs running Ubuntu Linux and a FortiGate VM.
The following preparation steps are required:
1. Create a vSwitch for the Tenant Network
From vSphere, run the following commands:
1. Select the host server.2. Create a standard vSwitch.3. Do not select any physical adapters.4. Set the network label to Tenant Network.5. Set the VLAN id to All.6. Edit the vSwitch. In the security tab, set promiscuous mode.
2. Create Two VMs (Controller Node, Compute Node)
Use the following minimum settings:
l 2 Coresl 4G RAMl Two network adapters
3. Install Ubuntu 14.04 on the Controller and Compute VMs
4. Install Git and OpenSSH. Create a new user named stack.
Run the following commands on the Controller and Compute VMs:
apt-get updateapt-get install git openssh-serversudo adduser stacksudo gpasswd -a stack sudo
Edit the file /etc/network/interfaces to configure eth0: Control/Management network and eth1: Tenant Network:
auto eth0iface eth0 inet static
15 FortiOS VM OpenStack CookbookFortinet Technologies Inc.
Preparation 5. Create a FortiGate VM
address 172.30.71.224netmask 255.255.255.0gateway 172.30.71.1dns-nameservers 172.30.68.8 172.30.68.9
auto eth1iface eth1 inet manual
up ifconfig $IFACE 0.0.0.0 upup ip link set $IFACE promisc ondown ip link set $IFACE promisc offdown ifconfig $IFACE 0.0.0.0 down
5. Create a FortiGate VM
From the Fortinet support site, download the OVA for FortiGate VM 5.2.3 or higher version
We use three interfaces on the FGT-VM:l port1: Control/Management networkl port2: Tenant networkl port3: External network (this can be the same network as port1)
Refer to the following document for instructions on how to download and deploy the FGT OVA file:
http://docs.fortinet.com/d/fortigate-vm-install-guide
6. FortiGate VM basic configuration
Do not configure port2 or port3. The ML2 plugin will automatically set up the initial configuration.
From the VMware console, configure port1:
config system interfaceedit port1
set ip 172.30.71.222 255.255.255.0set allowaccess ping https http ssh snmp telnet
end
7. Install the FortiGate License
Now that you have configured port1, you should be able to HTTP to the FortiGate VM and use the web-basedAdmin interface to install the FGT-VM license.
To enable VDOMs (next step), you must install a VM04 or VM08 license.
FortiOS VM OpenStack CookbookFortinet Technologies Inc.
16
8. Enable VDOMs Preparation
8. Enable VDOMs
After you install the license, you can enable VDOM using the following commands:
config system global
set vdom-admin enable (note: this is a hidden command)
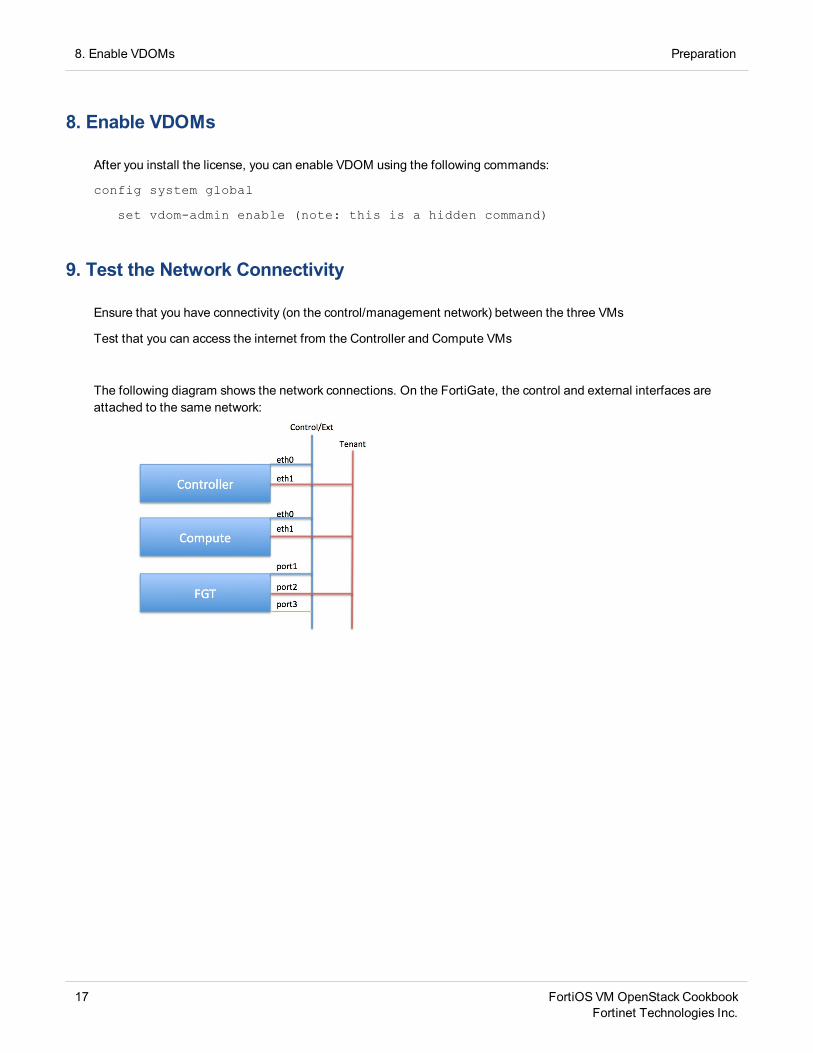
9. Test the Network Connectivity
Ensure that you have connectivity (on the control/management network) between the three VMs
Test that you can access the internet from the Controller and Compute VMs
The following diagram shows the network connections. On the FortiGate, the control and external interfaces areattached to the same network:
17 FortiOS VM OpenStack CookbookFortinet Technologies Inc.
Install DevStack and ML2 Plugin
The examples in this section assume the following VM port1 IP address values:
Controller VM: 10.98.1.200
Compute VM: 10.98.1.201
FortiGate VM: 10.98.1.202
To execute this set of instructions, log in as user “stack” . Unless otherwise specified, execute thecommands on both nodes (controller and compute).
1. Download the ML2 Plugin
a. Navigate to the Fortinet Support site.b. Select Download -> Firmware image, select product FortiGateConnector and click the Download tab.c. ClickOpenstack-‐ML2 and download “FortiGate_Connector_OpenStackML2-‐1.0.0.tar.gz”
2. Download the DevStack Software (stable Liberty version)
Run “git clone https://github.com/openstack-dev/devstack -b stable/liberty” and save it to /home/stack directory.
3. Copy local.conf file to the Devstack folder
For the controller node:
Copy ~stack/networking-fortinet/devstack/local.conf.example.controller to ~stack/devstack/local.conf
For the compute node:
Copy ~stack/networking-fortinet/devstack/local.conf.example.compute to ~stack/devstack/local.conf
4. Modify the local.conf file
Edit the /devstack/local.conf file. Search for the #CHANGEME comments.
Set the following fields for the controller node:
a. FortiGate IP addressb. FGT ports for tenant trafficc. FGT port for external trafficd. Set control plane interface.Example:
18 FortiOS VM OpenStack CookbookFortinet Technologies Inc.
Install DevStack and ML2 Plugin 5. Take a Snapshot
# fortigate ml2 plugin parameters# CHANGEME: ip address of the fortigate rest APIQ_FORTINET_PLUGIN_FG_IP=10.98.1.202# CHANGEME: interface for tenant trafficQ_FORTINET_PLUGIN_FG_INT_INF=port2# CHANGEME: interface for external trafficQ_FORTINET_PLUGIN_FG_EXT_INF=port3# CHANGEME: if use fortivm set to False, True if hardware npu available#Q_FORTINET_PLUGIN_NPU_AVAILABLE=False
# networking configuration parameters# CHANGEME: control plane nicHOST_IP_IFACE=eth0
Set the following fields for the compute node:
a. Interface for tenant trafficb. The control plane interfacec. IP address of the Nova compute node (this node)d. IP address of the controller nodeExample:
# fortigate ml2 plugin parameters# CHANGEME: The interface for tenant trafficQ_FORTINET_TENANT_INTERFACE=eth1
# networking configuration parameters# CHANGEME: control plane nicHOST_IP_IFACE=eth0
# CHANGEME: management ip of the nova compute nodeNOVA_SERVICE_LOCAL_HOST=10.98.1.201
# CHANGEME: hostname or ip of controllerSERVICE_HOST=10.98.1.200
5. Take a Snapshot
We recommend that you take a snapshot of both VMs at this point. The snapshot provides a good recovery pointin the event that the stack.sh script runs into problems.
FortiOS VM OpenStack CookbookFortinet Technologies Inc.
19
6. Run stack.sh on the Controller Node Install DevStack and ML2 Plugin
6. Run stack.sh on the Controller Node
Run “stack.sh” on Controller node first. under ~stack/devstack.
You will see following message when the stack script completes successfully:
This is your host IP address: 10.98.1.200This is your host IPv6 address: fe80::20c:29ff:fe8e:a13aHorizon is now available at http://10.98.1.200/dashboardKeystone is serving at http://10.98.1.200:5000/The default users are: admin and demoThe password: fortinet done./stack.sh: line 1384: 8762 Terminated spinner...[/]./stack.sh: line 344: 3: Bad file descriptorstack@UbuntuCtrl:~/devstack$ 2016-03-29 23:06:25.068 | stack.sh log/opt/stack/logs/stack.sh.log.2016-03-29-152417Installing package prerequisitesInstalling OpenStack project sourceStarting RabbitMQConfiguring and starting MySQLStarting KeystoneConfiguring and starting HorizonConfiguring Glance...
7. Run stack.sh on Compute Node
Run “stack.sh” on the Compute node, under ~stack/devstack.
You will see following message when the stack script completes successfully:
This is your host IP address: 10.98.1.201This is your host IPv6 address: fe80::20c:29ff:fe0e:c12done./stack.sh: line 1384: 8762 Terminated spinner...[/]./stack.sh: line 344: 3: Bad file descriptorstack@UbuntuCtrl:~/devstack$ 2016-03-29 23:06:25.068 | stack.sh log/opt/stack/logs/stack.sh.log.2016-03-29-152417Installing package prerequisitesInstalling OpenStack project source...
8. Open the OpenStack Dashboard
The stack.sh script creates a demo project and one private network.
You will be able to login OpenStack with https://<IP address of Controller node>
use ID: admin and password: secretsecret (the admin password that you set in local.conf)
20 FortiOS VM OpenStack CookbookFortinet Technologies Inc.
Install DevStack and ML2 Plugin 9. Verify the Installation
9. Verify the Installation
Navigate the the FortiGate Admin,
Verify that the FortiGate is configured with two VDOMs:
l “osvdmext”: to control connectivity with external networkl “osvdm1”: to inspect traffic for the “demo” tenant
.
FortiOS VM OpenStack CookbookFortinet Technologies Inc.
21
Use Demo Scripts to Create Tenant Networks
The FortiGate ML2 plugin includes the following demo scripts:
demo.sh:
demo.sh <action> <tenant name>
Enter a new tenant name, and specify one of the following actions:
l add-tenantl create-public-netl create-tenant-netl boot-vm
demo_wrapper.sh:
demo_wrapper.sh <tenant name>
Enter a new tenant name. This command performs all four of the above actions.
1. Copy the scripts to stack/devstack
From the stack home directory, navigate to networking-fortinet/devstack, and copy demo.sh anddemo_wrapper.sh to stack/devstack
2. Set the Environment Variables
Run the following command to set the OpenStack environment variables:
source openrc admin admin
3. Run the demo_wrapper command
./demo_wrapper.sh <tenant name>
The command requires one parameter, which is the name of the tenant. This command performsthe following:
l adds a tenantl creates the public network (if it does not already exist)l creates the tenant's private networkl launches a VM
22 FortiOS VM OpenStack CookbookFortinet Technologies Inc.

Use Demo Scripts to Create Tenant Networks 4. Run the demo command
4. Run the demo command
You can run the demo command to execute individual sub-commands.
./demo.sh <action> <tenant name>
Enter a new tenant name, and specify one of the following actions:
l add-tenantl create-public-netl create-tenant-netl boot-vm
5. View Results
Log in to the Horizon Dashboard using the admin user to view all of the tenant networks.
Note: After you add a new tenant, you need to log out and log in again for the tenant to becomevisible.
Log in to the FortiGate Admin UI to see the VDOM configurations for each tenant.
FortiOS VM OpenStack CookbookFortinet Technologies Inc.
23
Launch a Cirros Instance
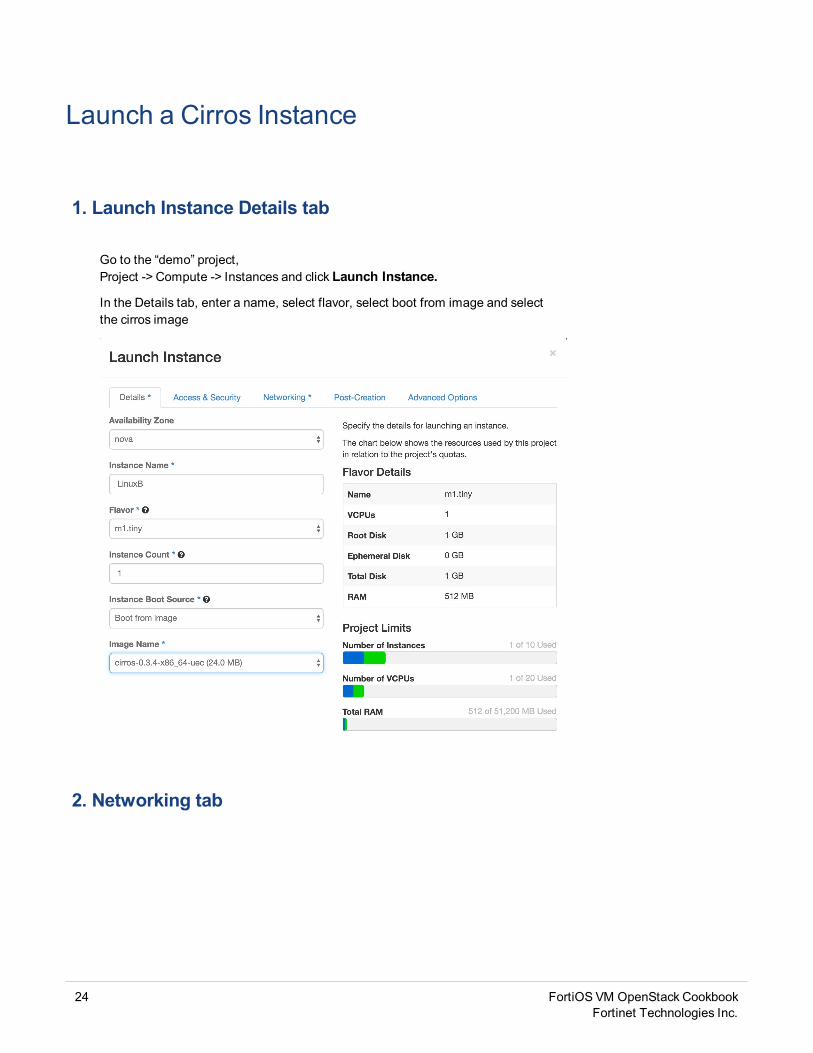
1. Launch Instance Details tab
Go to the “demo” project,Project -> Compute -> Instances and click Launch Instance.
In the Details tab, enter a name, select flavor, select boot from image and selectthe cirros image
2. Networking tab
24 FortiOS VM OpenStack CookbookFortinet Technologies Inc.
Launch a Cirros Instance 3. Ping the public network
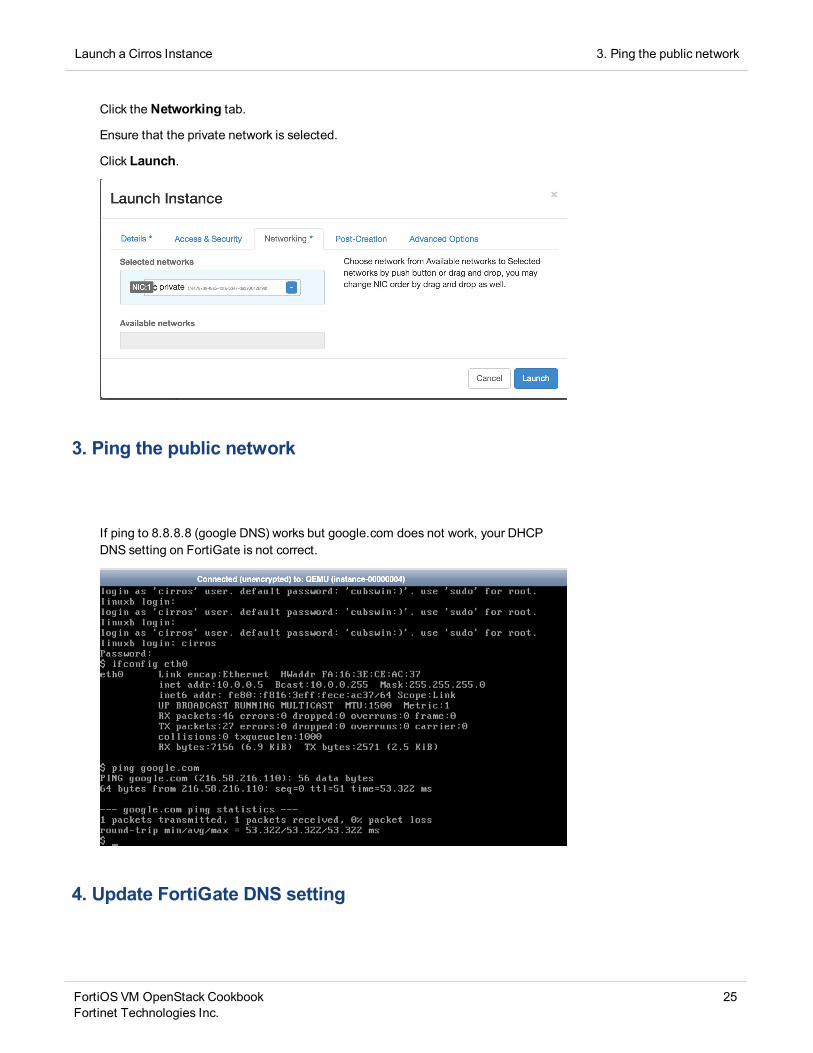
Click the Networking tab.
Ensure that the private network is selected.
Click Launch.
3. Ping the public network
If ping to 8.8.8.8 (google DNS) works but google.com does not work, your DHCPDNS setting on FortiGate is not correct.
4. Update FortiGate DNS setting
FortiOS VM OpenStack CookbookFortinet Technologies Inc.
25

5. Manage Floating IP setting Launch a Cirros Instance
Go toVirtual Domains -> Network -> Interfaces
Change the DNS server to “Same as System DNS”.
5. Manage Floating IP setting
Go toCompute -> Instances
Click pull down Actions menu and select Associate Floating IP
Pick one floating IP and clickAssociate
26 FortiOS VM OpenStack CookbookFortinet Technologies Inc.

FortiGate as Guest VM in OpenStack
You can run FortiGate VM in your OpenStack environment, to provide Firewall services for traffic between thetenant VMs.
This section contains the following examples:
"Run FortiGate as Guest VM in OpenStack " on page 28
This example uses the Horizon dashboard and some OpenStack CLI commands to perform the following steps:
1. Download FGT and FMG VM images2. Prepare the DevStack Environment3. Create two private networks4. Create Fortinet Access & Security Profile5. Deploy a FGT VM6. Deploy a FMGR VM7. Connect to FortiGate-VM
"Using Cloud-init to Launch FortiGate as Guest VM" on page 38
1. Create a text file to contain the parameters that you want to configure on the FortiGate.2. Use the nova command to launch the FortiGate VM and run the configuration file automatically.
27 FortiOS VM OpenStack CookbookFortinet Technologies Inc.
Run FortiGate as Guest VM in OpenStack
This section describes how to install and run FortiGate as a Guest VM in the OpenStack environment.
The objective is to demonstrate how a FortiGate-VM can monitor network traffic between VMs created in anOpenCloud environment.
From a browser, connect to the Horizon dashboard and log in with the demo user name and password.
1. Download FortiGate and FortiManager VM Image Files
Download the FortiManager and FortiGate KVM images from support.fortinet.com. The image names will havethe following format:
l FortiGate: FGT_VM64_KVM-v5-build1011-FORTINET.out.kvm.zipl FortiManager: FMG_VM64_KVM-v5-build1019-FORTINET.out.kvm.zip
Unzip the .qcow files, and upload them to your Ubuntu server. The commands below assume that the image filesare stored in a directory named images, which is a peer directory to devstack.
2. Prepare the DevStack Environment
Run the openrc file. This sets environment variables for you to run OpenStack commands:
# source openrc admin admin
Create a flavor for FortiGate-VM (1 G of RAM, 20 G disk, 1 vCPU):
# nova flavor-create m1.fgt-vm 6 1024 20 1
Create a KVM image for FortiGate-VM:
glance image-create --name fortigate_vm_dhcp-kvm-image --disk-format qcow2 --is-public True --container-format bare --file ../images/fortios.qcow2
Create a FortiManager-VM KVM image for license validation
glance image-create --name fmg-kvm-vm --disk-format qcow2 --is-public True --con-tainer-format bare --file ../images/fmg.qcow2
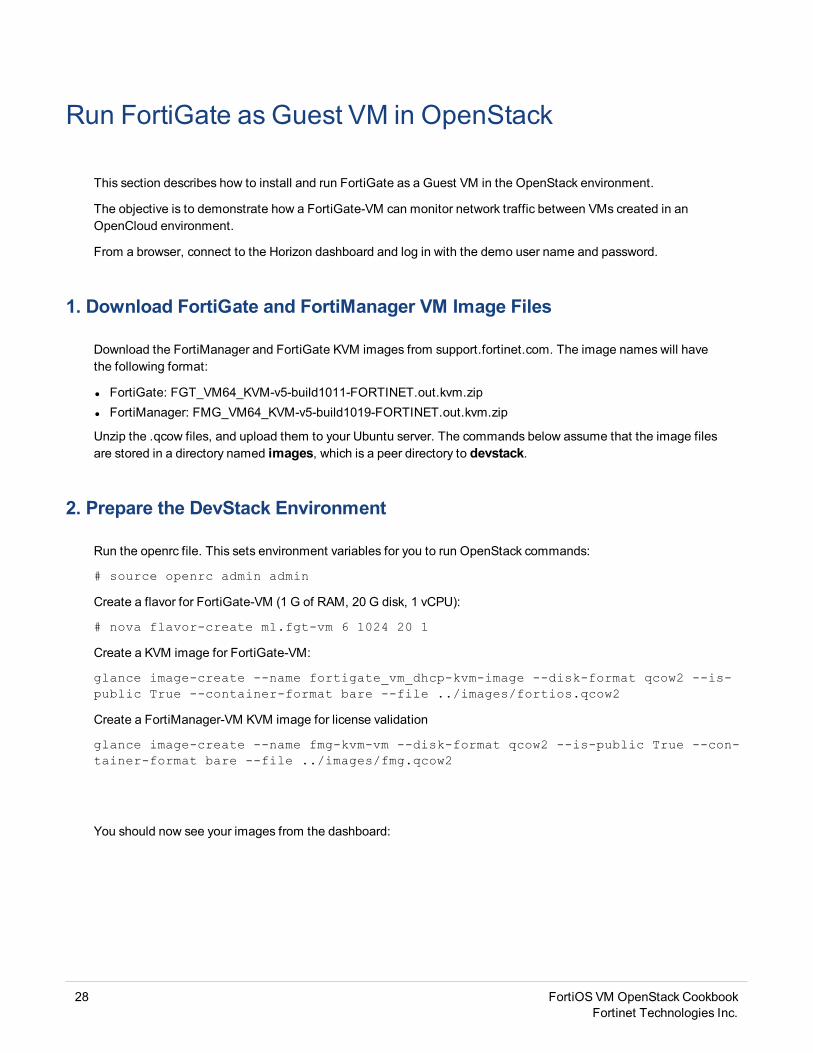
You should now see your images from the dashboard:
28 FortiOS VM OpenStack CookbookFortinet Technologies Inc.
Run FortiGate as Guest VM in OpenStack 3. Create Private Networks
You can also check the images from the CLI:
$ nova image-list
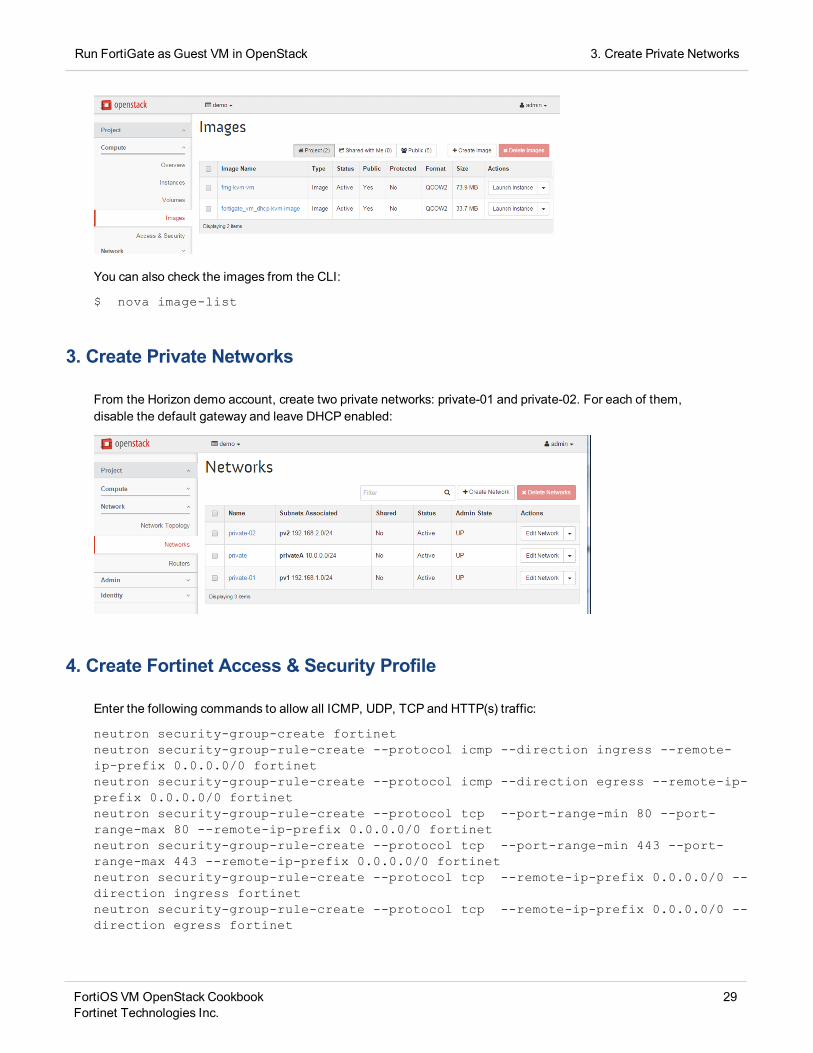
3. Create Private Networks
From the Horizon demo account, create two private networks: private-01 and private-02. For each of them,disable the default gateway and leave DHCP enabled:
4. Create Fortinet Access & Security Profile
Enter the following commands to allow all ICMP, UDP, TCP and HTTP(s) traffic:
neutron security-group-create fortinetneutron security-group-rule-create --protocol icmp --direction ingress --remote-ip-prefix 0.0.0.0/0 fortinetneutron security-group-rule-create --protocol icmp --direction egress --remote-ip-prefix 0.0.0.0/0 fortinetneutron security-group-rule-create --protocol tcp --port-range-min 80 --port-range-max 80 --remote-ip-prefix 0.0.0.0/0 fortinetneutron security-group-rule-create --protocol tcp --port-range-min 443 --port-range-max 443 --remote-ip-prefix 0.0.0.0/0 fortinetneutron security-group-rule-create --protocol tcp --remote-ip-prefix 0.0.0.0/0 --direction ingress fortinetneutron security-group-rule-create --protocol tcp --remote-ip-prefix 0.0.0.0/0 --direction egress fortinet
FortiOS VM OpenStack CookbookFortinet Technologies Inc.
29
5. Deploy a FortiGate-VM Run FortiGate as Guest VM in OpenStack
neutron security-group-rule-create --protocol udp --remote-ip-prefix 0.0.0.0/0 --direction ingress fortinetneutron security-group-rule-create --protocol udp --remote-ip-prefix 0.0.0.0/0 --direction egress fortinet
5. Deploy a FortiGate-VM
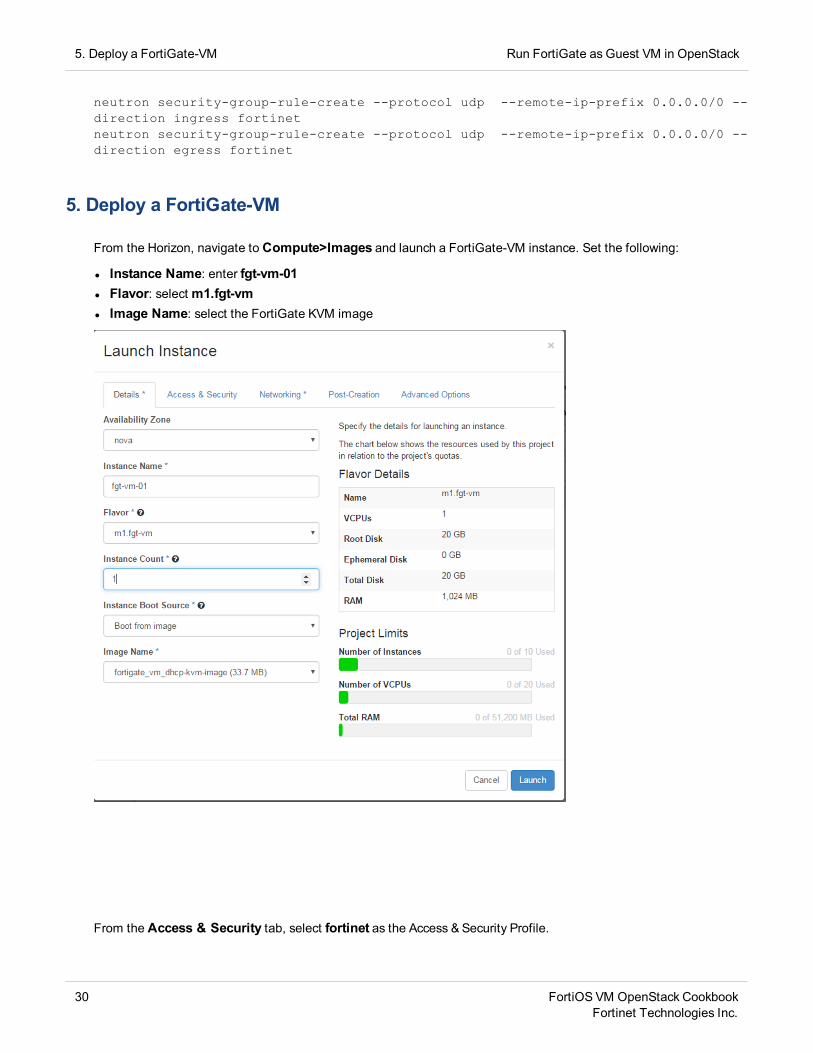
From the Horizon, navigate to Compute>Images and launch a FortiGate-VM instance. Set the following:
l Instance Name: enter fgt-vm-01l Flavor: selectm1.fgt-vml Image Name: select the FortiGate KVM image
From the Access & Security tab, select fortinet as the Access & Security Profile.
30 FortiOS VM OpenStack CookbookFortinet Technologies Inc.
Run FortiGate as Guest VM in OpenStack 6. Deploy a FortiManager VM
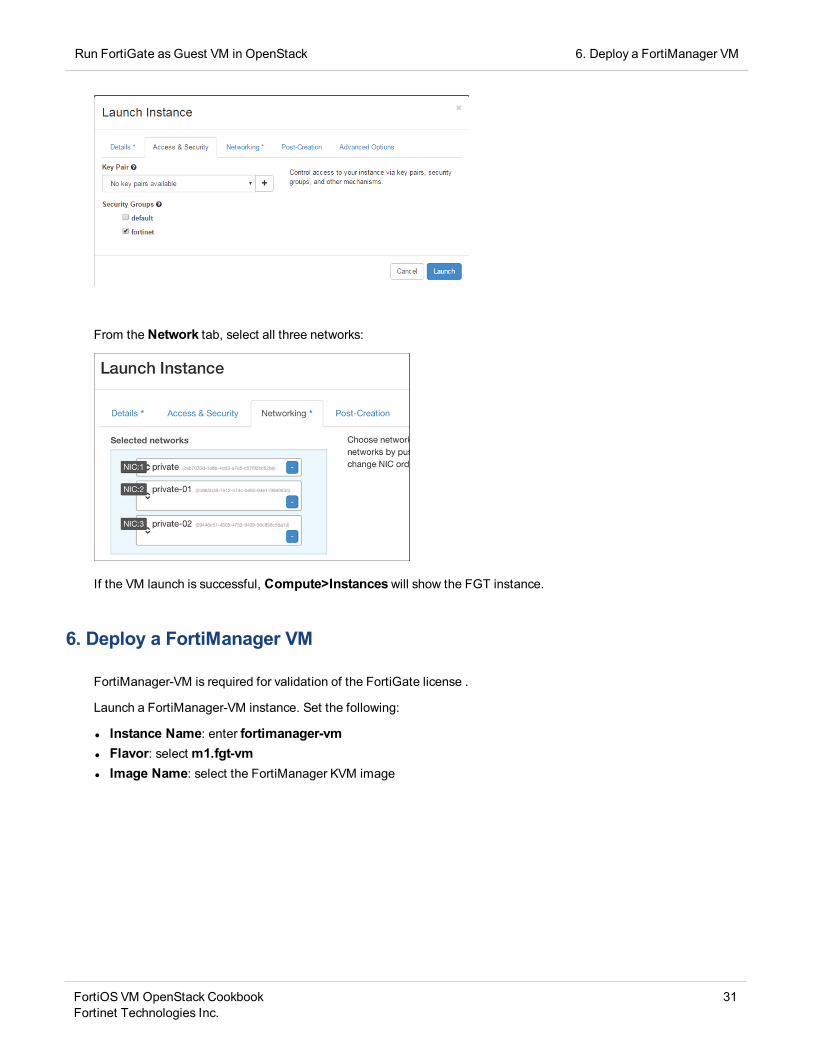
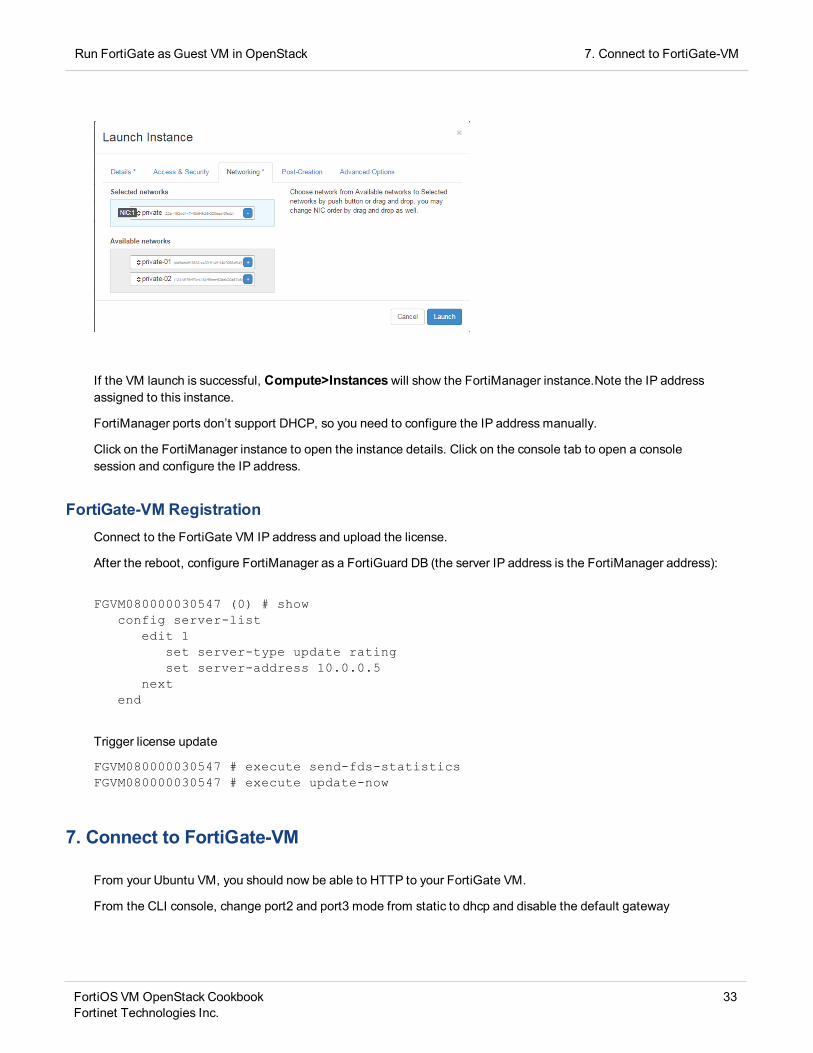
From the Network tab, select all three networks:
If the VM launch is successful, Compute>Instanceswill show the FGT instance.
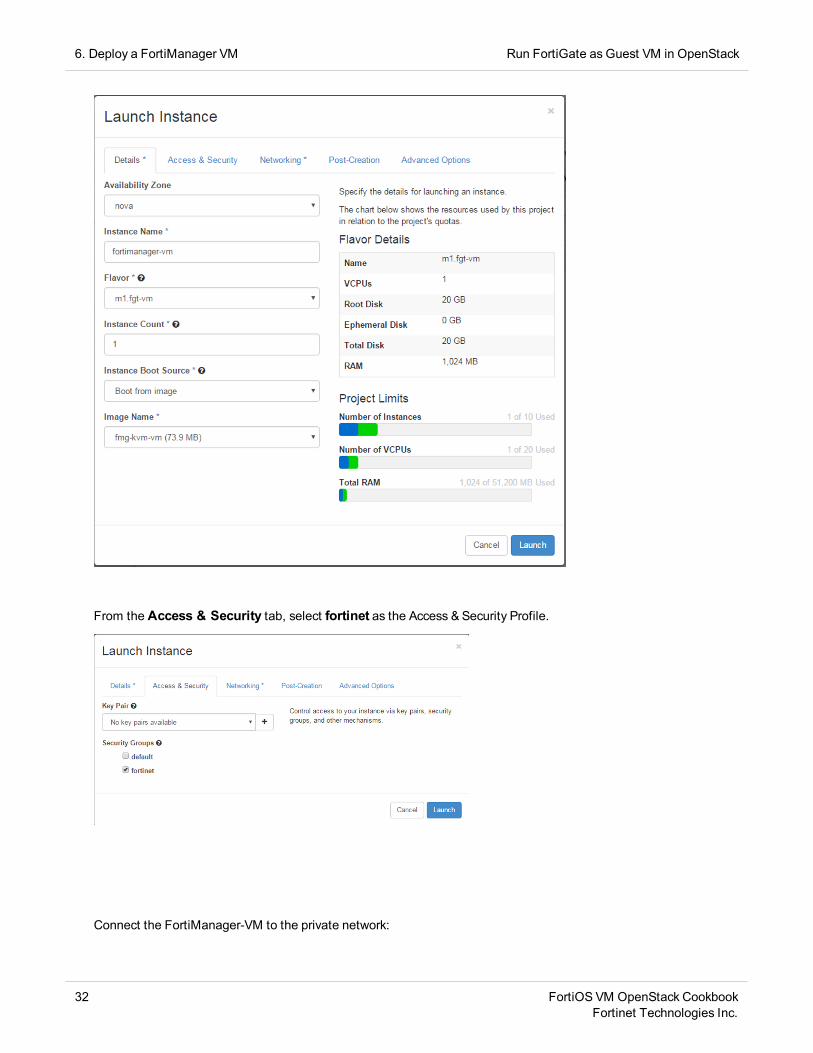
6. Deploy a FortiManager VM
FortiManager-VM is required for validation of the FortiGate license .
Launch a FortiManager-VM instance. Set the following:
l Instance Name: enter fortimanager-vml Flavor: selectm1.fgt-vml Image Name: select the FortiManager KVM image
FortiOS VM OpenStack CookbookFortinet Technologies Inc.
31
6. Deploy a FortiManager VM Run FortiGate as Guest VM in OpenStack
From the Access & Security tab, select fortinet as the Access & Security Profile.
Connect the FortiManager-VM to the private network:
32 FortiOS VM OpenStack CookbookFortinet Technologies Inc.
Run FortiGate as Guest VM in OpenStack 7. Connect to FortiGate-VM
If the VM launch is successful, Compute>Instanceswill show the FortiManager instance.Note the IP addressassigned to this instance.
FortiManager ports don’t support DHCP, so you need to configure the IP address manually.
Click on the FortiManager instance to open the instance details. Click on the console tab to open a consolesession and configure the IP address.
FortiGate-VM RegistrationConnect to the FortiGate VM IP address and upload the license.
After the reboot, configure FortiManager as a FortiGuard DB (the server IP address is the FortiManager address):
FGVM080000030547 (0) # showconfig server-list
edit 1set server-type update ratingset server-address 10.0.0.5
nextend
Trigger license update
FGVM080000030547 # execute send-fds-statisticsFGVM080000030547 # execute update-now
7. Connect to FortiGate-VM
From your Ubuntu VM, you should now be able to HTTP to your FortiGate VM.
From the CLI console, change port2 and port3 mode from static to dhcp and disable the default gateway
FortiOS VM OpenStack CookbookFortinet Technologies Inc.
33
7. Connect to FortiGate-VM Run FortiGate as Guest VM in OpenStack
FGVM080000030547 (port2) # showconfig system interface
edit "port2"set vdom "root"set mode dhcpset allowaccess pingset type physicalset snmp-index 2set defaultgw disable
nextendFGVM080000030547 (port3) # showconfig system interface
edit "port3"set vdom "root"set mode dhcpset allowaccess pingset type physicalset snmp-index 3set defaultgw disable
nextend
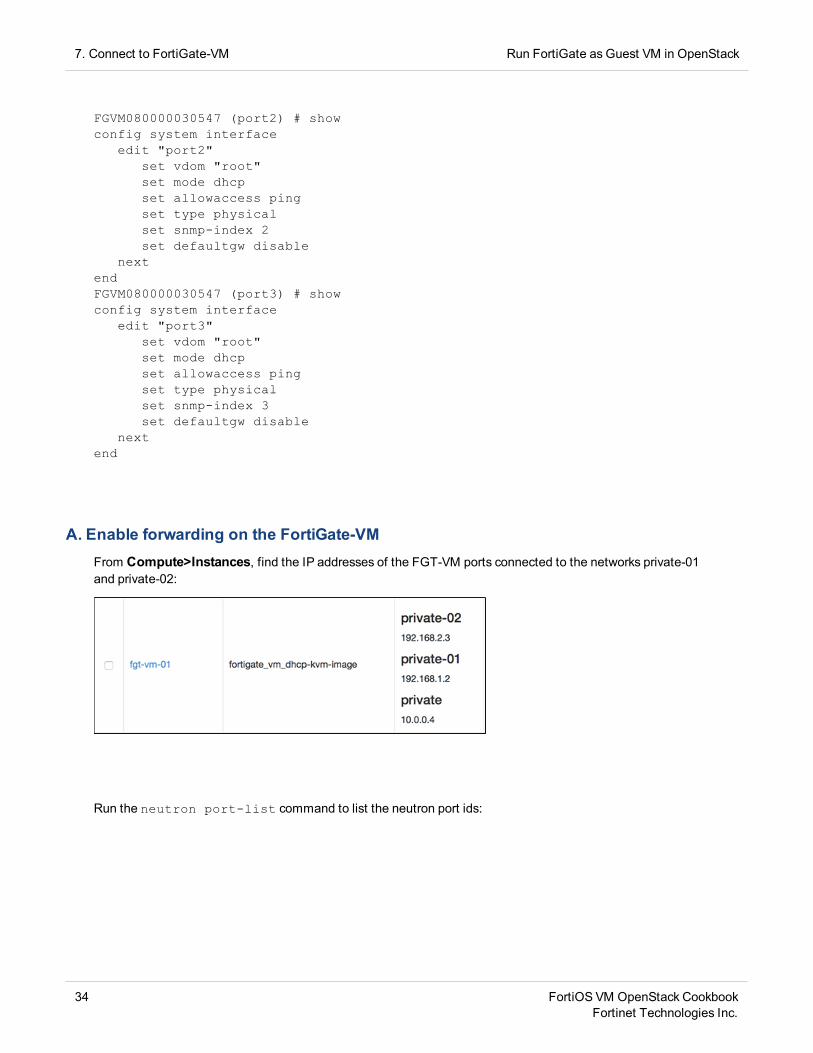
A. Enable forwarding on the FortiGate-VMFrom Compute>Instances, find the IP addresses of the FGT-VM ports connected to the networks private-01and private-02:
Run the neutron port-list command to list the neutron port ids:
34 FortiOS VM OpenStack CookbookFortinet Technologies Inc.

Run FortiGate as Guest VM in OpenStack 7. Connect to FortiGate-VM
From the IP address field, identify the neutron port IDs of the two ports (the following is a truncated output of theabove screen-shot):
+-------------------------------------+----+------------------+-------------| id |name| mac_address | fixed_ips+-------------------------------------+----+------------------+-------------| 0887db03-ca2a-454e-a68a-3ae0afaf4a45| |fa:16:3e:46:13:bd| "192.168.1.2"
...
| aeeb125e-82e9-4db5-b503-2b00283c8abc| |fa:16:3e:58:4b:7f| "192.168.2.3"+-------------------------------------+----+------------------+-------------
Disable the security group and the port security on the 2 ports:
neutron port-update 0887db03-ca2a-454e-a68a-3ae0afaf4a45 --no-security-groups --port_security_enabled=False
#neutron port-update aeeb125e-82e9-4db5-b503-2b00283c8abc --no-security-groups --port_security_enabled=False
Verify the port security status, by running the port-show command:
#stack@ubuntu:~$ neutron port-show aeeb125e-82e9-4db5-b503-2b00283c8abc+-----------------------+----------------------------------------------+| Field | Value |+-----------------------+----------------------------------------------+| admin_state_up | True || allowed_address_pairs | || binding:host_id | ubuntu || <truncated>| device_owner | compute:nova || extra_dhcp_opts | || fixed_ips | "ip_address": "192.168.2.3" || id | aeeb125e-82e9-4db5-b503-2b00283c8abc || mac_address | fa:16:3e:58:4b:7f || name | || network_id | fc015239-4e77-4cfb-ae40-65d5c1d4a717 || port_security_enabled | False || security_groups | || status | ACTIVE || tenant_id | 84cbb0f0fcd54b319c12dd0307e94894 |+-----------------------+----------------------------------------------+
FortiOS VM OpenStack CookbookFortinet Technologies Inc.
35
7. Connect to FortiGate-VM Run FortiGate as Guest VM in OpenStack
B. Network Configuration UpdateNavigate to Network>Networks.Click the network private-01, then clickEdit Subnet for subnet pv1, then clickSubnet Details.
Modify the Host Routes to add a default route pointing to the FGT IP address.
Repeat this configuration for the private-02 network.
The image below shows the values for private-01 and private-02.
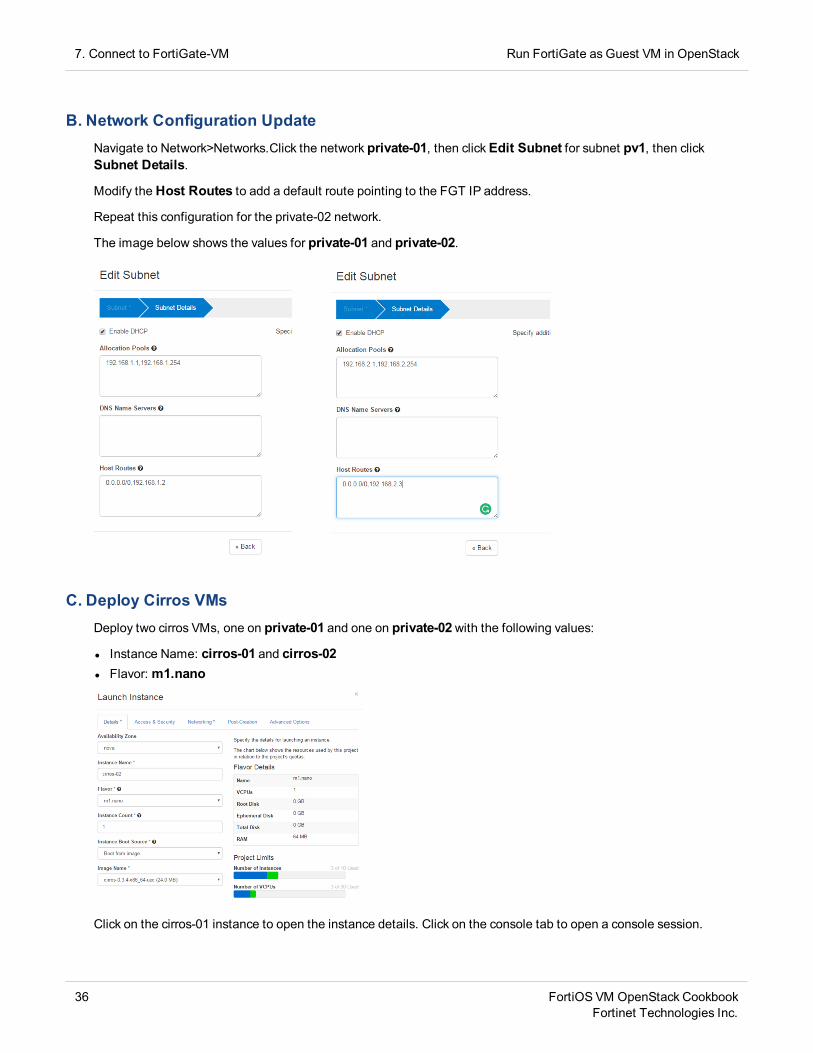
C. Deploy Cirros VMsDeploy two cirros VMs, one on private-01 and one on private-02with the following values:
l Instance Name: cirros-01 and cirros-02l Flavor:m1.nano
Click on the cirros-01 instance to open the instance details. Click on the console tab to open a console session.
36 FortiOS VM OpenStack CookbookFortinet Technologies Inc.
Run FortiGate as Guest VM in OpenStack 7. Connect to FortiGate-VM
Verify the routing table in each instance – ensure that the default route points to the FGT-VM
cirros-01:
$ ip route
default via 192.168.1.2 dev eth0
192.168.1.0/24 dev eth0 src 192.168.1.3
cirros-02:
$ ip route
default via 192.168.2.3 dev eth0
192.168.2.0/24 dev eth0 src 192.168.2.4
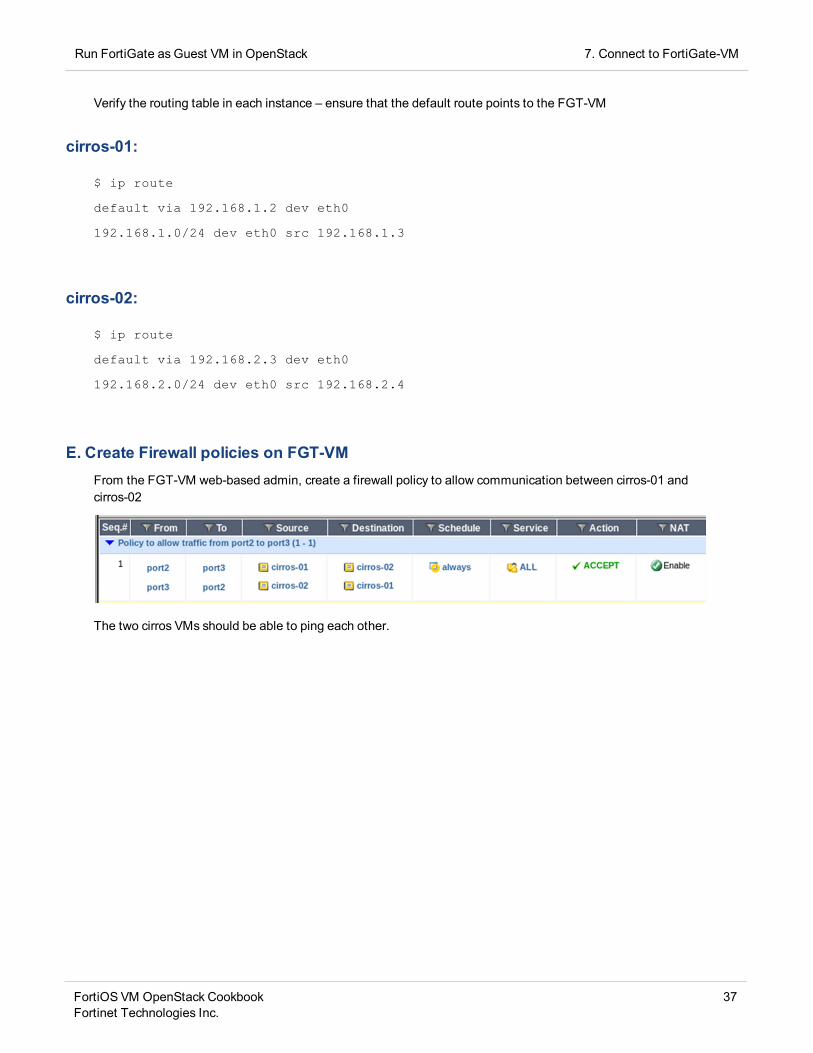
E. Create Firewall policies on FGT-VMFrom the FGT-VM web-based admin, create a firewall policy to allow communication between cirros-01 andcirros-02
The two cirros VMs should be able to ping each other.
FortiOS VM OpenStack CookbookFortinet Technologies Inc.
37
Using Cloud-init to Launch FortiGate as Guest VM
Instead of launching the FortiGate VM from the Horizon GUI, you can use CLI commands and use Cloud-init toinitialize the FortiGate VM.
The following prerequisites are covered in Run FortiGate as Guest VM in OpenStack.
Prerequisites1. Cloud-init requires FortiOS 5.4.1 or higher release for the FortiGate VM.2. Run the source command3. Download FGT-VM image file.4. Create an image flavor for FGT-VM5. Create the image using Glance6. Download the License file to the same directory as the images.The commands below assume that the image files and license file are stored in a directory named images, whichis a peer directory to devstack.
Steps:
1. Create FortiGate initial configuration file
Create the FortiGate initial configuration file (fgtinit.txt) in the images directory.
2. Edit the FGT initial configuration file.
The command syntax is the same as CLI commands:
config system globalset hostname OpenStackTest
endconfig system interface
edit "port1"set mode dhcpset allowaccess ping https ssh fgfm
nextendconfig system central-management
set type fortimanagerset fmg "10.100.14.222"
config server-listedit 1
set server-type update ratingset server-address 10.100.14.222
next
38 FortiOS VM OpenStack CookbookFortinet Technologies Inc.
Using Cloud-init to Launch FortiGate as Guest VM 3. Get the Image id and Network id
endend
3. Get the Image id and Network id
Run the following commands to get the image id and the network id of the private network
$ nova image-list
$ nova network-list
4. Run Nova Boot Command
The following example launches a FGT-VM instance (FGT-VM-CSE-Demo) in the demo project and connect tothe private network. The user-data parameter names the post-creation user file, and the file command makes thelicense file available to the newly-created instance.
nova boot-os-tenant-name demo-config-drive true-flavor m1.fgt-vm-image f1a6dfde-fbb3-4861-85ef-b88bd28f1b8e-user-data=fgtinit.txt-nic net-id=5fb6e777-8f38-44e3-a0e5-71b747c61c11-file license=FGVM080000059099.licFGT-VM-CSE-Demo
5. Verify
Check the console to see the FortiGate VM load the initial configuration and the license file.
FortiOS VM OpenStack CookbookFortinet Technologies Inc.
39
Tenant Networks
This section contains examples related to tenant network.
Examples include:
"Configure External Network" on page 41
Without the external network, tenants can only access other tenants on this host.
"Create the Tenant Network" on page 44
This example uses the Horizon Dashboard to create the infrastructure required for a tenant network.
40 FortiOS VM OpenStack CookbookFortinet Technologies Inc.
Configure External Network
Using the admin project, create an external network. All of the tenant VM's communicate externally through thisnetwork.
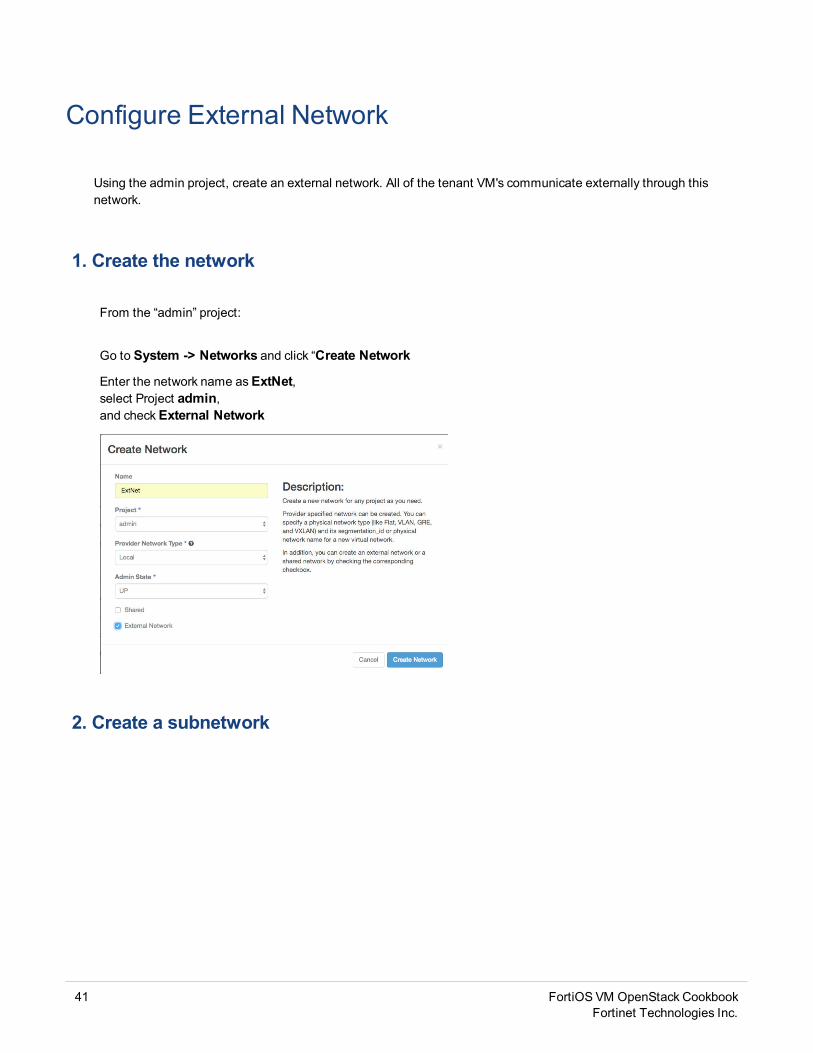
1. Create the network
From the “admin” project:
Go to System -> Networks and click “Create Network
Enter the network name asExtNet,select Project admin,and checkExternal Network
2. Create a subnetwork
41 FortiOS VM OpenStack CookbookFortinet Technologies Inc.
Configure External Network 2. Create a subnetwork
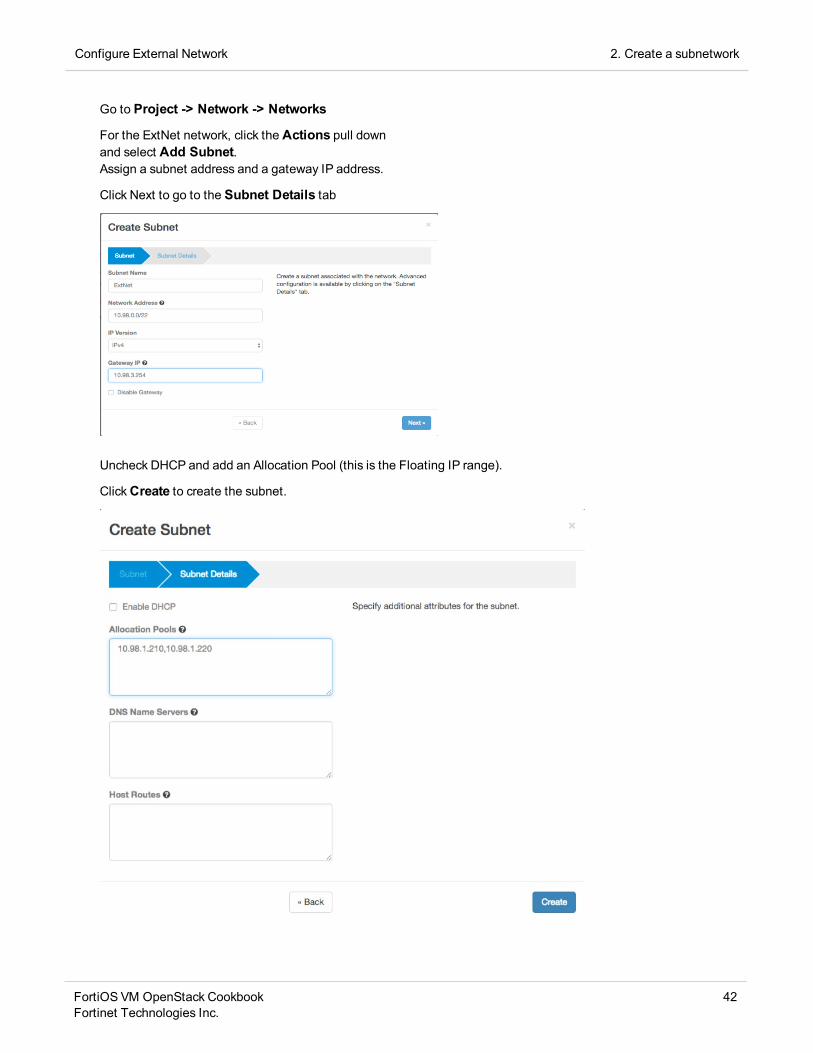
Go to Project -> Network -> Networks
For the ExtNet network, click the Actions pull downand select Add Subnet.Assign a subnet address and a gateway IP address.
Click Next to go to the Subnet Details tab
Uncheck DHCP and add an Allocation Pool (this is the Floating IP range).
ClickCreate to create the subnet.
FortiOS VM OpenStack CookbookFortinet Technologies Inc.
42

2. Create a subnetwork Configure External Network
43 FortiOS VM OpenStack CookbookFortinet Technologies Inc.
Create the Tenant Network
Tenants can log in and create their tenant network. Tenant creates a router attached to the external network.
All of the tenant VM's communicate externally through this network.
1. Create the network
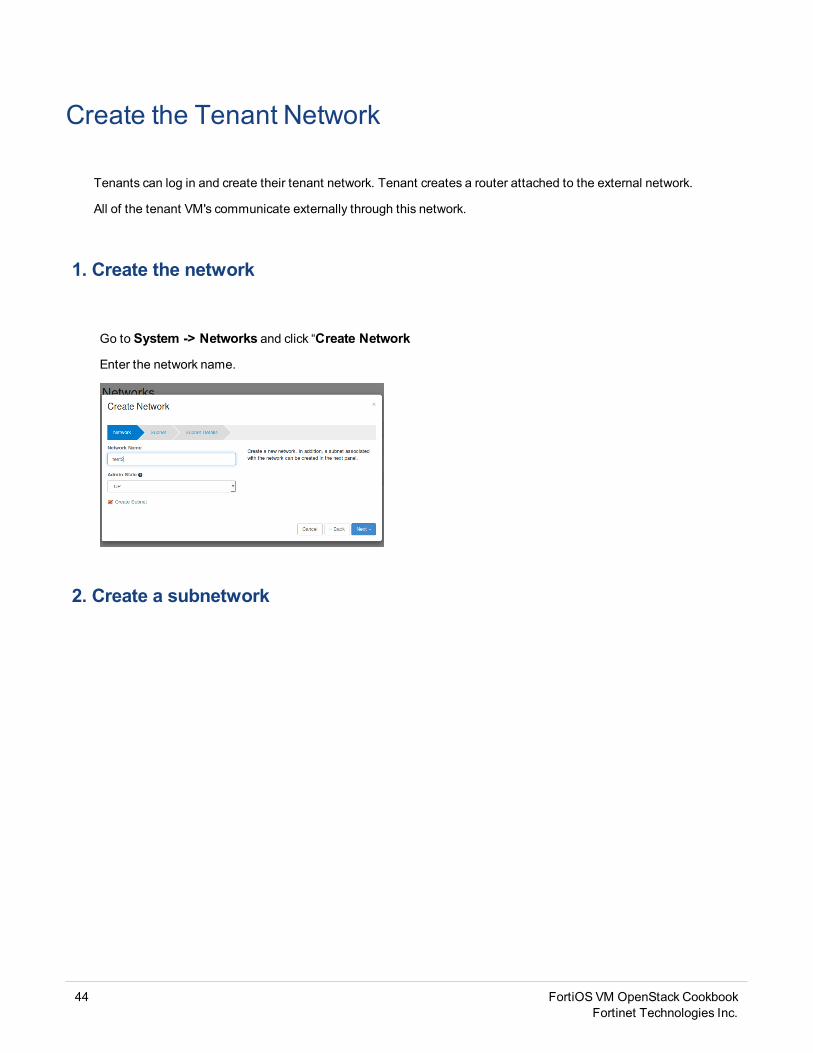
Go to System -> Networks and click “Create Network
Enter the network name.
2. Create a subnetwork
44 FortiOS VM OpenStack CookbookFortinet Technologies Inc.
Create the Tenant Network 3. Configure the Router
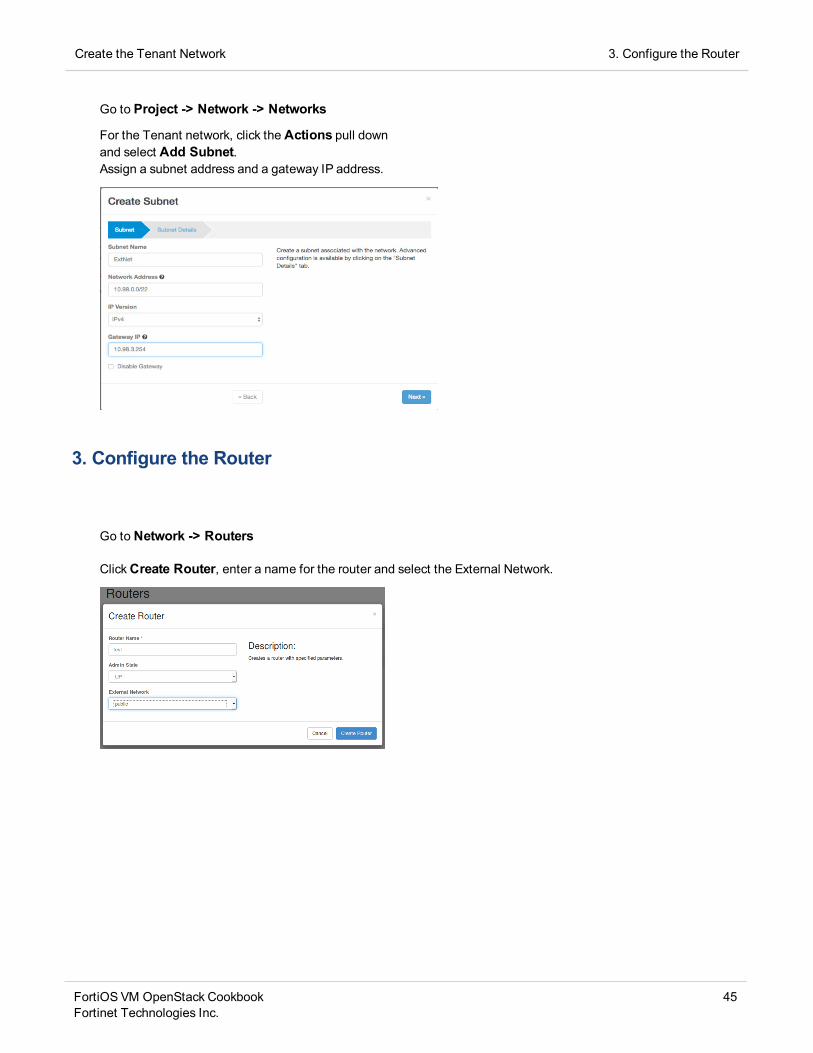
Go to Project -> Network -> Networks
For the Tenant network, click the Actions pull downand select Add Subnet.Assign a subnet address and a gateway IP address.
3. Configure the Router
Go to Network -> Routers
ClickCreate Router, enter a name for the router and select the External Network.
FortiOS VM OpenStack CookbookFortinet Technologies Inc.
45
4. Allocate Floating IP Create the Tenant Network
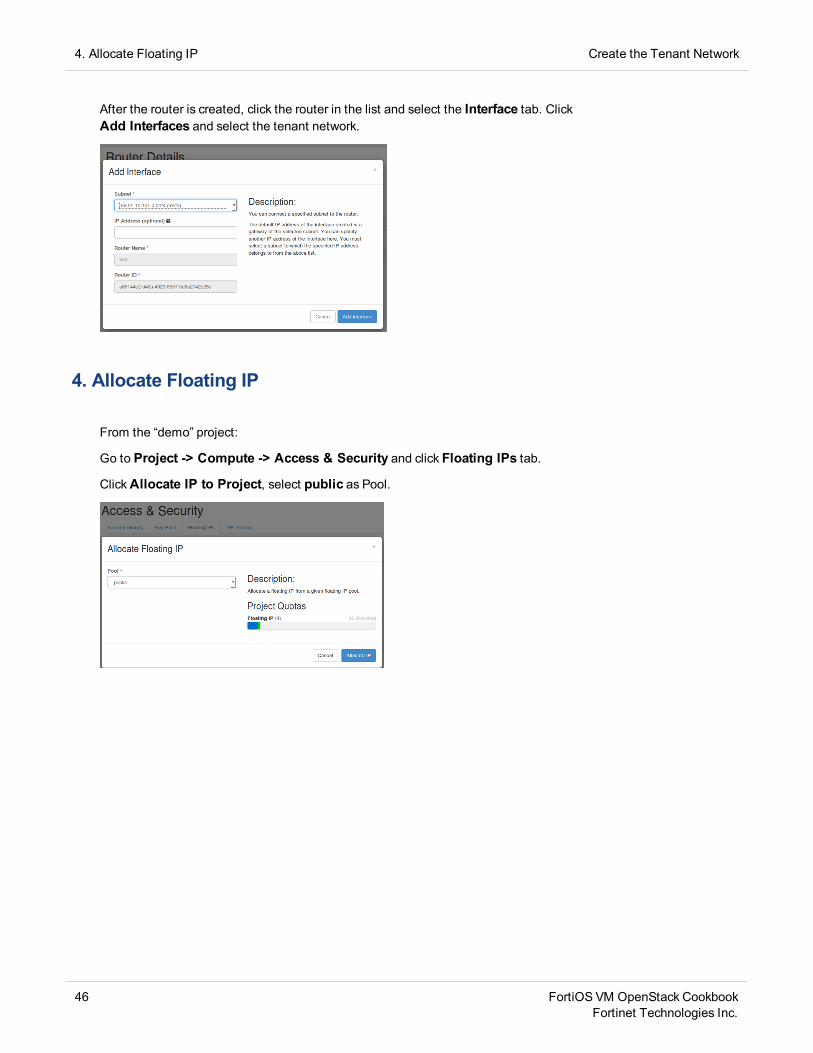
After the router is created, click the router in the list and select the Interface tab. ClickAdd Interfaces and select the tenant network.
4. Allocate Floating IP
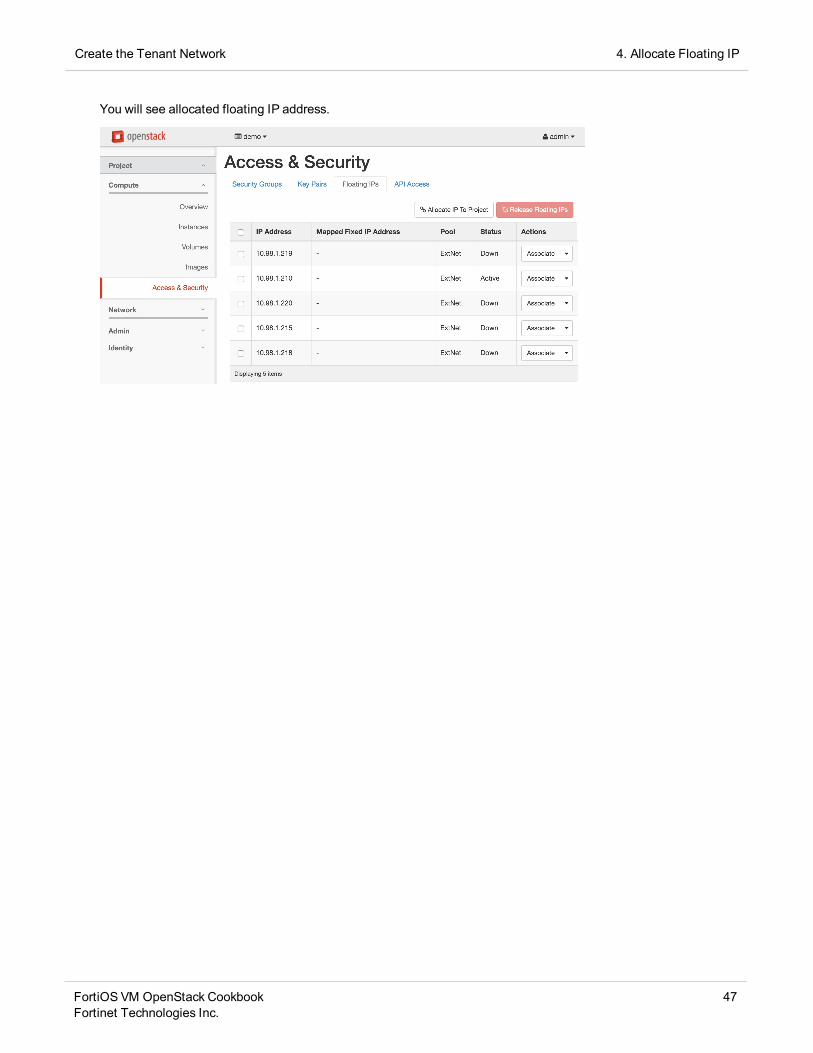
From the “demo” project:
Go to Project -> Compute -> Access & Security and click Floating IPs tab.
ClickAllocate IP to Project, select public as Pool.
46 FortiOS VM OpenStack CookbookFortinet Technologies Inc.
Create the Tenant Network 4. Allocate Floating IP
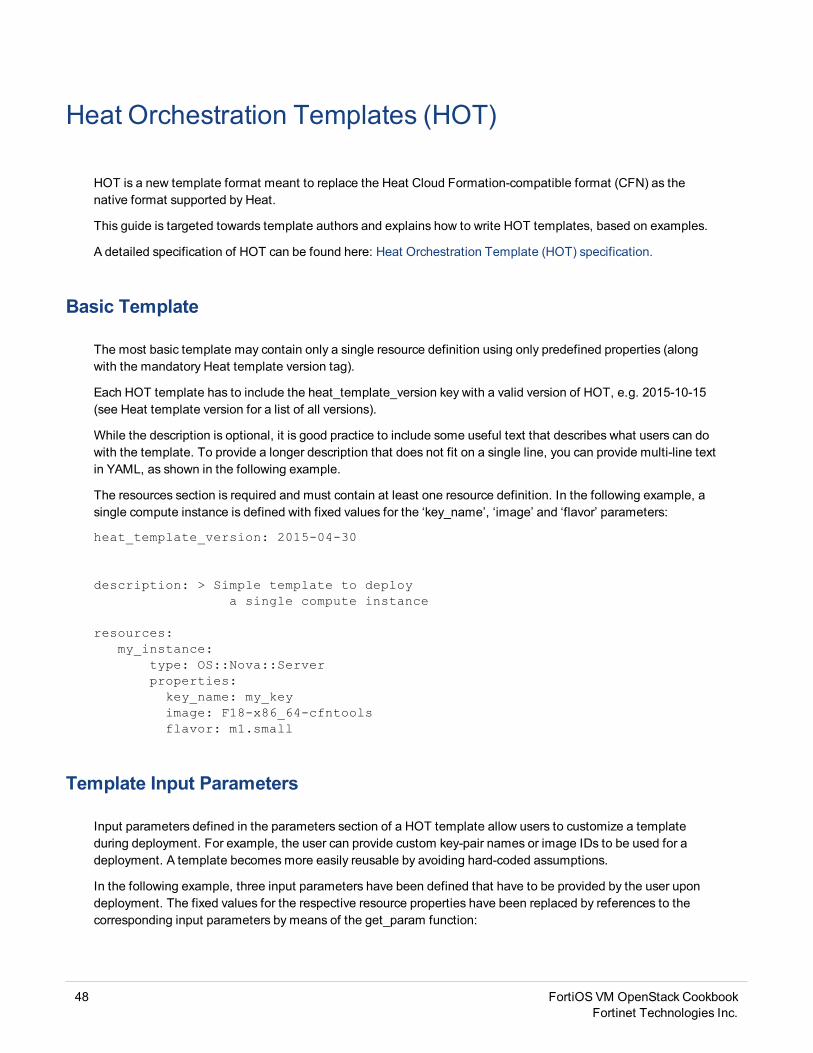
You will see allocated floating IP address.
FortiOS VM OpenStack CookbookFortinet Technologies Inc.
47
Heat Orchestration Templates (HOT)
HOT is a new template format meant to replace the Heat Cloud Formation-compatible format (CFN) as thenative format supported by Heat.
This guide is targeted towards template authors and explains how to write HOT templates, based on examples.
A detailed specification of HOT can be found here: Heat Orchestration Template (HOT) specification.
Basic Template
The most basic template may contain only a single resource definition using only predefined properties (alongwith the mandatory Heat template version tag).
Each HOT template has to include the heat_template_version key with a valid version of HOT, e.g. 2015-10-15(see Heat template version for a list of all versions).
While the description is optional, it is good practice to include some useful text that describes what users can dowith the template. To provide a longer description that does not fit on a single line, you can provide multi-line textin YAML, as shown in the following example.
The resources section is required and must contain at least one resource definition. In the following example, asingle compute instance is defined with fixed values for the ‘key_name’, ‘image’ and ‘flavor’ parameters:
heat_template_version: 2015-04-30
description: > Simple template to deploya single compute instance
resources:my_instance:
type: OS::Nova::Serverproperties:
key_name: my_keyimage: F18-x86_64-cfntoolsflavor: m1.small
Template Input Parameters
Input parameters defined in the parameters section of a HOT template allow users to customize a templateduring deployment. For example, the user can provide custom key-pair names or image IDs to be used for adeployment. A template becomes more easily reusable by avoiding hard-coded assumptions.
In the following example, three input parameters have been defined that have to be provided by the user upondeployment. The fixed values for the respective resource properties have been replaced by references to thecorresponding input parameters by means of the get_param function:
48 FortiOS VM OpenStack CookbookFortinet Technologies Inc.

Heat Orchestration Templates (HOT) Template Outputs
heat_template_version: 2015-04-30
description: > Simple template to deploya single compute instance
parameters:key_name:
type: stringlabel: Key Namedescription: Name of key-pair to be used for compute instance
image_id:
type: stringlabel: Image IDdescription: Image to be used for compute instance
instance_type:type: stringlabel: Instance Typedescription: Type of instance (flavor) to be useddefault: m1.small
resources:my_instance:
type: OS::Nova::Serverproperties:
key_name: { get_param: key_name }image: { get_param: image_id }flavor: { get_param: instance_type }
Note that you can specify a default value, which will be used if the user does not specify a value.
Template Outputs
You will typically provide outputs to users using the outputs section of a template. For example, the IP address forthe instance (defined in the example above) should be provided to users. Otherwise, users would have to look itup themselves. The definition for providing the IP address of the compute instance as an output is shown in thefollowing snippet:
outputs:
instance_ip:description: The IP address of the deployed instancevalue: { get_attr: [my_instance, first_address] }
Examples
This section includes the following examples:
FortiOS VM OpenStack CookbookFortinet Technologies Inc.
49

Examples Heat Orchestration Templates (HOT)
l "Using Heat to instantiate a FOS-VM" on page 55l "Using Heat to configure FortiGate" on page 51
50 FortiOS VM OpenStack CookbookFortinet Technologies Inc.
Using Heat to configure FortiGate
This example describes a HEAT template for configuring FortiGate.
This template shows how to configure FortiGate via config-drive and to install a license and also to demonstratepassing parameters via heat command line to be interpolated into the config-drive configuration template.
This heat template uses a config-drive file to configure the hostname and admintimeout of a FortiGate instance.The config-drive file (fgt.txt) contains:
config system globalset hostname $HOSTNAMEset admintimeout $TIMEOUT
end
They heat template uses the “str_replace” function and “template” parameter. To replace specific text in theconfig-drive file with parameters passed to the stack-create command via CLI. The parameters required/acceptedby this template are:
1. hostname : used to set the hostname configuration on the fortigate itself (optional: defaults to fgt)2. admintimeout: used to set the admintimeout on the fortigate itself. (optional: defaults to 60)Instantiation example:
heat stack-create –f fgtvm.yml –poll –P “hostname=fgttest;admintimeout=480” test-stack2
51 FortiOS VM OpenStack CookbookFortinet Technologies Inc.
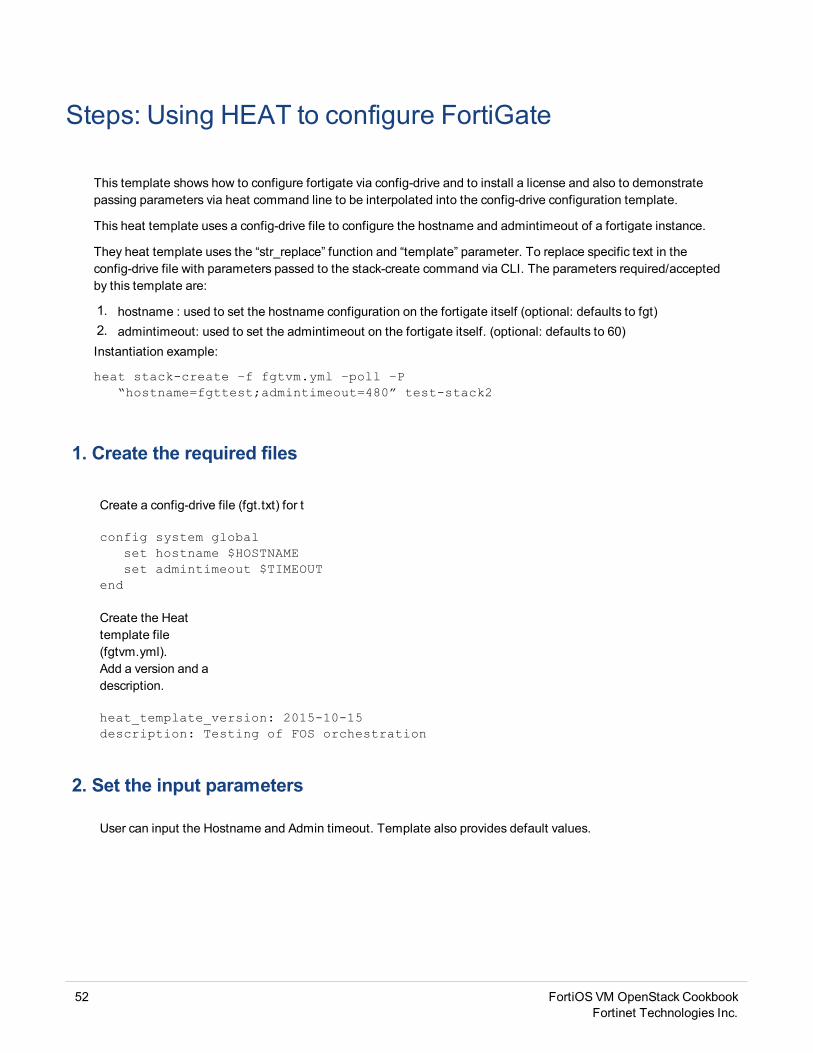
Steps: Using HEAT to configure FortiGate
This template shows how to configure fortigate via config-drive and to install a license and also to demonstratepassing parameters via heat command line to be interpolated into the config-drive configuration template.
This heat template uses a config-drive file to configure the hostname and admintimeout of a fortigate instance.
They heat template uses the “str_replace” function and “template” parameter. To replace specific text in theconfig-drive file with parameters passed to the stack-create command via CLI. The parameters required/acceptedby this template are:
1. hostname : used to set the hostname configuration on the fortigate itself (optional: defaults to fgt)2. admintimeout: used to set the admintimeout on the fortigate itself. (optional: defaults to 60)Instantiation example:
heat stack-create –f fgtvm.yml –poll –P“hostname=fgttest;admintimeout=480” test-stack2
1. Create the required files
Create a config-drive file (fgt.txt) for t
config system globalset hostname $HOSTNAMEset admintimeout $TIMEOUT
end
Create the Heattemplate file(fgtvm.yml).Add a version and adescription.
heat_template_version: 2015-10-15description: Testing of FOS orchestration
2. Set the input parameters
User can input the Hostname and Admin timeout. Template also provides default values.
52 FortiOS VM OpenStack CookbookFortinet Technologies Inc.
Steps: Using HEAT to configure FortiGate 3. Define the resources
parameters:hostname:
type: stringlabel: Hostnamedescription: Hostname for instancedefault: fgt
admintimeout:type: stringlabel: Admin Timeoutdescription: Session timeout in mins (1-480)default: 60
3. Define the resources
resources:fgt:
type: OS::Nova::Serverproperties:image: c21626bc-3a95-45b0-9932-ce4fb4fc90ffflavor: custom1security_groups: [ default ]networks:- network: a090ab14-c913-482e-a456-c091a6fdd9f4config_drive: Trueuser_data:
str_replace:template: { get_file:
/home/ftnt/config_drive/fgt.txt }params:
$HOSTNAME: { get_param: hostname }$TIMEOUT: { get_param: admintimeout }
user_data_format: RAWpersonality: {"license": {get_
file:/home/hyyperlite/licenses/vm1.lic}}
4. Define the Outputs
FortiOS VM OpenStack CookbookFortinet Technologies Inc.
53

4. Define the Outputs Steps: Using HEAT to configure FortiGate
outputs:instance_name:
description: Name of the instancevalue: { get_attr: [ fgt, name ] }
instance_ip:description: IP Address of instancevalue: {get_attr: [ fgt, first_address ] }
networks:description: IP address of the servervalue: { get_attr: [ fgt , networks,
net-10.200.1.0/24, 0 ] }
54 FortiOS VM OpenStack CookbookFortinet Technologies Inc.

Using Heat to instantiate a FOS-VM
This section describes an example template.
This template is used to instantiate a new FOS-VM, including configuration of the mgmt port, port1 and port2,security groups, floating-ip, disable port-security on specific ports, assign an instance name and assign aFortiManager IP via config-drive.
In this template 3 OS:Neutron:Port ports are created to be used by the FOSVM mgmt, port1 and port2. Port1 andport2 are configured with static IPs and have OpenStack Port-Security disabled so that traffic can be routedthrough the device from port1 to port2. A floating IP is associated to the fosvm mgmt port also. In this heattemplate I also create a neutron security-group mgmt-secgroup and assign it to the neutron port that will be usedfor mgmt interface.
Finally, an instance of type OS:Nova:Server is created. The instance is associated to the 3 ports created aboveand also uses config-drive to configure the FortiManager IP. However, I use the HOT option “str_replace” &“template” to replace a variable ($FMGIP) in the referenced config drive file with a parameter that I passed in tostack-create with the actual fortimanager IP.
The HOT file includes several defined parameters:
1. fmgip which should contain the FortiManager IP, as I referenced above.2. mgmt-net network-id to associate mgmt interface to.3. ixpub-net network-id to associated port1 to4. ixpri-net the network id to associated port2 to.5. ftntname name to give to the fosvm instance (this is optional because I defined a default)6. floatingipid the OS id of the floating ip that I want to assign to the instance.Instantiation example:
heat stack-create –f fosvm.yml --poll –P “fmgip=10.1.1.1; mgmt-net=net-10.1.1.0/24;ixpub-net=net-172.18.101.0/24;ixpri-net-t=192.168.100.0/24;ftntname=fosvm-1;floatingipid= 12e03b39-76ed-497d-a7ee-9eca18b-c2c64” test-stack1
55 FortiOS VM OpenStack CookbookFortinet Technologies Inc.
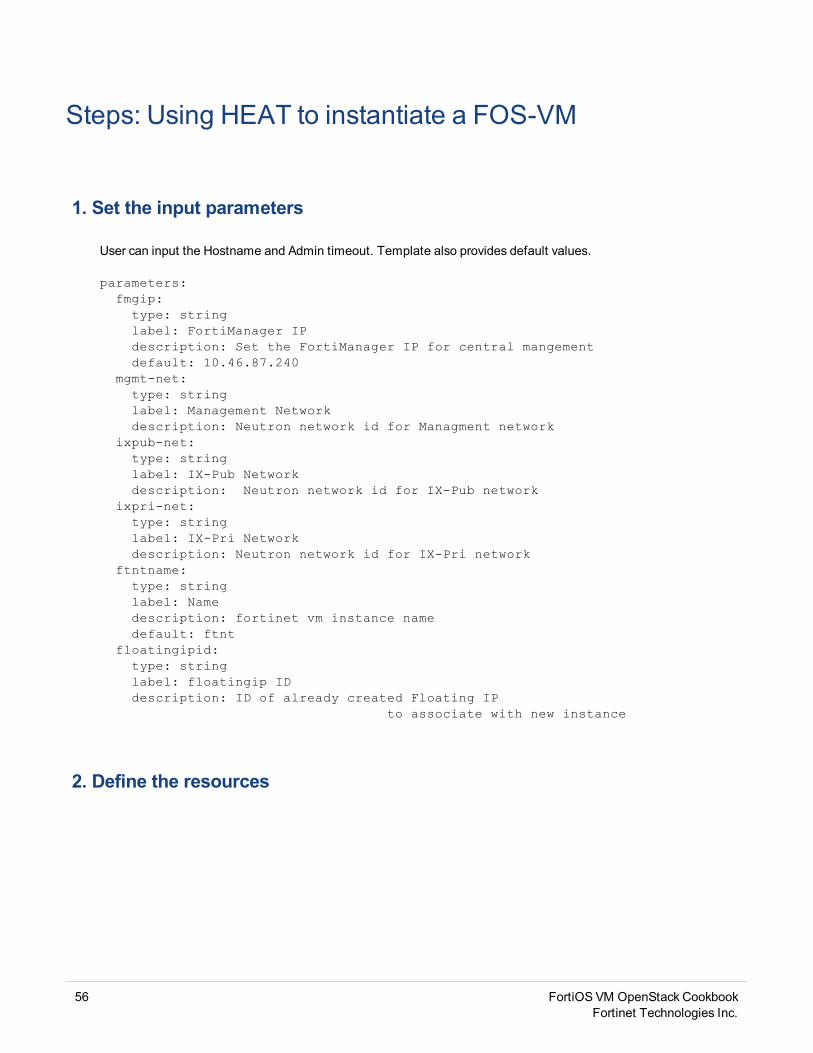
Steps: Using HEAT to instantiate a FOS-VM
1. Set the input parameters
User can input the Hostname and Admin timeout. Template also provides default values.
parameters:fmgip:
type: stringlabel: FortiManager IPdescription: Set the FortiManager IP for central mangementdefault: 10.46.87.240
mgmt-net:type: stringlabel: Management Networkdescription: Neutron network id for Managment network
ixpub-net:type: stringlabel: IX-Pub Networkdescription: Neutron network id for IX-Pub network
ixpri-net:type: stringlabel: IX-Pri Networkdescription: Neutron network id for IX-Pri network
ftntname:type: stringlabel: Namedescription: fortinet vm instance namedefault: ftnt
floatingipid:type: stringlabel: floatingip IDdescription: ID of already created Floating IP
to associate with new instance
2. Define the resources
56 FortiOS VM OpenStack CookbookFortinet Technologies Inc.

Steps: Using HEAT to instantiate a FOS-VM 3. Define the ftnt VM
resources:mgmt-port:
type: OS::Neutron::Portproperties:
network: { get_param: mgmt-net }security_groups:
- { get_resource: mgmt-secgroup }
ixpub-port:type: OS::Neutron::Portproperties:
network: { get_param: ixpub-net }port_security_enabled: Falsefixed_ips:
- ip_address: 172.18.101.254
ixpri-port:type: OS::Neutron::Portproperties:
network: { get_param: ixpri-net }port_security_enabled: Falsefixed_ips:
- ip_address: 172.18.201.254
3. Define the ftnt VM
ftntvm:type: OS::Nova::Serverproperties:
image: ccc081d1-26b5-461b-abf0-586a4039b62fflavor: m1.smallname: { get_param: ftntname }networks:- port: { get_resource: mgmt-port }- port: { get_resource: ixpub-port }- port: { get_resource: ixpri-port }config_drive: Trueuser_data:
str_replace:template: { get_file: /home/ftnt/config_drive/fos-fmgip.txt }params:
$FMGIP: { get_param: fmgip }user_data_format: RAW
4. Define the Floating IP Association
FortiOS VM OpenStack CookbookFortinet Technologies Inc.
57
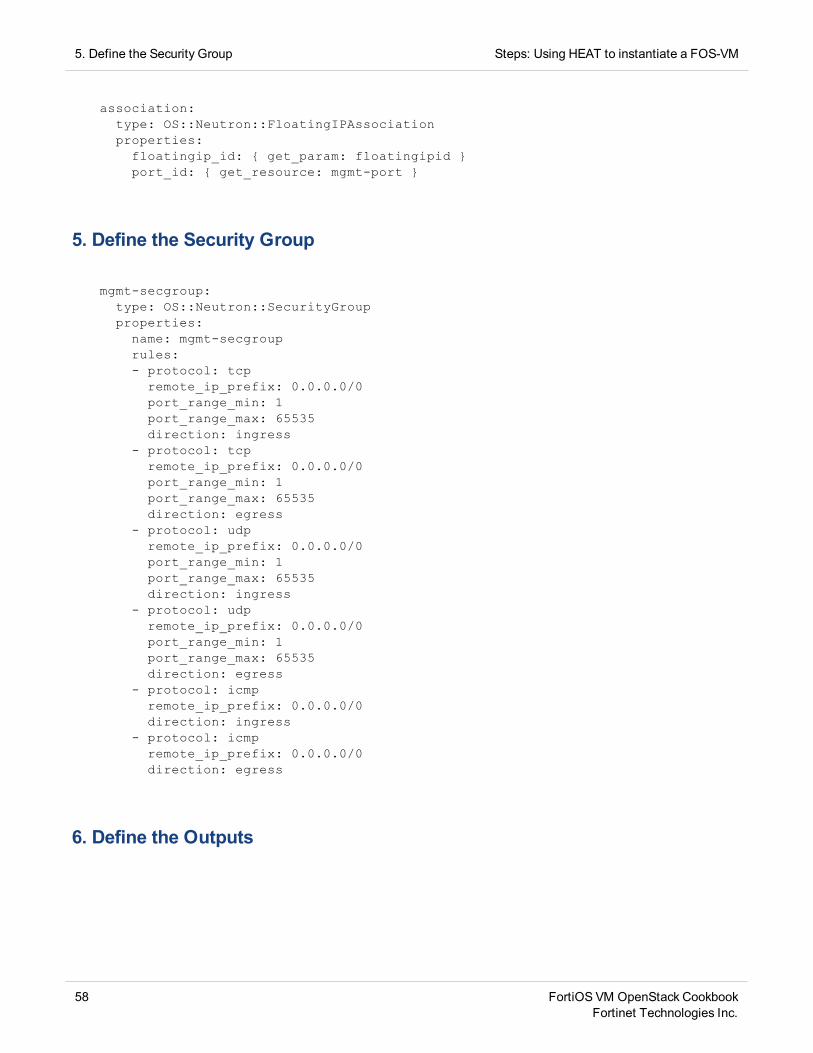
5. Define the Security Group Steps: Using HEAT to instantiate a FOS-VM
association:type: OS::Neutron::FloatingIPAssociationproperties:
floatingip_id: { get_param: floatingipid }port_id: { get_resource: mgmt-port }
5. Define the Security Group
mgmt-secgroup:type: OS::Neutron::SecurityGroupproperties:
name: mgmt-secgrouprules:- protocol: tcp
remote_ip_prefix: 0.0.0.0/0port_range_min: 1port_range_max: 65535direction: ingress
- protocol: tcpremote_ip_prefix: 0.0.0.0/0port_range_min: 1port_range_max: 65535direction: egress
- protocol: udpremote_ip_prefix: 0.0.0.0/0port_range_min: 1port_range_max: 65535direction: ingress
- protocol: udpremote_ip_prefix: 0.0.0.0/0port_range_min: 1port_range_max: 65535direction: egress
- protocol: icmpremote_ip_prefix: 0.0.0.0/0direction: ingress
- protocol: icmpremote_ip_prefix: 0.0.0.0/0direction: egress
6. Define the Outputs
58 FortiOS VM OpenStack CookbookFortinet Technologies Inc.
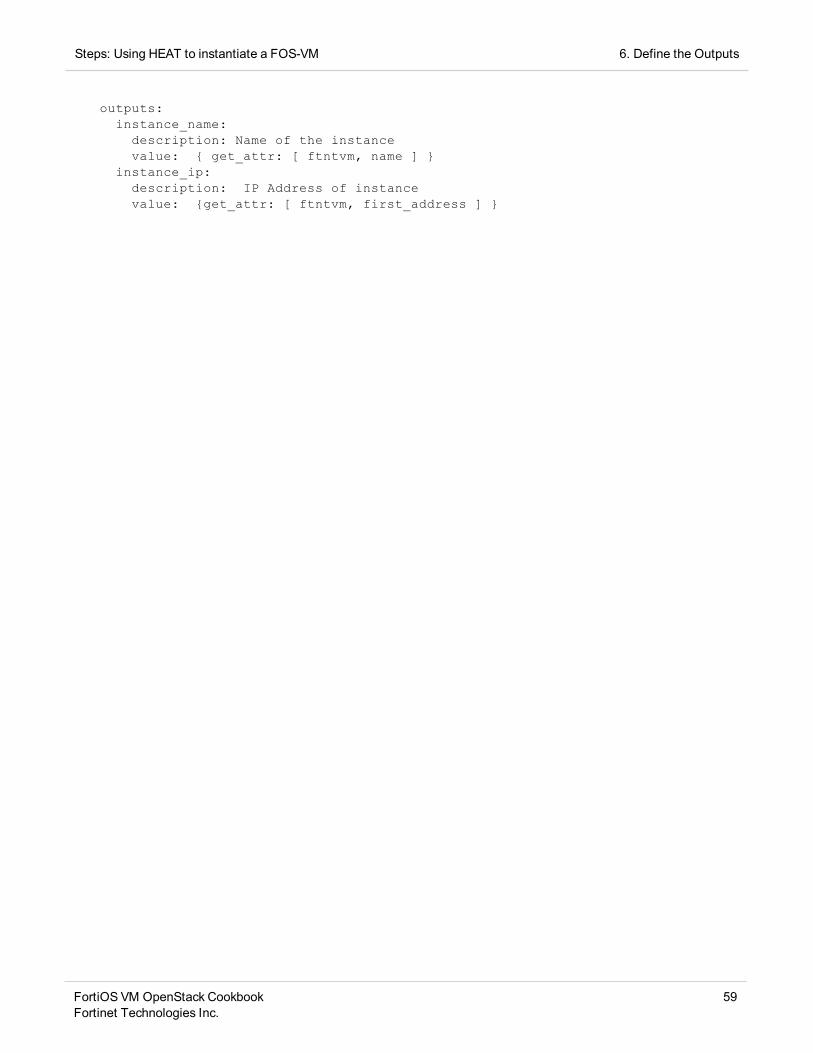
Steps: Using HEAT to instantiate a FOS-VM 6. Define the Outputs
outputs:instance_name:
description: Name of the instancevalue: { get_attr: [ ftntvm, name ] }
instance_ip:description: IP Address of instancevalue: {get_attr: [ ftntvm, first_address ] }
FortiOS VM OpenStack CookbookFortinet Technologies Inc.
59