operating instructions and parts list...
TRANSCRIPT

1
0A7738Copyright © November, 2000 DBInc.Printed in U.S.A.
MODEL: Port-A-Saw
Masonry / Refractory SawElectric & Gasoline Models
OPERATING INSTRUCTIONS AND PARTS LISTINSTRUCCIONES DE OPERACIÓN Y LISTA DE PIEZAS
17400 West 119th StreetOlathe, Kansas 66061Customer Service ............ 800-288-5040Corp. Office ...................... 913-928-1000Cust. Service FAX ............ 800-825-0028Corp. Office FAX .............. 913-438-7951Int�l. FAX ........................... 913-438-7938Internet ........... http://www.targetdbi.com
Target Products JapanRoom 806Taichi Roppongi Mansion6-3-15 RoppongiMinato-ku,TokyoJapan 106Phone ................................ 03-5411-2775FAX .................................... 03-5411-2776
Diamant Boart/Target Australia26/7 Salisbury RoadCastle Hill, N.S.W. 2154AustraliaPHONE ............................... 02-96344677FAX ..................................... 02-96804982

2
EVERY MACHINE IS THOROUGHLY TESTED BEFORE LEAVING THE FACTORY. EACH MACHINE IS SUP-PLIED WITH A COPY OF THIS MANUAL. OPERATORS OF THIS EQUIPMENT MUST READ AND BE FAMIL-IAR WITH THE SAFETY WARNINGS. FAILURE TO OBEY WARNINGS MAY RESULT IN INJURY OR DEATH.FOLLOW INSTRUCTIONS STRICTLY TO ENSURE LONG SERVICE IN NORMAL OPERATION.
CONTENTSSymbol Definitions ............................................................................................................................................ 3 - 6Hearing Hazard Warnings ................................................................................................................................ 6Decal Descriptions and Locations .................................................................................................................... 7Specifications & Power Sources ....................................................................................................................... 8Saw Dimensions ............................................................................................................................................... 9Safety Warnings - Do's and Do Not's ............................................................................................................... 10 - 11Reference Figures: 1 - 12 ................................................................................................................................. 12 - 14Pre Operation Checklist .................................................................................................................................... 15Instructions:
1 - Features ..................................................................................................................... ............... 162 - Assembly ..................................................................................................................... ............. 16 - 173 - Check Before Operating ........................................................................................................... 17 - 184 - Fitting the Blade ........................................................................................................................ 185 - Operating Instructions ............................................................................................................... 18 - 196 - Incidents During Operation ....................................................................................................... 207 - Maintenance .................................................................................................................. ........... 20 - 218 - V-Belt Tension ........................................................................................................................... 219 - Important Advice ....................................................................................................................... 21 - 22
10 - Accessories ................................................................................................................. .............. 2211 - Repairs ..................................................................................................................... ................. 2212 - Spare Parts ................................................................................................................. .............. 22
Diagrams and Spare Parts ................................................................................................................................ 40 - 47Wiring Diagrams ................................................................................................................ ............................... 48 - 49
ANTES DE COMENZAR: Lea y comprenda todas las advertencias e instrucciones antes de operar la máquinaque se describe en este manual. ¡LAS ADVERTENCIAS Y PRECAUCIONES DE ESTE MANUAL DEBEN SERCOMPRENDIDAS Y CUMPLIDAS! SI NO SE OBEDECEN LAS ADVERTENCIAS, SE PUEDEN PRODUCIRSERIAS LESIONES O LA MUERTE. ES SU RESPONSABILIDAD el asegurarse que las personas que usenesta máquina hayan leído este manual.
CONTENIDODefinición de Símbolos ..................................................................................................................................... 3 - 6Advertencias Auditivas de Peligro .................................................................................................................... 6Calcomanís - Descripciones y Ubicaciones ..................................................................................................... 7Especificiones y Fuentes de Energía ............................................................................................................... 24Dimensiones de la Sierra .................................................................................................................................. 25Advertencias de Seguridad - Los SI y Los NO ................................................................................................. 26 - 27Ilustraciones de Referencia: 1 - 12 .................................................................................................................. 28 - 30Pre-Operation Checklist .................................................................................................................................... 31Instrucciones:
1 - Usos ......................................................................................................................... ................. 322 - Armado ....................................................................................................................... .............. 32 - 333 - Verifique Antes De Operar ........................................................................................................ 344 - Colocación De La Hoja ............................................................................................................. 34 - 355 - Instrucciones De Operación ..................................................................................................... 35 - 366 - IIncidentes Durante La Operación ............................................................................................ 36 - 377 - Mantenimiento .......................................................................................................................... 37 - 388 - Tensión De La Cinta En V ......................................................................................................... 389 - Consejo Importante................................................................................................................... 38 - 39
10 - Accesorios ................................................................................................................................ 3911 - Reparaciones ............................................................................................................................ 3912 - Piezas De Repuesto ................................................................................................................. 39
Diagramas y Lista de Piezas ............................................................................................................................ 40 - 47Diagramas de Cableado ................................................................................................................................... 48 - 49

3
SYMBOL DEFINITIONSDEFINICIÓN DE SIMBOLOS
� Please read the instructions for use prior to operating the machine for the first time.� Antes de la puesta en marcha, lea detenidamente las instrucciones y familiaricese con la máquina.
� Mandatory� Obligatorio
� Indication� Indicación
� Prohibition� Prohibición
� Warning Triangle� Triángwulo De Advertencia
� Wear Eye Protection� Usar Gafas De Protección
� Wear Head Protection� Usar Casco De Protección
� Wear Breathing Protection� Usar Máscara De Protección
� The Use Of Ear Protection Is Mandatory� Es Obligatorio El Uso De Protección Auditiva
� Wear a Hard Hat� Usar Casco Duro
� Wear Safety Shoes� Usar Zapatos De Seguridad
� Wear Appropriate Clothing� Usar Ropa Adecuada
� Remove The Blade Prior To Hoisting, Loading, Unloading And Transporting The Machine On Jobsite.� Desmontar El Disco Antes De Desplazar, Cargar, Descargar O Transportar La Máquina En La Obra.

4
� Motor Off� Parar El Motor
� Use In Well Ventilated Area� Usar En Una Área Bien Ventilada
� Do Not Use In Flammable Areas� No Usar In Áreas Inflamables
� Machinery Hazard, Keep Hands And Feet Clear.� Máquina Peligrosa - Mantenga Manos Y Pies Alejados De La Máquina
� Danger, Poison Exhaust Gas� Peligro, Gases De Escape Tóxicos
� No Non-working Personnel In Area� Prohibido Para Personas Ajenas A La Obra
� No Smoking� No Fumar
� Do Not Operate Without All Guards In Place� No Operar Sin Todas Las Protecciones In Su Sitio
� Always Keep the Blade Guards In Place� Mantenga Siempre Las Protecciones De La Hoja En Su Sitio
� Water Supply On� Suministro De Agua Conectado
� Water Supply Off� Suministro De Agua Desconectado
� Water Supply� Suministro De Agua
� Keep Work Area Clean/Well Lit, Remove All Safety Hazards� Mantenga Limpio El Sitio De Trabajo/Bien Iluminado, Elimine Todos Los Riesgos De Seguridad

5
� Dangerously High Noise Level� Nivel De Ruido Elevadamente Peligroso
� Pay Extreme Attention To The Care And Protection Of The Machine Before Starting Up� Ponga Extrema Atención Al Cuidado Y Preparación De La Máquina Antes De Ponerla En Marcha
� Remove Tools From Area and Machine� Elimine Las Herramientas Del Área Y De La Máquina
� Oil Pressure� Presión De Aceite
� Oil Required� Necesita Aceite
� Dipstick, Maintain Proper Oil Level� Varilla De Control, Mantenga El Nivel De Aceite Correcto
� Lubrication Point� Punto De Lubrication
� Unleaded Fuel Only� Solamente Combustible Sin Plomo
� Repairs Are To Be Done By An Authorized Dealer Only� Las Reparaciones Deben Ser Efectuadas Únicamente Por Un Distribuidor Autorizado
� Diamond Blade� Sierra Diamantada
� Blade Diameter� Diámetro De La Hoja
� Pulley Diameter� Diámetro De La Correa

6
� Number of Revolutions Per Minute, Rotational Speed� N° De Revoluciones Por Minuto, Velocidad De Rotación
� Blade Flange Diameter� Diámetro De La Brida De La Hoja
� Machine Mass (lbs)� Masa De La Máquina (lbs)
� Engine� Motor
� Engine Speed Revolutions/Minute� Velocidad Del Motor En Revoluciones Por Minuto (RPM)
� Engine Start� Arranque Del Motor
� Electric Motor� Motor Electrica
WARNINGHEARING HAZARD
DURING NORMAL USE OF THIS MACHINE, OPERATOR MAY BE EXPOSED TO A NOISE LEVEL EQUAL OR SUPERIOR TO 85 dB (A)
ATENCIONRIESGO DE DAÑO AUDITIVO
EN CONDICIONES NORMALES DE UTILIZACIÓN, EL OPERADOR DE ESTA MÁQUINA PUEDEESTAR EXPUESTO A UN NIVEL DE RUIDO IGUAL O SUPERIOR A 85 dB (A)

7
P/N 177588Location: Blade Guard
(Qty. 1) All Models
P/N 030506Location: Water Pan Sides
(Qty. 2) All Models
P/N 169065Location: Muffler
(Qty. 1) Gas Models
P/N 046326Location: Motor
(Qty. 1) Electric Models
P/N 046327Location: Motor
(Qty. 1) Electric Models
DECAL DESCRIPTIONS AND LOCATIONSDESCRIPCIÓN DE CALCAMONIAS Y UBICACIONES
P/N 030898Location: Blade Guard
(Qty. 1) All Models
P/N 052130Location: Water Pan(Qty. 2) All Models

8
Port-A-Saw SpecificationsMODEL NO. PS1411 PS1421 PS1431 PS1455
TYPE 1-1/2 HP Electric 2 HP Electric 3 HP Electric 5.5 HP GasolineItem No.
(with Water Pump) M5405120S M5406120S M5407120S M50109Blade Guard Capacity: 10 - 14" 10 - 14" 10 - 14" 14" Only
(250 - 350 mm) (250 - 350 mm) (250 - 350 mm) (350 MM)Blade Shaft RPM: 2509 2509 2509 2950Max. Depth Of Cut: 5.0" (127 mm)Blade Arbor Size: 1.00" (25.4 mm)Blade Shaft: Sealed Ball BearingsBlade Shaft Drive: Two 4L370 V-Belts Two 4L370 V-Belts Two 4L370 V-Belts 3VX V-Belt (2 Band)Blade Guard: One Piece Steel, Sta-LevelTM Design, 14" (350 mm) Maximum CapacityBlade Coolant: WaterWater Pan: 3.86 x 17.73 x 30.73 Inch (98 x 450 x 780.5 mm), 6.75 Gallon (25 Liter) Capacity (At 3" Depth)Conveyor Cart: Cast Aluminum w/ Vulcanized Rubber Top, Adjustable Measuring Rule, 45° / 90° Cutting GuideWater Pump:
Electric Models: 300 Gallons / Hour, Submersible, Totally Epoxy Sealed, Thermal Over Load ProtectedGasoline Model: 8 GPM, Belt Drive, Solid Bronze, With Strainer & Built-In Priming Pump with Check Valve
Frame: Heavy duty, Jig Welded �X� Braced Steel, Open Throat Design For Unlimited RippingWeight: Pounds (kg): Saw Crated: 171 (77.7) 182 (82.7) 192 (87.3) 209 (95.0) Saw Uncrated: 160 (72.7) 169 (76.8) 181 (82.3) 198 (90.0) Saw Operating (Water In Pan): 221 (100.5) 230 (104.5) 242 (110.0) 259 (117.7) Folding Stand (Unboxed): 24 (10.9) 24 (10.9) 24 (10.9) 24 (10.9) Foot Pedal Kit (Boxed):14 (6.4) 14 (6.4) 14 (6.4) 14 (6.4) Electric Cord: 0.40 (.18 ) N / A N / A N / A
MODEL NO. PS1411 PS1421 PS1431 PS1455TYPE Electric Electric Electric Gasoline
Engine / Motor: Baldor Baldor Baldor HondaHorsepower (kw): 1-1/2 (1.1) 2 (1.5) 3 (2.2) 5.5 (4.0)RPM: 3450 3450 3450 3500Specifications: T.E.F.C T.E.F.C T.E.F.C ���Voltage: 115 / 208-230 115 / 208-230 208-230 ���Cycle (Hz) / Current/ Phase: 60 / A.C. / 1 60 * / A.C. / 1 60 * / A.C. / 1 ** ���Displacement: ��� ��� ��� 9.9 cu. Inch (163 cc)
Bore: ��� ��� ��� 2.7 inch (68 mm)Stroke: ��� ��� ��� 1.8 inch (45 mm)
Cylinders / Cycle: ��� ��� ��� 1 / 4Fuel Capacity: ��� ��� ��� .95 Gallon (3.6 liter)Oil Capacity: ��� ��� ��� .63 Quart (.6 liter)Air Filter: ��� ��� ��� Dry Type
Dual Elementwith Precleaner
Starter: Capacitor Capacitor Capacitor RecoilCoolant: Air Air Air Air
* 50 cycle motors available upon special request: 2 HP model is 240 Volt, 3 HP model is 220-380 Volt ** 3 phase motor available upon special request - specify 230 or 460 volts for factory wiring.
Note: For item numbers on motors / engine see parts list section of this document.
Specifications are subject to change without notice.
Power Source

9
Saw Dimensions
ELECTRIC MODELFIGURE A
SAW DIMENSIONSELECTRIC MODELS (Figure A) GASOLINE MODEL (Figure B)
Item Length (cm) Description Item Length (cm) DescriptionA 38.2" (97.0) Saw Length (Maximum) A 43.6" (110.7) Saw Length (Maximum)B 19.4" (49.3) Saw Width (Maximum) B 22.7" (57.7) Saw Width (Maximum)C 28.2" (716.3) Saw Height (Minimum) C 34.8" (88.4) Saw Height (Minimum)D 26.1" (66.3) Stand Height (Optional) D 26.1" (66.3) Stand Height (Optional)E 56.4" (143.3) Saw Height (Maximum) E 63.0" (160.0) Saw Height (Maximum)F 3.8 - 15.1" Blade Shaft Height F 6.4 - 15.0" Blade Shaft Height
(9.6 - 38.4) (Minimum - Maximum) (16.2 - 38.2) (Minimum - Maximum)G 10.0" (25.4) Cart Length G 10.0" (25.4) Cart LengthH 18.7" (47.5) Cart Width H 18.3" (47.5) Cart WidthI 18.5" (47.0) Cart Travel I 18.3" (46.5) Cart TravelJ 33.0" (76.2) Saw Base Length J 33.0" (76.2) Saw Base LengthK 18.0" (45.7) Pan Width K 18.0" (45.7) Pan WidthL 33.7" (85.6) Stand To Cart Top L 33.7" (85.6) Stand To Cart TopM 35.8" ( 90.9) Skid To Cart Top M 35.8" ( 90.9) Skid To Cart TopN 7.6" (19.3) Base To Cart Top N 7.6" (19.3) Base To Cart TopO 2.1" (5.3) Skid Height (Optional) O 2.1" (5.3) Skid Height (Optional)P 11.5" (29.2) Cart - LH Side P 6.5" (16.5) Cart - LH SideQ 6.5" (16.5) Cart - RH Side Q 11.5" (29.2) Cart - RH SideR 4.0" (10.16) Flange Diameter R 4.0" (10.16) Flange DiameterS 32.0" (81.3) Skid Width (Optional) S 32.0" (81.3) Skid Width (Optional)
GASOLINE MODELFIGURE B

10
SAFETY FIRST!
WARNINGSDO�s AND DO NOT�s
WARNING: FAILURE TO COMPLY WITH THESE WARNINGS AND OPERATINGINSTRUCTIONS COULD RESULT IN DEATH OR SERIOUS BODILY INJURY.
DO
DO read this entire operator�s manual before operating this machine. Understand all warnings, instructions, and controls.DO keep all guards in place and in good condition.DO wear safety approved hearing, eye, head and respiratory protection.DO read and understand all warnings and instructions on the machine.DO read and understand the symbol definitions contained in this manual.DO keep all parts of your body away from the blade and all other moving parts.DO know how to stop the machine quickly in case of emergency.DO shut off the engine and allow it to cool before refueling.DO inspect the blade, flanges and shafts for damage before installing the blade.DO use only reinforced abrasive blades or steel center diamond blades manufactured for use on masonry saws.DO use only blades marked with a maximum operating speed greater than the blade shaft speed. Verify speed by check-
ing blade shaft rpm and pulley diameters and blade flange diameters.DO verify saw drive configuration by checking blade shaft RPM, pulley diameters, and blade flange diameter.DO read all safety materials and instructions that accompany any blade used with this machine.DO inspect each blade carefully before using it. If there are any signs of damage or unusual wear, DO NOT USE THE
BLADE.DO mount the blade solidly and firmly. Wrench tighten the arbor nut.DO make sure the blade and flanges are clean and free of dirt and debris before mounting the blade on the saw.DO use dry cutting diamond blades with a 1" (diameter arbor only). Never use damaged or worn blade flanges.DO use the correct blade for the type of work being done. Check with blade manufacturer if you do not know if blade is
correct.DO operate this machine only in well ventilated areas.DO instruct bystanders on where to stand while the machine is in operation.DO establish a training program for all operators of this machine.DO clear the work area of unnecessary people. Never allow anyone to stand in front of or behind the blade while the
engine is running.DO make sure the blade is not contacting anything before starting the engine.DO always tie down the machine when transporting.DO use caution and follow instructions when setting up or transporting the machine.DO have all service performed by competent service personnel.DO verify the blade arbor hole matches the machine spindle before mounting the blade.DO make sure the gas caps of the machine and the fuel can are properly tightened before starting the engine. Move fuel
can at least 10 feet from machine after fueling.DO clean the machine after each day�s use.DO remove adjusting keys and wrenches from tool before turning it on.DO keep the handles dry, clean and free of oil and dirt.DO carefully maintain and clean for better and safer performance. Follow instructions for changing accessories. Inspect
tool cords periodically and, if damaged, have repaired by authorized service facility.DO use the proper blade flange size for each blade size. Never use damaged or worn blade flanges.DO use caution when handling fuel.DO only cut in a straight line.DO make sure electric powered machines are plugged into a properly grounded circuit.DO make sure power cords are the proper size and in good condition.DO follow all electrical codes in your area.DO use correct voltage and proper extension cords. Never carry tool by cord or yank it to disconnect it from
recepticle. Keep cord away from heat, oil and sharp edges.DO disconnect tools from power source when not in use, before servicing and, when changing accessories.DO carefully maintain and clean for better and safer performance. Follow instructions for changing accessories.
Inspect tool cards periodically and, if damaged, have repaired by authorized service facility.DO always give a copy of this manual to the equipment user. If you need extra copies, call TOLL FREE 1-800-288-5040.

11
SAFETY FIRST!
WARNINGSDO�s AND DO NOT�s
WARNING: FAILURE TO COMPLY WITH THESE WARNINGS AND OPERATINGINSTRUCTIONS COULD RESULT IN DEATH OR SERIOUS BODILY INJURY.
DO NOT
*****************
This saw was designed for certain applications only. DO NOT modify this saw or use for any application other thanfor which is it was designed. If you have any questions relative to its application, DO NOT use the saw until you havewritten Diamant Boart, Inc. and we have advised you.
Diamant Boart, Inc.17400 West 119th Street
Olathe, Kansas 66061In USA 1-800-288-5040
DO NOT operate this machine unless you have read and understood this operator�s manual.DO NOT operate this machine without the blade guard, or other protective guards in place.DO NOT leave this machine unattended while the engine is running.DO NOT work on this machine while the engine is running.DO NOT operate this machine when you are tired or fatigued.DO NOT use a wet blade without adequate water supply to the blade.DO NOT exceed maximum blade speed shown for each blade size. Excessive speed could result in blade breakage.DO NOT operate the machine if you are uncertain of how to run the machine.DO NOT use damaged equipment or blades.DO NOT touch or try to stop a moving blade with your hand.DO NOT cock, jam, wedge or twist the blade in a cut.DO NOT transport a cutting machine with the blade mounted on the machine.DO NOT use a blade that has been dropped or damaged.DO NOT use carbide tipped blades.DO NOT lay power cords in or near water.DO NOT replace the motor with any motor that does not have a special grounding connection.DO NOT use segmented diamond blades without water unless specifically designed for dry cutting.DO NOT touch a dry cutting diamond blade immediately after use. These blades require several minutes to cool after
each cut.DO NOT use damaged or worn blade flanges.DO NOT allow other persons to be near the machine when starting, refueling, or when the machine is in operation.DO NOT operate this machine in an enclosed area unless it is properly vented.DO NOT operate this machine in the vicinity of anything that is flammable. Sparks could cause a fire or an explosion.DO NOT allow blade exposure from the guard to be more than 180 degrees.DO NOT operate this machine with the belt guard or blade guard removed.DO NOT operate this machine unless you are specifically trained to do so.DO NOT use a blade that has been over heated (Core has a bluish color).DO NOT jam material into the blade.DO NOT grind on the side of the blade.DO NOT start cutting with a saw until you have a clear work area and secure footing.DO NOT operate this machine while under the influence of drugs or alcohol.

12
FIGURES

13
FIGURES
EE
U
RR
DD
GGC
A1
B2
KK
JJ
T
CCDD
BB
VV
Y
T
RRZ
TT
X
KK
UU
GG
C
DD
B2
KKKK

14
Parts Identification:
A. Pan Weldment
B. Head Platform Assembly
C. Conveyor Cart Assembly
D. Folding Stand (Optional)
E. Skid Kit (Optional)
F. Foot Pedal Kit (Optional)
G. Bearing Clamps
H. Bearings
I. �����������
J. Pivot Blocks
K. Knobs (or Capscrews)
L. Counterbalance Arm
M. Capscrew
N. Lower Bracket
O. �����������
P. Lock Handle
Q. Spring
R. Eyebolt
S. Strainer (Gasoline Model)
T. Water Valve
U. Water Pump
V. Primer Bulb (Gasoline Model)
W. Isolator (Gasoline Model)
X. Wheel (Blade Guard Pivot)
Y. Setscrew (Blade Guard Pivot)
Z. Track Bar
AA. Engine Base
BB. Capscrew (Blade Shaft)
CC. Outer Flange
DD. Diamond Blade
EE. Water Pump Belt (Gasoline Model)
FF. Upper Spring Support
GG. Square
HH. Shims (Not Shown In Figures)
II. �����������
JJ. Capscrews (Blade Shaft Housing- Rear)
KK. Capscrews (Blade Shaft Housing- Top)
LL. Wrench
MM. Splash Curtain
NN. Electrical Cord (Water Pump)
OO. Electrical Plug (Electrical Models)
PP. Reset Button (Electric Models)
QQ. �����������
RR. Power Switch (Electric Models)
SS. Belt Tensioning Bolt
TT. Serial Number Plate
UU. Hand Grip
VV. Engine Stop Switch (Gasoline Model)
WW. Oil Drain Hose

15
PRE OPERATION CHECKLIST
Before leaving our factory, every machine is thoroughly tested. Follow our instructions strictly andyour machine will give you long service in normal operating conditions.
Before starting up the machine, make sure you read this entire Operation�s Manual and are familiarwith the operation of the machine.
WITH MACHINE COLD AND SETTING LEVEL:
1. Gasoline Models: Check engine oil. Fill to the full mark on dip stick with 10W30 oil, class MS, SD, SE or better.2. Electric Models: Verify all electrical connections are intact.
1 - 2 HOUR OPERATION CHECK LIST:
ALWAYS place the machine on a level surface with the engine/motor �OFF", the ignition switch set inthe �OFF� position and disconnected from the power source before performing any maintenance. Letthe machine cool down!!
1. Check the engine air cleaner hose clamps. Tighten as required.2. Tension the blade drive V-belts. DO NOT over tension!!
SCHEDULED MAINTENANCE QUICK REFERENCE:
Before performing any maintenance, ALWAYS place the machine on a level surface with theengine/motor �OFF� and the ignition switch set in the �OFF� position.
SERVICE DAILY:1. Check engine oil level.2. Check blade guard for damage.3. Check hoses and clamps for damage
or looseness. Tighten or replace as necessary.4. Check air cleaner. Clean or replace as required.5. Clean the reservoir pan frequently.6. At the end of each day, flush clean water through the
water pump and hoses
SERVICE EVERY 50 HOURS:1. Replace engine oil and filter.2. Clean engine air fins.3. Check blade drive V-belt tension.
DO NOT over tension!!!4. Clean engine fuel bowl.

16
1 Features
2 Assembly
The operator mustwear protective clothingappropriate to the work he isdoing.
Any persons not involved in the work shouldleave the area.
Use only blades marked with a maximumoperating speed greater than the blade shaftspeed.
Use: Wet or Dry sawing of masonry and refractory.
Tools: Diamond blades � dry or water cooled,Ø: 10" (250 mm), 12" (300 mm), and14" (350 mm), with Arbor Ø 1" (25.4 mm).(For information contact your Dealer)
Depth of Cut (Maximum):5.00" (127 mm) with Ø 14" (350 mm) blade
Maximum Material Size:8" x 8" x 16" (20.3 x 20.3 x 40.6 cm) block
Block must be rotated 180 degrees to completecutting through 8" (20.3 cm) depth.
Nominal Weight: See �Specifications�Operating Weight: See �Specifications�Dimensions: See �Saw Dimensions�Blade Guard Capacity:
Electric Models: 10" (250 mm), 12" (300 mm) &14" (350 mm) Ø Blades.
Gas Model: 14" (350 mm) Ø Only. (Smaller BladeDiameter not recommended because blade will not cutthrough material. Head tilt is limited because themaximum engine inclination angle is 20 degrees.)
Before starting up the machine, make sure youread this entire manual and are familiar withthe operation of this machine.
The working area must be completely clear, welllit and all safety hazards removed.
All Models: (FIGS. 1, 2, 3, and 4)
� When unpacked, this unit consists of three (3) majorparts: Pan Weldment (A), Head Platform Assembly (B)and Cart Assembly (C) (FIG. 1).
� If this unit is to use the optional Folding Stand (D) (SeeFig. 1) and Skid Kit (E) (See FIG. 2) assemble theseitems first. Follow the instructions provided with theseoptions.
� Set the Pan Weldment (A) on a table or on the optionalFolding Stand / Skid Kit (D / E) as shown in FIG. 1. It isvery important that the Pan Weldment (A) beassembled on the Folding Stand (D) as shown inFig. 1, or the optional Foot Pedal Kit (F) CAN NOT beassembled onto the unit.
� Remove the Cart Assembly (C) from its shippingcarton. Set the Cart Assembly (C) onto the PanWeldment (A) so that the wheels of the Cart Assembly(C) roll along the sides of the Pan Weldment (A)(FIG. 1).
� Make sure that the left and right Bearing Clamps (G)on the Pan Weldment (A) are pivoted into their loweredposition (FIG. 3). Carefully pick up the HeadPlatform Assembly (B) and mount it to the PanWeldment (A) such that the Bearings (H) (on Head Plat-form) are resting in the Pivot Blocks (J) (on PanWeldment) and that the blade shaft end of the HeadPlatform (B) is resting on the Cart Assembly (C)(FIG. 3).
� Pivot the left and right Bearing Clamps (G) into their upper position, and tighten the Knobs (K) [or Capscrews(K) depending on the date of manufacture] until theHead Platform (B) is secured to Pan Weldment (A)(FIG. 4).
� Note: If the unit uses Capscrews (K) to hold theBearing Clamps (G) in place, tighten them with the 1/2"end of the Wrench (LL) provided with the saw(FIG. 4).
Electric Models (FIG. 5):
� Install the Counterbalance Arm (L): Place the slottedend of the Counterbalance Arm onto the stud locatedon the Left Hand Rear Corner of the Head PlatformAssembly (B). Be sure to put 1/2" Washers on bothside of the ARM before installation. Note that the lowerhole of the ARM is positioned toward the Pan Weldment(A). A capscrew holds the ARM to the brackets on theback of the Pan Weldment through this lower hole.
These signs will giveadvice for your safety
Before leaving our factory every machine isthoroughly tested.
Follow our instructions strictly and your machine willgive you long service in normal operating conditions.
MANDATORYINDICATIONI N F O R M AT I O NINSTRUCTION
WARNING PROHIBITION

17
� Install the Lock Handle (P) onto the stud on the LeftHand corner of the Head Platform Assembly (B). Tightenthe Lock Handle (P) so that the Head PlatformAssembly (B) is securely locked with the blade shaft inthe maximum upper position.
� Make sure that the Eyebolt (R) is securely fastened ontothe Arm (L), and note that the eye of the Eyebolt (R)should be aligned with the spring mounting hole in theHead Platform Assembly (B).
� Attach the top of the Spring (Q) through the hole in therear flange of the Head Platform Assembly (B). With atool (such as a screwdriver), stretch the lower end ofthe Spring (Q) so that it is hooked over the Eyebolt (R).
� Install the Water Pump (U) by plugging its Electrical Cord(NN) into the electric motor pigtail cord. Install the hosebarb fitting onto the Water Pump (U), then push on thehose. Route hose & electrical cord above thecross-brace of the Pan Weldment (B) to avoid contactwith the blade during operation and so that the splashcurtain can be easily installed (NOT as shown in Figure5). Place the Electric Water Pump (U) in the bottom ofthe Pan Weldment (A). Hook the top of the SplashCurtain (MM) over the head pivot bar, & place thebottom of the Splash Curtain (MM) in the pan(Fig. 1).
� Single phase masonry saw motors are furnished withthe correct NEMA configuration Plug (OO) on themotor pigtail. The matching connectors are as follows:
Electric Motor Plugs & Connectors
Motor Pigtail ConnectorMotor Wired For Plug Required
Voltage (NEMA No.) (NEMA No.)
1-1/2 HP 115 V L5-20P L5-20R2 HP 230 V L6-15P L6-15R3 HP 230 V L6-30P L6-30R
To change operation to either 115, or 230 V, the 1-1/2 and2 HP motors have a voltage change switch mounted on theterminal box. This switch must be changed to either 115, or230 Volt, to match the voltage supply. Local electrical codesmay require changing the plug on the motor to the properNEMA connector to match the voltage supply.
WARNING: Always make sure the saw isconnected to a properly grounded electricaloutlet. Failure to comply with this warningcould result in serious bodily injury or death!
WARNING: DO NOT operate on low voltage!Low voltage causes loss of power, motoroverheating, and possibly motor windingburnout. Voltage should be checked at the
m o t o r while it is operating.
Good motor performance depends on proper voltage.Extension cords that are too long and / or too small reducethe voltage to a motor under load. Use extension cords NO
SMALLER than the sizes indicated in the chart shown:
EXTENSION CORD SIZE (Minimum)MOTOR 50 ft Long 75 ft Long 100 ft Long
HP 115 V 230 V 115 V 230 V 115 V 230 V1-1/2 # 10 # 14 # 10 # 14 # 10 # 142 HP # 10 # 12 # 10 # 12 # 10 # 123 HP � # 10 � # 10 � # 10
Gasoline Model (Fig. 6):� Assemble the Upper Spring Support (FF) using the two
(2) 3/8"-16UNC x 1.00" Long Capscrews and 3/8"-16UNC Locknuts provided.
� Install the Counterbalance Arm (L). Loosely assemblethe 3/8" x 1.00" Long Capscrew (M) and 3/8"-16UNCLocknut through the Lower Bracket (N) and the lowerend (13/32" diameter hole) of the CounterbalanceArm (L).
� Raise the Head Platform Assembly (B) until the slot inthe Arm (L) can be put onto the 1/2" Stud on the UpperSpring Support (FF). Be sure to install the 1/2" flatWashers(Supplied) on both sides of the Arm (L).
� Mount and secure the Lock Handle (P) onto the 1/2"Stud of the Upper Spring Support (FF). Tighten the3/8" x 1.00" Long Capscrew (M) and 3/8"-16UNCLocknut previously installed at the Lower Bracket (N).
� Install the upper end of the Spring (Q) in the hole in therear of the Upper Spring Support (FF). Loosen the LockHandle (P) and pivot the Head Platform Assembly (B)so that the blade shaft is in the upper position, thentighten the Lock Handle (P) securely. Using a tool (suchas a screwdriver or pliers) stretch the lower end of theSpring (Q) so that it is secured into the Eyebolt (R) onthe Lower Bracket (N).
� Install the hoses to the water pump. They must beconnected together as shown in the parts list section ofthis document. Place the Strainer (S) in the bottom ofthe Pan Weldment (A) after connecting the hose. Hookthe top of the Splash Curtain (MM) over the head pivotbar, & place the bottom of the curtain in the pan(FIG. 1).
� When the unit is fully assembled, but before startingthe engine, verify that the engine does NOT exceed 20degrees angle of inclination in any position of the HeadPlatform [Use an angle measuring gauge (customersupplied) held flat against the Engine Platform (AA)].
CAUTION: Engine inclination angles greaterthan 20 degrees could cause severe enginedamage and void your engine warranty!
3 Check Before Operating
All Models:
� Take into account the working conditions from a healthand safety point of view.
� For start up refer to the engine or motor manual.

18
Electric Models Only:� Make sure that the extension cord length is properly
sized for the motor used on this saw. See the chart inSection 2 of this document.
WARNING: Make sure the unit is connected toa properly grounded outlet. Failure to complywith this warning could result in serious bodilyinjury or death!
Gasoline Model Only:
� Fuel: Check the engine operation manual. Unleadedgasoline is recommended.
� Oil: Lock the Head Platform Assembly (B) with theengine in a horizontal position, then, check that theengine oil level is correct. Check the oil level frequentlyto ensure that the level never falls below that specifiedin the engine operation manual. If the oil level is low,add SAE 10W30, service classification SF or SG oil(for normal conditions) as recommended in the engineoperation manual. DO NOT overfill engine with oil!
5 Operating Instructions
All Models:� The blade rotates in a �down-cut� direction. This means
that the front of the blade is moving downward whilethe rear of the blade is moving upward. Mount theDiamond Blade (DD) so that the arrow on the bladerotates in this �down-cut� direction. The Diamond Blade(DD) can be installed / removed by using the 3/4"(19 mm) end of the Wrench (LL) provided (Fig. 4).
� After mounting the blade, it should align over the top ofthe wooden insert in the Conveyor Cart (C). If this isnot true, loosen the setscrews that secure the Bearings(H) to the Head Platform Assembly (B) (Fig. 3).Position the Head Platform Assembly (B) to the left orright until the Diamond Blade (DD) is aligned over thetop of the wooden insert, then re-tighten the Bearing(H) setscrews. During operation of this unit, the bladecan, and should, pass into the wooden insert, but NOTinto the cast aluminum part of the Conveyor Cart (C).
WARNING: Conventional �Wet� diamondblades MUST be used with water. DO NOT useconventional �Wet� diamond blades withoutwater. Using conventional �wet� diamondblades without water can result in injury ordeath of the operator or persons in the workarea!
Warning: Use only Abrasive blades of areinforced type.
Electric Models Only:
� Mount the Diamond Blade (DD):1. Using the Wrench (LL) provided (or one of your own)
loosen the Capscrew (BB) by turning it Counter-Clockwise (Electric Models Only).
CAUTION: Note that on Electric Models theCapscrew (BB) has RIGHT HAND THREADS.Installation of the wrong capscrew coulddamage the blade shaft!
2. Remove the outer Flange (CC) and make sure theouter Flange (CC), the Inner Flange (Not Shown),and arbor shaft (Not Shown) are clean and notdamaged.
3. Mount the Diamond Blade (DD) to the arbor andinstall the outer Flange (CC). Install and tightenCapscrew (BB) by turning it in a Clockwisedirection (Right Hand Thread). Use the Wrench (LL)to firmly tighten the Capscrew (BB) to the arborshaft.
Gasoline Model Only:
Always set the Engine Key Switch (VV) to the"OFF" position BEFORE mounting the blade
� Mount the Diamond Blade (DD):1. Using the Wrench (LL) provided (or one of your own)
loosen the Capscrew (BB) by turning it Clockwise(Gasoline Model Only).
CAUTION: Note that on Gasoline Models theCapscrew (BB) has LEFT HAND THREADS.Installation of the wrong capscrew coulddamage the blade shaft!
2. Remove the outer Flange (CC) and make sure theouter Flange (CC), the Inner Flange (Not Shown),and arbor shaft (Not Shown) are clean and notdamaged.
3. Mount the Diamond Blade (DD) to the arbor andinstall the outer Flange (CC). Install and tighten theCapscrew (BB) by turning it in a Counter-Clockwisedirection (Left Hand Thread). Use the Wrench (LL)to firmly tighten the Capscrew (BB) to the arborshaft.
All Models: (See Figures 5 & 6)� Configure the saw for the type of operation required,
wet or dry. Note that the saw is factory assembledfor wet operation.
Wet Configuration:� Fill the water reservoir pan [Pan Weldment (A)] with
water to within 1 inch (25 mm) of the top. Be sure thatthe water pump intake Strainer (S) (Figure 6 - GasolineModel) or Electric Water Pump Intake (U) (Figure 5 -Electric Model) is fully immersed in water at all times.Keep the intake screen of these items clean and free ofsludge, slurry, or other foreign material.
Dry Configuration:� All Models:
4 Fitting The Blade (Figure 7)

19
WARNING: Conventional �Wet� diamondblades MUST be used with water. DO NOT useconventional �Wet� diamond blades withoutwater. Using conventional �wet� diamond
blades without water can result in injury or death of theoperator or persons in the work area!
WARNING: When cutting without water use onlydiamond blades that are intended to be useddry (without water). Conventional �Wet�diamond blades MUST be used with water.
Þ Hint: To reduce vibration of the saw, the waterreservoir pan [Pan Weldment (A)] can be filled with sand.Be sure to remove the Water Pump (U) (ElectricModels) or the water pump intake Strainer (S)(Gasoline Model) to avoid contaminating it with dirt orsand.
WARNING: Always use respiratory protection whendry sawing
Electric Model (Figure 5):
Before cutting dry unplug the Water Pump (U) from theelectric motor by disconnecting the Electrical Cord (NN).
Gasoline Model (Figure 8):
Remove the water pump drive V-Belt (EE):
1. Remove the two shields covering the Water Pumpbelt drive, and the belt guard (Not Shown).
2. Loosen the two (2) bolts that hold the Water Pumpinposition. Loosen the drawbolt that tensions thewater pump belt.
3. Slide the water pump forward and remove the beltfrom the water pump pulley.
4. Disassemble the water pump V-Belt (EE):a. Turn the belt inside out and with one hand
squeeze the two strands of the belt together.b. Twist one tab 90 degrees so that it is parallel
with the slot in the adjacent link.c. Pull the end of that link over the tab.d. Pull belt end through the other two links.
5. Re-install the Belt Guard and water pump shields.Save the water pump belt so that it can bere-installed if the unit needs to be used for wetcutting.
CAUTION: DO NOT run the Water Pump (U) forextended periods of time without water! TheWater Pump could be damaged!
CUTTING OPERATIONS:
� Place material on Conveyor Cart (C) and moveconveyor cart to the front of the saw so that the bladeDOES NOT contact the material.
� Cutting Methods: This unit allows three methods forthe blade to contact the material:1. Fixed Head: Position the head to the desired height,
then tighten the Lock Handle (P) (Figures 5 & 6).Then the material can be pushed into the blade.
2. Hold the Hand Grip (UU) and lower the blade intothe material (See Fig. 10). The blade will return tothe upper position when force is released.
3. Push the optional Foot Pedal Kit (F) (Fig. 1) withyour foot to lower the blade into the material. Theblade will return to the upper position when force isreleased.
Start / Stop (Electric Models): (Figures 9 & 10)
� Open the Water Valve (T) fully, and check the waterflow before cutting.
� Start the electric motor by turning the Power Switch (RR)to the "ON" position.
� Cut the material using one of the Cutting Methodsdescribed in the above section.
WARNING: Keep hands clear of rotating bladeduring operation. READ ALL SAFETYWARNINGS before operating this machine.
CAUTION: DO NOT cut into the cast aluminumarea of the Conveyor Cart (C). The blade shouldonly cut into the wooden insert area ofConveyor Cart (C)!
STOPPING THE UNIT (Electric Models):
Stop the unit by turning the Power Switch (RR) tothe OFF position. (Fig. 9) Wait for all blademovement to stop before removing material fromthe machine.
Start / Stop (Gasoline Models): (See Figures 1 & 7)
� Open the Water Valve (T) (Fig. 7) and prime the WaterPump (U) using the Primer Bulb (V) (Fig. 1). Squeezethe Primer Bulb until water passes through the bladeguard water tubes.
� Start the engine by using the procedure in the engineoperation manual.
� Open the engine throttle full open. All sawing is done atfull throttle. DO NOT change the engine governorsetting � it is factory set for the correct speed. See the�Specifications� section of this document for properengine & blade shaft RPM.
WARNING: Keep hands clear of rotating bladeduring operation. READ ALL SAFETYWARNINGS before operating this machine.
� Adjust the water flow with the Water Valve (T), and checkthe water flow before cutting.
� Cut the material using one of the Cutting Methodsdescribed in the above section.
STOPPING THE UNIT (Gasoline Models):
Normal Operation: Stop the unit by following the procedurein the engine operation manual. Wait for all blademovement to stop before removing material from themachine.
Emergency: Turn the Engine Stop Switch (VV) tothe OFF position (Fig. 7).

20
6 Incidents During Operation
� If the engine or motor stops during sawing, check thefollowing:
Electric Model:1. Interruption to electrical connection: Check all
electrical connections.2. Manual Overload switch has been tripped: Single phase,
60 Hertz motors are equipped with a manual overloadReset Button (PP) (Fig. 5). If the motor stopsbecause of an electrical overload and the overloadReset Button (PP) trips, turn the motor Power Switch(RR) to the OFF position (Fig. 9). Allow the motor tocool for 5 to 10 minutes, then push the Reset Button(PP). A click indicates that the motor is reset and readyfor operation. Restart the motor by turning the PowerSwitch (RR) to the ON position.
Gasoline Model:1. Out of fuel: Check fuel level.2. Low Oil Level: This unit is equipped with a shut down
system that stops the engine if a low oil level isencountered. Check the engine oil level with the HeadPlatform Assembly (B) pivoted so that the engine is in ahorizontal position.
� If the engine, motor or blade stalls for any reason, raisethe blade completely out of the cut, inspect the machinethoroughly before restarting. When lowering the bladeinto a partial cut, align the blade exactly with the cut toprevent damage to the blade.
� Excessively fast cutting will stall the engine or motor.� If the blade stops during sawing check that the drive
belt tension is adequate.
7 Maintenance
WARNING: Before performing anymaintenance, ALWAYS locate the machine ona level surface with the engine / motor OFF, andthe start switch in the OFF position, or powersource disconnected.
After each use: CLEAN the machine.
Check Daily (All Models):� Clean the reservoir pan [Pan Weldment (A)] to remove
sludge and slurry. This concrete slurry is an abrasivecutting compound and will shorten the life of the WaterPump (U) and the Diamond Blade (DD). Clean thereservoir pan twice a day in heavy cutting. Then refillthe water reservoir pan with clean water.
� At the end of each day clean the water reservoir pan[Pan Weldment (A) ] to remove sludge from the saw.Flush clean water through the Water Pump (U) andhoses.
Gasoline Model:
1. Check engine air cleaner daily! If cutting dry checkengine air cleaner every four hours! Clean orreplace air cleaner element as recommended bythe engine manufacturer.
2. Check engine oil daily. Change engine oil afterevery 50 hours of operation. See engine operationmanual for proper care and maintenance.
Gasoline Model:
� Change Engine Oil: Change engine oil after every 50hours of operation.
� Engine Oil Type: Under normal operating conditionsuse SAE 10W30 API service classification SF or SG.See engine operation manual for other recommendedoil types.
� Engine Oil Capacity (Honda GX160)0.63 U.S. Quarts 0.6 Liters 0.63 Imperial Quarts
Engine Oil Change Procedure:
1. Drain the oil while the engine is still warm to assurerapid and complete oil drain. Pivot the Head Platform(B) so that the blade is in the lowered position. Place abucket in the Pan Weldment (A) under the Oil DrainHose (WW) to catch the used oil. Remove the oil drainplug on the end of the Oil Drain Hose (WW) [Fig. 1] andwait for all of the used oil to be drained for the engine.
2. Re-install and securely tighten the plug in the Oil DrainHose (WW).
3. Re-fill engine with the recommended oil type. See theengine operation manual for the oil fill location andproper oil level. Note that the required oil capacity willbe larger because of the volume of oil contained in theOil Drain Hose (WW).
4. Re-install the oil fill cap.
5. Dispose of the used oil in a proper container and in amanner that is compatible with the environment.
When Required:
� �Sta-Level� Blade Guard (Fig. 10): If the blade guardbecomes loose and pivots too freely the blade guardrotation can be tightened. Adjust the Top Wheel (X) ofthe three (3) wheels behind the blade guard:
1. Loosen the nut holding the Top Wheel (X).2. Adjust the Setscrew (Y) to force the Top Wheel (X)
down against the Track Bar (Z).3. Re-tighten the nut holding the Top Wheel (X) in
position.

21
8 V-Belt Tension
All Models (FIGS. 5 & 6):
� Check V-Belt tension when unit is new and never setbelt tension beyond this point.
� The saw is equipped with high tension V-Belts. Thebelts are properly tensioned at the factory, but after afew hours of operation they will stretch and becomeloose.
� Tensioning Blade Shaft V-Belts:
1. Loosen the four (4) capscrews that attach themotor (Electric Models), or the Engine Platform(Gasoline Models).
2. Tighten the Belt Tensioning Bolt (SS) at the rear ofthe saw until the belt a tightened to the originalfactory tension.
3. Re-tighten the four (4) capscrews that attach themotor (Electric Models), or the Engine Platform(Gasoline Models).
Electric Model:
� See �All Models� from above text.
Gasoline Model:
� Blade Shaft V-Belt Tension (FIG. 6): Excessive belttension will cause engine misalignment because theengine is mounted on four (4) rubber vibration Isolators(W). Stop tensioning the blade shaft drive V-belt whenthe center section of the front right hand Isolator (W)begins to separate from its mounting plate. Tensioningthe Blade Shaft drive V-Belt beyond this point is notrecommended because the front right hand Isolator (W)will not function properly.
� Water Pump V-Belt (EE) Tension (FIG. 8): May need tobe tightened after a few hours of operation. Over timethis V-Belt may stretch beyond the length of theadjustment slot. If this happens simply remove theV-Belt and take out one or more links (as required) fromits length.
Blade Alignment (FIGS. 11 & 12):
� The blade shaft arbor on this machine is aligned at thefactory so that a new blade will cut �square� with thematerial placed on the Cart Assembly (C). If the saw orHead Platform Assembly (B) is dropped or damagedthe blade could become mis-aligned so that it no longercuts �squarely� through the material. If this occurs theblade shaft should be re-aligned so that the saw willproduce �square� cuts. If the Blade is severely out ofalignment [1/16" (1.5 mm) or more] the Head PlatformAssembly (B) may need to be �bent� so that the blade iscloser to being aligned. In cases of severe damage theHead Platform Weldment should be replaced. Precisealignment can be achieved by using Shims (HH) ofvarious thickness. See the parts list section of thisdocument for the part number and thicknessinformation about the shims.
Þ Note: Before starting to align the head platform makesure the blade is flat and is NOT bent or damaged!
Þ Note: When aligning the blade against the square besure to allow for the difference in thickness betweenthe diamond segment and the center core of the blade!
1. Make sure the Conveyor Cart (C) rolls freely along thepan. If the pan is damaged it must be repaired orreplaced before the blade can be aligned. Lock theHead Platform Assembly (B) securely in a horizontalposition.
2. PARALLEL ALIGNMENT (Figure 11): Supply a Square(GG) and place it on the Conveyor Cart (C) and roll thecart while the Square (GG) rests against the blade.Adjust the Blade Shaft into Parallel Alignment (if re-quired) by putting Shims (HH) between the blade shafthousing and the head platform weldment at location �A1�(Figure 11). Loosen, but do not remove, the Capscrews(JJ) holding the blade shaft in position. Slide a shim, ofthe proper thickness, upward and position around thethread of one of the capscrews. Tighten the hardwareand check the blade alignment. Add more shims if re-quired until the blade shaft has Parallel Alignment.
3. PERPENDICULAR ALIGNMENT (Figure 12): Place theSquare (GG) on the Conveyor Cart (C) so that it isagainst the saw blade and is below the center of theblade shaft. If the Square (GG) does NOT contact theDiamond Blade (DD) along the entire height of thesquare, the blade shaft must adjusted into Perpendicu-lar Alignment. Adjust the blade shaft by putting Shims(HH) between the blade shaft housing and the headplatform weldment at location �B2� (Figure 12). Loosen,but do not remove, the Capscrews (KK) that hold theblade shaft in position. Slide a shim, of the proper thick-ness, inward and position around the thread of one ofthe capscrews. Tighten the hardware and check theblade alignment. Add more shims if required until theblade shaft has Perpendicular Alignment.
� Never transport the saw with the cutting head positionedon the frame. The movement can knock the head outof alignment.
� When storing for an extended period of time, use a wirebrush to remove hard, caked sludge. Clean andthoroughly lubricate moving parts - so on the next jobthe saw is ready for operation.
� Drive belts must be tight. When the belts are loose,power is lost. Replace worn belts without delay!
� The blade must fit the arbor snugly - especially diamondblades. Otherwise, pounding will occur and this willseriously damage the blades. If the arbor shoulder isgrooved where the diamond blade has bound in the cutas the shaft has continued to turn, the arbor must bereplaced, or the blade life will be severely shortened.
9 Important Advice

22
10 Accessories
The following accessories and kits are available for thismachine. See the Parts List section of this document forthe part number. For additional information contact your lo-cal dealer or call our Toll free Customer Service Telephonenumber shown on the front cover:
� Folding Stand Assembly� Skid Kit� Foot Pedal Kit� Wheel Kit, Conveyor Cart (Set of 4)� Adapter Cord, 115V, 15 Amp Straight To
20 Amp Twist-Lock (For 1-1/2 HP Motor Only)� Water Pump Repair Kit *� Conveyor Cart Kit, Complete *� Ruler Set, Conveyor Cart *
* Note: This item has a different part number for theelectric and gasoline units.
11 Repairs
We carry out all repairs in the shortest possible time and atthe most economical prices. See front cover for our ad-dress and telephone numbers.
The manufacturer accepts noresponsibility caused by unsuitable
use or modifications.
The instructions for use and spare parts found in this documentare for information only and are not binding. As part of our productquality improvement policy, we reserve the right to make any and
all technical modifications without prior notice.
� Blade flanges must be full diameter - minimum of 4"(100 mm). Replace worn flanges at once becauseundersized flanges shorten blade life and cause bladebreakage.
� Check the conveyor cart condition on a regular basis.Replace the wheels and the wooden insert frequently.
� Be certain the cutting head is correctly aligned. Blademisalignment because of handling damage, ortransporting the saw with the cutting head on the framecan seriously affect blade life.
� Replace noisy bearings immediately! Worn bearingswill quickly destroy the blade.
� Flush clean water through the pump and spray theassembly after every job to prolong the pump andblade life.
� Diamond blades may need to be �sharpened�. Bladesmay be efficiently �dressed� with dressing sticks.
WARNING: Never use fire bricks to �sharpen�or dress diamond blades!
� Abrasive blades must be a reinforced type. Never usean abrasive blade with water. These products can bedamaged by operator abuse such as jamming thematerial into the blade. This can also be hazardous!
For a quick supply of spare parts it is essential to quote thedata shown on the Serial Number Plate (TT) [FIG. 10] fixedto the machine. Make note of this information below forquick reference:
Reference Information
Model No:
Serial No:
Date Received:
NOTES:
12 Spare Parts

23

24
ESPECIFICACIONES
FUENTE DE ENERGIA
MODELO NO. PS1411 PS1421 PS1431 PS1455TIPO 1-1/2 HP, Eléctrico 2 HP, Eléctrico 3 HP, Eléctrico 5.5 HP, A Gasolina
Artículo No.(con Bomba de Agua) M5405120S M5406120S M5407120S M50109
Capacidad del Protector 10 - 14" 10 - 14" 10 - 14" 14" Onlyde la Hoja (250 - 350 mm) (250 - 350 mm) (250 - 350 mm) (350 MM)
RPM del Eje de la Hoja 2509 2509 2509 2950Profundidad Máxima de Corte 5.0" (127 mm)Tamaño del Eje de la Hoja 1.00" (25.4 mm)
Eje de la Hoja: Cojinetes a Rodillos SelladosTransmisión del Eje de la Hoja: Dos Cintas en V 4L370 Dos Cintas en V 4L370 Dos Cintas en V 4L370 Cinta en V 3VX (2 Bandas)
Protector de la Hoja: Acero de una Pieza, Diseño Sta-LevelMR, Capacidad Máxima de 14" (350 mm)Enfriador de la Hoja: Agua
Bandeja para Agua: 3,86 x 17,73 x 30,73 pulgados (98 x 450 x 780,5 mm), 6,75 galones (25 litros) de capacidad (A 3 �de profundidad)Carro Transportador: Aluminio Fundido con Tope de Goma Vulcanizada, Regla de Medición Ajustable, Guía de Corte de 45° / 90° Bomba de Agua:Modelos Eléctricos: 300 Galones / Hora, Sumergible, Sellado Totalmente con Epoxy, Protegido Contra Sobrecarga TérmicaModelo a Gasolina: 8 GPM, Transmisión por Cinta, Bronce Sólido, Con Retén y Bomba con Cebador Incluido con Válvula de Verificación Armazón: De Alta Resistencia, Acero en�X� Reforzado, Soldado con Portapiezas, Diseño de Cuello Abierto para llimitados Longitudinales
Peso: Libras (kg):Sierra Embalada: 171 (77.7) 182 (82.7) 192 (87.3) 209 (95.0)
Sierra No Embalada: 160 (72.7) 169 (76.8) 181 (82.3) 198 (90.0)Sierra En Operación
(Agua en la Bandeja): 221 (100.5) 230 (104.5) 242 (110.0) 259 (117.7)Soporte Doblable
(Sin Caja): 24 (10.9) 24 (10.9) 24 (10.9) 24 (10.9)Equipo de Pedal de Pie
(En Caja): 14 (6.4) 14 (6.4) 14 (6.4) 14 (6.4)Cable de Conexión Eléctrica 0.40 (.18 ) N / A N / A N / A
MODELO NO. PS1411 PS1421 PS1431 PS1455TIPO Eléctrico Eléctrico Eléctrico Gasolina
Motor: Baldor Baldor Baldor HondaPotencia (kw): 1-1/2 (1.1) 2 (1.5) 3 (2.2) 5.5 (4.0)RPM: 3450 3450 3450 3500Especificaciones: T.E.F.C T.E.F.C T.E.F.C ���Voltaje: 115 / 208-230 115 / 208-230 208-230 ���Ciclo (Hz)/Corriente/ Fase: 60 / A.C. / 1 60 * / A.C. / 1 60 * / A.C. / 1 ** ���Desplazamiento: ��� ��� ��� 9.9 cu. Inch (163 cc)Diåmetro Interno del Cilindro:��� ��� ��� 2.7 inch (68 mm)
Tiempo: ��� ��� ��� 1.8 inch (45 mm)Cilindros/Ciclo: ��� ��� ��� 1 / 4Capacidad de Combustible: ��� ��� ��� .95 Galones (3,6 litros)Capacidad de Aceite: ��� ��� ��� 63 Cuartos de
Galón (0,6 litros)Filtro de Aire: ��� ��� ��� Tipo Seco
Elemento Dualcon Pre-limpiador
Arrancador: Capacitor Capacitor Capacitor RetrocesoEnfriador: Aire Aire Aire Aire
* Motores de 50 ciclos disponibles sobre pedido especial: el modelo de 2 HP es de 240 Volitios, el modelo de 3 HP es de 220-380 Volitios. **Motor de 3 fases disponible sobre pedido especial - especificar 230 ó 460 voltios para el cableado en fábrica.
Nota:Para obtener los números de los articulos en los motores/máquinas, vea la sección de lista de piezas de este documento. Lasespecificaciones están sujetas a cambios sin notificación.

25
MODELOS ELECTRICOSFIGURA A
MODELOS A GASOLINAFIGURA B
DIMENSIONES DE LA SIERRAMODELOS ELECTRICOS (Illustración A) MODELOS A GASOLIA (Illustración B)
Artículo Longitud (cm) Descripción Artículo Longitud (cm) DescripciónA 38,2" (97,0) Longitud de la Sierra (Máxima) A 43,6" (110,7) Longitud de la Sierra (Máxima)B 19,4" (49,3) Ancho de la Sierra (Máximo) B 22,7" (57,7) Ancho de la Sierra(Máximo)C 28,2" (716,3) Altura de la Sierra (Minima) C 34,8" (88,4) Altura de la Sierra (Minima)D 26,1" (66,3) Altura del Soporte (Opcional) D 26,1" (66,3) Altura del Soporte (Opcional)E 56,4" (143,3) Altura de la Sierra (Máxima) E 63,0" (160,0) Altura de la Sierra (Máxima)F 3,8 - 15,1" Altura del Eje de la Hoja F 6,4 - 15,0" Altura del Eje de la Hoja
(9,6 - 38,4) (Minimo - Máxima) (16,2 - 38,2) (Minimo - Máxima)G 10,0" (25,4) Longitud del Carro G 10,0" (25,4) Longitud del CarroH 18,7" (47,5) Ancho del Carro H 18,3" (47,5) Ancho del CarroI 18,5" (47,0) Viaje delCarro I 18,3" (46,5) Viaje del CarroJ 33,0" (76,2) Longitud de la Base de la Sierra J 33,0" (76,2) Longitud de la Base de la SierraK 18,0" (45,7) Ancho de la Bandeja K 18,0" (45,7) Ancho de la BandejaL 33,7" (85,6) Soporte al Tope del Carro L 33,7" (85,6) Soporte al Tope del CarroM 35,8" ( 90,9) Patin al Tope del Carro M 35,8" ( 90,9) Patin al Tope del CarroN 7,6" (19,3) Base al Tope del Carro N 7,6" (19,3) Base al Tope del CarroO 2,1" (5,3) Altura del Patin (Opcional) O 2,1" (5,3) Altura del Patin (Opcional)P 11,5" (29,2) Carro - Costado Izquierdo P 6,5" (16,5) Carro - Costado IzquierdoQ 6,5" (16,5) Carro - Costado Derecho Q 11,5" (29,2) Carro - Costado DerechoR 4,0" (10,16) Diámetro de la Brida R 4,0" (10,16) Diámetro de la BridaS 32,0" (81,3) Ancho del Patin (Opcional) S 32,0" (81,3) Ancho del Patin (Opcional)
DIMENSIONES DE LA SIERRA

26
¡SEGURIDAD ANTE TODO!
ADVERTENCIASHACER y NO HACER
ADVERTENCIA: EL NO RESPETAR ESTAS ADVERTENCIAS E INSTRUCCIONES DEOPERACION PUEDE PROVOCAR GRAVES LESIONES O LA MUERTE.
HACER
SI Lea todo el manual antes de manejar esta máquina. Entienda todas las advertencias, instrucciones y controles.SI Mantenga siempre las protecciones en su lugar y en buenas condiciones.SI Siempre use protecciones aprobadas para los oídos, ojos, cabeza y respiración.SI Lea y entienda todas las advertencias e instrucciones sobre la sierra.SI Lea y entienda las definiciones de los símbolos que aparecen en este manual.SI Mantenga todas las partes de su cuerpo alejadas de la hoja y de todas las piezas móviles.SI Aprenda cómo parar la sierra rápidamente en caso de emergencia.SI Apague el motor y déjelo enfriar antes de cargar combustible.SI Verifique que la hoja, las bridas y los ejes no estén dañados antes de instalar la hoja.SI Utilice hojas abrasivas reforzadas de alta velocidad, o bien, hojas diamantadas con centro de acero fabricadas para uso en sierraspara hormigón.SI Utilice solamente hojas abrasivas marcadas para velocidad máxima de funcionamiento mayor que la velocidad del eje de la hoja.SI Verifique la velocidad comprobando las rpm del eje de la hoja, diámetro de las poleas y diámetro de la brida de la polea.SI Lea toda la literatura e instrucciones de seguridad que acompañan a la hoja utilizada con esta sierra.SI Inspeccione cuidadosamente cada hoja antes de usarla. Si se observan señales de daño o desgaste poco común, NO USE LA HOJA.SI Instale la hoja firmemente. Apriete la tuerca del eje con un aprietatuercas.SI Asegúrese que la hoja y las bridas estén limpias y libres de tierra y suciedad antes de instalar la hoja en la sierra.SI Utilice el tamaño de brida indicado para cada tamaño de hoja. No use bridas que estén dañadas o desgastadas.SI Verifique que el agujero del eje de la hoja coincida con el portaherramienta de la máquina antes de instalar la hoja.SI Utilice la hoja correcta para el tipo de trabajo que se vaya a ejecutar. En caso de dudas, consulte con el fabricante de la hoja.SI Siempre sujete la máquina con ambas manos cuando el motor esté funcionando. Encierre la empuñadura firmemente con los pulgares y dedos.SI Tenga cuidado y siga las instrucciones cuando cargue y descargue la sierra.SI Maneje esta máquina solamente en lugares bien ventilados.SI Indique a las personas dónde situarse mientras la sierra está funcionando.SI Establezca un programa de entrenamiento para todos los operadores de esta máquina.SI Despeje el lugar de trabajo de personas innecesarias. No permita que nadie se sitúe delante o detrás de la hoja mientras el motor está funcionando.SI Maneje el combustible con cuidado.SI Aleje la máquina por los menos 10 pies (3 m) del punto de abastecimiento de combustible antes de arrancar el motor y asegúrese de apretar bien
la tapa de la gasolina en la sierra y del bidón de combustible.SI Asegúrese que la hoja no esté haciendo contacto con ninguna cosa antes de arrancar el motor.SI Tenga cuidado al izar y transportar esta máquina.SI Siempre levántela del gancho de izar solamente.SI Siempre amarre la máquina cuando la transporte.SI Siempre maneje esta máquina con el interruptor de freno de estacionamiento en la posición �Auto�.SI Pida que todo trabajo de servicio lo haga un personal técnico competente.SI Asegúrese de enchufar las máquinas eléctricas a un circuito debidamente conectado a tierra.SI Asegúrese que los cordones eléctricos sean del tamaño correcto y estén en buenas condicionesSI Cumpla con el reglamento eléctrico de su localidad.SI Use el voltaje correcto y un cable de extensión adecuado. Nunca transporte la herramienta colgando del cable y nunca tire del cable para
desenchufarlo. Aleje el cable del calor, aceite y de las aristas filudas.SI Desenchufe los equipos cuando no los usa, antes de hacer mantenimiento y al cambiar accesoriosSI limpie y efectúe un mantenimiento cuidadoso para obtener un rendimiento mejor y más seguro. Siga las instrucciones al cambiar accesorios.
Revise los cables del equipo con frecuencia y, si hay daños, hágalos reparar por un servicio autorizado.SI Siempre verifique si hay cables eléctricos enterrados antes de cortar con la sierra. Si se necesitan ejemplares adicionales, lammar SIN CARGO
al 1-800-288-5040.

27
¡SEGURIDAD ANTE TODO!
ADVERTENCIASHACER y NO HACER
ADVERTENCIA: EL NO RESPETAR ESTAS ADVERTENCIAS E INSTRUCCIONES DEOPERACION PUEDE PROVOCAR GRAVES LESIONES O LA MUERTE.
NO HACER
*****************
NO haga funcionar esta máquina sin antes haber leído y entendido este manual.NO maneje esta máquina sin tener el protector de la hoja u otras protecciones instaladas en su lugar.NO se sitúe delante o detrás del paso de la hoja mientras el motor está funcionando.NO deje esta máquina desatendida mientras el motor está funcionando.NO trabaje en esta máquina mientras el motor está funcionando.NO maneje esta máquina si está cansado o fatigado.NO maneje la máquina si no está seguro de como hacerlo.NO utilice una hoja de corte húmedo sin tener el suministro adecuado de agua.NO sobrepase la velocidad máxima indicada para cada tamaño de hoja. El exceso de velocidad puede causar la rotura de la hoja.NO utilice equipos u hojas que estén dañados.NO utilice hojas con puntas de carburo.NO trate de parar con las manos una hoja en movimiento.NO incline, atasque, encaje o tuerza la hoja en el corte.NO amontone material en la hoja.NO deje los córdones eléctricos en o cerca del agua.NO cambie el motor por alguno que no tenga una conexión especial de tierra de seguridad.NO transporte una máquina de cortar con la hoja instalada.NO utilice una hoja que ha sufrido una caída.NO toque una hoja diamantada de corte en seco inmediatamente después de usarla. Estas hojas se demoran varios minutos en
enfriarse después de cada corte.NO use una hoja que se ha sobrecalentado. (El núcleo tiene un color azulado.)NO utilice bridas de hojas que estén dañadas o desgastadas.NO permita que nadie se acerque a la máquina durante la puesta en marcha, abastecimiento de combustible o mientras la sierra está
funcionando.NO maneje esta máquina en un lugar encerrado a menos que tenga buena ventilación.NO maneje esta máquina cerca de ningún objeto que sea inflamable. Las chispas podrían causar un incendio o una explosión.NO permita que la hoja sobresalga más de 180 grados del protector.NO maneje esta máquina sin que tenga colocado el capó del motor.NO maneje esta máquina sin que tenga colocado el protector de la transmisión.NO use los soportes de amarre para izar esta máquina.NO remolque esta máquina tirada por un vehículo.NO maneje esta máquina a menos que esté especialmente capacitado para hacerlo.NO maneje la sierra si está bajo la influencia de drogas o bebidas alcohólicas.
Esta sierra fue diseñada para ciertas aplicaciones solamente. NO la modifique ni utilice para ninguna otra aplicaciónsalvo aquéllas para las cuales fue diseñada. En caso de dudas respecto a su aplicación, NO use la sierra sin anteshaber consultado por escrito a Diamant Boart, Inc. y haber recibido nuestras indicaciones.
Diamant Boart, Inc.17400 West 119th Street
Olathe, Kansas 66061USA 1-800-288-5040

28
FIGURAS

29
FIGURAS
EE
U
RR
DD
GGC
A1
B2
KK
JJ
T
CCDD
BB
VV
Y
T
RRZ
TT
X
KK
UU
GG
C
DD
B2
KKKK

30
Identificación de Piezas:
A. Estructura Soldada de la BandejaB. Conjunto de Plataforma del CabezalC. Conjunto del Carro TransportadorD. Soporte Doblable (Opcional)E. Equipo de Patín (Opcional)F. Equipo de Pedal de Pie (Opcional)G. Abrazaderas de CojineteH. CojinetesI. �����������J. Bloques PivotantesK. Perillas (o Tornillos de Cabeza Plana)L. Brazo de ContrabalanceM. Tornillo de Cabeza PlanaN. Ménsula InferiorO. �����������P. Palanca de TrabaQ. ResorteR. Perno de OjoS. Retén (Modelo a Gasolina)T. Válvula de AguaU. Bomba de AguaV. Bulbo del Cebador (Modelo a Gasolina)W. Aislador (Modelo a Gasolina)X. Rueda (Pivote del Protector de la Hoja)Y. Tornillo de Fijación (Pivote del Protector de la
Hoja)Z. Barra de Trayectoria
AA. Base del MotorBB. Tornillo de Cabeza Plana (Eje de la Hoja)CC. Brida ExternaDD. Hoja DiamantadaEE. Cinta de la Bomba de Agua (Modelo a
Gasolina)FF. Soporte de Resorte SuperiorGG. EscuadraHH. Calces (No Mostrado en las Ilustraciones)II. �����������JJ. Tornillos de Cabeza Plana (Carcasa del Eje
de la Hoja - Trasero)KK. Tornillos de Cabeza Plana (Carcasa del Eje
de la Hoja - Superior)LL. LlaveMM. Cortina para SalpicadoNN. Cable de Conexión Eléctrica (Bomba de Agua)OO. Enchufe Eléctrico (Modelos Eléctricos)PP. Botón de Reinicio (Modelos Eléctricos)QQ. �����������RR. Perilla de Encendido (Modelos Eléctricos)SS. Perno de Tensionamiento de la CintaTT. Placa de Número de SerieUU. AsaVV. Perilla de Apagado del Motor (Modelo a
Gasolina)WW. Manguera de Drenaje de Aceite

31
LISTA DE COMPROBACIONES PREVIAS A LA OPERACION
Antes de salir de la fábrica, todas las máquina son probadas extensivamente. Siga nuestras instruccionesal pie de la letra y su máquina le brindará muchos años de servicio en condiciones normales de trabajo.
Lea todo este manual y familiarícese con el funcioanamiento de la máquina antes de ponerla en marcha.
CON LA MAQUINA FRIA Y NIVELADA:
1. Modelos a Gasolina: Revisar el aceite del motor. Llenar hasta la marca �full� en la varilla de medición con aceite10W30.� Clase MS, SD, SE o mejor.
2. Modelos Eléctricos: Verificar que todas las conexiones eléctricas estén intactas.
LISTA DE REVISIONES DURANTE EL PERIODO DE RODAJE
LISTA DE REVISIONES DESPUES DE 1 A 2 HORAS DE FUNCIONAMIENTO:
SIEMPRE estacione la máquina en una superficie plana con el motor �APAGADO� y el interruptor deencendido puesto en la posición de DESCONECTADO antes de hacer ningún trabajo de mantenimiento.¡Deje que la máquina se enfríe!
1. Revisar las abrazaderas de las mangueras del filtro de aire del motor. Apretar según se requiera.2. Tensar las correas trapezoidales impulsoras de la hoja. ¡NO tensar demasiado!
REFERENCIA RAPIDA DEL MANTENIMIENTO PROGRAMADO:
SIEMPRE estacione la máquina en una superficie plana con el motor �APAGADO� y el interruptor deencendido puesto en la posición de DESCONECTADO antes de hacer ningún trabajo de mantenimiento.¡Deje que la máquina se enfríe!
MANTENIMIENTO DIARIO:1. Revisael nivel de aceite del motor.2. Revisar la condición del protector de la hoja.3. Revisar las mangueras y abrazaderas en busca de daño o flojedad, Apretar o cambiar
según sea necesario.4. Observar el indicador de restricción del filtro de aire. Limpiar o reemplazar cuando sea
necesario.5. Limpie la bandeja del reservorio frecuente.6. Al final del cada día, limpie la bandeja del reservorio de agua para sacar el lodo de la
sierra. Haga pasar agua limpia a través de la Bomba de Agua y de las mangueras.
MANTENIMIENTO CADA 50 HORAS:1. Cambiar el aceite y filtro del motor.2. Limpiar la aletas de aire del motor.3. Revisar la tensión de la correa trapezoidal impulsora de la hoja. ¡NO tensar demasiado!4. Limpiar el recipiente del combustible del motor.

32
Estos avisos le dan consejospara su seguridad
Antes de salir de la fábrica, todas lasmáquinas son probadas extensivamente.
Siga nuestras instrucciones al pie de la letra y sumáquina le brindará muchos años de servicio encondiciones normales de trabajo.
Antes de poner en marcha la máquina,asegúrese de leer todo este manual yfamiliarícese con el funcionamiento de estamáquina.
El lugar de trabajo debe estar totalmentedespejado, bien iluminado y totalmente librede riesgos para la seguridad.
El operador debe usar ropaprotectora adecuada para eltrabajo que está realizando.
Toda persona ajena al trabajo debe retirarsedel lugar.
Use solamente hojas marcadas con unavelocidad máxima de funcionamiento mayorque la velocidad del eje de la hoja.
OBLIGATORIO
ADVERTENCIA
INDICACIONINFORMACIONINSTRUCCIONES
PROHIBICION
Uso: Corte Húmedo o en Seco de materiales refractariosy de mampostería.
Herramientas: Hojas diamantadas � enfriadas en seco ocon agua,
Ø: 10" (250 mm), 12" (300 mm), y14" (350 mm), con Eje de Ø 1" (25,4 mm).
(Para obtener información, póngase en contacto con sudistribuidor)
Profundidad de Corte (Máxima):5,00" (127 mm) con hoja de Ø 14" (350 mm)
Máximo Tamaño del Material:Bloque de 8 x 8 x 16" (20,3 x 20,3 x 40,6 cm)
El bloque debe ser rotado 180 grados para completarel corte a través de 8" (20,3 cm) de profundidad.
Peso Nominal: Ver �Especificaciones�Peso de Operación: Ver �Especificaciones�Dimensiones: Ver �Dimensiones de la Sierra�Capacidad del Protector de la Hoja:
MODELOS ELECTRICOS: Hojas de Ø 10" (250 mm),12" (300 mm) y 14" (350 mm)
MODELOS A GASOLINA: Ø de14" (350 mm) solamente.(No se recomiendan diámetros de sierra más pequeñosporque la sierra no cortará a través del material. Lainclinación del cabezal es limitada porque el máximo ángulode inclinación del motor es 20 grados.)
RPM del Eje de la Hoja: Ver �Especificaciones�
Todos los Modelos: ( Ilustraciones 1, 2, 3 y 4)
� Cuando se desembala, esta unidad consiste de tres(3) grandes piezas: Estructura Soldada de la Bandeja(A), Conjunto de Plataforma del Cabezal (B) y Conjuntodel Carro (C) (Ilustracion 1).
� Si esta unidad usara el Soporte Doblable (D) (Ilustracion1) y el Equipo de Patín (E) (Ilustracion 2) opcionales,primero arme estos artículos. Siga las instruccionesproporcionadas con estas opciones.
� Coloque la Estructura Soldada de la Bandeja (A) sobreuna tabla o en el Soporte Doblable / Equipo de Patín(D / E), como se muestra en la Ilustracion 1. Es muyimportante que la Estructura Soldada de la Bandeja (A)sea armada sobre el Soporte Doblable (D), como semuestra en la Ilustracion. 1, ó el Equipo de Pedal dePie (F) opcional NO PUEDE ser armado en la unidad.
� Saque el Conjunto del Carro (C) de su caja de embalaje.Coloque el Conjunto del Carro (C) sobre la EstructuraSoldada de la Bandeja (A), de modo que las ruedas delConjunto del Carro (C) rueden a lo largo de loscostados de la Estructura Soldada de la Bandeja (A)(Ilustracion 1).
� Asegúrese que las Abrazaderas de Cojinete (G) de laderecha y de la izquierda en la Estructura Soldada dela Bandeja (A) están pivotadas dentro de su posiciónrebajada (Ver la Ilustracion 3). Cuidadosamente,levante el Conjunto de Plataforma del Cabezal (B) ymóntelo en la Estructura Soldada de la Bandeja (A) demanera tal que los Cojinetes (H) (en la Plataforma delCabezal) estén descansando en los Bloques Pivotantes(J) (en la Estructura Soldada de la Bandeja) y que elextremo del eje de la hoja de la Plataforma del Cabezal(B) esté descansando en el Conjunto del Carro (C)(Ilustracion 3).
1 Caracteristicas
2 Armado

33
� Gire las Abrazaderas de Cojinete (G) dentro de suposición elevada y apriete las Perillas (K) [o los Tornil-los de Cabeza Plana (K), dependiendo de la fecha defabricación] hasta que la Plataforma del Cabezal (B)esté asegurada a la Estructura Soldada de la Bandeja(A) (Ilustracion 4).
� Nota: Si la unidad usa Tornillos de Cabeza Plana (K)para sostener las Abrazaderas de Cojinete (G) en susitio, apriételos con el extremo de la Llave (LL) de 1/2",proporcionada con la sierra (Ilustracion 4).
Modelos Eléctricos (Ilustracion 5):
� Instale el Brazo de Contrabalance (L): Coloque elextremo ranurado del Brazo de Contrabalance en elpasador ubicado en la Esquina Posterior Izquierda delConjunto de Plataforma del Cabezal (B). Asegúresede poner Arandelas de 1/2" en ambos costados delBRAZO antes de la instalación. Note que el orificioinferior del BRAZO está posicionado hacia la EstructuraSoldada de la Bandeja (A). Un tornillo de cabeza planasostiene el BRAZO en las ménsulas de la parteposterior de la Estructura Soldada de la Bandeja (A)por medio de este orificio inferior.
� Instale la Palanca de Traba (P) en el pasador de laEsquina Posterior Izquierda del Conjunto de Plataformadel Cabezal (B). Apriete la Palanca de Traba (P), demodo que el Conjunto de Plataforma del Cabezal (B)esté trabado de manera segura con el eje de la hoja enla máxima posición elevada.
� Asegúres que el Perno de Ojo (R) esté ajustado demanera segura en el Brazo (L) y note que el ojo delPerno de Ojo (R) debería estar alineado con el orificiode montaje del resorte en el Conjunto de Plataformadel Cabezal (B).
� Agregue la parte superior del Resorte (Q) a través delorificio en la brida superior del del Conjunto dePlataforma del Cabezal (B). Con una herramienta (talcomo un destornillador), extienda el extremo inferiordel Resorte (Q), de manera que el mismo se enganchesobre el PERNO DE OJO (R).
� Instale la Bomba de Agua (U) enchufando su Cable deConexión Eléctrica (NN) dentro del cable flexible delmotor eléctrico. Instale el acoplador de púa de lamanguera en la Bomba de Agua (U), luego empuje enla manguera. Dirija la manguera y el cable eléctricoencima de la cruceta de la Estructura Soldada de laBandeja (B) para evitar el contacto con la hoja durantela operación y de manera que la cortina para salpicadopueda ser instalada fácilmente (NO como se muestraen la Ilustracion 5). Coloque la Bomba de Agua Eléctrica(U) en el fondo de la Estructura Soldada de la Bandeja(A). Enganche la parte superior de la Cortina paraSalpicado (MM) sobre la barra de pivote del cabezal ycoloque el fondo de la Cortina para Salpicado (MM) enla bandeja (Ilustracion 1).
� Los motores de sierras para mampostería de una fasese proporcionan con el Enchufe (OO) con la correctaconfiguración NEMA en el cable flexible del motor. Losconectores correspondientes son los siguientes:
Enchutes y Connectores del Motor Electrico
Cableado Enchute Flexible ConectorMotor para del Motor Requenido
Voltaje (NEMA No.) (NEMA No.)1-1/2 HP 115 V L5-20P L5-20R
2 HP 230 V L6-15P L6-15R3 HP 230 V L6-30P L6-30R
Para cambiar la operación, ya sea a 115 ó 230 V, los motoresde 1-1/2 y 2 HP tienen una perilla para cambio de voltajemontada en la caja terminal. Esta perilla debe ser cambiadaa ya sea 115 ó 230 Voltios, para corresponder al voltaje dela fuente de energía. Los códigos eléctricos locales puedenrequerir el cambio del enchufe en el motor al conector NEMAapropiado para corresponder al voltaje de la fuente deenergía.
ADVERTENCIA: Siempre asegúrese que lasierra esté conectada a un tomacorriente conapropiada conexión a tierra. ¡Elincumplimiento de esta advertencia podríaresultar en serios daños corporales o en lamuerte!
ADVERTENCIA: ¡NO opere con bajo voltaje! Elbajo voltaje causa la pérdida de energía, elsobrecalentamiento del motor y, posiblemente,la quemadura del revanado del motor. Elvoltaje del motor debería ser verificado cuandoel mismo está en operación.
El buen desempeño del motor depende del voltajeapropiado. Los cables prolongadores que son demasiadolargos y/o demasiado pequeños reducen el voltaje a unmotor bajo carga. Use cables prolongadores NO MASPEQUEÑOS que los tamaños indicados en la cartamostrada más abajo:
Modelo a Gasolina (Ver la Ilustracion 6):
� Arme el Soporte de Resorte Superior (FF) usando losdos (2) Tornil los Largos de Cabeza Plana de3/8"-16UNC x 1,00" y las Contratuercas de 3/8"-16UNCque se proporcionan.
� Instale el Brazo de Contrabalance (L). Arme de maneraaflojada el Tornillo de Cabeza Plana (M) Largo de3/8" x 1,00" y la Contratuerca de 3/8"-16UNC a travésde la Ménsula Inferior (N) y del extremo inferior (orificiode diámetro 13/32") del Brazo de Contrabalance (L).
� Eleve el Conjunto de Plataforma del Cabezal (B) hastaque la ranura en el Brazo (L) pueda ser puesta en elPasador de 1/2" en el Soporte de Resorte Superior (FF)-
TAMAÑO DEL CABLE PROLONGADOR (Mínimo) MOTOR 50 pies de longitud 75 pies de longitud 100 pies de longitud
HP 115 V 230 V 115 V 230 V 115 V 230 V1-1/2 # 10 # 14 # 10 # 14 # 10 # 142 HP # 10 # 12 # 10 # 12 # 10 # 123 HP � # 10 � # 10 � # 10

34
Modelo a Gasolina Solamente:
� Combustible: Verifique el manual de operación delmotor. Se recomienda la gasolina sin plomo.
� Aceite: Trabe el Conjunto de Plataforma del Cabezal(B) con el motor en una posición horizontal, luegoverifique que el nivel de aceite del motor sea el correcto.Verifique el nivel del aceite frecuentemente paraasegurarse que ese nivel nunca descienda por debajodel especificado en el manual de operación del motor.Si el nivel del aceite está bajo, agregue aceite SAE10W30, clasificación de servicio SF o SG (paracondiciones normales), tal como se recomienda en elmanual de operación del motor. ¡NO sobrecargue elmotor con aceite!
Todos los Modelos:
� Tenga en cuenta las condiciones de trabajo desde elpunto de vista de la salud y la seguridad.
� Para el arranque, refiérase al manual del motor.
Solamente Modelos Eléctricos:
� Asegúrese que el tamaño del cable prolongador estéapropiadamente dimensionado para el motor usado enesta Sierra. Ver la Carta en la Sección 2 de estedocumento.
ADVERTENCIA: Asegúrese que la unidad estéconectada a un tomacorriente apropiadamenteconectado a tierra. ¡El incumplimiento de estaadvertencia podría resultar en serias lesionescoprporales o la muerte!
asegúrese de instalar las Arandelas Planas de1/2" (proporcionadas) en ambos costados del Brazo (L).
� Monte y asegure la Palanca de Traba (P) en el Pasadorde 1/2" del Soporte de Resorte Superior (FF). Aprieteel Tornillo de Cabeza Plana (M) Largo de 3/8" x 1,00" yla Contratuerca de 3/8"-16UNC previamente instaladaen la Ménsula Inferior (N).
� Instale la parte superior del Resorte (Q) en el orificio dela parte superior del Soporte de Resorte Superior (FF).Afloje la Palanca de Traba (P) y gire el Conjunto dePlataforma del Cabezal (B) de manera que el eje de lahoja esté en la posición superior, luego apriete laPalanca de Traba (P) de manera segura. Usando unaherramienta (tal como un destornillador o alicates)extienda el extremo inferior del Resorte (Q), de maneraque esté asegurado dentro del Perno de Ojo (R) en laMénsula Inferior (N).
� Instale las mangueras en la bomba de agua. Ellasdeben ser conectadas juntas, tal como se muestra enla lista de piezas de este documento. Coloque el Retén(S) en el fondo de la Estructura Soldada de la Bandeja(A) después de conectar la manguera. Enganche laparte posterior de la Cortina para Salpicado (MM) sobrela barra de pivote del cabezal y coloque el fondo de lacortina en la bandeja (Ilustracion 1).
� Cuando la unidad esté totalmente armada, pero antesde arrancar el motor, verifique que el motor NO exceda20 grados en su ángulo de inclinación en cualquierposición de la Plataforma del Cabezal [Use un indicadorde medición de ángulos (proporcionados por el cliente)sostenido de manera plana contra la Base delMotor (AA)].
PRECAUCION: ¡La inclinación a ángulosmayores que 20 grados podría producir severosdaños en el motor y anular su garantía!
(Ver la Ilustracion 7)
Siempre ponga el interruptor de arranque del mo-tor (VV) en la posición de DESCONECTADOantes de instalar la hoja.
Todos los Modelos:
� La hoja rota en una dirección de �corte de bajada�. Estosignifica que el frente de la hoja se mueve hacia abajomientras que la parte posterior de la hoja se muevehacia arriba. Monte la Hoja Diamantada (DD) demanera que la flecha en la hoja rote en esta direcciónde �corte de bajada�. La Hoja Diamantada (DD) puedeser instalada / sacada usando el extremo de la Llave(LL) de 3/4" (19 mm) proporcionada (Ilustracion 4).
� Después de montar la hoja, ella debería alinearse sobrela parte superior de la inserción de madera en el CarroTransportador (C). Si esto no ocurre, afloje los tornil-los de fijación que aseguran los Cojinetes (H) alConjunto de Plataforma del Cabezal (B) (Ilustracion 3).Posicione el Conjunto de Plataforma del Cabezal (B) ala izquierda o a la derecha hasta que la Hoja Diamantada(DD) esté alineada sobre la parte superior de la inserciónde madera, luego vuelva a apretar los tornillos de fijaciónde los Cojinetes (H). Durante la operación de estaunidad, la hoja puede, y debería, pasar dentro de lainserción de madera, pero NO dentro de la pieza dealuminio fundido del Carro Transportador (C).
ADVERTENCIA: Las hojas diamantadasconvencionales �Húmedas� DEBEN ser usadascon agua. NO use hojas diamantadasconvencionales �Húmedas� sin agua. ¡El uso
de las hojas diamantadas convencionales �húmedas�sin agua puede resultar en lesiones o en la muerte deloperador o de las personas presentes en el área detrabajo!
Advertencia: Use solamente hojas abrasivas deltipo reforzado.
4 Colocación De La Hoja
3 Verifique Antes De Operar

35
5 Instrucciones De Operación
Modelos Eléctricos Solamente:
� Monte la Hoja Diamantada (DD):
1. Usando la Llave (LL) proporcionada (u otra queusted tenga), afloje el Tornillo de Cabeza Plana (BB)girándolo en sentido anti-horario (ModelosEléctricos Solamente).
PRECAUCION: Note que, en los ModelosEléctricos, el Tornillo de Cabeza Plana (BB)tiene muescas A LA MANO DERECHA. ¡Lainstalación del tornillo de cabeza planaequivocado podría dañar el eje de la hoja!
2. Saque la Brida (CC) externa y asegúrese que laBrida (CC) externa, la Brida interna (No Mostrada)y el eje (No Mostrado) están limpios y sin daños.
3. Monte la Hoja Diamantada (DD) al eje e instale laBrida (CC) externa. Instale y apriete el Tornillo deCabeza Plana (BB) girándolo en una direcciónhoraria (Muescas a la Mano Derecha). Use la Llave(LL) para apretar firmemente el Tornillo de CabezaPlana (BB) al eje.
Modelo a Gasolina Solamente:
� Monte la Hoja Diamantada (DD):
1. Usando la Llave (LL) proporcionada (u otra queusted tenga), afloje el Tornillo de Cabeza Plana (BB)girándolo en sentido horario (Modelos a GasolinaSolamente).
PRECAUCION: Note que, en los ModelosEléctricos, el Tornillo de Cabeza Plana (BB)tiene muescas A LA MANO IZQUIERDA. ¡Lainstalación del tornillo de cabeza planaequivocado podría dañar el eje de la hoja!
2. Saque la Brida (CC) externa y asegúrese que laBrida (CC) externa, la Brida interna (No Mostrada)y el eje (No Mostrado) están limpios y sin daños.
3. Monte la Hoja Diamantada (DD) al eje e instale laBrida (CC) externa. Instale y apriete el Tornillo deCabeza Plana (BB) girándolo ena una direcciónAntihoraria (Muescas a la Mano Izquierda). Use laLlave (LL) para apretar firmemente el Tornillo deCabeza Plana (BB) al eje.
Todos los Modelos: (Ilustraciones 5 y 6)
� Configure la sierra para el tipo de operación requerida,húmeda o en seco. Note que la sierra está montada enfábrica para operación húmeda.
Configuración Húmeda:
� Llene la bandeja del reservorio de agua [EstructuraSoldada de la Bandeja (A)] con agua hasta dentro de1 pulgada (25 mm) de la parte superior. Asegúreseque el Retén (S) de la toma de la bomba de agua(Ilustracion 6, Modelo a Gasolina) o la Toma de la Bombade Agua Eléctrica (U) (Ilustracion 5, Modelo Eléctrico)está totalmente inmersa en agua todo el tiempo.Mantenga la rejilla de admisión de estos artículos limpiasy libres de lodo, suspensiones acuosas u otrosmateriales extraños.
Configuración en Seco:� Todos los Modelos:
ADVERTENCIA: Las hojas diamantadasconvencionales �Húmedas� DEBEN ser usadascon agua. NO use hojas diamantadasconvencionales �Húmedas� sin agua. ¡El usode las hojas diamantadas convencionales
�húmedas� sin agua puede resultar en lesiones o en lamuerte del operador o de las personas presentes en elárea de trabajo!
ADVERTENCIA: Cuando corte sin agua, usesolamente hojas diamantadas que estándestinadas a ser usadas en seco (sin agua). Lashojas diamantadas convencionales �Húmedas�DEBEN ser usadas con agua.
Þ Indicación: Para reducir la vibración de la sierra, labandeja del reservorio de agua [Estructura Soldadade la Bandeja (A)] puede ser llenada con arena.Asegúrese de sacar la Bomba de Agua (U) (ModelosEléctricos) o el Retén (S) (Modelos a Gasolina) de latoma de la bomba de agua para evitar su contaminacióncon tierra o con arena.
ADVERTENCIA: Use siempre protecciónrespiratoria cuando efectúe cortes en seco.
Modelos Eléctricos: (Ilustracion 5)
Antes de cortar en seco, desenchufe la Bomba de Agua(U) del motor eléctrico, desconectando el Cable de ConexiónEléctrica (NN).
Modelo a Gasolina: (Ilustracion 8)
Saque la Cinta en V (EE) de transmisión de la bomba deagua:
1. Saque los dos escudos que cubren la cinta detransmisión de la Bomba de Agua y el protector dela cinta (No Mostrado).
2. Afloje los dos (2) pernos que sostienen la Bombade Agua en posición. Afloje el perno de tracciónque tensiona la cinta de la bomba de agua.
3. Deslice la Bomba de Agua hacia adelante y saquela cinta de la polea de la bomba de agua.
4. Desarme la Cinta en V (EE) de la bomba de agua:a. Gire la cinta hacia afuera y, con una mano,
exprima conjuntamente los dos ramales de lacinta.
b. Doble una lengüeta 90 grados de manera queesté paralela con la ranura en la conexiónadyacente.
c. Estire el extremo de esa conexión sobre lalengüeta.
d. Estire el extremo de la cinta a través de las otrasdos conexiones.
5. Vuelva a instalar el Protector de la Cintay losescudos de la bomba de agua. Guarde la cinta dela bomba de agua de manera que ella pueda volvera ser instalada si la unidad necesita ser usada paracortes húmedos.

36
� Si el motor se apaga durante el corte, verifique losiguiente:
Modelo Eléctrico:
1. Interrupción de la conexión eléctrica: Verifique todaslas conexiones eléctricas.
2. La perilla de Sobrecarga Manual ha sido activada:Los motores de 60 Hertz de una sola fase estánequipados con un Botón de Reinicio de SobrecargaManual (PP) (Ilustracion 5). Si el motor se apaga debidoa una sobrecarga eléctrica y el Botón de Reinicio deSobrecarga Manual (PP) se activa, gire la Perilla deEncendido (RR) a la posición de APAGADO (�OFF�)(Ilustracion 9). Permita que el motor se enfríe por 5 a10 minutos, luego empuje el Botón de Reinicio (PP).Un golpe seco indica que el motor ha sido reiniciado yque está listo para la operación. Vuelva a encender elmotor, girando la Perilla de Encendido (RR) a la posiciónde ENCENDIDO (�ON�).
Modelo a Gasolina:
1. Sin Combustible: Verifique el nivel del combustible.
2. Bajo Nivel de Aceite: Esta unidad está equipada con unsistema de apagado que detiene el motor si seencuentra un nivel bajo de aceite. Verifique el nivel deaceite del motor con el Conjunto de Plataforma delCabezal (B) pivotado, de manera que el motor esté enuna posición horizontal.
� Si el motor o la hoja se atasca por alguna razón, elevecompletamente la hoja fuera del corte, inspeccioneminuciosamente la máquina antes de volver aencenderla. Cuando descienda la hoja dentro de uncorte parcial, alinee la hoja exactamente con el cortepara evitar daños en la hoja.
PRECAUCION: ¡NO haga funcionar la Bombade Agua (U) por largos períodos de tiempo sinagua! ¡La Bomba de Agua podría dañarse!
Operaciones de Corte:
� Coloque el material en el Carro Transportador (C) ymueva el carro transportador al frente de la sierra, demanera que la hoja NO esté en contacto con el mate-rial.
� Métodos de Corte: Esta unidad permite tres métodospara que la hoja entre en contacto con el material:
1. Cabezal Fijo: Posicione el cabezal a la alturadeseada, luego apriete la Palanca de Traba (P)(Ilustraciones 5 y 6). Luego el material puede serempujado dentro de la hoja.
2. Sostenga el Asa (UU) y descienda la hoja dentrodel material (Ilustracion 10). La hoja retornará a laposición superior cuando se libere el esfuerzo.
3. Empuje con su pie el Equipo del Pedal de Pie (F)(Ilustracion1) para descender la hoja dentro delmaterial. La hoja retornará a la posiciónsuper iorcuando se libere el esfuerzo.
Encendido / Apagado (Modelos Eléctricos):
(Ilustraciones 9 y 10)
� Abra la Válvula de Agua (T) completamente y verifiqueel flujo de agua antes de cortar.
� Encienda el motor eléctrico girando la Perilla deEncendido (RR) a la posición de ENCENDIDO (�ON�).
� Corte el material usando uno de los Métodos de Cortedescritos en la sección anterior.
ADVERTENCIA: Mantenga las manos alejadasde la hoja rotante durante la operación. LEATODAS LAS ADVERTENCIAS SOBRESEGURIDAD antes de operar esta máquina.
PRECAUCION: ¡NO corte dentro del área delaluminio fundido del Carro Transportador (C ).La hoja debería cortar solamente dentro delárea de la inserción de madera del CarroTransportador (C)!
APAGADO DE LA UNIDAD (Modelos Eléctricos):
Apague la unidad girando la Perilla de Encendido(RR) a la posición de APAGADO (�OFF�)(Ilustracion 9). Espere a que todo movimiento dela hoja se detenga antes de sacar el material de lamáquina.
Encendido / Apagado (Modelos a Gasolina):(Ilustraciones 1 y 7)
� Abra la Válvula de Agua (T) (Ilustracion 7) y cebe laBomba de Agua (U) usando el Bulbo del Cebador (V)(Ver la Ilustracion 1). Apriete el Bulbo del Cebador hastaque el agua pase a través de las tuberías de agua delprotector de la hoja.
� Encienda el motor usando el procedimiento del manualde operación.
� Abra completamente el estrangulador del motor. Todocorte es hecho en esa posición. No cambie la posición
del regulador del motor; está fijado en fábrica para lavelocidad correcta. Ver la sección �Epecificaciones�de este documento para obtener la RPM apropiada delmotor y de la hoja.
ADVERTENCIA: Mantenga las manos alejadasde la hoja rotante durante la operación. LEATODAS LAS ADVERTENCIAS SOBRESEGURIDAD antes de operar esta máquina.
� Ajuste el flujo de agua con la Válvula de Agua (T) yverifique el flujo de agua antes de cortar.
� Corte el material, usando uno de los Métodos de Cortedescritos en la sección anterior.
APAGADO DE LA UNIDAD (Modelos a Gasolina):
Operación Normal: Apague la unidad siguiendo elprocedimiento del manual de operación. Espere a que todomovimiento de la hoja se detenga antes de sacar el mate-rial de la máquina.
Emergencia: Gire la Perilla de Apagado del Mo-tor (VV) a la posición de APAGADO (�OFF�)(Ilustracion 7).
6 Incidentes Durante La Operación

37
ADVERTENCIA: Antes de efectuar cualquiermantenimiento, SIEMPRE ubique la máquina enuna superficie nivelada, con el motor APAGADOy la perilla de encendido en la posiciónAPAGADO, o desconectado de la fuente deenergía.
Después de cada uso: LIMPIAR la máquina.
Verifique Diariamente (Todos los Modelos):
� Limpie la bandeja del reservorio [Estructura Soldadade la Bandeja (A)] para sacar el lodo y las solucionesacuosas. Esta solución acuosa de concreto es uncompuesto abrasivo de corte y acortará la vida deBomba de Agua (U) y de la Hoja Diamantada (DD).Limpie la bandeja del reservorio dos veces por día encasos de corte pesado. Luego vuelva a llenar la bandejadel reservorio de agua con agua limpia.
� Al final del cada día, limpie la bandeja del reservorio deagua [Estructura Soldada de la Bandeja (A) ] para sacarel lodo de la sierra. Haga pasar agua limpia a través dela Bomba de Agua (U) y de las mangueras.
Modelo a Gasolina:
1. ¡Inspeccione el limpiador de aire del motordiariamente! ¡Si corta en seco, inspeccione ellimpiador de aire del motor cada cuatro horas!Limpie o reemplace el elemento limpiador de airede acuerdo a lo recomendado por el fabricante delmotor.
2. Inspeccione el aceite del motor diariamente.Cambie el aceite del motor después de cada 50horas de operación. Ver el manual de operacióndel motor para realizar un apropiado cuidado ymantenimiento.
Modelo a Gasolina:
� Cambie el Aceite del Motor: Cambie el aceite del mo-tor después de cada 50 horas de operación.
� Tipo de Aceite de Motor: Bajo condiciones normalesde operación, use SAE 10W30 API, clasificación deservicio SF or SG. Ver el manual de operación del motorpara verificar otros tipos de aceite recomendados.
� Capacidad del Aceite del Motor (Honda GX160)0,63 Cuartos de Galón de EE.UU.0,6 Litros0,63 Cuartos de Galón Imperial
Procedimiento para el Cambio de Aceite del Motor:
1. Drene el aceite mientras el motor está todavía calientepara asegurar un rápido y completo drenaje del aceite.Gire la Plataforma del Cabezal (B), de manera que lahoja esté en la posición inferior. Coloque un balde en
la Estructura Soldada de la Bandeja (A) bajo laManguera de Drenaje de Aceite (WW) para colectar elaceite usado. Saque el tapón del drenaje del aceite enel extremo de la Manguera de Drenaje de Aceite (WW)[Ver la Ilustracion 1] y espere a que todo el aceite usadosea drenado del motor.
2. Vuelva a instalar y apriete de manera segura el tapónde la Manguera de Drenaje de Aceite (WW).
3. Vuelva a llenar el motor con el tipo de aceiterecomendado. Ver el manual de operación del motorpara conocer la ubicación del sitio para cargar el aceitey el nivel apropiado de aceite. Note que la capacidadrequerida de aceite será mayor debido al volumen deaceite contenido en la Manguera de Drenaje de Aceite(WW).
4. Vuelva a instalar la tapa del sitio para cargar el aceite.
5. Descarte el filtro de aceite usado en un contenedorapropiado y de una manera que sea compatible con elambiente.
Cuando Se Requiera:
� Protector de Hoja �Sta-Level� (Ilustracion 10): Si elprotector de la hoja se afloja y gira demasiadolibremente, la rotación del protector de la hoja puedeser apretada. Ajuste la Rueda (X) Superior de las tres(3) ruedas debajo del protector de la hoja:
1. Afloje la tuerca que sostiene la Rueda (X)Superior.
2. Ajuste el Tornillo de Fijación (Y) para forzar la Rueda(X) Superior contra la Barra de Trayectoria (Z).
3. Vuelva a apretar la tuerca que sostiene la Rueda(X) Superior en posición.
Alineación de la Hoja (Ilustraciones 11 y 12):
� El eje de la hoja en esta máquina está alineado enfábrica, de modo que una nueva hoja cortará �aescuadra� con el material colocado en el Conjunto delCarro (C). Si la sierra o el Conjunto de Plataforma delCabezal (B) se cae o se daña, la hoja podríadesalinearse, de manera que ya no corte �a escuadra�a través del material. De ocurrir esto, el eje de la hojadebería ser realineado de manera que produzca cortes�a escuadra�. Si la Hoja está seriamente fuera dealineación [1/16" (1,5 mm) o más] el Conjunto dePlataforma del Cabezal (B) puede necesitar ser�doblado�, de modo que la hoja esté más cerca de estaralineada. En casos de daño severo, la EstructuraSoldada de la Plataforma del Cabezal debería serreemplazada. La alineación precisa puede seralcanzada usando Calces (HH) de distinto espesor. Verla sección de lista de piezas de este documento paraobtener información sobre el número de pieza y elespesor de los calces.
Þ Nota: ¡Antes de comenzar a alinear la plataforma delcabezal, asegúrese que la hoja esté plana y que NOestá doblada o dañada!
Þ Nota: ¡Cuando alinee la hoja contra la escuadra,asegúrese de permitir la diferencia de espesor entre elsegmento diamantado y el núcleo central de la hoja!
� Los cortes excesivamente rápidos atascarán el motor.� Si la hoja se detiene durante el corte, verifique que la
tensión de la cinta de transmisión es adecuada.
7 Mantenimiento

38
1. Asegúrese que el Carro Transportador (C) ruedelibremente a lo largo de la bandeja. Si la bandeja sedaña, ella debe ser reparada o reemplazada antes quela hoja pueda ser alineada. Trabe el Conjunto dePlataforma del Cabezal (B), de manera segura, en unaposición horizontal.
2. ALINEACION PARALELA (Ver la Ilustracion 11):Proporcione una Escuadra (GG) y colóquela en el CarroTransportador (C), y ruede el carro mientras la Escuadra(GG) descansa contra la hoja. Ajuste el Eje de la Hojadentro de la Alineación Paralela (si se requiere) poniendoCalces (HH) entre la carcasa del eje de la hoja y laestructura soldada de la plataforma del cabezal en laubicación �A1� (Ver la Ilustracion 11). Afloje, pero nosaque, los Tornillos de Cabeza Plana (JJ) que sostenienel eje de la hoja en posición. Deslice un calce, delespesor apropiado, hacia arriba y posiciónelo alrededorde la rosca de uno de los tornillos de cabeza plana.Ajuste los herrajes y verifique la alineación de la hoja.Agregue más calces, de ser necesario, hasta que el ejede la hoja tenga Alineación Paralela.
3. ALINEACION PERPENDICULAR (Ver la Ilustracion 12):Coloque la Escuadra (GG) en el Carro Transportador(C), de manera que esté contra la hoja de la sierra yque esté debajo del centro del eje de la hoja. Si laEscuadra (GG) NO está en contacto con la HojaDiamantada (DD) a lo largo de toda la altura de laescuadra, el eje de la hoja debe ser ajustado enAlineación Perpendicular. Ajuste el eje de la hojaponiendo Calces (HH) entre la carcasa del eje de la hojay la estructura soldada de la plataforma del cabezal enla ubicación �B2� (Ver la Ilustracion 12). Afloje, pero nosaque, los Tornillos de Cabeza Plana (KK) que sostienenel eje de la hoja en posición. Deslice un calce, delespesor apropiado, hacia adentro y posicióneloalrededor de la rosca de uno de los tornillos de cabezaplana. Ajuste los herrajes y verifique la alineación de lahoja. Agregue más calces, de ser necesario, hasta queel eje de la hoja tenga Alineación Perpendicular.
Modelo Eléctrico:
� Ver �Todos los Modelos� del texto anterior.
Modelo a Gasolina:
� Tensión de la Cinta en V del Eje de la Hoja (Ver laIlustracion 6): La excesiva tensión de la cinta produciráel desalineamiento del motor porque elmotor está montado en cuatro (4) Aisladores (W) devibración de goma. Pare de tensionar la cinta en V detransmisión del eje de la hoja cuando la sección centraldel Aislador (W) del frente a la mano derecha comienzaa separarse de su plato de montaje. El tensionamientode la Cinta en V de transmisión del Eje de la Hoja másallá de este punto no es recomendado porque el Aislador(W) del frente a la mano derecha no funcionará demanera apropiada.
� Tensión de la Cinta en V (EE) de la Bomba de Agua(Ver la Ilustracion 8): Puede necesitar ser apretadadespués de cuatro horas de operación. Con el tiempo,esta Cinta en V puede extenderse más allá de la longitudde la ranura de ajuste. Si esto sucede, simplementesaque la Cinta en V y extraiga una o más conexiones(las que sean necesarias) de su longitud.
� Nunca transporte la sierra con el cabezal de corteposicionado en el armazón. El movimiento puede hacerque el cabezal se desalinee.
� Cuando guarde la máquina por un extenso período detiempo, use un cepillo de metal para sacar el lodoendurecido y solidificado. Limpie y lubrifiquecuidadosamente las piezas móviles, de manera quepara el siguiente trabajo la sierra esté lista para laoperación.
� Las cintas de transmisión deben estar ajustadas.Cuando las cintas están flojas, se pierde potencia.¡Reemplace las cintas usadas sin demoras!
� La hoja debe ajustarse apretadamente al eje,especialmente en las hojas diamantadas. De otraforma, se producirá un martillamiento y esto dañaráseriamente las hojas. Si el reborde del eje está hendidoen donde la hoja diamantada se ha trabado en el cortemientras el eje continuaba su giro, el eje debe serreemplazado, o la vida útil de la hoja será acortadaseveramente.
� Las bridas de la hoja deben ser de diámetro completo,como mínimo de 4" (100 mm). Reemplace las bridasdesgastadas de una vez porque las bridas de tamañoreducido acortarán la vida útil y producirán la rotura dela hoja.
� Verifique regularmente la condición del carrotransportador. Reemplace frecuentemente las ruedasy la inserción de madera.
� Asegúrese que el cabezal de corte esté correctamentealineado. El desalineamiento de la hoja debido al dañopor manipuleo o el transporte de la sierra con el cabezalde corte en el armazón puede afectar seriamente lavida útil de la hoja.
� ¡Reemplace los cojinetes ruidosos inmediatamente!Los cojinetes desgastados destruirán la hojarápidamente.
9 Consejo Importante
8 Tensión de la Cinta en V
Todos los Modelos: (Ver Ilustraciones 5 y 6)
� Inspeccione la tensión de la Cinta en V cuando la unidades nueva y nunca fije la tensión de la cinta más allá deeste punto.
� La sierra está equipada con Cintas en V de alta tensión.Las cintas están tensionadas apropiadamente enfábrica, pero después de unas pocas horas deoperación, ellas se extenderán y se aflojarán.
� Tensionamiento de las Cintas en V del Eje de la Hoja:
1. Afloje los cuatro (4) tornillos de cabeza plana quesostienen el motor (Modelos Eléctricos) o laPlataforma del Motor (Modelos a Gasolina).
2. Apriete el Perno de Tensionamiento de la Cinta (SS)en la parte posterior de la sierra hasta que la cintasea apretada a la tensión original de fábrica.
3. Vuelva a apretar los cuatro (4) tornillos de cabezaplana que sostienen el motor (Modelos Eléctricos)o la Plataforma del Motor (Modelos a Gasolina).

39
Para una pronta provisión de piezas de repuesto, es esencialque se proporcionen los datos mostrados en la Placa deNúmero de Serie (TT) (Ver la Ilustracion 10) fijada a lamáquina. Tome nota de esta información más abajo paratener una rápida referencia:
Información de Referencia
Modelo No:
Serie No:
Fecha Recibida:
NOTAS:
11 Reparaciones� Haga pasar agua limpia a través de la bomba y rocíe elconjunto después de cada trabajo para prolongar la vidaútil de la bomba y de la hoja.
� Las hojas diamantadas pueden necesitar ser �afiladas�.Las hojas pueden ser eficientemente �afiladas� conpalillos afiladores.
ADVERTENCIA: ¡Nunca use ladrillosrefractarios para �afilar� las hojas diamantadas!
� Las hojas abrasivas deben ser de un tipo reforzado.Nunca use una hoja abrasiva con agua. Estosproductos puden ser dañados por el abuso del operador;por ejemplo, atascando el material dentro de la hoja.¡Esto también puede ser peligroso!
Nosotros efectuamos todas las reparaciones en el períodode tiempo más corto posible y a los precios máseconómicos. Vea nuestra dirección y números de teléfonoen la página frontal.
12 Piezas De Repuesto
Los siguientes accessorios y equipos están disponiblespara esta máquina. Vea la sección Lista de Piezas de estedocumento para obtener el número de pieza. Para obtenerinformación adicional, póngase en contacto con suproveedor local o llame a nuestro número de teléfonogratuito de Servicio al Cliente, que se muestra en la páginafrontal:
� Conjunto de Soporte Doblable� Equipo de Patín� Equipo de Pedal de Pie� Equipo de Rueda, Carro Transportador (Juego de 4)� Cable Adaptador, 115V, 15 Amperes Directo A Una
Traba por Giro de 20 Amperes (Para Motor de1-1/2 HP Solamente)
� Equipo para Reparación de Bomba de Agua *� Equipo de Carro Transportador, Completo *� Juego de Reglas, Carro Transportador *
*Nota: Este artículo tiene un número de pieza diferentepara las unidades eléctricas y a gasolina.
Las instrucciones de uso y las piezas de recambio presentadas en estedocumento son solamente para información y no constituyen obligación
ninguna. Como parte de nuestra política de mejoramiento de la calidad denuestros productos, nos reservamos el derecho de hacer cualquiera y todas
las modificaciones técnicas sin previo aviso.
¡El fabricante no acepta ningunaresponsabilidad por accidentes debidos aluso indebido o modificaciones hechas a la
maquina!
10 Accesorios
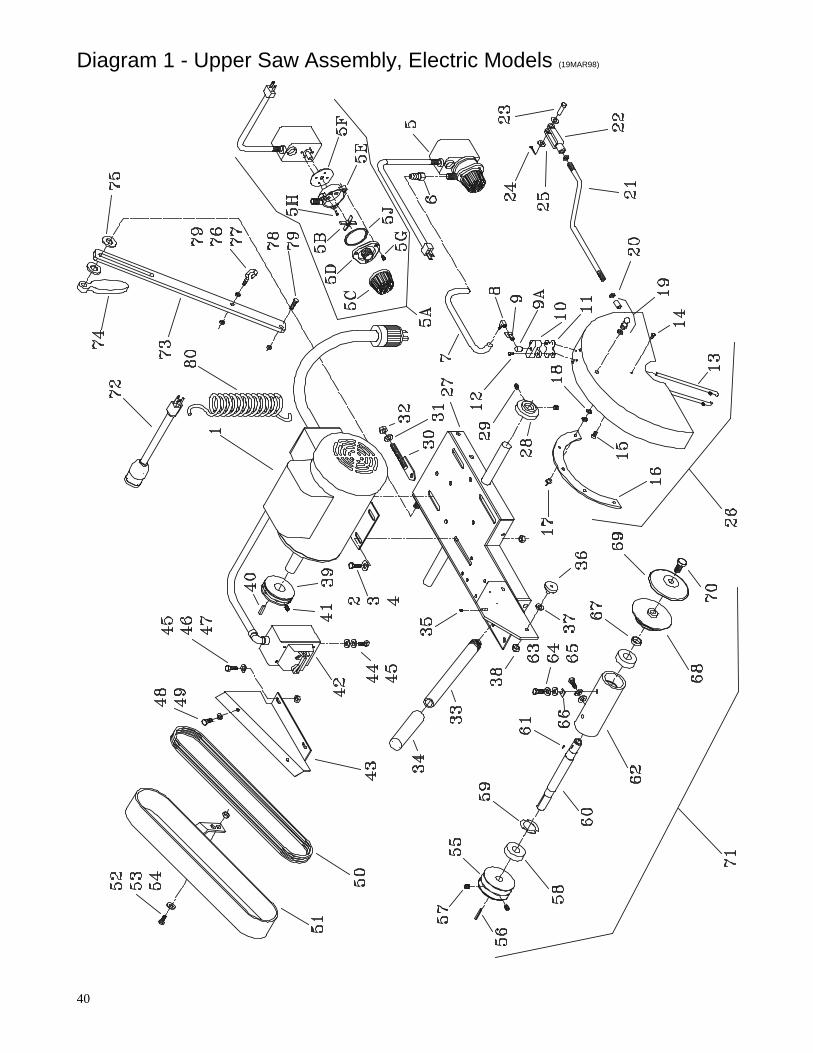
40
Diagram 1 - Upper Saw Assembly, Electric Models (19MAR98)

41
Diagram 1 - PARTS LIST(23MARCH98)
DIAG.LOC.
PARTNO.
QTY.REQ. DESCRIPTION
DIAG.LOC.
PARTNO.
QTY.REQ. DESCRIPTION
1 000605 1 Motor & Switch, 1.5 hp 115/208-230/60/1 (A) 35 020572 1 Setscrew,Soc. Hd #10-24UNC x ½”-- 169422 1 Motor & Switch, 1.5 hp 115/60/1 (B) 36 030822 3 Wheel-- 000716 1 Motor & Switch, 2 HP 115/208-230/60/1 37 020763 3 Washer, Flat 3/8"-- 160885 1 Motor & Switch, 3 HP 115/208-230/60/1 38 032366 3 Nut, Keps 5/16"-18UNC-- 000806 1 Motor & Switch, 3 HP 208-230/460/60/3 39 060504 1 Pulley, 2GA2.0-7/8 w/ SS (60 Hz)2 021416 4 Capscrew,5/16-18UNC x 1" (1.5 & 2HP) -- 060519 1 Pulley, 2GA2.25-7/8 w/SS (50 Hz)-- 020323 4 Capscrew, 3/8-16UNC x 1" (3HP Only) -- 172101 1 Pulley, 6GJ2.80-5/8 w/ SS (B)3 020742 4 Washer, Flat 5/16" (1-1/2 & 2 HP) 40 020062 1 Key, 3/16 Sq. x 1-¼" (Replacement)-- 020743 4 Washer, Flat 3/8" (3 HP Only) 41 020550 2 Setscrew, 5/16-18UNC x 3/8"4 020197 4 Locknut, Fiber 5/16"-18UNC (1.5 & 2 HP) 42 032080 1 Switch, Motor w/ wiring - 1 Phase-- 020199 4 Locknut, Fiber 3/8"-16UNC (3 HP Only) -- 030071 1 Switch, Motor w/ wiring - 3 Phase5 032605 1 Water Pump Assy-115V, G300 (Incl 6 & 7) (A) 43 177427 1 Bracket, Belt Guard (1-1/2 & 2HP)-- 032606 1 Water Pump Assy-230V, G300 (Incl 6 & 7) -- 177426 1 Bracket, Belt Guard (3 HP)-- 177701 1 Water Pump Assy-115V, G100 (Incl 6 & 7) (B) 44 020489 2 Screw,Hex Washer Hd 1/4-20x3/4"
5A 032124 1 Repair Kit, G300 Water Pump(Incl 5B - 5J) 45 020741 6 Washer, Flat ¼ "-- 161049 1 Repair Kit, G100 Water Pump(Incl 5B - 5J) 46 020370 2 Capscrew, Hex 1/4"-20UNC x 3/4"
5B 032072 1 Impeller (G300) 47 020195 2 Locknut, Hex 1/4"-20UNC-- 161052 1 Impeller (G100) 48 021423 2 Screw, Hex Hd 1/4"-20UNC x 1/2"
5C 050171 1 Screen (G300 & G100) 49 020741 2 Washer, Flat 1/4"5D 161490 1 Plate, Front (G300) 50 031025 1 V-Belt, 4L370 Set of 2-- 161054 1 Plate, Front (G100) -- 030063 1 V-Belt, 360J6 (B)
5E 032093 1 Volute (G300) 51 031026 1 Guard, Belt-- 161051 1 Volute (G100) 52 020370 1 Capscrew, Hex 1/4-20UNC x 3/4"5F 032094 1 Gasket (G300 & G100) 53 020741 1 Washer, Flat 1/4"5G 032122 3 Screw, Rd Hd, #8-18 x ½”(G300 & G100) 54 020195 1 Locknut, Fiber 1/4"-20UNC5H 032123 4 Screw,Flat Hd, #8-18 x ½”(G300 & G100) 55 060495 1 Pulley, 2GA3.00-.75 w/ Setscrew5J 032095 1 O – Ring (G300) -- 175261 1 Pulley,6GJ2.25-.75 w/ Setscrew (B)-- 161053 1 O – Ring, #30 (G100) 56 020062 1 Key 3/16 sq x 1.25"6 030654 1 Fitting, Hose 57 020550 2 Setscrew,Soc Hd 5/16-18UNC x 3/8"7 161776 1 Tubing, Vinyl 3/8 I.D. x 42" Long 58 139273 2 Bearing8 161176 1 Fitting, Elbow, Barb 1/4 NPTx3/8" Hose 59 030004 1 Washer, Spring9 090578 1 Valve, w/ Hose Fitting 60 031022 1 Shaft, Blade
9A 020813 1 Fitting, Street Elbow, .25NPT x 90 Deg. 61 020089 1 Key, Woodruff #40310 030870 1 Manifold 62 177416 1 Housing11 030875 1 Gasket, Manifold 63 020314 4 Capscrew, Hex 5/16-24UNF x ¾"12 020425 2 Screw, Rnd Hd #10-32 x ½" Brass 64 020763 4 Washer, Flat 5/16" SAE13 030865 2 Water Tube, 14" 65 020785 4 Lockwasher, 5/16"14 020424 1 Screw, Rnd Hd #10-32 x 3/8" Brass 66 032501 (as req) Shim, .005" Thick15 020426 1 Screw, Flat Hd #10-32 x 3/8" Brass -- 032502 (as req) Shim, .015" Thick16 060435 1 Track, Blade Guard -- 032503 (as req) Shim, .020" Thick17 020701 5 Rivot, Pop 67 139274 1 Spacer18 020762 10 Washer, Flat 1/4" SAE 68 030945 1 Collar, Inner19 031045 1 Ball and Joint 69 030951 1 Collar, Outer20 020171 2 Nut, Hex Jam 3/8"-24 70 020378 1 Capscrew, Hex 1/2-20UNF x 1”21 060455 1 Link 71 031019 1 Blade Shaft Assembly22 060460 1 Yoke (Includes Items: 58-62 & 67-70)23 060465 1 Pin24 020611 1 Pin, Cotter 3/32 x 5/8" Long 72 173120 1 Cord, Adapter, 10” Long,115V25 020764 2 Washer, Flat 3/8" SAE -- ------ -- 15A Straight to 20A Twist-Lock26 161228 1 Blade Guard Assy-w/Decals (Item 8-18) -- ------ -- (Accessory: 1-1/2HP Motor Only)(A)27 177425 1 Platform, Motor28 030580 2 Bearing, Head Pivot 73 177433 1 Arm, Counter Balance29 020553 4 Setscrew,1/4-28UNF x 1/4" 74 030285 1 Nut, Handle, ½”-13UNC30 060411 1 Drawbolt Weldment, 3/8-16UNC 75 020745 2 Washer, Flat, ½”-- 177696 1 Drawbolt Weldment, 3/8-16UNC (B) 76 030251 1 Eyebolt, 5/16-18UNC x 1-½ ”31 020764 1 Washer, Flat 3/8" 77 020169 1 Nut, Hex Jam, 5/16”-18UNC32 020199 1 Locknut, Fiber 3/8"-16UNC 78 020373 1 Capscrew, 5/16”-18UNC x 1-1/2”33 020263 1 Handle 79 020197 2 Locknut, Fiber, 5/16”-18UNC34 043935 1 Grip, Handle 80 060395 1 Spring, Head Balance
(A) for Model PS1411(1.5 hp, 115 / 230 Volt – Has Voltage Change Switch & Remote Mounted ON/OFF Switch)
(B) for Model PS1411S(1.5 hp, 115 Volt Only – DOES NOT Have Voltage Change Switch Or Remote Mounted ON/OFF Switch)

42
Diagram 2 - Lower Saw Assembly, Electric Models (14jan97)
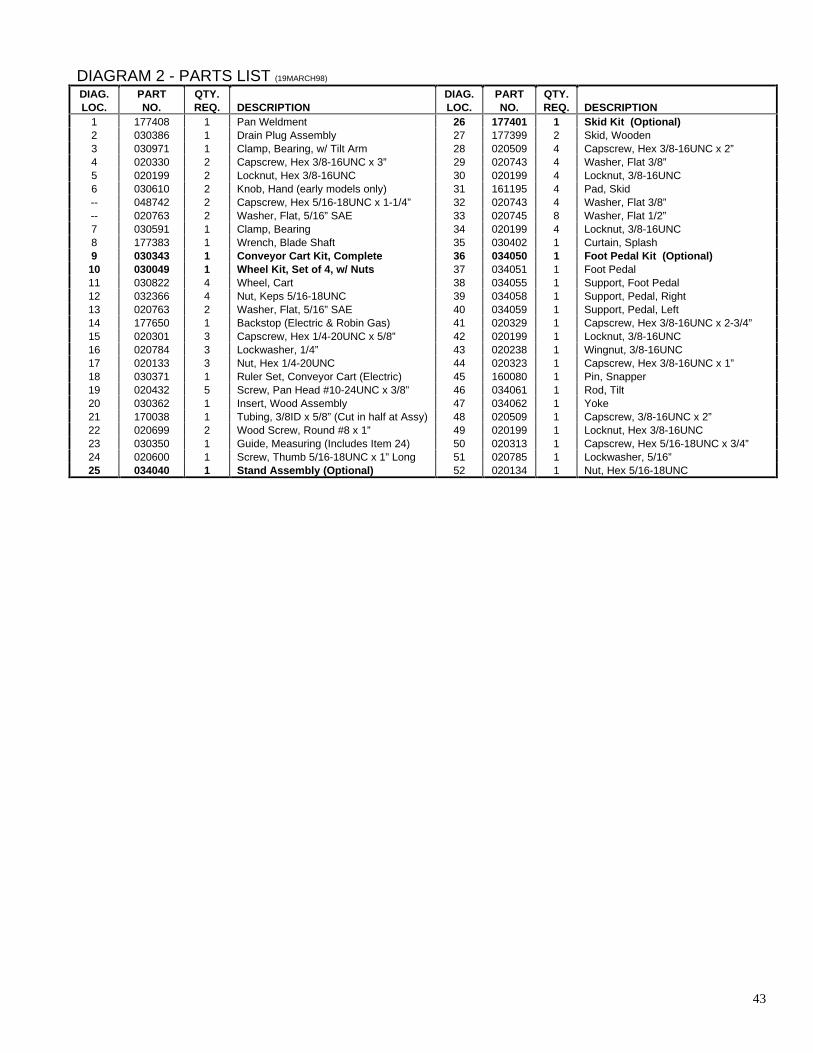
43
DIAGRAM 2 - PARTS LIST (19MARCH98)
DIAG.LOC.
PARTNO.
QTY.REQ. DESCRIPTION
DIAG.LOC.
PARTNO.
QTY.REQ. DESCRIPTION
1 177408 1 Pan Weldment 26 177401 1 Skid Kit (Optional)2 030386 1 Drain Plug Assembly 27 177399 2 Skid, Wooden3 030971 1 Clamp, Bearing, w/ Tilt Arm 28 020509 4 Capscrew, Hex 3/8-16UNC x 2”4 020330 2 Capscrew, Hex 3/8-16UNC x 3” 29 020743 4 Washer, Flat 3/8”5 020199 2 Locknut, Hex 3/8-16UNC 30 020199 4 Locknut, 3/8-16UNC6 030610 2 Knob, Hand (early models only) 31 161195 4 Pad, Skid-- 048742 2 Capscrew, Hex 5/16-18UNC x 1-1/4” 32 020743 4 Washer, Flat 3/8”-- 020763 2 Washer, Flat, 5/16” SAE 33 020745 8 Washer, Flat 1/2”7 030591 1 Clamp, Bearing 34 020199 4 Locknut, 3/8-16UNC8 177383 1 Wrench, Blade Shaft 35 030402 1 Curtain, Splash9 030343 1 Conveyor Cart Kit, Complete 36 034050 1 Foot Pedal Kit (Optional)10 030049 1 Wheel Kit, Set of 4, w/ Nuts 37 034051 1 Foot Pedal11 030822 4 Wheel, Cart 38 034055 1 Support, Foot Pedal12 032366 4 Nut, Keps 5/16-18UNC 39 034058 1 Support, Pedal, Right13 020763 2 Washer, Flat, 5/16” SAE 40 034059 1 Support, Pedal, Left14 177650 1 Backstop (Electric & Robin Gas) 41 020329 1 Capscrew, Hex 3/8-16UNC x 2-3/4”15 020301 3 Capscrew, Hex 1/4-20UNC x 5/8” 42 020199 1 Locknut, 3/8-16UNC16 020784 3 Lockwasher, 1/4” 43 020238 1 Wingnut, 3/8-16UNC17 020133 3 Nut, Hex 1/4-20UNC 44 020323 1 Capscrew, Hex 3/8-16UNC x 1”18 030371 1 Ruler Set, Conveyor Cart (Electric) 45 160080 1 Pin, Snapper19 020432 5 Screw, Pan Head #10-24UNC x 3/8” 46 034061 1 Rod, Tilt20 030362 1 Insert, Wood Assembly 47 034062 1 Yoke21 170038 1 Tubing, 3/8ID x 5/8” (Cut in half at Assy) 48 020509 1 Capscrew, 3/8-16UNC x 2”22 020699 2 Wood Screw, Round #8 x 1” 49 020199 1 Locknut, Hex 3/8-16UNC23 030350 1 Guide, Measuring (Includes Item 24) 50 020313 1 Capscrew, Hex 5/16-18UNC x 3/4”24 020600 1 Screw, Thumb 5/16-18UNC x 1” Long 51 020785 1 Lockwasher, 5/16”25 034040 1 Stand Assembly (Optional) 52 020134 1 Nut, Hex 5/16-18UNC
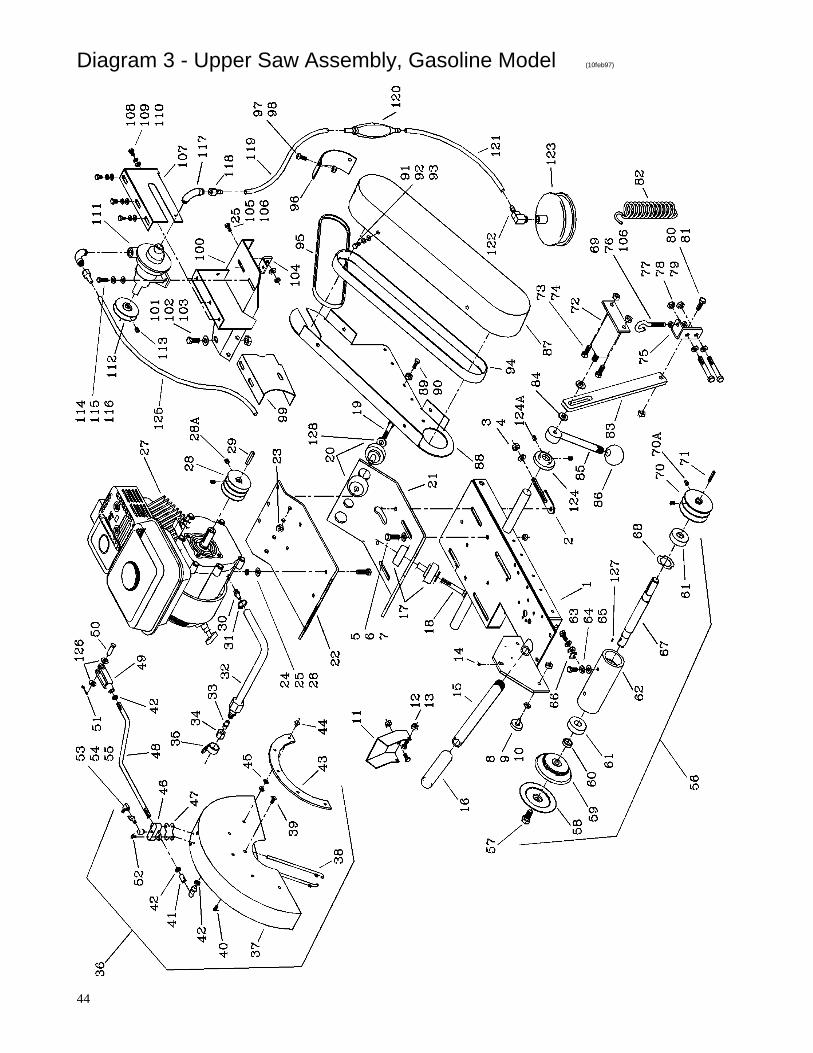
44
Diagram 3 - Upper Saw Assembly, Gasoline Model (10feb97)

45
Diagram 3 - Parts List (Rev: 23Oct2000) (Rev: 10Feb97)
DIAG.LOC.
PARTNO.
QTY.REQ. DESCRIPTION
DIAG.LOC.
PARTNO.
QTY.REQ. DESCRIPTION
1 177299 1 Platform Weldment -- 032502 (as req.) Shim, .015" Thick2 060411 1 Drawbolt Weldment, 3/8"-16UNC -- 032503 (as req.) Shim, .020" Thick3 020764 1 Washer, Flat 3/8" SAE 67 177289 1 Shaft, Blade, LH Thread4 020199 1 Locknut, Fiber 3/8"-16 68 030004 1 Washer, Spring5 048740 4 Capscrew, Hex Hd., 3/8"-16 x 1-1/4" 69 020169 1 Nut, Hex Jam Thin 5/16"-186 020743 4 Washer, Flat 3/8" 70 060106 1 Pulley, 2G3V3.15 - .75 w/ Setscrew7 020199 4 Locknut, Fiber 3/8"-16 70A 020550 2 Setscrew, Socket Hd., 5/16"-18 x 3/8"8 030822 3 Wheel 71 020062 1 Key, 3/16" Sq. x 1-1/4"9 020763 3 Washer, Flat 5/16" SAE 72 177385 1 Support Weldment, Spring Top10 032366 3 Nut, Keps 5/16"-18UNC 73 020323 2 Capscrew, Hex Hd., 3/8"-16 x 1"11 177300 1 Shield, Water 74 020199 2 Locknut, Fiber 3/8"-1612 020301 2 Capscrew, Hex Hd., 1/4" - 20 x 5/8" 75 177387 1 Support, Spring Bottom13 020195 2 Locknut, Fiber 1/4" – 20 76 030251 1 Eye Bolt, 5/16"-18 x 2"14 020572 1 Setscrew, Socket Hd., #10-24 x 1/2" 77 020329 2 Capscrew, Hex Hd., 3/8"-16 x 2-3/4"15 020263 1 Handle, 1/2" x 12" Long 78 020764 2 Washer, Flat, 3/8" SAE16 043935 1 Grip, Handle 79 020199 2 Locknut, Fiber 3/8"17 161197 1 Isolator, Engine 40-45 Durometer 80 048740 1 Capscrew, Hex Hd., 3/8"-16 x 1-1/4"18 020329 1 Capscrew, Hex Hd., 3/8"-16 x 2-3/4" 81 020199 1 Locknut, Fiber 3/8"-1619 020329 3 Capscrew, Hex Hd., 3/8"-16 x 2-3/4" 82 060395 1 Spring20 161196 3 Isolator, Engine 30-35 Duro 83 177389 1 Arm, Counterbalance21 177348 1 Plate, Engine Base 84 020745 2 Washer, Flat 1/2"22 177307 1 Plate, Engine 85 174679 1 Handle, Lock23 020199 4 Locknut, Fiber 3/8"-16 86 163212 1 Knob (Early Models Only)24 020373 4 Capscrew, Hex Hd.,5/16"-18 x 1-1/2" 87 177381 1 Belt Guard w/ Decal25 020763 5 Washer, Flat 5/16" SAE 88 177296 1 Support, Belt Guard26 020197 4 Locknut, Fiber 5/16"-18 89 020370 3 Capscrew, Hex Hd., 1/4"-20 x 3/4"27 173098 1 Engine, 5.5HP Honda 90 020195 3 Locknut, Fiber 1/4"-2028 177356 1 Pulley, 3G3V2.65 - .75 w/Setscrews 91 020370 4 Capscrew, Hex Hd., 1/4"-20 x 3/4"
28A 020541 2 Setscrew, Socket .Hd. 1/4"-20 x 3/8" 92 020784 4 Lockwasher, Split 1/4"29 020063 1 Key, 3/16" Sq. x 1-1/2" (Replacement) 93 020741 4 Washer, Flat 1/4"30 177382 1 Fitting, Oil Drain M10 x 1.25 x .38 Barb 94 177380 1 V-Belt, 2/3VX425 (2-Band)31 020049 1 Clamp, Hose 95 177439 1 V-Belt, 3L x 39 Links (For water pump)32 167304 1 Hose Assembly, Oil Drain 96 177405 1 Cover, Rear Belt Grd (w/o H2O Pump)33 167307 1 Cap, Blanking 97 020313 2 Capscrew, Hex Hd., 5/16"-18 x 3/4"34 167622 1 Nut, Tube M16 98 020197 2 Locknut, Fiber 5/16"-1835 166676 1 Clamp, Insulated 99 177346 1 Shield, Front, Water Pump36 177374 1 Blade Guard Assy (Incl. 37-47 & 53-55) 100 177342 1 Support Weldment37 177291 1 Blade Guard Weldment, 14" 101 020323 4 Capscrew, Hex Hd., 3/8"-16 x 1"38 030865 2 Water Tube 14" 102 020764 4 Washer, Flat 3/8" SAE39 020426 1 Screw, Machine Flat #10-32 x 3/8" 103 020199 4 Locknut, Fiber 3/8"-1640 020424 1 Screw, Machine Round #10-32 x 3/8" 104 177357 1 Bracket, Drawbolt41 031045 1 Joint, Ball 105 177378 1 Capscrew, Hex Hd., 5/16"-18 x 2"42 020171 3 Nut, Thin Jam 3/8"-24 106 020197 2 Locknut, Fiber 5/16"-1843 060435 1 Track, Blade Guard 107 177344 1 Shield, Rear, Water Pump44 020701 5 Rivet, Pop 108 021423 6 Capscrew, Hex Hd., 1/4"-20 x 1/2"45 020762 10 Washer, Flat 1/4" SAE 109 020784 6 Lockwasher, Split 1/4"46 030870 1 Manifold 110 020762 6 Washer, Flat 1/4" SAE47 030875 1 Gasket, Water Manifold 111 177375 1 Pump, Water (Modified)48 060455 1 Rod Link --- 177424 1 Repair Kit, Water Pump (Not Shown)49 060460 1 Yoke 112 177354 1 Pulley,1G3V2.65 - .625, w/ Setscrews50 060465 1 Pin, Clevis 113 020541 2 Setscrew, Socket Hd., 1/4"-20 x 3/8"51 020611 1 Pin, Cotter 114 020306 2 Capscrew, Hex Hd., 1/4"-20 x 1"52 020425 2 Screw, Machine #10-32 x 1/2" 115 020762 2 Washer, Flat 1/4" SAE53 161176 1 Fitting, 90° Elbow 1/4" - 18, 3/8" Barb 116 020195 2 Locknut, Fiber 1/4"-2054 090578 1 Valve, 1/4"-18NPT 117 020815 2 Fitting, Street Elbow, 3/8" NPT x 90°55 020813 1 Fitting, 90° Street Elbow 1/4"-18 NPT 118 020819 2 Fitting, 3/8" NPT x 3/8" Barb56 177305 1 Blade Shaft Assy (Incl. 57-62 & 67-68) 119 161225 1 Tubing, 3/8" ID x 16" Long57 177290 1 Capscrew, Hex Hd.,1/2-20UNF-LH x 1.0" 120 161158 1 Bulb, Primer58 030951 1 Collar, Outer 121 161194 1 Tubing, 3/8" ID x 12" Long59 030945 1 Collar, Inner 122 161181 1 Fitting, 90° Elbow 1/2NPT x 3/8" Barb60 139274 1 Spacer 123 161159 1 Strainer, Suction61 139273 2 Bearing 124 030580 2 Bearing, Head Pivot62 177416 1 Housing, Blade Shaft 124A 020553 4 Setscrew, Socket Hd., 1/4"-28 x 1/4"63 020314 4 Capscrew, Hex Hd.,5/16"-24 x 3/4" 125 177379 1 Tubing, 3/8" ID x 32" Long64 020763 4 Washer, Flat 5/16"SAE 126 020764 2 Washer, Flat 3/8" SAE65 020785 4 Lockwasher, Split, 5/16" 127 020089 1 Key, Woodruff (ANSI #403)66 032501 (as req.) Shim, .005" Thick 128 163187 4 Washer, Flat .06 x .38ID x 1.5"OD

46
Diagram 4 - Lower Saw Assembly, Gasoline Model

47
DIAGRAM 4 - PARTS LIST (19MAR98)
DIAG.LOC.
PARTNO.
QTY.REQ. DESCRIPTION
DIAG.LOC.
PARTNO.
QTY.REQ. DESCRIPTION
1 177408 1 Pan Weldment 26 177401 1 Skid Kit (Optional)2 030386 1 Drain Plug Assembly 27 177399 2 Skid, Wooden3 030971 1 Tilt Arm Clamp 28 020509 4 Capscrew, Hex Hd., 3/8-16 x 2�4 020330 2 Capscrew, Hex Hd., 3/8-16 x 3� 29 020743 4 Washer, Flat 3/8�5 020199 2 Locknut, Fiber 3/8-16 30 020199 4 Locknut, Fiber, 3/8-166 030610 2 Knob, Hand (early models) 31 161195 4 Pad, Skid-- 048742 2 Capscrew, Hex Hd., 5/16-18 x 1-1/4� 32 020743 4 Washer, Flat 3/8�-- 020763 2 Washer, Flat, 5/16� SAE 33 020745 8 Washer, Flat 1/2�7 030591 1 Clamp 34 020199 4 Locknut, Fiber, 3/8� - 168 177383 1 Wrench, Blade Shaft 35 030402 1 Curtain, Splash9 177303 1 Conveyor Cart Kit, Complete 36 034050 1 Foot Pedal Kit (Optional)10 030049 1 Wheel Kit, Set of 4, w/ Nuts 37 034051 1 Foot Pedal11 030822 4 Wheel, Cart 38 034055 1 Support, Foot Pedal12 032366 4 Nut, Keps 5/16-18UNC 39 034058 1 Support, Pedal, Right13 020763 2 Washer, Flat 5/16� SAE 40 034059 1 Support, Pedal, Left14 177652 1 Backstop, Honda Gas 41 020329 1 Capscrew, Hex Hd., 3/8-16 x 2-3/4�15 020301 3 Capscrew, Hex Hd., ¼-20 x 5/8� 42 020199 1 Locknut, Fiber 3/8-1616 020784 3 Lockwasher, Split, 1/4� 43 020238 1 Wingnut, 3/8� - 1617 020133 3 Nut, Hex 1/4� - 20 RH 44 020323 1 Capscrew, Hex Hd., 3/8-16 x 1�18 177404 1 Ruler Set, Conveyor Cart (Gas Model) 45 160080 1 Pin, Snapper19 020432 5 Screw, Pan Head #10-24 x 3/8� 46 034061 1 Rod, Tilt20 030362 1 Insert, Wood Assembly 47 034062 1 Yoke, Tilt Rod21 170038 1 Tubing, 3/8� ID x 5/8� (Cut in half at
Assy)48 020509 1 Capscrew, Hex Hd., 3/8-16 x 2�
22 020699 2 Wood Screw, Round Hd., #8 x 1� 49 020199 1 Locknut, Fiber 3/8� - 1623 030350 1 Guide, Measuring (Incl. Item 24) 50 020313 1 Capscrew, Hex Hd., 5/16-18 x 3/4�24 020600 1 Screw, Thumb, 5/16-18 x 1� Flat Pt 51 020785 1 Lockwasher, Split, 5/16�25 034040 1 Stand Assembly (Optional) 52 020134 1 Nut, Hex 5/16� - 18

48
Wiring Diagram: 1-1/2 HP Electric Motor
Wiring Diagram: 2 HP Electric Motor

49
Wiring Diagram: 3 HP Electric Motor
Wiring Diagram: 5.5 HP Honda Gasoline Engine
See Honda Engine Operation Manual

50

51

52