operating instructions cq-dvr7000u - panasonic › pcs › operatinginstructions › ... · this...
TRANSCRIPT

Removable Full Front DVD Player/Receiver with CD Changer ControlLecteur DVD/Récepteur avec commande de changeur de CD etpanneau avant entièrement amovibleReproductor de DVD/Receptor con carátula completa desmontable ycontrol de cambiador de CD
CQ-DVR7000UOperating InstructionsManuel d’instructions
Manual de instruccionesVOL
SEL TUNESOURCE
OSD
CQ-DVR7000U
DVD RECEIVER WITH CHANGER CONTROL
DISP
S •MODE
P •MODE OPEN
PWR
TRACK
DISC
P •SET
BAND
REMOTE PLAY
MUTE
R
SOURCE
RETURN TITLE
SUBTITLE AUDIO ANGLE
RANDOM
P-MODE
SCAN REPEAT
TRACK
S - MODE
CAR DVD PLAYER/RECEIVER
TITLE / CHAPTER
PWR
RET
SEL
MUTE
VOL
OSD GRP
1 2 3
4 5 6
7 8 9
0
MENU
STOP
TRACK / SEARCH
PAUSE PLAY
BAND
ENTER
1 2CH •C
≥ Please read these instructions carefully before using this product and save this manual for future use.≥ Prière de lire ces instructions attentivement avant d’utiliser Ie produit et garder ce manuel pour l’utilisation ultérieure.≥ Lea con atención estas instrucciones antes de utilizar el producto y guarde este manual para poderlo consultar en el futuro.
ENGLISH
ENGLISH
CQ-DVR7000U CQ-DVR7000U2 3
Panasonic welcomes you to our ever growing family of electronic product owners. We know thatthis product will bring you many hours of enjoyment. Our reputation is built on precise electronicand mechanical engineering, and our products are manufactured with carefully selectedcomponents and assembled by people who take pride in their work. Once you discover the quality,reliability, and value we have built into this product, you too will be proud to be a member of ourfamily.
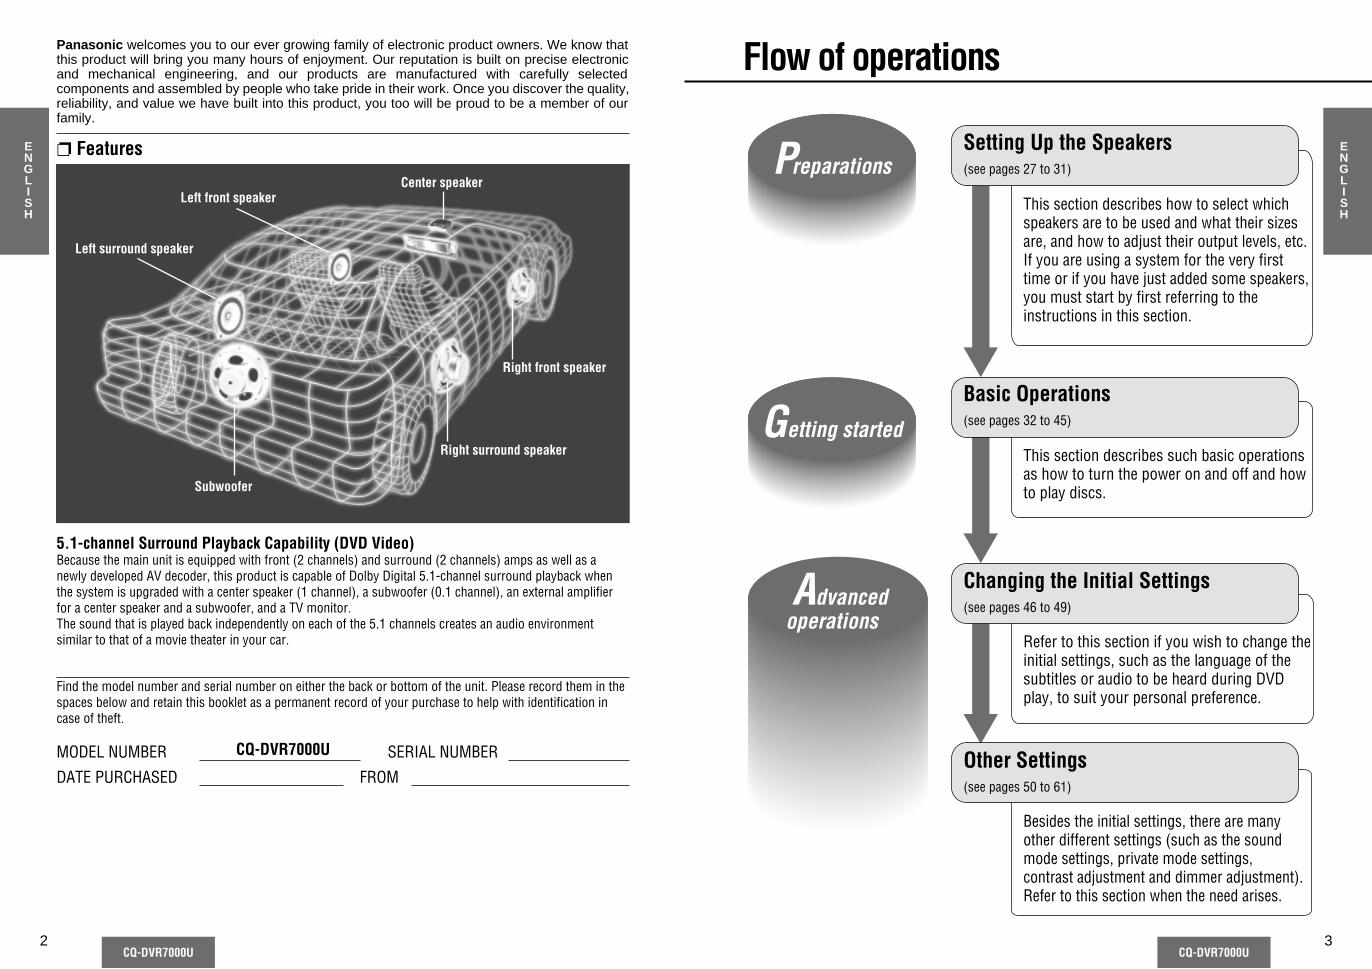
Features
Find the model number and serial number on either the back or bottom of the unit. Please record them in thespaces below and retain this booklet as a permanent record of your purchase to help with identification incase of theft.
MODEL NUMBER CQ-DVR7000U SERIAL NUMBER
DATE PURCHASED FROM
Left surround speaker
Left front speakerCenter speaker
Right front speaker
Right surround speaker
Subwoofer
5.1-channel Surround Playback Capability (DVD Video)Because the main unit is equipped with front (2 channels) and surround (2 channels) amps as well as anewly developed AV decoder, this product is capable of Dolby Digital 5.1-channel surround playback whenthe system is upgraded with a center speaker (1 channel), a subwoofer (0.1 channel), an external amplifierfor a center speaker and a subwoofer, and a TV monitor. The sound that is played back independently on each of the 5.1 channels creates an audio environmentsimilar to that of a movie theater in your car.
Flow of operations
Changing the Initial Settings (see pages 46 to 49)
Setting Up the Speakers (see pages 27 to 31)
Basic Operations (see pages 32 to 45)
Other Settings(see pages 50 to 61)
Preparations
This section describes how to select which speakers are to be used and what their sizes are, and how to adjust their output levels, etc.If you are using a system for the very first time or if you have just added some speakers, you must start by first referring to the instructions in this section.
This section describes such basic operations as how to turn the power on and off and how to play discs.
Refer to this section if you wish to change theinitial settings, such as the language of the subtitles or audio to be heard during DVD play, to suit your personal preference.
Besides the initial settings, there are manyother different settings (such as the sound mode settings, private mode settings, contrast adjustment and dimmer adjustment). Refer to this section when the need arises.
Advanced operations
Getting started

Safety Information . . . . . . . . . . . . . . . . . . . . . . . . . . . . . . .6Radio Frequency Interference Statement (Part 15 of the FCC rules) .6 Discs that can be Played Back . . . . . . . . . . . . . . . . . . . . .7 Meaning of Symbols . . . . . . . . . . . . . . . . . . . . . . . . . . . .20 Names and Functions of Parts . . . . . . . . . . . . . . . . . . . . . .22 Remote Control Unit Preparation . . . . . . . . . . . . . . . . . . . .26 Setting Up the Speakers . . . . . . . . . . . . . . . . . . . . . . . . . .27
Common Operations . . . . . . . . . . . . . . . . . . . . . . . . . . . .32Setting the Clock . . . . . . . . . . . . . . . . . . . . . . . . . . . . . . . . . . . . . . . . . . . .33
Radio Basics . . . . . . . . . . . . . . . . . . . . . . . . . . . . . . . . .34Changing the Display . . . . . . . . . . . . . . . . . . . . . . . . . . . . . . . . . . . . . . . . . 34Setting Up Station Presets . . . . . . . . . . . . . . . . . . . . . . . . . . . . . . . . . . . . . 35Listening to a Preset Station . . . . . . . . . . . . . . . . . . . . . . . . . . . . . . . . . . . 35
Basic Disc Operations . . . . . . . . . . . . . . . . . . . . . . . . . . .36Inserting/Ejecting the Disc . . . . . . . . . . . . . . . . . . . . . . . . . . . . . . . . . . . . . 36Starting Playback . . . . . . . . . . . . . . . . . . . . . . . . . . . . . . . . . . . . . . . . . . . . 36Changing the Display . . . . . . . . . . . . . . . . . . . . . . . . . . . . . . . . . . . . . . . . . 37Stopping . . . . . . . . . . . . . . . . . . . . . . . . . . . . . . . . . . . . . . . . . . . . . . . . . . 37Selecting a Menu Item . . . . . . . . . . . . . . . . . . . . . . . . . . . . . . . . . . . . . . . . 38Go to Beginning . . . . . . . . . . . . . . . . . . . . . . . . . . . . . . . . . . . . . . . . . . . . . 38Fast Forward/Fast Backward . . . . . . . . . . . . . . . . . . . . . . . . . . . . . . . . . . . 39Pause . . . . . . . . . . . . . . . . . . . . . . . . . . . . . . . . . . . . . . . . . . . . . . . . . . . . 39Repeat . . . . . . . . . . . . . . . . . . . . . . . . . . . . . . . . . . . . . . . . . . . . . . . . . . . . 39Starting Playback from a Specific Track/Title/Chapter . . . . . . . . . . . . . . . . 40Slow Playback . . . . . . . . . . . . . . . . . . . . . . . . . . . . . . . . . . . . . . . . . . . . . . 40Mute/Attenuator . . . . . . . . . . . . . . . . . . . . . . . . . . . . . . . . . . . . . . . . . . . . 40On-Screen Displays (OSD) . . . . . . . . . . . . . . . . . . . . . . . . . . . . . . . . . . . . 41Switching the Subtitle Language . . . . . . . . . . . . . . . . . . . . . . . . . . . . . . . . 42Switching the Audio Language . . . . . . . . . . . . . . . . . . . . . . . . . . . . . . . . . 42Switching between Stereo and Monaural . . . . . . . . . . . . . . . . . . . . . . . . . 42Switching the Angle . . . . . . . . . . . . . . . . . . . . . . . . . . . . . . . . . . . . . . . . . . 43DVD Menu . . . . . . . . . . . . . . . . . . . . . . . . . . . . . . . . . . . . . . . . . . . . . . . . . 43Title Menu . . . . . . . . . . . . . . . . . . . . . . . . . . . . . . . . . . . . . . . . . . . . . . . . . 43
CD Changer Basics . . . . . . . . . . . . . . . . . . . . . . . . . . . . .44Changing the Display . . . . . . . . . . . . . . . . . . . . . . . . . . . . . . . . . . . . . . . . 44Scan Play . . . . . . . . . . . . . . . . . . . . . . . . . . . . . . . . . . . . . . . . . . . . . . . . . 45Repeat Playback . . . . . . . . . . . . . . . . . . . . . . . . . . . . . . . . . . . . . . . . . . . . 45Random Play . . . . . . . . . . . . . . . . . . . . . . . . . . . . . . . . . . . . . . . . . . . . . . . 45Using Two Changers (Dual changers) . . . . . . . . . . . . . . . . . . . . . . . . . . . . 45
ENGLISH
CQ-DVR7000U5
ENGLISH
CQ-DVR7000U4
Contents Changing the Initial Settings . . . . . . . . . . . . . . . . . . . . . .46
Menu Language . . . . . . . . . . . . . . . . . . . . . . . . . . . . . . . . . . . . . . . . . . . . 47Subtitle Language . . . . . . . . . . . . . . . . . . . . . . . . . . . . . . . . . . . . . . . . . . . 47Audio Language . . . . . . . . . . . . . . . . . . . . . . . . . . . . . . . . . . . . . . . . . . . . 47TV Aspect . . . . . . . . . . . . . . . . . . . . . . . . . . . . . . . . . . . . . . . . . . . . . . . . . 48TV Mode . . . . . . . . . . . . . . . . . . . . . . . . . . . . . . . . . . . . . . . . . . . . . . . . . . 48On-Screen Messages . . . . . . . . . . . . . . . . . . . . . . . . . . . . . . . . . . . . . . . . 48Audio Output Level . . . . . . . . . . . . . . . . . . . . . . . . . . . . . . . . . . . . . . . . . . 49D. Range Compression . . . . . . . . . . . . . . . . . . . . . . . . . . . . . . . . . . . . . . . 49
Listening to Surround Sound . . . . . . . . . . . . . . . . . . . . . .50Signal Format Display . . . . . . . . . . . . . . . . . . . . . . . . . . . . . . . . . . . . . . . . 50SOUND 1-4 . . . . . . . . . . . . . . . . . . . . . . . . . . . . . . . . . . . . . . . . . . . . . . . . 51PROLOGIC . . . . . . . . . . . . . . . . . . . . . . . . . . . . . . . . . . . . . . . . . . . . . . . . 51
Setting Up the Sound . . . . . . . . . . . . . . . . . . . . . . . . . . .52LOUD SEL . . . . . . . . . . . . . . . . . . . . . . . . . . . . . . . . . . . . . . . . . . . . . . . . . 53BASS SEL . . . . . . . . . . . . . . . . . . . . . . . . . . . . . . . . . . . . . . . . . . . . . . . . . 53TREBLE SEL . . . . . . . . . . . . . . . . . . . . . . . . . . . . . . . . . . . . . . . . . . . . . . . 53BAL // FAD . . . . . . . . . . . . . . . . . . . . . . . . . . . . . . . . . . . . . . . . . . . . . . . . . 53CENTER VOL . . . . . . . . . . . . . . . . . . . . . . . . . . . . . . . . . . . . . . . . . . . . . . . 55SUB-WFR VOL . . . . . . . . . . . . . . . . . . . . . . . . . . . . . . . . . . . . . . . . . . . . . 55
Setting Other Functions . . . . . . . . . . . . . . . . . . . . . . . . . .56MUTING SEL . . . . . . . . . . . . . . . . . . . . . . . . . . . . . . . . . . . . . . . . . . . . . . . 57MUTE KEY SEL . . . . . . . . . . . . . . . . . . . . . . . . . . . . . . . . . . . . . . . . . . . . . 57CONTRAST SEL . . . . . . . . . . . . . . . . . . . . . . . . . . . . . . . . . . . . . . . . . . . . 57DIMMER SEL . . . . . . . . . . . . . . . . . . . . . . . . . . . . . . . . . . . . . . . . . . . . . . 59S-LED SEL . . . . . . . . . . . . . . . . . . . . . . . . . . . . . . . . . . . . . . . . . . . . . . . . 59TITLE SCROLL . . . . . . . . . . . . . . . . . . . . . . . . . . . . . . . . . . . . . . . . . . . . . 59
Enjoying different sources at the front and rear . . . . . . . . .60PRIVATE MODE . . . . . . . . . . . . . . . . . . . . . . . . . . . . . . . . . . . . . . . . . . . . 60
Installation . . . . . . . . . . . . . . . . . . . . . . . . . . . . . . . . . . .62 Anti-Theft System . . . . . . . . . . . . . . . . . . . . . . . . . . . . . .69 Wiring Connections . . . . . . . . . . . . . . . . . . . . . . . . . . . . .70 Troubleshooting . . . . . . . . . . . . . . . . . . . . . . . . . . . . . . .74 Maintenance . . . . . . . . . . . . . . . . . . . . . . . . . . . . . . . . .78 Language Code List . . . . . . . . . . . . . . . . . . . . . . . . . . . . .79 Specifications . . . . . . . . . . . . . . . . . . . . . . . . . . . . . . . . .80 Definition of Terms . . . . . . . . . . . . . . . . . . . . . . . . . . . . .81
Components1. Operating Instructions . . . . . . . . . . . . . . . . . . .12. Supplied Hardware . . . . . . . . .1 set ( page 62)3. Power Connector . . . . . . . . . . . . . . . . . . . . . . .14. Power Amplifier Unit . . . . . . . . . . . . . . . . . . . . .1
5. Remote Control Unit . . . . . . . . . . . . . . . . . . . . .16. Battery (CR 2025) . . . . . . . . . . . . . . . . . . . . . . .17. Warranty Card . . . . . . . . . . . . . . . . . . . . . . . . . .1
Preparation
Gettingstarted
Advancedoperations
When required

Safety Information
ENGLISH
ENGLISH
CQ-DVR7000U CQ-DVR7000U6 7
When Driving The driver must not operate the color LCD monitor.Operating the color LCD monitor may lead to distractionand cause an accident. Stop your car in a safe locationwhen operating the unit.When Car WashingDo not expose the product, including its speakers anddiscs, to water or excessive moisture. This could causeelectrical shorts, fire or other damage.When ParkedParking in direct sunlight can produce very hightemperatures inside your car. Give the interior a chance tocool down before switching the unit on.Use the Proper Power SupplyThis product is designed to operate with a 12 volt, negativeground battery system (the regular system in a NorthAmerican car).
Protect the Disc MechanismAvoid inserting any foreign objects into the slot of the discplayer.Failure to observe this may cause malfunction due to theprecise mechanism of this unit.Protect the DVD SoftwareWhen you leave the car, be sure to eject the disc from thisunit and bring it out.Use Authorized ServicentersDo not attempt to disassemble or adjust this precisionproduct. Please refer to the Servicenter list included withthis product for service assistance.
For InstallationThe unit should be installed in a horizontal position withthe front end up at a convenient angle, but not more than30x. The user should bear in mind that in some areas theremay be restrictions on how and where this unit must beinstalled. Consult your dealer for further details.
CAUTION:THIS PRODUCT IS A CLASS I LASER PRODUCT.HOWEVER THIS PRODUCT USES A VISIBLE/INVISIBLE LASER BEAM WHICH COULD CAUSEHAZARDOUS RADIATION EXPOSURE IF DIRECTED.BE SURE TO OPERATE THIS PRODUCT CORRECTLYAS INSTRUCTED.USE OF CONTROLS OR ADJUSTMENTS ORPERFORMANCE OF PROCEDURES OTHER THANTHOSE SPECIFIED HEREIN MAY RESULT INHAZARDOUS RADIATION EXPOSURE.DO NOT OPEN COVERS AND DO NOT REPAIRYOURSELF. REFER SERVICING TO QUALIFIEDPERSONNEL.
WARNING:TO REDUCE THE RISK OF FIRE OR ELECTRICSHOCK, DO NOT EXPOSE THIS PRODUCT TO RAINOR MOISTURE.
TO REDUCE THE RISK OF FIRE OR ELECTRICSHOCK, AND ANNOYING INTERFERENCE, USEONLY THE INCLUDED COMPONENTS.
Apparatus Claims of U.S. Patent Nos. 4,631,603,4,577,216, and 4,819,098, licensed for limitedviewing uses only.This product incorporates copyright protectiontechnology that is protected by method claims ofcertain U.S. patents and other intellectual propertyrights owned by Macrovision Corporation and otherrights owners. Use of this copyright protectiontechnology must be authorized by MacrovisionCorporation, and is intended for home and otherlimited viewing uses only unless otherwiseauthorized by Macrovision Corporation. Reverseengineering or disassembly is prohibited.
WARNING:NOT FOR USE WHERE VIDEO MONITOR IS VISIBLETO DRIVER TO AVOID RISK OF SERIOUS INJURYOR POSSIBLE VIOLATION OF STATE LAWS.
MOBLE DVD PLAYERCX-DV700
C Q - D V R 7 0 0 0 UModel No.N˚ De Modèle
Serial No.N˚ De Série
Manufactured by Matsushita Communication Industrial Co., Ltd.Yokohama Japan Made in Japan
5A FM75Ω12V
This device complies with Part 15 of the FCC rules. Operation is subject to the condition that this device does not cause harmful interference.
Label indication and location
Radio Frequency Interference Statement (Part 15 of the FCC rules)Applies only in U.S.A.This equipment has been tested and found to comply with the limits for a Class B digital, Pursuant to Part 15 of theFCC Rules.≥ These limits are designed to provide reasonable protection against harmful interference in an automobile
installation. This equipment generates, uses, and can radiate radio frequency energy and, if not installed and usedin accordance with the instructions, may cause harmful interference to radio communications. However, there isno guarantee that interference will not occur in a particular installation. If this equipment does cause harmfulinterference to radio/television reception, which can be determined by turning the equipment off and on, the useris encouraged to consult the dealer or an experience radio/television technician for help.
FCC Warning:Any unauthorized changes or modifications to this equipment would void the user’s authority to operate this device.
This device complies with Part 15 of the FCC rules:Operation is subject to the following two conditions:(1)This device may not cause harmful interference, and(2)This device must accept any interference received, including interference that may cause undesired operation.
For Canada:This Class B digital apparatus complies with Canadian ICES-003.
Laser products:Wave length: 650nmLaser power: No hazardous radiation is emitted
with safety protection.
Region numberVideo formatDisc sizeMark (logo)Disc
DVD video5z(12 cm)
3z(8 cm)
NTSC
NTSC
1All
Video CD
T E X T
CD, CD TEXT
Region Management Information
Region Management Information: This product is designed and manufactured torespond to the Region Management Information that is recorded on a DVD disc. If theRegion number described on the DVD disc does not correspond to the Region numberof this product, this product cannot play this disc.The Region number for this product is “1” and “ALL”.
Discs that can be Played Back
Use This Product Safely
The following discs cannot be played back on this product.≥ DVD-Audio≥ DVD-ROM ≥ DVD-R ≥ DVD-RAM ≥ DVD+RW ≥ dts DVDs ≥ SVCD ≥ VSD ≥ CVD ≥ CD-G ≥CD-ROM ≥ CD-RW ≥ SACD ≥ photo CD ≥ CD-R ≥ dts CDs ≥ CDV≥ Divx Video Discs ≥ CD-EXTRA (audio-only playback possible)≥ Discs recorded in PAL format, others≥ DVDs with a region number other than “1” or “ALL”
The data on photo CDs and CD-R can be damaged if you attempt to play them.Even if you play back a dts CD, normal sound cannot be output.

Il est recommandé de noter, dans l’espace prévu ci-dessous, les numéros de modèle et de série inscrits soit à l’arrièresoit sur le fond de l’appareil, et de conserver ce manuel comme mémorandum de l’achat afin de permettre l’identificationde l’appareil en cas de vol.
Numéro de modèle: CQ-DVR7000U Numéro de série:
Date de l’achat: Vendeur:
CQ-DVR7000U9
FRANÇAIS
Suite d'opérations
CQ-DVR7000U8
FRANÇAIS
Panasonic est heureuse de vous compter parmi le nombre sans cesse croissant d’utilisateurs de sesappareils électroniques. Nous pouvons vous assurer que cet appareil vous procurera de longues heuresd’agrément. Notre réputation est fondée sur une ingénierie électronique et mécanique de haute précision,laquelle préside à la fabrication d’appareils ne comportant que des composants de choix assemblés par unpersonnel soucieux de la bonne réputation acquise par la qualité de son travail. Après avoir découvert laqualité, la valeur et la fiabilité de cet appareil, vous aussi serez fier d’être un client Panasonic.
Caractéristiques
Haut-parleur central
Haut-parleuravant droit
Haut-parleurd’extrêmes-graves
Haut-parleuravant gauche
Haut-parleurambiophoniquegauche
Haut-parleurambiophoniquedroit
Capacité de lecture ambiophonique 5,1 canaux (DVD vidéo)L’appareil étant doté d’amplificateurs pour canaux avant (2 canaux) et ambiophoniques (2 canaux), ainsi que d’undécodeur audio-vidéo de conception nouvelle, il peut faire la lecture ambiophonique en mode Dolby Digital sur 5.1canaux si vous ajoutez au système un haut-parleur central (1 canal), un haut-parleur d’extrêmes-graves (0.1 canal), unamplificateur externe de haut-parleurs central et d’extrêmes-graves, ainsi qu'un écran de télévision. Le son étant dirigéindépendamment sur chacun des 5,1 canaux, ce système restitue dans votre voiture un environnement sonore similaire àcelui d’une salle de cinéma.
Modification des réglages initiaux (voir pages 108 à 111)
Réglage des haut-parleurs (voir pages 89 à 93)
Fonctions de base (voir pages 94 à 107)
Autres réglages (voir pages 112 à 123)
Cette section décrit comment sélectionner les haut-parleurs à utiliser et leurs dimensions, ainsi que la façon de régler leurs niveaux de sortie, etc.Si vous utilisez une chaîne pour la toute première fois ou si vous venez d’ajouter de nouveaux haut-parleurs, vous devez d’abord vous référez aux instructions de la présente section.
La présente section décrit des opérations de base telles que la mise de l’appareil sous et hors tension, et la façon de faire la lecture des disques.
Référez-vous à la présente section si vous désirez modifier les réglages initiaux, tels que la langue dessous-titres ou la langue audio à écouter pendant la lecture de DVD, en fonction de vos préférences personnelles.
Outre les réglages initiaux, il y a plusieurs autres réglages différents (tels que les réglages de mode sonore, les réglages de mode privé, le réglage du contraste et le réglage du gradateur).Référez-vous à cette section en cas de besoin.
Préparatifs
Pour commencer
Opérations de niveau avancé

CQ-DVR7000U11
FRANÇAIS
CQ-DVR7000U10
FRANÇAIS
Table des matièresConsignes de sécurité . . . . . . . . . . . . . . . . . . . . . . . . . . . . .12 Disques pouvant être lus . . . . . . . . . . . . . . . . . . . . . . . . .13 Signification des symboles . . . . . . . . . . . . . . . . . . . . . . . .82 Noms et fonctions des pièces . . . . . . . . . . . . . . . . . . . . . .84 Préparation de la télécommande . . . . . . . . . . . . . . . . . . .88 Configuration des haut-parleurs . . . . . . . . . . . . . . . . . . . .89
Opération communes . . . . . . . . . . . . . . . . . . . . . . . . . . . .94Réglage de l’horloge . . . . . . . . . . . . . . . . . . . . . . . . . . . . . . . . . . . . . . . . . .95
Fonctionnement de base de la radio . . . . . . . . . . . . . . . . .96Changement d’affichage . . . . . . . . . . . . . . . . . . . . . . . . . . . . . . . . . . . . . . 96Mémorisation des stations . . . . . . . . . . . . . . . . . . . . . . . . . . . . . . . . . . . . 97Écote d’une station mémorisée . . . . . . . . . . . . . . . . . . . . . . . . . . . . . . . . . 97
Opérations de base pour les disques . . . . . . . . . . . . . . . . .98Insertion/retrait du disque . . . . . . . . . . . . . . . . . . . . . . . . . . . . . . . . . . . . . 98Commencement de la lecture . . . . . . . . . . . . . . . . . . . . . . . . . . . . . . . . . . 98Changement d’affichage . . . . . . . . . . . . . . . . . . . . . . . . . . . . . . . . . . . . . . 99Arrêt . . . . . . . . . . . . . . . . . . . . . . . . . . . . . . . . . . . . . . . . . . . . . . . . . . . . . 99Sélection d’une rubrique du menu . . . . . . . . . . . . . . . . . . . . . . . . . . . . . . 100Retour au début . . . . . . . . . . . . . . . . . . . . . . . . . . . . . . . . . . . . . . . . . . . . 100Avance accélérée/Recul accéléré . . . . . . . . . . . . . . . . . . . . . . . . . . . . . . . 101Pause . . . . . . . . . . . . . . . . . . . . . . . . . . . . . . . . . . . . . . . . . . . . . . . . . . . 101Lecture en reprise . . . . . . . . . . . . . . . . . . . . . . . . . . . . . . . . . . . . . . . . . . 101Début de la lecture depuis un(e) plage/titre/chapitre spécifique . . . . . . . 102Lecture ralentie . . . . . . . . . . . . . . . . . . . . . . . . . . . . . . . . . . . . . . . . . . . . 102Baisse temporaire du volume (Silencieux/Atténuateur) . . . . . . . . . . . . . . 102Affichage à l’écran . . . . . . . . . . . . . . . . . . . . . . . . . . . . . . . . . . . . . . . . . . 103Changement de la langue des sous-titres . . . . . . . . . . . . . . . . . . . . . . . . 104Changement de la langue audio . . . . . . . . . . . . . . . . . . . . . . . . . . . . . . . . 104Passage entre les modes stéréo et mono . . . . . . . . . . . . . . . . . . . . . . . . 104Changement de l’angle . . . . . . . . . . . . . . . . . . . . . . . . . . . . . . . . . . . . . . 105Menu DVD . . . . . . . . . . . . . . . . . . . . . . . . . . . . . . . . . . . . . . . . . . . . . . . . 105Menu de titres . . . . . . . . . . . . . . . . . . . . . . . . . . . . . . . . . . . . . . . . . . . . . 105Fonctionnement de base du changeur CD . . . . . . . . . . . . . .106Changement d’affichage . . . . . . . . . . . . . . . . . . . . . . . . . . . . . . . . . . . . . 106Lecture des débuts de plage . . . . . . . . . . . . . . . . . . . . . . . . . . . . . . . . . . 107Lecture en reprise . . . . . . . . . . . . . . . . . . . . . . . . . . . . . . . . . . . . . . . . . . 107Lecture aléatoire . . . . . . . . . . . . . . . . . . . . . . . . . . . . . . . . . . . . . . . . . . . 107Utilisation de deux changeurs (double changeur) . . . . . . . . . . . . . . . . . . 107
Pourcommencer
Éléments constitutifs1. Manuel d’instructions . . . . . . . . . . . . . . . . . . . . . . . . 12. Matériel fourni . . . . . . . . . . . . . . 1 ensemble ( page 124)3. Connecteur d’alimentation . . . . . . . . . . . . . . . . . . . . 14. Amplificateur de puissance . . . . . . . . . . . . . . . . . . . . . 1
5. Télécommande . . . . . . . . . . . . . . . . . . . . . . . . . . 16. Pile (CR2025) . . . . . . . . . . . . . . . . . . . . . . . . . . . 17. Carte de garantie . . . . . . . . . . . . . . . . . . . . . . . . . 1
Changement des réglages initiaux . . . . . . . . . . . . . . . .108Menu Language (Langue du menu) . . . . . . . . . . . . . . . . . . . . . . . . . . . . 109Subtitle Language (Langue des sous-titres) . . . . . . . . . . . . . . . . . . . . . . 109Audio Language(Langue audio) . . . . . . . . . . . . . . . . . . . . . . . . . . . . . . . 109TV Aspect (Rapport largeur-hauteur de l’image de télévision) . . . . . . . . 110TV Mode (Mode d’image du téléviseur) . . . . . . . . . . . . . . . . . . . . . . . . . 110On-Screen Messages (Messages à l’écran) . . . . . . . . . . . . . . . . . . . . . . . 110Audio Output Level (Niveau de sortie audio) . . . . . . . . . . . . . . . . . . . . . . 111D. Range Compression (Compression dynamique) . . . . . . . . . . . . . . . . . 111
Écoute de son ambiophonique . . . . . . . . . . . . . . . . . . .112Affichage du format de signal . . . . . . . . . . . . . . . . . . . . . . . . . . . . . . . . . 112SOUND 1-4 . . . . . . . . . . . . . . . . . . . . . . . . . . . . . . . . . . . . . . . . . . . . . . . 113PROLOGIC . . . . . . . . . . . . . . . . . . . . . . . . . . . . . . . . . . . . . . . . . . . . . . . 113
Réglage du son . . . . . . . . . . . . . . . . . . . . . . . . . . . . .114LOUD SEL . . . . . . . . . . . . . . . . . . . . . . . . . . . . . . . . . . . . . . . . . . . . . . . . 115BASS SEL . . . . . . . . . . . . . . . . . . . . . . . . . . . . . . . . . . . . . . . . . . . . . . . . 115TREBLE SEL . . . . . . . . . . . . . . . . . . . . . . . . . . . . . . . . . . . . . . . . . . . . . . 115BAL // FAD . . . . . . . . . . . . . . . . . . . . . . . . . . . . . . . . . . . . . . . . . . . . . . . . 115CENTER VOL . . . . . . . . . . . . . . . . . . . . . . . . . . . . . . . . . . . . . . . . . . . . . . 117SUB-WFR VOL . . . . . . . . . . . . . . . . . . . . . . . . . . . . . . . . . . . . . . . . . . . . 117
Réglage des autres fonctions . . . . . . . . . . . . . . . . . . . .118MUTING SEL . . . . . . . . . . . . . . . . . . . . . . . . . . . . . . . . . . . . . . . . . . . . . . 119MUTE KEY SEL . . . . . . . . . . . . . . . . . . . . . . . . . . . . . . . . . . . . . . . . . . . . 119CONTRAST SEL . . . . . . . . . . . . . . . . . . . . . . . . . . . . . . . . . . . . . . . . . . . 119DIMMER SEL . . . . . . . . . . . . . . . . . . . . . . . . . . . . . . . . . . . . . . . . . . . . . 121S-LED SEL . . . . . . . . . . . . . . . . . . . . . . . . . . . . . . . . . . . . . . . . . . . . . . . 121TITLE SCROLL . . . . . . . . . . . . . . . . . . . . . . . . . . . . . . . . . . . . . . . . . . . . 121
Lecture de sources différentes à l’avant et à l’arrière . . .122MODE PRIVÉ . . . . . . . . . . . . . . . . . . . . . . . . . . . . . . . . . . . . . . . . . . . . . . 122
Installation . . . . . . . . . . . . . . . . . . . . . . . . . . . . . . . . .124 Système antivol . . . . . . . . . . . . . . . . . . . . . . . . . . . . . .131 Raccordement des câbles . . . . . . . . . . . . . . . . . . . . . . .132 En cas de difficulté . . . . . . . . . . . . . . . . . . . . . . . . . . .136 Entretien . . . . . . . . . . . . . . . . . . . . . . . . . . . . . . . . . .140 Liste des codes de langue . . . . . . . . . . . . . . . . . . . . . .141 Données techniques . . . . . . . . . . . . . . . . . . . . . . . . . . .142 Définition des termes . . . . . . . . . . . . . . . . . . . . . . . . . .143
Opérationsde niveauavancé
Lorsque nécessaire
Préparatif

CQ-DVR7000U CQ-DVR7000U12 13
FRANÇAIS
FRANÇAIS
Disques pouvant être lusConsignes de sécurité
ATTENTION :CET APPAREIL EST UN PRODUIT LASER DE LACLASSE I. IL UTILISE, TOUTEFOIS, UN RAYONLASER VISIBLE/INVISIBLE POUVANT EXPOSER ÀUN RAYONNEMENT DANGEREUX S’IL EST DIRIGÉ.UTILISEZ CET APPAREIL CORRECTEMENT ENSUIVANT LES INSTRUCTIONS.L’UTILISATION DE COMMANDES OU RÉGLAGES OUL’EXÉCUTION D’OPÉRATIONS AUTRES QUE CELLESQUI SONT INDIQUÉES DANS CE DOCUMENTPEUVENT RÉSULTER EN UNE EXPOSITION À UNRAYONNEMENT DANGEREUX.N’OUVREZ PAS LES COUVERCLES ET N’ESSAYEZPAS D’EFFECTUER VOUS-MÊME DES RÉPARATIONS.ADRESSEZ-VOUS À UN PERSONNEL QUALIFIÉ POURTOUTE RÉPARATION.
MISE EN GARDE:POUR RÉDUIRE LES RISQUES D’INCENDIE OUD’ÉLECTROCUTION, N’EXPOSEZ PAS CET APPAREILÀ LA PLUIE OU À L’HUMIDITÉ.
AFIN DE PRÉVENIR TOUT RISQUE D’INCENDIEOU D’INTERFÉRENCES, UTILISER UNIQUEMENTLES ACCESSOIRES RECOMMANDÉS.
MISE EN GARDE:(Pour Le Canada uniquement)AFIN DE PRÉVENIR TOUT RISQUE D’INCENDIEOU DE CHOCS ÉLECTRIQUES, NE PAS BRANCHERLA FICHE (POLARISÉE) DU CORDOND’ALIMENTATION DE L’APPAREIL DANS UNCORDON PROLONGATEUR, UNE PRISE DECOURANT OU TOUTE AUTRE PRISE À MOINS QUELES LAMES NE PUISSENT ÊTRE INSÉRÉES ÀFOND.
L’emballer soigneusement et l’envoyer port payé, suffisamment assuré et de préférence dans son cartond’emballage d’origine. Joindre une lettre timbrée sur l’extérieur du carton, décrivant l’ennui en détail. Ne pasenvoyer l’appareil au siège social ou au Bureau de vente régional. lls ne sont pas équipés pour les réparations.
Si l’appareil doit être transporté
Avertissement:Pour éviter tout risque de blessures graves oud’infraction aux lois, le moniteur ne doit pas êtreutilisé à un endroit où il est visible par leconducteur.
Précautions à prendreAu volantLe conducteur ne doit jamais faire fonctionner cet écran couleur à cristaux liquides lorsqu’il conduit son véhicule. Le faitd’utiliser le moniteur lorsqu’on est au volant réduit considérablement la vigilance du conducteur et multiplie les risquesd’accident. Arrêter le véhicle dans un endroit sur pour faire fonctionner le moniteur.
Lavage de la voitureAfin de prévenir tout risque de court-circuit ou d’incendie, n’exposez pas l’équipement, y compris les haut-parleurs et lesdisques, à l’eau ou à une humidité excessive.
Voiture stationnéeL’habitacle d’une voiture immobile exposée au soleil toutes vitres fermées devient rapidement très chaud. Laisserrafraîchir l’intérieur du véhicule avant de mettre l’appareil sous tension.
Source d’alimentationCet appareil est conçu pour fonctionner sur un système d’alimentation avec batterie de 12 V à masse négative (systèmestandard sur les voitures de construction nord-américaine).
Protection du mécanisme de lecture de disqueN’ insérez pas d’objet dans le logement du disque. Autrement, le mécanisme ultra-précis du lecteur pourrait êtreendommagé.
Protection des disques DVDLorsque vous quittez le véhicule, éjectez le disque de l’appareil et apportez-le.
Faites appel à un centre de services agrééNe tentez pas de démonter ou d’ajuster ce produit de précision vous-même. Veuillez vous référer à la liste ci-incluse pourle service après-vente.
InstallationCet appareil doit être installé en position horizontale, avec l’extrémité avant incliné à un angle commode mais nedépassant pas 30°. L’utilisateur doit garder à l’esprit que dans certaines régions il peut y avoir des restrictions spécifiantcomment et où installer cet appareil. Pour plus d'informations, contactez votre détaillant.
12 cm (5 po)
8 cm (3 po)
Code régionalFormat vidéoTaille du disqueMarque (logo)Disque
DVD vidéo
Informations de code régional
Informations de code régional: Cet appareil est conçu et fabriqué pour répondre auxinformations de code régional inscrites sur les disques DVD. Si un disque DVD a uncode régional différent de celui de cet appareil, il ne peut pas être lu par cet appareil.
Le code régional pour cet appareil est “1” et “ALL”.
NTSC
NTSC
1All
CD vidéo
T E X T
CD, CD TEXT
Les disques suivants ne peuvent pas être lus sur cet appareil:≥ DVD-Audio≥ DVD-ROM ≥ DVD-R ≥ DVD-RAM ≥ DVD+RW ≥ DVD dts ≥ SVCD ≥ VSD ≥ CVD ≥ CD-G ≥ CD-ROM ≥ CD-RW ≥ SACD ≥CD photo ≥ CD-R ≥ CD dts ≥ CDV≥ Disques vidéo Divx ≥ CD-EXTRA (seule la lecture audio est possible)≥ Les disques enregistrés en format PAL, autres≥ DVD avec un code régional autre que “1” ou “ALL”
Les données sur les CD photo et CD-R pourraient être endommagées si leur lecture est tentée sur celecteur.Même si vous faites la lecture d'un CD dts, la sortie du son normal n'est pas possible.

Encuentre el número de modelo y el número de serie en la parte posterior o inferior de la unidad. Anótelos en el espaciode abajo y guarde este manual a modo de prueba permanente de su compra, para que pueda utilizarlo en el caso de quele roben la unidad.
NÚMERO DE MODELO CQ-DVR7000U NÚMERO DE SERIE
FECHA DE ADQUISICIÓN A
CQ-DVR7000U CQ-DVR7000U14 15
ESPAÑOL
ESPAÑOL
OperacionesPanasonic le da la bienvenida a la familia constantemente en aumento de poseedores de productos elec-trónicos. Nos esforzamos en proporcionarle las ventajas de la ingeniería mecánica y electrónica de precisión,de una fabricación con componentes cuidadosamente seleccionados, y de un montaje realizado porpersonas orgullosas de la reputación que su trabajo ha cimentado para nuestra empresa. Estamos segurosde que este producto le proporcionará muchas horas de distracción y, una vez comprobada la calidad, elvalor y la fiabilidad incorporados, used también se sentirá orgulloso de pertenecer a nuestra familia.
Características
Altavoz de sonidoambientai izquierdo
Altavoz delanteroizquierdo
Altavoz central
Altavoz delanteroderecho
Altavoz de sonidoambiental derecho
Altavoz de subgraves
Capacidad de reproducción de sonido ambiental de 5,1 canales (DVD Vídeo)Como el aparato principal está equipado con amplificadores para los altavoces delanteros (2 canales), y altavoces desonido ambiental (2 canales), así como también con un descodificador AV de reciente desarrollo, este producto es capazde reproducir sonido ambiental de 5,1 canales Dolby Digital cuando al sistema se le añade un altavoz central (1canal), , unaltavoz de subgraves (0,1 canales) y un monitor de TV un amplificador externo para altavos central y subgraves.El sonido que se reproduce independientemente en cada uno de los 5,1 canales crea en su vehículo un ambiente de audiosimilar al de un cine.
Preparativos
Para empezar
Operaciones avanzadas
Preparación de los altavoces(Consulte las páginas 151 a 155.)
Esta sección describe cómo seleccionar qué altavoces van a ser utilizados y cuáles son sus tamaños, y cómo ajustar sus niveles de salida, etc.Si está utilizando un sistema por primera vez o si acaba de añadir algunos altavoces, usted deberá empezar consultando primero las instrucciones de esta sección.
Operaciones básicas(Consulte las páginas 156 a 169.)
Esta sección describe operaciones básicas tales como la conexión y la desconexión de la alimentación y cómo reproducir discos.
Cambio de los ajustes iniciales(Consulte las páginas 170 a 173.)
Consulte esta sección si desea cambiar los ajustes iniciales, tales como el idioma de los subtítulos o el idioma de audio que va a ser escuchado durante la reproducción de los DVD, para adaptarlos a sus preferencias personales.
Otros ajustes(Consulte las páginas 174 a 185.)
Además de los ajustes iniciales, hay muchos otros ajustes diferentes (tales como los ajustes del modo de sonido, los ajustes del modo privado, el ajuste del contraste y el ajuste de intensidad de iluminación). Consulte esta sección cuando sea necesario.
CQ-DVR7000U16
ESPAÑOL
Índice
CQ-DVR7000U17
ESPAÑOL
Información para su seguridad . . . . . . . . . . . . . . . . . . . . . . .18 Discos que pueden reproducirse . . . . . . . . . . . . . . . . . . . .19 Significado de los símbolos . . . . . . . . . . . . . . . . . . . . . . .144 Nombres y funciones de las partes . . . . . . . . . . . . . . . . . .146 Preparación del control remoto . . . . . . . . . . . . . . . . . . . . .150 Preparación de los altavoces . . . . . . . . . . . . . . . . . . . . . .151
Operaciones comunes . . . . . . . . . . . . . . . . . . . . . . . . . . .156Puesta en hora del reloj . . . . . . . . . . . . . . . . . . . . . . . . . . . . . . . . . . . . . .157
Operaciones básicas de la radio . . . . . . . . . . . . . . . . . . . .158Cambio de la visualización . . . . . . . . . . . . . . . . . . . . . . . . . . . . . . . . . . . . 158Preparación para al almacenamiento de emisoras . . . . . . . . . . . . . . . . . . 159Escucha de una emisora presintonizada . . . . . . . . . . . . . . . . . . . . . . . . . 159
Operaciones básicas de los discos . . . . . . . . . . . . . . . . . .160Inserción/expulsión del disco . . . . . . . . . . . . . . . . . . . . . . . . . . . . . . . . . 160Comienzo de la reproducción . . . . . . . . . . . . . . . . . . . . . . . . . . . . . . . . . 160Cambio de la visualización . . . . . . . . . . . . . . . . . . . . . . . . . . . . . . . . . . . . 161Parada . . . . . . . . . . . . . . . . . . . . . . . . . . . . . . . . . . . . . . . . . . . . . . . . . . . 161Selección de un elemento de menú . . . . . . . . . . . . . . . . . . . . . . . . . . . . . 162Al comienzo . . . . . . . . . . . . . . . . . . . . . . . . . . . . . . . . . . . . . . . . . . . . . . . 162Avance rápido/retroceso rápido . . . . . . . . . . . . . . . . . . . . . . . . . . . . . . . . 163Pausa . . . . . . . . . . . . . . . . . . . . . . . . . . . . . . . . . . . . . . . . . . . . . . . . . . . 163Repetición . . . . . . . . . . . . . . . . . . . . . . . . . . . . . . . . . . . . . . . . . . . . . . . . 163Comienzo de la reproducción desde una pista/título/capítulo específico . 164Reproducción a cámara lenta . . . . . . . . . . . . . . . . . . . . . . . . . . . . . . . . . 164Bajada temporal del volumen (silenciamiento/atenuador) . . . . . . . . . . . . 164Visualizaciones en pantalla . . . . . . . . . . . . . . . . . . . . . . . . . . . . . . . . . . . 165Cambio de idioma de los subtítulos . . . . . . . . . . . . . . . . . . . . . . . . . . . . . 166Cambio de idioma de audio . . . . . . . . . . . . . . . . . . . . . . . . . . . . . . . . . . . 166Cambio entre estéreo y mono . . . . . . . . . . . . . . . . . . . . . . . . . . . . . . . . . 166Cambio del ángulo . . . . . . . . . . . . . . . . . . . . . . . . . . . . . . . . . . . . . . . . . . 167Menú de DVD . . . . . . . . . . . . . . . . . . . . . . . . . . . . . . . . . . . . . . . . . . . . . 167Menú de títulos . . . . . . . . . . . . . . . . . . . . . . . . . . . . . . . . . . . . . . . . . . . . 167
Operaciones básicas del cambiador de CD . . . . . . . . . . . . .168Cambio de la visualización . . . . . . . . . . . . . . . . . . . . . . . . . . . . . . . . . . . . 168Reproducción con exploración . . . . . . . . . . . . . . . . . . . . . . . . . . . . . . . . 169Repetición de reproducción . . . . . . . . . . . . . . . . . . . . . . . . . . . . . . . . . . . 169Reproducción aleatoria . . . . . . . . . . . . . . . . . . . . . . . . . . . . . . . . . . . . . . 169Utilización de dos cambiadores (cambiadores dobles) . . . . . . . . . . . . . . .169
Preparativos
Paraempezar
Componentes1. Manual de Instrucciones . . . . . . . . . . . . . . . . . . . . . 12. Hardware Suministrado . . . . . 1juego ( página 186)3. Conector de alimentación . . . . . . . . . . . . . . . . . . . . 14. Unidad del amplificador de potencia . . . . . . . . . . . . 1
5. Control remoto . . . . . . . . . . . . . . . . . . . . . . . . . . . . 16. Pilas . . . . . . . . . . . . . . . . . . . . . . . . . . . . . . . . . . . . 27. Tarjeta de garantía. . . . . . . . . . . . . . . . . . . . . . . . . . 1
Cambio de los ajustes iniciales . . . . . . . . . . . . . . . . . . 170Menu Language (Idioma de menús) . . . . . . . . . . . . . . . . . . . . . . . . . . . . 171Subtitle Language (Idioma de subtítulos) . . . . . . . . . . . . . . . . . . . . . . . . 171Audio Language (Idioma de audio) . . . . . . . . . . . . . . . . . . . . . . . . . . . . . 171TV Aspect (Aspecto del televisor) . . . . . . . . . . . . . . . . . . . . . . . . . . . . . . 172TV Mode (Modo del televisor) . . . . . . . . . . . . . . . . . . . . . . . . . . . . . . . . . 172On-Screen Messages (Mensajes en pantalla) . . . . . . . . . . . . . . . . . . . . . 172Audio Output Level (Nivel de salida de audio) . . . . . . . . . . . . . . . . . . . . . 173D. Range Compression (Compresión de gama dinámica) . . . . . . . . . . . . 173
Escucha del sonido ambiental . . . . . . . . . . . . . . . . . . . .174Visualización del formato de señal . . . . . . . . . . . . . . . . . . . . . . . . . . . . . 174SOUND 1-4 . . . . . . . . . . . . . . . . . . . . . . . . . . . . . . . . . . . . . . . . . . . . . . . 175PROLOGIC . . . . . . . . . . . . . . . . . . . . . . . . . . . . . . . . . . . . . . . . . . . . . . . 175
Preparación del sonido . . . . . . . . . . . . . . . . . . . . . . . .176LOUD SEL . . . . . . . . . . . . . . . . . . . . . . . . . . . . . . . . . . . . . . . . . . . . . . . . 177BASS SEL . . . . . . . . . . . . . . . . . . . . . . . . . . . . . . . . . . . . . . . . . . . . . . . . 177TREBLE SEL . . . . . . . . . . . . . . . . . . . . . . . . . . . . . . . . . . . . . . . . . . . . . . 177BAL // FAD . . . . . . . . . . . . . . . . . . . . . . . . . . . . . . . . . . . . . . . . . . . . . . . . 177CENTER VOL . . . . . . . . . . . . . . . . . . . . . . . . . . . . . . . . . . . . . . . . . . . . . . 179SUB-WFR VOL . . . . . . . . . . . . . . . . . . . . . . . . . . . . . . . . . . . . . . . . . . . . 179
Ajuste de otras funciones . . . . . . . . . . . . . . . . . . . . . . .180MUTING SEL . . . . . . . . . . . . . . . . . . . . . . . . . . . . . . . . . . . . . . . . . . . . . . 181MUTE KEY SEL . . . . . . . . . . . . . . . . . . . . . . . . . . . . . . . . . . . . . . . . . . . . 181CONTRAST SEL . . . . . . . . . . . . . . . . . . . . . . . . . . . . . . . . . . . . . . . . . . . 181DIMMER SEL . . . . . . . . . . . . . . . . . . . . . . . . . . . . . . . . . . . . . . . . . . . . . 183S-LED SEL . . . . . . . . . . . . . . . . . . . . . . . . . . . . . . . . . . . . . . . . . . . . . . . 183TITLE SCROLL . . . . . . . . . . . . . . . . . . . . . . . . . . . . . . . . . . . . . . . . . . . . 183
Disfrute de fuentes diferentes en la parte delantera y trasera . .184MODE PRIVADO . . . . . . . . . . . . . . . . . . . . . . . . . . . . . . . . . . . . . . . . . . . 184
Instalación . . . . . . . . . . . . . . . . . . . . . . . . . . . . . . . . .186 Sistema antirrobo . . . . . . . . . . . . . . . . . . . . . . . . . . . .193 Conexiones del cableado . . . . . . . . . . . . . . . . . . . . . . .194 Localización y solución de averías . . . . . . . . . . . . . . . . .198 Mantenimiento . . . . . . . . . . . . . . . . . . . . . . . . . . . . . .202 Lista de códigos de idiomas . . . . . . . . . . . . . . . . . . . . .203 Especificaciones . . . . . . . . . . . . . . . . . . . . . . . . . . . . .204 Definición de términos . . . . . . . . . . . . . . . . . . . . . . . . .205
Operacionesavanzadas
Cuando seanecesario

CQ-DVR7000U19
ESPAÑOL
Discos que pueden reproducirse
CQ-DVR7000U18
ESPAÑOL
Información para su seguridad
Uso de este equipo con seguridadCuando conduzcaEl conductor no debe utilizar el monitor LCD en color. La utilización del monitor LCD en color puede distraerlo y causar unaccidente. Detenga su automóvil en un lugar seguro cuando manipule el aparato.
Cuando lave el automóvilNo exponga el equipo, incluyendo los altavoces y los CDs, al agua o a una humedad excesiva. Esto puede causarcortocircuitos eléctricos, incendios u otros daños.
Cuando esté estacionadoEl estacionamiento a la luz solar directa puede producir temperaturas muy altas en el interior de su vehículo. Procureenfriar el interior antes de encender el aparato.
Uso de la alimentación apropiadaEste equipo ha sido diseñado para funcionar con un sistema de batería de 12 voltios con puesta a masa negativa (elsistema normal en un vehículo norteamericano.
Protección del mecanismo de los discosEvite insertar objetos extraños en la ranura del reproductor disco.En caso contrario, podrán producirse fallos en el funcionamiento porque el mecanismo de esta unidad es muy preciso.
Protección de los programas de DVDCuando salga de su vehículo, asegúrese de expulsar el disco del aparato y retirarlo.
Uso de los centros de servicio autorizadosNo intente desmontar ni ajustar este equipo de precisión. Consulte la lista de centros de servicio incluidos con esteproducto para acudir a ellos cuando sea necesario.
InstalaciónLa unidad deberá instalarse en posición horizontal, con el extremo delantero hacia arriba formando un ánguloconveniente, pero no superior a 30x. El usuario deberá tener en cuenta que en algunas zonas tal vez haya restriccionessobre como y donde puede ser instalado este aparato. Consulte a su concesionario para conocer más detalles.
PRECAUCIÓN:ÉSTE ES UN PRODUCTO LÁSER DE LA CLASE I. SINEMBARGO, ESTE PRODUCTO UTILIZA UN RAYOLÁSER VISIBLE/INVISIBLE QUE PODRÍA CAUSARUNA EXPOSICIÓN PELIGROSA A LA RADIACIÓN.ASEGÚRESE DE UTILIZAR CORRECTAMENTE ESTEPRODUCTO, COMO SE INDICA EN LASINSTRUCCIONES. LA UTILIZACIÓN DE CONTROLES,EL HACER AJUSTES O EL SEGUIRPROCEDIMIENTOS DISTINTOS DE LOSESPECIFICADOS EN ESTE MANUAL PODRÍACAUSAR UNA EXPOSICIÓN PELIGROSA A LARADIACIÓN.NO ABRA LAS CUBIERTAS NI HAGA REPARACIONESUSTED MISMO. SOLICITE LOS TRABAJOS DESERVICIO AL PERSONAL CALIFICADO.
ADVERTENCIA:PARA REDUCIR EL RIESGO DE INCENDIOS OSACUDIDAS ELÉCTRICAS, NO EXPONGA ESTEPRODUCTO A LA LLUVIA NI A LA HUMEDAD.
PARA REDUCIR EL RIESGO DE INCENDIOS OSACUDIDAS ELÉCTRICAS, Y PARA EVITAR LAS INTERFERENCIAS MOLESTAS, UTILICE SOLAMENTE LOS ACCESORIOS RECOMENDADOS.
Reclamaciones de aparatos de patentes de los Estados Unidos de América número 4,631,603, 4,577,216 y4,819,098, con licencia para usos de visión limitada solamente.
Este producto incorpora tecnología de protección de los derechos de autor que está protegida por reclamacionesde métodos de ciertas patentes de los Estados Unidos de América y otros derechos de propiedad intelectualpropiedad de Macrovision Corporation y otros propietarios de derechos. La utilización de esta tecnología deprotección de los derechos de autor debe contar con la autorización de Macrovision Corporation, y sólo deberáutilizarse en el hogar y con otros usos de visión limitada a menos que Macrovision Corporation autorice lo contrario.La inversión de la ingeniería o el desmontaje están prohibidos.
ADVERTENCIA:ESTE APARATO NO DEBE UTILIZARSE DONDE ELCONDUCTOR PUEDA VER EL MONITOR DEVÍDEO, PARA EVITAR ACCIDENTES GRAVES OPOSIBLES VIOLACIONES DE LAS LEYESESTATALES.
Número de regiónFormato de vídeoTamaño del discoMarca (logotipo)Disco
DVD Vídeo
Información de gestión de región
Información de gestión de región: Este producto ha sido diseñado y fabricado pararesponder a la información de gestión de región que está grabada en los discos DVD.Si el número de región descrito en el disco DVD no corresponde al número de regiónde este producto, este producto no podrá reproducir ese disco.
El número de región de este producto es “1” y “ALL”.
5z(12 cm)
3z(8 cm)
NTSC
NTSC
1All (Todos)
CD de vídeo
T E X T
CD, CD TEXT
Los discos siguientes no pueden reproducirse en este producto:≥ DVD-Audio≥ DVD-ROM ≥ DVD-R ≥ DVD-RAM ≥ DVD+RW ≥ DVD dts ≥ SVCD ≥ VSD ≥ CVD ≥ CD-G ≥ CD-ROM ≥ CD-RW ≥ SACD ≥ CD de fotos ≥ CD-R ≥ CD dts ≥ CDV≥ Discos de vídeo Divx ≥ CD-EXTRA (sólo es posible la reproducción de audio)≥ Discos grabados en el formato PAL y otros discos≥ DVDs con un número de región diferente de “1” o “ALL”
Los datos de los CDs de fotos y CD-Rs pueden estropearse si intenta reproducirlos.Aunque se reproduce un CD dts no se puede dar salida al sonido normal.

ENGLISH
1
ENGLISH
2
CQ-DVR7000U CQ-DVR7000U20 21
Meaning of Symbols
Indicates that each time you press thebutton, the display changes as shown.
Hold (2 seconds)Press
Indicates pressing abutton.
Indicates pressing a button foran extended period of time.
This manual primarily explains how toperform operations using the remote control.When performing an operation directly on themain unit, do as indicated in this box.
Indicates detailed information aboutoperations and settings.
Indicates operationsthat can only beperformed throughthe main unit.
Indicates the compatible types of disc.
CD
Pages marked “Basic”describe thebasic functions and operations for eachitem.
This manual uses its own form of illustrations and methods of description toindicate the operating procedures and provide information.
How these illustrations and methods of description are used is explainedbelow to ensure that the user will derive the maximum use from the manual.

ENGLISH
4
CQ-DVR7000U23
ENGLISH
3
CQ-DVR7000U22
Names and Functions of Parts
VOL
SEL TUNESOURCE
OSD
CQ-DVR7000U
DVD RECEIVER WITH CHANGER CONTROL
DISP
S •MODE
P •MODE OPEN
PWR
TRACK
DISC
P •SET
BAND
REMOTE PLAY
MUTE
P
P•SET (PRESET) "#, DISC"# • Preset memory/preset receive (p.35)• Selects the disc in the changer (p.44)• Selects items when making speaker,
sound or function settings
REMOTE• Remote control receiver
MUTE• Lowers the volume
(p.40)
S · MODE (SOUND MODE)• Sets the SOUND MODE (p.50)
DISP (DISPLAY),(CLOCK)• Switches the display (p.34)• Setting the time (p.33)• Returns to normal mode during settings
TUNE, TRACK• Adjusts the frequency (p.34)• Selects/seaches the track/chapter (p.38,39)• Selects items when making speaker,
sound or function settings
VOL"#• Adjusts the volume (p.32)
SEL (SELECT)• Sets the sound and other functions (p.52)
PLAY, BAND• Playback• Band selection (p.34) • Stores presets automatically (p.34) • Switches between changer 1 and changer 2 (p.44)
OPEN• Opens the panel (p.36)
PWR, SOURCE • Power on/off (p.32) • Selects the audio source (p.32)
P · MODE (PRIVATE MODE)• Switches the PRIVATE MODE to on/off (p.60)
OSD (On Screen Display)• Switches OSD to on/off (p.41)
1 2CH •C
LOUD
PRO LOGICDR COMP
REPRAND
S T
MUTE L C
LFE
SLS RS
DOWN MIX
R
1 2
2024bit
kHz
DIGITALLPCM
MPEGS W
REAR PLAY
16
Changer stanby (p.44)
Selected Changer Number (p.44)
Number of Quantization Bits(p.81)
Sampling Frequency (p.81)
Disc stanby (p.37)
LOUD (LOUDNESS) (p.53)
MUTE (p.40)
REP (REPEAT) (p.37)
RAND (RANDOM)(p.44)
ST (STEREO) (p.34)
ÎDIGITAL (p.81)
LPCM(p.81)
MPEG(p.81)
ÎPRO LOGIC (p.51)
PRIVATE MODE indicator(p.60)
DR COMP(DYNAMIC RANGE COMPRESSION)(p.49)
DOWN MIX (p.31)
Speaker Setup Display(p.27)
Main unit
Front panel Display

ENGLISH
6
CQ-DVR7000U25
ENGLISH
5
CQ-DVR7000U24
Names and Functions of Parts (continued)
SOURCE
RETURNTITLE
SUBTITLEAUDIO
ANGLESCAN
REPEAT
TRACKS - MODE
CAR DVD PLAYER/RECEIVER
TITLE / CHAPTER
STOPTRACK / SEARCH
PAUSEPLAY
BANDRET
OSD
GRP
12
45
678
90
ENTER
VOL
MUTE
SEL
"
#
P- MODE
RANDOM
3
MENU
PWR
PWR, SOURCE• Power On/Off (p.32)• Selects the audio source (p.32)
STOP ∫ (p.37)
PAUSE ; (p.39)
PLAY 1, BAND• Playback • Band selection (p.34)• Stores presets automatically (p.35)• Switches between changer 1 and 2 (p.44)
TRACK/SEARCH • Selects/seaches the track/chapter (p.38,39)
Numeric buttons• Menu selection (p.38)• Title/chapter/track selection (p.40)• Select preset stations (p.35)
MENU (TITLE)• Selects the menu (p.38)
GRP(TRACK/TITLE/CHAPTER)• Direct selection (p.40)
RET (RETURN)• Returns to the previous state• Returns to normal mode during settings
REPEAT• Repeats chapter/track (p.39)
SOURCE
RETURNTITLE
SUBTITLEAUDIO
ANGLESCAN
REPEAT
TRACKS • MODE
CAR DVD PLAYER/RECEIVER
TITLE / CHAPTER
STOPTRACK / SEARCH
PAUSEPLAY
BANDRET
GRP
68
9
MENU
ENTER
VOL
PWR
P • MODE
RANDOM 5
"
#
SEL
21
4
7
0
OSD
3
MUTE
ENTER "#% $• Selects and confirms the menu• Adjusts the frequency (p.34)• Selects the disc in the changer (p.44)
SUBTITLE• Switches the Subtitle Language (p.42)
SEL (SELECT)• Selects the sound and other function (p.52)
VOL "#• Adjusts the volume(p.32)
ANGLE• Switches the Angle (p.43)
MUTE (ATT) "#• Lowers the volume (p.40)
S•MODE (SOUND MODE)• Sets the SOUND MODE (p.50)
OSD (On Screen Display)• Switches OSD to on/off (p.41)
P • MODE
(PRIVATE MODE)• Switches the PRIVATE MODE to on/off (p.60)
RANDOM• Random play(p.45)
AUDIO• Switches the Audio Language (p.42)• Switches between stereo and monaural (p.42)
SCAN• Disc/Track scan play (p.45)
Remote Control Unit
Buttons other than those shown at left≥Point the remote control unit at the main unit’s sensor(REMOTE)≥ Perform operations with the remote control in a bright location while the car is stopped.
Note:The remote control does not have the followingbuttons. These operations must be performed on themain unit.• DISP• OPEN• <

L C
LS RS
R
S W
S
ENGLISH
7
ENGLISH
8
CQ-DVR7000U CQ-DVR7000U26 27
Setting Up the SpeakersRemote Control Unit Preparation
Battery Installation (Inserting/Replacing batteries)1.Remove the battery holder.
Pull the holder by the position B whilepushing position A in the direction indicatedby the arrow.
2.Install the battery on the battery holder.Set a new battery properly with its (i) sidefacing up as shown in the figure.
3.Insert the battery holder.Push in the battery holder back into itsoriginal position.
Battery NotesRemove and dispose of an old battery immediately.
Battery Information:≥ Battery type: Panasonic lithium battery (CR 2025)(supplied)≥ Battery life: Approximately 6 months with normal use (at room temperature)
≥ Do not disassemble or short the battery. Do not throw a battery into a fire.≥ Keep batteries away from children to avoid the risk of accidents.≥ Be careful to the local disposal rules when you dispose of batteries.
Lithium battery(Back side)
Position A
Position B
Battery holder
Caution:≥ Improper use of batteries may cause overheating, an explosion or ignition, resulting in injury or a fire.
Battery leakage may damage the unit.
Speakers that are Used
Speaker Setup Display
Front speakersUse the type of speakers that are built into thedriver’s door and the passenger’s door.
Surround speakersUse the type of speaker that is used on the leftand right side of the rear of the passengercabin, or that is built into the rear deck.
Center speakerInstall the speaker near the center console ofthe car, or near the dashboard. (A separate center speaker amplifier isrequired.)If the center speaker is not going to be used,refer to page 29, and select “None”as thecenter speaker setting.
SubwooferBecause the positioning of the sound from thesubwoofer is not as dependent on theinstallation location as it is with other speakers,the subwoofer can be placed anywhere desired.(A separate subwoofer amplifier is required.)If the subwoofer is not going to be used, referto page 29, and select “NO” as the subwoofersetting.
Note:≥ If this unit is going to be used without the
installation of the center speaker, thesurround speakers or subwoofer, set thespeaker setting to suit the speaker system tobe used. ( page 28)
Left surround speaker(L-SURROUND)
Left front speaker(FRONT-L)
Center speaker(CENTER)
Right front speaker(FRONT-R)
Right surround speaker(R-SURROUND)
Subwoofer (SUB-WOOFER)
Speaker Indications (Ex: Center speaker)
No indication When the speaker type ( page 29) is set to “None”.
When the speaker type ( page 29) is set to “Large”.
When the speaker type ( page 29) is set to “Small”.
These arrows show which speakersare outputting which channel'ssound sources.
Set Each Speaker Type and whether They are Present or Not
SOURCE
RETURNTITLE
SUBTITLEAUDIO
ANGLESCAN
REPEAT
TRACKS •MODE
CAR DVD PLAYER/RECEIVER
TITLE / CHAPTER
STOPTRACK / SEARCH
PAUSEPLAY
BANDRET
OSD
GRP
12
345
678
90
MENU
ENTER
VOL
MUTE
SEL
"
#
PWR
P •MODE
RANDOM
[STOP ∫]
ENGLISH
9
ENGLISH
10
CQ-DVR7000U CQ-DVR7000U28 29
Setting Up the Speakers (continued)
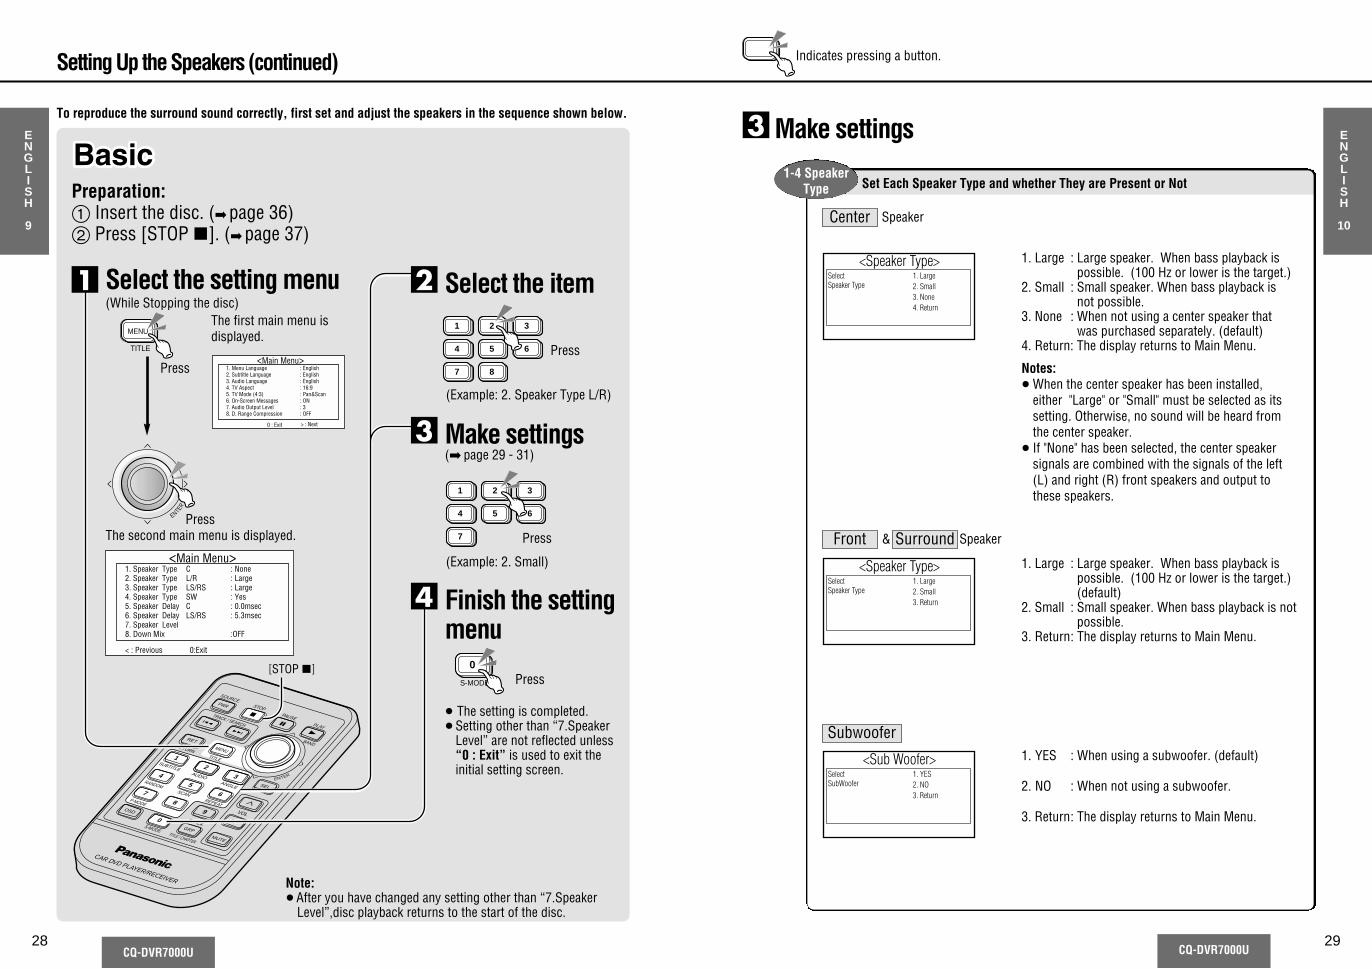
Preparation:1 Insert the disc. ( page 36)2 Press [STOP ∫]. ( page 37)
<Main Menu>1. Speaker Type C : None2. Speaker Type L/R : Large3. Speaker Type LS/RS : Large4. Speaker Type SW : Yes5. Speaker Delay C : 0.0msec6. Speaker Delay LS/RS : 5.3msec7. Speaker Level 8. Down Mix :OFF
< : Previous 0:Exit
The second main menu is displayed.
Select the itemSelect the setting menu(While Stopping the disc)
1
TITLE
MENU
ENTER
Press
Press
Make settings3
1. Large2. Small3. None4. Return
<Speaker Type>SelectSpeaker Type
1. Large2. Small3. Return
<Speaker Type>SelectSpeaker Type
1. YES2. NO3. Return
<Sub Woofer>SelectSubWoofer
Center Speaker
Surround SpeakerFront &
Subwoofer
Indicates pressing a button.
1 2 3
4 5 6
7 8
Press
Make settings( page 29 - 31)
1 2 3
4 5 6
7 Press
Finish the settingmenu
≥ The setting is completed.≥ Setting other than “7.Speaker
Level” are not reflected unless “0 : Exit” is used to exit theinitial setting screen.
4
S-MODE
0Press
1. Large : Large speaker. When bass playback ispossible. (100 Hz or lower is the target.)
2. Small : Small speaker. When bass playback isnot possible.
3. None : When not using a center speaker thatwas purchased separately. (default)
4. Return: The display returns to Main Menu.
Notes: ≥ When the center speaker has been installed,
either "Large" or "Small" must be selected as its setting. Otherwise, no sound will be heard from the center speaker.
≥ If "None" has been selected, the center speaker signals are combined with the signals of the left (L) and right (R) front speakers and output to these speakers.
1. Large : Large speaker. When bass playback ispossible. (100 Hz or lower is the target.)(default)
2. Small : Small speaker. When bass playback is notpossible.
3. Return: The display returns to Main Menu.
1. YES : When using a subwoofer. (default)
2. NO : When not using a subwoofer.
3. Return: The display returns to Main Menu.
3
2
<Main Menu>1. Menu Language : English2. Subtitle Language : English3. Audio Language : English4. TV Aspect : 16:95. TV Mode (4:3) : Pan&Scan6. On-Screen Messages : ON7. Audio Output Level : 38. D. Range Compression : OFF
0 : Exit > : Next
The first main menu isdisplayed.
To reproduce the surround sound correctly, first set and adjust the speakers in the sequence shown below.
Note:≥ After you have changed any setting other than “7.Speaker
Level”,disc playback returns to the start of the disc.
(Example: 2. Speaker Type L/R)
(Example: 2. Small)
1-4 SpeakerType

Adjust the Speaker Delay TimesSet a delay for the output from center and surround speakers so that the sound from theother speakers reaches the listening position at the same time as the front speakers.
Combining the Speaker OutputWhen listening to Dolby Digital encoded material (the “Î DIGITAL” indicator willlight), the signals for each speaker channel can be combined and output as stereo.(Down Mix)
Adjust the Speaker Output LevelsUsing a test signal, adjust the audio output of each speaker so that the volumelevel from every speaker sounds equal. (Adjustable range: 0 to `12 dB)
ENGLISH
11
ENGLISH
12
CQ-DVR7000U CQ-DVR7000U30 31
Setting Up the Speakers (continued)Indicates pressing a button.
8 Down Mix
Notes:≥OFF is recommended as the setting when surround speakers and center speaker are used.≥In the PRIVATE MODE ( page 60), the disc will be played with Down Mix at "ON"
regardless of the setting which has been selected.
5-6 SpeakerDelay
Make settings3
1. 0.0 msec2. 1.3 msec3. 2.6 msec4. 3.9 msec5. 5.3 msec6. Return
<Speaker Delay>SelectSpeaker Delay
1. 0.0 msec2. 5.3 msec3. 10.6 msec4. 15.9 msec5. Return
<Speaker Delay>SelectSpeaker Delay
Center Speaker Surround Speaker
Make settings3
1. ON2. OFF3. Return
<Down Mix>SelectDown Mix
1. ON : Down Mix (2-channel stereo playback)Use this setting when only front speakers areconnected.≥ The C, LS, and RS signals are combined with
and output through L and R.2. OFF : Recorded signal format
(Example: 5.1-channel surround playback)(default)
3. Return : The display returns to Main Menu.
1. 0.0 msec (default)2. 1.3 msec3. 2.6 msec4. 3.9 msec5. 5.3 msec6. Return: The display returns to Main Menu.
1. 0.0 msec2. 5.3 msec (default)3. 10.6 msec4. 15.9 msec5. Return: The display returns to Main Menu.
7 SpeakerLevel
The speaker (in yellow) specified by the number buttons outputs a test signal.The setting value is shown on the main unit display.Upon completion of the speakersettings, select "7. Return" and exit. (default : 0dB)
To adjust the test signal volume:
VOL
Notes:≥ The test signal is not output from a speaker for which “`¶” was set. ( page 55)≥ After increasing the volume level and adjusting the test signal, restore the original optimum
volume level.
Press
1. L ch2. C ch3. R ch4. RSch5. LS ch6. SW7. Return
<Speaker Level>SelectSpeaker
1. L ch2. C ch3. R ch4. RSch5. LS ch6. SW7. Return: The display returns to Main Menu.
What has been set will be reflected only withDolby Digital play.
What has been set will be reflected only whenDolby Digital play is performed or when ON isset for PROLOGIC.
To adjust the speaker level:
ENTER
Press
L C
LFE
SLS RS
DOWN MIX
R
S W
REAR PLAY
Lights when Down Mix is ON.

SOURCE
RETURNTITLE
SUBTITLEAUDIO
ANGLESCAN
REPEAT
TRACKS•MODE
CAR DVD PLAYER/RECEIVER
TITLE / CHAPTER
STOPTRACK / SEARCH
PAUSEPLAY
BANDRET
OSD
GRP
12
345
678
90
MENU
ENTER
VOL
MUTE
SEL
"
#
PWR
P•MODE
RANDOM
The clock uses a 12-hour display.ENGLISH
13
ENGLISH
14
CQ-DVR7000U CQ-DVR7000U32 33
Common Operations
Power [PWR]
≥ Turn the power on.≥ The first time that you turn the unit on,
the radio will begin playing and themessage “Panasonic Presents……”(demonstration mode) will bedisplayed.
To cancel the demonstration mode:
To turn the power off:
Note:≥ Loading/ejecting a disc also turns
the power on/off. ( page 36)
Volume [VOL "#](Adjustable range: 0 to 40)
:Increases the volume.
:Decreases the volume.
Note:≥ When you switch the source, the volume
that was set last for that source isrestored. (Intelligent Volume)
Before performing any of these operations, turn your car’s ignition switch to “ACC” or “ON”.
VOL
SEL TUNESOURCE
OSD
CQ-DVR7000U
DVD RECEIVER WITH CHANGER CONTROL
DISP
S•MODE
P•MODE OPEN
PWR
TRACK
DISC
P•SET
BAND
REMOTE PLAY
MUTE
P
1 2CH•C
(depends on the disc)
(Auxiliary source)
(Radio)
(When a separate CD changer is connected)
AUXILIARY
CHANGER
DVD VIDEO
TUNER
Audio Source [SOURCE]SOURCE
PWR
SOURCE
PWR
VOL
SOURCE
PWR
BTo turn the power off:
SOURCE
PWR
Hold (1 second)
Press
Press
Press
"#DISPWhen using the main unit
DISPPress
ACVOL
A
B
C
Setting the Clock
% $
To display the time:
Press the button repeatedly until the time is displayed.≥ “ADJUST” will be displayed when the clock is not adjusted.
DISP
Press
3 Finalize the time setting.
≥The clock begins to run.
DISP
Press
F 10 : 35
2 Switch between the hours and minutes displays, and set both.
1DISP
Hold(2 seconds) F 12 : 00
SOURCE
PWR
Press
TUNETRACK
DISC
P •SET Increases the number inthe selected display.TUNE
TRACK
DISC
P •SET
Selects the hours display,which begins to blink.
Decreases the numberin the selected display. Selects the minutes display,
which begins to blink.
Indicates pressinga button.
Indicates pressing abutton for an extendedperiod of time.
Indicates operationsthat can only beperformed throughthe main unit.
Hold (1 second)
When “/” is displayedInput is not possible because a soundtrack, subtitle language or angle number which was not recordedon the disc has been selected or because the user has attempted to perform an operation which is notsupported by the unit.

SOURCE
RETURNTITLE
SUBTITLEAUDIO
ANGLESCAN
REPEAT
TRACKS •MODE
CAR DVD PLAYER/RECEIVER
TITLE / CHAPTER
STOPTRACK / SEARCH
PAUSEPLAY
BANDRET
OSD
GRP
12
345
678
90
MENU
ENTER
VOL
MUTE
SEL
"
#
PWR
P •MODE
RANDOM
You can store presets for up to 6 stations in each AM and FM band (up to a maximum of 24).ENGLISH
15
ENGLISH
16
CQ-DVR7000U CQ-DVR7000U34 35
Radio Basics
Select the station
≥ The frequency changes each time oneof these buttons is pressed. <stepmode>
≥ If you hold down the button for morethan 0.5 second and then release thebutton, the tuner will begin scanningfrequencies in that direction, and thenwill stop when it picks up a station.<seek mode>
After selecting a band and a station... After selecting a band...
After selecting a band...
≥ The stored station is received.
BAND
PLAY
DISP
1 2 3
4 5 6
1 2 3
4 5 6
1 2 3
4 5 6
Setting Up Station Presets
Listening to a Preset Station
Changing the Display
≥ When the station is stored in the preset,the frequency will blink once.
Storing Presets Manually Storing Presets Automatically
Using the buttons on the main unit1 Set preset mode.
≥ The preset number blinks.
2 Select a preset number.
3 Store the station in the preset.
≥ The preset number stops blinking,and the frequency blinks once.
To cancel during setting procedure:
DISC
P •SET
DISC
P •SET
DISC
P •SET
≥ Starting from the low end of thefrequency spectrum, the unit will beginstoring each station that it picks up withclear reception in preset numbers 1through 6.
≥ When a station is stored in a preset, thepreset number blinks for about 5 seconds, and then the next presetnumber is called up. <preset scanmode>
To stop preset scanning:Select a preset number.
Using the buttons on the main unit
DISC
P •SET
Normal display
Clock display
Display off
Select “TUNER”VOL
SEL TUNESOURCE
OSD
CQ-DVR7000U
DVD RECEIVER WITH CHANGER CONTROL
DISP
S •MODE
P •MODE OPEN
PWR
TRACK
DISC
P •SET
BAND
REMOTE PLAY
MUTE
P
1 2CH •C
SOURCE
PWR
BAND
PLAYTUNETRACK
FM 3AM
FM 1 FM 2
Press
Press
Press
Hold (2 seconds)
Hold (2 seconds)
Press
Press
Press
DISPPress
Hold (2 seconds)
Hold (2 seconds)
When using the main unit
Main unit:
DISC
P •SET
ENTER
Increases thefrequency.
Decreases thefrequency.
Normal display
1
3
2 3
DISP# P•SET "
1
Select a preset number.
LOUD
PRO LOGICDR COMP
REPRAND
S T
MUTE L C
LFE
SLS RS
DOWN MIX
R
1 2
162024bit
kHz
DIGITAL LPCM
S W
REAR PLAY
MPEG
Band Preset Number FrequencyLights when an FM stereo broadcast is received
Select the band
BAND
PLAY
Press
2
SOURCE
PWR
Press
Main unit: BAND
PLAY
Hold (2 seconds)
(Example: 2)
(Example: 3)
Indicates pressing a button. Indicates pressing a button for an extended period of time.
Press
(Example: 3)

ENGLISH
18
CQ-DVR7000U37
ENGLISH
17
CQ-DVR7000U36
LOUD
PRO LOGICDR COMP
REPRAND
S T
MUTE L C
LFE
SLS RS
DOWN MIX
R
1 2
162024bit
kHz
DIGITALLPCM
S W
REAR PLAYMPEG
Basic Disc Operations
SOURCE
RETURNTITLE
SUBTITLEAUDIO
ANGLESCAN
REPEAT
TRACKS •MODETITLE / CHAPTER
STOPTRACK / SEARCH
PAUSEPLAY
BANDRET
OSD
GRP
12
345
678
90
MENU
ENTER
VOL
MUTE
SEL
"
#
PWR
P •MODE
RANDOM
36 37
<
Label side
Before performing any operation, check the TV connection setting (TV Aspect, TV Mode)( page 48) .
Operations vary according to the disc. For details, refer to the guide provided with the disc.
Open the panel
Insert the disc≥ Before inserting a disc, check to make sure
that a disc is not already loaded.≥ The disc begins playing.≥ The type of disc is automatically discriminated.
Close the panel manually
OPEN
<
DVD Video
DISP
Changing the Display
VIDEO 01`003 003 00 : 00’ 01 F 10 : 22 DVD VIDEO(Title number)
(Chapter number) (Elapsed playback time) (Clock display) (Display off)
(Chapter number)
(Elapsed playback time) (Clock display) (Display off)
VOL
SEL TUNESOURCE
OSD
CQ-DVR7000U
DVD RECEIVER WITH CHANGER CONTROL
DISP
S •MODE
P •MODE OPEN
PWR
TRACK
DISC
P •SET
BAND
REMOTE PLAY
MUTE
P
1 2CH •C
Ejecting a disc
Notes:≥Since some DVD discs have data recorded on both sides, take care not to mistake the top side for the
reverse side and vice versa.≥ When the disc is removed while the unit is in DVD/video CD/CD mode, the power turns off.≥ If a disc is inserted while the power is off, the power turns on.≥ It may take a few moments for play to begin after the disc has been inserted.≥ Do not interfere with the disc operation when a disc is inserted or ejected.
Press
Inserting/Ejecting the Disc
Starting Playback
Select the disc mode(Example: “DVD VIDEO”)
Playback starts.
SOURCE
PWR
Press
CD
Video CD
00 : 00’ 01VCD F 10 : 22 VCD
Press
CD
CD 01 0’ 01 F 10 : 22 CD(Track number)
(Elapsed playback time)
(Clock display) (Display off)
Press
1
2
Indicates pressinga button.
Indicates pressing abutton for an extendedperiod of time.
Indicates operationsthat can only beperformed throughthe main unit.
DISP
3Lights when disc is loaded.Blinks during disc and changer mode.
Sampling frequency( page 81)
Number of quantization bits ( page 81)
Lights/blinks during repeat playback.
When a disc has been inserted in the unit in any mode except thedisc mode
Recording method of softwarebeing played back
Stopping≥ Playback stops.≥ Pressing [PLAY1] causes playback to resume from the location where it
stopped. (Continued playback function)(During stop, Hold [STOP∫] for 2 seconds to cancel continued playback and“STOP” turns to light.)
STOP
Press
CD
∗ The [PLAYBACK CTL] display appears when the video CD is equipped with the playback control function.
∗∗

Some DVD discs have unique menu structures called DVD menu. Although the DVD menu’scontents and operation differ from disc to disc, the following explains basic operation when thisfeature is used.
ENGLISH
19
ENGLISH
20
CQ-DVR7000U CQ-DVR7000U38 39
Basic Disc Operations (continued)
Selecting a Menu Item
Go to Beginning
Pause
Repeat
DVD video
(Finalize selection)
(Example)
(Example)
DVD MENU1 SUBTITLE2 AUDIO3 ANGLE
ENTER
ENTER
DVD video/Video CD with playback control
1 2 3
4 5 6
7 8 9
0
(Select item) (Finalize selection)
1. Love Supremes2. Impressions3. In a sentimental mood Number:
Notes:≥ Pressing [9][:] while a video CD with
playback control is being played may cause youto return to the menu screen.
≥ Operations vary according to the disc. Fordetails, refer to the guide provided with the disc.
≥ Only a message as shown right is displayed onthe DVD/Video CD screen while driving the car.Only audio is enabled.
(Backward) (Forward)≥ Each time one of these buttons is pressed, the player jumps
to the start of the appropriate track (chapter).≥ If the backward button is pressed once, the player returns to
the start of the track (chapter) that is currently being played.
(During playback)
(During playback)
PAUSE
≥ “PAUSE” is displayed and theplayback pauses.
BAND
PLAY PAUSE
DVD video“CHAPT REP ON” is displayed andthe chapter that is currently beingplayed repeats.
Video CD/CD“REPEAT ON” is displayed and thetrack that is currently being playedrepeats.
REPEAT
6
To resume normal playback:
REPEAT
6Note:≥ When playing a DVD video,
there are cases where it isnot possible to return to thestart of a chapter that spans 2 titles.
To resume normal playback:
CD
CD
Press Press
PressPress
Press Press
Hold(2 seconds)
Hold (2 seconds)
Press
TRACK / SEARCH
Press
Chapter/Track Repeat
or
(Select item)
ENTER
CD
Note:≥ The repeat mode is also cancelled if:
[:], [9] or [∫] is pressed,the disc is ejected.
DVD video/Video CD
Fast Forward/Fast Backward CD
To resume normal playback:BAND
PLAY
Press
TRACK / SEARCH
TRACK / SEARCH
TRACK / SEARCH TRACK / SEARCH
TRACK / SEARCH TRACK / SEARCH
Regularspeed 1.5 times 10 times 20 times
Regularspeed 1.5 times 10 times 20 times
Forward
CD
Backward
TRACK / SEARCH
Regularspeed 20 times
Regularspeed
20 times
Forward Backward
Hold
Hold
Press Press
Press Press
Hold Hold
(Example: 2)
Warning
When driving please enjoy sound only
Indicates pressing a button. Indicates pressing a button for an extended period of time.
TRACK / SEARCH

The extent to which the volume is lowered depends on the MUTE/ATT setting. ( page 57)
Basic Disc Operations (continued)
ENGLISH
21
ENGLISH
22
CQ-DVR7000U40 41
CQ-DVR7000U
1 (During playback) Select the input mode.
Chapter :Chapter number input mode
Title :Title numberinput mode
2
3
Input the desiredtrack/title/chapter number.
≥ Playback starts.
1 2 3
4 5 6
7 8 9
0
ENTER
TITLE / CHAPTER
GRP
TRACK
Press
Press
Press
(Regular mode)
Starting Playback from a Specific Track/Title/Chapter
DVD CD
Track :Track number input mode
(Regular mode)
to input the number again:
RETURN
RETPress
Note:≥ If a non-existent track/title/chapter number is input
and entered, the command is invalid and the displayreturns to regular mode.
≥ Selections can be made even in the stop mode but only for DVD video.
CD
(During pause)
≥Playback is at approximately 1/3 normal speed.
TRACK / SEARCH
To pause: To resume normal playback:
Note:≥ Reverse slow playback is not possible.
BAND
PLAYPAUSE
Press PressHold
Slow Playback
(During playback)
OSD
Press
On-Screen Displays (OSD) CD
1 Current Operation ModeThis indicates the operation that is currently being performed.(Loading, Eject, Play, Pause, Stop, FF, REW, Still, Repeat, Slow Play)
2 Title Number (DVD only)This displays the number of the title that is currently being played.
3 Chapter Number (DVD only)This displays the number of the chapter in the title that is currently being played.
Track Number (CD only)This displays the number of the track that is currently being played.
4 Playback TimeThis displays how much time has elapsed since the start of playback.In the case of CD, the playback time of the track now being played is displayed.
[CD only]The display automatically differs according to whether CD-TEXT is present.
Notes:≥ Each display may sometimes show “---”. This is not a malfunction.≥ The On-Screen Display may not be displayed properly when the display size (Aspect) of the
connected display unit is set to “ZOOM”. In this case, select the other display size type:NORMAL, JUST or FULL.
2 3 4
1
Each time the button is pressed:ON (default) !# OFF
≥ In the case of CD, the On-ScreenDisplay cannot be turned off.
PlayTitle Track 01Artist
:PANA :First song:ABC
Track : 001 Time : 0 : 03 : 37
Play
CD PLAYER MODE
Track : 001 Time : 0 : 03 : 37OSD
Press(“NO CD-Text” appears fordiscs without CD-TEXT.)
(Example: 2)
Normal volume
Volume goes to “0”(silence).
When MUTE is set:Normal volume
Volume goes to 1/10 ofwhat it was.
When ATT is set:MUTE
≥ When Mute/Attenuate is“ON”, “MUTE” blinks and youcan not operate except forsome buttons.
MUTE OFF
MUTE
ATT OFF
ATT
Press
Mute/Attenuator CD
Indicates pressing a button. Indicates pressing a button for an extended period of time.

ENGLISH
24
CQ-DVR7000U43
It is possible to switch the audio between stereo sound and monaural sound (L or R).
Basic Disc Operations (continued)
ENGLISH
23
42CQ-DVR7000U
It is possible to change the subtitle language during play if multiple languages are recorded on thedisc.
(During playback)
SUBTITLE
1
Notes:≥ The language number disappears if no
operation is performed for 5 seconds.≥ The number of subtitle languages depends
on the disc.≥ It may not be possible to switch the subtitles
unless the unit is at the DVD menu ( page43) or is at the initial settings ( page 46).
≥ There may be a brief delay before thesubtitles appear.
Hold (More than 2 seconds)
Switching the Subtitle LanguageFor DVDs which contain scenes which have been shot simultaneously from a number ofdifferent angles the same scene can be viewed from each of these different angles during play.
Switching the Angle
(During playback)
ANGLE
3
Note:≥ The angle number
disappears if no operation isperformed for 5 seconds.
Use this menu during playback to select content, audio, subtitles, etc., from a menu (the DVD menu)that is unique to each disc.
1 (During playback)
TITLE
MENU
≥ The DVD menu appears on the screen.(Pressing this button again causes playback to startat the scene from which the DVD menu was called.)
(Example) 2
(Select item.) (Finalize selection.)
ENTER
Note:≥ DVD menu content and operations depend on the disc. For details, refer to the guide provided with
your disc.
DVD MENU1 SUBTITLE2 AUDIO3 ANGLEPress
Press ENTER
Press
≥ If you do not perform any operationfor 5 seconds, the unit returns toregular mode.
≥ When either “L ch” or “R ch” isselected, the left or right channelaudio is output on both the left andright speakers.
AUDIO
2
It is possible to change the audio language during play if multiple audio languages are recorded onthe disc.
(During playback) Notes:≥ The language number disappears if no
operation is performed for 5 seconds.≥ The number of audio languages depends on
the disc. (Some discs have only onelanguage.)
≥ It may not be possible to switch languagesunless the unit is at the DVD menu ( page43) or is at the initial settings ( page 46).
AUDIO
2
Switching the Audio Language
If the DVD has multiple titles recorded on it, it is possible to select the preferred title fromthe title menu to start playback.
Title Menu
1
TITLE
MENU
≥ The title menu appears on the screen.(Pressing this button again causes playback to start atthe scene from which the title menu was called.)
≥ This can also be selected during stop.
(Example)
TITLE MENU
Castles
Woods
Rivers
LoversHold(2 seconds)
(Select item.) (Finalize selection.)
ENTER
ENTER
Press Press
(stereo)
(left channel)
(right channel)
L/R CH ST
L/R CH L
L/R CH R
2
≥ The subtitle language is switched every time this ispressed for more than 2 seconds.
≥ Initially, the subtitle language is the language thatis set in the initial settings. (If this language hasnot been recorded, the language that is displayedis determined by the disc.)
Switching between Stereo and Monaural
(During playback)
DVD Menu
Hold (More than 2 seconds)
Hold (More than 2 seconds)
Hold (More than 2 seconds)
Indicates pressing a button. Indicates pressing a button for an extended period of time.
≥ The audio language is switched every time this is pressed for more than 2 seconds.
≥ Stereo is switched to monaural or vice versa every time this is pressed for more than 2 seconds.
≥ The angle is switched every time this is pressed for more than 2 seconds.
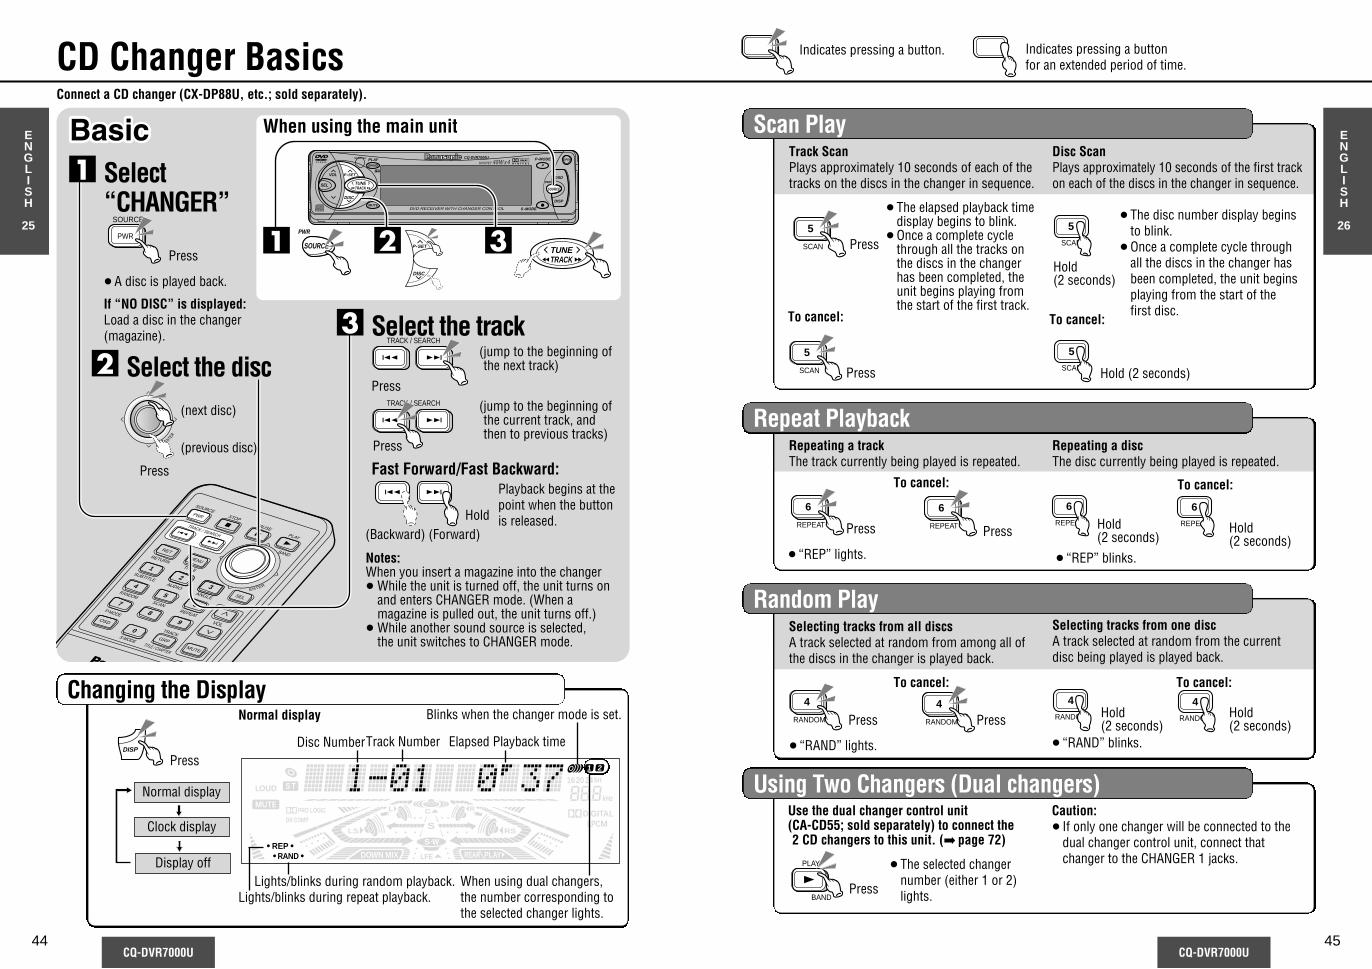
SOURCE
RETURNTITLE
SUBTITLEAUDIO
ANGLESCAN
REPEAT
TRACKS •MODETITLE / CHAPTER
STOPTRACK / SEARCH
PAUSEPLAY
BANDRET
OSD
GRP
12
345
678
90
MENU
ENTER
VOL
MUTE
SEL
"
#
PWR
P •MODE
RANDOM
ENGLISH
25
ENGLISH
26
CQ-DVR7000U CQ-DVR7000U44 45
CD Changer Basics
LOUD
PRO LOGICDR COMP
REPRAND
S T
MUTE L C
LFE
SLS RS
DOWN MIX
R
1 2
162024bit
kHz
DIGITALLPCM
S W
REAR PLAY
Changing the Display
Track ScanPlays approximately 10 seconds of each of the tracks on the discs in the changer in sequence.
Scan Play
Selecting tracks from all discsA track selected at random from among all of the discs in the changer is played back.
Random Play
Repeating a trackThe track currently being played is repeated.
Repeat Playback
Using Two Changers (Dual changers)
Disc ScanPlays approximately 10 seconds of the first trackon each of the discs in the changer in sequence.
Selecting tracks from one discA track selected at random from the currentdisc being played is played back.
Repeating a discThe disc currently being played is repeated.
≥ The elapsed playback timedisplay begins to blink.
≥ Once a complete cyclethrough all the tracks onthe discs in the changerhas been completed, theunit begins playing fromthe start of the first track.
≥ The disc number display beginsto blink.
≥ Once a complete cycle throughall the discs in the changer hasbeen completed, the unit beginsplaying from the start of thefirst disc.
SCAN
5
SCAN
5
SCAN
5
SCAN
5
To cancel:
To cancel:
To cancel: To cancel:
To cancel:
To cancel:
≥ “REP” lights.
≥ “RAND” lights. ≥ “RAND” blinks.
≥ “REP” blinks.
REPEAT
6REPEAT
6
REPEAT
6REPEAT
6
RANDOM
4RANDOM
4
RANDOM
4RANDOM
4
Use the dual changer control unit (CA-CD55; sold separately) to connect the 2 CD changers to this unit. ( page 72)
BAND
PLAY ≥ The selected changernumber (either 1 or 2)lights.
Caution:≥ If only one changer will be connected to the
dual changer control unit, connect thatchanger to the CHANGER 1 jacks.
Connect a CD changer (CX-DP88U, etc.; sold separately).
VOL
SEL TUNESOURCE
OSD
CQ-DVR7000U
DVD RECEIVER WITH CHANGER CONTROL
DISP
S •MODE
P •MODE OPEN
PWR
TRACK
DISC
P •SET
BAND
REMOTE PLAY
MUTE
P
1 2CH •C
SOURCE
PWR
DISC
P •SET TUNETRACK
TRACK / SEARCH
TRACK / SEARCH
Press Press
Press
Press
Press
Press
Press Hold(2 seconds)
Hold(2 seconds)
Hold(2 seconds)
Hold(2 seconds)
Hold(2 seconds)
Hold (2 seconds)
When using the main unit
Notes:When you insert a magazine into the changer≥ While the unit is turned off, the unit turns on
and enters CHANGER mode. (When amagazine is pulled out, the unit turns off.)
≥ While another sound source is selected, the unit switches to CHANGER mode.
DISP
Normal display
Clock display
Display off
Press
Normal display
Select“CHANGER”
≥ A disc is played back.
If “NO DISC” is displayed:Load a disc in the changer (magazine).
1
Select the track(jump to the beginning ofthe next track)
(jump to the beginning ofthe current track, andthen to previous tracks)
Fast Forward/Fast Backward:
(Backward) (Forward)
3
Hold
321
Blinks when the changer mode is set.
Lights/blinks during random playback.Lights/blinks during repeat playback.
When using dual changers,the number corresponding tothe selected changer lights.
Disc NumberTrack Number Elapsed Playback time
SOURCE
PWR
Press
Press
Select the disc(next disc)
(previous disc)
2
ENTER
Press
Press
Playback begins at thepoint when the buttonis released.
Indicates pressing a button. Indicates pressing a button for an extended period of time.

3. Audio Language
2. Subtitle Language
1. Menu LanguageENGLISH
27
ENGLISH
28
CQ-DVR7000U CQ-DVR7000U46 47
Changing the Initial Settings
1. English (default)
2. French
3. Spanish
Make Settings3
4. Other(See below)
5. Return(The display returns to Main Menu.)
1. English2. French3. Spanish4. Other5. Return
<Menu Language>SelectLanguage
1. English (default)
2. French
3. Spanish
4. Other(See below)
5. Disp Off(Subtitle language is not displayed.)
6. Return(The display returns to Main Menu.)
1. English2. French3. Spanish4. Other5. Disp Off6. Return
<Subtitle Language>SelectLanguage
1. English (default)
2. French
3. Spanish
4. Other(See below)
5. Return(The display returns to Main Menu.)
1. English2. French3. Spanish4. Other5. Return
<Audio Language>SelectLanguage
In “Other” cases (Menu Language, Subtitle Language, Audio Language)1 2To input the number again:
RETURN
RET
Press
Input the four digitlanguage code. ( page 79)
Setting is finished and thedisplay returns to “MainMenu”.
(Finalize selection.)
ENTER
Press
1 2 3
4 5 6
7 8 9
0Press
≥ The setting is completed.
The settings are not reflected unless“0:Exit” is used to exit the initialsetting screen.
S-MODE
0
Press
Notes:≥ After the initial settings have been changed and entered, the player returns to the start of the disc
and begins playback.≥ When the disc has predetermined language or other settings, the initial settings are not reflected.
1 2 3
4 5 6 Press
SOURCE
RETURNTITLE
SUBTITLEAUDIO
ANGLESCAN
REPEAT
TRACKS •MODE
CAR DVD PLAYER/RECEIVER
TITLE / CHAPTER
STOPTRACK / SEARCH
PAUSEPLAY
BANDRET
OSD
GRP
12
345
678
90
MENU
ENTER
VOL
MUTE
SEL
"
#
PWR
P •MODE
RANDOM
Select the Menu(while stopped)
1
TITLE
MENU
Press
<Main Menu>1. Menu Language : English2. Subtitle Language : English3. Audio Language : English4. TV Aspect : 16:95. TV Mode (4:3) : Pan&Scan6. On-Screen Messages : ON7. Audio Output Level : 38. D. Range Compression : OFF
0:Exit >: Next
The initial setting screen is displayed.
Make Settings ( page 47–49)
3
Finish the InitialSettings
4
1 2 3
4 5 6
7 8
Select the item2
Press
(Example: 2.Subtitle Language)
(Example: French)
The settings for the language, display, etc. can changed.
Indicates pressing a button.

8. D. Range Compression
Adjust the level at which the audio signals are to be output in the PRIVATE MODE.7. Audio Output Level
6. On-Screen Messages
5. TV Mode
4. TV Aspect
ENGLISH
29
ENGLISH
30
CQ-DVR7000U CQ-DVR7000U48 49
Changing the Initial Settings (continued)
Make Settings3
TV picture mode (4:3)Set this when playing wide-screen video on a conventional-size(4:3) TV.
1. Pan & Scan: Plays wide-screen video in Pan & Scan mode(in which the left and right edges of the screenare cut off) (default)
2. Letterbox: Plays wide-screen video in Letter Box mode(in which black bands appear at the top andbottom of the screen)
3. Return: The display returns to Main Menu.
This is to select On-Screen Display messages which will bedisplayed when On-Screen Display is turned off by pressing[OSD].( Page 41)
1. ON: When the power is turned on, On-Screen Displaymessages such as “Play” and “Pause” will always bedisplayed on the screen for 5 seconds. (default)
2. OFF: When the power is turned on, On-Screen Displaymessages such as “Play” and “Pause” will not bedisplayed on the screen.
3. Return: The display returns to Main Menu.
Note:≥ If “Pan & Scan” or “Letterbox” is already set in the software, this setting is ignored.
1. 4:3 : Use this setting when a conventional TV Monitor isconnected.
2. 16:9 : Use this setting when a wide-screen TV Monitor isconnected. (default)≥ Wide screen video can be played on the full screen.
3. Return:The display returns to Main Menu.
1. 4 : 32. 16 : 93. Return
<TV Aspect>SelectTV Aspect
1. Pan & Scan2. Letterbox3. Return
<TV Mode>SelectTV Mode
1 ON2 OFF3 Return
<On-Screen Messages>SelectOn-ScreenMessages
Make Settings3
1. 1 (Minimum level)
2. 2 (Middle level)
3. 3 (Maximum level) (default)
4. Return: The display returns to Main Menu.
For your reference:We recommend that you select the initial setting when you use this player in the systemconfigurations ( Pages 70-72), and adjust the volume control on the display unit connected tothis unit.
Dynamic Range CompressionBy compressing the range of the playback level (the dynamicrange), it is possible to maintain the impact of audio even at lowvolumes.This function only works with Dolby Digital encoded material.
1. Minimum: Most compressed mode like TV broadcasts, etc.“DR COMP” lights.
2. Standard: Mode recommended by software creators forlistening at low volumes.
“DR COMP” lights.
3. OFF: Does not compress the dynamic range.(default)
4. Return: The display returns to Main Menu.
Note:≥ When it is difficult to hear comparatively quiet sounds (such
as movie dialogue), setting “Minimum” will make thosesounds easier to hear.
1. 12. 23. 34. Return
<Audio Output Level>SelectAudio Output Level
1 Minimum2 Standard3 OFF4 Return
<D.Range Compression>SelectD.RangeCompression
OFF Conversation level
Standard
Minimum
CD
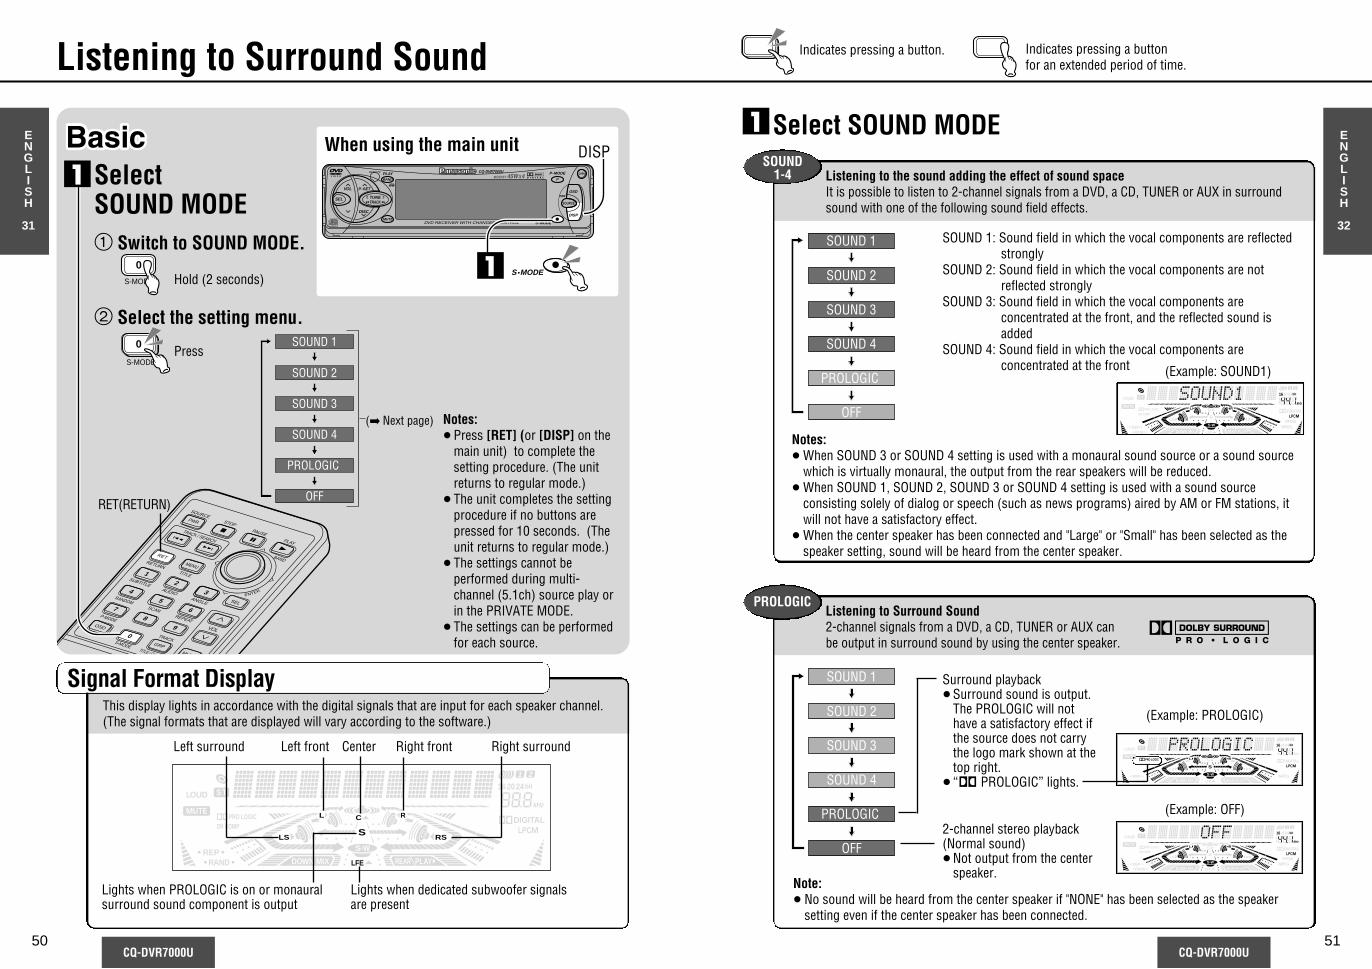
ENGLISH
32
CQ-DVR7000U51
This display lights in accordance with the digital signals that are input for each speaker channel.(The signal formats that are displayed will vary according to the software.)
LOUD
PRO LOGICDR COMP
REPRAND
S T
MUTE L C
LFE
SLS RS
DOWN MIX
R
1 2
162024bit
kHz
DIGITALLPCM
S W
REAR PLAY
Listening to the sound adding the effect of sound spaceIt is possible to listen to 2-channel signals from a DVD, a CD, TUNER or AUX in surroundsound with one of the following sound field effects.
SOURCE
RETURNTITLE
SUBTITLEAUDIO
ANGLESCAN
REPEAT
TRACKS•MODETITLE / CHAP
STOPTRACK / SEARCH
PAUSEPLAY
BAND
OSD
GRP
12
345
678
90
MENU
ENTER
VOL
MUT
SEL
"
#
PWR
P•MODE
RANDOM
RET
ENGLISH
31
Notes:≥ Press [RET] (or [DISP] on the
main unit) to complete thesetting procedure. (The unitreturns to regular mode.)
≥ The unit completes the settingprocedure if no buttons arepressed for 10 seconds. (Theunit returns to regular mode.)
≥ The settings cannot beperformed during multi-channel (5.1ch) source play orin the PRIVATE MODE.
≥ The settings can be performed for each source.
VOL
SEL TUNESOURCE
OSD
CQ-DVR7000U
DVD RECEIVER WITH CHANGER CONTROL
DISP
S•MODE
P•MODE OPEN
PWR
TRACK
DISC
P•SET
BAND
REMOTE PLAY
MUTE
P
1 2CH•C
When using the main unit
S •MODE
Listening to Surround Sound2-channel signals from a DVD, a CD, TUNER or AUX can be output in surround sound by using the center speaker.
CQ-DVR7000U50
Listening to Surround Sound
LOUD
PRO LOGICDR COMP
DAB
REPRAND
S T
MUTE
SIRIUS
L C
LFE
SLS RS
DOWN MIX
R
1 2
162024bit
kHz
DIGITALLPCM
MPEGS W
REAR PLAY
MONOLOCALLOUD
PRO LOGICDR COMP
DAB
REPRAND
S T
MUTE
SIRIUS
L C
LFE
SLS RS
DOWN MIX
R
1 2
162024bit
kHz
DIGITALLPCM
PPCMMPEGS W
REAR PLAY
SOUND1-4
PROLOGIC
Signal Format Display
2-channel stereo playback(Normal sound)≥Not output from the center
speaker.
Surround playback≥Surround sound is output.
The PROLOGIC will nothave a satisfactory effect ifthe source does not carrythe logo mark shown at thetop right.
≥ “Î PROLOGIC” lights.
1
S-MODE
0 1
Select SOUND MODE1
( Next page)
SOUND 2
SOUND 3
SOUND 4
SOUND 1
PROLOGIC
OFF
SOUND 2
SOUND 3
SOUND 4
SOUND 1
PROLOGIC
OFF
SOUND 2
SOUND 3
SOUND 4
SOUND 1
PROLOGIC
OFF
Left front Right frontLeft surround Right surround
Lights when dedicated subwoofer signalsare present
Lights when PROLOGIC is on or monauralsurround sound component is output
SOUND 1: Sound field in which the vocal components are reflectedstrongly
SOUND 2: Sound field in which the vocal components are notreflected strongly
SOUND 3: Sound field in which the vocal components areconcentrated at the front, and the reflected sound isadded
SOUND 4: Sound field in which the vocal components areconcentrated at the front
Center
DISP
RET(RETURN)
Select SOUND MODE1 Switch to SOUND MODE.
Hold (2 seconds)
2 Select the setting menu.
PressS-MODE
0
MONOLOCALLOUD
PRO LOGICDR COMP
DAB
REPRAND
S T
MUTE
SIRIUS
L C
LFE
SLS RS
DOWN MIX
R
1 2
162024bit
kHz
DIGITALLPCM
PPCMMPEGS W
REAR PLAY
(Example: SOUND1)
(Example: PROLOGIC)
(Example: OFF)
Notes:≥ When SOUND 3 or SOUND 4 setting is used with a monaural sound source or a sound source
which is virtually monaural, the output from the rear speakers will be reduced.≥ When SOUND 1, SOUND 2, SOUND 3 or SOUND 4 setting is used with a sound source
consisting solely of dialog or speech (such as news programs) aired by AM or FM stations, itwill not have a satisfactory effect.
≥ When the center speaker has been connected and "Large" or "Small" has been selected as thespeaker setting, sound will be heard from the center speaker.
Indicates pressing a button. Indicates pressing a button for an extended period of time.
Note:≥ No sound will be heard from the center speaker if "NONE" has been selected as the speaker
setting even if the center speaker has been connected.

SOURCE
RETURNTITLE
SUBTITLEAUDIO
ANGLESCAN
REPEAT
TRACKS •MODE
CAR DVD PLAYER/RECEIVER
TITLE / CHAPTER
STOPTRACK / SEARCH
PAUSEPLAY
BAND
OSD
GRP
12
345
678
90
MENU
ENTER
VOL
MUTE
SEL
"
#
PWR
P •MODE
RANDOM
RET
Adjusting the Front/Rear/Left/Right Balance(Adjustable range: 15 for each)
ENGLISH
33
ENGLISH
34
CQ-DVR7000U CQ-DVR7000U52 53
Setting Up the Sound
Notes:≥ Press [RET] (or [DISP] on the main
unit) to complete the settingprocedure. (The unit returns toregular mode.)
≥ The unit completes the settingprocedure if no buttons are pressedfor 10 seconds. (The unit returns toregular mode.)
≥ LOUD SEL, BASS SEL and TREBLE SEL can be set for each source.
Adjusting the Bass(Adjustable range: `12 to _12 dB)
Adjusting the Treble(Adjustable range: `12 to _12 dB)
BASS SEL
["]: Increases the bass.[#]: Decreases the bass.
TREBLE SEL
["]: Increases the treble.[#]: Decreases the treble.
[#]: Increases the rear.
BASS 0 dB
TREBLE 0 dB
B : R15 2 1 F : F15
B : L15 2 1 F : R15
B : CNT 2 1 F : CNT
Select thesetting menu
Make settings( Next Page)
Press
ENTER
VOL
SEL TUNESOURCE
OSD
CQ-DVR7000U
DVD RECEIVER WITH CHANGER CONTROL
DISP
S •MODE
P •MODE OPEN
PWR
TRACK
DISC
P •SET
BAND
REMOTE PLAY
MUTE
P
1 2CH •C
When using the main unit
SEL
TUNETRACK
DISC
P •SET
LoudnessThis function boosts the bass and treble at low-volume levels.
LOUD SEL
[%] or [$] : Normal sound (default)
[%] or [$] : Boosts the bass and treble when playing.≥ “LOUD” lights.
LOUD OFF
LOUD ON
Indicates pressing a button.
Make settings2
21
(Regular mode)
( Next page)BASS SEL
LOUD SEL
TREBLE SEL
BAL // FAD
CENTER VOL
SUB-WFR VOL( Page 55)
VIDEO 01-02
1
2
DISP
Note:≥ Neither the Balance control nor Fader control can be set during the PRIVATE MODE.
( page 60)
SEL
Press
RET(RETURN)
[%]: Increases the left side.
[$]: Increases the right side. ["]: Increases the front.
Balance Fader
Center
BAL // FAD
(default)
(default)
B: CNT (default)F: CNT (default)

ENGLISH
35
ENGLISH
36
CQ-DVR7000U CQ-DVR7000U54 55
Setting Up the Sound (continued)
Make settings2
Adjusting the Center Speaker Volume (When Center Speaker is set.)(Adjustable range: `¶, `10 to _10 dB)
Adjusting the Subwoofer Volume (When Subwoofer is set.)(Adjustable range: `¶,`10 to _10 dB)
CENTER VOL
SUB-WFR VOL
Connect a center speaker (sold separately).["]: Increases the level.[#]: Decreases the level.
["]: Increases the level.[#]: Decreases the level.
CENTER 0 dB
SUB-W 0 dB
Connect a subwoofer (sold separately).
Note:≥ Setting “`¶” makes no sounds to output.
Note:≥ Setting “`¶” makes no sounds to output.
Indicates pressing a button.
SOURCE
RETURNTITLE
SUBTITLEAUDIO
ANGLESCAN
REPEAT
TRACKS •MODE
CAR DVD PLAYER/RECEIVER
TITLE / CHAPTER
STOPTRACK / SEARCH
PAUSEPLAY
BAND
OSD
GRP
12
345
678
90
MENU
ENTER
VOL
MUTE
SEL
"
#
PWR
P •MODE
RANDOM
RET
Notes:≥ Press [RET] (or [DISP] on the main unit) to
complete the setting procedure. (The unitreturns to regular mode.)
≥ The unit completes the setting procedure if nobuttons are pressed for 10 seconds. (The unitreturns to regular mode.)
Select thesetting menu
Make settings( Next Page)
Press
ENTER
VOL
SEL TUNESOURCE
OSD
CQ-DVR7000U
DVD RECEIVER WITH CHANGER CONTROL
DISP
S •MODE
P •MODE OPEN
PWR
TRACK
DISC
P •SET
BAND
REMOTE PLAY
MUTE
P
1 2CH •C
When using the main unit
SELDISC
P •SET21
(Regular mode)
( Page 53)BASS SEL
LOUD SEL
TREBLE SEL
BAL // FAD
CENTER VOL
SUB-WFR VOL( Next page)
VIDEO 01-02
2
DISP
1
SEL
Press
RET(RETURN)
(default)
(default)
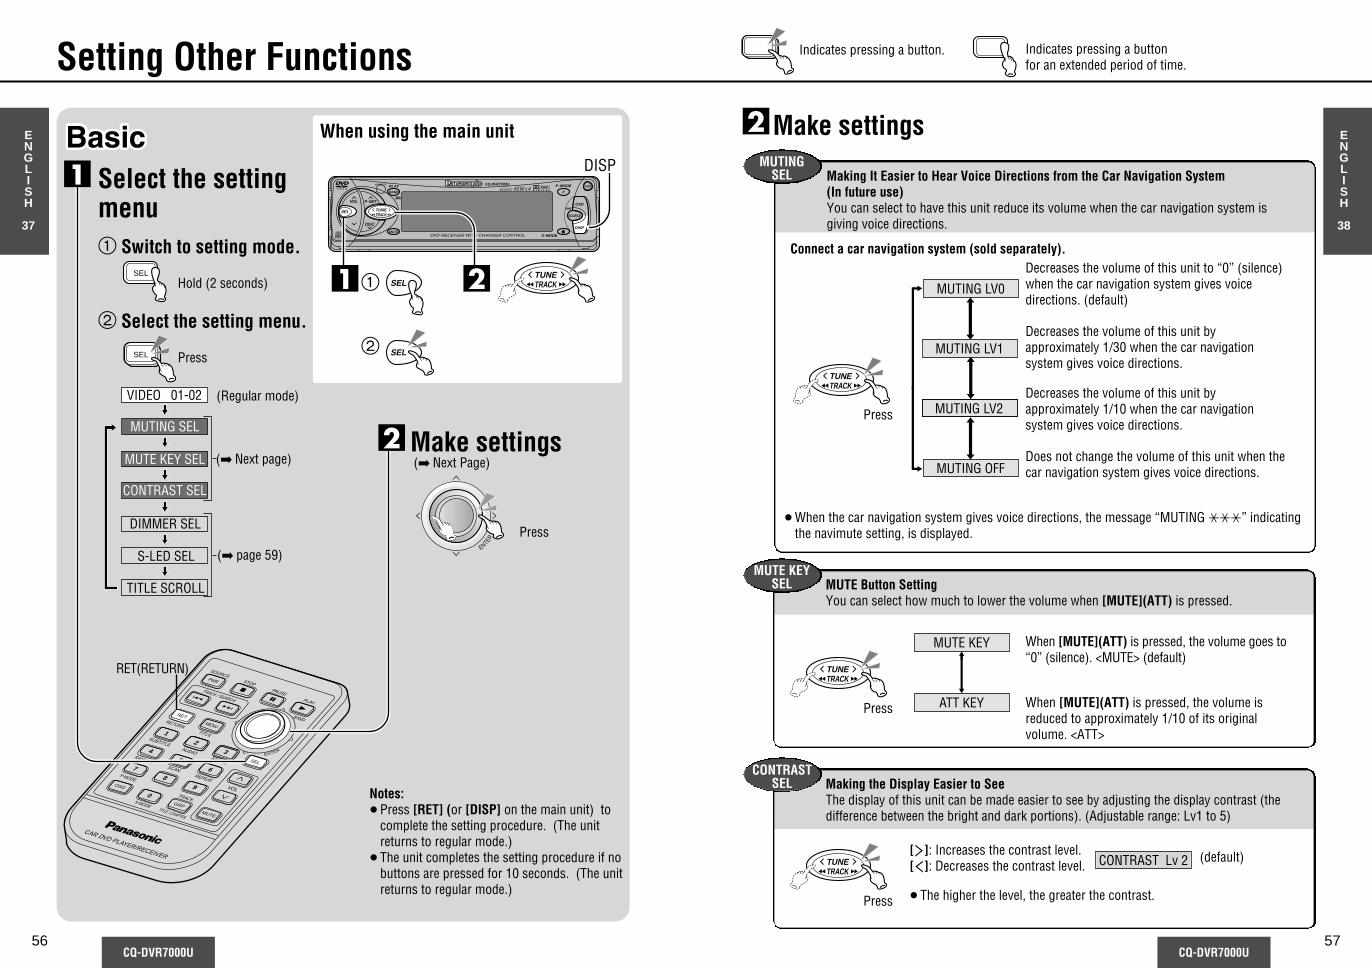
SOURCE
RETURNTITLE
SUBTITLEAUDIO
ANGLESCAN
REPEAT
TRACKS •MODE
CAR DVD PLAYER/RECEIVER
TITLE / CHAPTER
STOPTRACK / SEARCH
PAUSEPLAY
BAND
OSD
GRP
12
345
678
90
MENU
ENTER
VOL
MUTE
SEL
"
#
PWR
P •MODE
RANDOM
RET
Making It Easier to Hear Voice Directions from the Car Navigation System (In future use)You can select to have this unit reduce its volume when the car navigation system isgiving voice directions.
Decreases the volume of this unit to “0” (silence)when the car navigation system gives voicedirections. (default)
Decreases the volume of this unit byapproximately 1/30 when the car navigationsystem gives voice directions.
Decreases the volume of this unit byapproximately 1/10 when the car navigationsystem gives voice directions.
MUTINGSEL
Connect a car navigation system (sold separately).
≥ When the car navigation system gives voice directions, the message “MUTING £££” indicatingthe navimute setting, is displayed.
ENGLISH
37
ENGLISH
38
CQ-DVR7000U CQ-DVR7000U56 57
Setting Other Functions
Notes:≥ Press [RET] (or [DISP] on the main unit) to
complete the setting procedure. (The unitreturns to regular mode.)
≥ The unit completes the setting procedure if nobuttons are pressed for 10 seconds. (The unitreturns to regular mode.)
VOL
SEL TUNESOURCE
OSD
CQ-DVR7000U
DVD RECEIVER WITH CHANGER CONTROL
DISP
S •MODE
P •MODE OPEN
PWR
TRACK
DISC
P •SET
BAND
REMOTE PLAY
MUTE
P
1 2CH •C
When using the main unit
1
2
SELTUNETRACK MUTING LV0
MUTING LV1
MUTING LV2
MUTING OFF
Make settings( Next Page)
2
ENTER Press
SEL
21
Does not change the volume of this unit when thecar navigation system gives voice directions.
Making the Display Easier to SeeThe display of this unit can be made easier to see by adjusting the display contrast (thedifference between the bright and dark portions). (Adjustable range: Lv1 to 5)
CONTRAST SEL
[$]: Increases the contrast level.[%]: Decreases the contrast level.
≥ The higher the level, the greater the contrast.
CONTRAST Lv 2
Make settings2
( page 59)
( Next page)
(Regular mode)
MUTE KEY SEL
MUTING SEL
DIMMER SEL
CONTRAST SEL
S-LED SEL
VIDEO 01-02
TITLE SCROLL
Select the settingmenu1 Switch to setting mode.
Hold (2 seconds)
2 Select the setting menu.
Press
SEL
SEL
1
RET(RETURN)
DISP
Indicates pressing a button. Indicates pressing a button for an extended period of time.
(default)TUNETRACK
MUTE Button SettingYou can select how much to lower the volume when [MUTE](ATT) is pressed.
MUTE KEYSEL
When [MUTE](ATT) is pressed, the volume goes to“0” (silence). <MUTE> (default)
When [MUTE](ATT) is pressed, the volume isreduced to approximately 1/10 of its originalvolume. <ATT>
MUTE KEY
ATT KEY
TUNETRACK
TUNETRACK
Press
Press
Press

ENGLISH
39
ENGLISH
40
CQ-DVR7000U CQ-DVR7000U58 59
Setting Other Functions (continued)
Make settings2
Indicates pressing a button. Indicates pressing a button for an extended period of time.
Adjusting the Display Brightness (Dimmer)DIMMER
SEL
Illumination is bright. (Default: When the car’ssmall light is off.)
Illumination is moderate. (Default: When the car’ssmall light is on.)
Illumination is dim.
DIMMER LEV 3
DIMMER LEV 2
DIMMER LEV 1
SOURCE
RETURNTITLE
SUBTITLEAUDIO
ANGLESCAN
REPEAT
TRACKS •MODE
CAR DVD PLAYER/RECEIVER
TITLE / CHAPTER
STOPTRACK / SEARCH
PAUSEPLAY
BAND
OSD
GRP
12
345
678
90
MENU
ENTER
VOL
MUTE
SEL
"
#
PWR
P •MODE
RANDOM
RET
Notes:≥ Press [RET] (or [DISP] on the main unit) to
complete the setting procedure. (The unitreturns to regular mode.)
≥ The unit completes the setting procedure if nobuttons are pressed for 10 seconds. (The unitreturns to regular mode.)
VOL
SEL TUNESOURCE
OSD
CQ-DVR7000U
DVD RECEIVER WITH CHANGER CONTROL
DISP
S •MODE
P •MODE OPEN
PWR
TRACK
DISC
P •SET
BAND
REMOTE PLAY
MUTE
P
1 2CH •C
When using the main unit
1
2
SELTUNETRACK
Make settings( Next Page)
2
ENTER Press
SEL
21
( Next page)
( page 57)
(Regular mode)
MUTE KEY SEL
MUTING SEL
DIMMER SEL
CONTRAST SEL
S-LED SEL
VIDEO 01-02
TITLE SCROLL
Select the settingmenu1 Switch to setting mode.
Hold (2 seconds)
2 Select the setting menu.
Press
SEL
SEL
1
RET(RETURN)
DISP
Scrolling the Title DisplayThe CD changer title display can be made to scroll continuously or be made stationary.
TITLESCROLL
SCROLL ON
SCROLL OFF
The display scrolls continuously. (default)
The display scrolls once and then stops.
Note:≥Once scrolling is stopped, the characters can be scrolled across again once. (Re-scroll)
Press and hold [DISP] for more than 2 seconds.
TUNETRACK
Using the Security FunctionSet whether the security function is to be used or not when the panel has been removedfrom the main unit.
S-LED SEL
When ACC has been set to OFF, "PANEL" is displayedon the main unit, and the alarm for preventingoperation without first re-attaching the removed panelsounds. When the panel is now removed, thesecurity indicator blinks. (Security function) (default)
Note:≥If ACC is set to OFF within 10 seconds after it was set to ON, the security function will not work.
S-LED ON
S-LED OFF The security function does not work.
TUNETRACK
TUNETRACK
Press
Press
Press

ENGLISH
42
CQ-DVR7000U61
Main unitDISC MODE(During DVD play)
ENGLISH
41
CQ-DVR7000U60
Enjoying different sources at the front and rear
When this function is used, the passengers in the back seat can have fun listening to the sound of aCD or listening to the sound and watching the picture of a DVD video or Video CD while the frontseat occupants can enjoy listening to the sound of a different source.
PRIVATE MODE
1
2
Set the PRIVATE MODE to ON.
Hold
P•MODE
7
≥ “P • MODE ON” is displayed on the mainunit.
Hold
P •MODE
Por
Select the front channel source.
Press
SOURCE
PWR
Each time the button is pressed, only the front channels are switchedto the source shown on the unit's display. While the PRIVATE MODEis ON, the source which is output from the monitor will not beswitched even when the [SOURCE] button is pressed.No sound is output from the rear speakers.
When the PRIVATE MODE is OFF
When the PRIVATE MODE is ON
Front
Rear
Main unitDISC MODE(During DVD play)
TV monitor(DVD pictures)
Notes:≥ PRIVATE MODE is canceled if the disc is ejected while PRIVATE MODE is ON.≥ Before a DVD, Video CD or CD disc operation is to be performed or the volume or other setting is to be
changed while the PRIVATE MODE is being used, press [SOURCE] and set the front speaker source toDVD, Video CD or CD, and then proceed with the operation.
≥ In the PRIVATE MODE, the disc will be played with Down Mix at "ON" regardless of the setting whichwas selected for Down Mix ( page 31).
≥ The disc returns to the start each time you switch to PRIVATE MODE.≥ When an attempt is made to perform any of the following operations which cannot be selected, "CAN'T
SELECT" is displayed on the main unit to indicate that the selected operation is invalid.Setting the private mode ON while there is no disc in the main unitSwitching the private mode OFF within the first 5 seconds after it was set to ONPerforming a "BAL/FAD" operation
Press
SOURCE
PWR
Front
Rear MUTE
TV monitor(DVD pictures)
Actual examples where the monitor has been installed on the back seat and theconnections on pages 70 and 71 have been performed
DVD sound
MUTE
Front
Rear
Tuner
Tuner
Main unitTUNER MODE
TV monitor(No picture)
MUTE
Turning P• MODE OFF:
HoldP•MODE
7
Hold
P •MODE
P
or
DISC MODE TUNER MODE
Front
Rear
Tuner
MUTE
TV monitor(DVD pictures)
Main unitTUNER MODE
DVD sound
DVD sound
DVD sound
Press
SOURCE
PWR
DISC MODE TUNER MODE
L C
LFE
SLS RS
DOWN MIX
R
S W
REAR PLAY
Blinks while PRIVATE MODE is ON.Only "PLAY 1" is turned off while a disc is stopped.
Indicates pressing a button. Indicates pressing a button for an extended period of time.
DVD sound
≥ “P • MODE OFF” is displayed on the mainunit.
Example:When the passengers in the back seat want to keep enjoying DVD play and the frontseat occupants want to listen to the radio
Example: When interrupting DVD play to listen to a radio broadcast
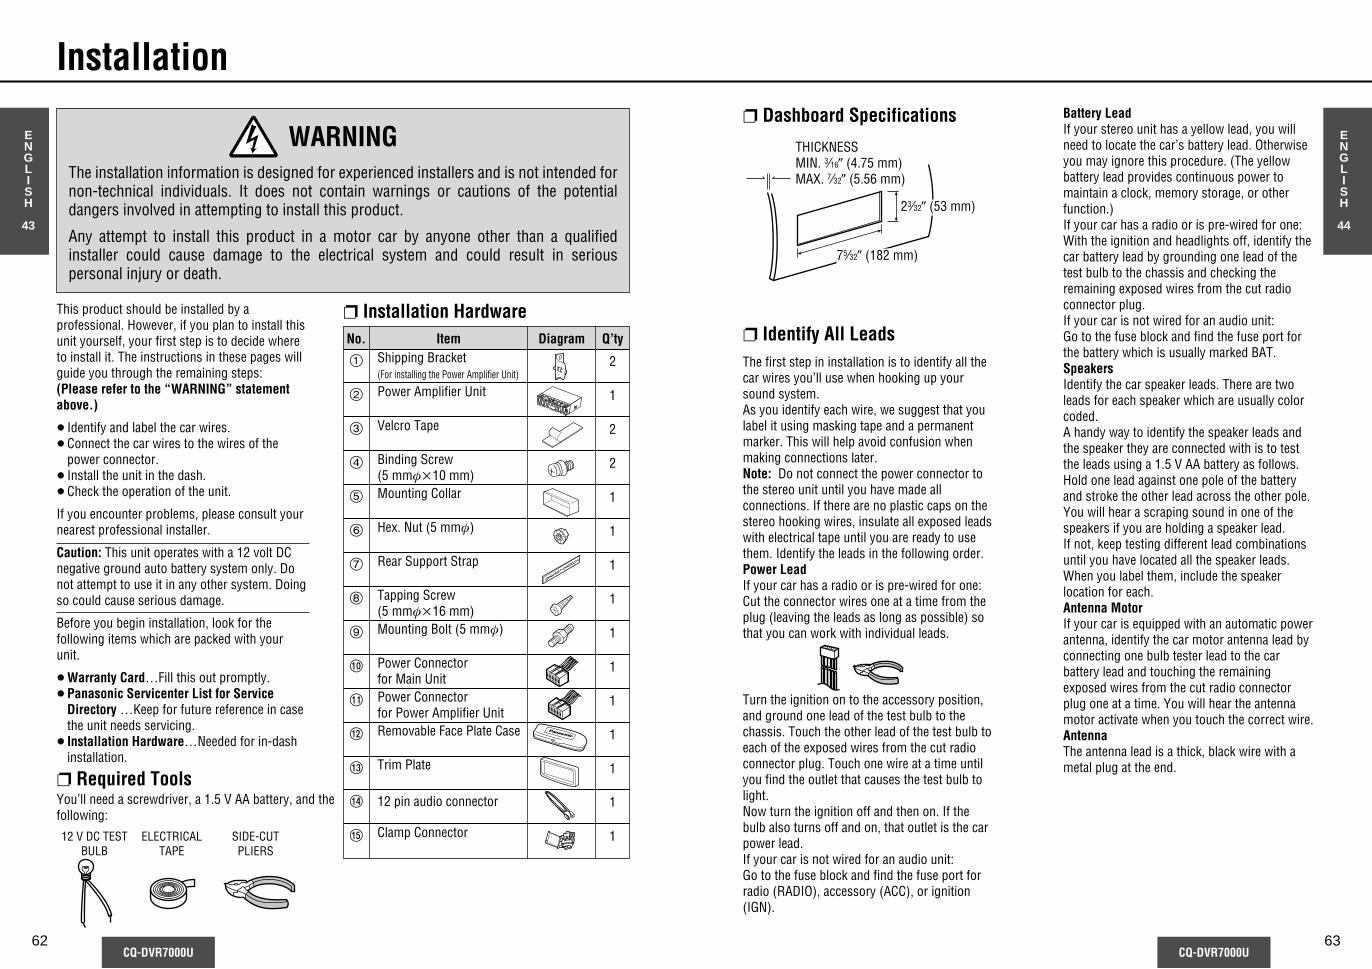
Removable Face Plate Case
ENGLISH
43
ENGLISH
44
CQ-DVR7000U CQ-DVR7000U62 63
Installation
Required Tools
Dashboard Specifications
You’ll need a screwdriver, a 1.5 V AA battery, and thefollowing:
THICKNESSMIN. 3⁄16z (4.75 mm)MAX. 7⁄32z (5.56 mm)
23⁄32z (53 mm)
75⁄32z (182 mm)
The first step in installation is to identify all thecar wires you’ll use when hooking up yoursound system.As you identify each wire, we suggest that youlabel it using masking tape and a permanentmarker. This will help avoid confusion whenmaking connections later.Note: Do not connect the power connector tothe stereo unit until you have made allconnections. If there are no plastic caps on thestereo hooking wires, insulate all exposed leadswith electrical tape until you are ready to usethem. Identify the leads in the following order.Power LeadIf your car has a radio or is pre-wired for one: Cut the connector wires one at a time from theplug (leaving the leads as long as possible) sothat you can work with individual leads.
Turn the ignition on to the accessory position,and ground one lead of the test bulb to thechassis. Touch the other lead of the test bulb toeach of the exposed wires from the cut radioconnector plug. Touch one wire at a time untilyou find the outlet that causes the test bulb tolight.Now turn the ignition off and then on. If thebulb also turns off and on, that outlet is the carpower lead.If your car is not wired for an audio unit: Go to the fuse block and find the fuse port forradio (RADIO), accessory (ACC), or ignition(IGN).
Identify All Leads
WARNINGThe installation information is designed for experienced installers and is not intended fornon-technical individuals. It does not contain warnings or cautions of the potentialdangers involved in attempting to install this product.
Any attempt to install this product in a motor car by anyone other than a qualifiedinstaller could cause damage to the electrical system and could result in seriouspersonal injury or death.
No. Item Diagram Q’ty
1
2
3
4
5
6
Shipping Bracket(For installing the Power Amplifier Unit)
Power Amplifier Unit
2
1
2
2
1
1
1
1
7
8
9
Velcro Tape
Binding Screw(5 mm·k10 mm)Mounting Collar
Hex. Nut (5 mm·)
Rear Support Strap
Tapping Screw(5 mm·k16 mm)
Installation HardwareThis product should be installed by aprofessional. However, if you plan to install thisunit yourself, your first step is to decide whereto install it. The instructions in these pages willguide you through the remaining steps: (Please refer to the “WARNING” statementabove.)
≥ Identify and label the car wires.≥ Connect the car wires to the wires of the
power connector.≥ Install the unit in the dash.≥ Check the operation of the unit.
If you encounter problems, please consult yournearest professional installer.
Caution: This unit operates with a 12 volt DCnegative ground auto battery system only. Donot attempt to use it in any other system. Doingso could cause serious damage.
Before you begin installation, look for thefollowing items which are packed with yourunit.
≥ Warranty Card…Fill this out promptly.≥ Panasonic Servicenter List for Service
Directory …Keep for future reference in casethe unit needs servicing.
≥ Installation Hardware…Needed for in-dashinstallation.
1Mounting Bolt (5 mm·)
: 1Power Connectorfor Main Unit
; 1Power Connectorfor Power Amplifier Unit
< 1
= 1Trim Plate
12 V DC TESTBULB
ELECTRICALTAPE
SIDE-CUTPLIERS
Battery LeadIf your stereo unit has a yellow lead, you willneed to locate the car’s battery lead. Otherwiseyou may ignore this procedure. (The yellowbattery lead provides continuous power tomaintain a clock, memory storage, or otherfunction.)If your car has a radio or is pre-wired for one: With the ignition and headlights off, identify thecar battery lead by grounding one lead of thetest bulb to the chassis and checking theremaining exposed wires from the cut radioconnector plug.If your car is not wired for an audio unit: Go to the fuse block and find the fuse port forthe battery which is usually marked BAT.SpeakersIdentify the car speaker leads. There are twoleads for each speaker which are usually colorcoded.A handy way to identify the speaker leads andthe speaker they are connected with is to testthe leads using a 1.5 V AA battery as follows.Hold one lead against one pole of the batteryand stroke the other lead across the other pole.You will hear a scraping sound in one of thespeakers if you are holding a speaker lead.If not, keep testing different lead combinationsuntil you have located all the speaker leads.When you label them, include the speakerlocation for each.Antenna MotorIf your car is equipped with an automatic powerantenna, identify the car motor antenna lead byconnecting one bulb tester lead to the carbattery lead and touching the remainingexposed wires from the cut radio connectorplug one at a time. You will hear the antennamotor activate when you touch the correct wire.AntennaThe antenna lead is a thick, black wire with ametal plug at the end.
> 112 pin audio connector
? 1Clamp Connector

ENGLISH
45
ENGLISH
46
CQ-DVR7000U CQ-DVR7000U64 65
Installation (continued)
1 Shipping Bracket
Before Installation
Power Amplifier Unit
Connect All LeadsNow that you have identified all the wires in thecar, you’re ready to begin connecting them tothe stereo unit wires. The wiring diagram (page 70) shows the proper connections andcolor coding of the leads.We strongly recommend that you test the unitbefore making a final installation.You can set the unit on the floor and maketemporary connections to test the unit. Useelectrical tape to cover all exposed wires.
Important: Connect the red power lead last,after you have made and insulated all otherconnections.
GroundConnect the black ground lead of the powerconnector to the metal car chassis.
SpeakersConnect the speaker wires. See the wiringdiagram ( page 70) for the proper hookups.Follow the diagram carefully to avoid damagingthe speakers and the stereo unit.The speakers used must be able to handle morethan 45 W of audio power. If using an optionalaudio amplifier, the speakers should be able tohandle the maximum amplifier output power.Speakers with low input ratings can bedamaged. Speaker impedance should measure4–8 ≠, which is typically marked on mostspeakers. Lower or higher impedance speakerswill affect output and can cause both speakerand stereo unit damage.
Caution: Never ground the speaker cords. Forexample, do not use a chassis ground systemor a three-wire speaker common system. Eachspeaker must be connected separately usingparallel insulated wires. If you are in doubtabout how your car’s speakers are wired,please consult your nearest professionalinstaller.
Motor AntennaConnect the car motor antenna lead to the bluemotor antenna relay control lead.
Note:≥ The shipping brackets are sometimes used when
installing the power amplifier unit. Do not discard theshipping brackets.
Be sure to remove the Shipping Brackets 1.
2 Power Amplifier Unit
Carpet3 Velcro Tape
Using Velcro Tape 3, secure the Power Amplifier Unit2 underneath the passenger seat.≥Affix the adhesive-backed Velcro Tape 3 to the
bottom of the power amplifier unit, and then place theunit on the carpet under the seat.
Note:≥ Velcro Tape 3 may not adhere to some types of
carpet.
Tapping screws (sold separetely) (5 mm·t16 mm) (4 pieces)1 Shipping Bracket
4 Binding Screw (5 mm·t10mm) (2 pieces)
2 Power Amplifier Unit
Use a knife or other cutting tools to open cross-shaped cuts in the carpet.
Apply anti-corrosion treatment to the Tapping screws and the holes.
When using the shipping bracket 1
1 Using a Binding Screw 4,attach a Shipping Bracket 1 tothe Power Amplifier Unit 2.
2 Drill 3.5 mm holes in the bodyof the car in alignment with theholes in the Shipping Bracket1.
3 Use Tapping screws to attachthe Power Amplifier Unit 2 tothe car.
Cautions:≥ Continuous use of this unit will cause the power amplifier unit to become hot. Be careful not to touch
the power amplifier unit while it is in operation. Also, do not place other objects on top of the poweramplifier unit.
≥ Do not install the power amplifier unit in a location where it may be subject to damage fromoverheating, such as next to a heater vent, or in a location exposed to direct sunlight such as thedashboard or the rear window deck.
≥ Do not install the power amplifier unit near a door or other locations where it may be readily exposedto water or stepped on.
≥ Clean away all oil, moisture, dust, etc., from the surface where the velcro tape is to be applied.≥ When drilling holes in the car, make certain that you do not damage any pipes or wiring on the
underside of the car.≥ When installing the power amplifier unit, make sure that the cord is positioned in a location where it
will not be pinched or damaged when the seat slides forward or backward.
BatteryConnect the yellow battery lead to the correctradio wire or to the battery fuse port on the fuseblock.
AntennaConnect the antenna by plugging the antennalead into the antenna receptacle.
ProductConnect any optional product such as anamplifier, according to the instructionsfurnished with the product. Leave about12 inches (30 cm) of distance between thespeaker cords/amplifier unit and theantenna/antenna extension cord. Read theoperating and installation instructions of anyproduct you will connect to this unit.
Power Connect the red power lead to the correct carradio wire or to the appropriate fuse port on thefuse block.If the stereo unit functions properly with allthese connections made, disconnect the wiresand proceed to the final installation.
Final InstallationLead ConnectionsConnect all wires, making sure that eachconnection is insulated and secure. Bundle allloose wires and fasten them with tape so theywon’t fall down later. Now insert the stereo unitinto the mounting collar.
Congratulations! After making a few finalchecks, you’re ready to enjoy your new autostereo system.
Final Checks1. Make sure that all wires are properly
connected and insulated.2. Make sure that the stereo unit is securely
held in the mounting collar.3. Turn on the ignition to check the unit for
proper operation.
If you have difficulties, consult your nearestauthorized professional installer for assistance.

ENGLISH
47
CQ-DVR7000U66
Installation (continued)
ENGLISH
48
CQ-DVR7000U
First complete the electrical connections, andthen check them for correctness. ( page 70)
:Power connectorLock lever (§)
Mounting tabs9Mounting bolt
Installation Procedures Insert Mounting Collar 5 into thedashboard, and bend the mounting tabsout with a screwdriver.
1
(a) Using the rear support strap 7
8Tapping screw
6 Hex. nut
7 Rear supportstrap
9 Mounting bolt
5 Mounting collar
Fire wall of car
3 mm·
(b) Using the rubber cushion (option)
9 Mounting bolt
5 Mounting collar
Rear support bracket(provided on the car)Rubber cushion (option)
Make sure that the locklever (§) is flush with themounting collar 5(not projecting outward).
Lock lever
Secure the rear of the unit.After fixing Mounting Bolt 9 and Power Connector:, fix the rear of the unit to the car body by eithermethod (a) or (b) shown below.
2
Insert Trim Plate =.3
After installation, reconnect thenegative - battery terminal.4
Preparation≥ We strongly recommend that you wear gloves
for installation work to protect yourself frominjuries.
≥ When bending the mounting tabs of themounting collar with a screwdriver, be carefulnot to injure your hands and fingers.
≥ Disconnect the cable from the negative - batteryterminal (see cautions below).
≥ Unit should be installed in a horizontal positionwith the front end up at a convenient angle, butless than 30o.
Caution:≥ Do not disconnect the battery terminals of a
car with a trip or navigational computer sinceall user settings stored in memory will be lost.Instead take extra care with installing the unitto prevent shorts.
Less than 30x
Dashboard InstallationInstallation Opening
(182 mm)
(53 mm)
75/32q
23/32q
This unit can be installed in any dashboard havingan opening as shown above. The dashboard shouldbe 3⁄16z (4.75mm)j7⁄32z (5.56 mm) thick in order tobe able to support the unit.
67

ENGLISH
49
ENGLISH
50
CQ-DVR7000U CQ-DVR7000U68 69
Installation (continued) Anti-Theft System
Remove the removable face plate.1 Press [OPEN]. The removable face plate
will be opened.
2 Push the face plate to either the right orleft.
3 Pull it out toward you..
Remove the trim plate with ascrewdriver.
Pull out the unit while pushing downthe lock lever with a screwdriver.
Remove the unit pulling with bothhands.
4
3
2
1 1
2
3
<
<
<
<
VOLSEL
TUNE
SOURCE
OSD
CQ-DVR7000U
DVD RECIEVER WITH CHANGER CONTROL
DISPS•MODE
R•MODEOPEN
PWR
TRACKDISC
P•SETBAND
REMOTEPLAY
MUTE
R
<Removable Face Plate Case
This unit is equipped with a removable face plate. Removing this face plate makes the radio totally inoperable.The security indicator will blink.
Remove the UnitSwitch off the power of the unit.
OSD
P •MODE OPEN
P
1 Open
2 Push
3 Pull out
ContactMain unit
ScrewdriverTrim plate
1
2
Lock lever
Lock lever
4<
Place the Removable FacePlate into Case1 Switch off the power of the unit.2 Remove the removable face plate. ( page 68)3 Gently press the button of the case and open the
cover. Place the face plate into the case and takeit with you when you leave the car.
Security IndicatorThe security indicator blinks when the removableface plate is removed from the unit.
1 Press and hold [SEL] for more than 2 seconds tochange to function control mode.
2 Press [SEL] to select “S-LED SEL”.3 Press [>] [<] to turn the security indicator
(S-LED) ON
Install Removable Face Plate1 Fit the face plate with its right or left hole on one
of the pins provided on the main unit.2 Fit the other hold on the other pin applying slight
pressure.3 Move the face plate up and down a few times to
make sure it is secure. Then close the frontpanel and press down the right side of the faceplate until it clicks into plate.
<
<
Security indicator
Contact
1
23
Display Security indicator
Blinks
OFF
≥ This face plate is not water-proof. Do not expose it to water or excessive moisture.≥ Do not remove the face plate while driving your car.≥ Do not place the face plate on the dashboard or nearby areas where the temperature rises to high level.≥ Do not touch the contacts on the face plate or on the main unit, since this may result in poor electrical
contacts.≥ If dirt or other foreign substances get on the contacts, wipe them off with a clean and dry cloth.≥ Do not apply a strong downward force onto the face plate and do not put anything on it while it is open,
or it might be damaged.
Default
Caution
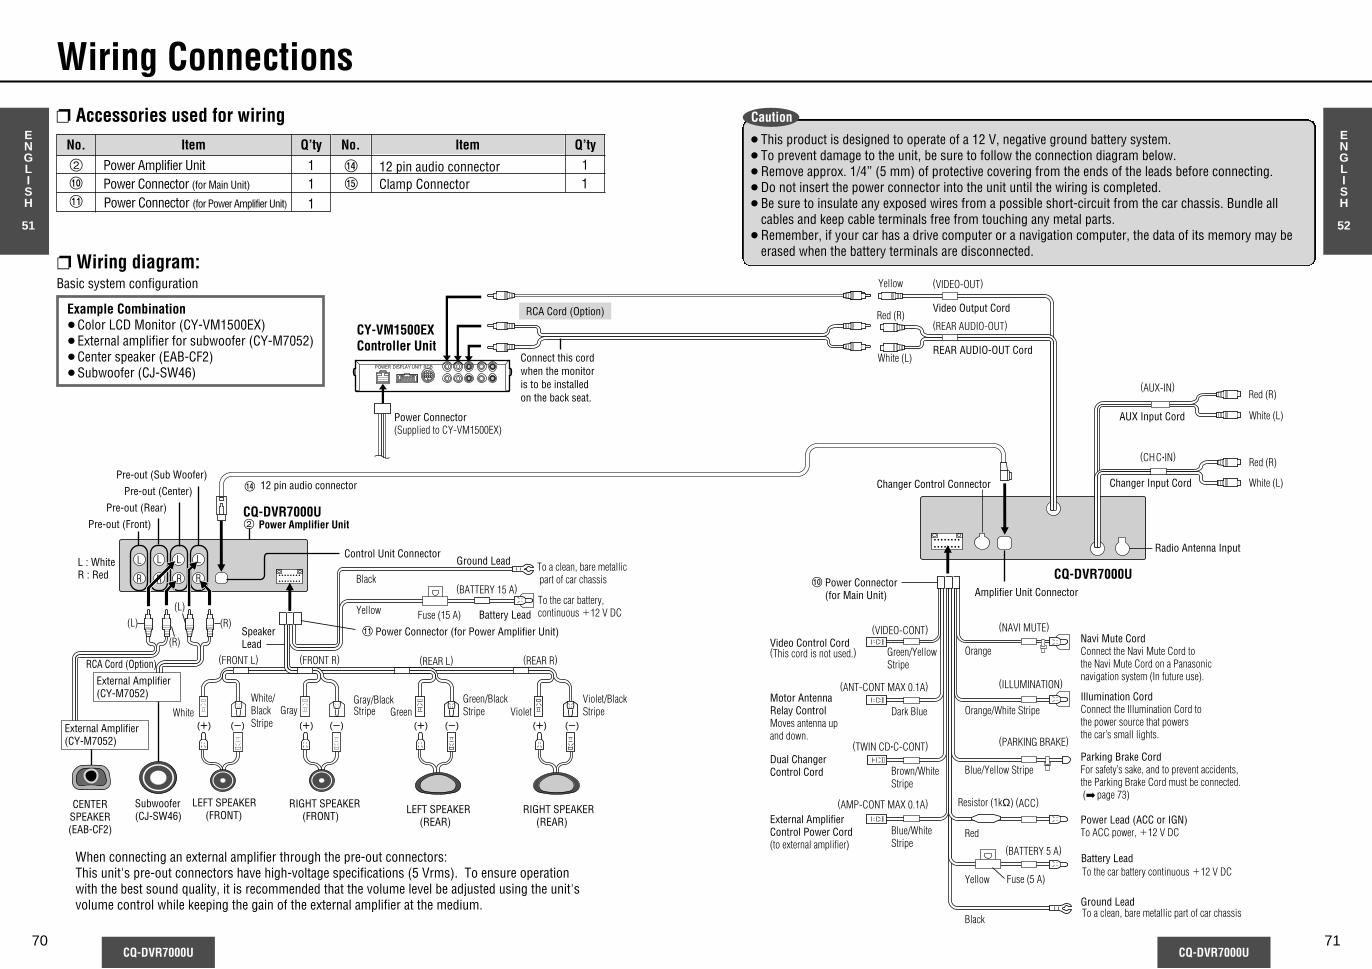
Q’tyQ’tyItemNo.ENGLISH
51
ENGLISH
52
CQ-DVR7000U CQ-DVR7000U70 71
Wiring Connections Accessories used for wiring
2 Power Amplifier Unit 1?Power Connector (for Main Unit) 1> 12 pin audio connector 1
POWER DISPLAY UNIT RGB
CENTERSPEAKER(EAB-CF2)
(s)(r)(s)(r)(s)(r) (s)(r)
Pre-out (Front)
Pre-out (Rear)
: Power Connector (for Main Unit)
; Power Connector (for Power Amplifier Unit)
2 Power Amplifier Unit
Pre-out (Center)
Pre-out (Sub Woofer)
Video Output Cord
Changer Input Cord
AUX Input Cord
CQ-DVR7000U
CY-VM1500EXController Unit
Yellow
Black
Fuse (15 A) Battery Lead
Speaker Lead
LEFT SPEAKER (FRONT) LEFT SPEAKER
(REAR)
RIGHT SPEAKER (FRONT)
RIGHT SPEAKER (REAR)
Yellow
White Gray Green Violet
Power Connector (Supplied to CY-VM1500EX)
Changer Control Connector
Radio Antenna Input
Dual Changer Control Cord
External Amplifier Control Power Cord(to external amplifier)
Motor Antenna Relay Control Moves antenna up and down.
Video Control Cord(This cord is not used.)
(VIDEO-OUT)
(FRONT L) (FRONT R) (REAR L) (REAR R)
(BATTERY 15 A)
(AUX-IN)
(NAVI MUTE)
Orange
Orange/White Stripe
Blue/Yellow Stripe
Red
Yellow
Black
Blue/WhiteStripe
Brown/WhiteStripe
Dark Blue
Green/YellowStripe
(VIDEO-CONT)
(ILLUMINATION)
(PARKING BRAKE)
(ACC)
(BATTERY 5 A)
(ANT-CONT MAX 0.1A)
(TWIN CD•C-CONT)
(CH.C•IN)
(AMP-CONT MAX 0.1A)
Red (R)
White (L)
Fuse (5 A)
Navi Mute CordConnect the Navi Mute Cord to the Navi Mute Cord on a Panasonic navigation system (In future use).
Illumination CordConnect the Illumination Cord to the power source that powers the car’s small lights.
Parking Brake CordFor safety’s sake, and to prevent accidents, the Parking Brake Cord must be connected. ( page 73)
Power Lead (ACC or IGN)To ACC power, _12 V DC
To the car battery, continuous _12 V DC
White/Black Stripe
Green/Black Stripe
To a clean, bare metallic part of car chassis
Ground LeadTo a clean, bare metallic part of car chassis
To the car battery continuous _12 V DC
Violet/Black Stripe
Gray/Black Stripe
RCA Cord (Option)
Red (R)
White (L)
Resistor (1kΩ)Subwoofer(CJ-SW46)
Red (R)
White (L)
(REAR AUDIO-OUT)
REAR AUDIO-OUT Cord
External Amplifier(CY-M7052)
External Amplifier(CY-M7052)
> 12 pin audio connector
Connect this cord when the monitor is to be installed on the back seat.
(R)
(L)(L)
(R)
RCA Cord (Option)
Control Unit Connector
Amplifier Unit Connector
L L L L
RR R RL : WhiteR : Red
Battery Lead
Ground Lead
CQ-DVR7000U
Wiring diagram:
≥ This product is designed to operate of a 12 V, negative ground battery system.≥ To prevent damage to the unit, be sure to follow the connection diagram below.≥ Remove approx. 1/4” (5 mm) of protective covering from the ends of the leads before connecting.≥ Do not insert the power connector into the unit until the wiring is completed.≥ Be sure to insulate any exposed wires from a possible short-circuit from the car chassis. Bundle all
cables and keep cable terminals free from touching any metal parts.≥ Remember, if your car has a drive computer or a navigation computer, the data of its memory may be
erased when the battery terminals are disconnected.
Caution
: Clamp Connector 1
Example Combination≥Color LCD Monitor (CY-VM1500EX)≥External amplifier for subwoofer (CY-M7052)≥Center speaker (EAB-CF2)≥Subwoofer (CJ-SW46)
Basic system configuration
1Power Connector (for Power Amplifier Unit);
No. Item
When connecting an external amplifier through the pre-out connectors:This unit's pre-out connectors have high-voltage specifications (5 Vrms). To ensure operationwith the best sound quality, it is recommended that the volume level be adjusted using the unit'svolume control while keeping the gain of the external amplifier at the medium.
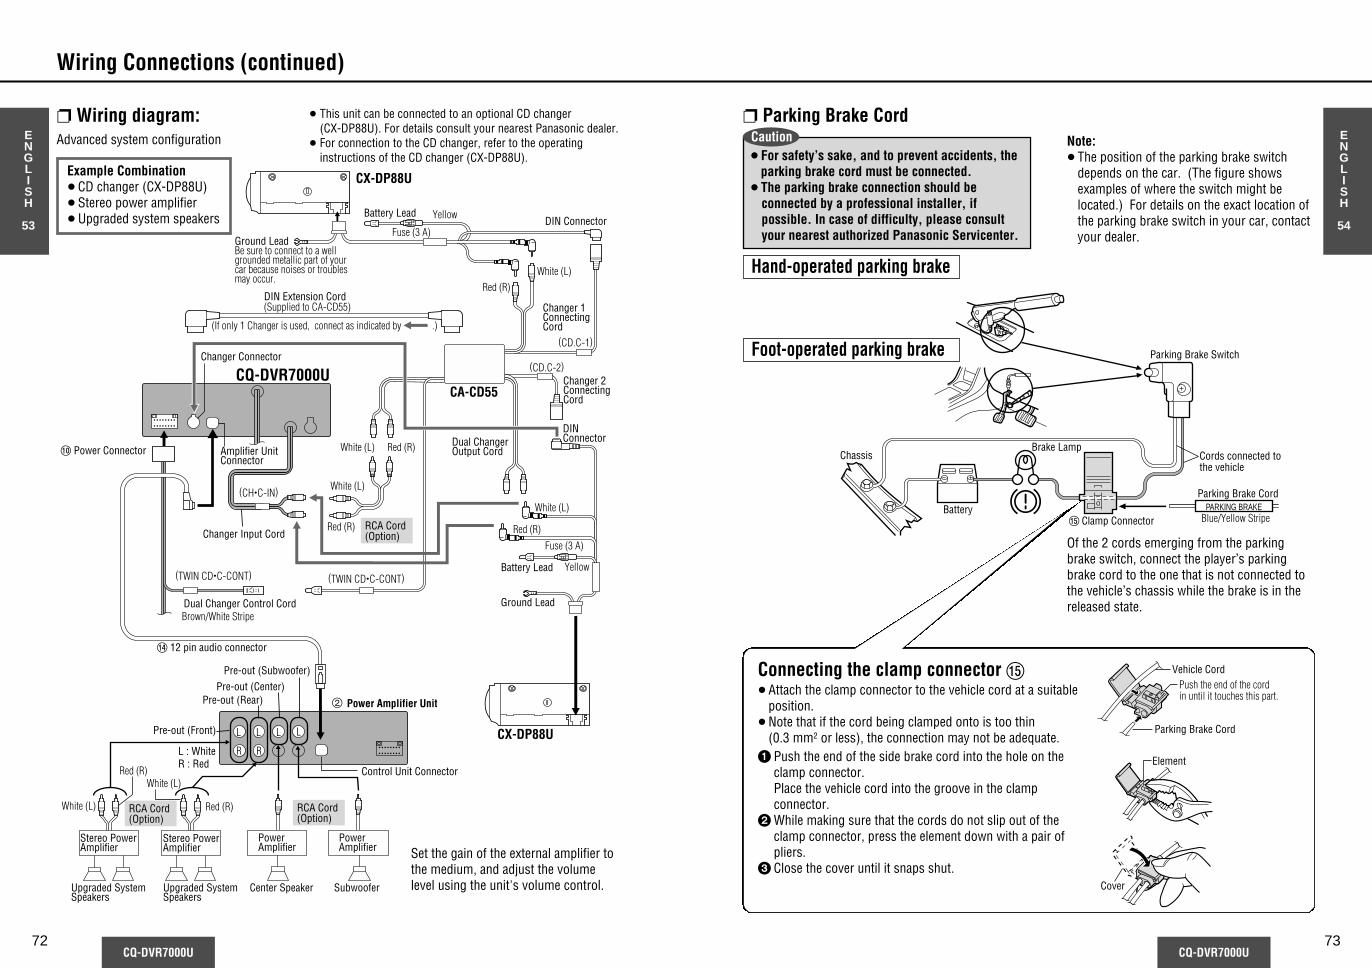
Power Amplifier
Center Speaker Subwoofer
Power Amplifier
2 Power Amplifier Unit
(TWIN CD•C-CONT)
CX-DP88U
CA-CD55CQ-DVR7000U
CX-DP88U
Ground LeadBe sure to connect to a well grounded metallic part of your car because noises or troubles may occur.
Battery Lead
Battery Lead
Ground Lead
Yellow
(Supplied to CA-CD55)
White (L)
White (L)
White (L)
(If only 1 Changer is used, connect as indicated by .)
Stereo Power Amplifier
Upgraded System Speakers
Upgraded System Speakers
Stereo Power Amplifier
Brown/White Stripe
: Power Connector
White (L)
Red (R)
Red (R)
Red (R) Red (R)
DIN Connector
DIN Connector
DIN Extension Cord
Dual Changer Output Cord
Changer Connector
Changer 1ConnectingCord
Changer 2ConnectingCord
Fuse (3 A)
Yellow
Fuse (3 A)
(CD.C-1)
(CD.C-2)
(CH•C-IN)
(TWIN CD•C-CONT)
RCA Cord (Option)
Dual Changer Control Cord
> 12 pin audio connector
Pre-out (Front)
Pre-out (Rear)Pre-out (Center)
Pre-out (Subwoofer)
RCA Cord (Option)
RCA Cord (Option)
Amplifier Unit Connector
Control Unit Connector
R R
L L L L
L : WhiteR : Red
White (L)
Red (R)White (L)
Red (R)
Changer Input Cord
Example Combination≥ CD changer (CX-DP88U)≥ Stereo power amplifier≥ Upgraded system speakers
PARKING BRAKE
Parking Brake Switch
Cords connected to the vehicle
Parking Brake Cord
Brake Lamp
Battery
Chassis
? Clamp Connector Blue/Yellow Stripe
Hand-operated parking brake
Foot-operated parking brake
ENGLISH
53
ENGLISH
54
CQ-DVR7000U CQ-DVR7000U72 73
Wiring Connections (continued)
Vehicle Cord
Parking Brake Cord
Element
Cover
Push the end of the cord in until it touches this part.
Of the 2 cords emerging from the parkingbrake switch, connect the player’s parkingbrake cord to the one that is not connected tothe vehicle’s chassis while the brake is in thereleased state.
Connecting the clamp connector ?≥ Attach the clamp connector to the vehicle cord at a suitable
position.≥ Note that if the cord being clamped onto is too thin
(0.3 mm2 or less), the connection may not be adequate.1 Push the end of the side brake cord into the hole on the
clamp connector.Place the vehicle cord into the groove in the clampconnector.
2 While making sure that the cords do not slip out of theclamp connector, press the element down with a pair ofpliers.
3 Close the cover until it snaps shut.
≥ For safety’s sake, and to prevent accidents, theparking brake cord must be connected.
≥ The parking brake connection should beconnected by a professional installer, ifpossible. In case of difficulty, please consultyour nearest authorized Panasonic Servicenter.
Note:≥ The position of the parking brake switch
depends on the car. (The figure showsexamples of where the switch might belocated.) For details on the exact location ofthe parking brake switch in your car, contactyour dealer.
Wiring diagram: Parking Brake CordAdvanced system configuration Caution
≥ This unit can be connected to an optional CD changer (CX-DP88U). For details consult your nearest Panasonic dealer.
≥ For connection to the CD changer, refer to the operatinginstructions of the CD changer (CX-DP88U).
Set the gain of the external amplifier tothe medium, and adjust the volumelevel using the unit's volume control.

262626=
≥ Insert the battery correctly.≥ Make sure that the battery is of the correct type.≥ Replace the batteries.≥ Point the remote control at the remote control sensor labeled
“REMOTE”.
ENGLISH
55
ENGLISH
56
CQ-DVR7000U CQ-DVR7000U74 75
Troubleshooting Maintenance
Your product is designed and manufactured to ensure the minimum of maintenance. Use a soft cloth forroutine exterior cleaning. Never use benzine, thinner or other solvents.
Product ServicingIf the suggestions in the charts don’t solve the problem, we recommend that you take it to your nearestauthorized Panasonic Servicenter. The unit should be serviced only by a qualified technician.
Replacing the FuseUse fuses of the same specified rating (15 A). Using different substitutes or fuses with higher ratings, orconnecting the unit directly without a fuse, could cause fire or damage to the stereo unit. If the replacement fuse fails, contact your nearest Panasonic Servicenter for service.
Error Display Messages DVD/Video CD/CD
Display Cause Check/Remedy
Display Cause Check/Remedy
PAL/NTSC ERR
REGION ERR
E3 PLS EJECT
An attempt was made to play aPAL disc.
Press [<] and check thedisc.
Press [<] and check thedisc.
Press [<] and check thedisc.
Eject the disc. If the discdoes not eject when youpress [<], then simply pressthe reset switch.
The unit will not operate forsome reason.
CD • CHsE1s
CD • CHsE2s
NO DISC
CD • CHsE3s
≥ Either the disc is dirty, orupside down.
≥ There is a scratch on thedisc.
There are no discs in thechanger or magazine.
Load discs in the changer or magazine.
Check the disc. (The changerautomatically switches to the nextdisc.)
The changer will not operatefor some reason.
Changer
Remote Control
Press [<] on the changer. If thechanger does not respond, press thechanger’s reset switch.
Notes≥ The number of the disc that is the cause of the error is sometimes displayed before “E1” or “E2”.≥ Depending on the changer, the information that is displayed and the remedy may sometimes differ in
part. For details, refer to the User’s Manual provided with your changer.
Symptom Remedy Page
Troubleshooting Tips Common
Symptom Remedy Page
The buttons do notwork.
Cannot set the clock.
The power does notcome on.
≥ Turn the ignition switch to “ON” or “ACC”.≥ Connect the cords correctly.≥ Replace the fuse.
=70-7374
The unit produces nosound.
≥ Turn muting off.≥ Connect the cords correctly.≥ Wait until the condensation clears.
4070-73=
≥ Change the display to something other than demo mode andthen try again.
≥ Set the MUTE/ATT to “OFF”.
Press [PWR] and turn the power on before attempting to set theclock.
32
40
32
Pressing the buttonshas no effect.
≥ Either the disc is dirty, orupside down.
≥ Either the disc is scratchedor has some other problems.The disc is not playable.
An attempt was made to play adisc with a region number thatwas not “1” or “ALL”.
OSD
This type of disccannot be played.
Please eject.
This disc may notbe played in your
regionPlease eject.
Mechanical ErrorPlease eject.
E1 PLS EJECT Playback ErrorPlease eject.
E2 PLS EJECTThis type of disc
cannot be played.Please eject.
The sound quality ispoor and/or noise isgenerated when theexternal amplifier isused.
Set the gain of the external amplifier to the medium for operation. 72

≥ Condensation has formed in the unit. Wait 1 or 2 hours for theunit to dry, and then try again.
≥ The unit can only play the following types of discs: DVD video,Video CD, and music CD.
≥ Refer to the section “Notes on Disc” and clean the disc.≥ Insert the disc with the label facing up.
ENGLISH
57
CQ-DVR7000U CQ-DVR7000U76 77
Troubleshooting (continued)
Sound Settings
Radio
DVD/Video CD/CD
DVD/Video CD/CD (Continued)
If the Unit does not Operate Properly
<
Reset SwitchReset SwitchPush a thin, unbreakable object into this hole to press thereset switch.≥ After a reset, the unit reverts to its initial state.
Note that any information or settings stored in the unit’smemory will be lost.
Station presets werecancelled.
The sound skips.The sound quality ispoor.
The disc will not eject.
Symptom Remedy Page
Symptom Remedy Page
Symptom Remedy Page
Symptom Remedy Page
There is a lot of noisein FM stereo andmonaural broadcasts.
Vibrations causeskips.
Select another station with a stronger signal. 34
The audio/subtitlelanguage selected inthe initial settings isnot used.
If audio or subtitles in that language are not recorded on the disc,the audio or subtitles do not switch to that language. (Somediscs permit switching through a menu screen. Refer to the guideprovided with your disc.)
42
≥ Install the unit at an angle less than 30 degrees.≥ Refer to the section on installation and make sure that the unit
is securely attached to the mounting bracket, etc.
The disc will not play,or else it stops veryquickly.
≥ Press the reset switch if pressing any of the otherbuttons has no effect.
Caution
Connect the battery power cord to a terminal that is alwayssupplied with power.
Refer to the section “Notes on Disc” and clean the disc.
Open the panel and press [<]. If the disc still does not eject,press the reset switch.
ENGLISH
58
49It is difficult to hearquiet sounds. Set the DR COMP setting to “Minimum”.
71
78
6667
36, 77
=
7
7836
Cannot switch theaudio language/subtitle language/angle.
≥ It is not possible to switch if the disc does not have multipleaudio languages/subtitle languages/angles recorded on it.(Refer to the guide provided with your disc.)
≥ Some discs permit switching through a menu screen.≥ Sometimes, switching angles is possible only with certain
scenes.
=
43=
Messages in the menuscreen are not in thedesired language.
Check the setting for “Menu Language” in the initial settings. 47
No sound is outputfrom a speaker.
≥ Adjust “BAL//FAD” to a suitable position.≥ Connect the cords correctly.≥ Correct the speaker settings.≥ The sound is recorded only for the center speaker parts on the
disc, and SOUND or PROLOGIC has been set. Select OFF as the sound mode setting.
537027
50
No sound is outputfrom the centerspeaker.
≥ Raise the output level/volume.≥ Select any surround sound setting except OFF.≥ Set the speaker output setting to “OFF”.≥ Set the Private Mode to OFF.
30, 55513160
DR COMP does notwork. (“DR COMP”does not light .)
This function only works with Dolby Digital encoded material. 49
=
=The picture becomesdistorted while fastforwarding orreversing.
The picture does notappear on the TV.
A certain amount of distortion is normal.
≥ Check the connections.≥ Check the settings for the TV itself.≥ Stop the car and apply the parking brake.
The buttons do notwork. Some operations are not permitted with certain discs.
=Video CD menuplayback does notwork.
Menu playback is only possible when playing a video CD that hasthe playback control feature.
No subtitles appear. =Subtitles must be recorded on the disc, or they will not appear.(Refer to the guide provided with your disc.)
70==
The size on theconnected TV is not4:3 (16:9).
48Set “TV Aspect” correctly in accordance with the TV that you areusing.
When playing instereo, left and rightchannels are reversed.
Connect the speaker cords correctly. 70-72

ENGLISH
59
ENGLISH
60
CQ-DVR7000U CQ-DVR7000U78 79
Maintenance Language Code List
6565 Afar6566 Abkhazian6570 Afrikaans6577 Ameharic6582 Arabic6583 Assamese6588 Aymara6590 Azerbaijani6665 Bashkir6669 Byelorussian6671 Bulgarian6672 Bihari6678 Bengali; Bangla6679 Tibetan6682 Breton6765 Catalan6779 Corsican6783 Czech6789 Welsh6865 Danish6869 German6890 Bhutani6976 Greek6978 English6979 Esperanto6983 Spanish6984 Estonian6985 Basque7065 Persian7073 Finnish7074 Fiji7079 Faroese7082 French7089 Frisian7165 Irish7168 Scots Gaelic7176 Galician7178 Guarani7185 Gujarati7265 Hausa7273 Hindi7282 Croatian7285 Hungarian
Code Language Name7289 Armenian7365 Interlingua7378 Indonesian7383 Icelandic7384 Italian7387 Hebrew7465 Japanese7473 Yiddish7487 Javanese7565 Georgian7575 Kazakh7576 Greenlandic7577 Cambodian7578 Kannada7579 Korean7583 Kashmiri7585 Kurdish7589 Kirghiz7665 Latin7678 Lingala7679 Laothian7684 Lithuanian7686 Latvian, Lettish7771 Malagasy7773 Maori7775 Macedonian7776 Malayalam7778 Mongolian7779 Moldavian7782 Marathi7783 Malay7784 Maltese7789 Burmese7865 Nauru7869 Nepali7876 Dutch7879 Norwegian7982 Oriya8065 Panjabi8076 Polish8083 Pashto, Pushto8084 Portuguese8185 Quechua
Code Language Name8277 Rhaeto-Romance8279 Romanian8285 Russian8365 Sanskrit8368 Sindhi8372 Serbo-Croatian8373 Singhalese8375 Slovak8376 Slovenian8377 Samoan8378 Shona8379 Somali8381 Albanian8382 Serbian8385 Sundanese8386 Swedish8387 Swahili8465 Tamil8469 Telugu8471 Tajik8472 Thai8473 Tigrinya8475 Turkmen8476 Tagalog8479 Tonga8482 Turkish8484 Tatar8487 Twi8575 Ukrainian8582 Urdu8590 Uzbek8673 Vietnamese8679 Volapük8779 Wolof8872 Xhosa8979 Yoruba9072 Chinese9085 Zulu
Code Language Name
How to input the language code, refer to page 47.Care of the Unit Cleaning this UnitUse a dry, soft cloth to wipe.
Notes on DiscHow to hold the disc≥ Do not touch the underside of the disc.≥ Do not make scratches on the discs.≥ Do not bend disc.≥ When not in use, keep disc in the case.
Do not use irregular shaped discs.
Do not leave discs on the following places:≥ Direct sunlight≥ Near car heaters≥ Dirty, dusty and damp areas≥ Seats and dashboards
Disc cleaningUse a dry, soft cloth to wipe from the centeroutward.
Caution on new discsA new disc may have rough edges on its inner andouter perimeter. These may cause malfunction.Remove the rough edges using a pencil, etc.
Caution on CleaningNever use solvents such as benzine, thinner as theymay mar the surface of the unit.
Label side
<Right> <Wrong>
Rough edge
Rough edge
Do not use irregular shaped discs.

ENGLISH
61
ENGLISH
62
CQ-DVR7000U CQ-DVR7000U80 81
Specifications Definition of TermsDolby DigitalThis is a digital audio compression technology thatwas developed by Dolby Labs. This technologybreaks up a music signal into 5.1 channels forrecording and playback: left front, right front, center,left surround, right surround and subwoofer (0.1 channel). Because this technology makes itpossible to store a large amount of audio data on adisc efficiently, it is used to record audio in multiplelanguages, in stereo or monaural.
Dolby SurroundThis is a system that records a 4-channel signal (leftfront, right front, center, monaural surround) in 2 channels, and then uses a Dolby Pro Logicdecoder to decode the resulting signal back into 4 signals for output. The surround channel output ismonaural.
Linear PCM Audio (LPCM)This is a signal recording format that is used formusic CDs. Music CDs are recorded at 44.1 kHz/16 bits, DVD video discs are recorded at 44.1 kHz/16 bits to 96 kHz/24 bits.
MPEGMPEG is an international standard format for thecompression of motion video as defined by theMoving Picture Experts Group, a working committeewhich functions under the auspices of theInternational Standardization Organization andInternational Electrotechnical Commission.On some DVD discs, the digital sound iscompressed using this system before it is recorded.
Playback Control (Video CD)When a video CD package is labeled as “supportsplayback control”, etc., the user can display a menuscreen on the TV and interactively access certainscenes and information.
Sampling Frequency, Number of Quantization BitsWhen an analogue signal is converted into a digitalsignal, the signal is divided into fixed time intervalsand digitized. This method is called “sampling”. Thesampling frequency indicates how many intervals 1 second is divided into; the number of quantizationbits indicates the size of the data that is used torepresent each interval. The larger these figures are,the more faithfully the analogue sound can bereproduced.
Titles and Chapters (DVD Video))A DVD is divided into several large divisions (titles),and several smaller divisions (chapters). Thesedivisions are assigned numbers, allowing the userto easily specify where he or she wants to startplayback.Example) DVD video
Tracks (Video CD, Music CD)Video CDs and music CDs are divided into severaldivisions (tracks), each of which is numbered.Example)
Pan & Scan ScreenThis is one method for displaying wide-screen videoon a normal sized (4:3) TV; in this view, the left andright edges of the screen are cut off.
Letterbox ScreenThis is one method for displaying wide-screen videoon a normal sized (4:3) TV; in this view, black bandsappear at the top and bottom of the screen.
Power supply voltage : 12 V DC, - ground(test voltage: 14.4 V)
Current consumption : Less than 8.5 A(during discoperations at ratedoutput)
Power output : 20Wa4 ch (1 kHz, 1 %, 4 ≠)
Maximum output : 45 Wa4 chSuitable speaker impedance : 4 ≠Audio input impedance : 10 k≠
Audio input sensitivity : 200 mVPre-out output voltage : 5 VrmsPre-out output impedance : 60 ≠External dimensions(Main unit) : 7za115/16za61/8z
(WaHaD) (178a50a155 mm)(Power amplifier unit) : 57/8za15/8za45/16z
(WaHaD) (150a42a110 mm)Weight (Main unit) : 3 lbs. 10 oz (1.65 kg)(Power amplifier unit) : 24 oz. (0.64 kg)
General Audio Section
Video sectionTuner (Radio) SectionFM tuner section Reception frequency range : 87.9 MHzj107.9 MHzUsable sensitivity : 11 dBf (75 ≠)Total harmonic distortion(mono) : 0.3 % (1 kHz)Auditory compensation S/N ratio(mono) : 60 dBFrequency response : 20 Hzj15 kHz, d3 dBStereo separation : 35 dB (1 kHz)Alternate channel selectivity : 75 dB50 dB quieting sensitivity : 15.4 dBf (75 ≠)
AM tuner sectionReception frequency range : 530 kHzj1710 kHzUsable sensitivity : 28 dB/¨V (S/N 20 dB)Image interference ratio : 65 dB
Frequency response(When LARGE is selected) : 20 Hzj44 kHz (96 kHz
sampling frequencyDVD video only)20 Hzj22 kHz (48 kHzsampling frequencyDVD video only)20 Hzj20 kHz (CD)
Delay timeDolby digital• Center : 0 msj5.3 ms• Surround L/R : 0 msj15.9 msDolby Pro Logic• Surround L/R : 0 msj15.9 msDistortionFront L/R (1 kHz, 0 dB, PCM input)
: 0.01 %Dynamic range : more than 100 dBS/N ratio : more than 100 dBPickup-wave length : 650 nm
Signal format : NTSC (standard signalformat in Japan, U.S.)
Video output : 75 ≠, 1 Vp-pRegion No. : 1 and ALL
Above specifications comply with EIA standards.The specifications and appearance of this unit are subject to change without notice.
≥ Manufactured under license from Dolby Laboratories.“Dolby”, “Pro Logic” and the double-D symbol aretrademarks of Dolby Laboratories. Confidential unpublished works.C 1992-1997 Dolby Laboratories, Inc.All rights reserved.
Chapter 1 Chapter 2 …… Chapter 1 ……Title 1 Title 2
Track 1 Track 3Track 2 ……Track