operating instructions labx balance - mettler toledo · contents 4 mettler toledo labx balance v1.4...
TRANSCRIPT
Balance Control Software
LabX balance Version 1.4
Operating instructions

Leer

Contents
METTLER TOLEDO LabX balance V1.4 �
Contents
1 License Agreement for METTLER TOLEDO LabX Software .........................................................................9
2 Introduction ........................................................................................................................................112.1 Brief presentation of LabX ................................................................................................................................ 112.2 What you need to know regarding the content of this instructions ..................................................................... 122.� User interface ................................................................................................................................................. 14
3 Installing the software ........................................................................................................................15�.1 LabX balance system requirements .................................................................................................................. 15�.2 Installation and License Administration ............................................................................................................ 16�.2.1 Installation (Standalone) ................................................................................................................................. 16�.� License Administration and Activation of LabX .................................................................................................. 20�.�.1 Initial Startup of LabX ...................................................................................................................................... 20�.�.2 Activation and Reactivation of the System ........................................................................................................ 21�.�.� Managing instrument licenses ...................................................................................................... 22�.�.4 Managing module licenses ............................................................................................................................. 22
4 Creating users and groups ...........................................................................................234.1 Defining users and profiles .............................................................................................................................. 244.1.1 User properties ............................................................................................................................................... 244.1.2 Deleting a user ............................................................................................................................................... 264.1.� Changing the password of a user ..................................................................................................................... 274.2 Defining group rights and group members ....................................................................................................... 284.2.1 Group properties ............................................................................................................................................. 284.2.2 Deleting groups .............................................................................................................................................. �04.� Starting LabX pro and selecting a profile ......................................................................................................... �14.4 Changing your own password .......................................................................................................................... �14.5 Forced password change ................................................................................................................................. �2
5 General settings ................................................................................................................................335.1 Account Policies ........................................................................................................................ ��5.2 General Policies ......................................................................................................................... �45.� Electronic signature .................................................................................................................... �55.4 Managing documents ................................................................................................................. �65.4.1 Document settings .......................................................................................................................................... �65.4.2 Displaying documents ..................................................................................................................................... �65.5 Printing the security settings ............................................................................................................................ �65.6 General LabX settings (Menu>Tools>Options) .................................................................................................. �65.7 Setting up Instrument Management ................................................................................................................. �75.8 Setting up Job Management ........................................................................................................................... �85.9 Setting up Report Management ....................................................................................................................... �95.10 User specific settings ...................................................................................................................................... 405.10.1 Defining the folder for export of reports ............................................................................................................ 405.10.2 Option Allow subdirectory for export of reports .................................................................................................. 405.11 Transfer Mode ................................................................................................................................................. 415.11.1 Manual Transfer Mode configuration ................................................................................................................ 41
6 Tree view Configuration ......................................................................................................................436.1 Tree view LabX pro .................................................................................................................... 4�6.2 Tree view LabX light ......................................................................................................................................... 446.� Icons .............................................................................................................................................................. 45
7 Connecting peripheral devices ............................................................................................................467.1 Settings of the e-Link network interfaces ........................................................................................................... 467.2 Defining the computer connection in the balances ........................................................................................... 477.2.1 Defining the computer connection in the AX/MX/UMX balances ......................................................................... 47

Contents
4 METTLER TOLEDO LabX balance V1.4
7.2.2 Defining the computer connection in the XS balances ...................................................................................... 477.2.� Defining the computer connection in the XP balances ...................................................................................... 477.2.4 Defining the computer connection in the AT/MT/UMT balances .......................................................................... 487.2.5 Defining the computer connection in the AG/PG balances ................................................................................ 487.2.6 Defining the computer connection in the PG-S balances ................................................................................... 487.2.7 Defining the computer connection in the PR/SR/SG balances ............................................................................ 487.2.8 Defining the computer connection in the AB-L/AB-S/PB-L/PB-S balances ............................................................ 487.� Defining balances in LabX ............................................................................................................................... 497.�.1 Define RS connection ...................................................................................................................................... 497.�.2 Define Network connection .............................................................................................................................. 507.�.� Show configured devices ................................................................................................................................. 517.4 Modifying Communication parameters ............................................................................................................. 517.5 Managing and identifying balances ................................................................................................................. 527.6 Creating maintenance intervals and MinWeigh Settings .................................................................................... 5�7.6.1 MinWeigh functionality in LabX ........................................................................................................................ 547.7 Removing balances ......................................................................................................................................... 55
8 Setting up Weights Management .........................................................................................................568.1 Signing weights .......................................................................................................................... 578.2 Changing weights ........................................................................................................................................... 578.� Removing weights ........................................................................................................................................... 58
9 Balance-specific settings ....................................................................................................................599.1 Defining FACT and proFACT settings ................................................................................................................. 599.2 Scheduler for adjustment and tests .................................................................................................................. 609.2.1 Scheduler for sensitivity adjustment with internal weight ................................................................................... 609.2.2 Scheduler for sensitivity adjustment with external weight .................................................................................. 619.2.� Scheduler for sensitivity test with internal weight .............................................................................................. 6�9.2.4 Scheduler for sensitivity test with external weight .............................................................................................. 659.2.5 Scheduler for Repeatability test with external weight ......................................................................................... 679.� Configuring the Release Control ...................................................................................................................... 70
10 Displaying histories ............................................................................................................................7110.1 Histories of adjustment/test ............................................................................................................................. 7110.2 Histories of repeatability .................................................................................................................................. 7210.� Histories of MinWeigh incidents ....................................................................................................................... 7�
11 Tree view Weighing .............................................................................................................................7411.1 Introduction .................................................................................................................................................... 7411.2 Overview......................................................................................................................................................... 7411.� Icons .............................................................................................................................................................. 75
12 Job template definition .......................................................................................................................7612.1 Chronological sequence of a running job ........................................................................................................ 7612.2 Flow chart of a Job template ........................................................................................................................... 7712.� Defining a new job template ............................................................................................................................ 7812.4 Definition of job data ....................................................................................................................................... 7912.5 Definition of the Applications data.................................................................................................................... 8012.5.1 Simple Weighing ............................................................................................................................................. 8012.5.2 Totalization ..................................................................................................................................................... 8012.5.� Differential Weighing, weighing in several loops ................................................................................................ 8112.5.4 Dynamic weighing .......................................................................................................................................... 8112.5.5 Interval weighing ............................................................................................................................................. 8212.5.6 General settings .............................................................................................................................................. 8212.6 Defining the balance and the minimum requirements for the balance ............................................................... 8�12.7 Definition of the Sample data .......................................................................................................................... 8412.8 Defining calculations, statistics ........................................................................................................................ 85

Contents
METTLER TOLEDO LabX balance V1.4 5
12.8.1 Definitions and rules ....................................................................................................................................... 8512.8.2 Constants ....................................................................................................................................................... 8612.8.� Results ........................................................................................................................................................... 8612.8.4 Statistics ......................................................................................................................................................... 8712.8.5 SQC parameters .............................................................................................................................................. 8712.8.6 Post Job Results .............................................................................................................................................. 8812.9 Defining the data processing ........................................................................................................................... 8912.9.1 Transfer Mode ................................................................................................................................................. 8912.9.2 Report data ..................................................................................................................................................... 9112.10 Saving a job template ..................................................................................................................................... 9112.11 Duplicating job templates ................................................................................................................................ 9212.12 Exporting a job template .................................................................................................................................. 9212.1� Importing a job template ................................................................................................................................. 9�12.14 Organizing job templates................................................................................................................................. 9�12.15 Signing job templates ............................................................................................................... 9412.16 Adding a job template to the queue ................................................................................................................. 9412.17 Running a job ................................................................................................................................................. 9512.18 Deleting job templates .................................................................................................................................... 9512.19 Printing job templates ..................................................................................................................................... 95
13 Balance queue and job types ...............................................................................................................961�.1 Job types and status ....................................................................................................................................... 961�.1.1 Weighing jobs ................................................................................................................................................. 961�.1.2 Adjustment jobs .............................................................................................................................................. 971�.1.� Test jobs ......................................................................................................................................................... 971�.2 Reading FACT/proFACT records ......................................................................................................................... 98
14 Working with weighing jobs ................................................................................................................9914.1 Generating a weighing job .............................................................................................................................. 9914.1.1 Using a job template ....................................................................................................................................... 9914.1.2 Creating a one-time job .................................................................................................................................10014.1.� Creating a job thanks to Rapid Access-Job Template .......................................................................................10014.2 Generating adjustment and test jobs..............................................................................................................10014.2.1 Generating adjustment and test jobs with the scheduler .................................................................................10014.2.2 Generating adjustment and test jobs manually ...............................................................................................10114.� Starting/continuing weighing and adjustment/test jobs ...................................................................................10114.�.1 Jobs starting/continuing from LabX ................................................................................................................10114.�.2 Jobs starting from the balance with Rapid Access ..........................................................................................10114.4 Stopping a weighing job ................................................................................................................................10214.4.1 Pausing a weighing job from LabX .................................................................................................................10214.4.2 Closing a weighing job from LabX ..................................................................................................................102
15 Balance monitor ...............................................................................................................................10315.1 Overview.......................................................................................................................................................10�
16 Navigation on the balance .................................................................................................................10416.1 AX/MX/UMX balances with Remote software ...................................................................................................10416.1.1 Rapid Access ...............................................................................................................................................10416.1.2 General operation .........................................................................................................................................10516.1.� Starting a weighing job..................................................................................................................................10516.1.�.1 Starting a weighing job from a queue ............................................................................................................10516.1.�.2 Starting a weighing job with a job template ....................................................................................................10616.1.4 Executing weighings .....................................................................................................................................10716.1.5 Deleting samples from a running job .............................................................................................................10816.1.6 Pausing/Terminating a weighing job ...............................................................................................................10916.1.7 Disconnecting from LabX ...............................................................................................................................10916.1.8 Using peripheral devices ...............................................................................................................................109

Contents
6 METTLER TOLEDO LabX balance V1.4
16.1.8.1 Barcode reader .............................................................................................................................................10916.1.8.2 Local printer ..................................................................................................................................................10916.2 AX/MX/UMX balances with standard software ..................................................................................................11016.2.1 General operation .........................................................................................................................................11016.2.2 Starting a weighing job..................................................................................................................................11016.2.� Executing weighings .....................................................................................................................................11016.2.4 Deleting samples from a running job .............................................................................................................11116.2.5 Pausing/Terminating a weighing job ...............................................................................................................11216.2.6 Using peripheral devices ...............................................................................................................................11216.2.6.1 Barcode reader .............................................................................................................................................11216.2.6.2 Local printer ..................................................................................................................................................11216.� XS balances ..................................................................................................................................................11�16.�.1 Rapid Access ...............................................................................................................................................11�16.�.2 General operation .........................................................................................................................................11�16.�.� Starting a weighing job .................................................................................................................................11416.�.�.1 Starting a weighing job from a queue ............................................................................................................11416.�.�.2 Starting a weighing job with a job template ....................................................................................................11516.�.4 Executing weighings .....................................................................................................................................11616.�.5 Deleting samples from a running job .............................................................................................................11716.�.6 Pausing/Terminating a weighing job ...............................................................................................................11816.�.7 Disconnecting from LabX ...............................................................................................................................11816.�.8 Using peripheral devices ...............................................................................................................................11816.�.8.1 Barcode reader .............................................................................................................................................11816.�.8.2 Local printer ..................................................................................................................................................11816.4 XP balances ..................................................................................................................................................11916.4.1 Rapid Access ...............................................................................................................................................11916.4.2 General operation .........................................................................................................................................11916.4.� Starting a weighing job .................................................................................................................................12016.4.�.1 Starting a weighing job from a queue ............................................................................................................12016.4.�.2 Starting a weighing job with a job template ....................................................................................................12116.4.4 Executing weighings .....................................................................................................................................12216.4.5 Deleting samples from a running job .............................................................................................................12�16.4.6 Pausing/Terminating a weighing job ...............................................................................................................12416.4.7 Disconnecting from LabX ...............................................................................................................................12416.4.8 Using peripheral devices ...............................................................................................................................12416.4.8.1 Barcode reader .............................................................................................................................................12416.4.8.2 Local printer ..................................................................................................................................................12416.5 AT/MT/UMT balances with standard software ..................................................................................................12516.5.1 Key assignments on AT/MT/UMT balances.......................................................................................................12516.5.2 Starting a weighing job..................................................................................................................................12516.5.� Executing weighings .....................................................................................................................................12516.5.4 Pausing/Terminating a weighing job ...............................................................................................................12616.5.5 Using peripheral devices ...............................................................................................................................12616.6 AG, PG-S balances with standard software ......................................................................................................12716.6.1 Key assignments on AG, PG-S balances ..........................................................................................................12716.6.2 Starting a weighing job..................................................................................................................................12716.6.� Executing weighings .....................................................................................................................................12716.6.4 Deleting samples from a running job .............................................................................................................12816.6.5 Pausing/Terminating a weighing job ...............................................................................................................12816.6.6 Using peripheral devices ...............................................................................................................................12816.7 PG/SG balances with standard software .........................................................................................................12916.7.1 Key assignments on PG/SG balances .............................................................................................................12916.7.2 Starting a weighing job..................................................................................................................................12916.7.� Executing weighings .....................................................................................................................................12916.7.4 Deleting samples from a running job .............................................................................................................1�016.7.5 Pausing/Terminating a weighing job ...............................................................................................................1�0

Contents
METTLER TOLEDO LabX balance V1.4 7
16.7.6 Using peripheral devices ...............................................................................................................................1�016.8 PR/SR balances with standard software ..........................................................................................................1�116.8.1 Key assignments on PR/SR balances ..............................................................................................................1�116.8.2 Starting a weighing job..................................................................................................................................1�116.8.� Executing weighings .....................................................................................................................................1�116.8.4 Deleting samples from a running job .............................................................................................................1�216.8.5 Pausing/Terminating a weighing job ...............................................................................................................1�216.8.6 Using peripheral devices ...............................................................................................................................1�216.9 AB-L/AB-S/PB-L/PB-S balances with standard software .....................................................................................1��16.9.1 Key assignments on AB-L/AB-S/PB-L/PB-S balances .........................................................................................1��16.9.2 Starting a weighing job..................................................................................................................................1��16.9.� Executing weighings .....................................................................................................................................1��16.9.4 Deleting samples from a running job .............................................................................................................1�416.9.5 Pausing/Terminating a weighing job ...............................................................................................................1�416.9.6 Using peripheral devices ...............................................................................................................................1�4
17 Tree view Reports .............................................................................................................................13517.1 Introduction ..................................................................................................................................................1�517.2 Overview.......................................................................................................................................................1�517.� Icons ............................................................................................................................................................1�6
18 Working with reports .........................................................................................................................13718.1 Report filter ...................................................................................................................................................1�718.2 Display reports ..............................................................................................................................................1�818.� Structure of reports .......................................................................................................................................1�918.�.1 Report start (job data) ...................................................................................................................................1�918.�.2 Report body (measurement values per sample loop and sample) ...................................................................1�918.�.� Report end (results and statistics) ..................................................................................................................14018.4 Functions in the report view ...........................................................................................................................14118.5 Printing reports .............................................................................................................................................14118.6 Exporting reports ...........................................................................................................................................14118.6.1 Manual export reports ...................................................................................................................................14118.6.2 Automatic export reports .........................................................................................................14218.6.� Programmed export reports ...........................................................................................................................14218.7 Searching the document for text ....................................................................................................................14218.8 Adding comments to the report ......................................................................................................................14218.9 Signing reports ........................................................................................................................14�18.10 Deleting reports ............................................................................................................................................14�
19 Backup on the PC/Server ...................................................................................................................14419.1 Database backup ..........................................................................................................................................14419.2 Starting DB Maintenance ...............................................................................................................................14519.2.1 Data backup ................................................................................................................................................14519.2.2 Data restore ..................................................................................................................................................14619.2.� Data initialization/clear .................................................................................................................................14619.� Automated data backup ................................................................................................................................147
20 Audit Trail ..................................................................................................................148
21 What is 21 CFR Part 11? ...................................................................................................................15021.1 Purpose of 21 CFR Part 11 .............................................................................................................................15021.2 Implementation within LabX .....................................................................................................15121.� Specific implementation of user login within LabX pro balance ...................................................15�21.�.1 The impact of PC solution on the weighing process ........................................................................................15�21.�.2 A- and B- Choices: discussion about Part 11 compliance ................................................................................154
22 Appendix LabX Functions ..................................................................................................................155

Contents
8 METTLER TOLEDO LabX balance V1.4
LabX is a trademark of Mettler-Toledo AG Switzerland. Current version 1.4.Reference to third parties and products is only for information purposes. Mettler-Toledo AG accepts no liability for the selection, performance or use of these products. All agreements, contracts or guarantees apply directly between the manufacturer and the customer.
23 Network installations ..................................................................................................1562�.1 Network examples .........................................................................................................................................1562�.1.1 LabX light .....................................................................................................................................................1562�.1.2 LabX pro stand alone installation ...................................................................................................................1562�.1.� LabX pro network installation .........................................................................................................................1572�.2 General notes on network installation ............................................................................................................1582�.2.1 Optimizing the performance of the installation ...............................................................................................1592�.2.2 Planning the installation ................................................................................................................................1592�.� Installation (Distributed) ................................................................................................................................1602�.�.1 Installation (Server) .......................................................................................................................................1602�.�.2 Installation (Client) .......................................................................................................................................1652�.�.� Installation (Broker) .......................................................................................................................................1692�.�.4 Installation of independent systems ...............................................................................................................1702�.�.5 Troubleshooting ............................................................................................................................................1702�.�.6 Installing Patches, Updates and Upgrades ......................................................................................................172
24 Index ...............................................................................................................................................173

License Agreement for METTLER TOLEDO LabX Software
METTLER TOLEDO LabX balance V1.4 9
1 License Agreement for METTLER TOLEDO LabX Software
IMPORTANT-READ CAREFULLY: This License Agreement is a legal agreement between you ("Licensee") and Mettler-Toledo AG for the proprietary software product identified above, which includes computer software and may include associated media, printed materials, and "online" or electronic documentation ("SOFTWARE PRODUCT"). This SOFTWARE PRODUCT is made available to you only on the terms and conditions of this agreement. By installing, copying, or otherwise using the SOFTWARE PRODUCT (which ever occurs first), you agree to be bound by the terms of this agreement. If you do not agree with the terms of this agree-ment, you are not authorized to use the SOFTWARE PRODUCT. All rights not expressly granted to Licensee in this agreement are specifically reserved to Mettler-Toledo AG.
Software Product License The SOFTWARE PRODUCT is protected by copyright laws and international copyright treaties, as well as other intellectual prop-erty laws and treaties. The SOFTWARE PRODUCT is licensed, not sold.
1. Grant of LicenseInstallation and Use. This agreement grants to you the non-exclusive and non-transferable right to use the SOFTWARE PRODUCT for your own internal purposes only. For each network installation, a base license is required. In addition, each device which is controlled by the SOFTWARE PRODUCT requires a separate instrument license or as defined by separate agreement between the parties. You may only install the SOFTWARE in accordance with our installation manuals. The rights and limitation of this agreement also govern updates/upgrades of the SOFTWARE PRODUCT. You may make copies of the SOFTWARE PRODUCT solely for archival purposes in support of your use of the SOFTWARE PRODUCT. You may not reproduce or distribute the software in any other way, including rental or leasing.
2. Description of other Rights and LimitationsLimitations on Reverse Engineering, Decompilation, and Disassembly. You may not reverse engineer, decompile, or disassemble the SOFTWARE PRODUCT, except and only to the extent that such activity is expressly permitted by applicable law notwithstand-ing this limitation.
Support Services and Registration of Licensee. Mettler-Toledo AG may provide you with support services related to the SOFTWARE PRODUCT ("Support Services"). Use of Support Services is governed by Mettler-Toledo AG's policies and programs described in the user manual, in "online" documentation, and/or in other Mettler-Toledo-provided materials. Any supplemental software code provided to you as part of the Support Services shall be considered part of the SOFTWARE PRODUCT and subject to the terms and conditions of this agreement. With respect to technical and other information you may provide to Mettler-Toledo AG, Met-tler-Toledo AG may use such information for its business purposes, including for product registration, support and development. Mettler-Toledo AG will not divulge such information to third parties in a manner that allows personal identification
Transfer. You may not transfer any of your rights under this agreement. Licensee agrees to communicate the terms and restric-tions contained in this agreement to all persons under his or her employment, direction, or control who have access to the SOFTWARE PRODUCT.
Taxes. Any withholding tax is to be paid by the party liable for payment. The parties to this Agreement bind themselves to obtain a refund of deductions if necessary. They will give one another mutual support in carrying out their procedural obligations.
Termination. Without prejudice to any other rights, Mettler-Toledo AG may terminate this agreement if you fail to comply with the terms and conditions of this agreement. In such event, you may not use the SOFTWARE PRODUCT any longer and you must destroy all copies of the SOFTWARE PRODUCT and all of its component parts

License Agreement for METTLER TOLEDO LabX Software
10 METTLER TOLEDO LabX balance V1.4
3. CopyrightAll title and copyrights in and to the SOFTWARE PRODUCT (including but not limited to any images, photographs, animations, video, audio, music, text, and "applets" incorporated into the SOFTWARE PRODUCT), the accompanying printed materials, and any copies of the SOFTWARE PRODUCT are owned by Mettler-Toledo AG or its suppliers. The SOFTWARE PRODUCT is protected by copyright laws and international treaty provisions. Therefore, you must treat the SOFTWARE PRODUCT like any other copyright protected material.
4. WarrantiesThe SOFTWARE PRODUCT and any related documentation is provided to you ''as is". Licensee is solely responsible for selection of the SOFTWARE PRODUCT and components to achieve Licensees intended results or for particular applications and systems.
Limited Warranty. If the SOFTWARE PRODUCT is or becomes defective or unusable due to incorrect manufacture within 90 days after you first accept this agreement, Mettler-Toledo AG undertakes at its sole discretion at your written request to provide you with a performing copy of the SOFTWARE PRODUCT or to refund you the purchase price and terminate this agreement. Mettler-Toledo AG specially does not warrant that the SOFTWARE PRODUCT will run uninterrupted or error-free.
No other warranties. Mettler-Toledo AG expressly disclaims any further warranty for the SOFTWARE PRODUCT including warranty of any kind, whether express or implied, including, without limitation, the implied warranties of merchantability, fitness for a particular purpose, or non-infringement. The entire risk arising out of use or performance of the SOFTWARE PRODUCT remains with you.
No liability for damages. In no event shall Mettler-Toledo AG or its suppliers be liable for any damages whatsoever including, without limitation, damages for loss of business profits, business interruption, loss of business information, or any other pecu-niary loss arising out of the use of or inability to use this SOFTWARE PRODUCT, even if Mettler-Toledo AG has been advised of the possibility of such damages. Because, however, some jurisdictions do not allow the exclusion or limitation of liability for consequential or incidental damages by compulsory law, the above limitation may not apply to you.
5. MiscellaneousThis agreement is governed by the laws of Switzerland. Any dispute arising out of or in connection with this agreement shall be subject to the exclusive jurisdiction of the ordinary courts of the Canton of Zurich, Switzerland. The provisions of the United Nations convention on Contracts for the International Sale of Goods are expressly excluded. Notwithstanding the foregoing, Mettler-Toledo AG retains the right to bring legal action against you before any other competent court.

METTLER TOLEDO LabX balance V1.4 11
Introduction
2 Introduction
In this chapter you will find a description of the fundamental aspects of LabX software. Please read carefully, even if you already have some experience with similar applications and laboratory software.
One important point before you begin. Before updating LabX software you should save your data (see chapter 19 “Backup on the PC/Server”).
2.1 Brief presentation of LabX
Thank you for making the decision to purchase LabX from METTLER TOLEDO.
LabX is the software used by METTLER TOLEDO for controlling and handling data in conjunction with laboratory balances and titrators. LabX allows for central instrument management. Operations such as checking, adjusting or weighing application optimisation can be carried out on a PC workstation. With LabX, measurements with balances and titrators can be carried out from any PC included in your network. LabX contains all the necessary tools for handling and data storage according to the FDA requirements, (21 CFR part 11). The software is available in various levels (see function overview):• LabX light contains all the standard applications.• LabX pro contains all the functionality of LabX light and also additionally allows for networking capabilities, 21 CFR Part
11 support and possibilities to export data. Several instruments can also be supported.
The main features are:
• A Job template editor and management (for routine jobs)• Report and statistics functions (with export possibility)• Quality assurance functions (Scheduler and Release Control for every balance)
• User management and security functions (Electronic signature, Audit Trail)
• Complete network capability
• Control of multiple balances from one single PC • Rapid Access from the balance to the LabX system. “Rapid Access” is only possible with balances which include a LabX
Client. On the AX/MX/UMX balances, the “Remote” application must be installed.
You can define your job templates in advance. Just choose a weighing application and the number of samples, and then enter your job data. The application starts when you drag the symbol for the job template over the symbol of the desired balance. The job template can be reused an unlimited number of times for routine operations. With LabX it is easy to create and manage job templates for routine use. Job templates can be used to store test job data and to specify balance requirements. In each job template a weighing application can be selected. The job templates which have been created can be grouped at will to allow complete job libraries to be conveniently managed. Job templates can also be exported, so that they can easily be sent by e-mail, for example.
LabX offers the best overview of processes in the laboratory. When a weighing job is started, the online view appears on the screen. The weight values from the balance are displayed on the PC screen. If a LabX weighing job is also active on the selected balance, information about this is also displayed. In a window, the measurement values recorded in a weighing job are updated similar to the way they are printed on a balance printer. After a weighing job has been started, LabX guides the user on the bal-ance. The user can terminate the process at any time while it is running, or interrupt it to restart it later. Individual measurements of a series can be repeated, provided that sample identifications are used.
In the “Report” area you can obtain a summary of your measurement results sorted by job template. All the measurements for one weighing job are displayed in one window and are comparable with the information normally printed on a balance printer. Weighing reports with tables of measurement values, statistical analyses, etc. can be displayed by double-clicking. The structure of the data allows rapid access to desired values. If desired, a powerful filter function also allows the data to be reduced to the essentials. Reports can be printed or exported in various standard formats.
12 METTLER TOLEDO LabX balance V1.4
Introduction
2.2 What you need to know regarding the content of this instructions
The following conventions are relevant for this operating instructions.
Keyboard designations are enclosed in double pointed brackets (e.g. «ESC» or «Return»).
This symbol signifies safety and security references. Ignoring these may lead to malfunction of the software or the whole measurement system.
This operating instructions is still valid for both LabX light and LabX pro. The different versions are directly associated with various performance factors. Such cases will be highlighted in the text.
Whereas you should use this operating instructions for LabX and relevant adjustments of the connected METTLER TOLEDO bal-ances, you should refer to the balance operating instructions for fundamental aspects of balance operation.
LabX pro offers all functions required for data management according to FDA guidelines (21 CFR Part 11). Every user has to log in to the system with a user name and password. The User Manager allows user rights to be defined for four different user groups. Critical manipulations have to be confirmed with the user name and password (Electronic signature). Every action is recorded in the Audit Trail.LabX stores data in a SQL database. Data cannot be removed, moved, or deleted without being detected. All interventions in the database require valid access rights in the form of login and user name. If desired, the data can also be exported. This takes place either automatically – e.g. using one LIMS – or manually. In either case, only one copy of the original data is maintained.

METTLER TOLEDO LabX balance V1.4 1�
Introduction
Overview of Features LabX balance LabX balance pro light Control of METTLER TOLEDO AB-L, AB-S, PB-L, PB-S, AT, MT, UMT, AG, PG, PG-S, PR, SR, SG, AX, MX, UMX, XS and XP balances • •Job managementUser guidance on the balance display • •Rapid Access (only for AX, XP and XS balances) – start jobs from the balance • •Online view • •Job template editor • •Simple weighing, Differential weighing, Interval weighing and Totalization • •Job queue • •Balance settings management • •Instrument managementInstrument release control • •Sensitivity adjustments and performance tests scheduler and controller • •Sensitivity adjustments and performance tests histories, incl. FACT and ProFACT • •Tolerances management with built-in tolerance database • •Weights library • •MinWeigh incident history • •Calibration certificate explorer • •Data managementResults stored in MS SQL database • • Powerful database search/filter function • •Flexible statistical evaluation • •Report generator for automatic GLP-compliant reports • •Manual export to Excel or LIMS • •Automatic data export to Excel or LIMS •Bidirectional, fully configurable and automated communication with LIMS available as an option (LabX connect) •Database tool for manual/automated backup and maintenance • •21 CFR Part 11 complianceUser management with password management •Electronic signature for modification •Electronic signature for Review/Approve of all documents •Audit Trail with filter and export functionality •SystemFull network capability / instruments directly connectable via Ethernet • Client/server architecture: All data can be put on a central database server •Integrated help (PDF file) • •

14 METTLER TOLEDO LabX balance V1.4
Introduction
2.3 User interface
The LabX window is divided into two panes, the tree view in the navigations window (1) for navigation and the working area (2) for entering data and report view.
The tree view Weighing, Reports and Configuration can be activated by clicking the corresponding tab directly below the navi-gations window (see marking). Many functions can be performed with drag-and-drop operations (e.g. moving a Job template) or via a context menu (right-click the icon).
- You can open or close a folder by clicking a or sign or by double-clicking the folder. - If you right-click an icon in the tree view, a context menu appears with an overview of possible functions. - Double-clicking an icon opens the corresponding working window in the working area. You can switch between working
windows by clicking the tab directly below the working area.
The working area contains various views, such as the monitor view, job templates or reports. You can rearrange the working area using the Window menu command. You can switch between working windows by clicking the tab directly below the working area. To close working windows of the same type, use the Window > Close All… menu command.The menu bar and toolbar (�) always have those commands available that are required for the active working window in the working area.
1 2
3

METTLER TOLEDO LabX balance V1.4 15
Installation and Configuration
3 Installing the software
3.1 LabX balance system requirements
Supported operating systems / Databases- Windows 2000 Professional / Server (SP4 or higher)- Windows XP Professional (SP1 or higher)- Windows Server 200� (SP1 or higher)- MS SQL Server 2000 (SP� or higher)- MS SQL Server 2000 Desktop Engine (SP� or higher) maximum database size 2 GB- MS SQL Server 2005 (SP2 or higher)- MS SQL Server 2005 Express Edition (SP2 or higher) maximum database size 4 GB
Software- Internet Explorer 6.01 (SP1 or higher)- MDAC 2.8 (will be installed if not present)- .NET 2.0 (will be installed if not present)
Client / LabX light- Industry standard PC, 800 MHz (1.5 GHz recommended)- 512 MB RAM (1024 MB RAM recommended)- 5 GB free harddisk space (10 GB recommended)- 1024x768 screen resolution (1280x1024 recommended)- 100 Mbit Ethernet
Server / Standalone- Industry standard PC, 1.5 GHz (2.4 GHz recommended)- 1024 MB RAM (2048 MB RAM recommended)- 10 GB free harddisk space (20 GB recommended)- 1024x768 screen resolution (1280x1024 recommended)- 100 Mbit Ethernet
Supported BalancesAB-L, AB-S, PB-L, PB-S, AT, MT, UMT, AG, PG, PG-S, PR, SR, SG, AX, MX, UMX, XS and XP

16 METTLER TOLEDO LabX balance V1.4
Installation and Configuration
3.2 Installation and License Administration
3.2.1 Installation (Standalone)
For network installation please refer to “2�. Network installations”. In order to be able to install the software, you must have administrator rights on the PC. It is mandatory, that the following services and Windows settings are installed and active:
- TCP/IP Protocol- DCOM- WMI- File and Printer Sharing for Microsoft Network.- “Use simple file sharing” must be deactivated.
1. Insert the LabX CD in the CD-ROM drive. The HelloCD window appears automatically with a choice of different options. (If the HelloCD window does not appear, double-click start.exe on the CD in the Windows-Explorer to start the installation). Choose Software Installation > LabX pro balance.
2. Choose the installation text language in which you wish LabX to be installed.
The installation program prepares the installation and examines the available software components.
�. The welcome screen appears. Click Next.

METTLER TOLEDO LabX balance V1.4 17
Installation and Configuration
4. The license agreements are displayed. Mark the option that you accept these and click Next.
5. The user information and the use of LabX are displayed. Enter this and click Next.
6. Select the language for the LabX Installation and click Next. A subsequent change of the language is not possible.
7. Select the target folder and click Next.

18 METTLER TOLEDO LabX balance V1.4
Installation and Configuration
8. When installing LabX, you can choose between a “Standalone” installation or a “Distributed” installation. Select “Standalone” and click Next.
9. Select a password for the user “LabX” and click Next.
10. Select the administrator password for the MSDE database and click Next.
11. Start installing the components by clicking Install.

METTLER TOLEDO LabX balance V1.4 19
Installation and Configuration
12. The installation of various software components is executed and displayed.
13. On completion of installation, click Finish to complete the operation. We recommend that you should now reboot the system.
Notes• In order to correctly display superscripted and subscripted numbers, e.g. in the job editor, the Option “Install files for East
Asian languages” must be activated. It may be necessary to install additional operating system components.• In the chapter 23.3.5 “Error messages” you will find a listing with possible errors and their correction.

20 METTLER TOLEDO LabX balance V1.4
Installation and Configuration
3.3 License Administration and Activation of LabX
LabX pro balanceFor each system you will need a LabX “Module License Key” and for each instrument an “Instrument License”. Balances which are exclusively assigned to LabX pro titration do not require a license.Both a module license key and an instrument license key are included in the scope of delivery of the LabX. If you wish to connect several instruments to LabX pro, you will require additional instrument licenses. You can purchase the instrument licenses from your local METTLER TOLEDO representative. Licenses are available in sets of 1, �, 5 and 10.LabX must be activated within �0 days of installation.
LabX light balanceLabX light balance comes with one “Module License” and one “Instrument License”. The use of further instrument licenses is not supported. LabX light balance must be activated within �0 days of installation. LabX light does not contain any user administration.
3.3.1 Initial Startup of LabX
The first time you start up LabX, you must enter the “Module License Key”. You will find this key on the LabX Box.After installation of LabX pro only a single user is defined who has administrator rights. We recommend that after entry of the instrument licenses and activation you change the code or define a new administrator and delete the standard existing administrator.
1. Start LabX by double-clicking the LabX icon on the desktop.or Select Start > Programs > LabX > LabX .... The Module License Key dialog box appears.
2. Enter the Module License Key and click OK. The LabX License Manager dialog box appears.�. If you do not wish to install any additional instrument licenses, then proceed directly with the activation of the software. See
chapter �.�.2 “Activation and Reactivation of the System”.or if you wish to install additional instrument licenses, then proceed with the entry of instrument licenses. See chapter �.�.�
“Administering Instrument Licenses”.
Notes• LabX must be activated within �0 days of installation. See chapter �.�.2 “Activation and Reactivation of the System”.• To set up the administrator under LabX, follow the instructions under chapter 4.1.1 “User Properties”.
METTLER TOLEDO LabX balance V1.4 21
Installation and Configuration
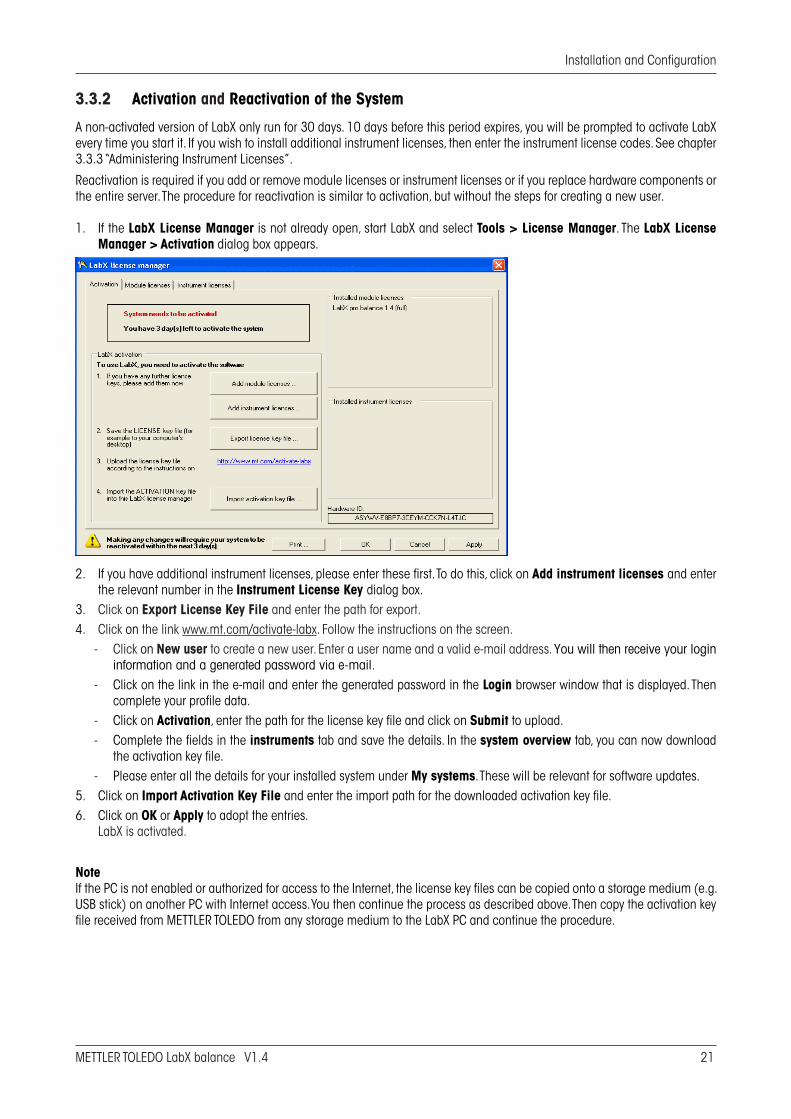
3.3.2 Activation and Reactivation of the System
A non-activated version of LabX only run for �0 days. 10 days before this period expires, you will be prompted to activate LabX every time you start it. If you wish to install additional instrument licenses, then enter the instrument license codes. See chapter �.�.� “Administering Instrument Licenses”.
Reactivation is required if you add or remove module licenses or instrument licenses or if you replace hardware components or the entire server. The procedure for reactivation is similar to activation, but without the steps for creating a new user.
1. If the LabX License Manager is not already open, start LabX and select Tools > License Manager. The LabX License Manager > Activation dialog box appears.
2. If you have additional instrument licenses, please enter these first. To do this, click on Add instrument licenses and enter the relevant number in the Instrument License Key dialog box.
�. Click on Export License Key File and enter the path for export.4. Click on the link www.mt.com/activate-labx. Follow the instructions on the screen.
- Click on New user to create a new user. Enter a user name and a valid e-mail address. You will then receive your login information and a generated password via e-mail.
- Click on the link in the e-mail and enter the generated password in the Login browser window that is displayed. Then complete your profile data.
- Click on Activation, enter the path for the license key file and click on Submit to upload.- Complete the fields in the instruments tab and save the details. In the system overview tab, you can now download
the activation key file.- Please enter all the details for your installed system under My systems. These will be relevant for software updates.
5. Click on Import Activation Key File and enter the import path for the downloaded activation key file.6. Click on OK or Apply to adopt the entries. LabX is activated.
NoteIf the PC is not enabled or authorized for access to the Internet, the license key files can be copied onto a storage medium (e.g. USB stick) on another PC with Internet access. You then continue the process as described above. Then copy the activation key file received from METTLER TOLEDO from any storage medium to the LabX PC and continue the procedure.

22 METTLER TOLEDO LabX balance V1.4
Installation and Configuration
3.3.3 Managing instrument licenses
In order to operate more than one instrument on LabX pro, you must install one or more additional instrument licenses. A maxi-mum of �1 instruments can be operated on LabX pro, balances used only by LabX pro titration do not require a license.
1. If the LabX License Manager is not already open, select Tools > License Manager in the menu. The LabX License Man-ager > Activation dialog box appears.
2. Click the Instrument Licenses tab. The LabX License Manager > Instrument Licenses dialog box appears.
2. To add instrument licenses, click the Add button.
�. Enter the instrument license number, which you will have received in an envelope, and confirm your entry by clicking the OK button.
4. Click OK or Apply to save the settings.LabX pro must be immediately activated after any changes to the LabX License Manager. Proceed directly with the activation of the software. See chapter �.�.2 “Activation and reactivation of the system”.
NoteIn order to be able to remove instrument licenses, you must beforehand remove the corresponding number of instruments from LabX, otherwise you will receive a corresponding reminder. Select the license from the list and confirm your selection by clicking the Remove button. A license once removed can be installed on another system, whereby in this case the system will also have to be reactivated.
3.3.4 Managing module licenses
Module licenses can be added or removed under certain conditions. If you have any questions about module licenses, please contact your local METTLER TOLEDO representative.

METTLER TOLEDO LabX balance V1.4 2�
Installation and Configuration
4 Creating users and groups
With a security system you can ensure that data is not deleted or changed by mistake.This chapter explains how you can make LabX secure by defining access rights for user and groups, and how you can use profiles to define access to devices individually. In a network with more LabX modules, e.g. LabX pro titration, you can also administer these modules with the LabX pro balance User and Group Manager.
Users can be added, changed, deleted or temporarily disabled. Each user is assigned to at least one group. Each user can have several profiles. The profile defines which devices the user can use.
The administrator cannot be deprived of the rights “Modify policies”, “Modify user manager settings” and “Add/remove instru-ment licenses”. At least one administrator must be defined. If only one administrator is defined, it can neither be deleted nor be disabled.
In the groups you define the rights that are available to the assigned user. The default LabX setting is a division into 4 groups. However, groups can be edited, deleted are added as desired. The names of the groups can be changed.
The settings for account guidelines are described under chapter 5.1 “Account Policies”.

24 METTLER TOLEDO LabX balance V1.4
Installation and Configuration
4.1 Defining users and profiles
4.1.1 User properties
You must have the appropriate rights before you can create a new user or change a user's properties; make sure that you are logged on as a user with the necessary rights.
1. Select Tools > User Manager from the menu. The User and Group Manager dialog box appears.
2. Click the button Add ... or Duplicate ... to add a new user or choose one or more (Shift key) existing users and click Prop-erties .... The User Properties > Properties dialog box appears.
�. Now enter all the user data. When several groups are being edited simultaneously the deviating fields are highlighted in magenta.
– The “User name” and “Full name” boxes must be completed. For more information on the password settings see chapter 5.1 “Account Policies”.
– If you select the “User must change password at next login” check box, the user must enter a new password the first time the user logs on.
– If you have selected “Account disabled”, then the user will be refused access.

METTLER TOLEDO LabX balance V1.4 25
Installation and Configuration
4. If you click the Group Membership tab, the dialog box changes its display.
5. Select one or more groups to define the user's memberships.6. If you click the Profiles tab, the dialog box changes to the Profiles display.
7. To create a new profile, click the New Profile … button and enter a meaningful name in the dialog box. You can create several different profiles for a user, and assign them different devices.
8. Select the required instruments and then click Apply or OK.
Notes• The “Default” profile cannot be deleted or renamed.• All the available devices are listed, even those that are switched off.• Devices can be assigned to several different users.• If any user account is disabled, a message is displayed to users with the right “Modify group manager settings”.• If your company has different laboratories, you can define one profile per laboratory. If a user with the profile for a laboratory
logs on, the user concerned does not see the devices belonging to the other laboratory. This simplifies the overall view and prevents devices from being mixed up.
26 METTLER TOLEDO LabX balance V1.4
Installation and Configuration
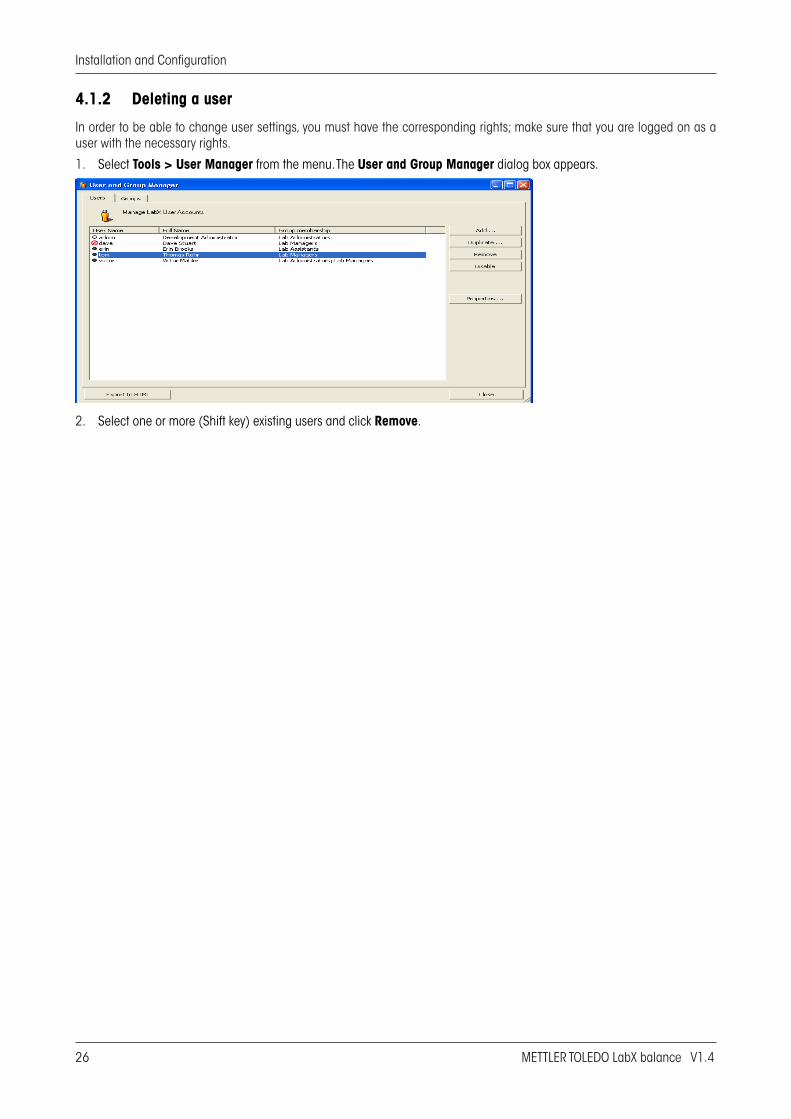
4.1.2 Deleting a user
In order to be able to change user settings, you must have the corresponding rights; make sure that you are logged on as a user with the necessary rights.
1. Select Tools > User Manager from the menu. The User and Group Manager dialog box appears.
2. Select one or more (Shift key) existing users and click Remove.

METTLER TOLEDO LabX balance V1.4 27
Installation and Configuration
4.1.3 Changing the password of a user
In order to be able to change user settings, you must have the corresponding rights; make sure that you are logged on as a user with the necessary rights.
1. Select Tools > User Manager from the menu. The User and Group Manager dialog box appears.
2. Select a user and click Properties. The User Properties > Properties dialog box appears.
�. Enter the new password in the “Password” box and again in the “Confirm Password” box to confirm this. For more information on the password settings see chapter 5.1 “Account Polices”.- If you have selected the “User must change password at next login” check box, the user must enter a new password the first
time he logs on.4. Click Apply or OK to save the settings.

28 METTLER TOLEDO LabX balance V1.4
Installation and Configuration
4.2 Defining group rights and group members
4.2.1 Group properties
In order to be able to change group settings, you must have the corresponding rights; make sure that you are logged on as a user with the necessary rights.
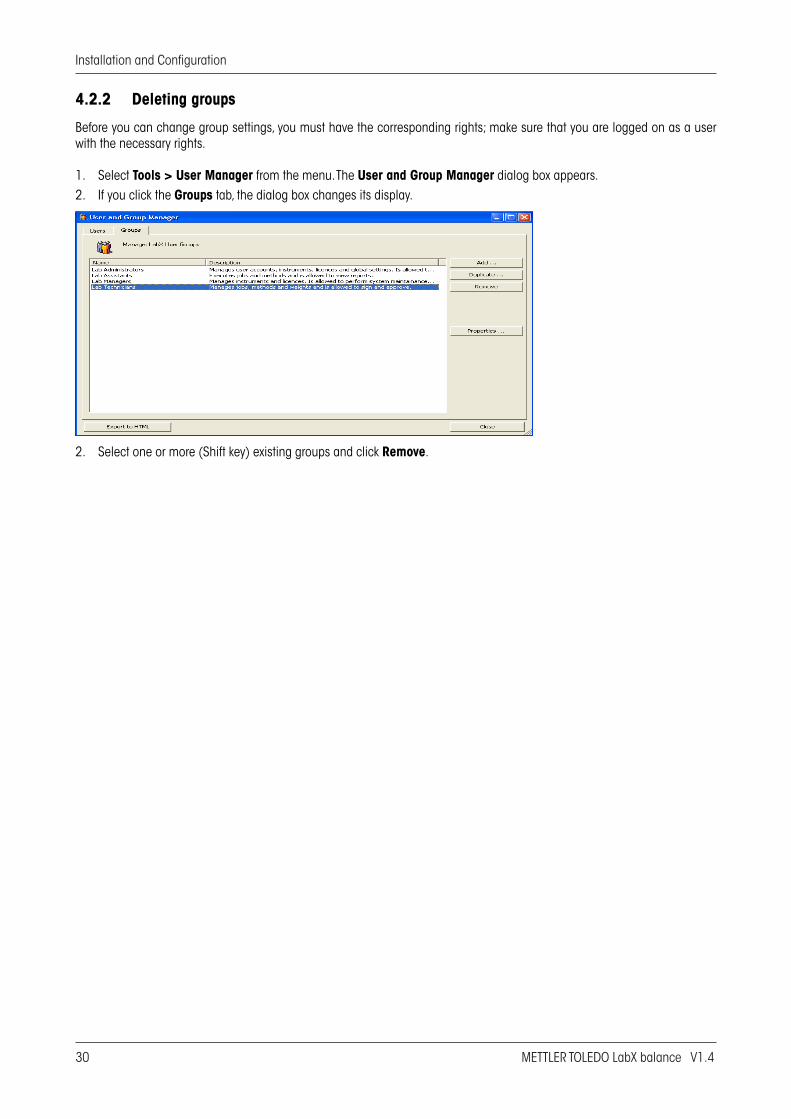
1. Select Tools > User Manager from the menu. The User and Group Manager dialog box appears.2. If you click the Groups tab, the dialog box changes its display.
�. Click the button Add or Duplicate to add a new group or choose one or more (Shift key) existing groups and click Proper-ties. The Group Properties > Properties dialog box appears.
4. Enter the group name. When several groups are being edited simultaneously the deviating fields are highlighted in ma-genta. If you want to add a description, use the “Description” box.

METTLER TOLEDO LabX balance V1.4 29
Installation and Configuration
5. If you click the Rights tab, the dialog box changes to the display in which you can grant rights.
The rights for the default groups are predefined, however these can be adapted to your requirements.
6. Mark the desired rights.7. If you click the Members tab, the dialog box changes to the display in which you can define the assignments of the users
to the groups.
8. Select the required user and then click OK. The dialog box is closed and the User and Group Manager dialog box reap-pears.
NoteA user can be a member of several different groups; the rights are cumulative.
�0 METTLER TOLEDO LabX balance V1.4
Installation and Configuration
4.2.2 Deleting groups
Before you can change group settings, you must have the corresponding rights; make sure that you are logged on as a user with the necessary rights.
1. Select Tools > User Manager from the menu. The User and Group Manager dialog box appears.2. If you click the Groups tab, the dialog box changes its display.
2. Select one or more (Shift key) existing groups and click Remove.

METTLER TOLEDO LabX balance V1.4 �1
Installation and Configuration
4.3 Starting LabX pro and selecting a profile
The normal startup procedure with the logging on of any user is as follows:
1. Start LabX by double-clicking the LabX icon on the desktop.or Choose Start > Programs > LabX > LabX balance. The LabX - Login dialog box appears.
2. Enter the user name and the password.�. Select the desired profile from the “Profile” drop-down list.4. Click the OK button to start LabX.Notes• If you are working with a network of several LabX computers, you can log on at any computer, select a profile and will then
see the corresponding devices.• You can log on at several PCs at the same time.• The user can be disabled after a number of incorrect login attempts. See also chapter 5.1 “Account Policies”.
4.4 Changing your own password
1. Select in the menu File > Modify Password .... The Modify Password dialog box appears.
2. Enter your old password in the “Old password:” box.�. Enter the new password in the “New password:” box and again to confirm in the “Confirm new password” box.4. Click the OK button to confirm your entries.Notes• Depending on the settings in chapter 5.1 “Account Policies”, a password cannot be used more than once.• The settings in chapter 5.1 “Account Policies” define whether a password must contain letters, numbers or special charac-
ters. Moreover, if the password contains the user name it will not be accepted.

�2 METTLER TOLEDO LabX balance V1.4
Installation and Configuration
4.5 Forced password change
The password must be changed periodically, depending on the setting in the “Account Policies” dialog box. Users are will be prompted to change the password the next time that they log on after this time has lapsed. In this case, after logging on to LabX, the Modify Password dialog box appears.
1. Enter your old password in the “Old password:” box.2. Enter the new password in the “New password:” box and again to confirm in the “Confirm new password” box.�. Click OK to start LabX or click Cancel.Notes• Depending on the settings in chapter 5.1 “Account Policies”, a password cannot be used more than once.• The settings in chapter 5.1 “Account Policies” define whether a password must contain letters, numbers or special charac-
ters. Moreover, if the password contains the user name it will not be accepted.

METTLER TOLEDO LabX balance V1.4 33
Installation and Configuration
5 Generalsettings
5.1 AccountPolicies
In order to be able to change the password-specific settings applicable to all users, you must have the corresponding rights; make sure that you are logged on as a user with the necessary rights. In the AccountPolicies dialog box you can define the password-specific settings. These include the expiration date, and the length and complexity of the password.
1. Select Tools>Policies... from the menu. The Policies>AccountPolicies dialog box appears.2. Select your desired settings (see below).3. Click the OK or Apply button to confirm your entries.
ExpirydateofthepasswordIf you select the “Expires after” option and enter the number of days in the “days” box, the user will be requested to change the password after this number of days has elapsed. See also chapter 4.5 “Forced password change”.
PasswordlengthSelecting the “Allow empty password” option, allows you to log on without a password. Select the “Password must be at least … characters” option and enter the minimum number of characters for the password.
ReusingthepasswordIf you select the “Enforce password history for …” check box and enter a number, you cannot use the same password after this many times.
PasswordcomplexityIf you select the “Password must meet complexity requirements” check box, the password must contain letters, numbers and special characters. Furthermore, the user name may not be included, otherwise the password will not be accepted.
CheckforbiddenstringsIf you select the “Considerforbiddenstrings” dialog box appears in which you can define strings that are not to be al-lowed.
LoginattemptsIf you select the “Allow max. … login attempts” check box and enter a number, the user is disabled after the specified number of incorrect logins. See also chapter 4.1.2 “Deleting a user”.
Notes• The changes do not take effect until LabX has been restarted.• If only one administrator is defined, this can neither be deleted nor be disabled.

34 METTLER TOLEDO LabX balance V1.4
Installation and Configuration
5.2 GeneralPolicies
In order to be able to change the policies valid for all users, you must have the corresponding rights; make sure that you are logged on as a user with the necessary rights. In the “General Policies” dialog box you define general settings. This includes the 21 CFR Part 11 options and the automatic locking of LabX clients.
1. Select Tools>Policies... from the menu. The Policies>AccountPolicies dialog box appears. Click the GeneralPolicies tab and select the settings (see below).
2. Click the OK or Apply button to confirm your entries.
Signallmodifications(21CFRPart11)If you select the “Sign all modifications” check box, all additions, changes and deletions require an electronic signature with reasons for the modification. These details are also recorded in the AuditTrail.
EnforcesequenceofsigningIf you select the “Enforce sequence of signing” check box, the order of signing of methods and results is set by LabX. The first signature is “Review” and the next one “Approved”.
AutomaticlockThe “Automatic lock after … minutes” check box enables LabX to lock out the user after a set time. The UnlockLabX dialog box appears that requests the user to enter the password. You can also quit LabX by clicking Exit. If the 21 CFR 11 functions are activated, you must enter a valid user name and password with explanations in the dialog box before you can exit LabX.
NoteThe changes do not take effect until LabX has been restarted.

METTLER TOLEDO LabX balance V1.4 35
Installation and Configuration
5.3 Electronicsignature
When LabX is operating in “Secure Mode (21 CFR Part 11)” see chapter 5.2 “General Policies”, changes must be confirmed by user Id and password in a dialog before the change is confirmed. If the signature is successful, an entry will be made in the AuditTrail.
1. Under “Reason:”, describe why the modification was made.2. Under “User name:” enter the name that you used to log on.3. Under “Password:” enter your password.4. Click on OK to confirm your new settings and close the dialog, or click on Cancel to reject the new settings and close the
dialog.NoteIn case of three incorrect password entries, the change is discarded. All attempts are recorded in the AuditTrail.
In “Secure Mode (21 CFR Part 11)” the user must input an electronic signature before the respective changes are accepted.
Area Object Subject ActionLicense Management Instrument License Key License Manager Add, Remove
Instrument Management Balance Properties * MinWeigh Settings Release Control Scheduler
Modify Modify Modify Modify Remove
Job Management Job template Delete, Modify, Import
Report Management Report Comment
Delete Modify
Weights Management Weights Delete, Modify
* Only in areas of Identification and Maintenance

36 METTLER TOLEDO LabX balance V1.4
Installation and Configuration
5.4 Managingdocuments
You can directly access documents such as operating instructions, certificates, calibration instructions and SOPs from LabX. The documents can be created with different programs such as Adobe Acrobat, Microsoft Word, Excel, or also HTML. The documents can be filed at different locations that can for example be accessed by means of an HTML page with corresponding links.
NoteTo display the different documents, the corresponding program must be installed on the computer.
5.4.1 Documentsettings
To configure the home page for “Documents”, proceed as follows:
1. Select Tools>DocumentSettings from the menu. The DocumentSettings dialog box appears.
2. Enter a URL for the home page or click “Browse” and specify the desired folder. Enter the login details for the identification in the Login pane.
3. Click the OK button to confirm your entries.
5.4.2 Displayingdocuments
To start the documents home page, proceed as follows:
1. Select Tools>Documents from the menu. The home page configured under chapter 5.4.1 “Document settings” ap-pears.
5.5 Printingthesecuritysettings
The security settings, which include groups, users, account policies and general policies, can be exported as HTML files and printed out.
1. Select Tools>UserManager... from the menu. The UserandGroupManager dialog box appears.2. Click “Export to HTML”. The ExporttoHTML dialog box appears.3. Select the desired folder and save the settings by clicking the Save button.4. Open the saved file which will be displayed in the Internet browser. You can now print out the settings.
5.6 GeneralLabXsettings(Menu>Tools>Options)
Under the menu point Tools>Options you can customize LabX by designating identifications and deciding other global settings. LabX offers the flexibility of a large number of identifications and freely-definable labels for identifying instruments, samples as well as company information. You can also configure extended balance functions that are used for process control purposes. Take a little time and consider all the data that you will have to manage. If you do this, you will have an optimized and reliable solution for your day-to-day work. Stored settings can be called up quickly and easily at any time.
NoteTypically, these settings are made by a LabX Administrator.

METTLER TOLEDO LabX balance V1.4 37
Installation and Configuration
5.7 SettingupInstrumentManagement
If you work with several balances, it is a good idea to enter detailed information about the identifying features of each balance. This will give you a clear overview of which balance was used to do what, when and where.
You can use the following basic settings for instrument management and instrument control.
1. Select Tools>Options from the menu.2. The InstrumentManagement dialog box appears. “Balance ID1” shows the designation currently used to identify the bal-
ance. This is permanently set to “BalanceName” and cannot be changed.
3. Under “Balance ID2”, now enter “Location”, for example, so that you can assign a location to every balance (see chapter 7.5 “Managing and identifying balances”).
4. Under “Balance ID3”, enter “Responsibility”, for example, so that you can assign a reference person to every balance. This person will then be responsible for that balance (see chapter 7.5 “Managing and identifying balances”).
5. If desired, you can enter another identifying feature under “Balance ID4”.
6. Balance Control is used to make further global settings. Here you can decide whether LabX should allow Rapid Access to LabX or not.
7. “Automatic pausing” may be switched On or Off. If you select On, then you must define the period of inactivity after which the running job becomes paused.
8. Select On or Off under “Check for local FACT histories:”. If you select On, enter a time interval after which the local FACT history is to be looked up.
9. Click on OKto confirm your new settings and close the dialog, or click on Cancel to reject the new settings and close the dialog.
Notes• “Rapid Access” is only possible with balances which include a LabX Client. On the AX/MX/UMX balances, the “Remote” ap-
plication must be installed.• With Rapid Access activated, the user must identify himself on the balance in order to start a weighing job from the bal-
ance.• The query of local FACT history is made on FACT-supported balances.• Changes affect all connected balances.

38 METTLER TOLEDO LabX balance V1.4
Installation and Configuration
5.8 SettingupJobManagement
For your day-to-day work, you should now select the Job Management tab in order to enter designations for the parameters to be used in the job templates for user guidance and in reports.
You can use the following basic settings for job management.
1. Select Tools>Options from the menu.2. The InstrumentManagement dialog box appears. Click on the JobManagementtab.
3. In the “Sample ID Labels” section, enter “Charge”, for example, under “ID1” and “Sample ID” under “ID2”. You may create more ID labels if you wish. In the Job Template, you can then select for which Sample ID you wish to scan a barcode iden-tification. If you select Yes, the balance will prompt you to enter the relevant Sample ID(s).
4. Click on OKto confirm your new settings and close the dialog, or click on Cancel to reject the new settings and close the dialog.
NoteChanges do not affect existing job templates.

METTLER TOLEDO LabX balance V1.4 39
Installation and Configuration
5.9 SettingupReportManagement
You should now select the Report Management tab to define additional global information for your job reports.
You can use the following basic settings for report management.
1. Select Tools>Options from the menu.2. The InstrumentManagement dialog box appears. Click on the ReportManagement tab.
3. In the “Company Info” section, enter under “Company ID1:” Brand, for example. You can then enter the company name. You can also enter further information about the company.
4. Click on OKto confirm your new settings and close the dialog, or click on Cancelto reject the new settings and close the dialog.
NoteChanges made affect all existing reports.

40 METTLER TOLEDO LabX balance V1.4
Installation and Configuration
5.10 Userspecificsettings
5.10.1 Definingthefolderforexportofreports
Reports can be automatically exported to a predefined folder at any desired location in the PC file system or on an available server for which you have permissions.
1. Select Tools>Options from the menu.2. Click on the UserSettings tab.
3. Use the Windows Explorer function to specify a directory to which the reports of weighing jobs can be automatically ex-ported.
4. Click on OKto confirm your new settings and close the dialog, or click on Cancelto reject the new settings and close the dialog.
5.10.2 OptionAllowsubdirectoryforexportofreports
Activate this option to save exported reports automatically within the specified path according to the job template which was used, thereby giving greater clarity.
NoteSubdirectories are given the name of the “Job template”.

METTLER TOLEDO LabX balance V1.4 41
Installation and Configuration
5.11 TransferMode
Transfer Mode can be used to simply transfer weight data from the balance to an open external application window or directly to a text file. Transfer mode works by configuring a definable function key, which when pressed will send a user-formatted weight value to an open Excel* worksheet. This sheet must be the top window (in focus) on the PC for a transfer to happen.Transfer Mode can also be used to automatically send weight data to an open window or to a text file during a running job by configuring the feature in the Job Template (see chapter 12.5 “Defining the Application data”).With the weight values, LabX allows you to add formatting as well to automatically fill in your own defined Excel templates. These formatting strings are customized for each user in the LabX system.* or any other program where text is required as input
5.11.1 ManualTransferModeconfiguration
The Transfer Mode functions only with a single balance at a time on a single client PC.
1. In the tree view Weighing, right-click the mouse on the desired Balance and select Transfer Mode. Note: Only one bal-ance may be selected at a time. If another balance had been using Transfer Mode when selecting a new balance, the old balance will be deactivated for Transfer Mode.
2. After activating the ManualTransfer Mode , you can send the weight data by pressing the chosen function key (Tools…Options) at the PC or by pressing the Print key at the balance. You may also deactivate Transfer Mode at the balance by holding down the Home or Cancel key (for AT balances, touch the Print key twice). Transfer Mode also functions within a running job by sending the weight values exactly as recorded in the LabX database to an open window (e.g. Excel) or to an external text file
3. Select Tools>Options from the menu.4. Click on the UserSettings tab to see the Transfer Mode options
5. “Key:” This option allows you to define which function key on the keyboard you would like to use to trigger a data transfer to Excel.
6. “Stable Weights Only:” Check this option if you only want stable weights transferred. When checked, LabX will wait for a stable value from the balance before transferring to Excel. If unchecked, the next available weight value will be sent.
7. “Decimal Symbol:” Choose either period or comma to be used in the sent result.8. “Transfer To:” By choosing the option Window, weight values are transferred to an open window. When File is chosen, data
is transferred to a text file. Both options can be chosen and will work simultaneously.9. “Transfer To File:” When transferring to a text file, you may specify an export directory and path. See chapter 5.10.1 “Defining
the Folder for export of reports”, for default folder location.10. Click the “Data Settings…” button to format the string you wish to send to Excel.

42 METTLER TOLEDO LabX balance V1.4
Installation and Configuration
11. The TransferModeData dialog box appears.
12. Click on the format buttons to add to the window list on the right. After adding format values you can change the order using the up and down arrow buttons. In addition to the standard formatting buttons you can also add your own custom string by clicking the ab¦ button next to the Format String list.
13. Click on OKto confirm your new settings and close the dialog, or click on Cancelto reject the new settings and close the dialog.
14. After pressing the function key (or Print key at the balance) to transfer values, an ApplicationFinder dialog box appears.
15. Open the desired target application (e.g. Excel, Word, etc) and drag the finder tool within the dialog to the open window and click OK. Now LabX knows the destination to send all Transfer Mode values.

METTLER TOLEDO LabX balance V1.4 4�
Installation and Configuration
6 Tree view Configuration
6.1 Tree view LabX pro
The tree view Configuration contains all the functions you need for instrument and weight management.Here you can define connections to balances and other computers.
You can activate the tree view Configuration by clicking the Configuration tab directly below the navigations window.
- The tree has the following structure:
a Connections. Connection to PC’s and in-struments.
b Weights. Directory containing defined test weights.
- You can open or close a folder by clicking the or sign.
- If you right-click an icon, a context menu ap-pears with an overview of possible functions.
a
b
12�
456
7

44 METTLER TOLEDO LabX balance V1.4
Installation and Configuration
6.2 Tree view LabX light
The tree view Configuration contains all the functions you need for instrument management.Here you can define connection to balance.
You can activate the tree view Configuration by clicking the Configuration tab directly below the navigations window.
- The tree has the following structure:a Connections. Connection to PC’s and in-
stalled instrument.b Weights. Directory containing defined test
weights.- You can open or close a folder by clicking the
or sign. - If you right-click an icon, a context menu ap-
pears with an overview of possible functions.
a
b
12�
6
7

METTLER TOLEDO LabX balance V1.4 45
Installation and Configuration
6.3 Icons
Icon Number Function/ContentsConnections 1 Contains all connections to PC’s and balances in the current
user profile.
PC 2 PC defined in network or locally.
Balance Connection OK
� Balance installed on a PC (2), connection OK.
Balance No connection
4 Balance installed on a PC (2). No connection to the balance.
Balance No connection
5 Balance installed on a network. No connection to the balance.
Test weights 6 List of test weights.
Test weight 7 Defined test weight.

46 METTLERTOLEDOLabXbalanceV1.4
InstallationandConfiguration
7 Connectingperipheraldevices
PeripheraldevicessuchastitratorsandbalancesareconnectedtocomputersviaUSB,RS232orLocalCANinterfacesorbythenetwork(TCP/IP).LabXcomputershaveoneortwoUSB,RS232orLocalCANinterfacesorevennoneatall.Dependingonthenumberofperipheraldevicesyouwanttoconnect,youmustinstalloneormoreinterfacecards.Tointegratetitratorsandbal-anceswithoutanEthernetinterfaceinanetwork,werecommendtheuseofMETTLERTOLEDOe-Linknetworkinterfaces.Forfur-therinformation,contacttheITsupportgroupinyourcompany,acomputerspecialist,oryourlocalMETTLERTOLEDOService.
Theordernumbersforthecorrespondingconnectioncablescanbefoundintheoperatinginstructionsoftheperipheraldevicesconcerned.
BeforeyoucandefinetitratorsandbalancesinLabX,youmusthavethecorrespondingrights;makesurethatyouareloggedonasauserwiththenecessaryrights.
Notes• IftheLocalCANinterfaceisused,thenanLC-RScablewillalsoberequired.• LabXlightcanonlycontrolonetitratorandonebalance.
7.1 Settingsofthee-Linknetworkinterfaces
MakesurethatthetitratororthebalanceisconnectedtotheserialRS232interfaceofthee-Linkandthattheinstrumentsareswitchedon.Forthee-Linktobeabletocommunicatewiththetitratororthebalance,thesettingsmustcorrespondtothee-Linksettings.Tofindouthowtochangethesesettingsonthee-Link,pleaseconsultthee-LinkProEB01&EB02e-Linknetworkinterfaceoperatinginstructions.
DetermineanIPaddressforeache-Linkandconfigureitaccordingly(IPaddress,SubNet,DNSanddefaultgateway).Asportnumberselect8000;thisisthedefaultsettingofthee-LinkandontheLabXside.
NoteThefollowinge-Linksettingsmustbeselectedtoguaranteeproblem-freeoperation:
ApplicationSettings>RS232InputtoNetworkOutput Serverenabled yes Serverport 8000 Clientenabled yes HostIPaddress address/nameoftheComputerwiththeBroker HostPort 8000 Hostretrytime 10s Mode string EOL CR Timeout 0ms Networkqueuesize 10messages Prefix empty RS232queue 10messages• EnteraDNSServeraddressentryineache-Link,sothatcomputernamescanberesolved.• AdefaultgatewayentryisalsorequiredifthenetworkonwhichLabXisoperatedisdividedintoseveralsubnets.• Makesurewiththee-LinkconfigurationthatthedefaultgatewayaddressisdefinedinthesamesubnetastheownIPad-
dress.

METTLERTOLEDOLabXbalanceV1.4 47
InstallationandConfiguration
7.2 Definingthecomputerconnectioninthebalances
LabXcontainsadefaultsettingforcommunicationwiththebalances.Thismaybeadapted,ifnecessary.ToallowLabXtocom-municatewiththebalance,therelevantbalancesettingsmustagreewiththeLabXsettings.Werecommendthatyousetthelanguageonthebalancetothesameasisusedonthecomputer(sinceLabXsynchronizesthedateandtimewiththeserverdateandtimebeforeexecutingajob).
Notes• Inthischapter,anetworkinterface(e.g.e-Link)mayberegardedasaPC.• NotallUSBserialadapterscorrectlysupporthandshaking.
7.2.1 DefiningthecomputerconnectionintheAX/MX/UMXbalances
1. SelectthePeripherals>Host>RS232fixedmenuonthebalance.Youcanonlyactivateasingledevice.Allotherdevicesmustbedeactivated(“Off”).Ifyouactivateanewdevice,thepreviouslyselecteddeviceisautomaticallydeactivated.
2. SelectDefine.MakesurethatthefollowingentriesunderDefinehavebeendefined: Baudrate: 9600Baud Bit/Parity: 8-bit/none Handshake: XON/XOFF Endoflinecharacter: <CR><LF> Characterset: ANSI/WINDOWS3. ClickonOK.Important:Toensurethatspecialcharacters(e.g.“°C”)areprintedoutcorrectlyonMETTLERTOLEDOprinters,Balanceandprintermustbesetto8-bit.
7.2.2 DefiningthecomputerconnectionintheXSbalances
1. SelectthePeripherals>Host>RS232fixedmenuonthebalance.Youcanonlyactivateasingledevice.Allotherdevicesmustbedeactivated(“Off”).Ifyouactivateanewdevice,thepreviously-selecteddeviceisautomaticallydeactivated.
2. SelectDefine.MakesurethatthefollowingentriesunderDefinehavebeendefined: Baudrate: 9600Baud Bit/Parity: 8-bit/none Handshake: XON/XOFF Endoflinecharacter: <CR><LF> Characterset: ANSI/WINDOWS3. ClickonOK.Important:Toensurethatspecialcharacters(e.g.“°C”)areprintedoutcorrectlyonMETTLERTOLEDOprinters,Balanceandprintermustbesetto8-bit.
7.2.3 DefiningthecomputerconnectionintheXPbalances
1. SelectthePeripherals>Host>RS232fixedmenuonthebalance.Youcanonlyactivateasingledevice.Allotherdevicesmustbedeactivated(“Off”).Ifyouactivateanewdevice,thepreviously-selecteddeviceisautomaticallydeactivated.
2. SelectDefine.MakesurethatthefollowingentriesunderDefinehavebeendefined: Baudrate: 9600Baud Bit/Parity: 8-bit/none Handshake: XON/XOFF Endoflinecharacter: <CR><LF> Characterset: ANSI/WINDOWS3. ClickonOK.Important:Toensurethatspecialcharacters(e.g.“°C”)areprintedoutcorrectlyonMETTLERTOLEDOprinters,Balanceandprintermustbesetto8-bit.
48 METTLERTOLEDOLabXbalanceV1.4
InstallationandConfiguration
7.2.4 DefiningthecomputerconnectionintheAT/MT/UMTbalances
1. SelecttheConfigurationmenubyholdingdownthebuttononthebalance.2. PressthebuttonbrieflytocontinuetoInterface,thenpressSelectbutton1toselectInt-FACE.3. PressSelectbutton1tocontinuetoDatatransfermode,thenpressSelectbutton2toactivateALL.4. PressSelectbutton1tocontinuetoDatatransferspeed,thenpressSelectbutton2toactivate9600bd.5. PressSelectbutton1tocontinuetoParity,thenpressSelectbutton2toactivate-E-.6. PressSelectbutton1tocontinuetoTransferprotocol,thenpressSelectbutton2toactivateHSnone.7. PressSelectbutton1tocontinuetoEndoflinemode,thenpressSelectbutton2toactivatecrLF.8. PresstheSetbuttontosaveyoursettingsandreturntoweighingmode.9. ChoosetheDoorAutotoautomatic(pressthenMenukey4times).InLabX,choosesettingsof7databitsand1stopbit.Allotherparametersmustmatchthebalancesettings.
7.2.5 DefiningthecomputerconnectionintheAG/PGbalances
AllsettingsmustbeconfiguredontheLC-RS9boxusing3switches.1. Usetheleft-handswitchtochangethepositionto0.2. Usethemiddleswitchtochangethepositionto5.3. Usetheright-handswitchtochangethepositionto7.
7.2.6 DefiningthecomputerconnectioninthePG-Sbalances
1. SelecttheDevice>Hostmenuonthebalance.2. GotoSendcommands>S.ALL3. GotoSendformat>S.SICS4. ContinuetoBaudrate>bd96005. NowselectParity/Bit>8B/no6. ContinuetoHandshake>HSSoFt7. HolddowntheMenubuttonuntilthebalancereturnstoweighingmode.Yoursettingswillnowbesaved.
7.2.7 DefiningthecomputerconnectioninthePR/SR/SGbalances
AllsettingsmustbeconfiguredontheLC-RS9boxusing3switches.1. Usetheleft-handswitchtochangethepositionto0.2. Usethemiddleswitchtochangethepositionto5.3. Usetheright-handswitchtochangethepositionto7.
7.2.8 DefiningthecomputerconnectionintheAB-L/AB-S/PB-L/PB-Sbalances
1. Pressthe«Cal/Menu»keyuntilthedisplayshows“Menu”.Releasethekeyandthefirstmenuitemwillbedisplayed.2. Usethe«±»keyuntilPeripheralDevicesisshownandchooseHoStwiththe«“»key.3. Usingthe«±»keygofurthertoBaudrateandchoosebd9600withthe«“»key.4. Usingthe«±»keygotoBits/Paritätandchoose8b-nowiththe«“»key.5. Usingthe«±»keygotoHandshakeandchooseHSSoftwiththe«“»key.6. Press«Cal/Menu»until“StorEd”showsinthedisplay.Yoursettingsarenowsaved.

METTLER TOLEDO LabX balance V1.4 49
Installation and Configuration
7.3 DefiningbalancesinLabX
7.3.1 DefineRSconnection
Make sure that the balance is connected either directly or via LC-RS9 to an RS232 serial interface on the PC, and that it is switched on. Alternatively, you can use a serial-to-USB adapter cable to connect a balance to a PC’s USB port. You will need to also install the software driver that came with the adapter cable.
1. In the tree view Configuration, right-click the Connections icon and choose and select AddSerialBalance... from the context menu. The Addserialbalance dialog appears.
2. Choose the COM-Port from the drop-down list. Be sure that the chosen COM-Port is not already being used for something else.3. Click on “Auto-DetectBalance”. The connected balance will appear after a few seconds in the “Balance type” window.
Enter a name of your choice into the window “BalanceName”. You can then define the position and responsibilities in the relevant fields”.
4. Click on Save in order to apply the information.5. Should this not be the case then click on More in which case the balance communication parameters can be manually entered.6. From the drop-down list in the “Model:” box, select the balance model and in the “BalanceName:” box, enter a name. The
procedure is the same for the other balance models.7. Now check that the communication parameters are set correctly, and change if necessary. Select a COM port which is not
in use by another balance or device.8. Click on Save to confirm your new settings and close the dialog, or click on Cancel to reject the new settings and close the
dialog.The newly defined balances appear in the tree structure.

50 METTLER TOLEDO LabX balance V1.4
Installation and Configuration
Notes• If the balance is connected to another PC that has not yet been defined, right click on Connections and first establish
a connection to the PC.• We recommend that you leave all the communication parameters set to their default values, apart from the COM port.• Select a unique name for the balances so that they can be quickly identified if several balances are connected.• Make sure that the communications settings are identical to those on the balances.
7.3.2 DefineNetworkconnection
Make sure that the balance is connected on the PC and is switched on.
1. In the tree view Configuration, right-click the Connections icon and choose and select AddNetworkBalance... from the context menu. The Addnetworkbalance dialog appears.
2. Enter the required IP-address or host name of the network interface now. If you do not know the addresses, please contact IT Support in your organization and make sure that chapter 7.1 “Settings of the e-Link network interfaces” has been carried out.
3. Click on “Auto-DetectBalance”. The connected balance will appear after a few seconds in the “Balance type” window. Enter a name of your choice into the window “BalanceName”. You can then define the position and responsibilities in the relevant fields”.
4. Click on Save in order to apply the information.5. Should this not be the case then click on More in which case the balance communication parameters can be manually entered.6. Enter the required IP-address and from the drop-down list in the “Model:” box, select the balance model and in the “Balan-
ceName:” box, enter a name. The procedure is the same for the other balance models.7. Click on Save to confirm your new settings and close the dialog, or click on Cancel to reject the new settings and close the
dialog.The newly defined balances appear in the tree structure.
Notes• Select a unique name for the balances so that they can be identified if several balances are connected.• Each IP address should only be assigned once within the network. Make sure that the settings are identical to those for the
network interfaces.

METTLERTOLEDOLabXbalanceV1.4 51
InstallationandConfiguration
• Thedeviceserialnumbersareusedastheiruniqueidentification.Thebalancenameisalsounique-andselectable-andincreasesthereadabilitywithintheLabXnavigationanduserinterface.
• TheportnumberforMETTLERTOLEDOlaboratorybalanceswithanintegratednetworkinterfaceis8001.
7.3.3 Showconfigureddevices
1. InthetreeviewConfiguration,right-clicktheConnections iconandchooseandselectShowConfiguredDevicesfromthecontextmenu.TheConfiguredDevicesdialogappears.
Allconfigureddevicesaredisplayed.Deviceswhicharenotassignedtoaprofilewillbemarkedwith“No”inthe“InAnyProfile”column.
NoteIfyouselectadeviceandthenclickRemove,thedeviceisremovedandtheinstrumentlicenseisagainreleased.
7.4 ModifyingCommunicationparameters
Thecommunicationparametersforeachbalancecanbemodifiedaftertheinitialconnection.IfthereisaproblemgettingabalanceconnectedinLabX,performthefollowingstepstotryandresolvetheproblem.
1. InthetreeviewConfiguration,right-clickonthedesiredBalance andselectProperties.ThePropertiesofbalance…dialogappears.
2. SelecttheCommunicationtab.
3. Makesureallparametersinthistabmatchthesettingsonthebalance.4. ClicktheTestbuttontocheckifthesettingsyouhavemadeenableasuccessfulconnectiontothebalance.5. ClickonOKtoconfirmyournewsettingsandclosethedialog,orclickonCanceltorejectthenewsettingsandclosethe
dialog.

52 METTLERTOLEDOLabXbalanceV1.4
InstallationandConfiguration
7.5 Managingandidentifyingbalances
Ifyouareworkingwithseveralbalancesofthesamemodel,itisagoodideatoprovideamoreprecisedesignationforeachbalanceinordertoavoidconfusion.Youcanusethefollowingbasicsettings.
1. FromthetreeviewConfiguration, right-clickonthedesiredBalance andselectProperties.ThePropertiesofbal-ance…dialogappears.
2. SelecttheIdentificationtab.
3. Under“<Location>:”enteradesignationofthebalance’scurrentlocation,e.g.Lab-1.4. Under“<Responsibility>:”enterthenameofthepersonwithresponsibility,e.g.JohnMiller.5. Ifyouhavealsodefinedsomethingunder“BalanceID4”,entertheappropriateinformation.6. Under“Notes:”youcanenterfurthercommentsaboutthebalance.7. ClickonOKtoconfirmyournewsettingsandclosethedialog,orclickonCanceltorejectthenewsettingsandclosethe
dialog.NoteIfyouareoperatingyoursysteminthe“SecureMode(21CFRPart11)”,whenyouexecutethisstepyouwillbepromptedtoenteryourelectronicsignature(seechapter5.3“Electronicsignature”).Ifthesignatureissuccessful,anentrywillbemadeintheAuditTrail.

METTLERTOLEDOLabXbalanceV1.4 53
InstallationandConfiguration
7.6 CreatingmaintenanceintervalsandMinWeighSettings
IfyouwantLabXtoremindyouwhenthenextserviceorthenextMinWeighdeterminationisdue,enterthecorrespondingdatehere.
Youcanonlyconfigurethebalancereleasecontrolwithrespecttothesecriteriaifyouhaveenteredtherelevantdate.
Theprocedureforcheckingthisdataorenteringitmanuallyisasfollows:
1. FromthetreeviewConfiguration, right-clickonthedesiredBalance andselectProperties.ThePropertiesofbal-ance…dialogappears.
2. SelecttheMaintenancetab.
NoteThesedialogwindowsappearonlyforbalanceswhichsupportthematchingfeatures.LabXreadsparametersdirectlyfromthebalanceinread-onlyform.AlldatainputishandledonlyinLabXandisnotsendbacktothebalance.Onlyuserswiththecorrectpermissionsareallowedtoenterthesevalues.
3. Under“Nextservice:”,enterthedateonwhichthenextserviceisdue.4. Under“NextMinWeightest:”enterthedatefortheMinWeightest.5. Under“Methodname:”,youcanenterthenameoftheregulationsaccordingtowhichthedeterminationwascarriedout.
Thiswillappearonthe“MinWeighaccordingto”report.6. Under“TestParameters:”,specifytheparametersusedtodetermineMinWeigh.7. Under“Tarerange1:”and“MinWeigh:”,enterthedatafromthelastMinWeighdetermination.Youcanenterupto3tare
valueswiththeassociatedMinWeighdeterminations.8. EntertheMinWeighdeterminationtoapplytoweighingparameters.9. RepeatSteps5-8forfurtherMinWeighmethods.10. Chooseunder“AppliedMinWeighMethods”adefinedmethod.LabXsupportsworkingwithoneMinWeighmethodperbal-
ance.11. ClickonOKtoconfirmyournewsettingsandclosethedialog,orclickonCanceltorejectthenewsettingsandclosethe
dialog.

54 METTLERTOLEDOLabXbalanceV1.4
InstallationandConfiguration
Function AX/MX/MX AX/MX/UMX XS XP AT/MT/UMT StandardV3.22+ AG/PG/SG/PG-S RemoteV1.02 PR/SR AB-L/AB-S/ PB-L/PB-S
(1)Putintooperation
(2)Counter
(3)NextServicedate
MinWeighData:
(4)NextMinWeighDate – –
(5)MinWeighMethod – –
(6)MethodName – –
(7)TestParameters – –
(8)WegingParameters – –
(9)MinWeighperTarerange – –
Legend WritepermissionsforLabXuser,thevalueissavedinLabX Write-protectedvaluesarereadfromthebalance Write-protectedvaluesarereadfromthebalance
– Functionalityonthebalanceisnotsupported
Notes• Ifyouareoperatingyoursysteminthe“SecureMode(21CFRPart11)”,whenyouexecutethisstepyouwillbeprompted
toenteryourelectronicsignature(seechapter5.3“Electronicsignature”).Ifthesignatureissuccessful,anentrywillbemadeintheAuditTrail.
• AssoonastheMinWeighparameterinthebalanceisreceived,allmanualentriesinLabXareoverwritten.Thevalueinthebalancealwayshashigherpriority.
• AllthevaluesonthistabarestoredinLabX,regardlessofwhethertheywereenteredbythebalanceorhadtobeenteredmanually.
7.6.1 MinWeighfunctionalityinLabX
RequirementsforusingMinWeighwithLabX:
• ThebalancesupportsMinWeigh• TheMinWeighdeterminationisenforced• TheMinWeighparametersinLabXareassigned.(automaticallyormanuallydependingonbalancetype)
Functionality:• ManagementofMinWeighparameters• MonitoringofupcomingMinWeighdetermination• ActivationofMinWeighcontrolinjobtemplate• RecordingofMinWeighviolationsduringweighings• DisplayofMinWeighviolationsinweighingreports• OverviewdisplayofallMinWeighviolations(MinWeighIncidentHistory)

METTLERTOLEDOLabXbalanceV1.4 55
InstallationandConfiguration
7.7 Removingbalances
Youcanremoveanybalancesthatarenolongerneededorhavebeenreplaced.Makesurethatyouhavethenecessaryac-cessrights.Beawarethatthisoperationremovesthebalancefromallprofiles.Ifyoutemporarilydonotneedthebalanceinthesystem,butwanttoadditagainlater,usetheprofilefunctionAdd/removeBalances(seechapter4.1“Definingusersandprofiles”).
1. FromthetreeviewConfiguration,right-clickonthedesiredBalance andselectRemove.TheTheselectedbalancewillberemovedfromallprofiles.Areyousureyouwanttoremoveselecteditems?dialogappears.
2. SelectYes.NoteIfyouareoperatingyoursysteminthe“SecureMode(21CFRPart11)”,whenyouexecutethisstepyouwillbepromptedtoenteryourelectronicsignature(seechapter5.3“Electronicsignature”).Ifthesignatureissuccessful,anentrywillbemadeintheAuditTrail.
Attention• Thisoperationgivesyouauniqueopportunitytoexporttheadjustmentandtestrecordsofthebalance,
becauseafter thebalancehasbeenremovedfromthesystem,nofurtheraccesstothisdata ispos-sible.
• Balanceswhichhavebeenremovedcannotbereinstalledunderthesamename.ThisistheonlywaytoruleoutthepossibilityofdataredundancyorwrongdataintheAuditTrail.

56 METTLER TOLEDO LabX balance V1.4
Installation and Configuration
8 Setting up Weights Management
Here you can install and define your available weights that you will need for adjustments with external weights, tests with exter-nal weights and repeatability tests with external weights.
1. Select the tree view Configuration.2. Right-click on the Weights icon and select “New” from the context menu. The Weight Data form appears.
�. Complete the form with the weight specifications. The weight specifications are shown in the certificate that you received with the weight.
4. Click on the Save button from the toolbar to save.5. All the weights you have defined are displayed in a weights library. Right-click on the Weights icon and select “List” from
the context menu. An overview with the Weights list in LabX appears.
Notes• We strongly recommend for clarity reasons that no local weights library is set up in the embedded balance software. This
could lead to data redundancy and wrong data on the local print-out.• The weight form can only be saved if all fields marked with an asterisk * are filled out.• The identification of all weights must be clearly defined.

METTLER TOLEDO LabX balance V1.4 57
Installation and Configuration
8.1 Signing weights
Weights can be signed with the Reviewed and/or Approved options. Weights are marked with Reviewed and/or Approved at the top of the window, at the end of the weight data form, and on the printout. If a signed weight is edited, the signature is automatically deleted.
To be able to sign, you must have the corresponding rights. Make sure that you are logged in as a user which has the corre-sponding rights.
1. Click with the right mouse button on the Weights icon in the tree view Configuration. In the context menu, select “Sign”.
2. The Sign Weight: dialog appears.
�. Enter the user name and password, and in the drop-down list of the “Meaning” field, select Review or Approve. See also chapter 5.2 “General Policies”.
4. Click on OK to confirm the changed settings and close the dialog, or click on Cancel to reject all the changed settings and close the dialog.
8.2 Changing weights
Select an existing Weight for editing by double-clicking on it, or use the right mouse button to select “Edit” in the context menu. The weight now appears as a form which you can change.
NoteIf you are operating your system in the “Secure Mode (21 CFR Part 11)”, when you execute this step, you will be prompted to enter your electronic signature (see chapter 5.� “Electronic signature”). If the signature is successful, an entry will be made in the Audit Trail.

58 METTLER TOLEDO LabX balance V1.4
Installation and Configuration
8.3 Removing weights
If a weight is no longer required or has been replaced, you can remove it. Make sure that you have the corresponding rights to do this.
1. Select the tree view Configuration.2. With the right mouse button, click on an existing Weight and in the context menu, select “Delete”. The Confirm Modi-
fication dialog appears.
NoteIf you are operating your system in the “Secure Mode (21 CFR Part 11)”, when you execute this step, you will be prompted to enter your electronic signature (see chapter 5.� “Electronic signature”). If the signature is successful, an entry will be made in the Audit Trail.
Attention
The weight can only be removed when it is no longer defined for Adjustment or Test jobs (see chapters 9.2.2, 9.2.4, and 9.2.5).

METTLER TOLEDO LabX balance V1.4 59
Installation and Configuration
9 Balance-specific settings
LabX allows you to check the FACT/proFACT settings on the balance and to modify them if necessary. Follow the instructions in your SOPs in order to make these settings, and enter these as a reference.
Weighing parameters such as autozero, vibration adapter and stability criterion are handled in LabX in relation to specific jobs, and can be determined in the job templates (see chapter 12.� “Defining a new job template”). The environmental parameters, on the other hand, should be set individually and once only on each balance to suit the environmental conditions at the work-place.
The display area can also be determined job-specifically in the working templates or a one-off job.
The date and time of the balance are synchronized with the LabX system time before each weighing or testing job.
9.1 Defining FACT and proFACT settings
FACT or proFACT automatically adjusts and linearizes the balance to take account of changed environmental conditions. Define the time and/or temperature criteria at which a FACT or proFACT should be activated.
1. From the tree view Configuration, right-click on the desired Balance and select from the context menu “Adjustment and Test”.
2. The Adjustment and Test for balance: dialog appears.
�. Select “FACT/proFACT” by means of double-click for working or you click on Setting….
4. The Settings in balance: dialog appears. Under “Time criterion:” click on On.5. Define the day of the weeks and time at which an automatic or manual adjustment is to be carried out.6. Under “Temperature criterion:” click on On.7. “Activate at position” refers to selecting one of the temperatures which are part of each individual balance. Select the posi-
tion here which matches the desired temperature setting position on the balance.8. Click on OK to confirm your new settings and close the dialog or click on Cancel to reject all your new settings and close
the dialog.

60 METTLER TOLEDO LabX balance V1.4
Installation and Configuration
Notes• The FACT settings are still managed by the balance. LabX can be used to configure them.• The number of selectable parameters depends on the selected balance model.• There are special rules for certified balances.
9.2 Scheduler for adjustment and tests
Schedules for adjustments and tests can be set up for every balance in LabX in accordance with table in chapter 22 “Appendix LabX Functions”. This provides several options for planning adjustments and tests, in addition to the standard FACT/proFACT functions for balances.
The scheduler can be switched on and off individually. An active scheduler places an adjustment or test job in the balance’s queue at the programmed times. LabX attempts to run test jobs automatically with an internal weight. Test jobs with external weights must be started and implemented by the user.
LabX allows management of weighing tolerances for certain checkpoints on all installed balances. Dependent on the balance model, recommended factory tolerance values T0 are given. In case the value for T0 remains blank or “0” after having selected a nominal weight value, the balance model does not support this function. The T0 values correspond to the maximum deviation of a specific characteristic, e.g. the sensitivity offset of a certain type of balance in relation to the specified nominal weight value.
You can take T0 as the basis and derive your own tolerances T1 and T2 from it. T1 and T2 tolerances must be greater than the T0 value. They correspond to what you consider to be reasonable in your industry and application. As default, the T1 and T2 values are proposed according to the rule T1 = � * T0 and T2 = 10 * T0.
The Release Control that can be configured for every balance in LabX (see chapter 9.� “Configuring the Release Control”) is partly based on an assessment of reports from completed adjustment and test jobs.
For each adjustment and test setting, you may define up to 5 different test points. Each test point contains separate settings for weights used and tolerance values accepted. Any or all of the test points can be enabled at any given time. If the scheduler finds more than 1 test point enabled, a single job is created, all test points are carried out within that job and a single pass/fail status is generated.
9.2.1 Scheduler for sensitivity adjustment with internal weight
This menu is used to define the schedule for running and recording an adjustment with internal weight. When it is due, an adjustment job is placed in the queue for the relevant balance in the tree view Weighing, and LabX attempts to run it at the same time.
1. From the tree view Configuration, right-click on the desired Balance and select from context menu “Adjustment and Test”.
2. The Adjustment and Test for balance: dialog appears.
�. Select “Sensitivity adjustment with internal calibration weight” by means of double-click for working or you click on Set-ting….

METTLER TOLEDO LabX balance V1.4 61
Installation and Configuration
4. The Scheduler for Adjustment with internal weight for balance: dialog appears. Under “Scheduler” click on On.5. You can enter a reference under the “Test procedure reference:” sequence.6. Under “Generate/Execute maintenance job at:” select the time at which the adjustment is to be carried out.7. Under “Recurrence pattern”, define how often and from when the adjustment is to be carried out. You may define daily,
weekly or monthly intervals.8. Click on OK to confirm your new settings and close the dialog or click on Cancel to reject all your new settings and close
the dialog.NoteIf you are operating your system in the “Secure Mode (21 CFR Part 11)”, when you execute this step you will be prompted to enter your electronic signature (see chapter 5.� “Electronic signature”). If the signature is successful, an entry will be made in the Audit Trail.
9.2.2 Scheduler for sensitivity adjustment with external weight
This menu is used to define the schedule for running and recording an adjustment with external weight. When it is due, an ad-justment job is placed in the queue for the relevant balance in the tree view Weighing. As a user with the appropriate access right, you are then prompted to run this adjustment job as soon as possible.
1. From the tree view Configuration, right-click on the desired Balance and select from the context menu “Adjustment and Test”.
2. The Adjustment and Test for balance: dialog appears.
�. Select “Sensitivity adjustment with external calibration weight” by means of double-click for working or you click on Set-ting….
4. The Scheduler for Adjustment with external weight for balance: dialog appears.

62 METTLER TOLEDO LabX balance V1.4
Installation and Configuration
5. Select in tab Testpoint the test point 1 and click on Properties….
6. The Testpoint 1 Properties dialog appears.7. Select the weights needed for this external adjustment by clicking on “Add Weight…”. An overview with the Weights list
in LabX appears.
8. Select up to three adjustment weights in order to achieve the necessary nominal, and click on OK to accept the selection. The selected adjustment weight(s) now appear(s) in the Testpoint 1 Properties dialog box.
9. Activate the check box “Enabled testpoint” now and click the OK button to confirm the settings. Further test points can be defined in the same manner.
10. Select the tab Scheduler.

METTLER TOLEDO LabX balance V1.4 6�
Installation and Configuration
11. The Scheduler for Adjustment with external weight for balance: dialog appears. Under “Scheduler” click on On.12. You can enter a reference under the “Test procedure reference:” sequence.1�. Under “Generate/Execute maintenance job at:” select the time at which the adjustment is to be carried out.14. Under “Recurrence pattern”, define how often and from when the adjustment is to be carried out. You may define daily,
weekly or monthly intervals.15. Click on OK to confirm your new settings and close the dialog or click on Cancel to reject all your new settings and close
the dialog.Notes• For each adjustment and test setting, you may define up to 5 different test points. Each test point contains separate set-
tings for weights used and tolerance values accepted. Any or all of the test points can be enabled at any given time. If the scheduler finds more than 1 test point enabled, a single job is created, all test points are carried out within that job and a single pass/fail status is generated.
• If you are operating your system in the “Secure Mode (21 CFR Part 11)”, when you execute this step you will be prompted to enter your electronic signature (see chapter 5.� “Electronic signature”). If the signature is successful, an entry will be made in the Audit Trail.
9.2.3 Scheduler for sensitivity test with internal weight
This menu is used to define the schedule for running and recording a sensitivity test with internal weight. When it is due, a test job is placed in the queue for the relevant balance in the tree view Weighing, and LabX attempts to run it at the same time.
1. From the tree view Configuration, right-click on the desired Balance and select from the context menu “Adjustment and Test”.
2. The Adjustment and Test for balance: dialog appears.
�. Select “Sensitivity adjustment test with internal calibration weight” by means of double-click for working or you click on Setting….

64 METTLER TOLEDO LabX balance V1.4
Installation and Configuration
4. The Scheduler for Adjustment test with internal weight for balance: dialog appears. Select the tab Tolerances.5. Check the specified nominal load to which the test is related, and adjust if necessary (e.g. to the typical operating range). Enter individual tolerance values in the form of a Control limit (T1) and a warning limit (T2) so that LabX can assess the
effective deviation. Take account of the tolerance value T0 suggested by METTLER TOLEDO and the recommendation for T1 and T2 derived from it.
To ensure that the Release Control has a unique basis for determining whether a test was passed, please select “Passed criteria:” T1 or T2.
6. Click on OK to confirm your new settings and close the dialog or click on Cancel to reject all your new settings and close the dialog.
7. Select the tab Scheduler.
8. The Scheduler for Adjustment test with internal weight for balance: dialog appears. Under “Scheduler” click on On.9. You can enter a reference under the “Test procedure reference:” sequence.10. Under “Generate/Execute maintenance job at:” select the time at which the adjustment is to be carried out.11. Under “Recurrence pattern”, define how often and from when the adjustment is to be carried out. You may define daily,
weekly or monthly intervals.12. Click on OK to confirm your new settings and close the dialog or click on Cancel to reject all your new settings and close
the dialog.NoteIf you are operating your system in the “Secure Mode (21 CFR Part 11)”, when you execute this step you will be prompted to enter your electronic signature (see chapter 5.� “Electronic signature”). If the signature is successful, an entry will be made in the Audit Trail.

METTLER TOLEDO LabX balance V1.4 65
Installation and Configuration
9.2.4 Scheduler for sensitivity test with external weight
This menu is used to define the schedule for carrying out and recording a sensitivity test with external weight. When it is due, a test job is placed in the queue for the relevant balance in the tree view Weighing. As a user with the appropriate access right, you are then prompted to carry out this test job as soon as possible.
1. From the tree view Configuration, right-click on the desired Balance and select from the context menu “Adjustment and Test”.
2. The Adjustment and Test for balance: dialog appears.
�. Select “Sensitivity adjustment test with external calibration weight” by means of double-click for working or you click on Setting….
4. The Scheduler for Adjustment test with external weight for balance: dialog appears.
5. Select in tab Testpoint the test point 1 and click on Properties….
6. The Testpoint 1 Properties dialog appears.7. Select the weights needed for this external adjustment by clicking on “Add Weight…”. An overview with the Weights list
in LabX appears.

66 METTLER TOLEDO LabX balance V1.4
Installation and Configuration
8. Select up to three adjustment weights in order to achieve the necessary nominal, and click on OK to confirm your selection. The selected adjustment weight(s) now appear(s) in the Testpoint 1 Properties dialog box.
9. Check the specified nominal load to which the test is related, and adjust if necessary (e.g. to the typical operating range). Enter individual tolerance values in the form of an intervention- (T1) and a warning limit (T2) so that LabX can assess the
effective deviation. Take account of the tolerance value T0 suggested by METTLER TOLEDO and the recommendation for T1 and T2 derived from it.
To ensure that the Release Control has a unique basis for assessing whether a test was passed, please select the “Passed criteria”: T1 or T2.
10. Activate the check box “Enabled testpoint” now and click the OK button to confirm the settings. Further test points can be defined in the same manner.
11. Click on OK to confirm your new settings and close the dialog or click on Cancel to reject all your new settings and close the dialog.
12. Select the tab Scheduler.
1�. The Scheduler for Adjustment test with external weight for balance: dialog appears. Under “Scheduler” click on On.14. You can enter a reference under the “Test procedure reference:” sequence.15. Under “Generate/Execute maintenance job at:” select the time at which the adjustment is to be carried out.16. Under “Recurrence pattern”, define how often and from when the adjustment is to be carried out. You may define daily,
weekly or monthly intervals.17. Click on OK to confirm your new settings and close the dialog or click on Cancel to reject all your new settings and close
the dialog.

METTLER TOLEDO LabX balance V1.4 67
Installation and Configuration
Notes• For each adjustment and test setting, you may define up to 5 different test points. Each test point contains separate set-
tings for weights used and tolerance values accepted. Any or all of the test points can be enabled at any given time. If the scheduler finds more than 1 test point enabled, a single job is created and all test points are carried out within that job and a single pass/fail status is generated.
• If you are operating your system in the “Secure Mode (21 CFR Part 11)”, when you execute this step you will be prompted to enter your electronic signature (see chapter 5.� “Electronic signature”). If the signature is successful, an entry will be made in the Audit Trail.
• The sensitivity test does not take account of the accuracy of the external weights. It is recommended to use a reference weight whose measurement uncertainty is not greater than one third of the value used for the tolerances T1 and T2.
ExampleThe maximum sensitivity offset of an AX204 is 2 ppm. At 200 g, this corresponds to 0.4 mg (T0). You decide to use a tolerance of 1 mg (T1) at 200 g.The maximum permissible error (mpe) of the selected reference weight should be less than 0.� mg at 200 g (corresponds to 1.5 ppm). For practical reasons, a weight of class E2 should be used.If you have a weight whose actual value is known, an OIML weight with a maximum permissible error (mpe) corresponding to the test limit, here 1 mg at 200 g, must be used. That in turn corresponds to 5 ppm, which means an F2 weight. (Reason: The uncertainty of an OIML weight must be not more than 1/� of the maximum permissible error (mpe). Mpe of class F2: 5 ppm or 1 mg at 200 g; measurement uncertainty of this weight: mpe/� = 1/� mg, which corresponds to 1/� of the desired tolerance).
9.2.5 Scheduler for Repeatability test with external weight
This menu is used to define the schedule for running and recording a repeatability test with external weight. When it is due, a test job is placed in the queue for the relevant balance in the tree view Weighing. As a user with the appropriate access rights, you are then prompted to run this test job as soon as possible.
1. From the tree view Configuration, right-click on the desired Balance and select from the context menu “Adjustment and Test”.
2. The Adjustment and Test for balance: dialog appears.
�. Select “Repeatability test with external calibration weight” by means of double-click for working or you click on Setting….
4. The Scheduler for Repeatability test for balance: dialog appears.

68 METTLER TOLEDO LabX balance V1.4
Installation and Configuration
5. Under “Repeat factor:”, enter the number of repetitions.6. Under “Weight Entry:” select Automatic or Manual to control the method of reading weights from the balance into LabX.7. Under “Minimum Change:” and “Minimum Change Unit:” enter the desired criteria. After the minimum weight change is
reached, the next stable weight is captured. Additionally, under “Delay Time [s]:” you can specify the delay time after which the weight should be captured.
8. Select in tab Testpoint the test point 1 and click on Properties….
9. The Testpoint 1 Properties dialog appears.10. Select the weights needed for this external adjustment by clicking on “Add Weight…”. An overview with the Weights list
in LabX appears.
11. Select up to three adjustment weights in order to reach the necessary nominal, and click on OK to confirm your selection. The selected adjustment weight(s) now appear(s) in the dialog box.
12. Enter individual tolerance values in the form of a Control limit (T1) and a warning limit (T2) so that LabX can assess the effective deviation. Take account of the nominal load and associated tolerance value T0 specified by METTLER TOLEDO, and the recommended T1 and T2 derived from it.
To ensure that the Release Control has a unique basis for assessing whether a test was passed, please selected the “Passed criteria”: T1 or T2.
Note: T0 always relates to a test with the specified nominal load. This cannot be changed for the repeatability test.
1�. Activate the check box “Enabled testpoint” now and click the OK button to confirm the settings. Further test points can be defined in the same manner.
14. Select the tab Scheduler.

METTLER TOLEDO LabX balance V1.4 69
Installation and Configuration
15. The Scheduler for Repeatability test for balance: dialog appears. Under “Scheduler” click on On.16. You can enter a reference under the “Test procedure reference:” sequence.17. Under “Generate/Execute maintenance job at:” select the time at which the adjustment is to be carried out.18. Under “Recurrence pattern”, define how often and from when the adjustment is to be carried out. You may define daily,
weekly or monthly intervals.19. Click on OK to confirm your new settings and close the dialog or click on Cancel to reject all your new settings and close
the dialog.Notes• For each adjustment and test setting, you may define up to 5 different test points. Each test point contains separate set-
tings for weights used and tolerance values accepted. Any or all of the test points can be enabled at any given time. If the scheduler finds more than 1 test point enabled, a single job is created, all test points are carried out within that job and a single pass/fail status is generated.
• If you are operating your system in the “Secure Mode (21 CFR Part 11)”, when you execute this step you will be prompted to enter your electronic signature (see chapter 5.� “Electronic signature”). If the signature is successful, an entry will be made in the Audit Trail.

70 METTLERTOLEDOLabXbalanceV1.4
InstallationandConfiguration
9.3 ConfiguringtheReleaseControl
TheReleaseControlprovidesageneralassessmentofwhetherdatamayberecordedwithabalanceinLabXornot.Thecriteriatobefulfilledcanbeconfiguredonthreelevels,Low,Medium,High.Thusanindividualreleaselevelmaybeselectedoneveryworkingtemplate.Thismaybelinkedtotheexecutionofaspecifictypeofjob.
Example:AweighingjobbasedonajobtemplatewithReleaselevel“High”canonlyberunifallthecriteriastoredforthislevelarefulfilledatthetimeofstartingthejob.
1. FromthetreeviewConfiguration,right-clickonthedesiredBalance andselect“ReleaseControl”.TheReleaseControldialogfortheselectedbalanceappears.
2. Selectareleaselevel.YouhavethechoiceofLow,MediumandHigh.3. Nowdefinethecriteriathatmustbefulfilledfortheselectedreleaselevel.4. Settherundateswitches(Service,MinWeighTest)toOnforthoserundatesthatyouregardastheconditionforfulfillment
ofthisreleaselevel.ContactyourLabXAdministratorifoneofmoreofthesedatesisnotavailable.5. SelectaminimalrequiredOntimeinhours,andsettheOn/Offswitchtodeterminewhetherthiscriterionshouldapplyto
thebalance.6. Thebuilt-inlevelsensoronyourbalancecontinuouslymonitorsthecorrecthorizontalalignmentofyourbalance.Setting
theLevelSensorCheckswitchto“On”enablestheinclinometer.Ifthelevelsensordetectsthatthebalanceisnotlevel,ajoberrormessageisdisplayedandthejobcannotcontinueuntilthebalancehasbeenre-levelled.
7. SelectamaximumtimeitshouldtakeforasuccessfulsensitivityadjustmenttoberecordedinLabX,thensettheOn/Offswitchtodeterminewhetherthiscriterionshouldapplytothebalance.
8. SelectamaximumtimeitshouldtakeforasuccessfulsensitivityadjustmenttesttoberecordedinLabX,thensettheOn/Offswitchtodeterminewhetherthiscriterionshouldapplytothebalance.
9. SelectamaximumtimeitshouldtakeforasuccessfulrepeatabilitytesttoberecordedinLabX,thensettheOn/Offswitchtodeterminewhetherthiscriterionshouldapplytothebalance.
10. ClickonOKtoconfirmyournewsettingsandclosethedialogorclickonCanceltorejectyournewsettingsandclosethedialog.
Notes• Ifyouareoperatingyoursysteminthe“SecureMode(21CFRPart11)”,whenyouexecutethisstepyouwillbeprompted
toenteryourelectronicsignature(seechapter5.3“Electronicsignature”).Ifthesignatureissuccessful,anentrywillbemadeintheAuditTrail.
• Thesupportedfunctionsaredependentonbalancemodels.AdditionallyanexpiryofthecurrentminimumweightmayrequirethatMinWeighmaybeupdated.Seetableinchapter22“AppendixLabXFunctions”.

METTLER TOLEDO LabX balance V1.4 71
Installation and Configuration
10 Displaying histories
10.1 Histories of adjustment/test
You can view and print the adjustment/test histories at any time. You can use the filter function to display only those data reports which are relevant for you.
1. Use the right mouse button to click on the desired Balance in the tree view Configuration. In the context menu, select Histories > Adjustment/Test.
2. The working area displays an evaluation filter.
�. Enter the from/until dates of the period for which you wish to see the reports.4. Click on OK to accept the changed inputs and close the dialog, or on Cancel to abort the operation and close the dialog.5. The working area then displays the history of adjustment/test with all relevant data.

72 METTLER TOLEDO LabX balance V1.4
Installation and Configuration
10.2 Histories of repeatability
You can view and print the repeatability histories at any time. You can use the filter function to display only those data reports which are relevant for you.
1. Use the right mouse button to click on the desired Balance in the tree view Configuration. In the context menu, select Histories > Repeatability.
2. The working area displays an evaluation filter.
�. Enter the from/until dates of the period for which you wish to see the reports.4. Click on OK to accept the changed inputs and close the dialog, or on Cancel to abort the operation and close the dialog.5. The working area then displays the histories of repeatability with all relevant data.

METTLER TOLEDO LabX balance V1.4 73
Installation and Configuration
10.3 Histories of MinWeigh incidents
You can view and print the MinWeigh incident histories at any time. You can use the filter function to display only those reports which are relevant for you.
1. Use the right mouse button to click on the desired Balance in the tree view Configuration. In the context menu, select Histories > MinWeigh Incident.
2. The working area then displays an evaluation filter.
�. Enter the from/until dates of the period for which you wish to see the reports.4. Click on OK to accept the changed inputs and close the dialog, or on Cancel to abort the operation and close the dialog.5. The working area then displays the histories of MinWeigh incidents with all relevant data.

74 METTLERTOLEDOLabXbalanceV1.4
Weighing
11 TreeviewWeighing
11.1 Introduction
Whenperformingyourdailyworkwithyourbalances,youareinthetreeviewWeighing.Thisiswhereyouprepareandorganizeroutinework,defineonce-onlyjobs,andcontrolalltypesofjobssuchasweighing,adjustment,andtestjobs.
11.2 Overview
ThetreeviewWeighingprovidesanoverviewofthebalancesavailableinthesystem,theirconnectionstatus,andanyqueuesofwaitingjobs.Italsoprovidesanoverviewofstoredjobtemplates,fromwhichyoucaneasilygenerateweighingjobs.
ToactivatethetreeviewWeighing,clickontheWeighingtabinthebottommarginofthenavigationswindow.Ifyouhavegen-eratedjobtemplates,alldefinedjobsandmaintenancejobswillbedisplayed,asinthisexample.Howtogenerateandprocessjobtemplatesisdescribedinthechapterswhichfollow.
- Theelementsofthestructureareasfollows:1. Thebalancefolder(1)withallthebalances(2)installedlocallyorinthenetwork.Ifthesearenotavailable,theyare
displayedcrossedthrough.2. Thejobtemplatesfolder(10)canalsocontainsub-folders(11and13).Newlycreatedjobtemplatesaresaveddirectly
inthejobtemplatesfolder.3. Adjustmentsandtests(3)whichyouhavespecifiedinthescheduler,andwhicharenowdue,areshownhereinthe
queueandmustbeexecuted.4. Jobtemplates(6)inthequeue.
- Thefoldersinthetoplevelofthehierarchyarepermanentlydefined.Forgreaterclarity,youcandefinesub-folderswithintheJobtemplates folder.
- Folderscanbeopenedandclosedbyclickingona or character,orbydouble-clicking.
12
3
4567
9
1011
12
1314
8

METTLERTOLEDOLabXbalanceV1.4 75
Weighing
- Arightmouseclickonasymbolopensacontextmenuwithalistofpossiblefunctions. Forexample,arightmouseclickontheJobtemplates (10)symbolopensalistwiththeoptionsNew,Import,orNew
Folder….- Double-clickingonJobtemplates ortheBalance symbolopenstherespectivedialogintheworkingarea.Youcan
switchbackwardandforwardbetweentheopenworkingareasbyclickingonthebuttonatthebottomofthewindow.- Themenu-andtoolbaralwaysshowsthefunctionswhichareavailableinaworkingarea.- YoucancloseopenworkingareasbyclickingontheClose buttoninthemenubar.
11.3 Icons
Icon Number Function/contentsBalancesfolder 1 Allbalancesinthecurrentuser'sprofile
XP205DR 2 Switched-onandconnectedXP205DRbalancewithactivatedmanualtransfermode
Adjustmentsandtests 3 Theadjustmentandtestdatehasexpired;youmustperformtheadjustmentsandtests
Jobstarted 4 Jobstartedinthequeue
Jobaborted 5 Jobabortedinthequeue
Job 6 Jobinthequeue
Jobpaused 7 Jobpausedinthequeue
Jobinvalid 8 Jobinvalidinthequeue
XP8002S,XS4001S 9 Switched-offordisconnectedbalance
Jobtemplatesfolder 10 JobtemplatesfolderintheLabXdatabase
(Sub)jobtemplatesfolder 11 Sub-folderinthejobtemplatesfolder
Predefinedjobtemplates 12 Predefinedjobtemplatesinthesub-folderofthejobtem-platesfolder
(Sub)jobtemplatesfolder 13 Sub-folderinthejobtemplatesfolder
Predefinedjobtemplate 14 Predefinedjobtemplate

76 METTLER TOLEDO LabX balance V1.4
Weighing
12 Job template definition
The concept of LabX is based on a) system configuration and b) basic considerations based on requirements and defaults de-fined by a Q-System. In this environment a task is completed as order. Additionally a job template is defined which as single job which can be transferred into the balance folder or for routine jobs can be transferred as template into the template folder.
Whether you are defining a single job or a job for a pending routine job – the form is the same. In order to simply define a job template the following is recommended.
• Preparation of the necessary data (job data, application, job specifications, sample data, calculation steps: What should happen with data?.
• Consider how the user should be lead through the process.• Definition of the corresponding names (job templates, job names, (name of the job information fields, name of the sample
series fields, name of the sample identification fields).• Consider changing the designations in Menu>Extras>Options, e.g sample ID1 (see chapter 5.8, “Setting up Job Manage-
ment”).• Enter all the data in the job template form.• Test run; check whether every runs as it should.• Check the calculations.
12.1 Chronological sequence of a running job
In order to check that a job is running according to the definition in a template it is imperative to know, by key entry, when which entry will be requested and whether the process should follow step-by-step or continually.
Job order (Drag and Drop)
Entering job names
Starting a job
Entering the value for constants
Entering job information
Weighing process, sample series
Confirming sample loop
Pre Taring (for sample series)
Weighing process for single samples
Entering sample ID’s
Place x
«Print»
Remove x
«Print»
Job from the Job template (Drag and Drop)
Single job (Context menu)
Job templates

METTLER TOLEDO LabX balance V1.4 77
Weighing
12.2 Flow chart of a Job template
Job
Definition of the job data
Definition of the Application
Simple Weighing * Totalization *• Single Mode• Additive Mode
Dynamic weighing *• Dynamic Behaviour
Interval weighing *• Interval• Duration• Maximum points• Points• Zero• Delay
Differential weighing *• Fixed loop sequence• Auto loop recognition• Number of sample loops• Name of the sample loop
General settings• Zero between samples• Weight Capture manual/automatic• Pretare
Balance Prerequisites **• Balance to be used• Required Readability• Readability Unit• Required Weighing Capacity• MinWeigh Control *• Release Control Level• Balance Settings • Display Unit • SmartTrac
• Autozero • Weighing Mode • Dynamic Behaviour • Measurement Release
Sample Data **• Constant Per Sample• Sample Selection manual/predefined• Number of Samples• Sample Identification Prompting (1-6)• Sample selection (LIMS)
Calculations/Statistic *• Constants • Fixed • Entries• Formulae• SQC Definitions• Final result of a measurement series• Calculations from statistical results
Data management **
Print Electronically
Strip-Printer PC-Printer Protocol
Export
Transfer Mode
Data-Export* Entsprechen Waagenapplikationen XP/XS-Waagen** Vorgehensschritte

78 METTLER TOLEDO LabX balance V1.4
Weighing
12.3 Defining a new job template
Job template creationIn the tree view Weighing, use the right mouse button to select in the context menu Job templates “New”, in order to create a job template. A form then appears which you can edit to create a new job template or a single job.
General operation, see chapter 12.5.6
The individual settings in the job template are described in the chapters that now follow.
Data Processing, see chapter 12.9
Definition of the names, see chapter 12.7
Weighing application, dynamic weighing, see chapter 12.5.4
Data Processing, see chapter 12.9

METTLER TOLEDO LabX balance V1.4 79
Weighing
Single job definitionIn the tree view Weighing, use the right mouse button to select in the context menu of the Balance “New Job”, you can define a single job.
12.4 Definition of job data
Menu selection Selection possibilities DescriptionDate/Time created 2�.08.2005 06:02:59 Defined by LabX
Date/Time last modified 2�.08.2005 06:02:59 Defined by LabX
Job Template Name * Here, a title is given for a job template. You can only save a job template when the fields are completed according to LabX syntax.
Job Name Here you can define a job name ac-cording to your wishes. By default LabX will take the job template name. LabX will always insert a relevant internal job number thus avoiding job description duplication.
Entering an asterisk will allow you to enter a name during the job, e.g. the job number.
A maximum of thirty characters can be entered.
<Job Info> Here you have the possibility to adapt the description of the job info field.
You can define as many job fields as you like. Click on the scroll down field on the right and choose “Request value when job starts”. You now have a new job info field in which you can enter the corresponding information.

80 METTLER TOLEDO LabX balance V1.4
Weighing
Menu selection Selection possibilities Description
Max �0 characters can be entered into a job info field and for the corresponding text a maximum of 256 characters can be defined.
Hello Nothing should happen with this info Action NoneWhat? This info should appear on the PC screen
Action None The information only appears on the job report..
Show on online view only The information will only be shown on the main field and in the info field of the balance terminal.Also it appears on the report.
Request value when job starts The information will be shown in a dia-logue field and can be adapted on be-ginning a job.The adapted info appears on the job report.
Show when job starts The information will be shown on the screen as running text and as dialogue text on the terminal. You must confirm on the terminal with «OK» before you can proceed with the job.This information will appear on the job report.
12.5 Definition of the Applications data
Here you can choose the weighing process according to the type of weighing application and the number of samples taken.The type of application also defines the way in which the operator uses the balance. The content of the formula “Application data” is not linked to the chosen application and will therefore will be described in the following sub-chapters of each applica-tion.
Information relating to the general settings is described in chapter 12.5.7, “General settings”. Information regarding sample data is defined in chapter 12.7 “Definition of the Sample data“ and the data processing is defined in chapter 12.9 “Definition of the data processing”.
12.5.1 Simple Weighing
With this application weighing results are taken within a single run. The differentiation between Gross, net and tare follows ac-cording to the corresponding balance operation.
Various modes of calculation are of course already integrated into relevant fields of the job template.
12.5.2 Totalization
With this application, the individual weighing values are summed to a total. Job Execution and Job Reports for Totalization are almost identical to normal weighing jobs except that a summation of all net weights appears on a Totalization report.

METTLER TOLEDO LabX balance V1.4 81
Weighing
Application Data Application Totalization Mode Additive
You can choose between two placing methods: “Single” and “Additive”. If single mode is chosen, then you will be prompted to remove the sample between weighings. If Additive mode is chosen, then you will not be prompted and each successive weigh-ing is an accumulation of all past weighings.
In Single mode, the individual weights are recorded and then automatically set to zero. In combination with automatic weight recording, this option allows fast and completely automatic execution of a series weighing.
NoteIn Additive mode, the balance is zeroed. In the special case of a certified balance, the balance is not zeroed but tared.
12.5.3 Differential Weighing, weighing in several loops
In conjunction with LabX, this application offers the most application possibilities. For example, different weighing results for a sample are recorded which can then be used together in the “Calculations” section to define custom formulas. You will find details of the “Calculations” section in chapter 12.8 “Defining calculations, statistics”.
This application offers various procedures for weighing, allowing you to choose between a fixed and an automatic sample sequence.
Sample loop 1 Sample loop 2 Sample loop 3 Sample loop 1 Sample loop 2 Sample loop 3 Sample loop 4 Taring and Remove or add Residual Record Taring Remove or add Components Residual record initial components weighing initial weight weighing
weight
Sample 1
Sample 1
Sample 2Sample 2
Sample 3
Sample n Sample 2
(n = 1..500) Sample 1
Fixed sample loop Automatic sample loop
Using fixed loop sequence, the user is prompted for all samples in each loop before proceeding with the next loop. With auto-matic loop detection, samples can be taken in any order and across any loop order. The limitation of automatic loop detection is that at least 1 sample ID must be defined for the job in order to track the weighings of each sample throughout the job.
Each sample loop which is defined can be given its own name. The maximum number of sample loops is 20.
12.5.4 Dynamic weighing
The “Dynamic Weighing” application allows efficient, convenient, and accurate weighing of unstable weighing objects (e.g. animals). To work with this application, the settings in chapter 12.6 “Defining the balance and the minimum requirements for the balance” must be made in the “Balance settings” section.
Dynamic Weighing Mode Off Dynamic Behaviour Unstable
For dynamic behavior, you can choose between Stable, Standard, and Unstable. Adapt this parameter to the movement pattern of your weighing object.

82 METTLER TOLEDO LabX balance V1.4
Weighing
12.5.5 Interval weighing
With this application, it is possible to perform long-term weighings and time-dependent weighings.
Application Data Application Interval Weighing Request Interval * 00:00:10 Duration (dd.hh.mm.ss) * 00:00:01:00 Maximum Number Of Points �0000 Zero Balance At Start/Resume Yes Begin Capture At Start/Resume Immediately Verzögerungszeit bei Start/Wiederaufnahme (Sekunden) 0
Choosing Interval Weighing enables several settings specific to this application: Interval, Duration, Maximum Number of Points, Zero at Start/Resume, Count from Start/Pause, and Delay time to Start/Pause.
If you placed the weighing object on the balance before the job was started, the function “Zero Balance At Start” does not apply in all cases.
If your balance has FACT, before you start such a job, make sure that FACT has been switched off.
12.5.6 General settings
Zeroizing between samplesFor the Simple Weighing, Differential Weighing, and Totalization (Single Mode) applications, you can choose whether LabX should zero the balance between each sample or not. This option is not available for Totalization (Additive Mode) because it is already included.
Weight CaptureIf Manual weight capture is chosen, you will be prompted to remove samples between weighings and you will be required to confirm with a keypress
Weight Capture Manual Minimum Change 1.0 Minimum Change Unit g Delay Time [s] 0
If Automatic weight capture is chosen, you will still be prompted between samples, but you will not have to confirm with a keypress.
Weight Capture Automatic Minimum Change 1.0 Minimum Change Unit g Delay Time [s] 0
For automatic weight capture, you define the change amount in the job form. While the job is being executed, if the balance overshoots this weight change, it automatically records the weighing value and continues with the next sample.
Manual tareIf the “Manual tare” function is activated, on balances with Rapid Access functionality a corresponding input possibility is offered at the start of a sample series.

METTLER TOLEDO LabX balance V1.4 8�
Weighing
12.6 Defining the balance and the minimum requirements for the balance
In principle, a job template can be used to generate a weighing job on any balance available in the system. However, for some weighing processes and regulations there are minimum prerequisites which the measuring instrument must fulfill.
In this section you can enter the prerequisites which the balance to be used must fulfill.
The following requirements may apply:
• A specific balance must be used.• A certain readability and/or a certain minimum weighing range can be given.• The control of MinWeigh feature can be activated.• A certain Release Control level can be required (see chapter 9.� “Configuring the Release Control”).
Balance prerequisites Balance to be used - Required Readability 0.01 g Readability Unit mg Required Weighing Capacity 100 Weight range Unit g Minweigh Control Yes Release Control Level High
When saving a job template, or when generating a weighing job, the prescribed requirements and possibilities of the selected balance are verified and, if they are not as required, an error message is issued.
In addition to the balance and the general requirements, the weighing filters of the balances being used for the job can be set. They apply from the start of a weighing job that is based on this job template.
Balance Settings Display unit g SmartTrac Off SmartTrac Nominal (Unit=Display Unit) 50.00 SmartTrac +T (%) 10 SmartTrac -T (%) 10 Accept only weights within tolerance No Autozero Off Weighing mode (process adapter) Universal Dynamic Weighing Mode On Dynamic Behaviour Standard Measurement release (stability criterion) Reliable and Fast
• The display unit specifies the unit to be used for working and reporting.• SmartTrac is a graphic range indicator which can be used to display the used and available weighing range. The Smart-
Trac feature can be enabled for all applications. With an XP balance, values within the specified tolerances are displayed in green, outside the tolerances in red. When the field “Accept only weights within tolerance” is enabled the print button is disabled for values outside of specified tolerances. This feature cannot be enabled for interval weighing. SmartTrac is only available on AX/MX/UMX/XP balances. The graphic display and color of SmartTrac can be set at the balance.
• When minimum weight is activated, LabX can not modify predetermined weighing parameters.• Dynamic mode can be selected to weigh moving objects. If this mode is selected, the balance that is used must contain
the “Dynamic Weighing” application.• The weighing parameters are recorded for each job that is performed and printed out on the report.

84 METTLER TOLEDO LabX balance V1.4
Weighing
• The “Environment” weighing parameters (which are not shown here) cannot be changed with LabX, because their optimal settings depend on the location where the balance is installed and not on the type of weighing process. It is advisable to set these parameters once on the balance itself.
• When the end of the job is reached, the balance settings are reset to their original values.• Weighing Mode and Measurement Release parameters match to settings in AX/MX/UMX/XP/XS balances.
Weighing mode Weighing process adapter Measurement release Automatic stability detec-tion (ASD)
AX/XP/XS AT/MT AX/XP/XS AT/MTUniversal Universal Very Fast 1-2
Dosing Weighing in Fast 2-�
Sensor mode Off Reliable and Fast 4
Checkweighing Absolute Reliable 5-6
Very Reliable 7
12.7 Definition of the Sample data
In this section you can enter the type of sample selection (manual or predefined) about the samples to be weighed, as well as their number if this is known. Predefined means that the sample list has already been created and the job execution follows this list.
Sample Data Constant Per Sample Off Prompt Temperature Sample Selection Manual Number of Samples 5 Sample Identification Prompting
Sample designation Yes Charge Yes Number Yes <Sample ID4> No <Sample ID5> No <Sample ID6> No
The “Constant Per Sample” section allows you to define the values for calculations. These can be either fixed values (= con-stants) such as π (pi), e (Euler’s number), NA (Avogadro's constant), g (gravitational constant), gravimetric factors, etc., or also variable values such as environmental parameters (temperature, pressure, humidity), volumes, molecular weights, etc., which you can enter for the specific job after the job has started.
When set to on, the field “Constant Per Sample” allows for a prompt to entered. This prompt will appear at the first loop for each sample on both the balance and LabX. The entered sample constant can be used in sample results calculations. This constant per sample can be referred to in the formulas as “CS”. If an overwrite or a deletion of the first loop’s measurement is performed, the constant per sample will be re-requested. E.g. Constants per sample are useful if the purity varies per sample and needs to be taken into account in the results.
If you want to change the sample designations <Samples IDx> globally, you must make the changes under Menu > Tools > Options. However, you can also change the designations directly in the form - they then apply for the respective job.
If you want to arrange it so that within a job, several related weighing processes (number of sample series) follow immediately after each other, you can do so with 1 in “Number of samples”.

METTLER TOLEDO LabX balance V1.4 85
Weighing
Notes (LabX pro with LabX connect only):If this option is chosen, a list currently in the LabX database may be selected from the list or an asterisk “*” may be used to indicate that the user will be prompted to select a list when the job begins. Sample data can be either prompted to be input during a running job or the list can be predefined by using LabX connect software.
12.8 Defining calculations, statistics
The option of further processing of weighing results opens many possibilities. For example, it is only possible for some jobs to be done if calculations are used. Examples of such jobs are:
• Determination of statistical values of measurement series• Production of solutions: Simple production; USP <1251> with differential weighing• Production of mixtures of substances (mole fraction)• Density determination: solid, liquid with gamma sphere, liquid with pycnometer, powder in pycnometer• Piece counting (in 2 steps)
• 1. Step 1: Determination of the reference weight• Step 2: Entering the reference weight as constant
• Gravimetric analyses
12.8.1 Definitions and rules
The “Constants”, “Results”, and “Job results” sections contain the following nomenclature:
Reserved terms MeaningN Net weightG Gross weightT Tare weight
N[1], N[2] Net weight in the first and second sample series
G[1], G[2] Gross weight in the first and second sample series
T[1], G[2] Tare weight in the first and second sample series
(If no index is specified, the value 1 is assumed automatically, i.e. N = N[1]).
CS Constant Per Sample
C1..….C10 (or user-definable name) Defined constants
R1..….R20 (or user-definable name) Defined results
PR1….PR20 (or user-definable name) Defined job result(User-defined names in the formulas must be enclosed in braces { }).
The rules for the creation of calculations and formulas are:
• Sequential execution of the individual steps• Constants must not depend on the weighing, and must be known before the first weighing• No dependence on the calculation steps of partial weighing results• No comparing of statistical values against values of the same series
Results: These are calculated from the individual weighing values of the various sample series. For the calculations, more or less complex mathematical functions can be used. From the results, LabX can carry out various statistical calculations.

86 METTLER TOLEDO LabX balance V1.4
Weighing
Job results: This calculation step allows further processing of the statistical measures. For example, in this section, the sum-marized weighing values of a measurement series can be processed further. In addition, SQC-specific calculations can be performed.
12.8.2 Constants
The “Constants” section allows you to define the values for calculations. These can be either fixed values (= constants) such as π (pi), e (Euler’s number), NA (Avogadro's constant), g (gravitational constant), gravimetric factors, etc., or also variable values such as environmental parameters (temperature, pressure, humidity), volumes, molecular weights, etc., which you can enter for the specific job after the job has started.
Up to a maximum of 10 numerical values per job can be defined, which you can use in the calculations of the results in the formulas that must also be defined. For each constant definition, you are prompted to enter a valid name and the numerical value. Use of a unit is optional, and serves only to make interpretation of the constant by the job template more certain.
If only an asterisk * is entered in a value field in the job form, you then have the possibility of entering a value after this job starts and before weighing.
Constants Number of constants 2 Constant C1
Name Pi (Fixed value) Value * �.1415828 Unit Yes Constant C2
Name Room temperature (input) Value * * Unit *C
Notes• The following names are reserved, and can not be used for naming constants: N, G, T, CS, C1...C10, R1...R20, PR1...PR20.• Fractional values can only be entered as decimals.
12.8.3 Results
LabX allows you to save up to 20 individual calculations with sample data. For each result which is output, you determine a name, the associated formula, the unit as well as the number of decimal places in the result values.
Otherwise, the rules and definitions stated in chapter 12.8.1 “Definitions and rules” apply.

METTLER TOLEDO LabX balance V1.4 87
Weighing
Sample Job Results Number of Results 1 Result R1
Name MyResult Display result on balance No Formula * 10* {myConstant}*(N [2]-N [1]) Unit g Decimal places 5
Notes• The result can be displayed in a window on the balance display.• Rounding to the input number of decimal places is only applied to the presentation of the results. The number of decimal
places must always be defined.• The sample serial number behind the variables N, B, and T is given in square brackets.• User-defined constant names in formulas must be enclosed in braces { }.• In the “Formula” field, the formula that is necessary for the results definition can be saved.
• Operators: +,-,/,*, ^• Functions: • abs(n) Absolute value of value n • rt((n,x) nth root of value n • sqrt(n) Square root of n • log(n) Logarithm of n • In(n) Natural logarithm of n • round(n,x) Round n to x places• The number of levels of parentheses which is allowed is only limited by the maximum length of the formula. The maxi-
mum length of the formula is 50 characters.• LabX checks the input formula for validity when the job template is saved.
12.8.4 Statistics
LabX calculates the following statistical values for each defined result:
• Minimum value (min)• Maximum value (max)• Maximum difference (variance)• Arithmetic mean (x)• Absolute standard deviation (s)• Relative standard deviation (srel)
If you want to calculate statistical values from your weighing results, you must first define a result and fomula. Define a formula in which the weighing values are accepted directly as the result, and define the number of decimal places. In the report, you then receive the statistical measures of the weighing values that were described above.
12.8.5 SQC parameters
In this section, you can compare your measurement results with prescribed values from your quality system. You thereby define a reference value, warning limits, and intervention limits. Review of your weighings within predefined limits is equivalent to review of quality control results in a rule card. Based on mathematical evaluations, you can make statements regarding tendencies, and intervene promptly in processes if necessary.

88 METTLER TOLEDO LabX balance V1.4
Weighing
Target Value 0.8788 Limits SQC Limits in % Warning Limit High (T2+) 110 Control Limit High (T1+) 125 Control Limit Low (T1-) 75 Warning Limit Low (T2-) 90
For illustration, the comparison with a rule card:
The limit value can be defined as follows:
• As absolute values based on the target value• As relative values based on the target value• As calculated standard deviation factors
These can be used for the following statistical evaluations:• Number of samples < warning limit low• Number of samples between warning limit low and control limit low• Number of samples between control limit low and target • Number of samples between target and control limit high• Number of samples between control limit high and warning limit high• Number of samples > warning limit high
NoteIf no target value is entered, LabX takes the mean of the measured samples as reference.
12.8.6 Post Job Results
For all defined job results, one value per job can be calculated. This value is recalculated each time a sample is taken, so that the report contains, for example, the mean value. Up to 20 individual job results can be defined.
Post Job Results Number of Results 1 Result PR1
Name MyResult Display result on balance No Formula * sqrt (abs(R1.total)) Unit g Decimal Places 5
Dimension of the characteristic result
Chronological sequence
Control area
Warning range
Lower Warning limit T2-Warning limit!
Lower Control limit T1-Control limit!
Reference value
Control limit!Upper Control limit T1+
Warning limit!Upper Warning limit T2+

METTLER TOLEDO LabX balance V1.4 89
Weighing
In addition to operators and functions, further reference values (variables) for the construction of formulas are available here:
• total Total• count Sample Count (only valid samples are counted)• mean Mean• min Min value• max Max value• variance Max Difference• stdev Standard Deviation• relstdev Relative Standard Deviation• target Target• t1plus T1+ value• t2plus T2+ value• t1minus T1- value• t2minus T2- value• cntt2plus >T2+• cntt1plus >T1+ and <=T2+• cnttargetplus >target and <=T1+• cnttargetminus >=T1- and <target• cntt1minus >=T2- and <T1-• cntt2minus <T2-C1 or {name} Constant (by C or by user defined name)R1 or {name} Results (by R or by user defined name)PR1 or {name} Post Job Results (by PR or by user defined name)
Example: PR1 = sqrt (R1.total).
Notes• If you end the job by pressing «A» the result is displayed in a window on the balance display. This also occurs if the job ends
when there are no more samples to be weighed.• Formulas may be nested. Example: sqrt(abs(R1.total)).• Variables are always used in connection with a result.• Variables may only be used in result calculations.
12.9 Defining the data processing
12.9.1 Transfer Mode
In the “Applications data” section there is a menu item Transfer mode. By means of the transfer mode, the weight values are automatically transmitted to an external application window and/or into a file. The transfer mode is activated as follows:
1. Choose “Yes” to enable Transfer Mode and select the format of the decimal symbol.2. After starting a job, a dialog will appear with a target window selection tool. When text file is chosen, data is transferred to a
text file. The file path is given by the settings in Menu>Tools>Options. The filename has the format of: TM_JobID_JobTem-plateName_Date_Time.xls.
�. Under Data Settings specify they Measured value info you would like to transfer. Click on the button at the right mar-gin.
4. The Transfer Mode Data dialog box appears.

90 METTLER TOLEDO LabX balance V1.4
Weighing
5. In the Header info tab click on the format buttons to add to the window list on the right. After adding format values you can change the order using the up and down arrow buttons. In addition to the standard formatting buttons you can also add your own custom string by clicking the ab¦ button next to the Format String list.
6. Click on the Loop Info tab and immediately go forward like in point 5.
7. Then choose the Measurement tab and define the desired format buttons.
8. Click on OK to confirm your new settings and close the dialog, or click on Cancel to reject the new settings and close the dialog.
9. As soon as a job begins with job-based Transfer Mode enabled, an Application Finder dialog box appears.
10. Open the desired target application (e.g. Excel, Word, etc) and drag the finder tool within the dialog to the open window and click OK. Now LabX knows the destination to send all Transfer Mode values.
NoteThe job name is used as part of the final file name created, e.g.: TM_�1_Diff_June212005_0920.txt.
You can also define the transfer mode in Menu > Tools > Options. To transmit the weight values, define a function key that you can use to start the operation. However, if you define the transfer mode in the job template, it will be started automatically with the job and data values transferred will match samples stored in the database.

METTLER TOLEDO LabX balance V1.4 91
Weighing
12.9.2 Report data
Measurement values recorded in weighing jobs, and calculated results, can be printed on a report as soon as the first measure-ment values are available. To do this, however, the user must change to the tree view Reports. If your weighing process requires the report to be printed automatically, or the weighing data to be exported automatically, you can specify this here.
Report data Automatic Print No Automatic Export No Local Printout Yes
Automatic Print If you select this function, when a weighing job is finished the results are sent automatically as a print job to the printer which is defined as standard. The job must be started from the PC. Rapid Access does not support this functionality.
Automatic Export If you select this function, when a weighing job is finished, its results are copied automatically into an Excel spreadsheet in the directory specified in the user settings.
Automatic export is supported via “Rapid Access”. The print out takes place on the machine running the Broker process.
Local PrintoutThis function requires a strip printer which is connected to the balance and configured as a peripheral device. If this function is activated, LabX sends a report to the strip printer. Specific information can be found in the job report.
N = Net weightT = Tare weightPT = PretareD = Dynamic behavior - not stable* = MinWeigh Violation
12.10 Saving a job template
When you attempt to save a job template, the contents of the fields are checked for validity. If necessary, you will be prompted to change invalid entries.
Toolbar with memory function
A saved job template appears in the tree view Weighing under the Job templates node where you opened or created the job template.
NoteIf you are operating your system in the “Secure Mode (21 CFR Part 11)” and have modified an existing template, before you execute this operation you will be prompted to enter your electronic signature (see chapter 5.� “Electronic signature”). If the signature is successful, an entry is made in the Audit Trail.

92 METTLER TOLEDO LabX balance V1.4
Weighing
12.11 Duplicating job templates
You can duplicate a job template by using the right mouse button to select an existing Job template in the tree view Weighing and then selecting “Duplicate” in the context menu. A copy of the selected job template is then saved in the tree structure.
NoteOn successful completion of this step, an entry is made in the Audit Trail.
12.12 Exporting a job template
The Export function can be used to make job templates available in other LabX balance systems. The data of the job template are saved in a specific LabX format with the file name extension *.JTF. To export a job template, use the right mouse button in the tree view Weighing to select an existing Job template and then select “Export” in the context menu.
Notes• Job templates are documents which are specific to LabX balance and can only be processed by a LabX balance system.• If the export is successful, an entry is made in the Audit Trail.

METTLER TOLEDO LabX balance V1.4 9�
Weighing
12.13 Importing a job template
The Import function can be used to make use of job templates from other LabX balance systems. Job templates can only be imported from a system with the same or a lower software version. To import a job template, use the right mouse button in the tree view Weighing to select the Job templates folder and then select “Import” in the context menu.
Notes• Job Templates can be imported from the same version of LabX or an older version. If a job template was created in a newer
version, you cannot import it into your current version.• Job templates imported from an older version of LabX will most likely contain new fields in the template as well as the
default values for these new fields. Please check the imported template with your old one to confirm any settings which are different.
• If you are operating your system in the “Secure Mode (21 CFR Part 11)”, when you execute this step you will be prompted to enter your electronic signature (see chapter 5.� “Electronic signature”). If the signature is successful, an entry will be made in the Audit Trail.
• Job templates are documents which are specific to LabX balance and can only be processed by a LabX balance system.• If the import is successful, an entry is made in the Audit Trail.
12.14 Organizing job templates
Job templates can be managed in a freely definable directory structure. Folders can be created and managed at any level below the job template node.
The folders can be given the names of, for example, users, job types, laboratories, or instruments, to make management of the job templates as easy as possible.

94 METTLER TOLEDO LabX balance V1.4
Weighing
12.15 Signing job templates
Job templates can be signed with the options Reviewed and/or Approved. Job templates are marked at the top edge of the window, at the end of the job template, and on the printout with Reviewed and/or Approved. If a signed job template is edited, the signature is automatically deleted.
To be able to sign, you must possess the necessary authorizations. Make sure you are logged on with a user which has the necessary rights.
1. In the tree view Weighing, click with the right mouse button on the symbol of a Job template . In the context menu, select Sign.
2. The Sign… dialog appears.
�. Enter the user name and password, and in the drop-down list of the “Meaning” field select Review or Approve. See also chapter 5.2 “General Polices”.
4. Click on OK to accept the inputs and close the dialog, or on Cancel to reject the inputs and close the dialog.
12.16 Adding a job template to the queue
If you are working with several balances, you can allocate a job template to a particular balance by right-clicking an existing Job template . in the tree view Weighing and selecting the appropriate balance in the “Add to queue” option in the context menu. This places a weighing job in the queue for the balance.

METTLER TOLEDO LabX balance V1.4 95
Weighing
12.17 Running a job
If you are working with several balances, you can allocate a job template to a particular balance by right-clicking an existing Job template in the tree view Weighing and selecting the appropriate balance in the “Run” option in the context menu. The weighing job is executed with the selected balance.
12.18 Deleting job templates
Provided you have the necessary user rights, you can delete job templates. Deleting a job template has no effect on weighing jobs which use the job template and have already been executed, or are currently being executed, or are in a queue for a bal-ance; deletion also does not affect stored data for weighing jobs. To delete a job template, in the tree view Weighing click with the right mouse button on an existing Job template and in the context menu select “Delete”.
Once the delete command is confirmed, the job template is irretrievably deleted.
NoteIf you are operating your system in the “Secure Mode (21 CFR Part 11)”, when you execute this step you will be prompted to enter your electronic signature (see chapter 5.� “Electronic signature”). If the signature is successful, an entry will be made in the Audit Trail.
12.19 Printing job templates
To print an open job template, click on the print function in the LabX toolbar.
Toolbar with print function
Define the view by pressing the Minimal/Maximal key.

96 METTLER TOLEDO LabX balance V1.4
Weighing
13 Balance queue and job types
Each balance in LabX has its own queue. Weighing jobs, adjustment jobs, and test jobs can all be processed through this queue.
The sequence of processing the jobs in a queue can be freely determined by the user.
NoteAs a matter of principle, the adjustment and test jobs should have a higher priority since these outcomes affect the balance’s release control for weighing jobs.
13.1 Job types and status
13.1.1 Weighing jobs
Weighing jobs may originate either from a job template or from a one-time job. Jobs in the queue can be started, paused, completed, or aborted. This is done by using the context menu of a weighing job in the queue.
With a balance monitor window open, the same functions can be activated from the associated toolbar.
The icon of a weighing job indicates its current status:
Weighing job ready for execution Weighing job executing Weighing jobs paused by the user, ready to resume Weighing jobs aborted due to error, ready to resume
Weighing job is invalid due to a change in the balance service settings
NoteThe context menu contains further information about the job status.

METTLER TOLEDO LabX balance V1.4 97
Weighing
13.1.2 Adjustment jobs
Adjustment jobs are initiated according to plan by the scheduler, or unplanned by selecting a corresponding function in the toolbar. Adjustment jobs can only be started or aborted from LabX. This is done by using the context menu of a weighing job in the job queue. Adjustment jobs which have been started can also be aborted from the balance.
With a balance monitor window open, the same functions can also be activated from the associated toolbar.
The icon of an adjustment job indicates its current status:
Adjustment job ready for execution
Adjustment job executing
Notes• If an adjustment job with an external weight is started manually from the toolbar, the weight currently saved in the scheduler
is used for execution. The weight must be defined in advance.• For records to be made in the LabX database, adjustment jobs must be started from one of the LabX functions (scheduler,
manual start, or start of an adjustment job via Rapid Access). Exception: Balances with FACT or proFACT and built-in adjust-ment history.
• “Rapid Access” is only possible with balances which include a LabX Client. On the AX/MX/UMX balances, the “Remote” ap-plication must be installed.
13.1.3 Test jobs
Test jobs are initiated according to plan by the scheduler, or unplanned by selecting a corresponding function in the toolbar. Test jobs can only be started or aborted from LabX. This is done by using the context menu of a weighing job in the job queue. Test jobs which have been started can also be aborted from the balance.
With a balance monitor window open, the same functions can also be activated from the associated toolbar.
The icon of an adjustment job indicates its current status:
Test job ready for execution
Test job executing

98 METTLER TOLEDO LabX balance V1.4
Weighing
Notes• If a test job is started manually from the toolbar, the weights and tolerances currently saved in the scheduler are used for
execution and evaluation. The weights must be defined in advance.• For records to be made in the LabX database, test jobs must be started from one of the LabX functions through the (sched-
uler, manual start). Local tests are not recorded in the LabX database.
13.2 Reading FACT/proFACT records
LabX can be configured in the global settings (see chapter 9.1 “Defining FACT and proFACT settings”) so that it periodically at-tempts to read the adjustment records in balances memories. This event is placed in the job queue of the appropriate balance at the time of execution. This is only valid for balances equipped with FACT/proFACT and has some restrictions, see Section 22 “Appendix LabX Functions”.
FACT history is currently read
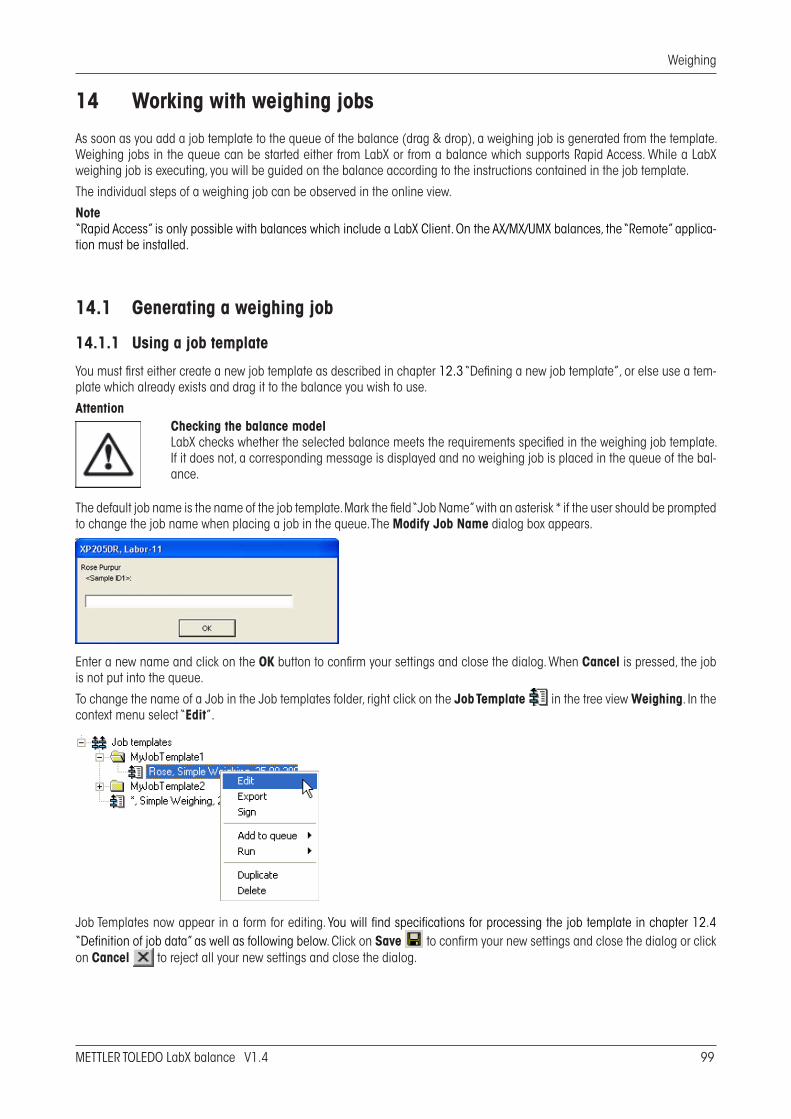
METTLER TOLEDO LabX balance V1.4 99
Weighing
14 Working with weighing jobs
As soon as you add a job template to the queue of the balance (drag & drop), a weighing job is generated from the template. Weighing jobs in the queue can be started either from LabX or from a balance which supports Rapid Access. While a LabX weighing job is executing, you will be guided on the balance according to the instructions contained in the job template.
The individual steps of a weighing job can be observed in the online view.
Note“Rapid Access” is only possible with balances which include a LabX Client. On the AX/MX/UMX balances, the “Remote” applica-tion must be installed.
14.1 Generating a weighing job
14.1.1 Using a job template
You must first either create a new job template as described in chapter 12.� “Defining a new job template”, or else use a tem-plate which already exists and drag it to the balance you wish to use.
AttentionChecking the balance modelLabX checks whether the selected balance meets the requirements specified in the weighing job template. If it does not, a corresponding message is displayed and no weighing job is placed in the queue of the bal-ance.
The default job name is the name of the job template. Mark the field “Job Name” with an asterisk * if the user should be prompted to change the job name when placing a job in the queue. The Modify Job Name dialog box appears.
Enter a new name and click on the OK button to confirm your settings and close the dialog. When Cancel is pressed, the job is not put into the queue.
To change the name of a Job in the Job templates folder, right click on the Job Template in the tree view Weighing. In the context menu select “Edit”.
Job Templates now appear in a form for editing. You will find specifications for processing the job template in chapter 12.4 “Definition of job data” as well as following below. Click on Save to confirm your new settings and close the dialog or click on Cancel to reject all your new settings and close the dialog.

100 METTLER TOLEDO LabX balance V1.4
Weighing
Notes• If you are operating your system in the “Secure Mode (21 CFR Part 11)”, when you execute this step you will be prompted
to enter your electronic signature (see chapter 5.� “Electronic signature”). If the signature is successful, an entry will be made in the Audit Trail.
• You can also use an existing job template with Rapid Access.• The job template you use remains in the directory of job templates.
14.1.2 Creating a one-time job
Using the right mouse button, click on the Balance symbol and in the context menu select “New Job” for a new weighing job. A form appears in which you can specify the new job.
Notes• After the data in the form have been validated, and provided the balance meets the requirements, the weighing job is placed
in the queue of the balance. • This one-time job is only visualized in the weighing tree until it has finished executing.
14.1.3 Creating a job thanks to Rapid Access-Job Template
You can create a job based on a job template directly from the balance. Please read chapter 16 “Navigation on the balance”.
Note“Rapid Access” is only possible with balances which include a LabX Client. On the AX/MX/UMX balances, the “Remote” applica-tion must be installed.
14.2 Generating adjustment and test jobs
14.2.1 Generating adjustment and test jobs with the scheduler
The scheduler automatically places adjustment and test jobs with external weight in the queue. Adjustment and test jobs with internal weight are started by LabX directly, provided no job is currently executing.
NoteLabX attempts to start an adjustment and test job for a maximum of 1 hour. After that, the job remains in the queue.

METTLER TOLEDO LabX balance V1.4 101
Weighing
14.2.2 Generating adjustment and test jobs manually
After the necessary settings for weights and tolerances have been made in the scheduler, adjustment and test jobs with internal or external weights can also be generated manually direct from the LabX toolbar. Such jobs can then be started in the job queue.
NoteThe values for external weights and tolerances which are saved in the scheduler are used.
14.3 Starting/continuing weighing and adjustment/test jobs
Jobs can be started either from LabX or with Rapid Access from the balance.
Attention
Depending on the model of balance, the following conditions can be checked: Expiry of maintenance intervals, elapsed switch-on time, date/time of the last successful adjustments and tests (see chapter 9.�, “Configuring the Release Control”).
Notes• Before an initial adjustment/test job with external weight can be carried out on a balance, an external weight needs to be
specified in the appropriate scheduler section of the balance.• If execution of an announced adjustment or test job is refused by the balance, the job is not repeated automatically.
14.3.1 Jobs starting/continuing from LabX
Select a job in the queue of the balance and start it from the context menu with “Run”, or from the toolbar. If the job has been paused, start again from the context menu with “Resume”.
14.3.2 Jobs starting from the balance with Rapid Access
Select a job from those shown for the balance, and confirm the job start with the related details.
After the job starts, you are guided on the balance (see chapter 16, “Navigation on the balance”).
Note“Rapid Access” is only possible with balances which include a LabX Client. On the AX/MX/UMX balances, the “Remote” applica-tion must be installed.
Checking balance releaseEach time a weighing job is started, and if a specific release level (Low, Medium, High) is required to execute the job, LabX checks the release status of the balance.

102 METTLER TOLEDO LabX balance V1.4
Weighing
14.4 Stopping a weighing job
Jobs can be stopped either from LabX or from the balance. A weighing job which has been started can be stopped in two dif-ferent ways. Stopping on the balance is described in chapter 16 “Navigation on the balance”.
14.4.1 Pausing a weighing job from LabX
A weighing job which has been paused remains in the queue of the balance and can be continued at a later time/date. The measurement values which have been collected before interruption, and the calculated results, can already be called up in the tree view Reports.
Notes• Adjustment and test jobs cannot be paused.• If the global option “Automatic pausing” (see chapter 5.7 “Setting up Instrument Management”) is selected then LabX can
automatically pause a weighing job.• In the case of an error condition, LabX will pause the job and update the job icon.
14.4.2 Closing a weighing job from LabX
A job which has been closed is permanently removed from the queue.
NoteIf adjustment and test jobs are closed prematurely, they abort. Data collected by adjustment and test jobs before they are aborted is not written into the database.

METTLER TOLEDO LabX balance V1.4 103
Wägen
15 Balance monitor
In the tree view Weighing, a monitor window can be opened for every balance. In the balance monitor window, jobs which are executing on the balance can be observed.
Attention
It is not permitted to use the weight display in the balance monitor window as the main display in a commercial application.
15.1 Overview
Shown below is the monitor view of an executing weighing job.
1 Name of the job or the job template2 Unique name of the balance� Number of samples measured / total number of samples (if the number was specified)4 User guidance (next step for execution)5 Full name of the user who started the job, starting time, job information6 Application information and sample loop display7 Recorded measurement values with sample identifications8 Residual range display
Notes• The designations of the sample identifications for the job are defined in the global settings (see chapter 5.8 “Setting up
Job Management”) and may be changed for each job template.• Date and time stamps for all recorded measurement values are added to the database.• The widths of the columns in the monitor window can be set individually.
1 2
5 6
3 4
8
7

104 METTLER TOLEDO LabX balance V1.4
Weighing
16 Navigation on the balance
Particular LabX features may require certain balance models and/or versions of balance software. Please check with the cor-responding table in the chapter 22 “Appendix LabX Functions”.
The navigation possibilities, and the resulting levels of convenience, depend not only on the balance but also on the software used on the balance. LabX seeks to utilize the available possibilities as optimally as possible while maintaining minimum standards.
While a LabX weighing job is executing, please follow the instructions on the display. Windows may appear which request inputs from you, or a text on the weight line may prompt you to execute the next process step.
When a weighing job is started, the balance keys are given specific functions. A confirmation key and an abort key are available for general use.
Pressing the Confirmation key may be avoided by choosing the automatic weight entry in the job template.
If the global option “Automatic pausing” (see chapter 5.7 “Setting up Instrument Management”) is selected then LabX can automatically pause a weighing job. If a job is paused, a corresponding login at the balance is presented when you want to resume the job.
16.1 AX/MX/UMX balances with Remote software
Use of Remote software in your balance allows you to work more directly with LabX from the balance with Rapid Access.
16.1.1 Rapid Access
When you switch the balance on, or select Application “Remote”, the balance attempts to establish a connection to LabX to obtain a LabX navigation window.
As soon as the balance is connected to LabX, the top navigation level appears in the balance display. You can now call up bal-ances, queues, and job templates directly from the balance.
In the top navigation level, the keys in the display have the following meanings:
LabX Exit: Terminate connection with LabX
Job Templ...: Call up the job templates for this balance
Job Queue: Call up the queue of this balance
NoteNo user login is required to operate the top navigation level on the balance.

METTLER TOLEDO LabX balance V1.4 105
Weighing
16.1.2 General operation
While a LabX weighing job is executing, the keys of the operating terminal on the balance have the following meanings:
3 Home key: Paused job (unprompted) or answer “No” (to a question in the display)
8 Print key: Confirm job step (unprompted) or answer “Yes” (to a question in the display)
Notes• The function of the «3» key is similar to the Escape key, and the function of the «8» key is similar to the Enter key on a PC
keyboard.• While a prompt for input is displayed, the «C» key and the «OK» key is the navigation key.
16.1.3 Starting a weighing job
16.1.3.1 Starting a weighing job from a queue In the selection window, click on the “Job Queue” symbol.
All jobs in the queue are displayed. Click on a job you now want to execute.
When you have selected the job, the display shown at the left appears. Click on «OK» to start the job, or on «Abort» to quit the job.

106 METTLER TOLEDO LabX balance V1.4
Weighing
When you have confirmed the selected job, you will be prompted for your user identifica-tion. Enter your user name and press «OK» to start the job, or «C» key to quit the job.
Enter your password and press «OK» to start the job, or «C» key to quit the job. After you have pressed «OK», the display briefly shows “* Job started”.
Notes• The password is case sensitive.• The user ID is not case sensitive.
16.1.3.2 Starting a weighing job with a job templateIn the selection window, touch the “Job Templ...” symbol.
The display shows all the job templates which are suitable for this balance. Touch a job template you want to use to execute a weighing job.
After you have selected the job template, the detailed information is displayed. Click on «OK» to start a weighing job, or press «Abort» to return.
After you have confirmed the selected job, you are prompted for your user identification.
Enter your user name and press «OK» to start the job, or «C» key to quit the job.

METTLER TOLEDO LabX balance V1.4 107
Weighing
Enter your password and press «OK» to start the job, or «C» key to quit the job. After you have pressed «OK», the message “* Job started” the display briefly shows.
NoteOnly those job templates are displayed on the balance which can actually be executed with this balance according to the criteria in the templates, see chapter 12.6 “Defining the balance and the minimum requirements for the balance” of the job template.
16.1.4 Executingweighings
Depending on the specification for the defined weighing job, before each weighing you will be prompted to enter sample iden-tifications (forexample:Simpleweighing). Up to 6 sample identifications can be used.
When a weighing job is started from LabX and Sample ID's are used, you will be prompted to enter the Sample ID's from both the balance and the computer where you started the job. You may enter the ID from computer or on the balance. When «OK» is pressed on the balance resp. the Enter key at the computer, the Sample ID will be accepted and the dialogs on both LabX and the balance will close.
Now follow the instructions on the display:
When the message “* Place -1-” appears, place the sample on the weighing pan and confirm the weighing with the «8» key. The weighing is then saved in the database.
If the application “Differential Weighing, automatic loop detection” is being used, the next sample in the order is shown in the LabX display (e.g. Put 1/2).
“SmartTrac” is a graphical weighing aid which simplifies weighing aimed at a specific nominal value. The “SmartTrac” appears below the weighing result on the right-hand side of the display. To use the “SmartTrac” feature the nominal value, upper and lower tolerance values must be supplied in the job template. The lower bar indicates the coarse range for fast weighing in. The upper bar represents the +/- tolerances. Additionally if the “Accept only weights within tolerance” field is set to yes, the print button will be disabled for values outside of the specified tolerance and values can not be sent to LabX.
When the message “* Clear pan” appears, remove the sample from the weighing pan and press the «8» key to confirm. You will be repeatedly prompted to enter sample iden-tifications and make weighings until the specified number of samples is reached or you terminate.
At the end, the message “* Job done” appears. However, you can terminate at any time with the «3» key. The balance again displays the top navigation level of LabX.
To start a new job, proceed according to chapter 16.1.3.
You can now print and/or export the report which is created (see chapters 18.5 “Printing reports” and 18.6 “Exporting reports”).

108 METTLER TOLEDO LabX balance V1.4
Weighing
Repeating a sampleTo repeat a sample within a current weighing job, read in the corresponding sample identification again and confirm overwriting the previous weighing before you can repeat the weighing.
If the application “Differential Weighing, automatic loop detection” is being used, thus functions repeat to a measurement only on balances with Remote Software. When overwriting a sample, all samples taken are shown so that one can be chosen from any loop to overwrite.
NoteAn entry will be made in the Audit Trail showing the older and the newer weight.
16.1.5 Deleting samples from a running job
Samples can also be deleted during a job. During a running job, press «3» key, and you will be prompted to confirm the deletion of the last sample. This operation can be continued back to the first sample of the loop. You can only delete samples within the current loop. After a job is finished, samples can no longer be deleted.
Select in the display “Delete Sample?”.
Press «OK» to delete the “Sample -1-” or «Abort» to return to the job without deleting.
In the display you will receive a confirmation “Sample -1- deleted”. Press «OK» to con-tinue.
Enter a new Sample ID 1 at the balance or computer and confirm with the Enter key or click «OK».
NoteAn entry will be made in the Audit Trail showing the older and the newer weight. The deleted sample is also shown in the report.
If the application “Differential Weighing, automatic loop detection” is chosen, samples can be taken across sample loops.
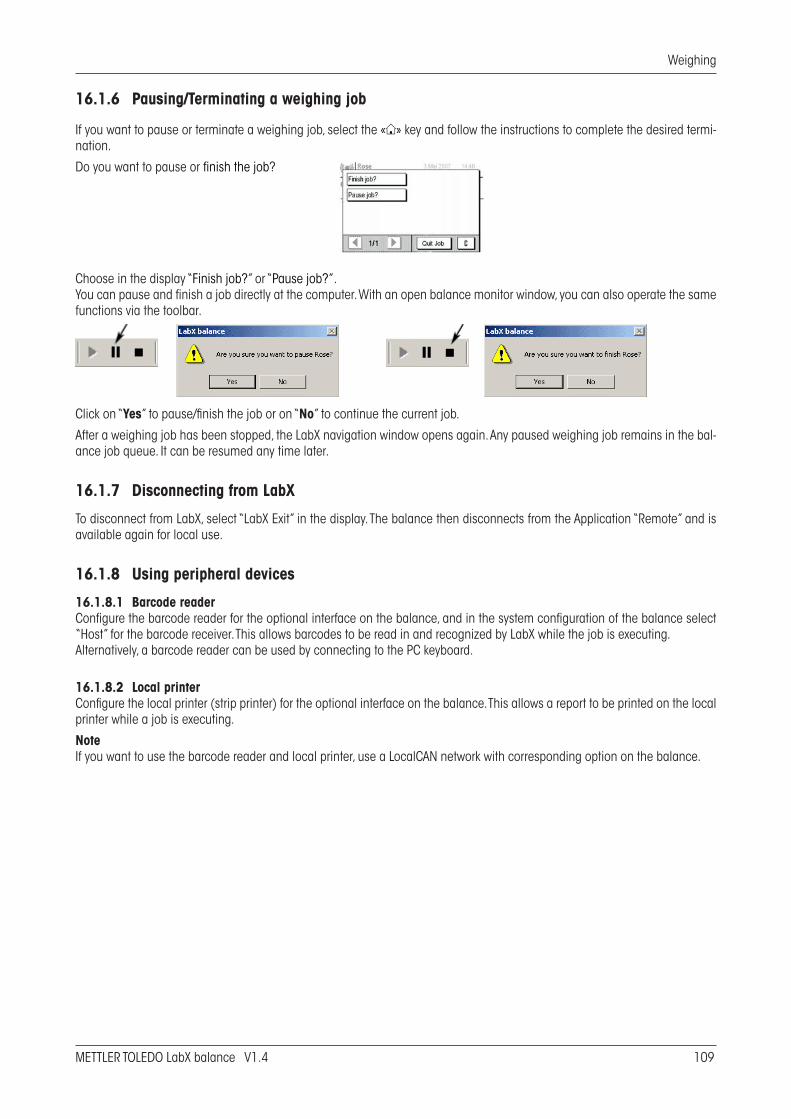
METTLER TOLEDO LabX balance V1.4 109
Weighing
16.1.6 Pausing/Terminating a weighing job
If you want to pause or terminate a weighing job, select the «3» key and follow the instructions to complete the desired termi-nation.
Do you want to pause or finish the job?
Choose in the display “Finish job?” or “Pause job?”.You can pause and finish a job directly at the computer. With an open balance monitor window, you can also operate the same functions via the toolbar.
Click on “Yes” to pause/finish the job or on “No” to continue the current job.
After a weighing job has been stopped, the LabX navigation window opens again. Any paused weighing job remains in the bal-ance job queue. It can be resumed any time later.
16.1.7 Disconnecting from LabX
To disconnect from LabX, select “LabX Exit” in the display. The balance then disconnects from the Application “Remote” and is available again for local use.
16.1.8 Using peripheral devices
16.1.8.1 Barcode readerConfigure the barcode reader for the optional interface on the balance, and in the system configuration of the balance select “Host” for the barcode receiver. This allows barcodes to be read in and recognized by LabX while the job is executing.Alternatively, a barcode reader can be used by connecting to the PC keyboard.
16.1.8.2 Local printerConfigure the local printer (strip printer) for the optional interface on the balance. This allows a report to be printed on the local printer while a job is executing.
NoteIf you want to use the barcode reader and local printer, use a LocalCAN network with corresponding option on the balance.

110 METTLER TOLEDO LabX balance V1.4
Weighing
16.2 AX/MX/UMX balances with standard software
Weighing jobs and job templates on AX/MX/UMX balances with standard software must always be selected and started from LabX.
16.2.1 General operation
When executing a LabX weighing job, please follow the instructions in the display. A text in the weight line may prompt you to perform the next process step.
While a LabX weighing job is executing, the keys of the operating terminal on the balance have the following meanings:
3 Home key: Paused job (unprompted) or answer “No” (to a question in the display)
8 Print key: Confirm job step (unprompted) or answer “Yes” (to a question in the display)
NotesThe function of the «3» key is similar to the Escape key, and the function of the «8» key similar to the Enter key on a PC key-board.
16.2.2 Starting a weighing job
Weighing jobs and job templates must always be selected and started from LabX. Select a job in the queue of the balance and start the job with “Run” in the context menu or from the toolbar.
16.2.3 Executing weighings
Depending on the specification of the defined weighing job, before each weighing you will be prompted to enter sample iden-tifications (for example: Simple weighing). Up to 6 sample identifications can be used.
When a weighing job is started from LabX and Sample ID's are used, you will be prompted to enter the Sample ID's from both the balance and the computer where you started the job. You may enter the ID from computer or on the balance with Barcode reader. When «8» key is pressed on the balance resp. the Enter key at the computer, the Sample ID will be accepted and the dialogs on both LabX and the balance will close.
Now follow the instructions on the display.

METTLER TOLEDO LabX balance V1.4 111
Weighing
When the message “* Place -1-” appears, place the sample on the weighing pan and confirm the weighing with the «8» key.
If the application “Differential Weighing, automatic loop detection” is being used, the next sample in the order is shown in the LabX display (e.g. Put 1/2).
“SmartTrac” is a graphical weighing aid which simplifies weighing aimed at a specific nominal value. The “SmartTrac” appears below the weighing result on the right-hand side of the display. To use the “SmartTrac” feature the nominal value, upper and lower tolerance values must be supplied in the job template. The lower bar indicates the coarse range for fast weighing in. The upper bar represents the +/- tolerances. Addition-ally if the “Accept only weights within tolerance” field is set to yes, the print button will be disabled for values outside of the specified tolerance and values can not be sent to LabX.
When the message “*Clear pan” appears, remove the sample from the weighing pan and confirm the weighing with the «8» key. You will be repeatedly prompted to enter sample identifications and make weighings until the specified number of samples is reached or you terminate. At the end, the message “* Job done” appears. However, you can terminate at any time with the «3» key. The balance again displays the top navigation level of LabX.
To start a new job, proceed according to chapter 16.2.2.
You can now print and/or export the report which is created (see chapters 18.5 “Printing reports” and 18.6 “Exporting reports”).
Repeating a sampleTo repeat a sample within a current weighing job, read in the corresponding sample identification again and confirm overwriting the previous weighing before you can repeat the weighing.
If the application “Differential Weighing, automatic loop detection” is being used, thus functions repeat to a measurement only on balances with Remote Software. When overwriting a sample, all samples taken are shown so that one can be chosen from any loop to overwrite.
NoteAn entry will be made in the Audit Trail showing the older and the newer weight.
16.2.4 Deleting samples from a running job
Samples can also be deleted during a job. During a running job, press «7» key, and you will be prompted to confirm the dele-tion of the last sample via the «7» key. This operation can be continued back to the first sample of the loop. You can only delete samples within the current loop. After a job is finished, samples can no longer be deleted.
Press the «3» key. In the display, the message “Delete Sample -1- ?” appears. To confirm, press the «8» key.
After pressing the «8» key, the message “Sample -1- deleted” appears. Press the «8» key again to confirm.

112 METTLER TOLEDO LabX balance V1.4
Weighing
Enter a new Sample ID 1 at the balance with the barcode reader and confirm with the «8» key, or enter from the computer and confirm with the Enter key or click «OK».
NoteAn entry will be made in the Audit Trail showing the older and the newer weight. The deleted sample is also shown in the report.
If the application “Differential Weighing, automatic loop detection” is chosen, samples can be taken across sample loops.
16.2.5 Pausing/Terminating a weighing job
If you want to pause or terminate a weighing job, select the «3» key and follow the instructions to complete the desired termi-nation.
To stop a weighing job, you are guided by the following two-step procedure:
No Yes Result
1. Do you want to pause the job? 3 8 No: You can continue to work Yes: ➜ Question 2
2. Do you want to close the job? 3 8 No: The job is paused Yes: Job closedYou can pause and finish a job directly at the computer. With an open balance monitor window, you can also operate the same functions via the toolbar.
Click on “Yes” to pause/finish the job or on “No” to continue the current job.
After a LabX weighing job has been stopped, the balance is released for local use again. Any paused weighing job remains in the balance job queue. It can be resumed any time later.
16.2.6 Using peripheral devices
16.2.6.1 Barcode readerConfigure the barcode reader for the optional interface on the balance, and select “Host” for the barcode receiver in the system configuration of the balance. This allows barcodes to be read in and recognized by LabX while the job is executing.Alternatively, a barcode reader can be used by connecting to the PC keyboard.
16.2.6.2 Local printerConfigure the local printer (strip printer) for the optional interface on the balance. This allows a report to be printed on the local printer while a job is executing.
NoteIf you want to use the barcode reader and local printer, use a LocalCAN network with corresponding option on the balance.

METTLER TOLEDO LabX balance V1.4 11�
Weighing
16.3 XS balances
Use of Application “LabX Client” in your balance allows you to work more directly with LabX from the balance with Rapid Ac-cess.
16.3.1 Rapid Access
When you switch the balance on, or select Application “LabX Client”, the balance attempts to establish a connection to LabX to obtain a LabX navigation window.
As soon as the balance is connected to LabX, the top navigation level appears in the balance display. You can now call up bal-ance queues and job templates directly from the balance.
In the top navigation level, the keys in the display have the following meanings:
LabX Exit: Terminate connection with LabX
Job Templ...: Call up the templates for this balance
Job Queue: Call up the queue of this balance
NoteNo user login is required to operate the top navigation level on the balance.
16.3.2 General operation
While a LabX weighing job is executing, the keys of the operating terminal on the balance have the following meanings:

114 METTLER TOLEDO LabX balance V1.4
Weighing
A Home key: Paused job (unprompted) or answer “No” (to a question in the display)
F Print key: Confirm job step (unprompted) or answer “Yes” (to a question in the display)
Notes• The function of the «A» key is similar to the Escape key, and the function of the «F» key is similar to the Enter key on a PC
keyboard.• While a prompt for input is displayed, the «C» key and the «OK» key is the navigation key.
16.3.3 Starting a weighing job
16.3.3.1 Starting a weighing job from a queueIn the selection window, click on the “Job Queue” symbol.
All jobs in the queue are displayed. Click on a job you now want to execute.
When you have selected the job, the display shown at the left appears. Click on «OK» to start the job, or on «C» key to quit the job.
When you have confirmed the selected job, you will be prompted for your user identifica-tion.
Enter your user name and press «OK» to start the job, or «C» key to quit the job.

METTLER TOLEDO LabX balance V1.4 115
Weighing
Enter your password and press «OK» to start the job, or press «C» key to quit the job. After you have pressed «OK», the display briefly shows “* Job started”.
Notes• The password is case sensitive.• The user ID is not case sensitive.
16.3.3.2 Starting a weighing job with a job templateIn the selection window, touch the “Job Templ...” symbol.
The display shows all the job templates which are suitable for this balance. Touch a job template you want to use to execute a weighing job.
After you have selected the job template, the detailed information is displayed. Click on «OK» to start a weighing job or press «C» key to return.
After you have confirmed the selected job, you are prompted for your user identification.
Enter with your user name and press «OK» to start the job, or «C» key to quit the job.

116 METTLER TOLEDO LabX balance V1.4
Weighing
Enter your password and press «OK» to start the job, or “C” key to quit the job. After you have pressed «OK», the message “* Job started” appears briefly in the display.
NoteOnly those job templates are displayed on the balance which can actually be executed with this balance according to the criteria in the templates, see chapter 12.6 “Defining the balance and the minimum requirements for the balance” of the job template.
16.3.4 Executing weighings
Depending on the specification for the defined weighing job, before each weighing you will be prompted to enter sample iden-tifications (for example: Simple weighing). Up to 6 sample identifications can be used.
When a weighing job is started from LabX and Sample ID's are used, you will be prompted to enter the Sample ID's from both the balance and the computer where you started the job. You may enter the ID from computer or on the balance. When «OK» is pressed on the balance resp. the Enter key at the computer, the Sample ID will be accepted and the dialogs on both LabX and the balance will close.
Now follow the instructions on the display:
When the message “* Place -1-” appears, place the sample on the weighing pan and confirm the weighing with the «F» key. The weighing is then saved in the database.
If the application “Differential Weighing, automatic loop detection” is being used, the next sample in the order is shown in the LabX display (e.g. Put 1/2).
When the message “* Clear pan” appears, remove the sample from the weighing pan and press the «F» key to confirm. You will be repeatedly prompted to enter sample iden-tifications and make weighings until the specified number of samples is reached or you terminate.
At the end, the message “* Job done” appears. However, you can terminate at any time with the «A» key. The balance again displays the top navigation level of LabX.
To start a new job, proceed according to chapter 16.�.�.
You can now print and/or export the report which is created (see chapters 18.5 “Printing reports” and 18.6 “Exporting reports”).
Repeating a sampleTo repeat a sample within a current weighing job, read in the corresponding sample identification again and confirm overwriting the previous weighing before you can repeat the weighing.
If the application “Differential Weighing, automatic loop detection” is being used, thus functions repeat to a measurement only on balances with Application “LabX Client”. When overwriting a sample, all samples taken are shown so that one can be chosen from any loop to overwrite.
NoteAn entry will be made in the Audit Trail showing the older and the newer weight.

METTLER TOLEDO LabX balance V1.4 117
Weighing
16.3.5 Deleting samples from a running job
Samples can also be deleted during a job. During a running job, press «A» key, and you will be prompted to confirm the deletion of the last sample. This operation can be continued back to the first sample of the loop. You can only delete samples within the current loop. After a job is finished, samples can no longer be deleted.
Select in the display “Delete Sample?”.
Press «OK» to delete the “Sample -1-” or «C» to return to the job without deleting.
In the display you will receive a confirmation “Sample -1- deleted”. Press «OK» to con-tinue.
Enter a new Sample ID 1 at the balance or computer and confirm with the Enter key or click «OK».
NoteAn entry will be made in the Audit Trail showing the older and the newer weight. The deleted sample is also shown in the report.
If the application “Differential Weighing, automatic loop detection” is chosen, samples can be taken across sample loops.

118 METTLER TOLEDO LabX balance V1.4
Weighing
16.3.6 Pausing/Terminating a weighing job
If you want to pause or terminate a weighing job, select the «A» key and follow the instructions to complete the desired termina-tion.
Do you want to pause or terminate the job?
Choose in the display “Finish job?” or “Pause job?”.You can pause and finish a job directly at the computer. With an open balance monitor window, you can also operate the same functions via the toolbar.
Click on “Yes” to pause/finish the job or on “No” to continue the current job.
After a weighing job has been stopped, the LabX navigation window opens again. Any paused weighing job remains in the bal-ance job queue. It can be resumed any time later.
16.3.7 Disconnecting from LabX
To disconnect from LabX, select “LabX Exit” in the display. The balance then disconnects from the Application “LabX Client” and is available again for local use.
16.3.8 Using peripheral devices
16.3.8.1 Barcode readerConfigure the barcode reader for the optional interface on the balance, and in the system configuration of the balance select “Host” for the barcode receiver. This allows barcodes to be read in and recognized by LabX while the job is executing.Alternatively, a barcode reader can be used by connecting to the PC keyboard.
16.3.8.2 Local printerConfigure the local printer (strip printer) for the optional interface on the balance. This allows a report to be printed on the local printer while a job is executing.
NoteIf you want to use the barcode reader and local printer, use a LocalCAN network with corresponding option on the balance.

METTLER TOLEDO LabX balance V1.4 119
Weighing
16.4 XPbalances
Use of Application “LabX Client” in your balance allows you to work more directly with LabX from the balance with Rapid Ac-cess.
16.4.1 RapidAccess
When you switch the balance on, or select Application “LabX Client”, the balance attempts to establish a connection to LabX to obtain a LabX navigation window.
As soon as the balance is connected to LabX, the top navigation level appears in the balance display. You can now call up bal-ance queues and job templates directly from the balance.
In the top navigation level, the keys in the display have the following meanings:
LabX Exit: Terminate connection with LabX
Job Templ...: Call up the templates for this balance
Job Queue: Call up the queue of this balance
NoteNo user login is required to operate the top navigation level on the balance.
16.4.2 Generaloperation
While a LabX weighing job is executing, the keys of the operating terminal on the balance have the following meanings:
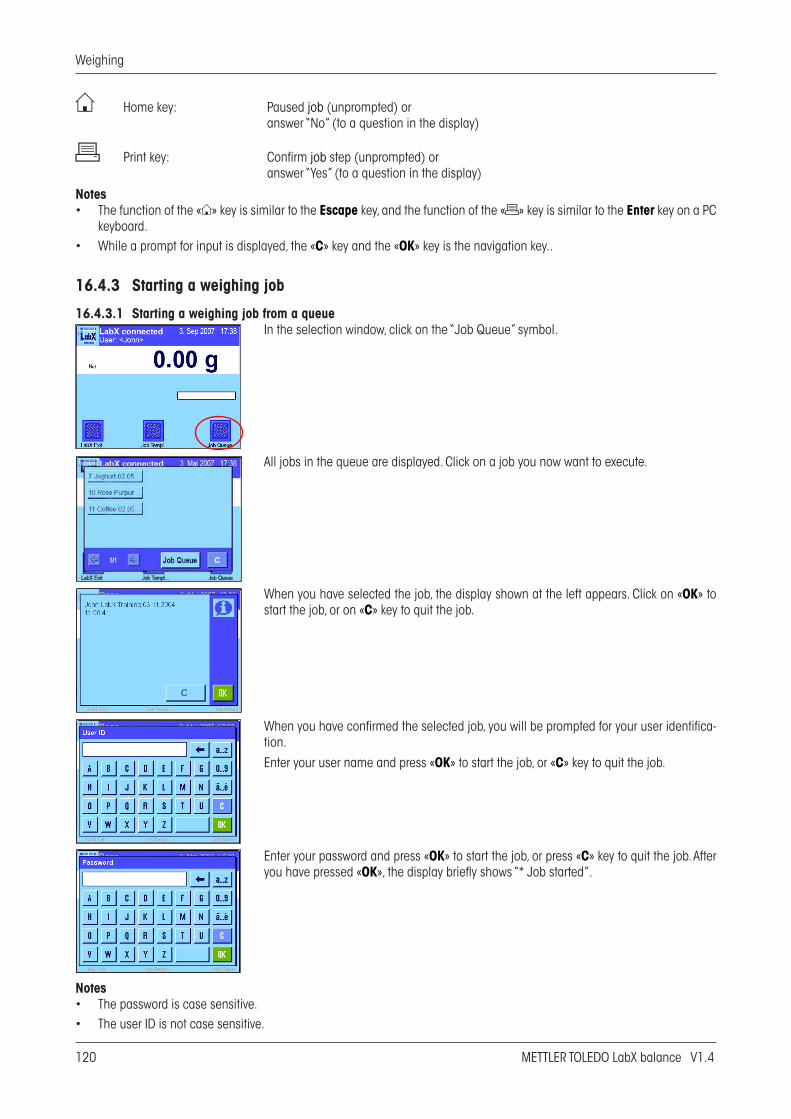
120 METTLER TOLEDO LabX balance V1.4
Weighing
A Home key: Paused job (unprompted) or answer “No” (to a question in the display)
F Print key: Confirm job step (unprompted) or answer “Yes” (to a question in the display)
Notes• The function of the «A» key is similar to the Escape key, and the function of the «F» key is similar to the Enter key on a PC
keyboard.• While a prompt for input is displayed, the «C» key and the «OK» key is the navigation key..
16.4.3 Starting a weighing job
16.4.3.1 Starting a weighing job from a queueIn the selection window, click on the “Job Queue” symbol.
All jobs in the queue are displayed. Click on a job you now want to execute.
When you have selected the job, the display shown at the left appears. Click on «OK» to start the job, or on «C» key to quit the job.
When you have confirmed the selected job, you will be prompted for your user identifica-tion.
Enter your user name and press «OK» to start the job, or «C» key to quit the job.
Enter your password and press «OK» to start the job, or press «C» key to quit the job. After you have pressed «OK», the display briefly shows “* Job started”.
Notes• The password is case sensitive.• The user ID is not case sensitive.

METTLER TOLEDO LabX balance V1.4 121
Weighing
16.4.3.2 Starting a weighing job with a job templateIn the selection window, touch the “Job Templ...” symbol.
The display shows all the job templates which are suitable for this balance. Touch a job template you want to use to execute a weighing job.
After you have selected the job template, the detailed information is displayed. Click on «OK» to start a weighing job or press «C» key to return.
After you have confirmed the selected job, you are prompted for your user identification.
Enter with your user name and press «OK» to start the job, or «C» key to quit the job.
Enter your password and press «OK» to start the job, or «C» key to quit the job. After you have pressed «OK», the message “* Job started” appears briefly in the display.
NoteOnly those job templates are displayed on the balance which can actually be executed with this balance according to the criteria in the templates, see chapter 12.6 “Defining the balance and the minimum requirements for the balance” of the job template.

122 METTLERTOLEDOLabXbalanceV1.4
Weighing
16.4.4 Executingweighings
Dependingonthespecificationforthedefinedweighingjob,beforeeachweighingyouwillbepromptedtoentersampleiden-tifications(forexample:Simpleweighing).Upto6sampleidentificationscanbeused.
WhenaweighingjobisstartedfromLabXandSampleID'sareused,youwillbepromptedtoentertheSampleID'sfromboththebalanceandthecomputerwhereyoustartedthejob.Youmayenter the ID fromcomputeroron thebalance.When«OK» ispressedonthebalanceresp.theEnterkeyatthecomputer,theSampleIDwillbeacceptedandthedialogsonbothLabXandthebalancewillclose.
Nowfollowtheinstructionsonthedisplay:
When themessage“*Place -1-”appears,place thesampleon theweighingpanandconfirmtheweighingwiththe«F»key.Theweighingisthensavedinthedatabase.
If the application “Differential Weighing, automatic loop detection” is being used, the next sample in the order is shown in the LabX display (e.g. Put 1/2).
“SmartTrac” is a graphical weighing aid which simplifies weighing aimed at a specific nominal value. The “SmartTrac” appears below the weighing result on the right-hand side of the display. To use the “SmartTrac” feature the nominal value, upper and lower tolerance values must be supplied in the job template. The lower bar indicates the coarse range for fast weighing in. The upper bar represents the +/- tolerances. Additionally if the “Accept only weights within tolerance” field is set to yes, the print button will be disabled for values outside of the specified tolerance and values can not be sent to LabX.
When themessage“*Clearpan”appears, remove thesample from theweighingpanandpressthe«F»keytoconfirm.Youwillberepeatedlypromptedtoentersampleiden-tificationsandmakeweighingsuntilthespecifiednumberofsamplesisreachedoryouterminate.
Attheend,themessage“*Jobdone”appears.However,youcanterminateatanytimewiththe«A»key.ThebalanceagaindisplaysthetopnavigationlevelofLabX.
Tostartanewjob,proceedaccordingtochapter16.4.3.
Youcannowprintand/orexportthereportwhichiscreated(seechapters18.5“Printingreports”and18.6“Exportingreports”).
RepeatingasampleTorepeatasamplewithinacurrentweighingjob,readinthecorrespondingsampleidentificationagainandconfirmoverwritingthepreviousweighingbeforeyoucanrepeattheweighing.
Iftheapplication“DifferentialWeighing,automaticloopdetection”isbeingused,thusfunctionsrepeattoameasurementonlyonbalanceswithApplication“LabXClient”.Whenoverwritingasample,allsamplestakenareshownsothatonecanbechosenfromanylooptooverwrite.
NoteAnentrywillbemadeintheAuditTrailshowingtheolderandthenewerweight.
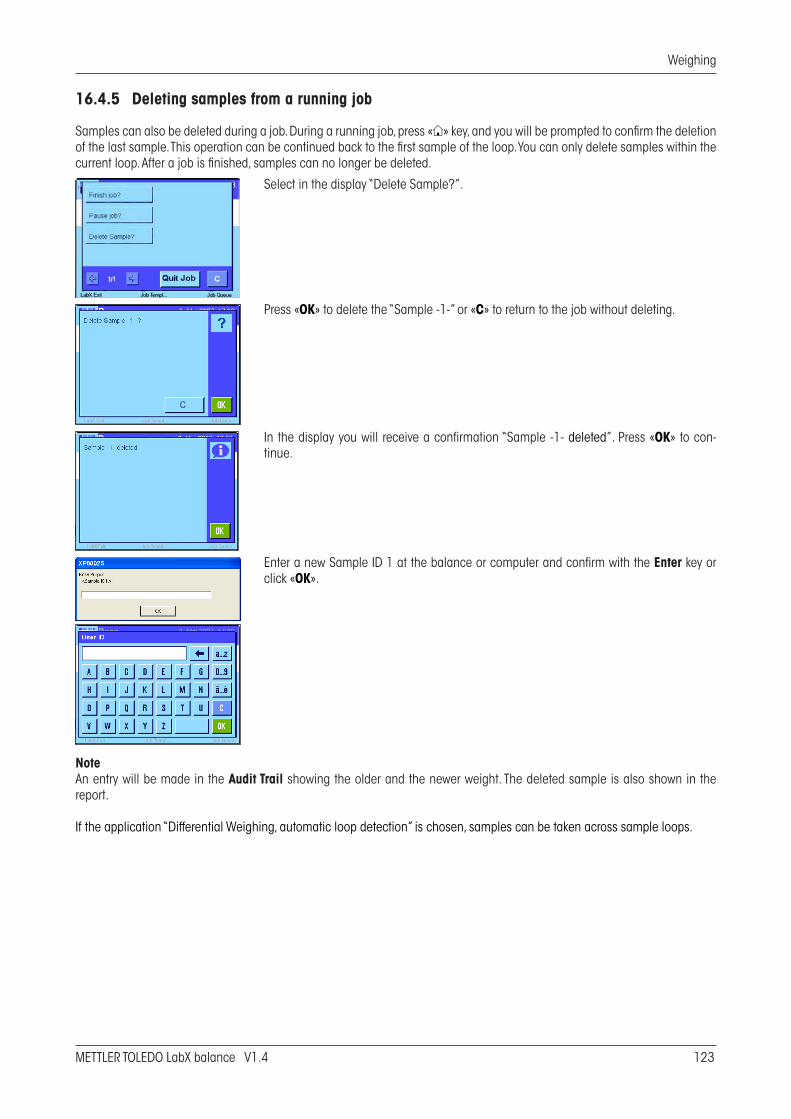
METTLER TOLEDO LabX balance V1.4 12�
Weighing
16.4.5 Deleting samples from a running job
Samples can also be deleted during a job. During a running job, press «A» key, and you will be prompted to confirm the deletion of the last sample. This operation can be continued back to the first sample of the loop. You can only delete samples within the current loop. After a job is finished, samples can no longer be deleted.
Select in the display “Delete Sample?”.
Press «OK» to delete the “Sample -1-” or «C» to return to the job without deleting.
In the display you will receive a confirmation “Sample -1- deleted”. Press «OK» to con-tinue.
Enter a new Sample ID 1 at the balance or computer and confirm with the Enter key or click «OK».
NoteAn entry will be made in the Audit Trail showing the older and the newer weight. The deleted sample is also shown in the report.
If the application “Differential Weighing, automatic loop detection” is chosen, samples can be taken across sample loops.

124 METTLER TOLEDO LabX balance V1.4
Weighing
16.4.6 Pausing/Terminating a weighing job
If you want to pause or terminate a weighing job, select the «A» key and follow the instructions to complete the desired termina-tion.
Do you want to pause or terminate the job?
Choose in the display “Finish job?” or “Pause job?”.You can pause and finish a job directly at the computer. With an open balance monitor window, you can also operate the same functions via the toolbar.
Click on “Yes” to pause/finish the job or on “No” to continue the current job.
After a weighing job has been stopped, the LabX navigation window opens again. Any paused weighing job remains in the bal-ance job queue. It can be resumed any time later.
16.4.7 Disconnecting from LabX
To disconnect from LabX, select “LabX Exit” in the display. The balance then disconnects from the Application “LabX Client” and is available again for local use.
16.4.8 Using peripheral devices
16.4.8.1 Barcode readerConfigure the barcode reader for the optional interface on the balance, and in the system configuration of the balance select “Host” for the barcode receiver. This allows barcodes to be read in and recognized by LabX while the job is executing.Alternatively, a barcode reader can be used by connecting to the PC keyboard.
16.4.8.2 Local printerConfigure the local printer (strip printer) for the optional interface on the balance. This allows a report to be printed on the local printer while a job is executing.
NoteIf you want to use the barcode reader and local printer, use a LocalCAN network with corresponding option on the balance.

METTLER TOLEDO LabX balance V1.4 125
Weighing
16.5 AT/MT/UMT balances with standard software
When using LabX with the AT/MT/UMT balances, the standard door functionality must be selected and not the automatic door.
16.5.1 Key assignments on AT/MT/UMT balances
While a LabX weighing job is executing, the keys of the operating terminal on the balance have the following meanings:
Print key (double-click): Abort job, turn off Manual Transfer Mode or answer “No” to a question
Print key: Confirm job step or answer “Yes” to a question in the display
16.5.2 Starting a weighing job
Weighing jobs and job templates must always be selected and started from LabX. Select a job in the queue of the balance, and start the job with “Run” in the context menu or from the toolbar.
16.5.3 Executing weighings
Depending on the specification for the defined weighing job, before each weighing you will be prompted to enter sample iden-tifications (for example: Simple weighing). Up to 6 sample identifications can be used.
When a weighing job is started from LabX and Sample ID's are used, you will be prompted to enter the Sample ID's from both the balance and the computer where you started the job. You may enter the ID from computer or on the balance with Barcode reader. When «Print» key is pressed on the balance resp. the Enter key at the computer, the Sample ID will be accepted and the dialogs on both LabX and the balance will close.
Now follow the instructions on the display.
When the message “PLACE -1-” appears, place the sample on the weighing pan and con-firm the weighing with the «Print» key.
If the application “Differential Weighing, automatic loop detection” is being used, the next sample in the order is shown in the LabX display (e.g. Put 1/2).
When the message “REMOVE” appears, remove the sample from the weighing pan and confirm the weighing with the «Print» key. You will be repeatedly prompted to enter sample identifications and make weighings until the specified number of samples is reached or you terminate.
You can terminate at any time with the «Print» key (double-click). The balance again displays the top navigation level of LabX.
To start a new job, proceed according to chapter 16.5.2.
You can now print and/or export the report which is created (see chapters 18.5 “Printing reports” and 18.6 “Exporting reports”).
NoteIf the application “Differential Weighing, automatic loop detection” is chosen, samples can be taken across sample loops.

126 METTLER TOLEDO LabX balance V1.4
Weighing
16.5.4 Pausing/Terminating a weighing job
If you want to pause or terminate a weighing job, select the «Print» key and follow the instructions to complete the desired termination.
To stop a weighing job, you are guided by the following single-step procedure:
No Yes Result
1. Do you want to terminate the job? No: The job is paused
(double-click) Yes: Job closed
You can pause and finish a job directly at the computer. With an open balance monitor window, you can also operate the same functions via the toolbar.
Click on “Yes” to pause/finish the job or on “No” to continue the current job.
After a LabX weighing job has been stopped, the balance is released for local use again.
16.5.5 Using peripheral devices
The peripheral devices on the AT balance are not supported by LabX. If you use a barcode reader on the AT balance, it is prefer-able to connect it to an e-Link EB02 device which allows it to be operated on the network along with the AT balance. For further information, please contact METTLER TOLEDO.Alternatively, a barcode reader can be used by connecting to the PC keyboard.
PrintPrint

METTLER TOLEDO LabX balance V1.4 127
Weighing
16.6 AG, PG-S balances with standard software
16.6.1 Key assignments on AG, PG-S balances
While a LabX weighing job is executing, the keys of the operating terminal on the balance have the following meanings:
C Cancel key: Short press = Zero Long press = Abort job, turn off Manual Transfer Mode or answer “No” to a question
± Print key: Confirm job step or answer “Yes” to a question
NoteThe function of the «C» key is similar to the Escape key, and the function of the «±» key similar to the Enter key on a PC keyboard.
16.6.2 Starting a weighing job
Weighing jobs and job templates must always be selected and started from LabX. Select a job in the queue of the balance and start the job with “Run” in the context menu or from the toolbar.
16.6.3 Executing weighings
Depending on the specification of the defined weighing job, before each weighing you will be prompted to enter sample iden-tifications (for example: Simple weighing). Up to 6 sample identifications can be used.
When a weighing job is started from LabX and Sample ID's are used, you will be prompted to enter the Sample ID's from both the balance and the computer where you started the job. You may enter the ID from computer or on the balance with Barcode reader. When «±» key is pressed on the balance resp. the Enter key at the computer, the Sample ID will be accepted and the dialogs on both LabX and the balance will close.
Now follow the instructions on the display.
When the message “* PLACE -1-” appears, place the sample on the weighing pan and confirm the weighing with the «±» key.
If the application “Differential Weighing, automatic loop detection” is being used, the next sample in the order is shown in the LabX display (e.g. Put 1/2).
When the message “REMOVE” appears, remove the sample from the weighing pan and confirm the weighing with the «±» key. You will be repeatedly prompted to enter sample identifications and make weighings until the specified number of samples is reached or you terminate.
You can terminate at any time with the «C» key. The balance again displays the top naviga-tion level of LabX.
To start a new job, proceed according to chapter 16.6.2. You can now print and/or export the report which is created (see chapters 18.5 “Printing reports” and 18.6 “Exporting reports”).

128 METTLER TOLEDO LabX balance V1.4
Weighing
16.6.4 Deleting samples from a running job
Samples can also be deleted during a job. During a running job, press «F» key, and you will be prompted to confirm the deletion of the last sample via the «±» key. This operation can be continued back to the first sample of the loop. You can only delete samples within the current loop. After a job is finished, samples can no longer be deleted.
Press the «F» key. In the display, the message “Delete Sample -1- ?” appears. To confirm, press the «±» key.
After pressing the «±» key, the message “Sample -1- deleted” appears. Press the «±» key again to confirm.
Enter a new Sample ID 1 at the balance with the barcode reader and confirm with the «±» key, or enter from the computer and confirm with the Enter key or click «OK».
NoteAn entry will be made in the Audit Trail showing the older and the newer weight. The deleted sample is also shown in the report.
If the application “Differential Weighing, automatic loop detection” is chosen, samples can be taken across sample loops.
16.6.5 Pausing/Terminating a weighing job
If you want to pause or terminate a weighing job, hold the «C» key (Long press) and follow the instructions to complete the desired termination.
To stop a weighing job, you are guided by the following two-step procedure:
No Yes Result
1. Do you want to pause the job? No: You can continue to work
Yes: ➜ Question 2
2. Do you want to close the job? No: The job is paused
Yes: Job closed
You can pause and finish a job directly at the computer. With an open balance monitor window, you can also operate the same functions via the toolbar.
Click on “Yes” to pause/finish the job or on “No” to continue the current job.
After a LabX weighing job has been stopped, the balance is released for local use again. Any paused weighing job remains in the balance job queue. It can be resumed any time later.
16.6.6 Using peripheral devices
A LocalCAN network can be used to connect peripheral devices directly to the balance. Printers and barcode readers are gener-ally supported. For further information, please contact METTLER TOLEDO.Alternatively, a barcode reader can be used by connecting to the PC keyboard.
C
C
±
±

METTLER TOLEDO LabX balance V1.4 129
Weighing
16.7 PG/SG balances with standard software
16.7.1 Key assignments on PG/SG balances
While a LabX weighing job is being executed, the keys on the operating terminal on the balance have the following meanings:
C Cancel key: Short press = Zero Long press = Abort job, turn off Manual Transfer Mode or answer “No” to a question
± Print key: Confirm a job step or answer “Yes” to a question
NoteThe function of the «C» key is similar to the Escape key, and the function of the «±» key similar to the Enter key on a PC keyboard.
16.7.2 Starting a weighing job
Weighing jobs and job templates must always be selected and started from LabX. Select a job in the queue of the balance and start the job with “Run” in the context menu or from the toolbar.
16.7.3 Executing weighings
Depending on the specification of the defined weighing job, before each weighing you will be prompted to enter sample infor-mation (for example: Simple weighing). Up to 6 sample identifications can be used.
When a weighing job is started from LabX and Sample ID's are used, you will be prompted to enter the Sample ID's from both the balance and the computer where you started the job. You may enter the ID from computer or on the balance with Barcode reader. When «±» key is pressed on the balance resp. the Enter key at the computer, the Sample ID will be accepted and the dialogs on both LabX and the balance will close.Now follow the instructions on the display.
When the message “* PLACE -1-” appears, place the sample on the weighing pan and confirm the weighing with the «±» key.
If the application “Differential Weighing, automatic loop detection” is being used, the next sample in the order is shown in the LabX display (e.g. Put 1/2).
When the message “REMOVE” appears, remove the sample from the weighing pan and confirm the weighing with the «±» key. You will be repeatedly prompted to enter sample identifications and make weighings until the specified number of samples is reached or you terminate.
You can terminate at any time with the «C» key. The balance again displays the top naviga-tion level of LabX.
To start a new job, proceed according to chapter 16.7.2.
You can now print and/or export the report which is created (see chapters 18.5 “Printing reports” and 18.6 “Exporting reports”).

1�0 METTLER TOLEDO LabX balance V1.4
Weighing
16.7.4 Deleting samples from a running job
Samples can also be deleted during a job. During a running job, press «F» key, and you will be prompted to confirm the deletion of the last sample via the «±» key. This operation can be continued back to the first sample of the loop. You can only delete samples within the current loop. After a job is finished, samples can no longer be deleted.
Press the «F» key. In the display, the message “Delete Sample -1- ?” appears. To confirm, press the «±» key
After pressing the «±» key, the message “Sample -1- deleted” appears. Press the «±» key again to confirm.
Enter a new Sample ID 1 at the balance with the barcode reader and confirm with the «±» key, or enter from the computer and confirm with the Enter key or click “OK”.
NoteAn entry will be made in the Audit Trail showing the older and the newer weight. The deleted sample is also shown in the report.
If the application “Differential Weighing, automatic loop detection” is chosen, samples can be taken across sample loops.
16.7.5 Pausing/Terminating a weighing job
If you want to pause or terminate a weighing job, hold the «C» key (Long press) and follow the instructions to complete the desired termination.
To stop weighing jobs you are guided by the following two-step procedure:
No Yes Result
1. Do you want to pause the job? No: You can continue to work
Yes: ➜ Question 2
2. Do you want to close the job? No: The job is paused
Yes: Job closed
You can pause and finish a job directly at the computer. With an open balance monitor window, you can also operate the same functions via the toolbar.
Click on “Yes” to pause/finish the job or on “No” to continue the current job.
After a LabX weighing job has been stopped, the balance is released for local use again. Any paused weighing job remains in the balance job queue. It can be resumed any time later.
16.7.6 Using peripheral devices
A LocalCAN network can be used to connect peripheral devices directly to the balance. Printers and barcode readers are gener-ally supported. For further information, please contact METTLER TOLEDO.Alternatively, a barcode reader can be used by connecting to the PC keyboard.
C ±
C ±
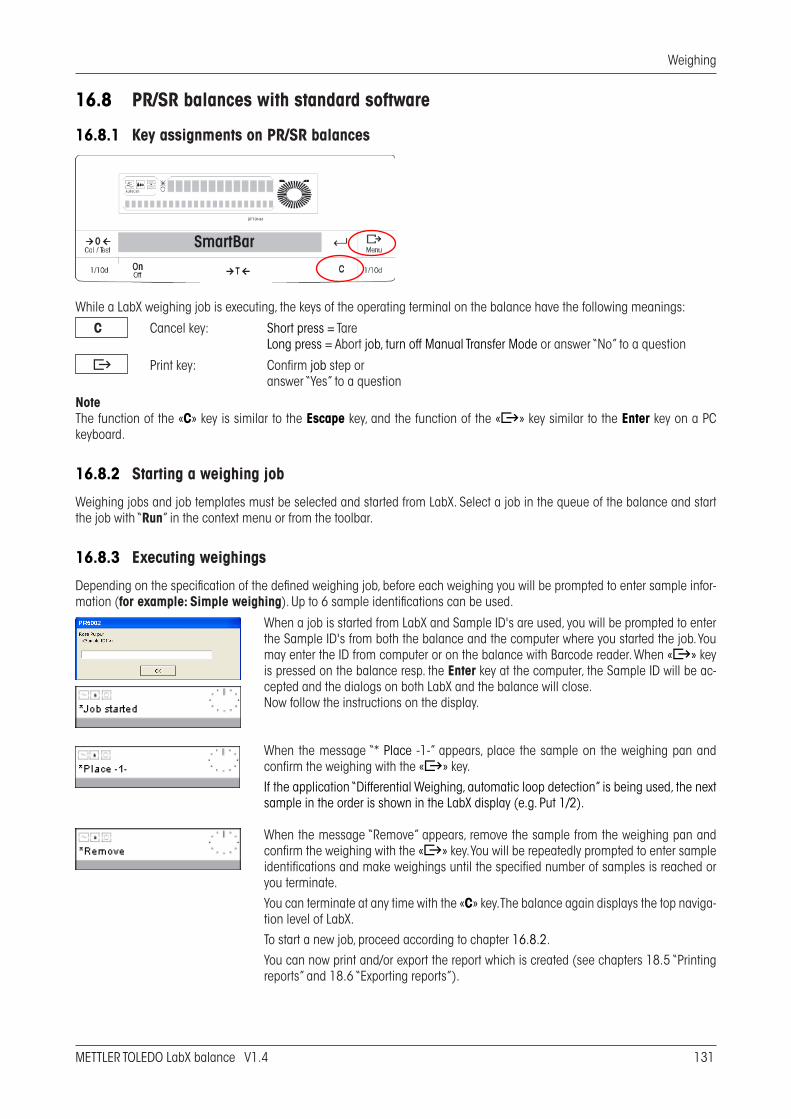
METTLER TOLEDO LabX balance V1.4 1�1
Weighing
16.8 PR/SR balances with standard software
16.8.1 Key assignments on PR/SR balances
While a LabX weighing job is executing, the keys of the operating terminal on the balance have the following meanings:
C Cancel key: Short press = Tare Long press = Abort job, turn off Manual Transfer Mode or answer “No” to a question
± Print key: Confirm job step or answer “Yes” to a question
NoteThe function of the «C» key is similar to the Escape key, and the function of the «±» key similar to the Enter key on a PC keyboard.
16.8.2 Starting a weighing job
Weighing jobs and job templates must be selected and started from LabX. Select a job in the queue of the balance and start the job with “Run” in the context menu or from the toolbar.
16.8.3 Executing weighings
Depending on the specification of the defined weighing job, before each weighing you will be prompted to enter sample infor-mation (for example: Simple weighing). Up to 6 sample identifications can be used.
When a job is started from LabX and Sample ID's are used, you will be prompted to enter the Sample ID's from both the balance and the computer where you started the job. You may enter the ID from computer or on the balance with Barcode reader. When «±» key is pressed on the balance resp. the Enter key at the computer, the Sample ID will be ac-cepted and the dialogs on both LabX and the balance will close.Now follow the instructions on the display.
When the message “* Place -1-” appears, place the sample on the weighing pan and confirm the weighing with the «±» key.
If the application “Differential Weighing, automatic loop detection” is being used, the next sample in the order is shown in the LabX display (e.g. Put 1/2).
When the message “Remove” appears, remove the sample from the weighing pan and confirm the weighing with the «±» key. You will be repeatedly prompted to enter sample identifications and make weighings until the specified number of samples is reached or you terminate.
You can terminate at any time with the «C» key. The balance again displays the top naviga-tion level of LabX.
To start a new job, proceed according to chapter 16.8.2.
You can now print and/or export the report which is created (see chapters 18.5 “Printing reports” and 18.6 “Exporting reports”).

1�2 METTLER TOLEDO LabX balance V1.4
Weighing
16.8.4 Deleting samples from a running job
Samples can also be deleted during a job. During a running job, press «ã» key, and you will be prompted to confirm the deletion of the last sample via the «±» key. This operation can be continued back to the first sample of the loop. You can only delete samples within the current loop. After a job is finished, samples can no longer be deleted.
Press the «ã» key. In the display, the message “Delete Sample -1- ?” appears. To confirm, press the «±» key.
After pressing the «±» key, the message “Sample -1- deleted” appears. Press the «±» key again to confirm.
Enter a new Sample ID 1 at the balance with the barcode reader and confirm with the «±» key, or enter from the computer and confirm with the «ã» key or click «OK».
NoteAn entry will be made in the Audit Trail showing the older and the newer weight. The deleted sample is also shown in the report.
If the application “Differential Weighing, automatic loop detection” is chosen, samples can be taken across sample loops.
16.8.5 Pausing/Terminating a weighing job
If you want to pause or terminate a weighing job, hold the «C» key (Long press) and follow the instructions to complete the desired termination.
To stop a weighing job, you are guided by the following two-step procedure.
No Yes Result
1. Do you want to pause the job? No: You can continue to work
Yes: ➜ Question 2
2. Do you want to close the job? No: The job is paused
Yes: Job closed
You can pause and finish a job directly at the computer. With an open balance monitor window, you can also operate the same functions via the toolbar.
Click on “Yes” to pause/finish the job or on “No” to continue the current job.
After a LabX weighing job has been stopped, the balance is released for local use again. Any paused weighing job remains in the balance job queue. It can be resumed any time later.
16.8.6 Using peripheral devices
A LocalCAN network can be used to connect peripheral devices directly to the local balance. As standard, LabX supports printers and barcode readers which can be configured on the balance. For further information, please contact METTLER TOLEDO.Alternatively, a barcode reader can be used by connecting to the PC keyboard.
C
C
±
±

METTLER TOLEDO LabX balance V1.4 1��
Weighing
16.9 AB-L/AB-S/PB-L/PB-S balances with standard software
16.9.1 Key assignments on AB-L/AB-S/PB-L/PB-S balances
While a LabX weighing job is being executed, the keys on the operating terminal on the balance have the following meanings:
C Cancel key: Short press = Zero Long press = Abort job, turn off Manual Transfer Mode or answer “No” to a question
± Print key: Confirm a job step or answer “Yes” to a question
NoteThe function of the «C» key is similar to the Escape key, and the function of the «±» key similar to the Enter key on a PC keyboard.
16.9.2 Starting a weighing job
Weighing jobs and job templates must always be selected and started from LabX. Select a job in the queue of the balance and start the job with “Run” in the context menu or from the toolbar.
16.9.3 Executing weighings
Depending on the specification of the defined weighing job, before each weighing you will be prompted to enter sample infor-mation (for example: Simple weighing). Up to 6 sample identifications can be used.
When a weighing job is started from LabX and Sample ID's are used, you will be prompted to enter the Sample ID's from both the balance and the computer where you started the job. You may enter the ID from computer with Barcode reader. When «±» key is pressed on the balance resp. the Enter key at the computer, the Sample ID will be accepted and the dialogs on both LabX and the balance will close.Now follow the instructions on the display.
When the message “* PLACE -1-” appears, place the sample on the weighing pan and confirm the weighing with the «±» key.
If the application “Differential Weighing, automatic loop detection” is being used, the next sample in the order is shown in the LabX display (e.g. Put 1/2).
When the message “REMOVE” appears, remove the sample from the weighing pan and confirm the weighing with the «±» key. You will be repeatedly prompted to enter sample identifications and make weighings until the specified number of samples is reached or you terminate.
You can terminate at any time with the «C» key. The balance again displays the top naviga-tion level of LabX.
To start a new job, proceed according to chapter 16.9.2.
You can now print and/or export the report which is created (see chapters 18.5 “Printing reports” and 18.6 “Exporting reports”).

1�4 METTLER TOLEDO LabX balance V1.4
Weighing
16.9.4 Deleting samples from a running job
Samples can also be deleted during a job. During a running job, press «F» key, and you will be prompted to confirm the deletion of the last sample via the «±» key. This operation can be continued back to the first sample of the loop. You can only delete samples within the current loop. After a job is finished, samples can no longer be deleted.
Press the «F» key. In the display, the message “Delete Sample -1- ?” appears. To confirm, press the «±» key.
After pressing the «±» key, the message “Sample -1- deleted” appears. Press the «±» key again to confirm.
Enter a new Sample ID 1 at the balance with the barcode reader and confirm with the «±» key, or enter from the computer and confirm with the Enter key or click «OK».
NoteAn entry will be made in the Audit Trail showing the older and the newer weight. The deleted sample is also shown in the report.
If the application “Differential Weighing, automatic loop detection” is chosen, samples can be taken across sample loops.
16.9.5 Pausing/Terminating a weighing job
If you want to pause or terminate a weighing job, hold the «C» key (Long press) and follow the instructions to complete the desired termination.
To stop weighing jobs you are guided by the following two-step procedure:
No Yes Result
1. Do you want to pause the job? No: You can continue to work
Yes: ➜ Question 2
2. Do you want to close the job? No: The job is paused
Yes: Job closed
You can pause and finish a job directly at the computer. With an open balance monitor window, you can also operate the same functions via the toolbar.
Click on “Yes” to pause/finish the job or on “No” to continue the current job.
After a LabX weighing job has been stopped, the balance is released for local use again. Any paused weighing job remains in the balance job queue. It can be resumed any time later.
16.9.6 Using peripheral devices
A LocalCAN network can be used to connect peripheral devices directly to the balance. Printers and barcode readers are gener-ally supported. For further information, please contact METTLER TOLEDO.Alternatively, a barcode reader can be used by connecting to the PC keyboard.
C
±
±
C

METTLER TOLEDO LabX balance V1.4 1�5
Reports
F
17 Tree view Reports
17.1 Introduction
In the tree view Reports, you see the reports which have been saved for weighing jobs. You can filter the displayed list of reports, and select a report to be exported or printed.
17.2 Overview
The tree view Reports is activated by clicking the Reports tab directly below the navigation window.
• The folders in the tree view are automatically created the first time a report is transferred from the balance. • The name of the folder corresponds to the title of the job template. • The individual reports are saved by LabX in the respective Report folders .• Clicking a or sign allows you to open or close folders. • If you right-click an Report symbol , a context menu appears with an overview of possible functions (except with folder
icons). • Double-clicking on a Report symbol opens the working area and displays the selected report along with the toolbar of
available functions.• You can close working windows by clicking the Close button in the menu bar.• You can use the filter function to limit the displayed data records to only those reports which are relevant for you.
123
4
5

1�6 METTLER TOLEDO LabX balance V1.4
Reports
17.3 Icons
Icon Number Function/contentReport folder 1 Contains all reports of weighing jobs.
Report folder of a on-time weighing jobs
2 Contains the reports of weighing jobs.
Report � Report of a on-time weighing jobs which were created with the same job template.
Report folder of a job template
4 Contains the reports of weighing jobs which were created with the same job template.
Report 5 Report of a weighing job with measurement values and calculations.
Filter activated F The list currently displays only those reports which match the specified filter criteria.
Filter deactivated F The list displays all reports which are saved.

METTLER TOLEDO LabX balance V1.4 137
Reports
18 Workingwithreports
Each time a weighing job is started, a report is generated automatically. The report is visualized in the tree view Reports and can be opened even before the weighing job has finished executing. The data contained in the report is updated each time the report is opened. The format of the report is a simple standard format based on the information in the job template (e.g. selected application, sample loops, results definitions).
18.1 Reportfilter
You can use the filter function to limit the data sets in the tree view Reports so that only the data sets of interest are visible. Different combinations of filter criteria are available.
Switchfilteron/offYou can switch the filter on or off by clicking the Filter button at the top of the tree view Reports.
Filtersettings1. If you right-click the Filter button , the FilterSettings dialog box appears.2. You can now enter the filter criteria. For example, enter a “Job name” and a “Start date from... to” and confirm the entries
by clicking the “OK” button.

138 METTLER TOLEDO LabX balance V1.4
Reports
Thefollowingfiltersettingsareavailable:Weighingjob
Start date from: Weighing job started between …
To: and …
Template name: Name of the job template
Name: Name of the job
Job Info Job information
Application
Name: Name of the application (e.g. Simple Weighing)
Sampleidentification(s)
ID1…6: Sample identifications (Sample ID1…Sample ID6)
Balance
Name: Name of balance used
Model: Balance model, e.g. AX204
User
Name: Name of the user
Notes• If an * is used in a box, all values are allowed.• You can fill out several boxes at the same time, which causes job templates to be searched and displayed which match all
the criteria.
18.2 Displayreports
In the tree view Reports, click with the right mouse button on a desired Reportofaweighingjob : and select “Open”. The Reportoftheweighingjob appears in the working space.

METTLER TOLEDO LabX balance V1.4 139
Reports
18.3 Structureofreports
The reports of weighing jobs all have a standard structure.
18.3.1 Reportstart(jobdata)
1 Company information (according to settings, see chapter 5.9 “Setting up Report Management”) and title of the job tem-plate used, under which the report was displayed or printed
2 Job information, details of the user, sample informations and nominal value3 Information about the balance usedNotes• Company identifications and user data in the title line and footer do not belong to the report data.• When the report is displayed, company identifications are included according to the current global settings.• The user information in the title and footer indicates the currently logged-in user who opens the report.
18.3.2 Reportbody(measurementvaluespersampleloopandsample)
4 Calculated results according to the formulas entered and sample ID5 Sample loop information6 Data of the last sensitivity adjustment record saved in LabX and start date of the sample loop with date/time7 Samples with IDs, sample constants and measurement values. With activated MinWeigh function information regarding
MinWeigh violations

140 METTLER TOLEDO LabX balance V1.4
Reports
18.3.3 Reportend(resultsandstatistics)
8 Statistics and SQC of the results (if limit values were specified in the job template)9 Used Formulas10 Used Constants11 Post Job Results, showing the used formulas and variables12 Balance settings for this job13 Balance prerequisites for this job14 Comments15 Signed elements of the document (Electronic signature) with date/time16 Footer with information about the user and report page number

METTLER TOLEDO LabX balance V1.4 141
Reports
18.4 Functionsinthereportview
After you have opened a report, you can choose between the following functions:
18.5 Printingreports
Reports can be printed by selecting the Print function in the context menu of a report, or with a report open by using the Print function in the toolbar:
18.6 Exportingreports
18.6.1 Manualexportreports
After you have opened a report, its data can be exported in a selectable file format. To do this, use either the Exportfunction in the toolbar or the respective function in the context menu of a report.
As standard, LabX chooses a name composed of
job ID, job title, date, time
and the export format .pdf. There is a choice of export formats. The following file formats are supported: pdf, rpt, doc,xls, txt, rtf, and xml.

142 METTLER TOLEDO LabX balance V1.4
Reports
18.6.2 Automaticexportreports
After a weighing job has been completed, reports can be exported automatically into an Excel table (*.xls), provided that this option was selected in the job template which was used (see chapter 12.9.2 “Report data”).
You can define a user-specific location for this exported data to be saved (see chapter 5.10.1 “Defining the folder for export of reports”).
18.6.3 Programmedexportreports
Programmed access from your system (e.g. LIMS, ERP) to the LabX report data is possible with the LabX connect Software which is available as an option.
18.7 Searchingthedocumentfortext
Using the integrated Searchfunction in the report toolbar, you can search for any text in the document.
18.8 Addingcommentstothereport
A short comments text can be added to every weighing report. The comments are logically part of the weighing report and are handled correspondingly when modifications are made.
1. In the tree view Reports, click with the right mouse button on the symbol of a Report . In the context menu, select ModifyComment….
2. The dialog ModifyComment... appears.
3. Enter a free text.4. Click on OK to confirm the inputs and close the dialog, or on Cancel to reject the inputs and close the dialog.NoteIf you are operating your system in the “Secure Mode (21 CFR Part 11)”, when you execute this step you will be prompted to enter your electronic signature (see chapter 5.3 “Electronic signature”). If the signature is successful, an entry will be made in the AuditTrail.

METTLER TOLEDO LabX balance V1.4 143
Reports
18.9 Signingreports
Reports can be signed with the options Reviewed and/or Approved. Reports are marked with Reviewed and/or Approvedat the top margin of the window, at the end of the report form, and on the printout. If a signed report is edited, the signature is automatically deleted.
To be able to sign, you must possess the corresponding rights; make sure you are logged in with a user that possesses the corresponding rights.
1. In the tree view Reports, click with the right mouse button on the symbol of a Report . In the context menu, select Sign….
2. The dialog Sign… appears.
3. Enter the Username and Password, and in the pop-up list of the “Meaning” field, select Review or Approve.4. Click on OK to confirm the inputs and close the dialog, or on Cancel to reject the inputs and close the dialog.
18.10 Deletingreports
Provided you have the necessary user rights, you can delete a report. To delete a report, in the tree view Reports click with the right mouse button on an existing Report and in the context menu select “Delete”.
Once the delete command is confirmed, the report is irretrievably deleted.
NoteIf you are operating your system in the “Secure Mode (21 CFR Part 11)”, when you execute this step you will be prompted to enter your electronic signature (see chapter 5.3 “Electronic signature”). If the signature is successful, an entry will be made in the AuditTrail.
144 METTLER TOLEDO LabX balance V1.4
Backup
19 Backup on the PC/Server
Every document that is saved on a computer should be backed up regularly. Backup means that files and programs are copied to another storage medium. A full backup will require the use of third-party software.
Data backup can be done in a number of different ways using different storage media. You can, for example, store copies of important files on another part of the file system (on a different partition or hard disk).
Centralized data backup is particularly important on a network. It is essential that one person is designated as being responsible for the routine backup of data.
Note that modern backup tools must be used to correctly backup “MSDE” databases (SQL). Basic tools may not be able to backup and restore such databases.
Using the windows function “Scheduled Tasks” and the program “LabX Database Maintenance” the database backup can be automated. See chapter “19.� Automated Data Backup”.
19.1 Database backup
LabX is based on the Microsoft Data Engine “MSDE” database (SQL); all the data used by LabX is therefore organized in a database.The “LabX Database Maintenance” program allows you to backup and restore databases and to change to new or other exist-ing databases. Another possibility is to reset existing databases so that all the jobs and installation data are retained (only the results are deleted), or that all reports are retained while jobs and configuration data is deleted.
Notes• The “LabX DB Maintenance” program must be installed separately on the PC where the database is resident. See chapter
2�.2.2 “Installation Planning”.• If the data base server (MSDE) was installed on the operating systems 2000 or XP without SQL server authentification (only
with Windows authentification), the “DB Maintenance” actions under the registers Restore and Database can be performed only by a member of the administrators group.
• A backup or restore with “DB Maintenance” is only possible with a local administrator on the database server.• Changes should only be performed by a specialist in order to prevent the possibility of data being lost.• When working with “DB Maintenance”, any attempt to access to databases must be prevented. Make sure that all LabX
Clients are closed.• Logging on is always done under an administrator account.• Backup is only possible on the PC, where the active database is resident.• The process can take several minutes.• The name of the database cannot be changed.

METTLER TOLEDO LabX balance V1.4 145
Backup
19.2 Starting DB Maintenance
1. Start “DB Maintenance” by double clicking the “LabX DB Maintenance” program icon on the desktop.or Choose Start > Programs > LabX > LabX DB Maintenance.2. Make sure that no LabX client is active in your network, and then confirm the message.
The dialog LabX DB Maintenance - Login appears. (LabX pro only).
�. Enter a user name and a LabX administrator password in the dialog and click OK.
19.2.1 Data backup
1. Start “DB Maintenance”.2. Click the Backup database tab.
�. Click the button to the right of the “Backup path:” box and the dialog box to save files appears. LabX provides a name for the file; you can change this as required.
4. Choose the destination folder and click Save.5. Click the Start backup button to perform the data backup.Note• The secured file has the extension .BAK.

146 METTLER TOLEDO LabX balance V1.4
Backup
19.2.2 Data restore
1. Start DB Maintenance.2. Click the Restore database tab.
�. If you mark the check box “Reset initial LabX administrator account after restore”, an administrator with the user name “admin” and password “admin” will be created.
Click the button to the right of the “Restore path:” box and the dialog box to open files appears. Select a backup copy and click Open.
4. If you click Start restore, a dialog box appears.
5. The database will be restored once you click the OK button.Notes• The currently active database will be overwritten without any further warning once you click the OK button in the
Dialog.• It is possible that an administrator does not know the password for a database being restored. If you mark the check box
“Reset initial LabX administrator account after restore”, an administrator with the user name “admin” and password “admin” will be created.
• It may not be possible to perform a restore operation when the Scheduler component is in use (since it uses the database). In this case, wait until the Scheduler is not active to perform the restore operation.
19.2.3 Data initialization/clear
1. Start DB Maintenance.2. Click on the Reset database tab.

METTLER TOLEDO LabX balance V1.4 147
Backup
�. If you click Initialize database a dialog box appears. The database is initialized once you click the OK button.or If you click Clear reports a dialog box appears.
All the applications and installation data are retained (only the reports are deleted) once you click the OK button.
19.3 Automated data backup
Using the windows function “Scheduled Tasks” and the LabX component “LabX Database Maintenance” the database backup can be automated. The backup can be executed at regular intervals, for example every evening at 7 pm.
1. Open the “Control Panel” in Windows and double-click on “Scheduled Tasks”.2. Double-click on “Add Scheduled Task”. The “Scheduled Task Assistant” will appear.�. You must indicate the path to the program component “LabX Database Maintenance” of LabX. You can find this program
component under: Programs\Mettler-Toledo\LabX\DBServices\DBTools.4. If you create this task you will be prompted to enter the user name. This is the user under whom DBMaintenance runs.5. The command line to be executed is for example: “C:\Programs\Mettler-Toledo\LabX\DBServices\DBTools\DBMaintenance.exe”/b c:\mybackup /b is the parameter for backup. c:\mybackup is the target directory for the backup. The target directory must exist, the user under whose name
the task is running must possess write entitlements.NoteFor data backups we recommend the use of a network which is saved in regular intervals.

148 METTLER TOLEDO LabX balance V1.4
Audit Trail
20 Audit Trail
The Audit Trail records all the important activities such as: Logging on, starting the application, creating application, changing application. The Audit Trail is only a viewer and is an independent program that is be started separately from LabX. With the filter function, you can limit the data records so that only those data records that are of interest to you are visible.To be able to access Audit Trail, you must have LabX administrator rights; make sure that you log in on as a user with the necessary rights.
1. Start “Audit Trail” by double-clicking the “Audit Trail” program icon on the desktop.or Choose Start > Programs > LabX > LabX Audit Trail. The dialog LabX Audit Trail appears
2. Enter your user name and password in the “LabX Audit Trail - Login”..
�. You can now enter the filter criteria. Select either a user, or all users in the drop-down list in the “User name:” box. Enter values for the “Data from” and “Data to” date range and confirm the entries by clicking the Show Audit Trail button or .
You may activate additional filter criteria by clicking the “More filter options:” Enable button or . Enter filter criteria and confirm the entries by clicking the Show Audit Trail button or .
The LabX Audit Trail window appears with a table of all activities.
Available options

METTLER TOLEDO LabX balance V1.4 149
Audit Trail
• Zoom drop-down list on the toolbar for expanding and scaling the display.• The Print icon on the toolbar for printing.• With the Navigation arrows you can backward and forward or jump to the end or beginning. You can also
enter the desired page number in the box and press the Enter key on the PC keyboard.• The Export icon on the toolbar is for exporting files in HTML or text format to any folder. The exported files can be opened
with a Web browser or text editor and displayed.Notes• The LabX Audit Trail dialog box is always in the foreground. To disable this property click on .• You can quit LabX Audit Trail by clicking the Close button on the title bar of the dialog box.• The “Audit Trail” program can be installed separately on any LabX PC. See chapter 2�.2.2 “Installation planning”.

150 METTLER TOLEDO LabX balance V1.4
Appendix
21 What is 21 CFR Part 11?
21CFR Part 11 is a regulation issued in 1997 by the American Food and Drug Administration (FDA) to define the requirements for submitting documentation in electronic form and the criteria for the use of legally binding electronic signatures.
Section 21 covers all regulations pertaining to GCP (Good Clinical Practice), GLP (Good Laboratory Practice) and GMP(Good Manufacturing Practice), collectively designated GxP, relating to the pharmaceutical and health care industries.
CFR relates to the “Code of Federal Regulations”.
Part 11 covers all FDA regulated issues pertaining to electronic records and electronic signatures.
This regulation is of importance to all U.S. pharmaceutical and health care companies together with all international pharma-ceutical or health care companies wishing to or currently exporting to the USA. In addition to the above, many countries or companies are using this regulation as a guideline for developing their own guidelines or regulations.
21.1 Purpose of 21 CFR Part 11
The main purposes of 21 CFR Part 11 are:
• To allow the use and submission of electronic data instead of having to store and submit a mass of paper documenta-tion.
• To prevent, or at least reduce the risk of, records being deliberately manipulated to falsify results.• To prevent unauthorized access to data.• To ensure traceability of data to their originator or owner.
21 CFR Part 11 compliance cannot be provided by an instrument or analytical system alone. To fully comply with the rule, it is important for an organization that uses electronic data and electronic signatures to have Standard Operating Procedures (SOPs) that support and complement the functionality within the analytical system being used. In addition to the above, it is also the responsibility of the organization to ensure that all personnel involved have an adequate level of education, are aware of, and are trained on 21 CFR Part 11 related issues.
Companies that need to comply with this regulation must define their own realistic requirements. Compliance is not the respon-sibility of the equipment or system supplier. All the supplier can do is to provide systems that support compliance thus making it easier for the organization to become or remain compliant.
The final Electronic Records and Electronic Signature Rule may be accessed athttp://www.fda.gov/ora/compliance_ref/part11

METTLER TOLEDO LabX balance V1.4 151
Appendix
21.2 Implementation within LabX
LabX pro functions are designed for FDA 21 CFR Part 11 compliant workflow/data processing. As defined by 21 CFR Part 11, LabX balance software together with connected balances comprises a closed system. Section 11.� defines a Closed system as “an environment in which the system access is controlled by persons who are responsible for the content of electronic records that are on the system”.
Section 11.10 addresses controls for closed systems and the security of closed systems:
"Persons who use closed systems to create, modify, maintain, or transmit electronic records shall employ procedures and controls designed to ensure authenticity, integrity, and when appropriate, the confidentiality of electronic records, and to ensure that the signer cannot readily repudiate the signed record as genuine."
Such procedures and controls should include:"Limiting system access to authorized individuals."LoginLogin to the system is only possible by entering a matching and valid user name and password. Signatures must employ at least 2 distinct components such as ID code and password. After logging in, the name of the current user is displayed on the screen. LabX can be locked au-tomatically after a specified time to prevent unauthorized access while the instrument is unattended.
"Use of authority checks to ensure that only authorized individuals can use the system, electronically sign a record, access the operation or computer system input or output device, alter a record, or perform the operation at hand."
Group ManagerUser Account defined by unique user name and password. User Profile defined in 4 groups. Comprehensive definition of individual access privileges.

152 METTLER TOLEDO LabX balance V1.4
Appendix
Electronic signatureWith the option “Sign all modifications” in the “General policies” ac-tivated, all additions, modifications or deletions require an electronic signature together with the reason for the change. These details are then automatically entered in the Audit Trail.
Section 11.200 states that:
"Electronic signatures that are not based upon biometrics shall: (1) Employ at least two distinct components such as an identification code and a password."
LabX requires that each person trying to access the system has to enter a unique user name and password (see Login).
Sector 11.�00 states that:
"Persons who use electronic signatures based upon the use of ID codes in combination with passwords shall employ controls to en-sure their security and integrity. Such controls shall include:(a) Uniqueness of each User ID/password combination;(b) Ensuring that identification code and passwords are periodi-
cally checked, recalled or revised (e.g. to cover such events as password aging);
(c) Following loss management procedures to electronically de-authorize lost, stolen, or otherwise potentially compromised devices that bear the identification code and password:
(d) Use of transaction safeguards to prevent unauthorized use of passwords and/or identification codes, and to detect and report any attempts at their unauthorized use."
PasswordsIt is possible for the Administrator to set up password controls such as:
• Passwords have a minimum length.• Passwords must contain a mixture of letters, numbers and special
characters.• Passwords expire after specified intervals and must be redefined.• A defined history of passwords cannot be reused.• Passwords do not include forbidden strings.
A user account is automatically deactivated after x consecutive unsuc-cessful login attempts and can only be reactivated by an Administrator. In addition it is possible for the Administrator to manually deactivate or activate an user account and force the user to enter a new password (see Group Manager).Any successful or unsuccessful login attempt is automatically entered in the Audit Trail log.

METTLER TOLEDO LabX balance V1.4 15�
Appendix
Audit TrailUse of secure, computer-generated, time-stamped Audit Trail to in-dependently record the date and time of operator changes. Record changes shall not obscure previously recorded information. The log file can be viewed, printed and backed up.
Section 11.50 states that:
"Signed electronic records shall contain information associated with the signing that clearly indicates all of the following: (1) The printed name of the signer; (2) The date and time when the signature was executed; and (3) The meaning associated with the signature."
Data securityAll data is stored in a database that cannot be directly accessed by a user. It is impossible to remove or alter data in an uncon-trolled manner.
21.3 Specific implementation of user login within LabX pro balance
21.3.1 The impact of PC solution on the weighing process
Connecting lab instruments to the network thanks to networkable PC-solutions is a big trend in the pharmaceutical and chemi-cal industries. Let us compare the weighing process and the titration process (titration is taken as an example), both with PC solutions and highlight the main differences.
Imagine an analyst wanting to execute a titration task. Following steps have to be executed:
- Step 1: The analyst sets up the titrator and prepares the required material.- Step 2: The analyst starts the titration task from the PC.- Step 3: The titrator executes the method.- Step 4: The analyst evaluates data on the PC, edits a report.Now, imagine the analyst wanting to weigh a sample on a computerized balance.
- Step 1: The analyst sets up the balance.- Step 2: The analyst starts the weighing job from the PC.- Step 3: The analyst executes the weighing job on the balance.- Step 4: The analyst evaluates data on the PC, edits a report.Contrary to the titration activities, the analyst is still needed in front of the instrument during weighing data acquisition (step �). This cannot be changed without balance automation! Two main choices are offered to preserve the analyst’s efficiency:
- Choice A- The analyst can start the weighing job from the balance.- Choice B- Reduce distance between PC and balance.

154 METTLER TOLEDO LabX balance V1.4
Appendix
21.3.2 A- and B- Choices: discussion about Part 11 compliance
A-ChoiceThe A-choice is possible for LabX pro in use with the AX, MX, UMX and XP balances thanks to their comfortable Touch Screens. This special feature, called “Rapid Access”, allows the user to start any routine weighing task directly from the balance display at any time and execute it without touching the PC. These balances must be equipped with the Application “Remote” or LabX Client. In a multi-user and multi-instrument environment (e.g. � users, 5 balances), in order to trace which user has executed which weighing job, a login mechanism is necessary on the balance. The current implementation within the LabX pro bal-ance Software allows the user to log into LabX from the balance display. This login strictly follows the settings within LabX user manager.
B-ChoiceThe B-choice is valid for all other balances supported by LabX balance. The weighing job is started at the PC by the analyst (login described in Section 21.�) and must be executed immediately on the balance by this analyst. The customer is responsible to decide which practical set-up best fits his interpretation of 21 CFR Part 11:
- 1 PC next to each balance. Although LabX balance does not need a PC next to each balance, this solution clearly underlines that the lab assistant who starts the weighing job also executes it immediately on the balance next to it.
- 1 PC near to a group of balances. LabX balance can support multiple balances, serially connected or connected to the net-work. In that case, we recommend that weighing jobs started from that PC only concern the group of balances nearby. The “Profile” feature of LabX is appropriate to ensure that the analyst starting the weighing job is also the person who executes it.

METTLER TOLEDO LabX balance V1.4 155
Appendix
22 AppendixLabXFunctions
BalanceModelrequired SW-Version
AX/M
X/UM
XRe
mot
e-SW
>=
V 1.
11
AX/M
X/UM
XV
>= 3
.22
XS XS Appl
icat
ion
LabX
Clie
nt >
= V
4.00
XP Rem
ote-
SW >
= V1
.10
orAp
plic
atio
n La
bX C
lient
>=
V 4.
00
XP AT/M
T/UM
T
AG/P
G-S
V >=
1.2
0
AG/P
G/SG
/PG-
SV
<1.2
0PR
/SR
V >=
1.6
5AB
-S/P
B-S
AB-L
/PB-
L
LabX FunctionRapid Access ✔ – – ✔ ✔ – – – – – – –
Allows Alphanumeric Password ✔ – – ✔ ✔ – – – – – – –
Job Execution
✔
✔
✔
✔
✔
✔
✔
✔
✔
✔
✔
✔
Date/Time Synchronizing ✔ ✔ ✔ ✔ ✔ ✔ – – – ✔ – –
MinWeigh Support ✔ ✔ – – ✔ ✔ – – – – – –
SmartTrac Support ✔ ✔ – – ✔ ✔ ✔** – – ✔** – –
Info Field Control ✔ ✔ – ✔ ✔ – – – – – – –
LabX Controlled Local Printout ✔ – ✔ ✔ ✔ ✔ – ✔ ✔ ✔ – –
FACT/proFACT Settings
✔
✔
✔
✔
✔
✔
–
–
–
–
–
–
FACT/proFACT Hoover ✔ ✔ ✔ ✔ ✔ ✔ – – – – – –
Maintenance Job Execution
✔
✔
✔
✔
✔
✔
✔*
✔
✔*
✔
✔
✔*
Adjustment/Test Scheduler ✔ ✔ ✔ ✔ ✔ ✔ ✔* ✔ ✔* ✔ ✔ ✔*
Adjustment/Test Histories ✔ ✔ ✔ ✔ ✔ ✔ ✔* ✔ ✔* ✔ ✔ ✔*
Balance Release Control
✔
✔
✔
✔
✔
✔
✔
✔
✔
✔
✔
✔
Service Date ✔ ✔ ✔ ✔ ✔ ✔ ✔ ✔ ✔ ✔ ✔ ✔
MinWeigh Date ✔ ✔ – – ✔ ✔ – – – – – –
Power Up Time ✔ ✔ ✔ ✔ ✔ ✔ – – – – – –
Level Sensor Check – – – – ✔ ✔ – – – – – –
Adjustment Event Check ✔ ✔ ✔ ✔ ✔ ✔ – ✔ – ✔ ✔ –
Test Result Check ✔ ✔ ✔ ✔ ✔ ✔ – ✔ – ✔ ✔ –
Repeatability Test Result Check ✔ ✔ ✔ ✔ ✔ ✔ ✔ ✔ ✔ ✔ ✔ ✔
✔* Only Repeatability✔** “Acceptonlyweightswithintolerance”featureisnotsupported
NoteIt is recommended to upgrade all balance software versions when installing/upgrading LabX software.

156 METTLER TOLEDO LabX balance V1.4
Appendix
23 Network installations
LabX is available in two versions:
• LabX light includes all the standard application functions.• LabX pro offers all the functions of LabX light, but also includes additional functions such as network capability, quality
management, security and automatic export features.The advantage of a network installation is that all data is stored centrally on the server. This thereby eliminates data redundancy and minimizes the problem of data security.You can log on at any LabX Client on your network and follow applications in another laboratory, or view the results of applica-tions that you performed beforehand in the laboratory. A job template is only present once on the server and can be used on several titrators.
The server should be installed by trained specialists. Our own specialists will be pleased to help you with the installation. Please contact your METTLER TOLEDO representative.
23.1 Network examples
23.1.1 LabX light
You can connect a titrator and a balance. You can connect the devices either via USB, RS2�2 or Ethernet.
23.1.2 LabX pro stand alone installation
With a standalone solution you can use several titrators and a balance. In addition, LabX pro fulfills quality management re-quirements. You can connect the devices either via USB, RS2�2 or Ethernet.

METTLER TOLEDO LabX balance V1.4 157
Appendix
23.1.3 LabX pro network installation
A network installation allows you to use LabX and several titrators and/or balances over the network. The data is stored on the server. You can work at any computer, and perform weighing jobs.
PC 1 PC 2 PC 3 PC 4Client Component • • • •Device server • • •Database •Broker •DB Maintenace •Audit Trail •

158 METTLER TOLEDO LabX balance V1.4
Appendix
23.2 General notes on network installation
LabX consists of 6 software components that partly dependent on each other and can be installed on different computers.The components are the:
- Device Server Component- Broker Component- Client Component- Database- DB Maintenance- Audit Trail
Device Server ComponentThis component is responsible for communication between the instruments and the Broker. You can connect the devices either via USB, RS2�2 or Ethernet. The Device Server Component can be installed more than once on a system.
BrokerThis component coordinates all the activities that take place between the different components. The Broker Component may only be installed once on a system.
Client ComponentThis component (GUI) enables LabX to be operated by the graphical user interface and can be used to control devices. The Client Component can be installed more than once on a system.
DatabaseThe Database enables data generated by LabX to be stored in a structured way. The Database may only be installed once on a system.
DB MaintenanceThe DB Maintenance Program (only in English) allows you to backup and restore databases. DB Maintenance can only be installed on the database server.
Audit TrailThe “Audit Trail” program displays and prints all the important activities such as logging on, starting job templates, creating job templates, changing job templates. The Audit Trail can be installed more than once on a system.
Schematic representation

METTLER TOLEDO LabX balance V1.4 159
Appendix
23.2.1 Optimizing the performance of the installation
We recommend that the Broker Component and the Database be installed on the same computer. This reduces network traffic significantly compared with when the components are installed separately.We strongly recommend the use of a powerful computer for the server installation.
23.2.2 Planning the installation
When you install LabX pro, you can choose either a “Standalone Installation” or a “Distributed Installation”. The “Standalone Installation” option installs all the components on one computer, while the “Distributed Installation” leaves it to you to decide which to install where.
1. Identify the computers you want to use with LabX.2. Identify the computer on which you want to install the Database Component and note its name.�. Identify the computer on which you want to install the Broker Component and note its name (the computer with the Data-
base server is recommended).4. Identify the computers to which you want to connect the instruments. The device server component must be installed on
these computers.5. Identify the computers on which you want to install the Client Component.
With a “Distributed Installation”, the following information is needed:- When a Client Component is installed: the name of the broker computer.- When the Broker Component is installed: the name of the database computer.
Example
A: Client, DeviceServer B: Client, DeviceServer, Broker, Audit Trail, DBMaintenace,
Database
C: Client, DeviceServer, Audit Trail
D: Client, DeviceServer
In this example, the system comprises 4 computers.
All the components are installed on computer B. This means that LabX can be installed with the “Standalone Installation” op-tion.The “Distributed Installation” of the Client components requires the name of the computer on which the Broker Component was installed (computer B).

160 METTLER TOLEDO LabX balance V1.4
Appendix
23.3 Installation (Distributed)
In order to be able to install the software, you must have administrator rights on the PC. It is mandatory, that the following services and Windows settings are installed and active:
- TCP/IP Protocol- DCOM- WMI- File and Printer Sharing for Microsoft Network.- “Use simple file sharing” must be deactivated.
23.3.1 Installation (Server)
If you want to use a SQL server make sure, that a SQL server in a named or unnamed instance is available.
This is how you install LabX:
1. Insert the LabX CD in the CD-ROM drive. The HelloCD window appears automatically with a choice of different options. (If the HelloCD window does not appear, double-click start.exe on the CD in the Windows-Explorer to start the installation). Choose Software Installation > LabX pro balance.
2. Choose the language for the installation routine.
The installation program prepares the installation and examines the available software components.

METTLER TOLEDO LabX balance V1.4 161
Appendix
�. The welcome screen appears. Click Next.
4. The license agreements are displayed. Mark the option that you accept these and click Next.
5. The user information and the use of LabX are displayed. Enter this and click Next.
6. Select the language for the LabX Installation and click Next.A subsequent change of the language is not possible.

162 METTLER TOLEDO LabX balance V1.4
Appendix
7. Select the target folder and click Next.
8. When installing LabX pro, you can choose between a “Stand-alone” installation or a “Distributed” installation. Select “Distrib-uted” and click Next.
9. Select the components “Database” and “DB Maintenance” that you want to install on this PC and click Next.
• If no “Broker” is installed, you will be prompted to enter the name of the PC where the corresponding broker is in-stalled.
• In order to connect devices via Ethernet, a “Device Server” has to be installed on the same PC as the "Broker" compo-nent is installed.
10. Select a password for the user “LabX” and click Next.• The password must be identical on all PCs.• A new local Windows user (VUSR_LabX) is created.

METTLER TOLEDO LabX balance V1.4 163
Appendix
11. Select the administrator password for the MSDE (Database En-gine) and click Next if you want to install a MSDE on the local PC.
or select from the drop-down list an existing SQL server, installed
on the local PC.The LabX database will be installed on the SQL server you se-lected.
12. If no “Broker” is installed, enter the name of the PC where the corresponding “Broker” is installed.
13. Start the installation of the components by clicking Install.
14. The installation of various software components is executed and displayed.

164 METTLER TOLEDO LabX balance V1.4
Appendix
15. On completion of installation, click Finish to complete the operation. We recommend that you should now reboot the system.
Notes• In order to correctly display superscripted and subscripted numbers, e.g. in the job editor, the Option “Install files for Asian
languages” must be activated. It may be necessary to install additional operating system components.• In the chapter 2�.�.5 “Error messages” you will find a listing with possible errors and their correction.

METTLER TOLEDO LabX balance V1.4 165
Appendix
23.3.2 Installation (Client)
This is how you install LabX:
1. Insert the LabX CD in the CD-ROM drive. The HelloCD window appears automatically with a choice of different options. (If the HelloCD window does not appear, double-click start.exe on the CD in the Windows-Explorer to start the installation). Choose Software Installation > LabX pro balance.
2. Choose the language for the installation routine.
The installation program prepares the installation and examines the available software components.
�. The welcome screen appears. Click Next.

166 METTLER TOLEDO LabX balance V1.4
Appendix
4. The license agreements are displayed. Mark the option that you accept these and click Next.
5. The user information and the use of LabX are displayed. Enter this and click Next.
6. Select the language for the LabX Installation and click Next.A subsequent change of the language is not possible.
7. Select the target folder and click Next.

METTLER TOLEDO LabX balance V1.4 167
Appendix
8. When installing LabX pro, you can choose between a “Stand-alone” installation or a “Distributed” installation. Select “Distrib-uted” and click Next.
9. Select the components “Client” and “Device Server” that you want to install on this PC and click Next.
10. Select a password for the user “LabX” and click Next.• The password must be identical on all PCs.• A new local Windows user (VUSR_LabX) is created.
11. Enter the name of the PC where the corresponding “Broker” is installed.

168 METTLER TOLEDO LabX balance V1.4
Appendix
12. Start the installation of the components by clicking Install.
1�. The installation of various software components is executed and displayed.
14. On completion of installation, click Finish to complete the operation. We recommend that you should now reboot the system.
Notes• In order to correctly display superscripted and subscripted numbers, e.g. in the job editor, the Option “Install files for Asian
languages” must be activated. It may be necessary to install additional operating system components.• In the chapter 2�.�.5 “Error messages” you will find a listing with possible errors and their correction.

METTLER TOLEDO LabX balance V1.4 169
Appendix
23.3.3 Installation (Broker)
In order to connect devices via Ethernet, a “Device Server” has to be installed on the same PC as the “Broker” component is installed.
1. Start the LabX installer. Follow the instructions on the screen.2. Select the “Broker” and “Device Server” components to be installed on the local PC. Follow the instructions on the screen.�. Enter the name of the PC where the corresponding MSDE or
SQL service is installed and the database name “Computer-name\Instancename”.
4. Continue with the installation.
NoteIn the chapter 2�.�.5 “Error messages” you will find a listing with possible errors and their correction.

170 METTLER TOLEDO LabX balance V1.4
Appendix
23.3.4 Installation of independent systems
If you want to install more than one system, you must make sure that the systems are completely independent of each other. This means that each combination of Broker and Database components must be unique and that no instruments / devices / titrators used in these combinations are common, otherwise serious problems can arise.
23.3.5 Troubleshooting
Error 1603If “Error 160�” is displayed during the installations, the installation was aborted.Please follow the steps below to eliminate possible errors.
Causes ProceduresCheck if an old MSDE is installed. 1. Check whether an old SQL service is executed (to be identified by the
SQL icon in the task bar).2. If applicable end the service (Right click the SQL icon and choose MS-
SQLServer-Stop).�. Check whether the following entries are available under Control Panel
> Add or Remove Programs.- MSDE- Microsoft SQL Server Desktop Engine
4. If one of the listed MSDE is installed, make sure that no other application is using it, before you deinstall it.
5. Remove the MSDE (Control Panel > Add or Remove Programs)6. Check whether the following folders are available:
- C:\MSSQL- C:\MSSQL7- C:\Program Files\Microsoft SQL Server
7. If one of the listed folder is available, rename it.Check whether “Use simple file sharing” is de-activated.
1. Check whether “Use simple file sharing” is deactivated and if ap-plicable, deactivate it. With Windows XP you find the setting under: Explorer > Tools > Folder Options. In the tab View, deactivate “Use simple file sharing”.
Check whether “File and Printer Sharing for Microsoft Network” is available and activated.
1. Open Control Panel > Network Connections.2. Right click Local Area Connection and choose Properties.�. Check whether “File and Printer Sharing for Microsoft Network” is avail-
able and activated.4. If not available, install the service. Click Install > Service.
Check whether “File and Printer Sharing for Microsoft Network” is running.
1. Click Start > Run and enter “services.msc”. Click OK.2. Check whether in the window Services the server status is “Started”.�. If the service is not started, right click Server and choose Start.
After all this points were checked, the installation can be again executed.
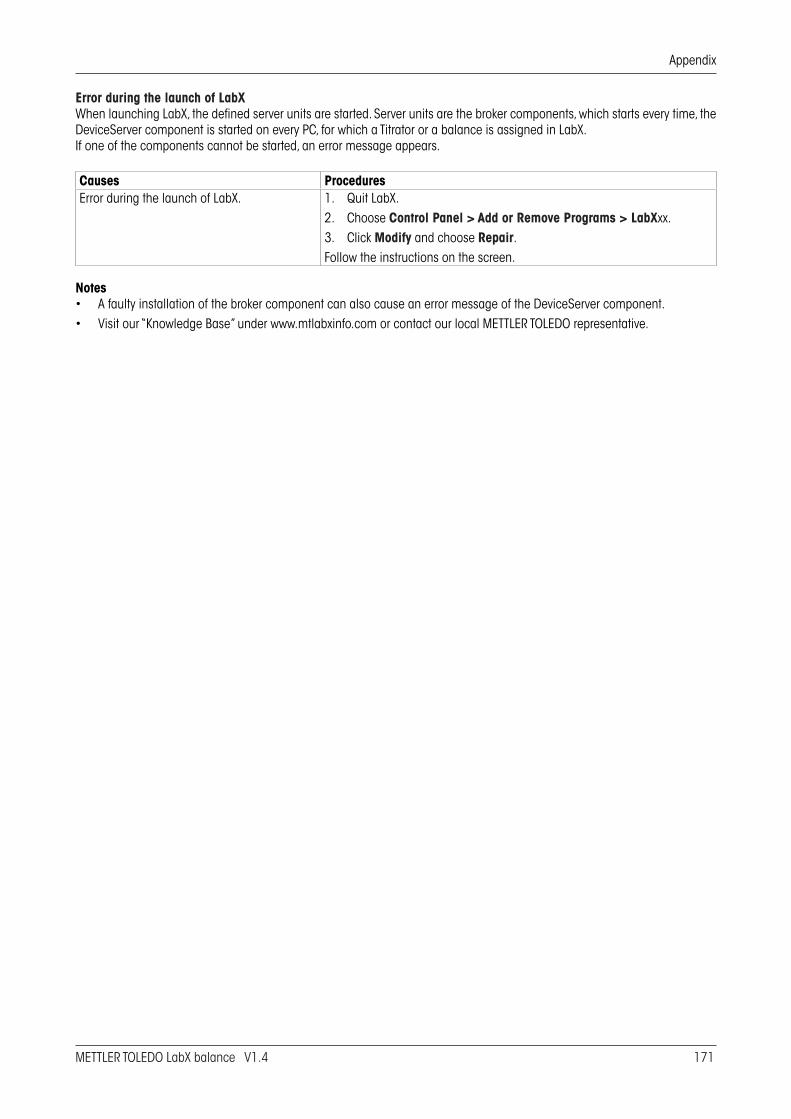
METTLER TOLEDO LabX balance V1.4 171
Appendix
Error during the launch of LabXWhen launching LabX, the defined server units are started. Server units are the broker components, which starts every time, the DeviceServer component is started on every PC, for which a Titrator or a balance is assigned in LabX.If one of the components cannot be started, an error message appears.
Causes ProceduresError during the launch of LabX. 1. Quit LabX.
2. Choose Control Panel > Add or Remove Programs > LabXxx.�. Click Modify and choose Repair.Follow the instructions on the screen.
Notes• A faulty installation of the broker component can also cause an error message of the DeviceServer component.• Visit our “Knowledge Base” under www.mtlabxinfo.com or contact our local METTLER TOLEDO representative.

172 METTLER TOLEDO LabX balance V1.4
Appendix
23.3.6 Installing Patches, Updates and Upgrades
Patches, Updates and Upgrades must be installed on all PC on which LabX components are available. Please follow the in-structions given below. Make sure, that you have administrator rights. Please be aware, that it concerns an intervention into the LabX system and that the procedure needs to be planned carefully. Furthermore, make sure that during the process LabX is not launched on any other PC. LA stands for “local administrator”.
Procedure1. Shut down all the PCs on which components of LabX are installed, with the exception of the server.2. Print a randomly chosen report and a job or method template.�. Perform a manual back up, using “DBMaintenace” and copy the backup to a save location (Network drive, USB stick etc.).4. Restart the server, and do not launch LabX.5. (LA) Install the patch on the server and follow the instruction of the installer carefully.6. (LA) Restart the server. Login using the very same user as before the restart and do not launch LabX.7. (LA) Execute the “Installation Checker” and check that none of the symbols are canceled.8. Launch LabX and print the same reports, the same job or method template as before and check them for compliance.9. (LA) Quit LabX on the server and check if all relevant processes are stopped after a short time (approx 15 seconds).
LabX balance LabX titrationBalBroker.exe DLBroker.exeLXDeviceServer.exe LXDeviceServer.exeLabXbal.exe LabX.exe
To check this use the task manager using the keys CTRL-SHIFT-ESC. If the above mentioned tasks are not stopped, restart the server.
10. (LA) Start a client PC and do not launch LabX.11. (LA) Install the patch on the client and follow the instruction of the LabX installer carefully.12. (LA) Restart the client. Login using the very same user as before the restart and do not launch LabX.1�. (LA) Execute the “Installation Checker” and check whether non of the symbols are canceled.14. Launch LabX on a client and check some basic functions of LabX.15. Repeat the steps 10-14 for all remaining LabX clients including all dedicated Device servers.
Notes• If there are any inconsistencies between the printouts (see step 8), restore the database using “DBMaintenance”.• For a standalone installation, follow the steps 1-8 only.• If there are any canceled symbols after executing steps 7 and 1�, please use the repair function. Select Control Panel >
Add or Remove Programs > LabXxx. Click Modify and select Repair.

METTLER TOLEDO LabX balance V1.4 17�
Index
24 Index
Symbole21 CFR Part 11 12, �4, 150, 151, 154
AAB-L/AB-S/PB-L/PB-S balances 48AB-L/AB-S/PB-L/PB-S balances with standard software 1��Access rights 12, 2�Account Policies 24, �1, ��Activation of the system 21Adding comments to the report 142Add Serial Balance 49Adjustment 59, 60, 61, 62, 6�, 65, 67Adjustment history 97Adjustment job 60, 61Adjustment jobs 96, 97, 102Adjustments 74, 101Adjustments with external weights 56Adjustment weights 66, 68Administrator ��, 145, 146, 148AG, PG-S balances with standard software 127AG/PG balances 48Appendix LabX Functions 155Application 1�7, 1�8Application “LabX Client” 119Application “Remote” 154Applications 147, 156AT/MT/UMT balances 48AT/MT/UMT balances with standard software 125Audit Trail 12, �4, �5, 52, 54, 55, 57, 58, 61, 6�,
64, 67, 69, 70, 91, 9�, 95, 100, 108, 111, 112, 116, 117, 122, 12�, 128, 1�0, 1�2, 1�4, 142, 14�, 148, 152, 15�, 158
Automated data backup 147Automatic export reports 142Automatic lock �4Autozero 59AX/MX/UMX balances 47AX/MX/UMX balances with Remote software 104AX/MX/UMX balances with standard software 110
BBackup 1�Backup of data 144Backup on the PC/Server 144Balance-specific settings 59Balance display 104Balance monitor 10�Balance monitor window 10�Balance queue 96Balance release control 5�Balance settings 1�, 47Barcode identification �8Barcode reader 109, 112, 118, 124, 128, 1�0, 1�2,
1�4
Basic settings 52Baud rate 47Bit/Parity 47Broker 169Broker Component 158
C«C» key 105, 106, 114, 115, 120, 127, 129, 1�1,
1��Calculations 85Calibration certificate explorer 1�Calibration instructions �6Certificates �6Changing the password of a user 27Changing weights 57Changing your own password �1Character set 47Check forbidden strings ��Checking balance release 101Checking the balance model 99Client Component 158Closing a weighing job from LabX 102COM-Port 49Comment 142Comments 52Communication parameters 49Company identification �9Company information �9, 1�9COM port 50Configuration 48Configuring the Release Control 70Connecting peripheral devices 46Connections 4�, 44, 45Connection status 74Constant Per Sample 84Constants 85Context menu 14, 56, 57, 75, 92, 9�, 94, 96, 97,
99, 100, 101, 125, 127, 129, 1�1, 1��, 141, 14�Creating a job thanks to Rapid Access-Job Template 100Creating a one-time job 100Creating maintenance intervals 5�Creating users and groups 2�
DData backup 145Database 97, 98, 102, 116, 122, 144, 146, 158Database backup 144, 147Database search/filter function 1�Data export 1�Data initialization/clear 146Data management 1�Data restore 146Data transfer mode 48Data transfer speed 48Date 47, 59, 71, 72, 7�, 141

174 METTLER TOLEDO LabX balance V1.4
Index
DB Maintenance 145, 146, 158Defining balances in LabX 49Defining FACT and proFACT settings 59Defining group rights and group members 28Defining the balance 8�Defining the computer connection in the balances 47Defining the data processing 89Defining the folder for export of reports 40Defining users and profiles 24Definition of the Applications data 80Deleting a user 26Deleting groups �0Deleting job templates 95Deleting reports 14�Deleting samples from a running job 108, 111, 117,
12�, 128, 1�0, 1�2, 1�4Device Server 162, 169Device Server Component 158Differential Weighing 81, 82Directory structure 9�Disconnecting from LabX 109, 118, 124Display area 59Displaying documents �6Displaying histories 71Display reports 1�8Document settings �6Duplicating job templates 92Dynamic weighing 81
Ee-Link 46, 47e-Link EB02 126Electronic data 150Electronic signature 12, �4, �5, 52, 54, 55, 57, 58,
61, 6�, 64, 67, 69, 70, 91, 9�, 95, 100, 140, 142, 14�, 150, 152
End of line character 47End of line mode 48Enforce sequence of signing �4Environmental conditions 59Error 160� 170Ethernet 1�Evaluation filter 71, 72, 7�Excel 1�Excel table 142Executing weighings 107, 110, 116, 122, 125, 127,
129, 1�1, 1��Expiry date of the password ��Export 107, 111, 116, 122, 125, 127, 129, 1�1,
1��, 149Exported 1�5Exported automatically 91Export format 141Export function 141Exporting a job template 92Exporting reports 141Export License Key File 21
F«F» key 128, 1�0, 1�4FACT 59, 97, 98FACT histories �7File format 141Filter 1�6, 1�7Filter button 1�7Filter criteria 1�6, 1�7Filter function 1�5Filter settings 1�8Forced password change �2Formula 89Functions 89Functions in the report view 141
GGeneral Policies �4General Policies tab �4General settings ��, 82Generating adjustment and test jobs 100Generating a weighing job 99GLP-compliant reports 1�Group Manager 151, 152Group Membership tab 25Group properties 28Groups 2�, 29
HHandshake 47Help system 1�Histories of adjustment/test 71Histories of MinWeigh incidents 7�Histories of repeatability 72Home key 105, 110, 114, 120
IIcons 45, 75, 1�6Identification tab 52Identifying balances 52Identifying feature �7Import Activation Key File 21Importing a job template 9�Initial Startup of LabX 20Installation 16Installation (Broker) 169Installation (Distributed) 160Installation (Server) 160Instrument License 20, 22, 51Instrument License Key �5Instrument licenses 21Instrument Management 1�, �5, �7, �8, �9, 44Interface 48, 109, 112, 118, 124Interval weighing 82IT Support 50

METTLER TOLEDO LabX balance V1.4 175
Index
JJob 76, 88, 10�, 105, 114, 115, 116, 120, 121,
127, 129, 1�1, 1��Job data 1�9Job Execution 80Job form 76, 82Job ID 141Job Management 1�, �5, �8Job Name 99Job queue 1�Job results 85, 86Jobs starting/continuing from LabX 101Jobs starting from the balance with Rapid Access 101Job template 1�, �5, 40, 70, 76, 86, 87, 94, 95,
96, 99, 10�, 106, 1�5, 1�7, 1�9, 142Job template creation 78Job templates 11, 14, �8, 59, 74, 75, 78, 91, 9�,
104, 107, 110, 11�, 115, 119, 121Job title 1�7, 141Job types 9�
KKey assignments on AB-L/AB-S/PB-L/PB-S balances 1��Key assignments on AG, PG-S balances 127Key assignments on AT/MT/UMT balances 125Key assignments on PG/SG balances 129Key assignments on PR/SR balances 1�1
LLabX connect 85LabX DB Maintenance 144LabX light 11, 1�, 20, 44LabX pro 11, 12, 4�, 85, 154, 156Language 47LC-RS9 49LC-RS cable 46LC interface 46License administration 16, 20License key 20License Management �5License Manager �5Limit values 140LIMS 12, 142LocalCAN 109, 112, 118, 124, 128, 1�0, 1�2, 1�4Local printer 109, 112, 118, 124Local Printout 91Login �1, 151Login attempts ��
MMaintenance intervals 101Maintenance job 61, 6�, 64, 66, 69Maintenance jobs 74Maintenance tab 5�Managing balances 52Managing documents �6Managing instrument licenses 22
Manual export reports 141Manual Transfer Mode configuration 41Mean 89Measurement uncertainty 67Measurement values 91Measurement values per sample loop and sample 1�9Members tab 29Menu bar 14, 75, 1�5Minimum requirements for the balance 8�Minimum weighing range 8�MinWeigh 5�, 8�MinWeigh control 54MinWeigh determination 5�, 54MinWeigh functionality in LabX 54MinWeigh incident 1�MinWeigh methods 5�MinWeigh parameters 54MinWeigh Settings �5, 5�MinWeigh Test 70Modifying Communication parameters 51Module License Key 20MSDE 170
NNavigation level 104Navigation on the balance 104Navigations window 14, 4�, 44Net weights 80Network 126, 128, 1�0, 1�2, 1�4, 144, 145, 15�,
154Network examples 156Network installations 156Nominal 62, 66Nominal load 66, 68
O«OK» key 105, 114, 120Operators 89Optimizing the performance of the installation 159Option Allow subdirectory for export of reports 40Organizing job templates 9�Overview of Features 1�
PParity/Bit 48Password 12, 24, �1, �2, �4, �5, 57, 94, 106, 107,
115, 116, 120, 121, 14�, 146, 151, 152Password complexity ��Password length ��Password management 1�Pause a weighing job 109, 112, 118, 124, 126, 128,
1�0, 1�2, 1�4Pausing/Terminating a weighing job 109, 112, 118,
124, 126, 128, 1�0, 1�2, 1�4Pausing a weighing job from LabX 102Peripheral device 91Peripheral devices 109, 112, 118, 124, 126, 128,
1�0, 1�2, 1�4
176 METTLER TOLEDO LabX balance V1.4
Index
PG-S balances 48PG/SG balances with standard software 129Policies > Account Policies ��, �4Post Job Results 88PR/SR/SG balances 48PR/SR balances with standard software 1�1Print 111, 116, 122, 127, 129, 1�1, 1��, 141Printer 128, 1�0, 1�2, 1�4Printing job templates 95Printing reports 141Printing the security settings �6Print job 91Print key 105, 110, 114, 120, 125, 127, 129, 1�1,
1��proFACT 59, 97, 98Profile 154Profiles 25, 55Profiles tab 25Programmed export reports 142Properties of balance 52, 5�
QQueue 60, 61, 6�, 65, 67, 94, 95, 96, 97, 98, 99,
100, 101, 102, 104, 105, 11�, 114, 119, 120, 125, 127
RRapid Access �7, 97, 99, 101, 104, 11�, 119, 154Reactivation of the system 21Readability 8�Reference values 89Reference weight 67, 85Release Control 1�, �5, 60, 66, 68, 8�, 101Release Control level 8�Release level 70Release status 101Remote software 104Removing balances 55Removing weights 58Repeatability test 70Repeat factor 68Repeating a sample 108, 111, 116, 122Report 11, �5, 5�, 88, 107, 111, 116, 122, 125,
127, 129, 1�1, 1��, 1�6, 1�7, 1�9, 141, 142, 14�, 15�
Report data 91, 142Report filter 1�7Report generator 1�Report Management �5, �9Report of a weighing job 1�8Reports 14, �8, 40, 1�5, 147Reset database 146Restore database 146Results 85, 86, 1�9Results and statistics 140Results definitions 1�7Reusing the password ��Rights tab 29
RS2�2 interface 49
SSample 82, 84, 107, 108, 110, 111, 116, 122, 125,
129, 1��Sample data 76Sample ID �8Sample identification 1�8Sample identifications 11, 10�, 107, 110, 116, 122,
125, 127, 129, 1�1, 1��Sample loops 1�7Samples 10�, 1�9Save 56Saving a job template 91Scheduled Tasks 147Scheduler �5, 60, 61, 62, 64, 66, 69, 74, 97, 98,
100, 101Scheduler for adjustment and tests 60Scheduler for Repeatability test with external weight 67Scheduler for sensitivity adjustment with external weight
61Scheduler for sensitivity adjustment with internal weight
60Scheduler for sensitivity test with external weight 65Scheduler for sensitivity test with internal weight 6�Search function 142Searching the document for text 142Secure Mode �5, 52, 54, 55, 57, 58, 61, 6�, 64, 67,
69, 70, 91, 9�, 95, 100, 142, 14�Security 151Security settings �6Security system 2�Selecting a profile �1Selection window 105, 106, 114, 115, 120, 121Send commands 48Send format 48Sensitivity adjustment 70Sensitivity adjustments and performance tests scheduler
1�Sensitivity offset 60, 67Sensitivity test 67Serial numbers 51Server 1�, 160Service 5�, 70Settings of the e-Link network interfaces 46Setting up Instrument Management �7Setting up Job Management �8Setting up Report Management �9Setting up Weights Management 56Show configured devices 51Sign 57, 94, 14�Sign all modifications �4Signatures 150Signing job templates 94Signing reports 14�Signing weights 57Simple Weighing 80, 82SmartTrac 8�

METTLER TOLEDO LabX balance V1.4 177
Index
SOP �6, 59Special characters ��, 47Specific implementation of user login within LabX pro bal-
ance 15�SQC parameters 87SQL database 1�, 160Stability criterion 59Standard Deviation 89Start backup 145Starting adjustment jobs 101Starting a weighing job 105, 110, 114, 120, 125, 127,
129, 1�1, 1��Starting a weighing job from a queue 105, 114, 120Starting a weighing job with a job template 106, 115,
121Starting DB Maintenance 145Starting LabX pro �1Starting test jobs 101Statistics 85, 87, 140Stopping a weighing job 102Strip printer 91, 109, 112, 118, 124Structure of reports 1�9
TTab Scheduler 64, 66, 68Tab Testpoint 62, 65, 68Tab Tolerances 64Tare values 5�Temperature criteria 59Terminate a weighing job 1�4Testing job 59Test job 6�, 65, 67, 98Test jobs 96, 97, 102Test Parameters 5�Testpoint 62, 65, 68Test procedure reference 61, 6�, 64, 66, 69Tests 60, 74, 101Tests with external weights 56Test weights 4�, 44, 45Time 47, 59, 141Time criterion 59Tolerance 60Tolerance database 1�Tolerances management 1�Tolerance values 66, 68Toolbar 14, 75, 91, 95, 96, 97, 101, 110, 125, 127,
129, 1�1, 1��, 1�5, 141, 142, 149Totalization 80, 82Traceability 150Transfer Mode 41, 89Transfer protocol 48Tree view Configuration 4�, 44, 52, 5�, 55, 56, 57,
58, 59, 60, 61, 6�, 65, 67, 70, 71, 72, 7�Tree view Reports 91, 102, 1�5, 1�7, 1�8, 142, 14�Tree view Weighing 14, 60, 61, 6�, 65, 67, 74, 78,
79, 91, 9�, 94, 99, 10�Troubleshooting 170
UUnlock LabX �4User 12, 2�, 24, 29, �2, ��, �7, 55, 9�, 10�User account 152User data 24User guidance �8User identification 106, 114, 115, 120, 121User interface 14User login 104User Manager 12User name 12, 24, �1, �4, �5, 57, 94, 106, 114,
115, 120, 121, 14�, 145, 146, 151User properties 24User Settings tab 40, 41User specific settings 40
VVibration adapter 59
WWeighing application 11, 80Weighing data 91Weighing job �7, 59, 91, 99, 100, 102, 10�, 104,
106, 107, 109, 112, 11�, 115, 116, 118, 119, 121, 122, 124, 125, 126, 127, 128, 129, 1�0, 1�1, 1�2, 1��, 1�4, 1�7, 1�8, 142, 15�, 154
Weighing jobs 40, 74, 80, 96, 110, 1�6Weighing job template 99Weighing pan 111, 116, 122, 125, 129, 1��Weighing parameters 5�, 59Weighing process 80, 8�, 84, 91, 15�Weighing report 142Weighing reports 11, 54Weight 62, 65, 68Weight capture 82Weight Entry 68Weights �5, 4�, 44, 56Weights library 1�, 56Weights list 56, 62, 65, 68Weights Management �5Weight specifications 56Working with reports 1�7Working with weighing jobs 99
XXP balances 47, 11�, 119XS balances 47
ZZeroizing between samples 82

Leer
Leer

Leer

© Mettler-Toledo AG 2007 11780511D Printed in Switzerland 0710/2.12
Mettler-Toledo AG, Laboratory & Weighing Technologies, CH-8606 Greifensee, Switzerland Phone +41-44-944 22 11, Fax +41-44-944 �0 60, Internet: http://www.mt.com
To protect your METTLER TOLEDO product’s future :METTLER TOLEDO Service assures the quality, measuring accuracy and preservation of value of all METTLER TOLEDO products for years to come.Please send for full details about our attractive terms of service.Thank you.
Subject to technical changes.
*11780511*