operation backbone rules
TRANSCRIPT

OPERATION BACKBONE | Page 21
Operation Backbone rules
1. Introduction. 2. Scale. 3. Generalizations. 4. Tokens and markers. 5. Stacking. 6. Efficiency. 7. Zones of Control. 8. Deployment and sequence of play. 9. Headquarters and special units. 10. Meteorology and events. 11. Control of the Strait of Gibraltar. 12. Supply. 13. Reinforcements, replacements, fortifications. 14. Amphibious invasion. 15. Land movement. 16. Fighting. 17. End of Turn and Conditions of Victory. 18. Scenarios. 19. Optional Rules.
The Allied Invasion of the Protectorate, December 1942 - January 1943
1. Introduction
Operation "Backbone" was a contingency plan designed by the Allies in World War II, during preparations for the invasion of North Africa (Operation Torch), given the possibility that Spain would intervene mili-tarily against it, or that Germany would in-vade Spain to attack the Allies in Morocco.
This wargame simulates the Allied plan and the hypothetical confrontation in the Spanish Protectorate of Morocco, under the assumption that the Allied invasion occurred at the end of December 1942. As a result of German and Italian pressure,
having made a dent in the Franco regime’s determination of not wanting to interfere, as well as internal pressures, Spain was forced to intervene in the conflict. This allowed the passage of the Germans in the direction of Gibraltar and the Spanish Pro-tectorate of Morocco, which would pose a serious threat to the allies, who would be forced to activate "Backbone" at the first signs of this situation.
Like any hypothetical situation or “What if”, the situation that arises cannot be exactly the same as the historical one, but an attempt has been made to respect as much as is possible of the order of battle of the different armies involved and the planned lines of action of the plan “Bac-kbone”, but giving players some freedom with deployment and Allied amphibious landing.
2. Scale
The scale of the game is 3 days per turn and approximately 17 km per hex. The combat units are Brigades, Regiments, “Combat Commands” and Battalions, which belong to Divisions or Army Corps (CE) and Task Forces (TF).
3. Generalizations
In the game you always round down. The attack or defense factors are calculated by stacks.
The minimum factor / number, whether in combat factors, movement points, etc.,
will always be at least 1, even if its sum, rounding down, is lower.
The effects are always cumulative.
Whenever mention is made of a distance from one unit to another, it must be un-derstood without counting the hex of the first one of them but counting that of the destination hex.
On the first turn, the weather will always be good, and all units will be in supply, so there is no need to check the weather or supplies.
4. Tokens and markers
The tokens represent Headquarters and combat units. Units have various informa-tion printed on them, see figure 1.
A. The unit size if it is a brigade, regiment, or battalion.
B. Number of steps, represented by red dots, as a graphic reference of the number of steps the unit has, and which represent its size, with a minimum of 1 and a maxi-mum of 4.
C. Movement, represents the unit's mobi-lity, expressed in movement points (MP).
Figure 1

ALEA#37 - RULES | Page 22
D. Defense factor, defensive capacity of the unit.de la unidad.
E. Attack factor, offensive capacity of the unit.
F. Its Superior unit, the Division to which it belongs, if it does not have it, it means that it is a CE (Army Corps / TF (Task For-ce) unit.
G. Efficiency factor.
H. Unit type with NATO symbology (in-fantry, armor, engineers ...) and that, by its color, can be determined as to what TF (Task Force) or CE (Corps) it belongs.
I. Historical identification of the unit.
The Headquarters units (CG “Cuartel Ge-neral” / HQ Headquarters), instead of the attack factor, represents the support fac-tor that they can provide to the combat units, in the form of a modification of the die roll (MD). Therefore, they cannot at-tack by themselves, if not supporting the attack or defense of the combat units. Ad-ditionally, the defense factor is located in parentheses, which means that it can only be used when the unit is alone in a hex and cannot be used to add it when stac-ked with other combat units. See figure 2.
The markers represent various graphical aids for controlling multiple facets of the game.
Control of the current shift, weather con-ditions, control of the Strait of Gibraltar, air and naval points, shortages, bea-chhead and fortifications. See figure 3.
Note. On page 20 of this magazine, readers will find additional printed markers that aug-ment those on the die-cut index card templa-te. They will also be available in the download section of the website: www.alealudopress.com
5. Stacking The tokens can have between one and four steps. Maximum stacking is 16 steps per hex in clear or broken terrain, 10 in
Figure 2
Figure 3
city and half mountain hexes, and 8 in mountain hexes.
Stacking is taken into account at the end of the movement phase.
The units of the American and English armies cannot stack together at the end of a turn, although they can pass through the hex that one or the other is occupying, as long as they do not end the movement there.
Spanish and German units can be stac-ked together without any penalty. (Ex-ception: event "Dissensions in the Axis". See point 10.2 of these rules).
There are no restrictions on stacking units of different CE / TF, of the same na-tionality.
6. Efficiency
Efficiency represents a value for each unit, training, morale, "Esprit de corps" and the doctrine of your army. This value is used as a modifier in combat, and how it works is explained in point 16.3 of the-se rules, “Difference in efficiencies”.
7. Control Zones
Zones of Control (ZOC) are the 6 hexes adjacent to a combat unit or CE / HQ. ZOCs influence movement and supply. The ZOCs do not extend across rivers, or through impassable hexes, such as sea hexes, or mountain hexes for armored units (see point 15.2 of the rules). The la-tter cannot project ZOC from a mountain hex with a road to another hex that is not connected by a road.
7.1. ZOC and movement: When a unit enters an enemy ZOC, it must end its mo-vement, even if it has MP left to continue moving, (except units with special abili-ties. See point 9.2 of these rules). A unit can move from ZOC to another enemy ZOC, of the same or different unit, consu-ming all its movement points, and there-fore, as its only movement that turn. No additional MP is consumed for entering or exiting an enemy ZOC.
For movement purposes, neither a ZOC nor a friendly unit can negate the enemy ZOC in that hex, and thus, if a unit intends to move through an enemy ZOC where there is a friendly unit, it must stop in the enemy ZOC.
7.2. ZOC and supply: Enemy ZOCs block supply lines (see point 12 “Supplies”). A friendly unit (not a friendly ZOC), negates the enemy ZOC in that hex for supply line purposes, and therefore supply can be traced through a hex with the presence of a friendly unit, even if it is in an enemy ZOC.
See example on this page.
8. Deployment and sequence of play
8.1. Deployment: Deployment is carried out as specified in the scenarios, in point 18 of these rules.
8.2. Game sequence: the game has 10 turns, each divided into different phases and segments, indicated in the following game sequence:
• Administrative phase (both players): - Meteorology and events segment. - Control segment of the Strait of Gibraltar, (until achieved). - Segment for determining supply. - Segment of reinforcements, replacements and fortifications.
In this example, and starting from the initial position of the units and the mo-vement segment in Allied hands, the player first decides to move the unit of 1 Ranger + 509 Para, through the gap left by the two Spanish units. Normally it should stop when moving from one enemy ZOC to another and end its mo-vement, but since Rangers + Para have the special ability to ignore the first enemy ZOC encountered, it can infiltra-te and move one more hex, up to 6,17 or 7,16, and stop, since it cannot ignore the second enemy ZOC.Later, the CCA of the 1st AD, takes ad-vantage of the same gap, and moves to 7.17, (6,17) but this unit must stop in that hex when it is in an enemy ZOC. So far everything would go well, having managed to sneak the Allied units into the Spanish defenses, except that the two units would be out of supply, at the beginning of the next turn, when the su-pply was checked, so the Allied player decides to move the 36th unit. Engineer Regiment until 8.17 so that the supply line (SL) can be drawn through it, (and because it has to stop when entering enemy ZOC) to reach the tanks and ran-gers, from the ZOC of the Engineers, it does not allow the passage of the SL, but its presence in the hexagon, does.
Example, Zone of Control and combat

OPERATION BACKBONE | Page 23
• Operations phase: Allied Subphase: - Amphibious invasion segment, (only first turn). - Segment of land movement. - Combat segment. Spanish sub-phase: - Terrestrial movement segment. - Combat segment.
• End of Turn. Determination of the conditions of victory if it is the last turn.
9. Headquarters and special units
9.1. Headquarters - These tokens (CG or HQ for its acronym in English) provide combat support for the units under their command and each has a color that it shares with tho-se units.
In combat, a CQ / HQ can provide a favo-rable die roll (DRM) modifier of 1 for the Spanish player or 2 for the Allied player, representing the Army Corps / Task Force capabilities it can contribute, (mainly arti-llery, but also smaller units of anti-tanks, antiaircraft, communications, greater quantity of supplies, etc…). For this, the units that participate in combat and want to benefit from this support, must be un-der the control of the same CE / TF as the CG / HQ, and the hex where the combat takes place, be a maximum of 2 distances from the CG / HQ for the Allied player, or 1 for the Spanish, and have supply line to him. To remember it more easily, think that the distance to receive the support is the same as the DRM (Die Roll Modifier) of the CG / HQ.
This support can be used twice per turn, that is, once during a single attack in the player’s own phase, and once during a single defensive combat in the enemy phase.
The CG / HQ cannot advance after combat if it is stacked in the hex from which it is attacking, and the defender retreats.
If a CG / HQ is destroyed, it is recovered 2 turns later in a city that the side controlled at the start of the game at the player's choi-ce, respecting that it is closer to the units under its command than to those of ano-ther formation. In the case of the English, they can do it at the beachhead.
9.2. Special units. Units with qualities in-trinsic to themselves are detailed here.
- Legionaries, “The bride and groom of death”: By themselves, or stacked with other units, a + 1MD or -1MD can be ad-ded (voluntarily, not mandatory), to the combat roll (offensive or defensive) if the-re is Legionary units present (1 or more units). If casualties occur for the Spanish player, the legionary unit will necessa-
rily assume the first casualty. If there is more than one legionary unit involved in combat, the Spanish player chooses who takes the casualty.
- “Moors”: The Spanish player's Regulars and Mehalas units can ignore the first enemy ZOC hex when moving. This does not affect the effects of ZdC on supply li-nes, only the unit's movement capacity.
- British “Commandos” and US Army Ran-gers + Paratroopers unit: these two units can ignore the first enemy ZOC hex when moving. This does not affect the effects of ZdC on supply lines, only the unit's move-ment capacity.
- British paratrooper battalions of the 1st Parachute Brigade: when the option is chosen to use the three battalions of the British paratrooper brigade, independent-ly and not as an entire unit and part of the amphibious landing, these units have the ability to carry out a paratrooper assault, (see optional rule of scenario 1, in point 18.1 of the rules).
- Engineers: these units provide +1 MD when attacking city hexes or hexes con-taining fortifications. If there are casual-ties, the engineers will compulsorily re-ceive the first of them.
Administrative phase10. Meteorology and events
10.1. Meteorology At the beginning of each turn, the meteo-rological time that exists during the turn will be determined (exception: remem-ber that according to point 3 of the rules it is specified that in the first turn, there is always good weather), and will depend on the result of a roll of 1D6 in the Meteoro-logy Table.
• Good weather: 1-4 / In good weather there is no effect on the game.
• Bad weather: 5-6 / The bad weather effects are the following:
Units with 4 or 5 MP are reduced to 3 MP.
Air points in that turn are reduced to 2 for the allies and 0 for the Spanish.
Naval points are reduced to 0.
See Table and Help Items (elements) printed at the bottom of the game map.
10.2. EventsIn the odd turns, the Spanish player, and in the even turns, the Allied, will draw some markers from an opaque container that each one will have, that represent an event that affects the game. They can be played at that time and if saved, during odd, Spanish or even turns Allied, by each side, as appropriate. The effects of each of them are explained below:
• AlliesRebellion in the Rif: The allies propitiate and support an uprising in the Rif areas of the Protectorate.
Use: can be used immediately or saved, (hidden) to be used only once, on any even turn, as soon as it is available.
Effect: The Allied player places 2 Rif units, in any mountain or half mountain hex, controlled by the Spanish player, still in ZOC, but not occupied by a Spanish unit. These Rif units are now controlled by the Allied player but cannot stack or attack together with Allied units. These units can ignore the first enemy ZOC, they will always be in supply, but will not have ZOC, nor can they receive replacement points.
Ultra: The Ally, thanks to the information provided by Ul-tra, the Spanish plans are dis-covered.
Use: can be used immediately or saved (hidden), to be used only once, on any even turn as soon as it is available.
Effect: The Allied player randomly steals a chit from the Spanish player, either those pending to come out or those that he alre-ady has ready for use but has not used yet.
Increased Tactical Air Power: Allies enjoy increased tac-tical air support as a one off action.
Use: can be used immediately or saved (hidden), to be used only once, on any even turn as soon as it is available.
Effect: On that turn Allied air points will increase from 6 to 12. If there is bad wea-ther (and the Allied player has chosen to use it that turn), it will only be 4 factors.
Naval Power Increase : Allied navies on a particular and exceptional occasion can in-crease their units in the area.
Use: can be used immediately or saved (hidden), to be used only once, on any even turn as soon as it is available. Not applicable in a bad weather turn.
Effects: Naval support points will increase from 2 to 3 and a -1 is applied to the Control of the Strait roll on that turn if it is not already controlled by the friendly player.
German limited Offensive in Tunisia : The Germans carry out a limited attack against the Allies in Tunisia causing casualties and confusion among the Allies, requiring reinforcements.

ALEA#37 - RULES | Page 24
Use: immediately on the same turn.
Effect: the Allied player will not have re-placements that turn and has to withdraw two battalions (of armored / tank destro-yers / commandos / rangers or paratroo-pers), from the game (to send them to Tunisia) from among those units on the map (or ready for use in the case of pa-ratroopers), and are in supply. The Allied player chooses which units. Such units will no longer participate in the remainder of the game.
The OSS buys wills: the US secret services promote de-sertion among the enemy troops.
Use: can be used immediately or saved (hidden), to be used only once, on any even turn as soon as it is available.
Effect: for each Mehalas unit and in a single GFRI unit to be chosen by the Ally, it must pass a 1D6 check, and if it does not pass, it loses a step. The Mehalas will lose a step if they roll from 4 to 6, and the GFRI, 5 or 6.
• Spanish people :
Baraka: Fortuna, Divine luck.
Use: can be used immediately from the turn that it appears, and thereafter, once each turn.
Effects: The Spanish player re-rolls his own dice or those of the enemy in a combat, ignoring the results of the first roll.
The Luftwaffe arrives: the Germans decide to increase the aid of their aviation and bring reinforcements from other fronts.
Use: from when it comes out of the pot and for the rest of the game turns.
Effects: 2 additional aerial points for the Spanish player (a single point in scenario 2). In both the first and second scenarios, in bad weather, there is 1 aerial point left during that turn.
Nest of spies: German or Spa-nish intelligence agents disco-ver Allied plans.
Use: can be used immediately or saved (hidden), to be used only once, on any odd turn, from when it is available.
Effects: the Spanish player randomly steals a chit from the Allies, either those pending to appear or those that he alre-ady has ready for use but has not used yet.
Sea lions in the Strait: The Kriegsmarine sends its sub-marines to attack in the Strait area.
Use: can be used immediately or saved (hidden), to be used only once, on any odd turn, from when it is available.
Effects: If Spanish control of the Strait has not yet been lost, during the turn this event occurs, the Control of the Strait die roll is canceled. If the Allied player alre-ady controls the strait, then Allied naval support points are removed from play on that turn.
Dissensions in the Axis: Spani-sh and German commanders encounter great difficulties on the ground to understand each other and cooperate effectively with their respec-tive forces.
Use: it takes effect from the moment it is taken out and for the rest of the game.
Effects: where Spanish and German units are stacked together. These when defen-ding or attacking, will have a penalty of + 1MD or -1MD in combat.
Spanish initiative: the Spani-sh commanders manage to "catch the Allies on the wrong foot" and have the initiative temporarily.
Use: can be used immediately or saved (hidden), to be used only once, on any odd turn after it becomes available. Exception: if it comes out on the first turn of scenario 1, it cannot be used and must be saved for another odd turn where the Spanish player can play his events.
Effects: the Spanish player goes first that turn in the operations phase, both in mo-vement and in combat.
11. Control of the Strait of Gibraltar
The Allied player controls the Atlantic and the Mediterranean Sea, but has to roll 1D6, to determine if the Allied for-ces succeed in forcing the opening of the Strait of Gibraltar (mainly to destroy the artillery of the Spanish coast but also with the enemy naval and air units in the area), and allow the entry of supplies and soldiers through it. This roll depends on the turn the game is in, who is in control of Tangier and Ceuta, the Allied air points and the weather. With a roll equal to or less than the indicated number, the Allies gain control of the Strait, enough to allow naval movement between the Atlantic and the Mediterranean.
Turn Results 1 1 2 2 3 & 4 3 5 & 6 4 7 & 8 5 9 & 10 6
If the Allied player has taken Tangier or Ceuta, they have -1 MD for each.
If he dedicates 1 aerial point (and only one), to this roll, which he cannot use la-ter on in the turn, he gets -1 MD.
In bad weather +1 MD.
Once the Mediterranean is open, it is no longer necessary to roll for it, and it is considered open for the rest of the game.
Once the Mediterranean is open, it is no longer necessary to roll for it, and it is considered open for the rest of the game.
12. Supply
12.1. Supply Sources and Requirements. In order for units to receive the necessary supplies and to be able to operate to the best of their capabilities, it is necessary to draw a line of any number of hexes from a valid supply source to the units, which is not interrupted by units or by enemy zo-nes of control (see point 7.2 ZOC and su-pply), nor impassable hexes. We will call this line the Supply Line (SL).
Valid sources of supply are:
- The city of Port-Lyautey for all Allied units.- The Beachhead for British units after a successful landing. Tadourit- The city of Tadourit for all Allied units, after they take control of the Strait of Gi-braltar.- The cities of Ceuta and Melilla for the Spanish and Germans.
12.2. Out of Supply: If the CGs / HQs or units cannot trace a valid SL to a supply source, they will be out of supply. The effects of being out of supplies for com-bat units are that their attack and defense factors will be halved, and CGs / HQs will lose their support factors. Additionally, units with 4 or 5 MP have their move-ment capacity reduced by half.
Supplies are checked in the administrative phase, and the state the units are in will be maintained until the end of that turn.
12.3. Limited offensive supply. The Allied player, as long as he does not have control of the Strait of Gibraltar, and with respect to the attacks he wants to carry out on an enemy hex in, or east of the X, 13 hex co-lumn, will have a penalty column on the Combat Table in each one of them. This res-triction will be lifted on the following turn after taking control of the Strait of Gibraltar.
OPERATION BACKBONE | Page 25
In the British landing as long as the Strait is not controlled (scenario 1), or its units cannot trace an SL to Port-Lyautey, they will suffer the same restrictions in their offensive combats. Similarly, if he can tra-ce an SL to Port-Lyautey, but the Strait is not under Allied control, if hexes east of X, 13 are attacked, he will continue to suffer from offensive restrictions.
The Spanish player, due to the lack of offensive capacity of his forces, can only launch one attack per CE (Army Corps) and turn.
13. Reinforcements, Replacements, Fortifications
13.1. German reinforcements arrive in this segment of the game as specified in scenario 1.
13.2. The replacements will arrive each turn, starting from the second turn, in the following way, and they are distributed in such a way that the opponent cannot know it (by writing them down on a pie-ce of paper, for example) until they have both been put into play.
• Spanish: 1 efficiency steps 1, and 1 efficiency step 2. CG / HQs are recovered if they are eliminated in the manner exp-lained in their section. When Spain loses control of the Strait of Gibraltar and 4 ci-ties, it stops achieving efficiency step 2, and when, in addition, it loses 6 cities, it does not receive the efficiency step 1 that was left over from replacements.
Mehalas and German units cannot receive replacements.
• Allies: receive 2 replacement points, with which they can:
a) Recover or bring from the elimina-ted steps quota an infantry step of effi-ciency 2 for each point.
b) Recover or bring from the elimina-ted ones a step of armored units for the 2 points.
Efficiency 3 units cannot recall steps. The CG / HQ are recovered if they are elimi-nated in the manner explained in their section.
In the specific case of the British, they can receive replacements once control of the Strait of Gibraltar is in Allied hands or they can draw an SL to Port-Lyautey. Before that they cannot receive replacements.
To receive replacements units must be in su-pply. If not, they cannot receive them.
Each replacement step serves to recover a step of reduced units, but also to bring elimi-nated units back into battle. Units rebuilt af-ter being destroyed, return to the same hex as their CG / HQ, or adjacent to it, provided
they are not in an enemy ZOC not negated by the presence of a friendly unit. Also in the event that the CG / HQ has been eliminated and is not present on that turn.
• The Spanish player will place the unit in Tetouan, Tangier, Ceuta, Villa Sanjurjo or Melilla, depending on the CE to which they belong, IX in the first three cities and X in the second two, to be chosen by the player.
• The Allied player will place them in Port-Lyautey, Meknes or Fez for the Wes-tern TF, or in Taourirt or Taza for the Central TF, and in any of them (in case of failure of the amphibious invasion or that an SL can be drawn to Port-Lyautey or Taourirt), or on a beachhead (in the event of a successful amphibious landing), in the case of the British.
Replacement points cannot be saved for other turns.
13.3. Fortifications can only be built and used by the Spanish player. During deplo-yment, you can place 5 of them anywhe-re within your territory, even adjacent to enemy units, (historically there were some in the border areas with the French protec-torate).
Then, during even turns (to represent the duration of building of these defensive positions), he can build one and place it in a hex controlled by him still adjacent to enemy units. These fortifications provide -1 MD and can also accumulate other terra-in effects.
More than one fortification can be placed per hex, their effects being cumulative, al-though it must be taken into account that the maximum die modifier for the defender is -3 MD in any combat, (see point 16.3 of these rules, Combat Modifiers) .
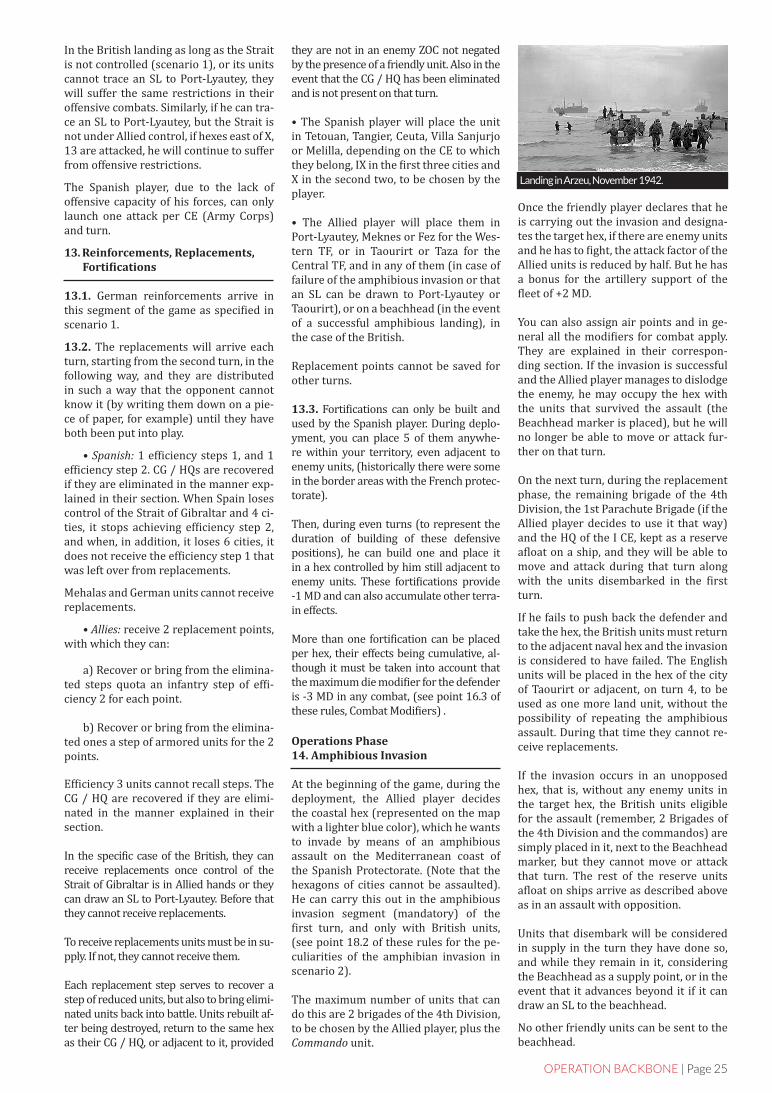
Operations Phase14. Amphibious Invasion
At the beginning of the game, during the deployment, the Allied player decides the coastal hex (represented on the map with a lighter blue color), which he wants to invade by means of an amphibious assault on the Mediterranean coast of the Spanish Protectorate. (Note that the hexagons of cities cannot be assaulted). He can carry this out in the amphibious invasion segment (mandatory) of the first turn, and only with British units, (see point 18.2 of these rules for the pe-culiarities of the amphibian invasion in scenario 2).
The maximum number of units that can do this are 2 brigades of the 4th Division, to be chosen by the Allied player, plus the Commando unit.
Once the friendly player declares that he is carrying out the invasion and designa-tes the target hex, if there are enemy units and he has to fight, the attack factor of the Allied units is reduced by half. But he has a bonus for the artillery support of the fleet of +2 MD.
You can also assign air points and in ge-neral all the modifiers for combat apply. They are explained in their correspon-ding section. If the invasion is successful and the Allied player manages to dislodge the enemy, he may occupy the hex with the units that survived the assault (the Beachhead marker is placed), but he will no longer be able to move or attack fur-ther on that turn.
On the next turn, during the replacement phase, the remaining brigade of the 4th Division, the 1st Parachute Brigade (if the Allied player decides to use it that way) and the HQ of the I CE, kept as a reserve afloat on a ship, and they will be able to move and attack during that turn along with the units disembarked in the first turn.
If he fails to push back the defender and take the hex, the British units must return to the adjacent naval hex and the invasion is considered to have failed. The English units will be placed in the hex of the city of Taourirt or adjacent, on turn 4, to be used as one more land unit, without the possibility of repeating the amphibious assault. During that time they cannot re-ceive replacements.
If the invasion occurs in an unopposed hex, that is, without any enemy units in the target hex, the British units eligible for the assault (remember, 2 Brigades of the 4th Division and the commandos) are simply placed in it, next to the Beachhead marker, but they cannot move or attack that turn. The rest of the reserve units afloat on ships arrive as described above as in an assault with opposition.
Units that disembark will be considered in supply in the turn they have done so, and while they remain in it, considering the Beachhead as a supply point, or in the event that it advances beyond it if it can draw an SL to the beachhead.
No other friendly units can be sent to the beachhead.
Landing in Arzeu, November 1942.

ALEA#37 - RULES | Page 26
Remember that you can only receive replace-ments at the Beachhead if the Strait of Gibral-tar is controlled by the Allies.
See example of Amphibious Landing.
15. Earth Movement
15.1. Generalities. The forces of one side move in whatever order the player wishes. He is able to alternate units of different TF / CE, without having to first move those of a CG / HQ and then another, etc ...
The units of an army can move by spen-ding their movement points (MP) reflec-ted on the counters, through the hexes on the map, and with the cost explained in the following point.
Remember that, on turns with bad weather, the movement capacity of units with 4 or 5 MP is reduced to 3 MP, and that if these units run out of supplies, their MP is redu-ced by half.
15.2. The costs of moving through the te-rrain are as follows:
• Clear and Broken: : 1 MP • Half mountain: 2 MP
• Mountain: 3 MP. *For armored units (tanks or tank destroyers), it is im-passable terrain, except through the roads that are reflected on the map.• Roads: ½ MP for CG / HQ and units with 4 or 5 MP of movement capacity, and 1 MP for the rest.• Cities: Use the other terrain present in the hexagon.• Rivers: +1 MP for crossing the river hex face, except on a road.
For movement, the effects of enemy ZOCs must also be taken into account, see 7. ZOC of these rules.
See Movement Table, located below the game plane.
16. Combat
16.1. Generalizations. In this segment is where the combats that the active player wants to carry out are resolved. It is not necessary to declare all of them at the beginning, they are resolved as the player announces them, but once announced, they must be done.
A hex can be attacked from one or more adjacent hexes. The attacker can choose to attack with one, some or all units from those adjacent hexes, while the defender must defend himself with all units pre-sent in the target hex.
US and British Army units cannot attack the same target in combat.
Spanish and German units can attack the same objective and defend themselves in the same hex.
Example of Amphibious Landing.
During the first turn of scenario 1, the Allied player has to choose a landing point for the British forces among the Mediterranean coastal areas of the Protectorate, whose coastline is light blue. In this case, the English player is clear that he wants to disem-bark near Tetouan and Ceuta but hesitates between several options.
The first thing he has done is to choose the units that are going to take part in the assault. The Commandos are a safe bet. Of the three brigades of the 4th Division, he chooses the most powerful, the 21st Tank Brigade, and one of the remaining two, which have equal factors, so he chooses either one of the two, in this case, the 12th Infantry Brigade. With this combination, you have the maximum potential for amphi-bious landing, with 15 attack factors, halved by landing, to 7 (15/2 = 7.5, rounded down, 7).
He then examines the defending units that the Spanish player has placed first. In 2.6 there is a Legion unit with 4 defense factors with an efficiency of 2, so its base ratio will be just 1 to 1. In 2.7, there are 2 Regulars units, with 6 defense factors. defense and efficiency 2, so again, it's a 1 to 1 ... not very promising. Finally, note that in 3.7 there is a cavalry unit with only 2 defense factors and 1 efficiency, so it will allow you to have a base ratio of 4 to 1 (3 to 1 for the factors, 7/2 = 3 , 5, rounded to 3, and the difference in efficiency, 2-1 = + 1 column), so this option seems much more favorable.
There would be another option, which would be to make an unopposed landing on the other side of the Emsa River, at 4.8, but the Allied player decides to take a risk so as to be as close to Tetouan as possible.
With a 4 to 1, and two naval support points, plus two air support, for a total of +4 MD, the Spanish player can only oppose a -1 for the broken terrain, and decides to use his precious air point to prevent The landing. At the end the Allied player has a +2 MD.
The Ally rolls the die and gets a 2, which, modified by +2, gets a final 4, for a result of 1 / 1R, just to be able to push back the defenders (if he had rolled a 1, modified to a 3, it would not have pushed the defenders back, result 1/2, but since it would have caused the cavalry units to lose two steps, and would have been eliminated, the hex would be vacant, and the Ally could advance and take it).
Thus, the Allied player loses one step of an efficiency unit 2 that he must choose, and takes it away from the 12th Infantry Brigade, while the Spanish loses one step of the cavalry unit, and goes back one hex until Tetouan. The Allied player advances to the now vacant hex and can no longer move or attack that turn, but he can defend himself if he is attacked in the Spanish combat segment.
Place the Beachhead marker to serve as a supply point for the landed English troops.

OPERATION BACKBONE | Page 27
Units cannot attack more than once per turn, (except for exploitation attacks). Enemy units cannot be attacked more than once per turn in the same hex.
Combats are resolved by rolling 1D6 on the Combat Results Table (TRC) whe-re the ratio between attack and defense factors of the units engaged in combat is established. This determines the base column on which to apply modifiers that can vary that column, and also the roll of the dice (modifier of the roll of the dice or MD), which is rolled to know the result of the combat once all the modifiers have been established.
Combats with attacker / defender ratios higher than 6 to 1, are resolved in the 6 to 1 column, and with final ratios lower than 1: 2 it is not possible to launch an attack.
16.2. Combat sequence
• The attacker's attack and defender's defense factors (ATA / DEF) are counted, and a base relationship is made between them, dividing the former by the lat-ter. (Remember to take into account the effects on landing and attacking across ri-vers). Following the rounding rule, which is done on stackings where the ratio is rounded down. For example, a ratio of 17/5 is equal to 3/1.
• The ratio of the ATA / DEF base co-lumn is modified if attacking from 4, 5 or 6 hexes as indicated in point 16.3, by en-veloping attack.
• The greatest number of steps with an efficiency given by each side are taken into account and the base column of the ATA / DEF ratio is modified if pertinent.
• Modifiers for the terrain or fortifi-cations are applied, modifying the ATA / DEF column or the die (MD) according to the type of terrain of the target hex of the attack.
• The appropriate MDs are applied on the aviation, naval and / or CG / HQ su-pports.
• The die is rolled (1D6).
• The results are applied, with the withdrawal (possible last stand defense), the advances and the exploitation.
16.3. Modifiers for combats are as fo-llows:
• Efficiency difference. This is deter-mined by the efficiency factor that con-tributes the greatest number of steps to combat from each side, including those of the HQ / HQ units (if the latter is pro-viding its support factor). If the number
is the same for one side, then the player chooses which efficiency he wants to use, taking into account that it will be a unit with that efficiency that will absorb the first casualty, unless special abilities such as legionnaires or engineers are used. in combat, in which case, the first casualty is absorbed by these units, as explained later in the results of the Combat Table. The difference is the number of columns in favor of the one that is greater. Thus, an efficiency 3 versus an efficiency 1 will have a 2 column bonus.
Example: in a combat there are 4 efficien-cy steps 2, and 3 efficiency steps 3, against 2 efficiency steps 1 and 2 efficiency steps 2. Thus, the first player has to use efficiency 2, since it is the one with the highest num-ber of steps of his troops participating in combat, while the second player can choo-se, being the same number, if he wants to use his efficiency units 1 or 2 to determine the combat modifier.
Note. Use the efficiency of the Paratrooper Regiment (FJR) or German Mountain Regi-ment (GJR) as 3 or 2 as appropriate to the Spanish player.
Example: if there is a Spanish stacking with 4 efficiency steps 1, 2 efficiency steps 2, and 3 efficiency steps 3 (the FJR), accor-ding to the rules on the efficiency modifier, stacking, it should have an efficiency of 1, by being the efficiency with more steps (4), but since the Spanish player can use the effi-ciency of the FJR as 3 or 2, if he chooses to use it as efficiency 2, then it turns out that there are 5 efficiency steps 2 and 4 of effi-ciency 1, so that the efficiency to be taken into account in that stack will be 2 and not 1. Similarly, if there is a stack with 3 steps of efficiency 2 and another 3 steps of efficiency 3 (the FJR), the Spanish player can choose to use the ef. 3 of the German unit as stac-king efficiency.
• Terrain (always in favor of the defen-der):
- Clear: no effect. - River: Units that attack across a river have their attack factors halved (even if the-re is a road). - Fortification (for each one): -1 MD (not exactly for the terrain, but for clarity it is included here). - Broken: -1 MD - City: -1 column. - Half mountain: -1 column. - Mountain: -2 columns, (tanks and tank destroyers cannot attack a mountain hex if it is not through a road). • Supports. They will be designated first by the attacker and then by the de-fender: - Aviation (air points): + 1MD or - 1MD for each air point used in combat with a maxi-mum of 3 points per side and combat. Each
point can only be used once per turn. They are affected by bad weather. - Naval support: can only be used by the friendly player and once per turn. They are used as DM and there is a +1 for the hexagons bathed by the Atlantic, from La-rache to Tangier, and another +1 for those bathed by the Mediterranean, from Ceuta to Melilla. On the first turn, during the am-phibious invasion segment, support will be +2 MD and then you will no longer have naval support during that turn's combat segment in the Mediterranean.
When control of the Strait of Gibraltar is in Allied hands, this naval support can also be used between Tangier and Ceuta, and the MD can be added as a +2 MD in any coastal hex, or continue to be divided into two +1 MD. Remember that in bad weather there are no naval points.
- CG / HQ support: +, - 1 or +, - 2 bonus MD for fighting in attack or defense with the CG / HQ stacked with the units partici-pating in the combat, or at a maximum of 1 or 2 hexes away, of the combat target hex, provided the units are in supply. Remem-ber that this support is valid for the entire turn, that is, it can be used in an attack of the player’s own phase, and then used in a defensive combat of the enemy phase.
The maximum of MD applicable by the set of modifiers to a combat, is 6 for the attac-ker and 3 for the defender.
• Other combat modifiers: - Enveloping attack: attack from 4 hexagons = +1 column / from 5 hexagons = +2 columns / from 6 hexagons (totally surrounded) = +3 columns.
16.4. Air support. It is reflected in the game in an abstract way. Thus, the air power of both parties is represented in the form of air support points, and they represent the different squadrons of fi-ghter, attack and bomber aircraft. As already explained, they provide +1 MD for each one used in combat and with a maximum of 3 points per combat and side.
The Allied player will have 6 air support points available each turn, and the Spani-sh 1 point per turn (this may change due to events and in scenario 2). The control is carried out with the air point marker located on the game plan and which mo-ves as the air points are "consumed".
Spanish Army. Panzer I, 1940.

ALEA#37 - RULES | Page 28
They can be used in any hex in the game, regardless of where the combat is taking place, meaning there is no range to cal-culate. Being support forces, they cannot attack by themselves, if not in support of a combat between ground units, and they recover each time a new turn begins, always taking into account the weather.
In bad weather, they are reduced to 2 for the Ally and 0 for the Spanish.
16.5 Last Stand Defense. The defender in city, mountain, and half mountain hexes may attempt to avoid a retreat result by using an all-out defense. This is done with the roll of 1D6 and if the result is equal to or less than the sum of the modifiers to be applied, then he can avoid the re-treat, but assumes the loss of one more step (among the most efficient present). If he is unsuccessful, he has to withdraw, although he does not lose the step.
Modifiers : • If there are between 6 and 10 steps in the defending hex: +1. • If there are half or more efficiency steps 2 or higher in the defending hex: +1. • If there is a CG / HQ in the defending hex: +1.
Example : A defender who has to retreat from a city where he has 10 steps, more than half efficiency 2 and with a CG / HQ present, adds +3, so if he rolls a die and gets a 1, 2 or 3, you can cancel the withdrawal by losing an extra step.
Example : A defender in a mountain hex, with 4 steps, where 3 are efficiency 1 and there is no CG / HQ, then he cannot avoid re-treat, since his modifiers do not even add up to 1 in order to have a chance.
16.6 Combat table and results
- The first step of the casualties is for a unit that has used its special abilities, (engi-neers or legionnaires).
- If units with special abilities have not been used, the first step of casualties go over to the unit whose efficiency has been used by the player to determine the diffe-rence in efficiencies in combat.
- The second step of casualties will be assigned by the opposing player to the enemy unit that interests him the most.
- The third, will be assigned by the pla-yer himself, without limitations, being able to choose any unit he wants.
- The fourth step, again by the opposing player, in the same way as before.
- If one side cannot satisfy all the losses because it has no more steps, the opponent
only has to satisfy the same or less than his opponent depending on the result. Example: On a 2/2 result where the attac-ker has 3 steps and the defender 1, the de-fender will lose his only step, but the attac-ker will not lose two, but only one. In the same case and if the result was 1/2 then the defender would lose his only step, but the attacker would not lose any.
16.7. Withdrawals (or Retreats), advance after combat and exploitation.
- Withdrawals: they are 1 hex and mo-ving away from the attacking enemy units, and whenever possible it must be towards territory controlled by their side. If you can only go for one hex in an enemy ZOC, but which is empty, you can (remember: as long as there is no other option), but you will lose an extra step.
In retreats, one’s own units negate the ZOC if they are physically in them, and check in order to see if they take another retreat loss in an enemy ZOC.
If the enemy hex (s) (the only ones possi-ble) are occupied by opposing units, the retreating defenders are automatically eli-minated.
Units that have retreated, and that do so to a vacant hex or with friendly units, may be attacked again by units that exploited the previous combat, and will defend themsel-ves with their full defense factor.
If they retreat to a vacant hex, an enemy unit (s) that did not participate in the pre-vious combat may not attack those retrea-ting units.
If the retreat takes them to a hex with their own units that will be attacked in another subsequent combat, the previously retired units do not add any defensive value, and if they are forced to retreat again, they lose an additional step.
Remember that if, with the result of retreat (R), if the defender is in a mountain, half mountain or city hex, he can stay in the hex if he wishes and successfully performs a last stand defense, but losing an additio-nal step.
If the only possible option when retreating is to exceed the stacking limits, the unit may retreat one additional hex.
- Advance after combat: if there has been a withdrawal of the defenders, or the hex has become vacant due to the loss of all the units present in it, at least one com-bat unit of those that participated in the attack must advance by obligation and oc-cupy the vacant hex. The rest of the units (except the CG / HQ), can advance volun-tarily, or stay in the hexagon from which they attacked.
- Advance after combat: if there has been a withdrawal of the defenders, or the hex has become vacant due to the loss of all the units present in it, at least one combat unit of those that participated in the attack must advance by obligation and occupy the vacant hex. The rest of the units (except the CG / HQ), can advance voluntarily, or stay in the hexagon from which they attacked.
17. End of turn and Victory Conditions
At the end of the last turn it is determined if the victory conditions are met for each player and what the result of the game is. If victory conditions are reached at the end of any turn, players can agree to end the game or continue to the end. Victory conditions :
Allied Tactical Victory if: • It controls 8 cities of the Spanish Protectorate, of which 2 are mandatorily, Tangier and Ceuta. • Keeps the road through Port Lyua-tey-Meknes-Fez-Taza-Taourirt- to the Eastern end of the map free of ZdC or enemy presence.

OPERATION BACKBONE | Page 29
Allied Strategic Victory if: • Controls the 9 cities of the Spanish Protectorate, (it may seem like a small di-fference compared to the tactical victory, but it is very important).
• Keeps the road through Port Lyua-tey-Meknes-Fez-Taza-Taourirt- to the Eastern end of the map free of ZdC or enemy presence.
If you don't get either one, it's a Spanish victory.
18. Scenarios
18.1. Scenario 1: represents the most li-kely option of how the “Backbone” ope-ration would have been carried out, with the allies taking the initiative.
Deployment: On the first turn of the game, players must deploy and place their units as follows, in that order as they wish and without exceeding the stacking limits:
• Spanish units: IX Army Corps: north of the border between the Spanish Protectorate of Mo-rocco and the French, taking into account that its area of responsibility correspon-ded to the West of the Protectorate and covered the cities of Larache, Asilah. Alca-zarquivir, Chauen, Tetouan, Tangier and Ceuta, and specifically from the extreme west of the Spanish Protectorate to co-lumn X, 13.
X Army Corps: north of the border be-tween the Spanish Moroccan Protecto-rate and the French, taking into account that its area of responsibility correspon-ded to the Eastern part of the Protecto-rate and covered the cities of Melilla and Villa Sanjurjo, and specifically from the Eastern end of the Spanish Protectorate to column X, 14.
Mehalas: they are troops of the Moroccan puppet government of the Protectorate, which are considered for the purposes of the game as Spanish units and under the CE that the Spanish player wants. They can be placed where the Spanish player determines freely. Historically, they had the mission of defending the mountai-nous area of the Rif together with some regiment of the 52 DI.
In Ceuta, Tangier, Tetouan, Villa Sanjurjo and Melilla, there must be at least one combat unit as a garrison at the start (no CG / HQ). They can then move freely, even on the first turn.
• German units: a sign of German com-mitment to Spain, the units, 5th FJR and 756th GJR, are considered for the purposes of the game as Spanish units and under the command of IX CE. The paratroopers arrive in the reinforcements segment of turn 2, and
Combat example. The assault of Larache.
The city of Larache, garrisoned by 2 Spanish units of the IX CE: the 58th RI and the 2nd Ter Leg (re-duced to 2 steps), both from the 91st DI, suffered the assault of 3 Allied units of the Western TF: the CCB of the 2nd AD, the 70th Tank Btl and the 7th RI of the 3rd ID, all of them North American. All the units present are supplied (the units in Larache are thanks to the presence of the GFRI 3).
The first thing is to calculate the base relationship between the attack and defense factors of the contestants. On the Allied side: 10 + 3 attack factors for the armored units of southern Larache, while we add 2 attack factors for the infantry regiment of the southeast (5 divided in half, for attacking across the river, and rounding down), for a total of 15 attack factors. While in the target hex of the attack, the Spanish units add 5 defense factors, thus establishing a base ratio of 3 to 1 (15/5 = 3). Only attacking from 2 hexes, then no enveloping attack occurs.
Next, the difference in efficiency between the units of each side is verified. They only attack with units of 2 efficiency, therefore this will be used, while the Spanish have 2 efficiency steps 2 (the Legion unit), and 2 efficiency steps 1, (the 58th RI). Now the Spanish player, having the same number of steps of one efficiency as another, can choose which efficiency to use. He chooses efficiency 2, which does not make him modify any column against it, since if he had chosen efficiency 1, now the rela-tionship in the Combat Table would be 4 to 1 (efi.2 - efi.1 = +1 for the attacker). But on the other hand, if the Spanish player has to take losses, the Legion unit will be the first to suffer a loss step, even if it did not use its special ability bonus. Therefore, the ratio remains 3 to 1 in favor of the attacker.Next, the modifiers are checked for the terrain, and we see that only the city is applicable, and there-fore, the relationship is reduced by one column, remaining at 2 to 1.
Finally, we place the support modifiers, first the attacker, who uses the 2 support points of his HQ (located 2 hexes away), plus a naval support point, and 3 air support (the maximum of air support points per attack), for a total of +6 MD (the maximum allowed for an attack). Afterwards, the defen-der can only use the -1 MD modifier of the Legion unit, which he decides to use, since in any case, the first loss would be for it. He cannot use the -1 of its HQ, as it is more than 1 hex away, meaning it must be adjacent to use its modifier. Therefore, it will be a fight in the column of 2 to 1, and the resulting MD to be applied will be +5 in favor of the attacker.
The die is rolled, and a 3 is obtained, which is modified to an 8, by applying the +5 MD, and the final result is 1 / 2R.
The Allied player chooses to lose a step in the 7 RI, and the Spanish player, whose first loss must be that of the Legion, for having used his special ability, while the second is chosen by the Allied player, and decides to remove another step of the 2nd Ter Leg, eliminating the unit entirely. The 58th IR must also retreat, since it does not meet any of the modifiers that would allow it to make a roll for last stand defense even if it so wishes, despite being in a city. The Spanish Regiment retreats towards the hexagon where the GFRI 3 is and does not lose an additional step because the ZoC that the Allied 7 RI would exercise, is negated by the presence of the GFRI.
The Allied player advances with the armored units and both enter Larache. If he wished, he could make an exploitation attack, (only armored units), but seeing that his attack factors would be halved for attacking across the river (13/2 = 6.5 for a final round of 6), that they cannot receive support in this type of combat, and that the Spanish player has 5 defense factors, he considers that a 1 to 1 ratio without any MD is too risky for his valuable armored units. Therefore, with the taking of Larache and the destruction of the Tercio de la Legion in exchange for a step from an infantry regiment of his own, he accepts the result and goes on to the next.

ALEA#37 - RULES | Page 30
the mountain jagers, in the same segment of turn 3. If the Strait of Gibraltar is under Spanish control, the player can choose to have the German units deploy in Ceuta, Tangier or Tetouan (or hex adjacent to this last city), while if it is not, they will only be able to deploy in Tetouan or a hex adjacent to this city, when arriving by air.
• Allied units: WTF: south of the border between the Spanish Protectorate of Morocco and the French, taking into account that its area of responsibility would correspond to the Western area that would include the cities of Port-Lyautey, Meknes and Fez, specifica-lly between the Atlantic coast of the French Protectorate, up to column X, 12.
CTF: south of the border between the Spanish Protectorate of Morocco and the French, taking into account that its area of responsibility would correspond to the Eastern area that would include the cities of Taza or Taourirt, specifically between column X, 13 and the Eastern boundary of the map.
The British I CE must be placed at the beginning of that first turn, adjacent to any Mediterranean coastal hex controlled by Spain, from Ceuta to Melilla, excluding city hexes, that it wants to assault by means of an amphibious invasion in the Mediterranean Sea, (see Amphibious In-vasion, 14).
• Optional rule: British paratrooper assault
The Allied player can, at the start of the game, choose whether he wants to use the paratrooper brigade as reflected in the standard rules (see 14, Amphibious Inva-sion), or use the paratrooper brigade divi-ded into its 3 battalions. If you choose the latter, the paratrooper battalions will not arrive as light infantry at the landing, but must enter the map (they are supposed to be off the map, in Algeria), by means of a paratrooper assault, at the beginning of the Allied movement phase of the turn chosen by the player, including (but not necessari-ly) at the start of the amphibious landing.
A maximum of two battalions can be laun-ched per turn, in clear or broken terrain (not in the city), and it will consume 1 air point for each battalion that is launched in that turn, but cannot later be used as an air point of land support in that same turn, (representing the cost and diversion of the logistical resources necessary for the operation).
On the turn they land, they cannot attack, but they can defend themselves and move with a single point of movement (MP). From the next, they can operate normally.In bad weather, no skydiving jumps can be performed.
The battalions will be in supply on the turn they jump, but from the next turn, they must draw a normal supply line to avoid being out of supply.
The procedure to perform the launch is as follows: a hex is selected where the jump is to be made and the dispersion factor of the jump is calculated depending on the terrain, +1 with broken terrain and +1 if there is an enemy ZOC. A D6 is rolled and if the result is equal to or less than the jump dispersion factor, the battalion is considered to have made a dispersed jump and is at the mercy of the defen-ders, losing the unit for the rest of the game. A check is made for each battalion that jumps.
Example: the Ally decides to launch the 2 bat-talions in the same turn, paying 2 air points, in a hexagon of broken terrain and in an enemy ZOC. He must pass a check on a 1D6 roll, and with a 2 or less (+1 for enemy ZOC and +1 for broken terrain), the battalion making that roll is eliminated for the rest of the game. It may happen that one battalion passes the check and the other does not. If on the other hand the jump takes place in a clear terrain hex and there is no enemy ZOC, the paratroo-pers arrive safely and simply drop into the target hex.
18.2. Scenario 2: Spain takes the initiative. Spain and Germany are ahead of the Allies and take measures for a better defense of the Spanish Protectorate of Morocco.
In this scenario, the following variants are used:
Deployment : • British The British landing will take place as explained below: the Strait of Gibraltar is considered closed before the British fleet with the units of the I CE can cross it, making it impossible to disembark in the Mediterranean until the Strait is open.
The allies can disembark from Turn 2 on the Atlantic coast, south of Tangier (they cannot disembark in cities, so they will only be able to disembark in hexes 2,3, 4,2 or 6,2), or wait for the Strait to be open and disembark in the Mediterranean on the next turn after this occurs.
You cannot disembark in bad weather.
• North Americans Deployed in the sectors as explained in scenario 1, but they must be in, or adjacent to one of the cities that they control at the beginning in Morocco.
• Additional German units: the Germans have a large a Kampfgruppe (KG) in Moroc-co, and in addition to the units referred to in scenario 1, the 754th RI / 334th DI, and the 1st Panzer Battalion, 25th Reg. Pz, from the 7th D. Pz (I / 25th / 7th PzD). The entire KG
is deployed from the beginning of the game, located in the area of responsibility of the IX Spanish CE and under its command.
• Control of the Strait: to control the Strait of Gibraltar, the Allies will have a +1 MD given the greater German involve-ment in the fight in the form of air units and submarines.
• Air points: Spain will have 2 air points from Turn 1 due to the arrival of a greater number of German planes, but in bad wea-ther they will still remain at 0. The Allies keep the 6 air points.
19. Optional Rules
19.1. A more severe winter: The winter of 1942-43 will be assumed to be somewhat harsher, and therefore there will be a greater chance of adverse weather. Add +1 MD to the rolls each turn to determi-ne the weather. This is to the benefit of the Spanish player.
19.2. Limited Intelligence: To simulate the fog of war, players will only be able to examine the top tile of any enemy stack. When a combat has been declared, (which must be carried out obligatorily), all the pieces of the stack can be observed to determine the ratio between attacker and defender. As the Allied player is the one who is going to attack the greatest number of times, this rule mainly benefits the Spanish player.
List of acronyms used
CCA/CCB: Combat Command A/BCE: Army CorpsTF: Task Force, WTF (Western), CTF (Central)RI: Infantry Regiment, (IR Infantry Reg.)GFRI: Group of Indigenous Regular ForcesTer Leg: Tercio of the LegionParaB: Parachute BrigadeEng Reg: Engineer RegimentTank Btl: Tank Battalion Tank Bde: Tank BrigadeInf Bde: Infantry BrigadeFJR: FallschirmjagerGJR: GebirgsjägerHQ: HeadquarterMD: Die modifierZdC/ZoC/ZOC: Zone of ControlPM / MP: P: Movement PointsLS / SL: Supply line
Credits
Design : Antonio Rodríguez.Development : Javier Hoyos.Playtesting : Jose A. Camacho, Óscar Oliver, Javier Hoyos. José M. Castanys, Manuel Ángel, P.M. Peón.Graphic design and infographics :Xavier P.Rotllán.English translation : Dermot Quigley
Note. See errata at the end of the de-signer's notes.

ALEA#37 | Pág. 31
Designer's notesBackbone. The Allied Invasion of the Protectorate
The first thing that comes to mind when writing these de-sign notes for the game "Backbone" is to explain why one wants to design a “ucronic” game. A "what if" wargame on this subject.
As almost all of us who share a hobby with these games like history, I consider the historical simulation that wargames genera-te very interesting. We always find it attractive to put ourselves in the shoes of one or another general and try to emulate or improve the historical results they obtained in order to understand how that battle came about and why it happened. But also, personally, I like the side that wargames have as a “sandbox”, or test bench. And using them in a way similar to the original idea of the “Kriegsspiel”, which was none other than to be used as a tool of learning and study, to be able to prepare tactics and strategies that would later be used in the battles that could be fought in the future.
Thus, this aspect is still reflected in modern commercial ga-mes, which try to anticipate future conflicts and propose how they could develop, and that surely comes to one’s mind. But in addition, there are the wargames that unite, in some way, both sides. The wargames that study possibilities of alternative con-frontations that could have been carried out throughout history, but that never took place. I like to call them uchronic wargames. Perhaps the clearest example in this regard is the wargames about a Third World War in Europe, usually in the 70s or 80s. This type of game may not be to the liking of many, but they interest me, perhaps because they like to explore what could have happened if other circumstances had occurred, perhaps because by not being so “directed” by the story, they can give a little more freedom when playing them.
And why design it on an operation like "Backbone"? Pro-bably because, when reading about this operation for the first time, I was very interested in what it might have meant if it rea-lly happened, and how it could have changed the history of our country. So, after documenting everything I could, I set out to design a game about it, which is the one you have in hand.
The scale I chose was the one I like the most, an operational one, with brigade / regiment-type units and battalions which, gi-ven the size of the Theater of Operations, and the size of the map, was well suited to the game. In addition, I wanted it to be a classic "hex and counters" (with supply lines, control zones, CRT ...), of medium-low difficulty, and that did not take too long to play, with a density of tokens that was not very high.
The elaboration of the Order of Battle, especially the Spa-nish Army took some time. However, with the information that is available today on the internet, it was not an insurmountable obstacle. Also on the Allied taking as a base all the existing do-cumentation in relation to the Operation Torch that I have been able to read, it was not a big obstacle either. Regarding the Allied Orbat, it was only necessary to "marry" the existing units in the area or that were destined for it, with the requirements of the "Backbone" operation, and here there was not too much pro-blem to be quite clear which units they could be. It was decided to use the British Paratrooper Brigade to give the Allied player one more option to be able to use it in their air assault role. I also added some additional Allied battalions, since at that level, the plan is not so precise, and It only mentions the British Com-
mandos, but it seems reasonable to think that the tank and tank destroyer battalions, as well as the North American Rangers, would also be present in this operation. I also added some engi-neering units. And with regard to the engineers of the Spanish Army, I only found references to each Protectorate Army Corps having one, but upon further investigation, I could not discover anything that would clarify the potential of these units, and I only found references to transmission units, so I finally decided not to include them. I should also mention that in the game there are no artillery units at division level, because during the tests carried out, I found that the Spanish units, more numerous but less powerful than the Allies and what they did was to cancel out each other, so they ended up contributing little to the game and slowed it down.
As regarding the reason for a more or less flexible deplo-yment, it is because rigid games where all the units are located exactly where they were historically, do not convince me. Or at least I like for the player to be given the option of carrying out another deployment in an alternate setting. The deployment he would have made had he been in command. And in this type of uchronic game, it seems to me that it is justified even more while it adds some extra interest to the game.
The rules for the special abilities of certain units and the event markers, were introduced during the tests of the game and have provided a flexibility and variability which I think have worked quite well, in addition to adding some chaos to the ba-ttle.
Regarding air power, one of the great advantages of the Allies, and because this game is not of a high difficulty, I decided to model it in a more abstract way and not create a subgame of the air part, which in addition to complicating it, It would have slowed it down, (which isn't bad, but it wasn't one of the ga-me's requirements). And of course, given the absolute imbalan-ce between one opponent and the other in this section, I think it would not contribute anything interesting by making it more detailed, so I opted for the well-known system of air support
Legionary, Spanish Protectorate of Marocco, 1942.

ALEA#37 | Pág. 32
points. It not only represents the greater advantage of Allied air, it also gives some possibility of using it to the Spanish player.
I would also like to explain the reason for introducing German units into the game. And it is that if important contingents of Ger-man forces were taken to that country to defend Tunisia, during this timeline. In the circumstances of Operation Backbone, it see-med logical to me that part of them would have been destined for Spanish Morocco, assuming , as I do for the game, that the Spanish Government had allied with the German in this conflict. If the pla-yer considers that there is no place for such an alliance or wants to explore the option that there would have been no German support, he only has to stop using the pieces of the German units and the markers that have to do with a greater intervention of that country, to explore that possibility. Likewise, I have chosen to introduce two possibilities when it comes to this German support. The first one following the deployment, the units and the rules on the control of the Strait, the Allied landing and the air points, of the general rules, which make the most plausible option of "Backbone" with the allies taking the initiative, and the Germans arriving with less force. While in a second possibility in the alternative scenario, whe-re Spain and Germany are considered to have sufficient indications that "Backbone" will be carried out in a short time and therefore anticipate the Allied plans with the Germans getting involved with more forces. This scenario is somewhat more balanced, but it is still very challenging for the Spanish player.
And so I come to another point that I would like to com-ment on about the game. As the reader will discover, if you have read the article on the historical background, the chances that the Spanish army could retain the Protectorate in the face of a de-termined Allied attack were very low, so that is reflected in the game, being in that sense quite asymmetric. As in any wargame that reflects the initial stages of "Barbarossa" or the Normandy campaign, it is already known in advance that one of the two sides will always be on the offensive, while the other will have to defend itself with nails and teeth. Something very similar happens in this wargame. The game is a constant Allied attack, which has to run a race against time, while pushing back the Spanish forces to achie-ve their objectives as soon as possible, but with care not to expose themselves too much or lose a turn without having achieved any progress. , while the Spanish player, must be a great striker, take one blow after another, while creating defensive lines as solid as possible, and try to delay the enemy advance in all the ways he can, and yet carry out some fortunate counter attack if the oppor-tunity arises.
And with all this, is the game re-playable? Well, obviously it has its limitations, but I think it has a series of variable decisions that can be made to test various games, such as testing different options for the initial Allied landing or the different deployments of both sides, in addition to having two scenarios, and the Event markers that can vary greatly from one game to another. During the tests, most of the time, the Allied player has achieved victory, sometimes without breaking sweat, other times suffering un-til the last moment. But there have also been cases in which the Spanish player, in a much tighter way has achieved victory in the terms given by the game. So I think the game allows for several or more games.
And speaking of the victory conditions, they have been adjus-ted taking into account the main Allied objective, which was none other than the southern area of the Strait of Gibraltar. And therefore the obligation to conquer Ceuta and Tangier, if the game is to be won, but also, and given the Allied contingent that would participa-te, and the possibility of leaving large pockets of enemy resistance inside the Protectorate, the obligation to conquer most of the terri-tory, if not all, to obtain a clear victory and ensure Allied dominance in the region. But in addition, it would have to be carried out in as short a time as possible, so that the Allied player could, on the one hand, fight again in Tunisia to definitively eliminate the Axis forces in North Africa. While at the same time he would have to prepare a possible assault on the south of the peninsula, and not give too much time to a great mobilization and a Spanish and German pre-paration for the defense of Andalusia. So the Allied player has to win, but to do it before the end of the 10 turns of the game, while the Spanish player, must delay the Anglo-Americans as much as possible in order to allow time for the mobilization and prepara-tion of the rest of the Army in Spain.
If you've finally come this far, just to wish you that "Backbone" provides you with some moments of simple, agile and interesting wargaming enjoyment, since the purpose of this game is none other.
By Antonio Rodríguez
USA troops ready to landing, Operation Torch.
Errata. Backbone operation
Map. city of Tadourit, the correct name is Taourirt (as stated in the rules).
Tables and help elements, below the game map.- Sequence of play - Administrative phase.Suppress: Deploy (first turn only).Replacements segment, fortifications.Put: Segment of reinforcements, replacements and fortifica-tions.
Replacement table: Spain3rd and 4th lines of text. Replace with: when Spain loses con-trol of the Strait of Gibraltar and 4 cities, it stops achieving efficiency step 2, and when, in addition, it loses 6 cities, it does not receive the efficiency step 1 that was left over from replacements.
Combat Results TableSubstitute: the last two values, (with a modified roll of 7 or 8) in the column from 6 to 1, must be - / 4.
Modifiers in combat, left column: Delete point 5: if the proportions between the factors ...
In the procedure for assigning cancellations, the text inclu-ded in the rules is better expressed than that which appears under the table.
Terrain tableEffects in ground combat "shore landing-allowed": Attack reduced by half for units launching amphibious invasion.
The corrected table sheet in English will be available at::www.alealudopress.com