operation guide - epsondownload.epson.com.sg/manuals/operation guide.pdfphotocopying, recording, or...
TRANSCRIPT
Operation GuideCMP0017-00 EN
Copyrights and Trademarks
No part of this publication may be reproduced, stored in a retrieval system, or transmitted in any form or by any means, electronic, mechanical,photocopying, recording, or otherwise, without the prior written permission of Seiko Epson Corporation. The information contained herein is designedonly for use with this Epson printer. Epson is not responsible for any use of this information as applied to other printers.
Neither Seiko Epson Corporation nor its affiliates shall be liable to the purchaser of this product or third parties for damages, losses, costs, or expensesincurred by the purchaser or third parties as a result of accident, misuse, or abuse of this product or unauthorized modifications, repairs, or alterations tothis product, or (excluding the U.S.) failure to strictly comply with Seiko Epson Corporation’s operating and maintenance instructions.
Seiko Epson Corporation shall not be liable for any damages or problems arising from the use of any options or any consumable products other than thosedesignated as Original Epson Products or Epson Approved Products by Seiko Epson Corporation.
Seiko Epson Corporation shall not be held liable for any damage resulting from electromagnetic interference that occurs from the use of any interface cablesother than those designated as Epson Approved Products by Seiko Epson Corporation.
EPSON®, EPSON EXCEED YOUR VISION, EXCEED YOUR VISION and their logos are registered trademarks or trademarks of Seiko EpsonCorporation.
Microsoft® and Windows® are registered trademarks of Microsoft Corporation.
Apple®, Macintosh®, Mac OS®, and OS X® are registered trademarks of Apple Inc.
General Notice: Other product names used herein are for identification purposes only and may be trademarks of their respective owners. Epson disclaimsany and all rights in those marks.
© 2014 Seiko Epson Corporation. All rights reserved.
SL-D700 Operation Guide
Copyrights and Trademarks
2
Contents
Copyrights and Trademarks
IntroductionMeaning of Symbols. . . . . . . . . . . . . . . . . . . . . . . . 5Screen Shots In the Guide. . . . . . . . . . . . . . . . . . . . 5Printer Parts. . . . . . . . . . . . . . . . . . . . . . . . . . . . . . 6
Front. . . . . . . . . . . . . . . . . . . . . . . . . . . . . . . . . 6Rear. . . . . . . . . . . . . . . . . . . . . . . . . . . . . . . . . . 8Feeding Unit. . . . . . . . . . . . . . . . . . . . . . . . . . . 9Print head unit. . . . . . . . . . . . . . . . . . . . . . . . . 10Spindle Unit. . . . . . . . . . . . . . . . . . . . . . . . . . . 10Lights. . . . . . . . . . . . . . . . . . . . . . . . . . . . . . . . 11
Safety Instructions. . . . . . . . . . . . . . . . . . . . . . . . 13Meaning of Symbols and Marks. . . . . . . . . . . . . 13Notes on Installation. . . . . . . . . . . . . . . . . . . . . 14Notes on Handling. . . . . . . . . . . . . . . . . . . . . . 14Notes on the Power Supply. . . . . . . . . . . . . . . . 16Notes on Consumables. . . . . . . . . . . . . . . . . . . 17
Notes on Usage. . . . . . . . . . . . . . . . . . . . . . . . . . . 18Notes when Handling the Main Unit. . . . . . . . . 18Notes on the Paper. . . . . . . . . . . . . . . . . . . . . . 18Notes on Ink Cartridges. . . . . . . . . . . . . . . . . . 19Disposing of Used Ink Cartridges andMaintenance Cartridges. . . . . . . . . . . . . . . . . . 20
Introducing the Software. . . . . . . . . . . . . . . . . . . . 20
Printing MethodsBasic Printing Methods. . . . . . . . . . . . . . . . . . . . . 21
Replacing PaperHow to replace. . . . . . . . . . . . . . . . . . . . . . . . . . . 23
Preparing to Replace Paper. . . . . . . . . . . . . . . . 23Recording paper level. . . . . . . . . . . . . . . . . . . . 25Removing the Spindle Unit. . . . . . . . . . . . . . . . 27Removing the Roll Paper. . . . . . . . . . . . . . . . . . 29Attaching the Roll Paper. . . . . . . . . . . . . . . . . . 31Attaching the Spindle Unit. . . . . . . . . . . . . . . . 32Changing Paper Settings. . . . . . . . . . . . . . . . . . 37
Ejecting PaperPrint tray (optional). . . . . . . . . . . . . . . . . . . . . . . 41Large Print Tray (Optional). . . . . . . . . . . . . . . . . . 42Attaching and Removing the Print Tray. . . . . . . . . 43Attaching and Removing the Large Print Tray. . . . 45
Replacing Ink CartridgesChecking Ink Levels. . . . . . . . . . . . . . . . . . . . . . . 47
Checking from the Printer. . . . . . . . . . . . . . . . . 47Checking from the Computer. . . . . . . . . . . . . . 48
Replacement Procedure. . . . . . . . . . . . . . . . . . . . . 51
Replacing the Maintenance CartridgeChecking the Free Space in the MaintenanceCartridge. . . . . . . . . . . . . . . . . . . . . . . . . . . . . . . 55
Checking from the Printer. . . . . . . . . . . . . . . . . 55Checking from the Computer. . . . . . . . . . . . . . 56
Replacement Procedure. . . . . . . . . . . . . . . . . . . . . 58
Emptying the Scrap Paper Box
MaintenanceMaintenance Tool. . . . . . . . . . . . . . . . . . . . . . . . . 62Checking Items List. . . . . . . . . . . . . . . . . . . . . . . . 63Scrap paper box. . . . . . . . . . . . . . . . . . . . . . . . . . 63Airflow vent. . . . . . . . . . . . . . . . . . . . . . . . . . . . . 63
TroubleshootingWhen an Error Occurs. . . . . . . . . . . . . . . . . . . . . 64
Warning Buzzer and Light Indicators. . . . . . . . . 64Error Messages (Windows). . . . . . . . . . . . . . . . 67Error Messages (Mac). . . . . . . . . . . . . . . . . . . . 67Errors and Solutions. . . . . . . . . . . . . . . . . . . . . 68Cannot Clear the Displayed Error. . . . . . . . . . . 75
Paper Jams. . . . . . . . . . . . . . . . . . . . . . . . . . . . . . 77Deleting Print Jobs. . . . . . . . . . . . . . . . . . . . . . 78Paper is Jammed in the Roll Paper Feeder. . . . . . 80Paper is Jammed in the Internal Paper Feeder. . . . . . . . . . . . . . . . . . . . . . . . . . . . . . . . . . . . 87
Problems with Print Results. . . . . . . . . . . . . . . . . . 93Problems when Cutting Paper. . . . . . . . . . . . . . . . 94When a Problem Cannot be Cleared. . . . . . . . . . . 94
AppendixConsumables and Optional Items. . . . . . . . . . . . . 95Notes on Moving the Printer. . . . . . . . . . . . . . . . . 95
Preparing to Move. . . . . . . . . . . . . . . . . . . . . . 96After Moving. . . . . . . . . . . . . . . . . . . . . . . . . . 96
SL-D700 Operation Guide
Contents
3
Printer Specifications. . . . . . . . . . . . . . . . . . . . . . 96Standards and Approvals. . . . . . . . . . . . . . . . . . 98Necessary space. . . . . . . . . . . . . . . . . . . . . . . . 99
Notes. . . . . . . . . . . . . . . . . . . . . . . . . . . . . . . . . 100FCC Compliance Statement. . . . . . . . . . . . . . . 100For European customers only. . . . . . . . . . . . . 101For Turkish customers only. . . . . . . . . . . . . . . 101For Ukraine customers only. . . . . . . . . . . . . . . 101
Where To Get HelpTechnical Support Web Site. . . . . . . . . . . . . . . . . 102Contacting Epson Support. . . . . . . . . . . . . . . . . . 102
Before Contacting Epson. . . . . . . . . . . . . . . . . 102Help for Users in North America. . . . . . . . . . . 103Help for Users in Europe. . . . . . . . . . . . . . . . . 103Help for Users in Taiwan. . . . . . . . . . . . . . . . . 103Help for Users in Australia. . . . . . . . . . . . . . . 104Help for Users in Singapore. . . . . . . . . . . . . . . 104Help for Users in Thailand. . . . . . . . . . . . . . . . 105Help for Users in Vietnam. . . . . . . . . . . . . . . . 105Help for Users in Indonesia. . . . . . . . . . . . . . . 105Help for Users in Hong Kong. . . . . . . . . . . . . . 106Help for Users in Malaysia. . . . . . . . . . . . . . . . 106Help for Users in India. . . . . . . . . . . . . . . . . . 106Help for Users in the Philippines. . . . . . . . . . . 107
SL-D700 Operation Guide
Contents
4
Introduction
Meaning of Symbols
!Warning: Warnings must be followed to avoid serious bodily injury.
!Caution: Cautions must be followed to avoid damage to this product or bodily injury.
c Important: Important must be followed to avoid damage to this product.
Note: Notes contain important information on the operation of this product.
Screen Shots In the Guide
❏ Screen shots used in this manual may differ to the actual screens. Also, the screens may differ depending on theoperating system used and the usage environment.
❏ Unless otherwise noted, screen shots in this manual shows case of Windows 7 and Mac OS X 10.7.
SL-D700 Operation Guide
Introduction
5
Printer Parts
Front
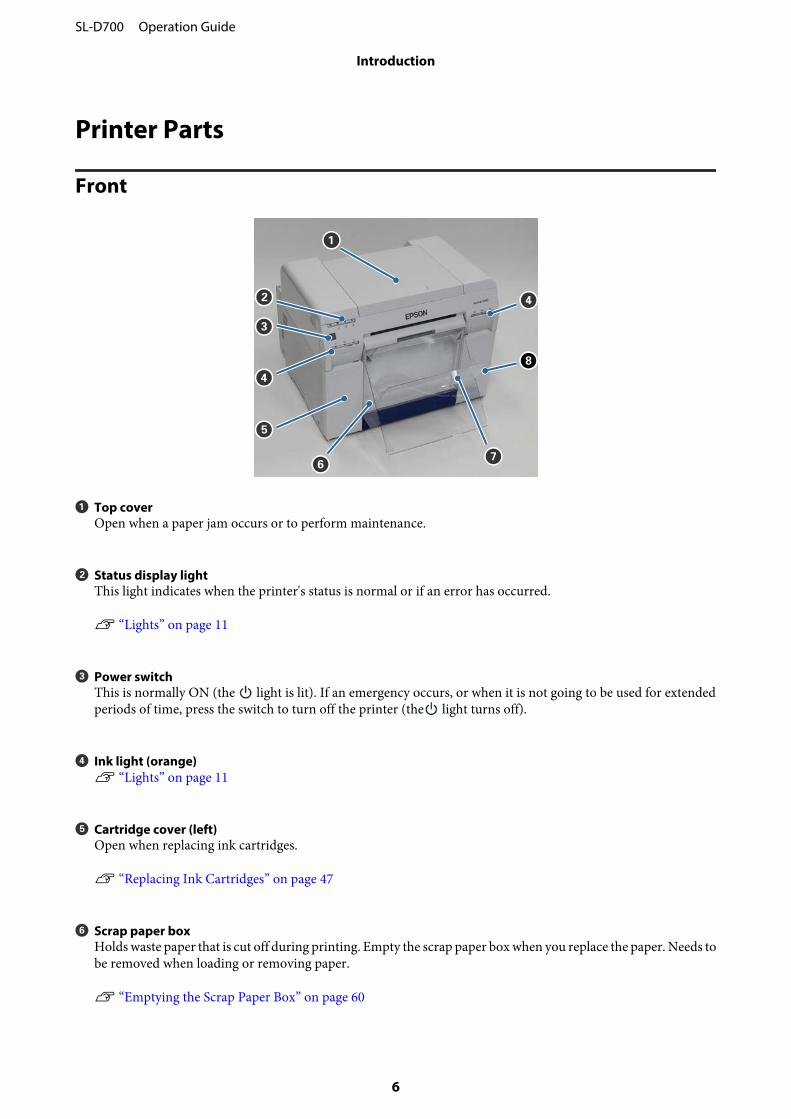
A Top coverOpen when a paper jam occurs or to perform maintenance.
B Status display lightThis light indicates when the printer's status is normal or if an error has occurred.
U “Lights” on page 11
C Power switchThis is normally ON (the light is lit). If an emergency occurs, or when it is not going to be used for extendedperiods of time, press the switch to turn off the printer (the light turns off).
D Ink light (orange)U “Lights” on page 11
E Cartridge cover (left)Open when replacing ink cartridges.
U “Replacing Ink Cartridges” on page 47
F Scrap paper boxHolds waste paper that is cut off during printing. Empty the scrap paper box when you replace the paper. Needs tobe removed when loading or removing paper.
U “Emptying the Scrap Paper Box” on page 60
SL-D700 Operation Guide
Introduction
6
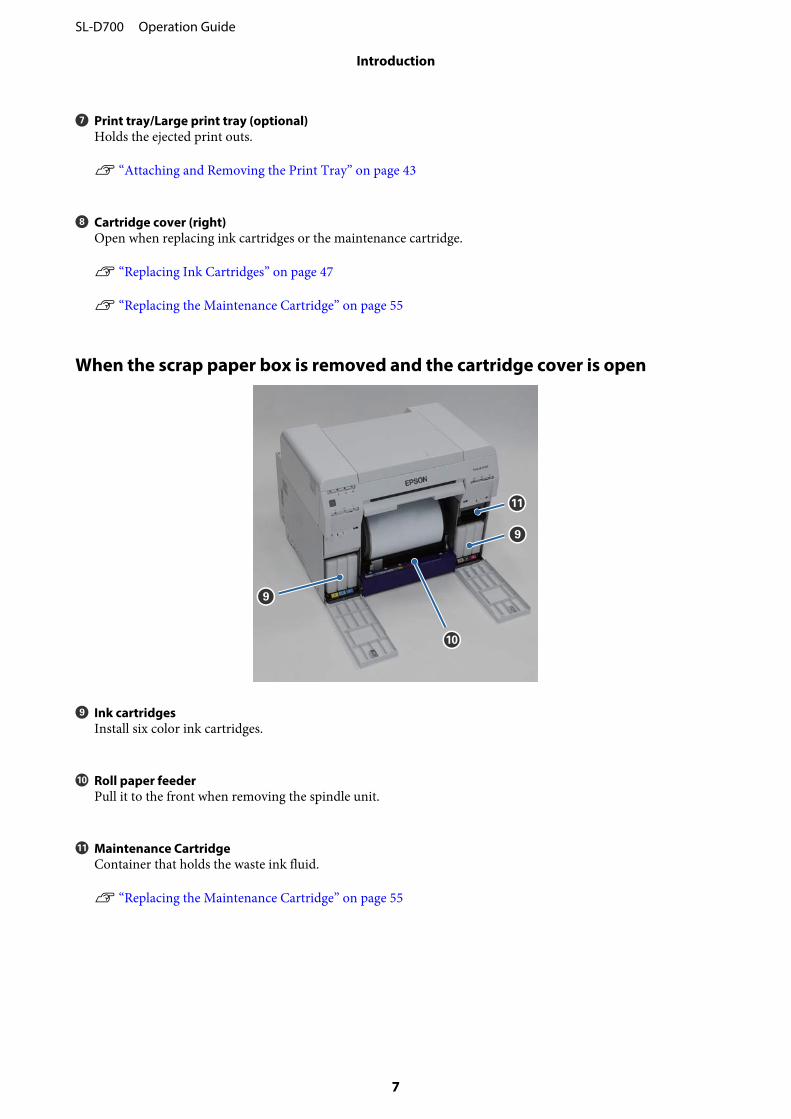
G Print tray/Large print tray (optional)Holds the ejected print outs.
U “Attaching and Removing the Print Tray” on page 43
H Cartridge cover (right)Open when replacing ink cartridges or the maintenance cartridge.
U “Replacing Ink Cartridges” on page 47
U “Replacing the Maintenance Cartridge” on page 55
When the scrap paper box is removed and the cartridge cover is open
I Ink cartridgesInstall six color ink cartridges.
J Roll paper feederPull it to the front when removing the spindle unit.
K Maintenance CartridgeContainer that holds the waste ink fluid.
U “Replacing the Maintenance Cartridge” on page 55
SL-D700 Operation Guide
Introduction
7
Rear
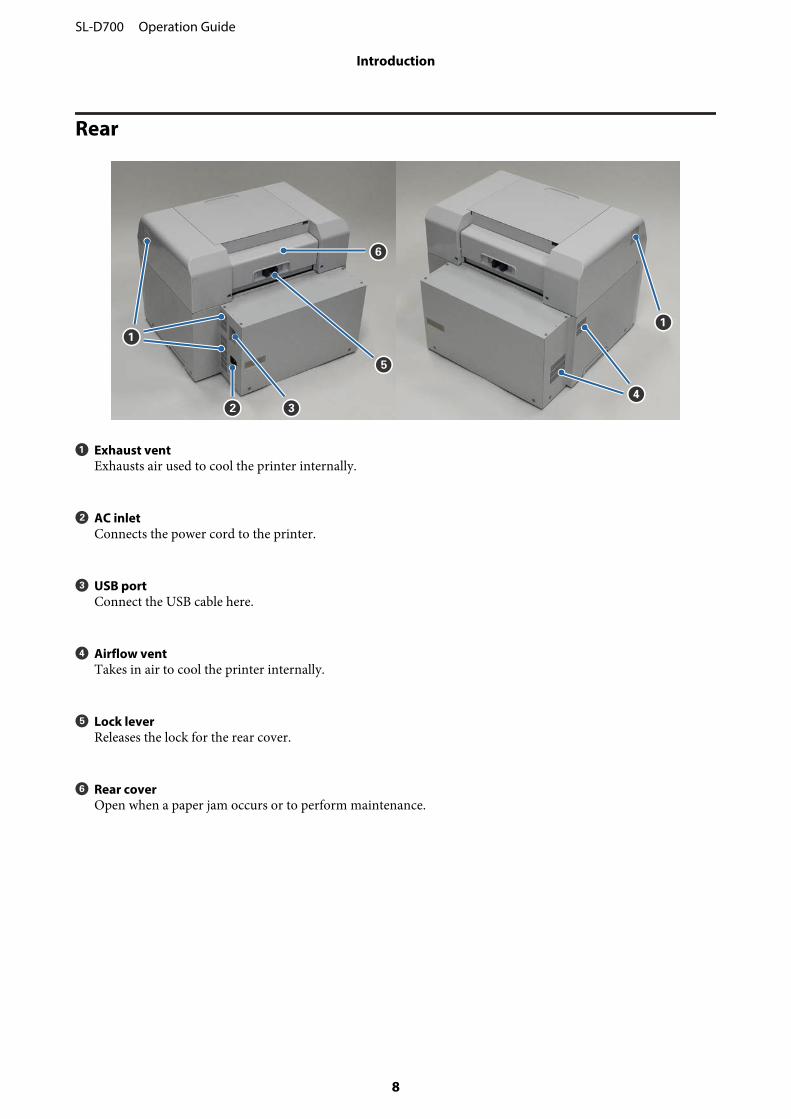
A Exhaust ventExhausts air used to cool the printer internally.
B AC inletConnects the power cord to the printer.
C USB portConnect the USB cable here.
D Airflow ventTakes in air to cool the printer internally.
E Lock leverReleases the lock for the rear cover.
F Rear coverOpen when a paper jam occurs or to perform maintenance.
SL-D700 Operation Guide
Introduction
8
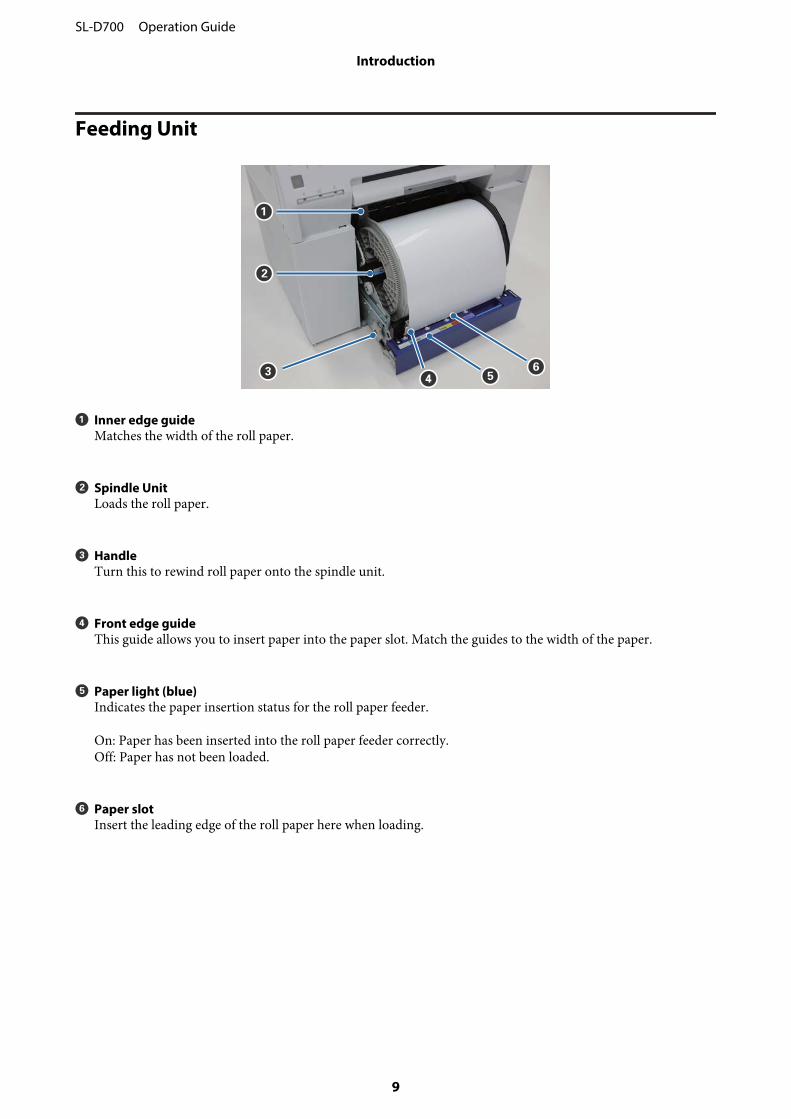
Feeding Unit
A Inner edge guideMatches the width of the roll paper.
B Spindle UnitLoads the roll paper.
C HandleTurn this to rewind roll paper onto the spindle unit.
D Front edge guideThis guide allows you to insert paper into the paper slot. Match the guides to the width of the paper.
E Paper light (blue)Indicates the paper insertion status for the roll paper feeder.
On: Paper has been inserted into the roll paper feeder correctly.Off: Paper has not been loaded.
F Paper slotInsert the leading edge of the roll paper here when loading.
SL-D700 Operation Guide
Introduction
9
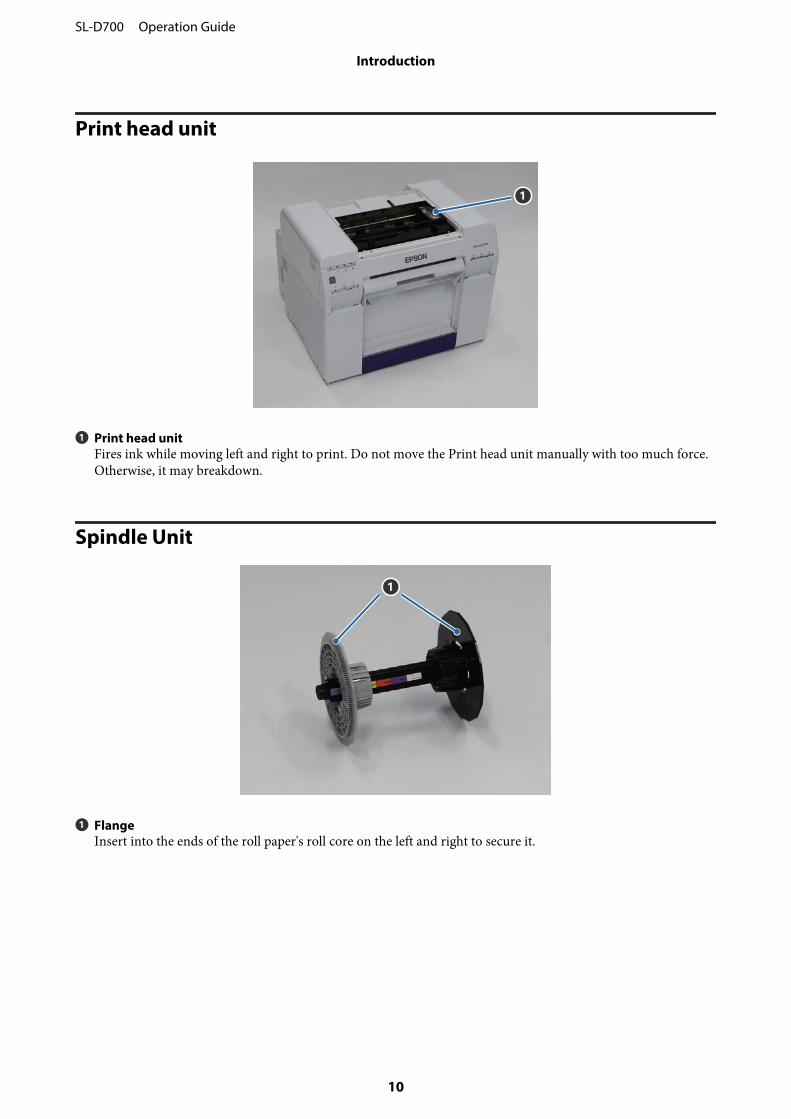
Print head unit
A Print head unitFires ink while moving left and right to print. Do not move the Print head unit manually with too much force.Otherwise, it may breakdown.
Spindle Unit
A FlangeInsert into the ends of the roll paper's roll core on the left and right to secure it.
SL-D700 Operation Guide
Introduction
10
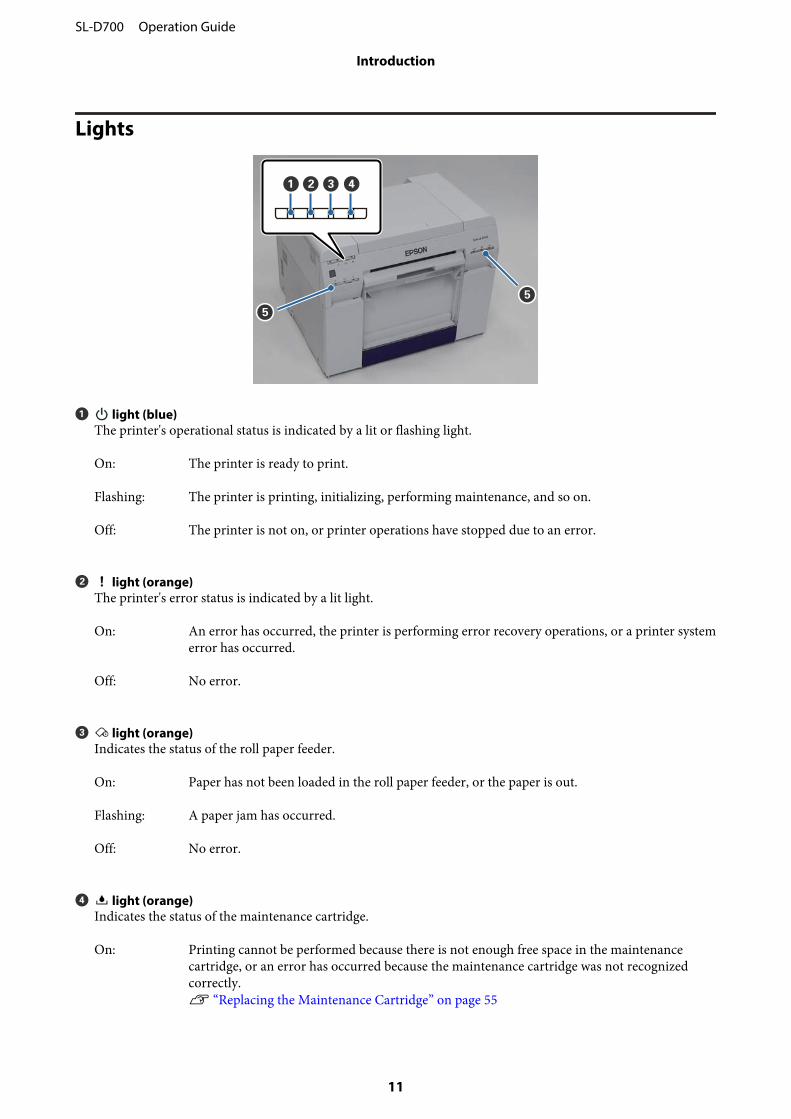
Lights
A light (blue)The printer's operational status is indicated by a lit or flashing light.
On: The printer is ready to print.
Flashing: The printer is printing, initializing, performing maintenance, and so on.
Off: The printer is not on, or printer operations have stopped due to an error.
B light (orange)The printer's error status is indicated by a lit light.
On: An error has occurred, the printer is performing error recovery operations, or a printer systemerror has occurred.
Off: No error.
C light (orange)Indicates the status of the roll paper feeder.
On: Paper has not been loaded in the roll paper feeder, or the paper is out.
Flashing: A paper jam has occurred.
Off: No error.
D light (orange)Indicates the status of the maintenance cartridge.
On: Printing cannot be performed because there is not enough free space in the maintenancecartridge, or an error has occurred because the maintenance cartridge was not recognizedcorrectly.U “Replacing the Maintenance Cartridge” on page 55
SL-D700 Operation Guide
Introduction
11
Off: No error.
E Ink light (orange)Indicates the status of the ink cartridges.
On: Printing cannot be performed because the light is on indicating that there is not enough free spacein the ink cartridge, or an error has occurred because the ink cartridge was not recognizedcorrectly.
U “Replacing Ink Cartridges” on page 47
Off: No error.
SL-D700 Operation Guide
Introduction
12
Safety Instructions
To use this printer safely, be sure to read the manual supplied with the printer before use. Not handling this printer asdescribed in the supplied manual could cause a breakdown of the printer or an accident. To resolve any unclear pointsregarding the printer, keep this manual on hand at all times.
Meaning of Symbols and Marks
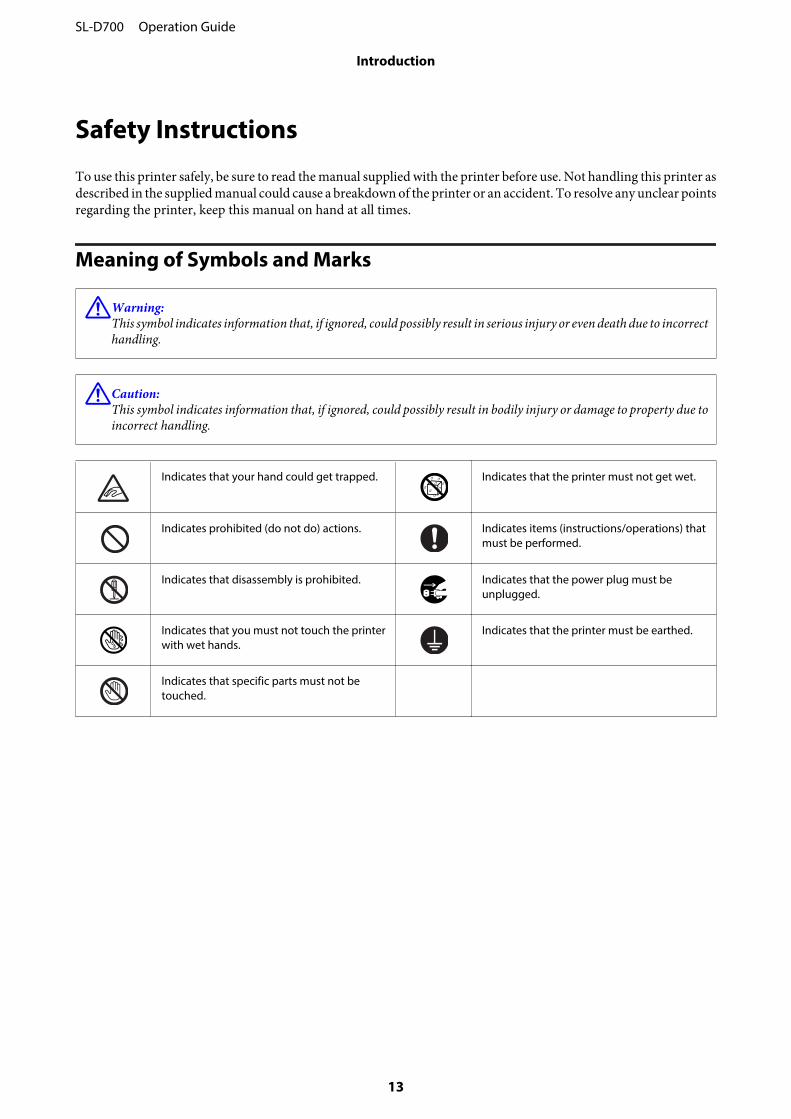
!Warning:This symbol indicates information that, if ignored, could possibly result in serious injury or even death due to incorrecthandling.
!Caution:This symbol indicates information that, if ignored, could possibly result in bodily injury or damage to property due toincorrect handling.
Indicates that your hand could get trapped. Indicates that the printer must not get wet.
Indicates prohibited (do not do) actions. Indicates items (instructions/operations) thatmust be performed.
Indicates that disassembly is prohibited. Indicates that the power plug must beunplugged.
Indicates that you must not touch the printerwith wet hands.
Indicates that the printer must be earthed.
Indicates that specific parts must not betouched.
SL-D700 Operation Guide
Introduction
13
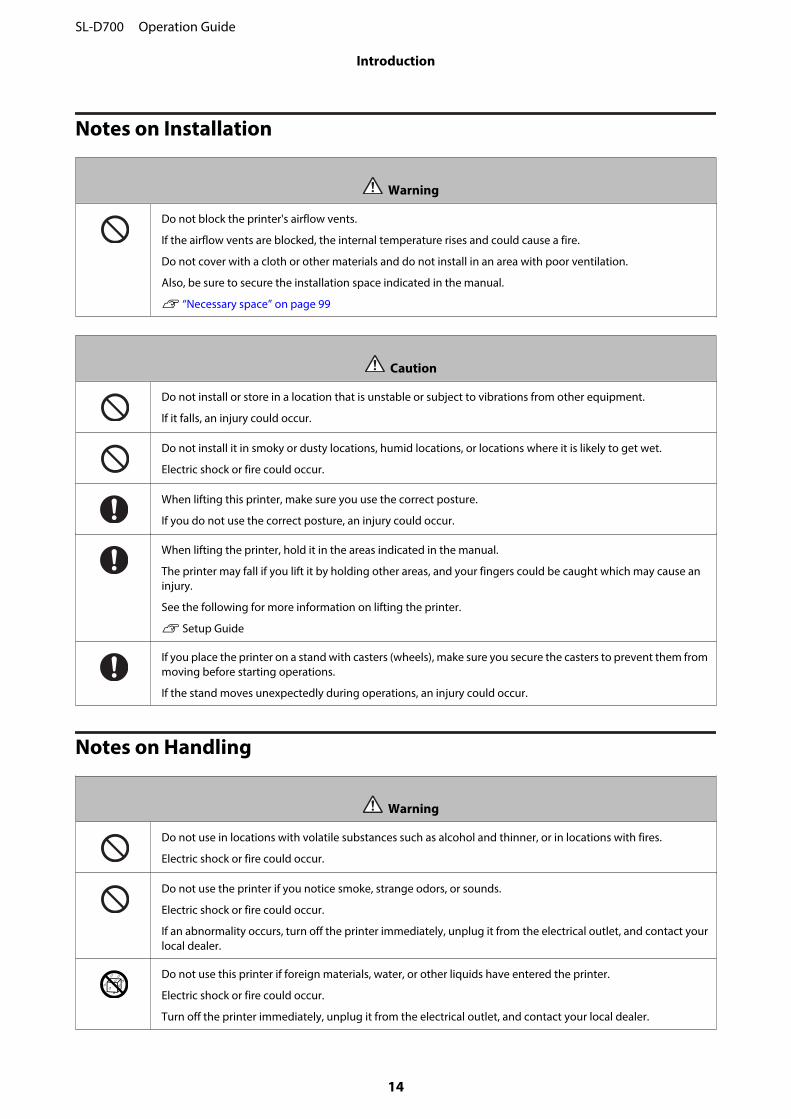
Notes on Installation
Warning
Do not block the printer's airflow vents.
If the airflow vents are blocked, the internal temperature rises and could cause a fire.
Do not cover with a cloth or other materials and do not install in an area with poor ventilation.
Also, be sure to secure the installation space indicated in the manual.
U “Necessary space” on page 99
Caution
Do not install or store in a location that is unstable or subject to vibrations from other equipment.
If it falls, an injury could occur.
Do not install it in smoky or dusty locations, humid locations, or locations where it is likely to get wet.
Electric shock or fire could occur.
When lifting this printer, make sure you use the correct posture.
If you do not use the correct posture, an injury could occur.
When lifting the printer, hold it in the areas indicated in the manual.
The printer may fall if you lift it by holding other areas, and your fingers could be caught which may cause aninjury.
See the following for more information on lifting the printer.
U Setup Guide
If you place the printer on a stand with casters (wheels), make sure you secure the casters to prevent them frommoving before starting operations.
If the stand moves unexpectedly during operations, an injury could occur.
Notes on Handling
Warning
Do not use in locations with volatile substances such as alcohol and thinner, or in locations with fires.
Electric shock or fire could occur.
Do not use the printer if you notice smoke, strange odors, or sounds.
Electric shock or fire could occur.
If an abnormality occurs, turn off the printer immediately, unplug it from the electrical outlet, and contact yourlocal dealer.
Do not use this printer if foreign materials, water, or other liquids have entered the printer.
Electric shock or fire could occur.
Turn off the printer immediately, unplug it from the electrical outlet, and contact your local dealer.
SL-D700 Operation Guide
Introduction
14
Warning
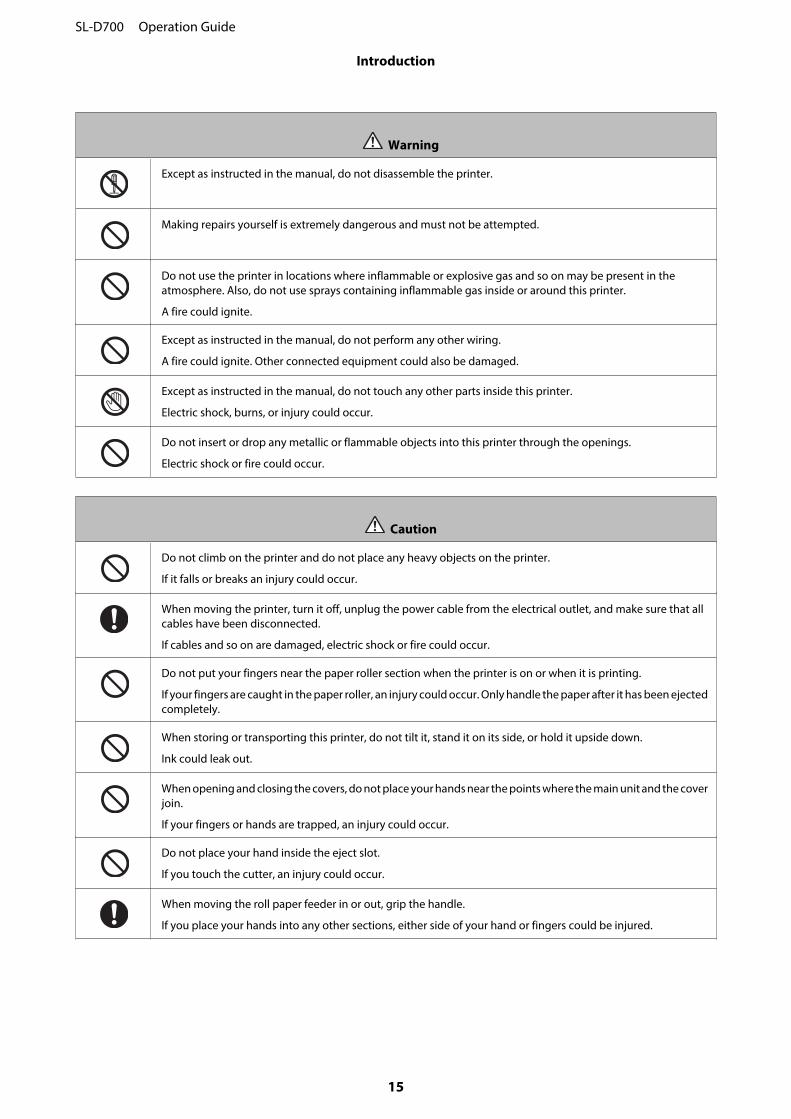
Except as instructed in the manual, do not disassemble the printer.
Making repairs yourself is extremely dangerous and must not be attempted.
Do not use the printer in locations where inflammable or explosive gas and so on may be present in theatmosphere. Also, do not use sprays containing inflammable gas inside or around this printer.
A fire could ignite.
Except as instructed in the manual, do not perform any other wiring.
A fire could ignite. Other connected equipment could also be damaged.
Except as instructed in the manual, do not touch any other parts inside this printer.
Electric shock, burns, or injury could occur.
Do not insert or drop any metallic or flammable objects into this printer through the openings.
Electric shock or fire could occur.
Caution
Do not climb on the printer and do not place any heavy objects on the printer.
If it falls or breaks an injury could occur.
When moving the printer, turn it off, unplug the power cable from the electrical outlet, and make sure that allcables have been disconnected.
If cables and so on are damaged, electric shock or fire could occur.
Do not put your fingers near the paper roller section when the printer is on or when it is printing.
If your fingers are caught in the paper roller, an injury could occur. Only handle the paper after it has been ejectedcompletely.
When storing or transporting this printer, do not tilt it, stand it on its side, or hold it upside down.
Ink could leak out.
When opening and closing the covers, do not place your hands near the points where the main unit and the coverjoin.
If your fingers or hands are trapped, an injury could occur.
Do not place your hand inside the eject slot.
If you touch the cutter, an injury could occur.
When moving the roll paper feeder in or out, grip the handle.
If you place your hands into any other sections, either side of your hand or fingers could be injured.
SL-D700 Operation Guide
Introduction
15

Notes on the Power Supply
Warning
Use only the type of the power supply indicated on the label.
Electric shock or fire could occur.
Do not use the power plug if any foreign materials such as dust are stuck to it.
Electric shock or fire could occur.
Make sure the blades of the power plug are fully inserted into the electrical outlet.
Electric shock or fire could occur.
Do not use the power cable if it is damaged.
Electric shock or fire could occur.
Contact your local dealer if the power cable is damaged.
Note the following points to avoid damaging the power cable.
❏ Do not modify the power cable
❏ Do not put heavy objects on the power cable
❏ Do not bend, twist, or pull
❏ Do not place it near heating appliances
Do not plug in or unplug the power cable with wet hands.
Electric shock could occur.
Do not perform daisy-chain wiring for the power cable.
It could overheat and cause a fire.
Take power directly from a residential electrical outlet.
Unplug the power cable periodically and clean between the blades and the base of the blades.
If the power cable is left plugged in for an extended period of time, dust could accumulate around the edge of theplug which could cause a short-circuit and a fire.
When unplugging the power cable from the electrical outlet, grasp the plug itself and not the cable.
The cable could be damaged or the plug could be deformed and an electric shock or fire could occur.
Make sure the printer is earthed to prevent accidental short circuits.
If the printer is used without being earthed, an electric shock or fire could occur. Attach the earth wire for thepower cable to one of the following points.
❏ The earth terminal on the electrical outlet
❏ Copper wire and so on that has been buried at least 65 cm underground.
❏ An earth terminal for which grounding has been performed
When attaching or removing the earth wire, the power plug must be removed from the electrical outlet. Checkthe earthing for the electrical outlet being used. If you cannot perform earthing, contact your local dealer.
Do not connect the earth wire to the following points.
❏ Gas pipes (they could ignite and cause an explosion)
❏ Earth wires for telephone wires or lightning rods (this is dangerous as a lightning strike causes a huge surge inelectricity)
❏ Water pipes or faucets (earthing is not performed if there is any plastic piping in the pipes)
SL-D700 Operation Guide
Introduction
16
Caution
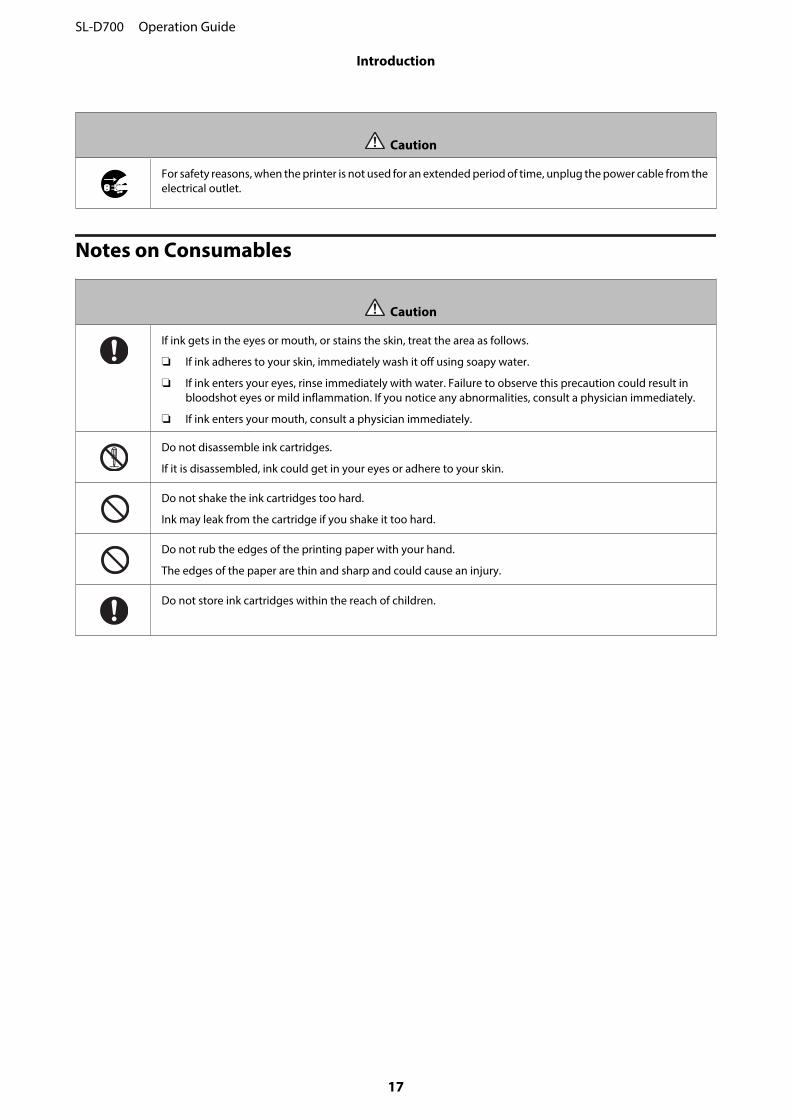
For safety reasons, when the printer is not used for an extended period of time, unplug the power cable from theelectrical outlet.
Notes on Consumables
Caution
If ink gets in the eyes or mouth, or stains the skin, treat the area as follows.
❏ If ink adheres to your skin, immediately wash it off using soapy water.
❏ If ink enters your eyes, rinse immediately with water. Failure to observe this precaution could result inbloodshot eyes or mild inflammation. If you notice any abnormalities, consult a physician immediately.
❏ If ink enters your mouth, consult a physician immediately.
Do not disassemble ink cartridges.
If it is disassembled, ink could get in your eyes or adhere to your skin.
Do not shake the ink cartridges too hard.
Ink may leak from the cartridge if you shake it too hard.
Do not rub the edges of the printing paper with your hand.
The edges of the paper are thin and sharp and could cause an injury.
Do not store ink cartridges within the reach of children.
SL-D700 Operation Guide
Introduction
17
Notes on Usage
Notes when Handling the Main Unit
❏ Do not suddenly change the temperature in the room where this printer is installed.
If the temperature changes suddenly, drops of water (condensation) could occur inside the printer which mayhave an adverse effect on operations.
❏ Use the printer in an environment with a temperature of 10 to 35˚C, and a humidity of 20 to 80%. When the printeris placed on a system rack, make sure the environment of the rack is within these ranges.
❏ Do not place any containers containing water, such as vases or cups, on the printer. If water enters the printer, itmay breakdown. Also, do not put any heavy objects on the printer.
❏ The printer is equipped with several airflow vents. The airflow vents allow air to go in and out of the printer. Do notblock these airflow vents by placing any objects near them, or by covering them with film sheets or paper.
❏ Do not use accessories designed for this printer with any other products.
❏ If the printer's covers are opened during printing, a safety device is activated and printing is stoppedautomatically. Do not turn off the printer in this condition. This could cause the print head nozzles to dry andprint quality to decline.
❏ If the printer is not used for an extended period of time, make sure you leave the Ink cartridges and MaintenanceCartridge installed.
❏ Do not leave the printer for more than three days in a state in which the power was turned off due to a power outageand so on. Paper may curl which could cause a decline in printer performance.
❏ Contact our service support when transporting the printer.
Notes on the Paper
Notes on Handling
Use paper recommended by our company.
Note the following points when handling the paper.
❏ Do not bend the paper or scratch the surface of the printable side.
❏ Do not touch the printable side of the paper. Moisture and oil from hands can have an adverse effect on the printquality.
❏ Handle the paper by the edges. We recommend wearing cotton gloves.
❏ Do not throw away the paper packaging as you can use it for storing the paper.
❏ Do not wet the paper.
❏ Do not use paper that is wrinkled, scuffed, torn, or dirty.
SL-D700 Operation Guide
Introduction
18
Notes on storage
Before and after opening the paper, store it in an environment that is not subject to direct sunlight and meets thefollowing conditions. If paper is not being used after it has been opened, remove it from the spindle unit and wind it upbefore storing.
Notes on printing
Make sure that the leading edge of the paper is perpendicular to the long side and cut completely straight.
Storing and displaying print outs
❏ Make sure you do not rub or scratch the printed side.
❏ Avoid locations that are subject to high temperature, humidity, and direct sunlight, and store in a dark place.
❏ Avoid displaying print outs outdoors or in direct sunlight. This may accelerate the fading.
❏ When displaying print outs indoors, we recommend placing them in glass frames and so on. This allows you todisplay your print outs for a long time without them fading.
Notes on Ink Cartridges
❏ If you move the ink cartridges from a cold place to a warm place, leave them at room temperature for more thanfour hours before use.
❏ We recommend that ink cartridges be stored in a cool location and used before the expiry date printed on thepackaging. Also, the ink cartridges should be used within six months of opening.
❏ Do not touch the ink supply port on the ink cartridge or its surrounding area. Ink may leak from it.
❏ The ink level and other data are stored in the IC chip, allowing ink cartridges to be used after being removed andreplaced.
❏ To avoid getting dirt on the ink supply port, store the removed ink cartridge properly. The ink supply port has avalve in it so it does not need to be capped.
❏ Removed ink cartridges may have ink around the ink supply port, so be careful not to get any ink on thesurrounding area when removing the cartridges.
❏ Do not touch the green chip on the ink cartridge; otherwise you may not be able to print properly.
❏ Do not drop or knock ink cartridges against hard objects; otherwise, the ink may leak.
❏ Even while nothing is printed, the printer uses ink from all cartridges during head cleaning and other maintenanceoperations to keep the print head in good condition.
❏ Although the ink cartridges may contain recycled materials, this does not effect printer function or performance.
❏ Do not leave the printer without ink cartridges installed. The inks inside the printer may dry and you may not beable to print. When you are not using the printer, make sure there is an ink cartridge installed in each slot.
❏ Install ink cartridges into each slot. You cannot print if any of the slots are empty.
SL-D700 Operation Guide
Introduction
19
❏ To maintain the quality of the head, the printer stops printing before ink cartridges are completely expended;therefore, some ink is left in used cartridges.
❏ Do not dismantle or remodel ink cartridges. You may not be able to print properly.
Disposing of Used Ink Cartridges and Maintenance Cartridges
Dispose of consumables and optional parts in accordance with your local laws and statutes, such as by entrusting themto an industrial waste disposal company.
Introducing the Software
You need to install the printer driver on your computer to use the printer.
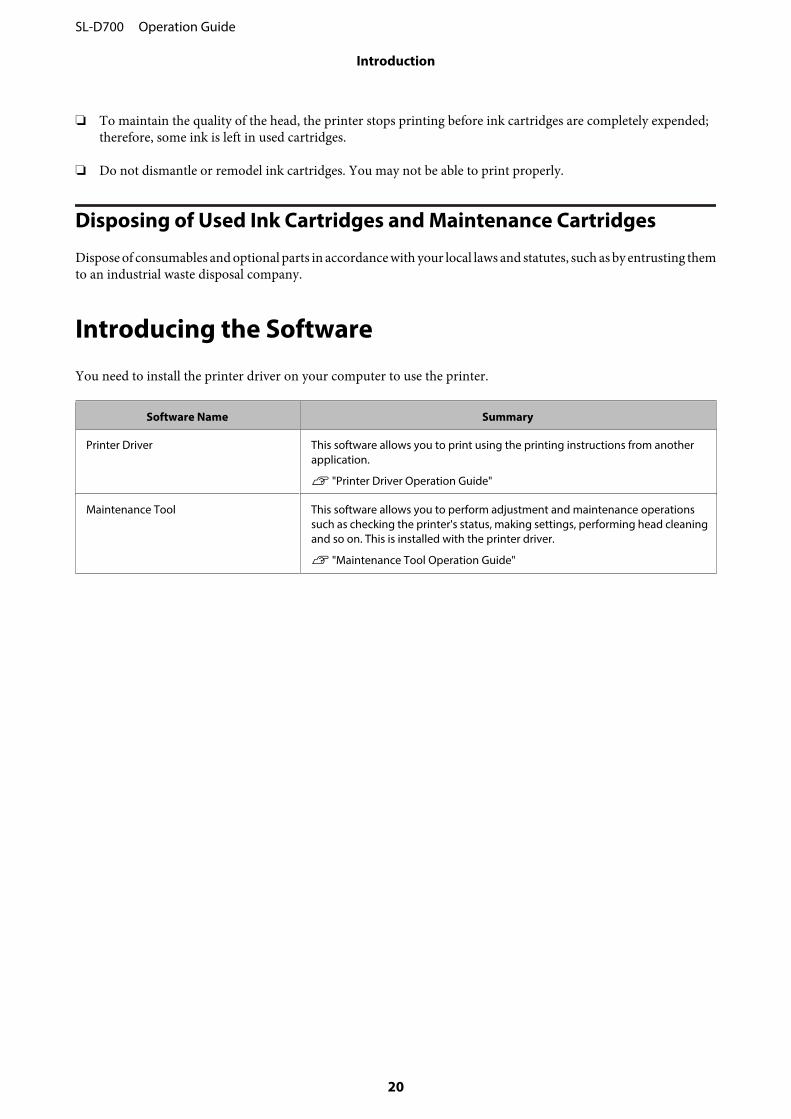
Software Name Summary
Printer Driver This software allows you to print using the printing instructions from anotherapplication.
U "Printer Driver Operation Guide"
Maintenance Tool This software allows you to perform adjustment and maintenance operationssuch as checking the printer's status, making settings, performing head cleaningand so on. This is installed with the printer driver.
U "Maintenance Tool Operation Guide"
SL-D700 Operation Guide
Introduction
20
Printing Methods
Basic Printing Methods
Open the printer driver screen on the connected computer, and then make settings such as the Paper Type and PaperSize.
See the "Printer Driver Operation Guide" for more details on the printer driver.
A Load paper into the printer.
U “Replacing Paper” on page 23
B Display the print screen for the application you are using.
Click Print (or Print... and so on) from the File menu.
Operations may differ depending on the application software being used. See the manual supplied with theapplication for more details.
C Display the printer driver's screen from the application's print screen.
In Windows, select this printer, and then click Print Settings (or Detailed Settings or Properties).
In Mac OS X, select this printer, and then select Print Settings from the list.
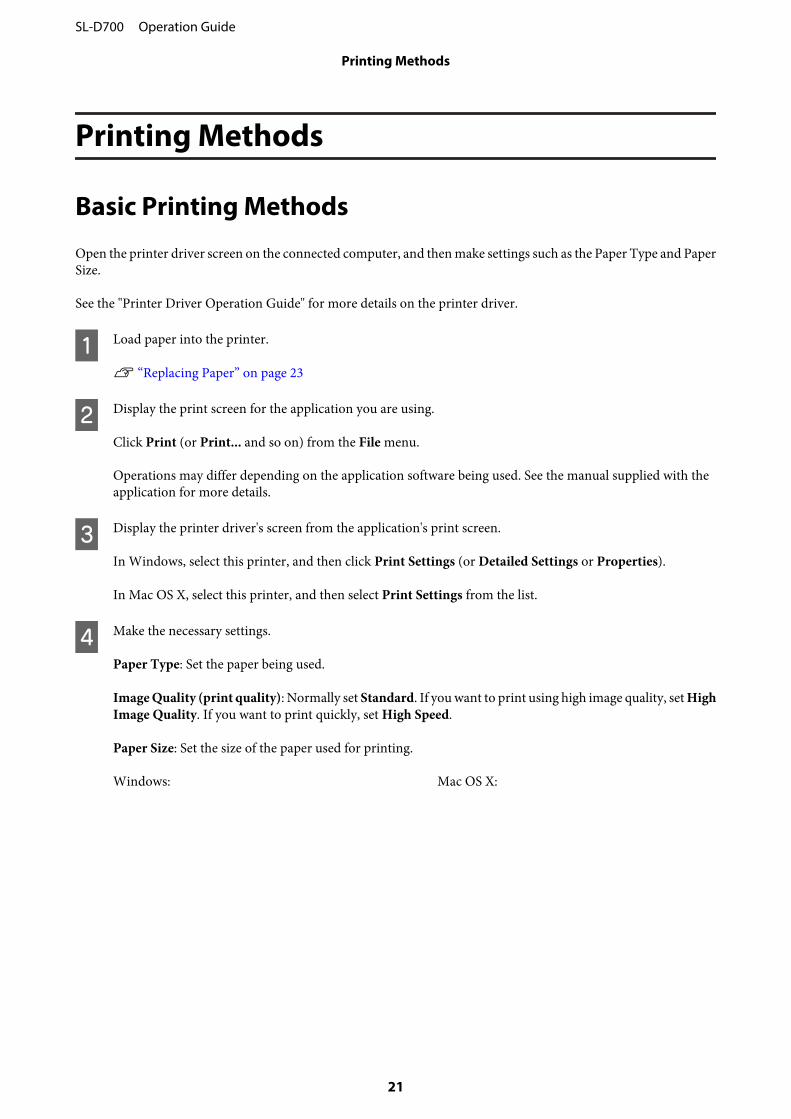
D Make the necessary settings.
Paper Type: Set the paper being used.
Image Quality (print quality): Normally set Standard. If you want to print using high image quality, set HighImage Quality. If you want to print quickly, set High Speed.
Paper Size: Set the size of the paper used for printing.
Windows: Mac OS X:
SL-D700 Operation Guide
Printing Methods
21
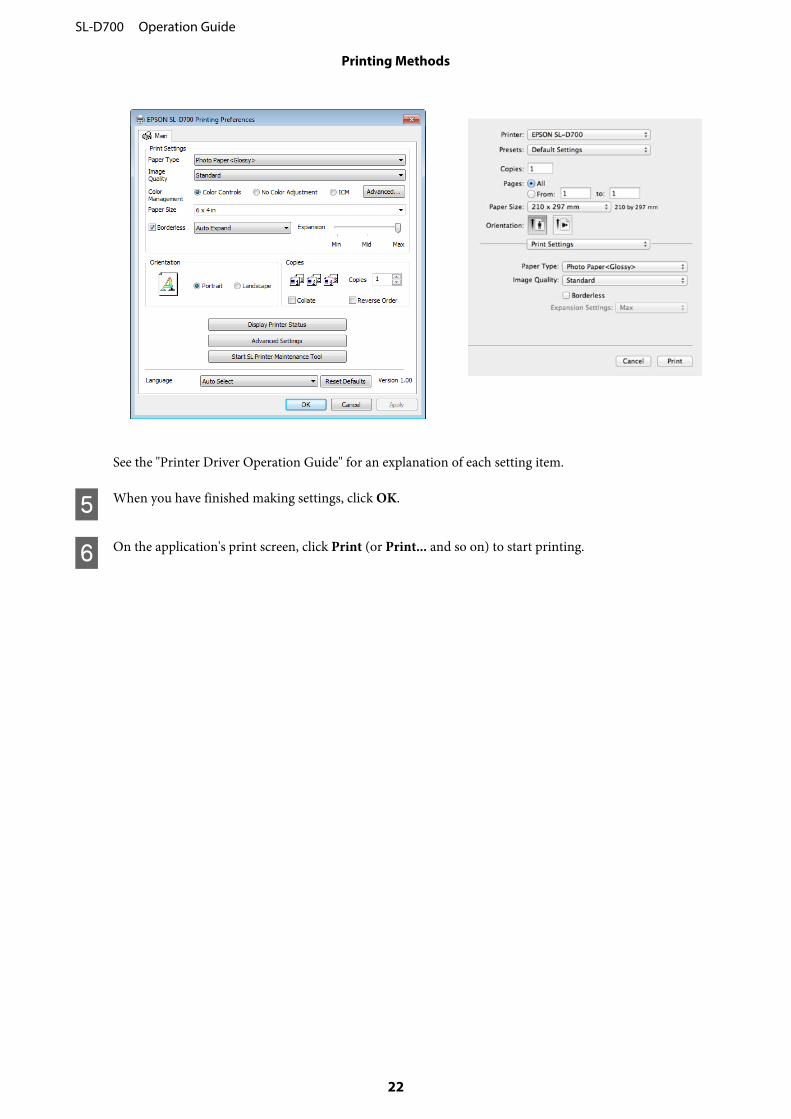
See the "Printer Driver Operation Guide" for an explanation of each setting item.
E When you have finished making settings, click OK.
F On the application's print screen, click Print (or Print... and so on) to start printing.
SL-D700 Operation Guide
Printing Methods
22
Replacing Paper
This section explains how to remove paper from the roll paper feeder, and load new paper.
c Important:Make sure the Paper Type setting in the Maintenance Tool matches the paper being loaded. Change the Paper Typesetting straight after replacing paper.
U “Changing Paper Settings” on page 37
Note:❏ If the leading edge of the paper is ragged, cut it in a straight line with a pair of scissors and so on, and then load.
❏ See the following for supported paper types.
U “Printer Specifications” on page 96
❏ The following conditions are necessary when replacing paper with the same paper width and type.
❏ Before replacing, note the current paper level.
❏ When replacing paper, the paper level after replacement is set with the Maintenance Tool.
If the Paper Level is not set correctly, the level displayed may not be correct.
U “Changing Paper Settings” on page 37
❏ You can load paper with a width of 102 to 210 mm in the roll paper feeder.
How to replace
Preparing to Replace Paper
Prepare the following items.
Item Prepared Explanation
New paper for loading -
Cloth or vinyl rug Spread it out where the spindle unit will be loaded/removed so that the paper does notbecome soiled.
Soft cloth Clean the leading edge of the paper before installing.
Gloves Wear when handling paper so that the paper does not become soiled.
Replace paper in the following order. Follow the steps for each procedure.
❏ “Recording paper level” on page 25
❏ “Removing the Spindle Unit” on page 27
❏ “Removing the Roll Paper” on page 29
SL-D700 Operation Guide
Replacing Paper
23
❏ “Attaching the Roll Paper” on page 31
❏ “Attaching the Spindle Unit” on page 32
❏ “Changing Paper Settings” on page 37
SL-D700 Operation Guide
Replacing Paper
24
Recording paper level
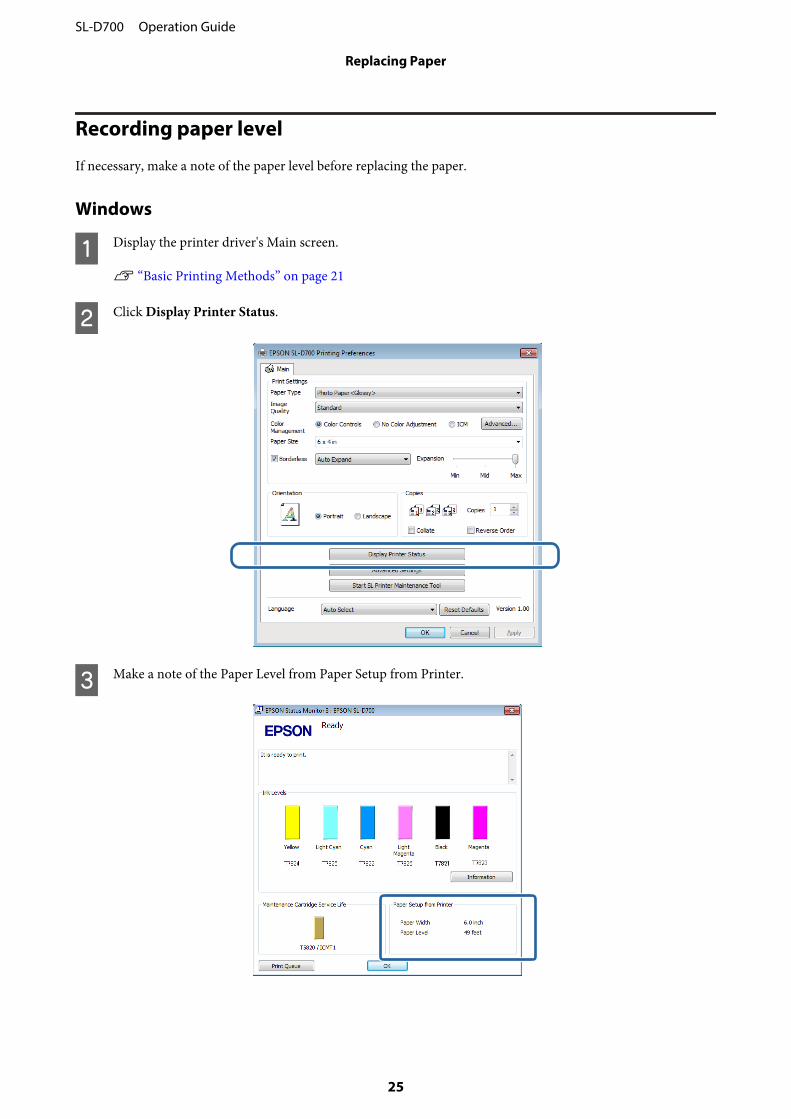
If necessary, make a note of the paper level before replacing the paper.
Windows
A Display the printer driver's Main screen.
U “Basic Printing Methods” on page 21
B Click Display Printer Status.
C Make a note of the Paper Level from Paper Setup from Printer.
SL-D700 Operation Guide
Replacing Paper
25
Mac OS X
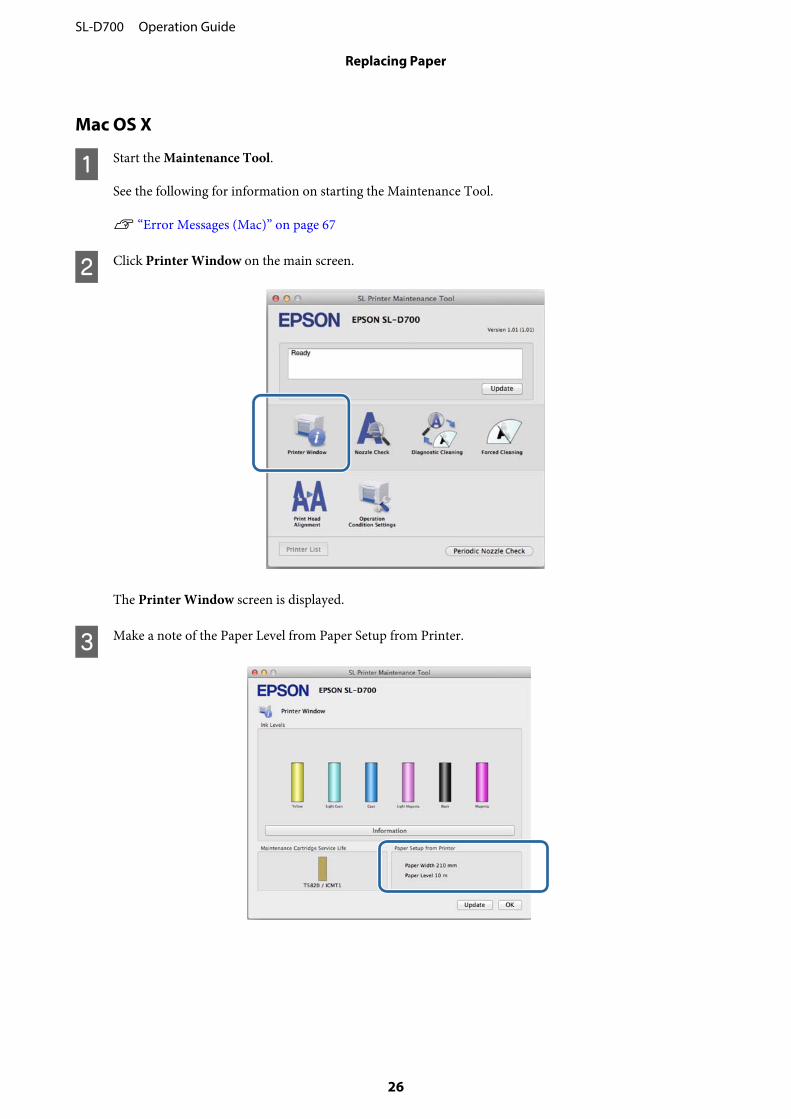
A Start the Maintenance Tool.
See the following for information on starting the Maintenance Tool.
U “Error Messages (Mac)” on page 67
B Click Printer Window on the main screen.
The Printer Window screen is displayed.
C Make a note of the Paper Level from Paper Setup from Printer.
SL-D700 Operation Guide
Replacing Paper
26
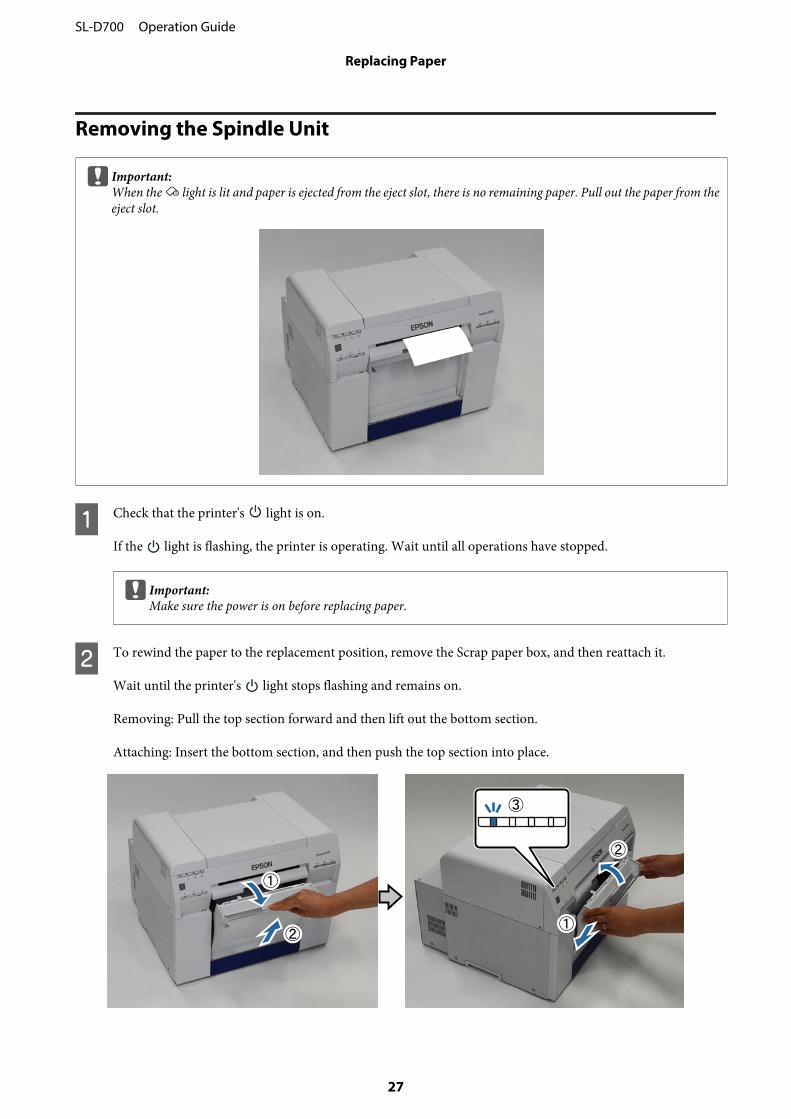
Removing the Spindle Unit
c Important:When the light is lit and paper is ejected from the eject slot, there is no remaining paper. Pull out the paper from theeject slot.
A Check that the printer's light is on.
If the light is flashing, the printer is operating. Wait until all operations have stopped.
c Important:Make sure the power is on before replacing paper.
B To rewind the paper to the replacement position, remove the Scrap paper box, and then reattach it.
Wait until the printer's light stops flashing and remains on.
Removing: Pull the top section forward and then lift out the bottom section.
Attaching: Insert the bottom section, and then push the top section into place.
SL-D700 Operation Guide
Replacing Paper
27

C Remove the Scrap paper box again and empty out the scrap paper.
U “Emptying the Scrap Paper Box” on page 60
D Grip the handle to release the lock, and then pull out the roll paper feeder.
c Important:If you cannot remove the roll paper feeder for some reason, to not try to pull it out by force. Paper may be jammedinside. When you can access the top and rear of the printer, remove the paper by following the procedure in "Paperis Jammed in the Internal Paper Feeder".
U “Paper is Jammed in the Internal Paper Feeder” on page 87
Contact your local dealer if you cannot access the top or rear of the printer.
E Turn the handle on the left of the roll paper feeder in the direction indicated by the arrow to rewind the paper.
Rewind the paper until the leading edge comes out of the paper feed slot.
SL-D700 Operation Guide
Replacing Paper
28
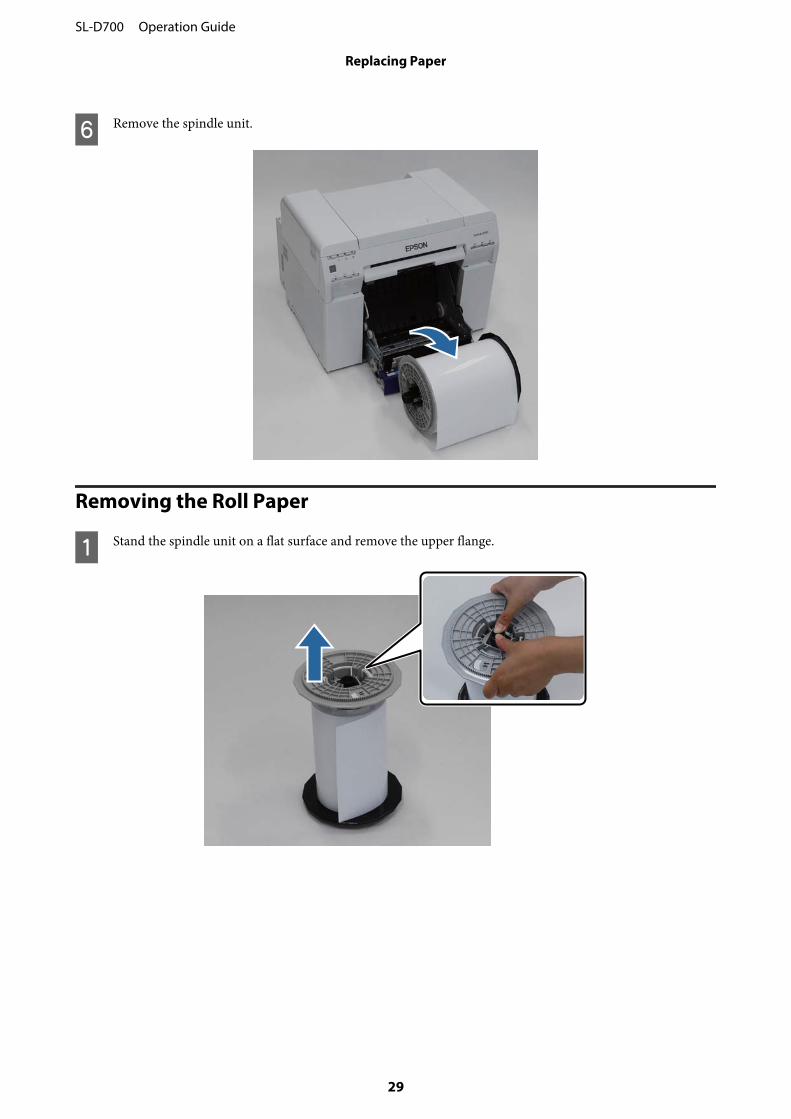
F Remove the spindle unit.
Removing the Roll Paper
A Stand the spindle unit on a flat surface and remove the upper flange.
SL-D700 Operation Guide
Replacing Paper
29
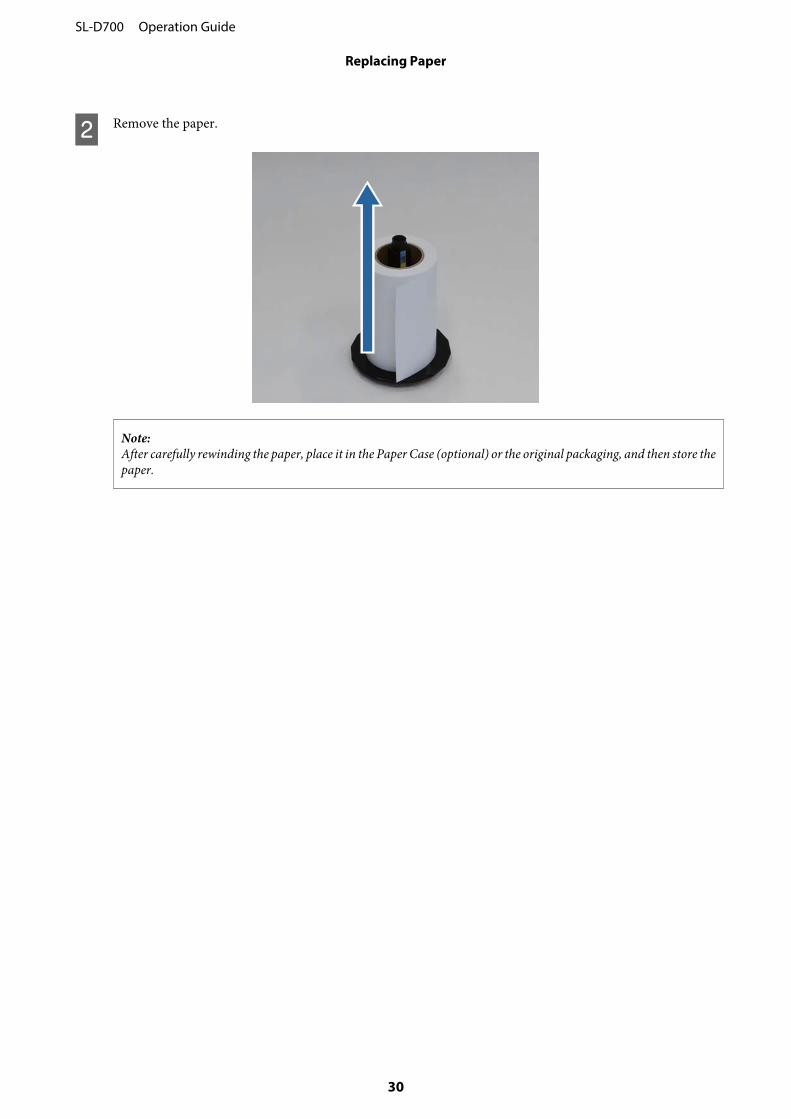
B Remove the paper.
Note:After carefully rewinding the paper, place it in the Paper Case (optional) or the original packaging, and then store thepaper.
SL-D700 Operation Guide
Replacing Paper
30
Attaching the Roll Paper
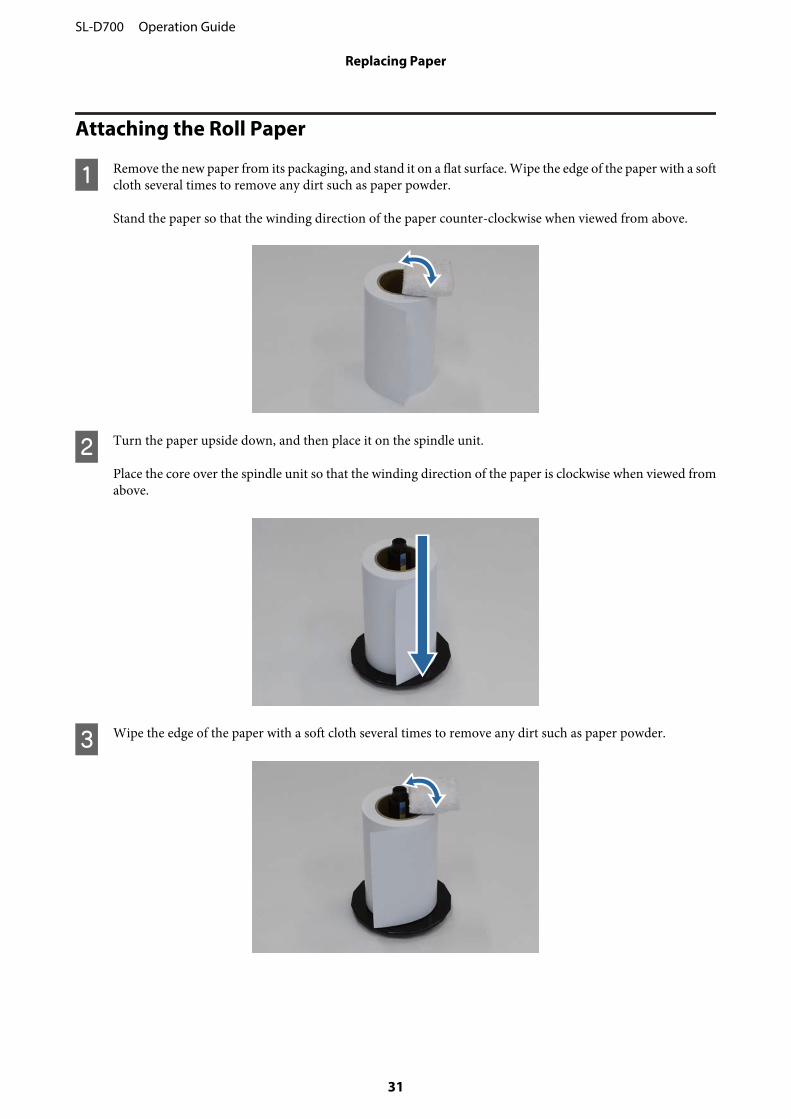
A Remove the new paper from its packaging, and stand it on a flat surface. Wipe the edge of the paper with a softcloth several times to remove any dirt such as paper powder.
Stand the paper so that the winding direction of the paper counter-clockwise when viewed from above.
B Turn the paper upside down, and then place it on the spindle unit.
Place the core over the spindle unit so that the winding direction of the paper is clockwise when viewed fromabove.
C Wipe the edge of the paper with a soft cloth several times to remove any dirt such as paper powder.
SL-D700 Operation Guide
Replacing Paper
31
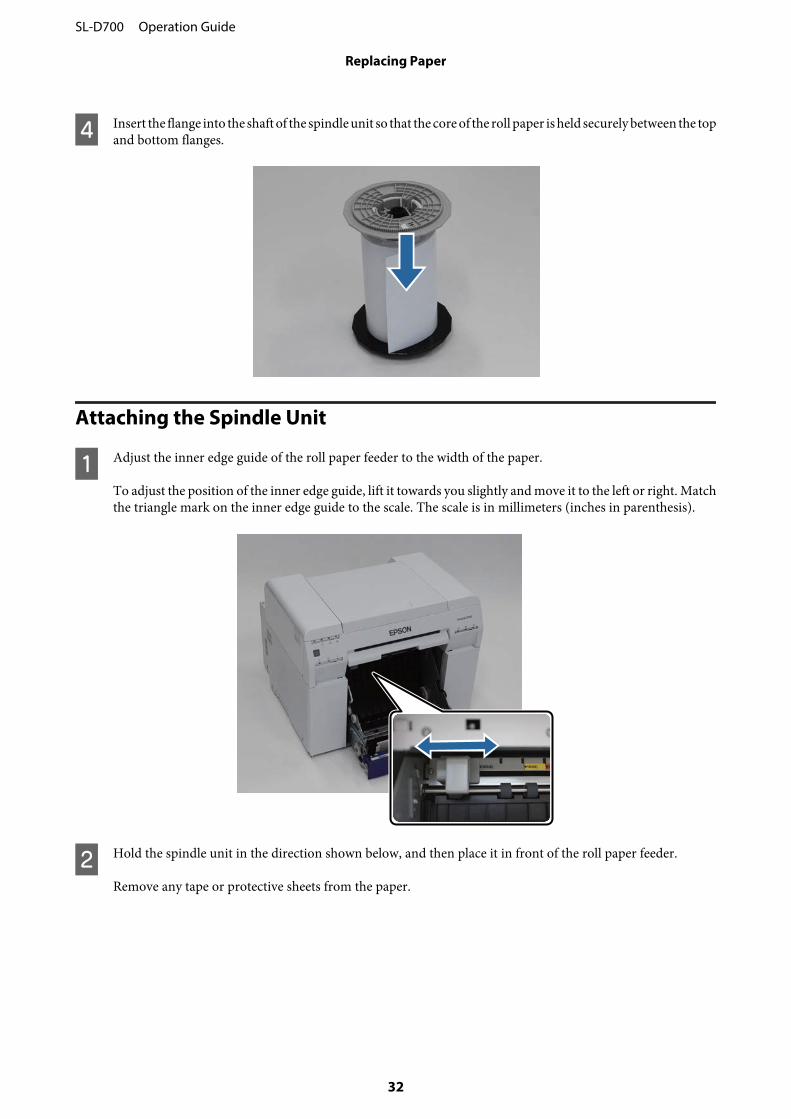
D Insert the flange into the shaft of the spindle unit so that the core of the roll paper is held securely between the topand bottom flanges.
Attaching the Spindle Unit
A Adjust the inner edge guide of the roll paper feeder to the width of the paper.
To adjust the position of the inner edge guide, lift it towards you slightly and move it to the left or right. Matchthe triangle mark on the inner edge guide to the scale. The scale is in millimeters (inches in parenthesis).
B Hold the spindle unit in the direction shown below, and then place it in front of the roll paper feeder.
Remove any tape or protective sheets from the paper.
SL-D700 Operation Guide
Replacing Paper
32
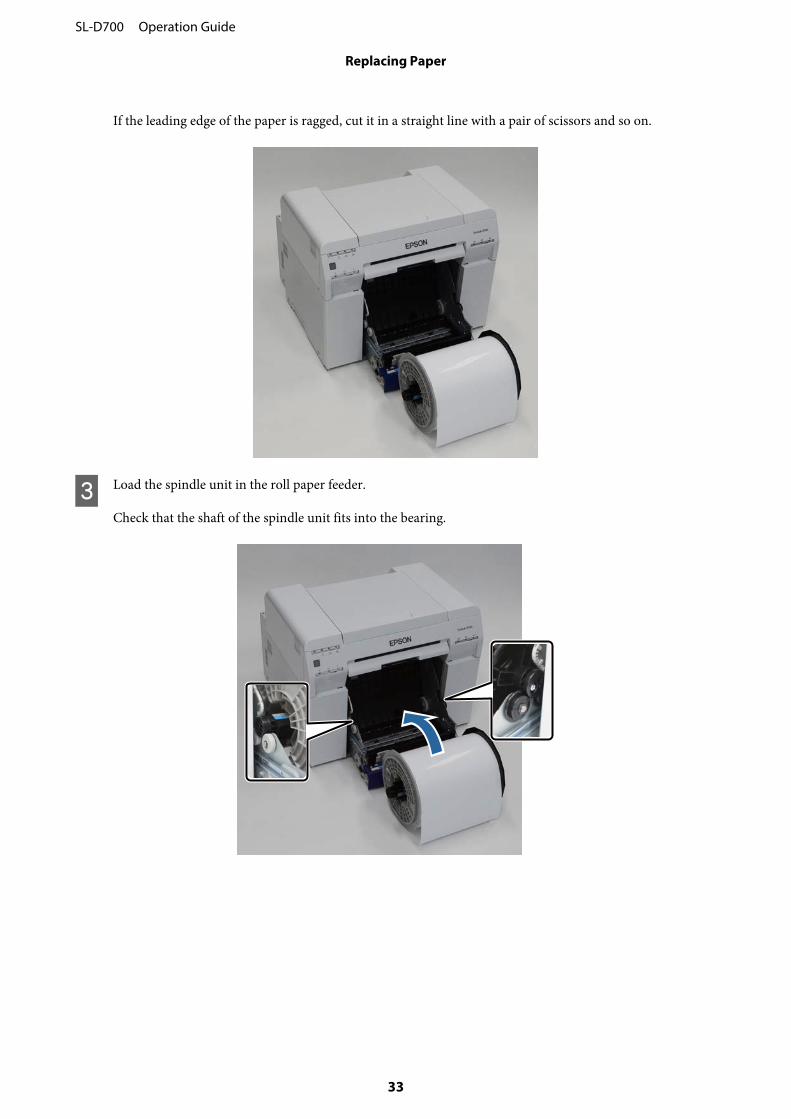
If the leading edge of the paper is ragged, cut it in a straight line with a pair of scissors and so on.
C Load the spindle unit in the roll paper feeder.
Check that the shaft of the spindle unit fits into the bearing.
SL-D700 Operation Guide
Replacing Paper
33
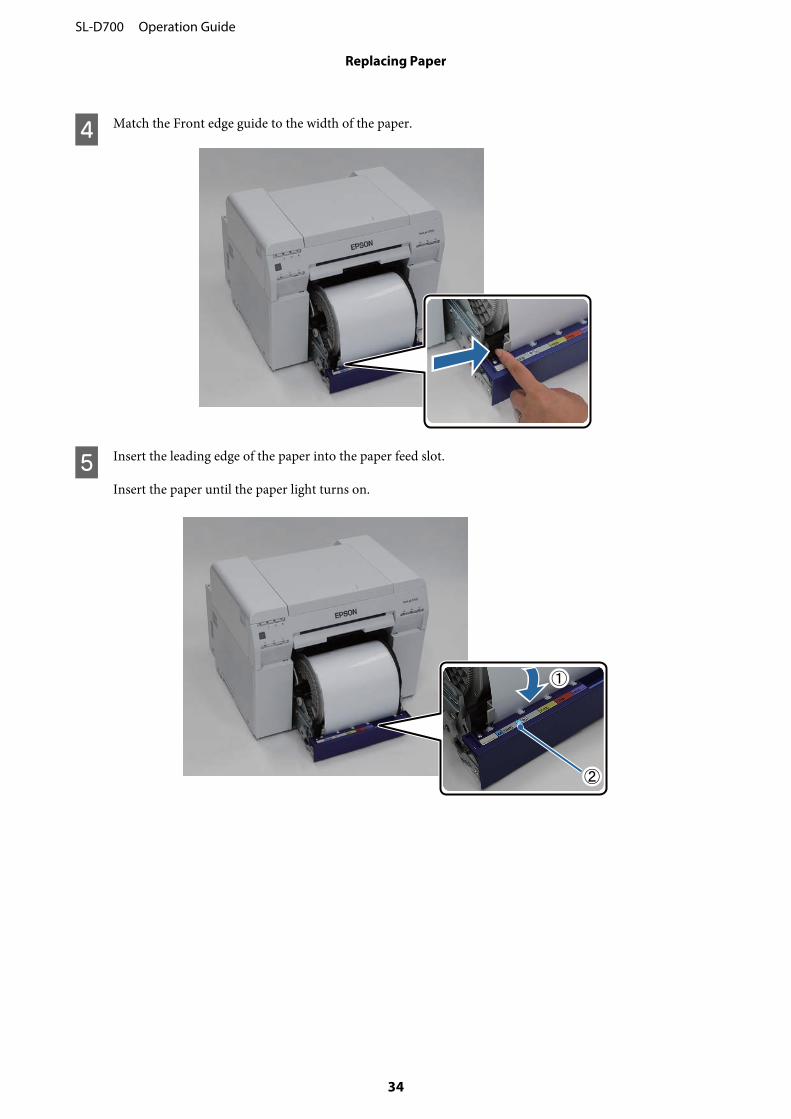
D Match the Front edge guide to the width of the paper.
E Insert the leading edge of the paper into the paper feed slot.
Insert the paper until the paper light turns on.
SL-D700 Operation Guide
Replacing Paper
34
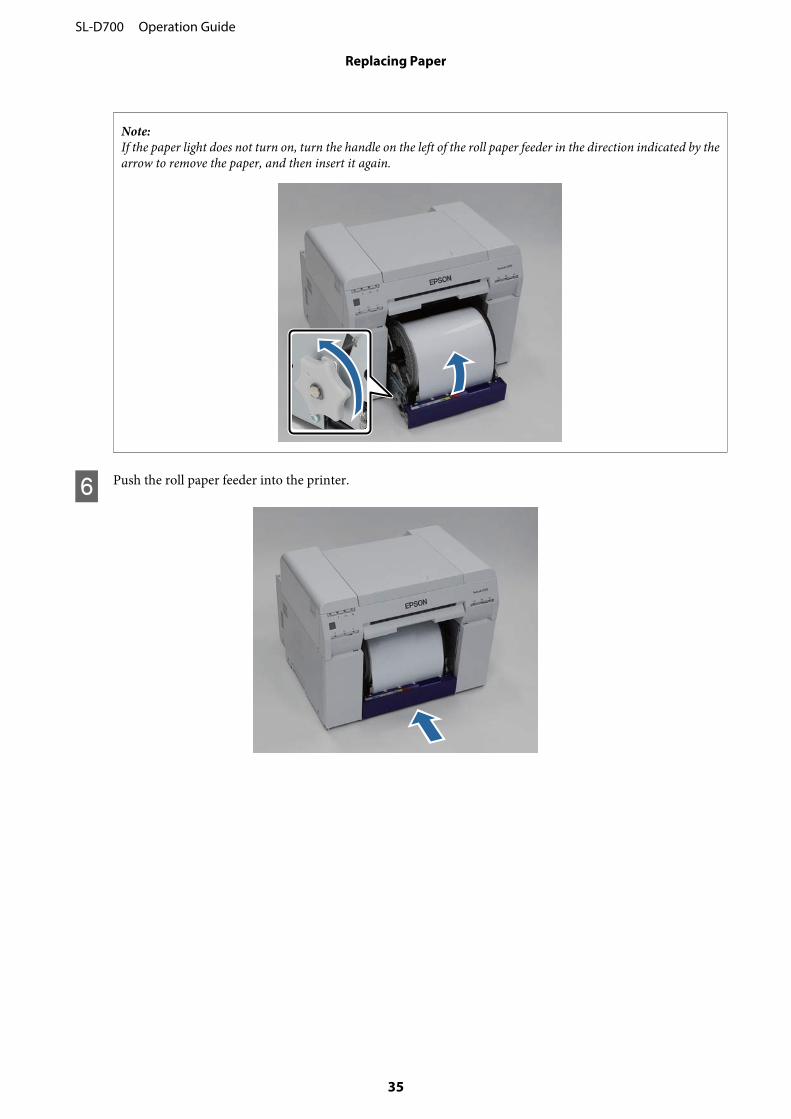
Note:If the paper light does not turn on, turn the handle on the left of the roll paper feeder in the direction indicated by thearrow to remove the paper, and then insert it again.
F Push the roll paper feeder into the printer.
SL-D700 Operation Guide
Replacing Paper
35
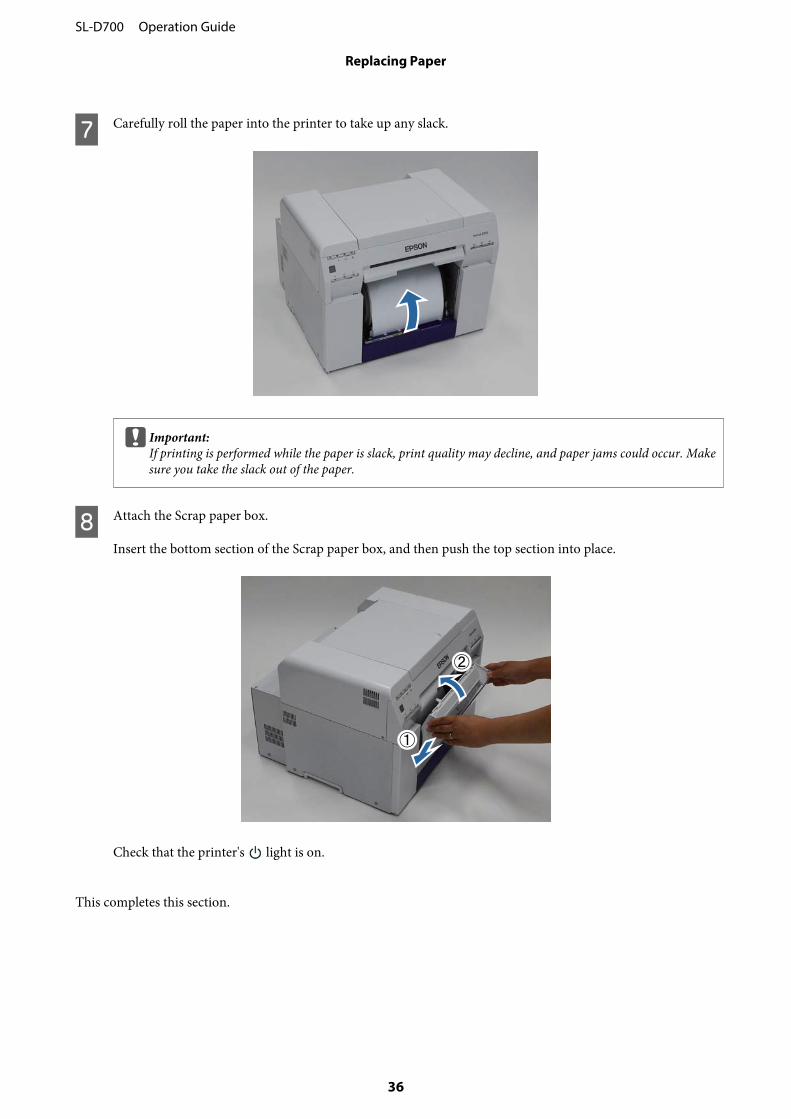
G Carefully roll the paper into the printer to take up any slack.
c Important:If printing is performed while the paper is slack, print quality may decline, and paper jams could occur. Makesure you take the slack out of the paper.
H Attach the Scrap paper box.
Insert the bottom section of the Scrap paper box, and then push the top section into place.
Check that the printer's light is on.
This completes this section.
SL-D700 Operation Guide
Replacing Paper
36
Changing Paper Settings
After replacing paper, set the Paper Type and the Paper Level in the Maintenance Tool.
See the "Maintenance Tool Operation Guide" for more details on the Maintenance Tool.
Update the paper information as necessary. See the "Maintenance Tool Operation Guide" for more details on updatingthe information.
Windows
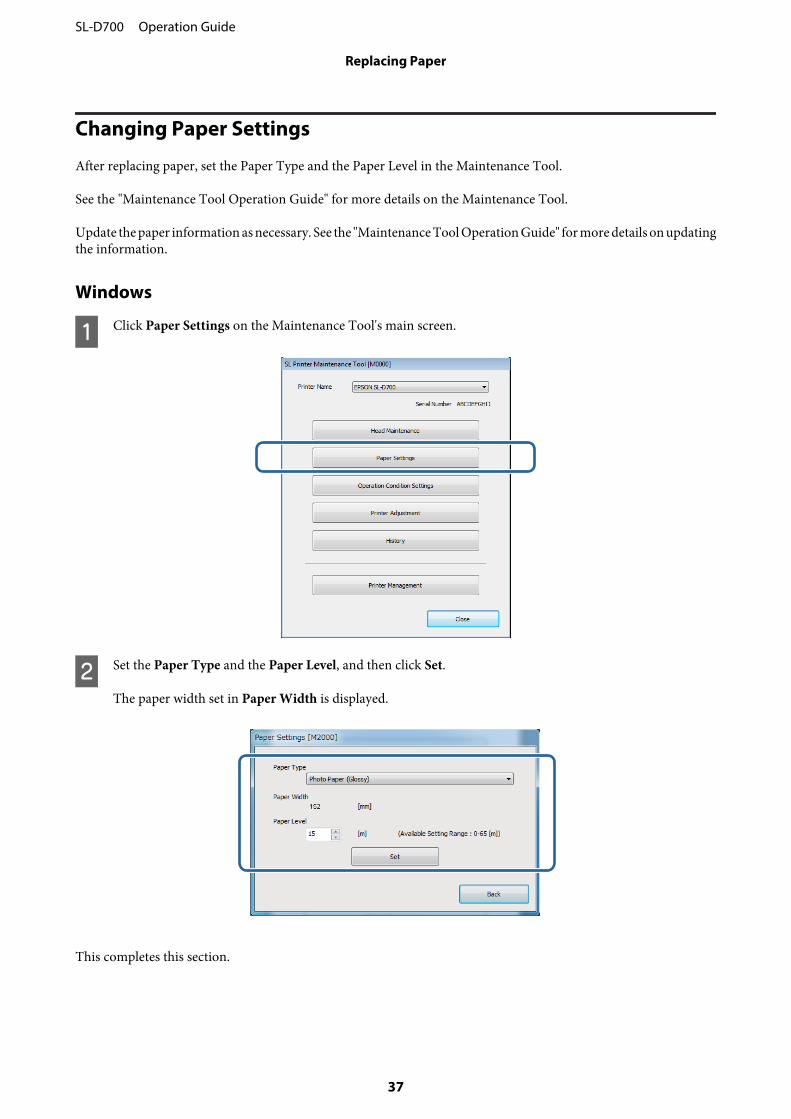
A Click Paper Settings on the Maintenance Tool's main screen.
B Set the Paper Type and the Paper Level, and then click Set.
The paper width set in Paper Width is displayed.
This completes this section.
SL-D700 Operation Guide
Replacing Paper
37
Mac OS X
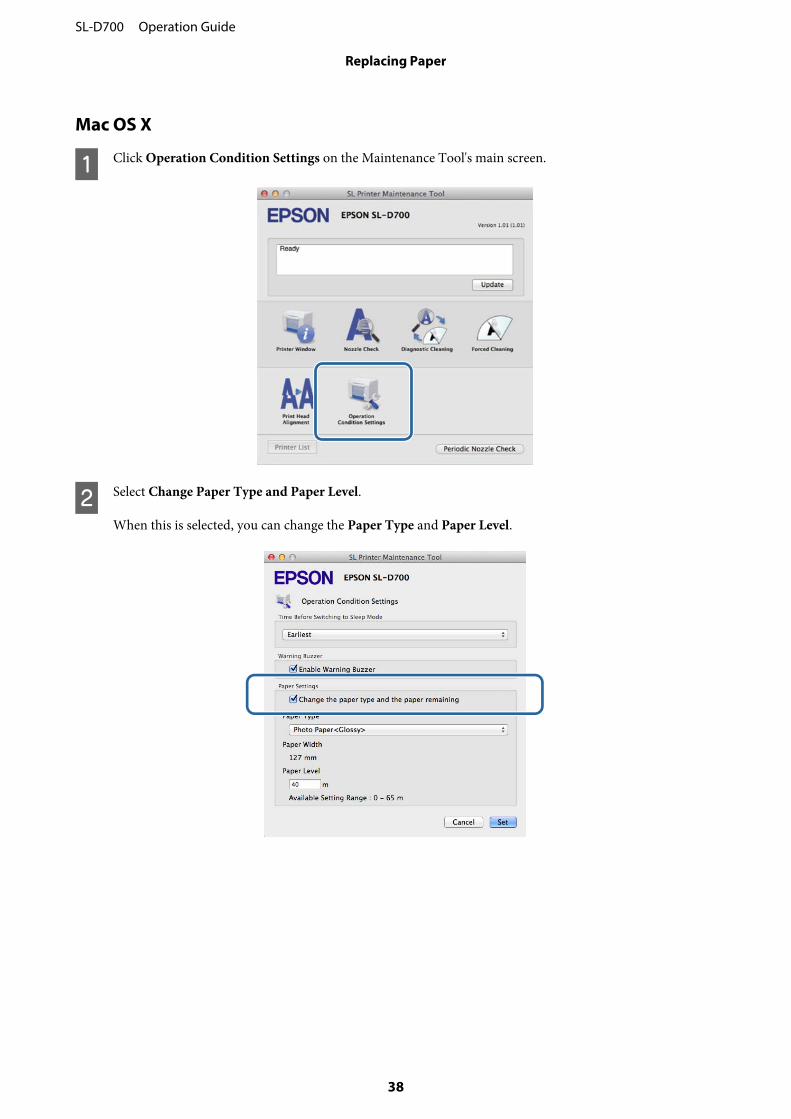
A Click Operation Condition Settings on the Maintenance Tool's main screen.
B Select Change Paper Type and Paper Level.
When this is selected, you can change the Paper Type and Paper Level.
SL-D700 Operation Guide
Replacing Paper
38
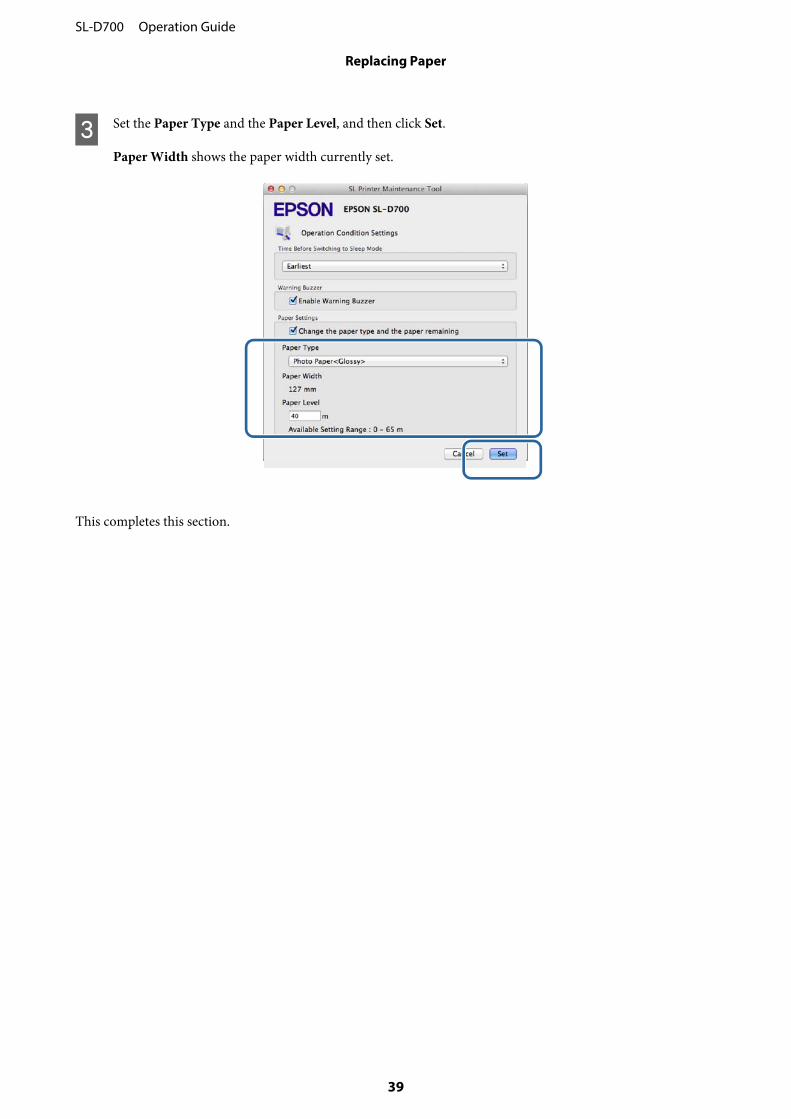
C Set the Paper Type and the Paper Level, and then click Set.
Paper Width shows the paper width currently set.
This completes this section.
SL-D700 Operation Guide
Replacing Paper
39
Ejecting Paper
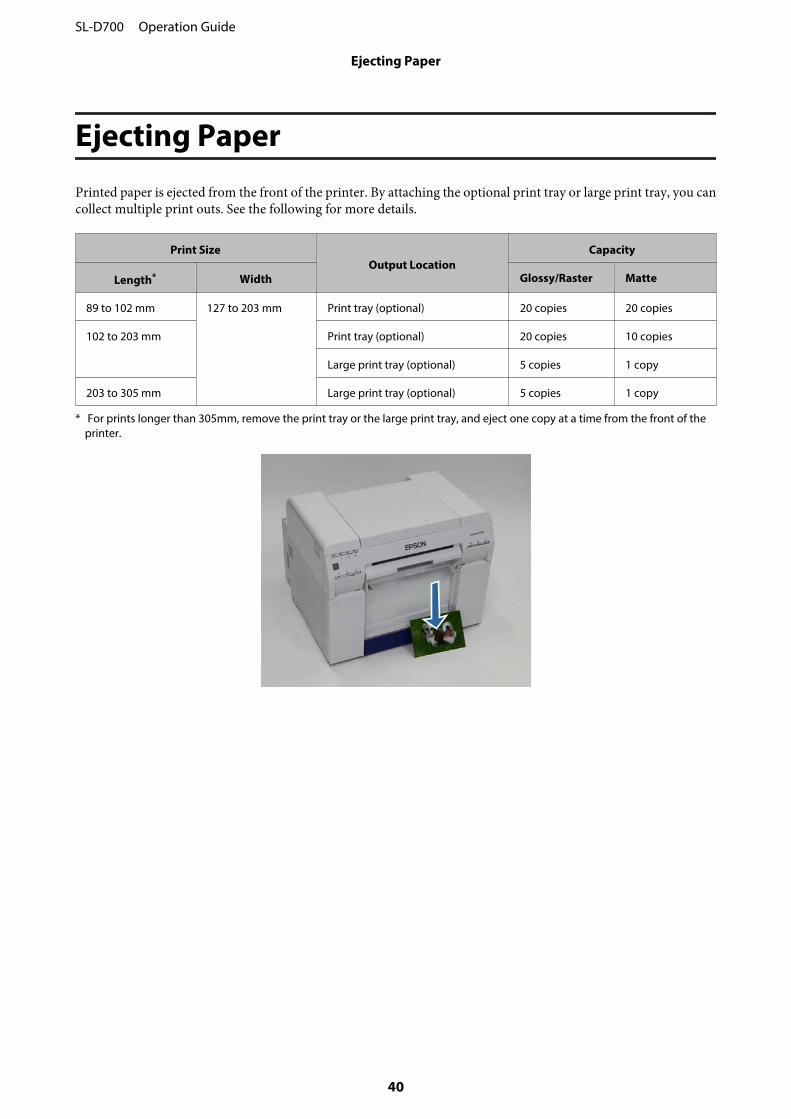
Printed paper is ejected from the front of the printer. By attaching the optional print tray or large print tray, you cancollect multiple print outs. See the following for more details.
Print SizeOutput Location
Capacity
Length* Width Glossy/Raster Matte
89 to 102 mm 127 to 203 mm Print tray (optional) 20 copies 20 copies
102 to 203 mm Print tray (optional) 20 copies 10 copies
Large print tray (optional) 5 copies 1 copy
203 to 305 mm Large print tray (optional) 5 copies 1 copy
* For prints longer than 305mm, remove the print tray or the large print tray, and eject one copy at a time from the front of theprinter.
SL-D700 Operation Guide
Ejecting Paper
40
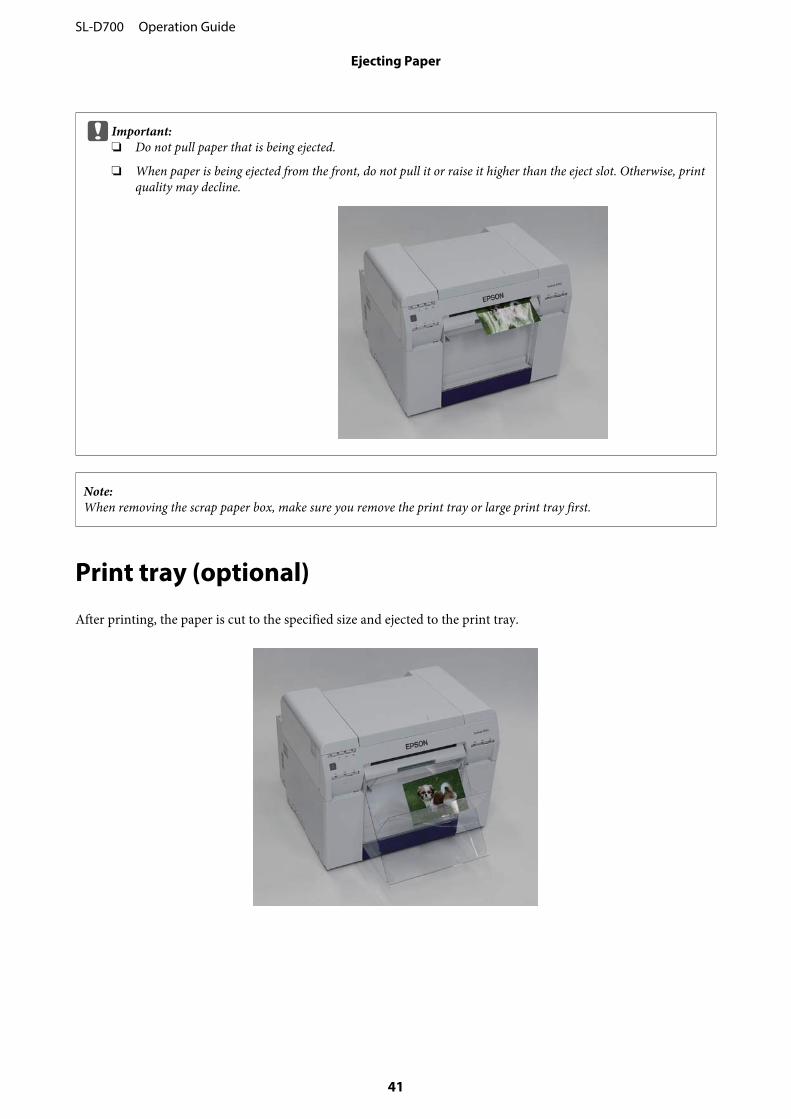
c Important:❏ Do not pull paper that is being ejected.
❏ When paper is being ejected from the front, do not pull it or raise it higher than the eject slot. Otherwise, printquality may decline.
Note:When removing the scrap paper box, make sure you remove the print tray or large print tray first.
Print tray (optional)
After printing, the paper is cut to the specified size and ejected to the print tray.
SL-D700 Operation Guide
Ejecting Paper
41

Large Print Tray (Optional)
After printing, the paper is cut to the specified size and ejected to the large print tray.
SL-D700 Operation Guide
Ejecting Paper
42
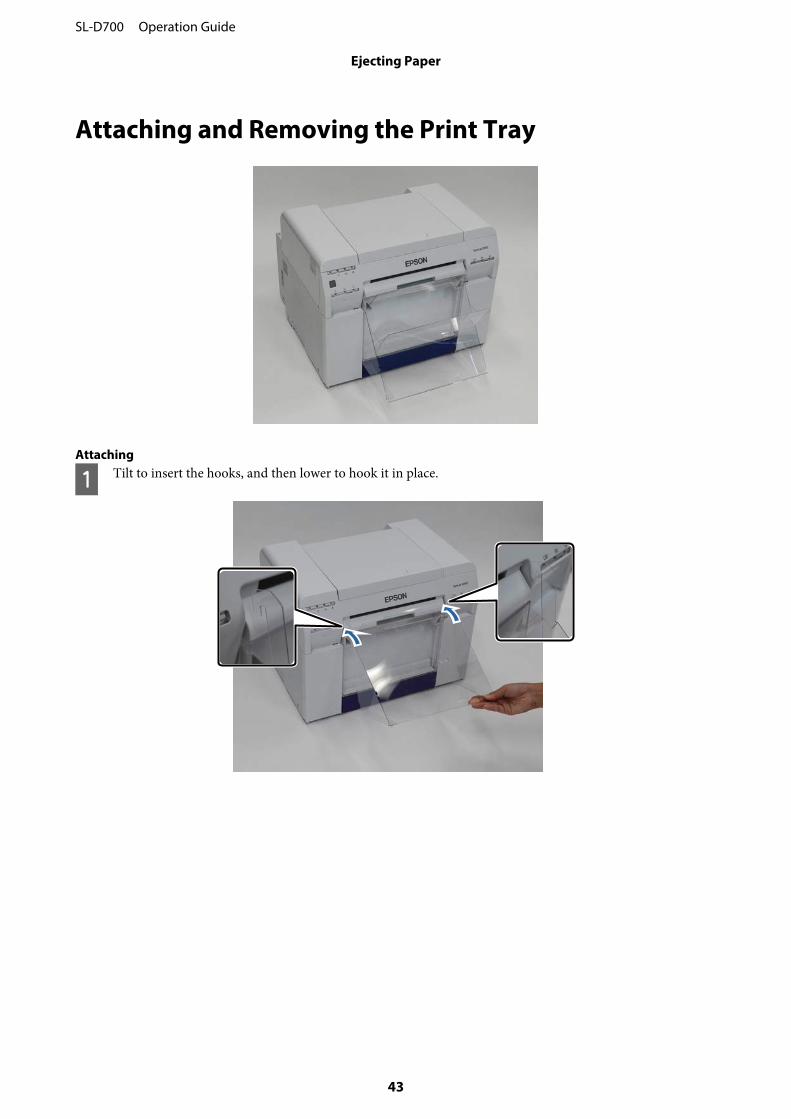
Attaching and Removing the Print Tray
Attaching
A Tilt to insert the hooks, and then lower to hook it in place.
SL-D700 Operation Guide
Ejecting Paper
43
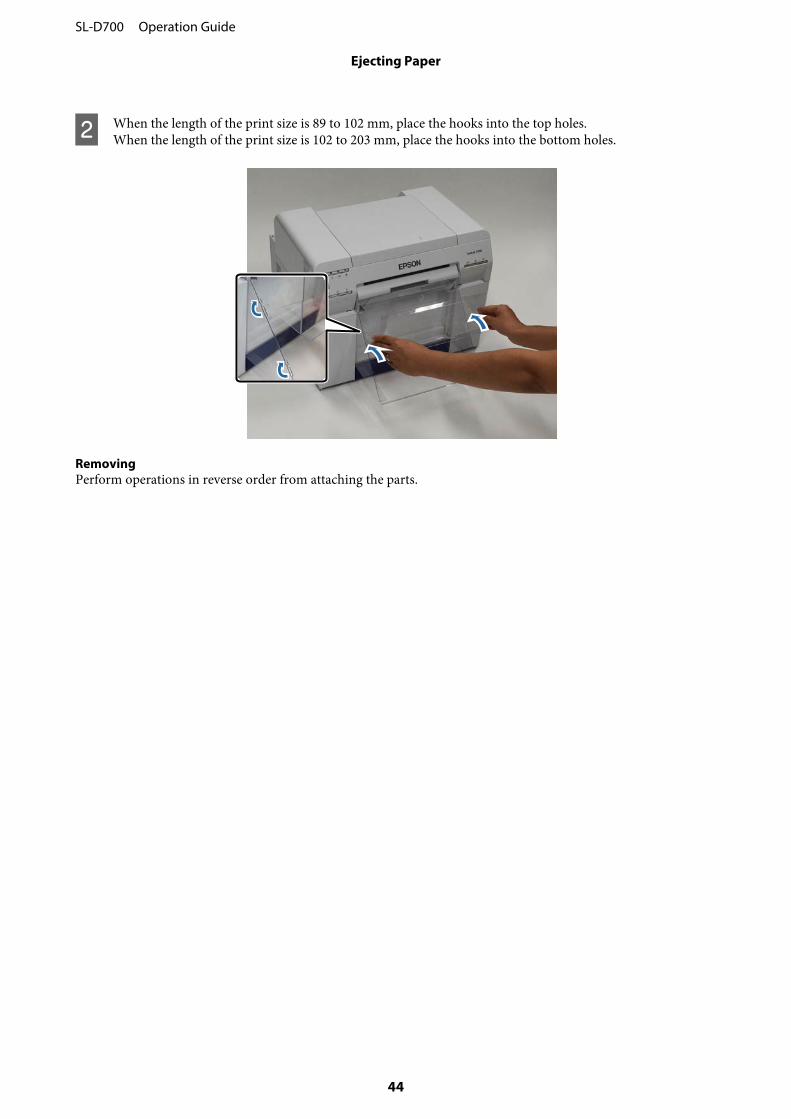
B When the length of the print size is 89 to 102 mm, place the hooks into the top holes.When the length of the print size is 102 to 203 mm, place the hooks into the bottom holes.
RemovingPerform operations in reverse order from attaching the parts.
SL-D700 Operation Guide
Ejecting Paper
44
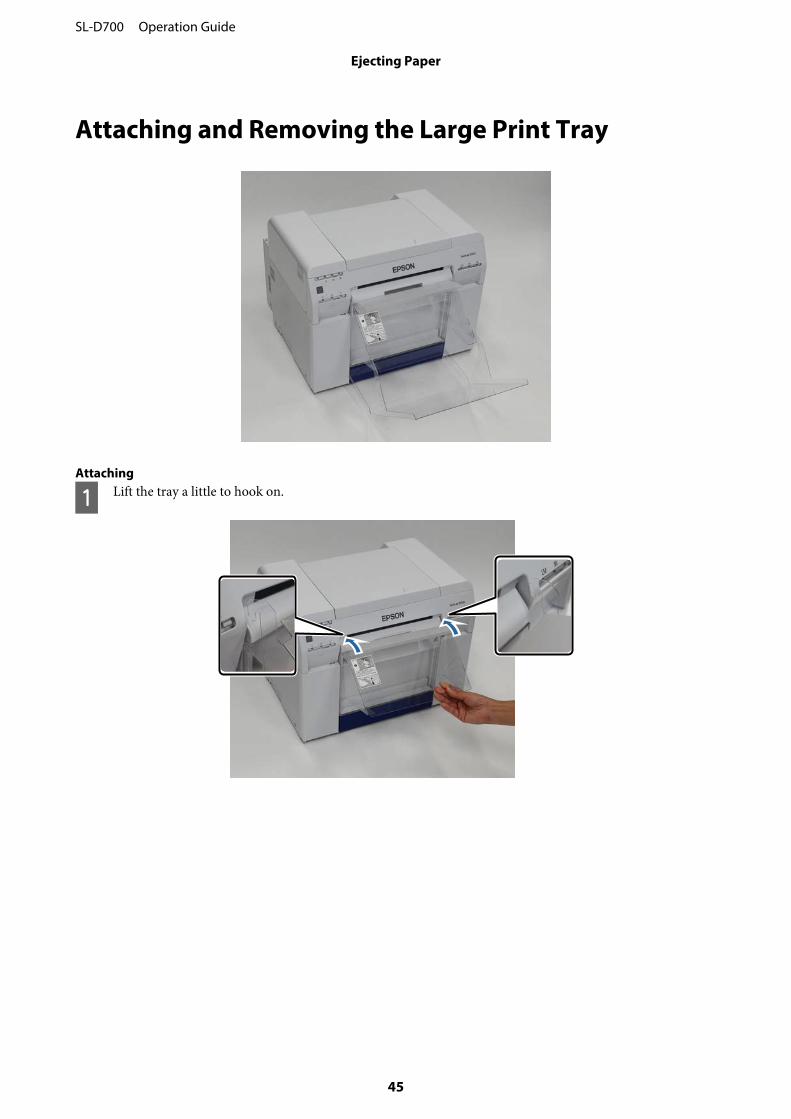
Attaching and Removing the Large Print Tray
Attaching
A Lift the tray a little to hook on.
SL-D700 Operation Guide
Ejecting Paper
45
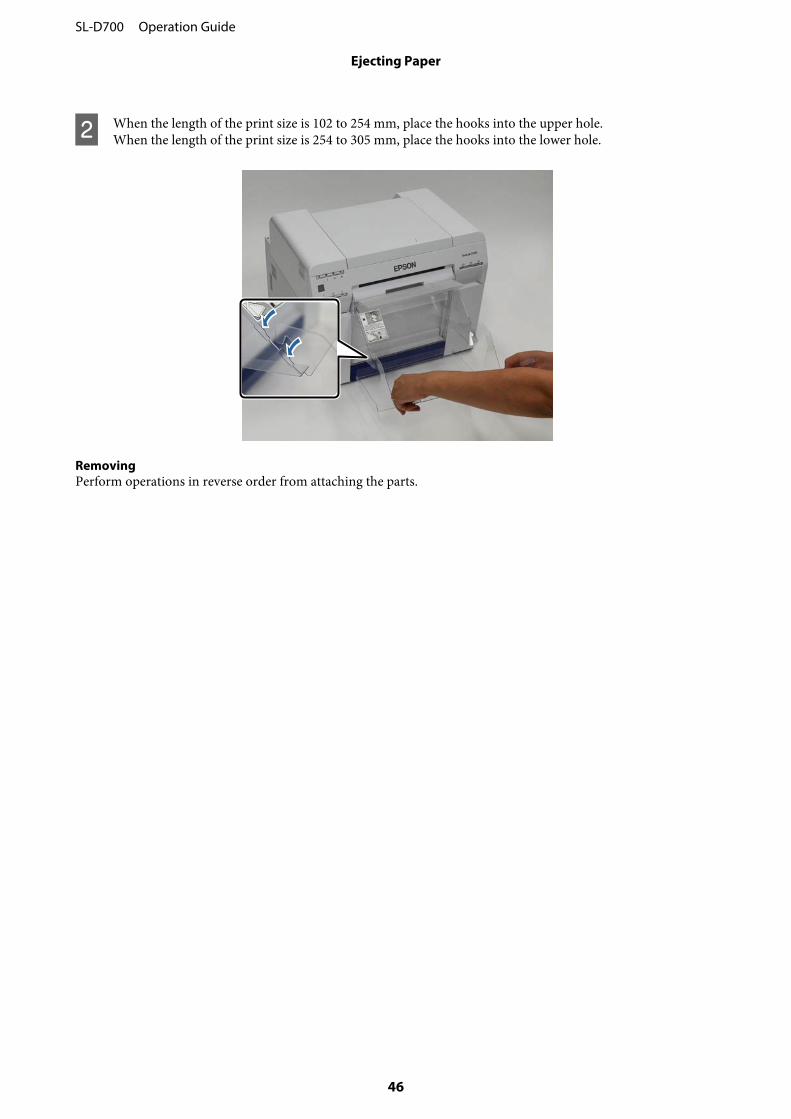
B When the length of the print size is 102 to 254 mm, place the hooks into the upper hole.When the length of the print size is 254 to 305 mm, place the hooks into the lower hole.
RemovingPerform operations in reverse order from attaching the parts.
SL-D700 Operation Guide
Ejecting Paper
46

Replacing Ink Cartridges
!Caution:❏ Do not disassemble ink cartridges.
If it is disassembled, ink could get in your eyes or adhere to your skin.
❏ Do not shake the ink cartridges too hard.
Ink may leak from the cartridge if you shake it too hard.
❏ Do not store ink cartridges within the reach of children.
❏ If ink gets in the eyes or mouth, or stains the skin, treat the area as follows.
- If ink adheres to your skin, immediately wash it off using soapy water.
- If ink enters your eyes, rinse immediately with water. Failure to observe this precaution could result in bloodshoteyes or mild inflammation. If you notice any abnormalities, consult a physician immediately.
- If ink enters your mouth, consult a physician immediately.
c Important:❏ See the following points when working with ink cartridges.
U “Notes on Ink Cartridges” on page 19
❏ If you do not have a new ink cartridge for installation, leave the expended ink cartridge in the printer until the newone is ready. If the printer is left without the ink cartridges, it may malfunction.
❏ When an ink cartridge is running low, replace it with a new ink cartridge as soon as possible.
❏ Do not leave the printer without ink cartridges installed. The inks inside the printer may dry and you may not beable to print. When you are not using the printer, make sure there is an ink cartridge installed in each slot.
Checking Ink Levels
Checking from the Printer
When the ink remaining falls below the minimum value, the ink light on the front of the printer turns on.
U “Front” on page 6
Ink light
SL-D700 Operation Guide
Replacing Ink Cartridges
47
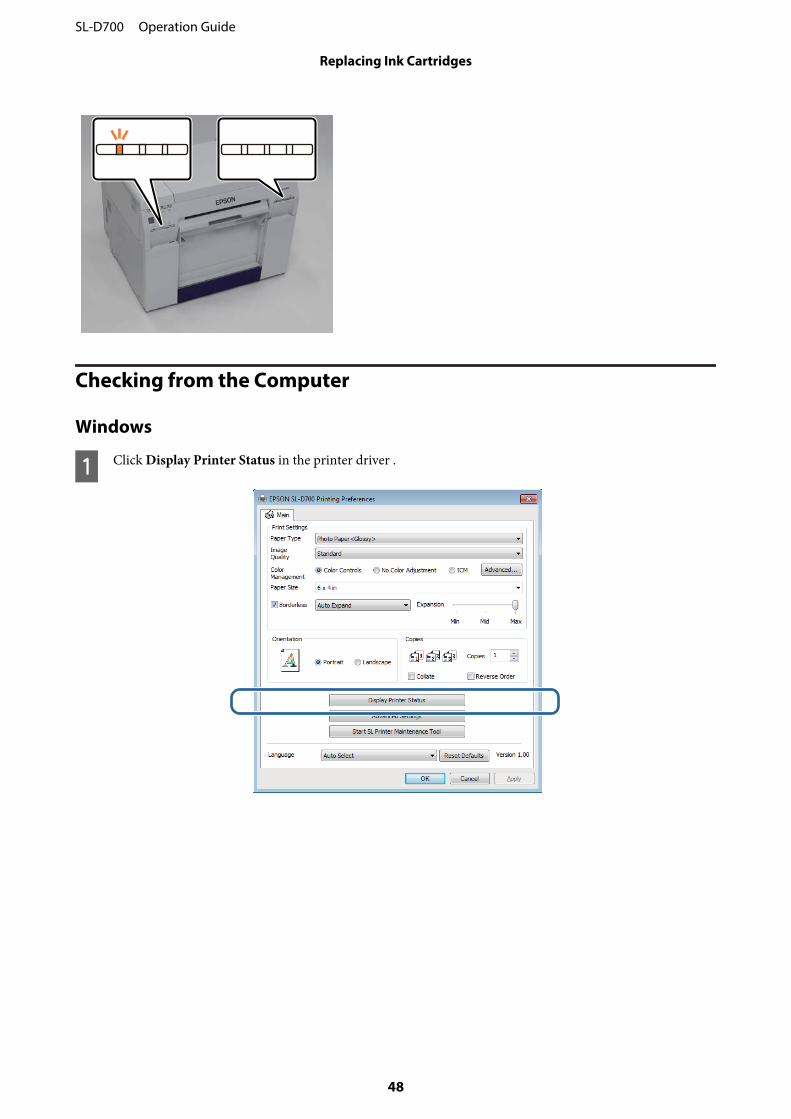
Checking from the Computer
Windows
A Click Display Printer Status in the printer driver .
SL-D700 Operation Guide
Replacing Ink Cartridges
48
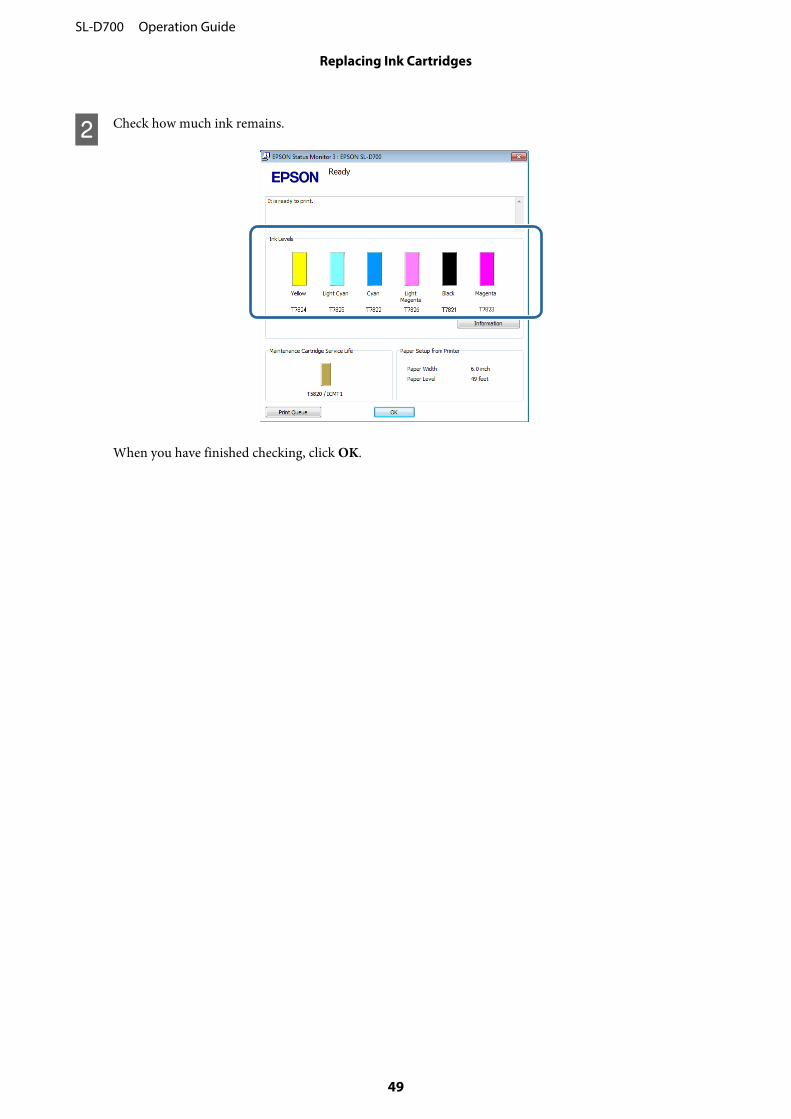
B Check how much ink remains.
When you have finished checking, click OK.
SL-D700 Operation Guide
Replacing Ink Cartridges
49
Mac OS X
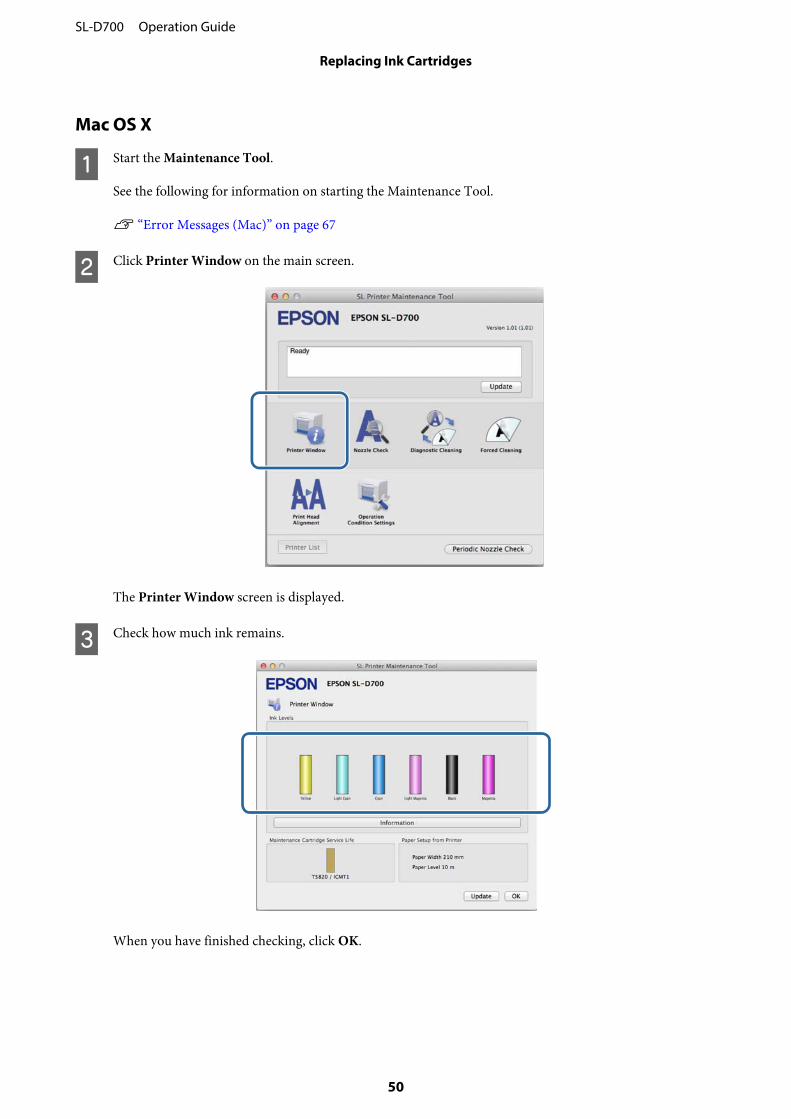
A Start the Maintenance Tool.
See the following for information on starting the Maintenance Tool.
U “Error Messages (Mac)” on page 67
B Click Printer Window on the main screen.
The Printer Window screen is displayed.
C Check how much ink remains.
When you have finished checking, click OK.
SL-D700 Operation Guide
Replacing Ink Cartridges
50

Replacement Procedure
c Important:❏ Install ink cartridges into each slot. You cannot print if any of the slots are empty.
A Check that the printer's light is on.
If the light is flashing, the printer is operating. Wait until all operations have stopped.
B The ink light indicates if it is necessary to replace the ink cartridges.
In this example we are replacing the Y (yellow) cartridge. The procedure is the same for the other colors.
C Open the cartridge cover on the side that needs to be replaced.
A warning buzzer sounds when you open the cover.
SL-D700 Operation Guide
Replacing Ink Cartridges
51
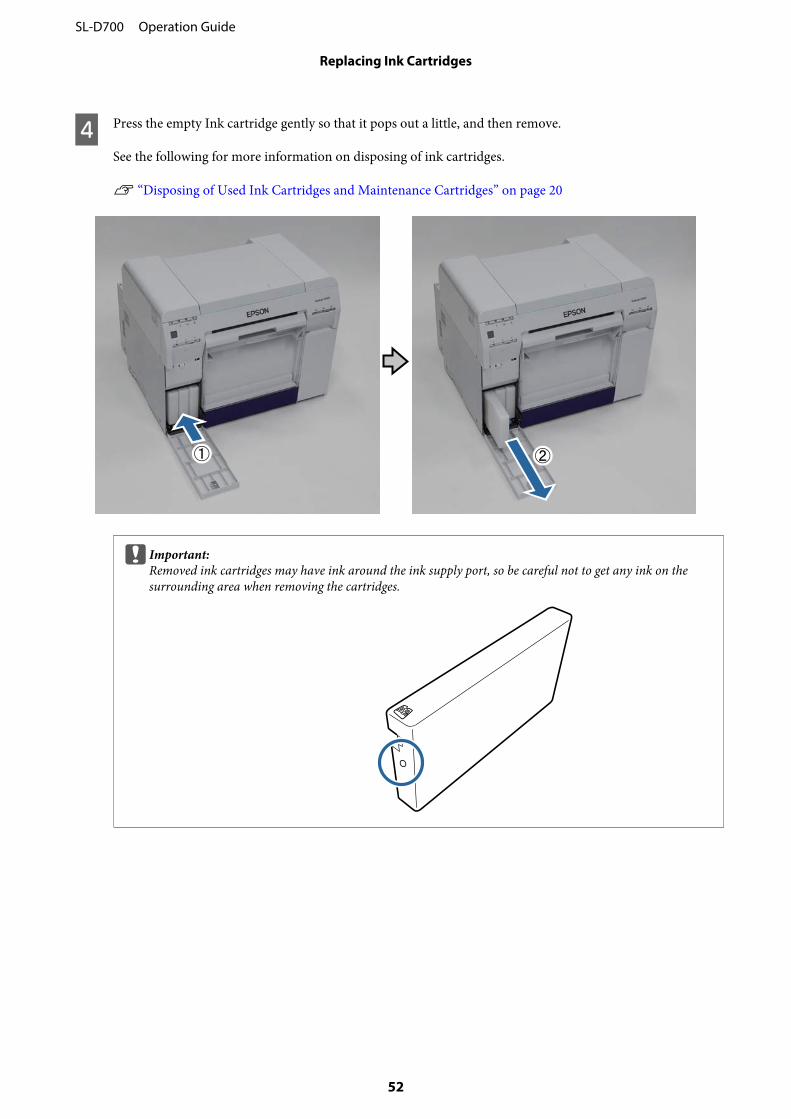
D Press the empty Ink cartridge gently so that it pops out a little, and then remove.
See the following for more information on disposing of ink cartridges.
U “Disposing of Used Ink Cartridges and Maintenance Cartridges” on page 20
c Important:Removed ink cartridges may have ink around the ink supply port, so be careful not to get any ink on thesurrounding area when removing the cartridges.
SL-D700 Operation Guide
Replacing Ink Cartridges
52
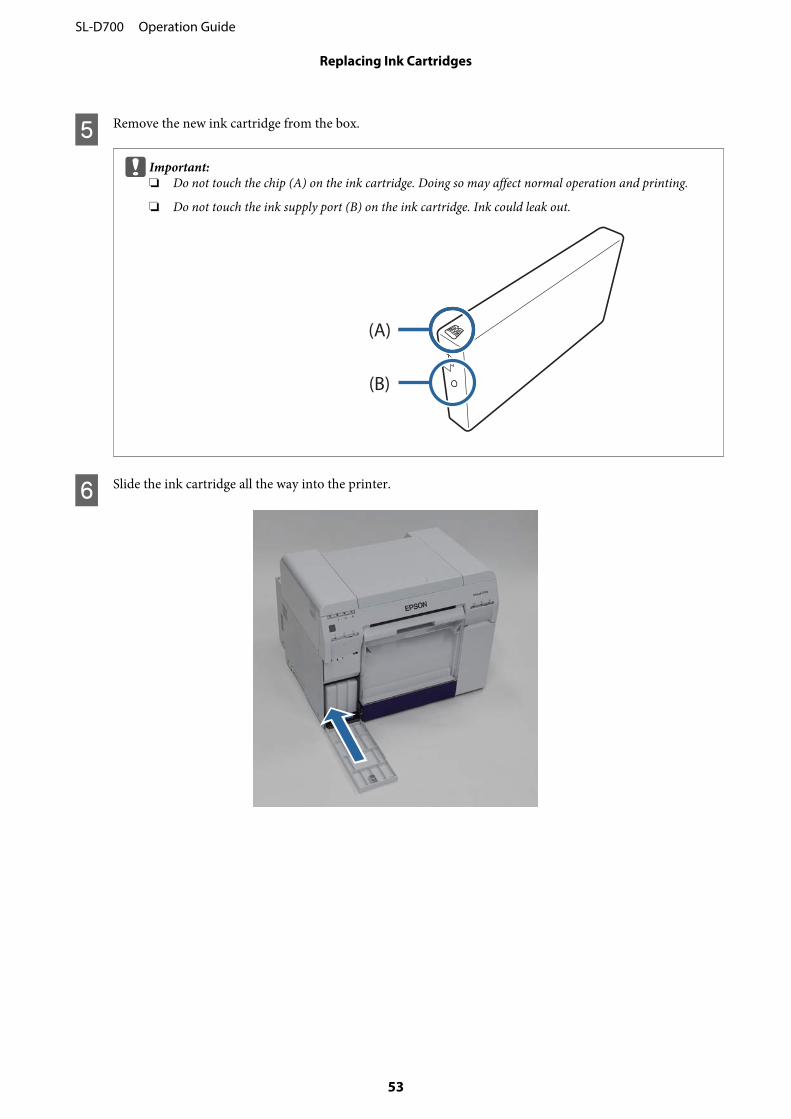
E Remove the new ink cartridge from the box.
c Important:❏ Do not touch the chip (A) on the ink cartridge. Doing so may affect normal operation and printing.
❏ Do not touch the ink supply port (B) on the ink cartridge. Ink could leak out.
(A)
(B)
F Slide the ink cartridge all the way into the printer.
SL-D700 Operation Guide
Replacing Ink Cartridges
53
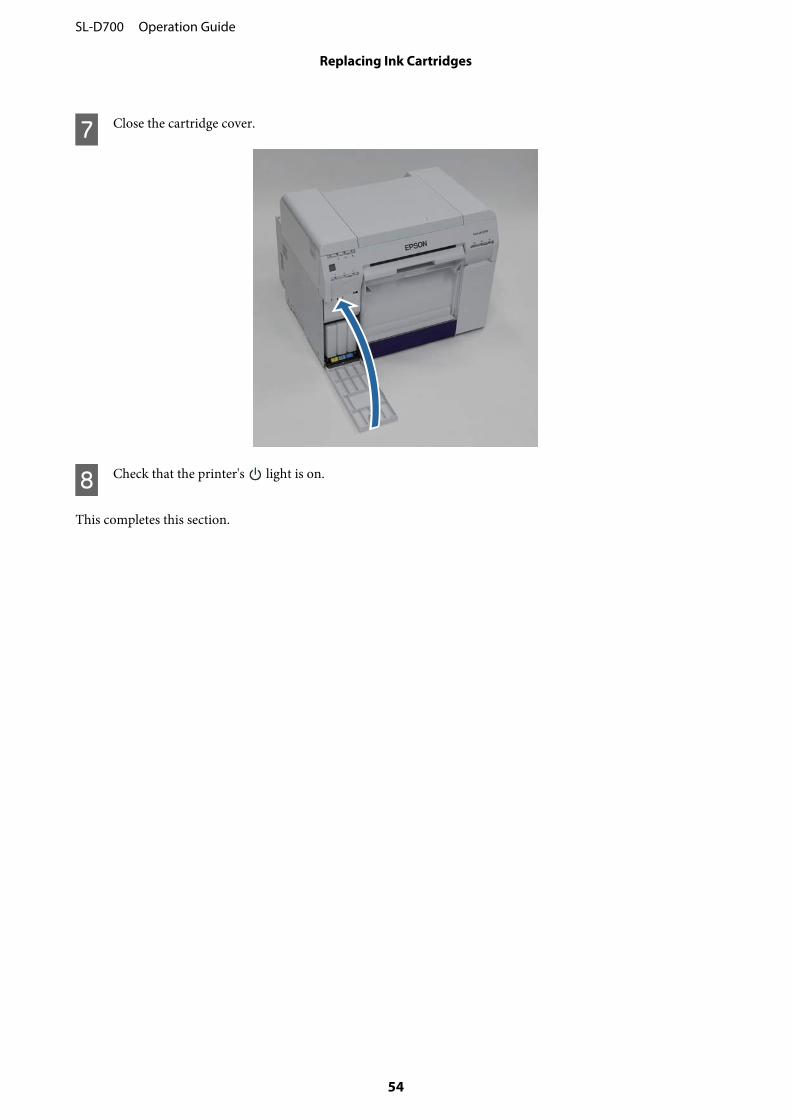
G Close the cartridge cover.
H Check that the printer's light is on.
This completes this section.
SL-D700 Operation Guide
Replacing Ink Cartridges
54
Replacing the Maintenance Cartridge
The maintenance cartridge absorbs ink consumed during head cleaning.
This section explains how to replace used maintenance cartridges.
c Important:After removing the maintenance cartridge, do not leave the cartridge cover open, install a new cartridge immediately.
Checking the Free Space in the Maintenance Cartridge
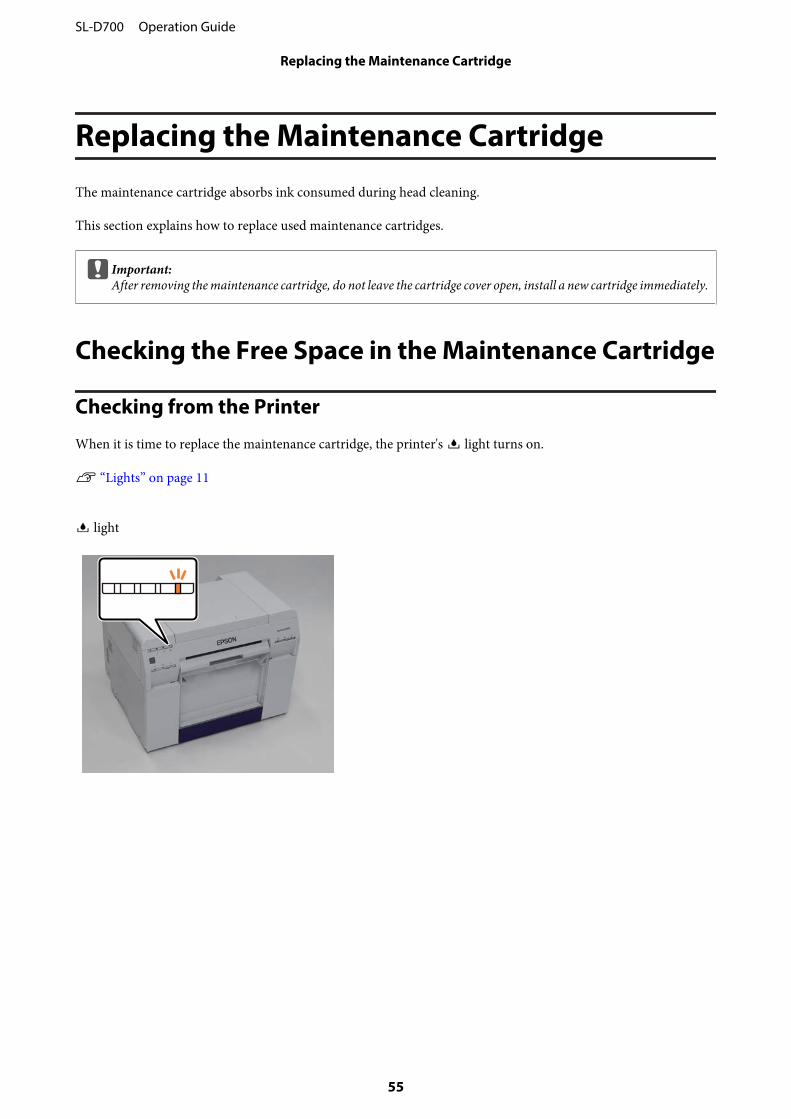
Checking from the Printer
When it is time to replace the maintenance cartridge, the printer's light turns on.
U “Lights” on page 11
light
SL-D700 Operation Guide
Replacing the Maintenance Cartridge
55
Checking from the Computer
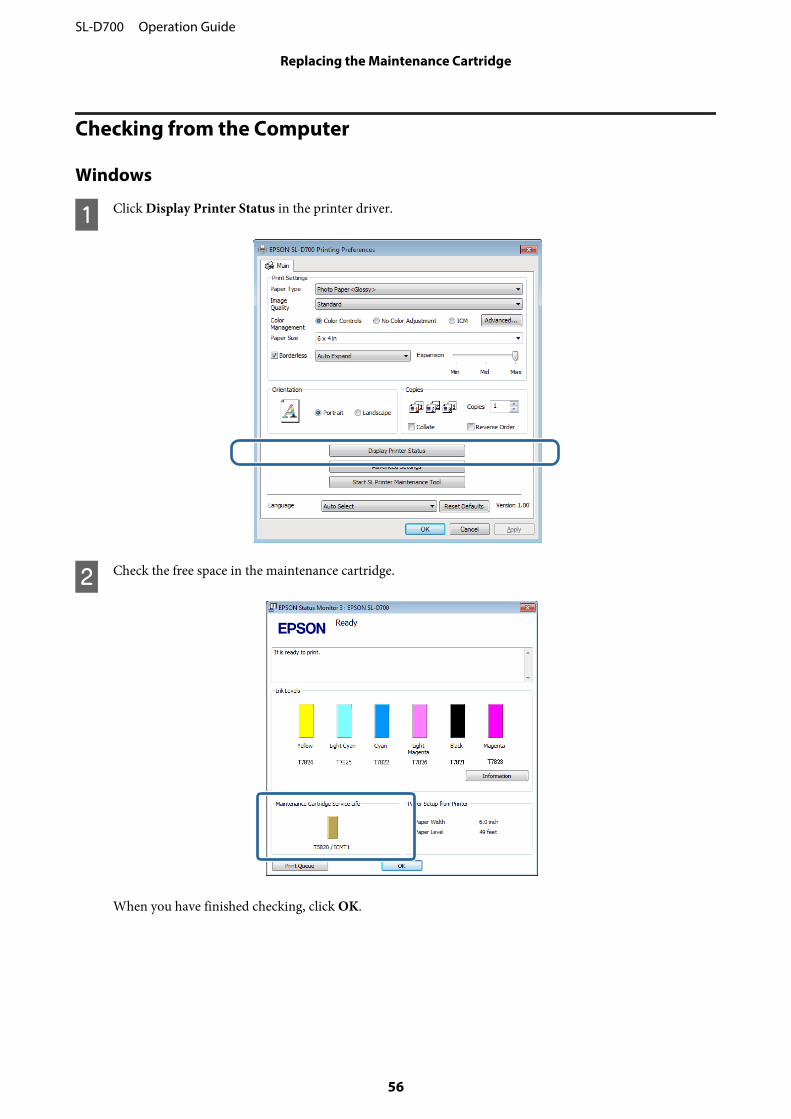
Windows
A Click Display Printer Status in the printer driver.
B Check the free space in the maintenance cartridge.
When you have finished checking, click OK.
SL-D700 Operation Guide
Replacing the Maintenance Cartridge
56

Mac OS X
A Start the Maintenance Tool.
See the following for information on starting the Maintenance Tool.
U “Error Messages (Mac)” on page 67
B Click Printer Window on the main screen.
The Printer Window screen is displayed.
C Check the free space in the maintenance cartridge.
When you have finished checking, click OK.
SL-D700 Operation Guide
Replacing the Maintenance Cartridge
57
Replacement Procedure
A Check that the printer's light is on.
If the light is flashing, the printer is operating. Wait until all operations have stopped.
B Open the cartridge cover on the right.
A warning buzzer sounds when you open the cover.
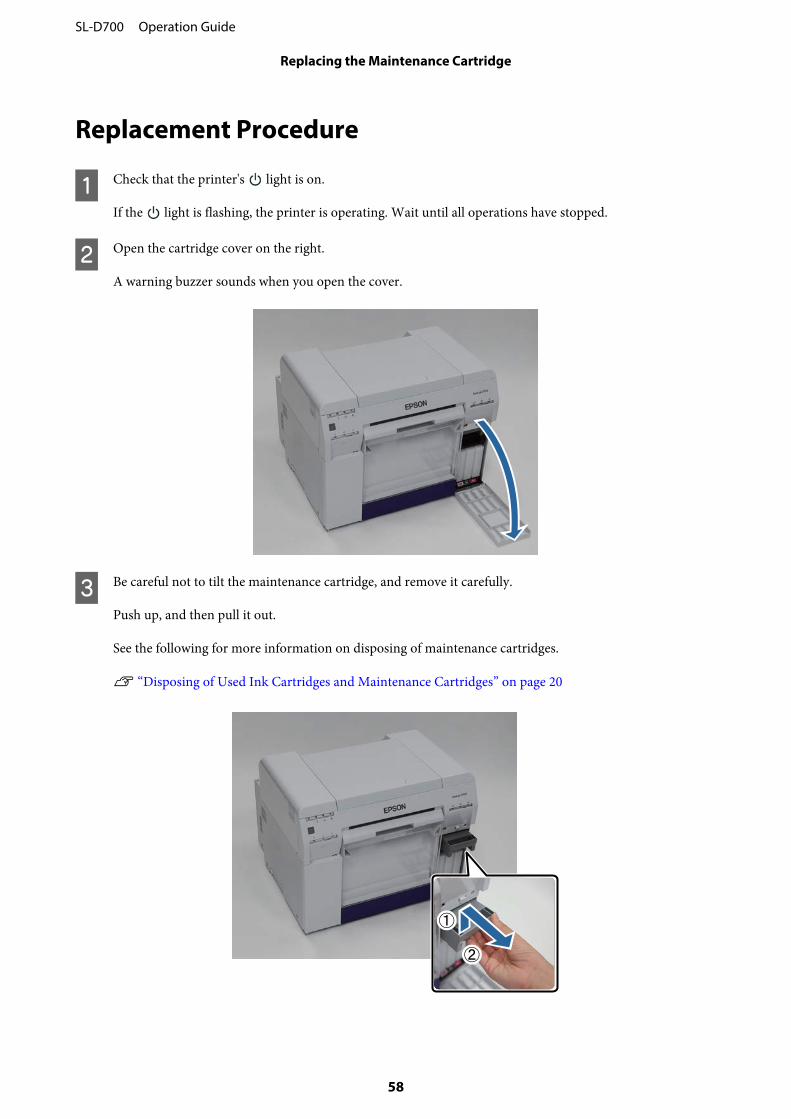
C Be careful not to tilt the maintenance cartridge, and remove it carefully.
Push up, and then pull it out.
See the following for more information on disposing of maintenance cartridges.
U “Disposing of Used Ink Cartridges and Maintenance Cartridges” on page 20
SL-D700 Operation Guide
Replacing the Maintenance Cartridge
58
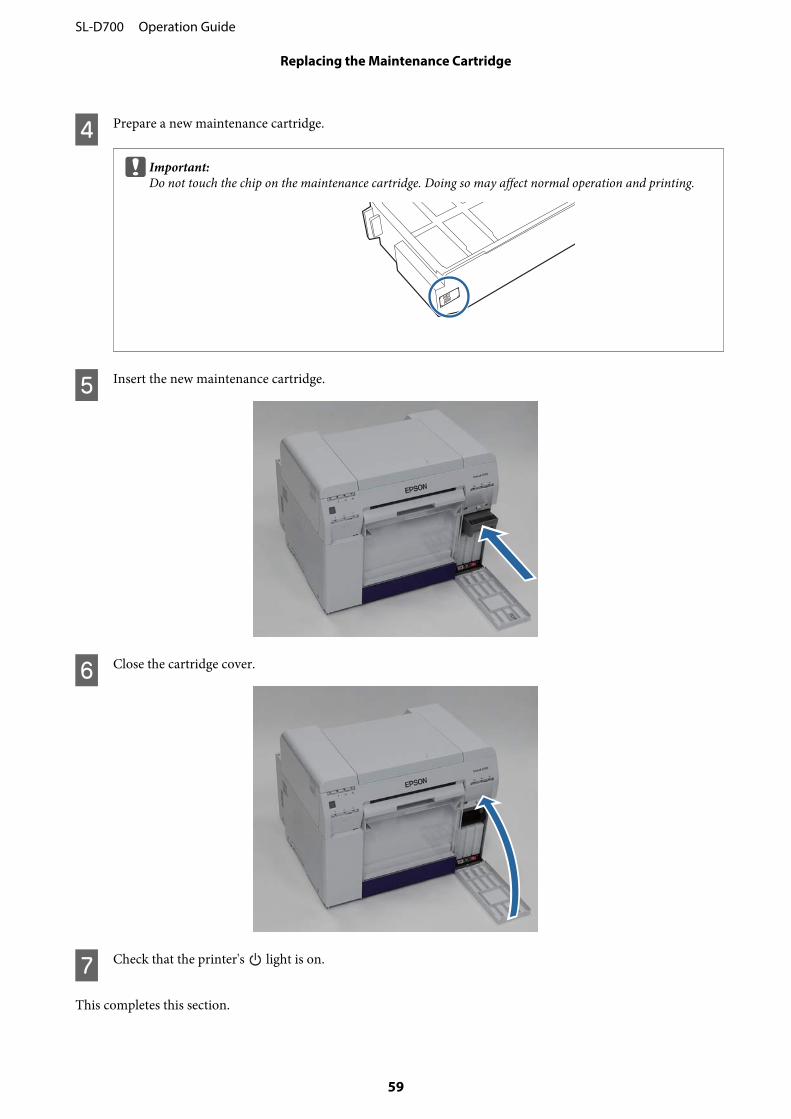
D Prepare a new maintenance cartridge.
c Important:Do not touch the chip on the maintenance cartridge. Doing so may affect normal operation and printing.
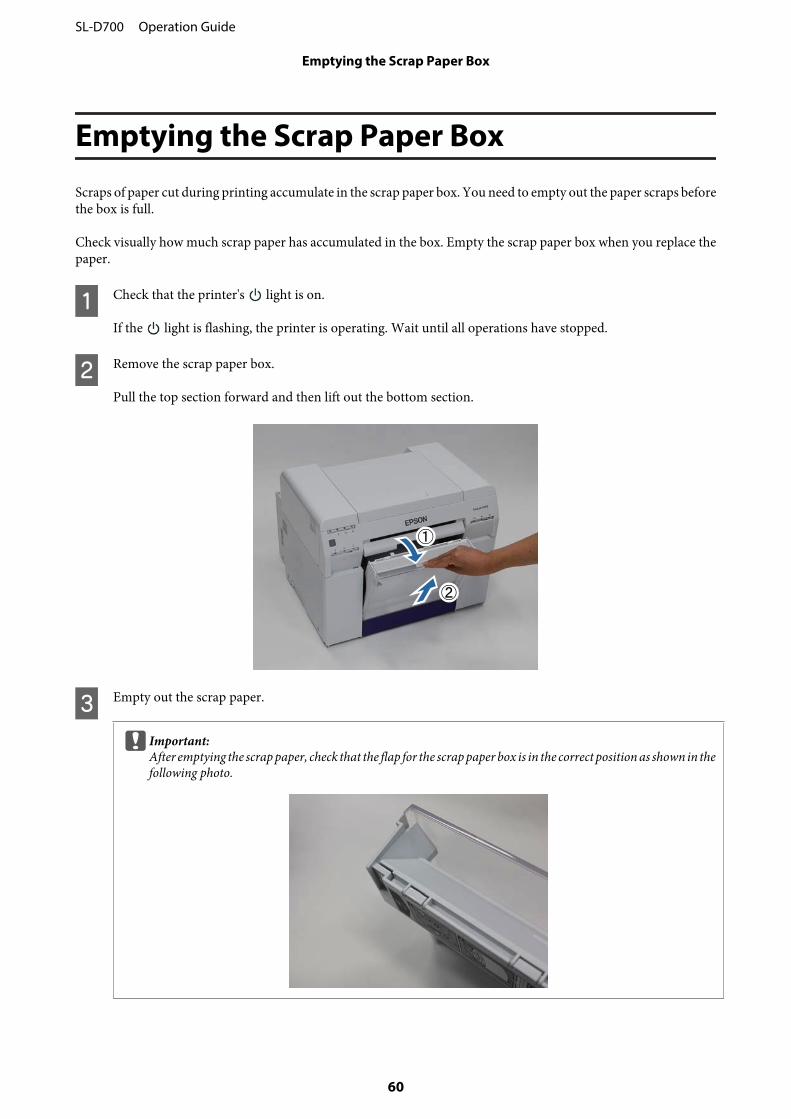
E Insert the new maintenance cartridge.
F Close the cartridge cover.
G Check that the printer's light is on.
This completes this section.
SL-D700 Operation Guide
Replacing the Maintenance Cartridge
59
Emptying the Scrap Paper Box
Scraps of paper cut during printing accumulate in the scrap paper box. You need to empty out the paper scraps beforethe box is full.
Check visually how much scrap paper has accumulated in the box. Empty the scrap paper box when you replace thepaper.
A Check that the printer's light is on.
If the light is flashing, the printer is operating. Wait until all operations have stopped.
B Remove the scrap paper box.
Pull the top section forward and then lift out the bottom section.
C Empty out the scrap paper.
c Important:After emptying the scrap paper, check that the flap for the scrap paper box is in the correct position as shown in thefollowing photo.
SL-D700 Operation Guide
Emptying the Scrap Paper Box
60

D Attach the scrap paper box.
Insert the bottom section, and then push the top section into place.
E Check that the printer's light is on.
This completes this section.
SL-D700 Operation Guide
Emptying the Scrap Paper Box
61
Maintenance
Maintenance Tool
By using the Maintenance Tool from your computer you can perform adjustment and maintenance operations such aschecking the printer's status, making settings, performing head cleaning and so on.
Windows
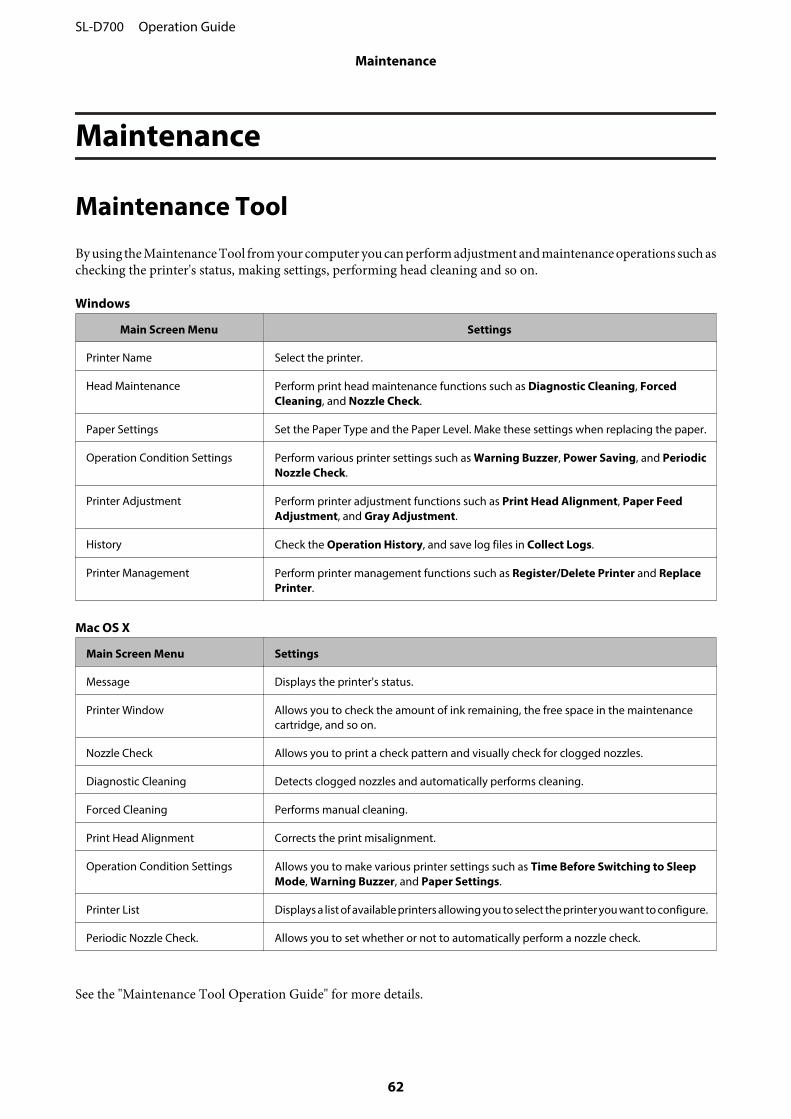
Main Screen Menu Settings
Printer Name Select the printer.
Head Maintenance Perform print head maintenance functions such as Diagnostic Cleaning, ForcedCleaning, and Nozzle Check.
Paper Settings Set the Paper Type and the Paper Level. Make these settings when replacing the paper.
Operation Condition Settings Perform various printer settings such as Warning Buzzer, Power Saving, and PeriodicNozzle Check.
Printer Adjustment Perform printer adjustment functions such as Print Head Alignment, Paper FeedAdjustment, and Gray Adjustment.
History Check the Operation History, and save log files in Collect Logs.
Printer Management Perform printer management functions such as Register/Delete Printer and ReplacePrinter.
Mac OS X
Main Screen Menu Settings
Message Displays the printer's status.
Printer Window Allows you to check the amount of ink remaining, the free space in the maintenancecartridge, and so on.
Nozzle Check Allows you to print a check pattern and visually check for clogged nozzles.
Diagnostic Cleaning Detects clogged nozzles and automatically performs cleaning.
Forced Cleaning Performs manual cleaning.
Print Head Alignment Corrects the print misalignment.
Operation Condition Settings Allows you to make various printer settings such as Time Before Switching to SleepMode, Warning Buzzer, and Paper Settings.
Printer List Displays a list of available printers allowing you to select the printer you want to configure.
Periodic Nozzle Check. Allows you to set whether or not to automatically perform a nozzle check.
See the "Maintenance Tool Operation Guide" for more details.
SL-D700 Operation Guide
Maintenance
62
Checking Items List
See the following table for details on inspections and cleaning.
Check Part Contents CheckingTime Reference
Scrap paper box Empty out the scrap paper. When replacingpaper
U “Scrap paper box” onpage 63
Airflow vent Clean the airflow vent filter with avacuum cleaner.
Every threemonths
U “Airflow vent” on page 63
Scrap paper box
Remove the scrap paper box and empty out the scrap paper.
U “Emptying the Scrap Paper Box” on page 60
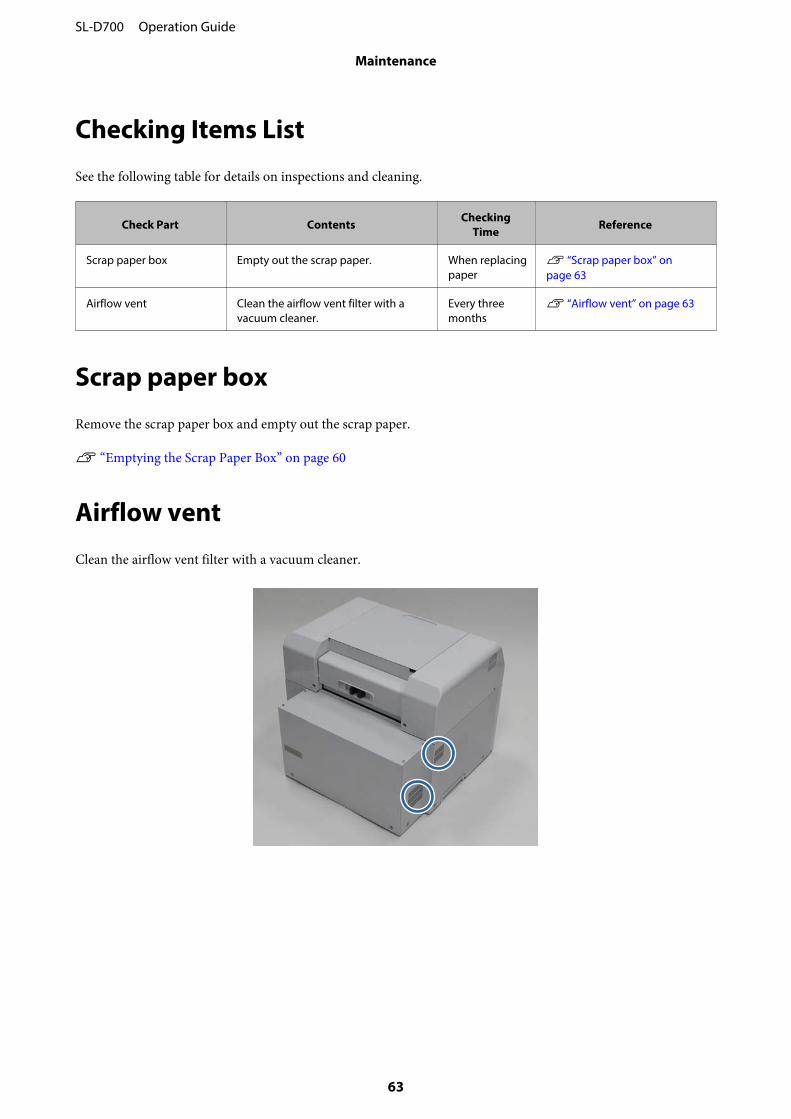
Airflow vent
Clean the airflow vent filter with a vacuum cleaner.
SL-D700 Operation Guide
Maintenance
63
Troubleshooting
Note:See the "Printer Driver Operation Guide" for more details on troubleshooting the printer driver.
U "Printer Driver Operation Guide" - "Troubleshooting"
When an Error Occurs
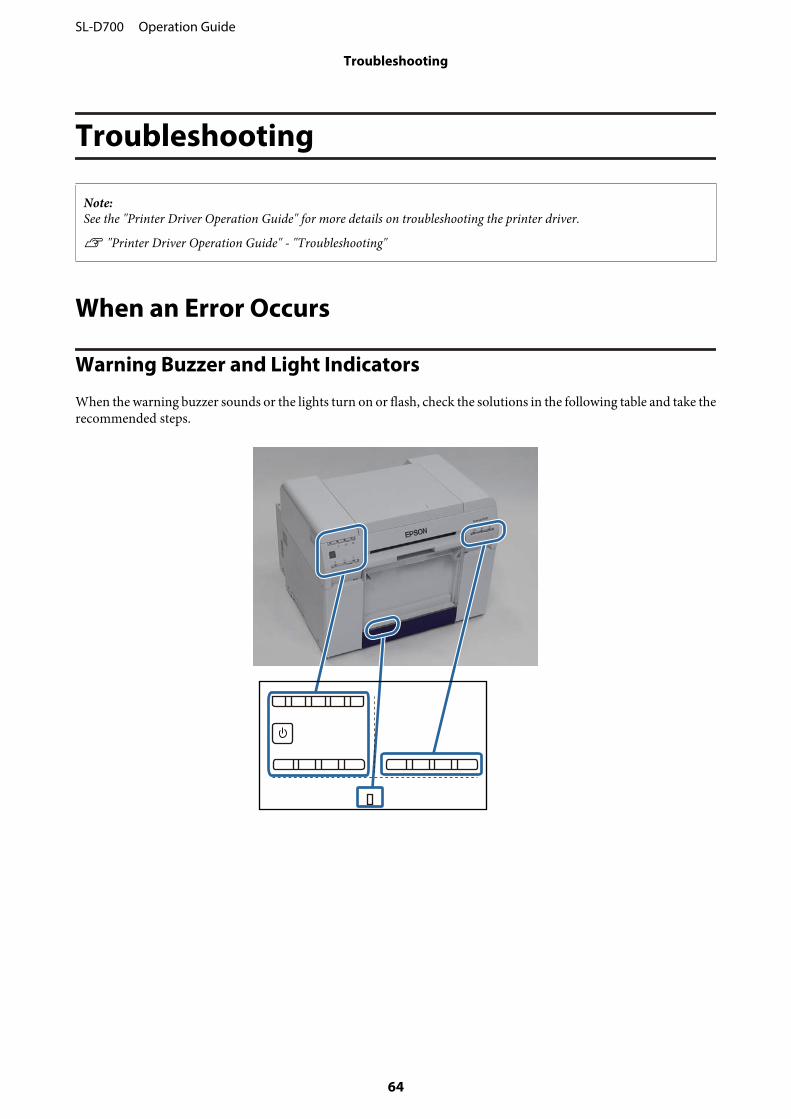
Warning Buzzer and Light Indicators
When the warning buzzer sounds or the lights turn on or flash, check the solutions in the following table and take therecommended steps.
SL-D700 Operation Guide
Troubleshooting
64
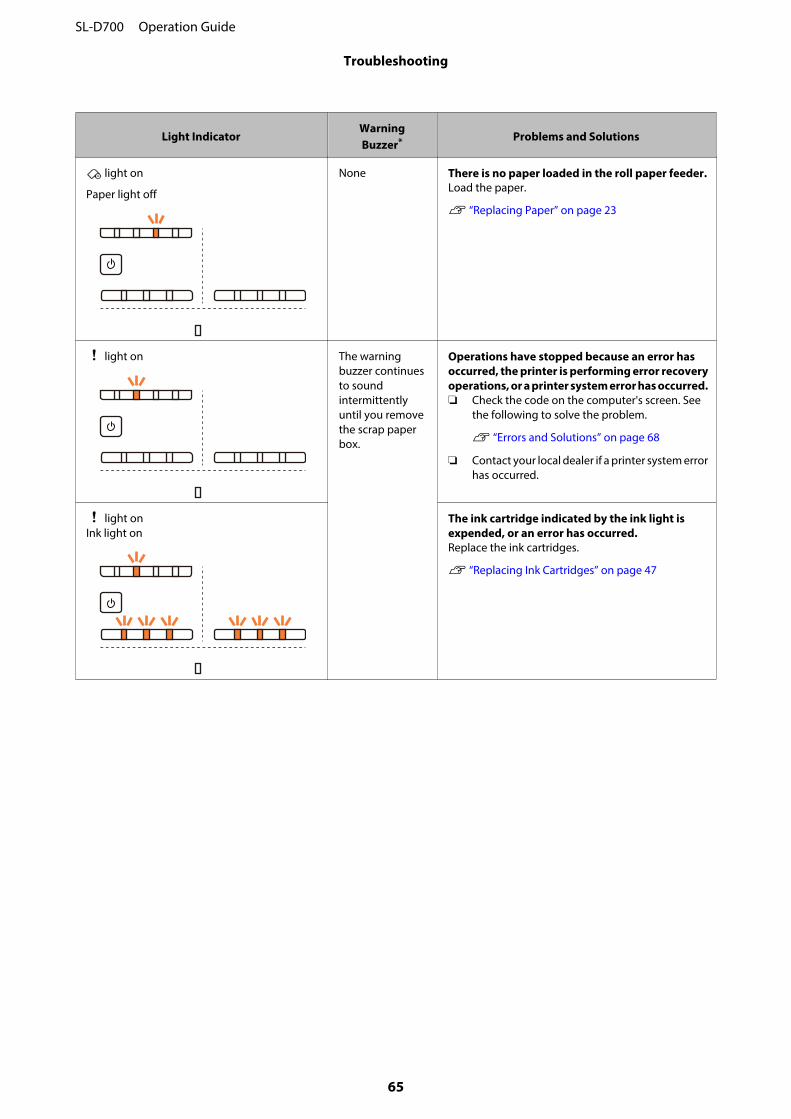
Light IndicatorWarningBuzzer* Problems and Solutions
light on
Paper light off
None There is no paper loaded in the roll paper feeder.Load the paper.
U “Replacing Paper” on page 23
light on The warningbuzzer continuesto soundintermittentlyuntil you removethe scrap paperbox.
Operations have stopped because an error hasoccurred, the printer is performing error recoveryoperations, or a printer system error has occurred.❏ Check the code on the computer's screen. See
the following to solve the problem.
U “Errors and Solutions” on page 68
❏ Contact your local dealer if a printer system errorhas occurred.
light onInk light on
The ink cartridge indicated by the ink light isexpended, or an error has occurred.Replace the ink cartridges.
U “Replacing Ink Cartridges” on page 47
SL-D700 Operation Guide
Troubleshooting
65
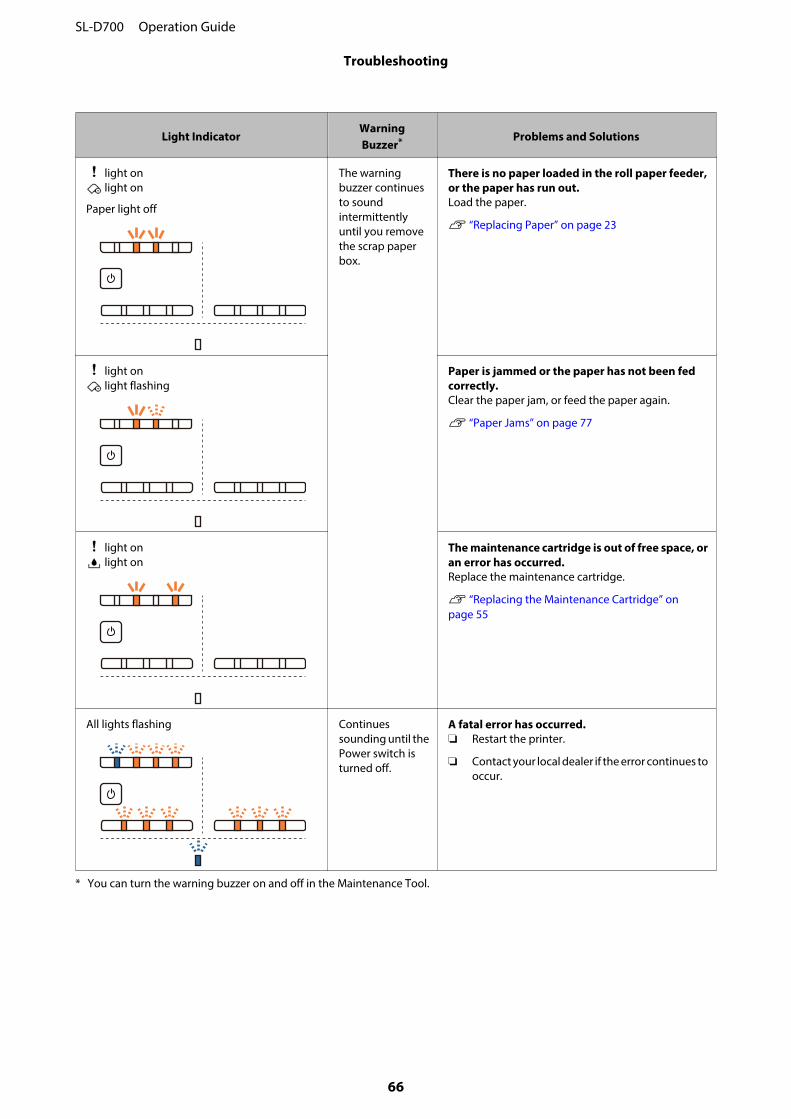
Light IndicatorWarningBuzzer* Problems and Solutions
light on light on
Paper light off
The warningbuzzer continuesto soundintermittentlyuntil you removethe scrap paperbox.
There is no paper loaded in the roll paper feeder,or the paper has run out.Load the paper.
U “Replacing Paper” on page 23
light on light flashing
Paper is jammed or the paper has not been fedcorrectly.Clear the paper jam, or feed the paper again.
U “Paper Jams” on page 77
light on light on
The maintenance cartridge is out of free space, oran error has occurred.Replace the maintenance cartridge.
U “Replacing the Maintenance Cartridge” onpage 55
All lights flashing Continuessounding until thePower switch isturned off.
A fatal error has occurred.❏ Restart the printer.
❏ Contact your local dealer if the error continues tooccur.
* You can turn the warning buzzer on and off in the Maintenance Tool.
SL-D700 Operation Guide
Troubleshooting
66
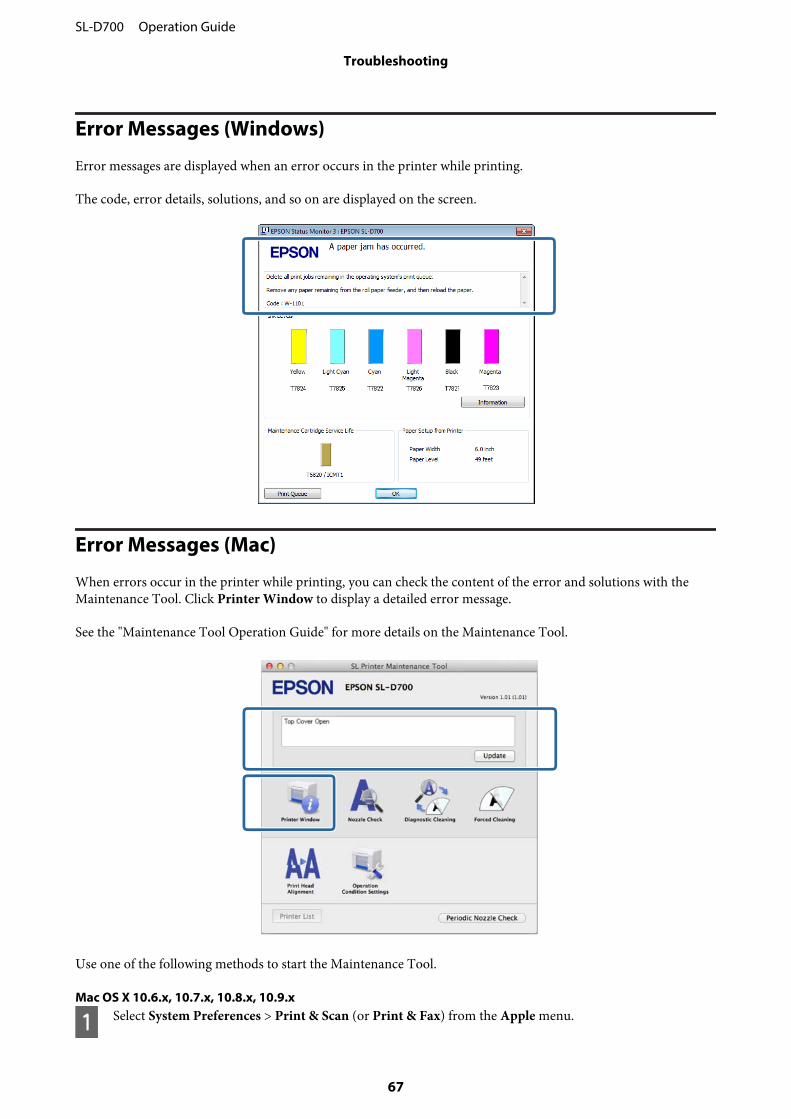
Error Messages (Windows)
Error messages are displayed when an error occurs in the printer while printing.
The code, error details, solutions, and so on are displayed on the screen.
Error Messages (Mac)
When errors occur in the printer while printing, you can check the content of the error and solutions with theMaintenance Tool. Click Printer Window to display a detailed error message.
See the "Maintenance Tool Operation Guide" for more details on the Maintenance Tool.
Use one of the following methods to start the Maintenance Tool.
Mac OS X 10.6.x, 10.7.x, 10.8.x, 10.9.x
A Select System Preferences > Print & Scan (or Print & Fax) from the Apple menu.
SL-D700 Operation Guide
Troubleshooting
67
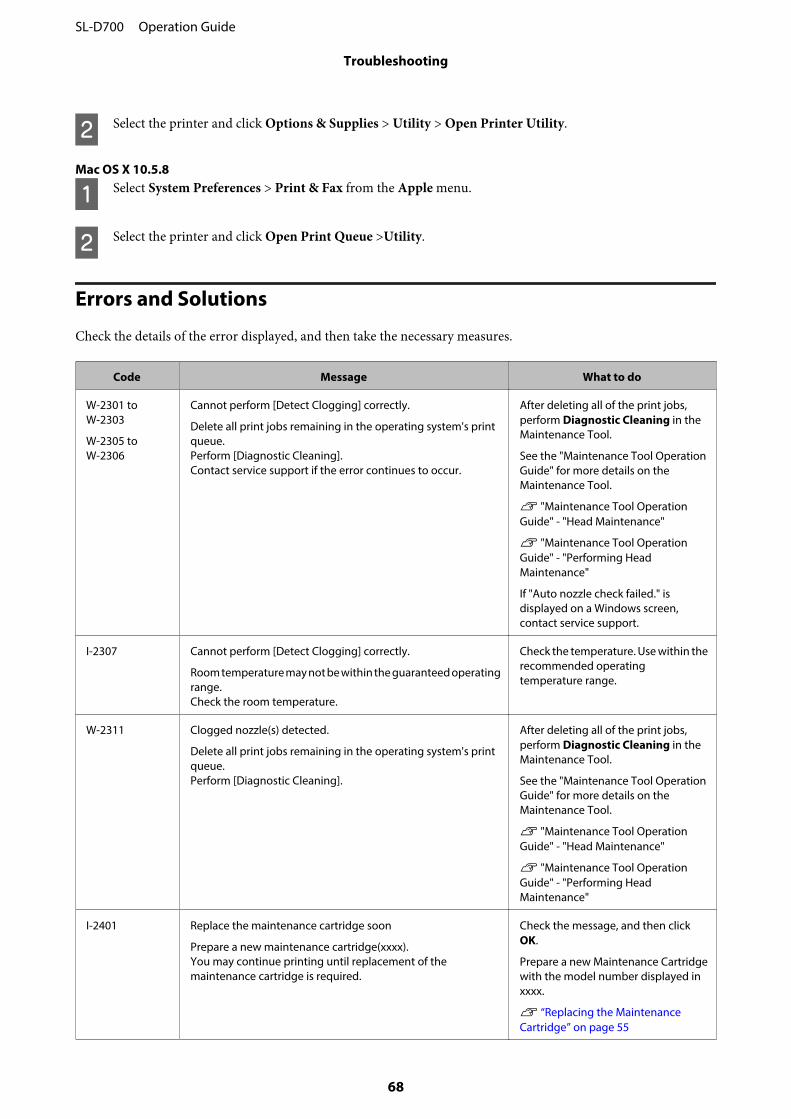
B Select the printer and click Options & Supplies > Utility > Open Printer Utility.
Mac OS X 10.5.8
A Select System Preferences > Print & Fax from the Apple menu.
B Select the printer and click Open Print Queue >Utility.
Errors and Solutions
Check the details of the error displayed, and then take the necessary measures.
Code Message What to do
W-2301 toW-2303
W-2305 toW-2306
Cannot perform [Detect Clogging] correctly.
Delete all print jobs remaining in the operating system's printqueue.Perform [Diagnostic Cleaning].Contact service support if the error continues to occur.
After deleting all of the print jobs,perform Diagnostic Cleaning in theMaintenance Tool.
See the "Maintenance Tool OperationGuide" for more details on theMaintenance Tool.
U "Maintenance Tool OperationGuide" - "Head Maintenance"
U "Maintenance Tool OperationGuide" - "Performing HeadMaintenance"
If "Auto nozzle check failed." isdisplayed on a Windows screen,contact service support.
I-2307 Cannot perform [Detect Clogging] correctly.
Room temperature may not be within the guaranteed operatingrange.Check the room temperature.
Check the temperature. Use within therecommended operatingtemperature range.
W-2311 Clogged nozzle(s) detected.
Delete all print jobs remaining in the operating system's printqueue.Perform [Diagnostic Cleaning].
After deleting all of the print jobs,perform Diagnostic Cleaning in theMaintenance Tool.
See the "Maintenance Tool OperationGuide" for more details on theMaintenance Tool.
U "Maintenance Tool OperationGuide" - "Head Maintenance"
U "Maintenance Tool OperationGuide" - "Performing HeadMaintenance"
I-2401 Replace the maintenance cartridge soon
Prepare a new maintenance cartridge(xxxx).You may continue printing until replacement of themaintenance cartridge is required.
Check the message, and then clickOK.
Prepare a new Maintenance Cartridgewith the model number displayed inxxxx.
U “Replacing the MaintenanceCartridge” on page 55
SL-D700 Operation Guide
Troubleshooting
68

Code Message What to do
I-2201 Ink Low
(xxxx)
Prepare a new ink cartridge.You may continue printing until replacement of the inkcartridge is required.Epson recommends the genuine Epson cartridges listed above.
Check the message, and then clickOK.
Prepare a new ink cartridge for thecolor and model number displayed inxxxx, and then get ready to replace thecartridge.
U “Replacing Ink Cartridges” onpage 47
I-2101 to I-2104 It is nearly time to replace parts.
xxxxxx
Contact a technical representative.You cannot print if parts have reached the end of their servicelife.
Contact service support and requestreplacement for the part displayed inxxxxxx.
W-1301 The scrap paper box has come off.
Delete all print jobs remaining in the operating system's printqueue.Install the scrap paper box correctly.
After deleting all of the print jobs,attach the scrap paper box. If amessage is displayed, check thedetails.
W-1302 Cartridge cover (right) open.
Delete all print jobs remaining in the operating system's printqueue.When replacing a cartridge, check the location and the cartridgetype.Close the cartridge cover.
After deleting all of the print jobs, closethe cartridge cover (right). If a messageis displayed, check the details.
W-1303 Cartridge cover (left) open.
Delete all print jobs remaining in the operating system's printqueue.When replacing a cartridge, check the location and the cartridgetype.Close the cartridge cover.
After deleting all of the print jobs, closethe cartridge cover (left). If a message isdisplayed, check the details.
W-1304 Top cover open.
Delete all print jobs remaining in the operating system's printqueue.Close the top cover.
After deleting all of the print jobs, closethe top cover. If a message is displayed,check the details.
W-1305 Rear cover open.
Delete all print jobs remaining in the operating system's printqueue.Close the top cover.
After deleting all of the print jobs, closethe rear cover. If a message isdisplayed, check the details.
I-1311 Check the scrap paper box.
Empty the scrap paper box when it is full.
Check the scrap paper box.
Empty the box if it is full.
Check the scrap paper box, and emptyit if it is full.
U “Emptying the Scrap Paper Box” onpage 60
W-1101 A paper jam has occurred.
Delete all print jobs remaining in the operating system's printqueue.Remove any paper remaining from the roll paper feeder, andthen reload the paper.
After deleting all of the print jobs,remove the paper from the roll paperfeeder, and then reload the paper.
U “Paper Jams” on page 77
SL-D700 Operation Guide
Troubleshooting
69
Code Message What to do
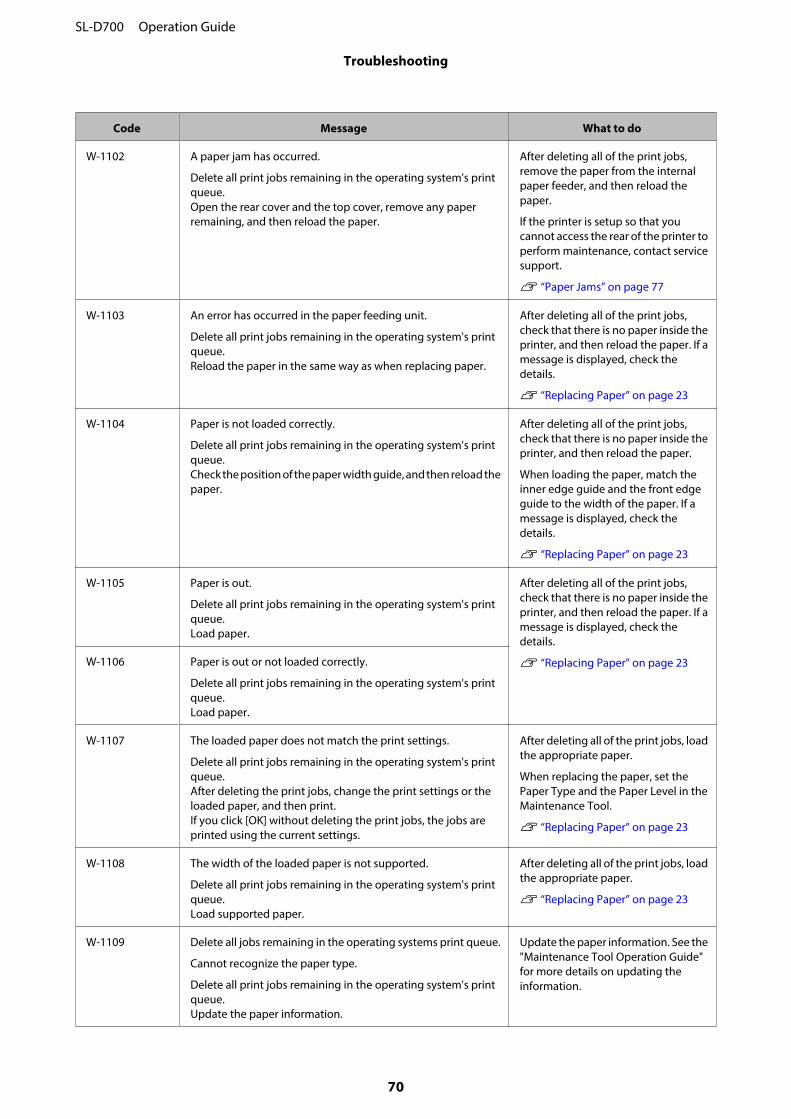
W-1102 A paper jam has occurred.
Delete all print jobs remaining in the operating system's printqueue.Open the rear cover and the top cover, remove any paperremaining, and then reload the paper.
After deleting all of the print jobs,remove the paper from the internalpaper feeder, and then reload thepaper.
If the printer is setup so that youcannot access the rear of the printer toperform maintenance, contact servicesupport.
U “Paper Jams” on page 77
W-1103 An error has occurred in the paper feeding unit.
Delete all print jobs remaining in the operating system's printqueue.Reload the paper in the same way as when replacing paper.
After deleting all of the print jobs,check that there is no paper inside theprinter, and then reload the paper. If amessage is displayed, check thedetails.
U “Replacing Paper” on page 23
W-1104 Paper is not loaded correctly.
Delete all print jobs remaining in the operating system's printqueue.Check the position of the paper width guide, and then reload thepaper.
After deleting all of the print jobs,check that there is no paper inside theprinter, and then reload the paper.
When loading the paper, match theinner edge guide and the front edgeguide to the width of the paper. If amessage is displayed, check thedetails.
U “Replacing Paper” on page 23
W-1105 Paper is out.
Delete all print jobs remaining in the operating system's printqueue.Load paper.
After deleting all of the print jobs,check that there is no paper inside theprinter, and then reload the paper. If amessage is displayed, check thedetails.
U “Replacing Paper” on page 23W-1106 Paper is out or not loaded correctly.
Delete all print jobs remaining in the operating system's printqueue.Load paper.
W-1107 The loaded paper does not match the print settings.
Delete all print jobs remaining in the operating system's printqueue.After deleting the print jobs, change the print settings or theloaded paper, and then print.If you click [OK] without deleting the print jobs, the jobs areprinted using the current settings.
After deleting all of the print jobs, loadthe appropriate paper.
When replacing the paper, set thePaper Type and the Paper Level in theMaintenance Tool.
U “Replacing Paper” on page 23
W-1108 The width of the loaded paper is not supported.
Delete all print jobs remaining in the operating system's printqueue.Load supported paper.
After deleting all of the print jobs, loadthe appropriate paper.
U “Replacing Paper” on page 23
W-1109 Delete all jobs remaining in the operating systems print queue.
Cannot recognize the paper type.
Delete all print jobs remaining in the operating system's printqueue.Update the paper information.
Update the paper information. See the"Maintenance Tool Operation Guide"for more details on updating theinformation.
SL-D700 Operation Guide
Troubleshooting
70

Code Message What to do
W-2401 Maintenance cartridge not installed
Delete all print jobs remaining in the operating system's printqueue.Install the maintenance cartridge.
After deleting all of the print jobs,install the maintenance cartridgecorrectly.
U “Replacing the MaintenanceCartridge” on page 55
W-2402 Maintenance cartridge usage exceeded the application limit.
Delete all print jobs remaining in the operating system's printqueue.Replace the maintenance cartridge(xxxx).
After deleting all of the print jobs,check the model number of theMaintenance Cartridge displayed inxxxx, and then replace the cartridge.
U “Replacing the MaintenanceCartridge” on page 55
W-2201 Ink cartridge error
(xxxx)
Delete all print jobs remaining in the operating system's printqueue.Please install correct cartridge.
After deleting all of the print jobs,check the color of the ink cartridgedisplayed in xxxx, and then replace thecartridge.
If a message is displayed, check thedetails.
U “Replacing Ink Cartridges” onpage 47
W-2202 Replace Cartridge
(xxxx)
Delete all print jobs remaining in the operating system's printqueue.Epson recommends the genuine Epson cartridges listed above.
After deleting all of the print jobs,check the color and model number ofthe ink cartridge displayed in xxxx, andthen replace the cartridge.
If a message is displayed, check thedetails.
U “Replacing Ink Cartridges” onpage 47
W-2203 Ink cartridge error
(xxxx)
Delete all print jobs remaining in the operating system's printqueue.Remove and reinstall them correctly or replace them.Epson recommends the genuine Epson cartridges listed above.
After deleting all of the print jobs,check the color and model number ofthe ink cartridge displayed in xxxx, andthen replace the cartridge or install itcorrectly.
If a message is displayed, check thedetails.
U “Replacing Ink Cartridges” onpage 47
W-2204 Ink cartridge error
(xxxx)
Delete all print jobs remaining in the operating system's printqueue.Please install correct cartridge.
After deleting all of the print jobs,check the color and model number ofthe ink cartridge displayed in xxxx, andthen replace the cartridge.
If a message is displayed, check thedetails.
U “Replacing Ink Cartridges” onpage 47
SL-D700 Operation Guide
Troubleshooting
71
Code Message What to do
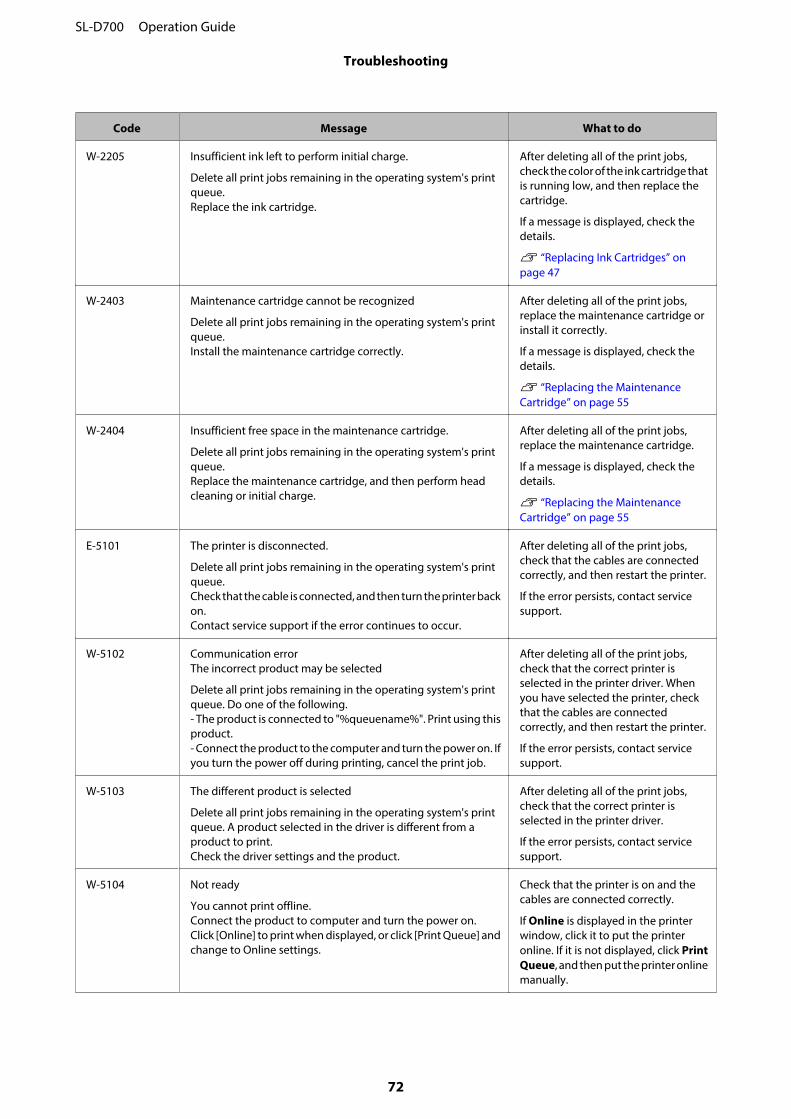
W-2205 Insufficient ink left to perform initial charge.
Delete all print jobs remaining in the operating system's printqueue.Replace the ink cartridge.
After deleting all of the print jobs,check the color of the ink cartridge thatis running low, and then replace thecartridge.
If a message is displayed, check thedetails.
U “Replacing Ink Cartridges” onpage 47
W-2403 Maintenance cartridge cannot be recognized
Delete all print jobs remaining in the operating system's printqueue.Install the maintenance cartridge correctly.
After deleting all of the print jobs,replace the maintenance cartridge orinstall it correctly.
If a message is displayed, check thedetails.
U “Replacing the MaintenanceCartridge” on page 55
W-2404 Insufficient free space in the maintenance cartridge.
Delete all print jobs remaining in the operating system's printqueue.Replace the maintenance cartridge, and then perform headcleaning or initial charge.
After deleting all of the print jobs,replace the maintenance cartridge.
If a message is displayed, check thedetails.
U “Replacing the MaintenanceCartridge” on page 55
E-5101 The printer is disconnected.
Delete all print jobs remaining in the operating system's printqueue.Check that the cable is connected, and then turn the printer backon.Contact service support if the error continues to occur.
After deleting all of the print jobs,check that the cables are connectedcorrectly, and then restart the printer.
If the error persists, contact servicesupport.
W-5102 Communication errorThe incorrect product may be selected
Delete all print jobs remaining in the operating system's printqueue. Do one of the following.- The product is connected to "%queuename%". Print using thisproduct.- Connect the product to the computer and turn the power on. Ifyou turn the power off during printing, cancel the print job.
After deleting all of the print jobs,check that the correct printer isselected in the printer driver. Whenyou have selected the printer, checkthat the cables are connectedcorrectly, and then restart the printer.
If the error persists, contact servicesupport.
W-5103 The different product is selected
Delete all print jobs remaining in the operating system's printqueue. A product selected in the driver is different from aproduct to print.Check the driver settings and the product.
After deleting all of the print jobs,check that the correct printer isselected in the printer driver.
If the error persists, contact servicesupport.
W-5104 Not ready
You cannot print offline.Connect the product to computer and turn the power on.Click [Online] to print when displayed, or click [Print Queue] andchange to Online settings.
Check that the printer is on and thecables are connected correctly.
If Online is displayed in the printerwindow, click it to put the printeronline. If it is not displayed, click PrintQueue, and then put the printer onlinemanually.
SL-D700 Operation Guide
Troubleshooting
72
Code Message What to do
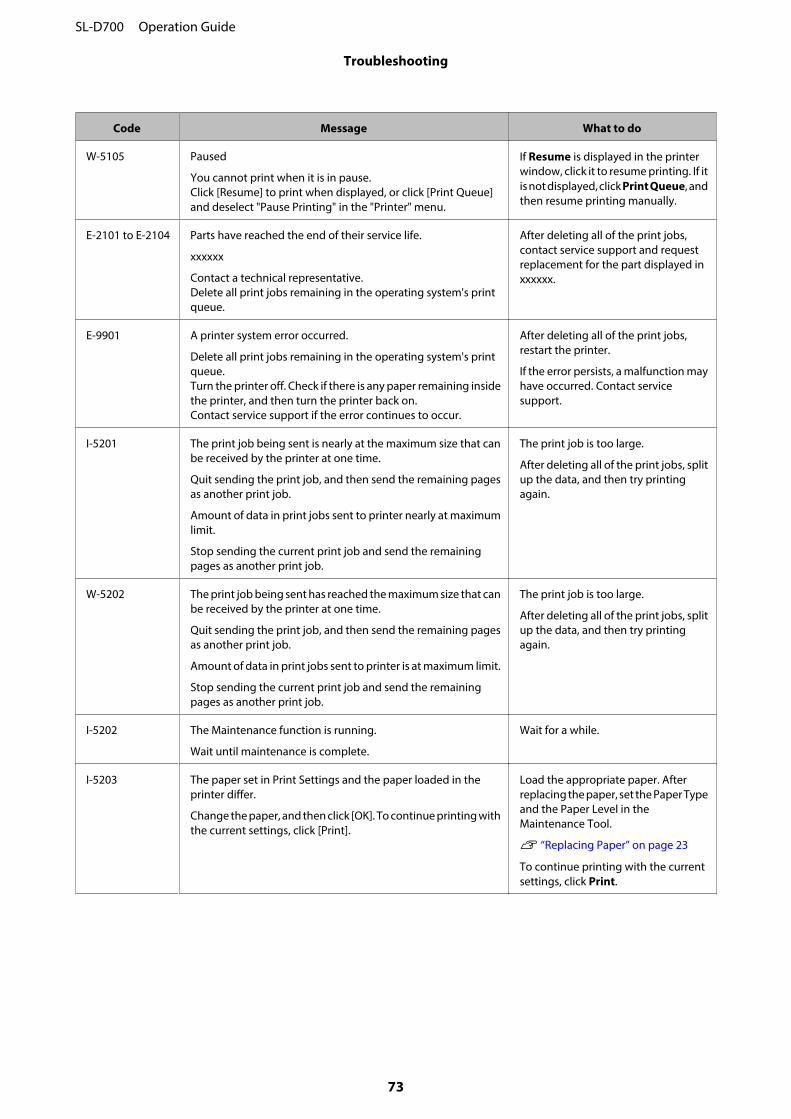
W-5105 Paused
You cannot print when it is in pause.Click [Resume] to print when displayed, or click [Print Queue]and deselect "Pause Printing" in the "Printer" menu.
If Resume is displayed in the printerwindow, click it to resume printing. If itis not displayed, click Print Queue, andthen resume printing manually.
E-2101 to E-2104 Parts have reached the end of their service life.
xxxxxx
Contact a technical representative.Delete all print jobs remaining in the operating system's printqueue.
After deleting all of the print jobs,contact service support and requestreplacement for the part displayed inxxxxxx.
E-9901 A printer system error occurred.
Delete all print jobs remaining in the operating system's printqueue.Turn the printer off. Check if there is any paper remaining insidethe printer, and then turn the printer back on.Contact service support if the error continues to occur.
After deleting all of the print jobs,restart the printer.
If the error persists, a malfunction mayhave occurred. Contact servicesupport.
I-5201 The print job being sent is nearly at the maximum size that canbe received by the printer at one time.
Quit sending the print job, and then send the remaining pagesas another print job.
Amount of data in print jobs sent to printer nearly at maximumlimit.
Stop sending the current print job and send the remainingpages as another print job.
The print job is too large.
After deleting all of the print jobs, splitup the data, and then try printingagain.
W-5202 The print job being sent has reached the maximum size that canbe received by the printer at one time.
Quit sending the print job, and then send the remaining pagesas another print job.
Amount of data in print jobs sent to printer is at maximum limit.
Stop sending the current print job and send the remainingpages as another print job.
The print job is too large.
After deleting all of the print jobs, splitup the data, and then try printingagain.
I-5202 The Maintenance function is running.
Wait until maintenance is complete.
Wait for a while.
I-5203 The paper set in Print Settings and the paper loaded in theprinter differ.
Change the paper, and then click [OK]. To continue printing withthe current settings, click [Print].
Load the appropriate paper. Afterreplacing the paper, set the Paper Typeand the Paper Level in theMaintenance Tool.
U “Replacing Paper” on page 23
To continue printing with the currentsettings, click Print.
SL-D700 Operation Guide
Troubleshooting
73
Code Message What to do
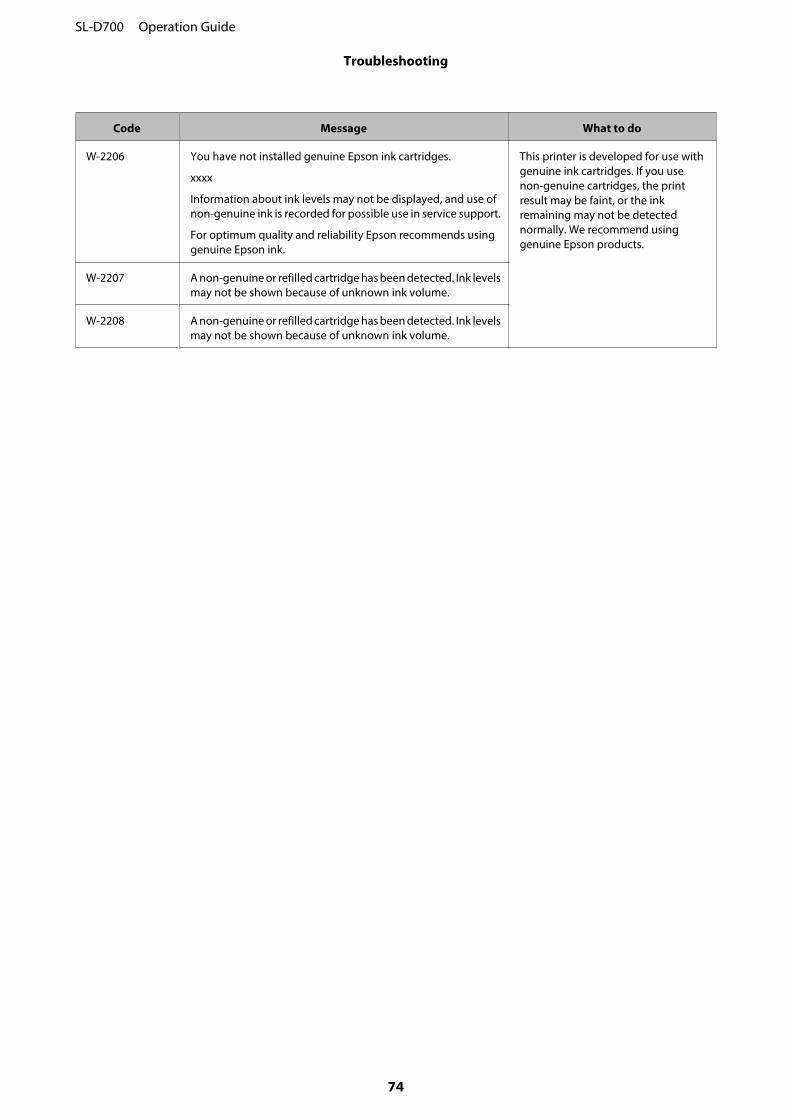
W-2206 You have not installed genuine Epson ink cartridges.
xxxx
Information about ink levels may not be displayed, and use ofnon-genuine ink is recorded for possible use in service support.
For optimum quality and reliability Epson recommends usinggenuine Epson ink.
This printer is developed for use withgenuine ink cartridges. If you usenon-genuine cartridges, the printresult may be faint, or the inkremaining may not be detectednormally. We recommend usinggenuine Epson products.
W-2207 A non-genuine or refilled cartridge has been detected. Ink levelsmay not be shown because of unknown ink volume.
W-2208 A non-genuine or refilled cartridge has been detected. Ink levelsmay not be shown because of unknown ink volume.
SL-D700 Operation Guide
Troubleshooting
74

Cannot Clear the Displayed Error
If an error is displayed that cannot be cleared, follow the steps below to restart the printer.
A Check that the printer's light is on. Turn off the Power switch (the light turns off).
If you cannot turn off the power using the switch, unplug the power cable.
SL-D700 Operation Guide
Troubleshooting
75
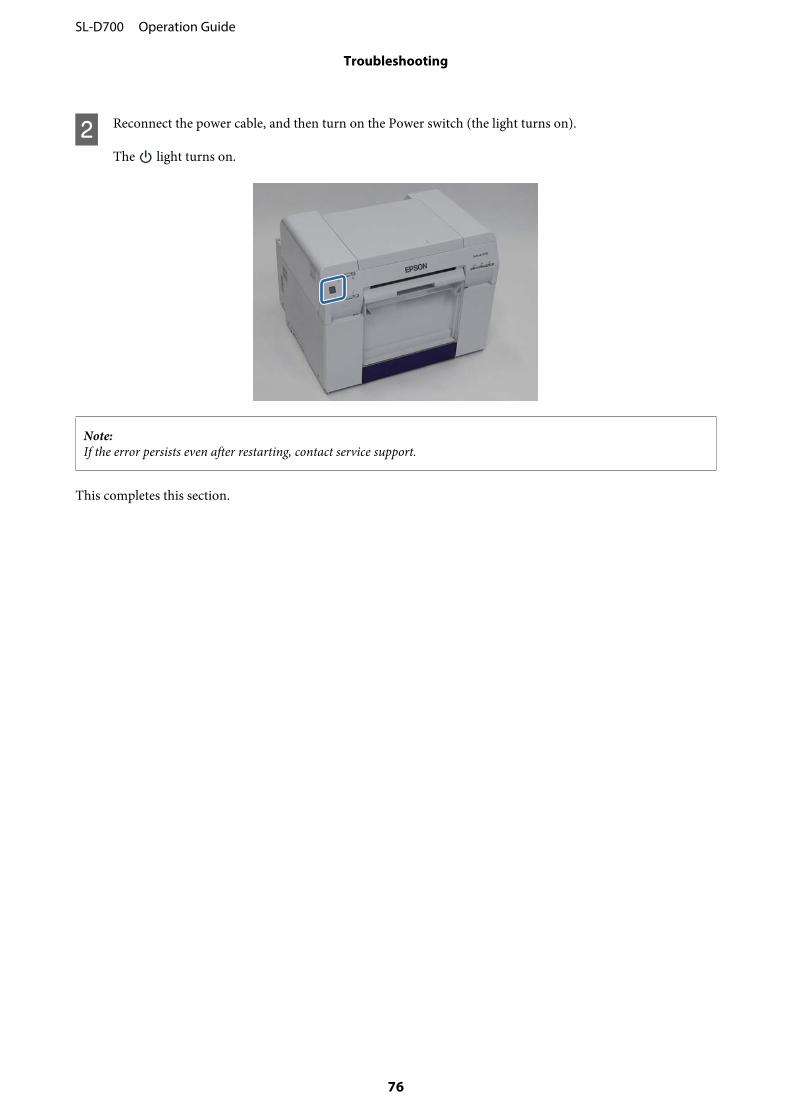
B Reconnect the power cable, and then turn on the Power switch (the light turns on).
The light turns on.
Note:If the error persists even after restarting, contact service support.
This completes this section.
SL-D700 Operation Guide
Troubleshooting
76

Paper Jams
This section explains how to clear paper jammed in the printer.
When a paper jam occurs, the light on the front of the printer turns on, and the light flashes.
U “Lights” on page 11
light
The procedure differs for the roll paper feeder and the internal paper feeder. Check the error message to determinewhich procedure to use.
❏ W-1101 When the message "A paper jam has occurred. Delete all jobs remaining in the operating systems printqueue. Remove paper that remains in the paper feeder, and then load the paper again." is displayed, the jam hasoccurred in the roll paper feeder.
U “Paper is Jammed in the Roll Paper Feeder” on page 80
❏ W-1102 When the message "A paper jam has occurred. Delete all jobs remaining in the operating systems printqueue. Open the rear cover and the top cover and remove any paper that remains, and then load the paper again." isdisplayed, the jam has occurred in the internal paper feeder.
U “Paper is Jammed in the Internal Paper Feeder” on page 87
c Important:❏ Do not leave the printer with a paper jam.
Fire could ignite or smoke could be emitted.
❏ When a printer system error occurs, if the error persists after restarting the printer, check if a paper jam hasoccurred.
❏ Do not remove the paper forcibly when clearing paper jams. Otherwise, the printer could be damaged.
SL-D700 Operation Guide
Troubleshooting
77
Deleting Print Jobs
Before starting operations, delete all jobs from the print queue.
Windows
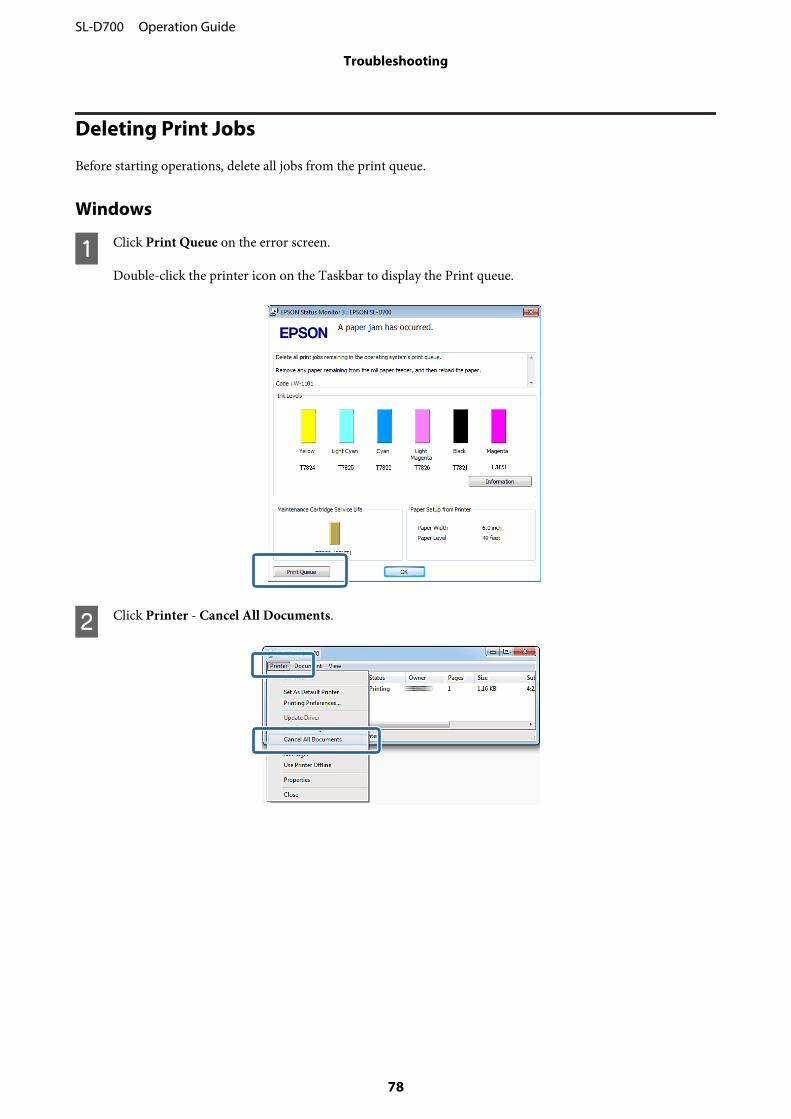
A Click Print Queue on the error screen.
Double-click the printer icon on the Taskbar to display the Print queue.
B Click Printer - Cancel All Documents.
SL-D700 Operation Guide
Troubleshooting
78

Mac OS X
A Click the printer icon in the Dock.
B Select the job you want to cancel, and then click X (or Delete).
SL-D700 Operation Guide
Troubleshooting
79
Paper is Jammed in the Roll Paper Feeder
Error message W-1101 - When the message "Remove paper that remains in the paper feeder, and then load the paperagain." is displayed, follow the steps below.
A Delete all jobs from the Print queue.
U “Deleting Print Jobs” on page 78
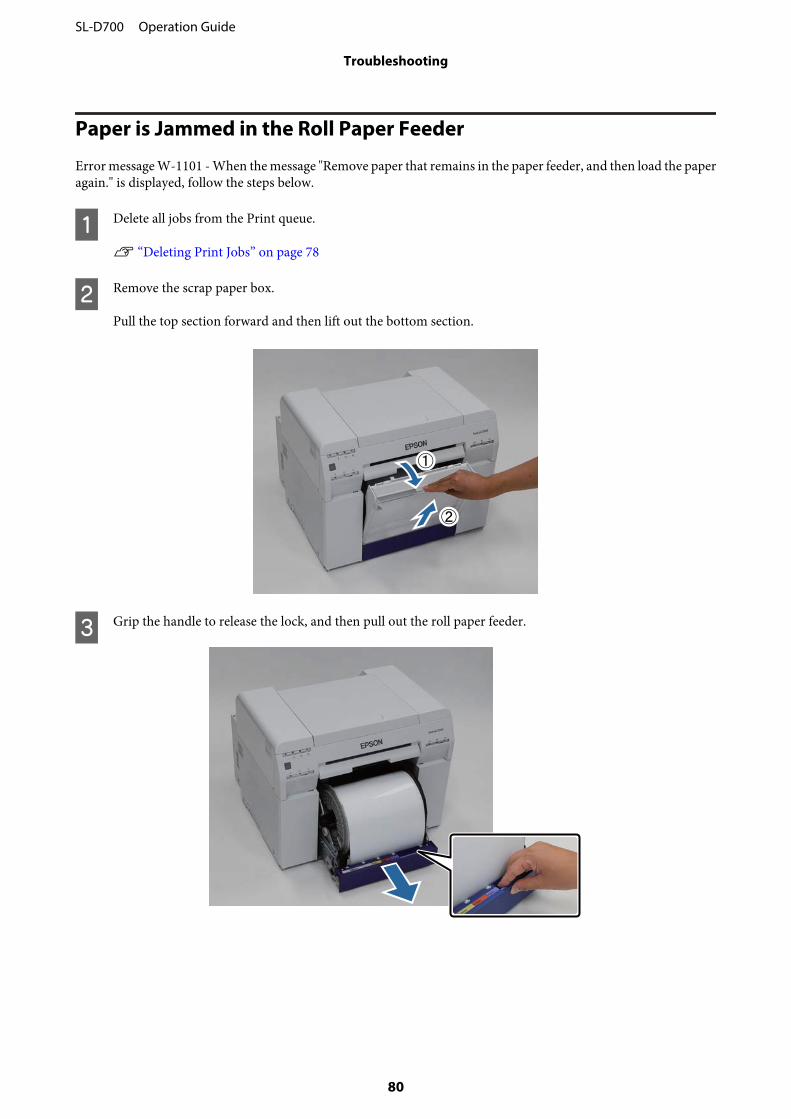
B Remove the scrap paper box.
Pull the top section forward and then lift out the bottom section.
C Grip the handle to release the lock, and then pull out the roll paper feeder.
SL-D700 Operation Guide
Troubleshooting
80
c Important:If you cannot remove the roll paper feeder for some reason, to not try to pull it out by force. Paper may be jammedinside. When you can access the top and rear of the printer, remove the paper by following the procedure in thenext section "Paper is Jammed in the Internal Paper Feeder".
U “Paper is Jammed in the Internal Paper Feeder” on page 87
Contact your local dealer if you cannot access the top or rear of the printer.
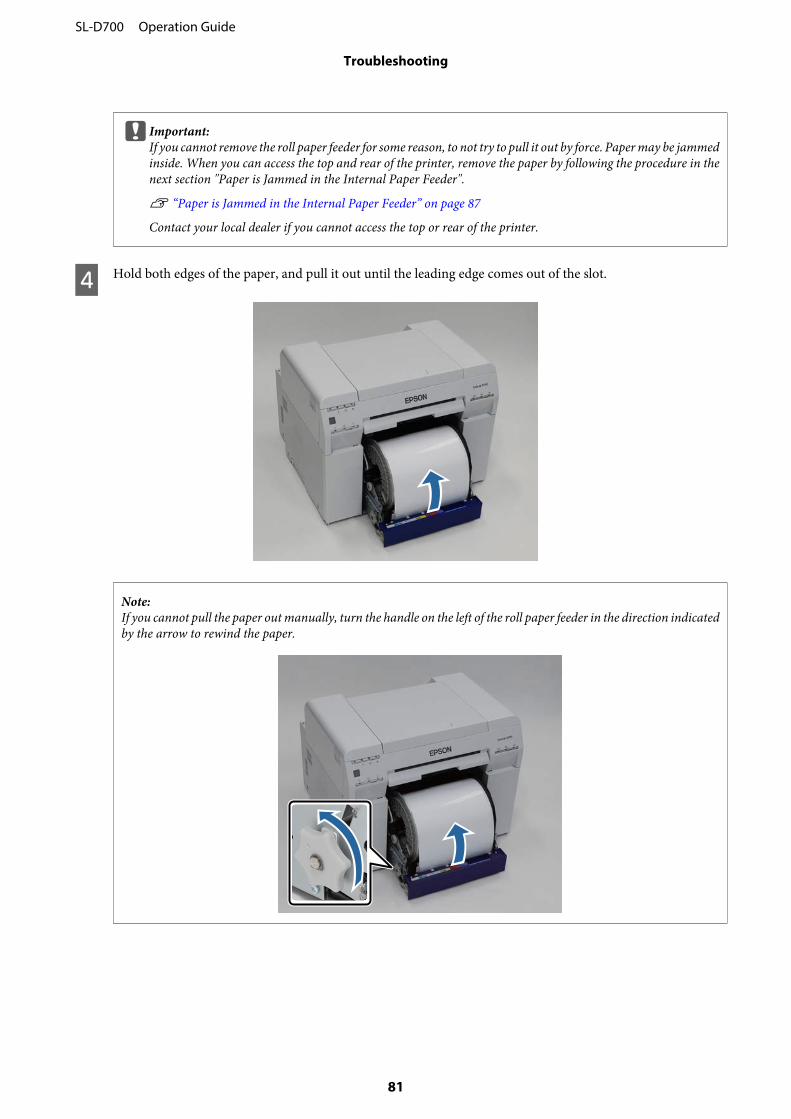
D Hold both edges of the paper, and pull it out until the leading edge comes out of the slot.
Note:If you cannot pull the paper out manually, turn the handle on the left of the roll paper feeder in the direction indicatedby the arrow to rewind the paper.
SL-D700 Operation Guide
Troubleshooting
81
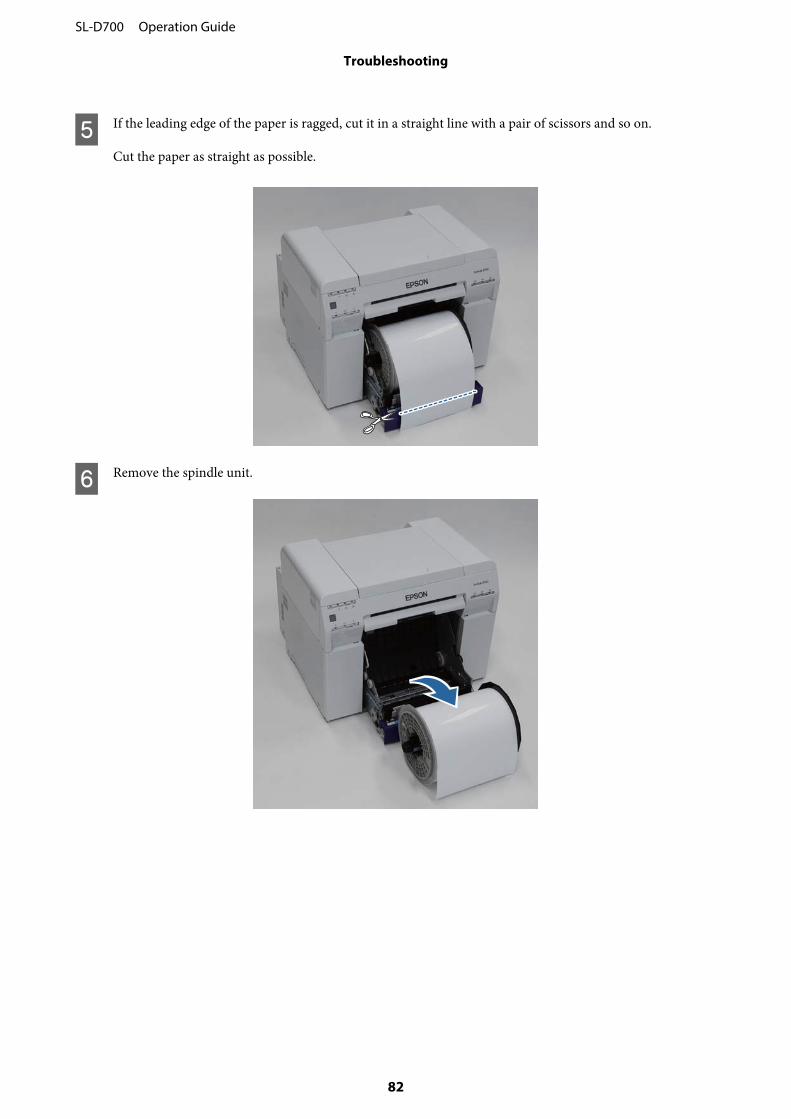
E If the leading edge of the paper is ragged, cut it in a straight line with a pair of scissors and so on.
Cut the paper as straight as possible.
F Remove the spindle unit.
SL-D700 Operation Guide
Troubleshooting
82
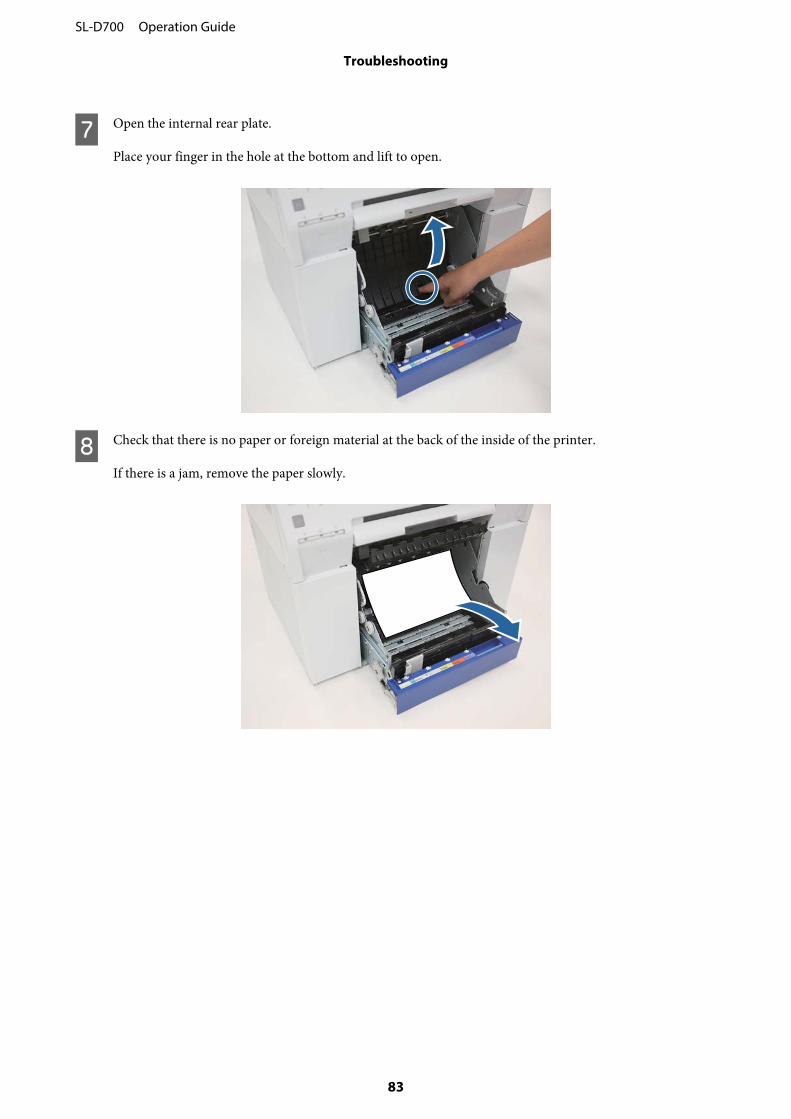
G Open the internal rear plate.
Place your finger in the hole at the bottom and lift to open.
H Check that there is no paper or foreign material at the back of the inside of the printer.
If there is a jam, remove the paper slowly.
SL-D700 Operation Guide
Troubleshooting
83
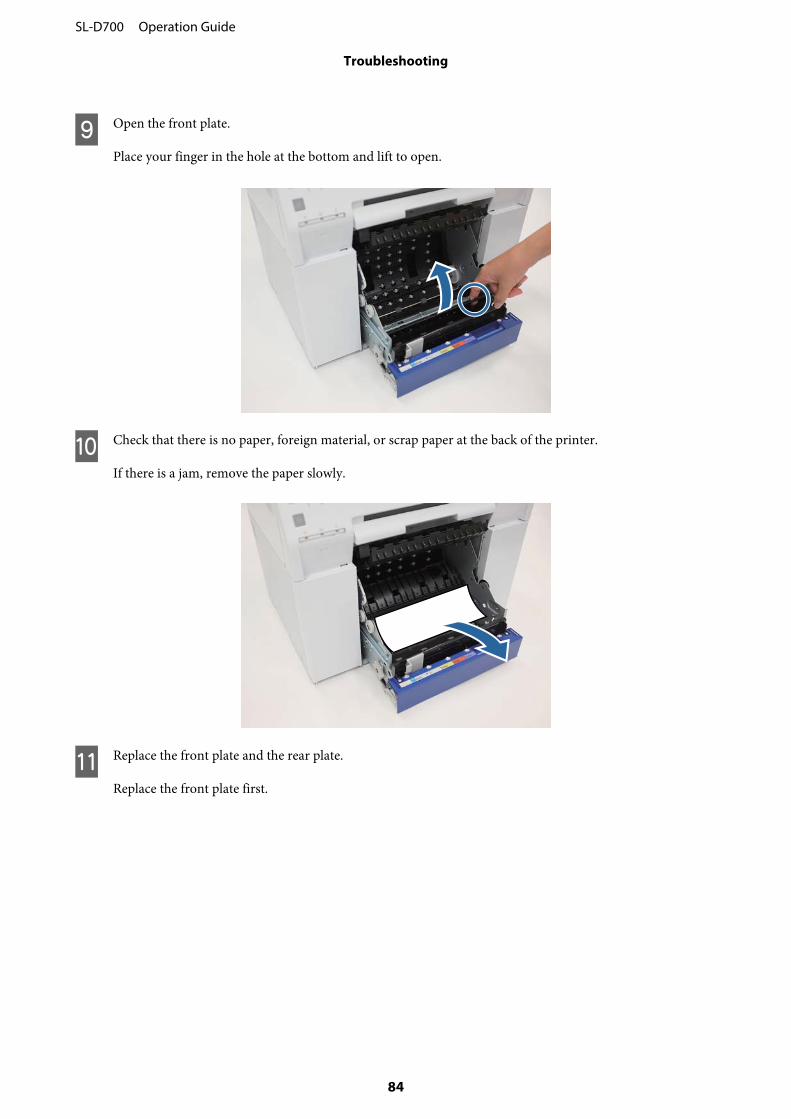
I Open the front plate.
Place your finger in the hole at the bottom and lift to open.
J Check that there is no paper, foreign material, or scrap paper at the back of the printer.
If there is a jam, remove the paper slowly.
K Replace the front plate and the rear plate.
Replace the front plate first.
SL-D700 Operation Guide
Troubleshooting
84
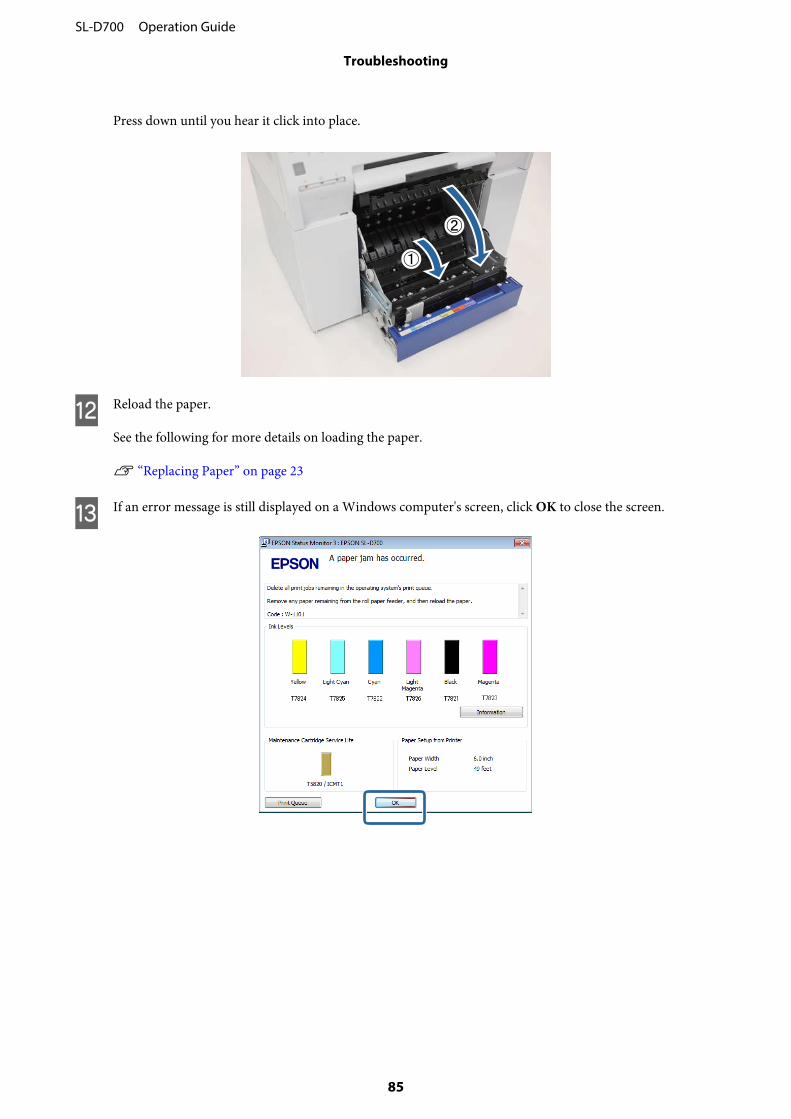
Press down until you hear it click into place.
L Reload the paper.
See the following for more details on loading the paper.
U “Replacing Paper” on page 23
M If an error message is still displayed on a Windows computer's screen, click OK to close the screen.
SL-D700 Operation Guide
Troubleshooting
85
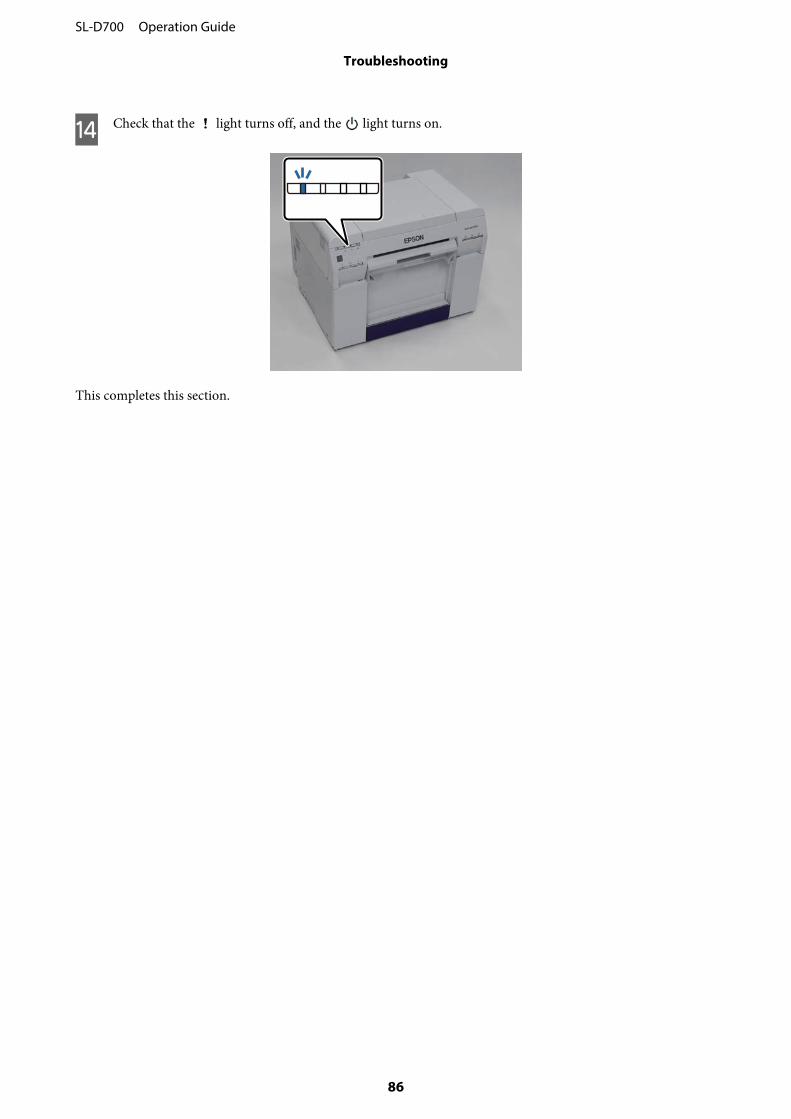
N Check that the light turns off, and the light turns on.
This completes this section.
SL-D700 Operation Guide
Troubleshooting
86
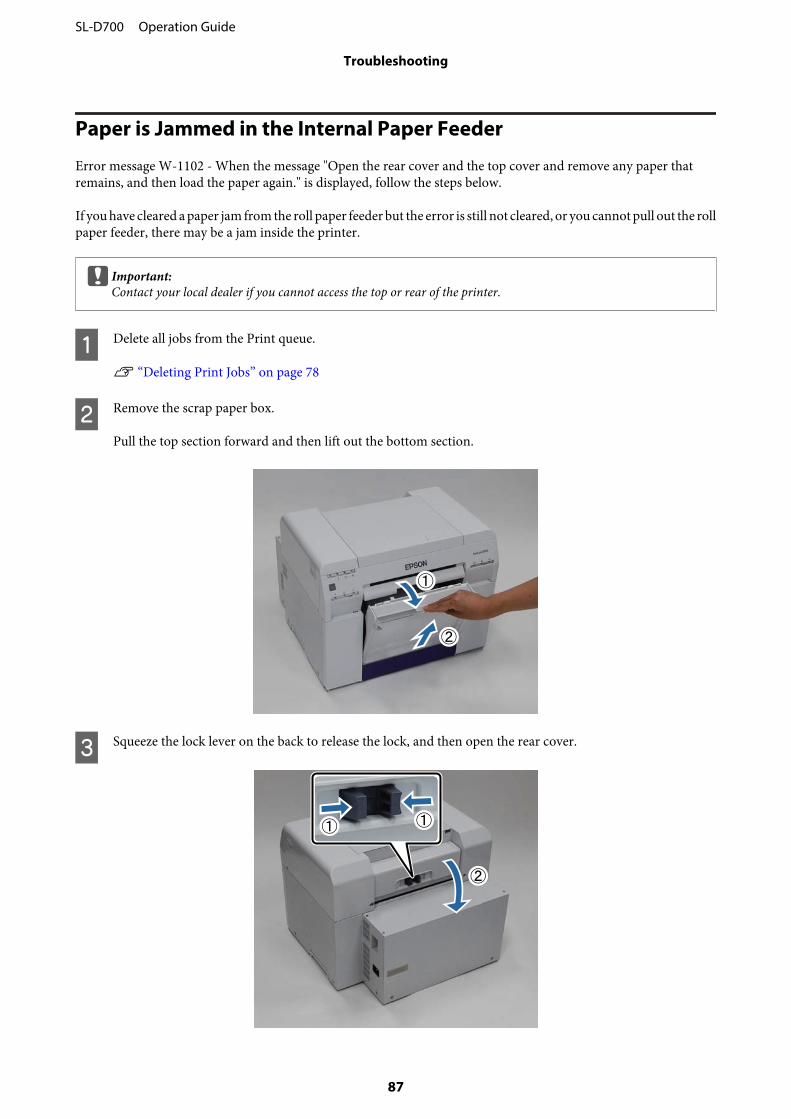
Paper is Jammed in the Internal Paper Feeder
Error message W-1102 - When the message "Open the rear cover and the top cover and remove any paper thatremains, and then load the paper again." is displayed, follow the steps below.
If you have cleared a paper jam from the roll paper feeder but the error is still not cleared, or you cannot pull out the rollpaper feeder, there may be a jam inside the printer.
c Important:Contact your local dealer if you cannot access the top or rear of the printer.
A Delete all jobs from the Print queue.
U “Deleting Print Jobs” on page 78
B Remove the scrap paper box.
Pull the top section forward and then lift out the bottom section.
C Squeeze the lock lever on the back to release the lock, and then open the rear cover.
SL-D700 Operation Guide
Troubleshooting
87
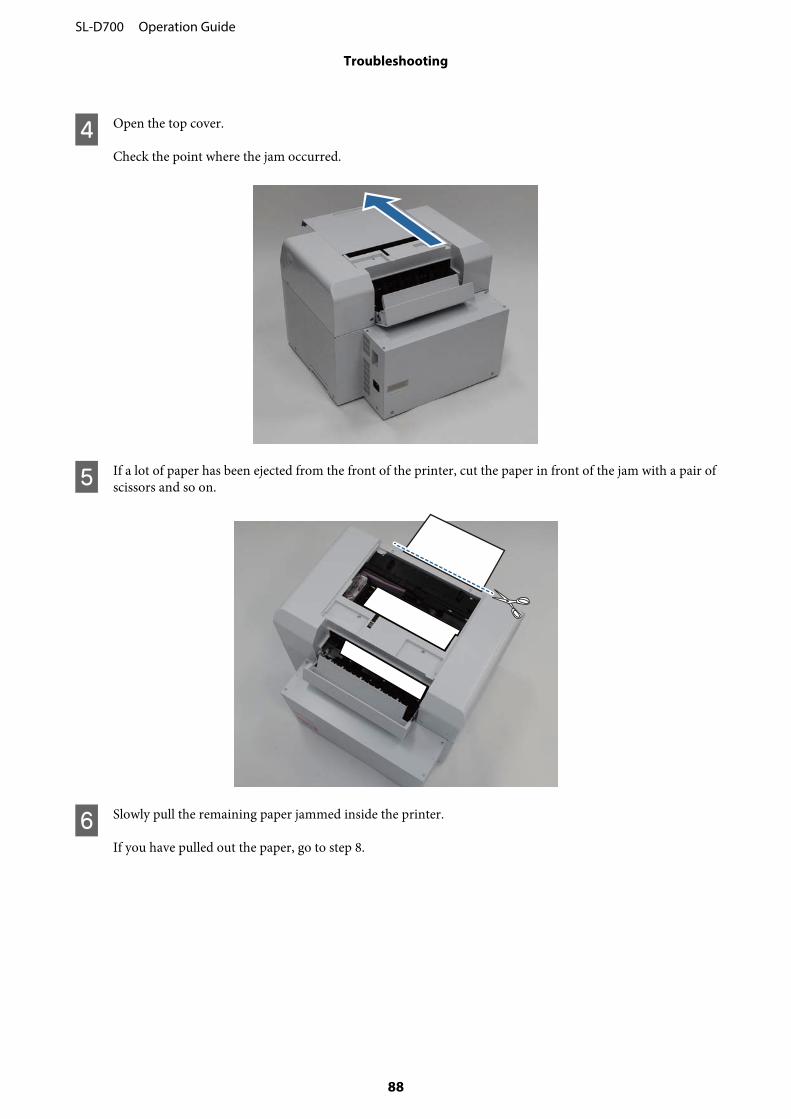
D Open the top cover.
Check the point where the jam occurred.
E If a lot of paper has been ejected from the front of the printer, cut the paper in front of the jam with a pair ofscissors and so on.
F Slowly pull the remaining paper jammed inside the printer.
If you have pulled out the paper, go to step 8.
SL-D700 Operation Guide
Troubleshooting
88
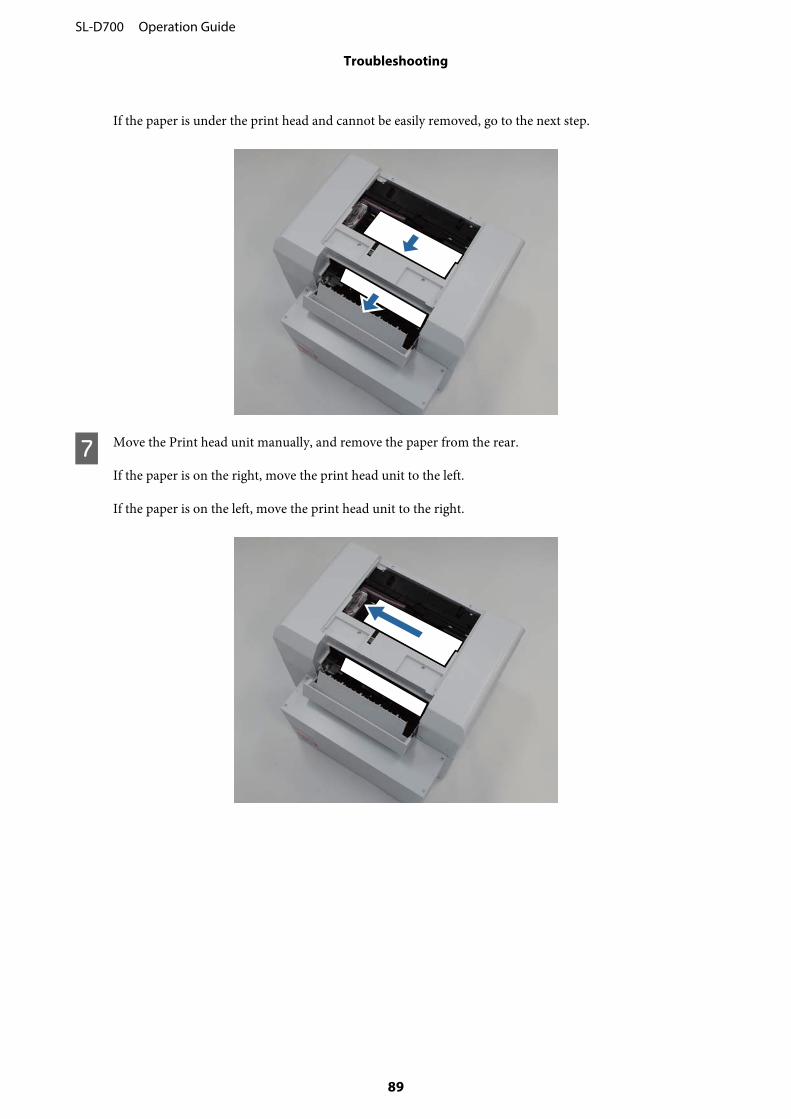
If the paper is under the print head and cannot be easily removed, go to the next step.
G Move the Print head unit manually, and remove the paper from the rear.
If the paper is on the right, move the print head unit to the left.
If the paper is on the left, move the print head unit to the right.
SL-D700 Operation Guide
Troubleshooting
89
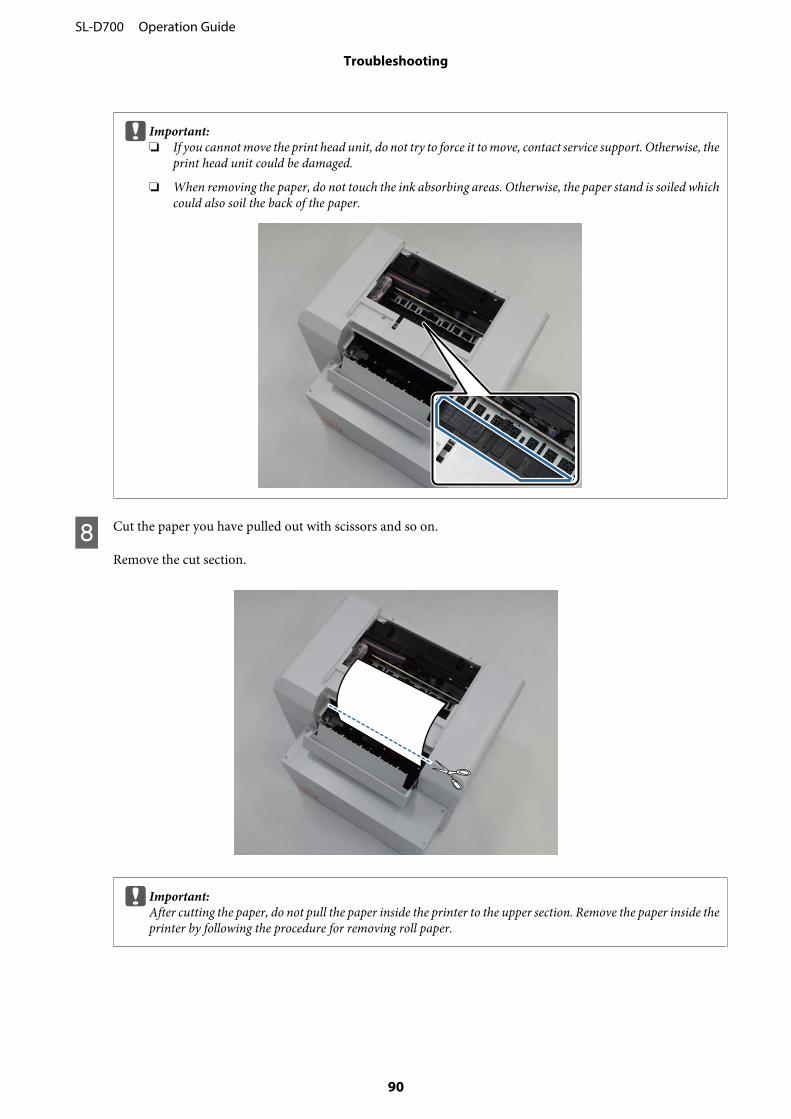
c Important:❏ If you cannot move the print head unit, do not try to force it to move, contact service support. Otherwise, the
print head unit could be damaged.
❏ When removing the paper, do not touch the ink absorbing areas. Otherwise, the paper stand is soiled whichcould also soil the back of the paper.
H Cut the paper you have pulled out with scissors and so on.
Remove the cut section.
c Important:After cutting the paper, do not pull the paper inside the printer to the upper section. Remove the paper inside theprinter by following the procedure for removing roll paper.
SL-D700 Operation Guide
Troubleshooting
90
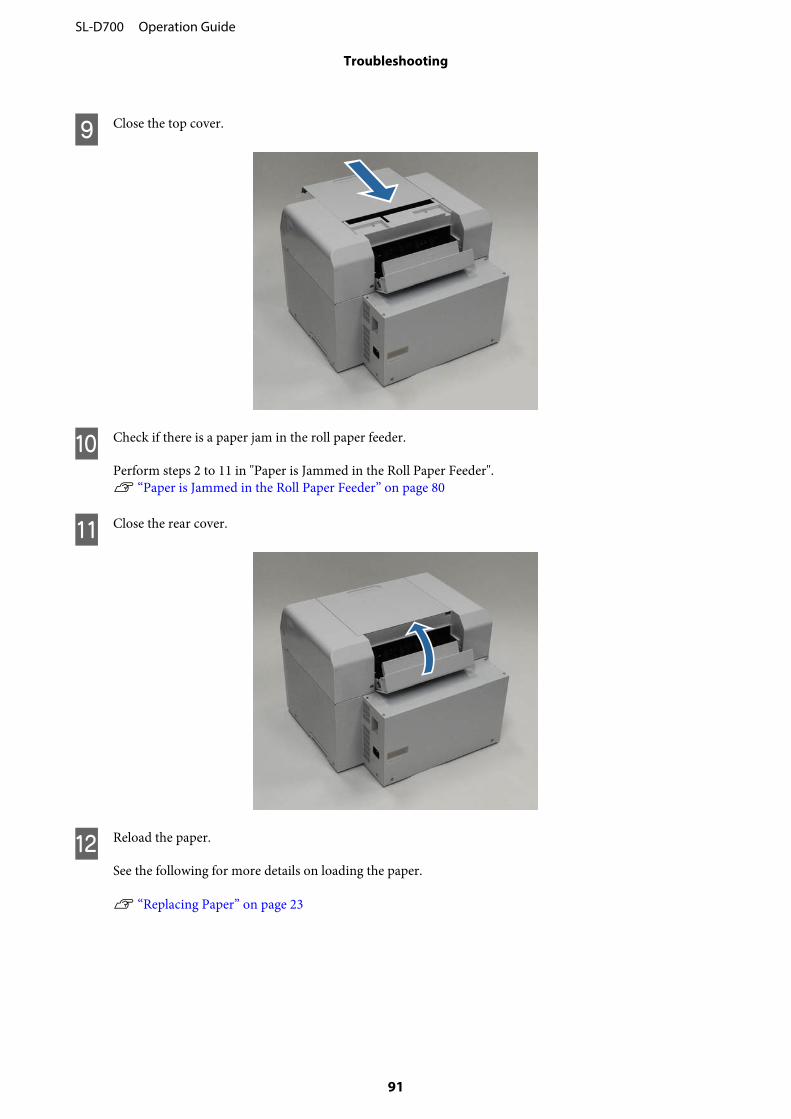
I Close the top cover.
J Check if there is a paper jam in the roll paper feeder.
Perform steps 2 to 11 in "Paper is Jammed in the Roll Paper Feeder".U “Paper is Jammed in the Roll Paper Feeder” on page 80
K Close the rear cover.
L Reload the paper.
See the following for more details on loading the paper.
U “Replacing Paper” on page 23
SL-D700 Operation Guide
Troubleshooting
91
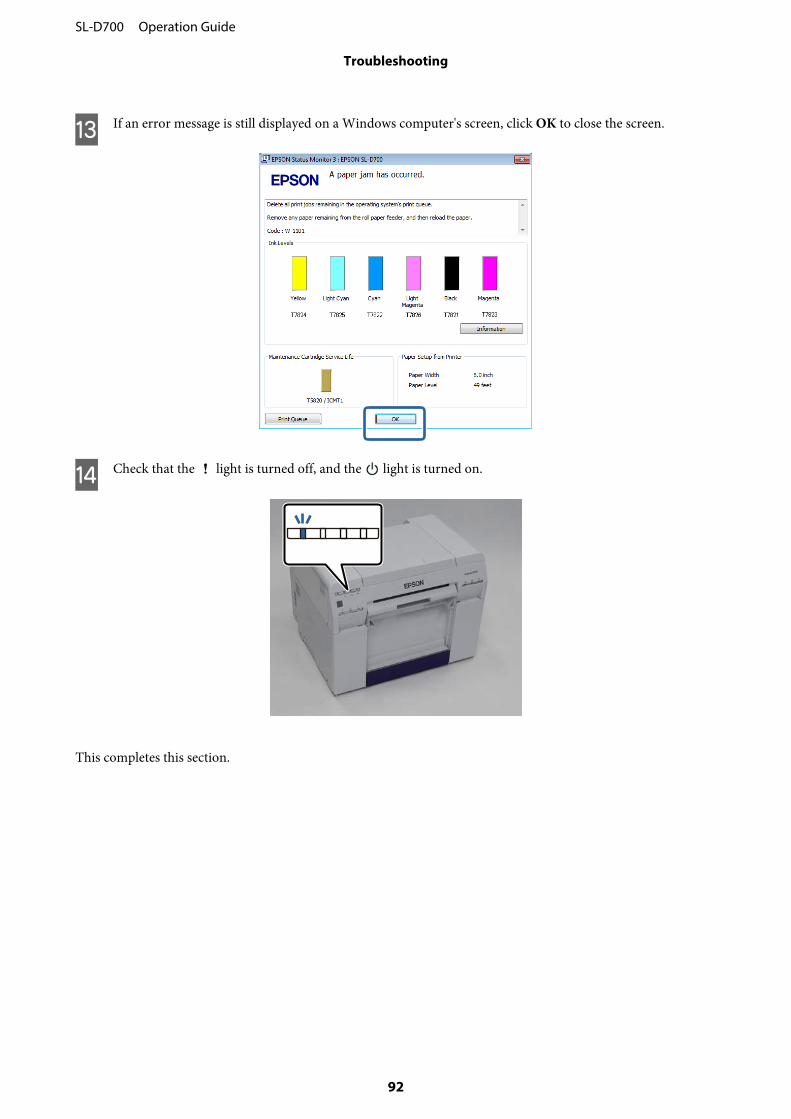
M If an error message is still displayed on a Windows computer's screen, click OK to close the screen.
N Check that the light is turned off, and the light is turned on.
This completes this section.
SL-D700 Operation Guide
Troubleshooting
92
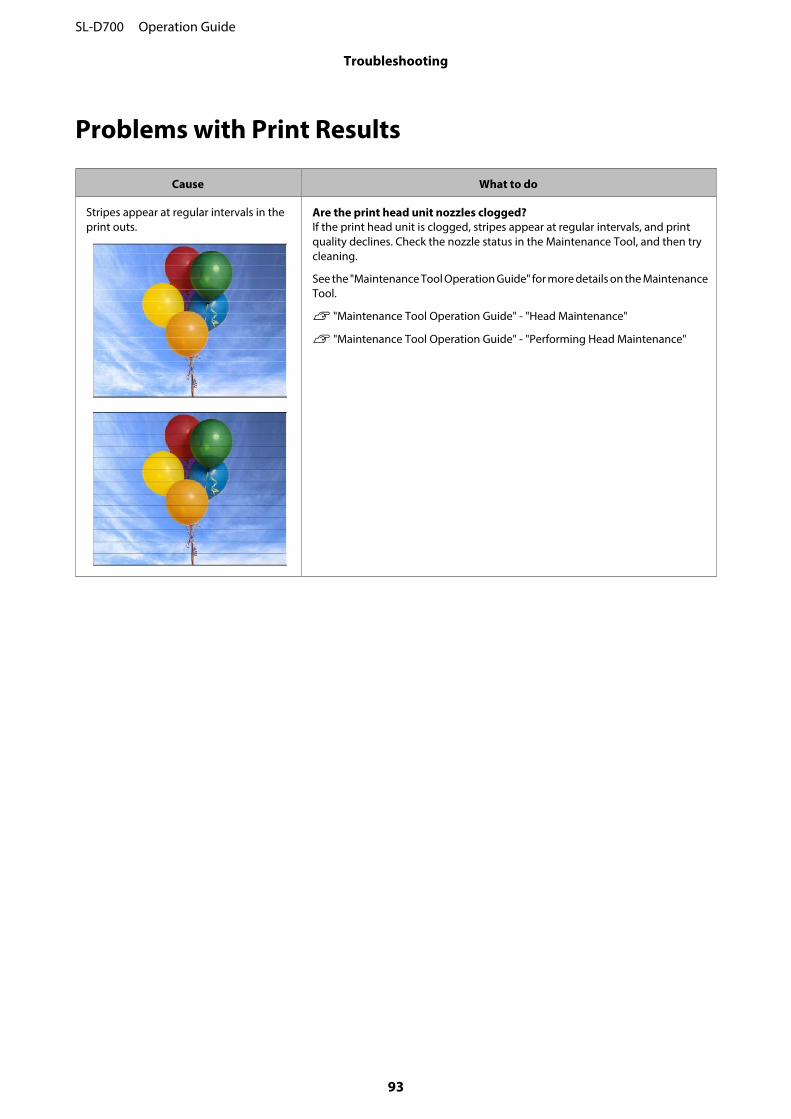
Problems with Print Results
Cause What to do
Stripes appear at regular intervals in theprint outs.
Are the print head unit nozzles clogged?If the print head unit is clogged, stripes appear at regular intervals, and printquality declines. Check the nozzle status in the Maintenance Tool, and then trycleaning.
See the "Maintenance Tool Operation Guide" for more details on the MaintenanceTool.
U "Maintenance Tool Operation Guide" - "Head Maintenance"
U "Maintenance Tool Operation Guide" - "Performing Head Maintenance"
SL-D700 Operation Guide
Troubleshooting
93
Cause What to do
Print quality is poor, uneven, too light, ortoo dark.
Are the print head unit nozzles clogged?If the nozzles in the print head unit are clogged, specific nozzles do not fire ink andthe print quality declines. Check the nozzle status in the Maintenance Tool, andthen try cleaning.
See the "Maintenance Tool Operation Guide" for more details on the MaintenanceTool.
U "Maintenance Tool Operation Guide" - "Head Maintenance"
U "Maintenance Tool Operation Guide" - "Performing Head Maintenance"
Are you using a genuine ink cartridge?The printer is developed for use with genuine ink cartridges. If you usenon-genuine ink cartridges, the prints may smear, or the color of the printedimage may be changed because the remaining ink level is not correctly detected.Be sure to use the correct ink cartridge.
Are you using an old ink cartridge?The print quality declines when an old ink cartridge is used. Replace the old inkcartridge with a new one. We recommend using all the ink in the ink cartridgebefore the expiry date printed on the package (within six months of installation).
U “Replacing Ink Cartridges” on page 47
Do the settings in the Maintenance Tool and the settings in the printer drivermatch the paper loaded in the printer?If the loaded paper type and the set Paper Type differ, print quality may decline.Check the settings.
U “Changing Paper Settings” on page 37
Have you compared the print result with the image on the display monitor?Since monitors and printers produce colors differently, printed colors will notalways match on-screen colors perfectly.
The printed surface is scuffed or soiled. Is the paper too thick or too thin?Check that the paper can be used with this printer.
U “Printer Specifications” on page 96
The paper is creased. Are you using the printer at normal room temperature?The printer should be used at normal room temperature (temperature: 15 to 25 ̊ C,humidity: 40 to 60 %). For information about paper such as thin paper from othermanufacturers that requires special handling, see the documentation suppliedwith the paper
Problems when Cutting Paper
Cause What to do
The cut is crooked, the cut edge is frayed orturned up, or the coating is cracked.
The cutter needs to be replaced.Contact service support to request cutter replacement.
When a Problem Cannot be Cleared
If you cannot resolve a problem after taking the measures described in the "Troubleshooting" section, contact servicesupport.
SL-D700 Operation Guide
Troubleshooting
94

Appendix
Consumables and Optional Items
The following consumable products and optional items are available for use with your printer. (As of December,2013)
Product name Product number Explanation
INK CARTRIDGE Black T7821 This printer is developed for use with genuine inkcartridges. If you use non-genuine cartridges, the printresult may be faint, or the ink remaining may not bedetected normally.
U “Replacing Ink Cartridges” on page 47
Cyan T7822
Magenta T7823
Yellow T7824
Light Cyan T7825
Light Magenta T7826
MAINTENANCE CARTRIDGE T5820 Absorbs ink consumed during head cleaning.
U “Replacing the Maintenance Cartridge” on page 55
SPINDLE UNIT for SL-D700 C12C811421 The same as the spindle unit supplied with the printer.Remove the tape before use.
PAPER CASE C12C890861 A case for storing paper to prevent the paper from beingdamaged.
U “Notes on storage” on page 19
PRINT TRAY C12C891171 A tray for holding print outs that are less than 102 mmlong.
LARGE PRINT TRAY C12C891181 A tray for holding print outs that are 102.1 to 305 mm long.
Notes on Moving the Printer
Perform the following operations when moving the printer.
!Caution:❏ When lifting this printer, make sure you use the correct posture.
❏ When lifting the printer, hold it in the areas indicated in the manual.The printer may fall if you lift it by holding other areas, and your fingers could be caught which may cause aninjury.
SL-D700 Operation Guide
Appendix
95
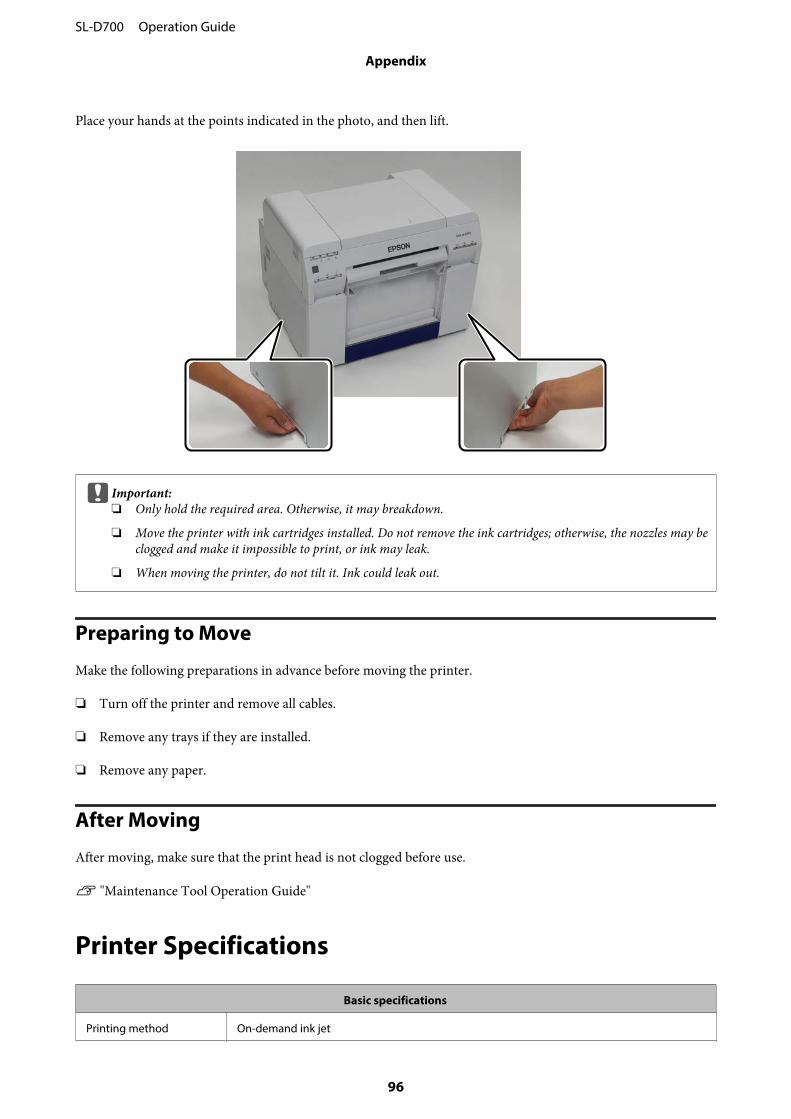
Place your hands at the points indicated in the photo, and then lift.
c Important:❏ Only hold the required area. Otherwise, it may breakdown.
❏ Move the printer with ink cartridges installed. Do not remove the ink cartridges; otherwise, the nozzles may beclogged and make it impossible to print, or ink may leak.
❏ When moving the printer, do not tilt it. Ink could leak out.
Preparing to Move
Make the following preparations in advance before moving the printer.
❏ Turn off the printer and remove all cables.
❏ Remove any trays if they are installed.
❏ Remove any paper.
After Moving
After moving, make sure that the print head is not clogged before use.
U "Maintenance Tool Operation Guide"
Printer Specifications
Basic specifications
Printing method On-demand ink jet
SL-D700 Operation Guide
Appendix
96
Basic specifications
Nozzle configuration 180 nozzles for each color
Print direction Bidirectional printing
Highest resolution 1440 x 720 dpi
Paper feed method Friction feed
Interface Universal Serial Bus Specifications Revision 2.0
Electrical Specifications
Rated voltage AC 100 to 120 V AC 220 to 240 V
Rated frequency range 50/60 Hz 50/60 Hz
Rated current 3.0 A 1.5 A
Power consumption Operating: Approximately 120 W
Sleep mode: Approximately 18 W
Power off: Less than 0.5 W
Operating: Approximately 120 W
Sleep mode: Approximately 18 W
Power off: Less than 0.5 W
Paper Feeder Specifications
Paper core size Roll paper feeder (3 inch core diameter): Outer diameter less than 170 mm/One can be loaded
Paper length 89 to 1,000 mm
Paper width 102 mm (4 inches), 127 mm (5 inches), 152 mm (6 inches), 203 mm (8 inches), 210 mm (A4)
Ink Specifications
Type Ink cartridges
Ink type Six color water-based dye
Use by date Three years after manufacture
Storage temperature In the packaging: -20 to 40 ˚C (within one month at 40 ˚C)Installed in printer: -20 to 40 ˚C (within one month at 40 ˚C)Transporting: -20 to 60 ˚C (within one month at 40 ˚C, 72 hours at 60 ˚C)
Capacity 200 ml
Cartridge dimensions 25 (W) x 200 (D) x 100 (H) mm
c Important:❏ The ink freezes if left at below -15 ˚C for a long time. If it does freeze, leave it at room temperature (25 ̊ C) for at
least four hours until it has defrosted (without condensation).
❏ Do not disassemble the ink cartridges or refill the ink.
SL-D700 Operation Guide
Appendix
97
Maintenance Cartridge Specifications
Type Maintenance cartridge for waste ink.
Number installed 1
Environmental conditions In the packaging: -20 to 40 ˚C (temperature), 20 to 85% (humidity)Installed in printer: Conforms to the general specifications belowTransporting: -20 to 60 ̊ C (temperature) 5 to 85% (humidity) (within one month at 40 ̊ C, 120 hoursat 60 ˚C)
Cartridge dimensions 78.8 (W) x 254.5 (D) x 38.5 (H) mm
General Specifications
Temperature Operating: 10 to 35 ˚CStorage (before unpacking): -20 to 60 ˚C (within 120 hours at 60 ˚C, one month at 40 ˚C)Storage (after unpacking): -20 to 40 ˚C (within one month at 40 ˚C)
Humidity Operating: 20 to 80% (without condensation)Storage (before unpacking): 5 to 85% (without condensation)Storage (after unpacking): 5 to 85% (without condensation)
Weight Approx. 23 kg (printer only)
Dimensions 460 (W) x 430 (D) x 354 (H) mm
U “Necessary space” on page 99
Standards and Approvals
Safety UL 60950-1
CAN/CSA No. 60950-1
Low Voltage Directive 2006/95/EC EN 60950-1
EMC FCC part 15 subpart B class A
CAN/CSA-CEI/IEC CISPR 22 Class A
AS/NZS CISPR 22 Class A
EMC Directive 2004/108/EC EN 55022 Class A
EN 55024
EN 61000-3-2
EN 61000-3-3
!Warning:This is a class A product. In a domestic environment this product may cause radio interference in which case the usermay be required to take adequate measures.
SL-D700 Operation Guide
Appendix
98
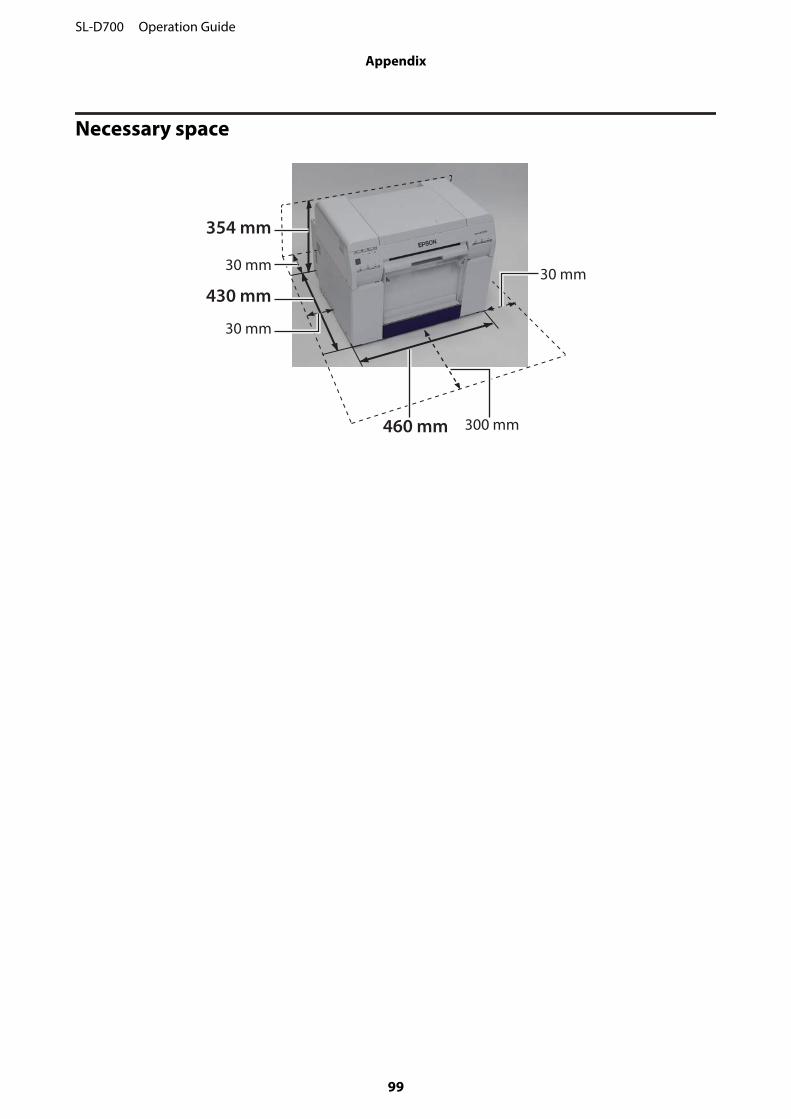
Necessary space
SL-D700 Operation Guide
Appendix
99
Notes
❏ Unauthorized reproduction of a part or all of this manual is strictly prohibited.
❏ The contents of this manual are subject to change without prior notice.
❏ Contact our company if you have any questions, find a mistake, encounter a missing description, and so on in thecontents of this manual.
❏ Regardless of the previous point, we will under no conditions be liable for any damages or losses resulting fromoperation of this product.
❏ We will under no conditions be liable for any damages or losses resulting from operation of this product in anyway other than described in this manual, inappropriate use of this product, or repairs or modifications performedby a third party other than our company or our suppliers.
❏ We are unable to accept responsibility for any problems resulting from the use of options or consumable productsother than our genuine products, or products that we recommend, even if the problem occurs within the warrantyperiod. In this case, a fee will be required for any necessary repairs.
FCC Compliance Statement
For United States UsersThis equipment has been tested and found to comply with the limits for a Class A digital device, pursuant to Part 15 ofthe FCC Rules. These limits are designed to provide reasonable protection against harmful interference when theequipment is operated in a commercial environment. This equipment generates, uses, and can radiate radio frequencyenergy and, if not installed and used in accordance with the instruction manual, may cause harmful interference toradio communications. Operation of this equipment in a residential area is likely to cause harmful interference, inwhich case the user will be required to correct the interference at his own expense.
This device complies with Part 15 of the FCC Rules. Operation is subject to the following two conditions:
(1) this device may not cause harmful interference, and
(2)this device must accept any interference received, including interference that may cause undesired operation.
WARNINGThe connection of a non-shielded equipment interface cable to this equipment will invalidate the FCC Certification ofthis device and may cause interference levels which exceed the limits established by the FCC for this equipment. It isthe responsibility of the user to obtain and use a shielded equipment interface cable with this device. If this equipmenthas more than one interface connector, do not leave cables connected to unused interfaces. Changes or modificationsnot expressly approved by the manufacturer could void the user’s authority to operate the equipment.
For Canadian UsersThis Class A digital apparatus complies with Canadian ICES-003.
Cet appareil numéique de la classe A est conforme à la norme NMB-003 du Canada.
SL-D700 Operation Guide
Appendix
100
For European customers only
The crossed out wheeled bin label that can be found on your product indicates that this product should not be disposedof via the normal household waste stream. To prevent possible harm to the environment or human health pleaseseparate this product from other waste streams to ensure that it can be recycled in an environmentally sound manner.For more details on available collection facilities please contact your local government office or the retailer where youpurchased this product.
This information only applies to customers in the European Union, according to Directive 2002/96/EC OF THEEUROPEAN PARLIAMENT AND OF THE COUNCIL OF 27 January 2003 on waste electrical and electronicequipment (WEEE) and legislation transposing and implementing it into the various national legal systems.
For other countries, please contact your local government to investigate the possibility of recycling your product.
Indication of the manufacturer and the importer in accordance with requirements of directive 2011/65/EU (RoHS)
Manufacturer: SEIKO EPSON CORPORATIONAddress: 3-5, Owa 3-chome, Suwa-shi, Nagano-ken 392-8502 JapanTelephone: 81-266-52-3131
Importer: EPSON EUROPE B.V.Address: Azië building, Atlas ArenA, Hoogoorddreef 5, 1101 BA Amsterdam Zuidoost The NetherlandsTelephone: 31-20-314-5000
For Turkish customers only
For Ukraine customers only
SL-D700 Operation Guide
Appendix
101
Where To Get Help
Technical Support WebSite
Epson’s Technical Support Web Site provides help withproblems that cannot be solved using thetroubleshooting information in your productdocumentation. If you have a Web browser and canconnect to the Internet, access the site at:
http://support.epson.net/
If you need the latest drivers, FAQs, manuals, or otherdownloadables, access the site at:
http://www.epson.com
Then, select the support section of your local EpsonWeb site.
Contacting EpsonSupport
Before Contacting Epson
If your Epson product is not operating properly and youcannot solve the problem using the troubleshootinginformation in your product documentation, contactEpson support services for assistance. If Epson supportfor your area is not listed below, contact the dealer whereyou purchased your product.
Epson support will be able to help you much morequickly if you give them the following information:
❏ Product serial number(The serial number label is usually on the back of theproduct.)
❏ Product model
❏ Product software version(Click About, Version Info, or similar button in theproduct software.)
❏ Brand and model of your computer
❏ Your computer operating system name and version
❏ Names and versions of the software applicationsyou normally use with your product
SL-D700 Operation Guide
Where To Get Help
102

Help for Users in North America
Epson provides the technical support services listedbelow.
Internet Support
Visit Epson’s support website at http://epson.com/support and select your product for solutions tocommon problems. You can download drivers anddocumentation, get FAQs and troubleshooting advice,or e-mail Epson with your questions.
Speak to a Support Representative
Dial: (562) 276‐1300 (U.S.), or (905) 709-9475(Canada), 6 am to 6 pm, Pacific Time, Monday throughFriday. Days and hours of support are subject to changewithout notice. Toll or long distance charges may apply.
Before you call Epson for support, please have thefollowing information ready:
❏ Product name
❏ Product serial number
❏ Proof of purchase (such as a store receipt) and dateof purchase
❏ Computer configuration
❏ Description of the problem
Note:For help using any other software on your system, see thedocumentation for that software for technical supportinformation.
Purchase Supplies and Accessories
You can purchase genuine Epson ink cartridges, ribboncartridges, paper, and accessories from an Epsonauthorized reseller. To find the nearest reseller, call800-GO-EPSON (800-463-7766). Or you can purchaseonline at http://www.epsonstore.com (U.S. sales) orhttp://www.epson.ca (Canadian sales).
Help for Users in Europe
Check your Pan-European Warranty Document forinformation on how to contact Epson support.
Help for Users in Taiwan
Contacts for information, support, and services are:
World Wide Web (http://www.epson.com.tw)
Information on product specifications, drivers fordownload, and products enquiry are available.
Epson HelpDesk (Phone: +0800212873)
Our HelpDesk team can help you with the followingover the phone:
❏ Sales enquiries and product information
❏ Product usage questions or problems
❏ Enquiries on repair service and warranty
Repair service center:
Telephonenumber
Faxnumber
Address
02-23416969 02-23417070 No.20, Beiping E. Rd.,Zhongzheng Dist.,Taipei City 100, Taiwan
02-27491234 02-27495955 1F., No.16, Sec. 5,Nanjing E. Rd.,Songshan Dist., TaipeiCity 105, Taiwan
02-32340688 02-32345299 No.1, Ln. 359, Sec. 2,Zhongshan Rd.,Zhonghe City, TaipeiCounty 235, Taiwan
039-605007 039-600969 No.342-1, GuangrongRd., LuodongTownship, Yilan County265, Taiwan
038-312966 038-312977 No.87, Guolian 2nd Rd.,Hualien City, HualienCounty 970, Taiwan
03-2810606 03-2810707 No.413, Huannan Rd.,Pingzhen City, TaoyuanCounty 324, Taiwan
SL-D700 Operation Guide
Where To Get Help
103
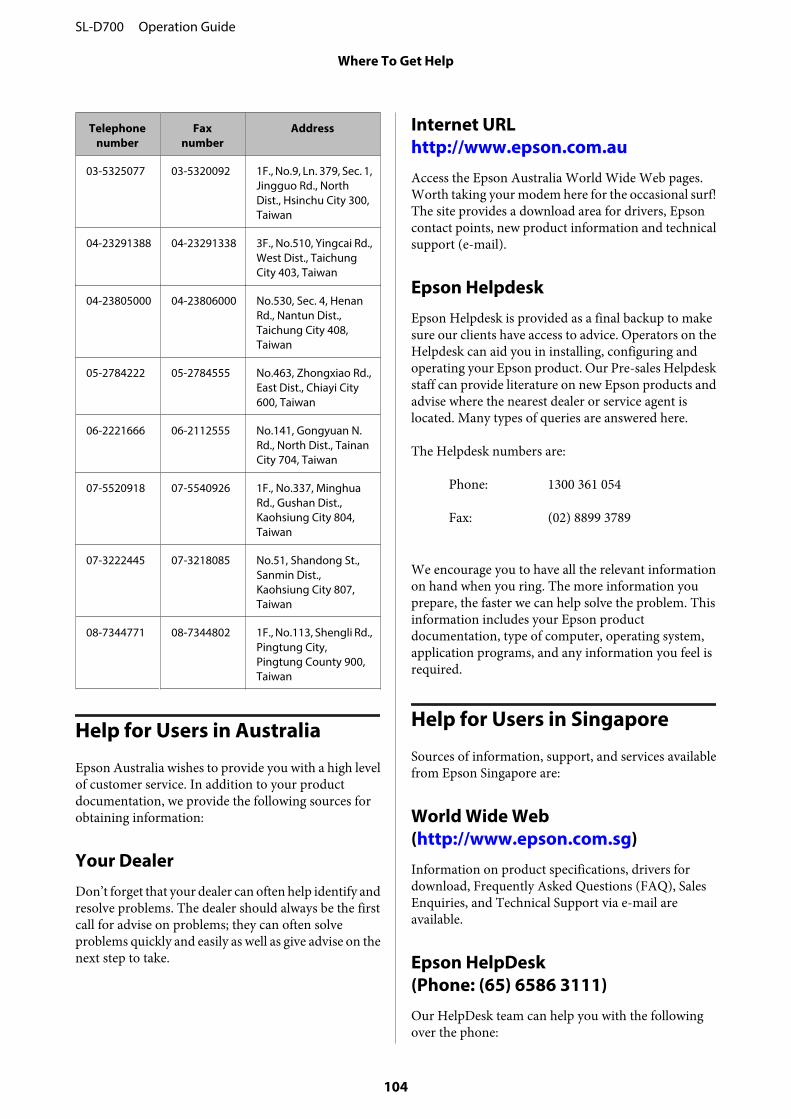
Telephonenumber
Faxnumber
Address
03-5325077 03-5320092 1F., No.9, Ln. 379, Sec. 1,Jingguo Rd., NorthDist., Hsinchu City 300,Taiwan
04-23291388 04-23291338 3F., No.510, Yingcai Rd.,West Dist., TaichungCity 403, Taiwan
04-23805000 04-23806000 No.530, Sec. 4, HenanRd., Nantun Dist.,Taichung City 408,Taiwan
05-2784222 05-2784555 No.463, Zhongxiao Rd.,East Dist., Chiayi City600, Taiwan
06-2221666 06-2112555 No.141, Gongyuan N.Rd., North Dist., TainanCity 704, Taiwan
07-5520918 07-5540926 1F., No.337, MinghuaRd., Gushan Dist.,Kaohsiung City 804,Taiwan
07-3222445 07-3218085 No.51, Shandong St.,Sanmin Dist.,Kaohsiung City 807,Taiwan
08-7344771 08-7344802 1F., No.113, Shengli Rd.,Pingtung City,Pingtung County 900,Taiwan
Help for Users in Australia
Epson Australia wishes to provide you with a high levelof customer service. In addition to your productdocumentation, we provide the following sources forobtaining information:
Your Dealer
Don’t forget that your dealer can often help identify andresolve problems. The dealer should always be the firstcall for advise on problems; they can often solveproblems quickly and easily as well as give advise on thenext step to take.
Internet URLhttp://www.epson.com.au
Access the Epson Australia World Wide Web pages.Worth taking your modem here for the occasional surf!The site provides a download area for drivers, Epsoncontact points, new product information and technicalsupport (e-mail).
Epson Helpdesk
Epson Helpdesk is provided as a final backup to makesure our clients have access to advice. Operators on theHelpdesk can aid you in installing, configuring andoperating your Epson product. Our Pre-sales Helpdeskstaff can provide literature on new Epson products andadvise where the nearest dealer or service agent islocated. Many types of queries are answered here.
The Helpdesk numbers are:
Phone: 1300 361 054
Fax: (02) 8899 3789
We encourage you to have all the relevant informationon hand when you ring. The more information youprepare, the faster we can help solve the problem. Thisinformation includes your Epson productdocumentation, type of computer, operating system,application programs, and any information you feel isrequired.
Help for Users in Singapore
Sources of information, support, and services availablefrom Epson Singapore are:
World Wide Web(http://www.epson.com.sg)
Information on product specifications, drivers fordownload, Frequently Asked Questions (FAQ), SalesEnquiries, and Technical Support via e-mail areavailable.
Epson HelpDesk(Phone: (65) 6586 3111)
Our HelpDesk team can help you with the followingover the phone:
SL-D700 Operation Guide
Where To Get Help
104
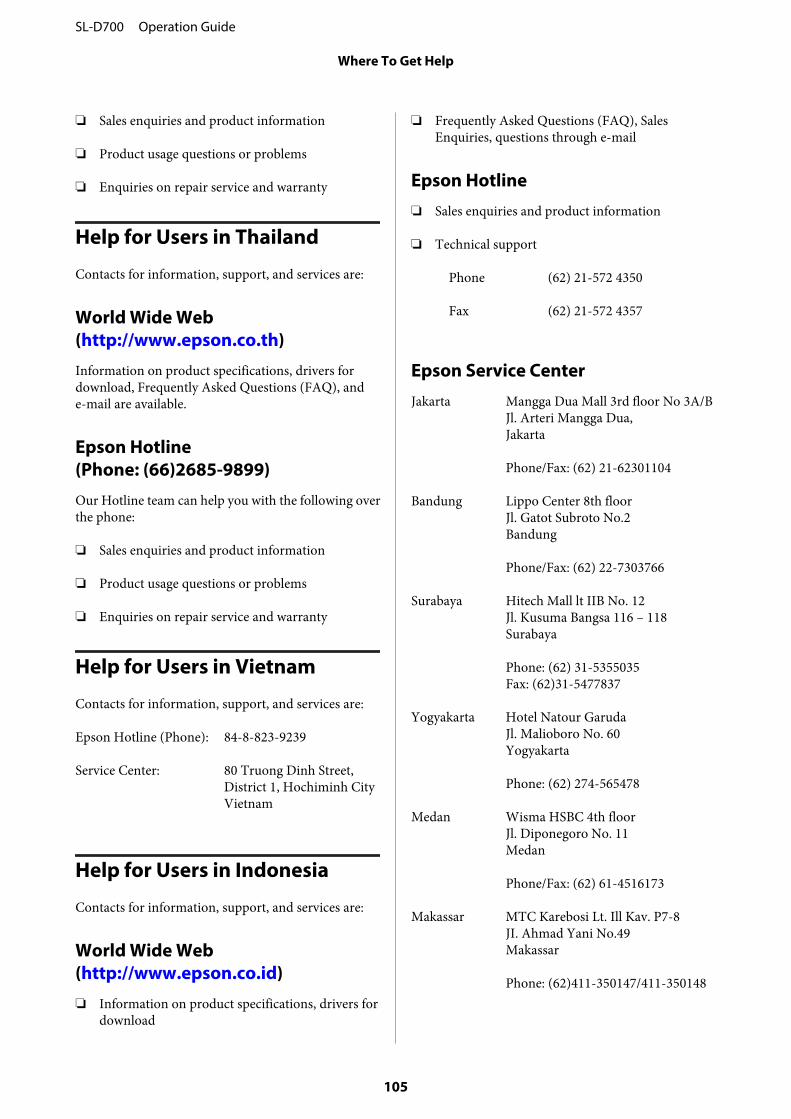
❏ Sales enquiries and product information
❏ Product usage questions or problems
❏ Enquiries on repair service and warranty
Help for Users in Thailand
Contacts for information, support, and services are:
World Wide Web(http://www.epson.co.th)
Information on product specifications, drivers fordownload, Frequently Asked Questions (FAQ), ande-mail are available.
Epson Hotline(Phone: (66)2685-9899)
Our Hotline team can help you with the following overthe phone:
❏ Sales enquiries and product information
❏ Product usage questions or problems
❏ Enquiries on repair service and warranty
Help for Users in Vietnam
Contacts for information, support, and services are:
Epson Hotline (Phone): 84-8-823-9239
Service Center: 80 Truong Dinh Street,District 1, Hochiminh CityVietnam
Help for Users in Indonesia
Contacts for information, support, and services are:
World Wide Web(http://www.epson.co.id)
❏ Information on product specifications, drivers fordownload
❏ Frequently Asked Questions (FAQ), SalesEnquiries, questions through e-mail
Epson Hotline
❏ Sales enquiries and product information
❏ Technical support
Phone (62) 21-572 4350
Fax (62) 21-572 4357
Epson Service Center
Jakarta Mangga Dua Mall 3rd floor No 3A/BJl. Arteri Mangga Dua,Jakarta
Phone/Fax: (62) 21-62301104
Bandung Lippo Center 8th floorJl. Gatot Subroto No.2Bandung
Phone/Fax: (62) 22-7303766
Surabaya Hitech Mall lt IIB No. 12Jl. Kusuma Bangsa 116 – 118Surabaya
Phone: (62) 31-5355035Fax: (62)31-5477837
Yogyakarta Hotel Natour GarudaJl. Malioboro No. 60Yogyakarta
Phone: (62) 274-565478
Medan Wisma HSBC 4th floorJl. Diponegoro No. 11Medan
Phone/Fax: (62) 61-4516173
Makassar MTC Karebosi Lt. Ill Kav. P7-8JI. Ahmad Yani No.49Makassar
Phone: (62)411-350147/411-350148
SL-D700 Operation Guide
Where To Get Help
105
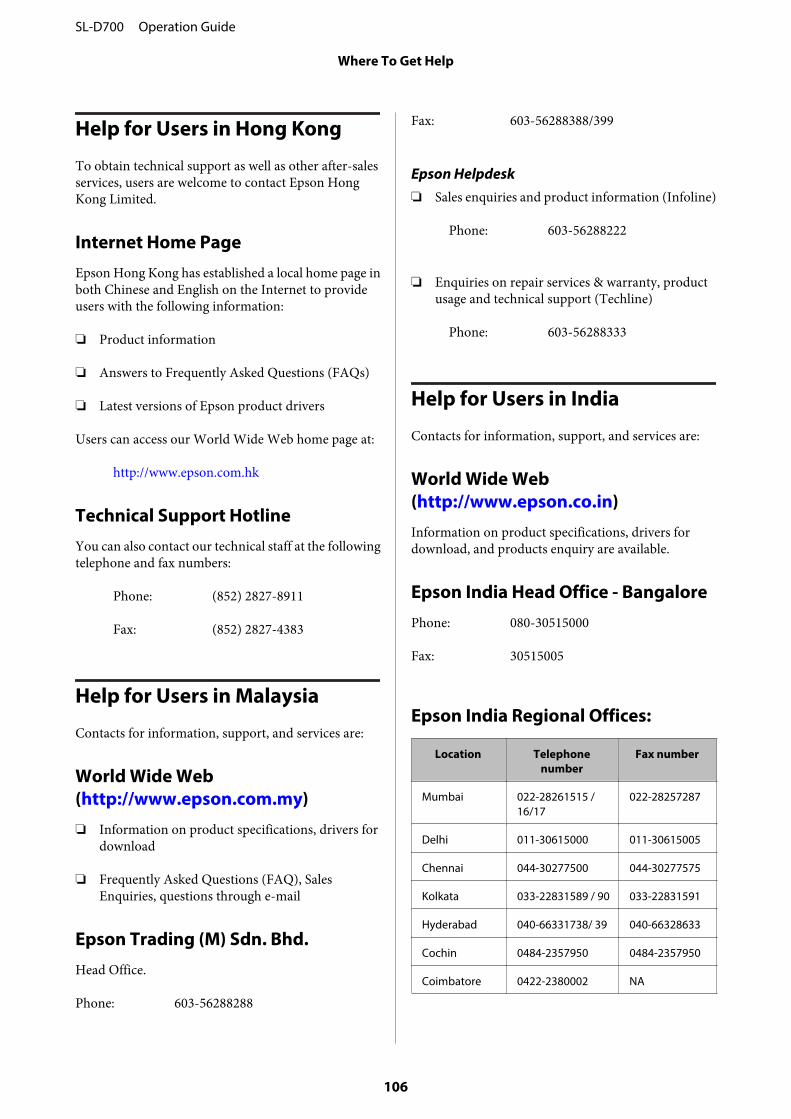
Help for Users in Hong Kong
To obtain technical support as well as other after-salesservices, users are welcome to contact Epson HongKong Limited.
Internet Home Page
Epson Hong Kong has established a local home page inboth Chinese and English on the Internet to provideusers with the following information:
❏ Product information
❏ Answers to Frequently Asked Questions (FAQs)
❏ Latest versions of Epson product drivers
Users can access our World Wide Web home page at:
http://www.epson.com.hk
Technical Support Hotline
You can also contact our technical staff at the followingtelephone and fax numbers:
Phone: (852) 2827-8911
Fax: (852) 2827-4383
Help for Users in Malaysia
Contacts for information, support, and services are:
World Wide Web(http://www.epson.com.my)
❏ Information on product specifications, drivers fordownload
❏ Frequently Asked Questions (FAQ), SalesEnquiries, questions through e-mail
Epson Trading (M) Sdn. Bhd.
Head Office.
Phone: 603-56288288
Fax: 603-56288388/399
Epson Helpdesk❏ Sales enquiries and product information (Infoline)
Phone: 603-56288222
❏ Enquiries on repair services & warranty, productusage and technical support (Techline)
Phone: 603-56288333
Help for Users in India
Contacts for information, support, and services are:
World Wide Web(http://www.epson.co.in)
Information on product specifications, drivers fordownload, and products enquiry are available.
Epson India Head Office - Bangalore
Phone: 080-30515000
Fax: 30515005
Epson India Regional Offices:
Location Telephonenumber
Fax number
Mumbai 022-28261515 /16/17
022-28257287
Delhi 011-30615000 011-30615005
Chennai 044-30277500 044-30277575
Kolkata 033-22831589 / 90 033-22831591
Hyderabad 040-66331738/ 39 040-66328633
Cochin 0484-2357950 0484-2357950
Coimbatore 0422-2380002 NA
SL-D700 Operation Guide
Where To Get Help
106
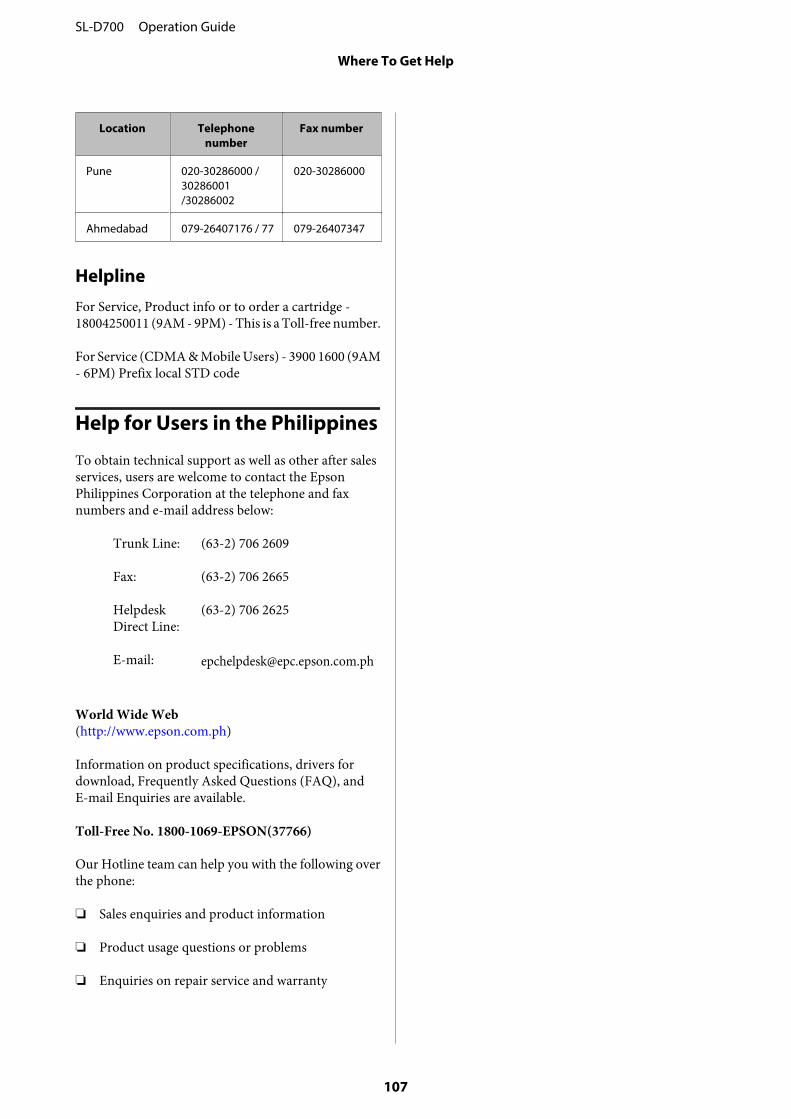
Location Telephonenumber
Fax number
Pune 020-30286000 /30286001/30286002
020-30286000
Ahmedabad 079-26407176 / 77 079-26407347
Helpline
For Service, Product info or to order a cartridge -18004250011 (9AM - 9PM) - This is a Toll-free number.
For Service (CDMA & Mobile Users) - 3900 1600 (9AM- 6PM) Prefix local STD code
Help for Users in the Philippines
To obtain technical support as well as other after salesservices, users are welcome to contact the EpsonPhilippines Corporation at the telephone and faxnumbers and e-mail address below:
Trunk Line: (63-2) 706 2609
Fax: (63-2) 706 2665
HelpdeskDirect Line:
(63-2) 706 2625
E-mail: [email protected]
World Wide Web (http://www.epson.com.ph)
Information on product specifications, drivers fordownload, Frequently Asked Questions (FAQ), andE-mail Enquiries are available.
Toll-Free No. 1800-1069-EPSON(37766)
Our Hotline team can help you with the following overthe phone:
❏ Sales enquiries and product information
❏ Product usage questions or problems
❏ Enquiries on repair service and warranty
SL-D700 Operation Guide
Where To Get Help
107