operation, maintenance and care windows, doors and façades
TRANSCRIPT

Schüco Aluminium Systems
Operation, maintenance and care Windows, doors and façades

Contents Schüco 3
Art. No. 68056/10.2013
Contents
2.1 Side-hung unit 2.2 Turn/tilt unit 2.3 Tilt-before-turn unit 2.4 Schüco TipTronic 2.5 Crank-operated turn/tilt unit 2.6 Double-vent unit a.) Access and secondary vents with turn function b.) Access vent with turn/tilt function and secondary vent with turn function 2.7 Horizontal pivot window 2.8 Vertical pivot window 2.9 Adjusting the pivot housing2.10 Limiting stay for horizontal and vertical pivot windows (optional) 2.11 Disengaging the limiting stay (cleaning position)
2.15 2.16 2.17 2.18 2.19 2.20 2.21 a.) b.) 2.22 a.) b.) c.) d.) e.) f.) g.) i.) 2.23 a.) b.) c.)
2.24 a.) b.) 2.25 2.26 2.27 a.) b.)
Bottom-hung toplight with catch Bottom-hung toplight with window handle Disengaging the rebate stay (cleaning position) Disengaging the safety restrictor and cleaning stay (cleaning position) Securing stay 200 kg Limiting stay Folding sliding unit Folding sliding unit without side-hung door Folding sliding unit with side-hung door Sliding units Operation with door pull Operation of the retaining catch without reset Operation of the retaining catch with reset Operation with window handle Operation with push-button window handle Operation with lockable window handle Operation with handle
Additional locking point in interlock section Lift-and-slide units Operation with handleOperation with bi-parting doors Operation with lockable handle Additional locking point in interlock section Tilt/slide unit Fitting with engagement mechanism (mainly doors) Fitting without engagement mechanism (mainly windows) Side-hung unit, outward-opening Top-hung unit, outward-opening Projected top-hung window, outward-opening Schüco AWS 102Schüco AWS 114
999
1011121212131314141415161617171818191920202122222222232323242424252525262627272728282929
1.0 Safety information 61.1 Transport 8
2.0 Operation of windows and window doors 9
d.) c
30

Contents Schüco 4
Art. No. 68056/10.2013
2.29 2.30 2.31 a.) b.) c.) 2.322.332.34 2.35
Parallel-opening window, outward-opening Roof window, outward-opening Lockable handles and burglar-resistant window and balcony door units Night ventilator Surface-mounted night ventilator Concealed night ventilator Multi-position ventilator Anti-turn lock Vent fastener Roller catch (e.g. for balcony doors) Limiting stayAnti-slam fitting
3233333334343535353636
3.0 Operation: doors 373.1 Door locks, external door with door pull 3.2 Door locks, external door with door handle 3.3 Door locks, door with intruder catch 3.4 Door locks, door with automatic locking 3.5 Door locks, door with electric opener3.6 Door locks, door with electric locking 3.7 Door lock, door with lock with electric coupling 3.8 Door locks, door with locking cylinder with locking thumb turn 3.9 Door locks, double-leaf doors 3.10 Door locks, double-leaf door with emergency lever bolt (panic function) a.) Secondary leaf locking via turn handle b.) Secondary leaf locking via emergency push bar 3.11 Magnetic door stop 3.12 Door stop 3.13 Door closer
373738393940404041424243444444
2.28 31

Contents Schüco 5
Art. No. 68056/10.2013
5.1 General information 5.2 Cleaning and care materials 5.3 General cleaning advice
6.0 Maintenance 6.1 Cleaning the drainage slot 6.2 Cleaning the roller guides of sliding and folding units 6.3 Checking and lubricating the gaskets
6.5 Doors 6.6 Maintaining the locking cylinder 6.7 Door hinges
7.0 Correct ventilation 7.1 Ventilating in summer / winter 7.2 Blast ventilation
8.0 Advice and repairs 8.1 Maintenance agreement
454546
4748484849505051
525253
5454
4.0 Misuse 44
5.0 Cleaning and care 45
6.0 Maintenance 47
7.0 Correct ventilation 52
8.0 Advice and repairs 54

Art. No. 68056/10.2013
Safety Information Schüco 6
1.0 Safety information
When using aluminium units, take note of the hazards listed below.
Danger of objects falling out when units slam shut Open units may slam in a draught which may knock over adjacent objects. If there is wind or a draught, please shut windows and window vents. There is wind or a draught if an open window or window vent opens or closes itself uncontrollably due to a positive or negative wind load.
Danger of falling There is a risk of falling out of open units. Do not leave open units unsupervised.

Art. No. 68056/10.2013
Safety Information Schüco 7
Danger of injury from open units There is a high risk of injury when working underneath open windows. Shut open windows before working underneath them and before children enter the room.
Danger of crushing
operating windows, patio doors or entrance doors, as well as power-operated windows.
Danger of injury from vents swinging open Bottom-hung units can unintentionally swing open when the stays are disengaged. There is a risk of injury from horizontal and vertical pivot windows swinging wide open during opening and closing.
When operating windows and doors that are insert units in facade constructions, the following descriptions apply accordingly.
INFORMATION
WARNING Only allow trained personnel from specialist companies to carry out any work involving transport, installation, dismantling, maintenance and repair.

Art. No. 68056/10.2013
Safety Information Schüco 8
1.1 Transport
INFORMATION
WARNING Risk of death from improper handling and transport. Incorrect handling and improper transport of the units could lead to dangerous situations and cause serious accidents and even death. Therefore, only allow specialist companies to carry out handling and transport tasks including assembly and installation.
Reaction forces may result in damage to or improper loads acting on the
in particular when using aids such as suction cups, transport nets, forklift trucks or cranes. Therefore, observe the following for all transport, loading and unloading processes:
Always select the points of application of force so that the resulting reaction forces are dispersed according to the constructive design of the
particular to the storage areas.
Always use the transport pin tailored to the respective rebate space (e.g. spacer pads) to hold the vent in its intended position in the outer frame during transport and thus transfer the reaction forces directly from the vent through the outer frame.
Transport the units in their intended installation position if possible so that the resulting reaction forces are dispersed according to
installation position. This applies in particular to the storage areas. If transport in the intended installation position is not possible, take the vent out and transport it separately from the accompanying outer frame.
In addition, observation of the following guidelines is recommended: TLE.01 of the German Association of Window and Façade Manufacturers (VFF)Proper handling of ready-to-install windows and external doors during transport, storage and installation

Art. No. 68056/10.2013
Operation of windows and window doors Schüco 9
2.0 Operation of windows and window doors
The following operating instructions apply to all types of unit and all opening types.
2.1 Side-hung unit
Turn position
Closed position
2.2 Turn/tilt unit
Tilt position
Closed position
Turn position
2.3 Tilt-before-turn unit
Closed position
Turn position
Tilt position
Art. No. 68056/10.2013
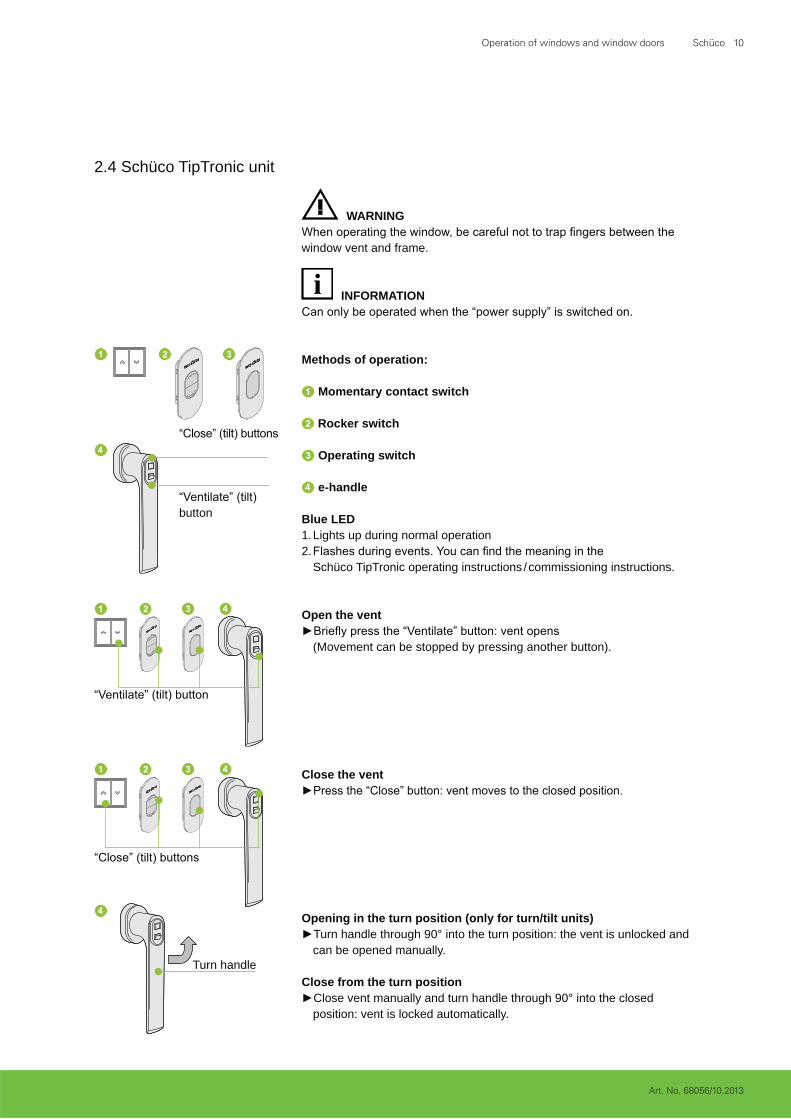
2.4 Schüco TipTronic unit
Open the vent
(Movement can be stopped by pressing another button).
Methods of operation:
Momentary contact switch
Close from the turn position Close vent manually and turn handle through 90° into the closed position: vent is locked automatically.
Turn handle
Opening in the turn position (only for turn/tilt units) Turn handle through 90° into the turn position: the vent is unlocked and can be opened manually.
e-handle
Rocker switch
Operating switch
Blue LED 1. Lights up during normal operation 2.
Schüco TipTronic operating instructions / commissioning instructions.
button
Close the vent
window vent and frame.
WARNING
INFORMATION
Operation of windows and window doors Schüco 10

Art. No. 68056/10.2013
2.5 Crank-operated turn/tilt unit
The crank housing has a position indicator. The red indicator shows the
Stop turning before the red indicator moves beyond the end position,
Open window in the tilt position 1. Pull out the crank handle from its base. 2. Turn the crank handle to the left until the desired opening angle is
shows the tilt position.
Close from the tilt position Turn the crank handle to the right until the red indicator shows the closed position.
Open in the turn position 1. Pull out the crank handle from its base. 2. Turn the crank handle to the right until the red indicator shows the turn
position. 3. Open the vent.
Close from the turn position 1. Close the vent. 2. Turn the crank handle to the left until the red indicator shows the closed
position.
Tilt position
Turn position
Closed position
Indicator
Tilt position Turn position Closed position
NOTE
Operation of windows and window doors Schüco 11

Art. No. 68056/10.2013
2.6 Double-vent unit
Open the access vent
Open the secondary vent 1. Open the access vent in the turn position. 2. Unlock rebate lever. 3. Open secondary vent.
Close in the reverse order.
3. Open Secondary vent
Access vent
2. Unlock
Turn position
Closed position
b.) Access vent with turn/tilt function and secondary vent with turn function
Open the secondary vent 1. Open the access vent in the turn position. 2. Unlock rebate lever. 3. Open secondary vent.
Close in the reverse order.
Open the access vent
Turn position
Closed position
Tilt position
3. Open
Secondary vent
Access vent
2. Unlock
a.) Access and secondary vents with turn function
Operation of windows and window doors Schüco 12
Art. No. 68056/10.2013
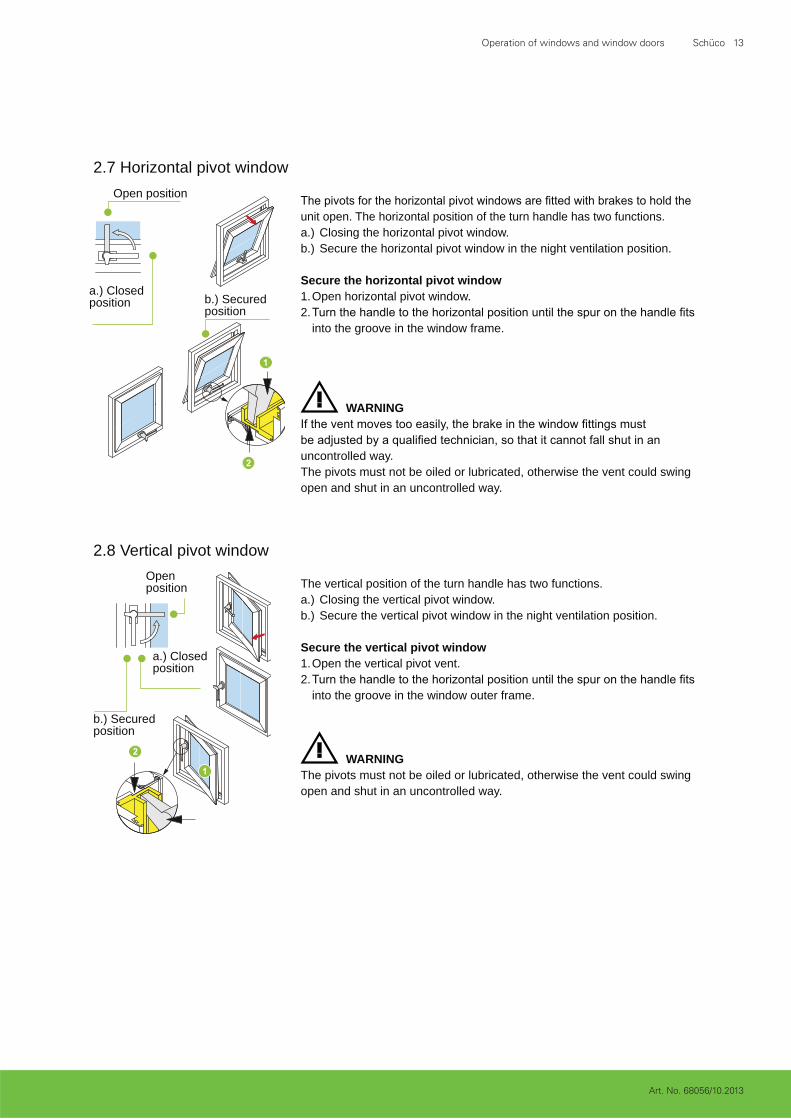
2.7 Horizontal pivot window
unit open. The horizontal position of the turn handle has two functions. a.) Closing the horizontal pivot window. b.) Secure the horizontal pivot window in the night ventilation position.
Secure the horizontal pivot window1. Open horizontal pivot window. 2.
into the groove in the window frame.
Open position
b.) Secured position
a.) Closed position
2.8 Vertical pivot window
The vertical position of the turn handle has two functions. a.) Closing the vertical pivot window. b.) Secure the vertical pivot window in the night ventilation position.
Open position
b.) Secured position
a.) Closed position
Secure the vertical pivot window1. Open the vertical pivot vent. 2.
into the groove in the window outer frame.
The pivots must not be oiled or lubricated, otherwise the vent could swing open and shut in an uncontrolled way.
uncontrolled way. The pivots must not be oiled or lubricated, otherwise the vent could swing open and shut in an uncontrolled way.
WARNING
WARNING
Operation of windows and window doors Schüco 13
Art. No. 68056/10.2013
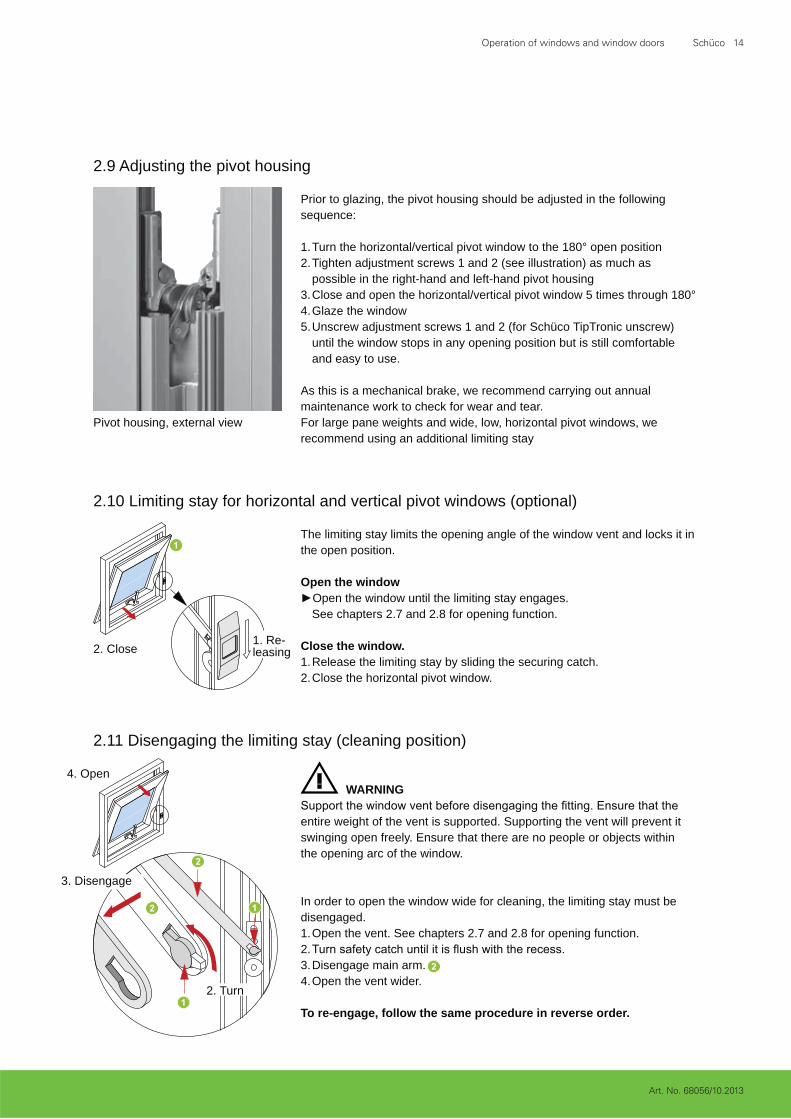
2.10 Limiting stay for horizontal and vertical pivot windows (optional)
2.11 Disengaging the limiting stay (cleaning position)
In order to open the window wide for cleaning, the limiting stay must be disengaged. 1. Open the vent. See chapters 2.7 and 2.8 for opening function.2. 3. Disengage main arm. 4. Open the vent wider.
To re-engage, follow the same procedure in reverse order.
entire weight of the vent is supported. Supporting the vent will prevent it swinging open freely. Ensure that there are no people or objects within the opening arc of the window.
4. Open
3. Disengage
2. Turn
The limiting stay limits the opening angle of the window vent and locks it in the open position.
2. Close 1. Re-leasing
Open the window Open the window until the limiting stay engages. See chapters 2.7 and 2.8 for opening function.
Close the window. 1. Release the limiting stay by sliding the securing catch.2. Close the horizontal pivot window.
2.9 Adjusting the pivot housing
Prior to glazing, the pivot housing should be adjusted in the following sequence:
1. Turn the horizontal/vertical pivot window to the 180° open position 2. Tighten adjustment screws 1 and 2 (see illustration) as much as
possible in the right-hand and left-hand pivot housing 3. Close and open the horizontal/vertical pivot window 5 times through 180° 4. Glaze the window 5. Unscrew adjustment screws 1 and 2 (for Schüco TipTronic unscrew)
until the window stops in any opening position but is still comfortable and easy to use.
As this is a mechanical brake, we recommend carrying out annual maintenance work to check for wear and tear.For large pane weights and wide, low, horizontal pivot windows, we recommend using an additional limiting stay
Pivot housing, external view
WARNING
Operation of windows and window doors Schüco 14

Art. No. 68056/10.2013
Methods of operation: Lever handle Crank handle Electric opener
1. Open 2. Close
1. Bend upwards
2. Open 3. Close
4. Push back in
1. Open 2. Close Open and close
Using a handle 1. Open the toplight by pulling down the handle.2. Close the toplight by pulling up the handle.
Using a crank handle 1. Remove the crank handle from the holder and move into the turn
position. 2. Open toplight by turning the crank handle to the left. 3. Close the toplight by turning the crank handle to the right.4.
Fix the crank handle to the holder.
Using electric opener 1. Press the button until the toplight is opened to the desired width. 2. Press the button until the toplight is fully closed.
Closed position
Open position
The toplight is prevented from opening onto the unit below by a rebate or security stay.
INFORMATION
Operation of windows and window doors Schüco 15
Art. No. 68056/10.2013
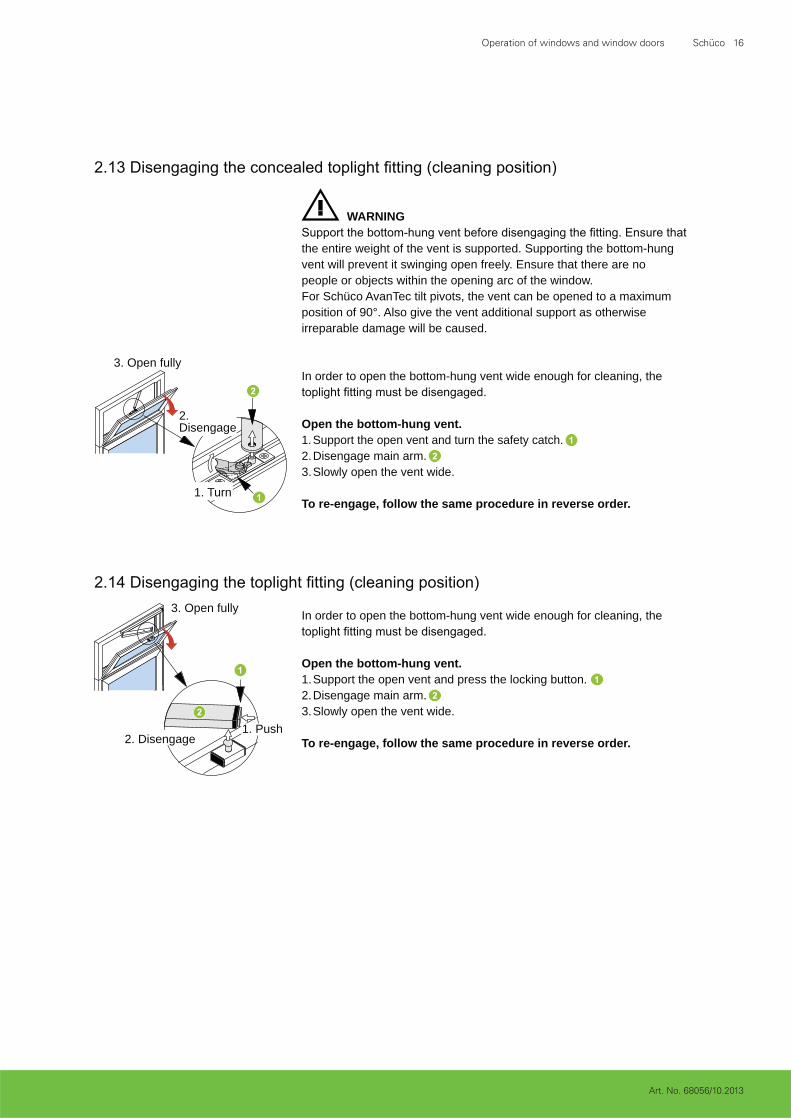
In order to open the bottom-hung vent wide enough for cleaning, the
Open the bottom-hung vent. 1. Support the open vent and turn the safety catch. 2. Disengage main arm. 3. Slowly open the vent wide.
To re-engage, follow the same procedure in reverse order.
In order to open the bottom-hung vent wide enough for cleaning, the
Open the bottom-hung vent. 1. Support the open vent and press the locking button. 2. Disengage main arm. 3. Slowly open the vent wide.
To re-engage, follow the same procedure in reverse order.
2. Disengage
3. Open fully
1. Push
1. Turn
2. Disengage
3. Open fully
the entire weight of the vent is supported. Supporting the bottom-hung vent will prevent it swinging open freely. Ensure that there are no people or objects within the opening arc of the window. For Schüco AvanTec tilt pivots, the vent can be opened to a maximum position of 90°. Also give the vent additional support as otherwise irreparable damage will be caused.
WARNING
Operation of windows and window doors Schüco 16

Art. No. 68056/10.2013
2.15 Bottom-hung toplight with catch
Open 1. Release both catches by pulling the loops. 2. Open the bottom-hung vent.
To close, push toplight until the catches engage.
2. Open
1. Pull
2.16 Bottom-hung toplight with window handle
Window handle at top Closed position
Tilt position
Window handle at side
Closed position
Tilt position
The toplight is prevented from opening onto the unit below by a rebate or security stay.
INFORMATION
For Schüco AvanTec tilt pivots, the vent can be opened to a maximum position of 90°. Also give the vent additional support as otherwise irreparable damage will be caused.
WARNING
Operation of windows and window doors Schüco 17

Art. No. 68056/10.2013
2.18 Disengaging the safety restrictor and cleaning stay (cleaning position)
1. Release
2. Open
In order to open the bottom-hung vent fully for cleaning, disengage the rebate stays at the sides.
Open the window vent. 1. Support the open vent and release from the ratchet. 2. Slowly open the vent.
Re-engage: after closing the bottom-hung vent, the security stay re-engages automatically.
Support the bottom-hung vent before disengaging the rebate stay. Ensure that the entire weight of the vent is supported. Supporting the bottom-hung vent will prevent it swinging open freely. Ensure that there are no people or objects within the opening arc of the window.
WARNING
2.17 Disengaging the rebate stay (cleaning position)
Open the bottom-hung vent. 1. Push the open vent so far out that the stay arm can be removed from its
guide. 2. Disengage main arm. 3. Slowly open the vent wide.
To re-engage, follow the same procedure in reverse order.
1. Disen-gage
2. Open fully
In order to open the bottom-hung vent fully for cleaning, disengage the rebate stays at the sides.
Support the bottom-hung vent before disengaging the rebate stay. Ensure that the entire weight of the vent is supported. Supporting the bottom-hung vent will prevent it swinging open freely. Ensure that there are no people or objects within the opening arc of the window. For Schüco AvanTec tilt pivots, the vent can be opened to a maximum position of 90°. Also give the vent additional support as otherwise irreparable damage will be caused.
WARNING
When opening the bottom-hung unit, ensure that the surface-mounted
NOTE
Operation of windows and window doors Schüco 18

Art. No. 68056/10.2013
WARNING
WARNING
2.19 Securing stay 200 kg
installation and dismantling.
Secure the bottom-hung vent 1. Support the open vent and push onto the stay arm. 2. The vent is now in the secured position.
2.20 Limiting stay
installation and dismantling.
Operation of windows and window doors Schüco 19

Art. No. 68056/10.2013
2.21 Folding sliding unit
a.) Folding sliding unit without side-hung door
Open 1. Unlock by turning the key. 2. Release the locking point on the folding units by turning the lever handle
upwards. 3. Open leaf by pushing the handles. 4. Open leaf.
Close 1. Pull the leaf into the frame using the door pulls. 2. Secure the locking point on the folding units by turning the lever handle
downwards. 3. Lock by turning the key.
3. Push
1. Unlock 2. Release
1. Pull
2. Lock
3. Lock
During opening and closing, do not place hands in the area where the
WARNING
The operation described only applies to the unit type shown. INFORMATION
Operation of windows and window doors Schüco 20

Art. No. 68056/10.2013
b.) Folding sliding unit with side-hung door
Open 1. Open side-hung door through 180°.
Engage in the catch of the adjacent leaf. 2. Release the locking point on the folding units by turning the lever handle
upwards. 3. Push the handle up 4. Slide the folding units open
4. Push open
3. Release
1. Open
2. Engage
5. Slide open
Close 1. Pull the sliding units shut using the door pulls. 2. Lock the folding units 3. Close the side-hung door.
1. Pull shut
2. Lock
During opening and closing, do not place hands in the area where the
WARNING
The operation described only applies to the unit type shown. INFORMATION
Operation of windows and window doors Schüco 21

Art. No. 68056/10.2013
2.22 Sliding units
Open 1. Unlock the sliding vent by pressing down on the inside of the handle. 2. Push the sliding vent open.
1. Push
2. Slide open
1. Slide shut 2. Check the door pull has engaged
b.) Operation of the retaining catch without reset
Open 1. Unlock the sliding vent by pushing the retaining catch downwards.
Signal colour = green. 2.
1. Slide shut
2. Slide open
1. Press downwards
2. Push upwards
a.) Operation with door pull
c.) Operation of the retaining catch with reset
Open 1. Unlock the sliding vent by pushing the retaining catch downwards and
press and hold the retaining catch – Signal colour on the locking unit = Green.
2. As soon as the locking area has been cleared, pressure on the retaining catch can be released – Signal colour on the locking unit = Red.
Close1.
The lock automatically re-engages and the vent is locked. Caution: There is a danger of locking oneself out.
To conserve the locking mechanism, we recommend manually supporting the locking process (by pushing the retaining catch downwards).
1. Slide shut
2. Slide open
Close 1. Push the sliding vent shut. 2. Ensure that the locking point of the handle engages.
Close1. 2. Lock the sliding vent by pushing the retaining catch upwards.
Signal colour = red.
1. Press downwards
Operation of windows and window doors Schüco 22

Art. No. 68056/10.2013
d.) Operation with window handle
e.) Operation with push-button window handle
Open1. Press the push-button on the handle. 2. Turn handle 90° anti-clockwise and release the push-button. 3. Push the sliding vent open.
Open1. Turn handle 90° anti-clockwise. 2. Push the sliding vent open.
1. Open
2. Slide open
1. Slide shut
2. Open
3. Slide open
1. Slide shut
Press button
f.) Operation with lockable handle
Open1. Turn the key on the handle to the right (unlock). 2. Turn handle 90° anti-clockwise. 3. Push the sliding vent open.
Slide position
3. Uncouple locking point
2. Slide position
1. Couple locking point
Closed position
Close1. Push the sliding vent shut. 2. Turn handle 90° clockwise.
Close1. Push the sliding vent shut. 2. Turn handle 90° clockwise.
Close1. Push the sliding vent shut.2. Turn handle 90° clockwise. 3. Turn the key on the handle to the left (lock).
Operation of windows and window doors Schüco 23

Art. No. 68056/10.2013Art. No. 68056/10.2013
g.) Operation with handle
Open 1. Turn handle 90° clockwise. 2. Push the sliding vent open.
Slide position
1. Turn down-wards
2. Slide open
Closed position
1. Slide shut 2. Turn handle
Open1. 2. Turn handle 90° clockwise. 3. Push the sliding vent open.
Slide position
Closed position
2. Turn down-wards
1. Unlock
1. Slide shut 2. Turn handle
3. Slide open
Close1. Push the sliding vent shut. 2. Turn handle 90° anti-clockwise. 3. Lock vent with key.
i.) Additional locking point in interlock section
Open1. Press in and turn (unlock) turning knob of centre locking point
to the left. 2. Operate unit as described.
Lock
Unlock
Close1. Close the unit.2. Press in turning knob of centre locking point until it engages
and turn to the right (lock).
Close 1. Push the sliding vent shut. 2. Turn handle 90° anti-clockwise.
Operation of windows and window doors Schüco 24

Art. No. 68056/10.2013
2.23 Lift-and-slide units
b.) Operation with lockable handle
Open1. Unlock vent with the key.2. Turn handle downwards through 180°.3. Push vent open.
Slide position
Closed position
2. Turndown-wards
1. Unlock
3. Slide open
1. Slide shut
a.) Operation with handle
c.) Additional locking point in interlock section
Open1. Press in and turn (unlock) turning knob of centre locking point
to the left. 2. Operate unit as described.
Lock
Unlock Close1. Close the unit.2. Press in turning knob of centre locking point until it engages and turn to
the right (lock).
Open 1. Turn handle downwards through 180°.2. Push vent open.
Slide position
1. Turndown-wards
Closed position
2. Slide open
1. Slide shut
Close 1. Push vent shut.2. Turn handle upwards through 180°.
Close1. Push vent shut2. Turn handle upwards through 180°.3. Lock vent with key.
could become trapped.
WARNING
Operation of windows and window doors Schüco 25

Art. No. 68056/10.2013
2.23 Lift-and-slide units
b.) Operation with bi-parting doors
OpenWhen viewing doors from the inside1.Turn active vent handle downwards through 180°.2.Turn passive vent handle downwards through 180°.3.Push vents open.
a.) Operation with handle
Open 1. Turn handle downwards through 180°.2. Push vent open.
Slide position
1. Turndown-wards
Closed position
2. Slide open
1. Slide shut
Close 1. Push vent shut.2. Turn handle upwards through 180°.
CloseWhen viewing doors from the inside1. Push vents shut.2. Turn passive vent handle upwards through 180°.3. Turn active vent handle upwards through 180°.
could become trapped.
WARNING
Operation of windows and window doors Schüco 25
Note: If you only want to open the active vent of the bi-parting doors you will only need to turn the handle of the active vent.
Note: If only the active vent is open you will only need to close and turn the handle of the active vent.

Art. No. 68056/10.2013
2.24 Tilt/slide unit
a.) Fitting with engagement mechanism (mainly doors)
b.) Fitting without engagement mechanism (mainly windows)
Tilt position Bring the sliding vent into the tilt position by turning the handle through 90°.
Closed position
Tilt position
Slide position
Close from the slide position Slide the vent to and then push the vent into the closed position (if necessary with both hands) and then turn the window handle downwards.
Close from the tilt position Close the vent and turn the handle downwards through 90° into the closed position.
Slide position 1. Place the vent in the tilt position.2. Slide open the vent at the bottom by continuing to press down on the
handle (handle springs back).
Tilt positionBring the sliding vent into the tilt position by turning the handle through 90°.
Slide position 1. Release sliding vent at the bottom by continuing to press down on the
handle.2. Allow handle to spring back and push the sliding vent open.
Closed position
Tilt position
Close1. Close sliding units until the vent automatically moves into the bottom
locking point (tilt position).2. Close the sliding units by turning the crank handle upwards.
Operation of windows and window doors Schüco 26

Art. No. 68056/10.2013
2.23 Lift-and-slide units
1. Slide shut
Operation of windows and window doors Schüco 27
c.) Operation with lockable handle
Open1. Unlock vent with the key.2. Turn handle downwards through 180°.3. Push vent open.
Slide position
Closed
2. Turndown-wards
1. Unlock
3. Slide open
Close1. Push vent shut2. Turn handle upwards through 180°.3. Lock vent with key.
d.) Additional locking point in interlock section
Lock
Unlock
Open1. Press in and turn (unlock) turning knob of centre locking point
to the left. 2. Operate unit as described.
Close1. Close the unit.2. Press in turning knob of centre locking point until it engages and turn to
the right (lock).

Art. No. 68056/10.2013
2.25 Side-hung unit, outward-opening
Open1. Turn handle upwards through 90°.2. Push the vent outwards.
Turn position
Closed position
1. Turnupwards
2. Pushoutwards
2.26 Top-hung unit, outward-opening, with opening stay
Close1. Pull the vent fully shut.2. Turn handle downwards through 90°.
Open1. Turn handle upwards through 90°.2. Push the vent outwards and engage at the required opening width.
Closed position
Top-hung position
1. Turnupwards
2. Pushoutwards andengage
Close1. Push the vent open to the end stop until the holding catch is released.2. Pull the vent fully shut.3. Turn handle downwards through 90°.
With negative wind loads, the rebate stay can be pulled into the end position causing the window to shut. Ensure that there are no objects or body parts in the stay and rebate area (risk of injury) .
WARNING
Operation of windows and window doors Schüco 28
Art. No. 68056/10.2013
Operation of windows and window doors Schüco 29
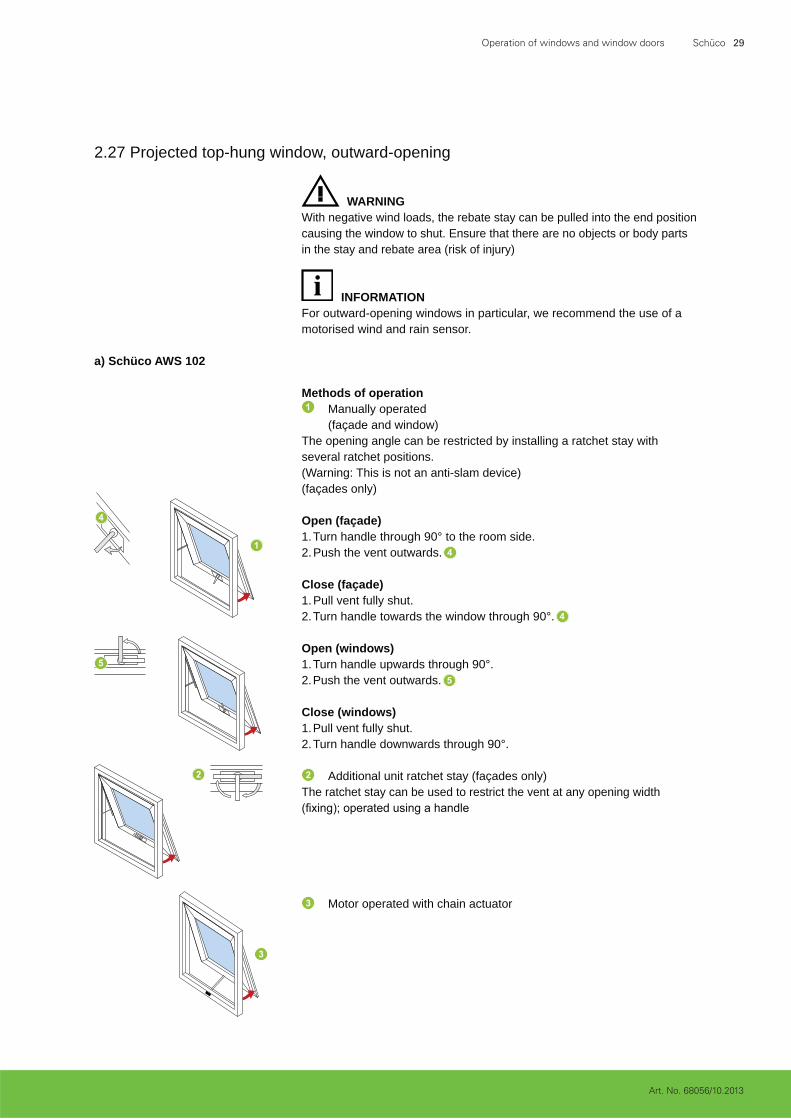
2.27 Projected top-hung window, outward-opening
Open (windows) 1. Turn handle upwards through 90°.2. Push the vent outwards.
Close (windows) 1. Pull vent fully shut.2. Turn handle downwards through 90°.
Motor operated with chain actuator
Additional unit ratchet stay (façades only) The ratchet stay can be used to restrict the vent at any opening width
Open (façade) 1. Turn handle through 90° to the room side.2. Push the vent outwards.
Close (façade) 1. Pull vent fully shut.2. Turn handle towards the window through 90°.
Methods of operation Manually operated (façade and window)
The opening angle can be restricted by installing a ratchet stay with several ratchet positions. (Warning: This is not an anti-slam device) (façades only)
With negative wind loads, the rebate stay can be pulled into the end position causing the window to shut. Ensure that there are no objects or body parts in the stay and rebate area (risk of injury)
WARNING
For outward-opening windows in particular, we recommend the use of a motorised wind and rain sensor.
INFORMATION
a) Schüco AWS 102

Art. No. 68056/10.2013
Operation of windows and window doors Schüco 30
b) Schüco AWS 114
Methods of operation Manually operated
The opening angle can be limited by moving the stop position in the C-shaped track.
Open 1. Turn handle through 90° to the room side.2. Push the vent outwards.
Close 1. Pull vent fully shut.2. Turn handle parallel to the window.
Motorised operation with concealed Schüco TipTronic motors for locking and opening
Operated using a) Momentary contact switchb) Rocker switchc) Operating switch
Art. No. 68056/10.2013
Operation of windows and window doors Schüco 31
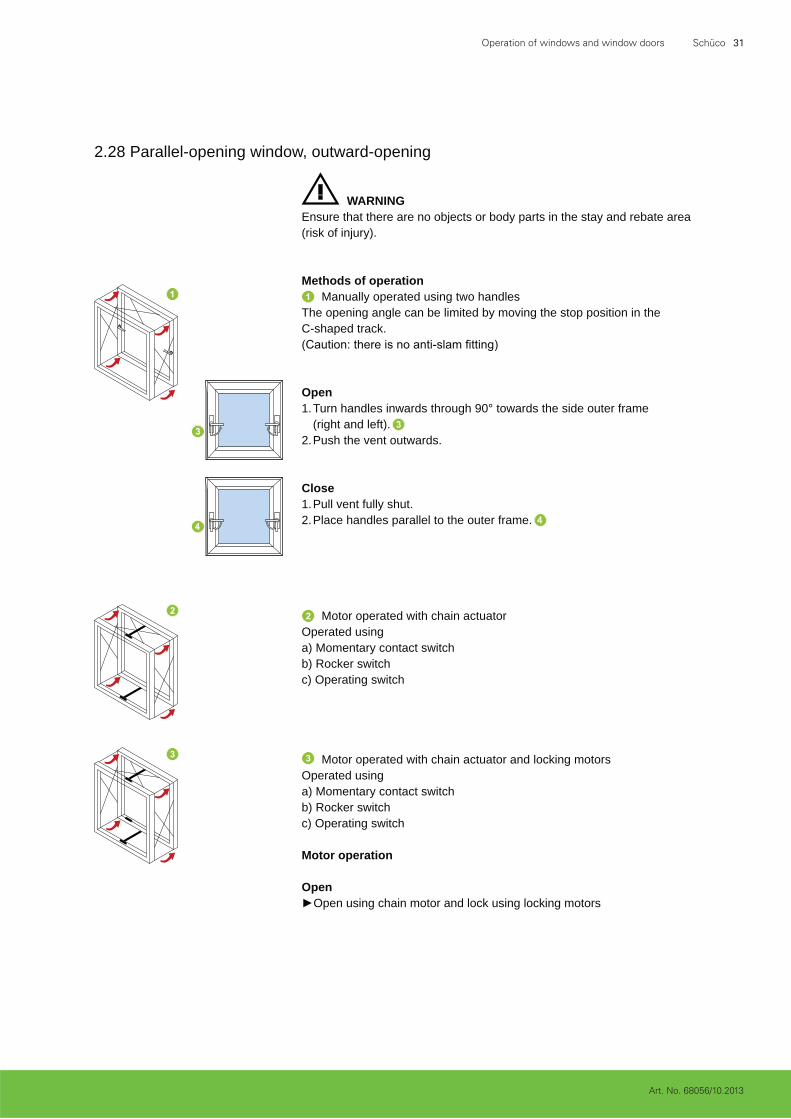
2.28 Parallel-opening window, outward-opening
Ensure that there are no objects or body parts in the stay and rebate area (risk of injury).
WARNING
Methods of operation Manually operated using two handles
The opening angle can be limited by moving the stop position in the C-shaped track.
Open 1. Turn handles inwards through 90° towards the side outer frame
(right and left).2. Push the vent outwards.
Close 1. Pull vent fully shut.2. Place handles parallel to the outer frame.
Motor operated with chain actuator Operated using a) Momentary contact switchb) Rocker switchc) Operating switch
Motor operated with chain actuator and locking motors Operated using a) Momentary contact switchb) Rocker switchc) Operating switch
Motor operation
Open Open using chain motor and lock using locking motors

Art. No. 68056/10.2013
Operation of windows and window doors Schüco 32
2.29 Roof window, outward-opening
Methods of operation With crank handle With chain or linear drive (power-operated)
Operated usinga) Individual control (momentary contact switch)b) Group controlc) SHEVS compact control unit
Support the roof vent before pulling the splint from the surface-mounted
installation or maintenance. Supporting the vent will prevent it from slamming shut. Ensure that there are no objects or body parts in the rebate area (risk of injury).
WARNING
NOTEThe use of a wind and rain sensor is recommended for the power-operated unit for the loft conversion. A magnetic switch kit can be used as a closing monitor.

Art. No. 68056/10.2013
Operation of windows and window doors Schüco 33
2.30 Lockable handles and burglar-resistant window and balcony door units
pushbutton lock.
To unlock (lockable handle): 1. Unlock by turning the key to the left.2. Move handle into the desired position (turn or turn/tilt).
To lock (lockable handle): 1. Close the vent.2. Lock by turning the key to the right.
1. Lock
2. Unlock
To lock (pushbutton lock): 1. Close the vent.2. In the closed position, the handle locks automatically.
To unlock (pushbutton lock): 1. Unlock the handle by pressing the pushbutton and simultaneously
turning the handle.2. Move handle into the desired position.
Full burglar resistance is only guaranteed when the unit is locked. INFORMATION
2.31 Night ventilation
a.) Surface-mounted night ventilator
The surface-mounted night ventilator limits the turn and tilt positions of the vent to a small opening width. The night ventilator is always in operation. After closing the unit, the night ventilator engages automatically.
Open the window wide: 1. Push the latch to the side.2. Open unit.
2. Open
1. Push the latch tothe side

Art. No. 68056/10.2013
Operation of windows and window doors Schüco 34
b.) Concealed night ventilator
The concealed night ventilator limits the turn and tilt positions of the vent to a small opening. To open the vent completely in the tilt position, the night ventilator must be disengaged.
To disengage the night ventilator: 1. Open the unit in the turn position.2. Pull out the latch.3. Turn it downwards.4. Push in again.5. Der Flügel lässt sich in die volle Kippstellung bringen.
The night ventilator must be re-engaged manually.
To lock the night ventilator: 1. Open the unit in the turn position.2. Pull out the latch.3. Turn it upwards.4. Push in again.5. The vent is limited to the night ventilation tilt position again.
Night ventilation
1. Open
2. Pull out
3. Turn
4. Push in
c.) Multi-position ventilator
The multi-position night ventilator restricts the tilt position of the vent to 4 different opening widths. To open the vent completely in the tilt position, the night ventilator must be disengaged.
To disengage the night ventilator: 1. Move handle into tilt position and close window.2. Then move handle into turn position and open window.
To lock the night ventilator: 1. Open unit slightly in tilt position2. Move handle by approx. 30º until it engages in the turn position.
The vent can be restricted to 4 different night ventilation positions.
Night ventilation 30º
Turn position

Art. No. 68056/10.2013
Operation of windows and window doors Schüco 35
2.33 Vent fastener
The windows are locked using a 4 mm Allen key.
Lock
Unlock
2.34 Roller catch (e.g. for balcony doors)
The roller catch holds the vent in the closed position without locking using
pull on the outside.
Operation: The vent is opened and closed with a light push or pull.
Disengage the anti-turn lock
Turn position
Tilt position
Tilt position possible
Engage the anti-turn lock
2.32 Anti-turn lock
The anti-turn lock prevents the vent from opening in the turn position. When the anti-turn lock is locked, the vent can only be put into the tilt position.
Turn position locked
Art. No. 68056/10.2013
Operation of windows and window doors Schüco 36
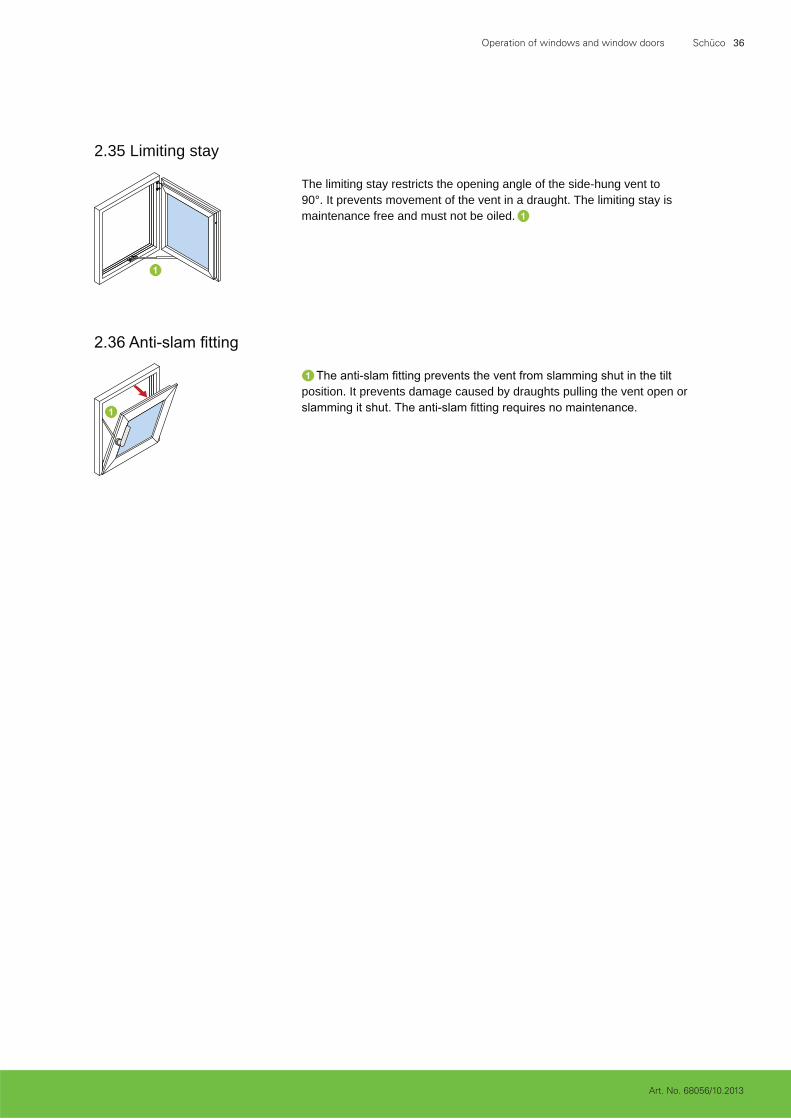
2.35 Limiting stay
The limiting stay restricts the opening angle of the side-hung vent to 90°. It prevents movement of the vent in a draught. The limiting stay is maintenance free and must not be oiled.
position. It prevents damage caused by draughts pulling the vent open or

Operation: Doors Schüco 37
Art. No. 68056/10.2013
3.0 Operation: Doors (Danger of crushing for door locks
being trapped between the frame and the door leaf. Do not use the key to move the door leaf.
All locks are activated by one turn of the key. However, the burglar-resistant function of the doors is only ensured by a full turn of the key. Single throw locks: one turn Double throw locks: two turns
3.1 Door locks, external door with door pull
3.2 Door locks, external door with door handle
To open from inside / outside: 1. 2. Press door handle down.3. Open the door.
Close in the reverse order.
To open lock from inside / outside: 1.
short time.2. Open the door slightly and release the key immediately.3. Open the door wide.4. Close the door.5. Lock the door by full turns of the key towards the frame side.
To open / lock from inside: 1. Press door handle down.2. Open the door.3. Close the door.4. Lock the door by full turns of the key towards the frame side.
1. Turn
2. Open
4. Lock
2. Open
4. Lock
1. Push
1. Unlock
2. Push
3. Open
Lock
WARNING
INFORMATION

Operation: Doors Schüco 38
Art. No. 68056/10.2013
3.3 Door locks, door with intruder catch
The intruder catch limits the opening angle of the door leaf to a small gap. The intruder catch must be re-engaged manually.
To engage the intruder catch: 1. Close the door leaf.2. Engage the intruder catch by rotating the thumb turn clockwise.The door leaf can only be opened as far as the catch allows.
To disengage the intruder catch from the inside: 3. Engage the intruder catch by rotating the thumb turn anti-clockwise.4. The door leaf can now be opened wide.
To disengage the intruder catch from the outside: The intruder catch can be disengaged from the outside by following a
1. Close
3. Disengage
2. Engage
4. Open 3. Turn onceto unlock
1. Turn twiceto unlock2. Turn
once to lock
Locking sequence: 1. 2. Unlock the door by one full turn of the key towards the frame side.3. 4.
See points 3.1 / 3.2 for operation of the door handle and lock. INFORMATION

Operation: Doors Schüco 39
Art. No. 68056/10.2013
Door locks, door with electric opener
A separately mounted switch releases the closed door for opening.
Once released, the door can only be opened for as long as the switch is operated.
Lock
Disengage
The electric opener will not release the door if it has been locked using the key.
Daytime setting: During the day, the latch on the electric opener can be permanently disengaged. The door can be opened at any time if the latch is disengaged.
Engaging and disengaging: Engage or disengage the latch by moving the catch.
INFORMATION
3.4 Door locks, door with automatic locking (self-locking)
This type of lock has additional latches at the top and bottom of the door leaf.
Open / close door 1. The top and bottom latches lock the door automatically against it being
opened from outside.2. The door can be opened from the inside using the handle.
Fully unlock the door. Locking the door with the key prevents it from being unlocked from the inside as well. The door handle is now blocked!
Fully unlock the door. The fully locked door can be opened from inside using the key (turning) and the handle.
4. Open
Disengage
Engage
1. Close
Operation: Doors Schüco 40
Art. No. 68056/10.2013
3.6 Door locks, door with electric locking
Doors with electrically operated locking are opened and closed by a motor integrated into the door, and are operated by the door handle or by remote control. For more information, see the separate operating instructions.
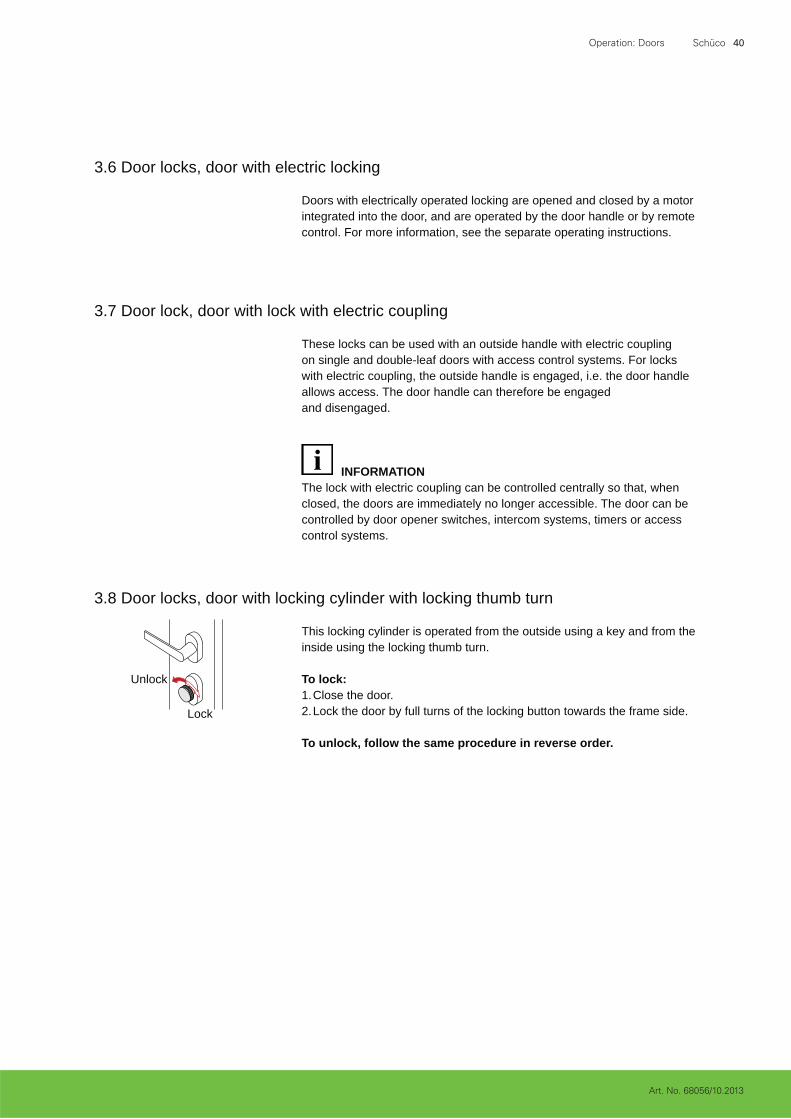
3.8 Door locks, door with locking cylinder with locking thumb turn
This locking cylinder is operated from the outside using a key and from the inside using the locking thumb turn.
To lock: 1. Close the door.2. Lock the door by full turns of the locking button towards the frame side.
To unlock, follow the same procedure in reverse order.
Unlock
Lock
The lock with electric coupling can be controlled centrally so that, when closed, the doors are immediately no longer accessible. The door can be controlled by door opener switches, intercom systems, timers or access control systems.
INFORMATION
3.7 Door lock, door with lock with electric coupling
These locks can be used with an outside handle with electric coupling on single and double-leaf doors with access control systems. For locks with electric coupling, the outside handle is engaged, i.e. the door handle allows access. The door handle can therefore be engaged and disengaged.
Operation: Doors Schüco 41
Art. No. 68056/10.2013
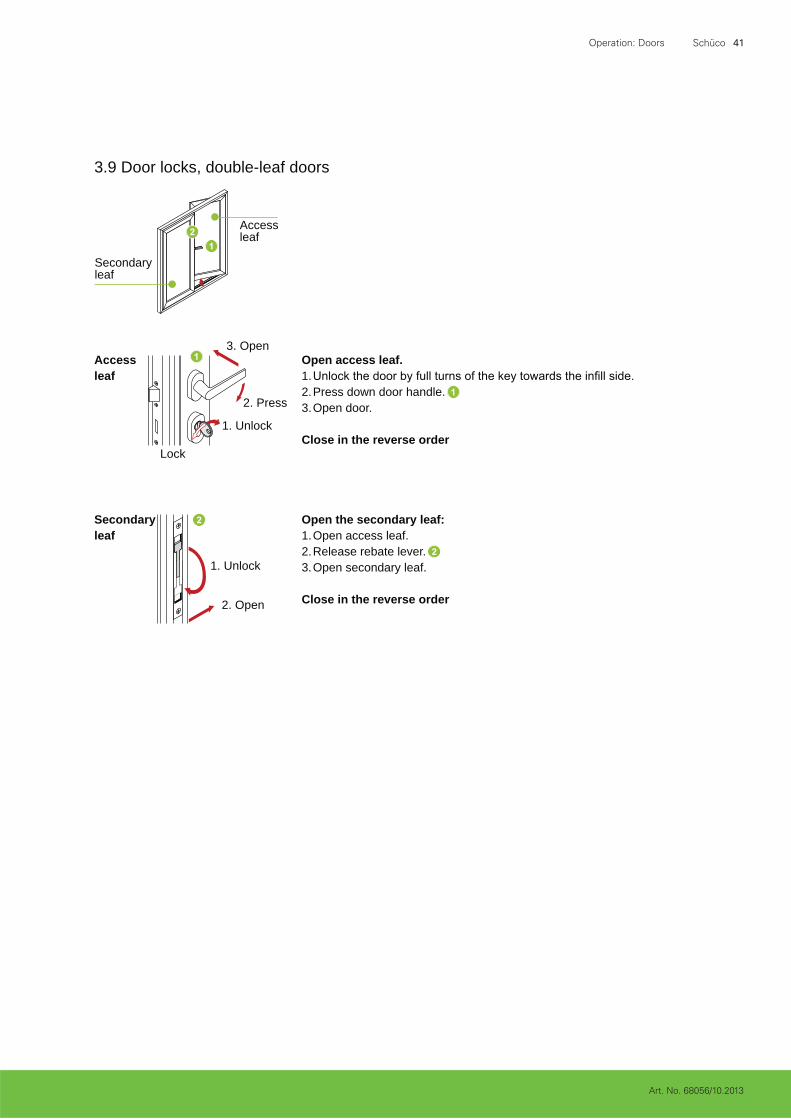
3.9 Door locks, double-leaf doors
Secondary leaf
Access leaf
Open access leaf. 1. 2. Press down door handle.3. Open door.
Close in the reverse order
3. Open
2. Press
1. Unlock
Lock
Open the secondary leaf: 1. Open access leaf.2. Release rebate lever.3. Open secondary leaf.
Close in the reverse order 2. Open
1. Unlock
Access leaf
Secondary leaf

Operation: Doors Schüco 42
Art. No. 68056/10.2013
Lock
1. Unlock
2. Press
3. Open
Secondary leaf
1. Unlock
To open the secondary leaf: 1. Press down door handle.2. Open access leaf and secondary leaf.
Close1. 2. Then close the access leaf.
Access leaf
Open the access leaf (panic function): 1. 2. Press down door handle.3. Open access leaf.
Close 1. Close the door.2. Lock access leaf by one full turn (panic function) of the key towards the
Access leaf
Secondary leaf
3.10 Door locks, double-leaf door with panic function
a.) Door handle (DIN EN 179) When the door is locked, one or both leaves can be opened in an emergency using the door handle.
2. Open

Operation: Doors Schüco 43
Art. No. 68056/10.2013
1. Press
Access leaf
1. Press
2. Lock
Open the access leaf (panic function): 1. Push emergency push bar.2. Push access leaf open.
To lock the access leaf: to the secondary leaf side.
Secondary leaf To open the secondary leaf: 1. Push emergency push bar.2. Push secondary leaf open (access leaf is also pushed open).
To lock the secondary leaf: 1. Close the secondary leaf.2. Locking is automatic using a special switch latch.
To unlock secondary and access leaves: 1. Both door leaves are opened by operating the emergency push bar on
the secondary leaf.2. The access leaf is unlocked by operating its emergency push bar.
b.) Push bar (DIN EN 1125) Locked doors can be opened in an emergency using the emergency push bars.
Secondary leaf
Access leaf
2. Open
INFORMATION
Operation: Doors Schüco 44
Art. No. 68056/10.2013
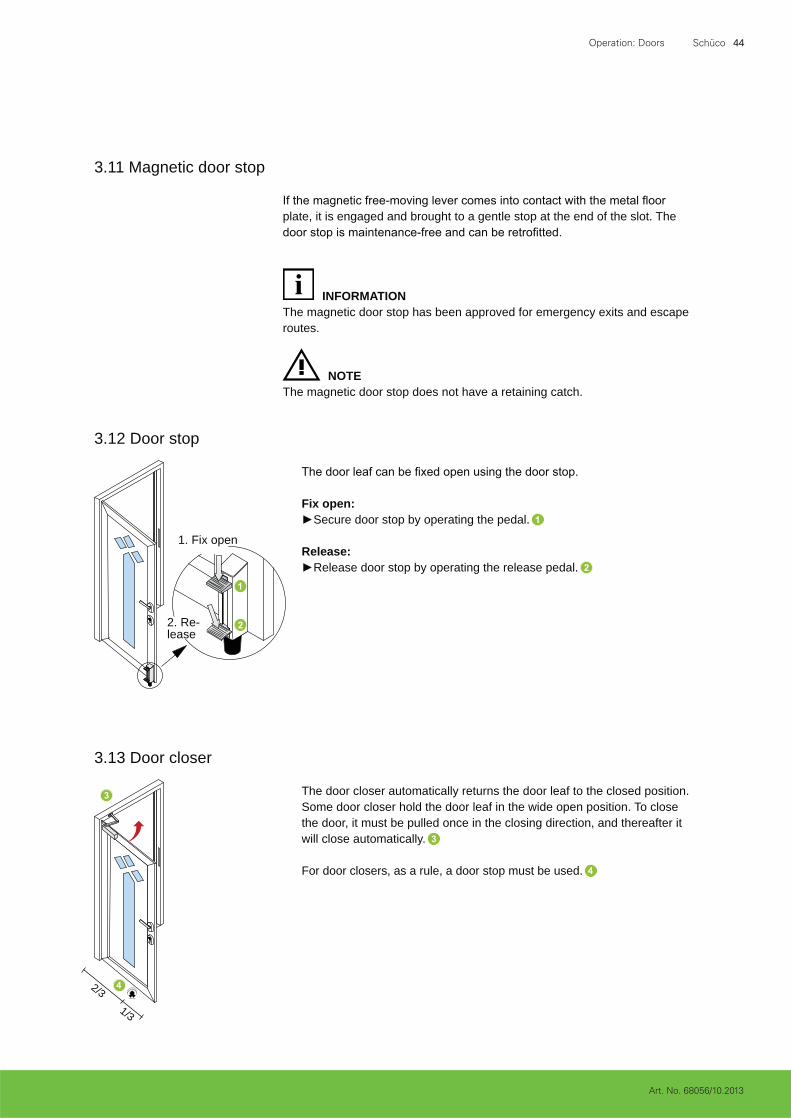
3.12 Door stop
Fix open: Secure door stop by operating the pedal.
Release: Release door stop by operating the release pedal.
1. Fix open
2. Re-lease
3.13 Door closer
The door closer automatically returns the door leaf to the closed position. Some door closer hold the door leaf in the wide open position. To close the door, it must be pulled once in the closing direction, and thereafter it will close automatically.
For door closers, as a rule, a door stop must be used.
The magnetic door stop has been approved for emergency exits and escape routes.
INFORMATION
2/3
1/3
3.11 Magnetic door stop
plate, it is engaged and brought to a gentle stop at the end of the slot. The
The magnetic door stop does not have a retaining catch. NOTE
Misuse Schüco 45
Art. No. 68056/10.2013
4.0 Misuse
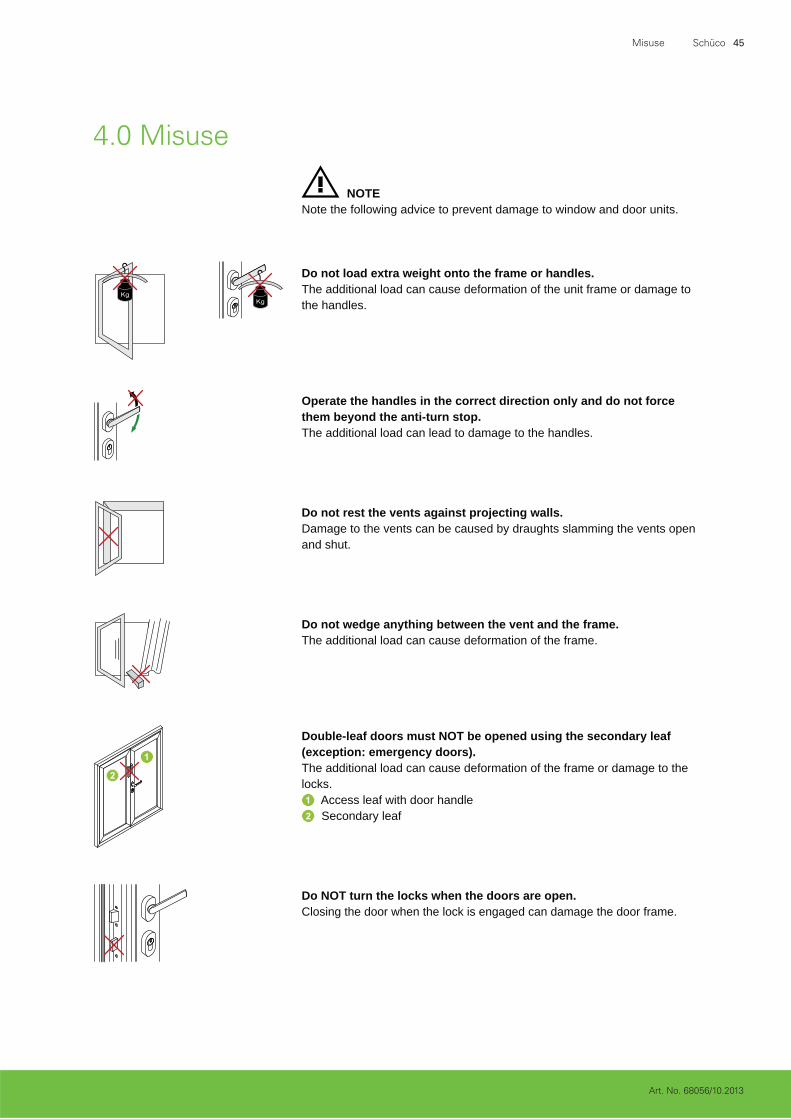
Do NOT turn the locks when the doors are open. Closing the door when the lock is engaged can damage the door frame.
Double-leaf doors must NOT be opened using the secondary leaf (exception: emergency doors). The additional load can cause deformation of the frame or damage to the locks.
Access leaf with door handle Secondary leaf
Do not wedge anything between the vent and the frame. The additional load can cause deformation of the frame.
Do not rest the vents against projecting walls. Damage to the vents can be caused by draughts slamming the vents open and shut.
Operate the handles in the correct direction only and do not force them beyond the anti-turn stop. The additional load can lead to damage to the handles.
Do not load extra weight onto the frame or handles. The additional load can cause deformation of the unit frame or damage to the handles.
Note the following advice to prevent damage to window and door units. NOTE

Art. No. 68056/10.2013
Cleaning and maintenance Schüco 46
5.0 Cleaning and maintenance5.1 General information
The following items must NOT be used for cleaning: Tools with sharp edges, e.g. knives, metal scrapers, steel wool, the scouring side of household sponges etc. will damage surfaces.
remover etc. will also cause irreversible damage to unit surfaces.
5.2 Cleaning and maintenance materials
Schüco specialists.
Aluminium maintenance kit 298 672: 1. Cleaner and preservative.2. 3. Grease stick to maintain gaskets.4. Touch-up sticks.
Maintenance materials for anodised aluminium units: 1. Basic cleaner 298 181
For initial and basic cleaning. Cleans and preserves the aluminiumsurface
2. Metal polish 298 010
aluminium and preserves the surface (can also be used on stainlesssteel).
3. Universal aluminium cleaner 298 001Removes stubborn grime, minor scuff marks and scratches.
For cleaning colour-coated units, observe the instructions on the cleaning agent.
NOTE

Art. No. 68056/10.2013
Cleaning and maintenance Schüco 47
5.3 General cleaning advice
For the best window care, clean the window frames and gaskets at the same time as the window panes. Use a mild, non-scouring cleaning agent.
Marks Can be removed safely and without residue using a cleaning agent from our range of cleaning products for aluminium units.
Solid substances Plaster, mortar or similar is best removed using a wooden or plastic spatula.
To prevent damage, observe the instructions for use given on the cleaning agent.
CAUTION!

Maintenance Schüco 48
Art. No. 68056/10.2013
6.0 Maintenance
In addition to normal cleaning and maintenance, you should carry out a brief inspection of your aluminium units annually. This will extend the working life of the units and maintain ease-of-use.
When releasing the chain actuators of Schüco TipTronic projected top-hung units, the vent might move unexpectedly. There is a risk of crushing and a danger of objects falling out. Secure the vent before releasing the actuators. Ensure that the entire weight of the vent is supported.
WARNING
NOTE
WARNING
year by a specialist company. Existing safety catches must also be checked. The test must be documented.
with only one chain actuator (see VFF data sheet KB0.1). Secure the vent
supported.
maintenance / care and inspection to ensure they maintain their value and
corresponding maintenance contract with a specialist window, door and façade company.
Risk of injury due to maintenance work carried out incorrectly. Incorrect maintenance could lead to severe injury or damage to property.
INFORMATION In addition, observation of the following guidelines is recommended:
WP.01 of the German Association of Window and Façade Manufacturers(VFF)Maintenance of windows, façades and external doors – maintenance,care and inspection – notes for salesWP.02 of the German Association of Window and Façade Manufacturers(VFF)Maintenance of windows, façades and external doors – maintenance,care and inspection – action and documentsWP.03 of the German Association of Window and Façade Manufacturers(VFF)Maintenance of windows, façades and external doors – maintenance,care and inspection – maintenance contract

Maintenance Schüco 49
Art. No. 68056/10.2013
Rub all gaskets with a grease stick or Vaseline. This will maintain suppleness and prevent sticking. At the same time, check all gaskets for damage.
6.3 Checking and lubricating the gaskets
Ask a Schüco specialist to replace any defective gaskets. NOTE
6.1 Cleaning the drainage slot
6.2 Cleaning the roller guides of sliding and folding units
Remove dust and dirt from the space between the gaskets and the external side of the frame using a vacuum cleaner.
Blocked drainage slots can be cleaned using, for example, a cocktail stick or cotton bud.
Remove dust and dirt from the roller guides on the bottom side of the frame using a vacuum cleaner.

Maintenance Schüco 50
Art. No. 68056/10.2013
free. However, a little acid-free oil and grease keep the mechanics smooth and ensure user comfort for a long period. Spray the locking pins and the positioning points of the tilt stay with the lubricant spray from the Schüco range.
Only a light application is required at all points. To avoid contamination, wipe off excess lubricant after lubrication.1. The locking bars, the locking bar guides and the corner drives are
lubricated during fabrication and do not require maintenance.2.
unit open.3. Do NOT oil or lubricate the pivots, otherwise the vent could swing open
and shut in an uncontrolled way.
NOTE
Maintenance work to be performed at least once a year (in school and hotel buildings every six months)
worn components.
proper functioning.

Maintenance Schüco 51
Art. No. 68056/10.2013
6.5 Doors
For doors, the latch (1) and bolt (2) on the door lock must be lubricated as necessary.
Before lubrication: Lock the door to expose the bolt.
After lubrication: Unlock the door to conceal the bolt.
6.6 Maintaining the locking cylinder
For doors with a touch bar / push bar, the gearboxes on the left and right-hand side must be lubricated twice a year. At the same time the tightness of the screws has to be checked and if required tightened to 2 - 2.5 Nm.
Depending on the loading, the locking cylinders have to be maintained at least twice a year.
Only use graphite powder to lubricate the locking cylinder.

Maintenance Schüco 52
Art. No. 68056/10.2013
Check door hinges: Check the door hinges are secure and check for damage. If required,
specialist.
Adjust the door hinges: If required, adjust the door hinges horizontally or vertically using the corresponding adjustment screws to ensure a uniform shadow joint and perfect door functioning.
Maintain the door hinges: The door hinges are maintenance-free and are not permitted to be lubricated or greased.
NOTE For concealed 100° hinges, a door stop generally has to be used.
6.7 Door hinges
Surface-mounted hinge, 3-part
Surface-mounted door hinges Barrel hinges
Barrel hinge, 3-part (aluminium)
Concealed door hinges
180° concealed hinge
Correct ventilation Schüco 53
Art. No. 68056/10.2013
7.0 Correct ventilation
How to prevent damage caused by dampness
The high weathertightness of the Schüco window systems reduces the exchange of air between the inside and outside. Depending on use, high humidity loads could occur. This is caused by evaporation from people and plants and facilities with high humidity levels such as bathrooms and kitchens.
The accumulation of water vapour leads to an increase in humidity and has to be let out to prevent damage caused by damp. The formation of condensation on materials that are not sensitive to water such as aluminium window frames and glass is permissible for a short time and in small quantities (DIN 4108-2). This phenomenon can be
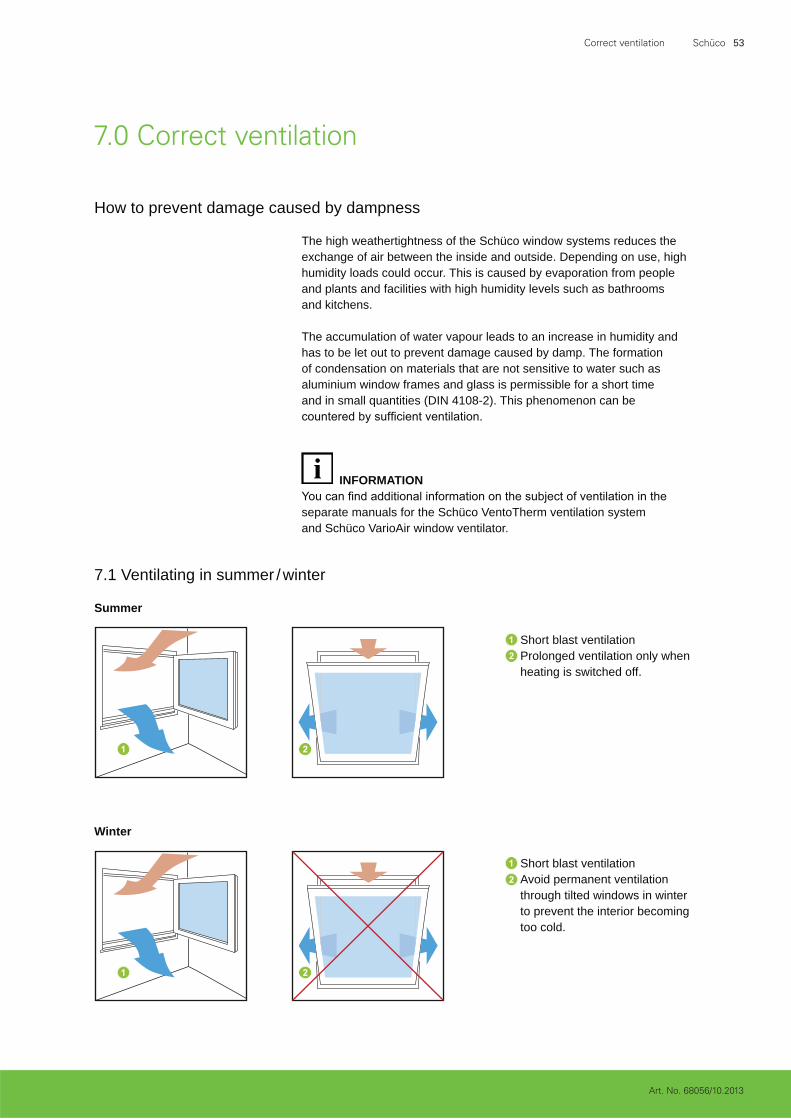
7.1 Ventilating in summer / winter
Summer
Winter
Short blast ventilation
Short blast ventilationProlonged ventilation only whenheating is switched off.
Avoid permanent ventilationthrough tilted windows in winterto prevent the interior becomingtoo cold.
separate manuals for the Schüco VentoTherm ventilation system and Schüco VarioAir window ventilator.
INFORMATION

Correct ventilation Schüco 54
Art. No. 68056/10.2013
June,July,August
4 - 6 minutes
May,September 8 - 10 minutes
April, October 12 - 15 minutes
March, November 16 - 20 minutes
January,February,December
25 - 30 minutes
Recommended duration of blast ventilation in the months:
7.2 Blast ventilation
Depending on use, the window should be completely opened several times a day to ensure blast ventilation. As illustrated the perfect ventilation time depends on the time of year and should be in the range of 4 -6 minutes in winter.
Blast ventilation ensures maximum protection against moisture damage. This effective exchange of damp air requires little heat energy as the interior barely cools down at all during the short period of ventilation.
The ventilation is even more economical if during ventilation the thermostat valve is turned off during ventilation and back on again after the windows are shut again.
Ventilation time required to exchange the air during blast ventilation (wide open window with no wind) depending on seasonal outside temperature.

Art. No. 68056/10.2013
Advice and repairs Schüco 55
8.0 Advice and repairs
If these operating instructions do not answer all your questions, refer to your Schüco specialist for help. In addition to providing expert advice, a specialist dealer can
8.1 Maintenance agreement
Schüco specialists can offer you the additional service of a maintenance agreement.
Under the terms of the maintenance agreement, the Schüco specialist will undertake all maintenance and repair work. Your aluminium units will be maintained at their optimum functional performance and value without the need for additional resources.
Only repairs by a specialist using original parts guarantee the continued correct operation of your Schüco units.
NOTE

Art.No. 68056/10.2013We reserve the right to make technical changes and to correct errors. All illustrations are similar.