operations manual ecosense ph100 - ysi library/documents/manuals for discontinued... · temperature...
TRANSCRIPT

Operations Manual EcoSense® pH100
Portable pH, mV and
Temperature Instrument
• English • Français • Español • Deutsch • Italiano

1
WARRANTY The EcoSense® pH100 Instrument is warranted for one year from date of purchase by the end user against defects in materials and workmanship. pH100 probes and cables are warranted for six months from date of purchase by the end user against defects in material and workmanship. Within the warranty period, YSI will repair or replace, at its sole discretion, free of charge, any product that YSI determines to be covered by this warranty.
To exercise this warranty, write or call your local YSI representative, or contact YSI Customer Service in Yellow Springs, Ohio. Send the product and proof of purchase, transportation prepaid, to the Authorized Service Center selected by YSI. Repair or replacement will be made and the product returned, transportation prepaid. Repaired or replaced products are warranted for the balance of the original warranty period, or at least 90 days from date of repair or replacement.
Limitation of Warranty
This Warranty does not apply to any YSI product damage or failure caused by: (i) failure to install, operate or use the product in accordance with YSI's written instructions; (ii) abuse or misuse of the product; (iii) failure to maintain the product in accordance with YSI's written instructions or standard industry procedure; (iv) any improper repairs to the product; (v) use by you of defective or improper components or parts in servicing or repairing the product; or (vi) modification of the product in any way not expressly authorized by YSI.
THIS WARRANTY IS IN LIEU OF ALL OTHER WARRANTIES, EXPRESSED OR IMPLIED, INCLUDING ANY WARRANTY OF MERCHANTABILITY OR FITNESS FOR A PARTICULAR PURPOSE. YSI's LIABILITY UNDER THIS WARRANTY IS LIMITED TO REPAIR OR REPLACEMENT OF THE PRODUCT, AND THIS SHALL BE YOUR SOLE AND EXCLUSIVE REMEDY FOR ANY DEFECTIVE PRODUCT COVERED BY THIS WARRANTY. IN NO EVENT SHALL YSI BE LIABLE FOR ANY SPECIAL, INDIRECT, INCIDENTAL OR CONSEQUENTIAL DAMAGES RESULTING FROM ANY DEFECTIVE PRODUCT COVERED BY THIS WARRANTY.
CONTACT INFORMATION YSI Inc. • 1725 Brannum Lane • Yellow Springs OH, 45387 800-897-4151 • 937-767-7241 • Fax: 937-767-1058 Email: [email protected] • Website: www.ysiecosense.com

2
CONTENTS
WARRANTY.................................................................................................... 1 CONTACT INFORMATION............................................................................. 1 GENERAL INTRODUCTION .......................................................................... 3 INITIAL INSPECTION ..................................................................................... 3 SPLASH RESISTANCE .................................................................................. 3 BATTERY INSTALLATION ............................................................................. 3 KEY FUNCTIONS OF THE MODEL pH100 ................................................... 4 THE LCD DISPLAY......................................................................................... 4 OPERATIONAL PROCEDURES .................................................................... 4
Buffer Set Selection ................................................................................... 4 pH Calibration ............................................................................................ 4 Using the model pH160 Electrode Simulator............................................. 5 pH Measurements...................................................................................... 5 Temperature Measurements...................................................................... 6 mV Measurements..................................................................................... 6
TROUBLESHOOTING .................................................................................... 6 SPECIFICATIONS .......................................................................................... 6 RECOMMENDED SPARE PARTS LIST ........................................................ 7

GENERAL INTRODUCTION The model pH100 is one of three instruments in the EcoSense product line from YSI. The pH100 is a precision tool that measures pH, mV and temperature. A built-in microprocessor stores, calculates and compensates for all parameters related to pH determinations including pH electrode temperature characteristics, electrode slope deviations and buffer solutions.
This unit has a splash-proof IP65 case. The mechanical touch keys are highly reliable with tactile and audio feedback. This meter uses one 9V battery. Re-calibration is not required when power is restored.
The front of the meter has a large LCD that displays pH or mV and temperature simultaneously along with user prompts and mode indicators. The unit prompts the user through calibration and measurement procedures.
An AUTOLOCK feature for both pH and mV measurements enables the unit to automatically sense the end point and "lock" the display to indicate the end point value of a measurement. The pH100 can also be used in non-AUTOLOCK mode. AUTOLOCK and user prompts help eliminate most errors in determining pH and mV values, resulting in precise, repeatable, error-free measurements.
The model pH100 is available with pH, mV, ORP and ATC (Automatic Temperature Compensation) probes. Other features include electrode offset recognition, electrode slope recognition, electrode efficiency display, built-in buffer coefficients, automatic or manual temperature compensation, long battery life, and 50/60 Hz AC noise rejection. This meter is universal, user-friendly, for field, industrial and laboratory applications.
INITIAL INSPECTION Carefully unpack the unit and accessories, and inspect for shipping damages. Compare received parts with materials listed on the packing list. Notify YSI immediately of any damage or missing parts. Save all packing materials until satisfactory operation is confirmed.
SPLASH RESISTANCE Though the pH100 meter is housed in a watertight case, DO NOT use it underwater. The splash-resistant case prevents permanent damage to the unit if accidentally dropped into non-corrosive solutions. Follow these steps immediately if the unit is immersed in any solution:
1. Rinse unit carefully with distilled water. After rinsing and drying, inspect and clean connectors to remove all contaminants that may affect probe connections.
2. Wait for the unit and probe to dry completely before resuming operation.
3. If the unit does not function correctly after steps 1 and 2, call YSI for possible repair or replacement (see Warranty).
BATTERY INSTALLATION An initial display of “BAT” on the LCD indicates approximately one hour of battery life for unit operation within specifications. Replace battery when “BAT” appears on the LCD. (See Figure 1.)
To replace battery, remove the two battery cover screws and battery
cover and o-ring. Replace the 9V battery. Replace battery cover and o-ring (align the o-ring properly to insure a good seal) and fasten the two battery cover screws for the splash-resistant feature.
Figure 1. Battery Installation
3

KEY FUNCTIONS OF THE MODEL pH100 1. : Turns the unit ON or OFF. The pH calibration values are not erased when the unit is
turned off. The unit powers up in the same status as when it was turned off. When the unit is not in use, turn it off to save battery life. For long term storage, remove the batteries.
2. MODE: Selects display mode. Press MODE to sequentially display pH-AUTOLOCK , mV-AUTOLOCK , pH, and mV. Calibration values are not affected by changing display mode.
3. STAND and SLOPE Keys: Used for dual-point pH calibration of the unit. Press and hold STAND while turning on the power to change buffer sets.
4. Δ and ∇ Keys: Press to enter temperature values in manual (MAN) mode. These keys are inoperative when operating in ATC mode.
5. MEA./EFF.: Press to release the unit from AUTOLOCK status when operating in pH-AUTOLOCK or mV-AUTOLOCK mode. Press and hold for 5 seconds to display the electrode efficiency.
6. ESC: Press to clear the unit when an error signal appears; it clears all calibration values stored in internal memory. To prevent accidental clearing during normal use, the key does not respond unless pressed and held for 2 seconds. The key responds only when an error message displays.
When ESC is pressed, all LCD elements light. After about 2 seconds, the unit enters pH-AUTOLOCK mode. “AUTOLOCK” displays and “STAND” begins to flash indicating the need for calibration. Press ESC only when errors occur that require unit re-calibration.
THE LCD DISPLAY
STANDSLOPE
ATCMAN
BA
T
AUTO
WAIT HOLD EFF%
pHmV
1
2
3
4
5
6
7
8
9
10C
Figure 2. LCD Display
1. WAIT: Displays while unit waits for a stable reading or end point sensing.
2. BAT: Low battery indicator.
3. ATC/MAN: “ATC” displays if an ATC probe is connected. Otherwise, “MAN” displays.
4. STAND/SLOPE: “STAND” or “SLOPE” remains steady if the parameter has been calibrated. If either one has not been calibrated, it flashes.
5. AUTO: Autolock mode indicator.
6. HOLD: Indicates a reading is frozen during Autolock mode.
7. EFF%: Displays when the user views electrode efficiency. It is recommended to replace the electrode when efficiency is less than 75%.
8. pH/mV : Unit and mode indicators.
9. Main display for pH, mV and probe efficiency values.
10. °C: Temperature display.
OPERATIONAL PROCEDURES
Buffer Set Selection The pH100 has two buffer sets: 7.00, 4.01, 10.01 pH and 6.86, 4.00, 9.18 pH. The factory default is buffer set 7.00, 4.01, and 10.01. To change the buffer set, turn off the unit and place the sensor in buffer 7.0. Next, turn the unit on while pressing and holding the STAND key. Continue pressing the STAND key until the unit beeps. If the unit is uncalibrated and in pH mode, it displays “7.00” if the first set is active, and “6.86” if the second set is active.
4

5
pH Calibration The pH100 uses a 2-point calibration. The first point must be a 6.86/7.00 buffer, and the second either a 4.00/4.01 or 9.18/10.01. These buffers can be purchased from a YSI representative.
1. Turn the unit on. Connect the pH electrode to the BNC connector and the ATC/Temp probe to the ATC/Temp connector of the unit; “ATC” displays. Press MODE until “pH” displays. Autolock may be on or off as desired.
2. Place the pH and ATC/temp probes into the first buffer solution (either 7.00 or 6.86). Allow temperature readings to stabilize, then press and hold “STAND” for 3 seconds to calibrate. If AUTOLOCK is off, the first point has been calibrated. If AUTOLOCK is on, “WAIT” flashes until the unit detects a stable reading. Once the unit calibrates the first point, “SLOPE” flashes.
NOTE: If no temperature probe is connected, adjust the temperature reading to that of the first buffer using the Δ or ∇ keys (0.0 to 60ºC) BEFORE pressing “STAND”.
3. Rinse the pH and ATC/temp probes in distilled water, then place into the second buffer solution (either 4.01/4.00 or 10.01/9.18). Allow temperature readings to stabilize, then press “SLOPE” to calibrate. If AUTOLOCK is off, the second point has been calibrated. If AUTOLOCK is on, “WAIT” flashes until the unit detects a stable reading. Once the unit calibrates the second point, the unit beeps twice and both “STAND” and “SLOPE” display steadily. NOTE: If no temperature probe is connected, adjust the temperature reading to that of the first buffer using the Δ or ∇ keys (0.0 to 60ºC) BEFORE pressing “SLOPE”.
4. The unit calculates and compensates for the pH electrode slope deviation corresponding to the values of the two calibration buffers. The unit is now dual-point calibrated and ready for measurements. After calibration, press and hold MEA. /EFF. for about 5 seconds to display the new electrode efficiency.
Using the model pH160 Electrode Simulator The model pH160 Electrode Simulator can be used to confirm proper instrument calibration. To use the simulator:
1. Install the 9V battery provided.
2. Attach the pH160 to the pH100. Turn both units on. The pH160 has a small switch to the right of the pH buttons.
3. In pH measurement mode, press one of the pH buffer simulator buttons on the pH160. The corresponding pH value should appear on both screens.
Note: Calibration with the pH simulator calibrates only the instrument - NOT the instrument and probe. For best accuracy, calibrate the pH instrument and probe together using buffer solutions.
pH Measurements To take pH measurements, “STAND” and “SLOPE” must display steadily, indicating the unit is dual-point calibrated and ready for measurements. If “STAND” and “SLOPE” are blinking, perform a pH calibration before taking measurements.
1. Press MODE to enter pH mode with AUTOLOCK on or off as desired. For inherently unstable samples, the unit will not AUTOLOCK. Turn AUTOLOCK off in this case.
2. Rinse the pH electrode and/or ATC/temp probe with distilled water and immerse in the sample to be measured. Remove any air bubbles trapped around the probe by shaking or stirring the probe. Allow the pH and/or temperature to stabilize. If no ATC/temp probe is connected, “MAN” displays, indicating manual temperature compensation. Set unit to display the sample temperature by pressing the Δ and ∇ keys (-10.0 to 120°C). If an ATC/temp probe is connected “ATC” displays along with the sample temperature.

6
3. If AUTOLOCK is off, the pH value of the sample displays on the screen. If both pH and temperature readings are stable, take a reading. If AUTOLOCK is on, press MEA./EFF. “WAIT” flashes until the unit determines a stable pH reading.
Temperature Measurements The model pH100 can measure temperature independently with the ATC/Temp probe without using the pH electrode. Place the ATC/Temp probe in the media to be measured. The measured temperature displays.
mV Measurements 1. Connect the optional combination mV electrode to the unit. Press MODE to enter mV mode
with AUTOLOCK on or off as desired. For inherently unstable samples, the unit will not AUTOLOCK. Use mV mode with AUTOLOCK off in this case.
2. Rinse electrode with distilled water and immerse it in sample to be measured. If AUTOLOCK is off, the mV value of the sample will be displayed on the screen. If AUTOLOCK is on, press MEA./EFF. “WAIT” flashes until the unit determines a stable mV reading.
TROUBLESHOOTING
MAIN DISPLAY POSSIBLE CAUSE CORRECTIVE ACTION
Er 1 • pH electrode offset is greater/less than
+/-1.5 pH. • STAND was pressed before the
electrode and ATC/Temp probe settle to within ±1.5 pH of the buffer value.
• pH electrode is faulty
• Replace the buffer and/or the pH electrode. Press ESC.
• Allow sufficient time for the electrode and ATC/Temp probe to stabilize.
• Return for service.
Er 2 • pH electrode slope is off by more than
30% of ideal slope. • SLOPE was pressed before the
electrode and ATC/Temp probe settled to within 30% of the buffer value.
• Buffer 4.00, 4.01, 9.18 or 10.01 is not correct.
• Check that the correct buffer is used and that the electrode slope is not off by more than 30% from the theoretical slope.
• Allow sufficient time for the electrode and ATC/Temp probe to stabilize.
• Replace the buffer and/or the pH electrode. Press ESC.
• Return for service.
Er 3 • Temperature is out of the 0.0 to 60.0 °C range.
• Bring the buffer temperature within range.
• Return for service.
OvEr/Undr • Measured pH is out of the 16.00/-2.00
pH range. • Measured mV is out of the 1250/-2000
mV range. • Measured temperature is out of the -
10/120 °C range.
• Bring the out of range unit into the correct measuring range.
• If units are within proper range, return product for service.
SPECIFICATIONS Display Range Accuracy Resolution
pH -2.00 to 16.00 pH ±0.1%, ±2 lsd 0.01 pH mV -1999 to 1250 mV ±0.1%, ±1 lsd 1 mV
Temperature °C -10.0 to 120 °C ±0.5 °C 0.1 °C

7
pH Temp Compensation AUTO/MANual -10.0 to 120.0 °C pH Buffer Recognition (4.01, 7.00 & 10.01) or (4.00, 6.86 & 9.18) pH Buffer Calibration Temp. Range
0 to 60 °C
pH Electrode Offset Recognition ±90mV at pH 7.00 or 6.86 pH Electrode Slope Recognition ±30% at pH 4.00, 4.01, 9.18 or 10.01 Power One 9V battery Calibration Back-up Yes Audio Feedback Yes, on all touch keys Autolock Feature Yes Operating Temp. Range 0 to 50 °C Operating Relative Humidity Range
up to 95%
ATC Probe Thermistor, 10kΩ / 25 °C Dimensions (L x W x D) 186 mm x 70 mm x 37 mm (7.3 in x 2.8 in x 1.5
in) Weight (batteries included) 430 grams (1 lb)
RECOMMENDED SPARE PARTS LIST
PART # DESCRIPTION
100-1 1-meter waterproof Y-cable with combo pH/reference junction & ATC electrodes.
100-4 4-meter waterproof Y-cable with combo pH/reference junction & ATC electrode.
110-1 pH electrode with 1-meter cable.
115-1 mV electrode with 1-meter cable.
130-1 ATC (temperature) electrode with 1-meter cable.
160 pH Simulator electrode.
180 pH carrying case, hard sided.
440 Cable weight kit
480 Instrument carrying case, soft sided.
Item #605367 • Drawing #A605367 Revision E • March 2008
For the latest version of this manual, visit www.ysiecosense.com

1
GARANTIE L'appareil EcoSense® pH100 est garanti pour une période d'un an, à compter de la date d'achat par l'utilisateur final, contre tout défaut matériel et de fabrication. Les sondes et les câbles de l' pH100 sont garantis pour une période de six mois, à compter de la date d'achat par l'utilisateur final, contre tout défaut matériel et de fabrication. Pendant la période de garantie, YSI s'engage à réparer ou à remplacer, gratuitement et à sa discrétion, tout produit qu'YSI peut établir comme étant couvert par la garantie.
Pour faire valoir cette garantie, écrivez ou appelez votre représentant YSI ou contactez le Service clientèle d'YSI à Yellow Springs, Ohio, États-Unis. Envoyez le produit et son justificatif d'achat en port payé au Centre de service homologué sélectionné par YSI. La réparation ou le remplacement seront effectués et le produit vous sera retourné en port payé. Les produits réparés ou remplacés sont garantis jusqu'à expiration de la période de garantie originale ou pour au moins 90 jours, à compter de la date de réparation ou de remplacement.
Limitation de garantie
Cette garantie ne s'applique pas aux produits YSI endommagés ou présentant des dysfonctionnements pour les raisons suivantes : (i) installation, exploitation ou utilisation du produit d'une façon non conforme aux instructions écrites d'YSI ; (ii) abus ou mésusage du produit ; (iii) manquement à l'entretien du produit conformément aux instructions écrites d'YSI ou aux procédures industrielles normales ; (iv) réparation non conforme du produit ; (v) utilisation par vous de pièces ou de composants défectueux ou non conformes lors de l'entretien ou de la réparation du produit, ou ; (vi) modification du produit d'une façon non expressément autorisée par YSI.
CETTE GARANTIE REMPLACE TOUTES LES AUTRES GARANTIES, EXPRESSES OU INDUITES, Y COMPRIS LES GARANTIES DE COMMERCIABILITÉ OU D'ADAPTATION À UN USAGE PARTICULIER. LA RESPONSABILITÉ D'YSI SELON LES TERMES DE CETTE GARANTIE SE LIMITE À LA RÉPARATION OU AU REMPLACEMENT DU PRODUIT, CONSTITUANT VOTRE SEUL ET UNIQUE RECOURS POUR TOUT PRODUIT DÉFECTUEUX COUVERT PAR CETTE GARANTIE. YSI NE POURRA EN AUCUN CAS ÊTRE TENU RESPONSABLE DE DOMMAGES SPÉCIAUX, INDIRECTS, ACCIDENTELS OU CONSÉCUTIFS RÉSULTANT DE L'UTILISATION DE TOUT PRODUIT DÉFECTUEUX COUVERT PAR CETTE GARANTIE.
COMMENT NOUS CONTACTER YSI Inc. • 1725 Brannum Lane • Yellow Springs OH, 45387, États-Unis 800-897-4151 • 937-767-7241 • Télécopie : 937-767-1058 E-mail : [email protected] • Site Web : www.ysiecosense.com

2
TABLE DES MATIÈRES
GARANTIE ...................................................................................................... 1 COMMENT NOUS CONTACTER................................................................... 1 INTRODUCTION GÉNÉRALE........................................................................ 3 INSPECTION INITIALE................................................................................... 3 PROTECTION CONTRE LES ÉCLABOUSSURES ....................................... 3 INSTALLATION DE LA PILE .......................................................................... 4 FONCTIONNALITÉS CLÉS DU MODÈLE pH100.......................................... 4 ÉCRAN À CRISTAUX LIQUIDES ................................................................... 4 PROCÉDURES D'UTILISATION .................................................................... 5
Sélection du jeu de tampons...................................................................... 5 Étalonnage du pH ...................................................................................... 5 Utilisation du simulateur d'électrode du modèle pH160 ............................ 6 Mesures du pH........................................................................................... 6 Mesures de température............................................................................ 6 Mesures de millivoltage ............................................................................. 6
DÉPANNAGE.................................................................................................. 7 SPÉCIFICATIONS .......................................................................................... 7 LISTE DES PIÈCES DÉTACHÉES RECOMMANDÉES ................................ 8

3
INTRODUCTION GÉNÉRALE Le modèle pH100 est un des trois instruments de la ligne de produits EcoSense de YSI. Le modèle pH100 est un instrument de précision mesurant le pH, les mV et la température. Un microprocesseur incorporé stocke, calcule et compense tous les paramètres relatifs aux déterminations liées au pH, y compris les caractéristiques de température de l'électrode de détection du pH, les écarts de pente de l'électrode et les solutions tampons.
L'appareil est doté d'un boîtier de protection contre les éclaboussures conforme à la norme IP65. Les touches mécaniques sont très fiables et produisent une réaction tactile et sonore. Cet appareil de mesure utilise une pile de 9 V. Aucun réétalonnage n'est nécessaire lorsque l'alimentation électrique est rétablie.
L'avant de l'appareil dispose d'un écran à cristaux liquides de grande taille affichant simultanément les mesures de pH, de millivoltage et de température, ainsi que les invites destinées à l'utilisateur et les indicateurs de mode. L'appareil émet des invites destinées à l'utilisateur lors des procédures d'étalonnage et de mesure.
Une fonctionnalité de verrouillage automatique AUTOLOCK, applicable aux mesures de pH et de millivoltage, permet à l'appareil de détecter automatiquement le point de virage et de verrouiller l'affichage pour indiquer la valeur du point de virage de la mesure. Le pH100 peut également être utilisé alors que le mode de verrouillage AUTOLOCK est désactivé. La fonctionnalité de verrouillage automatique et les invites permettent d'éliminer la plupart des erreurs de détermination des valeurs de pH et de millivoltage et d'obtenir des mesures précises, fiables et pouvant être répétées.
Le modèle pH100 est disponible avec des sondes à pH, millivoltage, potentiel redox et compensation automatique de la température (CAT). Parmi les autres fonctionnalités, on peut compter la reconnaissance du décalage de l'électrode, la reconnaissance de la pente de l'électrode, l'affichage de l'efficacité de l'électrode, des coefficients de tampon incorporés, la compensation automatique ou manuelle de la température, une pile longue durée et un dispositif d'atténuation du bruit C.A. à 50 ou 60 Hz. Cet appareil est convivial et particulièrement souple dans les applications sur le terrain, industrielles et en laboratoire.
INSPECTION INITIALE Déballez soigneusement l'appareil et les accessoires et vérifiez qu'ils n'ont pas été endommagés lors de l'expédition. Comparez les pièces reçues aux matériaux répertoriés dans le bordereau d'emballage. Notifiez immédiatement YSI s'il s'avère que des pièces sont endommagées ou manquantes. Mettez de côté les matériaux d'emballage jusqu'à ce que le fonctionnement correct de l'appareil soit confirmé.
PROTECTION CONTRE LES ÉCLABOUSSURES Bien que le modèle pH100 soit enfermé dans un boîtier étanche, NE l'utilisez PAS sous l'eau. Le boîtier résistant aux éclaboussures prévient les dommages permanents si l'appareil est accidentellement immergé dans des solutions non corrosives. Suivez immédiatement ces étapes si l'appareil est immergé dans une solution quelconque :
1. Rincez soigneusement l'appareil avec de l'eau distillée. Après le rinçage et le séchage, inspectez et nettoyez les connecteurs en vue d'éliminer tout contaminant pouvant affecter les connexions de la sonde.
2. Attendez que l'appareil et la sonde soient parfaitement secs avant de reprendre les opérations.
3. Si l'appareil ne fonctionne pas correctement après les étapes 1 et 2, appelez YSI en vue d'une réparation ou d'un remplacement éventuels (voir la Garantie).

INSTALLATION DE LA PILE Lorsque l'écran à cristaux liquides affiche pour la première fois « BAT », il reste environ une heure de fonctionnement sur pile selon les spécifications. Remplacez la pile lorsque l'indication « BAT » s'affiche sur l'écran. (Voir Figure 1.)
Pour remplacer la pile, enlevez les deux vis du compartiment ainsi que le couvercle et le joint torique. Remplacez la pile de 9 V. Replacez le couvercle et le joint torique (alignez le joint correctement afin d'assurer une bonne étanchéité) et revissez les deux vis du compartiment pour conserver une bonne résistance aux éclaboussures. Figure 1.
Installation de la pile
FONCTIONNALITÉS CLÉS DU MODÈLE pH100 1. : Met l'appareil hors ou sous tension. Les valeurs d'étalonnage du pH ne sont pas
effacées lorsque l'appareil est mis hors tension. L'appareil démarre dans le même état que lorsqu'il a été mis hors tension. Lorsque l'appareil n'est pas utilisé, mettez-le hors tension pour économiser la pile. Enlevez les piles pour un entreposage prolongé.
2. MODE : Permet de sélectionner le mode d'affichage. Appuyez plusieurs fois sur MODE pour afficher successivement pH-AUTOLOCK (verrouillage automatique de la mesure du pH), Mv-AUTOLOCK (verrouillage automatique de la mesure du millivoltage), pH et mV. Les valeurs d'étalonnage ne sont pas affectées par le changement de mode d'affichage.
3. Touches STAND et SLOPE : Utilisées pour l'étalonnage en deux points du pH de l'appareil. Maintenez la touche STAND enfoncée tout en mettant l'appareil sous tension pour changer les jeux de tampons.
4. Touches Δ et ∇ : Appuyez sur ces touches pour entrer les valeurs de température en mode manuel (MAN). Ces touches sont inopérantes en mode CAT.
5. MEA./EFF. : Appuyez sur cette touche pour désactiver le verrouillage automatique lorsque l'appareil est en mode pH-AUTOLOCK ou mV-AUTOLOCK. Maintenez la touche enfoncée pendant 5 secondes pour afficher l'efficacité de l'électrode.
6. ESC : Appuyez sur cette touche pour effacer la mémoire de l'appareil lorsqu'un message d'erreur apparaît. Toutes les valeurs d'étalonnage stockées en mémoire interne sont effacées. Afin d'éviter un effacement accidentel lors d'un fonctionnement normal, la touche doit être maintenue enfoncée pendant 2 secondes pour être active. La touche n'est active que lorsqu'un message d'erreur est affiché.
Lorsque la touche ESC est enfoncée, tous les éléments de l'écran à cristaux liquide s'allument. Au bout d'environ 2 secondes, l'appareil se met en mode pH-AUTOLOCK. La mention « AUTOLOCK » s'affiche et la mention « STAND » commence à clignoter, indiquant qu'un étalonnage est nécessaire. Appuyez sur la touche ESC uniquement lorsque surviennent des erreurs nécessitant un réétalonnage.
ÉCRAN À CRISTAUX LIQUIDES
STANDSLOPE
ATCMAN
BA
T
AUTO
WAIT HOLD EFF%
pHmV
1
2
3
4
5
6
7
8
9
10C
Figure 4. Écran à cristaux liquides
1. WAIT : S'affiche lorsque l'appareil attend une lecture stable ou la détection d'un point de virage.
2. BAT : Indicateur de pile déchargée.
3. ATC/MAN : La mention « ATC » s'affiche si une sonde à compensation automatique de la température est connectée. Sinon, la mention « MAN » est affichée.
4. STAND/SLOPE : Les mentions « STAND » et « SLOPE » restent
4

5
allumées si le paramètre a été étalonné. Si l'un d'entre eux n'a pas été étalonné, la mention clignote.
5. AUTO : Indicateur de mode de verrouillage automatique.
6. HOLD : Indique qu'une lecture est gelée en mode de verrouillage automatique.
7. EFF% : S'affiche lorsque l'utilisateur vérifie l'efficacité de l'électrode. Nous vous recommandons de remplacer l'électrode lorsque la valeur d'efficacité est inférieure à 75 %.
8. pH/mV : Indicateurs d'unité et de mode.
9. Affichage principal pour les mesures de pH, de millivoltage et d'efficacité de l'électrode.
10. °C : Affichage de la température.
PROCÉDURES D'UTILISATION
Sélection du jeu de tampons Le pH mètre pH 100 possède deux jeux de tampons : 7.00,4.01,10.01pH et 6.86,4.00,9.18 pH. Pour changer de jeu de tampons, mettez l'appareil hors tension et plongez l' électrode pH dans la solution tampon pH 7.00 Remettez ensuite l' appareil sous tension tout en appuyant et maintenant la touche STAND appuyée. Si l'appareil n'est pas étalonné et en mode pH, il affiche « 7.00 » si le premier jeu est actif et « 6.86 » si le deuxième jeu est actif.
Étalonnage du pH Le modèle pH100 utilise un étalonnage à deux points. Le premier point doit être le tampon 6.86/7.00 et le deuxième point 4.00/4.01 ou 9.18/10.01. Ces tampons peuvent être achetés chez un représentant YSI.
1. Mettez l'appareil sous tension. Connectez la sonde pH au connecteur BNC et la sonde CAT/Temp au connecteur CAT/Temp de l'appareil. La mention « ATC » s'affiche. Appuyez sur la touche MODE jusqu'à ce que la mention « pH » s'affiche. La fonction de verrouillage automatique peut être indifféremment activée ou désactivée.
2. Placez les sondes pH et CAT/Temp dans la première solution tampon (7,00 ou 6,86). Laissez la lecture de température se stabiliser, puis appuyez sur la touche « STAND » pour 3 secondes étalonner. Si le verrouillage automatique (AUTOLOCK) est désactivé, le premier point est étalonné. Si le verrouillage automatique (AUTOLOCK) est activé, la mention « WAIT » clignote jusqu'à ce que l'appareil détecte une lecture stable. Une fois que l'appareil a effectué l'étalonnage du premier point, « SLOPE » clignote.
REMARQUE : Si aucune sonde de température n'est connectée, réglez la lecture de température sur celle du premier tampon à l'aide des touches Δ et ∇ (entre 0,0 et 60 °C) AVANT d'appuyer sur « STAND ».
3. Rincez les sondes pH et CAT/Temp avec de l'eau distillée, puis placez-les dans la deuxième solution tampon (4,01/4,00 ou 10,01/9,18) Laissez la lecture de température se stabiliser, puis appuyez sur la touche « SLOPE » pour étalonner. Si le verrouillage automatique (AUTOLOCK) est désactivé, le deuxième point est étalonné. Si le verrouillage automatique (AUTOLOCK) est activé, la mention « WAIT » clignote jusqu'à ce que l'appareil détecte une lecture stable. Une fois que l'appareil a effectué l'étalonnage du deuxième point, l’unité fait bip-bip deux fois et les mentions « STAND » et « SLOPE » restent toutes les deux allumées. REMARQUE : Si aucune sonde de température n'est connectée, réglez la lecture de température sur celle du premier tampon à l'aide des touches Δ et ∇ (entre 0,0 et 60 °C) AVANT d'appuyer sur « SLOPE ».
4. L'appareil calcule et compense l'écart de pente de l'électrode pH correspondant aux valeurs des deux tampons d'étalonnage. L'appareil est maintenant étalonné en deux points et prêt à la prise de mesure. Après l'étalonnage, maintenez la touche MEA. /EFF. enfoncée pendant environ 5 secondes pour afficher la nouvelle efficacité de l'électrode.

6
Utilisation du simulateur d'électrode du modèle pH160 Le simulateur d'électrode du modèle pH160 peut être utilisé pour confirmer l'étalonnage correct de l'appareil. Pour utiliser le simulateur :
1. Installez la pile de 9 V fournie.
2. Connectez le pH160 au pH100. Mettez les deux appareils sous tension. Le pH160 est doté d'un petit interrupteur, situé à droite des touches de pH.
3. En mode de mesure du pH, appuyez sur une des touches de simulation de tampon pH du pH160. La valeur de pH correspondante doit s'afficher sur l'écran des deux appareils.
Remarque : Le simulateur de pH permet seulement d'étalonner l'appareil, PAS l'appareil et la sonde. Pour obtenir une meilleure précision, étalonnez le pH de l'appareil et de la sonde simultanément à l'aide de solutions tampons.
Mesures du pH Pour effectuer des mesures de pH, les mentions « STAND » et « SLOPE » doivent rester allumées, indiquant que l'appareil a été étalonné en deux points et qu'il est prêt à effectuer des mesures. Si les mentions « STAND » et « SLOPE » clignotent, effectuez l'étalonnage du pH avant de prendre des mesures.
1. Appuyez sur la touche MODE pour entrer en mode pH et activez ou désactivez la fonction de verrouillage automatique, selon vos besoins. L'appareil ne pourra pas se verrouiller automatiquement si les caractéristiques inhérentes de l'échantillon mesuré sont instables. Dans ce cas, désactivez la fonction de verrouillage automatique.
2. Rincez l'électrode à pH et/ou la sonde CAT/Temp avec de l'eau distillée et plongez-la dans l'échantillon devant être mesuré. Enlevez toute bulle d'air se trouvant autour de la sonde en secouant ou en remuant la sonde. Laissez la lecture de pH et/ou de température se stabiliser. Si aucune sonde CAT/Temp n'est connectée, la mention « MAN » s'affiche, indiquant une compensation de température manuelle. Réglez l'appareil pour qu'il affiche la température de l'échantillon en appuyant sur les touches Δ et ∇ (-10,0 à 120 °C). Si une sonde CAT/Temp est connectée, la mention « ATC » s'affiche avec la température de l'échantillon.
3. Si la fonction de verrouillage automatique est désactivée, la valeur de pH de l'échantillon s'affiche sur l'écran. Si les lectures de pH et de température sont toutes les deux stables, notez les valeurs. Si la fonction de verrouillage automatique est activée, appuyez sur MEA./EFF. La mention « WAIT » s'affiche jusqu'à ce que l'appareil détecte une lecture de pH stable.
Mesures de température Le modèle pH100 peut mesurer la température indépendamment avec la sonde CAT/Temp, sans utiliser l'électrode à pH. Placez la sonde CAT/Temp dans le liquide devant être mesuré. La mesure de température s'affiche.
Mesures de millivoltage 1. Connectez l'électrode de millivoltage optionnelle à l'appareil. Appuyez sur la touche MODE
pour entrer en mode de mesure du millivoltage et activez ou désactivez la fonction de verrouillage automatique, selon vos besoins. L'appareil ne pourra pas se verrouiller automatiquement si les caractéristiques inhérentes de l'échantillon mesuré sont instables. Dans ce cas, utilisez le mode de mesure du millivoltage sans la fonction de verrouillage automatique.
2. Rincez l'électrode avec de l'eau distillée et immergez-la dans l'échantillon à mesurer. Si la fonction de verrouillage automatique est désactivée, la valeur de millivoltage de l'échantillon s'affiche sur l'écran. Si la fonction de verrouillage automatique est activée, appuyez sur MEA./EFF. La mention « WAIT » s'affiche jusqu'à ce que l'appareil détecte une lecture de millivoltage stable.

7
DÉPANNAGE
AFFICHAGE
PRINCIPAL
CAUSE POSSIBLE MESURE CORRECTIVE
Er 1 • Le décalage de l'électrode à pH est
supérieur/inférieur à +/- 1,5 pH. • La touche STAND a été enfoncée avant
que l'électrode et la sonde CAT/Temp ne se stabilisent dans une fourchette de ±1,5 pH de la valeur du tampon.
• L'électrode à pH est défectueuse.
• Remplacez le tampon et/ou l'électrode à pH. Appuyez sur ESC.
• Attendez suffisamment longtemps pour que l'électrode et la sonde CAT/Temp se stabilisent.
• Retournez l'appareil au centre de service.
Er 2 • La pente de l'électrode à pH présente
un écart de plus de 30 % par rapport à la pente idéale.
• La touche SLOPE a été enfoncée avant que l'électrode et la sonde CAT/Temp ne se stabilisent dans une fourchette de 30 % de la valeur du tampon.
• Le tampon 4,00, 4,01, 9,18 ou 10,01 n'est pas correct.
• Vérifiez que le tampon correct est utilisé et que la pente de l'électrode ne diffère pas de plus de 30 % de la pente théorique.
• Attendez suffisamment longtemps pour que l'électrode et la sonde CAT/Temp se stabilisent.
• Remplacez le tampon et/ou l'électrode à pH. Appuyez sur ESC.
• Retournez l'appareil au centre de service.
Er 3 • La température dépasse les limites de 0,0 à 60 °C.
• Modifiez la température du tampon pour qu'elle soit dans les limites.
• Retournez l'appareil au centre de service.
OvEr/Undr • Le pH mesuré est hors des limites de
16,00/-2,00 pH. • Le millivoltage mesuré est hors des
limites de 1250/-2000 mV. • Les températures mesurées sont hors
des limites de -10/120 C.
• Amenez l'appareil hors limite dans les limites correctes de la fourchette de mesure.
• Si les appareils se trouvent dans la fourchette correcte, retournez le produit au centre de service.
SPÉCIFICATIONS Affichage Fourchette Précision Résolution
pH -2,00 à 16,00 pH ±0,1 %, ±2 lsd 0,01 pH mV -1999 à 1250 mV ±0,1 %, ±1 lsd 1 mV
Température °C -10,0 à 120 °C ±0,5 °C 0,1 °C Compensation de la température et du pH AUTO/MANuel –10,0 à 120,0 °C Reconnaissance du tampon à pH (4,01, 7,00 et 10,01) ou (4,00, 6,86 et 9,18) Fourchette de températures d'étalonnage du tampon à pH
0 à 60 °C
Reconnaissance du décalage de l'électrode à pH ±90 mV à 7,00 ou 6,86 pH Reconnaissance de la pente de l'électrode à pH ±30 % à 4,00, 4,01, 9,18 ou 10,01 pH Alimentation Une pile de 9 V Sauvegarde de l'étalonnage Oui Touches sonores Oui, toutes les touches tactiles Fonction de verrouillage automatique Oui Fourchette de températures de fonctionnement 0 à 50 °C Limite d'humidité relative lors du fonctionnement
Jusqu'à 95 %

8
Sonde CAT Thermistor, 10 kΩ / 25 °C Dimensions (L x P x H) 186 mm x 37 mm x 72 mm Poids (avec pile) 430 g
LISTE DES PIÈCES DÉTACHÉES RECOMMANDÉES
N° RÉF. DESCRIPTION
100-1 Câble en Y étanche de 1 mètre avec combinaison d'électrodes à pH/jonction de référence et CAT.
100-4 Câble en Y étanche de 4 mètres avec combinaison d'électrodes à pH/jonction de référence et CAT.
110-1 Électrode à pH avec câble de 1 mètre.
115-1 Électrode à millivoltage avec câble de 1 mètre.
130-1 Électrode CAT (température) avec câble de 1 mètre.
160 Électrode de simulation de pH.
180 Sacoche de transport de solutions pH, flancs durs.
440 Kit de poids pour le câble
480 Sacoche de transport de l'appareil, flancs souples.
Article n° 605367 • Dessin n° A605367 Révision E • Mars 2008
Pour obtenir la version la plus récente de ce manuel, visitez www.ysiecosense.com

1
GARANTÍA El medidor EcoSense® pH100 tiene un año de garantía contra defectos de materiales y fabricación, contado a partir de la fecha de compra por el usuario final. Las sondas y cables del medidor pH100 tienen seis meses de garantía contra defectos de materiales y fabricación, contados a partir de la fecha de compra por el usuario final. Durante el período de garantía, YSI reparará o reemplazará, según su criterio, sin coste alguno, cualquier producto que YSI determine que está cubierto por esta garantía.
Para hacer valer esta garantía, escriba o llame al representante local de YSI, o comuníquese con el Servicio de atención al cliente de YSI en Yellow Springs, Ohio, EE.UU. Envíe el producto y la factura de compra, con el flete prepagado, al centro de servicio técnico autorizado seleccionado por YSI. Se realizará la reparación necesaria o el reemplazo y el producto será enviado de vuelta, con el flete prepagado. Los productos reparados o reemplazados se garantizan durante el resto del período de la garantía original, o al menos durante 90 días contados a partir de la fecha de reparación o reemplazo.
Limitación de la garantía
Esta garantía no tendrá validez en caso de daños o fallos en el producto de YSI debido a lo siguiente: (i) la instalación, funcionamiento o utilización del producto de manera contraria a las instrucciones escritas suministradas por YSI; (ii) abuso o uso inadecuado del producto; (iii) falta de mantenimiento del producto de acuerdo con las instrucciones escritas suministradas por YSI o con los procedimientos estándares de la industria; (iv) cualquier reparación indebida realizada en el producto; (v) utilización por parte del usuario de componentes o repuestos defectuosos o inadecuados para el mantenimiento o reparación del producto; o (vi) cualquier modificación del producto no autorizada de manera expresa por YSI.
ESTA GARANTÍA SE OTORGA EN LUGAR DE CUALQUIER OTRA GARANTÍA, EXPLÍCITA O IMPLÍCITA, LO QUE INCLUYE TODA GARANTÍA DE COMERCIALIZACIÓN O IDONEIDAD PARA UN PROPÓSITO ESPECÍFICO. DE CONFORMIDAD CON ESTA GARANTÍA, LA RESPONSABILIDAD DE YSI SE LIMITA A LA REPARACIÓN O REEMPLAZO DEL PRODUCTO, LO CUAL SERÁ LA SOLUCIÓN ÚNICA Y EXCLUSIVA QUE TENDRÁ EL COMPRADOR POR CUALQUIER PRODUCTO DEFECTUOSO CUBIERTO POR ESTA GARANTÍA. EN NINGÚN CASO YSI SERÁ RESPONSABLE POR NINGÚN DAÑO CUANTIFICABLE, INDIRECTO, INCIDENTAL O CONSIGUIENTE QUE RESULTARA DE ALGÚN PRODUCTO DEFECTUOSO CUBIERTO POR ESTA GARANTÍA.
INFORMACIÓN DE CONTACTO YSI Inc. • 1725 Brannum Lane • Yellow Springs OH, 45387. EE.UU. 800-897-4151 • 937-767-7241 • Fax: 937-767-1058 Correo electrónico: [email protected] • Página en Internet: www.ysiecosense.com

2
CONTENIDO:
GARANTÍA ...................................................................................................... 1 INFORMACIÓN DE CONTACTO ................................................................... 1 INTRODUCCIÓN GENERAL.......................................................................... 3 INSPECCIÓN INICIAL .................................................................................... 3 RESISTENCIA A LAS SALPICADURAS ........................................................ 3 INSTALACIÓN DE LA PILA ............................................................................ 4 FUNCIONES PRINCIPALES DEL MODELO pH100...................................... 4 PANTALLA DE CRISTAL LÍQUIDO................................................................ 4 PROCEDIMIENTOS DE FUNCIONAMIENTO ............................................... 5
Selección del juego de tampones.............................................................. 5 Calibración de pH ...................................................................................... 5 Uso del simulador de electrodo del modelo pH160................................... 5 Mediciones de pH ...................................................................................... 6 Mediciones de temperatura ....................................................................... 6 Mediciones de mV...................................................................................... 6
LOCALIZACIÓN Y RESOLUCIÓN DE PROBLEMAS.................................... 7 ESPECIFICACIONES ..................................................................................... 8 LISTA DE PIEZAS DE RECAMBIO RECOMENDADAS ................................ 8

3
INTRODUCCIÓN GENERAL El modelo pH100 es uno de los tres medidores de la línea de productos EcoSense de YSI. E; modelo pH100 es una herramienta de precisión que mide pH, mV y temperatura. Tiene un microprocesador integrado que almacena, calcula y realiza la compensación de todos los parámetros relacionados con la determinación del pH, incluso las características de temperatura del electrodo de pH, desviaciones de la inclinación del electrodo y soluciones tampón.
Esta unidad cuenta con un estuche IP65 resistente a salpicaduras. Las teclas de contacto mecánico son muy confiables y al pulsarlas proporcionan una respuesta táctil y audible. Este medidor utiliza una pila de 9 voltios. No requiere nueva calibración cuando se restablece la corriente.
La parte delantera del medidor tiene una pantalla grande de cristal líquido que muestra simultáneamente el pH o mV y temperatura, junto con las indicaciones para el usuario y los indicadores del modo de funcionamiento. La unidad orienta al usuario durante los procedimientos de calibración y medición.
La característica AUTOLOCK (autobloqueo) para las mediciones de pH y mV permite que la unidad detecte automáticamente el punto terminal y que “fije” la pantalla para indicar el valor del punto terminal de la medición. El pH100 también se puede utilizar sin el modo AUTOLOCK (autobloqueo). El modo AUTOLOCK (autobloqueo) y las indicaciones para el usuario ayudan a eliminar la mayoría de los errores al determinar los valores de pH y mV, lo que da como resultado medidas precisas, repetibles y sin errores.
El modelo pH100 también está disponible con sondas para pH, mV, ORP y ATC (compensación automática de temperatura). Entre otras características se incluyen el reconocimiento de desfase del electrodo, reconocimiento de la inclinación del electrodo, pantalla de eficiencia del electrodo, coeficientes incorporados de las soluciones tampón, compensación automática o manual de temperatura, larga duración de la pila y rechazo de ruido de CA de 50/60 Hz. Este medidor es universal y fácil de usar en aplicaciones in situ, industriales y de laboratorio.
INSPECCIÓN INICIAL Saque la unidad de su embalaje con cuidado y verifique que no haya sufrido daños durante el envío. Compare las piezas recibidas con los materiales enumerados en la lista de embalaje. Notifique inmediatamente a YSI en caso de que haya piezas faltantes o dañadas. Guarde todos los materiales de embalaje hasta que confirme que la unidad funciona satisfactoriamente.
RESISTENCIA A LAS SALPICADURAS Aunque el medidor pH100 se encuentra en un estuche a prueba de agua, NO lo utilice bajo agua. Este tipo de estuche evita los daños permanentes en la unidad en caso de que caiga accidentalmente en soluciones no corrosivas. Siga estos pasos de inmediato si la unidad se inmerge en cualquier solución:
1. Enjuague la unidad cuidadosamente con agua destilada. Después del enjuague y secado, revise y limpie los conectores para eliminar cualquier contaminante que pueda afectar las conexiones de la sonda.
2. Espere hasta que la unidad y la sonda se sequen por completo antes de reanudar el funcionamiento.
3. Si la unidad no funciona correctamente después de realizar los pasos 1 y 2, comuníquese con YSI para su posible reparación o reemplazo (consulte la garantía).
INSTALACIÓN DE LA PILA En la pantalla de cristal líquido aparecerá el mensaje de “BAT” (pila) para indicar que queda aproximadamente una hora de carga de la pila para el funcionamiento de la unidad según las especificaciones. Cambie la pila cuando aparezca el mensaje “BAT” (pila) en la pantalla de cristal líquido. (Vea la figura 1).
Para cambiar la pila, saque los dos tornillos de la tapa y luego retire la tapa y el aro tórico. Coloque una nueva pila de 9 voltios. Vuelva a colocar la tapa y el aro tórico (alinee este aro correctamente para garantizar un buen sellado) y ajuste los dos tornillos de la tapa para que funcione la protección contra salpicaduras.
Figura 1. Instalación de la pila
FUNCIONES PRINCIPALES DEL MODELO pH100 1. : Para encender y apagar la unidad. Los valores de calibración de pH no se suprimen
cuando se apaga la unidad. La unidad se enciende en el mismo estado en que se encontraba cuando se apagó. Cuando la unidad no esté en uso, apáguela para ahorrar carga de la pila. Para el almacenamiento a largo plazo debe quitar las pilas.
2. MODE: Selecciona el modo de la pantalla. Presione MODE para ver pH-AUTOLOCK, mV-AUTOLOCK, pH y mV de manera secuencial. Los valores de calibración no se ven afectados al cambiar el modo de la pantalla.
3. Teclas STAND y SLOPE: Se utilizan para la calibración de pH de dos puntos de la unidad. Pulse y mantenga pulsada la tecla STAND mientras enciende la energía para cambiar los juegos de tampones.
4. Teclas Δ y ∇: Pulse para introducir los valores de temperatura en el modo manual (MAN). Estas teclas no funcionan en el modo ATC.
5. MEA./EFF.: Pulse para liberar la unidad del estado AUTOLOCK (autobloqueo) cuando funciona en el modo pH-AUTOLOCK o mV-AUTOLOCK. Pulse y mantenga pulsada por 5 segundos para ver la eficiencia del electrodo.
6. ESC: Presione para despejar la unidad cuando aparezca una señal de error y suprimirá los valores de calibración almacenados en la memoria interna. Para evitar la supresión accidental durante el uso normal, las teclas no funcionan a menos que se pulsen durante 2 segundos. La tecla funciona solamente cuando aparece un mensaje de error.
Cuando se pulsa ESC, todos los elementos de la pantalla de cristal líquido se iluminan. Después de 2 segundos la unidad entra en el modo pH-AUTOLOCK. “AUTOLOCK” aparece y “STAND” comienza a parpadear indicando la necesidad de realizar la calibración. Pulse ESC sólo cuando se produzcan errores que requieran la recalibración de la unidad.
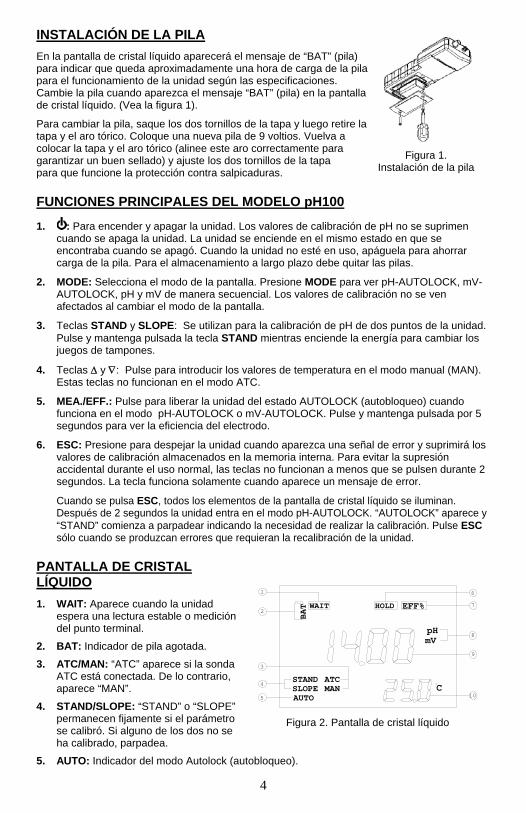
PANTALLA DE CRISTAL LÍQUIDO
STANDSLOPE
ATCMAN
BA
T
AUTO
WAIT HOLD EFF%
pHmV
1
2
3
4
5
6
7
8
9
10C
Figura 2. Pantalla de cristal líquido
1. WAIT: Aparece cuando la unidad espera una lectura estable o medición del punto terminal.
2. BAT: Indicador de pila agotada.
3. ATC/MAN: “ATC” aparece si la sonda ATC está conectada. De lo contrario, aparece “MAN”.
4. STAND/SLOPE: “STAND” o “SLOPE” permanecen fijamente si el parámetro se calibró. Si alguno de los dos no se ha calibrado, parpadea.
5. AUTO: Indicador del modo Autolock (autobloqueo).
4

5
6. HOLD: Indica que la lectura se mantiene durante el modo Autolock (autobloqueo).
7. EFF%: Aparece cuando el usuario visualiza la eficiencia del electrodo. Se recomienda reemplazar el electrodo cuando la eficiencia es inferior a 75%.
8. pH/mV: Indicadores de la unidad y de modo.
9. Pantalla principal para los valores de pH, mV y eficiencia de la sonda.
10. °C: Indicador de la temperatura.
PROCEDIMIENTOS DE FUNCIONAMIENTO
Selección del juego de Tampones El pH 100 tiene 2 juegos de tampones: 7.00, 4.01, 10.01 pH y 6.86, 4.00, 9.18 pH. La configuración de fábrica por defecto es la combinación 7.00, 4.01, y 10.01. Para cambiar esta configuración, apague la unidad y coloque el sensor en tampón 7.0. A continuación, encienda la unidad y mantenga presionada la tecla STAND . Continue presionando la tecla STAND hasta que la unidad haga un “beep”. Si la unidad está nocalibrada y en modo pH, marcará “7.00” si el primer juego está activo, y “6.86” si el segundo juego está activo
Calibración de pH El pH100 utiliza calibración de 2 puntos. El primer punto debe ser el tampón 6,86/7,00 y el segundo debe ser 4,00/4,01 ó 9,18/10,01. Estas soluciones tampón se pueden comprar al representante de YSI.
1. Encienda la unidad. Conecte el electrodo de pH en el conector BNC y la sonda ATC/Temp en el conector ATC/Temp en la unidad; aparece “ATC”. Pulse MODE hasta que aparezca “pH”. Autolock (autobloqueo) puede estar encendido o apagado según lo desee.
2. Coloque las sondas pH y ATC/Temp en la primera solución tampón (7,00 ó 6,86). Permita las lecturas de temperatura para estabilizar, entonces prense "STAND" y mantengan para 3 segundos para calibrar. Si AUTOLOCK (autobloqueo) está apagado, el primer punto se ha calibrado. Si AUTOLOCK (autobloqueo) está encendido, “WAIT” parpadea hasta que la unidad detecta una lectura estable. Cuando la unidad calibra el primer punto, “SLOPE” parpadea.
NOTA: Si no está conectada la sonda de temperatura, ajuste la lectura de temperatura al nivel de la primera solución tampón utilizando la tecla Δ o ∇ (0,0 a 60° C) ANTES de pulsar “STAND”.
3. Enjuague las sondas pH y ATC/Temp con agua destilada, luego colóquelas en la segunda solución tampón (4,01/4,00 ó 10,01/9,18). Deje que las lecturas de temperatura se estabilicen, luego pulse “SLOPE” para calibrar. Si AUTOLOCK (autobloqueo) está apagado, el segundo punto se ha calibrado. Si AUTOLOCK (autobloqueo) está encendido, “WAIT” parpadea hasta que la unidad detecta una lectura estable. Cuando la unidad calibra el segundo punto, la unidad emite un sonido dos veces y los dos la “STAND” como “SLOPE” no parpadean. NOTA: Si no está conectada la sonda de temperatura, ajuste la lectura de temperatura al nivel de la primera solución tampón utilizando la tecla Δ o ∇ (0,0 a 60° C) ANTES de pulsar “SLOPE”.
4. La unidad calcula y compensa la desviación de inclinación del electrodo de pH correspondiente a los valores de las dos soluciones tampón de calibración. La unidad ahora cuenta con dos puntos calibrados y está lista para realizar mediciones. Después de la calibración, pulse y mantenga pulsado MEA. /EFF. por 5 segundos para ver la nueva eficiencia del electrodo.
Uso del simulador de electrodo del modelo pH160 El simulador de electrodo del modelo pH160 se puede utilizar para confirmar la calibración apropiada del medidor. Para utilizar el simulador:
1. Instale la pila de 9 voltios proporcionada.

6
2. Conecte el pH160 al pH100. Encienda ambas unidades. El pH160 tiene un interruptor pequeño a la derecha de los botones de pH.
3. En el modo de medición de pH, pulse uno de los botones de simulador de solución tampón de pH en el pH160. El valor correspondiente de pH debe aparecer en ambas pantallas.
Nota: La calibración con el simulador de pH sólo se hace en el medidor y NO en el medidor y la sonda. Para obtener la mejor precisión, calibre el medidor de pH y la sonda juntos utilizando las soluciones tampón.
Mediciones de pH Para tomar mediciones de pH, “STAND” y “SLOPE” no deben parpadear, lo que indica que la unidad está calibrada en dos puntos y está lista para realizar mediciones. Si “STAND” y “SLOPE” parpadean, realice la calibración de pH antes de tomar las mediciones.
1. Pulse MODE (modo) para entrar en el modo pH con AUTOLOCK (autobloqueo) encendido o apagado, como lo desee. Para las muestras naturalmente inestables, la unidad no entrará en AUTOLOCK (autobloqueo). En este caso debe apagar AUTOLOCK (autobloqueo).
2. Enjuague el electrodo de pH y/o sonda ATC/Temp con agua destilada y sumérjala en la muestra que será medida. Saque las burbujas de aire atrapadas alrededor de la sonda sacudiendo o agitando la sonda. Deje que el pH y/o la temperatura se estabilicen. Si la sonda ATC/Temp no está conectada, aparece “MAN”, lo que indica que se utiliza la compensación manual de temperatura. Fije la unidad para que indique la temperatura de la muestra pulsando las teclas Δ y ∇ (-10,0 a 120° C). Si la sonda ATC/Temp está conectada, aparece “ATC” junto a la temperatura de la muestra.
3. Si AUTOLOCK (autobloqueo) está apagado, el valor de pH de la muestra aparece en la pantalla. Si las lecturas de pH y temperatura son estables, tome la lectura. Si AUTOLOCK (autobloqueo) está encendido, pulse MEA./EFF. “WAIT” parpadea hasta que la unidad detecta una lectura estable de pH.
Mediciones de temperatura El modelo pH100 puede medir temperatura de manera independiente con la sonda ATC/Temp, sin utilizar el electrodo de pH. Ponga la sonda ATC/Temp en el medio a ser medido. Aparecerá la medición de temperatura.
Mediciones de mV 1. Conecte el electrodo opcional de combinación mV en la unidad. Pulse MODE (modo) para
entrar en el modo mV con AUTOLOCK (autobloqueo) encendido o apagado, como lo desee. Para las muestras naturalmente inestables, la unidad no entrará en AUTOLOCK (autobloqueo). En este caso utilice el modo mV con AUTOLOCK (autobloqueo) apagado.
2. Enjuague el electrodo con agua destilada y sumérjalo en la muestra a ser medida. Si AUTOLOCK (autobloqueo) está apagado, el valor de mV de la muestra aparece en la pantalla. Si AUTOLOCK (autobloqueo) está encendido, pulse MEA./EFF. “WAIT” parpadea hasta que la unidad detecta una lectura estable de mV.

7
LOCALIZACIÓN Y RESOLUCIÓN DE PROBLEMAS
PANTALLA PRINCIPAL
CAUSAS POSIBLES ACCIÓN CORRECTIVA
Er 1 • El desfase del electrodo de pH es mayor/inferior a +/-1,5 pH.
• Se pulsó STAND antes de que el electrodo y la sonda ATC/Temp lleguen cerca del valor de la solución tampón de ±1,5 pH.
• El electrodo de pH tiene fallos
• Reemplace la solución tampón y/o el electrodo de pH. Pulse la tecla ESC.
• Deje transcurrir suficiente tiempo para que el electrodo y la sonda ATC/Temp se estabilicen.
• Envíelo al servicio técnico.
Er 2 • La inclinación del electrodo de pH está a
más de 30% de la inclinación ideal. • Se pulsó SLOPE antes de que el
electrodo y la sonda ATC/Temp lleguen cerca del 30% del valor de la solución tampón.
• La solución tampón 4,00, 4,01, 9,18 ó 10,01 no es correcta.
• Verifique el uso de la solución tampón correcta y que la inclinación del electrodo no sea superior al 30% de la inclinación teórica.
• Deje transcurrir suficiente tiempo para que el electrodo y la sonda ATC/Temp se estabilicen.
• Reemplace la solución tampón y/o el electrodo de pH. Pulse la tecla ESC.
• Envíelo al servicio técnico.
Er 3 • La temperatura está fuera de la escala de 0,0 a 60,0° C.
• Haga que la temperatura de la solución tampón esté dentro de la escala.
• Envíelo al servicio técnico.
OvEr/ Undr
• El pH medido está fuera de la escala de 16,00/-2,00 pH.
• El mV medido está fuera de la escala de 1250/-2000 mV.
• La temperatura medida está fuera de la escala de -10/120° C.
• Haga que la unidad fuera de escala entre en la escala de medición correcta.
• Si las unidades se encuentran dentro de la escala correcta, devuelva el producto para obtener servicio técnico.

8
ESPECIFICACIONES Pantalla Escala Precisión Resolución
pH -2,00 a 16,00 pH ±0,1%, ±2 lsd 0,01 pH mV -1999 a 1250 mV ±0,1%, ±1 lsd 1 mV
Temperatura en °C
-10,0 a 120° C ±0,5° C 0,1° C
Compensación de pH temperatura AUTO/MANual –10,0 a 120,0 °C Reconocimiento de pH de solución tampón
(4,01, 7,00 y 10,01) o (4,00, 6,86 y 9,18)
Escala de temperatura de calibración de pH de la solución tampón
0 a 60° C
Reconocimiento de desfase del electrodo de pH
±90 mV a pH 7,0 ó 6,86
Reconocimiento de inclinación del electrodo de pH
±30% a pH 4,00, 4,01, 9,18 ó 10,01
Energía Una pila de 9 voltios Respaldo de la calibración Sí Respuesta audible Sí, en todas las teclas Característica Autolock (autobloqueo)
Sí
Escala de temperatura de funcionamiento
0 a 50° C
Escala de humedad relativa de funcionamiento
Hasta 95%
Sonda ATC Termistor, 10kΩ / 25° C Dimensiones (anc x prof x alt) 70 mm x 37 mm x 186 mm (2,8 pulg. x 1,5 pulg.
x 7,3 pulg.) Peso (con la pila) 430 gramos (1 libra)
LISTA DE PIEZAS DE RECAMBIO RECOMENDADAS
PIEZA No DESCRIPCIÓN
100-1 Cable Y hidrófugo de 1 metro con combinación de electrodos pH/unión de referencia y ATC.
100-4 Cable Y hidrófugo de 4 metros con combinación de electrodos pH/unión de referencia y ATC.
110-1 Electrodo de pH con cable de 1 metro.
115-1 Electrodo de mV con cable de 1 metro.
130-1 Electrodo de ATC (temperatura) con cable de 1 metro.
160 Electrodo simulador de pH.
180 Estuche portátil de pH, de lados rígidos
440 Kit del peso para el cable
480 Estuche portátil para medidor, no rígido
Artículo #605367 • Ilustración #A605367 Revisión E • Marzo de 2008
Para la versión más reciente de este manual, visite www.ysiecosense.com

1
GARANTIE Für das Instrument EcoSense® pH100 wird für den Zeitraum von einem (1) Jahr ab dem Datum des Kaufs durch den Endbenutzer eine Garantie bezüglich Material- und Fabrikationsfehlern gewährt. Für pH100-Sonden und -Kabel wird für den Zeitraum von sechs (6) Monaten ab dem Datum des Kaufs durch den Endbenutzer eine Garantie bezüglich Material- und Fabrikationsfehlern gewährt. Innerhalb der Garantiefrist wird YSI jedes Produkt, für das diese Garantie gilt, nach eigenem Ermessen entweder kostenlos reparieren oder ersetzen.
Setzen Sie sich schriftlich oder telefonisch mit Ihrem örtlichen YSI-Vertreter in Verbindung oder kontaktieren Sie den YSI-Kundendienst in Yellow Springs (Ohio/USA), um diese Garantie in Anspruch zu nehmen. Schicken Sie das Produkt mit dem Kaufnachweis unter Vorauszahlung der Frachtkosten an das von YSI ausgewählte Vertragskundendienstzentrum. Dort wird die Reparatur oder der Ersatz vorgenommen und das Produkt anschließend frachtfrei an Sie zurückgesandt. Für reparierte oder ersetzte Produkte erstreckt sich die Garantie über die Restlaufzeit des ursprünglichen Garantiezeitraums, mindestens jedoch über 90 Tage ab dem Datum der Reparatur oder des Ersatzes.
Garantiebegrenzung
Diese Garantie gilt nicht für irgendwelche Beschädigungen oder Ausfälle eines YSI-Produkts, die durch Folgendes verursacht werden: (i) Versäumnis, das Produkt in Übereinstimmung mit den schriftlichen Instruktionen von YSI zu installieren, in Betrieb zu nehmen oder zu benutzen; (ii) Missbrauch oder Zweckentfremdung des Produkts; (iii) Versäumnis, das Produkt in Übereinstimmung mit den schriftlichen Instruktionen von YSI oder einem branchenüblichen Verfahren in Stand zu halten; (iv) unsachgemäße Reparaturen am Produkt; (v) eine von Ihnen vorgenommene Verwendung defekter oder ungeeigneter Komponenten oder Teile bei der Wartung oder Reparatur des Produkts; oder (vi) die Abänderung des Produkts in irgendeiner Weise, die nicht ausdrücklich von YSI genehmigt ist.
DIESE GARANTIE TRITT AN DIE STELLE ALLER ANDEREN GEWÄHRLEISTUNGEN, GLEICHGÜLTIG, OB VERTRAGLICH ODER GESETZLICH ZUGESICHERT, EINSCHLIESSLICH JEGLICHER ZUSICHERUNG ALLGEMEINER GEBRAUCHSTAUGLICHKEIT ODER EIGNUNG FÜR EINEN BESTIMMTEN ZWECK. DIE HAFTUNG VON YSI GEMÄSS DIESER GARANTIE BESCHRÄNKT SICH AUF DIE REPARATUR ODER DEN ERSATZ DES PRODUKTS, UND DIES STELLT IHREN EINZIGEN UND AUSSCHLIESSLICHEN RECHTSBEHELF FÜR JEDES DEFEKTE PRODUKT DAR, FÜR DAS DIESE GARANTIE GILT. YSI HAFTET AUF KEINEN FALL FÜR IRGENDWELCHE BESONDEREN, MITTELBAREN, BEILÄUFIG ENTSTANDENEN ODER FOLGESCHÄDEN, DIE AUS IRGENDEINEM DEFEKTEN PRODUKT RESULTIEREN, FÜR DAS DIESE GARANTIE GILT.
KONTAKTINFORMATION YSI Inc. • 1725 Brannum Lane • Yellow Springs, OH 45387, USA 800-897-4151 (gebührenfrei in den USA) • 937-767-7241 • Fax: 937-767-1058 Email: [email protected] • Website: www.ysiecosense.com

2
INHALTSVERZEICHNIS
GARANTIE ...................................................................................................... 1 KONTAKTINFORMATION .............................................................................. 1 ALLGEMEINE EINLEITUNG........................................................................... 3 INSPEKTION VOR DEM EINSATZ ................................................................ 3 SPRITZWASSERSCHUTZ ............................................................................. 3 EINSETZEN DER BATTERIE......................................................................... 4 HAUPTFUNKTIONEN DES MODELLS pH100 .............................................. 4 DAS LCD-ANZEIGEFELD .............................................................................. 4 BEDIENUNGSVERFAHREN .......................................................................... 5
pH Puffer Set Auswahl............................................................................... 5 pH-Kalibrierung .......................................................................................... 5 Verwendung des Elektrodensimulators Modell pH160.............................. 6 pH-Messungen........................................................................................... 6 Temperaturmessungen.............................................................................. 6 mV-Messungen.......................................................................................... 6
AUFFINDEN UND BESEITIGEN VON STÖRUNGEN ................................... 7 TECHNISCHE DATEN.................................................................................... 7 LISTE EMPFOHLENER ERSATZTEILE......................................................... 8

3
ALLGEMEINE EINLEITUNG Das Modell pH100 ist eines von drei Instrumenten aus der EcoSense-Produktgruppe von YSI. Das Modell pH100 ist ein Präzisionsinstrument, das pH, mV und die Temperatur misst. Ein eingebauter Mikroprozessor speichert, berechnet und kompensiert alle Parameter im Zusammenhang mit der pH-Bestimmung, einschließlich der Temperaturcharakteristika der Elektrode, Neigungsabweichungen der Elektrode und Pufferlösungen.
Dieses Gerät besitzt ein spritzwasserfestes Gehäuse gemäß der Schutzklasse IP65. Die mechanischen Berührungstasten mit fühlbarem und hörbarem Feedback sind äußerst zuverlässig. Das Instrument wird von einer 9 Volt-Batterie gespeist. Es ist keine erneute Kalibrierung notwendig, wenn die Stromversorgung wiederhergestellt wird.
Auf der Vorderseite des Instruments befindet sich ein großes LCD-Anzeigefeld, das gleichzeitig die pH- oder mV-Werte sowie die Temperatur mit Bedienerhinweisen/Eingabeaufforderungen und die Betriebsart anzeigt. Das Gerät führt den Benutzer durch die Kalibrierungs- und Messverfahren.
Mit einer AUTOLOCK-Funktion für pH- und mV-Messwerte kann das Gerät automatisch den Umschlagspunkt wahrnehmen und die Anzeige „festschreiben“, um den Wert des Umschlagspunkts einer Messung anzuzeigen. Das pH100-Gerät kann auch ohne AUTOLOCK-Betriebsmodus benutzt werden. AUTOLOCK und Bedienerhinweise/Eingabeaufforderungen tragen dazu bei, die meisten Fehler bei der Bestimmung von pH- und mV-Werten zu eliminieren. Das Ergebnis sind präzise, wiederholbare und fehlerfreie Messungen.
Das Modell pH100 ist mit pH-, mV-, ORP- und ATC-Sonden (Automatische Temperaturkompensation) erhältlich. Zu den weiteren Merkmalen gehören Elektrodenoffset-Erkennung, Elektrodenneigungs-Erkennung, Elektrodeneffizienz-Anzeige, eingebaute Pufferkoeffizienten, automatische oder manuelle Temperaturkompensation, eine lange Batterielebensdauer und eine hohe 50/60 Hz WS-Störgeräuschunterdückung. Das Instrument ist vielseitig, benutzerfreundlich und für Anwendungen in der Feldforschung, Industrie und im Labor geeignet.
INSPEKTION VOR DEM EINSATZ Packen Sie das Gerät und sein Zubehör sorgfältig aus und untersuchen Sie alle Teile auf eventuelle Transportschäden. Vergleichen Sie die erhaltenen Teile mit den Gegenständen, die auf dem Packzettel aufgeführt sind. Benachrichtigen Sie YSI unverzüglich über irgendwelche Schäden oder fehlende Teile. Bewahren Sie das Verpackungsmaterial auf, bis der einwandfreie Betrieb des Geräts bestätigt ist.
SPRITZWASSERSCHUTZ Obwohl das pH100-Messinstrument in einem spritzwassergeschützten Gehäuse untergebracht ist, DARF ES NICHT unter Wasser eingesetzt werden. Das spritzwassergeschützte Gehäuse verhindert permanente Schäden am Gerät, falls es versehentlich in nichtätzende Lösungen fällt. Im Falle eines Eintauchens in eine Flüssigkeit müssen sofort die folgenden Schritte ausgeführt werden:
1. Spülen Sie das Gerät sorgfältig mit destilliertem Wasser ab. Nach dem Abspülen und Trocknen sollten Sie die Anschlussstücke inspizieren und säubern, um alle verunreinigenden Substanzen zu entfernen, die die Sondenanschlüsse angreifen könnten.
2. Warten Sie, bis das Gerät und die Sonde völlig trocken sind, bevor Sie das Gerät wieder in Betrieb nehmen.
3. Falls das Gerät nach den Schritten 1 und 2 nicht korrekt funktionieren sollte, rufen Sie YSI wegen einer möglichen Reparatur oder eines Ersatzes an (siehe Garantie).

EINSETZEN DER BATTERIE Eine anfängliche Anzeige von „BAT” auf dem LCD bedeutet, dass das Gerät noch ca. 1 Stunde innerhalb der Spezifizierungen mit der Batterie betrieben werden kann. Wechseln Sie die Batterie aus, wenn „BAT” auf dem LCD-Anzeigefeld erscheint. (Siehe Abbildung 1)
Zum Austausch der Batterie entfernen Sie die beiden Schrauben für die Batterieabdeckung, die Batterieabdeckung und den O-Ring. Wechseln Sie die 9 Volt-Batterie aus. Setzen Sie die Batterieabdeckung und den O-Ring wieder ein (achten Sie auf die korrekte Ausrichtung des O-Rings für eine gute Abdichtung) und ziehen Sie die beiden Schrauben für die Batterieabdeckung fest, damit das Gerät spritzwassergeschützt bleibt.
HAUPTFUNKTIONEN DES MODELLS pH100 1. : Schaltet das Gerät EIN oder AUS. Die pH-
Kalibrierungswerte werden nicht gelöscht, wenn das Gerät ausgeschaltet wird. Das Gerät schaltet sich im selben Status wie beim Ausschalten ein. Wenn das Gerät nicht benutzt wird, schalten Sie es aus, um die Batterie zu schonen. Entfernen Sie die Batterien im Falle einer längeren Lagerung.
Abbildung 1. Einsetzen der Batterie
2. MODE: Wählt den Anzeigemodus. Drücken Sie auf MODE, um nacheinander pH-AUTOLOCK, mV-AUTOLOCK, pH und mV anzuzeigen. Die Änderung des Anzeigemodus wirkt sich nicht auf die Kalibrierungswerte aus.
3. STAND- und SLOPE-Tasten: Werden zur Zwei-Punkte-pH-Kalibrierung des Geräts verwendet. Drücken Sie auf die STAND-Taste, während Sie den Strom anschalten, um die Puffersätze zu ändern.
4. Δ und ∇ Tasten: Drücken Sie auf diese Tasten, um die Temperaturwerte manuell (MAN-Modus) einzugeben. Diese Tasten funktionieren im ATC-Betriebsmodus nicht.
5. MEA./EFF.: Drücken Sie diese Taste, um den AUTOLOCK-Status aufzuheben, wenn das Gerät im pH-AUTOLOCK- oder mV-AUTOLOCK-Modus betrieben wird. Drücken Sie die Taste 5 Sekunden lang, um die Elektrodeneffizienz anzuzeigen.
6. ESC: Drücken Sie auf diese Taste, wenn eine Fehlermeldung angezeigt wird; es werden alle Kalibrierungswerte im internen Speicher gelöscht. Die Taste reagiert nur, wenn sie mindestens 2 Sekunden lang gedrückt wird. Somit wird eine unbeabsichtigte Löschung während des normalen Gebrauchs verhindert. Die Taste reagiert nur dann, wenn eine Fehlermeldung gezeigt wird.
Wenn die ESC-Taste gedrückt wird, leuchten alle LCD-Elemente auf. Nach ungefähr 2 Sekunden wird der pH-AUTOLOCK-Modus aufgerufen. „AUTOLOCK“ wird angezeigt und „STAND“ beginnt zu blinken; dies weist darauf hin, dass eine Kalibrierung erforderlich ist. Drücken Sie nur dann auf die ESC-Taste, wenn Fehler auftreten, die eine Neukalibrierung des Geräts erforderlich machen.
STANDSLOPE
ATCMAN
BA
T
AUTO
WAIT HOLD EFF%
pHmV
1
2
3
4
5
6
7
8
9
10C
Abbildung 2. LCD-Anzeigefeld
DAS LCD-ANZEIGEFELD 1. WAIT: Wird angezeigt, während das
Gerät auf einen stabilen Messwert oder die Wahrnehmung des Umschlagspunkts wartet.
2. BAT: Anzeige für niedrigen Batteriestand.
3. ATC/MAN: „ATC“ wird angezeigt, falls eine ATC-Sonde angeschlossen ist. Andernfalls wird „MAN“ angezeigt.
4
4. STAND/SLOPE: „STAND“ oder „SLOPE“ bleiben konstant, falls der Parameter kalibriert wurde. Die Anzeige blinkt, falls keiner der Parameter kalibriert wurde.

5
5. AUTO: Anzeige des Autolock-Modus.
6. HOLD: Zeigt an, dass ein Messwert während des Autolock-Modus festgeschrieben ist.
7. EFF%: Wird angezeigt, wenn der Benutzer die Elektrodeneffizienz abliest. Es wird empfohlen, die Elektrode auszuwechseln, wenn die Effizienz unter 75% fällt.
8. pH/mV: Einheits- und Modusanzeigen.
9. Hauptanzeige für pH-, mV- und Sondeneffizienz-Werte.
10. °C: Temperaturanzeige.
BEDIENUNGSVERFAHREN
pH Puffer Set Auswahl Für pH 100 gibt es zwei Einstellungen für Puffersets: 7,00 / 4,01 / 10,01 pH und 6,86 / 4,00 / 9,18 pH. Die Werkseinstellung ist das Puffer Set 7,00 / 4,01 und 10,01 pH. Um das Puffer Set zu ändern, schalten Sie das Gerät aus und tauchen Sie den Sensor in pH 7,0 Puffer. Als Nächstes schalten Sie das Gerät ein während Sie die STAND Taste drücken und gedrückt halten. Halten Sie die STAND Taste gedrückt bis das Gerät piept. Wenn das Gerät nicht kalibriert ist und sich im pH Modus befindet, zeigt es *7.00* falls das erste Set aktiviert ist und *6.86* falls das zweite Set aktiviert ist.
pH-Kalibrierung Das Modell pH100 verwendet eine Zweipunkt-Kalibrierung. Der erste Punkt muss ein 6.86/7.00-Puffer und der zweite Punkt entweder ein 4.00/4.01- oder ein 9.18/10.01-Puffer sein. Diese Puffer können bei einem YSI-Vertreter gekauft werden.
1. Schalten Sie das Gerät ein. Schließen Sie die pH-Elektrode an den BNC-Anschluss und die ATC/Temp-Sonde an den ATC/Temp-Anschluss des Geräts an; „ATC“ wird angezeigt. Drücken Sie auf MODE, bis „pH“ angezeigt wird. Autolock kann je nach Wunsch ein- oder ausgeschaltet sein.
2. Tauchen Sie die pH- und ATC/Temp-Sonden in die erste Pufferlösung (entweder 7.00 oder 6.86). Warten Sie, bis sich die Temperaturwerte stabilisiert haben, drücken Sie dann 3 Sekunden lang „STAND“ und Griff, um zu kalibrieren. Falls AUTOLOCK abgeschaltet ist, wurde der erste Punkt kalibriert. Falls AUTOLOCK angeschaltet ist, blinkt „WAIT“, bis das Gerät einen stabilen Messwert erkennt. Sobald das Gerät den ersten Punkt kalibriert hat, wird „SLOPE“ blinkt auf.
HINWEIS: Falls keine Temperatursonde angeschlossen ist, müssen Sie mit den Δ- oder ∇- Tasten (0,0 bis 60 ºC) den Temperaturmesswert an den des ersten Puffers angleichen, BEVOR Sie auf „STAND” drücken.
3. Spülen Sie die pH- und ATC/Temp-Sonden in destilliertem Wasser ab, und geben Sie sie dann in die zweite Pufferlösung (entweder 4.01/4.00 oder 10.01/9.18). Warten Sie, bis sich die Temperaturwerte stabilisiert haben, und drücken Sie dann zur Kalibrierung auf „STAND“. Falls AUTOLOCK ausgeschaltet ist, wurde der zweite Punkt kalibriert. Falls AUTOLOCK angeschaltet ist, blinkt „WAIT“, bis das Gerät einen stabilen Messwert wahrnimmt. Sobald das Gerät den zweiten Punkt kalibriert, die Einheitssignaltöne zweimal und beider „STAND“ und „SLOPE“ konstant angezeigt. HINWEIS: Falls keine Temperatursonde angeschlossen ist, müssen Sie mit den Δ- oder ∇-Tasten (0,0 bis 60 ºC) den Temperaturmesswert an den des ersten Puffers angleichen, BEVOR Sie auf „SLOPE” drücken.
4. Entsprechend den Werten der beiden Kalibrierungspuffer berechnet das Gerät die pH-Elektrodenneigungs-Abweichung und nimmt einen Ausgleich vor. Das Gerät ist jetzt mit zwei Punkten kalibriert und einsatzbereit für Messungen. Nach der Kalibrierung drücken Sie die Taste MEA./EFF. ungefähr 5 Sekunden lang, um die neue Elektrodeneffizienz anzuzeigen.

6
Verwendung des Elektrodensimulators Modell pH160 Der Elektrodensimulator Modell pH160 kann zur Bestätigung der ordnungsgemäßen Kalibrierung des Instruments verwendet werden. So benutzen Sie den Simulator:
1. Legen Sie die mitgelieferte 9 V-Batterie in das Batteriefach.
2. Bringen Sie den pH160 am pH100 an. Schalten Sie beide Geräte ein. Der pH160 hat einen kleinen Schalter rechts neben den pH-Tasten.
3. In der Betriebsart für die pH-Messung drücken Sie auf eine der pH-Puffersimulatortasten am pH160. Der entsprechende pH-Wert sollte auf beiden Bildschirmen erscheinen.
Hinweis: Die Kalibrierung mit dem pH-Simulator kalibriert nur das Messgerät – NICHT das Messgerät und die Sonde. Für die größte Genauigkeit sollten Sie das pH-Messgerät und die Sonde gemeinsam mit Pufferlösungen kalibrieren.
pH-Messungen „STAND“ und „SLOPE“ müssen konstant angezeigt werden, um pH-Messungen vorzunehmen. Dies zeigt an, dass das Gerät an zwei Punkten kalibriert und einsatzbereit für Messungen ist. Falls „STAND“ und „SLOPE“ blinken, müssen Sie vor Messungen eine pH-Kalibrierung durchführen.
1. Drücken Sie auf MODE, um den pH-Modus aufzurufen, wobei AUTOLOCK je nach Wunsch ein- oder ausgeschaltet sein kann. Für Proben, die inhärent instabil sind, kann derAUTOLOCK-Modus nicht aufgerufen werden. In diesem Fall sollten Sie AUTOLOCK ausschalten.
2. Spülen Sie die pH-Elektrode und/oder ATC/Temp-Sonde mit destilliertem Wasser ab und tauchen Sie sie in die zu messende Probe ein. Schütteln Sie die Sonde oder schwenken Sie sie, um Luftblasen an der Sonde zu entfernen. Warten Sie, bis sich der pH-Wert und/oder die Temperatur stabilisiert haben. Falls keine ATC/Temp-Sonde angeschlossen ist, erscheint „MAN“ für die manuelle Temperaturkompensation. Stellen Sie das Gerät mit den Tasten Δ und ∇ (-10,0 bis 120 °C) ein, um die Temperatur der Probe anzuzeigen. Falls eine ATC/Temp-Sonde angeschlossen ist, wird „ATC“ zusammen mit der Temperatur der Probe angezeigt.
3. Falls AUTOLOCK ausgeschaltet ist, wird der pH-Wert der Probe auf dem Bildschirm angezeigt. Falls sowohl der pH- als auch der Temperaturwert stabil sind, lesen Sie die Messwerte ab. Falls AUTOLOCK eingeschaltet ist, drücken Sie auf MEA./EFF. „WAIT“ blinkt auf, bis das Gerät einen stabilen pH-Messwert bestimmt.
Temperaturmessungen Das Modell pH100 kann die Temperatur mit der ATC/Temp-Sonde unabhängig ohne die pH-Elektrode messen. Tauchen Sie die ATC/Temp Sonde in das zu messende Element. Die gemessene Temperatur wird angezeigt.
mV-Messungen 1. Schließen Sie die wahlweise einsetzbare mV-Kombinationselektrode an das Gerät an.
Drücken Sie auf MODE, um den mV-Modus aufzurufen, wobei AUTOLOCK je nach Wunsch ein- oder ausgeschaltet sein kann. Für Proben, die inhärent instabil sind, kann der AUTOLOCK-Modus nicht aufgerufen werden. Benutzen Sie in diesem Fall den mV-Modus mit ausgeschaltetem AUTOLOCK.
2. Spülen Sie die Elektrode mit destilliertem Wasser ab und tauchen Sie sie in die zu messende Probe. Falls AUTOLOCK ausgeschaltet ist, wird der mV-Wert der Probe auf dem Bildschirm angezeigt. Falls AUTOLOCK eingeschaltet ist, drücken Sie auf MEA./EFF. „WAIT“ blinkt auf, bis das Gerät einen stabilen mV-Messwert bestimmt.

7
AUFFINDEN UND BESEITIGEN VON STÖRUNGEN
HAUPT-ANZEIGE
MÖGLICHE URSACHE ABHILFSMASSNAHME
Er 1 • pH-Elektrodenausgleich ist größer/kleiner als +/-1,5 pH.
• STAND wurde gedrückt, bevor sich die Elektrode und die ATC/Temp-Sonde auf einen Bereich von ±1,5 pH des Pufferwerts einpendelten.
• Die pH-Elektrode ist fehlerhaft.
• Wechseln Sie den Puffer und/oder die pH-Elektrode aus. Drücken Sie auf ESC.
• Geben Sie der Elektrode und der ATC/Temp-Sonde genügend Zeit, um sich zu stabilisieren.
• Schicken Sie das Gerät zur Inspektion zurück.
Er 2 • Die pH-Elektrodenneigung weicht mehr
als 30% von der Idealneigung ab. • SLOPE wurde gedrückt, bevor sich die
Elektrode und die ATC/Temp-Sonde auf einen Bereich innerhalb von 30% des Pufferwerts einpendelten.
• Puffer 4.00, 4.01, 9.18 oder 10.01 sind nicht richtig.
• Überprüfen Sie, dass der richtige Puffer benutzt wird und dass die Elektrodenneigung nicht mehr als 30% von der theoretischen Neigung abweicht.
• Geben Sie der Elektrode und der ATC/Temp-Sonde genügend Zeit, um sich zu stabilisieren.
• Wechseln Sie den Puffer und/oder die pH-Elektrode aus. Drücken Sie auf ESC.
• Schicken Sie das Gerät zur Inspektion zurück.
Er 3 • Die Temperatur liegt außerhalb des Bereichs von 0,0 bis 60,0 °C.
• Bringen Sie die Puffertemperatur in den angegebenen Bereich.
• Schicken Sie das Gerät zur Inspektion zurück.
OvEr/Undr • Der gemessene pH-Wert liegt außerhalb
des Bereichs von 16,00/-2,00 pH. • Der gemessene mV-Wert liegt außerhalb
des Bereichs von 1250/-2000 mV. • Die gemessene Temperatur liegt
außerhalb des Bereichs von –10/120 °C.
• Bringen Sie die außerhalb des Bereichs befindliche Maßeinheit in den korrekten Messbereich zurück.
• Falls die Maßeinheiten sich innerhalb des ordnungsgemäßen Bereichs befinden, schicken Sie das Produkt zur Inspektion zurück.
TECHNISCHE DATEN
Anzeige Bereich Genauigkeit Auflösung pH -2,00 bis 16,00 pH ±0,1%, ±2 lsd 0,01 pH mV -1999 bis 1250 mV ±0,1%, ±1 lsd 1 mV
Temperatur °C -10,0 bis 120 °C ±0,5 °C 0,1 °C
pH-Temperaturkompensation AUTO/MANuell -10,0 bis 120,0 °C pH-Puffererkennung (4.01, 7.00 & 10.01) oder (4.00, 6.86 & 9.18) Temperaturbereich der pH-Pufferkalibrierung
0 bis 60 °C
pH-Elektrodenoffset-Erkennung ±90 mV bei pH 7.00 oder 6.86

8
pH-Elektrodenneigungs-Erkennung
±30% bei pH 4.00, 4.01, 9.18 oder 10.01
Stromquelle Eine 9 Volt-Batterie Sicherung der Kalibrierungsdaten Ja Audio-Feedback Ja, auf allen Tasten Autolock-Funktion Ja Betriebstemperaturbereich 0 bis 50 °C Relative Luftfeuchtigkeit Betriebsbereich
bis zu 95%
ATC-Sonde Thermistor, 10 kΩ / 25 °C Abmessungen (B x T x H) 70 mm x 37 mm x 186 mm (2.8 in x 1.5 in x 7.3
in) Gewicht (mit Batterie) 430 Gramm (1 lb)
LISTE EMPFOHLENER ERSATZTEILE
Artikelnummer
BESCHREIBUNG
100-1 1 Meter langes wasserdichtes Y-Kabel mit kombinierter pH-/Referenzverbindung & ATC-Elektroden.
100-4 4 Meter langes wasserdichtes Y-Kabel mit kombinierter pH-/Referenzverbindung & ATC-Elektrode.
110-1 pH-Elektrode mit 1 Meter langem Kabel.
115-1 mV-Elektrode mit 1 Meter langem Kabel.
130-1 ATC (Temperatur)-Elektrode mit 1 Meter langem Kabel.
160 pH-Simulatorelektrode
180 pH-Tragekoffer, Hartschale
440 Kabelgewichtinstallationssatz
480 Instrument-Tragetasche, weich
Artikel-Nr. 605367 • Zeichnung-Nr. A605367 Revision E • März 2008
Die aktuellste Version dieses Handbuchs finden Sie unter www.ysiecosense.com

1
GARANZIA Il misuratore EcoSense® pH100 è coperto da garanzia per un anno dai difetti di manodopera e di materiali a partire dalla data di acquisto dell'utente finale. Le sonde e i cavi di pH100 sono coperti da garanzia per sei mesi dai difetti di manodopera e di materiali a partire dalla data di acquisto dell'utente finale. Durante il periodo di validità della garanzia, Entro il periodo della garanzia, YSI si assume la responsabilità di riparare o sostituire, a sua discrezione, gratuitamente, qualsiasi prodotto che YSI ritenga coperto da garanzia.
Per esercitare il diritto alla garanzia, scrivere o contattare il rappresentante di zona YSI, oppure il Servizio Assistenza Clienti a Yellow Springs, in Ohio. Inviare il prodotto e la prova d'acquisto, con trasporto a proprio carico, al Centro Assistenza autorizzato scelto da YSI. Una volta effettuata la riparazione o la sostituzione il prodotto verrà rinviato, sempre con trasporto a proprie spese. I prodotti riparati o sostituti sono coperti da garanzia per il rimanente periodo di validità della garanzia originale, o per almeno 90 giorni dalla data di riparazione o sostituzione.
Limitazione della garanzia
Questa garanzia non si applica ai prodotti YSI il cui danno o cattivo funzionamento è dovuto a: (i) installazione, messa in funzione o utilizzo del prodotto non conformi alle istruzioni scritte di YSI; (ii) abuso o uso improprio del prodotto; (iii) mancato rispetto delle istruzioni scritte di YSI o delle procedure standard dell'industria; (iv) eventuali riparazioni improprie del prodotto; (v) utilizzo da parte dell'utente di parti o componenti impropri o difettosi in fase di manutenzione o riparazione del prodotto; o (vi) eventuali modifiche del prodotto in modalità non espressamente autorizzate da YSI.
QUESTA GARANZIA SOSTITUISCE TUTTE LE ALTRE, ESPLICITE O IMPLICITE, COMPRESE QUELLE DI COMMERCIABILITÀ O IDONEITÀ AD UNO SCOPO PARTICOLARE. LA RESPONSABILITÀ DI YSI SECONDO QUESTA GARANZIA SI LIMITA ESCLUSIVAMENTE ALLA RIPARAZIONE O ALLA SOSTITUZIONE DEL PRODOTTO CHE COSTITUIRÀ L'UNICA ED ESCLUSIVA FORMA DI RIMBORSO PER EVENTUALI DIFETTI COPERTI DA QUESTA GARANZIA. IN NESSUN CASO YSI SARÀ RESPONSABILE DI EVENTUALI DANNI SPECIALI, INDIRETTI, INCIDENTALI O CONSEQUENZIALI DERIVANTI DA EVENTUALI DIFETTI DEL PRODOTTO COPERTO DA QUESTA GARANZIA.
REFERENTE YSI Inc. • 1725 Brannum Lane • Yellow Springs, Ohio, 45387 800-897-4151 • 937-767-7241 • Fax: 937-767-1058 E-mail: [email protected] • sito Web: www.ysiecosense.com

2
INDICE
GARANZIA ...................................................................................................... 1 REFERENTE................................................................................................... 1 INTRODUZIONE GENERALE ........................................................................ 3 ISPEZIONE INIZIALE...................................................................................... 3 TENUTA STAGNA .......................................................................................... 3 INSTALLAZIONE DELLA BATTERIA ............................................................. 4 FUNZIONI CHIAVE DEL MODELLO pH100 .................................................. 4 IL DISPLAY LCD............................................................................................. 4 PROCEDURE DI FUNZIONAMENTO ............................................................ 5
Selezione Set di tamponi ........................................................................... 5 Calibrazione pH.......................................................................................... 5 Utilizzo del simulatore dell'elettrodo modello pH160 ................................. 6 Misurazioni pH ........................................................................................... 6 Misurazioni della temperatura.................................................................... 6 Misurazioni mV........................................................................................... 6
INDIVIDUAZIONE E RISOLUZIONE DEI PROBLEMI ................................... 7 SPECIFICHE................................................................................................... 8 ELENCO DEI PEZZI DI RICAMBIO RACCOMANDATI ................................. 8

3
INTRODUZIONE GENERALE Il modello pH100 è uno dei tre misuratori della linea di prodotti EcoSense di YSI. Il modello pH100 è uno strumento di precisione che misura pH, mV e la temperatura. Un microprocessore incorporato memorizza, calcola e compensa tutti i parametri relativi alle determinazioni del pH comprese le caratteristiche della temperatura dell'elettrodo pH, le deviazioni di pendenza dell'elettrodo e le soluzioni buffer.
Questa unità ha un alloggiamento IP65 a tenuta stagna. I tasti a sfioramento meccanico sono estremamente affidabili grazie alla conferma di azionamento tattile e acustica. Questo misuratore utilizza una batteria da 9V. Quando viene ripristinata l'alimentazione non è richiesta alcuna ricalibrazione.
La parte anteriore del misuratore presenta un ampio display LCD che visualizza simultaneamente pH o mV e la temperatura insieme ai prompt per l'utente e agli indicatori di modalità. L'unità avvisa l'utente attraverso procedure di calibrazione e di misurazione.
Una funzione AUTOLOCK per le misurazioni pH e mV consente all'unità di rilevare automaticamente il punto finale e di "bloccare" il display per indicare il valore del punto finale di una misurazione. È possibile utilizzare pH100 anche in modalità non-AUTOLOCK. La funzione AUTOLOCK e i prompt per l'utente aiutano a eliminare la maggior parte degli errori di determinazione dei valori pH e mV, effettuando misurazioni precise, riproducibili e senza errori.
Il modello pH100 è disponibile con le sonde pH, mV, ORP e ATC (CAT: Compensazione automatica della temperatura). Le altre funzioni includono il riconoscimento offset dell'elettrodo, quello della pendenza dello stesso, il display di rendimento dell'elettrodo, i coefficienti del buffer incorporati, la compensazione automatica o manuale della temperatura, una lunga durata utile della batteria e un filtraggio CA 50/60 Hz. Questo misuratore è universale, di facile utilizzo, per applicazioni su campo, industriali e di laboratorio.
ISPEZIONE INIZIALE Disimballare accuratamente l'unità e gli accessori e valutare la presenza di eventuali danni da trasporto. Controllare se i pezzi ricevuti corrispondono ai materiali elencati nella distinta di spedizione. Informare immediatamente YSI di eventuali parti danneggiate o mancanti. Conservare tutti i materiali di imballaggio fino al corretto funzionamento.
TENUTA STAGNA Sebbene il misuratore pH100 sia montato in un alloggiamento a tenuta stagna, NON utilizzarlo sott'acqua. L'alloggiamento a tenuta stagna impedisce danni permanenti all'unità nel caso cada accidentalmente in soluzioni non corrosive. Seguire immediatamente queste procedure se l'unità viene immersa in qualsiasi tipo di soluzione:
1. Risciacquare accuratamente l'unità con acqua distillata. Dopo il risciacquo e l'asciugatura, ispezionare e pulire i connettori per rimuovere tutte le eventuali sostanze contaminanti che potrebbero danneggiare i collegamenti della sonda.
2. Attendere che l'unità e la sonda siano completamente asciutte prima di riprendere il funzionamento.
3. Se l'unità non funziona correttamente dopo le fasi 1 e 2, rivolgersi a YSI per eventuali riparazioni o per la sostituzione (vedere Garanzia).

INSTALLAZIONE DELLA BATTERIA Un messaggio iniziale di “BAT” sul display indica un tempo residuo di funzionamento a batteria pari a circa un'ora, entro le specifiche. Sostituire la batteria quando sul display appare “BAT”. (Vedere Figura 1.)
Per la sostituzione, rimuovere i due coprivite della batteria, il dispositivo di copertura della batteria e l'o-ring. Sostituire la batteria da 9V. Rimettere il dispositivo di copertura della batteria e l'o-ring (allineare l'o-ring correttamente per garantire un'adeguata chiusura) e stringere i due coprivite della batteria per conservare l'ermeticità.
Figura 1 Installazione della
batteriaFUNZIONI CHIAVE DEL MODELLO pH100 1. : Accende e spegne l'unità. I valori di calibrazione del pH non si cancellano quando l'unità
viene spenta. Una volta riattivata, l'unità presenta lo stesso stato di quando è stata spenta. Quando l'unità non è in uso, spegnerla per prolungare la durata utile della batteria. Per un immagazzinaggio a lungo termine, rimuovere le batterie.
2. MODALITÀ: seleziona la modalità display. Premere MODE per visualizzare in successione pH-AUTOLOCK , mV-AUTOLOCK , pH, e mV. I valori di calibrazione non vengono influenzati dal cambiamento di modalità del display.
3. Tasti STAND e SLOPE: utilizzati per una calibrazione pH a doppio punto dell'unità. Mantenere premuto STAND durante l'accensione per modificare le impostazioni del buffer.
4. Tasti Δ e ∇: premere per inserire i valori della temperatura in modalità (MAN) manuale. Questi tasti sono inattivi in modalità ATC.
5. MEA./EFF.: Premere per disabilitare lo stato AUTOLOCK quando si opera in modalità pH-AUTOLOCK o mV-AUTOLOCK. Mantenere premuto per 5 secondi per visualizzare il rendimento dell'elettrodo.
6. ESC: premere per azzerare l'unità quando appare un segnale di errore; questo azzera tutti i valori di calibrazione conservati nella memoria interna. Per prevenire azzeramenti accidentali durante il normale utilizzo, il tasto non risponde a meno che non venga premuto per 2 secondi. Il tasto risponde solo quando viene visualizzato un messaggio di errore.
Quando viene premuto ESC, tutti gli elementi LCD si illuminano. Dopo circa 2 secondi, l'unità entra in modalità pH-AUTOLOCK. Si visualizza “AUTOLOCK” e “STAND” comincia a lampeggiare indicando la necessità della calibrazione. Premere ESC esclusivamente quando si verificano errori che richiedono la ricalibrazione dell'unità.
IL DISPLAY LCD
STANDSLOPE
ATCMAN
BA
T
AUTO
WAIT HOLD EFF%
pHmV
1
2
3
4
5
6
7
8
9
10C
Figura 2. Display LCD
1. WAIT: si visualizza quando l'unità è in attesa di una lettura stabile o di un rilevamento del punto finale.
2. BAT: indicatore di batteria scarica.
3. ATC/MAN: si visualizza “ATC” se una sonda ATC è collegata.. Altrimenti si visualizza "MAN".
4. STAND/SLOPE: “STAND” o “SLOPE” rimane stabile se il parametro è stato calibrato. Se uno dei due non è stato calibrato, questo lampeggia.
5. AUTO: indicatore della modalità Autolock .
6. HOLD: indica che una lettura è congelata durante la modalità Autolock.
7. EFF%: si visualizza quando l'utente visualizza il rendimento dell'elettrodo. Si raccomanda di sostituire l'elettrodo quando il rendimento è inferiore al 75%.
4

5
8. pH/mV: unità e indicatori di modalità.
9. Il display principale per i valori pH, mV e di rendimento della sonda.
10. °C: display della temperatura.
PROCEDURE DI FUNZIONAMENTO
Selezione Set di tamponi Il pH100 ha memorizzato due differenti sets di tamponi: 7.00, 4.01, 10.01 pH e 6.86, 4.00, 9.18 pH. Il set di tamponi impostato in fabbrica è 7.00, 4.01 e 10.01. Per passare da una modalità all'altra, spegnere lo strumento e posizionare il sensore pH in un tampone 7.00. Successivamente, accendere lo strumento e simultaneamente premere e manterenere premuto il tasto STAND fino a quando lo strumento emette un beeps. Se l'unità non è calibrata e impostata in modalità pH, il display mostrerà il valore "7.00" se è attivo il primo set di tamponi o "6.86" se è attivo il secondo.
Calibrazione pH Il pH100 utilizza una calibrazione del 2-punto. Il primo punto deve essere un buffer 6,86/7,00 e il secondo uno di 4,00/4,01 o 9,18/10,01. È possibile acquistare questi buffer presso il rappresentante di zona YSI.
1. Accendere l'unità. Collegare l'elettrodo pH al connettore BNC e la sonda ATC/Temp al connettore ATC/Temp dell'unità; si visualizza "ATC". Premere MODE fino a quando non si visualizza "pH". Autolock potrebbe essere acceso o spento, come si desidera.
2. Posizionare le sonde pH e ATC/temp nella soluzione del primo buffer (7,00 o 6,86). Consentire la stabilizzazione delle letture della temperatura, poi la stampa e tiene "STAND" per 3 secondi per calibrare. Se AUTOLOCK è off, il primo punto è stato calibrato. Se AUTOLOCK è on, "WAIT" lampeggia fino a quando l'unità non rileva una lettura stabile. Dopo che l'unità ha calibrato il primo punto, "SLOPE" lampeggia.
NOTA: se non è collegata alcuna sonda della temperatura, regolare la lettura della temperatura in base a quella del primo buffer utilizzando i tasti Δ o ∇ (0,0 a 60ºC) PRIMA di premere "STAND".
3. Risciacquare le sonde pH e ATC/temp in acqua distillata, quindi immergerle nella soluzione del secondo buffer (4,01/4,00 o 10,01/9,18). Consentire la stabilizzazione delle letture della temperatura, quindi premere "SLOPE" per calibrare. Se AUTOLOCK è off, il secondo punto è stato calibrato. Se AUTOLOCK è on, "WAIT" lampeggia fino a quando l'unità non rileva una lettura stabile. Una volta che l'unità calibra il secondo punto, l’unità segnala due volte e "STAND" e "SLOPE" si visualizzano stabilmente. NOTA: se la sonda della temperatura non è collegata, regolare la lettura della temperatura in base a quella del primo buffer utilizzando i tasti Δ o ∇ (0,0 a 60ºC) PRIMA di premere "SLOPE".
4. L'unità calcola e compensa per la deviazione della pendenza dell'elettrodo pH corrispondente ai valori dei due buffer della calibrazione. L'unità è adesso calibrata a doppio punto e pronta per le misurazioni. Dopo la calibrazione, tenere premuto MEA. /EFF. per 5 secondi per visualizzare il nuovo rendimento dell'elettrodo.

6
Utilizzo del simulatore dell'elettrodo modello pH160 È possibile utilizzare il Simulatore dell'elettrodo pH160 per confermare la giusta calibrazione del misuratore. Per utilizzare il simulatore:
1. Installare la batteria da 9V in dotazione.
2. Fissare pH160 a pH100. Accendere entrambe le unità. Il pH160 presenta un piccolo interruttore sulla destra dei pulsanti pH.
3. In modalità misurazione pH, premere uno dei pulsanti del simulatore buffer pH sul pH160. Il valore pH corrispondente appare su entrambi gli schermi.
Nota: la calibrazione con il simulatore pH calibra esclusivamente il misuratore - NON il misuratore e la sonda. Per una maggiore precisione, calibrare il misuratore pH e la sonda insieme utilizzando le soluzioni buffer.
Misurazioni pH Per effettuare misurazioni di pH, "STAND" e "SLOPE" devono essere visualizzati in maniera stabile, indicando che l'unità è calibrata a doppio punto e pronta per le misurazioni. Se "STAND" e "SLOPE" lampeggiano, eseguire una calibrazione pH prima di eseguire le misurazioni.
1. Premere MODE per inserire la modalità pH con AUTOLOCK on o off come desiderato. Per campioni intrinsecamente instabili, l'unità non passerà in AUTOLOCK. Disattivare AUTOLOCK in questo caso.
2. Risciacquare l'elettrodo pH e/o la sonda ATC/temp con acqua distillata e immergere nel campione da misurare. Rimuovere eventuali bolle d'aria intrappolate intorno alla sonda agitando o muovendo la sonda. Consentire la stabilizzazione del pH e/o della temperatura. Se non è collegata alcuna sonda ATC/temp, si visualizza "MAN", ad indicare la compensazione della temperatura manuale. Impostare l'unità per visualizzare la temperatura del campione premendo i tasti Δ e ∇ (-10,0 a 120°C). Se è collegata una sonda ATC/temp, si visualizza "ATC", insieme alla temperatura del campione.
3. Se AUTOLOCK è off, il valore pH del campione si visualizza sullo schermo. Se entrambe le letture del pH e della temperatura sono stabili, effettuare una lettura. Se AUTOLOCK è on, premere MEA./EFF. "WAIT" lampeggia fino a quando l'unità determina una lettura pH stabile.
Misurazioni della temperatura Il modello pH100 può misurare la temperatura indipendentemente con la sonda ATC/Temp senza utilizzare l'elettrodo pH. Posizionare la sonda ATC/Temp nel fluido da misurare. Si visualizza la temperatura misurata.
Misurazioni mV 1. Collegare l'elettrodo mV di combinazione opzionale all'unità. Premere MODE per inserire la
modalità mV con AUTOLOCK on o off come desiderato. Per campioni intrinsecamente instabili, l'unità non passerà in AUTOLOCK. Utilizzare la modalità mV con AUTOLOCK off in questo caso.
2. Risciacquare l'elettrodo con acqua distillata e immergerlo nel campione da misurare. Se AUTOLOCK è off, il valore mV del campione viene visualizzato sullo schermo. Se AUTOLOCK è on, premere MEA./EFF. "WAIT" lampeggia fino a quando l'unità determina una lettura mV stabile.

7
INDIVIDUAZIONE E RISOLUZIONE DEI PROBLEMI
DISPLAY PRINCIPALE POSSIBILE CAUSA AZIONE CORRETTIVA
Er 1 • L'offset dell'elettrodo pH è maggiore/inferiore rispetto a +/- 1,5 pH
• STAND era stato premuto prima dell'elettrodo e la sonda ATC/Temp regolata all’interno dello ±1,5 pH del valore del buffer.
• l'elettrodo pH è difettoso
• Sostituire il buffer e/o l'elettrodo del pH. Premere ESC.
• Consentire un tempo sufficiente di stabilizzazione per l'elettrodo e la sonda ATC/Temp.
• Restituire all'assistenza.
Er 2 • La pendenza dell'elettrodo pH devia
oltre il 30% della pendenza ideale. • SLOPE era stato premuto prima
dell'elettrodo e la sonda ATC/Temp regolata all'interno del 30% del valore del buffer.
• Buffer 4,00, 4,01, 9,18 o 10,01 non è corretto.
• Controllare che venga utilizzato il buffer corretto e che la pendenza dell'elettrodo non devii oltre il 30% dalla pendenza teorica.
• Consentire un tempo sufficiente di stabilizzazione per l'elettrodo e la sonda ATC/Temp.
• Sostituire il buffer e/o l'elettrodo del pH. Premere ESC.
• Restituire all'assistenza.
Er 3 • La temperatura è fuori dall'intervallo 0,0 - 60,0 °C.
• Portare la temperatura del buffer nell'intervallo.
• Restituire all'assistenza.
OvEr/Undr • Il pH misurato è fuori dall'intervallo
16,00/-2,00 pH. • L'mV misurato è fuori dall'intervallo
1250/-2000 mV. • La temperatura misurata è fuori
dall'intervallo 10/120 °C.
• Portare l'unità fuori dall'intervallo in quello di misurazione corretto.
• Se le unità sono nell'intervallo giusto, restituire il prodotto all'assistenza.

8
SPECIFICHE
Display Intervallo Precisione Risoluzione pH -2,00 – 16,00 pH ±0,1%, ±2 lsd 0,01 pH mV -1999 – 1250 mV ±0,1%, ±1 lsd 1 mV
Temperatura °C -10,0 - 120 °C ±0,5 °C 0,1 °C
Compensazione Temp pH AUTO/MANuale –10,0 – 120,0 °C Riconoscimento buffer pH (4,01, 7,00 e 10,01) o (4,00, 6,86 e 9,18) Temp. calibrazione buffer pH Intervallo
0 - 60 °C
Riconoscimento offset elettrodo pH
±90mV a pH 7,00 o 6,86
Riconoscimento pendenza elettrodo pH
±30% a pH 4,00, 4,01, 9,18 o 10,01
Potenza Una batteria da 9V Back up di calibrazione Sì Feedback audio Sì, su tutti i tasti a sfioramento Funzione Autolock Sì Intervallo temp. di funzionamento 0 - 50 °C Intervallo di umidità relativa al funzionamento
fino al 95%
Sonda ATC Termistore, 10kΩ / 25 °C Dimensioni (L x P x A) 86 mm x 241 mm x 72 mm (3 in x 9,5 in x 2,8 in) Peso (batterie incluse) 430 grammi (1 lb)
ELENCO DEI PEZZI DI RICAMBIO RACCOMANDATI
N. PEZZO DESCRIZIONE
100-1 Cavo Y da 1 metro resistente all'acqua con combo pH/giunto freddo ed elettrodi ATC.
100-4 Cavo Y da 4 metri resistente all'acqua con combo pH/giunto freddo ed elettrodo ATC.
110-1 Elettrodo pH con cavo da 1 metro.
115-1 Elettrodo mV con cavo da 1 metro.
130-1 Elettrodo ATC (temperatura) con cavo da 1 metro.
160 Elettrodo simulatore pH.
180 Contenitore per il trasporto pH, rigido.
440 Equipaggiamento di peso per cavo/
480 Contenitore per il trasporto del misuratore, morbido.
N. di pezzo 605367 • N. disegno A605367 Revisione E • Marzo 2008
Per la versione più recente di questo manuale, visitare www.ysiecosense.com