operations manual | manual de instrucciones …...operations manual | manual de instrucciones manuel...
TRANSCRIPT
1
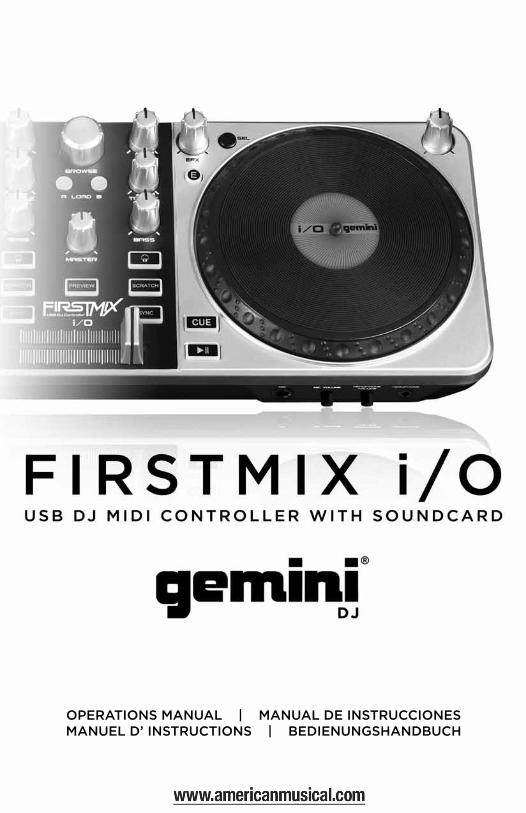
OPERATIONS MANUAL | MANUAL DE INSTRUCCIONESMANUEL D’ INSTRUCTIONS | BEDIENUNGSHANDBUCH

2
PL E ASE RE AD CAREFULLY BEFORE PROCEEDING
Always follow the basic precautions listed below to avoid the possibility of serious injury or even death from electrical shock, short-circuiting, dam-ages, fire or other hazards.
• READ INSTRUCTIONS: - All the safety and operating instructions should be read before the prod-uct is operated.
• RETAIN INSTRUCTIONS: - The safety and operating instructions should be retained for future reference. -All the safety and operating instructions should be read before the product is operated.
• HEED WARNINGS: - All warnings on the product and in the operating instructions should be adhered to.
• FOLLOW INSTRUCTIONS: - All operating and use instructions should be followed.
• CLEANING: - The product should be cleaned only with a polishing cloth or a soft dry cloth. - Never clean with furniture wax, benzine, insecticides or other volatile liq-uids since they may corrode the cabinet.
• WATER AND MOISTURE: - Do not use this product near water, for example, near a bathtub, wash bowl, kitchen sink, or laundry tub; in a wet basement; or near a swimming pool; and the like.
• DO NOT OPEN: - Do not open the device or attempt to disassemble the internal parts or modify them in any way. The device contains no user- serviceable parts. If it should appear to be malfunctioning, discontinue use immediately and have it inspected by qualified GEMINI service personnel.
• REPLACEMENT PARTS: - When replacement parts are required, be sure the service technician has used replacement parts specified by the manufacturer or have the same characteristics as the original part. Unauthorized substitutions may result in fire, electric shock, or other hazards.

3
GETT ING STARTED
Welcome to the FIRSTMIX I/O Computer DJ system - a great way to be-gin DJing with your computer. To get started DJing with the FIRSTMIX I/O, install the included MixVibes’ CrossDJ LE software with the included CD and plug the FIRSTMIX I/O into an available USB port. You can immedi-ately begin mixing, scratching, cutting, reversing, and other slick DJ moves! FIRSTMIX I/O works with MP3s and other audio files on your MAC or PC. The FIRSTMIX I/O makes it easy to get your feet wet and begin DJing!
BEFORE connecting the FIRSTMIX I/O, install the Mixvibes Cross software:
1. Insert the included CD into your CD/DVD drive.2. Open the CD and select the .exe file for PC or the .dmg file for MAC.3. Follow the on-screen instructions.
To start using the FIRSTMIX I/O:
1. Connect the FIRSTMIX I/O’s attached USB cable to an available USB port on your MAC/PC.
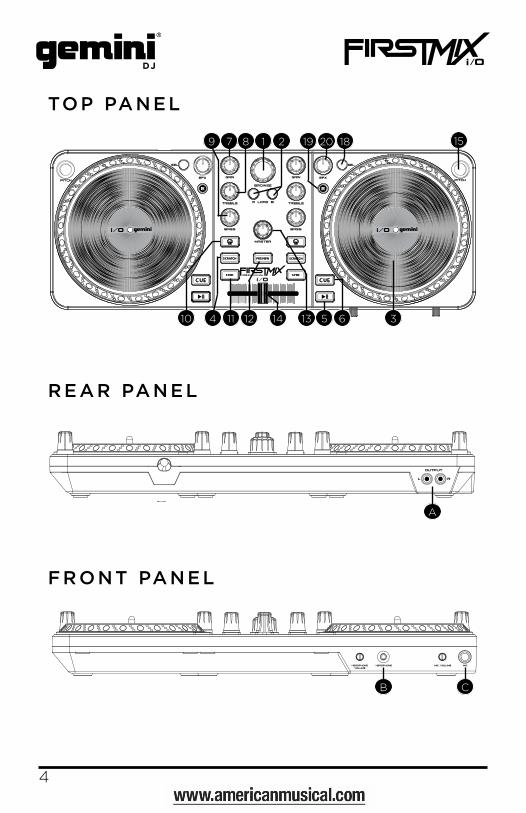
2. Connect an RCA cable from the FIRSTMIX I/O’s RCA Master Output (A) to a set of speakers, receiver, or anything with a RCA Line out-put, such as a mixer.
3. Connect a set of headphones to the Headphone Output (B)4. If you would like to use a microphone, connect your microphone to
the FIRSTMIX I/O’s mic input (C).5. After you have connected the FIRSTMIX I/O, open the CrossDJ LE
software.
4
10 10B C
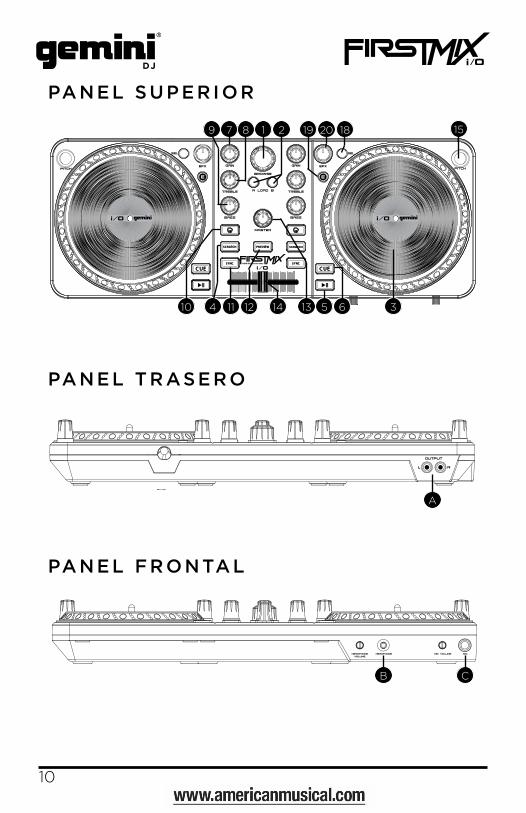
TOP PA N E L
REAR PA NEL
F R ON T PA NEL
10 10 1010101 2 20 151819
10
10
3
A
105 1019
1010
11 1 610
79
1312 1410 104 11
108
5
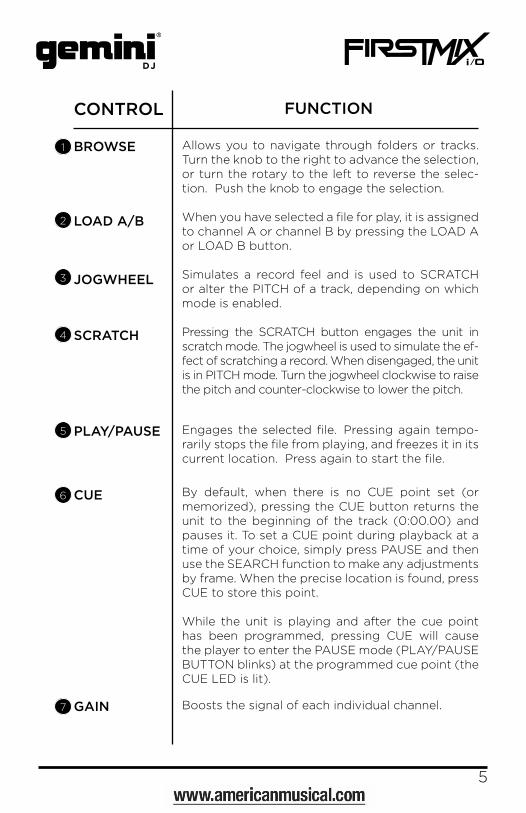
BROWSE
LOAD A/B
JOGWHEEL
SCRATCH
PLAY/PAUSE
CUE
GAIN
CONTROL FUNCTION
Allows you to navigate through folders or tracks. Turn the knob to the right to advance the selection, or turn the rotary to the left to reverse the selec-tion. Push the knob to engage the selection.
When you have selected a file for play, it is assigned to channel A or channel B by pressing the LOAD A or LOAD B button.
Simulates a record feel and is used to SCRATCH or alter the PITCH of a track, depending on which mode is enabled.
Pressing the SCRATCH button engages the unit in scratch mode. The jogwheel is used to simulate the ef-fect of scratching a record. When disengaged, the unit is in PITCH mode. Turn the jogwheel clockwise to raise the pitch and counter-clockwise to lower the pitch.
Engages the selected file. Pressing again tempo-rarily stops the file from playing, and freezes it in its current location. Press again to start the file.
By default, when there is no CUE point set (or memorized), pressing the CUE button returns the unit to the beginning of the track (0:00.00) and pauses it. To set a CUE point during playback at a time of your choice, simply press PAUSE and then use the SEARCH function to make any adjustments by frame. When the precise location is found, press CUE to store this point.
While the unit is playing and after the cue point has been programmed, pressing CUE will cause the player to enter the PAUSE mode (PLAY/PAUSE BUTTON blinks) at the programmed cue point (the CUE LED is lit).
Boosts the signal of each individual channel.
1
2
3
4
5
6
7
6
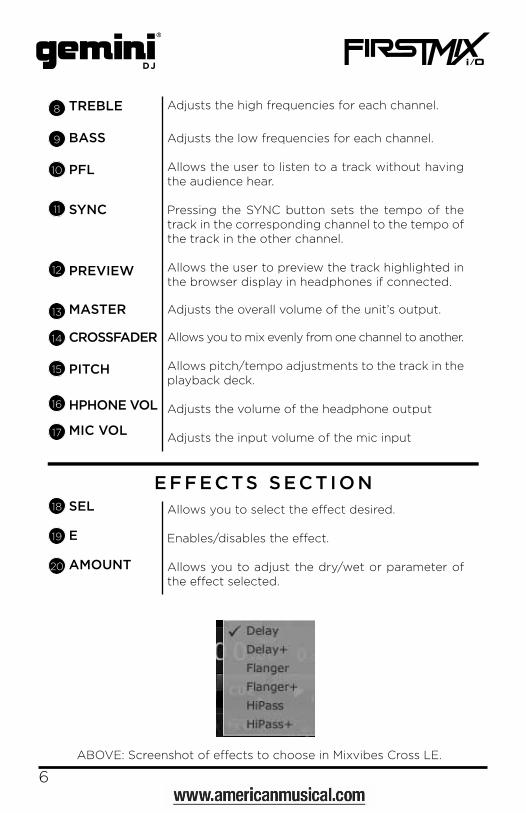
TREBLE
BASS
PFL
SYNC
PREVIEW
MASTER
CROSSFADER
PITCH
HPHONE VOL
MIC VOL
SEL
E
AMOUNT
Adjusts the high frequencies for each channel.
Adjusts the low frequencies for each channel.
Allows the user to listen to a track without having the audience hear.
Pressing the SYNC button sets the tempo of the track in the corresponding channel to the tempo of the track in the other channel.
Allows the user to preview the track highlighted in the browser display in headphones if connected.
Adjusts the overall volume of the unit’s output.
Allows you to mix evenly from one channel to another.
Allows pitch/tempo adjustments to the track in the playback deck.
Adjusts the volume of the headphone output
Adjusts the input volume of the mic input
Allows you to select the effect desired.
Enables/disables the effect.
Allows you to adjust the dry/wet or parameter of the effect selected.
10
11
12
13
14
15
16
17
18
19
20
ABOVE: Screenshot of effects to choose in Mixvibes Cross LE.
E FFECTS SECT ION
9
8
7
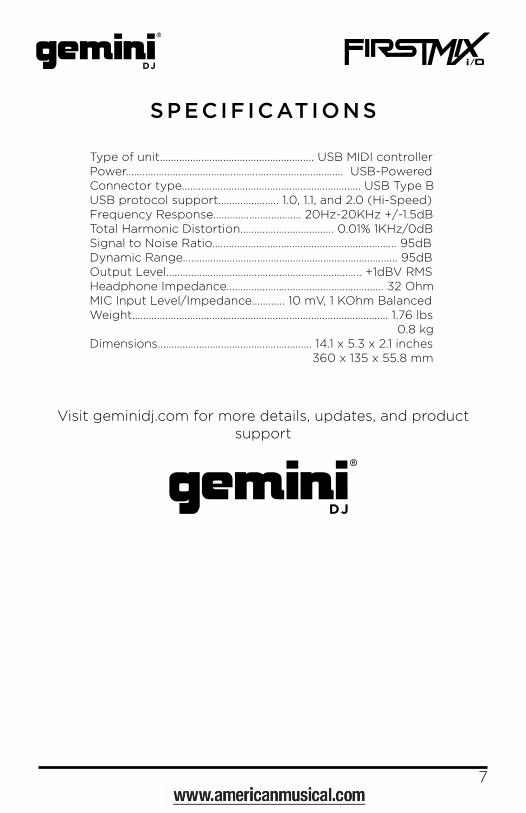
SPECIF IC AT IONS
Type of unit........................................................ USB MIDI controllerPower............................................................................... USB-PoweredConnector type................................................................. USB Type BUSB protocol support...................... 1.0, 1.1, and 2.0 (Hi-Speed)Frequency Response................................ 20Hz-20KHz +/-1.5dBTotal Harmonic Distortion.................................. 0.01% 1KHz/0dBSignal to Noise Ratio................................................................... 95dBDynamic Range.............................................................................. 95dBOutput Level....................................................................... +1dBV RMSHeadphone Impedance......................................................... 32 OhmMIC Input Level/Impedance............ 10 mV, 1 KOhm BalancedWeight............................................................................................. 1.76 lbs 0.8 kgDimensions........................................................ 14.1 x 5.3 x 2.1 inches 360 x 135 x 55.8 mm
Visit geminidj.com for more details, updates, and product support

8
POR FAVOR LEA DETENIDAMENTE ANTES DE PROCEDER
Siguiendo siempre las precauciones básicas indicadas a continuación para evitar la posibilidad de lesiones serias incluso la muerte por descarga eléc-trica, cortocircuito, daños, fuego u otros peligros.
• LEA LAS INSTRUCCIONES:- Todas las instrucciones de seguridad y funcionamiento deben ser leídas antes de hacer funcionar el producto.
.• CONSERVE LAS INSTRUCCIONES:- Las instrucciones de seguridad y funcionamiento se deben conservar para futuras consultas.Todas las instrucciones de seguridad y funcionamiento de-ben ser leídas antes de hacer funcionar el producto.
• PRESTEN ATENCION A LAS ADVERTENCIAS:- Todas las advertencias e instrucciones de funcionamiento del producto deben ser tenidas en cuenta.
• SIGAN LAS INSTRUCCIONES:- Todas las instrucciones de funcionamiento y uso deben ser seguidas.
• LIMPIEZA:- El producto debe ser limpiado solamente con un paño limpio o un paño seco. Nunca limpien con cera para muebles, gasolina, insecticidas u otros líquidos volátiles que puedan corroer el recinto.
• AGUA Y HUMEDAD:- No use este producto cerca del agua, por ejemplo, cerca de la bañera, lavamanos, fregadero o la lavadora; en un sótano húmedo, o cerca de una piscina; o parecidos.
• NO LO ABRA:- No abrá el aparato o intente desmontar las partes internas o modificarlas de alguna manera. El aparato no contiene partes inservibles. Caso de que pareciera que no funcionara, deje de usarlo inmediatamente y haga que sea revisado por un técnico cualificado de GEMINI.
• PIEZAS DE RECAMBIO:- Cuando son necesarias piezas de recambio, tengan por seguro que el ser-vicio técnico ha usado piezas de recambio específicas de la marca o de las mismas características como las originales. Recambios no autorizados pu-eden ocasionar incendios, descargas eléctricas u otros peligros.

9
COMEN Z AN DO
El sistema DJ para ordenador FIRSTMIX I/O, es una gran manera de em-pezar a pinchar como DJ con tu ordenador. Para empezar a pinchar con el FIRSTMIX I/O, instalar el software Mixvibes CrossDJ LE con el CD incluido y conectar el FIRSTMIX I/O en un puerto USB disponible. Puedes empezar inmediatamente a mezclar, hacer scratch, cortar, dar marcha atrás y otros movimientos de DJ! FIRSTMIX I/O funciona con MP3 y otros archivos de audio en tu MAC o PC. El FIRSTMIX I/O hace que sea más fácil lanzarse y empezar a pinchar!
ANTES de conectar el FIRSTMIX I/O, instalar el software Mixvibes Cross:
1. Insertar el CD incluido en tu unidad de CD/DVD.2. Abrir el contenido del CD y seleccionar el archivo .exe para PC o el
archivo .dmg para MAC.3. Sequir las instrucciones que aparecen en la pantalla.
Para empezar a usar el FIRSTMIX I/O:
1. Conectar el cable USB del FIRSTMIX I/O a un Puerto USB dis-ponible de su MAC/PC.
2. Conectar un cable RCA desde la Salida RCA Master (A) del FIRST-MIX I/O a unos altavoces, receptor, o cualquier otro dispositivo con una entrada RCA de línea.
3. Conectar los auriculares en la toma de Auriculares (B)4. Si quiere utilizar un micrófono, conecte su micrófono a la toma de
micro (C) del FIRSTMIX I/O.5. Después de que haya conectado el FIRSTMIX I/O, abra el software
CrossDJ LE.
10
10 10B C
PANE L SUPERIOR
PANE L TRASERO
PANE L F RONTAL
10 10 1010101 2 20 151819
10
10
3
A
105 1019
1010
11 1 610
79
1312 1410 104 11
108
11
NAVEGAR
CARGAR A/B
JOGWHEEL
SCRATCH
PLAY/PAUSA
CUE
GAIN
CONTROL FUNCION
Permite navegar a través de carpetas o pistas. Mover el botón hacia la derecha para avanzar la selección. Pulsar el botón para realizar la selección.
Cuando hayas seleccionado un archivo para repro-ducir, se asigna al canal A o canal B pulsando el botón LOAD A o LOAD B.
Simula la sensación del vinilo y se usa para SCRATCH o para alterar el PITCH de la pista, de-pendiendo en que modo se habilita.
Pulsando el botón de SCRATCH habilita la unidad en modo scratch. El jogwheel se usa para simular el efec-to de hacer scratch con un vinilo. Cuando quitamos la opción de scratch, la unidad está en modo PITCH. Mover el jogwheel hacia la derecha para aumentar el pitch y hacia la izquierda para disminuir el pitch.
Pulsar en el archivo seleccionado. Pulsando de nuevo detiene temporalmente la reproducción del archivo y queda retenido en el punto actual. Pulsar otra vez para continuar la reproducción.
Por defecto, cuando no hay un punto CUE marcado (o memorizado), pulsando el botón CUE devuelve la unidad al inicio de la pista (0:00:00) y se detiene. Para marcar un punto CUE durante la reproducción en el momento que quieras, simplemente pulsar PAUSE y luego usar la función BUSQUEDA para hacer cualquier ajuste por frame. Cuando se encuentra la localización precisa, pulsar CUE para almacenar este punto.
Mientras la unidad está reproduciendo y después que el punto cue ha sido programado, pulsando CUE provocará que el reproductor entre en modo PAUSA (los botones PLAY/PAUSE parpadean) en el punto cue programado (la luz LED de CUE se enciende).
Aumenta la señal de cada canal individual.
1
2
3
4
5
6
7

12
TREBLE
BASS
PFL
SYNC
PREVIEW
MASTER
CROSSFADER
PITCH
HPHONE VOL
MIC VOL
SEL
E
AMOUNT
Ajusta las frecuencias altas para cada canal.
Ajusta las frecuencias bajas para cada canal.
Permite al usuario escuchar una pista sin que la au-diencia lo oiga.
Pulsando el botón SYNC ajusta el tempo de la pista en el correspondiente canal con el tempo de la pista del otro canal.
Permite al usuario una vista previa de la pista resaltada en la pantalla del navegador y en los auriculares si se conecta.
Ajusta el volumen total de la salida de la unidad.
Permite mezclar de manera gradual de un canal al otro.
Permite ajustar pitch/tempo de cada pista.
Ajusta el nivel de la salida de auriculares.
Ajusta el nivel de la toma de micrófono.
Permite seleccionar el efecto deseado.
Activa/desactiva el efecto.
Permite ajustar el dry/wet o el parámetro del efec-to deseado.
10
11
12
13
14
15
16
17
18
19
20
ABOVE: Captura de pantalla de los efectos a elegir en el Mixvibes Cross LE.
E FFECTS SECT ION
9
8
13
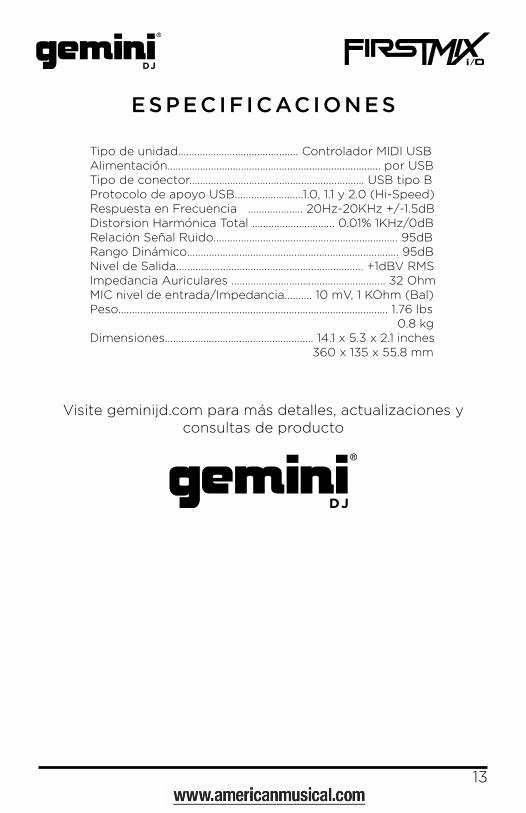
ESPEC IF IC ACIONES
Tipo de unidad…………………....................... Controlador MIDI USBAlimentación……………….......………………................................... por USBTipo de conector…………………..…..............................…….. USB tipo BProtocolo de apoyo USB.....................….1.0, 1.1 y 2.0 (Hi-Speed)Respuesta en Frecuencia .................... 20Hz-20KHz +/-1.5dBDistorsion Harmónica Total .............................. 0.01% 1KHz/0dBRelación Señal Ruido................................................................... 95dBRango Dinámico............................................................................. 95dBNivel de Salida.................................................................... +1dBV RMSImpedancia Auriculares ........................................................ 32 OhmMIC nivel de entrada/Impedancia.......... 10 mV, 1 KOhm (Bal)Peso.................................................................................................. 1.76 lbs 0.8 kgDimensiones...................................................... 14.1 x 5.3 x 2.1 inches 360 x 135 x 55.8 mm
Visite geminijd.com para más detalles, actualizaciones y consultas de producto

14
LIRE LES INSTRUCTIONS AVANT TOUTE UTILISATION
Veuillez prendre connaissance des instructions suivantes afin de prévenir tout accident et/ou mauvaise utilisation du produit. Le non respect de ces principes de base peut entraîner différents risques: blessure, choc élec-trique , court-circuit, dommage & risque d’incendie.
• LIRE LES INSTRUCTIONS: - Toutes les notifications techniques et de sécurité doivent être lues avant utilisation du produit.
• CONSERVATION DU MANUEL D’INSTRUCTIONS: - Le manuel d’instructions doit être conservé à l’abri pour un usage futur. Veuillez vous y reporter en cas de nécessité et avant toute utilisation du produit.
• MISES EN GARDE: - Vous devez prendre connaissance de toutes les mises en garde et y ad-hérer avant toute utilisation du produit.
• SUIVI & RESPECT DES INSTRUCTIONS: - Toutes les instructions de fonctionnement & d’utilisation doivent être respectées.
• ENTRETIEN/NETTOYAGE: - Cet appareil ne doit être nettoyé qu’avec un chiffon légèrement humide ou tissu de polissage. Ne jamais utiliser de produit de nettoyage pour meuble, benzine, insecticide ou tout autre produit volatile qui pourrait entraîner une corrosion du contrôleur.
• EAU & HUMIDITE: - Ne pas utiliser cet appareil à proximité d’un robinet, d’un évier, d’une douche, d’une baignoire, d’une piscine. Ne pas installer le contrôleur sur un sol humide.
• NE PAS OUVRIR: - Ne pas démonter l’appareil afin d’accéder aux composants internes en vue d’une éventuelle réparation/modification. Cet appareil ne contient pas de pièces/composants qui puissent être réparés par l’utilisateur. En cas de panne/dysfonctionnement, veuillez contacter votre revendeur ou le service technique de GEMINI au 01 69 79 97 79 (FRANCE).
• REMPLACEMENT DE PIECES DETACHEES: En cas d’intervention technique, veillez à ce que le technicien n’utilise que des pièces d’origine ou recommandées par le constructeur. L’utilisation de composants non spécifiés par le constructeur pourrait entrainer un mauvais fonctionnement, ainsi que divers risques (Incendies, choc élec-trique, court-circuit...) & l’annulation de la garantie.
15
DEMARRAGE
Bienvenue dans le contrôleur pour FIRSTMIX I/O DJ - une excellente fa-çon de commencer le DJing avec votre ordinateur. Pour commencer avec FIRSTMIX I/O, installez le logiciel CrossDJ LE de Mixvibes en utilisant le CD fourni et branchez le contrôleur FIRSTMIX I/O sur un port USB disponible. Vous pouvez immédiatement commencer à mixer, scratcher, effectuer des cuts, lire en mode reverse et réaliser tout autre effet DJ! FIRSTMIX I/O est compatible avec les fichiers MP3 et divers autres formats de fichier audio sur votre Mac ou PC. Le FIRSTMIX I/O offre bien plus qu’une simple initia-tion au DJing!
AVANT de connecter le FIRSTMIX I/O, installez le logiciel CROSS de Mixvibes:
1. Insérez le CD dans votre lecteur CD/DVD.2. Ouvrez le CD et sélectionnez le fichier .exe pour PC ou le fichier
.dmg pour MAC.3. Suivez les instructions à l’écran.
Pour commencer à utiliser le FIRSTMIX I/O:
1. Connecter le FIRSTMIX I/O à un port USB disponible de votre ordi-nateur (MAC/PC).
2. Connecter un cordon RCA à la sortie Master Output (A) du FIRST-MIX I/O & relier l’autre extrémité à une paire d’enceintes amplifiées ou à une entrée de niveau ligne sur votre amplificateur ou console de mixage.
3. Connecter un casque pour la pré-écoute à la Sortie Casque (B).4. Si vous souhaitez utiliser un microphone, brancher ce dernier sur
l’entrée Mic Input (C) du FIRSTMIX I/O.5. Après avoir effectuer l’ensemble des branchements, démarrer le
logiciel CrossDJ LE.

16
10 10B C
FACE SUPERIEURE
FACE A RRIERE
FACE AVA NT
10 10 1010101 2 20 151819
10
10
3
A
105 1019
1010
11 1 610
79
1312 1410 104 11
108
17
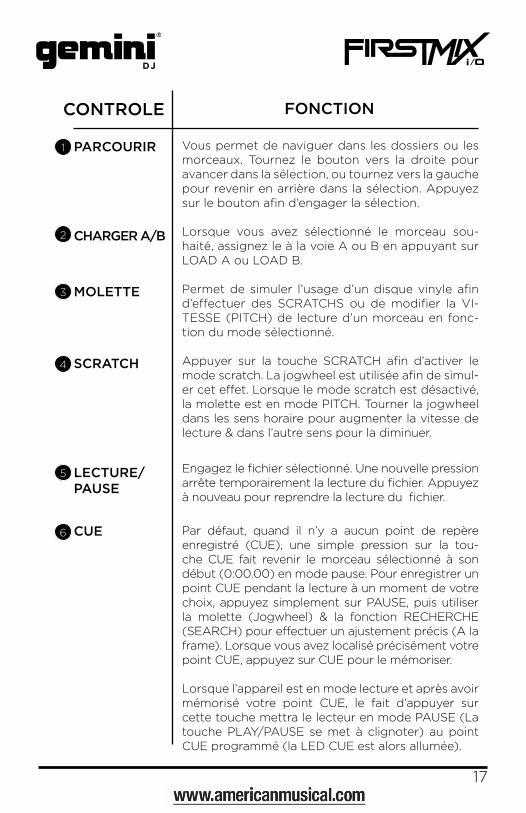
PARCOURIR
CHARGER A/B
MOLETTE
SCRATCH
LECTURE/PAUSE
CUE
CONTROLE FONCTION
Vous permet de naviguer dans les dossiers ou les morceaux. Tournez le bouton vers la droite pour avancer dans la sélection, ou tournez vers la gauche pour revenir en arrière dans la sélection. Appuyez sur le bouton afin d’engager la sélection.
Lorsque vous avez sélectionné le morceau sou-haité, assignez le à la voie A ou B en appuyant sur LOAD A ou LOAD B.
Permet de simuler l’usage d’un disque vinyle afin d’effectuer des SCRATCHS ou de modifier la VI-TESSE (PITCH) de lecture d’un morceau en fonc-tion du mode sélectionné.
Appuyer sur la touche SCRATCH afin d’activer le mode scratch. La jogwheel est utilisée afin de simul-er cet effet. Lorsque le mode scratch est désactivé, la molette est en mode PITCH. Tourner la jogwheel dans les sens horaire pour augmenter la vitesse de lecture & dans l’autre sens pour la diminuer.
Engagez le fichier sélectionné. Une nouvelle pression arrête temporairement la lecture du fichier. Appuyez à nouveau pour reprendre la lecture du fichier.
Par défaut, quand il n’y a aucun point de repère enregistré (CUE), une simple pression sur la tou-che CUE fait revenir le morceau sélectionné à son début (0:00.00) en mode pause. Pour enregistrer un point CUE pendant la lecture à un moment de votre choix, appuyez simplement sur PAUSE, puis utiliser la molette (Jogwheel) & la fonction RECHERCHE (SEARCH) pour effectuer un ajustement précis (A la frame). Lorsque vous avez localisé précisément votre point CUE, appuyez sur CUE pour le mémoriser.
Lorsque l’appareil est en mode lecture et après avoir mémorisé votre point CUE, le fait d’appuyer sur cette touche mettra le lecteur en mode PAUSE (La touche PLAY/PAUSE se met à clignoter) au point CUE programmé (la LED CUE est alors allumée).
1
2
3
4
5
6
18
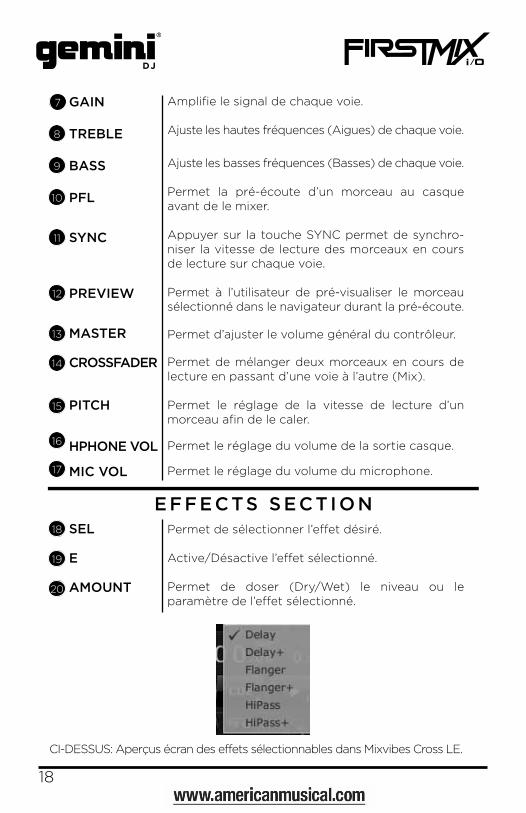
GAIN
TREBLE
BASS
PFL
SYNC
PREVIEW
MASTER
CROSSFADER
PITCH
HPHONE VOL
MIC VOL
SEL
E
AMOUNT
Amplifie le signal de chaque voie.
Ajuste les hautes fréquences (Aigues) de chaque voie.
Ajuste les basses fréquences (Basses) de chaque voie.
Permet la pré-écoute d’un morceau au casque avant de le mixer.
Appuyer sur la touche SYNC permet de synchro-niser la vitesse de lecture des morceaux en cours de lecture sur chaque voie.
Permet à l’utilisateur de pré-visualiser le morceau sélectionné dans le navigateur durant la pré-écoute.
Permet d’ajuster le volume général du contrôleur.
Permet de mélanger deux morceaux en cours de lecture en passant d’une voie à l’autre (Mix).
Permet le réglage de la vitesse de lecture d’un morceau afin de le caler.
Permet le réglage du volume de la sortie casque.
Permet le réglage du volume du microphone.
Permet de sélectionner l’effet désiré.
Active/Désactive l’effet sélectionné.
Permet de doser (Dry/Wet) le niveau ou le paramètre de l’effet sélectionné.
10
11
12
13
14
15
16
17
18
19
20
CI-DESSUS: Aperçus écran des effets sélectionnables dans Mixvibes Cross LE.
E FFECTS SECT ION
9
8
7
19
CA RACTÉRIST IQUE TECHNIQUES
Type d’appareil.............................................. Contrôleur MIDI USB Alimentation.....................................................................via port USBType de connecteur........................................................ USB Type BCompatibilité protocole USB.................1.0, 1.1 & 2.0 (Hi-Speed)
Bande Passante........................................... 20Hz-20KHz +/-1.5dBDistorsion Harmonique Totale.......................... 0.01% 1KHz/0dBRapport Signal/Bruit................................................................... 95dBPlage Dynamique.......................................................................... 95dBNiveau de Sortie................................................................ +1dBV RMSImpédance Casque............................................................... 32 OhmsMIC niveau de Entree/Impédance............ 10 mV, 1 KOhm Bal.Poids................................................................................................ 1.76 lbs 0.8 kgDimensions........................................................ 14.1 x 5.3 x 2.1 inches 360 x 135 x 55.8 mm
Visitez le site www.geminidj.com pour plus de détails, mises à jour et sup-port produit.

20
BITTE UNBEDINGT VOR INBETRIEBNAHME LESEN
Folgen Sie stets den nachfolgenden Vorsichtsmaßnahmen, um die Möglichkeit von schweren Verletzungen oder gar eines tödlichen elek-trischen Schlages sowie Kurzschluss, Beschädigung, Feuer oder anderer Gefahren zu verhindern.
• ANWEISUNGEN LESEN: - Lesen Sie alle Sicherheits- und Bedienungsanweisungen, bevor Sie mit dem Produkt arbeiten.
• AUFBEWAHRUNGSHINWEIS: - Bewahren Sie alle Sicherheits- und Bedienungs an weis ungen gut auf.
• WARNHINWEISE: - Alle Warnhinweise für das Produkt und die Bedienungsan weis ungen müssen genau eingehalten werden.
• ANWEISUNGEN BEFOLGEN: - Alle Anweisungen zum Betrieb des Produkts sollten be folgt werden.
• REINIGUNG: - Das Produkt sollte nur mit einem Polier- oder einem weichen trockenen Tuch gereinigt werden. Benutzen Sie dazu niemals Möbelwachs, Benzine, In sekten mittel oder andere flüchtige Reinigungsmittel, denn Sie könnten zur Korrosion des Gehäuses führen.
• WASSER & FEUCHTIGKEIT: - Benutzen Sie dieses Produkt nicht in der Nähe von Was ser, z. B. in der Nähe einer Badewanne, einer Waschschüssel, eines Küchenspül-beckens, eines Waschbeckens, in einem feuchten Keller, in der Nähe eines Schwimmbeckens oder an ähnlichen Orten.
• NICHT ÖFFNEN: - Öffnen Sie niemals das Produkt und versuchen Sie nicht, interne Bau-gruppen zu entnehmen oder zu modifizieren. Das Produkt enthält keine vom Nutzer zu wechselnde Ersatzteile. Sollten Sie eine Fehlfunktion fest-stellen stellen Sie unverzüglich den Betrieb des Produktes ein und lassen Sie es von qualifiziertem GEMINI Servicepersonal prüfen.
• ERSATZTEILE: - Wenn Ihr Produkt Ersatzteile benötigt, achten Sie darauf, dass der Service-techniker nur vom Hersteller erlaubte Ersatzteile oder Ersatzteile, die gleichen Eigenschaften wie die originalen Teile aufweisen, einsetzt. Falsche Ersatzteile können zu Bränden, elektrischen Schlägen oder anderen Risiken führen.
21
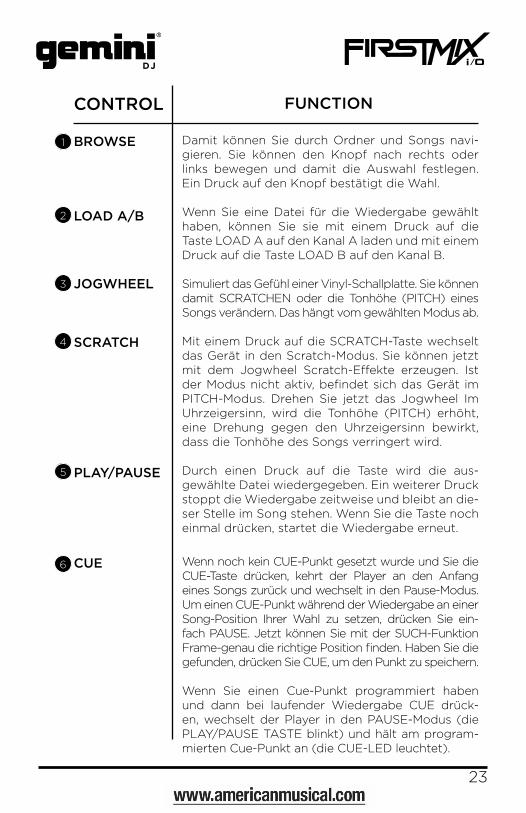
E INST IEG
Schön, dass Sie sich für das FIRSTMIX I/O Computer-DJ-System entschie-den habe. Es ist eine großartige Möglichkeit, um mit dem DJing am Com-puter zu beginnen. Um mit dem DJing mit FIRSTMIX I/O starten zu können, installieren Sie zuerst die mitgelieferte “MixVibes’ CrossDJ LE”-Software von der CD und schließen das FIRSTMIX I/O an einen freien USB-Anschluss an Ihrem Computer an. Sie können sofort mit dem Mixen, Scratchen, Cutten, Rückwärtsabspiele und anderen DJ-Tricks beginnen! FIRSTMIX I/O arbeitet sowohl mit MP3-Dateien als auch anderen Audio-Dateiformaten auf dem PC oder Mac. Dank FIRSTMIX I/O gelingt Ihnen der Einstieg ins DJing ganz leicht!
BEVOR Sie den FIRSTMIX I/O anschließen, installieren Sie die “Mix-Vibes Cross”-Software:
1. Legen Sie die mitgelieferte CD in Ihr CD-/DVD-Laufwerk. 2. Öffnen Sie die CD mit einem Doppelklick und wählen Sie am PC die
.exe-Datei und am Mac die .dmg-Datei.3. Folgen Sie den Anweisungen am Bildschirm.
Vorbereitungen für den ersten Start von FIRSTMIX I/O:
1. Schließen Sie den FIRSTMIX I/O mit dem mitgelieferten USB-Kabel an einen freien USB-Anschluss an Ihrem PC oder MAC an.
2. Mit einem Cinch-Kabel verbinden Sie den Cinch-Master-Ausgang (A) des FIRSTMIX I/O mit einem Gerät (Mixer, Aktiv-Lautsprecher, Verstärker, Rekorder), das über einen Cinch-Line-Eingang verfügt.
3. Schließen Sie einen Kopfhörer an den Kopfhörer-Ausgang (B) an.4. Falls Sie ein Mikrofon verwenden möchten, schließen Sie dieses an
den Mikrofon-Eingang (C) am FIRSTMIX I/O an.5. Nachdem Sie den FIRSTMIX I/O verbunden haben, öffnen Sie die
“CrossDJ LE”-Software.

22
10 10B C
OBE RSE ITE
RÜ C KSE ITE
VOR D E RSE ITE
10 10 1010101 2 20 151819
10
10
3
A
105 1019
1010
11 1 610
79
1312 1410 104 11
108
23
BROWSE
LOAD A/B
JOGWHEEL
SCRATCH
PLAY/PAUSE
CUE
CONTROL FUNCTION
Damit können Sie durch Ordner und Songs navi-gieren. Sie können den Knopf nach rechts oder links bewegen und damit die Auswahl festlegen. Ein Druck auf den Knopf bestätigt die Wahl.
Wenn Sie eine Datei für die Wiedergabe gewählt haben, können Sie sie mit einem Druck auf die Taste LOAD A auf den Kanal A laden und mit einem Druck auf die Taste LOAD B auf den Kanal B.
Simuliert das Gefühl einer Vinyl-Schallplatte. Sie können damit SCRATCHEN oder die Tonhöhe (PITCH) eines Songs verändern. Das hängt vom gewählten Modus ab.
Mit einem Druck auf die SCRATCH-Taste wechselt das Gerät in den Scratch-Modus. Sie können jetzt mit dem Jogwheel Scratch-Effekte erzeugen. Ist der Modus nicht aktiv, befindet sich das Gerät im PITCH-Modus. Drehen Sie jetzt das Jogwheel Im Uhrzeigersinn, wird die Tonhöhe (PITCH) erhöht, eine Drehung gegen den Uhrzeigersinn bewirkt, dass die Tonhöhe des Songs verringert wird.
Durch einen Druck auf die Taste wird die aus-gewählte Datei wiedergegeben. Ein weiterer Druck stoppt die Wiedergabe zeitweise und bleibt an die-ser Stelle im Song stehen. Wenn Sie die Taste noch einmal drücken, startet die Wiedergabe erneut.
Wenn noch kein CUE-Punkt gesetzt wurde und Sie die CUE-Taste drücken, kehrt der Player an den Anfang eines Songs zurück und wechselt in den Pause-Modus. Um einen CUE-Punkt während der Wiedergabe an einer Song-Position Ihrer Wahl zu setzen, drücken Sie ein-fach PAUSE. Jetzt können Sie mit der SUCH-Funktion Frame-genau die richtige Position finden. Haben Sie die gefunden, drücken Sie CUE, um den Punkt zu speichern.
Wenn Sie einen Cue-Punkt programmiert haben und dann bei laufender Wiedergabe CUE drück-en, wechselt der Player in den PAUSE-Modus (die PLAY/PAUSE TASTE blinkt) und hält am program-mierten Cue-Punkt an (die CUE-LED leuchtet).
1
2
3
4
5
6
24
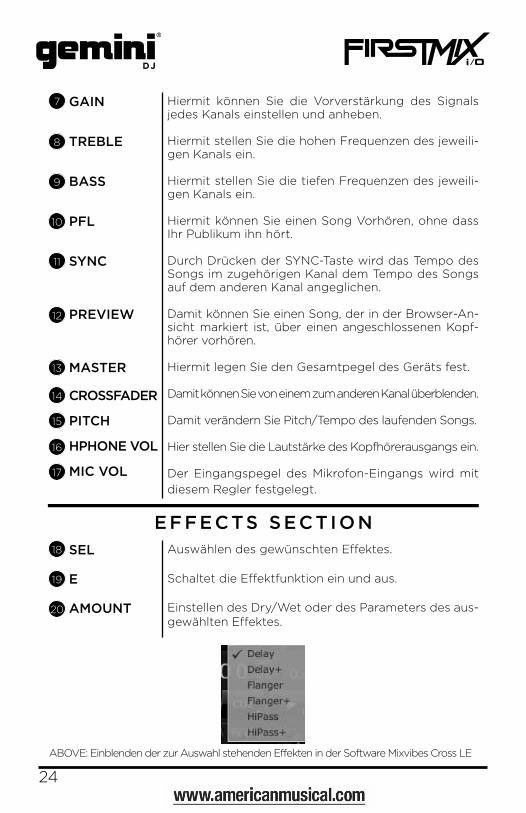
GAIN
TREBLE
BASS
PFL
SYNC
PREVIEW
MASTER
CROSSFADER
PITCH
HPHONE VOL
MIC VOL
SEL
E
AMOUNT
Hiermit können Sie die Vorverstärkung des Signals jedes Kanals einstellen und anheben.
Hiermit stellen Sie die hohen Frequenzen des jeweili-gen Kanals ein.
Hiermit stellen Sie die tiefen Frequenzen des jeweili-gen Kanals ein.
Hiermit können Sie einen Song Vorhören, ohne dass Ihr Publikum ihn hört.
Durch Drücken der SYNC-Taste wird das Tempo des Songs im zugehörigen Kanal dem Tempo des Songs auf dem anderen Kanal angeglichen.
Damit können Sie einen Song, der in der Browser-An-sicht markiert ist, über einen angeschlossenen Kopf-hörer vorhören.
Hiermit legen Sie den Gesamtpegel des Geräts fest.
Damit können Sie von einem zum anderen Kanal überblenden.
Damit verändern Sie Pitch/Tempo des laufenden Songs.
Hier stellen Sie die Lautstärke des Kopfhörerausgangs ein.
Der Eingangspegel des Mikrofon-Eingangs wird mit
diesem Regler festgelegt.
Auswählen des gewünschten Effektes.
Schaltet die Effektfunktion ein und aus.
Einstellen des Dry/Wet oder des Parameters des aus-gewählten Effektes.
10
11
12
13
14
15
16
17
18
19
20
E FFECTS SECT ION
9
8
7
ABOVE: Einblenden der zur Auswahl stehenden Effekten in der Software Mixvibes Cross LE
25
SP EZ IF IKAT IONEN
Geräteart........................................................... USB-MIDI-ControllerStromversorgung............................................ USB-Bus-PoweredAnschluss………...................................................................... USB Typ BUSB-Protokolle………........................... 1.0, 1.1, und 2.0 (Hi-Speed)Frequenzgang....................................... 20 Hz - 20 KHz +/-1,5 dBTotal Harmonic Distortion.............................. 0,01 % 1 KHz/0 dBGeräuschspannungsabstand.................................................. 95 dBDynamikumfang............................................................................ 95 dBAusgangspegel................................................................. +1 dBV RMSKopfhörer-Impedanz.............................................................. 32 OhmMIC Eingangspegel/ Impedanz................... 10 mV, 1 KOhm BalGewicht........................................................................................... 1.76 lbs 0.8 kgAbmessungen................................................... 14.1 x 5.3 x 2.1 inches 360 x 135 x 55.8 mm
Besuchen Sie www.geminidj.com für mehr Informationen, Updates und Produktsupport.

Warranty and Repair :All Gemini products are designed and manufactured to the highest standards in the industry. With proper care and maintenance, your product will provide years of reliable service. LIMITED WARRANTYA. Gemini warrants its products to be free from defects in materials and workmanship for One (1) year from the original purchase date. Excep-tions: Laser assemblies on CD Players, cartridges, and crossfaders are covered for 90 days.
B. This limited warranty does not cover damage or failure caused by abuse, misuse, abnormal use, faulty installation, improper maintenance or any repairs other than those provided by an autho-rized Gemini Service Center.
C. There are no obligations of liability on the part of Gemini for consequential damages arising out of or in connection with the use or performance of the product or other indirect damages with respect to loss of property, revenues, of profit, or costs of removal, installation, or reinstallation. All implied warranties for Gemini, including implied warranties for fitness, are limited in duration to One (1) year from the original date of purchase, unless otherwise mandated by local statutes.
RETURN/REPAIRA. In the U.S.A., please call our helpful Customer Service Representatives at (732)738-9003, and they will be happy to give you a Return Authorization Number (RA#) and the address of an authorized service center closest to you.B. After receiving an RA#, include a copy of the original sales receipt, with defective product and a description of the defect. Send by insured freight to:
Gemini Sound Products Corp, and use the address provided by your cus-tomer service representative. Your RA# must be written on the outside of the package, or processing will be delayed indefinitely!C. Service covered under warranty will be paid for by Gemini and returned to you. For non-warrantied products, Gemini will repair your unit after pay-ment is received. Repair charges do not include return freight. Freight charges will be added to the repair charges.D. On warranty service, you pay for shipping to Gemini, we pay for return shipping within the continental United States. Alaska, Hawaii, Puerto Rico, Canada, Bahamas, and the Virgin Islands will be charged for freight.E. Please allow 2-4 weeks for return of your product. Under normal circum-stances your product will spend no more than 10 working days at Gemini. We are not responsible for shipping times.
Gemini Sound ProductsWorldwide Headquarters280 Raritan Center ParkwayEdison, NJ 08837 USATel: (732) 346-0061Fax: (732) 346-0065
IN THE UNITED KINGDOMIn the event that you need service on your Gemini product under war-ranty, simply write a letter describing the problem, along with your contact information. Make sure to enclose a copy of your receipt for proof of war-ranty information. A return number is not required. You will be responsible for shipping charges to Gemini UK, and Gemini UK will pay to return the unit to you if it is considered under warranty.

Gemini Sound Products Unit 44 Brambles Enterprise Centre Waterlooville P07 7TH, UKTel: 087 087 00880 Fax: 087 087 00990
EN ESPAÑAEn caso de mal funcionamiento de esta unidad, por favor contacte con el Servicio de Atención al Cliente en el teléfono 93 436 37 00 que le asesorará sobre el procedimiento correcto para solucionarlo. En caso de ser necesario enviar la unidad para su reparación, el Servicio de Atención al Cliente le proveerá de un número de incidencia, así como de la dirección del Servicio de Asistencia Técnica más cercano a su residencia.
Gemini S.A. Caspe, 172 - 5º A08013 Barcelona, SpainTel: 34 93 436 37 00 Fax: 34 93 347 69 61-EN FRANCEEn cas de panne, merci de contacter votre revendeur. Tout appareil en panne doit y être retourné, accompagné de
sa facture d’achat, de son emballage d’origine et d’un descriptif de panne. L’appareil sera expédié au SAV de GCI Technologies France. Tout produit reçu sans facture sera réparé hors garantie. L’appareil sera ensuite ré-expédié au revendeur.
Gemini s.a.r.l 2bis, rue Léon Blum91120 Palaiseau, FranceTél: + 33 1 69 79 97 70 Fax: + 33 1 69 79 97 80-IN DEUTSCHLANDDie allgemeinen gesetzlichen Gewährleistungen bleiben von den Herstellergarantien unberührt. Der Garantieanspruch erlischt bei Eingriffen durch den Käufer oder durch Dritte sowie bei unsachgemässer Behandlung. Gewährleistungsansprüche sind auss-chließlich gegenüber Ihrem Fachhändler geltend zu machen.
Gemini GmbHLerchenstraße 1480995 München, GermanyTel: 089 - 319 019 8 - 0Fax: 089 - 319 019 8 - 18
IN THE USA IF YOU EXPERIENCE PROBLEMS WITH THIS UNIT, CALL 1-732-346-0061 FOR GEMINI CUSTOMER SERVICE. DO NOT ATTEPT TO
RETURN THIS EQIPMENT TO YOUR DEALER.
Parts of the design of this product may be protected by worldwide patents. Information in this manual is subject to change without notice and does not represent a commitment on the part of the
vendor. Gemini shall not be liable for any loss or damage whatsoever arising from the use of information or any error contained in this
manual. No part of this manual may be reproduced, stored in a retrevial system or transmitted, in any form or by photocopying and recording, for any purpose without the express written permission of Gemini. It is recommended that all
maintenance and service on this product is performed by Gemini, or its authorized agents. Gemini will not accept liability for loss or damage caused by maintence or
repair performed by unauthorized personnel.

Register your product online at www.geminidj.com to be eligible for great prize giveaways! If you do not have internet access, fill out the form below and mail it to the appropriate address listed at the left side of this page.
First and Last Name
Address (Number and Street) Apartment Number
City and State or Province
Country
Zip Code or Postal Code
Email Address
Telephone Number
Date of Birth
Date of Purchase
Purchase Price (Excluding Tax)
City of Purchase
Model Number (Example: CDT-05) Serial Number (Located on the back of most units)
© Gemini 2011 All Rights Reserved.Gemini® and FIRSTMIX I/O® are registered trademarks of GCI-Technologies.
Worldwide Headquarters • 280 Raritan Center Parkway • Edison, NJ 08837 • USATel: (732)346-0061 • Fax: (732)346-0065
France • Gemini • 2 BIS RUE LEON BLUM - 91120 PA:AISEAU, FranceTél: +33 1 69 79 97 70 • Fax: +33 1 69 79 97 80Germany • Gemini GmbH • Lerchenstrasse 14,
Haus3 - 2. Stock, 80995 München, Munich, GermanyTel: +49 (0) 89 319 019 80 • Fax: +49 (0) 89 319 019 819
UK • Gemini • Unit 44 Brambles Enterprise Centre, Waterbury Drive, Waterlooville Hampshire, PO7 7TH, UK
Tel: 087 087 00880 • Fax: 087 087 00990Spain • Gemini S.A. • Caspe 172, 1° A • 08013 Barcelona, Spain
Tel: 3493-435-0814 • Fax: 3493-347-6961