operator's manual - milwaukee tool | power tools, hand ... · operator's manual to reduce...
TRANSCRIPT
M18™ Cordless greAse gUN
Cat. No.M18 GG
oPerATor's MANUAl
To reduce The risk of injury, user musT read and undersTand operaTor's manual.
2
personal safeTy
general poWer Tool safeTy Warnings
Work area safeTy
elecTrical safeTy
•Keepworkareacleanandwelllit. Cluttered or dark areas invite accidents.•Donotoperatepower tools inexplosiveat-mospheres,suchasinthepresenceofflam-mableliquids,gasesordust. Power tools create sparks which may ignite the dust or fumes.•Keep children and bystanders awaywhileoperatingapowertool. Distractions can cause you to lose control.
•Powertoolplugsmustmatchtheoutlet.Nevermodify theplug inanyway.Donotuseanyadapterplugswithearthed(grounded)powertools.Unmodified plugs and matching outlets will reduce risk of electric shock.•Avoidbodycontactwithearthedorgroundedsurfacessuchaspipes,radiators,rangesandrefrigerators.There is an increased risk of electric shock if your body is earthed or grounded.•Donotexposepowertoolstorainorwetcondi-tions.Water entering a power tool will increase the risk of electric shock.•Donotabusethecord.Neverusethecordforcarrying,pullingorunpluggingthepowertool.Keepcordaway fromheat,oil,sharpedgesormovingparts.Damaged or entangled cords increase the risk of electric shock.•Whenoperatingapowertooloutdoors,useanextensioncordsuitableforoutdooruse.Use of a cord suitable for outdoor use reduces the risk of electric shock.•Ifoperatingapowertool inadamplocationisunavoidable,usearesidualcurrentdevice(RCD)protectedsupply.Use of an RCD reduces the risk of electric shock.
attached to a rotating part of the power tool may result in personal injury. •Donotoverreach.Keepproper footing andbalanceatalltimes. This enables better control of the power tool in unexpected situations.•Dressproperly.Donotwearlooseclothingorjewellery.Keepyourhair,clothingandglovesawayfrommovingparts. Loose clothes, jewel-lery or long hair can be caught in moving parts. •Ifdevicesareprovided for theconnectionofdustextractionandcollectionfacilities,ensuretheseareconnectedandproperlyused.Use of dust collection can reduce dust-related hazards.
Warning read all safeTy Warnings and all insTrucTions. Failuretofollowthewarningsandinstructionsmayresultinelectricshock,fireand/orseriousinjury.save all warnings and instructions for future reference.Theterm"powertool"inthewarningsreferstoyourmains-operated(corded)powertoolorbattery-operated(cordless)powertool.
poWer Tool use and care•Donotforcethepowertool.Usethecorrectpower tool for your application. The correct power tool will do the job better and safer at the rate for which it was designed.•Donotusethepowertooliftheswitchdoesnotturnitonandoff. Any power tool that cannot be controlled with the switch is dangerous and must be repaired.•Disconnect theplug from thepowersourceand/or thebatterypack fromthepower toolbeforemaking any adjustments, changingaccessories, or storing power tools.Such preventive safety measures reduce the risk of starting the power tool accidentally.•Storeidlepowertoolsoutofthereachofchil-drenanddonotallowpersonsunfamiliarwiththepowertoolortheseinstructionstooperatethepowertool.Power tools are dangerous in the hands of untrained users.•Maintainpowertools.Checkformisalignmentorbindingofmovingparts,breakageofpartsandanyother condition thatmayaffect thepowertool’soperation.Ifdamaged,havethepowertoolrepairedbeforeuse.Many accidents are caused by poorly maintained power tools.•Keepcuttingtoolssharpandclean. Properly maintained cutting tools with sharp cutting edges are less likely to bind and are easier to control.•Usethepowertool,accessoriesandtoolbitsetc., in accordancewith these instructions,takingintoaccounttheworkingconditionsandtheworktobeperformed.Use of the power tool for operations different from those intended could result in a hazardous situation.
•Stayalert,watchwhatyouaredoingandusecommonsensewhenoperatingapowertool.Donotuseapowertoolwhileyouaretiredorundertheinfluenceofdrugs,alcoholormedication.A moment of inattention while operating power tools may result in serious personal injury.•Usepersonal protective equipment.Alwaysweareyeprotection. Protective equipment such as dust mask, non-skid safety shoes, hard hat, or hearing protection used for appropriate conditions will reduce personal injuries.•Prevent unintentional starting. Ensure theswitchisintheoff-positionbeforeconnectingtopowersourceand/orbatterypack,pickinguporcarryingthetool.Carrying power tools with your finger on the switch or energising power tools that have the switch on invites accidents.•Removeanyadjustingkeyorwrenchbeforeturningthepowertoolon.A wrench or a key left
•Rechargeonlywiththechargerspecifiedbythemanufacturer.A charger that is suitable for one type of battery pack may create a risk of fire when used with another battery pack.•Usepowertoolsonlywithspecificallydesig-natedbatterypacks.Use of any other battery packs may create a risk of injury and fire.
baTTery Tool use and care
3
•Highpressurecancausesometoolparts orhose assembly to rupture, posing a riskofinjectioninjuryand/oramputation.Inspect tool and hose assembly for damage or wear before each use. Do not use if damaged or worn. •Donotoperatewithoutpropersafetyapparel,including eyeprotection.
funcTional descripTion
•WARNING: Some dust created by power sanding, sawing, grinding, drilling, and other construction activities contains chemicals known to cause cancer, birth defects or other reproductive harm. Some examples of these chemicals are:
• lead from lead-based paint• crystalline silica from bricks and cement and other masonry products, and
• arsenic and chromium from chemically-treated lumber.
Your risk from these exposures varies, depending on how often you do this type of work. To reduce your exposure to these chemicals: work in a well ventilated area, and work with approved safety equipment, such as those dust masks that are specially designed to filter out microscopic particles.
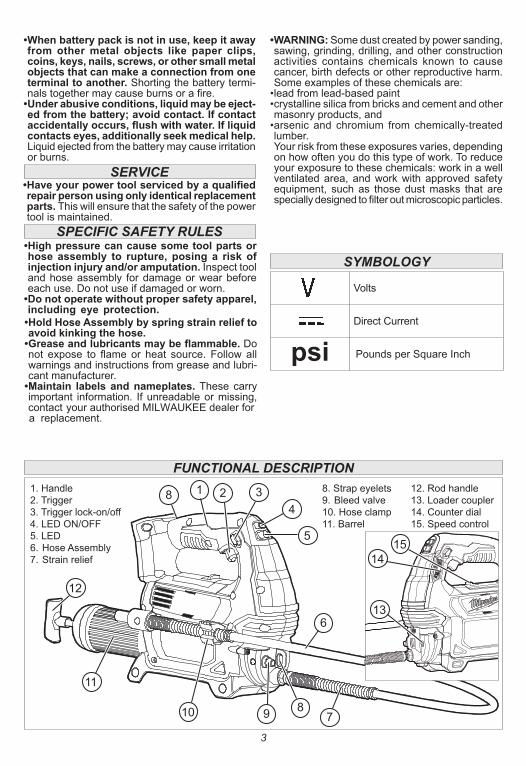
1. Handle2. Trigger3. Trigger lock-on/off4. LED ON/OFF5. LED6. Hose Assembly7. Strain relief
8. Strap eyelets9. Bleed valve10. Hose clamp11. Barrel
1 2
6
5
34
789
8
10
11
12
12. Rod handle13. Loader coupler14. Counter dial15. Speed control
specific safeTy rules
•Whenbatterypackisnotinuse,keepitawayfrom othermetal objects like paper clips,coins,keys,nails,screws,orothersmallmetalobjectsthatcanmakeaconnectionfromoneterminaltoanother.Shorting the battery termi-nals together may cause burns or a fire.•Underabusiveconditions,liquidmaybeeject-edfromthebattery;avoidcontact.Ifcontactaccidentallyoccurs,flushwithwater.Ifliquidcontactseyes,additionallyseekmedicalhelp.Liquid ejected from the battery may cause irritation or burns.
service•Haveyourpowertoolservicedbyaqualifiedrepairpersonusingonlyidenticalreplacementparts.This will ensure that the safety of the power tool is maintained.
1415
13
Volts
Direct Current
psi Pounds per Square Inch
SYMBOLOGY
•HoldHoseAssemblybyspringstrainrelieftoavoidkinkingthehose.•Greaseandlubricantsmaybeflammable.Do not expose to flame or heat source. Follow all warnings and instructions from grease and lubri-cant manufacturer.•Maintain labelsandnameplates. These carry important information. If unreadable or missing, contact your authorised MILWAUKEE dealer for
a replacement.
4
assembly
Inserting/RemovingtheBatteryTo remove the battery, push in the release buttons and pull the battery pack away from the tool.To insert the battery, slide the pack into the body of the tool. Make sure it latches securely into place.
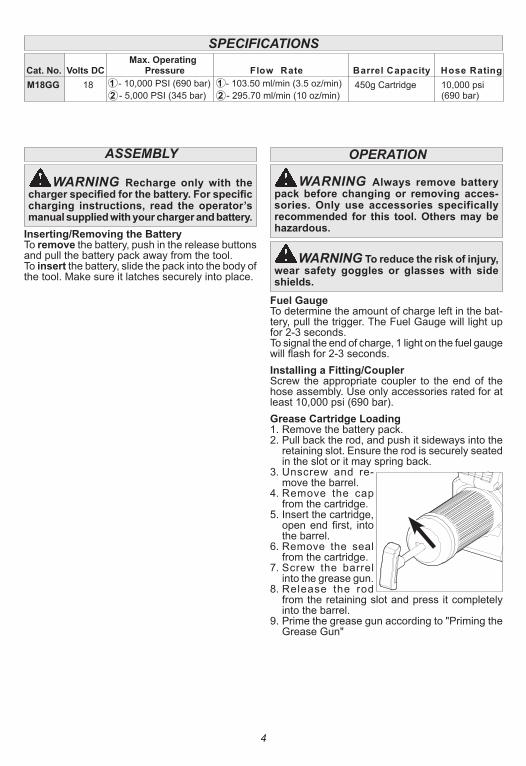
FuelGaugeTo determine the amount of charge left in the bat-tery, pull the trigger. The Fuel Gauge will light up for 2-3 seconds. To signal the end of charge, 1 light on the fuel gauge will flash for 2-3 seconds.InstallingaFitting/CouplerScrew the appropriate coupler to the end of the hose assembly. Use only accessories rated for at least 10,000 psi (690 bar).GreaseCartridgeLoading1. Remove the battery pack.2. Pull back the rod, and push it sideways into the
retaining slot. Ensure the rod is securely seated in the slot or it may spring back.
3. Unscrew and re-move the barrel.
4. Remove the cap from the cartridge.
5. Insert the cartridge, open end first, into the barrel.
6. Remove the seal from the cartridge.
7. Screw the barrel into the grease gun.
8. Release the rod from the retaining slot and press it completely into the barrel.
9. Prime the grease gun according to "Priming the Grease Gun"
operaTion
Warning Toreducetheriskofinjury,wear safety goggles or glasseswith sideshields.
Warning Always remove batterypack before changingor removing acces-sories.Only use accessories specificallyrecommended for this tool.Othersmaybehazardous.
Warning Recharge onlywith thechargerspecifiedforthebattery.Forspecificcharging instructions, read the operator’smanualsuppliedwithyourchargerandbattery.
SPECIFICATIONS
Cat. No. Volts DCMax. Operating
Pressure gnitaR esoH M18GG 18 1 - 10,000 PSI (690 bar)
2 - 5,000 PSI (345 bar)450g Cartridge
(690 bar)1 - 103.50 ml/min (3.5 oz/min)2 - 295.70 ml/min (10 oz/min)
etaR wolF yticapaC lerraB 10,000 psi
5
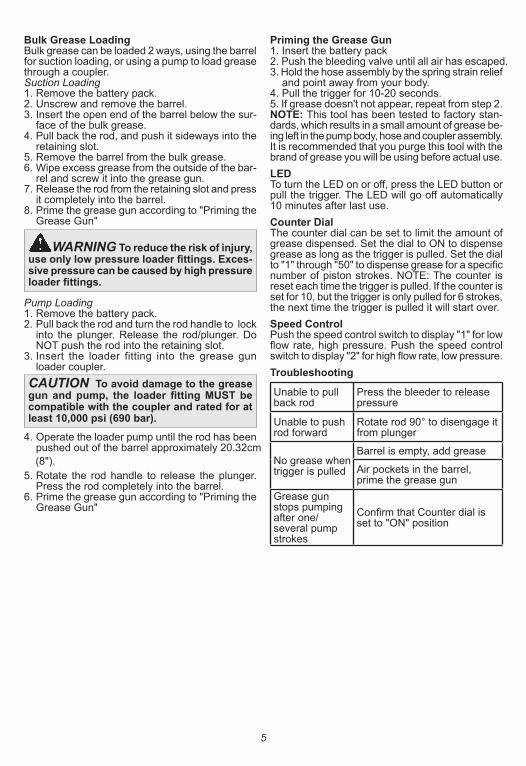
cauTionToavoiddamagetothegreasegunandpump, the loaderfittingMUSTbecompatiblewiththecouplerandratedforatleast10,000psi(690bar).
Pump Loading1. Remove the battery pack.2. Pull back the rod and turn the rod handle to lock
into the plunger. Release the rod/plunger. Do NOT push the rod into the retaining slot.
3. Insert the loader fitting into the grease gun loader coupler.
PrimingtheGreaseGun1. Insert the battery pack2. Push the bleeding valve until all air has escaped.3. Hold the hose assembly by the spring strain relief
and point away from your body.4. Pull the trigger for 10-20 seconds. 5. If grease doesn't not appear, repeat from step 2.NOTE:This tool has been tested to factory stan-dards, which results in a small amount of grease be-ing left in the pump body, hose and coupler assembly. It is recommended that you purge this tool with the brand of grease you will be using before actual use.ledTo turn the LED on or off, press the LED button or pull the trigger. The LED will go off automatically 10 minutes after last use.CounterDialThe counter dial can be set to limit the amount of grease dispensed. Set the dial to ON to dispense grease as long as the trigger is pulled. Set the dial to "1" through "50" to dispense grease for a specific number of piston strokes. NOTE: The counter is reset each time the trigger is pulled. If the counter is set for 10, but the trigger is only pulled for 6 strokes, the next time the trigger is pulled it will start over.SpeedControlPush the speed control switch to display "1" for low flow rate, high pressure. Push the speed control switch to display "2" for high flow rate, low pressure. Troubleshooting
Unable to pull back rod
Press the bleeder to release pressure
Unable to push rod forward
Rotate rod 90° to disengage it from plunger
No grease when trigger is pulled
Barrel is empty, add grease
Air pockets in the barrel, prime the grease gun
Grease gun stops pumping after one/several pump strokes
Confirm that Counter dial is set to "ON" position
BulkGreaseLoadingBulk grease can be loaded 2 ways, using the barrel for suction loading, or using a pump to load grease through a coupler.Suction Loading1. Remove the battery pack.2. Unscrew and remove the barrel. 3. Insert the open end of the barrel below the sur-
face of the bulk grease.4. Pull back the rod, and push it sideways into the
retaining slot.5. Remove the barrel from the bulk grease.6. Wipe excess grease from the outside of the bar-
rel and screw it into the grease gun.7. Release the rod from the retaining slot and press
it completely into the barrel. 8. Prime the grease gun according to "Priming the
Grease Gun"
Warning Toreducetheriskofinjury,useonlylowpressureloaderfittings.Exces-sivepressurecanbecausedbyhighpressureloaderfittings.
4. Operate the loader pump until the rod has been pushed out of the barrel approximately 20.32cm
5. Rotate the rod handle to release the plunger. Press the rod completely into the barrel.
6. Prime the grease gun according to "Priming the Grease Gun"
(8").
6
CleaningClean dust and debris from charger and tool vents. Keep tool handles clean, dry and free of oil or grease. Use only mild soap and a damp cloth to clean the tool, battery pack and charger since certain cleaning agents and solvents are harmful to plastics and other insulated parts. Some of these include gasoline, turpentine, lacquer thinner, paint thinner, chlorinated cleaning solvents, ammonia and house-hold detergents containing ammonia. Never use flammable or combustible solvents around tools.RepairsFor repairs, return the tool, battery pack and char-ger to your MILWAUKEE authorised dealer.
Warning Toreducetheriskofper-sonalinjuryanddamage,neverimmerseyourtool,batterypackorchargerinliquidorallowaliquidtoflowinsidethem.
MaintainingToolKeep your tool, battery pack and charger in good re-pair by adopting a regular maintenance program. After six months to one year, depending on use, return the tool, battery pack and charger to your authorised MILWAUKEE dealer for:• Lubrication• Mechanical inspection and cleaning (gears,
spindles, bearings, housing, etc.)• Electrical inspection (battery pack, charger, motor)• Testing to assure proper mechanical and
electrical operationIf the tool does not start or operate at full power with a fully charged battery pack, clean the contacts on the battery pack. If the tool still does not work properly, return the tool, charger and battery pack, to your authorised MILWAUKEE dealer.
mainTenance
Warning Toreducetheriskofinjury,alwaysunplug thechargerand remove thebatterypackfromthechargerortoolbeforeperforminganymaintenance.Neverdisas-semble the tool, battery pack or charger.Contact amilWaukee service facility forALLrepairs.

7
WARRANTY - AUSTRALIA AND NEW ZEALAND Please refer to AUSTRALIAN and NEW ZEALAND warranty supplied with tool.This warranty applies only to product sold in Australia and New Zealand.
AUSTRALIA and NEW ZEALANDMILWAUKEE Service
MILWAUKEE prides itself in producing a premium quality product that is Nothing But Heavy Duty®.Your satisfaction with our products is very important to us! If you encounter any problems with the operation of this tool, please contact your authorised MILWAUKEE dealer.

Milwaukee Electric Tool Corporation13135 West Lisbon Road, Brookfield, Wisconsin U.S.A. 53005
Milwaukee Electric Tool Corporation (Australia)Techtronic Industries (Australia) Pty. Ltd.
Doncaster, Victoria, Australia, 3108
Milwaukee Electric Tool Corporation (New Zealand)Techtronic Industries (New Zealand) Pty. Ltd.
Auckland, New Zealand, 1060
Designed by Milwaukee Electric Tool Corporation.Professionally made in China for Milwaukee Electric Tool Corporation
961016009-01(A)