opm installation and configuration guide...installation and setup this section describes the basic...
TRANSCRIPT

BlackBerry AtHocOPM Installation and Configuration Guide
Last Published: June 2019
2.9.21

2019-09-10Z
| | 2

Contents
Getting started.................................................................................................. 5
Product requirements and prerequisites........................................................... 6Hardware and firmware requirements..................................................................................................................6Software requirements...........................................................................................................................................6Network Requirements...........................................................................................................................................6
Installation and setup........................................................................................8Installation prerequisites........................................................................................................................................8Install the OPM plug-in files.................................................................................................................................. 8Verify the plug-in installation.................................................................................................................................8Set up the organization account...........................................................................................................................8
Create the organization account............................................................................................................... 8Create a user and bind the user to the account...................................................................................... 9Add the user to the account......................................................................................................................9Configure the OPM plug-in for NDS.......................................................................................................... 9Customize the OPM configuration for each account............................................................................ 10Test the configuration.............................................................................................................................. 10
Upgrade OPM plug-in......................................................................................11
Register the NDS email delivery gateway with BlackBerry AtHoc.....................12
Set up advanced OPM plug-in features...........................................................13Configure failover mode or parallel mode......................................................................................................... 13Set up relay authentication..................................................................................................................................13Enable PKI digital signatures.............................................................................................................................. 14
Add a certificate........................................................................................................................................14Configure a certificate..............................................................................................................................14
Configure email throttling....................................................................................................................................14Configure email templates.................................................................................................................................. 15
Guidelines for editing email templates................................................................................................... 16Parameters and variables........................................................................................................................ 16Text template............................................................................................................................................ 16HTML template......................................................................................................................................... 16Verify and test the template changes.....................................................................................................18
Microsoft exchange servers................................................................................................................................19Email priority.........................................................................................................................................................19
Configuration reference.................................................................................. 21
| | iii

(OpmConfig | pluginConfig).................................................................................................................................21Sender settings (OpmConfig | senderConfig)....................................................................................................25Relay settings (OpmConfig | senderConfig | relayConfigs).............................................................................. 26Receiver setting (OpmConfig | receiverConfig)................................................................................................. 28Account setting (OpmConfig | listAccountConfig | AccountConfig)................................................................ 29Platform setting (platform)................................................................................................................................. 31
Tools for monitoring, troubleshooting, and managing OPM.............................32Tracking the life cycle of delivery tasks.............................................................................................................32BlackBerry AtHoc health monitor....................................................................................................................... 33BlackBerry AtHoc log files...................................................................................................................................33
Turn on verbose mode for log files........................................................................................................ 33Microsoft performance monitor..........................................................................................................................34
BlackBerry AtHoc Customer Support Portal.................................................... 36
Legal notice.................................................................................................... 37
| | iv

Getting startedThe On-Premise Email plug-in works with the Notification Delivery Service (NDS)to provide email servicesfor BlackBerry AtHoc. The NDS is a dedicated server that processes and delivers alert messages fromthe NDS host service plug-ins.
See the BlackBerry AtHoc Notification Delivery Service Installation and Configuration Guide for information onrequirements, installation, and basic configuration of the Notification Delivery Service.
| Getting started | 5

Product requirements and prerequisitesThis section describes hardware, firmware, software, and network requirements for the OPM plug-in.
Hardware and firmware requirementsOPM has the following hardware and firmware requirements (unless otherwise noted):
• A minimum of Dual-Core Dual CPUs (2 Dual-Core CPUs such as Xeon 51xx family, Xeon E53xx family or X53xxfamily) 2 GHz or higher
• One database server core for each of the two application server cores• 512 MB per application server core plus 2 GB for Windows 2008 R2 SP1 or Windows 2012 (for OPM without
attachments)• 512 MB per application server core plus 16 GB for Windows 2008 R2 SP1 or Windows 2012 (for OPM with
attachments)• Recommended: Dual, redundant Intel NICs and power supplies• If using Broadcom NICs, complete the following steps:
1. Ensure that the latest drivers are installed.2. Disable the TCP Chimney feature, as described in the following Microsoft article: http://
support.microsoft.com/kb/951037• Disk space for storage on a RAID 5, RAID 0+1 or RAID 10 configured disk system. The exact allocation of disks
depends on the hardware configuration.
Important: These requirements are for a small-scale installation. For a large-scale installation, contact BlackBerryAtHoc support for assistance.
Software requirementsOPM has the following software requirements (unless otherwise noted):
• Notification Delivery Service (NDS) and its prerequisites. For more information, see the BlackBerryAtHoc Notification Delivery Service Installation and Configuration Guide. To determine which version of NDS toinstall, check with your BlackBerry AtHoc Professional Services representative.
• Windows Server 2012 or 2008 R2, Standard Edition 64-bit, Service Pack 1 or higher.• Microsoft SQL Server Express, Version 2012 or 2008 R2• Internet Information Services (IIS) Standard Edition, Version 7.0• Microsoft .NET Framework, Version 4.6.1• IIS extension ASP.Net 4.0 enabled• An email relay server to send emails• A configured receiver address (MX record) where alert responses can be received
Network Requirements• Firewalls
OPM sends and receives emails using the standard SMTP port (25). This port should be opened on all firewalls(including Windows Firewall) that protect the OPM application servers.
| Product requirements and prerequisites | 6

Note: Simply turning Windows Firewall off might not guarantee the port is opened. Turn on Windows Firewalland create inbound and outbound to allow TCP traffic on port 25.
• Anti virus software
Anti virus software installed on OPM application servers might affect OPM operations if configured incorrectly.You should uninstall anti virus software if its behavior is uncertain.
• Server Clock Synchronization
All application and database server clocks must be synchronized with the network server time.
| Product requirements and prerequisites | 7

Installation and setupThis section describes the basic installation and setup of the OPM plug-in for NDS. Contact your BlackBerryAtHoc implementation engineer to download the installation package.
Installation prerequisites1. Install and set up NDS version 2.9.21 on the computer you plan to install the plug-in on.2. Ensure all performance counters are registered.3. Stop the AtHoc delivery service.4. Set up an email relay server to relay outbound emails sent from OPM. For more information, see Configuration
reference.5. Provision an email domain (such as alerts.mycorp.com) for OPM to use to send and receive emails.6. To support inbound email, set up a DNS/MX record to direct incoming SMTP traffic to this NDS server.
Install the OPM plug-in files1. Copy the AtHoc.Delivery.PlugIn.OPM_build.zip file to the NDS server.2. Right-click the zip file and click Unblock.3. Unzip the package into the NDS plug-in folder: ..\Program Files (x86)\AtHocENS\DeliveryServer
\Plugins.
Verify the plug-in installation1. Go to the following folder and run NdsConsole.exe: ..\AtHocENS\DeliveryServer\Tools\NDSConsole.2. On the Testing screen, verify that the following plug-in is displayed on the Supported Devices list: <email
> AtHoc.Delivery.PlugIn.OPM.
Set up the organization accountAfter you have verified that the OPM plug-in is available in the NDS console, you set up the account for yourorganization. You also associate a user that is an initiator or operator who publishes email alerts.
1. Create the organization account for NDS.2. Create a user for the account.3. Bind the user to the account.
Create the organization account1. In the NDS console, navigate to Management > Account.2. Click New Account.3. Enter a Display Name and set following defaults:
• Status: Select Active• Enable anonymization: Selected
| Installation and setup | 8

Create a user and bind the user to the accountYou can create a new user in the NDS console and then customize the user profile for branding, billing, andtracking purposes.
1. In the NDS console, navigate to Management > User.2. On the User Management screen, click New User.3. On the New User screen, enter a login name.4. Enter and confirm the password associated with the user.
This login name and password will be used to configure the delivery gateway in the BlackBerryAtHoc management system. For example, account Name\login name. For more information, see Register theNDS email delivery gateway with BlackBerry AtHoc.
5. In the Status field, select Active.6. Optionally, add a description.7. Click Save.
Add the user to the accountTo add the user to the organization account, which is known as binding the user to the account, complete thefollowing steps:
1. In the NDS console, click Management > Account.2. Select the account, then right-click on the Login Name of the user that you created in Create a user and bind
the user to the account.
This login name will be used to configure the delivery gateway in the BlackBerry AtHoc management system.For example, account Name\login name. For more information, see Register the NDS email delivery gatewaywith BlackBerry AtHoc.
3. In the bottom-right panel, select API from the drop-down list to add the user with an API role.4. In the Accounts section, select the account, then click the Account Resource tab.5. Select Email.6. Click Save.
Configure the OPM plug-in for NDSIn this section you configure the OPM plug-in for the NDS server.
1. Run the OPM configuration script:
a. On the NDS database server, open SQL Server Management Studio.b. Connect to the ngdelivery database and run the following script: AtHocENS\DeliveryServer\Plug-
ins\AtHoc.Delivery.Plugin.OPM\Installation\OPMConfiguration.sql.2. Customize the nds.plugins.opm plug-in key:
a. In the NDS console, navigate to Management > Configuration.b. Change the following tag values as specified:
• <subDomain>email_domain_name</subDomain>
For example: <subDomain>alerts.athoc.com</subDomain>• (Obsolete) <hostName>nds host name or IP name</hostName>• Go to the first <RelayConfig> tag, under <relayInfoList> and verify the tag value: <isRelayEnabled>true</
isRelayEnabled>c. Click Save.
3. Restart AtHocDeliveryService for the changes to take effect.
| Installation and setup | 9

Customize the OPM configuration for each accountYou can use the default OPM configuration for all accounts or you can add customized configurations for eachaccount, as needed. For example, if you need enable digital signing for one account, you can create a customconfiguration.
1. In the NDS console, navigate to Management > Account.2. Record the Account ID for the account that needs a customized OPM account configuration. You will need this
ID in a later step.3. From the NDS server file system, open the following folder: AtHocENS\DeliveryServer\Plugins\OPM
Plugin.4. Copy the contents of the following file: nds.plugins.opm.accountConfig.xml.5. In the NDS console, navigate to Management > Configuration.
The list of plug-in keys is displayed.6. Click New Configuration and enter the following information into the fields:
• New Key: Enter nds.plugins.opm.accountConfig• AccountId: Enter the Account ID that you saved in Step 1.• Device Type: Insert the string email.• Value: Paste the contents of the following file that you
copied: nds.plugins.opm.accountConfig.xml.7. Optionally, add a sub-domain for each account. The default for each account is the system domain, unless you
modify it as shown in the following example.
<AccountConfig xmlns:xsd="http://www.w3.org/2001/XMLSchema" xmlns:xsi="http://www.w3.org/2001/XMLSchema-instance"> <accountId>10009</accountId> <accountThrottle>0</accountThrottle> <targetThrottle>0</targetThrottle> <subDomain>your_domain_name</subDomain> <displayInfo>
8. Click Save and verify that the custom configuration was added:
• The NDS console configuration should have the added configuration under the key.• AtHoc Event Viewer should show the message that new configuration was uploaded.
Test the configurationAfter installing and configuring the plug-in, verify that it works.
1. Open the NDS console and click Testing.2. Send a test email to yourself, using the default template file:
a. Select Send Single Alert.b. Enter the title and body text and add response options.c. Select Device and enter email.d. In the Address field, enter your email address.e. In the AccountId field, enter the account ID that was set up for OPM.
For more information about how to create an account, see Create the organization account.f. Click Send Alert.
3. Go to the Monitoring page and click Refresh to see the new alert status.4. Check the Sent status for errors.5. Check your email inbox for the test email.
| Installation and setup | 10

Upgrade OPM plug-inTo upgrade OPM from a previous release, complete the following steps on the NDS Application Server.
1. Copy the latest OPM package in C:\Temp.2. Stop AtHoc Delivery Services and check Task Manager to make sure that AtHoc Delivery Services is not
running.3. Close the NDS console.4. Make a backup of any existing OPM-related files and folders under the following directory: \AtHocENS
\deliveryserver\Plugins\AtHoc.Delivery.PlugIn.OPM 5. Delete the directory: \AtHocENS\deliveryserver\Plugins\AtHoc.Delivery.PlugIn.OPM6. Complete the OPM installation steps described in Install the OPM plug-in files.7. Start AtHoc Delivery Services and open the NDS console.8. In the NDS console, send a test email to verify that the upgrade has succeeded.
| Upgrade OPM plug-in | 11

Register the NDS email delivery gateway with BlackBerryAtHocConfigure the gateway in the Settings page of the BlackBerry AtHoc management system to enablethe BlackBerry AtHoc server to publish alerts through NDS.
Register the NDS server for each organization.
1. Open Internet Explorer and launch the BlackBerry AtHoc management system.2. Log in as an administrator or advanced operator. See the BlackBerry AtHoc Operator Quick Start Guide to learn
how to log in and use the management system.3. Click Change Organization to select the applicable organization.4. In the navigation bar, click .5. In the Devices section, click AtHoc Cloud Delivery Services East or AtHoc Cloud Delivery Services West.6. Click Copy Default Settings.
1. Complete the connection information for NDS:
• Notification Delivery Server address: Enter the address of the NDS server.• Username: Enter the user name defined in Create a user and bind the user to the account for
the endpointUsername parameter in the following file on the NDS server:<AthocENSHome>\DeliveryServer\configuration\server.config.
• Password: Enter the same password defined in Create a user and bind the user to the account forthe endpointPw parameter in the server.config file on the NDS server.
Important: For security purposes, you should change this password.• Email Templates:<OPM_plugin>\templates\AllTemplates.xml• From Display Name: The value of the display name used in the From address for alerts sent through SMTP.
For example: AtHoc Admin or XYZ Alerts<[email protected]>2. Click Save.3. In the navigation bar, click .4. Click Devices.5. On the Devices Manager screen, enable the applicable OPM device:
a. Select the email types from the list of devices, for example: Email - Personal.b. On the email device page, click Save.c. Scroll to the top of the screen and click Enable.
| Register the NDS email delivery gateway with BlackBerry AtHoc | 12

Set up advanced OPM plug-in featuresUse the following sections to set up advanced OPM plug-in features.
Configure failover mode or parallel modeYou can configure relay servers for failover or parallel mode if you have more than one relay servers configured.These options provide additional assurance that the email delivery component of your alerting system isfunctional.
When you use failover mode or default mode, the primary relay is available. If the primary relay is unavailable thenother relays are available.
When you use parallel mode, all the relays are available and the work is distributed among the relays based onthe number of connections. This mode can improve performance when one relay does not have the capacity tohandle all the work.
1. In the NDS console, navigate to Management > Configuration.2. In the navigation pane on the left, click to open the nds.plugin.opm key.3. Locate the <OPMConfig><senderConfig><sendingMode> attribute in the list.4. Choose one of the following options:
• Failover mode: Enter the attribute value failover• Parallel mode: Enter the attribute value parallel
5. Click Save.
Set up relay authenticationIf a relay server requires security authentication, set up SMTP authentication for the OPM plug-in. The OPM plug-insupports the three most commonly used SMTP authentication methods: LOGIN, PLAIN, or NTLM.
1. In the NDS console, navigate to Management > Configuration.2. In the navigation pane on the left, click to open the nds.plugins.opm key.3. Locate <OPMConfig><senderConfig><relayInfoList><RelayConfig> <relayAuthInfo> of the
relay server you need to set up authentication for.4. Change the <isAuthNeeded> attribute to true.5. Change <authMode> to one of the following values, based on the relay settings:
• LOGIN: Requires the user to login.• PLAIN: Requires no user login.• NTLM: Requires login on Windows servers that use NT LAN Manager (NTLM).
6. To enter the user name and password in clear text, change the value of <encryptCredential> to false.
Note: When the BlackBerry AtHoc delivery services starts OPM, the username and password display withencrypted characters.
7. Enter the relay server account username and password in clear text.8. Restart NDS and OPM.
OPM then reads and encrypts the username and password and saves them in the configuration file.
| Set up advanced OPM plug-in features | 13

Enable PKI digital signaturesOPM supports PKI digital signed email messages using one certificate for each account, stored inthe NDS database.
Prerequisites
Before enabling digital signatures, perform the following steps:
1. Provision a valid PKI X509 certificate issued by one of the Certification Authorities (CA) with a private key. Thecertificate needs to be in the certificate file format .pfx.
Important: Protect this file with a password.2. Add the root certificate of the issuer (for example, Verisign) to the LocalMachine|Trusted Root
Certificate Authorization store on each application server.
Add a certificateYou can sign your email with certificates. Perform the following steps to import the certificate into the system.
1. Start the NDS console.2. Click the Utilities tab.3. In the Import System Certificate section, click Load File to locate your Certificate.4. Type the required certificate name.5. Click Import.6. A pop-up screen confirms whether the certificate has uploaded. Click OK.7. After the import, go to Management > Configuration.
The certificate with a name in nds.certificate.repository is displayed.
Configure a certificate1. Navigate to Management > Configuration.2. Open the nds.plugins.opm.accountConfig key.3. Locate the <AccountConfig> tag with the value of <accountId> to match the certificate you imported.4. If you want to enable the signing, change the value of <enableSigning> to true.5. If the <systemCertName> is missing, type the system certificate name to match the certificate you imported.6. Wait for 30 seconds and then send a test email alert to your email box.7. Verify the digital signature in the email. The message displays a seal icon next to the message to display the
digital signature.
Configure email throttlingThe OPM plug-in supports throttling by limiting the number of emails sent per second at both the account andrelay levels.
1. In the NDS console, navigate to Management > Configuration.2. Open nds.plugins.opm.accountConfig and locate the account by account ID.3. Change the following values:
| Set up advanced OPM plug-in features | 14

Parameter Description Value
(OpmConfig |listAccountConfig| AccountConfig)<accountThrottle>
Specifies the system widethroughput limit.
0: no limit
m: Where m is the max numberof mails per second that can besent.
(OpmConfig |listAccountConfig| AccountConfig) <targetThrottle >
Specifies the throughput limit setfor each target email domain.
0: no limit
m: Where m is the max numberof mails per second that can besent.
(OpmConfig | senderConfig| relayConfigs)<throttle>
Specifies the throughput limit setfor the relay.
0: no limit
m: Where m is the max numberof mails per second that can besent.
4. Click Save.
Configure email templatesOPM uses XSLT based templates to control the email body format and content to be sent out. You can savemultiple templates in a single XML file and send through system with the BlackBerry AtHoc management system.The following image shows part of a template XML file. Each <template> tag defines a template, and CDATAtags contain the actual template:
In BlackBerry AtHoc alerting, all email templates are listed under Email Device options. You can select onetemplate for each alert. Two default templates are provided: Text and HTML. You can edit and customize thesetemplates to fit your need. The following sections provide guidelines for editing a template.
| Set up advanced OPM plug-in features | 15

Important: You need to have basic knowledge of XSLT before you edit the email templates. The email templatescontain displayable content info and formats, but they also contain other invisible crucial formatting and codinginformation, like MIME headers, to communicate with email clients like Microsoft Outlook. You can accidentallychange this crucial formatting information when you edit the templates, which can cause email messages todisplay incorrectly.
Guidelines for editing email templates• Use an XSLT editor to edit email templates.• Do not change any parameters.• Do not change XSL logical statements, such as xsl:if, xsl:call-template, unless you have a very good
understanding of XLST.• Do not change MIME headers, such as Content-Type:, Content-Transfer-Encoding: unless you
have a good understanding of MIME.
Parameters and variablesOPM email templates are place holders for dynamic data passed in by the BlackBerry AtHoc OPM plug-induring run time. The dynamic data is passed through parameters or variables. Each template lists all the validparameters at the top. The parameters are pre-defined; do not change them.
The following figure shows a template the defines the parameters:
Parameters can be used anywhere in the content. The following example shows a placeholder forthe MessageBody parameter. <xsl:value-of select="$MessageBody" />
Text templateThe text template has a body part, which you can edit starting with the following line: <xsl:text> </xsl:text>.
HTML templateThe HTML template has two body parts, the MIME multipart and the alternative part, separated by a border:
----=OPM_Alternative_Boundary=)
One is plain text version for email clients that do not support HTML. The other part is an HTML version. If youchange content in one part, you need to also change the other part to make sure they are consistent.
The following figure displays the plain text version of the body:
| Set up advanced OPM plug-in features | 16
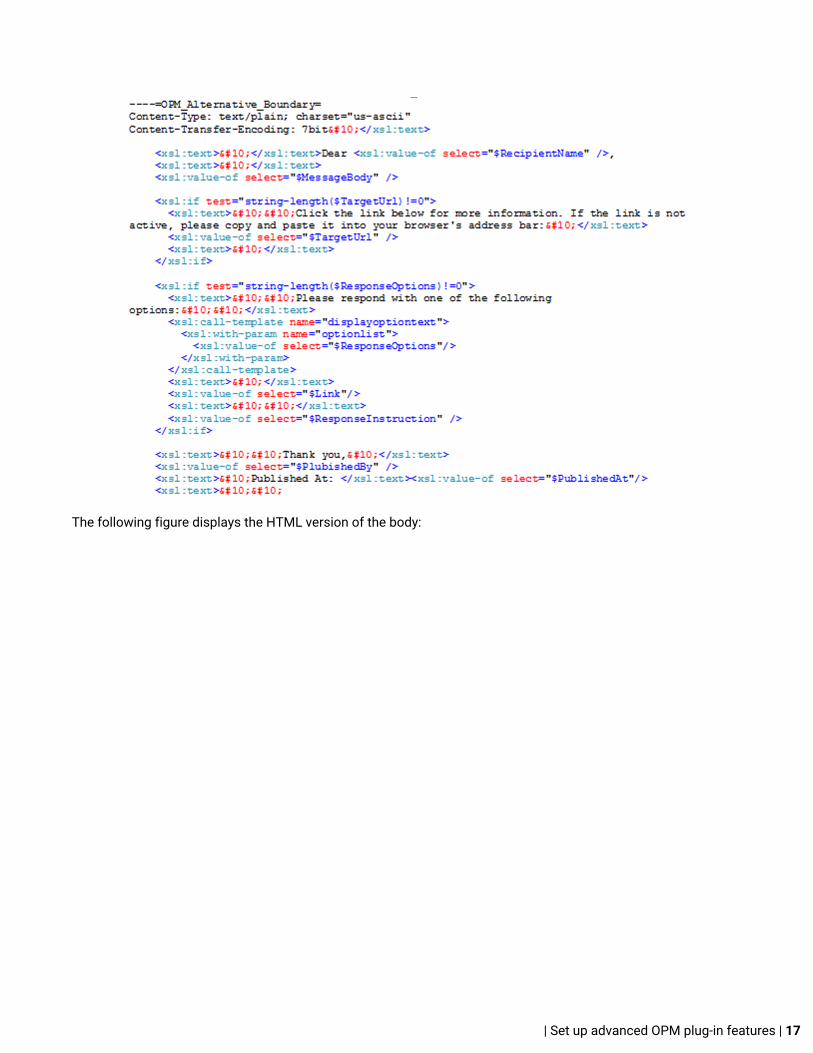
The following figure displays the HTML version of the body:
| Set up advanced OPM plug-in features | 17

Verify and test the template changesAfter changing any part of a template, perform the following verification and test steps to ensure that yourchanges work before putting the template into production:
1. Open the template in an XSLT editor to verify that the syntax is correct.2. Test the alert:
a. Open the BlackBerry AtHoc management system and click Alerts > New Alert.b. Create a new alert with small number of recipients.c. Select the template to be tested and publish the alert.
3. Verify if the alert delivers correctly:
• If the alert failed to deliver, complete the following steps:
a. Check Event Log for error messages from OPM.b. Correct the template and test again.
• If the alert is delivered, complete the following steps:
a. Check the received email messages and verify the result.b. Correct any template problems and test again.
• If the template has been corrupted, get the default templates from the software package for a clean start.
| Set up advanced OPM plug-in features | 18

Microsoft exchange serversOPM can work with different kinds of SMTP mail servers configured as relay servers. This section demonstrateshow to set up Microsoft Exchange Server 2007 and 2010.
1. Open the Exchange Management Console on the mail server.2. Navigate to Microsoft Exchange > Server Configuration > Hub Transfer.3. Go to the Receive Connectors section in the middle lower pane and select or create a new Receive connector
for OPM relay purposes.4. Open the Property window.5. Click the Network tab and specify the port. The default is 25.6. Add the BlackBerry AtHoc NDS server IP to the IP addresses list.7. Click Authentication and select the authentication mode that you want to use:
• Select Basic Authentication to enable login authentication.• Select Integrated Windows authentication to enable NTLM authentication.• Select Externally Secured (for example, with IPSec) to have no authentication (anonymous).
8. Open Exchange Management Shell, which is part of PowerShell (PS).9. In PS, run the following command to display the settings of the relay server receive connector: Get-
ReceiveConnector “ReceiveConnectorName” | format-list
This command lists all the current settings, including important parameters that can significantlyaffect OPM performance:
• MaxInboundConnectionsPerSource: Set to between 100-200. A value less than 100 can slow downthroughput.
• MaxInboundConnectionsPercentagePerSource: Set to 100.• MessageRatelimit – throttling: Set to unlimited to achieve maximum performance.• MaxAcknowledgementDelay: Set to 0 (turn off Acknowledgement Delay feature) to achieve maximum
performance.10.Use the following command to change any of the above parameters: Set-ReceiveConnector
“ReceiveConnectorName” ParamName NewValue.11.In the OpmPlugin.config file, set up the relayConfig section to match the relay setting specified in the
prior step.
Email priorityThe priority setting for emails specifies the priority displayed in email alerts. The priority is set at the accountlevel and the default setting is Highest (1). This section describes how to change the priority in the plug-in in theAccountConfig section.
1. In the NDS console, navigate to Management > Configuration.2. Open the nds.plugins.opm.accountConfig key.3. Locate the <AccountConfig> node with the subnode of <accountId> that matches the account to be
modified.4. In the <xHeaders> sub node, change the value of the Priority attribute: to 3 instead of 1.
The following example shows the updated value:
<xHeaders>X-Priority: 3 (Highest) Priority: Urgent Importance: high</xHeaders>
5. Change the value of the following node so that the value is "true": <hasChanged>true</hasChanged>6. Click Save.
| Set up advanced OPM plug-in features | 19

7. Wait for 30 seconds and then send a test email alert to your email inbox.8. Verify the priority in the email.
| Set up advanced OPM plug-in features | 20

Configuration referenceThis section provides information about the XML tags and attributes used to configure the OPM plug-in.
The following table lists the XML tags, describes their usage, and provides important tips and best practices.
• All tags and values in the configuration file are case sensitive.• Changes to the configuration file do not take effect until the OPM plug-in restarts. On start, the OPM plug-in
loads and verifies the configuration file. Any invalid setting can cause the OPM plug-in fail to start. Errors arelogged in event log in any case.
• The user name and password values are encrypted in the OPMplugin.config file. When you need to changea user name or password complete the following steps:
1. Type the user name or password in the provided fields. The values appear in clear text.2. Change the value of the <encryptCredentials> tag to false and click Update.3. To encrypt the user name and password values, set <encryptCredential> to true and save your
changes. The user name and password values are now protected. For more information, see Set up relayauthentication. The next time that the OPM plug-in loads the configuration file, the plug-in encrypts thevalues.
(OpmConfig | pluginConfig)For OPM without attachments, all default values are used if settings are missing from the configuration file.
For OPM with attachments, the default values listed are optimum values. If optimum values are not providedfor OPM with attachments, then the default values for OPM without attachments are used, which will causefunctionality issues with the OPM plug-in.
XML tag Description Comments
<subDomain> An email domain or sub-domain created anddedicated for OPM use.All outgoing alert emailmessages are sent from thisdomain, and all replies to goback this domain. Ensurethe domain name doesnot include “@” sign. Forexample, <subDomain>alerts.athoc.com</subDomain>
The DNS MX record needs beadded to direct emails thattarget this sub-domain forthe NDS server.
<outQueueThreads> The number of threads forprocessing and signingemails in the outgoing queue.
Default: 4
Range: 1 – 20
This parameter affects thesent throughput especiallywhen digital signing is turnedon.
| Configuration reference | 21

XML tag Description Comments
<inQueueThreads> The number of threads forprocessing email responsesin the incoming queue.
Default: 2
Range: 1 – 20
This parameter can affectreceived throughput.
<dbQueueName> The database queue namefor incoming emails. Thename must match the namespecified on the NDS system.
Default: /delivery/opm/emailreply
Change only whendirected by BlackBerryAtHoc Customer Support orImplementation.
<maxRelayErrorsPerSecAllowed> Specifies the threshold todetermine if a relay has failedand need human attention.
Default: 10 errors per second
Occasionally, OPM canexperience connection drops,timeouts, and other errors(such as, SMTP 452) fromrelay servers, which arenormal. However, frequentoccurrences of these typesof errors can indicate thata relay server is unstable orhas failed.
<validateReceivedEmailAddress> Species that on receivingemails, OPM validates thesender email address againstthe recipient email address.
Values:
true: Validate emailaddresses.
false (Default): Do notvalidate the email addresses.
—
<engineLaunchTimeout> The delay timeout, inseconds, that occurswhen launchingOpmEngine. At start up,the OPM plug-in launchesthe OpenEngine.exe andwaits the specified numberof seconds (default: 5seconds). OPM triesconnect to the OpmEngine.If OPM cannot connect, itretries again.
Default: 5 seconds
—
| Configuration reference | 22

XML tag Description Comments
<reuseEngine> Specifies whether to reuseor re-launch an instance ofOpmEngine, if it is alreadyrunning.
Values:
false (Default): Close therunning engine and launch anew instance.
true: Connect to the runningengine.
—
<logTaskLifeCycle> Turn on task life cyclelogging.
Default: True
—
<logPurgeInterval> Log purging interval (savingto database) in seconds.
Default: 1
—
<logPurgeBatchSize> Purging batch size forrecords.
Default: 2000
Range: 1000-2000
—
<maxTasksPerExecution> The maximum number ofdelivery tasks that OPM canprocess in a single batch.
Default:
• 2000 (withoutattachments)
• 5 (with attachments)
Change only whendirected by BlackBerryAtHoc Customer Support orImplementation.
<maxBacklot> The maximum number ofoutstanding delivery tasksthat OPM process at anytime.
Default:
• 6000 (withoutattachments)
• 5 (with attachments)
Change only whendirected by BlackBerryAtHoc Customer Support orImplementation.
| Configuration reference | 23

XML tag Description Comments
<minBatchSize> The minimum available batchsize that OPM can offerto NDS before capacity isavailable.
Default:
• 100 (withoutattachments)
• 5 (with attachments)
Change only whendirected by BlackBerryAtHoc Customer Support orImplementation.
<counterCategery> The OPM performancecounter category that isregistered on WindowsPerformance Monitor.The category must matchthe category specified onthe NDS system.
Default: AtHoc DeliveryOPM
Change only whendirected by BlackBerryAtHoc Customer Support orImplementation.
<selfTestInterval> The OPM performance selftest is an in depth healthcheck that runs periodicallywhen OPM is idle. Thisparameter controls how oftenthe self test runs.
Default: 30 seconds
Range: 10 - 180 seconds
Change only whendirected by BlackBerryAtHoc Customer Support orImplementation.
<selfTestEmail> A valid email address usedby OPM when runningthe self test. OPM doesnot actually send the testemail to this address.Instead, OPM uses aseparate domain from therelay server to test the relaycapability.
Default: [email protected]
—
| Configuration reference | 24

XML tag Description Comments
< selfTestMode> The self test modes used forsystem health checks:
Values:
PingRelay (Default): Testonly the connection to relay.
Send: Connect and issue allSMTP commands exceptDATA.
NoRelay: Turn off scheduledrelay test. For OPM internaltest, only.
—
Sender settings (OpmConfig | senderConfig)
XML Tag Description Comments
<isSenderEnabled> Enable the sender.
Values:
true: Turn on sender (default)
false: Turn off sender.
Note: Sender and receiver cannotbe turned off at the same time.
<bufferSizePerConn> The buffer size in bytes perconnection.
Default: 5000
Range: 1,000 – 100,000
—
<failOverMode> Specifies whether the relay serveris set failover or parallel mode.
Values:
true: Failover mode; use the highorder relay until it is down then fail-over to the next relay
false: Parallel mode; use all theenabled relays in parallel.
For more information about how toconfigure relay servers for failoveror parallel mode, see Configurefailover mode or parallel mode.
<failOverTimeOut> The number of failure tries onestablishing connection to relaybefore claiming it down.
Default: 1
Change only when directedby BlackBerry AtHoc customersupport or implementation.
| Configuration reference | 25

XML Tag Description Comments
<sendingRetries> The number of times OPM retriessend an email, if non-system errorsoccur.
Default: 2
Change only when directedby BlackBerry AtHoc customersupport or omplementation.
<sendTimeOut> SMTP send session timeout (inseconds)
Default: 60
New in OPM 2.2.
<startTlsmode> Specifies the TLS behavior onthe OPM Sender level.
Values:
none: Indicates as the defaultvalue and does not use TLS.
optional: Try StartTls andhandshaking, if TLS is notsupported or fails, log a warningbut fall back to none TLS mode(plain SMTP) and continuesending.
must: Try StartTls andhandshaking, if TLS is notsupported or fails, display a new"TlsFailure" error, shut downthe relay server and stop theoperations (similar to AuthFailureerror).
STARTTLS is a standard(RFC 3207) way to upgradeSMTP connections to SSL/TLS optionally. It is widely usedby many email servers today,including our cloud email deliveryprovider Dyn. Starting from thisversion, OPM supports STARTTLSas SMTP client (sender), on eitherport 25 or 587.
Note: TLS 1.2 version is enforcedin the app server system level, notapplication level.
Relay settings (OpmConfig | senderConfig | relayConfigs)Relay servers are SMTP mail servers provided by customers. The servers are configured to relay outbound emailsfor the OPM plug-in. The OPM plug-in supports up to three relay servers, using either Failover mode or Parallelmode. The user name and password values are encrypted in the OPMplugin.config file. For more information,see ../advanced-setup/set-up-relay-authentication.dita.
Each relay setting in the configuration file must match the corresponding settings in the relay server. To learnmore about configuring relay servers, see the documentation for your email server. For example, for MicrosoftExchange Server, see MS Technet.
| Configuration reference | 26

XML Tag Description Comments
<isRelayEnabled> Specifies whether the relay serveris in use.
Values:
true: The relay server is in use.
false: The relay server is not inuse.
If you have three relay servers, bydefault, the first relay server valueis set to true. The other two relayservers are set to false.
<hostName> The relay host name or IPaddress of the relay server, suchas mail1.xyzcorp.com
—
<port> The port number set on the relayserver to support relay activitiesfor OPM.
Default: Default port is 25, orcan be set to the new port 587,depending on the relay sideconfiguration.
—
<order> Specifies the order used by OPM todetermine the failover order, whenin Failover mode only.
Values: 1 to 3, where 1 is thehighest priority and 3 is the lowestpriority.
The value of <order> must beunique among the relay servers. Ifyou have three relay servers, onlyone can have the value of 1, 2, or 3.
<connections> The number of concurrentconnections that can beestablished to the current relayserver.
Default:
• 100 (without attachments)• 30 (with attachments)
Range: 1-1000
To achieve high throughput, 100or more should be used. It shouldmatch the relay server setting.(This parameter greatly affectssend throughput.)
<throttle> Throughput limit set for therelay. 0: No limit. Otherwise,the maximum number of mails/second can be sent through thisrelay.
Default: 20 (with attachments)
This parameter greatly affectssend throughput.
| Configuration reference | 27

XML Tag Description Comments
<isAuthNeeded> Specifies whether the relay serverrequires authorization.
Values:
true: The relay server requiresauthentication
false: The relay server does notneed authentication.
If the value is true, set the<authMode> value to one of thefollowing modes: LOGIN, PLAIN,or NTLM. Must be one of theSMTP AUTH methods currentlysupported by the relay server.
<authMode> Three most commonly usedSMTP authentication modes aresupported: LOGIN, PLAIN, andNTLM.
—
<encryptCredential> Specifies whether the user nameand password are encrypted.
Values:
true: The credential is encrypted.
false: The credential is notencrypted.
When you modify the user nameand password, set the valueto false to type them in cleartext and click Update. After you'vesaved the username and passwordvalues, set <encryptCredential>to true and save your change toprotect the credentials.The nexttime that the OPM plug-in loadsthe configuration file, the plug-inencrypts the values.
<username> The user name of an emailaccount on the relay server, in fullemail address format.
—
<password> The password of an email accounton relay server.
—
Receiver setting (OpmConfig | receiverConfig)
XML Tag Description Comments
<isReceiverEnabled> Specifies whether OPM receivesemail responses through NDS.
Values:
true: Receives mail.
false (Default): Does not receiveemail.
—
| Configuration reference | 28

XML Tag Description Comments
<portSMTP> Species the SMTP port.
Default: 25, the standard SMTPport.
Best practice: Use the defaultvalue of 25 so that OPM canreceive email from most countries.Change only when directedby BlackBerry AtHoc customersupport or implementation.
<connections> The number of concurrentconnections a receiver can handleat the same time.
Default: 200
Range: 1-1000
This parameter impacts theamount of received throughput.
<backlogs> The number of backlog connectionrequests allowed when allconnections are full.
Default: 100
—
<bufferSizePerConn> The buffer size, in bytes, byconnection.
Default: 5000
Range: 1,000 – 100,000.
Change only when directedby BlackBerry AtHoc customersupport or implementation.
Account setting (OpmConfig | listAccountConfig | AccountConfig)
XML Tag Description Comments
<accountId> The account ID. —
<accountThrottle> The throughput specified for theaccount.
Values: 0: No limit
Other values: The maximumnumber of mails per second canbe sent.
—
<subDomain An email sub-domain dedicatedfor OPM use and assigned to anaccount. Each account can haveits own sub-domain.
The owner of the sub-domainneeds to add the DNS MX recordin order to send emails that targetthis sub-domain.
| Configuration reference | 29
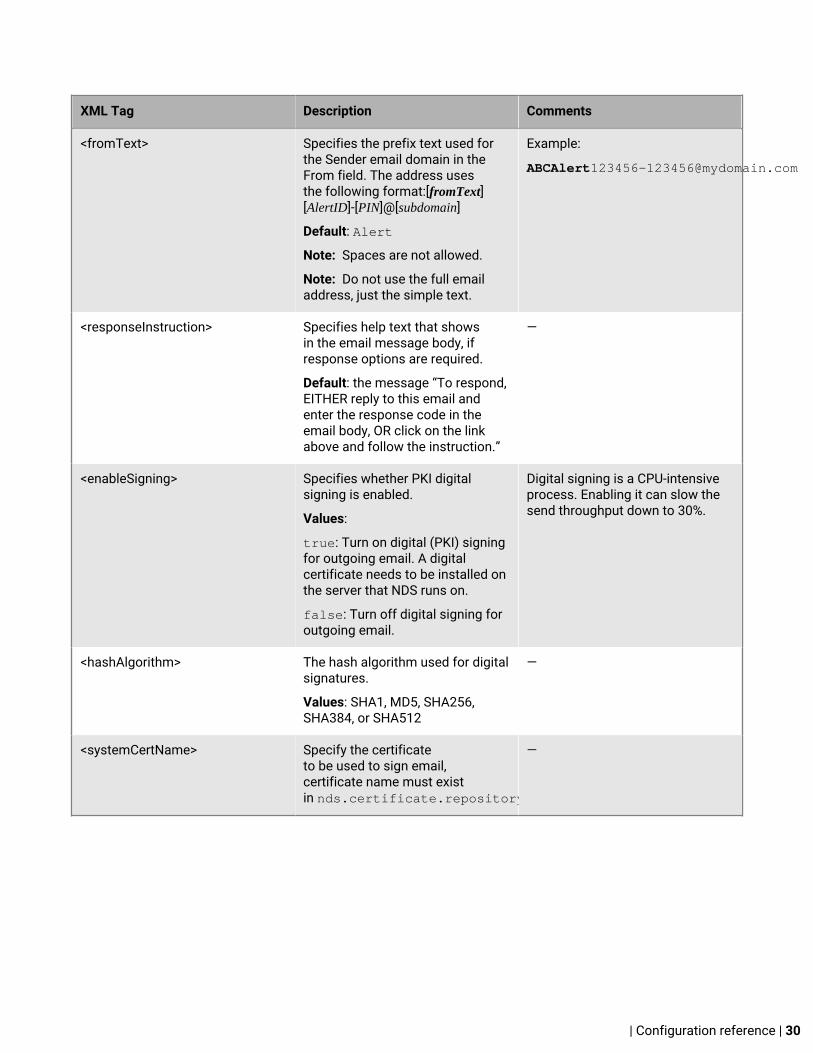
XML Tag Description Comments
<fromText> Specifies the prefix text used forthe Sender email domain in theFrom field. The address usesthe following format:[fromText][AlertID]-[PIN]@[subdomain]
Default: Alert
Note: Spaces are not allowed.
Note: Do not use the full emailaddress, just the simple text.
Example:
<responseInstruction> Specifies help text that showsin the email message body, ifresponse options are required.
Default: the message “To respond,EITHER reply to this email andenter the response code in theemail body, OR click on the linkabove and follow the instruction.”
—
<enableSigning> Specifies whether PKI digitalsigning is enabled.
Values:
true: Turn on digital (PKI) signingfor outgoing email. A digitalcertificate needs to be installed onthe server that NDS runs on.
false: Turn off digital signing foroutgoing email.
Digital signing is a CPU-intensiveprocess. Enabling it can slow thesend throughput down to 30%.
<hashAlgorithm> The hash algorithm used for digitalsignatures.
Values: SHA1, MD5, SHA256,SHA384, or SHA512
—
<systemCertName> Specify the certificateto be used to sign email,certificate name must existin nds.certificate.repository.
—
| Configuration reference | 30

Platform setting (platform)
XML Tag Description Comments
<delivery> For OPM with attachments, addthe perfAdjusterMaxDeliveryLoopThreadNumber attribute tothe <delivery> tag.
The perfAdjusterMaxDeliveryLoopThreadNumber attributespecifies the number of threads on the platform that areused to process and submit tasks to the OPM plug-in. Thedefault value is 1.
Do not changeany other existingattributes.
Sample configuration:
<platform> <delivery alertInitMsecInterval="XXX" deviceInitMsecInterval="XXX" taskInitMsecInterval="XXX" taskExecMsecInterval="XXX"pingPluginsSecInterval="XXX" taskExecTimeoutCheckSecInterval="XXX" perfAdjusterMaxDeliveryLoopThreadNumber = "1"/></platform>
| Configuration reference | 31
Tools for monitoring, troubleshooting, andmanaging OPMThis section describes tasks and tools for monitoring, troubleshooting issues, and managing the OPM plug-in.
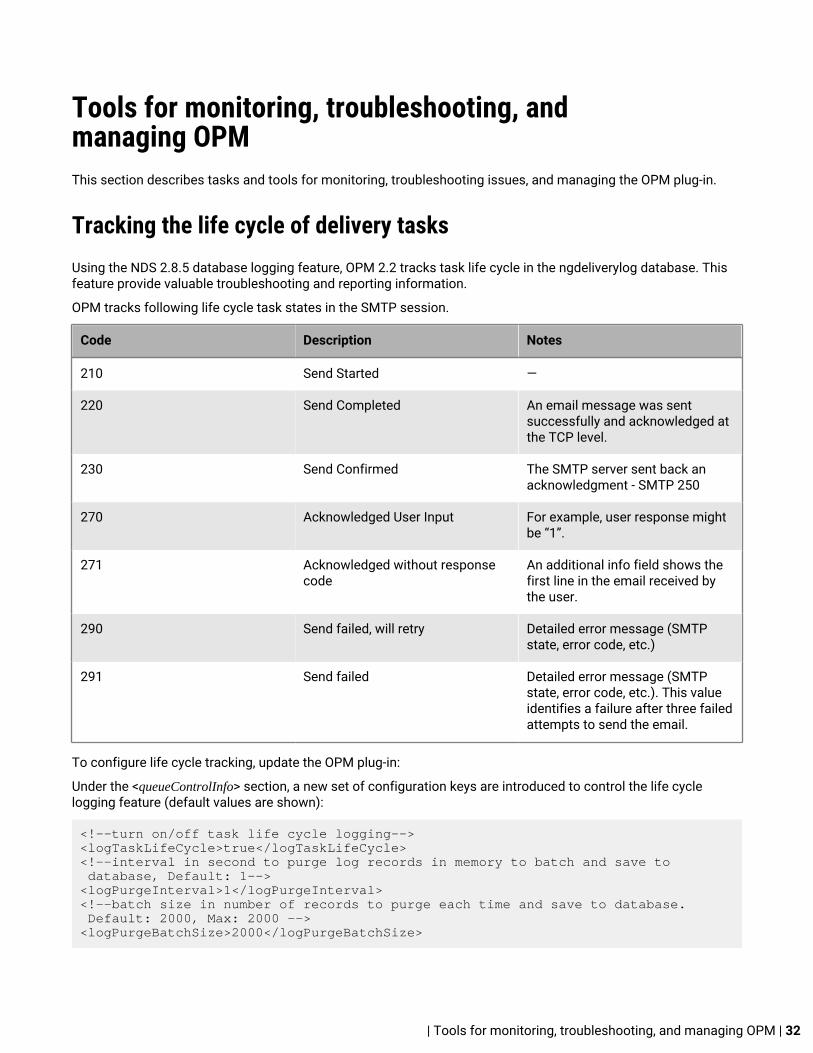
Tracking the life cycle of delivery tasksUsing the NDS 2.8.5 database logging feature, OPM 2.2 tracks task life cycle in the ngdeliverylog database. Thisfeature provide valuable troubleshooting and reporting information.
OPM tracks following life cycle task states in the SMTP session.
Code Description Notes
210 Send Started —
220 Send Completed An email message was sentsuccessfully and acknowledged atthe TCP level.
230 Send Confirmed The SMTP server sent back anacknowledgment - SMTP 250
270 Acknowledged User Input For example, user response mightbe “1”.
271 Acknowledged without responsecode
An additional info field shows thefirst line in the email received bythe user.
290 Send failed, will retry Detailed error message (SMTPstate, error code, etc.)
291 Send failed Detailed error message (SMTPstate, error code, etc.). This valueidentifies a failure after three failedattempts to send the email.
To configure life cycle tracking, update the OPM plug-in:
Under the <queueControlInfo> section, a new set of configuration keys are introduced to control the life cyclelogging feature (default values are shown):
<!--turn on/off task life cycle logging--><logTaskLifeCycle>true</logTaskLifeCycle><!--interval in second to purge log records in memory to batch and save to database, Default: 1--><logPurgeInterval>1</logPurgeInterval><!--batch size in number of records to purge each time and save to database. Default: 2000, Max: 2000 --><logPurgeBatchSize>2000</logPurgeBatchSize>
| Tools for monitoring, troubleshooting, and managing OPM | 32

BlackBerry AtHoc health monitorOPM continuously reports its health status to BlackBerry AtHoc, and you can monitor the statususing AtHoc Health Monitor. For more information about AtHoc Health Monitor, see "Monitor System Health" inthe BlackBerry AtHoc System Administrator Configuration Guide.
BlackBerry AtHoc log filesBlackBerry AtHoc provides two log files for you to use when monitoring system health and troubleshooting errors.
• AtHoc Event Log: OPM logs all errors and event information in the BlackBerry AtHoc Event Log. Usethe BlackBerry AtHoc Event Log Viewer to monitor the error messages. Use verbose mode to log detailedinformation.
• OpmEngine.log File: In additional to the Event Log, OpmEngine.exe logs detailed information inthe OpmEngine.log file. The log file is rolling, controlled by the OpmEngine.exe. configuration file.The default rolling interval is 2 MB per month.
Turn on verbose mode for log files1. Open Windows Explorer and navigate to the following directory: \\AtHocENS\DeliveryServer\Plugins
\AtHoc.Delivery.PlugIn.OPM
2. Open the following file: OpmEngine.exe.config.3. Change the highlighted value to: verbose.
The log will start displaying verbose messages within 30 seconds.
| Tools for monitoring, troubleshooting, and managing OPM | 33

Microsoft performance monitorThe Microsoft Windows performance monitor monitors and logs system and application performance.The Microsoft Windows performance monitor comes with the Microsoft Windows operating system.
To troubleshoot and monitor OPM performance, OPM provides the following custom performance countersfor the Windows system. You can add additional counters to the performance monitor in the BlackBerryAtHoc Delivery OPM category:
• eMails Sent/sec (the send rate)• eMails Read/sec (the receive rate)• Connections – Sender• Connections – Receiver• Relays (number of active relay servers)• Capacity (number of email messages OPM can take from NDS to send)• Send Queue Size (in OPM Plugin: number email messages waiting to be signed/passed to OPM Engine to
send)• Event Queue Size (in OPM Plugin: number of task tracking events (sent, responded …) waiting to be passed
back to NDS• Eng Send Queue Size (in OPM Engine: number email messages waiting to be sent)• Eng Receive Queue Size (in OPM Engine: number email messages received waiting to be processed)• Eng Event Queue Size (number of events, task lifecycle log batches and received emails waiting to be passed
back to OPM Plugin)
The following image displays typical activity for the OPM performance counters:
| Tools for monitoring, troubleshooting, and managing OPM | 34

| Tools for monitoring, troubleshooting, and managing OPM | 35

BlackBerry AtHoc Customer Support PortalBlackBerry AtHoc customers can obtain more information about BlackBerry AtHoc products or get answers toquestions about their BlackBerry AtHoc systems through the Customer Support Portal:
https://support.athoc.com/customer-support-portal.html
The BlackBerry AtHoc Customer Support Portal also provides support via computer-based training, operatorchecklists, best practice resources, reference manuals, and user guides.
| BlackBerry AtHoc Customer Support Portal | 36

Legal notice ©2019 BlackBerry Limited. Trademarks, including but not limited to BLACKBERRY, BBM, BES, EMBLEM Design,ATHOC, CYLANCE and SECUSMART are the trademarks or registered trademarks of BlackBerry Limited, itssubsidiaries and/or affiliates, used under license, and the exclusive rights to such trademarks are expresslyreserved. All other trademarks are the property of their respective owners.
This documentation including all documentation incorporated by reference herein such as documentationprovided or made available on the BlackBerry website provided or made accessible "AS IS" and "AS AVAILABLE"and without condition, endorsement, guarantee, representation, or warranty of any kind by BlackBerry Limited andits affiliated companies ("BlackBerry") and BlackBerry assumes no responsibility for any typographical, technical,or other inaccuracies, errors, or omissions in this documentation. In order to protect BlackBerry proprietary andconfidential information and/or trade secrets, this documentation may describe some aspects of BlackBerrytechnology in generalized terms. BlackBerry reserves the right to periodically change information that is containedin this documentation; however, BlackBerry makes no commitment to provide any such changes, updates,enhancements, or other additions to this documentation to you in a timely manner or at all.
This documentation might contain references to third-party sources of information, hardware or software,products or services including components and content such as content protected by copyright and/or third-party websites (collectively the "Third Party Products and Services"). BlackBerry does not control, and is notresponsible for, any Third Party Products and Services including, without limitation the content, accuracy,copyright compliance, compatibility, performance, trustworthiness, legality, decency, links, or any other aspectof Third Party Products and Services. The inclusion of a reference to Third Party Products and Services in thisdocumentation does not imply endorsement by BlackBerry of the Third Party Products and Services or the thirdparty in any way.
EXCEPT TO THE EXTENT SPECIFICALLY PROHIBITED BY APPLICABLE LAW IN YOUR JURISDICTION, ALLCONDITIONS, ENDORSEMENTS, GUARANTEES, REPRESENTATIONS, OR WARRANTIES OF ANY KIND, EXPRESSOR IMPLIED, INCLUDING WITHOUT LIMITATION, ANY CONDITIONS, ENDORSEMENTS, GUARANTEES,REPRESENTATIONS OR WARRANTIES OF DURABILITY, FITNESS FOR A PARTICULAR PURPOSE OR USE,MERCHANTABILITY, MERCHANTABLE QUALITY, NON-INFRINGEMENT, SATISFACTORY QUALITY, OR TITLE, ORARISING FROM A STATUTE OR CUSTOM OR A COURSE OF DEALING OR USAGE OF TRADE, OR RELATED TO THEDOCUMENTATION OR ITS USE, OR PERFORMANCE OR NON-PERFORMANCE OF ANY SOFTWARE, HARDWARE,SERVICE, OR ANY THIRD PARTY PRODUCTS AND SERVICES REFERENCED HEREIN, ARE HEREBY EXCLUDED.YOU MAY ALSO HAVE OTHER RIGHTS THAT VARY BY STATE OR PROVINCE. SOME JURISDICTIONS MAYNOT ALLOW THE EXCLUSION OR LIMITATION OF IMPLIED WARRANTIES AND CONDITIONS. TO THE EXTENTPERMITTED BY LAW, ANY IMPLIED WARRANTIES OR CONDITIONS RELATING TO THE DOCUMENTATION TOTHE EXTENT THEY CANNOT BE EXCLUDED AS SET OUT ABOVE, BUT CAN BE LIMITED, ARE HEREBY LIMITED TONINETY (90) DAYS FROM THE DATE YOU FIRST ACQUIRED THE DOCUMENTATION OR THE ITEM THAT IS THESUBJECT OF THE CLAIM.
TO THE MAXIMUM EXTENT PERMITTED BY APPLICABLE LAW IN YOUR JURISDICTION, IN NO EVENT SHALLBLACKBERRY BE LIABLE FOR ANY TYPE OF DAMAGES RELATED TO THIS DOCUMENTATION OR ITS USE,OR PERFORMANCE OR NON-PERFORMANCE OF ANY SOFTWARE, HARDWARE, SERVICE, OR ANY THIRDPARTY PRODUCTS AND SERVICES REFERENCED HEREIN INCLUDING WITHOUT LIMITATION ANY OF THEFOLLOWING DAMAGES: DIRECT, CONSEQUENTIAL, EXEMPLARY, INCIDENTAL, INDIRECT, SPECIAL, PUNITIVE,OR AGGRAVATED DAMAGES, DAMAGES FOR LOSS OF PROFITS OR REVENUES, FAILURE TO REALIZE ANYEXPECTED SAVINGS, BUSINESS INTERRUPTION, LOSS OF BUSINESS INFORMATION, LOSS OF BUSINESSOPPORTUNITY, OR CORRUPTION OR LOSS OF DATA, FAILURES TO TRANSMIT OR RECEIVE ANY DATA,PROBLEMS ASSOCIATED WITH ANY APPLICATIONS USED IN CONJUNCTION WITH BLACKBERRY PRODUCTS ORSERVICES, DOWNTIME COSTS, LOSS OF THE USE OF BLACKBERRY PRODUCTS OR SERVICES OR ANY PORTIONTHEREOF OR OF ANY AIRTIME SERVICES, COST OF SUBSTITUTE GOODS, COSTS OF COVER, FACILITIES ORSERVICES, COST OF CAPITAL, OR OTHER SIMILAR PECUNIARY LOSSES, WHETHER OR NOT SUCH DAMAGES
| Legal notice | 37

WERE FORESEEN OR UNFORESEEN, AND EVEN IF BLACKBERRY HAS BEEN ADVISED OF THE POSSIBILITY OFSUCH DAMAGES.
TO THE MAXIMUM EXTENT PERMITTED BY APPLICABLE LAW IN YOUR JURISDICTION, BLACKBERRY SHALLHAVE NO OTHER OBLIGATION, DUTY, OR LIABILITY WHATSOEVER IN CONTRACT, TORT, OR OTHERWISE TOYOU INCLUDING ANY LIABILITY FOR NEGLIGENCE OR STRICT LIABILITY.
THE LIMITATIONS, EXCLUSIONS, AND DISCLAIMERS HEREIN SHALL APPLY: (A) IRRESPECTIVE OF THE NATUREOF THE CAUSE OF ACTION, DEMAND, OR ACTION BY YOU INCLUDING BUT NOT LIMITED TO BREACH OFCONTRACT, NEGLIGENCE, TORT, STRICT LIABILITY OR ANY OTHER LEGAL THEORY AND SHALL SURVIVE AFUNDAMENTAL BREACH OR BREACHES OR THE FAILURE OF THE ESSENTIAL PURPOSE OF THIS AGREEMENTOR OF ANY REMEDY CONTAINED HEREIN; AND (B) TO BLACKBERRY AND ITS AFFILIATED COMPANIES, THEIRSUCCESSORS, ASSIGNS, AGENTS, SUPPLIERS (INCLUDING AIRTIME SERVICE PROVIDERS), AUTHORIZEDBLACKBERRY DISTRIBUTORS (ALSO INCLUDING AIRTIME SERVICE PROVIDERS) AND THEIR RESPECTIVEDIRECTORS, EMPLOYEES, AND INDEPENDENT CONTRACTORS.
IN ADDITION TO THE LIMITATIONS AND EXCLUSIONS SET OUT ABOVE, IN NO EVENT SHALL ANY DIRECTOR,EMPLOYEE, AGENT, DISTRIBUTOR, SUPPLIER, INDEPENDENT CONTRACTOR OF BLACKBERRY OR ANYAFFILIATES OF BLACKBERRY HAVE ANY LIABILITY ARISING FROM OR RELATED TO THE DOCUMENTATION.
Prior to subscribing for, installing, or using any Third Party Products and Services, it is your responsibility toensure that your airtime service provider has agreed to support all of their features. Some airtime serviceproviders might not offer Internet browsing functionality with a subscription to the BlackBerry® Internet Service.Check with your service provider for availability, roaming arrangements, service plans and features. Installationor use of Third Party Products and Services with BlackBerry's products and services may require one or morepatent, trademark, copyright, or other licenses in order to avoid infringement or violation of third party rights. Youare solely responsible for determining whether to use Third Party Products and Services and if any third partylicenses are required to do so. If required you are responsible for acquiring them. You should not install or useThird Party Products and Services until all necessary licenses have been acquired. Any Third Party Products andServices that are provided with BlackBerry's products and services are provided as a convenience to you and areprovided "AS IS" with no express or implied conditions, endorsements, guarantees, representations, or warrantiesof any kind by BlackBerry and BlackBerry assumes no liability whatsoever, in relation thereto. Your use of ThirdParty Products and Services shall be governed by and subject to you agreeing to the terms of separate licensesand other agreements applicable thereto with third parties, except to the extent expressly covered by a license orother agreement with BlackBerry.
The terms of use of any BlackBerry product or service are set out in a separate license or other agreement withBlackBerry applicable thereto. NOTHING IN THIS DOCUMENTATION IS INTENDED TO SUPERSEDE ANY EXPRESSWRITTEN AGREEMENTS OR WARRANTIES PROVIDED BY BLACKBERRY FOR PORTIONS OF ANY BLACKBERRYPRODUCT OR SERVICE OTHER THAN THIS DOCUMENTATION.
BlackBerry Enterprise Software incorporates certain third-party software. The license and copyright informationassociated with this software is available at http://worldwide.blackberry.com/legal/thirdpartysoftware.jsp.
BlackBerry Limited2200 University Avenue EastWaterloo, OntarioCanada N2K 0A7
BlackBerry UK Limited200 Bath RoadSlough, Berkshire SL1 3XEUnited Kingdom
Published in Canada
| Legal notice | 38