optimizing mailmarshal 5.5 smtp for anti-spam - …€¦ · that some solicited bulk email ......
TRANSCRIPT

Contents
Introduction ........................... 1
What is the SpamCensor?..... 1
Basic Configuration............... 2
Spam Management Tips ....... 6
Advanced Configuration..... 11
Conclusion ............................ 21
Optimizing MailMarshal 5.5 SMTP for Anti-Spam Technical White Paper October 14, 2003
With its new SpamCensor technology, MailMarshal 5.5 SMTP has even more ways to combat and manage spam. Some of these features are quite simple to configure. However there is also a great deal of power ‘under the hood’ for those more technically proficient administrators who wish to take advantage of advanced features. This white paper covers the range of options you have for configuring MailMarshal 5.5 SMTP for optimum anti-spam performance and manageability.

THIS DOCUMENT AND THE SOFTWARE DESCRIBED IN THIS DOCUMENT ARE FURNISHED UNDER AND ARE SUBJECT TO THE TERMS OF A LICENSE AGREEMENT OR A NON-DISCLOSURE AGREEMENT. EXCEPT AS EXPRESSLY SET FORTH IN SUCH LICENSE AGREEMENT OR NON-DISCLOSURE AGREEMENT, MARSHAL LIMITED PROVIDES THIS DOCUMENT AND THE SOFTWARE DESCRIBED IN THIS DOCUMENT "AS IS" WITHOUT WARRANTY OF ANY KIND, EITHER EXPRESS OR IMPLIED, INCLUDING, BUT NOT LIMITED TO, THE IMPLIED WARRANTIES OF MERCHANTABILITY OR FITNESS FOR A PARTICULAR PURPOSE. SOME STATES DO NOT ALLOW DISCLAIMERS OF EXPRESS OR IMPLIED WARRANTIES IN CERTAIN TRANSACTIONS; THEREFORE, THIS STATEMENT MAY NOT APPLY TO YOU. This document and the software described in this document may not be lent, sold, or given away without the prior written permission of Marshal Limited, except as otherwise permitted by law. Except as expressly set forth in such license agreement or non-disclosure agreement, no part of this document or the software described in this document may be reproduced, stored in a retrieval system, or transmitted in any form or by any means, electronic, mechanical, or otherwise, without the prior written consent of Marshal Limited. Some companies, names, and data in this document are used for illustration purposes and may not represent real companies, individuals, or data. This document could include technical inaccuracies or typographical errors. Changes are periodically made to the information herein. These changes may be incorporated in new editions of this document. Marshal Limited may make improvements in or changes to the software described in this document at any time. © 1995-2006 Marshal Limited, all rights reserved. U.S. Government Restricted Rights: If the software and documentation are being acquired by or on behalf of the U.S. Government or by a U.S. Government prime contractor or subcontractor (at any tier), in accordance with 48 C.F.R. 227.7202-4 (for Department of Defense (DOD) acquisitions) and 48 C.F.R. 2.101 and 12.212 (for non-DOD acquisitions), the government’s rights in the software and documentation, including its rights to use, modify, reproduce, release, perform, display or disclose the software or documentation, will be subject in all respects to the commercial license rights and restrictions provided in the license agreement. Check Point, FireWall-1, VPN-1, Provider-1, and SiteManager-1 are trademarks or registered trademarks of Check Point Software Technologies Ltd. Firewall Suite, MailMarshal, Security Reporting Center, and WebMarshal are trademarks or registered trademarks of Marshal Limited. All other company and product names mentioned are used only for identification purposes and may be trademarks or registered trademarks of their respective companies.

Introduction
NetIQ MailMarshal 5.5 SMTP provides a comprehensive tool to control spam based on an extensive array of functionality. The two key concepts are detection and management. MailMarshal SMTP uses technologies that enable high spam detection rates and few false positives, with easy administration. And it does this within the context of an integrated email content management package. MailMarshal is more than an anti-spam system – it provides organizations with the means to control all email content, including spam, viruses, text, and attachments, within a rules-based framework. New in MailMarshal 5.5 SMTP are the SpamCensor and Category Scripts. The SpamCensor is a unique spam detection system that draws upon a range of analysis techniques to determine whether an email message is spam. This paper outlines how you can configure MailMarshal 5.5 SMTP, the SpamCensor, and Category Scripts for optimum results in the battle against spam.
This white paper focuses on the tuning and customization of the new anti-spam features. For more information on existing features such as TextCensor blacklists, whitelists, anti-relay, anti-spoofing, DNS Blacklists and reverse DNS lookups, please refer to the MailMarshal User Guide.
What is the SpamCensor?
The SpamCensor is a heuristic filter that utilizes a range of advanced techniques to identify spam. Much more than a simple key word filter, it utilizes the following:
• Detailed header analysis. This technique closely examines email message headers for the telltale signs of spammers. The SpamCensor looks for hundreds of typical indicators of spam, including such things as missing To: or From: addresses, invalid dates, the presence of numbers in addresses, spaces in unusual places, or bulk mailer footprints.
• Advanced analysis of message content. The SpamCensor filter performs advanced searches of message content. It searches for thousands of preset spam patterns such as “get rich quick”, multiple “$”characters in a row, or g a p p y text. It has rules that target different areas of each message, including plain text, raw html, and URL links. The SpamCensor also strips html tags prior to word searches – essential as spammers often obfuscate messages with bogus html tags.
• Message composition. The message size and composition is checked. Spam is not typically large, and often has only an HTML part. This information is used alongside numerous other indicators.
• DNS lookups of blacklists. The SpamCensor can also query DNS blacklists to determine whether the sender is blacklisted as a spammer.
As the SpamCensor runs, the results from each of the thousands of tests contribute to an overall spam ‘picture’. A ‘score’ is determined as to whether the message is likely to be spam (Figure 1). Once the score exceeds a threshold, MailMarshal will treat the message as spam and take predefined action. This weighted score approach results in high spam detection rates with few false positives.
Optimizing MailMarshal 5.5 SMTP for Anti-Spam 1
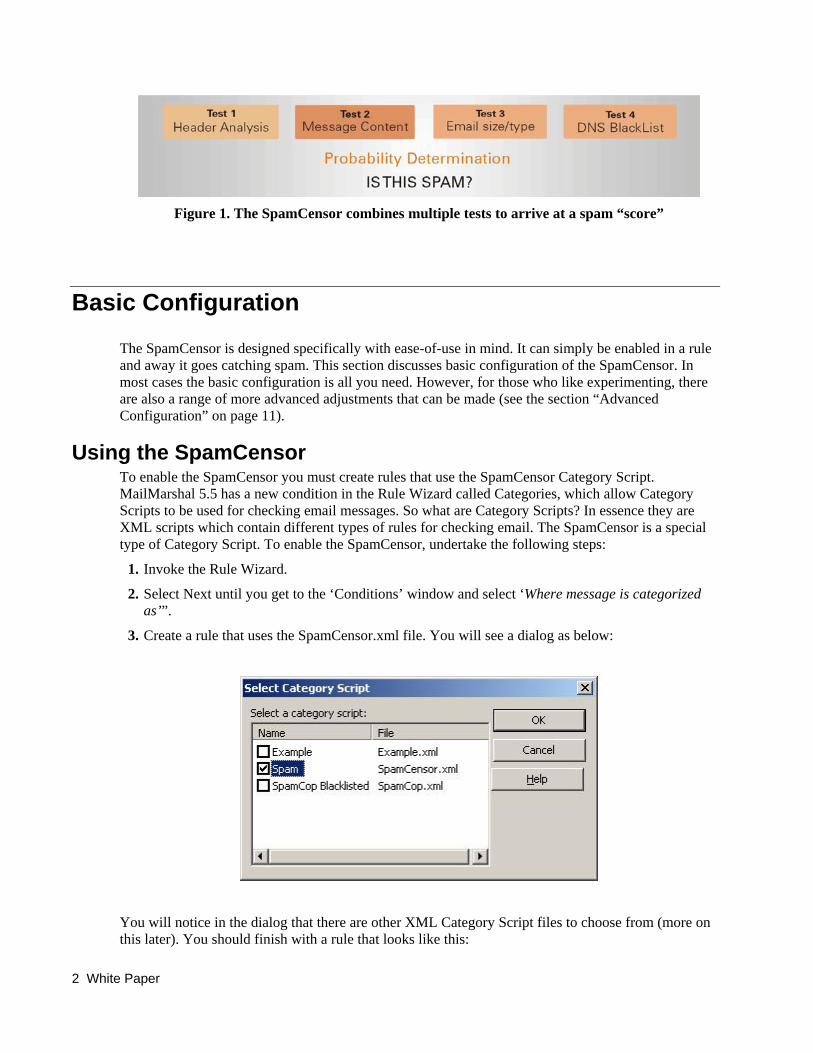
Figure 1. The SpamCensor combines multiple tests to arrive at a spam “score”
Basic Configuration
The SpamCensor is designed specifically with ease-of-use in mind. It can simply be enabled in a rule and away it goes catching spam. This section discusses basic configuration of the SpamCensor. In most cases the basic configuration is all you need. However, for those who like experimenting, there are also a range of more advanced adjustments that can be made (see the section “Advanced Configuration” on page 11).
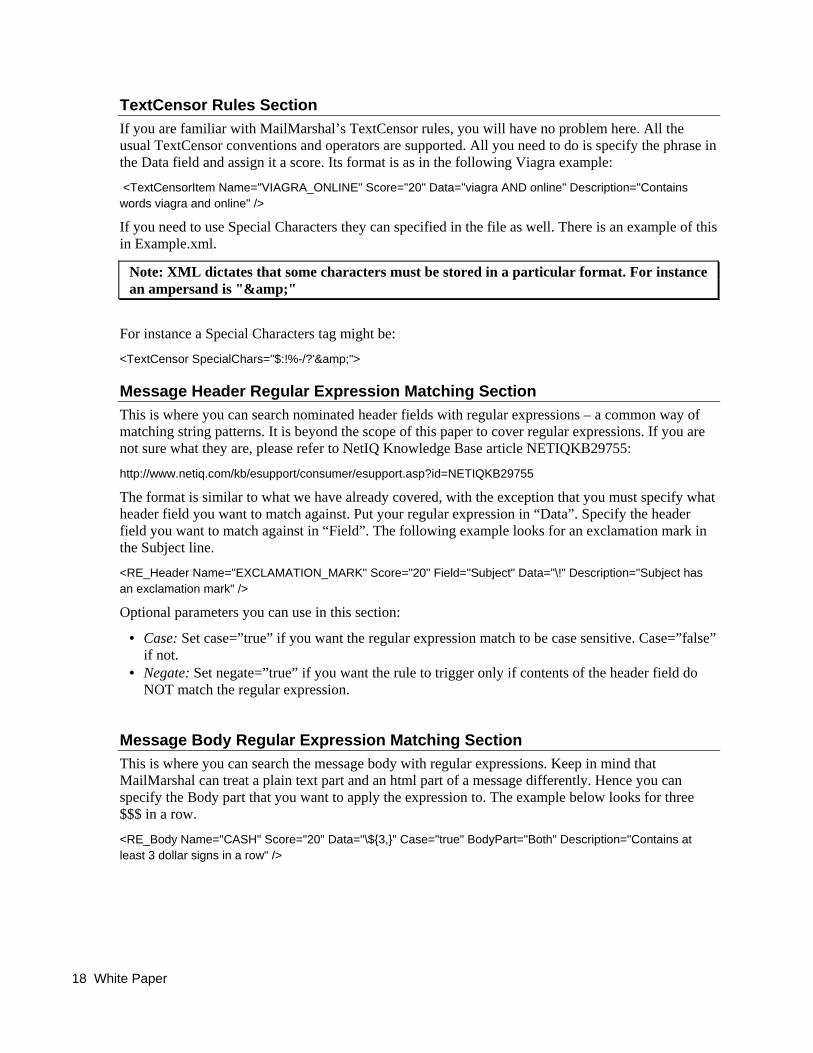
Using the SpamCensor To enable the SpamCensor you must create rules that use the SpamCensor Category Script. MailMarshal 5.5 has a new condition in the Rule Wizard called Categories, which allow Category Scripts to be used for checking email messages. So what are Category Scripts? In essence they are XML scripts which contain different types of rules for checking email. The SpamCensor is a special type of Category Script. To enable the SpamCensor, undertake the following steps:
1. Invoke the Rule Wizard.
2. Select Next until you get to the ‘Conditions’ window and select ‘Where message is categorized as’”.
3. Create a rule that uses the SpamCensor.xml file. You will see a dialog as below:
You will notice in the dialog that there are other XML Category Script files to choose from (more on this later). You should finish with a rule that looks like this:
2 White Paper

Standard Rule: SpamCensor When a message arrives Where message is incoming Where message is categorized as 'Spam' Move the message to 'Spam'
You can use all the usual rule elements to refine your rules. For instance you can combine a whitelist and a size rule to improve accuracy. The whitelist would typically contain lists of newsletter or other trusted or key sources of bulk email. The size would eliminate scanning of emails that are unlikely to be spam. Virtually no spam exceeds 100Kb in size, and less than 0.5% exceeds 50Kb. So your rule might be refined to look similar to this:
Standard Rule: SpamCensor When a message arrives Where message is incoming Except where addressed from 'Friendly Listservers' Where message size is less than '100 KB' And where message is categorized as 'Spam' Move the message to 'Spam'
A note on False Positives Whitelists are an important tool to use. The SpamCensor is a heuristic filter that seeks to identify unsolicited bulk email. It has a very low false positive rate, particularly on person-to-person business email. While NetIQ takes great care in optimizing the SpamCensor, the very nature of the filter means that some solicited bulk email (business related or otherwise) may be wrongly detected as spam. It is therefore essential that business critical bulk email sources are added to your whitelist. See also “Deployment Tips” below.
Reviewing the SpamCensor Result You can check out the log file in the MailMarshal Console for the reason why a particular message gets blocked. You will see an excerpt like the one below.
------ Category <Spam> evaluation result ------ - HTML_BGCOLOR: (1.00) HTML uses background color - HTTP_LINK: (8.00) HTTP link in message - LINKED_IMAGE: (1.00) Contains a link to an image retrieved from the web - META_IMAGE_2_TO_3: (41.00) Has a Linked Image and is under 3Kb - MSG_SIZE_2: (1.00) IsBigger than 2K - TC_REMOVE_NOTICE: (30.00) Spammers removal notice - X_MAILER_OUTLOOK_7: (17.00) X-Mailer: bogus Outlook footprint (7) Total score: (99.0) required (60.0) ------ End of Category <Spam> evaluation ------
The log file illustrates how the SpamCensor works. The filter contains thousands of unique rules that look for different spam indicators in the email message. Each rule has a name, a score and a description. The SpamCensor tests the message against all the rules, then adds up the score. If it exceeds the trigger level then MailMarshal will take whatever action you have defined. In this case the message scored 99 points, well above the 60 points required. It is not uncommon for some spam to exceed 400 points.
Optimizing MailMarshal 5.5 SMTP for Anti-Spam 3

Deployment Tips
Copy Only Once you have your SpamCensor rule ready, you may want to implement it in copy-only mode prior to going live. This enables you to see what effect it is having, and particularly whether it is wrongly blocking any particular “good” email. You can then add any false positives to your whitelist. Thus:
Standard Rule: SpamCensor When a message arrives Where message is incoming Except where addressed from 'Friendly Listservers' Where message size is less than '100 KB' And where message is categorized as 'Spam' Copy the message to 'Spam' And pass message to the next rule for processing.
Trial Tag Period Another option is to tag the subject line (see “Spam Management Tips” below) for a trial period and let users report any obvious spam or false positives to a nominated administrative email address such as [email protected]. This provides feedback so you can identify critical business bulk email sources and build your whitelists, while allowing usual email flow to continue. Once the trial period is over, change the rule to quarantine spam.
4 White Paper

Automatic Updates One of the best things about the SpamCensor is its ease of use. All the administrator needs to do is to enable it in a rule. The SpamCensor filter has been optimized by anti-spam experts at NetIQ, who have trained it using thousands of actual spam messages. However, spam is dynamic. Thousands of new spam messages are created daily, and spammers are constantly devising techniques to avoid spam filtering. So NetIQ has engineered the SpamCensor to be extensible and flexible. The NetIQ anti-spam team is constantly adjusting and improving the SpamCensor’s filters. To remain up-to-date, MailMarshal can perform automatic downloads of new SpamCensor configuration files.
You can configure updates in Server Properties, Updates tab.
There are two options:
1. Check the check box for automatic updates. This will poll a NetIQ Server daily for any new SpamCensor XML or DLL files to download.
2. Leave the box unchecked to perform manual updates. Simply click the Update Now button whenever you wish to update.
Optimizing MailMarshal 5.5 SMTP for Anti-Spam 5

Spam Management Tips
There are many different ways to handle messages once the SpamCensor has identified them as spam. MailMarshal provides you with the flexibility to decide what to do with that spam once it is detected.
Header Rewriting MailMarshal has inbuilt header matching and rewriting ability. This feature can be used to tag the header to flag the message as spam. Then, instead of quarantining the message, the message can be passed through to the end-user email client where automatic rules can determine what to do with it. The message may, for example, be automatically moved to a “Possible Spam” folder for the end user to periodically review at their convenience. The following header rewriting configuration tags the subject line with [SPAM].
This can be used in a rule as follows:
Standard Rule: Modify Subject Line of Spam When a message arrives Except where addressed from 'Friendly ListServers' Where message is categorized as 'Spam' Rewrite message headers using 'Add Spam to Subject' And pass message to the next rule for processing.
6 White Paper

Of course, you are not limited to rewriting the subject line. MailMarshal can also be used to add custom headers. For example, you may want to add a custom header field called X-MailMarshal and add “Spam” in the field. This has the advantage of keeping the subject line intact. And the end-user’s email client (depending on the type) can usually be configured to detect its presence. The rule looks like this:
Standard Rule: SpamCensor When a message arrives Except where addressed from 'Friendly Listservers' Where message size is less than '100 KB' And where message is categorized as 'Spam' Rewrite message headers using 'Add X-Marshal Header' And pass message to the next rule for processing.
To configure the custom header, go to the Rule Wizard. In the Rewrite Message Header action add a custom field as illustrated below. There are standards relating to header fields so be wary. Ensure your field starts with X- and uses alphanumeric characters.
Optimizing MailMarshal 5.5 SMTP for Anti-Spam 7

The second step is to add an entry to the field, in this case “Spam”. This is illustrated below.
The header field will look like this: X-MailMarshal:Spam
Auto-Message Release Another option for managing spam is to quarantine it, and send a special email template to the end user that enables the user to automatically release the message if necessary. Why, you might ask? This is useful if:
• As email administrator, you have little time to manage spam; • You are concerned about possible false positives and want end users to manage their own
quarantined email; and • You are concerned about possible legal implications of porn or similar spam reaching your end
users.
With spam, messages can be quarantined in a folder and a notification sent to the intended recipient. This notification will have a special message hash added to the bottom of the message. The end user can configure rules in their email client to automatically divert these notifications to a special folder for periodic review. When the user replies to the message MailMarshal will decode the hash and release the appropriate message to the user. To configure this in MailMarshal follow the steps in the rest of this section.
8 White Paper

Step 1: Message Templates Create a notification template similar to the one illustrated below. The important components that will need to be exactly as shown are the From: and To: address details.
The body and subject can contain any information you feel is relevant. However the variable {ReleaseProcessRemaining} must be contained in the body of the message somewhere as this will insert the hash that the MailMarshal server will act upon when it receives the reply to this notification.
Optimizing MailMarshal 5.5 SMTP for Anti-Spam 9

Step 2: Notification Rule Create a rule similar to the one illustrated below. This rule will trigger for anyone in the Authorized to Release Spam group where the message is categorized as Spam.
Standard Rule: Notify Users of Spam When a message arrives Where message is incoming Where addressed to 'Authorized to Release Spam' Where message is categorized as 'Spam' Send a 'Automatic Message Release' notification message And move the message to 'Messages Available for Release'
The notification template created earlier will be sent to the affected recipients and the message quarantined into the Messages Available for Release folder (you may need to create this folder).
End users will receive this template with instructions to reply to the message if they would like it released. The message will have the hash at the bottom that will be included in the reply. MailMarshal will validate the hash and release the message to the recipient.
Step 3: Release Rule The next rule to be created is the one that will process release request messages. These messages are the users’ replies to notifications about quarantined messages. They will only be processed if they have an appropriately encoded Hash within the message.
Standard Rule: Release Message When a message arrives Where message is incoming Where addressed both to 'MessageRelease@*' and from 'Authorized to Release Spam' Run the external command 'Message Release' And write log message(s) with 'Release Requests' And delete the message
This rule will only apply to messages addressed to MessageRelease at the current host. Valid requests will be sent to this address because MailMarshal sets this as the Reply-To address when sending a notification. The rule will only apply to messages sent by members of the Authorized to Release Spam group.
When MailMarshal receives this message, it will run the Message Release external command which will decode the hash and release the message to the appropriate recipient. A logging classification will also be written so that reporting on the number of messages released can be performed. Finally the release request message will be deleted.
Array Support If you have multiple MailMarshal servers in an array, you will have to ensure that the release request will always be routed to the server that generated it. In some environments release replies may be routed correctly by DNS. However, if MailMarshal is configured in a load balanced array, load balancing could allocate the reply to any member of the array.
Configuration of message release in array environments is beyond the scope of this paper. Contact NetIQ Technical Support for more information on this subject.
10 White Paper

Advanced Configuration
The remainder of this white paper deals with advanced options. Note that it is not necessary to implement these features. You can implement the SpamCensor as described above and forget it. However for those who like to fine tune, the Category Script architecture provides this flexibility. By altering parameters in the base XML files, you can alter the behavior and functionality of the SpamCensor.
Warning! The information and suggestions in this section are of an advanced nature. You should be comfortable editing XML files to implement these options. Be aware that incorrectly configured XML files could lead to adverse impacts on email flow, including blocking email unnecessarily. Always test your configuration prior to putting it into production in a live environment. NetIQ accepts no responsibility for errors incurred by editing these XML files. This information is provided purely to explain advanced options that may increase anti-spam effectiveness.
SpamCensor File Settings The rules of the SpamCensor are contained in an XML file. More accurately, they are a series of XML files contained in the MailMarshal\Config directory.
SpamCensor.xml This is the master SpamCensor file, and is very simple. Open up the file in notepad or an XML editor. The key part of the file is shown below
<SpamConfig Name="Spam" Description="Main SpamCensor configuration file"> <!--SpamCensor Configuration File parameters--> <Configuration> <Config Name="TriggerLevel" Data="60" /> </Configuration> <Include FileName="SpamFilter.xml" /> <Include FileName="UserDefined.xml" /> </SpamConfig>
Display Name Note the name of the file SpamConfig Name="Spam". This is the name that appears in the Category Script dialog in the Configurator. You can change this name to suit whatever purpose you are applying the script to.
Trigger Level Second, note the overall trigger level setting of 60. A message will be triggered if its score reaches this level. This score can be adjusted up or down.
Be aware that the SpamFilter.xml file is optimized for a trigger level of 60. There is a tradeoff. Altering the trigger level up will result in a lower spam detection rate. Conversely adjusting the trigger level down will result in a higher false positive rate.
Optimizing MailMarshal 5.5 SMTP for Anti-Spam 11

Normally you would adjust the score up to say 80 or 100 (or more) to reduce the aggressiveness of the script for a specific purpose (for instance, see “Running Multiple Scripts” below). However, you also may want to try increasing the trigger level to reduce false positives. Below is a graph that illustrates the relationship between spam detected and the trigger level for a sample of email:
SpamCensor: % Spam Detected Vs Trigger Level
0%
10%
20%
30%
40%
50%
60%
70%
80%
90%
100%
0 20 40 60 80 100 120 140 160 180 200 220 240 260 280 300 320 340 360 380 400
Trigger Level
Pec
enta
ge
Sp
am C
aug
ht
Below is a graph that illustrates the relationship between the false positive rate and the trigger level for a sample of email:
12 White Paper

SpamCensor: % False Positives Vs Trigger Level
0.00%
1.00%
2.00%
3.00%
4.00%
5.00%
6.00%
7.00%
8.00%
9.00%
10.00%
0 10 20 30 40 50 60 70 80 90 100 110 12
Trigger Level
% F
alse
Po
siti
ves
0
As you can see from the above, lowering the trigger level, especially below 40, will result in significantly higher levels of false positives.
Included Files Note the “Include” of the two other files. The SpamFilter.xml file is the special file that that is updated automatically from NetIQ (if you have your auto-update settings enabled). It is the heart of the SpamCensor filter and is maintained and updated by NetIQ. You cannot view or alter its contents. The other file is UserDefined.xml. This is a file where, as the name suggests, the user can adjust some settings.
UserDefined.xml This is a useful file for several reasons. First you can enable DNS Blacklists, covered next. You can also exclude rules via exceptions. And you can even create your own custom rules and add them to the file (see ‘Custom Category Scripts’).
Enabling DNS Blacklists A powerful part of the Category Script architecture is the ability to verify incoming message sources against your favorite DNS blacklist(s).
There are a quite a number of blacklists available on the Internet (over 100 at last count) of varying quality and availability. These lists are usually maintained by non-profit organizations, although some charge for certain services. One of the best known pay-sites is the Mail Abuse Prevention System Real-time Blackhole List (MAPS RBL). As the services use DNS as the method of querying their servers, they are also often referred to as DNS blacklists. Some of the well known services are:
Optimizing MailMarshal 5.5 SMTP for Anti-Spam 13

Common DNS Blacklists MAPS http://www.mail-abuse.org SPAMCOP http://spamcop.net SPEWS http://www.spews.org SPAMHAUS http://www.spamhaus.org
The effectiveness of this method of blocking spam is entirely dependent on the quality of your chosen list, and how often it is updated. The services sometimes attract criticism because occasionally legitimate email hosts can find themselves unwittingly on the list, and it becomes difficult for them to send email! Even so, DNS blacklists are good at blocking spam and should form part of an overall anti-spam strategy.
With MailMarshal 5.5 using DNS Blacklists is now faster and more flexible. You can use them in Category Scripts, either in conjunction with the SpamCensor filter, standalone, or in your own custom script (for the latter see the advanced section “Custom Category Scripts” on page 17).
In the UserDefined.xml file you will see the DNSBlacklists section. This is where each DNS blacklist is listed, and various settings configured. A number of DNS Blacklist providers are defined. You can add others in the list by copying the format below and substituting the correct lookup address in the Data field. Below is an example for SpamCop.
<Evaluations> <Eval Name="SpamCop" Enabled="true" Score="30" Type="DNSLookup" Description="IP Listed on SpamCop" Data="bl.spamcop.net" SkipFirstIPs="0" Except="DNSBlacklistExclusions" /> </Evaluations>
DNS Blacklist Settings
Eval Name: Name of the service. In the example it is SpamCop. You can alter this. Enabled: A switch to enable or disable the check. Enter true to enable, and false to disable. Score: The score you wish to assign to this evaluation. In this case it is set to 30. Type: The type of this evaluation is DNSLookup. Do not alter this. Description: A description of the evaluation. You can alter this.
Data: The address where MailMarshal should query the blacklist database. Get this address from the blacklist provider. In this case it is bl.spamcop.net.
SkipFirstIPs: How many IP addresses to ignore from the received lines starting from the top of the header. Typically if you have a proxying firewall you would set this to “1” so that the IP address of the firewall is not checked. (Default=0, Max=5).
SkipLastIPs: How many IP addresses to ignore starting from the bottom of the header. Only use if you have a specific problem with dial-up or internal addresses. (Default=0, Max=5).
ProcessFirstIPs: The number of IP address to check in the header (after SkipFirstIPs is taken into account). (Default=3, Max=5)
Except: The Exceptions Group name. If you have any IP addresses that should be excluded from checking they should be added to the Group list. In this case the list is called “DNSBlacklistExclusions”.
LookupRetry: Sets the number of retries when checking DNS Blacklist servers, after which MailMarshal will time out and continue processing the message. (Default=4)
Note that these setting names are case sensitive.
14 White Paper

To exclude an IP address from checking, place the IP address and a name (optional), one per line in the exclusions group, as below:
<Group Name="DNSBlacklistExclusions"> 202.37.162.70 Marshal Software 63.88.212.67 NetIQ 63.88.212.66 </Group>
Assigning a score to a DNS Blacklist evaluation
Basically, assign a score that a) is suitable for the trigger level of the script, and b) matches your confidence in the accuracy of your chosen blacklist. When using DNS Blacklists in conjunction with the SpamCensor, remember that the other rules come into play. With a trigger level of 60, and a relatively high confidence in the blacklist, we recommend of score of 30-40. With less confidence in the blacklist, a score of 5-15 is more suitable. What you are aiming for is to have the rules work in combination, so that if say the SpamCensor filter assigns a score of 40 and your Blacklist rule assigns 30, then the chances are good that the message is spam.
Of course you could assign a score of 60 as well, but if so you might as well run the blacklist as a separate script – as every time a message gets a positive result from the blacklist, it would trigger the overall SpamCensor. There is an example of a separate DNS Blacklist script in the MailMarshal\Config directory called SpamCop.xml.
DNS Blacklist Server Downtime and Timeouts
Occasionally DNS Blacklist servers become unavailable. Under this scenario, MailMarshal waits for a period after a failed DNS Blacklist connection and tests connectivity before resuming full use of the server. Messages will be processed without checking against the DNS Blacklist until the server becomes available again. The default number of retries before a connection fails is 4.
Rule Exceptions If you open the UserDefined.xml file you will see a <Group Name="Exceptions"> part. This is where you can make exceptions for specific rules. For example there may be some industry specific rules you may want disabled. For instance your company may be in the health sector and you find the VIAGRA rule triggering all the time. To make a rule exception, add the rule name, one per line, to the <Group Name= “exceptions”> group. You will find the problem rule name in the log file evaluation output result (viewed in the console or in the engine log). It should end up looking something like this:
<Group Name="Exceptions"> TC_WORK TC_VIAGRA </Group>
Rule exceptions are not generally recommended – they are intended for specific problematic cases, not for large scale rule exceptions. They are likely to detract from the overall accuracy of the script.
Optimizing MailMarshal 5.5 SMTP for Anti-Spam 15

When a rule exception is made it means that the rule is disabled. As rules and scores vary, disabling rules will have different effects depending on the nature of the rule. Look at the rule description and make a judgment. Disabling a rule that looks for “Viagra” or specific phrases will have less impact than disabling a rule that looks for generic indicators of spam like a malformed From: address. If you do need to disable a rule, test it first to see what the impact is prior to going live.
Running Multiple Scripts Let’s say you want all messages that score above 100 to be quarantined in a folder, but all messages between 60 – 100 to be tagged with [SPAM] in the subject line. This could enable end users to receive lower scoring messages, and create rules in their email clients to automatically handle the tagged subject line. This can be done by running multiple scripts. Here are the steps to follow:
1. Take two copies of the SpamCensor.xml file and rename one SpamCensor60.xml and the other SpamCensor100.xml.
2. In each file, adjust the trigger level accordingly. So for instance SpamCensor100.xml should have a trigger level of 100. Also adjust the SpamConfigName parameter so the correct name gets displayed in the rule wizard (for instance SpamConfigName = “Spam100”).
3. Create two rules, which use the different SpamCensor.xml files, with the higher trigger level rule first. With the above example, the rules would look something like this:
Standard Rule: SpamCensor 100 When a message arrives Except where addressed from 'Friendly Listservers' Where message size is less than '100 KB' And where message is categorized as 'Spam100' Move the message to 'Spam100'
Standard Rule: SpamCensor 60 Tag When a message arrives Except where addressed from 'Friendly Listservers' Where message size is less than '100 KB' And where message is categorized as 'Spam60' Rewrite message headers using 'Tag Subject As Spam' And pass message to the next rule for processing.
Logging Options
Always Log Spam Result When testing the SpamCensor it is sometimes useful to know what rules triggered when a message did not reach the trigger level. The following edit in the registry will allow the SpamCensor to always log its output. Open regedit, navigate to:
HKEY_LOCAL_MACHINE\SOFTWARE\NetIQ\MailMarshal\Default\Engine
And add the following DWORD entry: LogSpamAlways.
Set the value to 1 (true). Setting the value to 0 (false) will disable the extra logging.
16 White Paper

Append Spam Result to Message Sometimes users want to know what SpamCensor rules a message triggered. The logging result of the SpamCensor can be appended to an email message with a message stamp, or it can be added to a message notification template, using a MailMarshal variable:
{SpamCensorResult}
In either the message stamp or notification template, type a { to view a list of available variables, and select SpamCensorResult.
Custom Category Scripts So far you have seen two types of uses for Category Scripts, the SpamCensor and DNS Blacklists. These can be used together or separately to detect spam.
In fact, there are other ways to create and use your own custom rules and Category Scripts. And they don’t have to be limited to spam detection either. Through the use of standard TextCensor phrases and regular expressions, you can create sophisticated scripts to detect almost anything you want, fast and efficiently. The flexibility is of this system is high. It does require you to be comfortable editing XML files.
Creating custom scripts In the MailMarshal Config directory there is an example of a custom script file called, appropriately, Example.xml. Open this in notepad or an XML editor. This file is an illustration of a category file that you can use for content filtering of email messages. It has a general configuration section, and three sections for different types of rules:
• Configuration Section: Where, as we have seen, the overall trigger level is set.
• TextCensor Section: Where the message can be scanned with usual MailMarshal TextCensor-like phrases
• Message Header section: Where regular expressions can be used to match against specified fields in the header
• Message Body Section: Where regular expressions can be used to match against the message body.
As rules trigger, they add their score to a running total. At the end of the evaluation, an overall score is determined and compared to the trigger level. The advantages of this system are:
1. You can use advanced regular expression matching
2. You can combine TextCensor rules with regular expression rules
3. It is efficient, especially compared to utilizing regular expression matching via a third party external command such as fgrep.
When creating custom Category Scripts, use the Example.xml file as a template, and add or modify rules as appropriate. Remember each of the sections below must have beginning and ending tags, as in Example.xml.
Optimizing MailMarshal 5.5 SMTP for Anti-Spam 17
TextCensor Rules Section If you are familiar with MailMarshal’s TextCensor rules, you will have no problem here. All the usual TextCensor conventions and operators are supported. All you need to do is specify the phrase in the Data field and assign it a score. Its format is as in the following Viagra example:
<TextCensorItem Name="VIAGRA_ONLINE" Score="20" Data="viagra AND online" Description="Contains words viagra and online" />
If you need to use Special Characters they can specified in the file as well. There is an example of this in Example.xml.
Note: XML dictates that some characters must be stored in a particular format. For instance an ampersand is "&"
For instance a Special Characters tag might be:
<TextCensor SpecialChars="$:!%-/?'&">
Message Header Regular Expression Matching Section This is where you can search nominated header fields with regular expressions – a common way of matching string patterns. It is beyond the scope of this paper to cover regular expressions. If you are not sure what they are, please refer to NetIQ Knowledge Base article NETIQKB29755:
http://www.netiq.com/kb/esupport/consumer/esupport.asp?id=NETIQKB29755
The format is similar to what we have already covered, with the exception that you must specify what header field you want to match against. Put your regular expression in “Data”. Specify the header field you want to match against in “Field”. The following example looks for an exclamation mark in the Subject line.
<RE_Header Name="EXCLAMATION_MARK" Score="20" Field="Subject" Data="\!" Description="Subject has an exclamation mark" />
Optional parameters you can use in this section:
• Case: Set case=”true” if you want the regular expression match to be case sensitive. Case=”false” if not.
• Negate: Set negate=”true” if you want the rule to trigger only if contents of the header field do NOT match the regular expression.
Message Body Regular Expression Matching Section This is where you can search the message body with regular expressions. Keep in mind that MailMarshal can treat a plain text part and an html part of a message differently. Hence you can specify the Body part that you want to apply the expression to. The example below looks for three $$$ in a row.
<RE_Body Name="CASH" Score="20" Data="\${3,}" Case="true" BodyPart="Both" Description="Contains at least 3 dollar signs in a row" />
18 White Paper
Optional parameters you can use in this section:
• Case: Set case=”true” if you want the regular expression match to be case sensitive. Case=”false” if not.
• BodyPart: To limit scanning to HTML part only, specify BodyPart="Html". To limit to the plain text part, specify BodyPart="Plain". For both, specify BodyPart="Both".
Using Custom Rules in Userdefined.xml You might have an extremely clever idea for a spam detection rule. In fact you can use the above information to create your own custom rules that extend the SpamCensor’s functionality by adding your own rules to the UserDefined.xml. The steps to follow are:
1. Create your rule, either a TextCensor type rule, a header rule, a body rule (or a combination of all three if you wish).
2. You might want to test your rules in a separate Category Script prior to adding them to your UserDefined.xml file.
3. Once happy that your rules work, give them a suitable score and add them to the UserDefined.xml file. Be careful to add both the group header tags e.g. <TextCensor> and </TextCensor> and the rules. Follow the format in Example.xml.
Simple example of custom rules Sown here are two sample custom rules that could be added in the UserDefined.xml file. The first is a TextCensor rule that looks for the word “lemon”. The second is a simple Body Regular expression rule that looks for a question mark. The resulting block of text to be inserted into the UserDefined.xml file would look like this:
<TextCensor> <TextCensorItem Name="TC_LEMON" Description="Contains Lemon" Score="10" Data="lemon" /> </TextCensor> <RegExpBody> <RE_Body Name="QUESTION_MARK" Data="\?" BodyPart="Both" Description="Question mark" Score="5" /> </RegExpBody> If this block was inserted in UserDefined.xml, these rules would simply be run in conjunction with the SpamCensor. If they triggered, the scores associated with them would be added to the running total.
PTR Record Check Example Here is a tip you won’t find in the manual. You can use MailMarshal’s inbuilt reverse DNS check, and, via a TextCensor or Header rule, scan the header for a Not Verified result.
A reverse DNS lookup is used to resolve a message sender's IP address to a valid host name. It is called reverse DNS because a normal DNS lookup is used the opposite way (to resolve a host name to an IP address). Performing a reverse DNS check on a sender’s IP address is a traditional method of trying to combat spam. Properly configured DNS should include reverse DNS (or PTR) records for email servers, and spam has tended to originate from, or be relayed through, servers without reverse DNS. You can use this information, in conjunction with other rules, as an additional check against spam. Follow these steps.
Optimizing MailMarshal 5.5 SMTP for Anti-Spam 19

1. In Server Properties, Host Validation tab, enable "Validate connecting hosts in DNS" and choose "Accept unknown hosts". This will allow the message through to the MailMarshal engine, but the receiver writes the words "Not Verified" in the received: line in the header. The received line will look something like this:
Received: from Snoopy (Not Verified[192.168.1.1]) by mail.yourcompany.com with NetIQ MailMarshal
2. Create a TextCensor type rule which triggers on the line that is inserted. You will need to tailor this string to the machine name of your own MailMarshal server. You would need a rule that looks like this in your UserDefined.xml file:
<TextCensor>
<TextCensorItem Name="TC_PTR_CHECK" Description="PTR Record: Sender Not Verified" Score="10" Data="received FOLLOWEDBY=7 not verified FOLLOWEDBY=8 mail.yourcompany.com" /> </TextCensor>
3. Instead of (2) above, another option, if you are used to regular expressions, is to use a header rule.
This is a more targeted rule – it only searches Received: lines in the header. It would look like this (again, tailor the machine name to your own MailMarshal server):
<RegExpHeader> <RE_Header Name="RECVD_PTR_CHECK" Score="10" Field="Received" Data=" from\s.+?\(Not\sVerified\[.+\]\)\sby\smail\.yourcompany\.com\swith\sNetIQ\sMailMarshal" Description="Unresolved Reverse DNS Check" />
</RegExpHeader>
The above rule, if triggered, will give a score of 10 to the running total. It pays to keep the score relatively low, as reverse DNS checks, while valid, are not as strong an indicator as they may have been in the past.
More on DNS Blacklists As seen earlier you can use one or more DNS blacklists in combination with the SpamCensor. You can also use Category Scripts and DNS blacklists in the following ways:
Single Blacklist If a message source is listed on a blacklist then take action. Here you would set up a DNS lookup in your Category Script and set the score equal to the trigger level. See SpamCop.xml in the MailMarshal Config directory for an example of this.
Multiple Blacklists If a message source is listed on a combination of blacklists then take action. Here you would set up multiple DNS lookup in your Category Script and set an individual score for each blacklist, depending on your level of confidence with each blacklist. In the following case if a message returns positive for SpamCop, it assigns a score of 60 and is immediately triggered. However, as the other scores are 30, it would take two other Blacklists to return a positive score for a message to be triggered.
Multiple DNS Blacklist File Example:
20 White Paper

Optimizing MailMarshal 5.5 SMTP for Anti-Spam 21
<?xml version="1.0" encoding="utf-8" ?> <MailMarshal Version="5.5" Date="11/04/2003"> <SpamConfig Name="DNSBlackists" Description="DNS Blacklist configuration file"> <Configuration> <Config Name="TriggerLevel" Data="60" /> </Configuration> <Evaluations> <Eval Name="SpamCop" Enabled="true" Score="60" Type="DNSLookup" Description="IP Listed on SpamCop" Data="bl.spamcop.net" SkipFirstIPs="0" Except="DNSBlacklistExclusions" /> <Eval Name="MAPS RBL" Enabled="true" Score="30" Type="DNSLookup" Description="IP Listed on MAPS RBL" Data="blackholes.mail-abuse.org" SkipFirstIPs="0" Except="DNSBlacklistExclusions" /> <Eval Name="Orbs" Enabled="true" Score="30" Type="DNSLookup" Description="IP Listed on Orbs" Data="orbs.dorkslayers.com" SkipFirstIPs="0" Except="DNSBlacklistExclusions" /> <Eval Name="SpamHaus" Enabled="true" Score="30" Type="DNSLookup" Description="IP Listed on Spamhaus" Data="sbl.spamhaus.org" SkipFirstIPs="0" Except="DNSBlacklistExclusions" /> </Evaluations> </SpamConfig> </MailMarshal>
Conclusion
MailMarshal 5.5 SMTP is an effective and capable anti-spam filter by default. It is designed to offer ‘set and forget’ installation and operation. However its architecture is also customizable for the particular needs of individual sites or organizations. Advanced options can be set that can make a marked difference to the overall effectiveness of MailMarshal’s anti-spam capability. We trust you have found this white paper to be useful and informative. If you require further assistance please contact NetIQ Technical Support or your local NetIQ partner.