oracle apex lab 4 creating reports
TRANSCRIPT
www.bisptrainings.com www.bispsolutions.com
Oracle APEX - Creating Reports
Description:
BISP is committed to provide BEST learning material to the beginners and advance learners. In the same series, we have prepared a complete end-to end Hands-on
Beginner’s Guide for Oracle Application Express. The document focuses on creating different types of Reports. Join our professional training program and learn from experts.
History: Version Description Change Author Publish Date 0.1 Initial Draft Shiva Kant Pandey Aug 2012 0.1 Review#1 Amit Sharma Aug 2012
www.bisptrainings.com www.bispsolutions.com
Table of Contents Creating Reports in Oracle Apex Through Application Builder......................................................... 3
Types of Reports Created Through Oracle APEX Application Builder ................................................ 3
Step wise procedure of creating these reports : ................................................................................ 3
Procedure to create Interactive Report .............................................................................................. 4
Functionality Of Action Button ...................................................................................................... 11
Procedure to create Classic Report ................................................................................................. 15
Procedure to create Wizard Report ................................................................................................. 22
www.bisptrainings.com www.bispsolutions.com
Creating Reports in Oracle Apex Through Application Builder Report : A document containing information organized in a narrative, graphic, or tabular form,
prepared on ad hoc, periodic, recurring, regular, or as required basis. Reports may refer to specific periods, events, occurrences, or subjects, and may be communicated or presented in oral or written form.
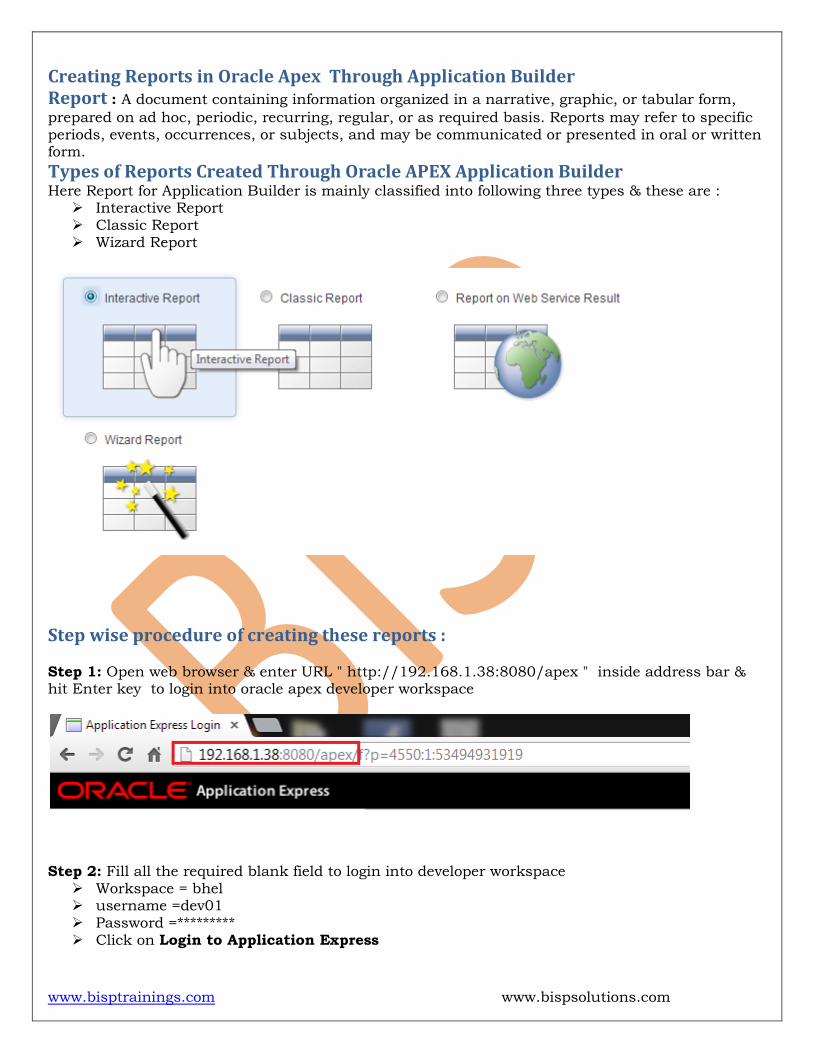
Types of Reports Created Through Oracle APEX Application Builder Here Report for Application Builder is mainly classified into following three types & these are :
Interactive Report Classic Report Wizard Report
Step wise procedure of creating these reports : Step 1: Open web browser & enter URL " http://192.168.1.38:8080/apex " inside address bar & hit Enter key to login into oracle apex developer workspace
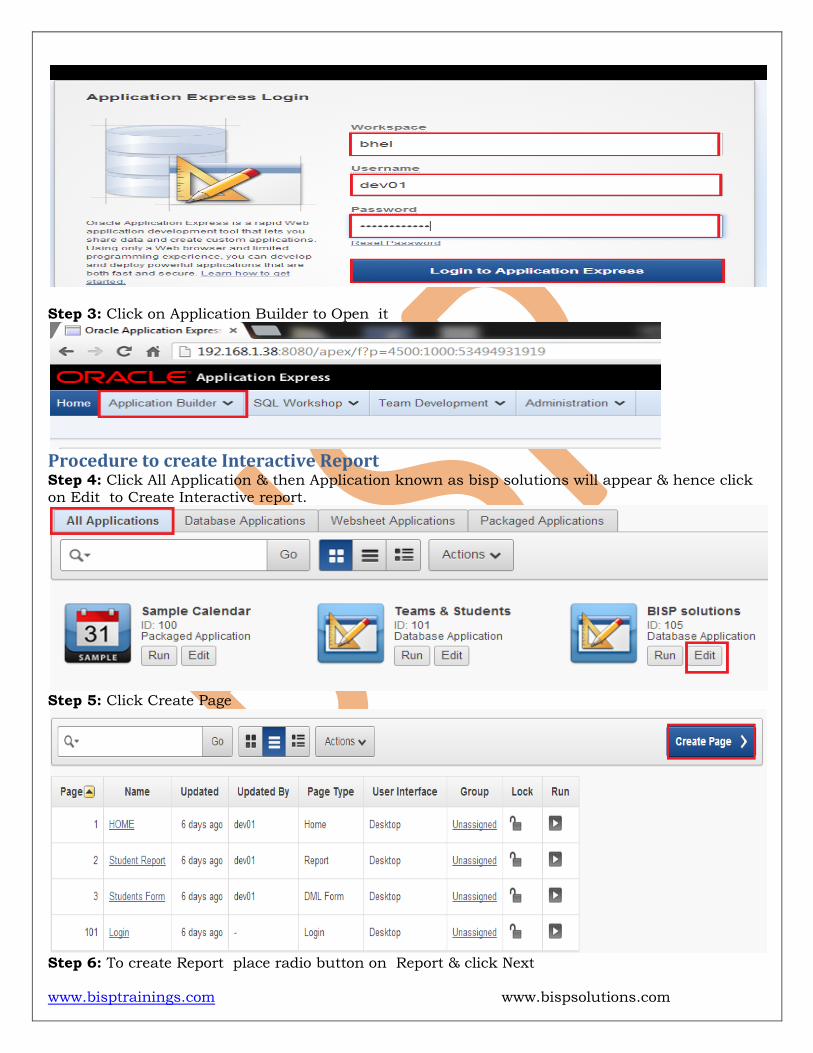
Step 2: Fill all the required blank field to login into developer workspace
Workspace = bhel username =dev01 Password =********* Click on Login to Application Express
www.bisptrainings.com www.bispsolutions.com
Step 3: Click on Application Builder to Open it
Procedure to create Interactive Report Step 4: Click All Application & then Application known as bisp solutions will appear & hence click on Edit to Create Interactive report.
Step 5: Click Create Page
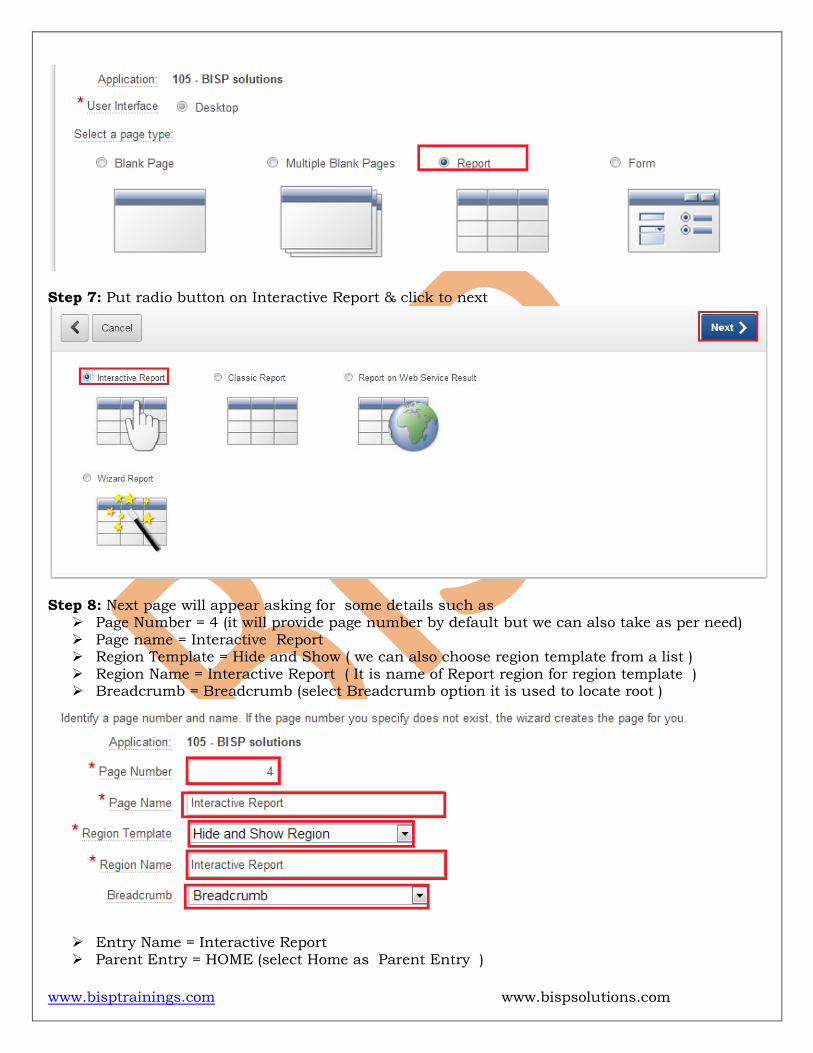
Step 6: To create Report place radio button on Report & click Next
www.bisptrainings.com www.bispsolutions.com
Step 7: Put radio button on Interactive Report & click to next
Step 8: Next page will appear asking for some details such as
Page Number = 4 (it will provide page number by default but we can also take as per need) Page name = Interactive Report Region Template = Hide and Show ( we can also choose region template from a list ) Region Name = Interactive Report ( It is name of Report region for region template ) Breadcrumb = Breadcrumb (select Breadcrumb option it is used to locate root )
Entry Name = Interactive Report Parent Entry = HOME (select Home as Parent Entry )
www.bisptrainings.com www.bispsolutions.com
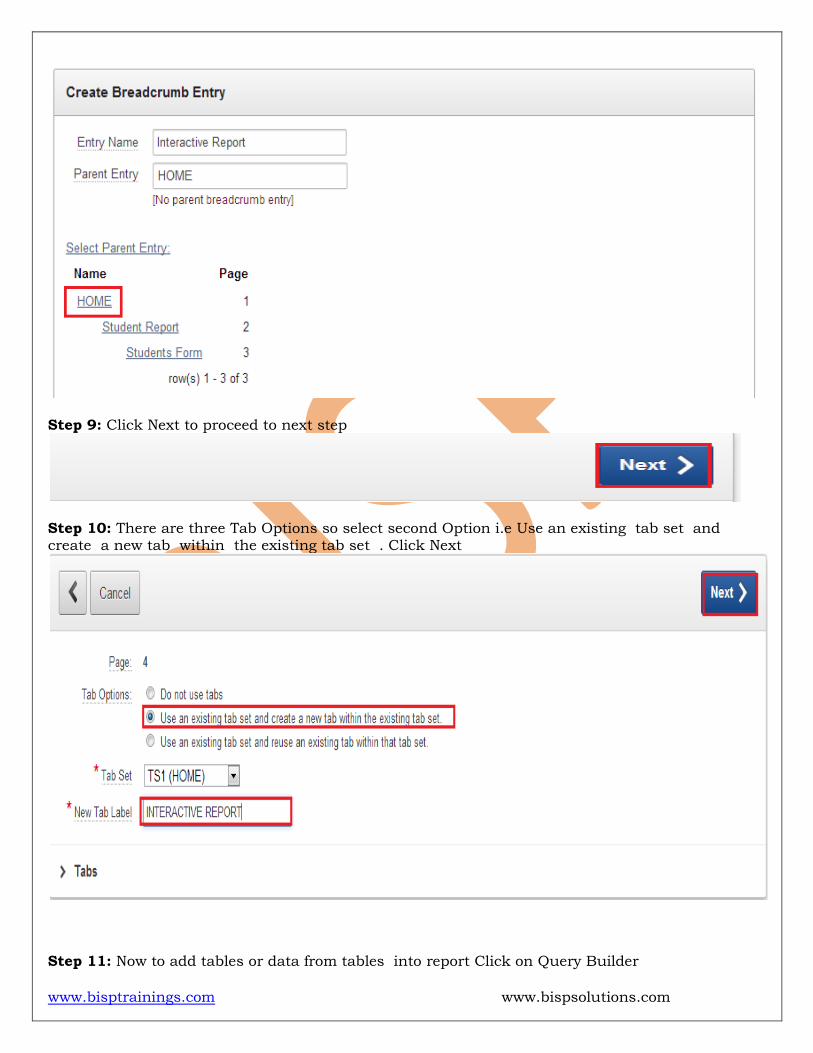
Step 9: Click Next to proceed to next step
Step 10: There are three Tab Options so select second Option i.e Use an existing tab set and create a new tab within the existing tab set . Click Next
Step 11: Now to add tables or data from tables into report Click on Query Builder
www.bisptrainings.com www.bispsolutions.com
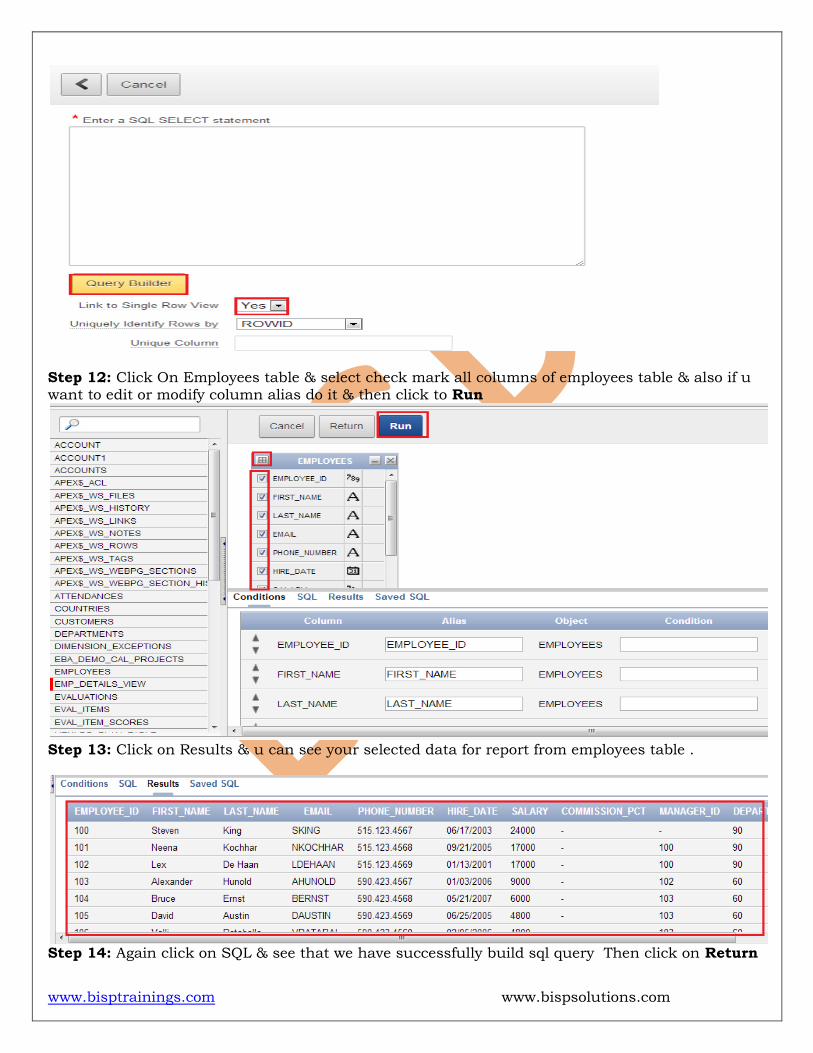
Step 12: Click On Employees table & select check mark all columns of employees table & also if u want to edit or modify column alias do it & then click to Run
Step 13: Click on Results & u can see your selected data for report from employees table .
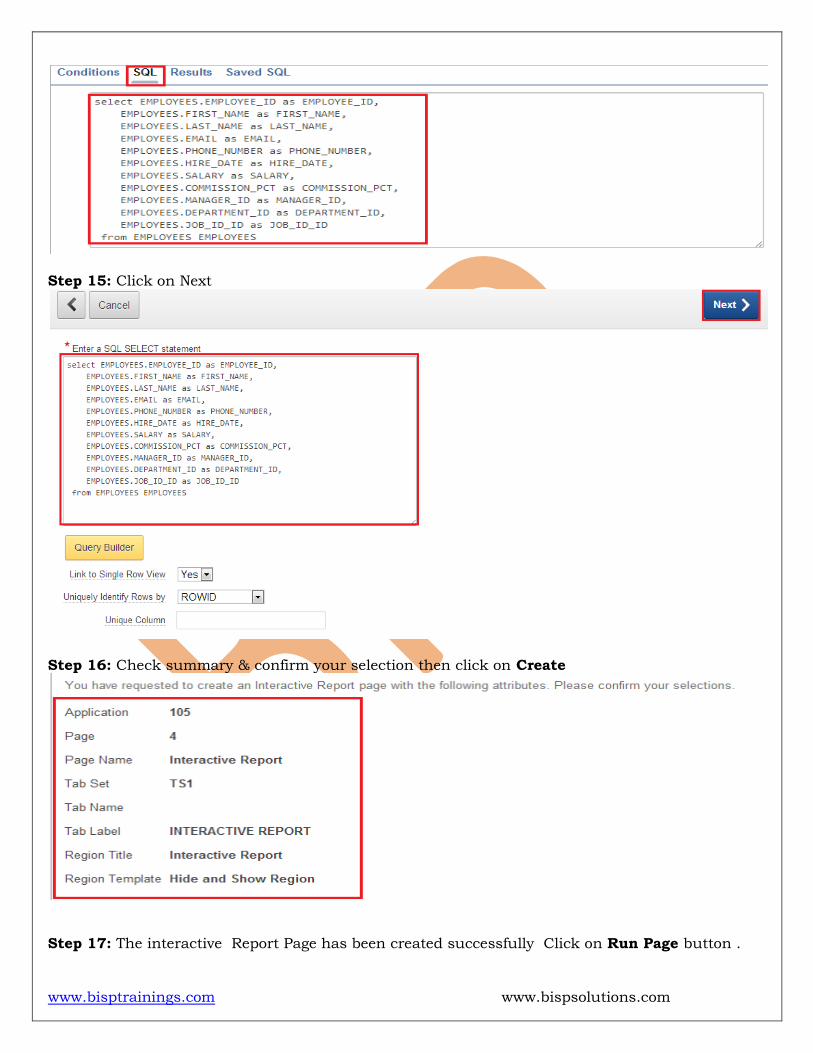
Step 14: Again click on SQL & see that we have successfully build sql query Then click on Return
www.bisptrainings.com www.bispsolutions.com
Step 15: Click on Next
Step 16: Check summary & confirm your selection then click on Create
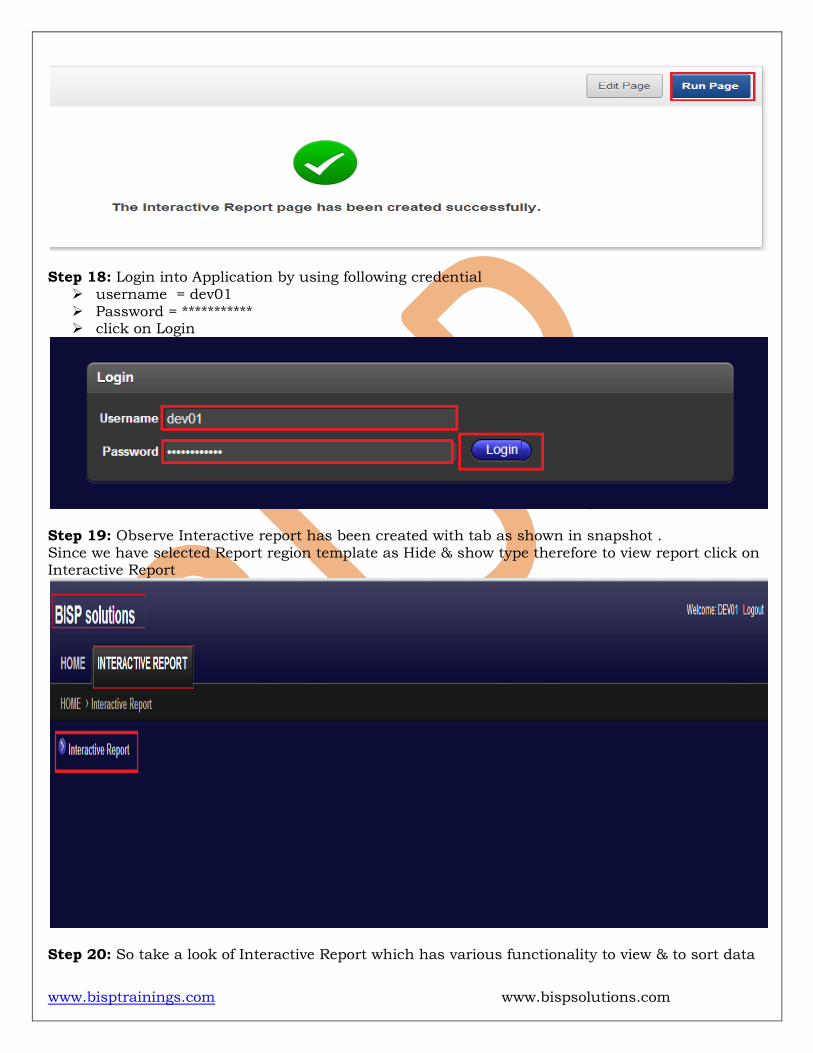
Step 17: The interactive Report Page has been created successfully Click on Run Page button .
www.bisptrainings.com www.bispsolutions.com
Step 18: Login into Application by using following credential
username = dev01 Password = *********** click on Login
Step 19: Observe Interactive report has been created with tab as shown in snapshot . Since we have selected Report region template as Hide & show type therefore to view report click on Interactive Report
Step 20: So take a look of Interactive Report which has various functionality to view & to sort data
www.bisptrainings.com www.bispsolutions.com
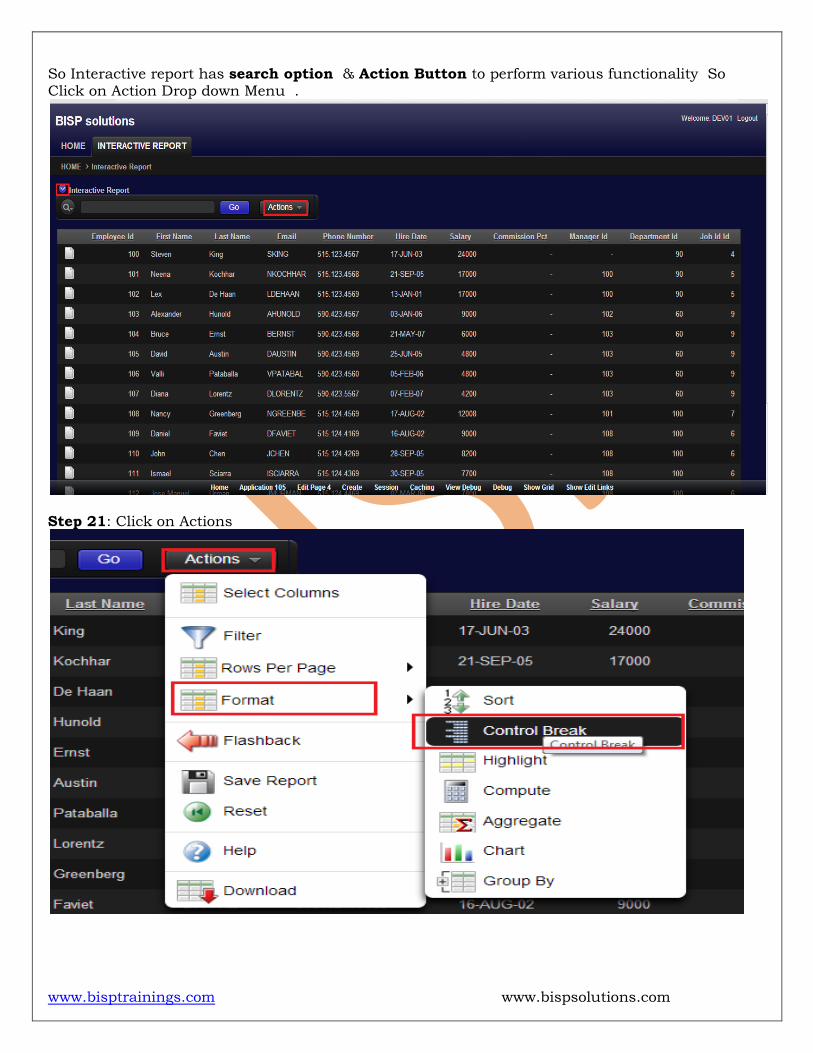
So Interactive report has search option & Action Button to perform various functionality So Click on Action Drop down Menu .
Step 21: Click on Actions
www.bisptrainings.com www.bispsolutions.com
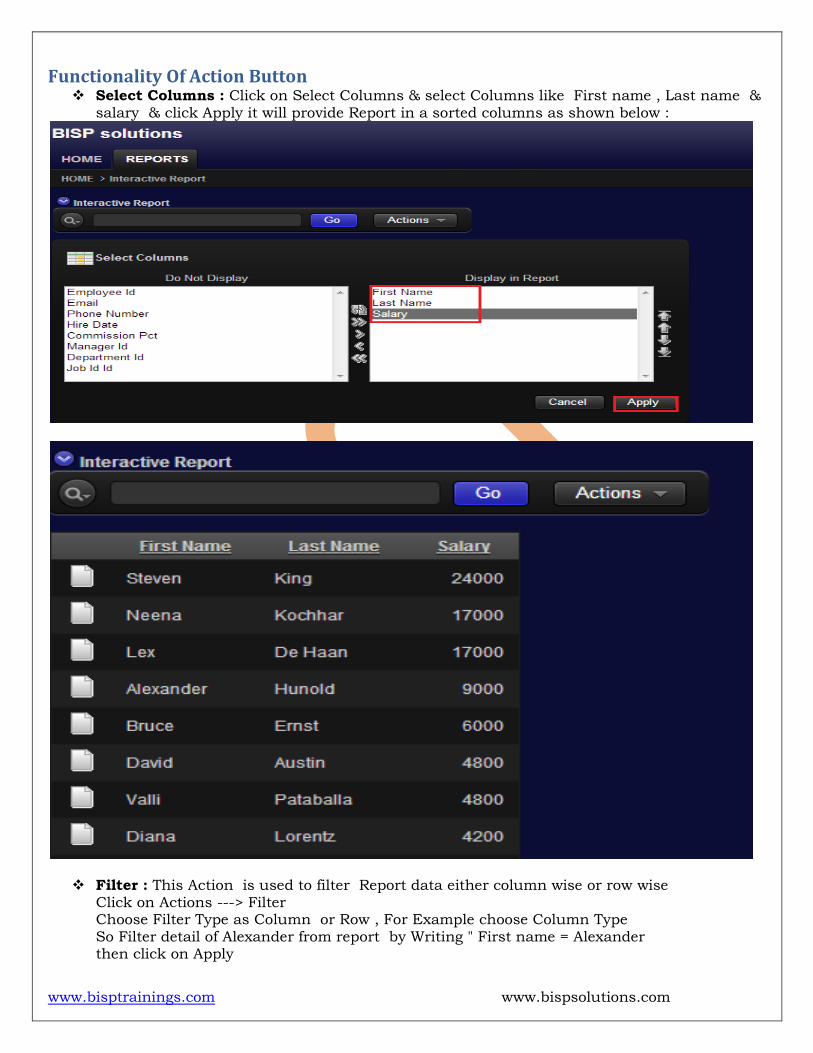
Functionality Of Action Button Select Columns : Click on Select Columns & select Columns like First name , Last name &
salary & click Apply it will provide Report in a sorted columns as shown below :
Filter : This Action is used to filter Report data either column wise or row wise Click on Actions ---> Filter Choose Filter Type as Column or Row , For Example choose Column Type So Filter detail of Alexander from report by Writing " First name = Alexander then click on Apply

www.bisptrainings.com www.bispsolutions.com
Now Observe Filtered data
Rows Per Page : This action is used to select number of rows to display on report page
Format : This Format Action does following tasks:
www.bisptrainings.com www.bispsolutions.com
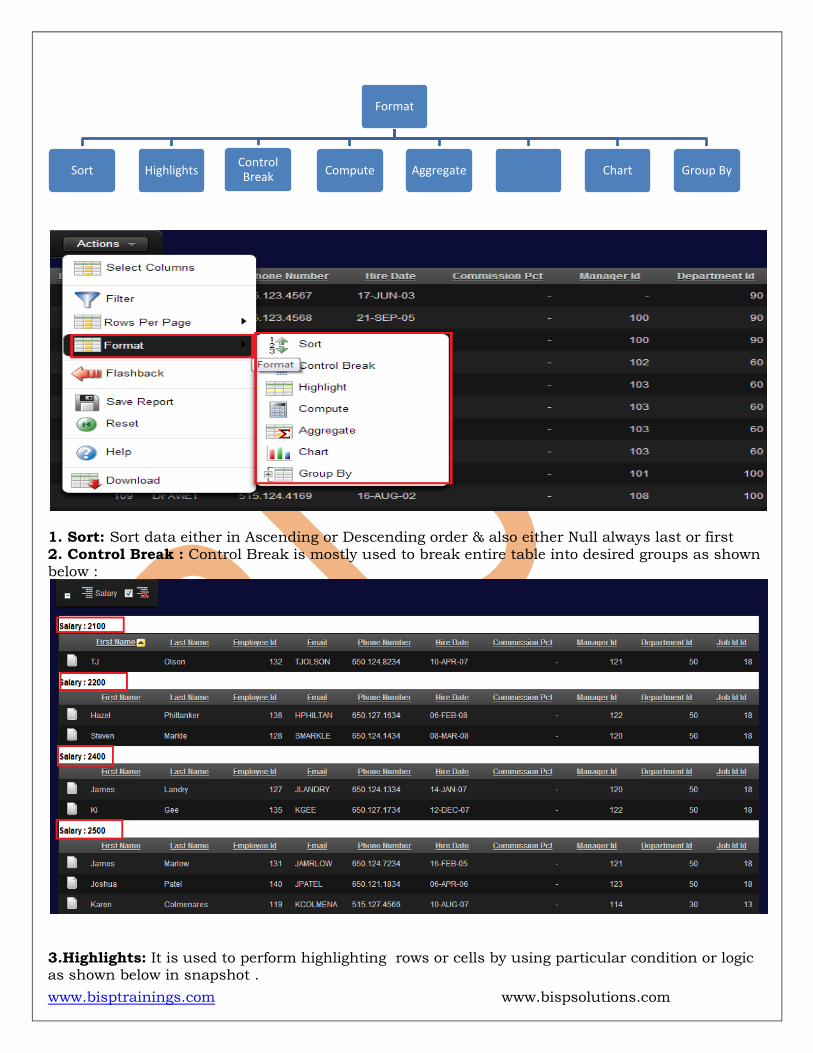
1. Sort: Sort data either in Ascending or Descending order & also either Null always last or first 2. Control Break : Control Break is mostly used to break entire table into desired groups as shown below :
3.Highlights: It is used to perform highlighting rows or cells by using particular condition or logic as shown below in snapshot .
Format
Sort Highlights Control Break Compute Aggregate Chart Group By
www.bisptrainings.com www.bispsolutions.com
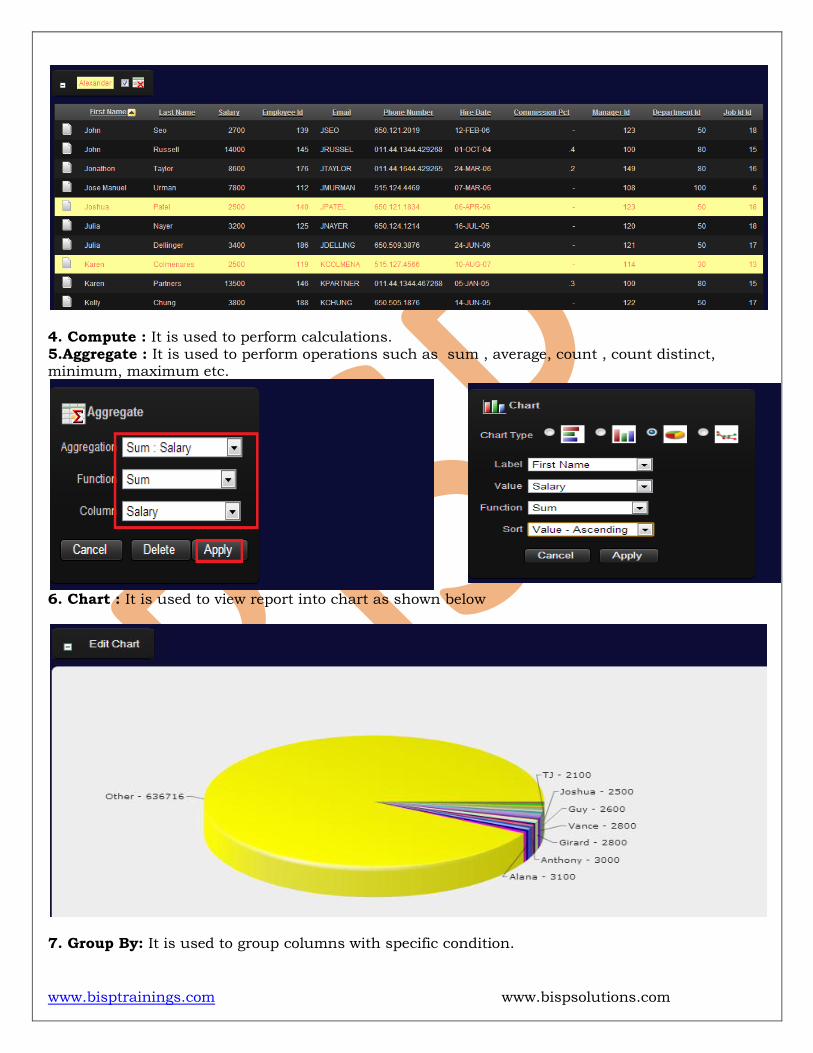
4. Compute : It is used to perform calculations. 5.Aggregate : It is used to perform operations such as sum , average, count , count distinct, minimum, maximum etc.
6. Chart : It is used to view report into chart as shown below
7. Group By: It is used to group columns with specific condition.

www.bisptrainings.com www.bispsolutions.com
Flashback: A flash back query allows you to view data as it existed at a previous point in time .
Save Report : Ii is used to save report for future use . Reset : It is used to restore report to the default setting . Help: It is used for more assistance . Download : It is used to Download report .
Step 22: Click on blank page icon to edit particular row detail.
Procedure to create Classic Report
www.bisptrainings.com www.bispsolutions.com
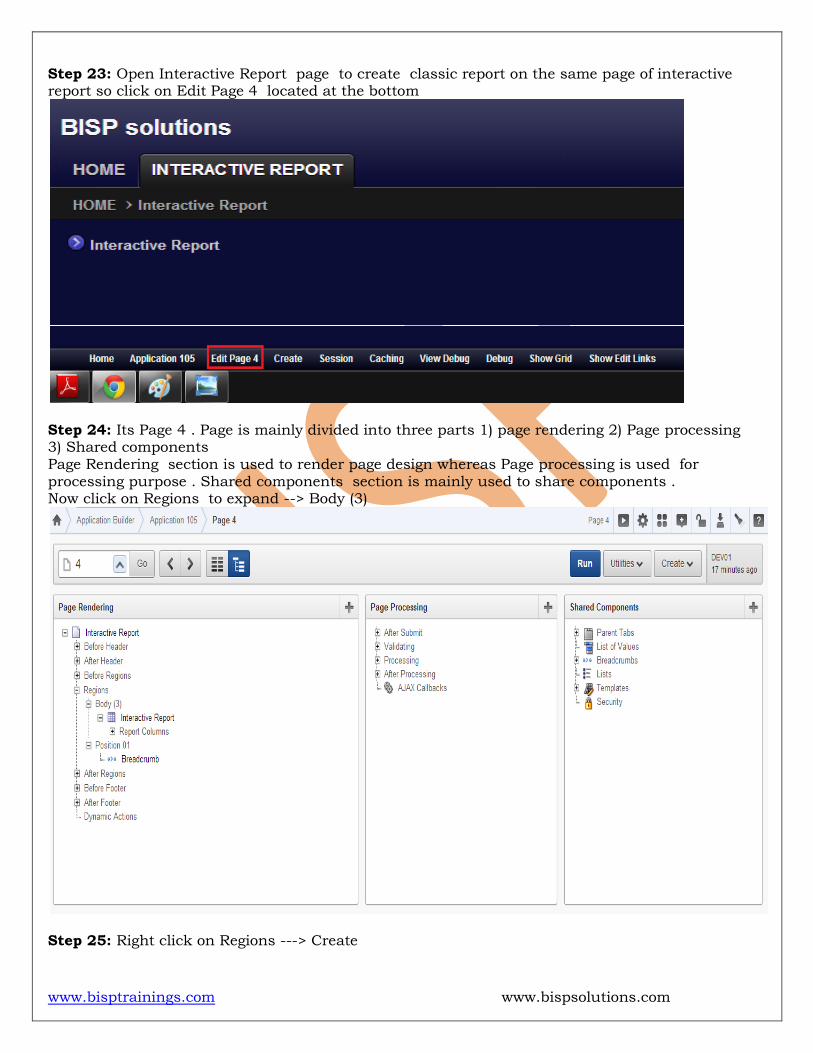
Step 23: Open Interactive Report page to create classic report on the same page of interactive report so click on Edit Page 4 located at the bottom
Step 24: Its Page 4 . Page is mainly divided into three parts 1) page rendering 2) Page processing 3) Shared components Page Rendering section is used to render page design whereas Page processing is used for processing purpose . Shared components section is mainly used to share components . Now click on Regions to expand --> Body (3)
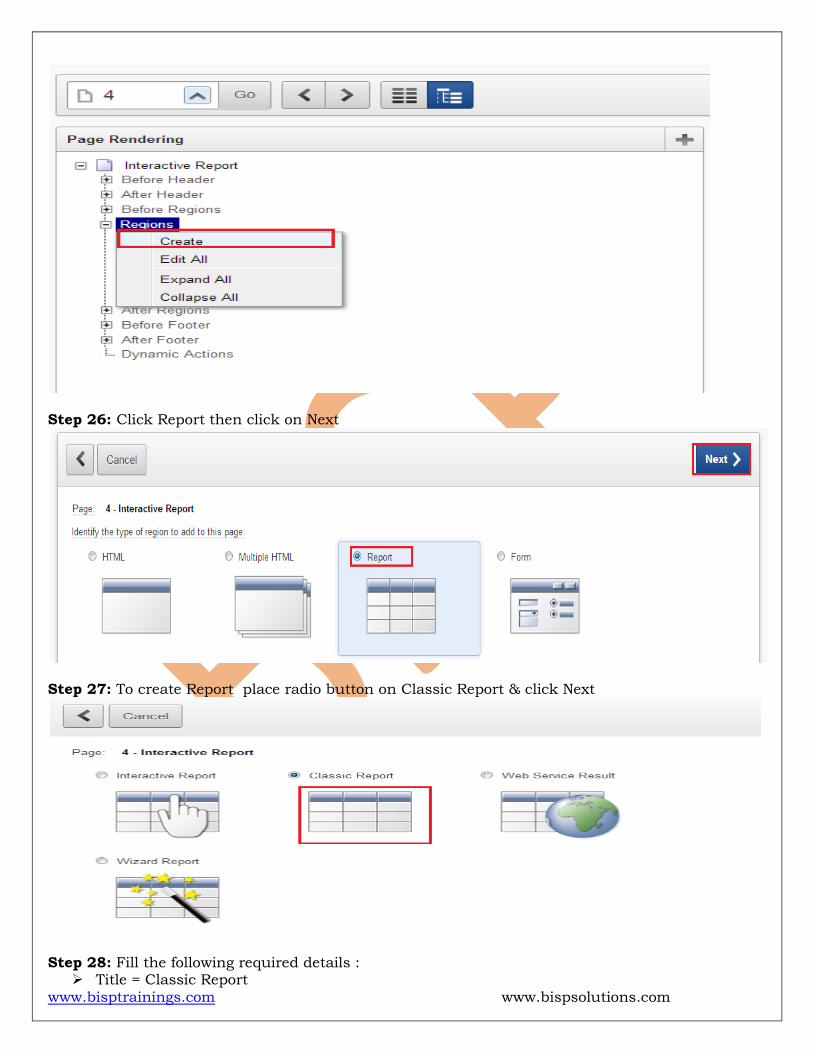
Step 25: Right click on Regions ---> Create
www.bisptrainings.com www.bispsolutions.com
Step 26: Click Report then click on Next
Step 27: To create Report place radio button on Classic Report & click Next
Step 28: Fill the following required details :
Title = Classic Report
www.bisptrainings.com www.bispsolutions.com
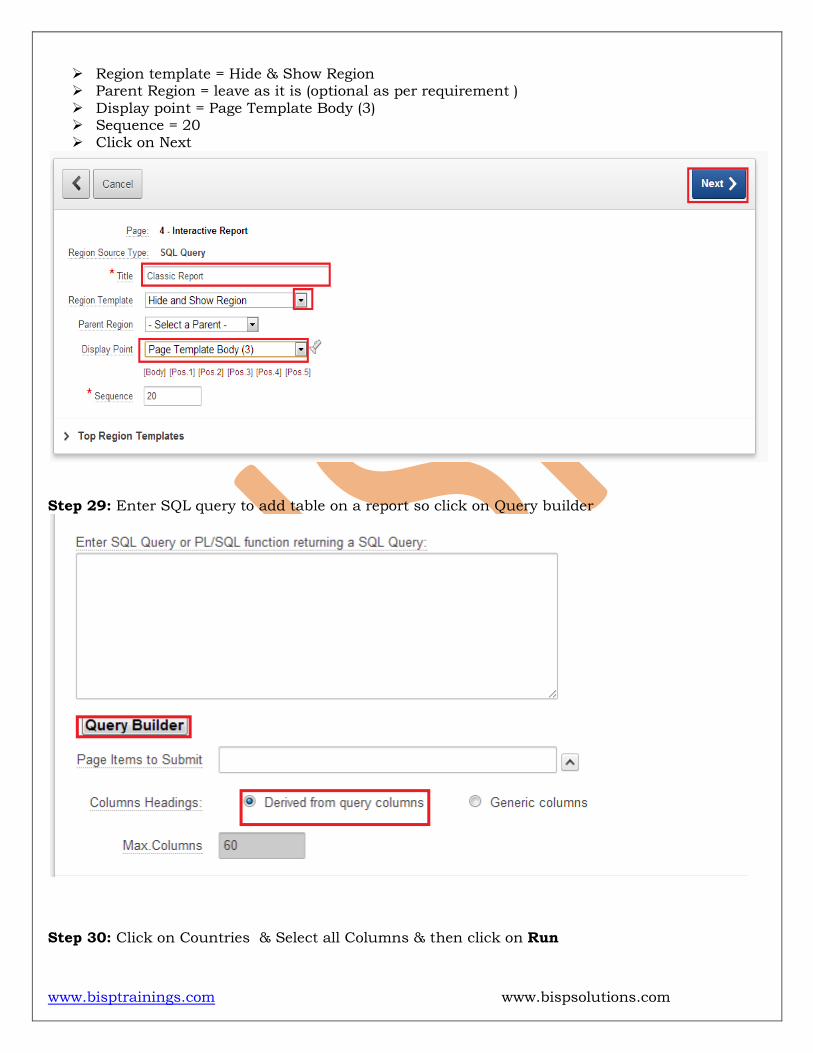
Region template = Hide & Show Region Parent Region = leave as it is (optional as per requirement ) Display point = Page Template Body (3) Sequence = 20 Click on Next
Step 29: Enter SQL query to add table on a report so click on Query builder
Step 30: Click on Countries & Select all Columns & then click on Run
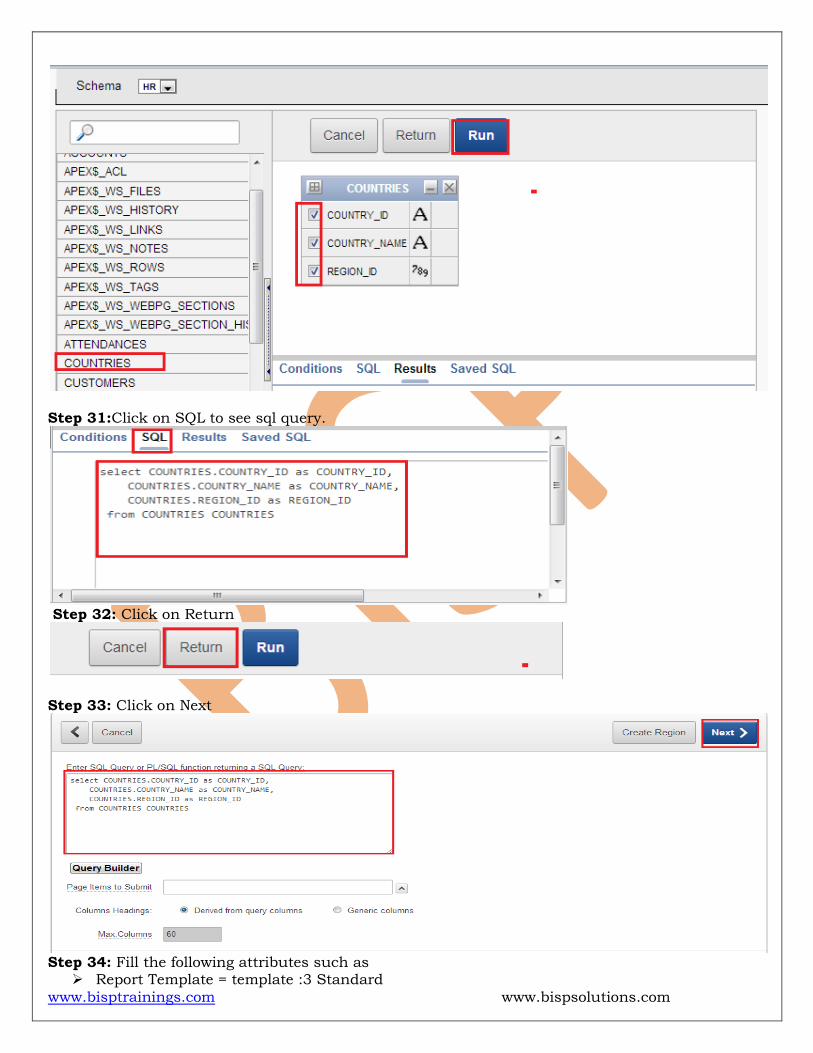
www.bisptrainings.com www.bispsolutions.com
Step 31:Click on SQL to see sql query.
Step 32: Click on Return
Step 33: Click on Next
Step 34: Fill the following attributes such as
Report Template = template :3 Standard
www.bisptrainings.com www.bispsolutions.com
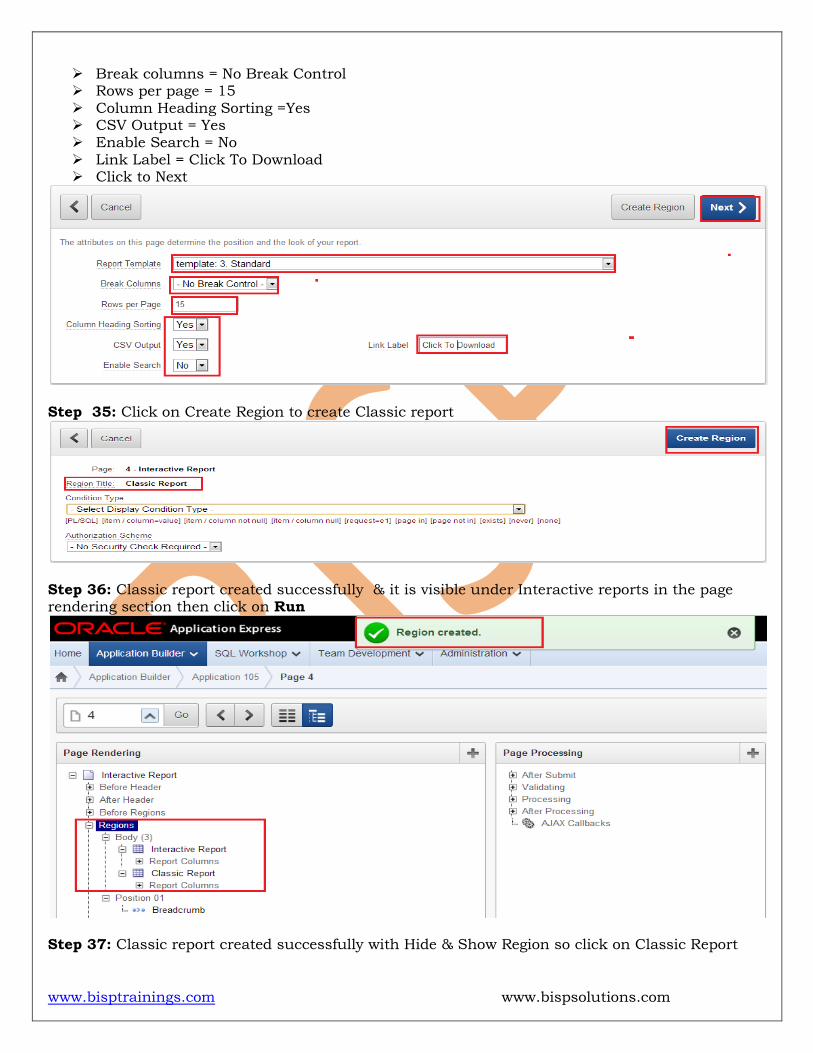
Break columns = No Break Control Rows per page = 15 Column Heading Sorting =Yes CSV Output = Yes Enable Search = No Link Label = Click To Download Click to Next
Step 35: Click on Create Region to create Classic report
Step 36: Classic report created successfully & it is visible under Interactive reports in the page rendering section then click on Run
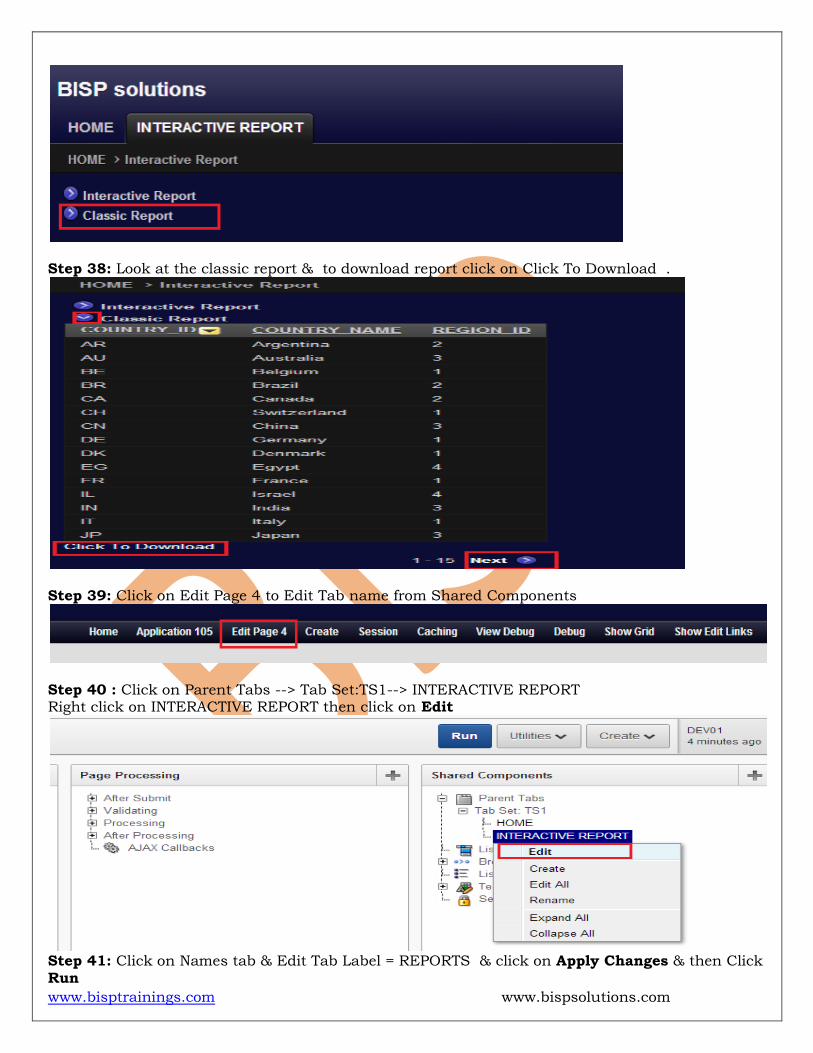
Step 37: Classic report created successfully with Hide & Show Region so click on Classic Report
www.bisptrainings.com www.bispsolutions.com
Step 38: Look at the classic report & to download report click on Click To Download .
Step 39: Click on Edit Page 4 to Edit Tab name from Shared Components
Step 40 : Click on Parent Tabs --> Tab Set:TS1--> INTERACTIVE REPORT Right click on INTERACTIVE REPORT then click on Edit
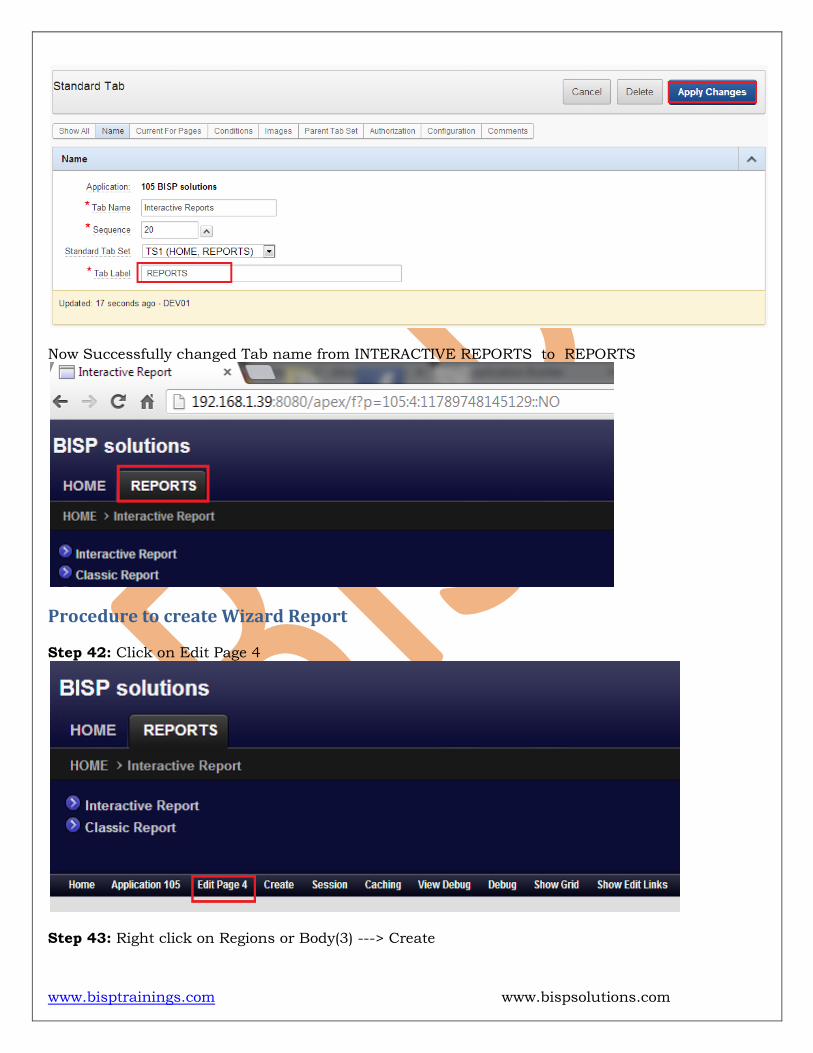
Step 41: Click on Names tab & Edit Tab Label = REPORTS & click on Apply Changes & then Click Run
www.bisptrainings.com www.bispsolutions.com
Now Successfully changed Tab name from INTERACTIVE REPORTS to REPORTS
Procedure to create Wizard Report Step 42: Click on Edit Page 4
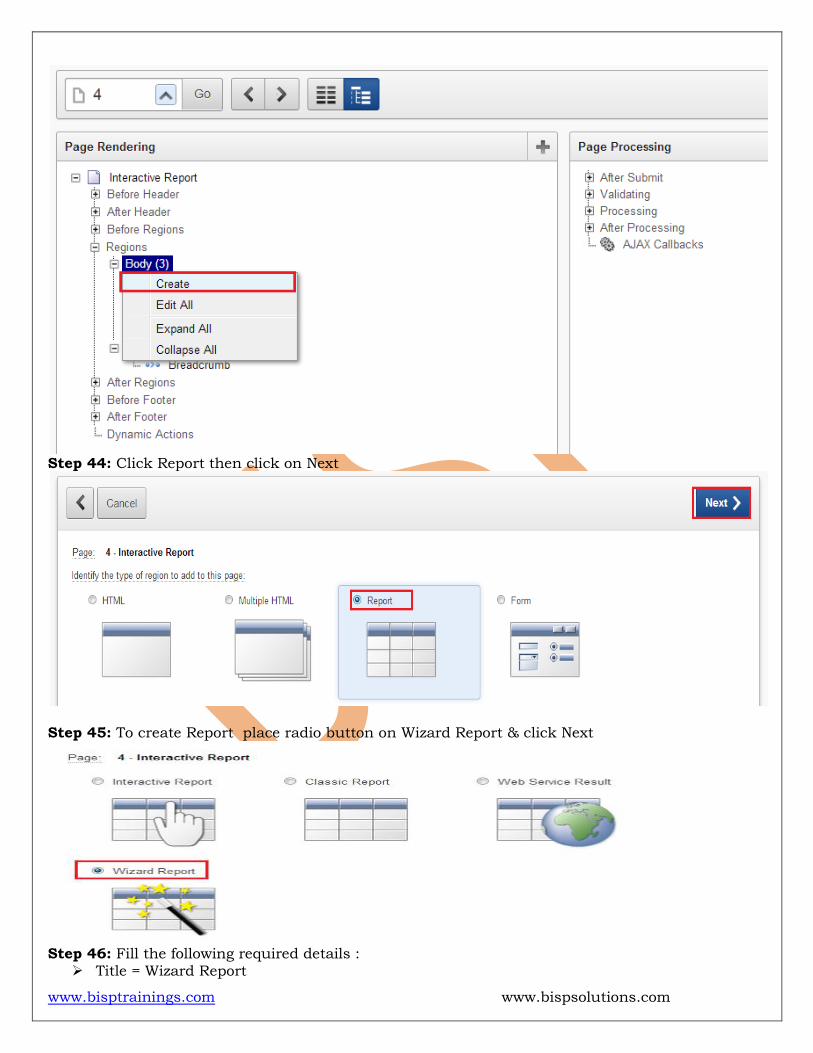
Step 43: Right click on Regions or Body(3) ---> Create
www.bisptrainings.com www.bispsolutions.com
Step 44: Click Report then click on Next
Step 45: To create Report place radio button on Wizard Report & click Next
Step 46: Fill the following required details :
Title = Wizard Report
www.bisptrainings.com www.bispsolutions.com
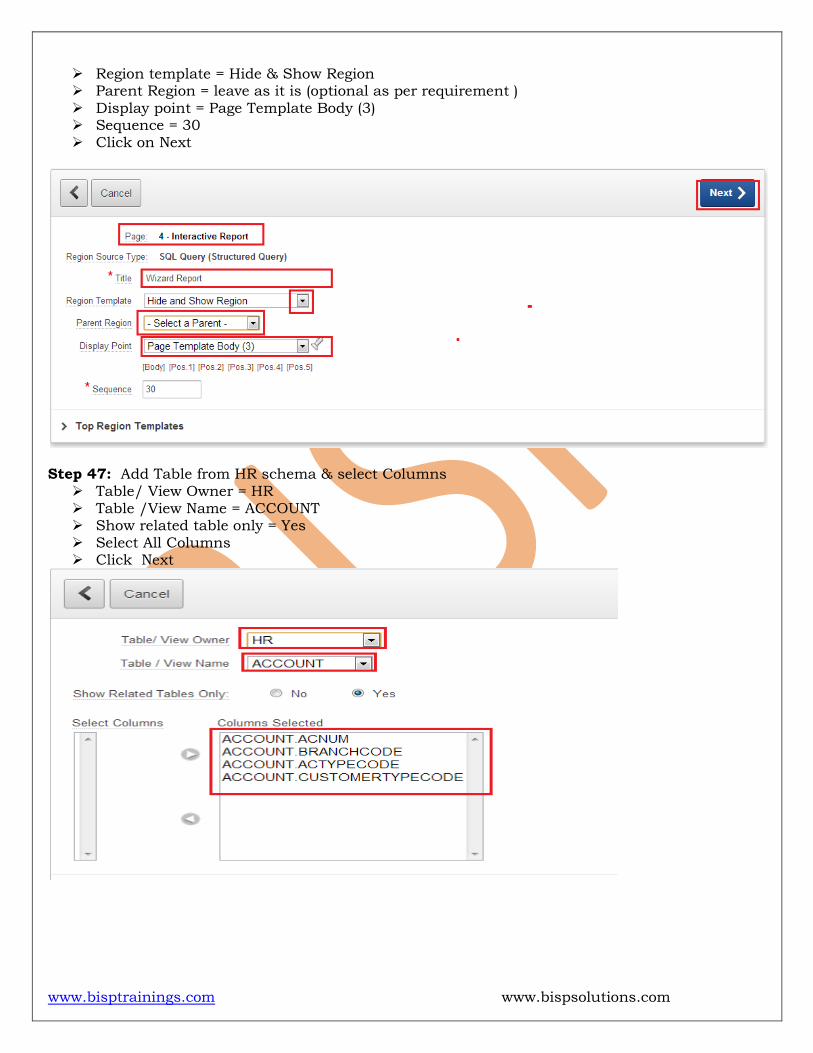
Region template = Hide & Show Region Parent Region = leave as it is (optional as per requirement ) Display point = Page Template Body (3) Sequence = 30 Click on Next
Step 47: Add Table from HR schema & select Columns
Table/ View Owner = HR Table /View Name = ACCOUNT Show related table only = Yes Select All Columns Click Next