oracle bills of material user guide · welcome to the oracle bills of material user’s guide,...
TRANSCRIPT

Oracle� Bills ofMaterial UserGuideRELEASE 11iVOLUME 1
January 2000

Oracle� Bills of Material User Guide Release 11i
The part number for this book is A75087–01.
Copyright � 2000, Oracle Corporation. All rights reserved.
Primary Authors: Bryan Dobson
Major Contributors: Kurt Thompson, Tony Gaughan
Contributors: Girish Divate, Rahul Chitko, Vikram Basappa, Julie Maeyama, Mani Govindaraju
The Programs (which include both the software and documentation) contain proprietary informationof Oracle Corporation; they are provided under a license agreement containing restrictions on use anddisclosure and are also protected by copyright, patent and other intellectual and industrial propertylaw. Reverse engineering, disassembly or decompilation of the Programs is prohibited.
Program Documentation is licensed for use solely to support the deployment of the Programs and notfor any other purpose.
The information contained in this document is subject to change without notice. If you find anyproblems in the documentation, please report them to us in writing. Oracle Corporation does notwarrant that this document is error free. Except as may be expressly permitted in your licenseagreement for these Programs, no part of these Programs may be reproduced or transmitted in anyform or by any means, electronic or mechancial, for any purpose, without the express writtenpermission of Oracle Corporation.
If the Programs are delivered to the US Government or anyone licensing or using the Programs onbehalf of the US Government, the following notice is applicable:
RESTRICTED RIGHTS LEGEND Programs delivered subject to the DOD FAR Supplement are ’commercial computer software’ and use,duplication and disclosure of the Programs including documentation, shall be subject to the licensingrestrictions set forth in the applicable Oracle license agreement. Otherwise, Programs delivered subjectto the Federal Acquisition Regulations are ’restricted computer software’ and use, duplication anddisclosure of the Programs shall be subject to the restrictions in FAR 52.227–19, Commercial ComputerSoftware – Restricted Rights (June, 1987). Oracle Corporation, 500 Oracle Parkway, Redwood City, CA94065.” The Programs are not intended for use in any nuclear, aviation, mass transit, medical, or otherinherently dangerous applications. It shall be licensee’s responsibility to take all appropriate fail–safe,back up, redundancy and other measures to ensure the safe use of such applications if the Programsare used for such purposes, and Oracle disclaims liability for any damages caused by such use of thePrograms.
Oracle is a registered trademark and ConText, Enabling the Information Age, Oracle7, Oracle8,Oracle8i, Oracle Access, Oracle Application Object Library, Oracle Financials, Oracle Discoverer, OracleWeb Customers, Oracle Web Employees, Oracle Workflow, Oracle Work in Process, PL/SQL, Pro*C,SmartClient, SQL*, SQL*Forms, SQL*Loader, SQL*Menu, SQL*Net, SQL*Plus, and SQL*Report aretrademarks or registered trademarks of Oracle Corporation. Other names may be trademarks of theirrespective owners.

iiiContents
Contents
Preface vii. . . . . . . . . . . . . . . . . . . . . . . . . . . . . . . . . . . . . . . . . . . . . . . . . . . . . . . .
Chapter 1 Setting Up 2 – 1. . . . . . . . . . . . . . . . . . . . . . . . . . . . . . . . . . . . . . . . . . . . . . Overview of Setting Up 2 – 2. . . . . . . . . . . . . . . . . . . . . . . . . . . . . . . . . . .
Related Product Setup Steps 2 – 2. . . . . . . . . . . . . . . . . . . . . . . . . . . Setup Flowchart 2 – 4. . . . . . . . . . . . . . . . . . . . . . . . . . . . . . . . . . . . . . Setup Checklist 2 – 6. . . . . . . . . . . . . . . . . . . . . . . . . . . . . . . . . . . . . . Setup Steps 2 – 7. . . . . . . . . . . . . . . . . . . . . . . . . . . . . . . . . . . . . . . . . . Defining Bills of Material Parameters 2 – 13. . . . . . . . . . . . . . . . . . . Creating Alternates 2 – 15. . . . . . . . . . . . . . . . . . . . . . . . . . . . . . . . . . . Creating Custom Deletion Constraints 2 – 16. . . . . . . . . . . . . . . . . . Creating a Department Class 2 – 18. . . . . . . . . . . . . . . . . . . . . . . . . . . Defining a Department 2 – 19. . . . . . . . . . . . . . . . . . . . . . . . . . . . . . . . Assigning Resources to a Department 2 – 21. . . . . . . . . . . . . . . . . . . Defining a Resource 2 – 23. . . . . . . . . . . . . . . . . . . . . . . . . . . . . . . . . .
Overview of Workday Calendar 2 – 28. . . . . . . . . . . . . . . . . . . . . . . . . . . Repeating Workday Patterns 2 – 28. . . . . . . . . . . . . . . . . . . . . . . . . . . Workday Exceptions 2 – 28. . . . . . . . . . . . . . . . . . . . . . . . . . . . . . . . . . Shifts 2 – 29. . . . . . . . . . . . . . . . . . . . . . . . . . . . . . . . . . . . . . . . . . . . . . . Organizations 2 – 31. . . . . . . . . . . . . . . . . . . . . . . . . . . . . . . . . . . . . . . . Creating a Workday Exception Template 2 – 31. . . . . . . . . . . . . . . . Creating a Workday Calendar 2 – 33. . . . . . . . . . . . . . . . . . . . . . . . . . Copying Calendar and Shift Information 2 – 35. . . . . . . . . . . . . . . . Creating a Workday Pattern 2 – 36. . . . . . . . . . . . . . . . . . . . . . . . . . . Creating Shifts and Shift Times 2 – 38. . . . . . . . . . . . . . . . . . . . . . . . . Assigning Workday or Shift Exceptions 2 – 39. . . . . . . . . . . . . . . . . Reviewing the Workday Calendar 2 – 40. . . . . . . . . . . . . . . . . . . . . . Building the Workday Calendar 2 – 41. . . . . . . . . . . . . . . . . . . . . . . . Importing Bills and Routings 2 – 42. . . . . . . . . . . . . . . . . . . . . . . . . .

iv Oracle Bills of Material User’s Guide
Bills of Material Profile Options 2 – 43. . . . . . . . . . . . . . . . . . . . . . . . . . . . Profile Option Settings 2 – 43. . . . . . . . . . . . . . . . . . . . . . . . . . . . . . . .
Chapter 2 Bills of Material 3 – 1. . . . . . . . . . . . . . . . . . . . . . . . . . . . . . . . . . . . . . . . . Overview of Bills of Material 3 – 2. . . . . . . . . . . . . . . . . . . . . . . . . . . . . .
Bill of Material Types 3 – 2. . . . . . . . . . . . . . . . . . . . . . . . . . . . . . . . . Phantoms 3 – 3. . . . . . . . . . . . . . . . . . . . . . . . . . . . . . . . . . . . . . . . . . . Primary and Alternate Bills of Material 3 – 5. . . . . . . . . . . . . . . . . . Item and Routing Revisions 3 – 6. . . . . . . . . . . . . . . . . . . . . . . . . . . . Components 3 – 7. . . . . . . . . . . . . . . . . . . . . . . . . . . . . . . . . . . . . . . . . Access Control by Item Type 3 – 9. . . . . . . . . . . . . . . . . . . . . . . . . . .
Creating a Bill of Material 3 – 10. . . . . . . . . . . . . . . . . . . . . . . . . . . . . . . . . Copying Bill and Routing Information 3 – 14. . . . . . . . . . . . . . . . . . Referencing Common Bills and Routings 3 – 17. . . . . . . . . . . . . . . . Common Bills of Material 3 – 17. . . . . . . . . . . . . . . . . . . . . . . . . . . . . Common Routings 3 – 18. . . . . . . . . . . . . . . . . . . . . . . . . . . . . . . . . . . Assigning Descriptive Elements 3 – 18. . . . . . . . . . . . . . . . . . . . . . . . Creating Reference Designators 3 – 19. . . . . . . . . . . . . . . . . . . . . . . . Assigning Substitute Components 3 – 20. . . . . . . . . . . . . . . . . . . . . . Defining Item Revisions 3 – 21. . . . . . . . . . . . . . . . . . . . . . . . . . . . . . . Defining Bill or Routing Operation Documents 3 – 21. . . . . . . . . . . Attaching Files 3 – 21. . . . . . . . . . . . . . . . . . . . . . . . . . . . . . . . . . . . . . . Checking for Bill Loops 3 – 22. . . . . . . . . . . . . . . . . . . . . . . . . . . . . . .
Mass Changing Bills of Material 3 – 23. . . . . . . . . . . . . . . . . . . . . . . . . . . Viewing an Indented Bill of Material 3 – 28. . . . . . . . . . . . . . . . . . . . . . . . Comparing Bills of Material 3 – 31. . . . . . . . . . . . . . . . . . . . . . . . . . . . . . . Viewing Item Usage 3 – 33. . . . . . . . . . . . . . . . . . . . . . . . . . . . . . . . . . . . . . Bills of Material Field Reference 3 – 35. . . . . . . . . . . . . . . . . . . . . . . . . . . .
Item and Operation Sequence Fields 3 – 35. . . . . . . . . . . . . . . . . . . . Effective Date Fields 3 – 36. . . . . . . . . . . . . . . . . . . . . . . . . . . . . . . . . . Yield Field 3 – 37. . . . . . . . . . . . . . . . . . . . . . . . . . . . . . . . . . . . . . . . . . . Planning Percent Field 3 – 38. . . . . . . . . . . . . . . . . . . . . . . . . . . . . . . . Extended Quantity Field 3 – 38. . . . . . . . . . . . . . . . . . . . . . . . . . . . . . Supply Subinventory and Locator Fields 3 – 39. . . . . . . . . . . . . . . . Mutually Exclusive and Optional Fields 3 – 39. . . . . . . . . . . . . . . . . Check ATP (Available To Promise) Field 3 – 40. . . . . . . . . . . . . . . . . Minimum and Maximum Quantity Fields 3 – 40. . . . . . . . . . . . . . . Basis Field 3 – 41. . . . . . . . . . . . . . . . . . . . . . . . . . . . . . . . . . . . . . . . . . . Shipping Details Fields 3 – 41. . . . . . . . . . . . . . . . . . . . . . . . . . . . . . . .
Bill / Component Validation Rules 3 – 43. . . . . . . . . . . . . . . . . . . . . . . . .

vContents
Creating a Product Family 3 – 46. . . . . . . . . . . . . . . . . . . . . . . . . . . . . . . . Assigning Product Family Members 3 – 47. . . . . . . . . . . . . . . . . . . . Setting Planning Percentages for Product Family Members 3 – 48
Chapter 3 Routings 4 – 1. . . . . . . . . . . . . . . . . . . . . . . . . . . . . . . . . . . . . . . . . . . . . . . Overview of Routings 4 – 2. . . . . . . . . . . . . . . . . . . . . . . . . . . . . . . . . . . .
Primary and Alternate Routings 4 – 2. . . . . . . . . . . . . . . . . . . . . . . . Operations 4 – 4. . . . . . . . . . . . . . . . . . . . . . . . . . . . . . . . . . . . . . . . . . Resource Usage 4 – 5. . . . . . . . . . . . . . . . . . . . . . . . . . . . . . . . . . . . . .
Creating a Routing 4 – 8. . . . . . . . . . . . . . . . . . . . . . . . . . . . . . . . . . . . . . . Switching Between Primary and Alternate Routings 4 – 12. . . . . . Assigning a Completion Subinventory and Locator 4 – 13. . . . . . . Creating a Routing Revision 4 – 13. . . . . . . . . . . . . . . . . . . . . . . . . . . Assigning Operation Resources 4 – 15. . . . . . . . . . . . . . . . . . . . . . . . Rolling Up Costs 4 – 17. . . . . . . . . . . . . . . . . . . . . . . . . . . . . . . . . . . . .
Creating a Standard Operation 4 – 18. . . . . . . . . . . . . . . . . . . . . . . . . . . . . Viewing Resource Usage 4 – 20. . . . . . . . . . . . . . . . . . . . . . . . . . . . . . . . . . Routings Field Reference 4 – 22. . . . . . . . . . . . . . . . . . . . . . . . . . . . . . . . . .
Completion Subinventory and Locator Fields 4 – 22. . . . . . . . . . . . Count Point and Autocharge Fields 4 – 22. . . . . . . . . . . . . . . . . . . . . Schedule Field 4 – 25. . . . . . . . . . . . . . . . . . . . . . . . . . . . . . . . . . . . . . . Charge Type Field 4 – 26. . . . . . . . . . . . . . . . . . . . . . . . . . . . . . . . . . . .
Chapter 4 Deleting Information 5 – 1. . . . . . . . . . . . . . . . . . . . . . . . . . . . . . . . . . . . Deleting Items, Bills, Routings, Components, and Operations 5 – 2. .
Deleting Components and Operations 5 – 6. . . . . . . . . . . . . . . . . . Deletion Constraints 5 – 7. . . . . . . . . . . . . . . . . . . . . . . . . . . . . . . . . . . . . .
Chapter 5 Configure to Order 6 – 1. . . . . . . . . . . . . . . . . . . . . . . . . . . . . . . . . . . . . . Overview of Configure To Order 6 – 2. . . . . . . . . . . . . . . . . . . . . . . . . . .
Configure to Order and Pick–to–Order Steps 6 – 3. . . . . . . . . . . . . Overview of Model and Option Class Bills of Material 6 – 5. . . . . . . .
Configure to Order Environments 6 – 7. . . . . . . . . . . . . . . . . . . . . . Forecast Model / Option Demand 6 – 21. . . . . . . . . . . . . . . . . . . . . . . . . .
Establishing the Production Forecast 6 – 21. . . . . . . . . . . . . . . . . . . . Forecast Control 6 – 21. . . . . . . . . . . . . . . . . . . . . . . . . . . . . . . . . . . . . . Forecast Explosion 6 – 22. . . . . . . . . . . . . . . . . . . . . . . . . . . . . . . . . . . Forecast Consumption 6 – 24. . . . . . . . . . . . . . . . . . . . . . . . . . . . . . . .
Master Schedule Models and Options 6 – 27. . . . . . . . . . . . . . . . . . . . . .

vi Oracle Bills of Material User’s Guide
Production Relief 6 – 27. . . . . . . . . . . . . . . . . . . . . . . . . . . . . . . . . . . . . Shipment Relief 6 – 27. . . . . . . . . . . . . . . . . . . . . . . . . . . . . . . . . . . . . .
Sales Order Management 6 – 29. . . . . . . . . . . . . . . . . . . . . . . . . . . . . . . . . Match and Reserve 6 – 30. . . . . . . . . . . . . . . . . . . . . . . . . . . . . . . . . . . Pricing Configurations 6 – 30. . . . . . . . . . . . . . . . . . . . . . . . . . . . . . . . Order Processing Cycles 6 – 30. . . . . . . . . . . . . . . . . . . . . . . . . . . . . . .
ATP Check 6 – 32. . . . . . . . . . . . . . . . . . . . . . . . . . . . . . . . . . . . . . . . . . . . . . AutoCreate Configuration Items and Final Assembly Orders 6 – 35. .
Configuration Items 6 – 35. . . . . . . . . . . . . . . . . . . . . . . . . . . . . . . . . . AutoCreate by Release Date 6 – 35. . . . . . . . . . . . . . . . . . . . . . . . . . . Item Numbering Methods 6 – 37. . . . . . . . . . . . . . . . . . . . . . . . . . . . . Single Level Bill of Material 6 – 38. . . . . . . . . . . . . . . . . . . . . . . . . . . . Configuration Item Routings 6 – 39. . . . . . . . . . . . . . . . . . . . . . . . . . . Cost Rollup 6 – 40. . . . . . . . . . . . . . . . . . . . . . . . . . . . . . . . . . . . . . . . . . Lead Time Calculation Option 6 – 41. . . . . . . . . . . . . . . . . . . . . . . . . Configuration Item Catalog 6 – 41. . . . . . . . . . . . . . . . . . . . . . . . . . . . Existing Configuration Item Numbers 6 – 44. . . . . . . . . . . . . . . . . . . AutoCreate Final Assembly Orders 6 – 44. . . . . . . . . . . . . . . . . . . . . Manually Create Final Assembly Orders 6 – 44. . . . . . . . . . . . . . . . AutoCreating Configuration Items and Final Assembly Orders . . . . . 6 – 45
Final Assembly Order Completion 6 – 47. . . . . . . . . . . . . . . . . . . . . . . . . Build Final Assembly Orders 6 – 47. . . . . . . . . . . . . . . . . . . . . . . . . . Automatic Inventory Reservations 6 – 47. . . . . . . . . . . . . . . . . . . . . . Manual Inventory Reservations 6 – 47. . . . . . . . . . . . . . . . . . . . . . . . Complete Lot and Serial Number Controlled Assemblies 6 – 48. .
Pick Release and Ship Configuration Orders 6 – 49. . . . . . . . . . . . . . . . . Automatic Pick Release 6 – 49. . . . . . . . . . . . . . . . . . . . . . . . . . . . . . . Shipping Documents 6 – 49. . . . . . . . . . . . . . . . . . . . . . . . . . . . . . . . .
Deactivating Configuration Items 6 – 51. . . . . . . . . . . . . . . . . . . . . . . . . .
Chapter 6 Manufacturing Scheduling 7 – 1. . . . . . . . . . . . . . . . . . . . . . . . . . . . . . . Overview of Manufacturing Scheduling 7 – 2. . . . . . . . . . . . . . . . . . . .
Oracle Manufacturing Products and Scheduling 7 – 2. . . . . . . . . . Detailed Scheduling 7 – 3. . . . . . . . . . . . . . . . . . . . . . . . . . . . . . . . . . . . . . Repetitive Line Scheduling 7 – 4. . . . . . . . . . . . . . . . . . . . . . . . . . . . . . . . Dynamic Lead Time Offsetting 7 – 5. . . . . . . . . . . . . . . . . . . . . . . . . . . . .
Uses of Dynamic Lead Time Offsetting 7 – 5. . . . . . . . . . . . . . . . . . Required Lead Time Information 7 – 7. . . . . . . . . . . . . . . . . . . . . . . . . . . Lead Time Offsetting Computations 7 – 8. . . . . . . . . . . . . . . . . . . . . . . .

viiContents
Chapter 7 Manufacturing Lead Times 8 – 1. . . . . . . . . . . . . . . . . . . . . . . . . . . . . . . Overview of Lead Time Management 8 – 2. . . . . . . . . . . . . . . . . . . . . . .
Computed vs. Assigned Lead Times 8 – 2. . . . . . . . . . . . . . . . . . . . Item Lead Time Attributes 8 – 3. . . . . . . . . . . . . . . . . . . . . . . . . . . . . Manufacturing Lead Time Computations 8 – 6. . . . . . . . . . . . . . . . Lead Time Lot Size 8 – 6. . . . . . . . . . . . . . . . . . . . . . . . . . . . . . . . . . . Routings 8 – 6. . . . . . . . . . . . . . . . . . . . . . . . . . . . . . . . . . . . . . . . . . . . Lead Time Percent 8 – 7. . . . . . . . . . . . . . . . . . . . . . . . . . . . . . . . . . . . Offset Percent 8 – 7. . . . . . . . . . . . . . . . . . . . . . . . . . . . . . . . . . . . . . . . Fixed and Variable Lead Times 8 – 7. . . . . . . . . . . . . . . . . . . . . . . . . Processing Lead Time 8 – 11. . . . . . . . . . . . . . . . . . . . . . . . . . . . . . . . . Offset Computations 8 – 13. . . . . . . . . . . . . . . . . . . . . . . . . . . . . . . . . . Cumulative Lead Time Computations 8 – 14. . . . . . . . . . . . . . . . . . .
Calculating Lead Times 8 – 17. . . . . . . . . . . . . . . . . . . . . . . . . . . . . . . . . . . Rolling Up Cumulative Lead Times 8 – 18. . . . . . . . . . . . . . . . . . . . .
Chapter 8 Reports 9 – 1. . . . . . . . . . . . . . . . . . . . . . . . . . . . . . . . . . . . . . . . . . . . . . . . . Bill of Material Comparison Report 9 – 2. . . . . . . . . . . . . . . . . . . . . . . . .
Report Submission 9 – 2. . . . . . . . . . . . . . . . . . . . . . . . . . . . . . . . . . . Report Parameters 9 – 2. . . . . . . . . . . . . . . . . . . . . . . . . . . . . . . . . . . .
Bill of Material Listing 9 – 3. . . . . . . . . . . . . . . . . . . . . . . . . . . . . . . . . . . . Report Submission 9 – 3. . . . . . . . . . . . . . . . . . . . . . . . . . . . . . . . . . . Report Parameters 9 – 3. . . . . . . . . . . . . . . . . . . . . . . . . . . . . . . . . . . .
Bill of Material Loop Report 9 – 5. . . . . . . . . . . . . . . . . . . . . . . . . . . . . . . Report Submission 9 – 5. . . . . . . . . . . . . . . . . . . . . . . . . . . . . . . . . . . Report Parameters 9 – 5. . . . . . . . . . . . . . . . . . . . . . . . . . . . . . . . . . . .
Bill of Material Structure Report 9 – 7. . . . . . . . . . . . . . . . . . . . . . . . . . . Report Submission 9 – 7. . . . . . . . . . . . . . . . . . . . . . . . . . . . . . . . . . . Report Parameters 9 – 7. . . . . . . . . . . . . . . . . . . . . . . . . . . . . . . . . . . .
Bills of Material Parameters Report 9 – 11. . . . . . . . . . . . . . . . . . . . . . . . . Report Submission 9 – 11. . . . . . . . . . . . . . . . . . . . . . . . . . . . . . . . . . .
Consolidated Bill of Material Report 9 – 12. . . . . . . . . . . . . . . . . . . . . . . . Report Submission 9 – 12. . . . . . . . . . . . . . . . . . . . . . . . . . . . . . . . . . . Report Parameters 9 – 12. . . . . . . . . . . . . . . . . . . . . . . . . . . . . . . . . . . .
Delete Items Report 9 – 15. . . . . . . . . . . . . . . . . . . . . . . . . . . . . . . . . . . . . . Report Submission 9 – 15. . . . . . . . . . . . . . . . . . . . . . . . . . . . . . . . . . . Report Parameters 9 – 15. . . . . . . . . . . . . . . . . . . . . . . . . . . . . . . . . . . .
Department Classes Report 9 – 17. . . . . . . . . . . . . . . . . . . . . . . . . . . . . . . . Report Submission 9 – 17. . . . . . . . . . . . . . . . . . . . . . . . . . . . . . . . . . . Report Parameters 9 – 17. . . . . . . . . . . . . . . . . . . . . . . . . . . . . . . . . . . .

viii Oracle Bills of Material User’s Guide
Department Report 9 – 18. . . . . . . . . . . . . . . . . . . . . . . . . . . . . . . . . . . . . . . Report Submission 9 – 18. . . . . . . . . . . . . . . . . . . . . . . . . . . . . . . . . . . Report Parameters 9 – 18. . . . . . . . . . . . . . . . . . . . . . . . . . . . . . . . . . . .
Item Where Used Report 9 – 19. . . . . . . . . . . . . . . . . . . . . . . . . . . . . . . . . . Report Submission 9 – 19. . . . . . . . . . . . . . . . . . . . . . . . . . . . . . . . . . . Report Parameters 9 – 19. . . . . . . . . . . . . . . . . . . . . . . . . . . . . . . . . . . .
Resource Report 9 – 21. . . . . . . . . . . . . . . . . . . . . . . . . . . . . . . . . . . . . . . . . Report Submission 9 – 21. . . . . . . . . . . . . . . . . . . . . . . . . . . . . . . . . . . Report Parameters 9 – 21. . . . . . . . . . . . . . . . . . . . . . . . . . . . . . . . . . . .
Resource Where Used Report 9 – 22. . . . . . . . . . . . . . . . . . . . . . . . . . . . . . Report Submission 9 – 22. . . . . . . . . . . . . . . . . . . . . . . . . . . . . . . . . . . Report Parameters 9 – 22. . . . . . . . . . . . . . . . . . . . . . . . . . . . . . . . . . . .
Routing Report 9 – 23. . . . . . . . . . . . . . . . . . . . . . . . . . . . . . . . . . . . . . . . . . Report Submission 9 – 23. . . . . . . . . . . . . . . . . . . . . . . . . . . . . . . . . . . Report Parameters 9 – 23. . . . . . . . . . . . . . . . . . . . . . . . . . . . . . . . . . . .
Standard Operation Report 9 – 26. . . . . . . . . . . . . . . . . . . . . . . . . . . . . . . . Report Submission 9 – 26. . . . . . . . . . . . . . . . . . . . . . . . . . . . . . . . . . . Report Parameters 9 – 26. . . . . . . . . . . . . . . . . . . . . . . . . . . . . . . . . . . .
Workday Exception Sets Report 9 – 27. . . . . . . . . . . . . . . . . . . . . . . . . . . . Report Submission 9 – 27. . . . . . . . . . . . . . . . . . . . . . . . . . . . . . . . . . .
Oracle Configurator Concurrent Programs 9 – 29. . . . . . . . . . . . . . . . . . Parameters 9 – 29. . . . . . . . . . . . . . . . . . . . . . . . . . . . . . . . . . . . . . . . . .
Appendix A Oracle Bills of Material Windows and Navigator Paths A – 1. . . . . . Bills of Material Windows and Navigator Paths A – 2. . . . . . . . . . . . . .
Appendix B Oracle Bills of Material Special Menu B – 1. . . . . . . . . . . . . . . . . . . . . Bills of Material Tools menu B – 2. . . . . . . . . . . . . . . . . . . . . . . . . . . . . . . Oracle Bills Of Material Character Mode Forms and CorrespondingGUI Windows B – 3. . . . . . . . . . . . . . . . . . . . . . . . . . . . . . . . . . . . . . . . . . . GLOSSARY 1. . . . . . . . . . . . . . . . . . . . . . . . . . . . . . . . . . . . . . . . . . . . .
����� ����� � �� � � � � � � � � � � � � � � � � � � � � � � � � � � � � � � � � � � � � � � � � � � � � � � � � � � � � � � � � � � � � �

ixPreface
Preface
Welcome to the Oracle� Bills of Material User’s Guide, Release 11.
This user’s guide includes the information you need to work withOracle Bills of Material effectively. It contains detailed informationabout the following:
• Overview and reference information
• Specific tasks you can accomplish using Oracle Bills of Material
• Oracle Bills of Material setup
• Oracle Bills of Material functions and features
• Oracle Bills of Material windows
• Oracle Bills of Material reports and processes
This preface explains how this user’s guide is organized and introducesother sources of information that can help you.

x Oracle Bills of Material User’s Guide
About This User’s Guide
This guide contains overviews as well as task and referenceinformation about Oracle Bills of Material. This guide includes thefollowing chapters:
• Chapter 1 describes how to set up Bills of Material.
Implementation information and procedures are contained inthis chapter.
• Chapter 2 describes different types of bills of material andexplains how to create them.
• Chapter 3 describes how to create routings and standardoperations.
• Chapter 4 explains how to delete item, bill, and routinginformation.
• Chapter 5 explains how to use configure to order functionality toprocess orders for unique product configurations whilemaintaining control of inventory, planning, and cost accounting.
• Chapter 6 describes the three scheduling methods used inManufacturing Scheduling: detailed scheduling, repetitive linescheduling, and dynamic lead time offsetting.
• Chapter 7 explains how to calculate manufacturing lead times.
• Chapter 8 provides information on running Bills of Materialreports.
• The appendices provide you with navigation paths to allwindows and Tools menu options in Bills of Material.

xiPreface
Audience for This Guide
This guide assumes you have a working knowledge of your businessarea’s processes and tools. It also assumes you are familiar with OracleBills of Material. If you have never used Oracle Bills of Material, wesuggest you attend one or more of the Oracle Bills of Material trainingclasses available through World Wide Education. For more informationabout Oracle Bills of Material and Oracle training, see: OtherInformation Sources.
Do Not Use Database Tools to Modify Oracle Applications Data
Because Oracle Applications tables are interrelated, any change youmake using Oracle Applications can update many tables at once. Butwhen you modify Oracle Applications data using anything other thanOracle Applications, you may change a row in one table withoutmaking corresponding changes in related tables. If your tables get outof synchronization with each other, you risk retrieving erroneousinformation and you risk unpredictable results throughout OracleApplications.
When you use Oracle Applications to modify your data, OracleApplications automatically checks that your changes are valid. OracleApplications also keeps track of who changes information. If you enterinformation into database tables using database tools, you may storeinvalid information. You also lose the ability to track who has changedyour information because SQL*Plus and other database tools do notkeep a record of changes.
Consequently, we STRONGLY RECOMMEND that you never useSQL*Plus or any other tool to modify Oracle Applications data unlessotherwise instructed.
Other Information Sources
Here are some other ways you can increase your knowledge andunderstanding of Oracle Bills of Material.
Online Documentation
All Oracle Applications documentation is available online onCD–ROM, except for technical reference manuals. There are two online

xii Oracle Bills of Material User’s Guide
formats, HyperText Markup Language (HTML) and Adobe Acrobat(PDF).
All user’s guides are available in HTML, PDF, and paper. Technicalreference manuals are available in paper only. Other documentation isavailable in PDF and paper.
The content of the documentation does not differ from format to format.There may be slight differences due to publication standards, but suchdifferences do not affect content. For example, page numbers andscreen shots are not included in HTML.
The HTML documentation is available from all Oracle Applicationswindows. Each window is programmed to start your web browser andopen a specific, context–sensitive section. Once any section of theHTML documentation is open, you can navigate freely throughout allOracle Applications documentation. The HTML documentation alsoships with Oracle Information Navigator (if your national languagesupports this tool), which enables you to search for words and phrasesthroughout the documentation set.
Related User’s Guides
Oracle Bills of Material shares business and setup information withother Oracle Applications products. Therefore, you may want to referto other user’s guides when you set up and use Oracle Bills of Material.
If you do not have the hardcopy versions of these manuals, you canread them online using the Applications Library icon or Help menucommand.
Country–Specific User’s Guides
These manuals document functionality developed to meet specific legaland business requirements in more than 25 countries. You should usethe appropriate user’s guide, such as the Oracle Financials forGermany User’s Guide, for more information about using OracleFinancials in a specific country. Consult your country–specific user’sguide, Oracle Financials Regional User’s Guide, and your financialproduct’s manual to effectively use Oracle Financials in your country.
Global Accounting Engine
Use the Global Accounting Engine to replace the transfer to GeneralLedger and create subledger accounting entries that meet additionalstatutory standards within some countries. The Accounting Engine

xiiiPreface
provides subledger balances, legal reports, and bidirectional drilldownfrom General Ledger to the subledger transaction.
Oracle Applications User’s Guide
This guide explains how to enter data, query, run reports, and navigateusing the graphical user interface (GUI) available with this release ofOracle Bills of Material (and any other Oracle Applications products).This guide also includes information on setting user profiles, as well asrunning and reviewing reports and concurrent processes.
You can access this user’s guide online by choosing ”Getting Startedwith Oracle Applications” from any Oracle Applications help file.
Oracle Applications Demonstration User’s Guide
This guide documents the functional storyline and product flows forVision Enterprises, a fictional manufacturer of personal computersproducts and services. As well as including product overviews, thebook contains detailed discussions and examples across each of themajor product flows. Tables, illustrations, and charts summarize keyflows and data elements.
Oracle Configurator User’s Guide
This guide describes how to improve order taking and fulfillmentproductivity by eliminating errors in new sales orders and bills ofmaterials. You can use Oracle Configurator to verify productconfigurations, automatically select configuration options, and generatemanufacturing bills of materials according to configuration constraints.
Oracle Engineering User’s Guide
This guide enables your engineers to utilize the features of OracleEngineering to quickly introduce and manage new designs intoproduction. Specifically, this guide details how to quickly andaccurately define the resources, materials and processes necessary toimplement changes in product design.
Oracle Financials Regional User’s Guide
This manual describes functionality developed to meet specific legaland business requirements that are common to several countries in agiven region. Consult this user’s guide along with your

xiv Oracle Bills of Material User’s Guide
country–specific user’s guide and your financial product’s manual toeffectively use Oracle Financials in your country.
Oracle Flow Manufacturing User’s Guide
This guide describes how to use Oracle’s Flow manufacturingfunctionality to support the processes of flow manufacturing. Itdescribes design features of demand management, line design andbalancing, and kanban planning. It also describes production featuresof line scheduling, productions and kanban execution.
Oracle Inventory User’s Guide
This guide describes how to define items and item information,perform receiving and inventory transactions, maintain cost control,plan items, perform cycle counting and physical inventories, and set upOracle Inventory.
Oracle Master Scheduling/MRP and Supply Chain Planning User’sGuide
This guide describes how to anticipate and manage both supply anddemand for your items. Using a variety of tools and techniques, youcan create forecasts, load these forecasts into master productionschedules, and plan your end–items and their componentrequirements. You can also execute the plan, releasing andrescheduling planning suggestions for discrete jobs and repetitiveschedules.
Oracle Order Management User’s Guide
This guide describes how to enter sales orders and returns, copyexisting sales orders, schedule orders, release orders, create price listsand discounts for orders, run processes and create reports.
Oracle Work in Process User’s Guide
This guide describes how Oracle Work in Process provides a completeproduction management system. Specifically this guide describes howdiscrete, repetitive, assemble–to–order, project, flow, and mixedmanufacturing environments are supported.

xvPreface
Reference Manuals
Oracle Automotive Implementation Manual
This manual describes the setup and implementation of the OracleApplications used for the Oracle Automotive solution.
Oracle Manufacturing and Distribution Open Interfaces Manual
This manual contains up–to–date information about integrating withother Oracle Manufacturing applications and with your other systems.This documentation includes open interfaces found in OracleManufacturing.
Oracle Applications Message Reference Manual
This manual describes all Oracle Applications messages. This manualis available in HTML format on the documentation CD–ROM forRelease 11i.
Oracle Project Manufacturing Implementation Manual
This manual describes the setup steps and implementation for OracleProject Manufacturing.
Oracle Self–Service Web Applications Implementation Manual
This manual describes the setup steps for Oracle Self–Service WebApplications and the Web Applications dictionary.
Installation and System Administration
Oracle Alert User’s Guide
This guide explains how to define periodic and event alerts to monitorthe status of your Oracle Applications data.
Multiple Reporting Currencies in Oracle Applications
If you use the Multiple Reporting Currencies feature to recordtransactions in more than one currency, use this manual beforeimplementing Oracle Bills of Material. This manual details additionalsteps and setup considerations for implementing Oracle Bills ofMaterial with this feature.

xvi Oracle Bills of Material User’s Guide
Multiple Organizations in Oracle Applications
If you use the Oracle Applications Multiple Organization Supportfeature to use multiple sets of books for one Oracle Bills of Materialinstallation, this guide describes all you need to know about setting upand using Oracle Bills of Material with this feature.
Oracle Applications Implementation Wizard User’s Guide
If you are implementing more than one Oracle product, you can use theOracle Applications Implementation Wizard to coordinate your setupactivities. This guide describes how to use the wizard.
Oracle Applications Developer’s Guide
This guide contains the coding standards followed by the OracleApplications development staff. It describes the Oracle ApplicationObject Library constituents needed to implement the OracleApplications user interface described in the Oracle Applications UserInterface Standards. It also provides information to help you build yourcustom Developer/2000 forms so that they integrate with OracleApplications.
Oracle Applications Flexfields Guide
This guide provides flexfields planning, setup and referenceinformation for the Oracle Bills of Material implementation team, aswell as for users responsible for the ongoing maintenance of OracleApplications product data. This manual also provides information oncreating custom reports on flexfields data.
Oracle Applications Installation Manual for Windows Clients
This guide provides information you need to successfully install OracleFinancials, Oracle Public Sector Financials, Oracle Manufacturing, orOracle Human Resources in your specific hardware and operatingsystem software environment.
Oracle Applications Product Update Notes
If you are upgrading your Oracle Applications, refer to the productupdate notes appropriate to your update and product(s) to seesummaries of new features as well as changes to database objects,profile options and seed data added for each new release.

xviiPreface
Oracle Applications Upgrade Preparation Manual
This guide explains how to prepare your Oracle Applications productsfor an upgrade. It also contains information on completing theupgrade procedure for each product. Refer to this manual and theOracle Applications Installation Manual when you plan to upgrade yourproducts.
Oracle Applications System Administrator’s Guide
This manual provides planning and reference information for theOracle Bills of Material System Administrator.
Other Sources
Training
We offer a complete set of formal training courses to help you and yourstaff master Oracle Bills of Material and reach full productivity quickly.We organize these courses into functional learning paths, so you takeonly those courses appropriate to your job or area of responsibility.
You have a choice of educational environments. You can attendcourses offered by Oracle Education Services at any one of our manyEducation Centers, or you can arrange for our trainers to teach at yourfacility. In addition, Oracle training professionals can tailor standardcourses or develop custom courses to meet your needs. For example,you may want to use your organization structure, terminology, anddata as examples in a customized training session delivered at yourown facility.
Support
From on–site support to central support, our team of experiencedprofessionals provides the help and information you need to keepOracle Bills of Material working for you. This team includes yourTechnical Representative, Account Manager, and Oracle’s large staff ofconsultants and support specialists with expertise in your businessarea, managing an Oracle8 server, and your hardware and softwareenvironment.

xviii Oracle Bills of Material User’s Guide
About Oracle
Oracle Corporation develops and markets an integrated line ofsoftware products for database management, applicationsdevelopment, decision support, and office automation, as well asOracle Applications, an integrated suite of more than 45 softwaremodules for financial management, supply chain management,manufacturing, project systems, human resources and sales and servicemanagement.
Oracle products are available for mainframes, minicomputers, personalcomputers, network computers and personal digital assistants,allowing organizations to integrate different computers, differentoperating systems, different networks, and even different databasemanagement systems, into a single, unified computing and informationresource.
Oracle is the world’s leading supplier of software for informationmanagement, and the world’s second largest software company.Oracle offers its database, tools, and applications products, along withrelated consulting, education, and support services, in over 140countries around the world.
Thank You
Thank you for using Oracle Bills of Material and this user’s guide.
We value your comments and feedback. At the end of this guide is aReader’s Comment Form you can use to explain what you like ordislike about Oracle Bills of Material or this user’s guide. Mail yourcomments to the following address or call us directly at (650) 506–7000.
Oracle Applications Documentation ManagerOracle Corporation500 Oracle ParkwayRedwood Shores, CA 94065U.S.A.
Or, send electronic mail to [email protected].

C H A P T E R
1T
1 – 1Setting Up
Setting Up
his chapter provides information on setting up Oracle Bills ofMaterial, including:
• Overview of Setting Up: page 1 – 2
• Setup Steps: page NO TAG
• Defining Bills of Material Parameters: page 1 – 13
• Creating Alternates: page 1 – 15
• Creating Custom Deletion Constraints: page 1 – 16
• Creating a Department Class: page 1 – 18
• Defining a Department: page 1 – 19
• Assigning Resources to a Department: page 1 – 21
• Defining a Resource: page 1 – 23
• Creating a Workday Exception Template: page 1 – 32
• Creating a Workday Calendar: page 1 – 34
• Creating a Workday Pattern: page 1 – 37
• Creating Shifts and Shift Times: page 1 – 39
• Importing Bills and Routings: page 1 – 43
• Bills of Material Profile Options: page 1 – 44

1 – 2 Oracle Bills of Material User’s Guide
Overview of Setting Up
This section contains an overview of each task you need to complete toset up Oracle Bills of Material.
Oracle Applications Implementation Wizard
If you are implementing more than one Oracle Applications product, itis recommended that you use the Oracle Applications ImplementationWizard (AIW) to coordinate your setup activities. The Wizard guidesyou through the setup steps for the applications you have installed,suggesting a logical sequence that satisfies cross–productimplementation dependencies and reduces redundant setup steps.
You can use the Wizard to see a graphical overview of setup steps, readonline help for a setup activity, and open the appropriate setupwindow. You can also document your implementation, for furtherreference and review, by using the Wizard to record comments for eachstep.
Related Product Setup Steps
The following steps may need to be performed to implement OracleBills of Material. These steps are discussed in detail in the Overview ofSetting Up sections of other Oracle product user’s guides.
Set up Underlying Oracle Applications Technology
The Wizard guides you through the entire Oracle Applications setup,including system administration. However, if you do not use theImplementation Wizard, you need to complete several other setupsteps, including:
• Performing system–wide setup tasks such as configuringconcurrent managers and printers
• Managing data security, which includes setting upresponsibilities to allow access to a specific set of business dataand complete a specific set of transactions, and assigningindividual users to one or more of these responsibilities
• Setting up Oracle Workflow

1 – 3Setting Up
See Also
Oracle Applications Implementation Wizard User’s Guide
Oracle Applications System Administrator’s Guide
Oracle Workflow Guide
Inventory Setup Steps
Refer to the Overview of Setting Up section in the Inventory User’sGuide for details of the following setup steps.
Step AIW Reference
Defining Items
See: Defining Items, Oracle Inventory User’s Guide
CommonApplications

1 – 4 Oracle Bills of Material User’s Guide
Setup Flowchart
Some of the steps outlined in this flowchart and setup checklist areRequired and some are Optional. Required Step With Defaults refers tosetup functionality that comes with pre–seeded, default values in thedatabase; however, you should review those defaults and decidewhether to change them to suit your business needs. If you want orneed to change them, you should perform that setup step. You need toperform Optional steps only if you plan to use the related feature orcomplete certain business functions.

1 – 5Setting Up

1 – 6 Oracle Bills of Material User’s Guide
Setup Checklist
The following table lists setup steps and a reference to their locationwithin the Wizard. For a detailed description of AIW reference levels,see the Oracle Applications Implementation Wizard User’s Guide. After youlog on to Oracle Applications, complete these steps to implement Billsof Material:
StepNo.
Required Step AIWReference
Step 1 Required Set Profile Options OracleBills ofMaterial
Step 2 Optional Define Exception Templates OracleBills ofMaterial
Step 3 Required Define and Build your Workday Calendar OracleBills ofMaterial
Step 4 Required Assign Workday Calendar to Organization OracleBills ofMaterial
Step 5 Required Define Bills of Material Parameters OracleBills ofMaterial
Step 6 Optional Define Department Classes OracleBills ofMaterial
Step 7 Optional Define Resources OracleBills ofMaterial
Step 8 Optional Define Resource Groups OracleBills ofMaterial
Step 9 Optional Define Simulation Sets OracleBills ofMaterial
Step 10 Optional Define Locations OracleBills ofMaterial

Step 1
1 – 7Setting Up
Step 11 Optional Define Departments OracleBills ofMaterial
Step 12 Optional Assign Resources and Resource Shifts to Departments OracleBills ofMaterial
Step 13 Optional Define Overheads OracleBills ofMaterial
Step 14 Optional Associate Overheads with Departments OracleBills ofMaterial
Step 15 Optional Define Alternates OracleBills ofMaterial
Step 16 Optional Define Standard Bill of Material Comments OracleBills ofMaterial
Step 17 Optional Define Standard Instructions OracleBills ofMaterial
Step 18 Optional Define Change Order Types OracleBills ofMaterial
Step 19 Optional Define Delete Constraints OracleBills ofMaterial
Setup Steps
For each step, a Context section indicates whether you need to repeatthe step for each set of books, set of tasks, inventory organization, HRorganization, or other operating unit under Multiple Organizations.
Set Profile Options (Required)
Profile options specify how Oracle Bills of Material controls access toand processes data. In general, profile options can be set at one ormore of the following levels: site, application, responsibility, and user.
Oracle Bills of Material users use the Update Personal Profile Optionsform to set profile options only at the user level. System administrators

Step 2
Step 3
�
Step 4
1 – 8 Oracle Bills of Material User’s Guide
use the Update System Profile Options form to set profile options at thesite, application, responsibility, and user levels. See: Oracle Bills ofMaterial Profile Options: page 1 – 44
Context: Perform this step once for each entity, that is, organizationoperating unit, business group, or legal entity.
See Also: Oracle Bills of Material Profile Options: page 1 – 44
Define Exception Templates (Optional)
You can define your own exception templates. When you assign anexception template to your workday calendar, you can assign workdayexceptions to account for plant workday differences—such as holidays,scheduled maintenance, or extended downtime.
Context: Perform this step once per installation.
See Also: Creating a Workday Exception Templates: page 1 – 32
Define and Build your Workday Calendar (Required)
You define a workday calendar for one or more organizations, andassign an exception set to each calendar. For each workday calendarand exception set, you assign a list of holidays or workday exceptions.You then define shifts for your workday calendar, and assign any shiftworkday exceptions.
After you define your workday calendar information, you build yourworkday calendar with the exception set. If you associate one calendarwith multiple organizations, you can build your workday calendarwith multiple exception sets to account for workday differences acrossorganizations.
Attention: If you use Oracle Master Scheduling/MRP, choosethe calendar options 445 weekly quarter pattern or 544 weeklyquarter pattern if you want to report MRP information inweeks and months. Otherwise, if you choose 13 periodcalendar or Regular calendar months, you can only reportMRP information in monthly buckets.
Context: Perform this step once per installation.
See Also: Creating a Workday Calendar: page 1 – 34
Assign Workday Calendar to Organization (Required)
You assign a workday calendar and exception set to each of yourorganizations. You can share the same workday calendar acrossorganizations with either the same or a different exception set for eachorganization.

Step 5
Step 6
Step 7
Step 8
1 – 9Setting Up
Default: If you skip this step, <enter value here> will be used as thedefault value.
Context: Perform this step once per organization.
See Also: Assigning Workday or Shift Exceptions: page 1 – 40
Define Bill of Material Parameters (Required)
You assign the maximum number of bill of material levels for billexplosions, loop checks and implosions. For assemble to ordermanufacturers, you assign configuration item information.
Oracle Cost Management does require that you assign values to eachparameter if you compute an organization’s manufacturing costs basedon bill of material and routing information defined in Oracle Bills ofMaterial.
Context: Perform this step once per organization.
See Also: Defining Bill of Material Parameters: page 1 – 13
Define Department Classes (Optional)
You can define department classes to group departments and toidentify manufacturing cells. This information is for your referenceonly.
Context: Perform this step once per organization.
See Also: Creating a Department Class: page 1 – 18
Define Resources (Optional)
You can define a resource as anything of value, except material andcash, required to manufacture, cost, and schedule products. Resourcesinclude people, tools, labor purchased from a supplier, and physicalspace.
Context: Perform this step once per organization.
See Also: Defining a Resource: page 1 – 23
Define Resource Groups (Optional)
You can group department resources by resource group to facilitate billof resource generation and capacity planning in Oracle Capacity.
Context: Perform this step once per installation.
See Also: Defining a Resource: page 1 – 23

Step 9
Step 10
Step 11
Step 12
Step 13
Step 14
1 – 10 Oracle Bills of Material User’s Guide
Define Simulation Sets (Optional)
You can group deviations to available resource capacity for resourceshifts and use each set in shop floor scheduling and capacity planning.
Context: Perform this step once per installation.
See Also: Defining a Resource: page 1 – 23
Define Locations (Optional)
You define delivery locations for departments with outside processingresources.
Context: Perform this step once per organization.
See Also: Defining a Resource: page 1 – 23
Define Departments (Optional)
You can define departments as areas within your organization whereyou perform work and/or collect costs.
Context: Perform this step once per organization.
See Also: Defining a Department: page 1 – 19
Assign Resources and Resource Shifts to Departments (Optional)
You can assign resources to a department and then assign shifts tothose resources. You can group department resources by resourcegroup, and assign a simulation set with capacity modifications for eachresource shift.
Default: If you skip this step, <enter value here> will be used as thedefault value.
Context: Perform this step once per organizational department.
See Also: Assigning Resources to a Department: page 1 – 21
Define Overheads (Optional)
You can define resource overhead by using the Define Overhead form.Each overhead sub–element has a default basis, default activity, andabsorption account. The overhead absorption account offsets yourcorresponding overhead cost pool in the general ledger.
Context: Perform this step once per organizational resource.
See Also: Defining a Resource: page 1 – 23
Associate Overheads with Departments (Optional)

Step 15
Step 16
Step 17
Step 18
1 – 11Setting Up
You can assign overhead rates or amounts to your department by costtype and department. The cost rollup uses the assigned basis type toallocate the overhead charge. The cost rollup assigns the activity to thecalculated overhead cost. You can define pending rates and use thecost rollup/update process to change the pending rates to Frozenoverhead rates.
Context: Perform this step once per organizational department.
See Also: Defining a Department: page 1 – 19
Define Alternates (Optional)
You can define any number of alternate names that you use when youcreate alternate bills of material and routings. You use alternate billsand routings to produce an identical product using a different bill orrouting. You can apply the same alternate name to a bill of materialand a routing.
Context: Perform this step once per organization.
See Also: Primary and Alternate Bills of Material: page 2 – 5
Define Standard Bill of Material Comments (Optional)
You can define any number of standard bill of material comments thatyou can assign to your bills of material.
Context: Perform this step once per organization.
See Also: Creating a Bill of Material: page 2 – 10
Define Standard Instructions (Optional)
You can define any number of operation instructions that you canassign to a routing operation or standard operation.
Context: Perform this step once per organization.
See Also: Creating a Standard Operation: page 3 – 18
Define Change Order Types (Optional)
You can define mass change order types, using your own terminology,to describe mass changes to your manufacturing bills of material.
Default: If you skip this step, Oracle shipped change order types willbe used as the default value.
Context: Perform this step once per installation.
See Also: Mass Changing Bills of Material: page 2 – 23

Step 19
1 – 12 Oracle Bills of Material User’s Guide
Define Delete Constraints (Optional)
Oracle Bills of Material provides a list of rules to determine if an item,bill of material or routing can be deleted. Each rule insures dataintegrity across all Oracle Manufacturing applications. You can add tothis list with your own business rules to further restrict the entities thatcan be deleted. You write each of your delete constraints as a SQLselect statement that either prevents or lets a user delete an item, bill, orrouting.
Default: If you skip this step, Oracle shipped delete constraints will beused as the default value.
Context: Perform this step once per organization.
See Also: Creating Custom Delete Constraints: page 2 – 23

1 – 13Setting Up
Defining Bills of Material Parameters
Use bill of material parameters to define modes of operation anddefault values for an organization that affect functions such as billdefinition, bill deletion, and assemble–to–order configurationnumbering.
Define bill of material parameters for each organization in which youuse bills or routings. (Bill parameters are specific to, and must bedefined for, each organization.) Doing so ensures access to resource,outside processing, and overhead cost information for certain costmanagement functions.
� To define bill of material parameters:
1. Navigate to the Parameters window.
2. Enter the maximum bill levels to explode. The maximum is 60.
3. For configurations only, enter an inactive status.
4. For configurations only, enter the numbering segment to use whencreating configuration item numbers.
5. Select an automatic or user defined numbering method. A uniqueconfiguration item number is automatically assigned based on thenumbering method you select:

1 – 14 Oracle Bills of Material User’s Guide
Append Sequence: Appends a sequence number to the item segmentyou entered for the numbering segment.
Replace with Sequence: Replace the item segment you entered in thenumbering segment with a sequence number.
Replace with Order, Line Number: Replace the item segment youentered for numbering segment with the sales order and linenumber.
User Defined: Allows you to define a numbering scheme that meetsyour business needs.
6. If you would like Work in Process to maintain the individualoperation sequence numbers for phantom subassemblies, and tocharge their resource and overhead costs to the parent or higherlevel assembly, you set the following two parameters in Oracle Billsof Material:
Use Phantom Routings: Set this parameter to specify whetherphantom routing resources and overhead costs (including those foroutside processing resources assigned to phantom routingoperations) are charged to the parent or higher level assembly.Setting this parameter also implies department inheritance forresources; thus, phantom resources can be used by departmentsthat they are not owned by or assigned to as a borrowed resource.You set the parameter at the inventory organization level and itthen applies to all phantoms within a single inventory organization.These are its two values:
• Yes: If you select this value, phantom routing components andresources and overheads are included in the cost of the higherlevel assembly. Routing resource costs are also included incapacity planning.
• No: This is the default. This value specifies that only componentsare included in the higher assembly’s cost, not resources andoverheads.
Replace with Sequence: Set this parameter to specify whetherphantom subassembly components inherit the operation sequencenumber of their parent or higher level assembly, or maintain theirown operation sequence number. This parameter is set at theinventory organization level, and applies to all phantoms within asingle inventory organization. The parameter has these two values:
• Yes: If you select this value, phantom subassembly componentsmaintain their own operation sequence numbers

1 – 15Setting Up
• .No: This is the default. This value specifies that phantomsubassembly components inherit the operation sequence numberof their parent or higher level assemblies.
See Also
Overview of Configure To Order: page 5 – 2
Bills of Material Parameters Report: page 8 – 11
Creating Alternates
An alternate bill describes an alternate list of component items thatproduce an assembly. An alternate routing describes an alternatemanufacturing process that produces an assembly.
� To create or update an alternate:
1. Navigate to the Alternates window.

1 – 16 Oracle Bills of Material User’s Guide
2. Enter an alphanumeric string to describe a unique alternate.
3. Enter a date that the alternate is inactive on. As of the inactivedate, you can no longer assign the alternate to a bill of material orrouting.
See Also
Primary and Alternate Bills of Material: page 2 – 5
Primary and Alternate Routings: page 3 – 2
Effective Date Fields: page 2 – 36
Creating Custom Deletion Constraints
Use custom deletion constraints to enforce specific business rules.Custom deletion constraints prevent the deletion of bills or routings ifyour data meets the conditions set forth in the constraint.

1 – 17Setting Up
� To create a custom deletion constraint:
1. Navigate to the Deletion Constraints window.
2. Enter a name for the deletion constraint.
3. Indicate whether the constraint is enabled. An enabled deletionconstraint means that it is in effect when the delete concurrentprogram runs.
4. Select what kind of delete entity the constraint applies to: item, bill,routing, component, or operation.
5. Enter the SQL Select Statement that the delete concurrent programis to execute. You cannot update SQL statements for predefineddeletion constraints.
6. Indicate whether to delete if there are rows found or no rows foundby the SQL Select Statement

1 – 18 Oracle Bills of Material User’s Guide
7. Enter a failure message from Oracle Application Object Library’smessage dictionary to display if the delete fails.
See Also
Deletion Constraints: page 4 – 7
Creating a Department Class
Use department classes to group departments for shop floor schedulingand control, and to identify manufacturing cells and flexible machinecenters. Department classes are used for reporting purposes.
� To create a department class:
1. Navigate to the Department Classes window.

1 – 19Setting Up
2. Enter text that uniquely describes the department class. Forexample, you could use ASSY to group all final assemblydepartments.
3. Choose the Departments button to display the departmentsassigned to this department class and the dates when thesedepartments can no longer be assigned to routing operations.
Note: Assign departments to classes when you definedepartments.
See Also
Defining a Department: page 1 – 19
Department Classes Report: page 8 – 17
Defining a Department
A department is an area within your organization that consists of oneor more people, machines, or suppliers, where you want to collectcosts, apply overhead, and compare load to capacity. You assign adepartment to each operation in a routing, and assign resources thatare available for that department.
When you define a department, you specify any department overheadcosts and the resources that are available. You can enter multipleresources for each department. For each resource, you can specify theshifts that the resource is available. For each resource shift, you canalso specify capacity modifications that change the available hours perday, units per day, or workdays.

�
1 – 20 Oracle Bills of Material User’s Guide
� To define a department:
1. Navigate to the Departments window.
2. Enter a name for the department unique for the organization.
3. Optionally, enter a department class. See: Creating a DepartmentClass: page 1 – 18.
4. Enter a location for the department.
Attention: You must assign a location to a department if it is thereceiving department following outside processing. See: OutsideProcessing, Oracle Work in Process User’s Guide..
5. Enter a project expenditure organization.
6. Optionally, enter an inactive date on which you can no longerassign this department to routing operations.
7. Choose the Rates button to view the overhead rates for thedepartment.
8. Choose the Resources button to assign and update resources to thedepartment.

1 – 21Setting Up
See Also
Assigning Resources to a Department: page 1 – 21
Department Report: page 8 – 18
Assigning Resources to a Department
� To assign resources to a department:
1. Navigate to the Resources window. You can do this by choosingthe Resources button from the Departments window.
The Resources window is split into owned and borrowedresources.
2. Enter the resource to assign to the current department.
3. Optionally, for owned resources, indicate whether the resource isavailable 24 hours a day. You cannot assign shifts to a resource thatis available 24 hours a day.
4. For owned resources, indicate whether this department can sharethe resource and capacity with other departments.
5. For borrowed resources, enter the owning department.
6. Enter the number of capacity units (resource units) available forthis department, for example, the number of machines for amachine resource.
Each resource can be assigned to any number of departments;multiple resources can be assigned to each department.
7. Optionally, enter a resource group for the resource in thisdepartment.
8. Optionally, select the Check CTP check box. The Check CTP checkbox tells the system to use this resource in a Capable to Promise(CTP) check. See: Capable to Promise, Oracle Master Scheduling/MRPand Supply Chain Planning User’s Guide, Release 11
9. Optionally, enter an exception set. The exception sets that youassign help identify capacity problems. See: .Creating PlanningException Sets, Oracle Master Scheduling/MRP and Supply ChainPlanning User’s Guide, Release 11
10. Enter an expenditure type for the resource.
1 – 22 Oracle Bills of Material User’s Guide
11. For owned resources that are not available 24 hours, choose theShifts button to assign and update shift information for theresource.
� To assign shift information for the resource:
1. Navigate to the Shifts window. Do this by choosing the Shiftsbutton from the Resources window.
2. Enter a shift number to assign to the resource.
The shifts available to assign to the resource are those assigned tothe workday calendar assigned to the organization.
3. Choose the Capacity Changes button to define capacity changes fora shift.
� To define capacity changes:
Capacity modifications can add or delete a day, or add or reducecapacity for a shift.
1. Navigate to the Capacity Changes window. Do this by choosingthe Capacity Changes button from the Shifts window.
2. Enter or select a simulation set for the capacity change. Usesimulation sets for capacity requirements planning in OracleCapacity. See: Creating Simulation Sets, Oracle Capacity User’sGuide..
3. Select the action to take for the department resource:
Add: Adds a workday and capacity changes.
Delete: Deletes a workday for this department resource.
Add or Reduce Capacity: Add or reduce capacity for a resource shift.The capacity change can fall outside a shift time, so you can addtime to a shift. To reduce capacity, enter negative numbers.
4. Enter the number of resource units to increase or decrease capacity(if applicable). Make sure to use a negative number if you arereducing capacity.
5. Enter an effective date and time from which the capacity changestarts. If you are adding or reducing capacity, you must also entera date and time on which the change is no longer in effect.
If you are adding a shift’s workday, this is the date of the newworkday. If you are deleting a shift’s workday, this is the date of

1 – 23Setting Up
the deleted workday. If you are changing capacity, this is the firstday the resource shift’s capacity changes.
See Also
Cost Management Profile Options and Security Functions, Oracle CostManagement User’s Guide
Overview of Capacity Planning, Oracle Capacity User’s Guide
Defining a Resource
Use resources to define the time an assembly spends at an operationand the cost you incur at the operation. A resource is anything yourequire to perform, schedule, or cost, including but not limited to:employees, machines, outside processing services, and physical space.A resource and usage rate for all scheduled activities is required in arouting. Scheduled resources can include queue, setup, run, and movetime.
When you define your departments, you assign the resources availablein each department and the shifts that each resource is available. Foreach operation you define, you specify a department and list ofresources and usages. An operation can use any resource that isavailable in the department, but you do not need to use all resourcesassigned to the department.
Prerequisites
❑ Before you can define resources, set up your units of measure andunit of measure conversion rates. Some resources may representcurrency such as a fixed charge resource, but currency resourcescannot be scheduled since their unit of measure is not time–based.
❑ Set the site level profile option BOM: Hour UOM to hold the unit ofmeasure that represents an hour. Oracle Work in Process preventsyou from scheduling resources whose unit of measure is not in thesame unit of measure class as the hour unit or measure and has noconversions defined to the hour unit or measure.

1 – 24 Oracle Bills of Material User’s Guide
� To define a resource:
1. Navigate to the Resources window.
2. Enter a resource name unique to the organization to describe theresource. For example, you could assign AS1 to signify assemblergrade 1, or WE for welder.
3. Optionally, enter an inactive date after which you can no longerassign this resource.
4. Select a resource type: Amount, Currency (the set of bookscurrency as defined in Oracle General Ledger), Machine,Miscellaneous, Person, or physical Space.
5. Enter a unit of measure (UOM) that describes how you measure theresource. (You can only update this if the BOM: Update ResourceUOM profile option is set to Yes.)
6. Select a charge type. When an operation is completed, Oracle Workin Process records the units applied to the job or repetitive schedule

�
1 – 25Setting Up
in the resource unit of measure for all resources you chargemanually or automatically. See: Charge Types: page 3 – 26.
7. Select a basis type by which to charge and schedule the resource.
Item: Charge and schedule the resource where the resource usagequantity is the amount required per assembly unit you make.
Lot: Charge and schedule the resource where the resource usagequantity is the amount required per job or schedule.
8. Select an expenditure type for this resource.
If the Project Cost Collection Enabled parameter is set in theOrganization Parameters window, you must associate the resourcewith an expenditure type. See: Organization Parameters Window,Oracle Inventory User’s GuideDefining Project Parameters, OracleInventory User’s Guide and .
You can only select expenditure types that belong to the Work inProcess expenditure type class. Expenditure types are defined inOracle Projects. See: Expenditure Type Classes, Oracle ProjectsUser’s Guide, Expenditure Types, Oracle Projects User’s Guide,andDefining Expenditure Types, Oracle Projects User’s Guide.
9. Indicate whether to enable the outside processing resource, and ifso, enter its item number.
Attention: If you specify PO Move or PO Receipt, OraclePurchasing uses this item when it creates requisitions for youroutside processing resource. See: Overview of Shop Floor Control,Oracle Work in Process User’s Guide.. See: Outside Processing, OracleWork in Process User’s Guide.
10. Enable the Costed check box to collect and assign costs to thisresource, and if so, optionally enter an activity for the resource.
You cannot view costing information if the Privilege To View CostInformation function is excluded from the responsibility. Youcannot update costing information if, in addition, the Privilege ToMaintain Cost Information function is excluded.
You can use activities to group resource charges for cost reportingpurposes. See: Defining Activities and Activity Costs, Oracle CostManagement User’s Guide..
11. If the resource is costed, indicate whether to charge jobs andrepetitive schedules based on a standard rate you define.
Or, disable Standard Rate to enter a rate to charge the resource inWork in Process for an internal resource, or derive the rate from thepurchase order for an outside processing resource. For outside
�
1 – 26 Oracle Bills of Material User’s Guide
processing resources, if you charge a job or repetitive schedule atthe standard rate, a purchase price variance is computed andposted to the rate variance account. If you charge for all otherresources, if you charge a job or repetitive schedule at the actualrate, a resource rate variance is computed and posted to the ratevariance account.
12. If this resource is costed, enter an absorption account (generalledger account) used to offset resource charges earned in work inprocess.
At period end, you normally compare this account to the resourcecharges in the general ledger.
For outside processing resources, the default is the receivingvaluation account from Oracle Purchasing, as defined in thereceiving options.
Attention: For outside processing resources, do not change thedefault receiving valuation account. When you receive an outsideprocessing purchase order, Oracle Purchasing credits the inventoryAP accrual account, and debits the receiving valuation account.Bills of Material then debits the work in process outside processingaccount and credits the receiving valuation account. If you changethe above default account, your receiving valuation account willhave an incorrect balance.
13. If this resource is costed, enter a variance account (general ledgeraccount) to accumulate resource rate variances for a job orrepetitive schedule. For outside processing resources, this is thepurchase price variance account.
� To define cost type and resource rate associations:
1. Navigate to the Resource Costs window. Do this by choosing theRates button from the Resources window.
Note: You cannot view costing information if the Privilege To ViewCost Information function is excluded. You cannot update costinginformation if, in addition, the Privilege To Maintain CostInformation function is excluded.
2. Enter or select a cost type to associate with each resource overheadrate.
3. Enter the Resource Unit Cost, that is, the resource’s currentstandard cost per UOM.

1 – 27Setting Up
� To associate overheads with resources:
1. Navigate to the Resource Overhead Associations window. Do thisby choosing the Overheads button from the Resources window.
Note: You cannot view costing information if the Privilege To ViewCost Information function is excluded from the responsibility. Youcannot update costing information if, in addition, the Privilege ToMaintain Cost Information function is excluded.
2. Enter or select the cost type for the resource.
The Allow Updates check box indicates whether the cost type isdefined as updatable.
3. Enter or select the overhead to associate with the resource.
For example, you could assign resource cost as dollars per hour. Ifyou enter a new resource, you can directly enter a frozen unit cost.However, you cannot directly update the frozen unit cost for apreviously entered resource.
See Also
Defining a Department: page 1 – 19
Defining a Cost Type, Oracle Cost Management User’s Guide
Setting Up Inventory Standard Costing, Oracle Cost Management User’sGuide
Cost Management Profile Options and Security Functions, Oracle CostManagement User’s Guide
Resource Report: page 8 – 21
1 – 28 Oracle Bills of Material User’s Guide
Overview of Workday Calendar
A workday calendar defines the valid working days for amanufacturing organization and consists of repeating pattern of dayson and days off and exceptions to that pattern. This allows you to, forexample, designate a normal workday as a scheduled downtime day,or designate a holiday as a workday.
You can define one or more workday calendars and assign them to anynumber of organizations, and any number of organizations can share acalendar. You can specify the start and end dates, and the weekendschedule for each calendar.
Repeating Workday Patterns
You can also define a series of repeating workday patterns for a givencalendar. For example, you have a repeating two–week pattern whereyou work five days the first week, and three days the second week. Or,you have a repeating pattern of 17 consecutive workdays, followed byfour days off. When you build the calendar, Oracle Bills of Materialautomatically determines the valid workdays for you, based on thepatterns you specify.
You can also specify repeating workday patterns for shifts (see below).
Workday Exceptions
There are three ways to apply exceptions to the workday calendar:
• selecting individual exception days
• loading them from an exception template, another calendar, andanother calendar shift
• copying a set of exceptions from another calendar.
An exception template allows you to create groups of exception datesand apply them to different calendars. You can define multipleworkday exception templates that define different holidays andscheduled down times for different organizations. Multiple exceptiontemplates can be applied to the same calendar. As each template isapplied, new exception dates are added to the exception list for thatcalendar.
Conflicts on a particular date between one template and another areresolved as follows:

1 – 29Setting Up
• if the exception date already exists in the target calendar, it is notcopied
• if the exception on day falls on a workday, the exception iscopied but is redundant and has no effect on the calendar
• if the exception off day falls on a non–workday, the exception iscopied but is redundant and has no effect on the calendar
This allows you to define different holidays or scheduled down times,for example, for organizations in different countries. Differentorganizations can use the same calendar, but apply different exceptiondates. In addition, you can apply the same exception dates to differentorganizations.
You can optionally define exception templates, lists of exception dates,before you set up your workday calendar. Then when you define yourcalendar, you can choose an exception template, and apply itsexception dates to that calendar.
Shifts
For a given workday calendar, you can specify any number of shifts.Each shift can have a different weekend schedule and a list of specificwork interval start and end times. For both calendars and shifts, youcan assign sets of workday exceptions and repeating workday patterns.
Shifts inherit workday exceptions and workday patterns from the basecalendar. Shift exceptions can either add to or override those of thebase calendar.
If an exception on the base calendar changes, those shifts that do nothave an overriding exception on that date will automatically reflect thechange. Those shifts that do have an overriding exception on that datewill not reflect the change and must be changed manually if they are toreflect the change in the base calendar.
Shift exceptions are applied to a calendar the same way as workdaycalendar exceptions by selecting individual exception days, by definingexception templates, or by copying a set of exceptions from anothershift.
The following diagram illustrates the steps Bills of Material uses todetermine workdays from an organization’s workday calendar andexception template information.

Figure 1 – 1
1 – 30 Oracle Bills of Material User’s Guide

1 – 31Setting Up

1 – 32 Oracle Bills of Material User’s Guide
Organizations
For each organization, you specify the calendar to use. All schedulingfunctions use the calendar you specify. Detailed scheduling usesspecific resource availability information by department and shift toschedule resources. Dynamic lead time offsetting, however, uses anorganization’s workday calendar and does not consider shiftinformation.
See Also
Creating a Workday Exception Template: page 1 – 32
Creating a Workday Calendar: page 1 – 34
Organization Parameters Window, Oracle Inventory User’s Guide
Creating a Workday Exception Template
Exception templates define and group deviations to your workdaycalendar, such as holidays, downtime, or scheduled maintenance.
When defining a workday calendar, specify which days (or shifts) areon and off. The workday calendar, in combination with the exceptionsto it, determine the work pattern for each organization.

1 – 33Setting Up
� To create a workday exception template:
1. Navigate to the Exception Templates window.
2. Enter a unique name for the exception template.
3. Enter a date on which this template becomes inactive.
4. Enter all exception dates, and indicate whether each is an on or offworkday.
See Also
Overview of Workday Calendar: page 1 – 28
Creating a Workday Calendar: page 1 – 34
Assigning Workday or Shift Exceptions: page 1 – 40

�
1 – 34 Oracle Bills of Material User’s Guide
Workday Exception Sets Report: page 8 – 27
Creating a Workday Calendar
A workday calendar consists of a start date, and end date, and on andoff days that follow one or more defined workday patterns. Aworkday calendar can also include shift information and exceptiondates, such as holidays or scheduled down time.
Use a workday calendar for forecasting and planning materialrequirements, use shift information for job scheduling, and capacityanalysis.
Workday exceptions identify deviations to the workday calendar. Shiftexceptions identify deviations for a shift.
Attention: Shift exceptions take precedence over workdayexceptions. (This is only relevant if a workday exception and ashift exception overlap.)
To assign workday exceptions to a workday calendar or calendar shift,either select them intuitively from the Calendar Dates (or ShiftCalendar Dates) window, or apply them from an existing template,calendar, or shift.

1 – 35Setting Up
� To create a workday calendar:
1. Navigate to the Workday Calendar window.
2. Enter a name for the workday calendar.
3. Select a quarterly calendar type:
4/4/5 Week Pattern: Two four–week periods followed by onefive–week period.
5/4/4 Week Pattern: One five–week period followed by twofour–week periods.
Calendar Months: Twelve periods per year based on calendarmonths.
13 Periods: Thirteen four–week periods per year.
Note: If you use Oracle Master Scheduling/MRP, choose the 4/4/5Weekly Pattern or the 5/4/4 Weekly Pattern to report MRPinformation in weeks and months. Otherwise, if you choose the 13Periods calendar or Calendar Months, you can only report MRPinformation in monthly buckets.

1 – 36 Oracle Bills of Material User’s Guide
4. Enter a date range for the workday calendar. The default end dateis four years from the start date.
Note: Days on and off are calculated based on the start date andthe day of the week. For example, if you want a standard five dayworkweek to start on 01–JAN, you must enter the start date as theMonday before 01–JAN (unless 01–JAN falls on a Monday).
5. Continue creating the workday calendar by choosing one of thefollowing buttons:
Workday Pattern: Set workdays on or off.
Shifts: Assign shifts to the workday calendar.
Dates: Review your work so far and its effect on the workdaycalendar. Do this before you build or rebuild the workday calendaryou are now creating. (You can only do this after you have defineda workday pattern.)
Once you have created a workday pattern, assigned shifts,assigned workday and shift exceptions, and reviewed your work,you must build the calendar and assign it to an organization.
6. Save your work.
See Also
Copying Calendar and Shift Information: page 1 – 36
Creating a Workday Pattern: page 1 – 37
Creating Shifts and Shift Times: page 1 – 39
Assigning Workday or Shift Exceptions: page 1 – 40
Reviewing the Workday Calendar: page 1 – 41
Building the Workday Calendar: page 1 – 42
Creating a Workday Exception Template: page 1 – 32
Copying Calendar and Shift Information
You can copy the entire calendar, including workday patterns,exceptions, and all or none of its specific shift information. Or, you cancopy a specific shift, including the workday patterns, exceptions, andshift times.

1 – 37Setting Up
Exactly what is copied depends upon how you navigate to the Copywindow:
• From the Workday Calendar, Calendar Dates, and WorkdayPatterns windows, all workday patterns, all exceptions, andselected shift information are copied.
• From the Shifts, Shift Times, Shift Dates, or Shift WorkdayPatterns windows, the shift workday patterns, shift exceptions,and all shift times for the specified shift are copied.
Note: If you copy calendar information to an existing calendar, allnew information is appended to the existing calendar; existinginformation, in other words, is retained.
� To copy a calendar or shifts:
1. Navigate to the Copy window. Do this by choosing Copy from theTools menu.
2. If you are copying calendar information, enter the calendar to copyinformation from and indicate if you want none, all, or specificshift information. If you select a specific shift, enter the shiftnumber.
If you are copying shift information, enter the calendar you want tocopy the shift information from and the specific shift number.
See Also
Overview of Workday Calendar: page 1 – 28
Creating a Workday Pattern
� To create a workday pattern:
1. Navigate to the Workday Patterns (or Shift Workday Patterns)window. You can do this by choosing the Workday Pattern buttonfrom either the Workday Calendar or Shifts window.
2. Enter a sequence number in which the workday patterns areapplied when the calendar is built.
3. Enter the number for consecutive workdays on and off. Forexample, if you want Monday through Friday on and Saturday andSunday off, enter 5 for Days On and 2 for Days Off.
1 – 38 Oracle Bills of Material User’s Guide
4. Enter a description for the sequence.
Repeat the previous three steps for each workday pattern to create.All defined sequences are repeated for the duration of the workdaycalendar. If there are two sequences, sequence 1 will be in effectfirst, then sequence 2, then 1 again, and so on.
For example, assume that sequence 1 is 5 on and 2 off, andsequence 2 is 4 on and 3 off. The calendar shows 5 on, 2 off, 4 on,and 3 off.
5. Save your work. Doing so ensures that you can view calendardates.
See Also
Overview of Workday Calendar: page 1 – 28
Reviewing the Workday Calendar: page 1 – 41

1 – 39Setting Up
Creating Shifts and Shift Times
� To create shifts and shift times:
1. Navigate to the Shifts window. You can do this by choosing theShifts button from the Workday Calendar window.
2. Enter a shift number and a description.
3. Choose the Times button to open the Shift Times window.
4. Enter the start and stop times for each shift.
You can enter multiple start and stop times, but the start and stoptimes for a shift cannot overlap.
If you create a shift without first creating a workday pattern, adefault workday pattern of 5 days on and 2 days off is created.You can then update that workday pattern.
5. Save your work.
See Also
Overview of Workday Calendar: page 1 – 28

1 – 40 Oracle Bills of Material User’s Guide
Assigning Workday or Shift Exceptions
� To select workday or shift exceptions:
1. Navigate to the Calendar Dates window (or Shift Calendar Dateswindow). Do this by choosing the Dates button from the WorkdayCalendar window.

1 – 41Setting Up
2. Select individual days of the month to toggle them on or off. Daysyou change become either workday or shift exceptions, dependingon how you entered the window.
3. Save your work.
� To load existing workday or shift exceptions:
1. Navigate to the Exceptions window. Do this by choosing theException List button from the Calendar Dates window.
2. Chooses the Load button and select whether existing exceptionsshould be applied from a template, a calendar, or a shift.
If you select Template, enter a template name.
If you select Calendar, enter a calendar name.
If you select Shift, enter the calendar name that the shift belongs toand the shift number.
3. When finished, choose OK to save your work.
See Also
Overview of Workday Calendar: page 1 – 28
Creating a Workday Exception Template: page 1 – 32
Reviewing the Workday Calendar
� To review the calendar:
� Navigate to the Calendar Dates window (or Shift Calendar Dateswindow). Do this by choosing the Dates button from either theWorkday Calendar or Shifts windows.
See Also
Overview of Workday Calendar: page 1 – 28

1 – 42 Oracle Bills of Material User’s Guide
Building the Workday Calendar
Caution: Rebuilding an existing workday calendar affects allorganizations that reference the same calendar and exceptiontemplate. Changes to your workday information impacts yourmaterial plans, capacity plans, scheduling, and any other functionin Oracle Manufacturing that uses the workday calendar. (Thisdoes not apply if you are building a calendar for the first time.)
� To build the workday calendar:
� From the Tools menu, choose Build (or Rebuild).
See Also
Overview of Workday Calendar: page 1 – 28

�
1 – 43Setting Up
Importing Bills and Routings
The Bill and Routing Open Interface programs allow you to import billand routing information.
Imported bills include revision, component, substitute component, andreference designator information.
Imported routings include routing revision, operation, instruction, andresource information.
� To import bills and routings:
1. Navigate to the Import Item Information window.
2. Indicate whether to include all organization codes in the bill ofmaterial and routing interface tables, or just the currentorganization.
Attention: If you specify just the current organization, rows in theinterface tables that do not have either an organization code or anorganization ID assigned are ignored.
3. Indicate whether to import routings from the interface tables.
4. Indicate whether to import bills of material from the interfacetables.
5. Indicate whether to delete processed rows from the bill of materialand routing interface tables.
See Also
Integrating Your Systems: Oracle Manufacturing Implementation Manual,Release 10

1 – 44 Oracle Bills of Material User’s Guide
Bills of Material Profile Options
During implementation, you set a value for each user profile option tospecify how Bills of Material controls access to and processes data
The system administrator sets up and maintains profile values.
Profile Option Settings
You can set or view the following profile options in Oracle Bills ofMaterial. The table also includes some profile options from otherapplications that are used by Bills of Material.
User System Administrator Requirements
Profile OptionUser User Resp App Site Required?
DefaultValue
BOM: Check for DuplicateConfiguration
– 0 0 0 � Optional No
BOM: Component ItemSequence Increment
– � � � � Optional 10
BOM: Configuration ItemDelimeter
– 0 0 0 � Optional No
BOM: Configuration ItemType
– 0 0 0 � Optional No
BOM: Days Past BeforeStarting Cutoff of OrderManagement Bills
– 0 0 0 � Optional 0
BOM: Default Bill ofMaterial Levels
– � � � � Optional 1
BOM: Default WIP SupplyValues for Components
– 0 0 0 � Optional Yes
BOM: Hour UOM – 0 0 0 � Optional 1
BOM: Inherit Option ClassOperation SequenceNumber
– 0 0 0 � Optional No
BOM: Model Item Access – � � � � Optional Yes
BOM: Perform Lead TimeCalculations
– 0 0 0 � Optional No
BOM: Planning Item Access – � � � � Optional Yes
�
–
0
You can update the profile option.
You can view the profile option value but you cannot change it.
You cannot view or change the profile option value.
Key

1 – 45Setting Up
RequirementsSystem AdministratorUser
Profile Option DefaultValue
Required?SiteAppRespUserUserProfile Option
BOM: Standard Item Access – � � � � Optional Yes
BOM: Update ResourceUOM
– 0 0 0 � Optional No
Key
�
–
0
You can update the profile option.
You can view the profile option value but you cannot change it.
You cannot view or change the profile option value.
BOM: Check for Duplicate Configuration
Indicates whether to search for an existing duplicate configurationrather than create a new item.
BOM: Component Item Sequence Increment
Indicates the value by which to increment the sequence of thecomponent item on the bill.
BOM: Configuration Item Delimiter
Indicates a character used to separate the order and line numbers whenyou replace the base model’s segment value with the ordernumber/line number.
BOM: Configuration Item Type
Indicates the item type of the new configuration items that the createconfiguration program creates.
BOM: Days Past Before Starting Cutoff of Order Management Bills
Indicates n days ago to save versions of Order Management bills ofmaterial in the pre–explosions table. Components effective as of n daysbefore the current date are used to explode the indented bill.
BOM: Default Bill of Material Levels
Indicates the number of explosion levels to use as a default for bill ofmaterial indented explosions.
BOM: Default WIP Supply Values for Components
Indicates whether to default WIP Supply Type, WIP SupplySubinventory, and WIP Supply Locator from item master for a

1 – 46 Oracle Bills of Material User’s Guide
component item when defining a bill. If set to No, WIP reads the itemmaster.
BOM: Hour UOM
Indicates the unit of measure that represents an hour. You cannotschedule resources whose unit of measure is not in the same class asthe hour unit of measure.
BOM: Inherit Option Class Operation Sequence Number
Indicates whether to allow components on model bills to inheritoperation information from parent items.
BOM: Model Item Access
Indicates whether a holder of this responsibility can define and updatebills of material for model and option class items.
BOM: Perform Lead Time Calculations
Indicates whether to perform lead time calculations when youautocreate configuration items.
BOM: Planning Item Access
Indicates whether a holder of this responsibility can define and updatebills of material for planning items.
BOM: Standard Item Access
Indicates whether a holder of this responsibility can define and updatebills of material for standard items.
BOM: Update Resource UOM
Indicates whether you can update the resource unit of measure.
See Also
Setting Your Personal User Profile, Oracle Applications User’s Guide
Common User Profile Options, Oracle Applications User’s Guide
Profile Options in Oracle Application Object Library, Oracle AppliactionsSystem Administrator’s Guide
Defining Items, Oracle Inventory User’s Guide

1 – 47Setting Up
Overview of Function Security, Oracle Appliactions SystemAdministrator’s Guide
Implementing Function Security, Oracle Appliactions SystemAdministrator’s Guide

1 – 48 Oracle Bills of Material User’s Guide

C H A P T E R
2T
2 – 1Bills of Material
Bills of Material
his chapter provides you everything you need to know to defineand use bills of material, including:
• Overview of Bills of Material: page 2 – 2
• Primary and Alternate Bills of Material: page 2 – 5
• Item and Routing Revisions: page 2 – 6
• Components: page 2 – 7
• Creating a Bill of Material: page 2 – 10
• Creating Reference Designators: page 2 – 19
• Attaching Files: page 2 – 21
• Mass Changing Bills of Material: page 2 – 23
• Viewing an Indented Bill of Material: page 2 – 28
• Comparing Bills of Material: page 2 – 31
• Viewing Item Usages: page 2 – 33
• Bills of Material Field Reference: page 2 – 35
• Bill / Component Validation Rules: page 2 – 43
• Creating a Product Family: page 2 – 46
• Assiging Product Family Members: page 2 – 47

2 – 2 Oracle Bills of Material User’s Guide
Overview of Bills of Material
Oracle Manufacturing and Oracle Order Management use bills ofmaterial to store lists of items that are associated with a parent itemand information about how each item is related to its parent. OracleManufacturing supports standard, model, option class, and planningbills of material.
See Also
Bill of Material Types: page 2 – 2
Primary and Alternate Bills of Material: page 2 – 5
Item and Routing Revisions: page 2 – 6
Components: page 2 – 7
Access Control By Item Type: page 2 – 9
Bill of Material Types
Standard Bill of Material
A standard bill of material is the most common type of bill and lists themandatory components, the required quantity of each component, andinformation to control work in process, material planning, and otherOracle Manufacturing functions. Examples include bills formanufacturing assemblies, pick–to–order bills, kit bills, and phantoms.
A configuration bill (a type of standard bill) is a set of option choicesmade from a model bill that comprise a buildable, sellable product.Configuration items and bills are automatically created from modelbills after a customer chooses options on a sales order. Or, you canmanually create configuration bills by choosing options directly from amodel bill.
Model Bill of Material
A model bill of material defines the list of options and option classesyou can choose in Oracle Order Management to order a configuration.A model bill also specifies mandatory components or included itemsthat are required for each configuration of that model. You do notorder or build the model itself: you order and build configurations ofthe model. A model bill can be either assemble–to–order orpick–to–order.

2 – 3Bills of Material
Option Class Bill of Material
An option class is an item that groups optional components on a bill.An option class is an item that becomes a level in your model bill ofmaterial. Option classes can also have mandatory components thatapply for all of its options. For example, when you order a computer,the monitor is an option class, and the specific type of monitor youorder is an option within that option class. An option class bill can beeither assemble–to–order or pick–to–order.
Planning Bill of Material
A planning bill of material is a bill of material structure that includes apercentage distribution for its components. The percentages associatedwith the components on a planning bill of material do not need to addto 100%. You can define alternate and common planning bills, wherethe bill you reference as a common must be another planning bill.
Planning items can be nested within one another any number of times.When you nest planning items, Oracle Master Scheduling explodesforecasts level by level and applies planning percentages at each level.
Engineering Bills of Material
You can define an engineering bill of material as an alternate for amanufacturing bill. The typical use for an alternate engineering bill isto prototype variations from the primary bill that produce the sameassembly.
You can specify a list of item catalog descriptive elements for modeland option class engineering bills. After you release the engineeringbill to manufacturing and take customer orders for specificconfigurations, Bills of Material creates the new configuration item andautomatically assigns values to each catalog descriptive element.
Oracle Engineering users are allowed to assign manufacturing andengineering items as components to an engineering bill. Bills ofMaterial users can assign only manufacturing items as components tomanufacturing bills.
Phantoms
A phantom assembly is a non–stocked assembly that lets you grouptogether material needed to produce a subassembly. When you create abill of material for a parent item, you can specify whether a componentis a phantom. One bill of material can represent a phantom

2 – 4 Oracle Bills of Material User’s Guide
subassembly for one parent item, and a stocked subassembly foranother parent item.
Oracle Work in Process explodes through a phantom subassembly tothe components as if the components were tied directly to the parentassembly. You can define routing for phantoms assemblies the sameway as other assemblies. Work in Process ignores phantom assemblyroutings when you define a job or repetitive schedule.
You can compute manufacturing and cumulative lead times forphantom assemblies that have routings. If you do not want to offsetthe components of a phantom assembly in the planning process,exclude the phantom item from the lead time calculations.
In general, phantom assemblies behave like normal assemblies whenthey represent a top level assembly, such as when you master schedulethem or manufacture them using a discrete job. As a subassembly,however, they lose their identity as distinct assemblies and are acollection of their components. The components of the phantomsubassembly are included on the job and on the pick list of the job—notthe phantom itself.
Oracle Master Scheduling/MRP plans the phantom subassembly usingthe lot–for–lot lot–sizing technique. Otherwise, the same rules apply tophantoms as for other assemblies. Set the lead time of a phantom tozero to avoid lead time offset during the planning process.
When model or option class bills are components to another bill ofmaterial, the component supply type is phantom. See: Two–LevelMaster Scheduling, Oracle Master Scheduling/MRP User’s Guide..
The cost rollup treats phantom assemblies the same as regularassemblies. The phantom is treated as a distinct entity; the costelements of the phantom (material, resource, and so on) are added tothe cost elements of the higher assembly. Also, the full cost rollupprocess sets the pending phantom assembly burden to 0.
See Also
Overview of Configure to Order: page 5 – 2
Item Attributes Listed in Alphabetical Order, Oracle Inventory User’sGuide

2 – 5Bills of Material
Primary and Alternate Bills of Material
A primary bill is a list of the components you most frequently use tobuild a product. An alternate bill is another list of components for thesame basic assembly. The primary bill is the default for rolling upcosts, defining a job, and calculating cumulative item lead times.
You must define a primary bill before you define an alternate. Aprimary bill can have many alternate bills. Any bill of material typecan have an alternate.
Oracle Master Scheduling/MRP uses the primary bill to plan yourmaterial. Oracle Order Management uses the primary bill for modeland option class products to list available options.
When you build an item, roll up costs, and perform other functions thatuse bills of material, you can specify whether to use the primary bill(the default) or an alternate bill. You can also use engineering changeorders to control changes to primary and alternate bills of material.
Use alternate bills to account for manufacturing variations that producethe same assembly, by specifying the parent item number and analternate name when you create a bill. You cannot enter new revisionsfor alternate bills of material.
You can use an alternate to define an engineering bill or routing. Thealternate used as a prototype variation from the primarymanufacturing bill that produces essentially the same assembly.
Bills and routings can share alternate labels. If you create an alternatebill with the same label as an alternate routing, components areassigned to operations on the alternate routing. If there is no routingwith the same alternate label, components are assigned to operationson the primary routing.
See Also
Creating Alternates: page 1 – 15
Item and Operation Sequence: page 2 – 35
Engineering Bills of Material and Routings, Oracle Engineering User’sGuide

�
2 – 6 Oracle Bills of Material User’s Guide
Item and Routing Revisions
You can define any number of revisions for the item and any number ofrouting revisions for an item’s routing.
Attention: Item revisions and routing revisions function alike andare discussed together below. However, item revisions and routingrevisions are two distinct pieces of information. They are createdand maintained separately and have no influence over each other.
Assign each revision a unique three character alphanumeric revisionidentifier (such as A, B, B1, and so on) and a revision date. Revisionsare sorted according to ASCII rules. Each revision must be greater thanthe previous revision. Therefore, you cannot use revision 10 afterrevision 9 because, according to ASCII sorting, 10 precedes 9.
Use letters and/or numbers to label revisions. Letters are alwaysupper case and numbers may include decimals. To ensure thatrevisions sort properly (according to ASCII sorting rules), decimalsshould always be followed by a number. Therefore, valid revisions caninclude: A, B, 1, 2, A1, B1, 1A, 1B, 0.0, 0.1, A.0, A.1, and so on. Whenyou create an item or a routing, the beginning revision defaults to thevalue for Starting Revision in the Organization Parameters window.
When you create or update a bill of material or routing, you can chooseto create a new revision or modify an existing revision. When addingnew revisions, you should be sure that the revision date you enter doesnot overlap with other existing revision dates. Revisions aretime–stamped, so you can determine the latest revision for multiplerevisions defined on the same date. New revision numbers must begreater than the revision number of the currently effective revision.
Different versions of a bill of material or routing can be defined withinthe same revision. You can change component information for bills oroperation information for routings without modifying the revision.
For example, assume that you defined an initial revision A on 18–AUGand made a change on 20–AUG without creating a new revision. If youmake another change on 22–AUG, you can create a new revision B,effective 22–AUG. There are now three different versions of the item:revision A of 18–AUG, revision A of 20–AUG, and revision B of22–AUG.
See Also
Defining Item Revisions, Oracle Inventory User’s Guide
Routings: page 3 – 2

2 – 7Bills of Material
Effective Date Fields: page 2 – 36
Components
Bills of Material restricts the types of items you can assign ascomponents based on the type of bill you are defining.
Parent BOM Item Type Component BOM Item Type
Standard Item Standard Item
Model Item Standard Item, Model Item, Option ClassItem
Option Class Item Standard Item, Model Item, Option ClassItem
Planning Item Standard Item, Model Item, Option Class,Planning Item
Table 2 – 1 Valid Components (Page 1 of 1)
Component Attributes and Bill Types
Each bill of material can have many components. For each component,you specify attributes, such as operation sequence, item sequence,usage quantity, yield, supply type, supply subinventory and locator,and others.
The following table lists valid component attributes for each type ofbill:
Component AttributesStandardParent Item
ModelParent Item
Option ClassParent Item
PlanningParent Item
Item ✔ ✔ ✔ ✔
Item Sequence ✔ ✔ ✔ ✔
Operation Sequence ✔ ✔ ✔
Effective Date Range ✔ ✔ ✔ ✔
Planning Percent ✔ ✔ ✔
Table 2 – 2 Valid Component Attributes by Bill Type (Page 1 of 2)

2 – 8 Oracle Bills of Material User’s Guide
PlanningParent Item
Option ClassParent Item
ModelParent Item
StandardParent ItemComponent Attributes
Yield ✔ ✔ ✔
Include in Cost Rollup ✔ ✔ ✔
Supply Type ✔ ✔ ✔
Supply Subinventory ✔ ✔ ✔
Supply Locator ✔ ✔ ✔
Mutually ExclusiveOptions
✔ ✔
Optional Flag ✔ ✔
Check ATP ✔ ✔ ✔
Minimum Quantity ✔ ✔
Maximum Quantity ✔ ✔
Basis ✔ ✔
Include in Shipping Doc. ✔ ✔ ✔
Required to Ship ✔ ✔ ✔
Required for Revenue ✔ ✔ ✔
Quantity ✔ ✔ ✔
Descriptive Flexfield ✔ ✔ ✔ ✔
Comments ✔ ✔ ✔ ✔
Table 2 – 2 Valid Component Attributes by Bill Type (Page 2 of 2)
See Also
Item and Operation Sequence: page 2 – 35
Effective Date Fields: page 2 – 36
Yield: page 2 – 37
Planning Percent: page 2 – 38
Supply Types, Oracle Work in Process User’s Guide
Supply Subinventory and Locator: page 2 – 39

2 – 9Bills of Material
Mutually Exclusive and Optional: page 2 – 39
Check ATP: page 2 – 40
Minimum and Maximum Quantity: page 2 – 40
Basis: page 2 – 41
Shipping Details: page 2 – 41
Bill / Component Validation Rules: page 2 – 43
Consolidated Bill of Material Report: page 8 – 12
Access Control by Item Type
Control access to bills of material by item type using the followingprofile options:
• BOM: Standard Item Access
• BOM: Planning Item Access
• BOM: Model Item Access (also controls access to option classitems)
Each profile option can have either a Yes or No value. A Yes valueindicates that you can create and update bills for the associated itemtype. For example, you might specify No at the site level for BOM:Standard Item Access profile to restrict access for creating standardbills. But you might specify Yes for BOM: Planning Item Access profileoption at the user level for specific engineers so they can updateengineering bills of material for planning items.
Note: Profiles are ignored in query mode. A user with no access toany type of item can query all types of bills.
See Also
Defining Items, Oracle Inventory User’s Guide
Bills of Material Profile Options: page 1 – 44

2 – 10 Oracle Bills of Material User’s Guide
Creating a Bill of Material
A bill of material contains information on the parent item, components,attachments, and descriptive elements. Each standard component on abill can have multiple reference designators and substitute components.
You can create either an engineering or manufacturing bill, copy anexisting bill, or reference a common bill. When you create a bill, itexists only in the current organization. To use a bill in anotherorganization, you must either copy it or reference it as a common.
The procedure below describes how to create a bill. See: Copying Billand Routing Information: page 2 – 14. See: Referencing Common Billsand Routings: page 2 – 17.
Prerequisites
❑ Define the parent item and all components as inventory items andset the BOM Allowed attribute to Yes and BOM Item Type tomodel, option class, planning or standard. See: Defining Items,Oracle Inventory User’s Guide

2 – 11Bills of Material
� To create a bill of material:
1. Navigate to the Bills of Material window.
Note: If your current responsibility does not include the Privilegeto Maintain security function, you can only view bill information.If so, enter selection criteria in the Find Bills window and choosethe Find button. The Bills Summary folder window appears.
2. Enter the parent item for which you are creating a bill, and if youare creating an alternate bill, enter the alternate.
Note: Bills and routings can share alternate labels. If you create analternate bill with the same label as an alternate routing,components are assigned to operations on the alternate routing. Ifthere is no routing with the same alternate label, components areassigned to operations on the primary routing.
3. Enter or select the revision and the revision date.

�
2 – 12 Oracle Bills of Material User’s Guide
4. If you are updating or viewing a bill, use the Display poplist todisplay all, current, or future and current components effective asof the revision date you specify. Check the Implemented Only fieldto further restrict the components to display. See: ECO Statuses,Oracle Engineering User’s Guide.
The Bills of Material window contains the following tabbedregions: Main, Effectivity, Component Details, Material Control,Order Entry, Shipping, and Comments.
5. Enter the item sequence, operation sequence, and the componentitem. See: Item and Operation Sequence: page 2 – 35.
6. In the Main tabbed region, enter the quantity used to make one unitof this assembly item at the current operation.
This can include negative or decimal values, subject to thefollowing rules:
• Pick–to–order bills cannot have fractional component quantitiesif Oracle Order Management is installed.
• Pick–to–order option class components cannot have negativevalues.
• Components with Check ATP turned on cannot have negative orzero quantities.
• If the component has Quantity Related turned on, then thecomponent quantity cannot be fractional or negative.
• If an implemented component has Quantity Related turned on,then the component quantity must be equal to the number ofreference designators. See: By–Product Recovery, Oracle Work inProcess User’s Guide.
Attention: The planning process in Oracle MasterScheduling/MRP ignores negative requirements on standarddiscrete jobs and components with a negative usage on a bill ofmaterial when netting supply and demand.
Note: If you enter a negative quantity for a component, you shouldenter either Assembly pull or Operation pull for the supply type toensure that you transact the material when you build the bill.
The Revision field displays the current revision of the componentas of the revision date of the parent item.
7. Open the Effectivity tabbed region and enter the effective daterange for each component. See: Effective Date Fields: page 2 – 36.

2 – 13Bills of Material
The Implemented check box indicates whether the component isimplemented.
Checked: Component is on a pending Engineering Change Order(ECO)
Unchecked: Component is on implemented ECO or was addeddirectly to the bill
8. Open the Component Details tabbed region and enter the planningpercent. See: Planning Percent: page 2 – 38.
Enter the yield. See: Yield: page 2 – 37.
Indicate whether the component should be included in cost rollups.If enabled, the material cost of this component, but not the routingcost, is included in the cost of the parent item.
9. Optionally, open the Material Control tabbed region and enter thesupply type. See: Supply Types, Oracle Work in Process User’sGuide.
Enter the supply subinventory and the locator. See: SupplySubinventory and Locator: page 2 – 39.
If you have set the BOM: Default WIP Supply Values forComponents profile option to Yes, these values default from theitem master. If any of these values are left blank, Work in Processwill read the values contained in the item master. See: Bills ofMaterial Profile Options: page 1 – 44
10. For model, option class, and kit bills, open the Order Entry tabbedregion and enter the minimum and maximum sales orderquantities. See: Minimum and Maximum Quantities: page 2 – 40.
Indicate whether to check ATP. See: Check ATP: page 2 – 40.
Indicate whether the component is optional and mutuallyexclusive. See: Mutually Exclusive and Optional: page 2 – 39.
Enter the basis. See: Basis: page 2 – 41.
11. Open the Shipping tabbed region, and choose whether thecomponent should be listed on shipping documents, required toship, or required for revenue. See: Shipping Details: page 2 – 41.
12. Choose buttons to perform related tasks:
Substitutes: assign substitute components
Designators: create reference designators
Elements: assign descriptive elements

2 – 14 Oracle Bills of Material User’s Guide
Bill Details: reference common bills
Revision: define item revisions
See Also
Copying Bill and Routing Information: page 2 – 14
Referencing Common Bills and Routings: page 2 – 17
Assigning Descriptive Elements: page 2 – 18
Creating Reference Designators: page 2 – 19
Assigning Substitute Components: page 2 – 20
Defining Item Revisions: page 2 – 21
Attaching Files: page 2 – 21
Checking for Bill Loops: page 2 – 22
Deleting Components and Operations: page 4 – 6
Defining a Product Family: page NO TAG
Bill / Component Validation Rules: page 2 – 43
Bill of Material Listing Report: page 8 – 3
Customizing the Presentation of Data in a Folder, Oracle ApplicationsUser’s Guide
Copying Bill and Routing Information
You can save time defining new, similar bills or routings by copyingtheir information rather than creating them manually.
You can copy a bill or routing from your current organization or fromanother organization that shares your same item master organization.You can then modify your new bill or routing as necessary.
You can copy any revision of a primary or alternate bill or routing.
Subinventory and locator information are not copied acrossorganizations.

2 – 15Bills of Material
Bills of Material Only
When you copy bills from your current organization, everything iscopied to the new bill including the supply type and the supplysubinventories and locators.
You can only copy bills between items having the same BOM Item Typeattribute. For example, if the new bill is a model bill, you can only copyexisting bills that are model bills.
Know the structure of the bill you are copying, since the copy functiononly copies single level components of the bill. For example, if theparent item whose bill you want to copy has single level componentsthat are subassemblies, the bill copy function will not copy thecomponents of the subassembly.
When you copy the bill from another organization, the components onthe bill you are copying must exist in the target organization. Thesupply subinventories and locators are not copied. Substitutecomponent items must also exist in the target organization to becopied.
When copying an engineering bill to manufacturing, only thosesingle–level manufacturing (not engineering) components are copied.
Routings Only
When copying from another organization, only operations occurring indepartments that exist in both organizations are copied. Similarly, onlyresources that exist in both organizations are copied. The resourcemust also belong to the same department in the target organization.
� To copy bill or routing information:
1. Navigate to the Copy Bill / Rtg From window. Do this by choosingthe Tools menu item and then choosing Copy Bill / Rtg From.

2 – 16 Oracle Bills of Material User’s Guide
2. Enter the organization, item, alternate, revision, and revision datefor the bill or routing that to copy.
3. Select a copy option:
Current: components or operations effective on the revision date.
Future and Current: same as current and all future components andoperations.
Note: After you have copied information, you can update it as yousee fit.
4. Choose the Copy and Save button. Doing so copies the appropriatecomponents (or operations) and automatically saves the new bill orrouting.
See Also
Defining Items, Oracle Inventory User’s Guide
Bill / Component Validation Rules: page 2 – 43

2 – 17Bills of Material
Referencing Common Bills and Routings
Any two items that are of the same bill type can share common billsand routings. If two different items share the same bill or routing, youcan define the bill or routing once and then maintain one copy insteadof two.
The following notes apply to both bills and routings:
• You cannot reference another bill or routing as a common if thatbill or routing also references a common. In other words, youcannot create a chain of common references.
• You can only reference another bill or routing as a common if ithas the same alternate name assigned to it.
• If the current bill you are creating is a manufacturing bill, thecommon bill must also be a manufacturing bill.
Common Bills of Material
If two or more organizations manufacture the same item using thesame bill of material, you can define the bill in one organization andreference it from the other organizations. Necessary changes must thenbe made to the referenced bill.
When you enter orders for models, kits, and assemblies in OracleOrder Management, you must define all bills of material in your itemmaster organization (your OE: Item Validation Organization profileoption value). Using common bills of material, you can share bills ofmaterial that exist in your manufacturing organizations with your itemmaster organization.
When you define a bill for a new assembly, you can reference anotherassembly and organization as a common bill of material. You do notneed to make any further entries for the bill of material.
The following notes apply to bills of material:
• You can only reference bills from organizations that have thesame item master organization as the current organization.
• If components already exist for the new bill, you cannotreference another bill as a common.
• If your new assembly is in a different organization than the billyou reference, all component items must exist in the new bill’sorganization. This also applies to substitute components.

�
2 – 18 Oracle Bills of Material User’s Guide
Common Routings
The following notes apply to routings:
• You cannot reference a routing outside your currentorganization.
Attention: If an item’s routing references another item’s routing asa common, you should set both items’ lead time lot size to the samevalue. The lead time lot size and the routing information are usedto compute lead times.
� To reference a common bill or routing:
1. Navigate to the Common Bill window from either the Bills ofMaterial window or the Routings window. Do this by choosingAssign Common Bill from the Tools menu.
2. Enter the organization for the item to reference as a common bill.
3. Enter the bill or routing that to use as a common.
4. Choose OK.
Assigning Descriptive Elements
For each model and option class bills only, you can specify a list of itemcatalog descriptive elements. Values are assigned to catalog descriptiveelements when new configuration item are created. The descriptiveelement value of the chosen option is assigned for each descriptiveelement.
Prerequisites
❑ For model bills, you must assign the item to a catalog group. See: Defining Item Catalog Groups, Oracle Inventory User’s Guide.
� To assign descriptive elements:
1. Navigate to the Descriptive Elements window. Do this by choosingthe Elements button from the Bills of Material window.
2. Enter a descriptive element to assign automatically based on theoption chosen in the current bill.

2 – 19Bills of Material
For model bills, you can only specify a descriptive element namewithin the model item catalog group. For option class bills, youcan specify a descriptive element name from any catalog group.
When you order a configuration, Bills of Material automaticallycreates and assigns the configuration item to the model’s itemcatalog group, and assigns values to the descriptive elements inthis group.
See Also
Overview of Configure to Order: page 5 – 2
Creating Reference Designators
Reference designators are sequenced comments and instructions thatpertain to a component. For example, you may have drawings thatclarify the assembly process for certain components, or furtherinstructions for the use of a large quantity of the same component. Youcan specify whether to assign one reference designator for every usageof the component or assign any number of reference designators to thecomponent.
Planning bills and model, option class, and planning componentscannot have reference designators.
Reference designators are sorted in alphanumeric order on inquiriesand reports. You can also specify a comment for each referencedesignator.
� To create reference designators:
1. Navigate to the Reference Designators window. Do this bychoosing the Designators button from the Bills of Material window.
2. Indicate whether you want component quantity related to thenumber of reference designators.
Off: Assign any number of reference designators to eachcomponent (the default). The number of reference designators isindependent of the component quantity. With Quantity Relatedunchecked, if the usage quantity of the component is four, youcould, for example, define six or more reference designators.
On: Use one reference designator per usage of the component. Thecomponent usage quantity must be a positive integer in order for

2 – 20 Oracle Bills of Material User’s Guide
you to use this option. When the bill requires a quantity of four ofa given component, you assign four reference designators to thatcomponent, one for each usage.
3. Do one of the following:
• Enter a reference designator for the component. (A referencedesignator must be ten characters or less.)
• Choose the Add Range or Delete Range button to open theRange window. Enter a prefix and a suffix for the range ofreference designators to add or delete. For example, if you enterA as the Prefix, 1 and 4 as the starting and ending values, andXYZ as the Suffix; A1XYZ, A2XYZ, A3XYZ, and A4XYZ are thereference designators.
• To number reference designators, use the Starting Value field todefine the beginning value for a range of reference designators.Then either enter the number of values to add or delete, ordefine the ending value in the Ending field.
4. Save your work.
Assigning Substitute Components
You can assign any number of substitute items to each bill componentand you can assign the same substitute item to more than onecomponent. The substitute item quantity is the quantity needed toreplace the full component quantity. The quantity can differ from thecomponent usage quantity. Oracle Master Scheduling/MRP reportsthese substitutes on some planning reports, such as the MRP DetailReport. Oracle Work in Process does not consider substitute items inits pick lists.
Planning bills and model, option class, and planning componentscannot have substitute components.
� To assign substitute components:
1. Navigate to the Substitute Components window. Do this bychoosing the Substitutes button from the Bills of Material window.
2. Enter a substitute item for the component. If you are using Bills ofMaterial, use a manufacturing item; if you are using OracleEngineering, use an engineering or a manufacturing item.

2 – 21Bills of Material
3. Enter the quantity of the substitute item needed to replace the fullcomponent quantity. This quantity can differ from the bill usagequantity of the component.
Defining Item Revisions
� To define an item revision:
1. Navigate to the Item Revisions window. Do this by choosing theRevisions button from the Bills of Material window.
2. Enter an alphanumeric revision for the item.
3. Enter the effective date of the item revision.
See Also
Item and Routing Revisions: page 2 – 6
Defining Bill or Routing Operation Documents
You can attach documents to bills of material or to routing operations.
� To define bill or routing operation documents:
� Navigate to either the Bill Documents or Operation Documentswindow.
See Also
Working With Attachments, Oracle Applications User’s Guide
Attaching Files: page 2 – 21
Attaching Files
You can attach text and files, such as spreadsheets, graphics, and OLEobjects to bills of material, engineering change orders, and routingoperations.

2 – 22 Oracle Bills of Material User’s Guide
For example, an attached file may include comments, such as agraphical representation of the bill structure, or detailed instructionsand schematic diagrams for routing operations.
� To attach files:
� From the Bills of Material, Engineering Change Orders, or Routingswindow, choose the Attachments icon.
Note: To attach a file to a bill or ECO, position the cursor in theheader region. To attach a file to a routing operation, position thecursor in the Operations region.
See Also
Working With Attachments, Oracle Applications User’s Guide
Defining Bill or Routing Operation Documents: page 2 – 21
Checking for Bill Loops
Bill loops occur when a bill is assigned as a component to itselfsomewhere in the multilevel structure of the bill. The loop checkprogram searches for such loops.
The Check for Loops program can be run from the Tools menu of theBills of Material window.
� To check for bill loops:
1. Navigate to the Bills of Material window.
Note: The Check for Loops item on the Tools menu is onlyavailable when creating a new bill, after that new bill has beensaved.
2. Choose Check for Loops from the Tools menu.
See Also
Bill of Material Loop Report: page 8 – 5
2 – 23Bills of Material
Mass Changing Bills of Material
Use the Mass Change Bills window to mass change yourmanufacturing or engineering bills of material. You can define a masschange to add, delete or replace a component, alter a componentquantity or yield, or change other component information. You canmass change all using bills of material or choose a subset of bills byitem range, item category, or item type. You can mass change primaryand alternate bills of material for each using assembly. For engineeringbills, you can schedule the mass change for a future effective date. Formanufacturing bills, you can implement the changes immediately. Youcan also report effective changes for all using assemblies orcomponents.
If you are using Oracle Engineering, you can create an engineeringchange order (ECO) from the mass change order that affects bothengineering and manufacturing bills. You can then implement the ECOand report on any effected using assemblies.
Bills of Material or Engineering take into account all the actions youenter to determine if the change is applicable. For example, supposeyou add component A and delete component B. This change is madeonly if component A does not exist and component B does exist on theselected bills. The change is applied only if both conditions are met. Inthis example, two records are affected.
Prerequisites
❑ You must create at least one bill of material. See: Creating Bills ofMaterial: page 2 – 10
❑ You must create at least one change order type. See: Defining ECOTypes, Oracle Engineering User’s Guide.

2 – 24 Oracle Bills of Material User’s Guide
� To mass change bills of material:
1. Navigate to the Mass Change Bills window.
2. Enter a mass change order number and a change order type. If youhave Engineering installed and have set up ECO Autonumbering, adefault value will appear. See: Defining ECO Autonumbering,Oracle Engineering User’s Guide.
The change order type describes your changes and determines thetype of bills to modify.
3. Enter the effective date for the change (for engineering bills only).
4. Indicate whether to increment the parent item’s revision by 1(numeric based revisions only).

2 – 25Bills of Material
5. Indicate whether to update Work in Process material requirementsof any unreleased discrete job, or any release or unreleasedrepetitive schedule associated with the parent items.
6. Specify the parent items to change.
You can use a category set, a category range, or an item range.Alternatively, indicate whether to change all primary bills, allprimary and alternate bills, or a specific alternate bill.
Optionally, enter a base model to mass change configuration itemsrelated to this model that meets your other selection criteria.
7. Enter an item type for the parent items.
8. Choose the Changes button to enter component changes.
Caution: If you do not wish to replace the values for the SuppyType, Supply Subinventory, and Supply Locator fields, you mustenter the current value when executing a mass change. If you leavethe Supply Type, Supply Subinventory, and Supply Locator fieldsblank when entering component changes, their values will bereplaced by the blank (null) value when the mass change isexecuted.
9. When finished, select the action(s) to take.
For Bills of Material, select Report (to see affected bills), Implement(to perform the mass change), both, or neither.
For Engineering, select Report, Create ECO, both, or neither.
If you make no selection, the mass change order is saved for you towork on later.
Caution: You cannot undo a mass change. However, you cancreate another mass change to reverse the effects of a previousmass change.
10. Choose the Submit button to launch the selected actions.
� To enter component changes:
1. Choose the Changes button on the Mass Change Bills window.
2. For each component item to change, indicate the action to perform.You can add or delete components to or from a parent item.
Or, you can update existing information about the component onthe parent item. With this option a new row is created that youenter new information into.

2 – 26 Oracle Bills of Material User’s Guide
3. In the Main tabbed region, enter the item sequence, operationsequence, the quantity, and the inactive date for each component.See: Item and Operation Sequence: page 2 – 35.
4. Open the Component Detail tabbed region and enter the planningpercent. See: Planning Percent: page 2 – 38.
Enter the yield and indicate whether the component should bequantity related and included in cost rollups. See: Yield: page2 – 37
5. Open the Material Control tabbed region and enter the supply type.See: Supply Types, Oracle Work in Process User’s Guide.
Enter the supply subinventory and locator identifiers. See: SupplySubinventory and Locator: page 2 – 39.
6. For model, option class, and kit bills, open the Order Entry tabbedregion and enter the minimum and maximum sales orderquantities. See: Minimum and Maximum Quantity: page 2 – 40.
Indicate whether to check ATP. See: Check ATP: page 2 – 40.
Indicate whether the component is optional and mutuallyexclusive. See: Mutually Exclusive and Optional: page 2 – 39.
7. Open the Shipping tabbed region, and choose whether thecomponent should be listed on shipping documents, required toship, or required for revenue. See: Shipping Details: page 2 – 41.
� To set Engineering Change Order (ECO) options:
For Oracle Engineering only.
1. From the Mass Change Bills window, choose the Tools menu itemand choose Set ECO Options.
2. Use the Plan check box to indicate whether you want OracleMaster Scheduling/MRP to include the revised item in theplanning process.
3. Indicate whether each revised item’s effective date is based uponthe planned item’s use–up date. If so, check the Use Up check box.
4. Enter an item whose use–up date is tied to each revised itemeffective date. The default is the use–up item associated with theplan name. This can be the revised item or a component of therevised item.
Oracle Alert automatically notifies the planner for the revised itemif the use–up date changes based on information from a new MRPplan.

2 – 27Bills of Material
See Also
Bill / Component Validation Rules: page 2 – 43
Engineering Change Order Schedule Report, Oracle Engineering User’sGuide
Overview of Engineering Change Orders, Oracle Engineering User’sGuide

2 – 28 Oracle Bills of Material User’s Guide
Viewing an Indented Bill of Material
An indented (multilevel, exploded) manufacturing or engineering billof material displays the structure of a manufacturing or engineeringitem.
� To view an indented bill of material:
1. Navigate to the Indented Bill of Material window.
2. In the Find Indented Bills window, enter the item and/or thealternate for the bill.
Note: If you entered an alternate, the explosion process will searchfor all components with the same alternate label. If, at any level, analternate with the same label is not found, the primary is used. Theexplosion process then continues searching for the originalalternate label.
3. Enter the revision, the revision date, and the number of levels toexplode for this bill. See: Bills of Material Profile Options: page1 – 44.

2 – 29Bills of Material
4. Select a Display option: All, Current, or Future and Currentcomponents effective as of the revision date you specify.
Use the Implemented Only field to further restrict the componentsdisplayed. See: ECO Statuses, Oracle Engineering User’s Guide.
5. Select a sort option for each level of the bill, by operation sequencethen item sequence, or item sequence then operation sequence.
6. Indicate whether to see costing information, and if so, enter thecost type.
You can simulate product costs for budgeting and planninganalysis purposes. To do so, the Privilege to View Cost securityfunction must be enabled for the responsibility.
Indicate whether to view lead time and/or material controlinformation, and whether to use planning percents whencalculating component quantities.
Any field that is checked here causes a corresponding tabbedregion to appear on the Indented Bill of Material window.
7. Choose the Find button to explode the bill.

2 – 30 Oracle Bills of Material User’s Guide
The Indented Bill of Material window appears and displays thefirst level of the bill.
The Components window contains the following tabbed regions,some of which may be disabled according the display options youselected: Item Details, Bill Details, Quantities, Effectivity, MaterialControl, Lead Time, Order Entry, Costing, and Shipping.
8. Use the control buttons to expand or collapse portions of theindented bill. You can only expand up to the explosion levelindicated in the Find window.
See Also
Using Query Find, Oracle Applications User’s Guide
Using Query Operators, Oracle Applications User’s Guide
Searching For Information, Oracle Applications User’s Guide
Performing Query–by–Example and Query Count, Oracle ApplicationsUser’s Guide
Item and Operation Sequence: page 2 – 35
Effective Date Fields: page 2 – 36
Yield: page 2 – 37
Planning Percent: page 2 – 38
Supply Types, Oracle Work in Process User’s Guide
Supply Subinventory and Locator: page 2 – 39
Extended Quantity: page 2 – 38
Mutually Exclusive and Optional Components: page 2 – 39
Check ATP: page 2 – 40
Minimum and Maximum Quantity: page 2 – 40
Basis: page 2 – 41
Shipping Details: page 2 – 41
Overview of Lead Time Management: page 7 – 2
Viewing Item Usage: page 2 – 33
Overview of Routings: page 3 – 2
Bill of Material Structure Report: page 8 – 7

2 – 31Bills of Material
Comparing Bills of Material
You can compare any two bills. For example, compare the primary toan alternate bill, the same bill across organizations, or the currentrevision of an item to a future revision.
Note: The two assemblies and their attributes are referred to as Bill1 and Bill 2, or simply as 1 and 2.
� To compare two bills of materials:
1. Navigate to the Bill Components Comparison (or the Report Bill ofMaterial Comparison) window.
2. In the Find Bills to Compare window, enter selection criteria for Bill1. Do the same for Bill 2.
3. Check comparison criteria check boxes for the attributes tocompare the bills on.
4. Select an Order By option: by item sequence then operationsequence, or by operation sequence then item sequence.

2 – 32 Oracle Bills of Material User’s Guide
5. To view only the differences between bills, check the DifferencesOnly check box.
6. Choose the Compare button to compare the bills online. (If you arerunning the Bill of Material Comparison Report, choose the Reportbutton.)
The Bill Components Comparison window displays both bills.Two columns of check boxes, one for assembly #1 and one forassembly #2, indicate if the component appears in the assembly.
The Main tabbed region displays the item and operation sequences,the planning percent, the quantity, and whether the item isoptional.
The Effectivity tabbed region displays the effective date range andwhether the item is implemented.
See Also
Item and Operation Sequence: page 2 – 35
Planning Percent: page 2 – 38
Yield: page 2 – 37
Effective Date Fields: page 2 – 36
Bill of Material Comparison Report: page 8 – 2

�
2 – 33Bills of Material
Viewing Item Usage
View an imploded list of all the using assemblies for a specifiedcomponent.
� To view item where used:
1. Navigate to the FindItem WhereUsed window.
2. In the Find Item WhereUsed window, enter the item, the revision,the revision date, and the number of levels to implode for this billof material.
Attention: Only Current components effective as of the revisiondate you specify will be displayed.
Use the Implemented Only field to further restrict the componentsto display.
3. Choose the Find button to open the Item WhereUsed window.
The level bill of material where the inventory item appears in theusing assembly is displayed, starting at 1 (level 2 signifies theparent of level 1; level 3 signifies the parent of level 2, and so on.)
The Item WhereUsed window has three tabbed regions: ItemDetails, Bill Details, and Effectivity.
The Item Details tabbed region displays the revision, the type, andthe status for the component.

2 – 34 Oracle Bills of Material User’s Guide
The Bill Details tabbed region displays the alternate, whether thebill is an engineering bill, the usage quantity (of the item in theimmediate parent assembly), the ECO that implemented thecomponent (if it has been implemented), and the operationsequence.
The Effectivity tabbed region displays the effective date range andwhether the item is implemented. See: Effective Date Fields: page2 – 36.
4. Use the control buttons to expand or collapse portions of theindented item usages.
See Also
Using Query Find, Oracle Applications User’s Guide
Using Query Operators, Oracle Applications User’s Guide
Searching For Information, Oracle Applications User’s Guide
Performing Query–by–Example and Query Count, Oracle ApplicationsUser’s Guide
Viewing An Indented Bill of Material: page 2 – 28
Item Where Used Report: page 8 – 19
Consolidated Bill of Material Report: page 8 – 12

2 – 35Bills of Material
Bills of Material Field Reference
This section describes the use of certain major fields.
Item and Operation Sequence Fields
Item Sequence Field
The item sequence indicates the sequence of the item on the bill. It isused to sort components on reports and when choosing options from amodel bill in Oracle Order Management. This defaults to the value ofthe highest existing component item sequence plus the value of theBOM: Component Item Sequence Increment profile option. If thisprofile option is not set, the default is 10. You can override or changethis number.
Operation Sequence Field
On a bill, the operation sequence indicates the order in which youperform operations on a routing. You can assign any component to anyoperation on the routing, including all components to the sameoperation (such as the first operation). The planning process assignsmaterial requirement dates based on the operations to which youassign each component. Valid values range from 1 to 9999.
You can define bills of material for items with or without routings. Ifyou use routings, you can either define the bill first or the routing first.
With component–to–operation assignments, you can schedule andissue component material to the operation that requires the componenton the exact requirement date. You can also assign the samecomponent on the bill to different operations on the routing, withdifferent usage quantities for each assignment.
If no routing exists for the item, all components default to operationsequence 1. You cannot change this value until you define a routing forthe item. After you define the routing, you can update your bill ofmaterial with routing operations if you want specificcomponent–to–operation assignments.
If you define the routing before you define a bill, assign components tovalid routing operations, or an operation sequence 1 when you definethe bill. If you define an alternate routing and then define the alternatebill, you can assign components to the alternate routing operations. If

2 – 36 Oracle Bills of Material User’s Guide
you define an alternate bill and no alternate routing exists, you canassign components to the primary routing operations.
See Also
Bills of Material Profile Options: page 1 – 44
Overview of Material Control, Oracle Work in Process User’s Guide
Material Requirements Planning, Oracle Master Scheduling/MRP User’sGuide
Creating a Routing: page 3 – 8
Effective Date Fields
Effective date fields appear throughout Oracle Manufacturingproducts. These are defined as follows:
First date and time the component or operationbecomes effective. For components, the effectivedate is the first day a component becomes effectivefor a bill. For routings, it is the first day anoperation becomes effective in a routing.
Last date and time the component or operation iseffective. After this date, you can no longer assignthe component to a bill or the operation to arouting.
The first date and time the component or operationis inactive. As of 12:00AM on this date, you can nolonger assign the component to a bill or theoperation to a routing. If this date equals theeffective date, the component or operation isinactive.
To avoid confusion, make sure that effective dates for one revision donot overlap with those of another.
For example, if you must introduce three new components to a bill in aspecific order, you should assign each change to the appropriate parentitem revision. So, component 1 of revision B may be effective today,component 2 of revision C tomorrow, then component 3 of revision Dmay be effective the following day. If there are two operations on arouting and you replace the first operation with a new operation, you
Effective From /Effective Date
Effective To /Inactive After
Inactive On

2 – 37Bills of Material
should set the effective date for the new operation to the date theoperation you are replacing becomes inactive.
Effective dates can be either the current date or a date in the future; youcannot enter a date in the past.
For components, the default effective date is the later of the currentdate or the date entered for the bill. If an inactive date already existsfor the operation sequence/item combination, the default effective dateof any subsequent rows with the same operation sequence/itemcombination is the same as the inactive date. That means that thesubsequent operation sequence/item combination becomes effectiveimmediately after the previous one becomes inactive.
You cannot assign duplicate components to the same operation withoverlapping effective date ranges. For example, suppose componentA001 at operation 10 is effective from 10–JAN to 14–FEB. You may notadd another component A001 at operation 10 to the bill with aneffective date of 10–FEB.
Use Oracle Master Scheduling/MRP to identify any overlappingeffective dates.
See Also
Item and Routing Revisions: page 2 – 6
Yield Field
The yield is the percentage of the component that survives themanufacturing process. A yield factor of 0.90 means that only 90% ofthe usage quantity of the component on a bill actually survives to beincorporated into the finished assembly.
To compensate for the expected gain or loss, any function that explodesa bill of material increases or decreases the material requirements forthe component, based on the yield.
component requirements = component usage quantity /component yield
For example, when Master Scheduling/MRP plans a component with ausage quantity of 10 units per assembly and a component yield of 50%

2 – 38 Oracle Bills of Material User’s Guide
(or 0.5), the resulting component requirements increase to 20 units perassembly.
Note: You cannot enter component yield for an option class itemor for any components of a planning bill.
The default is 1, indicating 100% yield (no loss or gain).
See Also
Material Requirements Planning, Oracle Master Scheduling/MRP User’sGuide
Planning Percent Field
Master Scheduling/MRP uses component planning percentages inforecast explosions through planning, model, and option class bills ofmaterial.
Assign planning percentages to components on model, option class,and planning bills.
Note: You can assign planning percents to mandatory componentson model or option class bills only if the Forecast Control attributeis set to Consume and Derive.
Enter a component planning percent to specify a distributionpercentage for the components. You can enter a planning percentgreater than 100 to overplan a component. The default is 100.
See Also
Material Requirements Planning, Oracle Master Scheduling/MRP User’sGuide
Two–Level Master Scheduling, Oracle Master Scheduling/MRP User’sGuide
Extended Quantity Field
The extended quantity of the component used in the parent item iscalculated as follows:

2 – 39Bills of Material
((explosion quantity of parent item x component usage quantity)/ component yield)/ (1 – shrinkage rate for parent)
See Also
Two–Level Master Scheduling, Oracle Master Scheduling/MRP User’sGuide
Supply Subinventory and Locator Fields
Work in Process pulls components from the supply subinventory andthe locator within the subinventory during backflushing.
Assign a supply subinventory and locator, if applicable, to componentsthat have a supply type of Assembly pull or Operation pull. You mustspecify a supply locator if you have mandatory locator control for thesupply subinventory. The system validates any item subinventory andlocator restrictions you defined during your Oracle Inventory setup.
See Also
Overview of Material Control, Oracle Work in Process User’s Guide
Mutually Exclusive and Optional Fields
The following pertains to options for model and option class bills. Allcomponents are mandatory on standard and planning bills. Model andoption class bills can have both mandatory and optional components.
The Optional field indicates whether the component is mandatory oroptional. The Mutually Exclusive field applies only to option class billsand indicates whether you can choose one or many options within anoption class.
Oracle Order Management uses the Mutually Exclusive check box incombination with the Optional check box to determine the number ofoption items you can or must choose to order the components of theoption class bill. Refer to the table below for details on how the

�
2 – 40 Oracle Bills of Material User’s Guide
Optional check box and the Mutually Exclusive check box worktogether.
[ ] Mutually Exclusive(default) [X] Mutually Exclusive
[X] Optional Choose any numberor no options on theoption class bill
Choose one or no op-tions on the optionclass bill
[ ] Optional(default)
Choose at least oneoption on the optionclass bill
Choose one, and onlyone, option on the op-tion class bill
Check ATP (Available To Promise) Field
Check ATP indicates whether to perform an ATP check on thecomponent. The default is enabled if both the parent’s CheckComponent ATP item attribute is Yes and the component’s Check ATPitem attribute is set to Yes. You can update this check box only if all ofthe following are true:
• Selected the Check ATP attribute of the component item
• Selected the Check Component ATP item attribute of theassembly item
• Entered a component quantity greater than 0
Minimum and Maximum Quantity Fields
Oracle Order Management uses the minimum and maximum quantitiesto determine the number of optional items available when orders areplaced for components on option class bills. If you enter a minimumsales order quantity, you must also enter a maximum sales orderquantity. You can only enter a minimum and maximum quantity rangethat contains the quantity for the component. If you update thecomponent quantity, the minimum and maximum values are changedto include the new component quantity.
Attention: These attributes do not apply to mandatory standardcomponents.
2 – 41Bills of Material
Basis Field
If the component is an option class item, you must indicate whetheryou want to override the default quantity for the option class when asales order is entered (the default). Option class quantities affect themandatory standard components assigned to the option class.
If you select None for the Basis field, Oracle Order Management canoverride the default quantity for the option class. Order Managementdefaults the total quantity to release as the component quantitymultiplied by the option class extended quantity.
If you select Option class for the Basis field, Order Management cannotoverride the default quantity for the option class. Order Managementcalculates the total quantity to release as the component quantitymultiplied by the option class extended quantity.
Note: Set the basis to Option class for an ATO option classcomponent. When creating a configuration bill, OracleManufacturing computes the total quantity required for amandatory standard component as the component quantitymultiplied by the option class extended quantity—regardless of thequantity entered on the sales order.
Shipping Details Fields
Indicates whether the component item is shippable.The default is determined by the value of theShippable Item attribute in the item master.
Indicates whether Oracle Order Managementprints the components on external shippingdocuments, such as pack slips and commercialinvoices. The default is off.
Indicates whether the component is required toship the order. You can only update this check boxif the Assemble to Order item attribute for theassembly item in the Define Item window isdisabled.
This attribute only affects PTO included items (notATO items or configurations), and is only effective
Shippable
Include on ShipDocs
Required to Ship

2 – 42 Oracle Bills of Material User’s Guide
if your OE: Reservations profile option is set to No.If OE: Reservations is set to Yes, then the ShipModel Complete inventory attribute and the ShipSet feature in Order Management control what isrequired to ship, and what prints on the pick slip.
Indicates whether the component is required torecognize revenue before you ship the order. Youcan only update this check box if the Assemble toOrder item attribute for the assembly item in theDefine Item window is disabled.
This attribute is recognized by the ReceivablesInterface in Order Management. Required forRevenue components prevent their parent itemfrom invoicing until they are shipped. Forexample, if you have an option class bill with anon–optional component with the Required forRevenue attribute set to Yes, then the option classwill not invoice until the non–optional componenthas shipped.
This field does not affect mandatory or optionalcomponents for an ATO item or configuration.
Required forRevenue

2 – 43Bills of Material
Bill / Component Validation Rules
The following bill and component validation rules apply whendefining, copying, or mass changing bills of material:
• Depending on the setting of the profiles that limit access todifferent bill types (BOM: Model Item Access, BOM: PlanningItem Access, BOM: Standard Item Access), you may not be ableto modify bills.
• You cannot add a component with an operation sequencenumber that does not exist in the routing. The only exception isfor operation sequences that are equal to 1.
• You cannot add a component to a bill where the component itemis the same as the parent.
• You cannot add a component to a bill where the samecomponent, with the same operation sequence and effectivity,already exists on the bill.
• Only manufacturing items can be added to manufacturing bills.
• You cannot add a component to a bill that is being referenced asa common bill from another organization, where the componentdoes not exist in the other organization.
• You cannot add components to common bills.
• You cannot add a component to a bill if it violates the rulesshown in the following table:
Children
Parents PlanningPTOModel
PTOOptionClass
PTOItem(kit)
ATOModel
ATOOptionClass
ATOItem
StandardItem
Planning Bill Yes Yes Yes Yes Yes Yes Yes Yes
PTO Model Bill Yes Yes Yes Yes Yes* Yes
PTO OptionClass Bill
Yes Yes Yes Yes Yes* Yes
PTO Item (kit) Yes Yes
ConfigurationItem Bill***
Yes Yes Yes Yes
ATO Model Bill Yes Yes Yes Yes
Table 2 – 3
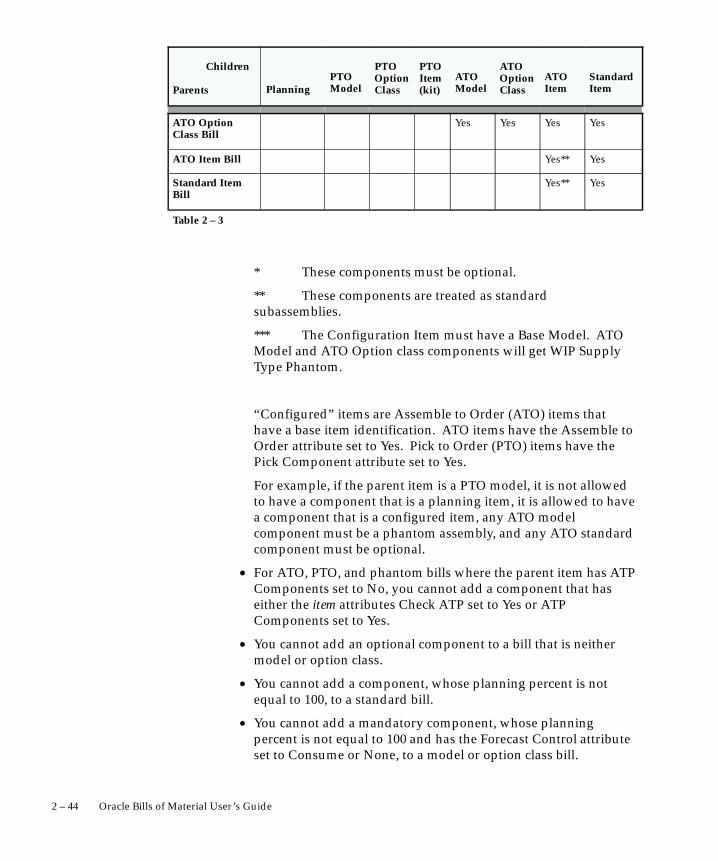
2 – 44 Oracle Bills of Material User’s Guide
StandardItem
ATOItem
ATOOptionClass
ATOModel
PTOItem(kit)
PTOOptionClass
PTOModelPlanning
Children
Parents
ATO OptionClass Bill
Yes Yes Yes Yes
ATO Item Bill Yes** Yes
Standard ItemBill
Yes** Yes
Table 2 – 3
* These components must be optional.
** These components are treated as standardsubassemblies.
*** The Configuration Item must have a Base Model. ATOModel and ATO Option class components will get WIP SupplyType Phantom.
“Configured” items are Assemble to Order (ATO) items thathave a base item identification. ATO items have the Assemble toOrder attribute set to Yes. Pick to Order (PTO) items have thePick Component attribute set to Yes.
For example, if the parent item is a PTO model, it is not allowedto have a component that is a planning item, it is allowed to havea component that is a configured item, any ATO modelcomponent must be a phantom assembly, and any ATO standardcomponent must be optional.
• For ATO, PTO, and phantom bills where the parent item has ATPComponents set to No, you cannot add a component that haseither the item attributes Check ATP set to Yes or ATPComponents set to Yes.
• You cannot add an optional component to a bill that is neithermodel or option class.
• You cannot add a component, whose planning percent is notequal to 100, to a standard bill.
• You cannot add a mandatory component, whose planningpercent is not equal to 100 and has the Forecast Control attributeset to Consume or None, to a model or option class bill.

2 – 45Bills of Material
• When adding a component to a bill, the mass change will set theCheck ATP component attribute to No if the component quantityis less than or equal to 0.
See Also
Creating a Bill of Material: page 2 – 10
Copying Bill and Routing Information: page 2 – 14
Referencing Common Bills and Routings: page 2 – 17
Deleting Components and Operations: page 4 – 6
Mass Changing Bills of Material: page 2 – 23

�
�
2 – 46 Oracle Bills of Material User’s Guide
Creating a Product Family
A product family is a grouping of products whose similarity inresource usage, design, and manufacturing process facilitates planningat an aggregate level. A product family cannot be a part of a Standard,Model, Option Class, or Planning Bill of Material. Consequently, aproduct family is a single level bill. Members of a product family canbelong to one and only one product family. You will be able to planbased on the planning percentages and effectivity of the product familymembers.
Attention: You must make sure that the Product Family flexstructure is configured to match the System Items structure. If theSystem Items structure is changed it should be reflected in theProduct Family structure as well. See: System Item Structure, OracleInventory User’s Guide
� To create a product family item:
1. Navigate to the Master Item window.
Attention: If you are a Flow Manufacturing customer, selectProduct Family from the Flow Manufacturing window. Theproduct family template is automatically applied.
2. Apply the product family template. See: Item Templates, OracleInventory User’s Guide
To define a default template for product family items, you mustselect a template from the INV: Product Family Item TemplateName profile option. The template assigned in this profile optionwill be automatically applied when you create a new productfamily item.
Note: You are not required to use the product family template. Ifyou choose not to use a template, make sure that you define thecorrect product family attributes. Specifically, the item must be aninventory item and the BOM Item Type must be Product Family.The item must also be BOM allowed.
Each product family corresponds to an item category. A newcategory is added for each product family item that is defined. Therelationship between the product family item and the productfamily category is established by the equality of their concatenatedkey flexfield segment values. The category has the same name asthe product family item. Consequently, product family itemcategories have the same flexfield structure as the System Items

�
�
2 – 47Bills of Material
Flexfield. A new structure called Product Family has been definedfor the Item Categories Flexfield. Each product family memberitem and the product family item itself are assigned to thecorresponding category within the Product Family category set.The assignment is removed when an item is no longer a member ofa product family.
See Also
Assigning Product Family Members: page 2 – 47
Oracle Flow Manufacturing: page NO TAG
Setting Planning Percentages for Product Family Members: page 2 – 48
Assigning Product Family Members
Prerequisites
❑ To create a product family you must first define all of the familymembers as items and the product family item. See: DefiningItems, Oracle Inventory User’s Guide and Defining Product Families:page 2 – 46.
� To assign product family members:
1. Navigate to the Product Family window.
Note: If you are using Oracle Flow Manufacturing, you can selectProduct Family Members from the Flow Manufacturing menu.
2. Select a product family item.
3. Select item members of the product family. The description, type,forecast control, and planning method for the member items aredisplayed for the items selected.
Attention: When an item is included in a product family, it will beautomatically assigned to the same category as the family item.
4. Commit the record by selecting Save from the File menu.
Attention: You can commit a record without assigning planningpercentages. The default planning percent is 100. The defaulteffectivity date is the system date.

�
2 – 48 Oracle Bills of Material User’s Guide
See Also
Oracle Flow Manufacturing: page NO TAG
Mixed Model Map: page NO TAG
Setting Planning Percentages for Product Family Members: page 2 – 48
Creating a Flow Routing: page NO TAG
Setting Planning Percentages for Product Family Members
Prerequisites
❑ To assign planning percentages you must first create a productfamily item and assign member items. See: Defining ProductFamilies: page 2 – 46 and Assigning Product Family Members: page2 – 47.
� To assign planning percentages to product family members:
1. Navigate to the Product Family window. Do this by selectingDefining Product Families from the Bills of Material menu.
2. To assign planning percentages for a member item, choose theAllocation button.
3. Enter the product family member’s planning factor.
4. Enter effectivity dates for the item. Effectivity dates cannotoverlap.
5. Optionally, enter comment text.
6. Commit the record by selecting Save from the File menu.
Attention: You can commit a record without assigning planningpercentages. The default planning percent is 100. The defaulteffectivity date is the system date.
See Also
Oracle Flow Manufacturing: page NO TAG
Creating a Flow Routing: page NO TAG

C H A P T E R
3T
3 – 1Routings
Routings
his chapter tells you everything you need to know to use routings,including:
• Overview of Routings: page 3 – 2
• Creating a Routing: page 3 – 8
• Creating a Standard Operation: page 3 – 18
• Viewing Resource Usage: page 3 – 20
• Routings Reference: page 3 – 22

3 – 2 Oracle Bills of Material User’s Guide
Overview of Routings
A routing defines the step–by–step operations you perform tomanufacture a product. Each routing can have any number ofoperations. For each operation you specify a department thatdetermines the resources you may use for that operation.
See Also
Primary and Alternate Routings: page 3 – 2
Routing Revisions: page 2 – 6
Creating a Routing: page 3 – 8
Operations: page 3 – 4
Resource Usage: page 3 – 5
Defining a Department: page 1 – 19
Defining a Resource: page 1 – 23
Primary and Alternate Routings
A primary routing is the list of operations most frequently performedto build a product. You can define one primary routing and manyalternate routings an item. When you define a new primary routing,you specify only the item (no alternate name) and you can assign arouting revision. For example, you can define a routing for an item thatincludes two operations—an assembly and a testing operation. Youtypically build your product with these operations, so you define thisrouting as the primary routing for the item.
Item Alternate Name OperationSequence
Description
A 10 Assembly
20 Test A/B
Table 3 – 1 Primary Routing (Page 1 of 1)
You can define an alternate routing to describe a differentmanufacturing process used to produce the same product. Unlike a

3 – 3Routings
new primary routing, specify the item and alternate name to define analternate routing. You must define a primary routing before you candefine alternate routings, and you can define any number of alternateroutings for an item. For example, you have three test machines, onenew machine capable of performing both tests A and B and two oldermachines that can only perform test A or test B. Ideally you would liketo use the new machine that can perform both tests, but if it isunavailable, you use the other machines to complete the job.
Item Alternate Name OperationSequence
Description
A 10 Assembly
20 Test A/B
A Split Test 10 Assembly
20 Test A
30 Test B
Table 3 – 2 Primary and Alternate Routings (Page 1 of 1)
Bills and routings can share alternate labels. If you create an alternatebill with the same label as an alternate routing, components areassigned to operations on the alternate routing. If there is no routingwith the same alternate label, components are assigned to operationson the primary routing.
Engineering Routings
You can define an engineering routing as an alternate for amanufacturing routing. This would typically be used to prototype avariation from the primary routing that produces the same assembly.
Both engineering and manufacturing routings share the same resource,department, and standard operation information.
See Also
Switching Between Primary and Alternate Routings: page 3 – 12
Creating Alternates: page 1 – 15
Primary and Alternate Bills of Material: page 2 – 5

3 – 4 Oracle Bills of Material User’s Guide
Operations
To define a routing operation you first specify an operation sequencenumber to indicate the order to perform operations. Components inyour bill of material can reference an operation sequence. Next, youcan choose either a standard operation, or you can enter a newoperation.
Sequence of Operations
Routings define the step–by–step descriptions, or operations, formanufacturing an assembly. Each operation on a routing defines aspecific portion of the manufacturing process for the assembly. You canuse operations to identify the location, the quantity, and the state ofcompletion of the assemblies you are currently manufacturing.
For each component item on the bill of material associated with arouting, you can specify the operation sequence where you require theitem. You can then only issue material where and when it is needed.See: Creating a Bill of Material: page 2 – 10.
Standard Operation
A standard operation is a commonly used operation that you define asa template to default operation information when you define routings.When you define a new operation on a routing, you can specify astandard operation whose information Bills of Material copies into theoperation you are currently defining. You can then change any of thecopied information for the new operation. See: Creating a StandardOperation: page 3 – 18.
Backflushing Transactions
You can specify at what point in the routing you backflush componentmaterial. Moves automatically backflush the appropriate componentsat the time they are needed. You can postpone the backflush ofmaterial at time–critical operations until a later operation. See: IssuingComponents From Inventory to WIP, Oracle Work in Process User’sGuide.
Minimum Transfer Quantities
You can set the minimum quantity that you move from an operationwhen you define a routing. The Shop Floor Transaction window issuesa warning when you move a quantity less than this minimum.

3 – 5Routings
Attachments
You can attach files, which may include instructions, to routingoperations. See: Attaching Files to Bills and Routing Operations: page2 – 21.
Option Dependent Operations
When you define routings for model and option class items, you canindicate the operations that appear in a configuration item’s routingonly if you choose an option that references that operation. Bills ofMaterial automatically creates a configuration item’s routing includingall operations that are not option–dependent and anyoption–dependent operations referenced by a chosen option. See:Configure to Order Environments: page 5 – 7.
Resource Usage
You can associate multiple resources with an operation on a routing.For each resource, you can determine if you want to include thatresource in scheduling and lead time calculations. You can also collectcosts for a resource on a routing if you specified the resource as acosted resource. See: Defining a Resource: page 1 – 23.
Item or Lot–Based Resources
You can specify resource usage as a fixed rate per job for activities suchas setup and teardown, and variable rates for resources whose usagedepends on the number of units processed. For lot based resources youchoose the Lot basis type and your usage rate is fixed, and for itembased resources you choose the Item basis type to indicate that yourusage rate is variable.
For example, you might define an operation where you schedule lotbased and item based resources.
OperationSequence
ResourceSequence
Activity Resource Usage UOM Basis ResourceUnit Cost
10 1 Queue Time 1 HR Lot $0
2 Run Labor 01 .2 HR Item $10
Table 3 – 3 Scheduling by Item or Lot (Page 1 of 1)

3 – 6 Oracle Bills of Material User’s Guide
Oracle Cost Management divides lot based resource usages by lot sizeto determine item costs. For example, you might define a lot basedresource that represents time spent setting up a machine, and aresource that represents the time to teardown the machine for the nextjob or schedule. You could schedule and collect costs for both the setupand teardown resources.
Resource Scheduling
You can specify usage rates either as resource units per item unit, or theinverse – item units per resource unit. For example, you could specifyusage rate for a machine hour resource in either units per hour, orhours per unit. For each routing operation, you can specify multipleresources and usage rates.
For each resource, you can specify whether to schedule it, and whetherit overlaps the prior or next operation. If you specify that a resourceoverlaps the prior operation, Oracle Work in Process schedules theresource so that the last resource on the prior operation ends at thesame time as this resource. Conversely, if you specify a resource thatoverlaps the next operation, Work in Process schedules the resource sothat the first resource on the next operation begins at the same time asthis resource.
Work in Process schedules assuming that the department uses up to thenumber of assigned units of the resource simultaneously – up to thenumber that exist in the department.
If you specify that a resource is available 24 hours (such as time in adrying area), Work in Process schedules it around the clock regardlessof shifts. See: Assigning Operation Resources: page 3 – 15.
Resource Charging Method
You can associate multiple resources with an operation on a routing,and for each resource you can determine how the resource is charged.You can automatically charge resources in Work in Process based onmove transactions and purchase order receipts (for outside processing).You can also manually charge resources. See: Overview of ResourceManagement, Oracle Work in Process User’s Guide.
You can collect and group resource charges by activity for costreporting. See: Work in Process Standard Cost Transactions, Oracle CostManagement User’s Guide.
Resource Capacity Modifications
For each resource on a shift, you can override the number of resourceunits available (such as number of machines) and specify additions or

3 – 7Routings
reductions to the amount of time the resource is available on that shift.These capacity modifications are assigned to simulation sets that youcan use later when you generate a capacity plan or schedule discretejobs or repetitive schedules to simulate capacity changes. See:Overview of Capacity Planning, Oracle Capacity User’s Guide.
Resource Usage Rate or Amount
The usage rate or amount is the amount of the resource consumed atthe operation, either the quantity per item or per lot. If you assignmore than one resource unit to work at an operation, Work in Processconsiders the number of units when scheduling a resource at anoperation. (Assign the usage rate for the resource as the total quantityper item or lot, regardless of the number of resource units you specify.)For example, if you define a machine resource to require 10 hours peritem and you assign 2 resource units to the resource, Work in Processautomatically schedules 2 machines for 5 hours.
Standard Resource Costs
When you define a routing, you specify the resources you use to buildthe items, and each resource has costs associated with it. By definingthe routing with specific resources, you establish standard resourcecosts for any item that uses the routing. See: Setting Up ManufacturingStandard Costing, Oracle Cost Management User’s Guide.
Outside Processing
You can define outside processing resources and then assign theseresources to operations on a routing. Work in Process considers anyoperation that has an outside processing resource as an outsideoperation. See: Outside Processing, Oracle Work in Process User’s Guide.

�
3 – 8 Oracle Bills of Material User’s Guide
Creating a Routing
For each routing, define the operations, the sequence to perform them,and the resources required at each operation. You can define either aprimary or an alternate routing. If you are a Flow Manufacturingcustomer you can also create a Flow Routing. See: Creating a FlowRouting: page NO TAG.
Attention: You cannot create routings for planning orpick–to–order items.
Note: Use attachments, such as detailed operation instructions, forrouting operations. See: Attaching Files: page 2 – 21.
Prerequisites
❑ You must define at least one department before you can create arouting.
❑ BOM Allowed must be set to Yes for the item you are creating arouting for.
You can create a routing manually, copy an existing routing, orreference a common routing. See: Copying Bills and Routings: page2 – 14. See: Referencing Common Bills and Routings: page 2 – 18
The procedure below describes how to manually create a routing.

3 – 9Routings
� To create a routing:
1. Navigate to the Routings window.
Note: If your current responsibility does not include the Privilegeto Maintain security function, you can only view routinginformation. If so, enter selection criteria in the Find Routingswindow and choose the Find button. The Routings Summaryfolder window appears.
2. Enter a manufacturing item to create a routing for.
3. If you are creating an alternate routing, enter an alternate. For aprimary routing, do not enter an alternate. See: Primary andAlternate Routings: page 3 – 2.
4. If you are updating an existing routing, enter the routing revisionand the effective date.

�
3 – 10 Oracle Bills of Material User’s Guide
To update the revision, choose the Routing Revisions button toopen the Routing Revisions window. See: Creating a RoutingRevision: page 3 – 13.
5. If you would like this routing to be capable to promise, then choosethe Capable to Promise button. See: Capable to Promise, OracleMaster Scheduling/MRP and Oracle Supply Chain Planning User’sGuide
Note: Capable to promise describes an available to promisecalculation that considers both available material and capacity ofmanufacturing and distribution resources. You are able to defineone and only one CTP routing for each item.
6. Select a display option to display All, Current, or Future andCurrent operations effective as of the revision date you specify.
To enter completion subinventory and locator information, or viewa common routing, choose the Routing Details button to open theRouting Details window. See: Completion Subinventory andLocator: page 3 – 22.
7. Enter the operation sequence. See: Item and Operation Sequence:page 2 – 35
8. To copy or reference standard operations into a routing, use theOperation Code list of values. You can define a new standardoperation by selecting Standard Operations from the Tools menu.
If you use a standard operation code, the operation information forthat code will be copied into the operation you are currentlydefining. You can then update that information as desired. See:Creating a Standard Operation: page 3 – 18.
Attention: You can assign the same standard operation to morethan one operation sequence within the same routing.
The Routings window has three tabbed regions: Main, WIP, andDescription.
9. Enter the department in which the operation is performed.
10. Enter an effective date range. See: Effective Date Fields: page2 – 36.
11. For operations in ATO model or option class routings only, indicatewhether the operation is option dependant, that is, whether theoperation is dependant on the choice of an optional component.All mandatory components and their related operations appear onthe routing for each configuration. The default is enabled. See:Overview of Configure to Order: page 5 – 2.

3 – 11Routings
12. Optionally, enter the item’s manufacturing lead time percentrequired to complete all previous operations on the routing. See:Calculating Manufacturing Lead Times: page 7 – 17
If the manufacturing lead time equals 10 days and all previousoperations combined require 2 days, the lead time percent is 20%.
13. Open WIP tabbed region and select Count Point and Autochargeoptions. See: Count Point and Autocharge: page 3 – 22. See:Charge Type: page 3 – 26.
Indicate whether to backflush components on shop floor moves atthis operation. A backflush transaction automatically pullsOperation pull components from inventory. Work in Process alsopulls all Operation pull components at non–backflush operationspreceding this operation (through the previous completedbackflush operation.) See: Backflush Transaction Options, OracleWork in Process User’s Guide.
Enter the minimum transfer quantity of assemblies to move fromthis operation to the next. Work in Process will warn you if youattempt to move a number less than this value. If you used astandard operation, this value defaults to minimum transferquantity defined for the standard operation. Otherwise the defaultis 0.
See Also
Defining a Department: page 1 – 19
Creating a Standard Operation: page 3 – 18
Defining Bill or Routing Operation Documents: page 2 – 21
Defining a Resource: page 1 – 23
Deleting Components and Operations: page 4 – 6
Attaching Files: page 2 – 21
Creating a Bill of Material: page 2 – 10
Routing Report: page 8 – 23
Customizing the Presentation of Data in a Folder, Oracle ApplicationsUser’s Guide

3 – 12 Oracle Bills of Material User’s Guide
Switching Between Primary and Alternate Routings
From the Routings window you can switch between Primary andAlternate routings.
Prerequisites
❑ You must define both the primary and alternate routing before youare able to perform the switch.
� To switch between a primary and alternate routing:
1. Navigate to the the Routings window.
2. Perform a query to display the alternate routing which you wouldlike to switch to the primary routing.
3. Choose the Tools menu and select Switch to Primary.
4. After the switch is completed a message will appear confirming theswitch. Choose OK.

3 – 13Routings
Assigning a Completion Subinventory and Locator
� To assign a completion subinventory and locator:
1. Navigate to the Routing Details window. You can do this bychoosing the Routing Details button from the Routings window.
2. Enter the completion subinventory and locator.
See Also
Completion Subinventory and Locator: page 3 – 22
Creating a Routing Revision
� To create or update a routing revision:
1. Navigate to the Routing Revisions window. You can do this bychoosing the Revision button from the Routings window.
2. Enter the routing revision.

3 – 14 Oracle Bills of Material User’s Guide
3. Enter an effective date and time.
The implementation date, which is either the date the revision wasadded or the date the routing was transferred from OracleEngineering, is displayed. If the routing was transferred fromEngineering, the ECO text is displayed.
See Also
Item and Routing Revisions: page 2 – 6
Transferring or Copying Engineering Items, Bills, and Routings, OracleEngineering User’s Guide

3 – 15Routings
Assigning Operation Resources
� To assign a resource to a routing operation:
1. Navigate to the Operation Resources window. You can do this bychoosing the Resources button from the Routings window.
2. Enter the sequence number of the resource and the resource name.You can use any resource assigned to the department. Valid valuesfor sequence range from 1 to 9999 and must be unique for theoperation.
3. Select a basis type by which to charge and schedule the resource.The default is the basis specified for the resource.
Item: Charge and schedule the resource by multiplying the usagerate by the job or schedule quantity for the assembly. Select Itemwhen your charges fluctuate with quantity change.
Lot: Charge and schedule the resource by charging the usage rateor amount once per job or schedule. Select Lot when your resource

3 – 16 Oracle Bills of Material User’s Guide
usage quantity is the amount required per job or schedule, forexample, setup charges.
4. Enter a value for the Rate or Amount in either the Usage or Inversefields. That is, enter the resource consumed at the operation (peritem or per lot) or it’s inverse. Entering a value for either fieldupdates the other field.
Resources with time–based unit of measures must have usage ratesgreater than zero.
Enter an inverse when you know the number of units a resourcecan process (rather than the duration an assembly unit consumesthe resource. For example, if you know a resource can process 10units per hour, enter 10 for the inverse.
Usage or Inverse can be negative only for resources that cannot bescheduled and where the charge type is neither PO move nor POreceipt.
5. Open the Scheduling tabbed region and enter the number ofassigned units to the resource. See: Resource Usage: page 3 – 5
6. If the unit of measure of the resource is time–based, select aschedule value. See: Schedule: page 3 – 25.
7. Enter the resource offset percent within this routing.
For example, a value of 50 means that you utilize the resourcewhen the routing is half completed. This value is automaticallycalculated when you compute the lead time for the assembly.
8. Open the Costing tabbed region and enter an activity to performwhen you use the resource. Use activities to group resourcecharges for cost reporting. The default is the activity associatedwith the resource. See: Defining Activities and Activity Costs,Oracle Cost Management User’s Guide.
9. Indicate whether to charge jobs or schedules based on the standardrate defined for the resource (default).
Off: Use this option if you import charges from an outside laborsystem and want to record actual costs, or to record the labor rateof an employee.
On: For outside processing resources, if you charge a job andrepetitive schedule at the standard rate, Oracle Purchasingcomputes any purchase price variance and posts it to the ratevariance account.
10. Select a charge type. The default is the charge type specified for theresource. See: Charge Type: page 3 – 26.

3 – 17Routings
See Also
Viewing Resource Usage: page 3 – 20
Work in Process Standard Cost Transactions, Oracle Cost ManagementUser’s Guide
Resource Report: page 8 – 21
Rolling Up Costs
From the Routing window, you can perform a single–level cost rollupfor the currently–selected routing.
� To roll up costs:
1. Navigate to the Cost Rollup window. Do this by choosing CostRollup from the Tools menu.
2. Enter the cost type.
3. Enter the effective date and time to determine the structure of thebill of material to use in the cost rollup. You can use this to roll uphistorical and future bill structures using current rates andcomponent costs. The default is the current date and time.
4. Indicate whether to include unimplemented engineering changeorders (ECO).
5. Indicate whether to produce the Indented Bill of Material CostReport, which lists the detailed cost structure by level.
6. Choose OK.
See Also
Rolling Up Assembly Costs, Oracle Cost Management User’s Guide
Indented Bills of Material Cost Report, Oracle Cost Management User’sGuide

3 – 18 Oracle Bills of Material User’s Guide
Creating a Standard Operation
Standard operations are commonly used operations you can define as atemplate for use in defining future routing operations. If you assign theoperation code of standard operation in a routing, the standardoperation information is copied into the operation you are currentlydefining. You can then modify the operation information in your newoperation.
Prerequisites
❑ You must define at least one department before you can define astandard operation. See: Defining a Department: page 1 – 19.
� To create a standard operation:
1. Navigate to the Standard Operations window.
2. Enter a unique operation code to identify a standard operation.
3. Enter the department where the operation is performed.
4. Enter the minimum transfer quantity of assemblies to move fromthis operation to the next.

3 – 19Routings
5. For operations in ATO model or option class routings only, indicatewhether the operation is option dependant, that is, whether theoperation is dependant on the choice of an optional component.All mandatory components and their related operations appear onthe routing for each configuration. The default is enabled. See:Overview of Configure to Order: page 5 – 2.
6. Select your Count Point and Autocharge options. See: Count Pointand Autocharge: page 3 – 22.
7. Indicate whether to backflush components on shop floor moves atthis operation.
A backflush transaction automatically pulls Operation pullcomponents from inventory. Work in Process also pulls allOperation pull components at non–backflush operations precedingthis operation (through the previous completed backflushoperation.)
8. Choose the Operation Resources button to assign resources to thestandard operation. See: Assigning Operation Resources: page3 – 15.
See Also
Defining a Department: page 1 – 19
Overview of Shop Floor Control, Oracle Work in Process User’s Guide
Overview of Routings: page 3 – 2
Overview of Bills of Material: page 2 – 2
Defining Activities and Activity Costs, Oracle Cost Management User’sGuide
Defining Bill or Routing Operation Documents: page 2 – 21
Work in Process Standard Cost Transactions, Oracle Cost ManagementUser’s Guide
Standard Operation Report: page 8 – 26

3 – 20 Oracle Bills of Material User’s Guide
Viewing Resource Usage
You can view the operations and routings that use a particularresource.
� To view resource usage:
1. Navigate to the Resource WhereUsed window.
2. Enter the name of the resource for which to view the operation androuting usage.
3. Enter an effective date. Operation information effective on thisdate is displayed.
The Resource WhereUsed window contains four tabbed regions:Operation Details, Resource Details, Descriptions, and More.
The Operation Details tabbed region displays the operationsequence, department, the effective date range, and the routing inwhich the resource is used.

3 – 21Routings
The Resource Details tabbed region displays the resource, the basistype, the usage rate (or amount) and its inverse, and the number ofresource units assigned.
The More tabbed region displays the resource sequence, theactivity for the resource, the scheduling type (Yes, No, Prior, Next),and whether this is an engineering routing.
See Also
Assigning Operation Resources: page 3 – 15
Resource Where Used Report: page 8 – 22

3 – 22 Oracle Bills of Material User’s Guide
Routings Field Reference
This section describes the use of certain major fields.
Completion Subinventory and Locator Fields
In a routing, you can define the completion subinventory and locatorwhere you store finished assemblies upon completion. When youdefine a job or repetitive schedule, Work in Process uses these values asthe default, and you can change the completion subinventory andlocator if necessary. Upon completion of assemblies, the completionsubinventory and locator you defined for the job and repetitiveschedule is the default, and you can change these values if necessary.
See Also
Overview of Assembly Completions and Returns, Oracle Work inProcess User’s Guide
Count Point and Autocharge Fields
You can define which operations in a routing record move transactionsby defining how resources are consumed at that operation.
The Count Point and Autocharge check boxes work together. In thefollowing discussion, the Count Point and Autocharge check boxes canbe set to either on or off. However, you cannot set Count Point on andAutocharge off.
When you move assemblies from an operation with Count Point on /Autocharge on operation to another count point operation set the sameway, Work in Process automatically completes all Count Point off /Autocharge on count point operations between them.
To transact a Count Point off / Autocharge off count point operation,you must explicitly move assemblies into and out of that operation.Moving assemblies past a Count Point off / Autocharge off count pointoperation acts as though the operation did not exist in the routing.This is particularly useful for rework or debug operations that areperformed on a portion of the assemblies you process.
If you issue components with a supply type of Operation pull to anassembly at a Count Point off / Autocharge off count point operation,

3 – 23Routings
Work in Process backflushes these components when you move out ofthe Count Point off / Autocharge off count point operation into a countpoint operation that allows backflushing. Work in Process never pullscomponents with a supply type of Assembly pull from Count Pointoff/ Autocharge off count point operations. However, you must turnBackflush on for Count Point off / Autocharge off count pointoperations. The Backflush field should always be turned on for the lastoperation in a routing. See: Overview of Shop Floor Control, OracleWork in Process User’s Guide.
In the following example, the routing has five operations. The secondand fourth operations are not count points, and you must explicitlymove units in and out of the fourth operation if you want to charge thejob or repetitive schedule for the consumed resources.
OperationSequence
Description CountPoint
Backflush Instructions
10 Assembly 1 Yes–Auto-charge
Yes
20 Assembly 2 No–Auto-charge
No
30 Painting Yes–Auto-charge
Yes If color and texture do not meetstandards, send to Op 40. If jobmeets standards, send to Op 50.
40 Painting Rework
No–Directcharge
Yes Sand finish and repaint to meetstandards.
50 Packaging Yes–Auto-charge
Yes Ship directly to customer sitewhen finished with this operation.
Table 3 – 4 Count Point Operations (Page 1 of 1)
Count Point off / Autocharge on
Assign this count point to operations that you always perform in arouting, but where you do not want to monitor assembly moves into,out of, and through the operation. For example, choose this countpoint for non–bottleneck operations that are not labor ortime–intensive, such as inspection or minor assembly operations.
Work in Process automatically completes the operation and charges itsWIP move resources to your job or schedule when you record a movetransaction through or beyond the operation, as with Count Point on /Autocharge on count point operations.

3 – 24 Oracle Bills of Material User’s Guide
Work in Process does not default the operation, unlike Count Point on/ Autocharge on count point operations. You can still recordmovements into, out of, and through the operation by overriding thedefault in Work in Process.
Count Point off / Autocharge off
Assign this count point to operations that you do not typically performin a routing. For example, a rework operation that you only performon occasion. If you choose this count point for an operation, Work inProcess does not complete the operation and charge its resources toyour job or schedule unless you explicitly record a move transactioninto and through the operation.
Work in Process does not default the operation. You can still recordmovements into, out of, and through the operation by overriding thedefault in Work in Process.
Count Point on / Autocharge on
Assign this count point to operations you want to automatically defaultas destination operations in the Move Transactions window. Youshould always assign this count point to the final operation in arouting, to insure that you record move transactions into the operation,and then record completion transactions.
You can automatically complete and charge operations in a routingwith this count point. Work in Process automatically completes anoperation and charges its WIP Move resources to your job or schedulewhen you record a move transaction through or beyond the operation.
For operations that you always perform in a routing, you can alsomonitor assembly moves into, out of, and through the operation. Forexample, choose this count point for critical, time–intensive, orbottleneck operations.
See Also
Overview of Shop Floor Control, Oracle Work in Process User’s Guide
Overview of Routings: page 3 – 2

3 – 25Routings
Schedule Field
Include this resource when scheduling anoperation from a job or repetitive schedule andcalculating manufacturing lead time for theassembly.
Do not include scheduling the operation orcalculating the lead time.
Include this resource when scheduling a job orschedule by backward scheduling the previousoperation from the end of this resource. Use thisoption when setup resources can work in parallelwith previous operations. The lead time iscalculated the same way Work in Process schedulesthe job or repetitive schedule.
Op10 R1 R2 R3 R4
Op20 R1 R2 R3
(R=resource) ↑Prior
Include this resource when scheduling a job orrepetitive schedule by forward scheduling the nextoperation from the start of this resource. Use thisoption when the teardown of the current operationcan overlap with the execution of the nextoperation. The lead time is calculated the sameway Work in Process schedules the job or repetitiveschedule.
Next↓
(R=resource)
Op10 R1 R2 R3 R4
Op20 R1 R2 R3
Yes
Nodefault
Prior
Next

3 – 26 Oracle Bills of Material User’s Guide
Charge Type Field
You can determine how each resource is charged in Work in Process.When an operation completes, Work in Process records the unitsapplied to the job or repetitive schedule in the resource unit ofmeasure. You can charge resources manually or automatically.
Work in Process does not automatically charge thistype of resource to a job or repetitive schedule.You must manually charge it to a job or repetitiveschedule using Work in Process.
Automatically charge this resource upon receipt ofa purchase order in Oracle Purchasing. Theassemblies are not automatically moved to the nextoperation upon receipt, so you must manuallymove them using Work in Process.
Automatically charge this resource upon receipt ofa purchase order in Oracle Purchasing and movethe assemblies to the Queue intraoperation step ofthe next operation, or to the To moveintraoperation step if this is the last operation.
Work in Process automatically charges this type ofresource to a job or repetitive schedule when youcomplete an operation.
Manual
PO Receipt
PO Move
WIP Move
C H A P T E R
4T
4 – 1Deleting Information
Deleting Information
his chapter tells you everything you need to know to delete item,bill, and routing information, including:
• Deleting Items, Bills, Routings, Components, and Operations:page 4 – 2
• Deleting Components and Operations: page 4 – 6
• Deletion Constraints: page 4 – 7

4 – 2 Oracle Bills of Material User’s Guide
Deleting Items, Bills, Routings, Components, and Operations
Set up groups of entities to check, delete and optionally archive.Entities can include items, bills of material, components, routings, oroperations.
What entities you can delete depends on what Oracle application youare currently using and what applications you have installed.
• if you are using Oracle Bills of Material, you can delete only bills,routings, components, and operations
• if you are using Oracle Engineering, you can delete anyengineering entity except ECOs
• if you are using Oracle Inventory and you do not have Bills ofMaterial installed, you can only delete manufacturing items
• if you are using Inventory and you do have Bills of Materialinstalled, you can delete only items, bills, and routings
Deleting physically removes information from the database tables.Deleted bill or routing information can be archived to database tables.(You cannot archive item–level information.) You can then writecustom programs to report on the archived data. Summaryinformation is saved for all deletion groups. You can report on deletiongroups.
Note: Files or objects that are attached to bills or routings are notdeleted. Instead, the link between the bill or routing and theattached file is severed. The files themselves remain intact in theiroriginal location.
Several deletion constraints are installed with Bills of Material.However, you can define custom deletion constraints. If what you areattempting to delete does not pass deletion constraints, it is notdeleted. For example, you can define a constraint that prevents youfrom deleting a bill of material for an assembly that has an item statusof active.
When you delete an entire bill, you delete all the components for theassembly along with their reference designators and substitute items.When you delete a routing, all operations are deleted. For both billsand routings, any links to attachments are severed.
Oracle Work in Process reflects any changes to the bills or routingsusing the delete functionality only if you re–explode the bill or routingin Work in Process.

�
4 – 3Deleting Information
� To define a deletion group:
1. Navigate to the Deletion Groups window.
If you are updating an existing deletion group, the date it was lastsubmitted (if applicable) is displayed.
2. Enter a group name to identify the group of entities to delete.
3. Select what type of entity to delete.
4. Indicate whether to archive the deleted entities in the archivetables.
Attention: You can archive bill and routing information, but notitem information. The option to archive is not available if you aredeleting only items.
5. Enter the item, bill, or routing to delete, or from which to deletecomponents or operations.
The Details tabbed region displays the organization the entitybelongs to, its type, and the alternate (if applicable). The Effectivity
�
4 – 4 Oracle Bills of Material User’s Guide
tabbed region displays the effective date range. See: Effective DateFields: page 2 – 36.
The Results tabbed region displays the delete status and the date ofdeletion (if applicable).
6. To delete an alternate bill or routing, enter the alternate.
7. If you are deleting components, choose the Components button; ifyou are deleting operations, enter the Operations button.
8. When finished, choose either the Delete Group button or the CheckGroup button.
� To specify components to delete:
1. Navigate to the Components window. Do this by choosing theComponents button from the Deletion Groups window.
2. Enter a component item to delete.
The Results tabbed region displays the status as Error, Check OK,or Deleted. A status of Pending indicates the delete program hasnot run yet. The Effectivity tabbed region displays the effectivedate range of the component. See: Effective Date Fields: page2 – 36.
If the status is listed as Error, choose the Error button to reviewwhy the deletion failed.
� To specify operations to delete:
1. Navigate to the Operations window. Do this by choosing theOperations button from the Deletion Groups window.
2. Enter the operation sequence to delete.
The Results tabbed region displays the status as Error, Check OK,or Deleted. A status of Pending indicates the delete program hasnot run yet. The Effectivity tabbed region displays the effectivedate range of the operation. See: Effective Date Fields: page 2 – 36.
If the status is listed as Error, choose the Error button to reviewwhy the deletion failed.
� To check entities for deletion:
Attention: If you perform a check on the item, bill, and routing,the check program will return an Error status for the item. This

4 – 5Deleting Information
simply indicates that the item’s bill or routing still exists. In thiscase, disregard the Error status for the item.
� Choose the Check Group button to verify whether any deletionconstraints are violated.
The delete concurrent program updates the entity’s status to Error,or Check OK. A status of Pending indicates the delete program hasnot run yet.
� To submit entities for deletion:
� Choose the Delete Group button to submit the delete concurrentprogram.
The delete concurrent program first performs a check for all theentities listed for deletion. Once the check succeeds, the entities aredeleted.
The delete concurrent program updates the entity’s status to Error,Check OK, or Deleted. A status of Pending indicates the deleteprogram has not run yet.
� To review errors:
1. Choose the Errors button to see why the entity could not bedeleted. Do this from either the Components, Operations, orDelete Groups windows.
2. Choose the View Constraint button or the drill down indicator tosee the violated deletion constraint.
See Also
Item Deletion, Oracle Inventory User’s Guide
Deletion Constraints: page 4 – 7
Creating Custom Deletion Constraints: page 1 – 16
Deleting Components and Operations: page 4 – 6
Delete Items Report: page 8 – 15
4 – 6 Oracle Bills of Material User’s Guide
Deleting Components and Operations
You can delete components from the Bills of Material or operationsfrom the Routings window.
� To delete components and operations:
1. Navigate to either the Bills of Material or Routings windows.
2. Do one of the following:
• If deleting a component, select a component.
• If deleting an operation, select an operation.
3. Choose either the Delete Record icon, or Delete from the Editmenu.
The Delete Component or Delete Operation window appears. Adefault value for the delete group name may appear, dependingupon the last entity deleted.
4. Do one of the following:
• accept the default delete group name
• select or enter an existing delete group name
• enter a new delete group name
5. If you are entering a new delete group name, enter a description forthe group.
6. Choose OK.
7. Navigate to the Delete Groups window and run the Delete Groupconcurrent process.
Note: Components and operations are not assigned to the deletegroup until you save the bill or routing. If you do not save the billor routing, components and operations are not assigned to thedelete group.
See Also
Deletion Constraints: page 4 – 7
Creating Custom Deletion Constraints: page 1 – 16
Deleting Items, Bills, Routings, Components, and Operations: page4 – 2
4 – 7Deleting Information
Deletion Constraints
Predefined constraints for deleting bills of material or routings are asfollows:
• a primary bill if an alternate exists
• a bill if it is used as a common in another bill
• a bill if a repetitive schedule references the bill
• a bill if a discrete job references the bill
• a bill if any sales orders are open for the parent item
• a bill if any demand exists for the parent item
• a model bill if any configuration items exist for the model
• an option class bill if it is a component of another bill
• a primary routing if an alternate exists
• a routing if it is used as a common routing
• a routing if a repetitive schedule references the routing
• a routing if a discrete job references the routing
• a component where the parent item is an option class or modeland there is an open sales order for the parent item
• an item, bill, or component that is affected by a pending ECO
• mandatory standard components if there is demand for it
See Also
Deleting Items, Bills, Routings, Components, and Operations: page4 – 2
Item Deletion, Oracle Inventory User’s Guide

4 – 8 Oracle Bills of Material User’s Guide

C H A P T E R
5T
5 – 1Configure to Order
Configure to Order
his chapter tells you everything you need to know to use theconfigure–to–order features of Oracle Manufacturing, including:
• Overview of Configure to Order: page 5 – 2
• Model and Option Class Bills of Material: page 5 – 5
• Forecast Model / Option Demand: page 5 – 21
• Master Schedule Models and Options: page 5 – 27
• Sales Order Management: page 5 – 29
• ATP Check: page 5 – 32
• AutoCreate Configuration Items and Final Assembly Orders:page 5 – 35
• Final Assembly Order Completion: page 5 – 47
• Pick Release and Ship Configuration Orders: page 5 – 49
• Deactivating Configuration Items: page 5 – 51

5 – 2 Oracle Bills of Material User’s Guide
Overview of Configure To Order
Oracle Manufacturing enables you to define options available forproducts and to process orders for unique product configurationswhile maintaining control of inventory, planning, and cost accounting.

5 – 3Configure to Order
Configure to Order and Pick–to–Order Steps
Process orders for configurations in assemble–to–order (ATO) andpick–to–order (PTO) environments using the following steps:
# ATO PTO Name Description
1 ✔ ✔ Define Model and Option ClassBills of Material
Define multilevel model andoption class bills to control ordermanagement, masterscheduling/MRP, work in process,and costing.
2 ✔ ✔ Forecast Model/Option Demand Forecast demand for model,options, or both. Explodeforecasts through planning bills tomodels and/or options.
3 ✔ ✔ Master Schedule Models andOptions
Master schedule ATO models,options, or both.
4 ✔ ✔ Enter Sales Order Enter sales orders for models withoptions.
5 ✔ ✔ Check ATP Perform group ATP check for allsupply constrained components tofind earliest possible ship date forconfiguration.
6 ✔ AutoCreate Configuration Items Automatically generate new itemnumber, bill, and routing for eachnew sales order and assign newitem to sales order.
7 ✔ AutoCreate Final AssemblyOrders
Automatically open discrete jobfor each new ATO configurationorder. Reserve work in process jobto sales order.
8 ✔ Complete Final AssemblyOrders
Complete configuration item toinventory, automatically convertwork in process reservation intoinventory reservation.
9 ✔ ✔ Pick Release and ShipConfiguration Orders
Pick Release all configurationsales orders for which work inprocess jobs are completed.
10 ✔ Deactivate Configuration Items Deactivate auto–generatedconfiguration item numberswhose orders are complete morethan x days ago.
Table 5 – 1 Configure to Order Steps (Page 1 of 1)

5 – 4 Oracle Bills of Material User’s Guide
The following diagram illustrates the flow of the steps listed above:

5 – 5Configure to Order
Overview of Model and Option Class Bills of Material
Oracle Manufacturing enables you to define integrated multilevel billsthat contain planning bills, model and option class bills, as well asstandard product and subassembly bills. For example:
Level Item Item Type Optional Planning % Qty
1 Training Computer Planning 1
. 2 . Laptop Computer ATO Model No 60% 1
. . 3 . . Carrying Case Product No 100% 1
. . 3 . . Keyboard Product No 100% 1
. . 3 . . CPU ATO Option Class No 100% 1
. . . 4 . . . 386 Processor Purchased Item Yes 65% 1
. . . 4 . . . 486 Processor Purchased Item Yes 35% 1
. . 3 . . Monitor ATO Option Class No 100% 1
. . . 4 . . . VGA ATO Option Class Yes 70% 1
. . . . 5 . . . . VGA Manual Purchased Item No 100% 1
. . . . 5 . . . . VGA1 Purchased Item Yes 50% 1
. . . . 5 . . . . VGA2 Purchased Item Yes 50% 1
. . . 4 . . . EGA ATO Option Class Yes 30% 1
. . . . 5 . . . . EGA1 Product Yes 55% 1
. . . . 5 . . . . EGA2 Product Yes 45% 1
. . . 4 . . . Monitor Manual Purchased Item No 100% 1
. . 3 . . Operating System ATO Option Class Yes 90% 1
. . . 4 . . . DOS Phantom Yes 80% 1
. . . . 5 . . . . DOS Manual Purchased Item No 100% 1
. . . . 5 . . . . DOS Diskettes Subassembly No 100% 1
. . . 4 . . . UNIX Phantom Yes 20% 1
. . . . 5 . . . . UNIX Manual Purchased Item No 100% 1
. . . . 5 . . . . UNIX Diskettes Subassembly No 100% 1
Table 5 – 2 Indented Planning Bill of Material (Page 1 of 1)
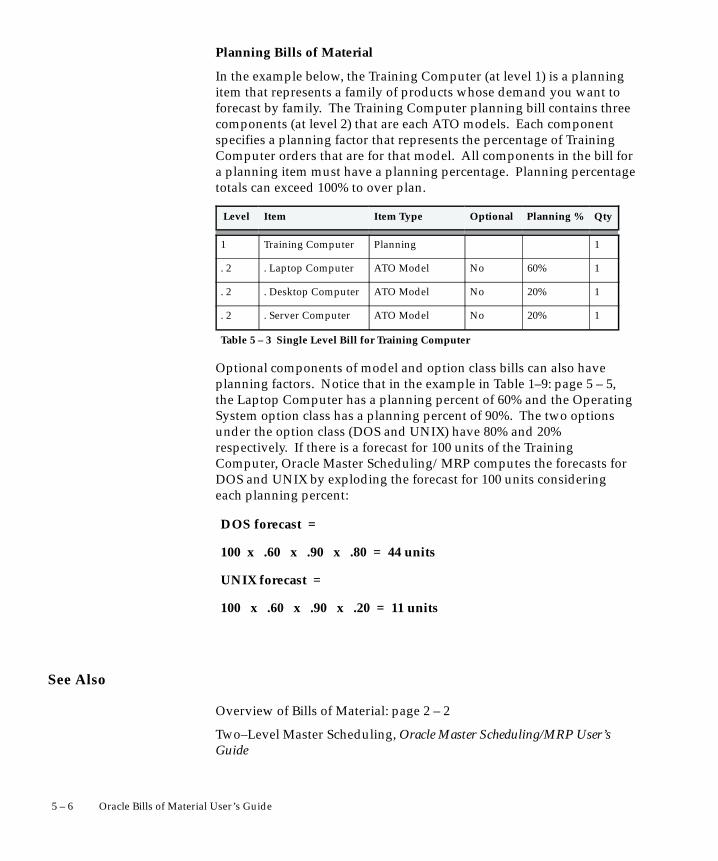
5 – 6 Oracle Bills of Material User’s Guide
Planning Bills of Material
In the example below, the Training Computer (at level 1) is a planningitem that represents a family of products whose demand you want toforecast by family. The Training Computer planning bill contains threecomponents (at level 2) that are each ATO models. Each componentspecifies a planning factor that represents the percentage of TrainingComputer orders that are for that model. All components in the bill fora planning item must have a planning percentage. Planning percentagetotals can exceed 100% to over plan.
Level Item Item Type Optional Planning % Qty
1 Training Computer Planning 1
. 2 . Laptop Computer ATO Model No 60% 1
. 2 . Desktop Computer ATO Model No 20% 1
. 2 . Server Computer ATO Model No 20% 1
Table 5 – 3 Single Level Bill for Training Computer
Optional components of model and option class bills can also haveplanning factors. Notice that in the example in Table 1–9: page 5 – 5,the Laptop Computer has a planning percent of 60% and the OperatingSystem option class has a planning percent of 90%. The two optionsunder the option class (DOS and UNIX) have 80% and 20%respectively. If there is a forecast for 100 units of the TrainingComputer, Oracle Master Scheduling/MRP computes the forecasts forDOS and UNIX by exploding the forecast for 100 units consideringeach planning percent:
DOS forecast =
100 x .60 x .90 x .80 = 44 units
UNIX forecast =
100 x .60 x .90 x .20 = 11 units
See Also
Overview of Bills of Material: page 2 – 2
Two–Level Master Scheduling, Oracle Master Scheduling/MRP User’sGuide

5 – 7Configure to Order
Configure to Order Environments
You can define model and option class bills of material that list theoptions your customers can choose from when they place a sales orderfor an assemble to order configuration. To define assemble to ordermodels whose configurations you assemble using manufacturing workorders, you must set the Assemble to Order Item Master field to Yes forthe model and option class items.
Item Item TypeBOMItem Type
Assembleto Order
PickComponents
Laptop Computer ATO Model Model Yes No
CPU ATO Option Class Option Class Yes No
Modem ATO Item Standard Yes No
Table 5 – 4 Item Attributes for Configure to Order Items (Page 1 of 1)
When you assign an option class item to a model or option class bill ofmaterial, the component item (option class) must have the same valuefor the Assemble to Order Item Master field or Pick Components ItemMaster field as the parent item (model or option class). So, you canonly assign assemble to order option classes to assemble to ordermodels and pick–to–order option classes to pick–to–order models.
You can also define hybrid model bills where you list some options thatyou pick and some options that you assemble using a final assemblyorder. When you place an order, your customers can choose theoptions for the assembled configurations as well as the picked optionsthat ship with the order. For each of these hybrid model bills, you setthe Pick Components Item Master field to Yes for the top model itemand assign assemble to order model items as components (where theAssemble to Order Item Master field is Yes). So the components of aPTO model can include ATO models as well as PTO option classes andincluded items. Also, an option under a PTO model or option class canbe a standard ATO item that requires a manufacturing work order toassemble it, but unlike the ATO model, has no options.
Model Bills of Material
A model bill lists the option classes, options, and standard items thatexist for a model. The bill of material for a PTO model lists the optionclasses, options, and included items that exist for that model. Forexample, the Promotional Laptop is a model where you have bothpicked and assembled components. The single level bill under the

5 – 8 Oracle Bills of Material User’s Guide
Promotional Laptop contains one option, one option class and twoincluded items. Both the Accessories option class and Diskettes areoptional, and you can choose any number of options under theAccessories option class. The included items, Battery Pack and LaptopComputer, are not optional in the bill.
The single level bill under the Laptop Computer contains twomandatory components and three option classes. The mandatorycomponents, Computer Case and Keyboard, are standard items that arenot optional in the bill. CPU and Monitor are mandatory option classessince they are not optional, while Operating System is an optionaloption class. You must choose at least one option under mandatoryoption classes. CPU and Operating System option classes are mutuallyexclusive which means you can only choose a single option under each.You can choose any number of Monitors however.
Level Item Item Type Optional Planning %MutuallyExclusive
1 Promotional Laptop PTO Model
.2 . Battery Pack Kit No 100%
.2 . Accessories PTO Option Class Yes 40% No
.2 . Diskettes Purchased Item Yes 95%
.2 . Laptop Computer ATO Model No 100%
. 2 . Laptop Computer ATO Model 60%
. . 3 . . Carrying Case Product No 100%
. . 3 . . Keyboard Product No 100%
. . 3 . . CPU ATO Option Class No 100% Yes
. . 3 . . Monitor ATO Option Class No 100% No
. . 3 . . Operating System ATO Option Class Yes 90% Yes
Table 5 – 5 Single Level Bill for Laptop Computer
When you place an order for the Promotional Laptop, you choose fromthe list of options (Diskettes, Accessories options) and from the list ofoptions under the Laptop Computer bill of material, such as DOS,VGA1 and 386 Processor. As described earlier, you open a work orderfor the Laptop Computer configuration.
Order Management then includes the completed Laptop Computerconfiguration on the sales order pick slip for the Promotional

5 – 9Configure to Order
Computer configuration, along with any other chosen options andincluded items. See: Mutually Exclusive and Optional: page 2 – 39.
Option Class Bills of Material
Option class bills can contain standard components, options, as well asother option classes. Oracle Manufacturing lets you structure anynumber of levels of option classes within option classes so you cancreate an indented hierarchy of choices. You can also specify amandatory component under any option class in the indented structurethat would automatically be included anytime you choose an optionfrom that option class (or a lower level option class).
In the example below, the indented Promotional Computer (explodedto three levels) contains one option class at level 2 (Accessories) andthree option classes (CPU, Monitor, and Operating System) in itsstructure at level three. The Accessories option class has one includeditem (Peripherals Guide) and three options, Mouse, LaserPrinter, andScanner. When you place an order for the Promotional Laptop, you canchoose as many options as you like (or no options) from theAccessories option class. If you choose at least one option, youautomatically include the Peripherals Guide for the order.
The Laptop Computer bill contains three option classes at level 3 andthe Monitor option class has two option classes (VGA and EGA) in itsstructure at level 4. The Monitor option class has a mandatorycomponent (Monitor Manual) that is included for any monitor choice.The VGA option class has a mandatory component (VGA Manual) thatis included if you choose VGA1 or VGA2.
Level Item Item Type Optional Planning %MutuallyExclusive
1 Promotional Laptop PTO Model
.2 . Battery Pack Kit No 100%
.2 . Accessories PTO Option Class Yes 40% No
.2 . Diskettes Purchased Item Yes 95%
. 2 . Laptop Computer ATO Model No 60%
. . 3 . . CPU ATO Option Class No 100% Yes
. . . 4 . . . 386 Processor Purchased Yes 65%
. . . 4 . . . 486 Processor Purchased Yes 35%
Table 5 – 6 Indented Bill of Material for Laptop Computer (Page 1 of 2)

5 – 10 Oracle Bills of Material User’s Guide
MutuallyExclusivePlanning %OptionalItem TypeItem Level
. . 3 . . Monitor ATO Option Class No 100% No
. . . 4 . . . VGA ATO Option Class Yes 70% No
. . . . 5 . . . . VGA Manual Purchased Item No 100%
. . . . 5 . . . . VGA1 Purchased Item Yes 50%
. . . . 5 . . . . VGA2 Purchased Item Yes 50%
. . . 4 . . . EGA ATO Option Class Yes 30% No
. . . . 5 . . . . EGA1 Product Yes 55%
. . . . 5 . . . . EGA2 Product Yes 45%
. . . 4 . . . Monitor Manual Purchased Item No 100%
. . 3 . . Operating System ATO Option Class Yes 90% Yes
. . . 4 . . . DOS Phantom Yes 80%
. . . 4 . . . UNIX Phantom Yes 20%
Table 5 – 6 Indented Bill of Material for Laptop Computer (Page 2 of 2)
Standard Bills of Material
Standard bills are bills of material for manufactured products, kits,subassemblies, phantoms, or purchased assemblies. Standard billsappear at the bottom levels of the indented structure.
In the example below, the DOS option in the model bill for the LaptopComputer is a phantom item whose bill contains DOS Manual andDOS Diskettes. Each time you order a Laptop Computer and choosethe DOS option, your final assembly order requires DOS Diskettes andDOS Manual. Oracle Work in Process automatically explodes therequirement for DOS to its components, DOS Diskettes and DOSManual, since the DOS option is a phantom item. DOS Diskettes is asubassembly, so it also has a standard bill of material although it is notshown below.
Level Item Item Type OptionalSupplyType Qty
. 2 . Laptop Computer ATO Model No 1
. . 3 . . Operating System ATO Option Class Yes 1

5 – 11Configure to Order
QtySupplyTypeOptionalItem TypeItem Level
. . . 4 . . . DOS Phantom Yes 1
. . . . 5 . . . . DOS Manual Purchased Item No AssemblyPull
1
. . . . 5 . . . . DOS Diskettes Subassembly No AssemblyPull
1
Table 5 – 7 Standard Bill of Material (Page 2 of 2)
Option Quantity Ranges
For each option, you can specify a quantity range that limits thequantity of the option you can order during Order Management. In theexample below, you can order only one CPU and Operating System butyou can order up to 10 VGA1 or VGA2 monitors and up to 20 EGA1 orEGA2 monitors.

5 – 12 Oracle Bills of Material User’s Guide
Level Item Item Type OptionalMinQty
Max Qty
1 Promotional Laptop PTO Model
.2 . Battery Pack Kit No
. . 3 . . Recharger Purchased Item No
. . 3 . . 12Hour Battery Purchased Item No
.2 . Accessories PTO Option Class Yes
. . 3 . . Mouse Product Yes 1 1
. . 3 . . LaserPrinter Product Yes 1 1
. . 3 . . Scanner Product Yes 1 1
. . 3 . . Peripherals Guide Purchased Item No
.2 . Diskettes Purchased Item Yes 1 20
. 2 . Laptop Computer ATO Model No
. . 3 . . CPU ATO Option Class No
. . . 4 . . . 386 Processor Purchased Item Yes 1 1
. . . 4 . . . 486 Processor Purchased Item Yes 1 1
. . 3 . . Monitor ATO Option Class No
. . . 4 . . . VGA ATO Option Class Yes
. . . . 5 . . . . VGA1 Purchased Item Yes 1 10
. . . . 5 . . . . VGA2 Purchased Item Yes 1 10
Table 5 – 8 Option Quantity Ranges for Laptop Computer (Page 1 of 1)
Basis Option Class
You can define a basis of option class for PTO Option Class items. Thismeans Order Management prevents you from modifying the extendedorder quantity of the option class item. You can still modify theextended quantity of the options below the PTO Option Class.
In the example below, basis is set to Option Class for the Accessoriesoption class item, and the extended order quantity for the option classis 3. You cannot modify the extended order quantity for theAccessories option class. You can, however, modify the extended orderquantity for any of the options below the accessories option class(Mouse, LaserPrinter, and Scanner). The Peripherals Guide included

5 – 13Configure to Order
item’s extended quantity is based on the extended order quantity of theoption class, so this quantity cannot be changed by modifying theaccessories option class.
Level Item Item Type Basis QtyQtyOrdered
ExtendQty
1 Promotional Laptop PTO Model 1 3 3
. 2 . Accessories PTO Option Class None 1 3
. . 3 . . Mouse Option Option Class 1 3
. . 3 . . LaserPrinter Option 1 3
. . 3 . . Scanner Option 1 3
. . 3 . . PeripheralsGuide
Included Item 1 3
ATP Check Controls
Oracle Manufacturing lets you specify the components in model andoption class bills of material for which you want to check Available toPromise before scheduling a ship date for a configuration. OracleManufacturing lets you specify for each item in the item masterwhether you must check ATP for that item itself and whether the itemhas bill of material components that require an ATP check.
For example, you might need to check ATP for the keyboard and CPUeach time you order a Laptop Computer configuration but the supplyof all other components is not constrained. In that case, you would setthe ATP Components Item Master field to Yes for the Laptop Computerand the CPU option class, and you would set the Check ATP ItemMaster field to Yes for the Keyboard and CPUs. That way, when youorder a Laptop Computer and choose a 486 Processor, Oracle OrderManagement performs an ATP check for each component in the LaptopComputer bill where Check Component ATP is set to Yes (Keyboardonly) and it would check ATP for the 486 Processor since that optionwas selected.
Note: If the Check ATP item master field is set to Yes, you canchange this value when you create a bill of material. If the CheckATP is set to No, it cannot be updated when you create the bill.

5 – 14 Oracle Bills of Material User’s Guide
Level Item Item TypeCheckATP
ATPComponents
1 Promotional Laptop PTO Model No Yes
.2 . Battery Pack Kit No Yes
. . 3 . . Recharger Purchased Item No No
. . 3 . . 12Hour Battery Purchased Item Yes No
.2 . Accessories PTO Option Class No Yes
. . 3 . . Mouse Product Yes No
. . 3 . . LaserPrinter Product No No
. . 3 . . Scanner Product No No
. . 3 . . Peripherals Guide Purchased Item No No
.2 . Diskettes Purchased Item No No
. 2 . Laptop Computer ATO Model No Yes
. . 3 . . Carrying Case Product No No
. . 3 . . Keyboard Product Yes No
. . 3 . . CPU ATO Option Class No Yes
. . . 4 . . . 386 Processor Purchased Item Yes No
. . . 4 . . . 486 Processor Purchased Item Yes No
Table 5 – 9 ATP Checks for Laptop Computer (Page 1 of 1)
ATP calculation can also be done for a product family. A productfamily calculation takes into account demand and supply for individualitems that are members of the product family.
Oracle Manufacturing supports multiple levels of ATP checkcomponents. For example, a standard component of a model couldcontain a phantom item with ATP check components in its bill. In thatcase, you would set the ATP Components Item Master field to Yes forboth the model and the phantom item. That way, Order Managementknows to continue exploding the bill through the phantom item lookingfor components to include in the group ATP check for theconfiguration.

5 – 15Configure to Order
MultiOrganization Bills of Material
You can enter sales orders for assemble to order configurations in youritem master organization and build the configurations in otherorganizations. Using common bills of material, you can share modeland option class bills of material between organizations. You define themodel and option class bills in the manufacturing organization thatowns each bill, creating common bills in your item master organization(and other manufacturing organizations) to reference the bill in themanufacturing organization.
For example, you can enter orders for the Laptop Computer in youritem master organization(Global Computers) and build the LaptopComputer in two other organizations—Sacramento and Austin. And,all engineering changes to the Laptop Computer (and its components)originate from the Sacramento organization. You define the LaptopComputer model item in your item master organization (GlobalComputers) and assign the item to the Sacramento and Austinorganizations. Then you can define the Laptop Computer’s model billof material in the Sacramento organization, creating common bills ofmaterial in the Global Computers and Austin organizations. Eachcommon bill references the model bill in the Sacramento organization.For each component that has its own bill of material (option class andstandard items), you define the component’s bill in the Sacramentoorganization and create common bills in the Global Computers andAustin organizations(where each common bill references a bill in theSacramento organization).
Organization Item AlternateCommon Bill Details
Organization Item Alternate
Sacramento Laptop Computer Primary
GlobalComputers
Laptop Computer Primary Sacramento Laptop Computer Primary
Austin Laptop Computer Primary Sacramento Laptop Computer Primary
Table 5 – 10 Shared Bills of Material for Laptop Computer (Page 1 of 1)
Option Dependent Routing Steps
Oracle Bills of Materials lets you define routing steps for models thatcan be selected as options for configurations. You can specify that arouting step is option dependent which causes the configuration toinclude that routing step only if an option referencing that step waschosen.
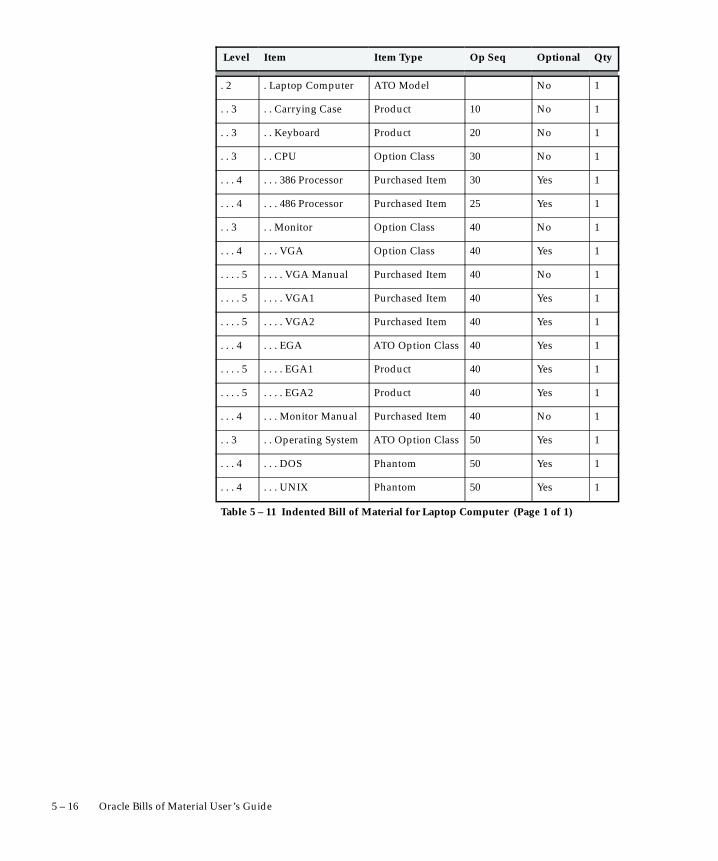
5 – 16 Oracle Bills of Material User’s Guide
Level Item Item Type Op Seq Optional Qty
. 2 . Laptop Computer ATO Model No 1
. . 3 . . Carrying Case Product 10 No 1
. . 3 . . Keyboard Product 20 No 1
. . 3 . . CPU Option Class 30 No 1
. . . 4 . . . 386 Processor Purchased Item 30 Yes 1
. . . 4 . . . 486 Processor Purchased Item 25 Yes 1
. . 3 . . Monitor Option Class 40 No 1
. . . 4 . . . VGA Option Class 40 Yes 1
. . . . 5 . . . . VGA Manual Purchased Item 40 No 1
. . . . 5 . . . . VGA1 Purchased Item 40 Yes 1
. . . . 5 . . . . VGA2 Purchased Item 40 Yes 1
. . . 4 . . . EGA ATO Option Class 40 Yes 1
. . . . 5 . . . . EGA1 Product 40 Yes 1
. . . . 5 . . . . EGA2 Product 40 Yes 1
. . . 4 . . . Monitor Manual Purchased Item 40 No 1
. . 3 . . Operating System ATO Option Class 50 Yes 1
. . . 4 . . . DOS Phantom 50 Yes 1
. . . 4 . . . UNIX Phantom 50 Yes 1
Table 5 – 11 Indented Bill of Material for Laptop Computer (Page 1 of 1)

5 – 17Configure to Order
Op Seq OptionDependent Department
OperationDescription
10 No Casing Cut and smooth case edges
20 No Assembly 1 Attach keyboard and cable
25 Yes Assembly 2 Clean processor
30 No Assembly 2 Insert processor into board
40 No Assembly 3 Attach monitor cable/glare screen
50 No Packaging Wrap OS kit with power supply
Table 5 – 12 Routing Steps for Laptop Computer (Page 1 of 1)
In the example above, Oracle Manufacturing automatically includesOperation Sequence 25 in any configuration containing a 486 processorsince the 486 processor option in the bill references step 25. Thisrouting step can also add to the standard cost for configurations withthe 486 Processor, since Oracle Manufacturing performs a single levelrollup for configurations and accounts for all costed resources used inthe configuration routing.
The routing for your model should include all steps that anyconfiguration might require. You can then establish option classroutings by referencing the model routing as a common routing. Thatway, lower level options can still reference the model’s routing. Forexample, you can reference the Laptop Computer’s routing as acommon routing for the CPU option class, referencing the LaptopComputer’s routing steps in the option class bill.
Operation Sequence Inheritance
You can specify that items within the model structure inherit theoperation sequence from their parent option class or model. Youinvoke this option by setting the site level profile BOM: Inherit OptionClass Operation Sequence Number to yes. Bills of Material appliesinheritance logic for all items in the model structure with an operationsequence defaulted to 1. You should maintain a routing for the toplevel model, but may not need to maintain a routing for any optionclass or model where all items below it have an operation sequence of1.
In the example below, the profile option is set to yes, and the CPU andMonitor option class items have operation sequence numbers for theLaptop Computer routing. The processor options are defaulted to an

5 – 18 Oracle Bills of Material User’s Guide
operation sequence of 1, and inherit operation sequence 30 from theCPU option class item. The VGA Option class, options and includeditem are defaulted to an operation sequence of 1, and inherit operationsequence 40 from the manual option class item. Routings are notrequired for the CPU, Monitor, and VGA option classes.
Level Item Item Type Op SeqOperation SequenceInherited
. 2 . Laptop Computer ATO Model
. . 3 . . CPU Option Class 30 Retains 30
. . . 4 . . . 386 Processor Option 1 Inherits 30
. . . 4 . . . 486 Processor Option 1 Inherits 30
. . 3 . . Monitor Option Class 40 Retains 40
. . . 4 . . . VGA Option Class 1 Inherits 40
. . . . 5 . . . . VGA Manual Included Item 1 Inherits 40
. . . . 5 . . . . VGA1 Option 1 Inherits 40
. . . . 5 . . . . VGA2 Option 1 Inherits 40
Cataloging Configurations
Oracle Manufacturing provides features that help you catalog yourassemble to order configurations so you can easily find on handconfigurations that meet customer requirements, or find configurationitem numbers that were used to fulfill previous orders for the sameconfiguration. Oracle Manufacturing lets you set up rules toautomatically assign Item Catalog descriptive element values toassemble to order configurations based on the options selected.
For example, you might want to catalog computer configurations usingdescriptive elements that indicate the Processor Type, Monitor Type,and Operating System chosen for each configuration. You could thenassign the Laptop Computer model item to a catalog group thatspecifies those descriptive elements, but not assign any values to thoseattributes since the Laptop Computer is a model, not a specificconfiguration. You would also assign each option item to a cataloggroup with descriptive elements that describe that option. So youwould assign the processor option items (386,486) to a ”Processors”catalog group containing a Processor descriptive element as well asothers that might describe more specific processor attributes.

5 – 19Configure to Order
Item Catalog GroupDescriptiveElement Name
DescriptiveElement Value
Laptop Computer Personal Computers Processor
Monitor
OS
386 Processor Processors Processor Slow
486 Processor Processors Processor Fast
VGA1 Monitors Monitor VGA
VGA2 Monitors Monitor VGA
EGA1 Monitors Monitor EGA
EGA2 Monitors Monitor EGA
DOS Operating Systems OS MS–DOS
UNIX Operating Systems OS SCO–Unix
Table 5 – 13 Catalog and Descriptive Elements (Page 1 of 1)
You would also specify which descriptive elements to assignautomatically to an ordered configuration, based on options chosenunder each option class in the Laptop Computer’s bill. For example,when you defined the bill for the CPU option class, you would specifythat the Processor descriptive element should be assignedautomatically based on options chosen under this class. The Bills ofMaterial window lets you specify descriptive elements for each modelor option class bill of material. If you want the autocreateconfiguration items process to concatenate descriptions, you mustspecify descriptive elements for each model and option class bill. Anexample of a concatenated description might be “486–VGA–DOS”.
Item Item Type Element Name
CPU Option Class Processor
VGA Option Class Monitor
EGA Option Class Monitor
Operating System Option Class OS
Table 5 – 14 Descriptive Elements for Bills of Material (Page 1 of 1)

5 – 20 Oracle Bills of Material User’s Guide
See Also
Defining Items, Oracle Inventory User’s Guide
Overview of Bills of Material: page 2 – 2
On–hand and Availability, Oracle Inventory User’s Guide
Overview of Routings: page 3 – 2

5 – 21Configure to Order
Forecast Model / Option Demand
Establishing the Production Forecast
Oracle Master Scheduling/MRP lets you define and maintain forecastsfor any item, at any level on your bills of material. You can forecastdemand for products directly, or forecast product families and explodeforecasts to individual products through planning bills. You candirectly forecast demand for option classes, options, and mandatorycomponents. You can also explode forecasts for models and optionclasses, through model and option class bills, to selected option classes,options, and mandatory components.
Forecast Control
Use the Forecast Control item attribute to tell Master Scheduling/MRPthe types of demand that you place for models, option classes, options,and mandatory components. Master Scheduling/MRP uses theForecast Control value you assign to each assemble–to–order andpick–to–order item when forecasting and master scheduling modelsand options.
Independent Forecast Demand
Independent forecast demand is demand that you place for an item bydirectly entering forecasts for the item, rather than exploding forecastto the item.
If you forecast demand directly for an item, then set Forecast Control toConsume.
Exploded Forecast Demand
The forecast explosion process generates the “exploded forecastdemand” for an item by collecting the forecasted demand for all thecomponents in the item’s bill of material. You typically generateexploded forecast demand for items, such as option classes andoptions, whose demand is directly related to or derived from the bill ofmaterial structure for other items.
If you forecast demand for an item by exploding demand from a higherlevel item in a bill of material, then set Forecast Control to Consumeand derive.
If you forecast demand for an item directly, and explode forecastdemand to the item, then set Forecast Control to Consume and derive.

5 – 22 Oracle Bills of Material User’s Guide
Sales Order Demand
Sales order demand is demand that you place when your customersorder configurations. As your customers order configurations, OrderManagement can automatically place sales order demand for eachmodel, option class, and option selected by your customer when theyplace the order.
If you place sales order demand for an item, but do not forecast theitem, then set Forecast Control to None.
Derived Sales Order Demand
Under normal circumstances, Order Management does not place salesorder demand for mandatory components when your customers orderconfigurations.
You can set the Forecast Control attribute to Consume or Consume andderive to automatically place demand and consume forecasts formandatory components when you place sales orders demand forconfigurations that include the mandatory components.
If you forecast demand for a mandatory component, either directly orthrough forecast explosion, then set Forecast Control to Consume orConsume and derive.
Forecast Explosion
Forecast explosion is the process that explodes forecasts for planningitems, models, product families and option classes to selectedcomponents on your planning, model, product family and option classbills. Forecast explosion calculates exploded forecast quantities byextending parent forecast quantities using the component usages andplanning percents defined on your planning, model, and option classbills.
A product family can be exploded to dependent quantity explosion forthose members that have a forecast control of Consume and derive.This explosion is based on the product family allocation percentage inrelation to the existing sales order quantity. You can associate alternatebills of material to multiple forecasts for the same item. This lets youexplode the same forecast using different components, usages, andplanning percents.
You explode forecasts, using the Load Forecasts or Load MasterSchedules forms, by choosing the Explode Forecasts option whenloading a forecast into another forecast or a master schedule.

5 – 23Configure to Order
The following table shows how forecast explosion explodes a forecastfor 100 Laptop computers. Notice that forecast is only exploded toitems where you have set Forecast Control to Consume and derive.
Level Item BOM Item Type
ForecastControl
Optional
Plan%
Forecast/Sales Order
. 2 . Laptop Computer Model Consume No 100
. . 3 . . Carrying Case Standard Consumeand derive
No 100% 100
. . 3 . . Keyboard Standard Consumeand derive
No 100% 100
. . 3 . . CPU OptionClass
Consumeand derive
No 100% 100
. . . 4 . . . 386 Processor Standard Consumeand derive
Yes 65% 65
. . . 4 . . . 486 Processor Standard Consumeand derive
Yes 35% 35
. . 3 . . Monitor OptionClass
Consumeand derive
No 100% 100
. . . 4 . . . VGA OptionClass
Consumeand derive
Yes 70% 70
. . . . 5 . . . . VGA Manual Standard Consumeand derive
No 100% 70
. . . . 5 . . . . VGA1 Standard Consumeand derive
Yes 50% 35
. . . . 5 . . . . VGA2 Standard Consumeand derive
Yes 50% 35
. . . 4 . . . EGA OptionClass
Consumeand derive
Yes 30% 30
. . . . 5 . . . . EGA1 Standard Consumeand derive
Yes 55% 16.5
. . . . 5 . . . . EGA2 Standard Consumeand derive
Yes 45% 13.5
. . . 4 . . . Monitor Manual Standard None No 100%
. . 3 . . Operating System OptionClass
Consumeand derive
Yes 90% 90
Table 5 – 15 Forecast Explosion Example (Page 1 of 2)
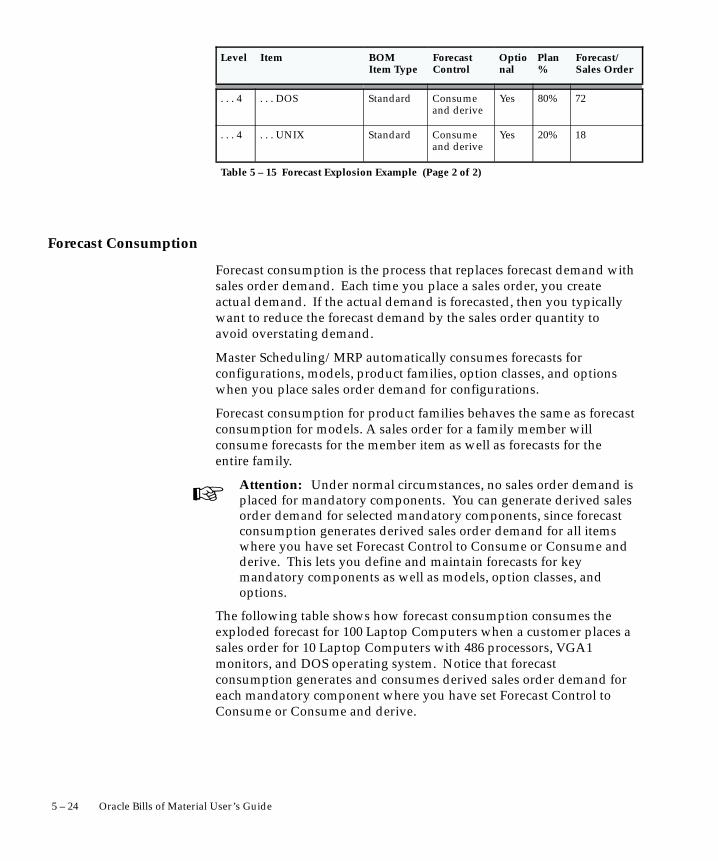
�
5 – 24 Oracle Bills of Material User’s Guide
Forecast/Sales Order
Plan%
Optional
ForecastControl
BOM Item Type
ItemLevel
. . . 4 . . . DOS Standard Consumeand derive
Yes 80% 72
. . . 4 . . . UNIX Standard Consumeand derive
Yes 20% 18
Table 5 – 15 Forecast Explosion Example (Page 2 of 2)
Forecast Consumption
Forecast consumption is the process that replaces forecast demand withsales order demand. Each time you place a sales order, you createactual demand. If the actual demand is forecasted, then you typicallywant to reduce the forecast demand by the sales order quantity toavoid overstating demand.
Master Scheduling/MRP automatically consumes forecasts forconfigurations, models, product families, option classes, and optionswhen you place sales order demand for configurations.
Forecast consumption for product families behaves the same as forecastconsumption for models. A sales order for a family member willconsume forecasts for the member item as well as forecasts for theentire family.
Attention: Under normal circumstances, no sales order demand isplaced for mandatory components. You can generate derived salesorder demand for selected mandatory components, since forecastconsumption generates derived sales order demand for all itemswhere you have set Forecast Control to Consume or Consume andderive. This lets you define and maintain forecasts for keymandatory components as well as models, option classes, andoptions.
The following table shows how forecast consumption consumes theexploded forecast for 100 Laptop Computers when a customer places asales order for 10 Laptop Computers with 486 processors, VGA1monitors, and DOS operating system. Notice that forecastconsumption generates and consumes derived sales order demand foreach mandatory component where you have set Forecast Control toConsume or Consume and derive.

5 – 25Configure to Order
Level Item BOM Item Type
ForecastControl
Optional
Plan%
Forecast/Sales Order
. 2 . Laptop Computer Model Consume No 9010
. . 3 . . Carrying Case Standard Consumeand derive
No 100% 9010
. . 3 . . Keyboard Standard Consumeand derive
No 100% 9010
. . 3 . . CPU OptionClass
Consumeand derive
No 100% 9010
. . . 4 . . . 386 Processor Standard Consumeand derive
Yes 65% 65
. . . 4 . . . 486 Processor Standard Consumeand derive
Yes 35% 2510
. . 3 . . Monitor OptionClass
Consumeand derive
No 100% 9010
. . . 4 . . . VGA OptionClass
Consumeand derive
Yes 70% 6010
. . . . 5 . . . . VGA Manual Standard Consumeand derive
No 100% 6010
. . . . 5 . . . . VGA1 Standard Consumeand derive
Yes 50% 2510
. . . . 5 . . . . VGA2 Standard Consumeand derive
Yes 50% 35
. . . 4 . . . EGA OptionClass
Consumeand derive
Yes 30% 30
. . . . 5 . . . . EGA1 Standard Consumeand derive
Yes 55% 16.5
. . . . 5 . . . . EGA2 Standard Consumeand derive
Yes 45% 13.5
. . . 4 . . . Monitor Manual Standard None No 100%
. . 3 . . Operating System OptionClass
Consumeand derive
Yes 90% 8010
Table 5 – 16 Forecast Consumption Example

5 – 26 Oracle Bills of Material User’s Guide
Forecast/Sales Order
Plan%
Optional
ForecastControl
BOM Item Type
ItemLevel
. . . 4 . . . DOS Standard Consumeand derive
Yes 80% 6210
. . . 4 . . . UNIX Standard Consumeand derive
Yes 20% 18
Table 5 – 16 Forecast Consumption Example
See Also
Two–Level Master Scheduling, Oracle MRP/Master Scheduling User’sGuide

5 – 27Configure to Order
Master Schedule Models and Options
Master Scheduling/MRP lets you master schedule any planned item,anywhere on your bills of material, including models, option classes,options, product families and mandatory components. You can createmaster production schedules to load forecasts and sales orders into amaster demand schedule. You can then use the master demandschedule to drive the planning process. Identify your masterproduction schedules as visible to the Oracle Inventoryavailable–to–promise (ATP) process, so that Order Management cancheck ATP information for your key subassemblies when schedulingsales orders for configurations. The shipment and production reliefs forproduct families prevents the duplication of supply/demand and keepsthe supply/demand for the product family in sync with those of themember items.
Production Relief
Production relief, also known as MPS relief, is the process that replacesplanned supply with actual supply when you create a work order tobuild a manufactured item, or when you create a purchase requisitionto buy a purchased item. Each time you create a work order orpurchase requisition, you create actual supply. If the actual supply isplanned, then you typically want to reduce the planned supply by thework order or purchase requisition quantity to avoid overstatingsupply. When a purchase order, purchase requisition or discrete job iscreated for a member of a product family, the MPS is relieved for themember items as well as the product family.
Production relief relieves your master production schedules for anyphantom item when you create a work order for the phantom’s parent.Since models and option classes are created as phantoms on theconfiguration item bill, Master Scheduling/MRP automatically relievesyour master production schedules for models and option classes whenyou create a final assembly order for a configuration. Production reliefrelieves your master production schedules for options and mandatorycomponents when you create work orders for them.
Shipment Relief
Shipment relief, also known as MDS relief, is the process that reducesanticipated demand when you ship product that satisfies a sales order.Each time you ship a product to a customer, you satisfy demand. If thedemand is included on your master demand schedules, then you

5 – 28 Oracle Bills of Material User’s Guide
typically want to reduce the anticipated demand by the sales orderquantity to avoid overstating demand.
Master Scheduling/MRP automatically relieves master demandschedules when you ship a sales order for a configuration. If you havenot reloaded your master demand schedule after the AutoCreateConfiguration process, there is be no master demand schedule for theconfiguration item. When there is no master demand schedule for theconfiguration item, shipment relief explodes the configuration bill andrelieves master demand schedules for each model and option class onthe bill. Shipment relief also relieves master demand schedules foreach standard item where you have set Forecast Control to Consume orConsume & Derive. If you ship a sales order for a member of a productfamily, sales order shipment relieves the master demand schedule formember items as well as the product family. If you have reloaded yourmaster demand schedule since the AutoCreate Configuration process,shipment relief finds and relieves master demand schedules for theconfiguration item only.
See Also
Two–Level Master Scheduling, Oralce MRP/Master Scheduling User’sGuide

5 – 29Configure to Order
Sales Order Management
Order Management supports ordering Pick–to–Order configurationswhere you pick and ship options from stock, and Assemble to Orderconfigurations where you use a work order to build configurationsbefore you ship them.
The entire indented list of option classes and options from which tochoose from is displayed. Specify one of the Select options next to yourchoices to take the default quantity; you can choose all options withinan option class (if it is not mutually exclusive) or bill, you can overridequantities within the allowed range, or you can use new navigationchoices to move quickly to a specific option class.
Select Item Item Type OptionalMutuallyExclusive Qty
CPU Option Class No Yes
. 386 Processor Purchased Item
✔ . 486 Processor Purchased Item 1
Monitor Option Class No No
. VGA Option Class Yes No
✔ . . VGA1 Purchased Item 1
. . VGA2 Purchased Item
. EGA Option Class Yes No
. . EGA1 Product
. . EGA2 Product
Operating System Option Class Yes Yes
✔ . DOS Phantom 1
. UNIX Phantom
Table 5 – 17 Configuration Selection (Page 1 of 1)
You can select individual options for the model from all availableoptions, displayed as an indented bill of material. Each option isdisplayed as it is selected. Classes are automatically added as optionswithin the classes are selected.
Order Management prevents users from violating mutually exclusiveand mandatory option class rules when the order is booked. If an

5 – 30 Oracle Bills of Material User’s Guide
option class is mutually exclusive then only one choice is allowed. If anoption class is mandatory (not optional), then at least one choice isrequired. See: Mutually Exclusive and Optional: page 2 – 39.
Match and Reserve
Match and Reserve ATO Configurations allow you to check for anexisting matching configuration and reserve against it. While enteringan order you can search for matching active ATO configurations andassociated available–to–transact quantities based on the optionsselected for the entered order line. To select a matching configurationthe following criteria must be met:
• The order must be booked
• The order line cannot have an associated configuration itemassigned
• The profile option BOM: Check for Duplicate Configurationsmust be set to Match and Reserve
Pricing Configurations
Order Management automatically prices your configurations as theyare entered. You can price the model and individual options, or priceonly the model or options. As you select the options for yourconfiguration, Order Management displays the cumulative total for theconfiguration.
Order Processing Cycles
Order Management uses order cycles to process your orders. Cyclesinclude actions, such as Enter, Pick Release, and Close to identify therequired actions for the order, and results, such as Booked, Released,and Closed to indicate the condition of an order or order line. TheManufacturing Release cycle action monitors the progress of Assembleto Order items and configurations through the manufacturing process.This action identifies when the order line is released to manufacturing;when the ATO configured item has been created (ConfigurationCreated); when the work order has been opened (Work Order Opened);when some portion of the work order quantity is complete (WorkOrder Partially Completed); and when the total quantity of the workorder is complete (Work Order Completed). You can see the actionsand results for any order or order line.

5 – 31Configure to Order
Assemble–to–order (ATO) configurations are treated like ship–togethermodels. Additionally, even though the assembled configuration item isassociated only with the ATO model order line, the status of eachassociated order line is updated identically and simultaneously as theconfiguration is pick released, ship confirmed, and interfaced toInventory or Receivables.

5 – 32 Oracle Bills of Material User’s Guide
ATP Check
Order Management lets you promise ship dates for configurationsbased on Available–to–Promise information for key components. Youcan check Available–to–Promise for an individual item, an entireconfiguration, a ship set or an entire order.
You can specify for each item in a model or option class bill whetherOrder Management must perform an ATP check before scheduling aship date for that item using the Check ATP Bill of Material attributefor the orderable items in the bill and the Check ATP item attribute forall standard components. The ATP Components item attributeindicates whether an item contains components in its structure that alsorequire an ATP check.
Note: If the Check ATP item master field is set to Yes, you canchange this value when you create a bill of material. If the CheckATP is set to No, it cannot be updated when you create the bill.
Select Code Level Item Type Optional
ATPComponents
CheckATP
Yes . 2 . Laptop Computer ATO Model No Yes
. . 3 . . Carrying Case Product No
. . 3 . . Keyboard Product No Yes
. . 3 . . CPU Option Class No Yes
. . . 4 . . . 386 Processor Purchased Item Yes Yes
Yes . . . 4 . . . 486 Processor Purchased Item Yes Yes
. . 3 . . Monitor Option Class No Yes
. . . 4 . . . VGA Option Class Yes Yes
. . . . 5 . . . . VGA Manual Purchased Item No Yes
Yes . . . . 5 . . . . VGA1 Purchased Item Yes
. . . . 5 . . . . VGA2 Purchased Item Yes
. . . 4 . . . EGA Option Class Yes
. . . . 5 . . . . EGA1 Product Yes
. . . . 5 . . . . EGA2 Product Yes
. . . 4 . . . Monitor Manual Purchased Item No Yes
Table 5 – 18 ATP Check (Page 1 of 2)

5 – 33Configure to Order
CheckATP
ATPComponentsOptionalTypeItemLevel
Select Code
. . 3 . . Operating System Option Class Yes
Yes . . . 4 . . . DOS Phantom Yes
. . . 4 . . . UNIX Phantom Yes
Table 5 – 18 ATP Check (Page 2 of 2)
You would set item attributes per the above table if you wanted topromise ship dates for Laptop Computers based on the availablesupply of keyboards, processors, and monitor manuals, but the supplyfor other components was not constrained.
If you ordered a Laptop Computer with a 486 processor, VGA1monitor, and DOS operating system and requested a shipment on 2/5,Order Management would offset that ship date to compute a requestedavailability date for components and then perform a group ATP checkfor all Check ATP components simultaneously.
The table below illustrates sample results of a group ATP check. Itincludes all components from the previous table that would beincluded in the selected configuration and whose Check ATP attributeis Yes. In this case, the requested date for components is offset to 2/1,four days before the requested ship date. The group ATP check foundthat the Keyboard is the latest available component, so the ship date forthe entire configuration would be set to 2/3 plus the four day offset formanufacturing lead time.
Level Item Type QtyRequestedDate ATP Date
. . 3 . . Keyboard Product 1 2/1 2/3
. . . 4 . . . 486 Processor Purchased Item 1 2/1 1/28
. . . . 5 . . . . VGA Manual Purchased Item 1 2/1 2/2
. . . 4 . . . Monitor Manual Purchased Item 1 2/1 2/1
Table 5 – 19 Group ATP Check (Page 1 of 1)
Oracle Inventory lets you define different ATP rules for different items,depending on how you manage your inventory. You can promise ship

5 – 34 Oracle Bills of Material User’s Guide
dates from master schedules, discrete jobs, repetitive schedules,purchase orders, on–hand inventory, or any combination. And, youcan specify rules to control ATP netting to match your order promisingpolicies.

5 – 35Configure to Order
AutoCreate Configuration Items and Final Assembly Orders
Note: The functions documented here are for use in ATOenvironments only.
Once you have entered and scheduled a sales order for anassemble–to–order model, Bills of Material automatically defines anew, unique configuration item complete with a bill of material androuting (based on the model bill and routing) that you can manufactureto fulfill the sales order. When Bills of Material creates a configurationitem for a sales order, it links the new configuration item to the salesorder such that Order Management ships the new item to fulfill theorder.
Once a configuration item has been linked to a sales order, you canopen a Final Assembly Order to build the configuration. Work inProcess lets you reserve discrete jobs to sales orders manually, or youcan use the AutoCreate Final Assembly Orders concurrent program toautomatically open and reserve a work in process discrete job for eachconfiguration sales order.
Configuration Items
AutoCreate by Release Date
When you start the AutoCreate Configuration Items concurrentprogram, you can specify Release Offset Days to help you minimize theimpact of order changes on the planning process. By entering theRelease Offset Days, you can create configuration items only for salesorders whose work order must be released within that number of days.In other words, if you specify Release Offset Days = 2, then you onlycreate configuration items for orders whose work order must beginwithin two days.
The AutoCreate Configuration Item process searches your new orders,finds your orders for assemble–to–order models, and assigns anestimated work order release date to these order lines. OracleManufacturing computes the estimated work order release date byoffsetting the scheduled ship date by the order lead time (through theworkday calendar). Using the lead time information for the modelitem (as specified in the item master), Oracle Manufacturing calculatesorder lead time as follows:

5 – 36 Oracle Bills of Material User’s Guide
fixed lead time + (quantity x variable lead time)
After assigning the estimated work order release dates to the neworders, the AutoCreate Configuration Item process finds all orderswhose work order release date is within the Release Offset Days youspecified and automatically creates configuration items for thoseorders.
For example, the table below describes the results if you placed anorder for the Laptop Computer with the following options:
SelectionCode Item Item Type Optional
MutuallyExclusive Qty
CPU Option Class No Yes
. 386 Processor Purchased Item
Yes . 486 Processor Purchased Item 1
Monitor Option Class No No
. VGA Option Class Yes No
Yes . . VGA1 Purchased Item 1
. . VGA2 Purchased Item
. EGA Option Class Yes No
. . EGA1 Product
. . EGA2 Product
Operating System Option Class Yes Yes
Yes . DOS Phantom 1
. UNIX Phantom
Table 5 – 20 AutoCreate Configuration Item (Page 1 of 1)
Bills of Material automatically defines a new, unique configuration itemin the item master and assigns a bill of material and routing. Tables inthe next few pages show the single level bill and routing that would beassigned to the new configuration item.

5 – 37Configure to Order
See Also
Overview of Lead Time Management: page 7 – 2
Item Numbering Methods
You can choose from four methods to automatically assign itemnumbers to configuration items:
• Replace model item number with a sequence number
• Replace model item number with the order number/line number
• Append a sequence to the model number
• User defined Configuration Item numbering
For each method, you can specify which segment of the item flexfieldyou want to either append or replace. For the Order number/linenumber method, you can specify a delimiter to separate order numberand line number.
For example, the following table illustrates the item numbers thatwould be created for different sales orders and different model itemnumbers. In this example, you have a two segment item flexfield with’–’ as the delimiter, you have chosen ’/’ as the order number/linenumber delimiter, the sales order number is 123, the line number is 21,and the next available sequence number is 2001.
MethodNumberingSegment
Model ItemNumber
Configuration ItemNumber
Append with Sequence 2 Computer–00 Computer–002001
Replace with Sequence 2 Computer–00 Computer–2001
Replace with order # / line # 2 Computer–00 Computer–123/21
Append with Sequence 1 Computer–00 Computer–2001–00
Replace with Sequence 1 Computer–00 2001–00
Replace with order # / line # 1 Computer–00 123/21–00
Table 5 – 21 Assign Item Numbers (Page 1 of 1)
You can also generate unique configuration numbers by using the userdefined configuration item numbering method. You can develop anumbering scheme that works for your own unique business needs

5 – 38 Oracle Bills of Material User’s Guide
which must return an item number consistent with the existing ATOarchitecture. The unique configuration number segment returned bythe package will be accepted and used to form the configuration itemnumber. The length of the returned number should be 40 or the themaximum size specified in the config segment parameter, which ever isgreater. If it is longer than forty it will be truncated to 40.
Note: If the System Items flexfield has been configured to usemultiple segments, then only the column specified in the BOMparameter Config Segment is available for customizedmodifications. Modifications to all other segments will be ignoredand these segments will be inherited from the ATO model’s itemflexfield.
See Also
Defining Bills of Material Parameters: page 1 – 13
Single Level Bill of Material
Bills of Material creates the new configuration item and then assigns asingle level bill of material with the following components:
• Options from the sales order
• Mandatory components of the model and any option class thatwas included on the sales order
• The Model and each Option Class included on the sales order.
The model and option classes appear on configuration bills as phantomcomponents only to consume forecast and to consume masterschedules. Material Requirements Planning and Work In Process donot use them since all mandatory components from the model andoption classes are also included directly on the single level bill. If youdo not forecast or master schedule options and option classes, theyperform no function on configuration bills, but they are still includedautomatically.
For example, the single level bill for the Laptop Computerconfiguration that was ordered in the example would include theComputer Case and Keyboard because they are mandatorycomponents for the model, the 486 processor, the VGA1 monitor, andDOS since they are options that were explicitly chosen. It would alsoinclude VGA Manual and Monitor Manual since they are mandatorycomponents of the VGA option class and the Monitor option class

5 – 39Configure to Order
respectively. And, it would include the Laptop Computer model itselfplus the CPU, Monitor, VGA, and Operating System option classes.
Operation ItemSequence Optional
MutuallyExclusive
Component Item
1 10 No No Laptop Computer
10 10 No No Computer Case
20 20 No No Keyboard
30 30 No No CPU
25 320 No No 486 Processor
40 40 No No Monitor
40 410 No No VGA
40 420 No No VGA–1
40 430 No No VGA Manual
40 440 No No Monitor Manual
50 50 No No Operating System
50 510 No No DOS
Table 5 – 22 Single Level Bill of Material (Page 1 of 1)
Bills of Material assigns each component to the operation sequence andthe item sequence from its original bill. For example, the 486 processoris item sequence 20 in the CPU option class bill and it referencesoperation 25 in that bill.
See Also
Overview of Bills of Material: page 2 – 2
Configuration Item Routings
Bills of Material automatically assigns a routing to each configurationitem by copying the model routing and then dropping any optiondependent routing steps for which no component exists that referencesthat step. Each routing step it includes has the Option Dependentoperation field set to No, since the new item is a mandatory item withno options in its bill. The routing for the Laptop Computer

5 – 40 Oracle Bills of Material User’s Guide
configuration includes step 25 to Clean processor since the 486processor was chosen which referenced step 25. Since step 25 is OptionDependent in the model routing, it would have been dropped if youhad not chosen the 486 processor option.
OperationOptionDependent Department
OperationDescription
10 No Casing Cut and smooth case edges
20 No Assembly 1 Attach keyboard and cable
25 No Assembly 1 Clean processor
30 No Assembly 2 Insert processor into board
40 No Assembly 3 Attach monitor cable/glare screen
50 No Packaging Wrap OS kit with power supply
Table 5 – 23 Routing for Configuration Item (Page 1 of 1)
See Also
Overview of Routings: page 3 – 2
Cost Rollup
Bills of Material automatically performs a single level cost rollup foreach new configuration item to establish accurate standard costs. TheLaptop Computer configuration in the example would get a frozenstandard cost equal to the sum of the costs of the components in itssingle level bill, any resource costs in its routing, plus any materialoverhead. Each new configuration item automatically inherits thematerial overheads of the model on which it is based.
Configuration items do not pick up any cost from models or optionclasses in their single level bill. Models and option classes are onlyconsidered by forecast consumption and master schedule relieffunctions.

5 – 41Configure to Order
Lead Time Calculation Option
Bills of Material lets you optionally compute the manufacturing andcumulative lead times for each new configuration item to establishaccurate lead times based only on the options chosen.
For example, the AutoCreate Configuration Item concurrent programcould automatically compute fixed and variable lead times for theLaptop Computer configuration based on the routing steps that wereincluded from the model routing. In this case, the Clean Processor stepwould contribute to the lead time. So, if the Clean Processor stepincluded one hour of setup time, then it would contribute one hour tothe fixed lead time for the configuration.
Note: When your model’s routings has no option dependentrouting steps (or has a minimum amount of time spent at optiondependent steps), you can choose not to calculate lead times foreach configuration item. Oracle Manufacturing automaticallyassigns the model item’s lead time information to the newconfiguration item when you do not specify to calculate lead timesfor the configuration item.
See Also
Overview of Lead Time Management: page 7 – 2
Configuration Item Catalog
Bills of Materials helps you catalog your configurations so you caneasily search for a pre–existing configuration item definitions, or onhand configurations.
The AutoCreate Configuration Item concurrent program automaticallyassigns the new configuration item to the same Item Catalog Group asthe model and assigns catalog descriptive element values based on theoptions chosen, depending on how you setup your item catalog andmodel and option class bills. And, you can specify that certain catalogdescriptive elements should become part of the configuration item’sdescription.
For example, you could define item catalog groups for personalcomputers, processors, monitors, and operating systems and assigndescriptive elements to each that represent key characteristics of itemsin that group. The Personal Computers catalog group might have alldescriptive elements while the catalog groups for the main components

5 – 42 Oracle Bills of Material User’s Guide
of a personal computer would have only the element that applies tothat type of component.
Catalog Group Element NameInclude in ItemDescription
Personal Computers Processor Type Yes
Monitor Yes
OS Yes
Processors Processor Type No
Monitors Monitor No
Operating Systems OS No
Table 5 – 24 Catalog Groups (Page 1 of 1)
You could assign the Laptop Computer model and its options tocatalog groups and assign elements as follows:
Item Catalog Group Element Name Element Value
Laptop Computer Personal Computers Processor Type
Monitor
OS
386 Processor Processors Processor Type Slow
486 Processor Processors Processor Type Fast
VGA1 Monitors Monitor VGA
VGA2 Monitors Monitor VGA
EGA1 Monitors Monitor EGA
EGA2 Monitors Monitor EGA
DOS Operating Systems OS MS–DOS
UNIX Operating Systems OS SCO–Unix
Table 5 – 25 Catalog Groups for model item (Page 1 of 1)
When you define the bill of material for models and option classes, youcan specify a list of descriptive elements that the AutoCreateConfiguration Item program should assign automatically to the

5 – 43Configure to Order
configuration item. In this example, when you define the bill for theCPU, VGA, EGA, and Operating System option classes, you wouldspecify a single descriptive element for each option class as shown inthe table below:
Item Item Type Element Name
CPU Option Class Processor Type
VGA Option Class Monitor
EGA Option Class Monitor
Operating System Option Class OS
Table 5 – 26 Specify Descriptive Elements (Page 1 of 1)
In the example where you order a Laptop Computer with a VGA1monitor, and 486 processor, and a DOS operating system, Bills ofMaterial would automatically assign the following values todescriptive elements:
Configuration Item Catalog Group Element Name Element Value
LaptopComputer–01
Personal Computers Processor Type Fast
Monitor VGA
OS MS–DOS
Table 5 – 27 Assign Descriptive Elements (Page 1 of 1)
Since the Personal Computers catalog group specifies that each of thethree descriptive elements should be included in the item description,Bills of Material would automatically assign the description”Fast–VGA–MS–DOS” to the configuration item.
See Also
Overview of Item Catalogs, Oracle Inventory User’s Guide
Searching for Items, Oracle Inventory User’s Guide

5 – 44 Oracle Bills of Material User’s Guide
Existing Configuration Item Numbers
The AutoCreate Configuration Item program does not contain featuresto search for existing configuration items. It always creates a newconfiguration item for each order. Your MIS department can, however,write a PL/SQL program to search for matching configurations anddirectly insert it into the AutoCreate Configuration Item PL/SQLpackage. If you set the profile option BOM: Check for DuplicateConfiguration to Yes, then the AutoCreate Configuration Item processcalls this custom procedure before creating new configuration items. Ifthat procedure returns an item number, AutoCreate Configuration Itemlinks that configuration item to the sales order instead a creating a newconfiguration item.
The AutoCreate Configuration Item program does, however, search formultiple new orders for duplicate configurations. If the program findsmultiple orders for the same configuration, it creates one newconfiguration item and links it to each order.
AutoCreate Final Assembly Orders
Note: The function documented here is for use in ATOenvironments only.
You can automatically create discrete jobs for configurations that youmust begin assembling within the number of days you specify. Work inProcess offsets the scheduled ship date for each configuration itemordered through the workday calendar. Work in Process uses the fixedand variable lead time for the configuration item to compute a workorder release date for each sales order and loads discrete jobs for salesorders whose release date is within the number of days you specify.You can minimize the impact of sales order changes by delaying thework in process job components requirements explosion as long aspossible.
Manually Create Final Assembly Orders
You can also manually reserve multiple final assembly orders to asingle sales order or reserve the same final assembly order to severalsales orders using Work in Process. You can view and report finalassembly orders that reference sales orders.

�
5 – 45Configure to Order
See Also
AutoCreating Configuration Items and Final Assembly Orders: page5 – 45
Overview of Discrete Manufacturing, Oracle Work in Process User’sGuide
AutoCreating Configuration Items and Final Assembly Orders
Note: The function documented here is for use in ATOenvironments only.
Create unique configuration items complete with bills of material androutings (based on the model bill and routing) to fulfill customer ordersfor manufactured configurations. A single–level cost rollup isperformed for each new configuration to establish accurate standardcosts that are posted to cost of goods sold. See: AutoCreateConfiguration Items and Final Assembly Orders: page 5 – 35.
Canned Configurations must exist to successfully use the Match andReserve functionality. Canned configurations are created when theAutoCreate Configuration process is run. This process will run eachtime an ATO model line is entered.
Attention: Canned configurations will only be created if theprofile option BOM: Check for Duplicate Configurations is set toMatch and Reserve.
� To autocreate configuration items and final assembly orders:
1. Navigate to the Submit Requests window. See: SubmittingRequests, Oracle Applications User’s Guide .
2. To autocreate a configuration item based on an order number, enterthe order number. Otherwise skip the Sales Order Number field.
3. If you chose not to enter an order number, enter the number ofrelease offset days for the configuration items. To minimize theimpact of order changes, you can delay creating configurationitems. You can create configuration items for only those salesorders where the estimated discrete job release date is within thenumber of days you specify.
4. If you chose not to enter an order number, enter the organization inwhich you want to autocreate configuration items.

5 – 46 Oracle Bills of Material User’s Guide
5. Indicate whether to compute the standard lead time for each newconfiguration item by actually scheduling a test WIP job to becompleted on the requirement date. If this is disabled, (thedefault), the configuration item lead time value is derived from thevalue of the base model.

5 – 47Configure to Order
Final Assembly Order Completion
Oracle Work in Process lets you build final assembly orders the sameway you build discrete jobs. You can automatically or manuallyconvert reservations between the sales order and the job intoreservations to inventory as you complete assemblies into inventory.
Build Final Assembly Orders
You can perform standard work in process transactions with your finalassembly orders. You can issue material, return components back toinventory from the job and perform move and resource transactions byusing the WIP Material Transactions, Move Transactions, and ResourceTransactions windows.
Automatic Inventory Reservations
As you complete assemblies from final assembly orders, Work inProcess automatically creates reservations from the job to thecompletion subinventory and locator and relieves the work in processreservation by the number of assemblies you complete.
For example, if you opened a discrete job to build 10 units of LaptopComputer–2001 (a configuration of Laptop Computer), you wouldestablish a reservation between the sales order and the work in processjob. If you then completed 4 units, Work in Process wouldautomatically reserve the inventory you completed to the sales orderand relieve the work in process reservation by 4.
If multiple sales orders were linked to the same work in process joband you did not manually specify which sales order you intended for aparticular completion transaction, Work in Process wouldautomatically choose the one with the earliest ship date.
Manual Inventory Reservations
You can also manually create reservations from the job to thesubinventory and locator as you complete assemblies from finalassembly orders. You can specify a sales order number, line andshipment to which Work in Process completes assemblies first beforetrying to allocate any remaining completions to other sales ordernumber, lines, and shipments.

5 – 48 Oracle Bills of Material User’s Guide
Complete Lot and Serial Number Controlled Assemblies
When you complete assemblies under serial number control from afinal assembly order to inventory, you can choose to specify the serialnumber immediately or wait until you actually ship the sales order.You must specify the lot number at completion time when youcomplete assemblies under lot control from a final assembly order intoinventory.

5 – 49Configure to Order
Pick Release and Ship Configuration Orders
Once you have built a configuration for a sales order and completed itto inventory, you are ready to pick release the sales order.
Automatic Pick Release
Order Management automatically holds pick release for all order linesthat require shipment of items you are manufacturing on work inprocess jobs linked to that sales order. For example, OrderManagement waits for work in process jobs to be completed any timeyou have a sales order for:
Unique configuration you assemble using a workin process job for that sales order.
Standard ATO product that you assemble using awork in process job for each sales order.
Pick–to–order configuration where one or moreoptions are assemble–to–order products that youassemble using a work in process job for each salesorder.
Pick–to–order model that includes one or moreassemble–to–order models, each of which youassemble using a work in process job for each salesorder.
If you have orders for several units of an ATO item or configuration,you can pick release as work in process completes partial quantities orwait until the entire quantity has been completed before releasing pickslips. You control this when you define your cycle action prerequisitesfor Pick Release. If you choose Manufacturing Release – Work OrderPartially Completed, Pick Release releases any available completedquantity. When you choose Manufacturing Release – Work OrderCompleted, Pick Release does not attempt to pick the order line untilwork in process has completed the full quantity. If PTO options shouldship proportionately with the ATO Models, then Ship Mode Completemust be set to Yes on the PTO Model.
Shipping Documents
Order Management supplies standard pick slips and pack slips tomanage customer shipments. All physical, shippable items appear onthe pick slip. For example, if the order line is for an ATO model, the
ATO Model
ATO StandardProduct
PTO Modelincluding ATOStandard Product
PTO Modelincluding ATOModel

5 – 50 Oracle Bills of Material User’s Guide
ATO configured item is listed on the pick slip, rather than the ATOmodel and options.
If the Bills of Material Include on Shipping Documents attribute is setto Yes, the option class and options print on the Pack Slip. Forexample, for an ATO model, it may be more reasonable to print theorder lines, ATO model and options on the Pack Slip, instead of or inaddition to the ATO configured item.

5 – 51Configure to Order
Deactivating Configuration Items
Bills of Material lets you automatically deactivate item numbersassociated with completed configuration orders. You can alsodeactivate configuration items to remove them from item masterreports and screens before you actually purge them from the database.See: Deletion Constraints: page 4 – 7
When you set up Inventory and Bills of Material, you can define anitem status to identify completed configuration items. You can use thisstatus to disable the configuration item from all Oracle Manufacturingfunctions. You would normally specify No for each of the followingitem attributes for inactive configuration items:
• BOM allowed
• Build in WIP
• Transactable
• Stockable
When defining bills of material parameters, specify the item status touse for completed configuration items. See: Defining Bills of MaterialParameters: page 1 – 13
You can run the Deactivate Configuration Items concurrent program toautomatically deactivate all configuration items that have no open salesorders or on–hand inventory, and whose most recent sales ordershipped more than the number of days ago you specify. Eachdeactivated configuration item has its status updated.
� To deactivate configuration items:
1. Navigate to the Submit Requests window. See: Submitting aRequest, Oracle Applications User’s Guide.
2. Select Report and select Deactivate Configuration Items.
3. Enter the organization for which you want to deactivateconfiguration items that were completed and shipped more thanthe number of days ago you specify.
4. Enter the shipped number of days ago. Configuration itemscompleted and shipped more than this are deactivated. Thedefault is 90.
Note: You can delete item information for completedconfigurations from the database, including the bills of materialand routings.

5 – 52 Oracle Bills of Material User’s Guide
The ability to delete configuration items is subject to the samedeletion constraints that operate for other item types as well.
See Also
Deletion Constraints: page 4 – 7
Deleting Items, Bills, Routings, Components, and Operations: page4 – 2

C H A P T E R
6T
6 – 1Manufacturing Scheduling
ManufacturingScheduling
his chapter tells you everything you need to know aboutmanufacturing scheduling, including:
• Overview of Manufacturing Scheduling: page 6 – 2
• Detailed Scheduling: page 6 – 3
• Repetitive Line Scheduling: page 6 – 4
• Dynamic Lead Time Offsetting: page 6 – 5
• Required Lead Time Information: page 6 – 7
• Lead Time Offsetting Computations: page 6 – 8

6 – 2 Oracle Bills of Material User’s Guide
Overview of Manufacturing Scheduling
Oracle Manufacturing schedules production orders and operationdates using three scheduling methods:
• detailed scheduling
• repetitive line scheduling
• dynamic lead time offsetting
Oracle Manufacturing Products and Scheduling
The following lists the Oracle Manufacturing products that scheduleorders and operations, and indicates their scheduling method:
Product Scheduling Function Scheduling Method
Oracle Work in Process Schedule Discrete Jobs Detailed Scheduling
Oracle Work in Process Schedule RepetitiveSchedules
Repetitive Line Scheduling
Oracle Bills of Material Compute ManufacturingLead Times
Detailed Scheduling
Oracle Master Scheduling/MRP
Compute Planned OrderStart Date
Dynamic Lead TimeOffsetting
Oracle Master Scheduling/MRP
Compute Planned OrderComponent RequirementDates
Dynamic Lead TimeOffsetting
Oracle Capacity Load Planned OrderResource Requirements
Dynamic Lead TimeOffsetting
Oracle Inventory Compute RequirementDates for Assemble toOrder Item Components forATP Checks
Dynamic Lead TimeOffsetting
Table 6 – 1 Manufacturing Scheduling

6 – 3Manufacturing Scheduling
Detailed Scheduling
Detailed scheduling is based on detailed resource availability andusages and is the most precise scheduling method in OracleManufacturing. It takes into account minute to minute resourceavailability information as well as exact resource requirements fromroutings to schedule precise start and end dates and times for jobs andoperations. Detailed scheduling is an infinite scheduling algorithm—soit does not take into account load from other discrete jobs. However,you can simulate the scheduling impact of the load by adding queue,move, and wait resources.
Job and Operation Scheduling
Oracle Work in Process schedules discrete jobs using detailedscheduling. Each resource required on a job is scheduled consecutively.Work in Process can either forward schedule, backward schedule, orboth from an operation.
Work in Process schedules repetitive production using repetitive linescheduling, schedules each resource in sequence based upon the shiftworkday calendar, the amount of the resource required, and thenumber of assigned resources that can be simultaneously scheduled.
See Also
Overview of Discrete Manufacturing, Oracle Work in Process User’sGuide
Overview of WIP Scheduling, Oracle Work in Process User’s Guide
Overview of Routings: page 3 – 2

6 – 4 Oracle Bills of Material User’s Guide
Repetitive Line Scheduling
Repetitive line scheduling is based on production line attributesincluding start and stop times, line speed, line capacity, and lead time.Repetitive line scheduling uses your workday calendar and the linestart and stop times rather than detailed resource shift availability.
Define Production Lines
Work in Process lets you define production lines and specify a start andstop time for each line. You must also specify the minimum andmaximum hourly rate on each line, and specify whether a line’s leadtime is fixed or routing based.
Repetitive Assembly
For lines with a lead time basis of Fixed, you must enter a fixed leadtime. Oracle Manufacturing uses this fixed lead time for all repetitiveassemblies assigned to the line. For lines with a lead time basis ofRouting–based, you can automatically compute manufacturing leadtime based upon a repetitive assembly’s routing.
Work in Process lets you specify the production line where you buildeach assembly and the line speed determines the production run rate toschedule that assembly on that line. If you have a fixed speed line, allassemblies should use the same line speed. For variable speed lines,you need to specify different speeds for each assembly. The line speedfor any particular assembly cannot exceed the line’s maximum rate.
See Also
Defining Production Lines, Oracle Work in Process User’s Guide
Overview of Lead Time Management: page 7 – 2

6 – 5Manufacturing Scheduling
Dynamic Lead Time Offsetting
Dynamic lead time offsetting is based on order quantity, lead times,and the workday calendar. It is a faster scheduling method thatquickly estimates the start date of an order, an operation, or a resource.
Dynamic lead time offsetting always computes a date that is aparticular number of days from a specified date in the workdaycalendar. It accounts for changes in lead time based on order quantity,using the fixed and variable components of manufacturing lead time,as well as operation and resource offsets.
See Also
Overview of Lead Time Management: page 7 – 2
Uses of Dynamic Lead Time Offsetting
Oracle Manufacturing functions whose processing performance is mostcritical use dynamic lead time offsetting while other functions thatschedule exact operation and resource start and end times use detailedscheduling.
For example, Master Scheduling/MRP generates MRP plans as quicklyas possible, so it schedules planned order start dates using dynamiclead time offsetting. Work in Process, however, uses detailedscheduling to schedule jobs since it schedules resource usages indepartments with exact start date, end dates and times, not schedulinga resource when one is not available.
Results from detailed scheduling and dynamic lead time offsetting maydiffer. The more resource availability exceptions and capacitymodifications from the workday calendar you have, the more detailedscheduling results differ from dynamic lead time offsetting results.Assigning preprocessing lead time to manufactured items can alsoproduce different results; detailed scheduling does not use lead timesin its calculations while dynamic lead time offsetting does.
Material Requirement Dates
Master Scheduling/MRP computes component requirement dates forplanned orders using the offset percentage for the operation whereeach component is used. Master Scheduling/MRP multiplies theoperation offset percentage times the planned order lead time to get
6 – 6 Oracle Bills of Material User’s Guide
offset days, and then finds the workday that is the number of days pastthe planned order start date.
Resource Load by Department / Date for Planned Orders
Oracle Capacity offsets resource requirement dates the same way thatMaster Scheduling/MRP offsets component requirement dates, exceptit uses resource offset percentages. Oracle Capacity computes resourceoffset days as the planned order lead time multiplied by the resourceoffset percentage. Oracle Capacity then finds the workday that is thenumber of days past the work order start date to find the resource startdate and time.
Component Requirement Dates for ATP Checks
Oracle Inventory lets you check component available to promise (ATP)for assemble to order (ATO) and Pick to Order (PTO) items. OracleBills of Material allows you to specify the components of an ATO orPTO product that must be promised using ATP. When you check ATPfor a product having such components, Inventory determines therequirement date for components by first computing the manufacturinglead time for that product using the dynamic lead time calculation andthen finding the date that is the number of workdays before therequested ship date. Inventory assumes that all ATO productcomponents are required at the beginning of the ATO job.
See Also
Material Requirements Planning, Oracle Master Scheduling/MRP User’sGuide
Overview of Capacity Planning, Oracle Capacity User’s Guide
Overview of On–hand and Availability, Oracle Inventory User’s Guide

6 – 7Manufacturing Scheduling
Required Lead Time Information
Bills of Material lets you automatically compute item, bill of materialand routing information required for dynamic lead time offsetting. Youcan also maintain lead time information manually.
Manufactured Items
Dynamic lead time offsetting uses the following lead time attributes fordiscretely manufactured items:
• fixed lead time
• variable lead time
• preprocessing lead time
Dynamic lead time offsetting uses the following lead time attributes forrepetitively manufactured items:
• processing lead time
• fixed lead time
Purchased Items
Dynamic lead time offsetting uses the following lead time attributes:
• preprocessing time
• processing lead time
• post–processing lead time
Routings
When computing manufacturing lead times, operation and resourceoffsets are automatically assigned to a routing. For material andresource requirement planning, you can optionally include offsets whencomputing requirement dates.
See Also
Overview of Lead Time Management: page 7 – 2

�
6 – 8 Oracle Bills of Material User’s Guide
Lead Time Offsetting Computations
Dynamic lead time offsetting offsets dates in two steps, computing totallead time and offsetting the date by total lead time. Total lead timecontains both fixed lead time and the quantity–dependent portion oflead time. Preprocessing lead time is also included for discrete items.
To compute the total lead time for discrete items use the followingequation:
preprocessing lead time + fixed lead time +(order quantity x variable lead time)
Compute the total lead time for repetitive items using the followingequation:
fixed lead time + (daily rate x processing lead time)
Offset the date by total lead time using the following equation:
start date = requirement date – total lead time
Attention: Oracle Manufacturing offsets the requirement date bythe total lead time using the workday calendar, accounting for anynon–workdays. Before subtracting total lead time, OracleManufacturing determines the workday for the requirement date.After offsetting by total lead time, the calendar date is derivedfrom the starting workday.
Example
Master Scheduling/MRP uses dynamic lead time offsetting to computea planned order release date. Master Scheduling/MRP computes totallead time and then uses the workday calendar to calculate the plannedorder release date.
Suppose your MRP plan produced a requirement for 100 discretelymanufactured assemblies on March 12 and the following informationexists for that assembly:
• Requirement date = 12–MAR
• Fixed lead time = 2 days
• Variable lead time = .05 days (1 day per 20 units)

6 – 9Manufacturing Scheduling
• Preprocessing lead time = 0 days
• Order quantity = 100
Master Scheduling/MRP first computes the total lead time as follows:
Total lead time = 0 + 2 + (100 x .05)Total lead time = 7 days
Suppose your organization’s workday calendar has a workday patternwith five days on and two days off. Workdays 1 – 5 are March 1 – 5.Saturday and Sunday, March 6 and 7, are off. Workdays 6 – 10 areMarch 8 – 12.
Master Scheduling/MRP then calculates the planned order release dateas follows:
Start date = requirement date – total lead timeStart date = (12–MAR) – 7 days
Convert planned order requirement date to a workday (using yourorganization’s workday calendar).
Start date = Date ((Workday 10) – 7))
Start date = Date (3)
Finally, determine the start date.
Start date = 03 – MAR (planned order release date)
See Also
Overview of On–hand and Availability, Oracle Inventory User’s Guide
Material Requirements Planning, Oracle Master Scheduling/MRP User’sGuide

6 – 10 Oracle Bills of Material User’s Guide

C H A P T E R
7T
7 – 1Manufacturing Lead Times
Manufacturing LeadTimes
his chapter tells you everything you need to know aboutmanufacturing lead times, including:
• Overview of Manufacturing Lead Times: page 7 – 2
• Calculating Lead Times: page 7 – 17

7 – 2 Oracle Bills of Material User’s Guide
Overview of Lead Time Management
Oracle Manufacturing uses dynamic (quantity dependent) lead times toplan material and resource requirements, and to determine materialrequirement dates for available to promise (ATP) calculations. Whencomputing requirement dates, both the fixed and variable componentsof an item’s manufacturing lead time are used. When setting timefences for planning and available to promise calculations, an item’scumulative lead times are used.
See Also
Overview of Manufacturing Scheduling: page 6 – 2
Material Requirements Planning, Oracle Master Scheduling/MRP User’sGuide
Computed vs. Assigned Lead Times
For manufactured items, you can automatically computemanufacturing and cumulative lead times for a specific item or a rangeof items. You can also maintain this information manually. You mustmanually assign all lead time information for purchased items.
Note: You can calculate manufacturing and cumulative lead timesfor manufacturing or engineering items.
Changing Lead Times
Updating the values assigned to your lead times may impact functionsthat use dynamic lead time offsetting— such as material and resourcerequirements planning. Updating cumulative lead times can alsoimpact material plans and available to promise calculations if theselead times are used to set time fences.
See Also
Overview of Manufacturing Scheduling: page 6 – 2

7 – 3Manufacturing Lead Times
Item Lead Time Attributes
For all scheduled time elements, which are less than the standardworkday, the system will compute the lead time day by dividing thelead time element by 24. The standard workday is defined in theworkday calendar. Oracle Manufacturing stores the following leadtime information for each item:
The portion of manufacturing lead time that isindependent of order quantity. You can enter thisfactor manually for an item, or compute itautomatically for manufactured items.
The portion of manufacturing lead time that isdependent on order quantity. You can enter thisfactor manually for an item, or compute itautomatically for manufactured items.
A component of total lead time that represents thetime required to release a purchase order or createa job from the time you learn of the requirement.You can manually enter preprocessing lead time forboth manufactured and purchased items.
A component of total lead time that represents thetime to make a purchased item available ininventory from the time you receive it. Manuallyenter postprocessing lead time for each purchaseditem. Postprocessing lead time for manufactureditems is not recognized.
The time required to procure or manufacture anitem. You can compute processing lead time for amanufactured item, or manually assign a value.Processing lead time is computed as the time astotal integer days required to manufacture 1 leadtime lot size of an item. You must manually assigna processing lead time for purchased items.
Processing lead time does not includepreprocessing and postprocessing lead times.
The quantity you use to calculate manufacturinglead times. You can specify an item’s lead time lotsize to be different from the standard lot size.
A scheduling method that quickly estimates thestart date of an order, operation, or resource.
Fixed Lead Time
Variable LeadTime
PreprocessingLead Time
PostprocessingLead Time
Processing LeadTime
Lead Time LotSize
Dynamic LeadTime Offsetting

7 – 4 Oracle Bills of Material User’s Guide
Dynamic lead time offsetting schedules using theorganization workday calendar.
The fixed lead time plus the variable lead timemultiplied by the order quantity. The planningprocess uses the total lead time for an item in itsscheduling logic to calculate order start dates fromorder due dates.
The total time required to make an item if you hadall raw materials in stock but had to make allsubassemblies level by level. Oracle Bills ofMaterial automatically calculates this value, or youcan manually assign a value.
The total time required to make an item if noinventory existed and you had to order all the rawmaterials and make all subassemblies level bylevel. Bills of Material automatically calculates thisvalue, or you can manually assign a value.
Total Lead Time
CumulativeManufacturingLead Time
Cumulative TotalLead Time

Figure 7 – 1
7 – 5Manufacturing Lead Times
The following diagram describes the relationship betweenpreprocessing, processing, and postprocessing lead times formanufactured items (assembly A and subassembly B) and purchaseditems (component C). This diagram also describes the cumulativemanufacturing lead time and cumulative total lead time for amanufactured item (assembly A).
See Also
Defining Items, Oracle Inventory User’s Guide
Manufacturing Lead Time Computations: page 7 – 6

7 – 6 Oracle Bills of Material User’s Guide
Manufacturing Lead Time Computations
Bills of Material computes manufacturing lead times from item, routingand resource availability information. Item and routing information isupdated as part of the computation.
Lead Time Lot Size
Processing lead time is computed as the time required to complete 1lead time lot size of an item (the time required to complete the secondscheduled job). Bills of Material determines an item’s lead time lot sizefrom two item master fields: standard lot size and lead time lot size.
For items that you plan and cost by the same lot size, you can specify avalue only for the standard lot size. Bills of Material then computesmanufacturing lead time using the standard lot size quantity.
Note: If an item’s routing references another item’s routing as acommon, set both items’ lead time lot size to the same value. Ifyou do not specify a lead time lot size, ensure that both items’standard lot sizes are equal.
For items that you plan with one lot size and cost with a different lotsize, you can enter a lead time lot size. Bills of Material then calculatesmanufacturing lead time using this value (rather than the standard lotsize). If an item does not have a value for the standard or lead time lotsize, Bills of Material uses a quantity of one to compute manufacturinglead times.
Note: If you enter a lead time lot size for an item, consider theitem’s planning lot size to accurately offset lead times. For planneditems with a fixed order quantity, set the lead time lot size to thefixed order quantity. If a planned item has varying lot sizes, assigna lead time lot size that represents the typical lot size.
Routings
Oracle Manufacturing uses routing, operation, and resourceinformation to compute fixed, variable, and processing lead times formanufactured items. Lead times are not calculated for purchased itemseven if they have a routing.
When computing manufacturing lead times, primary routings areautomatically updated with lead time and offset percents. As with theitem lead time attributes, you can also manually assign these values.

7 – 7Manufacturing Lead Times
Lead Time Percent
Oracle Manufacturing stores the lead time percent for each routingoperation as the percent of manufacturing (processing) lead timerequired for previous operations, calculated from the start of a job tothe start of an operation.
For example, if an item’s manufacturing lead time is two days and theprimary routing has two operations with the same duration (1 day), thefirst operation’s lead time percent is zero and the second operation’slead time percent is 50%.
Offset Percent
Oracle Manufacturing stores the offset percent for each resource on arouting operation as the percent of manufacturing (processing) leadtime required for previous operations, calculated from the start of thejob to the start time of a resource at an operation.
For example, both operations in the previous example for lead timepercent require one day(eight hours) to perform. If you have twodifferent resources assigned to the second operation, and each resourcerequires four hours to complete their task, the offset percent is 50% forthe first resource and 75% for the second resource.
Fixed and Variable Lead Times
You can automatically compute processing, fixed, and variable leadtimes for manufactured items, whether they are produced usingdiscrete jobs or repetitive schedules.
A value of zero is assigned to the fixed, variable, and processing leadtimes of a manufactured item that does not have a routing and is notassigned to a production line.
Discrete Jobs Lead Times
Bills of Material computes manufacturing lead time by forwardscheduling two jobs: the first job is scheduled for a quantity of zero andthe second job is scheduled for a quantity equal to the item’s lead timelot size. The first job determines the fixed lead time and the second jobdetermines the variable and processing lead times.
Using detailed scheduling, fixed and variable lead times are computedas the difference between the total time required for two scheduledjobs. In other words, Bills of Material plots total time required for a

�
7 – 8 Oracle Bills of Material User’s Guide
work in process job as a function of order quantity for both orderquantities and computes the slope of the line that the two points define.
Attention: Although Bills of Material uses detailed scheduling tocompute lead times, all calendar days are considered workdaysregardless of days off, workday exceptions, or shift exceptions.
Bills of Material uses the following formulas to compute fixed andvariable lead times:
Schedule a job for zero quantity beginning on the system date andcompute fixed lead time as follows:
completion date (of one item) – system date

7 – 9Manufacturing Lead Times
Schedule a job for the lead time lot size beginning on the system dateand compute variable lead time (rate) as follows:
[(completion date (of all items) – system date) – fixed lead time]/ lead time lot size
Repetitive Schedule Lead Times
A lead time lot size of 1 is always used to compute lead times for itemsproduced on routing–based schedules.
The following terms apply to repetitive schedules:
A day is equal to the number of hours theproduction line is active. If the line is active from8:00 to 16:00, the day is 8 hours long.
The number of assemblies built per line, per hour.
The fixed lead time of the production line, that is,the amount of time for one assembly to traveldown a production line.
The time between two assemblies on a productionline. If the production rate (line speed) is 10assemblies per hour, then the production interval is.1 hours or once every .0125 days, or 1/(10*8), for aline that runs 8 hours per day.
1 / (production rate * day)
The Calculate Manufacturing Lead Times program calls the schedulertwice, first using a quantity of 1, then using a quantity of 0. For eachcase, the scheduling lead time (expressed in days) is returned. This isthe total time taken to build the assemblies. The program then convertsthe two values into the fixed lead time and the variable lead time itemattributes, respectively.
Day
Production Rate(Line Speed)
Line Fixed LeadTime
ProductionInterval
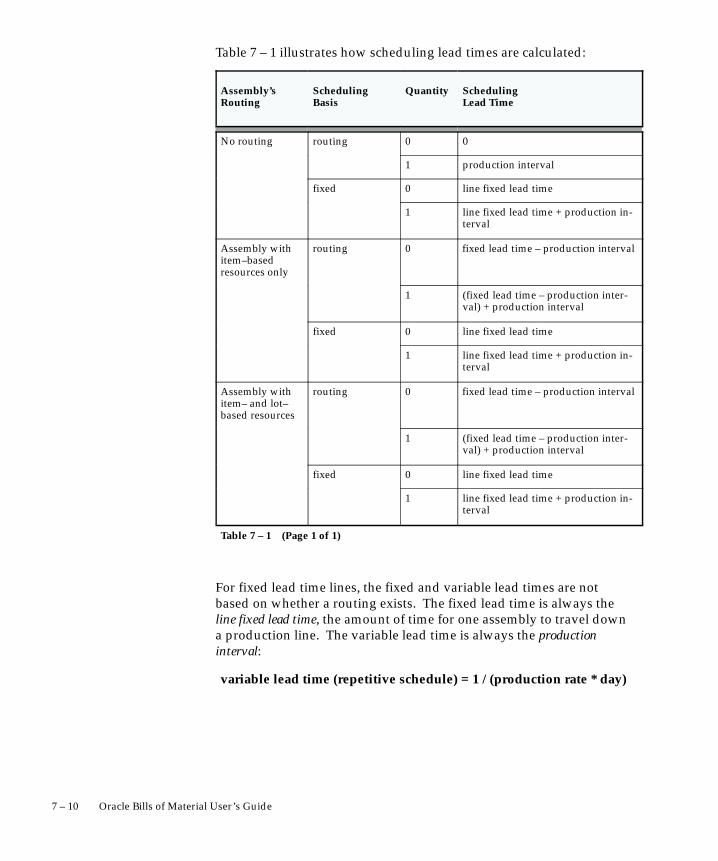
7 – 10 Oracle Bills of Material User’s Guide
Table 7 – 1 illustrates how scheduling lead times are calculated:
Assembly’sRouting
SchedulingBasis
Quantity SchedulingLead Time
No routing routing 0 0
1 production interval
fixed 0 line fixed lead time
1 line fixed lead time + production in-terval
Assembly withitem–basedresources only
routing 0 fixed lead time – production interval
1 (fixed lead time – production inter-val) + production interval
fixed 0 line fixed lead time
1 line fixed lead time + production in-terval
Assembly withitem– and lot–based resources
routing 0 fixed lead time – production interval
1 (fixed lead time – production inter-val) + production interval
fixed 0 line fixed lead time
1 line fixed lead time + production in-terval
Table 7 – 1 (Page 1 of 1)
For fixed lead time lines, the fixed and variable lead times are notbased on whether a routing exists. The fixed lead time is always theline fixed lead time, the amount of time for one assembly to travel downa production line. The variable lead time is always the productioninterval:
variable lead time (repetitive schedule) = 1 / (production rate * day)

7 – 11Manufacturing Lead Times
For a routing–based line, the fixed lead time is the time required tobuild one assembly; the fixed lead time includes the time for both itemand lot–based resources.
Processing Lead Time
Bills of Material also computes the processing lead time as the timerequired to complete the second scheduled job (where the job starts onthe system date):
completion date (of one item) – system date

7 – 12 Oracle Bills of Material User’s Guide
Processing lead time is presented in whole days rounded to the nextday.
Example
For example, if for item A, you had the following data:
• Lead time lot size = 10 units
• System date = 01–JAN
• End date for work in process job for 1 unit = 10–JAN
• End date for work in process job for 10 units = 13–JAN
Then:
fixed lead time = completion date (of one item) – system date
= 10–JAN – 01–JAN
= 10 days
Variable lead time = [(completion date – system date)(rate) – fixed lead time]
/ lead time lot size
= [(13–JAN – 01–JAN) – 10] / 10
= [13 – 10] / 10
= 0.3 days/unit
Processing lead time = completion date – system date
= 13–JAN – 01–JAN
= 13 days

7 – 13Manufacturing Lead Times
Offset Computations
The corresponding operation lead time percent for operations in theprimary routing is updated automatically.
For example, if the routing operations for item A had the followingstart dates (on a job for 10 assemblies), Bills of Material would computeand update the following operation lead time percentages:
OpSeq
Start Dateand Time
End Dateand Time
TimeRequired
Previous OpTimeRequired
Lead Time Percent
10 01–JAN –00:00
02–JAN –24:00
2 0 0/10 = 0%
20 03–JAN –00:00
04–JAN –24:00
2 2 2/10 = 20%
30 05–JAN –00:00
09–JAN –24:00
4 4 4/10 = 40%
40 09–JAN –00:00
10–JAN –24:00
2 8 8/10= 80%
Table 7 – 2 Operation Lead Time Percent
Bills of Material also computes, for each operation resource in an item’sprimary routing, the percent of total lead time required for previousresource operations in that routing.
For example, if your resource start and end times were as follows, Billsof Material would compute these resource offset percents:
OpSeq
Res.Seq
Start Dateand Time
End Dateand Time
TimeRequired
PreviousRes TimeRequired
Offset Percent
10 1 2
01–JAN –00:0002–JAN –00:00
01–JAN –24:0002–JAN –24:00
1 1
0 1
0/10 = 0%
1/10 = 10%
20 1 03–JAN –00:00
04–JAN –24:00
2 2 2/10 = 20%
Table 7 – 3 Resource Offset Percent

7 – 14 Oracle Bills of Material User’s Guide
Offset PercentPreviousRes TimeRequired
TimeRequired
End Dateand Time
Start Dateand Time
Res.Seq
OpSeq
30 1 2
05–JAN –00:0007–JAN –00:00
06–JAN –24:0008–JAN –24:00
2
2
4
6
4/10 = 40%
6/10 = 60%
40 1 09–JAN –00:00
10–JAN –24:00
2 8 8/10= 80%
Table 7 – 3 Resource Offset Percent
See Also
Creating a Routing: page 3 – 8
Calculating Manufacturing Lead Times: page 7 – 17
Overview of Work in Process Scheduling, Oracle Work in Process User’sGuide
Cumulative Lead Time Computations
Bills of Material computes cumulative manufacturing lead time andcumulative lead time by stepping through indented bill structures.Item information is updated as part of the both cumulativecalculations.
Cumulative Manufacturing Lead Time
Bills of Material sets an item’s cumulative manufacturing lead timeequal to its own manufacturing lead time plus the maximum value ofthe cumulative manufacturing lead time for any component, adjustedfor operation offset. The operation offset is the lead time percent forthe operation where the component is used times the item’smanufacturing lead time (based on one lead time lot size).
Purchasing items have no cumulative manufacturing lead time.
Bills of Material uses the following formula to compute cumulativemanufacturing lead time:

7 – 15Manufacturing Lead Times
manufacturing lead time for item + Maximum [(cumulative manufacturing lead time – offset days) for any component]
Cumulative Total Lead Time
Bills of Material sets an item’s cumulative total lead time to its owntotal lead time plus the maximum value of cumulative total lead timeless operation offset for any component. Operation offset for acomponent is the lead time percent for the operation where thecomponent is used times the item’s manufacturing lead time (based onone lead time lot size).
Bills of Material calculates cumulative total lead time using thefollowing equation:
total lead time for item + Maximum [(cumulative total lead time – offset days) for any component]
For example, suppose Item A is made up of B, C, and D. B, C, and Dare used at operations 20, 30, and 40 respectively and themanufacturing (processing) lead time for A (for the lead time lot size)equals 10. The following table illustrates the component, offset days,and lead time percent for each component:
Component Cum. Mfg.Lead Time.
Op Seq. Lead TimePercent
Offset Days Cum Mfg.Lead Time –Offset Days
B 15 20 20 2 13
C 20 30 40 4 16
D 22 40 80 8 14
Table 7 – 4 Cumulative Manufacturing Lead Time

7 – 16 Oracle Bills of Material User’s Guide
Bills of Material calculates cumulative manufacturing lead time asfollows:
manufacturing lead time for A + Maximum [(cumulative manufacturing lead time – offset days) for component B, C, or D]
Cumulative manufacturing lead time = 10 + 16 = 26 days
And, the following table illustrates the cumulative total lead timesassigned to components B, C, and D:
Component Cum. TotalLead Time.
Op Seq. Lead TimePercent
Offset Days Cum TotalLead Time –Offset Days
B 19 20 20 2 17
C 20 30 40 4 16
D 23 40 80 8 15
Table 7 – 5 Cumulative Total Lead Time
Bills of Material calculates cumulative total lead time for A as follows:
total lead time for A + Maximum [(cumulative total lead time – offset days) for component B, C, or D]
Cumulative total lead time = 10 + 17 = 27 days

7 – 17Manufacturing Lead Times
Calculating Lead Times
You can calculate manufacturing lead times for one item, a range ofitems, or a category of items. The calculation updates the lead timeattributes of all manufacturing items that you include, regardless ofwhether you manually maintain an item’s lead times.
Lead Times By Item Category
You can limit the items included in the manufacturing lead timecalculation by specifying an item range or item category range whenyou submit the manufacturing lead time program. Using itemcategories, you can segregate the manufactured items whose lead timesyou manually maintain from those items you include in themanufacturing lead time calculation. You can also limit the parentitems included in the cumulative lead time calculations by using itemcategories.
Recomputing Lead Times
Changes to routing and resource usages can impact an item’s leadtimes. After each change you make to a routing (adjusting usages,adding operations, and so on), recalculate the manufacturing lead timefor the item.
Prerequisites
❑ You must define a bill of material for the parent item and memberitems who’s lead time is to be calculated. See: Defining Bills ofMaterial
❑ You must define a routing for each item that will be used in thelead time calculation. See: Defining a Routing
❑ You must define a lead time lot size for the parent item who’s leadtime is to be calculated. See: Defining a Routing
� To calculate lead times:
1. Navigate to the Calculate Lead Times window. See: SubmittingRequests, Oracle Applications User’s Guide.
2. Select a Type:
Request: calculate or roll up lead times without a report.
Set: calculate lead times and produce either the Bills of MaterialStructure Report or the Routing Report.

7 – 18 Oracle Bills of Material User’s Guide
3. If you selected Set in the previous step, select one of the following:
Calculate Cumulative Lead Times Set GUI: calculates cumulative leadtimes and produces the Bills of Material Structure Report.
Calculate Manufacturing Lead Times Set GUI: calculatesmanufacturing lead times and produces the Routing Report.
If you selected Request in the previous step, select CalculateManufacturing Lead Times.
4. Indicate a range of items or a specific item.
5. If you chose a specific item, enter the item.
6. Optionally, enter a revision for the item.
Enter the date and time to snapshot the bill or routing. All dataeffective as of this date and time are included in the calculation.
7. If you chose to calculate lead times for a range of items, enter abeginning and ending range.
8. If you chose to calculate lead times for a range of items, you mayenter a category set to calculate the lead times of the itemsassociated with this category set. The default is the category setyou defined for your functional area.
9. If you chose to enter a category set, enter a beginning and endingcategory.
See Also
Manufacturing Lead Time Computations: page 7 – 6
Bill of Material Structure Report: page 8 – 7
Routing Report: page 8 – 23
Creating a Bill of Material: page 2 – 10
Rolling Up Cumulative Lead Times
Changes to the indented bill of material and component lead times canimpact a parent item’s cumulative lead times. After each change madeto a bill (adding components, assigning to a different operation, and soon) or the item lead times, roll up the cumulative lead times.

7 – 19Manufacturing Lead Times
� To roll up cumulative lead times:
1. Navigate to the Calculate Lead Times window. See: Submitting aRequest, Oracle Applications User’s Guide.
2. Select Request for the Type.
3. Select Rollup Cumulative Lead Times for the Name.
4. Indicate a range of items or a specific item.
5. If you chose a specific item, enter the item.
6. Optionally, enter a revision for the item.
7. Enter the date and time to explode the bill of material.
8. If you chose to roll up cumulative lead times for a range of items,enter a beginning and ending range.
9. If you chose to roll up cumulative lead times for a range of items,you may enter a category set to roll up the cumulative lead times ofthe items associated with this category set. The default is thecategory set you defined for your functional area.
10. If you chose to enter a category set, enter a beginning and endingcategory.
See Also
Manufacturing Lead Time Computations: page 7 – 6

7 – 20 Oracle Bills of Material User’s Guide

C H A P T E R
8T
8 – 1Reports
Reports
his chapter describes Oracle Bills of Material reports. Eachdescription includes a sample report, with a description of submissionparameters.

8 – 2 Oracle Bills of Material User’s Guide
Bill of Material Comparison Report
Use the Bill of Material Comparison Report to report the comparisonbetween two manufacturing assemblies. You can compare primarybills, manufacturing and engineering bills, alternates, and differentrevisions. Based on your comparison criteria, if the assemblies haveidentical components, item sequences, operation sequences, yields,quantities, and implementations, one line is printed for each identicalcomponent. Otherwise, the report prints a separate line for eachdifferent component.
Report Submission
Use the Report Bill of Material Comparison window to submit thisreport.
Report Parameters
The parameters for the Bill of Material Comparison Report are identicalto those you supply when comparing bills of material online.
See Also
Submitting a Request, Oracle Applications User’s Guide
Comparing Bills of Materials: page 2 – 31

8 – 3Reports
Bill of Material Listing
Use the Bill of Material Listing to report manufacturing andengineering bills without any associated component or routinginformation.
Report Submission
In the Submit Requests window, select Bill of Listing Report in theName field.
Report Parameters
Items From/To
To restrict the report to a range of items, select the beginning andending item numbers.
Category Set
Enter a category set to report on. The default is the category set youdefined for your functional area.
Categories From/To
To restrict the report to a range of categories, select the beginning andending category.
Alternate Selection
Choose one of the following options:
Report the bill of material information for theprimary and alternate assemblies.
Report the bill of material information for only theprimary assembly.
Report the bill of material information for thealternate assembly you specify.
Alternate
Enter a specific alternate to report.
All
Primary
Specific

8 – 4 Oracle Bills of Material User’s Guide
Common Organization
Enter the organization where you define bills of material in yourcurrent organization reference. Bills of Material prints the billinformation for each common bill of material.
Common Bill
Enter common bills that report bill of material information.
See Also
Submitting a Request, Oracle Applications User’s Guide

8 – 5Reports
Bill of Material Loop Report
Use the Bill of Material Loop Report to check for loops in a bill ofmaterial. Bill loops occur when you assign an assembly as acomponent to itself somewhere in the multilevel structure. You mustfix loops before you can run an accurate MRP, or define a discrete jobor repetitive schedule for the assembly.
If no loop exists, No Data Found is printed on the report.
Report Submission
In the Submit Requests window, select Bill of Material Loop Report inthe Name field.
Report Parameters
Item Selection
Choose one of the following options:
Check for loops in the bill of material structure fora range of items you specify.
Check for loops in the item you specify. Bills ofMaterial displays this option as the default.
Item
Enter a top–level item (not a component of another item). Bills ofMaterial checks for loops throughout the multilevel structure, startingwith this level.
Alternate Selection
Choose one of the following options:
Verify the bill structure for both the primary andalternate assemblies.
Verify the bill structure for the primary assembliesonly. Bills of Material displays this option as thedefault.
Verify the bill structure for a specific alternate only.
Range
Specific
All
Primary
Specific

8 – 6 Oracle Bills of Material User’s Guide
Alternate
Enter an alternate for the item. The bill structure for item associatedwith this alternate is checked.
Revision
Enter a revision for the item.
Date
Enter the date and time to explode the bill of material.
Items From/To
To restrict the report to a range of items, select the begining and endingitem numbers.
Category Set
Enter a category set. The bill structure associated with this category setis checked. The default is the category set you defined for yourfunctional area. You can enter a value in this field only if you enteredRange in the Item Selection field.
Category From/To
To restrict the report to a range of categories, select the beginning andending category.
See Also
Submitting a Request, Oracle Applications User’s Guide

8 – 7Reports
Bill of Material Structure Report
Use the Bill of Material Structure Report to report the detail for alllevels of an engineering or manufacturing bill of material. You canmultiply the component usage by an explosion quantity to get anextended quantity.
Report Submission
In the Submit Requests window, select Bill of Material Structure Reportin the Name field.
Report Parameters
Item Selection
Choose one of the following options:
Report the bill structure for the range of items youspecify.
Report the bill structure for the specific item youspecify.
Item
Enter a specific item to report its bill structure.
Alternate Selection
Choose one of the following options:
Report the bill structure for the primary andalternate assemblies.
Report the bill structure for only the primaryassembly.
Report the bill structure for the alternate assemblyyou specify.
Alternate
Enter a specific alternate to report.
Range
Specific
All
Primary
Specific

8 – 8 Oracle Bills of Material User’s Guide
Revision
Enter a revision for the item. The bill structure associated with thisrevision is printed.
Date
Enter a revision date and time. If you entered a specific item and arevision, the date defaults to the highest date of the revision. The billstructure effective as of this date and time is printed.
Items From/To
To restrict the report to a range of items, select the beginning andending item numbers.
Category Set
Enter a category set. The bill structure information associated with thiscategory set is reported. The category set you defined for yourfunctional area is the default.
Categories From/To
To restrict the report to a range of categories, select the beginning andending category.
Levels to Explode
Enter the number of levels to explode for the bill of material. Thedefault is the value specified when bill of material parameters weredefined.
Implemented Only
Indicate whether to report only implemented or all components usedby assemblies as of the effective date.
Display Option
Choose one of the following options:
Report all past, current, and pending componentsassociated with the bill.
All

8 – 9Reports
Report all components effective as of the revisiondate.
Report all future and current components as of therevision date.
Explosion Quantity
Enter a quantity to explode. This quantity is used to calculate therequirements for the components of the parent item by multiplying thisquantity by the component usage in the bill of material.
Assembly Detail
Indicate whether you want to print assembly detail associated with thebill.
Order Entry Detail
Indicate whether to print order entry detail for the components on thebill.
Leadtime and Other Detail
Indicate whether to print lead time details associated with thecomponents on the bill.
Reference Designators
Indicate whether to print reference designators for the components onthe bill.
Substitute Components
Indicate whether to print substitute components for the components onthe bill.
Order By
Choose one of the following options:
For each bill level, order the components by itemsequence, then by operation sequence.
Current
Future and current
Item Seq, Op Seq

8 – 10 Oracle Bills of Material User’s Guide
For each bill level, order the components byoperation sequence, then by item sequence.
Use Planning Percent
Indicate whether you want to use the planning percent to calculate thecomponent requirements of the present item. Component requirementsare calculated by multiplying the component usage quantity by theexplosion quantity, and then multiplying the component planningpercent.
See Also
Submitting a Request, Oracle Applications User’s Guide
Op Seq, Item Seq

8 – 11Reports
Bills of Material Parameters Report
Use the Bills of Material Parameters Report to report bill of materialdefault parameters. You use these parameters to define modes ofoperation and default values for Bills of Material.
Report Submission
In the Submit Requests window, select Bills of Material ParametersReport in the Name field.
See Also
Submitting a Request, Oracle Applications User’s Guide
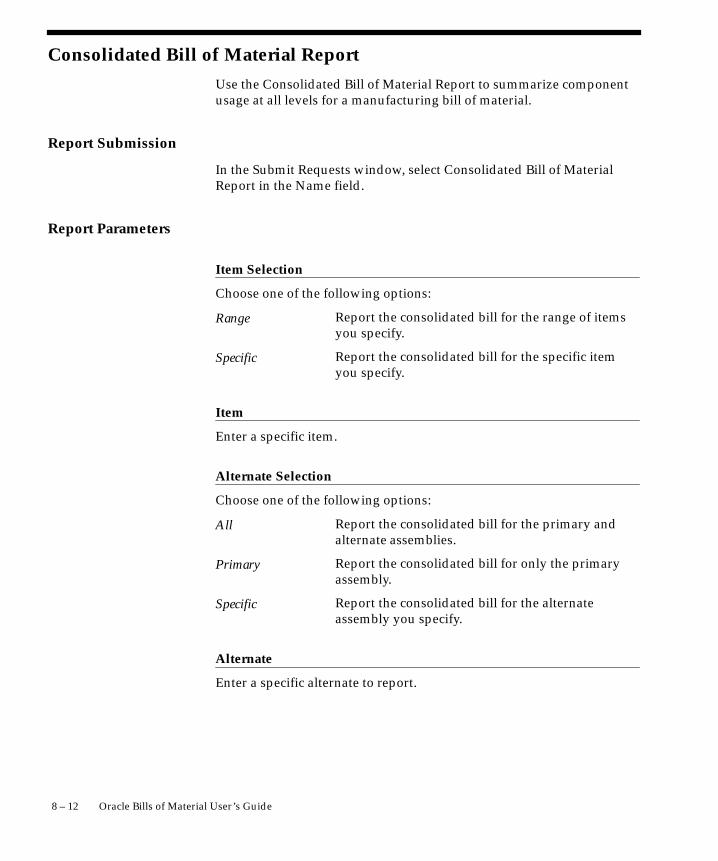
8 – 12 Oracle Bills of Material User’s Guide
Consolidated Bill of Material Report
Use the Consolidated Bill of Material Report to summarize componentusage at all levels for a manufacturing bill of material.
Report Submission
In the Submit Requests window, select Consolidated Bill of MaterialReport in the Name field.
Report Parameters
Item Selection
Choose one of the following options:
Report the consolidated bill for the range of itemsyou specify.
Report the consolidated bill for the specific itemyou specify.
Item
Enter a specific item.
Alternate Selection
Choose one of the following options:
Report the consolidated bill for the primary andalternate assemblies.
Report the consolidated bill for only the primaryassembly.
Report the consolidated bill for the alternateassembly you specify.
Alternate
Enter a specific alternate to report.
Range
Specific
All
Primary
Specific

8 – 13Reports
Revision
Enter a revision for the item. The consolidated bill associated with thisrevision is printed.
Date
Enter a revision date and time. If you entered a specific item and arevision, the date defaults to the highest date of the revision. Theconsolidated bill effective as of this date and time is printed.
Items From/To
To restrict the report to a range of items, select the beginning andending item numbers.
Category Set
Enter a category set. Routings associated with this category set arereported. The default is the category set you defined for yourfunctional area.
Categories From/To
To restrict the report to a range of categories, select the beginning andending category.
Levels to Explode
Enter the number of levels to explode the bill of material. The defaultis derived from the value entered when bill of material parameterswere defined.
Implemented Only
Indicate whether to report only implemented or all components usedby assemblies as of the effective date.
Display Option
Choose one of the following options:
Report all past, current, and pending componentsassociated with the bill.
All

8 – 14 Oracle Bills of Material User’s Guide
Report all components effective as of the revisiondate. Bills of Material displays this option as thedefault.
Report all future and current components as of therevision date.
Explosion Quantity
Enter a quantity to explode. This quantity is used to calculate therequirements for the components of the parent item by multiplying thisquantity by the component usage in the bill of material.
Assembly Detail
Indicate whether you want to print assembly detail associated with thebill.
Use Planning Percent
Indicate whether you want to use the planning percent to calculate thecomponent requirements of the present item. Component requirementsare calculated by multiplying the component usage quantity by theexplosion quantity, and then multiplying the component planningpercent.
See Also
Submitting a Request, Oracle Applications User’s Guide
Current
Future and current

8 – 15Reports
Delete Items Report
Use the Delete Items Report to report the delete history for items,components, bills of material, operations, and routings.
Report Submission
In the Submit Requests window, select Delete Items Report in theName field.
Report Parameters
Delete Group From/To
To restrict the report to a range of delete groups, select the beginningand ending delete group.
Item
Indicate whether to print delete groups that delete items.
Bill of Material
Indicate whether to print delete groups that delete bills of material.
Routing
Indicate whether to print delete groups that delete routings.
Bill and Routing
Indicate whether to print delete groups that delete bills and routings.
Item, Bill and Routing
Indicate whether to print delete groups that delete items, bills, androutings.
Component
Indicate whether to print delete groups that delete components.

8 – 16 Oracle Bills of Material User’s Guide
Operation
Indicate whether to print delete groups that delete operations.
Pending Status
Indicate whether to print delete groups that have entities waiting to bechecked or deleted.
Check Ok Status
Indicate whether to print delete groups that have entities that weresuccessfully checked and are eligible to be deleted.
Error Status
Indicate whether to print delete groups that have entities that could notbe checked or deleted because of an error.
Deleted Status
Indicate whether to print delete groups that you have successfullydeleted entities from.
See Also
Submitting a Request, Oracle Applications User’s Guide

8 – 17Reports
Department Classes Report
Use the Department Classes Report to report department classes andtheir member departments. You can use department classes to identifymanufacturing cells and flexible machine centers.
Report Submission
In the Submit Requests window, select Department Classes Report inthe Name field.
Report Parameters
Department Class Detail
Indicate whether to print member departments associated with thedepartment classes.
See Also
Submitting a Request, Oracle Applications User’s Guide

8 – 18 Oracle Bills of Material User’s Guide
Department Report
Use the Department Report to report department resource andoverhead information.
Report Submission
In the Submit Requests window, select Department Report in the Namefield.
Report Parameters
Overhead Details
Indicate whether to print department overhead information.
Resource Details
Indicate whether to print department resource information.
Department Class
Enter a department class to print member departments.
Departments From/To
To restrict the report to a range of departments, select the beginningand ending department.
See Also
Submitting a Request, Oracle Applications User’s Guide

8 – 19Reports
Item Where Used Report
Use the Item Where Used Report to report the assemblies that use theinventory items you specify.
Report Submission
In the Submit Requests window, select Item Where Used Report in theName field.
Report Parameters
Report Option
Choose one of the following options:
Report the range of items you specify.
Report the item you specify.
Specific Item
Enter an item to report where used information.
Items From/To
To restrict the report to a range of items, select the beginning andending item numbers.
Category Set
Enter a category set. Bills of Material reports item where usedinformation associated with this category set. The default is thecategory set defined for your functional area.
Categories From/To
To restrict the report to a range of categories, select the beginning andending category.
Levels to Implode
Enter the number of bill of material levels to implode. The default is15.
Range
Specific

8 – 20 Oracle Bills of Material User’s Guide
Implemented Only
Indicate whether to report only implemented or all components usedby assemblies as of the effective date.
Display Option
Choose one of the following options:
Report all past, current, and pending componentsassociated with the bill. This option is onlyavailable if Levels to Implode is set to 1.
Report all components effective as of the revisiondate.
Report all future and current components as of therevision date. This option is only available ifLevels to Implode is set to 1.
Date
Enter a revision date and time. Bills of Material uses the bill of materialinformation associated with this date when determining item usage.
See Also
Submitting a Request, Oracle Applications User’s Guide
All
Current
Future and current

8 – 21Reports
Resource Report
Use the Resource Report to report resource cost and overheadinformation.
Report Submission
In the Submit Requests window, select Resource Report in the Namefield.
Report Parameters
Resource Detail
Indicate whether to print resource cost and overhead information forthe resource.
Resources From/To
To restrict the report to a range of resources, select the beginning andending resources.
See Also
Submitting a Request, Oracle Applications User’s Guide
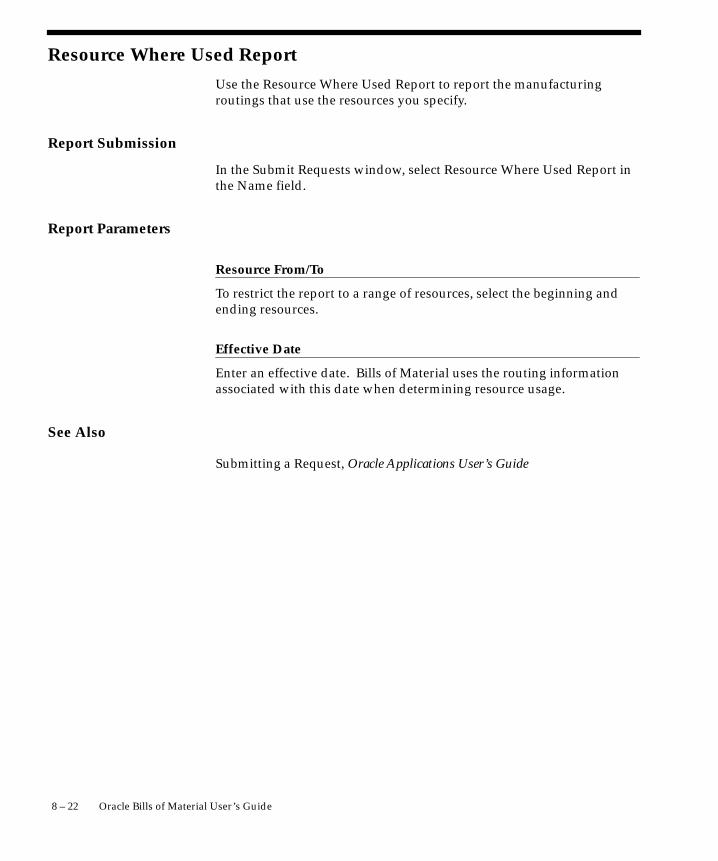
8 – 22 Oracle Bills of Material User’s Guide
Resource Where Used Report
Use the Resource Where Used Report to report the manufacturingroutings that use the resources you specify.
Report Submission
In the Submit Requests window, select Resource Where Used Report inthe Name field.
Report Parameters
Resource From/To
To restrict the report to a range of resources, select the beginning andending resources.
Effective Date
Enter an effective date. Bills of Material uses the routing informationassociated with this date when determining resource usage.
See Also
Submitting a Request, Oracle Applications User’s Guide

8 – 23Reports
Routing Report
Use the Routing Report for manufacturing routing information. Arouting defines the steps for manufacturing an item. For each routingyou define operations, the sequence in which to perform them, and theresources required at each operation.
Report Submission
In the Submit Requests window, select Routing Report in the Namefield.
Report Parameters
Item Selection
Choose one of the following options:
Report routings for the range of items you specify.
Report routings for the specific item you specify.Bills of Material displays this option as the default.
Item
Enter a specific item to report routing information.
Alternate Selection
Choose one of the following options:
Report routing information for the primary andalternate routings. Bills of Material displays thisoption as the default.
Report routing information only for the primaryrouting.
Report routing information for the alternaterouting you specify.
Alternate
Enter a specific alternate to report.
Range
Specific
All
Primary
Specific

8 – 24 Oracle Bills of Material User’s Guide
Revision
Enter a routing revision for the item. The routing associated with thisrevision is printed.
Date
Enter a revision date and time. Bills of Material prints the routingeffective as of this date and time.
Display Option
Choose one of the following options:
Report all past, current, and future operationsassociated with the assembly.
Report all operations effective as of the revisiondate.
Report all future and current operations as of therevision date.
Operation Detail
Indicate whether you want to print operation information associatedwith the routing.
Items From/To
To restrict the report to a range of items, select the beginning andending item numbers.
Category Set
Enter a category set. Bills of Material reports routings associated withthis category set. The default is the category set defined for yourfunctional area.
Categories From/To
To restrict the report to a range of categories, select the beginning andending categories.
All
Current
Future and current

8 – 25Reports
See Also
Submitting a Request, Oracle Applications User’s Guide

8 – 26 Oracle Bills of Material User’s Guide
Standard Operation Report
Use the Standard Operation Report to report standard operations touse in assembly routings. Standard operations are default templatesthat you use, with little or no modification, in more than one routing. Ifyou assign a standard operation as the operation code in a routing, thestandard operation information is loaded into the routing. You canthen modify the standard operation information in the routing.
Report Submission
In the Submit Requests window, select Standard Operation Report inthe Name field.
Report Parameters
Standard Operation Detail
Indicate whether you want to print resource information associatedwith the standard operation.
Standard Operations From/To
To restrict the report to a range of standard operations, select thebeginning and ending standard operations.
See Also
Submitting a Request, Oracle Applications User’s Guide

8 – 27Reports
Workday Exception Sets Report
Use the Workday Exception Sets Report to report exception sets. Youcan use workday exception sets to group workday changes for eachorganization. For example, you can define exception sets for holidays,schedule maintenance, or extended downtime.
You use exception sets in combination with your workday calendar, thedays on/off pattern, and shift on/off pattern to generate a workpattern for your organization.
Report Submission
In the Submit Requests window, select Workday Exception Sets Reportin the Name field.
See Also
Submitting a Request, Oracle Applications User’s Guide

8 – 28 Oracle Bills of Material User’s Guide

8 – 29Reports
Oracle Configurator Concurrent Programs
If you want to build configuration models based on BOM models, you can usea series of concurrent programs provided in Bills of Material to transfer BOMand Item Master data from the Bills of Material schema to the OracleConfigurator schema. The Oracle Configurator uses this data in itsdevelopment environment, Oracle Configurator Developer, to define aconfiguration model.
Use the following concurrent programs in the Other > Configurator menu totransfer, disable transfer, or refresh BOM Model data from the Bills ofMaterial schema to the Oracle Configurator schema:
• Populate Configuration Models
• Refresh Configuration Models
• Disable Import of Configuration Model
When you run the Oracle Configurator concurrent programs from thesesubmenus, you are prompted to enter the required parameters, if any. Onceyou complete the entry of these parameters, they are automatically added tothe Submit Request form.
Note: If you are familiar with these concurrent programs and knowthe required parameters, you can also run these concurrent programsdirectly from the Submit Request form.
Parameters
Populate Configuration Models
Transfers BOM Model tree structures and associated Item Master datafrom the BOM schema to Oracle Configurator schema. This data isthen available in Oracle Configurator Developer for developingconfiguration models.
Enter (or choose from the drop–down list) the codedefined for the applicable organization.
Enter (or choose from the drop–down list) the firstModel Inventory Item in the range of items for whichyou want to transfer data.
Enter (or choose from the drop–down list) the lastModel Inventory Item in the range of items for whichyou want to transfer data.
Organization Code
Model InventoryItem From
Model InventoryItem To

8 – 30 Oracle Bills of Material User’s Guide
Note: All Model Inventory Items between and including the firstand last specified, are in the data transfer. The range can includemultiple Model Inventory Item Types. For example, from ATO800to CNO500 is a valid range.
Refresh Configuration Models
Refreshes data between the BOM schema and the Oracle Configuratorschema. Updates Model tree structures and associated Item Master data withnew or revised BOM data in Oracle Configurator Developer.
Note: No parameters are required to run this concurrentprogram.
Disable Import of Configuration Model
Disables transfer of BOM model data to the Oracle Configurator schema forthe specified Model Inventory Item.
Enter (or choose from the drop–down list) the codedefined for the applicable organization.
Enter (or choose from the drop–down list) the ModelInventory Item for which you want to disable datatransfer to the Oracle Configurator schema.
See Also
Submitting a Request, Oracle Applications User’s GuideOracleConfigurator Administration Guide
Organization Code
Model InventoryItem

A P P E N D I X
A
T
A – 1Oracle Bills of Material Windows and Navigator Paths
Oracle Bills of MaterialWindows andNavigator Paths
his appendix shows you the default navigator path for each Billsof Material window. Refer to this appendix when you do not alreadyknow the navigator path for a window you want to use.

A – 2 Oracle Bills of Material User’s Guide
Bills of Material Windows and Navigator Paths
For windows described in other manuals:
See... Refer to this manual for a complete window description.
CAP Oracle Capacity User’s Guide
CST Oracle Cost Management User’s Guide
ENG Oracle Engineering User’s Guide
Flex Oracle Applications Flexfields Manual
GL Oracle General Ledger User’s Guide
HR Oracle Human Resources User’s Guide
PO Oracle Purchasing User’s Guide
MRP Oracle Master Scheduling/MRP User’s Guide
SYS Oracle System Administrator’s Guide
User Oracle Applications User’s Guide
Although your system administrator may have customized yournavigator, typical navigational paths include the following:
Note: Text in brackets ([ ]) indicates a button.
Bills of Material Responsibility
Window Name Navigation Path
Add Range: page 2 – 19 Bills > Bills > [Designators] > [Add Range]
Alternates: page 1 – 15 Setup > Alternates
Bill Components Comparison: page2 – 31
Bills > Comparison
Bill Details: page 2 – 17 Bills > Bills > [Bill Details]
Bill Documents: page 2 – 21 Bills > Documents
Bills of Material: page 2 – 10 Bills > Bills

A – 3Oracle Bills of Material Windows and Navigator Paths
Bills of Material Responsibility
Calculate Lead Times: page 7 – 17 Routings > Lead Times
Calendar Dates: page 1 – 41 Setup > Calendars > [Dates] or Setup > Calendars > [Shifts] > [Dates]
Change Types (See ENG) Setup > Change Types
Component Changes: page 2 – 23 Bills > Mass Changes > [Changes]
Delete Range: page 2 – 19 Bills > Bills > [Designators] > [Delete Range]
Deletion Constraints: page 1 – 16 Setup > Delete Constraints
Deletion Groups: page 4 – 2 Delete Groups
Department Classes: page 1 – 18 Setup > Department Classes
Departments: page 1 – 19 Routings > Departments
Descriptive Elements: page 2 – 18 Bills > Bills > [Elements]
Exceptions: page 1 – 40 Setup > Calendars > [Dates] > [Exceptions]
Exception Templates: page 1 – 32 Setup > Exception Templates
Import Bills and Routings: page1 – 43
Bills > Import or Routings > Import
Indented Bill of Material: page2 – 28
Bills > Indented Bills
Item Revisions: page 2 – 21 Bills > Bills > [Revision]
Item WhereUsed: page 2 – 33 Bills > Item WhereUsed
Locations (See HR) Setup > Locations
Mass Change Bills: page 2 – 23 Bills > Mass Changes
Operation Resources: page 1 – 23 Routings > Resources
Parameters: page 1 – 13 Setup > Parameters
Reference Designators: page 2 – 19 Bills > Bills > [Designators]
Resource Groups (See CAP) Setup > Resource Groups
Resource WhereUsed: page 3 – 20 Routings > Resource WhereUsed
Routing Details: page 3 – 8 Routings > Routings > [Routing Details]
Routing Documents: page 2 – 21 Routings > Documents

A – 4 Oracle Bills of Material User’s Guide
Bills of Material Responsibility
Routing Revisions: page 3 – 13 Routings > Routings > [Routing Revisions]
Routings: page 3 – 8 Routings > Routings
Run Assemble to Order Processes:page 5 – 45
Routings > ATO
Simulation Sets (See CAP) Setup > Simulation Sets
Shifts: page 1 – 39 Setup > Calendars > [Shifts]
Shift Times: page 1 – 39 Setup > Calendars > [Shifts] > [Times]
Standard Operations: page 3 – 18 Routings > Standard Operations
Substitute Components: page 2 – 20 Bills > Bills > [Substitutes]
Workday Calendar: page 1 – 34 Setup > Calendars
Workday Patterns: page 1 – 37 Setup > Calendars > [Workday Pattern]

A P P E N D I X
BT
B – 1Oracle Bills of Material Special Menu
Oracle Bills of MaterialSpecial Menu
his appendix describes the options on the Bills of Material Toolsmenu.

B – 2 Oracle Bills of Material User’s Guide
Bills of Material Tools menu
Depending upon the currently active window and other factors, theTools menu for Bills of Material includes:
Navigates to the Cost Rollup window, where youcan perform a cost rollup.
Executes the Calculate Cumulative Lead Timesprogram.
Executes the Loop Check program that searches forloops in your bill. Bill loops occur when youassign a bill as a component to itself somewhere inthe multilevel structure of the bill.
Navigates to the Transfer Engineering Datawindow so that you can transfer engineering datato manufacturing.
Navigates to the Copy Bill / Rtg From windowwhere you can copy bills or routings.
Navigate to the Common Bill / Rtg window whereyou can reference a common bill or routing.
Navigate to the Oracle Product Configuratorwindow.
See Also
Rolling Up Assembly Costs, Oracle Cost Management User’s Guide
Rolling Up Cumulative Lead Times: page 7 – 18
Checking for Bill Loops: page 2 – 22
Transferring or Copying Engineering Items, Bills, and Routings, OracleEngineering User’s Guide
Copying Bill and Routing Information: page 2 – 14
Referencing Common Bills and Routings: page 2 – 17
Roll Up Costs
Roll Up LeadTimes
Check for Loops
Transfer Bill / Rtg
Copy Bill / RtgFrom
Assign CommonBill / Rtg
Configure Bill

B – 3Oracle Bills of Material Special Menu
Oracle Bills Of Material Character Mode Forms and CorrespondingGUI Windows
The following table matches character mode forms with theircorresponding GUI windows or processes. This informationsupplements Windows and Navigator Paths in the product onlinedocumentation. Text in brackets ([ ]) indicates a button.
The GUI Navigator paths are based on the BOM Supervisorresponsibility.
For more information on any window, navigate to the window andchoose the help icon.
Character Mode Form and Menu Path GUI Window or Process, and Navigation Path
ÁÁÁÁÁÁÁÁÁÁÁÁÁÁÁÁÁÁÁÁÁÁÁÁÁÁÁÁÁÁÁÁÁÁÁÁÁÁÁÁÁÁÁÁÁÁÁÁ
Assemble to Order Reports and Processes
\Navigate ATOÁÁÁÁÁÁÁÁÁÁÁÁÁÁÁÁÁÁÁÁÁÁÁÁÁÁÁÁÁÁÁÁÁÁÁÁÁÁÁÁÁÁÁÁÁ
Run Assemble to Order Processes
Navigator: Routings > ATO
ÁÁÁÁÁÁÁÁÁÁÁÁÁÁÁÁÁÁÁÁÁÁÁÁÁÁÁÁÁÁÁÁÁÁÁÁÁÁÁÁÁÁÁÁÁÁÁÁ
Assign Descriptive Security Rules
\Navigate Setup Flexfields Descriptive SecurityDefine
ÁÁÁÁÁÁÁÁÁÁÁÁÁÁÁÁÁÁÁÁÁÁÁÁÁÁÁÁÁÁÁÁÁÁÁÁÁÁÁÁÁÁÁÁÁ
Assign Security Rules
Navigator: Setup > Flexfields > Descriptive >Security > Assign
ÁÁÁÁÁÁÁÁÁÁÁÁÁÁÁÁÁÁÁÁÁÁÁÁÁÁÁÁÁÁÁÁÁÁÁÁÁÁÁÁÁÁÁÁÁÁÁÁÁÁÁÁÁÁÁÁÁÁÁÁÁÁÁÁ
Assign Key Flexfield Security Rules
\Navigate Setup Flexfields Key Security Assign
ÁÁÁÁÁÁÁÁÁÁÁÁÁÁÁÁÁÁÁÁÁÁÁÁÁÁÁÁÁÁÁÁÁÁÁÁÁÁÁÁÁÁÁÁÁÁÁÁÁÁÁÁÁÁÁÁÁÁÁÁ
Assign Security Rules
Navigator: Setup > Flexfields
ÁÁÁÁÁÁÁÁÁÁÁÁÁÁÁÁÁÁÁÁÁÁÁÁÁÁÁÁÁÁÁÁÁÁÁÁÁÁÁÁÁÁÁÁÁÁÁÁ
Assign Security Rules
\Navigate Setup Flexfields Key Security AssignÁÁÁÁÁÁÁÁÁÁÁÁÁÁÁÁÁÁÁÁÁÁÁÁÁÁÁÁÁÁÁÁÁÁÁÁÁÁÁÁÁÁÁÁÁ
Assign Security Rules
Navigator: Setup > Flexfields > Key > Security >Assign
ÁÁÁÁÁÁÁÁÁÁÁÁÁÁÁÁÁÁÁÁÁÁÁÁÁÁÁÁÁÁÁÁÁÁÁÁÁÁÁÁÁÁÁÁÁÁÁÁ
Bill of Material Comparison Report
\Navigate Report Bill Compare
ÁÁÁÁÁÁÁÁÁÁÁÁÁÁÁÁÁÁÁÁÁÁÁÁÁÁÁÁÁÁÁÁÁÁÁÁÁÁÁÁÁÁÁÁÁ
Bill Components Comparison
Navigator: Bills > ComparisonÁÁÁÁÁÁÁÁÁÁÁÁÁÁÁÁÁÁÁÁÁÁÁÁÁÁÁÁÁÁÁÁÁÁÁÁÁÁÁÁÁÁÁÁÁÁÁÁ
Bill of Material Loop Report
\Navigate Report Bill LoopCheck
ÁÁÁÁÁÁÁÁÁÁÁÁÁÁÁÁÁÁÁÁÁÁÁÁÁÁÁÁÁÁÁÁÁÁÁÁÁÁÁÁÁÁÁÁÁ
Bill of Material Reports
Navigator: Reports > BillsÁÁÁÁÁÁÁÁÁÁÁÁÁÁÁÁÁÁÁÁÁÁÁÁÁÁÁÁÁÁÁÁÁÁÁÁÁÁÁÁÁÁÁÁÁÁÁÁÁÁÁÁÁÁÁÁÁÁÁÁÁÁÁÁ
Bill of Material Structure Report
\Navigate Report Bill Structure
ÁÁÁÁÁÁÁÁÁÁÁÁÁÁÁÁÁÁÁÁÁÁÁÁÁÁÁÁÁÁÁÁÁÁÁÁÁÁÁÁÁÁÁÁÁÁÁÁÁÁÁÁÁÁÁÁÁÁÁÁ
Bill of Material Reports
Navigator: Reports > Bills
ÁÁÁÁÁÁÁÁÁÁÁÁÁÁÁÁÁÁÁÁÁÁÁÁÁÁÁÁÁÁÁÁÁÁÁÁÁÁÁÁÁÁÁÁÁÁÁÁ
Bills of Material Setup Reports
\Navigate Report Setup Bills of MaterialÁÁÁÁÁÁÁÁÁÁÁÁÁÁÁÁÁÁÁÁÁÁÁÁÁÁÁÁÁÁÁÁÁÁÁÁÁÁÁÁÁÁÁÁÁ
BOM Setup Reports
Navigator: Reports > Setup
ÁÁÁÁÁÁÁÁÁÁÁÁÁÁÁÁÁÁÁÁÁÁÁÁÁÁÁÁÁÁÁÁÁÁÁÁÁÁÁÁÁÁÁÁÁÁÁÁ
Calculate Lead Times
\Navigate LeadtimesÁÁÁÁÁÁÁÁÁÁÁÁÁÁÁÁÁÁÁÁÁÁÁÁÁÁÁÁÁÁÁÁÁÁÁÁÁÁÁÁÁÁÁÁÁ
Calculate Lead Times
Navigator: Routings > Lead Times
Table 8 – 1 (Page 1 of 6)

B – 4 Oracle Bills of Material User’s Guide
GUI Window or Process, and Navigation PathCharacter Mode Form and Menu Path
ÁÁÁÁÁÁÁÁÁÁÁÁÁÁÁÁÁÁÁÁÁÁÁÁÁÁÁÁÁÁÁÁÁÁÁÁÁÁÁÁÁÁÁÁÁ
Change Organization
\Navigate Other ChangeOrg
ÁÁÁÁÁÁÁÁÁÁÁÁÁÁÁÁÁÁÁÁÁÁÁÁÁÁÁÁÁÁÁÁÁÁÁÁÁÁÁÁÁÁÁÁÁÁÁÁ
Change Organization
Navigator: Other > Change OrganizationÁÁÁÁÁÁÁÁÁÁÁÁÁÁÁÁÁÁÁÁÁÁÁÁÁÁÁÁÁÁÁÁÁÁÁÁÁÁÁÁÁÁÁÁÁÁÁÁÁÁÁÁÁÁÁÁÁÁÁÁ
Define Alternates
\Navigate Setup BOM Alternates
ÁÁÁÁÁÁÁÁÁÁÁÁÁÁÁÁÁÁÁÁÁÁÁÁÁÁÁÁÁÁÁÁÁÁÁÁÁÁÁÁÁÁÁÁÁÁÁÁÁÁÁÁÁÁÁÁÁÁÁÁÁÁÁÁ
Alternates
Navigator: Setup > Alternates
ÁÁÁÁÁÁÁÁÁÁÁÁÁÁÁÁÁÁÁÁÁÁÁÁÁÁÁÁÁÁÁÁÁÁÁÁÁÁÁÁÁÁÁÁÁÁÁÁÁÁÁÁÁÁÁÁÁÁÁÁÁÁÁÁÁÁÁÁÁÁÁÁÁÁÁÁÁÁÁÁÁÁÁÁÁÁÁÁÁÁÁÁÁÁÁÁÁÁÁÁÁÁÁÁÁ
Define Bill of Material
\Navigate Bill DefineÁÁÁÁÁÁÁÁÁÁÁÁÁÁÁÁÁÁÁÁÁÁÁÁÁÁÁÁÁÁÁÁÁÁÁÁÁÁÁÁÁÁÁÁÁÁÁÁÁÁÁÁÁÁÁÁÁÁÁÁÁÁÁÁÁÁÁÁÁÁÁÁÁÁÁÁÁÁÁÁÁÁÁÁÁÁÁÁÁÁÁÁÁÁÁÁÁÁÁÁÁÁÁÁÁÁÁÁÁÁÁÁ
Delete Range
Navigator: Bills > Bills > [Designators] > [DeleteRange]
or
Add Range
Navigator: Bills > Bills > [Designators] > [AddRange]
ÁÁÁÁÁÁÁÁÁÁÁÁÁÁÁÁÁÁÁÁÁÁÁÁÁÁÁÁÁÁÁÁÁÁÁÁÁÁÁÁÁÁÁÁÁ
Define Bills of Material Parameters
\Navigate Setup BOM ParametersÁÁÁÁÁÁÁÁÁÁÁÁÁÁÁÁÁÁÁÁÁÁÁÁÁÁÁÁÁÁÁÁÁÁÁÁÁÁÁÁÁÁÁÁÁÁÁÁ
Parameters
Navigator: Setup > Parameters
ÁÁÁÁÁÁÁÁÁÁÁÁÁÁÁÁÁÁÁÁÁÁÁÁÁÁÁÁÁÁÁÁÁÁÁÁÁÁÁÁÁÁÁÁÁ
Define Change Order types
\Navigate Setup BOM TypesÁÁÁÁÁÁÁÁÁÁÁÁÁÁÁÁÁÁÁÁÁÁÁÁÁÁÁÁÁÁÁÁÁÁÁÁÁÁÁÁÁÁÁÁÁÁÁÁ
Change Types
Navigator: Setup > Change Types
ÁÁÁÁÁÁÁÁÁÁÁÁÁÁÁÁÁÁÁÁÁÁÁÁÁÁÁÁÁÁÁÁÁÁÁÁÁÁÁÁÁÁÁÁÁ
Define Delete Constraint
\Navigate Setup BOM Delete
ÁÁÁÁÁÁÁÁÁÁÁÁÁÁÁÁÁÁÁÁÁÁÁÁÁÁÁÁÁÁÁÁÁÁÁÁÁÁÁÁÁÁÁÁÁÁÁÁ
Deletion Constraints
Navigator: Setup > Delete Constraints
ÁÁÁÁÁÁÁÁÁÁÁÁÁÁÁÁÁÁÁÁÁÁÁÁÁÁÁÁÁÁÁÁÁÁÁÁÁÁÁÁÁÁÁÁÁ
Define Department
\Navigate Setup Organization Department
ÁÁÁÁÁÁÁÁÁÁÁÁÁÁÁÁÁÁÁÁÁÁÁÁÁÁÁÁÁÁÁÁÁÁÁÁÁÁÁÁÁÁÁÁÁÁÁÁ
Departments
Navigator: Routings > Departments
ÁÁÁÁÁÁÁÁÁÁÁÁÁÁÁÁÁÁÁÁÁÁÁÁÁÁÁÁÁÁÁÁÁÁÁÁÁÁÁÁÁÁÁÁÁ
Define Department Classes
\Navigate Setup Organization DeptClass
ÁÁÁÁÁÁÁÁÁÁÁÁÁÁÁÁÁÁÁÁÁÁÁÁÁÁÁÁÁÁÁÁÁÁÁÁÁÁÁÁÁÁÁÁÁÁÁÁ
Department Classes
Navigator: Setup > Department Classes
ÁÁÁÁÁÁÁÁÁÁÁÁÁÁÁÁÁÁÁÁÁÁÁÁÁÁÁÁÁÁÁÁÁÁÁÁÁÁÁÁÁÁÁÁÁÁÁÁÁÁÁÁÁÁÁÁÁÁÁÁ
Define Key Flexfield Security Rule
\Navigate Setup Flexfields Key Security Define
ÁÁÁÁÁÁÁÁÁÁÁÁÁÁÁÁÁÁÁÁÁÁÁÁÁÁÁÁÁÁÁÁÁÁÁÁÁÁÁÁÁÁÁÁÁÁÁÁÁÁÁÁÁÁÁÁÁÁÁÁÁÁÁÁ
Define Security Rules
Navigator: Setup > Flexfields > Key > Security >Define
ÁÁÁÁÁÁÁÁÁÁÁÁÁÁÁÁÁÁÁÁÁÁÁÁÁÁÁÁÁÁÁÁÁÁÁÁÁÁÁÁÁÁÁÁÁ
Define Key Flexfield Segments
\Navigate Setup Flexfields Key Segments
ÁÁÁÁÁÁÁÁÁÁÁÁÁÁÁÁÁÁÁÁÁÁÁÁÁÁÁÁÁÁÁÁÁÁÁÁÁÁÁÁÁÁÁÁÁÁÁÁ
Key Flexfield Segments
Navigator: Setup > Flexfields > Key > Segments
ÁÁÁÁÁÁÁÁÁÁÁÁÁÁÁÁÁÁÁÁÁÁÁÁÁÁÁÁÁÁÁÁÁÁÁÁÁÁÁÁÁÁÁÁÁ
Define Key Segment Values
\Navigate Setup Flexfields Key Values
ÁÁÁÁÁÁÁÁÁÁÁÁÁÁÁÁÁÁÁÁÁÁÁÁÁÁÁÁÁÁÁÁÁÁÁÁÁÁÁÁÁÁÁÁÁÁÁÁ
Segment Values
Navigator: Setup > Flexfields > Key > Values
ÁÁÁÁÁÁÁÁÁÁÁÁÁÁÁÁÁÁÁÁÁÁÁÁÁÁÁÁÁÁÁÁÁÁÁÁÁÁÁÁÁÁÁÁÁ
Define Location
\Navigate Setup Location
ÁÁÁÁÁÁÁÁÁÁÁÁÁÁÁÁÁÁÁÁÁÁÁÁÁÁÁÁÁÁÁÁÁÁÁÁÁÁÁÁÁÁÁÁÁÁÁÁ
Location
Navigator: Setup > Locations
Table 8 – 1 (Page 2 of 6)

B – 5Oracle Bills of Material Special Menu
GUI Window or Process, and Navigation PathCharacter Mode Form and Menu Path
ÁÁÁÁÁÁÁÁÁÁÁÁÁÁÁÁÁÁÁÁÁÁÁÁÁÁÁÁÁÁÁÁÁÁÁÁÁÁÁÁÁÁÁÁÁÁÁÁ
Define Resource Groups
\Navigate Setup Organization ResourceGroup
ÁÁÁÁÁÁÁÁÁÁÁÁÁÁÁÁÁÁÁÁÁÁÁÁÁÁÁÁÁÁÁÁÁÁÁÁÁÁÁÁÁÁÁÁÁ
Application Utilities
Navigator: Setup > Resource GroupÁÁÁÁÁÁÁÁÁÁÁÁÁÁÁÁÁÁÁÁÁÁÁÁÁÁÁÁÁÁÁÁÁÁÁÁÁÁÁÁÁÁÁÁÁÁÁÁÁÁÁÁÁÁÁÁÁÁÁÁÁÁÁÁ
Define Rollup Groups
\Navigate Setup Flexfields Key Groups
ÁÁÁÁÁÁÁÁÁÁÁÁÁÁÁÁÁÁÁÁÁÁÁÁÁÁÁÁÁÁÁÁÁÁÁÁÁÁÁÁÁÁÁÁÁÁÁÁÁÁÁÁÁÁÁÁÁÁÁÁ
Rollup Groups
Navigator: Setup > Flexfields > Key > Groups
ÁÁÁÁÁÁÁÁÁÁÁÁÁÁÁÁÁÁÁÁÁÁÁÁÁÁÁÁÁÁÁÁÁÁÁÁÁÁÁÁÁÁÁÁÁÁÁÁÁÁÁÁÁÁÁÁÁÁÁÁÁÁÁÁÁÁÁÁÁÁÁÁÁÁÁÁÁÁÁÁÁÁÁÁÁÁÁÁÁÁÁÁÁÁÁÁÁÁÁÁÁÁÁÁÁÁÁÁÁÁÁÁÁÁÁÁÁÁÁÁÁÁÁÁÁÁÁÁÁÁÁÁÁÁÁÁÁÁÁÁÁÁÁÁ
Define Routing
\Navigate Routing DefineÁÁÁÁÁÁÁÁÁÁÁÁÁÁÁÁÁÁÁÁÁÁÁÁÁÁÁÁÁÁÁÁÁÁÁÁÁÁÁÁÁÁÁÁÁÁÁÁÁÁÁÁÁÁÁÁÁÁÁÁÁÁÁÁÁÁÁÁÁÁÁÁÁÁÁÁÁÁÁÁÁÁÁÁÁÁÁÁÁÁÁÁÁÁÁÁÁÁÁÁÁÁÁÁÁÁÁÁÁÁÁÁÁÁÁÁÁÁÁÁÁÁÁÁÁÁÁÁÁÁÁÁÁÁÁ
Routing Details
Navigator: Routings > Routings > [Routing Details]
or
Routing Revisions
Navigator: Routings > Routings > [RoutingRevisions]
or
Routings
Navigator: Routings > Routings
ÈÈÈÈÈÈÈÈÈÈÈÈÈÈÈÈÈÈÈÈÈÈÈÈÈÈÈÈÈÈÈÈÈÈÈÈÈÈÈÈÈÈÈÈÈÈÈÈ
Define Security Rule
\Navigate Setup Flexfields Validation Security Define
ÁÁÁÁÁÁÁÁÁÁÁÁÁÁÁÁÁÁÁÁÁÁÁÁÁÁÁÁÁÁÁÁÁÁÁÁÁÁÁÁÁÁÁÁÁ
Define Security Rules
Navigator: Setup > Flexfields > Validation > Security> Define
ÁÁÁÁÁÁÁÁÁÁÁÁÁÁÁÁÁÁÁÁÁÁÁÁÁÁÁÁÁÁÁÁÁÁÁÁÁÁÁÁÁÁÁÁÁÁÁÁÁÁÁÁÁÁÁÁÁÁÁÁÁÁÁÁ
Define Segment Values
\Navigate Setup Flexfields Validation Values
ÁÁÁÁÁÁÁÁÁÁÁÁÁÁÁÁÁÁÁÁÁÁÁÁÁÁÁÁÁÁÁÁÁÁÁÁÁÁÁÁÁÁÁÁÁÁÁÁÁÁÁÁÁÁÁÁÁÁÁÁ
Segment Values
Navigator: Setup > Flexfields > Validation > Values
ÁÁÁÁÁÁÁÁÁÁÁÁÁÁÁÁÁÁÁÁÁÁÁÁÁÁÁÁÁÁÁÁÁÁÁÁÁÁÁÁÁÁÁÁÁÁÁÁ
Define Shorthand Aliases
\Navigate Setup Flexfields Key AliasesÁÁÁÁÁÁÁÁÁÁÁÁÁÁÁÁÁÁÁÁÁÁÁÁÁÁÁÁÁÁÁÁÁÁÁÁÁÁÁÁÁÁÁÁÁ
Shorthand Aliases
Navigator: Setup > Flexfields > Key > Aliases
ÁÁÁÁÁÁÁÁÁÁÁÁÁÁÁÁÁÁÁÁÁÁÁÁÁÁÁÁÁÁÁÁÁÁÁÁÁÁÁÁÁÁÁÁÁÁÁÁ
Define Simulation Sets
\Navigate Setup Organization SimulationSetsÁÁÁÁÁÁÁÁÁÁÁÁÁÁÁÁÁÁÁÁÁÁÁÁÁÁÁÁÁÁÁÁÁÁÁÁÁÁÁÁÁÁÁÁÁ
Simulation Sets
Navigator: Setup > Simulation Sets
ÁÁÁÁÁÁÁÁÁÁÁÁÁÁÁÁÁÁÁÁÁÁÁÁÁÁÁÁÁÁÁÁÁÁÁÁÁÁÁÁÁÁÁÁÁÁÁÁ
Define Standard Comments
\Navigate Setup BOM CommentsÁÁÁÁÁÁÁÁÁÁÁÁÁÁÁÁÁÁÁÁÁÁÁÁÁÁÁÁÁÁÁÁÁÁÁÁÁÁÁÁÁÁÁÁÁ
Bill Documents
Navigator: Bills > Documents
ÁÁÁÁÁÁÁÁÁÁÁÁÁÁÁÁÁÁÁÁÁÁÁÁÁÁÁÁÁÁÁÁÁÁÁÁÁÁÁÁÁÁÁÁÁÁÁÁ
Define Standard Instructions
\Navigate Setup BOM Instructions
ÁÁÁÁÁÁÁÁÁÁÁÁÁÁÁÁÁÁÁÁÁÁÁÁÁÁÁÁÁÁÁÁÁÁÁÁÁÁÁÁÁÁÁÁÁ
Operation Documents
Navigator: Routing > Documents
ÁÁÁÁÁÁÁÁÁÁÁÁÁÁÁÁÁÁÁÁÁÁÁÁÁÁÁÁÁÁÁÁÁÁÁÁÁÁÁÁÁÁÁÁÁÁÁÁ
Define Standard Operation
\Navigate Routing Define
ÁÁÁÁÁÁÁÁÁÁÁÁÁÁÁÁÁÁÁÁÁÁÁÁÁÁÁÁÁÁÁÁÁÁÁÁÁÁÁÁÁÁÁÁÁ
Standard Operations
Navigator: Routings > Standard Operations
ÁÁÁÁÁÁÁÁÁÁÁÁÁÁÁÁÁÁÁÁÁÁÁÁÁÁÁÁÁÁÁÁÁÁÁÁÁÁÁÁÁÁÁÁÁÁÁÁ
Define Value Set
\Navigate Setup Flexfields Validation Sets
ÁÁÁÁÁÁÁÁÁÁÁÁÁÁÁÁÁÁÁÁÁÁÁÁÁÁÁÁÁÁÁÁÁÁÁÁÁÁÁÁÁÁÁÁÁ
Value Sets
Navigator: Setup > Flexfields > Validation > Sets
Table 8 – 1 (Page 3 of 6)

B – 6 Oracle Bills of Material User’s Guide
GUI Window or Process, and Navigation PathCharacter Mode Form and Menu Path
ÁÁÁÁÁÁÁÁÁÁÁÁÁÁÁÁÁÁÁÁÁÁÁÁÁÁÁÁÁÁÁÁÁÁÁÁÁÁÁÁÁÁÁÁÁÁÁÁÁÁÁÁÁÁÁÁÁÁÁÁÁÁÁÁÁÁÁÁÁÁÁÁÁÁÁÁÁÁÁÁÁÁÁÁÁÁÁÁÁÁÁÁÁÁÁÁÁÁÁÁÁÁÁÁÁÁÁÁÁÁÁÁÁÁÁÁÁÁÁÁÁÁÁÁÁÁÁÁÁÁÁÁÁÁÁÁÁÁÁÁÁÁÁÁÁÁÁÁÁÁÁÁÁÁÁÁÁÁÁÁÁÁÁÁÁÁÁÁÁÁÁÁÁÁÁÁÁÁÁÁÁÁÁÁÁÁÁÁÁÁÁÁÁÁÁÁÁÁÁÁÁÁÁÁÁÁÁÁÁÁÁÁÁÁÁÁÁÁÁÁÁÁÁÁÁÁÁÁÁÁÁÁÁÁÁÁÁÁÁÁÁÁÁÁÁÁÁÁÁÁÁÁÁÁÁÁÁÁÁÁÁÁÁÁÁÁÁÁÁÁÁÁÁÁÁÁÁÁÁÁÁÁÁÁÁ
Define Workday Calendar
\Navigate Setup Calendar Define
ÁÁÁÁÁÁÁÁÁÁÁÁÁÁÁÁÁÁÁÁÁÁÁÁÁÁÁÁÁÁÁÁÁÁÁÁÁÁÁÁÁÁÁÁÁÁÁÁÁÁÁÁÁÁÁÁÁÁÁÁÁÁÁÁÁÁÁÁÁÁÁÁÁÁÁÁÁÁÁÁÁÁÁÁÁÁÁÁÁÁÁÁÁÁÁÁÁÁÁÁÁÁÁÁÁÁÁÁÁÁÁÁÁÁÁÁÁÁÁÁÁÁÁÁÁÁÁÁÁÁÁÁÁÁÁÁÁÁÁÁÁÁÁÁÁÁÁÁÁÁÁÁÁÁÁÁÁÁÁÁÁÁÁÁÁÁÁÁÁÁÁÁÁÁÁÁÁÁÁÁÁÁÁÁÁÁÁÁÁÁÁÁÁÁÁÁÁÁÁÁÁÁÁÁÁÁÁÁÁÁÁÁÁÁÁÁÁÁÁÁÁÁÁÁÁÁÁÁÁÁÁÁÁÁÁÁÁÁÁÁÁÁÁÁÁÁÁÁÁÁÁÁÁÁÁÁÁÁÁÁÁÁÁÁÁÁÁÁÁÁÁÁÁÁÁÁÁÁÁÁÁÁÁÁÁÁÁÁÁÁÁÁÁÁÁÁÁÁÁÁÁÁÁÁ
Calendar Dates
Navigator: Setup > Calendars > [Dates]
or
Navigator: Setup > Calendars > [Shifts] > [Dates]
or
Shifts
Navigator: Setup > Calendars > [Shifts]
or
Shift Times
Navigator: Setup > Calendars > [Shifts] > [Times]
or
Workday Calendar
Navigator: Setup > Calendars
or
Workday Patterns
Navigator: Setup > Calendars > [Workday Pattern]
or
Exceptions
Navigator: Setup > Calendars > [Dates] >[Exceptions]
ÁÁÁÁÁÁÁÁÁÁÁÁÁÁÁÁÁÁÁÁÁÁÁÁÁÁÁÁÁÁÁÁÁÁÁÁÁÁÁÁÁÁÁÁÁÁÁÁÁÁÁÁÁÁÁÁÁÁÁÁ
Define Workday Exception Sets
\Navigate Setup Calendar ExceptionSets
ÁÁÁÁÁÁÁÁÁÁÁÁÁÁÁÁÁÁÁÁÁÁÁÁÁÁÁÁÁÁÁÁÁÁÁÁÁÁÁÁÁÁÁÁÁÁÁÁÁÁÁÁÁÁÁÁÁÁÁÁÁÁÁÁ
Exception Templates
Navigator: Setup > Exception Templates
ÁÁÁÁÁÁÁÁÁÁÁÁÁÁÁÁÁÁÁÁÁÁÁÁÁÁÁÁÁÁÁÁÁÁÁÁÁÁÁÁÁÁÁÁÁÁÁÁÁÁÁÁÁÁÁÁÁÁÁÁ
Delete Item Information
\Navigate DeleteÁÁÁÁÁÁÁÁÁÁÁÁÁÁÁÁÁÁÁÁÁÁÁÁÁÁÁÁÁÁÁÁÁÁÁÁÁÁÁÁÁÁÁÁÁÁÁÁÁÁÁÁÁÁÁÁÁÁÁÁÁÁÁÁ
Deletion Groups
Navigator: Delete Groups
or
Navigator: Routings > Delete GroupsÁÁÁÁÁÁÁÁÁÁÁÁÁÁÁÁÁÁÁÁÁÁÁÁÁÁÁÁÁÁÁÁÁÁÁÁÁÁÁÁÁÁÁÁÁÁÁÁÁÁÁÁÁÁÁÁÁÁÁÁ
Delete Items Report
\Navigate Report Setup Item
ÁÁÁÁÁÁÁÁÁÁÁÁÁÁÁÁÁÁÁÁÁÁÁÁÁÁÁÁÁÁÁÁÁÁÁÁÁÁÁÁÁÁÁÁÁÁÁÁÁÁÁÁÁÁÁÁÁÁÁÁÁÁÁÁ
Delete History Report
Navigator: Reports > Delete Groups
ÁÁÁÁÁÁÁÁÁÁÁÁÁÁÁÁÁÁÁÁÁÁÁÁÁÁÁÁÁÁÁÁÁÁÁÁÁÁÁÁÁÁÁÁÁ
Indented Bill of Material Cost Report
\Navigate Report Setup Cost IndentedÁÁÁÁÁÁÁÁÁÁÁÁÁÁÁÁÁÁÁÁÁÁÁÁÁÁÁÁÁÁÁÁÁÁÁÁÁÁÁÁÁÁÁÁÁÁÁÁ
Use the Cost Management responsibility and See:Oracle Cost Management User’s Guide or onlinedocumentation.
ÁÁÁÁÁÁÁÁÁÁÁÁÁÁÁÁÁÁÁÁÁÁÁÁÁÁÁÁÁÁÁÁÁÁÁÁÁÁÁÁÁÁÁÁÁÁÁÁÁÁÁÁÁÁÁÁÁÁÁÁ
Item Cost Information Report
\Navigate Report Setup Item Cost CostItem
ÁÁÁÁÁÁÁÁÁÁÁÁÁÁÁÁÁÁÁÁÁÁÁÁÁÁÁÁÁÁÁÁÁÁÁÁÁÁÁÁÁÁÁÁÁÁÁÁÁÁÁÁÁÁÁÁÁÁÁÁÁÁÁÁ
Use the Cost Management responsibility and See:Oracle Cost Management User’s Guide or onlinedocumentation.
Table 8 – 1 (Page 4 of 6)

B – 7Oracle Bills of Material Special Menu
GUI Window or Process, and Navigation PathCharacter Mode Form and Menu Path
ÁÁÁÁÁÁÁÁÁÁÁÁÁÁÁÁÁÁÁÁÁÁÁÁÁÁÁÁÁÁÁÁÁÁÁÁÁÁÁÁÁÁÁÁÁÁÁÁ
Item Usage Report
\Navigate Report WhereUsed
ÁÁÁÁÁÁÁÁÁÁÁÁÁÁÁÁÁÁÁÁÁÁÁÁÁÁÁÁÁÁÁÁÁÁÁÁÁÁÁÁÁÁÁÁÁ
Item WhereUsed Report
Navigator: Reports > BillsÁÁÁÁÁÁÁÁÁÁÁÁÁÁÁÁÁÁÁÁÁÁÁÁÁÁÁÁÁÁÁÁÁÁÁÁÁÁÁÁÁÁÁÁÁÁÁÁÁÁÁÁÁÁÁÁÁÁÁÁÁÁÁÁ
Manufacturing Setup Reports
\Navigate Report Setup Organization
ÁÁÁÁÁÁÁÁÁÁÁÁÁÁÁÁÁÁÁÁÁÁÁÁÁÁÁÁÁÁÁÁÁÁÁÁÁÁÁÁÁÁÁÁÁÁÁÁÁÁÁÁÁÁÁÁÁÁÁÁ
BOM Setup Reports
Navigator: Reports > Setup
ÁÁÁÁÁÁÁÁÁÁÁÁÁÁÁÁÁÁÁÁÁÁÁÁÁÁÁÁÁÁÁÁÁÁÁÁÁÁÁÁÁÁÁÁÁÁÁÁ
Mass Change Bills of Material
\Navigate Bill MassChangeÁÁÁÁÁÁÁÁÁÁÁÁÁÁÁÁÁÁÁÁÁÁÁÁÁÁÁÁÁÁÁÁÁÁÁÁÁÁÁÁÁÁÁÁÁ
Mass Change Bills
Navigator: Bills > Mass Changes
ÁÁÁÁÁÁÁÁÁÁÁÁÁÁÁÁÁÁÁÁÁÁÁÁÁÁÁÁÁÁÁÁÁÁÁÁÁÁÁÁÁÁÁÁÁÁÁÁ
Mass Change Bills of Material
\Navigate Bill MassChangeÁÁÁÁÁÁÁÁÁÁÁÁÁÁÁÁÁÁÁÁÁÁÁÁÁÁÁÁÁÁÁÁÁÁÁÁÁÁÁÁÁÁÁÁÁ
Component Changes
Navigator: Bills > Mass Changes > Changes >[Changes]
ÁÁÁÁÁÁÁÁÁÁÁÁÁÁÁÁÁÁÁÁÁÁÁÁÁÁÁÁÁÁÁÁÁÁÁÁÁÁÁÁÁÁÁÁÁÁÁÁÁÁÁÁÁÁÁÁÁÁÁÁÁÁÁÁ
Resource Usage Report
\Navigate Report WhereUsed
ÁÁÁÁÁÁÁÁÁÁÁÁÁÁÁÁÁÁÁÁÁÁÁÁÁÁÁÁÁÁÁÁÁÁÁÁÁÁÁÁÁÁÁÁÁÁÁÁÁÁÁÁÁÁÁÁÁÁÁÁ
Resource Usage Report
Navigator: Reports > Routings
ÁÁÁÁÁÁÁÁÁÁÁÁÁÁÁÁÁÁÁÁÁÁÁÁÁÁÁÁÁÁÁÁÁÁÁÁÁÁÁÁÁÁÁÁÁÁÁÁ
Routing Reports
\Navigate Report RoutingÁÁÁÁÁÁÁÁÁÁÁÁÁÁÁÁÁÁÁÁÁÁÁÁÁÁÁÁÁÁÁÁÁÁÁÁÁÁÁÁÁÁÁÁÁ
Routing Reports
Navigator: Reports > Routings
Run Reports\Navigate Report Routing GUI Obsolete
ÁÁÁÁÁÁÁÁÁÁÁÁÁÁÁÁÁÁÁÁÁÁÁÁÁÁÁÁÁÁÁÁÁÁÁÁÁÁÁÁÁÁÁÁÁÁÁÁ
Substitute Components
\Navigate Bill Define
ÁÁÁÁÁÁÁÁÁÁÁÁÁÁÁÁÁÁÁÁÁÁÁÁÁÁÁÁÁÁÁÁÁÁÁÁÁÁÁÁÁÁÁÁÁ
Substitute Components
Navigator: Bills > Bills > [Substitutes]ÁÁÁÁÁÁÁÁÁÁÁÁÁÁÁÁÁÁÁÁÁÁÁÁÁÁÁÁÁÁÁÁÁÁÁÁÁÁÁÁÁÁÁÁÁÁÁÁ
Update Personal Profile Options
\Navigate Other Profile
ÁÁÁÁÁÁÁÁÁÁÁÁÁÁÁÁÁÁÁÁÁÁÁÁÁÁÁÁÁÁÁÁÁÁÁÁÁÁÁÁÁÁÁÁÁ
Personal Profile Values
Navigator: Setup > ProfilesÁÁÁÁÁÁÁÁÁÁÁÁÁÁÁÁÁÁÁÁÁÁÁÁÁÁÁÁÁÁÁÁÁÁÁÁÁÁÁÁÁÁÁÁÁÁÁÁÁÁÁÁÁÁÁÁÁÁÁÁÁÁÁÁ
View Bill of Material Comparison
\Navigate Inquiry Bill Compare
ÁÁÁÁÁÁÁÁÁÁÁÁÁÁÁÁÁÁÁÁÁÁÁÁÁÁÁÁÁÁÁÁÁÁÁÁÁÁÁÁÁÁÁÁÁÁÁÁÁÁÁÁÁÁÁÁÁÁÁÁ
Bill Components Comparison
Navigator: Bills > Comparison
ÁÁÁÁÁÁÁÁÁÁÁÁÁÁÁÁÁÁÁÁÁÁÁÁÁÁÁÁÁÁÁÁÁÁÁÁÁÁÁÁÁÁÁÁÁÁÁÁ
View Bill of Material Details
\Navigate Inquiry Bill DetailÁÁÁÁÁÁÁÁÁÁÁÁÁÁÁÁÁÁÁÁÁÁÁÁÁÁÁÁÁÁÁÁÁÁÁÁÁÁÁÁÁÁÁÁÁ
Bill Details
Navigator: Bills > Bills > [Bill Details]
View Concurrent Requests\Naviagate Other Requests GUI Obsolete
ÁÁÁÁÁÁÁÁÁÁÁÁÁÁÁÁÁÁÁÁÁÁÁÁÁÁÁÁÁÁÁÁÁÁÁÁÁÁÁÁÁÁÁÁÁÁÁÁ
View Delete History
\Navigate Inquiry DeleteHistory
ÁÁÁÁÁÁÁÁÁÁÁÁÁÁÁÁÁÁÁÁÁÁÁÁÁÁÁÁÁÁÁÁÁÁÁÁÁÁÁÁÁÁÁÁÁ
Deletion Groups
Navigator: Routings > Delete GroupsÁÁÁÁÁÁÁÁÁÁÁÁÁÁÁÁÁÁÁÁÁÁÁÁÁÁÁÁÁÁÁÁÁÁÁÁÁÁÁÁÁÁÁÁÁÁÁÁ
View Department
\Navigate Inquiry Organization Department
ÁÁÁÁÁÁÁÁÁÁÁÁÁÁÁÁÁÁÁÁÁÁÁÁÁÁÁÁÁÁÁÁÁÁÁÁÁÁÁÁÁÁÁÁÁ
Departments
Navigator: Routings > DepartmentsÁÁÁÁÁÁÁÁÁÁÁÁÁÁÁÁÁÁÁÁÁÁÁÁÁÁÁÁÁÁÁÁÁÁÁÁÁÁÁÁÁÁÁÁÁÁÁÁÁÁÁÁÁÁÁÁÁÁÁÁÁÁÁÁ
View Indented Bill of Material
\Navigate Inquiry Bill Indented
ÁÁÁÁÁÁÁÁÁÁÁÁÁÁÁÁÁÁÁÁÁÁÁÁÁÁÁÁÁÁÁÁÁÁÁÁÁÁÁÁÁÁÁÁÁÁÁÁÁÁÁÁÁÁÁÁÁÁÁÁ
Indented Bills of Material
Navigator: Bills > Indented Bills
Table 8 – 1 (Page 5 of 6)

B – 8 Oracle Bills of Material User’s Guide
GUI Window or Process, and Navigation PathCharacter Mode Form and Menu Path
ÁÁÁÁÁÁÁÁÁÁÁÁÁÁÁÁÁÁÁÁÁÁÁÁÁÁÁÁÁÁÁÁÁÁÁÁÁÁÁÁÁÁÁÁÁ
View Item Cost Information
\Navigate Inquiry Item Cost
ÁÁÁÁÁÁÁÁÁÁÁÁÁÁÁÁÁÁÁÁÁÁÁÁÁÁÁÁÁÁÁÁÁÁÁÁÁÁÁÁÁÁÁÁÁÁÁÁ
Use the Cost Management responsibility and See:Oracle Cost Management User’s Guide or online help
ÁÁÁÁÁÁÁÁÁÁÁÁÁÁÁÁÁÁÁÁÁÁÁÁÁÁÁÁÁÁÁÁÁÁÁÁÁÁÁÁÁÁÁÁÁÁÁÁÁÁÁÁÁÁÁÁÁÁÁÁ
View Item Revisions
\Navigate Inquiry Item Revision
ÁÁÁÁÁÁÁÁÁÁÁÁÁÁÁÁÁÁÁÁÁÁÁÁÁÁÁÁÁÁÁÁÁÁÁÁÁÁÁÁÁÁÁÁÁÁÁÁÁÁÁÁÁÁÁÁÁÁÁÁÁÁÁÁ
Item Revisions
Navigator: Bills > Bills > [Revision]
ÁÁÁÁÁÁÁÁÁÁÁÁÁÁÁÁÁÁÁÁÁÁÁÁÁÁÁÁÁÁÁÁÁÁÁÁÁÁÁÁÁÁÁÁÁ
View Item Usage
\Navigate Inquiry WhereUsed ItemÁÁÁÁÁÁÁÁÁÁÁÁÁÁÁÁÁÁÁÁÁÁÁÁÁÁÁÁÁÁÁÁÁÁÁÁÁÁÁÁÁÁÁÁÁÁÁÁ
Item WhereUsed
Navigator: Bills > Item WhereUsed
ÁÁÁÁÁÁÁÁÁÁÁÁÁÁÁÁÁÁÁÁÁÁÁÁÁÁÁÁÁÁÁÁÁÁÁÁÁÁÁÁÁÁÁÁÁ
View Resource Usage
\Navigate Inquiry WhereUsed ResourceÁÁÁÁÁÁÁÁÁÁÁÁÁÁÁÁÁÁÁÁÁÁÁÁÁÁÁÁÁÁÁÁÁÁÁÁÁÁÁÁÁÁÁÁÁÁÁÁ
Resource WhereUsed
Navigator: Routings > Resource WhereUsed
ÁÁÁÁÁÁÁÁÁÁÁÁÁÁÁÁÁÁÁÁÁÁÁÁÁÁÁÁÁÁÁÁÁÁÁÁÁÁÁÁÁÁÁÁÁ
View Routing Details
\Navigate Inquiry RoutingÁÁÁÁÁÁÁÁÁÁÁÁÁÁÁÁÁÁÁÁÁÁÁÁÁÁÁÁÁÁÁÁÁÁÁÁÁÁÁÁÁÁÁÁÁÁÁÁ
Routing Details
Navigator: Routings > Routings > [Routing Details]
Table 8 – 1 (Page 6 of 6)
See Also
Oracle System Administrator Character Mode Forms andCorresponding GUI Windows: page NO TAG

1Glossary
GLOSSARY
activity A business action or task which uses a resource or incurs a cost.
alternate bill of material An alternate list of component items you can use to produce an assembly.
alternate routing An alternate manufacturing process you can use to produce an assembly.
assemble–to–order (ATO) An environment where you open a final assembly order to assembleitems that customers order. Assemble–to–order is also an item attribute that you can apply tostandard, model, and option class items.
assembly An item that has a bill of material. You can purchase or manufacture an assembly item.See also assemble–to–order, bill of material.
assigned units The number of resource units assigned to work at an operation in a routing. Forexample, if you have 10 units of machine resource available at a department, you can assign up to10 of these units to an operation in a routing. The more units you assign, the less elapsed timeWork in Process schedules for the operation.
autocharge A method of charging a discrete job or repetitive schedule for the resources consumedat an operation.
backflush operation A routing operation where you backflush component items.
base model The model item from which a configuration item was created.
bill of material A list of component items associated with a parent item and information about howeach item relates to the parent item. Oracle Manufacturing supports standard, model, option class,and planning bills. The item information on a bill depends on the item type and bill type. Themost common type of bill is a standard bill of material. A standard bill of material lists thecomponents associated with a product or subassembly. It specifies the required quantity for eachcomponent plus other information to control work in process, material planning, and other OracleManufacturing functions. Also known as product structures.
bill revision A specific version of an item which specifies the components that are active for a daterange.
BOM item type An item classification that determines the items you can use as components in a billof material. BOM Item types include standard, model, option class, and planning items.
by–product Material produced as a residual of a production process. Represented by negativeusage in the bill of material for an assembly.
calendar type The period pattern used to define a manufacturing calendar.
capacity modification Deviation to available resources for a specific department shift.
capacity units The number of units of a resource available in a department. For example, thenumber of machines.
2 Oracle Bills of Material User’s Guide
charge type See autocharge
common bill of material An assembly that uses the bill of material of another assembly as its bill.This enables you to reduce your maintenance effort by sharing the same bill structure among twoor more assemblies. For example, if you have identical bills of material that produce the sameproduct in two different organizations, you can define common bills of material for the identicalstructures.
common routing A routing that uses the routing of another assembly as its routing. This enablesyou to reduce your maintenance effort by sharing the same routing and operations for two ormore assemblies.
component demand Demand passed down from a parent assembly to a component.
component item An item associated with a parent item on a bill of material.
component yield The percent of the amount of a component you want to issue to build an assemblythat actually becomes part of that assembly. Or, the amount of a component you require to buildplus the amount of the component you lose or waste while building an assembly. For example, ayield factor of 0.90 means that only 90% of the usage quantity of the component on a bill actuallybecomes part of the finished assembly.
configuration A product a customer orders by choosing a base model and a list of options. It can beshipped as individual pieces as a set (kit) or as an assembly (configuration item).
configuration bill of material The bill of material for a configuration item.
configuration item The item that corresponds to a base model and a specific list of options. Bills ofMaterial creates a configuration item for assemble–to–order models.
configurator A form that allows you to choose options available for a particular model, thusdefining a particular configuration for the model.
configure–to–order An environment where you enter customer orders by choosing a base modeland then selecting options from a list of choices.
count point operation A default operation to move to and from where you record move and chargeresource transactions. Also known as pay point.
cumulative manufacturing lead time The total time required to make an item if you had all rawmaterials in stock but had to make all subassemblies level by level. Bills of Material automaticallycalculates this value. Purchased items have no cumulative manufacturing lead time.
cumulative total lead time The total time required to make an item if no inventory existed and youhad to order all the raw materials and make all subassemblies level by level. Bills of Materialautomatically calculates this value.
days off The number of consecutive days off a shift has before a day on.
days on The number of consecutive days that a shift works before a day off.
delete entity An item, bill of material or routing you choose to delete.

3Glossary
delete group A set of items, bills, and routings you choose to delete.
delete subentity A component or operation you choose to delete.
deletion constraint A business rule that restricts the entities you can delete. A deletion constraint isa test that must succeed before an item, bill, or routing can be deleted.
department An area within your organization that consists of one or more people, machines, orsuppliers. You can also assign and update resources to a department.
department class A group of departments.
detailed scheduling A method of scheduling production that considers minute to minute resourceavailability information as well as exact resource requirements from routings.
disable date A date when an Oracle Manufacturing function is no longer available for use. Forexample, this could be the date on which a bill of material component or routing operation is nolonger active, or the date a forecast or master schedule is no longer valid.
dynamic lead time offsetting A scheduling method that quickly estimates the start date of an order,operation, or resource. Dynamic lead time offsetting schedules using the organization workdaycalendar.
effective date Date when an Oracle Manufacturing function is available for use. For example, thiscould be the date a bill of material component or routing operation becomes effective, or the dateyou anticipate revised item changes become part of a bill of material and can no longer becontrolled by an ECO.
elapsed time The clock time between start and completion. For example, if the build time of aresource is 10 hours, but you only schedule 5 hours of work a day, the elapsed time is 29 hours.
engineer–to–order An environment where customers order unique configurations for whichengineering must define and release custom bills for material and routings. Oracle Manufacturingdoes not provide special support for this environment beyond the support it provides forassemble–to–order manufacturing.
engineering change order (ECO) A record of revisions to one or more items usually released byengineering.
engineering item A prototype part, material, subassembly, assembly, or product you have not yetreleased to production. You can order, stock, and build engineering items.
fixed lead time The portion of the time required to make an assembly independent of orderquantity, such as time for setup or teardown.
flow manufacturing Manufacturing philosophy utilizing production lines and schedules instead ofwork orders to drive production. Mixed models are grouped into families and produced on linesbalanced to the TAKT time.
implementation date The date a component becomes part of a bill of material and is no longercontrolled through an ECO. Implementation date does not necessarily equal the effective date.
4 Oracle Bills of Material User’s Guide
included item A standard mandatory component in a bill, indicating that it ships (if shippable)whenever its parent item is shipped. Included items are components of models, kits, and optionclasses.
item Anything you make, purchase, or sell, including components, subassemblies, finishedproducts, or supplies. Oracle Manufacturing also uses items to represent planning items that youcan forecast, standard lines that you can include on invoices, and option classes you can use togroup options in model and option class bills.
item–based resource A resource whose usage quantity is the amount required per assembly unityou make.
item sequence The sequence of the component item on the bill of material used to sort componentson reports.
kit An item that has a standard list of components (or included items) you ship when you processan order for that item. A kit is similar to a pick–to–order model because it has shippablecomponents, but it has no options and you order it directly by its item number, not using theconfiguration selection screen.
lead time lot size The item quantity used to compute the fixed and variable portions ofmanufacturing lead time. For manufactured items, the processing lead time represents the timerequired to build this quantity.
lead time rollup A Bill of Material program that computes cumulative lead times for items.
locator Physical area within a subinventory where you store material, such as a row, aisle, bin, orshelf.
lot based resource A resource whose usage quantity is the amount required per job or schedule.
make–to–order An environment where customers order unique configurations that must bemanufactured using multiple discrete jobs and/or final assembly orders where the product fromone discrete job is required as a component on another discrete job. Oracle Manufacturing doesnot provide special support for this environment beyond the support it provides forassemble–to–order manufacturing.
mandatory component A component in a bill that is not optional. Bills of Material distinguishesrequired components from options in model and option class bills of material. Mandatorycomponents in pick–to–order model bills are often referred to as included items, especially if theyare shippable.
manufacturing lead time The total time required to manufacture an assembly.
mass change order A record of a plan to replace, delete, or update one or more component items inmany bills of material at the same time.
minimum transfer quantity The minimum number of assemblies to move from your currentoperation to the next. Work in Process warns you when you move less than the minimum transferquantity.

5Glossary
model bill of material A bill of material for a model item. A model bill lists option classes andoptions available when you place an order for the model item.
model item An item whose bill of material lists options and option classes available when you placean order for the model item.
multi–department resource A resource whose capacity can be shared with other departments.
occurrence An individual quality result. For example, a measurement that falls in or out of aspecified tolerance. Occurrences can be charted using Oracle Quality.
offset percent An operation resource field that holds the percent of total manufacturing lead timerequired for previous operations. For example, if all operations require a total of ten hours toperform and the offset percent for a resource is 40%, then the resource is used four hours after thestart of the first operation.
operation A step in a manufacturing process where you perform work on, add value to, andconsume department resources for an assembly.
operation code A label that identifies a standard operation.
operation instructions Directions that describe how to perform an operation.
operation offset Elapsed days from the start of your first operation until the beginning of yourcurrent operation.
operation sequence A number that orders operations in a routing relative to each other.
option An optional item component in an option class or model bill of material.
option class A group of related option items. An option class is orderable only within a model. Anoption class can also contain included items.
option class bill of material A bill of material for an option class item that contains a list of relatedoptions.
option class item An item whose bill of material contains a list of related options.
option dependent operation An operation in a model or option class item’s routing that appears ina configuration item routing only if the configuration contains an option that references thatoperation.
option item A non–mandatory item component in an option class or model bill of material.
outside processing operation Any operation that has an outside processing resource. See outsideresource
outside processing item An item you include on a purchase order line to purchase supplier servicesas part of your assembly build process. This item can be the assembly itself or a non–stocked itemwhich represents the service performed on the assembly.
over–completions Completing an assembly quantity into inventory that is greater than the Discretejob or Repetitive schedule start quantity, whether or not the assemblies have a routing.

6 Oracle Bills of Material User’s Guide
over–completion quantity The transaction quantity minus the available quantity.
over–moves Moving a quantity from one interoperation step to another that is greater than thequantity at the interoperation step, whether or not the assemblies have a routing.
overhead The indirect expenses allocated in your budgeting process and assigned to your resourcesor departments. You charge overhead costs based on resource value, resource units, or operationcompletions. You typically include administration, facility, depreciation activity, and other costsyou cannot directly charge to your manufactured items. Does not include material overhead.
phantom assembly An assembly Work in Process explodes through when it creates the bill ofmaterial for a job or schedule. A particular assembly can be a phantom assembly on one bill and asubassembly on another.
pick–to–order A configure–to–order environment where the options and included items in a modelappear on pick slips and order pickers gather the options when they ship the order. Alternative tomanufacturing the parent item on a work order and then shipping it. Pick–to–order is also an itemattribute that you can apply to standard, model, and option class items.
planning bill of material A bill of material for a planning item that contains a list of items andplanning percentages. You can use a planning bill to facilitate master scheduling and/or materialplanning. The total output of a planning bill of material is not limited to 100% (it can exceed thisnumber by any amount).
planning item A type of item representing a product family or demand channel whose bill ofmaterial contains a list of items and planning percentages.
planning percent A component usage percentage that facilitates planning for optional componentson model and option class bills, and all components on planning bills.
PO move resource An outside resource that is automatically charged upon receipt of a purchaseorder. PO move resources also automatically initiate shop floor move transactions upon receipt.
PO receipt resource An outside resource that is automatically charged upon receipt of a purchaseorder.
postprocessing lead time The time required to receive a purchased item into inventory from theinitial supplier receipt, such as the time required to deliver an order from the receiving dock to itsfinal destination.
preprocessing lead time The time required to place a purchase order or create a discrete job orrepetitive schedule that you must add to purchasing or manufacturing lead time to determine totallead time. If you define this time for a repetitive item, the planning process ignores it.
primary bill of material A list of the components you most frequently use to build a product. Theprimary bill is the default bill for rolling up costs, defining a job, and calculating cumulative itemlead times. Master Scheduling/MRP uses this bill to plan your material.
primary routing A list of the operations you most frequently perform to build a product. Theprimary routing is the default routing for defining a job and calculating manufacturing lead times.

7Glossary
processing lead time The time required to procure or manufacture an item. For manufacturedassemblies, processing lead time equals the manufacturing lead time.
reference designator An optional identifier you can assign to a component on a bill. For example,when the bill requires four of a component, you can assign four reference designators to thatcomponent, one for each usage.
related item An acceptable substitute you define for an item so that you may receive the item ifyour supplier cannot ship the original item on the purchase order.
resource Anything of value, except material and cash, required to manufacture, cost, and scheduleproducts. Resources include people, tools, machines, labor purchased from a supplier, andphysical space.
resource basis The basis for resource usage quantity that indicates whether that quantity is requiredper item or per lot.
resource sequence The number that indicates the order of a resource in an operation relative toother resources.
revision A particular version of an item, bill of material, or routing.
routing A sequence of manufacturing operations that you perform to manufacture an assembly. Arouting consists of an item, a series of operations, an operation sequence, and operation effectivedates.
routing revision A specific version of a routing that specifies the operations that are active for adate range.
scheduled resource A resource on a routing that is scheduled by Work in Process.
setup time The time required to for a machine or work center to convert from the production of oneitem to another.
shift A scheduled period of work for a department within an organization.
shrinkage rate The percentage on a parent assembly expected to be scrapped in work in process.
simulation schedule Unofficial schedules for personal use that contain the most current scheduleditem information. You can print Simulation schedules, but you cannot confirm or send them viaEDI.
simulation set A group of capacity modifications for resource shifts to simulate, plan, or schedulecapacity.
standard bill of material A bill of material for a standard item, such as a manufactured product orassembly.
standard item Any item that can have a bill or be a component on a bill except planning items,option classes, or models. Standard items include purchased items, subassemblies, and finishedproducts.

8 Oracle Bills of Material User’s Guide
standard operation A commonly used operation you can define as a template for use in definingfuture routing operations.
standard rate The frozen standard unit cost for a resource.
subinventory Subdivision of an organization, representing either a physical area or a logicalgrouping of items, such as a storeroom or receiving dock.
substitute item An item that can be used in place of a component. Master Scheduling/MRPsuggests substitutes items on some reports.
supply A quantity of materials available for use. Supply is replenished in response to demand oranticipated demand.
supply type A bill of material component field that controls issue transactions from inventory towork in process. Supply types supported by Work in Process include: Push, Assembly pull,Operation pull, Bulk, Supplier, Phantom, and Based on bill.
teardown time The time required to clean up or restore a machine or work center after operation.
total lead time An item’s fixed lead time plus the variable lead time multiplied by the orderquantity. For lead time calculations, Bills of Material sets the order quantity to the item’s standardor lead time lot size. The planning process uses the total lead time for an item in its schedulinglogic to calculate order start dates from order due dates.
usage rate The amount of a resource consumed at an operation.
variable lead time The time required to produce one additional unit of an assembly. To compute anitem’s total lead time multiply variable lead time by order quantity, and add an item’s fixed leadtime.
workday calendar A calendar that identifies available workdays for one or more organizations.Master Scheduling/MRP, Inventory, Work in Process, and Capacity plan and schedule activitiesbased on a calendar’s available workdays.
workday exception set An entity that defines mutually exclusive sets of workday exceptions. Foreach organization, you can specify a workday calendar and exception set.
workday exceptions Dates that define plant or shift workday variations, including holidays,scheduled maintenance, or extended downtime.
yield See component yield.

Index – 10
Index
AAbsorption account, for costed resources,
2 – 26Activity
for resource charges, 4 – 16to group resources, 2 – 25
All organizations, importing bills and routings,2 – 42
Alternate, 2 – 16for bills, 3 – 11for routings, 4 – 9when deleting information, 5 – 4
Alternate bills of material, 3 – 5Alternates window, Creating Alternates, 2 – 15Archive, deleted entities, 5 – 3Assemble–to–order
ATP check, 6 – 13, 6 – 32autocreate configuration items, 6 – 35automatic inventory reservation, 6 – 47automatic pick release, 6 – 49build final assembly order, 6 – 47catalog configurations, 6 – 18completing lot and serial controlled
assemblies, 6 – 48deactivate configuration item, 6 – 51forecast model demand, 6 – 21forecast option demand, 6 – 21manual inventory reservations, 6 – 47manually create final assembly order, 6 – 44master schedule models, 6 – 27model bill, 6 – 7, 6 – 15operation sequence inheritance, 6 – 17option class bill, 6 – 9option dependent routing steps, 6 – 15option quantity ranges, 6 – 11order processing cycle, 6 – 30planning bill, 6 – 6sales orders, 6 – 29shipping documents, 6 – 49standard bills, 6 – 10steps, 6 – 3
Assigned units, 4 – 16
Assigning a completion subinventory andlocator, 4 – 13
Assigning Descriptive Elements, 3 – 18Assigning Operation Resources, 4 – 15Assigning Substitute Components, 3 – 20Assigning Workday or Shift Exceptions, 2 – 39Attaching Files, 3 – 21Attachments, 3 – 21Autocharge, 4 – 22AutoCreating Configuration Items, 6 – 45AutoCreating Final Assembly Orders, 6 – 45Available 24 hours, resource, 2 – 21Available–to–promise, check, 6 – 13, 6 – 32
BBackflush, 4 – 19Base model, 3 – 25Basis, 3 – 41Basis option class, 6 – 12Basis type, 2 – 25, 4 – 15Bill / component validation rules, 3 – 43Bill components, 3 – 7Bill Components Comparison window,
Comparing Bills of Material, 3 – 31Bill Documents window, Defining Bill or
Routing Operation Documents, 3 – 21Bill loops. See Checking for Bill LoopsBill of material, operation sequence, 3 – 35Bill of Material Comparison report, 9 – 2Bill of Material Information report, 9 – 3Bill of Material Loop report, 9 – 5Bill of Material Structure report, 9 – 7Bill of material types, 3 – 2Bills of material
access control, 3 – 9copying, 3 – 14creating, 3 – 10

Index – 11
importing, 2 – 42item sequence, 3 – 35mass change, 3 – 23profile options, 3 – 9referencing, 3 – 17
Bills of Material Parameters report, 9 – 11Bills of Material window
Attaching Files to Bills, Components, andRouting Operations, 3 – 22
Checking for Bill Loops, 3 – 22Referencing Common Bills and Routings,
3 – 18Creating a Bill of Material, 3 – 11
CCommon Bill window, Referencing Common
Bills and Routings, 3 – 18Calculating manufacturing lead times, 8 – 17Calendar Dates window
Assigning Workday or Shift Exceptions,2 – 39
Reviewing the Workday Calendar, 2 – 40Capacity Changes window, Assigning
Resources to a Department, 2 – 22Catalog, configuration item, 6 – 18, 6 – 41Category set, when calculating lead times,
8 – 18Change order type, 3 – 24Charge type, 2 – 24, 4 – 26Check ATP, 3 – 40Class, department, 2 – 19Comparing bills of material, 3 – 31Completion locator, 4 – 22Completion subinventory, 4 – 22Component
computing requirement dates for ATP, 7 – 6to delete, 5 – 4
Component item, for bills, 3 – 12Components, on bills of material, 3 – 7Components window, Viewing Item Usage,
3 – 30
Components window, Deleting Items, Bills,Routings, Components, and Operations,5 – 4
Computingcomponent requirement dates for ATP, 7 – 6dynamic lead time, 7 – 7fixed lead time, 8 – 7, 8 – 12manufacturing lead time, 8 – 2, 8 – 3, 8 – 6MRP material requirement dates, 7 – 5operation lead time percents, 8 – 13resource load for planned orders, 7 – 6variable lead time, 8 – 7, 8 – 12
Computing fixed lead time, 8 – 11Computing variable lead time, 8 – 11Configuration item
autocreate, 6 – 35catalog, 6 – 18, 6 – 41cost rollup, 6 – 40creating single level bill for options, 6 – 38lead time calculation, 6 – 41linking existing item to sales order, 6 – 44numbering method, 6 – 37routings, 6 – 39
Consolidated Bill of Material report, 9 – 12Constraints, when deleting bills and routings,
5 – 7Copy options, for bills and routing operations,
3 – 16Copy window
Copying Bill and Routing Information, 3 – 15Copying Calendar and Shift Information,
2 – 36Cost rollup, configuration item, 6 – 40Cost type
for overhead and resource associations,2 – 27
for resource overhead rate associations,2 – 26
Costed resource, 2 – 25Costing information, 3 – 29Count point, 4 – 22Cumulative
lead time computations, 8 – 14

Index – 12
manufacturing lead time, 8 – 14total lead time, 8 – 15
Cumulative lead times, rolling up, 8 – 18Cumulative manufacturing lead time,
calculation, 8 – 14, 8 – 16Cumulative total lead time, calculation, 8 – 15
DDates
effective from and effective date, 3 – 36effective to and inactive after, 3 – 36inactive on, 3 – 36
Deactivating Configuration Items, 6 – 51Delete Component window, Deleting
Components and Operations, 5 – 6Delete entity, and deletion constraints, 2 – 17Delete if, in deletion constraints, 2 – 17Delete Items report, 9 – 15Delete Operation window, Deleting
Components and Operations, 5 – 6Delete processed rows, importing bills and
routings, 2 – 42Deleting Components and Operations, 5 – 6Deleting information, 5 – 2Deletion constraint, 2 – 17Deletion constraints, predefined, 5 – 7Deletion Constraints window, Creating
Custom Deletion Constraints, 2 – 17Deletion group, 5 – 3Deletion Groups window, Deleting Items, Bills,
Routings, Components, and Operations,5 – 3
Department, 2 – 19, 2 – 20for standard operations, 4 – 18
Department Class report, 9 – 17Department classes, 2 – 18Department Classes window, Creating a
Department Class, 2 – 18Department report, 9 – 18Departments window, Defining a Department,
2 – 20Derived sales order demand, 6 – 22
Descriptive element, 3 – 18Descriptive Elements window, Assigning
Descriptive Elements, 3 – 18Detailed scheduling, 7 – 3Differences only, 3 – 32Discrete job scheduling, 7 – 3Display option, 3 – 29Dynamic lead time offsetting, 7 – 5, 7 – 7
EEffectivity dates. See DatesEnable outside processing, 2 – 25Exception template name, 2 – 32Exception Templates window, Creating a
Workday Exception Template, 2 – 31, 2 – 32Exceptions window, Assigning Workday or
Shift Exceptions, 2 – 40Extended quantity, 3 – 38
calculation, 3 – 38
FFailure message, deletion constraint, 2 – 17Final assembly order
building, 6 – 47manually creating, 6 – 44
Fixed lead time, calculation, 8 – 8Folders
Bills Summary window, 3 – 11Routings Summary window, 4 – 9
GGeneral ledger account. See Absorption
accountGroup, 5 – 3
IImplemented only, 3 – 29

Index – 13
Import bills of material, 2 – 42Import Item Information window, Importing
Bills and Routings, 2 – 42Import routings, 2 – 42Importing Bills and Routings, 2 – 42Inactive status, 2 – 13Include on ship docs, 3 – 41Included in cost rollups, 3 – 13Increment revision, 3 – 24Indented Bills of Material window, Viewing an
Indented Bill of Material, 3 – 28Inventory reservations. See ReservationInverse rate or amount. See Usage rate or
amountItem
creating a bill, 3 – 11for routings, 4 – 9to delete, 5 – 3
Item revisions, 3 – 6defining, 3 – 21
Item Revisions window, Defining ItemRevisions, 3 – 21
Item selection, to calculate lead times, 8 – 18Item sequence, on bills of material, 3 – 35Item Where Used report, 9 – 19Item WhereUsed window, Viewing Item
Usage, 3 – 33
LLead time, 3 – 29
computing manufacturing, 8 – 2, 8 – 3, 8 – 6computing operation percents, 8 – 13configuration item, 6 – 41cumulative manufacturing, 8 – 14cumulative total, 8 – 15dynamic offsetting, 7 – 5, 7 – 7fixed, 8 – 7, 8 – 11, 8 – 12processing, 8 – 3variable, 8 – 7, 8 – 11, 8 – 12
Lead time percent, 4 – 11Location, department, 2 – 20Locator. See Completion locator; Supply
locator
Loops in bills of material. See Checking for BillLoops
MManufacturing Lead Times, calculating, 8 – 17Mass change bill of material, 3 – 23Mass Change Bills window, Mass Changing
Bills of Material, 3 – 24Mass change order number, 3 – 24Master schedule
model bill, 6 – 27option class bill, 6 – 27production relief, 6 – 27shipment relief, 6 – 27
Material control, 3 – 29Material requirement dates, 7 – 5Maximum bill levels, 2 – 13Maximum quantity, 3 – 40Minimum quantity, 3 – 40Minimum transfer quantity, 4 – 18Model bills of material
defining, 6 – 7, 6 – 15forecast demand, 6 – 21master schedule, 6 – 27
MRP material requirement dates, 7 – 5Mutually exclusive, 3 – 39
NNumbering method, 2 – 13Numbering segment, 2 – 13
OOffset percent, 4 – 16Operation
defining, 4 – 4lead time percents, 8 – 13outside processing, 4 – 7scheduling, 7 – 3
Operation sequence, on bills of material, 3 – 35

Index – 14
Operation Documents window, Defining Billor Routing Operation Documents, 3 – 21
Operation sequence inheritance, 6 – 17Operations window, Deleting Items, Bills,
Routings, Components, and Operations,5 – 4
Option class bills of materialdefining, 6 – 9forecast demand, 6 – 21master schedule, 6 – 27
Option dependent, 4 – 19Option dependent routing steps, 6 – 15Option quantity ranges, 6 – 11Optional, 3 – 39Order lead time, calculation, 6 – 35Order processing cycle, 6 – 30Organization, 3 – 18
when autocreating configuration items,6 – 45
when copying a bill, 3 – 16when deactivating configuration items,
6 – 51Outside processing enabled, 2 – 25Outside processing operation, 4 – 7Overhead, to associate to resource, 2 – 27Owning department, for borrowed resources,
2 – 21
PParameters window, Defining Bill of Material
Parameters, 2 – 13Perform lead time calculation, 6 – 46Personal profile option, bill of material access,
3 – 9Phantoms, 3 – 3Pick Release, automatic, 6 – 49Pick–to–order
ATP check, 6 – 13, 6 – 32automatic pick release, 6 – 49basis option class, 6 – 12catalog configurations, 6 – 18
deactivate configuration item, 6 – 51forecast model demand, 6 – 21forecast option demand, 6 – 21master schedule options, 6 – 27model bill, 6 – 7, 6 – 15option class bill, 6 – 9option dependent routing steps, 6 – 15order processing cycle, 6 – 30planning bill, 6 – 6sales orders, 6 – 29shipping documents, 6 – 49standard bills, 6 – 10steps, 6 – 3
Plan, 3 – 26Planned order release date, calculation, 7 – 9Planning bills of material, 6 – 6Planning percent, 3 – 38Primary and alternate bills, 3 – 5Primary bills of material, 3 – 5Processes
Autocreating Configuration Items and FinalAssembly Orders, 6 – 45
Calculating Manufacturing Lead Times,8 – 17
Deactivating Configuration Items, 6 – 51Importing Bills and Routings, 2 – 42Rolling Up Cumulative Lead Times, 8 – 18
Processing lead time, 8 – 3calculation, 8 – 11
Product Families, 3 – 46assigning members, 3 – 47Setting Planning Percentages, 3 – 48
Production relief, 6 – 27Profile options, 2 – 43Purchase price variance account, 2 – 26
QQuantity
for bill components, 3 – 12minimum and maximum, 3 – 40of substitute item, 3 – 21
Quantity related, 3 – 19
Index – 15
Quarterly types, of workday calendar, 2 – 34
RRate or amount. See Usage rate or amountReceiving valuation account, 2 – 26Reference designator, 3 – 20Reference designators, creating, 3 – 19Reference Designators window, Creating
Reference Designators, 3 – 19Referencing Common Bills and Routings,
3 – 17Release offset days, 6 – 45Repetitive assembly scheduling, 7 – 4Repetitive scheduling, line, 7 – 4Reports
Bill of Material Comparison, 9 – 2Bill of Material Information, 9 – 3Bill of Material Loop, 9 – 5Bill of Material Structure, 9 – 7Bills of Material Parameters, 9 – 11Consolidated Bill of Material, 9 – 12Delete Items, 9 – 15Department, 9 – 18Department Class, 9 – 17Item Where Used, 9 – 19Resource, 9 – 21Resource Where Used, 9 – 22Routing, 9 – 23Standard Operation, 9 – 26Workday Exception Sets, 9 – 27
Required for revenue, 3 – 41Required to ship, 3 – 41Reservations
automatic, 6 – 47manual, 6 – 47
Resource, assigning to a department, 2 – 21Resource name, 2 – 24Resource type, 2 – 24Resource Costs window, Defining a Resource,
2 – 26Resource group, 2 – 21Resource load for planned orders, 7 – 6Resource name, 4 – 15
Resource Overhead Associations window,Defining a Resource, 2 – 27
Resource report, 9 – 21Resource unit cost, 2 – 26Resource usage, 4 – 5Resource Where Used report, 9 – 22Resources, collecting and assigning costs to,
2 – 25Resources WhereUsed window, Viewing
Resource Usage, 4 – 20Resources window
Assigning Operation Resources, 4 – 15Assigning Resources to a Department, 2 – 21Defining a Resource, 2 – 24
Revisionitem, 3 – 21when creating a bill, 3 – 11
Revisionsitem, 3 – 6routing, 3 – 6
Rolling Up Costs, 4 – 17Rolling Up Cumulative Lead Times, 8 – 18Routing
configuration item, 6 – 39operation sequence inheritance, 6 – 17operations, 4 – 4option dependent steps, 6 – 15outside operations, 4 – 7resource usage, 4 – 5
Routing Details window, Assigning aCompletion Subinventory and Locator,4 – 13
Routing report, 9 – 23Routing revision, 4 – 9
creating, 4 – 13Routing revisions, 3 – 6Routing Revisions window, Creating a Routing
Revision, 4 – 13Routings
copying, 3 – 14creating, 4 – 8importing. See Importing bills and routingsreferencing, 3 – 17switching between Primary and Alternate,
4 – 12

Index – 16
Routings windowCreating a Routing, 4 – 9Referencing Common Bills and Routings,
3 – 18Switching between Primary and Alternate,
4 – 12
SSales order demand, 6 – 22Sales order number, 6 – 45Sales orders
assemble–to–order, 6 – 29linking to existing configuration item, 6 – 44pick–to–order, 6 – 29
Schedule, when scheduling an operation,4 – 25
Schedulingdetailed, 7 – 3discrete jobs, 7 – 3dynamic lead time, 7 – 5operations, 7 – 3operations based on resources, 4 – 5repetitive assembly, 7 – 4repetitive line, 7 – 4creating a workday calendar, 2 – 28, 2 – 33
Sequence number, 4 – 15Share, resources across departments, 2 – 21Shift Calendar Dates window
Assigning Workday or Shift Exceptions,2 – 39
Reviewing the Workday Calendar, 2 – 40Shift number, when creating shifts, 2 – 38Shift number, to assign to resource, 2 – 22Shift times, start and stop, 2 – 38Shifts window
Assigning Resources to a Department, 2 – 22Creating Shifts and Shift Times, 2 – 38
Shipment relief, 6 – 27Shippable, 3 – 41Shipped number of days ago, 6 – 51Shipping documents, 6 – 49Simulation set, for capacity change, 2 – 22Sort option, 3 – 29
Special menu, B – 2Standard bills of material, 6 – 10Standard comments, 3 – 21Standard instructions, 3 – 21Standard operation code, 4 – 18Standard Operation report, 9 – 26Standard Operations window, Creating a
Standard Operation, 4 – 18Standard rate, 4 – 16
for charging jobs and schedules, 2 – 25Starting value, 3 – 20Subinventory. See Completion subinventory;
Supply subinventorySubstitute Components window, Assigning
Substitute Components, 3 – 20Substitute components, assigning, 3 – 20Substitute item, 3 – 20Supply locator, 3 – 39Supply subinventory, 3 – 39
TTotal lead time for discrete items, calculation,
7 – 8Total lead time for repetitive items, calculation,
7 – 8Type of delete entity, 5 – 3
UUpdate WIP, 3 – 25Usage rate or amount, 4 – 16Use up, 3 – 26Use–up item, 3 – 26
VValidation rules, bill and component, 3 – 43Variable lead time, calculation, 8 – 8, 8 – 10Variable lead time rate, calculation, 8 – 9Variance account, for costed resources, 2 – 26

Index – 17
Viewing Resource Usage, 4 – 20
WWorkday calendar, building, 2 – 41Workday Calendars window, Creating a
Workday Calendar, 2 – 34Workday Exception Sets report, 9 – 27
Workday Patterns window, Creating aWorkday Pattern, 2 – 36
YYield, 3 – 37
calculation, 3 – 37

Reader’s Comment Form
Oracle Bills of Material User’s Guide A75087–01
Oracle Corporation welcomes your comments and suggestions on the quality and usefulnessof this publication. Your input is an important part of the information we use for revision.
• Did you find any errors?
• Is the information clearly presented?
• Do you need more information? If so, where?
• Are the examples correct? Do you need more examples?
• What features did you like most about this manual? What did you like least about it?
If you find any errors or have any other suggestions for improvement, please indicate the topic, chapter,and page number below:
Please send your comments to:
Oracle Applications Documentation ManagerOracle Corporation500 Oracle ParkwayRedwood Shores, CA 94065 USAPhone: (415) 506–7000 Fax: (415) 506–7200
If you would like a reply, please give your name, address, and telephone number below:
Thank you for helping us improve our documentation.
