oracle e-business suite: punchout redirect configuration ...€¦ · oracle e-business suite:...
TRANSCRIPT
Copyrightt © 2017, Oracle and/or its affiliates Page 1
1.
2.
3.
4.
Oracle E-Business Suite: Punchout RedirectConfiguration Guide for Oracle Supplier Network
v1.0 | April 19, 2017
Table of Contents
For BuyersStep 1: Register on Oracle Supplier Network (OSuN)Step 2: Add Access to a PunchOut Supplier on OSuN Step 3: Secure E-Business Suite Connectivity to OSuNStep 4: Configure your E-Business Suite Environment
For SuppliersStep 1: Register on OSuNStep 1: Setup Punchout Configuration on OSuNStep 3: Authenticate Connection Between OSuN and Your Server
Appendix I: The internalsAppendix II: Data-Mapping on OSuN
Setting Up Data Mapping
For BuyersFollow these instructions in the order specified.
Step 1: Register on Oracle Supplier Network (OSuN)
If you do not have an account on (OSuN), your company to create an account. For detailed instructions,Oracle Supplier Network registerrefer to the - section titled "Company Registration". Note, you will be required to create a Service RequestTrading Partner User Guidethrough My Oracle Support to allow the OSuN administration team to validate your registration request (you will be required to includeyour Customer Support Identifier and the SR# with your registration details).
Login and create other users as you deem fit. It is recommended that you create at least 2 separate Administrator accounts to ensurepersonnel changes don't result in a loss of access to the platform. See section titled "User Management" in the Trading Partner UserGuide for detailed instructions.
Set up your E-Business Suite environment to communicate with OSuN. It is likely that this step can only be completed with the assistanceof the System Administrator for your EBS instance. Refer to Oracle Supplier Network Buyer's Guide to connecting Oracle E-Business
. You may need to configure XML Gateway and OXTA. Refer to the for more details. Suite XML Solution Guide
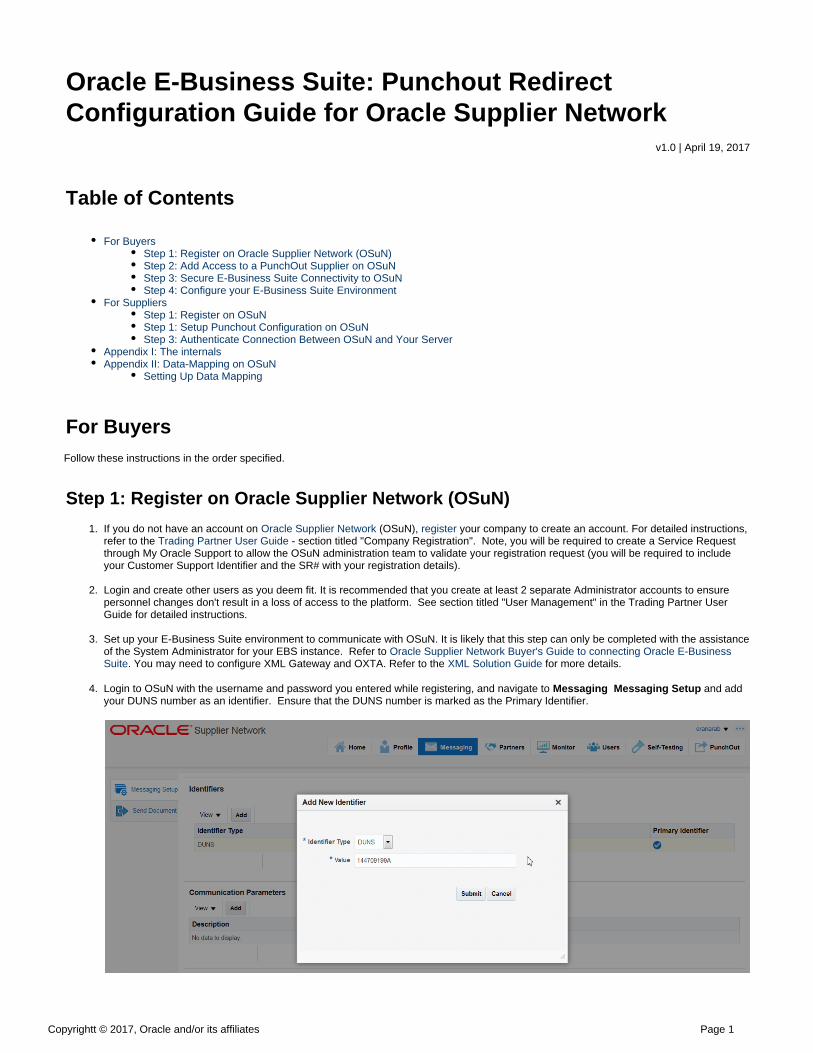
Login to OSuN with the username and password you entered while registering, and navigate to and addMessaging Messaging Setupyour DUNS number as an identifier. Ensure that the DUNS number is marked as the Primary Identifier.

Copyrightt © 2017, Oracle and/or its affiliates Page 2
1.
2.
3.
4.
5.
1.
2.
Step 2: Add Access to a PunchOut Supplier on OSuN
Ask your punchout suppliers to register on Oracle Supplier Network. You will need to provide each supplier with your exact TradingPartner Name and Alias to ensure that when they register, their request will be routed to you for approval.
Each time one of your supplier's registers their company details on OSuN, you will receive the approval request as an email from OSuN.Approve each supplier's registration request.
Once their account is active, each supplier will be required to configure their punchout details, setup connectivity and then test theconnection with OSuN. You will need to wait until each supplier has confirmed that they have completed these steps before you can'activate' their punchout connection.
Once each supplier has confirmed that they have configured and tested their connection to OSuN, click on aPunchOut Buyer Access,nd click on A pop-up window will open listing all available suppliers offering punchout information. Select one or moreAdd Punchout. and click .Add Access
The selected punchout will now be visible in the Available Punchout section.
Step 3: Secure E-Business Suite Connectivity to OSuN
This step can only be completed with the assistance of the System Adminstrator for your EBS instance. Access frhttps://osn.oracle.comom your browser. The instructions provided here are for Mozilla Firefox.
Click the padlock icon in the address bar and select More Information.
Copyrightt © 2017, Oracle and/or its affiliates Page 3
2.
3.
4.
5.
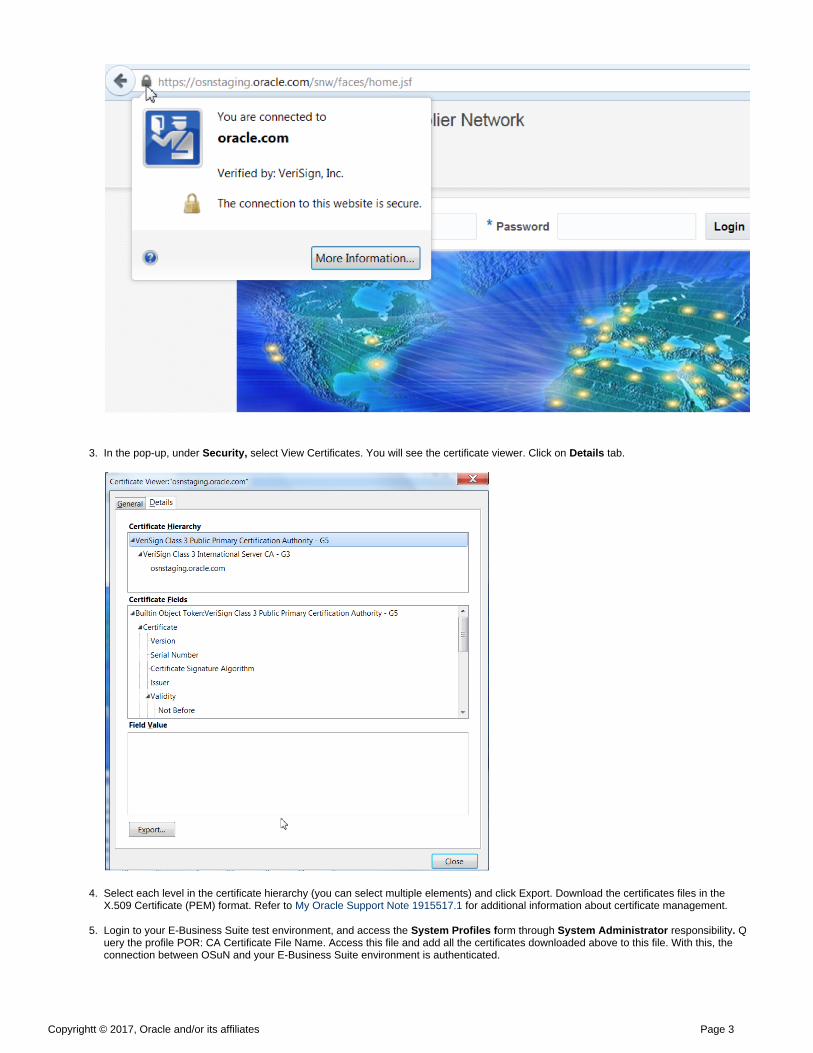
In the pop-up, under select View Certificates. You will see the certificate viewer. Click on tab.Security, Details
Select each level in the certificate hierarchy (you can select multiple elements) and click Export. Download the certificates files in theX.509 Certificate (PEM) format. Refer to for additional information about certificate management. My Oracle Support Note 1915517.1
Login to your E-Business Suite test environment, and access the orm through responsibility QSystem Profiles f System Administrator . uery the profile POR: CA Certificate File Name. Access this file and add all the certificates downloaded above to this file. With this, theconnection between OSuN and your E-Business Suite environment is authenticated.
Copyrightt © 2017, Oracle and/or its affiliates Page 4
1.
2.
3.
4.
5.
1.
2.
3.
Step 4: Configure your E-Business Suite Environment
This step can only be completed with the assistance of the System Adminstrator for your EBS instance. Login to your E-Business Suitetest environment that is connected to OSuN, navigate to eCommerce Gateway Setup Code Conversions Define Code Conversion
, and define your UOM and Item Category mappings. While making entries, define Key1 as (or give it another appropriateValues OSNname). For more information, refer to Appendix II at the end of this page, and get additional details at Oracle E-Commerce Gateway
. Implementation Manual
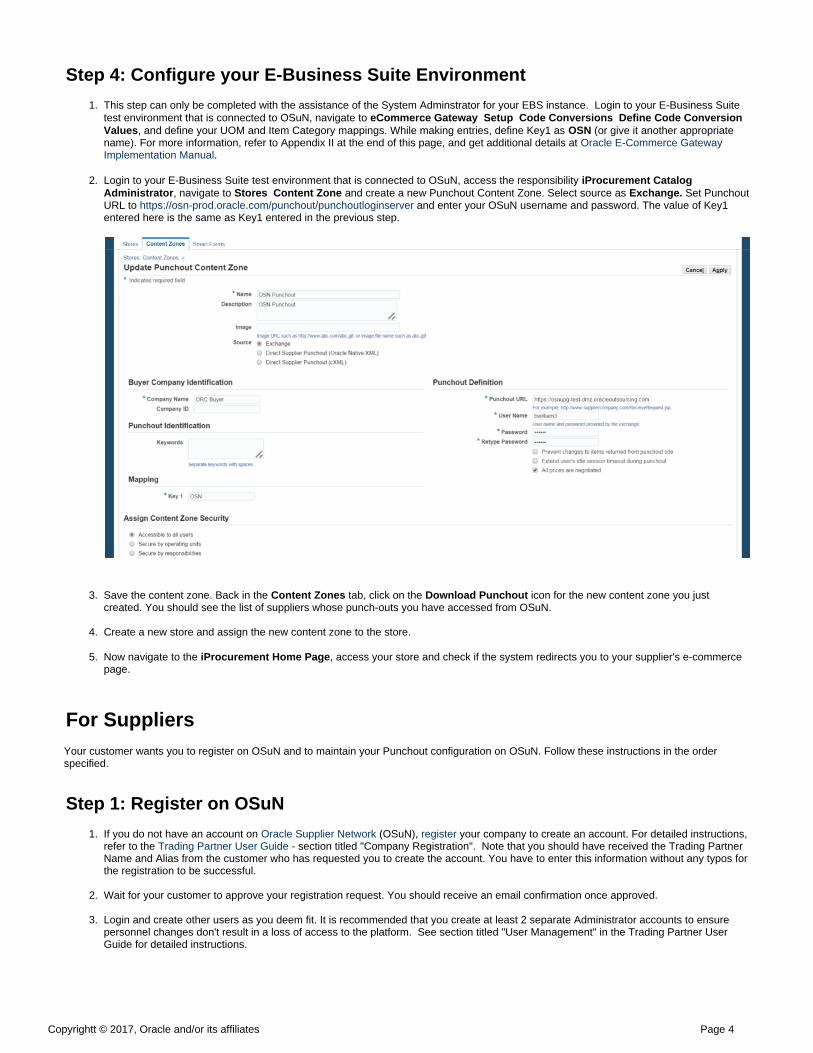
Login to your E-Business Suite test environment that is connected to OSuN, access the responsibility iProcurement Catalog, navigate to and create a new Punchout Content Zone. Select source as Set PunchoutAdministrator Stores Content Zone Exchange.
URL to and enter your OSuN username and password. The value of Key1https://osn-prod.oracle.com/punchout/punchoutloginserverentered here is the same as Key1 entered in the previous step.
Save the content zone. Back in the tab, click on the icon for the new content zone you justContent Zones Download Punchout created. You should see the list of suppliers whose punch-outs you have accessed from OSuN.
Create a new store and assign the new content zone to the store.
Now navigate to the , access your store and check if the system redirects you to your supplier's e-commerceiProcurement Home Pagepage.
For SuppliersYour customer wants you to register on OSuN and to maintain your Punchout configuration on OSuN. Follow these instructions in the orderspecified.
Step 1: Register on OSuN
If you do not have an account on (OSuN), your company to create an account. For detailed instructions,Oracle Supplier Network registerrefer to the - section titled "Company Registration". Note that you should have received the Trading PartnerTrading Partner User GuideName and Alias from the customer who has requested you to create the account. You have to enter this information without any typos forthe registration to be successful.
Wait for your customer to approve your registration request. You should receive an email confirmation once approved.
Login and create other users as you deem fit. It is recommended that you create at least 2 separate Administrator accounts to ensurepersonnel changes don't result in a loss of access to the platform. See section titled "User Management" in the Trading Partner UserGuide for detailed instructions.
Copyrightt © 2017, Oracle and/or its affiliates Page 5
1.
2.
1.
2. 3. 4.
1. 2.
3. 5.
Step 1: Setup Punchout Configuration on OSuN
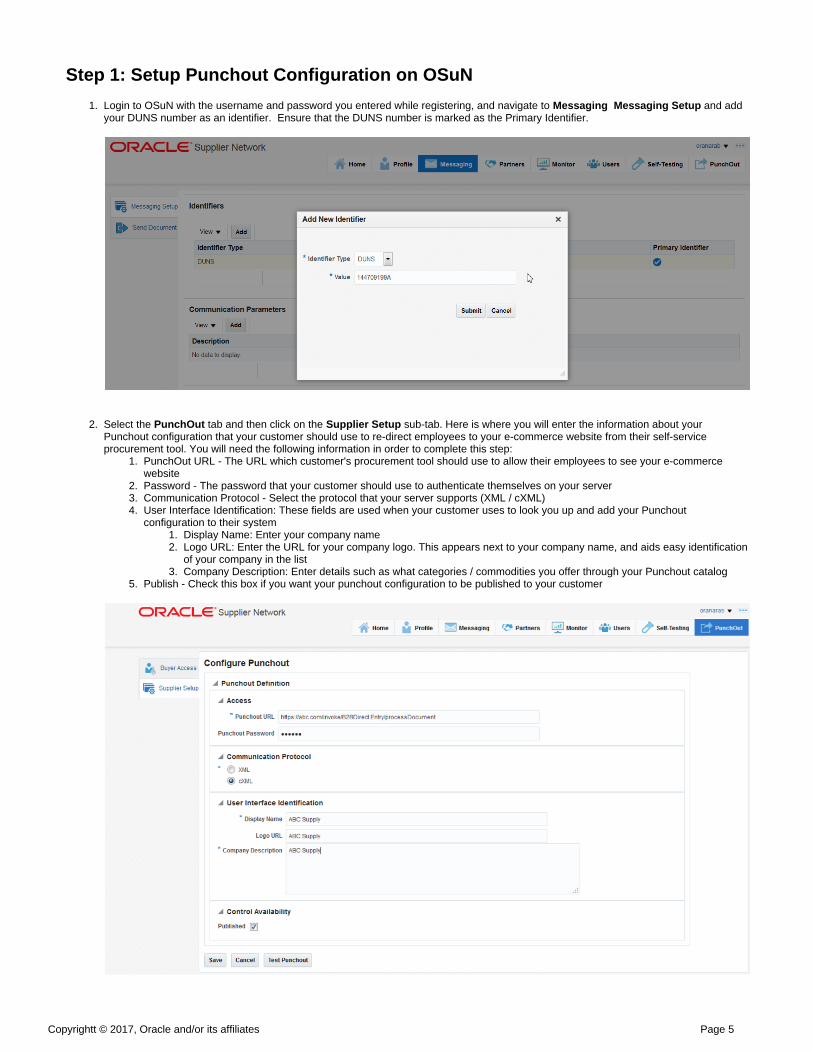
Login to OSuN with the username and password you entered while registering, and navigate to and addMessaging Messaging Setupyour DUNS number as an identifier. Ensure that the DUNS number is marked as the Primary Identifier.
Select the tab and then click on the sub-tab. Here is where you will enter the information about yourPunchOut Supplier SetupPunchout configuration that your customer should use to re-direct employees to your e-commerce website from their self-serviceprocurement tool. You will need the following information in order to complete this step:
PunchOut URL - The URL which customer's procurement tool should use to allow their employees to see your e-commercewebsitePassword - The password that your customer should use to authenticate themselves on your serverCommunication Protocol - Select the protocol that your server supports (XML / cXML)User Interface Identification: These fields are used when your customer uses to look you up and add your Punchoutconfiguration to their system
Display Name: Enter your company nameLogo URL: Enter the URL for your company logo. This appears next to your company name, and aids easy identificationof your company in the listCompany Description: Enter details such as what categories / commodities you offer through your Punchout catalog
Publish - Check this box if you want your punchout configuration to be published to your customer
Copyrightt © 2017, Oracle and/or its affiliates Page 6
2.
3.
4.
1.
1. 2. 3. 4. 5. 6.
Save and test your configuration by clicking . If your configuration is correct, you should receive a confirmation fromTest PunchoutOSuN that it was able to connect to your punchout server. If there OSuN is unable to connect to your server, an error message will bedisplayed. Correct the configuration and test it again until successful.
Write back to your customer that you have completed the setup. The customer will download your punchout information into their system,and attempt a punchout transaction to reach your e-commerce website.
Step 3: Authenticate Connection Between OSuN and Your Server
If your server is using active certificates from any of the supported certifying agencies, OSuN will be able to authenticate the connectionwith your server. There can be cases where OSuN is unable to authenticate your server's certificates. If this happens, please click on Co
link at the bottom of the page, and provide all necessary details that will help the OSuN team to add your certificate to the OSuNntact Uswallet.
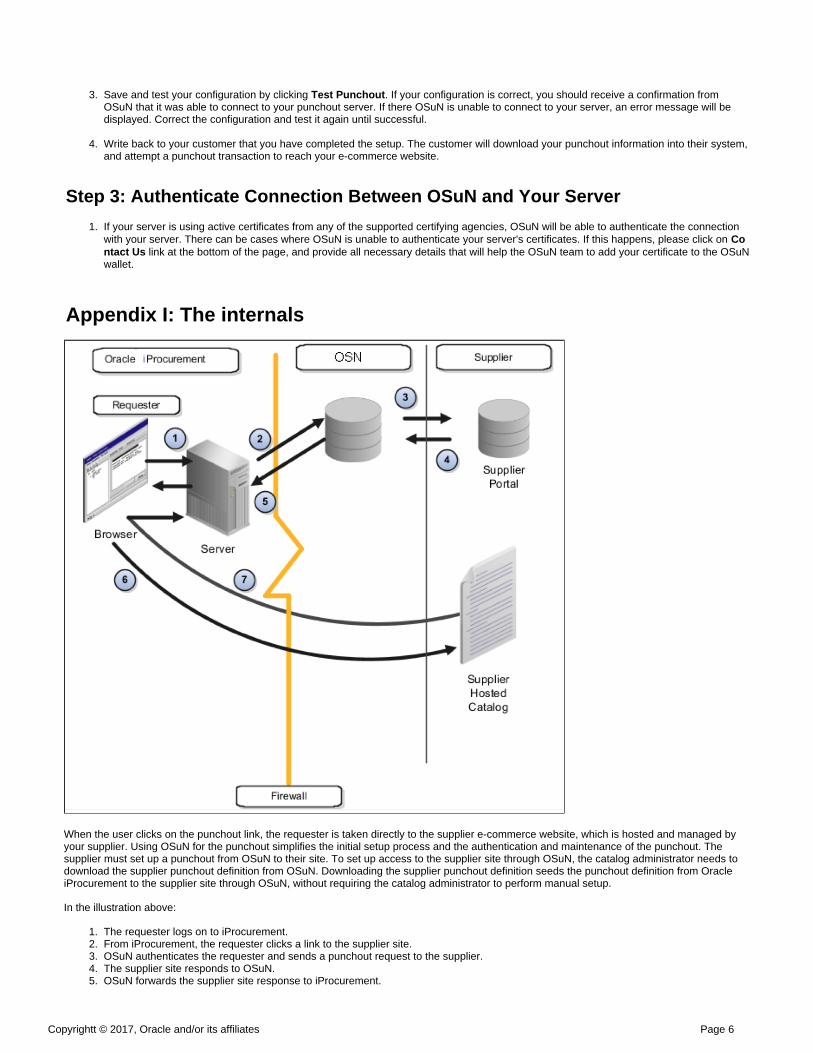
Appendix I: The internals
When the user clicks on the punchout link, the requester is taken directly to the supplier e-commerce website, which is hosted and managed byyour supplier. Using OSuN for the punchout simplifies the initial setup process and the authentication and maintenance of the punchout. Thesupplier must set up a punchout from OSuN to their site. To set up access to the supplier site through OSuN, the catalog administrator needs todownload the supplier punchout definition from OSuN. Downloading the supplier punchout definition seeds the punchout definition from OracleiProcurement to the supplier site through OSuN, without requiring the catalog administrator to perform manual setup.
In the illustration above:
The requester logs on to iProcurement.From iProcurement, the requester clicks a link to the supplier site.OSuN authenticates the requester and sends a punchout request to the supplier.The supplier site responds to OSuN.OSuN forwards the supplier site response to iProcurement.

Copyrightt © 2017, Oracle and/or its affiliates Page 7
6. 7. 8.
1. 2. 3.
1.
iProcurement redirects the requester’s browser to the supplier site for shopping.When the requester finishes shopping, the supplier site returns the shopping cart items to iProcurement via the requester’s browser.The requester completes the checkout process, and iProcurement processes the order
Appendix II: Data-Mapping on OSuNData mapping enables user to define the conversions between Buyer codes and Supplier codes. For example, a buyer uses the unit of measure(UOM) code ‘EA’ for Each. The supplier uses ‘E’. Customer can use either OSuN or iProcurement (specifically,E-Commerce Gateway) to mapthese codes.
Mapping can be performed with the following options:
OSuN looks for Supplier’s Data Mappings, if anyOSuN looks for Buyer’s Data Mappings, if anyAlternatively data mapping can be done in e-Commerce Gateway
Model Mapping Method Mapping Performed
Redirect Punchout – Punchout fromOracle iProcurement to Supplier-HostedCatalog via OSuN
Use OSuN to perform data mapping for codes UOM,Currency. You can use e-Commerce Gateway as well toperform the data mapping
OSuN performs the mapping beforethe cart is returned to iProcurementfrom Supplier Site.
The main considerations for buyers and suppliers implementing data mapping include the following:
Data mapping is an optional step. Perform the below steps for ‘Punchout to supplier-hosted catalog through OSuN.Use this step to map the codes that are used in OSuN to the codes that you use, if they are different.Data mapping allows OSuN to recognize codes that are passed to it by the supplier or to send codes to the buying organization that itssystem recognizes.For punchout, the buyer and supplier can use OSuN to map the following codes:
Currency codesUnit of measurement (UOM) codes
If you perform no mapping on OSuN, the value is passed as is from OSuN to the buying organization’s system. The buying organizationmay have set up data mapping in its system.It is important to decide on the data mapping type that buyers and suppliers want to use. Decide which data mapping the buyer and thesupplier will need to do.
Setting Up Data Mapping
Login to OSuN and navigate to . Review any mapping previously created for Currency and Unit of Measure byPunchOut Data Mappingselecting the appropriate Mapping Type in the drop-down. If you wish to make changes, you can do so.

Copyrightt © 2017, Oracle and/or its affiliates Page 8
1.
1. 2.
2.
3.
For example, select as the . You will see the UOM Description and the OSuN standard. Unit of Measure Mapping TypeIf you are a supplier, enter your company standard UOM against OSuN Standard in column My Company to OSNIf you are a buyer, enter your company standard UOM against OSuN Standard in columnOSN to My Company
Alternatively, you can export existing OSuN mapping data to a spreadsheet. Download the spreadsheet, make any changes, save thespreadsheet and uploaded it back. Review the imported data-mapping.
Review your work and save the changes.