oracle® hyperion public sector planning and … 1. about public sector ... 23 how public sector...
TRANSCRIPT

Oracle® Hyperion Public Sector Planning and Budgeting
User's Guide
Release 11.1.2.4

Public Sector Planning and Budgeting User's Guide, 11.1.2.4
Copyright © 2008, 2015, Oracle and/or its affiliates. All rights reserved.
Authors: EPM Information Development Team
This software and related documentation are provided under a license agreement containing restrictions on use anddisclosure and are protected by intellectual property laws. Except as expressly permitted in your license agreement orallowed by law, you may not use, copy, reproduce, translate, broadcast, modify, license, transmit, distribute, exhibit,perform, publish, or display any part, in any form, or by any means. Reverse engineering, disassembly, or decompilationof this software, unless required by law for interoperability, is prohibited.
The information contained herein is subject to change without notice and is not warranted to be error-free. If you findany errors, please report them to us in writing.
If this is software or related documentation that is delivered to the U.S. Government or anyone licensing it on behalf ofthe U.S. Government, then the following notice is applicable:
U.S. GOVERNMENT END USERS:
Oracle programs, including any operating system, integrated software, any programs installed on the hardware, and/ordocumentation, delivered to U.S. Government end users are "commercial computer software" pursuant to the applicableFederal Acquisition Regulation and agency-specific supplemental regulations. As such, use, duplication, disclosure,modification, and adaptation of the programs, including any operating system, integrated software, any programs installedon the hardware, and/or documentation, shall be subject to license terms and license restrictions applicable to the programs.No other rights are granted to the U.S. Government.
This software or hardware is developed for general use in a variety of information management applications. It is notdeveloped or intended for use in any inherently dangerous applications, including applications that may create a risk ofpersonal injury. If you use this software or hardware in dangerous applications, then you shall be responsible to take allappropriate fail-safe, backup, redundancy, and other measures to ensure its safe use. Oracle Corporation and its affiliatesdisclaim any liability for any damages caused by use of this software or hardware in dangerous applications.
Oracle and Java are registered trademarks of Oracle and/or its affiliates. Other names may be trademarks of their respectiveowners.
Intel and Intel Xeon are trademarks or registered trademarks of Intel Corporation. All SPARC trademarks are used underlicense and are trademarks or registered trademarks of SPARC International, Inc. AMD, Opteron, the AMD logo, and theAMD Opteron logo are trademarks or registered trademarks of Advanced Micro Devices. UNIX is a registered trademarkof The Open Group.
This software or hardware and documentation may provide access to or information about content, products, and servicesfrom third parties. Oracle Corporation and its affiliates are not responsible for and expressly disclaim all warranties of anykind with respect to third-party content, products, and services unless otherwise set forth in an applicable agreementbetween you and Oracle. Oracle Corporation and its affiliates will not be responsible for any loss, costs, or damages incurreddue to your access to or use of third-party content, products, or services, except as set forth in an applicable agreementbetween you and Oracle.

Contents
Documentation Accessibility . . . . . . . . . . . . . . . . . . . . . . . . . . . . . . . . . . . . . . . . . . . . . . . . . . . . . . . . . . 17
Documentation Feedback . . . . . . . . . . . . . . . . . . . . . . . . . . . . . . . . . . . . . . . . . . . . . . . . . . . . . . . . . . . . 19
Part I. Getting Started . . . . . . . . . . . . . . . . . . . . . . . . . . . . . . . . . . . . . . . . . . . . . . . . . . . . . . . . . . . . . . 21
Chapter 1. About Public Sector Planning and Budgeting . . . . . . . . . . . . . . . . . . . . . . . . . . . . . . . . . . . . . . . 23
How Public Sector Planning and Budgeting Will Help You . . . . . . . . . . . . . . . . . . . . . . . 23
Integration With Your Source System . . . . . . . . . . . . . . . . . . . . . . . . . . . . . . . . . . . 24
General Ledger and HRMS . . . . . . . . . . . . . . . . . . . . . . . . . . . . . . . . . . . . . . . . 24
PeopleSoft Financials and Commitment Control . . . . . . . . . . . . . . . . . . . . . . . . 25
Support for a Variety of Budgeting Approaches . . . . . . . . . . . . . . . . . . . . . . . . . . . . . 25
The Basics of the Budget Process . . . . . . . . . . . . . . . . . . . . . . . . . . . . . . . . . . . . . . . . . . 26
Building a Budget: Components and Concepts . . . . . . . . . . . . . . . . . . . . . . . . . . . . . . . . 27
Plan Types . . . . . . . . . . . . . . . . . . . . . . . . . . . . . . . . . . . . . . . . . . . . . . . . . . . . . . . 27
About Configuring the Decision Package Reporting Plan Type . . . . . . . . . . . . . . . . . 28
Configuration Options . . . . . . . . . . . . . . . . . . . . . . . . . . . . . . . . . . . . . . . . . . . . . . 28
Employees, Positions, and Jobs . . . . . . . . . . . . . . . . . . . . . . . . . . . . . . . . . . . . . . . . 28
How Positions and Jobs Differ . . . . . . . . . . . . . . . . . . . . . . . . . . . . . . . . . . . . . . . . . 29
FTE, Headcount, Overtime, and Vacancy Calculations . . . . . . . . . . . . . . . . . . . . . . . 29
FTE . . . . . . . . . . . . . . . . . . . . . . . . . . . . . . . . . . . . . . . . . . . . . . . . . . . . . . . . . 29
Short-Term Disability and Maternity Leave . . . . . . . . . . . . . . . . . . . . . . . . . . . . 30
Sample Case: Maternity Leave . . . . . . . . . . . . . . . . . . . . . . . . . . . . . . . . . . . . . . 30
FTE and Long Term Disability Leave . . . . . . . . . . . . . . . . . . . . . . . . . . . . . . . . . 31
Overtime . . . . . . . . . . . . . . . . . . . . . . . . . . . . . . . . . . . . . . . . . . . . . . . . . . . . . 31
Headcount . . . . . . . . . . . . . . . . . . . . . . . . . . . . . . . . . . . . . . . . . . . . . . . . . . . 31
Vacant Positions . . . . . . . . . . . . . . . . . . . . . . . . . . . . . . . . . . . . . . . . . . . . . . . . 32
Shared Positions . . . . . . . . . . . . . . . . . . . . . . . . . . . . . . . . . . . . . . . . . . . . . . . . 32
Pooled Positions . . . . . . . . . . . . . . . . . . . . . . . . . . . . . . . . . . . . . . . . . . . . . . . . 32
Incumbent Positions . . . . . . . . . . . . . . . . . . . . . . . . . . . . . . . . . . . . . . . . . . . . . 32
Compensation Funding Across Departments . . . . . . . . . . . . . . . . . . . . . . . . . . . 33
Additional Earnings . . . . . . . . . . . . . . . . . . . . . . . . . . . . . . . . . . . . . . . . . . . . . 33
Decision Packages and Budget Requests . . . . . . . . . . . . . . . . . . . . . . . . . . . . . . . . . . 33
iii

The Fiscal Year . . . . . . . . . . . . . . . . . . . . . . . . . . . . . . . . . . . . . . . . . . . . . . . . . . . . 34
Provided Dimensions . . . . . . . . . . . . . . . . . . . . . . . . . . . . . . . . . . . . . . . . . . . . . . . 34
Important Considerations . . . . . . . . . . . . . . . . . . . . . . . . . . . . . . . . . . . . . . . . . 34
Scenario and Version . . . . . . . . . . . . . . . . . . . . . . . . . . . . . . . . . . . . . . . . . . . . 35
Element . . . . . . . . . . . . . . . . . . . . . . . . . . . . . . . . . . . . . . . . . . . . . . . . . . . . . . 35
Budget Item . . . . . . . . . . . . . . . . . . . . . . . . . . . . . . . . . . . . . . . . . . . . . . . . . . . 36
Entity . . . . . . . . . . . . . . . . . . . . . . . . . . . . . . . . . . . . . . . . . . . . . . . . . . . . . . . . 36
Account . . . . . . . . . . . . . . . . . . . . . . . . . . . . . . . . . . . . . . . . . . . . . . . . . . . . . . 37
Currency . . . . . . . . . . . . . . . . . . . . . . . . . . . . . . . . . . . . . . . . . . . . . . . . . . . . . 37
Dimensions in Decision Package-Enabled Applications . . . . . . . . . . . . . . . . . . . . 38
Additional Dimensions . . . . . . . . . . . . . . . . . . . . . . . . . . . . . . . . . . . . . . . . . . . 38
Predefined Accounts . . . . . . . . . . . . . . . . . . . . . . . . . . . . . . . . . . . . . . . . . . . . . . . . 40
User Defined Dimensions . . . . . . . . . . . . . . . . . . . . . . . . . . . . . . . . . . . . . . . . . . . . 40
Smart Lists . . . . . . . . . . . . . . . . . . . . . . . . . . . . . . . . . . . . . . . . . . . . . . . . . . . . . . . 41
Task Lists . . . . . . . . . . . . . . . . . . . . . . . . . . . . . . . . . . . . . . . . . . . . . . . . . . . . . . . . 41
Tasks Lists in Decision Package-Enabled Applications . . . . . . . . . . . . . . . . . . . . . . . . 41
Annotations, Comments, and Attachments . . . . . . . . . . . . . . . . . . . . . . . . . . . . . . . . . . 42
Requirements . . . . . . . . . . . . . . . . . . . . . . . . . . . . . . . . . . . . . . . . . . . . . . . . . . . . . . . . 42
Assumptions . . . . . . . . . . . . . . . . . . . . . . . . . . . . . . . . . . . . . . . . . . . . . . . . . . . . . . . . 42
Accessibility . . . . . . . . . . . . . . . . . . . . . . . . . . . . . . . . . . . . . . . . . . . . . . . . . . . . . . . . . 42
Chapter 2. Understanding What Tasks to Perform, and When . . . . . . . . . . . . . . . . . . . . . . . . . . . . . . . . . . . . 43
Initial Implementation Tasks . . . . . . . . . . . . . . . . . . . . . . . . . . . . . . . . . . . . . . . . . . . . . 43
Verify Your Artifacts . . . . . . . . . . . . . . . . . . . . . . . . . . . . . . . . . . . . . . . . . . . . . . . 44
Prepare to Load Data . . . . . . . . . . . . . . . . . . . . . . . . . . . . . . . . . . . . . . . . . . . . . . . 44
Configure the Compensation and Line Item Budget . . . . . . . . . . . . . . . . . . . . . . . . . 45
Secure Your Data . . . . . . . . . . . . . . . . . . . . . . . . . . . . . . . . . . . . . . . . . . . . . . . . . . 45
Administration and Maintenance Tasks . . . . . . . . . . . . . . . . . . . . . . . . . . . . . . . . . . . . . 45
Planner Tasks . . . . . . . . . . . . . . . . . . . . . . . . . . . . . . . . . . . . . . . . . . . . . . . . . . . . . . . . 46
Part II. For Administrators . . . . . . . . . . . . . . . . . . . . . . . . . . . . . . . . . . . . . . . . . . . . . . . . . . . . . . . . . . . . 47
Chapter 3. Creating and Preparing Applications . . . . . . . . . . . . . . . . . . . . . . . . . . . . . . . . . . . . . . . . . . . . . 49
About Creating Applications . . . . . . . . . . . . . . . . . . . . . . . . . . . . . . . . . . . . . . . . . . . . . 49
Creating Applications Using Planning Application Administration . . . . . . . . . . . . . . . . . 49
Preparing Applications . . . . . . . . . . . . . . . . . . . . . . . . . . . . . . . . . . . . . . . . . . . . . . . . . 50
Best Practices . . . . . . . . . . . . . . . . . . . . . . . . . . . . . . . . . . . . . . . . . . . . . . . . . . . . . 50
Configuring and Customizing Applications . . . . . . . . . . . . . . . . . . . . . . . . . . . . 50
Loading Data . . . . . . . . . . . . . . . . . . . . . . . . . . . . . . . . . . . . . . . . . . . . . . . . . . 51
Human Capital Budgeting . . . . . . . . . . . . . . . . . . . . . . . . . . . . . . . . . . . . . . . . 51
iv
Configuring Dimensions . . . . . . . . . . . . . . . . . . . . . . . . . . . . . . . . . . . . . . . . . . . . . 51
Entity . . . . . . . . . . . . . . . . . . . . . . . . . . . . . . . . . . . . . . . . . . . . . . . . . . . . . . . 52
Budget Item . . . . . . . . . . . . . . . . . . . . . . . . . . . . . . . . . . . . . . . . . . . . . . . . . . . 52
Account and Element . . . . . . . . . . . . . . . . . . . . . . . . . . . . . . . . . . . . . . . . . . . . 52
Scenario . . . . . . . . . . . . . . . . . . . . . . . . . . . . . . . . . . . . . . . . . . . . . . . . . . . . . 53
Version . . . . . . . . . . . . . . . . . . . . . . . . . . . . . . . . . . . . . . . . . . . . . . . . . . . . . . 53
Enabling the Right Plan Type for Dimensions . . . . . . . . . . . . . . . . . . . . . . . . . . . 53
Making Member Names Intuitive and Descriptive . . . . . . . . . . . . . . . . . . . . . . . 54
Why You Shouldn't Change the Dimensional Order . . . . . . . . . . . . . . . . . . . . . . 54
Updating Rules After Renaming or Creating Dimensions . . . . . . . . . . . . . . . . . . 54
Verifying Artifacts and Create Planning Units . . . . . . . . . . . . . . . . . . . . . . . . . . . . . . 54
Defining Exchange Rates . . . . . . . . . . . . . . . . . . . . . . . . . . . . . . . . . . . . . . . . . . . . . 55
Defining Substitution Variables . . . . . . . . . . . . . . . . . . . . . . . . . . . . . . . . . . . . . . . . 55
Specify Data Load Settings . . . . . . . . . . . . . . . . . . . . . . . . . . . . . . . . . . . . . . . . . . . . 55
Set Up Smart Lists . . . . . . . . . . . . . . . . . . . . . . . . . . . . . . . . . . . . . . . . . . . . . . . . . . 56
Defining Smart Lists . . . . . . . . . . . . . . . . . . . . . . . . . . . . . . . . . . . . . . . . . . . . . 56
Required Smart Lists . . . . . . . . . . . . . . . . . . . . . . . . . . . . . . . . . . . . . . . . . . . . 57
Additional Smart Lists . . . . . . . . . . . . . . . . . . . . . . . . . . . . . . . . . . . . . . . . . . . . 57
Common Smart Lists . . . . . . . . . . . . . . . . . . . . . . . . . . . . . . . . . . . . . . . . . . . . 58
Verifying Smart Lists Before Loading Data . . . . . . . . . . . . . . . . . . . . . . . . . . . . . 60
Associating Smart Lists With Dimensions . . . . . . . . . . . . . . . . . . . . . . . . . . . . . . 60
Including New or Modified Smart List Entries in Essbase Reports . . . . . . . . . . . . 61
Securing Applications . . . . . . . . . . . . . . . . . . . . . . . . . . . . . . . . . . . . . . . . . . . . . . . 61
Securing Dimensions and Members . . . . . . . . . . . . . . . . . . . . . . . . . . . . . . . . . . 62
Securing Forms . . . . . . . . . . . . . . . . . . . . . . . . . . . . . . . . . . . . . . . . . . . . . . . . . 64
Securing Task Lists . . . . . . . . . . . . . . . . . . . . . . . . . . . . . . . . . . . . . . . . . . . . . . 64
Securing Business Rules . . . . . . . . . . . . . . . . . . . . . . . . . . . . . . . . . . . . . . . . . . . 64
Loading General Ledger and HRMS Metadata and Data . . . . . . . . . . . . . . . . . . . . . . 65
Using FDMEE . . . . . . . . . . . . . . . . . . . . . . . . . . . . . . . . . . . . . . . . . . . . . . . . . 65
Using the Outline Load Utility . . . . . . . . . . . . . . . . . . . . . . . . . . . . . . . . . . . . . 66
Using Enterprise Performance Management Architect . . . . . . . . . . . . . . . . . . . . . 66
Requirements and Guidelines . . . . . . . . . . . . . . . . . . . . . . . . . . . . . . . . . . . . . . 67
Customizing Provided Components . . . . . . . . . . . . . . . . . . . . . . . . . . . . . . . . . . . . . . . . 67
Business Rules . . . . . . . . . . . . . . . . . . . . . . . . . . . . . . . . . . . . . . . . . . . . . . . . . . . . 67
Task Lists . . . . . . . . . . . . . . . . . . . . . . . . . . . . . . . . . . . . . . . . . . . . . . . . . . . . . . . . 68
Forms That Use Formulas . . . . . . . . . . . . . . . . . . . . . . . . . . . . . . . . . . . . . . . . . . . . 68
Forms That Use Validation Rules . . . . . . . . . . . . . . . . . . . . . . . . . . . . . . . . . . . . . . . 69
Menus . . . . . . . . . . . . . . . . . . . . . . . . . . . . . . . . . . . . . . . . . . . . . . . . . . . . . . . . . . 69
v

Chapter 4. Using PeopleSoft Financials Commitment Control . . . . . . . . . . . . . . . . . . . . . . . . . . . . . . . . . . . 71
About the Integration . . . . . . . . . . . . . . . . . . . . . . . . . . . . . . . . . . . . . . . . . . . . . . . . . . 71
Budget Definitions . . . . . . . . . . . . . . . . . . . . . . . . . . . . . . . . . . . . . . . . . . . . . . . . . . . . 72
Parent and Child Budgets . . . . . . . . . . . . . . . . . . . . . . . . . . . . . . . . . . . . . . . . . . . . . . . 72
Periods and Calendars . . . . . . . . . . . . . . . . . . . . . . . . . . . . . . . . . . . . . . . . . . . . . . . . . . 73
Validations . . . . . . . . . . . . . . . . . . . . . . . . . . . . . . . . . . . . . . . . . . . . . . . . . . . . . . . . . . 73
Preparing to Integrate . . . . . . . . . . . . . . . . . . . . . . . . . . . . . . . . . . . . . . . . . . . . . . . . . 74
Assumptions . . . . . . . . . . . . . . . . . . . . . . . . . . . . . . . . . . . . . . . . . . . . . . . . . . . . . 74
Requirements and Guidelines . . . . . . . . . . . . . . . . . . . . . . . . . . . . . . . . . . . . . . . . . 74
PeopleSoft Requirements . . . . . . . . . . . . . . . . . . . . . . . . . . . . . . . . . . . . . . . . . . 74
Planning Requirements . . . . . . . . . . . . . . . . . . . . . . . . . . . . . . . . . . . . . . . . . . . 75
FDMEE Requirements . . . . . . . . . . . . . . . . . . . . . . . . . . . . . . . . . . . . . . . . . . . 75
Performing Validations and Writing Back Data . . . . . . . . . . . . . . . . . . . . . . . . . . . . . . . . 76
Defining the Integration . . . . . . . . . . . . . . . . . . . . . . . . . . . . . . . . . . . . . . . . . . . . . . . . 77
Register the Source System and Your Application . . . . . . . . . . . . . . . . . . . . . . . . . . . 77
Define an Import Format, the Location, and Run Data Load Rules . . . . . . . . . . . . . . . 77
Specify Mappings in Planning . . . . . . . . . . . . . . . . . . . . . . . . . . . . . . . . . . . . . . . . . 78
Specify the Writing-Back . . . . . . . . . . . . . . . . . . . . . . . . . . . . . . . . . . . . . . . . . . . . . 78
Chapter 5. Configuring the Line Item Budget . . . . . . . . . . . . . . . . . . . . . . . . . . . . . . . . . . . . . . . . . . . . . . . 79
About Linking Compensation Budget and Line Item Budgets . . . . . . . . . . . . . . . . . . . . . 79
Scenario 1: One-to-One Mapping Between Segments or Chart Fields andDimensions . . . . . . . . . . . . . . . . . . . . . . . . . . . . . . . . . . . . . . . . . . . . . . . . . . . . . . 80
Define Entity Dimensions and Members . . . . . . . . . . . . . . . . . . . . . . . . . . . . . . 80
Define User Defined Dimensions and Members . . . . . . . . . . . . . . . . . . . . . . . . . 80
Add or Modify Smart Lists . . . . . . . . . . . . . . . . . . . . . . . . . . . . . . . . . . . . . . . . . 81
Add Segment or Chart Field Members to the HCP Plan . . . . . . . . . . . . . . . . . . . 81
Scenario 2: Combining General Ledger Segments or Chart Fields in a Dimension . . . . 82
Populating the Line Item Budget . . . . . . . . . . . . . . . . . . . . . . . . . . . . . . . . . . . . . . . . . . 83
Linking HCP Compensation Data to Plan 1, 2, or 3 . . . . . . . . . . . . . . . . . . . . . . . . . . 83
Sample HCP Mappings . . . . . . . . . . . . . . . . . . . . . . . . . . . . . . . . . . . . . . . . . . . 84
Map the POV . . . . . . . . . . . . . . . . . . . . . . . . . . . . . . . . . . . . . . . . . . . . . . . . . . 85
Pushing Compensation And Operational Expense Data to Reporting Applications . . . 85
Creating the HCP Dimension Mappings . . . . . . . . . . . . . . . . . . . . . . . . . . . . . . . 86
Pushing Data to Reporting Applications . . . . . . . . . . . . . . . . . . . . . . . . . . . . . . . 92
Chapter 6. Setting Up Compensation Budgets . . . . . . . . . . . . . . . . . . . . . . . . . . . . . . . . . . . . . . . . . . . . . . 93
After Loading Source Data . . . . . . . . . . . . . . . . . . . . . . . . . . . . . . . . . . . . . . . . . . . . . . . 93
Before Creating Compensation Budgets . . . . . . . . . . . . . . . . . . . . . . . . . . . . . . . . . . . . . 94
Managing Salary Grades . . . . . . . . . . . . . . . . . . . . . . . . . . . . . . . . . . . . . . . . . . . . . . . . 95
vi

About Salary Grades . . . . . . . . . . . . . . . . . . . . . . . . . . . . . . . . . . . . . . . . . . . . . . . . 95
Differentiating Between Salary Steps and Sequences . . . . . . . . . . . . . . . . . . . . . . . . . 95
Defining Salary Grades . . . . . . . . . . . . . . . . . . . . . . . . . . . . . . . . . . . . . . . . . . . . . . 96
Specifying Step-based Salary Grades . . . . . . . . . . . . . . . . . . . . . . . . . . . . . . . . . 97
Specifying Rate-Based Grades . . . . . . . . . . . . . . . . . . . . . . . . . . . . . . . . . . . . . . 97
Specifying Value-based Salary Grades . . . . . . . . . . . . . . . . . . . . . . . . . . . . . . . . . 98
About Modifying Salary Grades . . . . . . . . . . . . . . . . . . . . . . . . . . . . . . . . . . . . . . . . 98
Synchronizing Salary Properties . . . . . . . . . . . . . . . . . . . . . . . . . . . . . . . . . . . . . . . . 99
Simultaneously Adjusting Grade Steps or Sequences . . . . . . . . . . . . . . . . . . . . . . . . . 99
About Specifying Annual Salary Spreads . . . . . . . . . . . . . . . . . . . . . . . . . . . . . . . . . 100
Salary Spread Options . . . . . . . . . . . . . . . . . . . . . . . . . . . . . . . . . . . . . . . . . . . . . . 101
Using a 52-Week Fiscal Year . . . . . . . . . . . . . . . . . . . . . . . . . . . . . . . . . . . . . . . . . 101
Managing Other Compensation Elements . . . . . . . . . . . . . . . . . . . . . . . . . . . . . . . . . . 102
Defining Other Compensation Elements . . . . . . . . . . . . . . . . . . . . . . . . . . . . . . . . 102
Element Definition Settings . . . . . . . . . . . . . . . . . . . . . . . . . . . . . . . . . . . . . . . 103
Adding Compensation Element Options . . . . . . . . . . . . . . . . . . . . . . . . . . . . . 104
Defining Overtime . . . . . . . . . . . . . . . . . . . . . . . . . . . . . . . . . . . . . . . . . . . . . 105
Modifying Compensation Elements and Options . . . . . . . . . . . . . . . . . . . . . . . . . . 107
Updating Multiple Compensation Options . . . . . . . . . . . . . . . . . . . . . . . . . . . . . . 107
About Synchronizing Compensation Element Properties . . . . . . . . . . . . . . . . . . . . . 108
Synchronizing Compensation Element Properties . . . . . . . . . . . . . . . . . . . . . . . . . . 108
About Processing Loaded HRMS Data . . . . . . . . . . . . . . . . . . . . . . . . . . . . . . . . . . . . . 108
Processing Loaded HRMS Data . . . . . . . . . . . . . . . . . . . . . . . . . . . . . . . . . . . . . . . . . . 109
Reviewing Loaded Position, Job, and Employee Data . . . . . . . . . . . . . . . . . . . . . . . . . . . 109
Reviewing Position and Employee Data . . . . . . . . . . . . . . . . . . . . . . . . . . . . . . . . . 109
Reviewing Job and Employee Data . . . . . . . . . . . . . . . . . . . . . . . . . . . . . . . . . . . . . 110
Reviewing Position-Only Data . . . . . . . . . . . . . . . . . . . . . . . . . . . . . . . . . . . . . . . . 111
About Updating Entity-Specific Positions and Employees . . . . . . . . . . . . . . . . . . . . . . . 111
Performing Mass Updates . . . . . . . . . . . . . . . . . . . . . . . . . . . . . . . . . . . . . . . . . . . . . . 112
Making Mass Updates . . . . . . . . . . . . . . . . . . . . . . . . . . . . . . . . . . . . . . . . . . . . . . . . . 112
Assigning or Overwriting Compensation Element and Allocation Defaults . . . . . . . . 113
Sample Mass Update . . . . . . . . . . . . . . . . . . . . . . . . . . . . . . . . . . . . . . . . . . . . . . . 114
Spreading Salary Expenses . . . . . . . . . . . . . . . . . . . . . . . . . . . . . . . . . . . . . . . . . . . 114
Updating FTE and Status after Defining the Compensation Calculation Period . . . . . . . 115
Updating FTE and Status Data . . . . . . . . . . . . . . . . . . . . . . . . . . . . . . . . . . . . . . . . . . . 115
Part III. Creating Compensation Budgets, Decision Packages, and Budget Requests . . . . . . . . . . . . . . . . . . 117
Chapter 7. Defining Salary, Compensation, and Allocation Defaults . . . . . . . . . . . . . . . . . . . . . . . . . . . . . . 119
How Defaults are Helpful . . . . . . . . . . . . . . . . . . . . . . . . . . . . . . . . . . . . . . . . . . . . . . 119
vii

Defining and Applying Entity-Specific Position Defaults . . . . . . . . . . . . . . . . . . . . . . . . 120
Specifying Salary Grade Defaults . . . . . . . . . . . . . . . . . . . . . . . . . . . . . . . . . . . . . . 120
Maintaining Compensation Elements Defaults . . . . . . . . . . . . . . . . . . . . . . . . . . . . 121
Adding Elements . . . . . . . . . . . . . . . . . . . . . . . . . . . . . . . . . . . . . . . . . . . . . . 121
Deleting Elements . . . . . . . . . . . . . . . . . . . . . . . . . . . . . . . . . . . . . . . . . . . . . 122
Maintaining Natural Account Defaults . . . . . . . . . . . . . . . . . . . . . . . . . . . . . . . . . 122
About Default Natural Accounts . . . . . . . . . . . . . . . . . . . . . . . . . . . . . . . . . . . 122
Specifying Natural Account Defaults . . . . . . . . . . . . . . . . . . . . . . . . . . . . . . . . 123
Maintaining Salary Allocation Defaults . . . . . . . . . . . . . . . . . . . . . . . . . . . . . . . . . . . . . 123
About Salary Allocations . . . . . . . . . . . . . . . . . . . . . . . . . . . . . . . . . . . . . . . . . . . . 123
About the Follows Salary Allocation Option . . . . . . . . . . . . . . . . . . . . . . . . . . . 124
Sample Allocations . . . . . . . . . . . . . . . . . . . . . . . . . . . . . . . . . . . . . . . . . . . . . 124
Allocation Guidelines . . . . . . . . . . . . . . . . . . . . . . . . . . . . . . . . . . . . . . . . . . . 128
Overwriting the Default GL Accounts to Which Salary Expenses are Allocated . . . . . 128
Correcting Overlapping Allocations . . . . . . . . . . . . . . . . . . . . . . . . . . . . . . . . . . . . 129
Mass Adjusting Compensation Expenses . . . . . . . . . . . . . . . . . . . . . . . . . . . . . . . . . . . 129
Making Mass Adjustments . . . . . . . . . . . . . . . . . . . . . . . . . . . . . . . . . . . . . . . . . . . . . . 130
Using Increments . . . . . . . . . . . . . . . . . . . . . . . . . . . . . . . . . . . . . . . . . . . . . . . . . . . . 131
About Increments . . . . . . . . . . . . . . . . . . . . . . . . . . . . . . . . . . . . . . . . . . . . . . . . . 131
Sample Increment for an Employee . . . . . . . . . . . . . . . . . . . . . . . . . . . . . . . . . . . . 131
Important Notes . . . . . . . . . . . . . . . . . . . . . . . . . . . . . . . . . . . . . . . . . . . . . . . . . . 132
Performing Compensation Increments . . . . . . . . . . . . . . . . . . . . . . . . . . . . . . . . . . 132
Step 1 . . . . . . . . . . . . . . . . . . . . . . . . . . . . . . . . . . . . . . . . . . . . . . . . . . . . . . . 132
Step 2 . . . . . . . . . . . . . . . . . . . . . . . . . . . . . . . . . . . . . . . . . . . . . . . . . . . . . . . 133
About Salary Increments . . . . . . . . . . . . . . . . . . . . . . . . . . . . . . . . . . . . . . . . . . . . 134
Performing Salary Grade Step Increments . . . . . . . . . . . . . . . . . . . . . . . . . . . . . . . . 134
Step 1 . . . . . . . . . . . . . . . . . . . . . . . . . . . . . . . . . . . . . . . . . . . . . . . . . . . . . . . 134
Step 2 . . . . . . . . . . . . . . . . . . . . . . . . . . . . . . . . . . . . . . . . . . . . . . . . . . . . . . . 134
Performing Salary Grade Increments . . . . . . . . . . . . . . . . . . . . . . . . . . . . . . . . . . . 135
Step 1 . . . . . . . . . . . . . . . . . . . . . . . . . . . . . . . . . . . . . . . . . . . . . . . . . . . . . . . 136
Step 2 . . . . . . . . . . . . . . . . . . . . . . . . . . . . . . . . . . . . . . . . . . . . . . . . . . . . . . . 136
Sample Increments . . . . . . . . . . . . . . . . . . . . . . . . . . . . . . . . . . . . . . . . . . . . . . . . 137
Multiple Elements Associated With the Same Rate-Based Salary Grade . . . . . . . . 137
Multiple Elements Associated With the Same Salary Grade Step . . . . . . . . . . . . . 139
Defining Custom Numbers of Workdays and Paydays . . . . . . . . . . . . . . . . . . . . . . . . . . 141
Chapter 8. Working with Human Capital Compensation Budgets . . . . . . . . . . . . . . . . . . . . . . . . . . . . . . . . 143
Recommended Task Flow . . . . . . . . . . . . . . . . . . . . . . . . . . . . . . . . . . . . . . . . . . . . . . 143
Requirements . . . . . . . . . . . . . . . . . . . . . . . . . . . . . . . . . . . . . . . . . . . . . . . . . . . . . . . 144
viii

About Using Recurring Budgets . . . . . . . . . . . . . . . . . . . . . . . . . . . . . . . . . . . . . . . . . . 144
Maintaining Jobs . . . . . . . . . . . . . . . . . . . . . . . . . . . . . . . . . . . . . . . . . . . . . . . . . . . . 145
Creating Jobs . . . . . . . . . . . . . . . . . . . . . . . . . . . . . . . . . . . . . . . . . . . . . . . . . . . . 145
Activating Jobs . . . . . . . . . . . . . . . . . . . . . . . . . . . . . . . . . . . . . . . . . . . . . . . . . . . 145
Viewing Job Details . . . . . . . . . . . . . . . . . . . . . . . . . . . . . . . . . . . . . . . . . . . . . . . . 146
Before Specifying Job Compensation . . . . . . . . . . . . . . . . . . . . . . . . . . . . . . . . . . . 146
Maintaining Job Compensation Details . . . . . . . . . . . . . . . . . . . . . . . . . . . . . . . . . 146
Maintaining General Job Information . . . . . . . . . . . . . . . . . . . . . . . . . . . . . . . 146
Viewing Job Status . . . . . . . . . . . . . . . . . . . . . . . . . . . . . . . . . . . . . . . . . . . . . 147
Viewing Employees Assigned to Jobs and Employee Details . . . . . . . . . . . . . . . . 147
Maintaining Job Salary Grades . . . . . . . . . . . . . . . . . . . . . . . . . . . . . . . . . . . . . 148
Maintaining Additional Earnings for Jobs . . . . . . . . . . . . . . . . . . . . . . . . . . . . . 149
Maintaining Job Benefits . . . . . . . . . . . . . . . . . . . . . . . . . . . . . . . . . . . . . . . . . 149
Maintaining Job Tax Details . . . . . . . . . . . . . . . . . . . . . . . . . . . . . . . . . . . . . . 150
Maintaining Job Allocations . . . . . . . . . . . . . . . . . . . . . . . . . . . . . . . . . . . . . . 150
Specifying Employee Assignments . . . . . . . . . . . . . . . . . . . . . . . . . . . . . . . . . . . . . 151
Assigning a New Hire . . . . . . . . . . . . . . . . . . . . . . . . . . . . . . . . . . . . . . . . . . . 151
Assigning an Existing Employee . . . . . . . . . . . . . . . . . . . . . . . . . . . . . . . . . . . . 152
Terminating Jobs and Excluding Jobs From Calculations . . . . . . . . . . . . . . . . . . . . 152
Maintaining Employees . . . . . . . . . . . . . . . . . . . . . . . . . . . . . . . . . . . . . . . . . . . . . . . . 153
Maintaining Employee Compensation Details . . . . . . . . . . . . . . . . . . . . . . . . . . . . . 153
Managing and Specifying General Employee Data . . . . . . . . . . . . . . . . . . . . . . . 154
Managing and Specifying FTE . . . . . . . . . . . . . . . . . . . . . . . . . . . . . . . . . . . . . 154
Managing and Specifying Salary Grades . . . . . . . . . . . . . . . . . . . . . . . . . . . . . . 155
Managing and Specifying Allocations . . . . . . . . . . . . . . . . . . . . . . . . . . . . . . . . 156
About Changing Status . . . . . . . . . . . . . . . . . . . . . . . . . . . . . . . . . . . . . . . . . . 156
Managing and Specifying Additional Earnings . . . . . . . . . . . . . . . . . . . . . . . . . 157
Managing and Specifying Benefits . . . . . . . . . . . . . . . . . . . . . . . . . . . . . . . . . . 157
Managing and Specifying Tax Details . . . . . . . . . . . . . . . . . . . . . . . . . . . . . . . . 157
Changing Employee Status . . . . . . . . . . . . . . . . . . . . . . . . . . . . . . . . . . . . . . . . . . 158
Step 1 . . . . . . . . . . . . . . . . . . . . . . . . . . . . . . . . . . . . . . . . . . . . . . . . . . . . . . . 158
Step 2 . . . . . . . . . . . . . . . . . . . . . . . . . . . . . . . . . . . . . . . . . . . . . . . . . . . . . . 159
About Synchronizing Employee Properties . . . . . . . . . . . . . . . . . . . . . . . . . . . . . . . 160
Synchronizing Employee Properties . . . . . . . . . . . . . . . . . . . . . . . . . . . . . . . . . . . . 160
Deleting Employees from Budgets . . . . . . . . . . . . . . . . . . . . . . . . . . . . . . . . . . . . . 161
Terminating Employees . . . . . . . . . . . . . . . . . . . . . . . . . . . . . . . . . . . . . . . . . . . . 161
Transferring Employees . . . . . . . . . . . . . . . . . . . . . . . . . . . . . . . . . . . . . . . . . . . . . 162
About Transfers . . . . . . . . . . . . . . . . . . . . . . . . . . . . . . . . . . . . . . . . . . . . . . . 162
Transferring Employees Out of Entities . . . . . . . . . . . . . . . . . . . . . . . . . . . . . . 163
ix

Transferring Employees Into Positions . . . . . . . . . . . . . . . . . . . . . . . . . . . . . . . 164
Performing Single-Step Employee Transfers . . . . . . . . . . . . . . . . . . . . . . . . . . . 164
Reversing Transfers . . . . . . . . . . . . . . . . . . . . . . . . . . . . . . . . . . . . . . . . . . . . . 165
Assigning Employees to Positions . . . . . . . . . . . . . . . . . . . . . . . . . . . . . . . . . . . . . 166
Assigning Employees to Jobs . . . . . . . . . . . . . . . . . . . . . . . . . . . . . . . . . . . . . . . . . 166
Deleting Employee Assignments . . . . . . . . . . . . . . . . . . . . . . . . . . . . . . . . . . . . . . 167
Maintaining Positions . . . . . . . . . . . . . . . . . . . . . . . . . . . . . . . . . . . . . . . . . . . . . . . . . 167
Creating Positions . . . . . . . . . . . . . . . . . . . . . . . . . . . . . . . . . . . . . . . . . . . . . . . . . 168
About Synchronizing Position Properties . . . . . . . . . . . . . . . . . . . . . . . . . . . . . . . . 168
Synchronizing Position Properties . . . . . . . . . . . . . . . . . . . . . . . . . . . . . . . . . . . . . 169
Maintaining Position Compensation Details . . . . . . . . . . . . . . . . . . . . . . . . . . . . . . 169
Maintaining General Position Data . . . . . . . . . . . . . . . . . . . . . . . . . . . . . . . . . 169
Maintaining Position FTE . . . . . . . . . . . . . . . . . . . . . . . . . . . . . . . . . . . . . . . . 170
Maintaining Position Salary Grades . . . . . . . . . . . . . . . . . . . . . . . . . . . . . . . . . 171
Maintaining Allocations . . . . . . . . . . . . . . . . . . . . . . . . . . . . . . . . . . . . . . . . . 171
About Excluding Position Expenses From Budget Calculations . . . . . . . . . . . . . 172
Maintaining Position Status . . . . . . . . . . . . . . . . . . . . . . . . . . . . . . . . . . . . . . . 172
Maintaining Additional Earnings . . . . . . . . . . . . . . . . . . . . . . . . . . . . . . . . . . . 173
Maintaining Benefits . . . . . . . . . . . . . . . . . . . . . . . . . . . . . . . . . . . . . . . . . . . 173
Maintaining Assigned Employees . . . . . . . . . . . . . . . . . . . . . . . . . . . . . . . . . . . 173
Maintaining Tax Details . . . . . . . . . . . . . . . . . . . . . . . . . . . . . . . . . . . . . . . . . 174
Excluding Positions from Budget Calculations . . . . . . . . . . . . . . . . . . . . . . . . . . . . 174
Copying Position Data . . . . . . . . . . . . . . . . . . . . . . . . . . . . . . . . . . . . . . . . . . . . . 175
Performing Single Step Transfers . . . . . . . . . . . . . . . . . . . . . . . . . . . . . . . . . . . . . . 175
Reviewing Pending Transfers . . . . . . . . . . . . . . . . . . . . . . . . . . . . . . . . . . . . . . . . . 175
Deleting Positions . . . . . . . . . . . . . . . . . . . . . . . . . . . . . . . . . . . . . . . . . . . . . . . . . 176
About Terminating Positions . . . . . . . . . . . . . . . . . . . . . . . . . . . . . . . . . . . . . . . . . 176
Terminating Positions . . . . . . . . . . . . . . . . . . . . . . . . . . . . . . . . . . . . . . . . . . . . . . 176
Applying Compensation and Salary Allocation Defaults . . . . . . . . . . . . . . . . . . . . . . . . 177
Maintaining Employees by Job or Position . . . . . . . . . . . . . . . . . . . . . . . . . . . . . . . . . . 178
Viewing Employee Job Details . . . . . . . . . . . . . . . . . . . . . . . . . . . . . . . . . . . . . . . . 178
About Filling Vacant Positions or Jobs . . . . . . . . . . . . . . . . . . . . . . . . . . . . . . . . . . 178
Filling Vacant Positions or Jobs . . . . . . . . . . . . . . . . . . . . . . . . . . . . . . . . . . . . . . . 178
Reviewing and Accepting Pending Transfers . . . . . . . . . . . . . . . . . . . . . . . . . . . . . . 179
Calculating and Allocating Compensation Expenses . . . . . . . . . . . . . . . . . . . . . . . . . . . 180
Viewing the Budget Impact of Compensation Expenses . . . . . . . . . . . . . . . . . . . . . . . . . 181
Chapter 9. Calculating, Reviewing, and Allocating Compensation Expense Budgets . . . . . . . . . . . . . . . . . . . 183
Calculating Budgets . . . . . . . . . . . . . . . . . . . . . . . . . . . . . . . . . . . . . . . . . . . . . . . . . . 183
x

Reviewing Expenses . . . . . . . . . . . . . . . . . . . . . . . . . . . . . . . . . . . . . . . . . . . . . . . . . . 184
Reviewing Position and Job Budgets . . . . . . . . . . . . . . . . . . . . . . . . . . . . . . . . . . . . 184
Reviewing Employee Budgets . . . . . . . . . . . . . . . . . . . . . . . . . . . . . . . . . . . . . . . . . 185
Reviewing Compensation Element Budgets . . . . . . . . . . . . . . . . . . . . . . . . . . . . . . 185
Reviewing FTE Assignments . . . . . . . . . . . . . . . . . . . . . . . . . . . . . . . . . . . . . . . . . 186
About Allocating Compensation Expenses to General Ledger Accounts . . . . . . . . . . . . . 186
Allocating Compensation Expenses to General Ledger Accounts . . . . . . . . . . . . . . . . . . 187
Chapter 10. Working with Decision Packages and Budget Requests . . . . . . . . . . . . . . . . . . . . . . . . . . . . . . 189
About Decision Packages . . . . . . . . . . . . . . . . . . . . . . . . . . . . . . . . . . . . . . . . . . . . . . . 189
How Decision Packages Are Useful . . . . . . . . . . . . . . . . . . . . . . . . . . . . . . . . . . . . 189
Sample Decision Package 1 . . . . . . . . . . . . . . . . . . . . . . . . . . . . . . . . . . . . . . . . . . 190
Sample Decision Package 2 . . . . . . . . . . . . . . . . . . . . . . . . . . . . . . . . . . . . . . . . . . 190
Kinds of Decision Packages and Budget Requests . . . . . . . . . . . . . . . . . . . . . . . . . . 191
Baseline Decision Packages . . . . . . . . . . . . . . . . . . . . . . . . . . . . . . . . . . . . . . . 191
Shared Decision Packages . . . . . . . . . . . . . . . . . . . . . . . . . . . . . . . . . . . . . . . . 191
Recurring Budget Requests . . . . . . . . . . . . . . . . . . . . . . . . . . . . . . . . . . . . . . . 192
Who Builds and Approves Decision Packages? . . . . . . . . . . . . . . . . . . . . . . . . . . . . 192
Accessing Decision Packages . . . . . . . . . . . . . . . . . . . . . . . . . . . . . . . . . . . . . . . . . 193
How Decision Packages are Reviewed and Approved . . . . . . . . . . . . . . . . . . . . . . . . 194
Shared Decision Package Approvals . . . . . . . . . . . . . . . . . . . . . . . . . . . . . . . . . 194
Sample Approvals . . . . . . . . . . . . . . . . . . . . . . . . . . . . . . . . . . . . . . . . . . . . . . 194
About Using the DP_ASO Plan Type . . . . . . . . . . . . . . . . . . . . . . . . . . . . . . . . . . . 196
About Decision Package Types . . . . . . . . . . . . . . . . . . . . . . . . . . . . . . . . . . . . . . . . . . . 196
Provided Decision Package Types . . . . . . . . . . . . . . . . . . . . . . . . . . . . . . . . . . . . . 197
About Custom Decision Package Types . . . . . . . . . . . . . . . . . . . . . . . . . . . . . . . . . 197
How Budget Request Type Impacts Compensation Budgeting . . . . . . . . . . . . . . . . . 198
End Dates . . . . . . . . . . . . . . . . . . . . . . . . . . . . . . . . . . . . . . . . . . . . . . . . . . . . 198
Searches . . . . . . . . . . . . . . . . . . . . . . . . . . . . . . . . . . . . . . . . . . . . . . . . . . . . . 198
Transfers and Terminations . . . . . . . . . . . . . . . . . . . . . . . . . . . . . . . . . . . . . . . 198
Getting Started . . . . . . . . . . . . . . . . . . . . . . . . . . . . . . . . . . . . . . . . . . . . . . . . . . . . . . 199
Requirements . . . . . . . . . . . . . . . . . . . . . . . . . . . . . . . . . . . . . . . . . . . . . . . . . . . . 199
Identifying the Data to Capture and Budgeting Tasks to be Performed . . . . . . . . 199
Performing Basic Setup Tasks . . . . . . . . . . . . . . . . . . . . . . . . . . . . . . . . . . . . . 200
Source System Integration Tasks . . . . . . . . . . . . . . . . . . . . . . . . . . . . . . . . . . . 200
Configuring Planning Unit Hierarchies . . . . . . . . . . . . . . . . . . . . . . . . . . . . . . 200
Mapping Salary and POV Dimensions . . . . . . . . . . . . . . . . . . . . . . . . . . . . . . . 201
Preparing for Data Aggregation and Rollup . . . . . . . . . . . . . . . . . . . . . . . . . . . 202
Preparing Forms and Enabling Custom Forms . . . . . . . . . . . . . . . . . . . . . . . . . 203
xi

Understanding and Configuring the BIUpdate Rule . . . . . . . . . . . . . . . . . . . . . 203
Preparing for Recurring Budgets . . . . . . . . . . . . . . . . . . . . . . . . . . . . . . . . . . . 205
Creating Attributes . . . . . . . . . . . . . . . . . . . . . . . . . . . . . . . . . . . . . . . . . . . . . . . . 205
Starting the Decision Packages Process . . . . . . . . . . . . . . . . . . . . . . . . . . . . . . . . . . 206
Creating Decision Package Types . . . . . . . . . . . . . . . . . . . . . . . . . . . . . . . . . . . . . . . . . 207
Defining Mappings . . . . . . . . . . . . . . . . . . . . . . . . . . . . . . . . . . . . . . . . . . . . . . . . 208
About Rollup Members . . . . . . . . . . . . . . . . . . . . . . . . . . . . . . . . . . . . . . . . . . . . . 208
Defining Rollup Members . . . . . . . . . . . . . . . . . . . . . . . . . . . . . . . . . . . . . . . . . . . 209
Defining Justification Criteria . . . . . . . . . . . . . . . . . . . . . . . . . . . . . . . . . . . . . . . . 209
Assigning Attributes . . . . . . . . . . . . . . . . . . . . . . . . . . . . . . . . . . . . . . . . . . . . . . . 210
Deleting and Removing Attributes . . . . . . . . . . . . . . . . . . . . . . . . . . . . . . . . . . . . . 210
Creating Task Lists for Decision Package Types . . . . . . . . . . . . . . . . . . . . . . . . . . . . 211
Creating Decision Packages and Budget Requests . . . . . . . . . . . . . . . . . . . . . . . . . . . . . 211
Before You Begin . . . . . . . . . . . . . . . . . . . . . . . . . . . . . . . . . . . . . . . . . . . . . . . . . 211
Creating Decision Packages . . . . . . . . . . . . . . . . . . . . . . . . . . . . . . . . . . . . . . . . . . 212
Step 1 . . . . . . . . . . . . . . . . . . . . . . . . . . . . . . . . . . . . . . . . . . . . . . . . . . . . . . . 212
Step 2 . . . . . . . . . . . . . . . . . . . . . . . . . . . . . . . . . . . . . . . . . . . . . . . . . . . . . . 213
Creating Baseline Decision Packages . . . . . . . . . . . . . . . . . . . . . . . . . . . . . . . . . . . 214
Creating Budget Requests . . . . . . . . . . . . . . . . . . . . . . . . . . . . . . . . . . . . . . . . . . . 214
Step 1 . . . . . . . . . . . . . . . . . . . . . . . . . . . . . . . . . . . . . . . . . . . . . . . . . . . . . . 214
Step 2 . . . . . . . . . . . . . . . . . . . . . . . . . . . . . . . . . . . . . . . . . . . . . . . . . . . . . . 215
Using Notes and Attachments . . . . . . . . . . . . . . . . . . . . . . . . . . . . . . . . . . . . . . . . 216
Defining Notes . . . . . . . . . . . . . . . . . . . . . . . . . . . . . . . . . . . . . . . . . . . . . . . 216
Deleting Notes . . . . . . . . . . . . . . . . . . . . . . . . . . . . . . . . . . . . . . . . . . . . . . . . 216
Attaching Files . . . . . . . . . . . . . . . . . . . . . . . . . . . . . . . . . . . . . . . . . . . . . . . . 217
Deleting Attachments . . . . . . . . . . . . . . . . . . . . . . . . . . . . . . . . . . . . . . . . . . . 217
Deleting Attributes . . . . . . . . . . . . . . . . . . . . . . . . . . . . . . . . . . . . . . . . . . . . . 217
Using Budget Requests . . . . . . . . . . . . . . . . . . . . . . . . . . . . . . . . . . . . . . . . . . . . . . . . 218
Considerations . . . . . . . . . . . . . . . . . . . . . . . . . . . . . . . . . . . . . . . . . . . . . . . . . . . 218
Entering Expenses . . . . . . . . . . . . . . . . . . . . . . . . . . . . . . . . . . . . . . . . . . . . . . . . . 218
Transferring Positions and Employees Across Budget Requests . . . . . . . . . . . . . . . . 219
Performing Transfers . . . . . . . . . . . . . . . . . . . . . . . . . . . . . . . . . . . . . . . . . . . . . . 220
Reversing Transfers . . . . . . . . . . . . . . . . . . . . . . . . . . . . . . . . . . . . . . . . . . . . . . . . 220
Saving Decision Packages and Budget Requests . . . . . . . . . . . . . . . . . . . . . . . . . . . . . . . 221
About Modifying Decision Packages and Budget Requests . . . . . . . . . . . . . . . . . . . . . . . 221
Modifying Budget Request Basic Properties . . . . . . . . . . . . . . . . . . . . . . . . . . . . . . . . . 221
Modifying Budget Request Details and Expenses . . . . . . . . . . . . . . . . . . . . . . . . . . . . . . 222
Copying Decision Package Types . . . . . . . . . . . . . . . . . . . . . . . . . . . . . . . . . . . . . . . . . 222
About Copying Decision Packages and Budget Requests . . . . . . . . . . . . . . . . . . . . . . . . 223
xii

Requirements . . . . . . . . . . . . . . . . . . . . . . . . . . . . . . . . . . . . . . . . . . . . . . . . . . . . 223
Recommendations and Notes . . . . . . . . . . . . . . . . . . . . . . . . . . . . . . . . . . . . . . . . 223
Which Copy Tasks Can Administrators Perform? . . . . . . . . . . . . . . . . . . . . . . . . . . 224
Which Copy Tasks Can Planners Perform? . . . . . . . . . . . . . . . . . . . . . . . . . . . . . . . 224
How Different Owner Entities Affect Copy Operations . . . . . . . . . . . . . . . . . . . . . . 224
How Modifying Dimensions, Attributes, and Planning Unit Hierarchies Affects CopiedDecision Packages . . . . . . . . . . . . . . . . . . . . . . . . . . . . . . . . . . . . . . . . . . . . . . . . . 225
Understanding the Add and Synchronize Copy Operations . . . . . . . . . . . . . . . . . . . 225
Add . . . . . . . . . . . . . . . . . . . . . . . . . . . . . . . . . . . . . . . . . . . . . . . . . . . . . . . . 225
Synchronize . . . . . . . . . . . . . . . . . . . . . . . . . . . . . . . . . . . . . . . . . . . . . . . . . . 225
Simultaneous Copying . . . . . . . . . . . . . . . . . . . . . . . . . . . . . . . . . . . . . . . . . . . . . 226
Copying Decision Packages and Budget Requests . . . . . . . . . . . . . . . . . . . . . . . . . . . . . 226
Identifying Decision Packages . . . . . . . . . . . . . . . . . . . . . . . . . . . . . . . . . . . . . . . . 226
Specifying Copy Options . . . . . . . . . . . . . . . . . . . . . . . . . . . . . . . . . . . . . . . . . . . . 227
Copying Data to Multiple Years . . . . . . . . . . . . . . . . . . . . . . . . . . . . . . . . . . . . . . . 228
Managing Decision Package Types, Decision Packages, and Budget Requests . . . . . . . . . 228
Sharing Decision Packages . . . . . . . . . . . . . . . . . . . . . . . . . . . . . . . . . . . . . . . . . . . 229
Unsharing Decision Packages . . . . . . . . . . . . . . . . . . . . . . . . . . . . . . . . . . . . . . . . 229
About Filtering and Reporting on Data . . . . . . . . . . . . . . . . . . . . . . . . . . . . . . . . . . 229
About Attributes . . . . . . . . . . . . . . . . . . . . . . . . . . . . . . . . . . . . . . . . . . . . . . . 230
Attribute Types . . . . . . . . . . . . . . . . . . . . . . . . . . . . . . . . . . . . . . . . . . . . . . . . 230
About Rollup Groups . . . . . . . . . . . . . . . . . . . . . . . . . . . . . . . . . . . . . . . . . . . 231
Performing Queries . . . . . . . . . . . . . . . . . . . . . . . . . . . . . . . . . . . . . . . . . . . . . . . 232
Detaching Data . . . . . . . . . . . . . . . . . . . . . . . . . . . . . . . . . . . . . . . . . . . . . . . . . . . 233
Moving Budget Requests Between Decision Packages . . . . . . . . . . . . . . . . . . . . . . . 233
Deleting Decision Packages and Budget Requests . . . . . . . . . . . . . . . . . . . . . . . . . . 233
Migrating Decision Package Types . . . . . . . . . . . . . . . . . . . . . . . . . . . . . . . . . . . . . 234
About Submitting Decision Packages for Approval and Viewing Promotional Paths . . . . 234
Submitting Decision Packages for Review and Approval . . . . . . . . . . . . . . . . . . . . . . . . 234
Approving and Rejecting Decision Packages . . . . . . . . . . . . . . . . . . . . . . . . . . . . . . . . . 235
About Migrating Decision Packages Between Environments Using LifecycleManagement . . . . . . . . . . . . . . . . . . . . . . . . . . . . . . . . . . . . . . . . . . . . . . . . . . . . . . . 235
Performing Tasks Not Displayed in My Tasks List . . . . . . . . . . . . . . . . . . . . . . . . . . . . . 236
About Graphing and Analyzing Data . . . . . . . . . . . . . . . . . . . . . . . . . . . . . . . . . . . . . . 236
Accessing Graphs . . . . . . . . . . . . . . . . . . . . . . . . . . . . . . . . . . . . . . . . . . . . . . . . . . . . 237
Chapter 11. Reviewing and Approving Budgets . . . . . . . . . . . . . . . . . . . . . . . . . . . . . . . . . . . . . . . . . . . . . 239
About Approving Compensation . . . . . . . . . . . . . . . . . . . . . . . . . . . . . . . . . . . . . . . . . 239
About Submitting Budgets for Approval . . . . . . . . . . . . . . . . . . . . . . . . . . . . . . . . . . . . 239
Requirements . . . . . . . . . . . . . . . . . . . . . . . . . . . . . . . . . . . . . . . . . . . . . . . . . . . . . . . 240
xiii
Approving Positions, Jobs, and Employee FTE and Compensation . . . . . . . . . . . . . . . . 240
Approval Options . . . . . . . . . . . . . . . . . . . . . . . . . . . . . . . . . . . . . . . . . . . . . . . . . 240
Approving Positions . . . . . . . . . . . . . . . . . . . . . . . . . . . . . . . . . . . . . . . . . . . . . . . 241
Approving Jobs . . . . . . . . . . . . . . . . . . . . . . . . . . . . . . . . . . . . . . . . . . . . . . . . . . 241
Approving Employee Assignments to Positions . . . . . . . . . . . . . . . . . . . . . . . . . . . . 242
Approving Period-Level FTEs . . . . . . . . . . . . . . . . . . . . . . . . . . . . . . . . . . . . . . . . 242
Submitting Budgets for Approval . . . . . . . . . . . . . . . . . . . . . . . . . . . . . . . . . . . . . . . . . 243
Chapter 12. Revising and Adjusting Budgets . . . . . . . . . . . . . . . . . . . . . . . . . . . . . . . . . . . . . . . . . . . . . . 245
About Revisions . . . . . . . . . . . . . . . . . . . . . . . . . . . . . . . . . . . . . . . . . . . . . . . . . . . . . 245
Performing Revisions in Decision Package-Enabled Applications . . . . . . . . . . . . . . . . . . 246
Task Overview . . . . . . . . . . . . . . . . . . . . . . . . . . . . . . . . . . . . . . . . . . . . . . . . . . . 246
Making Revisions in Non HCP - Based Applications . . . . . . . . . . . . . . . . . . . . . . . 247
Tracking Revisions in PeopleSoft Commitment Control . . . . . . . . . . . . . . . . . . . . . 248
Before Performing Revisions . . . . . . . . . . . . . . . . . . . . . . . . . . . . . . . . . . . . . . . . . 249
Configuring Planning Units and Substitution Variables . . . . . . . . . . . . . . . . . . . 249
Enabling Preparers to Create Revision Members . . . . . . . . . . . . . . . . . . . . . . . . 249
Creating Right-Click Menus for Customized Revisions . . . . . . . . . . . . . . . . . . . 250
Enabling Preparers to Assign or Modify Decision Package Types . . . . . . . . . . . . 250
Preparing Revisions . . . . . . . . . . . . . . . . . . . . . . . . . . . . . . . . . . . . . . . . . . . . . . . 251
Creating Forms . . . . . . . . . . . . . . . . . . . . . . . . . . . . . . . . . . . . . . . . . . . . . . . 251
Consolidating Data and Creating Revisions if the HCP Cube is Disabled . . . . . . 251
Consolidating Data and Creating Revisions if the HCP Cube is Enabled . . . . . . . 252
Populating Revisions With Decision Package Data . . . . . . . . . . . . . . . . . . . . . . 253
Creating and Populating a Budget Request for Revisions . . . . . . . . . . . . . . . . . . . . . 253
Performing Revisions in Non HCP- Based Applications . . . . . . . . . . . . . . . . . . . . . 254
Adjusting Revisions . . . . . . . . . . . . . . . . . . . . . . . . . . . . . . . . . . . . . . . . . . . . . . . . 254
Performing Revisions in Regular Applications . . . . . . . . . . . . . . . . . . . . . . . . . . . . . . . . 255
Constraining Revisions . . . . . . . . . . . . . . . . . . . . . . . . . . . . . . . . . . . . . . . . . . . . . 255
Requirements . . . . . . . . . . . . . . . . . . . . . . . . . . . . . . . . . . . . . . . . . . . . . . . . . . . . 255
Step 1 . . . . . . . . . . . . . . . . . . . . . . . . . . . . . . . . . . . . . . . . . . . . . . . . . . . . . . . 255
Step 2 . . . . . . . . . . . . . . . . . . . . . . . . . . . . . . . . . . . . . . . . . . . . . . . . . . . . . . . 256
Creating Revision Requests . . . . . . . . . . . . . . . . . . . . . . . . . . . . . . . . . . . . . . . . . . 257
Step 1 . . . . . . . . . . . . . . . . . . . . . . . . . . . . . . . . . . . . . . . . . . . . . . . . . . . . . . . 257
Step 2 . . . . . . . . . . . . . . . . . . . . . . . . . . . . . . . . . . . . . . . . . . . . . . . . . . . . . . 257
Specifying Revision Data . . . . . . . . . . . . . . . . . . . . . . . . . . . . . . . . . . . . . . . . . . . . 258
Recalculating Expenses and Submitting Revision Requests for Approval . . . . . . . . . . 258
About Modifying Revisions . . . . . . . . . . . . . . . . . . . . . . . . . . . . . . . . . . . . . . . . . . 259
xiv

Part IV. Analyzing Compensation Data . . . . . . . . . . . . . . . . . . . . . . . . . . . . . . . . . . . . . . . . . . . . . . . . . . 261
Chapter 13. Using Compensation Dashboards . . . . . . . . . . . . . . . . . . . . . . . . . . . . . . . . . . . . . . . . . . . . . 263
Analyzing Compensation Breakdown . . . . . . . . . . . . . . . . . . . . . . . . . . . . . . . . . . . . . . 263
Analyzing Budget Variance . . . . . . . . . . . . . . . . . . . . . . . . . . . . . . . . . . . . . . . . . . . . . 264
Analyzing FTE and Headcount . . . . . . . . . . . . . . . . . . . . . . . . . . . . . . . . . . . . . . . . . . 264
Analyzing Proposed Compensation . . . . . . . . . . . . . . . . . . . . . . . . . . . . . . . . . . . . . . . 265
Chapter 14. Using Reports and Budget Books . . . . . . . . . . . . . . . . . . . . . . . . . . . . . . . . . . . . . . . . . . . . . 267
Provided Reports . . . . . . . . . . . . . . . . . . . . . . . . . . . . . . . . . . . . . . . . . . . . . . . . . . . . 267
Decision Package and Budget Request Reports . . . . . . . . . . . . . . . . . . . . . . . . . . . . 267
Compensation Expense Reports . . . . . . . . . . . . . . . . . . . . . . . . . . . . . . . . . . . . . . . 268
Creating Compensation Reports . . . . . . . . . . . . . . . . . . . . . . . . . . . . . . . . . . . . . . 270
About Using Custom Templates . . . . . . . . . . . . . . . . . . . . . . . . . . . . . . . . . . . . . . . . . 270
Working With Custom Templates . . . . . . . . . . . . . . . . . . . . . . . . . . . . . . . . . . . . . . . . 271
Customizing Reports to Create Templates . . . . . . . . . . . . . . . . . . . . . . . . . . . . . . . 271
Managing Template - Report Associations . . . . . . . . . . . . . . . . . . . . . . . . . . . . . . . 271
Editing Templates . . . . . . . . . . . . . . . . . . . . . . . . . . . . . . . . . . . . . . . . . . . . . . . . . 272
Creating Decision Package Reports . . . . . . . . . . . . . . . . . . . . . . . . . . . . . . . . . . . . . . . 272
Specifying Report Settings . . . . . . . . . . . . . . . . . . . . . . . . . . . . . . . . . . . . . . . . . . . . . . 273
About Customizing Reports in BI Publisher . . . . . . . . . . . . . . . . . . . . . . . . . . . . . . . . . 273
Installing the BI Publisher Desktop . . . . . . . . . . . . . . . . . . . . . . . . . . . . . . . . . . . . 274
Customizing Reports in BI Publisher . . . . . . . . . . . . . . . . . . . . . . . . . . . . . . . . . . . 274
Using Financial Reporting . . . . . . . . . . . . . . . . . . . . . . . . . . . . . . . . . . . . . . . . . . . . . 275
Creating Budget Books . . . . . . . . . . . . . . . . . . . . . . . . . . . . . . . . . . . . . . . . . . . . . 275
Using Budget Data in Financial Reporting Reports . . . . . . . . . . . . . . . . . . . . . . . . . 276
Part V. Appendixes . . . . . . . . . . . . . . . . . . . . . . . . . . . . . . . . . . . . . . . . . . . . . . . . . . . . . . . . . . . . . . . . 277
Appendix A. Frequently Asked Questions . . . . . . . . . . . . . . . . . . . . . . . . . . . . . . . . . . . . . . . . . . . . . . . . . 279
Data Loading . . . . . . . . . . . . . . . . . . . . . . . . . . . . . . . . . . . . . . . . . . . . . . . . . . . . . . . 279
Employees, Jobs, and Positions . . . . . . . . . . . . . . . . . . . . . . . . . . . . . . . . . . . . . . . . . . 280
Allocations . . . . . . . . . . . . . . . . . . . . . . . . . . . . . . . . . . . . . . . . . . . . . . . . . . . . . . . . . 281
Transfers . . . . . . . . . . . . . . . . . . . . . . . . . . . . . . . . . . . . . . . . . . . . . . . . . . . . . . . . . . 281
Miscellaneous . . . . . . . . . . . . . . . . . . . . . . . . . . . . . . . . . . . . . . . . . . . . . . . . . . . . . . . 282
Appendix B. Loading Metadata and Data Using the Outline Load Utility . . . . . . . . . . . . . . . . . . . . . . . . . . . 283
Requirements and Important Notes . . . . . . . . . . . . . . . . . . . . . . . . . . . . . . . . . . . . . . . 283
Reviewing the Dimensional Structure . . . . . . . . . . . . . . . . . . . . . . . . . . . . . . . . . . . 284
Identifying the Smart Lists to Load, and Their Entry Names . . . . . . . . . . . . . . . . . . . 285
About Load Files . . . . . . . . . . . . . . . . . . . . . . . . . . . . . . . . . . . . . . . . . . . . . . . . . . . . . 286
xv

Required Data Load File Run Order . . . . . . . . . . . . . . . . . . . . . . . . . . . . . . . . . . . . 287
About Creating Load Files and Verifying Loads . . . . . . . . . . . . . . . . . . . . . . . . . . . . 287
Loading Metadata and Data . . . . . . . . . . . . . . . . . . . . . . . . . . . . . . . . . . . . . . . . . . . . . 289
About Loading Data into Decision Package-Enabled Applications . . . . . . . . . . . . . . 289
Loading Smart Lists and Smart List Values . . . . . . . . . . . . . . . . . . . . . . . . . . . . . . . 289
Loading Salary Grade Details . . . . . . . . . . . . . . . . . . . . . . . . . . . . . . . . . . . . . . . . 290
Loading Salary Grade Detail Lines . . . . . . . . . . . . . . . . . . . . . . . . . . . . . . . . . . . . . 291
Loading Compensation Elements . . . . . . . . . . . . . . . . . . . . . . . . . . . . . . . . . . . . . . 292
Loading Compensation Element Detail Lines . . . . . . . . . . . . . . . . . . . . . . . . . . . . . 294
Loading Employee Information . . . . . . . . . . . . . . . . . . . . . . . . . . . . . . . . . . . . . . . 295
Loading Position Information . . . . . . . . . . . . . . . . . . . . . . . . . . . . . . . . . . . . . . . . 297
Loading Employee-Position Associations . . . . . . . . . . . . . . . . . . . . . . . . . . . . . . . . 298
Loading Position FTE Information . . . . . . . . . . . . . . . . . . . . . . . . . . . . . . . . . . . . . 299
Loading Employee FTE Information . . . . . . . . . . . . . . . . . . . . . . . . . . . . . . . . . . . 300
Loading Position Salary Grade Information . . . . . . . . . . . . . . . . . . . . . . . . . . . . . . 301
Loading Employee Salary Grade Information . . . . . . . . . . . . . . . . . . . . . . . . . . . . . 302
Loading Position Compensation Information . . . . . . . . . . . . . . . . . . . . . . . . . . . . . 304
Loading Employee Compensation Information . . . . . . . . . . . . . . . . . . . . . . . . . . . . 305
Loading Position Allocation Information . . . . . . . . . . . . . . . . . . . . . . . . . . . . . . . . 306
Loading Employee Allocation Information . . . . . . . . . . . . . . . . . . . . . . . . . . . . . . . 307
Loading Job Information . . . . . . . . . . . . . . . . . . . . . . . . . . . . . . . . . . . . . . . . . . . . 309
Loading Employee Job Assignments and Details . . . . . . . . . . . . . . . . . . . . . . . . . . . 310
Testing Load Files . . . . . . . . . . . . . . . . . . . . . . . . . . . . . . . . . . . . . . . . . . . . . . . . . . . . 311
Verifying Data Loads . . . . . . . . . . . . . . . . . . . . . . . . . . . . . . . . . . . . . . . . . . . . . . . . . . 312
Running Load Files . . . . . . . . . . . . . . . . . . . . . . . . . . . . . . . . . . . . . . . . . . . . . . . . . . 314
Troubleshooting . . . . . . . . . . . . . . . . . . . . . . . . . . . . . . . . . . . . . . . . . . . . . . . . . . . . 315
Appendix C. Updating Business Rules After Changing Predefined Smart Lists . . . . . . . . . . . . . . . . . . . . . . . 317
Business Rule and Smart List Associations . . . . . . . . . . . . . . . . . . . . . . . . . . . . . . . . . . 317
Employee Budget Detail . . . . . . . . . . . . . . . . . . . . . . . . . . . . . . . . . . . . . . . . . . . . 317
Position and Employee Budget Detail . . . . . . . . . . . . . . . . . . . . . . . . . . . . . . . . . . . 322
Position Budget Detail . . . . . . . . . . . . . . . . . . . . . . . . . . . . . . . . . . . . . . . . . . . . . 327
Modifying Smart List Values . . . . . . . . . . . . . . . . . . . . . . . . . . . . . . . . . . . . . . . . . . . . 331
xvi

Documentation Accessibility
For information about Oracle's commitment to accessibility, visit the Oracle Accessibility Program website athttp://www.oracle.com/pls/topic/lookup?ctx=acc&id=docacc.
Access to Oracle SupportOracle customers that have purchased support have access to electronic support through My Oracle Support.For information, visit http://www.oracle.com/pls/topic/lookup?ctx=acc&id=info or visit http://www.oracle.com/pls/topic/lookup?ctx=acc&id=trs if you are hearing impaired.
17

18

Documentation Feedback
Send feedback on this documentation to: [email protected]
Follow EPM Information Development on these social media sites:
LinkedIn - http://www.linkedin.com/groups?gid=3127051&goback=.gmp_3127051
Twitter - http://twitter.com/hyperionepminfo
Facebook - http://www.facebook.com/pages/Hyperion-EPM-Info/102682103112642
Google+ - https://plus.google.com/106915048672979407731/#106915048672979407731/posts
YouTube - http://www.youtube.com/user/OracleEPMWebcasts
19

20

P a r t I
Getting Started
In Getting Started:
l About Public Sector Planning and Budgetingl Understanding What Tasks to Perform, and When
21

22
1About Public Sector Planning
and Budgeting
In This Chapter
How Public Sector Planning and Budgeting Will Help You .. . . . . . . . . . . . . . . . . . . . . . . . . . . . . . . . . . . . . . . . . . .23
The Basics of the Budget Process ... . . . . . . . . . . . . . . . . . . . . . . . . . . . . . . . . . . . . . . . . . . . . . . . . . . . . . . . . . . . . . . . . . . . . .26
Building a Budget: Components and Concepts .. . . . . . . . . . . . . . . . . . . . . . . . . . . . . . . . . . . . . . . . . . . . . . . . . . . . . . . .27
Annotations, Comments, and Attachments .. . . . . . . . . . . . . . . . . . . . . . . . . . . . . . . . . . . . . . . . . . . . . . . . . . . . . . . . . . . .42
Requirements... . . . . . . . . . . . . . . . . . . . . . . . . . . . . . . . . . . . . . . . . . . . . . . . . . . . . . . . . . . . . . . . . . . . . . . . . . . . . . . . . . . . . . . . . . . . .42
Assumptions .. . . . . . . . . . . . . . . . . . . . . . . . . . . . . . . . . . . . . . . . . . . . . . . . . . . . . . . . . . . . . . . . . . . . . . . . . . . . . . . . . . . . . . . . . . . . . .42
Accessibility . . . . . . . . . . . . . . . . . . . . . . . . . . . . . . . . . . . . . . . . . . . . . . . . . . . . . . . . . . . . . . . . . . . . . . . . . . . . . . . . . . . . . . . . . . . . . . . .42
How Public Sector Planning and Budgeting Will HelpYouOracle Hyperion Public Sector Planning and Budgeting, is an integrated budgeting and planningsolution in the Oracle Enterprise Performance Management System suite that enables publicsector and higher-education organizations to manage existing and projected budgets usingcurrent and previous General Ledger and Human Resource Management (HRMS) data. Youcan also load data from PeopleSoft Financials Commitment Control.
Public Sector Planning and Budgeting also enables you, at a departmental or Human Resourceorganization level to manage, modify, and update employee and job data, identify thecompensation budget impact, and define General Ledger allocations. Use Public Sector Planningand Budgeting to:
l Build budgets from prior years or versions. Decision package users can flag line items inbudget requests that will continue to be funded as recurring, and then copy them to futurebudget years.
l Define decision packages and budget requests to submit funding requests for proposedprojects, and to identify the impact these new proposals will have on the existing baselinebudget.
l Manage positions, and position data, and position-related compensation details
l Manage employee-related data such as salary grades, benefits, location, status, employer-paid taxes, and union information
l Project and evaluate the impact of employee compensation on overall budgets
23

l Forecast the impact of new positions, workforce reductions, contract proposals, andcompensation and benefit changes as they occur throughout the year
l Perform mass updates and globally or conditionally apply compensation default changes
l Allocate budget amounts to different programs, projects, or other chart-of-accountdimensions
l Integrate and aggregate position and employee budgets into operating expense line itembudgets
l Issue notifications when budget issues need attention or the budget is completed
l Handle overrides with comprehensive audit trails to ensure accuracy
l Access budget data in Oracle Smart View for Office
l Create detailed budget books and reports in Oracle Hyperion Financial Reporting, enablingyou to publish budget details internally or externally, and use report queries
Integration With Your Source System
Subtopics
l General Ledger and HRMS
l PeopleSoft Financials and Commitment Control
General Ledger and HRMS Build your budget using data and metadata in supported systems by creating and runningintegration in Oracle Hyperion Financial Data Quality Management, Enterprise Edition or usingother tools such as the Oracle Data Integrator or the Outline Load utility. Integrating with sourcesystems lets you:
l Load previous budgets and actuals from the General Ledger.
l Load detailed information from HRMS to prepare detailed position budgets and updateexisting salary-related budgetary information.
l Allocate salary and position budgets into General Ledger accounts to enforce budgetarycontrol. Compensation data in the Human Capital Plan type integrates with the overall lineitem budget, enabling you to identify the impact of detailed salary plans on the overalloperating expense budget.
For information about using FDMEE to download and upload financial data, see the OracleHyperion Financial Data Quality Management ERP Integration Adapter for Oracle ApplicationsAdministrator's Guide.
For information about supported General Ledger, HRMS, and Oracle Enterprise PerformanceManagement System sources, see the Oracle Enterprise Performance Management SystemCertification Matrix: http://www.oracle.com/technetwork/middleware/ias/downloads/fusioncertification-100350.html.
24

PeopleSoft Financials and Commitment ControlIntegrate with PeopleSoft Financials (PSFT) and use Commitment Control budgets if you wantto:
l Extract actuals, budgets, encumbrances, financial references, and supporting data such asthe following from the PSFT Commitment Control tables for use in your application:
m Business units
m Chartfields
m Calendars
m Line item budgets
l Perform large scale changes to many or all budgets, and send revisions as journals back toERP for posting while maintaining distinctions in your budgets between original proposals,adjustments, revisions, and adjusted budgets.
l Post delta revisions that you track in decision packages and budget requests without havingto create new revision members in the Version dimension.
l Seed data back to PSFT Commitment Control
To transfer data between PSFT andPublic Sector Planning and Budgeting budgets use:
l Control rules that consist of rules for budget definitions and combinations of segments orchartfield values; both of which are used to validate line item budgets.
l Line item budgets that have final approval and are posted back to budget ledgers in PSFT.Line item budgets are validated against the budget definition and combination edit rulesdefined in PSFT.
Support for a Variety of Budgeting ApproachesYou can create budgets inPublic Sector Planning and Budgeting using any of these approaches:
l Baseline budgeting, in which your previous year's imported actuals and \ or unspent balancesform the beginning of the current year's budget under preparation. For example, you mayhave $25,000 approved in your 2011 budget for maintenance contracts, $15,000 of whichwas spent. If at the start of the budget preparation process for 2012 you use actuals to createthe baseline budget, your account for maintenance contracts has $15,000. If you use the2011 budget, you have $25,000.
l Bottom-up budgeting, in which expenses from low-level entities (cost centers, departments,business units, and so on) aggregate upward.
l Distributing or top-down budgeting, in which expenses are disseminated from the highest levelentity downward. In this budget implementation, initial budgets are prepared by the toplevel owners of the entity hierarchy, who pass the control to update and view budgets tolower level entity owners such as cost center or business unit managers. These lower levelentity owners update compensation expenses, and then submit budgets back to the top levelowners.
25

l Target budgeting. Although this approach prevents you from using Approvals, it enables youto identify, enforce, and track the budget allocated to all offices, bureaus, cost centers, andbusiness units by defining target versions. For example, a Public Sector organization mayreceive $800,000 from the federal or country government. Using target budgeting, theorganization allocates funds to different departments, preventing them from submittingbudget requests that exceed their departmental limits.
The Basics of the Budget ProcessCreating your budget will probably involve these steps performed by different people in yourorganization:
1. At the start of the budget cycle, product implementors satisfy the requirements, and loadGeneral Ledger, possibly from PeopleSoft Financials, and HRMS actuals from the previousbudget year or version (baseline budget).
Note: If you use decision packages to budget, and have approved and finalized decisionpackages from a previous year, copy this data to upcoming budget years instead ofloading source data from external systems.
2. Under the guidance of finance staff, planners:
l Create budgets, or decision packages and budget requests, for their cost centers to reflectposition and employee changes such as filled vacant positions, and, changes to benefits.Decision packages and budget requests let planners submit related line item budgetrequests for approval.
l Create positions and apply salary, compensation, and allocation defaults.
l Calculate compensation expenses for their entity (cost center or department).
l Assign employees to jobs or positions.
l Allocate entity compensation expenses to General Ledger Accounts by specifying chartfields or segments.
l Review the budget impact of existing positions, employees, and compensation schedulechanges.
3. Planners then submit budgets to their financial and division heads for review usingapprovals.
4. After budgets are approved, administrators:
l Write back next year's budget from an aggregate storage database to the General Ledgeras journal entries.
l Run journal imports in the General Ledger.
5. Finance and budget staff can then:
l Consolidate compensation budget plans and publish budget reports, budget books, bills,and other statutory documents
l Revise budgets
26

Building a Budget: Components and Concepts
Subtopics
l Plan Types
l About Configuring the Decision Package Reporting Plan Type
l Configuration Options
l Employees, Positions, and Jobs
l How Positions and Jobs Differ
l FTE, Headcount, Overtime, and Vacancy Calculations
l Decision Packages and Budget Requests
l The Fiscal Year
l Provided Dimensions
l Predefined Accounts
l User Defined Dimensions
l Smart Lists
l Task Lists
l Tasks Lists in Decision Package-Enabled Applications
Plan Types Plan types, often called '“cubes” represent Oracle Essbase databases that Administrators createto contain dimensional data that they have mapped in map reporting applications. You will usethese plan types:
l Plan Type 1, 2, or 3: For line item operating expenses such as lease, utility expenses, and otherdriver-based budgets such as capital plans. One of these plan types can later contain the lineitem budget.
l Human Capital Planning (HCP): For compensation budget dimensions such as effective-datedsalary, benefit assignments, and General Ledger account allocation percentages.Administrators populate the line item budget by mapping HCP dimensions and membersto General Ledger accounts segments and chart fields.
l ASO1: For non decision package-enabled applications
l DP_ASO: For decision package-enabled applications only, this plan type-provides extensivesupport for reporting in Financial Reporting and Smart View. It provides these dimensions:
m Decision Packages
m Budget Requests
m Currency
m Period
m Scenario and version (for decision package-enabled applications)
27

About Configuring the Decision Package Reporting Plan Type
To report on a wide variety of detailed decision package and budget request data, administratorsmust:
l Create a reporting application and map dimensions to link data in the BSO HCP, and Plan1, 2, or 3 plan types to the DP_ASO plan type. Map dimensions as described in Chapter 5,“Configuring the Line Item Budget.”, but note that the Request dimension in the BSO plantype is automatically mapped to the Decision Package and Budget Request dimensions inDP_ASO plan type.
l Add DP_ASO using the Map Reporting Application tab, to the decision package type uponwhich decision packages are based. This enables budget preparers to report on new orrecently modified data.
Configuration OptionsWhen creating applications, select the configuration option that should derive overall budgetexpenses. For example, to budget only for position-related expenses, select the Position option.
l Position and Employee— Budget employees by their assignments to positions, which drivecompensation expense calculations. This lets you plan and track expenses by position andby employee in which each position represents a unique corporate role and is characterizedby cost center and job title. Employee-specific salary, earnings, benefits, tax, and allocationinformation is used to ensure that position expenses are calculated and allocated as preciselyas that of current incumbent information.
m The position and employee dimensions are mandatory
m Job is a property of the position dimension
m Job is a member of the account dimension associated with a Smart List
l Employee—Track and budget solely by employees assigned to various jobs. If yourorganization does not use the position management module in your HRMS, select thisconfiguration option. With the employee configuration option, Job Code is a dimension, ispopulated during application creation, and drives personnel expense calculations.
l Position— Track and budget solely by positions. Position is populated as a mandatorydimension and has Job as a property. Job is an Account member associated with a SmartList. The position configuration option lets you to generate budgets for overall FTE, but notfor headcount. The position configuration enables you to load average or maximumcompensation information across all employees.
Employees, Positions, and JobsEvery position is unique to a department and is characterized by the associated jobs. For example,Mechanic is a job. Mechanic in the Parks department is one position, and Mechanic in the
28
Highway department is a different position. Positions can be shared, pooled, or single-incumbent. The FTE for single incumbent positions cannot exceed one. Shared and pooledpositions can have multiple FTEs. Calculations are performed by position if you use the Positionconfiguration option or the Position and Employee configuration option. With the Employeeconfiguration option, Job drives compensation calculations.
Employees are assigned to positions. Until a position is filled by an employee, its vacant portionis tracked. If an employee terminates, the position remains vacant until another employee isassigned. Unless defined as single incumbent position, multiple employees can be assigned to aposition. Employees may also have multiple positions. For example, nurses may work day shiftsand night shifts but the nurse position is not differentiated by shift. The employee is assigned tothe same position twice so the pay for each shift can be calculated differently.
How Positions and Jobs DifferTo determine if you use jobs or positions, consider these questions that illustrate the role ofemployees or positions in your organization:
l Do you manage people or positions?
l Are the roles fixed or flexible?
l Can multiple employees assume the same role?
If roles exist after assigned employees leave, those roles are probably positions. If roles cease toexist or are reevaluated after assigned employees leave, those roles are probably jobs.
FTE, Headcount, Overtime, and Vacancy Calculations
Subtopics
l FTE
l Short-Term Disability and Maternity Leave
l Sample Case: Maternity Leave
l FTE and Long Term Disability Leave
l Overtime
l Headcount
l Vacant Positions
l Shared Positions
l Pooled Positions
l Incumbent Positions
l Compensation Funding Across Departments
l Additional Earnings
FTEWhen employees are hired, assign the FTE of the position to the employees. This fills the FTEand reduces the vacancy portion of the position. If employees are terminated or transferred, the
29

position's vacancy portion of FTE is added to vacancy. The total FTE for the employees assignedto a position cannot exceed the total FTE for the position. The difference between a position'sFTE and the number of incumbent employee FTEs is the vacant portion of the position.
To exclude the vacant portion of a position from calculations:
l Exclude or override the Total FTE assignment
l Exclude positions from calculations
For the Position and employee configuration option: If employees are absent due to maternity orshort-term disability, you can update their position FTE to create a replacement FTE that canbe temporarily filled by another employee until the absent employee returns to work. See “Short-Term Disability and Maternity Leave” on page 30 and “Changing Employee Status” on page158.
Short-Term Disability and Maternity LeaveApplies only to the Position and Employee configuration option
If an employee is on maternity leave or short-term disability leave, you can handle their absenceusing any of these options:
l Update the position's FTE to generate a replacement FTE vacancy that you can temporarilyfill by assigning another employee not associated already with the position. This otheremployee fills the vacant FTE until the absent employee's leave ends.
l Not update the position's FTE to have another employee already assigned to the positionperform, being compensated accordingly, the work of the absent employee.
l Set the status as active to have their compensation calculated during a particular period oftime
l Set the status as inactive to not calculate or pay their compensation during a particular timeperiod
l Include or exclude the compensation expenses from budget calculations
See “About Changing Status” on page 156 and “Changing Employee Status” on page 158.
Sample Case: Maternity LeaveFor example, an employee has an annual salary of $82,000, is away for three months on maternityleave, continues to receive compensation during her leave, and a replacement vacancy FTE isgenerated for her position. In this case, the replacement vacancy FTE is included in budgetcompensation calculations if another employee assumes the replacement FTE, which one does.By default, the replacement employee receives, for the three months they work until the originalemployee returns from leave, the same annual salary. Consequently, the annual and monthlycompensation for the position is:
l Employee on maternity leave: $82,000.00 (annual); $6,833.00 (monthly)
30

l Replacement employee working during the three months of the original employee'smaternity leave: $20,499.00
l Total annual compensation for the position: $82,000 + $20,499.00 = $102,499.00
FTE and Long Term Disability LeaveEmployees absent from work due to long term disability leave:
l Cannot have their vacant FTE generated and filled by another employee
l Cannot be have their status defined as active
l Cannot have their compensation calculated or paid
OvertimeOvertime is calculated only for nonexempt and hourly employees. Overtime is budgetedseparately from salary, and paid at a higher rate (typically, 1.5 times or two times the hourlyrate). You can modify overtime calculation to scale it by the number of employees in a group,and by the overtime hours projected for each eligible employee. Create overtime as an additionalearnings element. See “Defining Overtime” on page 105.
Headcount Headcount is internally calculated in budgets created using the Position and Employeeconfiguration option. Headcount is user-specified input for budgets created using the Positiononly configuration option. The following are the different kinds of headcount used inapplications:
l Existing headcount—In the Position configuration, existing headcount is an input value. Inthe Position and Employee configuration option, existing headcount is calculated based onthe number of loaded employees assigned to a position. In the Employee configuration,existing headcount is a loaded, read-only value.
l Total headcount—The existing loaded headcount in addition to approved headcount.
l Approved headcount—Headcount is loaded from HRMS in addition to accepted employee-position assignments made during the budget year. Empty or vacant headcount loaded fromHRMS are approved, but further employee assignments in Public Sector Planning andBudgeting are unapproved. For example, if you load a position with a headcount of six towhich four employees are assigned, the remaining vacancy of two is approved. If you assigntwo employees to the position, their headcount is unapproved. Specify headcount topositions in HRMS to accommodate future employee assignments before loading positions.
l Proposed headcount—The number of newly assigned employees to approved orunapproved positions in the budget year.
l Unapproved headcount—Number of remaining unapproved employee assignments.
31
Vacant Positionsl For the Position and Employee option, compensation is identified and calculated using
vacancies, FTE, and employee-position assignments.
l For the Position option, FTE is one of several factors used to determine compensation. Otherfactors such as start dates and salary changes are also used. Vacancies are excluded fromcalculations.
l For the Employee option, vacancy is calculated at the employee level and includes to-be-hired assignments.
For the position and employee option, you can generate position vacancies for employees onmaternity or short-term disability leave. You can then temporarily assign other employees tothe position until the absent employees return. See “Short-Term Disability and Maternity Leave”on page 30.
Shared PositionsSeveral incumbent employees can be assigned to a shared position, up to the value of the FTEdefined. With shared positions, Public Sector Planning and Budgeting ensures that the totalnumber of FTEs is the same as the number of assigned employees filling the position, plus theposition vacancies. For example, if a position has an FTE of six to which four employees (eachwith an FTE of one) are assigned, the remaining headcount of two is a vacant expense.
Assume that a Night Security Guard position has an FTE of two, a loaded headcount of four,and to which four part-time employees (each having an FTE of 0.5) will be assigned. If you assignone of the Night Security Guards an FTE of one (full time), three FTE or headcount remain. Ifa shared position is partially filled, average or default position-level salary, benefit, and allocationinformation derives the expense estimates of the filled and vacant portions of the position.
Pooled PositionsBecause a potentially changing number of employees can be assigned to a pooled position, pooledpositions can have multiple employee assignments. If an FTE value is unspecified for a pooledposition, expenses are not calculated. Loaded pooled positions usually do not have FTEs. Forthese positions, budget expenses are calculated for assigned employees, and vacant expenses donot exist.
FTE is usually not defined for pooled positions. However, to budget for a new pooled positionwithout knowing how many employees will be assigned, assign a position FTE; budget expensesare computed based on this FTE. Typically, pooled positions are not used to calculate vacancycompensation, although you can define FTE without having first specified employeeassignments.
Incumbent PositionsIncumbent positions can be held by only one employee.
32

Compensation Funding Across DepartmentsEach employee's salary, earnings, benefits, employer-paid tax, and allocation information is usedin calculations, ensuring that employee expenses are calculated and distributed correctly. Whena position is shared across departments, only one department owns the position and can modifyposition expenses. Define position or employee allocations to allocate compensation expensesto the owning department.
If an employee has two jobs, each in a different department, each department accounts for theirportion of employee expenses. For example, if an Administrative Assistant has an FTE of 1 andworks in two departments, each department pays 50% of the expense, and the FTE is calculatedas follows:
l Each department accounts for its portion of the employee FTE (0.5 per department in thiscase)
l The Administrative Assistant's two job records are grouped under the employee. The jobrecords are accessible only by the primary department.
You can also allocate a general expenses (hardware, furniture, and floor space, for example)across departments.
Additional EarningsModifying additional earnings can affect other calculations, such as those deriving effectivedating and percent of gross pay. You must enter percentage values for additional earnings andbenefits calculations as decimals. For example, to perform a Cost of Living Adjustment whichis 4% per year, you must enter the 4% as the decimal value. This is calculated by dividing theperiod of time you are using (12 in this case for an annual calculation) and then multiplying byten which is 0.3333%.
Decision Packages and Budget RequestsDecision packages present related resolutions, objectives, or proposals. Decision packagescontain budget requests that are the individual personnel, operational, or line item budgetsrequired to implement decision packages. For example, Public Safety Improvements could be amunicipal decision package that contains budget requests defined by the Fire Department andthe Police Departments that present the line item costs and total amount involved to fulfill thedecision package.
There are two kinds of budget requests:
l Recurring — Contain line items that are funded each budget period to support the currentlevel of service, as opposed to one-time budgets that are created for special purposes.
l Non-recurring—Temporary or one-time budgets such as special programs that sponsor aparticular event, or those used in an emergency to fund the additional resources requiredsuch as flood control.
33

The Fiscal Year Although Planning by default uses a fiscal year start date of January 1, you can budget usingfiscal years that do not start on January 1 and that start in the previous calendar year. For example,the 2011 fiscal year can start on July 1, 2010.
l If it starts on the same calendar year, the fiscal year is July 1, 2011, to June 30, 2012.
l If it starts on the previous calendar year, the fiscal year is July 1, 2010, to June 30, 2011.
Important: If your application fiscal year doesn't start on January, and you have salarycomponents, such as employer-paid taxes, that must max out during the calendar year, you mustinclude the previous year in your application and in the compensation budget start year and endyear variables.
Although position and employee compensation expenses are driven and calculated by effectivecalendar dates, quarterly and annual values are based on the fiscal year definition. For example:
l Monthly salary expenses in an entity in calendar year 2009 are $75,000 from January to May,and $60,000 from June to December.
l If the fiscal year 2010 starts April 1, 2009, and ends March 31, 2010, the annual salary expensefor the entity is $750,000.
l If the fiscal year 2010 starts January 1, 2010, and ends December 31, 2010, the annual salaryexpense for the entity is $720,000.
Provided Dimensions
Subtopics
l Important Considerations
l Scenario and Version
l Element
l Budget Item
l Entity
l Account
l Currency
l Dimensions in Decision Package-Enabled Applications
l Additional Dimensions
This topic describes the out-of-box dimensions. By default, the Scenario, Version, Period, Year,and Currency (for multi-currency applications) dimensions are enabled for the HCP plan, andplan types 1, 2, and 3.
Important ConsiderationsDo not change the order of the provided dimensions and members delivered in the HumanCapital Planning plan type. The order of the dimensions and members is optimized to deliverproper calculation results and the best performance, and should not be altered. .
34

Note: If you must change the order of any of the provided dimensions or members, thoroughlyanalyze every business rule for impacts to calculation results and performance.
Scenario and VersionThe Scenario and Version dimensions represent the broadest categories of data in yourapplication.
l Scenario—Contains the type of data you are working with, such as actual, forecast, or budget.To load and use actuals from PeopleSoft Financials Commitment Control, create a childmember called Actuals in the Scenario dimension.
l Version—Contains the stages or iterations that you use, providing snapshots of data duringeach phase of the budget preparation process. Create members in the version dimension torepresent possible budget stages such as initial budget and final budget. Version also containsrevision members used when budgets are updated. Administrators create members forbudget revisions R(x) in the Revision parent member.
Changing the names of the predefined Version dimension members under the Stage parentdoes not impact on the pre-built content in the application.
ElementThe Element dimension contains your compensation components and salary grade structures.Each parent member represents a compensation type, such as a salary grade or employer-paidtaxes. These are the predefined parent members:
l Total Compensation Expenses—Includes Salary Grades, Additional Earnings, Benefits, andEmployer-paid Taxes. This member is empty because it will contain the members you createfor your specific compensation components.
l Salary Grades—Stores all your salary grades. Create salary grades or load them from HRMSas child members.
l Additional Earnings—Create additional earnings members (shift differential and hazardpay, for example) or load them from HRMS. Generally, additional earnings are taxablecomponents of salary, but cannot be classified as base salaries.
l Benefits—Tracks all benefits paid by the company to employees. Create benefits (medicalinsurance, short-term disability, for example) or load them from HRMS as child members.Generally, benefits are nontaxable. Create benefit elements such as "Fringe Benefits" tobenefits using blended benefit rates that are percentages of salary.
l Employer-paid Taxes—Tracks taxes paid to state and federal governments or otherauthorities on behalf of employees. Create employer-paid taxes (SUTA, and FICA forexample) as child members or load them from HRMS. You can add blended taxes to budgettax as an overall percentage of salary.
l Defaults—Includes salary grade, benefit, additional earning, and employer-paid taxdefaults.
35

TIP: Use the Addition aggregation option for child members so that they roll up correctly to theparent members. For example, add all benefit members to calculate the total for the Benefitsparent member. Also, for faster aggregation speeds, try to organize Entity dimension membersin hierarchies.
Budget ItemEnabled only for the HCP plan type, this dimensions contains FTE assignments and changes,status assignments and changes, compensation element changes, and allocation assignments.These are the predefined members:
l Unspecified Budget Item—Contains and tracks data that does not change by period or yearsuch as position name, employee name, and employee number.
l FTE and Status Assignments—Parent member that includes 25 placeholder child members(1st Assignment through 25th Assignment) that tracks changes to FTE, employees, andposition status. For example, track changes to employee status when employees aretransferred, terminated, or go on maternity leave.
l Element Changes—Parent member that includes 25 placeholder child members (1stElement Change through 25th Element Change) that tracks changes to the elements assignedto positions and employees, such as changes to benefits, salary grades, or additional earnings.Set the Addition aggregation option for all child members of Element Changes.
l Allocation Assignments—Parent member that includes 25 placeholder child members (1stAllocation through 25th Allocation) that tracks the allocation assignments for positions andemployees. Allocations link position and employee compensation expenses to thecorresponding General Ledger accounts through segments or chartfields. The details of thoseallocations are captured by these members.
l Percentage Allocation—Parent member for the account percentage used to fund positionsand employees. For example, a position's funding could be comprised of 35% allocated fromone GL account, and 65% from another account.
l Flat Allocations—Parent member for fixed dollar amounts, such as grants, used in positionor employee allocations. For example, a position's funding could be comprised of an annualfederal grant of $75,000 .
l Rule Criteria—Preserves the search results for employees or positions that you adjust. Forexample, when you launch a business rule to search for positions to which to add benefits,the search results are stored in this member.
Tip: Applications include 25 effective-dated changes for a given scenario and version during abudget cycle. Determine the number of changes you will need in a budget cycle, and then addor load members to the dimension hierarchy.
EntityDo not modify the order of the Unspecified Entity member in the Entity dimension. Doing sowill cause calculation errors. See “Why You Shouldn't Change the Dimensional Order” on page54.
36

The Entity dimension contains members for HR organizations (departments, for example)enabled in the HCP plan, and for General Ledger organizations (cost centers) enabled in PlanType 1, 2, or 3. Configure the Entity dimension as follows:
l Add members to represent HR organizations under Total Entity.
l If you maintain separate HR and General Ledger organizations, in order to use GeneralLedger organizations in HR organization allocations, define a separate member hierarchyto represent General Ledger organizations. Then enable these members on Plan 1, 2, or 3,or the plan type for the line item budget .
l If HR and General Ledger organizations are the same, enable members in the HCP plantype, and Plan 1, 2, or 3, or the plan type for the line item budget.
l Specify descriptive aliases for entity members such as HR departments to enable plannersto more easily recognize and select intuitively named entity members when working withdecision packages. Then enable the corresponding preference by selecting File, thenPreferences, then Planning, then Application Preferences, and then select Yes for ShowPlanning Unity Hierarchy As Aliases.
For multi-currency applications, select the currency using the Base Currency property. To defineand modify a decision package, users must have write-access to the entity that owns the decisionpackage.
TIP: For faster Essbase aggregation speed, create dimensional hierarchies to contain entitymembers. If none exist, try to create generic hierarchies.
AccountThe Account dimension contains salary, job code, employee, and allocation properties enteredby planners. It also contains compensation expense accounts, personnel expenses, and loadedGeneral Ledger natural account segment or chart field values. Create account members for allbudgeted items.
Enable all Account dimension members, including those for Personnel Expense accounts, onPlan Type 1, 2, or 3 as the source plan type. If members have HCP as the source plan type, changeit to Plan Type 1, 2, or 3.
By default for decision package-enabled applications, and for all plan types, a request amountmember is created in the Accounts dimension as a child of Request Accounts. Request amountstores the total budget impact that a particular budget request has on the decision package inwhich it exists. Request amount is also used in the roll up of the compensation expenses decisionpackage type to aggregate and display budget request totals.
IMPORTANT: If you add, delete, or modify segment information in the Account dimension, youmust redeploy all rules that reference the Account dimension.
CurrencyLocal Currency identifies the currency in which values are displayed. You can budget in multiplecurrencies. You can convert local currencies to different currencies (for use in reporting
37

applications and line item budgets) when you define mappings. For information about usingdifferent currencies, see Chapters 4 and 12 in the Oracle Hyperion Planning Administrator'sGuide.
Dimensions in Decision Package-Enabled Applications
In the DP_ASO plan type
These two locked dimensions are provided for reporting purposes in decision package-enabledapplications:
l Decision Package — Contains members that correspond to the names of all decisionpackages
l Budget Request — Contains members that correspond to the names of all budget requests
Although you cannot modify these dimensions, you can create 1000 members in eachdimensions to define the decision packages and budget requests you need. If you exceed thisnumber, and need more members, you are prompted to refresh the data base. This generates anadditional 1000 members in the decision package and budget request dimensions.
Additional Dimensions
Subtopics
l Employee
l Job Code
l Position
l HSP_Rates
Employee
The Employee dimension contains employed workers in your organization. Employees aretypically paid compensation and benefits through the employer’s payroll application. Thisdimension is created if you use the Employee configuration option or Position and Employeeconfiguration options. The Employee dimension uses these members:
l Unspecified Employee—Tracks data for which this dimension does not apply, such asvacancy compensation details with respect to positions.
l Vacancy—Tracks position vacancy compensation details. When you specify position details,track the position vacancy in the Vacancy member from the Employee dimension.
l Existing Employees—Parent member for all existing employees. Loads all existingemployees from HR as children of Existing Employees.
l New Employees—Parent member that includes 100 placeholder child members (To beHired 1 through To be Hired 100) that are used to add new employees during a budget cycle.
38

Set the Addition aggregation option for child members so that they aggregate correctly to theparent members. For example, add all existing employee members to calculate the total for theExisting Employees parent member.
TIP: For faster Essbase aggregation speed, create dimensional hierarchies to contain employeemembers. If none exist, try to create generic hierarchies. For example, in an Employee-Onlybudget you could create parent members in which a letter range (A-K, for example) is used tocontain employee names.
Job Code
The Job Code dimension contains generic employee roles or classifications that can beindependent of positions or organizations. For example, Secretary can be a job code in theFinance department and the Youth Services department. Job Code is used only with theEmployee configuration option, and uses these predefined members:
l Unspecified Job Code—Tracks data for which this dimension does not apply
l Total Job Code—Parent member for all job codes. Load job codes from HRMS as childrenof Total Job Code.
l Default Job Code—Captures job defaults
Administrators can add job codes during a budget cycle to reflect new proposed jobs.
Position
The Position dimension contains the occurrences of jobs in entities. For example, position 2655could hold a Firefighter job in the Fire Services department. These members are used:
l Unspecified Position—Tracks data for which this dimension does not apply
l Total Existing Positions—Parent member for all existing positions. Load all existingpositions from HR as children of Total Existing Positions.
l Total New Positions—Parent member that includes 100 placeholder child members (NewPosition 1 through New Position 100) that are used to add new positions during a budgetcycle.
l Default Position—Captures position defaults by entity
Set the Addition aggregation option for child members so that they aggregate correctly to theparent members. For example, add all new position members to calculate the total for the TotalNew Positions parent member.
TIP: For faster Essbase aggregation speed, create dimensional hierarchies to contain positions. Ifnone exist, try to create generic hierarchies.
39

HSP_Rates
Used only in multi-currency applications, the HSP_Rates dimension contains a member to storeexchange rate values for each currency. It also contains a member for input values and currencyoverrides.
Predefined Accountsl System Members—Includes members used in date calculations in predefined business rules.
You must keep the System Member parent and its members at the top of the Accountdimension hierarchy. Do not delete these members or modify their properties.
l Unspecified Account—Tracks data for which this dimension does not apply.
l Human Capital Planning Accounts—Includes the accounts that capture input in thepredefined forms. The parent includes three categories: Assumption Input, HCP BudgetingAssumptions, and Position-Expense.
l Revision Properties—Includes accounts that capture input for budget revisions. Accountsinclude Revision Approval Status, Posting Date, and Revision Amount.
l Segment Information—Includes a child which is a Smart List for each General Ledgersegment or chart field that is part of your compensation allocation definition. If you wantto specify allocation rules using segment or chart field values use these Smart Lists.
l Segment Descriptions—Includes members for Smart Lists corresponding to each GeneralLedger segment or chart field used in compensation allocations. Use these Smart Lists tospecify allocation rules using segment or chart field descriptions.
The child members in Segment Information and Segment Descriptions are a sample of segmentssuch as Account, Entity, Fund, Program, Project, and other user-defined dimensions that youmay have in your General Ledger chart of accounts. To set up the allocation detail for positionsor employees:
For Administrators
l Modify the list of child members to match your General Ledger chart of account.
l Modify Smart Lists associated with segment members. Smart Lists must include entries forall base members of the corresponding dimensions. For example, the Entity Segmentmember is associated with a Smart List that contains all base members of the Entity.
Add additional values here to allocate to an even lower level of granularity than codecombination or a chart field combination. For example, you can add performance objectiveas an extra allocation field.
User Defined DimensionsYou can create dimensions such as Fund, Program, Project, and Activity to suit yourorganization's budgeting needs. For example, define a Project dimension to budget expenses forprojects such as community center swimming pool installation and community center adult
40

education computer upgrade. Important: If you use custom dimensions you must update anybusiness rule in which related data is referenced or used in calculations.
Although you need not enable user-defined dimensions on the HCP plan type, if you want touse them to track employee or position expenses, map and integrate the dimensions with theline item budget as described in Chapter 5, “Configuring the Line Item Budget”
You cannot delete user-defined dimensions, but you can:
l Assign plan types at the dimension, not the member, level
l Rearrange the dimension hierarchy
l Share members
Note: Although you can use 20 dimensions, assign no more than 12 dimensions to each PlanType for optimal performance.
Smart ListsSmart lists are linked to the members used to manage positions, jobs, and employees. When youbuild budgets using forms, Smart Lists provide the values that you can select for specific fields.For example, the Employee_Type Smart List includes Temporary, Permanent, and Contractorvalues. Smart Lists are also used by predefined business rules that perform calculations. SmartLists capture the allocation information for a given period of time. For more information, seethe Oracle Hyperion Planning Administrator's Guide, Oracle Hyperion Planning User Guide, and“Set Up Smart Lists” on page 56.
Task ListsTask lists guide you through the actions that you must take based on your role in the budgetingprocess. For example, Budget Preparation tasks help budget center managers or planning unitstaff perform tasks such as creating positions, assigning employees to positions, and applyingposition compensation details.
The tasks that you can perform based on your account provisioning, display in My task lists. Ifyou use decision packages, some tasks may display differently.
Tasks Lists in Decision Package-Enabled ApplicationsIf you use decision packages and budget requests, you'll notice these differences in My tasklists:
l In Budget Administration, there is not a task for Mass update position and employee.
l In Budget Preparation, there are no sub tasks for Manage Position and Employee Data.Selecting this task launches your decision packages and budget requests in which youperform position and employee data tasks such as fill to be hired vacancies, edit positiondetails, and manage position-employee assignments.
41

l In Budget Preparation, there are no tasks for:
m Mass adjust compensation and benefits
m Review and approve positions
m Manage revision requests
You don't initiate and perform tasks from My task lists, but in decision packages and their budgetrequests. For example, to modify employee compensation details, open the appropriate decisionpackage, and edit the relevant budget request using the Maintain Employee Data form tab.
Tip: If the forms that you need to perform tasks aren't in a budget request, have your administratormodify the decision package to be based on the Compensation Expenses decision package type.
Annotations, Comments, and Attachments Planners and cost center managers can explain and support their budget decisions andassumptions using:
l Annotations and comments
l Hyperlinks and URLs
l Microsoft Word documents or Microsoft Excel spreadsheets
RequirementsBefore planners can create budgets, product implementors and administrator must perform thetasks described in:
l Chapter 2, “Understanding What Tasks to Perform, and When”
l Part II, “For Administrators”
AssumptionsOracle assumes that administrators managing Public Sector Planning and Budgetingapplications are familiar with the predefined content provided, Oracle Hyperion Planning,Oracle Hyperion Calculation Manager, and, if used, Financial Reporting.
Accessibility For menu and navigation keyboard alternatives, see the Oracle Hyperion PlanningAdministrator's Guide on:http://www.oracle.com/technetwork
42

2Understanding What Tasks to
Perform, and When
In This Chapter
Initial Implementation Tasks ... . . . . . . . . . . . . . . . . . . . . . . . . . . . . . . . . . . . . . . . . . . . . . . . . . . . . . . . . . . . . . . . . . . . . . . . . . . .43
Administration and Maintenance Tasks... . . . . . . . . . . . . . . . . . . . . . . . . . . . . . . . . . . . . . . . . . . . . . . . . . . . . . . . . . . . . . . .45
Planner Tasks... . . . . . . . . . . . . . . . . . . . . . . . . . . . . . . . . . . . . . . . . . . . . . . . . . . . . . . . . . . . . . . . . . . . . . . . . . . . . . . . . . . . . . . . . . . . .46
Given your budgeting role and responsibilities, review the tasks that different individualsperform in the budgeting process:
l If you must set up and initialize Public Sector Planning and Budgeting in your organization,see “Initial Implementation Tasks” on page 43.
l If. you or periodically maintain budgets, see “Administration and Maintenance Tasks” onpage 45.
l If you are a department or business unit owner responsible for creating budgets, see “PlannerTasks” on page 46.
Initial Implementation TasksIf you must set up and initialize Public Sector Planning and Budgeting in your organization,define and prepare applications as follows:
l Install and configure Public Sector Planning and Budgeting. See the Oracle HyperionEnterprise Performance Management Installation and Configuration Guide and the OracleEnterprise Performance Management System Deployment Options Guide.
l If upgrading from a previous release, perform the steps in the Planning Readme.
l Create applications using Calculation Manager as the calculation engine.
l Define, customize, and secure all artifacts such as dimensions and Smart Lists. See Chapter 3,“Creating and Preparing Applications”
l To use PeopleSoft Commitment Control data to build decision packages and budgetrequests, define decision package types and decision packages before loading source data.SeeChapter 10, “Working with Decision Packages and Budget Requests”
l Prepare to load metadata and then data from supported source systems using tools.
l Perform the steps in “Configure the Compensation and Line Item Budget” on page 45.
43

Verify Your Artifacts l If organization units in your HRMS or HR systems differ from those in the General Ledger,
define two separate sets of members in the Entity dimension:
m Create one set of members to represent HR organizations (departments, for example)under Total Entity. Enable these members only on the HCP plan type.
m Create another set to represent General Ledger organizations (funding sources and costcenters) used in allocations to fund HR organizations. Enable these members on Plan1. 2, 3, or where they apply.
l Define the additional dimensions and members required for your budgets. For example, tobudget by project, create a project dimension hierarchy for individual project data andexpenses. See “Configuring Dimensions” on page 51.
l Define Smart Lists for the General Ledger segments or chart fields that you use in allocationsto fund positions and employees. For example, ensure that General Ledger organizationsused as funding sources are in Entity_List. See “Set Up Smart Lists” on page 56.
Important: Ensure that Smart Lists for allocation segments or chart fields contain entries forall leaf level members. Also make sure that Smart List labels have the same name as thecorresponding dimension member or alias.
l Ensure that all dimensions, Smart Lists, task lists, business rules, validation rules, andsubstitution variables required for your business logic and budgeting needs are created.
l To give planners the guidance and information required to finish the budget process, ensurethat task lists contain the appropriate tasks. Make sure that you assign access as required totask lists.
l Specify application and system preferences.
See Chapter 3, “Creating and Preparing Applications”or the Oracle Hyperion PlanningAdministrator's Guide.
Prepare to Load Data To load and write-back data from PSFT Commitment Control, see Chapter 4, “Using PeopleSoftFinancials Commitment Control”.
l Determine how to load General Ledger and HRMS source data (using the FDMEE or theOutline Load Utility, for example). See “Loading General Ledger and HRMS Metadata andData” on page 65 or Appendix B, “Loading Metadata and Data Using the Outline LoadUtility”.
Note: To load data from PeopleSoft Financials, you must use FDMEE.
l Define Budget Item as a data load dimension when verifying the data load settings.
l If using FDMEE, define and run integrations to load actual and budget metadata and datafrom the HRMS and General Ledger. Load General Ledger data to Plan 1, 2, or 3. Load
44

HRMS data to the HCP plan type. See Oracle Hyperion Financial Data Quality ManagementERP Integration Adapter for Oracle Applications Administrator's Guide.
l Review the loaded data. See “About Processing Loaded HRMS Data” on page 108 and“Reviewing Loaded Position, Job, and Employee Data” on page 109.
Configure the Compensation and Line Item Budgetl Configure the line item budget to link compensation data and expenses on the HCP plan
type to operation expenses on Plan 1, 2, or 3. See Chapter 5, “Configuring the Line ItemBudget”.
l Configure predefined artifacts, such as task lists, business rules, and validation rules to suityour business logic and budgeting needs. See “Customizing Provided Components” on page67, and the Oracle Hyperion Planning Administrator's Guide.
l In Essbase, set the current values for substitution variables to represent the current year,forecast year, and previous year. These are used in reporting. See “Defining SubstitutionVariables” on page 55.
l Define other compensation elements, such as benefit schedules and additional earnings. See“Managing Other Compensation Elements” on page 102.
l Specify salary, compensation, and allocation defaults. See Chapter 7, “Defining Salary,Compensation, and Allocation Defaults”.
l Perform mass updates to apply updated compensation elements globally or to specificpositions and employees. See “Performing Mass Updates” on page 112.
l Calculate and review the initial budget to ensure aggregations and calculations are correct.See “Calculating Budgets” on page 183 and “Reviewing Expenses” on page 184.
l Allocate the initial budget to General Ledger accounts. See “About Allocating CompensationExpenses to General Ledger Accounts” on page 186.
Secure Your DataRestrict access to sensitive financial and personnel data by applying access permissions todimensions, members, forms, task lists, and business rules. See “Securing Forms” on page 64,“Securing Task Lists” on page 64, and “Securing Business Rules” on page 64
Administration and Maintenance TasksAdministrators who are responsible for maintaining budgets may need to perform tasks suchas:
l Create a version member for each budget stage and assign users version access for data entry.See “Version” on page 53and “Securing Dimensions and Members” on page 62.
45

l Update the new budget's calendar span by setting Start Year, End Year, Start Period, andEnd Period for the scenario. See Chapter 12 in the Oracle Hyperion Planning Administrator'sGuide.
l Define new positions, employees, and jobs mid budget cycle.
l Assign new users access to artifacts such as scenarios. See “Securing Dimensions andMembers” on page 62.
l Completely or partially refresh data from the General Ledger and HRMS source systemsusing FDMEE. See Oracle Hyperion Financial Data Quality Management ERP IntegrationAdapter for Oracle Applications Administrator's Guide.
l Incorporate changes to budget guidelines and assumptions and specify options for existingcompensation elements, and salary grades (grade steps, for example). See Chapter 6, “SettingUp Compensation Budgets” and Chapter 7, “Defining Salary, Compensation, andAllocation Defaults”.
l Distribute the budget for review by defining and starting planning units. See “AboutSubmitting Budgets for Approval” on page 239.
l Recalculate the compensation budget to reflect the impact of modified data. See “CalculatingBudgets” on page 183.
l After budget approval, upload data to the General Ledger or to PeopleSoft Financials usingsupported tools.
l Revise approved budgets. See Chapter 12, “Revising and Adjusting Budgets”.
Planner TasksPlanners such as department manager and finance staff review and maintain data for theirentities during the planning cycle by performing tasks such as:
l Define and activate new positions or job .
l Define basic compensation elements, such as benefits, salaries, additional earnings, andallocations.
l Optional: Define entity-specific compensation defaults that new employees, jobs, orpositions can inherit.
l Specify the compensation details and assignments, such as salary allocations, FTE, benefits,taxes, and additional earnings for employees, jobs, or positions.
l Assign employees to jobs or positions.
l Modify employee status to budget for changes such as maternity or disability leave.
l Create decision packages and associated line item budgets to request funding for positionsand employees, and non-personnel related costs, for initiatives and projects.
l Calculate the compensation budget for their HR organizations, and allocate expenses toGeneral Ledger accounts.
l Review and approve compensation expenses. .
l Submit their HR organization budgets for overall approval.
46
P a r t I I
For Administrators
In For Administrators:
l Creating and Preparing Applicationsl Using PeopleSoft Financials Commitment Controll Configuring the Line Item Budgetl Setting Up Compensation Budgets
47

48

3Creating and Preparing
Applications
In This Chapter
About Creating Applications ... . . . . . . . . . . . . . . . . . . . . . . . . . . . . . . . . . . . . . . . . . . . . . . . . . . . . . . . . . . . . . . . . . . . . . . . . . . .49
Creating Applications Using Planning Application Administration... . . . . . . . . . . . . . . . . . . . . . . . . . . . . . . . . . .49
Preparing Applications... . . . . . . . . . . . . . . . . . . . . . . . . . . . . . . . . . . . . . . . . . . . . . . . . . . . . . . . . . . . . . . . . . . . . . . . . . . . . . . . . . .50
Customizing Provided Components ... . . . . . . . . . . . . . . . . . . . . . . . . . . . . . . . . . . . . . . . . . . . . . . . . . . . . . . . . . . . . . . . . . . .67
About Creating ApplicationsYou can create applications as follows:
l Using Planning application administration. See “Creating Applications Using PlanningApplication Administration” on page 49.
l Using the Oracle Hyperion EPM Architect application wizard. If you use this optionandPerformance Management Architect to administer your application, do not rename theEmployee, Position, Element, and Budget Item dimensions. If you do, you cannot validateor deploy the application.
Note: To use decision packages, you must create your application using Planning applicationadministration and select Enable Decision Packages.
Creating Applications Using Planning ApplicationAdministrationCreate an application using the Oracle Hyperion Planning Administrator's Guide, but apply thesetab settings:
l Application Type—Public Sector Planning and Budgeting to add the HCP, Human CapitalPlanning plan.
l Shared Services Project—Default Application Group (project for which you defined securityand provisioning)
l Calculation Module—Calculation Manager
l To create decision packages, select Enable Decision Packages. This generates the DP_ASPplan type that enables you to report on decision package data in Smart View and FinancialReporting.
49

l First Fiscal Year—First year for which to use actual data. Oracle recommends that you makeactuals from at least one prior budget available.
l Fiscal Year First Month—Month in the first fiscal year for which to have actuals available.
l Same Calendar Year—If the fiscal year begins in the same year
l Previous Calendar Year—If the fiscal year began in the previous year
l Plan Type:
m To budget for operational (non personnel related) expenses in line item budgets, selectStandard Plan Type 1, 2, or 3.
m If you are creating a decision package-enabled application, enter the name for theEssbase application for use with the DP_ASO plan type, and the corresponding mapreporting application. DP_ASOl let syou run reports again decision package data inSmart View and Financial Reporting.
m To budget for compensation expenses, select HCP, and then the budget configuration.See “Configuration Options” on page 28. If you use decision packages, this loads theCompensation Expenses decision package type that enables budget preparers to capturepersonnel costs based on delivered position budgeting forms you later select.
Preparing Applications
Subtopics
l Best Practices
l Configuring Dimensions
l Verifying Artifacts and Create Planning Units
l Defining Exchange Rates
l Defining Substitution Variables
l Specify Data Load Settings
l Set Up Smart Lists
l Securing Applications
l Loading General Ledger and HRMS Metadata and Data
Best Practices
Subtopics
l Configuring and Customizing Applications
l Loading Data
l Human Capital Budgeting
Configuring and Customizing Applicationsl Do not change the order of dimensions or their members
50

l Configure forms, menus and other artifacts to make the application more intuitive and easyto use
l Add Smart Lists to track additional data
l Rater than modifying existing rules, add new rules to perform special calculations
l Do not run the CalcAll rule on the HCP cube
Loading DataUse Oracle Hyperion Financial Data Quality Management for Hyperion Enterprise for:
l EBS
l PeopleSoft GL
l PeopleSoft HCM
l PeopleSoft Commitment Control
Use the Oracle Database Integrator (ODI) for any source system.
Human Capital Budgetingl If possible, limit number the number of pay codes.
l For faster Essbase aggregation speed, create dimensional hierarchies to contain position,employee, entity. and element names. If none exist, try to create generic hierarchies. Forexample, in an Employee-Only budget you could create parent members in which a letterrange (A-K, for example) is used to contain employee names:
Total Employee
m A -K
o Atkins, James
o Eddy, Laura
o Hollinger, Nadine
o Kurtz, Joseph
m L-Z
o Lane, Sebastian
o Porter, Adele
o Stanfield, Jessica
o Wainright, Martin
Configuring DimensionsAfter setting up these dimensions, ensure that you enable them for the correct plan type asdescribed in “Enabling the Right Plan Type for Dimensions” on page 53:
51
l “Entity ” on page 52
l “Budget Item ” on page 52
l “Scenario ” on page 53
l “Version” on page 53
EntityIf organization units in your HRMS or HR systems differ from those in the General Ledger,define two separate sets of members:
l Create one set of members to represent HR organizations (departments, for example) underTotal Entity. Enable these members only on the HCP plan type, and load position, employeeand compensation data to these members.
l Create another set to represent General Ledger organizations (funding sources and costcenters) used in allocations to fund HR organizations. Create these General Ledger membersunder Total Entity in the Entity dimension, and enable them only on Plan 1, 2, 3, or theappropriate data source. Load General Ledger data against these members.
Note: Do not enable the HCP plan type for General Ledger entities that you also use to captureoperating expenses. Only enable the HCP plan for HR entities. If HR and General Ledgerentities are the same, enable the HCP plan type, and the other plan types, for the entity.
If planners will define decision packages and budget requests, specify descriptive aliases for Entitymembers. This will enable users to choose to display aliases for entity members in decisionpackages. Enable the corresponding application preference by selecting File, then Preferences,then Planning, then Application Preferences, and then enable Show Planning Unity Hierarchy AsAliases
Caution! Oracle strongly advises against modifying the order of dimensions in yourdimensional outline. Changing the order of dimensions will cause calculation errors.See “Why You Shouldn't Change the Dimensional Order” on page 54.
Budget ItemEnsure that the Percentage Allocation and Flat Allocation parents in the Budget Item dimensioncontain members for any fixed amounts (such as grant funding) or account percentages to beused in allocations.
Account and ElementCreate child members for custom dimensions used in the General Ledger (on Plan 1, 2, or 3) inthe Segment member of the Account dimension. Note: Enable all Account dimension members,including those for Personnel Expense accounts, on Plan Type 1, 2, or 3 as the source plan type.If members have HCP as the source plan type, change it to Plan Type 1, 2, or 3. Create dimensions
52

and members in the Element dimension for salary, benefit, additional earning, and employer-paid tax details and options.
Scenario Set up scenarios such as Actual and Budget by specifying the start and end period and start andend year, and by securing scenario members to determine the correct level of access for planners.Indicate whether a scenario is included in the approval process. For example, exclude the Actualscenario, but include the Budget scenario. For multicurrency applications, set up the exchangerate table and enter exchange rates so that values can be converted and viewed in differentcurrencies. If you create scenario members specify a start year, specify an end year, and selectEnabled for Process Management to later submit budget scenarios for approval.
Note: To use decision packages and budget requests, define the master Planning Unit Hierarchy(PUH) and assign it to the scenario for the new budget cycle. See “Configuring PlanningUnit Hierarchies” on page 200. To enable users to create and modify a decision packageand its budget requests, ensure that they are specified as the owner of the scenario, version,and owning entity of the decision package. See Setting Up Access Permissions in the OracleHyperion Planning Administrator's Guide.
VersionTo enable planners to enter data at each stage of the budget and revision processes, set upversions, and secure version members to determine the correct level of access for planners. Forexample, within the Version dimension, set up stages such as Agency Request and Governor sothat budgets can be prepared for each version.
To create members for revisions that can later be used to modify approved budgets, add childrenin Revisions. TIP: To enable budget preparers to create additional revision members on the fly,without having to refresh the database, enable the appropriate dimension member for dynamicchildren. See “Enabling Preparers to Create Revision Members” on page 249.
Note: To use decision packages and budget requests, define the master Planning Unit Hierarchy(PUH) and assign it to the version for the new budget cycle. See “Configuring PlanningUnit Hierarchies” on page 200. To enable users to create and modify a decision packageand its budget requests, ensure that they are specified as the owner of the scenario, version,and owning entity of the decision package. See Setting Up Access Permissions in the OracleHyperion Planning Administrator's Guide.
Enabling the Right Plan Type for Dimensionsl Select HCP in Valid for Plan Types for all dimensions and members that you use to calculate
human capital compensation expenses.
l Select a Plan 1, 2, or 3 in Valid for Plan Types for dimensions and members that you use tocalculate nonsalary operating expenses such as equipment and training.
53
Note: If you maintain separate HR and General Ledger entities, to use Genera Ledger entitiesin HR entity allocations, enable members representing each entity only the Plan 1, 2,or 3 type, or the plan type used for the line item budget. If your HR and GeneralLedger entities are the same, enable their members both in the HCP plan, and in Plan1, 2, or 3, or the plan type for the line item budget.
Making Member Names Intuitive and DescriptiveTo enable planners to find and select data more quickly, specify descriptive aliases for dimensionmembers. For example, the state of Delaware may have over 50 entities representingdepartments, bureaus, and offices. In addition to specifying numeric names for the entitymembers (D100 and D200, for example), enter aliases such as Department of Housing Services
and Board of Library Commissioners. Click on Member Selection dialogs to display byand search using these aliases.
Why You Shouldn't Change the Dimensional OrderOracle strongly recommends that you do not modify the order of dimensions and dimensionmembers delivered as part of Human Capital Planning during your implementation. The orderof dimensions and members has been optimized to deliver proper calculation results with bestcalculation performance and should not be altered. If you must change the order of any of thedelivered dimensions or dimension member, you must thoroughly analyze every business rulefor possible adverse impact on calculation results and calculation performance.
Updating Rules After Renaming or Creating Dimensions If you use Performance Management Architect, do not rename Employee, Position, Element,Budget Item, or Job Code. If you do, you cannot validate or deploy the application. Oraclerecommends that instead of renaming dimensions and members, that you use aliases that moreaccurately and intuitively describe the dimensions and members. To do this, selectAdministration, then Manage, then Alias Tables, and then see the Oracle Hyperion PlanningAdministrator's Guide.
If you rename any provided dimension or implement custom dimensions, perform these tasksto update your rules:
1. In Calculation Manager, right-click your application, and then select Load PredefinedRules.
2. Update the reports provided with Public Sector Planning and Budgeting so that theyreference the custom or renamed dimensions and members.
Verifying Artifacts and Create Planning Unitsl Create the Planning unit hierarchies and identify budget owners and reviewers who approve
submitted budgets. See “About Submitting Budgets for Approval” on page 239 .
54

l Ensure that all Planning artifacts, such as scenarios and versions that are required forbudgeting, exist .
l Specify the Essbase substitution variables later used to report on compensation and linebudget data. See “Defining Substitution Variables” on page 55.
l Ensure that the existing task lists include all tasks that planners need to perform, the guidanceto perform these tasks, and values they need to enter to create compensation budgets. Ifnecessary, define tasks, and secure them by defining different task lists for different usergroups. See the Oracle Hyperion Planning Administrator's Guide.
l Define access to task lists and data artifacts. See “Securing Applications” on page 61.
l Optional: Configure artifacts such as business rules, forms, task lists, and validation rules tosuit your budgeting requirements. See “Customizing Provided Components” on page67.
l Optional: Increase the default length for inputs in text and comment cells.
Defining Exchange RatesFor multicurrency applications, select Administration, then Manage, and then Exchange Rates tospecify how values are converted and viewed in different currencies.
Defining Substitution VariablesTo ensure that users can use predefined reports, set values for these substitution variables inOracle Essbase Administration Services or using MaxL statements:
l CurrScenario
l CurrentStage
l CurrentYear
l PreviousStage
l PreviousYear
l PriorScenario
l ProposedYear
See the Essbase Database Administrator's Guide and the Oracle Hyperion Planning Administrator'sGuide.
Specify Data Load SettingsTo use loaded source system data such as effective-dated data at the period level, ensure that theBudget Item dimension is defined as a data load dimension and that DIRECT_DATA_LOADproperty is TRUE.
55

ä To configure data load settings:
1 Select Administration, and then Data Load Administration.
2 From Data Load Dimension, select Budget Item.
3 From Driver Dimension, select Account.
4 Adjacent to Driver Dimension, click the icon to select:
l Descendants (Human Capital Planning Accounts)
l Descendants (Segment Descriptions)
l Descendants (Segment Information)
5 Click Add Row three times.
6 In Advanced Settings, click the member selector, and then select the following:
l Allocation Assignment—Allocation start date, percentage allocation,descendants(segment info)
l Element Changes—Grade step, salary grade sequence, option start date
l FTE and Status Assignments—FTE start date
For more information see the Planning Administrator's Guide.
Set Up Smart Lists
Subtopics
l Defining Smart Lists
l Required Smart Lists
l Additional Smart Lists
l Common Smart Lists
l Verifying Smart Lists Before Loading Data
l Associating Smart Lists With Dimensions
l Including New or Modified Smart List Entries in Essbase Reports
Defining Smart ListsSmart Lists are used in predefined business rules, which drive calculations in Public SectorPlanning and Budgeting applications. They also contain values for the members that users selectto build budgets. Consequently, perform these tasks:
l For the required Smart Lists and those used in General Ledger allocations, ensure that SmartList names and entries match the corresponding dimension member names
l Specify a label for each Smart List entry
Before changing or adding Smart List entries, or the dimension members with which they areassociated, identify the business rules that are affected. See Appendix C, “Updating BusinessRules After Changing Predefined Smart Lists”.
56

To define Smart Lists, see Chapter 12 of the Oracle Hyperion Planning Administrator's Guide.
Required Smart Lists You must populate the following Smart Lists. Important: For Smart Lists used in GL allocations,each Smart List much match the member or alias name of the corresponding dimension. Forexample, Salary_Account_List must have the same name as the corresponding Accountdimension member or alias. :
l Grade_Steps—Steps that increment salary grades
l Grade_Sequence—Sequences for the progression between salary grades
l Job_Class—Job codes
l Benefit_Options—The medical plans (Dependants, for example) for health benefits
l Salary_Account_List—Compensation element members of GL account entries used inallocations
l Entity_List—Members for GL and/or department, business unit, or cost centers
l Revision_Transactions—Members for changes made to an approved budget
l Smart Lists to implement custom dimensions (fund or project, for example) used in GLaccount chart fields or segments
Additional Smart ListsYou can also load these Smart Lists or those that link budget versions in Planning withcorresponding budget versions in the General Ledger or HRMS:
l Budget_Set
l GL_Budget_Set — Contains General Ledger budget names in ERP Integrator to which youcan write back data using revision request for HR data
l HR_Budget_Set — Contains HR budget names to which budgets are written back
l Union_Code — Contains all your organizational unions with which positions or employeesmay belong
l Location_Code —Contains all geographic locations with which employees or positions maybe associated
57

Common Smart Lists
Subtopics
l Salary Grade Details
l Salary Grade Steps and Sequences
l Compensation Element Information
l Employee Information
l Position Information
l Employee Position Associations
For Smart Lists used in General Ledger allocations, each label must match the member or aliasname of the corresponding dimension. For example, the Salary_Account_List label must havethe same name as the corresponding dimension member name or alias.
Salary Grade Details
Table 1 Smart Lists for Salary Grade Data
Smart List Associated Member Names Entries
Salary_Type Salary Grade Type Input Grade_Step, Grade_Rate and so on
Salary_Basis Grade Salary Basis Input Annual, Monthly, and so on
Yes_No Allow Value Change Input Yes and No
HR_Budget_Set Sample Budget Set
Salary Grade Steps and Sequences
Table 2 Grade Step and Sequence Smart Lists
Smart List Associated Member Names Entries
Grade_Steps Grade Step Step1, Step2, and so on
Grade_Sequence Grade Sequence (for rate-based grades) Sequence1, Sequence2, and so on
Compensation Element Information
Table 3 Compensation Element Smart Lists
Smart List Associated Member Names
Yes_No Options Based
Payment_Terms Payment Terms Input
Element_Type Value Type Input
58

Smart List Associated Member Names
Yes_No Allow Value Change Input
Element_Type Maximum Value Type
Earning_Type Earning Type Input
Frequency Payment Frequency Input
Yes_No Taxable Component
Yes_No Follows Salary Allocation
HR_Budget_Set Budget Set (Optional)
Employee Information
Table 4 Employee Data Smart Lists
Smart List Associated Member Names
Full_Time_Status FT/PT
Employee_Type Employee Type
Pay_Type Pay Type
Union_Code Union Code
Location_Code Location Code
Position Information
Does not apply to the Employee configuration option
Table 5 Position Data Smart Lists
Smart List Associated Member Names
Position_Type Position Type
Job_Class Job
Location_Code Location Code
Union_Code Union Code
Salary_Basis Salary Basis
59

Employee Position Associations
Table 6 Employee-Related Smart Lists
Smart List Associated Member Names
Position_Type Position Type
Job_Class Job
Location_Code Location Code
Union_Code Union Code
Salary_Basis Salary Basis
Full_Time_Status FT/PT
Employee_Type Employee Type
Pay_Type Pay Type
Verifying Smart Lists Before Loading Data Because they are pre-seeded with values, ensure that these Smart Lists only contain the entriesthat you want to use to. If you will load values from HRMS, such as full time or part time values,delete the existing corresponding entries.
Table 7 Pre-Seeded Smart Lists
Smart List Entry Label
Employee_Type
Temporary LABEL_TEMPORARY
Regular LABEL_EMP_TYPE_REGULAR
Contract LABEL_CONTRACTOR
Full_Time Status
FullTime LABEL_FULL_TIME
PartTime LABEL_PART_TIME
Associating Smart Lists With DimensionsTo ensure that Smart Lists correctly display dimensional members that users can select, performthese tasks:
l If you created General Ledger segment members or chart field, create corresponding SmartList entries.
60

l If you modified General Ledger segment members or chart field, modify the correspondingSmart List entry names to ensure that they match.
l If dimensions were concatenated when loaded, ensure that the Smart List entries match theconcatenated dimension member names.
If you modify these items, update the associated business rules as follows:
l The names of the Employee, Position, Budget Item, Element, or Job Code dimensions
l Entry names in Smart List that are used in business rules. See Appendix C, “UpdatingBusiness Rules After Changing Predefined Smart Lists”.
Including New or Modified Smart List Entries in Essbase Reports
ä To include Smart List entry values in the reporting application mappings used to generatereports:
1 Select Administration, then Manage, and then Dimensions.
2 From the first drop down list, select the dimension that corresponds to the updated Smart List.
3 When the page refreshes, select the parent member, and then click Edit.
4 From Data Type, select SmartList.
5 Click Save.
6 Select the parent member again, and then click Edit.
7 From Smart Lists, select the Smart List that contains new or modified entries, and then click Save
8 Select Administration, then Manage, and then Smart Lists.
9 Select the updated Smart List, and then click Synchronize.
Securing Applications
Subtopics
l Securing Dimensions and Members
l Securing Forms
l Securing Task Lists
l Securing Business Rules
Security is based on user privileges and system roles and access permissions that you assign tousers and to groups. Groups are sets of users who need similar access permissions. You assigntask security by assigning roles to a user. Each role is associated with a set of tasks. See the OracleHyperion Enterprise Performance Management System User Security and Administration Guide.
By default, users can open only those artifacts, such as forms and task lists, to which they haveaccess. Assign access using the following guidelines, following the procedure in “Setting Up
61

Access Permissions” and “Assigning Access to Members” in the Oracle Hyperion PlanningAdministrator's Guide.
l Dimensions and Members—Grant access so that planners can view and change informationonly for their own employees and positions. Do so by providing access to the Entitydimension and Element members. Do not restrict access to descendants of New Positionsand New Employees. See “Securing Dimensions and Members” on page 62.
l Forms—Assign appropriate access to forms based on their relevance to users. For example,assign planners access to all forms in the Budget Preparation form folder. If you grant accessto the Human Capital Planning folder, planners can view all child folders and forms. See“Securing Forms” on page 64.
l Task lists—Assign appropriate access to task lists based on their relevance to users. Forexample, allow planners access to the Budget Preparation task list, but not to the BudgetAdministration task list. Validation rules prevent users from entering invalid data. See“Securing Task Lists” on page 64.
l Business rules—Selectively assign access permissions to business rules at the HR entity levelto enable position mass updates. Because you must use Calculation Manager as thecalculation module, assign access permissions to business rules in Planning. See “SecuringBusiness Rules” on page 64.
l Planning unit hierarchies––Grant access only to cost center owners or reviewers.
l Reporting applications––Assign access to reporting applications in Shared Services, and setup security filters for the reporting applications in Administration Services.
l During the budget cycle, lock user sets to prevent users from modifying scenario-versiondata combinations.
Securing Dimensions and Members
Subtopics
l Entity
l Account and Element
l Position and Employee
l Scenario and Version
l Budget Item and Job Code
l Custom Dimensions
Generally, grant users access only to the employees and positions in their entity parent. Forexample, specify that planners can view and modify employee and position information onlyfor their department or cost center. Also, grant access to all unspecified members in eachdimension, such as Unspecified Position or Unspecified Element.
Entity
Grant users access only to their HR or departmental entities. This practice ensures that userscan view and modify only compensation, employee, job, or position data specific to their
62

department or cost center. Similarly, grant only cost center or department managers andplanners access to the General Ledger entities in their cost centers or departments. For example,do not grant planners in the Transportation Department access to the Education Department’sbudget and associated General Ledger account entities.
Account and Element
l Grant all users access to predefined accounts, such as HCP accounts.
l Secure the General Ledger accounts as appropriate for your budget access.
l Grant all users access to the descendants of the Additional Earnings, Benefits, and Employer-paid Taxes elements.
l As needed, grant user access to salary-grade elements to limit access to the salary grades ofother departments. For example, in an education environment, you may not want themedical school to view the salary grades that apply to the business school. Rather than givinggroups access to all salary grades in the application, grant access only to the salary gradesthat apply to a group.
l Grant all users access to these Element members: Salary Grades Defaults, Benefit Defaults,Additional Earnings Defaults, and Employer-paid Taxes Defaults.
Note: Although you can secure members of the grade dimension, grade values are globally visiblein Smart Lists.
Position and Employee
Secure the existing positions and employees loaded from HR based on their relevance toplanners.
l Grant users access to all new positions and employees in their entities, so that planners cancreate positions and add employees in their respective departments.
l Grant all users access to the Default Position member (in the Position dimension) and theVacancy member (in the Employee dimension).
Scenario and Version
l Grant users access to scenarios, such as providing access to actual budget data but restrictingaccess to forecast data.
l Grant users access to the Stages parent version and its children. For example, assign viewaccess to a final version of the budget, but restrict access to previous working versions.Permissions for versions are independent of scenarios, so view access to the final versionprevents write access to the final version data for all scenarios.
l Grant all users access to the Revisions parent version and its children.
63

Note: To enable users to modify a decision packages, ensure they have write-access to thescenario and version assigned to the decision package. They must also have write-accessto the entity that owns the decision package. See Setting Up Access Permissions in the OracleHyperion Planning Administrator's Guide.
Budget Item and Job Code
Grant all users access to the predefined Budget Item and Job Code members. You need not securethe Job Code dimension.
Custom Dimensions
Grant users access to user-defined dimensions, such as Program, Project, and Fund.
Securing Formsl Grant administrators access to all forms.
l Grant planners access to all Budget Preparation and Inquiry forms.
l Do not grant planners access to the Budget Administration forms.
Securing Task ListsProvide access to the predefined and custom task lists, based on their relevance to users.
l Grant administrators access to all task lists.
l Grant entity, cost center, or department managers access to the Budget Preparation task list.
l Grant planners access only to the Budget Preparation task list. To prevent these users fromapproving or rejecting sensitive budget data, remove access to the Review and ApprovePositions or Review and Approve Employee Budget Details tasks.
Securing Business Rulesl Grant administrators access to all business rules.
l Unless necessary, do not grant planners access to these common business rules:
m AddDefaultNonSalElement
m AddDefaultRateBasedOption
m AddDefaultStepBasedOption
m AddDefaultValueBasedOption
m CriteriaAnnualSalSpread
m CriteriaCreateMissingDistributions
m CriteriaCreateMissingNonSalElement
m CriteriaCreateMissingSalElement
64

m CriteriaOverwriteDistribution
m CriteriaOverwriteNonSalElement
m CriteriaOverwriteSalElement
l Grant planners access to all remaining business rules, unless there is reason to limit access.
Loading General Ledger and HRMS Metadata and Data
Subtopics
l Using FDMEE
l Using the Outline Load Utility
l Using Enterprise Performance Management Architect
l Requirements and Guidelines
Using FDMEEPerform the following steps to load data using FDMEE. For details, see the Oracle HyperionFinancial Data Quality Management ERP Integration Adapter for Oracle ApplicationsAdministrator's Guide.
When mapping members to the default natural account segment Smart List in FDMEE, maponly personnel expense-related accounts, and load only leaf-level members into the Smart Liststo upload member data to General Ledger.
1. Register your General Ledger and HRMS source systems and the target application. To usePSFT Commitment Control, select Enable Commitment Control.
2. For PSFT Commitment Control, define an import format that specifies how to mapPeopleSoft chart fields to dimensions in Public Sector Planning and Budgeting applications.
3. Define a location that identifies the PSFT accounting entity (business unit) from which toload data.
4. Create metadata load rules to extract metadata from your source systems to the targetapplication. For PSFT Commitment Control, define metadata load rule to load PeopleSofttrees to chart fields. Select tree \ chart field with most depth.
5. Run metadata rules to load metadata into your target application.
6. For PSFT Commitment Control, launch Planning, select Manage, select Dimensions, selectAccount, and ensure that the PeopleSoft accounting entities and chart fields loaded to thecorrect dimensions.
7. Define calendar mappings to map General Ledger periods to the appropriate Year and Perioddimension members in the target application.
8. For PSFT Commitment Control, define global, application, and source mappings thatspecify how period keys in the PeopleSoft calendar and time periods correspond to periods(quarters, years etc.) in your application.
65
9. Create and run data rules. For PSFT Commitment Control: Select, for the accounting entity,the ledger group and ledger whose data to load and map to your dimensions.
10. Define an import format that contains write back mappings that identify the budget data towrite to the PSFT accounting entity chart fields.
11. Define a write back rule.
12. Define write back filters that identify the portions of budget data to load to PSFT.
13. Run the write back rule.
Using the Outline Load Utility The outline load utility only works with applications created using Planning applicationadministrator. Use the Outline Load Utility to load General Ledger and HRMS metadata for:
l Account, Position, Element, Employee, Year, Scenario, Version, Currency, and Entitydimensions
l Job dimension if you use the Employee configuration option
l User-defined dimensions
l User-defined attributes
l Smart Lists
See Appendix B.
Using Enterprise Performance Management ArchitectYou can load data to Enterprise Performance Management Architect using flat files or interfacetables. After you deploy the Enterprise Performance Management Architect application, theloaded data is available in Planning. Load flat files can contain metadata for the following:
l Account, Entity, Scenario, Version, Period, Year, and Currency dimensions
l User-defined dimensions
l Aliases
l Smart List dimensions
If you use flat files, you can include any combination of dimensions in the load file, and can havemultiple load files (one file for the Account, Scenario, and Version dimensions, for example).You perform these tasks to load data using flat files:
l Create an import profile.
l Map dimensions in the load file to dimensions in Planning Dimension Library.
l Map fields for the load file to dimension properties in Planning Dimension Library.
l Run the import profile.
l Check the status of job and correct any import errors.
66

See the Enterprise Performance Management Architect Administrator's Guide for detailedinstructions.
Requirements and GuidelinesRegardless of the product or utility you use to load source data, you must:
l Load compensation budget expenses to the HCP BSO cube
l Load operating expenses to the Plan 1, 2, or 3 BSO cube
Load dimensional data as follows:
l Position dimension—Load data below Total Existing Positions
l Employee dimension—Load data below Total Existing Employees
l Job Code—Load data below Total Job Code
l Element dimension—Load data below the corresponding member (benefits, or salarygrades, for example)
l Budget Item dimension—Load data below FTE and Status Assignments, Element Changes(for compensation) , or Allocation Assignments (for GL allocations)
l Entity dimension—Load data below Total Entity
l Account dimension—Load natural account expenses below Personnel Expenses. Load GLdimensions below Segment Information. Load GL dimension alias below SegmentDescription
For information about using the data in these members, see “About AllocatingCompensation Expenses to General Ledger Accounts” on page 186.
Customizing Provided Components
Subtopics
l Business Rules
l Task Lists
l Forms That Use Formulas
l Forms That Use Validation Rules
l Menus
Business RulesForms, many short cut menu options launch predefined business rules, which display runtimeprompt windows that you use to select data, apply changes, and calculate expenses. Thepredefined business rules enable you to perform these tasks:
l Set or change defaults for compensation elements
l Add, transfer, change, or remove positions or employees
67

l Define allocations for position expenses
l Specify when employees move from one salary grade to another
l Recompute expenses for the entire budget or a subset of data, based on new input (forexample, for overall expenses, FTE, or status)
Use Calculation Manager to create forms and business rules to suit your organization's businesslogic and needs.
Tip: To more easily secure business rules, group them into sets or sequences and specify accesspermissions for the individual set or sequence.
Task ListsModify the predefined task lists or tasks to provide planners with additional information andguidance that will help them complete budgets, or create custom tasks such as reviewinginstructions, performing validations when exporting data from or writing data back to PSFT,entering data in specific forms, and running business rules. When adding tasks, you can:
l Specify due dates to use alerts that notify the appropriate users of actions that they musttake specific actions
l Add instructions
See Managing Task Lists in the Oracle Hyperion Planning Administrator's Guide.
Forms That Use FormulasDefine formulas to perform specific calculations on forms. For example, you can create a formulafor a column to calculate the variance between the multiple budget versions. To customize formsand refine the data displayed, create formulas to perform these tasks:
l Average values
l Total values
l Multiply values
l Identify maximum and minimum values
l Round values
l Truncate values
l Display the numeric or percent variance to compare values
l Rank values in a range that you specify
For information, see Forms and Formula Functions in the Oracle Hyperion PlanningAdministrator's Guide.
68

Forms That Use Validation RulesTo implement and enforce budget or business policies and processes, create validation rules andassociate them with forms. When you create validation rules, specify colors in which to indicateinvalid data, and the error message generated.
For example, a company requires special approval for monthly expenses exceeding $70,000. Toimplement this policy, create a validation rule to flag criterion in blue and trigger notificationto management. In the same form, include another rule that identifies variances below 0 inyellow. When viewing the form, planners can display the data validation messages that youdefined in the rule. The validation messages contain links to the cells that violated the rule.
To ensure that budgets adhere to company policies, you can also enforce limits on submittedplanning unit data by using validation rules. For example, create a validation rule to ensure thatan employee’s salary is within a certain range for the grade and department. In addition to thevalidation rules that you create, predefined validation rules help ensure valid data entry, byensuring conditions:
l New option dates occur between the Element start and end dates.
l The Assigned FTE for a position does not exceed its Total FTE.
l Tax is computed on taxable salary, not just salary.
MenusPublic Sector Planning and Budgeting includes predefined short-cut menus that drivecalculations on predefined forms. If you add or modify business rules and forms, create newmenus or update the appropriate existing menus. For example, if you delete a business rulereferenced by a menu, remove it from the menu. You can delete predefined short cut menuswithout affecting predefined calculations.
See Working With Menus in the Oracle Hyperion Planning Administrator's Guide.
69

70

4Using PeopleSoft Financials
Commitment Control
In This Chapter
About the Integration ... . . . . . . . . . . . . . . . . . . . . . . . . . . . . . . . . . . . . . . . . . . . . . . . . . . . . . . . . . . . . . . . . . . . . . . . . . . . . . . . . . . .71
Budget Definitions ... . . . . . . . . . . . . . . . . . . . . . . . . . . . . . . . . . . . . . . . . . . . . . . . . . . . . . . . . . . . . . . . . . . . . . . . . . . . . . . . . . . . . . .72
Parent and Child Budgets .. . . . . . . . . . . . . . . . . . . . . . . . . . . . . . . . . . . . . . . . . . . . . . . . . . . . . . . . . . . . . . . . . . . . . . . . . . . . . . . .72
Periods and Calendars .. . . . . . . . . . . . . . . . . . . . . . . . . . . . . . . . . . . . . . . . . . . . . . . . . . . . . . . . . . . . . . . . . . . . . . . . . . . . . . . . . . .73
Validations... . . . . . . . . . . . . . . . . . . . . . . . . . . . . . . . . . . . . . . . . . . . . . . . . . . . . . . . . . . . . . . . . . . . . . . . . . . . . . . . . . . . . . . . . . . . . . . .73
Preparing to Integrate .. . . . . . . . . . . . . . . . . . . . . . . . . . . . . . . . . . . . . . . . . . . . . . . . . . . . . . . . . . . . . . . . . . . . . . . . . . . . . . . . . . . .74
Performing Validations and Writing Back Data... . . . . . . . . . . . . . . . . . . . . . . . . . . . . . . . . . . . . . . . . . . . . . . . . . . . . . . .76
Defining the Integration ... . . . . . . . . . . . . . . . . . . . . . . . . . . . . . . . . . . . . . . . . . . . . . . . . . . . . . . . . . . . . . . . . . . . . . . . . . . . . . . . .77
About the IntegrationIntegrate with PSFT Commitment Control budgets to:
l Extract, in addition to budgets, encumbrances, and actuals, financial reference andsupporting data such as the following from the PeopleSoft Financials (PSFT) CommitmentControl tables, use and modify the data in Public Sector Planning and Budgetingapplications, and write it back to PSFT:
m Business units
m Chartfields (account segments)
m Calendars
m Line item budgets
l Perform large scale changes to many or all budgets, and write revisions as journals back tosource systems for posting while maintaining distinctions in PSB budgets between originalproposals, adjustments, revisions, and adjusted budgets.
l Transfer data between PSFT andPublic Sector Planning and Budgeting budgets using:
m Control rules—Consist of rules for budget definitions and combinations of segmentsor chartfield values; both of which are used to validate line item budgets.
m Line item budgets that have final approval and are posted back to budget ledgers in thePPST system
The validations performed before budgets are posted back to PeopleSoft are specified in budgetdefinitions. See “Budget Definitions” on page 72.
71

Budget DefinitionsA budget definition defines the account segments and calendars to use in a budget ledger group.You can also use it to configure the eligible members of each account segment and the controloption for the budgets. The budget definition is defined for a Commitment Control LedgerGroup. The validations that are performed on budgets prior to posting are based on the rulesyou specify in the budget definition. Budget definitions include:
l Effective dates—Because budget definitions are created by effective date, configuration rulesrelating to budget keys, calendars and control rules may change over time. Consequently,you must extract the correct effective date records for a budget.
l Rulesets in child table—Groups of budgets accounts that are collectively assigned a set ofbudget keys, calendars and other options. Differences in configuration between rulesetscould include the ChartFields selected as budget account keys, translation trees, calendars,and cumulative budgeting options. You must use the RuleSet ChartField as the Entity inPublic Sector Planning and Budgeting.
l Trees, Keys & Translations—Enable you to budget at a summary level but transact usinglower level or detail ChartField values. This enables you to maintain fewer budgets withoutsacrificing the means for tracking fiscal activity at a more granular level. If you use a mix ofparent and child level Chartfield members across all of the budgets in the ledger group,define a dimension to contain the parent level budget amounts. In Public Sector Planningand Budgeting, the account segment hierarchy aggregates to parent level, so parent amountsextracted from PeopleSoft are replaced in the aggregation.
l Trees Type— You can use the tree from the budget definition in the FDMEE mapping orcreate trees for use only in the integration.
l Excluded account types—Accounts used to filter transaction lines that are not to be recordedin a specific ledger group. Use trees that contain only the values allowed in a budget ledgergroup.
l Offset accounts—Used for balancing rows generated by budget processing. You mustexclude them from baseline budgets as they are offsets and will net an account to zero. Ensurethat these account members are not included in the tree designated for the natural accountin the FDME mapping.
Parent and Child BudgetsCommitment Control supports parent / child budget relationships. When you post budgets, avalidation is performed that determines if budgets have a parent, and if that parent allows thesum of its child budgets to exceed its own. If it doesn't, exceptions occur. To avoid this situation:
l Prepare the parent budget first
l Select the Generate Parent Budgets option in the FDMEE write back rule to automaticallypost child budgets to parents.
72

Periods and CalendarsA Commitment Control ledger group may have multiple budget period calendars. You mustmap these periods by calendar in the Period Mapping section of FDMEE. For information, seethe FDMEE Administrator's Guide or online help.
ValidationsCommitment Control validations are performed only on line item budgets (budget rowscontaining a combination of segments/chartfields, periods, and amounts). Validations do notapply to position or asset budgeting. Validations occur in these situations:
l During funds check before budgets in a decision package are submitted for promotion andapproval. Note that the decision package budgets are not posted, even if validation issuccessful.
l When approved budgets are exported back to PSFT they are validated again by thePeopleSoft budget processor. If all budgets pass validations, they are posted to the ledger.
This following is validated:
l That a budget ledger is enabled for stat code budgets if statistical budgets were entered
l That a valid Funding Source is populated on the budget account if the budget ledger isenabled for funding source
l Budget period values for a budget ledger, if you use budget calendars
l That natural accounts and other account segment dimension members are valid for aparticular budget ledger. The combination of the Chartfield dimension members in eachbudget row is validated according to rules in PeopleSoft.
Important Notes:
l Only one version of an effective dated budget definition is supported in validations.Consequently, ensure that you do not have multiple effective date budget definitions in thesame budget preparation year.
l Ensure the effective-date does not exceed the end date of the period for which you arepreparing budgets in Public Sector Planning and Budgeting.
l Ensure that the effective date of combination edit rules defined in the PeopleSoft sourcesystem is applicable to the period for which budgets are being prepared.
l If one or more budgets fail pre-posting validations, users cannot promote budgets forapproval.
l If one of more budgets fail export validations performed during an export, no budgets areposted back to PSFT.
l If decision packages and their associated budget requests have any validation errors,promotion for approval is not permitted.
73

Preparing to Integrate
Subtopics
l Assumptions
l Requirements and Guidelines
AssumptionsTo integrate with PeopleSoft Commitment Control, Oracle assumes that you:
l Are using PeopleSoft 9.1; the only supported version.
l Use FDMEE and the delivered mappings to define integration mappings between PeopleSoftand Public Sector Planning and Budgeting.
This chapter identifies the basic tasks you perform in PeopleSoft to prepare for integration. Itdoes not provide specific procedures. For details about PeopleSoft Commitment Control, see:
l PeopleSoft Enterprise Application Fundamentals 9.1
l PeopleSoft Enterprise General Ledger 9.1
l PeopleSoft Enterprise Global Options and Reports 9.1
Requirements and Guidelines
Subtopics
l PeopleSoft Requirements
l Planning Requirements
l FDMEE Requirements
To ensure a proper integration, satisfy the integration requirements in PeopleSoft and Planningas described in the following topics. Perform these tasks before defining the integration usingFDMEE.
PeopleSoft RequirementsBefore defining your integration with Public Sector Planning and Budgeting using FDMEE,perform these tasks to ensure your Commitment Control budget ledger groups and budgetdefinitions are correctly set up:
1. Ensure your Commitment Control budget ledger group has a valid budget definition.Budget definitions are created by effective date and the control rules, key configurations andcalendars may be changed in new effective date versions.
2. Ensure that the budget definition reflects any changes in rules for the period for which youare preparing budgets.
74

3. To populate entry event codes on the Public Sector Planning and Budgeting budgets thatare written back to PeopleSoft, enter the default entry event code in the Control ChartFieldof the budget definition. This enables you to assign a default entry event code by ControlChartField value or range of values.
4. Ensure that all desired rules for budget definitions and valid combinations for the budgetyear are defined in the source ERP system using an effective date that will be valid for theyear for which budgets are being prepared.
5. Ensure that dimension members in Public Sector Planning and Budgeting also exist in thePeopleSoft and are, if necessary, incorporated into the combination rules and budget rules.
6. Before exporting budgets back to a PeopleSoft child budget ledger, ensure that changes inthe rules are synchronized with parent budget ledgers.
7. Ensure that the appropriate users are authorized in the PeopleSoft database so that they candrill down to budget exception pages.
8. Use the Excluded Account Types tab to note chart field members that you exclude from budgetaccounts. You must exclude these from trees used in the integration.
Planning Requirements1. To create decision packages using PSFT data, create the required decision package types and
decision packages before loading source data using FDMEE. See Chapter 10, “Working withDecision Packages and Budget Requests”.
2. If you track budget revisions as budget requests, decide if you want to reuse existing revisionmembers in the Version dimension. Doing so frees you from having to create new membersfor revisions in Planning, and enables you to track revision submissions by uniquetransaction ID. To reuse members, perform these tasks and then see “Tracking Revisions inPeopleSoft Commitment Control” on page 248.
l Select Administration, then Application, and then Properties.
l Create a property called ALWAYS_GET_UNIQUE_XACT_ID, and set it to “True”.
3. To load encumbrances and expenses, map the relevant detail ledger to a scenario andcategory in the FDME mapping.
4. To prorate summary level amounts to a detailed level such as months, create allocationbusiness rules.
5. Define tasks that end users will use to validate budgets before submitting them for promotionand approval.
FDMEE Requirementsl To extract budgets posted at a parent level to Planning, map the parent level dimension
member to a child level dimension member in Planning. This ensures that you won't loseparent level budgets in Public Sector Planning and Budgeting since parent level dimensionmember are used for roll ups or aggregation.
75

l Under Import Format, Data Load Mappings, map RulesetCF to the appropriate entity inPlanning.
If you use Commitment Control budget periods, map the budgets periods in the PeopleSoftsource to the periods in Public Sector Planning and Budgeting applications.
If you use summary level budget periods in the source system, map the summary period toone of the periods in Public Sector Planning and Budgeting. For example, map 2011Q1 inthe source system to July, August or September of the year in Planning. Use a business ruleto spread summary amounts across periods. For example, for 2011Q1, you should map toJuly then use a business rule to spread the amount across July, August and September.
l On Source Mapping under Period Mapping, select the Budget mapping type. Ensure that if abudget period exists at a parent level, it is mapped to a child level dimension in Planning forextraction. It is later written back to the parent level in PeopleSoft. If you must create a childdimension member to map to in Hyperion, create the member in PeopleSoft.
l Remove chart field members that you exclude from budget accounts from trees whileconfiguring the integration.
l To use stat code budgeting, ensure that the Stat Code Account has the STATISTICES_CODEdimension enabled and uses a multi-dimensional mapping.
l To aggregate amounts from lower level periods in Public Sector Planning to summary levelbudget periods in PeopleSoft, use rollup periods such as quarters or year-to-date in the write-back mappings. For example, to export budgets back to PSFT, map leaf members to parentmembers.
To use PSFT data with decision packages and budget requests:
l Select a default decision package and budget request when configuring FDME to extractbudgets from PeopleSoft.
l Ensure that the PSFT Dept chartfield that contains the ruleset is mapped to the Entitydimension in Planning.
l Ensure that the forms used to build budget requests contain the dimensions and membersloaded from PeopleSoft.
Performing Validations and Writing Back DataBudgets are submitted for promotion, approval and then posted back to the source PSFT systemas planning units. Perform these steps to validate, submit, and write back budgets:
1. In Planning, select Tools, and then Manage Approvals.
2. Select the scenario and version, and then click .
3. Select each planning unit associated with the budget set, click or select Action and thenBudget Check to launch commitment control validations.
4. Select Action and then Validate
76

5. Monitor the budget check and validate processes using the job console, and resolve anyerrors that may occur using the link provided.
6. In FDMEE, run the write back rule to post data back to PSFT Commitment Control.
Defining the Integration
Subtopics
l Register the Source System and Your Application
l Define an Import Format, the Location, and Run Data Load Rules
l Specify Mappings in Planning
l Specify the Writing-Back
You will perform these basic tasks in FDMEE to define the data load and write back integrationsto use PeopleSoft Commitment Control. For details, see the Oracle Hyperion Financial DataQuality Management ERP Integration Adapter for Oracle Applications Administrator's Guide.
Register the Source System and Your Application1. Register the PeopleSoft Financials source system, and select Enable Commitment Control.
2. Register the Public Sector Planning and Budgeting application as the target application:
l Application type— Planning
l Data load method—Classic or Application Administration
Define an Import Format, the Location, and Run Data LoadRules
Note: Remove chart field members that you exclude from budget accounts from trees whiledefining your integration.
l Define an import format that specifies how to map PeopleSoft chart fields to dimensions inPublic Sector Planning and Budgeting applications. Select the source system, the PeopleSoftaccounting entity (business unit) and the registered target Public Sector Planning andBudgeting application.
l Define a location that identifies the PeopleSoft accounting entity (business unit) from whichto load data.
l For the location, define metadata load rule and mapping to load PeopleSoft trees to chartfields to dimensions. Select the tree or chart field with most depth. For example, for theAccount dimension select Base Hierarchy, CONTROL_BD_ACCTS as the tree, and specifyIgnore for How to Process Source Orphan Members
77

l Run metadata rules to load source PeopleSoft metadata into the Public Sector Planning andBudgeting application.
l Define the data load mappings described in the Oracle Hyperion Financial Data QualityManagement ERP Integration Adapter for Oracle Applications Administrator's Guide.
l Create and run data load rules. For the accounting entity, select the ledger group and ledgerwhose data to load and map to Public Sector Planning and Budgeting dimensions.
Specify Mappings in Planningl Select Manage, select Dimensions, select Account, and ensure that the PeopleSoft accounting
entities and chart fields loaded to the correct dimensions.
l Define calendar mappings to map General Ledger periods to the appropriate Year and Perioddimension members in the Public Sector Planning and Budgeting application.
l Define global and source period mappings that specify how period keys and the prior periodkeys in the PeopleSoft calendar correspond to periods (months, quarters etc.) in the PublicSector Planning and Budgeting budget application. This mapping must specify the range oftime for which you want to load data. On Source Mapping, map the Commitment Controlcalendar and budget periods to period keys.
l Define category mappings that specify Actuals and Budget as Category entries. Map these toActuals and Budget in Target Category.
To load pre-encumbrances and encumbrances from Commitment Control, define one ormore encumbrance categories and then map them.
Specify the Writing-Backl Define an import format that contains write back mappings that identify the source Public
Sector Planning and Budgeting dimensions to write to the PeopleSoft accounting entitychart fields.
l Define write back mapping for each dimension. For dimensions that cannot be explicitlymapped, select a Blank value.Important: If you use budget requests to contain and track deltarevisions and want to reuse revision members in the Version member, ensure that the writeback mapping uses the same budget request member.
l Define a write back data load that specifies filter condition for all dimensions used in PublicSector Planning and Budgeting. Also, select the Budget Scenario , Ledger Group, andLedger in Target Options.
l Specify the appropriates execute rule option such as if you use budget hierarchies, and theeffective date of the records to load and write-back from Public Sector Planning andBudgeting to PeopleSoft.
l Execute the write back rule.
78

5Configuring the Line Item
Budget
In This Chapter
About Linking Compensation Budget and Line Item Budgets .. . . . . . . . . . . . . . . . . . . . . . . . . . . . . . . . . . . . . . . .79
Populating the Line Item Budget .. . . . . . . . . . . . . . . . . . . . . . . . . . . . . . . . . . . . . . . . . . . . . . . . . . . . . . . . . . . . . . . . . . . . . . . .83
About Linking Compensation Budget and Line ItemBudgets
Subtopics
l Scenario 1: One-to-One Mapping Between Segments or Chart Fields and Dimensions
l Scenario 2: Combining General Ledger Segments or Chart Fields in a Dimension
Line item budgets are maintained in Plan 1, 2, or 3, because compensation budgets in the HCPplan type roll up to the dimension members in Plan 1, 2 or 3 that correspond to allocationsegments. The following sections assume that you defined the dimensional model for GeneralLedger segments or chart fields in Plan 1.
Important: The dimensions used in position expense allocations must match those in the lineitem budget.
To link the compensation budget with the line item budget using reporting applications, mapdimensional data to General Ledger segments or chart field using the appropriate scenario:
l One-to-one mapping between General Ledger segments or chart fields and dimensions. See“Scenario 1: One-to-One Mapping Between Segments or Chart Fields and Dimensions” onpage 80.
l Two or more combined General Ledger segments or chart fields represent one dimension.See “Scenario 2: Combining General Ledger Segments or Chart Fields in a Dimension” onpage 82.
After performing the required configuration tasks described in this section, see “Populating theLine Item Budget” on page 83.
79

Scenario 1: One-to-One Mapping Between Segments or ChartFields and Dimensions
Subtopics
l Define Entity Dimensions and Members
l Define User Defined Dimensions and Members
l Add or Modify Smart Lists
l Add Segment or Chart Field Members to the HCP Plan
Perform these steps:
1. Perform a task based on any distinction between HR entities (departments and businessunits, for example) and General Ledger entities (cost centers) used in allocations:
l If you have separate General Ledger and HR entities, ensure that the Entity dimensioncontains:
m General Ledgers entities enabled only on Plan 1, 2, 3, or whatever plan type used inthe line item budget
m HR entities enabled only on the HCP plan
l If the General Ledger and HR entities are the same, enable them and their members onthe HCP plan, and on Plan 1, 2, or 3, or whatever plan type is used in the line itembudget.
2. Add corresponding Smart Lists.
3. Add segment members to the HCP Plan.
4. If necessary, configure business rules.
Define Entity Dimensions and Membersl Create all HR entity members, such as departments and business units under the Total Entity
parent member.
l Create General Ledger entity members under a separate parent.
Define User Defined Dimensions and Membersl Create dimensions for the General Ledger dimensions, such as Fund, Program, Project, and
Activity in one of the standard plan types.
l For each dimension that you add, add corresponding segment or chart field members belowthe Segment Information and Segment Description members.
l Associate each segment or chart field member with a Smart List.
80

Add or Modify Smart ListsAdd Smart Lists to contain all General Ledger account codes and their chart field or segmentdescriptions. Use FDMEE to map the General Ledger account codes and descriptions tocorresponding Smart Lists in the compensation budget.
Note: Later map segments that represent default natural accounts to the Account dimension.
These predefined Smart Lists are provided. Change or delete them to match your line item budgetdimensions:
l Salary_Account_List and Salary_Account_Alias_List
These Smart Lists represent personnel expense default natural account members. Do notinclude summary level default natural account, expense, or statistical members.
l Entity_List and Entity_Alias_List
These Smart Lists represent General Ledger entity structures. Do not include summary levelentity members. Only include leaf-level members.
l Fund_List and Fund_Alias_List
l Program_List and Program_Alias_List
l Project_List and Project_Alias_List
Add Segment or Chart Field Members to the HCP Plan Perform the tasks in these sections to ensure that HCP allocation details are captured in Accountmembers and associated Smart Lists that you create:
l “Create Account Members ” on page 81
l “Modify Existing Account Members” on page 82
Note: The default member for Natural Accounts is Account Segment. This member is taggedwith a Natural_Account UDA. If this does not correspond to your natural account, and youwant to add another member, set up the member so the UDA is Natural_Account, and thendelete the UDA Natural_Account from Account Segment.
Create Account Members
ä To create members:
1 Select Administration, then Manage, then Dimensions, and then Account.
2 Under Segment Information, create a member to reflect your GL segments or chartfields codes, andspecify these properties:
l Alias Table—Default
l Account Type—Saved Assumption
81

l Time Balance—Flow
l Data Storage—Never Share
l Plan Type—Plan Type 1, 2, or 3, and HCP
l Source Plan Type—HCP
l Smart List—Smart List
l Data Type—Smart List
Note: For line item budgeting, enable all dimension members, including those for PersonnelExpense accounts, on Plan Type 1, 2, or 3 as the source plan type. If members have HCP asthe source plan type, change it.
Modify Existing Account Members
1. Modify the predefined Account dimension members to reflect your actual segmentstructure. To rename or remove any predefined segments or chart fields, see the appropriateproduct documentation:
l For Planning applications, see the Oracle Hyperion Planning Administrator's Guide.
l For Oracle Hyperion EPM Architect applications, see the Oracle Hyperion EnterprisePerformance Management Architect Administrator’s Guide.
2. Note the predefined segments under the Segment Information parent member.
3. To rename placeholder members, enter new Aliases for the member.
4. To add placeholder member, add child member, and then specify member properties.
5. Refresh the database.
Scenario 2: Combining General Ledger Segments or ChartFields in a DimensionFor information on combining source General Ledger segments and mapping them to one PublicSector Planning and Budgeting dimension, see the Oracle Hyperion Financial Data QualityManagement ERP Integration Adapter for Oracle Applications Administrator's Guide.
See also:
l “Define Entity Dimensions and Members” on page 80
l “Define User Defined Dimensions and Members” on page 80
l “Add or Modify Smart Lists” on page 81
Note: The Smart List created to represent this combined dimension must containconcatenated members in Name or Alias.
l “Add Segment or Chart Field Members to the HCP Plan ” on page 81
82

Populating the Line Item BudgetAdministrators perform these tasks to populate the line item budget:
l Populate the portion of the line item budget for personnel expenses by mapping line itemdimensions with corresponding HCP dimensions. This involves mapping chart fields orsegments in the Segment Allocation Information parent in the Account dimension tocorresponding compensation dimension members.
l Report and query all integrated compensation and line item budget data, by creating andpushing data to an ASO reporting application.
Linking HCP Compensation Data to Plan 1, 2, or 3
Note: The following mapping assumes that you use the Position and Employee configurationoption. Use a similar approach for the other configuration options.
ä To link compensation budget data to line item budgets:
1 Select Administration, and then Map Reporting Applications.
2 Click New.
3 Under Details, enter a name and description, such as HCP Linked To Operating Expenses.
4 From Plan Type, select HCP.
Although you can specify another name, HCP is the default name for the Essbase applicationdatabase used with Public Sector Planning and Budgeting
5 Expand Reporting Application, and select the server that hosts Plan Type 1, 2, or 3.
6 Click Next.
7 For each Public Sector Planning and Budgeting dimension or Smart List, select:
l Mapping type:
m Dimension to Dimension—Map shared dimensions such as scenario, period, andyear.
m Smart List to Dimension—Map segment or chart fields in Segment Information todimensions in Plan 1.
Note: If you expect that segments or chart fields will be blank in position oremployee allocations, update the #MISSING drop down label in thecorresponding Smart Lists. See the Oracle Hyperion Planning AdministratorsGuide.
l A dimension and its members, or a Smart List
l The corresponding General Ledger dimension in Plan Type 1, 2, or 3.
8 To help you with your mapping, see “Sample HCP Mappings” on page 84
83

Sample HCP MappingsUse this table to map HCP dimensions. Create rows to map Smart Lists for custom dimensionssuch as Project_List or Program_List.
The HCP compensation dimensions in Public Sector Planning and Budgeting on the left mapto the General Ledger or operational expense dimensions in Plan Type 1, 2, or 3 on the right.
Table 8 HCP Mapping
MappingType
Dimension/Smart List Member Reporting ApplicationDimension
Smart List toDimension
Salary_Account_List Account Segment default natural Account
Dimension toDimension
Period level 0 members
For example: ILvl0Descendants(Period)
Period
Include the entire dimensionin the reporting application.
Dimension toDimension
Year fiscal years
For example: FY09,FY10,FY11
Year
Include the entire dimensionin the reporting application.
Dimension toDimension
Request
Note: Available if youenabled Decision Packagesand Budget Requests.
level 0 members
For example: ILvl0DescendantsBudgetRequest)
Request.
Include the entire dimensionin the reporting application.
Dimension toDimension
Version version to include
For example, Final
Version
Dimension toDimension
Currency Local Currency
Smart List toDimension
Entity_List Entity Segment General Ledger Dimension
For example, Cost_Center
Dimension toDimension
Scenario scenario
For example, Budget
Scenario
Include the entire dimensionin the reporting application.
Smart List toDimension
Smart List corresponding toGeneral Ledger dimension
Create row mappings forcustom Smart Lists such as:
l Activity_List
l Fund_List
General Ledger segment member
Examples:
l Activity Segment
l Fund Segment
General Ledger dimension
After configuring your mapping, click Next and see “Map the POV” on page 85.
84

Map the POV1. Map these source dimensions:
l Account—Allocated Expense
l Budget Item—level 0 membersFor example: ILvl0Descendants(AllocationAssignments)
l Entity—ILVl0Descendants(Total Entity)
l Employee—ILVl0Descendants(Employees)
l Position—ILVl0Descendants(Total Positions)
l Element—ILVl0Descendants(Total Compensation Expenses)
2. Save, then select Administration, and then Map Reporting Applications.
3. Select the mapping that you defined, click Push Data, and then select an option:
l Push—Update existing data with new data.
l Clear and Push Data—Delete existing data and push new data.
Note: Select Push only if this is the first time mapping to Reporting applications.Otherwise, select Clear and Push Data.
Pushing Compensation And Operational Expense Data toReporting Applications
Subtopics
l Creating the HCP Dimension Mappings
l Pushing Data to Reporting Applications
For fast calculations, full reporting, and querying, perform these tasks to push all compensationbudget, line item, and decision package data to an ASO reporting application:
l To query and report on all decision package and budget request data, enable the providedDP Reporting ASO cube, create a reporting application, and map dimensions..
l To query and report on compensation and line item data:
m Create an ASO cube in Essbase. See the Oracle Essbase Database Administrator's Guide.
m Create a reporting application in Planning that contains dimensions that correspond toeach HCP and operating expense dimensions used in your Public Sector Planning andBudgeting application.
m Load members that map to the Public Sector Planning and Budgeting members onwhich to report or aggregate into the reporting application dimensions. Oraclerecommends using FDMEE.
After performing the initial tasks, perform these tasks:
85

l Define HCP dimension mappings to map salary expenses, headcount, FTE, and non-compensation operational expense dimensions (in Plan 1, 2, or 3) to the ASO application.See “Creating the HCP Dimension Mappings” on page 86.
l Ensure that you allocated expenses to General Ledger Accounts.
l Push the data. See “Pushing Data to Reporting Applications” on page 92.
Creating the HCP Dimension Mappings
ä To create the mappings:
1 Select Administration, and then Map Reporting Applications.
2 Click New.
3 Under Details, enter a name such as Salary for the first mapping, and FTE and Headcount for the second.
4 Under Source Application, for Plan Type, select HCP.
5 Under Reporting Application, select the Essbase server that hosts the BSO cube containing the PublicSector Planning and Budgeting application, and then select the ASO reporting application.
6 Click Next.
7 See “Mapping Salary Dimensions” on page 86.
Mapping Salary Dimensions
On the Map Dimensions tab, map the Public Sector Planning and Budgeting dimensions andSmart Lists on the left to the ASO application members on the right.
ä To map the salary:
1 For each Public Sector Planning and Budgeting dimension or Smart List, select a Mapping Type, theDimension or Smart List, members, and then select the corresponding reporting application dimension.
About Mapping Type:
l Dimension to Dimension—Dimensions that are shared or identical in Public SectorPlanning and Budgeting and the reporting application map automatically. However,you must map any unmapped dimensions.
l Smart List to Dimension—Map dimensions and members to Smart List account membersbased on alias.
For example:
86

2 Use these salary mapping, noting that Smart List to dimensions map based on alias:
Table 9 Salary Mapping
MappingType
Dimension/Smart List Member Selection Reporting ApplicationDimension
Smart List toDimension
Salary_Account_List Account Segment natural Account
Dimension toDimension
Request level 0 members
For example: ILvl0DescendantsBudgetRequest)
Request
Dimension toDimension
Period level 0 members
For example: ILvl0Descendants(Period)
Period
Include the entiredimension in thereporting application.
Dimension toDimension
Year fiscal years
For example: FY09,FY10,FY11
Year
Include the entiredimension in thereporting application.
Dimension toDimension
Version version
For example, Final
Version
Dimension toDimension
Currency Local Currency
Smart List toDimension
Entity_List Entity Segment General Ledgerdimension
For example, Cost_Center
87

MappingType
Dimension/Smart List Member Selection Reporting ApplicationDimension
Dimension toDimension
Scenario scenario
For example Budget
Scenario
Include the entiredimension in thereporting application.
Smart List toDimension
Smart Listcorresponding toGeneral Ledgerdimension
Create a separate rowmapping for each SmartList.
Examples:
l Activity_List
l Fund_List
l Program_List
l Project_List
General Ledger segment member
Examples:
l Activity Segment
l Fund Segment
l Program Segment
l Project Segment
General Ledgerdimension
Dimension toDimension
Employee ILvl0Descendants(Total Employees) Employee
Include the entiredimension
Dimension toDimension
Position level 0 members. For example:ILvl0Descendants(All Positions)
Note: Applies only to the Position configuration option
Position
Include the entiredimension
Dimension toDimension
Budget Item ILvl0Descendants(Allocation Assignments) Budget Item
Include the entiredimension
Dimension toDimension
Element ILvl0Descendants(Total CompensationExpenses)
3 Click Next.
4 On the Point of View tab, map these source dimensions:
POV dimensions must have only one member selected.
l Account —Allocated Expense. Maps to the Account dimension in the reportingapplication
l Entity—Corresponds to the Entity representing a cost center or department in thereporting application
5 See “Mapping Headcount and FTE” on page 89.
88

Mapping Headcount and FTE
ä To map headcount and FTE:
1 Map the Headcount and FTE dimensions or Smart Lists on the left to the corresponding dimensions tothe right in the ASO application. Remember that Smart List map to dimensions based on alias. Forexample:
2 Use these mappings:
Table 10 Headcount and FTE Mapping
MappingType
Dimension/Smart List
Member Selection Reporting Application Dimension
DimensiontoDimension
Account level 0 members for Total FTE and Headcount Forexample: ILvl0Descendants(TotalFTE)ILvl0Descendants(Headcount)
Account dimension
DimensiontoDimension
Request
Note:Available onlyfor decisionpackages andbudgetrequests.
level 0 members
For example: ILvl0DescendantsBudgetRequest)
Request.
Include the entire dimension in thereporting application.
DimensiontoDimension
Period level 0 members
For example: ILvl0Descendants(Period)
Period
Include the entire dimension
DimensiontoDimension
Year fiscal years to include
For example: FY09,FY10,FY11
Year
Include the entire dimension
89

MappingType
Dimension/Smart List
Member Selection Reporting Application Dimension
DimensiontoDimension
Budget Item Unspecified Budget Item Budget Item. Include the entiredimension
DimensiontoDimension
Version version
For example: Final
Version
DimensiontoDimension
Currency Local Currency
DimensiontoDimension
Element Unspecified Element Unspecified Element
Select only one member
DimensiontoDimension
Entity level 0 members. For example:ILvl0Descendants(Entity)
General Ledger dimension
For example,ILvl0Descendants(TotalEntity)
DimensiontoDimension
Position level 0 members. For example:ILvl0Descendants(All Positions)
Note: Applies only to the Position configuration option
Position
Include the entire dimension
DimensiontoDimension
Employee level 0 members. For example:ILvl0Descendants(Employee)
Note: Applies only to the Employee configurationoption
Employee
Include the entire dimension
DimensiontoDimension
Scenario scenario
Typically, the scenario member is Budget
Scenario
Include the entire dimension
Not Linked Examples:
l Activity Segment
l Fund Segment
l Program Segment
l Project Segment
General Ledger dimensions
For example:
l Activity
l Fund
l Program
l Project
3 Click Next.
4 On the POV tab, select only one member for each General Ledger Smart Lists such as Activity, Fund,Program, and Project (Unspecified Activity and Unspecified Project, for example).
5 Click Save.
6 See “Mapping Operational Dimensions on Plan Type 1, 2, or 3” on page 91.
90

Mapping Operational Dimensions on Plan Type 1, 2, or 3
ä To define the mapping:
1 In Planning, select Administration, and then select Map Reporting Applications.
2 Click New.
3 Under Details, enter a name, such as Operation Expenses.
4 Under Source Application, for Plan Type, select Plan 1, Plan 2, or Plan 3.
5 Under Reporting Application, select the ASO reporting application.
6 Click Next.
7 Use this table to map the operational expense dimensions:
Table 11 Operational Dimension Mapping
MappingType
Dimension/SmartList
Member Reporting Application Dimension
DimensiontoDimension
Account Members identifying operational expense and revenuesdata. Forexample:ILvl0Descendants(Revenues),ILvl0Descendants(Operational Expenses),Descendents(Depreciation Expense),520000
Account
DimensiontoDimension
Period Periods into which to load data. For example:ILvl0Descendants(Period)
Period
DimensiontoDimension
Year fiscal years
For example: FY09,FY10,FY11
Year
DimensiontoDimension
Entity Dimension members for which to load data. For example:1030,1031, ILvl0Descendants(2000)
General Ledger Entity dimensionthat represents Cost Centers orDepartments. For example:ILvl0Descendants(TotalGL Entity)
DimensiontoDimension
Version Version to include. For example:
Final
Version
DimensiontoDimension
Scenario Scenario, such as:
Forecast
Scenario
DimensiontoDimension
Currency Currency, such as Local Currency
91

MappingType
Dimension/SmartList
Member Reporting Application Dimension
DimensiontoDimension
User-definedGeneral Ledgerdimensions
ILvl0DescendantsdimensionFor example:ILvl0Descendants(Fund),ILvl0Descendants(Program),ILvl0Descendants(Project),ILvl0Descendants(Activity)
User-defined General Ledgerdimensions
8 Click Next and map these reporting application POV dimensions:
l Budget Item—ILvl0Descendants or Unspecified Budget Item
l Element—Unspecified Element
l Employee—Unspecified Employee
l Position—Unspecified Position
9 See “Pushing Data to Reporting Applications” on page 92.
Pushing Data to Reporting ApplicationsAfter defining application mappings, push data to the reporting application.
Note: If you modified the reporting application, refresh it. Also, ensure that you allocatedexpenses to General Ledger accounts.
ä To push data:
1 In Planning, select Administration, and then select Map Reporting Application.
2 Under Application Mapping Name, select the three application mappings that you defined.
3 Click Push Data and then select an option.
l Push—Update existing data with new data.
l Clear and push data—Delete existing data and push new data.
92

6Setting Up Compensation
Budgets
In This Chapter
After Loading Source Data ... . . . . . . . . . . . . . . . . . . . . . . . . . . . . . . . . . . . . . . . . . . . . . . . . . . . . . . . . . . . . . . . . . . . . . . . . . . . . .93
Before Creating Compensation Budgets .. . . . . . . . . . . . . . . . . . . . . . . . . . . . . . . . . . . . . . . . . . . . . . . . . . . . . . . . . . . . . . .94
Managing Salary Grades ... . . . . . . . . . . . . . . . . . . . . . . . . . . . . . . . . . . . . . . . . . . . . . . . . . . . . . . . . . . . . . . . . . . . . . . . . . . . . . . .95
Managing Other Compensation Elements ... . . . . . . . . . . . . . . . . . . . . . . . . . . . . . . . . . . . . . . . . . . . . . . . . . . . . . . . . . . 102
About Processing Loaded HRMS Data ... . . . . . . . . . . . . . . . . . . . . . . . . . . . . . . . . . . . . . . . . . . . . . . . . . . . . . . . . . . . . . . 108
Processing Loaded HRMS Data... . . . . . . . . . . . . . . . . . . . . . . . . . . . . . . . . . . . . . . . . . . . . . . . . . . . . . . . . . . . . . . . . . . . . . . 109
Reviewing Loaded Position, Job, and Employee Data ... . . . . . . . . . . . . . . . . . . . . . . . . . . . . . . . . . . . . . . . . . . . . . 109
About Updating Entity-Specific Positions and Employees ... . . . . . . . . . . . . . . . . . . . . . . . . . . . . . . . . . . . . . . . . 111
Performing Mass Updates... . . . . . . . . . . . . . . . . . . . . . . . . . . . . . . . . . . . . . . . . . . . . . . . . . . . . . . . . . . . . . . . . . . . . . . . . . . . . 112
Making Mass Updates... . . . . . . . . . . . . . . . . . . . . . . . . . . . . . . . . . . . . . . . . . . . . . . . . . . . . . . . . . . . . . . . . . . . . . . . . . . . . . . . . 112
Updating FTE and Status after Defining the Compensation Calculation Period .. . . . . . . . . . . . . . . . . . 115
Updating FTE and Status Data... . . . . . . . . . . . . . . . . . . . . . . . . . . . . . . . . . . . . . . . . . . . . . . . . . . . . . . . . . . . . . . . . . . . . . . . 115
After Loading Source DataPerform these setup tasks after loading data from the source or before starting a budget cycle:
l Review, modify, or create salary grades. See “Managing Salary Grades” on page 95.
l If you use FDMEE to load HRMS data, use another tool, such as the Outline Load Utility,to load benefits. See “Loading General Ledger and HRMS Metadata and Data” on page 65.
l Review, modify, or create other compensation elements such, as additional earnings andovertime, and compensation element options. See “Managing Other CompensationElements” on page 102.
l Process the effective-dated data loaded from HRMS to calculate the activation status andFTE for each period in Public Sector Planning and Budgeting. See “About Processing LoadedHRMS Data” on page 108.
l Tip: To later be able to calculate compensation for specific years in the period of time coveredby the application, modify the appropriate substitution variables and use the Update FTEand Status task. See “Updating FTE and Status after Defining the Compensation CalculationPeriod ” on page 115.
l Review and modify position and employee data. See “Reviewing Loaded Position, Job, andEmployee Data” on page 109.
93

l Globally or conditionally apply data that is missing in HRMS which is required for you toset up employees, positions, and jobs. See “Performing Mass Updates” on page 112.
l Apply salary grades to vacant positions which could determine the total FTE or headcount.
l Calculate the budget impact.
l Allocate expenses to General Ledger accounts.
Before Creating Compensation Budgets Perform these tasks before defining salary grades and compensation elements, and performingmass updates:
l Ensure an Administrator creates:
m Corresponding salary grade members under Salary Grades in Total CompensationExpenses in the Element dimension.
m Corresponding compensation element members (benefits, for example) in theappropriate folder in Total Compensation Expenses in the Element dimension.
l Ensure that you can select the correct budget year, scenario, and version in the Point of Viewbar on the upper portion of forms, by performing these steps:
m Select File, then Preferences, and then Planning.
m Select User Variables.
m Select the year, scenario, and version members and click OK.
l To budget using recurring budget requests in a decision package-enabled application, reviewhow using recurring budget requests affects some aspects of compensation budgeting. See“How Budget Request Type Impacts Compensation Budgeting” on page 198.
l Extend the business rule default timeout as described in Oracle Hyperion PlanningAdministrator's Guide. This is useful because some business rules you run may display errorsindicating that processing has exceeded the allowed limit. In addition to increasing thedefault timeout, select Administration and then Job Console to view the status of businessrules.
94

Managing Salary Grades
Subtopics
l About Salary Grades
l Differentiating Between Salary Steps and Sequences
l Defining Salary Grades
l About Modifying Salary Grades
l Synchronizing Salary Properties
l Simultaneously Adjusting Grade Steps or Sequences
l About Specifying Annual Salary Spreads
l Salary Spread Options
l Using a 52-Week Fiscal Year
Before making the budget accessible to planners and cost center managers, verify, create, modify,and delete salary grades so that planners can apply the correct salaries to positions and employees.
About Salary Grades You can create three kinds of salary grades:
l Rate-based — A salary value in a range of minimum to maximum values is applied basedon factors such as certification or seniority. For example, you could pay IT programmersbetween $74,000 and $78,000 depending on certification and seniority. An entry levelprogrammer with little experience receives a lower salary ($75,000) than a programmer withover ten years of experience who would receive a higher value ($84,000)
l Step-based—Employees are entitled, based on factors such as adjustment date, to salaryincrements along the pay scale or grade scale. For example, in the education system, thesteps assigned to teachers that determine their salary may increase according to the degree(Bachelor's, Master's, or Ph.D) that they hold, or years or service.
l Value-based—Only one salary value is available, such as a contractor's hourly rate or thehourly pay of library clerks.
See “Differentiating Between Salary Steps and Sequences” on page 95.
Tip: If you apply salary grade defaults or salary grades to positions or employees, all sequences,steps, and ranges for salary element changes are also associated with the position oremployee, irrespective of year. This enables you to associate the complete, historic, recordof a salary grade with positions and employees; not just the first element change. See“Applying Compensation and Salary Allocation Defaults” on page 177.
Differentiating Between Salary Steps and SequencesThe difference between steps and sequences is that sequences:
l Are used with value-based salary grades
95

l Increase periodically by year or based on other factors. For example, sequences for thenonunion hourly position of seasonal worker could increment over three years as follows:
m Year 1—$12.01
m Year 2—12.61
m Year 3—13.21
Similarly, sequences for the hourly nonunion position of Dispatcher in a Public Safety agencycould reflect a 2.5% annual adjustment over three years:
m Year 1—$17.74
m Year 2—18.18
m Year 3—18.64
Defining Salary Grades
ä To define salary grades:
1 See “Before Creating Compensation Budgets ” on page 94.
2 From My task lists, select Budget Administration.
3 Select Manage salary grades.
4 Select the budget Scenario and Version in the POV.
5 From the drop down list, select the salary grade, and then click .
6 Under Grade Details, specify:
l Salary Grade Type Input—Kind of salary to create
l Grade Salary Basis Input—Period to which the Option Value applies. For example, ifGrade Salary Basis Input is Monthly and Option Value is 1,000, the salary is $1,000 permonth.
l Allow Value Change Input—To enable cost center managers or other users to modify thesalary grade at the position or employee level, select Yes.
l Element Start Date and Element End Date—When the salary grade is effective
l Budget Set—Version of the budget in the source system to which the budgets are writtenback
7 See:
l “Specifying Step-based Salary Grades ” on page 97
l “Specifying Rate-Based Grades” on page 97
l “Specifying Value-based Salary Grades” on page 98
96

Specifying Step-based Salary Grades Use step-based salary grades for positions or employees whose salary corresponds to a point onthe grade-scale or pay-scale. Salary steps entitle these positions and employees to salary increasesby moving from one step to another.
ä To specify grade steps:
1 Ensure that the salary grade is defined.
2 From the drop down list, select the salary grade, and then click .
3 From Salary Grade Type Input, select Grade Step, and then click Save.
4 See “Defining Salary Grades” on page 96 for the information to specify in Grade Details.
5 Right-click 1st Element Change, select Add Salary Option, and then select Add Progression Steps.
6 Specify the following:
l Grade Step—Number for the step
l Enter Effective Date—When the step is effective
l Select Operator—Set to initially define the step
If you are editing the salary step, select the operation to perform. For example, to increasethe step by $100.00, select Add.
l Enter Value—Salary amount to budget
If you are editing the salary step, enter the value by which to change the step. For example,to increase the step by $100.00, enter 100.
7 Click Add.
8 Specify the remaining step details such as an end date.
Specifying Rate-Based GradesDefine rate-based salary grades to associate a range of salary values with a specific grade sequence.This enables you for example, to pay security officers between $45,000 and $47,000 dependingon seniority and skill level. The sequence is the exact salary value in the range to apply. In thiscase, sequence 1 could have a value of $45,000 and apply to entry level security officers. Sequence2 could have a value of $46,000 for security officers with more than two years of experience.
ä To specify salary rates:
1 Ensure that the salary grade is defined.
2 From the drop down list, select the salary grade, and then click .
3 From Salary Grade Type Input, select Grade Rate, and then click Save.
4 See “Defining Salary Grades” on page 96 for the information to specify in Grade Details.
5 Right-click 1st Element Change, select Add Salary Option, and then select Add Grade Rates.
6 Specify:
97

l Select Grade Sequence—Specific salary value, in a range of possible values, to use.
l Effective Start Date—When the salary rate is effective
l Select Operator— Set to initially define the rate
If you are editing the salary rate, select the operation to perform. For example, to decreasethe rate by $130.00, select Subtraction.
l Enter Value—Salary amount to budget
If you are editing the salary rate, enter the value by which to change the rate. For example,to decrease the salary rate by $130.00 enter 130.
l Grade Minimum Value—Lowest salary amount
l Grade Mid Point Value—Average salary amount
l Grade Maximum Value—Highest salary amount
7 Click Add, and then Save.
Specifying Value-based Salary GradesUse value-based salary grades to pay employees a predefined single salary amount.
ä To add value-based salary grades:
1 Ensure that the salary grade is defined.
2 From the drop down list, select the salary grade and then click .
3 From Salary Grade Type Input, select Value, and then click Save.
4 Right-click 1st Element Change, select Add Salary Option, and then select Modify Values.
5 Specify information such as:
l Effective Start Date—When the salary value is effective
l Select Operator—Set to initially define the value
If you are editing the value, enter the calculation to perform. For example, to apply a2% change, select Percent Change.
l Enter Value—Amount to budget
If you are editing the salary value, enter the value in the operation to perform. Forexample, to apply a 2% change, enter 2.
6 Click Add, and then Save.
About Modifying Salary GradesAdministrators can change salary grade values by modifying:
l Step values
l Minimum, mid, and maximum values (for rate-based grades)
98

l Effective dates
l Payment periods
l Salary basis spread patterns. See “About Specifying Annual Salary Spreads” on page 100and “Spreading Salary Expenses” on page 114.
Note: Only administrators can modify salary values. For example, regular planners cannotmodify the minimum, mid, and maximum values of rate-based salary grades. If the valuesfor the salary grade rates, steps, or sequences that you use to budget need to be changed,contact an administrator.
You can also modify salary grades by applying missing data or date-specific changes, (a cost ofliving adjustment, for example) to all salary values associated with a step or grade sequence. See“Simultaneously Adjusting Grade Steps or Sequences” on page 99.
Synchronizing Salary PropertiesSynchronize salary properties to apply changes to basic salary data such as grade type and gradesalary basis Input (how often the salary is paid) to all positions or employees, possibly in differententities and departments, to whom the salary grade is assigned. Changes to grade steps,sequences, and values are not synchronized.
ä To synchronize salary grade properties:
1 From My task lists, select Budget Administration.
2 Select Manage salary grades.
3 From the drop down list, select the salary grade, and then click
4 As needed, modify any master salary grade data in Grade Details.
For information about the data you can change, see “Defining Salary Grades” on page 96and the topics for creating step-based, value-based, and rate-based grades.
5 Save.
6 Under Grade Details, right-click, and then select Synchronize Compensation Properties.
7 Specify the entity, such as an HR department in which to update the data for positions and employeesto whom the salary grade is assigned.
8 Recalculate the compensation budget. See “Calculating and Allocating Compensation Expenses” onpage 180 and “Viewing the Budget Impact of Compensation Expenses” on page 181.
Simultaneously Adjusting Grade Steps or SequencesYou can simultaneously modify, by effective date, values for multiple grade steps or sequences.For example, assume that a salary grade has 12 steps. The first step was effective March 1, 2009,and you must accommodate a 2% inflation increase occurring on July 1, 2011. Instead of
99

modifying each step to end-date them on June 30, 2011, perform this procedure to update allsteps or grade sequences simultaneously.
ä To adjust steps or sequences:
1 From My task lists, select Budget Administration, and then select Manage salary grades.
2 From the drop down list, select the salary grade, and then click
3 Under Grade Details, right-click, and then select Adjust Multiple Grade Steps or Sequences.
4 Specify:
l Enter Effective Start Date—When to make the adjustment
l Operator—Kind of change to make. In the example, a percentage.
l Enter Value—Value used to adjust the grade step or grade sequence. In this case, 2.
5 Click Adjust.
About Specifying Annual Salary SpreadsAlthough distributing salaries evenly across all periods is common (spreading an employee'sannual salary of $78,000 to $6,500 in each month of the annual budget), you can spread expensesacross periods differently as described in “Salary Spread Options” on page 101. You can applythese different spread patterns to positions, affecting positions and employees, or only toemployees if you do not use positions.
If you use a nine or ten month spread, but the default start and end dates do not apply based onyour fiscal year settings, Administrators can edit the formula for the Mapping Spread Factormember in the Accounts dimension to customize these spread options. Administrators can alsodefine entries for the Custom_Salary_Spread Smart List.
Note: When configuring spread patterns for multiple years, remember that the number of workdays in a year may vary.
Administrators or budget analysts can apply global changes across entities, effective on a certaindate, typically based on a common attribute. For example, assume that the Public EmploymentRetirement System (PERS) rate increases from 4.5% to 5% on August 1. You can retrieve allemployees or positions across all entities that have a PERS assignment and apply the 5% increase.You can make mass adjustments based on these attributes:
l An entity or an entity's parent member
l Job code
l Salary (plan, grade, or step)
l Union code
l Earning code (additional earnings)
l Tax class
100

Salary Spread Optionsl All and No Salary Spread–For internal use only
l Average–Spread expenses equally spread across periods for an average distribution.
l Workdays in a month—Spread expenses across a certain number of days (manufacturingplant employees working six days a week, for example) that you or a planner define in eachmonth. See “Defining Custom Numbers of Workdays and Paydays” on page 141.
l Paydays in a month—Spread expenses across the number of payday in each month. See“Defining Custom Numbers of Workdays and Paydays” on page 141.
l Summer pay—Spread expenses from mid-May to mid-September for summer positions suchas adjunct professorships and lifeguarding.
l Nine months—Spread expenses across nine months for positions such as full-time universityprofessors, active from September to May. By default the time period for this spread optionis January to September.
For example, assume a Professor is paid $100,000 over a 12 month period for 9 months ofwork ($100,000/12 for each year). Use the Nine months option to identify that only 9 of the12 months are work months. The annual salary amount for the salary grade assigned to theprofessor position would be 9 months * the monthly salary. If the monthly salary amountsdiffer, modify the Monthly Spread Factor to redistribute the monthly amounts.
l Ten months—Spread expenses across 10 months for positions such as public school teachers,that are active from September to June. By default the time period for this spread option isJanuary to October.
l Custom—Spread expenses using period-level FTE that you specify at the entity, position, oremployee level.
Using a 52-Week Fiscal YearIn a 52-week year, weeks are distributed in repeating cycles of 4 and 5, resulting in 13 weeks perquarter. The cycle specifies the number of weeks in each of the three months used.
l 4-4-5 Calendar—The first month of the quarter has four weeks, the second, four weeks, andthe third, five weeks.
l 5-4-4 Calendar—The first month of the quarter has five weeks, the second, four weeks, andthe third, four weeks.
l 4-5-4 Calendar—The first month of the quarter has four weeks, the second, five weeks, andthe third, four weeks.
101

Managing Other Compensation Elements
Subtopics
l Defining Other Compensation Elements
l Modifying Compensation Elements and Options
l Updating Multiple Compensation Options
l About Synchronizing Compensation Element Properties
l Synchronizing Compensation Element Properties
Other compensation elements are non-salary expenses, such as additional earnings (bonuses,and so on), benefits, and employer-paid taxes. These elements have different rates and are usuallyallocated to different General Ledger segments or chart fields than basic salary. In some sourcesystems, individual benefits and employer-paid taxes are called attributes.
Before releasing the budget, review and update compensation elements and attributes,particularly employer-paid taxes for which you may need to define tax elements (attributes) formultiple countries or currencies. If tax rates change by year, modify the tax elements or attributesto reflect updated tax rate and base them on the fiscal or the calendar year.
To apply compensation element or attribute changes to multiple positions in a cost center, clickMass update position data.
See “Defining Other Compensation Elements” on page 102 and “Defining Overtime” on page105.
Note: To budget using recurring budget requests in a decision package-enabled application,review how using recurring budget requests affects some aspects of compensationbudgeting. See “How Budget Request Type Impacts Compensation Budgeting” on page198.
Defining Other Compensation ElementsYou can adjust existing options by end-dating and adding new ones.
ä To define compensation elements or attributes:
1 From My task lists, select Budget Administration, and then select Manage other compensationelements.
2 In the POV, select Version and Scenario members.
3 From the drop down list, select the kind of compensation element (a medical insurance benefit, for
example) to define, and then click .
4 Under Element Definition, apply the settings in “Element Definition Settings” on page 103
5 To define a new compensation element, see “Adding Compensation Element Options ” on page 104.
6 To remove element options, right-click, and then select Delete Option.
102

7 To specify the General Ledger accounts, segments, or chartfields from which funds are allocated, clickAllocations, and then select the chart fields or segments.
Element Definition SettingsUse these settings to define compensation elements:
l Options Based—Yes if the element can be applied in different ways to multiple individuals,such as an employee's medical insurance benefit covering their spouse and dependents.
l Payment Terms Input—When the element is paid, such as monthly for health insurance orannual for bonuses. NOTE: If you select a frequency less than monthly, the payment frequencyinput option that you select will be ignored.
l Value Type Input—How the attribute or element is computed. For health insurance, this valueis Amount because coverage is not calculated and provided by factors such as overtime orpercentage of salary.
l Allow Value Change Input—If planners and cost center managers can update the element atthe employee or position level.
l Maximum Value Type— Value type (amount or percentage) that the calculated compensationelement cannot exceed. For example, to calculate employer paid tax such as FICA (in whichthe Value type Input is percentage), select Amount for Maximum Value Type to assign amonetary amount that the tax cannot exceed.
Note: The Maximum Value in the lower Element Details area of the form takes precedenceover that specified in the upper Element Definition area. If you do not specify amaximum value in Element Details, the value in Element Definitions is used. IfMaximum Value is specified in both areas, the value in Element Details is used.
l Maximum Value—Value or percentage (as specified as Maximum Value Type) that cannotbe exceeded and that caps the compensation element for the entire year based on eachmonth. For example, hazard pay could be capped at $5,000.
l Earnings Type Input—Only for overtime.
l Payment Frequency Input-–How often the attribute or element is funded. For example,monthly health care insurance might be paid during the first period, whereas annual bonusesare onetime payments. NOTE: The payment frequency option that you select is ignored ifPayment Terms Input is less than monthly. If Payment Type is monthly, the expense is reflectedper month. If Payment Type is semimonthly, the expense is reflected twice per month,regardless of Payment Frequency. To use a payment frequency, select a payment term ofgreater than monthly.
l Element start and end dates—Period during which the element applies.
l Required Element Input—Whether the element must be specified and assigned to allpositions, such as group life insurance.
l Taxable Component—Whether the compensation element is subject to tax. In the case ofmedical and dental insurance, for example, this is No.
l Budget Set—Budget in the HRMS source system in which to apply the element or attribute.
103

l Follows Salary Allocation:
m Yes—Use allocations for salary unless you defined allocations at the compensation oremployee level. Changes that you make to compensation element or employee leveldetails are applied first, and salary allocations are applied to missing segments or chartfields. For example, if you apply this option to benefits for a Research Scientist position,benefits are allocated using the same ratio of allocations defined for the position salary,and allocations on the benefit's Allocations tab are overridden.
m No—You must select all chart fields or segments on the compensation element'sAllocation tab.
m Allocate to Base Elements—If defining a benefit or tax that is a percent of gross earnings,select this option to roll the calculated amount of the benefit or tax into the amountsfor the allocation, instead of assigning them to separate allocations. See “AllocatingBenefit or Tax Amounts to Salary, Additional Earnings, or Benefit Ratios” on page127
Adding Compensation Element Options
ä To specify compensation elements options:
1 Perform steps 1 to 6 in “Defining Other Compensation Elements” on page 102.
2 In Element Details, select Options, right-click, and then select Add Option.
3 Specify information such as:
l Select Option—Plan or method available for the element, such as Survivor Spouse andChildren for health insurance coverage.
l Enter Effective Start Date—Period during which the option or attribute applies
l Enter Value—Corresponding to the specified value type, the dollar amount of the option($3,500 for survivor spouse and children health insurance coverage, for example) or thepercentage used to calculate the option value.
l Enter Maximum Value—The value or percentage that determines the maximum extent,that cannot be exceeded, of the option ($3,650 for survivor spouse and children healthinsurance, for example).
4 In Select Operator, select Set to initially define the option. To modify an option, select the kind ofcalculation to perform on the existing option value.
5 Click Add.
6 To specify the General Ledger account from which funds are allocated to compensation element, clickAllocations, select the chart fields or segments, and the allocation percentage.
104

Defining Overtime
Subtopics
l Step 1
l Step 2
l Step 3
Overtime is the number of times (typically 1.5 or 2.0) by which you multiply the regular hourlysalary rate, or calculated as a percentage of salary or gross earnings. Overtime is not a benefit.
Step 1
ä To specify overtime:
1 Perform steps 1 to 6 in “Defining Other Compensation Elements” on page 102.
2 In Element Details, select Options, right-click, and then select Add Option.
3 Under Element Definition, specify the following:
l Options Based—If overtime can be implemented and paid differently, such as anincreased value during statutory holidays. You later define these implementations.
l Payment Terms Input—When overtime is paid, such as annually. If you budget by fiscalyear (may differ from the calendar year) and want the maximum overtime amount tobe paid based on the fiscal year, select Monthly (fiscal year). If your fiscal year is the sameas the calendar year, and you want the maximum overtime amount to be paid accordingto the calendar year, select Monthly (calendar year).
l Value Type Input—The amount depending on the maximum value type
l Maximum Value Type Input—A fixed amount, or percentage of salary, overall earnings,or taxable earnings.
l Allow Value Change Input—If planners or cost center managers can modify overtime atthe employee or position level.
l Maximum Value Input—Depending on the maximum value type:
m Number of times by which to multiply salary rate to calculate the overtime
m If overtime is calculated as a percentage of salary or taxable earnings, enter thegreatest percentage used to calculate overtime
m If overtime is paid as a single sum, enter the greatest possible amount
If maximum value type is a percentage of salary, the product annualizes the salary. Itthen uses the maximum value input value as a percentage to determine the maximumover time amount. For example, if salary is $1,000 Bimonthly(Calendar), (once every 2months), then the annual salary is $6,000. If maximum value is percentage of salary,and maximum value is 10, then maximum overtime amount for the calendar year is$600.
4 See “Step 2 ” on page 106.
105
Step 2
ä To specify overtime:
1 Under Element Definition, specify the following:
l Earnings Type Input—If overtime is included in employee gross pay.
l Payment Frequency Input—If an employee is eligible for payment annually, semi-annually, quarterly, monthly, and so on. NOTE: The payment frequency option that youselect is ignored if Payment Terms Input is less than monthly. If Payment Type is monthlythe expense is reflected per month. If Payment Type is semimonthly the expense isreflected twice per month, regardless of Payment Frequency.
l Element start and end dates—Period during which the overtime applies
l Required Input—If overtime must be assigned to all positions
l Taxable Component—If overtime is subject to tax
l Follows Salary Allocation—To enable users to specify allocation details for overtime,select No.
2 Specify if overtime is option-based and varies by time or other factors, by selecting Options, and thenAdd Option in Element Details:
l Select Option—An available overtime plan
l Enter Effective Start Date—When the option applies, such as statutory holidays such asChristmas and New Year
l Enter Value—Number of times to multiply pay to compute overtime
l Enter Maximum Value—Highest number by which to multiply pay to calculate overtime,or maximum percentage of salary, overall earnings, or taxable earnings used to calculateovertime.
For example, Christmas overtime could be defined using a start date of Dec. 25, 2011,a dollar value for overtime (1000) or using a portion of bimonthly salary or earnings (.20), and a value or percentage for overtime that cannot be exceeded (1100 or .25, forexample).
3 See “Step 3” on page 106.
Step 3
ä To specify overtime:
1 In Select Operator, select Set to initially define overtime. If you are modifying overtime, the operationthat you select modifies the existing value.
2 Click Add.
3 Specify missing overtime information, such as an end date.
4 To specify the General Ledger account from which funds are allocated to compensation element, clickAllocations, select the chart fields or segments, and the allocation percentage.
106

Modifying Compensation Elements and Options
ä To edit compensation elements or options:
1 From My task lists, select Budget Administration, and then select Manage other compensationelements.
2 In the POV, select the Version and Scenario members.
3 From the drop down list, select the compensation element of the option, and then click
4 Perform any task:
l Modify compensation element or option definitions such as payment terms in put,maximum value, start date, and payment frequency at the top of the form. See “DefiningOther Compensation Elements” on page 102.
l Remove options
l Modify option details (changing values or payment frequencies, for example):
m Select the option, and then click
m In Element Details, change settings such as start date, end date, option value, andmaximum value.
m In Element Details, remove options by right-clicking, and selecting Delete.
5 To update numerous options simultaneously, see “Updating Multiple Compensation Options ” on page107.
6 To specify the General Ledger account from which funds are allocated to compensation element, clickAllocations, select the chart fields or segments, and the allocation percentage.
Updating Multiple Compensation Options
ä To adjust multiple options simultaneously:
1 From the drop down list, select the compensation element, and then click
2 In Element Definition, right-click the first column header, and then select Adjust multiple options.
3 Ensure that the correct compensation element is selected.
4 From Select Operator, select the operation to modify existing options values. For example, to increaseoptions by $1,150.00 select Add.
5 In Enter Value enter the amount by which to change option values. For example, to increase options by$1,150.00, enter 1150.
6 Click Adjust.
107

About Synchronizing Compensation Element PropertiesSynchronize compensation properties to apply changes to basic data such as the following to allexisting positions or employees, possibly in different entities and departments, to whom thecompensation element is assigned:
l If the element is options based
l If the element is taxable
l If it is added to gross pay
l Maximum values
Synchronizing Compensation Element Properties
ä To synchronize compensation properties:
1 From My task lists, select Budget Administration, and then select Manage other compensationelements.
2 From the drop down list, select the employee's current HR entity to which they were transferred, and
then click
3 Modify any master compensation data such as Value Type Input (how the compensation is distributedand paid out), and individual option values and dates.
See steps 6 and 7 in “Managing Other Compensation Elements” on page 102.
4 Save.
5 Under Element Definition, right-click, and then select Synchronize Element Properties.
6 Specify the entity, such as a department, in which to update the data for positions and employees towhom the compensation element is assigned.
7 Recalculate the compensation budget. See “Calculating and Allocating Compensation Expenses” onpage 180 and “Viewing the Budget Impact of Compensation Expenses” on page 181.
About Processing Loaded HRMS DataYou can review these effective dates loaded from HRMS, in order to calculate period-level statusand FTEs in applications:
l Position start and end dates
l Employee hire dates
l FTE start and end dates
Perform the Process loaded human resources data tasks to ensure that the position or employeeis active between these dates, and that the respective Planning period's status is updatedaccordingly.
108

Note: For the Employee configuration option, performing this procedure activates job codes towhich employees are assigned. If the job codes are not associated with employees, activatethe jobs later.
Processing Loaded HRMS Data
ä To process loaded human resource data:
1 From My task lists, select Budget Administration, and then select Process loaded human resourcesdata.
2 Accept the defaults, and then click Launch.
3 Specify the following to identify the budget in which to use loaded effective-dated data at the periodlevel:
l Entity—Department or cost center
l Version—Budget iteration or stage. For example, if the scenario is forecast, worst casecould be a version.
l Scenario—Budget type, such as baseline or forecast
4 Click Launch.
Reviewing Loaded Position, Job, and Employee DataWhenever you load job, position, and employee information from HRMS or a previous budgetversion, review the following to identify invalid or missing data:
l Positions and all related compensation elements, FTE assignments, and salary
l Employees and all related compensation elements, FTE assignments, and salary
Modify employees, jobs, and positions to resolve incorrect or missing data, and apply changesby performing a mass update.
l “Reviewing Position and Employee Data” on page 109
l “Reviewing Job and Employee Data” on page 110
l “Reviewing Position-Only Data” on page 111
Reviewing Position and Employee Data
ä To review loaded position and employee data:
1 From My task lists, select Budget Administration, and then select Review position and employeedata .
109

2 Select the budget type (forecast, for example) and stage (forecast revision, for example), and then click
.
3 Select the HR organization, and then click .
4 Perform any task:
l To display employees and compensation data by position, select Position’s EmployeeAssignments and perform a task.
m To view position details such as benefits and salary grades, right-click and then selectView position details.
Note: If you loaded data using FDMEE, you can only review salary information.
m To view employee details, right-click in the second column, and then select Viewemployee details.
l To view the budget impact, by period, of maintaining employees by position performthese tasks:
a. Calculate the compensation budget. See “Calculating Budgets” on page 183.
b. Right-click, and then select View employee expense by period.
l To display position or job, and compensation data by employee, select Employee's
Position Assignments, select the employee, click , and then:
m In the drop down list, right-click the employee.
m Select View employee details.
Reviewing Job and Employee Data
ä To review loaded job and employee data:
1 From My task lists, select Budget Administration, and then select Review employee and job data.
2 Select the budget scenario (base, for example), applicable job code, HR organization, and version.
3 Click .
4 Perform a task:
l To display employees and compensation data by job, select Jobs Assigned to
Employees, right-click the employee in the drop down list, and then click .
l To view job details such as taxes, right-click, and select View job details.
l To view employee details, right-click in the second column, and then select Viewemployee details.
l To display jobs and compensation data by employee, select Employees Job
Assignments, select the employee from the drop down list, and then click .
110

l To review employee details and compensation, right-click, and then select View employeedetails.
l To view the budget impact, by period, of maintaining employees by job, right-click,perform these tasks:
a. Calculate the compensation budget. See “Calculating Budgets” on page 183.
b. Right-click, and then select View employee expense by period.
Reviewing Position-Only Data
ä To review loaded position data:
1 From My task lists, select Budget Administration, and then select Review position data.
2 From Page, select the HR organization (your cost center, for example), the budget scenario (base, forexample), and the budget version.
3 To view details such as allocations and taxes, right-click, and then select View position details.
4 To view the expense, by period, of positions, perform these tasks:
l Calculate the compensation budget. See “Calculating Budgets” on page 183.
l Right-click, and then select View position expense by period.
About Updating Entity-Specific Positions andEmployeesThroughout the budget cycle, you may have to update positions and employees in a particularentity such as a department in these situations:
l After loading data from the HRMS source system to implement global assumptions (a newbenefit option, for example)
l When defining compensation details for new positions or employees in your entity or HRdepartment
l Before releasing the budget to planners or cost center managers
l When new or modified salary information or compensation (salary adjustments for multiplepositions, or a new dental benefit, for example) must be incorporated
You can perform updates in three ways:
l Using mass updates. See “Performing Mass Updates” on page 112.
l Applying entity-level defaults to positions or employees. See “Applying Compensation andSalary Allocation Defaults” on page 177.
l Synchronizing salary, position, employee, and other compensation master data.
111

To budget using recurring budget requests in a decision package-enabled application, reviewhow using recurring budget requests may affect updates and increments. See “How BudgetRequest Type Impacts Compensation Budgeting” on page 198.
Performing Mass UpdatesPerform mass updates to adjust:
l Salary grades and details
l Benefits
l Additional earnings
l Employer-paid taxes
When performing mass updates on positions or employees, you can overwrite or fill data asfollows:
l Overwrite:
m Existing data and assignments are updated with new defaults. New assignment rows arenot created, but existing rows are updated.
m If salary or compensation details do not exist, the new defaults are not applied.
l Fill:
m Assignment rows for the new default data are added to position and employee details.
m If salary or compensation assignments do not exist, new assignment rows are added toemployee and position details.
See “Sample Mass Update” on page 114.
Note: If you use decision packages and budget requests, you cannot make mass updates toperform tasks such as spread salary expenses or overwrite compensation or allocationdefaults using the My tasks List pane. Instead, see “Performing Tasks Not Displayed inMy Tasks List” on page 236.
Making Mass Updates
ä To make mass updates to position, job, and employee data:
1 From My tasks List, select Budget Administration, and then select Mass update position data or Massupdate employee data.
Note: If you use decision packages and budget requests these tasks are not available. See“Performing Tasks Not Displayed in My Tasks List” on page 236.
2 Select the correct budget scenario, stage, and year.
112

3 From the drop down list, select the HR organization, and then click .
Note: If you select Total Entity to search all positions, jobs, and employees, check the resultsof the search by individual, lower-level entities.
4 Right-click, select Search, and then select Find Positions or Employees or Find Jobs or Employees.
5 Specify the criteria, such as pay type, approval status, union code, or position start date, to identify thepositions, jobs, or employees to update.
6 Click Find.
7 Select an option in the Apply Defaults column:
l No—Omit the position or employee from the update
l Yes—Include the position or employee in the update
8 See “Assigning or Overwriting Compensation Element and Allocation Defaults” on page 113.
9 To define how to spread position or employee expenses over the year, see “Spreading Salary Expenses”on page 114.
Assigning or Overwriting Compensation Element andAllocation Defaults
ä To apply defaults or overwrite existing defaults:
1 Perform steps 1 to 8 in “Performing Mass Updates” on page 112 to identify the positions or employeesto update.
2 Right-click, and then select the default to apply or overwrite:
l Salary Grade Defaults—All salary information
l Allocation Defaults—Allocations to General Ledger or default natural accounts
l Other Compensation Defaults—Additional earnings, employer-paid taxes, and benefits
3 Select one:
l Overwrite—Each of existing salary assignments or selected non salary assignments arecleared, and Assignment rows for the new default data are added to position andemployee details. If salary or compensation details are undefined, the new defaults arenot applied.
l Fill—Assignment rows for the new default data are added to position and employeedetails as follows:
m For salary: If no salary assignment are made, the defaults of the selected element areadded. If salary assignments exist, new records are not added, and the existingrecords are not modified
m For other compensation: If assignments for the selected elements do not exist, thedefaults are added. If assignments exist, no new records are added, and existing
113

records are not modified If salary or compensation assignments do not exist, newassignment rows are not added to employee and position details.
4 Depending on what you are updating, specify information such as:
l Select Other Compensation Element—The new or updated compensation element toassign
l Select Option—The new or updated compensation element option to apply
l Salary Data—The salary grade, step, and grade sequence to apply
l Enter Effective End Date—Date after which to withhold the new or modifiedcompensation element
5 Click Run.
Sample Mass UpdateIn your department, you want to assign an overtime compensation default to only the new, andnot yet filled, positions of Office Clerk and Office Manager currently without this element. Theeffective date for these positions is January 1, 2012.
ä To apply the overtime default:
1 Perform steps 1 to 8 in “Performing Mass Updates” on page 112 to identify the positions or employeesto update.
2 Select the correct budget scenario, stage, and year.
3 From the drop down list,, select your HR organization, and then click .
4 Right-click, select Search, and then select Find Positions or Employees.
5 Specify January 1, 2012 as the Start Date to filter and find the positions.
6 Click Find.
7 For each position, ensure that Yes is selected in the Apply Defaults column.
8 Right-click, select Other Compensation Defaults, and then select Fill.
Spreading Salary Expenses
ä To perform spreads:
1 Perform steps 1 to 8 in “Performing Mass Updates” on page 112 to identify the positions or employeesto update.
2 If you select Total Entity to search all positions, jobs, and employees, check the results of the searchby individual, lower-level entities.
3 Select Populate Annual Salary Spread Property.
4 Select your accounting period structure pattern. See “About Specifying Annual Salary Spreads” on page100.
114
5 Click Fill, and then Save.
Updating FTE and Status after Defining theCompensation Calculation Period When they create applications, administrators define the number of years applications span,which is typically 3 -5 years. If you do not want to calculate the compensation for all of theseyears, and want to perform calculations for a shorter period of time, specify values for thefollowing substitution variables that enable you to identify the years on which to start and endcompensation calculations:
l Compensation_Budget_Start_Year
l Compensation_Budget_End_Year
For example, to calculate the compensation budget only for 2013, 2014, and 2015, setCompensation_Budget_Start_Year as 2013, and Compensation_Budget_End_Year as 2015.You can then update position and employee FTE and status to reflect the new budget period oftime. After updating the FTE and status data, calculate the compensation budget and allocatecompensation data. For more information see the Oracle Hyperion Planning Administrator'sGuide.
Updating FTE and Status Data
ä To update FTE and status data:
1 Select Administration, then Manage, and then Variables.
2 Select Substitution Variables.
3 Select the variable that manages the budget start year, such as Compensation_Budget_Start_Year.
4 Click .
5 In Value, enter the year in which to start compensation budget calculations.
6 Select Substitution Variables, and then select Compensation_Budget_End_Year.
7 Click .
8 In Value, enter the last year for which compensation budget will be calculated.
For example, to calculate compensation budgets for 2014 to 2016, specify 2014 asCompensation_Budget_Start_Year, and 2016 as Compensation_Budget_End_Year.
9 Refresh the database.
10 Select Budget Administration, and then select Reset FTE and Status Calculations.
11 Ensure that the plan type is HCP, and that the ResetFTEandStatus rule is selected, .
12 Click Launch.
115

13 Select or enter values for the scenario, version, and entity, and then click Launch.
14 Calculate the compensation budget and perform allocations. See “Calculating and AllocatingCompensation Expenses” on page 180.
116

P a r t I I I
Creating Compensation Budgets,Decision Packages, and Budget Requests
In Creating Compensation Budgets, Decision Packages, and Budget Requests:
l Defining Salary, Compensation, and Allocation Defaultsl Working with Human Capital Compensation Budgetsl Calculating, Reviewing, and Allocating Compensation Expense Budgetsl Working with Decision Packages and Budget Requestsl Reviewing and Approving Budgetsl Revising and Adjusting Budgets
117

118

7Defining Salary, Compensation,
and Allocation Defaults
In This Chapter
How Defaults are Helpful . . . . . . . . . . . . . . . . . . . . . . . . . . . . . . . . . . . . . . . . . . . . . . . . . . . . . . . . . . . . . . . . . . . . . . . . . . . . . . . . 119
Defining and Applying Entity-Specific Position Defaults.. . . . . . . . . . . . . . . . . . . . . . . . . . . . . . . . . . . . . . . . . . . . . 120
Maintaining Salary Allocation Defaults .. . . . . . . . . . . . . . . . . . . . . . . . . . . . . . . . . . . . . . . . . . . . . . . . . . . . . . . . . . . . . . . 123
Mass Adjusting Compensation Expenses ... . . . . . . . . . . . . . . . . . . . . . . . . . . . . . . . . . . . . . . . . . . . . . . . . . . . . . . . . . . . 129
Making Mass Adjustments ... . . . . . . . . . . . . . . . . . . . . . . . . . . . . . . . . . . . . . . . . . . . . . . . . . . . . . . . . . . . . . . . . . . . . . . . . . . . 130
Using Increments... . . . . . . . . . . . . . . . . . . . . . . . . . . . . . . . . . . . . . . . . . . . . . . . . . . . . . . . . . . . . . . . . . . . . . . . . . . . . . . . . . . . . . . 131
Defining Custom Numbers of Workdays and Paydays... . . . . . . . . . . . . . . . . . . . . . . . . . . . . . . . . . . . . . . . . . . . . . 141
How Defaults are HelpfulUse defaults to:
l Automatically apply salary, compensation element options, and salary allocations to newpositions or jobs. Existing or new employees not yet assigned to these positions or jobsinherit the defaults when assigned. See “Defining and Applying Entity-Specific PositionDefaults” on page 120
If you use the Position configuration option or the Position and Employee configurationoption, specify defaults at the entity level. This lets you apply default salary grades andcompensation for positions and associated employees in an HR organization (cost center,department etc.)
If you use the Employee configuration option, specify defaults at the job-level, and activatejobs.
l Have Public Sector Planning and Budgeting quickly match jobs and positions with salaryand compensation based on the default criteria that you define.
For example, to apply the same salary grade steps to all positions in a union, regardless ofposition type or job, define a default for which you specify only the union code, and leaveapplicable job and applicable location blank or select All. This enables the product to applythe salary steps to union-specific employees regardless of their job or location.
119

Defining and Applying Entity-Specific Position Defaults
Applies to the Position, and the Position and Employee HCP configurations
ä To define defaults for new positions:
1 In My task list, select Budget Preparation, and then select Manage compensation defaults for eachentity or Manage compensation defaults.
2 From the POV, select the budget scenario and version.
3 From Page, select the HR organization.
The Details area displays any existing position defaults such as associated jobs, position startand end dates, and salary basis.
4 In Position Type:
l Select the type that, if not overwritten when you define positions, new positions inherit.For example, selecting Shared means that all new positions added to the cost center areautomatically shared positions unless you specify otherwise.
l Make no selection to enable users to specify a position type when they create positions.
5 Click and perform any task:
l Specify the following if not at the default, than at the position level:
m Start Date—When positions start
m Adjustment Date—When changes to compensation elements that are assigned topositions are applied (annual bonuses or a new health benefit option, for example)
m Salary Basis—How often employees assigned to positions are paid (weekly or bi-monthly, for example)
m Default Weekly Hours—Number of hours per week
m Annual Salary Spread—How salary expenses for positions are spread across theaccounting periods in your organization. See “About Specifying Annual SalarySpreads” on page 100.
l Add or change salary grades, see “Specifying Salary Grade Defaults ” on page 120.
l Remove salary grade defaults by right-clicking, and then selecting Delete.
Specifying Salary Grade Defaults
ä To define salary grade defaults:
1 Perform steps 1 to 5 in “Defining and Applying Entity-Specific Position Defaults” on page 120.
2 Perform any task:
l Add step, value, or rate-based salary grades by right-clicking, selecting the grade type,and seeing “Defining Salary Grades” on page 96.
120
l Modify salary grade defaults.
l Remove salary grade defaults by right-clicking, and then selecting Delete.
Maintaining Compensation Elements DefaultsIf your departments or cost centers have positions to which certain compensation elements apply(hazard pay for police officers, for example), define these elements as entity-specificcompensation defaults. These compensation details are automatically applied to new positionsin your entity.
ä To specify compensation defaults:
1 Ensure that a member exists for the element. For example, to add a Vision Care benefit, ensure that aVision Care benefit member exists in the Element dimension.
2 Perform steps 1 to 5 in “Defining and Applying Entity-Specific Position Defaults” on page 120.
3 Select Other Compensation.
4 Define defaults by specifying:
l Option—Plan or method available for the element, such as Survivor Spouse and Childrenfor health insurance coverage
l Applicable Jobs to which to assign the compensation default
l Enter Override Value — Amount by which the default element or attribute can change,if you enabled Allow Value Change Input.
l Applicable Location Code — Geographical or regional areas to which to apply the defaults
l Applicable Union Code—Union to whose positions you want to assign the compensationdefaults
Tip: Specify the lowest number of criteria to match and apply compensation defaults topositions, jobs, and the associated employees. For example, if all IT Support Staff,regardless of location or union, are eligible for an overtime compensation element,select IT Support Staff in Applicable Job, and leave Applicable Union Code, andApplicable Location Code blank or select All.
See also “Adding Elements” on page 121 and “Deleting Elements ” on page 122
Adding ElementsRight-click, select Add Other Compensation, and specify information such as:
l Other Compensation Element—Compensation element (drug benefit, for example) to add
l Select Option—Plan or implementation of the compensation element such as Member andSpouse, or overtime as additional earnings
l Select Job—Jobs to which to add the element
121

l Enter Override Option Value—Value by which the planners can change the compensationelement value for individual positions (increasing a benefit default value by $200, forexample)
Deleting ElementsSelect the compensation element, right-click, select Delete Other Compensation.
Maintaining Natural Account Defaults
Subtopics
l About Default Natural Accounts
l Specifying Natural Account Defaults
About Default Natural AccountsNatural accounts are the portion of general ledger account segments and chart fields that identifyfinancial activity, such as expenses, withholding tax, and other wages. The natural accountsegments or chart fields in the General Ledger are usually set up as members in the Accountdimension. Use the Manage other compensation defaults , Natural Accounts tab to specify howbasic expenses and compensation expenses (for positions and employees in an entity) areallocated to General Ledger account segments or chart fields. For example, an administrator canspecify that dental plan benefits are allocated to the 515600 account segment (natural account)for all entities.
Department or cost center managers can associate natural accounts with benefits, additionalearnings, and employer-paid taxes for selected entities. For example, the Department of PublicSafety manager can associate account 515500 (Medical Insurance Expense) with the BenefitExpense account, and account 512290 (FICA) with Employer-Paid Taxes.
When department managers associate natural accounts with compensation categories (Benefit,additional earning, and employer-paid tax defaults, for example) for selected entities, elementsin the categories are allocated to the associated account segment, unless the administratordefined a natural account for an element. In this case, if Medical Insurance and Vision Carebenefits are not assigned a natural account, their expenses are allocated to the account segment(515500) associated with Benefit Defaults for the entity. However, Dental Plan benefits areallocated to the 515600 account segment that is specified for all entities.
To define allocations at the individual compensation element level, you use the Allocations tab.
122

Specifying Natural Account Defaults
Applies to the Position and Employee configuration option
ä To specify natural accounts for compensation elements:
1 Ensure that the Salary_Account_List Smart List includes entries for the natural account segments orchart fields.
2 Perform steps 1 to 5 in “Defining and Applying Entity-Specific Position Defaults” on page 120.
3 Select Natural Account.
4 Review the default Account Segment and Account Segment Description information.
5 To add natural account default settings, perform these tasks in Default Setup:
a. Right-click and then select Add Default Account.
b. In Provide Defaults, select or enter the account segment.
c. Click Add.
d. Select the Account Segment Description and then save.
6 To remove default natural accounts overwrites, reverting to the global default defined by Administratorsfor expense allocations, right-click the default row, and then select Delete Default Account.
Maintaining Salary Allocation Defaults
Subtopics
l About Salary Allocations
l Overwriting the Default GL Accounts to Which Salary Expenses are Allocated
l Correcting Overlapping Allocations
About Salary AllocationsHuman capital salary and compensation expenses are charged against General Ledger accountsbased on specified allocations stored in account segments, budget combinations, or chart fields.You can allocate funds by percentage or a specific flat amount.
Unlike percent allocations which are calculated, a flat allocation is a specific amount, often agrant, that is reserved to fund a portion of employee or position expenses and is not modifiedin the event of expense increases.
For example, assume an employee's monthly salary is $2,400.00. The salary allocation definedto support this salary could be a flat allocation of $1200.00 from GL account combination ABC01000. This means that only $1,200.00 can r be taken from ABC 01000. A remaining $1,200.00of the salary must be accounted for. A second percent allocation is defined for 100% forcombination ABC 01100, a different account combination. This 100% refers to the remainingsalary expense of $1,200.00, minus the flat allocation. If the salary increases to $2,800.00 per
123

month, the flat allocation remains static at $1200.00 charged against ABC 01000. The percentallocation provides the difference and becomes $1,600.00.
Use the Manage other compensation defaults, Salary Allocations Details tab to specify the GeneralLedger account segments or chart fields from which positions in your cost center are funded byallocations.
About the Follows Salary Allocation OptionUse the Follows Salary Allocation to allocate as follows:
l Yes—Use the same allocations as those defined for salary expenses. In this case, you neednot specify all segments or chart fields when defining element details on the Allocation tab.
l No—Do not use the allocations defined for salary expenses, and manually specify segmentsor chart fields when defining element properties on the Allocations tab.
l Allocate to Base Elements—If defining allocations for a benefit that uses percentage of overallearnings, or for a tax that uses percentage of taxable earnings, select this option to add thecalculated amount of the benefit or tax to the amounts for the allocation, rather thanassigning them to separate allocations. Allocated tax and benefit amounts are shown in theAllocated Benefits and Allocated Taxes accounts. See “Allocating Benefit or Tax Amountsto Salary, Additional Earnings, or Benefit Ratios” on page 127.
Caution! If you use flat-amount allocations, do not use this option.
Sample Allocations
Subtopics
l Example 1
l Example 2
l Example 3
l Example 4
l Example 5
l Allocating Benefit or Tax Amounts to Salary, Additional Earnings, or Benefit Ratios
l Allocating Additional Earning Pay to Non-Salary Allocation Accounts
Example 1
Compensation expenses for a Research Scientist position are allocated as follows using twodefault natural accounts:
l 80% is allocated from the first account using Fund A, Program B, and Department D.
l 20% is allocated from the second account using Fund B, Program B, and Department D.
Assume that these compensation expenses, totaling $131,700, are added to the position:
l Base Salary—$100,000
124

l Additional earnings—$20,000
l Benefits—$5,500
l Employer-paid taxes—$6,200
The resulting base salary allocation for the position:
Table 12 Compensation Allocations
Natural Account Fund Program Department Percentage Amount
Nat Sal Fund A Program B Depart-D 80 $80,000
Nat Sal Fund B Program B Depart-D 20 $20,000
Note: Allocations that you define for individual compensation elements take precedence overallocation defaults. If you do not specify allocations at the compensation element level,then allocation defaults are applied.
Example 2
If Follows Salary Allocation is No, then benefit and compensation expenses are allocated asspecified on the Allocations tab of the Manage other compensation elements form. Assume thatthis information is specified on that tab:
l Natural Account—Nat Ben
l Fund—C
l Program—P
l Department—Y
Using these settings, benefit expenses are allocated as follows:
Table 13 Research Scientist Compensation Allocations
Position Natural Account Fund Program Department Allocation Percentage Allocated Amount
Research Scientist Nat Ben Fund C Program P Depart-Y 100 $5,500
Example 3
If Follows Salary Allocation is Yes, then the allocations specified on the Manage other compensationelements are used, and blank chart fields and segments on Manage other compensationelements, use the salary allocations. If Follow Salary Allocation is No, then you must specify eachchart field or segment allocation, even if they match the salary allocations.
For example, assume that the following is specified on the Allocations tab of the Manage othercompensation elements form:
l Natural Account—Nat Ben
125

l Fund—C
If Follows Salary Allocation is Yesbenefits expenses for the Research Scientist position are allocatedas follows:
Table 14 Research Scientist Benefits Allocations
Natural Account Fund Program Department Allocation Percentage Allocated Amount
Nat Ben Fund C Program B Depart-D 80 $4,400
Nat Ben Fund C Program B Depart-D 20 $1,100
Example 4
If Follows Salary Allocation is Yes, then benefit expenses for Research Scientists are allocated inthe same way as the position's salary. Allocations defined for the compensation element areoverridden. In this case however, a natural account segment is not specified on the Manage othercompensation elements form, and a department default is specified on the Manage compensationdefault form. Assume that:
l No data other than Fund C is specified on the Allocations tab of the Manage othercompensation elements form.
l No data other than Ben-D is specified on the Natural Account tab of the ManageCompensation Defaults form.
Benefits expenses for the Research Scientist position are allocated as follows:
Table 15 Research Scientist Benefits Allocations
Natural Account Fund Program Department Allocation Percentage Allocated Amount
Ben-D Fund C Program B Depart-D 80 $4,400
Ben-D Fund C Program B Depart-D 20 $1,100
Example 5
In this case, the allocations in Example 1 are effective from 01/01/10 to 6/30/10, and those inExample 2 are effective on 07/01/10 but have no end date. Benefits expenses for the ResearchScientist position are allocated as follows:
Table 16 Allocations Resulting from Effective Dating
Start Date End Date Natural Account Fund Program Department Allocation Percentage Allocated Amount
01/01/10 06/30/10 Nat Ben Fund C Program P Depart-Y 100 $5,500
07/01/10 Nat Ben Fund A Program B Depart-D 80 $4,400
07/01/10 Nat Ben Fund B Program B Depart-D 20 $1,100
126

Allocating Benefit or Tax Amounts to Salary, Additional Earnings, or Benefit Ratios
Use the Allocate to Base Elements option when defining allocations for benefits or taxes that area percent of gross earnings, to roll the calculated amount of the benefits or taxes into the amountsfor the allocation, as opposed to assigning them to individual allocations. This is helpful when:
l Benefits are a percentage of gross earnings, are defined as salary + additional earnings, andthe additional earnings have allocations that use different GL segments or chartfields (theFollows Salary Allocation Setting is No). The enables you to allocate benefits in the ratio ofsalary and additional earnings.
l Taxes are a percentage of taxable compensation, defined as salary + eligible additionalearnings + eligible benefits, and the additional earnings and benefits use allocations anddifferent GL segments or chartfields. To allocate the taxes to salary, additional earnings andbenefits, use this option.
Allocating Additional Earning Pay to Non-Salary Allocation Accounts
Allocations for additional earnings, taxes, and benefits can differ from salary allocations, in whichthe additional pay type can have a fixed allocation for one or more account segments or chartfields. If you define additional earnings, taxes, and benefit allocations with Follows SalaryAllocation as Yes, and not all allocation segments or chartfields are populated, unspecifiedsegments or chartfields are populated using the salary allocations defined. You can define adefault allocation for additional earnings pay. This default is initially used when additionalearnings pay is assigned.
Example
An additional earning for a position is configured with Follow Salary Allocation as Yes. Theposition's monthly salary is $1,000, and the position receives an assignment for a taxableIncentive Pay for the flat amount of $100 per month. Because the additional earning pay istaxable, the employer-paid tax is calculated using salary + additional pay ($165 in this case). Thesalary + employer tax is allocated to Entity Fire, Fund General, Program Suppression, AccountSalaries at 92.1% which is $1,165. The uniform allowance additional pay is allocated to EntityFire, Fund State S-R Fund, Program Suppression, Account UnifAllow at 7.9% translates to $100.Account and Fund are derived from the allocation defaults for Uniform Allowance, and theremaining allocation segments or chartfields are derived using the salary allocation defaults.
Compensation Type Entity Fund Program Account Allocation % Amount
Salary Fire 4300 General Suppression Salaries 92.1% $1,165.00
Unif Fire 4300 State S-R Fund Suppression UnifAllow 7.9% $100.00
The allocation for the Uniform Allowance additional pay uses the Entity and Program defaultsfrom the salary allocation but the Fund and Natural Account uses the settings defined in theadditional earning allocation defaults.
If, for the same position and compensation setup Follow Salary Allocation is No, you must specifyall allocation segments or chartfields at the individual additional earning element level. Theseare then applied as defaults to new positions.
127

Allocation GuidelinesTo ensure that your allocations do not overlap and can submitted for approval, perform thesetasks:
l End-date allocations worth 100%.
l Ensure that allocations that use the same segments or chart fields during the same perioddo not exceed 100%.
l Ensure that allocations total to exactly 100%.
Overwriting the Default GL Accounts to Which SalaryExpenses are Allocated
ä To overwrite the default General Ledger accounts to which salary expenses are allocated byentity:
1 Review how benefit, salary, and General Ledger allocations work. See “About Salary Allocations” onpage 123.
2 Perform steps 1 to 5 in “Defining and Applying Entity-Specific Position Defaults” on page 120.
3 Select Salary Allocation Details.
4 To change allocation defaults:
l Select different segments or chart fields in the Account, Entity, Program, and Projectsegments, in addition to custom segments you use in budgets (Fund or Initiative, forexample).
l Enter different allocation start dates and end dates.
l Change the allocation percentages.
5 To add allocations, right-click, select Add Allocation Information, and then perform these tasks:
a. Specify a start and end date that define when to use the allocation.
b. From each drop-down list, select the segments or chart fields to use.
c. In Allocation Type, click , select Budget Item, and then specify the kind of allocationto use:
l Select Flat Allocation Assignments to allocate a specific amount, click , click OK,and then enter the amount in Enter Allocated Flat Amount.
l Select Percentage Allocation Assignments to allocate a certain percentage, click
, click OK, and then enter the percent in Enter Allocation Percentage.
6 Ensure that salary expenses do not overlap by right-clicking and selecting Allocation Percentage PerPeriod. If they do, see “Correcting Overlapping Allocations” on page 129.
128

Note: You cannot modify allocation percentages on the current form to resolve overlaps.To change allocation percentages, access the position or employee details form asdescribed in “Correcting Overlapping Allocations” on page 129.
Correcting Overlapping Allocations
ä To resolve overlapping allocations:
1 On the Review Overlapping Allocations form, or the current form, review the invalid allocations in red.
2 Perform a task:
l Right-click and select Return to Previous Form.
l Access the position or employee details form, and then make the selection for theconfiguration option:
m Manage position and employee data, and then Maintain position data
m Manage employee data, and then Maintain employees by job
m Maintain position data
3 From the drop-down list select an entity, and then click .
4 Right-click a position or employee, and then select Edit Position Details or Edit Employee Details.
5 Select Allocations.
6 Modify start dates, end dates, and the percentages allocated, to ensure that allocations using the sameGeneral Ledgers segments or chart fields during the same period do not exceed 100.
Mass Adjusting Compensation Expenses
Applies to the Position and Employee configuration option
You can make large-scale updates across a group of positions, employees, or (for the Employeeconfiguration option) jobs in your departments. For example:
l A benefits rate increases by 5% during the year, and it applies to all hourly employees.
l Salaries for a certain salary grade increase by $2,000.00.
Tip: To define and budget for salary and compensation increments see “PerformingCompensation Increments” on page 132, “Performing Salary Grade Step Increments” onpage 134, and “Performing Salary Grade Increments ” on page 135.
Note: If you use decision packages, you cannot perform mass adjustments.
129

Making Mass Adjustments
ä To mass adjust compensation and benefits:
1 From My task list, select Budget Preparation, and then select Mass adjust compensation andbenefits.
2 From the drop-down list, select the HR organization.
3 Select the scenario and version, and then click .
4 Right-click the grid, select Search, and then select Find Positions or Employees to locate jobs,employees, and positions using criteria such as:
l Hire dates
l Annual salary spread
5 Click Find. To omit employees, jobs, or positions from the update, select No in Apply Defaults and save
6 To update salaries or other compensation, right-click a position or employee, and then select SalaryIncrement, Compensation Increment, or Increment to Next Step.
7 Specify the following:
l Salary grade
l Grade sequence
l Operator (addition or division, for example) for the kind of change to make
l Amount by which to modify the salary grade
8 To view position details, right-click, select View Position Details, and then the kind of details to access,such as benefits.
9 To identify the budgetary impact of your changes, select Calculate compensation budgets.
130

Using Increments
Subtopics
l About Increments
l Sample Increment for an Employee
l Important Notes
l Performing Compensation Increments
l About Salary Increments
l Performing Salary Grade Step Increments
l Performing Salary Grade Increments
l Sample Increments
About IncrementsIncrements remove the need for you to manually modify and run adjustments to salary gradesand other compensation elements that change over time. Increments enable your budgets toinclude changes such as progressions to the next salary step or to an increased benefit optionvalue. For example, a budget for the years 2013 through to 2017 could include increments of anadditional 3% to value-based salary grades every second year, and annual increases in the dollaramount defined for dental benefit options.
Numbers of increment cycles run from one of the following Increment Cycle Start Dates thatyou choose to the business rule start date that you specify. This date determines the compoundfactor that calculates the salary or other compensation increment value for the first cycle. Thefirst cycle is always the time between one of these dates and the business rule start date:
l Position Start Date
l Hire Date
l Adjustment Date
l Job Code Start Date
For example, if the Increment Cycle Start Date is a position start date of 2010, the incrementperiod is yearly, the increment frequency is 1, and the business rule start date is 2012, two cyclesfit in the first cycle, so the increment value is compounded twice. The business rule that appliesincrements runs from the business rule start date to the business rule end date.
The Start From Increment First Cycle option enables you to include or exclude the first cyclewith its compounded value in increments. Selecting Yes begins increments from the first cycleonward until the business rule end date. Selecting No begins increments after the first cyclecompletes and stops increments on the business rule end date.
Sample Increment for an EmployeeAssume these increment settings for an employee hired on January 1 2009:
l Increment Cycle Start Date—Hire date (January 1, 2009)
131

l Business rule start date — January 1, 2012
l Business rule end date — December 31, 2014
l Period—Yearly
l Increment Frequency — 1
l Increment Value — 100
l Operator — Add
In this case a cycle completes after running from the hire date January 1, 2009 to the businessrule start date January 1, 2012, a total of 3 years. Increments begin on the business rule start dateJanuary 1, 2012 with an increment value compounded three times, because three cycles existbetween the effective date and the business rule start date. Afterward, from second cycle onwards,increments are made in each cycle until the business rule end date.
Important NotesIf you use decision packages and budget requests, you cannot perform increments as describedin the following topics. Instead, see “Performing Tasks Not Displayed in My Tasks List” on page236.
If you use recurring budget requests, see “How Budget Request Type Impacts CompensationBudgeting” on page 198.
Performing Compensation Increments
Subtopics
l Step 1
l Step 2
Perform these steps to create and automatically apply compensation (such as benefit) incrementsto jobs, employees, and positions. This enables you for example, to automatically apply benefitoption increases of a dollar amount based on a period and frequency that you specify, such asone increment every four years.
Step 1
ä To apply compensation increments:
1 Familiarize yourself with the concept of increment cycles. See “About Increments” on page 131.
2 From My task lists, select Budget Preparation, and then select Mass adjust compensation andbenefits.
3 Select the appropriate entity, such as a department, and click .
132

4 Right-click, then select Search, and then select Find Positions or Employees or Find Jobs orEmployees.
5 Identify the positions, employees, or jobs to which to apply increments by selecting an option in ApplyDefaults:
l Yes — Apply the increments.
l No — Do not apply the increments.
6 Save and see “Step 2” on page 133.
Step 2Right-click, select Compensation Increment, and specify:
l Compensation Element — Compensation element to increment.
l Increment Cycle Start Date — The effective date (an employee hire date, for example) forthe first cycle that determines the compound factor used to calculate the salary or othercompensation increment value for the first cycle. The first cycle is the time between one ofthese dates and the business rule start date. The rule that applies increments operates betweenthe business rule start and end dates.
l Business Rule Start Date—When to begin increments. If position or employee salary or othercompensation assignments start on a later date, increments start from the position oremployee salary assignment start date.
l Business Rule End Date—When to stop increments.
l Period — The time frame (months or years, for example) in which to make increments.
l Increment Frequency—How often to make increments. For example, to increment aposition's salary every three years, select Yearly for Period and enter 3 for IncrementFrequency. To increment monthly, every 12 months, select Monthly for Period and enter12 for Frequency.
l Select Operator — How to calculate increments. For example, to apply a 4.5 percent increase,select Percent Change. Or, to decrease the salary by a dollar amount, select Subtract.
l Increment Value — Amount for increments. For example, to increase a salary by 4.5 percent,enter 4.5.
l Start from Increment First Cycle:
m Yes—Start increments from first cycle (determined by the number of cycles that existbetween the increment cycle start date and the business rule start date) and stop themon the business rule end date. For example, if the business rule start date is January 1,2012, period is yearly, frequency is 1, and you select Yes, the increment runs from January1, 2012 onward.
m No—Start increments on completion of first cycle and stop them on the business ruleend date. For example, if the business rule start date is January 1,2012, period is yearly,frequency is 1, and you select this option, the increment applies either at the completionof first cycle or from second increment cycle onward; starting on January 1, 2013.
133

About Salary IncrementsUse salary increments to project and budget for increases in salary. You can: perform salaryincrements as follows: One (Step Increment) is to project the increases in the Position/Employee's Grade Steps. The other one (Auto Increment) is to project for raises for the stepsthat are already assigned to position/employee.
l Increment to the next salary step to budget for increases in the next salary step for a positionor employee
l Increment the salary (for rate, value, or step-based salary grades) to budget for increases inthe same salary step, value, or rate already assigned to a position or employee
Performing Salary Grade Step Increments
Subtopics
l Step 1
l Step 2
Applies to all HCP configurations that use salary steps
Step 1
ä To apply increments for step-based salary grades:
1 Review how increment cycles work. See “About Increments” on page 131.
2 From My task lists, select Budget Preparation, and then select Mass adjust compensation andbenefits.
3 Select the appropriate entity or department, and then click .
4 Right-click, select Search, and then select Find Positions or Employees or Find Jobs or Employees.
5 Identify the jobs, positions, or employees to which to apply the step increment, and then click Find.
6 Specify the positions, jobs, or employees to which to apply increments by selecting an option in ApplyDefaults:
l Yes — Apply the increments.
l No — Do not apply the increments.
7 Save and see “Step 2” on page 134.
Step 2
ä To apply increments for step-based salary grades:
1 Right-click, and select Increment to Next Step.
134

2 Specify when and how often to apply the increment to progress to the next step:
l Increment Cycle Start Date — The effective start date (a job start date, for example).Increment cycles are determined starting from this date to the business rule start date,and calculate the compensation for the first cycle. However, the rule that appliesincrements operates between the business rule start and end dates.
l Business Rule Start Date—When to begin increments. If position or employee salaryassignments start on a later date, increments start from the position or employee salaryassignment start date.
l Business Rule End Date — When to stop increments.
l Period — Time frame in which to assign increments (quarterly, for example).
l Increment Frequency—How often to apply increments.
l Start from First Increment Cycle:
m Yes—Start increments from first cycle (determined by the number of cycles thatexist between the increment cycle start date and the business rule start date) andstop them on the business rule end date. For example, if the business rule start dateis January 1, 2015, period is yearly, frequency is 1, and you select Yes, the incrementruns from January 1, 2015 onward.
m No—Apply increments on completion of the first cycle and stop them on thebusiness rule end date. For example, if the business rule start date is January 1, 2015,the period is yearly, the frequency is 1, and you select this option, the incrementapplies either at the completion of the first cycle or from second increment cycleonwards; starting on January 1, 2016.
Performing Salary Grade Increments
Subtopics
l Step 1
l Step 2
To see how an increment works if more than one element is associated with the same rate-basedsalary grade, see “Sample Increments” on page 137.
Note: Performing increments on step-based salary using this procedure changes the same stepby making increments to the element changes. For example, if step 1 is $45,000, and youincrement it by $500 every year, the 2nd element change at step 1 is $45,500 , the 3rdelement change is $46,00, and so on. To define increments that associate employees,positions, or jobs with the next step in a salary grade see “Performing Salary Grade StepIncrements” on page 134.
135
Step 1
ä To define salary increments:
1 Review how increment cycles work. See “About Increments” on page 131.
2 From My task lists, select Budget Preparation, and then select Mass adjust compensation andbenefits.
3 Select the appropriate entity or department, and then click .
4 Right-click, select Search, and then select Find Positions or Employees or Find Jobs or Employees.
5 Identify the jobs, positions, or employees for which to apply the salary increment, and then click Find.
6 Identify the positions, employees, or jobs for which to apply increments by selecting an option in ApplyDefaults:
l Yes — Apply the increments.
l No — Do not apply the increments.
7 Save and see “Step 2” on page 136.
Step 2
ä To define salary increments:
1 Right-click, and then select Salary Increment.
2 Specify when and how often to apply the increment to progress to the next step:
l Increment Cycle Start Date — The effective start date. Increment cycles are determinedstarting from this date, which could be position adjustment date, to the business rulestart date, and calculates the compensation for the first cycle. However, the rule thatapplies increments operates between the business rule start and end dates.
l Business Rule Start Date—When to begin increments. If position or employee salaryassignments start on a later date, increments start from the position or employee salaryassignment start date.
l Business Rule End Date — When to stop increments.
l Period — Time frame in which to assign increments (quarterly, for example).
l Increment Frequency—How often to apply increments. For example, to increment everysecond quarter, enter 2.
l Select Operator — How to calculate increments. For example, to apply a 2 percentincrease, select Percent Change. Or, to increase the salary by a dollar amount, selectAdd.
l Increment Value — Amount for increments. For example, to increase a salary by 324.00dollars, enter 324.
l Start from First Increment Cycle:
136

m Yes—Start increments from first cycle (determined by the number of cycles thatexist between the increment start date and the business rule start date) and stopthem on the business rule end date. For example, if the business rule start date isJanuary 1, 2013, period is yearly, frequency is 1, and you select Yes, the incrementruns from January 1, 2013 onward.
m No—Apply increments on completion of the first cycle and stop them on thebusiness rule end date. For example, if the business rule start date is January 1, 2013,the period is yearly, the frequency is 1, and you select this option, the incrementapplies either at the completion of first cycle or from second increment cycleonward; starting on January 1, 2014.
Sample Increments
Multiple Elements Associated With the Same Rate-Based Salary GradeThis use case illustrates what happens if you perform a salary increment if multiple elementchanges are defined for the same salary grade. Assume these element changes for a rate-basedsalary grade in which grade salary basis input is Annual, and the element start date is January 1,2005:
Table 17 Salary Grade
ElementChange
GradeSequence
OptionValue
Option StartDate
Option EndDate
GradeMinimumValue
GradeMaximumValue
GradeMidpoint
1 1 1000 1/1/2005 12/31/11 500 1500 1000
2 1 1500 1/1/2012 500 2000 1200
3 2 1700 1/1/2005 600 2000 1200
4 3 1800 1/1/2005 700 2100 1300
5 4 1900 1/1/2005 800 2200 1400
Assume the salary grade is assigned to Position 1-Vacancy, and that the following is specified onthe position's Salary Grade tab. The position start date is 1/1/2008, and the budget spans thetime from 1/1/2009 - 12/31/2013.
Table 18 Position 1 Vacancy Salary Grade Assignments
SalaryGradeType
SalaryGradeBasis
GradeSequence
OptionValue
OptionStart Date
Option EndDate
Allow ValueChange
OverrideOptionValue
1st elementchange
GradeRate
Annual 2 1700 1/1/08 12/31/08 Yes 1700
137

SalaryGradeType
SalaryGradeBasis
GradeSequence
OptionValue
OptionStart Date
Option EndDate
Allow ValueChange
OverrideOptionValue
2ndelementchange
GradeRate
Annual 3 1800 1/1/09 12/31/09 Yes 1800
3rd elementchange
GradeRate
Annual 4 1900 1/1/10 Yes 1900
Assume that you define the increment with these options:
l Increment Cycle Start Date—Position Start Date
l Business Rule Start Date —1/1/08
l Business Rule End Date—None
l Period—Quarterly
l Increment Frequency —1 (Days)
l Start From First Increment Cycle—Yes
l Operator—Add
l Increment Value —20
After running the increment, the position's salary is updated as follows. For grade sequence, theincrement value is applied once in every quarter on grade sequences 2, 3 and 4.
Table 19 Salary Grade Assignments After Increment
ElementChange
SalaryGradeType
SalaryGradeBasis
GradeSequence
Option StartDate
Option EndDate
OptionValue
AllowOverrideInput
OptionChangeValue
1st GradeRate
Annual 2 1/1/08 3/31/2008 1700 Yes 1720
GradeRate
Annual 3 4/1/08 6/30/08 1800 Yes 1800
2nd GradeRate
Annual 2 7/1/08 9/30/08 1700 Yes 1740
3rd GradeRate
Annual 2 10/1/08 12/31/08 1700 Yes 1760
4th GradeRate
Annual 3 1/1/09 3/31/09 1800 Yes 1820
5th GradeRate
Annual 3 4/1/09 6/30/09 1800 Yes 1840
6th GradeRate
Annual 3 7/1/09 9/30/11 1800 Yes 1860
138

ElementChange
SalaryGradeType
SalaryGradeBasis
GradeSequence
Option StartDate
Option EndDate
OptionValue
AllowOverrideInput
OptionChangeValue
7th GradeRate
Annual 4 1/1/10 3/31/10 1900 Yes 1920
8th GradeRate
Annual 4 4/1/10 6/30/10 1900 Yes 1940
9th GradeRate
Annual 4 7/1/10 9/30/10 1900 Yes 1960
10th GradeRate
Annual 4 10/1/10 12/31/10 1900 Yes 1980
11th GradeRate
Annual 4 1/1/11 3/31/11 1900 Yes 2000
12th GradeRate
Annual 4 4/1/11 Continues untilall availableelements arepopulated
1900 Yes 2020
Multiple Elements Associated With the Same Salary Grade StepAssume these positions and employees:
Table 20 Positions and Employees
Position Employee Position Start Date Hire Date Adjustment Date
Position 2 Vacancy 1/1/2009 3/1/2012
Position 2 To Be Hired 1 1/1/2009 1/1/2009
Assume that the budget is for the time period of 1/1/2009 - 12/31/2013. Assume these elementsfor an annual step-based salary grade that starts on 1/1/05, and in which value change input isyes:
Table 21 Salary Grade Step
Element Change Grade Step Option Value Option Start Date Option End Date
1 0 40 1/1/05
2 1 50 1/1/05 12/31/08
3 1 60 1/1/09
4 2 60 1/1/05
5 3 70 1/1/05
6 4 80 1/1/05
139

You apply the salary to the Position 2 Vacancy, so that the following is on the position's SalaryGrade tab:
Table 22 Position 2 Vacancy: Salary Grades
ElementChange
SalaryGradeType
SalaryGradeBasis
GradeStep
OptionValue
OptionStart Date
Option EndDate
AllowValueChange
OverrideOptionValue
1st GradeStep
Annual 0 40 1/1/09 12/31/09 Yes 40
2nd GradeStep
Annual 2 60 1/1/10 12/31/10 Yes 60
3rd GradeStep
Annual 4 80 1/1/11 Yes 80
You apply the salary to the To Be Hired employee, so that the following is on the employee'sSalary Grade tab:
Table 23 To Be Hired Employee: Salary Grades
ElementChange
SalaryGradeType
SalaryGradeBasis
GradeStep
OptionValue
OptionStart Date
Option EndDate
Allow ValueChange
OverrideOption Value
1st GradeStep
Annual 0 40 1/1/09 12/31/09 Yes 40
2nd GradeStep
Annual 1 60 1/1/10 12/31/10 Yes 60
3rd GradeStep
Annual 2 60 1/1/11 Yes 60
Assume that you define the increment with these options:
l Increment Cycle Start Date—Position Start Date
l Business Rule Start Date —1/1/08
l Business Rule End Date—1/1/15
l Period—Quarterly
l Increment Frequency —1 (Days)
l Start From First Increment Cycle—Yes
Because the period is quarterly, an existing step is ended. The quarter now starts from the optionstart date, and a new step is applied at the beginning of the new quarter.
140

Table 24 Position 2 Vacancy After Increment
ElementChange
SalaryGradeType
SalaryGradeBasis
GradeStep
Option StartDate
Option EndDate
OptionValue
Allow ValueChangeInput
OverrideOptionValue
1st GradeStep
Annual 0 1/1/09 3/31/09 40 Yes 40
2nd GradeStep
Annual 1 4/1/09 6/30/09 60 60
3rd GradeStep
Annual 2 7/1/09 9/30/09 60 60
4th GradeStep
Annual 3 10/1/09 12/31/09 70 70
5th 0 Annual 4 1/1/10 80 80
The Position To Be Hired Employee is updated. Because the salary step increment was quarterly,an existing grade step is ended, the quarter starts from the option start date, and a new gradestep is applied at the beginning of the new quarter.
Table 25 Position 2 To Be Hired After Increment
ElementChange
SalaryGradeType
SalaryGradeBasis
GradeStep
Option StartDate
Option EndDate
OptionValue
Allow ValueChangeInput
OverrideOptionValue
1st GradeStep
Annual 0 1/1/09 3/31/09 40 Yes 40
2nd GradeStep
1 4/1/09 6/30/09 60 Yes 60
3rd GradeStep
2 7/1/09 9/30/09 60 Yes 60
4th GradeStep
3 10/1/09 12/31/09 70 Yes 70
5th GradeStep
4 1/1/10 80 Yes 80
Defining Custom Numbers of Workdays and Paydays
ä To specify the number of work and pay days in a month:
1 From My task lists, select Budget Preparation, and then select Manage number of working days andpay days in a month.
2 In the POV, select the Scenario, Version, and Year.
3 Select the HR organization, and then click .
141

Tip: To set the total number of work and paydays as a default that is applied to all newpositions, select Unspecified Entity.
4 In Pay Days, enter the number of paydays in each month.
5 In Working Days, enter the number of workdays in each month.
142

8Working with Human Capital
Compensation Budgets
In This Chapter
Recommended Task Flow ... . . . . . . . . . . . . . . . . . . . . . . . . . . . . . . . . . . . . . . . . . . . . . . . . . . . . . . . . . . . . . . . . . . . . . . . . . . . . 143
Requirements... . . . . . . . . . . . . . . . . . . . . . . . . . . . . . . . . . . . . . . . . . . . . . . . . . . . . . . . . . . . . . . . . . . . . . . . . . . . . . . . . . . . . . . . . . . 144
About Using Recurring Budgets.. . . . . . . . . . . . . . . . . . . . . . . . . . . . . . . . . . . . . . . . . . . . . . . . . . . . . . . . . . . . . . . . . . . . . . . . 144
Maintaining Jobs .. . . . . . . . . . . . . . . . . . . . . . . . . . . . . . . . . . . . . . . . . . . . . . . . . . . . . . . . . . . . . . . . . . . . . . . . . . . . . . . . . . . . . . . 145
Maintaining Employees... . . . . . . . . . . . . . . . . . . . . . . . . . . . . . . . . . . . . . . . . . . . . . . . . . . . . . . . . . . . . . . . . . . . . . . . . . . . . . . . 153
Maintaining Positions... . . . . . . . . . . . . . . . . . . . . . . . . . . . . . . . . . . . . . . . . . . . . . . . . . . . . . . . . . . . . . . . . . . . . . . . . . . . . . . . . . 167
Applying Compensation and Salary Allocation Defaults .. . . . . . . . . . . . . . . . . . . . . . . . . . . . . . . . . . . . . . . . . . . . 177
Maintaining Employees by Job or Position ... . . . . . . . . . . . . . . . . . . . . . . . . . . . . . . . . . . . . . . . . . . . . . . . . . . . . . . . . . 178
Calculating and Allocating Compensation Expenses ... . . . . . . . . . . . . . . . . . . . . . . . . . . . . . . . . . . . . . . . . . . . . . . 180
Viewing the Budget Impact of Compensation Expenses ... . . . . . . . . . . . . . . . . . . . . . . . . . . . . . . . . . . . . . . . . . . 181
Recommended Task FlowOracle recommends that you define or assign position and employee compensation details inthe this order:
l FTE
l Salary grades
l Allocations
Define these compensation details first because they drive the budget, and to ensure that youcan calculate, and then allocate, position and employee budget expenses.
After specifying FTE, salary grades, and allocations, assign the following optional data andassignments. These details are not required to calculate basic compensation (for example, vacantposition expenses can be calculated for positions without employee assignments).
l Benefits
l Additional earnings
l Employer-paid taxes
l Employee assignments
143

RequirementsBefore creating compensation budgets, perform these tasks:
l Ensure that an Administrator created the salary grades and other compensation expenses(benefits, additional earnings and so on) you use to specify employee and positioncompensation details. See Chapter 6.
l Perform these tasks to ensure that you can select the correct budget year, scenario, andversion in the Point of View (POV) bar:
m Select File, then Preferences, and then Planning.
m Select User Variables.
m Select the year, scenario, and version members and click OK.
l If you use decision packages and budget requests, ensure that they are based on theCompensation Expense decision package type provided with the product.
l Optional: Extend the business rule default timeout as described in Oracle Hyperion PlanningAdministrator's Guide. This is useful because some of the business rules you run may displayerrors indicating that processing has exceeded the allowed limit. In addition to increasingthe default timeout, select Administration and then Job Console to view the status of businessrules.
About Using Recurring BudgetsIf you create compensation budgets using decision packages that contain recurring budgetrequests for ongoing line items, see “How Budget Request Type Impacts CompensationBudgeting” on page 198.
144

Maintaining Jobs
Subtopics
l Creating Jobs
l Activating Jobs
l Viewing Job Details
l Before Specifying Job Compensation
l Maintaining Job Compensation Details
l Specifying Employee Assignments
l Terminating Jobs and Excluding Jobs From Calculations
Applies only to the Employee configuration option
Creating JobsAt the beginning of the budget cycle, Administrators load jobs from the HRMS. To add jobsduring the budget cycle, Administrators must perform these tasks, after which you must activatethe jobs.
l In the Job Code dimension, create a member under Total Job Code.
Specify these settings:
m Data Storage— Never Share
m Plan Type–—HCP if you accepted the default plan type name when you created theapplication
m Aggregation— Addition
m Smart Lists— None
m Data Type—Unspecified
l Refresh the database.
Activating Jobs
ä To activate jobs:
1 From My task lists, select Budget Preparation, and then select Maintain job details.
2 Select Active Jobs.
3 Right-click jobs, and then select Activate.
4 When prompted, specify the following:
l Enter Effective Date—When to activate the job
l Select Entity—Specific department in which to activate the job
l Select Scenario—Budget scenario (Forecast, for example) in which to activate the job
145

l Select Version—Budget version (stage 1 or stage 2 for example) in which to activate thejob
l Select Job—Job to activate
5 Click Activate.
Viewing Job Details
ä To view job details:
1 From My task lists, select Budget Preparation, and then select Maintain job details.
2 Select All Jobs to view information such as FTE capacity, start date, and salary basis for all loaded jobs.
3 Select Active Jobs to view all jobs that were activated.
4 Right-click jobs, select View Job Details, and then select the kind of data to view, such as ViewBenefits.
Before Specifying Job CompensationBefore defining job details, ensure that:
l An Administrator created salary grades to assign to employees in various jobs.
l An Administrator created the other compensation element (benefit, additional earning andso on.) that you may want to assign.
l You know the version and year of the budget with which you are working.
Maintaining Job Compensation Details
Subtopics
l Maintaining General Job Information
l Viewing Job Status
l Viewing Employees Assigned to Jobs and Employee Details
l Maintaining Job Salary Grades
l Maintaining Additional Earnings for Jobs
l Maintaining Job Benefits
l Maintaining Job Tax Details
l Maintaining Job Allocations
Maintaining General Job Information
ä To maintain basic job information:
1 See “Before Specifying Job Compensation” on page 146.
146

2 From My task lists, select Budget Preparation, and then select Maintain job details.
3 Select Active Jobs.
4 Select the HR organization, and then click .
5 Right-click the job to modify, and then select Edit Job Details.
6 Under Job Details, click General.
7 Enter or select basic data such as:
l Salary Basis—How often the assigned employees are paid (semimonthly or weekly, forexample)
l FTE Capacity—Number of full-time employees required to perform the job
l Headcount— Number of employees associated with the job, regardless of FTE. Forexample, if five full-time employees and two part-time employees are assigned to thejob, headcount is seven.
l Assigned FTE— Number of full time employees assigned to the job.
l Job Status:
m Vacant Vacant—No employees are assigned to the job
m Filled—The correct number of employees for the defined FTE and headcount areassigned to the job
m Active—Job expenses are included in budget calculations
m Inactive or Not Budgeted—Job expenses are omitted from budget calculations
Viewing Job Status
ä To view recent status changes to jobs:
1 Perform steps 1-5 in “Maintaining General Job Information” on page 146.
2 Under Job Details, click Status Changes.
A list of all job changes (termination, exclusion from the budget, for example) are displayed.
Viewing Employees Assigned to Jobs and Employee Details
Applies only to the Employee HCP configurations
ä To view data for employees assigned to jobs:
1 From My task lists, select Budget Preparation, and then select Maintain job details.
2 Select Active Jobs.
3 Select the HR organization, and then click .
4 Right-click jobs and then select Edit job details.
147

5 Under Job Details, select Employee.
6 To modify basic employee settings, specify data such as:
l Adjustment Date—When changes to compensation elements are effective and appliedto employees. For example, if employees assigned to a job get a raise on January 1, butthe budget year starts in July, specify the date that determines when the increasedemployee salaries are paid.
l Salary Basis—How often salary is paid. For example, the salary basis for a contractorcould be Hourly.
l Annual Salary Spread—How salary is distributed across periods. See “About SpecifyingAnnual Salary Spreads” on page 100.
7 To view proposed, existing, approved, and unapproved FTE, expand the Total FTE header.
8 To view benefit, additional earning, basic salary, and total tax expenses for each employee, expand theTotal Compensation header.
9 To view more employee data, right-click, and then select View Employee Details.
10 To modify employee data, right-click, and then select Edit Employee Details.
See “Maintaining Employee Compensation Details” on page 153.
Maintaining Job Salary Grades
Applies only to the Employee configuration option
Use the Salary Grades tab to add, modify, or remove salary information. Ensure that anAdministrator created the salary grade. See “Defining Salary Grades” on page 96.
Note: If an Administrator enabled Allow Value Change for the salary grade, you can adjust salaryvalues. If however, you cannot modify salary values because this option is disabled, or ifthe salary grade steps, sequences, and rates that you must use are unavailable, have anadministrator modify or define new salary grades.
ä To maintain salary grades:
1 Perform steps 1-4 in “Maintaining General Job Information” on page 146.
2 Select Salary Grades.
3 Perform a task:
l To add salary grades, right-click, select Add Salary Information, and then select:
m Select Salary Grade—Grade to assign
m Select Grade Sequence—Sequence of the grade to assign
m Select Grade Step—Step of the salary grade to assign
m Enter Effective Start Date—When to apply the salary grade
148

l To remove salary grades, right-click, select Delete Salary Information, and then selectDelete.
Maintaining Additional Earnings for Jobs
Applies only to the Employee configuration option
ä To maintain additional earnings:
1 Perform steps 1-5 in “Maintaining General Job Information” on page 146.
2 Under Defaults Setup, select Additional Earnings.
3 Perform any task:
l To create additional earnings, such as bonuses, right-click, select Add AdditionalEarnings, and then specify the following before clicking Add:
m Employee—Employee to assign the additional earnings
m Additional Earnings Element—Member corresponding to the additional earnings
m Option—Plan or option for the additional earnings, such as Overtime_2 orBonus_2010
m Effective Start Date—When to create and assign the additional earnings
l To remove additional earnings, right-click, select Delete Additional Earnings, and thenclick Delete.
Maintaining Job Benefits
Applies only to the Employee configuration option
Use the Benefits tab to specify benefits for positions in your cost center or department. To addbenefits, an Administrator must create a corresponding member in the Benefits dimension.
ä To maintain benefits:
1 Perform steps 1- 5 in “Maintaining General Job Information” on page 146.
2 Under Defaults Setup, select Benefits.
3 Perform a task:
l To add benefits, right-click, select Add Benefit, and then specify the following beforeclicking Add:
m Select Benefit Element—Expand Benefits to select the member for the benefit
m Select Option—The plan or option associated with the benefit, such as SurvivorSpouse for health benefits
m Enter Effective Start Date—When to add and activate the benefit
l To modify benefits, enter or select new values on the form such as:
149

m Option—Plan used to apply benefits (Member Only, for example)
m End Date—When the benefit no longer applies
m Maximum Value—Highest benefit value (an increased number of days permitted bymaternity leave, for example)
l To delete benefits, right-click, select Delete Benefit, ensure that you are removing thecorrect benefit, and then click Delete.
Maintaining Job Tax DetailsModify tax details to identify the budget impact of new, changed, or obsolete employer-paidtaxes used in your country, and calculate the compensation budget. Use the Tax Details tab toremove from or add employer-paid taxes to jobs. To associate jobs with a new tax, ensure thatan Administrator has defined a corresponding member.
Applies only to the Employee configuration option
ä To maintain employer-paid tax details:
1 Perform steps 1-5 in “Maintaining General Job Information” on page 146.
2 Under Defaults Setup, select Tax Details, and then perform any task:
l To add taxes, right-click, select Add Employer-paid tax, and then specify the followingbefore clicking Add:
m Select Employee—Employee to whose job to add the tax
m Select Tax Element—Element for the member representing the tax
m Select Option—The tax plan or option
m Enter Effective Start Date—When to apply the tax
l To remove taxes, right-click, select Delete Employer-paid Tax, confirm the job from whichto remove the tax, specify when to remove the tax, and then click Delete.
Maintaining Job AllocationsUse the Job Allocations tab to manage job allocations to General Ledger chart fields or segments,and to identify overlapping allocations. You can allocate funds to support jobs by percentage ora specific flat amount.
Applies only to the Employee configuration option
ä To maintain job allocations:
1 Perform steps 1-5 in “Maintaining General Job Information” on page 146.
2 Under Defaults Setup, select Allocations.
3 To add allocations, right-click, select Add Allocation Information, and then perform these tasks:
150

a. Specify a start and end date that define when to use the allocation.
b. From each drop down list, select the segments or chart fields to use.
c. In Allocation Type, click , select Budget Item, and then specify the kind of allocationto use:
l Select Flat Allocation Assignments to allocate a specific amount, click , click OK,and then enter the amount in Enter Allocated Flat Amount.
l Select Percentage Allocation Assignments to allocate a certain percentage, click
, click OK, and then enter the percent in Enter Allocation Percentage.
4 To remove allocations, right-click, and then select Delete Allocation Information.
5 Important: Ensure that multiple allocations do not overlap by right-clicking, and then selecting AllocationPercentage Per Period. See “Correcting Overlapping Allocations” on page 129
Specifying Employee Assignments
ä To specify employee job assignments:
1 From My task lists, select Budget Preparation, and then select Maintain job details.
2 Select the HR organization, and then click .
3 Right-click the job, select Edit Job Details, and then select General.
4 Right-click Job Code Level, and perform a task:
l To assign a current employee, select Assign Existing Employee, and see “Assigning anExisting Employee” on page 152:
l To assign a new hire, select Assign To-Be-Hired Employee and see “Assigning a New Hire”on page 151:
5 Specify the remaining settings such as:
l Annual Salary Spread—How the salary expenses are distributed based on yourorganization's accounting period. See “About Specifying Annual Salary Spreads” onpage 100
l Adjustment Date—When changes such as salary increases are effective. For example, ifa budget year starts January 1, and the salaries of employees assigned to a specific jobincrease on April 1, specify when to apply the salary increase as the adjustment date.
l Salary Basis—How often the employee is paid, such as hourly or weekly.
Assigning a New HireTo assign a new hire, select Assign To-Be-Hired Employee, and then specify the following:
l Select Employee Type—If the employee is a regular, replacement, contract, or temporaryemployee
151

l Select Pay Type—Non-exempt if the employee is paid hourly
l Full time—The employee works exclusively on the job
l Part time—The employee spends some time working on the job
l Enter FTE —Value typically between 0-1 that indicates if the employee is full time or parttime. Note that employee can have a full time FTE, but an FTE of 0.5 if they are assigned to2 positions or jobs. 1 normally indicates if the employee is full time, and less than 1 indicatespart time.
l Enter Overtime Hours—If employees might work more than the specified default weeklyhours, define overtime as an additional earning. This enables you, if necessary, to allocatefunds to cover overtime expenses using different General Ledger segments or chart fields.See “Defining Overtime” on page 105.
Assigning an Existing EmployeeTo assign a current employee, select Assign Existing Employee, and then specify the following :
l Enter FTE—Value typically (although not necessarily) between 0-1 that indicates if theemployee is full time or part time. Note that employee can have a full time FTE, but an FTEof 0.5 if they are assigned to 2 jobs. 1 normally indicates if the employee is full time.
l Enter Effective Date— When the assignment occurs
Terminating Jobs and Excluding Jobs From Calculations
Applies only to the Employee configuration option
In decision package-enabled applications, you cannot terminate jobs in non recurring budgetrequests, but only in recurring budget requests. See “How Budget Request Type ImpactsCompensation Budgeting” on page 198.
ä To terminate or exclude jobs:
1 From My task lists, select Budget Preparation, and then select Maintain job details.
2 Right-click jobs, and then select Terminate job or Exclude job from budget.
3 Perform a task:
l Specify when to terminate or exclude the job from calculations in Enter Effective Dateor Enter Effective Start Date.
l Specify when to include the job again in budget calculations in Enter Effective EndDate.
4 Click Terminate or Exclude.
Jobs excluded from budgets have a status of Inactive or Not Budgeted.
152

Maintaining Employees
Subtopics
l Maintaining Employee Compensation Details
l Changing Employee Status
l About Synchronizing Employee Properties
l Synchronizing Employee Properties
l Deleting Employees from Budgets
l Terminating Employees
l Transferring Employees
l Assigning Employees to Positions
l Assigning Employees to Jobs
l Deleting Employee Assignments
Applies only to the Employee configuration option
Maintain employees to identify the budget impact of modified employee and job data, plan foremployee status changes such as transfers and terminations, assign employees to positions, andview expenses by period.
Maintaining Employee Compensation Details
Applies only to the Employee configuration option
If you must override some compensation element default settings for individual employees, see“Requirements” on page 144. Identify the order in which to specify employee details describedin “Recommended Task Flow” on page 143.
ä To manage employee compensation:
1 Review the order in which to define compensation details. See “Recommended Task Flow” on page143.
2 From My task lists, select Budget Preparation, and then select Manage employee data or Manageposition and employee data.
3 Select Maintain employees by job or Maintain employees by position.
4 Select the Human Resource organization, and then click .
5 You can specify basic information such as the following, for individual employees in the entity:
l Pay Type—If the employee is temporary or not on the payroll, select Non-exempt.
l Salary Basis—How often the employee is paid, such as weekly or bimonthly.
l Annual Salary Spread—–How the employee's salary expenses are distributed across theperiods defined for your corporate accounting period. See “About Specifying AnnualSalary Spreads” on page 100.
l Default Weekly Hours—Number of hours per week that the employee must work
153
6 Right-click the employee for which to view or specify compensation, and then select Edit EmployeeDetails.
Managing and Specifying General Employee DataPerform the following procedure to
l Enter or modify employee numbers, names, job codes, hire dates, salary basis, annual salaryspread, and to recalculate the compensation budget.
l Apply entity specific defaults (defined on the Manage compensation defaults form ) thatyou applied to positions to employees assigned to those positions.
ä To manage general employee compensation data:
1 Perform steps 1-7 in “Maintaining Employee Compensation Details” on page 153.
2 On the General tab, specify data such as:
l Pay Type—If the employee is paid by the hour, select Non-exempt.
l Salary Basis—How often the employee is paid, such as weekly or bimonthly.
l Annual Salary Spread—How the employee's salary expenses are distributed across theperiods defined for your corporate accounting period. See “About Specifying AnnualSalary Spreads” on page 100.
3 To apply entity level defaults such as salary grades, additional earnings, or salary allocations, performthese tasks:
a. Ensure that the salary allocations and compensation element defaults are correct byselecting Manage Compensation Defaults. See “Defining and Applying Entity-SpecificPosition Defaults” on page 120
b. Right-click on a column head, and select:
l Apply Default Compensation Elements—Apply predefined compensation defaults,such as employer paid taxes and salary grades.
l Apply Default Allocations—Apply the General Ledger segments (Account, Entity,Program etc.) defined as the Salary Allocation defaults. To review these defaultallocation settings, see “Specifying Salary Grade Defaults ” on page 120
c. Select one for Clear Before Load:
l Yes—Remove any existing compensation details or allocations, and apply thedefaults.
l No—Overwrite any existing compensation details or allocations with the defaults.
Managing and Specifying FTE Use the FTE tab to specify the full-time equivalent assignments for an employee. For example,if an employee is full-time January to March and part-time the rest of the year, specify 1 forJanuary, February, and March, and 0.5 for the remaining months.
154

ä To manage employee FTE data:
1 Perform steps 1-7 in “Maintaining Employee Compensation Details” on page 153.
2 Select FTE, and enter a value of 1 or greater in Proposed FTE if the employee is full time. Enter a valueof less than 1 if the employee is part time.
3 Enter the dates during which the FTE applies in FTE Start Date and FTE End Date.
4 Perform any task to specify FTE data:
l To add or change employee FTE assignments:
a. Right-click a column and then select Update FTE.
b. Indicate if the employee works full time or part time between a range of dates.
For example, if a full time employee must reduce hours and work part time betweenMarch 1 and June 15, specify the following:
m Enter FTE — Value typically, (although not necessarily) between 0-1 thatindicates if the employee is full time or part time. Normally, an FTE of oneindicates fulltime assignment. Note that employee can have a full time FTE,but an FTE of 0.5 if they are assigned to 2 positions.
m Enter Effective Start Date—March 1, 2011
m Enter Effective End Date—June 15, 2011
l To specify and budget for FTEs that change by month, quarter, or year, select AdjustPeriod-Level Details, and then perform these tasks:
a. In Overtime Hours, enter the number of additional hours for which the employee ispaid.
b. In Total FTE, right-click, and then select Calculate Compensation Expense to displaythe budget impact.
Managing and Specifying Salary Grades
Note: If an Administrator enabled Allow Value Change for the salary grade, you can adjust salaryvalues. If however, you cannot modify salary values because this option is disabled, or ifthe salary grade steps, sequences, and rates that you must use are unavailable, have anadministrator modify or define new salary grades.
ä To manage employee salary grades:
1 Perform steps 1-7 in “Maintaining Employee Compensation Details” on page 153.
2 Select Salary Grades, and perform any task:
l To specify new salary data, right-click, select Add Salary Information, and specify thevalues described in “Defining Salary Grades” on page 96.
l If permitted, modify the start date, end date, and override option values for existingsalary assignments.
155

l To remove salaries, right-click assignments, and then select Delete Salary Information.
3 Save.
Managing and Specifying AllocationsUse the Allocations tab to define employee compensation allocations to General Ledgeraccounts. You can view and modify allocation data by segments or chart fields such as project,fund, or program. .
ä To manage allocations:
1 Perform steps 1-7 in “Maintaining Employee Compensation Details” on page 153.
2 Select Allocations.
3 To add allocations, right-click, select Add Allocation Information, and then perform these tasks:
a. Specify a start and end date that define when to use the allocation.
b. From each drop down list, select the segments or chart fields to use.
c. In Allocation Type, click , select Budget Item, and then specify the kind of allocationto use:
l Select Flat Allocation Assignments to allocate a specific amount, click , click OK,and then enter the amount in Enter Allocated Flat Amount.
l Select Percentage Allocation Assignments to allocate a certain percentage, click
, click OK, and then enter the percent in Enter Allocation Percentage.
Important: Ensure that allocations do not overlap, causing the total allocationpercentage to exceed 100%, by right-clicking, and then selecting Allocation PercentagePer Period. See “Correcting Overlapping Allocations” on page 129.
4 To remove allocations, right-click, and then select Delete Allocation Information.
About Changing StatusUse the Status Changes tab on Employee Detail forms to specify the dates associated with changesto employees work status, such as short-term disability, long term disability, and maternity leave.You can also use this tab to:
l Identify the impact of the employee status changes on the compensation budget
l Specify if, and for how long, employees absent due to maternity, short-term disability orlong term disability are active or inactive.
To actually modify employee status, see “Changing Employee Status” on page 158.
156

Managing and Specifying Additional EarningsModify additional earnings to budget for new employee earnings, to delete existing earnings,and to allocate the expenses to be budgeted for additional earnings to General Ledger accounts.
ä To view or specify additional earnings:
1 Perform steps 1-7 in “Maintaining Employee Compensation Details” on page 153.
2 Perform any task on the Additional Earnings tab:
l To budget for new additional earnings, right-click, select Add Additional Earnings, andthen specify the following:
m Additional earning element—The member corresponding to the additional earningssuch as annual bonus or hazard pay.
m Option—Select Set to initially define the additional earnings. You can later changethis to perform calculations.
m Effective start date—When the additional earnings are applied.
l To remove additional earnings, right-click assignments, and then select Delete AdditionalEarning.
Managing and Specifying BenefitsModify benefits to calculate the budget for new, modified, or deleted employee benefits, andallocate the compensation budget to General Ledger accounts for inclusion in the line itembudget.
ä To manage benefits:
1 Perform steps 1-7 in “Maintaining Employee Compensation Details” on page 153.
2 Perform any task on the Benefits tab:
l To identify and budget for new benefits, such as a dental plan, right-click, select AddBenefit, and then specify the following:
m Select Benefit Element—Expand Benefits to select the member for the benefit.
m Select Option—The plan or option associated with the benefit, such as Survivor andDependants for health benefits.
m Enter Effective Start Date—When to add and activate the benefit.
l To remove benefits, right-click the assignment, and then select Delete Benefit.
3 Save.
Managing and Specifying Tax DetailsModify tax details to identify the budget impact of new, modified, or obsolete employer-paidtaxes in your country or region, and calculate the compensation budget. Although these
157
American taxes are used in examples, you define employer paid tax elements as required foryour budgeting needs:
l Federal Insurance Compensation Act (FICA)
l State Unemployment Tax Act (SUTA)
l Federal Unemployment Tax Act (FUTA)
ä To manage tax details:
1 Perform steps 1-7 in “Maintaining Employee Compensation Details” on page 153.
2 Perform any task on the Tax Details tab:
l To budget for new employer-paid taxes, right-click, select Add Employer-paid Tax, andspecify this information:
Data such as the payment frequency, payment terms, option value, and maximum valuedetermined by the tax are displayed on the employee details form.
m Select Tax Element—Member representing the tax
m Select Option—The tax plan or option
m Enter Effective Start Date—When to apply the tax
l To remove taxes, right-click, and then select Delete Employer-paid Tax.
3 Save.
Changing Employee Status
Subtopics
l Step 1
l Step 2
You can plan and budget for employee status changes such as maternity, short-term disability,or long term disability leave by modifying employees or employee details.
Applies to the Position and Employee configuration option
Step 1
ä To budget for status changes:
1 From My task lists, select Budget Preparation, and then select Manage position and employeedata or Manage employee data.
2 Select Maintain employees by job or Maintain employees by position.
3 Select the Human Resources organization, and then click .
4 Right-click employees, and then select Change Status twice.
158

5 Assign a status:
l Long Term Disability—The employee is taking an extended absence from work, isconsidered inactive, is not fully compensated, and their expenses are excluded frombudget calculations. You cannot generate an FTE vacancy.
l Short-Term Disability—The employee is temporarily absent, during a period you specify,due to medical factors, but is active, fully compensated, and their expenses included inbudget calculations.
l Maternity— The employee is away on maternity leave, is active, is paid, receivesmaternity leave-specific compensation, and their expenses included in budgetcalculations.
l On Sabbatical—The employee is inactive, not paid, and their compensation is notincluded in budget calculations.
l Leave of Absence—The employee is inactive, not paid, and their compensation is notincluded in budget calculations.
l Terminated—A manager or supervisor request that the employee leaves the company.
l Inactive or Excluded or Inactive —Employee expenses are excluded by date, from budgetcalculations.
6 Go to “Step 2 ” on page 159
Step 2
ä To budget for status changes:
1 Specify the start and end dates between which the status applies.
2 For the Position and Employee configuration option: Select a Create Vacancy option:
l Yes—Update the FTE to generate a vacancy that accounts for the employee's absence,and using which another employee can be temporarily assigned until the absentemployee returns to work.
l No—Do not update the FTE and do not budget for the vacant part of the position to betemporary filled by another employee.
3 Click Change and then Save the employee details.
4 If you changed employee status to Maternity or Short-Term Disability, and created a replacement FTE:
l Review the FTE details for the position to which the absent employee is assigned. See“Maintaining Position FTE ” on page 170.
l Review the absent employee's status details reflect the time during which they are awayon maternity or short-term disability leave.
l If necessary, assign another employee to fill the position vacancy. See “AssigningEmployees to Positions” on page 166.
159

About Synchronizing Employee PropertiesSynchronize employee properties to update employee master data (pay type, for example) thatyou modify to:
l The same employee if they are associated with another position in another entity ordepartment
l Another individual employee
l All related forms, such as employee details
For example, Janice Copeland, a full-time administrative assistant, may work part time for themunicipal department of Parks and Recreation and part time for the Office of CommunityOutreach. If you adjust her annual salary spread and employee number, synchronize heremployee properties to apply these changes in records in Parks and Recreation and the Officeof Community Outreach.
Synchronizing Employee Properties
ä To synchronize employee properties:
1 From My task lists, select Budget Preparation, and then select Maintain Employee Information.
2 Select the employee from the drop down list, and then click
3 If necessary, modify any master data such as:
l Pay Type—If employees are temporary or are not on the payroll, select Non-exempt. Ifthey are full time, regular, or are on the payroll, select Exempt
l Annual Salary Spread—How employee salary expenses are distributed across the periodsdefined for your corporate accounting period. For example:
m Average–Expenses are equally spread across periods resulting in an averagedistribution.
m Paydays in a month—Expenses are spread across the number of paydays that you ora planner define for each month.
l Adjustment Date—When employee compensation, such as additional earnings andbenefits, can be modified.
4 Right-click Page, select Synchronize Employee Properties, and specify one:
l Entity—To update employees in another department, expand Total Entity to select thatdepartment. To apply the change in all entities or departments, select Total Entity.
l Employee:
m To update all employees, select Total Employees.
m To update an existing employee, expand Total Employees, then Existing Employees,and then select the employee.
160

m To update groups of certain kinds of employees, such as To Be Hired, expand TotalEmployees, and then select the group.
Deleting Employees from BudgetsApplies to the Employee, and the Position and Employee HCP configurations
You can only delete proposed to be hired employees from budgets. To delete existing employeesyou must first terminate them, or reassign them.
ä To remove employees from budgets:
1 From My task lists, select Budget Preparation, and then select Maintain employee information.
2 From Page, select the employee.
3 Right-click the employee in Page, and then an option:
l Delete employee for a specific version—Remove the employee from a budget versionthat you specify.
l Delete employee across all versions—Remove the employee from all budget versions.
Terminating Employees
Applies to the Employee, and the Position and Employee HCP configurations
Note: In decision package-enabled applications, you cannot terminate employees in nonrecurring budget requests. Terminate employees in recurring budget requests.
When an employee is terminated, the assigned FTE at the employee level moves to the job orposition level.
ä To terminate employees:
1 From My task lists, select Budget Preparation, and then select Manage employee data or Manageposition and employee data.
2 Select Maintain employee by job or Maintain employee by position.
3 Select the HR organization in which the employee works, and then click .
4 Right-click the employee, and then select Terminate Employee.
5 Specify the following:
l Termination type:
m Departed—The employee is leaving
m Terminated—Human Resources initiated the termination
l Effective date—When to terminate the employee
161

Transferring Employees
Subtopics
l About Transfers
l Transferring Employees Out of Entities
l Transferring Employees Into Positions
l Performing Single-Step Employee Transfers
l Reversing Transfers
About TransfersYou can move employees between entities, such as HR organizations, and then later assign themto new or existing positions or jobs. Employees retain their employee numbers, theirassignments, and their assignment end-dates. Employee details are not available in the originalentity after the effective transfer date. Unless you perform a single step transfer, the associatedemployee compensation budget expenses are stored in the common Generic entity untilemployees are transferred into the target entity.
You can transfer employees to new or existing positions as follows:
l If the transfer is approved, you know the position to which to transfer the employee, andcan access both the source and target entities involved, see “Performing Single-StepEmployee Transfers” on page 164.
l If the transfer is unapproved, perform these steps:
m Transfer the employee out of your entity. See “Transferring Employees Out of Entities”on page 163.
m Have management accept the transfer. See “Reviewing and Accepting PendingTransfers” on page 179.
m Have the manager overseeing the target position or entity transfer the employee in. See“Transferring Employees Into Positions” on page 164.
If, after performing transfers, compensation expenses are not what you desire, you can performreverse transfers to restore positions and employees back to their original source entities. See“About Reverse Transfers” on page 163.
Important Tips and Notes
l Employees must be transferred into the target entity within the next business day.
l If you use Approvals to submit budgets along a promotional approval path, have anadministrator define Generic Entity as a planning unit
l In decision package-enabled applications, you cannot perform transfers in non recurringbudget requests. Perform transfers in recurring budget requests. See “How Budget RequestType Impacts Compensation Budgeting” on page 198.
162

About Reverse Transfers
You can reverse employee and position transfers if you made them by mistake, or if they do notresult in the desired compensation expense. Although you should confirm that they have beenrestored, all original position and employee details such as FTE, status, salary, and benefits arereinstated after you reverse a transfer.
Important Notes:
l You can only reverse the transfer for a position or employee that was just transferred to thegeneric, global entity
l The person who made the original transfer cannot reverse it. The manager who is currentlyresponsible for a transferred employee is the only one who can reverse their transfer backto their original entity or department.
l You can only reverse transfers for positions and employees whose has not been updated inthe target department or entity.
You can reverse transfers using the context menus on these forms:
l Maintain positions
l Maintain employees by position
l Review Pending Transfer
l Maintain Position Data
About Transfers Between Budget Requests
You can transfer out positions or employees in one budget request into another budget request.This is helpful if your organization's entities function as separate units, and is an alternative tosharing decision package and budget requests between entities in order to perform transfers.You can reverse these transfers too. See “Transferring Positions and Employees Across BudgetRequests” on page 219.
Transferring Employees Out of EntitiesTransfer employees out of entities to enable another manager to transfer them in to anotherposition in another HR organization.
ä To transfer employees out:
1 From My task lists, select Budget Preparation, select Manage position and employee data, and thenselect Maintain employees by position.
2 Select the HR organization, and then click .
3 Right-click the employee, select Transfer Employee, and then Transfer Out an Employee.
4 Specify the effective date on which to transfer the employee out of the current position.
5 Click Transfer.
163

Tip: To undo a transfer, see “About Reverse Transfers” on page 163
Transferring Employees Into PositionsManagers and supervisors accept employees that are awaiting transfer into their target positionsby transferring them in.
Note: In decision package-enabled applications, you cannot perform transfers in non recurringbudget requests. Perform transfers in recurring budget requests.
ä To transfer employees into positions:
1 From My task lists, select Budget Preparation, and then select Manage position and employeedata.
2 Select Review pending transfers.
Note: If you use decision packages and budget requests these task links do not display. See“Performing Tasks Not Displayed in My Tasks List” on page 236.
3 Right-click Position Name, and then select Transfer In an Employee.
4 Specify values such as:
l Employee to transfer
l Job or position to which to transfer the employee
l Date on which the transfer is effective
5 Click Transfer In.
Performing Single-Step Employee TransfersPerform a single-step transfer to transfer existing employees from one department to another,and to identify the budget impact. Oracle recommends that an Administrator who can accessboth the source and target entities perform single-step transfers. To perform a transfer in adecision package, see “Transferring Positions and Employees Across Budget Requests” on page219.
ä To perform a single-step transfer:
1 Ensure that you can access the source and target entities.
2 From My task lists, select Budget Preparation, and then perform the task for the configuration optionyou use:
l Expand Manage employee data, and then select Maintain employees.
l Expand Manage position and employee data, and then select Maintain employees byposition.
3 Select the HR organization in which the employee works, and then click .
4 Right-click the employee, select Transfer Employee, and then select Single Step Transfer.
164

5 Specify the following:
l Select Source Position—Employee's current position
l Select Source Entity—Department or cost center in which the employee is currentlyassociated
l Select Target Position—Position to which to transfer the employee
l Select Target Entity—Cost center or department into which the employee transfers
l Enter Effective Date—When the employee is transferred
6 Click Transfer.
Reversing TransfersReverse a transfer to move an employee who was transferred to another HR entity, back to theiroriginal entity. Only the current manager of the employee can reverse the transfer; not the personwho performed the original transfer.
Does not apply to the Position only configuration option
ä To reverse a transfer:
1 From My task lists, select Budget Preparation, and then make the selection for your configurationoption:
l Manage employee data, and then Maintain employees
l Manage position and employee data, and then Maintain employees by position
2 For a decision package-enabled application:
l Access the decision package that contains the budget request to recalculate afterreversing the transfer. On the Decision Package Manage tab. specify the scenario, version,and year of the decision package, and click Go.
l Select the decision package, and then click .
l On Budget Requests, select the budget request, and then select Data Collection Forms .
l Select the form used to manage employee assignments such as Manage requestpositions or Manage request position-employee assignments.
3 Select the employee's current HR entity, and then click .
4 Right-click employees, and then select the task for your configuration option:
l Transfer Employee, and then Reverse Transfer
l Transfer Position, and then Reverse Transfer
5 When prompted, ensure that:
l Source Entity is the employee's current entity out of which to transfer them.
l Source Position is the employees current position.
165

l Target Entity is the employee's original entity to which you want to transfer them back.
l Target Position is the employee's original position in their original entity.
6 Click Transfer.
Assigning Employees to Positions
Applies to the Position and Employee configuration option
ä To assign employees to positions:
1 From My task lists, select Budget Preparation, select Manage position and employee data, and thenselect Maintain employees by position.
2 Select the HR organization, and then, click .
3 Right-click employees, select Assign Employee, and then select:
l Existing Employee: Assign a current employee by performing these steps:
a. Select the employee to fill the position.
b. Enter the effective date when they are assigned to the position.
c. Enter the FTE.
d. Select Is Replacement if the employee is temporarily filling the replacement FTE fora position generated by another employee being away on maternity or short-termdisability leave.
l To Be Hired Employee. An employee will be hired to fill the position or temporarily fill avacancy. See “About Filling Vacant Positions or Jobs ” on page 178.
Note: To replace a To-Be-Hired employee currently assigned to a position with an existingemployee, both employees must have the same employee type, hire date, and FTE.
Assigning Employees to Jobs
Applies to the Employee configuration option
ä To assign employees to jobs:
1 From My task lists, select Budget Preparation, select Manage employee data, and then selectMaintain employees by job.
2 Select the HR organization, and then click .
3 Right-click employees, select Assign Employee, and then:
l Existing Employee: Assign a current employee by performing these steps:
a. Select the employee.
166

b. Enter the effective date when they are assigned to the job.
c. Enter the FTE.
l To Be Hired Employee. An employee will be hired for the job. See “About Filling VacantPositions or Jobs ” on page 178.
Note: To replace a To-Be-Hired employee currently assigned to a job with an existing employee,both employees must have the same employee type, hire date, and FTE.
Deleting Employee AssignmentsWhen an employee no longer holds a position or job, remove the assignment, and identify thebudget impact. For example, if an employee performs two jobs but has completed work on one,delete the assignment.
ä To delete employee assignments:
1 From My task lists, select Budget Preparation, and then perform the task for your configuration option:
l Employee—Select Manage employee data, and then Maintain employees by job.
l Position and Employee—Select Manage position and employee data, and then Maintainemployees by position.
2 Select the HR organization, and then click .
3 Right-click employees, select Delete Employee Assignment, and then click Launch.
Maintaining Positions
Subtopics
l Creating Positions
l About Synchronizing Position Properties
l Synchronizing Position Properties
l Maintaining Position Compensation Details
l Excluding Positions from Budget Calculations
l Copying Position Data
l Performing Single Step Transfers
l Reviewing Pending Transfers
l Deleting Positions
l About Terminating Positions
l Terminating Positions
Applies to the Position, and the Position and Employee HCP configurations
Positions that you create, and their associated expenses, must be reviewed and approved. See“Approving Positions, Jobs, and Employee FTE and Compensation ” on page 240.
167

Creating Positions
Note: Position settings that you do not specify are populated by position defaults, if defined.
ä To create positions:
1 From My task lists, select Budget Preparation, select Manage position and employee data, and thenselect Maintain position data.
2 In the POV, select the Scenario, Year, and Version.
3 Select the HR organization with which the position is associated, and then click .
4 Right-click in Position Name, and select Add Position.
5 When prompted, define the position by specifying information such as:
l Entity—Department with which the position is associated
l Position Type:
m Pooled—Multiple headcount and FTE
m Shared—Multiple headcount with a specifically defined FTE limit
m Single Incumbent—Single FTE and headcount to support one employee
l FTE — Normally 1 if the position is full-time or less than 1 if it is part-time
l Position Start Date—When the position begins
l Annual Salary Spread—See “About Modifying Salary Grades” on page 98.
6 Click Add.
7 To define and budget for all other position settings, see “Maintaining Position Compensation Details”on page 169.
About Synchronizing Position Properties
Applies only to the Position and Employee HCP Configuration
Synchronize position properties to apply changes to this master position data to any employeewho is, or will be, assigned to a position:
l Name
l Number
l Type
l Start Date
l End Date
l Job
168
Synchronizing Position Properties
ä To synchronize position properties:
1 From My task lists, select Budget Preparation, select Manage position and employee data, and thenselect Maintain position data.
2 In the POV, select the Scenario, Year, and Version.
3 Select the HR organization with which the position, and the employees assigned to the position, are
associated, and then click .
4 Modify basic position data, such as the following, and save:
l Salary Basis—How often assigned employees are paid, such as weekly or bimonthly.
l Adjustment Date—When changes such as salary increases become effective. For example,if a budget year starts January 1, and the salaries of employees assigned to a specificposition increase on June 1, the adjustment date is the day on which to apply the salaryincrease.
5 Right-click the position, and then select Synchronize Position Properties.
Maintaining Position Compensation Details
Subtopics
l Maintaining General Position Data
l Maintaining Position FTE
l Maintaining Position Salary Grades
l Maintaining Allocations
l About Excluding Position Expenses From Budget Calculations
l Maintaining Position Status
l Maintaining Additional Earnings
l Maintaining Benefits
l Maintaining Assigned Employees
l Maintaining Tax Details
Applies to the Position, and the Position and Employee HCP configurations
Maintaining General Position DataBefore defining position compensation, review the order in which to specify compensationdetails and satisfy the requirements. See “Recommended Task Flow” on page 143 and“Requirements” on page 144.
ä To maintain general data:
1 Ensure that the entity defaults are correct. See Chapter 7, “Defining Salary, Compensation, andAllocation Defaults”
169

2 From My task lists, select Budget Preparation, select Manage position and employee data, and thenselect Maintain positions or Maintain position data.
3 Select the desired entity, such as an HR organization, and then click .
4 Right-click a position, and then select Edit Position Details.
5 On the General tab, specify basic position data such as:
l In Position Start Date, double-click to specify when the position is active.
l In Position End Date, double-click to specify when the position ends.
6 To apply the defaults defined for an entity (as specified on the Manage compensation defaults form)to the position, such as salary grades, benefits, or allocations, perform these tasks:
a. Right-click on a column head, and select:
l Apply Default Compensation Elements—Apply predefined compensation defaults,such as employer paid taxes, salary grades, and additional earnings.
If multiple changes to salary grades and steps exist, data is applied according toposition start date.
l Apply Default Allocations—Apply the General Ledger segments (Account, Entity,Program etc.) defined as the Salary Allocation defaults to the position. To reviewthese default allocation settings, see “Specifying Salary Grade Defaults ” on page120
b. Select one for Clear Before Load:
l Yes—Remove any existing compensation details or allocations, and apply thedefaults.
l No—Overwrite any existing compensation details or allocations with the defaults.
7 If you applied entity-specific compensation element or allocation defaults, perform these tasks:
l If employees are assigned to the position, see “Managing and Specifying GeneralEmployee Data” on page 154.
l Review the data on the appropriate tab. For example, if you applied a salary gradedefaults and benefit defaults review the information on the Salary Grades and Benefitstabs.
8 See “Calculating and Allocating Compensation Expenses” on page 180.
Maintaining Position FTE Specify position FTE to define or modify how many full time or part time employees are requiredfor a position. For example, a position that previously required only part-time employment maynow require full-time employee assignments.
ä To manage FTE data:
1 Perform steps 1-4 “Maintaining General Position Data” on page 169.
2 Perform any task on the FTE tab:
170

l To modify FTEs, right-click, select Update FTE, and specify this data:
m Enter FTE— Value typically between 0-1 that indicates if the employee is full timeor part time. Note that employee can have a full time FTE, but an FTE of 0.5 if theyare assigned to 2 positions.
m Enter Effective Start Date—When the FTE assignment begins
m Enter Effective End Date—When the FTE assignment ends
l To specify and budget for FTEs and the associated head count that change by month,quarter, or year, select Adjust Period Level Details.
a. In Overtime Hours, enter the number of additional hours for which an hourlyemployee is paid.
b. In Total FTE, right-click, and then select Calculate Compensation to display the finalbudget impact.
l Modify the monthly spread factor.
Maintaining Position Salary GradesThe salary data you specify on the Salary Grades tab is automatically assigned to employeesassigned to the position, and to future employee who are assigned to the position. Use this SalaryGrades tab to define, modify, and remove salary for positions.
Note: If an Administrator enabled Allow Value Change for the salary grade, you can adjust salaryvalues. If however, you cannot modify salary values because this value was not enabled,or if the salary grade steps, sequences, and rates that you must use are unavailable, havean administrator modify or define new salary grades.
ä To manage position salary grades:
1 Perform steps 1-4 in “Maintaining General Position Data” on page 169.
2 Select Salary Grade.
3 To apply a new salary assignment, right-click, select Add Salary Information, and then see “DefiningSalary Grades” on page 96.
4 Click Add.
5 On the form, specify the remaining salary information, such as start and end dates.
6 See “Calculating and Allocating Compensation Expenses” on page 180 and “Viewing the Budget Impactof Compensation Expenses” on page 181.
Maintaining Allocations
ä To maintain position allocations:
1 Review how allocations are used. See “About Salary Allocations” on page 123.
171

2 Perform steps 1-4 in“Maintaining General Position Data” on page 169.
3 Select Allocations.
4 To add allocations, right-click, select Add Allocation Information, and then perform these tasks:
a. Specify a start and end date that define when to use the allocation.
b. From each drop down list, select the segments or chart fields to use.
c. In Allocation Type, click , select Budget Item, and then specify the kind of allocationto use:
l Select Flat Allocation Assignments to allocate a specific amount, click , click OK,and then enter the amount in Enter Allocated Flat Amount.
l Select Percentage Allocation Assignments to allocate a certain percentage, click
, click OK, and then enter the percent in Enter Allocation Percentage.
Important: Ensure that multiple allocations do not overlap, causing the total allocationpercentage to exceed 100%, by right-clicking and then selecting Allocation Percentage PerPeriod.
See “Correcting Overlapping Allocations” on page 129.
5 To remove allocations, right-click, and then select Delete Allocation.
About Excluding Position Expenses From Budget CalculationsTo exclude a vacant or filled position and all associated expenses, select Exclude position on the“Manage All Positions” form. To exclude a vacant position from calculations, but include allemployees assigned to the position then try “Change status”, set the status as “Inactive”, startdate as current budget cycle Effective start date and Effective end date as current budget cyclelast date
Maintaining Position StatusUse the Status Changes tab to modify, and then budget for position status changes, such as whento exclude positions from budget calculations.
ä To manage position status:
1 Perform steps 1-4 in “Maintaining General Position Data” on page 169.
2 Select Status Changes.
3 To include positions that have been excluded from budgets, right-click them, and then select Active.
4 To omit positions from budget calculations, right-click them, and then select Inactive. To exclude avacant position from calculations, but include all employees assigned to the position, select this option,specify the current budget cycle Effective Date as the Start Date, and then specify the last date in thebudget cycle as the End date.
172

Maintaining Additional EarningsUse the Additional Earnings tab to add, remove, or modify any additional that are part of overallcompensation expenses such as hazard pay or relocation costs. Modifying additional earningscan impact other calculations such as those deriving effective dating and percent of gross pay.
ä To manage additional earnings:
1 Perform steps 1-4 in “Maintaining General Position Data” on page 169.
2 To specify a new earning, or to add another row to modify existing earnings, right-click, select AddAdditional Earning, and then select the corresponding earning element and an option.
3 To remove an earning, right-click, and then select Delete Additional Earning.
4 To manage the allocations for the additional earning, right-click on an additional earning, selectAllocation Details, and create, edit, or remove allocations as described in “Maintaining Allocations”on page 171.
5 See “Calculating and Allocating Compensation Expenses” on page 180 and “Viewing the Budget Impactof Compensation Expenses” on page 181.
Maintaining Benefits Use the Benefits tab to remove, change, or add benefits assigned to positions. Before assigningbenefits, ensure that an Administrator has created a corresponding element.
ä To manage benefits:
1 Perform steps 1-4 in “Maintaining General Position Data” on page 169.
2 Perform any task:
l To assign benefits, right-click, select Add Benefit, select the benefit, and then specify thestart and end dates after the benefit is added.
l To modify benefits, click in cells and use the cell drop-down lists to change settings suchas start dates, end dates, and value type.
l To remove benefits, right-click the assignment, and then select Delete Benefit.
Maintaining Assigned EmployeesUse the Employee tab to assign and remove employees from positions, in addition to changingdata such as salary spreads and basis.
ä To manage employees:
1 Perform steps 1-4 in “Maintaining General Position Data” on page 169.
2 In the Employee tab, change such data as:
l Salary Basis—How often assigned employees are paid, such as monthly
l Annual Salary Spread—See “About Modifying Salary Grades” on page 98.
173

3 To assign an employee to another position, right-click, select Modify, and then select a Transfer option.
4 To associate an employee who was transferred out of a position so that they could fill a position, selectTransfer Employee In.
5 To assign an employee to a position, right-click, and then select Assign Employee.
See “Assigning Employees to Positions” on page 166.
6 To remove an employee from the position, right-click, and then select Delete Employee Assignment.
Maintaining Tax Details
ä To manage tax details:
1 Perform steps 1-4 in “Maintaining General Position Data” on page 169.
2 Perform any task on the Tax Details tab:
l To budget for new employer-paid taxes, right-click, select Add Employeer-Paid Tax, andthen specify data such as:
m Element—Tax element such as FUTA
m Option—Type or recipient of the tax, such as survivor spouse and children
m Payment frequency, payment terms, option value, and maximum value determinedby the tax
m Option End Date—When the tax obligation ends
l To remove taxes, right-click, and then select Delete Employer-Paid Tax.
l To identify the monthly, quarterly, and annual effect of taxes on the budget, right-click,and then select View Budget Impact of Taxes.
Excluding Positions from Budget Calculations
Applies to the Position, and to the Position and Employee HCP configurations
You may need to temporarily exclude positions from budget calculations to perform “what-if”analysis based on their inclusion and exclusion. Positions that you exclude become inactive untilyou change their status.
ä To exclude positions from budget calculations:
1 From My task lists, select Budget Preparation, and then perform the task for your configuration option:
l Select Manage position and employee data, and then select Maintain position data.
l Select Maintain position data.
Note: If you use decision packages and budget requests these task links do not display. See“Performing Tasks Not Displayed in My Tasks List” on page 236.
174

2 Select the cost center or department that contains the position, and then click .
3 Right-click the first column, and then select Exclude Position from Budget.
4 Specify the dates between which to omit position expenses, and then click Exclude.
To include expenses for a position that was previously excluded from calculations, see“Maintaining Position Status” on page 172.
Copying Position DataWhen budgeting for departments that have similar positions, create positions more quickly bycopying common elements such as FTE, salary grades, and benefits from an existing position.
ä To create a position by copying existing position data:
1 From My task lists, select Budget Preparation, select Manage position and employee data, and thenselect Maintain position data.
2 Select the cost center or department, and then click .
3 Right-click the position, and then select Copy Position Data.
4 When prompted, select Yes for the elements to copy, such as allocations and assignments.
Performing Single Step TransfersPerform a single step transfer to transfer a position and its associated expenses from onedepartment to another in a single step. Because you must have access to the source and targetentities, Oracle recommends that an Administrator performs the transfer.
ä To perform a single step position transfer:
1 From My task lists, select Budget Preparation, and then select Maintain position data. If this taskdoes not display, see “Performing Tasks Not Displayed in My Tasks List” on page 236.
2 In the POV, select the Scenario, Version, and Year.
3 Select the HR organization in which the position exists, and then click .
4 Right-click the position and then select Single Step Position Transfer.
5 Ensure that the correct position is selected, and then select the target cost center or department.
6 Click Transfer.
Reviewing Pending TransfersTransfer requests for employees whose managers have transferred them out of their currentposition, need to be approved. Approve transfers by transferring employees in. See “TransferringEmployees Into Positions” on page 164.
175

Deleting PositionsYou can only delete new and initialized positions.
ä To delete positions:
1 From My task lists, select Budget Preparation, and then perform the task for your configuration option:
l Select Manage position and employee data, and then select Maintain position data.
l Select Maintain position data.
2 In the POV, select the Year, Scenario, and Version.
3 Select the HR organization in which the position exists, and then click .
4 Right-click the position, and then select one:
l Delete position for a specific version—Delete the position from a particular budget.
l Delete position across all versions—Delete the position in all budgets.
5 Specify when to delete the position.
About Terminating PositionsAlthough you typically terminate positions so that the budget does not reflect default vacancyexpenses, you can also terminate new and unapproved positions, or positions filled in the futureby to be hired employees. Terminated positions remain in the dimensional structure and theHRMS. Position expenses accrued prior to termination are included in the budget.
Before terminating positions, determine if there are assigned employees. If there are, performany task:
l Reassign them to another position
l Remove their assignment to the current position
l Terminate them
Terminating PositionsNote: In decision package-enabled applications, you cannot terminate positions in non recurringbudget requests, but only in recurring budget requests.
ä To terminate positions:
1 From My task lists, select Budget Preparation, select Manage position and employee data, and thenselect Maintain position data.
2 Select the Year, Scenario, or Version in the POV.
3 Select the HR organization in which the position exists and then click .
4 Right-click the position, and then select Terminate Position.
176

5 Specify when to terminate the position.
Applying Compensation and Salary Allocation Defaults
ä To assign department or entity-specific compensation defaults (such as salary grades andbenefits) and default allocations to positions or employees:
1 Review the existing defaults to ensure they are correct and are those that you want to apply. SeeChapter 7, “Defining Salary, Compensation, and Allocation Defaults”
2 From My task lists, select Budget Preparation.
3 Make the selections for your configuration option:
l Manage employee data, and then Maintain employees by position
l Manage positions, and then Maintain positions
4 From Page, select the entity or department.
5 Right-click a position or an employee, select Edit Position or Edit Employee, and then select General.
6 Right-click on a column head, and select:
l Apply Default Allocations—Apply the General Ledger segments (Account, Entity,Program etc.) defined as the Salary Allocation defaults to the position. To review thesedefault allocation settings, see “Specifying Salary Grade Defaults ” on page 120
l Apply Default Compensation Elements—Apply predefined compensation defaults, suchas employer paid taxes and additional earnings
7 Select one for Clear Before Load:
l Yes—Remove any existing compensation details or allocations, and apply the defaults.
l No—Overwrite any existing compensation details or allocations with the defaults.
177

Maintaining Employees by Job or Position
Subtopics
l Viewing Employee Job Details
l About Filling Vacant Positions or Jobs
l Filling Vacant Positions or Jobs
l Reviewing and Accepting Pending Transfers
Viewing Employee Job Details
Applies only to the Employee configuration option
ä To view job details:
1 From My task lists, select Budget Preparation.
If you use decision packages, these task links do not display. See “Performing Tasks NotDisplayed in My Tasks List” on page 236.
2 Expand Manage employee data, and then select Maintain employees by job.
3 Right-click a job, select View Job Details, and then select the kind of data to view, such as Salary Gradesor Taxes.
About Filling Vacant Positions or JobsYou can fill vacancies with new hires or existing employees. Although assigning employees tovacant positions or jobs creates new employee records, information about previously heldassignments is retained.
Note:
l Although planners do not typically add employees, you may need to create a budget for jobsor positions that are not filled.
l Vacant job and position expenses are not applied to those in HRMS. However, compensationexpenses are always associated with employee that you may assign.
Filling Vacant Positions or Jobs
Applies to the Employee configuration option, and the Position and Employee configurationoption
Perform these tasks to fill vacancies with new hires not in the HRMS or with existing employees,and identify the budget impact.
178
ä To fill vacant positions or jobs:
1 If the vacancies impacted a position's FTE, ensure the FTE has been submitted for approval, andapproved. See Chapter 11, “Reviewing and Approving Budgets”.
2 From My task lists, select Budget Preparation, and then select Manage employee data or Manageposition and employee data.
3 Select Fill to-be-hired vacancies.
4 Select the cost center or department, and then click .
5 Right-click the vacancy, and perform a task:
l To assign an existing employee instead of a prospective new hire, select Replace to beHired With Existing Employee, and then select the employee.
l To assign an employee that was transferred out of their original position, perform thesesteps:
m Select Single Step Employee Transfer or Transfer In an Employee.
m Specify the employee, confirm the position for the transfer, confirm the associateddepartment, and specify when the transfer is effective.
l To assign a prospective employee, right click, select Assign Employee, select Assign to behired, and then specify data such as:
m Select Pay Type—Non-exempt if the employee is paid hourly
m Enter FTE — Value typically between 0-1 that indicates if the employee is full timeor part time. Note that employee can have a full time FTE, but an FTE of 0.5 if theyare assigned to 2 positions or jobs. 1 normally indicates if the employee is full time,and less than 1 indicates part time.
m Enter Overtime Hours— To define overtime as an additional earning, instead ofcovering overtime with regular salary pay, see “Defining Overtime” on page 105.
m Is Replacement—Yes if the employee is filling a temporary vacancy generated by apreviously assigned employee away on short-term disability or maternity leave.
Note: To replace a To-Be-Hired employee currently assigned to a position with an existingemployee, both employees must have the same employee type, hire date, and FTE.
Reviewing and Accepting Pending Transfers
Applies to the Employee, and the Position and Employee HCP configurations
Use this budget preparation task to view and approve requested transfers. Employees withpending transfers, must first be transferred out of their entity or department.
ä To review and approve pending transfers:
1 From My task lists, select Budget Preparation, and then select Manage position and employeedata or Manage employee data.
179

2 Select Review pending transfers.
3 Right-click an employee and then select Transfer In an Employee.
4 Specify the following:
l Position to which to transfer the employee
l Associated cost center or department
l When to transfer the employee
5 Click Transfer In.
Calculating and Allocating Compensation ExpensesAfter calculating a position's compensation expense, use the Total Position tab in the Expenseportion of the position details form to view the total aggregated values: Use the Vacancy tab todisplay the basic salary, taxable compensation, and gross earning expenses for positions withoutassigned employees.
ä To calculate period-level compensation expenses, and allocate them to GL accounts:
1 Access the position or the employee details form.
2 Select the tab for the kind of compensation to calculate (Benefit, Additional Earnings, and so on) andallocate.
3 In Expense, perform any task:
l Calculate period-level expenses for compensation in terms of basic salary, grossearnings, and taxable compensation by performing these tasks:
m For the Position configuration option or the Position and Employee configurationoption, select Total Position.
If compensation expenses are already calculated, expand Total CompensationExpense.
m Right-click in the first column, and then select Calculate Compensation Expense.
l Calculate compensation expenses for the vacant portion of the position, selectVacancy, right-click, and then select Calculate Compensation Expense.
l Allocate compensation expenses to General Ledger accounts, by performing these task:
m Ensure that allocations defaults are defined, or that the chart fields or segments forallocations are specified on the Allocations tab.
m Right-click, and then select Allocate Compensation Budget to General LedgerAccounts.
Allocate the vacant portion of position or employee expenses by selecting Vacancy,right-clicking, and then selecting Allocate Compensation Budget to General LedgerAccounts.
180

l View position and employee expenses by period after performing allocations by right-clicking, and then selecting View Allocated Expenses.
l To identify the annual, quarterly, or monthly impact of all assigned compensation detailson the budget, see “Viewing the Budget Impact of Compensation Expenses” on page181.
Viewing the Budget Impact of Compensation Expenses
ä To view the budget impact of compensation expenses:
1 From My task lists, select Budget Preparation, and then select the task for your configuration option:
l Maintain employees by job
l Maintain position data
l Maintain employees by position
2 Right-click positions or employees, and then select Edit position details or Edit employee details.
3 Select the tab for the kind of compensation expense whose budget impact to identify.
4 Right-click in the salary grade, benefit, tax, or additional earning in the first column, and then selectView Budget Impact of <expense>.
For example, to view, by period, the budget impact of all benefits assigned to a position, selectBenefits, right-click each benefit, and then select View Budget Impact of Benefits.
181

182

9Calculating, Reviewing, and
Allocating CompensationExpense Budgets
In This Chapter
Calculating Budgets .. . . . . . . . . . . . . . . . . . . . . . . . . . . . . . . . . . . . . . . . . . . . . . . . . . . . . . . . . . . . . . . . . . . . . . . . . . . . . . . . . . . . 183
Reviewing Expenses ... . . . . . . . . . . . . . . . . . . . . . . . . . . . . . . . . . . . . . . . . . . . . . . . . . . . . . . . . . . . . . . . . . . . . . . . . . . . . . . . . . . 184
About Allocating Compensation Expenses to General Ledger Accounts .. . . . . . . . . . . . . . . . . . . . . . . . . . . 186
Allocating Compensation Expenses to General Ledger Accounts .. . . . . . . . . . . . . . . . . . . . . . . . . . . . . . . . . . 187
Calculating BudgetsUse this procedure to calculate all employee and position expenses, by HR organization, thatreflect expenses and calculations for compensation elements such as benefits, FTE assignments,allocations, and vacancy expenses.
Note:
l Effective dating applies to all compensation types. For example, if a salary change is effectiveJune 5, 2012, other expenses are automatically calculated using this date.
l If benefit expenses are based on a percentage of total pay (bonuses and commissions forexample), benefits increase if the salary changes.
ä To calculate the compensation budget:
1 Ensure that FTE, salary grade, and allocation details are defined for the positions or employees whoseexpenses you want to calculate. This data must exist in order to calculate the budget. See “MaintainingJob Compensation Details” on page 146, “Maintaining Employee Compensation Details” on page153, or “Maintaining Position Compensation Details” on page 169.
2 From My task lists, select Budget Preparation, and then select Calculate compensation budgets.
3 Accept the default rule selected, and then click Launch.
4 Specify the following to identify the budget to calculate:
l Scenario—Type of budget such as baseline or forecast
l Version—Budget stage (for example, worst case if the scenario is forecast)
l Entity — Depending on your access permissions, select the HR organization(department, bureau, or cost center, for example) for which to calculate budgetexpenses. Selecting a parent level entity member calculates the budget for all children.Select Total Entity to calculate expenses for your entire organization.
183

Note: To recalculate the budget to reflect a version revision made on an approved budget,select the revision member.
5 Click Launch.
Review the budget calculated for positions and employees and make necessary changes. See“Reviewing Expenses” on page 184, “Reviewing Position and Job Budgets” on page 184, and“Reviewing Employee Budgets” on page 185. To allocate the entire calculated compensationbudget for the entity, see “Allocating Compensation Expenses to General Ledger Accounts” onpage 187.
Reviewing Expenses
Subtopics
l Reviewing Position and Job Budgets
l Reviewing Employee Budgets
l Reviewing Compensation Element Budgets
l Reviewing FTE Assignments
Reviewing Position and Job BudgetsAfter compensation budgets are entered and expenses calculated, you can review position, job,employee, and compensation element expenses by year, quarter, and month. You can also reviewFTE assignments.
ä To review position or job compensation expenses:
1 From My task lists, select Budget Preparation, and then select Review entity compensationbudgets.
2 Select Review position budgets or Review budgets for jobs.
3 On the POV, select the Version, Year, and Scenario.
4 Select the entity for the HR organization, and then click .
5 Confirm that the position or job expenses are correct.
6 To calculate the compensation budget for the position or job, right-click, select Calculate CompensationExpenses, select the position or job, and then click Calculate.
The annual, quarterly, and monthly expense of the position or job is displayed.
Note: If you perform changes such as adding new positions to which you assign employees,and do not calculate expenses, these changes are not displayed on the Review Budgetform. Calculate compensation expenses to ensure that all changes are included andupdated. In this case, this would include expenses for the new positions, and possiblevacancy reductions due to employee assignments.
184
7 To allocate position or job expenses to General Ledger accounts, right-click, select AllocateCompensation Budget to GL Accounts, and then see “Allocating Compensation Expenses to GeneralLedger Accounts” on page 187.
Reviewing Employee Budgets
Does not apply to the Position configuration option
ä To review employee budgets:
1 From My task lists, select Budget Preparation, and then select Review entity compensationbudgets.
2 Select Review employee budgets.
3 On the POV, select the correct Version, Year, and Scenario
4 Select the entity for the HR organization, and then click .
The annual compensation expense for each existing, new, and to be hired employee isdisplayed. The annual total compensation expense for all employees is also displayed.
5 If it is not already expanded, expand Year Total to list employee expenses by quarter. Expand theQuarter headers to list expenses by month.
Note: If you perform changes such as adding new positions to which you assign employees,and do not calculate expenses, these changes are not displayed on the Review Budgetform. Calculate compensation expenses to ensure that all changes are included andupdated. In this case, this would include expenses for the new positions, and possiblevacancy reductions due to employee assignments.
6 To calculate the compensation expenses associated with individual or types (existing and to be hired,for example) of employees, right-click, and then select Calculate Compensation Expense.
7 To allocate the entire entity compensation budget to General Ledger accounts, see “AllocatingCompensation Expenses to General Ledger Accounts” on page 187.
Reviewing Compensation Element Budgets
ä To review compensation element expenses:
1 From My task lists, select Budget Preparation, and then select Review entity compensationbudgets.
2 Select Review element budgets.
3 On the POV, select the correct Version, Year, and Scenario.
4 Select the entity for the HR organization, and then click .
185

Compensation expenses are displayed by employee and their assigned job or position. Thetotal of each compensation element is displayed for Total Employees at the bottom of theform.
5 If it is not already expanded, expand Year Total to list expenses by quarter. Expand Quarter to listexpenses by month.
6 Confirm that the benefit, additional earning, tax, and salary expenses for each employee are correct.
Reviewing FTE Assignments
ä To review FTE assignments:
1 From My task lists, select Budget Preparation, and then select Review entity compensationbudgets.
2 Select Review FTE assignments.
3 On the POV, select the correct Version, Year, and Scenario.
4 Select the entity for the HR organization, and then click .
The FTE capacity, proposed FTE, and assigned FTE is displayed for each job or position.
5 For the Employee configuration option, click the second tab to view:
l Proposed FTE
l Existing FTE
l Approved FTE
l Unapproved FTE
Note: To view updated values for Unapproved FTE and Unapproved Headcount, selectApprove in step 7 of “Approving Period-Level FTEs.”
6 To change FTEs, see“Managing and Specifying FTE ” on page 154 and “Maintaining Position FTE ” onpage 170.
7 To approve FTEs, see “Approving Period-Level FTEs ” on page 242.
About Allocating Compensation Expenses to GeneralLedger AccountsAfter changing employee, position, jobs, FTE, and other compensation data, and recalculatingthe compensation budget, allocate compensation expenses to General Ledger account segmentsor chart fields:
l For all, or individual, entities. Allocating to Total Entity enables you to take one action toallocate all expenses in your cost center instead of taking multiple actions to allocate forpotentially hundreds of positions and employees.
l For all, or individual, jobs or positions in an entity
186

l For all, or individual, employees in an entity
For example, to allocate only for new positions in a department, select the following on theAllocate Expenses to GL Accounts form:
l Select Entity—Department
l Select Positions—Total New Positions
To allocate for all existing employees in your entire organization, select:
l Select Entity—Total Entity
l Select Employees—Total Employees
Note: The entity you can select for which to allocate expenses, depends on your accesspermissions.
Allocating Compensation Expenses to General LedgerAccounts
ä To allocate compensation to General Ledger accounts:
1 From My task lists, select Budget Preparation, and then select Allocate compensation to GeneralLedger accounts.
2 Accept the default business rule, and then click Launch.
3 Select members based on the allocations to make. For example, to allocate for all employees holdingthe job or position of Fire Chief in the New Haven municipal fire department, select:
l Scenario—Type of budget, such as baseline or forecast from which to make allocations
l Version—Budget stage, such as worst case or best case from which to make allocations
l Select Entity—New Haven Fire
l Select Employee—Total Existing Employees
l Select Position or Select Job Code–Fire Chief
4 Click Launch.
5 Push compensation expenses on the HCP plan to Plan 1, 2, or 3 to update the line item budget. See“Populating the Line Item Budget” on page 83.
187

188
10Working with Decision Packages
and Budget Requests
In This Chapter
About Decision Packages ... . . . . . . . . . . . . . . . . . . . . . . . . . . . . . . . . . . . . . . . . . . . . . . . . . . . . . . . . . . . . . . . . . . . . . . . . . . . . 189
About Decision Package Types ... . . . . . . . . . . . . . . . . . . . . . . . . . . . . . . . . . . . . . . . . . . . . . . . . . . . . . . . . . . . . . . . . . . . . . . 196
Getting Started ... . . . . . . . . . . . . . . . . . . . . . . . . . . . . . . . . . . . . . . . . . . . . . . . . . . . . . . . . . . . . . . . . . . . . . . . . . . . . . . . . . . . . . . . . 199
Creating Decision Package Types ... . . . . . . . . . . . . . . . . . . . . . . . . . . . . . . . . . . . . . . . . . . . . . . . . . . . . . . . . . . . . . . . . . . . 207
Creating Decision Packages and Budget Requests.. . . . . . . . . . . . . . . . . . . . . . . . . . . . . . . . . . . . . . . . . . . . . . . . . . 211
Using Budget Requests.. . . . . . . . . . . . . . . . . . . . . . . . . . . . . . . . . . . . . . . . . . . . . . . . . . . . . . . . . . . . . . . . . . . . . . . . . . . . . . . . . 218
Saving Decision Packages and Budget Requests.. . . . . . . . . . . . . . . . . . . . . . . . . . . . . . . . . . . . . . . . . . . . . . . . . . . . 221
About Modifying Decision Packages and Budget Requests.. . . . . . . . . . . . . . . . . . . . . . . . . . . . . . . . . . . . . . . . . 221
Modifying Budget Request Basic Properties.. . . . . . . . . . . . . . . . . . . . . . . . . . . . . . . . . . . . . . . . . . . . . . . . . . . . . . . . . . 221
Modifying Budget Request Details and Expenses... . . . . . . . . . . . . . . . . . . . . . . . . . . . . . . . . . . . . . . . . . . . . . . . . . . 222
Copying Decision Package Types... . . . . . . . . . . . . . . . . . . . . . . . . . . . . . . . . . . . . . . . . . . . . . . . . . . . . . . . . . . . . . . . . . . . . 222
About Copying Decision Packages and Budget Requests .. . . . . . . . . . . . . . . . . . . . . . . . . . . . . . . . . . . . . . . . . . 223
Copying Decision Packages and Budget Requests .. . . . . . . . . . . . . . . . . . . . . . . . . . . . . . . . . . . . . . . . . . . . . . . . . . 226
Managing Decision Package Types, Decision Packages, and Budget Requests .. . . . . . . . . . . . . . . . . . 228
About Submitting Decision Packages for Approval and Viewing Promotional Paths ... . . . . . . . . . . . 234
Submitting Decision Packages for Review and Approval.. . . . . . . . . . . . . . . . . . . . . . . . . . . . . . . . . . . . . . . . . . . . 234
Approving and Rejecting Decision Packages ... . . . . . . . . . . . . . . . . . . . . . . . . . . . . . . . . . . . . . . . . . . . . . . . . . . . . . . . 235
About Migrating Decision Packages Between Environments Using Lifecycle Management .. . . . . . 235
Performing Tasks Not Displayed in My Tasks List . . . . . . . . . . . . . . . . . . . . . . . . . . . . . . . . . . . . . . . . . . . . . . . . . . . . . 236
About Graphing and Analyzing Data ... . . . . . . . . . . . . . . . . . . . . . . . . . . . . . . . . . . . . . . . . . . . . . . . . . . . . . . . . . . . . . . . . 236
Accessing Graphs ... . . . . . . . . . . . . . . . . . . . . . . . . . . . . . . . . . . . . . . . . . . . . . . . . . . . . . . . . . . . . . . . . . . . . . . . . . . . . . . . . . . . . . 237
About Decision Packages
How Decision Packages Are UsefulDecision packages enable department heads or financial support staff to submit incrementalrequests for compensation and capital asset funding, rather than submitting an entire budgetwith amounts that include the new funding amount. As such, decision packages collectivelypresent requests for funding along with narrative justification and supporting information thatmay be submitted through the review and approval process.
189

Decision packages contain budget requests that include the detailed budget amounts necessaryto implement a decision package. Budget requests could include funding for:
l Position and employee compensation expenses
l Personnel costs
l Operation costs
Decision Packages are generally, but not always, prepared by entity (department, office, bureau,branch etc.) level budget management personnel.
Sample Decision Package 1
Example 1
John, manager of Fire Prevention and Suppression, could define a decision package called NewFire Station that contains detailed line item budgets for all expenses anticipated to build the newfire station in budget requests such as:
l Construction of fire house
l Equipment and vehicles
l Staffing and associated compensation expenses such as salaries and benefits
John's decision package will be promoted for review and approval according to the masterPlanning Unit Hierarchy (PUH) defined by an administrator and will also be reviewed by anyreviewer specified during decision package creation.
Example 2
Sample Decision Package 2The line item for a department's personnel budget consists of $250,000 for two full-timepositions. A manager must request another full-time position, which will require an additional$125,000. Ordinarily, the manager would submit a personnel budget amount for $375,000 withan explanation (I require $375,000 for personnel salaries which includes an additional $125,000for a new position) for the amount which is an increase from his baseline budget. Decisionpackages and budget requests enable the manager to submit a request for the $125,000, and theapprover to see the baseline and the additional funds being requested:
l Baseline decision package: $250,000.00
l Decision package to create a position: $125,000.00
The line items in budget requests may consist of the same accounting segments and periods butdifferent amounts.
190

Kinds of Decision Packages and Budget Requests
Subtopics
l Baseline Decision Packages
l Shared Decision Packages
l Recurring Budget Requests
Baseline Decision Packages The baseline budget represents your status quo requirements; the funding required to maintainyour current level of service delivered. New decision packages enable you to compare theinclusion of different proposals to your baseline. Creating a Baseline decision package enablesyou to perform these actions:
l Analyze the impact of new budget requests to your overall budget. For example, you createa baseline package to illustrate how your current budgetary commitment is affected byproposed budget requests such as performing salary raises, or creating and filling newpositions. You can load existing annual budget data from one of the following sources:
m Supported source systems using FDMEE
m Other Public Sector Planning and Budgeting budgets
l Build budget requests using data in not just the owning entity, but in all entities, such asbureaus and departments.
Important: Only administrators should create decision packages for baseline budgets becausesuch budgets involve data loading and mapping in FDMEE. Oracle recommends that onlyadministrators, not typical preparers, create baseline budget decision packages. For informationabout the mappings that load previous budget values and actuals, see “Loading General Ledgerand HRMS Metadata and Data” on page 65.
Shared Decision PackagesBecause a decision package represents a proposal that may be for a new service, program, or astrategic outcome, the full cost for all resources necessary to meet the objective may span multipleentities or departments. In this case, the decision package must be shared with the otherparticipating entities. Preparers in each entity are responsible for entering line item expenses inbudget request. Shared entities prepare their budget requests concurrently, then promote themfor review and promotion. For example, a decision package to extend a municipal emergencyresponse system could necessitate budgets from both the fire department and the policedepartment; in which preparers in both departments would enter expense values.
Note:
l Any end user with write access to the current owning entity defined in the decision packagemay edit it.
191
l The decision package owner is automatically the first reviewer. Preparers in shared entitiescan create their budget requests, and then promote their entity's budget request(s) to thedecision package owner for review.
l Any user with read or write access to the current owning entity or shared entity can viewthe decision package, its budget requests, and budget amounts, but cannot modify content.
l The decision package owner may select only entities to which they have read or write accessin order to share the decision package. Although the promotional path is determined by thePlanning Unit Hierarchy before a decision package is defined, the person creating a decisionpackage can select a specific reviewer to review it who may or may not be in the master PUH.
l Users in shared entities can view decision package justification criteria, and public notes andattachments, but cannot modify justification criteria or change decision package properties.
l For a decision package to be considered approved, each shared entity must complete andpromote their budget requests.
Recurring Budget RequestsAlthough the meaning of recurring budgets varies slightly between industries, recurring budgetsare budget request line items that are funded each budget period to support the current level ofservice, as opposed to one-time budgets that are typically created for special purposes. Examplesof recurring budgets:
l The approved budget to maintain current permanent positions each year.
l Fixed asset depreciation
l Other ongoing operation costs
Use the recurring budget option when you create a baseline decision package for a budget requestto:
l Specify line items or budgets that will be prepared every year, and that you will copy to thescenario and version for upcoming years. For example, if five positions captured andapproved in the current baseline budget for FY13 will be funded for the next three years,you can apply the position costs to the budget scenario and versions used to prepare thebudgets for FY14, FY15, and FY16.
l When creating reports, filter recurring as opposed to one-time budget requests
Who Builds and Approves Decision Packages?These people are involved in the decision package process:
l Administrators (Admins) — Perform all initial setup tasks in “Requirements” on page199.
l Budget Preparers (Preparers) — Can be:
m Entity managers who define the decision packages and associated budget requestsnecessary for their entities
192

m Planners who own or have write-access to an entity
m Higher-level managers who create a decision package for their entity level budgetpreparers
m Individual entity level budget preparers who can create their own decision packages andbudget requests
To enter data in budget requests or modify decision packages preparers must have writeaccess to the owning entity or a level in the owning entity, and be associated with the PlanningUnit Hierarchy for the decision package. They must also have write access to the scenarioand version for the decision package. To enable others to review and enter budget requestdata, preparers can:
m Share decision packages with another entity, to enable users in that entity to review,specify, and promote decision packages.
m Specify individuals as reviewers
Preparers in shared entities must promote their data to the owner for review who thenpromotes all slices up the PUH.
l Budget Reviewers and Approvers — Higher-level budget officers or managers responsiblefor the evaluation of decision packages and budget requests, and who provide final approvalto allocate funds required to implement decision packages. Approvers are any individualsin the hierarchy of people who must assess and approve decision packages and the associatedbudget requests.
Accessing Decision PackagesDecision packages are associated with a scenario, version, an owning entity (planning unit), andpossibly one or more shared entities (planning units). Access to decision packages and theirbudget requests is based on rules that work in conjunction with the master Planning UnitHierarchy (PUH) defined for the scenario and version:
l Users who currently own the planning unit consisting of the scenario, version, and owningentity of a decision package can edit its attributes, such as budget amounts.
l Users with read access to scenario and version and either the owning entity or a shared entitycan view attributes and budget amounts.
l Administrators can edit decision packages and their budget requests.
l Only users who are the current owner of a decision package can delete it.
Note: The owning entity assigned to a decision package owns the decision package, not theperson who creates it.
For information about assigning access, see the Oracle Hyperion Planning Administrator'sGuide.
193

How Decision Packages are Reviewed and Approved
Subtopics
l Shared Decision Package Approvals
l Sample Approvals
Decision packages are submitted for review and approval as entity-specific planning units. Userspromote decision packages by promoting their entity on the Approval Status tab of the decisionpackage summary. The person who creates (owns) a decision package is always the first reviewerfor any shared entities. If you specify a reviewer for a decision package this person reviews andapproves the decision package directly before the last (highest) entity approver. The last (highest)entity approver is the only user able to modify a decision package after the decision packagereviewer signs off.
For information about defining a master PUH and promoting units for review and approval,see the Oracle Hyperion Planning Administrator's Guide.
Shared Decision Package ApprovalsIf a decision package is shared, each sharing entity owner must promote their entity or planningunit portion of the decision package. The owning entity and all the shared entity planning unitsmust be promoted and approved before the decision package can be considered for final approvaland signoff. Decision package owners, established in the master Planning Unit Hierarchy (PUH),usually approve decision packages and their budget requests, with these exceptions:
l Shared decision packages are first reviewed by the owner after shared entities have promotedtheir budget request for the decision package to the owner of the package. Decision packagespromoted by their owner then go to the next approver or reviewer in the master PUH. Theonly exception is when the creator is already present in the promotion path as defined bythe master PUH.
l Decision packages for which one or more decision package reviewers has been specified arerouted to the reviewers after all entity approvals except the final entity approval. This ensuresthat no other changes will be made to decision packages amounts after the decision packagereviewers have approved and promoted the package except by the final entity approver.
l Decision packages that contain rejected budget requests cannot be approved. In this case,the rejected budget request(s) must be modified by their preparers and resubmitted forreview along the promotional path, or removed from the decision package.
When all planning units that comprise a decision package are approved and pass along the masterPUH, the decision package is considered signed-off and funds can be allocated to implement it.
Sample ApprovalsThis sample master Planning Unit Hierarchy (PUH) determines the promotional path fordecision package approval in the situations listed below. If Barry prepares a decision package forhis entity E3510 and promotes it, the next approver is William, followed by the top approver for
194

all entities, Frank. In this case, the decision package is first reviewed by William. If he approvesit, and submits it for promotion for further review and approval, it is routed to Frank who canprovide final signoff.
Table 26 : Sample Master PUH
Entity Hierarchy Owner
All Entities Frank
3100
3400 William
3410 Carol
3420 George
3430 Carol
3440 George
3500 William
3510 Barry
3520 Catherine
l If Barry creates an unshared decision package for entity 3510 and does not specify a reviewer,it follows this promotional path for review and approval:
Barry (current owner), then William, and then Frank
l If Barry creates an unshared decision packages for entity 3510 and specifies George as areviewer, this is the promotional path:
Barry (current owner), then William, then George, and then Frank
l If Barry creates a decision package for entity 3510, specifies George as the reviewer, and thenshares the decision package with Carol's entity (3410), this is the promotional path:
Barry (current owner), then William, then George, and then Frank
If Carol approves and promotes the decision package, this is the promotional path:
Carol (current owner), then Barry, then William, then George, and then Frank
The decision package goes to Barry because he is the owner. When Barry promotes it, thedecision package goes to William. When William promotes it, the decision package goes toGeorge and so on up the entity hierarchy.
l If Barry creates a decision package for entity 3510 and shares it with Carol (entity 3410), thisis the promotional path:
Barry (current owner), then William, and then Frank
This is the promotional path for Carol because Barry is the owner:
Carol (current owner), then Barry, then William, and then Frank
195
The decision package cannot be promoted to William for final signoff until Carol promotesit to Barry, who must promote the decision package in entities 3510 and 3410 slice to routethe decision package to William.
About Using the DP_ASO Plan TypeUse the DP_ASO plan type to create detailed reports of decision package and budget requestdata in tools that use Essbase, such as Smart View. Members are set up in DP_ASO for all decisionpackages and budget requests that you create. These members are created in the Decision Packageand Budget Request dimensions. To use the DP_ASO plan for reporting, administrators must:
l Configure a map reporting application to link all the BSO plan types in your application tothe DP_ASO plan type. The Request dimension in a BSO plan type is automatically mappedto the Budget Request and Decision Packages dimensions in the DP_ASO plan type.Consequently, the Request dimension isn't available for mapping.
l Associate the map reporting application with a decision package type. This enables preparersto push data from decision packages, and have it be available for reporting.
About Decision Package Types
Subtopics
l Provided Decision Package Types
l About Custom Decision Package Types
l How Budget Request Type Impacts Compensation Budgeting
Decision package types, created by administrators, are templates that specify the data andbehavior that define the kind of decision packages and budget requests that preparers can create.For example, decision package types determine:
l How line item amounts are aggregated in aggregate storage or BSO databases and reportingapplications. This enables you to use the data in Planning, Essbase and in Financial Reportingtools.
l How users can aggregate and report on the totals of different kinds of expenses, such as typesof compensation (FTE and salary, for example) or non-compensation related expenses. See“About Rollup Groups” on page 231.
l The provided forms, or custom forms used to create budget requests
l The questions and additional information budget preparers must answer and provide tojustify budget requests
l Additional attributes, to capture custom data, that preparers can, or must, specify
l The kind of data upon which you can report. Administrators can define rollup groups thatenable you to calculate and report on the totals of different kinds of compensation and non-compensation data
196

Decision package types also logically group and organize decision packages and budget entry.They navigate preparers into the correct budget entry forms and prompt budget preparers toprovide detailed justification for the decision package. For example, a decision package type maybe created to provide access to forms for entering operating budgets and position budgets, butnot capital budgets. Sample decision package types could be Research and Development,Operational Expense Budgets, Capital Budgeting, and Workforce Budgeting.
Administrators can create custom decision package types, or configure one of the “ProvidedDecision Package Types” on page 197.
Provided Decision Package TypesAdministrators can create decision package types using the preseeded types:
l All Decision Packages — Enables budget preparers to:
m View all available decision packages and the budget requests regardless of the decisionpackage type with which they were built.
m Create decision packages and budget requests that encompass a variety of budget dataacross different data sources.
l Compensation Expenses — Enables budget preparers to capture personnel costs based ondelivered position budgeting forms you select.
TIP: To enable budget preparers to perform all employee, position, or employee and positionbudgeting tasks in budget requests, use this decision package type.
About Custom Decision Package TypesCreate your own decision package types to enable budget preparers to meet particular businessand budgeting requirements, such as capturing these kinds of costs:
l Personnel—To define decision packages that only include compensation based budgetrequests such as salary and wages, and benefits
l Capital Projects—To define decision packages dedicated to Capital Project budgets
l A mix of all budget types such as personnel, line item, and capital.
197

How Budget Request Type Impacts Compensation Budgeting
Subtopics
l End Dates
l Searches
l Transfers and Terminations
End Datesl When created in non recurring budget requests, newly added position or employees are
automatically end-dated to the budget year end date. If you change the budget request typeto recurring, position or employee end dates are not automatically updated or removed andmust be modified manually.
l All new position, employee, and compensation assignments in non recurring budgetrequests are considered active and end-dated to the end date defined for the application.For example, all benefits options, salaries, and FTE inherit the application's end date, or thatin the POV, unless you change them. Conversely, the new compensation assignments inrecurring budgets are not automatically end-dated.
l If a non recurring budget is changed to recurring, the end date previously set for newpositions when the budget request was created must be removed manually.
l If you add positions or perform employee assignments in non recurring budget requests,you cannot modify the positions or employee assignments in recurring budget requests.However, if you add positions and perform assignments in recurring budget requests, youcan modify them in non recurring budget requests.
l If you perform mass updates and increments in non recurring budget requests, the end dateof the updates and increments is the end date of the budget request.
l If in automatic increments the increment end date is after that of the budget request, or theincrement end date is unspecified (#missing), the budget request end date is used.
Searchesl Regardless of the budget request type in which they were added, positions or employees with
the end date are not listed if they were added in recurring budget requests.
l Searching for positions or employees creating in recurring budget requests returns thosecreating in previous budget requests.
l Searching for employees or positions in non-recurring budget requests returns those createdin previous recurring and non-recurring requests.
Transfers and Terminationsl If created in recurring budget requests, positions later used in non-recurring budget requests
cannot be transferred or terminated.
198

l Positions created in non-recurring budget requests cannot be transferred to or terminatedin recurring budget requests.
l Positions created in non-recurring requests can be transferred to or terminated in anothernon-recurring budget if both budget requests have the same end date.
Getting Started
Subtopics
l Requirements
l Creating Attributes
l Starting the Decision Packages Process
Requirements
Subtopics
l Identifying the Data to Capture and Budgeting Tasks to be Performed
l Performing Basic Setup Tasks
l Source System Integration Tasks
l Configuring Planning Unit Hierarchies
l Mapping Salary and POV Dimensions
l Preparing for Data Aggregation and Rollup
l Preparing Forms and Enabling Custom Forms
l Understanding and Configuring the BIUpdate Rule
l Preparing for Recurring Budgets
Before creating decision packages and budget requests, work with your administrator to performthese tasks in this topic.
Identifying the Data to Capture and Budgeting Tasks to be PerformedBefore you can create decision packages and budget requests, perform these tasks:
l Identify the budget data to capture in decision packages, and the forms required to capturethis data. Have your administrator associate these forms with the decision package type.
l To transfer positions and employees in and out of budget requests, have an administratorassociate the Manage Pending Transfer forms with your decision package type, and the formsfor your budget detail:
m Manage request positions
m Manage all positions
m Manage position employee assignments
m Manage request position-employee assignments
199

l Decide if you want to capture and filter decision package and budget request data usingcustom criteria. If so, have your administrator define and assign attributes.
l Decide if you want to report on the totals of particular kinds of expenses (compensation-related or otherwise). If you want to later generate reports containing the totals of specifictypes of expenses, have your administrator define rollup groups in the decision packagetypes they create.
Performing Basic Setup Tasksl Ensure that your application was created with these settings:
m Application Type is Public Sector Planning and Budgeting
m Enable Decision Packages is selected.
l Ensure that Total Request in the Request dimension contains a child member for each budgetrequest. After budget request members are created, assign them to budget requests flagged
as No BR Exists using this toolbar button .
l Specify descriptive and intuitive aliases for Entity dimension members. This allows plannersto display more recognizable and useful member for decision packages. Select File, thenPreferences, then Planning, then Application Preferences, and then select Yes for ShowPlanning Unity Hierarchy As Aliases.
Source System Integration TasksIf you integrate with a supported external source system, such as PeopleSoft, select a decisionpackage type ( typically the baseline decision package type), when specifying the mapping inFDMEE used to import budgets.
Configuring Planning Unit HierarchiesAdministrator must:
l Define the master, entity-specific, planning unit hierarchies (PUH) that specify thepromotional path decision packages and their budget requests will take to be reviewed andapproved by the appropriate people.
l Assign the master PUH to the scenario and version for the decision package. Any secondarydimension members you specify in the PUH are not used with decision packages.
l Specify descriptive aliases for Entity dimension members to enable planners to more readilyrecognize HR entity members when performing tasks such as sharing, and submittingdecision packages.
l Configure user access to decision packages and their associated budget requests as follows:
m For read only access (enabling review and approval): Grant users access to the planningunit's scenario, version, owning entity, and possibly a shared entity for the appropriatescenario and version.
200

m For write access (enabling preparation): Ensure that users has write access to thescenario, version, and owning entity (entity slice or node) of a decision package.
Important:
l If you change the entity dimension, PUH or ownership that determine the ownership andapproval hierarchy of a decision package that you copy, the approval hierarchies for thedecision packages to which you copy data inherit the changes.
l If the master PUH does not define the necessary review and approval hierarchy for decisionpackages and their budget requests, modify the master PUH in Planning and thensynchronize it.
Mapping Salary and POV DimensionsSee “Pushing Compensation And Operational Expense Data to Reporting Applications” on page85 for information about defining the mappings for use in map reporting applications. Thesemappings determine how data is pushed from the entire cube, such as a scheduled process, toreflect changes made by budget preparers.
Important Notes:
l To use HCP and other financial data reflected in one decision package:
m Select the forms that reference data in different cubes when you define the decisionpackage type.
m When specifying the mappings that connect HCP data to your financial cube, note thefollowing:
o You will have to have allocations on your positions that tie to the dimensions youhave in your financial cube
o Mapping from smartlists to dimensions is done based on aliases, so they have tomatch
m You can have multiple rollups on a DP so your total could come from a couple ofdifferent rollups from multiple cubes
l When selecting the mappings to be executed, only choose the required mappings, to avoidimpacting performance.
l Although you can define mappings for the scenario, version, entity, and request dimensions,these are replaced by the current context of decision packages when preparers click PushData to perform calculations.
201

Preparing for Data Aggregation and Rollup
Subtopics
l Administration Services Tasks
l Planning Tasks
Because human capital compensation data is stored in the HCP BSO cube, and operational datais stored in other BSO cubes (Plan 1, 2 or 3), perform the tasks in the following section to mapdata. Although you can use a BSO cube, Oracle recommends that you define, or update anexisting ASO cube to increase calculation speed and for extensive dimensionality. Data includingattachments and supporting details from all BSO cubes can be pushed to an ASO cube.
To create detailed and robust reports using tools that support Essbase such as Smart View andFinancial Reporting, create a map reporting application for the DP_ASO cube.
Administration Services Tasks
ä To prepare for data aggregation:
1 Create an ASO cube and a corresponding reporting application.
2 In the cube outline, create dimensions in the reporting application that correspond to each HCP andoperating expense dimension.
Specify only the required members from the HCP cube and the Plan 1, 2, or 3 cube to definecommon dimensionality. This means you must set up account, entity, scenario, version,period, year, request, fund, project, program , position, employee, element, and budget item.
3 Load members that map to the Public Sector Planning and Budgeting members on which to report oraggregate into the reporting application dimensions.
Note: Because you need not map currency, Hsp_Rates, Scenario,Version, Entity, andRequest, these dimensions do not display when you define queries. These dimensionmembers are substituted from the current decision package context.
4 Perform the steps in “Planning Tasks” on page 202.
Important:
l The data for decision package creator, as well as shared entities are queried while calculatingthe decision package total.
l Ensure that the names and members of these dimensions in the rollup exactly match thedimensions and members in the map reporting application.
Planning Tasks
1. Select Administration, then select Map Reporting Applications, and then click New.
2. Enter a name for the reporting application, and select HCP from Plan Type.
202

3. Select the Essbase server that hosts the BSO database for the Public Sector Planning andBudgeting application, and then select the ASO reporting application .
4. Click Next or select Map Dimensions, and see “Mapping Salary and POV Dimensions” onpage 201.
Preparing Forms and Enabling Custom FormsAn administrator must perform the following steps to ensure that you can build decisionpackages and budget requests using custom forms. Use the predefined Context Request variablewhen defining forms.
ä To use custom forms:
1 Add members for all budget requests in the Total Requests parent member in the Request dimension.
2 Perform these tasks to ensure that the Request dimension is supported on the forms you want to use:
a. Select Administration, then Manage, and then User Variables.
b. Click Add, select the Request dimension, specify a user variable name, and select the uservariable defined for the Request dimension.
c. When defining the forms, add context scenario, context version, and context request tothe columns in the Point Of View area on the Layout tab of the form builder. .
Although recommended, you need not add these dimensions to the point of view.However, pick user variable for the dimensions you use so that the appropriate datafrom the current context will be displayed when budget requests are built. Whilechoosing them on rows or columns, ensure that user variables are picked up in one ofthe segments.
Note: If you integrate with PSFT, ensure that the forms that will be used to build budget requestscontain the dimensions and members loaded from PeopleSoft. See the Oracle HyperionPlanning Administrator's Guide.
Understanding and Configuring the BIUpdate Rule
Subtopics
l Updates to the Budget Impact Member
l Updates to the Request End Date Member
l Understanding the Request Amount Member
In decision package applications; the predefined BIUpdate (plantype) is deployed to all plantypes. This rule launches when planners create, modify, or save decision packages. The ruleupdates Essbase if adecision package's budget requests are included in its total expense.
By default, a Budget Impact member and a Request End Date member are created. The BIUpdaterule updates data for both these members, and they are tagged with HSP_NOLINK UDA, sothat all plan types store the values. Do not remove this UDA. For information about how the
203

rule updates the Budget Impact and Request End Date members, see “Updates to the BudgetImpact Member” on page 204 and “Updates to the Request End Date Member” on page 205.
Administrators must:
l Ensure that the appropriate planners have launch access to the BIUpdate rule.
l For a custom plan type, update the BIUpdate rule in Oracle Hyperion Calculation Managerto use placeholder members for any custom dimensions before creating or modifying anybudget requests. Otherwise the rule will run for all members of custom dimensions and willpopulate the Budget Impact for Gen 1 member combinations. For example, to update thefund and project dimensions and populate the Budget Impact and Request End Datemembers, you would change this:
FIX("Period", "Year", "Entity",{Scenario}, {Version})
To this:
FIX("BegBalance", "No Year", "Unspecified Entity", ”General Fund”, ”Unspecified Project”,{Scenario}, {Version})
See the Oracle Hyperion Calculation Manager Designer's Guide.
Updates to the Budget Impact Member
The BIUpdate rule sets a value of 1 for included budget requests, and 0 for excluded budgetrequests. If a decision package is included, the Budget Impact value depends on the BudgetImpact selection of the Budget Requests. If a decision package is excluded, all associated budgetrequests are also excluded, regardless of their individual Budget Impact setting, and the BIUpdaterule sets a value of 0 for these budget requests. In the predefined HCP configuration options,this value is set as follows:
Table 27 Values
Dimension Value
Account Budget Impact
Request End Date
Period BegBalance
Year No Year
Budget Item Unspecified Budget Item
Element Unspecified Element
Entity Unspecified Entity
Position Default Position or Unspecified Position
Employee (if used) Unspecified Employee
Job Code (if used) Default Job Code
204

Updates to the Request End Date Member
The BIUpdate rule sets a value for the Request End Date member based on budget request type.If a budget request is recurring, the request end date is #Missing. If a budget request is nonrecurring, the Request End Date is populated with last date of the year in which the budgetrequest was created or modified. For example, if a budget request was created in FY12, and theyear starts on January 1, and ends on December 31, the request end date member is populatedwith 31-Dec-2012.
Understanding the Request Amount Member
By default for decision package-enabled applications, and for all plan types, a request amountmember is created in the Accounts dimension as a child of Request Accounts. Request amountstores the total budget impact that a particular budget request has on the decision package inwhich it exists. Request amount is also used in the rollup of the compensation expenses decisionpackage type to aggregate and display budget request totals.
Preparing for Recurring Budgetsl Ensure that scenario and version dimension members are defined for the budget
development in the upcoming budget year to which you will carry over recurring budgetrequest line items. Make sure that all scenario and version members have the appropriatestart and end years so that they encompass the span of your budgeting periods.
l Define the required PUH by performing one of these tasks:
m Create a new PUH so that you can copy the current, recurring, budget to next year'sbudget to which the scenario and versions are assigned.
m If the same entities (departments, bureaus, offices etc.) in your existing budget will alsoprepare next year's budget, copy your existing PUH and assign the appropriate scenarioand version.
l Ensure that the PUHs associated with the decision package that contains recurring budgetrequests have write-access to the scenario and version members.
Creating Attributes
ä To define attributes:
1 Select Administration, then Manage, then Decision Packages, and then Decision PackageAttributes.
2 Select Action and then Create Attribute, or click .
3 Specify the following:
l Name—A descriptive name that indicates the kind of data preparers will specify
l Attribute Type—How preparers will specify attribute values (in date format, forexample):
205

m List of Values—A Smart List value
m Boolean—In Yes / No format
m Number—To limit the range of numbers that preparers can specify, enter the lowestacceptable number in Lower and the highest possible number in Upper. For example,if preparers can only specify values between 5000 and 75000, enter 5000 in Lowerand 75000 in Upper.
m Date—Use the calendars in Lower and Upper to define a range of acceptable datesthat preparers can specify dates. For example, if you're creating an attribute calledBudget Request Initiated to record when a budget request was created, and thebudget request will be submitted between July 1 and November 30 of 2015, specifyJuly 1 2015 in Lower and November 30 2015 in Upper.
l Level—If the attribute should be applied to a budget request, decision package, or both.
l Constraints—Specify a lower and upper boundary that determines the dates or numbersbudget preparers can enter for the attribute, or a constraint that defines the format inwhich data is entered. For example, to enforce a date attribute, select two dates to forma range of acceptable dates, such as the start date and end date of the budget year.
l Select Global to make the attribute available for use with all decision packages, regardlessof decision package type.
l To ensure that preparers enter or select values for the attribute, select Yes inMandatory.
4 Select View, then Manage Columns, and move attributes to Visible Columns.
Starting the Decision Packages ProcessAdministrators can start the budget development process using any of these approaches:
l Flag decision packages that contain ongoing line items in their budget requests, such as thecontinuing funding of positions, and copy them over to future budgeting periods.
l Create a baseline decision package and budget request that is populated with budgets froman external source. This represents the baseline budgets for the new period for which budgetsare being created. The baseline budget may be created from a prior or current year budgetor from actuals, either of which is extracted from a source system.
l Create a custom decision package type and associated decision packages.
Budget preparers then:
l Review the current service level budget request to identify any required changes.
l Begin budget preparation for the new period, and create a decision package for any newfunding requests.
l Review the total cost of budget request and their impact on the decision package, and makeany required changes.
l Submit decision packages for promotion and approval
206
l If a decision package or budget request is rejected, perform these steps:
m Read the reviewer or approvers instructions and comments that are attached to thedecision package.
m Make the required changes. For example, if the decision package will not be approvedregardless of changes to its budget requests, and you are instructed to remove it, navigateto the decision package, and set it to Exclude. The amounts of the decision package arethen excluded from the total budget amounts displayed.
m If necessary, resubmit modified decision packages for review and approval along thedefined promotional path.
Creating Decision Package TypesTo view decision package and budget request total amounts in an international currency, defineexchange rate tables and run the currency converter. See the Oracle Hyperion PlanningAdministrator's Guide
ä To create decision package types:
1 Although using an ASO cube is optional, Oracle recommends that you create one, and the requiredreporting applications, to enable quick rollup aggregation calculations.
Note: If you defined rollup members for a BSO cube, create menu items for the appropriateforms. This enables data to aggregate to the rollup members you specified when youdefined the decision package type rollup.
2 Select Administration, then Manage, then Decision Packages, and then Decision Package Types.
3 Click , and enter a meaningful and descriptive name..
4 Click Save in the Decision Package Types toolbar.
5 In the top grid, select the decision package type, and then select Data Collection Forms.
6 Perform the steps in these sections:
l “Defining Mappings” on page 208
l “About Rollup Members” on page 208
l “Defining Justification Criteria” on page 209
l “Assigning Attributes” on page 210
Tip: To quickly direct budget preparers to decision packages that are based on a particulardecision package type, define a task list task to the decision package type.
207

Defining MappingsUse the Reporting Applications Mappings tab to choose the ASO or BSO plan type to which budgetpreparers can push this data for aggregation:
l Individual budget requests
l Decision packages and all associated budget requests
To reports on decision package and budget request data in products that use Essbase, such asOracle Smart View for Office, add the DP_ASO plan type, specify the corresponding reportingapplication, and then define specify rollup members.
ä To specify mappings:
1 Ensure that you created an ASO (recommended) or a BSO cube, and the required reporting applications.See “Preparing for Data Aggregation and Rollup” on page 202.
2 Select the reporting application that you created.
3 Select Rollup Members and see “About Rollup Members” on page 208.
About Rollup MembersUse the Rollup Members tab to specify the dimension members in the HCP, and Plan 1, 2, or 3plan types that are the aggregate totals in the common ASO or BSO cube. Because the dimensionsin each plan type differ, map to the common cube to calculate and display aggregate costs. Forexample, if the decision package type and associated budget requests will include just operationalexpenses you could select:
Plan 1, 2, or 3 (Operational Expenses)
l Account (Total Expenses)
l Fund (TotalFunds)
l Period (YearTotal)
l Project (TotalProject)
Predefined HCP Rollup
This rollup, predefined for the HCP cube, is provided by default for the Compensation Expensesdecision package type:
l Account (Request Amount)
l Budget Item (Unspecified Budget Item)
l Position (All Positions)
l Employees (Total Employees)
l Period (YearTotal)
l Element (Total Compensation Expenses)
208

Note: When you upgrade, or move an application to another environments, such as from asource development environment to a target production environment, ensure that yourrollup definitions use the correct application and server names in each environment. Ifthe rollup definitions don't contain the correct target-specific information, your totaldecision package amount will be incorrect.
Defining Rollup Members
ä To specify the rollup:
1 On Rollup Members, click .
2 Click the link that is displayed to select the reporting application, and then click OK.
3 In Rollup Description, summarize the kind and combination of data that you are using in the rollup.
4 For each dimension, select the parent member to aggregate. Select the level and combination of datato rollup and display in decision package and budget request totals based on the forms used. Forexample, a rollup from the HCP plan could define how dimensions such as Account, Budget Item, andEmployee are mapped to higher level members such as Total Expenses and Total Employees.
5 For BSO: Create business rules and menu options actions on the forms preparers will use to builddecision packages and budget requests to enable preparers to aggregate data to the rollup membersthat you select on this tab. Seethe Oracle Hyperion Planning Administrator's Guide.
Note: When you upgrade, or move an application to another environments, such as from asource development environment to a target production environment, ensure that yourrollup definitions use the correct application and server names in each environment. Ifthe rollup definitions don't contain the correct target-specific information, your totaldecision package amount will be incorrect.
Defining Justification CriteriaUse the Justification Questionnaire tab to define the kind of explanations and additionalinformation that users must submit with decision packages and budget requests, such as:
l Categories used to group related questions about decision packages and associated budgetrequests such as expected outcomes and detailed cost information.
l Questions or additional information users must provide, such as Will new legislation berequired as a result of this decision package and its budget requests?
When decision packages are approved, these explanations and answers may be mapped to budgetbooks when the budget is published.
ä To define required justification criteria:
1 On Justification Questionnaire, click Create Justification Question.
209
2 In Question Category, identify the kind of information the question will prompt users to provide, suchas Funding Implications and Expected Outcome.
3 Enter and format the question.
4 From Question Level, specify when to display the questions and requests. For example, to display themwhen users create budget requests, select Budget Request.
5 To ensure that decision packages cannot be saved unless the questions you specify are answered, selectMandatory.
6 Select Decision Package Attributes, and then see “Assigning Attributes” on page 210.
Assigning AttributesYou cannot apply global attributes to decision package types.
ä To assign attributes:
1 On Decision Package Type Attributes, click or select View, and then Create Decision PackageAttribute.
2 From Attribute Name, select the attribute.
3 From Level, indicate if you want to use the attribures on decision packages, their budget requests orboth.
4 From Mandatory, select Yes to specify that preparers must specify the attribute values.
5 Repeat these steps to assign all required attributes.
Deleting and Removing AttributesYou can only delete attributes if they have not been assigned to decision package types, decisionpackages, or budget requests. You cannot delete assigned attributes. However, you can removeattributes from individual decision package types, decision packages, or budget requests.
To remove assigned attributes:
1. Select Administration, then Manage, then Decision Packages, and then Decision PackageAttributes.
2. Select the attribute, and then click , or select Action and then Delete Decision PackageAttribute.
To delete unused attributes:
1. Select Administration, then Manage, then Decision Packages, and then Decision PackageAttributes.
210

2. Select the attribute, and then click , or select Action and then Delete Decision PackageAttribute.
Creating Task Lists for Decision Package TypesTo quickly direct budget preparers to certain decision packages, or to ensure that preparerscomplete decision package-related tasks in a specific order, administrators can define task listtasks for decision package types.
ä To create decision package task lists:
1 Select Manage, and then select Task Lists.
2 Click in the Task Lists pane to the left to create a high-level task list folder to contain tasks.
3 Specify a name for the task list folder.
4 Select the task list folder in Task Lists, on the page to the right select Action, and then select CreateTask List.
5 On the same page, select the task list, select Action, and then select Edit Task List.
6 Select Action, and then select Add Child.
7 Define the task as described in the Oracle Hyperion Planning Administrator's Guide but specify thisinformation in Task List Details:
l Type— Decision Package Type
l Decision Package Type—The decision package type upon which the decision packagesand budget requests are based to which you want to direct users.
l Scenario—The scenario of the decision package to which to direct users.
l Version—The version of the decision package to which to direct users.
l Year—The year for the decision package to which to direct users.
Creating Decision Packages and Budget Requests
Subtopics
l Before You Begin
l Creating Decision Packages
l Creating Baseline Decision Packages
l Creating Budget Requests
l Using Notes and Attachments
Before You BeginBefore defining decision packages, ensure that:
211

l An administrator defined the attributes you'll use to capture budget data, and associated therequired forms with the decision package type upon which your decision packages are based.
l If an administrator defined descriptive aliases for entity members, select and then selectAlias or Alias : Member Name.
l Members for the budget requests are in the Request dimension.
l The entity who owns the decision package is part of a planning unit hierarchy associatedwith the budget version and scenario.
l The people who will review the decision package have access to this owning entity.
l Read-access permissions are applied to any other entity with which the decision packagewill be shared.
See “Requirements” on page 199.
Creating Decision Packages
Subtopics
l Step 1
l Step 2
Step 1
ä To create decision packages:
1 Expand Decision Package Types and select the decision package type in which to create the decisionpackages.
2 Select Manage, and specify the budget context, such as:
l Scenario—Time period (for example, the current year's budget, Forecast1 etc.) for whichto create the decision package and its budget requests.
l Version—The budget stage or outcome in which to create the budget request. Forexample, if the scenario is Forecast, Best Case could be a version.
l Year—The year for which to show budget amounts.
3 Select Action, then Create Decision Package, or click .
4 Specify this information on Properties:
l Name—Descriptive title that easily identifies the decision package type and the budgetrequests that it will later contain.
l Description—Summary of the decision package, and the kind and purpose of thedecision packages that are based upon it.
l Rank—Priority of the decision package as compared to other decision packages. Enablesyou to rank the importance of decision packages.
212

l Include—Add the total expense of the associated budget request to the total expense ofthe decision package.
l Exclude—Do not add the total expense of the associated budget request to the totalexpense of the decision package.
l Scenario and Version—Oracle recommends that you select the same scenario and versionspecified for the decision package type. This ensures the same context is passed.However, to define a decision package and accompanying budget requests for anotherbudget purpose or period of time, select the appropriate members.
l Owner Entity—The single entity (department, office, or bureau, for example) to havewrite access to the decision package, and the ability to modify its properties, and viewall associated budget requests. To modify the decision package and its budget requests,the entity must be part of the PUH associated with the scenario, version, and owningentity slice of the planning unit.
l Decision Package Reviewer— Anyone, in order for the decision packaged to be signed-off, who must review and evaluate the decision package and its budget requests.
5 Go to “Step 2 ” on page 213.
Step 2
ä To create decision packages:
1 Select Justification, and answer the questions posed.
2 Select Attributes, and enter or select all attributes, such as additional dates and funding sources,required to fully define the decision package.
3 Select Summary, confirm that the decision package is properly defined, and then click Finish.
4 Optional: Provide supplementary or narrative information about the decision package, by selecting iton the grid, and selecting Notes and Attachments to attach notes, links, and documents.
5 Perform any task:
l Define budget requests; the line item budgets required to implement the decisionpackage. See “Creating Budget Requests” on page 214.
l View the promotional path for the decision package by selecting the decision package
on the Manage tab, selecting Approval Status, and then clicking . If thepromotional path is incorrect, have your administrator edit the master PUH, and thensynchronize it.
l Share the decision package to allow preparers in another entity (department, e.g.) tocreate or modify budget requests in the decision package . See “Sharing DecisionPackages” on page 229.
l Prevent preparers who could previously define budget requests in the decision package,because they belong to the shared entity, by unsharing the decision package. See“Unsharing Decision Packages” on page 229.
213

l Submit the decision package for approval or to preparers for budget request data entry.
Creating Baseline Decision PackagesOnly administrators should define baseline decision packages. To create baseline decisionpackages, perform the procedure in “Creating Decision Packages” on page 212, but, for step 4,
select Action, and then select Create Baseline Decision Package, or click . This is the decisionpackage that should be selected in FDMEE when budget data is extracted from an external sourcesystem.
Creating Budget Requests
Subtopics
l Step 1
l Step 2
Before defining budget requests make sure that you know if they are for ongoing, recurring,expenses that must be funded every year, or for one-time expenses.
Step 1
ä To create budget requests:
1 Ensure that an administrator created a member in the Total Requests parent of the Request dimensionfor each budget request you will define. If not enough members exist you receive a message that thereare insufficient members in Essbase for budget requests, and you will be unable to enter budget requestdata.
2 Expand Decision Package Types, and then, on Manage, select the decision package in which to createbudget requests.
3 Perform any task:
l Select Actions, then Add\Edit Budget Requests.
l Click , then on Budget Requests.
l On Budget Requests, click .
4 Specify these properties:
l Name—Descriptive title that identifies the request.
l Description—Summary of the request.
l Rank—Priority or importance of the budget request as compared to other budgetrequests.
214

l Include—Add the total expense of the budget request to that of its decision package.
l Exclude—Omit the total expense of the budget request from that of its decision package.
l Budget Impact—Select one:
l Owner Entity—The entity whose owner (office, department, program etc.) that can view,modify, promote, and approve the budget request.
l Budget Type— Select one:
m If the budget request contains line items for expenses that will be funded on anongoing basis in upcoming years, select Recurring. You will later copy these budgetrequests to the scenario, version, and years defined for future budget periods. See“About Copying Decision Packages and Budget Requests” on page 223.
m If the budget request is to fund a single event or program that will occur only onceor twice, select Non-Recurring.
5 See “Step 2 ” on page 215
Step 2
ä To create budget requests:
1 If an administrator defined attributes for additional budget data to capture in budget requests, selectAttributes, and enter or select values for the attributes that are displayed.
2 Select Justification and use the text editors to:
l Answer the mandatory questions and provide the required supplemental informationabout the budget request.
l Insert links to relevant internet or intranet web sites.
3 On Summary review the request.
4 Click Finish and perform any task:
l Build the budget request by entering data. See “Using Budget Requests” on page 218.
l Provide additional information about the budget request, by selecting it, and using thelowest Notes and Attachments tabs.
l Calculate total expenses and make data available by selecting Action, then Push Data.This:
m Performs rollup aggregation calculations so you can view total expenses.
m Executes the mappings defined for the associated decision package type. Themembers for scenario, version, budget request, and the entity dimensions aresubstituted based on the current context. Also, data is made available to usersassociated with the creator entity and shared entities.
l Place the budget request in another decision package by selecting Action, then MoveBudget Request, and then selecting the decision package type.
215

Using Notes and Attachments
Subtopics
l Defining Notes
l Deleting Notes
l Attaching Files
l Deleting Attachments
l Deleting Attributes
Use notes and attachments to provide additional information about decision packages andbudget requests. To restrict access, you can mark notes and attachments as private.
Defining NotesPublic notes can be modified by anyone. However, private notes can be modified only by theperson who created them.
ä To create or modify notes:
1 Perform a task: .
l To define notes for a decision package, select the decision package, select Notes andAttachments, and then select Notes.
l To define notes for a budget request, select the decision package, select the budgetrequest, select Action, select Add\Edit Budget Request, and then select Notes.
2 Click to create a note or to modify a public note or one that you created.
3 Enter or edit the note content.
4 To prevent others from reading or modifying the note, select Mark as Private.
Deleting Notesl Public notes can be deleted by the owner of the planning unit with which the decision
package is associated.
l Private notes can be deleted by the person who created them.
ä To delete notes
1 Perform a task:
l To delete decision package notes, select the decision package, then select Notes andAttachments, and then select Notes.
l To delete budget request notes, select the decision package, select the budget request,select Action, select Add\Edit Budget Request, and then select Notes.
2 Select the note and click .
216

Attaching Files
ä To create or modify attachments:
1 Perform a task: .
l To use decision package attachments, select the decision package, select Notes andAttachments, and then select Attachments.
l To use budget request attachments, select the decision package, select the budget request,select Action, select Add\Edit Budget Request, select Notes and Attachments, and thenselect Attachments.
2 Click to create an attachment or to modify an existing public attachment or one that youcreated.
3 Browse to a file or specify a URL.
4 To prevent others from viewing or modifying the attachment, select Mark as Private.
Deleting Attachments
ä To delete attachments:
1 Perform a task:
l To delete decision package attachments, select the decision package, select Notes andAttachments, and then select Attachments.
l To delete budget request attachments, select the decision package, select the budgetrequest, select Action, select Add\Edit Budget Request, select Notes and Attachments, andthen select Attachments.
2 Select the attachment to remove, and then click .
Deleting AttributesOnly Administrators can delete attributes that are not currently assigned to decision packagesor budget requests.
ä To delete attributes
1 Select Administration, then Manage, then Decision Packages, and then Decision PackageAttributes.
2 Select the attribute, and then click .
217
Using Budget Requests
Subtopics
l Considerations
l Entering Expenses
l Transferring Positions and Employees Across Budget Requests
l Performing Transfers
l Reversing Transfers
ConsiderationsThe tasks that you perform to build budget requests by entering expenses depend on:
l If the budget request is recurring or non recurring. See “How Budget Request Type ImpactsCompensation Budgeting” on page 198.
l The decision package and the forms an administrator associated with the decision packagetype. For example, if you are a department manager specifying the costs for adding newemployees and positions that are required to fund a proposed project you could be usingthe Maintain Positions, Edit Position Details, Maintain Employees, and Edit EmployeeDetails forms. For information about using the forms involved in defining and specifyingemployee and position compensation expenses, see Chapter 8, “Working with HumanCapital Compensation Budgets.”
Note: If you receive a message when you are working in a budget request that there are insufficientmembers in Essbase:
l Have an administrator create a member for the budget request. See “Requirements” on page199
l Access the budget request page, select the No BR Exists budget request , click , and assignthe member to the budget request.
Entering ExpensesEnsure that an administrator created a member for the budget request. If you receive an errorabout insufficient members, see “Considerations” on page 218.
ä To enter budget request expenses:
1 Expand Decision Package Types.
2 Select the scenario and version, and then click .
3 On Manage, select the decision package that contains the budget request for which to enter data.
4 Click to display the budget request master and detail grids.
5 Select the budget request in which to enter data.
218

6 Ensure that you select the entity that represents your department, office, or bureau.
7 Select Data Collection Form.
8 Select the appropriate budget entry form tab in the lower grid, and perform the tasks required to buildthe budget request and enter costs. If the required forms are unavailable, have your administrator modifythe decision package type.
9 In the Planning toolbar click Save.
As required, click to perform aggregation calculations to view updated totals orRefresh to reflect your work.
10 If necessary, promote the budget request.
Transferring Positions and Employees Across BudgetRequestsYou can transfer positions or employees out of budget request and into another. This is helpfulif your organization's entities function as separate units, and is an alternative to sharing decisionpackage and budget requests between entities in order to perform transfers. Based on your budgetconfiguration option, you will use these data collection forms in budget requests to performtransfers:
l Employee Transfer Status
l Position Transfer Status
l Two Step Transfer Status
l Manage Request Positions
l Manage Employees
The budget requests involved in a transfer must have the same include or exclude setting. If theydo, the transfer is valid and 0 displays on the Transfer Status tab. If the budget requests havedifferent include or exclude settings, the transfer isn't valid.
Requirements:
l You must be associated with the budget request's entity, which must also must be sharedwith your entity.
For example, Assume a budget request (BR1) is created for an entity (ENT1). Planners withaccess to BR1 can transfer out position or employees in ENT1 to the Generic Entity. Thesepositions or employees are displayed on Manage Pending Transfers. If another plannerreviewing Manage Pending Transfer wants to transfer in a position or employee, they cando so. If the planner does not have access to BR1, they can transfer the positions or employeesinto any of their budget requests.
l Have an administrator associate these forms with the decision package type used to createyour decision packages:
m Employee Transfer Status or Position Transfer Status
219

m Two Step Transfer Status
m Manage all Positions
m Manage all Employees
Performing Transfers
ä To transfer positions or employees:
1 Satisfy the requirements. See “Requirements” on page 199.
2 Ensure that the source and target budget requests have the same Include or Exclude setting
3 Select Decision Package Types, and then use the Scenario, Version, and Year filters to access thedecision package from which to transfer out the position or employee.
4 Select the decision package in the upper grid, and then select the budget request in the lower grid.
5 Click , and then select Data Collection Forms.
6 Select Manage Request Transfers, Manage all Positions, or Manage all Employees, right-click theposition or employee to transfer and perform any option:
l To transfer directly to another budget request, select Single Step Transfer, select the targetposition, target entity, when the transfer will be effective, and then click Transfer.
l To transfer to the generic entity so another user can transfer the position or employeeinto another budget request, select Transfer Out a Position, specify the date on which thetransfer will be performed, and then click Transfer Out. Select the Two Step Transfer Statusform tab to confirm that the transfer was performed or is pending.
For detailed transfer instructions, see the topics in “About Transfers” on page 162.
Reversing TransfersYou can only reverse transfers from the budget request into which positions or employees weretransferred. If you transferred a position or employee to the Generic Entity and the position oremployee wasn't transferred into another budget request, you can reverse the transfer from anybudget request.
ä To reverse transfers:
1 Select Decision Package Types, and then use the Scenario, Version, and Year filters to access thedecision package from which to transfer out the position or employee.
2 Select the decision package in the upper grid, and then select the budget request in the lower grid.
3 Click , and then select Data Collection Forms.
4 Select an appropriate form for your budget configuration such as Manage Request Transfers, Manageall Positions, or Manage all Employees,
220

5 Right-click the position or employee to transfer and select Reverse Transfer
For more information, see “About Reverse Transfers” on page 163 and “Reversing Transfers”on page 165.
Saving Decision Packages and Budget RequestsDecision packages and budget requests are automatically saved when you click Finish after
defining basic properties. However, you must click or use the Action drop down list to saveif you modify high level decision package or budget request data, such as the Include/Excludesetting on the upper grid. To save budget request data that you enter using forms, click theuppermost Save icon in the browser toolbar.
About Modifying Decision Packages and BudgetRequestsTo edit decision package attributes and basic properties, you must either be the creator or partof the owning entity. To modify budget request data and values you must have write-access tothe owning entity or, if used, the sharing entity.
To modify decision packages, select a decision package and perform a task:
l Modify basic decision package properties by selecting Action, then Edit Decision Package, or
clicking .
l Modify or enter data for budget requests in the decision package by clicking , orselecting Action, then Add\Edit Budget Request.
Note: If you make changes to the entity dimension, PUH or ownership that determine theownership and approval hierarchy of a decision package that you copy, the approvalhierarchies for the decision packages to which you copy data inherit the changes.
Modifying Budget Request Basic PropertiesFor information about editing or entering budget request expenses or performing budgetingtasks, see “Modifying Budget Request Details and Expenses” on page 222.
ä To modify budget request properties:
1 Expand Decision Package Types, and then select the decision package in the upper grid that containsthe budget request to modify.
221

2 On Budget Requests, select the budget request, and then click
.
3 Modify properties. For information about these properties, see “Creating Budget Requests” on page214.
Modifying Budget Request Details and ExpensesEdit budget requests details to performing tasks such as:
l Changing the expenses or values entered on the forms that constitute the budget request
l Performing personnel-related tasks such as adding positions, filling vacant positions, ormodifying employee details using the forms constituting the budget request. The tasks youperform depend on the purpose the budget request and the forms an administratorassociated with the decision package type upon which the budget request's decision packageis based.
l Share budget requests with other entities
l Push budget request data to the ASO cube to perform rollup calculations
l Associate the budget request with another decision package
ä To modify budget request details:
1 If you don't own the decision package that contains the budget request, ensure that you have readaccess to the decision package. Have an administrator confirm that you have write access to the budgetrequest's owning entity.
2 Expand Decision Package Types, and then select the decision package, in the upper grid, that containsthe budget request to modify.
3 Click or select Action, and then select Add\Edit Budget Requests.
4 Select the budget request in the upper grid and make your changes.
Copying Decision Package TypesTo more quickly define decision package types, you can copy and customize existing decisionpackage types. To copy decision packages, budget requests and supporting information betweendifferent scenarios and versions, see “About Copying Decision Packages and Budget Requests”on page 223.
ä To copy decision package types:
1 Select Administration, then Manage, then select Decision Packages, and then Decision PackageTypes.
222
2 Select the decision package type to copy, and then click Save As, or select Action, and then Save As.
3 Specify a name for the decision package type, and then click OK.
4 Click Save in the Decision Package Types toolbar.
5 Customize the copied decision package type as necessary.
About Copying Decision Packages and BudgetRequests
Subtopics
l Requirements
l Recommendations and Notes
l Which Copy Tasks Can Administrators Perform?
l Which Copy Tasks Can Planners Perform?
l How Different Owner Entities Affect Copy Operations
l How Modifying Dimensions, Attributes, and Planning Unit Hierarchies Affects Copied Decision Packages
l Understanding the Add and Synchronize Copy Operations
l Simultaneous Copying
You can copy recurring budget requests, one-time budget requests, or both.
Requirementsl Planners: Ensure that your user account is provisioned with the Copy Decision Package role
in Oracle Hyperion Shared Services.
l Administrators: Perform these tasks:
m Create the target scenario and version
m Assign the appropriate planners write access to the target scenario and version
m Assign the appropriate planning units to the target scenario and version combination.
m Either create a baseline decision package on the target, or copy the baseline budget fromthe previous budget scenario and version to the target. To copy the baseline budget,perform the steps in “Copying Decision Packages and Budget Requests” on page 226,but select Replace or Add to ensure that justification criteria and attributes are copied.
Recommendations and Notesl Copy only source budget data that is finalized and approved.
l Because exchange rates tables may differ between the source scenario and the target scenario,re-run the currency conversion calculations to translate data using the rates defined for thetarget scenario.
223

l Because not all decision packages and budget requests may be copied, run aggregation rulesagain after copying, to aggregate data to Total Entity.
l If a decision package that you copied to a target scenario and version is renamed in the sourcescenario and version, and the Copy Option is Add, the renamed decision package or budgetrequest is copied to the target.
For optimal performance, Oracle recommends that no more than 500 users are provisioned withthe Copy Decision Package role.
Which Copy Tasks Can Administrators Perform?Administrators can:
l Copy employee defaults
l Copy defaults for unspecified entities and unspecified budget requests
l Copy decision packages to unspecified target entities or entities to which they do not havewrite access
l Replace existing data in a decision package with copied data from another decision package
l Merge and integrate copied data to a single decision package in the target
The only task Administrators cannot perform is to copy decision packages to a target decisionpackage that contains finalized, approved data.
Which Copy Tasks Can Planners Perform?Planners can view and copy any decision package to which they have write access on the owneror sharing entity. Depending on if data already exists in the target scenario and versioncombination, Planners can copy as follows:
l If the selected decision packages and budget requests to be copied do not exist on the target,Planners can copy if they have write access to the target scenario, version and entity membercombination.
l If the target scenario and version already contain data: Planners can copy if:
m They have write access to the target scenario, version, and entity combination
m They are the current owner of the target decision package entity
Planners are unable to copy decision packages and will receive errors unless an administratorhas performed the setup tasks described in “Requirements” on page 223.
How Different Owner Entities Affect Copy OperationsIf the owning entities of a decision package are different on the source and target:
l New budget requests are not added to the target decision package.
224

l Decision package or budget request information like justification and attribute values arenot synchronized.
If budget request owner entities differ on the source and target, then budget request data is notsynchronized.
How Modifying Dimensions, Attributes, and Planning UnitHierarchies Affects Copied Decision Packagesl If a decision package that you copied is renamed in the source scenario/version, and Copy
Option is Add, the renamed decision package or budget request is copied to the target.
l If you change Entity members or the Planning Unit Hierarchies assigned to the scenario /version of the decision package to which you copied data, the approval hierarchies for thedecision packages to which you copy data inherit the changes:
l If changes other than renaming are made to the attributes of a copied decision package orits budget requests, subsequent changes are not reflected in the target unless the Copy Optionis Add or Add with Synchronize.
l Changes made to a source scenario/version or target scenario/version may result in scenariosand versions that cannot be used together for variance analysis.
Understanding the Add and Synchronize Copy Operations
Subtopics
l Add
l Synchronize
AddPerform an Add operation to place source decision packages and their budget requests in existingdecision packages in the target scenario and version. If an “add” is initiated by a user in a decisionpackage's shared entity, then:
l Budget requests are added to the target decision package, and the shared entity's list ofdecision packages reflects the budget request's owner entity
l The shared entity's list of decision packages is updated to reflect the budget request's ownerentity
SynchronizePerform a Synchronize operation if the same decision package exists on the target scenario andversion, and you want to update it with new or modified source decision package data.Synchronization updates the shared entities list for a target decision package or budget request
225

fashion. It also adds any entities that exist on the source but not the target. Synchronizationnever removes entities that only exist on the target.
Table 28 Synchronize Behavior
Situation Result
“synchronize” is initiated by current owner of the owning entity Decision packages and budget requests aresynchronized
“synchronize” is initiated by user in the source decision package's shared entity Synchronization is performed if the shared entity isalready the owner or shared entity for the targetdecision package.
“synchronize” is initiated by a user who isn't the current owner of a budget requestsowner entity
Only the budget request detail data that the user ownsin the budget request is copied.
Simultaneous CopyingAn error is returned if others concurrently copy the same decision package to the same targetscenario and version. Errors, warnings, and details are logged in the Job Console entry.
Copying Decision Packages and Budget Requests
Subtopics
l Identifying Decision Packages
l Specifying Copy Options
l Copying Data to Multiple Years
Identifying Decision PackagesTo copy data to multiple budget years, see “Copying Data to Multiple Years” on page 228.
ä To copy decision packages and budget requests:
1 Select Tools, and then Copy Decision Packages.
2 On Decision Packages, select the decision package that contains the data to copy by specifying thesource scenario and version and clicking Go.
3 In To Scenario and To Version, select the target scenario and version members to which to copy decisionpackage data.
4 Filter the decision packages displayed by criteria such as approval status or rank. To filter by customattributes:
l Click Advanced Search.
l From Decision Package Type, select the decision package type upon which the decisionpackage is based.
226

l For each attribute in Decision Package Filters enter or select values.
5 See “Specifying Copy Options” on page 227
Specifying Copy OptionsOnly administrators can merge decision package data or replace one set of data with another.Review how the copy operations work. See “Understanding the Add and Synchronize CopyOperations” on page 225.
ä To copy decision packages and budget requests:
1 From Copy Option, specify how to update the target with the decision package you are copying fromthe source:
l Replace—Overwrite existing decision packages in the target scenario and version.
l Add—Add the decision packages and constituent budget requests to existing decisionpackages in the target scenario and version.
l If the same decision package exists on the target scenario and version, and you want toupdate it with new data and changes in the source, select Synchronize.
For Administrators copying the baseline budget: Select Replace and Add to copy justificationcriteria and attributes.
For Planners: To choose whether or not to copy more recent attributes and justificationcriteria, select Add and Synchronize.
2 From Merge to one Decision Packages, select Yes to copy all budget requests in selected decisionpackages to a single target decision package that you specify. Select No to copy only the selecteddecision packages to the target scenario and version.
Note: If you select Yes, ensure that the sharing defined for the owning entity in the targetdecision package grants the appropriate users and entities the access required to enterand modify data.
3 From Budget Type, indicate if the decision packages that you are copying contain recurring or nonrecurring budgets. To copy all budget requests, select Both.
4 Specify if you want to copy attributes, and supporting information, such as attachments and justificationcriteria.
5 Click Copy Data.
6 Open the Job Console to view any warnings or errors.
7 For human capital budgeting: Select Budget Preparation, and then select Calculate compensationbudgets to process and view updated data.
227

Copying Data to Multiple Years
ä To copy decision packages and budget requests to multiple years:
1 Select Tools, and then Copy Decision Packages.
2 On Decision Packages, select the decision package that contains the data to copy by specifying thesource scenario and version and clicking Go.
3 In To Scenario and To Version, select the target scenario and version members to which to copy decisionpackage data.
4 Select the decision packages to copy.
5 Select Period Mapping. By default, Years is populated with the years defined for the target decisionpackage's scenario and version.
6 For each Target Year, select a corresponding Source Year.
The budget amounts in the target year are replaced by those from the source year.
7 Select Enabled for each year to which to copy data.
8 See “Specifying Copy Options” on page 227.
Managing Decision Package Types, DecisionPackages, and Budget RequestsAfter an administrator creates the required decision package types, preparers can perform thesetasks, using the icons or the Action list on the Manage tab:
l Create decision packages
l Create a decision package for a baseline budget
l Modify basic decision package properties
l Define or modify budget requests in a selection decision package
l Modify budget request properties such as owner and rank
l To enter data, use to assign a member an administrator creates to a budget request thatdoes not have one (is a No BR Exists budget request).
l Enable users in other entities to create budget requests in a selected, shared, decisionpackage
l Publish amounts to an ASO cube for rollup calculations or for reporting. .
l Transfer budget requests to another decision package
228
Sharing Decision PackagesShare decision packages to enable preparers in another shared entity (department or office) tocreate or modify budget requests in decision packages.
ä To share decision packages:
1 Expand Decision Package Types, and then select the decision package type upon which the decisionpackage is based.
2 On Manage, select the decision package.
3 Select Action, and then select Share Decision Package, or click .
4 On the left, select the entities with which to share the decision package, add them to the frame on theright, and then click OK. If an administrator defined descriptive aliases for entity members, and enabled
the appropriate preference, select and then select Alias or Alias : Member Name. See “ConfiguringPlanning Unit Hierarchies” on page 200.
Unsharing Decision PackagesYou can unshare a decision package that you own to prevent budget preparers in shared entitiesfrom continuing to work on budget requests. This is done by removing the shared entity fromthe decision package.
ä To unshare decision packages:
1 Ensure that preparers or owners in the shared entity moved or deleted their budget requests.
2 Expand Decision Package Types, and then, on Manage, select the decision package you want tounshare.
3 Select Action, and then Share Decision Package, or click .
4 Clear the check boxes for the selected shared entities, and then click OK.
About Filtering and Reporting on Data
Subtopics
l About Attributes
l Attribute Types
l About Rollup Groups
Use attributes to capture additional, custom decision package and budget request informationthat you can later use to filter decision packages. Use rollup group to report on the totals ofdifferent kinds of expenses, such as types of compensation (FTE and salary, for example) or non-compensation related expenses (facility or equipment rentals for example).
229

About AttributesAttributes are tags or labels that can be used to categorize decision packages and budget requests.Defined by Administrators, attributes can be assigned to decision packages, budget requests, orboth, and enable budget preparers to:
l Capture additional information that is specific to their budgeting needs andimplementations, such as:
m Related program (programs impacted by the decision package)
m Related performance objectives (objectives improved by the funds budgeted in adecision package)
m Performance Measure — Smart List attribute that could be used to organize budgets ifthe Program dimension is used at a more detailed child level
m Fund Group — Could be used to organize decision packages and business requiests forreporting by fund group. For example, you may be required to select State Grants as afund group in their budget request. Or you may have values for General OperatingFunds, Federal Grants, Enterprise Funds, Capital Outlay.
m Related area or location
m Additional budget dates, such as proposed start date, or proposed implementation date
m Funding source
l Group and filter decision packages and budget requests on dashboards and in reports basedon attribute criteria.
Attribute TypesYou can use two kinds of attributes:
l Non global attributes—Applied to decision package types and used so that preparerspopulate decision packages created on that type with specific attribute.
l Global attributes—Not specific to a decision package type. Can be used with any decisionpackage.
If you do not use decision package types, you can use 15 attributes for decision packages; and15 for budget requests.
You can define attributes as mandatory or optional. If mandatory, preparers cannot save decisionpackages and budget requests without specifying attribute values. The attribute type determinesthe format of the attribute data required.
Attribute Types
l Boolean - Yes or no
l Smart List - Any Smart List of Smart List value
l Number - One number or a number in a range of values. Use constraints to specify the lowerand upper limit for value ranges.
230
l Date - One date or a date within a date range. Use constraints to specify the date range (Nov1 2013 and Nov 1 2017, for example)
About Rollup GroupsIn addition to reporting on total expenses, you can also report on the totals of different expensetypes such as:
l The total FTE a budget request represents
l Compensation (additional earnings, for example) vs non-compensation costs (equipmentrental costs) while still reporting on the overall amount being requested.
l Total Funds Requested—All requested amounts delivered in a decision package or budgetrequest.
l Operational Costs—All non-personnel related costs being requested such maintainence andsupplies
To enable this kind of reporting, an Administrator, when creating decision package types, mustdefine rollup groups for each type of total expenses for which you want t to report. Rollup groupsare created by selecting one or more sets of plan-type specific dimension members (rollupmembers). For example, you could use one rollup group to report on total capital outlay, asecond to report on operating costs, and a third to report on aggregate totals across all accountsin selected decision packages and budget requests. .
You can modify a decision package type's rollup groups and members to display amountsdifferently even if decision packages and budget requests were already created using the decisionpackage type. Changes to rollup groups are immediately reflected.
Guidelines and Considerations
Before an Administrator create rollup groups, decide what totals you want to display and reporton. This might mean modifying your Account dimension, and other dimension hierarchies tosupport revision members to display the break down of total amounts. Also consider:
l If amounts are in the same cube but you want to display them separately
l If the amounts are in different cubes and need to be displayed separately
l If some amounts must be added to others for the correct total display
l You must define individual rollup groups to display totals for currency amounts and unitcounts. For example, to display the total for compensation cost and FTE, you must create arollup group for compensation and another for FTE.
Limitations:
l Administrators can only define 5 rollup groups for a decision package type
l At least 1 rollup group must be specified as the primary group
l You cannot change currency type once its members have been used in a rollup group. Tomodify currency type, delete the rollup members in use
231

Defining Separate Rollups for a Decision Package Type Using two Plan Types
You want to display and report on compensation (in an HCP cube) and capital outlay costs (inan Operation Budget) in addition to the overall total for a decision package or budget request.However, you want to display compensation and capital outlay expenses as separate totals. Youhave extended your dimension hierarchies to support multiple rollup levels in the dimensionhierarchy. You have at least 1 Plan1 cube and an HCP cube.
To create the rollups you want, perform these tasks:
1. Select Administration, then Manage, and then Decision Package Type ,
2. Selects a Decision Package Type (Operating Budget) and select Rollup Member
3. Create a rollup group called “Totals Requested”, and specify Plan 1 as the cube. Alldimensions in the cube are populated.
4. Click the member selector for the Account dimension and select the members for the totalexpense rollup.
5. On Rollup Member, create a rollup group called Total Capital, and specify Plan 1 as the cube.
6. Click on the member selector for the Account dimension and select the member CapitalRequest Expenses as the rollup member. Do this to select a members to use in the rollup.
7. Create a third rollup group called Total Compensation, and select the HCP cube.
8. Click the member selector to identify the members to use in the third rollup.
Performing QueriesPerform case-sensitive queries in the following to display, by column, only rows that contain aparticular value, letter, or series of letters. This enables you to filter column contents by datasuch as name, owning entity, and amount. For example, to display only decision packages thatare owned by an entity whose name starts with H, enter H* in the field above the Owner Entitycolumn.
ä To perform a query:
1 Access the decision package.
2 On the desired grid or tab, click .
3 In the field above any column, enter a number, letter, or series of letters. If you enter letters, enter anasterix (*) after your entry. For example, to display only budget requests with names starting with HUM,enter HUM*.
4 Press ENTER.
232

Detaching DataClicking enables you to view and use most budget request and decision package data,such as budget request grid data, and notes in a separate window. This enables you to focusexclusively on decision package or budget request data.
Moving Budget Requests Between Decision PackagesImportant: To move budget requests to another decision package the target decision packagemust use the same decision package type, and have the same assigned scenario, version, owningentity, and (if used) shared entity.
ä To move budget requests:
1 Expand Decision Package Types, and then select the decision package on Manage.
2 Click or select Action, and then select Add\Edit Budget Request.
3 In the upper grid, select the budget request to move.
4 Select Action, and then select Move Budget Request or click .
5 Select the decision package to which to move the budget request, and click OK.
Deleting Decision Packages and Budget RequestsThe current owner of a decision package can delete it after:
l All data and values in the budget requests it contains are deleted, or set to zero (0) so thatthe total compensation expense is zero. For a shared decision package, budget preparers inthe shared entity must also delete or zero-out all values in their budget requests.
l The budget requests that it contains are deleted by their owners or moved to another decisionpackage.
Note: Deleting decision packages removes them from the promotional path.
ä To delete decision packages and budget requests:
1 Expand Decision Package Types, and then select the decision package on Manage.
2 Perform a task:
l To delete individual budget requests within the decision package, select the budget
requests in the lower grid, and then click .
l To delete the entire decision package, click or select Action, and then select DeleteDecision Package
233

Migrating Decision Package TypesIf you use Oracle Hyperion Enterprise Performance Management System Lifecycle Managementto migrate decision packages types from one server to another, administrators must ensure that:
l The same databases (cubes) used in the source application also exist, with same names, inthe target application
l Users have access to the target application
l In the target environment, users have access to the applications referenced in the reportapplication mappings used in the source application
About Submitting Decision Packages for Approval andViewing Promotional PathsWhen viewing details for a planning unit used to submit and promote a decision package on theManage Approvals screen, you can view history and annotations using the tabs provided. TheHistory tab enables you to:
l View the status of each planning unit associated with a decision package, its owner, and thelast action taken. The Promotional Path button was also moved to the History tab and aRefresh button was added
l Access and refresh the promotional path using the corresponding buttons
The Annotations tab enables you to view the title, author, date, and text for existing annotationsand to add new annotations.
Submitting Decision Packages for Review and ApprovalPromote decision packages to pass them, as planning units, to the next reviewer or entityplanning unit in the promotional path. The promotional path is defined by administrators asdescribed in the Oracle Hyperion Planning Administrator's Guide. The owner of a decisionpackage is always the first reviewer.
Note: The only exception to this behavior is if the owner is already in the promotional pathdefined by the master PUH.
ä To submit decision packages for review:
1 Select the decision package.
2 Select Approval Status.
3 Select the following:
l Your entity (planning unit) row
234

l Any shared entities (planning unit rows) if you are the current owner of the decisionpackage
l To promote a shared decision package, select rows for all the entities (planning units)
Note: If you integrate with PeopleSoft Financials Commitment Control, click on selectedplanning unit rows to perform a funds check to ensure that the budget requests totalsvalidate against your PeopleSoft commitment control rules.
4 Click Change Status.
5 From Select Action, select Promote, and then click Refresh.
Approving and Rejecting Decision Packages
ä To approve or reject decision packages:
1 Select the decision package, select Action, and then select Add/Edit Budget Requests.
2 On the Budget Request page, click the tab for each form in a budget request, and review the enteredline item expenses and data.
3 Perform a task:
l If decision package and its budget requests do not require modification, perform thesetasks:
m Select Approval Status, select the entity (planning unit) row, and then select ChangeStatus.
m If you are the last person in the promotional path, select Signoff from Action.
m If you are a reviewer at any other point in the promotional path, select Approve.
m Start the approval process for the planning unit hierarchy as described in the OracleHyperion Planning Administrator's Guide.
l If decision packages or any of their budget requests must be modified and resubmitted,perform these tasks:
m Select Approval Status, select the entity (planning unit) row, and then select ChangeStatus.
m From Action, select Reject. This delivers the decision package to the previousreviewer.
m Use notes or attachments to indicate why you are rejecting a decision package.
About Migrating Decision Packages BetweenEnvironments Using Lifecycle ManagementWhen you upgrade, or move an application to another environments, such as from a sourcedevelopment environment to a target production environment, ensure that your rollup
235

definitions use the correct application and server names in each environment. If the rollupdefinitions don't contain the correct target-specific information, your total decision packageamount will be incorrect.
Performing Tasks Not Displayed in My Tasks List
ä To perform tasks not displayed in My tasks list:
1 Ensure the decision package is based on the Compensation Expenses decision package type. If it isnot, have your administrator modify the decision package to be based on this decision package type.
2 Expand Decision Package Types, and then select the appropriate decision package type.
3 On Manage, select the decision package that contains the budget requests in which to perform the
required task, and then click , or select Action, and then select Add \ Edit Budget Requests.
4 In the upper grid, select the budget request.
5 Click the tab for the task to perform and the corresponding form. If the form is unavailable:
l Click the navigation button, to the right or left of the first or last form tab, and selectthe form to display. For example:
l Have an administrator modify the decision package so that it is based on theCompensation Expenses decision package type.
6 Return to the previous or appropriate help topic for information about performing the budgeting task.
About Graphing and Analyzing DataUse the Analysis tab on the main decision package grid to depict the entity-wide distribution offunds for a given decision package. Click on a decision package to display basic informationabout the decision package in the lower grid, such as the total value of the budget requests thatthey contain, their owning entity, and rank. On the Analysis tab you can also:
l Generate comparative pie charts to graph and evaluate budgets with positive amounts asopposed to budgets with negative amounts. This enables you, for example, to graph increasesand reductions in operational expenses.
l Depict the total percentage of all lower-level entity decision packages within a parent entity.This enables you to view the budget impact of decision packages created by distinct offices,bureaus or portions of a larger entity.
236

Note: For 10 or more decision packages, the graph portion of the tenth decision packagecontains the remaining decision packages. For example, if you have 15 decisionpackages, drill down on the tenth decision package to access the remaining five.
On the grid you can:
l Drill down on decision packages to view their budget requests.
l Drill down on budget requests to view budget request properties and data collection forms.
Accessing Graphs
ä To graph and analyze decision packages:
1 Select Decision Package Types, and then select the appropriate decision package type.
2 Select the scenario, version, and year for the budget containing the decision packages that you wantto graph, and then click Go.
3 Select Analysis.
4 From Chart Option, perform a task:
l Select Pie to graph percentages
l Select Bar to graph expense values
5 Perform any task:
l On a graph, click slices to drill down on budget requests to access its data collectionforms.
l Filter the decision packages to graph by changing data such as:
m Scenario and version
m Year, using the slider bar to represent the annual value of a decision package foreach year in a range of years that you select. Select a year or range of users using theslider bar, and then click Go. If the slider bar does not display, select Back to yearview. The annual values of the decision package are displayed. For example, to graphor chart the value of a baseline decision package for FY10, FY11, FY12, and FY13,place the first slider bar arrow at 2010, the second at 2013, and then click Go.
m Attribute values by clicking Advanced Search and selecting the attributes to use asfilter criteria
l On the grid you can drill down on decision packages or budget request to view theirdata in a pie chart.
237

238
11Reviewing and Approving
Budgets
In This Chapter
About Approving Compensation ... . . . . . . . . . . . . . . . . . . . . . . . . . . . . . . . . . . . . . . . . . . . . . . . . . . . . . . . . . . . . . . . . . . . . . 239
About Submitting Budgets for Approval .. . . . . . . . . . . . . . . . . . . . . . . . . . . . . . . . . . . . . . . . . . . . . . . . . . . . . . . . . . . . . . 239
Requirements... . . . . . . . . . . . . . . . . . . . . . . . . . . . . . . . . . . . . . . . . . . . . . . . . . . . . . . . . . . . . . . . . . . . . . . . . . . . . . . . . . . . . . . . . . . 240
Approving Positions, Jobs, and Employee FTE and Compensation .. . . . . . . . . . . . . . . . . . . . . . . . . . . . . . . . 240
Submitting Budgets for Approval .. . . . . . . . . . . . . . . . . . . . . . . . . . . . . . . . . . . . . . . . . . . . . . . . . . . . . . . . . . . . . . . . . . . . . . 243
About Approving CompensationCompensation budget approval is based on positions or position-employee assignments, andthe budget is calculated based on approved FTEs and compensation expenses. You need approveonly Employee FTE assignments; not individual employees, because approving an employee'sFTE automatically approves the employee. Similarly, rejecting an FTE rejects an employee'sassignment to a position. Before submitting budgets to the approval hierarchy for overallapproval, perform these tasks:
l Calculate budgets to aggregate positions, vacancy, and employee expenses
l Confirm and approve compensation expenses such as:
m FTEs for employees or positions
m Compensation elements such as additional earnings and benefits
Note: To prevent users from approving and submitting budgets, revoke access to the Approvalform and task list.
About Submitting Budgets for ApprovalSupervisors or managers can submit all or individual HR entity budgets as Planning units forapproval. Budgets in Planning units are reviewed and validated based the defined user hierarchy.When Planning units are submitted, data is validated and becomes read-only for users all exceptthe next owner or reviewer in the approval hierarchy.
See Starting the Review Process in the Oracle Hyperion Planning User's Guide and “SubmittingBudgets for Approval” on page 243.
239
RequirementsManagers and supervisors cannot submit budgets for overall approval in Planning until:
l All pending transfers are resolved. See “Reviewing Pending Transfers” on page 175.
l All positions, jobs, employees, and associated FTE assignments and compensation detailsare calculated and approved in Public Sector Planning and Budgeting.
l An administrator defines Planning units for budgets by specifying the scenario, version, andentity. For example, to submit the budget for the Department of State Police to the stateGovernor, create a planning unit that specifies:
m Version—Governor
m Entity—Department of State Police
m Scenario—Budget
Note: To include transfers, Generic Entity must be defined in Planning units.
l An administrator specifies the Planning unit owners and reviewers in the budgetpromotional and approval hierarchy.
Approving Positions, Jobs, and Employee FTE andCompensation
Subtopics
l Approval Options
l Approving Positions
l Approving Jobs
l Approving Employee Assignments to Positions
l Approving Period-Level FTEs
Approval OptionsUse these options to approve or reject FTE assignments and compensation for employees, jobsand positions:
l Approved—Accept the associated FTE and compensation
l Rejected— FTE and compensation settings must be modified
l Approve FTE, Reject Compensation—Accept the associated FTE, but indicate that thecompensation settings must be modified
l Reject FTE, Approve Compensation—Accept the compensation settings but indicate thatFTE assignments must be modified
l Approve for all employees:
m Yes—Accept the FTE and compensation details for all employees assigned to a position
240

m No—Approve employee expenses individually at the employee level
Approving Positions
ä To approve or reject positions:
1 From My task lists, select Budget Preparation, and then select Review and approve positions.
Note: If you are using decision packages and budget requests, these task links do not display.See “Performing Tasks Not Displayed in My Tasks List” on page 236.
2 On the POV, select the correct Version, Time period, and Scenario
3 Select the HR organization with which the position is associated, and then click .
4 To specify missing or invalid data displayed in red, select Maintain position data, right-click positions,and select Edit Position Details.
5 Right-click positions, select Approve, and then specify:
l Select Year—Fiscal year in which to approve positions. To approve positions in multiplebudget years, specify the year range as follows: Yx:Yx. For example FY09:FY11.
l Approval Status—See “Approval Options” on page 240.
Approving Jobs
ä To approve or reject jobs:
1 From My task lists, select Budget Preparation, and then select Review and approve employee budgetdetails.
Note: If you are using decision packages and budget requests, these task links do not display.See “Performing Tasks Not Displayed in My Tasks List” on page 236.
2 On the POV, select the correct Version, Time period, and Scenario.
3 Select the HR entity, and then click .
4 Specify missing or invalid data displayed in red by selecting Maintain employees by job, right-clickingemployees, and then selecting Edit Employee Details.
5 After specifying missing data, save, and then select Review and approve employee budget details page.
6 Right-click jobs, select Approve, and then specify:
l Job Code
l Select Year—Fiscal year in which to approve positions. To approve positions in multiplebudget years, specify the year range as follows: Yx:Yx. For example FY10:FY12.
l Approval Status—See “Approval Options” on page 240.
241

Approving Employee Assignments to Positions
ä To approve or reject employee assignments to positions:
1 From My task lists, select Budget Preparation, and then select Review and approve positions.
Note: If these task links do not display, see “Tasks Lists in Decision Package-EnabledApplications” on page 41.
2 On the POV, select the correct Version, Time period, and Scenario.
3 Select the HR entity, and then click .
4 Right-click positions that have pending employee assignments, and then select Employee Approvals.
5 To specify missing or invalid data that is displayed in red, select Maintain employees by position, right-click the employee, and then select Edit Employee Details.
6 After specifying missing data, return to the Review and approve positions page.
7 Right-click positions, select Employee Approval, right-click positions again, and then select Approve.
8 Specify:
l Select Year—Fiscal year in which to approve positions. To approve positions in multiplebudget years, specify the year range as follows: Yx:Yx. For example FY08:FY10.
l Approval Status — See “Approval Options” on page 240.
Approving Period-Level FTEs
ä To approve period-level FTEs:
1 From My task lists, select Budget Preparation, and then select one:
l Review and approve positions
l Review and approve employee budget details
Note: If these task links do not display, see “Performing Tasks Not Displayed in My TasksList” on page 236.
2 On the POV, select the correct Version, Time period, and Scenario.
3 Select the entity for the HR organization, and then click .
4 Right-click in the first column and select Approve period-level FTE.
5 Enter FTE values in the Approved FTE Input row for each time period, and then save. Note that employeecan have a full time FTE, but an FTE of 0.5 if they are assigned to 2 positions or jobs.
6 Right-click the Approved FTE Input row, and then select Approve.
7 Specify:
l Fiscal year in which to approve the FTE. To approve FTE in multiple budget years,specify the year range as follows: FYx:FYx. For example FY10:FY13.
242

l An approval status. See “Approval Options” on page 240.
Submitting Budgets for Approval
ä To submit budgets for Approval:
1 Satisfy the requirements in “About Submitting Budgets for Approval” on page 239.
2 Select Administration, then Approvals, and then Planning Unit Hierarchies.
3 See the Oracle Hyperion Planning User's Guide to continue with the submission.
243

244

12Revising and Adjusting Budgets
In This Chapter
About Revisions ... . . . . . . . . . . . . . . . . . . . . . . . . . . . . . . . . . . . . . . . . . . . . . . . . . . . . . . . . . . . . . . . . . . . . . . . . . . . . . . . . . . . . . . . 245
Performing Revisions in Decision Package-Enabled Applications ... . . . . . . . . . . . . . . . . . . . . . . . . . . . . . . . . 246
Performing Revisions in Regular Applications ... . . . . . . . . . . . . . . . . . . . . . . . . . . . . . . . . . . . . . . . . . . . . . . . . . . . . . . 255
About RevisionsAfter budgets for the current year are closed, adopted, and posted, you can submit requests toupdate data for approved budgets using revision requests. Revisions are performed using R(x)members that Administrators create in the Revision parent of the Version dimension. To ensurethat revisions comply with your fiscal policies, create and apply validation rules to revisions. Seethe Oracle Hyperion Planning Administrator's Guide. Revisions are defined by transaction type(adjustment and transfer, for example) when used to modify employee compensation. You canapply revisions as temporary or permanent changes, to:
l Individual or multiple budget years, positions, and employees
l Individual or multiple entity budgets
l Employee compensation expenses, including vacancies, updated assignments, and transfer
Sample revisions:
l Updating salaries and benefits based on negotiated employee contracts
l Making modifications to reflect increases in spending budgets due to additional revenues
l Changes to salaries and benefits based on negotiated employment contracts
l Emergency funding
l Making updates to accommodate mid-year changes in legislative mandates
Tip for PeopleSoft Commitment Control users: If you track revisions as budget requests, you canre-use existing revision members to post data as deltas to your source. Each transaction isidentified by an incremental ID. See “Tracking Revisions in PeopleSoft Commitment Control”on page 248.
Note: After modifying position and employee data as part of a revision, recalculate the revisionbefore submitting it to the next Planning unit owner on the promotional path forapproval.
245

Performing Revisions in Decision Package-EnabledApplications
Subtopics
l Task Overview
l Making Revisions in Non HCP - Based Applications
l Tracking Revisions in PeopleSoft Commitment Control
l Before Performing Revisions
l Preparing Revisions
l Creating and Populating a Budget Request for Revisions
l Performing Revisions in Non HCP- Based Applications
l Adjusting Revisions
In decision package-enabled applications, revisions are captured as delta changes and associatedwith a decision package and budget request. If you write back revision data to PeopleSoft, andwant to reuse revision members instead of creating new ones, see “Tracking Revisions inPeopleSoft Commitment Control” on page 248 .
You can revise decision package budgets as follows:
l Make adjustments to one, many, or all adopted budgets in decision package-enabledapplications
l Prevent budgets from being adjusted below zero
l Capture and export delta changes and adjustment to your external source system for postingusing FDME
l View budget balances before making an adjustment
l View balances after adjustments
l Generate adjustment amounts by:
m Increasing or decreasing values by percent or monetary amounts
m Prorating increases or decreases based on the original amount or balance of the originalbudget
l Reverse adjustments that were posted to the source system
Task Overviewl An Administrator performs these initial tasks:
m Meets the requirements, and create a member for each revision in the Versiondimension. See “Before Performing Revisions” on page 249.
m PeopleSoft CC Users: If you track revisions as budget requests and want users to be ableto reuse existing revision members, see “Tracking Revisions in PeopleSoft CommitmentControl” on page 248.
246

m Views the current budget activity and available balance, and consolidates all decisionpackages in the baseline revision member using the Update Baseline Revision WithCompensation Data compensation data. task.
m Creates a revision, and then copies the appropriate decision package and budget requestdata to the baseline revision request.
m For each decision package type used, creates a right-click menu option that preparersuse to modify and adjust data.
m In each decision package type, creates a budget request to contain revised data. See“Creating and Populating a Budget Request for Revisions” on page 253
m In each decision package type, launches the Manage Compensation details by Entity formto load and modify position, salary, employee, and job data.
l Budget preparers then perform these tasks:
m In the budget request created for each revision, modify compensation data andrecalcuate compensation expenses.
m Submit the revised budget request for promotion and approval
Making Revisions in Non HCP - Based ApplicationsIf you created a decision package-enabled application that does not use the HCP cube, thefollowing occurs:
l The Budget preparation and the Manage Revision Requests tasks are loaded
l The Manage Revision Requests form is loaded
l The Populate Revision Data, Edit Revision, and Create Revision menus are loaded
l The following are loaded to the Account dimension:
m Revisions properties and descendants
m Request account and descendants
l Unspecified Entity is loaded
l In the Version dimension, the parent of Revisions is enabled for dynamic children.
You can extend the revision functionality provided using the following:
l Basic accounts that are used for revisions
l The “Manage revisions request” form that enables you to:
m Create revisions.
m Launch decision packages from revisions.
m Create and update the CreateRevisionRequest rule to include custom dimensions andmembers that you create in revisions.
247

Tracking Revisions in PeopleSoft Commitment ControlUsers can write-back revisions to the same application and scenario/version combinationwithout having to create new revision members each time data is posted to PeopleSoft. Insteadof defining new members each time a revision is submitted, existing version members are used.An ID is assigned to each transaction identifying the application, implementing an incrementaltransaction ID as follows: <application>_<transaction>
For example, these transaction IDs are generated in an application called A1 if the same usermakes two posts: A1_<X1>, A1_<X2>
If another user performs, for the first time, a post transaction to the same application, scenario,and version, this transaction ID is generated: A1_X3. If a third user performs a post A1_<X4> isgenerated.
To submit revisions:
1. Meet the requirements. See “Before Performing Revisions” on page 249.
2. Using FDME, submit the revision posting for the scenario and version.
3. Create a decision package to track all your revisions, and then create a budget request foreach individual revision. Each budget request's member, in the Budget Request dimension,is what you will specify in the write-back rule.
4. Ensure that the write-back rule is a POST type, and uses the appropriate budget requestmembers containing the revision data to post to PeopleSoft.
5. In Planning, select Administration, then Application, then Properties, and then ApplicationProperties.
6. Click , define this property ALWAYS_GET_UNIQUE_XACT_ID and set it to “True”
7. Consolidate the data, and populate the decision package and budget requests. See“Populating Revisions With Decision Package Data” on page 253 and “Creating andPopulating a Budget Request for Revisions” on page 253.
8. In Oracle Hyperion Financial Data Quality Management for Hyperion Enterprise, create arule called Check so that planners initiate a Budget Check before using approvals to promotethe planning units for each decision package.
See also “Performing Revisions in Non HCP- Based Applications” on page 254.
248

Before Performing Revisions
Subtopics
l Configuring Planning Units and Substitution Variables
l Enabling Preparers to Create Revision Members
l Creating Right-Click Menus for Customized Revisions
l Enabling Preparers to Assign or Modify Decision Package Types
Configuring Planning Units and Substitution VariablesAdministrators must associate the appropriate PUH with the scenario member identified in thecurrScenario substitution variable. They must also associate the appropriate PUH with theBaseline Revision member in the Version dimension. These members are used when you copydecision package data during the revision process.
To ensure that the Currscenario and CurrentStage substitution variables are correctly defined,perform these tasks:
l Select Administration, then Manage, then Variables, and then Substitution Variables.
l Select CurrScenario, click , and ensure that the substitution variable references thecorrect revision member.
l Select CurrentStage, click , and ensure that the substitution variable is set to baselinerevision.
Enabling Preparers to Create Revision Members1. Select Administration, then Manage, and then Manage Dimensions.
2. From Dimension, select Version.
3. Expand Version and then select Revisions.
4. Click .
5. Define the member as follows on the Member Properties tab:
l Select Enable for Dynamic Children. This allows users to create children by enteringmember names in the runtime prompt for any associated business rules configured touse a dynamic parent member.
l In Number of Possible Dynamic Children, enter the number of additional revisionmembers users can create.
l In Access Granted to Member Creator, select one:
m Inherit—You receive the access given to the closest member in hierarchy.
m Read—You can view but cannot modify members.
m Write—You can modify members.
249

l On Dimensions, select the member, click , and then grant the appropriate users access.
6. In Oracle Essbase Administration Services, refresh the cube(s) for the plan type.
Creating Right-Click Menus for Customized Revisions
ä To set up the menus users will use to perform revisions:
1 Select Administration, then Manage, and then Menus.
2 Select Revisions Menu, and then click .
3 Define these menu as described in the Oracle Hyperion Planning Administrator's Guide, but make thenoted selections:
l Revisions:
m Type—Decision Package
m Scenario—Scenario of the decision package type
m Version—Version of the decision package type
l Manage Decision Packages
m From, Type, select Decision Package.
m Select a decision package type.
l Copy Decision Package
m From/To Scenario —CurrScenario substitution variable
m From Version —CurrentStage substitution variable
m To Version — The current revision you are using. This revision memberautomatically displays when you copy data.
Enabling Preparers to Assign or Modify Decision Package Types1. Select Administration, then Manage, and then Menu.
2. Select Edit Revision Menu, and then click Edit.
3. Select Edit Compensation Decision Package.
4. To replace a default menu item, perform these tasks:
l Click Edit.
l From Decision Package Type, select the appropriate decision package type.
l Click Save.
250

Preparing Revisions
Subtopics
l Creating Forms
l Consolidating Data and Creating Revisions if the HCP Cube is Disabled
l Consolidating Data and Creating Revisions if the HCP Cube is Enabled
l Populating Revisions With Decision Package Data
Creating FormsBefore submitting revisions for approval, administrators can optionally enable budget preparersto evaluate and modify revisions by defining forms that provide this information andfunctionality:
l Original budget amount
l Current balance—The original adopted budget amount in addition to previous adjustmentsminus actuals and encumbrances
l Adjustment %—Percent by which the budget was adjusted
l Adjustment amount—Monetary value by which the budget was adjusted and which isapplied to the budget account. Budget preparers can modify this amount.
l Adjusted balance—The value of the original budget in addition to all modifications, lessactuals and encumbrances
Consolidating Data and Creating Revisions if the HCP Cube is DisabledAdministrators must perform this procedure to amalgamate all decision package and budgetrequest data and add it to the baseline revision member.
ä To consolidate data and create revisions:
1 Select Budget Preparation, then Manage Revision Requests, and then Manage Revisions.
2 In the POV, select the year and entity in which to make the revision, and then click .
3 On Manage Revisions, right click and then select Create Revision.
4 Specify the following:
l The entity (department or cost center) and version in which to make the revision
l Name—Enter a descriptive and intuitive name for the revision. This name ispermanently assigned to the revision member.
l Transfer— Move compensation expenses to another account by changing allocations.
l Revision—Apply major changes, such as modifying position expenses by addingcompensation elements that began midyear, such as Group Insurance.
l Adjustment—Apply minor changes, such as increasing municipal compensationallowance by 5%.
251

l Justification—Enter a reason for the revision
l Commitment—Source data was loaded into Planning from a commitment control systemthat tracks encumbrances, such as purchase requests
l Regular—Source data was not loaded from a commitment control system
l Permanent Option—Select one:
m Yes—Include revisions in the current and future budgets.
m No—Include revisions only in the current budget.
Consolidating Data and Creating Revisions if the HCP Cube is EnabledAdministrators must perform this procedure to amalgamate all decision package and budgetrequest data and add it to the baseline revision member.
ä To consolidate decision package data for revisions:
1 Select Budget Preparation, then Manage Revision Requests, and then Update Baseline RevisionsWith Compensation Data.
2 Select the decision package's owning entity, select the appropriate scenario and version, and then clickLaunch.
3 Select Budget Preparation, then Manage Revision Requests, and then Manage Revisions.
4 In the POV, select the year and entity in which to make the revision, and then click ..
5 On Manage Revisions, right click and then select Create Revision.
6 Specify the following:
l The entity and version in which to make the revision
l A descriptive and intuitive name for the revision. This name is permanently assigned tothe revision member.
l A Transaction Type:
m Transfer— Move compensation expenses to another account by changingallocations.
m Revision—Apply major changes, such as modifying position expenses by addingcompensation elements that began midyear, such as Group Insurance.
m Adjustment—Apply minor changes, such as increasing municipal compensationallowance by 5%.
l Justification—Enter a reason for the revision.
l Human resource budget—The HR budget referenced
l A Revision Source:
m Commitment—Source data was loaded into Planning from a commitment controlsystem that tracks encumbrances, such as purchase requests
m Regular—Source data was not loaded from a commitment control system.
252

m Permanent Option—Select Yes to include revisions in the current and future budgets.Select No to include revisions only in the current budget.
7 See “Populating Revisions With Decision Package Data” on page 253.
Populating Revisions With Decision Package Data
ä To populate revisions:
1 Select Budget Preparation, then Manage Revision Requests, and then Manage Revisions .
2 Right-click the revision, and select Populate With Decision Package.
3 Filter the decision packages that are displayed to locate those with which to populate the revision.
4 Select Copy Options, and, depending on if you are an administrator or a planner, specify how to populatethe revision with the decision package data:
l Replace—Overwrite existing decision package data in the revision. This option is onlyenabled for administrators.
l Add—Add the decision package data.
5 Click Copy Data.
6 Create a budget request to contain the revisions that budget preparers will make. See “Creating andPopulating a Budget Request for Revisions” on page 253.
Creating and Populating a Budget Request for Revisions
ä To setup the budget request in which revisions will be made:
1 Expand Decision Package Types, select the appropriate scenario and version, and then click .
2 On Manage, select the decision package in which to create the budget request in which revisions willbe made.
3 Select Action, and then Add\Edit Budget Request.
4 Define the budget request. See “Creating Budget Requests” on page 214, being sure to indicate, usingthe Description field, that the budget request is being used in a revision.
5 Select the budget request that you created, and then select Data Collection Forms.
6 Select Manage Compensation Details by Entity.
7 Right-click the revision, select Populate Revision, and then one:
l By Position Properties—Add positions or employees based on properties that you specify
l By Entity—Add positions or employees associated with a particular entity
l By Salary Grades—Add positions or employees that have a certain salary grade
l By Individual Selection—Add one position or employee
8 Specify revision data and perform all adjustments. See “Specifying Revision Data” on page 258.
253
Performing Revisions in Non HCP- Based Applications1. Select Administration, then Manage, and then Menu.
2. Select Edit Revision Menu, and then click Edit.
3. To add a menu item , perform these tasks:
l Click Create Siblings.
l Enter an intuitive and description name and label that indicates the purpose of the menuitem.
l From Type, select Decision Package.
l From Decision Package Type, select the appropriate decision package.
Adjusting Revisions
ä To change revisions:
1 Select Budget Preparation, then Manage Revision Requests, and then Manage Revisions .
2 Right-click the revision, and then use the menu that an Administrator created to perform your budgetchanges. This will display the data collection forms used to define the compensation or operational lineitems in the decision package revision.
3 Use individual data collection forms to add, modify, or delete compensation (changing a salary rate,performing employee transfers, for example). See Part III, “Creating Compensation Budgets, DecisionPackages, and Budget Requests”.
4 Right-click the revision, and then select Recalculate Revision.
5 Submit the decision package that contains the revised budget for promotion or approval.
254

Performing Revisions in Regular Applications
Subtopics
l Constraining Revisions
l Requirements
l Creating Revision Requests
l Specifying Revision Data
l Recalculating Expenses and Submitting Revision Requests for Approval
l About Modifying Revisions
Constraining Revisions
Applies only to non-decision package enabled applications
Administrators can create validation rules to ensure that budget revisions comply with fiscalpolicies. For example, apply validation rules only to permanent revisions, which are relevant tocurrent and future budgets. You can also use validation rules to:
l Restrict revisions by defining the maximum FTE at the overall position level or at the detaillevel
l Restrict salaries by a percentage or by a value
If revisions violate validation rules, correct the violations so planners can submit revisions.
Requirements
Applies only to non-decision package enabled applications
Before performing revisions, or whenever the baseline budget changes, copy data from theapproved budget (the Budget scenario and the Final version, for example) to:
l The Baseline Budget (scenario)
l The Baseline Revision (version)
Perform the tasks in the next sections.
Step 1
ä Before creating revisions:
1 Ensure that members for the revision exist in the Version dimension.
2 Important: If adjustments in the HRMS and General Ledger affect the approved budget, load the updateddata into your application using the following before copying data:
l Version—Current
255

l Scenario—Baseline Budget
3 Select Administration, then Manage, and then Copy Data.
4 In Plan Type, select HCP, and then click Go.
5 In Static Dimensions, specify:
l Account—IDescendants(Account)
l Element—IDescendants(Element)
l Period—Descendants of period, including BegBalance
l Year—NoYear
l Budget Item— IDescendants(Budget Item)
l Entity—Descendants(Entity)
l Employee—Descendants(Employee)
l Position—Descendants(Position)
6 See “Step 2”.
Step 2
ä Before creating revisions:
1 In Dimensions with Source and Destination, select:
l Source—Scenario and version of the existing and approved budget
l Destination—Baseline Budget (scenario) and Baseline Revision (version) members
2 Select the additional data to copy, and then click Copy Data.
3 In Public Sector Planning and Budgeting, expand My tasks list, select Budget Preparation, and thenselect Calculate compensation budgets.
4 Accept the default business rule, click Launch, and then specify:
l Scenario—Baseline budget
l Version—Baseline revision
l Entity —Descendants(Total Entity)
5 Click Launch.
256
Creating Revision Requests
Subtopics
l Step 1
l Step 2
Applies only to non-decision package enabled applications
Step 1
ä To create revision requests:
1 See “Requirements” on page 255.
2 From My task list, select Budget Preparation, and then select Manage revision requests.
Note: If these task links do not display, see “Performing Tasks Not Displayed in My TasksList” on page 236.
3 In the POV, select the year.
4 Select the HR entity, and then click . To enable revisions to child entities, select their parent entity.
5 Right-click, select Create Revision, and then specify the following:
l The entity and scenario in which to make the revision
l Transfer— Move compensation expenses to another account by changing allocations.
l Revision—Apply major changes, such as modifying position expenses by addingcompensation elements that began midyear, such as Group Insurance.
l Adjustment—Apply minor changes, such as increasing municipal compensationallowance by 5%.
l Justification—Reason for the revision
l Human resource budget—The HR budget referenced
l Commitment—Source data was loaded into Planning from a commitment control systemthat tracks encumbrances, such as purchase requests
l Regular—Source data was not loaded from a commitment control system
l Permanent Option—Yes to include revisions in the current and future budgets. No toinclude revisions only in the current budget.
6 Click Create and see “step 2”.
Step 2
ä To create revision requests:
1 Right-click the revision, select Populate Revision, and then make a selection:
257

l By Position Properties—Make position changes
l By Job and Employee Properties—Make employee or job changes
l By Entity—Make changes to employees, jobs, positions, or compensation elements inan HR organization
l By Salary Grades—Make salary grade changes
l By Individual Selection—Make changes to an existing employee or new position
2 Click Run.
3 See “Specifying Revision Data” on page 258.
Specifying Revision Data
Applies only to non-decision package applications
ä To specify revision data:
1 On the Manage revision requests form, right-click the revision, and then select Edit CompensationRevision.
2 Modify position, employee, job, salary, and compensation data. For example:
l To modify position, job, or employee data, right-click the employee, position, or job onthe Manage Revision Requests form, and then select the appropriate menu option.
For example, to use a revision request to adjust the salary for a Publication Managerposition, right-click the position, select Edit position details, select Salary Grades, andenter the override option value.
l To modify a salary grade, select Budget Administration, and then Manage Salary Grades.Change the salary grade, and then, if necessary, run a mass update.
l To modify non-salary compensation elements such as benefits, select BudgetAdministration, then Manage Other Compensation, and change compensation details.
3 Right - click in the Expense table and selec Calculate Compensation Expense.
4 See “Recalculating Expenses and Submitting Revision Requests for Approval” on page 258.
Recalculating Expenses and Submitting Revision Requestsfor Approval
Applies only to non-decision package enabled applications
ä To calculate revisions:
1 From My task lists, select Budget Preparation, and then Manage revision requests.
258
Note: If these task links do not display, see “Performing Tasks Not Displayed in My TasksList” on page 236.
2 Right-click revisions, and then select Recalculate Revision.
3 Select a position or employee, and then click Calculate.
4 In Revision Amount, review the updated budget expense displayed.
5 See Chapter 11, “Reviewing and Approving Budgets” and the Oracle Hyperion Planning User's Guideto submit the revision.
About Modifying Revisions
Applies only to non-decision package enabled applications
Using the scenario and version for the revision, you can perform all position and employeemanagement tasks such as the following while modifying revisions:
l Edit position details
l Edit employee details
l Terminate positions
l Exclude positions from the budget
l Add positions
l Perform mass adjustments to compensation data
259

260

P a r t I V
Analyzing Compensation Data
In Analyzing Compensation Data :
l Using Compensation Dashboardsl Using Reports and Budget Books
261

262

13Using Compensation
Dashboards
In This Chapter
Analyzing Compensation Breakdown... . . . . . . . . . . . . . . . . . . . . . . . . . . . . . . . . . . . . . . . . . . . . . . . . . . . . . . . . . . . . . . . . 263
Analyzing Budget Variance ... . . . . . . . . . . . . . . . . . . . . . . . . . . . . . . . . . . . . . . . . . . . . . . . . . . . . . . . . . . . . . . . . . . . . . . . . . . . 264
Analyzing FTE and Headcount .. . . . . . . . . . . . . . . . . . . . . . . . . . . . . . . . . . . . . . . . . . . . . . . . . . . . . . . . . . . . . . . . . . . . . . . . . 264
Analyzing Proposed Compensation... . . . . . . . . . . . . . . . . . . . . . . . . . . . . . . . . . . . . . . . . . . . . . . . . . . . . . . . . . . . . . . . . . . 265
Analyzing Compensation BreakdownUse this dashboard to perform these tasks:
l Graph the individual expense value of all compensation types such as taxes, basic salary,earnings, and benefits by year in a bar chart
l Graph the percent claimed by each compensation type such as benefits and basic salary, ina pie chart
l View the monthly, quarterly, and year total expense values for each compensation type
ä To use the compensation breakdown dashboard:
1 From My Task Lists, select Budget Analysis, and then select Compensation Breakdown Analysis.
2 On the POV, select the scenario, stage, and year.
3 From Entity, select the entity whose compensation you want to graph and evaluate, and click .
Table 29 Compensation Breakdown Graph
Graph Description
Compensation Expenses Yearly Trend Displays the annual dollar amount of each compensation expense.
Compensation Expense Breakup Displays the percentage of the overall compensation budget that each type of compensationexpense comprises.
Compensation Expenses by Entity Displays the actual dollar amount of each compensation amount by month, quarter, and year.
263

Analyzing Budget VarianceUse the dashboard to compare different types of compensation expenses such as salary, andadditional earnings between different budget stages and versions.
ä To use the dashboard:
1 From My Task Lists, select Budget Analysis, and then select Variance Analysis.
2 In the POV, select the appropriate budget scenario and year.
3 Select the entity, and then click .
4 Perform any task:
l Use the Compensation - Stage Variance graph compare compensation expense valuesby budget versions or stages.
l Use the Compensation - Scenario Variance compare compensation expense values bydifferent types of budgets such as projected or baseline.
l Use the FTE and Headcount - Stage Variance graph to depict the total amount ofheadcount or FTE in a particular budget stage, or version.
l Use the FTE and Headcount - Scenario Variance graph to compare headcount and FTEvalues by different kinds of budgets such as actual, current, or forecast. Perform thesetasks:
Analyzing FTE and HeadcountUse this dashboard to graph the amount of available headcount and FTE that can be assignedto new positions, and to depict the amount of currently assigned FTE.
ä To use the dashboard:
1 From My Task Lists, select Budget Analysis, and then FTE and Headcount Analysis.
2 In the POV, select the appropriate budget scenario, stage, and year.
3 Select the entity, and click .
Table 30 FTE and Headcount Graphs
Graph Description
Total Vacancy Displays, by all positions in an entity, the amount of used and available FTE. For example,if you have 10 positions, each with an FTE of 1, and 2 of these positions are vacant, assignedFTE is 8, and available FTE is 2.
Headcount Trend Anlysis Multiplies employee headcount by their assigned job or position FTE over a period of timethat you specify; enabling you to quickly view and asses staffing information. For example,if you have 10 positions, each with an FTE of 2 from January to May, and you add twopositions, each with an FTE of 2 in June, this graph displays a value of 20 for January-May,and 24 from June - December.
264

Graph Description
Vacancy - Existing vs Proposed Positions Displays the percentage of assigned and available FTE in an entity for current and proposedpositions; enabling you to determine if you have enough FTE to support new positions,
Headcount - Existing vs Proposed Positions Displays the employee headcount for existing positions and that projected to fill newpositions.
Analyzing Proposed Compensation
ä To use the dashboard:
1 From My Task Lists, select Budget Analysis, and then Proposed Compensation Analysis.
2 In the POV, select the appropriate budget scenario, stage, and year.
3 Select the entity, and then click .
Table 31 Proposed Compensation Graphs
Graph Description
Total Compensation Savings Displays the amount of available salary in dollars.
Filled vs Vacant Compensation Displays the percentage of compensation already being used, and available compensation that can beassigned.
Existing vs Proposed Positions Displays the percent of the compensation expense type that you select (additional earnings, andbenefits, for example) that is available to be assigned to new positions.
Existing vs Proposed Employees Displays the percent of the compensation expense type that you select (taxes, and salary, for example)that is available to be assigned to new employees.
265

266

14Using Reports and Budget Books
In This Chapter
Provided Reports .. . . . . . . . . . . . . . . . . . . . . . . . . . . . . . . . . . . . . . . . . . . . . . . . . . . . . . . . . . . . . . . . . . . . . . . . . . . . . . . . . . . . . . . . 267
About Using Custom Templates ... . . . . . . . . . . . . . . . . . . . . . . . . . . . . . . . . . . . . . . . . . . . . . . . . . . . . . . . . . . . . . . . . . . . . . 270
Working With Custom Templates ... . . . . . . . . . . . . . . . . . . . . . . . . . . . . . . . . . . . . . . . . . . . . . . . . . . . . . . . . . . . . . . . . . . . . 271
Creating Decision Package Reports .. . . . . . . . . . . . . . . . . . . . . . . . . . . . . . . . . . . . . . . . . . . . . . . . . . . . . . . . . . . . . . . . . . . 272
Specifying Report Settings ... . . . . . . . . . . . . . . . . . . . . . . . . . . . . . . . . . . . . . . . . . . . . . . . . . . . . . . . . . . . . . . . . . . . . . . . . . . . 273
About Customizing Reports in BI Publisher .. . . . . . . . . . . . . . . . . . . . . . . . . . . . . . . . . . . . . . . . . . . . . . . . . . . . . . . . . . . 273
Using Financial Reporting .. . . . . . . . . . . . . . . . . . . . . . . . . . . . . . . . . . . . . . . . . . . . . . . . . . . . . . . . . . . . . . . . . . . . . . . . . . . . . 275
Provided Reports
Subtopics
l Decision Package and Budget Request Reports
l Compensation Expense Reports
l Creating Compensation Reports
Decision Package and Budget Request ReportsYou can generate the following kinds of reports in PDF, HTML, or Microsoft Word documentformat to evaluate a variety of decision package data, in some cases spanning multiple years.Administrators can download the provided reports, customize them, and then upload them astemplates associated with reports. This enables you to generate more personalized reports. See“About Using Custom Templates” on page 270.
Report Description
DecisionPackageListing
Displays basic information about all available decision packages and the budget requests in a decision package. FromReport Type, select Detail to display more information about the decision package and budget requests.
To use data from up to three years, add the years to Selected Years.
DecisionPackageCost byEntity
Displays the total expenses of all decision packages and their budget requests in an entity
To use data from up to three years, add the years to Selected Years.
267

Report Description
DecisionPackage byEntity
Displays all decision packages in an entity. From Report Type, select Detail to display more information about the decisionpackage and budget requests such as the justification criteria that explain why decision packages are needed and why theassociated budget requests are required for implementation.
To use data from up to three years, add the years to Selected Years.
ScenarioVariance
Displays decision package totals for up to three different scenarios, enabling you to compare total values by budget scenario.Select the budget year, and then place the scenarios to use in Selected Scenarios.
VersionVariance
Displays decision package totals for up to three different versions, enabling you to evaluate total values by budget version.Select the budget year, and then place the versions to use in Selected Versions.
Compensation Expense ReportsYou can access these predefined Financial Reporting reports:
Report Description In the Position andEmployee BudgetDetail
In the PositionBudget Detail
In the EmployeeBudget Detail
Vacant Position Expense Displays all vacantpositions, their numbers,and compensationdetails and expenses byyear. Positions withoutcompensation expensesare not displayed.
Yes No No
Employment Levels Totals the current andproposed number ofemployees by entity, intabular and pie chartformat.
Yes No Yes
Vacant Positions Displays all vacantpositions, their numbers,and compensationdetails and expenses byyear. Positions withoutcompensation expensesare not displayed.
Yes Yes No
Position Adjustments Lists changes in positionproperties, employeeassignments,assignment dates, FTEchanges, salary details,taxes, benefits, andadditional earnings.
Yes Yes No
268

Report Description In the Position andEmployee BudgetDetail
In the PositionBudget Detail
In the EmployeeBudget Detail
FTE and Headcount by Position Summarizes, by entity,the FTE, headcount (ifavailable), andassociatedcompensation expensesby year.
Yes Yes No
FTE and Headcount by Job Summarizes, by entity,the FTE, headcount (ifavailable), andassociatedcompensation expensesby year.
No No Yes
New Position Costing Impact by Entity Summarizes the newpositions expenses byentity for the current andforecast year.
Yes Yes No
Position-Employee Associations Summarizes allemployee positionassignments, includingthe job, position, andtotal FTE.
Yes No No
Stage Variance for Positions Summarizes, for allpositions in an entity, therequested and final FTEand compensationexpenses, including theamount and percentchange between thestages.
Yes Yes No
Stage Variance for Jobs For all employees in anentity, summarizes therequested and final FTEand compensationexpenses, including theamount and percentchange between thestages.
No No Yes
Position Costing Summarizes, by entity, allcompensation expensesby position for the currentyear
Yes Yes No
New Employee Impact Summarizes newemployee compensationexpenses
No No Yes
Employee Expenses Summarizes employeecompensation expenses.
No No Yes
269

Report Description In the Position andEmployee BudgetDetail
In the PositionBudget Detail
In the EmployeeBudget Detail
Employee Adjustments Summarizes adjustedemployee expenses.
No No Yes
Employee-Job Association Summarizes the detailsof all employee-jobassociations by entity.
No No Yes
Creating Compensation ReportsYou can build reports by selecting the forms that you use in your application to manage andcalculate human capital compensation expenses. The configuration option upon which yourapplication is based determines what forms are available.
For detailed information about creating and using reports to analyze application artifacts suchas forms and task lists, see the Oracle Hyperion Planning Administrator's Guide.
ä To access provided reports:
1 Select Tools, and then Reports.
2 From the pane to the left select the kind of data or forms to use, and add them to the report using the
arrow buttons, .
3 To display column and row members on the report, select Include Member Selection List.
4 To add associated rules to the report, select Include Business Rules.
5 Click Create Report.
About Using Custom TemplatesAdministrators can create custom templates in two ways:
l Downloading and modifying provided templates in Microsoft Word
l Downloading and modifying provided templates in BI Publisher
Administrators then upload the templates and associate them with any of the provided reports,enabling you to report on data using the custom layout defined in the template. Commoncustomizations include:
l Adding corporate logos
l Changing titles or using different fonts
l Applying shading
l Modifying the page size
l Changing the number of columns used
270

Administrators can also view each report's XML source to familiarize themselves with the dataprovided and layout used.
Working With Custom Templates
Subtopics
l Customizing Reports to Create Templates
l Managing Template - Report Associations
l Editing Templates
Customizing Reports to Create Templates
ä To create custom templates:
1 Select Tools, then Reports, and then Decision Packages .
2 On Data, use the POV and the other filters to select the decision packages on which to report.
3 Select Options and then Manage Reports.
Optional: To familiarize yourself with a report's XML code, choose the report in SelectReport, click Generate XML, and then download and open the file
4 Click , or select Actions and then select Manage Templates.
5 Select the report to use as the basis for your own template, then click , or select Actions, and thenDownload Template.
6 Save the RTF file, then open it in Microsoft Word or BI Publisher to make your changes, and save it inRTF format.
7 On Manage Templates, click , or select Actions, then Add Template, and then enter a name anddescription for the template that you created.
8 Browse to the template RTF file that you customized, click OK, and then click Done.
9 Upload the template and attach it to a provided report as described in “Managing Template - ReportAssociations” on page 271.
Managing Template - Report AssociationsAfter you download a provided report and modify it to form a template, you must associate itwith a report. This enables users to use the format and styles in the template when they create atype of report.
1. Select Tools, then Reports, and then Decision Packages.
2. On Data, use the POV and the other filters to choose the decision packages on which toreport.
271

3. Select Options, and then Manage Reports.
4. Click or select Actions and then Manage Templates.
5. Click , or select Actions, and then Associate Template.
6. In the empty row, use Report Name to select the report to which to attach your template,and then select the template name.
7. Click Save, and then Done.
To disassociate a template from a report:
1. On Manage Reports, select the row for the report from which you want to remove a template.
2. Click , or select Actions, and then Delete Association.
Editing Templates
ä To modify templates:
1 Open the template RTF file that you downloaded, make your changes, and save in RTF format.
2 Select Tools, then Reports, and then Decision Packages.
3 Select Options, then click Manage Reports, and then click .
4 Select the template's row, and then click or select Action and then Edit Template.
5 Enter a different name, and browse to select the modified template RTF file. To use another template,browse to the RTF file and then click Update.
Creating Decision Package ReportsUse the predefined reports provided to evaluate a variety of decision package data, such asvariance of totals based on budget scenario and version or entity cost for multiple years. If youuse attributes to gather additional data, use attributes as filters to locate the decision packagesand budget requests on which to report.
TIP: To create templates that define report formats and styles that you prefer and that better meetyour reporting needs, administrators can download the provided reports, modify them, andupload them as RTF template files. See “About Using Custom Templates” on page 270.
ä To generate decision packages reports:
1 Select Tools, then Reports, and then Decision Packages.
2 On Data, select the scenario and version and then click :
3 Identify the decision packages by specifying filter criteria such as:
272

l Rank—-Report only on decision packages with a specific priority level
l Budget Impact —-Select Include to report only on decision packages whose total costincludes that of their budget requests. Select Exclude to report only on decision packageswhose total expense does not include that of associated budget requests.
l Approval Status—Report only decision packages that were approved, haven't yet beenapproved, or select Both to report on decision packages regardless of their approvalstatus.
l Click Advanced Search to list decision packages by decision package type and customattributes.
4 Select the decision packages for the report.
5 Click Next or Options, and see “Specifying Report Settings” on page 273.
Specifying Report Settings
ä To generate decision packages reports:
1 In Select Report, choose the kind of report to create. For report descriptions, see “Decision Packageand Budget Request Reports” on page 267.
2 To create the report using a custom template, select the template Report Type. For information aboutcreating templates and associating them with reports, see “About Using Custom Templates” on page270.
3 Based on the report, specify this information in Report Parameters:
l Currency (for multiple currency applications)
l Years (three maximum)
l For budget scenario and version variance: Select the scenario or version whose decisionpackages totals upon which to report and compare
4 To group report data by up to three attributes, place selected attributes in Selected Attributes, andthen arrange them in the order in which to use them to organize data in reports.
5 To omit decision packages that do not have a total expense value, select Yes from Suppress ZeroAmounts.
6 Select the report output format.
7 Click Create Report.
About Customizing Reports in BI PublisherYou can modify the provided templates in BI Publisher and then upload them and associatethem with reports. To customize templates, install and configure Microsoft Office Word 2000or later, and then Oracle Business Intelligence Publisher Desktop. You will then use MicrosoftWord BI Publisher menus to craft and create custom templates, save them as an RTF file, andupload them in Public Sector Planning and Budgeting.
273

Report Type Sample File Name Template File Name
Decision Package Listing - Summary PlanningDPListingSample.xml PlanningDPListingTmplt.rtf
Decision Package Listing - Detail PlanningDPListingSample.xml PlanningDPDetailTmplt.rtf
Decision Package Cost By Entity PlanningDPListingSample.xml PlanningDPBreakUPByEntityTmplt.rtf
Decision Package By Entity - Summary Planning DPEntityListingSample.xml PlanningDPByEntityTmplt.rtf
Decision Package By Entity – Detail Planning DPEntityListingSample.xml PlanningDPByEntityDetailTmplt.rtf
Scenario Variance PlanningDPScenarioVariance.xml PlanningDPScenarioVariance.rtf
Version Variance PlanningDPVersionVariance.xml PlanningDPVersionVariance.rtf
Note: This topic provides only general customization examples. For details, see the MicrosoftWord and Oracle Business Intelligence Publisher online help.
Installing the BI Publisher Desktop
ä To install the desktop:
1 Download the most recent version of BI Publisher Desktop from this location: http://www.oracle.com/technology/software/products/publishing/index.html.
2 Save the zip file locally, and extract it using the Use Folder Names option.
3 Close all Microsoft Office applications, and navigate to the directory where you extracted the zip file
4 Double-click the application's setup.exe file.
5 Follow the instructions in the installation wizard to perform a basic installation, and accept theinstallation defaults.
Customizing Reports in BI Publisher
ä To customize reports:
1 Download the provided report that you want to customize and use as a template as described in“Customizing Reports to Create Templates ” on page 271.
2 In Microsoft Word, open the .RTF template file for the report to customize. For example, for DecisionPackage Listing - Summary report, open PlanningDPListingTmplt.rtf.
3 From the Oracle BI Publisher menu, select Data, then Load Sample XML Data.
4 Open the sample file for the report. For example, to customize the Decision Package Listing - Summaryreport, open DecisionPackageListingSample.xml. If Microsoft Word does not display the BI Publishermenu, use the Template Builder by selecting View, then Toolbars, and then Template Builder. See theOracle Business Intelligence Publisher User's Guide.
274

5 Use Microsoft Word menus to customize the template. For example, you can insert graphics and updatefonts. For information, see the Microsoft Word online help or documentation.
6 Optional: To update fields in the report, use the BI Publisher menus to add fields from the sample file.For example, select Oracle BI Publisher, then Insert, then Field, click a field in the Field dialog box,and then drag the field into the template. For more information, see the BI Publisher online help.
7 When you finish customizing, select Oracle BI Publisher, then Preview Template, and select a formatfor previewing your changes.
8 Save the template locally using an intuitive name in .RTF format.
9 Upload the file and associate it with reports as described in “Managing Template - Report Associations”on page 271
Using Financial Reporting
Subtopics
l Creating Budget Books
l Using Budget Data in Financial Reporting Reports
Creating Budget BooksCreate budget books to present in your own structure, style, and sequence, your organization'sbudget data including all salary and compensation details and changes, strategic proposals,capital requirements, and other significant expenses. Budget books detail the revenue and capitalbudgets approved by the appropriate authority for the proposed fiscal year, and provide allassociated financial and operational data. After the budgeting process ends, publish budgetbooks as PDFs or as HTML on internal or public Web sites, enabling employees and the generalpublic to drill-down on links to access budget details and track expenditures.
Use budget books to:
l Insert and arrange Financial Reporting reports that provide a variety of:
m Decision package data. For example, you can insert a URL that displays a list of decisionpackage costs by entity.
m Compensation budget data
l Insert and arrange Microsoft Word and Microsoft Excel files, and links to externaldocuments as attachments; providing supplemental information
l Insert and arrange Planning attachments
l Export the book to PDF or HTML format
Note: If you modified the application dimensions, update reports accordingly.
275

For information, see the Oracle Hyperion Financial Reporting Workspace Administrator's Guide,and the Oracle Hyperion Financial Reporting Workspace User's Guide.
Using Budget Data in Financial Reporting ReportsAdministrators can map dimensions between Public Sector Planning and Budgeting and ASOreporting applications. This enables you report on budget data using Oracle Hyperion FinancialReporting. For example, administrators can aggregate and analyze dimensions and Smart Liststo:
l List all employees funded from Project 2221010 (Office of Infrastructure Development)
l Identify the final salary expense for business unit 00300 (Department of Agriculture)
Report on different aspects and combinations of budget data by selecting members. Commonmember selections enable you to view reports such as:
l Pooled positions
l Headcount and FTE by position
l Submission status
l Budget revision summaries
l Descriptions
l Notes in text boxes
l Justification criteria
l Member descriptions in row or column headers
For information about using Public Sector Planning and Budgeting data in ASO applicationsfor reporting, see Chapter 5, “Configuring the Line Item Budget.”
For information about Financial Reports, see the Oracle Hyperion Financial Reporting Workspacedocumentation.
276

P a r t V
Appendixes
In Appendixes:
l Frequently Asked Questionsl Loading Metadata and Data Using the Outline Load Utilityl Updating Business Rules After Changing Predefined Smart Lists
277

278

AFrequently Asked Questions
In This Appendix
Data Loading ... . . . . . . . . . . . . . . . . . . . . . . . . . . . . . . . . . . . . . . . . . . . . . . . . . . . . . . . . . . . . . . . . . . . . . . . . . . . . . . . . . . . . . . . . . . 279
Employees, Jobs, and Positions ... . . . . . . . . . . . . . . . . . . . . . . . . . . . . . . . . . . . . . . . . . . . . . . . . . . . . . . . . . . . . . . . . . . . . . 280
Allocations ... . . . . . . . . . . . . . . . . . . . . . . . . . . . . . . . . . . . . . . . . . . . . . . . . . . . . . . . . . . . . . . . . . . . . . . . . . . . . . . . . . . . . . . . . . . . . . 281
Transfers .. . . . . . . . . . . . . . . . . . . . . . . . . . . . . . . . . . . . . . . . . . . . . . . . . . . . . . . . . . . . . . . . . . . . . . . . . . . . . . . . . . . . . . . . . . . . . . . . . 281
Miscellaneous ... . . . . . . . . . . . . . . . . . . . . . . . . . . . . . . . . . . . . . . . . . . . . . . . . . . . . . . . . . . . . . . . . . . . . . . . . . . . . . . . . . . . . . . . . . 282
This topic provides answers to commonly asked questions about using Public Sector Planningand Budgeting.
Data Loading
For the Position and Employee configuration option: After loading data, I see categories of FTEfor positions, but also for headcount. Why do both exist, and must I load all positions, or justvacant positions, with an FTE of 1?
In this configuration, FTE and headcount for both positions and employees is loaded, even forsingle occupancy positions with active employee assignments. This is because position propertieslike FTE are applied to employees when they are assigned to positions, and these employeescould have additional benefits. Also, if employees are terminated or transferred, position-levelproperties (salary, benefits, etc.) are applied to other employees who are assigned to the position.
Why do details for existing positions that I manually create under the Total Existing Positionsparent member not display?
Although you can define positions by adding members under Total Existing Positions, theirdetails are unavailable until you load the following from your HRMS source system using OracleHyperion Financial Data Quality Management, Enterprise Edition or the Outline Load Utility:
l Position vacancy properties, such as:
m FTE and Status details
m Salary details
m Benefit details
m Allocation details
279

l Associated employee details, such as:
m Employee FTE and Status details
m Salary details
m Benefit details
m Allocation details
Employees, Jobs, and Positions
If I terminate an existing employee and replace the role (position or job) with a Contractoremployee type, will this increase the existing headcount?
Yes.
To budget for an unknown, currently non existant, employee being terminated in the future,can I assign a generic employee to a job or position?
Yes, but only by using the Position and Employee configuration option.
How can I distinguish between jobs and positions, if I use Oracle HR?
Although Oracle HR has jobs and positions, you are not required to use positions. Assignmentsin Oracle HR are employee assignments to jobs or positions. To determine if you use jobs orpositions, consider these questions that examine the role of employees or positions in yourorganization:
l Do you manage people or positions?
l Are the roles fixed or flexible?
l Can multiple employees assume the same role?
If roles continue to exist after assigned employees leave, those roles are probably positions. Ifroles cease to exist or are reevaluated after assigned employees leave, those roles are probablyjobs.
For the Position-Only configuration option: I have 5 jobs to which I assigned employees afteractivating them. The salary grades, other compensation elements and allocation informationare defined for each employee. How do I increase the salary mid year for one of the jobs so theincrease is against each assigned employee?
Perform a mass update or a mass adjust as described in “Performing Mass Updates” on page112 or “Mass Adjusting Compensation Expenses” on page 129. For information about definingcustom business rules to perform specific tasks, refer to the Oracle Hyperion PlanningAdministrator's Guide or the Oracle Hyperion Planning User Guide .
280

Allocations
How can I identify missing position or employee allocations?
Create a form with:
l Position Start Date/Hire Date
l Unspecified Budget Item in one Column Segment
l Allocation Start Date and 1st Allocation & 2nd Allocation for Unspecified Element foremployees and position.
How can I determine if allocations total to 100%?
This information is automatically validated when you allocate to the General Ledger. TheAllocation Percentage per Period/Review Overlapping Allocations form will contain problemswith allocations.
Why do allocations, and other assignments not work correctly after I load data using the OutlineLoad Utility?
A defect causes the Outline Load Utility to reorder the Unspecified Budget Item member in theBudget Item dimension. To resolve this issue, move the Unspecified Budget Item member sothat it is the first member in the Budget Item dimension, refresh the database, and then reloaddata using the Outline Load Utility.
Transfers
Can I reverse a pending transfer for a position that I transferred out, and return the positionto it's originating entity?
You can reverse the transfer for a position or employee that was just transferred to the generic,global entity.
Can I reverse the transfer of an employee or position if changes have been made to the employeeor position details?
No. You can only reverse transfers for positions and employees whose has not been updated inthe target department or entity.
Is there an audit report that captures transfers and reverse transfers?
No.
281

Miscellaneous
After I use Lifecycle Management to move a decision package application to anotherenvironment, why is my budget request total incorrect?
When you upgrade, or move an application to another environments, such as from a sourcedevelopment environment to a target production environment, ensure that your rollupdefinitions use the correct application and server names in each environment. If the rollupdefinitions don't contain the correct target-specific information, your total decision packageamount will be incorrect
Can I modify dimension and member ordering in my dimensional outline to improvecalculation speed and data retrieval performance?
Oracle recommends that the order of dimensions and dimension members delivered as part ofHuman Capital Planning is not changed during implementation. The order of dimensions andmembers has been optimized to deliver proper calculation results with best calculationperformance and should not be altered. If you must change the order of any of the delivereddimensions or dimension member, you must thoroughly analyze every business rule for possibleadverse impact on calculation results and calculation performance.
I use Internet Explorer, and Planning menus do not display correctly or let me navigate menuoptions; how can I resolve this?
To resolve menu display and behavior problems, perform these steps:
1. Select Tools, and then Internet Options.
2. In Security Setting, select Custom Level, , and then Miscellaneous.
3. Select Allow script-initiated windows without size or position constraint.
4. Restart the browser.
282

BLoading Metadata and Data
Using the Outline Load Utility
In This Appendix
Requirements and Important Notes ... . . . . . . . . . . . . . . . . . . . . . . . . . . . . . . . . . . . . . . . . . . . . . . . . . . . . . . . . . . . . . . . . . 283
About Load Files .. . . . . . . . . . . . . . . . . . . . . . . . . . . . . . . . . . . . . . . . . . . . . . . . . . . . . . . . . . . . . . . . . . . . . . . . . . . . . . . . . . . . . . . . 286
Loading Metadata and Data ... . . . . . . . . . . . . . . . . . . . . . . . . . . . . . . . . . . . . . . . . . . . . . . . . . . . . . . . . . . . . . . . . . . . . . . . . . 289
Testing Load Files .. . . . . . . . . . . . . . . . . . . . . . . . . . . . . . . . . . . . . . . . . . . . . . . . . . . . . . . . . . . . . . . . . . . . . . . . . . . . . . . . . . . . . . . 311
Verifying Data Loads... . . . . . . . . . . . . . . . . . . . . . . . . . . . . . . . . . . . . . . . . . . . . . . . . . . . . . . . . . . . . . . . . . . . . . . . . . . . . . . . . . . 312
Running Load Files .. . . . . . . . . . . . . . . . . . . . . . . . . . . . . . . . . . . . . . . . . . . . . . . . . . . . . . . . . . . . . . . . . . . . . . . . . . . . . . . . . . . . . 314
Troubleshooting .. . . . . . . . . . . . . . . . . . . . . . . . . . . . . . . . . . . . . . . . . . . . . . . . . . . . . . . . . . . . . . . . . . . . . . . . . . . . . . . . . . . . . . . . 315
Requirements and Important NotesNote: For information about using the Outline Load Utility with this release of Public SectorPlanning and Budgeting, see the Oracle Hyperion Planning 11.2.3.000 Readme. This appendixhas not been updated to reflect changes made in release 11.1.2.3.000.
Oracle strongly recommends that you create and test load files using a text editor or spreadsheettool, and copy of your current application in a development or test environment. Afterconfirming that the load files load data correctly, run them in your production environment. Ifyou use Microsoft Excel to create CSV load files, the date format differs from the required formatof MM-DD-YYYY.
Before using the Outline Load Utility, perform these tasks:
l Ensure that you maintain the line breaks in the sample data record provided that you modifyto define load files. Although you can use a text editor, Oracle recommends that you use aspreadsheet program to customize the sample data record, because some text editors mayremove the necessary line breaks.
l If member names start with zeros (0), change any numeric columns to text.
l Back up the application and application databases. See the Oracle Hyperion EnterprisePerformance Management System Backup and Recovery Guide.
l Set DIRECT_DATA_LOAD and DATA_LOAD_FILE_PATH as described in Chapter 5 of theOracle Hyperion Planning Administrator's Guide.
l Identify the Smart Lists that you must load. See “Required Smart Lists ” on page 57.
l Ensure that the data load settings are correct. See “Specify Data Load Settings” on page 55.
l If you modify dimensions, refresh the database.
283

l Ensure that you defined child members for the required dimension parent members. See“Reviewing the Dimensional Structure” on page 284.
l Identify the member names and entry names associated with Smart Lists. You specify thesenames in data load files. See “Identifying the Smart Lists to Load, and Their Entry Names”on page 285.
Important: Load metadata first; and then load data. Run load files in the order specified in“Required Data Load File Run Order” on page 287.
Reviewing the Dimensional StructureBefore loading data, ensure that you defined child members for the following dimensions andparent members. If you modified the dimensional outline, synchronize Smart Lists withdimension members and refresh the database before using the Outline Load Utility.
Note: You need not define the child members displayed below. These members are used in thesample load files, and are not required.
Table 32 Required Dimensionality and Sample Children
Dimension Parent Member Sample Child Members and Smart List Entries
Scenario Forecast and Current.
Note: Select BegBalance
Version Stage 1Stage 2
Position Total Existing Positionsl Mrk_4
l Admin_12
l Fac_Mngr
l survey_2
l education_hs_snr
l prk_sec_pa
l Fire_1
l Instructor
Employee Existing Employeesl Fergusson, Deborah
l Day, John
l Daniels, Mark
l MacKay, Derek
l Wu, Jonathan
284

Dimension Parent Member Sample Child Members and Smart List Entries
Entity Total Entityl tourism
l dept_tourism
l Parks and Recreation
l Department of Conservation
l Yorkville_Lib
Element Compensation elements:
l Benefits
l Salary grades
l Employer-paid taxes
l Additional earnings
l Benefits:
m Benefit 5
m benefit_1
m Dental
l Salary Grades
m Grade 1
m Grade 2
l Employer-paid taxes:
m Medicare
m SUTA
Accountl Personnel Expenses
l General Ledger accounts
l Personnel Expenses
m A100
m A120
l General Ledger accounts
m 600
m 601
Job Total Job Classl entry Faclty_Cor
l job_56
Identifying the Smart Lists to Load, and Their Entry NamesBefore loading Smart Lists and Smart List values, make a list of the Smart Lists used in the targetapplications. You must also note their associated member names and entry names.
ä To identify the Smart List to load and their entry names:
1 Log into Planning as an administrator.
2 Select Administration, then Manage, and then Smart Lists.
3 Select the Smart List, click Edit, and then select Entries.
4 Note the associated names.
To load Smart Lists, you will enter their names in theSmartListName column of the data loadfile. To load Smart List values, enter the corresponding entry names in the Entry Name columnof the data load file.
285

Although it depends on your application, you should probably load these commonly used SmartLists:
l Fund
l Program
l Project
l Entity
l Benefit Options
l Union code
l Job class
l Salary accounts
l Grade sequences or steps
l Location codes
About Load Files
Subtopics
l Required Data Load File Run Order
l About Creating Load Files and Verifying Loads
The first line in load file contains the header record columns that identifies the memberproperties and kinds of values to load. These are always budget item, data load cube name, Point-Of-View, and the kind of data to load. For example, this header record indicates that FTE datais being loaded:
Budget Item,Data Load Cube Name,Point-of-View,Proposed FTE,FTE Start Date,FTE End Date
The Point-of-View portion \ column contains information about the budget to which to loaddata (stage and version), and the artifacts to which you are loading data, or that are associatedwith the data you load (entity, position, employee and so on). Remove the placeholders provided(Entity1, Stage 1 and so on) to identify your budget and artifacts.
LINEITEM determines whether the kind of data that you want to load already exists. If it doesnot, a new record is loaded. If it does exist, it is updated with the new data you load. Forinformation about using LINEITEM to run incremental loads, see Command Line Parametersin the Oracle Hyperion Planning Administrator's Guide. The remaining portion of data load filescontain the metadata records . These are comma-separated lists of the data or values to load,and which represent Smart List selections in applications. For example:
LINEITEM("FTE and Status Assignments")>,HCP,"BegBalance,Local,Unspecified Element,Forecast,Stage 2,HR,No Year,Deborah Fergusson,Admin_Asst",1,01-01-2011,12-31-2012
You will replace the placeholders in the sample data record (Budget, Stage 1, Entity1, Employee1and so on) with the version and scenario of the budget to which you are loading data (ForecastStage 2, for example). You will also specify the appropriate entity (Human Resources, for
286
example), and the applicable employees or positions. For example, this code loads the followingFTE assignment data for employee1 in Entity1:
Budget Item,Data Load Cube Name,Point-of-View,Proposed FTE,FTE Start Date,FTE End Date <LINEITEM("FTE and Status Assignments")>,HCP,"BegBalance,Local,Unspecified Element,Forecast,Stage 2,HR,No Year,Deborah Fergusson,Admin_Asst",1,01-01-2011,12-31-2012
When run, this file loads the following to stage 2 of the forecast budget for Deborah Fergusson,an Administrative Assistant in Human Resources:
l A proposed FTE of 1
l The FTE start date as January 1, 2011
l The FTE end date as December 31, 2012
See “Loading Metadata and Data” on page 289.
Required Data Load File Run OrderTo ensure that your source data loads correctly, load artifacts in this order:
l Smart Lists
l Salary grades and salary grade details
l Compensation elements such as benefits and additional earnings
l Employees, positions, and jobs
l FTE and employee assignments
l Allocation details
See “Loading Metadata and Data” on page 289.
About Creating Load Files and Verifying Loads
Note: Before loading salary grades, compensation elements, positions, and employees, load therequired and optional Smart Lists.
ä Perform these tasks to create and verify data load files:
1 See “Requirements and Important Notes” on page 283.
2 Create a file in a tool such as Microsoft Excel. Note: Although you can use a text editor, it is best to usea spreadsheet program to customize the sample data record, because some text editors may notmaintain the necessary line breaks.
3 Copy and paste the code provided for the data you want to load (see the appropriate topic in “LoadingMetadata and Data” on page 289) into the file
287

4 Modify the code to specify the data that you want to load and the budget, or decision package, in whichto load it, and save as a CSV file.
In addition to specifying the member values to load, and modify variable placeholders suchas Position1, Employee1, and Entity1, you can also customize the sample data record byremoving:
l Placeholders for inapplicable data or data that you do not want to load without deletingthe comma after the placeholder. For example, to load a start date of January 1, 2011but to not load an end date, delete the end date but not the comma. For example,01-01-2011,, is correct; 01-01-2011, is not.
l Budget scenario and version used in the sample data record with your actual budgetscenario and version members
l Local if you are not using a multicurrency application
l Vacancy (for the Position, and the Employee configuration options)
5 Save the file in CSV format.
6 Perform a test run of the file, and then ensure that the correct metadata or data displays in theapplication. See “Testing Load Files” on page 311 and “Verifying Data Loads” on page 312.
7 After verifying files load data correctly, run them in your production environment. See “Running LoadFiles ” on page 314.
288

Loading Metadata and Data
Subtopics
l About Loading Data into Decision Package-Enabled Applications
l Loading Smart Lists and Smart List Values
l Loading Salary Grade Details
l Loading Salary Grade Detail Lines
l Loading Compensation Elements
l Loading Compensation Element Detail Lines
l Loading Employee Information
l Loading Position Information
l Loading Employee-Position Associations
l Loading Position FTE Information
l Loading Employee FTE Information
l Loading Position Salary Grade Information
l Loading Employee Salary Grade Information
l Loading Position Compensation Information
l Loading Employee Compensation Information
l Loading Position Allocation Information
l Loading Employee Allocation Information
l Loading Job Information
l Loading Employee Job Assignments and Details
About Loading Data into Decision Package-EnabledApplicationsBefore loading metadata and data, ensure that the application was created using the decisionpackage-enabled option. Use the sample data records provided in the following sections to loaddata into decision package enabled applications. Data specific to decision package-enabledapplications loads to Change Service Level or Unspecified Budget Requests. You do not need toreplace these two code elements.
Loading Smart Lists and Smart List ValuesBefore loading Smart Lists and Smart List values, identify the associated member and entrynames. To load Smart Lists, you specify their name in the Smart List Name column of the dataload file. To load Smart List values, you enter the corresponding entry name in the Entry Namecolumn in the data load file.
ä To load Smart Lists and entries:
1 Note the associated member and entry names. See “Identifying the Smart Lists to Load, and Their EntryNames” on page 285.
289

2 Create a file in a spreadsheet tool. Although you can use a text editor, it is best to use a spreadsheetprogram to customize the sample data record.
3 Copy and paste this code into the file:
SmartList Name, Operation, Entry Name, Entry Label Grade_Steps,addEntry,Step_1,Step Description1 Grade_Steps,addEntry,Step_2,Step Description2
4 For each Smart List to load, enter:
l The Smart List name (Salary_Type and Grade_Steps for example) in the SmartListName column.
l The name and label of all the entries to load (Step_1, Step_2, and Step_3 in this case)in the Entry Name and Entry Label columns.
l Enter addEntry as the operation.
5 Repeat steps 1-4 to load all required Smart Lists, custom Smart Lists, and their entries.
6 Save the file in CSV format.
7 Perform a test run of the file, and then ensure that the Smart Lists loaded correctly in the application.See “Testing Load Files” on page 311.
8 After verify the data load, run the CSV file in the production environment. See “Running Load Files ” onpage 314.
Loading Salary Grade Details
ä To load Smart Lists for salary grade details:
1 Review the member and entry names for these Smart Lists:
Table 33 Smart Lists for Salary Grade Data
Smart List Associated Member Names Entry Names
Salary_Type Salary Grade Type Input Grade_Step, Grade_Rate and so on
Salary_Basis Grade Salary Basis Input Annual, Monthly, and so on
Yes_No Allow Value Change Input Yes and No
HR_Budget_Set Sample Budget Set
2 Ensure that members for salary grades (Grade 1, Grade 2, Grade 3 etc.) exist under Salary Grades inthe Element dimension.
3 Create a file in a text editor or spreadsheet tool.
4 Copy and paste the code for your application type (decision package-enabled or regular) into the file:
l Non decision package-enabled application:
Budget Item,Data Load Cube Name,Point-of-View,Salary Grade Type Input,Grade Salary Basis Input,Allow Value Change Input,Element Start Date,Element End Date Unspecified Budget Item,HCP,"BegBalance,Local,Grade 1,Budget,Stage 1,Unspecified
290

Entity,No Year,Vacancy,Default Position",Grade_Step,Annual,Yes,01-01-2010,12-31-2010
l Decision package-enabled application:
Budget Item,Data Load Cube Name,Point-of-View,Salary Grade Type Input,Grade Salary Basis Input,Allow Value Change Input,Element Start Date,Element End Date Unspecified Budget Item,HCP,"BegBalance,Local,Grade 1,Budget,Stage 1,Unspecified Entity,No Year,Vacancy,Default Position,Unspecified Budget Request",Grade_Step,Annual,Yes,01-01-2010,12-31-2010
5 Replace Grade 1 with the name of the salary grade to load.
Example: You want to load a second monthly-based salary grade and an associated gradestep on September 30, 2012 for use in the Forecast budget for 2013. You want to preventPlanners from changing the grade value at the position level. To load the salary grade, youwould specify the following code given your application type:
Non decision package-enabled application:
Budget Item,Data Load Cube Name,Point-of-View,Salary Grade Type Input,Grade Salary Basis Input,Allow Value Change Input,Element Start Date,Element End Date Unspecified Budget Item,HCP,"BegBalance,Local,Grade 1,Forecast,Stage 1,Unspecified Entity,Unspecified Element,No Year,Vacancy,Default Position",Grade_Step,Annual,Yes,09-30-2012,
Decision Package-Enabled Application:
Budget Item,Data Load Cube Name,Point-of-View,Salary Grade Type Input,Grade Salary Basis Input,Allow Value Change Input,Element Start Date,Element End Date Unspecified Budget Item,HCP,"BegBalance,Local,Grade 1,Forecast,Stage 1,Unspecified Entity,Unspecified Element,No Year,Vacancy,Default Position,Unspecified Budget Request",Grade_Step,Annual,Yes, 09-30-2012,
6 Save the file in CSV format.
7 Perform a test run of the CSV file. See “Testing Load Files” on page 311.
8 In the application, confirm that the salary grade information loaded correctly. See “Verifying Data Loads”on page 312.
9 After ensuring that the file loads data correctly, run it in production. See “Running Load Files ” on page314.
Loading Salary Grade Detail Lines
ä To load salary grade details:
1 Review the member and entry names for these Smart Lists, and ensure that the salary steps or sequencesto load are defined:
Table 34 Grade Step and Sequence Smart Lists
Smart List Associated Member Names Entry Names
Grade_Steps Grade Step Step1, Step2, and so on
Grade_Sequence Grade Sequence (for rate-based grades) Sequence1, Sequence2, and so on
291

2 Create a file in a text editor or spreadsheet tool.
3 Copy and paste the code for your application type (decision package-enabled or regular) into the file:
l Non decision package-enabled application:
Budget Item,Data Load Cube Name,Point-of-View,Salary Grade Type Input,Grade Salary Basis Input,Allow Value Change Input,Element Start Date,Element End Date<LINEITEM("Element Changes")>Changes")>,HCP,"BegBalance,Local,Grade 1,Budget,Stage 1,Unspecified Entity,No Year,Vacancy,Default Position",S_2,3000,01-01-2012, 12-31-2012
l Decision package-enabled application:
Budget Item,Data Load Cube Name,Point-of-View,Salary Grade Type Input,Grade Salary Basis Input,Allow Value Change Input,Element Start Date,Element End Date<LINEITEM("ElementChanges")>,HCP,"BegBalance,Local,Grade 1,Budget,Stage 1,Unspecified Entity,No Year,Vacancy,Default Position,Unspecified Budget Request",S_2,3000,01-01-2012, 12-31-2012
4 Replace S_2 with the name of the grade step to load.
5 Specify the value of the grade in the Option Value column, and specify the dates during which the gradeis effective.
Example: To load a fourth grade step (S4) with an option value of $65,000 to be effective onApril 1, 2011, you would specify the code below for your application type:
Non decision package-enabled application:
<LINEITEM("Element Changes")>,HCP,"BegBalance,Local,Grade 4,Budget,Stage 1,Unspecified Entity,Unspecified Element,FY12,Default Position",S4,65000,04-01-2011,
Decision Package-Enabled Application:
<LINEITEM("ElementChanges"),HCP,"BegBalance,Local,Grade 4,Budget,Stage 1,Unspecified Entity,Unspecified Element,FY12,Default Position,Unspecified Budget Request",S4,65000,04-01-2011,
6 Save the file in CSV format.
7 Perform a test run of the CSV file. See “Testing Load Files” on page 311.
8 In the application, ensure the correctly salary data displays. See “Verifying Data Loads” on page 312.
9 After confirming that the file loads data properly, run it in the production environment. See “RunningLoad Files ” on page 314.
Loading Compensation Elements
ä To load compensation elements:
1 Review the member and entry names associated with these Smart Lists:
Table 35 Compensation Element Smart Lists
Smart List Associated Member Names
Yes_No Options Based
292
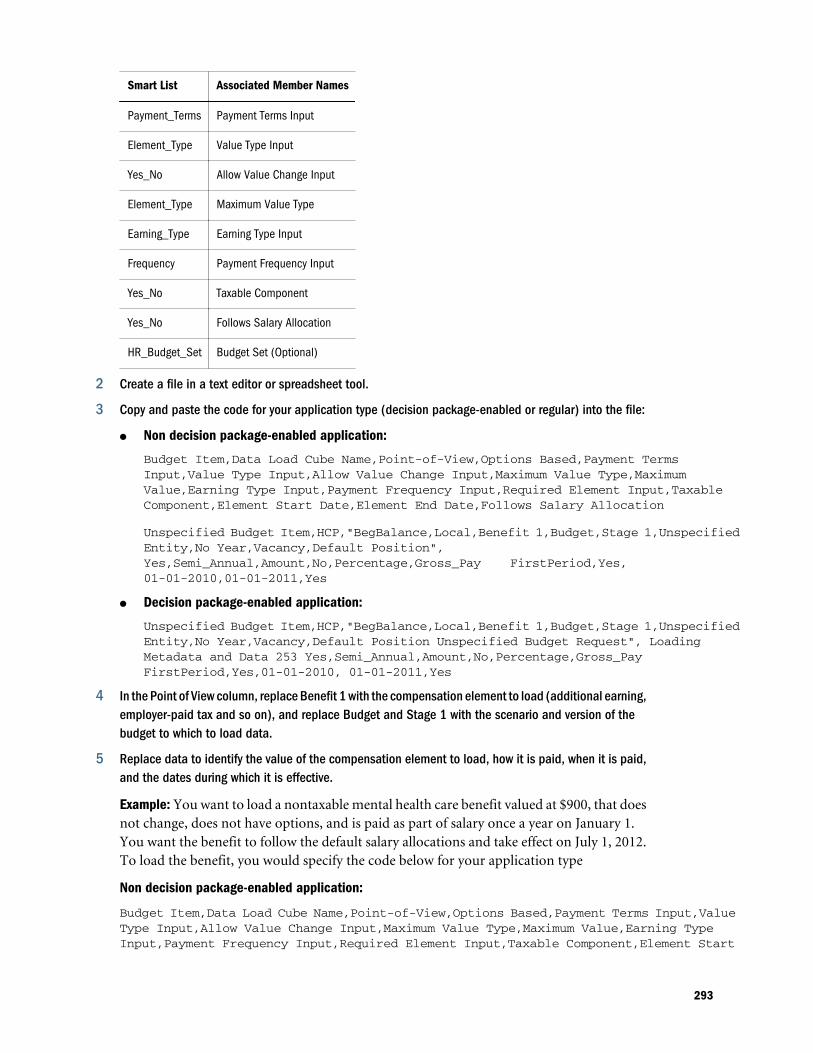
Smart List Associated Member Names
Payment_Terms Payment Terms Input
Element_Type Value Type Input
Yes_No Allow Value Change Input
Element_Type Maximum Value Type
Earning_Type Earning Type Input
Frequency Payment Frequency Input
Yes_No Taxable Component
Yes_No Follows Salary Allocation
HR_Budget_Set Budget Set (Optional)
2 Create a file in a text editor or spreadsheet tool.
3 Copy and paste the code for your application type (decision package-enabled or regular) into the file:
l Non decision package-enabled application:
Budget Item,Data Load Cube Name,Point-of-View,Options Based,Payment Terms Input,Value Type Input,Allow Value Change Input,Maximum Value Type,Maximum Value,Earning Type Input,Payment Frequency Input,Required Element Input,Taxable Component,Element Start Date,Element End Date,Follows Salary Allocation
Unspecified Budget Item,HCP,"BegBalance,Local,Benefit 1,Budget,Stage 1,Unspecified Entity,No Year,Vacancy,Default Position", Yes,Semi_Annual,Amount,No,Percentage,Gross_Pay FirstPeriod,Yes,01-01-2010,01-01-2011,Yes
l Decision package-enabled application:
Unspecified Budget Item,HCP,"BegBalance,Local,Benefit 1,Budget,Stage 1,Unspecified Entity,No Year,Vacancy,Default Position Unspecified Budget Request", Loading Metadata and Data 253 Yes,Semi_Annual,Amount,No,Percentage,Gross_Pay FirstPeriod,Yes,01-01-2010, 01-01-2011,Yes
4 In the Point of View column, replace Benefit 1 with the compensation element to load (additional earning,employer-paid tax and so on), and replace Budget and Stage 1 with the scenario and version of thebudget to which to load data.
5 Replace data to identify the value of the compensation element to load, how it is paid, when it is paid,and the dates during which it is effective.
Example: You want to load a nontaxable mental health care benefit valued at $900, that doesnot change, does not have options, and is paid as part of salary once a year on January 1.You want the benefit to follow the default salary allocations and take effect on July 1, 2012.To load the benefit, you would specify the code below for your application type
Non decision package-enabled application:
Budget Item,Data Load Cube Name,Point-of-View,Options Based,Payment Terms Input,Value Type Input,Allow Value Change Input,Maximum Value Type,Maximum Value,Earning Type Input,Payment Frequency Input,Required Element Input,Taxable Component,Element Start
293

Date,Element End Date,Follows Salary Allocation Unspecified Budget Item,HCP,"BegBalance,Local,Pharmacy,Budget,Stage 1,Unspecified Entity,No Year,Vacancy,Default Position",No,Annually,Amount,No,,,Gross_Pay,FirstPeriod,Yes,No,07-01-2012,,Yes
Decision package-enabled application:
Budget Item,Data Load Cube Name,Point-of-View,Options Based,Payment Terms Input,Value Type Input,Allow Value Change Input,Maximum Value Type,Maximum Value,Earning Type Input,Payment Frequency Input,Required Element Input,Taxable Component,Element Start Date,Element End Date,Follows Salary Allocation Unspecified Budget Item,HCP,"BegBalance,Local,Pharmacy,Budget,Stage 1,Unspecified Entity,No Year,Vacancy,Default Position Unspecified Budget Request",No,Annually,Amount,No,,,Gross_Pay,FirstPeriod,Yes,No, 07-01-2012,,Yes
6 Save the file in CSV format.
7 Perform a test run of the CSV files. See “Testing Load Files” on page 311.
8 Open the application, and ensure that compensation elements and details load properly. See “VerifyingData Loads” on page 312.
9 After confirming that the file loads compensation data correctly, run it in the production environment.See “Running Load Files ” on page 314.
Loading Compensation Element Detail Lines
ä To load compensation element data:
1 Identify the member and entry names associated with compensation element Smart Lists. See “CommonSmart Lists” on page 58.
2 Create a file in a text editor or spreadsheet tool.
3 Copy and paste the code for your application type into the file:
l Non decision package-enabled application:
Budget Item,Data Load Cube Name,Point-of-View,Options,Option Value,Option Start Date,Option End Date,Maximum Value <LINEITEM("Element Changes")>,HCP,"BegBalance,Local,No Year,Pharmacy,Budget,Stage 1,Unspecified Entity,Vacancy,Default Position",Self,2000,04-01-2011,,3000
l Decision package-enabled application:
Budget Item,Data Load Cube Name,Point-of-View,Options,Option Value,Option Start Date,Option End Date,Maximum Value <LINEITEM("ElementChanges")>,HCP,"BegBalance,Local,No Year,Pharmacy,Budget,Stage 1,Unspecified Entity,Vacancy,Default Position,Unspecified Budget Request",Self,2000,04-01-2011,,3000
4 In the Point-of-View column, replace stage 1 with the name of the budget stage and version to whichto load compensation details.
5 Specify the benefit that you are loading, and all benefit details such as option value, start date, andmaximum value.
294

6 In the appropriate columns, replace all sample data record to reference your actual data, and specifydata such as the options for the compensation element, its maximum value, and when the compensationelement settings are effective.
Example: To specify that benefit 5 has value of $2,000, a maximum value of $3,000 that cannotbe exceeded, applies to an employees spouse and children, and is effective on April 1, 2011,you would specify the code below based on your application type:
Non decision package-enabled application:
<LINEITEM("Element Changes")>,HCP,"BegBalance,Local,Benefit 5,Budget,Stage1, Unspecified Entity,Vacany,Default Position",Spouse and Children,2000,04-01-2011,,3000
Decision package-enabled application example:
<LINEITEM("ElementChanges")>,HCP,"BegBalance,Local,Benefit 5,Budget,Stage1, Unspecified Entity,Vacany,Default Position,Unspecified Budget request",Spouse and Children,2000,04-01-2011,,3000
7 Save the file in CSV format.
8 Perform a test run of the CSV files. See “Testing Load Files” on page 311.
9 In the application, ensure that the compensation elements loaded correctly. See “Testing Load Files”on page 311.
10 After confirming that the CSV file loads compensation data correctly, run the file in the productionenvironment. See “Running Load Files ” on page 314.
Loading Employee Information
Does not apply to the Position configuration option
ä To load employee data:
1 Review the names associated with these Smart Lists:
Table 36 Employee Data Smart Lists
Smart List Associated Member Names Entry Names
Full_Time_Status FT/PT
Employee_Type Employee Type Contract, replacement, temporary, regular, and so on
Pay_Type Pay Type
Union_Code Union Code union_1, union_2 and so on
Location_Code Location Code location_1, location_2 and so on
2 Create a file in a text editor or spreadsheet tool.
3 Copy the code for your application type into the file:
l Non decision package-enabled application:
295
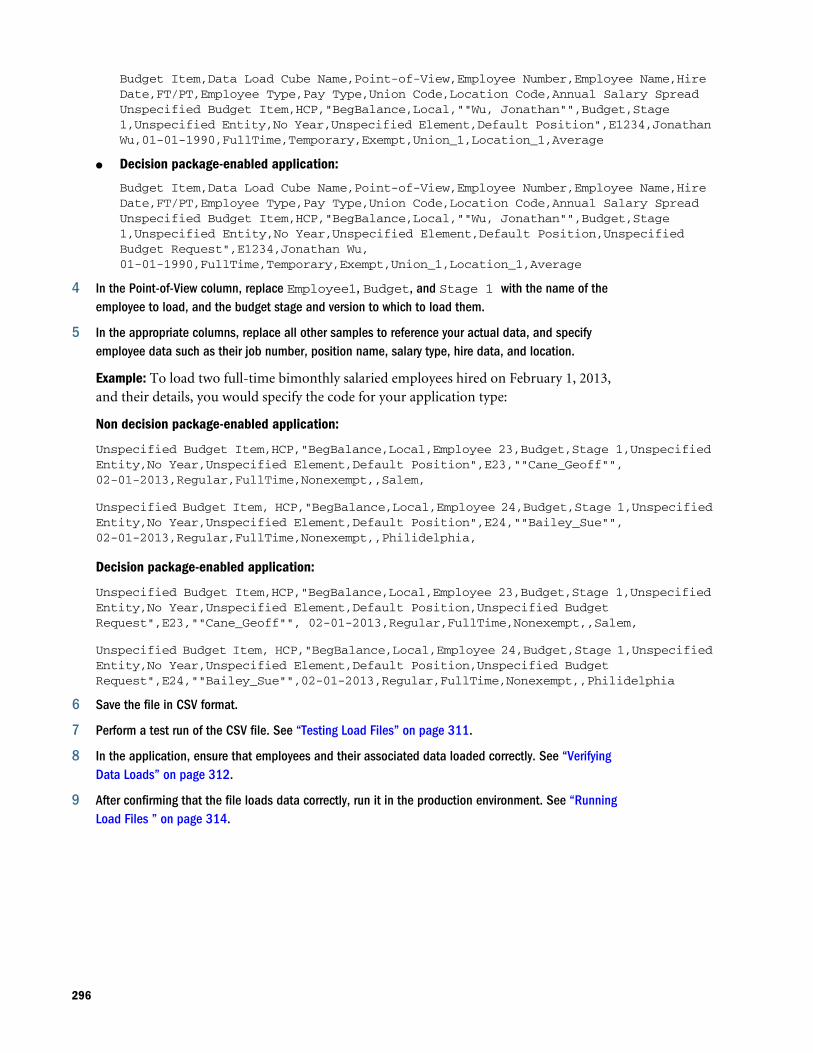
Budget Item,Data Load Cube Name,Point-of-View,Employee Number,Employee Name,Hire Date,FT/PT,Employee Type,Pay Type,Union Code,Location Code,Annual Salary Spread Unspecified Budget Item,HCP,"BegBalance,Local,""Wu, Jonathan"",Budget,Stage 1,Unspecified Entity,No Year,Unspecified Element,Default Position",E1234,Jonathan Wu,01-01-1990,FullTime,Temporary,Exempt,Union_1,Location_1,Average
l Decision package-enabled application:
Budget Item,Data Load Cube Name,Point-of-View,Employee Number,Employee Name,Hire Date,FT/PT,Employee Type,Pay Type,Union Code,Location Code,Annual Salary Spread Unspecified Budget Item,HCP,"BegBalance,Local,""Wu, Jonathan"",Budget,Stage 1,Unspecified Entity,No Year,Unspecified Element,Default Position,Unspecified Budget Request",E1234,Jonathan Wu, 01-01-1990,FullTime,Temporary,Exempt,Union_1,Location_1,Average
4 In the Point-of-View column, replace Employee1, Budget, and Stage 1 with the name of theemployee to load, and the budget stage and version to which to load them.
5 In the appropriate columns, replace all other samples to reference your actual data, and specifyemployee data such as their job number, position name, salary type, hire data, and location.
Example: To load two full-time bimonthly salaried employees hired on February 1, 2013,and their details, you would specify the code for your application type:
Non decision package-enabled application:
Unspecified Budget Item,HCP,"BegBalance,Local,Employee 23,Budget,Stage 1,Unspecified Entity,No Year,Unspecified Element,Default Position",E23,""Cane_Geoff"",02-01-2013,Regular,FullTime,Nonexempt,,Salem,
Unspecified Budget Item, HCP,"BegBalance,Local,Employee 24,Budget,Stage 1,Unspecified Entity,No Year,Unspecified Element,Default Position",E24,""Bailey_Sue"",02-01-2013,Regular,FullTime,Nonexempt,,Philidelphia,
Decision package-enabled application:
Unspecified Budget Item,HCP,"BegBalance,Local,Employee 23,Budget,Stage 1,Unspecified Entity,No Year,Unspecified Element,Default Position,Unspecified Budget Request",E23,""Cane_Geoff"", 02-01-2013,Regular,FullTime,Nonexempt,,Salem,
Unspecified Budget Item, HCP,"BegBalance,Local,Employee 24,Budget,Stage 1,Unspecified Entity,No Year,Unspecified Element,Default Position,Unspecified Budget Request",E24,""Bailey_Sue"",02-01-2013,Regular,FullTime,Nonexempt,,Philidelphia
6 Save the file in CSV format.
7 Perform a test run of the CSV file. See “Testing Load Files” on page 311.
8 In the application, ensure that employees and their associated data loaded correctly. See “VerifyingData Loads” on page 312.
9 After confirming that the file loads data correctly, run it in the production environment. See “RunningLoad Files ” on page 314.
296

Loading Position Information
Does not apply to the Employee configuration option
ä To load position data:
1 Review the member and entry names associated with these Smart Lists:
Table 37 Position Data Smart Lists
Smart List Associated Member Names Entry Names
Position_Type Position Type Contract, temporary, and so on
Job_Class Job job_1, job_2 and so on
Location_Code Location Code location_1, location_2 and so on
Union_Code Union Code union_1, union_2, and so on
Salary_Basis Salary Basis Monthly, weekly, and so on
2 Perform the steps for your application type:
l Non decision package-enabled application:
a. Create a file in a text editor or spreadsheet tool.
b. Copy this code into the file:
Budget Item,Data Load Cube Name,Point-of-View,Position Number,Position Name,Position Type,Job,Position Start Date,Position End Date,Adjustment Date,Default Weekly Hours,Union Code,Location Code,Annual Salary Spread
l Decision package-enabled application:
a. Create two files in a text editor or spreadsheet tool.
b. Copy this code into the first file:
c. Copy this code into the second file:
3 In the Point-of-View column(s), replace the placeholders such as Entity1 and Position1with thename of the position you are loading, the cost center or department with which it is associated, and thebudget stage to which to load the position.
4 In the appropriate columns, specify position data such as their name, number, type, start date, and ifcompensation element values can be overridden. Replace all other sample data record to referenceyour actual data.
5 Save the files in CSV format.
6 Perform a test run of the CSV file to ensure that source positions load and display correctly. See “TestingLoad Files” on page 311 and “Verifying Data Loads” on page 312.
7 After confirming that the files load data correctly, run them in the production environment. See “RunningLoad Files ” on page 314.
297

Loading Employee-Position Associations
Applies only to the Position and Employee configuration option
ä To load position and employee assignment data:
1 Review the entry and member names associated with employee and position-related Smart Lists, suchas the following. See “Common Smart Lists” on page 58.
Table 38 Employee Smart Lists
Smart List Associated Member Names
Position_Type Position Type
Job_Class Job
Location_Code Location Code
Union_Code Union Code
Salary_Basis Salary Basis
Full_Time_Status FT/PT
Employee_Type Employee Type
Pay_Type Pay Type
2 Perform the steps for your application type:
l Non decision package-enabled application:
a. Create a file in a text editor or spreadsheet tool.
b. Copy and paste this code into the file:
Budget Item,Data Load Cube Name,Point-of-View,Position Number,Position Name,Position Type,Job,Position Start Date,Position End Date,Adjustment Date,Default Weekly Hours,Salary Basis,Union Code,Location Code,Annual Salary Spread,Employee Number,Employee Name,Hire Date,FT/PT,Employee Type,Pay Type
l Decision package-enabled application:
a. Create two files in a text editor or spreadsheet tool.
b. Copy and paste this code into the first file:
Budget Item,Data Load Cube Name,Point-of-View,Position Number,Position Name,Position Type,Job,Position Start Date,Position End Date,Adjustment Date,Default Weekly Hours,Salary Basis,Union Code,Location Code,Annual Salary Spread,Employee Number,Employee Name,Hire Date,FT/PT,Employee Type,Pay Type Unspecified Budget Item,HCP,"BegBalance,Local,Admin_12,Budget,""Day, John"",Stage 1,Admission,No Year,Unspecified Element,Unspecified Budget Request",P32,Budget Admissions position,Single_Incumbent,Job_56, 01-06-2012,,,30,,,Bangor_1,Average,167,John Day, 08-15-2012,FullTime,Regular,Nonexempt
c. Copy and paste this code into the second file:
Budget Item,Data Load Cube Name,Point-of-View,Position Number,Position Name,Position Type,Job,Position Start Date,Position End Date,Adjustment
298

Date,Default Weekly Hours,Salary Basis,Union Code,Location Code,Annual Salary Spread,Employee Number,Employee Name,Hire Date,FT/PT,Employee Type,Pay Type Unspecified Budget Item,HCP,"BegBalance,Local,Admin_12,Budget,""Day, John"",Stage 1,Admission,No Year,Unspecified Element,Change Service Level",P32,Budget Admissions position,Single_Incumbent,Job_56, 01-06-2012,,,30,,,Bangor_1,Average,167,John Day, 08-15-2012,FullTime,Regular,Nonexempt
3 In the Point-of-View column, replace Entity1, Position1, Employee1, Budget, and Stage1 with the name of the positions and employees whose assignments to load, the associated cost centeror department, and the budget stage.
4 Replace all other examples (names of employees, locations etc.) to reference your actual data, andspecify assignment data such job name, job number, name of employee to assign to the job, andemployee type and salary basis.
5 Save the file(s) in CSV format.
6 Perform a test run of the CSV files to ensure that the correct employee-position assignments load anddisplay correctly. See “Testing Load Files” on page 311 and “Verifying Data Loads” on page 312.
7 After confirming that data loads correctly, run the files in the production environment. See “RunningLoad Files ” on page 314.
Loading Position FTE Information
ä To load position FTEs:
1 Identify the member and entry names associated with FTE-related Smart Lists. See “Common SmartLists” on page 58.
2 Create a file in a text editor or spreadsheet tool.
3 Copy the code for your application type into the file:
l Non decision package-enabled application:
Budget Item,Data Load Cube Name,Point-of-View,Proposed FTE,FTE Start Date,FTE End Date <LINEITEM("FTE and Status Assignments")>,HCP,"BegBalance,Local,Unspecified Element,Budget,Stage 1,Unspecified Entity,No Year,Vacancy,Mrk_3",1,01-01-2011,12-31-2012
l Decision packaged-enabled application:
Budget Item,Data Load Cube Name,Point-of-View,Proposed FTE,FTE Start Date,FTE End Date <LINEITEM("FTE and Status Assignments")>,HCP,"BegBalance,Local,Unspecified Element,Budget,Stage 1,Unspecified Entity,No Year,Vacancy,Change Service Level,Mrk_3",1,01-01-2011, 12-31-2012
4 In the Point-of-View column replace Entity1, Position1, Budget, and Stage 1 with the nameof the positions whose FTEs to load, and the budget stage and version to which to load the positionFTEs.
5 Replace all other sample data record to reference your actual data, and specify the proposed FTE , datesduring which it is effective, and applicable position.
299

Example: You want to load a proposed FTE of 7 to the Senior Marketer position (Mrk_3).The FTE is effective July 1, 2011 and does not have an end date. To load the FTE, you wouldspecify the appropriate code below:
l Non decision package-enabled application:
Budget Item,Data Load Cube Name,Point-of-View,Proposed FTE,FTE Start Date,FTE End Date <LINEITEM("FTE and Status Assignments")>,HCP,"BegBalance,Local,Unspecified Element,Budget,Stage 1,Unspecified Entity,No Year,Vacancy,Mrk_3",7,01-07-2011,
l Decision package-enabled application:
Budget Item,Data Load Cube Name,Point-of-View,Proposed FTE,FTE Start Date,FTE End Date <LINEITEM("FTE and Status Assignments")>,HCP,"BegBalance,Local,Unspecified Element,Budget,Stage 1,Unspecified Entity,No Year,Vacancy,Change Service Level,Mrk_3",7,01-07-2011,
6 Save the file in CSV format.
7 Perform a test run of the CSV file to confirm that the correct FTE data is loaded to the specified position.See “Verifying Data Loads” on page 312 and “Testing Load Files” on page 311.
8 After ensuring that the file loads data correctly, run it in the production environment. See “Running LoadFiles ” on page 314.
Loading Employee FTE Information
Does not apply to the Position configuration option
ä To load employee FTE:
1 Identify the member and entry names associated with FTE-related Smart Lists. See “Common SmartLists” on page 58.
2 Create a file in a text editor or spreadsheet tool.
3 Copy and paste the code for your application type into the file:
l Non decision package-enabled application:
Budget Item,Data Load Cube Name,Point-of-View,Proposed FTE,FTE Start Date,FTE End Date <LINEITEM("FTE and Status Assignments")>,HCP,"BegBalance,Local,Unspecified Element,Budget,Stage 1,Entity1,No Year,Employee1,Position1",1,01-01-2010,12-31-2010
l Decision package-enabled application:
Budget Item,Data Load Cube Name,Point-of-View,Proposed FTE,FTE Start Date,FTE End Date <LINEITEM("ElementChanges")>,HCP,"BegBalance,Local,Unspecified Element,Budget,Stage 1,Unspecified Entity,No Year,Vacancy,Change Service Level,Mrk_3",1,01-01-2011, 12-31-2012
4 In the Point-of-View column, replace Entity1, Employee1, Positon1, Budget, and Stage1 with the name of the employees for whom you are loading FTEs, their positions, their cost center ordepartment, and the budget stage and version.
Note: For the Employee configuration option, replace Position with Job Code.
300

5 In the second line of code, specify data such as the FTE, the position to apply it, and the dates duringwhich to apply it.
Example: To load an FTE of 1, that is effective March 1, 2011 to March 2, 2012 for DerekMacKay holding the Survey Implementation position (survey_2) in the Office of Tourism(dept_tourism), you would specify the appropriate code below:
Non decision package-enabled application example:
Budget Item,Data Load Cube Name,Point-of-View,Proposed FTE,FTE Start Date,FTE End Date <LINEITEM("FTE and Status Assignments")>,HCP,"BegBalance,Local,Unspecified Element,Budget,Stage 1,dept_tourism,No Year,""MacKay, Derek"",survey_2",1,03-01-2011,03-01-2012,
Decision package-enabled application example:
Budget Item,Data Load Cube Name,Point-of-View,Proposed FTE,FTE Start Date,FTE End Date<LINEITEM("FTE and Status Assignments")>,HCP,"BegBalance,Local,Unspecified Element,Budget,Stage 1,Unspecified Entity,No Year,Vacancy,Change Service Level,Mrk_3",7,01-07-2011,
6 Save the file in CSV format.
7 Perform a test run of the CSV file to ensure that it loads employee FTE is correctly. See “Verifying DataLoads” on page 312 and “Testing Load Files” on page 311.
8 After confirming that the file loads data correctly, run it in the production environment. See “RunningLoad Files ” on page 314.
Loading Position Salary Grade Information
Does not apply to the Employee configuration option
ä To load salary grades to positions:
1 Identify the member and entry names associated with position and salary-related Smart Lists. See“Common Smart Lists” on page 58.
2 Create a file in a text editor or spreadsheet tool.
3 Copy and paste the code for your application type into the file:
l Non decision package-enabled application:
Budget Item,Data Load Cube Name,Point-of-View,Grade Step,Option Value,Override Option Value,Option Start Date,Option End Date,Grade Salary Basis Input,Allow Value Change Input,Salary Grade Type Input<LINEITEM("Element Changes")>,HCP,"BegBalance,Local,Grade 1,Budget,Stage 1,Entity1,No Year,Vacancy,Position1",Step1,2000,3000,01-01-2010,12-31-2010,Annual,Yes,Grade_Step
l Decision package-enabled application:
Budget Item,Data Load Cube Name,Point-of-View,Grade Step,Option Value,Override Option Value,Option Start Date,Option End Date,Grade Salary Basis Input,Allow Value Change Input,Salary Grade Type Input <LINEITEM("Element Changes")>,HCP,"BegBalance,Local,Grade 1,Budget,Stage 1,Entity1,No
301

Year,Vacancy,Position1,Change Service Level",Step1,2000,3000,01-01-2010,12-31-2010,Annual,Yes,Grade_Step
4 In the Point-of-View column, replace Position1, Budget, and Stage 1 with the positions to whichto load salary grades, and the budget stage and version. You can also replace Entity1 with thecost center or department associated with the position.
Note: For the Employee configuration option, replace Position with Job Code.
5 Customize the second line of code to specify salary grade data such as the grade step to load, the gradestep value, when to apply the grade step, and the position to which to apply the grade step.
Example: You want to load a third grade step (S3) to the 2013 forecast budget for the NewYork Public School System (ny_ss). The salary grade rate has a static option value of $59,000a year, applies to all New York city high school teachers (educaton_hs_snr) with 25 yearsseniority, is paid out once bimonthly, and is effective on August 28, 2013. To load the gradestep, specify the following based on your application type:
Non decision package-enabled application:
Budget Item,Data Load Cube Name,Point-of-View,Grade Step,Option Value,Override Option Value,Option Start Date,Option End Date,Grade Salary Basis Input,Allow Value Change Input,Salary Grade Type Input <LINEITEM("Element Changes")>,HCP,"BegBalance,Local,Grade 1,Budget,Stage 1,ny_ss,No Year,Vacancy,education_hs_snr",S3,59000,,09-28-2013,,Bi_Monthly,No,Grade_Step
Decision package-enabled:
Budget Item,Data Load Cube Name,Point-of-View,Grade Step,Option Value,Override Option Value,Option Start Date,Option End Date,Grade Salary Basis Input,Allow Value Change Input,Salary Grade Type Input <LINEITEM("Element Changes"),HCP,"BegBalance,Local,Grade 1,Budget,Stage 1,Entity1,No Year,Vacancy,Position1,Change Service Level",Step1,2000,3000,01-01-2010,12-31-2010,Annual,Yes,Grade_Step
6 Save the file in CSV format.
7 Perform a test run of the CSV file to ensure that it loads the correct salary information to positions. See“Verifying Data Loads” on page 312 and “Testing Load Files” on page 311.
8 After confirming that the file loads salary data correctly, run it in the production environment. See“Running Load Files ” on page 314.
Loading Employee Salary Grade Information
Does not apply to the Position configuration option
ä To load salary grades to employees:
1 Identify the member and entry names associated with employee and salary-related Smart Lists. See“Common Smart Lists” on page 58.
2 Create a file in a text editor or spreadsheet tool.
3 Copy and paste the code for your application type into the file:
302

l Non decision package-enabled application:
Budget Item,Data Load Cube Name,Point-of-View,Grade Step,Option Value,Override Option Value,Option Start Date,Option End Date,Grade Salary Basis Input,Allow Value Change Input,Salary Grade Type Input LINEITEM("Element Changes")>,HCP,"BegBalance,Local,Grade 1,Budget,Stage 1,Entity1,No Year,Employee1,Position1",Step1,2000,3000,1-01-2010,12-31-2010,Annual,Yes,Grade_Step <LINEITEM("Element Changes")>,HCP,"BegBalance,Local,Grade 1,Budget,Stage 1,Entity1,No Year,Employee1,Position1",Step1,3000,3500,01-01-2011,12-31-2011,Annual,Yes,Grade_Step
l Decision package-enabled application:
Budget Item,Data Load Cube Name,Point-of-View,Grade Step,Option Value,Override Option Value,Option Start Date,Option End Date,Grade Salary Basis Input,Allow Value Change Input,Salary Grade Type Input LINEITEM("Element Changes")>,HCP,"BegBalance,Local,Grade 1,Budget,Stage 1,Entity1,No Year,Employee1,Position1",Step1,2000,3000,1-01-2010,12-31-2010,Annual,Yes,Grade_Step LINEITEM("ElementChanges"),HCP,"BegBalance,Local,Grade 1,Budget,Stage 1,Entity1,No Year,Employee1,Position1,Change Service Level",Step1,3000,3500,01-01-2011, 12-31-2011,Annual,Yes,Grade_Step
4 In the Point-of-View column, make the required replacements. For example, replace Grade 1 with thesalary grade to load and Employee1 with employee to whom to load the grade.
Note: For the Employee configuration option, replace Position with Job Code.
5 Specify salary grade data such as the grade step to load, the grade step value, whether the salary gradecan be modified at the employee level, and when to apply the salary grade.
Example: Assume you want to load a new grade value (value_3) to an existing salary grade(grade_36) to apply to the budgets for James Williams, the State Park Security PatrolRecreation Facilitator (prk_sec_pat) in the department of Tourism (tourism). The salary is$46,000 a year, paid monthly, and can be increased by $4,000 on July 1, 2014. You want toapply the grade on January 1, 2013. To do so, you would specify the appropriate code below:
Non decision package-enabled application:
Budget Item,Data Load Cube Name,Point-of-View,Grade Step,Option Value,Override Option Value,Option Start Date,Option End Date,Grade Salary Basis Input,Allow Value Change Input,Salary Grade Type Input <LINEITEM("Element Changes")>,HCP,"BegBalance,Local,Grade 36,Budget,Stage 1,tourism,No Year,""James, William"",prk_sec_pa,",,46000,4000,01-01-2013,,Monthly,Yes,Value
Decision-packaged enabled application:
Budget Item,Data Load Cube Name,Point-of-View,Grade Step,Option Value,Override Option Value,Option Start Date,Option End Date,Grade Salary Basis Input,Allow Value Change Input,Salary Grade Type Input <LINEITEM("Element Changes"),HCP,"BegBalance,Local,Grade 36,Budget,Stage 1,Change Service Level,tourism,No Year,""James, William"",prk_sec_pa,",,46000,4000,01-01-2013,,Monthly,Yes,Value
6 Save the file in CSV format.
7 Perform a test run of the CSV file See “Testing Load Files” on page 311.
8 In the application, ensure that salaries loaded correctly to the employees specified.
303

9 After confirming that the data load file loads the correctly data, run it in the production environment.See “Running Load Files ” on page 314.
Loading Position Compensation Information
Does not apply to the Employee configuration option
ä To load compensation information to positions:
1 Identify the member and entry names associated with position and compensation-related Smart Lists.See “Common Smart Lists” on page 58.
2 Create a file in a text editor or spreadsheet tool.
3 Copy the code for your application type into the file:
l Non decision package-enabled application:
Budget Item,Data Load Cube Name,Point-of-View,Options,Option Value,Override Option Value,Option Start Date,Option End Date,Taxable Component,Allow Value Change Input,Payment Frequency Input,Payment Terms Input
l Decision package-enabled application:
<LINEITEM("ElementChanges")>,HCP,"BegBalance,Local,benefit_1,Forecast,Stage 1,Change Service Level,FD_3,No Year,""Daniels, Mark"",Fire_1",Self,1100,, 03-01-2012,,No,No,FirstPeriod,Annually
4 Customize the data in the Point-of-View column. For example, replace Position1 with the positionto which to load compensation data, and Entity1 with the cost center or department associated withthe position. Replace Element 1 with the name of the compensation elements whose details you areloading to positions.
Note: For the Employee configuration option, replace Position with Job Code.
5 Specify position and compensation data such as option value, adjusted value, and if the element istaxed.
6 Save the file in CSV format.
7 Perform a test run of the file, and then ensure that it loaded compensation information to positionscorrectly in the application. See “Testing Load Files” on page 311 and “Verifying Data Loads” on page312.
8 After verifying the data file, run it in the production environment. See “Running Load Files ” on page314.
304

Loading Employee Compensation Information
Does not apply to the Position configuration option
ä To load compensation information to employees:
1 Identify the member and entry names associated with employee and compensation element-relatedSmart Lists. See “Common Smart Lists” on page 58.
2 Create a file in a text editor or spreadsheet tool.
3 Copy and paste the code for your application type into the file:
l Non decision package-enabled application:
Budget Item,Data Load Cube Name,Point-of-View,Options,Option Value,Override Option Value,Option Start Date,Option End Date,Taxable Component,Allow Value Change Input,Payment Frequency Input,Payment Terms Input <LINEITEM("Element Changes")>,HCP,"BegBalance,Local,Pharmacy,Budget,Stage 1,FD_3,No Year,""Fisher, Claire"",Clerk_1",Spouse,2000,3000,01-01-2010, 12-31-2010,Yes,Yes,FirstPeriod,Semi_Annual <LINEITEM("Element Changes")>,HCP,"BegBalance,Local,Dental,Budget,Stage 1,FD_4,No Year,""Fisher, Claire"",Clerk_1",Spouse,1500,2000,01-01-2010, 12-31-2010,Yes,Yes,FirstPeriod,Semi_Annual
l Decision package-enabled application:
Budget Item,Data Load Cube Name,Point-of-View,Options,Option Value,Override Option Value,Option Start Date,Option End Date,Taxable Component,Allow Value Change Input,Payment Frequency Input,Payment Terms Input <LINEITEM("Element Changes")>,HCP,"BegBalance,Local,Pharmacy,Budget,Stage 1,Change Service Level,FD_3,No Year,""Fisher, Claire"",Clerk_1",Spouse,2000,3000,01-01-2010, 12-31-2010,Yes,Yes,FirstPeriod,Semi_Annual <LINEITEM("Element Changes")>,HCP,"BegBalance,Local,Dental,Budget,Stage 1,Change Service Level,FD_4,No Year,""Fisher, Claire"",Clerk_1",Spouse,1500,2000,01-01-2010, 12-31-2010,Yes,Yes,FirstPeriod,Semi_Annual
4 Customize the data in the Point-of-View column, and the compensation data to load. For example,replace Pharmacy, Fisher, Claire, and Clerk_1 to represent the appropriate benefits,employee, and position.
5 Specify the compensation data and values to load such as option value, start date, and if thecompensation is taxable.
6 Save the file in CSV format.
7 Perform a test run of the CSV file. See “Testing Load Files” on page 311.
8 In the application, review compensation element tabs (benefits, for example) to ensure that data loadedcorrectly See “Verifying Data Loads” on page 312.
9 Run it in the production environment. See “Running Load Files ” on page 314.
305

Loading Position Allocation Information
Does not apply to the Employee configuration option
Before loading, ensure entries for all account segments or chart fields used in allocations existin the appropriate Smart Lists (Account_List, Entity_List, Fund_List, Program_List, andProject_List, for example).
ä To load allocations to positions:
1 Identify the member and entry names associated with position and allocation-related Smart Lists. See“Common Smart Lists” on page 58.
2 Create a file in a text editor or spreadsheet tool.
3 Copy the code for your application type into the file:
l Non decision package-enabled application:
Budget Item,Data Load Cube Name,Point-of-View,Account Segment,Entity Segment,Fund Segment, Program Segment, Project Segment,Percentage Allocation,Allocation Start Date,Allocation End Date
<LINEITEM("Allocation Assignments")>,HCP,"BegBalance,Local,Unspecified Element,Budget,Stage 1,y_arts,No Year,Vacancy,Instructor",A130,Bst_Pr_Rec,res10,class_8,Proj_10,35,06-01-2012,10-15-2012 <LINEITEM("Allocation Assignments")>,HCP,"BegBalance,Local,Unspecified Element,Budget,Stage 1,y_arts,No Year,Vacancy,Instructor",A130,Bst_Pr_Rec,srp001,class_8,Proj_10,65,06-01-2012,10-15-2012
l Decision package-enabled application:
<LINEITEM("Allocation Assignments")>,HCP,"BegBalance,Local,Unspecified Element,Budget,Stage 1,y_arts,No Year,Vacancy,Instructor",A130,Bst_Pr_Rec,res10,class_8,Proj_10,35,06-01-2012, 10-15-2012 <LINEITEM("Allocation Assignments")>,HCP,"BegBalance,Local,Unspecified Element,Budget,Stage 1,Change Service Level,y_arts,No Year,Vacancy,Instructor",A130,Bst_Pr_Rec,srp001,class_8,Proj_10,65,06-01-2012, 10-15-2012
4 Customize the data in the Point-of-View column. For example, replace y_arts and Instructorwith your specific entity and position.
Note: For the Employee configuration option, replace Position with Job Code.
5 Replace all other sample data with your employee and allocation data.
6 Specify the different General Ledger account segments or chart fields used in the allocation, thepercentage for each allocation, and when the allocations apply.
Example: You want to load two allocations to finance the Instructor of a Summer/Fallpainting program (pnt_4) at the Youth Arts office (y_arts) in a Boston recreation center.The allocations use the same Entity segment for the municipal Boston Parks and RecreationDepartment (Bst_Pr_Rec), Account segment (11001), and program segment (class_8). Thefirst allocations is for 35% from the reserved fund (res10), begins on June 1, 2012, and ends
306

October 15, 2012. The second allocation is for 65% from the surplus fund (srp001), beginsJune 1, 2012, and ends October 15, 2012
To load the allocations, modify the code as follows to identify the different General Ledgeraccount segments, allocation percentages, and dates:
l Non decision package-enabled application:
<LINEITEM("Allocation Assignments")>,HCP,"BegBalance,Local,Unspecified Element,Budget,Stage 1,y_arts,No Year,Vacancy,Instructor",A130,Bst_Pr_Rec,res10,class_8,Proj_10,35,06-01-2012,10-15-2012 <LINEITEM("Allocation Assignments")>,HCP,"BegBalance,Local,Unspecified Element,Budget,Stage 1,y_arts,No Year,Vacancy,Instructor",A130,Bst_Pr_Rec,srp001,class_8,Proj_10,65,06-01-2012,10-15-2012
l Decision package-enabled application:
<LINEITEM("Allocation Assignments")>,HCP,"BegBalance,Local,Unspecified Element,Budget,Stage 1,y_arts,No Year,Vacancy,Instructor",A130,Bst_Pr_Rec,res10,class_8,Proj_10,35,06-01-2012, 10-15-2012 <LINEITEM("Allocation Assignments")>,,HCP,"BegBalance,Local,Unspecified Element,Budget,Stage 1,y_arts,No Year,Vacancy,Instructor,Change Service Level",A130,Bst_Pr_Rec,srp001,class_8,Proj_10,65,06-01-2012, 10-15-2012
7 Save the file in CSV file.
8 Perform a test run of the file. See “Testing Load Files” on page 311.
9 In the application, ensure that the allocations loaded correctly. See “Verifying Data Loads” on page312.
10 After verifying the file, run it in production. See “Running Load Files ” on page 314.
Loading Employee Allocation InformationBefore loading, ensure entries for all account segments or chart fields for the employee allocationsexist in the appropriate Smart Lists (Account_List, Entity_List, Fund_List, Program_List, andProject_List, for example).
ä To load allocations to employees:
1 Identify the member and entry names associated with employee and allocation-related Smart Lists. See“Common Smart Lists” on page 58.
2 Create a file in a text editor or spreadsheet tool.
3 Copy the code for your application type into the file:
l Non decision package-enabled application:
Budget Item,Data Load Cube Name,Point-of-View,Account Segment,Entity Segment,Fund Segment, Program Segment, Project Segment,Percentage Allocation,Allocation Start Date,Allocation End Date <LINEITEM("Allocation Assignments")>,HCP,"BegBalance,Local,Unspecified Element,Budget,Stage 1,Entity1,No Year,Employee1,Position1",Account_1,Entity_1,Fund_1,Program_1,Project_1,100,01-01-2010,12-31-2010 <LINEITEM("Allocation
307

Assignments")>,HCP,"BegBalance,Local,Unspecified Element,Budget,Stage 1,Entity1,No Year,Employee1,Position1",Account_1,Entity_1,Fund_1,Program_1,Project_1,50,01-01-2011,
l Decision package-enabled application:
Budget Item,Data Load Cube Name,Point-of-View,Account Segment,Entity Segment,Fund Segment, Program Segment, Project Segment,Percentage Allocation,Allocation Start Date,Allocation End Date <LINEITEM("Allocation Assignments")>,,HCP,"BegBalance,Local,Unspecified Element,Budget,Stage 1,Entity1,No Year,Employee1,Position1",Account_1,Entity_1,Fund_1,Program_1,Project_1,100, 01-01-2010,12-31-2010 <LINEITEM("Allocation Assignments")>,HCP,"BegBalance,Local,Unspecified Element,Budget,Stage 1,Entity1,No Year,Employee1,Position1,Change Service Level",Account_1,Entity_1,Fund_1,Program_1,Project_1,50, 01-01-2011,
4 Customize the data in the Point-of-View column. For example, replace Employee1 with the employeeto which to load allocations, and Entity1 with the HR organization with which the employee isassociated.
Note: For the Employee configuration option, replace Position with Job Code.
5 In the appropriate columns, specify the different General Ledger account segments or chart fields usedin the allocation, the percentage for each allocation, and when the allocations apply.
Example: The Boston Parks and Recreation Department (Bst_Pr_Rec) needs to load threeallocations to budget for Marla Tate, who holds the single incumbent position ofCoordinator and Director. Marla will oversee a swimming pool installation project at adowntown recreation center. The allocations have the same start and end dates, Entitysegment (111), Account segment (011), and Facility Development program segment(fac_dev_1).
l The first allocation is for 25% from the reserved fund (res_10) segment and the swimproject (swm_01) segment, begins January 1, 2012, and ends June 1, 2012
l The second allocation is for 65% from the employee salary fund (e_1) and thedevelopment project (dev_12), begins January 1, 2012, and ends June 1, 2012
l The third allocation is for 10% from the employee salary fund (e_1) and the swim safetyproject (swm_saf_01), begins January 1, 2012, and ends June 1, 2012
To load the allocations, modify the code for your application type to identify the entity,Marla Tate and her position, and the different General Ledger account segments, allocationpercentages, and dates:
l Non decision package-enabled application:
LINEITEM("Allocation Assignments")>,HCP,"BegBalance,Local,Unspecified Element,Budget,Stage 1,No Year,Bst_Pr_Rec,""Tate, Marla"",coordinator_and_director",A011,E111,res10,fac_dev_1,swm_01,25,01-01-2012,06-01-2012 <LINEITEM("Allocation Assignments")>,HCP,"BegBalance,Local,Unspecified Element,Budget,Stage 1,No Year,Bst_Pr_Rec,""Tate, Marla"",coordinator_and_director",A011,E111,res10,fac_dev_1,dev_12,65,01-01-2012,06-01-2012 <LINEITEM("Allocation Assignments")>,HCP,"BegBalance,Local,Unspecified Element,Budget,Stage 1,No Year,Bst_Pr_Rec,""Tate,
308

Marla"",coordinator_and_director",A011,E111,res10,fac_dev_1,swm_saf_01,10,01-01-2012,06-01-2012
l Decision package-enabled application:
LINEITEM("Allocation Assignments")>,HCP,"BegBalance,Local,Unspecified Element,Budget,Stage 1,No Year,Bst_Pr_Rec,""Tate, Marla"",coordinator_and_director",A011,E111,res10,fac_dev_1,swm_01,25,01-01-2012, 06-01-2012 <LINEITEM("Allocation Assignments")>,HCP,"BegBalance,Local,Unspecified Element,Budget,Stage 1,No Year,Bst_Pr_Rec,""Tate, Marla"",coordinator_and_director",A011,E111,res10,fac_dev_1,dev_12,65,01-01-2012, 06-01-2012 <LINEITEM("Allocation Assignments")>,HCP,"BegBalance,Local,Unspecified Element,Budget,Stage 1,Change Service Level,No Year,Bst_Pr_Rec,""Tate, Marla"",coordinator_and_director",A011,E111,res10,fac_dev_1,swm_saf_01,10, 01-01-2012,06-01-2012
6 Save the file in CSV format.
7 Perform a test run of the file. See “Testing Load Files” on page 311.
8 In the application, at the correct allocations loaded. See “Verifying Data Loads” on page 312.
9 After confirming that the file loads data correctly, run it in the production environment. See “RunningLoad Files ” on page 314.
Loading Job Information
Applies only to the Employee configuration option
ä To load jobs:
1 Identify the member and entry names associated with job-related Smart Lists. See “Common SmartLists” on page 58.
2 Create a file in a text editor or spreadsheet tool.
3 Copy and paste the code for your application type into the file:
l Non decision package-enabled application:
Budget Item,Data Load Cube Name,Point-of-View,Job Code Level,Job Description,FTE Capacity,Job Code Start Date,Job Code End Date,Salary Basis,Default Weekly Hours,Headcount Unspecified Budget Item,HCP,"BegBalance,Local,Unspecified Employee,Budget,Stage 1,Unspecified Entity,No Year,Unspecified Element,JobCode1",job,"Facilities Cordinator",40,01-01-2012,,Annual,40,40
l Decision package-enabled application:
Budget Item,Data Load Cube Name,Point-of-View,Job Code Level,Job Description,FTE Capacity,Job Code Start Date,Job Code End Date,Salary Basis,Default Weekly Hours,Headcount Unspecified Budget Item,HCP,"BegBalance,Local,Unspecified Employee,Budget,Stage 1,Unspecified Entity,No Year,Unspecified Element,Change Service Level,JobCode1",job,"Facilities Cordinator",40,01-01-2012,,Annual,40,40
4 Customize the data in the Point-of-View column. For example, replace Unspecified Employeewith the employee to which to assign a loaded job and JobCode1 with the number of the job to load.
5 Specify job data such as name, start date, FTE capacity, salary basis, and default weekly hours.
309
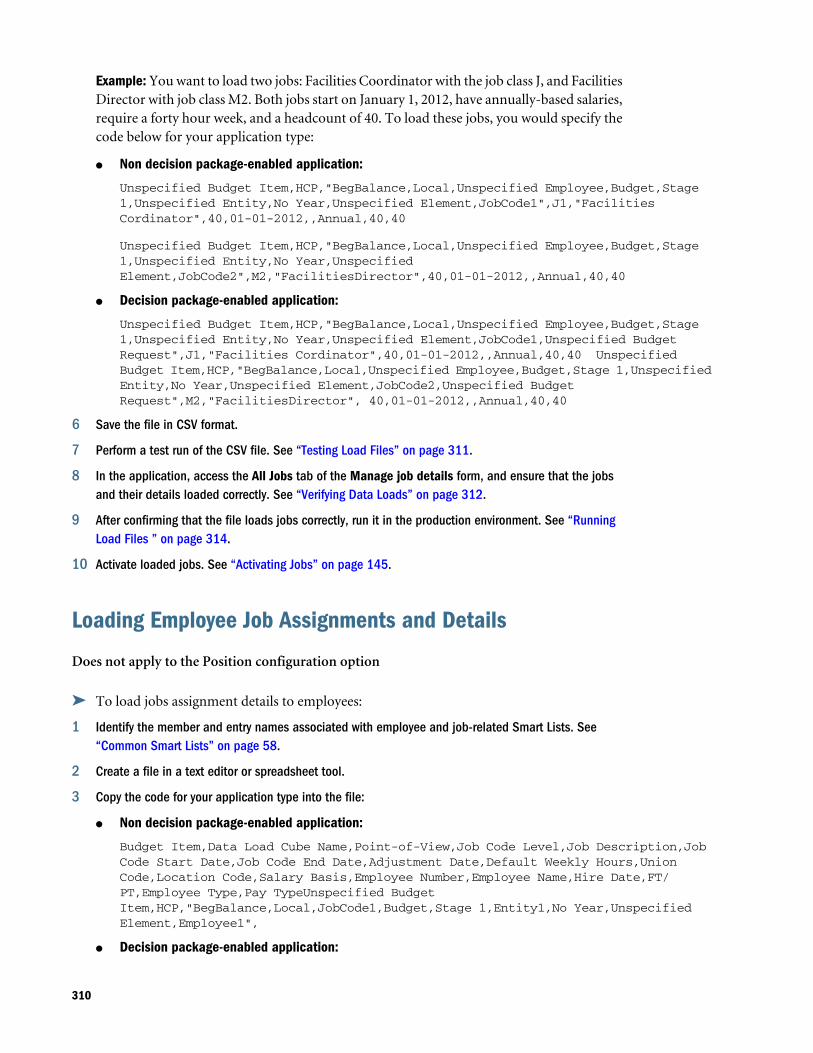
Example: You want to load two jobs: Facilities Coordinator with the job class J, and FacilitiesDirector with job class M2. Both jobs start on January 1, 2012, have annually-based salaries,require a forty hour week, and a headcount of 40. To load these jobs, you would specify thecode below for your application type:
l Non decision package-enabled application:
Unspecified Budget Item,HCP,"BegBalance,Local,Unspecified Employee,Budget,Stage 1,Unspecified Entity,No Year,Unspecified Element,JobCode1",J1,"Facilities Cordinator",40,01-01-2012,,Annual,40,40
Unspecified Budget Item,HCP,"BegBalance,Local,Unspecified Employee,Budget,Stage 1,Unspecified Entity,No Year,Unspecified Element,JobCode2",M2,"FacilitiesDirector",40,01-01-2012,,Annual,40,40
l Decision package-enabled application:
Unspecified Budget Item,HCP,"BegBalance,Local,Unspecified Employee,Budget,Stage 1,Unspecified Entity,No Year,Unspecified Element,JobCode1,Unspecified Budget Request",J1,"Facilities Cordinator",40,01-01-2012,,Annual,40,40 Unspecified Budget Item,HCP,"BegBalance,Local,Unspecified Employee,Budget,Stage 1,Unspecified Entity,No Year,Unspecified Element,JobCode2,Unspecified Budget Request",M2,"FacilitiesDirector", 40,01-01-2012,,Annual,40,40
6 Save the file in CSV format.
7 Perform a test run of the CSV file. See “Testing Load Files” on page 311.
8 In the application, access the All Jobs tab of the Manage job details form, and ensure that the jobsand their details loaded correctly. See “Verifying Data Loads” on page 312.
9 After confirming that the file loads jobs correctly, run it in the production environment. See “RunningLoad Files ” on page 314.
10 Activate loaded jobs. See “Activating Jobs” on page 145.
Loading Employee Job Assignments and Details
Does not apply to the Position configuration option
ä To load jobs assignment details to employees:
1 Identify the member and entry names associated with employee and job-related Smart Lists. See“Common Smart Lists” on page 58.
2 Create a file in a text editor or spreadsheet tool.
3 Copy the code for your application type into the file:
l Non decision package-enabled application:
Budget Item,Data Load Cube Name,Point-of-View,Job Code Level,Job Description,Job Code Start Date,Job Code End Date,Adjustment Date,Default Weekly Hours,Union Code,Location Code,Salary Basis,Employee Number,Employee Name,Hire Date,FT/PT,Employee Type,Pay TypeUnspecified Budget Item,HCP,"BegBalance,Local,JobCode1,Budget,Stage 1,Entity1,No Year,Unspecified Element,Employee1",
l Decision package-enabled application:
310

Budget Item,Data Load Cube Name,Point-of-View,Job Code Level,Job Description,Job Code Start Date,Job Code End Date,Adjustment Date,Default Weekly Hours,Union Code,Location Code,Salary Basis,Employee Number,Employee Name,Hire Date,FT/ PT,Employee Type,Pay Type Unspecified Budget Item,HCP,"BegBalance,Local,JobCode1,Budget,Stage 1,Entity1,No Year,Unspecified Element,Employee1,Change Service Level",
4 Customize the data in the Point-of-View column. For example, replace Employee1 with the employeeto whose job you are loading assignment details, and JobCode1 with the number of the job.
5 Specify job data such as name, type, start date, and location.
Example: You want to load a Facilities Coordinator job that starts January 1, 2011 and assignClaire Fisher (employee ID E133) as a temporary, exempt, and part-time employee hiredon January 1, 2011. The job is in Frankfurt Germany, has an annual based salary, and requiresa 30 hour week. To load this job and assignment data, you would specify the code for yourapplication type:
l Non decision package-enabled application:
Unspecified Budget Item,HCP,"BegBalance,Local,JobCode1,Budget,Stage 1,Entity1,No Year,Unspecified Element,Employee1",J1,Facilities Coordinator, 01-01-2011,,,30,,,Annual,E133,Fisher_Claire,01-01-1999,FullTime,Regular,Exempt
l Decision package-enabled application:
Unspecified Budget Item,HCP,"BegBalance,Local,JobCode1,Budget,Stage 1,Entity1,No Year,Unspecified Element,Employee1,Change Service Level",J1,Facilities Coordinator, 01-01-2011,,, 30,,,Annual,E133,Fisher_Claire,01-01-1999,FullTime,Regular,Exempt
6 Save the file in CSV format.
7 Perform a test run of the file. See “Testing Load Files” on page 311.
8 In the application, ensure that the correct job assignments loaded. See “Verifying Data Loads” on page312.
9 After confirming that the file loads data correctly, run it in production. See “Running Load Files ” onpage 314.
Testing Load FilesIn a test environment, run load files, and then open the appropriate form in Oracle HyperionPublic Sector Planning and Budgeting to ensure that the files load the correct metadata and data(see “Verifying Data Loads” on page 312.)
Important: Run the load files for metadata first, and then those for data. See “Required DataLoad File Run Order” on page 287.
Test load files by running commands using this syntax
OutlineLoad /A:<application> /U:<user name>/I:<.csv file>/D:<dimension> /
L:<log file>/N [/S:<server>] [/M] /X:<exception file>
l /A:— Application name
311

l /U:— User name of administrative user who can access Oracle Essbase and Oracle HyperionPlanning.
l /M:— Properties for each dimension to load
l /N:— If the file parses without loading data
l /I:— CSV load file that contains the header record and metadata records
l /D:— Dimension to load
l /C: —Refresh the database
l /L:— Name of the log file to report load status. Default is stdout.log
l /X:— Name of the file to report exceptions during the load. Default is stderr
l /S:— Server hosting the application
Omit components as necessary. For example, if you do not want to refresh the database,remove /C/.
For all command parameters, see Chapter 5 of the Oracle Hyperion Planning Administrator'sGuide.
For example: OutlineLoad /A:PO /U:jtadmin /I:<directory>\employee.csv/D:Employee /L:c:/employee_load.log /N/S:localhost /M/X:c:/
employee_load.exc:
l Loads data to the Position-Only (PO) application
l Logs on to the application usingjtadmin
l Loads data to the application on the localhost server
l Loads the Employee data specified in employee.csv
l Writes errors to employee_load.log
l Parses to ensure that the file is correctly defined
l Writes exception details to employee_load.exc
Verifying Data LoadsAfter performing test runs of the data load CSV files, log on to the Public Sector Planning andBudgeting application, and perform the appropriate steps below to ensure that the data loadedcorrectly.
Table 39 Verifying Data Loads
Data Loaded Steps to Verify Load
Salary Grades From My task lists, select Budget Administration, and then select Manage Salary Grades.
Salary gradedetails
From My task lists, select Budget Administration, and then select Manage Salary Grades.
312
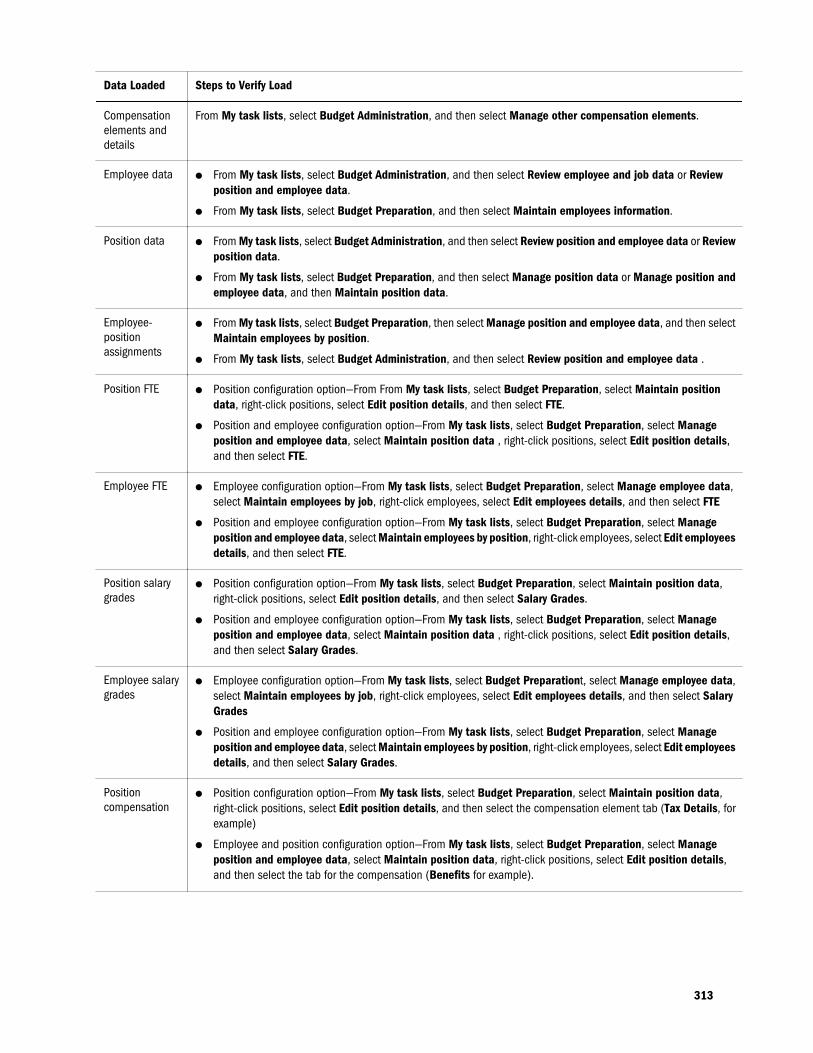
Data Loaded Steps to Verify Load
Compensationelements anddetails
From My task lists, select Budget Administration, and then select Manage other compensation elements.
Employee datal From My task lists, select Budget Administration, and then select Review employee and job data or Review
position and employee data.
l From My task lists, select Budget Preparation, and then select Maintain employees information.
Position datal From My task lists, select Budget Administration, and then select Review position and employee data or Review
position data.
l From My task lists, select Budget Preparation, and then select Manage position data or Manage position andemployee data, and then Maintain position data.
Employee-positionassignments
l From My task lists, select Budget Preparation, then select Manage position and employee data, and then selectMaintain employees by position.
l From My task lists, select Budget Administration, and then select Review position and employee data .
Position FTEl Position configuration option—From From My task lists, select Budget Preparation, select Maintain position
data, right-click positions, select Edit position details, and then select FTE.
l Position and employee configuration option—From My task lists, select Budget Preparation, select Manageposition and employee data, select Maintain position data , right-click positions, select Edit position details,and then select FTE.
Employee FTEl Employee configuration option—From My task lists, select Budget Preparation, select Manage employee data,
select Maintain employees by job, right-click employees, select Edit employees details, and then select FTE
l Position and employee configuration option—From My task lists, select Budget Preparation, select Manageposition and employee data, select Maintain employees by position, right-click employees, select Edit employeesdetails, and then select FTE.
Position salarygrades
l Position configuration option—From My task lists, select Budget Preparation, select Maintain position data,right-click positions, select Edit position details, and then select Salary Grades.
l Position and employee configuration option—From My task lists, select Budget Preparation, select Manageposition and employee data, select Maintain position data , right-click positions, select Edit position details,and then select Salary Grades.
Employee salarygrades
l Employee configuration option—From My task lists, select Budget Preparationt, select Manage employee data,select Maintain employees by job, right-click employees, select Edit employees details, and then select SalaryGrades
l Position and employee configuration option—From My task lists, select Budget Preparation, select Manageposition and employee data, select Maintain employees by position, right-click employees, select Edit employeesdetails, and then select Salary Grades.
Positioncompensation
l Position configuration option—From My task lists, select Budget Preparation, select Maintain position data,right-click positions, select Edit position details, and then select the compensation element tab (Tax Details, forexample)
l Employee and position configuration option—From My task lists, select Budget Preparation, select Manageposition and employee data, select Maintain position data, right-click positions, select Edit position details,and then select the tab for the compensation (Benefits for example).
313

Data Loaded Steps to Verify Load
Employeecompensation
l Employee configuration option—From My task lists, select Budget Preparation, select Manage employee data,select Maintain employees by job, right-click employees, select Edit employees details, and then select thecompensation type tab (Additional Earnings, for example)
l Position and employee configuration option—From My task lists, select Budget Preparation, select Manageposition and employee data, select Maintain employees by position, right-click employees, select Edit employeesdetails, and then select the compensation type tab (Benefits for example)
Positionallocation
l Position configuration option—From My task lists, select Budget Preparation, select Maintain position data,right-click positions, select Edit position details, and then select Allocations
l Employee and position configuration option—From My task lists, select Budget Preparation, select Manageposition and employee data, select Maintain position data, right-click positions, select Edit position details,and then select Allocations.
Employeeallocation
l Employee configuration option—From My task lists, select Budget Preparation, select Manage employee data,select Maintain employees by job, right-click employees, select Edit employees details, and then selectAllocations
l Position and employee configuration option—From My task lists, select Budget Preparation, select Manageposition and employee data, select Maintain employees by position, right-click employees, select Edit employeesdetails, and then select Allocations
Jobs From My task lists, select Budget Preparation, and then select Maintain job details.
Employee-jobassignments
From My task lists, select Budget Administration, and then select Review employee and job data You can alsoselect Budget Preparation, select Manage employee data , and then select Maintain employees by job
Running Load Files After you ensure load files load the correct data, review the order in which to run the filesdescribed in “Required Data Load File Run Order” on page 287). Then run the files in aproduction environment using this syntax:
OutlineLoad /A:<application> /U:<username> /I:<.csv file>/D:<dimension> /
L:<.log file> /N [/S:<server>] [/M] [/C]/X:<exception file>
ä To run load files:
1 From a command prompt, enter CD x:\oracle\middleware\user_projects\epmsystem1\Planning\planning1 or {EPM_ORACLE_INSTANCE}/Planning/planning1/OutlineLoad.cmd.
2 Run a command:
l Windows:
m To load dimensional metadata:
OutlineLoad /A:PO /U:jtadmin /I:<directory>\employee.csv/
D:Employee /L:c:/employee_load.log /N/S:localhost /M/X:c:/
employee_load.exc
314

m To load Smart List data:/A:<application> /U:<user name> /I:<directory>/<.csv file> /DS:HSP_SMARTLISTS /L:/<directory>/
<.LOG file> /N [/S:<server>] [/M] /X:/<directory>/<.EXC file>
For example, C:\Oracle\Middleware\user_projects\epmsystem1\Planning\planning1>OutlineLoad /A:psbapp /U:admin /M /I:c:
\psb_salgradedetails.csv /D:"Budget Item"
l UNIX: {EPM_ORACLE_INSTANCE}/Planning/planning1/OutlineLoad.sh /A:<appName> /U:<adminUser> /M /I:<filename.csv> /
DS:HSP_SMARTLISTS /L:outlineload.log /X:outlineload.exc
3 Review the LOG file to confirm that the file ran correctly.
4 Open the application to ensure that the correct metadata loaded.
5 Select Administration, then Manage Applications, and then Refresh Database to write the metadatato the Plan 1, 2, or 3, and the HCP plan type.
TroubleshootingIf after loading data such as salary steps or allocations do not display or work, perform thesetasks:
l Log into Planning as an administrator.
l Select Administration, select Manage, and then select Dimensions.
l Select the Budget Item dimension, and click Edit.
l Locate the Unspecified Budget Item member, and re-order it so that it is first in the memberhierarchy.
l Save.
l Refresh the database
l Load the same data again.
315

316

CUpdating Business Rules After
Changing Predefined Smart Lists
In This Appendix
Business Rule and Smart List Associations ... . . . . . . . . . . . . . . . . . . . . . . . . . . . . . . . . . . . . . . . . . . . . . . . . . . . . . . . . 317
Modifying Smart List Values ... . . . . . . . . . . . . . . . . . . . . . . . . . . . . . . . . . . . . . . . . . . . . . . . . . . . . . . . . . . . . . . . . . . . . . . . . . 331
Business Rule and Smart List AssociationsIf you add or modified entries in the predefined Smart Lists, you must update the associatedbusiness rules. See the section for your configuration option:
l “Employee Budget Detail” on page 317
l “Position and Employee Budget Detail” on page 322
l “Position Budget Detail” on page 327
Employee Budget DetailTable 40 Business Rules Associated With Predefined Smart Lists
Predefined Smart List Business Rules
Approval_Statusl Approve, EmployeeTransfer
l EmployeeTransferOut
l EmployeeTransferIn
l EvaluateCriteria
l GenerateMassEntriesByEmpProp
l GenerateMassEntriesByEntity
l GenerateMassEntriesBySalary
l TerminateEmp
l TerminateJob
Custom_Salary_Spreadsl CriteriaAnnualSalSpread
l EvaluateCriteria
317

Predefined Smart List Business Rules
Earning_Typel AddAdditionalEarning
l AllEmpDistElmCost
l AssignEmployee
l CriteriaCreateMissingNonSalElement
l CriteriaOverWriteNonSalElement
l DeleteNonSalElement
l TerminateEmp
l TerminateJob
l EmpDistElmCost
l EmployeeTransfer
l EmployeeTransferIn
l EmpToJobCode
Element_Typel AddBenefitElement
l AddAdditionalEarning
l AllEmpDistElmCost
l AddTaxElement
l AssignEmployee
l CriteriaCreateMissingNonSalElement
l CriteriaOverWriteNonSalElement
l DeleteNonSalElement
l TerminateEmp
l TerminateJob
l EmpDistElmCost
l EmployeeTransfer
l EmployeeTransferIn
l EmpToJobCode
Employee_Statusl ActivateJob
l AddEmpFTE
l ChangeEmpStatus
l AssignEmployee
l EmployeeTransfer
l EmployeeTransferIn
l EmployeeTransferOut
l TerminateEmp
l TerminateJob
l EmpToJobCode
l ExcludeJob
l SpreadByPeriod_ExistingFTE
l SpreadByPeriod
318

Predefined Smart List Business Rules
Employee_Typel AssignEmployee
l EvaluateCriterial
l ReconcileEmployee
Frequencyl AddAdditionalEarning
l AddDefaultNonSalElement
l AddBenefitElement
l AddTaxElement
l AllEmpDistElmCost
l EmployeeTransfer
l EmployeeTransferIn
l EmployeeTransferOut
l TerminateEmp
l TerminateJob
l EmpToJobCode
l AssignEmployee
l CriteriaCreateMissingNonSalElement
l CriteriaOverWriteNonSalElement
l EmpDistElmCost
l DeleteNonSalElement
Full_Time_Statusl AssignEmployee
l EvaluateCriteria
l ReconcileEmployee
Operation_Statusl CriteriaAnnualSalSpread
l CriteriaCreateMissingDistributions
l CriteriaCreateMissingNonSalElement
l CriteriaCreateMissingSalElement
l CriteriaOverWriteDistribution
l CriteriaOverWriteNonSalElement
l CriteriaOverWriteSalElement
l EvaluateCriteria
Pay_Typel AllEmpDistElmCost
l AssignEmployee
l EmpDistElmCost
l EvaluateCriteria
l ReconcileEmployee
319

Predefined Smart List Business Rules
Payment_Termsl AddAdditionalEarning
l AddBenefitElement
l AddDefaultNonSalElement
l AddTaxElement
l AllEmpDistElmCost
l AssignEmployee
l CriteriaCreateMissingNonSalElement
l CriteriaOverWriteNonSalElement
l DeleteNonSalElement
l EmpDistElmCost
l EmployeeTransfer
l EmployeeTransferIn
l EmpToJobCode
l TerminateEmp
l TerminateJob
Position_Statusl ActivateJob
l AllEmpDistElmCost
l AssignEmployee
l ChangeEmpStatus
l EmpDistElmCost
l EmployeeTransfer
l EmployeeTransferOut
l EmployeeTransferIn,
l EmpToJobCode
l EvaluateCriteria
l ExcludeJob
l GenerateMassEntriesByEmpProp
l GenerateMassEntriesBySalary
l SpreadByPeriod_ExistingFTE
l SpreadByPeriod
l TerminateEmp
l TerminateJob
Rule_Arithematic_Operatorsl AddDefaultNonSalElement
l AddDefaultRateBasedOption
l AddDefaultStepBasedOption
l AddDefaultValueBasedOption
l AddMultipleNonSalElemOptions
l AddMultipleSalElemOptions
l MassSalaryAdjustments
l MassValueUpdate
320

Predefined Smart List Business Rules
Rule_Date_Criterial EvaluateCriteria
l GenerateMassEntriesByEmpProp
Rule_Comparision_Operatorsl EvaluateCriteria
l GenerateMassEntriesByEmpProp
Salary_Basisl AddDefaultRateBasedOption
l AddDefaultStepBasedOption,
l AddDefaultValueBasedOption
l AddSalElement
l AllEmpDistElmCost]
l AssignEmployee]
l CriteriaCreateMissingSalElement
l CriteriaOverWriteSalElement
l DeleteSalElement
l EmpDistElmCost
l EmployeeTransfer
l EmployeeTransferIn
l EmpToJobCode
l TerminateJob
l TerminateEmp
Salary_Typel AddDefaultRateBasedOption
l AddDefaultStepBasedOption
l AddDefaultValueBasedOption
l AddMultipleSalElemOptions
l AddSalElement
l AssignEmployee
l CriteriaCreateMissingSalElement
l CriteriaOverWriteSalElement
l DeleteSalElement
l EmployeeTransfer
l EmployeeTransferIn
l EmpToJobCode
l TerminateJob
l TerminateEmp
321

Position and Employee Budget DetailTable 41 Business Rules Associated With Predefined Smart Lists
Predefined Smart Lists Business Rules
Approval_Statusl AddNewPosition
l Approve
l EmployeeTransfer
l EmployeeTransferIn
l EmployeeTransferOut
l EvaluateCriteria
l GenerateMassEntriesByEntity
l GenerateMassEntriesByPosProp
l GenerateMassEntriesBySalary
l TerminatePos
l TerminateEmp
Custom_Salary_Spreadsl AddNewPosition
l CopyPosition
l CriteriaAnnualSalSpread
l EvaluateCriteria
Earning_Typel AddAdditionalEarning
l AddNewPosition
l CriteriaCreateMissingNonSalElement
l CriteriaOverWriteNonSalElement
l DeleteNonSalElement
l EmpDistElmCost
l EmpDistElmCost_All
l EmployeeTransfer
l EmployeeTransferIn,
l EmpToPosition
l TerminatePos
l TerminateEmp
322

Predefined Smart Lists Business Rules
Element_Typel AddNewPosition
l Approve
l EmployeeTransfer
l EmployeeTransferIn
l EmployeeTransferOut
l EvaluateCriteria
l GenerateMassEntriesByEntity
l GenerateMassEntriesByPosProp
l GenerateMassEntriesBySalary
l TerminatePos
l TerminateEmp
Employee_Typel EvaluateCriteria
l FillPosition
l ReconcileEmployee
Employee_Statusl AddEmpFTE
l AddNewPosition
l ChangeEmpStatus
l EmployeeTransfer
l EmployeeTransferIn,
l EmployeeTransferOut
l EmpToPosition
l ExcludePos
l SpreadByPeriod_ExistingFTE
l SpreadByPeriod
l TerminateEmp
l TerminatePos
323

Predefined Smart Lists Business Rules
Frequencyl AddAdditionalEarning
l AddBenefitElement
l AddDefaultNonSalElement
l AddDefaultNonSalElemOption_Job
l AddNewPosition
l AddTaxElement
l CriteriaCreateMissingNonSalElement
l CriteriaOverWriteNonSalElement
l DeleteNonSalElement
l EmpDistElmCost
l EmpDistElmCost_All
l EmployeeTransfer
l TerminateEmp
l TerminatePos
l EmployeeTransferIn
l EmpToPosition
l FillPos
Full_Time_Statusl EvaluateCriteria
l FillPosition
l ReconcileEmployee
Operation_Statusl CriteriaAnnualSalSpread
l CriteriaCreateMissingDistributions
l CriteriaCreateMissingNonSalElement
l CriteriaCreateMissingSalElement
l CriteriaOverWriteDistribution
l CriteriaOverWriteNonSalElement
l CriteriaOverWriteSalElement
l EvaluateCriteria
Pay_Typel EmpDistElmCost
l EmpDistElmCost_All
l FillPosition
l EvaluateCriteria
l ReconcileEmployee
324

Predefined Smart Lists Business Rules
Payment_Termsl AddAdditionalEarning
l AddBenefitElement
l AddDefaultNonSalElement
l AddDefaultNonSalElemOption_Job
l AddNewPosition
l AddTaxElement
l CriteriaCreateMissingNonSalElement
l CriteriaOverWriteNonSalElement
l DeleteDefaultNonSalElmOption_Job
l DeleteNonSalElemen
l EmpDistElmCost
l EmpDistElmCost_All
l EmployeeTransfer
l EmployeeTransferIn
l EmpToPosition
l FillPosition
l TerminateEmp
l TerminatePos
Position_Statusl AddNewPosition
l ChangeEmpStatus
l CopyPosition
l EmpDistElmCost
l EmpDistElmCost_All
l EmployeeTransfer
l EmployeeTransferIn,
l EmployeeTransferOut
l EmpToPosition
l ExcludePos
l FillPosition
l GenerateMassEntriesBySalary
l SpreadByPeriod_ExistingFTE
l SpreadByPeriod
l TerminateEmp
l TerminatePos
325

Predefined Smart Lists Business Rules
Position_Typel AddNewPosition
l CopyPosition
l EmployeeTransfer
l EmployeeTransferIn
l EmpToPosition
l EvaluateCriteria
l FillPosition
Rule_Arithematic_Operatorsl AddDefaultNonSalElement
l AddDefaultRateBasedOption
l AddDefaultStepBasedOption
l AddDefaultValueBasedOption
l AddMultipleNonSalElemOptions
l AddMultipleSalElemOptions
l MassSalaryAdjustments
l MassValueUpdate
Rule_Date_Criterial EvaluateCriteria
l GenerateMassEntriesByPosProp
Salary_Basisl AddDefaultRateBasedOption
l AddDefaultRateBasedOption_Job
l AddDefaultStepBasedOption
l AddDefaultStepBasedOption_Job
l AddDefaultValueBasedOption
l AddDefaultValueBasedOption_Job
l AddNewPosition
l AddSalElement
l CopyPosition,
l CriteriaCreateMissingSalElement
l CriteriaOverWriteSalElement
l DeleteSalElement
l EmpDistElmCost
l EmpDistElmCost_All
l EmployeeTransfer
l EmployeeTransferIn
l EmpToPosition
l FillPosition
l TerminateEmp
l TerminatePos
326

Predefined Smart Lists Business Rules
Salary_Typel AddDefaultRateBasedOption
l AddDefaultRateBasedOption_Job
l AddDefaultValueBasedOption
l AddDefaultValueBasedOption_Job
l AddMultipleSalElemOptions
l AddDefaultStepBasedOption
l AddDefaultStepBasedOption_Job
l AddNewPosition
l AddSalElement
l CriteriaCreateMissingSalElement
l CriteriaOverWriteSalElement
l DeleteDefaultSalElmOption_Job
l DeleteSalElement
l EmployeeTransfer
l EmployeeTransferIn
l EmpToPosition
l FillPosition
l TerminateEmp
l TerminatePos
Position Budget Detail
Table 42 Business Rules Associated With Predefined Smart Lists
Predefined Smart Lists Business Rules
Approval_Statusl AddNewPosition
l Approve
l EvaluateCriteria
l GenerateMassEntriesByEntity
l GenerateMassEntriesByPosProp
l GenerateMassEntriesBySalary
l PositionTransfer
l PositionTransferIn
l PositionTransferOut
l TerminatePos
Custom_Salary_Spreadsl AddNewPosition
l CopyPosition
l CriteriaAnnualSalSpread
l EvaluateCriteria
327

Predefined Smart Lists Business Rules
Earning_Typel AddAdditionalEarning
l AddNewPosition
l CriteriaCreateMissingNonSalElement
l CriteriaOverWriteNonSalElement]
l DeleteNonSalElement
l EmpDistElmCost
l EmpDistElmCost_All,
l PositionTransfer
l PositionTransferIn
l TerminatePos
Employee_Statusl AddFTE
l AddNewPosition
l ChangeStatus
l ExcludePos
l PositionTransfer
l PositionTransferIn
l PositionTransferOut
l SpreadByPeriod_ExistingFTE
l SpreadByPeriod
l TerminatePos
Element_Typel AddAdditionalEarning
l AddBenefitElement
l AddDefaultNonSalElement
l AddDefaultNonSalElemOption_Job
l AddNewPosition
l AddTaxElement
l CriteriaCreateMissingNonSalElement
l CriteriaOverWriteNonSalElement
l DeleteDefaultNonSalElmOption_Job
l DeleteNonSalElement
l EmpDistElmCost
l EmpDistElmCost_All
l PositionTransferIn
l PositionTransfer
l TerminatePos
328

Predefined Smart Lists Business Rules
Employee_Statusl AddFTE
l AddNewPositions
l ChangeStatus
l ExcludePos
l PositionTransfer
l PositionTransferIn
l PositionTransferOut
l SpreadByPeriod_ExistingFTE
l SpreadByPeriod
l TerminatePos
Frequencyl AddAdditionalEarning
l AddBenefitElement
l AddDefaultNonSalElement
l AddDefaultNonSalElemOption_Job
l EmpDistElmCost
l EmpDistElmCost_All
l PositionTransfer
l PositionTransferIn
l TerminatePos
l AddTaxElement
l CriteriaCreateMissingNonSalElement
l CriteriaOverWriteNonSalElement
l DeleteNonSalElement
Operation_Statusl CriteriaAnnualSalSpread
l CriteriaCreateMissingDistributions
l CriteriaCreateMissingNonSalElement
l CriteriaCreateMissingSalElement
l CriteriaOverWriteDistribution
l CriteriaOverWriteNonSalElement
l CriteriaOverWriteSalElement
l EvaluateCriteria
329
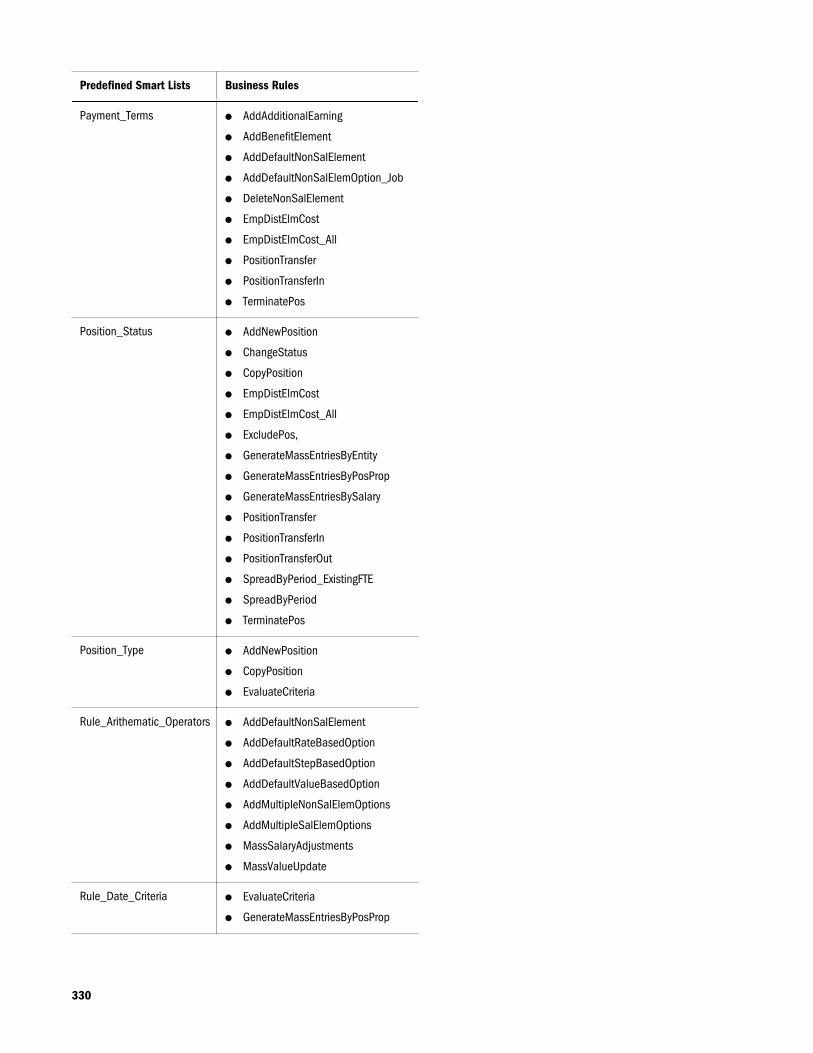
Predefined Smart Lists Business Rules
Payment_Termsl AddAdditionalEarning
l AddBenefitElement
l AddDefaultNonSalElement
l AddDefaultNonSalElemOption_Job
l DeleteNonSalElement
l EmpDistElmCost
l EmpDistElmCost_All
l PositionTransfer
l PositionTransferIn
l TerminatePos
Position_Statusl AddNewPosition
l ChangeStatus
l CopyPosition
l EmpDistElmCost
l EmpDistElmCost_All
l ExcludePos,
l GenerateMassEntriesByEntity
l GenerateMassEntriesByPosProp
l GenerateMassEntriesBySalary
l PositionTransfer
l PositionTransferIn
l PositionTransferOut
l SpreadByPeriod_ExistingFTE
l SpreadByPeriod
l TerminatePos
Position_Typel AddNewPosition
l CopyPosition
l EvaluateCriteria
Rule_Arithematic_Operatorsl AddDefaultNonSalElement
l AddDefaultRateBasedOption
l AddDefaultStepBasedOption
l AddDefaultValueBasedOption
l AddMultipleNonSalElemOptions
l AddMultipleSalElemOptions
l MassSalaryAdjustments
l MassValueUpdate
Rule_Date_Criterial EvaluateCriteria
l GenerateMassEntriesByPosProp
330
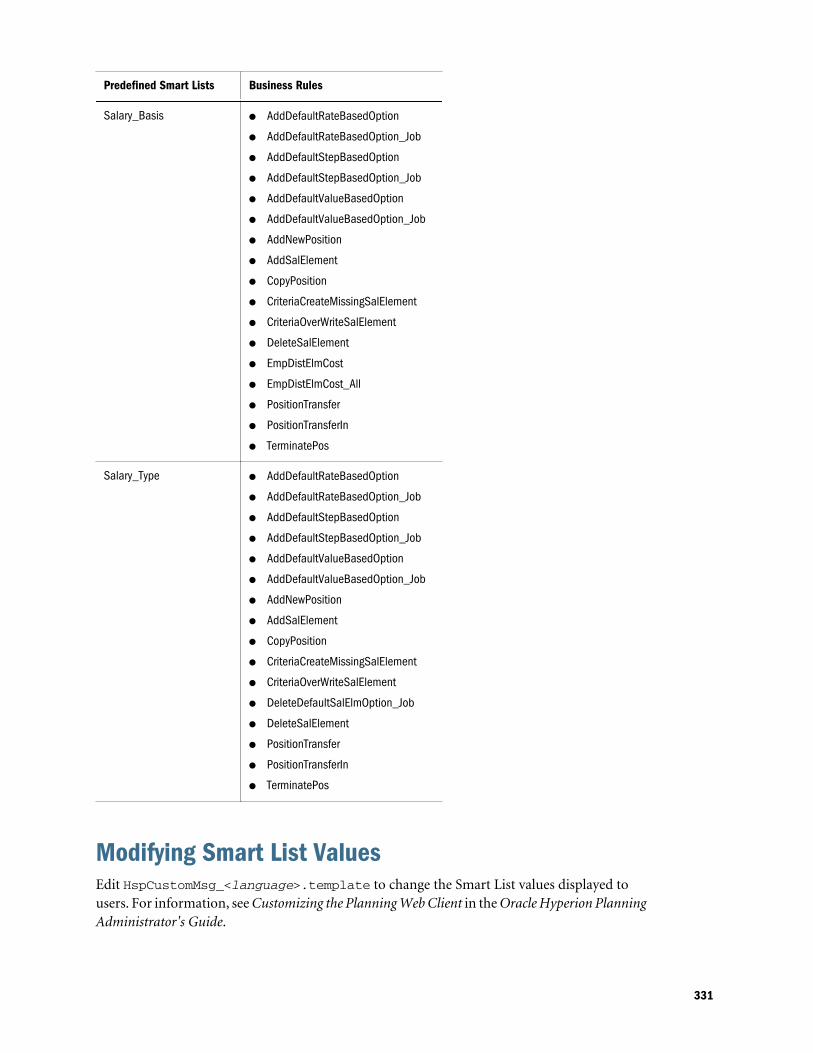
Predefined Smart Lists Business Rules
Salary_Basisl AddDefaultRateBasedOption
l AddDefaultRateBasedOption_Job
l AddDefaultStepBasedOption
l AddDefaultStepBasedOption_Job
l AddDefaultValueBasedOption
l AddDefaultValueBasedOption_Job
l AddNewPosition
l AddSalElement
l CopyPosition
l CriteriaCreateMissingSalElement
l CriteriaOverWriteSalElement
l DeleteSalElement
l EmpDistElmCost
l EmpDistElmCost_All
l PositionTransfer
l PositionTransferIn
l TerminatePos
Salary_Typel AddDefaultRateBasedOption
l AddDefaultRateBasedOption_Job
l AddDefaultStepBasedOption
l AddDefaultStepBasedOption_Job
l AddDefaultValueBasedOption
l AddDefaultValueBasedOption_Job
l AddNewPosition
l AddSalElement
l CopyPosition
l CriteriaCreateMissingSalElement
l CriteriaOverWriteSalElement
l DeleteDefaultSalElmOption_Job
l DeleteSalElement
l PositionTransfer
l PositionTransferIn
l TerminatePos
Modifying Smart List ValuesEdit HspCustomMsg_<language>.template to change the Smart List values displayed tousers. For information, see Customizing the Planning Web Client in the Oracle Hyperion PlanningAdministrator's Guide.
331

332