oracle identity manager integration implementation guide ... party... · oracle identity manager...
TRANSCRIPT

Oracle Identity Manager Integration Implementation Guide
Oracle FLEXCUBE Investor Servicing
Release 12.4.0.0.0
[May] [2017]
Table of Contents 1. INTRODUCTION ......................................................................................................................................................... 1-2
2. REQUIREMENTS/ PROBLEM STATEMENT ........................................................................................................ 2-1
3. PREREQUISITES ......................................................................................................................................................... 3-1
3.1 SOFTWARE REQUIRED .............................................................................................................................................. 3-1 3.2 ORACLE FLEXCUBE COMPONENT REQUIRED ........................................................................................................ 3-2
4. SYSTEM DESCRIPTION ............................................................................................................................................ 4-1
4.1 ABOUT ORACLE IDENTITY MANAGER ...................................................................................................................... 4-1 4.1.1 Oracle Identity Manager System Components ................................................................................................. 4-1
4.2 INTEGRATION / DESIGN ARCHITECTURE ................................................................................................................... 4-4 4.2.1 Provisioning Design Architecture .................................................................................................................... 4-4 4.2.2 Reconciliation Design Architecture ................................................................................................................. 4-4 4.2.3 Design Constraints .......................................................................................................................................... 4-5 4.2.4 Message Flow .................................................................................................................................................. 4-5
5. INSTALLATION / CONFIGURATION ..................................................................................................................... 5-1
5.1 ENVIRONMENT SETUP/ CONFIGURATIONS ................................................................................................................ 5-1 5.1.1 Enabling SSL for Weblogic and OIM Server ................................................................................................... 5-1 5.1.2 Enabling SSL on GTC Connector Server ......................................................................................................... 5-6 5.1.3 Configuring SSL Mode in Oracle Internet Directory ....................................................................................... 5-8 5.1.4 OIM FLEXCUBE Adapter Setup ................................................................................................................... 5-12 5.1.5 Build GWEJB ................................................................................................................................................. 5-25 5.1.6 OIM Setup ...................................................................................................................................................... 5-25 5.1.7 System Configurations ................................................................................................................................... 5-55
6. SOLUTION / USAGE GUIDELINES ......................................................................................................................... 6-1
6.1 WORKING WITH OIM ............................................................................................................................................... 6-1 6.1.1 Creating a user in Oracle FLEXCUBE through OIM ..................................................................................... 6-1 6.1.2 Modifying a user in FCIS through OIM ........................................................................................................... 6-8 6.1.3 Disable/Remove Accounts in FCIS through OIM .......................................................................................... 6-11 6.1.4 Enabling a Disabled user in FCIS through OIM ........................................................................................... 6-12 6.1.5 Running Reconciliation in OIM ..................................................................................................................... 6-14
7. REFERENCE ................................................................................................................................................................. 7-1
8. APPENDIX ..................................................................................................................................................................... 8-1
8.1 DATA SOURCE CREATION ......................................................................................................................................... 8-1
1. Introduction
For the purpose of centralized user provisioning FLEXCUBE is qualified with Oracle Identity Manager -Oracle® Fusion Middleware 11g Release 2 (11.1.2.3.0).
Scope
This document provides an understanding as to how centralized provisioning through OIM can be enabled for FCIS.
In addition to providing a background to the various components of the deployment, this document provides detailed steps as to how to install the various FCIS components required for the integration with OIM configuration in FCIS and Oracle Identity Manager to enable centralized provisioning.
Introduction to Oracle Identity Manager
Oracle Identity Manager is an identity management product that automates user provisioning, identity administration, and password management, integrated in a comprehensive workflow engine. It enables organizations to reduce Information Technology (IT) administration costs and improve security. Oracle identity manager achieves this by providing a centralized control mechanism to manage the entire life cycle of user identities and entitlements and to control user access to across all resources in the organization.
Advantage
Integrating FCIS with Oracle identity Manager provides capability for managing the entire life cycle of FCIS user identities through a centralized point provided by OIM in both scenario- FCIS without single sign on and FCIS with single sign on.

2. Requirements/ Problem Statement
The requirement is to integrate FCIS with Oracle Identity Manager for FCIS user provisioning and de-provisioning services with and without FCIS single sign on.
3. Prerequisites
3.1 Software Required
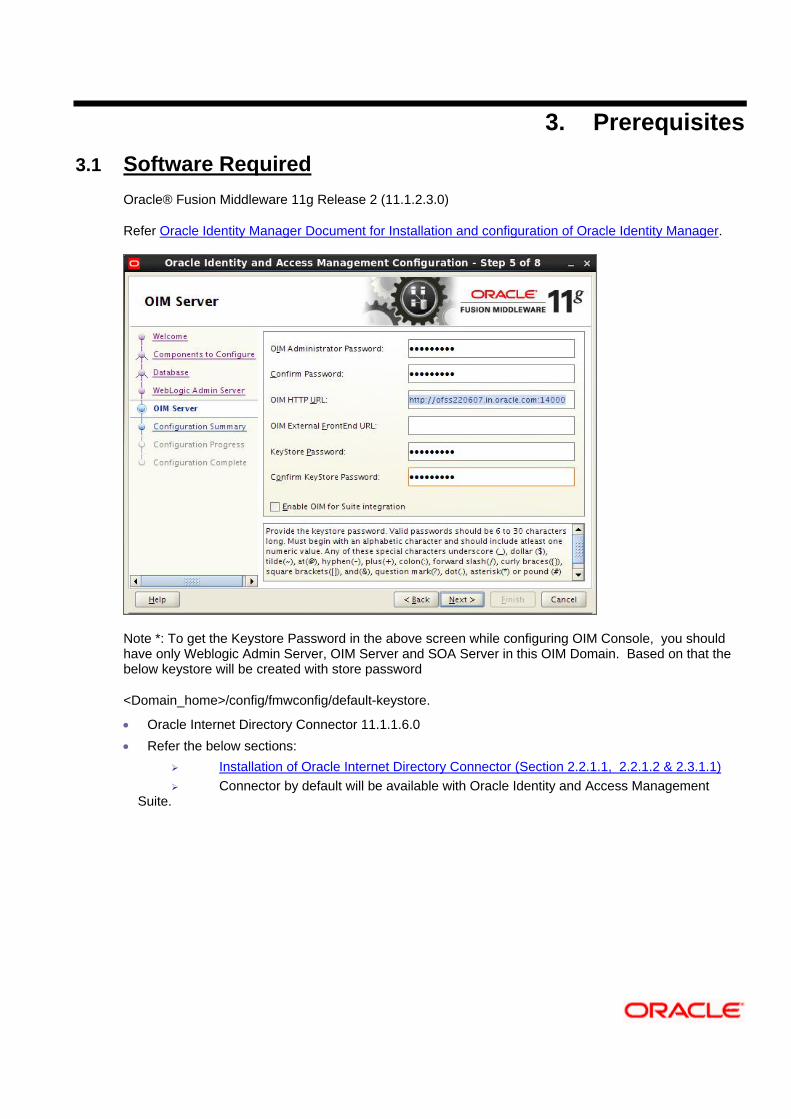
Oracle® Fusion Middleware 11g Release 2 (11.1.2.3.0)
Refer Oracle Identity Manager Document for Installation and configuration of Oracle Identity Manager.
Note *: To get the Keystore Password in the above screen while configuring OIM Console, you should have only Weblogic Admin Server, OIM Server and SOA Server in this OIM Domain. Based on that the below keystore will be created with store password
<Domain_home>/config/fmwconfig/default-keystore.
Oracle Internet Directory Connector 11.1.1.6.0
Refer the below sections:
Installation of Oracle Internet Directory Connector (Section 2.2.1.1, 2.2.1.2 & 2.3.1.1)
Connector by default will be available with Oracle Identity and Access Management Suite.
The path will be as follows:
<Oracle_Middleware>/<OIM_HOME>/connectors/oid
For example:
Linux: /app/oracle/Middleware/Oracle_IDM1/connectors/oid
Windows: C:\apps\oracle\Middleware\Oracle_IDM1\connectors\oid
The above directory <oid> has to be copied into
<Oracle_Middleware>/<OIM_HOME>/server/ConnectorDefaultDirectory
Configuring Oracle Identity Manager Design Console
3.2 Oracle FLEXCUBE Component Required
Oracle FLEXCUBE Gateway EJB
4. System Description
4.1 About Oracle Identity Manager
Oracle Identity Manager is an identity management product that automates user provisioning, identity administration, and password management, integrated in a comprehensive workflow engine. Key features of Oracle Identity Manager include password management, workflow and policy management, identity reconciliation, reporting and auditing, and extensibility through adapters.
4.1.1 Oracle Identity Manager System Components
Oracle Identity Manager is built on an enterprise-class, modular architecture that is both open and scalable. Each module plays a critical role in the overall functionality of the system:
Identity Administration
Identity administration includes creation and management of identities in Oracle Identity Manager. Identities include users, organizations, and roles. Identity administration also enables password management and user Oracle Identity Manager Self Service operations. Identity administration is performed by using Oracle Identity Manager Administration and Oracle Identity Manager Self Service Web clients, and the SPML Web service.
Provisioning
The provisioning transactions are assembled and modified in the provisioning module. This module maintains the "who" and "what" of provisioning. User profiles, access policies, and resources are defined in the provisioning module, as are business process workflows and business rules.
The Provisioning Server is the run-time engine for Oracle Identity Manager. It runs the provisioning process transactions as defined through Oracle Identity Manager Administration and Oracle Identity Manager Design Console and maintained within the provisioning module.
Audit and Reports
The audit and compliance functions include evaluating a person, organization, system, process, project, or product. This occurs by capturing data generated by the suite's workflow, policy, and reconciliation engines. By combining this data with identity data, an enterprise has all the information it requires to address any identity and to access a related audit inquiry. Audits are performed to ascertain the validity and reliability of information, and also provide an assessment of a system's internal control.
Reporting is the process of generating a formal document, which is created as a result of an audit. The report is subsequently provided to a user, such as an individual, a group of persons, a company, a government, or even the general public, as an assurance service so that the user can make decisions, based on the results of the audit. An enterprise can create reports on both the history and the current state of its provisioning environment. Some captured identity data includes user identity profile history, role membership history, user resource access, and fine-grained entitlement history.
Reconciliation and Bulk Load
The reconciliation engine ensures consistency between the provisioning environment of Oracle Identity Manager and Oracle Identity Manager managed resources within the organization. The reconciliation engine discovers illegal accounts created outside Oracle Identity Manager. The reconciliation engine also synchronizes business roles located inside and outside the provisioning system to ensure consistency.
If you want to load a large amount of data from other repositories in your organization into Oracle Identity Manager, then you can use the Bulk Load utility. The Bulk Load utility reduces the downtime in loading the data. In addition, Bulk Load utility import Oracle Identity Manager users, roles, role memberships, and accounts provisioned to users.
Common Services
Various services are grouped together that are shared and used by other Oracle Identity Manager components. These services are:
Form Designer
A form that allows you to create process and resource object forms that do not come packaged with Oracle Identity Manager.
Scheduler
A service that provides the capability to run specific jobs at specific schedules. This service can be used by users, application developers, connector developer, and administrators to create and configure a Job to be run at specified intervals. In addition, this service provides administrative capabilities to manage the functionality of jobs and their schedules.
Notification Templates
A common notification service is used by other functional components to send notifications to interested parties about events occurring in Oracle Identity Manager. In addition, this service provides the administrative capabilities for notification template management. A notification template is used for sending the outgoing notifications. These templates typically contain the variables that refer to the available data to provide more contextual content.
System Properties
A system property is an entity that controls the configuration aspect of an application. In addition, to the default system properties, you can create and manage system properties in Oracle Identity Manager.
Deployment Manager
The Deployment Manager is a tool for exporting and importing Oracle Identity Manager configurations. The Deployment Manager enables you to export the objects that make up your Oracle Identity Manager configuration.
Workflow and Request Management
Various operations in Oracle Identity Manager cannot be performed directly. Instead, the operations must be requested. The request management service provides a mechanism to create, approve, and manage requests. A request is an entity created by the users or administrators who want to perform a specific action, which requires a discretionary permission to be obtained from someone or some process before the action can be performed. For example, a user can create a request to gain access to a laptop computer, a manager can approve the request and create an open requisition, and an IT resource administrator can approve the request.
The primary goal of a provisioning solution is to manage requests and provision resources. Request service provides an abstraction layer on the Business Process Execution Language (BPEL) 11g workflow engine. Functional components such as request, provisioning, and attestation interacts with the workflow engine for human approvals. Request service caters to the various functional components in Oracle Identity Manager by managing workflow instances and categories, and provides an abstraction layer on BPEL.
Infrastructure and Middleware Integration
The Adapter Factory, Kernel Orchestration mechanism, Context Manager, and Plug-in Framework are designed to eliminate the need for hard-coding integrations with these systems.
Connector Framework
The integration solution strategy of Oracle Identity Manager provides connectors to various heterogeneous identity-aware IT systems. This strategy is designed to minimize custom development, maximize the reuse of code, and reduce deployment time. The tiers of the integration solution are:
Out-of-the box integration using predefined connectors and predefined generic technology connector providers
Identity connectors that are designed to separate the implementation of an application from the dependencies of the system that the application is attempting to connect to
Connectors based on custom generic technology connector providers
Custom connectors using the Adapter Factory
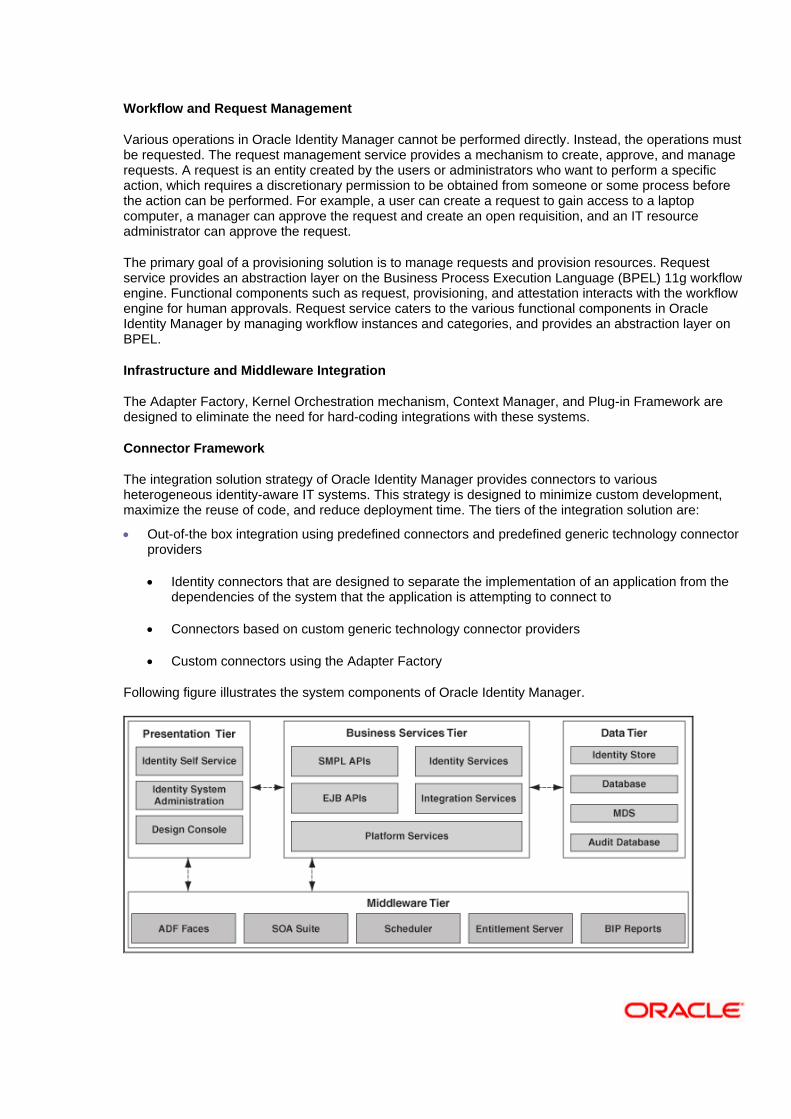
Following figure illustrates the system components of Oracle Identity Manager.
4.2 Integration / Design Architecture
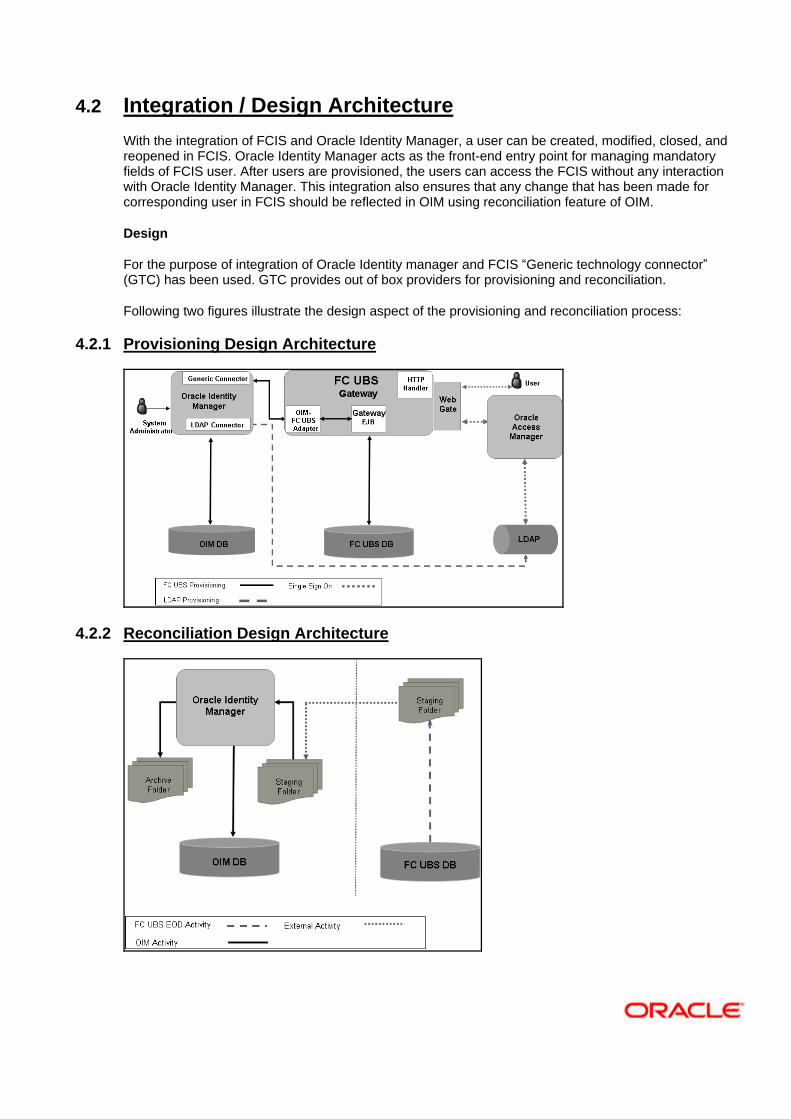
With the integration of FCIS and Oracle Identity Manager, a user can be created, modified, closed, and reopened in FCIS. Oracle Identity Manager acts as the front-end entry point for managing mandatory fields of FCIS user. After users are provisioned, the users can access the FCIS without any interaction with Oracle Identity Manager. This integration also ensures that any change that has been made for corresponding user in FCIS should be reflected in OIM using reconciliation feature of OIM.
Design
For the purpose of integration of Oracle Identity manager and FCIS “Generic technology connector” (GTC) has been used. GTC provides out of box providers for provisioning and reconciliation.
Following two figures illustrate the design aspect of the provisioning and reconciliation process:
4.2.1 Provisioning Design Architecture
4.2.2 Reconciliation Design Architecture
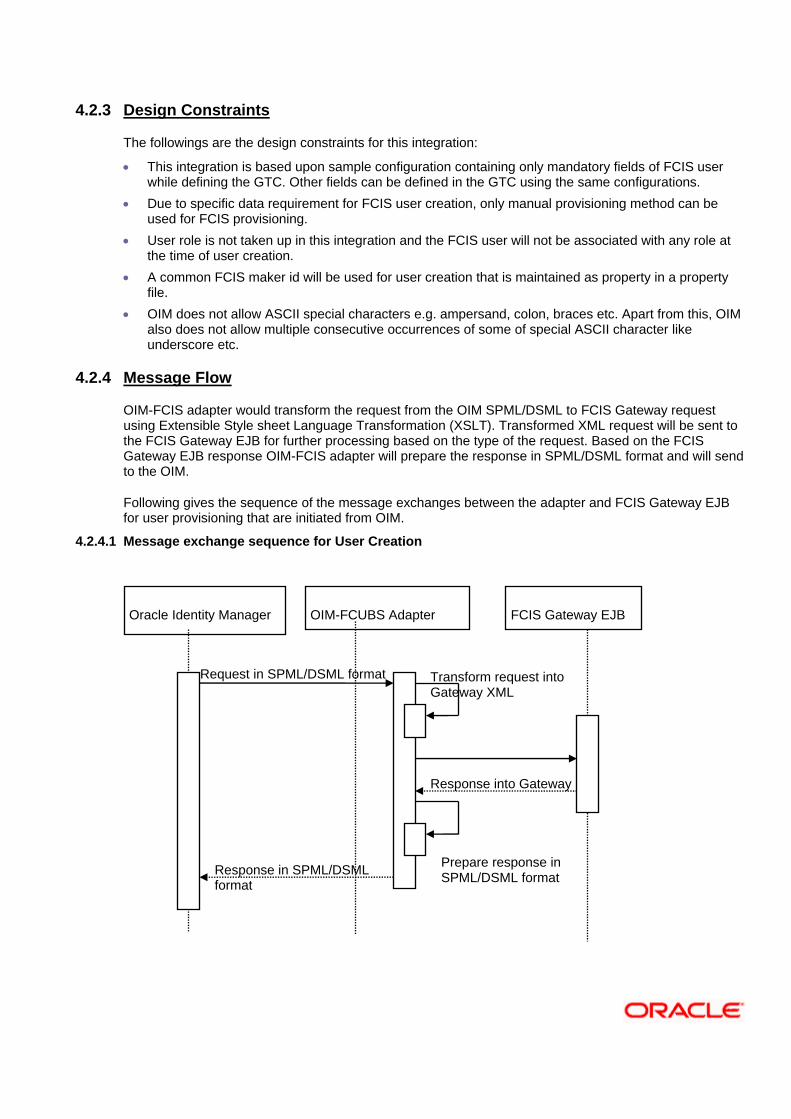
4.2.3 Design Constraints
The followings are the design constraints for this integration:
This integration is based upon sample configuration containing only mandatory fields of FCIS user while defining the GTC. Other fields can be defined in the GTC using the same configurations.
Due to specific data requirement for FCIS user creation, only manual provisioning method can be used for FCIS provisioning.
User role is not taken up in this integration and the FCIS user will not be associated with any role at the time of user creation.
A common FCIS maker id will be used for user creation that is maintained as property in a property file.
OIM does not allow ASCII special characters e.g. ampersand, colon, braces etc. Apart from this, OIM also does not allow multiple consecutive occurrences of some of special ASCII character like underscore etc.
4.2.4 Message Flow
OIM-FCIS adapter would transform the request from the OIM SPML/DSML to FCIS Gateway request using Extensible Style sheet Language Transformation (XSLT). Transformed XML request will be sent to the FCIS Gateway EJB for further processing based on the type of the request. Based on the FCIS Gateway EJB response OIM-FCIS adapter will prepare the response in SPML/DSML format and will send to the OIM.
Following gives the sequence of the message exchanges between the adapter and FCIS Gateway EJB for user provisioning that are initiated from OIM.
4.2.4.1 Message exchange sequence for User Creation
Oracle Identity Manager OIM-FCUBS Adapter FCIS Gateway EJB
Request in SPML/DSML format
Transformed request
Response into Gateway
XML Format
Response in SPML/DSML format
Transform request into Gateway XML
Prepare response in SPML/DSML format
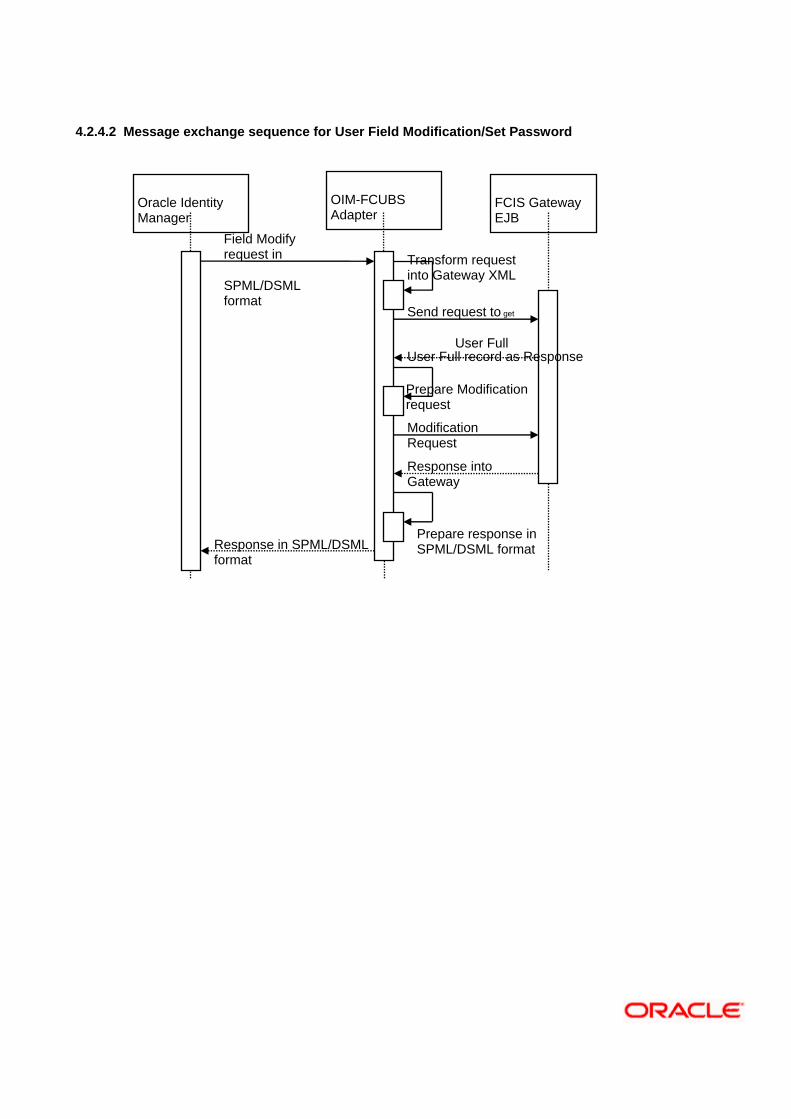
4.2.4.2 Message exchange sequence for User Field Modification/Set Password
Oracle Identity Manager
OIM-FCUBS Adapter
FCIS Gateway EJB
Field Modify request in
SPML/DSML format
Send request to get
User Full response User Full record as Response
Response in SPML/DSML format
Transform request into Gateway XML
Modification Request
in XML format
Response into Gateway
XML Format
Prepare response in SPML/DSML format
Prepare Modification request
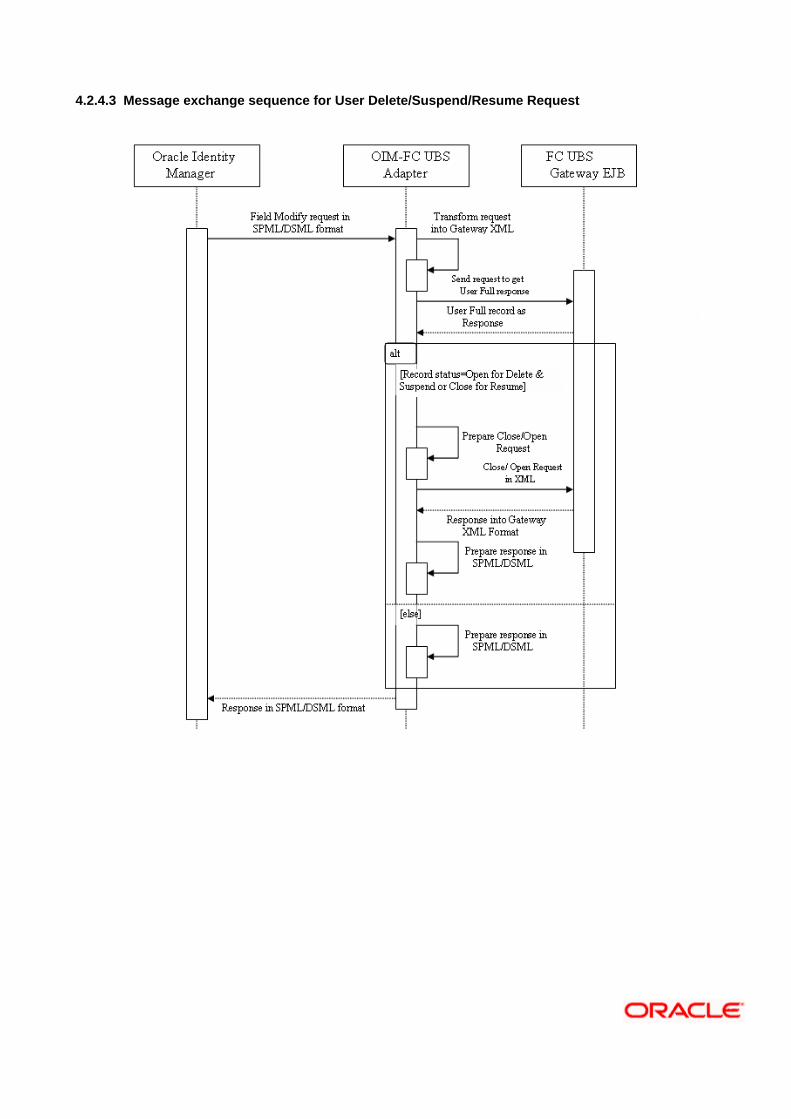
4.2.4.3 Message exchange sequence for User Delete/Suspend/Resume Request
5. Installation / Configuration
5.1 Environment Setup/ Configurations
Oracle FLEXCUBE - OIM Integration environment setup requires
OIM FLEXCUBE Adapter setup and configuration
OIM setup
Note: This implementation document describes the installation and setup of OIM FLEXCUBE Adapter on Oracle Fusion Middleware 11g Release 2 (11.1.2.3.0).
5.1.1 Enabling SSL for Weblogic and OIM Server
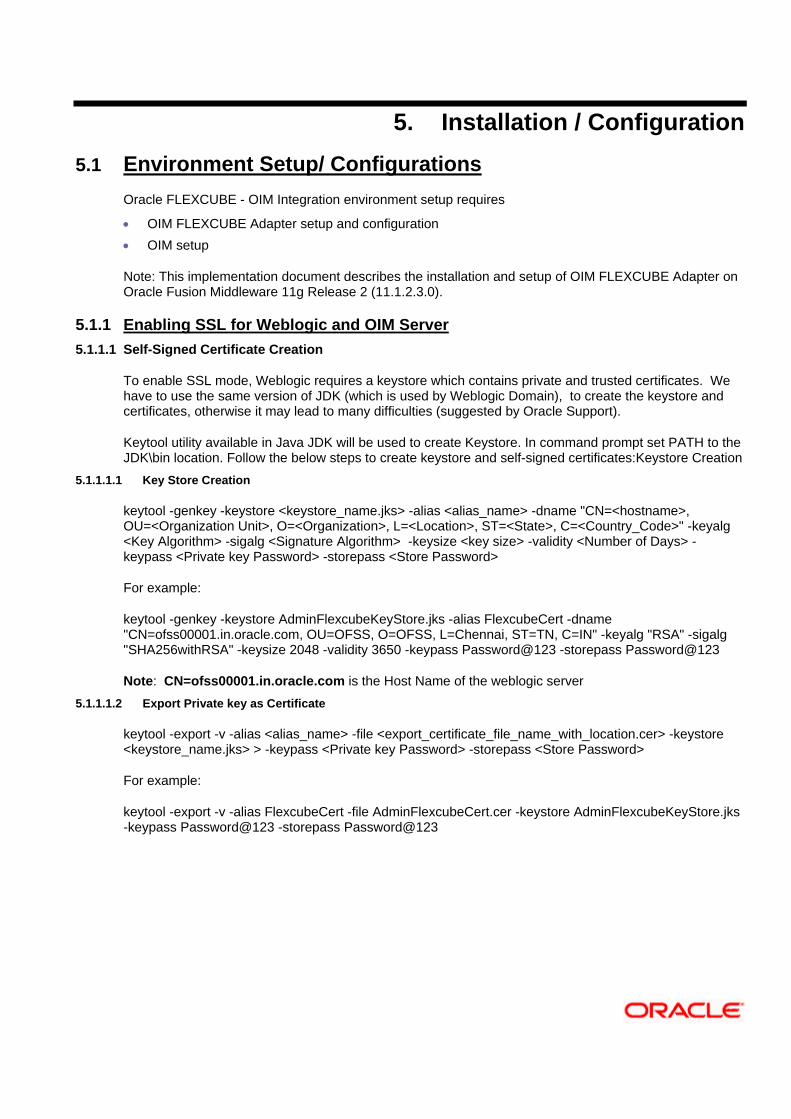
5.1.1.1 Self-Signed Certificate Creation
To enable SSL mode, Weblogic requires a keystore which contains private and trusted certificates. We have to use the same version of JDK (which is used by Weblogic Domain), to create the keystore and certificates, otherwise it may lead to many difficulties (suggested by Oracle Support).
Keytool utility available in Java JDK will be used to create Keystore. In command prompt set PATH to the JDK\bin location. Follow the below steps to create keystore and self-signed certificates:Keystore Creation
5.1.1.1.1 Key Store Creation
keytool -genkey -keystore <keystore_name.jks> -alias <alias_name> -dname "CN=<hostname>, OU=<Organization Unit>, O=<Organization>, L=<Location>, ST=<State>, C=<Country_Code>" -keyalg <Key Algorithm> -sigalg <Signature Algorithm> -keysize <key size> -validity <Number of Days> -keypass <Private key Password> -storepass <Store Password>
For example:
keytool -genkey -keystore AdminFlexcubeKeyStore.jks -alias FlexcubeCert -dname "CN=ofss00001.in.oracle.com, OU=OFSS, O=OFSS, L=Chennai, ST=TN, C=IN" -keyalg "RSA" -sigalg "SHA256withRSA" -keysize 2048 -validity 3650 -keypass Password@123 -storepass Password@123
Note: CN=ofss00001.in.oracle.com is the Host Name of the weblogic server
5.1.1.1.2 Export Private key as Certificate
keytool -export -v -alias <alias_name> -file <export_certificate_file_name_with_location.cer> -keystore <keystore_name.jks> > -keypass <Private key Password> -storepass <Store Password>
For example:
keytool -export -v -alias FlexcubeCert -file AdminFlexcubeCert.cer -keystore AdminFlexcubeKeyStore.jks -keypass Password@123 -storepass Password@123
5.1.1.1.3 Import as Trusted Certificate
keytool -import -v -trustcacerts -alias rootcacert -file <export_certificate_file_name_with_location.cer> -keystore <keystore_name.jks> > -keypass <Private key Password> -storepass <Store Password>
For example:
keytool -import -v -trustcacerts -alias rootcacert -file AdminFlexcubeCert.cer -keystore AdminFlexcubeKeyStore.jks -keypass Password@123 -storepass Password@123
References: Oracle Support Articles (Article ID 1281035.1, Article ID 1218695.1), in case of Certificates issued by the Trusted Authorities
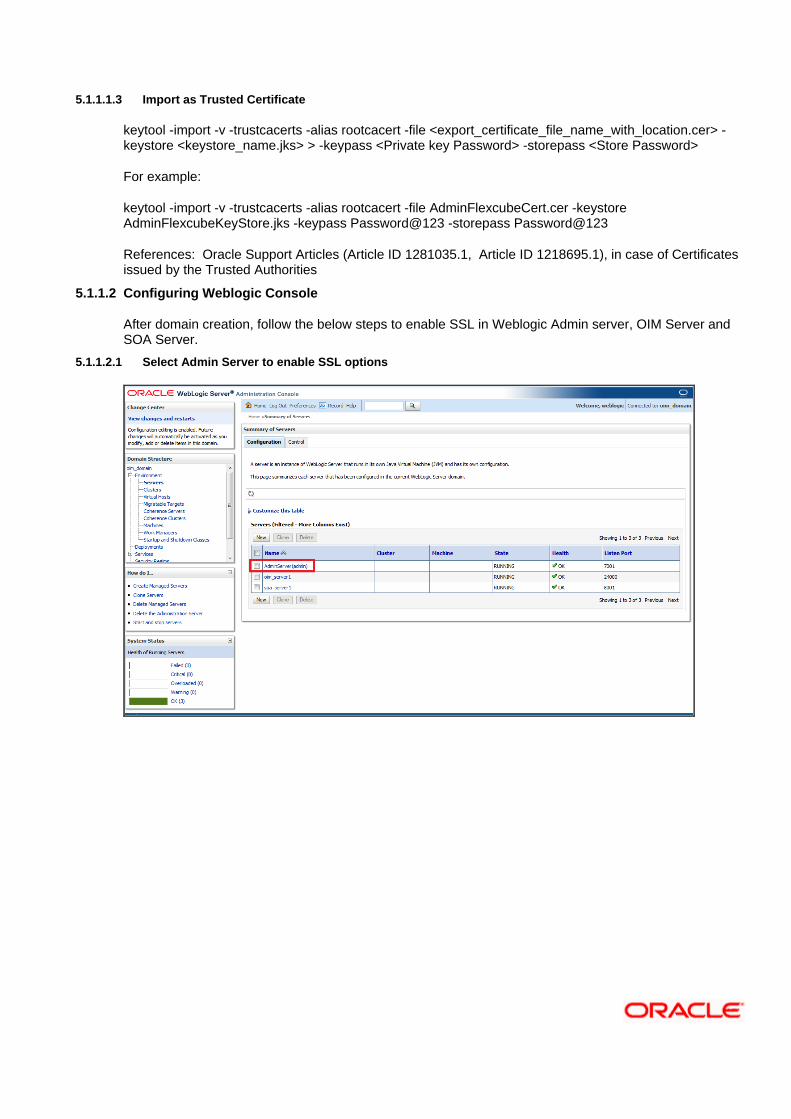
5.1.1.2 Configuring Weblogic Console
After domain creation, follow the below steps to enable SSL in Weblogic Admin server, OIM Server and SOA Server.
5.1.1.2.1 Select Admin Server to enable SSL options
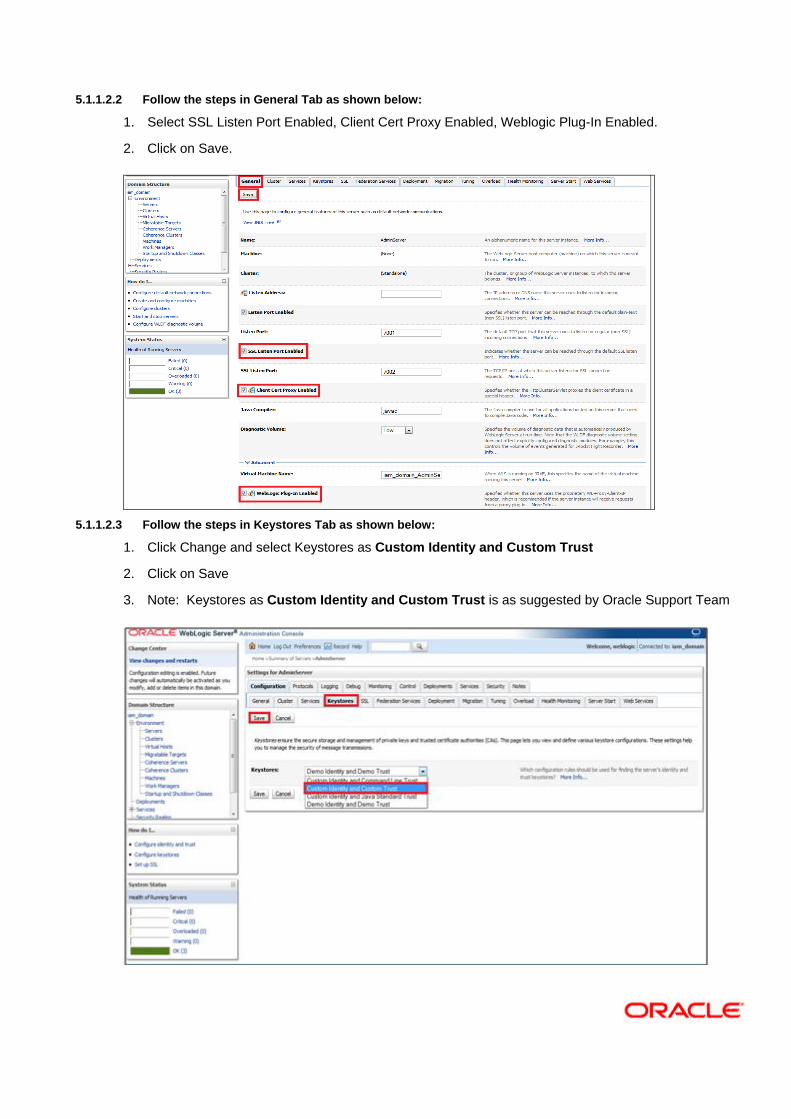
5.1.1.2.2 Follow the steps in General Tab as shown below:
1. Select SSL Listen Port Enabled, Client Cert Proxy Enabled, Weblogic Plug-In Enabled.
2. Click on Save.
5.1.1.2.3 Follow the steps in Keystores Tab as shown below:
1. Click Change and select Keystores as Custom Identity and Custom Trust
2. Click on Save
3. Note: Keystores as Custom Identity and Custom Trust is as suggested by Oracle Support Team
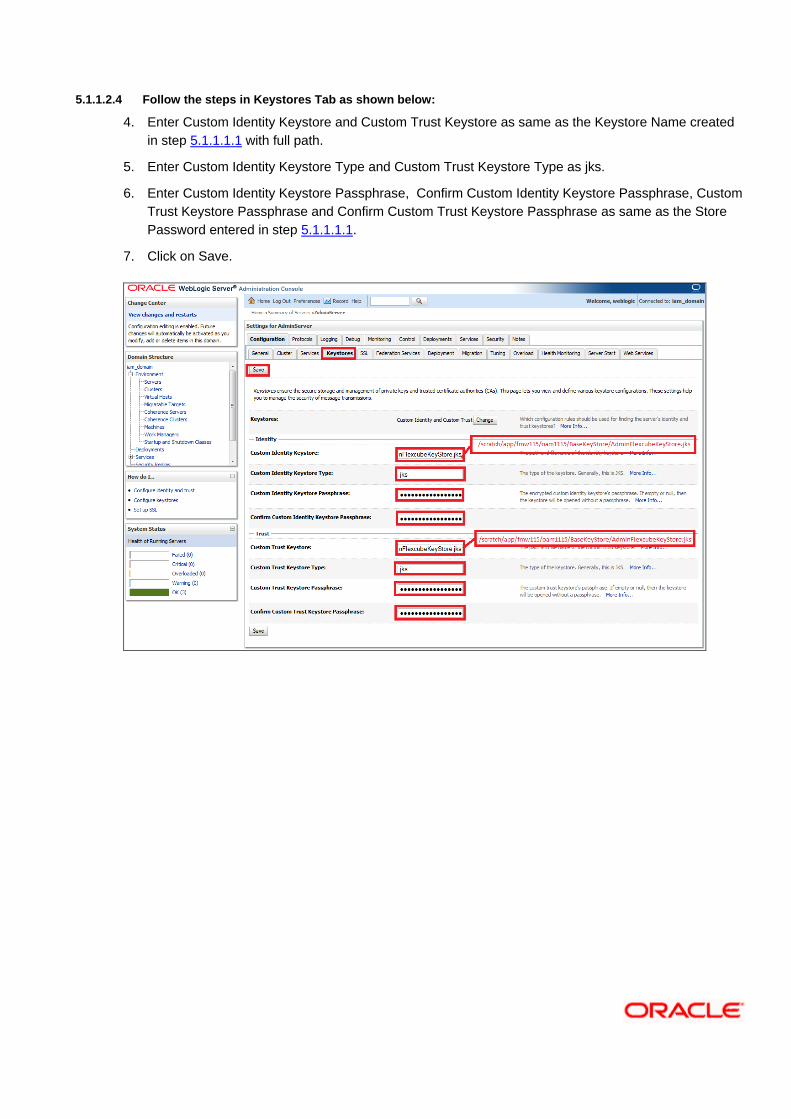
5.1.1.2.4 Follow the steps in Keystores Tab as shown below:
4. Enter Custom Identity Keystore and Custom Trust Keystore as same as the Keystore Name created
in step 5.1.1.1.1 with full path.
5. Enter Custom Identity Keystore Type and Custom Trust Keystore Type as jks.
6. Enter Custom Identity Keystore Passphrase, Confirm Custom Identity Keystore Passphrase, Custom
Trust Keystore Passphrase and Confirm Custom Trust Keystore Passphrase as same as the Store
Password entered in step 5.1.1.1.1.
7. Click on Save.
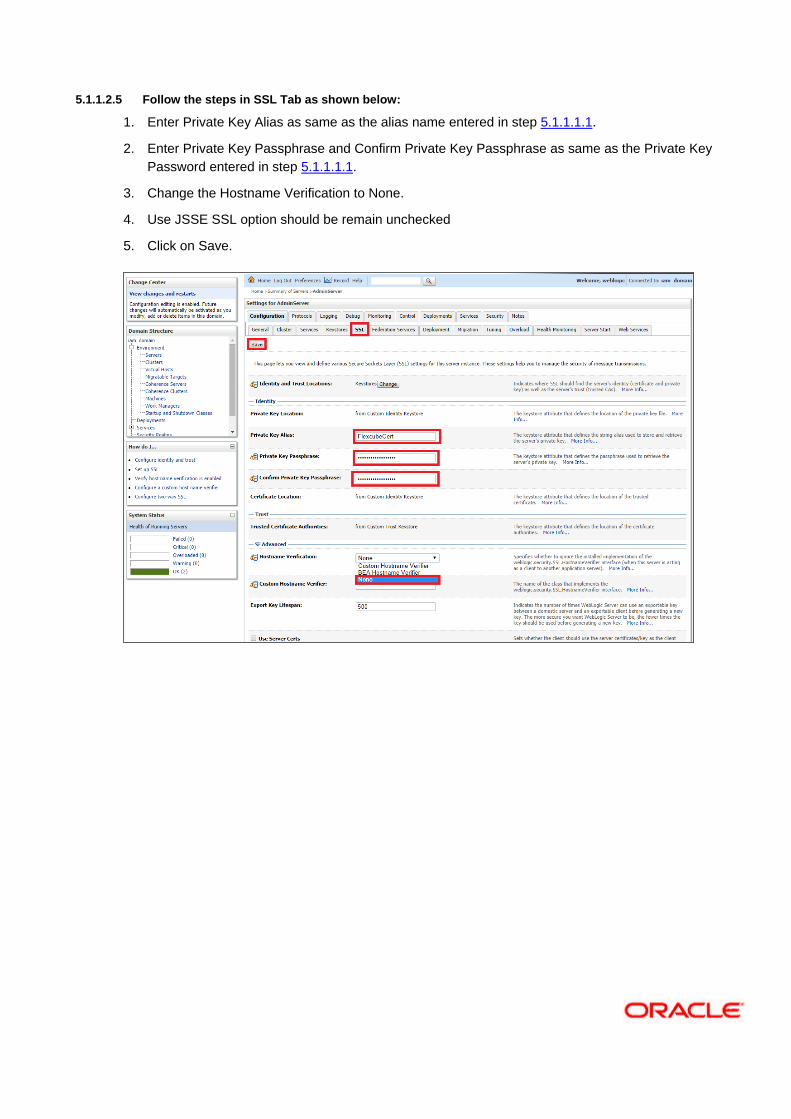
5.1.1.2.5 Follow the steps in SSL Tab as shown below:
1. Enter Private Key Alias as same as the alias name entered in step 5.1.1.1.1.
2. Enter Private Key Passphrase and Confirm Private Key Passphrase as same as the Private Key
Password entered in step 5.1.1.1.1.
3. Change the Hostname Verification to None.
4. Use JSSE SSL option should be remain unchecked
5. Click on Save.
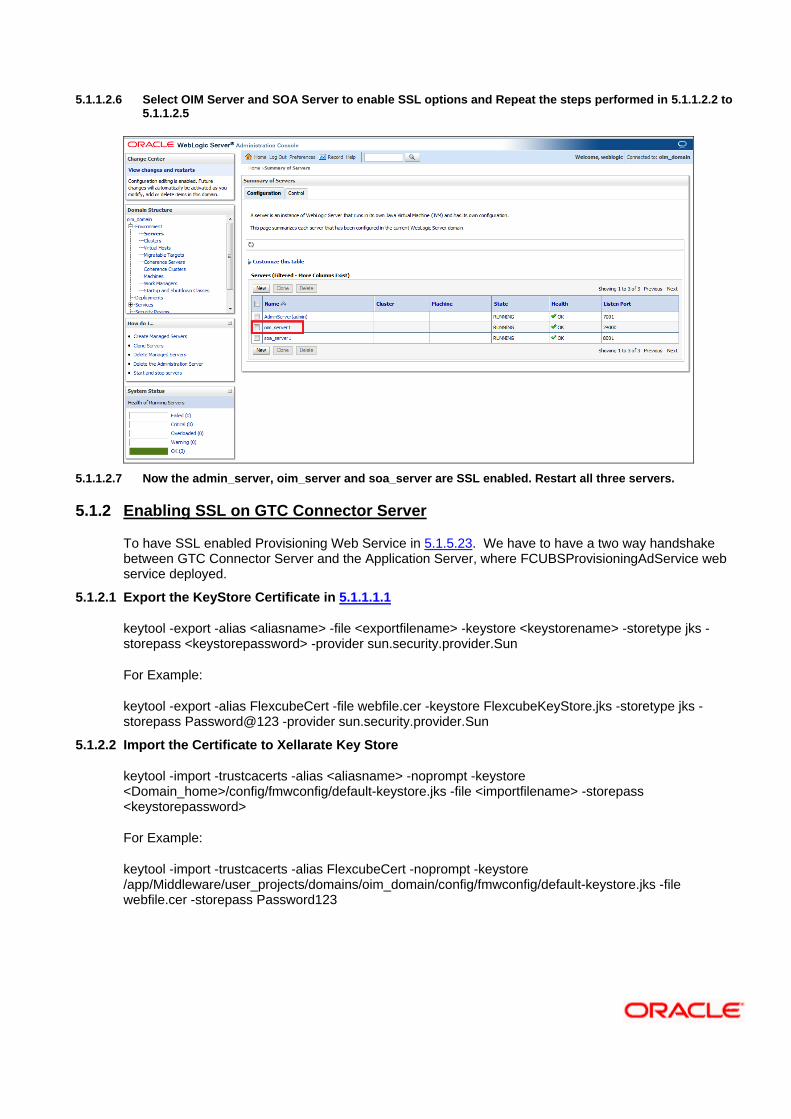
5.1.1.2.6 Select OIM Server and SOA Server to enable SSL options and Repeat the steps performed in 5.1.1.2.2 to 5.1.1.2.5
5.1.1.2.7 Now the admin_server, oim_server and soa_server are SSL enabled. Restart all three servers.
5.1.2 Enabling SSL on GTC Connector Server
To have SSL enabled Provisioning Web Service in 5.1.5.23. We have to have a two way handshake between GTC Connector Server and the Application Server, where FCUBSProvisioningAdService web service deployed.
5.1.2.1 Export the KeyStore Certificate in 5.1.1.1.1
keytool -export -alias <aliasname> -file <exportfilename> -keystore <keystorename> -storetype jks -storepass <keystorepassword> -provider sun.security.provider.Sun
For Example:
keytool -export -alias FlexcubeCert -file webfile.cer -keystore FlexcubeKeyStore.jks -storetype jks -storepass Password@123 -provider sun.security.provider.Sun
5.1.2.2 Import the Certificate to Xellarate Key Store
keytool -import -trustcacerts -alias <aliasname> -noprompt -keystore <Domain_home>/config/fmwconfig/default-keystore.jks -file <importfilename> -storepass <keystorepassword>
For Example:
keytool -import -trustcacerts -alias FlexcubeCert -noprompt -keystore /app/Middleware/user_projects/domains/oim_domain/config/fmwconfig/default-keystore.jks -file webfile.cer -storepass Password123
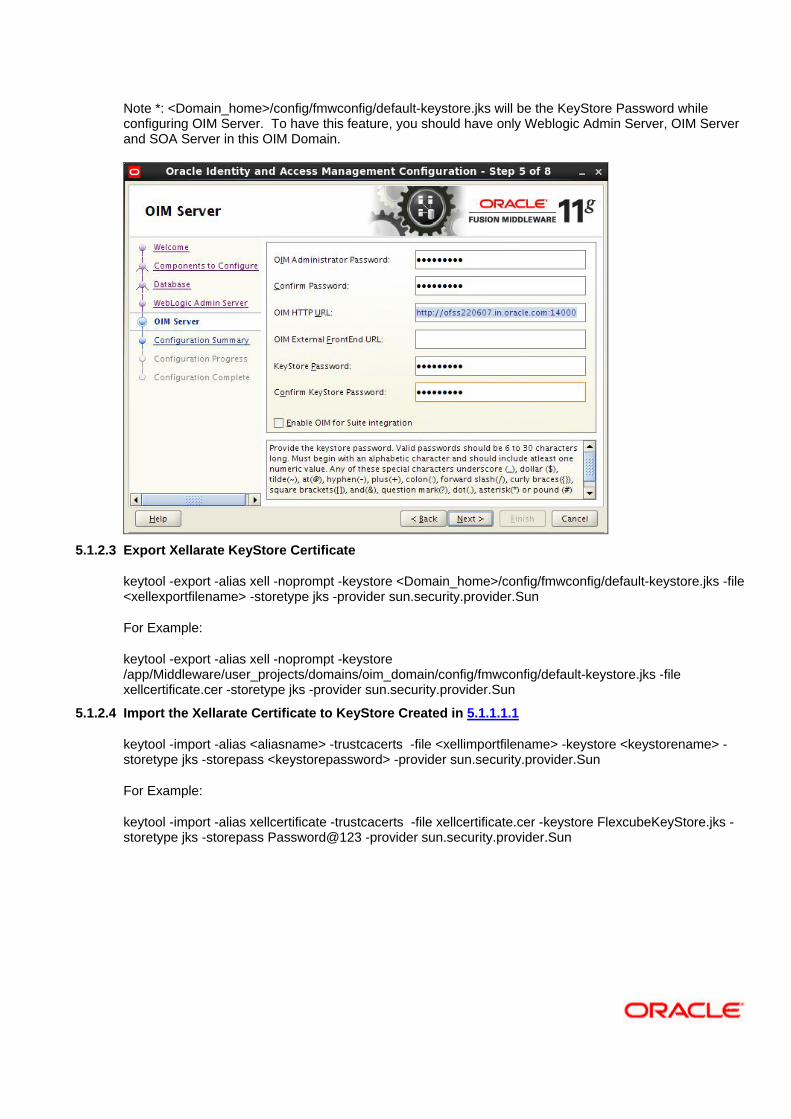
Note *: <Domain_home>/config/fmwconfig/default-keystore.jks will be the KeyStore Password while configuring OIM Server. To have this feature, you should have only Weblogic Admin Server, OIM Server and SOA Server in this OIM Domain.
5.1.2.3 Export Xellarate KeyStore Certificate
keytool -export -alias xell -noprompt -keystore <Domain_home>/config/fmwconfig/default-keystore.jks -file <xellexportfilename> -storetype jks -provider sun.security.provider.Sun
For Example:
keytool -export -alias xell -noprompt -keystore /app/Middleware/user_projects/domains/oim_domain/config/fmwconfig/default-keystore.jks -file xellcertificate.cer -storetype jks -provider sun.security.provider.Sun
5.1.2.4 Import the Xellarate Certificate to KeyStore Created in 5.1.1.1.1
keytool -import -alias <aliasname> -trustcacerts -file <xellimportfilename> -keystore <keystorename> -storetype jks -storepass <keystorepassword> -provider sun.security.provider.Sun
For Example:
keytool -import -alias xellcertificate -trustcacerts -file xellcertificate.cer -keystore FlexcubeKeyStore.jks -storetype jks -storepass Password@123 -provider sun.security.provider.Sun
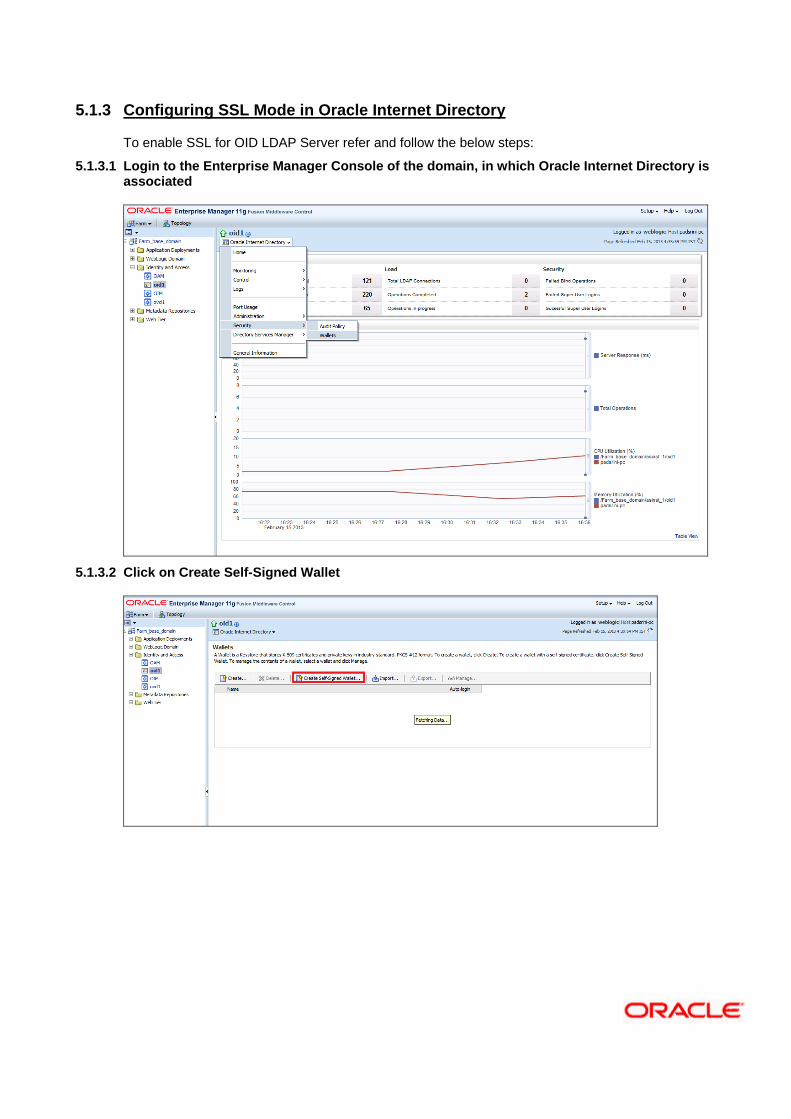
5.1.3 Configuring SSL Mode in Oracle Internet Directory
To enable SSL for OID LDAP Server refer and follow the below steps:
5.1.3.1 Login to the Enterprise Manager Console of the domain, in which Oracle Internet Directory is associated
5.1.3.2 Click on Create Self-Signed Wallet
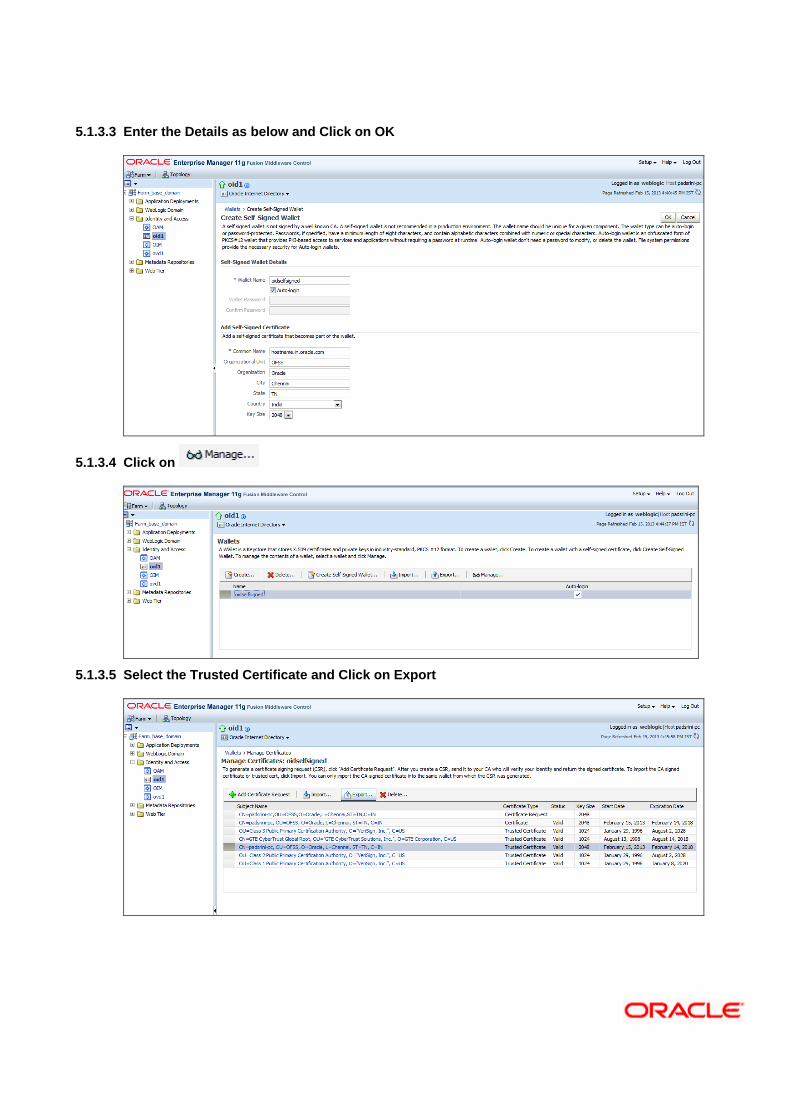
5.1.3.3 Enter the Details as below and Click on OK
5.1.3.4 Click on
5.1.3.5 Select the Trusted Certificate and Click on Export

5.1.3.6 Click Export Trusted Certificate and save the certificate file
5.1.3.7 Click on Server Properties
5.1.3.8 Click on Change SSL Settings
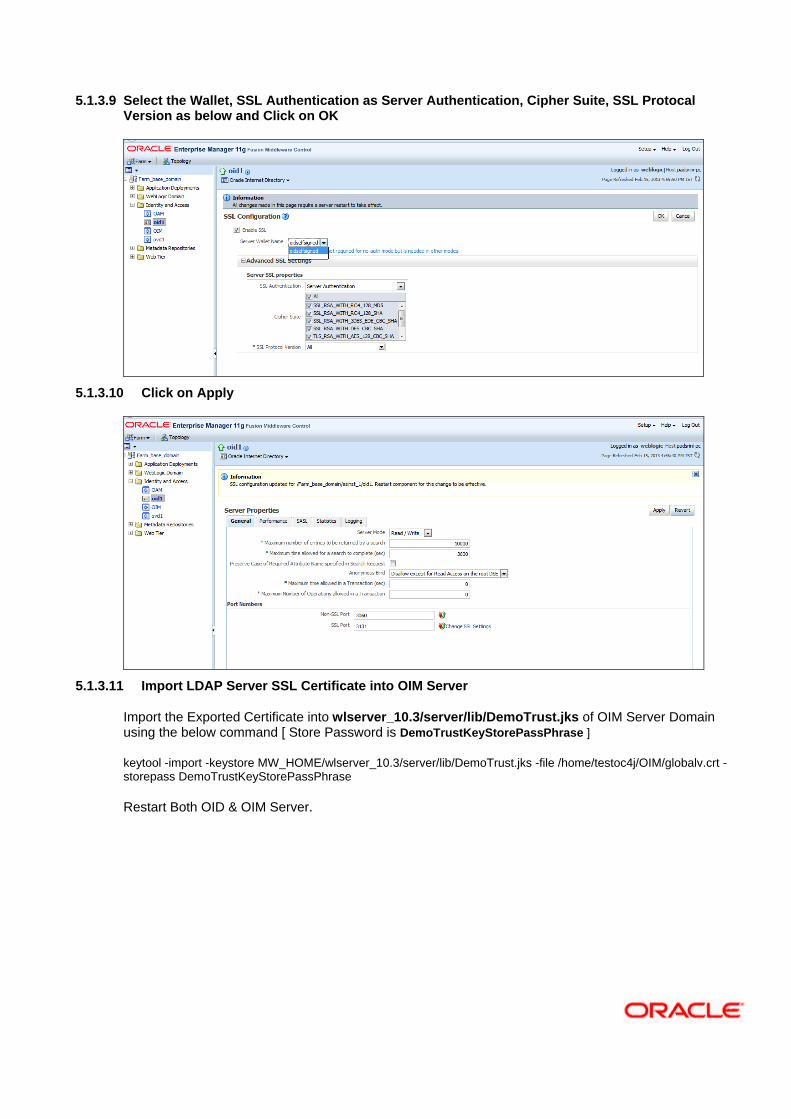
5.1.3.9 Select the Wallet, SSL Authentication as Server Authentication, Cipher Suite, SSL Protocal Version as below and Click on OK
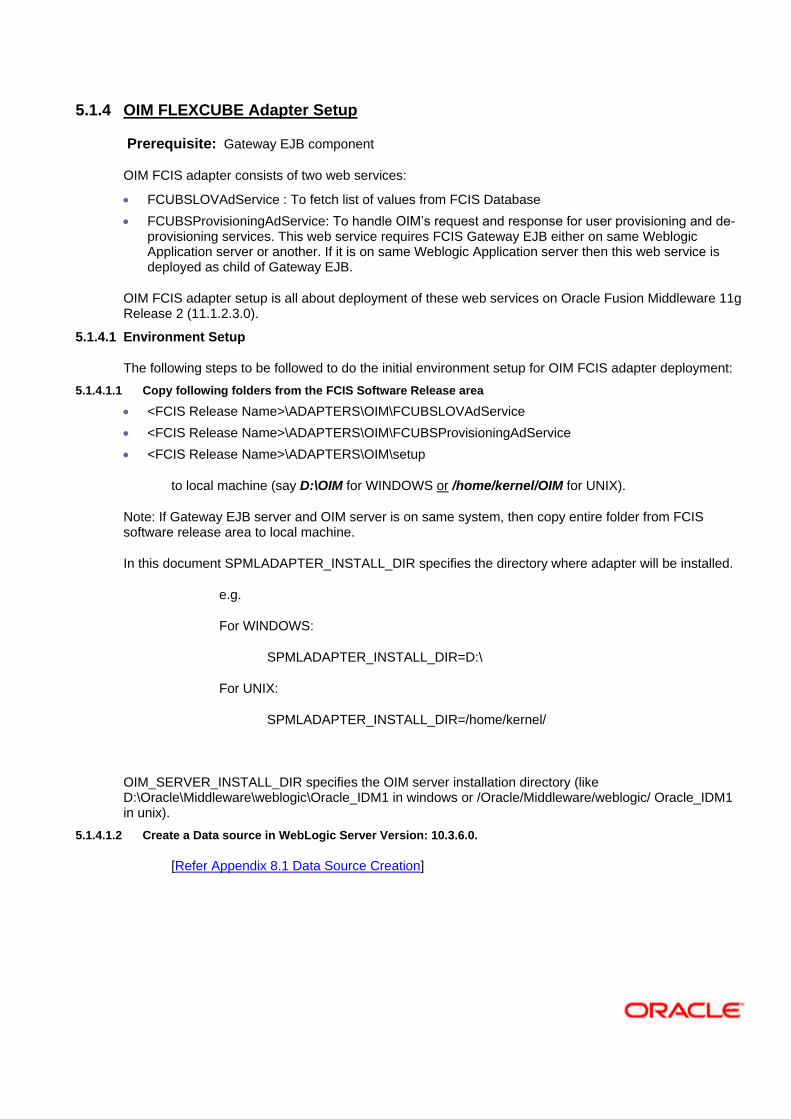
5.1.3.10 Click on Apply
5.1.3.11 Import LDAP Server SSL Certificate into OIM Server
Import the Exported Certificate into wlserver_10.3/server/lib/DemoTrust.jks of OIM Server Domain using the below command [ Store Password is DemoTrustKeyStorePassPhrase ]
keytool -import -keystore MW_HOME/wlserver_10.3/server/lib/DemoTrust.jks -file /home/testoc4j/OIM/globalv.crt -storepass DemoTrustKeyStorePassPhrase
Restart Both OID & OIM Server.
5.1.4 OIM FLEXCUBE Adapter Setup
Prerequisite: Gateway EJB component
OIM FCIS adapter consists of two web services:
FCUBSLOVAdService : To fetch list of values from FCIS Database
FCUBSProvisioningAdService: To handle OIM’s request and response for user provisioning and de-provisioning services. This web service requires FCIS Gateway EJB either on same Weblogic Application server or another. If it is on same Weblogic Application server then this web service is deployed as child of Gateway EJB.
OIM FCIS adapter setup is all about deployment of these web services on Oracle Fusion Middleware 11g Release 2 (11.1.2.3.0).
5.1.4.1 Environment Setup
The following steps to be followed to do the initial environment setup for OIM FCIS adapter deployment:
5.1.4.1.1 Copy following folders from the FCIS Software Release area
<FCIS Release Name>\ADAPTERS\OIM\FCUBSLOVAdService
<FCIS Release Name>\ADAPTERS\OIM\FCUBSProvisioningAdService
<FCIS Release Name>\ADAPTERS\OIM\setup
to local machine (say D:\OIM for WINDOWS or /home/kernel/OIM for UNIX).
Note: If Gateway EJB server and OIM server is on same system, then copy entire folder from FCIS software release area to local machine.
In this document SPMLADAPTER_INSTALL_DIR specifies the directory where adapter will be installed.
e.g.
For WINDOWS:
SPMLADAPTER_INSTALL_DIR=D:\
For UNIX:
SPMLADAPTER_INSTALL_DIR=/home/kernel/
OIM_SERVER_INSTALL_DIR specifies the OIM server installation directory (like D:\Oracle\Middleware\weblogic\Oracle_IDM1 in windows or /Oracle/Middleware/weblogic/ Oracle_IDM1 in unix).
5.1.4.1.2 Create a Data source in WebLogic Server Version: 10.3.6.0.
[Refer Appendix 8.1 Data Source Creation]
5.1.4.1.3 Modify configuration files as below:
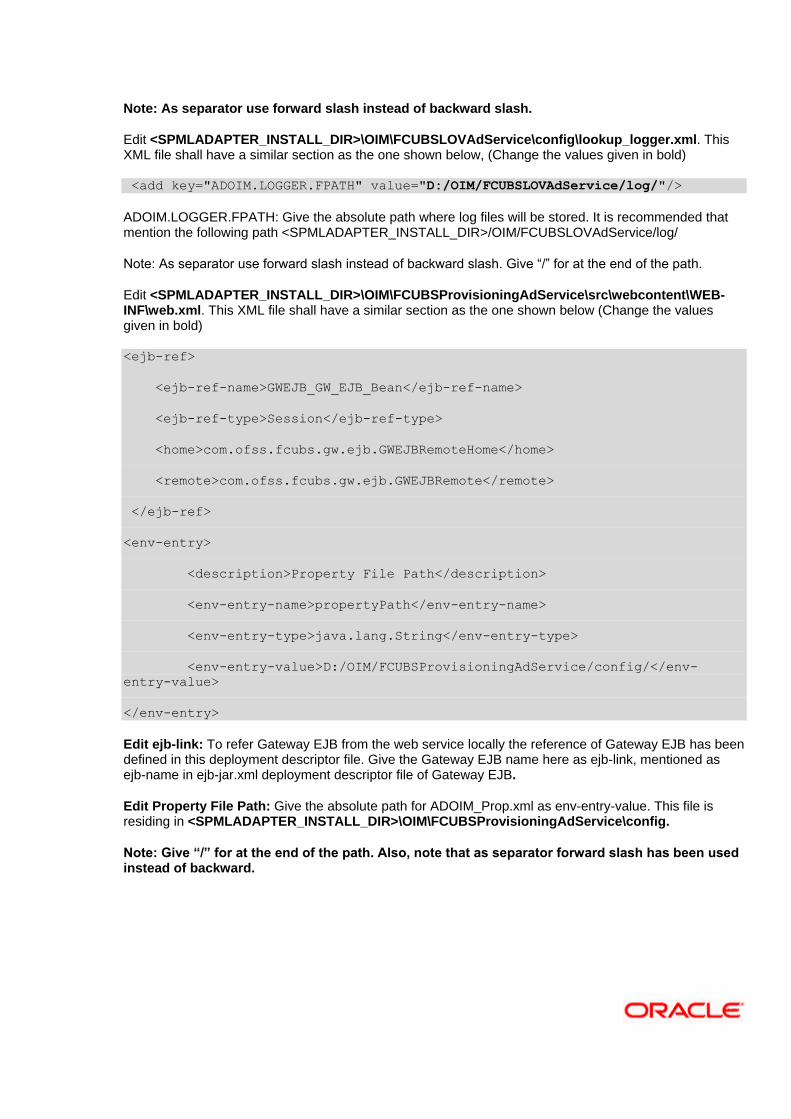
Edit <SPMLADAPTER_INSTALL_DIR>\OIM\FCUBSLOVAdService\src\webcontent\WEB-INF\web.xml. This XML file shall have a similar section as the one shown below (Change the values given in bold)
<resource-ref>
<res-ref-name>OIMLOVSQA</res-ref-name>
<res-type>javax.sql.DataSource</res-type>
<res-auth>Container</res-auth>
</resource-ref>
<env-entry>
<description>Property File Path</description>
<env-entry-name>propertyPath</env-entry-name>
<env-entry-type>java.lang.String</env-entry-type>
<env-entry-value>D:/OIM/FCUBSLOVAdService/config/</env-entry-value>
</env-entry>
Edit resource-ref section: Mention the JNDI name of the Datasource created in Application server for FLEXCUBE UBS Messaging Database Layer Instance at step 3 as res-ref-name.
Edit Property File Path: Give the absolute path for lookup_prop.xml as env-entry-value. Ideally, this file is residing in < SPMLADAPTER_INSTALL_DIR>\OIM\FCUBSLOVAdService\config.
Note: Give “/” for at the end of the path. Also, note that as separator forward slash has been used instead of backward.
Edit <SPMLADAPTER_INSTALL_DIR>\OIM\FCUBSLOVAdService\config\lookup_prop.xml. This XML file shall have a similar section as the one shown below, (Change the values given in bold)
<!-- DataBase Connection -->
<add key="FCUBS_CON_POOLNAME" value="OIMLOVSQA"/>
<!-- DataBase Connection -->
<add key="LOGGER_PATH"
value="D:/OIM/FCUBSLOVAdService/config/lookup_logger.xml"/>
Edit FCUBS_CON_POOLNAME: Give the same Datasource JNDI name mentioned in above web.xml for FLEXCUBE UBS Messaging Database Layer Instance.
Edit LOGGER_PATH: Give the logging configuration absolute path for lookup_logger.xml. This file is residing in <SPMLADAPTER_INSTALL_DIR>\OIM\FCUBSLOVAdService\config folder.
Note: As separator use forward slash instead of backward slash.
Edit <SPMLADAPTER_INSTALL_DIR>\OIM\FCUBSLOVAdService\config\lookup_logger.xml. This XML file shall have a similar section as the one shown below, (Change the values given in bold)
<add key="ADOIM.LOGGER.FPATH" value="D:/OIM/FCUBSLOVAdService/log/"/>
ADOIM.LOGGER.FPATH: Give the absolute path where log files will be stored. It is recommended that mention the following path <SPMLADAPTER_INSTALL_DIR>/OIM/FCUBSLOVAdService/log/
Note: As separator use forward slash instead of backward slash. Give “/” for at the end of the path.
Edit <SPMLADAPTER_INSTALL_DIR>\OIM\FCUBSProvisioningAdService\src\webcontent\WEB-INF\web.xml. This XML file shall have a similar section as the one shown below (Change the values given in bold)
<ejb-ref>
<ejb-ref-name>GWEJB_GW_EJB_Bean</ejb-ref-name>
<ejb-ref-type>Session</ejb-ref-type>
<home>com.ofss.fcubs.gw.ejb.GWEJBRemoteHome</home>
<remote>com.ofss.fcubs.gw.ejb.GWEJBRemote</remote>
</ejb-ref>
<env-entry>
<description>Property File Path</description>
<env-entry-name>propertyPath</env-entry-name>
<env-entry-type>java.lang.String</env-entry-type>
<env-entry-value>D:/OIM/FCUBSProvisioningAdService/config/</env-
entry-value>
</env-entry>
Edit ejb-link: To refer Gateway EJB from the web service locally the reference of Gateway EJB has been defined in this deployment descriptor file. Give the Gateway EJB name here as ejb-link, mentioned as ejb-name in ejb-jar.xml deployment descriptor file of Gateway EJB.
Edit Property File Path: Give the absolute path for ADOIM_Prop.xml as env-entry-value. This file is residing in <SPMLADAPTER_INSTALL_DIR>\OIM\FCUBSProvisioningAdService\config.
Note: Give “/” for at the end of the path. Also, note that as separator forward slash has been used instead of backward.

Edit <SPMLADAPTER_INSTALL_DIR>\OIM\FCUBSLOVAdService\config\ADOIM_Prop.xml. This XML file shall have a similar section as the one shown below, (Change the values given in bold)
<add key="GW_EJB_JNDI_NAME" value=" GWEJB#com.ofss.fcubs.gw.ejb.GWEJBRemote "/>
<add key="GW_EJB_CALL_TYPE" value="REMOTE"/>
<add key="GW_EJB_CTX_FACTORY"
value="weblogic.jndi.WLInitialContextFactory"/>
<add key="GW_EJB_SERVER_URL" value="t3s://localhost:7102"/>
<add key="GW_EJB_SECURITY_PRINCIPAL" value=""/>
<add key="GW_EJB_SECURITY_CREDENTIALS" value=""/>
Edit GW_EJB_JNDI_NAME: Give the Gateway EJB JNDI name.
Edit GW_EJB_CALL_TYPE: Give the LOCAL or REMOTE (must be in Upper Case) based on the way EJB is to be referred from web service. If FCIS Gateway EJB is deployed on same Weblogic Application server then it should be REMOTE.
Edit GW_EJB_SERVER_URL: Give the application server URL where Gateway EJB is deployed.
Following are the parts that make this URL:
t3s://HostName:PortNumber
Protocol Host Name Weblogic Port
Protocol: This should be t3s as in WebLogic application server.
Server URL: This should be the IP address or fully qualified computer name (i.e. <computer name>.<domain>) of the system where the application server is running on which Gateway EJB has been deployed.
Port: This should be the same as request port mentioned in domain.xml file.

Edit following section in the <SPMLADAPTER_INSTALL_DIR>\OIM\FCUBSLOVAdService\config\ADOIM_Prop.xml file: (Change the values given in bold )
<add key="MAKER_ID" value="OIMUSER9"/>
<add key="HEAD_OFFICE" value="CHO"/>
<add key="REQ_SOURCE" value="IDM"/>
<add key="UBS_OR_IS" value="FCIS"/>
<add key="LOGGER_PATH"
value="D:/OIM/FCUBSProvisioningAdService/config/adoim_logger.xml"/>
<add key="FCUBS_SPML_ERROR_FILE"
value="D:/OIM/FCUBSProvisioningAdService/config/
FCUBS_SPML_ERROR.properties"/>
<add key="ADOIM_MSG_LOGGING_ENABLED" value="N"/>
<add key="ADOIM_MSG_LOGGING_PATH"
value="D:/OIM/FCUBSProvisioningAdService/log/"/>
Edit MAKER_ID: Give FCIS user id that can serve as maker id for all OIM requests. Please ensure that this id should be a valid user in FCIS and should have rights for creating, authorizing and modifying user.
Edit HEAD_OFFICE: Give the head office branch code.
Edit REQ_SOURCE: Give the external source name. Please ensure that maintenance of this external source has been done in FCIS.
Edit UBS_OR_IS: Give the application name to which the user need to be provisioned. The value will be either FCUBS or FCIS.
Edit LOGGER_PATH: Give the logging configuration absolute path for adoim_logger.xml. This file is residing in <SPMLADAPTER_INSTALL_DIR>\OIM\FCUBSProvisioningAdService\config folder.
Edit FCUBS_SPML_ERROR_FILE: Give the absolute path for fcubs_spml_error.properties. This file is residing in < SPMLADAPTER_INSTALL_DIR>\OIM\FCUBSProvisioningAdService\config folder.
Edit ADOIM_MSG_LOGGING_ENABLED: Give ‘Y’ if OIM request and response message is required to be stored separately otherwise give ‘N”.
Edit ADOIM_MSG_LOGGING_PATH: Give the absolute path where OIM request–response will get stored.
Note: As separator use forward slash instead of backward slash. Give “/” for at the end of the path.
Edit <SPMLADAPTER_INSTALL_DIR>\OIM\ FCUBSProvisioningAdService\config\adoim_logger.xml. This XML file shall have a similar section as the one shown below, (Change the values given in bold)
<add key="ADOIM.LOGGER.FPATH" value="D:/OIM/FCUBSProvisioningAdService /log/"/>
Edit ADOIM.LOGGER.FPATH: Give the absolute path where log files will be stored. It is recommended that mention the following path <SPMLADAPTER_INSTALL_DIR>/OIM/ FCUBSProvisioningAdService/log/
Note: As separator use forward slash instead of backward slash. Give “/” for at the end of the path.
Remark: GW_EJB_SECURITY_PRINCIPAL & GW_EJB_SECURITY_CREDENTIALS can be update using <SPMLADAPTER_INSTALL_DIR>\OIM\FCUBSProvisioningAdService\setup\ChangePassword.bat or ChangePassword.sh
5.1.4.1.4 Building the Deployment Units for WINDOWS
5.1.4.1.4.1 Building FCUBSLOVAdService.ear
Edit <SPMLADAPTER_INSTALL_DIR>\OIM\FCUBSLOVAdService\setup\WEBLOGIC\ build.xml to set {server_home} entry to Weblogic Server installed directory
Eg: D:\Middleware\wlserver_10.3
Open a DOS command-prompt and change directory to, D:\OIM\FCUBSLOVAdService\
Set PATH to JDK\bin and ANT\bin in the command prompt
Set JAVA_HOME
Change the directory to D:\OIM\FCUBSLOVAdService\setup\WEBLOGIC
To execute the build file, type “ant” on the command-prompt and press enter.
Above step creates an EAR file in D:\OIM\FCUBSLOVAdService\build with the name FCUBSLOVAdService.ear
5.1.4.1.4.2 Building FCUBSProvisioningAdService.ear
Edit <SPMLADAPTER_INSTALL_DIR>\OIM\FCUBSProvisioningAdService\setup\WEBLOGIC\build.xml to set {server_home} and {JAVA_HOME} entry to Weblogic Server installed directory and JDK Installed directory.
Eg: D:\Middleware\wlserver_10.3
C:\Program Files\java\jdk1.7.0_51
Change directory to, D:\OIM\FCUBSProvisioningAdService\setup\WEBLOGIC
To execute the build file, type “ant” on the command-prompt and press enter.
Above step creates an EAR file in build D:\OIM\FCUBSProvisioningAdService folder with the name FCUBSProvisioningAdService.ear
5.1.4.1.5 Building the Deployment Units for UNIX / Linux
5.1.4.1.5.1 Building FCUBSLOVAdService.ear
Modify {server_home} entry in the build.xml to where Weblogic Server is installed ( for example /home/kernel/Middleware/wlserver_10.3 )
Open a UNIX shell prompt and change directory to, /home/OIM/FCUBSLOVAdService
Set PATH environment variable with JDK/bin path and ANT\bin path in the command prompt.
Change the directory to <SPMLADAPTER_INSTALL_DIR>/FCUBSLOVAdService/setup/WEBLOGIC
To execute the build file, type “ant” on the shell prompt and press enter.
Above step creates an EAR file in /home/kernel/OIM/FCUBSLOVAdService/build folder with the name FCUBSLOVAdService.ear
5.1.4.1.5.2 Building FCUBSProvisioningAdService.ear
Edit <SPMLADAPTER_INSTALL_DIR>/OIM/FCUBSProvisioningAdService/setup/WEBLOGIC/build.xml to set {server_home} entry to Weblogic Server installed directory
Eg: home/Oracle/Middleware/wlserver_10.3
home/java/jdk1.7.0_51
Change directory to, /home/kernel/OIM/FCUBSProvisioningAdService/setup/WEBLOGIC
To execute the build file, type “ant” on the command-prompt and press enter.
Above step creates an EAR file in /home/kernel/OIM/FCUBSProvisioningAdService/build folder with the name FCUBSProvisioningAdService.ear
5.1.4.2 Deployment
Deploy FCUBSLOVAdService
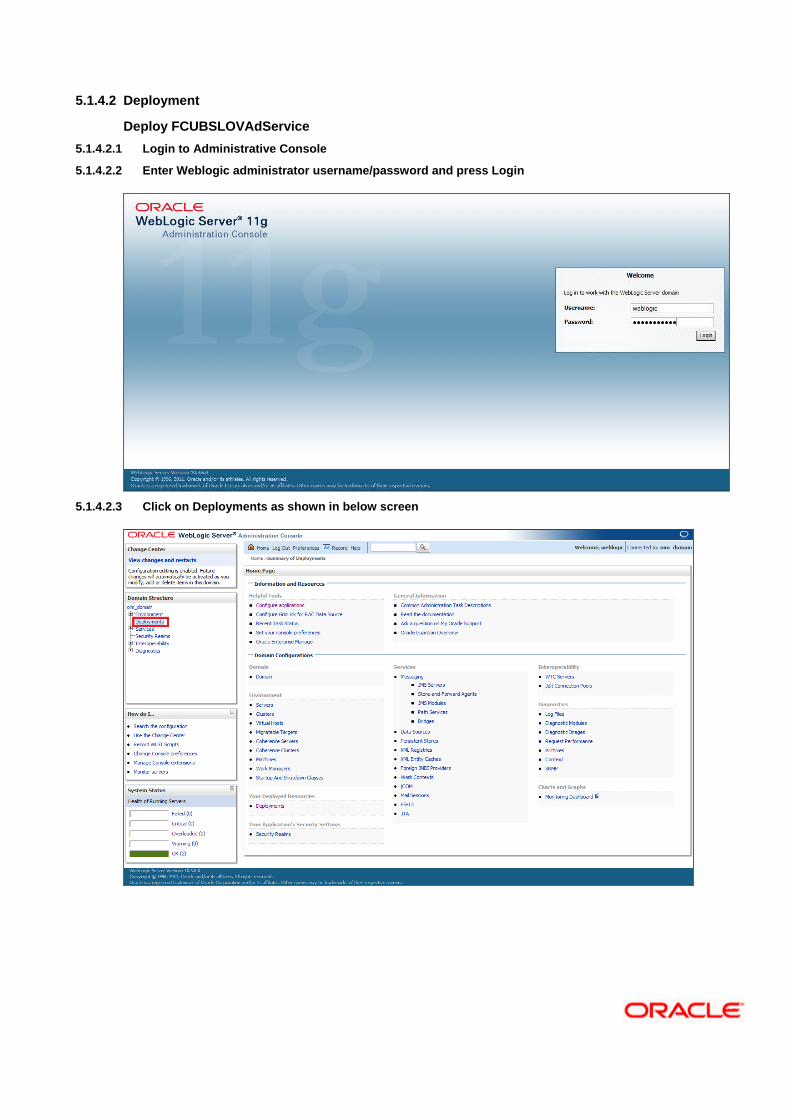
5.1.4.2.1 Login to Administrative Console
5.1.4.2.2 Enter Weblogic administrator username/password and press Login
5.1.4.2.3 Click on Deployments as shown in below screen

5.1.4.2.4 Click on the Install as shown below
5.1.4.2.5 The following screen is displayed
a. Click on upload your file(s)

5.1.4.2.6 Choose the enterprise archive file from the build path:
<SPMLADAPTER_INSTALL_DIR>\OIM\FCUBSLOVAdService\build\
a. Click on Next
5.1.4.2.7 Select the enterprises archive file FCUBSLOVAdService.ear
a. Click on Next
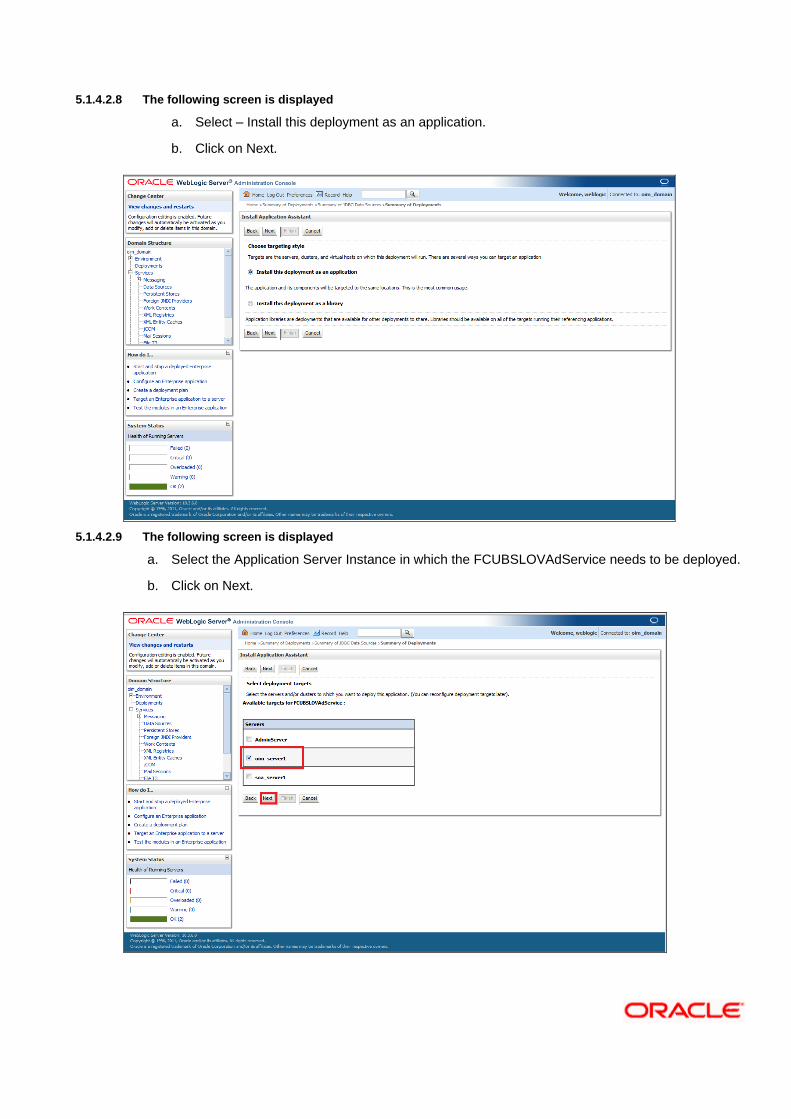
5.1.4.2.8 The following screen is displayed
a. Select – Install this deployment as an application.
b. Click on Next.
5.1.4.2.9 The following screen is displayed
a. Select the Application Server Instance in which the FCUBSLOVAdService needs to be deployed.
b. Click on Next.
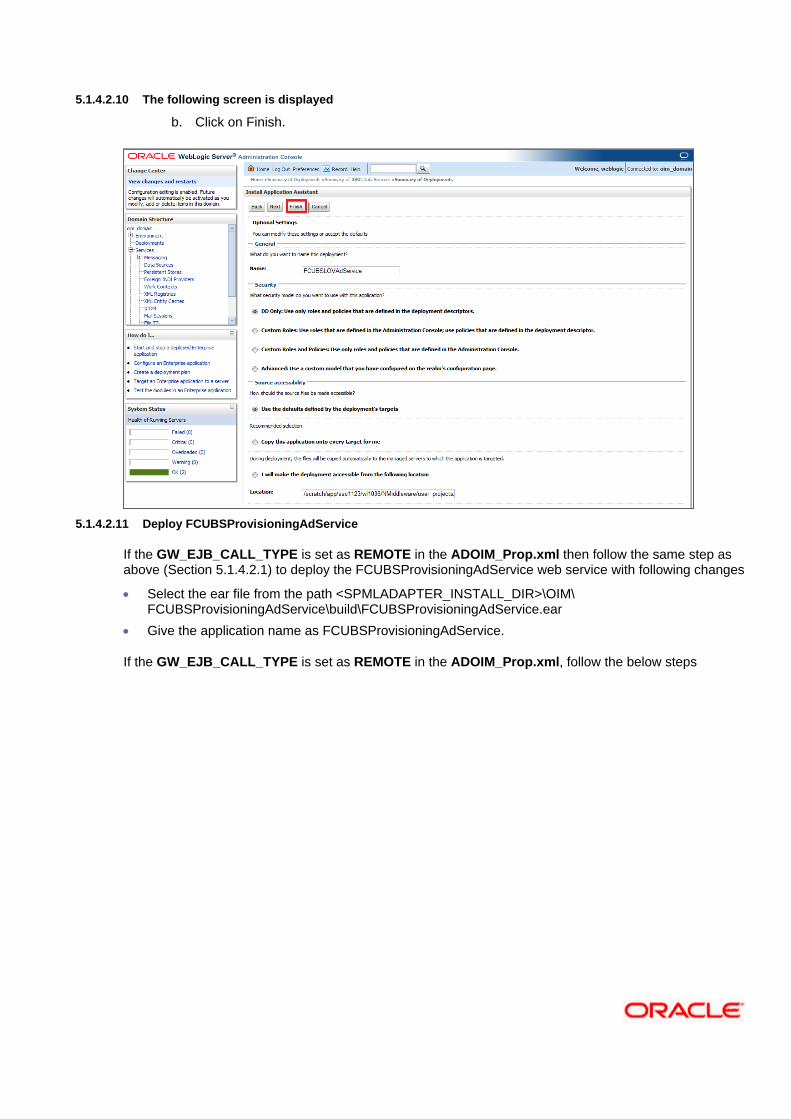
5.1.4.2.10 The following screen is displayed
b. Click on Finish.
5.1.4.2.11 Deploy FCUBSProvisioningAdService
If the GW_EJB_CALL_TYPE is set as REMOTE in the ADOIM_Prop.xml then follow the same step as above (Section 5.1.4.2.1) to deploy the FCUBSProvisioningAdService web service with following changes
Select the ear file from the path <SPMLADAPTER_INSTALL_DIR>\OIM\ FCUBSProvisioningAdService\build\FCUBSProvisioningAdService.ear
Give the application name as FCUBSProvisioningAdService.
If the GW_EJB_CALL_TYPE is set as REMOTE in the ADOIM_Prop.xml, follow the below steps
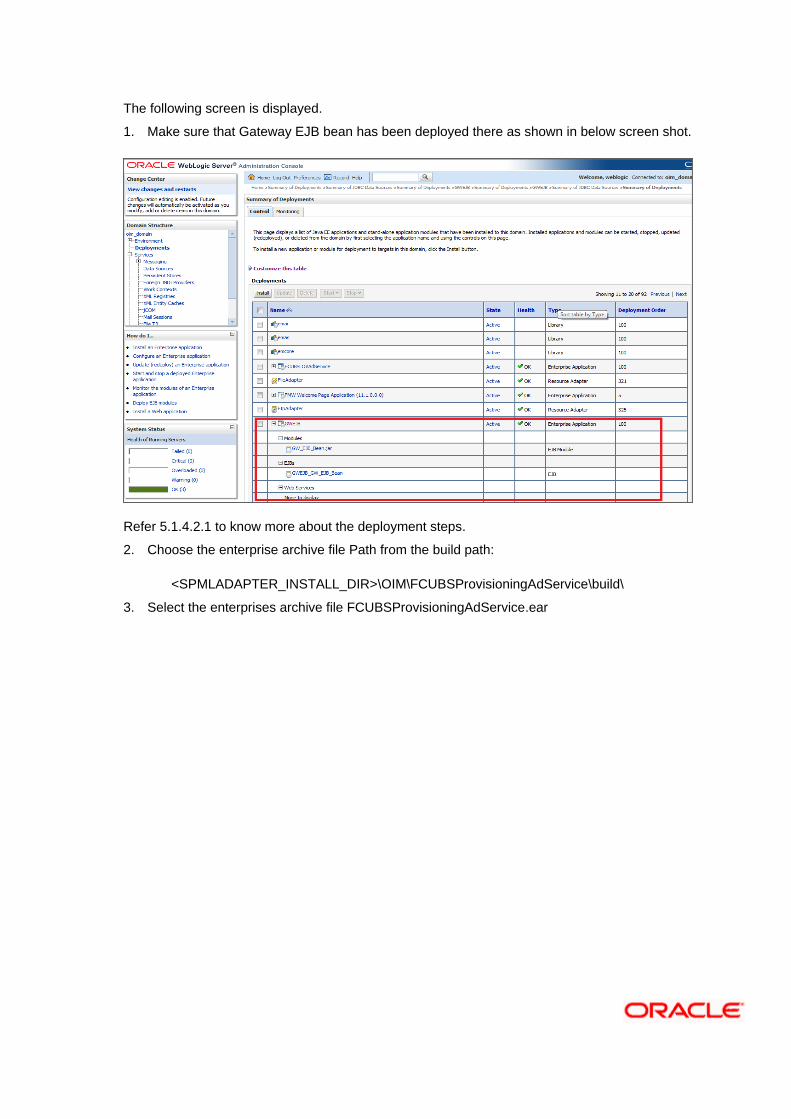
The following screen is displayed.
1. Make sure that Gateway EJB bean has been deployed there as shown in below screen shot.
Refer 5.1.4.2.1 to know more about the deployment steps.
2. Choose the enterprise archive file Path from the build path:
<SPMLADAPTER_INSTALL_DIR>\OIM\FCUBSProvisioningAdService\build\
3. Select the enterprises archive file FCUBSProvisioningAdService.ear
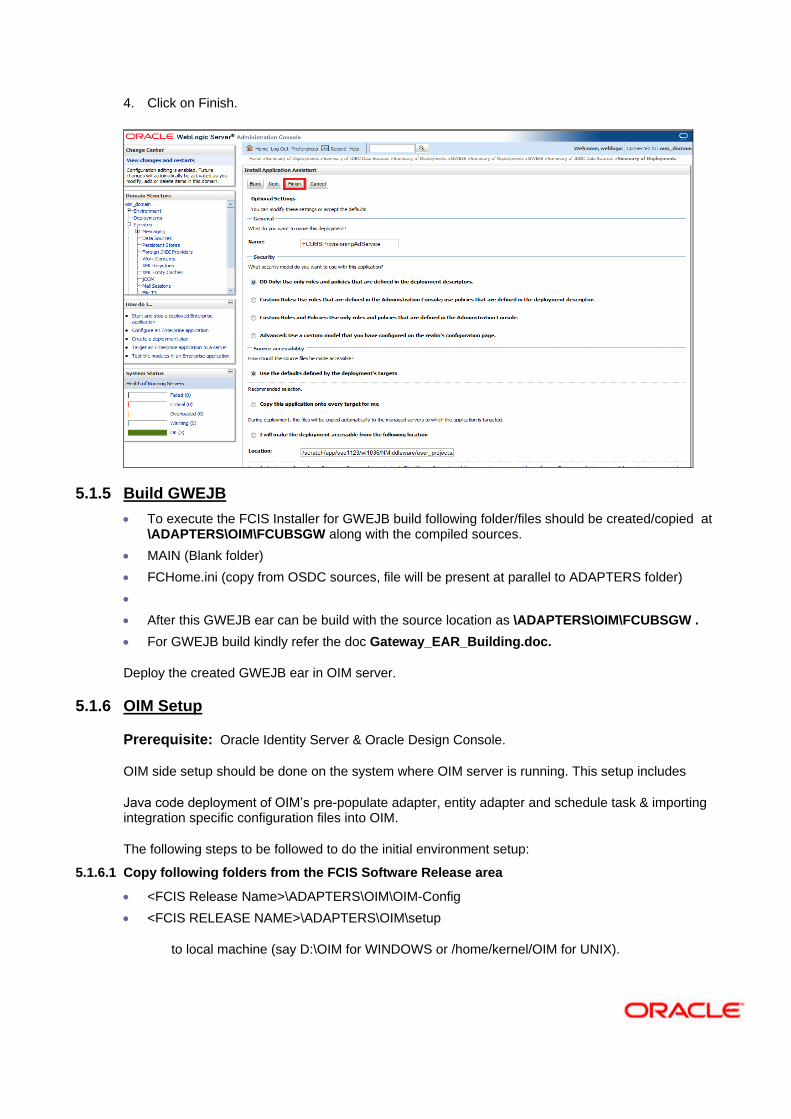
4. Click on Finish.
5.1.5 Build GWEJB
To execute the FCIS Installer for GWEJB build following folder/files should be created/copied at \ADAPTERS\OIM\FCUBSGW along with the compiled sources.
MAIN (Blank folder)
FCHome.ini (copy from OSDC sources, file will be present at parallel to ADAPTERS folder)
After this GWEJB ear can be build with the source location as \ADAPTERS\OIM\FCUBSGW .
For GWEJB build kindly refer the doc Gateway_EAR_Building.doc.
Deploy the created GWEJB ear in OIM server.
5.1.6 OIM Setup
Prerequisite: Oracle Identity Server & Oracle Design Console.
OIM side setup should be done on the system where OIM server is running. This setup includes
Java code deployment of OIM’s pre-populate adapter, entity adapter and schedule task & importing integration specific configuration files into OIM.
The following steps to be followed to do the initial environment setup:
5.1.6.1 Copy following folders from the FCIS Software Release area
<FCIS Release Name>\ADAPTERS\OIM\OIM-Config
<FCIS RELEASE NAME>\ADAPTERS\OIM\setup
to local machine (say D:\OIM for WINDOWS or /home/kernel/OIM for UNIX).
5.1.6.2 Building the Lookup Search Scheduled Task deployment units for WINDOWS.
Change directory to, D:\OIM\OIM-Config\Sch-Task\setup
Modify the OIM_SERVER_INSTALL_DIR entry in the build.xml to where OIM Server is installed ( for example D:\Oracle\Middleware\weblogic\Oracle_IDM1) and JAVA_HOME entry.
In the below section of build.xml change the WSDL location hostname and port.
<exec executable="${JAVA_HOME}/bin/wsimport">
<arg line="-keep -p com.iflex.fcubs.integration.oim.ws.client http:// <hostname>:<port>/FCUBSLOVAdService/FCUBSLOVAdServiceSEI?WSDL"/>
</exec>
To execute the build file, type “ant” on the command-prompt and press enter.
Above step creates a JAR file in D:\OIM\OIM-Config\Sch-Task\build\ FCUBSLOVSchTask folder with the name FCUBSLOVSchTask.Jar
Copy this FCUBSLOVSchTask.Jar to the <OIM_SERVER_INSTALL_DIR>\server\ScheduleTask folder and <OIM_SERVER_INSTALL_DIR>\server\apps\oim.ear\APP-INF\lib
5.1.6.3 Building the Lookup Search Scheduled Task deployment units for UNIX
Change directory to /home/kernel/OIM/OIM-Config/Sch-Task/setup
Modify the OIM_SERVER_INSTALL_DIR entry in the build.xml to where OIM Server is installed ( for example /Oracle/Middleware/weblogic/Oracle_IDM1 ) and JAVA_HOME entry.
In the below section of build.xml change the WSDL location hostname and port.
<exec executable="${JAVA_HOME}/bin/wsimport">
<arg line="-keep -p com.iflex.fcubs.integration.oim.ws.client http://<hostname>:<port>/FCUBSLOVAdService/FCUBSLOVAdServiceSEI?WSDL"/>
</exec>
To execute the build file, type “ant” on the shell and press enter.
Above step creates a JAR file in /home/kernel/OIM/OIM-Config/Sch-Task/build/FCUBSLOVSchTask folder with the name FCUBSLOVSchTask.Jar
Copy this FCUBSLOVSchTask.Jar to the <OIM_SERVER_INSTALL_DIR>/server/ScheduleTask folder and <OIM_SERVER_INSTALL_DIR>/server/apps/oim.ear/APP-INF/lib
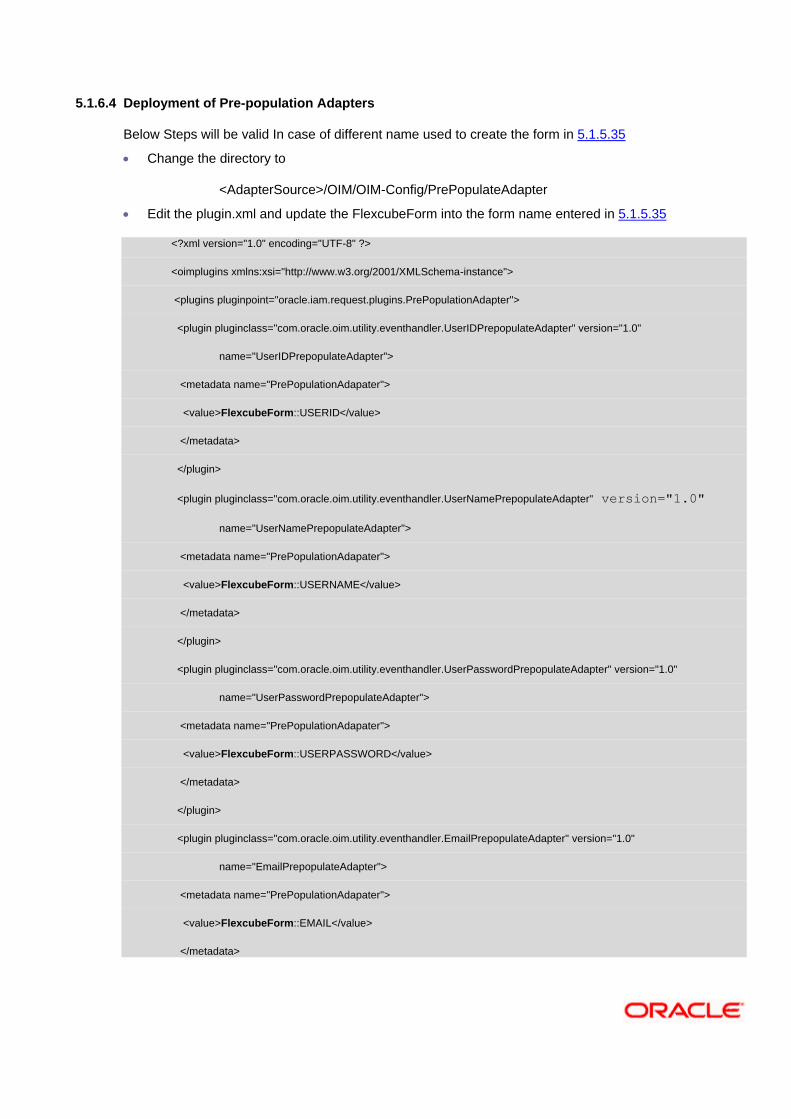
5.1.6.4 Deployment of Pre-population Adapters
Below Steps will be valid In case of different name used to create the form in 5.1.5.35
Change the directory to
<AdapterSource>/OIM/OIM-Config/PrePopulateAdapter
Edit the plugin.xml and update the FlexcubeForm into the form name entered in 5.1.5.35
<?xml version="1.0" encoding="UTF-8" ?>
<oimplugins xmlns:xsi="http://www.w3.org/2001/XMLSchema-instance">
<plugins pluginpoint="oracle.iam.request.plugins.PrePopulationAdapter">
<plugin pluginclass="com.oracle.oim.utility.eventhandler.UserIDPrepopulateAdapter" version="1.0"
name="UserIDPrepopulateAdapter">
<metadata name="PrePopulationAdapater">
<value>FlexcubeForm::USERID</value>
</metadata>
</plugin>
<plugin pluginclass="com.oracle.oim.utility.eventhandler.UserNamePrepopulateAdapter" version="1.0"
name="UserNamePrepopulateAdapter">
<metadata name="PrePopulationAdapater">
<value>FlexcubeForm::USERNAME</value>
</metadata>
</plugin>
<plugin pluginclass="com.oracle.oim.utility.eventhandler.UserPasswordPrepopulateAdapter" version="1.0"
name="UserPasswordPrepopulateAdapter">
<metadata name="PrePopulationAdapater">
<value>FlexcubeForm::USERPASSWORD</value>
</metadata>
</plugin>
<plugin pluginclass="com.oracle.oim.utility.eventhandler.EmailPrepopulateAdapter" version="1.0"
name="EmailPrepopulateAdapter">
<metadata name="PrePopulationAdapater">
<value>FlexcubeForm::EMAIL</value>
</metadata>
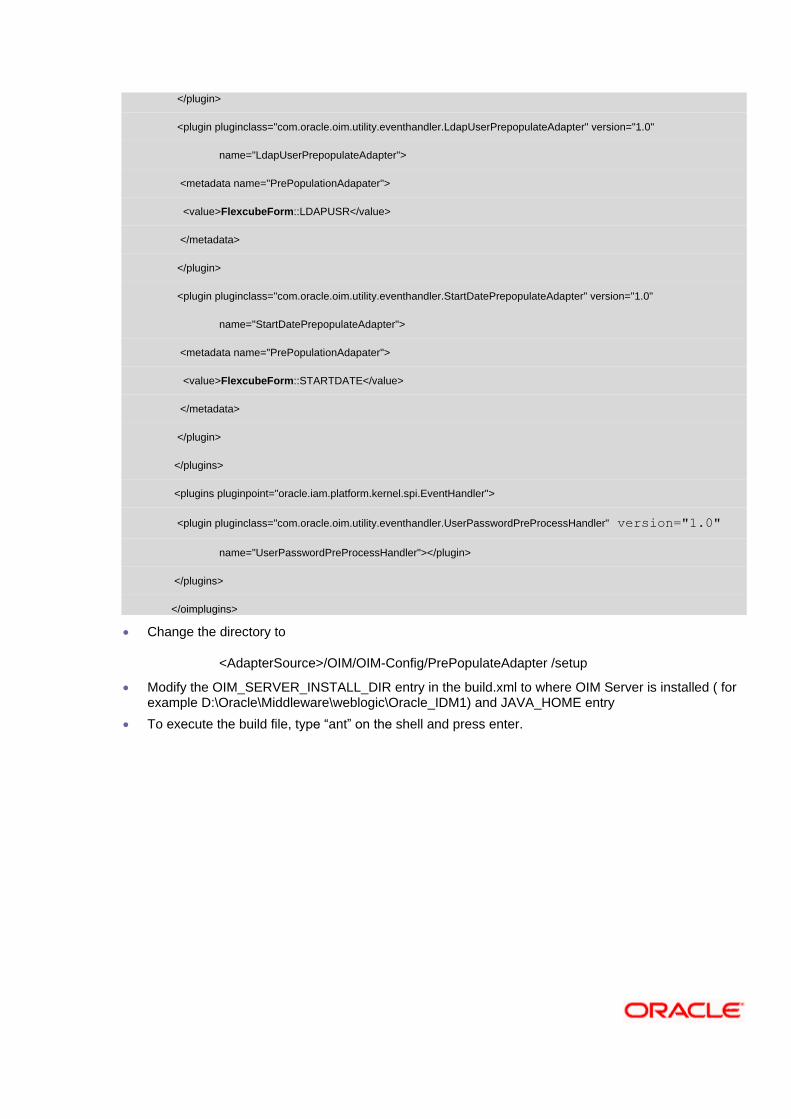
</plugin>
<plugin pluginclass="com.oracle.oim.utility.eventhandler.LdapUserPrepopulateAdapter" version="1.0"
name="LdapUserPrepopulateAdapter">
<metadata name="PrePopulationAdapater">
<value>FlexcubeForm::LDAPUSR</value>
</metadata>
</plugin>
<plugin pluginclass="com.oracle.oim.utility.eventhandler.StartDatePrepopulateAdapter" version="1.0"
name="StartDatePrepopulateAdapter">
<metadata name="PrePopulationAdapater">
<value>FlexcubeForm::STARTDATE</value>
</metadata>
</plugin>
</plugins>
<plugins pluginpoint="oracle.iam.platform.kernel.spi.EventHandler">
<plugin pluginclass="com.oracle.oim.utility.eventhandler.UserPasswordPreProcessHandler" version="1.0"
name="UserPasswordPreProcessHandler"></plugin>
</plugins>
</oimplugins>
Change the directory to
<AdapterSource>/OIM/OIM-Config/PrePopulateAdapter /setup
Modify the OIM_SERVER_INSTALL_DIR entry in the build.xml to where OIM Server is installed ( for example D:\Oracle\Middleware\weblogic\Oracle_IDM1) and JAVA_HOME entry
To execute the build file, type “ant” on the shell and press enter.
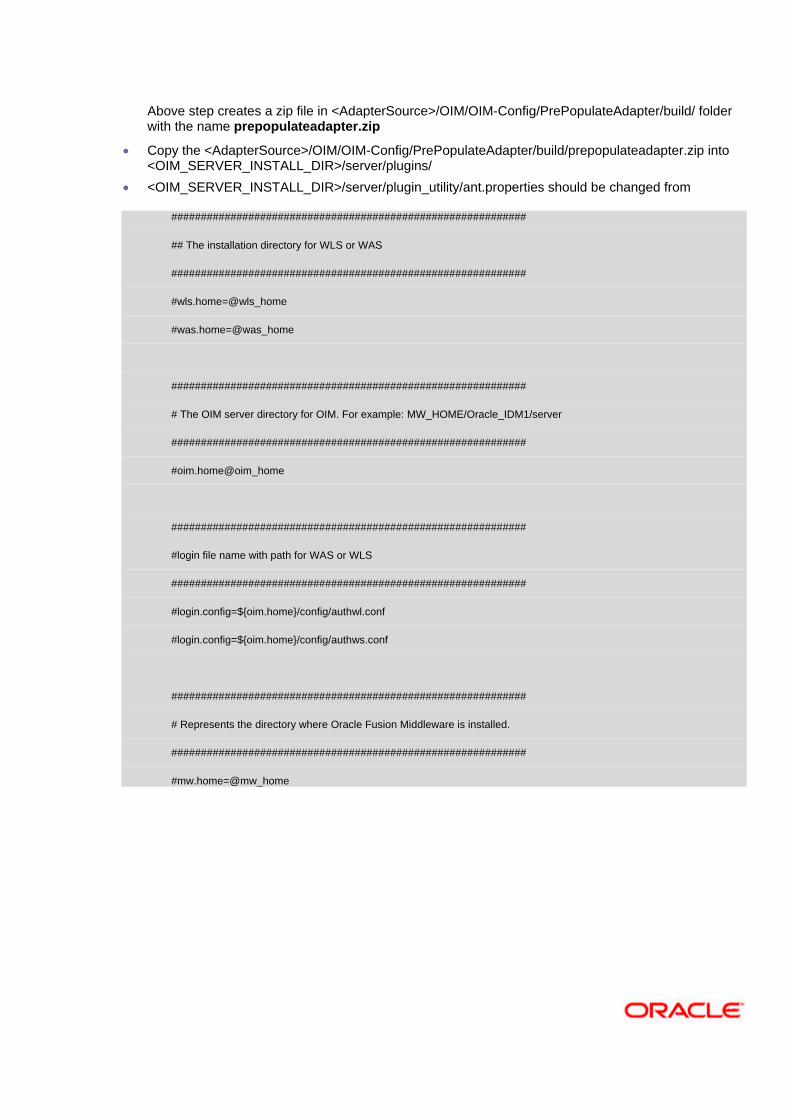
Above step creates a zip file in <AdapterSource>/OIM/OIM-Config/PrePopulateAdapter/build/ folder with the name prepopulateadapter.zip
Copy the <AdapterSource>/OIM/OIM-Config/PrePopulateAdapter/build/prepopulateadapter.zip into <OIM_SERVER_INSTALL_DIR>/server/plugins/
<OIM_SERVER_INSTALL_DIR>/server/plugin_utility/ant.properties should be changed from
############################################################
## The installation directory for WLS or WAS
############################################################
#wls.home=@wls_home
#was.home=@was_home
############################################################
# The OIM server directory for OIM. For example: MW_HOME/Oracle_IDM1/server
############################################################
#oim.home@oim_home
############################################################
#login file name with path for WAS or WLS
############################################################
#login.config=${oim.home}/config/authwl.conf
#login.config=${oim.home}/config/authws.conf
############################################################
# Represents the directory where Oracle Fusion Middleware is installed.
############################################################
#mw.home=@mw_home

To
############################################################
## The installation directory for WLS or WAS
############################################################
wls.home=<Installation_DIR>/Middleware/wlserver_10.3
#was.home=@was_home
############################################################
# The OIM server directory for OIM. For example: MW_HOME/Oracle_IDM1/server
############################################################
oim.home=<OIM_INSTALLATION_DIR>/server/
############################################################
#login file name with path for WAS or WLS
############################################################
login.config=${oim.home}/config/authwl.conf
#login.config=${oim.home}/config/authws.conf
############################################################
# Represents the directory where Oracle Fusion Middleware is installed.
############################################################
mw.home=<Installation_DIR>/Middleware
Set the ANT_HOME & JAVA_HOME
In Command Prompt / SHELL type the below command and Press Enter
ant -f pluginregistration.xml register
Following Information has to be provided
OIM Admin User – xelsysadm
OIM Admin User – Password
OIM Admin server URL : t3://hostname:portname
e.g :: t3://whf00bmc.in.oracle.com:14000
Full path of adapter which needs to be imported <OIM_SERVER_INSTALL_DIR>/server/plugins/prepopulateadapter.zip
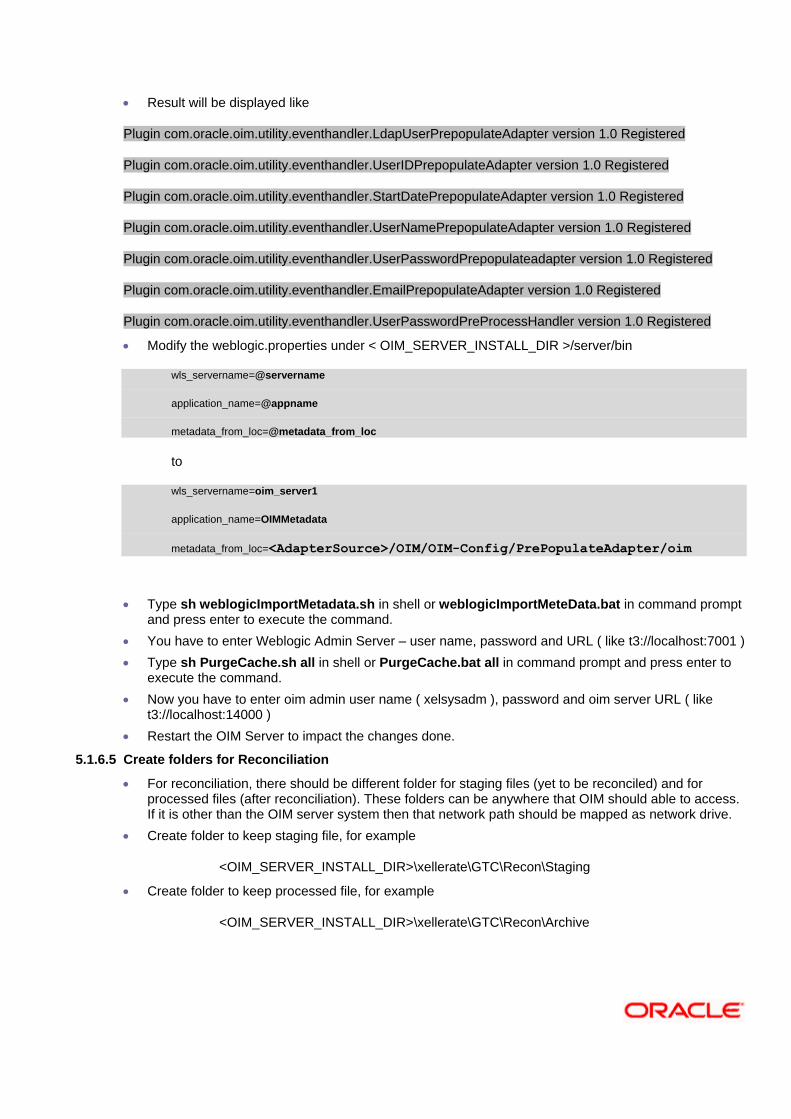
Result will be displayed like
Plugin com.oracle.oim.utility.eventhandler.LdapUserPrepopulateAdapter version 1.0 Registered
Plugin com.oracle.oim.utility.eventhandler.UserIDPrepopulateAdapter version 1.0 Registered
Plugin com.oracle.oim.utility.eventhandler.StartDatePrepopulateAdapter version 1.0 Registered
Plugin com.oracle.oim.utility.eventhandler.UserNamePrepopulateAdapter version 1.0 Registered
Plugin com.oracle.oim.utility.eventhandler.UserPasswordPrepopulateadapter version 1.0 Registered
Plugin com.oracle.oim.utility.eventhandler.EmailPrepopulateAdapter version 1.0 Registered
Plugin com.oracle.oim.utility.eventhandler.UserPasswordPreProcessHandler version 1.0 Registered
Modify the weblogic.properties under < OIM_SERVER_INSTALL_DIR >/server/bin
wls_servername=@servername
application_name=@appname
metadata_from_loc=@metadata_from_loc
to
wls_servername=oim_server1
application_name=OIMMetadata
metadata_from_loc=<AdapterSource>/OIM/OIM-Config/PrePopulateAdapter/oim
Type sh weblogicImportMetadata.sh in shell or weblogicImportMeteData.bat in command prompt and press enter to execute the command.
You have to enter Weblogic Admin Server – user name, password and URL ( like t3://localhost:7001 )
Type sh PurgeCache.sh all in shell or PurgeCache.bat all in command prompt and press enter to execute the command.
Now you have to enter oim admin user name ( xelsysadm ), password and oim server URL ( like t3://localhost:14000 )
Restart the OIM Server to impact the changes done.
5.1.6.5 Create folders for Reconciliation
For reconciliation, there should be different folder for staging files (yet to be reconciled) and for processed files (after reconciliation). These folders can be anywhere that OIM should able to access. If it is other than the OIM server system then that network path should be mapped as network drive.
Create folder to keep staging file, for example
<OIM_SERVER_INSTALL_DIR>\xellerate\GTC\Recon\Staging
Create folder to keep processed file, for example
<OIM_SERVER_INSTALL_DIR>\xellerate\GTC\Recon\Archive
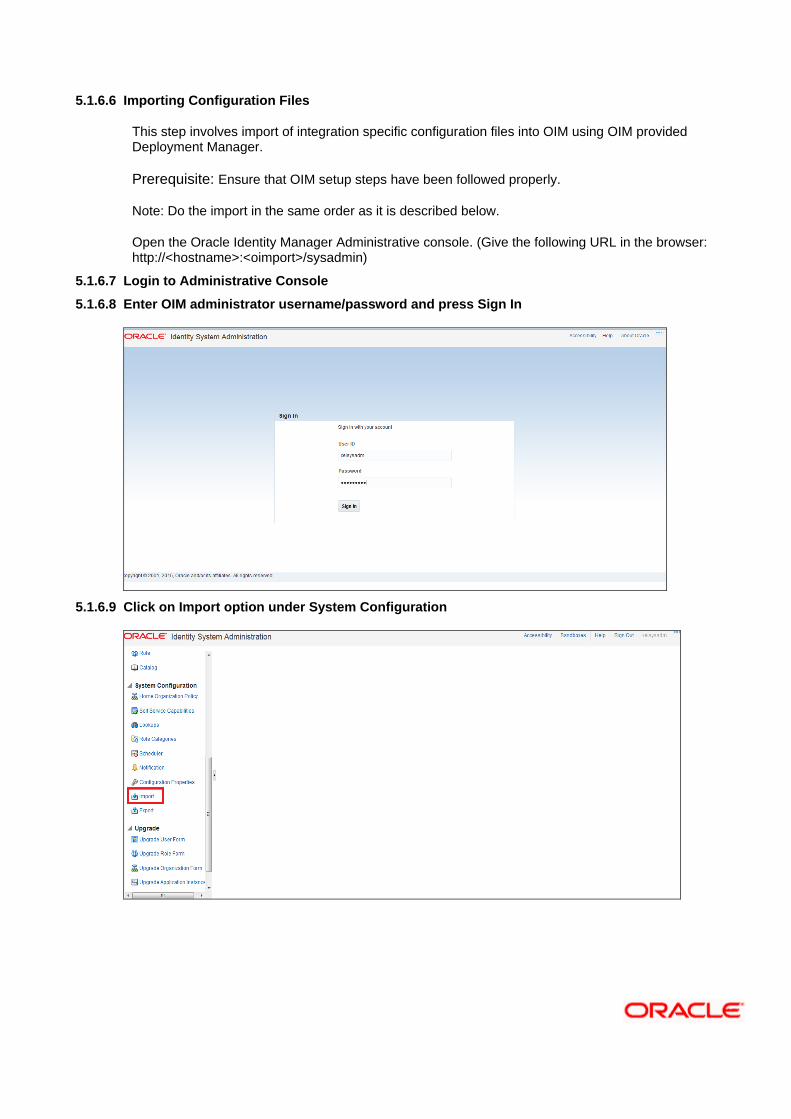
5.1.6.6 Importing Configuration Files
This step involves import of integration specific configuration files into OIM using OIM provided Deployment Manager.
Prerequisite: Ensure that OIM setup steps have been followed properly.
Note: Do the import in the same order as it is described below.
Open the Oracle Identity Manager Administrative console. (Give the following URL in the browser: http://<hostname>:<oimport>/sysadmin)
5.1.6.7 Login to Administrative Console
5.1.6.8 Enter OIM administrator username/password and press Sign In
5.1.6.9 Click on Import option under System Configuration

5.1.6.10 The following screen will get displayed with Add File option
a. Select Lookup.xml file from the folder <SPMLADAPTER_INSTALL_DIR>\OIM\OIM-Config\Screens-
Config.
b. Click on Open.
5.1.6.11 We will get File preview screen
a. Click on Add file.

5.1.6.12 Click on Add File
5.1.6.13 Select SchTask.xml file from the folder
<SPMLADAPTER_INSTALL_DIR>\OIM\OIM-Config\Sch-Tasks\Config-XML.
a. Click on Open.

5.1.6.14 We will get File preview screen
a. Click on Add file.
5.1.6.15 Click on Import

5.1.6.16 Above will prompt for Import Confirmation
a. Click on Import to start import.
5.1.6.17 On successful import following screen will come
a. Ensure that import is successful and click on ok.
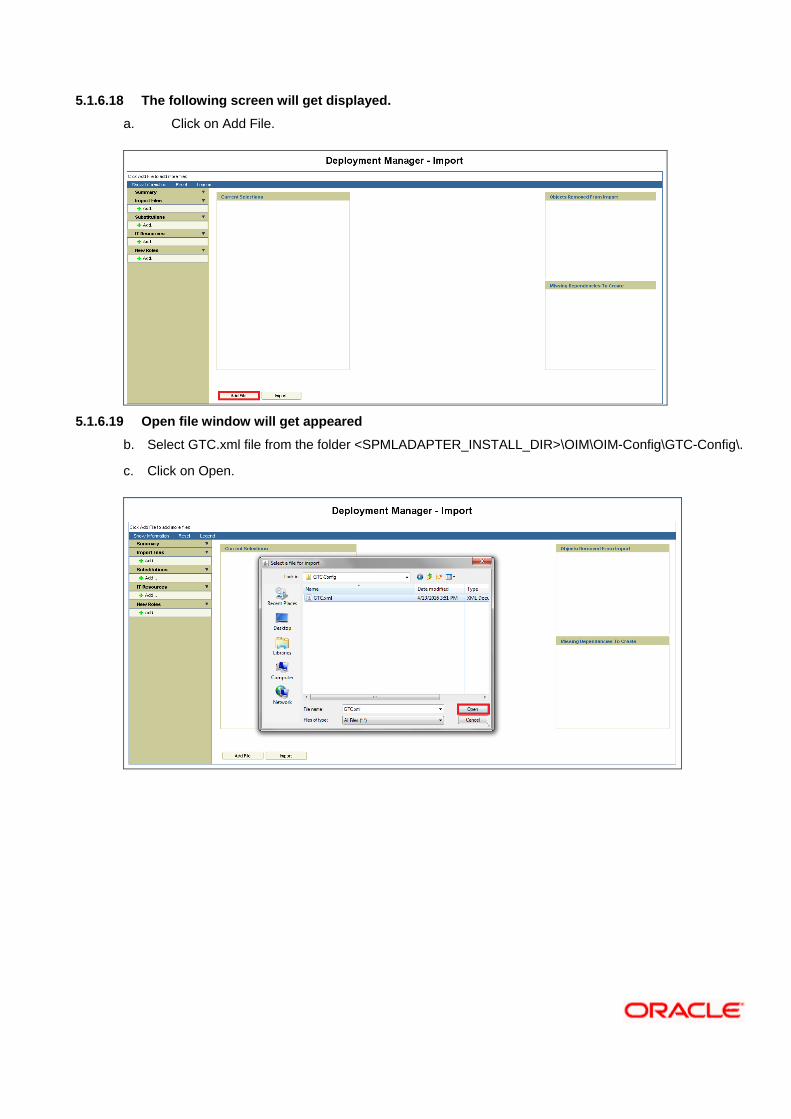
5.1.6.18 The following screen will get displayed.
a. Click on Add File.
5.1.6.19 Open file window will get appeared
b. Select GTC.xml file from the folder <SPMLADAPTER_INSTALL_DIR>\OIM\OIM-Config\GTC-Config\.
c. Click on Open.
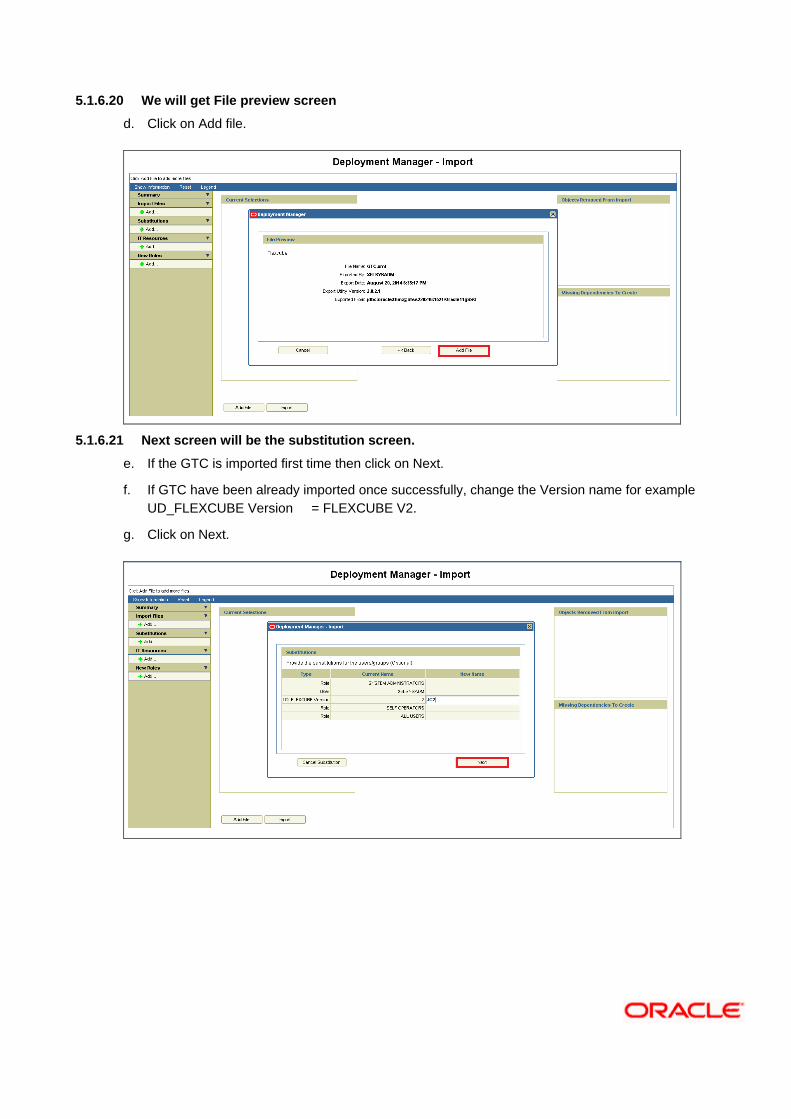
5.1.6.20 We will get File preview screen
d. Click on Add file.
5.1.6.21 Next screen will be the substitution screen.
e. If the GTC is imported first time then click on Next.
f. If GTC have been already imported once successfully, change the Version name for example
UD_FLEXCUBE Version = FLEXCUBE V2.
g. Click on Next.
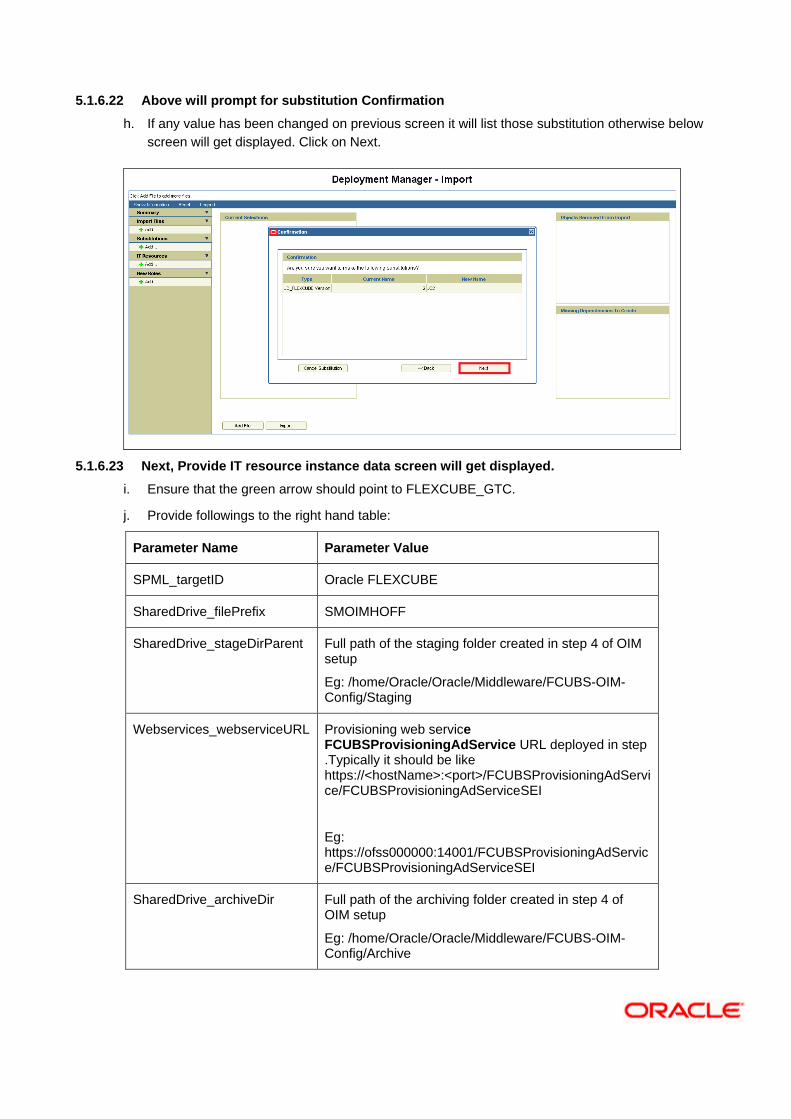
5.1.6.22 Above will prompt for substitution Confirmation
h. If any value has been changed on previous screen it will list those substitution otherwise below
screen will get displayed. Click on Next.
5.1.6.23 Next, Provide IT resource instance data screen will get displayed.
i. Ensure that the green arrow should point to FLEXCUBE_GTC.
j. Provide followings to the right hand table:
Parameter Name Parameter Value
SPML_targetID Oracle FLEXCUBE
SharedDrive_filePrefix SMOIMHOFF
SharedDrive_stageDirParent Full path of the staging folder created in step 4 of OIM setup
Eg: /home/Oracle/Oracle/Middleware/FCUBS-OIM-Config/Staging
Webservices_webserviceURL Provisioning web service FCUBSProvisioningAdService URL deployed in step .Typically it should be like https://<hostName>:<port>/FCUBSProvisioningAdService/FCUBSProvisioningAdServiceSEI
Eg: https://ofss000000:14001/FCUBSProvisioningAdService/FCUBSProvisioningAdServiceSEI
SharedDrive_archiveDir Full path of the archiving folder created in step 4 of OIM setup
Eg: /home/Oracle/Oracle/Middleware/FCUBS-OIM-Config/Archive
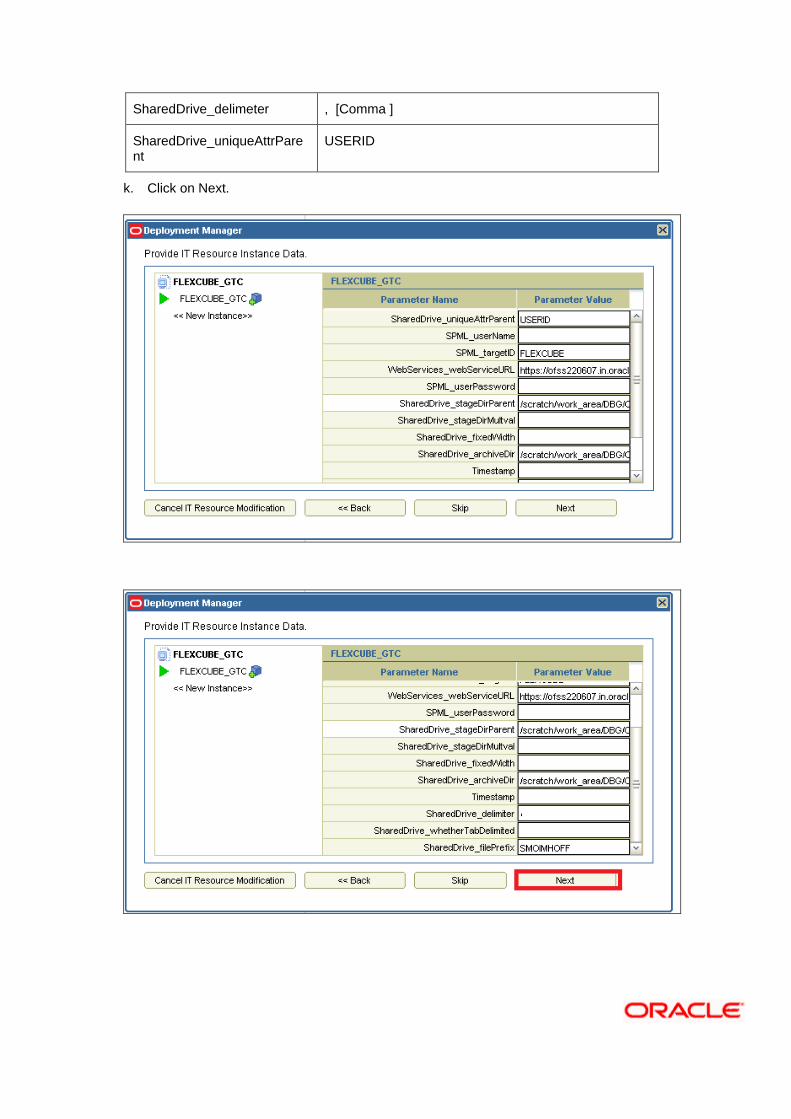
SharedDrive_delimeter , [Comma ]
SharedDrive_uniqueAttrParent
USERID
k. Click on Next.
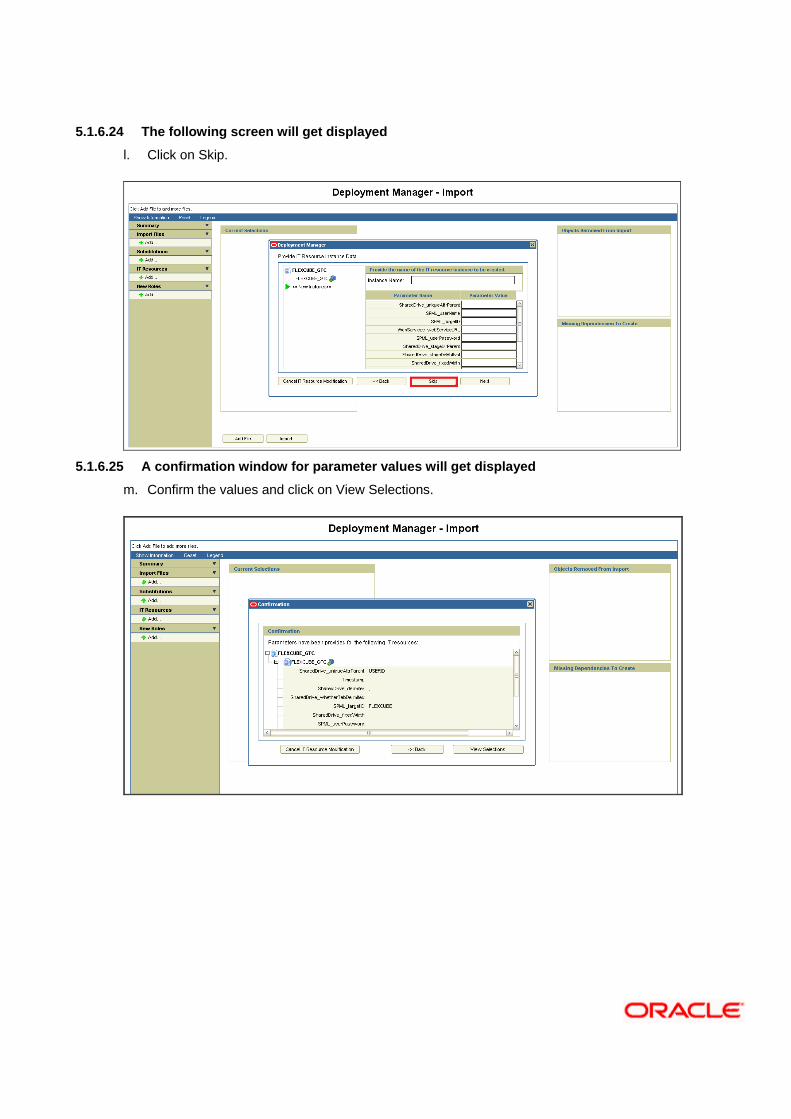
5.1.6.24 The following screen will get displayed
l. Click on Skip.
5.1.6.25 A confirmation window for parameter values will get displayed
m. Confirm the values and click on View Selections.
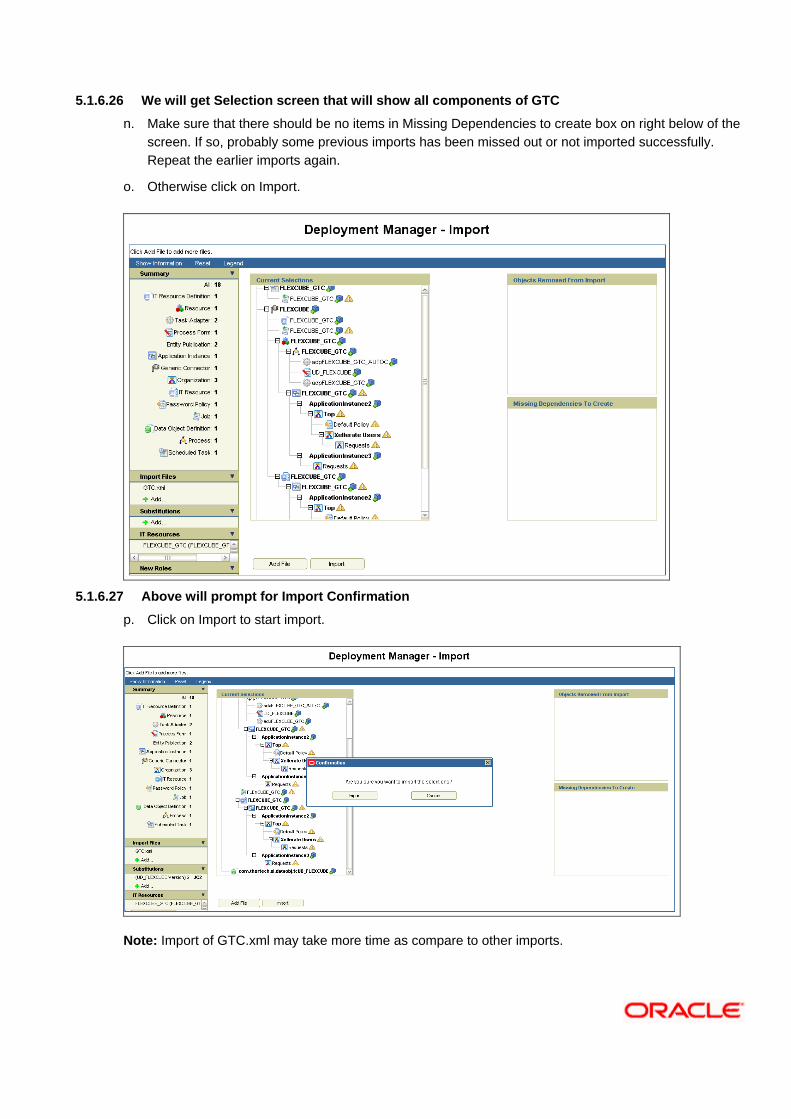
5.1.6.26 We will get Selection screen that will show all components of GTC
n. Make sure that there should be no items in Missing Dependencies to create box on right below of the
screen. If so, probably some previous imports has been missed out or not imported successfully.
Repeat the earlier imports again.
o. Otherwise click on Import.
5.1.6.27 Above will prompt for Import Confirmation
p. Click on Import to start import.
Note: Import of GTC.xml may take more time as compare to other imports.
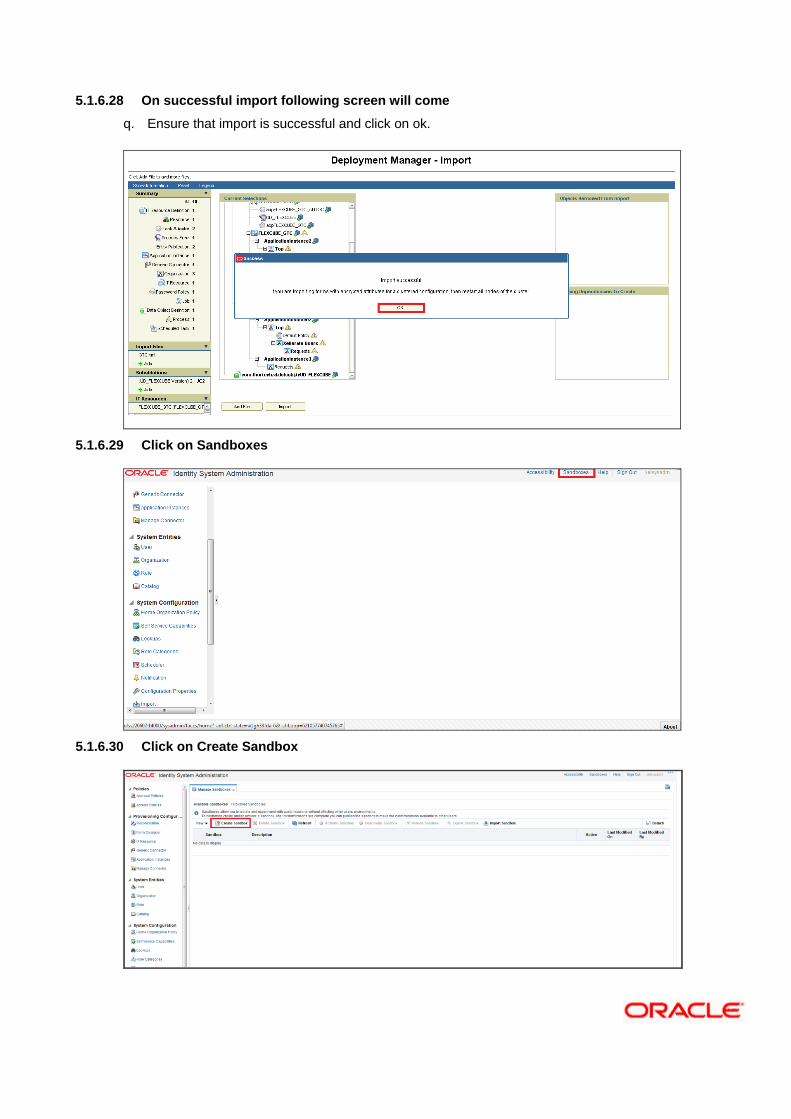
5.1.6.28 On successful import following screen will come
q. Ensure that import is successful and click on ok.
5.1.6.29 Click on Sandboxes
5.1.6.30 Click on Create Sandbox
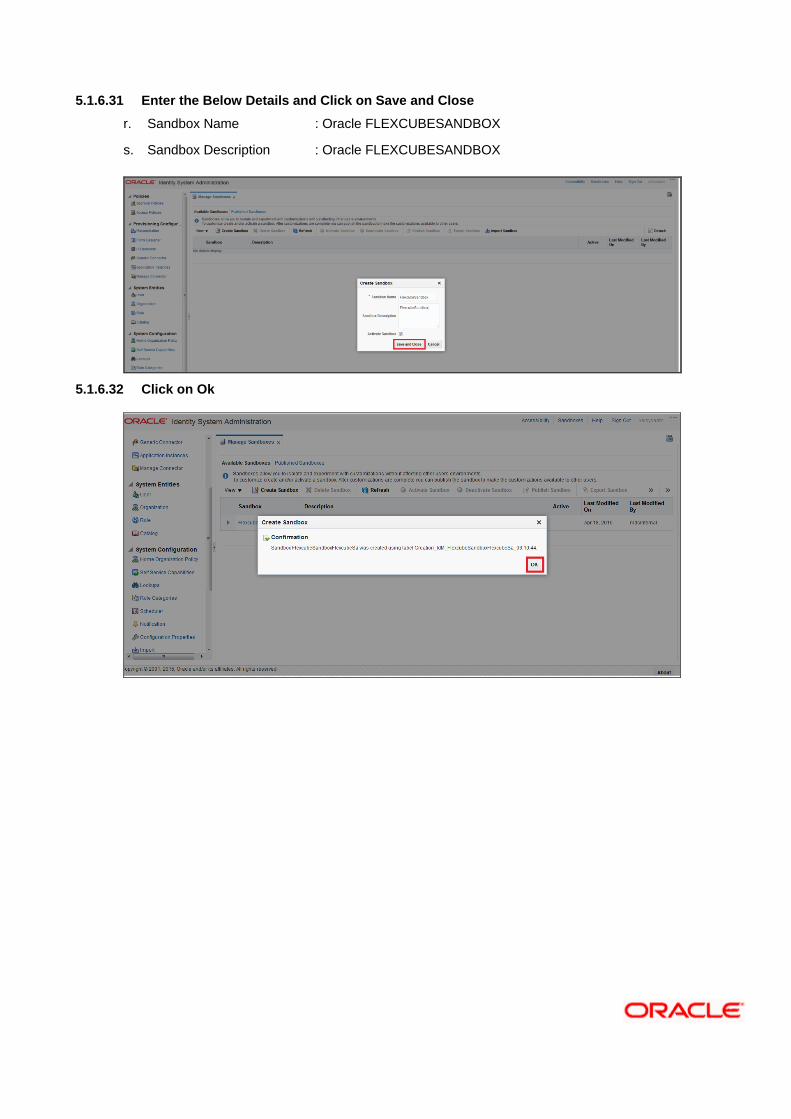
5.1.6.31 Enter the Below Details and Click on Save and Close
r. Sandbox Name : Oracle FLEXCUBESANDBOX
s. Sandbox Description : Oracle FLEXCUBESANDBOX
5.1.6.32 Click on Ok
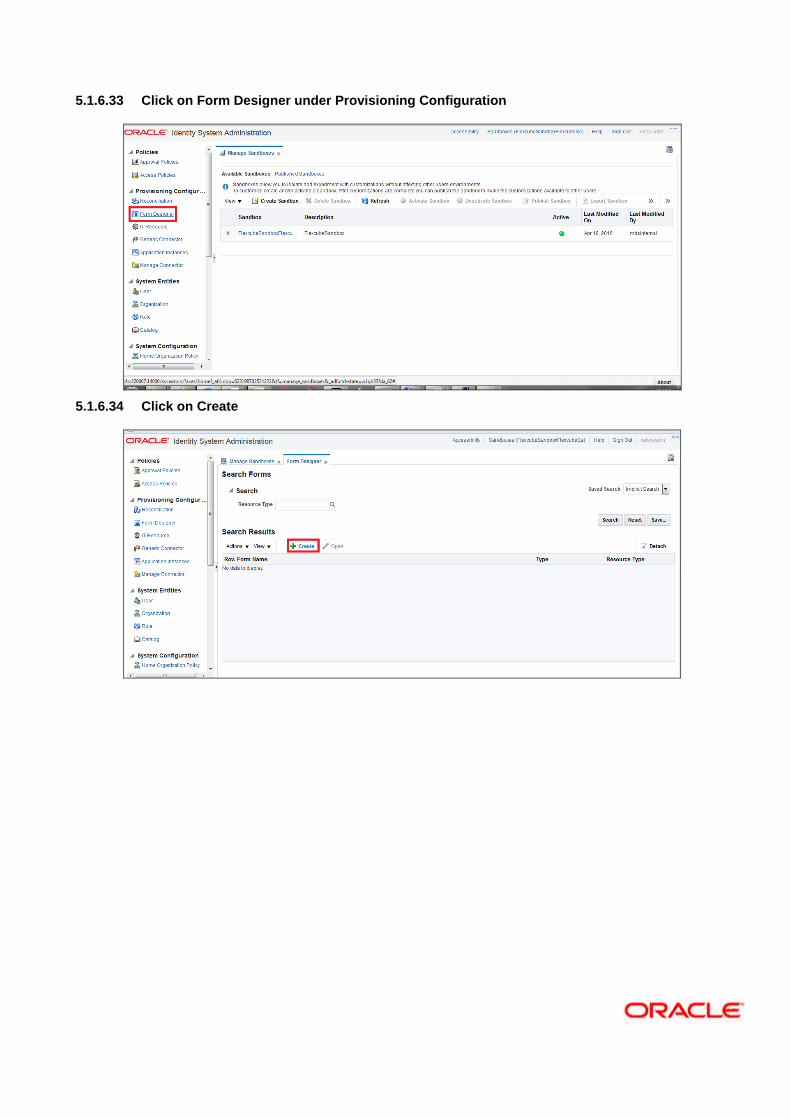
5.1.6.33 Click on Form Designer under Provisioning Configuration
5.1.6.34 Click on Create
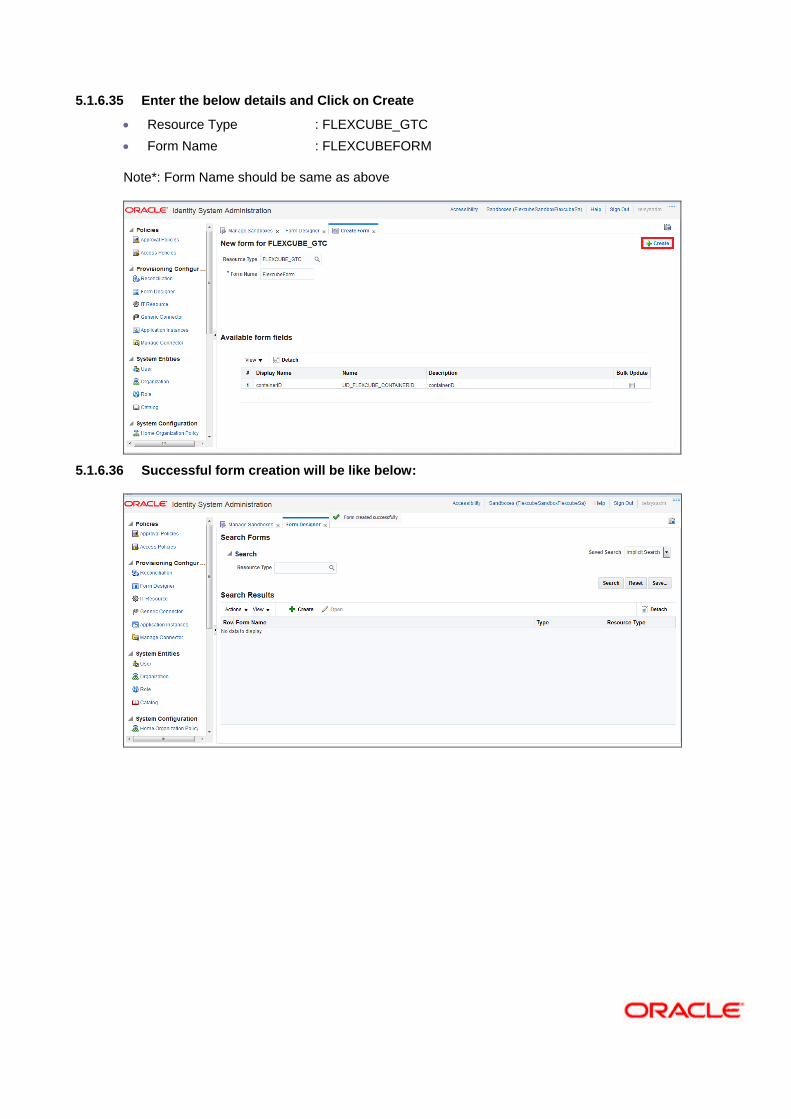
5.1.6.35 Enter the below details and Click on Create
Resource Type : FLEXCUBE_GTC
Form Name : FLEXCUBEFORM
Note*: Form Name should be same as above
5.1.6.36 Successful form creation will be like below:
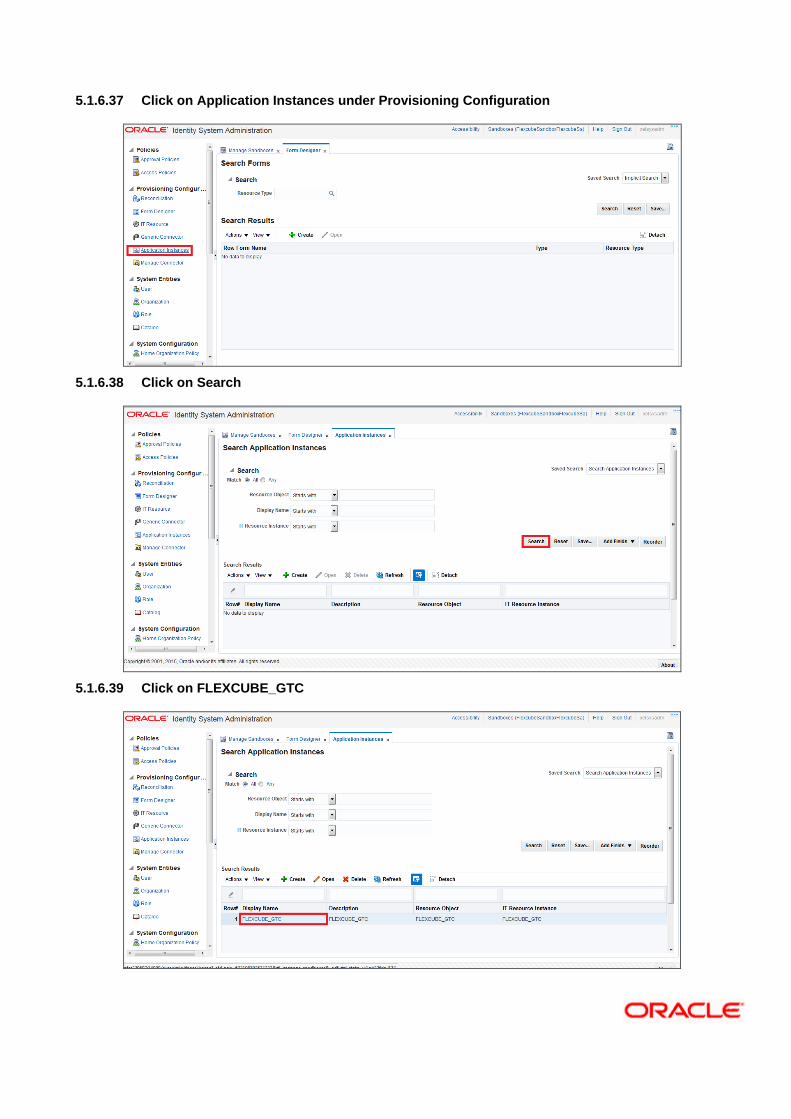
5.1.6.37 Click on Application Instances under Provisioning Configuration
5.1.6.38 Click on Search
5.1.6.39 Click on FLEXCUBE_GTC

5.1.6.40 Choose the Form as FlexcubeForm and Click on Apply
5.1.6.41 On Successful modification will be shown like below:
Application Instance belongs to the following Organizations
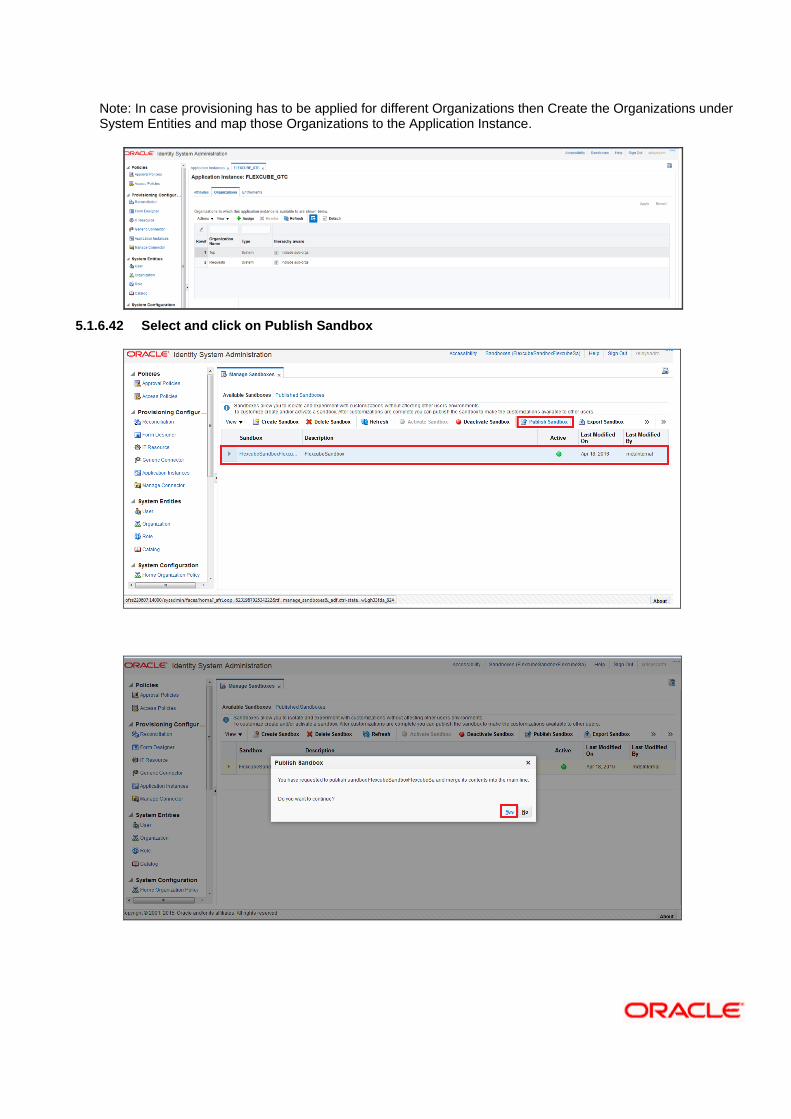
Note: In case provisioning has to be applied for different Organizations then Create the Organizations under System Entities and map those Organizations to the Application Instance.
5.1.6.42 Select and click on Publish Sandbox
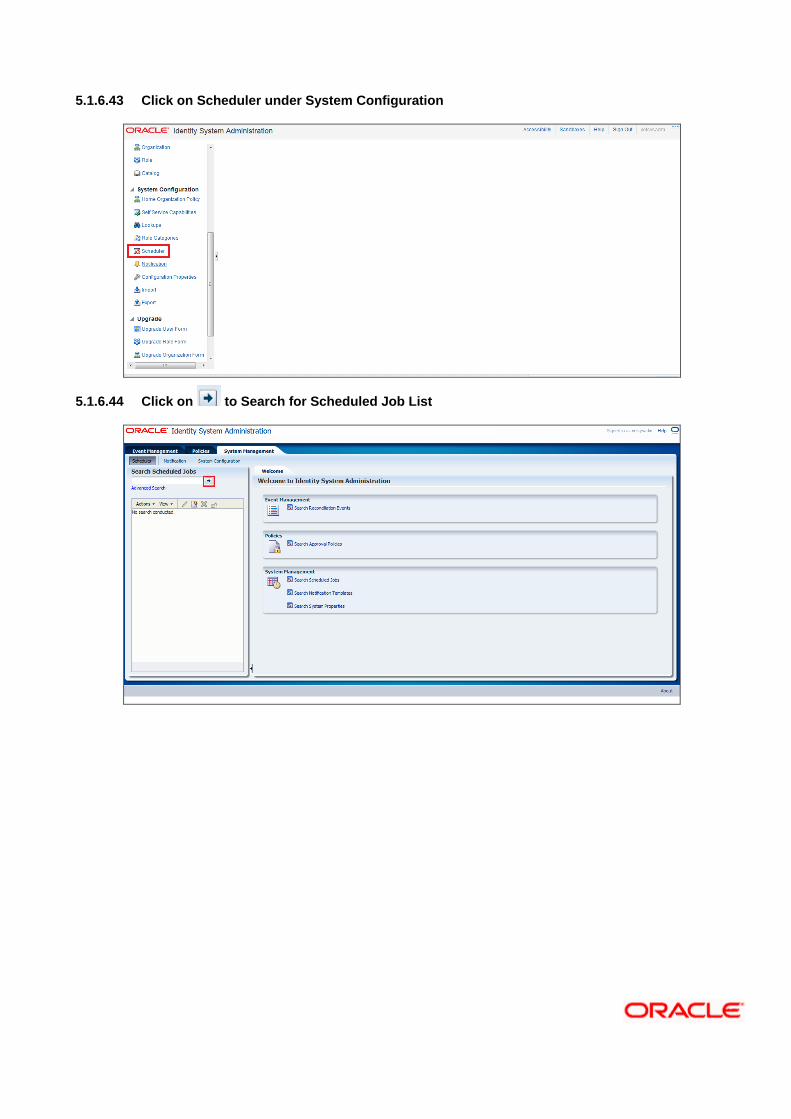
5.1.6.43 Click on Scheduler under System Configuration
5.1.6.44 Click on to Search for Scheduled Job List
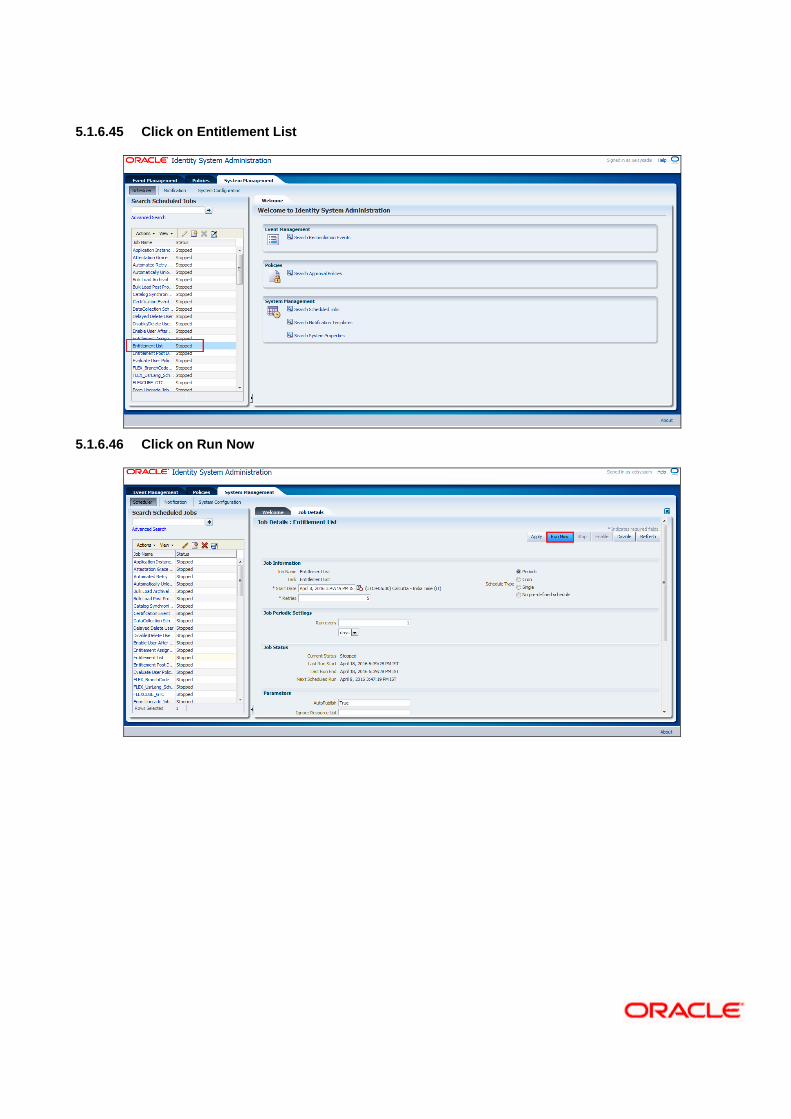
5.1.6.45 Click on Entitlement List
5.1.6.46 Click on Run Now
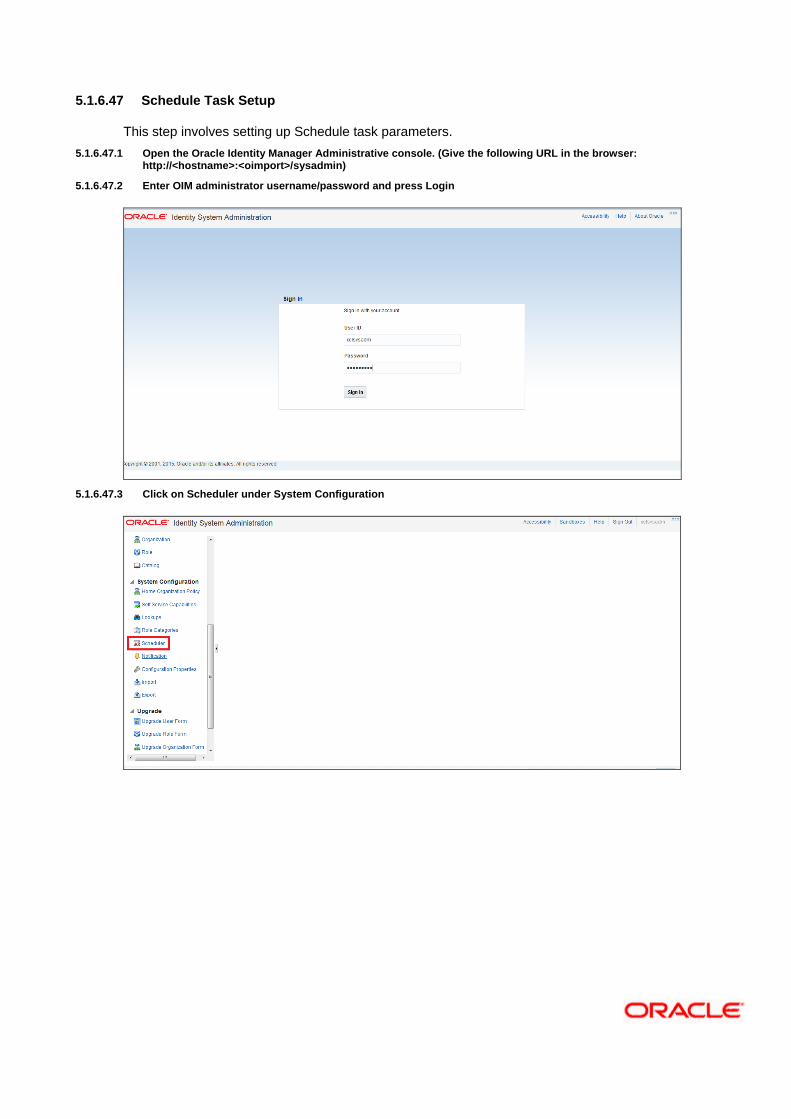
5.1.6.47 Schedule Task Setup
This step involves setting up Schedule task parameters.
5.1.6.47.1 Open the Oracle Identity Manager Administrative console. (Give the following URL in the browser: http://<hostname>:<oimport>/sysadmin)
5.1.6.47.2 Enter OIM administrator username/password and press Login
5.1.6.47.3 Click on Scheduler under System Configuration
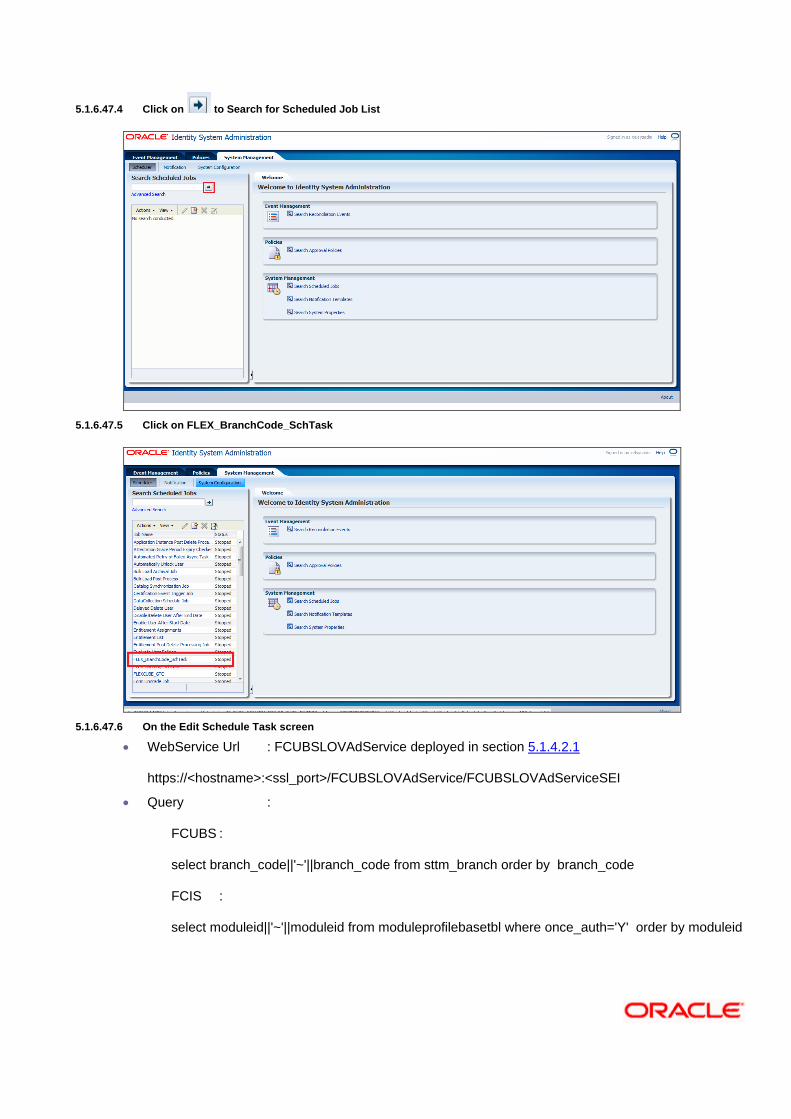
5.1.6.47.4 Click on to Search for Scheduled Job List
5.1.6.47.5 Click on FLEX_BranchCode_SchTask
5.1.6.47.6 On the Edit Schedule Task screen
WebService Url : FCUBSLOVAdService deployed in section 5.1.4.2.1
https://<hostname>:<ssl_port>/FCUBSLOVAdService/FCUBSLOVAdServiceSEI
Query :
FCUBS :
select branch_code||'~'||branch_code from sttm_branch order by branch_code
FCIS :
select moduleid||'~'||moduleid from moduleprofilebasetbl where once_auth='Y' order by moduleid
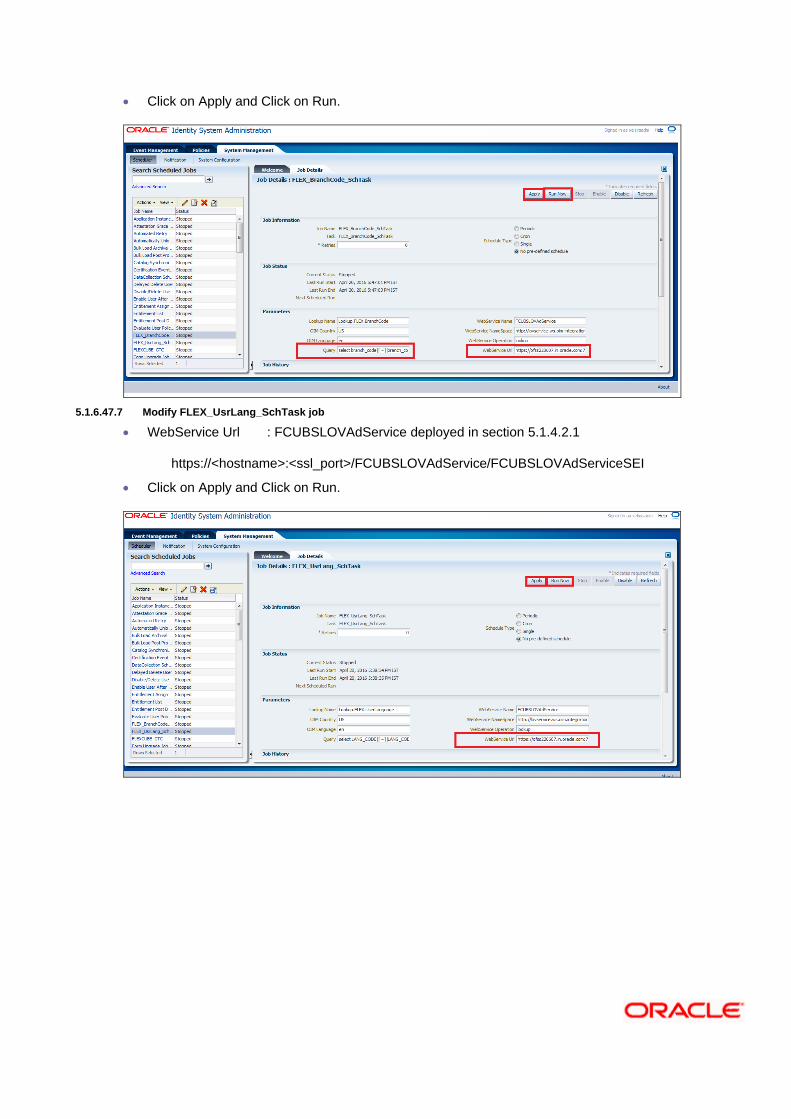
Click on Apply and Click on Run.
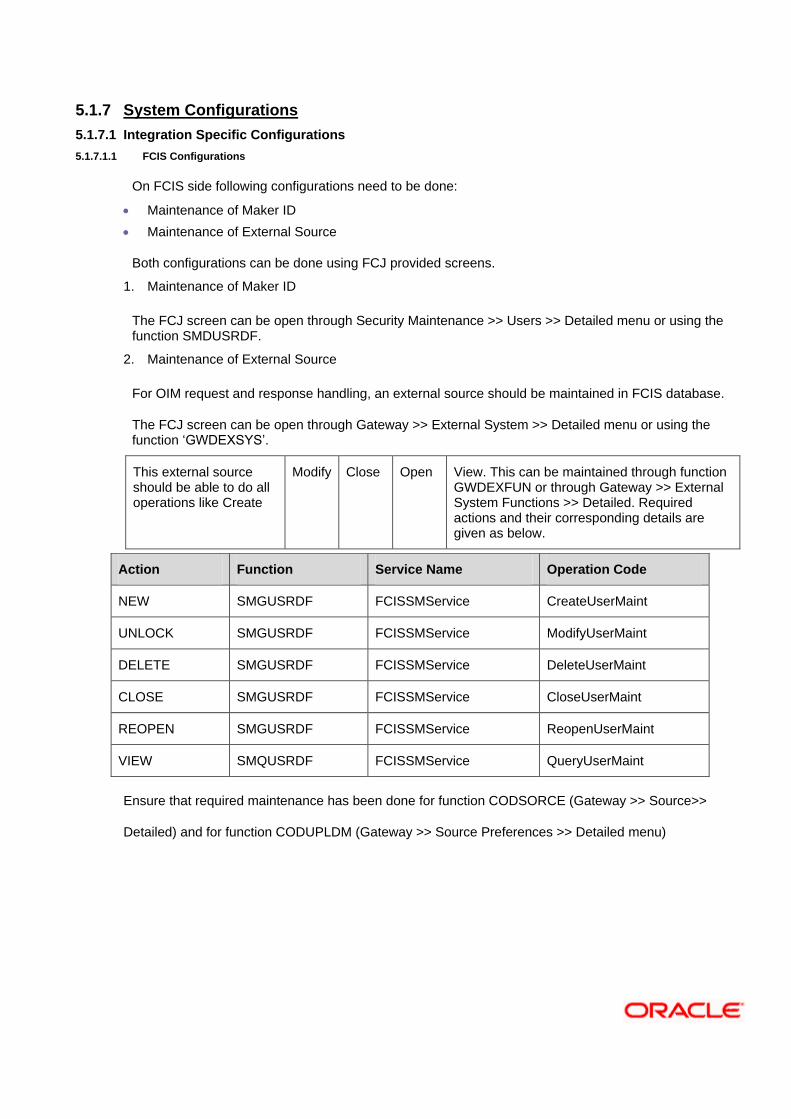
5.1.6.47.7 Modify FLEX_UsrLang_SchTask job
WebService Url : FCUBSLOVAdService deployed in section 5.1.4.2.1
https://<hostname>:<ssl_port>/FCUBSLOVAdService/FCUBSLOVAdServiceSEI
Click on Apply and Click on Run.
5.1.7 System Configurations
5.1.7.1 Integration Specific Configurations
5.1.7.1.1 FCIS Configurations
On FCIS side following configurations need to be done:
Maintenance of Maker ID
Maintenance of External Source
Both configurations can be done using FCJ provided screens.
1. Maintenance of Maker ID
The FCJ screen can be open through Security Maintenance >> Users >> Detailed menu or using the function SMDUSRDF.
2. Maintenance of External Source
For OIM request and response handling, an external source should be maintained in FCIS database.
The FCJ screen can be open through Gateway >> External System >> Detailed menu or using the function ‘GWDEXSYS’.
This external source should be able to do all operations like Create
Modify Close Open View. This can be maintained through function GWDEXFUN or through Gateway >> External System Functions >> Detailed. Required actions and their corresponding details are given as below.
Ensure that required maintenance has been done for function CODSORCE (Gateway >> Source>>
Detailed) and for function CODUPLDM (Gateway >> Source Preferences >> Detailed menu)
Action Function Service Name Operation Code
NEW SMGUSRDF FCISSMService CreateUserMaint
UNLOCK SMGUSRDF FCISSMService ModifyUserMaint
DELETE SMGUSRDF FCISSMService DeleteUserMaint
CLOSE SMGUSRDF FCISSMService CloseUserMaint
REOPEN SMGUSRDF FCISSMService ReopenUserMaint
VIEW SMQUSRDF FCISSMService QueryUserMaint
For maintenance of amendable fields in GWTM_AMEND_NODES and GWTM_AMEND_FIELDS entries can be made using the function STDAMDMT or through Gateway >> Amendment Maintenance >> Detailed. Following table gives the amendable node and fields details that should be maintained.
Field Name Value
Amend Nodes section
Node Name SMTB_USER
New Allowed Checked
Delete Allowed Checked
All Records Checked
Amend Fields section
Field Name HOME_BRANCH
Field Name START_DATE
Field Name TIME_LEVEL
Field Name USER_LANGUAGE
Field Name USER_NAME
Field Name USER_PASSWORD
Field Name SALT
5.1.7.2 OIM Configurations
5.1.7.2.1 OID Connector Configuration
For Oracle FLEXCUBE single sign on mode, the provisioning process consist of user creation in underlying LDAP directory and then provsioining into FLEXCUBE. OIM porvides out of box connectors for LDAP directorires. This connectors provides facility to connect with LDAP and to do the operation through OIM console.
In this integration, the underlying directory for Oracle access manager is Oracle Internet Directory. OIM porvides out of box connector for it that need to be imported as the connector document provided by OIM. After import, following steps should be followed :
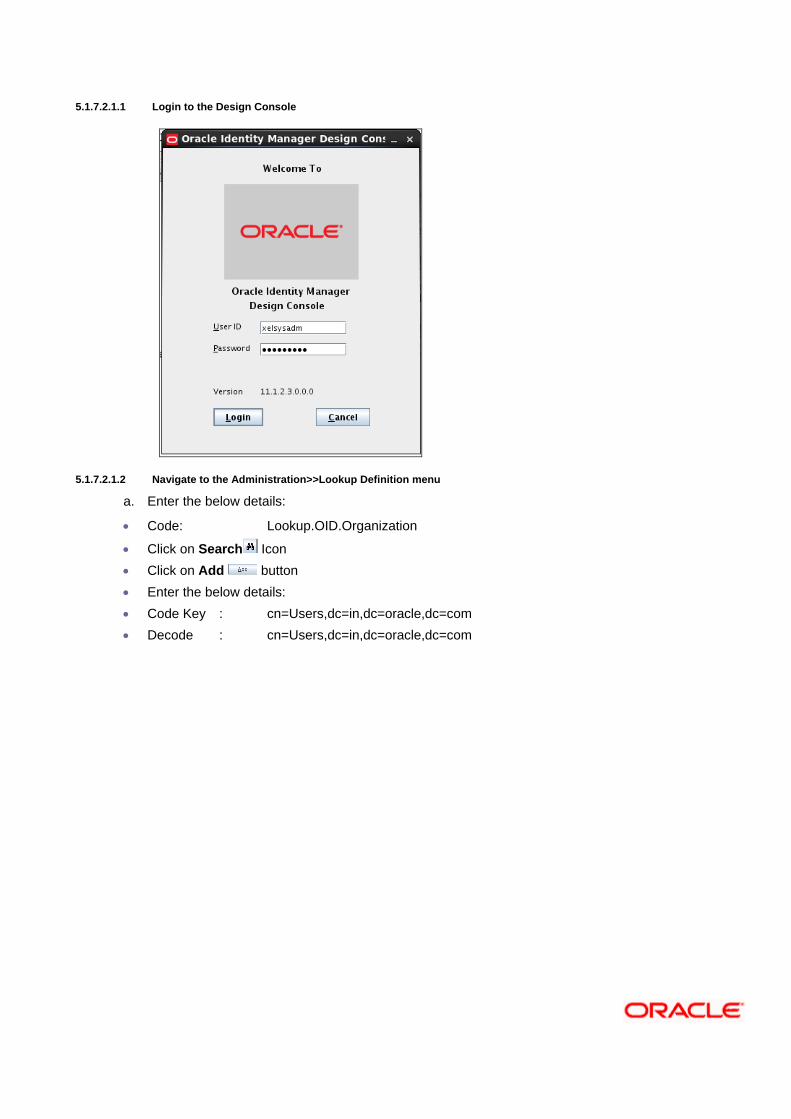
5.1.7.2.1.1 Login to the Design Console
5.1.7.2.1.2 Navigate to the Administration>>Lookup Definition menu
a. Enter the below details:
Code: Lookup.OID.Organization
Click on Search Icon
Click on Add button
Enter the below details:
Code Key : cn=Users,dc=in,dc=oracle,dc=com
Decode : cn=Users,dc=in,dc=oracle,dc=com
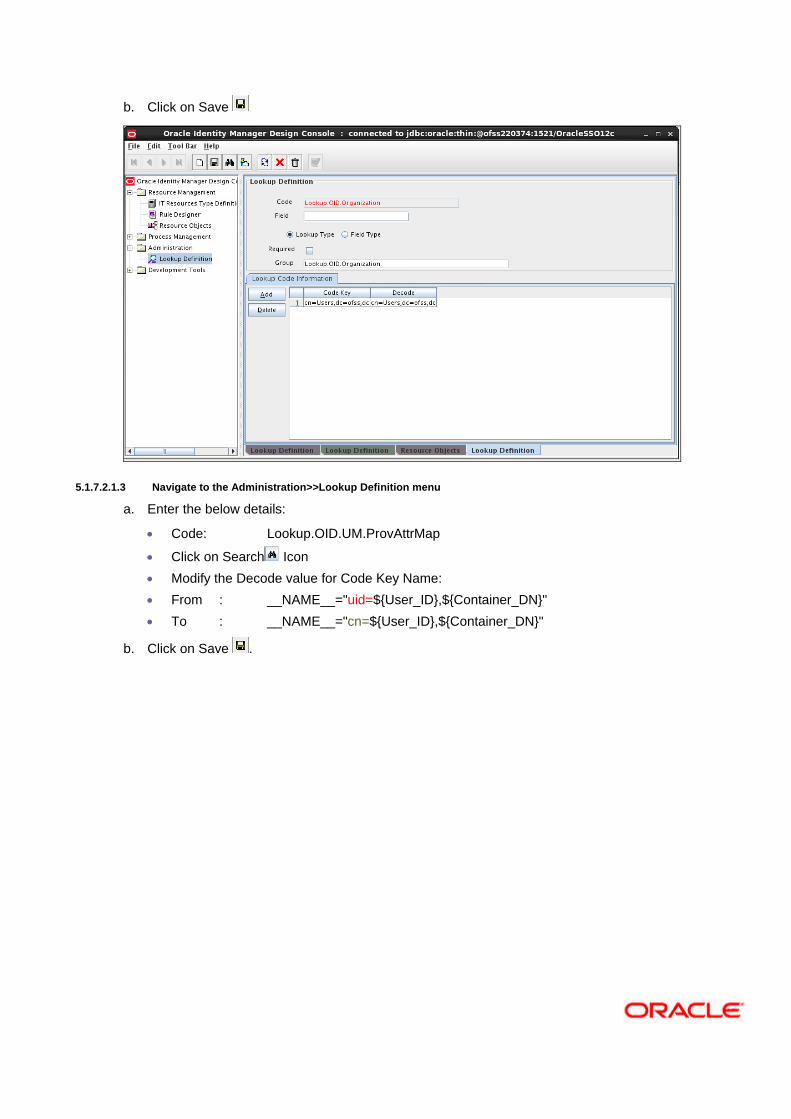
b. Click on Save
5.1.7.2.1.3 Navigate to the Administration>>Lookup Definition menu
a. Enter the below details:
Code: Lookup.OID.UM.ProvAttrMap
Click on Search Icon
Modify the Decode value for Code Key Name:
From : __NAME__="uid=${User_ID},${Container_DN}"
To : __NAME__="cn=${User_ID},${Container_DN}"
b. Click on Save .
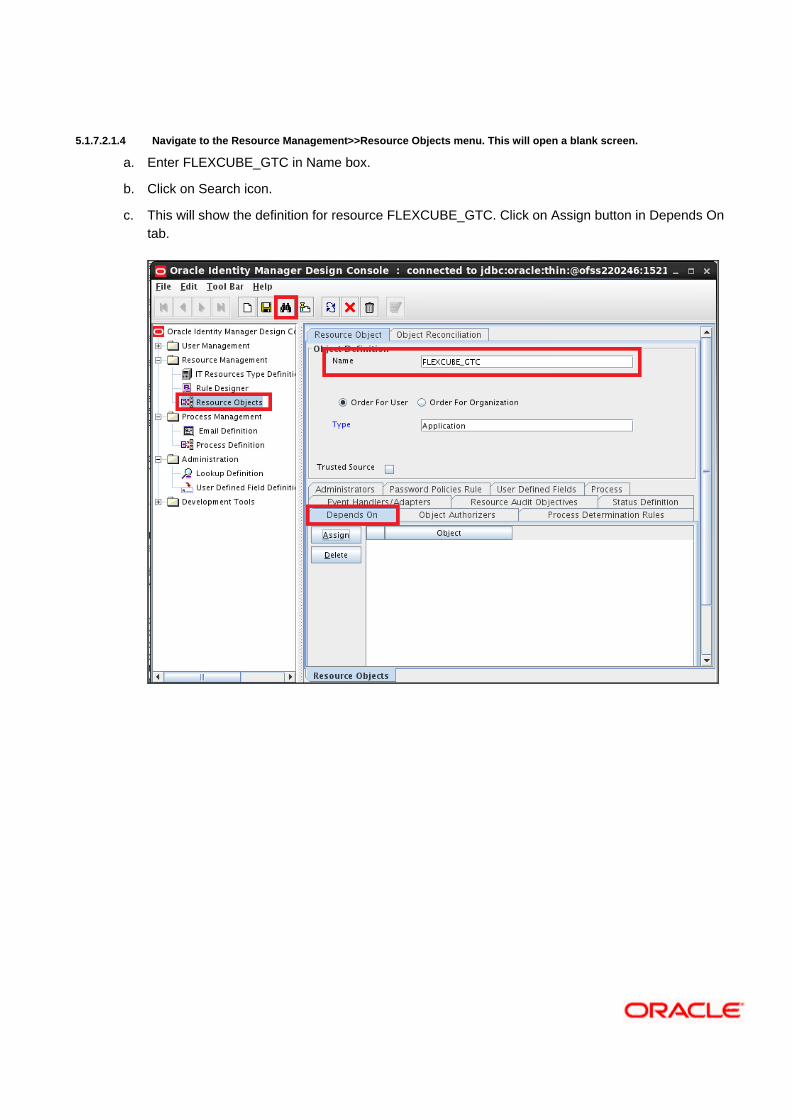
5.1.7.2.1.4 Navigate to the Resource Management>>Resource Objects menu. This will open a blank screen.
a. Enter FLEXCUBE_GTC in Name box.
b. Click on Search icon.
c. This will show the definition for resource FLEXCUBE_GTC. Click on Assign button in Depends On
tab.
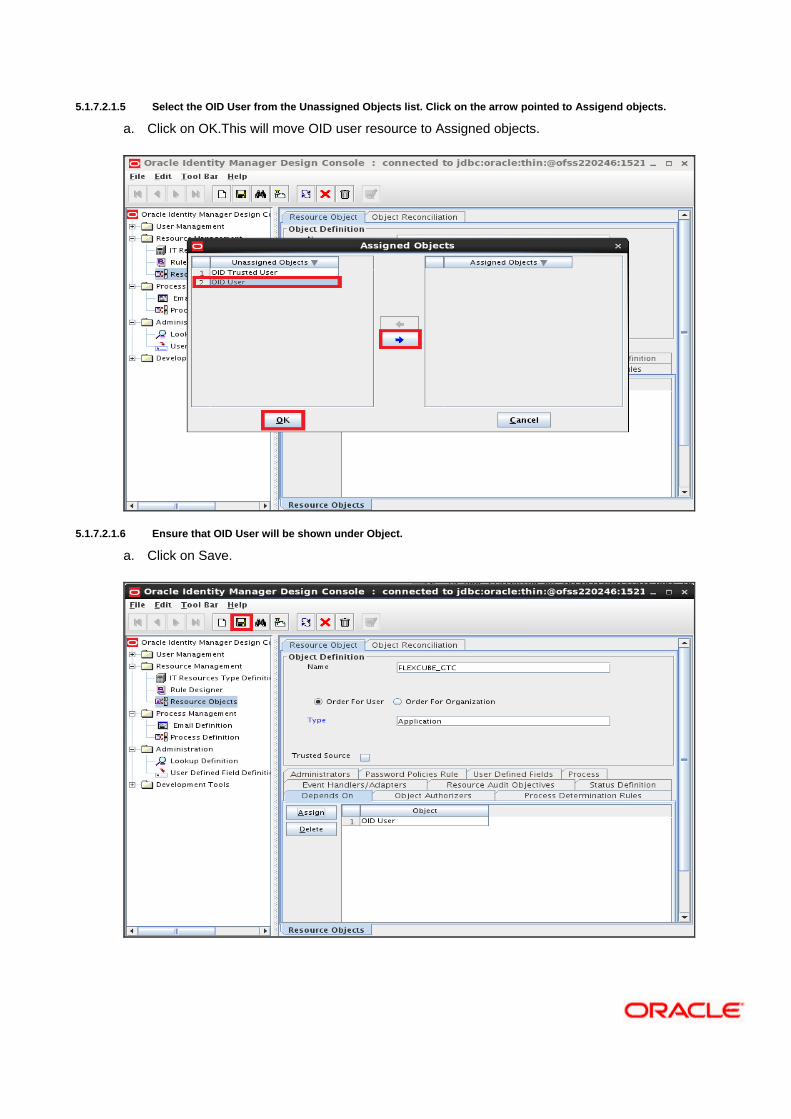
5.1.7.2.1.5 Select the OID User from the Unassigned Objects list. Click on the arrow pointed to Assigend objects.
a. Click on OK.This will move OID user resource to Assigned objects.
5.1.7.2.1.6 Ensure that OID User will be shown under Object.
a. Click on Save.
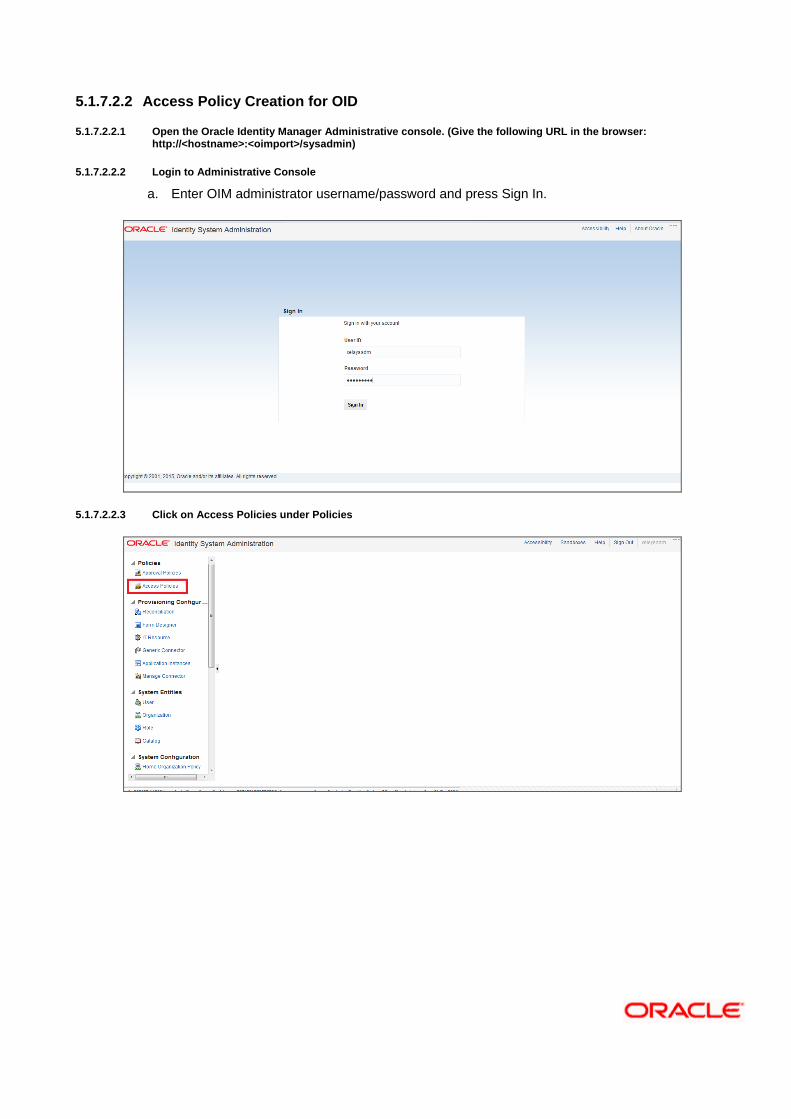
5.1.7.2.2 Access Policy Creation for OID
5.1.7.2.2.1 Open the Oracle Identity Manager Administrative console. (Give the following URL in the browser: http://<hostname>:<oimport>/sysadmin)
5.1.7.2.2.2 Login to Administrative Console
a. Enter OIM administrator username/password and press Sign In.
5.1.7.2.2.3 Click on Access Policies under Policies
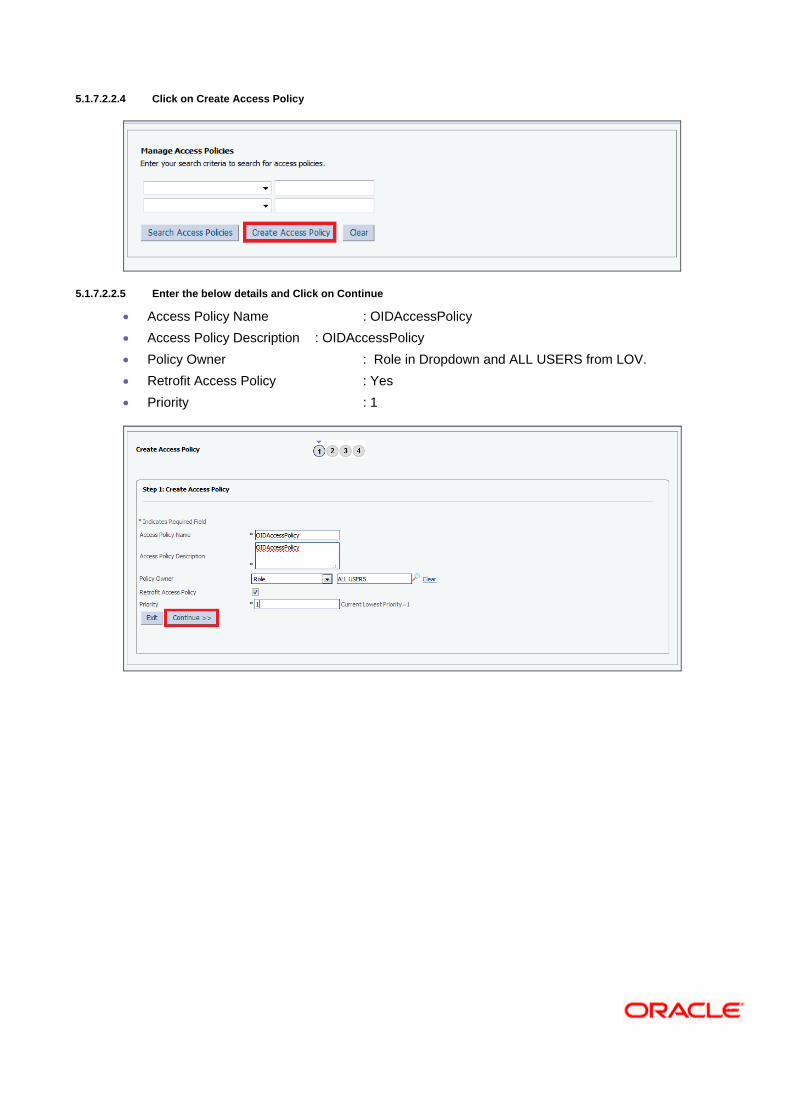
5.1.7.2.2.4 Click on Create Access Policy
5.1.7.2.2.5 Enter the below details and Click on Continue
Access Policy Name : OIDAccessPolicy
Access Policy Description : OIDAccessPolicy
Policy Owner : Role in Dropdown and ALL USERS from LOV.
Retrofit Access Policy : Yes
Priority : 1
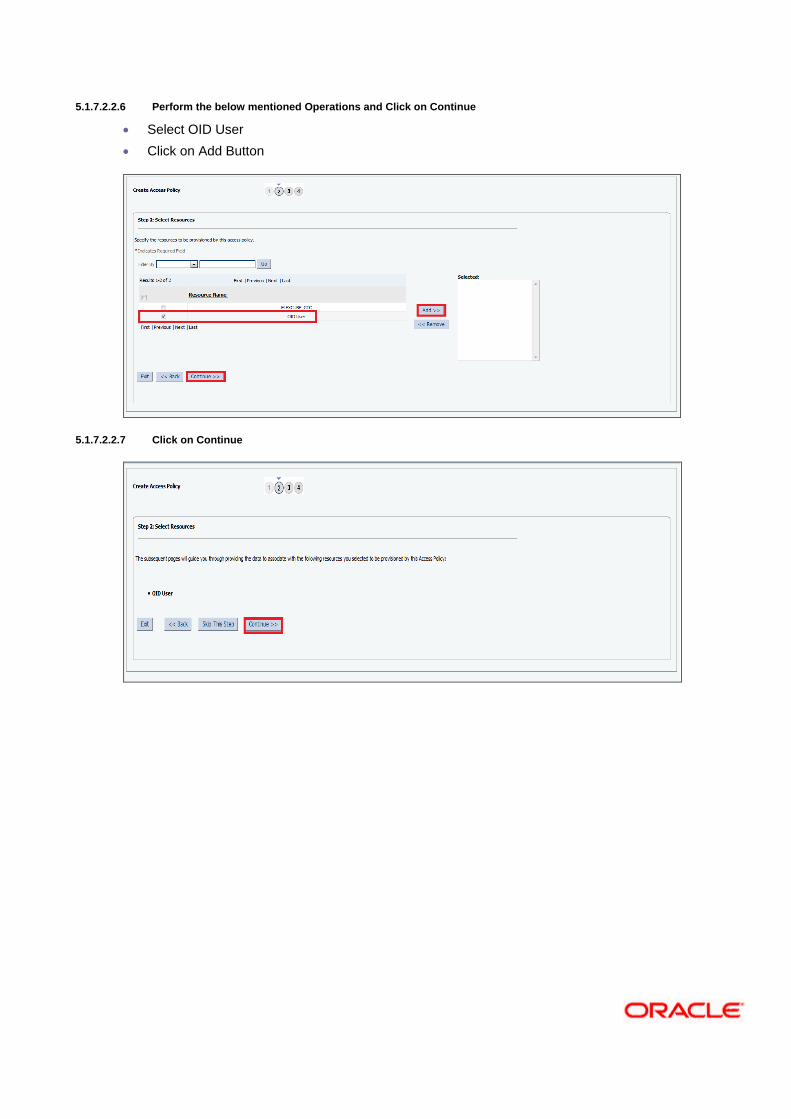
5.1.7.2.2.6 Perform the below mentioned Operations and Click on Continue
Select OID User
Click on Add Button
5.1.7.2.2.7 Click on Continue
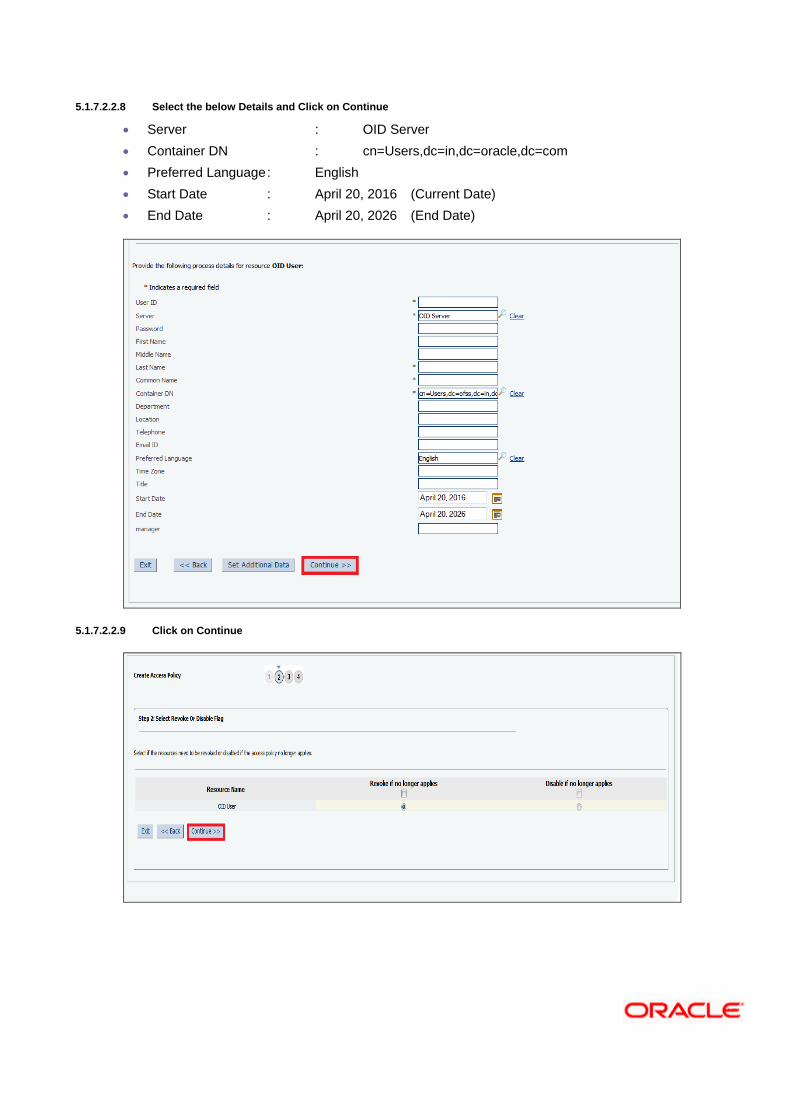
5.1.7.2.2.8 Select the below Details and Click on Continue
Server : OID Server
Container DN : cn=Users,dc=in,dc=oracle,dc=com
Preferred Language : English
Start Date : April 20, 2016 (Current Date)
End Date : April 20, 2026 (End Date)
5.1.7.2.2.9 Click on Continue
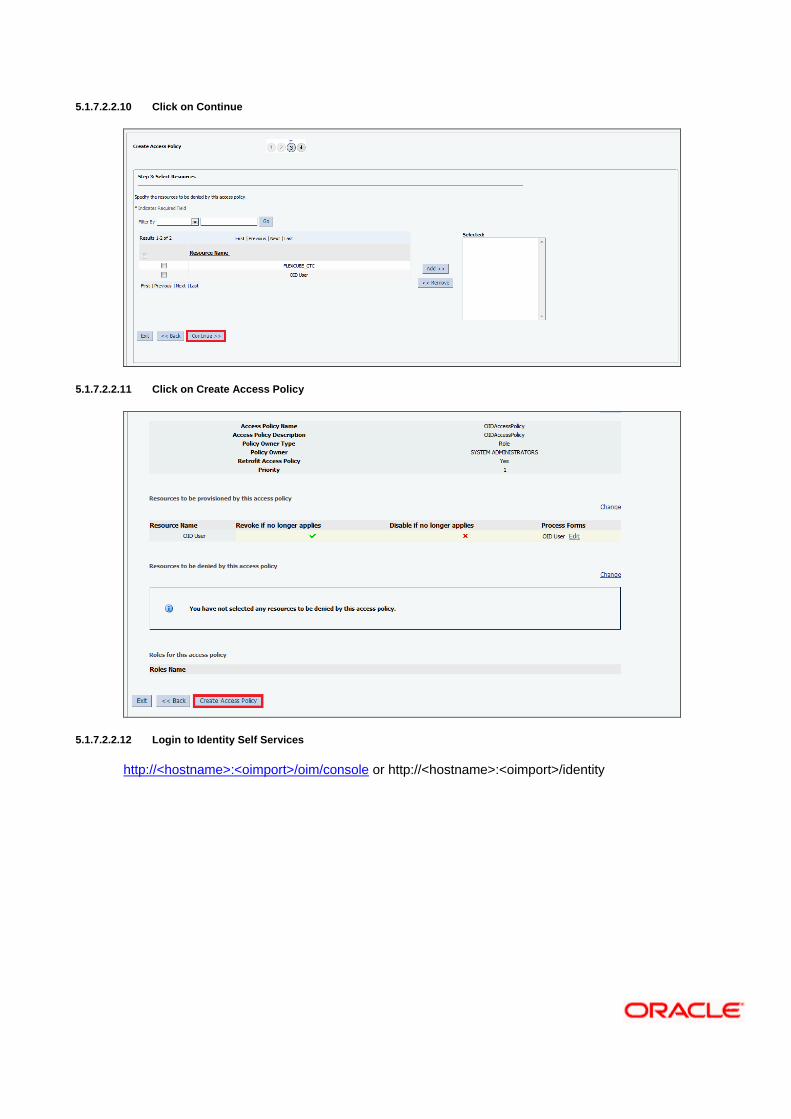
5.1.7.2.2.10 Click on Continue
5.1.7.2.2.11 Click on Create Access Policy
5.1.7.2.2.12 Login to Identity Self Services
http://<hostname>:<oimport>/oim/console or http://<hostname>:<oimport>/identity
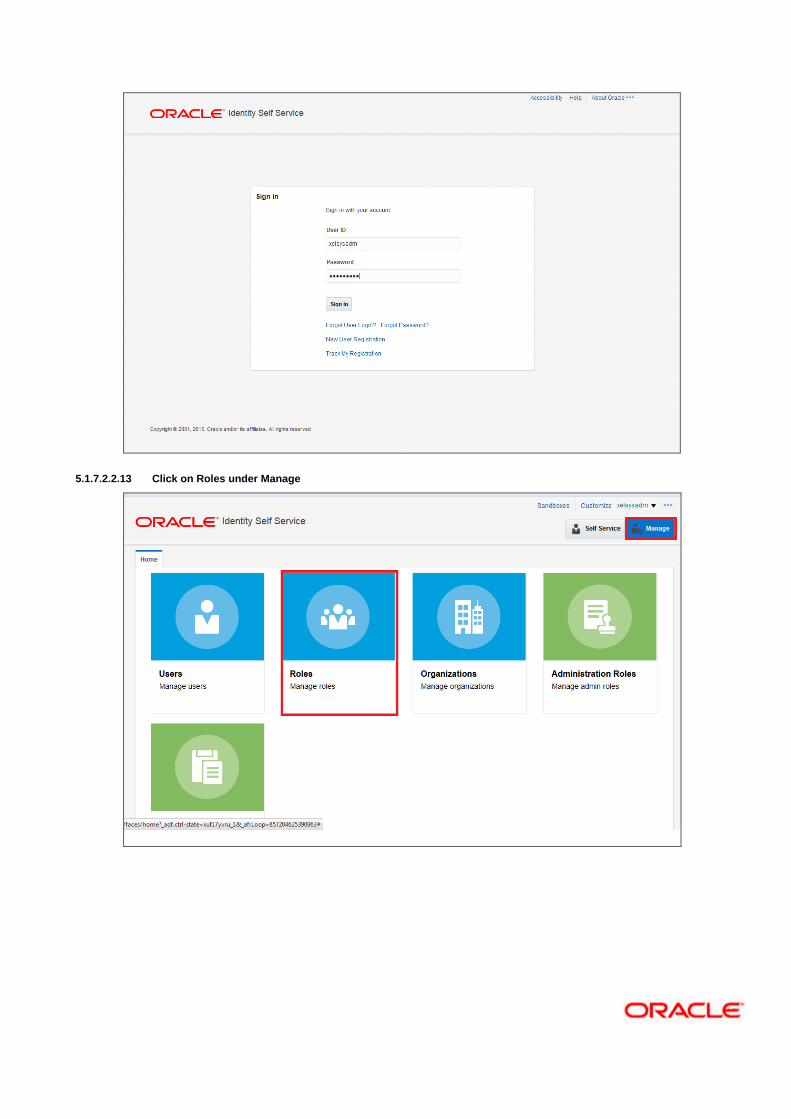
5.1.7.2.2.13 Click on Roles under Manage
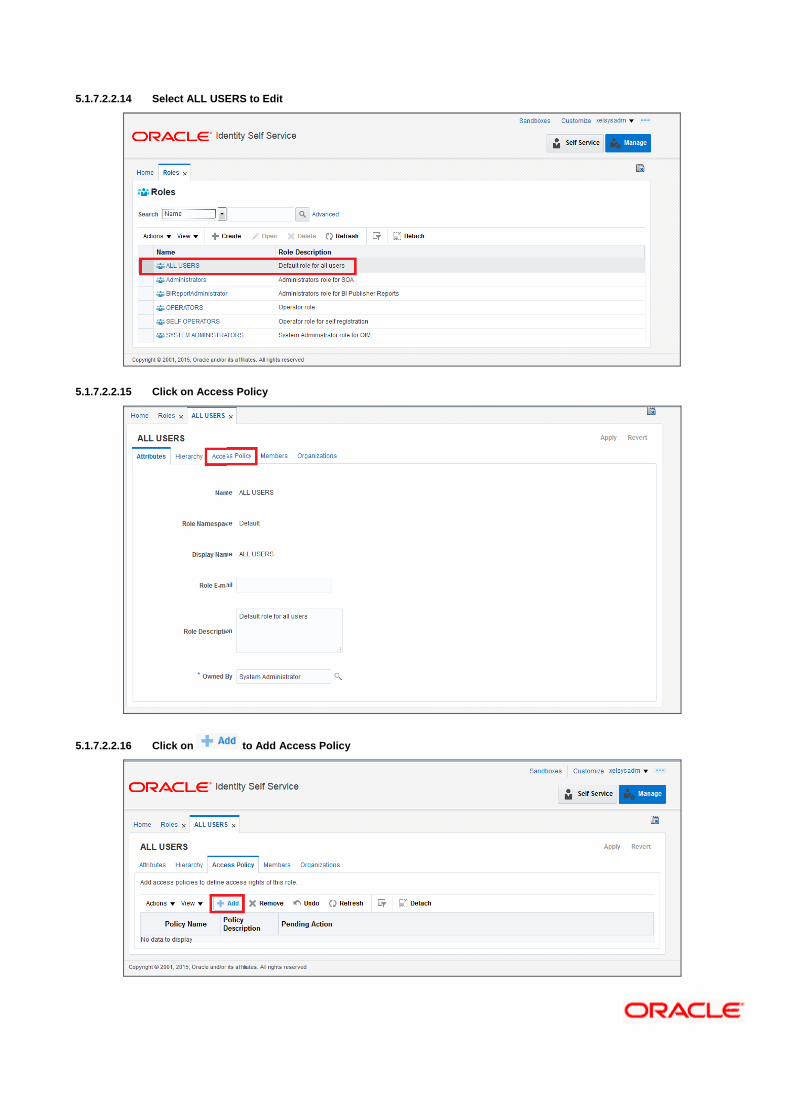
5.1.7.2.2.14 Select ALL USERS to Edit
5.1.7.2.2.15 Click on Access Policy
5.1.7.2.2.16 Click on to Add Access Policy
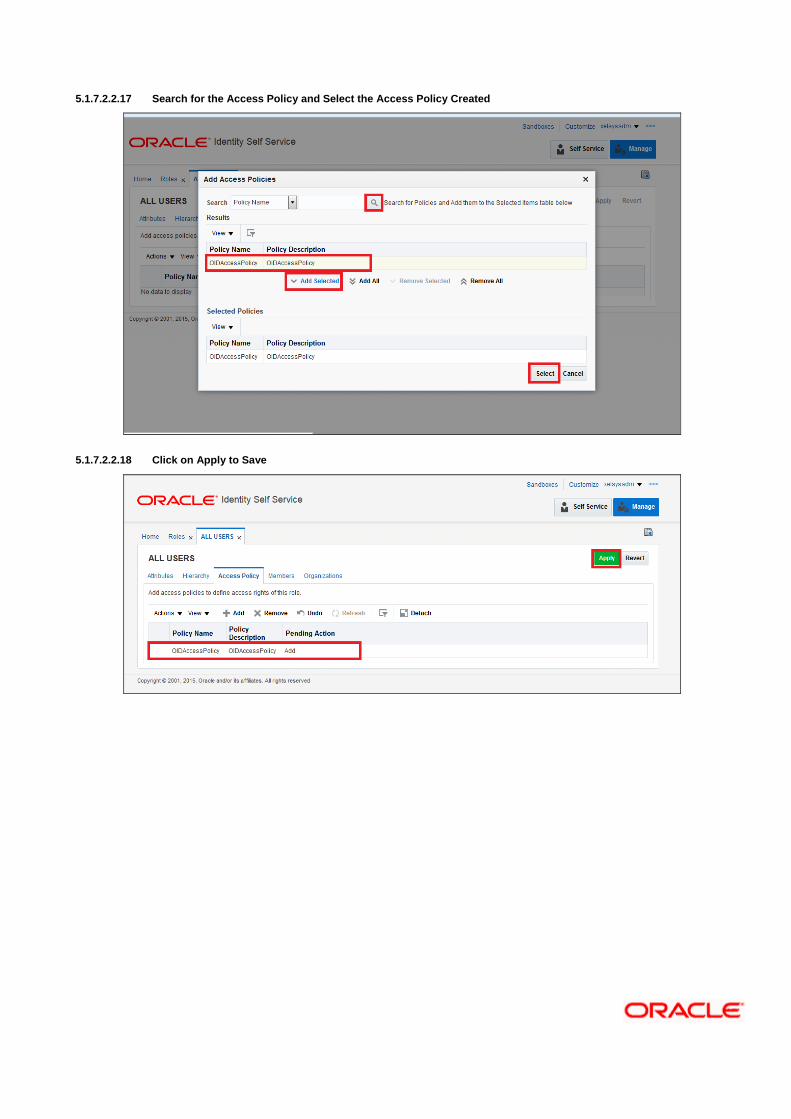
5.1.7.2.2.17 Search for the Access Policy and Select the Access Policy Created
5.1.7.2.2.18 Click on Apply to Save

5.1.7.2.2.19 Click on Scheduler under System Configuration
5.1.7.2.2.20 Click on Search shown below
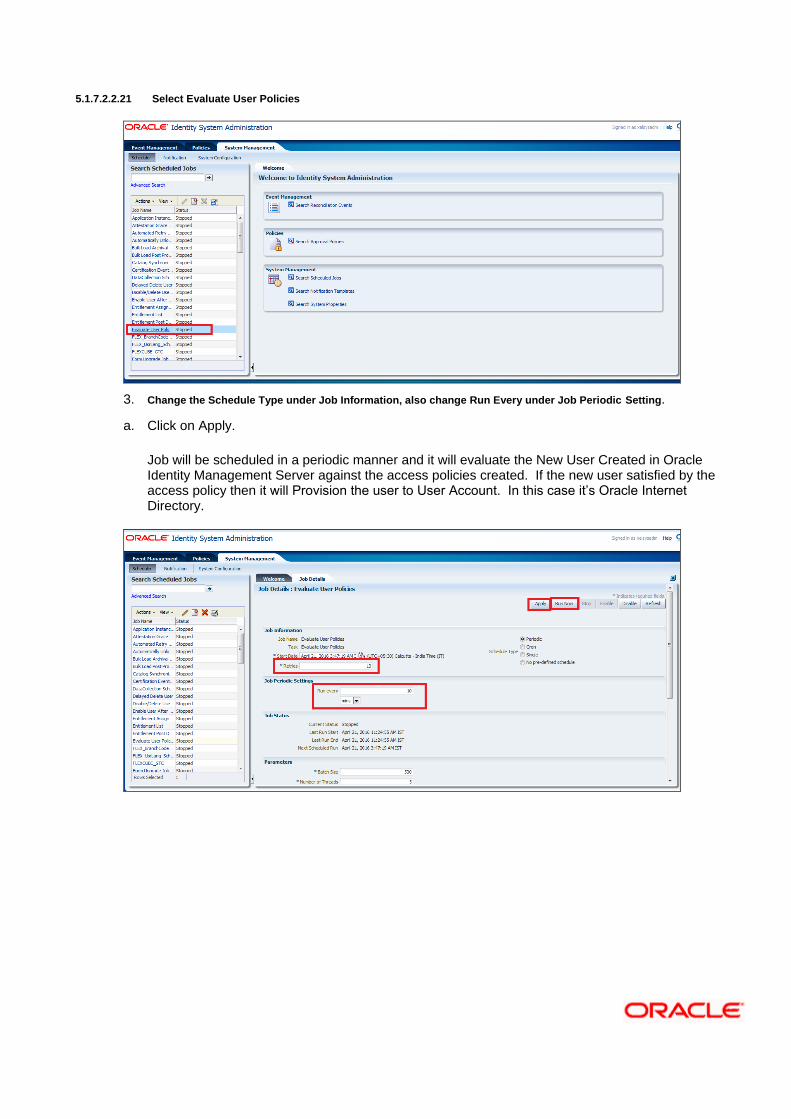
5.1.7.2.2.21 Select Evaluate User Policies
3. Change the Schedule Type under Job Information, also change Run Every under Job Periodic Setting.
a. Click on Apply.
Job will be scheduled in a periodic manner and it will evaluate the New User Created in Oracle Identity Management Server against the access policies created. If the new user satisfied by the access policy then it will Provision the user to User Account. In this case it’s Oracle Internet Directory.
6. Solution / Usage Guidelines
6.1 Working with OIM
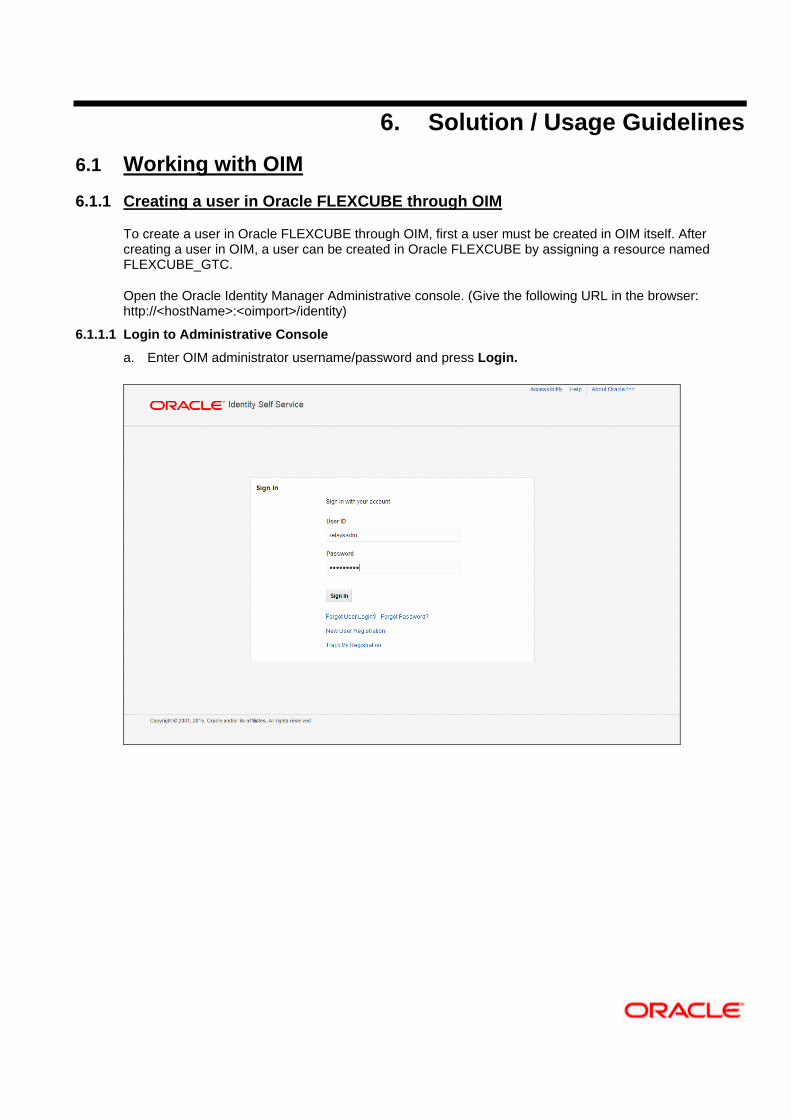
6.1.1 Creating a user in Oracle FLEXCUBE through OIM
To create a user in Oracle FLEXCUBE through OIM, first a user must be created in OIM itself. After creating a user in OIM, a user can be created in Oracle FLEXCUBE by assigning a resource named FLEXCUBE_GTC.
Open the Oracle Identity Manager Administrative console. (Give the following URL in the browser: http://<hostName>:<oimport>/identity)
6.1.1.1 Login to Administrative Console
a. Enter OIM administrator username/password and press Login.
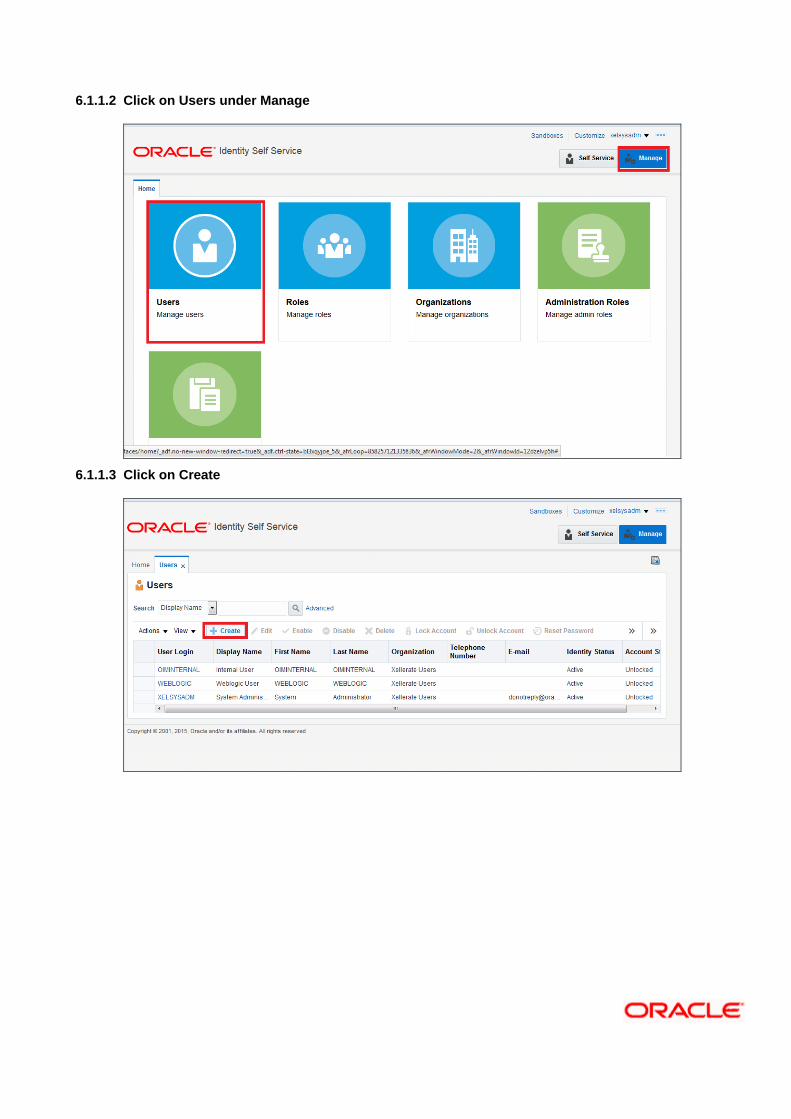
6.1.1.2 Click on Users under Manage
6.1.1.3 Click on Create
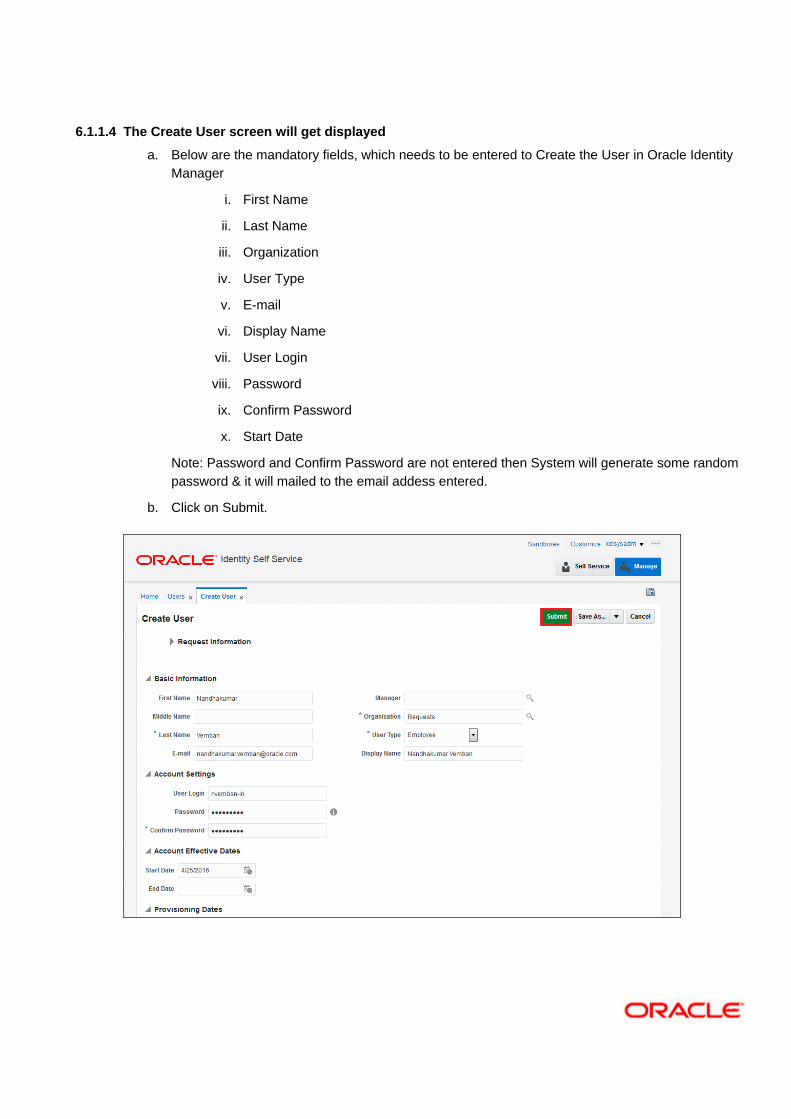
6.1.1.4 The Create User screen will get displayed
a. Below are the mandatory fields, which needs to be entered to Create the User in Oracle Identity
Manager
i. First Name
ii. Last Name
iii. Organization
iv. User Type
v. E-mail
vi. Display Name
vii. User Login
viii. Password
ix. Confirm Password
x. Start Date
Note: Password and Confirm Password are not entered then System will generate some random
password & it will mailed to the email addess entered.
b. Click on Submit.
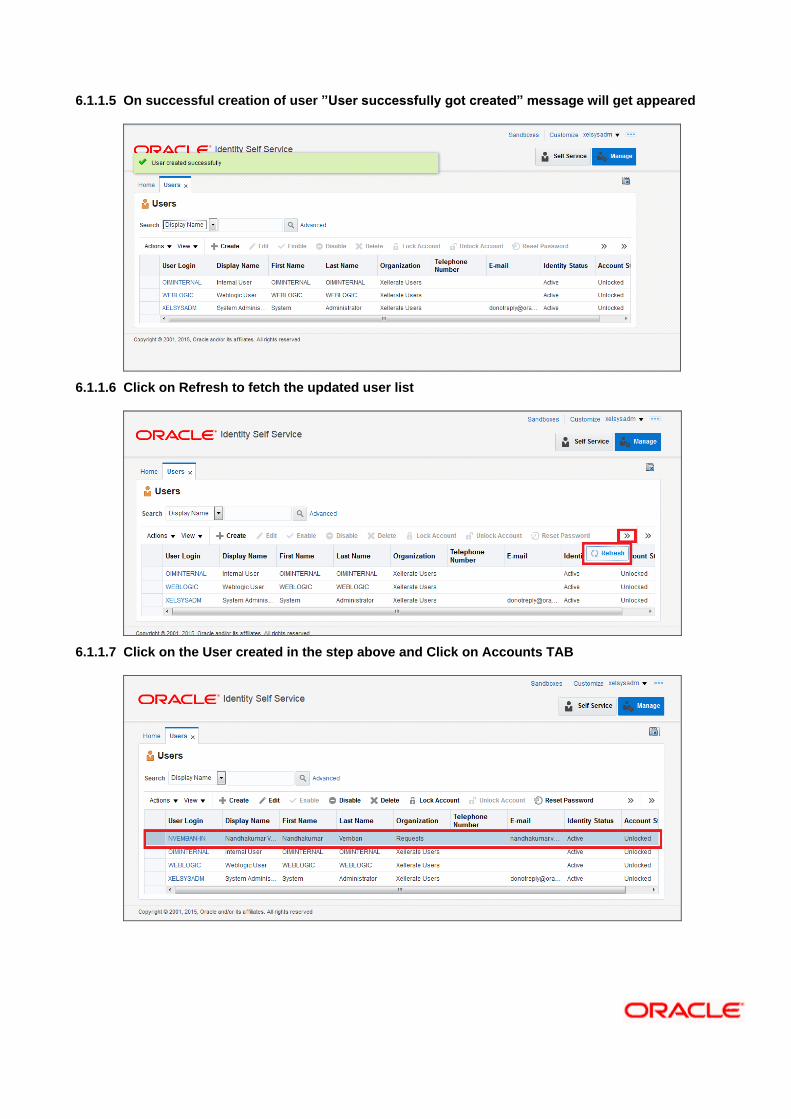
6.1.1.5 On successful creation of user ”User successfully got created” message will get appeared
6.1.1.6 Click on Refresh to fetch the updated user list
6.1.1.7 Click on the User created in the step above and Click on Accounts TAB
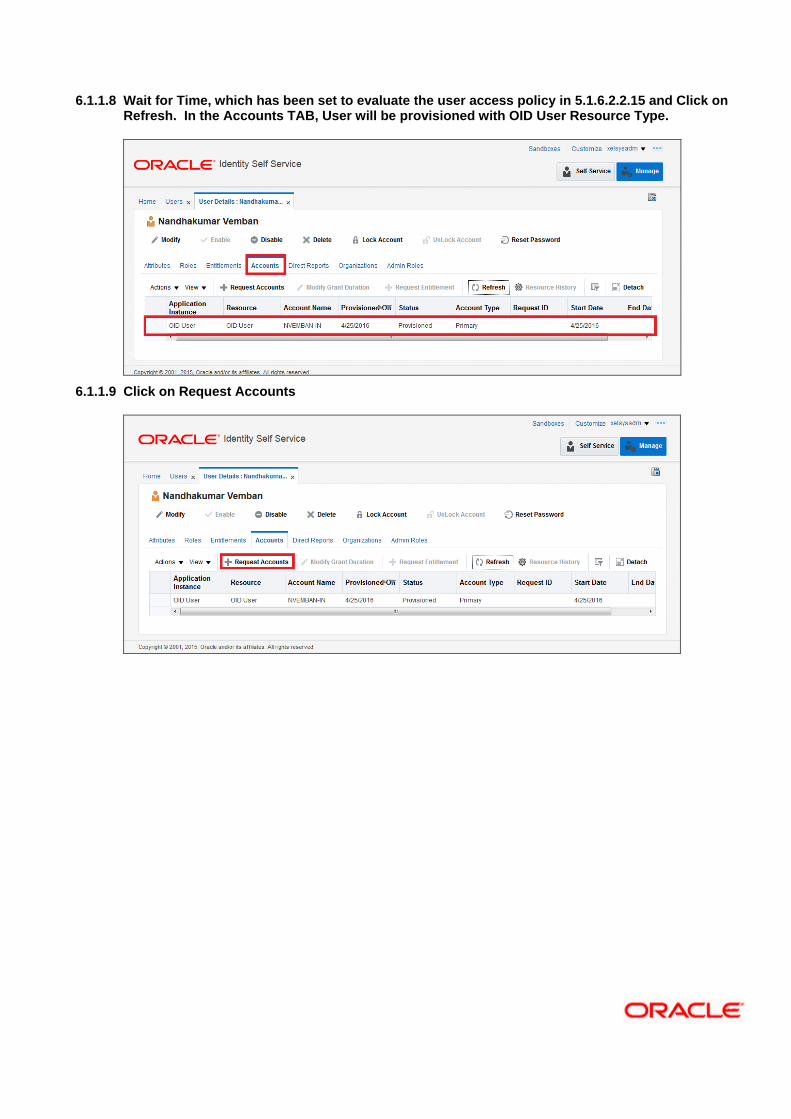
6.1.1.8 Wait for Time, which has been set to evaluate the user access policy in 5.1.6.2.2.15 and Click on Refresh. In the Accounts TAB, User will be provisioned with OID User Resource Type.
6.1.1.9 Click on Request Accounts
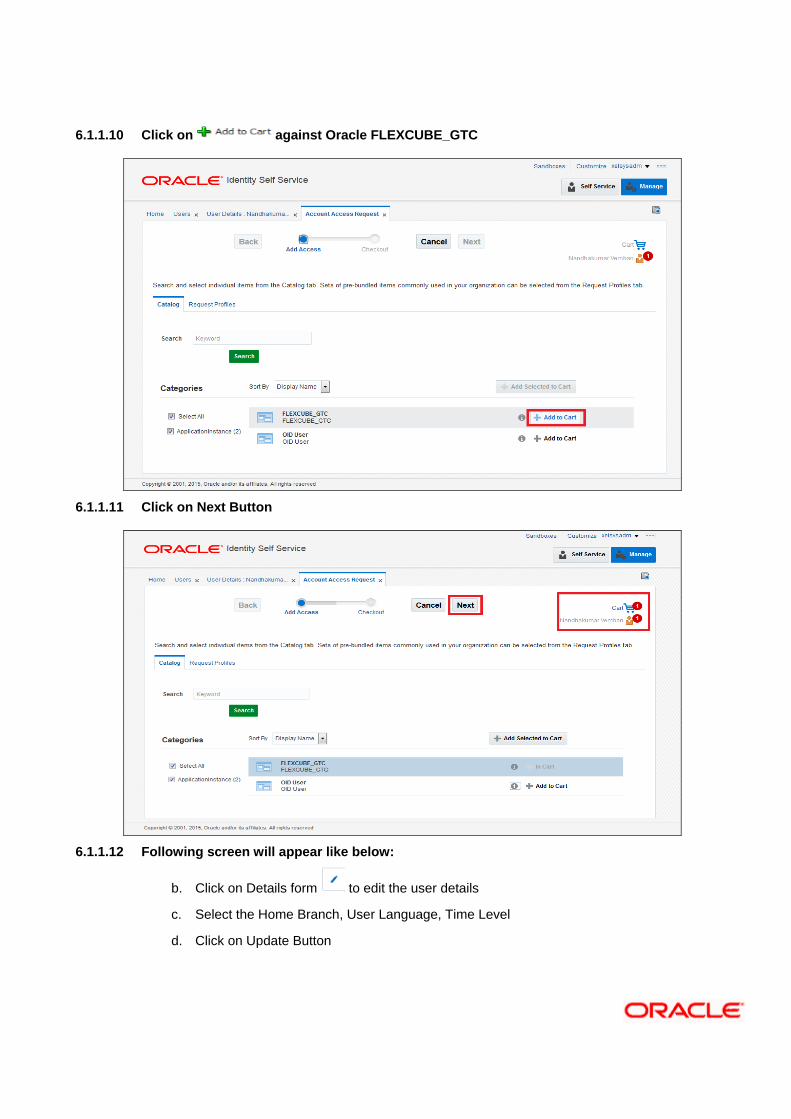
6.1.1.10 Click on against Oracle FLEXCUBE_GTC
6.1.1.11 Click on Next Button
6.1.1.12 Following screen will appear like below:
b. Click on Details form to edit the user details
c. Select the Home Branch, User Language, Time Level
d. Click on Update Button
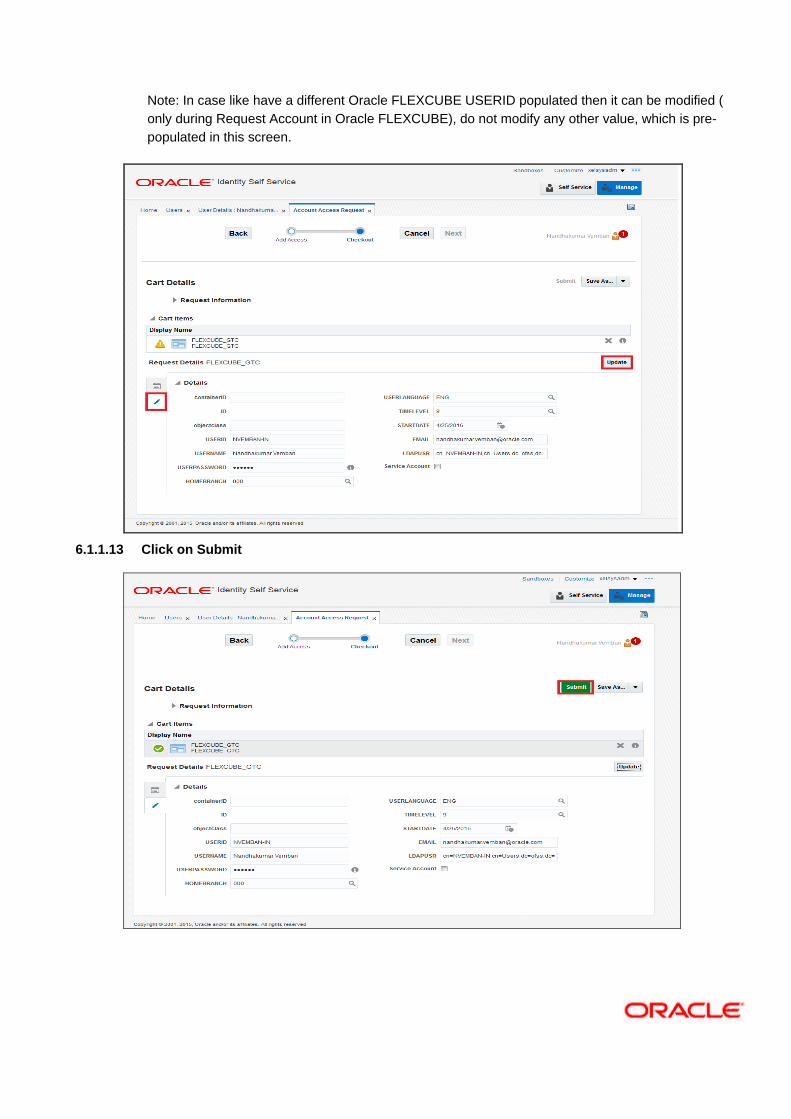
Note: In case like have a different Oracle FLEXCUBE USERID populated then it can be modified (
only during Request Account in Oracle FLEXCUBE), do not modify any other value, which is pre-
populated in this screen.
6.1.1.13 Click on Submit

6.1.1.14 Click on Refresh in Accounts TAB
6.1.1.15 It will show the Requested Account and It’s status
If the status is provisioned then the User is created in the Target Application.
6.1.2 Modifying a user in FCIS through OIM
6.1.2.1 Navigate to the Accounts TAB>>Select FLEXCUBE_GTC >> Click on Modify Accounts.
a. After successful provisioning User Details like User Name, User Password, Time Level, User
Language and Home Branch can be modified.
b. Email, LDAP User, Start Date should not be modified.
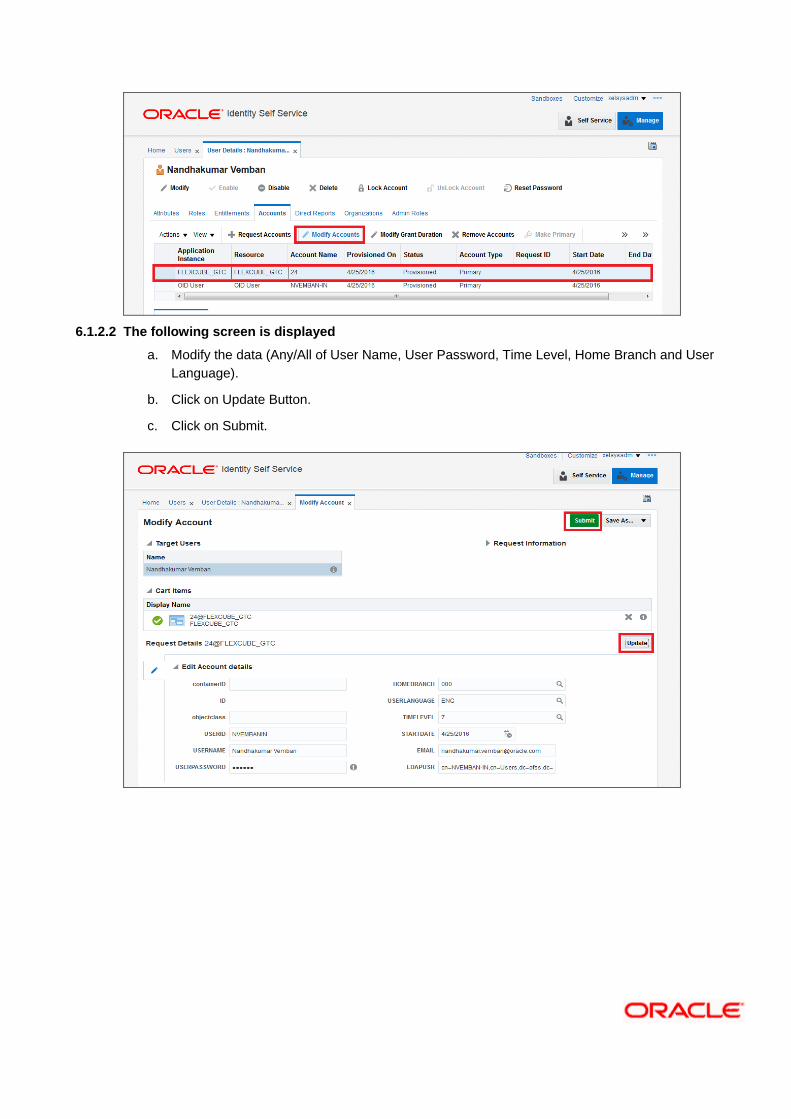
6.1.2.2 The following screen is displayed
a. Modify the data (Any/All of User Name, User Password, Time Level, Home Branch and User
Language).
b. Click on Update Button.
c. Click on Submit.
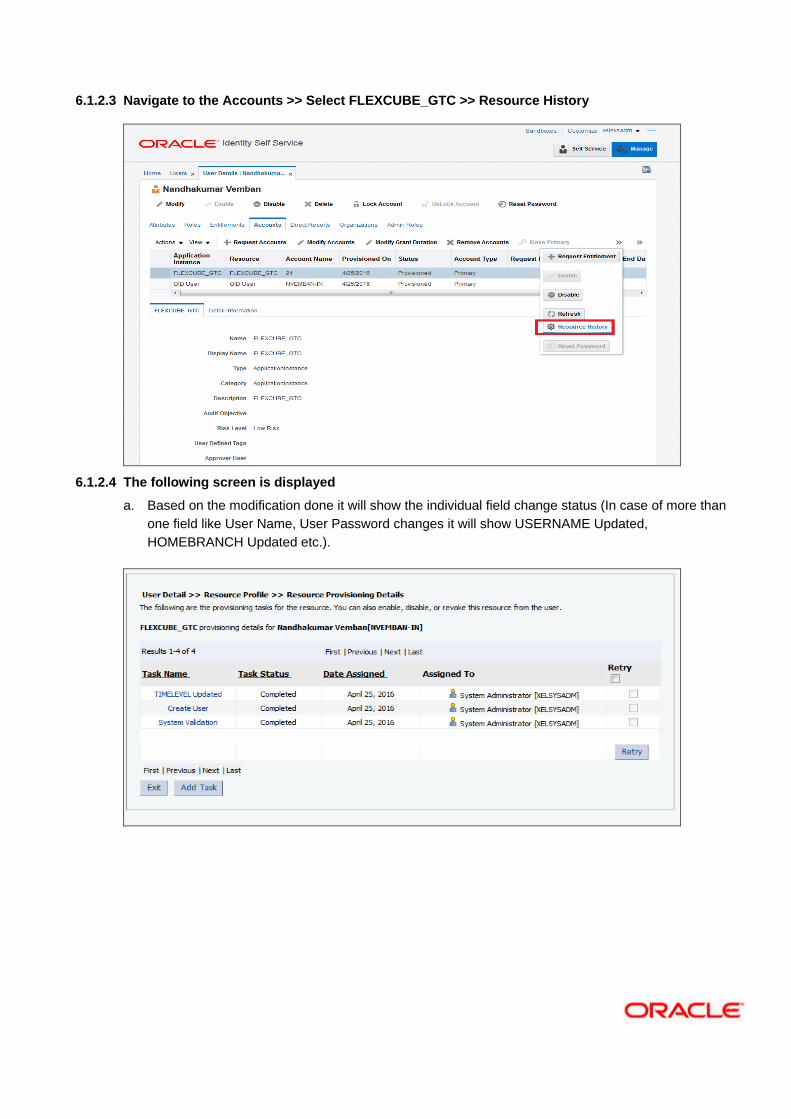
6.1.2.3 Navigate to the Accounts >> Select FLEXCUBE_GTC >> Resource History
6.1.2.4 The following screen is displayed
a. Based on the modification done it will show the individual field change status (In case of more than
one field like User Name, User Password changes it will show USERNAME Updated,
HOMEBRANCH Updated etc.).
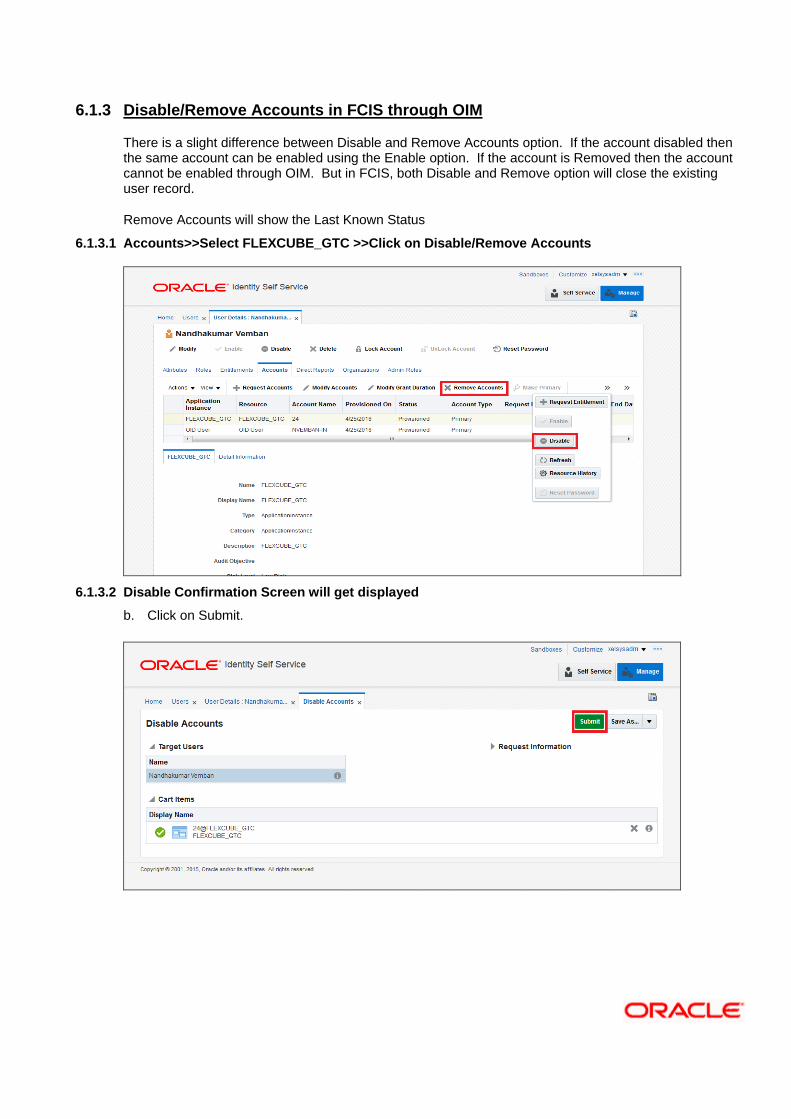
6.1.3 Disable/Remove Accounts in FCIS through OIM
There is a slight difference between Disable and Remove Accounts option. If the account disabled then the same account can be enabled using the Enable option. If the account is Removed then the account cannot be enabled through OIM. But in FCIS, both Disable and Remove option will close the existing user record.
Remove Accounts will show the Last Known Status
6.1.3.1 Accounts>>Select FLEXCUBE_GTC >>Click on Disable/Remove Accounts
6.1.3.2 Disable Confirmation Screen will get displayed
b. Click on Submit.

6.1.3.3 Go to Accounts Tab and Click on Refresh
a. On successful processing, it will display the FLEXCUBE_GTC status as Disabled.
6.1.4 Enabling a Disabled user in FCIS through OIM
6.1.4.1 Accounts>>Select FLEXCUBE_GTC >>Click on Enable
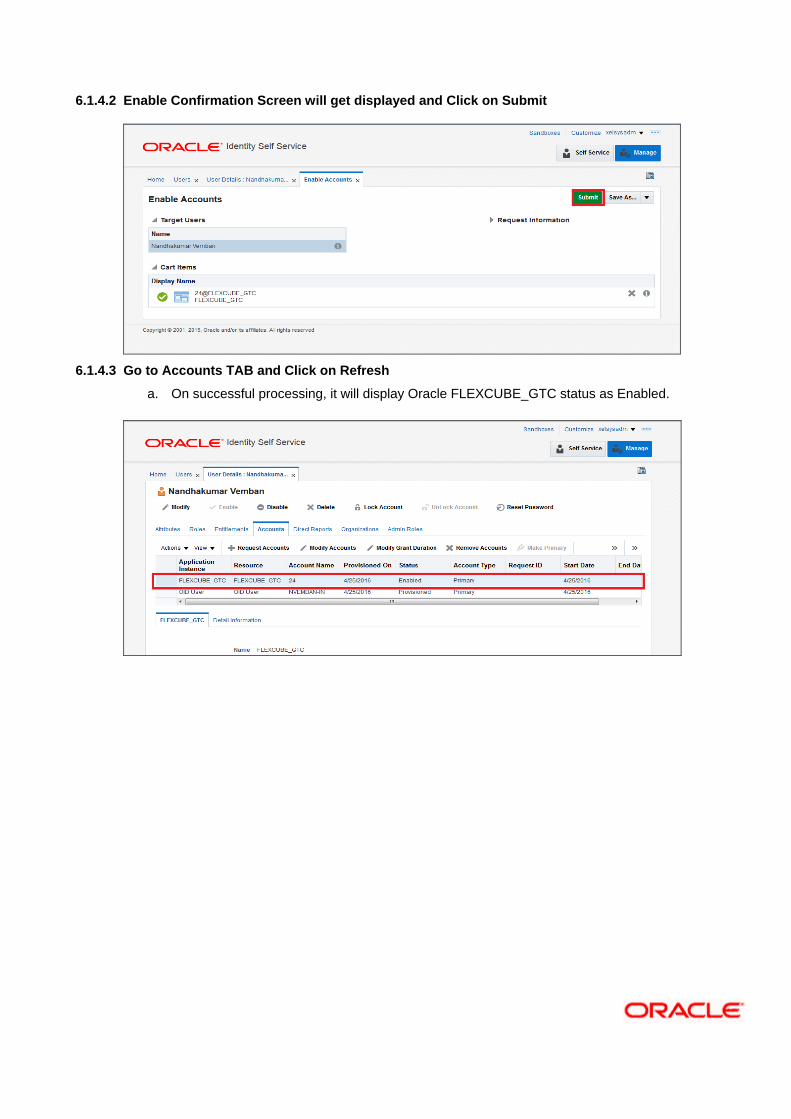
6.1.4.2 Enable Confirmation Screen will get displayed and Click on Submit
6.1.4.3 Go to Accounts TAB and Click on Refresh
a. On successful processing, it will display Oracle FLEXCUBE_GTC status as Enabled.

6.1.5 Running Reconciliation in OIM
Copy the reconciliation staging file that is created by function id SMBOIMHF as EOD day activity to the OIM server’s staging directory.
6.1.5.1 Login to OIM Admin Console and Click on Scheduler under System Management
6.1.5.2 Under System Management tab and search for FLEXCUBE_GTC Scheduled Job by clicking Search Button
a. If the job is scheduled periodically, based on the frequency and scheduled time, system will
automatically process the reconciliation. If it not scheduled, user can manually initiate the
reconciliation process by clicking the Run Now button.
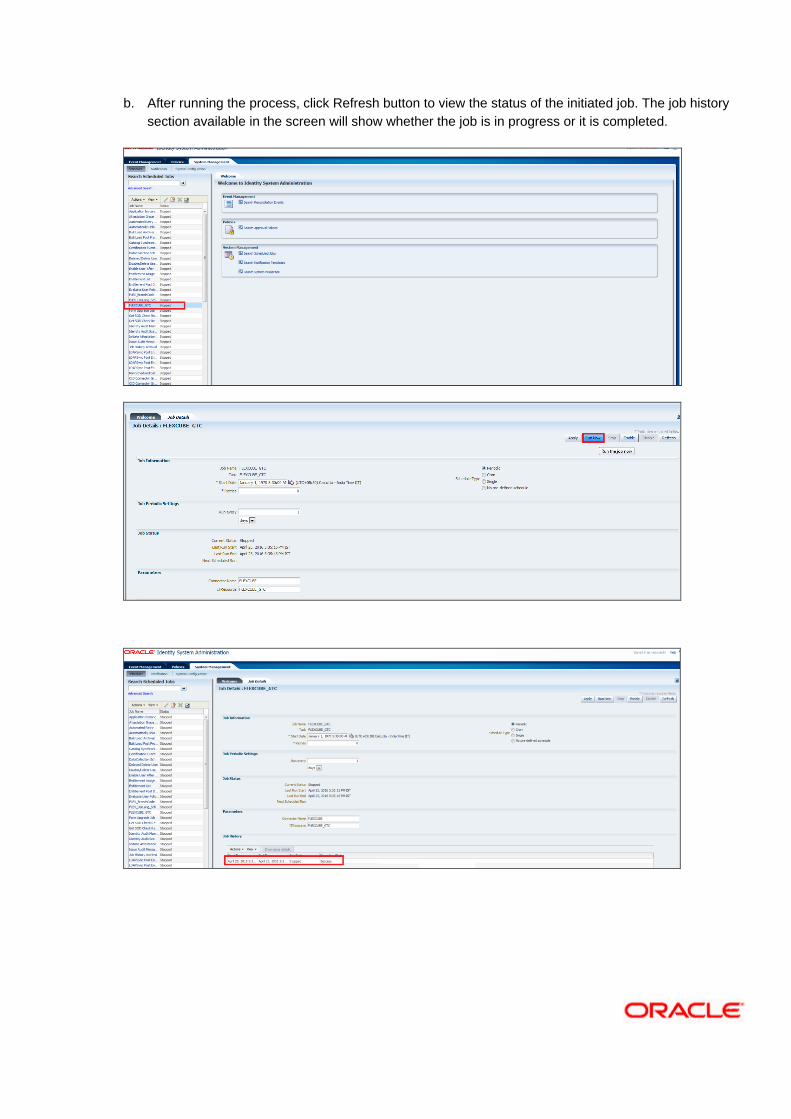
b. After running the process, click Refresh button to view the status of the initiated job. The job history
section available in the screen will show whether the job is in progress or it is completed.
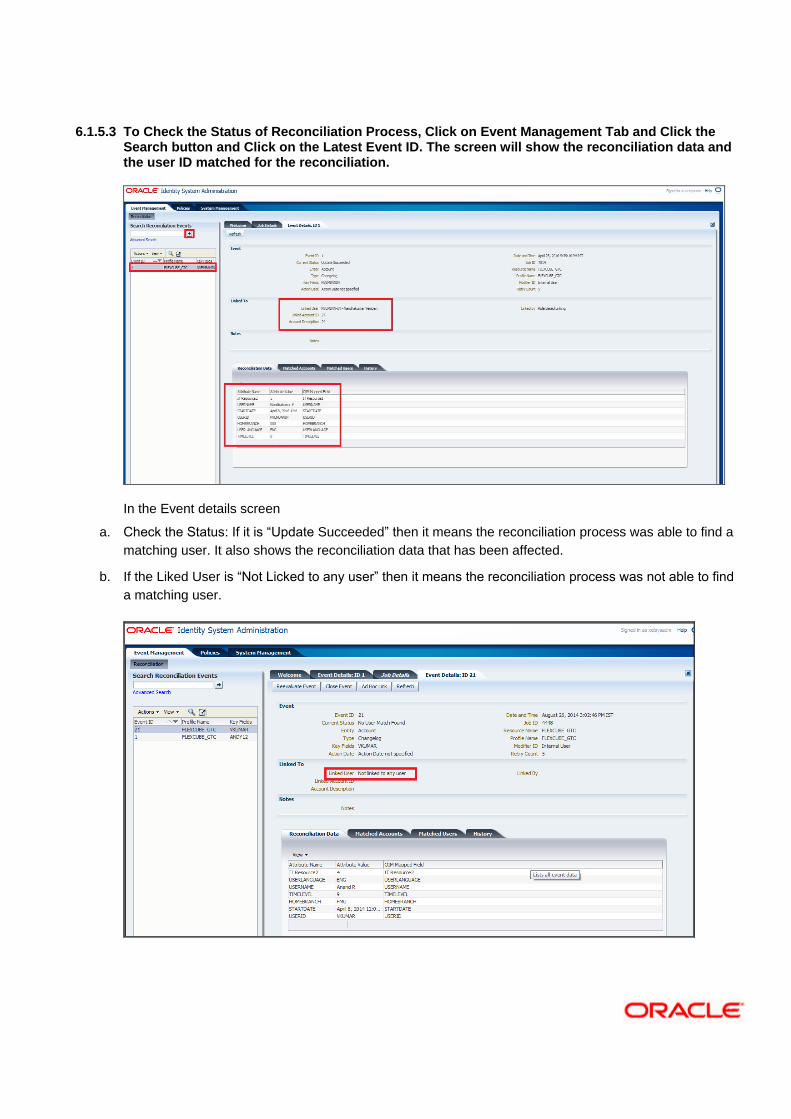
6.1.5.3 To Check the Status of Reconciliation Process, Click on Event Management Tab and Click the Search button and Click on the Latest Event ID. The screen will show the reconciliation data and the user ID matched for the reconciliation.
In the Event details screen
a. Check the Status: If it is “Update Succeeded” then it means the reconciliation process was able to find a
matching user. It also shows the reconciliation data that has been affected.
b. If the Liked User is “Not Licked to any user” then it means the reconciliation process was not able to find
a matching user.
7. Reference
Document Number Title
1 Oracle Identity Manager Document.
2 SPML specification Document.
8. Appendix
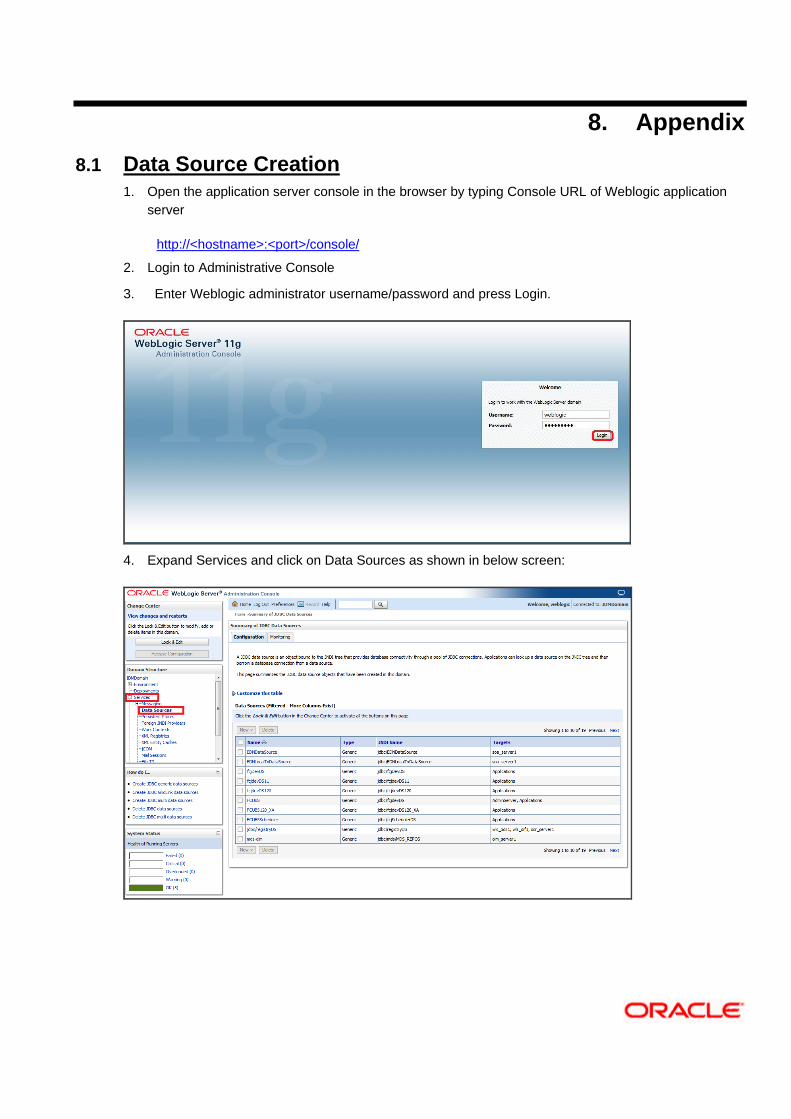
8.1 Data Source Creation 1. Open the application server console in the browser by typing Console URL of Weblogic application
server
http://<hostname>:<port>/console/
2. Login to Administrative Console
3. Enter Weblogic administrator username/password and press Login.
4. Expand Services and click on Data Sources as shown in below screen:
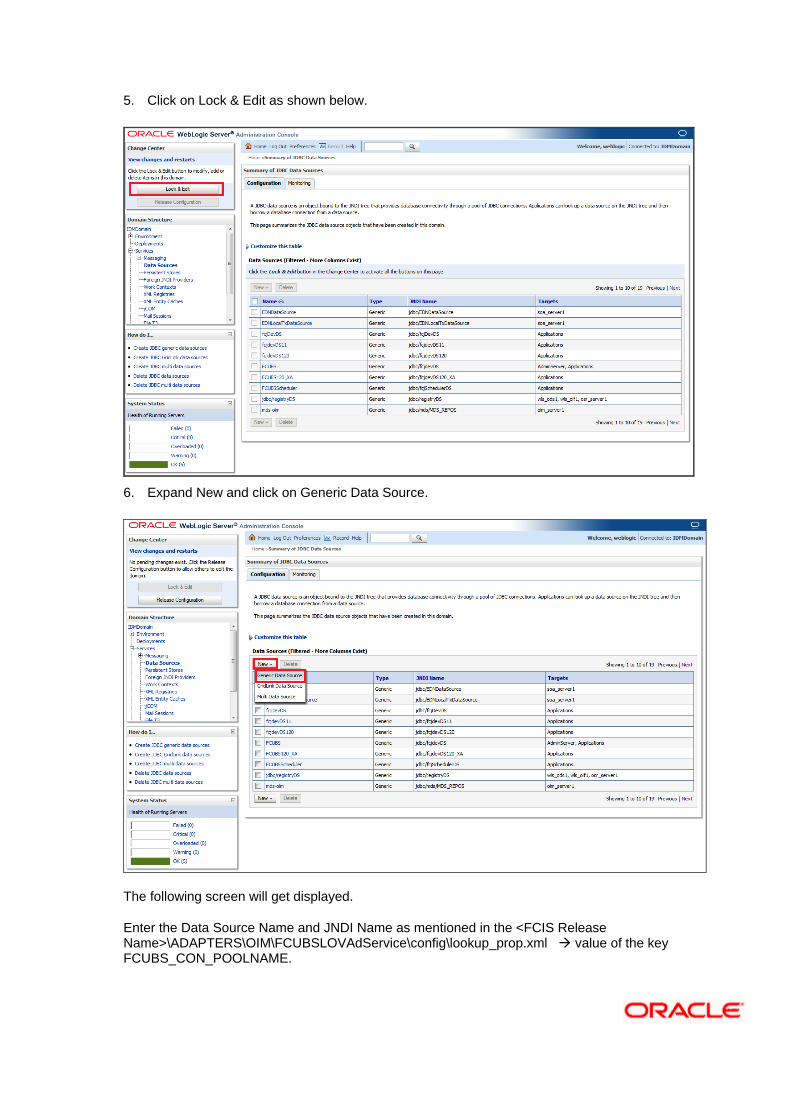
5. Click on Lock & Edit as shown below.
6. Expand New and click on Generic Data Source.
The following screen will get displayed.
Enter the Data Source Name and JNDI Name as mentioned in the <FCIS Release Name>\ADAPTERS\OIM\FCUBSLOVAdService\config\lookup_prop.xml value of the key FCUBS_CON_POOLNAME.
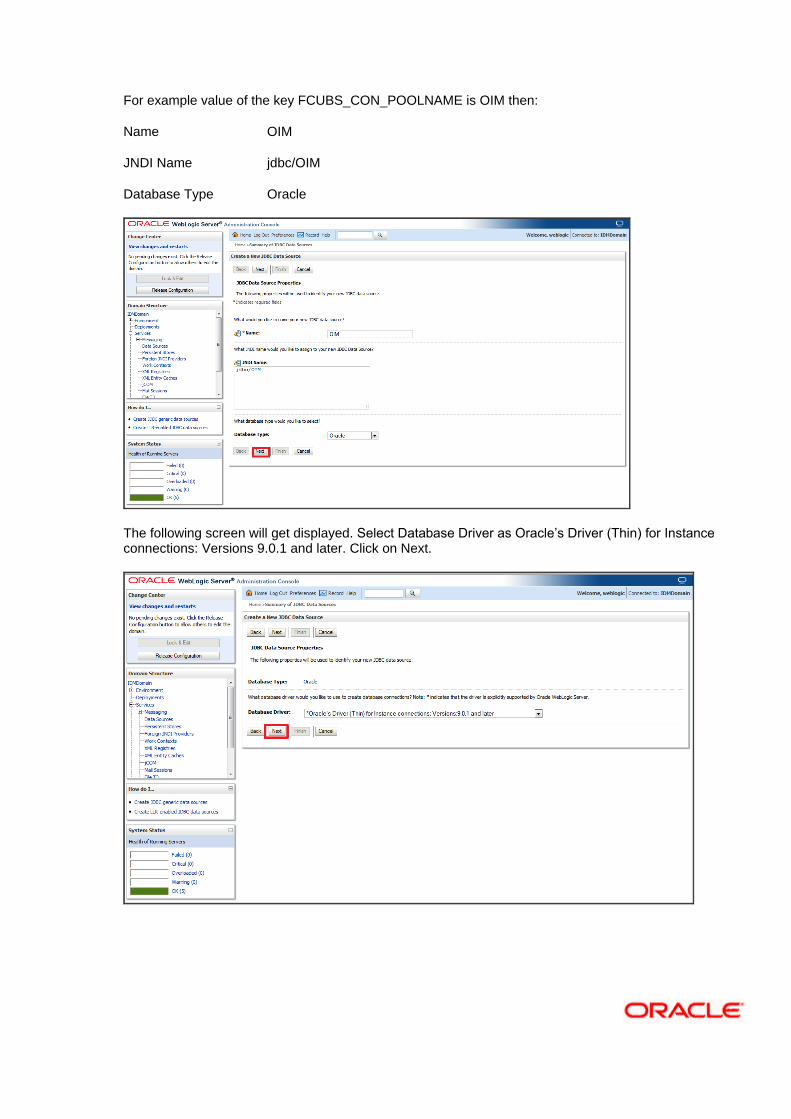
For example value of the key FCUBS_CON_POOLNAME is OIM then:
Name OIM
JNDI Name jdbc/OIM
Database Type Oracle
The following screen will get displayed. Select Database Driver as Oracle’s Driver (Thin) for Instance connections: Versions 9.0.1 and later. Click on Next.
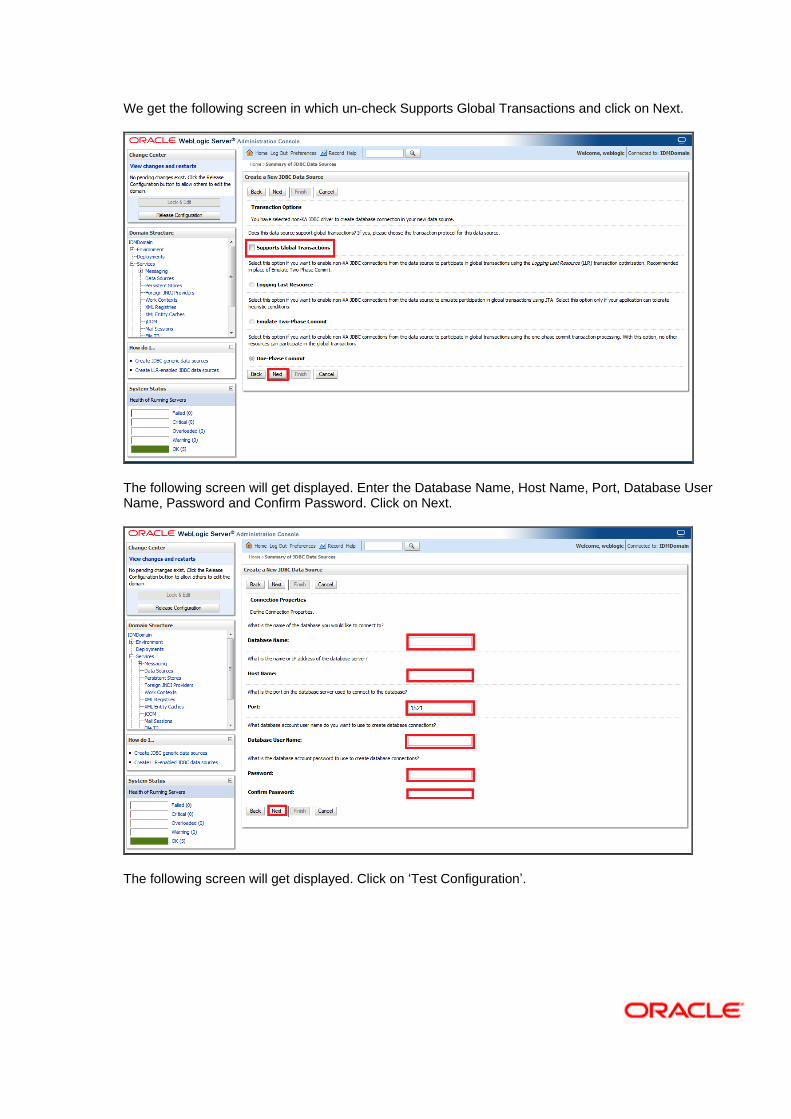
We get the following screen in which un-check Supports Global Transactions and click on Next.
The following screen will get displayed. Enter the Database Name, Host Name, Port, Database User Name, Password and Confirm Password. Click on Next.
The following screen will get displayed. Click on ‘Test Configuration’.
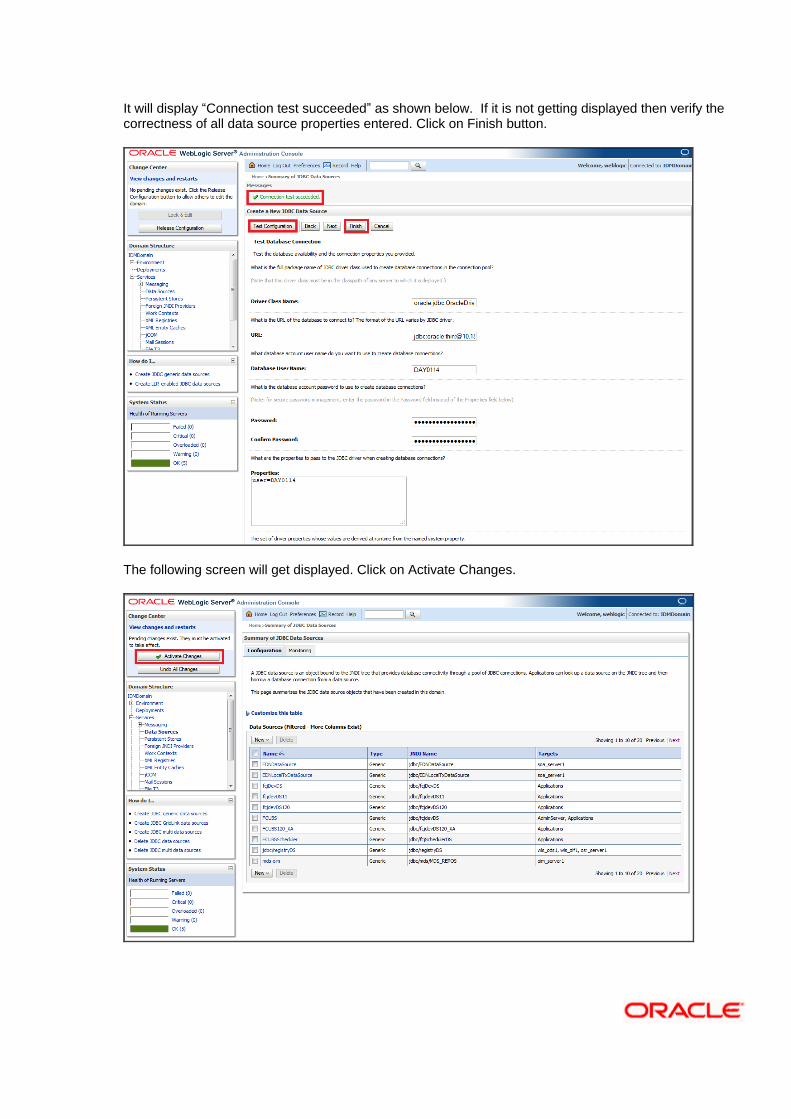
It will display “Connection test succeeded” as shown below. If it is not getting displayed then verify the correctness of all data source properties entered. Click on Finish button.
The following screen will get displayed. Click on Activate Changes.
Oracle Identity Manager Integration Implementation Guide [May] [2017] Version 12.4.0.0.0 Oracle Financial Services Software Limited Oracle Park Off Western Express Highway Goregaon (East) Mumbai, Maharashtra 400 063 India Worldwide Inquiries: Phone: +91 22 6718 3000 Fax:+91 22 6718 3001 www.oracle.com/financialservices/ Copyright © [2007], [2017], Oracle and/or its affiliates. All rights reserved. Oracle and Java are registered trademarks of Oracle and/or its affiliates. Other names may be trademarks of their respective owners. U.S. GOVERNMENT END USERS: Oracle programs, including any operating system, integrated software, any programs installed on the hardware, and/or documentation, delivered to U.S. Government end users are "commercial computer software" pursuant to the applicable Federal Acquisition Regulation and agency-specific supplemental regulations. As such, use, duplication, disclosure, modification, and adaptation of the programs, including any operating system, integrated software, any programs installed on the hardware, and/or documentation, shall be subject to license terms and license restrictions applicable to the programs. No other rights are granted to the U.S. Government. This software or hardware is developed for general use in a variety of information management applications. It is not developed or intended for use in any inherently dangerous applications, including applications that may create a risk of personal injury. If you use this software or hardware in dangerous applications, then you shall be responsible to take all appropriate failsafe, backup, redundancy, and other measures to ensure its safe use. Oracle Corporation and its affiliates disclaim any liability for any damages caused by use of this software or hardware in dangerous applications. This software and related documentation are provided under a license agreement containing restrictions on use and disclosure and are protected by intellectual property laws. Except as expressly permitted in your license agreement or allowed by law, you may not use, copy, reproduce, translate, broadcast, modify, license, transmit, distribute, exhibit, perform, publish or display any part, in any form, or by any means. Reverse engineering, disassembly, or decompilation of this software, unless required by law for interoperability, is prohibited. The information contained herein is subject to change without notice and is not warranted to be error-free. If you find any errors, please report them to us in writing. This software or hardware and documentation may provide access to or information on content, products and services from third parties. Oracle Corporation and its affiliates are not responsible for and expressly disclaim all warranties of any kind with respect to third-party content, products, and services. Oracle Corporation and its affiliates will not be responsible for any loss, costs, or damages incurred due to your access to or use of third-party content, products, or services.