oracle instances and scripts maintenance procedure · 7.3 example of hardware configuration ......
TRANSCRIPT

Save 06.09.05/ Print 02.10.08 T C:\Source-32bit\Databases\SQL-Script\Database_Manual_EF.doc
© 2008 Q-DAS Inc., Q-DAS GmbH [email protected] � Tel. 248-299-4910
Q-DAS Database Manual Oracle Instances and Scripts
Maintenance Procedure
Q-DAS Library
Living Documentation Last edited: 09/06/05
Version: EF

Save 06.09.05/ Print 02.10.08 T C:\Source-32bit\Databases\SQL-Script\Database_Manual_EF.doc
© 2008 Q-DAS Inc., Q-DAS GmbH [email protected] � Tel. 248-299-4910
Database Manual Oracle
Page 1 / 31
Table of Contents
1 CREATING A NEW DATABASE ------------------------------------------------------------------3
1.1 Creating a New Database Instance------------------------------------------------------------------------------------ 3
1.2 Configuring the Database Instance ----------------------------------------------------------------------------------- 5
2 INSTALLING THE QS-STAT TABLES ----------------------------------------------------------8
2.1 qs-STAT 16bit Tables --------------------------------------------------------------------------------------------------- 8
2.2 qs-STAT Millennium Tables ------------------------------------------------------------------------------------------10
2.3 Deleting the User --------------------------------------------------------------------------------------------------------14
3 DELETING A DATABASE INSTANCE -------------------------------------------------------- 14
4 EXPORT AND IMPORT A DATABASE ------------------------------------------------------- 15
4.1 Export a Database-------------------------------------------------------------------------------------------------------15
4.2 Import a Database-------------------------------------------------------------------------------------------------------16
5 DATABASE MAINTENANCE PROCEDURE ------------------------------------------------ 17
5.1 Export of the Database -------------------------------------------------------------------------------------------------17
5.2 Information about Database Contents ------------------------------------------------------------------------------17
5.3 Time Testing with Reference Data -----------------------------------------------------------------------------------18
5.4 Analyzing the Database ------------------------------------------------------------------------------------------------18
6 HISTORY OF CHANGES -------------------------------------------------------------------------- 19
7 INDEX --------------------------------------------------------------------------------------------------- 20
7.1 Example of DBINFO.sql data -----------------------------------------------------------------------------------------20
7.2 Example of the part_char_valuesinfo.sql data---------------------------------------------------------------------21
7.3 Example of Hardware Configuration Documentation -----------------------------------------------------------22
8 KNOWLEDGE BASE ------------------------------------------------------------------------------- 23
8.1 qs-STAT Millennium ---------------------------------------------------------------------------------------------------23
8.2 32-Bit Configuration (.INI) File (qsstat2000.ini) ------------------------------------------------------------------24

Save 06.09.05/ Print 02.10.08 T C:\Source-32bit\Databases\SQL-Script\Database_Manual_EF.doc
© 2008 Q-DAS Inc., Q-DAS GmbH [email protected] � Tel. 248-299-4910
Database Manual Oracle
Page 2 / 31
8.3 16-bit AutoUpload-------------------------------------------------------------------------------------------------------24
8.4 Q-DAS Database Values Index Move -------------------------------------------------------------------------------25
8.5 Imported Database Performance-------------------------------------------------------------------------------------25
9 DOCUMENT CONTROL --------------------------------------------------------------------------- 31

Save 06.09.05/ Print 02.10.08 T C:\Source-32bit\Databases\SQL-Script\Database_Manual_EF.doc
© 2008 Q-DAS Inc., Q-DAS GmbH [email protected] � Tel. 248-299-4910
Database Manual Oracle
Page 3 / 31
1 Creating a New Database 1.1 Creating a New Database Instance For creating a new database instance, you need the name of the instance (e.g. BLOCKDB). For Oracle 8.1.7. use
Programs OraHome81
Database Administration Database Configuration Assistant
There you can select the database instance to create. Select:
Typical database Create new database files Multipurpose Concurrently connected users = xx (Site Discretion, generally 15-30)
Options to Select Time Series Spatial
Advanced replication SQL Plus help
Define a global database name e.g. BLOCKDB, as well as, the SID e.g. BLOCKDB Note: It is recommended that these be named the same.
Create Now and Proceed The database instance will now be created. After installation reboot your computer and check if the instance is running properly. Test if your instance runs properly with SQL Plus:
Connect with User : internal Password : oracle SID: blockdb

Save 06.09.05/ Print 02.10.08 T C:\Source-32bit\Databases\SQL-Script\Database_Manual_EF.doc
© 2008 Q-DAS Inc., Q-DAS GmbH [email protected] � Tel. 248-299-4910
Database Manual Oracle
Page 4 / 31
In case of the necessity of using Unicode characters, e.g. with Asian languages, the database instance should use Unicode characters (AL32UTF8) instead of the standard Western European character set. This setting has to be done during the creation of the database instance, it cannot be changed once the instance has been created.

Save 06.09.05/ Print 02.10.08 T C:\Source-32bit\Databases\SQL-Script\Database_Manual_EF.doc
© 2008 Q-DAS Inc., Q-DAS GmbH [email protected] � Tel. 248-299-4910
Database Manual Oracle
Page 5 / 31
1.2 Configuring the Database Instance Get the name of the tablespaces with the following command under SQL Plus:
SELECT TABLESPACE_NAME FROM DBA_TABLESPACES; Write down the names of the tablespaces for the temporary data, the user data and the rollback data. (Oracle 8.i : e. g.: temp, users, rbs)
1.2.1 Script to initialize the tablespaces: “init_db.sql” or “init_tablespaces.sql”:
The script used to create the tablespace(s) will determine the script modifications needed to be made.
All modifications of the script files, should be saved in a directory called e.g. \ORA81\ADMIN\BLOCKDB\SCRIPTS, so that the changes can be reproduced.
1.2.1.1 Script “init_db.sql” Modify the script “init_tablespaces.sql” with the names of the selected tablespaces. (e.g. temporary_data will be temp; rollback_data will be rbs) You are also able to set the size of the new QDAS database and the directory where the database should be located. In the script “init_db.sql” are the following entries:
e.g.: create tablespace qwert_table datafile '<pathname\withinstancename>\qwert_tab.dbf' size 10M reuse autoextend on next 10 M maxsize unlimited default storage(initial 1 M next 5 M maxextents unlimited);
Create subdirectories for each instance of the database on the hard disk, where the tablespaces should reside.
e.g. C:\DATA\BLOCKDB for the datafiles and D:\INDEX\BLOCKDB for the index files
In the script, specify the location and size of the default datafiles
e.g. create tablespace qdas_default
datafile 'C:\DATA\BLOCKDB\ qdas_default.dbf' size 10M reuse autoextend on next 10 M maxsize unlimited default storage(initial 1 M next 5 M maxextents unlimited);
In the script, specify the location and size of the TABLE datafiles
e.g. create tablespace qwert_table
datafile 'C:\DATA\BLOCKDB\qwert_tab.dbf' size 100M reuse autoextend on next 10 M maxsize unlimited default storage(initial 1 M next 5 M maxextents unlimited);
(Continued on next page)

Save 06.09.05/ Print 02.10.08 T C:\Source-32bit\Databases\SQL-Script\Database_Manual_EF.doc
© 2008 Q-DAS Inc., Q-DAS GmbH [email protected] � Tel. 248-299-4910
Database Manual Oracle
Page 6 / 31
In the script, specify the location and size of the VALUES INDEX datafile e.g. create tablespace qwert_index
datafile 'D:\INDEX\BLOCKDB\qwert_ind.dbf' size 100M reuse autoextend on next 10 M maxsize unlimited default storage(initial 1 M next 5 M maxextents unlimited); In the script, set the rollback segment extent to unlimited (RBS1..RBS24 or RB1..RB24)
e.g. alter rollback segment rbs1 storage (NEXT 5M MAXEXTENTS UNLIMITED); Run this script with the command:
START <Path>\init_db.sql;
1.2.1.2 Script “init_tablespaces.sql” Modify the script “init_tablespaces.sql” with the names of the selected tablespaces. (e. g.: user_data will be users; temporary_data will be temp; rollback_data will be rbs) You are also able to set the size of the new QDAS database and the directory where the database should be located. In the script “init_tablespaces.sql” are the following entries:
e. g.: datafile 'qwert.tab' size 100M EXTENT MANAGEMENT LOCAL AUTOALLOCATE;
Create subdirectories for each instance of the database on the hard disk, where the tablespaces should reside.
e.g. C:\DATA\BLOCKDB for the datafiles and D:\INDEX\BLOCKDB for the index files
In the script, change the location and size of the TABLE datafiles
See section 1.2.1.1 In the script, change the location and size of the VALUES INDEX datafile
See section 1.2.1.1 In the script, set the rollback segment extent to unlimited (RBS1..RBS24 or RB1..RB24)
e.g. alter rollback segment rbs1 storage (NEXT 5M MAXEXTENTS UNLIMITED); Run this script with the command:
START <Path>\init_tablespaces.sql;

Save 06.09.05/ Print 02.10.08 T C:\Source-32bit\Databases\SQL-Script\Database_Manual_EF.doc
© 2008 Q-DAS Inc., Q-DAS GmbH [email protected] � Tel. 248-299-4910
Database Manual Oracle
Page 7 / 31
1.2.2 Script “cre_user.sql”: This script creates the user (e.g. qdas) and relates the default tablespaces. Modify the names of the tablespaces if it is necessary: “temporary_data” will be “temp” default tablespace will be “qdas_default”; Run this script with the command:
START <Path>\cre_user.sql;

Save 06.09.05/ Print 02.10.08 T C:\Source-32bit\Databases\SQL-Script\Database_Manual_EF.doc
© 2008 Q-DAS Inc., Q-DAS GmbH [email protected] � Tel. 248-299-4910
Database Manual Oracle
Page 8 / 31
2 Installing the qs-STAT Tables
2.1 qs-STAT 16bit Tables If you want to install the tables for qs-stat 3.x run the script Tables_16bit.sql If you want to install special versions for qs-stat 3.x :
To install the GM-Version run the script : • Tables_16bit.sql and then
• Modify_existingcharacteristics_GM.sql
To install the Ford-Version run the script : • Tables_16bit.sql and then
• Modify_existingtables_FORD.sql
2.1.1 Script “Tables_16bit.sql”: Through SQL Plus, get the connection to the user “QDAS” with the command:
Connect QDAS/QDAS@QDASDB;
(QDASDB is the database alias, it may be different within your facility) To create the tables necessary for using qs-STAT or procella, use the script “Tables_16bit.sql”. Run this script with the command:
START <Path>\tables_16bit.sql; Note: Using the script “Droptables_16bit.sql” allows deletion of the created tables.
2.1.2 Script “Modify_existingcharacteristics_GM.sql”: This script has to be ran if you want to reduce the size of the characteristic table. This script drops some additional data fields in the characteristic table which are implemented in the standard 16-bit scripts. Connect to the user “QDAS” with the command:
Connect QDAS/QDAS@QDASDB;
(QDASDB is the database alias, it may be different within your facility) To modify the characteristics table, use the script “Modify_existingcharacteristics_GM.sql”. Run this script with the command:
START <Path>\ Modify_existingcharacteristics_GM.sql;

Save 06.09.05/ Print 02.10.08 T C:\Source-32bit\Databases\SQL-Script\Database_Manual_EF.doc
© 2008 Q-DAS Inc., Q-DAS GmbH [email protected] � Tel. 248-299-4910
Database Manual Oracle
Page 9 / 31
2.1.3 Script “Modify_existingtables_Ford.sql”: This script has to be ran if you want to modify the characteristic table. This script modifies some of the data fields in the characteristic table, which are implemented in the standard 16-bit scripts. Connect to the user “QDAS” with the command:
Connect QDAS/QDAS@QDASDB;
(QDASDB is the database alias, it may be different) To modify the characteristics table, use the script “Modify_existingtables_Ford.sql”. Run this script with the command:
START <Path>\ Modify_existingtables_Ford.sql; After that, you can quit sql plus 3.3 window by using the command “exit”.

Save 06.09.05/ Print 02.10.08 T C:\Source-32bit\Databases\SQL-Script\Database_Manual_EF.doc
© 2008 Q-DAS Inc., Q-DAS GmbH [email protected] � Tel. 248-299-4910
Database Manual Oracle
Page 10 / 31
2.2 qs-STAT Millennium Tables Decision tree for the installation of qs-STAT millennium tables:

Save 06.09.05/ Print 02.10.08 T C:\Source-32bit\Databases\SQL-Script\Database_Manual_EF.doc
© 2008 Q-DAS Inc., Q-DAS GmbH [email protected] � Tel. 248-299-4910
Database Manual Oracle
Page 11 / 31
If you want to install the tables for qs-stat millennium on a fresh instance, run only the script Tables_2000.sql . If you want to upgrade from special versions qs-stat 3.x to qs-stat millennium or update from an earlier special version of qs-stat millennium, run the script:
• Tables_upgrade_2000special.sql and continue with the following instructions If you want to upgrade from qs-stat 3.x to qs-stat millennium or update from an earlier version of qs-stat millennium, run the scripts:
• Tables_upgrade_2000.sql and
• PARTCHARACTERISTIC_NEWFIELDS.SQL You can leave out PARTCHARACTERISTIC_NEWFIELDS.SQL or customize it if you want to use a customized set of part and characteristic fields (see 2.2.1). If you want to upgrade from qs-stat 3.x to qs-stat millennium, additionally run the script:
• MERKMAL_AD2MERKMAL.sql (only, if columns in MERKMAL_AD were used before)

Save 06.09.05/ Print 02.10.08 T C:\Source-32bit\Databases\SQL-Script\Database_Manual_EF.doc
© 2008 Q-DAS Inc., Q-DAS GmbH [email protected] � Tel. 248-299-4910
Database Manual Oracle
Page 12 / 31
2.2.1 Script “Tables_2000.sql”: Connect to the user “QDAS” with the command: Connect QDAS/QDAS@QDASDB;
(QDASDB is the database alias, it may be different) To create the tables necessary for using qs-STAT or procella, use the script “Tables_2000.sql”. It may be useful that not all fields in the table TEIL and table MERKMAL have to be created. The creation of these tables can be modified in the script, depending on the used K-Fields of the dataformat. In table TEIL the following columns must not be deleted : TETEIL and the columns used in the upload as key fields. In table MERKMAL the following columns must not be deleted : METEIL MEMERKMAL MEZYKLUS MEGLEITSTUMF MEPRUEFZST MEAUGROUP MEUPPERMERKMAL MEPRUEFORT MEUNTERSART MEPMGRUPPE and the columns used in the upload as key fields. Run this script with the command:
START <Path>\tables_2000.sql; After that, you can quit sql plus 3.3 window by using the command “exit”. Note: Using the script “Droptables_2000.sql” allows deletion of the created tables.
2.2.2 Script “Tables_upgrade_2000special.sql”: Before upgrading your qs-STAT version, it is recommended that a data export be created. This script has to be ran if you want to upgrade from a special customer version of the SQL scripts. This script adds some additional data fields to the tables, which are implemented in the standard 16-bit scripts. Get the connection to the user “QDAS” with the command: Connect QDAS/QDAS@QDASDB;
(QDASDB is the database alias, it may be different)

Save 06.09.05/ Print 02.10.08 T C:\Source-32bit\Databases\SQL-Script\Database_Manual_EF.doc
© 2008 Q-DAS Inc., Q-DAS GmbH [email protected] � Tel. 248-299-4910
Database Manual Oracle
Page 13 / 31
Create the tables, which are necessary for using qs – STAT or / procella with using the script “tables_upgrade_2000special.sql”. Run this script with the command:
START <Path>\ tables_upgrade_2000special.sql; After that, you can quit sql plus 3.3 window by using the command “exit”. Using the script “Drop2000.sql” allows deletion of all tables but the update can’t be reversed.
2.2.3 Script “Tables_upgrade_2000.sql”: Get the connection to the user “QDAS” with the command: Connect QDAS/QDAS@QDASDB;
(QDASDB is the database alias, it may be different) Create the tables, which are necessary for using qs – STAT or / procella with using the script “tables_upgrade_2000.sql”. Run this script with the command:
START <Path>\tables_upgrade_2000.sql; After that, you can quit sql plus 3.3 window by using the command “exit”. Using the script “Drop2000.sql” allows deletion of all tables but the update can’t be reversed.
2.2.3 Script “PARTCHARACTERISTIC_NEWFIELDS.SQL”: Get the connection to the user “QDAS” with the command: Connect QDAS/QDAS@QDASDB;
(QDASDB is the database alias, it may be different) If table TEIL or table MERKMAL have been created with reduced column sets, this script has to be reviewed, because it adds additional fields to these tables. Run this script with the command:
START <Path>\tables_upgrade_2000.sql; After that, you can quit sql plus 3.3 window by using the command “exit”.

Save 06.09.05/ Print 02.10.08 T C:\Source-32bit\Databases\SQL-Script\Database_Manual_EF.doc
© 2008 Q-DAS Inc., Q-DAS GmbH [email protected] � Tel. 248-299-4910
Database Manual Oracle
Page 14 / 31
2.3 Deleting the User To delete the user with all its related objects, connect as dba and call
DROP USER QDAS CASCADE; For deleting the user specific tablespaces, in addition call the script “DROP_tablespaces.sql” The datafiles have to be deleted manually afterwards.
3 Deleting a Database Instance For deleting a database instance, you need the name of the instance (e.g. BLOCKDB). For Oracle 8.1.7. use
Programs OraHome81
Database Administration Database Configuration Assistant
There you can select the database instance to be removed. This also removes all datafiles associated with the instance.

Save 06.09.05/ Print 02.10.08 T C:\Source-32bit\Databases\SQL-Script\Database_Manual_EF.doc
© 2008 Q-DAS Inc., Q-DAS GmbH [email protected] � Tel. 248-299-4910
Database Manual Oracle
Page 15 / 31
4 Export and Import a Database
4.1 Export a Database At the command line set the default oracle instance where the data should be imported to (only necessary, if more than one instance is installed).
SET ORACLE_SID=<INSTANCE_NAME> e.g.
SET ORACLE_SID=BLOCKDB Then call exp.exe from the command line:

Save 06.09.05/ Print 02.10.08 T C:\Source-32bit\Databases\SQL-Script\Database_Manual_EF.doc
© 2008 Q-DAS Inc., Q-DAS GmbH [email protected] � Tel. 248-299-4910
Database Manual Oracle
Page 16 / 31
4.2 Import a Database At the command line set the default oracle instance where the data should be exported from (only necessary if more than one instance is installed).
SET ORACLE_SID=<INSTANCE_NAME> e.g.
SET ORACLE_SID=BLOCKDB The tables for the imported user must not exist but the tablespaces and the user itself must exist already. Then call imp.exe from the command line: Logon using qdas, password qdas Import file- specify path of the file to be imported Press enter for the remainder of the questions (choosing the defaults)

Save 06.09.05/ Print 02.10.08 T C:\Source-32bit\Databases\SQL-Script\Database_Manual_EF.doc
© 2008 Q-DAS Inc., Q-DAS GmbH [email protected] � Tel. 248-299-4910
Database Manual Oracle
Page 17 / 31
5 Database Maintenance Procedure In addition to daily/weekly monitoring of the database system, a monthly maintenance procedure must be followed. This maintenance procedure will help with diagnosing database performance degradation.
All maintenance history, should be saved in a directory called e.g. \ORA81\ADMIN\<instance name>\MAINTENANCE\
In this maintenance directory, there should be two folders: DBINFO and TIME-TESTS. These two folders will hold the results of the monthly maintenance procedure.
Note: This maintenance procedure must be followed for EACH database instance.
5.1 Export of the Database For each database instance, create an export. This export should be kept in the Admin directory, noting the date that the export was created.
5.2 Information about Database Contents For each instance, content information must be collected. Two scripts will help collect this data: DBINFO.sql and PART_CHAR_VALUESINFO.sql.
5.2.1 General Info about the Database The script “dbinfo.sql” will collect information about the database structure. This script will create a text file named “dbinfo.txt” in the system directory. Connect to the user QDAS/QDAS@<instance name>, using sql Plus. To run this script,
START <Path>\dbinfo.sql Once the script is finished, rename the created text file to include the date in which the file was created. e.g. 07-31-02-dbinfo.txt Place this file in the DBINFO directory for the related instance. (See Index for example of dbinfo.sql output.)
5.2.2 Info about Parts, Characteristics and Values The script “part_char_valuesinfo.sql” will collect information about the amount of data in the database instance. This script will create a text file named “spool.txt” in the C:\TEMP directory. Connect to the user QDAS/QDAS@<instance name>, using sql Plus. To run this script,
START <Path>\part_char_valuesinfo.sql Once the script is finished, rename the created text file to include the date in which the file was created. e.g. 07-31-02-spool.txt Place this file in the DBINFO directory for the related instance. (See Index for example of part_char_valuesinfo.sql output.)

Save 06.09.05/ Print 02.10.08 T C:\Source-32bit\Databases\SQL-Script\Database_Manual_EF.doc
© 2008 Q-DAS Inc., Q-DAS GmbH [email protected] � Tel. 248-299-4910
Database Manual Oracle
Page 18 / 31
5.3 Time Testing with Reference Data Time tests must be performed on each database instance. Over the life of the database, the documented time tests will help with grading the database.
5.3.1 Test Part Predefined test parts will be used for half of the time tests. These test parts will include a part containing few characteristics with many values per characteristic, and a part containing many characteristics with a single value per characteristic. Procedure:
1. Upload each part separately. Record the time it takes for each upload. Also record the Upload PC specifications. (cpu, memory, etc.) 2. Query each part separately, from the same client machine. Record the time it takes for each query. Also record the client PC specifications. (cpu, memory, etc.) 3. Record these times in a text file. Name the text file “xx-xx-xx-test-part.txt”, including the date in which the tests were taken. 4. Place this file in the time-test folder, located in the maintenance directory.
5.3.2 Actual Data Actual data will be used for the other half of the time tests. Two existing parts from the database will be used, each representing the type of parts used for in the previous time test. (a part containing few characteristics with many values per characteristic, and a part containing many characteristics with a single value per characteristic) Note: To collect this data, stop the upload process and collect some relevant files waiting to be uploaded. This will assure that the data does not get duplicated in the database. Procedure:
1. Upload each part separately. Record the time it takes for each upload. Also record the Upload PC specifications. (cpu, memory, etc.) 2. Query each part separately, from the same client machine. Record the time it takes for each query. Also record the client PC specifications. (cpu, memory, etc.) 3. Record these times in a text file. Name the text file “xx-xx-xx-real-part.txt”, including the date in which the tests were taken. 4. Place this file in the time-test folder, located in the maintenance directory.
5.4 Analyzing the Database To analyze the database, it is recommended that you make the time tests with reference data (see above) and document the results. Run the analyzer script when connected as a dba to the database. Run this script with the command:
START <Path>\analyze_qdastables.sql; After the analyzer has run, it is recommended that you make the time tests again and compare and document the results. These results should be documented in the same files that the previous time tests were taken. When documenting, make note of the time tests before and after running the analyzer script.
Note: Depending on the SQL Plus client used (16 or 32-bit), the size of the file name may need to be altered.

Save 06.09.05/ Print 02.10.08 T C:\Source-32bit\Databases\SQL-Script\Database_Manual_EF.doc
© 2008 Q-DAS Inc., Q-DAS GmbH [email protected] � Tel. 248-299-4910
Database Manual Oracle
Page 19 / 31
6 History of Changes The history of changes is customer specific. This chapter should include every change to the database configuration, hardware configuration or software configuration. It is highly recommended to document the changes for querying and saving specific parts in the database before and after the changes. Changes on July 30th 2002:
• Check the contents of the database first (see Information about database contents)
• Take the index for the meas.values (typical QWERT_INDEX) offline and move it to another logical disk drive. (copying the index file with the operating system , you must be logged in as dba).
� see Script MOVEINDEXTABLESPACE.SQL
• Drop all indexes related to table wertevar and rebuild the indexes � see Script REINDEX_WERTEVAR.SQL
• Run the analyzer � see Script ANALYZE_QDASTABLES.SQL
• Copy the new autodbup.exe over to the old version Date/Time of the new AUTODBUP.EXE = ????/????
� (Changes are made for opening the table WERTEVAR optimized, because the index was not used properly).

Save 06.09.05/ Print 02.10.08 T C:\Source-32bit\Databases\SQL-Script\Database_Manual_EF.doc
© 2008 Q-DAS Inc., Q-DAS GmbH [email protected] � Tel. 248-299-4910
Database Manual Oracle
Page 20 / 31
7 Index 7.1 Example of DBINFO.sql data This is a partial example of the data produced from the DBINFO.sql script. Sever Name: Database Name (SID): BLOCKDB Version/SGA Information: Oracle8i Enterprise Edition Release 8.1.7.0.0 - Production PL/SQL Release 8.1.7.0.0 - Production CORE 8.1.7.0.0 Production TNS for 32-bit Windows: Version 8.1.7.0.0 - Production NLSRTL Version 3.4.1.0.0 - Production Total System Global Area as of July 16th, 2002: 185,432,092 bytes Tablespaces and Datafiles: File Size Tablespace ID Datafile in MG. ---------- ---- --------------------------------------------- ----------- INDX 6 E:\ORA81\ORADATA\BLOCKDB\INDX01.DBF 58.00 ********** ----------- TS SIZE: 58.00 QDAS_DEFAU 7 C:\BLOCKDB\QDAS_DEFAULT.DBF 3.00 ********** ----------- TS SIZE: 3.00 QMERK_INDE 11 C:\BLOCKDB\QMERK_IND.DBF 10.00 ********** ----------- TS SIZE: 10.00 QMERK_TABL 9 C:\BLOCKDB\QMERK_TAB.DBF 30.00 ********** ----------- TS SIZE: 30.00 QWERT_INDE 10 E:\ORA81\ORADATA\BLOCKDB\QWERT_IND.DBF 2,130.00 ********** ----------- TS SIZE: 2,130.00 QWERT_TABL 8 C:\BLOCKDB\QWERT_TAB.DBF 380.00 ********** ----------- TS SIZE: 380.00 RBS 2 E:\ORA81\ORADATA\BLOCKDB\RBS01.DBF 520.00 ********** ----------- TS SIZE: 520.00
Etc.

Save 06.09.05/ Print 02.10.08 T C:\Source-32bit\Databases\SQL-Script\Database_Manual_EF.doc
© 2008 Q-DAS Inc., Q-DAS GmbH [email protected] � Tel. 248-299-4910
Database Manual Oracle
Page 21 / 31
7.2 Example of the part_char_valuesinfo.sql data This is a partial example of the data produced from the part_char_valuesinfo.sql script. PARTKEY PARTDESC PARTNO CHAR_COUNT --------- -------------------- --------------- ---------- 50 L6 BLK INL 140A 12563712 7 56 L6 BLK INL 140B 12563712 7 51 L6 BLK INL 140C 12563712 7 54 L6 BLK INL 150A 12563712 6 52 L6 BLK INL 150B 12563712 6 44 L6 BLK INL 170A_AUD 12563712 36 45 L6 BLK INL 170A_PROD 12563712 11 46 L6 BLK INL 170B_AUD 12563712 36 48 L6 BLK INL 170B_PROD 12563712 11 80 L6 BLOCK 12563711 8 77 L6 BLOCK OP 10 12563712 64 68 L6 BLOCK OP 120 12563712 144 69 L6 BLOCK OP 130 12563712 158 70 L6 BLOCK OP 140 12563712 176 PARTKEY PARTDESC PARTNO VALUE_COUNT --------- -------------------- --------------- ----------- 50 L6 BLK INL 140A 12563712 400785 56 L6 BLK INL 140B 12563712 374535 51 L6 BLK INL 140C 12563712 469238 54 L6 BLK INL 150A 12563712 546276 52 L6 BLK INL 150B 12563712 563022 44 L6 BLK INL 170A_AUD 12563712 395568 45 L6 BLK INL 170A_PROD 12563712 913715 46 L6 BLK INL 170B_AUD 12563712 287136 48 L6 BLK INL 170B_PROD 12563712 905509 80 L6 BLOCK 12563711 20 77 L6 BLOCK OP 10 12563712 4352 68 L6 BLOCK OP 120 12563712 20298 69 L6 BLOCK OP 130 12563712 26228 70 L6 BLOCK OP 140 12563712 27383 Etc.
Save 06.09.05/ Print 02.10.08 T C:\Source-32bit\Databases\SQL-Script\Database_Manual_EF.doc
© 2008 Q-DAS Inc., Q-DAS GmbH [email protected] � Tel. 248-299-4910
Database Manual Oracle
Page 22 / 31
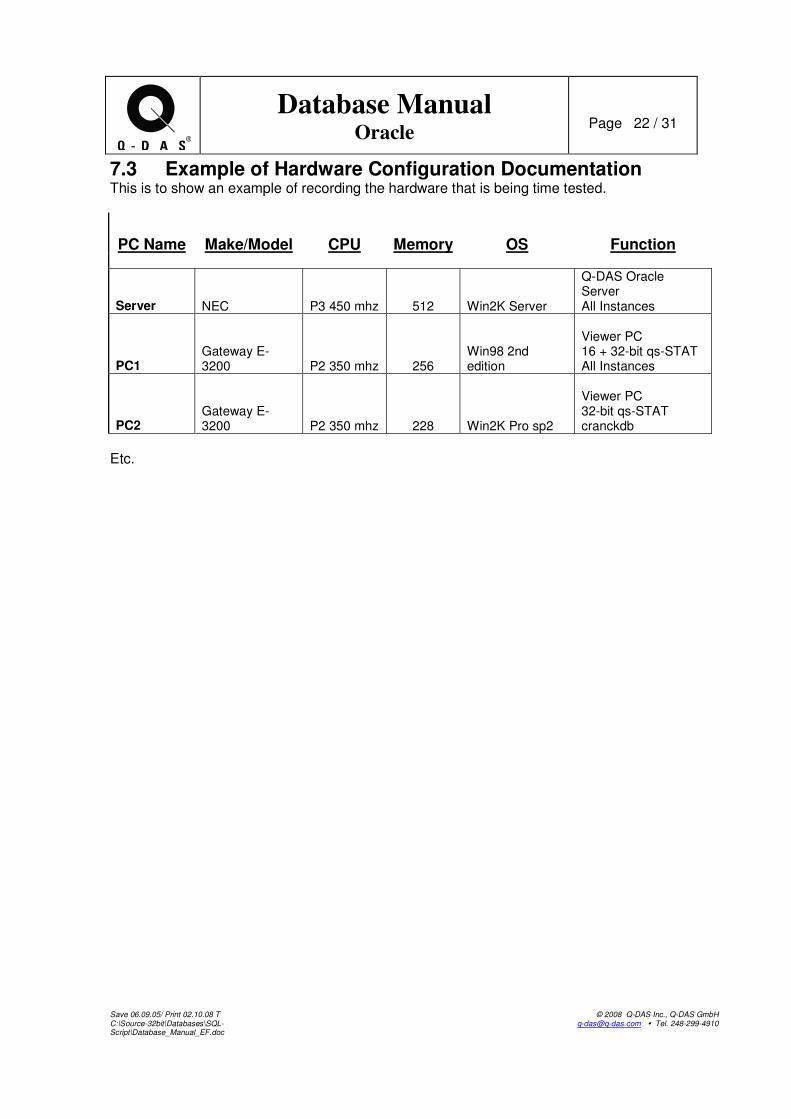
7.3 Example of Hardware Configuration Documentation This is to show an example of recording the hardware that is being time tested.
PC Name Make/Model CPU Memory OS Function
Server NEC P3 450 mhz 512 Win2K Server
Q-DAS Oracle Server All Instances
PC1 Gateway E-3200 P2 350 mhz 256
Win98 2nd edition
Viewer PC 16 + 32-bit qs-STAT All Instances
PC2 Gateway E-3200 P2 350 mhz 228 Win2K Pro sp2
Viewer PC 32-bit qs-STAT cranckdb
Etc.

Save 06.09.05/ Print 02.10.08 T C:\Source-32bit\Databases\SQL-Script\Database_Manual_EF.doc
© 2008 Q-DAS Inc., Q-DAS GmbH [email protected] � Tel. 248-299-4910
Database Manual Oracle
Page 23 / 31
8 Knowledge Base 8.1 qs-STAT Millennium 1. Symptom: While querying the database, it was noticed that the server cpu was idle and the client cpu was at 100%. The only time the server cpu showed activity was when it changed characteristics (there were 7 characteristics in the part and 7 peaks in the server cpu history) and the data was transferred to the client (verified on the network switch). (See Server-A) This also seemed to happen when the queried part contained few characteristics but with large amounts of values in each characteristic.
Solution: A change was made in the source code for qs-STAT Millennium, regarding the server-cursor and how the server handles the query. After this change, it was noticed that the server cpu was more active during the entire query time and there were no significant peaks in processor usage. (See Server-B) Also, data was being sent over the network continuously to the client. (verified on the network switch) The client cpu time was not at 100% during the entire query. (See Client-B)
There was an improvement in overall querytime with the server-cursor change.
Server-A Client-A
Server-B Client-B

Save 06.09.05/ Print 02.10.08 T C:\Source-32bit\Databases\SQL-Script\Database_Manual_EF.doc
© 2008 Q-DAS Inc., Q-DAS GmbH [email protected] � Tel. 248-299-4910
Database Manual Oracle
Page 24 / 31
2. Symptom Adding new fields to the database Solution: When you add fields to the database manually, you need to run the wv_insert script. The new tables script includes the contents of this script, but you need to run wv_insert script by itself after adding fields to the database. 3. Symptom When setting up a new database, the query speed when loading a part was very low. Solution: The sort area size of the database memory configuration was changed from 64 KB to 16 MB. This was changed directly in the init_db.ora file for the database instance.
8.2 32-Bit Configuration (.INI) File (qsstat2000.ini) Speed up query time: Change swap_breite_urwerte=16 to swap_breite_urwerte=512 (or to a higher value depending on the estimated average number of values per characteristic to be loaded ) If this entry is not present in the file, add it. NOTE: This setting speeds up the query time, but slows down the file loading time. This should only be used for a client PC, NOT an upload PC.
8.3 16-bit AutoUpload 1. Symptom: While uploading data to the database, the change of characteristics took a long time in the upload GUI. This only happened for files with few characteristics but many values inside them. Solution: Some source code changes were made so that the AutoUpload used the index more efficiently. This improved the upload time significantly. 2. Symptom: The upload lost connection to the database and was never able to renew the connection. A ping test and a TNS ping test was made; both successful. Solution: The AutoUpload log file was too large for the AutoUpload to manage. 32 KB is the maximum size for the log file. The AutoUpload automatically maintains the size of the file, but if it gets caught in a loop (the network cable is pulled or the like) than the log file can grow too large. Delete the file and restart the AutoUpload. 3. Symptom: The Upload loses connection to the database or takes a long time to connect. Solution: Try deleting the empty folders in the upload directory. It has been noticed that a large number of empty folders in the upload directory can cause the stated symptoms.

Save 06.09.05/ Print 02.10.08 T C:\Source-32bit\Databases\SQL-Script\Database_Manual_EF.doc
© 2008 Q-DAS Inc., Q-DAS GmbH [email protected] � Tel. 248-299-4910
Database Manual Oracle
Page 25 / 31
8.4 Q-DAS Database Values Index Move It was recommended to split the physical location of the database files and the database index files. It was decided and proven successful that moving the largest and busiest index, wertevar.ind, was needed. RAID-5 Moving the location of the Index file was tested on a RAID-5 build PC. There were three OS partions (C:\, D:\, E:\) created across the RAID-5 build. The database data files were located on the E:\ partition and the index file was moved to the D:\ partition. We did not see a dramatic increase in performance when we first moved the index to a different partition than the database data files are located. Analyzer After moving the index files, we ran an Oracle command “analyze” on the index file. After we ran the analyze command, the performance was greatly improved. 2 Physical Hard drives On a different PC with two physical hard drives, we moved the index file to another hard drive. (the database data files and index files were located on two separate hard drives). This immediately improved performance. The index files were then dropped and the tables were reindexed. This increased performance even more.
8.5 Imported Database Performance An import of a database was performed. After the import, an upload test was performed. The upload speed was fast. The database server was turned off and rebooted. After the restart, the upload speed was very slow. The analyzer script was ran and the upload speed was fast again.

Save 0
6.0
9.0
5/ P
rint
02.1
0.0
8 T
C
:\S
ourc
e-3
2b
it\D
ata
bases\S
QL-
Script\D
ata
base
_M
anual_
EF
.doc
© 2
008
Q-D
AS
Inc., Q
-DA
S G
mb
H
q-d
as@
q-d
as.c
om
�
T
el. 2
48-2
99-4
910
Data
base
Man
ua
l O
racl
e P
ag
e
26
/ 3
1
Testing D
ocum
en
tation
Ju
ly 2
2-3
1,
20
02
PC Name Make/Model CPU Memory OS Function
IP Address
10.10.10.x
showserver NEC P3 450 mhz 512 Win2K Server
Q-DAS Oracle Server
All Instances .4
PC1 Gateway E-3200 P2 350 mhz 256 Win98 2nd edition
Viewer PC
16 + 32-bit qs-STAT
All Instances .3
PC2 Gateway E-3200 P2 350 mhz 228 Win2K Pro sp2
Viewer PC
32-bit qs-STAT
cranckdb .2
blackpc DataMyte AMD-K6 300 mhz 160 Win98 2nd edition
Viewer PC
16 + 32-bit qs-STAT
All Instances
16-bit Upload
All Instances .1
Michael's laptop P3- 1 Ghz 256 Win2K Server
Viewer PC
All Instances .15
PC4 Gateway E-3200 P2 350 mhz 327 Win NT
Viewer PC and Upload
16+32-bit
All Instances .6IBM Netfinity 5600
RAID-5 Dual 500 mhz 256 Win NT Server
FES Oracle Server
Block and Head Instances .10
Hardware Configurations

Save 0
6.0
9.0
5/ P
rint
02.1
0.0
8 T
C
:\S
ourc
e-3
2b
it\D
ata
bases\S
QL-
Script\D
ata
base
_M
anual_
EF
.doc
© 2
008
Q-D
AS
Inc., Q
-DA
S G
mb
H
q-d
as@
q-d
as.c
om
�
T
el. 2
48-2
99-4
910
Data
base
Man
ua
l O
racl
e P
ag
e
27
/ 3
1
PARTKEY PARTDESC PARTNO CHAR_COUNT VALUE_COUNT Q-DAS PC4 32bit Michael 32bit
breite_urwerte=16
64 01/23/02-06/03/02 M140C 6 2112 3 2 5
55 02/08/02-06/02/02 M090 33 55836 112 60 70 23 86
74 02/14/02-06/04/02 M090 33 6633 8
60 02/17/02-06/01/02 M160 507 20280 50 50 50 19 110
63 03/25/02-05/09/02 M140A 6 768 2
28 04/10/01-06/04/02 M120 2 7458 10
79 04/19/02-06/03/02 M140A 6 282
31 05/01/01-02/27/02 M140A 6 1854
32 05/12/01-01/11/02 M140C 6 2418
30 05/19/01-06/03/02 M140B 6 2652
53 06/19/01-03/20/02 M140A 6 426
26 07/31/00-06/04/02 M010 20 53220 90 55 66 15 75
41 08/28/01-01/29/02 M160 507 33462 68 51 55 20 115
47 09/11/01-06/04/02 M020 4 9140
29 11/09/00-05/23/02 M130 8 9896
34 11/29/00-01/08/02 M090 33 152856 390 205 216 90 218
50 L6 BLK INL 140A 12563712 7 400785 2580 2600 900 570
56 L6 BLK INL 140B 12563712 7 374535
51 L6 BLK INL 140C 12563712 7 469238
54 L6 BLK INL 150A 12563712 6 546276
52 L6 BLK INL 150B 12563712 6 563022
44 L6 BLK INL 170A_AUD 12563712 36 395568
45 L6 BLK INL 170A_PROD 12563712 11 913715
46 L6 BLK INL 170B_AUD 12563712 36 287136
48 L6 BLK INL 170B_PROD 12563712 11 905509
80 L6 BLOCK 12563711 8 20
77 L6 BLOCK OP 10 12563712 64 4352
68 L6 BLOCK OP 120 12563712 144 20298
69 L6 BLOCK OP 130 12563712 158 26228
70 L6 BLOCK OP 140 12563712 176 27383
71 L6 BLOCK OP 150 12563712 129 42024 60 32 53 15 75
72 L6 BLOCK OP 160 12563712 80 1054
73 L6 BLOCK OP 170 12563712 144 1110
75 L6 BLOCK OP 20 12563712 270 17143
78 L6 BLOCK OP 30 12563712 66 4950
81 L6 BLOCK OP 40 12563712 202 1818
67 L6 BLOCK OP 50 12563712 194 28324
57 L6 BLOCK OP 90 12563712 720 99007 180 108 140 60 236
87 L6 BLOCK OP010M 12563711 4 120
85 L6 BLOCK OP020M 12563711 4 444
86 L6 BLOCK OP090M 12563710 33 990
88 L6 BLOCK OP120M 12563710 2 96
89 L6 BLOCK OP130M 12563710 8 96
82 L6 BLOCK OP140AM 12563710 6 90
83 L6 BLOCK OP140BM 12563710 6 162
84 L6 BLOCK OP140CM 12563710 6 126
QUERY TIME IN SECONDS
Query Times - Compare Q-DAS Inc. Server and Value Partitioning
Q-DAS PC4 32bit
breite_urwerte=512
Q-DAS PC1 16bit

Save 0
6.0
9.0
5/ P
rint
02.1
0.0
8 T
C
:\S
ourc
e-3
2b
it\D
ata
bases\S
QL-
Script\D
ata
base
_M
anual_
EF
.doc
© 2
008
Q-D
AS
Inc., Q
-DA
S G
mb
H
q-d
as@
q-d
as.c
om
�
T
el. 2
48-2
99-4
910
Data
base
Man
ua
l O
racl
e P
ag
e
28
/ 3
1
PARTKEY PARTDESC PARTNO CHAR_COUNT VALUE_COUNT Q-DAS PC4 32bit Michael 32bit Q-DAS PC1 16bit
breite_urwerte=16
64 01/23/02-06/03/02 M140C
55 02/08/02-06/02/02 M090 57 78 94
74 02/14/02-06/04/02 M090
60 02/17/02-06/01/02 M160 55 49 108
63 03/25/02-05/09/02 M140A
28 04/10/01-06/04/02 M120
79 04/19/02-06/03/02 M140A
31 05/01/01-02/27/02 M140A
32 05/12/01-01/11/02 M140C
30 05/19/01-06/03/02 M140B
53 06/19/01-03/20/02 M140A
26 07/31/00-06/04/02 M010 68 66 85
41 08/28/01-01/29/02 M160 56 55 116
47 09/11/01-06/04/02 M020
29 11/09/00-05/23/02 M130
34 11/29/00-01/08/02 M090 222 223 230
50 L6 BLK INL 140A 12563712 592
56 L6 BLK INL 140B 12563712
51 L6 BLK INL 140C 12563712
54 L6 BLK INL 150A 12563712
52 L6 BLK INL 150B 12563712
44 L6 BLK INL 170A_AUD 12563712
45 L6 BLK INL 170A_PROD 12563712
46 L6 BLK INL 170B_AUD 12563712
48 L6 BLK INL 170B_PROD 12563712
80 L6 BLOCK 12563711
77 L6 BLOCK OP 10 12563712
68 L6 BLOCK OP 120 12563712
69 L6 BLOCK OP 130 12563712
70 L6 BLOCK OP 140 12563712
71 L6 BLOCK OP 150 12563712 43 52 83
72 L6 BLOCK OP 160 12563712
73 L6 BLOCK OP 170 12563712
75 L6 BLOCK OP 20 12563712
78 L6 BLOCK OP 30 12563712
81 L6 BLOCK OP 40 12563712
67 L6 BLOCK OP 50 12563712
57 L6 BLOCK OP 90 12563712 126 128 255
87 L6 BLOCK OP010M 12563711
85 L6 BLOCK OP020M 12563711
86 L6 BLOCK OP090M 12563710
88 L6 BLOCK OP120M 12563710
89 L6 BLOCK OP130M 12563710
82 L6 BLOCK OP140AM 12563710
83 L6 BLOCK OP140BM 12563710
84 L6 BLOCK OP140CM 12563710
QUERY TIME IN SECONDS
Query Times- Compare FES Server and Index on different Partition
Q-DAS PC4 32bit
breite_urwerte=512

Save 06.09.05/ Print 02.10.08 T C:\Source-32bit\Databases\SQL-Script\Database_Manual_EF.doc
© 2008 Q-DAS Inc., Q-DAS GmbH [email protected] � Tel. 248-299-4910
Database Manual Oracle
Page 29 / 31
Upload Tests
PC Department Gauge Upload Time (Mins)
Black PC Block Zeiss 48
PC1 Block Zeiss 37
Black PC Block Marposs 24
PC1 Block Marposs 23
Black PC Head Zeiss 88
PC1 Head Zeiss 71
Black PC Head Marposs 8
PC1 Head Marposs 6
PC Department Gauge Upload Time (Mins)
Black PC Block Zeiss Very Long Time
PC1 Block Zeiss
Black PC Block Marposs 40
PC1 Block Marposs
Black PC Head
PC1 Head
Black PC Head
PC1 Head
Q-DAS Server 16-bit Upload Test
with index on different HDFull day's production from GMPT FES
Full day's production from GMPT FES
FES Server 16-bit Upload Test

Save 0
6.0
9.0
5/ P
rint
02.1
0.0
8 T
C
:\S
ourc
e-3
2b
it\D
ata
bases\S
QL-
Script\D
ata
base
_M
anual_
EF
.doc
© 2
008
Q-D
AS
Inc., Q
-DA
S G
mb
H
q-d
as@
q-d
as.c
om
�
T
el. 2
48-2
99-4
910
Data
base
Man
ua
l O
racl
e P
ag
e
30
/ 3
1
PC Department Gauge Upload Time (Mins) After Analyzer Changed Temp Tablespace
Black PC Block Zeiss25 minutes for 4 files
Stopped Upload
PC1 Block Zeiss 38 38
Black PC Block Marposs
PC1 Block Marposs 25
PC Department Gauge Upload Time (Mins)
Index back to RAID
partition (from independent
drive) and ran Analyzer
New Source Change- Includes all
PK's for better Index Search
Index to
Physical
HD
32-bit
Upload
Black PC Block Zeiss 47 30 30
PC1 Block Zeiss
Black PC Block Marposs 54 158 13 13
PC1 Block Marposs
PC4 Block Zeiss 12
PC4 Block Marposs 10
Q-DAS Server 16-bit Upload Testwith index on different HD and Value Part.
Full day's production from GMPT FES
FES Server 16-bit Upload Testwith Index on Different Partition
Full day's production from GMPT FES

Save 06.09.05/ Print 02.10.08 T C:\Source-32bit\Databases\SQL-Script\Database_Manual_EF.doc
© 2008 Q-DAS Inc., Q-DAS GmbH [email protected] � Tel. 248-299-4910
Database Manual Oracle
Page 31 / 31
9 Document Control
Version Edits/Additions Content Author
8/9/2002 V: EB Add.-Section 9 Document Control J. Kohl Add.-Section 5.4 Note: SQL Plus Client and File Size J. Kohl Edit-Section 1.2.1.2 “Start <Path>\init_tablespaces.sql” J. Kohl Add.-Section 8 32-bit INI file
Imported Database performance J. Kohl
10/1/2002 V: EC Edit-Section 1.2.1.1 Edited the specified contents of the Init_db.sql script
J. Kohl
Add.-Knowledgebase
16-bit AutoUpload wv_insert script after adding fields
J. Kohl
11/20/2002 V: ED Add- Script modifications Knowledgebase Other material
Updated the Script content, entire document
M. Wagner
12/10/02 V: EE
Edit- Section 2.2 Decision Tree
Edited the Decision tree to include “PartCharacteristic_NewField.sql”
J. Kohl
Add.-section 8.3 Knowledgebase
16-bit Upload Number of folders in Upload directory
J. Kohl
Edit- section 8.2 Grammar and details J. Kohl 09/06/2002 V: EF Edit - section 1.1 Unicode character set M. Oswald Edit - section 2.2 Decision tree including update from
earlier qs-STAT millennium versions M. Oswald
Edit - section 2.2.1 Field name added to “no-delete-columns”
M. Oswald