oracle® labor distribution contents send us your comments preface 1 oracle labor distribution...
TRANSCRIPT

Oracle® Labor DistributionUser GuideRelease 12Part No. B31621-02
December 2006

Oracle Labor Distribution User Guide, Release 12
Part No. B31621-02
Copyright © 1998, 2006, Oracle. All rights reserved.
Primary Author: Srinivas Vellikad
Contributing Author: Neerav Handa, Pragya Singh Nair, Sadagopan Chakravarthy, Shekar Chettupelly, Deependra Paudel, Tulasikrishna Balachandran, Venkataramana Dharmapuri
The Programs (which include both the software and documentation) contain proprietary information; they are provided under a license agreement containing restrictions on use and disclosure and are also protected by copyright, patent, and other intellectual and industrial property laws. Reverse engineering, disassembly, ordecompilation of the Programs, except to the extent required to obtain interoperability with other independently created software or as specified by law, is prohibited.
The information contained in this document is subject to change without notice. If you find any problems in the documentation, please report them to us in writing. This document is not warranted to be error-free. Except as may be expressly permitted in your license agreement for these Programs, no part of these Programs may be reproduced or transmitted in any form or by any means, electronic or mechanical, for any purpose.
If the Programs are delivered to the United States Government or anyone licensing or using the Programs on behalf of the United States Government, the following notice is applicable:
U.S. GOVERNMENT RIGHTSPrograms, software, databases, and related documentation and technical data delivered to U.S. Government customers are "commercial computer software" or "commercial technical data" pursuant to the applicable Federal Acquisition Regulation and agency-specific supplemental regulations. As such, use, duplication, disclosure, modification, and adaptation of the Programs, including documentation and technical data, shall be subject to the licensing restrictions set forth in the applicable Oracle license agreement, and, to the extent applicable, the additional rights set forth in FAR 52.227-19, Commercial Computer Software--Restricted Rights (June 1987). Oracle Corporation, 500 Oracle Parkway, Redwood City, CA 94065.
The Programs are not intended for use in any nuclear, aviation, mass transit, medical, or other inherently dangerous applications. It shall be the licensee's responsibility to take all appropriate fail-safe, backup, redundancy and other measures to ensure the safe use of such applications if the Programs are used for such purposes, and we disclaim liability for any damages caused by such use of the Programs.
The Programs may provide links to Web sites and access to content, products, and services from third parties. Oracle is not responsible for the availability of, or any content provided on, third-party Web sites. You bear allrisks associated with the use of such content. If you choose to purchase any products or services from a third party, the relationship is directly between you and the third party. Oracle is not responsible for: (a) the qualityof third-party products or services; or (b) fulfilling any of the terms of the agreement with the third party, including delivery of products or services and warranty obligations related to purchased products or services.Oracle is not responsible for any loss or damage of any sort that you may incur from dealing with any third party.
Oracle, JD Edwards, PeopleSoft, and Siebel are registered trademarks of Oracle Corporation and/or its affiliates. Other names may be trademarks of their respective owners.

iii
Contents
Send Us Your Comments
Preface
1 Oracle Labor DistributionProduct Overview...................................................................................................................... 1-1
2 Setting Up Oracle Labor DistributionSetting Up Oracle Labor Distribution...................................................................................... 2-2
Overview............................................................................................................................. 2-2Labor Distribution Setup Checklist...................................................................................... 2-2Labor Distribution Setup Steps............................................................................................ 2-6
3 System Administration SetupSystem Administration Setup................................................................................................... 3-2
Overview............................................................................................................................. 3-2System Administration Setup Checklist...............................................................................3-2System Administration Setup Steps..................................................................................... 3-5Configuring Values for Labor Distribution........................................................................3-15
4 Labor Scheduling SetupLabor Scheduling Setup............................................................................................................ 4-2
Definition............................................................................................................................. 4-2Overview............................................................................................................................. 4-2Process................................................................................................................................. 4-2Setting Up Organization Suspense Accounts Procedure..................................................... 4-7

iv
Organization Suspense Accounts Window Description...................................................... 4-9Setting Up Organization Default Labor Schedule Procedure............................................ 4-11Organization Default Labor Schedule Window Description............................................. 4-13Setting Up Organization Default Accounts Procedure ..................................................... 4-14Organization Default Accounts Window Description....................................................... 4-16Setting Up Elements Imported Procedure......................................................................... 4-18Elements Imported Window Description.......................................................................... 4-18Setting Up Global Element Override Procedure ............................................................... 4-19Global Element Override Window Description................................................................. 4-20Setting Up Element Groups Procedure ............................................................................. 4-22Element Groups Window Description............................................................................... 4-22Setting Up Payroll Sources Procedure .............................................................................. 4-23Payroll Sources Window Description................................................................................ 4-24Setting Up Begin Date Auto-fill Parameters Procedure .................................................... 4-24Begin Date Auto-fill Parameters Window Description...................................................... 4-25Setting Up End Date Auto-fill Parameters Procedure ....................................................... 4-25End Date Auto-fill Parameters Window Description.........................................................4-26Setting Up Clearing Account Procedure ........................................................................... 4-26Clearing Account Setup Window Description................................................................... 4-27
5 Labor Encumbrance SetupLabor Encumbrance Setup........................................................................................................ 5-2
Definition............................................................................................................................. 5-2Overview............................................................................................................................. 5-2Process................................................................................................................................. 5-2Setting Up Encumbrance Payroll and Assignment Selection Procedure..............................5-3Encumbrance - Payroll and Assignment Selection Window Description............................ 5-4Setting Up Default Encumbrance End Date Procedure .......................................................5-5Encumbrance - Default Encumbrance End Date Window Description................................5-6Setting Up Encumbrance Element Selection Procedure ...................................................... 5-6Encumbrance - Element Selection Window Description......................................................5-7Setting Up Creation Options for GL Procedure .................................................................. 5-7Encumbrance - Creation Options for GL Window Description........................................... 5-8
6 Expenditure Type and Natural Account Auto-Population SetupExpenditure Type and Natural Account Auto-Population Setup............................................ 6-2
Definition............................................................................................................................. 6-2Overview............................................................................................................................. 6-2Process................................................................................................................................. 6-3References............................................................................................................................ 6-5

v
Setting Up Autopop Segment Procedure ............................................................................ 6-6Auto-Population Segment Definition Window Description................................................ 6-6Setting Up Lookup Procedure .............................................................................................6-6Lookups (Auto Lookups) Window Description...................................................................6-7Defining Expenditure Type Auto-Population Rules Procedure ..........................................6-7Auto-Fill Expenditure Types Window Description............................................................. 6-9Define Rule Window Description...................................................................................... 6-10Defining Natural Account Auto-Population Rules Procedure ..........................................6-11Auto-Fill Natural Account Window Description............................................................... 6-12Setting Up Bypass Expenditure Types Procedure .............................................................6-13Bypass Expenditure Types Window Description.............................................................. 6-14Setting Up the Bypass Natural Account Procedure .......................................................... 6-14Bypass Natural Account Window Description.................................................................. 6-14
7 Labor Scheduling ProceduresLabor Scheduling Procedures................................................................................................... 7-2
Definition............................................................................................................................. 7-2Overview............................................................................................................................. 7-2Process................................................................................................................................. 7-2Prerequisites........................................................................................................................ 7-5Creating and Updating Labor Schedules Procedure ........................................................... 7-5Labor Scheduling Window Description............................................................................. 7-10Schedule Lines Window Description................................................................................. 7-12Viewing Labor Schedule Lines Procedure ........................................................................ 7-17Schedule Summary Window Description.......................................................................... 7-19Monthly Schedule Summary Window Description........................................................... 7-21Payroll Period Schedule Summary Window Description.................................................. 7-24
8 Import Payroll Transactions ProceduresImport Payroll Transactions Procedures...................................................................................8-2
Definition............................................................................................................................. 8-2Overview............................................................................................................................. 8-2Prerequisites........................................................................................................................ 8-6Importing Payroll Transactions Procedure.......................................................................... 8-6Rolling Back Oracle Payroll Import Procedure.................................................................... 8-7
9 Create Distribution Lines ProceduresCreate Distribution Lines Procedures.......................................................................................9-2
Definition............................................................................................................................. 9-2Overview............................................................................................................................. 9-2

vi
Creating Distribution Lines Procedure.............................................................................. 9-11Rolling Back Distribution Lines Procedure........................................................................ 9-12Setting Up a Generic Excess Salary Account......................................................................9-13Setting Up Salary Cap Rates.............................................................................................. 9-14Setting Up Project Overrides..............................................................................................9-14Setting Up an Organization Excess Salary Account........................................................... 9-15
10 Summarize and Transfer Payroll Distributions ProceduresSummarize and Transfer Payroll Distributions Procedures.................................................. 10-2
Definition........................................................................................................................... 10-2Overview........................................................................................................................... 10-2Process............................................................................................................................... 10-2Prerequisites...................................................................................................................... 10-4Summarizing and Transferring Payroll Distributions Procedure...................................... 10-4Recovering the Summarize and Transfer Payroll Distributions Procedure....................... 10-6
11 Archive and Retrieve Distributions History ProceduresArchive and Retrieve Distributions History Procedures....................................................... 11-2
Definition........................................................................................................................... 11-2Overview........................................................................................................................... 11-2Archiving and Retrieving Distributions History Procedures.............................................11-2Generating Archive History Report Procedure..................................................................11-3
12 Non-Oracle Payroll Interface ProceduresNon-Oracle Payroll Interface Procedures............................................................................... 12-2
Definition........................................................................................................................... 12-2Overview........................................................................................................................... 12-2Process............................................................................................................................... 12-2Prerequisites...................................................................................................................... 12-9Maintaining Non-Oracle Payroll Interface Procedure .......................................................12-9Maintain Non-Oracle Payroll Sublines Window Description, Payroll Period, Name, SourceTab .................................................................................................................................. 12-12Maintain Non-Oracle Payroll Sublines Window Description, Element, Earned, Check DateTab................................................................................................................................... 12-13Maintain Non-Oracle Payroll Sublines Window Description, Amt, Dly Rate, Salary, D/CFlag Tab........................................................................................................................... 12-14Maintain Non-Oracle Payroll Sublines Window Description, Subline Start End Dates, FTETab................................................................................................................................... 12-16Rolling Back Non-Oracle Payroll Procedure.................................................................... 12-17

vii
13 Pre-generated Distribution Lines Interface ProceduresPre-generated Distribution Lines Interface Procedures......................................................... 13-2
Definition........................................................................................................................... 13-2Overview........................................................................................................................... 13-2Process............................................................................................................................... 13-2Prerequisites...................................................................................................................... 13-8Importing Pre-generated Distribution Lines Procedure ....................................................13-8Maintain Pre-generated Distribution Lines Window Description, Payroll Name, Period,Element Tab..................................................................................................................... 13-10Maintain Pre-generated Distribution Lines Window Description, Pay Source, Dist Amt, D/CFlag Tab........................................................................................................................... 13-12Maintain Pre-generated Distribution Lines Window Description, GL Account Tab....... 13-13Maintain Pre-generated Distribution Lines Window Description, Project, Task, Award Tab......................................................................................................................................... 13-14Maintain Pre-generated Distribution Lines Window Description, Expenditure Organization,Type Tab.......................................................................................................................... 13-15
14 Distribution Adjustments ProceduresDistribution Adjustments Procedures.................................................................................... 14-2
Definitions......................................................................................................................... 14-2Overview........................................................................................................................... 14-2Actual and Adjusted Distributions.................................................................................... 14-2Distribution Adjustments ..................................................................................................14-3Features.............................................................................................................................. 14-5Process............................................................................................................................... 14-6Prerequisites.................................................................................................................... 14-11Configuration................................................................................................................... 14-12Adjusting Distributions Procedure ................................................................................. 14-12Distribution Adjustments Window Description ............................................................. 14-14Approving the Distribution Adjustments Workflow Procedure......................................14-20Summarizing and Transferring Adjustments Procedure................................................. 14-21Restarting Summarize and Transfer Adjustments Procedure..........................................14-21Generating Distribution Adjustment Register Report Procedure.................................... 14-22
15 Labor Encumbrance Processes and Reports ProceduresLabor Encumbrance Processes and Reports Procedures........................................................ 15-2
Definition........................................................................................................................... 15-2Overview........................................................................................................................... 15-2Processes............................................................................................................................ 15-2

viii
Review Posted Encumbrance Reports..............................................................................15-13Prerequisites.................................................................................................................... 15-14Summarizing and Transferring Encumbrances Procedure.............................................. 15-15Recovering the Encumbrance Summarize and Transfer Process..................................... 15-15Archiving Encumbrance Lines Procedure....................................................................... 15-16Retrieving Encumbrance Lines Procedure....................................................................... 15-16Generating Suspense Charge Encumbrance Report ........................................................15-17Generating Encumbrance History by Award Report.......................................................15-18Generating Encumbrance History by Organization Report............................................. 15-18Generating Organization Default Usage Encumbrance Report ...................................... 15-19Generating Assignments Processed by Create and Update Encumbrance Lines Report......................................................................................................................................... 15-20Creating, Updating, and Liquidating Encumbrances...................................................... 15-20
16 Effort Reporting ProceduresEffort Reporting Procedures................................................................................................... 16-2
Definition........................................................................................................................... 16-2Overview........................................................................................................................... 16-2Effort Reporting Process.................................................................................................... 16-3Purging the Create Effort Report Process Run................................................................. 16-10Handling Errors and Warnings in Create Effort Report Process......................................16-11Effort Report Workflow Approval Process ..................................................................... 16-11Superseding Employee Effort Reports............................................................................. 16-12Rollback Effort Report..................................................................................................... 16-14Importing Additional Effort Report Details..................................................................... 16-14Defining Custom Approval Types................................................................................... 16-14Effort Report Monitor...................................................................................................... 16-15
17 Reports ProcedureReports Procedures.................................................................................................................. 17-2
Definition........................................................................................................................... 17-2Overview........................................................................................................................... 17-2Generating Employees Using Default Labor Schedules Report Procedure .......................17-4Printing Options Window Description.............................................................................. 17-5Generating Employee Labor Schedule Report .................................................................. 17-6Employee Labor Schedules Report Description................................................................. 17-7Generating Organization Default Labor Schedule Report ................................................ 17-8Generating Default Account Report Procedure ................................................................ 17-9Generating Suspense Account Report Procedure ........................................................... 17-10Generating Distribution Adjustment History by Employee Report Procedure .............. 17-11

ix
Generating Distribution History by Project Report Procedure ....................................... 17-11Generating Distribution History by Award Report Procedure ....................................... 17-12Generating Distribution History by Organization Report Procedure ............................. 17-13Creating a Parameter Set..................................................................................................17-14
18 Reconciliation and Control Reports ProceduresReconciliation and Control Reports Procedures.....................................................................18-2
Definition........................................................................................................................... 18-2Overview........................................................................................................................... 18-2Process............................................................................................................................... 18-2Generating Reconciliation and Control Reports Procedure............................................... 18-3
A Labor Distribution ProcessDefinition.................................................................................................................................. A-1Oracle Labor Distribution Process Flow Diagram................................................................... A-1Oracle Labor Distribution Process........................................................................................... A-2
B Scheduling Hierarchy ProcessDefinition.................................................................................................................................. B-1Process....................................................................................................................................... B-1Scheduling Hierarchy Process Diagram................................................................................... B-4
C Labor Encumbrance ProcessDefinition.................................................................................................................................. C-1Labor Encumbrance Process Flow Diagram.............................................................................C-1Labor Encumbrance Process..................................................................................................... C-2Labor Encumbrance End Date Scenarios Diagram.................................................................. C-4
D Data Entry Validations ProcessOverview................................................................................................................................... D-1Data Entry Validations............................................................................................................. D-1
E Effort Calculation ProcessDefinition.................................................................................................................................. E-1Process....................................................................................................................................... E-1
F Distribution Adjustments Approval Notification Workflow ProcessOverview................................................................................................................................... F-1

x
The PSP Distribution Adjustments Approval Item Type........................................................F-1Distribution Adjustments Approval Workflow Diagram....................................................... F-2Distribution Adjustments Approval Workflow Process......................................................... F-3Customizing Distribution Adjustments Approval Workflow Process ................................ F-12
G Labor Distribution Navigation PathsNavigation................................................................................................................................ G-1
H Distribution and Configuration Options Overview................................................................................................................................... H-1Payroll Distribution Process.....................................................................................................H-1Configuration Options............................................................................................................. H-2Case 1 Diagram......................................................................................................................... H-2Case 2 Diagram......................................................................................................................... H-3Case 3 Diagram......................................................................................................................... H-4Case 4 Diagram......................................................................................................................... H-5
I Labor Distribution Accounting ExampleDefinition................................................................................................................................... I-1Payroll Balancing Overview...................................................................................................... I-1Labor Costing Example.............................................................................................................. I-1
J Non-Oracle Payroll Interface Table Non-Oracle Interface Table Field Description Table............................................................... J-1Non-Oracle Interface Table Population Rules..........................................................................J-3
K Pre-generated Interface Table Pre-generated Interface Table Field Description Table...........................................................K-1Pre-generated Interface Table Population Rules..................................................................... K-3
L Multiple Organizations Compliance in Oracle Labor DistributionDefinition.................................................................................................................................. L-1Overview................................................................................................................................... L-1User Procedures......................................................................................................................... L-2
Glossary
Index

xi
Send Us Your Comments
Oracle Labor Distribution User Guide, Release 12Part No. B31621-02
Oracle welcomes customers' comments and suggestions on the quality and usefulness of this document. Your feedback is important, and helps us to best meet your needs as a user of our products. For example:
• Are the implementation steps correct and complete? • Did you understand the context of the procedures? • Did you find any errors in the information? • Does the structure of the information help you with your tasks? • Do you need different information or graphics? If so, where, and in what format? • Are the examples correct? Do you need more examples?
If you find any errors or have any other suggestions for improvement, then please tell us your name, the name of the company who has licensed our products, the title and part number of the documentation andthe chapter, section, and page number (if available).
Note: Before sending us your comments, you might like to check that you have the latest version of the document and if any concerns are already addressed. To do this, access the new Applications Release Online Documentation CD available on Oracle MetaLink and www.oracle.com. It contains the most current Documentation Library plus all documents revised or released recently.
Send your comments to us using the electronic mail address: [email protected]
Please give your name, address, electronic mail address, and telephone number (optional).
If you need assistance with Oracle software, then please contact your support representative or Oracle Support Services.
If you require training or instruction in using Oracle software, then please contact your Oracle local officeand inquire about our Oracle University offerings. A list of Oracle offices is available on our Web site at www.oracle.com.


xiii
Preface
Intended AudienceWelcome to Release 12 of the Oracle Labor Distribution User Guide.
This guide assumes you have a working knowledge of the following:
• The principles and customary practices of your business area.
• Oracle HRMS.
If you have never used Oracle HRMS, Oracle suggests you attend one or more of the Oracle HRMS training classes available through Oracle University
• Oracle Self-Service Web Applications.
• The Oracle Applications graphical user interface.
To learn more about the Oracle Applications graphical user interface, read the Oracle Applications User's Guide.
See Related Information Sources on page xv for more Oracle Applications product information.
TTY Access to Oracle Support ServicesOracle provides dedicated Text Telephone (TTY) access to Oracle Support Services within the United States of America 24 hours a day, seven days a week. For TTY support, call 800.446.2398.
Documentation AccessibilityOur goal is to make Oracle products, services, and supporting documentation accessible, with good usability, to the disabled community. To that end, our

xiv
documentation includes features that make information available to users of assistive technology. This documentation is available in HTML format, and contains markup to facilitate access by the disabled community. Accessibility standards will continue to evolve over time, and Oracle is actively engaged with other market-leading technology vendors to address technical obstacles so that our documentation can be accessible to allof our customers. For more information, visit the Oracle Accessibility Program Web site at http://www.oracle.com/accessibility/ .
Accessibility of Code Examples in DocumentationScreen readers may not always correctly read the code examples in this document. The conventions for writing code require that closing braces should appear on an otherwise empty line; however, some screen readers may not always read a line of text that consists solely of a bracket or brace.
Accessibility of Links to External Web Sites in DocumentationThis documentation may contain links to Web sites of other companies or organizationsthat Oracle does not own or control. Oracle neither evaluates nor makes any representations regarding the accessibility of these Web sites.
Structure1 Oracle Labor Distribution2 Setting Up Oracle Labor Distribution3 System Administration Setup4 Labor Scheduling Setup5 Labor Encumbrance Setup6 Expenditure Type and Natural Account Auto-Population Setup7 Labor Scheduling Procedures8 Import Payroll Transactions Procedures9 Create Distribution Lines Procedures10 Summarize and Transfer Payroll Distributions Procedures11 Archive and Retrieve Distributions History Procedures12 Non-Oracle Payroll Interface Procedures13 Pre-generated Distribution Lines Interface Procedures14 Distribution Adjustments Procedures15 Labor Encumbrance Processes and Reports Procedures16 Effort Reporting Procedures17 Reports Procedure18 Reconciliation and Control Reports ProceduresA Labor Distribution ProcessB Scheduling Hierarchy ProcessC Labor Encumbrance ProcessD Data Entry Validations ProcessE Effort Calculation ProcessF Distribution Adjustments Approval Notification Workflow ProcessG Labor Distribution Navigation Paths

xv
H Distribution and Configuration Options I Labor Distribution Accounting ExampleJ Non-Oracle Payroll Interface Table K Pre-generated Interface Table L Multiple Organizations Compliance in Oracle Labor DistributionGlossary
Related Information SourcesOracle HRMS shares business and setup information with other Oracle Applications products. Therefore, you may want to refer to other user guides when you set up and use Oracle HRMS.
You can read the guides online by choosing Library from the expandable menu on yourHTML help window, by reading from the Oracle Applications Document Library CD included in your media pack, or by using a Web browser with a URL that your system administrator provides.
If you require printed guides, you can purchase them from the Oracle store at http://oraclestore.oracle.com.
Guides Related to All Products
Oracle Applications User's Guide
This guide explains how to enter data, query data, run reports, and navigate using the graphical user interface (GUI). This guide also includes information on setting user profiles, as well as running and reviewing reports and concurrent processes.
You can access this user's guide online by choosing "Getting started with Oracle Applications" from any Oracle Applications help file.
Guides Related to This Product
Oracle Daily Business Intelligence for HRMS User Guide
This guide describes the dashboards and reports available for HR Line Managers, Chief HR Officer, Budget Managers, and Benefits Managers using Daily Business Intelligence for HRMS. It includes information on using parameters, how DBI for HRMS derives values, and how to troubleshoot dashboards and reports.
Oracle Daily Business Intelligence for HRMS Implementation Guide
This guide provides basic setup procedures for implementing and maintaining HRMS-related dashboards.
Oracle Daily Business Intelligence Implementation Guide
This guide describes the common concepts for Daily Business Intelligence. It describes the product architecture and provides information on the common dimensions, securityconsiderations, and data summarization flow. It includes a consolidated setup checklist by page and provides detailed information on how to set up, maintain, and troubleshoot Daily Business Intelligence pages and reports for the following functional areas: Financials, Interaction Center, iStore, Marketing, Product Lifecycle Management,

xvi
Projects, Procurement, Sales, Service, Service Contracts, and Supply Chain.
Oracle Daily Business Intelligence User Guide
This guide describes the common concepts for Daily Business Intelligence. It describes the product architecture and provides information on the common dimensions, securityconsiderations, and data summarization flow. It includes a consolidated setup checklist by page and provides detailed information on how to set up, maintain, and troubleshoot Daily Business Intelligence pages and reports for the following functional areas: Financials, Interaction Center, iStore, Marketing, Product Lifecycle Management, Projects, Procurement, Sales, Service, Service Contracts, and Supply Chain.
Oracle Application Framework Personalization Guide
Learn about the capabilities of the OA Framework technologies.
Oracle Human Resources Management Systems Enterprise and Workforce Management Guide
Learn how to use Oracle HRMS to represent your enterprise. This includes setting up your organization hierarchy, recording details about jobs and positions within your enterprise, defining person types to represent your workforce, and also how to manage your budgets and costs.
Oracle Human Resources Management Systems Workforce Sourcing, Deployment, and Talent Management Guide
Learn how to use Oracle HRMS to represent your workforce. This includes recruiting new workers, developing their careers, managing contingent workers, and reporting on your workforce.
Oracle Human Resources Management Systems Payroll Processing Management Guide
Learn about wage attachments, taxes and social insurance, the payroll run, and other processes.
Oracle Human Resources Management Systems Compensation and Benefits Management Guide
Learn how to use Oracle HRMS to manage your total compensation package. For example, read how to administer salaries and benefits, set up automated grade/step progression, and allocate salary budgets. You can also learn about setting up earnings and deductions for payroll processing, managing leave and absences, and reporting on compensation across your enterprise.
Oracle Human Resources Management Systems Configuring, Reporting, and System Administration Guide
Learn about extending and configuring Oracle HRMS, managing security, auditing, information access, and letter generation.
Oracle Human Resources Management Systems Implementation Guide
Learn about the setup procedures you need to carry out in order to implement Oracle HRMS successfully in your enterprise.

xvii
Oracle Human Resources Management Systems FastFormula User Guide
Learn about the different uses of Oracle FastFormula, and understand the rules and techniques you should employ when defining and amending formulas for use with Oracle applications.
Oracle Self-Service Human Resources Deploy Self-Service Capability Guide
Set up and use self-service human resources (SSHR) functions for managers, HR Professionals, and employees.
Oracle Human Resources Management Systems Deploy Strategic Reporting (HRMSi)
Implement and administer Oracle Human Resources Management Systems Intelligence (HRMSi) in your environment.
Oracle Human Resources Management Systems Strategic Reporting (HRMSi) User Guide
Learn about the workforce intelligence reports included in the HRMSi product, including Daily Business Intelligence reports, Discoverer workbooks, and Performance Management Framework reports.
Oracle Human Resources Management Systems Approvals Management Implementation Guide
Use Oracle Approvals Management (AME) to define the approval rules that determine the approval processes for Oracle applications.
Oracle Human Resources Management Systems Window Navigation and Reports Guide
This guide lists the default navigation paths for all windows and the default reports andprocesses as they are supplied in Oracle HRMS.
Oracle iRecruitment Implementation and User Guide
Set up and use Oracle iRecruitment to manage all of your enterprise's recruitment needs.
Oracle Learning Management User Guide
Use Oracle Learning Management to accomplish your online and offline learning goals.
Oracle Learning Management Implementation Guide
Implement Oracle Learning Management to accommodate your specific business practices.
Oracle Time and Labor Implementation and User Guide
Learn how to capture work patterns, such as shift hours, so that this information can be used by other applications, such as General Ledger.
Installation and System Administration
Oracle Applications Concepts

xviii
This guide provides an introduction to the concepts, features, technology stack, architecture, and terminology for Oracle Applications Release 12. It provides a useful first book to read before an installation of Oracle Applications. This guide also introduces the concepts behind Applications-wide features such as Business Intelligence(BIS), languages and character sets, and Self-Service Web Applications.
Oracle Applications Installation Guide: Using Rapid Install
This guide provides instructions for managing the installation of Oracle Applications products. Oracle Rapid Install minimizes the time to install Oracle Applications and the Oracle technology stack by automating many of the required steps. This guide contains instructions for using Oracle Rapid Install and lists the tasks you need to perform to finish your installation. You should use this guide in conjunction with individual product user guides and implementation guides.
Oracle Applications Upgrade Guide: Release 11i to Release 12
Refer to this guide if you are upgrading your Oracle Applications Release 11i products to Release 12. This guide describes the upgrade process and lists database and product-specific upgrade tasks.
Oracle Applications Maintenance Procedures and Oracle Applications Maintenance Utilities
Use these guides to help you run the various AD utilities (such as AutoUpgrade, AutoPatch, AD Administration, AD Controller, AD Relink, and License Manager) and maintain the Oracle applications file system and database.
Oracle Applications System Administrator's Guides
These guides (Configuration, Maintenance, and Security) provide planning and reference information for the Oracle Applications System Administrator. They describe how to define security, customize menus and online help, and manage concurrent processing.
Oracle Alert User's Guide
This guide explains how to define periodic and event alerts to monitor the status of your Oracle Applications data.
Oracle Applications Developer's Guide
This guide contains the coding standards followed by the Oracle Applications development staff and describes the Oracle Application Object Library components thatare needed to implement the Oracle Applications user interface described in the Oracle Applications User Interface Standards for Forms-Based Products. This manual also provides information to help you build your custom Oracle Forms Developer forms so that the forms integrate with Oracle Applications.
Oracle Applications User Interface Standards for Forms-Based Products
This guide contains the user interface (UI) standards followed by the Oracle Applications development staff. It describes the UI for the Oracle Applications productsand how to apply this UI to the design of an application built by using Oracle Forms.

xix
Other Implementation Documentation
Oracle Workflow Administrator's Guide
This guide explains how to complete the setup steps necessary for any Oracle Applications product that includes workflow-enabled processes, as well as how to monitor the progress of runtime workflow processes.
Oracle Workflow Developer's Guide
This guide explains how to define new workflow business processes and customize existing Oracle Applications-embedded workflow processes. It also describes how to define and customize business events and event subscriptions.
Oracle Workflow User's Guide
This guide describes how Oracle Applications users can view and respond to workflow notifications and monitor the progress of their workflow processes.
Oracle Workflow API Reference
This guide describes the APIs provided for developers and administrators to access Oracle Workflow.
Oracle Applications Flexfields Guide
This guide provides flexfields planning, setup, and reference information for the Oracle HRMS implementation team, as well as for users responsible for the ongoing maintenance of Oracle Applications product data. This guide also provides information on creating custom reports on flexfields data.
Oracle eTechnical Reference Manuals
Each eTechnical Reference Manual (eTRM) contains database diagrams and a detailed description of database tables, forms, reports, and programs for a specific Oracle Applications product. This information helps you convert data from your existing applications, integrate Oracle Applications data with non-Oracle applications, and writecustom reports for Oracle Applications products. Oracle eTRM is available on OracleMetaLink.
Integration RepositoryThe Oracle Integration Repository is a compilation of information about the service endpoints exposed by the Oracle E-Business Suite of applications. It provides a complete catalog of Oracle E-Business Suite's business service interfaces. The tool lets users easily discover and deploy the appropriate business service interface for integration with any system, application, or business partner.
The Oracle Integration Repository is shipped as part of the E-Business Suite. As your instance is patched, the repository is automatically updated with content appropriate for the precise revisions of interfaces in your environment.

xx
Do Not Use Database Tools to Modify Oracle Applications DataOracle STRONGLY RECOMMENDS that you never use SQL*Plus, Oracle Data Browser, database triggers, or any other tool to modify Oracle Applications data unless otherwise instructed.
Oracle provides powerful tools you can use to create, store, change, retrieve, and maintain information in an Oracle database. But if you use Oracle tools such as SQL*Plus to modify Oracle Applications data, you risk destroying the integrity of your data and you lose the ability to audit changes to your data.
Because Oracle Applications tables are interrelated, any change you make using an Oracle Applications form can update many tables at once. But when you modify Oracle Applications data using anything other than Oracle Applications, you may change a row in one table without making corresponding changes in related tables. If your tables get out of synchronization with each other, you risk retrieving erroneous information and you risk unpredictable results throughout Oracle Applications.
When you use Oracle Applications to modify your data, Oracle Applications automatically checks that your changes are valid. Oracle Applications also keeps track of who changes information. If you enter information into database tables using database tools, you may store invalid information. You also lose the ability to track whohas changed your information because SQL*Plus and other database tools do not keep arecord of changes.

Oracle Labor Distribution 1-1
1Oracle Labor Distribution
Product OverviewThis chapter provides an overview of Oracle Labor Distribution. The topics include:
• Definition, page 1-1
• Overview, page 1-1
DefinitionOracle Labor Distribution provides a flexible approach to the following:
• Scheduling employees
• Encumbering labor costs
• Distributing labor costs
Labor Distribution enables organizations to schedule, create, correct, and certify labor cost distribution without a timecard system.
OverviewLabor Distribution is fully integrated with Oracle Human Resources, Oracle Payroll, Oracle General Ledger, Oracle Projects, and Oracle Grants Accounting.
Labor Distribution provides organizations and institutions with the ability to perform the following:
• Create and update employee labor schedules
• Distribute pay amounts

1-2 Oracle Labor Distribution User Guide
• Encumber salary and wages
• Provide interfaces to non-Oracle payroll and timecard systems
• Adjust posted labor distribution
• Create and approve or certify employee effort reports
• Route effort reports for review and approval or certification
• Route distribution adjustment for approval
Labor Distribution supports OMB A-21 Effort Reporting for institutions receiving federal research funding.
Labor Distribution includes the following features:
• Create and Maintain Labor Distribution Schedules, page 1-3
• Distribute Pay Amounts, page 1-3
• Provide Interfaces to Other Payroll and Timecard Systems, page 1-3
• Distribution Adjustments, page 1-3
• Create and Approve or Certify Effort Reports, page 1-4
• Labor Encumbrances, page 1-4
• Auto-Population of Expenditure Type and Natural Account, page 1-4
• Reconciliation Reports, page 1-4
• Scheduling and Distribution Reports, page 1-4
• Multiple Organization Compliance, page 1-5
• Summarize and Transfer Adjustments, page 1-5
• Rollback of Labor Distribution Processes, page 1-5
• Error Recovery Processes, page 1-5
• Enhanced Workflow, page 1-6
• Security, page 1-6
• Integration of Labor Distribution with Oracle Public Sector Budgeting, page 1-6

Oracle Labor Distribution 1-3
• Integration of Labor Distribution with Position Control in Human Resource Management Systems, page 1-6
Create and Maintain Labor Distribution SchedulesLabor Distribution enables managers or effort report initiators to create labor schedules for each employee assignment. These labor schedules are the basis for payroll labor distribution and encumbrances.
Each labor schedule provides a set of charging instructions that reflects the percentage of earnings to be charged to General Ledger, Grants Accounting, or Projects. You enter charging instructions on a schedule line that identifies the start and end date and the percent of effort to be charged to one of the target accounts. You can enter additional information about schedules and funding sources in a flexfield. Each employee assignment can have unlimited labor schedule lines. You can modify labor schedules at any time to reflect changes in charging instructions.
To simplify schedule line data entry, Labor Distribution includes default labor schedules for specific organizations and a user-defined schedule hierarchy. You can create default schedules for a department, and charge the pay for all the employees in that department on the basis of the default schedule.
Schedule hierarchies enable you to create schedules at the employee assignment, element group, and element levels. Labor Distribution uses the schedule hierarchy to determine which labor schedule to use.
Distribute Pay AmountsLabor Distribution enables you to distribute all types of pay to General Ledger accounts, Grants Accounting awards, and Projects based on the labor schedules you define for the employee assignment. The application calculates distribution amounts on a daily basis.
Provide Interfaces to Other Payroll and Timecard SystemsLabor Distribution integrates with other non-Oracle payroll systems by providing open interfaces to import non-Oracle payroll data and charging instructions that time management systems create. You write non-Oracle payroll to an interface table. You canedit payroll entries before distributing them to their target accounts. You can use and adjust these distributions in effort reporting.
Distribution AdjustmentsLabor Distribution enables you to adjust posted payroll distributions. If you adjust distributions, then you must reverse them, and create new distributions. You must provide an explanation for adjustments.
Adjustments are subject to appropriate security approvals. The Workflow routes adjustment approvals to appropriate personnel. The adjustments are posted to General Ledger, Grants Accounting, or Projects. After the appropriate person approves the distribution adjustments and the application processes the adjustments, you can

1-4 Oracle Labor Distribution User Guide
generate new effort reports and approve them to certify the correct effort distribution for the effort report period.
Create and Certify Effort ReportsEffort reporting ensures accurate disbursement of labor charges. Effort reports summarize the labor distributions made over a period of time. Certification of the effort report by an employee or supervisor verifies distributions made against actual work performed. The Oracle Approvals Management Workflow routes effort reports to approvers for review, and approval depending on how you configure the workflow.
You can customize effort reports to meet your institution's or organization's requirements. You can do all this using the Effort Report Template Pages.
In a typical effort report process flow, administrators set up the effort report templates, initiators create the effort report, approvers approve the effort report, and the final recipients receive the consolidated and approved effort reports to print and archive.
Labor EncumbrancesLabor Distribution encumbers salary and wages and posts the encumbrances to GeneralLedger and Grants Accounting. By reserving funds from a budget for expenses committed yet not expended, you can see what funds are available and plan accordingly. As payroll charges are distributed to the target accounts, you can liquidate encumbrances, and apply the burden rate of the original encumbrance line to the liquidated encumbrance line.
You can select employee assignments for encumbrance by selecting the payrolls to encumber, thereby including all assignments in the selected payroll. You can encumber different charging instructions for differing time periods based on a 100% time period definition for each organization. Labor Distribution creates encumbrance lines for the future based on the employee's organization and other setup information.
Auto-Population of Expenditure Type and Natural AccountAuto-population of expenditure type and natural account automatically populates expenditure type and natural account fields during labor distribution. You can define and modify the auto-fill mapping rules using a wide range of parameters.
Reconciliation ReportsA series of reconciliation reports enable you to view the step-by-step distribution of labor costs. Totals for each step are compared with totals from the previous step to verify accurate labor cost distribution.
Scheduling and Distribution ReportsScheduling and Distribution reports show details about labor schedules, default labor schedules, default accounts, suspense accounts, and actual distributions.
Oracle Labor Distribution 1-5
Multiple Organization ComplianceMultiple Organizations enable you to define multiple organizations and the relationship among them in a single installation and to secure access to data so that you can access only the information that is relevant to them.
Without multiple organizations, organizations with multiple business entities must install Labor Distribution multiple times within the same database. Multiple Organizations supports a single installation with any number of different logical business entities.
Summarize and Transfer AdjustmentsSummarize and Transfer Adjustments enable you to approve defined distribution adjustment batches without automatically transferring approved distribution adjustments to General Ledger, Grants Accounting, or Projects.
Summarize and Transfer Adjustments provide the following benefits:
• Approve distribution adjustment batch without automatically running the Summarize and Transfer Adjustments process
• Summarize and transfer approved distribution batches at one time
• Redefine distribution adjustments for rejected adjustments during the Summarize and Transfer Adjustments process
Rollback of Labor Distribution ProcessesRolling back Labor Distribution processes enables you to correct errors after running each process. This reduces the requirement to create distribution adjustments.
Rollback of Labor Distribution processes provide you the following benefits:
• Roll back of Oracle and Non-Oracle Payroll Import processes enable you to re-import the same payroll
• Rollback of Create Distribution Lines enable you to recreate distribution lines for lines that are not summarized and transferred.
Error Recovery ProcessesIf a system crash or abnormal termination due to database failures occurs during certainprocesses, Labor Distribution provides easy error recovery. In most cases, you need only restart the failed process (after you have fixed the error).
All restart and recovery processes used in previous releases have been obsoleted. When you experience an error condition:
• Correct the issue that caused the failure (if necessary)

1-6 Oracle Labor Distribution User Guide
• Rerun the process that failed. The failed processes will skip the phases that had completed successfully and will continue with the pending phase.
To recover the Summarize and Transfer Distribution Adjustments process, run its corresponding restart process.
Enhanced WorkflowLabor Distribution is integrated with Workflow to facilitate the approval processes in effort reporting and distribution adjustments. Workflow automates the approval processes.
SecurityLabor Distribution uses standard Oracle Applications security. Access and approvals are controlled through responsibilities that you create and assign to users.
Integration of Labor Distribution with Oracle Public Sector Budgeting The integration of Labor Distribution with Public Sector Budgeting enables you as a Public Sector Budgeting user to access a labor schedule from Labor Distribution instead of Oracle Human Resource Management Systems. This integration includes the following features:
• Ability to bring salary distribution lines information into Public Sector Budgeting from Labor Distribution
• Ability to facilitate successful completion of budget worksheet with position budgeting
For detailed information on the integration of Public Sector Budgeting with Labor Distribution, see Using HRMS Budgeting, Oracle HRMS Enterprise and Workforce Management Guide.
Integration of Labor Distribution with Position Control in Human Resource Management SystemsIntegration between Labor Distribution and Position Control functionality in Oracle Public Sector HRMS ensures the following:
• Position encumbrances created by Position Control are removed from Grants Accounting before Labor Distribution sends payroll encumbrances for employee assignments
• Ability to manage the budgets, encumbrances, and distribution of costs associated with positions and employee assignments
For detailed information on Position Control, see Enterprise Modeling, Oracle HRMS Enterprise and Workforce Management Guide

Setting Up Oracle Labor Distribution 2-1
2Setting Up Oracle Labor Distribution

2-2 Oracle Labor Distribution User Guide
Setting Up Oracle Labor Distribution
OverviewThis chapter provides a checklist of setup steps in Labor Distribution.
Complete all required setup steps for the following applications before beginning the Labor Distribution setup steps.
• Oracle Applications System Administration
• Oracle General Ledger
• Oracle Human Resource Management Systems
• Oracle Grants Accounting
Note: Grants Accounting is optional.
• Oracle Projects
Note: Oracle Projects is optional.
• Oracle Workflow
Labor Distribution Setup ChecklistTable 1, page 2-3 shows the Labor Distribution setup checklist.
Note: The sequence indicated for the setup checklist applies to the Labor Distribution setup process only. For each application installed, consult the guides for that application to determine the sequence of setup steps.
You must complete all required setup steps in this checklist.

Setting Up Oracle Labor Distribution 2-3
Labor Distribution Setup Checklist
Step Number Setup Step Type Oracle Applications
Oracle Applications System Administration
1. Set up System Administration
required System Administration
Oracle General Ledger
2. Define Account Combinations
required General Ledger
Oracle Human Resource Management Systems
3. Define Cost Allocation Flexfield
required HRMS
4. Create Locations required HRMS
5. Create Organizations required HRMS
6. Define Jobs required HRMS
7. Define Payrolls required HRMS
8. Define Elements and Input Values
seeded/ user-defined HRMS
9. Define Elements Links
required HRMS
10. Define a Salary Basis required HRMS
Oracle Grants Accounting

2-4 Oracle Labor Distribution User Guide
Step Number Setup Step Type Oracle Applications
11. Set Up Grants Accounting
optional Grants Accounting
Oracle Projects
12. Set Up Projects optional Projects
Workflow
13. Set Up Workflow required Workflow
Labor Distribution, Labor Scheduling Setup
14. Set Up Organization Suspense Accounts
optional Labor Distribution
15. Set Up Organization Default Labor Schedule
optional Labor Distribution
16. Set Up Organization Default Accounts
optional Labor Distribution
17. Set Up Elements Imported
required Labor Distribution
18. Set Up Global Element Override
optional Labor Distribution
19. Set Up Element Groups
optional Labor Distribution
20. Set Up Payroll Sources
optional Labor Distribution
21. Set Up Begin Date Auto-fill Parameters
optional Labor Distribution
22. Set Up End Date Auto-fill Parameters
optional Labor Distribution

Setting Up Oracle Labor Distribution 2-5
Step Number Setup Step Type Oracle Applications
23. Set Up Clearing Account
required Labor Distribution
Labor Distribution, Salary Cap Setup
24 Set up Salary Cap Rates
optional Labor Distribution
25 Set Up Project Overrides
optional Labor Distribution
26 Set Up an Organization Excess Salary Account
optional Labor Distribution
27. Set Up a Generic Excess Salary Account
required Labor Distribution
Effort Reporting Setup
29 Set up descriptive flexfields to enter additional effort report information
Optional HRMS
Labor Encumbrance Setup
30. Set Up Encumbrance Payroll and Assignment Selection
required if you use encumbrances
Labor Distribution
31. Set Up Default Encumbrance End Date
required if you use encumbrances
Labor Distribution
32. Set Up Encumbrance Element Selection
required if you use encumbrances
Labor Distribution

2-6 Oracle Labor Distribution User Guide
Step Number Setup Step Type Oracle Applications
33. Set Up Creation Options for GL
required if you use encumbrances
Labor Distribution
34. Set Up Database Triggers and the Functional Area
required if you use encumbrances
HRMS
Expenditure Type and Natural Account Auto- Population Setup
35. Set Up Lookups Table required if auto-population enabled
Labor Distribution
36. Define Expenditure Type Auto-Population Rules
required if auto-population enabled
Labor Distribution
37. Define Natural Account Auto-Population Rules
required if auto-population enabled
Labor Distribution
38. Set Up By-Pass Table required if auto-population enabled
Labor Distribution
39. Set Up Autopop Segment
required if Natural Account auto-population enabled
Labor Distribution
Labor Distribution Setup StepsTo set up Labor Distribution, perform the following steps.
1. Set Up System Administration.Set up System Administration.

Setting Up Oracle Labor Distribution 2-7
To set up System Administration, see System Administration Setup, page 3-2 and Oracle Applications System Administrator's Guide.
2. Define Account CombinationsAccounting flexfield combinations must be defined to use Labor Distribution.
Warning: You cannot select accounting flexfield combinations for the labor schedule if the application fails to post journals for those value combinations. For example, if you do not set up the accounting flexfieldcombination and enable it, then you cannot close the accounting flexfield window when you set up labor schedule lines.
Warning: After you set up autopopulation rules in Oracle Labor Distribution, if you want to change the ordering number of the accounting key flexfield natural account segment, or want to delete the natural account segment in Oracle General Ledger, then you must do the following before making changes:
• Delete all values in the Segment Setup window.
• Delete all values from the By-pass Natural Accounts window.
• Delete all values from the Natural Accounts window.
After you make the required changes, you can create the above values again.
See: Defining Accounts, Oracle General Ledger User Guide.
3. Define Cost Allocation FlexfieldTo use Labor Distribution, you must define the cost allocation flexfield and map it to Oracle General Ledger.
Warning: The cost allocation flexfield segments to General Ledger segment mapping must populate all fields of the General Ledger accounting flexfield structure. Otherwise, payroll costing does not post to General Ledger and you cannot import payrolls to Labor Distribution.
See: Key Flexfield Segments Window and Cost Allocation Flexfield, Oracle Applications Flexfields Guide and Cost Allocation Key Flexfield, Oracle HRMS Enterprise and Workforce Management Guide.
See: Running the Transfer to GL Process, Oracle HRMS Enterprise and Workforce

2-8 Oracle Labor Distribution User Guide
Management Guide.
4. Create LocationsTo use Labor Distribution, you must set up one or more locations in Oracle Human Resources.
See: Setting Up Locations, Oracle HRMS Enterprise and Workforce Management Guide.
5. Create OrganizationsOrganizations must be defined in Human Resources to use Multiple Organizations in Labor Distribution.
For information on creating organizations, see Creating an Organization, Oracle HRMS Enterprise and Workforce Management Guide.
6. Define JobsJobs must be defined in Human Resources to use Labor Distribution. If using Grants Accounting, each employee assignment must have a job assigned to it.
To define jobs, see Defining a Job, Oracle HRMS Enterprise and Workforce Management Guide.
7. Define PayrollsPayrolls must be defined in Human Resources to use Labor Distribution.
Warning: Labor Distribution imports and redistributes all employee assignments on a payroll for the elements selected. If users want to exclude certain employees from labor distribution, these employees must be assigned to a separate payroll that is not to be imported to Labor Distribution.
Within Oracle Human Resources and Oracle Payroll, labor costs can be assigned at the following hierarchical levels:
• Payroll
• Element link
• Organization
• Assignment
• Element entry

Setting Up Oracle Labor Distribution 2-9
For payroll imported to Labor Distribution, it is recommended that costing be done at the Payroll level. When distributing labor costs to General Ledger, Projects, or Grants Accounting charging instructions, Labor Distribution journals against the costing account setup for the payroll.
Warning: The costing account must be one of the clearing accounts selected in Labor Distribution; otherwise the payroll selected for importcannot be processed.
Note: The following settings must be defined as follows.
• A payroll clearing costing account must be entered in the Costing field.
• An appropriate General Ledger suspense account must be entered in the Suspense field.
For information on accounting transactions, see Labor Distribution Accounting Example, page I-1.
To define payroll groups, see Defining a Payroll, Oracle HRMS Payroll Processing Management Guide.
Note: Users are required to perform the following setup procedure if the following circumstances apply:
• the user intends to import Oracle Payroll into Labor Distribution
• the payroll effective date is outside the payroll date range
If the effective date of the payroll is outside the payroll date range, users must set the effective date in Oracle Payroll to date earned.
To set the effective date in Oracle Payroll to date earned, change the parameter value for TGL_DATE_USED to E in the PAY_ACTION_PARAMETERS table.
Warning: If users do not change the parameter name, TGL_DATE_USED, to a value of E in the PAY_ACTION_PARAMETERS table, the accounting date of the payrolltransfer to General Ledger defaults to the effective date of the payroll, which results in an effective date inconsistency between Oracle Payroll and Labor Distribution.

2-10 Oracle Labor Distribution User Guide
8. Define Elements and Input ValuesWarning: Labor Distribution performs special calculations on the element Regular Salary to account for changes in salary or wages. If users create other elements for these types of pay, no special calculations are performed for those elements.
For information on defining elements and inputs, see Defining an Element , Oracle HRMS Compensation and Benefits Management Guide and Defining an Element's Input Values, Oracle HRMS Compensation and Benefits Management Guide.
9. Define Element LinksWarning: Labor Distribution imports and redistributes all pay amounts for employees on the selected payrolls for the elements selected. If usersdo not want the pay amount distributed, a separate element that is not selected for import to Labor Distribution can be used.
Warning: For elements to be imported to Labor Distribution, if costing is set up at this level, the costing account must be identical to the clearing account selected in Labor Distribution; otherwise, the payroll selected for import cannot be processed.
For information on defining element links, see Defining Element Links, Oracle HRMS Compensation and Benefits Management Guide.
For information on accounting transactions, see Labor Distribution Accounting Example, page I-1.
10. Define a Salary BasisA salary basis must be defined in Labor Distribution to use Labor Distribution.
To define salary bases, see Defining a Salary Basis, Oracle HRMS Compensation and Benefits Management Guide.
11. Set Up Grants AccountingSet up Grants Accounting. This step is optional.
To set up Grants Accounting, see Oracle Grants Accounting Setup Overview, Oracle Grants Accounting User's Guide.

Setting Up Oracle Labor Distribution 2-11
12. Set Up ProjectsSet up Projects. This step is optional.
To set up Projects, see Planning Your Implementation in Oracle Projects Implementation Guide.
13. Set Up WorkflowSet up Workflow to enable the effort reporting and distribution adjustments workflow processes.
To set up Workflow, see Overview of Setting Up, Oracle Workflow Administrator's Guide.
14. Set Up Organization Suspense AccountsDefine Grants Accounting and Projects charging instructions and General Ledger accounting flexfields to set up Organization Suspense Accounts.
To set up Organization Suspense Accounts, see Labor Scheduling Setup, page 4-2.
15. Set Up Organization Default Labor ScheduleDefine Grants Accounting and Projects charging instructions and General Ledger accounting flexfields and percentages to set up Organization Default Labor Schedule.
To set up Organization Default Labor Schedule, see Labor Scheduling Setup, page 4-2.
16. Set Up Organization Default AccountsDefine Grants Accounting charging instructions and General Ledger accounting flexfields to set up Organization Default Accounts.
To set up Organization Default Accounts, see Labor Scheduling Setup, page 4-2.
17. Set Up Element ImportedSelect payroll elements that you want to import during the payroll import process.
See: Labor Scheduling Setup, page 4-2.
18. Set Up Global Element OverrideDefine a set of charging instructions for a particular element that overrides all of the employee, organization, and assignment schedule hierarchy selections.
See: Labor Scheduling Setup, page 4-2.

2-12 Oracle Labor Distribution User Guide
19. Set Up Element GroupsDefine element groups at the site level.
See: Labor Scheduling Setup, page 4-2.
20. Set Up Payroll SourcesDefine source codes for the payroll source.
See: Labor Scheduling Setup, page 4-2.
21. Set Up Begin Date Auto-fill ParametersSelect an auto-fill option for the begin date field.
See: Labor Scheduling Setup, page 4-2.
22. Set Up End Date Auto-fill ParametersSelect an auto-fill option for the end date field.
See: Labor Scheduling Setup, page 4-2.
23. Set Up Clearing AccountSet up a clearing account to maintain balancing transactions.
See: Labor Scheduling Setup, page 4-2.
24. Set Up Salary Cap RatesSet up the annual salary cap rates of the sponsor to enable the Create Distribution Lines process to compute the salary cap.
See: Setting Up Salary Cap Rates, page 9-14
25. Set Up Project OverridesSet up project overrides to enable the Create Distribution Lines process to override the annual salary cap rate, and use the salary cap rate that you defined for the project.
See: Setting Up Project Overrides, page 9-14
26. Set Up Organization Excess Salary AccountsSet up organization excess salary accounts to enable the Create Distribution Lines process to transfer funds that exceed the salary cap.

Setting Up Oracle Labor Distribution 2-13
See: Setting Up an Organization Excess Salary Account, page 9-15
27. Set Up a Generic Excess Salary AccountSet up a generic excess salary account. The application transfers excess salaries to this account if the organization excess salary account does not exist or is not valid.
See: Setting Up a Generic Excess Salary Account, page 9-13
28. Set Up Descriptive Flexfields to Enter Additional Effort Report InformationYou must set up the Effort Report Information descriptive flexfield to enter additional information in the Headers section. You must also set up the Effort Approval Information descriptive flexfield to enter additional information in the Details section.
29. Set Up Encumbrance Payroll and Assignment SelectionSet up encumbrance payroll and assignment selection to select specific payroll names for encumbrance.
See: Labor Encumbrance Setup, page 5-2.
30. Set Up Default Encumbrance End DateSet up the default encumbrance end date.
See: Labor Encumbrance Setup, page 5-2.
31. Set Up Encumbrance Element SelectionSelect elements to include in encumbrances.
See: Labor Encumbrance Setup, page 5-2.
32. Set Up Creation Options for GLSelect the effective date to post encumbrance transactions to Oracle General Ledger.
See: Labor Encumbrance Setup, page 5-2.
33. Set Up Database Triggers and the Functional AreaTo use encumbrances, you must select the Generated and Enabled check boxes of the following dynamic triggers in the Dynamic Trigger Generation window:
• PSP_ASG_CHANGES_ARD
• PSP_ASG_CHANGES_ARU
2-14 Oracle Labor Distribution User Guide
See: Defining Dynamic Triggers, Oracle HRMS Payroll Processing Management Guide
In addition, you must set the legislation and the business group of the PSP_ASG_CHANGES_ARD and PSP_ASG_CHANGES_ARU triggers for the PSP Update Encumbrance functional area in the Functional Area Maintenance window.
See: Grouping Dynamic Triggers into Legislative Functional Areas, Oracle HRMS PayrollProcessing Management Guide
34. Set Up Lookup TablesSeed all parameters and their associated information into a lookup table.
See: Expenditure Type and Natural Account Auto-Population Setup, page 6-2.
35. Define Expenditure Type Auto-Population RulesDefine auto-population rules for expenditure types.
See: Expenditure Type and Natural Account Auto-Population Setup, page 6-2.
36. Define Natural Account Auto-Population RulesDefine auto-population rules for natural accounts.
See: Expenditure Type and Natural Account Auto-Population Setup, page 6-2.
37. Set Up By-Pass TableSet up the By-Pass table to define expenditure types to be passed over by auto-population.
See: Expenditure Type and Natural Account Auto-Population Setup, page 6-2.
38. Set Up Autopop SegmentSet up Autopop Segment to use auto-population.
See: Expenditure Type and Natural Account Auto-Population Setup, page 6-2.

System Administration Setup 3-1
3System Administration Setup
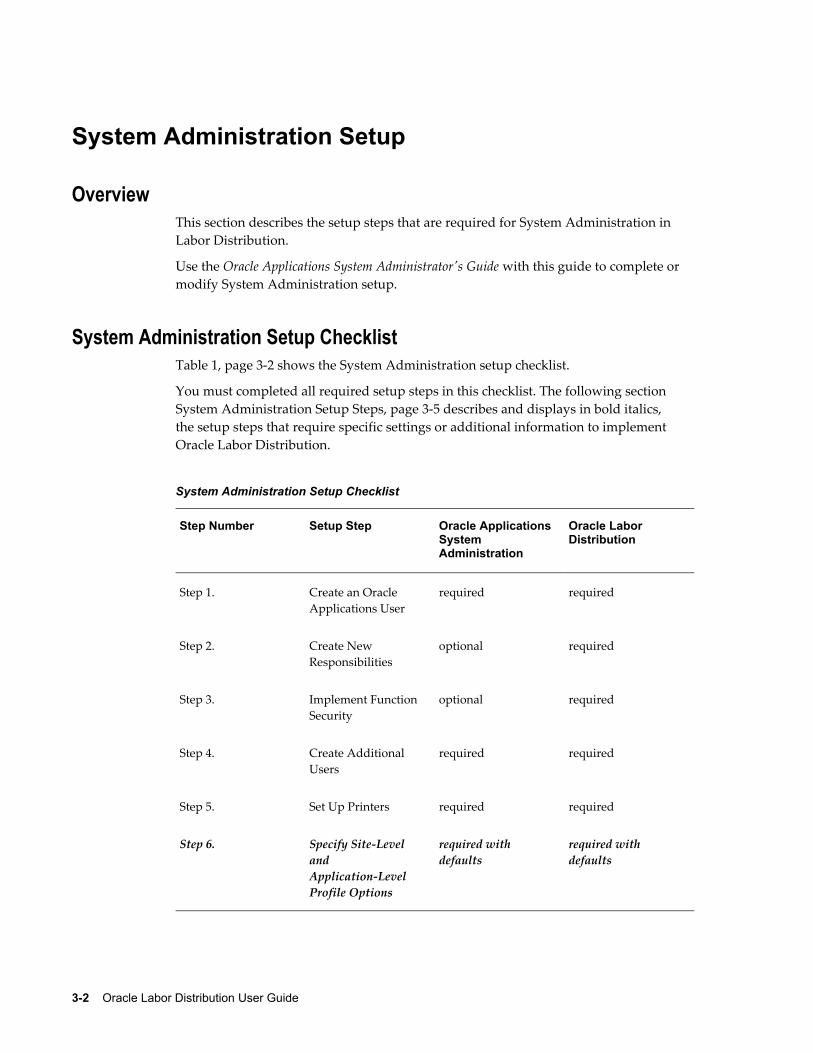
3-2 Oracle Labor Distribution User Guide
System Administration Setup
OverviewThis section describes the setup steps that are required for System Administration in Labor Distribution.
Use the Oracle Applications System Administrator's Guide with this guide to complete or modify System Administration setup.
System Administration Setup ChecklistTable 1, page 3-2 shows the System Administration setup checklist.
You must completed all required setup steps in this checklist. The following section System Administration Setup Steps, page 3-5 describes and displays in bold italics, the setup steps that require specific settings or additional information to implement Oracle Labor Distribution.
System Administration Setup Checklist
Step Number Setup Step Oracle Applications System Administration
Oracle Labor Distribution
Step 1. Create an Oracle Applications User
required required
Step 2. Create New Responsibilities
optional required
Step 3. Implement Function Security
optional required
Step 4. Create Additional Users
required required
Step 5. Set Up Printers required required
Step 6. Specify Site-Level and Application-Level Profile Options
required with defaults
required with defaults

System Administration Setup 3-3
Step Number Setup Step Oracle Applications System Administration
Oracle Labor Distribution
Step 7. Define Concurrent Managers
optional optional
Step 8. Define Request Sets optional optional
Step 9. Set Up AuditTrail optional optional
Step 10. Modify Language Prompts
optional optional
Step 11. Modify Territory LOV Values
optional optional

3-4 Oracle Labor Distribution User Guide
Step Number Setup Step Oracle Applications System Administration
Oracle Labor Distribution
Step 12. Enable the following Descriptive Flexfields:
• Adjustment Distributions Information - Labor Distribution
• Distribution Interface Information - Labor Distribution
• Employee Labor Schedule Information - Labor Distribution
• Global Elements Information - Labor Distribution
• Non Oracle Interface Information - Labor Distribution
• Organization Accounts Information - Labor Distribution
• Organization Default LS Information - Labor
optional optional

System Administration Setup 3-5
Step Number Setup Step Oracle Applications System Administration
Oracle Labor Distribution
Distribution
• Enter Journals: Lines (Oracle General Ledger)
• Encumbrance Items DescriptiveFlex Field (OracleGrants Management)
• Expenditure Items (Oracle Projects)
For more information about descriptive flexfields, see User Definable Descriptive Flexfields, Oracle HRMS Implementation Guide.
System Administration Setup StepsYou must complete all required System Administration setup steps to use Labor Distribution.
Use the Oracle Applications System Administrator's Guide with this guide to complete all required setup steps that are not described in this section.
Specify Site-Level and Responsibility-Level Profile OptionsThis section includes the following parts:
• Set Up Profile Option Levels, page 3-5
• Set Up Profile Option Values, page 3-7
• Set Up Configuration Options, page 3-13
Set Up Profile Option LevelsYou must specify the common user profile options for Oracle Applications as part of theOracle Applications System Administration setup. You can set a profile at the Site,

3-6 Oracle Labor Distribution User Guide
Application, Responsibility, or User level. Most profiles are seeded with default values at the site-level that serve as the default until you override them at other levels.
If you use a single organization, the profile options are set at the site level. If you implement Multiple Organizations, you must set all Labor Distribution profile values atthe responsibility level.
Table 2, page 3-6 describes the profile option levels.
Profile Option Levels
Feature Profile Option Name Site Application
Responsibility
User
Labor Scheduling
PSP: Use Organization Default Labor Schedule, page 3-8
x x
PSP: Use Organization Default Account, page 3-8 x x
PSP: Display Organization Default Account, page 3-8 x x
PSP: Generic Suspense Account Organization, page 3-9 x x
Labor Scheduling
PSP: Organization to be shown in reports, page 3-9 x x
GL: Ledger, page 3-9 x x
HR: Business Group, page 3-9 x x
HR: Security Profile, page 3-10 x x
MO: Security Profile, page 3-10 x
HR: Query Only Mode, page 3-10 x
Summarize Distribution Lines and Transfer
PSP: Enable Summarize & Transfer User Hooks, page 3-10
x x

System Administration Setup 3-7
Feature Profile Option Name Site Application
Responsibility
User
Distribution Adjustments andMaintenance of Non-Oracle and Pre-generated Distribution Lines
PSP: Use Default GL Posting Override Date, page 3-11 x x
Distribution Adjustments
PSP: Adjustment Approval Timeout in Days, page 3-11 x x
HR: Query Only Mode, page 3-10 x
Maintenance of Non-Oracle Sub-lines
PSP: Use Non-Oracle Effective Date, page 3-11 x x
Maintenance of Pre-generated Distribution Lines
PSP: Use Suspense Account for Pre-Gen Import, page 3-11
x x
Encumbrance Summarize and Transfer
PSP: Enable GL Summarization, page 3-12 x x
Labor Encumbrance
PSP: Integrate LD Encumbrances with Position Control, page 3-12
x x
Reports File Server: Enabled, page 3-12 x x
Concurrent: Save Output, page 3-13 x x
Concurrent: Report Copies, page 3-13 x x
Printer, page 3-13 x x
Set Up Profile Option ValuesTable 3, page 3-8 describes the profile option values.
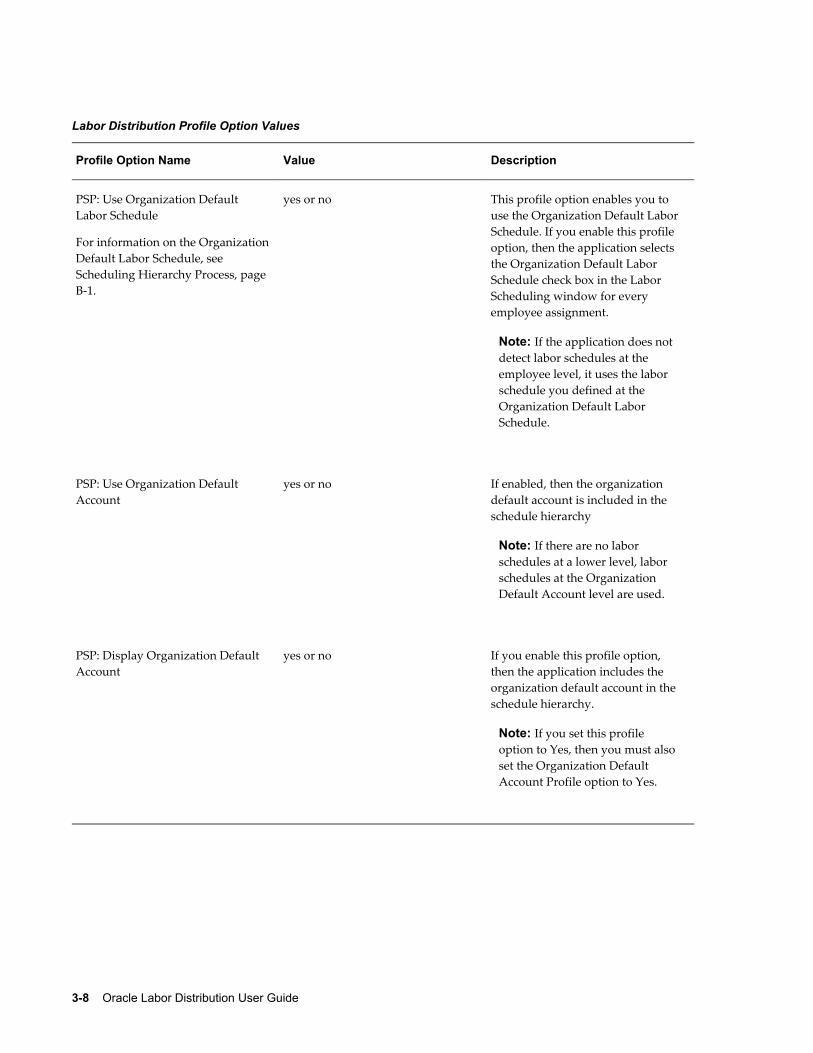
3-8 Oracle Labor Distribution User Guide
Labor Distribution Profile Option Values
Profile Option Name Value Description
PSP: Use Organization Default Labor Schedule
For information on the OrganizationDefault Labor Schedule, see Scheduling Hierarchy Process, page B-1.
yes or no This profile option enables you to use the Organization Default Labor Schedule. If you enable this profile option, then the application selects the Organization Default Labor Schedule check box in the Labor Scheduling window for every employee assignment.
Note: If the application does not detect labor schedules at the employee level, it uses the labor schedule you defined at the Organization Default Labor Schedule.
PSP: Use Organization Default Account
yes or no If enabled, then the organization default account is included in the schedule hierarchy
Note: If there are no labor schedules at a lower level, labor schedules at the Organization Default Account level are used.
PSP: Display Organization Default Account
yes or no If you enable this profile option, then the application includes the organization default account in the schedule hierarchy.
Note: If you set this profile option to Yes, then you must alsoset the Organization Default Account Profile option to Yes.

System Administration Setup 3-9
Profile Option Name Value Description
PSP: Generic Suspense Account Organization
generic suspense account Use this profile option to identify an Organization as the Generic Suspense Account Organization. You must set up this profile option at the responsibility level.
Note: If you implement MultipleOrganizations, then you must enable this profile option. You must also link a generic suspense account to each responsibility.
PSP: Organization to be shown in reports
organization name This profile option allows you to select the organization that you want to want the application to display in reports as the institution name.
GL: Ledger Ledger This profile option enables you to use the ledger in Labor Distribution.You must set up this profile option at the Site level or the Responsibilitylevel.
Note: If you implement MultipleOrganization, then you must use the GL: Ledger profile option to link the ledger to a specific Labor Distribution responsibility.
HR: Business Group Business group Enables business group to be used; must be set up at the Responsibility level
Note: If Multiple Organizations is implemented, data relating to the employee assignments and organizations is secured by the specific business group to which the Labor Distribution responsibility is linked.

3-10 Oracle Labor Distribution User Guide
Profile Option Name Value Description
HR: Security Profile Security profile You must specify a security profile that provides access to all the records in the business group that your responsibility links to. This is because all the concurrent processes in Labor Distribution need access to all the records within a business group.
MO: Security Profile Set of operating units This profile option defines access to projects, awards, tasks, and expenditure organizations across operating units. You must set up this profile option at the Responsibility level.
You can set the value of the MO: Security Profile option to the defaultsecurity profile of your business group. However, ensure that this security profile contains all the organizations in the business group.
HR: Query Only Mode Yes or No Use this to set read-only or update access to the Schedule Lines and the Distribution Adjustments windows.
PSP: Enable Summarize & Transfer User Hooks
yes or no If you enable this profile option, then the application detects user hooks when you run the Summarizeand Transfer Payroll Distributions process.

System Administration Setup 3-11
Profile Option Name Value Description
PSP: Use Default GL Posting Override Date
yes or no If you set this profile option to Yes, then the application uses the system date as the effective date for all General Ledger transactions. You cannot override this date. If you enable this profile option, then you cannot modify the GL Date fields in the Distribution Adjustments window.
If you set this profile option to No, then you can specify the override date for the application to post transactions to Oracle General Ledger. For example, if the original transaction occurs on 10-Jan-2000, and you set the GL override date to 31-Jan-2000, then the application uses 31-Jan-2000 as the effective datefor Oracle General Ledger transactions. If you do not specify anoverride date, then the application performs the transactions using the original date.
PSP: Adjustment Approval Timeout in Days
number This profile option enables you to specify when a distribution adjustment workflow approval notification must time out. The default value is zero days, which indicates that the approval notification never times out.
PSP: Use Non-Oracle Effective Date yes or no If you enable this profile option, then the application uses the Non-Oracle effective date from the interface table. If you do not enable this profile option, then the application uses the end date of the payroll period as the effective date.
PSP: Use Suspense Account for Pre-Gen Import
yes or no If you enable this profile option, the Import process uses the Suspense Account for Pre-Generated distribution lines that have invalid accounts.

3-12 Oracle Labor Distribution User Guide
Profile Option Name Value Description
PSP: Enable GL Summarization yes or no If you enable this profile option, then the application creates the summary journals at the General Ledger account level instead of the employee assignment level.
PSP: Integrate LD Encumbrances with Position Control
yes or no This profile option enables you to integrate Oracle Labor Distribution and the Position Control functionality in Oracle HRMS.
If you enable this profile, Labor Distribution will:
• Relieve the Position Control commitments for the date rangewhen it computes its own encumbrances for the assignment.
• Convey to Position Control that Labor Distribution is computingthe assignment encumbrances and Position Control does not need to compute the commitments.
• Provide Position Control with the encumbrance amount that Labor Distribution computes for the assignment, element, and date range with the charging instructions.
if you do not want to use the Position Control functionality, then set this profile option to No.
Note: To use the Position Control feature, you must install and implement Oracle HRMS.
File Server: Enabled yes or no This profile option enables you viewreports in the concurrent manager.

System Administration Setup 3-13
Profile Option Name Value Description
Concurrent: Save Output yes or no If you enable this profile option, then the application uses the default value in the Printing Options window that you use to print a report.
Concurrent: Report Copies number This profile option enables you to specify the default value for the number of copies to appear in the Printing Options window, which theapplication uses to print the report.
Printer printer This profile option enables you to specify the default printer to appear in the Printing Options window.
Set Up Configuration OptionsTable 4 , page 3-13 describes the configuration options available in Labor Distribution. Use the Configuration Values page to set these options.
See: Configuring Values in Labor Distribution, page 3-15
Labor Distribution Configuration Options
Configuration Option Name Value Description
Defer Auto-population at assignment or element group level
yes or no Set to yes to defer Auto-population rule invocation, at the assignment or element group level, until after you submit the batch.
Show 100% distributions for each element
yes or no Set to yes to show 100% summation for each element in the Distribution Adjustments window.

3-14 Oracle Labor Distribution User Guide
Configuration Option Name Value Description
Use DFF columns when creating summary lines for payroll distributions
yes or no Set to yes to enable the Descriptive Flexfields (DFF) and to send information collected from these DFFs to Oracle General Ledger, OracleProjects, and Oracle Grants Accounting
Use DFF columns when creating summary lines for encumbrances
yes or no Set to yes to enable the DFF and to send information collected from these DFFs to Oracle General Ledger, OracleProjects, and Oracle Grants Accounting
Assign Generic Organization for Excess Salary Account
NA Use this to identify an organization as a generic organization so that you can create a generic excess salary account. The application transfers excess funds to this account if the organization excess salary account does notexist or is not valid.
Enable Salary Cap yes or no Set to Yes, to enable salary cap processing in Labor Distribution.
Map Sponsor Code to Sponsor
NA Use this to associate the sponsor name with the predefined sponsor cap details. The application processes salary cap for this sponsor.
Enter the overriding element set
NA Use this to select an element set to specify the elements that the application uses to process the salary cap. By default the application uses the salary element associated with an employee's salary basis.

System Administration Setup 3-15
Configuration Option Name Value Description
Create Effort Report using PTAEO details in GL_CODE_COMBINATIONStable
yes or no This indicates how the application processes GL charging instructions. If you select Yes, then the application retrieves and converts information in GL Segments to display as Project, Task, Award, Expenditure Type, Expenditure Organization (PTAEO) information in the effort report. If you select No, then the application does not convert the PTAEO information and displays it asGL segments.
Select the columns in GL_CODE_COMBINATIONStable that store PTAEO details
NA Use this to select the GL Segments you use to store PTAEO information.
Enable Auto-Population NA Use this to enable auto-population rules at any level of the scheduling hierarchy.
Configuring Values for Labor DistributionUse the Configuration Values page to choose settings for the following modules:
• Distribution Adjustments, page 3-15
• Effort Reporting, page 3-16
• Salary Cap, page 3-16
• Summarize and Transfer, page 3-17
For details of these configuration values, see: Set Up Configuration Options, page 3-13
To configure values for Distribution Adjustments:1. Search for Distribution Adjustments as the Module Name.

3-16 Oracle Labor Distribution User Guide
2. Select Defer Auto-population at assignment or element group level as the Configuration Type.
3. In the Defer Auto-population at assignment or element group level region, select Yes to enable auto-population at assignment or element group level for your business group. Click Apply.
See: Configuration, page 14-12
4. Select Show 100% distributions for each element as the Configuration Type.
5. In the Show 100% distributions for each element region, select Yes to display the distribution percentages summed to 100% for each element rather than across all elements.
See: Distribution Adjustment at the Element Group Level, page 14-4
To configure values for Effort Reporting:1. Search for Effort Reporting as the Module Name.
2. Select Create Effort Report using PTAEO details in GL_CODE_COMBINATIONS table as the Configuration Type.
3. In the Create Effort Report using PTAEO details in GL_CODE_COMBINATIONS table region, select Yes if you store PTAEO information in GL segments in the Accounting Flexfield.
4. Click Apply.
5. Select Select the columns in GL_CODE_COMBINATIONS table that store PTAEO details as the Configuration Type.
6. Click Add Configuration Value.
7. In the Select the columns in GL_CODE_COMBINATIONS table that store PTAEO details region that displays, select the GL segment you use to store each type of information (Project ID, Task ID, Award ID, Expenditure Organization ID, and Expenditure Type).
8. Click Apply.
See: Create Effort Report Templates, page 16-4
To configure values for Salary Cap:1. On the Configuration Values page, select Salary Cap as the Module Name.
2. Select Enable Salary Cap Processing as the Configuration Type.

System Administration Setup 3-17
3. In the Enable Salary Cap Processing region that displays, select Yes to enable salary cap processing for your organization.
4. Click Apply.
5. On the Configuration Values page, select Map Sponsor Code to Sponsor as the Configuration Type.
6. Click Add Configuration Value.
7. Enter a Configuration Name.
8. Select a Sponsor Code. This is the list of predefined sponsors.
9. Select a Sponsor Name. This is the sponsor to whom you want to apply the salary cap. The list that displays is the list of sponsors defined in Oracle Grants.
10. Click Apply.
11. On the Configuration Values page, select Override Element Set as the ConfigurationType.
12. Click Add Configuration Value.
13. In the Override Element Set region that displays, select an Override Element Set from the list.
14. Click Apply.
See: Salary Cap, page 9-4
To configure values for Summarize and Transfer:1. On the Configuration Values page, select Summarize and Transfer as the Module
Name.
2. Select Use DFF columns when creating summary lines for encumbrances as the Configuration Type.
3. In the Use DFF columns when creating summary lines for encumbrances region that displays, select Yes to enable the application to use DFF columns to create encumbrance summary lines.
See: Labor Encumbrance Processes and Reports Procedures, page 15-2
4. Click Apply.
5. On the Configuration Values page, select Use DFF columns when creating summary lines for payroll distributions as the Configuration Type.

3-18 Oracle Labor Distribution User Guide
6. In the Use DFF columns when creating summary lines for payroll distributions region, select Yes to enable the application to use DFF Columns to create distribution summary lines.
See: Summarize and Transfer Payroll Distributions Procedures, page 10-2

Labor Scheduling Setup 4-1
4Labor Scheduling Setup

4-2 Oracle Labor Distribution User Guide
Labor Scheduling Setup
DefinitionThe labor scheduling setup options provide users with flexibility in labor scheduling.
OverviewWith this process you set up Oracle Labor Distribution to distribute payroll costs to one or more charging instructions in Oracle Grants Accounting, Oracle Projects, or Oracle General Ledger.
Table 1, page 4-2 shows the charging instructions you must enter for Projects and Grants Accounting.
Projects and Grants Accounting Charging Instructions
Field Projects Grants Accounting
Project x x
Expenditure Organization x x
Expenditure Type x x
Task x x
Award x
ProcessThe labor scheduling setup process includes setting up:
• Generic Suspense Account, page 4-3
• Organization Suspense Accounts, page 4-3
• Organization Default Labor Schedule, page 4-4
• Organization Default Accounts, page 4-4

Labor Scheduling Setup 4-3
• Elements Imported, page 4-5
• Global Element Override, page 4-5
• Element Groups, page 4-6
• Payroll Sources, page 4-6
• Begin Date and End Date Auto-fill Parameters, page 4-6
• Clearing Account, page 4-7
Generic Suspense Account The system administrator selects the Generic Suspense Account organization. For information on selecting the Generic Suspense Account Organization, see System Administration Setup, page 3-2.
RulesChoosing a Generic Suspense Account is mandatory. After the System Administrator selects Generic Suspense Account organization, users can specify Grants Accounting and Projects charging instructions and General Ledger accounting flexfields. Users specify the effective date range of the organization suspense account.
Once you save an organization suspense account, the following rules apply:
• You cannot delete the Generic Suspense Account if you have imported payrolls for the date range of the suspense account.
• You cannot modify the begin date.
• You can charge the Generic Suspense Account organization to a different organization by having the System Administrator select a different organization as a Generic Suspense Account organization.
Note: There can only be one Generic Suspense Account organization at one time.
For information on validation rules, see Data Entry Validations Process, page D-1.
Organization Suspense Accounts
RulesSetting up Organization Suspense Accounts is optional. You can specify Grants Accounting and Projects charging instructions and General Ledger accounting
4-4 Oracle Labor Distribution User Guide
flexfields. You specify the effective date range of the organization suspense account.
Once you save an organization suspense account, the following rules apply:
• You cannot delete an organization suspense account if you have imported payrolls for the date range of the suspense account.
• You cannot modify the begin date.
For information on validation rules, see Data Entry Validations Process, page D-1.
Organization Default Labor ScheduleSetting up the Organization Default Labor Schedule is optional. You make this determination when setting up system profile options.
For information on setting up system profile options, see System Administration Setup, page 3-2
The Organization Default Labor Schedule setup procedure defines the organization default labor schedule by specifying Grants Accounting and Projects charging instructions and General Ledger accounting flexfields and percentages. You specify the effective date range of the default labor schedule.
RulesOnce you have saved the default labor schedule, the following rules apply:
• You cannot delete the default labor schedule if you have imported payrolls for the date range of the default labor schedule.
• You cannot modify the begin date.
For information on validation rules, see Data Entry Validations Process, page D-1.
Organization Default AccountsSetting up Organization Default Accounts is optional. You can make this determination when setting up system profile options.
For information on setting up system profile options, see System Administration Setup, page 3-2.
The Organization Default Accounts setup procedure sets up an organization default account by specifying Grants Accounting and Projects charging instructions and General Ledger accounting flexfields. You specify the effective date range of the default account.
RulesOnce you save the default account, the following rules apply:

Labor Scheduling Setup 4-5
• You cannot delete the default if you have imported payrolls for the date range of the organization default account.
• You cannot modify the begin date.
For information on validation rules, see Data Entry Validations Process, page D-1.
Elements ImportedThe Elements Imported setup procedure enables users to define which payroll elementsthe payroll import process imports and the effective date range of the element. Some examples of payroll elements are earnings, deductions, and benefits. You can add or delete elements from the Elements Imported setup window. You cannot delete the element if you have imported payrolls for the defined dates, but you can end-date it.
Note: You can use only elements selected for import in the Scheduling Hierarchy region of the Schedule Lines window.
The following rules apply to Elements Imported:
• The same element can occur more than once as long as the periods do not overlap.
• You can extend the end date of an element as long as the new period does not overlap with that of an already existing period of the same element.
• Once you save an element import setup, you cannot modify the begin date of an element.
For information on validation rules, see Data Entry Validations Process, page D-1.
Global Element OverrideThe Global Element Override setup procedure creates a specific set of charging instructions for a particular element (such as earnings, deductions, and benefits). The global element overrides all of the employee and assignment schedule hierarchy selections. You cannot delete the global element if there are payrolls imported for the defined dates, but you can end-date it.
The user specifies Grants Accounting and Projects charging instructions and General Ledger accounting flexfields and percentages. The user also specifies the effective date range of the override.
RulesWhen you save the override schedule, the following rules apply:
• You cannot delete the override schedule if you have payrolls imported for the defined dates, but you can end-date it.

4-6 Oracle Labor Distribution User Guide
• You cannot modify the begin date.
For information on validation rules, see Data Entry Validations Process, page D-1.
Element GroupsYou define element groups at the site level and use them to group elements. These classification groups identify a common distribution group of all elements within a classification that are scheduled and distributed for an employee assignment.
RulesThe following rules apply to the element groups:
• An element can be active in only one group for a given day.
• Once you save an element group, you cannot modify its begin date. However, you can end-date it.
For information on validation rules, see Data Entry Validations Process, page D-1.
ExampleCreate a single schedule for an employee assignment at the element group level of Regular Salary, where Regular Salary includes the elements of Regular Pay, Overtime, and Shift. Any Regular Pay, Overtime, and Shift element paid to that employee assignment uses the labor schedule defined for the Regular Salary element group. This means that the user does not have to individually create a labor schedule for each element.
For information on scheduling hierarchies, see Scheduling Hierarchy Process, page B-1.
Payroll Sources Use the Payroll Sources setup procedure to define source codes for payroll sources other than Oracle. Use the Source Type source code for validations on the import of non-Oracle payroll sources and pregenerated distribution lines. You can have more than one source code for each payroll source type.
Begin Date and End Date Auto-fill Parameters Use the Begin Date and End Date Auto-fill Parameters setup procedures to select one of three options to auto-fill the begin date field and end date field in the Schedule Lines window for each charging instruction to Grants Accounting, Projects, and General Ledger:
• No auto-fill: The Begin Date is not auto-filled.

Labor Scheduling Setup 4-7
• User-specified: Use the user-defined Begin Date for auto-fill.
• System-generated: If you have installed Grants Accounting, the auto-filled Begin Date is the latest date between the current system date, the employee assignment Begin Date, the award Begin Date/project Begin Date, and the day after the last Payroll Process Date. If you have General Ledger installed, the auto-filled Begin Date is the latest date between the current system date, the employee assignment Begin Date, and the day after the last Payroll Process Date.
• System-generated: If you have installed Grants Accounting, the auto-filled End Date is the latest date between the current system date, the employee assignment Begin Date, the award Begin Date/project Begin Date, and the day after the last Payroll Process Date. If you have General Ledger installed, the auto-filled End Date is the latest date between the current system date, the employee assignment Begin Date, and the day after the last Payroll Process Date.
Clearing AccountUse the clearing account in Labor Distribution for all types of balancing transactions. The clearing account maintains a balance of zero as Labor Distribution processes transactions. You can use the clearing account to verify that transactions are processing correctly by returning to a zero balance.
The clearing account is usually the same General Ledger account that was charged with employee payroll costs when they were transferred to General Ledger from Oracle Payroll. Use the Clearing Account setup procedure to change the clearing account.
For information on accounting transactions, see Labor Distribution Accounting Example, page I-1.
For information on defining payrolls, see Labor Scheduling Setup, page 4-2.
Setting Up Organization Suspense Accounts ProcedureSetting up Organization Suspense Accounts includes:
• Entering a General Ledger Accounting Flexfield, page 4-8
• Entering a Grants Accounting or Projects Instruction, page 4-8
To set up organization suspense accounts, perform the following steps.
1. In Labor Distribution, navigate to the Organization Suspense Accounts window as follows:
Setup > Organization Suspense Accounts
2. Perform one of the following tasks:

4-8 Oracle Labor Distribution User Guide
• To set up a generic suspense account, select the Generic Suspense Account check box.
• To set up an organization suspense account, in the Organization field, select an organization from the list of values.
Entering a General Ledger Accounting FlexfieldIf entering a General Ledger accounting flexfield, perform the following steps:
1. In the GL Account field, select a General Ledger account from the list of values. A pop-up find window appears.
2. In the Shortcut Code field, select a code from the list of values, and click OK. The Parameters pop-up window appears.
3. Enter data in each field as required from the list of values, and click OK.
4. In the Begin Date field, enter the start date for the use of the General Ledger accountspecified by the accounting flexfield.
5. Optionally, in the End Date field, enter the end date for the use of the General Ledger account specified by the accounting flexfield.
For information on end date validation rules, see Data Entry Validations Process, page D-1.
6. Repeat steps 1 through 5, page 4-8 until completed.
Note: You must end-date records before you can create additional records.
7. Optionally, in the Comments field, enter comments.
Entering a Grants Accounting or Projects InstructionTo enter a Grants Accounting or Projects charging instruction, perform the following steps:
1. Enter data in the following fields as described in Table 2, page 4-9:
• Project Number
• Task Number
• Award Number, for Grants Accounting only

Labor Scheduling Setup 4-9
• Exp Org
• Exp Type
• Begin Date
• End Date
2. Repeat Step 1 until completed.
Note: You must end-date records before you can create additional records.
3. Save or save and continue.
4. Close the window.
Organization Suspense Accounts Window Description
Organization Suspense Accounts Window Description
Field Name Type Features Description
Organization required list of values Organization name.
Generic Suspense Account display only check box Indicates if you are using this organization as a generic suspense account. Corresponds to the organization you selected as PSP: Generic Suspense Account Organization profile option.
Account Details Region
GL Account conditionally required list of values: pop-up window
General Ledger accountingflexfield; required if there are no Grants Accounting or Projects charging instructions.
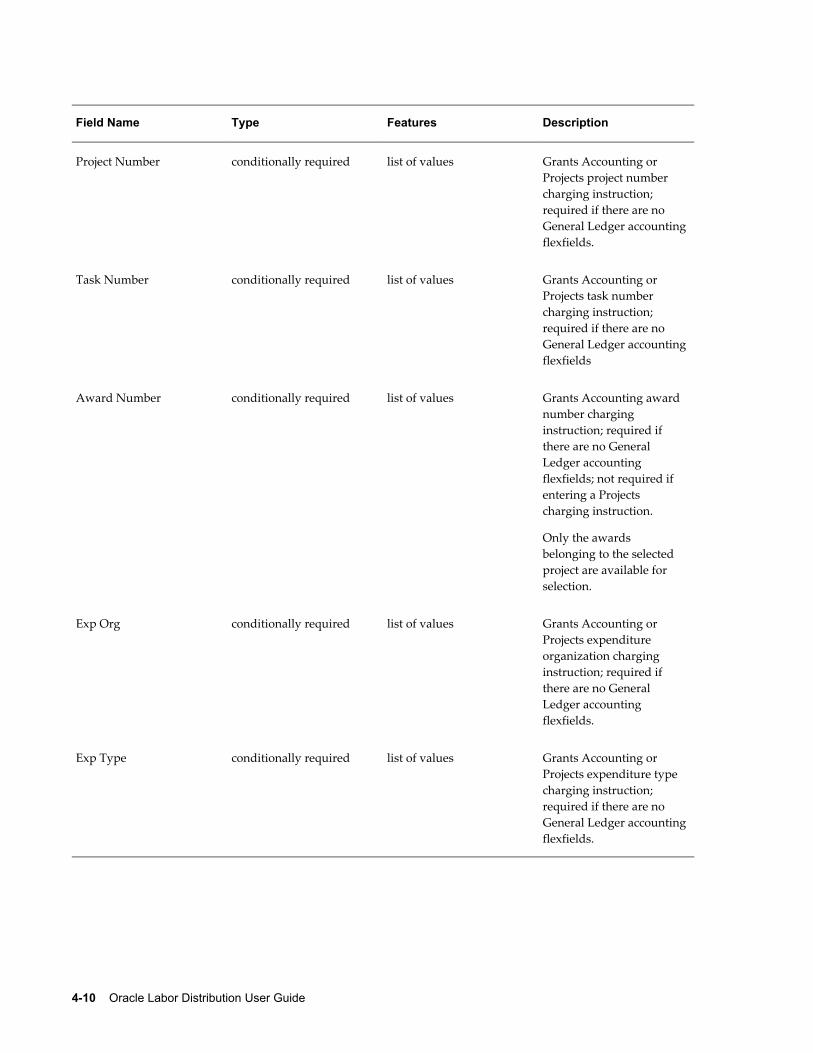
4-10 Oracle Labor Distribution User Guide
Field Name Type Features Description
Project Number conditionally required list of values Grants Accounting or Projects project number charging instruction; required if there are no General Ledger accountingflexfields.
Task Number conditionally required list of values Grants Accounting or Projects task number charging instruction; required if there are no General Ledger accountingflexfields
Award Number conditionally required list of values Grants Accounting award number charging instruction; required if there are no General Ledger accounting flexfields; not required if entering a Projects charging instruction.
Only the awards belonging to the selected project are available for selection.
Exp Org conditionally required list of values Grants Accounting or Projects expenditure organization charging instruction; required if there are no General Ledger accounting flexfields.
Exp Type conditionally required list of values Grants Accounting or Projects expenditure type charging instruction; required if there are no General Ledger accountingflexfields.

Labor Scheduling Setup 4-11
Field Name Type Features Description
Begin Date required list of values: pop-up calendar
Effective start date of suspense account. You cannot modify or delete this date.
End Date optional list of values: pop-up calendar
Effective end date of the suspense account.
Comments optional n/a User setup comments.
Setting Up Organization Default Labor Schedule ProcedureSetting up Organization Default Labor Schedule includes the following:
• Entering a General Ledger Accounting Flexfield, page 4-11
• Entering a Grants Accounting or Projects Charging Instruction, page 4-12
To set up organization default labor schedules:
1. In Labor Distribution, navigate to the Organization Default Labor Schedule window as follows:
Setup > Org. Default Labor Schedules
2. In the Organization field, select an organization from the list of values.
3. In the Begin Date field, enter the effective start date for the Organization Default Labor Schedule from the list of values.
4. Optionally, in the End Date field, enter the effective end date for the Organization Default Labor Schedule from the list of values.
For information on deletion and end date validation rules, see Data Entry Validations Process, page D-1.
Entering a General Ledger Accounting FlexfieldTo enter a General Ledger accounting flexfield:
1. In the GL Account field, select a General Ledger account from the list of values. A pop-up find window appears.
2. In the Shortcut Code field, enter a code from the list of values, and click OK. The

4-12 Oracle Labor Distribution User Guide
Parameters pop-up window appears.
3. From the list of values, enter data in each field as required, and click OK.
4. In the % field, enter the distribution percentage to be applied to this accounting flexfield.
5. Repeat steps 1 through 4, page 4-11 until completed.
Note: You must end-date records before you can create additional records.
Entering a Grants Accounting or Projects Charging InstructionTo enter a Grants Accounting or Projects charging instruction:
1. Enter data in the following fields as described in Table 3, page 4-13:
• Project Number
• Task Number
• Award Number, for Grants Accounting only
• Exp Org
• Exp Type
• %
2. Repeat step 1 until completed.
Note: You must end-date records before you can create additional records.
3. Save or save and proceed.
4. Close the window.

Labor Scheduling Setup 4-13
Organization Default Labor Schedule Window Description
Organization Default Labor Schedule Window Description
Field Name Type Features Description
Organization required list of values Organization name.
Begin Date required list of values: pop-up calendar
Effective start date for default labor schedule. You cannot modify or delete this date.
End Date optional list of values: pop-up calendar
Effective end date for default labor schedule.
Default Schedules Region
GL Account conditionally required list of values: pop-up window
General Ledger accountingflexfield. This is required ifthere are no Grants Accounting or Projects charging instructions.
Project Number conditionally required list of values Grants Accounting or Projects project number charging instruction. This is required if there are no General Ledger accountingflexfields.
Task Number conditionally required list of values Grants Accounting or Projects project task number charging instruction. This is required if there are no General Ledger accountingflexfields.

4-14 Oracle Labor Distribution User Guide
Field Name Type Features Description
Award Number conditionally required list of values Grants Accounting project award number charging instruction. This is required if there are no General Ledger accountingflexfields. It is not requiredif you are entering a Projects charging instruction.
Only the awards belonging to the selected project are available for selection.
Exp Org conditionally required list of values Grants Accounting or Projects project expenditure organization charging instruction. This is required if there are no General Ledger accountingflexfields.
Exp Type conditionally required list of values Grants Accounting or Projects project expenditure type charging instruction. This is required if there are no General Ledger accountingflexfields.
% required n/a Distribution percentage applied to the schedule line for the dates specified.
Comments optional n/a User setup comments.
Setting Up Organization Default Accounts Procedure Setting up Organization Default Accounts includes the following:
• Entering a General Ledger Accounting Flexfield, page 4-15
• Entering a Grants Accounting or Projects Instruction, page 4-15

Labor Scheduling Setup 4-15
To set up organization default accounts:
1. In Labor Distribution, navigate to the Organization Default Accounts window as follows:
Setup >Organization Default Accounts
2. In the Organization field, select an organization from the list of values.
Entering a General Ledger Accounting FlexfieldIf entering a General Ledger accounting flexfield:
1. In the GL Code field, select a General Ledger account from the list of values. A pop-up find window appears.
2. In the Shortcut Code field, enter a code from the list of values, and click OK. The Parameters pop-up window appears.
3. From the list of values, enter data in each field as required, and click OK.
4. In the Begin Date field, enter the start date for the use of the General Ledger accountspecified by the accounting flexfield.
5. Optionally, in the End Date field, enter the end date for the use of the General Ledger account specified by the accounting flexfield.
For information on end date validation rules, see Data Entry Validations Process, page D-1.
6. Repeat steps 1 through 7, page 4-15 until completed.
Note: You must end-date Records must be end-dated before additional records can be created.
Entering a Grants Accounting or Projects InstructionWhen entering a Grants Accounting or Projects charging instruction:
1. Enter data in the following fields as described in Table 4, page 4-16:
• Project Number
• Task Number
• Award Number, for Grants Accounting only
• Exp Org

4-16 Oracle Labor Distribution User Guide
• Exp Type
• Begin Date
• End Date
• Comments
2. Repeat Step 1 until completed.
Note: You must end-date Records must be end-dated before additional records can be created.
3. Save or save and proceed.
4. Close the window.
Organization Default Accounts Window Description
Organization Default Accounts Window Description
Field Name Type Features Description
Organization required list of values Organization name.
Account Details Region
GL Account conditionally required list of values: pop-up window
General Ledger accountingflexfield. This is required ifthere are no Grants Accounting charging instructions.
Project Number conditionally required list of values Grants Accounting or Projects project number charging instruction. This is required if there are no General Ledger accountingflexfields.

Labor Scheduling Setup 4-17
Field Name Type Features Description
Task Number conditionally required list of values Grants Accounting or Projects project task number charging instruction. This is required if there are no General Ledger accountingflexfields.
Award Number conditionally required list of values Grants Accounting award number charging instruction. This is required if there are no General Ledger accountingflexfields. This is not required if you are entering a Projects charging instruction.
Only the awards belonging to the selected project are available for selection.
Exp Org conditionally required list of values Grants Accounting or Projects expenditure organization charging instruction. This is required if there are no General Ledger accountingflexfields.
Exp Type conditionally required list of values Grants Accounting or Projects expenditure type charging instruction. This is required if there are no General Ledger accountingflexfields.
Begin Date required list of values: pop-up calendar
Effective start date of the default account. You cannot modify this date.
End Date optional list of values: pop-up calendar
Effective end date of the default account.

4-18 Oracle Labor Distribution User Guide
Field Name Type Features Description
Comments optional n/a User setup comments.
Setting Up Elements Imported ProcedureTo set up elements, perform the following steps.
1. In Labor Distribution, navigate to the Elements Imported window as follows:
Setup >Element Types
2. Enter data in each field of the Elements Imported window as described in Table 5, page 4-18.
3. To add a new line, place the cursor in the Element Name field. A new line appears.
4. Select an element from the list of values.
5. Repeat Step 2, page 4-18.
6. Save or save and proceed.
7. Close the window.
Elements Imported Window Description
Elements Imported Window Description
Field Name Type Features Description
Element Name required list of values All payroll elements appear in this list of values.
Begin Date required list of values: pop-up calendar
Effective import start date.
End Date optional list of values: pop-up calendar
Effective import end date.

Labor Scheduling Setup 4-19
Field Name Type Features Description
Adjust conditionally required check box If you select this, you can adjust the element in the Distribution Adjustments window.
Comments optional n/a User setup comments.
Setting Up Global Element Override Procedure Setting up Global Element Override includes the following:
• Entering a General Ledger Accounting Flexfield, page 4-19
• Entering a Grants Accounting or Projects Instruction, page 4-20
To set up a global element override:
1. In Labor Distribution, navigate to the Global Element Override window as follows:
Setup > Global Elements
2. In the Element field, select an element from the list of values.
3. In the Begin Date field, enter the effective start date for the global element override from the list of values.
4. Optionally, in the End Date field, enter the effective end date for the global element override from the list of values.
For information on end date validation rules, see Data Entry Validations Process, page D-1.
Entering a General Ledger Accounting FlexfieldIf entering a General Ledger accounting flexfield:
1. In the GL Account field, select a General Ledger account from the list of values. A pop-up find window appears.
2. In the Shortcut Code field, enter a code from the list of values. The Parameters pop-up window appears.
3. Click OK.

4-20 Oracle Labor Distribution User Guide
4. From the list of values, enter data in each field as required.
5. Click OK.
6. In the % field, enter the distribution percentage to be applied to the accounting flexfield.
Entering a Grants Accounting or Projects InstructionIf entering Grants Accounting or Projects charging instructions, perform the following steps.
1. Enter data in the following fields as described in Table 6, page 4-20:
• Project Number
• Task Number
• Award Number, for Grants Accounting only
• Exp Org
• Exp Type
• %
2. Save or save and proceed.
3. Close the window.
Global Element Override Window Description
Global Element Override Window Description
Field Name Type Features Description
Element required list of values Element.
Begin Date required list of values: pop-up calendar
Effective start date of the override. You cannot modify or delete this date.
End Date optional list of values: pop-up calendar
Effective end date of the override.

Labor Scheduling Setup 4-21
Field Name Type Features Description
Account Details Region
GL Account conditionally required list of values: pop-up window
General Ledger accountingflexfield. This is required ifthere are no Projects or General Ledger charging instructions.
Project Number conditionally required list of values Grants Accounting or Projects project number charging instruction. This is required if there are no General Ledger accountingflexfields.
Task Number conditionally required list of values Grants Accounting or Projects project task number charging instruction. This is required if there are no General Ledger accountingflexfields.
Award Number conditionally required list of values Grants Accounting project award number charging instruction. This is required if there are no General Ledger accountingflexfields. This is not required if you are entering a Projects charging instruction.
Only the awards belonging to the selected project are available for selection.
Exp Org conditionally required list of values Grants Accounting or Projects project expenditure organization charging instruction. This is required if there are no General Ledger accountingflexfields.

4-22 Oracle Labor Distribution User Guide
Field Name Type Features Description
Exp Type conditionally required list of values Grants Accounting or Projects project expenditure type charging instruction. This is required if there are no General Ledger accountingflexfields.
% required n/a Distribution percentage applied to schedule line for dates specified.
Comments optional n/a User setup comments
Setting Up Element Groups Procedure To set up an element group:
1. In Labor Distribution, navigate to the Element Groups window as follows:
Setup >Element Groups
2. Enter data in each field of the Element Groups window as described in Table 7, page 4-22.
3. Save or save and proceed.
4. Close the window.
Element Groups Window Description
Element Groups Window Description
Field Name Type Features Description
Element Group required n/a Element group name.
Begin Date required list of values: pop-up calendar
Effective start date for group. You cannot modify or delete this date.
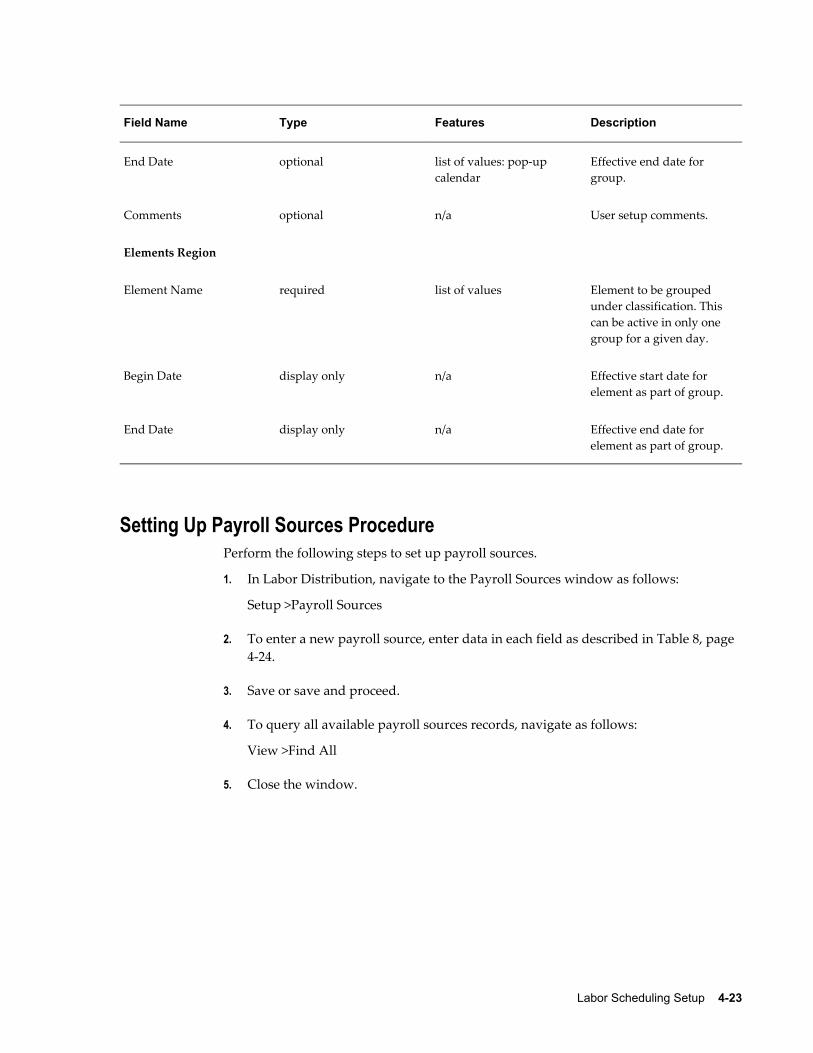
Labor Scheduling Setup 4-23
Field Name Type Features Description
End Date optional list of values: pop-up calendar
Effective end date for group.
Comments optional n/a User setup comments.
Elements Region
Element Name required list of values Element to be grouped under classification. This can be active in only one group for a given day.
Begin Date display only n/a Effective start date for element as part of group.
End Date display only n/a Effective end date for element as part of group.
Setting Up Payroll Sources Procedure Perform the following steps to set up payroll sources.
1. In Labor Distribution, navigate to the Payroll Sources window as follows:
Setup >Payroll Sources
2. To enter a new payroll source, enter data in each field as described in Table 8, page 4-24.
3. Save or save and proceed.
4. To query all available payroll sources records, navigate as follows:
View >Find All
5. Close the window.

4-24 Oracle Labor Distribution User Guide
Payroll Sources Window Description
Payroll Sources Window Description
Field Name Type Features Description
Header Region
Payroll Source Type required list of values Payroll source type name.
Source Codes Region
Source Code required n/a User-defined source code.
Description required n/a User description of source code.
Setting Up Begin Date Auto-fill Parameters Procedure To set up the begin date auto-fill parameter:
1. In Labor Distribution, navigate to the Begin Date Auto-fill Parameters window as follows:
Setup >Auto-fill Begin Date
2. Enter data in each field of the Begin Date Auto-fill Parameters window as describedin Table 9, page 4-25.
3. Save or save and proceed.
4. Close the window.

Labor Scheduling Setup 4-25
Begin Date Auto-fill Parameters Window Description
Begin Date Auto-fill Parameters Window Description
Field Name Type Features Description
Begin Date Auto-Fill Parameters Region
System-generated optional radio button Indicates if begin date fieldautomatically populated based on defined parameters.
User-specified optional radio button Indicates if users specify begin date.
No Auto-filled optional radio button Indicates if there is no begin date.
User-specified Date optional list of values: pop-up calendar
Users specify auto-fill begin date.
Description of Selected Auto-Fill Parameter Region
Description of Selected Auto-Fill Parameter
display only n/a Displays the auto-fill parameter rules for selected begin date auto-fill parameter.
Comments optional n/a User comments.
Setting Up End Date Auto-fill Parameters Procedure To set up the end date auto-fill parameter:
1. In Labor Distribution, navigate to the End Date Auto-fill Parameters window as follows:
Setup > Auto-fill End Date

4-26 Oracle Labor Distribution User Guide
2. Enter data in each field of the End Date Auto-fill Parameters window as described in Table 10, page 4-26.
3. Save or save and proceed.
4. Close the window.
End Date Auto-fill Parameters Window Description
End Date Auto-fill Parameters Window Description
Field Name Type Features Description
End Date Auto-Fill Parameters Region
System-generated optional radio button Indicates if the end date field is automatically populated based on defined parameters.
User-specified optional radio button Indicates if the users must specify an end date.
No Auto-filled optional radio button Indicates if there is no end date.
User-specified Date optional list of values: pop-up calendar
Users specify auto-fill end date.
Description of Selected Auto-Fill Parameter Region
Description of Selected Auto-Fill Parameter
display only n/a Displays the auto-fill rules for selected end date auto-fill parameter.
Comments optional n/a User comments on setup.
Setting Up Clearing Account Procedure To set up a clearing account:

Labor Scheduling Setup 4-27
1. In Labor Distribution, navigate to the Clearing Account window as follows:
Setup > Clearing Account
2. To change the clearing account, in the Clearing Account field, select a clearing account from the list of values. A pop-up find window appears.
3. In the Shortcut field, select a code from the list of values, and click OK. The Parameters pop-up window appears.
4. From the list of values, enter data in each field as required.
5. Click OK.
6. In the Comments field, enter a description of the clearing account.
7. Save or save and proceed.
8. Close the window.
Clearing Account Setup Window Description
Clearing Account Setup Window Description
Field Name Type Features Description
GL Account required list of values General Ledger clearing account
Comments required n/a User-defined comments


Labor Encumbrance Setup 5-1
5Labor Encumbrance Setup

5-2 Oracle Labor Distribution User Guide
Labor Encumbrance Setup
DefinitionLabor Encumbrance Setup options provide users with flexibility in using the labor encumbrance functionality.
OverviewOracle Labor Distribution encumbers salary and wages and posts the encumbrances to Oracle General Ledger and Oracle Grants Accounting.
ProcessThe labor encumbrance setup process includes the following tasks:
• Setting Up Encumbrance Payroll and Assignment Selection, page 5-2
• Setting Up Default Encumbrance End Date Selection, page 5-2
• Setting Up Encumbrance Element Selection, page 5-3
• Setting Up Creation Options for GL, page 5-3
Setting Up Encumbrance Payroll and Assignment SelectionYou can select specific payroll names for encumbrances. In addition, you can include or exclude all assignments in the payroll in the encumbrances. You can choose to include or exclude individual employee assignments. Therefore, if you select all employee assignments in a payroll, then you can include or exclude in encumbrances, by default, you can specify individual assignments to include or exclude in the encumbrance. The Create and Update Encumbrance Lines process considers the assignments you specifiedfor inclusion or exclusion for all payroll periods in the payrolls you select.
Setting Up Default Encumbrance End Date SelectionThe default encumbrance end date provides a common encumbrance ending date for allemployee assignments being charged to Oracle General Ledger.
The beginning of the default encumbrance period is determined by the earliest unpaid payroll that exists after the last paid payroll period for an assignment. You define the end date of this period. You can specify ageneric end date for all organizations listed in Oracle Human Resources.

Labor Encumbrance Setup 5-3
Note: For employee assignments being charged to Oracle Grants Accounting, the default encumbrance end date does not take effect. TheCreate and update Encumbrance Lines process encumbers such assignments to the award end date.
Setting Up Encumbrance Element SelectionSalary and wage encumbrances are based on elements. You can select recurring earnings and non-earnings elements for encumbrance. Recurring earnings elements include regular non-predefined or predefined and supplemental elements. Examples of regular non-predefiend and supplemental elements include stipends, reallocation bonuses, and living quarter allowances. Examples of non-earnings elements included benefits and deductions.
You can also attach fast formulas to payroll elements for calculating encumbrance amounts. This is useful if, for example, you want to apply a fast formula to calculate salaries for a nine-month assignment or to calculate salaries for hourly-wage employees.
Setting Up Creation Options for GLThe creation options for General Ledger selection enables you to select the date when the application posts transactions to Oracle General Ledger. The default transaction date is the payroll period end date. The options to select are:
• Begin Date
• End Date, default
• Check Date
• Scheduled Run Date
• Cutoff Date
Note: For encumbrance transactions that the process posts to Oracle Grants Accounting, the application uses the transaction date of the payroll period end date or the last valid charging instruction date, whichever is earlier.
Setting Up Encumbrance Payroll and Assignment Selection ProcedureTo set up encumbrance payroll and assignment selection, perform the following steps.
1. In Labor Distribution, navigate to the Encumbrance - Payroll and Assignment
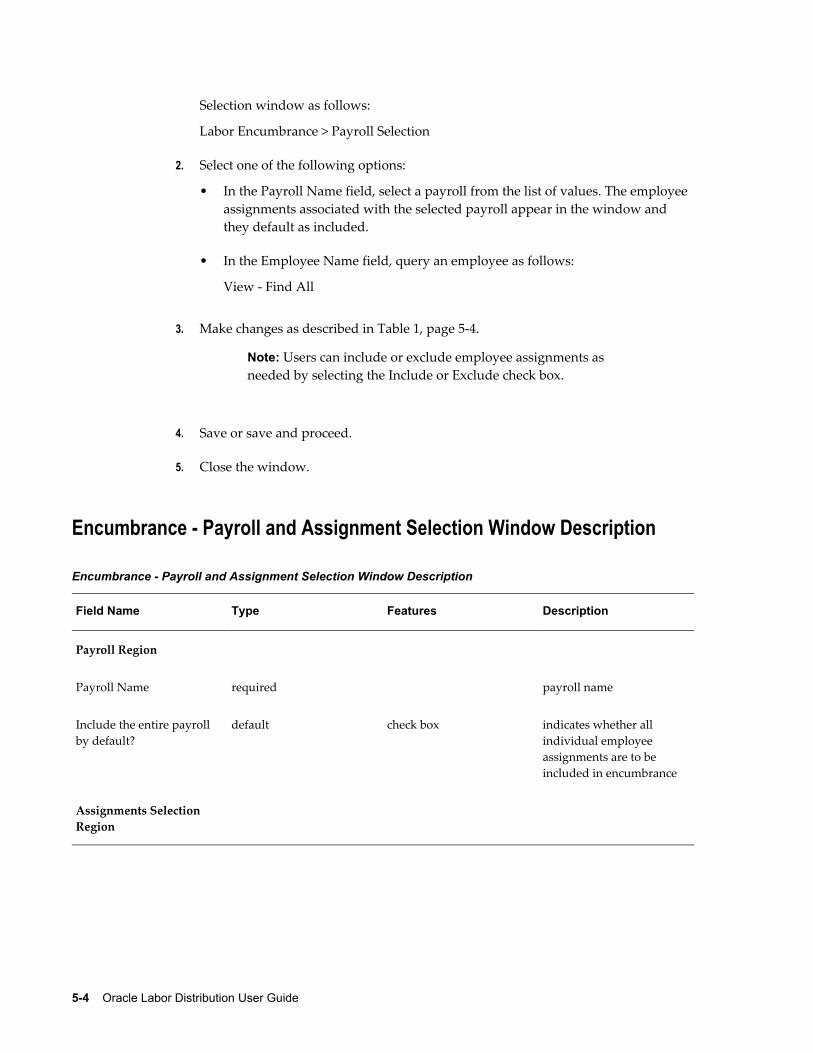
5-4 Oracle Labor Distribution User Guide
Selection window as follows:
Labor Encumbrance > Payroll Selection
2. Select one of the following options:
• In the Payroll Name field, select a payroll from the list of values. The employee assignments associated with the selected payroll appear in the window and they default as included.
• In the Employee Name field, query an employee as follows:
View - Find All
3. Make changes as described in Table 1, page 5-4.
Note: Users can include or exclude employee assignments as needed by selecting the Include or Exclude check box.
4. Save or save and proceed.
5. Close the window.
Encumbrance - Payroll and Assignment Selection Window Description
Encumbrance - Payroll and Assignment Selection Window Description
Field Name Type Features Description
Payroll Region
Payroll Name required payroll name
Include the entire payroll by default?
default check box indicates whether all individual employee assignments are to be included in encumbrance
Assignments Selection Region

Labor Encumbrance Setup 5-5
Field Name Type Features Description
Employee Name default display only employee name; defaults when Payroll Name selected or can query employee
Assignment Number default display only assignment number
Include required, if excluded not selected
check box indicates employee assignment to be included in encumbrance
Exclude required, if included not selected
check box indicates employee assignment to be excluded in encumbrance
Setting Up Default Encumbrance End Date Procedure To set up a default encumbrance period definition for an organization, perform the following steps.
1. In Labor Distribution, navigate to the Encumbrance - Default Encumbrance End Date window as follows:
Labor Encumbrance > Default End Date
2. Enter data in each field of the Encumbrance - Default Encumbrance End Date window as described in Table 2, page 5-6.
3. Save or save and proceed.
4. Close the window.

5-6 Oracle Labor Distribution User Guide
Encumbrance - Default Encumbrance End Date Window Description
Encumbrance - Default Encumbrance End Date Window Description
Field Name Type Features Description
Default Encumbrance End Date Region
Default End Date required list of values: pop-up calendar
Default period end date; last date up to which GL transactions are encumbered; encumbrances are created 100% until this date; must be current date or later
Previous End Date default Previous encumbrance period end date
Comments optional User-defined comments
Setting Up Encumbrance Element Selection Procedure To set up encumbrance element selection, perform the following steps.
1. In Labor Distribution, navigate to the Encumbrance - Element Selection window as follows:
Labor Encumbrance > Element Selection
2. Place the cursor on a new line.
3. Select an element from the list of values.
4. Select a corresponding input value from the list of values. If you want to attach a fast formula to the element, select one from the Fast Formula field.
5. Save or save and proceed.
6. Close the window.

Labor Encumbrance Setup 5-7
Encumbrance - Element Selection Window Description
Encumbrance - Element Selection Window Description
Field Name Type Features Description
Elements required List of values All recurring payroll elements appear in this listof values.
Input Value You must specify either aninput value, or a fast formula.
List of values Determines dollar amount to be encumbered.
Fast Formula You must specify either aninput value, or a fast formula.
List of values Enables you to attach a fast formula to an element.
Setting Up Creation Options for GL Procedure Warning: Users must access this window at least once and save the default settings for encumbrances to work.
To set up encumbrance creation options for GL, perform the following steps.
1. Navigate to the Encumbrance - Creation Options for GL window as follows:
Labor Encumbrance > Creation Options for GL
2. To save the default settings, click Save on the toolbar.
3. To change the default settings, select the appropriate radio button as described in Table 4, page 5-8.
4. Save or save and proceed.
5. Close the window.

5-8 Oracle Labor Distribution User Guide
Encumbrance - Creation Options for GL Window Description
Encumbrance - Creation Options for GL Window Description
Field Name Type Features Description
Effective Date for Posting
Payroll End Date optional radio button Payroll period end date; default
Payroll Begin Date optional radio button Payroll period begin date
Payroll Check Date optional radio button Constructive receipt of paydate when paychecks become negotiable
Payroll Scheduled Run Date
optional radio button Payroll run date
Payroll Cutoff Date optional radio button Final date for entering or charging payroll information before a run

Expenditure Type and Natural Account Auto-Population Setup 6-1
6Expenditure Type and Natural Account
Auto-Population Setup

6-2 Oracle Labor Distribution User Guide
Expenditure Type and Natural Account Auto-Population Setup
DefinitionSetup of Expenditure Type and Natural Account Auto-Population provides for automatic auto-population of expenditure type and natural account information for an employee's charging instruction based on user-defined auto-fill mapping rules.
OverviewYou can use auto-population rules for the following processes:
• PSP: Create Distribution Lines
• PSP: Summarize and Transfer Payroll Distributions
• PSP: Create and Update Encumbrance Lines
• PSP: Encumbrance Summarize and Transfer
• PSP: Distribution Adjustments
• PSP: Import Pre-generated Distribution Lines
This section describes the following:
• Auto-Population Rules, page 6-2
• Process, page 6-3
• References, page 6-5
Auto-Population RulesExpenditure Type and Natural Account Auto-Population setup procedures enable you to define rules for auto-population using a wide range of parameters. You can use a rulecalculator to build the rules.
You can develop ordering rules to order and specify effective dates for the auto-population rules. Ordering rules ensure that one rule is used over another in the event that multiple rules validate to true. This enables you to create multiple rules for the same expenditure type and to order them among the other rules. Effective dates ensure that the application uses the rule only for distribution lines with a valid payroll date.

Expenditure Type and Natural Account Auto-Population Setup 6-3
You can group rules by period type to:
• Apply rules to specific employees based on their payroll.
• Reduce processing time for the application to cycle through a set of rules.
When the application determines the expenditure type or natural account that it needs to use, it applies only those rules that you grouped under a specific period type.
You can override auto-population values from the list of values.
Note: The rules are specific to the business group and ledger of the Labor Distribution responsibility that you are using.
ProcessThe expenditure type and natural account auto-population setup process includes the following:
• Enabling or Disabling Auto-Population, page 6-3
• Defining the Natural Account Segment for Auto-Population, page 6-4
• Setting Up the Lookup, page 6-4
• Defining Expenditure Type Auto-Population Rules and Defining Natural Account Auto-Population Rules, page 6-4
• Setting Up the By-Pass Table, page 6-5
Enabling or Disabling Auto-Population RulesYou can run auto-population rules at the level at which you define a labor schedule. Forexample, you can configure the application to apply auto-population rules to a labor schedule that you defined at the Global Element level and the Organization Default Labor Schedule level.
To apply auto-population rules, you must enable the Enable Auto-Population configuration value in the Configuration Values page.
See: Set Up Configuration Options, page 3-13.
You can apply auto-population rules to any of the following schedule hierarchy levels:
• Global Element
• Assignment
• Assignment (Element)

6-4 Oracle Labor Distribution User Guide
• Assignment (Element Group)
• Organization Default Labor Schedule
• Organization Default Account
• Suspense Account
• Pre-generated Lines
• Excess Salary Account
Defining the Natural Account Segment for Auto-PopulationIf you enable auto-population, then you must define the natural account segment for auto-population for the present responsibility.
Setting Up the LookupWhen you set up the lookup, you can define the lookup table with all the parameters and its associated information to make the parameters available when you create rules. The parameters that you select in this window appear in the list of values when you create an auto-population rule.
Note: Lookup data is not partitioned by Multiple Organizations.
Defining Expenditure Type Auto-Population Rules and Defining Natural Account Auto-Population Rules
When defining expenditure type and natural account auto-population rules, the user performs the following tasks:
• selects the Period Type to group rules applying to a specific payroll as described inTable 1, page 6-4.
Period Type Description
Period Type Description
Calendar Month applies rules to all employee assignments belonging to a payroll based on a calendar month period

Expenditure Type and Natural Account Auto-Population Setup 6-5
Period Type Description
Semi-Month applies rules to all employee assignments belonging to a payroll based on a semi-month period
Bi-Weekly applies rules to all employee assignments belonging to a payroll based on a bi-weekly period
Weekly applies rules to all employee assignments belonging to a payroll based on a weekly period
• selects the expenditure type or the natural account
• selects effective payroll period start and payroll period end dates for a rule
• defines rules by defining parameter expressions
• builds a rule expression by combining parameter expressions with Boolean logic using a rule calculator
• saves validated rules
Setting Up the By-Pass TableThe bypass table stores the expenditure types that the application must skip when it applies auto-population rules. The auto-population process compares the present expenditure type on an employee's labor schedule with the expenditure types in the bypass table. If the application finds a match, then the application returns the same expenditure type and does not process any more rules.
Note: Bypass expenditure types are specific to the business group and ledger of the responsibility you are using.
ReferencesTo define expenditure types, see Expenditure Types, Oracle Projects User's Guide.
To define natural accounts, see Designing Your Account Segments, Oracle General LedgerUser Guide and Defining Your Account Structure, Oracle General Ledger User Guide.

6-6 Oracle Labor Distribution User Guide
Setting Up Autopop Segment Procedure To set up the autopop segment for Multiple Organizations, perform the following steps.
1. In Labor Distribution, navigate to the Auto-Population Segment Definition windowas follows:
Setup > Auto-Population > Segment Setup
2. In the Segment field, select a segment name from the list of values.
3. Close the window.
Auto-Population Segment Definition Window Description
Auto-Population Segment Definition Window Description
Field Name Type Features Description
Auto-Population SegmentRegion
Segment required list of values natural account segment used for auto-population
Setting Up Lookup Procedure To set up Lookup, perform the following steps.
1. In Labor Distribution, navigate to the Lookups (Auto Lookups) window as follows:
Setup > Auto-Population > Lookups Table
2. Enter data in each field of the Lookups (Auto Lookups) window as described in Table 3, page 6-7.
3. Save or save and proceed.
4. Close the window.

Expenditure Type and Natural Account Auto-Population Setup 6-7
Lookups (Auto Lookups) Window Description
Lookups (Auto Lookups) Window Description
Field Name Type Features Description
Parameter Class required list of values enabled flexfield segmentsfor Human Resources Job Key Flexfield and project information from Oracle Grants Accounting tables
Parameter required list of values parameter values associated with selected parameter class
Datatype users datatype information; automatically populated when parameter selected
Defining Expenditure Type Auto-Population Rules Procedure The Defining Expenditure Type Auto-Population Rules procedure includes the following parts:
• Defining Parameters, page 6-7
• Defining Parameter Expressions and Building Rule Expressions, page 6-8
Defining ParametersTo define parameters, perform the following steps.
1. In Labor Distribution, navigate to the Auto-Fill Expenditure Types window as follows:
Setup > Auto-Population > Expenditure Type
2. Enter data in each field of the Auto-Fill Expenditure Types window as described in Table 4, page 6-9.
3. Perform one of the following steps:
• save the record without defining a rule
6-8 Oracle Labor Distribution User Guide
• go to Step 4, page 6-8 to re-order the sequence of Expenditure Types,
• save the record and go to Step 8, page 6-8 to define a rule for an expenditure type
4. To re-order the sequence of Expenditure Types, place the cursor on the line to be reordered and click Re-Order.
The Reorder pop-up window appears.
5. In the From field, enter the sequence number of the selected line.
6. In the To field, enter the new sequence number for the selected line.
7. Click OK.
8. To define a rule for the expenditure type, click Define Rule. The Define Rule window appears.
Defining Parameter Expressions and Building Rule ExpressionsTo define parameter expressions, perform the following steps.
1. In the Parameter Class field, select a parameter class from the list of values.
2. If required, in the Parameter field, select a parameter from the list of values.
3. In the Operand field, select an operand from the pop-up list.
4. In the Parameter Value field, enter a value from the list of values.
5. Repeat steps 1 through 4, page 6-8 until all expressions needed are entered.
6. Save the record.
7. In the calculator field, click the line numbers for a particular expression on the calculator and combine them with the logic and parentheses buttons.
8. When the rule expression is complete, click OK. A Note pop-up window displays acknowledging the validity of the rule or indicating an error.
9. If the rule is valid, click OK.
10. Save or save and proceed.
11. Close the window.

Expenditure Type and Natural Account Auto-Population Setup 6-9
Auto-Fill Expenditure Types Window Description
Auto-Fill Expenditure Types Window Description
Field Name Type Features Description
Auto-Population Definition Region
Period Type required list of values window and displays rules, if any, defined for selected category
Seq. display only sequence number automatically generated after saving
Expenditure Type required list of values expenditure types
From required list of values payroll period start date; can be overridden
To optional list of values payroll period end date; can be overridden
Rule Definition Region
Rule Definition users user-defined rule; displayed after rule defined
Re-Order button re-orders Expenditure Type lines
Rules optional button opens Define Rule window

6-10 Oracle Labor Distribution User Guide
Define Rule Window Description
Define Rule Window Description
Field Name Type Features Description
check box indicates Define Rule window is linked to master detail windows, Auto-Fill Expenditure Types and Auto-Fill Natural Account; master detail windows refreshed when data saved in DefineRule window
Parameter Expressions Region
Line users sequence number automatically generated when record saved
Parameter Class required list of values parameter class
Parameter required list of values parameter
Datatype display only automatically populated based on parameters selected
Operand required list of values appropriate operand list for datatype selected
Parameter Value required list of values value to compare to the parameter with the operand chosen; automatically populated when operand selected
Define Rule Region

Expenditure Type and Natural Account Auto-Population Setup 6-11
Field Name Type Features Description
calculator required parameter expressions combined into a Boolean expression using sequence numbers
rule definition display only successfully validated ruledisplayed with parameter expressions substituted forsequence numbers used during calculator entry
Defining Natural Account Auto-Population Rules Procedure The Defining Natural Account Auto-Population Rules procedure includes the followingparts:
• Defining Parameters, page 6-7
• Defining Parameter Expressions and Building Rule Expressions, page 6-8
Defining ParametersTo define parameters, perform the following steps.
1. In Labor Distribution, navigate to the Auto-Fill Natural Account window as follows:
Setup > Auto-Population > Natural Account
2. Enter data in each field of the Auto-Fill Natural Account window as described in Table 6, page 6-12.
3. Perform one of the following steps:
• save the record without defining a rule
• go to Step 4, page 6-11 to re-order the sequence of Natural Accounts
• save the record and go to Step 7, page 6-12 to define a rule for a natural account
4. To re-order the sequence of Natural Accounts, place the cursor on the line to be reordered and click Re-Order. The Reorder pop-up window appears.

6-12 Oracle Labor Distribution User Guide
5. In the From field, enter the sequence number of the selected line.
6. In the To field, enter the new sequence number for the selected line, and click OK.
7. To define a rule for the natural accounts, click Define Rule. The Define Rule window appears.
Defining Parameter Expressions and Building Rule ExpressionsTo define parameter expressions, perform the following steps.
1. In the Parameter Class field, select a parameter class from the list of values.
2. If required, in the Parameter field, select a parameter from the list of values.
3. In the Operand field, select an operand from the pop-up list.
4. In the Parameter Value field, enter a value from the list of values.
5. Repeat steps 1 through 4, page 6-12 until all expressions needed are entered.
6. Save the record.
7. In the calculator field, click the line numbers for a particular expression on the calculator and combine them with the logic and parentheses buttons.
8. When the rule expression is complete, click OK. A Note pop-up window appears acknowledging the validity of the rule or indicating an error.
9. If the rule is valid, click OK.
10. Save or save and proceed.
11. Close the window.
Auto-Fill Natural Account Window Description
Auto-Fill Natural Account Window Description
Field Name Type Features Description
Auto-Population Definition Region

Expenditure Type and Natural Account Auto-Population Setup 6-13
Field Name Type Features Description
Period Type required list of values clears form and displays rules, if any, defined for selected category
Seq. users sequence number automatically generated after saving
Natural Account required list of values natural account
From required list of values payroll period start date; can be overridden
To optional list of values payroll period end date; can be overridden
Rule Definition Region
Rule Definition users user-defined rule; displayed after rule defined
Re-Order button re-orders Natural Account lines
Rules button opens Define Rule window
Setting Up Bypass Expenditure Types Procedure To set up bypass expenditure types, perform the following steps:
1. In Labor Distribution, navigate to the Bypass Expenditure Types window as follows:
Setup > Auto-Population > Bypass Expenditure Type
2. In the Bypass Expenditure Type fields, select bypass expenditure types from the listof values.
3. Save or save and proceed.

6-14 Oracle Labor Distribution User Guide
4. Close the window.
Bypass Expenditure Types Window Description
Bypass Expenditure Types Window Description
Field Name Type Features Description
Bypass Expenditure Type Region
Bypass Expenditure Type optional list of values expenditure types bypassed
Setting Up the Bypass Natural Account Procedure To set up the bypass natural account, perform the following steps:
1. In Labor Distribution, navigate to the Bypass Natural Account window as follows:
Setup > Auto-Population > Bypass Natural Account
2. In the Natural Account fields, select natural accounts from the list of values.
3. Save or save and proceed.
4. Close the window.
Bypass Natural Account Window Description
Bypass Natural Account Window Description
Field Name Type Features Description
Bypass Natural Account Region
Natural Account optional list of values natural accounts bypassed

Labor Scheduling Procedures 7-1
7Labor Scheduling Procedures

7-2 Oracle Labor Distribution User Guide
Labor Scheduling Procedures
DefinitionLabor Scheduling is used to create, update, and review employee labor schedules.
OverviewA labor schedule specifies how an employee's pay is to be distributed to Oracle Grants Accounting, Oracle Projects, or Oracle General Ledger.
Multiple labor schedules can be created for each employee assignment. Each schedule contains schedule lines with charging instructions for Grants Accounting, Projects, or General Ledger. Each payroll is distributed according to the schedule lines in effect for the period of the payroll to be distributed. An employee can have an unlimited number of schedule lines.
Users can define labor schedules at different levels and use a hierarchy structure to determine the charging instructions in effect for a given day. Schedule hierarchies provide the user with the ability to create schedules at the employee assignment, element group, element, global element, or organization levels.
For information on scheduling hierarchies, see Scheduling Hierarchy Process, page B-1.
For information on organization level schedules, see Labor Scheduling Setup, page 4-2.
ProcessTo create or update labor schedules at the employee or assignment level and to view labor schedule lines, the labor scheduling process consists of the following tasks:
• Select Employee and Assignment in Labor Distribution, page 7-3
• Define Labor Schedule Hierarchy Level, page 7-3
• Define Schedule Lines, page 7-4
• Create or Modify Labor Schedules Using the Copy and Merge Functions, page 7-4
• View Schedule Summary, page 7-5
• View Monthly Schedule Summary, page 7-5
• View Payroll Period Schedule Summary, page 7-5

Labor Scheduling Procedures 7-3
Select Employee and Assignment in Labor DistributionUsers can select an employee assignment by navigating in Labor Distribution to the Labor Scheduling window and selecting an employee and an assignment. To navigate to the Schedule Lines window, users click the Schedule Lines button.
Users have the option of enabling the Organization Default Labor Schedule profile option when setting up system profile options. For each employee assignment, an Organization Default check box is displayed.
• If users select Use Organization Default Labor Schedule during setup, the Organization Default check box is automatically selected. The selected check box is viewed in the Labor Scheduling window.
• If users do not select Use Organization Default Labor Schedule during setup, the Organization Default check box is not checked in the Labor Scheduling window.
For information on setting up system profile options, see System Administration Setup, page 3-2.
If the Organization Default check box is checked and an Organization Default Labor Schedule is defined, the Organization Default Labor Schedule is applied to each payroll element to be processed when an element does not have a labor schedule defined at either the Global Element, Element Group, or Assignment level.
Note: The check box in the Schedule Lines window is the same as the check box in the Labor Scheduling window.
For information on scheduling hierarchies, see Scheduling Hierarchy Process, page B-1.
Define Labor Schedule Hierarchy LevelThe user selects one of the following levels of the labor schedule hierarchy to create a labor schedule:
• Assignment
• Element group
• Element type
Labor schedules can be added or deleted at the schedule hierarchy level.
Note: Users must save the scheduling hierarchy before proceeding to defining schedule lines. This enables Labor Distribution to record the hierarchy level selected.

7-4 Oracle Labor Distribution User Guide
For information on scheduling hierarchies, see Scheduling Hierarchy Process, page B-1.
Define Schedule LinesAt the hierarchy level selected, users can create an unlimited number of schedule lines for the employee assignment's labor schedule. Each schedule line includes the following:
• General Ledger accounting flexfield, Grants Accounting, or Projects charging instructions
• Begin and end dates for each schedule line
• Labor distribution percentage to be applied to each schedule line for the date specified
You can create a labor schedule for an employee assignment for dates for which the assignment has not been paid. If an employee assignment has been paid for a payroll period, and you try to enter dates within this paid payroll period, you will receive an error message that states the last payroll period the assignment has been paid. You can then start a labor schedule for dates after the paid payroll period for the assignment.
You can modify a labor schedule for an employee assignment for dates for which the assignment has not been paid. If an employee assignment has been paid for a payroll period, and the user tries to modify the labor schedule within this paid payroll period, the user receives an error message that states that the schedule line is protected from updates.
In a payroll, Labor Distribution protects from creation or modification only the labor assignments of those employee assignments that have been paid for those periods. If some employee assignments in the same payroll are not paid for those payroll periods, then you can create and modify labor schedules for those payroll periods.
For all the labor distribution lines specified for a labor schedule, Labor Distribution provides a detailed matrix, separating the days that have identical charging instructionsinto dynamic labor schedule lines period columns. The period represents a set of continuous days for which the charging instructions are identical.
Create or Modify Labor Schedules Using the Copy and Merge FunctionsUsers can create or modify the labor schedules by using the copy or merge function to perform the following tasks:
• Copy the schedule lines from the current labor schedule to create a new schedule for the same employee assignment or for a different employee assignment.
• Merge the schedule lines of the current labor schedule with the labor schedule lines present on an existing labor schedule for the same or for a different employee

Labor Scheduling Procedures 7-5
assignment.
Labor Distribution performs validations on copy and merge to check whether the new or modified labor schedules exceed 100%.
View Schedule SummaryAfter completing and saving the schedule lines, users can view a summary display of how each element of the assignment is scheduled in the Schedule Summary window. This display allows the user to view how the entire assignment is scheduled.
The scheduling hierarchy that is displayed identifies the levels at which the assignment is scheduled. The highest level of the hierarchy displayed is the organization default and element is at the lowest level. Schedules at the lower level of the hierarchy take precedence over schedules at the higher level.
View Monthly Schedule SummaryIn the Monthly Schedule Summary window, users enter the begin date and end date, and Labor Distribution displays a monthly summary of the schedule lines.
View Payroll Period Schedule SummaryIn the Payroll Period Schedule Summary window, users enter the begin date and end date, and Labor Distribution displays the schedule lines and percentages by payroll periods.
PrerequisitesEmployees to be scheduled must exist in Human Resources, have at least one active assignment for the dates the labor schedules are to be created, and be assigned to a payroll.
To enter employees in Human Resources and assigning employees to a payroll, see Entering a New Person, Oracle HRMS Workforce Sourcing, Deployment, and Talent Management Guide and The Employee Assignment, Oracle HRMS Workforce Sourcing, Deployment, and Talent Management Guide.
Creating and Updating Labor Schedules Procedure The following procedures are used to create employee labor schedules:
• Selecting Employee and Assignment, page 7-6
• Defining Labor Schedule Hierarchy Level, page 7-6
• Defining Schedule Lines, page 7-8

7-6 Oracle Labor Distribution User Guide
• Creating or Modifying Labor Schedules Using the Copy and Merge Functions, page7-9
Selecting Employee and AssignmentTo select an employee and assignment, perform the following steps.
1. In Labor Distribution, navigate to the Labor Scheduling window as follows:
Labor Schedules
The Labor Scheduling window appears.
2. In the Full Name field, query the list of employees as follows:
View > Find or View > Find All
If View > Find is selected, the Find Employees window appears.
3. Select an employee from the list of values.
4. Click Find.
5. If there are more than one assignments listed in the assignment region, select an assignment in the Assignment No. field.
6. Click Schedule Lines. The Schedule Lines window appears.
7. Go to the following section:
Defining Labor Schedule Hierarchy Level, page 7-6
Defining Labor Schedule Hierarchy LevelDefine Labor Schedule at Hierarchy Level includes the following procedures:
• Defining First Labor Schedule for the Employee Assignment, page 7-6
• Adding a Labor Schedule, page 7-7
• Deleting a Labor Schedule, page 7-7
Defining First Labor Schedule for the Employee AssignmentTo define a labor schedule hierarchy level when a labor schedule is not already created for the employee assignment, perform the following steps.
1. In the Schedule Hierarchy region of the Schedule Lines window, click the appropriate hierarchy level radio button for the labor schedule.

Labor Scheduling Procedures 7-7
2. If Element Group or Element Type is selected, place the cursor in the Element Group or Element Type field and select an Element Group or Element Type from the list of values.
3. To create the scheduling hierarchy, save and continue as follows:
File > Save and Proceed
4. Go to the following section:
Defining Schedule Lines, page 7-8
Adding a Labor ScheduleTo add a labor schedule at a hierarchy level, perform the following steps.
1. In the Schedule Hierarchy region of the Schedule Lines window, click one of the radio buttons.
2. Add a new labor schedule as follows:
File > New
The schedule lines fields are cleared.
3. In the Schedule Hierarchy region of the Schedule Lines window, click the appropriate hierarchy level radio button for the labor schedule.
4. If Element Group or Element Type is selected, place the cursor in the Assignment, Element Group, or Element Type field and select an Element Group or Element Type from the list of values.
5. Save or save and proceed.
6. Go to the following section:
Defining Schedule Lines, page 7-8
Deleting a Labor ScheduleTo delete a labor schedule at a hierarchy level, perform the following steps.
1. In the Schedule Hierarchy region of the Schedule Lines window, place the cursor in the Element Group or Element Type field.
2. To select the labor schedule to be deleted, navigate through the Schedule Hierarchy region using the down arrow on the keyboard.
3. Delete the labor schedule as follows:

7-8 Oracle Labor Distribution User Guide
Edit > Delete Record
4. Save or save and proceed.
5. Close the window.
Defining Schedule LinesTo define schedule lines, perform the following steps.
1. In the GL Account field, select a General Ledger account from the list of values.
If not entering a General Ledger accounting flexfield, go to Step 5, page 7-8.
Note: It is not possible to enter a Grants Accounting charging instruction and a General Ledger accounting flexfield on the same line.
The accounting flexfield window appears.
2. Enter data in each required field from the list of values.
3. Click OK.
4. Enter data in each of the following fields as described in Table 2, page 7-12.
• Start Date
• End Date
• %
If not entering Grants Accounting charging instructions, go to Step 6, page 7-9.
5. If entering Grants Accounting charging instructions, enter the data in the following fields as described in Table 2, page 7-12.
• Project
• Task
• Award
• Organization
• Exp. Type

Labor Scheduling Procedures 7-9
• Start Date
• End Date
• %
6. Repeat Steps 1 through 4, page 7-8 or Step 5, page 7-8 until all labor schedules and schedule lines are created for the selected employee assignment.
7. Click Refresh Display.
The matrix displays an updated schedule view where columns display dates that have consistent charging instructions.
8. If no errors are displayed, save the schedule lines as follows:
File > Save or Save and Proceed
9. Repeat the Define Schedule Hierarchy and Define Schedule Lines procedures until all labor schedules are created for the employee assignment.
10. To delete a schedule line, place the cursor on the line to be deleted and delete the line as follows:
Edit > Delete
Note: A line cannot be deleted if it has already been distributed.
11. Click Refresh Display.
12. If no errors are displayed, save the schedule lines as follows:
File > Save or Save and Proceed.
Creating or Modifying Labor Schedules Using the Copy and Merge FunctionsTo create or modify labor schedules using the copy and merge functions, perform the following steps.
Note: Labor Distribution performs validations on copy and merge to check whether the new or modified labor schedules exceed 100%.
1. In the Schedule Hierarchy region, click Copy To. The Copy To window appears.
2. In the Assignment Number field, select an employee assignment from the list of values.

7-10 Oracle Labor Distribution User Guide
3. Perform one of the following tasks:
• To create a new labor schedule for the selected employee assignment or for a different employee assignment, click Copy to New Schedules.
Hierarchy values where no labor schedule exists for the selected employee assignment are displayed. These values include assignment, element groups, and element types.
• To update an existing labor schedule for the selected employee assignment or for a different employee assignment, click Merge to Existing Schedules.
Hierarchy values where labor schedules exist for the selected employee assignment are displayed. These include labor schedules defined at the assignment, element groups, and element type levels.
4. To select an assignment, select the Assignment check box.
5. To select an item in the Element Groups or Element Type regions, double click the item.
6. To select all items in the Element Groups or Element Type regions, click Select All.
7. To deselect an item in the Element Groups or Element Types region, select the item and click Deselect.
8. Click Done.
9. Save or save and proceed.
10. Close the window.
Labor Scheduling Window Description
Labor Scheduling Window Description
Field Name Type Features Description
Employee Region
Full Name display only Employee full name; last name first.
Employee No. display only Employee identification number.
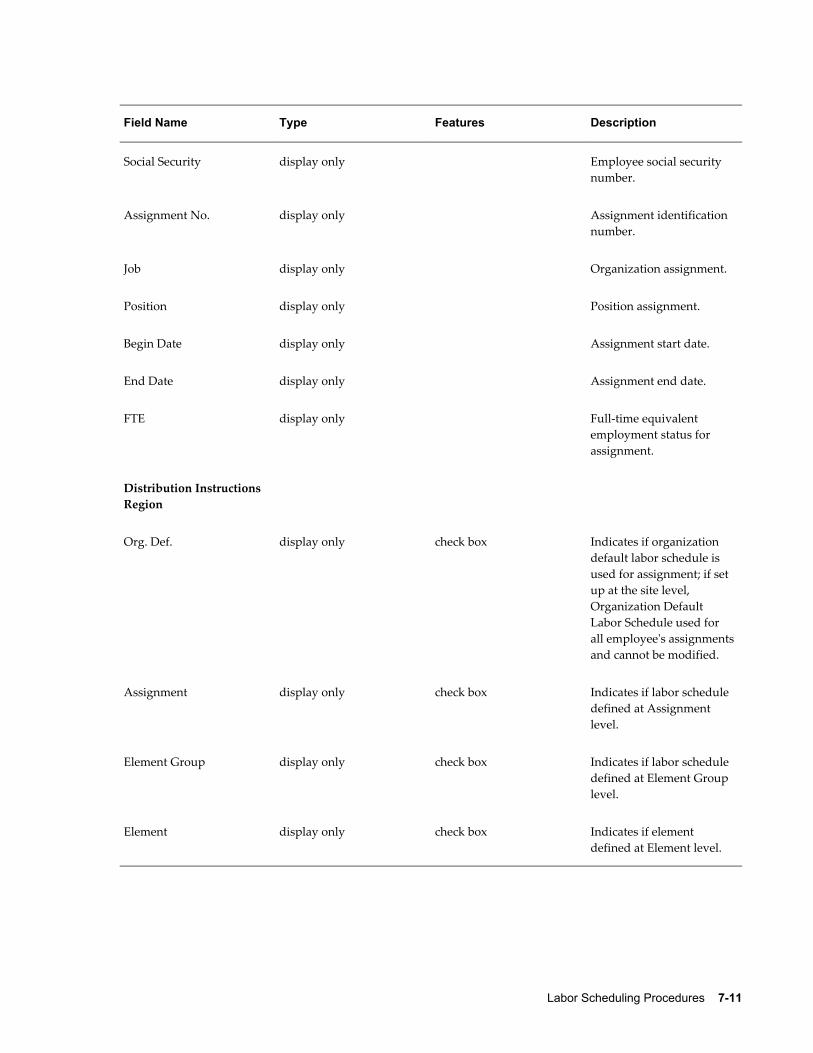
Labor Scheduling Procedures 7-11
Field Name Type Features Description
Social Security display only Employee social security number.
Assignment No. display only Assignment identification number.
Job display only Organization assignment.
Position display only Position assignment.
Begin Date display only Assignment start date.
End Date display only Assignment end date.
FTE display only Full-time equivalent employment status for assignment.
Distribution Instructions Region
Org. Def. display only check box Indicates if organization default labor schedule is used for assignment; if set up at the site level, Organization Default Labor Schedule used for all employee's assignmentsand cannot be modified.
Assignment display only check box Indicates if labor schedule defined at Assignment level.
Element Group display only check box Indicates if labor schedule defined at Element Group level.
Element display only check box Indicates if element defined at Element level.

7-12 Oracle Labor Distribution User Guide
Field Name Type Features Description
Schedule Lines button Opens Schedule Lines window.
Schedule Lines Window Description
Schedule Lines Window Description
Field Name Type Features Description
Employee Region
Full Name display only Employee full name.
Employee No. display only Employee identification number.
Assignment Region
Assignment display only Assignment identification number.
Org. display only Organization component of assignment.
Begin display only Assignment start date.
FTE optional Assignment employment status.
Payroll display only Employee payment cycle.
End default, display only Assignment end date.
Schedule Hierarchy Region
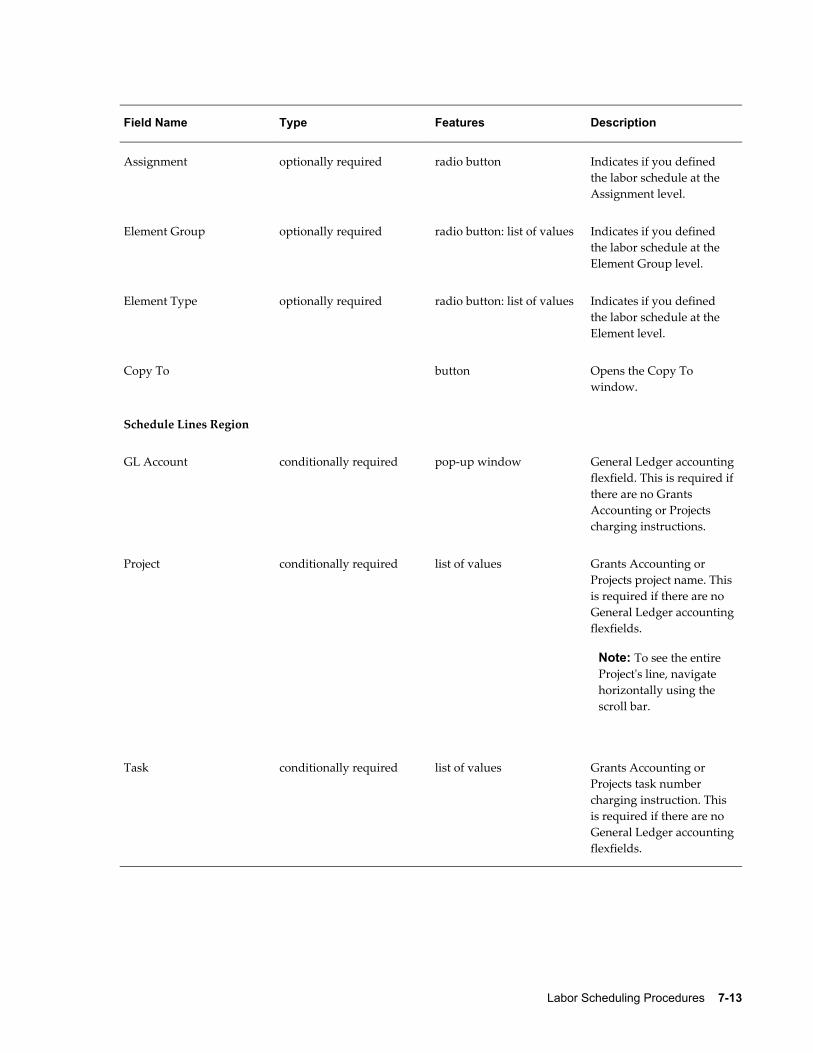
Labor Scheduling Procedures 7-13
Field Name Type Features Description
Assignment optionally required radio button Indicates if you defined the labor schedule at the Assignment level.
Element Group optionally required radio button: list of values Indicates if you defined the labor schedule at the Element Group level.
Element Type optionally required radio button: list of values Indicates if you defined the labor schedule at the Element level.
Copy To button Opens the Copy To window.
Schedule Lines Region
GL Account conditionally required pop-up window General Ledger accountingflexfield. This is required ifthere are no Grants Accounting or Projects charging instructions.
Project conditionally required list of values Grants Accounting or Projects project name. Thisis required if there are no General Ledger accountingflexfields.
Note: To see the entire Project's line, navigate horizontally using the scroll bar.
Task conditionally required list of values Grants Accounting or Projects task number charging instruction. This is required if there are no General Ledger accountingflexfields.

7-14 Oracle Labor Distribution User Guide
Field Name Type Features Description
Award conditionally required list of values Grants Accounting award number charging instruction. This is required if there are no General Ledger accountingflexfields.
Only the awards belonging to the selected project are available for selection.
Organization conditionally required list of values Grants Accounting or Projects organization charging instruction. This is required if there are no General Ledger accountingflexfields.
Exp. Type conditionally required list of values Grants Accounting or Projects expenditure type charging instruction. This is required if there are no General Ledger accountingflexfields.
Start Date required list of values: pop-up calendar
Charging instruction start date.
Note: Labor Distribution checks the end date of the most recently imported Oracle or non-Oracle payroll. You can only creat and modify schedules for dates after the end date of thelast processed payroll for the selected employee assignment.
End Date optional list of values: pop-up calendar
Charging instruction end date.

Labor Scheduling Procedures 7-15
Field Name Type Features Description
% required Labor distribution percentage applied to that schedule line for the specified dates.
[Matrix] display only Displays dates with identical charging instructions.
Note: Navigate horizontally using the Move Left and Move Right buttons.
Refresh Display button Updates the display matrix.
Schedule Summary button Opens the Schedule Summary window.
Monthly Summary button Opens the Monthly Schedule Summary window.
Payroll Period button Opens the Payroll Period Schedule Summary window.
Copy To Window
Employee required list of values Employee name to whom schedule line is copied or merged.
Assignment required list of values Employee assignment.
Copy to New Schedules button Copies the schedule lines from the current labor schedule for the same employee assignment or for a different employee assignment.

7-16 Oracle Labor Distribution User Guide
Field Name Type Features Description
Merge to Existing Schedules
button Merges the schedule lines of the current labor schedule with the labor schedule lines present on an existing labor schedule for the same or for a different employee assignment.
Element Groups default If you select Copy to New Schedules, this displays the element group hierarchy values where no labor schedule exists for the selected employee assignment. If you select Merge to Existing Schedules, this displays the element group hierarchy values that do exist for the selected employee assignment. If you select a value, it appears in the corresponding destination window.
Element Types default If you select Copy to New Schedules, this displays the element type hierarchyvalues where no labor schedule exists for the selected employee assignment. If you select Merge to Existing Schedules, this displays the element type hierarchyvalues that do exist for the selected employee assignment. If you select a value, it appears in the corresponding destination window.

Labor Scheduling Procedures 7-17
Field Name Type Features Description
Assignment check box check box Select the Assignment check box to merge a schedule line to a labor schedule defined at the Assignment level.
Select All button Selects all items in the Element Groups or Element Type regions.
Deselect button Deselects items selected in the Element Groups or Element Types region.
Cancel button Closes the window without saving.
Done button Indicates task completion.
Viewing Labor Schedule Lines Procedure Use the following procedures to view schedule lines:
• Viewing Schedule Summary, page 7-17
• Viewing Monthly Schedule Summary, page 7-18
• Viewing Payroll Period Schedule Summary, page 7-19
Viewing Schedule SummaryPerform the following steps to view the schedule summary.
1. In Labor Distribution, navigate to the Labor Scheduling window as follows:
Labor Schedules
The Labor Scheduling window appears.
2. In the Full Name field, query the list of employees as follows:
View > Find or View - Find All
The Find Employees window appears.

7-18 Oracle Labor Distribution User Guide
3. Select an employee.
Click Find.
4. Click Schedule Lines.
The Schedule Lines window appears.
5. Click Schedule Summary.
The Schedule Summary window appears.
6. In the Begin field in the Display region, enter the start display date from the list of values.
7. In the End field in the Display region, enter the end display date from the list of values.
8. Click Display. A display appears summarizing how each element of the assignmentis scheduled.
9. Close the window.
The Schedule Lines window appears.
Viewing Monthly Schedule Summary To view the monthly schedule summary, perform the following steps.
1. In the Schedule Lines window, click Monthly Summary. The Monthly Schedule Summary window appears.
2. In the Begin field in the Display region, enter the start display date from the list of values.
3. In the End field in the Display region, enter the end display date from the list of values.
4. In the Schedule Hierarchy region, select a hierarchy level to display.
5. Click Refresh Display. A monthly summary of the schedule lines appears.
6. Repeat Steps 4, page 7-18 and 5, page 7-18 until finished.
7. Close the window.
The Schedule Lines window appears.

Labor Scheduling Procedures 7-19
Viewing Payroll Period Schedule SummaryTo view the schedule lines by payroll period, perform the following steps:
1. In the Schedule Lines window, click Payroll Period. The Payroll Period Schedule Summary window appears.
2. In the Begin field of the Display region, enter the start display date from the list of values.
3. In the End field of the Display region, enter the end display date from the list of values.
4. In the Schedule Hierarchy region, select a hierarchy level to display.
5. Click Refresh Display. A monthly summary of the schedule lines appears.
6. Repeat Steps 4, page 7-19 and 5, page 7-19 until finished.
7. Close the window.
The Schedule Lines window appears.
8. Close the Schedule Lines window.
Schedule Summary Window Description
Schedule Summary Window Description
Field Name Type Features Description
Employee Region
Full Name display only Employee name.
Employee Number display only Employee identification number.
Social Security display only Employee social security number.
Display Region

7-20 Oracle Labor Distribution User Guide
Field Name Type Features Description
Begin required list of values: pop-up calendar
Schedule line for assignment begin date.
End required list of values: pop-up calendar
Schedule line for assignment end date.
Display button Populates Element and Element Group regions with appropriate data.
Main Region
Assignment display only Assignment identification number.
Organization display only Assignment organization name.
Element Type display only Lists elements scheduled for assignment.
Element Group display only Lists element groups scheduled for assignment.
Org Default display only Indicates if the element is defined at the Organization Default level.
Assignment display only Indicates if the element is defined at the Assignment level.
Element Group display only Indicates if the element is defined at the Element Class level.
Element display only Indicates if the element is defined at the Element level.

Labor Scheduling Procedures 7-21
Monthly Schedule Summary Window Description
Monthly Schedule Summary Window Description
Field Name Type Features Description
Employee Region
Full Name display only Employee full name.
Employee Number display only Employee identification number.
Assignment Region
Assignment display only Assignment identification number.
Organization display only Organization component of employee's assignment.
Begin display only Assignment start date.
FTE display only Employment status of employee's assignment.
Payroll display only Employee payment cycle.
End display only Assignment end date.
Schedule Hierarchy Region
Assignment display only You can select but cannot add. This indicates if the element is defined at the Assignment level.
Element Group display only You can select but cannot add. This indicates if the element is defined at the Element Type level.

7-22 Oracle Labor Distribution User Guide
Field Name Type Features Description
Element Type display only You can select but cannot add. This indicates if the element is defined at the Element level.
Display Region
Begin required list of values: pop-up calendar
Schedule line assignment begin date.
End required list of values: pop-up calendar
Schedule line assignment end date.
Refresh Display button Updates the matrix with appropriate data.
GL Account display only General Ledger accountingflexfield. This is required ifthere are no Grants Accounting or Projects charging instructions.
Project display only Grants Accounting or Projects project name. Thisis required if there are no General Ledger accountingflexfields.
Note: To see the entire Project's line, navigate horizontally using the scroll bar.
Task display only Grants Accounting or Projects task number charging instruction. This is required if there are no General Ledger accountingflexfields.

Labor Scheduling Procedures 7-23
Field Name Type Features Description
Award display only Grants Accounting award number charging instruction. This is required if there are no General Ledger accountingflexfields.
Only the awards belonging to the selected project are available for selection.
Organization display only Grants Accounting or Projects organization charging instruction. This is required if there are no General Ledger accountingflexfields.
Expenditure Type display only Grants Accounting or Projects expenditure type charging instruction. This is required if there are no General Ledger accountingflexfields.
Start Date display only Charging instruction start date.
End Date display only Charging instruction end date.
% display only Labor distribution percentage applied to that schedule line for the dates specified.
[Matrix] display only Displays dates with identical charging instructions.

7-24 Oracle Labor Distribution User Guide
Payroll Period Schedule Summary Window Description
Payroll Period Schedule Summary Window Description
Field Name Type Features Description
Employee Region
Full Name display only Employee full name.
Employee Number display only Employee identification number.
Social Security display only Employee social security number.
Assignment Region
Assignment display only Assignment identification number.
Organization display only Organization component of employee's assignment.
Begin display only Assignment start date.
FTE display only Employment status of employee's assignment.
Payroll display only Employee payment cycle.
End display only Assignment end date.
Schedule Hierarchy Region
Assignment display only You can select but cannot add. This indicates if the element is defined at the Assignment level.

Labor Scheduling Procedures 7-25
Field Name Type Features Description
Element Group display only You can select but cannot add. This indicates if the element is defined at the Element Type level.
Element Type display only You can select but cannot add. This indicates if the element is defined at the Element level.
Display Region
Begin required list of values Schedule line assignment begin date.
End required list of values Schedule line assignment end date.
Refresh Display required button Updates the matrix with appropriate data.
GL Account display only General Ledger accountingflexfield. This is required ifthere are no Grants Accounting or Projects charging instructions.
Project display only Grants Accounting or Projects project name. Thisis required if there are no General Ledger accountingflexfields.
To see the entire Project's line, navigate horizontally using the scroll bar.
Task display only Grants Accounting or Projects task number charging instruction. This is required if there are no General Ledger accountingflexfields.

7-26 Oracle Labor Distribution User Guide
Field Name Type Features Description
Award display only Grants Accounting award number charging instruction. This is required if there are no General Ledger accountingflexfields.
Only the awards belonging to the selected project are available for selection.
Organization display only Grants Accounting or Projects organization charging instruction. This is required if there are no General Ledger accountingflexfields.
Expenditure Type display only Grants Accounting or Projects expenditure type charging instruction. This is required if there are no General Ledger accountingflexfields.
Start Date display only Charging instruction start date.
End Date display only Charging instruction end date.
% display only Labor distribution percentage applied to that schedule line for the dates specified.
[Matrix] display only Displays dates with identical charging instructions.

Import Payroll Transactions Procedures 8-1
8Import Payroll Transactions Procedures

8-2 Oracle Labor Distribution User Guide
Import Payroll Transactions Procedures
DefinitionThe Import Payroll Transactions concurrent process imports Oracle Payroll lines and preformats them for the distribution process.
OverviewThis section describes the Import Payroll Transactions process.
ProcessThe Import Payroll Transactions process includes the following tasks:
• Select Payroll to be Imported, page 8-2
• Calculate Balance Amounts for Regular Salary Element, page 8-3
• Create Payroll Sublines, page 8-3
• Calculate Daily Pay Rate for the Subline, page 8-4
• Store Sublines, page 8-4
• Rollback Imported Payroll, page 8-4
Select Payroll to be ImportedTo select a payroll to be imported, users run the Import Payroll Transactions concurrentprocess.
Employee Assignments with Zero Work DayZero work day situations occur when an employee assignment is suspended or terminated during a previous payroll period and the assignment is inactive during the payroll period being imported into Labor Distribution. Zero work day situations also occur when an employee is hired in a payroll period on a non-business day and there are no more business days in that payroll period after the hire date.
Processing of Employee Assignments with zero work day allows the import of Oracle payroll for employees with zero work day situations, irrespective of employee assignment status, active or non-active, as long as the employee's final termination process in HRMS has not been completed.
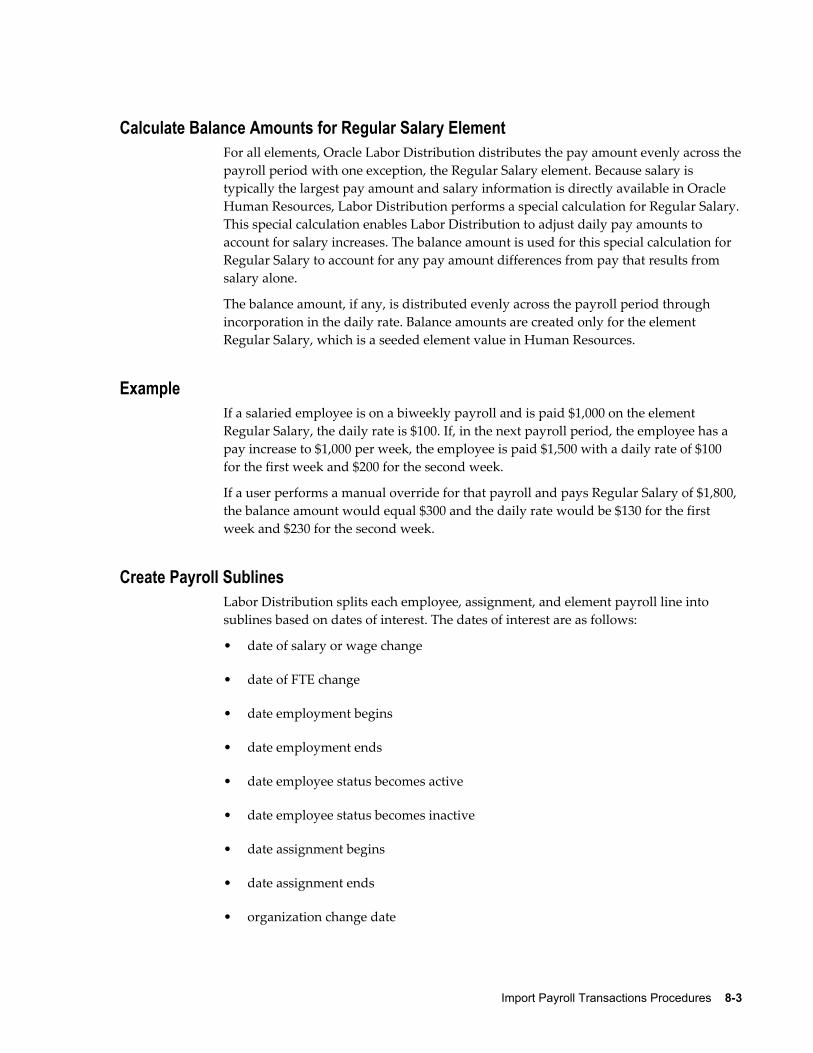
Import Payroll Transactions Procedures 8-3
Calculate Balance Amounts for Regular Salary ElementFor all elements, Oracle Labor Distribution distributes the pay amount evenly across thepayroll period with one exception, the Regular Salary element. Because salary is typically the largest pay amount and salary information is directly available in Oracle Human Resources, Labor Distribution performs a special calculation for Regular Salary.This special calculation enables Labor Distribution to adjust daily pay amounts to account for salary increases. The balance amount is used for this special calculation for Regular Salary to account for any pay amount differences from pay that results from salary alone.
The balance amount, if any, is distributed evenly across the payroll period through incorporation in the daily rate. Balance amounts are created only for the element Regular Salary, which is a seeded element value in Human Resources.
ExampleIf a salaried employee is on a biweekly payroll and is paid $1,000 on the element Regular Salary, the daily rate is $100. If, in the next payroll period, the employee has a pay increase to $1,000 per week, the employee is paid $1,500 with a daily rate of $100 for the first week and $200 for the second week.
If a user performs a manual override for that payroll and pays Regular Salary of $1,800, the balance amount would equal $300 and the daily rate would be $130 for the first week and $230 for the second week.
Create Payroll SublinesLabor Distribution splits each employee, assignment, and element payroll line into sublines based on dates of interest. The dates of interest are as follows:
• date of salary or wage change
• date of FTE change
• date employment begins
• date employment ends
• date employee status becomes active
• date employee status becomes inactive
• date assignment begins
• date assignment ends
• organization change date

8-4 Oracle Labor Distribution User Guide
• date job changes
• date position changes
• element effective date begin
• element effective date end
• assignment status
The sublines cover all the days between the payroll begin date and payroll end date.Each day within the payroll period can be covered by only one subline. Labor Distribution populates the subline begin date and subline end date for each subline.
Calculate Daily Pay Rate for the SublineLabor Distribution determines a daily rate for each subline and populates the appropriate subline field. Daily rates are used to calculate distribution amounts for a particular employee assignment, element, payroll, and day.
The daily rate is calculated as follows:
• For each element, except for Regular Salary, the daily rate equals the amount of the payroll run for the selected element and employee assignment divided by the number of working days in the payroll period where a working day equals a day in which the employee assignment is active.
• For Regular Salary, the daily rate equals the daily rate based on salary plus the balance amount, divided by the number of working days in the payroll period.
Daily rates are used to calculate distribution amounts for a particular employee assignment, element, payroll, and day.
Store SublinesAll sublines are stored in a table where the Create Distribution Lines process can access them.
Note: Import Payroll Transactions picks up payroll transactions in Human Resources on the basis of Date Earned. When the user runs the Import Payroll Transactions process, the user enters the payroll name and the pay period name. Labor Distribution gets the Date Earned for the selected payroll and pay period combination.
Rollback Imported PayrollThe Rollback Imported HRMS Payroll process rolls back a payroll imported from

Import Payroll Transactions Procedures 8-5
Oracle Human Resource Management Systems to rectify errors after the Import Payroll Transactions process is run but before Create Distribution Lines is run. This process reduces the need to create distribution adjustments to a great extent.
After a payroll is rolled back, users can reimport the same payroll. This process can be repeated several times.
Rollback Imported Payroll RulesThe following rules apply to the Rollback Imported HRMS Payroll process.
1. The Rollback Imported HRMS Payroll rolls back imported payrolls only for undistributed payrolls.
2. If the Create Distribution Lines process has been run, users must first roll back the distribution lines and then roll back the payroll.
Note: If users attempt to roll back an imported payroll after running Create Distribution Lines, a message appears advising the user to roll back the distribution lines first.
For information on rolling back distribution lines, see Rolling Back Distribution Lines Procedure.
3. If the Summarize and Transfer Payroll Distributions process has been run, the imported payroll cannot be rolled back. A message appears advising users that a rollback is not allowed.
Example 1If the user runs the Reconciliation Report between Payroll Lines and Sublines after running Import Payroll Transactions, any errors relating to the creation of sublines, such as assignments and elements, are reported. Users can roll back the imported payroll and make changes to data in Human Resources or Labor Distribution.
For information on running Reconciliation Report between Payroll Lines and Sublines, see Generating Reconciliation and Control Reports Procedure.
Example 2If the user runs the Reconciliation Report between Payroll Sublines and Distribution Lines after running Create Distribution Lines, the user can identify distribution lines that are not targeted for the correct transfer destination. To rectify the distributions, the user rolls back the distribution lines and the imported payroll, makes changes to labor schedules, and reruns the two processes. This rollback process is essential to preclude making adjustments in Distribution Adjustments for a large amount of distribution lines.

8-6 Oracle Labor Distribution User Guide
For information on running Reconciliation Report between Payroll Sublines and Distribution Lines, see Generating Reconciliation and Control Reports Procedure.
Prerequisites• Oracle Payroll Costing must be run, costed, and transferred to Oracle General
Ledger before initiating the Import Payroll Transactions procedure.
For information on payroll runs, see Payroll Runs and Processes, Oracle HRMS Payroll Processing Management Guide.
Importing Payroll Transactions ProcedureTo import payroll transactions, perform the following steps.
1. In Labor Distribution, navigate to the Submit Request window as follows:
Processes & Reports - Run
The Submit a New Request pop-up window appears.
2. Select the Single Request radio button.
3. Click OK.
The Submit Request window appears.
4. In the Name field, select PSP: Import Payroll Transactions from HRMS from the list of values.
5. Click OK.
The Parameters pop-up window appears.
6. In the Payroll Name field, select a payroll from the list of values.
Note: Users select the period name corresponding to the payroll run they want to import.
7. In the Period Name field, select a payroll period type from the list of values.
Note: The period type corresponds to the payroll period types in Oracle Human Resources. Users select the period type corresponding to the payroll run they want to import.
8. To apply the parameters, click OK.

Import Payroll Transactions Procedures 8-7
9. In the Submit Request window, click Submit.
The Requests window appears.
10. To view the report file, select the appropriate Request ID and click View Output.
11. Close the window.
Rolling Back Oracle Payroll Import ProcedureTo roll back payroll imported from Human Resource Management Systems, perform the following steps.
1. In Labor Distribution, navigate to the Submit Request window as follows:
Processes & Reports - Run
The Submit a New Request pop-up window appears.
2. Select the Single Request radio button.
3. Click OK.
The Submit Request window appears.
4. In the Name field, select PSP: Rollback Imported HRMS Payroll from the list of values.
5. Click OK.
The Parameters pop-up window appears.
6. In the Payroll Name field, select a payroll name from the list of values.
7. In the Period Name field, select a period name from the list of values.
8. To apply the parameters, click OK.
9. In the Submit Request window, click Submit.
The Requests window appears.
10. To view the report file, select the appropriate Request ID and click View Output.
11. Close the window.


Create Distribution Lines Procedures 9-1
9Create Distribution Lines Procedures

9-2 Oracle Labor Distribution User Guide
Create Distribution Lines Procedures
DefinitionThe Create Distribution Lines concurrent process is used to distribute all types of pay toOracle Grants Accounting and Oracle Projects projects and awards and to Oracle General Ledger accounts based on the labor schedules defined for the employee assignment.
OverviewThe Create Distribution Lines process includes the following inputs:
• Payroll sublines generated by the Import Payroll Transactions process
• Payroll sublines exported into and maintained through the Maintain Non-Oracle Payroll Interface process
• Labor schedules defined within the labor scheduling process
• Oracle Human Resources and Oracle Payroll information
• General Ledger account information
• Grants Accounting and Projects accounting information
Using these inputs, the Create Distribution Lines process calculates payroll distribution records that generate transactions to be posted to either Grants Accounting, Projects, or General Ledger.
ProcessThe Create Distribution Lines process consists of the following tasks:
• Create Distribution Lines, page 9-3
• Auto Population, page 9-3
• Determine Labor Schedule and Charging Instructions to Be Used for Distribution, page 9-3
• Calculate Distribution Amounts, page 9-4
• Perform Validation of Charging Instructions, page 9-9

Create Distribution Lines Procedures 9-3
• Produce Control Reports, page 9-10
• Roll Back Distribution Lines, page 9-10
Create Distribution LinesFor each payroll subline, Oracle Labor Distribution creates one or more distribution lines. The number of distribution lines created depends on the following:
• Number of unique schedule lines across the payroll periods
• Number of working days in the payroll sublines
ExampleIf the payroll subline covers January 16 to January 31, the number of distribution lines equals the number of Grants Accounting and Projects charging instructions and GeneralLedger accounts for that employee assignment across all periods of the element labor schedule that includes a date in the period from January 16 to January 31. As a result, distribution sublines are created for each day in the payroll period, for each employee, assignment, element type, and for each Grants Accounting and Projects charging instruction and General Ledger account.
Auto-PopulationYou need to set up the auto-population configuration value for the Create Distribution Lines process to apply the auto-population rules. Labor Distribution applies auto-population rules at all levels in the labor schedule hierarchy: See Enabling or Disabling Auto-Population Rules, page 6-3 for more information.
Note: If you have enabled auto-population, Create Distribution Lines invokes auto-population once on a set of distribution lines for the same person, assignment, element and charging instructions, and payroll sub-line (rather than for each individual distribution line). It invokes auto-population as of the maximum distribution date for this set of distribution lines.
For information on enabling the auto-population profile option, see System Administration Setup, page 3-2.
For information on setting up auto-population, see Expenditure Type and Natural Account Auto-Population Setup, page 6-2.
Determine Labor Schedule and Charging Instructions to Be Used for DistributionTo determine the labor schedule to be used for an element on a payroll, Labor

9-4 Oracle Labor Distribution User Guide
Distribution begins searching at the bottom of the schedule hierarchy and moves upward until it finds a defined labor schedule or account for the day being processed. The lower levels, which include Element, Element Group, and Assignment, are defined for the employee assignment linked to the element on the payroll. The upper levels, which include Organization Suspense Account, Organization Default Account, and Default Labor Schedule, are defined at the human resources organization level for the specified employee assignment.
For information on the labor scheduling hierarchy process and hierarchy rules, see the following:
• Scheduling Hierarchy Process, page B-1
• Distribution and Configuration Options, page H-1
Calculate Distribution AmountsFor each distribution line, Labor Distribution calculates the amount to be distributed forthe Grants Accounting or Projects charging instruction or the General Ledger account ofthat line for the dates of the distribution line. The distribution amount is calculated for each charging instruction for each day. The amount for a single day is the daily rate. The distribution amount is then stored in the Distribution Lines table.
Salary CapThe National Institute of Health (NIH) restricts the amount of direct salary that organizations can pay to individuals under an Agency for Healthcare Research and Quality (AHRQ) grant, cooperative agreement, or application contract. The maximum amount of direct salary is the Salary Cap. As a Labor Distribution Administrator, you use Labor Distribution to transfer salary in excess of the predefined salary cap to another PTAEO or GL Account (Excess Salary Account).
To set up Salary Cap, use the Salary Cap page. The Salary Cap page enables you to:
• Create new salary cap values for a sponsor.
• Set up overrides for a project. You can override the salary cap for a project if, for example, you have explicit permission from the sponsor, or if you have some salary cap amount remaining to distribute from a previous year.
• Create an excess salary account at the organization level.
The Create Distribution Lines process distributes the excess salary to the excess salary account based on your setup. If the organization excess salary account does not exist, or if its charging instruction dates are not valid, then the application transfers the funds to the generic excess salary account. For more information, see Setting Up a Generic ExcessSalary Account, page 9-13
Create Distribution Lines Procedures 9-5
Important: The Create Distribution Lines process does not apply salary cap rates to the suspense account. This is because a suspense account is a temporary location to store funds and not the actual account where the process distributes funds. Therefore, ensure that the process does not charge funds to the suspense account.
You can run the Reconciliation Between Sublines and Distribution Lines process to find out if the Create Distribution Lines process has charged funds to suspense accounts. If the process has charged funds tosuspense accounts, run the Rollback Distribution Lines process, modify your labor schedule accordingly, and run the Create Distribution Lines process again.
To use Salary Cap, you must configure the following:
• Enabled Salary Cap for your organization
• Associated the predefined sponsor details to the sponsor name
• Select an override element set to ignore salary basis elements and use the override element set to apply salary cap
• Identify a generic organization so that you can create a generic excess salary account.
See: Configuring Values for Labor Distribution, page 3-15
The following diagram illustrates how the application computes salary cap rates for employees' salaries:

9-6 Oracle Labor Distribution User Guide
Salary Cap calculation when distribution is 100% to a single awardThe table displays how Labor Distribution calculates the salary cap for an employee, John Doe, with a monthly salary of $15,000. The distribution is 100% to an NIH award with a salary cap and the NIH Salary Cap for the period 1 January 2005 and 31 December 2005 is $180,100.
The application calculates the monthly NIH cap amount by dividing the annual salary cap by 12: $180,100/12 = $15,008.33.
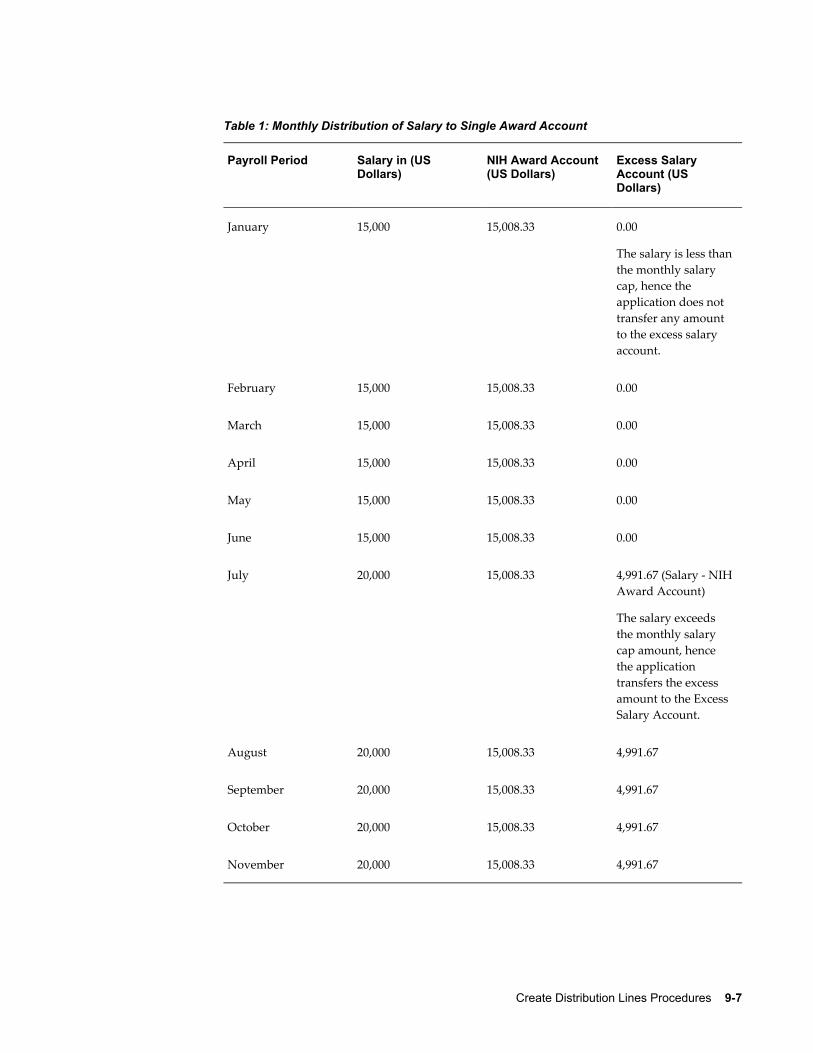
Create Distribution Lines Procedures 9-7
Table 1: Monthly Distribution of Salary to Single Award Account
Payroll Period Salary in (US Dollars)
NIH Award Account (US Dollars)
Excess Salary Account (US Dollars)
January 15,000 15,008.33 0.00
The salary is less thanthe monthly salary cap, hence the application does not transfer any amount to the excess salary account.
February 15,000 15,008.33 0.00
March 15,000 15,008.33 0.00
April 15,000 15,008.33 0.00
May 15,000 15,008.33 0.00
June 15,000 15,008.33 0.00
July 20,000 15,008.33 4,991.67 (Salary - NIHAward Account)
The salary exceeds the monthly salary cap amount, hence the application transfers the excess amount to the Excess Salary Account.
August 20,000 15,008.33 4,991.67
September 20,000 15,008.33 4,991.67
October 20,000 15,008.33 4,991.67
November 20,000 15,008.33 4,991.67

9-8 Oracle Labor Distribution User Guide
Payroll Period Salary in (US Dollars)
NIH Award Account (US Dollars)
Excess Salary Account (US Dollars)
December 20,000 15,008.33 4,991.67
Total 210,000.00 180,099.96 29,950.02
Salary Cap calculation when distribution is to two Awards, one having a salary capThe table displays how Labor Distribution calculates the salary cap for an employee, John Doe, with a monthly salary of $15,000. The distribution is 10% to an NIH award with a salary cap and 90% to a NASA award not having a salary cap. The NIH Salary Cap for the period 1 January 2005 and 31 December 2005 is $180,100.
The application calculates the monthly NIH cap amount by dividing the annual salary cap by 12 and multiplying by 10%, which is $180,100/12*10% = $15,00.83.
Table 2: Monthly Distribution of Salary to Different Award Accounts
Payroll Period Salary (US Dollars)
NIH Award Account (US Dollars)
NASA Award Account (US Dollars)
Excess Salary Account (US Dollars)
January 15,000 1,500 13,500 0.00
The salary is lessthan the monthlysalary cap, hencethe application does not transferany amount to the excess salary account.
February 15,000 1,500 13,500 0.00
March 15,000 1,500 13,500 0.00
April 15,000 1,500 13,500 0.00
May 15,000 1,500 13,500 0.00
June 15,000 1,500 13,500 0.00

Create Distribution Lines Procedures 9-9
Payroll Period Salary (US Dollars)
NIH Award Account (US Dollars)
NASA Award Account (US Dollars)
Excess Salary Account (US Dollars)
July 20,000 1,500.83 18,000 4,99.17 (Salary - NIH Award Account - NASAAward Account)
10% of the monthly salary ($2000) exceeds the NIH Salary Cap ($1500.83), hence the application transfers the excess amount ($2000 - $1500.83 = 499.17) to the Excess Salary Account.
August 20,000 1,500.83 18,000 4,99.17
September 20,000 1,500.83 18,000 4,99.17
October 20,000 1,500.83 18,000 4,99.17
November 20,000 1,500.83 18,000 4,99.17
December 20,000 1,500.83 18,000 4,99.17
Total 210,000.00 18,004.98 189,000 2,995.02
Perform Validation of Charging InstructionsA final validation of the charging instructions is performed after the charging instruction population is completed. All validations performed during labor schedulingare applied at this time with the following changes:
• The expenditure item date used for validation is the effective date from the payroll sublines.
• All edit failures are considered errors.

9-10 Oracle Labor Distribution User Guide
• If an edit failure occurs, the charging instruction is replaced by the organizational suspense charging account.
For information on the validation process and rules, see Data Entry Validations Process, page D-1.
Produce Control ReportsLabor Distribution provides control reports to assist the user with reconciling the payroll sublines with the distribution lines generated. The following reports can be produced:
• Suspense Account Report
• Payroll reconciliation reports
For information on Suspense Account Report, see Reports Procedures, page 17-2.
For information on payroll reconciliation reports, see Reconciliation and Control Reports Procedures, page 18-2.
Roll Back Distribution LinesThe Roll Back Distribution Lines process rolls back distribution lines to rectify errors after the Create Distribution Lines process is run but before the Summarize and Transfer Payroll Distributions process is run. This process reduces the need to create distribution adjustments to a great extent.
To roll back Oracle Payroll distributions, users specify the following:
• Payroll source name
• Payroll source code
• Optionally, payroll period to roll back a specific payroll
Note: If the user does not specify a payroll period, the process rolls back all Oracle payroll distribution lines that are not summarized and transferred.
To roll back non-Oracle payroll distributions, users specify the following:
• Payroll source name
• Payroll source code
• Optionally, batch name to roll back a specific batch

Create Distribution Lines Procedures 9-11
Note: If the user does not specify a batch name, the process rolls back all non-Oracle payroll distribution lines that are not summarized and transferred.
After the Roll Back Distribution Lines process is run, users run one of the following processes to rectify errors:
• Rollback Imported HRMS Payroll
• Rollback of Non-Oracle Payroll
For information on rolling back Oracle Payroll distribution lines, see Rolling Back Oracle Payroll Import Procedure, page 8-7.
For information on rolling back non-Oracle Payroll distribution lines, see Rolling Back Non-Oracle Payroll Procedure, page 12-17.
ExampleIf the user runs the Reconciliation Report between Payroll Sublines and Distribution Lines after running Create Distribution Lines, the user can identify distributions that arenot targeted for the correct transfer destination. To rectify the distributions, the user rolls back the distribution lines and the imported Oracle or non-Oracle payroll, makes changes to labor schedules, and reruns the processes. This rollback process is essential to preclude making adjustments in Distribution Adjustments for a large amount of distribution lines.
For information on running Reconciliation Report between Payroll Sublines and Distribution Lines, see Generating Reconciliation and Control Reports Procedure, page 18-3.
Creating Distribution Lines ProcedureTo create distribution lines:
1. In Labor Distribution, navigate to the Submit Request window as follows:
Processes & Reports - Run
The Submit a New Request pop-up window appears.
2. Select the Single Request radio button.
3. Click OK.
The Submit Request window appears.
4. In the Name field, select PSP: Create Distribution Lines from the list of values.

9-12 Oracle Labor Distribution User Guide
5. Click OK.
The Parameters pop-up window appears.
Note: If auto-population is enabled, Create Distribution Lines is runwith auto-population.
6. In the Source type field, select a source type from the list of values.
7. In the Source code field, select a source code from the list of values.
8. In the Payroll Name field, select a payroll from the list of values.
9. In the Time period field, select a time period from the list of values.
10. In the Batch name field, select a batch name from the list of values.
11. To apply the parameters, click OK.
12. In the Submit Request window, click Submit.
The Requests window appears.
13. To view the report file, select the appropriate Request ID and click View Output.
14. Close the window.
Note: To improve performance, you can run the PSP: Create Distribution Lines process in multiple threads. To do this, you must define an Action Group Parameter in the Pay Action Parameters window. Ensure that you enable the Action Parameters Group (HR: Action Parameter Group Name) profile you define for your responsibility in the System Profile Values window.
For more information on enabling Action Group Parameters, see Metalink Note ID 302304.1
Rolling Back Distribution Lines ProcedureTo roll back distribution lines, perform the following steps.
1. In Labor Distribution, navigate to the Submit Request window as follows:
Processes & Reports - Run
The Submit a New Request pop-up window appears.

Create Distribution Lines Procedures 9-13
2. Select the Single Request radio button.
3. Click OK.
The Submit Request window appears.
4. In the Name field, select PSP: Roll Back Distribution Lines from the list of values.
The Parameters pop-up window appears.
5. In the Source Type field, select a payroll name from the list of values.
Note: O indicates an Oracle payroll and N indicates a non-Oracle payroll batch.
6. In the Source Code field, enter a source code from the list of values.
Note: PAY indicates an Oracle payroll and NON-ORACLE indicates a non-Oracle payroll batch.
7. Perform one of the following:
• If rolling back distribution lines from an Oracle payroll, in the Time Period Id field, enter a time period from the list of values.
• If rolling back distribution lines from a non-Oracle payroll batch, in the Batch Name field, select a batch from the list of values.
8. To apply the parameters, click OK.
9. In the Submit Request window, click Submit.
The Requests window appears.
10. To view the report file, select the appropriate Request ID and click View Output.
11. Close the window.
Setting Up a Generic Excess Salary AccountIt is mandatory that you set up a generic excess salary account. The application transfers excess funds to this account if you do not define an organization excess salary account for the organization of the employee's assignment.
To set up a generic excess salary account, you identify an organization as a generic organization, and then set up an organization excess salary account under that organization.

9-14 Oracle Labor Distribution User Guide
To set up a generic excess salary account:1. On the Configuration Values page, select Salary Cap as the module from the
Module Name list.
2. Select Assign Generic Organization for Excess Salary Account from the Configuration Type list.
3. Click Update, select the organization that you want to identify as a generic organization, and click Apply.
4. On the Salary Cap page, in the Excess Salary Accounts tab, create an excess salary account under the organization that you identified as a generic organization.
Setting Up Salary Cap RatesYou can set up annual salary cap rates for a sponsor. Based on the annual salary cap rate that you define, the Create Distribution Lines process determines the excess funds. Ensure that you use the Configuration Values page to map the sponsor code to the sponsor that you created in Oracle Grants Accounting.
See: Configuring Values for Labor Distribution, page 3-15
To set up a salary cap rate:1. From the Setup menu, click Salary Cap.
2. On the Salary Cap page, click Add Salary Cap in the Annual Salary Cap tab.
3. On the Add Salary Cap page, specify the required information and click Apply. If you want to add another salary cap rate, then click Add Another.
Setting Up Project OverridesYou can set up a salary cap rate for a project. When the Create Distribution Lines process processes the salary cap for a project that contains an override, it overrides the annual salary cap rate and uses the salary cap rate that you defined for that project.
To set up a project override:1. From the Setup menu, click Salary Cap.
2. On the Salary Cap page, click the Project Overrides tab, and click Add Override.
3. On the Add Override page, specify the required information and click Apply. If youwant to add another override, then click Add Another.

Create Distribution Lines Procedures 9-15
Setting Up an Organization Excess Salary AccountYou must create an organization excess salary account to enable the Create Distribution Lines process to transfer excess funds.
To set up an organization excess salary account:1. From the Setup menu, click Salary Cap.
2. On the Salary Cap page, click the Excess Salary Accounts tab, and click Add Account.
3. On the Add Account page, specify the required information, and click Apply. If youwant to add another organization excess salary account, then click Add Another.


Summarize and Transfer Payroll Distributions Procedures 10-1
10Summarize and Transfer Payroll
Distributions Procedures

10-2 Oracle Labor Distribution User Guide
Summarize and Transfer Payroll Distributions Procedures
DefinitionThe Summarize and Transfer Payroll Distributions concurrent process reads and summarizes the distribution lines created from the Create Distribution Lines process and transfers these lines to Oracle Grants Accounting, Oracle Projects, and Oracle General Ledger for posting.
OverviewThis section describes the Summarize and Transfer Payroll Distributions process.
Note: If the Create Distribution Lines process was run with auto-population enabled, the Summarize and Transfer Payroll Distributions process uses the auto-populated expenditure type or natural account in the distribution lines table.
ProcessThe Summarize and Transfer Payroll Distributions process includes the following parts:
• Select Records for Summarization and Distribution, page 10-2
• Summarize Distribution Lines, page 10-3
• Execute a Prenamed Procedure, page 10-4
• Transfer Distribution Lines and Initiate Import, page 10-4
• Produce Control Reports, page 10-4
Select Records for Summarization and Distribution The user submits a request to the concurrent manager and Labor Distribution selects therecords for summarization and transfer. Summarize and Transfer Payroll Distributions reads the following tables to select records for summarization and transfer:
• Distribution Lines Table, page 10-3
• Pre-Generated Distribution Lines Table, page 10-3

Summarize and Transfer Payroll Distributions Procedures 10-3
Distribution Lines TableSummarize and Transfer Payroll Distributions selects all previously unprocessed records and batches the records by payroll. Each batch and record is marked with a status indicating the state of processing that the batch and record are in. This ensures that previously summarized and transferred records are not transferred more than once.
Pre-Generated Distribution Lines TableSummarize and Transfer Payroll Distributions reads the Pre-generated Distribution Lines table to select all previously unprocessed records and batches the records by reference identifiers. Each batch and record is marked with a status identifying the stateof processing that each batch and record is in. This ensures that previously summarizedand transferred records are not transferred more than once.
Summarize Distribution Lines For lines that are to be transferred to Grants Accounting or Projects, Labor Distribution summarizes the distribution lines and the pre-generated distribution lines at the employee, assignment, project, task, award, expenditure type, expenditure organization, and effective dates levels. The award level applies to Grants Accounting only.
For lines that are to be transferred to General Ledger, Labor Distribution summarizes the distribution lines by employee, assignment, General Ledger accounting flexfields, and effective dates.
All summarized distribution lines are posted to the Distribution Lines Summary table.
If General Ledger override date is specified for a batch, the Summarize and Transfer Payroll Distributions process uses this date as the effective date in posting General Ledger transactions. If this date is not specified, the effective date is based on the distribution dates on the distribution lines.
Processing of Employee Assignments with Zero Work DayProcessing of employee assignment with zero work day allows summarization and transfer of distribution lines, for employees with zero work day situations, irrespective of employee assignment status.
The following rules apply:
• If an employee has a non-active status and has a schedule charging to Oracle General Ledger, Labor Distribution does not change the posting date. General Ledger does not validate whether an employee has an active or non-active employee assignment status.

10-4 Oracle Labor Distribution User Guide
• If an employee has a non-active assignment status and has a schedule charging to Grants Accounting or Projects, Labor Distribution looks for the employee assignment's last active date and stores this date as the GMS Override Date. Grants Accounting or Projects then accepts the transfer of distribution lines with a non-active employee assignment status.
For information on employee assignments with zero work day situations, seeEmployee Assignments with Zero Work Day, page 8-2.
Execute a Prenamed ProcedureUsers can customize and execute a prenamed procedure to update or populate the Distribution Lines Summary table with additional information to be transferred to Grants Accounting, Projects, or General Ledger.
Transfer Distribution Lines and Initiate ImportLabor Distribution transfers the summarized distribution lines from the Distribution Lines Summary table to Grants Accounting, Projects, and General Ledger and initiates the journal import programs and the transaction import programs.
Produce Control ReportsLabor Distribution provides control reports to assist the user with reconciling the following:
• Payroll information imported
• Distribution lines created and summarized
• Transfer of the lines to the Grants Accounting, Projects, and General Ledger interface tables
For information on distribution reports, see Reports Procedures, page 17-2.
Prerequisites• The Summarize and Transfer Payroll Distributions and the Use Default GL Posting
Override Date profile options must be set.
To set up system profile options, see System Administration Setup, page 3-2.
Summarizing and Transferring Payroll Distributions ProcedureTo summarize distribution lines and transfer, perform the following steps.

Summarize and Transfer Payroll Distributions Procedures 10-5
1. In Labor Distribution, navigate to the Submit Request window as follows:
Processes & Reports - Run
The Submit a New Request pop-up window appears.
2. Select the Single Request radio button.
3. Click OK.
The Submit Request window appears.
4. In the Name field, select PSP: Summarize and Transfer Payroll Distributions from the list of values.
Click OK.
The Parameters pop-up window appears.
Note: If Create Distribution Lines was run with auto-population enabled, Summarize and Transfer Payroll Distributions uses the expenditure type and natural account auto-populated values.
5. In the Source type field, select a source type from the list of values.
6. In the Source code field, select a source code from the list of values.
7. In the Payroll Name field, select a payroll name from the list of values.
8. In the Time period field, select a time period from the list of values.
9. In the Batch name field, select a batch name from the list of values.
10. To apply the parameters, click OK.
11. In the Submit Request window, click Submit.
The Requests window appears.
12. To view the log file, select the appropriate Request ID and click View Log.
13. Close the window.
Note: Each time the Summarize and Transfer Payroll Distributions procedure is run, Labor Distribution updates the appropriate tables in Oracle Projects.
10-6 Oracle Labor Distribution User Guide
Recovering the Summarize and Transfer Payroll Distributions ProcedureIf the Summarize and Transfer Payroll Distributions process fails due to database problems, suspense account problems, or reversal account problems.
1. View the process's log to determine the cause of the failure.
2. Correct the errors in the database and/or suspense or reversal account.
3. Rerun the Summarize and Transfer Payroll Distributions process.

Archive and Retrieve Distributions History Procedures 11-1
11Archive and Retrieve Distributions History
Procedures

11-2 Oracle Labor Distribution User Guide
Archive and Retrieve Distributions History Procedures
DefinitionThe Archive Distributions History concurrent process archives and purges data from the distributions history and distribution adjustment tables for use at a later date. The Retrieve Distributions History concurrent process retrieves the archived data.
OverviewThis section describes the Archive and Retrieve Distributions History processes.
ProcessThe Archive and Retrieve Distributions History processes include the following:
• Archive and Retrieve Distributions History, page 11-2
• Archive History Report, page 11-2
Archive and Retrieve Distributions HistoryIn order to maintain performance on current and prior year data, distributions history lines and distribution adjustment lines can be archived and retrieved at a later time.
The archive distributions history process identifies all history and summary lines for thespecified payroll, for those payroll periods falling within the given begin and end time periods, and archives and purges the respective tables. If there is a payroll period within the specified begin and end periods for which there are no lines in the history or summary tables, the process completes successfully and ignores those periods for whichno payroll information exists in Oracle Labor Distribution.
Archive History ReportThe Archive History Report provides users with an account of archived distribution and encumbrance lines.
Archiving and Retrieving Distributions History ProceduresTo archive the actual cost distributions for a period, perform the following steps.
1. In Labor Distribution, navigate to the Submit Request window as follows:
Processes & Reports - Run

Archive and Retrieve Distributions History Procedures 11-3
The Submit a New Request pop-up window appears.
2. Select the Single Request radio button.
3. Click OK.
The Submit Request window appears.
4. In the Name field, select one of the following from the list of values:
• PSP: Archive Distributions History
• PSP: Retrieve Distributions History
The Parameters pop-up window appears.
5. In the Payroll Name field, select a payroll name from the list of values.
6. In the Begin Time Period field, select a beginning period from the list of values.
7. In the End Time Period field, select an ending period from the list of values.
8. Click OK.
9. In the Submit Request window, click Submit.
The Requests window appears.
10. To view the report file, select the appropriate Request ID and click View Output.
11. Close the window.
Generating Archive History Report ProcedureTo generate the Archive History Report for a period, perform the following steps.
1. In Labor Distribution, navigate to the Submit Request window as follows:
Processes & Reports - Run
The Submit a New Request pop-up window appears.
2. Select the Single Request radio button.
3. Click OK.
The Submit Request window appears.
4. In the Name field, select PSP: Archive History Report from the list of values.
The Parameters pop-up window appears.
11-4 Oracle Labor Distribution User Guide
5. In the Payroll Name field, select a payroll name from the list of values.
6. In the Begin Time Period field, select a beginning period from the list of values.
7. In the End Time Period field, select an ending period from the list of values.
8. Click OK.
9. In the Submit Request window, click Submit.
The Requests window appears.
10. To view the report file, select the appropriate Request ID and click View Output.
11. Close the window.

Non-Oracle Payroll Interface Procedures 12-1
12Non-Oracle Payroll Interface Procedures

12-2 Oracle Labor Distribution User Guide
Non-Oracle Payroll Interface Procedures
DefinitionNon-Oracle Payroll Interface enables the user to import, review, and edit payroll sublines created using a non-Oracle payroll system before initiating the Create Distribution Lines process.
OverviewUsers who are likely to use the Non-Oracle Payroll Interface include the following:
• Institutions using non-Oracle payroll applications
• Institutions using Oracle Human Resources and Oracle Payroll that want to distribute certain labor costs that are not within the scope of the Oracle payroll generation
ProcessThe Non-Oracle Payroll Interface process includes the following parts:
• Import Non-Oracle Sublines, page 12-2
• Maintain Non-Oracle Payroll Interface, page 12-7
• Non-Oracle Payroll Import Rollback, page 12-8
Import Non-Oracle SublinesThe methods for importing non-Oracle payroll sublines are as follows:
• Importing Non-Oracle Payroll Sublines Using the Maintain Non-Oracle Payroll Sublines Window, page 12-2
• Importing Non-Oracle Payroll Sublines Using the Concurrent Manager, page 12-3
Importing Non-Oracle Payroll Sublines Using the Maintain Non-Oracle Payroll Sublines WindowThis method includes importing sublines and validating each transaction.
If you use this window, you must specify a currency.

Non-Oracle Payroll Interface Procedures 12-3
Importing Non-Oracle Payroll Sublines Using the Concurrent ManagerThis method includes importing non-Oracle payroll sublines and validating each transaction. Oracle recommends using this method only if all transactions are valid.
If you do not specify a currency, your payroll interfaces will inherit the default currencyfrom the Business Group.
The Import Non-Oracle Sublines concurrent process completes the following tasks:
• Reads the Non-Oracle Payroll Interface table
• Validates data in the Non-Oracle Payroll Interface table
• Imports valid records into the Payroll Control table
All sublines are stored in the Non-Oracle Payroll Interface table by an interface program developed by the user during implementation. The information to be included on each subline is described in Table 1, page 12-3.
Non-Oracle Payroll Interface Table
Field Name Description
Payroll ID Payroll identifier; must be defined in Human Resources and linked to selected assignment
Payroll Period ID Payroll period identifier; must be defined in Human Resources and linked to payroll name of interface table record.
Person ID Employee identifier; must be entered in Human Resources.
Assignment ID Assignment identifier; assignment must be linked to employee in Human Resources.
Element Type ID Element identifier; must be linked to assignment in Human Resources.
Pay Amount Amount to be paid for selected subline period; pay amount equals daily rate multiplied by number of business days between subline start and end dates.
Date Earned Date pay amount is earned.

12-4 Oracle Labor Distribution User Guide
Field Name Description
Check Date Date check is made.
Effective Date Date when pay amount is effective. This is the defaultdate used for summary transactions for posting to General Ledger, Projects, or Grants Accounting.
Payroll Source Code Payroll batch source; payroll source code must be available in PSP_Payroll_Sources table.
FTE Full time equivalent employment status for assignment; value must not be greater than 10 and must be entered in the 9.99 format.
Status Code Validation status of subline; changes to New when record is modified. Values are New, Valid, Error, and Transferred.
Reason Code Reason code; indicates what needs to be fixed to successfully import the batch.
Payroll Interface ID Primary key of the interface table.
DR_CR_Flag D indicates debit
C indicates credit
Batch Name Batch name
Error Code Error lookup token for current subline.
Subline Start Date Subline start date for current subline period; must be a date after employee hire date in Human Resources.
Subline End Date Subline end date for current subline period.
Daily Rate Daily pay rate for subline.
Salary Used Salary or wage used for pay amount.
GL Posting Override Date General Ledger override date for posting. If defined, this date overrides the effective date for posting to General Ledger.
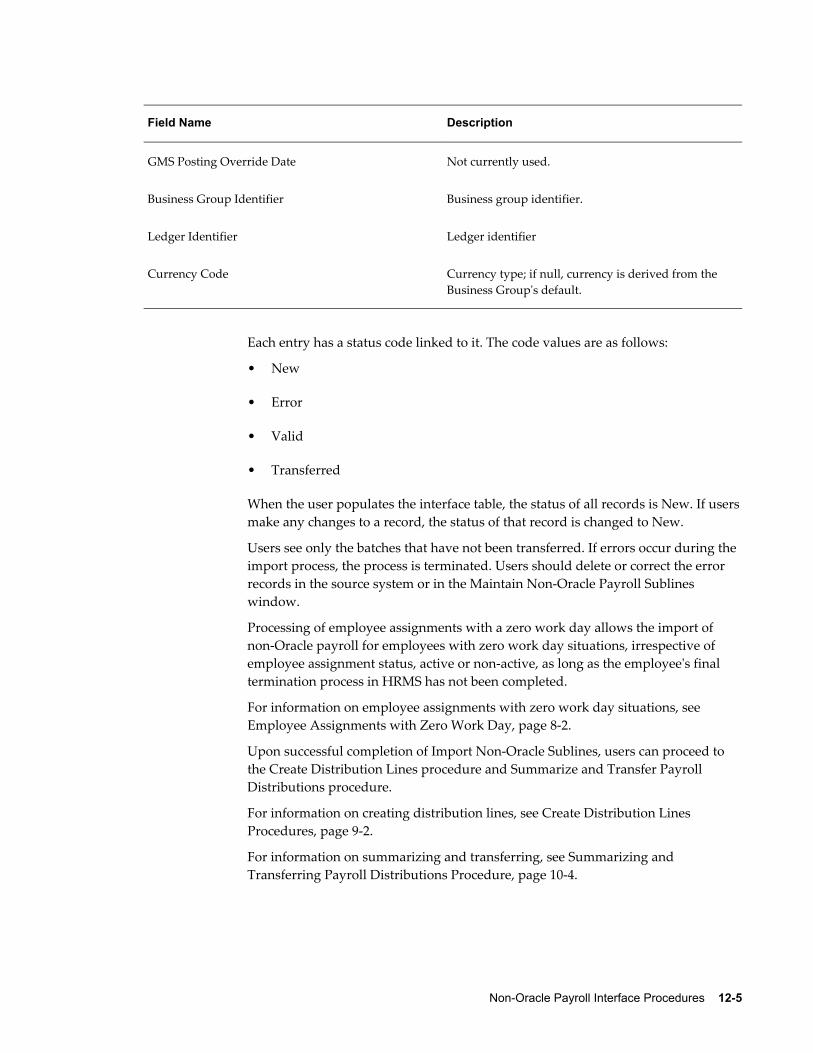
Non-Oracle Payroll Interface Procedures 12-5
Field Name Description
GMS Posting Override Date Not currently used.
Business Group Identifier Business group identifier.
Ledger Identifier Ledger identifier
Currency Code Currency type; if null, currency is derived from the Business Group's default.
Each entry has a status code linked to it. The code values are as follows:
• New
• Error
• Valid
• Transferred
When the user populates the interface table, the status of all records is New. If usersmake any changes to a record, the status of that record is changed to New.
Users see only the batches that have not been transferred. If errors occur during the import process, the process is terminated. Users should delete or correct the error records in the source system or in the Maintain Non-Oracle Payroll Sublines window.
Processing of employee assignments with a zero work day allows the import of non-Oracle payroll for employees with zero work day situations, irrespective of employee assignment status, active or non-active, as long as the employee's final termination process in HRMS has not been completed.
For information on employee assignments with zero work day situations, see Employee Assignments with Zero Work Day, page 8-2.
Upon successful completion of Import Non-Oracle Sublines, users can proceed to the Create Distribution Lines procedure and Summarize and Transfer Payroll Distributions procedure.
For information on creating distribution lines, see Create Distribution Lines Procedures, page 9-2.
For information on summarizing and transferring, see Summarizing and Transferring Payroll Distributions Procedure, page 10-4.

12-6 Oracle Labor Distribution User Guide
Create Non-Oracle Payroll InterfaceThrough the Maintain Non-Oracle Payroll Sublines window, users can populate a new Non-Oracle Payroll Sublines Interface table.
The following steps illustrate the Maintain Non-Oracle Payroll Interface process:
1. The user navigates to the Maintain Non-Oracle Payroll Sublines window.
2. The user types a name for the new batch.
3. The user selects a currency.
4. The user defines values in the Payroll Period, Name, Source tab.
5. The user defines values in the Element, Earned, Check Date tab. The elements available in this tab are determined by the selected currency.
6. The user defines values in the Amt, Dly Rate, Salary, D/C Flag tab.
7. If you have created auto-population rules for the following parameter classes, and ifchanges have occurred to any of them in HRMS within the relevant pay period, youmust add a subline for each such change:
• Assignment
• Grade
• People Group
• Job
• Position
• Organization
To validate the transactions, follow the steps in the Maintain Non-Oracle Payroll Interface, page 12-7 section.
Viewing Error Records in a BatchTo perform error checking on a batch:
1. The user navigates to the Maintain Non-Oracle Payroll Sublines window and selects a payroll batch.
2. The user selects the Error Records in Batch radio button.

Non-Oracle Payroll Interface Procedures 12-7
Maintain Non-Oracle Payroll InterfaceThe Maintain Non-Oracle Payroll Sublines window enables users to view the Non-Oracle Payroll Sublines Interface table and to make simple edits, corrections, and updates to the data.
The following steps illustrate the Maintain Non-Oracle Payroll Interface process:
1. The user navigates to the Maintain Non-Oracle Payroll Sublines window and selects a payroll batch.
2. The user defines the currency. By default, this is the business group's currency. You can change it to any currency available in this field's list of values. The new currency must be the same as the output currency of the elements constituting the batch.
If you change the currency after entering the distributions, you are warned that the currency format will be changed as well. If you agree to this, Labor Distribution formats all amounts according to the new currency precision. You may have to update the Pay Amount element in the Element, Earned, Check Date tab.
3. To run the Import Payroll Transactions concurrent process and to validate the transactions, the user clicks Validate.
4. The user views the request in the concurrent manager.
If the process is complete with no errors, the Status field displays Normal and the process is complete.
If there are errors, the Status field displays Error, and the user continues to Step 5, page 12-7 in the process.
5. The user returns to the Maintain Non-Oracle Payroll Sublines window to correct theerrors. The Maintain Non-Oracle Payroll Sublines window displays the error status as follows:
• The statuses of records with errors displays Error.
• An error description appears in the window.
• The error status is displayed for each row in the window.
6. After correcting errors, the user completes Steps 1 through 4, page 12-7 until all errors are corrected.
In the Non-Oracle Maintenance window, for Payroll Subline Start Date and Subline EndDate, users can enter any dates before the final termination process date of employee assignment. If users enter a date after the final process termination date, an error message will appear. For information on employee assignments with zero work day

12-8 Oracle Labor Distribution User Guide
situations, see Employee Assignments with Zero Work Day, page 8-2.
Upon completion of Maintain Non-Oracle Payroll Interface, users can proceed to the Import Non-Oracle Sublines concurrent process or the Create Distribution Lines procedure and Summarize and Transfer Payroll Distributions procedure.
For information on creating distribution lines, see Create Distribution Lines Procedures,page 9-2.
For information on summarize distribution lines and transfer, see Summarize and Transfer Payroll Distributions Procedures, page 10-2.
Non-Oracle Payroll Import RollbackThe Rollback of Non-Oracle Payroll process rolls back the import of a non-Oracle payroll batch to make changes after the Import Non-Oracle Sublines process is run but before Create Distribution Lines is run. This process reduces the need to create Distribution Adjustments to a great extent.
After a payroll batch is rolled back, users can reimport the same batch. This process can be repeated several times. The rollback process resets the status of the non-Oracle payroll batch to allow import of the same batch. Users can view the same batch in the Maintain Non-Oracle Payroll Sublines window.
Non-Oracle Payroll Import Rollback RulesThe following rules apply to the Rollback of Non-Oracle Payroll process.
1. The Rollback of Non-Oracle Payroll rolls back an imported payroll batch only for anundistributed batch.
2. If the Create Distribution Lines process has been run, the user must first roll back the distribution lines and then roll back the non-Oracle payroll batch.
Note: If the user attempts to roll back import of a non-Oracle payroll batch after running Create Distribution Lines, a message appears advising the user to roll back the distribution lines first.
For information on rolling back distribution lines, see Rolling Back Distribution Lines Procedure, page 9-12.
3. If the Summarize and Transfer Payroll Distributions process has been run, the distribution lines and the import of non-Oracle payroll batch cannot be rolled back.
Example 1If the user runs the Reconciliation Report between Payroll Lines and Sublines after running Import Non-Oracle Sublines, any errors relating to the labor schedules, such as

Non-Oracle Payroll Interface Procedures 12-9
assignments and elements, are reported. The user can roll back the imported payroll batch and make changes to data in the Maintain Non-Oracle Payroll Sublines window.
For information on running Reconciliation Report between Payroll Lines and Sublines, see Generating Reconciliation and Control Reports Procedure, page 18-3.
Example 2If the user runs the Reconciliation Report between Payroll Sublines and Distribution Lines after running Create Distribution Lines, the user can identify distributions that arenot targeted for the correct transfer destination. To rectify the distributions, the user rolls back the distribution lines and the imported payroll batch, makes changes to labor schedules, and reruns the two processes. This rollback process is essential to preclude making adjustments in Distribution Adjustments for a large amount of distribution lines.
For information on running Reconciliation Report between Payroll Sublines and Distribution Lines, see Generating Reconciliation and Control Reports Procedure, page 18-3.
Prerequisites• Elements to be imported must be predefined within Labor Distribution.
To define elements to be imported, see Labor Scheduling Setup, page 4-2.
• Non-Oracle payroll sources must be defined.
To define non-Oracle payroll sources, see Labor Scheduling Setup, page 4-2.
• The Non-Oracle Payroll Interface Table must be loaded with appropriate data eitherthrough a user-defined process or through the Maintain Non-Oracle Payroll Sublines window.
For information on loading the Non-Oracle Payroll Interface Table, see Non-Oracle Payroll Interface Table, page J-1.
Maintaining Non-Oracle Payroll Interface Procedure Use one of the following methods to maintain the non-Oracle payroll interface:
• Importing Non-Oracle Payroll Sublines Using the Maintain Non-Oracle Payroll Sublines Window, page 12-10
• Importing Non-Oracle Payroll Sublines Using the Concurrent Manager, page 12-11
12-10 Oracle Labor Distribution User Guide
WindowTo import non-Oracle payroll sublines using the Maintain Non-Oracle Payroll Sublines window, perform the following steps.
1. In Labor Distribution, navigate to the Maintain Non-Oracle Payroll Sublines window as follows:
Payroll Interface > Non-Oracle Sublines
The Maintain Non-Oracle Payroll Sublines window appears.
2. Select a batch name as follows:
View > Find
3. Select a batch and click OK.
4. If required, select a new currency to match the output currency of the elements in the batch. If you change the currency, the currency format changes, and you must update the Pay Amount element in the Element, Earned, Check Date tab.
5. To run the Import Non-Oracle Sublines process and validate those transactions, click Validate.
6. View the request in the concurrent manager as follows:
View > Requests
The Find Requests pop-up window appears.
7. Select the All My Requests radio button.
8. Click Find.
9. To view the report output, select the appropriate Request ID and click View Output.
10. Close the window.
11. If there are errors, return to the Maintain Non-Oracle Payroll Sublines window to correct the errors as follows:
Payroll Interface > Non-Oracle Sublines
12. To display errors records only, in the Display region, click the Error Records radio button.
13. Select one of the following tabs:

Non-Oracle Payroll Interface Procedures 12-11
• Payroll Period, Name, Source
• Element, Earned, Check Date
• Amt, Dly Rate, Salary, D/C Flag
• Subline Start End Dates, FTE
Note: To navigate to unseen tabs, use the arrows next to the tabs.
14. Enter data in each field of the Maintain Non-Oracle Payroll Sublines window as described in Table 2, page 12-12.
15. Repeat Step 4 until completed.
16. Close the window.
Importing Non-Oracle Payroll Sublines Using the Concurrent ManagerNote: Use this method only if all transactions are valid.
To import non-Oracle payroll sublines using the concurrent manager, perform the following steps.
1. In Labor Distribution, navigate to the Submit Request window as follows:
Processes & Reports > Run
The Submit a New Request pop-up window appears.
2. Select the Single Request radio button.
3. Click OK.
4. In the Request Name field, select PSP: Import Non-Oracle Sublines from the list of values.
The Parameters pop-up window appears.
5. In the Batch Name field, select a batch name from the list of values.
6. To apply the parameters, click OK.
7. In the Submit Request window, click Submit.
The Requests window appears.
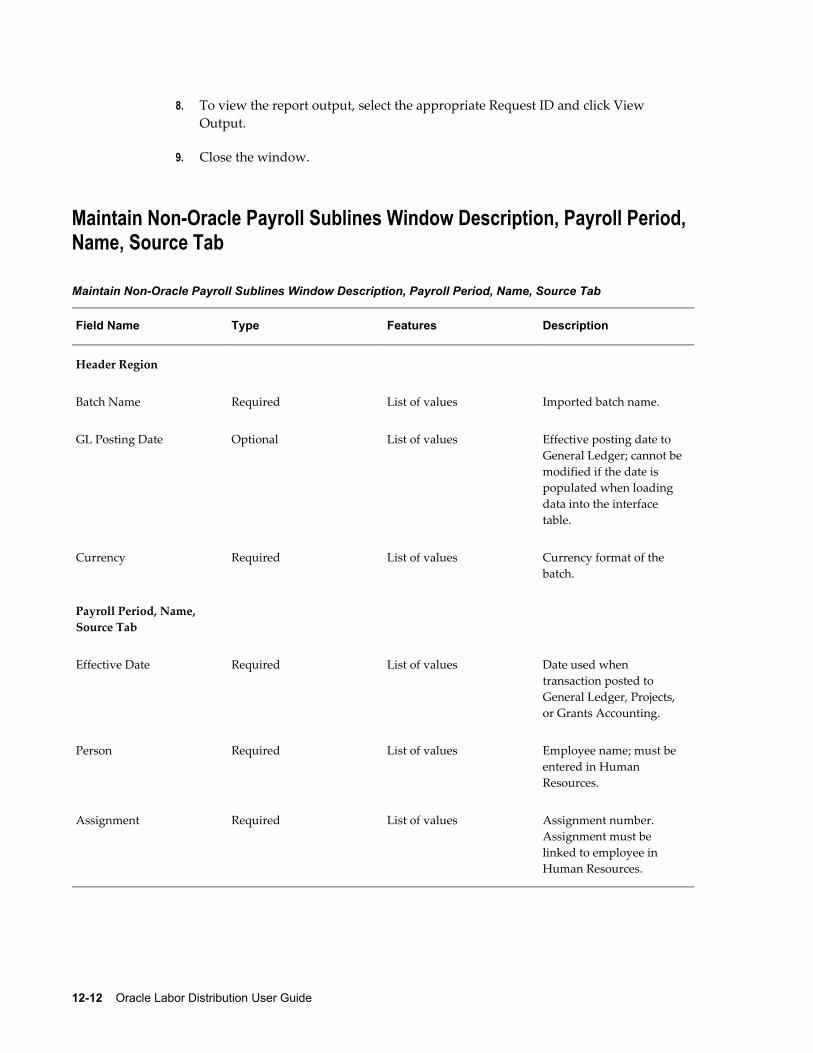
12-12 Oracle Labor Distribution User Guide
8. To view the report output, select the appropriate Request ID and click View Output.
9. Close the window.
Maintain Non-Oracle Payroll Sublines Window Description, Payroll Period, Name, Source Tab
Maintain Non-Oracle Payroll Sublines Window Description, Payroll Period, Name, Source Tab
Field Name Type Features Description
Header Region
Batch Name Required List of values Imported batch name.
GL Posting Date Optional List of values Effective posting date to General Ledger; cannot be modified if the date is populated when loading data into the interface table.
Currency Required List of values Currency format of the batch.
Payroll Period, Name, Source Tab
Effective Date Required List of values Date used when transaction posted to General Ledger, Projects, or Grants Accounting.
Person Required List of values Employee name; must be entered in Human Resources.
Assignment Required List of values Assignment number. Assignment must be linked to employee in Human Resources.

Non-Oracle Payroll Interface Procedures 12-13
Field Name Type Features Description
Payroll Name Required List of values Payroll cycle name; payroll name must be defined in Human Resources and linked to the assignment selected.
Payroll Period Required List of values Payroll period name; mustbe defined in Human Resources and linked to the assignment selected.
Payroll Source Required List of values Payroll batch source; must be available in PSP_Payroll_Sources table.
Status Default display only Validation status of pre-generated distribution line; changes to New whenrecord modified. Values are New, Valid, and Error.
Error Description Footer Region
Error Description Default display only Describes errors for all records.
Validate Optional Button Validates records with New and Error statuses.
Display Footer Region
All Records in Batch Required/ optional Radio button Displays all records in batch.
Error Records in Batch Required/ optional Radio button Displays only records in batch with errors.
Maintain Non-Oracle Payroll Sublines Window Description, Element, Earned, Check Date Tab
Table 3, page 12-14 describes the Maintain Non-Oracle Payroll Sublines window,

12-14 Oracle Labor Distribution User Guide
Element, Earned, Check Date tab. For information on the header, footer, and Display regions, see Table 2, page 12-12.
Maintain Non-Oracle Payroll Sublines Window Description, Element, Earned, Check Date Tab
Field Name Type Features Description
Element, Earned, Check Date Tab
Effective Date Required List of values Date used when transaction posted to General Ledger, Projects, or Grants Accounting.
Person Required List of values Employee name; must be entered in Human Resources.
Assignment Required List of values Assignment number. Assignment must be linked to employee in Human Resources.
Element Type Required List of values Payroll element type; mustbe linked to assignment in Human Resources.
Earned Date Optional List of values Date salary or wage earned.
Check Date Optional List of values Check date.
Status Default display only Validation status of pre-generated distribution line; changes to New whenrecord modified. Values are New, Valid, and Error.
Maintain Non-Oracle Payroll Sublines Window Description, Amt, Dly Rate, Salary, D/C Flag Tab
Table 4, page 12-15 describes the Maintain Non-Oracle Payroll Sublines window, Amt, Dly Rate, Salary, D/C Flag tab. For information on the header and footer regions, see

Non-Oracle Payroll Interface Procedures 12-15
Table 2, page 12-12.
Maintain Non-Oracle Payroll Sublines Window Description, Amt, Dly Rate, Salary, D/C Flag Tab
Field Name Type Features Description
Amt, Dly Rate, Salary, D/C Flag Tab
Effective Date Required List of values Date used when transaction posted to General Ledger, Projects, or Grants Accounting.
Person Required List of values Employee name; must be entered in Human Resources.
Assignment Required List of values Assignment number. Assignment must be linked to employee in Human Resources.
Pay Amount Optional List of values Pay amount equals daily rate times number of business days between subline start and end dates.
Daily Rate Required List of values Daily pay rate.
Salary Used Required List of values Salary batch used.
Debit/Credit Required List of values Indicates amount is debited or credited to an account in General Ledger.
Status Default display only Validation status of pre-generated distribution line; changes to New whenrecord modified. Values are New, Valid, and Error.

12-16 Oracle Labor Distribution User Guide
End Dates, FTE TabTable 5, page 12-16 describes the Maintain Non-Oracle Payroll Sublines window, Subline Start End Dates, FTE tab. For information on the header, footer, and Display regions, see Table 2, page 12-12.
Maintain Non-Oracle Payroll Sublines Window Description, Subline Start End Dates, FTE Tab
Field Name Type Features Description
Subline Start End Dates, FTE Tab
Effective Date Required List of values Date used when transaction posted to General Ledger, Projects, or Grants Accounting.
Person Required List of values Employee name; must be entered in Human Resources.
Assignment Required List of values Assignment number. Assignment must be linked to employee in Human Resources.
Start Date Required List of values Subline start date.
End Date Required List of values Subline end date.
FTE Optional List of values Full time equivalent employment status for assignment; must not be greater than 10 and must be entered in the 9.99 format.
Status Default display only Validation status of pre-generated distribution line; changes to New whenrecord modified. Values are New, Valid, and Error.

Non-Oracle Payroll Interface Procedures 12-17
Rolling Back Non-Oracle Payroll ProcedureTo roll back a non-oracle payroll batch, perform the following steps.
1. In Labor Distribution, navigate to the Submit Request window as follows:
Processes & Reports > Run
The Submit a New Request pop-up window appears.
2. Click the Single Request radio button.
3. Click OK. The Submit Request window appears.
4. In the Name field, select PSP: Rollback of Non-Oracle Payroll from the list of values.The Parameters pop-up window appears.
5. In the Batch Name field, select a batch name from the list of values.
6. To apply the parameters, click OK.
7. In the Submit Request window, click Submit. The Requests window appears.
8. To view the report output, select the appropriate Request ID and click View Output.
9. Close the window.

Pre-generated Distribution Lines Interface Procedures 13-1
13Pre-generated Distribution Lines Interface
Procedures

13-2 Oracle Labor Distribution User Guide
Pre-generated Distribution Lines Interface Procedures
DefinitionThe Pre-generated Distribution Lines Interface process enables the user to review, edit, and validate unprocessed pre-generated distribution lines before initiating the Import Pre-generated Distribution Lines concurrent process within Oracle Labor Distribution. The distribution lines can then be posted to Oracle Grants Accounting, Oracle Projects, and to Oracle General Ledger accounts through the Summarize and Transfer Payroll Distributions process.
OverviewLabor Distribution imports already-distributed charges from time management systemsand transfers them to Grants Accounting, Projects, and General Ledger accounts.
FeaturesThe Pre-generated Distribution Lines Interface process enables users to perform the following tasks:
• integrate timecard data with labor distribution data for reporting
• post timecard information to Grants Accounting, Projects, and General Ledger through Labor Distribution
ProcessThe Pre-generated Distribution Lines Interface process includes the following parts:
• Import Pre-generated Distribution Lines, page 13-2
• Maintain Pre-generated Distribution Lines Interface, page 13-7
Import Pre-generated Distribution LinesThe methods for importing pre-generated distribution lines are as follows:
• Importing Pre-generated Distribution Lines Using the Maintenance of Pre-generated Distribution Lines Window, page 13-3
• Importing Pre-generated Distribution Lines Using the Concurrent Manager, page 13-3

Pre-generated Distribution Lines Interface Procedures 13-3
Importing Pre-generated Distribution Lines Using the Maintenance of Pre-generated Distribution Lines Window
This method includes importing pre-generated distribution lines and validating each transaction.
If you use this window, you must specify a currency.
Importing Pre-generated Distribution Lines Using the Concurrent ManagerThis method includes importing pre-generated distribution lines and validating each transaction. Oracle recommends using this method only if all transactions are valid.
If you do not specify a currency, your Pre-generated Distribution Lines batch will inherit the default currency from the Business Group.
The Import Pre-generated Distribution Lines concurrent process performs the followingtasks:
• reads the Pre-generated Distribution Lines Interface table
• validates data in the Pre-generated Distribution Lines Interface table
• imports valid records into the Payroll Control table
The following information must be included on each line as described in Table 1, page 13-3.
Pre-generated Distribution Lines Interface Table
Field Name Description
Distribution_Interface_ID Unique identification number for pre-generated distribution batch. Primary key of the table.
Person_ID Employee identifier; must be entered in OracleHuman Resources.
Assignment_ID Assignment number; must be linked to an employee in Oracle Human Resources.
Element_Type_ID Element; must be linked to assignment in Human Resources.

13-4 Oracle Labor Distribution User Guide
Field Name Description
Distribution_Date Date the amount is distributed; default date used for summary transactions for posting to General Ledger, Grants Accounting, and Projects.
Distribution_Amount Amount distributed.
Payroll_ID Payroll identifier; must be defined in Human Resources and linked to the selected assignment.
Time_Period_ID Payroll period identifier; must be defined in Human Resources and linked to payroll name of interface table record.
DR_CR_Flag Indicates debit or credit; D for debit and C for credit.
Source_Code Payroll batch source; must be available in PSP_Payroll_Sources table.
GL_Code_Combination_ID General Ledger accounting flexfield; required if there is no project/project and award data entered.
Project_ID Projects project identifier; required if there is no General Ledger code combination ID entered.
Expenditure_Organization_ID Expenditure organization identifier for GrantsAccounting /Projects charging; required if there is no General Ledger code combination ID entered.
Expenditure_Type Project expenditure type; required if there is no General Ledger code combination ID entered.
Task_ID Task identifier linked to the selected project; required if there is no General Ledger code combination ID entered.
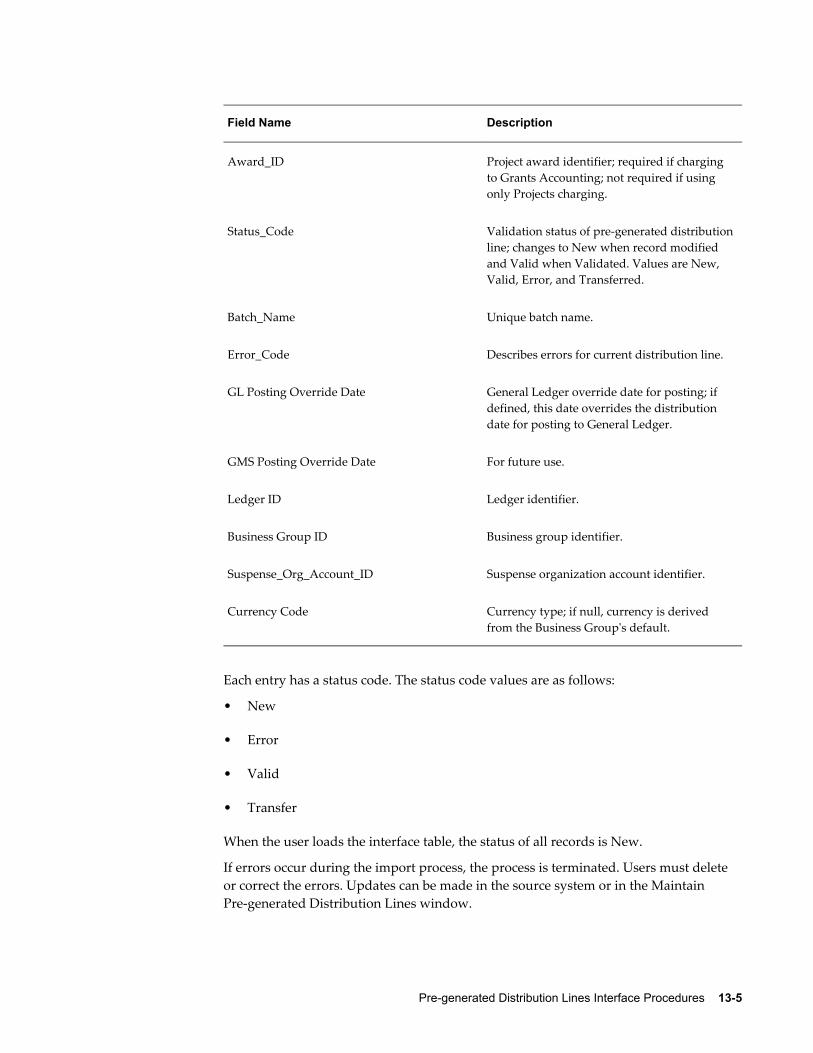
Pre-generated Distribution Lines Interface Procedures 13-5
Field Name Description
Award_ID Project award identifier; required if charging to Grants Accounting; not required if using only Projects charging.
Status_Code Validation status of pre-generated distributionline; changes to New when record modified and Valid when Validated. Values are New, Valid, Error, and Transferred.
Batch_Name Unique batch name.
Error_Code Describes errors for current distribution line.
GL Posting Override Date General Ledger override date for posting; if defined, this date overrides the distribution date for posting to General Ledger.
GMS Posting Override Date For future use.
Ledger ID Ledger identifier.
Business Group ID Business group identifier.
Suspense_Org_Account_ID Suspense organization account identifier.
Currency Code Currency type; if null, currency is derived from the Business Group's default.
Each entry has a status code. The status code values are as follows:
• New
• Error
• Valid
• Transfer
When the user loads the interface table, the status of all records is New.
If errors occur during the import process, the process is terminated. Users must delete or correct the errors. Updates can be made in the source system or in the Maintain Pre-generated Distribution Lines window.

13-6 Oracle Labor Distribution User Guide
If you set up auto-population rules then the application substitutes the original expenditure type or natural account with the auto-populated values.
When you re-query a batch, the application displays the natural accounts or expenditure types as a result of the auto-population rules that it applied. If the charginginstruction is not valid, the application displays the original values for the natural accounts or expenditure types.
If you re-query a batch and modify a valid charging instruction, then the application applies auto-population rules to that charging instruction again.
For information on setting up the auto-population profile options, see System Administration Setup, page 3-5.
For information on setting up auto-population, see Expenditure Type and Natural Account Auto-Population Setup, page 6-2.
Processing of employee assignments with zero work day allows the import of Pre-generated Distribution Lines for employees with zero work day situations, irrespective of employee assignment status, active or non-active, as long as the employee's final termination process in HRMS has not been completed.
For information on employee assignments with zero work day situations, see EmployeeAssignments with Zero Work Day, page 8-2.
A suspense account will be used if the PSP: Use Suspense Account for Pre-Gen Import profile option is set to Yes.
Upon completion of the Import Pre-generated Distribution Lines concurrent process, users can proceed to the Summarize and Transfer Payroll Distributions procedure.
For information on summarizing and transferring distribution lines, see Summarizing and Transferring Payroll Distributions Procedure, page 10-4.
Create Pre-Generated Distribution Lines InterfaceThrough the Maintain Pre-Generated Distribution Lines window, users can populate a new Pre-Generated Distribution Lines Interface table.
The following steps illustrate the Maintain Pre-Generated Distribution Lines Interface process:
1. The user navigates to the Maintain Pre-Generated Distribution Lines window.
2. The user types a name for the new batch.
3. The user selects a currency.
4. The user defines values for the Element Type, Payroll Source, Distribution Amount,Debit/Credit Flag, and Charging Instructions.
To validate the transactions, follow the steps in the Maintain Pre-Generated Distribution Lines Interface, page 13-7 section.

Pre-generated Distribution Lines Interface Procedures 13-7
Viewing Error Records in a BatchTo perform error checking on a batch:
1. The user navigates to the Maintain Non-Oracle Payroll Sublines window and selects a payroll batch.
2. The user selects the Error Records in Batch radio button.
Maintain Pre-generated Distribution Lines InterfaceThe Maintain Pre-generated Distribution Lines window enables users to view the Pre-generated Distribution Lines Interface table and to make simple edits, corrections, and updates to the data.
In the Pre-generated Maintenance window for Distribution Date, users can enter any dates before the final termination process date of employee assignment. If users enter a date after the final process termination date, an error message appears.
For information on employee assignments with zero work day situations, see EmployeeAssignments with Zero Work Day, page 8-2.
The following steps illustrate the Maintain Pre-generated Distribution Lines process:
1. The user navigates to the Maintain Pre-generated Distribution Lines window and selects a payroll batch.
2. The user defines the currency. By default, this is the business group's currency. You can change it to any currency available in this field's list of values. The new currency must be the same as the output currency of the elements constituting the batch.
If you change the currency after entering the distributions, you are warned that the currency format will be changed as well. If you agree to this, Labor Distribution formats all amounts according to the new currency precision.
3. To run the Import Pre-generated Distribution Lines process and to validate the transactions, the user clicks Validate.
4. The user views the request in the concurrent manager.
If the process is complete with no errors, the Status field displays Normal and the process is complete.
If there are errors, the Status field displays Error, and the user continues to Step 5, page 13-7 in the process.
5. The user returns to the Maintain Pre-generated Distribution Lines window to correct the errors. The Maintain Pre-generated Distribution Lines window displays the error status as follows:

13-8 Oracle Labor Distribution User Guide
• The statuses of records with errors displays Error.
• An error description appears in the window.
• The error status is displayed for each row in the window.
6. After correcting errors, the user completes Steps 1 through 4, page 13-7 until all errors are corrected.
PrerequisitesThe Pre-generated Distribution Lines Interface table must be loaded with appropriate data either through a user-defined process or through the Maintain Pre-generated Distribution Lines window.
To load the Pre-generated Distribution Lines Interface table, see Pre-generated InterfaceTable, page K-1.
Importing Pre-generated Distribution Lines Procedure Use one of the following methods to import pre-generated distribution lines:
• Importing Pre-generated Distribution Lines Using the Maintain Pre-generated Distribution Lines Window, page 13-8
• Importing Pre-generated Distribution Lines Using the Concurrent Manager, page 13-10
Importing Pre-generated Distribution Lines Using the Maintain Pre-generated Distribution Lines Window
To import pre-generated distribution lines using the Maintain Pre-generated Distribution Lines window, perform the following steps.
1. In Labor Distribution, navigate to the Maintain Pre-generated Distribution Lines window as follows:
Payroll Interface > Pre-Gen Distribution Lines
The Maintain Pre-generated Distribution Lines window appears.
2. Select a batch name as follows:
View > Find
3. Select a batch and click OK.
Pre-generated Distribution Lines Interface Procedures 13-9
4. To run the Import Pre-generated Distribution Lines process and validate those transactions, click Validate.
5. View the request in the concurrent manager as follows:
View > Requests
The Find Requests pop-up window appears.
6. Select the All My Requests radio button.
7. Click Find.
8. To view the report file, select the appropriate Request ID and click View Output.
9. If there are no errors, close the window.
10. If there are errors, return to the Maintain Pre-generated Distribution Lines window to correct the errors as follows:
Payroll Interface > Pre-Gen Distribution Lines
11. To display errors only, in the Display region click the Error Records radio button.
12. Select one of the following tabs:
• Payroll Name, Period, Element
• Pay Source, Dist Amt, D/C Flag
• GL Account
• Project, Task, Award
• Expenditure Organization, Type
Note: To navigate to unseen tabs, use the arrows next to the tabs.
13. Enter data in each field of the Maintain Pre-generated Distribution Lines window asdescribed in Table 2, page 13-10.
14. Repeat Step 4, page 13-9 until completed.
15. Close the window.

13-10 Oracle Labor Distribution User Guide
Importing Pre-generated Distribution Lines Using the Concurrent ManagerNote: Use this method only if all transactions are valid.
To import pre-generated distribution lines using the concurrent manager, perform the following steps.
1. In Labor Distribution, navigate to the Submit Request window as follows:
Processes & Reports > Run
The Submit a New Request pop-up window appears.
2. Select the Single Request radio button.
3. Click OK.
4. In the Request Name field, select PSP: Import Pre-generated Distribution Lines from the list of values. The Parameters pop-up window appears.
Note: If auto-population is enabled, the Import Pre-generated Distribution Lines procedure uses auto-population.
5. In the Batch Name field, select a batch name from the list of values.
6. To apply the parameters, click OK.
7. In the Submit Request window, click Submit. The Requests window appears.
8. To view the report file, select the appropriate Request ID and click View Output.
9. Close the window.
Maintain Pre-generated Distribution Lines Window Description, Payroll Name, Period, Element Tab
Maintain Pre-generated Distribution Lines Window Description, Payroll Name, Period, Element Tab
Field Name Type Features Description
Header Region

Pre-generated Distribution Lines Interface Procedures 13-11
Field Name Type Features Description
Batch Name Required List of values Pre-generated distribution batch identification number.
GL Posting Date Optional List of values: pop-up calendar
Effective date for posting transactions to General Ledger; cannot be modified if date is populated when loading data into the interface table.
Currency Required List of values Currency format of the batch.
Payroll Name, Period, Element Tab
Distribution Date Required List of values Distribution date.
Person Required List of values Employee's name; must beentered in Human Resources.
Assignment Required List of values Assignment number; mustbe linked to employee in Human Resources.
Payroll Name Required List of values Payroll cycle name; must be defined in Human Resources and linked to the selected assignment.
Payroll Period Required List of values Payroll period name; mustbe defined in Human Resources and linked to payroll name of interface table record.
Element Type Required List of values Element type; must be linked to assignment in Human Resources.
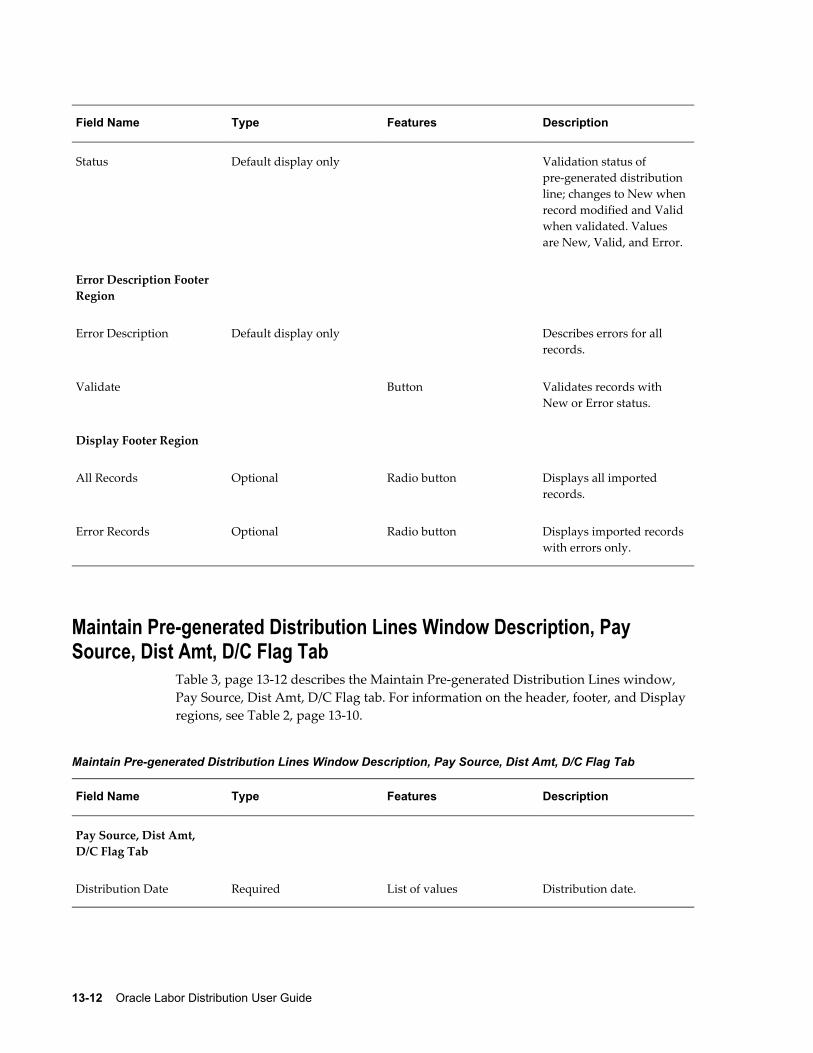
13-12 Oracle Labor Distribution User Guide
Field Name Type Features Description
Status Default display only Validation status of pre-generated distribution line; changes to New whenrecord modified and Validwhen validated. Values are New, Valid, and Error.
Error Description Footer Region
Error Description Default display only Describes errors for all records.
Validate Button Validates records with New or Error status.
Display Footer Region
All Records Optional Radio button Displays all imported records.
Error Records Optional Radio button Displays imported recordswith errors only.
Maintain Pre-generated Distribution Lines Window Description, Pay Source, Dist Amt, D/C Flag Tab
Table 3, page 13-12 describes the Maintain Pre-generated Distribution Lines window, Pay Source, Dist Amt, D/C Flag tab. For information on the header, footer, and Display regions, see Table 2, page 13-10.
Maintain Pre-generated Distribution Lines Window Description, Pay Source, Dist Amt, D/C Flag Tab
Field Name Type Features Description
Pay Source, Dist Amt, D/C Flag Tab
Distribution Date Required List of values Distribution date.

Pre-generated Distribution Lines Interface Procedures 13-13
Field Name Type Features Description
Person Required List of values Employee's name; must beentered in Human Resources.
Assignment Required List of values Assignment number; mustbe linked to employee in Human Resources.
Payroll Source Required List of values Payroll batch source; must be available in PSP_Payroll_Sources table.
Distribution Amount Required List of values Amount distributed.
D/C Flag Required List of values Indicates debit or credit.
Status default display only Validation status of pre-generated distribution line; changes to New whenrecord modified and Validwhen validated. Values are New, Valid, and Error.
Maintain Pre-generated Distribution Lines Window Description, GL Account Tab
Table 4, page 13-13 describes the Maintain Pre-generated Distribution Lines window, GL Account tab. For information on the header, footer, and Display regions, see Table 2,page 13-10.
Maintain Pre-generated Distribution Lines Window Description, GL Account Tab
Field Name Type Features Description
GL Account Tab
Distribution Date Required List of values Distribution date.

13-14 Oracle Labor Distribution User Guide
Field Name Type Features Description
Person Required List of values Employee's name; must beentered in Human Resources.
Assignment Required List of values Assignment number; mustbe linked to employee in Human Resources.
GL Account Conditionally required List of values General Ledger accountingflexfield; required if no other charging instruction entered.
Status Default display only Validation status of pre-generated distribution line; changes to New whenrecord modified and Validwhen validated. Values are New, Valid, and Error.
Maintain Pre-generated Distribution Lines Window Description, Project, Task, Award Tab
Table 5, page 13-14 describes the Maintain Pre-generated Distribution Lines window, Project, Task, Award tab. For information on the header, footer, and Display regions, see Table 2, page 13-10.
Maintain Pre-generated Distribution Lines Window Description, Project, Task, Award Tab
Field Name Type Features Description
Project, Task, Award Tab
Distribution Date Required List of values Distribution date.
Person Required List of values Employee's name; must beentered in Human Resources.

Pre-generated Distribution Lines Interface Procedures 13-15
Field Name Type Features Description
Assignment Required List of values Assignment number; mustbe linked to employee in Human Resources.
Project Conditionally required List of values Grants Accounting or Projects project number; required if there is no General Ledger account entered.
Task Conditionally required List of values Task number linked to the selected project.
Award Conditionally required List of values Project award number.
Status Default display only Validation status of pre-generated distribution line; changes to New whenrecord modified and Validwhen validated. Values are New, Valid, and Error.
Maintain Pre-generated Distribution Lines Window Description, Expenditure Organization, Type Tab
Table 6, page 13-15 describes the Maintain Pre-generated Distribution Lines window, Expenditure Organization, Type tab. For information on the header, footer, and Displayregions, see Table 2, page 13-10.
Maintain Pre-generated Distribution Lines Window Description, Expenditure Organization, Type Tab
Field Name Type Features Description
Expenditure Organization, Type Tab
Distribution Date Required List of values Distribution date.

13-16 Oracle Labor Distribution User Guide
Field Name Type Features Description
Person Required List of values Employee's name; must beentered in Human Resources.
Assignment Required List of values Assignment number; mustbe linked to employee in Human Resources.
Exp. Org. Conditionally required List of values Expenditure organization.
Expenditure Type Conditionally required List of values Project expenditure type.
Status Default display only Validation status of pre-generated distribution line; changes to New whenrecord modified and Validwhen validated. Values are New, Valid, and Error.

Distribution Adjustments Procedures 14-1
14Distribution Adjustments Procedures

14-2 Oracle Labor Distribution User Guide
Distribution Adjustments Procedures
DefinitionsThe Distribution Adjustments process adjusts payroll distributions and posts the new distributions to Oracle Grants Accounting, Oracle Projects, or Oracle General Ledger. Distribution Adjustments does not allow changes to total distribution amounts or changes to distribution dates.
An adjustment set is a group of actual distributions belonging to the same payroll element and the same type of transaction, whether debit or credit, that are adjusted to new distributions. An adjustment set is complete when the unaccounted balance is zero and the user freezes the set by clicking Freeze Set.
An adjustment batch is comprised of one or multiple adjustment sets that are submittedfor approval at the same time.
OverviewThis section describes the following sections:
• Actual and Adjusted Distributions, page 14-2
• Distribution Adjustments, page 14-3
• distribution adjustment at the assignment level
• distribution adjustment at the element level
• distribution adjustment at the element group level
• Features, page 14-5
• Process, page 14-6
Actual and Adjusted DistributionsAfter you have imported a payroll into Labor Distribution, the system creates payroll distributions for employees using cost schedules that include charging instructions. Charging instructions provide a schedule of accounts to which employees' pay distributions are charged. The employees' original pay distributions are called actual distributions.
Incorrect labor schedules, incorrect Auto-Population rules, or invalid labor schedules can cause actual distributions to be costed incorrectly. When this occurs, you can correct

Distribution Adjustments Procedures 14-3
charging instructions by adjusting distributions. Pay distributions that have been modified are called adjusted distributions.
Distribution Adjustments The Distribution Adjustments process enables users to view, modify, and transfer payroll distributions to Grants Accounting, Projects, or General Ledger. When adjustments are approved and summarized, they are automatically posted to Grants Accounting, Projects, or General Ledger.
Distribution Adjustments enables users to adjust distributions at the following levels:
• Assignment
• Element
• Element group
Distribution Adjustment at the Assignment LevelDistribution adjustment at the assignment level involves the adjusting of employee assignments' distributions, where each distribution is a summation of different elements costing to the same costing account (such as a General Ledger account or to a Grants Accounting or Projects charging instruction).
For example: An employee assignment has been paid from elements Regular Salary andOvertime, and both elements are distributed and costed to the same General Ledger account. If users elect to adjust distributions at the assignment level, they see one distribution costing to a General Ledger account with distribution amounts summed forelements Regular Salary and Overtime.
If users elect to adjust distributions at the assignment level, they can do the following:
• Select one distribution costing to a General Ledger account or Grants Accounting orProjects charging instruction, and adjust to one or multiple different costing accounts, whether a General Ledger account or Grants Accounting or Projects charging instruction, for the full distribution amount.
• Select multiple distributions costing to a General Ledger account or Grants Accounting or Projects charging instruction, and adjust to different costing accounts, whether a General Ledger account or a Grants Accounting or Projects charging instruction, for the full distribution amount.
• Submit one or multiple adjustment sets in a single adjustment batch.
Distribution Adjustment at the Element LevelDistribution adjustment at the element level involves adjusting your employee
14-4 Oracle Labor Distribution User Guide
assignments' distributions per elements paid and costed to a costing account (such as a General Ledger account or to a Grants Accounting or Projects charging instruction).
An element is a component used in the calculation of an employee's pay. Each element represents a compensation or benefit type, such as salary, wages, stock purchase plan, or pension contributions.
In the previous example, an employee assignment was paid Regular Salary and Overtime, and both elements were distributed and costed to the same General Ledger account. If you elect to adjust distributions at the element level, you would see two distributions: one for each element costing to the same General Ledger account and with the corresponding distribution amount for each element.
If users elect to adjust distributions at the element level, they can do one of the following:
• Select one distribution for an element costing to a General Ledger account or GrantsAccounting or Projects charging instruction, and adjust to one or multiple different costing accounts, whether a General Ledger account or Grants Accounting or Projects charging instruction, for the full distribution amount.
• Select multiple distributions for the same element costing to a General Ledger account or Grants Accounting or Projects charging instruction, and adjust to one or multiple different costing accounts, whether a General Ledger account or Grants Accounting or Projects charging instruction, for the full distribution amount.
• Adjust multiple distributions for the same element in an adjustment set.
• Adjust multiple distributions for different elements in a single adjustment batch.
For more information on the Distribution Adjustments Configuration Options concurrent process, see Configuration, page 14-12.
Distribution Adjustment at the Element Group LevelDistribution adjustment at the element group level involves adjusting employee assignments' distributions per element groups. An element group is a user-defined grouping of elements paid and costed to a costing account (such as a General Ledger account or to a Grants Accounting or Projects charging instruction).
Examples of element groups include:
• An earnings element group, which can consist of Regular Salary and Overtime.
• A benefits element group, which can consist of Dental Benefit and Medical Benefit.
Regular Salary and Overtime earnings elements are paid and costed to the same General Ledger account. Dental Benefit and Medical Benefit elements are paid and costed to a Grants Accounting or Projects charging instruction.
If users elect to adjust distributions at the element group level, they see two

Distribution Adjustments Procedures 14-5
distributions: one for each element group, with element group Earnings costing to a General Ledger account and element group Benefits costing to a Grants Accounting or Projects charging instruction.
If users elect to adjust distributions at the element group level, they can do one of the following:
• Select one distribution for an element group costing to a General Ledger account or Grants Accounting or Projects charging instruction, and adjust to one or multiple different costing accounts, whether a General Ledger account or Grants Accounting or Projects charging instruction, for the full distribution amount.
• Select multiple distributions for the same element groups costing to a General Ledger account or Grants Accounting or Projects charging instruction, and adjust toone or multiple different costing accounts, whether a General Ledger account or Grants Accounting or Projects charging instruction, for the full distribution amount.
• Adjust multiple distributions for the same element group in a single adjustment set.
• Adjust multiple distributions for different element groups in a single adjustment batch.
FeaturesWith Distribution Adjustments, users can:
• Display distributions for adjustment according to employee name, date range, assignment, and currency.
• Adjust distributions at the assignment level where you can sum all elements for each costing distribution at the element level, or at the element group level.
• Adjust one or multiple costing distributions for one or more days in a single adjustment batch. The adjustment begin date can be different from the adjustment end date.
• If adjusting at the element level, adjust costing distributions for one or more elements in a single adjustment batch. Users can only adjust from and to the same element in one adjustment set.
• If adjusting at the element group level, adjust costing distributions for one or more element groups in a single adjustment batch. Users can only adjust from and to the same element group in one adjustment set.
• Adjust costing distributions with debit and credit transactions in a single adjustment batch. Users can only adjust from and to the same type of transaction in one adjustment set.

14-6 Oracle Labor Distribution User Guide
• Define multiple adjustment sets in a single batch.
• Clear transferred distributions to redefine adjustments.
• Adjust all types of payroll elements, such as earnings, benefits, and deductions in a single distribution adjustment batch.
• Reverse original distributions.
• Select new distributions.
• Summarize and transfer new distribution transactions to Grants Accounting, Projects, or General Ledger.
• Restart summarize and transfer adjustments in the event of database or technical failures.
ProcessThe Distribution Adjustments process includes the following:
• Find Distributions, page 14-6
• Select the Distributions to Transfer, page 14-7
• Specify the Adjustments, page 14-7
• Submit the Adjustments, page 14-8
• Approve Distribution Adjustments Workflow, page 14-9
• Summarize and Transfer Adjustments, page 14-10
• Restart Summarize and Transfer Adjustments, page 14-11
• Distribution Adjustment Register Report, page 14-11
Find Distributions Users select the following items in the Find Distributions window to display the associated distribution lines:
• Employee name and assignment number
• Begin and end date of the adjustment
• Currency

Distribution Adjustments Procedures 14-7
• Level of adjustment
• Assignment
• Element
• Element group
Select the Distributions to TransferIn the Actual Distributions region of the Distribution Adjustments window, users select one or more distributions, along with the amounts to transfer, and Labor Distribution reverses the selected distributions and the amounts in the Adjusted Distributions region. In the Actual Distributions region, users can select the following for transfer:
• One or multiple distributions in an adjustment set at the assignment level.
• One or multiple distributions in an adjustment set within the same element at the element level. For example, users can select Regular Salary or Overtime.
• One or multiple distributions in an adjustment set within the same element group at the element group level. For example, users can select Deductions.
• One or multiple distributions in an adjustment set for one or multiple days. For example, users can query and adjust for distributions on 08-JAN-2003 or query and adjust for distributions from 08-JAN-2003 to 12-JAN-2003.
• One or multiple distributions in an adjustment set for the same type of debit or credit transaction. For example, users can select and adjust all debit or all credit transactions.
Specify the Adjustments Once the Adjusted Distributions region of the Distribution Adjustments window display the reversed distributions and amounts, users can specify the adjustments by entering Grants Accounting or Projects charging instructions or General Ledger accounts as transfer destinations. For each adjustment set, users can specify the modified distribution amounts to be transferred in either currency amounts or percentages.
Users can specify multiple adjustment sets in a single adjustment batch. An adjustment set is a group of actual distributions adjusted to new distributions. An adjustment batchis comprised of one or multiple adjustment sets that are submitted for approval at the same time.
To clear reversed amounts before freezing an adjustment set, users can deselect the appropriate Transfer check boxes and click Done.

14-8 Oracle Labor Distribution User Guide
To view details of the original charging instruction and its corresponding distributions, users can select a distribution in the Actual Distributions regions and click View Details.
To cancel all adjustment sets or close the window without saving, users can click Cancel.
When you adjust distribution lines, the application can compute and distribute additional information that you stored in DFFs. For example, when you make distribution adjustments, the application can automatically distribute, update, and display the number of hours that you stored in the DFF.
You must use a user hook to compute, update, and display information stored in these DFFs during adjustments. See: Technical Essay on Labor Distribution Configuration (Metalink Note ID 302304.1)
Auto-Population Profile Option with Distribution AdjustmentsYou can use the auto-population of the natural account and expenditure type with Distribution Adjustments if you have enabled the auto-population profile option. If Auto-Population is enabled, a label appears in the lower section of the window indicating that auto-population is on. You can override auto-population by choosing a natural account or expenditure type from the list of values.
You can specify that Labor Distribution defers its auto-population invocation until after you have submitted the batch. In this way, Labor Distribution would be able to apply element-based auto-population rules against each adjusted line, even for distribution adjustments batches that are being done at the Assignment and Element Group levels.
For information on enabling the auto-population profile option, see System Administration Setup, page 3-2.
For information on the Distribution Adjustments Configuration Options concurrent process, see Configuration, page 14-12.
Submit the Adjustments When users submit adjustments, Labor Distribution performs validations against them. To submit an adjustment batch, click Submit and type the following information:
• A mandatory, unique distribution adjustments batch name.
• An optional General Ledger override date.
Note: Users can override the General Ledger Posting date if the PSP: Use Default GL Posting Override Date profile option is set to "No".
For information on setting the PSP: Use Default GL Posting Override Date profile option, see System Administration Setup, page 3-2.

Distribution Adjustments Procedures 14-9
• Mandatory comments. Users can override a default comment, which specifies the employee name, assignment number, and the begin and end dates of the adjustment.
For information on the validation process, see Data Entry Validations Process, page D-1.
Distribution Adjustments and Effort ReportsIf you create an effort report for an employee and define distribution adjustments for any portion of the effort report period, then the effort report is superseded and you must generate a new effort report.
Labor Distribution issues warnings if lines in the period have been adjusted.
Approve Distribution Adjustments WorkflowOracle Workflow routes the distribution adjustment to the appropriate approver for approval. The approver has the following options:
• Approve the adjustment
• Reject the adjustment
• Return the adjustment with comments
Users with the necessary permissions can navigate to the Worklist window to approve or reject the transfer. The approver cannot modify adjustments.
If the adjustments are approved, the distribution lines are summarized and transferred to General Ledger, Projects, or Grants Accounting at the user's convenience as describedin the section, Summarize and Transfer Adjustments, page 14-10.
If the adjustments are rejected, all adjustment sets in the batch are rejected, and the distributions revert to the original charging instructions. The approver cannot reject only part of a batch. The approver must reject the whole batch and redefine the distribution adjustment.
Using Oracle Workflow with Distribution AdjustmentsUsers have the following options regarding the use of Oracle Workflow with distribution adjustments:
• Use Oracle Workflow with distribution adjustments. When a distribution adjustment is created for an employee, an Oracle Workflow notification is sent to the adjustment approver to approve or reject the adjustment.
• Refrain from using Oracle Workflow with distribution adjustments.
• Optionally use or refrain from using Oracle Workflow when a distribution

14-10 Oracle Labor Distribution User Guide
adjustment is created for an employee and the distribution adjustment creator is thesame person as the distribution adjustment approver.
For detailed information on omitting the approval step in the Distribution Adjustments Approval Workflow process, see Customizing Distribution Adjustments Approval Workflow Process, page F-12.
Summarize and Transfer AdjustmentsAfter distribution adjustments are defined and approved, Labor Distribution runs the Summarize and Transfer Adjustments process as a separate process. Users can include one or more batches in the process and can run the process at any time.
The steps in the PSP: Summarize and Transfer Adjustments process are:
1. The user initiates the Summarize and Transfer Adjustments process.
2. The user uniquely names the adjustment summary batch.
3. Labor Distribution searches for all distribution adjustment batches that are approved and must be summarized and transferred.
4. The Grants Accounting and Projects lines are compiled into one batch, and the General Ledger lines are compiled into multiple batches.
5. The Summarize and Transfer Adjustments process combines all the batches and creates an adjustment summary batch.
6. If a distribution line is rejected, only the batch that includes this line is rejected, not the entire adjustment summary batch.
7. The rejected batch reverts the distributions to the original charging instructions.
Note: The Summarize and Transfer Adjustments process does not use a suspense account to resend rejected lines to General Ledger, Grants Accounting, or Projects.
8. The Summarize and Transfer Adjustments process provides a log file with details ofbatches and adjustment summary batches that terminated normally and abnormally and the selection criteria included in the batches.
Employee Assignments with Zero Work Day With Labor Distribution, you can summarize and transfer adjustment lines for employees with zero work day situations, irrespective of employee assignment status.
The following rules apply:
Distribution Adjustments Procedures 14-11
• If an employee has a non-active status and has a schedule charging to General Ledger, Labor Distribution uses the current Summarize and Transfer Adjustments process. General Ledger does not validate whether an employee has an active or non-active employee assignment status.
• If an employee has a non-active assignment status and has a schedule charging to Grants Accounting or Projects, Labor Distribution looks for the employee assignment's last active date and posts this date as the GMS Override Date. Grants Accounting or Projects then accepts the transfer of adjustment lines with a non-active employee assignment status.
To process zero work day situations, Workflow disables its validation on an employee assignment status so it can process employee assignments with a non-active status.
For information on employee assignments with zero work day situations, see EmployeeAssignments with Zero Work Day, page 8-2.
Restart Summarize and Transfer AdjustmentsUse the Restart Summarize and Transfer Adjustments process if one of the following situations occurs while running the Summarize and Transfer Adjustments process:
• System crash
• Abnormal termination of the process
The restart process provides a log file with a list of adjustment summary batches that terminated abnormally and the selection criteria included in the terminated batches.
Distribution Adjustment Register Report The Distribution Adjustment Register report summarizes distribution adjustments created for employees by batch name. It provides users with a report of summarized and transferred distribution adjustments within the specified begin and end dates. The Distribution Adjustment Register report date is the date the adjustments were defined, not the distribution adjustments date range.
For information on generating the Distribution Adjustment Register report, see Generating Distribution Adjustment Register Report Procedure, page 14-22.
PrerequisitesThe timeout system profile option for approvals must be defined if the user wants to seta timeout for the Workflow approval process.
To define the PSP: Adjustment Approval Time Out in Days system profile, see System Administration Setup, page 3-2.

14-12 Oracle Labor Distribution User Guide
ConfigurationLabor Distribution provides you with the ability to configure how it performs its distribution adjustments:
• You can specify that Labor Distribution defers its auto-population invocation until after you have submitted the batch. In this way, Labor Distribution would be able to apply element-based auto-population rules against each adjusted line, even for distribution adjustments batches that are being done at the Assignment and Element Group levels.
• When you are adjusting at the element level, you can specify that the Distribution Adjustment window displays the distribution percentage either as 100% summation across all element or as 100% for each element.
See: Configuring Values for Labor Distribution, page 3-15, for more information on howto set up the configuration values
Adjusting Distributions Procedure To execute distribution transfers, perform the following steps.
1. In Labor Distribution, navigate to the Distribution Adjustments window by selecting Distribution Adjustments. The Find Distributions pop-up window appears.
2. In the Employee Name field, select an employee from the list of values.
3. Select an assignment from the list of values.
4. In the Begin Date field, enter a beginning date for the adjustment from the list of values.
5. In the End Date field, enter an ending date for the adjustment from the list of values.
6. In the Currency field, select the currency type from the list of values.
7. In the Adjust by region, select the Assignment, Element, or Element Group radio button to specify the adjustment level.
8. Click Find. The Distribution Adjustments window appears. If you chose either Element or Element Group level adjustments, this window includes the appropriatecolumn.
9. To view details of the original charging instruction and its corresponding

Distribution Adjustments Procedures 14-13
distributions, select a distribution in the Actual Distributions region and click View Details. The View Details window appears.
10. If the user selects the assignment level in Step 7, page 14-12, then one or multiple distributions can be transferred by selecting the appropriate Transfer check boxes inthe Actual Distributions region and clicking Done. The selected lines appear in the Adjusted Distributions region of the Distribution Adjustments window.
11. If the user selects the element level in Step 7, page 14-12, then one or multiple distributions can be transferred within the same element by selecting the appropriate Transfer check boxes in the Actual Distributions region and clicking Done. The selected lines appear in the Adjusted Distributions region of the Distribution Adjustments window.
12. If the user selects the element group level in Step 7, page 14-12, then one or multipledistributions can be transferred within the same element group by selecting the appropriate Transfer check boxes in the Actual Distributions region and clicking Done. Only elements matching the selected Currency are available for selection. Theselected lines appear in the Adjusted Distributions region of the Distribution Adjustments window.
13. If distributions consist of a combination of debit and credit transactions, then one ormore distributions can be transferred within the same transaction type by selecting the appropriate Transfer check boxes in the Actual Distributions region and clickingDone. The selected lines appear in the Adjusted Distributions region of the Distribution Adjustments window.
14. To optionally clear a reversed adjustment from the Adjusted Distributions region, deselect the appropriate Transfer check box and click Done.
15. To select the method of adjustment, in the Adjust By region, click one of the following radio buttons:
• Amount
• Percent
Note: When adjusting credit amounts, only the Percent radio button can be selected.
16. In the Adjusted Distributions region, specify new charging instructions and amounts as described in Table 1., page 14-14.
17. To complete the adjustment set, click Freeze Set. One adjustment set has been created and it is not updateable.
14-14 Oracle Labor Distribution User Guide
18. To create multiple adjustment sets, repeat Step 10, page 14-13 to Step 17, page 14-13.
19. To cancel the submission of all adjustment sets or close the window without saving,click Cancel.
20. To submit the adjustment batch, click Submit. The Submit pop-up window appears.
When you click Submit, Labor Distribution implements auto-population changes if:
• You have enabled auto-population.
• You are adjusting by Assignment or Element Group.
• You have enabled the "Defer auto-population at assignment/element group level" configuration option.
If you are adjusting at the Element level, the auto-population substitutions for GL Natural Account and Projects Expenditure Type occur immediately when you entera new adjustment line. This substitution occurs the very first time you enter a line; itdoes not occur when you change an adjustment.
21. In the Batch Name field, enter a batch name.
22. If necessary, enter a date in the GL Override Date field from the list of values.
23. In the Comments field, a default comment appears. Users can override the default comment by entering text that describe the reasons for the adjustment.
24. Click OK. The Find Distributions pop-up window appears so users can enter another adjustment.
25. Close the window.
Distribution Adjustments Window Description
Distribution Adjustments Window Description
Field Name Type Features Description
Employee Region
Full Name default display only Employee name
Employee Number default display only Eemployee identification number

Distribution Adjustments Procedures 14-15
Field Name Type Features Description
Assignment Region
Assignment default display only Employee assignment identification number
Organization default display only Organization to which theassignment belongs
Distribution Period Region
Begin Date default display only Distribution adjustment period start date.
End Date default display only Distribution adjustment period end date.
Currency default display only Currency used for these distributions.
Actual Distributions Region
GL Account default display only General Ledger accounting flexfield.
Project default display only Grants Accounting and Projects project charging instruction.
Note: Navigate horizontally to see the entire line by using the scroll bar.
Task default display only Grants Accounting and Projects task number.
14-16 Oracle Labor Distribution User Guide
Field Name Type Features Description
Award default display only Grants Accounting award number.
Only the awards belonging to the selected project are available for selection.
Expenditure Organization default display only Grants Accounting and Projects expenditure organization.
Expenditure Type default display only An implementation-defined classification of cost that you assign to each expenditure item. A Grants Accounting and Projects expenditure type.
Element default display only Field appears if you selectthe Element radio button in the Find Distributions window. A component in the calculation of employee pay. Each element represents a compensation or benefit type, such as salary, wages, stock purchase plan, or pension contributions.
Element Group default display only This field appears if you select the Element Group radio button in the Find Distributions window. It is a user-defined groupingof elements. Examples of element groups include an earnings element group and a benefits element group.

Distribution Adjustments Procedures 14-17
Field Name Type Features Description
Amount default display only Amount distributed for a specific period.
% default display only Percentage distributed fora specific period.
Transfer optional check box Indicates if the distribution item is to be transferred.
[Total Amount] default display only Total amount of distribution line to be transferred.
[%] default display only Total percentage of distribution line to be transferred.
View Details optional button Opens to the View Detailswindow so users can viewthe original charging instruction and the corresponding original distributions for the selected distribution in the Actual Distributions region of the Distribution Adjustments window.
Done required button Indicates task completion.
Adjusted Distributions Region
GL Account conditionally required General Ledger accounting flexfield. This is required if you have notentered any Grants Accounting or Projects charging instructions. Youcan override the Auto-Population value from the list of values.

14-18 Oracle Labor Distribution User Guide
Field Name Type Features Description
Project conditionally required Identifies Grants Accounting or Projects project charging instruction. This is required if you have not entered a General Ledger account.
Note: Navigate horizontally to see the entire line by using the scroll bar.
Task conditionally required Grants Accounting or Projects task number charging instruction.
Award conditionally required Grants Accounting award number charging instruction.
Only the awards belonging to the selected project are available for selection.
Expenditure Organization conditionally required Grants Accounting and Projects expenditure organization.
Expenditure Type conditionally required An implementation-defined classification of cost that you can assign to each expenditure item. A Grants Accounting or Projects expenditure type charging instruction. You can override the Auto-Population value from the list of values.

Distribution Adjustments Procedures 14-19
Field Name Type Features Description
Element default display only This field appears if you select the Element radio button in the Find Distributions window. This is a component in thecalculation of employee pay. Each element represents a compensation or benefit type, such as salary, wages, stock purchase plan, or pension contributions.
Element Group default display only This field appears if you select the Element Group radio button in the Find Distributions window. This is a user-defined grouping of elements. Examples of element groups include an earnings element group and a benefits element group.
Amount optional Amount distributed for a specific period.
% optional Percentage distributed fora specific period.
Unaccounted Balance default display only Unaccounted balance that must become $0.00 before submitting the adjustment.
Freeze Set required button Makes the current adjustment set nonupdatable, which enables users to define multiple adjustment sets in the same adjustment batch.

14-20 Oracle Labor Distribution User Guide
Field Name Type Features Description
Adjust By Region
Amount optionally required radio button Indicates if adjusted by amount.
Percent optionally required radio button Indicates if adjusted by percent.
Cancel button Cancels all adjustment sets; closes window without saving.
Submit required button Submits the adjustment for validation.
Submit Pop-up Window
Batch Name required User-defined batch.
GL Override Date optional Specify this date to override the General Ledger posting date.
Comments optional A default comment appears that you can override by entering text that describes the reasons for the adjustment.
Cancel required Closes window without saving.
OK button Confirms action and closes window.
Approving the Distribution Adjustments Workflow ProcedureTo approve a distribution adjustment:
1. In Labor Distribution, navigate to the Worklist window as follows:
Workflow > Workflow User > Worklist

Distribution Adjustments Procedures 14-21
The Worklist window appears.
2. In the Subject column, double-click on a notification link. The Notification Details window appears.
3. Click the Workflow Monitor icon. The Distribution Adjustments window appears.
4. To approve the distribution adjustment, click Approve.
5. To reject the distribution adjustment, click Reject. The distribution lines revert to theoriginal charging instructions.
6. Close the window.
Summarizing and Transferring Adjustments ProcedureTo summarize and transfer adjustments to General Ledger, Projects, and Grants Accounting, perform the following steps.
1. In Labor Distribution, navigate to the Submit Request window as follows:
Processes & Reports > Run
The Submit a New Request pop-up window appears.
2. Select the Single Request radio button.
3. Click OK. The Submit Request window appears.
4. In the Name field, select PSP: Summarize and Transfer Distribution Adjustments from the list of values. The Parameters pop-up window appears.
5. In the Adjustment Summary Batch Name field, enter a unique adjustment summarybatch name.
6. To apply the parameter, click OK.
7. In the Submit Request window, click Submit. The Requests window appears.
8. To view the report file, select the appropriate Request ID and click View Output.
9. Close the window.
Restarting Summarize and Transfer Adjustments ProcedureIf the Summarize and Transfer Distribution Adjustments process fails due to database problems:

14-22 Oracle Labor Distribution User Guide
1. View the process's log to determine the cause of the failure.
2. Correct the errors in the database.
3. Run the Restart Summarize and Transfer Distribution Adjustments process.
Generating Distribution Adjustment Register Report ProcedureTo run the Distribution Adjustment Register report:
1. In Labor Distribution, navigate to the Submit Request window as follows:
Processes & Reports > Run
The Submit a New Request pop-up window appears.
2. Select the Single Request radio button.
3. Click OK. The Submit Request window appears.
4. In the Name field, select PSP: Distribution Adjustment Register from the list of values. The Parameters pop-up window appears
5. In the Begin Date field, enter the distribution adjustment creation start date.
6. In the End Date field, enter the distribution adjustment creation end date which is greater than the start date.
7. In the Adjustment Batch Name field, select a distribution adjustment batch from thelist of values, or leave the field empty to retrieve all batches for the specified period.
8. In the Submitted By field, select an employee name from the list of values, or leave the field empty to retrieve batches submitted by any employee for the specified period.
9. In the Approved By field, select an employee name from the list of values, or leave the field empty to retrieve batches approved by any employee for the specified period.
10. In the Assignment Org. Name field, select an employee assignment organization from the list of values, or leave the field empty to retrieve all batches for employees having any assignment organization.
11. In the Primary Org. Name field, select an organization from the list of values, or leave the field empty to retrieve all batches for employees having any primary assignment organization.

Distribution Adjustments Procedures 14-23
Note: A value may only be entered in either the Assignment Org. Name field or the Primary Org. Name field.
12. Click OK.
13. In the Submit Request window, click Submit. The Requests window appears.
14. To view the report file, select the appropriate Request ID and click View Output.
15. Close the window.


Labor Encumbrance Processes and Reports Procedures 15-1
15Labor Encumbrance Processes and Reports
Procedures

15-2 Oracle Labor Distribution User Guide
Labor Encumbrance Processes and Reports Procedures
DefinitionThrough Labor encumbrance, users can differentiate unspent and uncommitted funds from unspent funds. In Oracle Labor Distribution, the user can reserve funds by selecting charging instructions in Oracle General Ledger and Oracle Grants Accounting.By reserving funds from a budget for expenses committed but not expended, users can see a more accurate available funds figure.
OverviewThe encumbrance feature in Labor Distribution enables users to accomplish the following:
• Avoid overspending on budgets for General Ledger accounts and Grants Accounting awards
• Predict and channel cash outflow
• Ensure that actual and planned labor cost and salary do not exceed available funds and grants
• Modify posted encumbrances as requirements change
This section describes the labor encumbrance processes and reports.
ProcessesThe labor encumbrance process includes the following processes:
• PSP: Create and Update Encumbrance Lines, page 15-3
• PSP: Encumbrance Summarize and Transfer, page 15-11
• PSP: Archive Encumbrance Lines and PSP: Retrieve Encumbrance Lines, page 15-12
• PSP: Liquidate Encumbrances for Employee Termination, page 15-12
Labor Encumbrance Processes and Reports Procedures 15-3
PSP: Create and Update Encumbrance LinesUse the PSP: Create and Update Encumbrance Lines process to create, update, and liquidate encumbrances for multiple payrolls.
See: Creating, Updating, and Liquidating Encumbrances, page 15-20
Using the PSP: Create and Update Encumbrance Lines Process to Create Encumbrance Lines
The PSP: Create and Update Encumbrance Lines process generates encumbrances for the elements that you selected using the Element Selection window. Leave the Payroll parameter blank to run the PSP: Create and Update Encumbrance Lines process for multiple payrolls.
When the process creates encumbrances for employee assignments, it creates encumbrances based on the period that you set in the assignment's charging instruction.
If the charging instruction is a GL account, then the process determines the encumbrance period based on the start date of the payroll and the end date you specified in the Default End Date window.
If the end date of the charging instruction is later than the date you set in the Default End Date window, then the process creates encumbrances up to the end date of the project, or task, or award, or expenditure type, or expenditure organization, whichever ends earlier. Otherwise, the process creates encumbrances up to the end date of the charging instruction. If the charging instruction ends before the end date of the assignment or the pay period, then the application prorates based on the scheduling hierarchy.
Example: Assume an employee's labor schedule runs from January 1 through January 15. The pay period is from January 1 to January 31, and you defined the Organization Default Labor Schedule (ODLS) from January 10 to February 1. In this case, the period from January 16 through the 31st goes to ODLS.
If you charge an assignment to a combination of General Ledger and award charging instructions, then the process creates encumbrance lines for GL percentage according to the GL functionality. In addition, the process creates the lines for the award percentage according to the award functionality.
Encumbrance RulesThe PSP: Create and Update Encumbrance Lines process creates encumbrances based on the payroll period for each assignment, element, and charging instruction. When yougenerate encumbrances, you select a payroll. Based on the payroll you select, the process creates encumbrance lines using the following rules:
1. The process detects all the assignments in the payroll you select in the Encumbrance– Payroll and Assignment Selection window to create encumbrance lines.

15-4 Oracle Labor Distribution User Guide
2. The PSP: Create and Update Encumbrance Lines process encumbers only those assignments from Rule 1 that have any of the elements that you specified in the Encumbrance – Element Selection window.
3. The process determines the encumbrance periods for all the charging instructions ofthe assignments that Rule 2 identifies. The process calculates the encumbrance period for each charging instruction in the following manner:
• Obtaining the Default Encumbrance End Date.
• Using the default organization's charging instructions that you set up in Labor Distribution for unaccounted schedule percentages (if the charging instructions do not account for 100% of an employee's schedule)
Note: The Default Encumbrance End Date must fall within the range of dates for which the organization default accounts labor schedule contains valid charging instructions. You can create only a single generic end date for all organizations. If you do not set up the organization default accounts labor schedule, the process posts the encumbrance lines that exceed the employee's labor schedule to the organization suspense account. You must set up the organization suspense account.
• Calculating the encumbrance amount for each payroll period in the encumbrance period determined in Rule 3 by taking the pay amount for the employee assignment based on salary, wage, and standard work week, and multiplying that by the percentages in the labor schedule for that date and the number of business days in the payroll period.
Note: If there are days in the payroll period for which an employee assignment is not active, or if you have changed employee information during the payroll period, such as increasing the employee's salary, then the process pro-rates the encumbrance amounts accordingly.
• Validating each encumbrance line created for Oracle Grants Accounting using Grants Accounting expenditure item validation rules.
For more information on encumbrance rules, see Labor Encumbrance Process, page C-1.
Using the PSP: Create and Update Encumbrance Lines Process to Update EncumbranceLines
If you change the information of one or more assignments, then you must run the PSP:

Labor Encumbrance Processes and Reports Procedures 15-5
Create and Update Encumbrance Lines process to update encumbrances for those assignments.
See: Labor Encumbrance Creation and Update Rules, page 15-5.
The process to pro-rate encumbrances captures these changes and posts to encumbrance lines with accurate encumbrance data.
When the PSP: Create and Update Encumbrance Lines process updates encumbrances, it reverses encumbrances that already exist, and then creates encumbrances. . The PSP: Create and Update Encumbrance Lines process does not create additional encumbrancelines because the process does not create any encumbrances for a date greater than the original Default Encumbrance End Date. The process uses this date when it needs to create encumbrance lines during an update operation. To create lines for an incrementaldefault encumbrance period, you must run the PSP: Create and Update Encumbrance Lines process.
You must run the PSP: Encumbrance Summarize and Transfer process after you run thePSP: Create and Update Encumbrance Lines process.
Labor Encumbrance Creation and Update RulesThe following rules apply to the labor encumbrance creation and update:
1. The PSP: Create and Update Encumbrance Lines process works on assignment element combinations based on each pay period. If the process has already encumbered an assignment element combination, then it processes encumbrances until the maximum encumbered date for that combination.
The PSP: Create and Update Encumbrance Lines process creates encumbrances onlyfor the period or sub-period in which the assignment is active. The process does notcreate encumbrances for sub-periods when the assignment is suspended, terminated, or has a non-active status.
Example Assignment A01 is active from 01-Jan to 15-Feb, suspended from 16-Feb to5-Mar, active again from 6-Mar to 20-Mar, and terminated on 21-Mar. The process creates encumbrances for this assignment from 1-Jan to 15-Feb, and from 6-Mar to 20-Mar.
2. The PSP: Create and Update Encumbrance Lines process captures the following changes:
• HR assignment level changes, including changes to organization, payroll, or assignment status
• HR element entry and salary proposal changes
• Employee level labor schedule changes
• Global element schedule changes

15-6 Oracle Labor Distribution User Guide
• Organization default accounts changes
• Organization default labor schedules changes
• Organization suspense account changes
• Generic suspense account changes
• Encumbrance elements setup changes
• Payroll assignment include or extract form changes
• Default encumbrance period end date changes
The PSP: Create and Update Encumbrance Lines process does not process changes in the GL encumbrance creation option.
3. When you change information at any scheduling level in the hierarchy, the process determines the assignments that it needs to process using the following rules:
• If you add a new schedule at a lower level in the hierarchy, then the PSP: Createand Update Encumbrance Lines process processes all related assignments in thehigher level schedules.
Example A new global element level schedule is defined for the Regular Salary element. Assignment B01 is charging to the employee-level labor schedule defined at the element type level for the element Regular Salary.
The PSP: Create and Update Encumbrance Lines process processes Assignment B01 since the new charging instruction of that assignment is at the global element level schedule.
Similarly, if you add a new Organization Default Labor Schedule, then the process considers all the assignments for that organization that you did not schedule previously at the global or employee level labor schedule.
• If you update a schedule that already exists, then the process considers all the assignments in that schedule as well as those assignments that exist in the new schedule. This is because an update may result in extending the end date of the schedule. Therefore, assignments that you charged to a higher level in the hierarchy in the past charge to the new schedule.
• If you delete a schedule, then the process considers all the assignments in that schedule.
4. The PSP: Create and Update Encumbrance Lines process encumbers labor schedules that you charge to General Ledger only until the default encumbrance end date. The process encumbers labor schedules you charged to awards until the earliest end date of either the labor schedule or the PTAEO combination. An award

Labor Encumbrance Processes and Reports Procedures 15-7
is invalid if:
• You complete the project, or the status of the project is Closed, or you set up theproject for new transactions.
• You complete the Task, or you have configured the task so that you cannot charge it.
• The award has a Closed status, you ended the installment, or you have not linked the award to a project and task, or control is not budgetary or you have not deferred the template.
• Expenditure type is invalid.
• Expenditure organization is invalid.
The start date for award charging is the latest of the following: project start date, task start date, preaward start date or award date, expenditure organization start date, or expenditure type start date.
The validity of award charging is the maximum continuous period in which the award is not invalid. This is the period between an award start date and end date.
5. You restrict the transaction control level checks to detect updates to any transaction controls for the project since you last used the PSP: Create and Update Encumbrance Lines process. Therefore, the process considers all the assignments charging to that project.
Example: You run encumbrances for a payroll on 10-Jan. The process liquidates the record. The process has created or updated:
• Record1 in pa_transaction_controls on 5-Jan
• Record2 in pa_transaction _controls, on 15-Jan
• Record3 in pa_transaction_controls on 25-Jan
All the three records correspond to the same project.
When you run the PSP: Create and Update Encumbrance Lines process for the payroll, then the process considers only Record2 and Record3 since their creation date is later than the encumbrance creation date.
When you run the PSP: Create and Update Encumbrance Lines process for the payroll, the process considers only Record3 since its creation date is later than the encumbrance run date.
6. When you extend the default period end date, you need to run the PSP: Create and Update Encumbrance Lines process. You then need to run the PSP: Encumbrance Summarize and Transfer process.

15-8 Oracle Labor Distribution User Guide
7. After an organization end date, you cannot traverse through the labor schedule hierarchy. If you start a new lower level schedule after the default encumbrance period end date, then the process does not create encumbrances till the lower level schedule. Similarly, if a lower level schedule ends after the default encumbrance period end date, then the process does not create encumbrances to the higher level in the schedule hierarchy.
For more information on schedule end date scenarios, see Labor Encumbrance End Date Scenarios Diagram, page C-4
8. The Create and Update Encumbrance Lines process does not encumber funds to default accounts or suspense accounts beyond the GL default encumbrance end date. However, if you have a PTAEO charging instruction valid beyond the default encumbrance end date at all other levels, then the application encumbers till the end date of that PTAEO charging instruction.
9. The PSP: Create and Update Encumbrance Lines process encumbers 100% of the schedule until the default encumbrance end date. If the labor schedule is less than 100%, then the process posts the balance to the organization default account or the suspense account. Beyond that date, the process may not encumber 100% of the schedule because of the following reasons:
• The process does not encumber schedules that contain GL charging instructionslater than the end date of the organization.
• The process encumbers an award schedule until the earliest end date of the PTAEO combination or the labor schedule. If an award is invalid, the process does not post funds to the default account or the suspense account later than the default encumbrance end date.
10. The process prorates funds that it needs to post to the suspense account and the default account. The process prorates and posts balance funds (if any) for the entire period into the organization default account, or the suspense account.
Example Consider the period from 01-Jan-02 to 30-Jan-02. The first Labor Schedule is valid for the assignment from from 16-Jan-02 to 30-Jan-2002 with a 50% distribution. The Award in the first Labor Schedule has a start date and end date of 21-Jan-02 and 30-Jan-02. The second Labor Schedule is valid for the assignment from from 21-Jan-02 to 30-Jan-02 with a 50% distribution. Its Award has a start date and end date of 16-Jan-02 and 30-Jan-02. The monthly salary for the employee equals $3000. If you assume that all 30 days are working days:
• Because you have not scheduled any charging instructions between 01-Jan-2002and 15-Jan-2005, the process charges the funds to the Organization Default Labor Schedule (ODLS). If you have not set up an ODLS, then the process charges the funds to the Organization Default Account (ODA). If you have not set up an ODA, then the process charges the funds to the suspense account. Theencumbrance amount is 3000 * (15/30) = $1500 for this period.

Labor Encumbrance Processes and Reports Procedures 15-9
• Because Labor Schedule1 is invalid from 16-Jan-02 to 20-Jan-02, Labor Distribution charges to suspense. The encumbrance amount is 3000 * (5/30) * 50/100 = $250 for this period.
• The process charges encumbrances between 21-Jan-2002 and 30-Jan-2002 to the first labor schedule. The encumbrance amount is 3000 * (10/30) * 50/100 = $500.
• The process charges encumbrances between 21-Jan-2002 and 30-Jan-2002 to the second labor schedule. The encumbrance amount is 3000 * (10/30) * 50/100 = $500.
• For the period from 01-Jan-02 to 30-Jan-02, the process charges the balance amount of 3000 - 2750 = $250 to ODLS. If you have not set up the ODLS, or if theODLS is not valid, then the process charges the balance amount to the suspense account.
Example 2: Consider the period from 01-Jan-02 to 30-Jan-02. Labor Schedule1 equals 50% of the assignment and is valid from 01-Jan-02 to 15-Jan-2002. Award Range1 is from 01-Jan-02 to 15-Jan-02. In this case, from January 16 onwards, Labor Distribution automatically attempts to charge first to the ODLS, then to the ODA, and if neither exists, then to suspense.
Example 3: Given the scenario in Example 2, if you were using the ODLS from January 16 to January 30 and then changed to a new organization on February 01, Labor Distribution would automatically change to the new ODLS.
11. If a new schedule begins after the default encumbrance period end date, then the process does not use that schedule to encumber. If the new schedule is only schedule that the process detects in the hierarchy, then it does not create any furtherencumbrances for that period and later.
Example: You have set the default encumbrance period end date as 31-Jul-2002. Your labor schedule ends on 31-Dec-2002. Your global element schedule begins on 15-Sep-2002. Because the PSP: Create and Update Encumbrance Lines process does not consider new schedules later than the default encumbrance period date, the process does not post funds to the organization default account or suspense accounts. The process does not create encumbrances from September.
12. The process considers the encumbrance creation option only for GL charging instructions, and not Oracle Grants Accounting charging. The process posts funds to Grants Accounting charging based on the period end date, or the last valid charging instruction date, whichever is earlier.
13. The following are special cases for users that also use both awards and GL.
• If an employee initially charges to GL, and then changes the charging instruction to an award and runs the PSP: Create and Update Encumbrance Lines process, then the process updates encumbrances only until the default

15-10 Oracle Labor Distribution User Guide
encumbrance period end date. To encumber the award charging beyond this date and until the PTAEO end date, you must run the PSP: Create and Update Encumbrance Lines process.
• If an employee initially charges to an award, and then changes the charging instructions to charge to a GL account, then the process creates new encumbrances until the default encumbrance period end date. The process liquidates encumbrances that are later than the default encumbrance period end date.
• If an employee charges to both GL and to an award, then the process encumbers the GL schedule until the default encumbrance period end date. Theprocess encumbers the award schedule until the earliest end date of the labor schedule or the PTAEO combination (assuming both continue after the default encumbrance period end date.)
Using the PSP: Create and Update Encumbrance Lines Process to Liquidate Encumbrance Lines
You can liquidate encumbrances for payroll periods for which you have already transferred payroll transactions to Oracle General Ledger or Oracle Grants Accounting. When the process liquidates encumbrances, it reverses encumbrance amounts for the payroll period that you select.
You must liquidate encumbrances for payroll periods for which you have already transferred payroll transactions to Oracle General Ledger, or Oracle Grants Accounting.You must do this task so that the process accurately reflects available funds. The process detects the date when you last ran the payroll and liquidates encumbrances for the payroll until that date.
If the PSP: Create and Update Encumbrance Lines process is unable to liquidate an encumbrance line, for example, if the award in the encumbrance line is closed, then the process skips the line and continues with the next one. The process liquidates each encumbrance line against their original accounts. To view a list of encumbrance lines that the process did not liquidate, run the Encumbrance Liquidation Exception report.
Generating Encumbrances Until the Award's Budgeted End DateYou can generate encumbrances until the budgeted end date of the award. You can reflect encumbrances for:
• Non-grant funded awards that you budgeted until the end of the fiscal year and
• Grant-funded awards that you budgeted until the end date of the award
You can specify an encumbrance end date for an award. If you specify the award encumbrance end date, the PSP: Create and Update Encumbrance Lines process

Labor Encumbrance Processes and Reports Procedures 15-11
generates encumbrances up to the earliest date of any of the following:
• Award encumbrance end date
• PTAEO end date
• Labor schedule end date
You must use a user hook to specify the encumbrance end date for an award. See: Technical Essay on Labor Distribution Configuration (Metalink Note ID 302304.1)
Summarizing and Transferring EncumbrancesYou run the PSP: Encumbrance Summarize and Transfer process after the PSP: Create and Update Encumbrance Lines process.
The summarization of encumbrances organizes the detailed accounting data into meaningful financial information in order to post this data to Oracle General Ledger or Oracle Grants Accounting. After the application creates the encumbrance lines, data exists for different assignments and charging instructions based on the payroll period selected.
Summarization RulesSummarization is based on the following rules:
1. The PSP: Encumbrance Summarize and Transfer process summarizes all the encumbrance lines based on person, organization, charging instruction, and time period.
2. When the process completes the summarization, it posts the summarized encumbrance lines to Oracle General Ledger and Oracle Grants Accounting. The process posts any lines that Oracle General Ledger or Oracle Grants Accounting rejects to the suspense account.
You can view encumbrances that the process posted, and the reasons if the post was notsuccessful.
If your labor schedule contains a PTAEO charging instruction that is invalid and extends beyond the default end date, the Encumbrance Summarize and Transfer process posts encumbrances to the suspense account up to the encumbrance default enddate. After the process successfully posts the funds to the suspense account, it deletes the charging instructions that extend beyond the default end date.
See: Review Posted Encumbrances Reports, page 15-13
These reports enable you to identify problems with the encumbrance lines. After you fixthe errors, you must run the PSP: Create and Update Encumbrance Lines process to charge encumbrances to the charging instructions you modified.

15-12 Oracle Labor Distribution User Guide
PSP: Archive Encumbrance Lines and PSP: Retrieve Encumbrance LinesThe PSP: Archive Encumbrance Lines and PSP: Retrieve Encumbrance Lines processes identify all encumbrance history and encumbrance summary lines for the specified payroll (for those payroll periods falling within the given begin and end time periods) and archives and purges the respective encumbrance tables. If there is a payroll period within the begin and end periods, for which there are no encumbrance lines in the encumbrance history or summary tables, then the process completes successfully and ignores those periods for which no payroll information exists in Labor Distribution.
The process archives only those encumbrance lines from payroll periods for which you have run the payrolls and for those lines that the process has liquidated.
Liquidating Encumbrances for Employees You Want to TerminateUse the PSP: Liquidate Encumbrances for Employee Termination process to liquidate encumbrances of up to five terminated employees simultaneously. You must liquidate all outstanding encumbrances before you terminate an employee. You cannot liquidate Oracle Grants Accounting encumbrances after you terminate the employee because the application does not accept encumbrances later than the employee's termination date.
If you encounter errors during the PSP: Liquidate Encumbrances for Employee Termination process (for example, if the award that the employee is charging to is closed), then you must run the PSP: Retry Liquidate Encumbrances for Employee Termination process after you fix the errors.
Reviewing and Undoing Encumbrances Before Transferring them to General Ledger or Grants Accounting
After the PSP: Create and Update Encumbrance Lines process completes its tasks, the process generates the Encumbrance Run Results report, which you can view from the Requests window. Use the Encumbrances Run Results report to detect inaccuracies (such as incorrect charging instructions) before you transfer the encumbrances to OracleGeneral Ledger or Oracle Grants Accounting.
If you detect inaccuracies, then you must run the PSP: Rollback Create and Update Encumbrance Lines process to undo the encumbrance calculations. You can undo the calculations for the entire process or up to five employees simultaneously. The RollbackCreate and Update Encumbrance Lines process reverts encumbrances that the PSP: Create and Update Encumbrance Lines process created. You can run the PSP: Create and Update Encumbrance Lines process to create the encumbrance lines again.
The following figure illustrates how you can review and undo encumbrances:

Labor Encumbrance Processes and Reports Procedures 15-13
Review Posted Encumbrance ReportsLabor encumbrance includes the following reports:
• Encumbrance Suspense Charge Report, page 15-13
• Organization Default Usage Encumbrance Report, page 15-14
• Encumbrance History by Award Report, page 15-14
• Encumbrance History by Organization Report, page 15-14
• Assignments Processed by Create and Update Encumbrance Lines Report, page 15-14
• Encumbrance Liquidation Exception Report, page 15-14
Encumbrance Suspense Charge Report If an employee has invalid schedule lines, then the application posts the encumbrance lines to the suspense account. The Suspense Charge Encumbrance report provides a list of employees along with encumbrance lines that the process has posted to the suspense account.

15-14 Oracle Labor Distribution User Guide
Organization Default Usage Encumbrance Report If an employee has insufficient charging instructions in the labor schedule, the application posts the encumbrance lines to the organization default account. The organization default usage encumbrance report provides a listing by time period for all employees with encumbrance lines that the application has posted to the organization default account.
Encumbrance History by Award ReportThe Encumbrance History by Award report enables you to view encumbrance amounts associated with a particular award for all employees.
Encumbrance History by Organization ReportThe Encumbrance History by Organization report enables you to view encumbrance amounts associated with a particular organization for all employees.
Assignments Processed by Create and Update Encumbrance Lines ReportThis report provides a listing by person of all assignments that have been processed by the Create and Update Encumbrance Lines process.
Encumbrance Liquidation Exception ReportIf the Create and Update Encumbrance Lines process rejects encumbrance transactions during liquidation (such as due to invalid charging accounts), then the process skips to the next transaction and continues processing.
After running the PSP: Encumbrance Summarize and Transfer process, you can run the Encumbrance Liquidation Exception report to see a list of all rejected transactions. Afteryou correct the errors, you can run the PSP: Encumbrance Summarize and Transfer process again.
Prerequisites• Elements must be selected to generate encumbrances.
To select elements for labor encumbrance, see Setting Up Encumbrance Element Selection Procedure, page 5-6.
• Assignments for selected payroll must be selected.
To select assignments for a selected payroll, see Setting Up Encumbrance Payroll and Assignment Selection Procedure, page 5-3.

Labor Encumbrance Processes and Reports Procedures 15-15
• Default encumbrance end date must be set up.
To set up the default encumbrance end date, see Setting Up Default Encumbrance End Date Procedure, page 5-5.
• An Organization Suspense Account must be set up.
To set up an Organization Suspense Account, see Setting Up Organization SuspenseAccounts Procedure, page 4-7.
• Encumbrance creation options must be selected.
To select encumbrance creation options, see Setting Up Creation Options for GL Procedure, page 5-7.
Summarizing and Transferring Encumbrances ProcedureTo summarize and transfer encumbrances, perform the following steps.
1. In Labor Distribution, navigate to the Submit Request window as follows:
Processes & Reports > Run
The Submit a New Request pop-up window appears.
2. Select the Single Request radio button.
3. Click OK. The Submit Request window appears.
4. In the Name field, select PSP: Encumbrance Summarize and Transfer from the list of values.
5. Click OK. The Parameters pop-up window appears.
6. Select the Payroll Name from the list of values.
7. To apply the parameters, click OK.
8. In the Submit Request window, click Submit. The Requests window appears.
9. To view the report file, select the appropriate Request ID and click View Output.
10. Close the window.
Recovering the Encumbrance Summarize and Transfer ProcessIf the Encumbrance Summarize and Transfer process fails due to database problems, suspense account problems, or reversal account problems:

15-16 Oracle Labor Distribution User Guide
1. View the process's log to determine the cause of the failure.
2. Correct the errors in the database and/or suspense or reversal account.
3. Rerun the Encumbrance Summarize and Transfer process.
Archiving Encumbrance Lines ProcedureTo archive encumbered history lines for a period, perform the following steps.
1. In Labor Distribution, navigate to the Submit Request window as follows:
Processes & Reports > Run
The Submit a New Request pop-up window appears.
2. Select the Single Request radio button.
3. Click OK. The Submit Request window appears.
4. In the Name field, select PSP: Archive Encumbrance Lines from the list of values. The Parameters pop-up window appears.
Note: Since encumbrance line history and summary are used on an ongoing basis by the Update and Liquidate processes, the archivingprocess prevents the user from mistakenly archiving live data, that is, encumbrance data that has not been liquidated.
5. In the Payroll Name field, select a payroll name from the list of values.
6. In the Begin Time Period field, select a beginning period from the list of values.
7. In the End Time Period field, select an ending period from the list of values.
8. Click OK.
9. In the Submit Request window, click Submit. The Requests window appears.
10. To view the report file, select the appropriate Request ID and click View Output.
11. Close the window.
Retrieving Encumbrance Lines ProcedureTo retrieve the encumbered history lines for a period, perform the following steps:

Labor Encumbrance Processes and Reports Procedures 15-17
1. In Labor Distribution, navigate to the Submit Request window as follows:
Processes & Reports > Run
The Submit a New Request pop-up window appears.
2. Select the Single Request radio button.
3. Click OK. The Submit Request pop-up window appears.
4. In the Name field, select PSP: Retrieve Encumbrance Lines from the list of values. The Parameters pop-up window appears.
5. In the Payroll Name field, select a payroll name from the list of values.
6. In the Begin Time Period field, select a beginning period from the list of values.
7. In the End Time Period field, select an ending period from the list of values.
8. Click OK.
9. In the Submit Request window, click Submit. The Requests window appears.
10. To view the report file, select the appropriate Request ID and click View Output.
11. Close the window.
Generating Suspense Charge Encumbrance Report To generate the Suspense Charge Encumbrance report, perform the following steps.
1. Navigate to the Submit Requests window.
2. In the Name field, select the PSP: Encumbrance Suspense Charge Report concurrentprocess.
3. In the Parameters window, optionally, select the organization set from the Organization Set field. You can create a set of organizations using a parameter set.
See: Creating a Parameter Set., page 17-14
Note: If you do not specify the organization set, then the report willdisplay information of all organizations during the specified period.
4. Optionally, select the payroll set from the Payroll Set field. You can create a set of payrolls using a parameter set.
15-18 Oracle Labor Distribution User Guide
See: Creating a Parameter Set., page 17-14
Note: If you do not specify the payroll set, then the report will display information of all payrolls during the specified period.
5. Enter the period during which you want to run the report in the Begin Date and End Date fields.
6. Click OK and then click Submit Request.
Generating Encumbrance History by Award ReportTo generate the Encumbrance History by Award report, perform the following steps.
1. Navigate to the Submit Requests window.
2. In the Name field, select the PSP: Encumbrance History By Award concurrent process.
3. In the Parameters window, optionally, select the award set from the Award Set field. You can create a set of awards using a parameter set.
See: Creating a Parameter Set., page 17-14
Note: If you do not specify the award set, then the report displays information of all awards during the specified period.
4. Optionally, select the payroll set from the Payroll Set field. You can create a set of payrolls using a parameter set.
See: Creating a Parameter Set., page 17-14
Note: If you do not specify the payroll set, then the report displays information of all payrolls during the specified period.
5. Enter the period during which you want to run the report in the Begin Date and End Date fields.
6. Click OK and then click Submit Request.
Generating Encumbrance History by Organization ReportTo generate the Encumbrance History by Organization report, perform the following steps:
Labor Encumbrance Processes and Reports Procedures 15-19
1. Navigate to the Submit Requests window.
2. In the Name field, select the PSP: Encumbrance History By Organization concurrentprocess.
3. In the Parameters window, optionally, select the organization set from the Award Set field. You can create a set of organizations using a parameter set.
See: Creating a Parameter Set., page 17-14
Note: If you do not specify the organization set, then the report displays information of all organizations during the specified period.
4. Optionally, select the payroll set from the Payroll Set field. You can create a set of payrolls using a parameter set.
See: Creating a Parameter Set., page 17-14
Note: If you do not specify the payroll set, then the report displays information of all payrolls during the specified period.
5. Enter the period during which you want to run the report in the Begin Date and End Date fields.
6. Click OK and then click Submit Request.
Generating Organization Default Usage Encumbrance Report To print the Organization Default Usage Encumbrance Report, perform the following steps.
1. In Labor Distribution, navigate to the Submit Request window as follows:
Processes & Reports >Run
The Submit a New Request pop-up window appears.
2. Click the Single Request radio button.
3. Click OK. The Submit Request window appears.
4. In the Name field, select PSP: Organization Default Usage Encumbrance Report from the list of values.
5. Click OK. The Parameters pop-up window appears.

15-20 Oracle Labor Distribution User Guide
6. Select the Payroll Name from the list of values.
7. To apply the parameters, click OK.
8. In the Submit Request window, click Submit. The Requests window appears.
9. To view the report file, select the appropriate Request ID and click View Output.
10. Close the window.
Generating Assignments Processed by Create and Update Encumbrance Lines Report
To run the Assignments Processed by Create and Update Encumbrance Lines Report process, perform the following steps.
1. In Labor Distribution, navigate to the Submit Request window as follows:
Processes & Reports > Run
The Submit a New Request pop-up window appears.
2. Click the Single Request radio button.
3. Click OK. The Submit Request window appears.
4. In the Name field, select PSP: Assignments Processed by Create and Update Encumbrance Lines Report from the list of values.
5. Click OK. The Parameters pop-up window appears.
6. Enter the Request ID.
7. To apply the parameter, click OK.
8. In the Submit Request window, click Submit. The Requests window appears.
9. To view the report file, select the appropriate Request ID and click View Output.
10. Close the window.
Creating, Updating, and Liquidating EncumbrancesUse the PSP: Create and Update Encumbrance Lines process to create, update, and liquidate encumbrances.
See: Processes, page 15-2

Labor Encumbrance Processes and Reports Procedures 15-21
To run the Create and Update Encumbrance Lines process:1. Navigate to the Submit Requests window.
2. In the Name field, select the PSP: Create and Update Encumbrance Lines process.
3. In the Parameters window, select the payroll that the process must use. If you do not specify the payroll, then the application runs the process for all the payrolls thatyou selected in the Encumbrance Payroll and Assignment Selection window.
4. Submit the process. The Create and Update Encumbrance Lines process automatically generates the Encumbrance Run Results report. View this report fromthe Requests window to display the encumbrances that the process creates.
Note: If the PSP: Create and Update Encumbrance Lines process fails (for example, if the FastFormula that you specified is not valid), then you can fix the errors and run the PSP: Retry Create and Update Encumbrance Lines process.


Effort Reporting Procedures 16-1
16Effort Reporting Procedures

16-2 Oracle Labor Distribution User Guide
Effort Reporting Procedures
DefinitionThe Effort Reporting process enables you to create, review, revise, and certify employee effort reports for a period of time. The effort report contains the Salary Distribution, Effort Percentage, Cost Share percentage spent and proposed by an employee against a Project, Task, Award, Expenditure Type, Expenditure Organization, or a General Ledger Account, or PTAEO information stored in GL segments in the accounting flexfield. The Effort Reporting process supports institutions subject to US Office of Management and Budget (OMB) Circular A-21 and A-122.
OverviewWhen submitting a Grants Proposal, employees have to specify the Salary needed, Effort percentage and Cost Share percentage that they will spend working on the proposed activity. Effort reports summarize the labor distributions over a period of time and ensure that employees actually spent the salary and effort that they proposed to spend.
The following Effort Report layouts are predefined:
• Effort Report Template for Employee Certification
• Effort Report Template for Award Principal Investigator Certification
• Effort Report Template for Project Manager Certification
• Effort Report Template for Task Manager Certification
To approve the effort reports, users can choose from the following seeded approval types:
• Pre-approved - the effort report is pre-approved at the time of creation, and does not require any approvals
• Approval by employee only - only the employee approves the effort report
• Approval by employee first and then by supervisor - the effort report approval usesthe employee and supervisor hierarchy
• Approval by supervisor only - the effort report approval uses the supervisor hierarchy
• Approval by Award Principal Investigator - the effort report approval uses the
Effort Reporting Procedures 16-3
Principal Investigator for the Award in Grants Accounting
• Approval by Project Manager - the effort report approval uses the Project Manager for the Project in Oracle Projects
• Approval by Task Manager - the effort report approval uses the Task Manager for the Task in Oracle Projects
Using the Custom Approval option, you can define your own approval rule using Oracle Approvals Management (AME). See Defining Custom Approval Types, page 16-14 for details on how to define a custom approval type.
This section describes the following:
• Effort Reporting Process, page 16-3
• Effort Report Workflow Approval Process, page 16-11
Effort Distribution ViewsAs an administrator, you can enable the Effort Distribution tab in Oracle Self-Service Human Resources (SSHR) so managers and employees in your organization can view their effort distribution.
For details on how to configure views in SSHR, see My Information and My Employee Information, Oracle HRMS Deploy Self-Service Capability Guide
As a manager, you can view effort distribution of your direct reports. As an employee, you can view your own effort distribution information.
As a manager, you can view information such as the name of the employee, the organization name, the assignment number, the latest effort report start and end dates. You can switch views between your list and hierarchy.
Click an employee name to view more details such as the assignment number, the PTAEO, GL, proposed salary, actuals, approver status and approver. Click Approver to send an email to the approver.
As an employee, you can view information about your effort distribution. You can see your name, the organization name, the assignment number, the latest effort report start and end date.
Effort Reporting ProcessThe Effort Reporting process enables users to perform the following tasks:
• Create Effort Report Templates, page 16-4
• Create Effort Reports, page 16-7

16-4 Oracle Labor Distribution User Guide
• Effort Report Workflow Approval Process, page 16-11
The sequence of steps in the Effort Reporting process is as follows:
• Administrators set up the effort report template
• Initiators submit the effort report process, receive the notification with attached consolidated effort reports, verify the consolidated effort reports, and submit for approval.
• Approvers approve the effort report
• Final recipients get the consolidated approved effort reports to archive and print
Create Effort Report TemplatesAn effort report template defines a set of parameters that are used for a specified effort reporting period. The selection criteria is saved as a template to be used at a different time. You can add, delete, or modify templates as needed.
If you use PTAEO information stored in GL Segments, you should have set up the configuration values on the Configuration Values page.
See: Configuring Values for Labor Distribution, page 3-15 for more information on how to set up the configuration values.
An effort report template consists of the following:
• Template Definition - contains the template name, template description, report type, frequency, start date, unit of measure, period duration, and element set
• Selection Criteria - the application uses these criteria to select the employees to create the effort reports
• Exclusion Criteria - the application uses these criteria to exclude employees from the effort reports
• Report Options - contains the XML Publisher reports layouts, sorting, summarization and workflow options
You can create effort reports using the following inclusion and exclusion criteria: Assignment Set, Assignment Status, Award Type, Awards, Consolidation Set, Individual Employees, General Ledger Accounts, Job, Location, Organization, Payroll, People Group, Position, Project, Project Type, Person Type, Supervisor. Fast Formula is available only in the exclusion criteria. The Effort Report Template does not support assignment sets that contain assignment criteria.
The Report Options contain the following options:
• Report Layout- these are XML Publisher RTF templates

Effort Reporting Procedures 16-5
• Sort order - use this to select the order in which you want the report to display. For example, you can sort the effort report by organizations (alphabetically) in ascending order and then by employees (alphabetically) in ascending order
• Choose to display all distributions for the employee - If you select Yes, approvers can view all distributions for the selected employee, however, if you select No, approvers can view only the relevant distributions for which the employee reports to them.
• Choose to compute the effort report based on person or assignment levels. If you select Person, then the effort report summarizes the total effort for the person. If you select Assignment, then the effort report summarizes the total effort for the assignment. Irrespective of whether you choose Person or Assignment, the sum total is 100 percent.
• Enable manual entry for effort and cost share percentages - if you enable this, users can enter Actual Over Written Effort Percentage and Cost Share Percentage
• Select effort summarization criteria - if you select this, the report displays a summary of the distributions for the group of employees based on Assignment or PTAEO details. The following example explains the importance of summarization criteria:
Table 1: Lets assume the following labor schedule for John Doe:
Employee Assignment Charging Instructions
%Effort
John Doe Assignment 1 Project1, Task1, Award1, ExpenditureType1, Expenditure Organization1
50%
John Doe Assignment 1 Project1, Task1, Award1, ExpenditureType2, Expenditure Organization1
50%
John Doe Assignment 2 Project2, Task2, Award2, ExpenditureType2, Expenditure Organization2
100%
Please note that in the above example, the first two lines have the same Project, Task, Award and Expenditure Organization.

16-6 Oracle Labor Distribution User Guide
Lets also assume that John Doe is on a monthly payroll and gets a salary of $1000.00 for Assignment1 and $1000.00 for Assignment2 in the month of January.
Table 2: If the summarization criteria is Employee, Assignment, Project, Task, Award, Expenditure Type, Expenditure Organization, the % effort for John Doe for January will look like this:
Employee Assignment Charging Account %Effort
John Doe Assignment1 Project1, Task1, Award1, ExpenditureType1, Expenditure Organization1
25%
John Doe Assignment1 Project1, Task1, Award1, ExpenditureType2, Expenditure Organization1
25%
John Doe Assignment2 Project2, Task2, Award2, ExpenditureType2, Expenditure Organization2
50%
Table 3: If the Summarization Criteria is Employee, Assignment, Project, Task, Award, and Expenditure Organization, the % effort for John Doe for January will now look like this:
Employee Assignment Charging Account %Effort
John Doe Assignment1 Project1, Task1, Award1, ExpenditureOrganization1
50%
John Doe Assignment2 Project2, Task2, Award2, ExpenditureOrganization2
50%
• Choose to view a preview of the effort report - this ensures that you as the Initiator, receive the report in PDF format before it is sent to any of the approvers or final recipients
• Specify the number of days after which to send automatic reminders to the approver, if you choose one

Effort Reporting Procedures 16-7
• Select a predefined approval type or define a custom approval type using Oracle Approvals Management. You can choose pre-approved approval type if you don't want workflow approval.
• Select the final recipients of the effort report - these are the recipients who receive the consolidated approved effort reports for archiving and printing after all the approvers have approved the effort reports.
• Allowable Tolerance for Supersedence - you can define the tolerance type of amount or percentage
• Persons to notify if the Effort Report is superseded - you can select one or more of the following persons: Initiator, All Approvers, Final Recipient, Employee.
You can override the predefined groups that appear in the effort report PDF and define your own groups to display effort report activities. By default, the effort report PDF displays efforts under the following groups:
• GL activities
• Non-sponsored activities
• Sponsored activities
You can use a user hook to override predefined groups and to define your own to appear in the effort report PDF. See: Technical Essay on Labor Distribution Configuration (Metalink Note ID 302304.1)
Create Effort ReportYou can create effort reports by running the PSP: Create Effort Reports (Multi-Threaded) process either from the Search Template page or from the Submit Requests window. The process has the following parameters:
• Select a Template Name from the list.
• Select a Start Date. By default, the start date day is the day after the end date for the last effort report submitted for the same template. For the very first process run of the template, the start date field is blank. For example: if the end date in the previous process run for the selected template was 31-DEC-2004, the start date will default to 01-JAN-2005.
• Select an End Date. By default, the end date is computed based on the start date andthe effort period frequency in the effort report template you select. For example: if the start date is 01-JAN-2005 and the frequency in the selected template is Calendar Monthly, the end date will default to 31-JAN-2005.
• Select the First Sort By criteria. By default, this is the sorting option in the effort

16-8 Oracle Labor Distribution User Guide
report template you select.
• Select the First Order By criteria. By default, this is the ordering option in the effort report template you select.
• Select the Second Sort By criteria. By default, this is the sorting option in the effort report template you select.
• Select the Second Order By criteria. By default, this is the ordering option in the effort report template you select.
• Select the Third Sort By criteria. By default, this is the sorting option in the effort report template you select.
• Select the Third Order By criteria. By default, this is the ordering option in the effortreport template you select.
• Select the Fourth Sort By criteria. By default, this is the sorting option in the effort report template you select.
• Select the Fourth Order By criteria. By default, this is the ordering option in the effort report template you select.
You can create effort reports for employees only once per effort report period.
A notification is sent to the initiator if the process completes successfully with the consolidated employee effort reports PDF attached to the notification. The initiator can preview the effort report and submit for approval. If the process encounters errors, thenthe consolidated employee effort reports PDF is not attached and the notification displays a Retry button. The initiator can fix the errors and click Retry button to restart the process. For example, initiators receive notifications, if the effort report has been superseded due to new transactions and can recreate the effort report.
Selecting Employees in the Effort Report ProcessLets assume the following employees exist in the Oracle HRMS database:
Table 4: Employees in the Oracle HRMS database:
Employee Name Primary Assignment Organization
Employment Type Segment in People Group Key Flexfield
John Stuart Department of Engineering Full Time
Michael Lawson Department of Chemistry Part Time
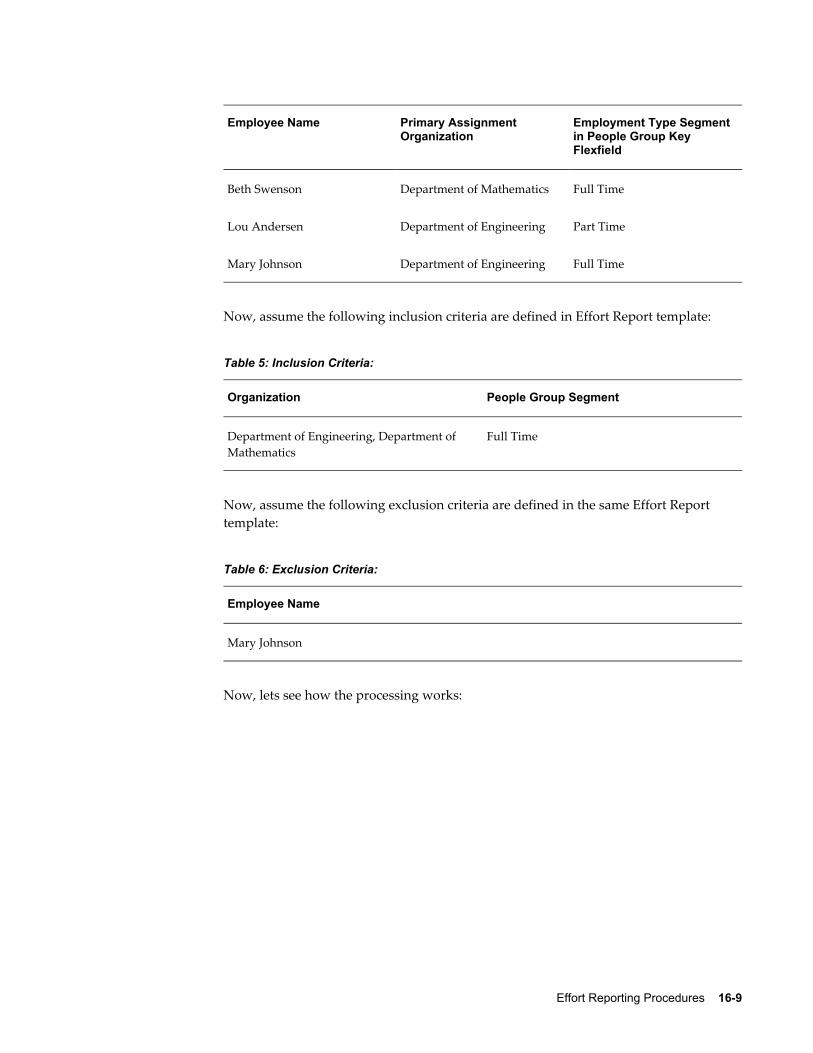
Effort Reporting Procedures 16-9
Employee Name Primary Assignment Organization
Employment Type Segment in People Group Key Flexfield
Beth Swenson Department of Mathematics Full Time
Lou Andersen Department of Engineering Part Time
Mary Johnson Department of Engineering Full Time
Now, assume the following inclusion criteria are defined in Effort Report template:
Table 5: Inclusion Criteria:
Organization People Group Segment
Department of Engineering, Department of Mathematics
Full Time
Now, assume the following exclusion criteria are defined in the same Effort Report template:
Table 6: Exclusion Criteria:
Employee Name
Mary Johnson
Now, lets see how the processing works:

16-10 Oracle Labor Distribution User Guide
Table 7: Processing Step 1 - Inclusion Criteria:
Inclusion Criteria Selected Employees After Applying Inclusion Criteria
Remarks
Organization John Stuart
Beth Swanson
Lou Andersen
Mary Johnson
Employees who belong to the organization Department of Engineering or Department ofMathematics are selected for processing
People Group John Stuart
Beth Swanson
Mary Johnson
From the list above, employees who belong to the Full Time people group are retained
Now, the application applies the selection criteria sequentially.
Table 8: Processing Step 2 - Exclusion Criteria:
Exclusion Criteria Selected Employees After Applying Exclusion Criteria
Remarks
Mary Johnson John Stuart
Beth Swanson
Mary Johnson is removed from the inclusion list in Table 6 as per the exclusion criteria defined in the Effort Report Template
The Effort Report is created for two employees - John Stuart and Beth Swenson. In summary, Inclusion Criteria is an AND operation. This means that the effort report selects employees common to all inclusion criteria. Exclusion Criteria is a MINUS operation, hence the effort report applies these criteria sequentially.
Purging the Create Effort Report Process RunAfter the Create Effort Report process completes successfully, the initiator receives a notification which contains the attached effort report PDF. The initiator can review the effort report. If the effort reports are not accurate or missing from some employees, initiators can purge the effort report run by clicking Purge on the notification.

Effort Reporting Procedures 16-11
Handling Errors and Warnings in Create Effort Report ProcessAfter the Create Effort Report process completes, a notification is sent to the initiator. If the process encounters errors, then the application does not generate the effort report and initiators can view the errors from the notification or from the concurrent process log. The Create Effort Report process can fail in the following scenarios:
• Workflow approver for the employee effort report was not found
• Unexpected Database error occurred like not enough available space
The Create Effort Report process also spawns a Generate Effort Report PDF process to generate the Effort Report PDF. The Generate Effort Report PDF can fail due to unexpected database errors like not enough space available.
The initiator receives a notification in case of errors and the notification displays a Retrybutton. Initiators can fix the problem and click Retry, which restarts the process from the point where it failed.
The notification also displays a Purge button and initiators can decide to purge the run, submit a fresh Create Effort Report process after they fix the errors.
Warnings could occur for the following scenarios:
• Effort Report already exists for the period
• No employees were selected based on the criteria in the template
In case of warnings, the effort report PDF is generated for the applicable employees (those for whom the processing did not encounter errors or warnings) and sent to the initiator. The warnings are also sent as an FYI to the initiator.
Effort Report Workflow Approval Process When you create and submit the effort report for approval, approvers for the effort report receive a workflow notification. The application embeds the effort report output in the workflow notification in a PDF format, so you can easily review and approve or reject the effort report. If you approve the effort report, and the approval definition in Oracle Approvals Management requires no further approvals, the effort report process is complete, and the application does not send an effort report workflow notification. However, if the approver rejects the effort report, the application sends a workflow notification to the effort report initiator and all previous approvers, who need to correct,recreate and resubmit the effort report for approval.
You can override certain values and add comments to an effort report that you receive for approval using the Enter Additional Effort Report Information page. The values thatyou can enter are:
• Effort Percentage

16-12 Oracle Labor Distribution User Guide
• Cost Share Percentage
• Comments
The Additional Effort Report Information contains the Header section and the Details section. The information that appears in these sections depends on the report layout that you select when you create the effort report template.
If you select ... Then ...
Employee Certification report layout The Header section displays the employees whose effort report details you must approve. You select an employee in the Header section to display that employee's effort report details in the Details section.
Any of the following report layouts:
• Award Principal Investigator
• Project Manager
• Task Manager
The Header section displays the details of the Principal Investigator, or Project Manager or Task Manager. The Details section displays the effort report details of the employees to approve.
You can also enter additional information using descriptive flexfields in the Header andDetails section. However, you must set up the DFFs so that you can enter additional information.
Superseding Employee Effort ReportsIf you defined distribution adjustments or brought in new payroll transactions for employees who had their effort reports already created, they are considered superseded, and you need to recreate the effort report. However, you can also specify the tolerance type and value for which the effort report is not superseded. The Summarize and Transfer Payroll Distribution process, Summarize and Transfer Distribution Adjustments process supersedes the employee effort report if there are new employee transactions for already approved effort reports and the tolerance limit isexceeded. The persons to be notified when superseding employee effort report are defined in the template. You can send superseding notifications to the Initiator, All Approvers, Final Recipient, and the Employee.
Consider that employee John Doe has following Effort Distributions in the Effort Reportfor January.

Effort Reporting Procedures 16-13
Table 9: Effort Distributions:
Charging Account Amount (USD) Percentage
General Ledger Account-1 40 40
Project1, Task1, Award1, Expenditure Type1, Expenditure Organization1
60 60
At this point, a Pre-Generated Distribution lines batch for this employee is imported into Labor distribution. Assume that the following is the Effort distribution after cumulating the pre-gen transactions:
Table 10: After Pre-Generated Distribution Lines are Imported:
Charging Account Amount (USD) Percentage
General Ledger Account-1 41 41
Project1, Task1, Award1, Expenditure Type1, Expenditure Organization1
59 59
Now, let us consider how different Supersedence Tolerance setups in Effort Report template will have an effect on superseding John Doe's effort report:
Table 11: After Supersedence Tolerance:
Scenario Supersedence Tolerance Setup
Result
1 No Tolerance Setup Effort Report Superseded
2 Tolerance Amount = $0.50 Effort Report Superseded
3 Tolerance Amount = $1.50 Effort Report is not superseded
4 Tolerance Percent = 1% Effort Report is not superseded

16-14 Oracle Labor Distribution User Guide
Scenario Supersedence Tolerance Setup
Result
5 Tolerance Percent = 0.9% Effort Report Superseded
Rollback Effort ReportThe rollback effort report process accepts a Request_ID as an input and rolls back the previously created Effort Report. The Request_ID corresponds to the concurrent processRequest_ID for the Create Effort Reports Process run. The parameter list of values for this input parameter displays the template_name, start_date, end_date along with the request_id to facilitate selection. You can resubmit the Create Effort Reports process to recreate Effort Reports, after running the Rollback Effort Reports process.
You can run the Rollback Effort Reports process only when notification is pending with the Initiator. The Rollback Effort Report Process also closes the open notification.
Importing Additional Effort Report DetailsYou can import the following additional information from a third party system using Effort Reporting user hooks. The Effort Report displays the following three fields:
• Proposed Salary
• Proposed Effort Report Percentage
• Committed Cost Share
You can populate attribute1 through attribute10 and value1 through value10 columns in the psp_eff_report_details table through the same user hook.
You can import external pay details in the effort report. For example, you can import pay details for income that employees receive working outside the organization and that their regular payroll does not include. In addition, the application enables you to import additional information through the optional ATTRIBUTE1 to ATTRIBUTE15 columns.
See: Technical Essay on Labor Distribution Configuration (Metalink Note ID 302304.1)
Defining Custom Approval TypesComplete the following steps to define a custom approval type in the Effort Report Template:
1. Define a new lookup code for the PSP_CUSTOM_APROVAL_TYPE Lookup Type.

Effort Reporting Procedures 16-15
2. Select the Custom Approval Type option, and select the lookup code from the list.
3. The Oracle Approvals Manager receives the lookup code from the the APPROVAL_TYPE attribute.
4. See: Implementing Oracle Approvals Management (Metalink Note #227391.1) for information on how to set up rules in Oracle Approvals Manager..
Effort Report MonitorAfter the initiator creates the effort report, administrators can run the effort report monitor to view the status of the effort reports and print the effort reports.
To run the effort report monitor, do the following:
1. Search for effort reports based on search criteria such as Effort Report Period, Template Name, Concurrent Process ID, or Employee.
2. Click Go.
The Effort Report Monitor page displays the following details:
• Effort Report Status - this includes Approval Pending, Approved, Pre-Approved, Rejected, and Superseded
• Employee Count - this displays the number of employees associated with the status of the effort report. Click on this to view details of the status. The details displayed differ based on the status type you choose.
• Percentages - this displays the percentage of employees associated with the status of the effort report.
You can also view a pie-chart that displays the percentages of the status.
3. Click Consolidated Effort Report to view details of all effort reports for the effort report period you selected. You can view information such as Template Name, Request ID, Effort Report Type, and the Effort Report. Click Template Name to view the template details. Click Effort Report to view the effort report pdf.


Reports Procedure 17-1
17Reports Procedure

17-2 Oracle Labor Distribution User Guide
Reports Procedures
DefinitionOracle Labor Distribution provides various management and operational reports that can be used for inquiry and analysis.
OverviewThe reports defined in this section are as follows:
• Employees Using Default Labor Schedules Report, page 17-2
• Employee Labor Schedule Report, page 17-2
• Organization Default Labor Schedule Report, page 17-3
• Default Account Report, page 17-3
• Suspense Account Report, page 17-3
• Distribution Adjustment History by Employee Report, page 17-3
• Distribution History by Project Report, page 17-3
• Distribution History by Award Report, page 17-3
• Distribution History by Organization, page 17-4
The option to print a hard copy of the report in its entirety is included with each report parameter window.
Employees Using Default Labor Schedules ReportThe Employees Using Default Labor Schedules report provides a listing of employees and assignments for which the organization level default labor schedule is to be used. The report is based on selected organizations, elements, and a time period.
Employee Labor Schedule ReportThe Employee Labor Schedule Report provides a listing of employee labor schedules for a particular period of time and for selected organizations. The report identifies labor schedules that need correction before payroll is imported into Labor Distribution. Laborschedules with totals greater than 100% should be corrected to avoid payroll transactions going to a suspense account.

Reports Procedure 17-3
Users have the option of running the regular report for all of the selected organizations or the exception report for selected organizations. The exception report provides details for the selected organizations that have schedules equalling less or greater than 100%.
Organization Default Labor Schedule ReportThe Organization Default Labor Schedule Report provides a listing of organization labor schedules for a particular period of time. The report also identifies the labor schedules that require correction before payroll is imported into Labor Distribution. Each labor schedule should equal 100% for each day. If the total is less than 100%, the remainder goes to a suspense account. Labor schedule with totals greater than 100% should be corrected.
The report can be run in either Regular or Exception mode. In Regular mode, the report provides schedule details and a schedule summary. In Exception mode, the report provides organization schedules with a Default Labor Schedule less than 100% and organization schedules with a Labor Schedule greater than 100%.
Default Account ReportThe Default Account report provides a listing of employees, assignments, and elements for which a default account of a particular organization is charged. This report is based on selected organizations and a time period.
Suspense Account ReportThe Suspense Account report provides a listing of employees, assignments, and elements for which a suspense account for a particular organization is charged. This report is based on selected organizations and a time period.
Distribution Adjustment History by Employee ReportThe Distribution Adjustment History by Employee report provides a detailed view of the actual employee salary distributed for a given assignment period and element. This report displays only element labor schedules by employee. All input fields are required.
Distribution History by Project ReportThe Distribution History by Project report provides the labor distribution history by Oracle Grants Accounting charging instruction by project. This report is based on selected Grants Accounting projects and a Grants Accounting period.
Distribution History by Award ReportThe Distribution History by Award report provides the labor distribution history by Grants Accounting charging instruction by award.
17-4 Oracle Labor Distribution User Guide
Note: If Grants Accounting is not installed, a warning message appearswhen the user attempts to navigate to this window.
Distribution History by OrganizationThe Distribution History by Organization report provides the labor distribution history by charging instruction by organization.
Generating Employees Using Default Labor Schedules Report Procedure To print the Employees Using Default Labor Schedules report, perform the following steps.
1. In Labor Distribution, navigate to the Employees Using Default Labor Schedules window as follows:
Scheduling Reports - Emp Using Default Schedules
2. Click Show Elements.
3. To include all the elements in the report, click >> (A).
4. To include selected elements in the report, select an element and click > (B).
5. Click Show Organizations.
6. To include all the organizations in the report, click >> (G).
7. To include selected organizations in the report, select an organization and click > (I).
8. To deselect all organizations, click << (K)).
9. To deselect selected organizations, select an organization and click < (J).
10. In the From field, select the start date for the report from the list of values.
11. In the To field, select the end date for the report from the list of values.
12. To print a hard copy of the report in its entirety, click Printing Options.
The Printing Options window appears.
13. Enter data in the Printing Options window as described in Table 1, page 17-5.
14. Click OK.
15. Click Run Report.

Reports Procedure 17-5
The Requests window appears.
16. To view the report file, select the appropriate Request ID and click View Output.
17. Close the window.
Note: If no organization level default labor schedules are found for the provided organization, element, and time period, an error message is displayed and the report is not submitted.
Printing Options Window Description
Printing Options Window Description
Field Name Type Features Description
Save all Output files required check box If selected, the report is saved to a file and printed;if deselected, only a hard copy can be printed, and the report is not saved.
Note: If the system profile value Concurrent: Save Output is set to Yes, thedefault value is the selected check box.
Notify the Following People
disabled
Print the Output to: Region
Style required list of values printing style
17-6 Oracle Labor Distribution User Guide
Field Name Type Features Description
Printer required list of values printer
Note: Note: The default value for the printer is set up using the system profile valuePrinter in Oracle Applications System Administration.
Copies required number of copies to be printed
Note: The default value for the number ofcopies is set using the system profile value Concurrent: Report Copies in System Administration.
Cancel button closes window without saving
OK button saves the printing options and returns to the report parameters window
Generating Employee Labor Schedule Report To obtain details of employee labor schedules by organization, perform the following steps:
1. In Labor Distribution, navigate to the Employee Labor Schedules Report window asfollows:
Scheduling Reports - Employee Labor Schedule Report
2. Click Show Organizations.
3. To include all organizations in the report, click >> (A).

Reports Procedure 17-7
4. To include selected organizations in the report, select an element and click > (B).
5. To deselect all selected organizations, click << (D).
6. To deselect a single selected organization, select an organization and click < (C).
7. In the Period From field, select the start date for the report from the list of values.
8. In the To field, select the end date for the report from the list of values.
Note: The value in the To field must be greater than the value in thePeriod From field.
9. To print a hard copy of the report in its entirety, click Printing Options.
The Printing Options window appears.
10. Enter data in the Printing Options window as described in Table 1, page 17-5.
11. Click OK.
12. To run a regular report, click Run Report.
To run an exception report, click Exception Report.
The Requests window appears.
13. To view the report output, select the appropriate Request ID and click View Output.
14. Close the window.
Employee Labor Schedules Report Description
Employee Labor Schedules Report Description
Region Description
Header Section report type, labor schedule period, date and time report run, and page number
Organization Name organization name
Employee Name employee name

17-8 Oracle Labor Distribution User Guide
Region Description
Assgn. Number assignment number
Hierarchy schedule level
Charging Instructions account charged
Start beginning of labor schedule
End end of labor schedule
Percent percent charged to the account
Generating Organization Default Labor Schedule Report To obtain schedule details and schedule summary information by organization, perform the following steps:
1. In Labor Distribution, navigate to the Organization Default Labor Schedule Report window as follows:
Scheduling Reports - Org Default Labor Schedule Report
2. In the Period From field, select the start date for the report from the list of values.
3. In the To field, select the end date for the report from the list of values.
Note: The value in the To field must be greater than the value in thePeriod From field.
4. Click Show Organizations.
5. To include all organizations in the report, click >> (A).
6. To include a single selected organization in the report, select an organization and click > (B).
7. To deselect all organizations, click << (D).
8. To deselect a single selected organization, select an organization and click < (C).
9. To print a hard copy of the report in its entirety, click Printing Options.

Reports Procedure 17-9
The Printing Options window appears.
10. Enter data in the Printing Options window as described in Table 1, page 17-5.
11. Click OK.
12. To run a regular report, click Run Report.
To run an exception report, click Exception Report.
The Requests window appears.
13. To view the report output, select the appropriate Request ID and click View Output.
14. Close the window.
Generating Default Account Report Procedure To print the Default Account report, perform the following steps.
1. In Labor Distribution, navigate to the Default Account Report window as follows:
Distribution Reports - Default Account Report
2. Click Show Organizations.
3. To include all the organizations in the report, click >> (A).
4. To include a single selected organization in the report, select an organization and click > (B).
5. To deselect all organizations, click << (D).
6. To deselect a single selected organization, select an organization and click < (C).
7. In the From field, select the start date for the report from the list of values.
8. In the To field, select the end date for the report from the list of values.
Note: The value entered in the To field must be greater than the value entered in the From field.
9. To print a hard copy of the report in its entirety, click Printing Options.
The Printing Options window appears.
10. Enter data in the Printing Options window as described in Table 1, page 17-5.

17-10 Oracle Labor Distribution User Guide
11. Click OK.
12. Click Run Report.
The Requests window appears.
13. To view the report file, select the appropriate Request ID and click View Output.
14. Close the window.
Generating Suspense Account Report Procedure To print the Suspense Account report, perform the following steps.
1. In Labor Distribution, navigate to the Suspense Account Report -- Input Parameters window as follows:
Distribution Reports - Suspense Account Report
2. In the Period From field, select the start date for the report from the list of values.
3. In the To field, select the end date for the report from the list of values.
Note: The value entered in the To field must be greater than the value entered in the From field.
4. Click Show Suspense Organizations to view only the organizations used for suspense posting.
5. Click Show All Organizations to view all organizations.
6. To include all the organizations in the report, click >> (A).
7. To include a selected single organization in the report, select an organization and click > (B).
8. To deselect all organizations, click << (D).
9. To deselect a single selected organization, select an organization and click < (C).
10. To print a hard copy of the report in its entirety, click Printing Options.
The Printing Options window appears.
11. Enter data in the Printing Options window as described in Table 1, page 17-5.
12. Click OK.

Reports Procedure 17-11
13. Click Run Report.
The Requests window appears.
14. To view the report file, select the appropriate Request ID and click View Output.
15. Close the window.
Generating Distribution Adjustment History by Employee Report Procedure
To print the Distribution Adjustment History by Employee report, perform the following steps.
1. In Labor Distribution, navigate to the Distribution Adjustment History by Employee window as follows:
Distribution Adjustments - Distribution Adj History by Emp.
2. In the Employee Name field, select the employee and assignment from the list of values.
3. In the Begin Date field, select the start date of the report from the list of values.
4. In the End Date field, select the end date of the report from the list of values.
5. To print a hard copy of the report in its entirety, click Printing Options.
The Printing Options window appears.
6. Enter data in the Printing Options window as described in Table 1, page 17-5.
7. Click OK.
8. Click Run Report.
The Requests window appears.
9. To view the report file, select the appropriate Request ID and click View Output.
10. Close the window.
Generating Distribution History by Project Report Procedure To print the Distribution History by Project report, perform the following steps.
1. In Labor Distribution, navigate to the Distribution History by Project Parameters window as follows:

17-12 Oracle Labor Distribution User Guide
Distribution Reports - Distribution History by Project
2. Click Show Projects.
3. To include all the projects in the report, click >> (A).
4. To include a single selected project in the report, select a project and click > (B).
5. To deselect all projects, click << (D).
6. To deselect a single selected project, select a project and click < (C).
7. In the Period From and To fields, select the Grants Accounting period for the report from the list of values.
8. To print a hard copy of the report in its entirety, click Printing Options.
The Printing Options window appears.
9. Enter data in the Printing Options window as described in Table 1, page 17-5.
10. Click OK.
11. Click Run Report.
The Requests window appears.
12. To view the report file, select the appropriate Request ID and click View Output.
13. Close the window.
Generating Distribution History by Award Report Procedure To print the Distribution History by Award report, perform the following steps.
1. In Labor Distribution, navigate to the Distribution History by Award Parameters window as follows:
Distribution Reports - Distribution History by Award
2. Click Show Awards.
3. To include all the awards in the report, click >> (A).
4. To include a single selected award in the report, select an award and click > (B).
5. To deselect all awards, click << (D).
6. To deselect a single selected award, select an award and click < (C).

Reports Procedure 17-13
7. In the Period From and To fields, select the Grants Accounting period for the report from the list of values.
8. To print a hard copy of the report in its entirety, click Printing Options.
The Printing Options window appears.
9. Enter data in the Printing Options window as described in Table 1, page 17-5.
10. Click OK.
11. Click Run Report.
The Requests window appears.
12. To view the report file, select the appropriate Request ID and click View Output.
13. Close the window.
Generating Distribution History by Organization Report Procedure To print the Distribution History by Organization report, perform the following steps.
1. In Labor Distribution, navigate to the Distribution History by Organization -- Input Parameters window as follows:
Distribution Reports - Distribution History by Org.
2. Click Show Organizations.
3. To include all the organizations in the report, click >> (A).
4. To include a single selected organization in the report, select an organization and click > (B).
5. To deselect all organizations, click << (D).
6. To deselect a single selected organization, select an organization and click < (C).
7. In the Begin Date field, select the start date for the report from the list of values.
8. In the End Date field, select the end date for the report from the list of values.
9. To print a hard copy of the report in its entirety, click Printing Options.
The Printing Options window appears.
10. Enter data in the Printing Options window as described in Table 1, page 17-5.

17-14 Oracle Labor Distribution User Guide
11. Click OK.
12. Click Run Report.
The Requests window appears.
13. To view the report file, select the appropriate Request ID and click View Output.
14. Close the window.
Creating a Parameter SetYou can create a parameter set to run an encumbrance report that you frequently use. For example, if you frequently run the Encumbrance History by Award report where you must select one or more parameters, then you can create a parameter set to store the parameters. You can then input the parameter set when you run the process to viewthe report.
You can create parameter sets for the following:
• Payrolls
• Awards
• Organizations
You can use parameter sets for the following encumbrance reports:
• Encumbrance History by Award
• Encumbrance History by Organization
• Encumbrance Suspense Charge
To create a parameter set:1. On the Setup menu, click Parameter Set.
2. On the Parameter Set page, click Add Parameter Set.
3. Enter the effective date of the parameter set in the Effective Date field.
4. Enter the name of the parameter set in the Set Name field.
5. Optionally, specify additional information about the parameter set in the Description field.
6. Select the type of parameter you want to include in the parameter set from the

Reports Procedure 17-15
Parameter list.
7. Click Add Rows from the LOV to add values to the parameter set. For example, if you select Award as the parameter type, then you can select the awards from this LOV.
8. Click Submit.
Note: If you want to modify the parameter set, select the parameter set, and click the Update icon in the table.


Reconciliation and Control Reports Procedures 18-1
18Reconciliation and Control Reports
Procedures

18-2 Oracle Labor Distribution User Guide
Reconciliation and Control Reports Procedures
DefinitionReconciliation and Control allows users to ensure reconciliation between processes. Thebasic principle in Oracle Labor Distribution is to ensure that amounts and records are accounted for. This means that there are ways to ensure that the amount distributed and transferred between one process or application and the next are equal and that all of the records are accounted for in the process.
OverviewFor each of the processes, appropriate control structures are maintained and reports andinquiries are available to confirm the reconciliation. When a problem exists with the reconciliation or when exceptions exist, users can view a report describing the problem.
ProcessReconciliation reports are generated for the following payroll sources:
• Oracle and Non-Oracle Payroll Sources, page 18-2
• Pre-generated Distributions, page 18-3
Oracle and Non-Oracle Payroll SourcesThe Reconciliation and Control process generates the following reports for payrolls from Oracle and Non-Oracle sources:
• Reconciliation Between Payroll Lines and Sublines Report, page 18-2
• Reconciliation Between Payroll Sublines Report and Distribution Lines, page 18-3
• Reconciliation Between Distribution Lines Report and Summarized Distributions, page 18-3
Reconciliation Between Payroll Lines and Sublines ReportAs a result of the Import Payroll Transactions process, the sum of the amounts of the payroll sublines must equal the sum of the amounts of the payroll lines coming from the payroll report. The amounts summarized by employee, assignment, and element should match between the payroll lines and payroll sublines.
If the reconciliation report indicates errors and the Create Distribution Lines process has

Reconciliation and Control Reports Procedures 18-3
not been run, users can roll back the Oracle payroll or the Non-Oracle payroll batch to correct the errors.
For information on rolling back an Oracle payroll, see Import Payroll Transactions Procedures, page 8-2.
For information on rolling back a non-Oracle payroll batch, see Rolling Back Non-Oracle Payroll Procedure, page 12-17.
Reconciliation Between Payroll Sublines Report and Distribution Lines As a result of the Create Distribution Lines process, the sum of the dollar amounts of the distribution lines for any one set of payroll sublines must equal the sum of the dollar amounts of those payroll sublines in total and by employee, assignment, and element.
If the reconciliation report indicates error and the Summarize and Transfer Payroll Distributions process has not been run, users can roll back the distribution lines to correct the errors.
For information on rolling back distribution lines, see Rolling Back Distribution Lines Procedure, page 9-12.
Reconciliation Between Distribution Lines Report and Summarized Distributions As a result of the Summarize and Transfer Payroll Distributions process, the sum of the amounts of the summarized lines for any one set of distribution lines must equal the sum of the amounts of those distribution lines in total and by employee, assignment, and charging instructions.
Pre-generated DistributionsThe Reconciliation and Control process generates the following report for pre-generateddistributions:
Reconciliation Between Pre-generated Distribution Lines and Report Summarized Distributions, page 18-3
Reconciliation Between Pre-generated Distribution Lines and Report Summarized Distributions As a result of the Summarize and Transfer Payroll Distributions process, the sum of the amounts of the summarized lines for any one set of pre-generated distribution lines must equal the sum of the amounts of those pre-generated distribution lines in total andby employee, assignment, and charging instructions.
Generating Reconciliation and Control Reports ProcedureTo create payroll sublines, perform the following steps.

18-4 Oracle Labor Distribution User Guide
1. In Labor Distribution, navigate to the Submit Request window as follows:
Processes & Reports - Run
The Submit a New Request pop-up window appears.
2. Select the Single Request radio button.
3. Click OK.
The Submit Request window appears.
4. In the Name field, select one of the following:
• Reconciliation between distribution lines and summary
• Reconciliation between pre-generated distribution lines and summary lines
• Reconciliation between payroll lines and sublines
• Reconciliation between sublines and distribution lines
The Parameters pop-up window appears.
5. In the Source Type field, select a source type from the list of values.
6. In the Source Code field, select a source code from the list of values.
7. In the Time Period field, select a time period from the list of values.
8. If the source type is not Oracle, in the Batch Name field, users must select a batch name from the list of values.
9. To apply the parameters, click OK.
10. In the Submit Request window, click Submit.
The Requests window appears.
11. To view the report file, select the appropriate Request ID and click View Output.
12. Close the window.

Labor Distribution Process A-1
ALabor Distribution Process
DefinitionThe purpose of this appendix is to provide an understanding of the Oracle Labor Distribution process. A process flow diagram shows the interaction between the different components in Labor Distribution. Each process is briefly explained and chapter references are provided for more information.
Oracle Labor Distribution Process Flow DiagramFigure 1, page A-2 shows the Oracle Labor Distribution Process Flow diagram as described in the accompanying text.

A-2 Oracle Labor Distribution User Guide
Oracle Labor Distribution Process Flow Diagram
Oracle Labor Distribution ProcessThis section describes the Labor Distribution process flow diagram.
The Labor Distribution process includes the following components:
• Setup, page A-3
• Labor Scheduling, page A-3
• Payroll Transactions, page A-3
• Non-Oracle Payroll Transactions Interface, page A-4
• Create Distribution Lines, page A-4
• Pre-generated Distribution Lines Interface, page A-5
• Summarize and Transfer Payroll Distributions, page A-5
• Distribution Adjustments, page A-5

Labor Distribution Process A-3
• Labor Encumbrance, page A-6
• Effort Reporting, page A-6
• Reports, page A-6
• Reconciliation and Control, page A-7
SetupLabor Distribution setup provides users with the ability to customize predefined components or modules through configuration options. These options, delivered with Labor Distribution, alleviate the need for software code modifications.
For information on Labor Distribution setup, see Labor Scheduling Setup, page 4-2.
Labor SchedulingLabor scheduling is an online process used to create, update, and review employee labor schedules. The labor schedules are a required input for the Create Distribution Lines process.
For information on labor scheduling, see Labor Scheduling Procedures, page 7-2.
Payroll Processes (Payroll Process, Costing, Transfer to GL)You must run the Payroll process, costing process, and the Transfer to GL process to prepare payroll transactions for use in Labor Distribution.
When you define costing information at the payroll level, the application charges the information to a single GL account. However, in Labor Distribution, you can maintain detailed costing information using labor schedules. Therefore, you must specify the GL account that you used to specify costing information at the payroll level, in Labor Distribution.
See: Setting Up Clearing Account Procedure, page 4-26
When you later run the Summarize and Transfer Payroll Distributions process, the application reverts funds that it posted in the clearing account, and posts the funds again, based on the new charging instructions you defined in the labor schedule.
Import Payroll Transactions From HRMSYou must run the Import Payroll Transactions from HRMS process to import the payroll information for use with Labor Distribution.
See: Import Payroll Transactions Procedures, page 8-2.

A-4 Oracle Labor Distribution User Guide
Non-Oracle Payroll Transactions InterfaceIf users do not use Oracle Payroll or uses another payroll system in addition to Oracle Payroll, the Non-Oracle Payroll Interface process is initiated to import transactions fromthe interface table. This process feeds Maintain Non-Oracle Payroll Transactions. Users must write their own process to export the appropriate records and load this interface table.
The Non-Oracle Payroll Transactions Interface includes the following:
• Maintain Non-Oracle Payroll Interface
• Import Non-Oracle Sublines
Maintain Non-Oracle Payroll InterfaceOnce a non-Oracle payroll interface is imported, the Maintain Non-Oracle Payroll Interface allows users to edit the imported file.
Import Non-Oracle SublinesThe Import Non-Oracle Sublines process reads the interface table and creates records in the Payroll Sublines table.
For information on maintaining non-Oracle payroll interface and importing non-Oracle payroll sublines, see Non-Oracle Payroll Interface Procedures, page 12-2.
Create Distribution LinesThere are three inputs for the Create Distribution Lines process. They are as follows:
• Create Payroll Sublines transactions
• Maintain Non-Oracle Payroll Interface transactions
• information from Oracle Human Resources
Based on the inputs, distribution lines are generated in preparation for the Summarize Distribution Lines and Transfer process.
To distribute payroll charges accurately, the system uses various employee-related events, such as salary increase, to calculate an accurate distribution amount. Actual payroll charges are distributed based on a daily rate. The daily rate is calculated by taking the salary that is in effect for the weekdays based on the payroll period and appropriate employee events. The total distribution for any employee assignment and earning classification or pay element cannot exceed 100% for any given day.
Labor Scheduling can be used to transfer pre-generated distribution charging instructions from other systems such as time and attendance systems. Labor Scheduling

Labor Distribution Process A-5
can also be used to distribute non-Oracle payrolls.
For information on Create Distribution Lines, see Create Distribution Lines Procedures, page 9-2.
Pre-generated Distribution Lines InterfaceThe Pre-generated Distribution Lines Interface table is used to import transactions from timecard systems. Users must write their own process to export the appropriate recordsand to load this interface table. This process creates records in the Pre-Generated Distribution Lines table.
The Pre-generated Distribution Lines Interface process includes the following:
• Maintain Pre-generated Distribution Lines
• Import Pre-generated Distribution Lines
Maintain Pre-generated Distribution LinesOnce pre-generated distribution lines are created in the interface table, Maintain Pre-generated Distribution Lines allows users to edit the imported transactions.
Import Pre-generated Distribution LinesImport Pre-generated Distribution Lines reads the interface table and creates records in the Payroll Sublines table.
For information on maintaining pre-generated distribution lines and importing pre-generated distribution lines, see Pre-generated Distribution Lines Interface Procedures, page 13-2.
Summarize and Transfer Payroll DistributionsThe Summarize and Transfer Payroll Distributions process summarizes the distribution lines and transfers the summarized transactions into the General Ledger, Oracle Projects, and Grants Accounting interface tables.
For information on summarizing distribution lines and transferring them to General Ledger, Projects, and Grants Accounting, see Summarize and Transfer Payroll Distributions Procedures, page 10-2.
Distribution AdjustmentsDistribution Adjustments involves changing labor distributions that have already been posted to General Ledger, Projects, and Grants Accounting. Distribution Adjustments can be made to each actual distribution or to a set of distributions across time. Labor Distribution reverses the original distribution transaction and creates new distribution

A-6 Oracle Labor Distribution User Guide
transactions.
Once the transfers are specified, they must be approved before they are processed. Users can configure workflow rules to determine appropriate routing and approvals formodifying payroll distributions.
For information on distribution adjustments, see Distribution Adjustments Procedures, page 14-2.
Labor EncumbranceLabor Encumbrance allows users to differentiate unspent and uncommitted funds from unspent funds. The labor encumbrance process includes the following processes:
• create encumbrance lines
• summarize and transfer encumbrances
• update encumbrance lines
• liquidate encumbrances
For information on the encumbrance processes and reports, see Labor Encumbrance Processes and Reports Procedures, page 15-2.
For information on the encumbrance process, see Labor Encumbrance Process, page C-1.
Effort ReportingEffort reports can be created for specified time periods, by employee, groups of employees, or other selection criteria. Effort reports can be generated online or in hard-copy format.
Effort is calculated based on the actual amount of base salary distributed. Therefore, effort equals base pay.
Online forms can be routed to appropriate individuals using workflow rules. Users can accept or return the report with comments. Users can also create ad hoc effort reports based on various user-selected parameters.
For information on effort reporting, see Effort Reporting Procedures, page 16-2.
ReportsLabor Distribution provides various management reports.
For information on reports, see Reports Procedures, page 17-2.

Labor Distribution Process A-7
Reconciliation and ControlReconciliation and Control allows users to ensure reconciliation between processes by generating various reports.
For information on reconciliation and control, see Reconciliation and Control Reports Procedures, page 18-2.


Scheduling Hierarchy Process B-1
BScheduling Hierarchy Process
DefinitionOracle Labor Distribution allows users to create labor schedules at the following levels:
• employee organization
• employee assignment
• element
The Scheduling Hierarchy process is used to determine which labor schedule to use based on the hierarchy.
ProcessFigure B - 1 illustrates the Scheduling Hierarchy process. Labor Distribution begins searching for a labor schedule at the lower level of the hierarchy and moves upward until finding a labor schedule or account.
The Global Element labor schedule is at the lowest level of the schedule hierarchy. At the next three levels of the scheduling hierarchy, Element Type, Element Group, and Assignment labor schedules are defined for the employee assignment. Schedules at the employee assignment level can apply to multiple elements for an employee.
At the upper three levels of the scheduling hierarchy, Organization Default Labor Schedule, Organization Default Account, and Organization Suspense Account labor schedules are defined at the human resources organization level. Schedules at the employee organization level can apply to many employees in that organization.
The Scheduling Hierarchy process consists of the following levels:
1. Organization
• Generic Suspense Account
B-2 Oracle Labor Distribution User Guide
• Suspense Account
• Default Account
• Default Labor Schedule
2. Employee Assignment
• Assignment
• Element Group
• Element
3. Element
• Global Element
Generic Suspense AccountThe Generic Suspense Account is set up to collect costs from labor distribution if there are no labor schedules at any level.
Organization Suspense AccountThe Organization Suspense Account is set up to collect costs from labor distribution if charging instructions at a lower level of the scheduling hierarchy are missing. This account also collects costs for rejected transactions.
Organization Default AccountThe Organization Default Account is set up to collect costs from labor distribution if charging instructions at the lower level of the scheduling hierarchy are missing. This account also collects costs for the unscheduled portion of a partially scheduled schedule.
This level is only used if the system administration profile, Use Organization Default Account, is enabled.
Organization Default Labor ScheduleUsers can create labor schedule lines for each organization. This labor schedule is used when the Organization Default Labor Schedule is selected at setup. This allows the user to create one labor schedule set at the Organization Default level for that unique organization that applies to all assignments and the elements associated with it.
This level is only used if the system administration profile, Use Organization Default

Scheduling Hierarchy Process B-3
Labor Schedule, is enabled.
ExampleA single schedule is created for the Budget Office. All assignments with an organizationof Budget Office and labor schedule set at the Organization Default level use the labor schedule defined for the organization of Budget Office. The user does not have to individually create a labor schedule for each employee assignment that is attached to the Budget Office.
Employee AssignmentUsers can create labor schedule lines for an employee assignment. This labor schedule isused when the Assignment box is checked in the Schedule Hierarchy region of the Labor Scheduling window. This allows the user to create one labor schedule that applies to all elements that may be paid to that assignment.
Labor schedules defined at the assignment level take precedence over labor schedules defined at the Organization level.
ExampleA single schedule is created at the employee assignment level. Any element paid to that employee assignment uses the assignment labor schedule. The user does not have to individually create a labor schedule for each element that an employee assignment might pay.
Element GroupElement groups are defined at the employee level and are used to group elements. These groups can be used to identify a common distribution schedule to which all elements that are within the specified group are scheduled and distributed to an employee assignment. This feature allows users to specify one distribution profile for a group, and all elements associated with this group are scheduled and distributed based on the specified single profile for an employee assignment.
For an employee assignment, users can define a labor schedule for each element group. This allows users to create one labor schedule that applies to all elements in a specified element group. Labor schedules defined at the element group level take precedence over labor schedules defined at the Assignment and Organization Default Schedule levels.
ExampleA single schedule is created for an employee assignment at the element group level of Regular Salary, where Regular Salary includes the elements of Regular Pay, Overtime, and Shift. Any Regular Pay, Overtime, and Shift element that is paid to the specified employee assignment uses the labor schedule defined for the Regular Salary element group. The user does not have to individually create a labor schedule for each element.

B-4 Oracle Labor Distribution User Guide
ElementUsers can create labor schedules at the employee level for individual elements. Labor schedules defined at the Element level take precedence over labor schedules defined at the Element Group, Assignment, and Organization Default Schedule levels.
ExampleA single schedule is created for an employee assignment at the element level. The user creates a schedule at the element group of Regular Salary, which includes the element of Regular Pay, Overtime, and Shift. The user also creates a schedule for the Shift element. Any pay for Shift pay uses the schedule for Shift and uses the Elements Group Schedule for any pay for Regular Pay and Overtime.
The user can create an element level labor schedule for any element that an employee assignment is paid.
Global ElementUsers can define a Global Element labor schedule for an individual element at the site level. This labor schedule is used only for the associated element and applies to all employee assignments. Users cannot select or change the Global Element labor schedulein the employee assignment labor schedule. This allows the institution to create a globallabor schedule that applies across the entire institution.
Labor schedules defined at the Global Element level take precedence over labor schedules defined at the Element, Element Group, Assignment, and Organization Default Schedule levels.
ExampleA Global Element Schedule is created for the element of Paid Time Off. Any pay for Paid Time Off uses the Global Element Schedule, regardless of other scheduling instructions.
Scheduling Hierarchy Process DiagramFigure 1, page B-5 shows the Scheduling Hierarchy Process diagram as described in the accompanying text.

Scheduling Hierarchy Process B-5
Scheduling Hierarchy Process Diagram


Labor Encumbrance Process C-1
CLabor Encumbrance Process
DefinitionThe purpose of this appendix is to provide an understanding of the Labor Encumbranceprocess in Labor Distribution. A process flow diagram shows the interaction between the different components in Labor Distribution. Each process is briefly explained and chapter references are provided for more information. Also included in this chapter is a description of rules governing the creation and update of encumbrances, including various scenarios pertaining to these processes.
Labor Encumbrance Process Flow DiagramFigure 1, page C-2 shows the Labor Encumbrance Process Flow diagram as described in the accompanying text.

C-2 Oracle Labor Distribution User Guide
Labor Encumbrance Process Flow Diagram
Labor Encumbrance ProcessThis section describes the Labor Encumbrance process flow diagram.
The Labor Encumbrance process includes the following components:
• Setup, page C-3
• Labor Scheduling, page C-3
• Create and Update Encumbrance Lines, page C-3
• Summarize and Transfer Encumbrances, page C-3
• Encumbrance History, page C-3
• Reports, page C-3

Labor Encumbrance Process C-3
SetupLabor Encumbrance setup provides users with the ability to customize predefined components through configuration options. These options delivered with Labor Distribution alleviate the need for software code modifications.
For information on Labor Encumbrance setup, see Labor Encumbrance Setup, page 5-2.
Labor SchedulingLabor scheduling is an online process used to create, update, and review employee labor schedules. The labor schedules are a required input for the Create Encumbrance Lines process.
For information on labor scheduling, see Labor Scheduling Procedures, page 7-2.
Create and Update Encumbrance Lines The PSP: Create and Update Encumbrance Lines process enables you to generate, update, and liquidate encumbrances for the elements that you selected when you set uplabor encumbrances.
See: Processes, page 15-2.
Summarize and Transfer EncumbrancesSummarize and Transfer Encumbrances is a concurrent process that posts data to Oracle General Ledger and Oracle Grants Accounting. Setup options allow the user to group the data based on time period and charging instructions.
For information on summarizing and transferring encumbrances, see Labor Encumbrance Processes and Reports Procedures, page 15-2.
Encumbrance HistoryDuring the Summarize and Transfer Encumbrances process, an encumbrance history is stored in the tables to be used for the Create and Update Encumbrance Lines process.
ReportsLabor Encumbrance includes the following reports:
• Suspense Charge Encumbrance Report
• Organization Default Usage Encumbrance Report
• Encumbrance History by Award Report

C-4 Oracle Labor Distribution User Guide
• Encumbrance History by Organization Report
• Assignments Processed by Create and Update Encumbrance Lines Report
See: Review Posted Encumbrance Reports, page 15-13.
Labor Encumbrance End Date Scenarios DiagramThis topic explains the labor encumbrance end date scenarios when you run the Create and Update Encumbrance Lines process.
See: Processes, page 15-2.
In the above example, the application creates encumbrances till 31-Oct, which is the award end date that you specified using the user hook.

Labor Encumbrance Process C-5
In the above example, the award end date that you specified using the user hook extends beyond the encumbrance default end date. Therefore, the application creates encumbrances till the award end date (31-Oct).
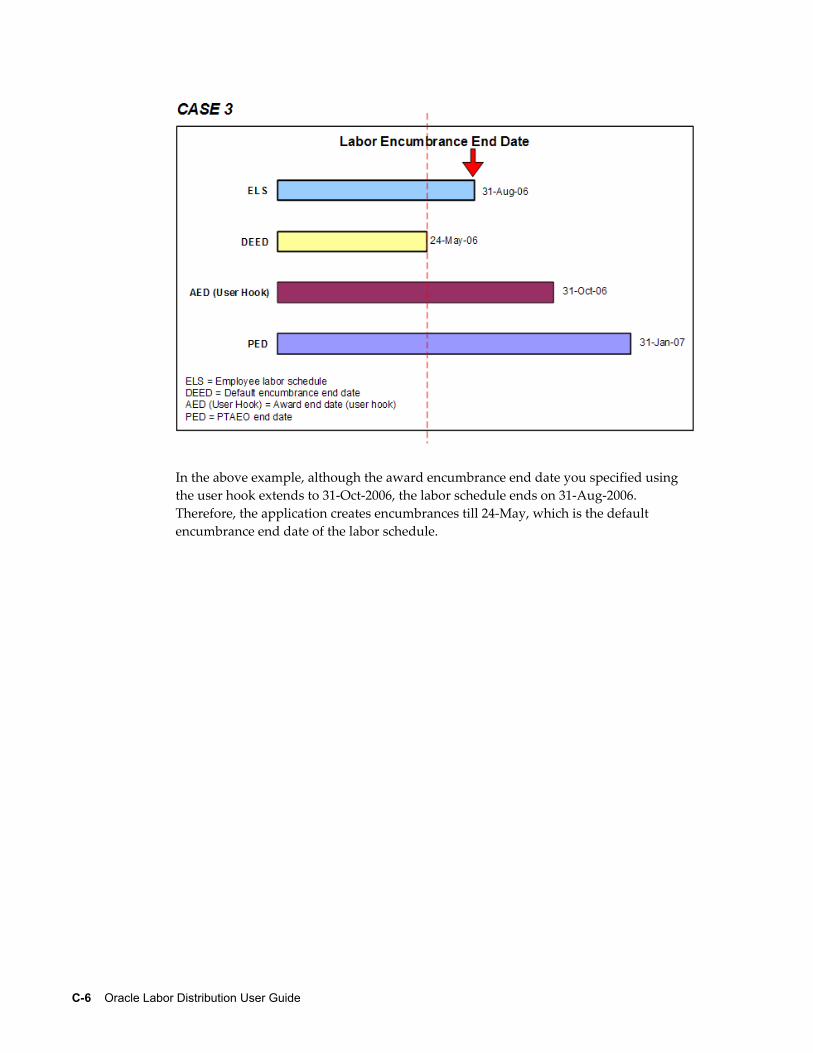
C-6 Oracle Labor Distribution User Guide
In the above example, although the award encumbrance end date you specified using the user hook extends to 31-Oct-2006, the labor schedule ends on 31-Aug-2006. Therefore, the application creates encumbrances till 24-May, which is the default encumbrance end date of the labor schedule.
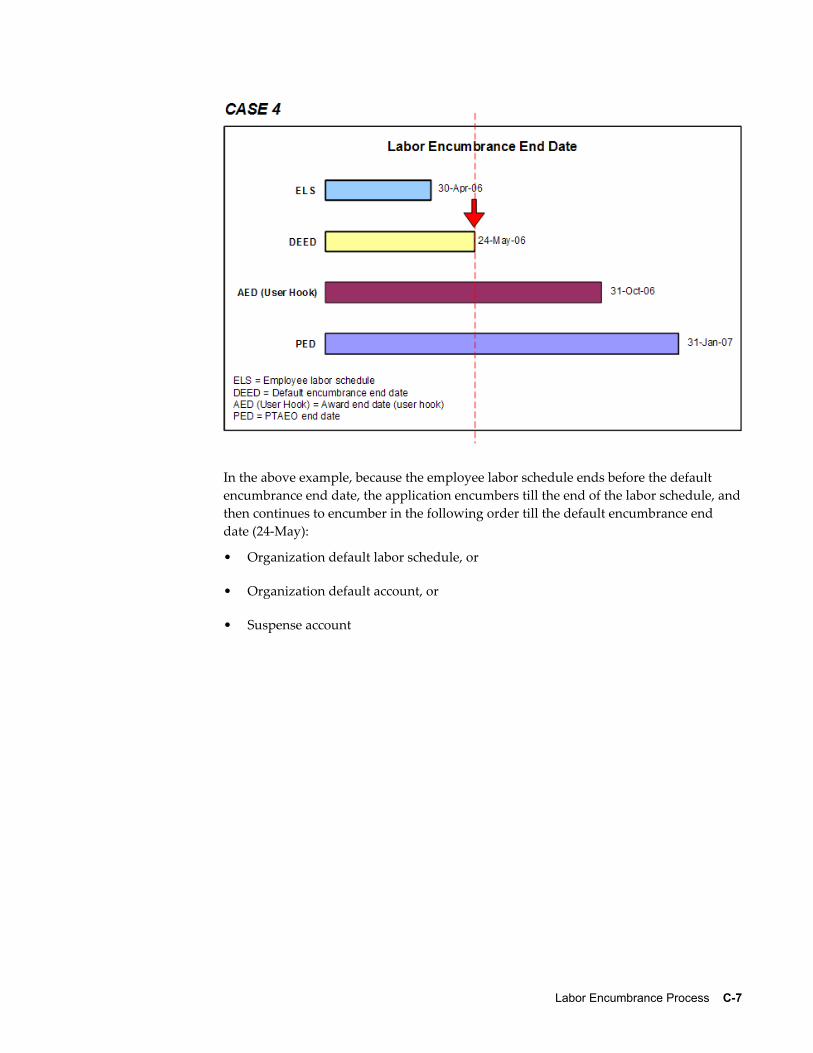
Labor Encumbrance Process C-7
In the above example, because the employee labor schedule ends before the default encumbrance end date, the application encumbers till the end of the labor schedule, andthen continues to encumber in the following order till the default encumbrance end date (24-May):
• Organization default labor schedule, or
• Organization default account, or
• Suspense account

C-8 Oracle Labor Distribution User Guide
In the above example, the award end date you specified using the user hook ends earlier than the labor schedule. Therefore, the application encumbers till the labor schedule is valid (31-Mar-2006). The application posts encumbrances beyond 31-Mar to the suspense account till the default encumbrance end date (24-May).

Labor Encumbrance Process C-9
In the above example, the application encumbers till the award end date you specified using the user hook. The application posts encumbrances beyond 31-Mar to the suspense account till the default encumbrance end date (24-May).
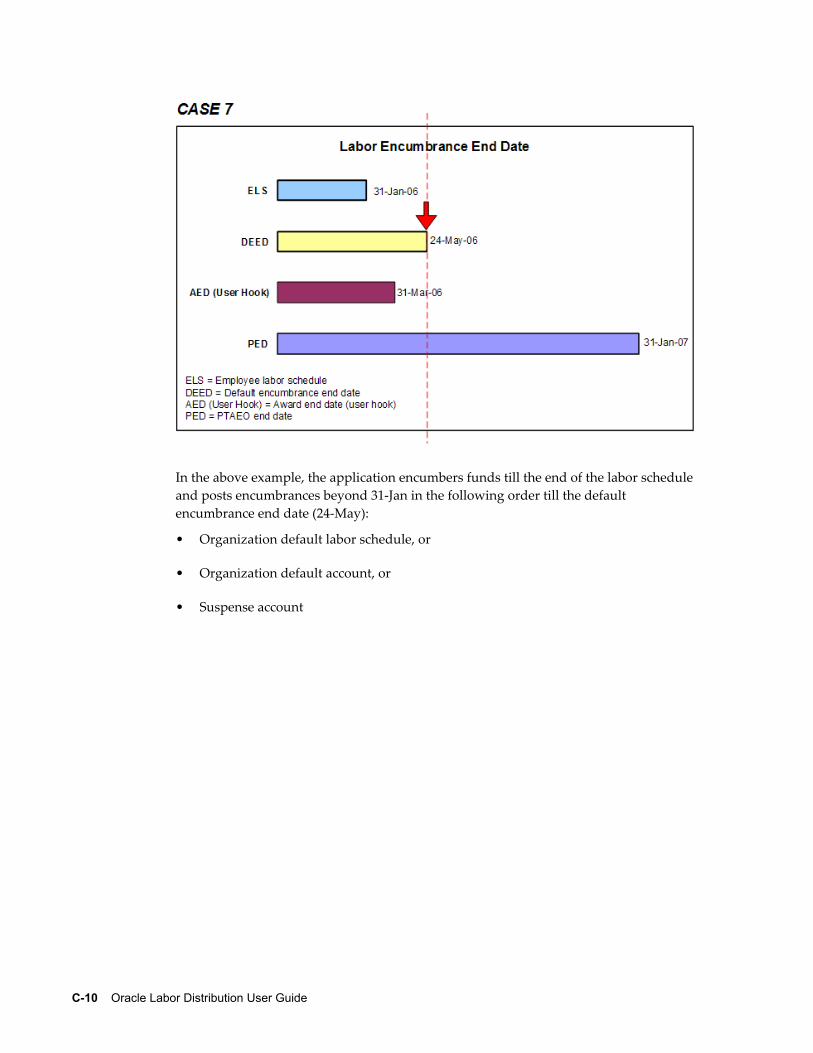
C-10 Oracle Labor Distribution User Guide
In the above example, the application encumbers funds till the end of the labor scheduleand posts encumbrances beyond 31-Jan in the following order till the default encumbrance end date (24-May):
• Organization default labor schedule, or
• Organization default account, or
• Suspense account

Labor Encumbrance Process C-11
In the above example, the end date of the award that you specified using the user hook occurs earlier than the labor schedule (31-Mar-2006). Therefore, the application posts encumbrances from 01-Apr to 30-Apr to the suspense account, and from 1-May to 24-May, to the organization default labor schedule, or the organization default account, or the suspense account.

C-12 Oracle Labor Distribution User Guide
In the above example, the labor schedule is invalid as the PTAEO ends before the labor schedule's end date. Therefore, the application creates encumbrances till the end of the PED (PTAEO end date,) and posts encumbrances beyond 15-Jan the suspense account until the encumbrance default end date (24-May).

Labor Encumbrance Process C-13
In the above example, the labor schedule after 15-Jan is invalid as the PTAEO ends before the labor schedule's end date. Therefore, the application creates encumbrances till the PED and posts encumbrances from 16-Jan to 30-Apr to the suspense account. Theapplication posts encumbrances beyond 30-Apr to the organization default labor schedule, or the organization default account, or suspense account, till the default encumbrance end date (24-May).

C-14 Oracle Labor Distribution User Guide
In the above example, the labor schedule after 30-Jun is invalid as the PED is before the labor schedule's end date (31-Aug). Therefore, the application creates encumbrances till PED (30-Jun)

Labor Encumbrance Process C-15
In the above example, the labor schedule after 28-Feb is invalid as the PED is before the labor schedule's end date. Therefore, the application creates encumbrances till the PED (28-Feb). The application posts encumbrances beyond 28-Feb to the suspense account till the default encumbrance end date (24-May).
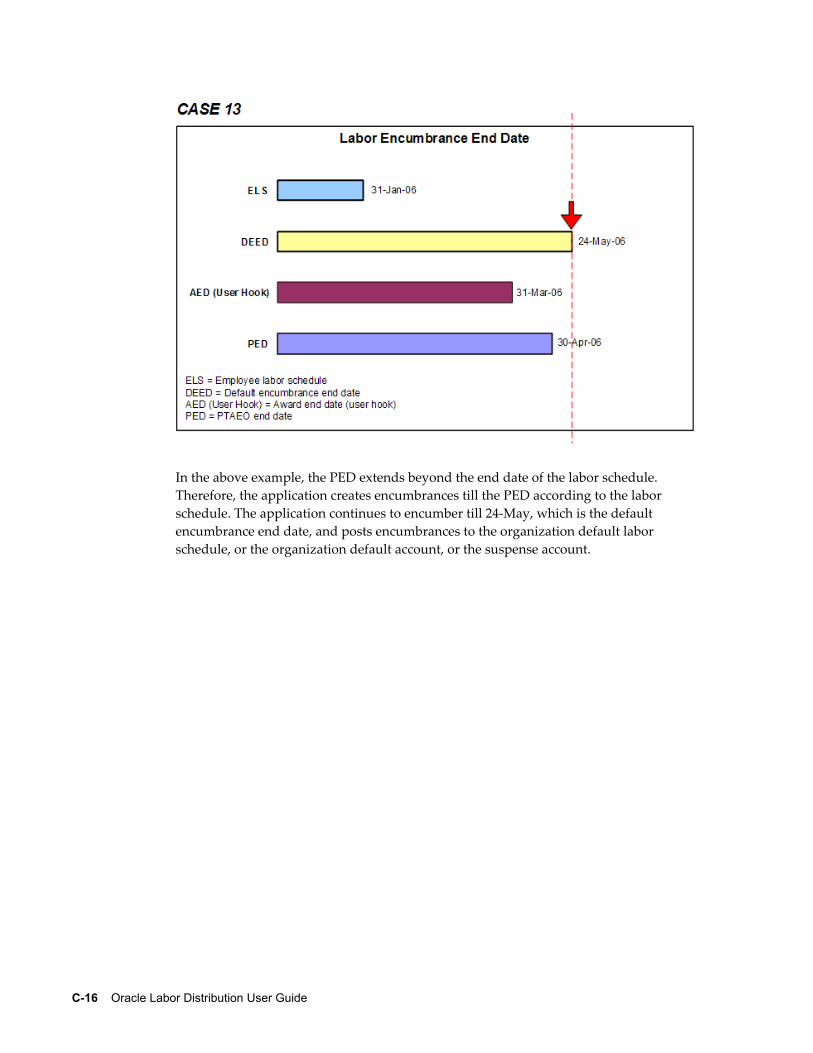
C-16 Oracle Labor Distribution User Guide
In the above example, the PED extends beyond the end date of the labor schedule. Therefore, the application creates encumbrances till the PED according to the labor schedule. The application continues to encumber till 24-May, which is the default encumbrance end date, and posts encumbrances to the organization default labor schedule, or the organization default account, or the suspense account.

Labor Encumbrance Process C-17
In the above example, the labor schedule extends beyond the award end date you specified using the user hook. Therefore, the application encumbers till the award end date and posts encumbrances beyond 31-Mar to the suspense account till 30-Apr. The application then continues to encumber from 01-May till the default encumbrance end date (24-May) to the organization default labor schedule, or organization default account, or the suspense account.


Data Entry Validations Process D-1
DData Entry Validations Process
OverviewData entry validations in Oracle Labor Distribution are performed on the following attributes:
• Oracle Projects charging instructions
• Oracle Grants Accounting charging instructions
• Oracle General Ledger code combinations
The purpose of data entry validation in Labor Distribution is as follows:
• to ensure that labor scheduled cannot be distributed more than 100% on any given day
• to prevent deletion of any schedule line whose begin and end dates overlap with the date of any distribution lines that are generated in the past
The validations that are performed for General Ledger code combinations are the same as those performed for other Oracle financial applications.
The validations that are performed for Projects and Grants Accounting charging instructions during the labor scheduling process are the same as those performed during the Create Distribution Lines process.
Data Entry ValidationsData Entry Validations consists of the following:
• Labor Scheduling Validation Rules, page D-2
• Labor Scheduling Setup Deletion Validation Rules, page D-2

D-2 Oracle Labor Distribution User Guide
• Labor Scheduling Setup End-Dating Validation Rules, page D-3
• Labor Scheduling Validation Errors, page D-5
• Labor Scheduling Validation Warnings, page D-5
• Create Distribution Lines Validations, page D-5
• Other Validations, page D-5
• Custom Data Entry Validation, page D-6
Labor Scheduling Validation RulesIn the Labor Scheduling window, the following validation rules are applied:
• The expenditure item date used when validating the Grants Accounting charging instruction is the begin date from the schedule line.
• The message box displayed to the user indicates which particular entry failed validation.
• All entry failures are considered errors or warnings.
• If entry failures are considered errors, Labor Distribution does not allow the schedule line to be saved until a correction is entered and passes validation.
• If entry failures are considered warnings, corrective action is not required, and the schedule line can be saved without making corrections.
Labor Scheduling Setup Deletion Validation RulesLabor scheduling rules for deletions are as follows:
• Element types can be deleted if the following conditions apply:
• No payrolls for the element type dates exist.
• No schedule lines for the element type dates exist.
• No element groups are associated with the element type.
• If a global element exists for this element type, the element type must exist in the PSP element types table at least once or more to maintain referential integrity.
• An element type can be deleted from an element group if there are no schedule

Data Entry Validations Process D-3
lines for the dates of the associated element group.
• An element group can be deleted if there are no element types associated with it.
• A global element can be deleted if there are no payrolls for the dates of the global element.
• A default schedule can be deleted if there are no payrolls imported for the dates of the default schedule.
• A default account can be deleted if there are no payrolls imported for the default account dates.
• A suspense account can be deleted if there are no payrolls imported for the dates of the suspense account.
Labor Scheduling Setup End-Dating Validation RulesRules for end-dating apply to the following:
• element type
• element group
• global element
• default schedules
• default accounts
• suspense accounts
Element TypeEnd-dating rules for element types are as follows:
• An element type can be end-dated to the last payroll import date.
• An element type can be end-dated to the last schedule line date.
• An element type in an element group must be end-dated to make the element type active for at least one day.
• An element type's end date can be extended if it does not overlap with other instances of this element type.
Element GroupEnd-dating rules for element groups are as follows:

D-4 Oracle Labor Distribution User Guide
• An element group can be end-dated to the last payroll import date.
• An element group can be end-dated to the date of the element group's last schedule line.
• An element group can be end-dated so that each element type associated with it canbe active for at least one day.
• An element group's end date can be extended if it does not overlap with other instances of this element group.
Global ElementEnd-dating rules for global elements are as follows:
• A global element can be end-dated to the last payroll date.
• A global element's end date can be extended if there are no payrolls for the extended period and if the global element does not overlap with other instances of this global element.
Default SchedulesEnd-dating rules for default schedules are as follows:
• A default schedule can be end-dated to the last payroll date.
• A default schedule's end date can be increased if there are no payrolls for the extended period and if the default schedule does not overlap with other instances ofthe default schedule organization.
Default AccountsEnd-dating rules for default accounts are as follows:
• A default account can be end-dated to the last payroll date.
• A default account's end date can be increased if there are no payrolls for the extended period and if the default account does not overlap with other default accounts for this organization.
Suspense AccountsEnd-dating rules for suspense accounts are as follows:
• A suspense account can be end-dated to the last payroll date.
• A suspense account's end date can be increased if there are no payrolls for the extended period and if the suspense account does not overlap with other suspense or global accounts for this organization.

Data Entry Validations Process D-5
Labor Scheduling Validation ErrorsIn the Labor Scheduling window, entry failures of many charging instructions or accounting flexfields are considered errors. Entry failure for charging instructions include the following:
• Project does not exist.
• Task does not exist for the project.
• Award does not exist.
• Expenditure Organization does not exist.
• Expenditure Type does not exist.
• General Ledger code combination does not exist.
Labor Scheduling Validation WarningsIn the Labor Scheduling window, the following entry failures are considered warnings:
• Project is not active for schedule line begin date.
• Task is not active for schedule line begin date.
• Award is not linked to the Project via an installment.
• A new schedule line is entered which has a begin-date that includes a payroll that has already been distributed.
Create Distribution Lines ValidationsDuring the Create Distribution Lines process, all entry failures are considered errors. All charging account entry failures are posted to the organizational suspense account.
Other ValidationsOther data entry validations include the following:
• End date can be changed if it is greater than the last payroll process date and can be changed to a date greater than the payroll process date.
• Begin date can be changed if it is greater than the last payroll process date and can be changed to a date greater than the payroll process date.
• New schedule lines can be created with a begin date that is greater than the last

D-6 Oracle Labor Distribution User Guide
payroll process date.
• Percentages cannot be changed on any schedule line if the schedule line has alreadybeen used in any payroll distribution.
Note: Users can change the end date and create a new record.
• The end date of the most recent Oracle Payroll, Quick Pay or non-Oracle payroll imported into Oracle Labor Distribution is checked by Labor Distribution. Schedules can only be adjusted for dates after the end date of the last processed payroll for the selected employee assignment, assuming that the employee assignment was included in the payroll import.
If Oracle Payroll, Quick Pay, or a non-Oracle payroll is imported into Labor Distribution for a payroll period for employee assignments, the schedules of these employee assignments are locked from update for any date within that payroll period. Users can update the schedules of employee assignments not included in that payroll import.
Custom Data Entry ValidationUsers can define and program additional validation rules for the labor scheduling process that meet the needs of their unique business requirements.

Effort Calculation Process E-1
EEffort Calculation Process
DefinitionThe underlying concept of effort calculation is that effort equals the percentage of pay distributed.
ProcessThe following steps illustrate the effort calculation process:
1. Determine the individual's meeting coverage criteria for the given effort reporting period.
2. Summarize all distribution lines, including transfers, where elements are not excluded from the element set selected in the effort report template and where begin and end dates fall completely within the effort reporting period.
3. Calculate the effort base for an individual employee by summing the total applicable distributions.
4. Calculate effort percentages by summing for each individual employee the applicable distributions for each summarization criteria defined in the effort report template.
ExamplesThe following examples provide clarification of the effort calculation process.
Doctor Jane Doe Smith has one assignment, Principal Investigator. Her annual salary was $60,000 ($5,000 per month) starting January 1, 1999. Her annual salary was increased to $72,000 on April 16, 1999 ($5,500 for the month of April).
Table 1, page E-2 shows Dr. Smith's schedule.

E-2 Oracle Labor Distribution User Guide
Dr. Smith's Schedule
Project Date Range Percentage of Time
89 AC Cardiology 01-Jan-1999 to 31-Mar-1999 100%
756 Study 01-Apr-1999 to 20-Apr-1999 50%
912 NIH Ca 01-Apr-1999 to 15-Apr-1999 50%
3784 NSF S 16-Apr-1999 to 30-Apr-1999 50%
Dr. Smith was paid as follows:
• $5,000.00 per month for January through March
• $2,500.00 for 1 - 15 April
• $3,000.00 for 16 - 30 April
Table 2, page E-2 shows Dr. Smith's actual distributions.
Dr. Smith's Actual Distributions
Project Date Range Actual Distributions
89 AC Cardiology 01-Jan-1999 to 31-Mar-1999 $15,000.00
756 Study 01-Apr-1999 to 20-Apr-1999 $1,659.09
912 NIH Ca 01-Apr-1999 to 15-Apr-1999 $1,250.00
Note: Project 3784 NSF was invalid at the time of distribution;suspense account posting is driven by user setup options.
Cardiology Suspense 21-Apr-1999 to 30-Apr-1999 $1,090.91
Total $20,500.00

Effort Calculation Process E-3
Before any distribution adjustment, Dr. Smith's effort is calculated for the period of February 1 through April 30 as shown in Table 3, page E-3.
Dr. Smith's Effort
Project Amount/Percentage
89 AC Cardiology $10,000.00/$15,500.00 = 64.52%
756 Study $1,659.09/$15,500.00 = 10.70%
912 NIH Ca $1,250.00/$15,500.00 = 8.06%
Note: Project 3784 NSF was invalid at the time of distribution; suspense account posting is driven by setup options.
Total 100%


Distribution Adjustments Approval Notification Workflow Process F-1
FDistribution Adjustments Approval
Notification Workflow Process
OverviewLabor Distribution uses Oracle Workflow to define and implement the distribution adjustments approval process.
Workflow features include the following:
• Oracle Workflow Builder, a graphical tool that allows users to create business process definitions
• Workflow Engine, which implements process definitions at runtime
• Notification System, which sends notifications and processes responses in a workflow
Workflow functionality in Labor Distribution automatically routes distribution adjustments approval notifications throughout the organization and delivers electronic notifications to users regarding distribution adjustments that require their attention or processes that are completed.
Use Oracle Workflow Builder to customize workflows or to create new workflows. For information on Workflow, see Overview of Oracle Workflow for Developers, Oracle Workflow Developer's Guide.
The PSP Distribution Adjustments Approval Item TypeSeveral Workflow attributes are associated with the PSP Distribution Adjustments Approval item type that reference information in the application tables. The attributes are used and maintained by function activities as well as notification activities throughout the process.
Table 1, page F-2 describes the attributes associated with PSP Distribution

F-2 Oracle Labor Distribution User Guide
Adjustments Approval.
Attributes Associated with the PSP Distribution Adjustments Approval Item Type
Display Name Description Type Length/Format/Lookup Type
Batch Name Text
Employee Person ID Number
Employee Display Name
Text 240
Assignment Text
Element Text
Begin Date Date
End Date Date
Distribution Adjustment
form Form
Creator UserName Text 100
Creator Display Name
Text 240
Approver UserName Text 100
Approver Display Name
Text 240
Note Text
Time Out time out for approver to approve
Distribution Adjustments Approval Workflow DiagramFigure 1, page F-3 shows the distribution adjustments approval nodes as described in
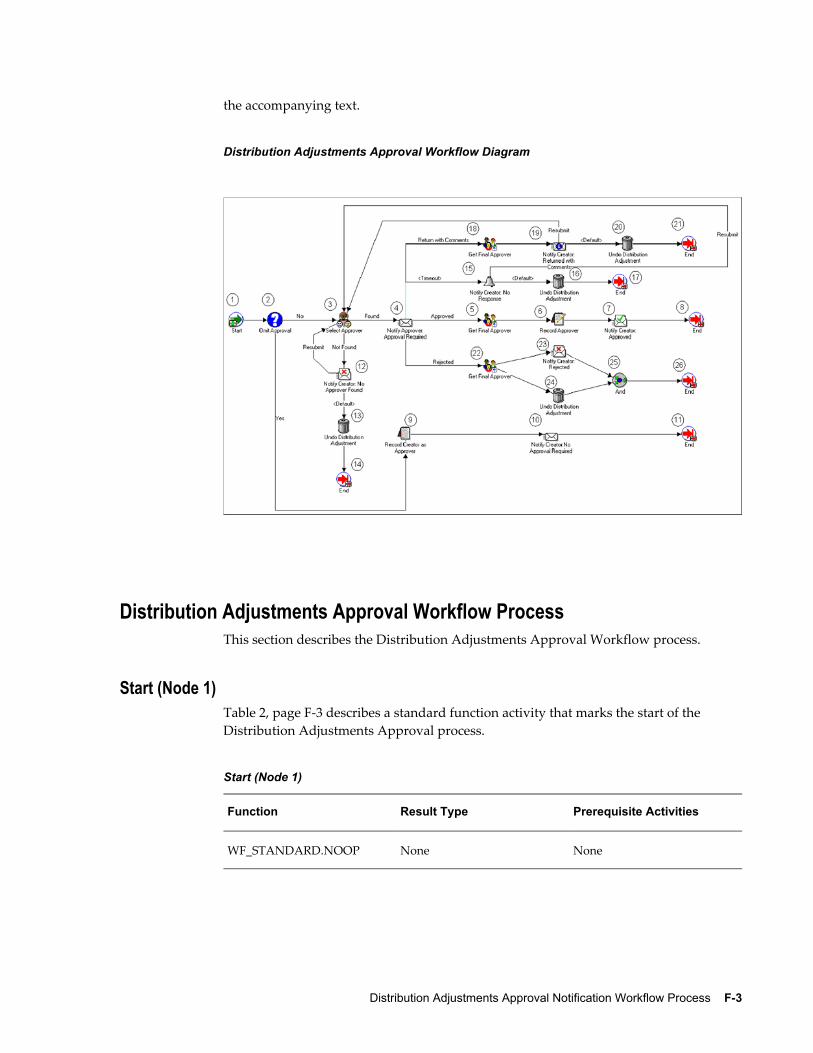
Distribution Adjustments Approval Notification Workflow Process F-3
the accompanying text.
Distribution Adjustments Approval Workflow Diagram
Distribution Adjustments Approval Workflow ProcessThis section describes the Distribution Adjustments Approval Workflow process.
Start (Node 1)Table 2, page F-3 describes a standard function activity that marks the start of the Distribution Adjustments Approval process.
Start (Node 1)
Function Result Type Prerequisite Activities
WF_STANDARD.NOOP None None

F-4 Oracle Labor Distribution User Guide
Omit Approval (Node 2)Table 3, page F-4 describes a function activity that checks to see whether an approver is required for the distribution adjustment. The system default is No. To customize this activity, use the PL/SQL stored procedure PSP_WF_ADJ_CUSTOM.OMIT_APPROVAL_CUSTOM.
Omit Approval (Node 2)
Function Result Type Prerequisite Activities
PSP_WF_ADJ_PKG.OMIT_APPROVAL
Yes/No Start
Select Approver (Node 3)Table 4, page F-4 describes a function activity that searches for the approver if an approver for the distribution adjustment is required. To customize this activity, use the PL/SQL stored procedure PSP_WF_ADJ_CUSTOM.SELECT_APPROVER_CUSTOM.
Select Approver (Node 3)
Function Result Type Prerequisite Activities
PSP_WF_ADJ_PKG.SELECT_APPROVER
Found/Not Found
or
Notify Creator: Returned withComments
or
Notify Creator: No Response
Omit Approval
Notify Approver: Approval Required (Node 4)Table 5, page F-5 describes an activity, which notifies the approver that approval for adistribution adjustment is required.

Distribution Adjustments Approval Notification Workflow Process F-5
Notify Approver: Approval Required (Node 4)
Message Result Type Prerequisite Activities
To Approver: Approval Required
Approval Select Approver
Get Final Approver [Approved] (Node 5)Table 6, page F-5 describes a function activity, which searches for the final approver's name if the distribution adjustment is approved.
Get Final Approver [Approved] (Node 5)
Function Result Type Prerequisite Activities
PSP_WF_ADJ_PKG.GET_APPROVAL_RESPONDER
None Notify Approver: Approval Required
Record Approver (Node 6)Table 7, page F-5 describes a function activity that updates the database to approved with the approver identifier.
Record Approver (Node 6)
Function Result Type Prerequisite Activities
PSP_WF_ADJ_PKG.RECORD_APPROVER
None Get Final Approver
Notify Creator: Approved (Node 7)Table 8, page F-6 describes an activity, which notifies the creator that the distribution adjustment is approved.

F-6 Oracle Labor Distribution User Guide
Notify Creator: Approved (Node 7)
Message Result Type Prerequisite Activities
To Creator: Approved None Record Approver
End (Node 8)Table 9, page F-6 describes a function activity, which marks the end of the process.
End (Node 8)
Function Result Type Prerequisite Activities
WF_STANDARD.NOOP None Notify Creator: Approved
Record Creator as Approver (Node 9)Table 10, page F-6 describes a function activity, which updates the distribution adjustment status in the database to approved with the creator as the approver identifier if the approval process is omitted. To customize this activity, use the PL/SQL stored procedure PSP_WF_CUSTOM.RECORD_CREATOR_CUSTOM.
Record Creator as Approver (Node 9)
Function Result Type Prerequisite Activities
PSP_WF_ADJ_PKG.RECORD_CREATOR
None Omit Approval
Notify Creator: No Approval Required (Node 10)Table 11, page F-7 describes an activity, which notifies the distribution adjustment creator that no approval is required for the adjustment.

Distribution Adjustments Approval Notification Workflow Process F-7
Notify Creator: No Approval Required (Node 10)
Function Result Type Prerequisite Activities
To Creator: No Approval Required
None Record Creator as Approver
End (Node 11)Table 12, page F-7 describes a function activity that marks the end of the process.
End (Node 11)
Function Result Type Prerequisite Activities
WF_STANDARD.NOOP None Notify Creator: No Approval Required
Notify Creator: No Approver Found (Node 12)Table 13, page F-7 describes an activity, which notifies the creator that no approver was found.
Notify Creator: No Approver Found (Node 12)
Message Result Type Prerequisite Activities
To Creator: No Approver Found
Decision Select Approver
Undo Distribution Adjustment (Node 13)Table 14, page F-8 describes a function activity, which reverts distribution adjustments to their original state.

F-8 Oracle Labor Distribution User Guide
Undo Distribution Adjustment (Node 13)
Function Result Type Prerequisite Activities
PSP_WF_ADJ_PKG.UNDO_DISTRIBUTION_ADJUSTMENT
None Notify Creator: No Approver Found
End (Node 14)Table 15, page F-8 describes a function activity that marks the end of the process.
End (Node 14)
Function Result Type Prerequisite Activities
WF_STANDARD.NOOP None Undo Distribution Adjustment
Notify Creator: No Response [Timeout] (Node 15)Table 16, page F-8 describes an activity, which notifies the distribution adjustment creator that there is no response to the distribution adjustment notification if the adjustment is not approved, rejected, or returned with comments within a specified period of time. The measure of time is in days and the default value is 0, which means no timeout.
Notify Creator: No Response [Timeout] (Node 15)
Message Result Type Prerequisite Activities
To Creator: No Response Decision Notify Approver: Approval Required
Undo Distribution Adjustment (Node 16)Table 17, page F-9 describes a function activity, which reverts distribution adjustment to its original state.

Distribution Adjustments Approval Notification Workflow Process F-9
Undo Distribution Adjustment (Node 16)
Function Result Type Prerequisite Activities
PSP_WF_ADJ_PKG.UNDO_DISTRIBUTION_ADJUSTMENT
None Notify Creator: No Response
End (Node 17)Table 18, page F-9 describes a function activity that marks the end of the process.
End (Node 17)
Function Result Type Prerequisite Activities
WF_STANDARD.NOOP None Undo Distribution Adjustment
Get Final Approver [Return with Comments] (Node 18)Table 19, page F-9 describes a function activity, which searches for the final approver if the distribution adjustment is returned with comments.
Get Final Approver [Return with Comments] (Node 18)
Function Result Type Prerequisite Activities
PSP_WF_ADJ_PKG.GET_APPROVAL_RESPONDER
None Notify Approver: Approval Required
Notify Creator: Returned with Comments (Node 19)Table 20, page F-10 describes an activity, which notifies the creator that the distributionadjustment is returned with comments.
F-10 Oracle Labor Distribution User Guide
Notify Creator: Returned with Comments (Node 19)
Message Result Type Prerequisite Activities
To Creator: Returned with Comments
Decision Get Final Approver
Undo Distribution Adjustment (Node 20)Table 21, page F-10 describes a function activity, which reverts distribution adjustment to its original state.
Undo Distribution Adjustment (Node 20)
Function Result Type Prerequisite Activities
PSP_WF_ADJ_PKG.UNDO_DISTRIBUTION_ADJUSTMENT
None Notify Creator: Returned withComments
End (Node 21)Table 22, page F-10 describes a function activity that marks the end of the process.
End (Node 21)
Function Result Type Prerequisite Activities
WF_STANDARD.NOOP None Undo Distribution Adjustment
Get Final Approver [Rejected] (Node 22)Table 23, page F-11 describes a function activity, which searches for the final approver if a distribution adjustment is rejected.

Distribution Adjustments Approval Notification Workflow Process F-11
Get Final Approver [Rejected] (Node 22)
Function Result Type Prerequisite Activities
PSP_WF_ADJ_PKG.GET_APPROVAL_RESPONDER
None Notify Approver: Approval Required
Notify Creator: Rejected (Node 23)Table 24, page F-11 describes an activity, which notifies the distribution adjustment creator that the distribution adjustment is rejected.
Notify Creator: Rejected (Node 23)
Message Result Type Prerequisite Activities
To Creator: Rejected None Get Final Approver
Undo Distribution Adjustment (Node 24)Table 25, page F-11 describes a function activity, which reverts distribution adjustments to its original state.
Undo Distribution Adjustment (Node 24)
Function Result Type Prerequisite Activities
PSP_WF_ADJ_PKG.UNDO_DISTRIBUTION_ADJUSTMENT
None Get Final Approver
And (Node 25)Table 26, page F-12 describes a function activity that completes when the Notify Creator: Rejected and the Undo Distribution Adjustment branches converge.

F-12 Oracle Labor Distribution User Guide
And (Node 25)
Function Result Type Prerequisite Activities
WF_STANDARD.AND JOIN None Notify Creator: Rejected and Undo Distribution Adjustment
End (Node 26)Table 27, page F-12 describes a function activity that marks the end of the process.
End (Node 26)
Function Result Type Prerequisite Activities
WF_STANDARD.NOOP None Notify Creator: Rejected and Undo Distribution Adjustment
Customizing Distribution Adjustments Approval Workflow Process This section describes how the Distribution Adjustments Approval Workflow process can be customized.
Required ModificationsNo modifications are required to run the Distribution Adjustments Approval Workflowprocess.
Optional CustomizationsUsers can perform the following tasks relative to optional customizations:
• Users can create new messages. Messages are used for notification activities in the workflow process.
• Users can create new notifications and notification activities and can modify the workflow process to accommodate these new activities.
• Users can omit the approval step in the Distribution Adjustments Approval

Distribution Adjustments Approval Notification Workflow Process F-13
Workflow process.
• If organizations elect to omit the approval step, no Oracle Workflow notification is sent requesting distribution adjustment approval, but users must set p_omit_approval to Y in procedure PSP_WF_ADJ_CUSTOM.OMIT_APPROVAL_CUSTOM, which is in file PSPWFACB.pls.
• When the distribution adjustment creator is the same person as the distribution adjustment approver, no Oracle Workflow notification is sent to the approver. When this circumstance applies, users must write code in the PSP_WF_ADJ_CUSTOM.OMIT_APPROVAL_CUSTOM function to omit the approval process.

Labor Distribution Navigation Paths G-1
GLabor Distribution Navigation Paths
NavigationTable 1, page G-1 shows the navigation path for each window in Labor Distribution.
Navigation Paths
Window Navigation Path
Auto-Fill Expenditure Types Setup > Auto-Population > Expenditure Type
Auto-Fill Natural Account Setup > Auto-Population > Natural Account
Auto-Population Segment Definition Setup > Auto-Population > Segment Setup
Begin Date Auto-fill Parameters Setup > Auto-fill Begin Date
Bypass Expenditure Types Setup > Auto-Population > Bypass Expenditure Type
Bypass Natural Account Setup > Auto-Population - Bypass Natural Account
Clearing Account Setup Setup > Clearing Account
Configuration Values Setup > Configuration Values
Create and Run Effort Reports Effort Reporting > Configure and Run Effort Report Templates
Default Account Report - Input Parameters Distribution Reports > Default Account Report

G-2 Oracle Labor Distribution User Guide
Window Navigation Path
Define Rule Setup > Auto-Population - Expenditure Type
Click Define Rule
or
Setup > Auto-Population > Natural Account
Click Define Rule
Distribution Adjustments Distribution Adjustments
Distribution History by Award - Input Parameters Distribution Reports > Distribution History by Award
Distribution History by Organization - Input Parameters
Distribution Reports > Distribution History by Org.
Distribution History by Project - Input Parameters Distribution Reports > Distribution History by Project
Elements Groups Setup > Element Groups
Elements Imported Setup > Element Types
Employee Labor Schedules Report - Input Parameters Scheduling Reports > Employee Labor Schedule Report
Employees Using Default Labor Schedules - Input Parameters
Scheduling Reports > Emp using Default Schedules
Encumbrance - Creation Options for GL Labor Encumbrance > Creation Options for GL
Encumbrance - Default Encumbrance End Date Labor Encumbrance > Default End Date
Encumbrance - Element Selection Labor Encumbrance > Element Selection
Encumbrance History by Organization Labor Encumbrance > Encumbrance History by Org
Encumbrance - Payroll and Assignment Selection Labor Encumbrance > Payroll Selection
End Date Auto-fill Parameters Setup > Auto-fill End Date
Global Element Override Setup > Global Elements

Labor Distribution Navigation Paths G-3
Window Navigation Path
Labor Scheduling Labor Schedules
Lookups (Auto Lookups) Setup > Auto-Population > Lookups Table
Maintain Non-Oracle Payroll Sublines Payroll Interface > Non-Oracle Sublines
Maintain Pre-generated Distribution Lines Payroll Interface > Pre-Gen Distribution Lines
Mass Print Effort Reports Effort Reporting > Mass Print Effort Report
Monthly Schedule Summary Labor Schedules
Click Schedule Lines
Click Monthly Summary
Organization Default Accounts Setup > Organization Default Accounts
Organization Default Labor Schedule Setup > Org. Default Labor Schedules
Organization Default Labor Schedule Report - Input Parameters
Scheduling Reports > Org Default Labor Schedule Report
Organization Suspense Accounts Setup > Organization Suspense Accounts
Parameter Set Setup > Parameter Set
Payroll Period Schedule Summary Labor Schedules
Click Schedule Lines
Click Payroll Period
Payroll Sources Setup > Payroll Sources
Reorder Setup > Auto-Population > Expenditure Type
Click Re-Order
or
Setup > Auto-Population > Natural Account
Click Re-Order

G-4 Oracle Labor Distribution User Guide
Window Navigation Path
Salary Cap Setup > Salary Cap
Schedule Lines Labor Schedules
Click Schedule Lines
Schedule Summary Labor Schedules
Click Schedule Lines
Click Schedule Summary
Suspense Account Report - Input Parameters Distribution Reports > Suspense Account Report
Worklist Workflow > Workflow User > Worklist

Distribution and Configuration Options H-1
HDistribution and Configuration Options
OverviewThe purpose of this appendix is to provide an understanding of how scheduling elements are used in the payroll distribution process to configure labor schedules.
Payroll Distribution ProcessThe Payroll Distribution Process illustrates the interaction of the organization level default labor schedule, organization default accounts, and organization suspense account during distribution in the labor schedule hierarchy.
For a specific payroll run that has been exported to Oracle Labor Distribution and for every payroll line that includes a single employee, assignment, and element, Labor Distribution performs the following steps:
1. Identifies the Oracle Grants Accounting charging instruction or Oracle General Ledger account that determines labor distribution by using the labor schedule hierarchy.
Labor Distribution begins searching for a labor schedule at the lower level of the hierarchy and moves upward until it finds a labor schedule or account.
At the lower three levels of the scheduling hierarchy, Element Type, Element Group, and Assignment, labor schedules are defined for the employee assignment.
At the upper three levels of the scheduling hierarchy, Organization Default, Organization Default Account, and Suspense Account, labor schedules are defined at the human resources organization level for that employee assignment.
2. Identifies and corrects incomplete labor schedules.
If a labor schedule is identified, Labor Distribution checks if the schedule distributes 100% of the element for the entire payroll period. If not, Labor Distribution adds a Grants Accounting suspense account charging instruction or a

H-2 Oracle Labor Distribution User Guide
General Ledger suspense account to the labor schedule based on the Hierarchy for Balances on Incomplete Labor Schedules illustrated in Figure C - 1. This additional line includes valid dates equal to the times when the labor schedule distribution does not equal 100%.
Only one suspense account, either a Grants Accounting suspense account or a General Ledger suspense account, can be set up for an organization.
3. Replaces Invalid, Closed, or Inactive charging instructions.
For every Grants Accounting charging instruction and General Ledger account line in the labor schedule, Labor Distribution checks if it is still valid. If the charging instruction or account is invalid, Labor Distribution replaces it with a Grants Accounting suspense account charging instruction or a General Ledger suspense account as illustrated in Figure 1, page H-3.
Only one suspense account, either a Grants Accounting suspense account or a General Ledger suspense account, can be set up for an organization.
4. Distributes the Element.
Configuration OptionsThe diagrams in this section illustrate how the scheduling hierarchy process works based on the site implementation of the following configuration options:
• Organization Level Default Labor Schedule for All Employees or Assignments
• Organization Level Default Accounts
The diagrams are explained in the previous section, Payroll Distribution Process, page H-1.
Case 1 DiagramFigure 1, page H-3 illustrates how the Scheduling Hierarchy works with the followingconfiguration setting:
Enable: Organization Level Default Labor Schedule for All Employees or Assignments
Enable: Organization Level Default Accounts

Distribution and Configuration Options H-3
Case 1 Diagram
Case 2 DiagramFigure 2, page H-4 illustrates how the Scheduling Hierarchy works with the followingconfiguration setting:
Enable: Organization Level Default Labor Schedule for All Employees or Assignments
Disable: Organization Level Default Accounts; indicated in italics

H-4 Oracle Labor Distribution User Guide
Case 2 Diagram
Case 3 DiagramFigure 3, page H-5 illustrates how the Scheduling Hierarchy works with the followingconfiguration setting:
Disable: Organization Level Default Labor Schedule for All Employees or Assignments
Disable: Organization Level Default Accounts; indicated in italics

Distribution and Configuration Options H-5
Case 3 Diagram
Case 4 DiagramFigure 4, page H-6 illustrates how the Scheduling Hierarchy works with the followingconfiguration setting:
Disable: Organization Level Default Labor Schedule for All Employees or Assignments
Enable: Organization Level Default Accounts; indicated in italics

H-6 Oracle Labor Distribution User Guide
Case 4 Diagram

Labor Distribution Accounting Example I-1
ILabor Distribution Accounting Example
DefinitionThe purpose of this appendix is to provide an understanding of balancing journal entries that are created during payroll, labor distribution, and grants processing.
Payroll Balancing OverviewIn Oracle Human Resources, there is a hierarchy for payroll costing. Labor costs can be assigned at the following levels with payroll at the highest level:
• payroll
• element link
• organization
• assignment
• element entry
In Human Resources and Payroll, each element is linked to a payroll using the Cost Allocation flexfield segments. Each element and payroll combination is costed using thepayroll costing hierarchy, with the balancing account being an appropriate liability or cash account defined in the Element Link window.
Entries made at the lower levels override entries at higher levels.
For information on labor costs, see The Oracle HRMS Cost Allocation Key Flexfield Example, Oracle HRMS Enterprise and Workforce Management Guide.
Labor Costing ExampleThe labor costing example includes the following parts:

I-2 Oracle Labor Distribution User Guide
• labor costing
• distribution adjustments
In the labor costing example, payroll is run and costed for two employees. These payrollcosts are distributed to Oracle Grants Accounting and Oracle General Ledger. These costs are then adjusted using Labor Distribution.
In this example, the balancing account is payroll liability.
Labor CostingThe following examples illustrate labor costing.
1. Two employees are on the monthly payroll at Oracle University. They are John Smith with a monthly salary of $2,400 and Mary Marshall with a monthly salary of $3,600. The one element is Regular Salary.
Total payroll costs are $6,000 for the current month. These costs are processed and costed from Payroll to General Ledger as shown in Table 1, page I-2.
Example of Labor Costing
Account Total Payroll Costs Debit/Credit
Payroll Clearing (00.000.1500)
$6,000 Debit
Payroll Liability (00.000.2100)
$6,000 Credit
2. Labor schedules are established at the employee assignment level for each employee in Labor Distribution.
Table 2, page I-2 shows schedule lines for John Smith.
Schedule Lines for John Smith
Charging Instructions Labor Schedule
GL Account 10.200.6010 20%
OGM DOD Project 80%

Labor Distribution Accounting Example I-3
Table 3, page I-3 shows schedule lines for Mary Marshall.
Schedule Lines for Mary Marshall
Charging Instructions Labor Schedule
GL Account 10.300.6010 40%
OGM NSF Project 60%
3. Through Labor Distribution, current payroll is matched with schedule lines for eachemployee. Table 4, page I-3 shows the distribution lines created.
Distribution Lines Created for John Smith and Mary Marshall
Employee Charging Instructions Distribution Amount
John Smith GL 10.200.6010 $480
John Smith DOD Project $1,920
Mary Marshall GL 10.300.6010 $1,440
Mary Marshall NSF Project $2,160
4. Labor Distribution summarizes and transfers distribution lines to the appropriate General Ledger accounts and Grants Accounting projects. Table 5, page I-3 shows the journal entries created by the General Ledger journal.
Journal Entries Created by the General Ledger Journal
Journal Entries Amount Debit/Credit
GL 10.200.6010 $480 Debit
GL 10.300.6010 $1,440 Debit
Payroll Clearing $1,920 Credit
Table 6, page I-4 shows the labor distribution transactions that Grants Accounting

I-4 Oracle Labor Distribution User Guide
imports.
Labor Distribution Transactions Imported by Grants Accounting
Grants Accounting Project Amount
DOD Project $1,920
NSF Project $2,160
5. In Grants Accounting, concurrent processes are initiated to transfer labor costs to General Ledger. Table 7, page I-4 shows the journal entries created according to the AutoAccounting setup in Grants Accounting after the concurrent processes complete.
Journal Entries Created According to the AutoAccounting Setup in Grants Accounting
Account Amount Debit/Credit
GL 20.000.6000 $4,080 Debit
Payroll Clearing $4,080 Credit
Note: The AutoAccounting setup in Grants Accounting must include an appropriate payroll clearing account. If it is important that the payroll clearing account net to zero, then the AutoAccounting setup in Grants Accounting must generate the same payroll clearing account as defined in Labor Distribution. This labor costing example assumes that this is true.
For information on defining auto accounting, see ®How to Use AutoAccounting, Oracle Public Sector Financials User's Guide.
6. Table 8, page I-5 shows the entries for each General Ledger account. After all processes and steps are complete, the payroll clearing has a zero balance and appropriate General Ledger accounts show debit balances for labor expenditures.
Labor Distribution Accounting Example I-5
General Ledger Journal Account Entries for Labor Costing
Account Example Number Debit Credit
00.000.1500, Payroll Clearing
1. $6,000
4. $1,920
5. $4,080
00.000.2100, Payroll Liability
1. $6,000
10.200.6010, General Fund.Engineering.Salary
4. $480
10.300.6010, General Fund.Cardiology.Salary
4. $1,440
20.000.6000, Restricted Fund.General.Salary
5. $4,080
Distribution AdjustmentsThe logic for distribution adjustments is the same as that of regular Labor Distribution transactions.
The following examples illustrate distribution adjustments in the labor costing example.
1. After the payroll was distributed, it was determined that only 50% of John Smith's time should have been charged to the DOD project instead of 80%. The other 30% should be charged to the General Fund.Engineering.Salary account, 10.200.6010.
After adjusting the distribution in the Distribution Adjustments window, the entries in the Adjusted Distributions region of the Distribution Adjustments window are as shown in Table 9, page I-6, with the calculations shown in parentheses.

I-6 Oracle Labor Distribution User Guide
Entries in the Adjusted Distributions Region of the Distribution Adjustments Window
Charging Instructions Amount Calculations
DOD Project -$1,920
DOD Project $1,200 ($2,400 x 50%)
GL 10.200.6010 $720 ($2,400 X 30%)
Unaccounted Balance $0.00
2. After the distribution adjustment is entered and approved, Labor Distribution creates General Ledger journal entries as shown in Table 10, page I-6.
General Ledger Journal Entries
Account Amount Debit/Credit
GL 10.200.6010 $720 Debit
Payroll Clearing $720 Credit
After the distribution adjustment is entered and approved, the Grants Accounting import is created as shown in Table 11, page I-6.
Grants Accounting Import
Project Amount
DOD Project -$1,920
DOD Project $1,200
The Grants Accounting transfer to General Ledger process creates the import and posting entries shown in Table 12, page I-7 using AutoAccounting.

Labor Distribution Accounting Example I-7
Import and Posting Entries Using AutoAccounting
Account Amount Debit/Credit
Payroll Clearing -$720 Credit
GL 20.000.6000 for DOD Project
-$720 Debit (1,200-1,900)
3. Table 13, page I-7 shows the entries for each General Ledger account transaction. Labor Distribution processes all adjustments as positive or negative debits and the clearing account as positive or negative credits.
General Ledger Journal Account Entries for Distribution Adjustments, John Smith
Account Example Number Debit Credit
00.000.1500, Payroll Clearing
1. $6,000
4. $1,920
5. $4,080
7. $720
8. -$720
00.000.2100,Payroll Liability
1. $6,000
10.200.6010, General Fund.Engineering.Salary
4. $480
7. $720
10.300.6010, General Fund.Cardiology.Salary
4. $1,440

I-8 Oracle Labor Distribution User Guide
Account Example Number Debit Credit
20.000.6000, Restricted Fund.General.Salary
5. $4,080
8. -$720
4. After the payroll was distributed, it was determined that Mary Marshall should have only 10% of her time charged to the General Fund in General Ledger instead of 40%. The other 30% should be charged to the NSF Project.
After adjusting the distribution in the Distribution Adjustments window, the entries in the Adjusted Distributions region of the Distribution Adjustments window are as shown in Table 14, page I-8, with the calculations shown in parentheses.
Entries in the Adjusted Distributions Region of the Distribution Adjustments Window
Charging Instructions Amount Calculations
GL 10.300.6010 -$1,440
NSF Project $1,080 ($3,600 x 30%)
GL 10.300.6010 $360 ($3,600 x 10%)
Unaccounted Balance $0.00
5. After the distribution adjustment is entered and approved, Labor Distribution creates General Ledger journal entries as shown in Table 15, page I-8.
General Ledger Journal Entries
Account Amount Debit/Credit
GL 10.300.6010 -$1,080 Debit
Payroll Clearing -$1,080 Credit

Labor Distribution Accounting Example I-9
The Grants Accounting import is created as shown in Table 16, page I-9.
Grants Accounting Import
Project Amount
DOD Project $1,080
The Grants Accounting transfer to General Ledger creates import and posting entries using AutoAccounting as shown in Table 17, page I-9.
Import and Posting Entries Using AutoAccounting
Account Amount Debit/Credit
Payroll Clearing $1,080 Credit
GL 20.000.6000 (for DOD Project)
$1,080 Debit
6. Table 18, page I-9 shows the entries for each General Ledger account transaction. Labor Distribution processes all adjustments as positive or negative debits and the clearing account as positive or negative credits.
General Ledger Journal Account Entries for Distribution Adjustments, Mary Marshall
Account Example Number Debit Credit
00.000.1500, Payroll Clearing
1. $6,000
4. $1,920
5. $4,080
7. $720
8. -$720
10. -$1,080

I-10 Oracle Labor Distribution User Guide
Account Example Number Debit Credit
11. $1,080
00.000.2100, Payroll Liability
1. $6,000
10.200.6010, General Fund.Engineering.Salary
4. $480
7. $720
10.300.6010, General Fund.Cardiology.Salary
4. $1,440
10. -$1,080
20.000.6000, Restricted Fund.General.Salary
5. $4,080
8. -$720
11. 1,080

Non-Oracle Payroll Interface Table J-1
JNon-Oracle Payroll Interface Table
Non-Oracle Interface Table Field Description TableThe interface table that contains data for sublines from non-Oracle sources is the PSP_PAYROLL_INTERFACE table. Table 1, page J-1 describes the various fields in this table and their data types.
Non-Oracle Interface Table Field Description Table
NAME NULL? DATA TYPE
PAYROLL_INTERFACE_ID NOT NULL NUMBER(10)
PAYROLL_ID NOT NULL NUMBER(9)
PAYROLL_PERIOD_ID NOT NULL NUMBER(9)
PERSON_ID NOT NULL NUMBER(9)
ASSIGNMENT_ID NOT NULL NUMBER(9)
ELEMENT_TYPE_ID NOT NULL NUMBER(9)
PAY_AMOUNT NOT NULL NUMBER
EARNED_DATE DATE
CHECK_DATE DATE

J-2 Oracle Labor Distribution User Guide
NAME NULL? DATA TYPE
EFFECTIVE_DATE NOT NULL DATE
PAYROLL_SOURCE_CODE NOT NULL VARCHAR2(30)
FTE NUMBER
REASON_CODE VARCHAR2(30)
SUB_LINE_START_DATE NOT NULL DATE
SUB_LINE_END_DATE NOT NULL DATE
DAILY_RATE NOT NULL NUMBER
SALARY_USED NOT NULL NUMBER
DR_CR_FLAG NOT NULL VARCHAR2(1)
STATUS_CODE NOT NULL VARCHAR2(1)
BATCH_NAME NOT NULL VARCHAR2(30)
ERROR_CODE VARCHAR2(30)
LAST_UPDATE_DATE NOT NULL DATE
LAST_UPDATED_BY NOT NULL NUMBER(15)
LAST_UPDATE_LOGIN NOT NULL NUMBER(15)
CREATED_BY NOT NULL NUMBER(15)
CREATION_DATE NOT NULL DATE
GL_POSTING_OVERRIDE_DATE
DATE
GMS_POSTING_OVERRIDE_DATE
NOT CURRENTLY USED

Non-Oracle Payroll Interface Table J-3
NAME NULL? DATA TYPE
ATTRIBUTE1 through ATTRIBUTE15
Non-Oracle Interface Table Population RulesThis section describes the validation checks that Labor Distribution performs when it validates and imports data from the interface tables. When you write programs to load the interface table, you must ensure that the data you enter must comply with the rules. If there is invalid data in the interface table, then Labor Distribution detects the errors and enables you to correct the errors using the Non-Oracle Sub-lines Maintenance window.
Table 2, page J-3 describes the validation checks that the application performs before it imports data.
Non-Oracle Interface Table Population Rules
Validation Name Description
1. BATCH_NAME The application imports sublines from non-Oracle sources into Labor Distribution based on the batches in which you loaded the sublines into the interface table. Ensure that the batch names in the interface table are unique. You must not reuse the batch names even after you load the batches into Labor Distribution and remove them from the interface table.
2. PAYROLL_INTERFACE_ID The PAYROLL_INTERFACE_ID field identifies records within any batch. The loaderprogram must use a sequence that you createdduring the installation process of Labor Distribution. The sequence you must use for this purpose is PSP_PAYROLL_INTERFACE_S.

J-4 Oracle Labor Distribution User Guide
3. EFFECTIVE_DATE You can use the EFFECTIVE_DATE field when you post a transaction to Oracle Grants Accounting or Oracle Public Sector General Ledger. You can use the date field to check thevalidity of number of other fields.
4. PERSON_ID The PERSON_ID field refers to the person for whom the subline is created. The PERSON_IDmust be a valid ID in Oracle Human Resource Management Systems for an active employee for the effective date specified in the record. The person is defined in the PER_PEOPLE_F table.
5. ASSIGNMENT_ID The ASSIGNMENT_ID field must be a valid assignment for the PERSON_ID specified in the record. The field must also be defined in Human Resource Management Systems. The assignment is defined in the PER_ASSIGNMENTS_F table.
6. PAYROLL_ID The PAYROLL_ID field must refer to a valid payroll identifier in Human Resource Management Systems. The payroll name referred to by this field must also be a valid payroll for the ASSIGNMENT_ID and EFFECTIVE_DATE specified by the record. The payroll is defined in the PAY_PAYROLLS_F table.
7. PAYROLL_PERIOD_ID The PAYROLL_PERIOD_ID field must refer to a valid payroll period identifier in Human Resource Management Systems. The payroll period must be linked to the PAYROLL_ID onthe effective date selected. The payroll period is defined in the PER_TIME_PERIODS table.
8. ELEMENT_TYPE_ID The ELEMENT_TYPE_ID field must refer to a valid element selected in the Elements Imported window in Labor Distribution for the dates of the payroll period. The elements selected in the setup window are valid element types in Human Resource Management Systems. The element type is defined in the PAY_ELEMENT_TYPES_F table.

Non-Oracle Payroll Interface Table J-5
9. PAY_AMOUNT PAY_AMOUNT is the amount that is to be paid to an employee over the subline date range specified. Pay amount = daily rate multiplied by number of business days between subline Start and End dates
10. EARNED_DATE EARNED_DATE is the date that pay amount is earned.
11. CHECK_DATE CHECK_DATE is the date that the check is made.
12. PAYROLL_SOURCE_CODE The PAYROLL_SOURCE_CODE field must refer to a valid non-Oracle source as specified in the Payroll Sources window in Labor Distribution. The payroll batch source is defined in the PSP_PAYROLL_SOURCES table.
13. DR_CR_FLAG The DR_CR_FLAG field must contain either a D for debit amount or C for credit amount.
14. STATUS_CODE All records loaded into the interface table by an external loader program must contain a status code of N for New.
15. ERROR_CODE The ERROR_CODE field must not contain anyvalue. This is filled by Labor Distribution when validating and importing records.
16. SUB_LINE_START_DATE The SUB_LINE_START_DATE field must fall within the valid date range for the specified payroll period in the PAYROLL_PERIOD_ID field. The date cannot fall before the assignment start date, and it must be before the subline end date.
17. SUB_LINE_END_DATE The SUB_LINE_END_DATE field must fall within the valid date range for the specified payroll period in the PAYROLL_PERIOD_ID field. The date cannot be after the assignment end date, and it must be greater than the SUB_LINE_START_DATE.
J-6 Oracle Labor Distribution User Guide
18. GL_POSTING_OVERRIDE_DATE General Ledger override date for posting. If defined, this date overrides the effective date for posting to General Ledger.
19. GMS_POSTING_OVERRIDE_DATE Not currently used
20. Invalid records No employee can be paid more than once for the same assignment, element, payroll period, and payroll source for overlapping subline date ranges. This rule ensures that there are notwo records with the same ASSIGNMENT_ID,ELEMENT_TYPE_ID, PAYROLL_PERDIOD_ID, and PAYROLL_SOURCE_CODE for subline start and end dates that overlap each other.
This rule is restricted to records in the same batch.
Table 3, page J-7 shows an example of two records in a batch that would result in an errorwhen importing the two records because of overlapping date ranges.
21. DAILY_RATE The external loader program must ensure that the PAY_AMOUNT field equals the product of DAILY_RATE and the number of working days, excluding Saturday and Sunday in everyweek, between the subline start and subline end dates for each subline.
Note: Labor Distribution does not performany validation on the DAILY_RATE field. Ensure that you enforce this rule.
22. BUSINESS_GROUP_ID Business group identifier.
23. LEDGER_ID Ledger identifier
24. LAST_UPDATE_DATE Standard Who Column
25. LAST_UPDATED_BY Standard Who Column

Non-Oracle Payroll Interface Table J-7
26. LAST_UPDATE_LOGIN Standard Who Column
27. CREATED_BY Standard Who Column
28. CREATION_DATE Standard Who Column
Table 3, page J-7 shows an example of invalid records in a batch with overlapping date ranges.
Example of Invalid Records in a Batch with Overlapping Date Ranges
Assgn_ID Elmnt_ID Period_ID Pay_ID Srce_cde Start_Date End_Date Pay_amnt
10 201 220 22 NON_1 01-jan-97 10-jan-97 100
10 201 220 22 NON_1 20-dec-96 05-jan-97 200


Pre-generated Interface Table K-1
KPre-generated Interface Table
Pre-generated Interface Table Field Description TableThe interface table that contains data for sublines from Non-Oracle sources is the PSP_DISTRIBUTION_INTERFACE table. Table 1, page K-1, describes the various fields in this table and their data types.
Pre-generated Interface Table Field Description Table
NAME NULL? DATA TYPE
DISTRIBUTION_INTERFACE_ID
NOT NULL NUMBER(10)
PAYROLL_ID NOT NULL NUMBER(9)
TIME_PERIOD_ID NOT NULL NUMBER(9)
PERSON_ID NOT NULL NUMBER(9)
ASSIGNMENT_ID NOT NULL NUMBER(9)
ELEMENT_TYPE_ID NOT NULL NUMBER(9)
DISTRIBUTION_AMOUNT NOT NULL NUMBER
DISTRIBUTION_DATE NOT NULL DATE
SOURCE_CODE NOT NULL VARCHAR2(30)
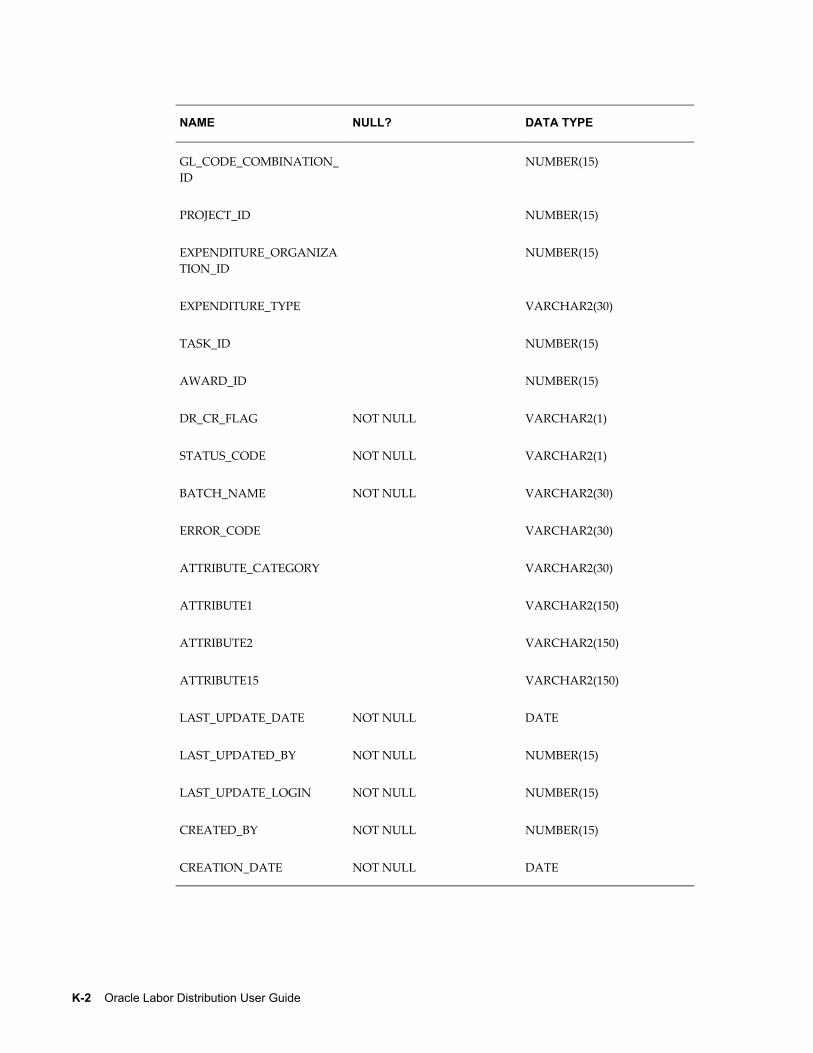
K-2 Oracle Labor Distribution User Guide
NAME NULL? DATA TYPE
GL_CODE_COMBINATION_ID
NUMBER(15)
PROJECT_ID NUMBER(15)
EXPENDITURE_ORGANIZATION_ID
NUMBER(15)
EXPENDITURE_TYPE VARCHAR2(30)
TASK_ID NUMBER(15)
AWARD_ID NUMBER(15)
DR_CR_FLAG NOT NULL VARCHAR2(1)
STATUS_CODE NOT NULL VARCHAR2(1)
BATCH_NAME NOT NULL VARCHAR2(30)
ERROR_CODE VARCHAR2(30)
ATTRIBUTE_CATEGORY VARCHAR2(30)
ATTRIBUTE1 VARCHAR2(150)
ATTRIBUTE2 VARCHAR2(150)
ATTRIBUTE15 VARCHAR2(150)
LAST_UPDATE_DATE NOT NULL DATE
LAST_UPDATED_BY NOT NULL NUMBER(15)
LAST_UPDATE_LOGIN NOT NULL NUMBER(15)
CREATED_BY NOT NULL NUMBER(15)
CREATION_DATE NOT NULL DATE

Pre-generated Interface Table K-3
NAME NULL? DATA TYPE
GL_POSTING_OVERRIDE_DATE
DATE
GMS_POSTING_OVERRIDE_DATE
NOT CURRENTLY USED
Pre-generated Interface Table Population RulesThis section describes the validation checks that Labor Distribution performs when it validates and imports data from the interface tables. When you write programs to load the interface table, you must ensure that the data you enter complies with the rules. If there is invalid data in the interface table, then Labor Distribution detects traps the errors and enables you to correct the errors using the Maintenance of Pre-Generated Distribution Lines window.
Table 2, page K-3 describes the validation checks Labor Distribution performs before it imports data.
Pre-generated Interface Table Population Rules
Validation Name Description
1. BATCH_NAME The application imports pre-generated distribution lines from non-Oracle sources into Labor Distribution based on the batches in which you loaded them into the interface table. Ensure that the batch names in the interface table are unique. Ensure that you do not reuse the batch names even after you load the batches into Labor Distribution and you remove the data you transferred from the interface table.
2. DISTRIBUTION_INTERFACE_ID The DISTRIBUTION_INTERFACE_ID identifies records within any batch. The loaderprogram uses a sequence that the application creates during the Labor Distribution installation process. The sequence that the loader program uses for this purpose is PSP_PAYROLL_INTERFACE_S.

K-4 Oracle Labor Distribution User Guide
Validation Name Description
3. DISTRIBUTION_DATE The application uses the DISTRIBUTION _DATE field when it posts a transaction to Oracle Grants Accounting, Oracle Projects, or Oracle General Ledger. You can use this date field to check the validity of a number of otherfields.
4. PERSON_ID The PERSON_ID field refers to the person for whom the subline is created. The PERSON_IDmust be a valid ID in Oracle Human Resource Management Systems for an active employee for the effective date specified in the record. The person is defined in the PER_PEOPLE_F table.
5. ASSIGNMENT_ID The ASSIGNMENT_ID field must be a valid assignment for the PERSON_ID specified in the record. The field must also be defined in Human Resource Management Systems. The assignment is defined in the PER_ASSIGNMENTS_F table.
6. PAYROLL_ID The PAYROLL_ID field must refer to a valid payroll cycle name in Human Resource Management Systems. When there is a complete installation of Human Resource Management Systems, the payroll name referred to by this field must also be a valid payroll for the ASSIGNMENT_ID and EFFECTIVE_DATE specified by the record. The payroll is defined in the PAY_PAYROLLS_F table.
7. TIME_PERIOD_ID The TIME_PERIOD_ID field must refer to a valid payroll period in Human Resource Management Systems. The payroll period must be linked to the PAYROLL_ID on the effective date selected. The time period is defined in the PER_TIME_PERIODS table.

Pre-generated Interface Table K-5
Validation Name Description
8. ELEMENT_TYPE_ID The ELEMENT_TYPE_ID field must refer to a valid element selected in the Elements Imported window in Labor Distribution. The elements selected in the setup window are valid element types in Human Resource Management Systems. The element type is defined in the PAY_ELEMENT_TYPES_F table.
9. DISTRIBUTION_AMOUNT DISTRIBUTION_AMOUNT is the amount that is to be paid to an employee over the subline date range specified.
12. PAYROLL_SOURCE_CODE The PAYROLL_SOURCE_CODE field must refer to a valid non-Oracle source as specified in the Payroll Sources window in Labor Distribution.
13. DR_CR_FLAG The DR_CR_FLAG field must contain either a D for debit amount or C for credit amount.
14. GL_CODE_COMBINATION_ID The GL_CODE_COMBINATION (GL_CCID) field must refer to a valid General Ledger account in General Ledger. This field can contain a value only if the PROJECT_ID, EXPENDITURE_ORGANIZATION_ID, EXPENDITURE_TYPE, TASK_ID, and AWARD_ID (POETA) fields are NULL. During validation and the import of sublines, Labor Distribution checks to ensure that GL_CCID and the POETA are mutually exclusive.

K-6 Oracle Labor Distribution User Guide
Validation Name Description
15. PROJECT_ID The PROJECT_ID field must refer to a valid project in Grants Accounting and Projects. Labor Distribution ensures that the PROJECT_ID field exists in the Grants Accounting view GMS_PROJECT_EXPEND_V. This field can contain a value only if the GL_CODE_COMBINATION_ID field does not. The PROJECT_ID field and the GL_CODE_COMBINATION_ID fields are mutually exclusive and Projects is implemented. The project is defined in the PA_PROJECTS table.
16. EXPENDITURE_ORGANIZATION_ID The EXPENDITURE_ORGANIZATION_ID field must refer to a valid Expenditure Organization in the Grants Accounting view PA_ORGANIZATIONS_EXPEND_V. This field can contain a value only if the GL_CODE_COMBINATION_ID field does not contain a value if Projects is implemented. The expenditure organization is define din thePA_ORGANIZATION_EXPEND_V table.
17. GL_POSTING OVERRIDE_DATE Date is to be specified if required to override this date to the Effective Date in PSP_DISTRIBUTION_LINES which is later transferred to the GL Accounts Interface. General Ledger override date for posting; if defined, this date overrides the distribution date for posting to General Ledger.
18. GMS_POSTING_OVERRIDE_DATE Not currently used
19. EXPENDITURE_TYPE The EXPENDITURE_TYPE field must be defined in Projects with an ST or STRAIGHT TIME system linkage function. If award is implemented, it must have an allowability schedule related to an award in Grants Accounting-allowable expenditures. This fieldcan contain a value only if the GL_CODE_COMBINATION_ID field is not entered and Projects is implemented. The expenditure type is defined in the PA_EXPENDITURE_TYPES table.

Pre-generated Interface Table K-7
Validation Name Description
20. TASK_ID The TASK_ID field must refer to a valid task in the Oracle Projects view PA_TASKS_EXPEND_V and must be linked to the project identified by the field PROJECT_ID. This field can contain a value only if the GL_CODE_COMBINATION_ID field does not contain a value and Projects is implemented. The task is defined in the PA_TASKS table.
21. AWARD_ID The AWARD_ID field must refer to a valid award in the Grants Management view GMS_AWARDS_BASIC_V. This field can contain a value only if the GL_CODE_COMBINATION_ID field does not contain a value and awards is implemented. The award is defined in the GMS_AWARDS table.
22. ATTRIBUTE_CATEGORY, ATTRIBUTE1 through ATTRIBUTE15
The attribute fields are designed for Descriptive Flexfields that are reserved for future use.
23. LEDGER_ID Ledger identifier
24. BUSINESS_GROUP_ID Business group identifier
25. LAST_UPDATE_DATE Standard Who column
26. LAST_UPDATED_BY Standard Who column
27. LAST_UPDATE_LOGIN Standard Who column
28. CREATED_BY Standard Who column
29. CREATION_DATE Standard Who column
Caution: Oracle recommends that you do not populate columns in the interface table that this topic does not list. This is because the application uses those columns for internal calculations.


Multiple Organizations Compliance in Oracle Labor Distribution L-1
LMultiple Organizations Compliance in Oracle
Labor Distribution
DefinitionMultiple Organizations enables users to define multiple organizations and the relationships among them in a single installation of Labor Distribution.
OverviewMultiple Organizations provides secure access to Oracle Human Resources data. Without Multiple Organizations, any user who logs into Labor Distribution can access scheduling and distribution data for all employees in the entire site because Labor Distribution does not specify the data that can be accessed by different users even if multiple business groups are defined in the implementation.
If you implement Multiple Organizations, then you can link more than one Labor Distribution responsibility to a business group, ledger, set of operating units, and generic suspense account.
For information on Multiple Organizations, see Multiple Organizations in Oracle Applications.
FeaturesMultiple Organizations includes the following features:
• Business Group, page L-2
• Ledger
• Operating Unit, page L-2

L-2 Oracle Labor Distribution User Guide
Business GroupIn Multiple Organizations, a Labor Distribution responsibility is linked to a business group set up in Human Resources. Data relating to employee assignments and organizations in a business group is accessible only to users using the related responsibility.
For information on defining business groups, see Adapting and Creating a New Business Group, Oracle HRMS Enterprise and Workforce Management Guide.
LedgerIf you implement Multiple Organizations, then you can link a Labor Distribution responsibility to a ledger that you define in Oracle General Ledger. Payrolls in Human Resources point to specific ledgers. The application partitions the payroll information based on the ledger that you link to each Labor Distribution responsibility.
For information on defining a ledger, see Defining Ledger, Oracle General Ledger User Guide.
Operating UnitThe MO: Security Profile option enables you to use a single Labor Distribution responsibility to access projects, tasks, awards, and expenditure organizations across operating units.
For information on operating units in Projects, see Support for Multiple Organizations in Oracle Projects, Oracle General Ledger User Guide.
User ProceduresThis section describes how Labor Distribution uses Multiple Organizations for the following:
• Labor Distribution Responsibility, page L-2
• Labor Distribution Setup, page L-3
• Labor Scheduling, page L-5
• Labor Distribution Processes, page L-6
Labor Distribution ResponsibilityYou can link a Labor Distribution responsibility to a unique combination of one business group, one ledger, and a set of operating units. If there are multiple business groups and ledgers, then you need to create multiple Labor Distribution responsibilities

Multiple Organizations Compliance in Oracle Labor Distribution L-3
for each BG-Ledger combination.
If you do not implement Multiple Organizations, then the Labor Distribution responsibility uses the Human Resources business group and the General Ledger default ledger.
If you implement Multiple Organizations, then you must set up Labor Distribution responsibilities and link the responsibilities to specific BG-Ledger combinations by using the following profile options:
• HR: Business Group
• GL: Ledger
• MO: Security Profile
• PSP: Generic Suspense Account Organization
The PSP: Generic Suspense Account Organization profile identifies the Organization with the Generic Suspense Account.
For every unique BG-Ledger combination, you must select one organization in the Labor Distribution profile set.
For information on defining system profiles, see System Administration Setup, page 3-2.
ExampleIf you use one business group (BG1), one Ledger (Ledger1), and a set of operating units,then you must configure the MO: Security Profile option with a set of operating units and link it to a responsibility called LD1. You can access projects, tasks, awards, and expenditure organizations of the operating units (OU1 and OU2) using the LD1 responsibility.
Multiple Organizations Combination Example
Labor Distribution SetupIf you implement Multiple Organizations, then ensure that you complete all the setups in Labor Distribution for each combination of business group and ledger. If there are

L-4 Oracle Labor Distribution User Guide
two different BG-Ledger combinations, then you need to complete the entire Labor Distribution setup twice to use the application with the combinations. You need to set up Labor Distribution for every unique BG-Ledger combination.
The business group and ledger partitions Labor Distribution data. The application uses the MO: Security Profile option to determine the Projects information when you schedule and distribute employees' salaries.
You must specify a different generic suspense account for each unique BG-Ledger combination. The application links the generic suspense account to the organization youselect in the PSP: Generic Suspense Account Organization profile for your responsibility.
You must set up a clearing account in the Clearing Account window for each unique BG-Ledger combination. You must also set up a natural account auto-population segment in the Autopop Segment Setup (Autopop Segment Definition) window.
For information on setting up a clearing account, see Labor Scheduling Setup, page 4-2.
For information on setting up a natural account auto-population segment, see Expenditure Type and Natural Account Auto-Population Setup, page 6-2.
ExampleIf you use a single business group and two ledgers, then you may encounter a situation where an organization may contain two records. For example, the Chemistry department can have a single organization suspense account that points to an accounting flexfield in Ledger1 that you set up using the LD1 responsibility. The department may also contain another record for the organization suspense account that points to Ledger2 that you set up using a different Labor Distribution responsibility (LD2.) Even though you can view the record using both the responsibilities (LD1 and LD2), the application stores the data using the correct context (business group identifier and Ledger identifier) and prevents conflicts when you run any of the Labor Distribution processes. This partition occurs even if you use a Projects charging instruction instead of a General Ledger charging instruction. Similarly, the application applies this methodology to the Organization Default Labor Schedule, Organization Default Accounts, Generic Suspense Account, and Global Earnings Element Override.

Multiple Organizations Compliance in Oracle Labor Distribution L-5
Multiple Organizations In Labor Distribution Setup Example
Labor SchedulingWhen you log on to Labor Distribution using a particular responsibility, then you can access and schedule assignments that belong to the BG-Ledger combination you linked to that responsibility. Therefore, the employee assignments that belong to an organization in a business group, and their respective payrolls, point to the ledger. If you use a single business group, and two ledgers, as shown in the figure, then you cannot secure the Human Resources data relating to employees and organizations since both LD1 and LD2 point to the same business group.
The application filters data of employee assignments based on the assignment's payroll. This payroll determines the ledger that is relevant to that employee assignment.
ExampleYou set up Labor Distribution with two responsibilities, LD1 and LD2 as you are working with a single business group but two ledgers. If Sarah Brown is on payroll Payroll1 and this payroll points to Ledger1, then you can schedule that employee assignment only with the LD1 responsibility.
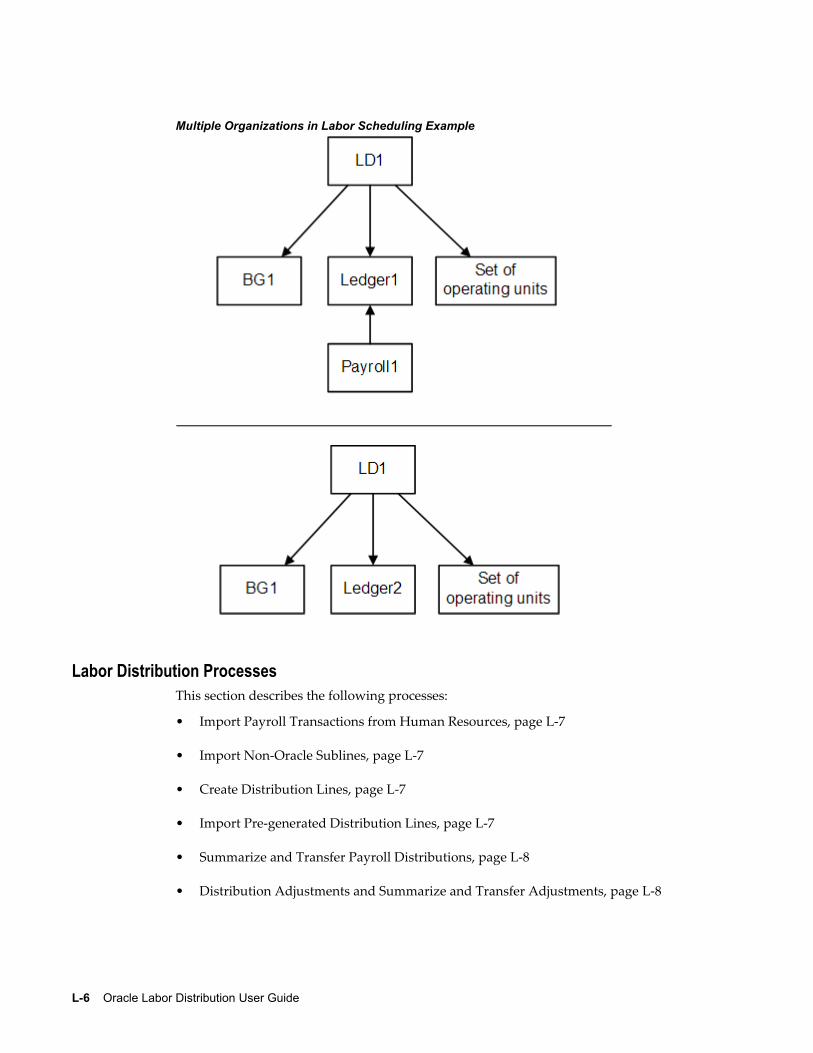
L-6 Oracle Labor Distribution User Guide
Multiple Organizations in Labor Scheduling Example
Labor Distribution ProcessesThis section describes the following processes:
• Import Payroll Transactions from Human Resources, page L-7
• Import Non-Oracle Sublines, page L-7
• Create Distribution Lines, page L-7
• Import Pre-generated Distribution Lines, page L-7
• Summarize and Transfer Payroll Distributions, page L-8
• Distribution Adjustments and Summarize and Transfer Adjustments, page L-8

Multiple Organizations Compliance in Oracle Labor Distribution L-7
• Effort Report, page L-9
• Labor Encumbrance, page L-9
Import Payroll Transactions from Human ResourcesIn the Import Payroll Transactions from Human Resources process, you select the nameof the payroll and the time period for the payroll you want to import. Based on your responsibility, you can view a list of valid payrolls. These payrolls are based on the business group and the ledger attached to the responsibility. This ensures that the application imports payroll lines only for the relevant employee assignments.
Import Non-Oracle SublinesThe application stores payroll lines from a non-Oracle payroll source in an interface table as batches based on a set of rules. These rules ensure that the batch contains payroll lines which pertain to employee assignments belonging to the same payroll. Since each payroll you create in Oracle Human Resources can link to a unique BG-Ledger combination, the rule ensures that the application groups the data it importsin a single batch into Labor Distribution so that you can link the data to a responsibility.
Create Distribution LinesIn the Create Distribution Lines process, if you use an Oracle payroll, then you select a payroll name and a payroll period. If you use a non-Oracle payroll, then you select a batch. You need to ensure that you specify parameters that are relevant to the specific BG-Ledger combination that your responsibility is linked to.
The Create Distribution Lines process applies the appropriate schedules to the payroll lines when it generates the distribution lines. If an assignment has a valid labor schedule, then the process uses this schedule. Because you set the business group and the ledger at the responsibility level, the application maintains the integrity of data, such as assignments, payroll lines, and schedule lines.
If you use the organization defaults, then the BG-Ledger identifier ensures that the process detects the correct organization defaults for creating the distribution lines. Eventhough an organization can have multiple records for each default, as described in the Labor Distribution setup example, only a single record for any BG-Ledger combination can exist to maintain integrity.
Import Pre-generated Distribution LinesThe process loads pre-generated distribution lines into an interface table based on a ledger. One of these rules stipulates that a batch can only contain distribution information pertaining to employee assignments. These assignments must belong to thesame business group and the payrolls of those assignments must point to the same ledger. This ensures that the application processes each batch using least one

L-8 Oracle Labor Distribution User Guide
responsibility that links a specific BG-Ledger combination.
Summarize and Transfer Payroll DistributionsIn the Summarize and Transfer Payroll Distributions process, if you use an Oracle payroll, then you specify a payroll name and a payroll period. If you use a non-Oracle payroll or pre-generated lines, then you specify the name of the batch. The BG-SOB combination that links to your responsibility determines the parameter values you can specify for this process.
In the Summarize and Transfer Payroll Distributions process, if you use an Oracle payroll, then you specify a payroll name and a payroll period. If you use a non-Oracle payroll or pre-generated lines, then you specify the name of the batch. The BG-Ledger combination that links to your responsibility determines the parameter values you can specify for this process.
Distribution Adjustments and Summarize and Transfer AdjustmentsYou can complete distribution adjustments for all employee assignments in the specific BG-Ledger context. The application maintains the integrity of the assignment data and the charging instructions.
If you select a date range for the distribution adjustment that encompasses a time period during which the charging instructions point to two different ledgers, then the distribution adjustments process limits the user to a modified date range. The date range includes the begin date on the original date ranges you specified and the last distribution date for the period when the assignment pointed to the first ledger.
If you want to make a distribution adjustment for the second set of charging instructions, then you define a separate distribution adjustment. To do this, you access the application with a different responsibility. This ensures that the Summarize and Transfer Adjustments process always processes individual distribution adjustment batches that point to the same ledger.
Projects Charging InstructionsThe rules in the Distribution Adjustments and Summarize and Transfer Adjustments section do not apply for Projects charging instructions. Because Labor Distribution does not maintain any information relating to operating units at the distribution history level, you can access distribution lines that you originally charged to projects in OU1 and attempt to transfer it to a project in OU2. The application enables you to transfer thedistribution lines only if its charging instruction is valid.
If you perform a distribution adjustment from projects in OU1 to projects in OU2, then the process completes successfully. If there is an anomaly in terms of cross charging, theapplication deals with it independent of Labor Distribution.

Multiple Organizations Compliance in Oracle Labor Distribution L-9
Effort ReportWhen you create an effort report template from the Effort Reporting page, the application displays selection criteria from Human Resources, General Ledger, Grants Accounting, and Projects. When you select information from the selection criteria, the application maintains the BG-Ledger integrity. This filter ensures that the employee assignment belongs to the relevant business group and the payroll of the assignment points to the relevant ledger.
Labor EncumbranceIf you implement Multiple Organizations, then you must set up the HR: Business Group profile option. The BG-Ledger combination that links to your responsibility determines the values you can specify to run the process.
For information on setting up profile options, see System Administration Setup, page 3-2.


Glossary-1
Glossary
Account Segment
One of up to 30 different sections of an accounting flexfield, which together make up the General Ledger account code. Each segment is separated from the other segments by a symbol, such as -, /, or \. Each segment typically represents an element of the business structure, such as Company, Cost Center, or Account.
Accounting Flexfield
The code used to identify a general ledger account in Oracle Applications. Each accounting flexfield segment value corresponds to a summary or rollup account within the chart of accounts.
Accounting Flexfield Structure
The account structure defined to fit the specific needs of the organization. Users choose the number of segments as well as the length, name, and order of each segment in the accounting flexfield structure.
Adjustment Batch
One or multiple adjustment sets that are submitted for approval at the same time.
Adjustment Set
A group of actual distributions belonging to the same payroll element and the same type of transaction, whether debit or credit, that are adjusted to new distributions. An adjustment set is complete when the unaccounted balance is zero and the user freezes the set by clicking Freeze Set.
Alternate Regions
A collection of logically related fields in a window, set apart from other fields by a drop-down list box.
Assignment
An employee's assignment identifies the employee's role and payroll within a business group. The assignment is made up of a number of assignment components. Of these, organization is mandatory and payroll is a required component for payment purposes.

Glossary-2
Assignment Number
A number that uniquely identifies an employee's assignment. An employee with multiple assignments has multiple assignment numbers.
Business Unit
An organization which represents the consolidated enterprise, a major division, or an operation company. This entity partitions Oracle Human Resource Management Systems information.
DateTrack
When the user changes the effective date to past or future, DateTrack enables the user toenter information that takes effect on the new effective date and to review information as of the new date.
Descriptive Flexfield
A field that an organization can extend to capture extra information not otherwise tracked by Oracle Applications. A descriptive flexfield appears on the form as a single character, unnamed field. An organization can customize this field to capture additionalinformation unique to the business.
Distribution Line
A line corresponding to an accounting transaction for an expenditure item on an invoiceor the liability on a payment.
Distribution Line Adjustments
An adjustment of a distribution line that has already been posted.
Element
A component in the calculation of employee pay. Each element represents a compensation or benefit type, such as salary, wages, stock purchase plans, and pension contributions.
Element Link
The association of an element to one or more components of an employee assignment. The link establishes employee eligibility for that element. Employees whose assignmentcomponents match the components of the link are eligible for the element.
Expenditure Organization
Grants Accounting and Projects expenditure organization charging instruction.

Glossary-3
Expenditure Type
An expenditure type is an implementation-defined classification of cost that users assign to each expenditure item. Expenditure types are grouped into expenditure categories such as Labor, Expense Reports, Assets, and Vendor Invoices and revenues categories such as Labor and Non-labor revenue. They are also made up of units of measure and system linkages which define a relationship between the expenditure type and another system such as Oracle Public Sector Payables. Examples of expenditure types are Professional Labor, Clerical Labor, Faculty Tenured Salary, Air Travel, Automobile Rental, Computer Services, and Supplies.
FTE
See full-time equivalency.
Full-time Equivalency
The sum of full-time positions plus part-time positions. For example, if a department has 3 full-time positions, 2 three-quarter time positions, 4 half-time positions, and 1 quarter-time positions, the department has 10 staff, but a full-time equivalency of 6.75 employees.
General Ledger Account
A specific account within an organization's chart of accounts. A General Ledger accountis made up of the General Ledger accounting flexfield segments that are defined for a ledger.
Grants Management Charging Instruction
A user-defined combination of Project, Organization, Expenditure Type, Task, and Award that specifies a particular charging instruction to Oracle Grants Accounting. These instructions constitute the Oracle Grants Accounting equivalent of a General Ledger account.
Labor Schedule
A collection of schedule lines that is defined at a single level of the labor schedule hierarchy. A single labor schedule specifies how all pay elements for an assignment, all pay elements in an element group, or a single pay element from a payroll is to be distributed for a given employee and assignment. A special case labor schedule is an Organization Default Labor Schedule.
Labor Schedule Hierarchy
A collection of labor schedules that specify how payroll pay elements associated with an employee and assignment are to be distributed.

Glossary-4
Labor Scheduling Window
A window that displays an employee and the employee's assignments. Each assignmentis scheduled at one of the following levels of the schedule hierarchy: Assignment, Element Group, Element, or Organization Default.
Natural Account
A natural account is the segment that determines whether an account is an asset, liability, equity, revenue, or expense account. When chart of accounts is defined, one segment must be defined as the natural account segment. Examples of natural accounts are Accounts Payable, Accounts Receivable, Revenue, Fixed Assets, and Accrued Liabilities.
Operating Unit
An organization that partitions data for subledger products, such as Payables, Receivables, Purchasing, and Oracle Order Entry. It is roughly equivalent to a single pre-Multi-Org installation.
Organization
A required component of employee assignments. Users can define as many organizations as required within a Business Group. Organizations can be internal, such as departments, or external, such as recruitment agencies. Users can structure organizations into organizational hierarchies for reporting purposes and for system access control.
PTAEO
Project, Task, Award, Expenditure Type, Expenditure Organization.
Payroll
A group of employees that Oracle Payroll processes together with the same processing frequency, such as weekly, monthly, or bimonthly. Users can set up as many payrolls asrequired within a business group.
Period Type
A time division in a budgetary calendar, such as week, month, or quarter.
Region
A collection of logically related fields in a window, set apart from other fields by a rectangular box or a horizontal line across the window.

Glossary-5
Report Parameters
Inputs made when submitting a report to control the sorting, formatting, selection, and summarizing of information in the report.
Responsibility
Determines the data, windows, menus, reports, and concurrent programs to access in Oracle Applications. It is linked to a data group. Several users can share the same responsibility, and a single user can have multiple responsibilities.
Reversal
Method of correcting payroll runs or QuickPay runs after post-run processing has takenplace. The system replaces positive run result values with negative ones and negative run result values with positive ones. Both old and new values remain on the database.
Salary Basis
The period of time for which an employee's salary is quoted, such as hourly or annually. Defines a group of employees assigned to the same salary basis and receiving the same salary element.
Schedule Line
A combination of Grants Accounting and General Ledger charging instructions, schedule line begin date, schedule line end date, and distribution percentage. One or more schedule lines constitute a labor schedule.
Schedule Line Period
Contiguous days in the schedule lines in which the distribution percent is the same.
Schedule Lines
Window that is used to create a labor schedule by entering all schedule lines for that labor schedule.
Scheduling Summary
Window that summarizes all labor schedules for an employee and assignment. The window also displays the hierarchy of labor schedules.
Suspense Account
An account that collects costs from labor distribution if charging instructions at lower levels are missing or if charging instructions at any level of the scheduling hierarchy aremissing. For example, if an employee receives a Special Production Bonus but no General Ledger account code for this earning type to debit exists in the Cost Allocation flexfield, the cost of the bonus goes into the suspense account.

Glossary-6
System Profile Options
Features that allow system administrators and users to tailor Oracle Labor Distribution to their exact requirements.
Zero Work Day
Zero work day situations occur when an employee assignment is suspended or terminated during a previous payroll period and the assignment is inactive during the payroll period being imported into Labor Distribution. Zero work day situations also occur when an employee is hired in a payroll period on a non-business day and there are no more business days in that payroll period after the hire date.

Index-1
Index
Aaccounting example
distribution adjustments, I-5labor costing, I-1overview, I-1payroll balancing overview, I-1
accounting flexfield, Glossary-1accounting flexfield structure, Glossary-1account segment, Glossary-1adjusting distributions procedure, 14-12adjustment batch, Glossary-1adjustment set, Glossary-1alternate regions, Glossary-1archive distributions history
definition, 11-2Archive Distributions History procedure, 11-2Archive Distributions History process, 11-2archive encumbrance lines procedure, 15-16Archive History Report procedure, 11-3Archive History Report process, 11-2assignment, Glossary-1assignment number, Glossary-2Assignments Processed by Create and Update Encumbrance Lines Report, 15-14, 15-20Auto-Fill Expenditure Types window
description, 6-9Auto-Fill Natural Account window
description, 6-12autopop segment setup procedure, 6-6auto-population
create distribution lines, 9-2
distribution adjustments, 14-2summarize and transfer payroll distributions, 10-2
auto-population lookupsetup procedure, 6-6
auto-population rulessetup, 6-2
auto-population setupAuto-Fill Expenditure Types window
description, 6-9Auto-Fill Natural Account window
description, 6-12autopop segment procedure, 6-6auto-population rules, 6-2Bypass (By-Pass Expenditure Types) window
description, 6-14bypass natural account procedure, 6-14Bypass Natural Account window
description, 6-14defining expenditure type auto-population rules procedure, 6-7defining natural account auto-population rules procedure, 6-11definition, 6-2lookup procedure, 6-6Lookups (Auto Lookups) window
description, 6-7overview, 6-2process, 6-3
bypass table setup, 6-5define expenditure type and natural account rules, 6-4enabling or disabling, 6-3

Index-2
lookup setup, 6-4natural account segment definition, 6-4
RULES windowdescription, 6-10
Bbegin date auto-fill
setup procedure, 4-24Begin Date Auto-fill Parameters window
description, 4-25business unit, Glossary-2Bypass (By-Pass Expenditure Types) window
description, 6-14bypass natural account
setup procedure, 6-14Bypass Natural Account window
description, 6-14
Cclearing account
setup procedure, 4-26Clearing Account window
description, 4-27configuration options
Case 1 diagram, H-2Case 2 diagram, H-3Case 3 diagram, H-4Case 4 diagram, H-5overview, H-1
create and update labor schedules procedure, 7-5create distribution lines
auto-population, 9-2create distribution lines procedure, 9-11definition, 9-2overview, 9-2
process, 9-2process, 9-2
calculate distribution amounts, 9-4control reports, 9-10create, 9-3determine labor schedule and charging instructions, 9-3validations, 9-9
rolling back distribution lines procedure, 9-12salary cap, 9-4
create distribution lines procedure, 9-11
Ddata entry validations, D-1
create distribution lines validations, D-5custom data entry validation, D-6labor scheduling, D-2labor scheduling setup deletion validation rules, D-2labor scheduling setup end-dating, D-3labor scheduling validation errors, D-5labor scheduling validation warnings, D-5other validations, D-5overview, D-1
DateTrack, Glossary-2Default Accounts procedure, 17-9default encumbrance end date
setup procedure, 5-5define account combinations, 2-7
General Ledger set up, 2-7define a salary basis, 2-10define cost allocation flexfield, 2-7
Human Resources setup, 2-7define element links
Human Resources setup, 2-10define elements and input values
Human Resources setup, 2-9define jobs
Human Resources setup, 2-8define locations
Human Resources setup, 2-8define payrolls
Human Resources setup, 2-8defining expenditure type auto-population rules procedure, 6-7defining natural account auto-population rules
setup procedure, 6-11descriptive flexfield, Glossary-2diagrams
Distribution Adjustments Approval Workflow, F-2Labor Distribution Process Flow, A-1Labor Encumbrance Process, C-1Labor Encumbrance Process Flow, C-1Scheduling Hierarchy Process, B-4
distribution adjustments, 14-3, 14-11adjusting distributions procedure, 14-12

Index-3
approving distribution adjustments Workflowprocedure, 14-20assignment level, 14-3, 14-3auto-population, 14-2definition, 14-2distribution adjustment register, 14-22Distribution Adjustments window
description, 14-14element group level, 14-4element level, 14-3features, 14-5overview, 14-2
features, 14-2process, 14-2
process, 14-6approve distribution adjustments workflow, 14-9restart summarize and transfer adjustments, 14-11select earnings distributions to be transferred, 14-7specify adjustment, 14-7submit adjustment, 14-8summarize and transfer adjustments, 14-10view distribution lines, 14-6
restart summarize and transfer adjustments process, 14-21summarize and transfer adjustments to GL and GMS process, 14-21with Auto-Population Profile Option, 14-8
distribution adjustments approval notification workflow
distribution adjustments approval workflowprocess, F-3
overview, F-1PSP distribution adjustments approval item type, F-1
distribution adjustments approval notification workflow process
distribution adjustments approval workflow process
customizing, F-12distribution adjustments approval workflow notification
Distribution Adjustments Approval Workflowdiagram, F-2
distribution adjustments proceduresDistribution Adjustment Register, 14-11
Distribution Adjustments windowdescription, 14-14
Distribution History by Award Report procedure, 17-12Distribution History by Employee Report procedure, 17-11Distribution History by Organization Report procedure, 17-13Distribution History by Project Report procedure, 17-11distribution line, Glossary-2distribution line adjustments, Glossary-2distributions
actual, 14-2adjusted, 14-2
Eeffort calculation process
definition, E-1process, E-1
examples, E-1effort reporting
overview, 16-2process, 16-2workflow notification process, 16-11
process, 16-3create template, 16-4
element, Glossary-2element groups
setup procedure, 4-22Element Groups window
description, 4-22element link, Glossary-2elements imported
setup procedure, 4-18Elements Imported window
description, 4-18Employee Labor Schedule Report
description, 17-7Employee Labor Schedule Report procedure, 17-6Employees Using Default Schedules Report procedure, 17-4encumbrance

Index-4
see also labor encumbrance, 5-2encumbrance creation options for GL procedure
setup procedure, 5-7Encumbrance - Creation Options for GL window
description, 5-8Encumbrance - Default Encumbrance Period Definition window
description, 5-6encumbrance element selection
setup procedure, 5-6Encumbrance - Element Selection window
description, 5-7Encumbrance History by Award
window, 15-18Encumbrance History by Award Report, 15-14Encumbrance History by Organization
window , 15-18Encumbrance History by Organization Report, 15-14encumbrance payroll and assignment selection
setup procedure, 5-3Encumbrance - Payroll and Assignment Selectionwindow
description, 5-4encumbrance process
definition, C-1description, C-2diagram, C-1
encumbrance processesarchive encumbrance lines procedure, 15-16definition, 15-2generating Organization Default Usage Encumbrance Report procedure, 15-19generating Suspense Charge Encumbrance Report procedure, 15-17overview, 15-2
create and update encumbrance lines, 15-2summarize and transfer, 15-11
prerequisites, 15-14reports, 15-13retrieve encumbrance lines procedure, 15-16summarize and transfer encumbrances process, 15-15
encumbrance reportsgenerating assignments processed by Create and Update Encumbrance Lines Report, 15-20
generating encumbrance history by award report, 15-18generating encumbrance history by organization report, 15-18Organization Default Usage Encumbrance, 15-14Suspense Charge Encumbrance, 15-13
EncumbrancesCreating, Updating, and Liquidating Encumbrances, 15-20
Encumbrance Suspense Charge Reportwindow, 15-17
end date auto-fill parameterssetup procedure, 4-25
End Date Auto-fill Parameters windowdescription, 4-26
expenditure organization, Glossary-2expenditure type, Glossary-3
FFTE, Glossary-3full-time equivalency, Glossary-3
GGeneral Ledger account, Glossary-3General Ledger setup
define account combinations, 2-7generating encumbrance history by award report, 15-18generating encumbrance history by organization report, 15-18global element override
setup procedure, 4-19Global Element Override window
description, 4-20Grants Management charging instruction, Glossary-3
HHuman Resources setup
define a salary basis, 2-10define cost allocation flexfield, 2-7define element links, 2-10define elements and input values, 2-9define jobs, 2-8

Index-5
define locations, 2-8define payrolls, 2-8
Iimport payroll transactions
definition, 8-2importing payroll transactions procedure, 8-6overview, 8-2prerequisites, 8-6process
calculate balance amounts, 8-2, 8-3calculate daily pay rate, 8-4calculate daily pay rate for the subline, 8-2create payroll sublines, 8-3create payroll sub-lines, 8-2payroll import rollback, 8-4select payroll, 8-2select payroll to be imported, 8-2store sub-lines, 8-2
roll back Oracle payroll import procedure, 8-7item type
PSP Distribution Adjustments Approval, F-1
Llabor distribution accounting example
distribution adjustments, I-5labor costing, I-1overview, I-1payroll balancing, I-1
labor distribution processdefinition, A-1description, A-2diagram, A-1
Labor Distribution Process Flow Diagram, A-1labor distribution setup overview
checklist, 2-2setup steps, 2-6
Labor Encumbrance Creation and Update Rules, 15-5Labor Encumbrance Process Flow Diagram, C-1labor encumbrance setup
default encumbrance end date procedure, 5-5definition, 5-2encumbrance creation options for GL procedure, 5-7
Encumbrance - Creation Options for GL window
description, 5-8Encumbrance - Default Encumbrance Period Definition window
description, 5-6encumbrance element selection procedure, 5-6Encumbrance - Element Selection window
description, 5-7Encumbrance - Payroll and Assignment Selection window
description, 5-4overview, 5-2payroll and assignment selection procedure, 5-3process, 5-2
creation options for GL, 5-3default encumbrance end date selection, 5-2encumbrance element selection, 5-3encumbrance payroll and assignment selection, 5-2
labor schedule, Glossary-3labor schedule hierarchy, Glossary-3labor scheduling
create and update labor schedules procedure, 7-5
create or modify labor schedules using copy and merge functions, 7-9define labor schedule hierarchy level, 7-6define schedule lines, 7-8select employee and assignment, 7-6
definition, 7-2Labor Scheduling window
description, 7-10Monthly Schedule Summary window
description, 7-21overview, 7-2
process, 7-2Payroll Period Schedule Summary window
description, 7-24prerequisites, 7-5process, 7-2
create or modify labor schedule, 7-4define labor schedule hierarchy, 7-3define schedule lines, 7-4select employee and assignment, 7-3
Index-6
view monthly schedule summary, 7-5view payroll period schedule summary, 7-5view schedule summary, 7-5
Schedule Lines windowdescription, 7-12
Schedule Summary windowdescription, 7-19
viewing labor schedule lines procedure, 7-17monthly schedule summary, 7-18payroll period schedule summary, 7-18schedule lines, 7-17
labor scheduling setupBegin Date Auto-fill Parameters window
description, 4-25begin date auto-fill procedure, 4-24clearing account procedure, 4-26Clearing Account window
description, 4-27definition, 4-2Earnings Element Groups window
description, 4-22elements imported procedure, 4-18Elements Imported window
description, 4-18End Date Auto-fill Parameters window
description, 4-26end date auto-fill procedure, 4-25global element override procedure, 4-19Global Element Override window
description, 4-20Organization Default Accounts procedure, 4-14Organization Default Accounts window
description, 4-16Organization Default Labor Schedule procedure, 4-11Organization Default Labor Schedule window
description, 4-13Organization Suspense Accounts procedure, 4-7Organization Suspense Accounts window
description, 4-9overview, 4-2payroll sources procedure, 4-23Payroll Sources window
description, 4-24
process, 4-2, 4-2begin date and end date auto-fill parameters, 4-6clearing account, 4-7Earnings Element Groups, 4-6Elements Imported, 4-5Generic Suspense Account, 4-3Global Element Override, 4-5Organization Default Accounts, 4-4Organization Default Labor Schedule, 4-4Organization Suspense Accounts, 4-3payroll sources, 4-6
setupelement groups procedure, 4-22
Labor Scheduling window, Glossary-4description, 7-10
Lookups (Auto Lookups) windowdescription, 6-7
Mmaintaining non-Oracle payroll interface procedure, 12-9maintaining pre-generated distribution lines procedure, 13-8Maintain Non-Oracle Payroll Sublines window
description, 12-12Maintenance of Pre-generated Distribution Lines Interface window
description, 13-10Monthly Schedule Summary window
description, 7-21Multi-Org compliance
features, L-1overview, L-1user procedures, L-2
labor scheduling, L-5processes, L-6responsibility, L-2setup, L-3
Nnatural account, Glossary-4navigator paths, G-1Non-Oracle Interface Table Field Description Table, J-1
Index-7
Non-Oracle Interface Table population rules, J-3non-Oracle payroll interface
definition, 12-2maintaining non-Oracle payroll interface procedure, 12-9Maintain Non-Oracle Payroll Sublines window
description, 12-12overview, 12-2prerequisites, 12-9process, 12-2
import non-Oracle payroll sublines, 12-2maintain non-Oracle payroll interface, 12-7rollback, 12-8
roll back non-Oracle payroll procedure, 12-17Notifications Summary distribution adjustments
prerequisites, 14-11
Ooperating unit, Glossary-4Oracle Public Sector Budgeting, 1-6organization, Glossary-4Organization Default Accounts
setup procedure, 4-14Organization Default Accounts window
description, 4-16Organization Default Labor Schedule
setup procedure, 4-11Organization Default Labor Schedule Report procedure, 17-8Organization Default Labor Schedule window
description, 4-13Organization Default Usage Encumbrance Report, 15-14Organization Default Usage Encumbrance Report procedure, 15-19Organization Suspense Accounts
setup procedure, 4-7Organization Suspense Accounts window
description, 4-9
PParameter Sets
Creating a Parameter Set, 17-14payroll, Glossary-4
payroll distribution and configuration optionsdiagrams, H-2overview, H-1payroll distribution process, H-1
Payroll Period Schedule Summary windowdescription, 7-24
payroll sourcessetup procedure, 4-23
Payroll Sources windowdescription, 4-24
period type, Glossary-4pre-generated distribution lines
features, 13-2process, 13-2process
import pre-generated distribution lines interface, 13-2maintain pre-generated distribution linesinterface, 13-7
pre-generated distribution lines interfacedefinition, 13-2maintaining pre-generated distribution lines procedure, 13-8Maintenance of Pre-generated Distribution Lines window
description, 13-10overview, 13-2
features, 13-2process, 13-2
prerequisites, 13-8Pre-Generated Interface Table Field Description Table, K-1Pre-Generated Interface Table population rules, K-3Printing Options window
description, 17-5product overview
definition, 1-1enhanced workflow, 1-6Oracle Public Sector Budgeting, 1-6overview, 1-1
auto-population, 1-4distribute pay amounts, 1-3distribution adjustments, 1-3effort reports, 1-4encumbrances, 1-4interfacing with other payroll and

Index-8
timecard systems, 1-3labor distribution schedules, 1-3multiple organization, 1-4reconciliation reports, 1-4scheduling and distribution reports, 1-4summarize and transfer adjustments, 1-5
recovery processes, 1-5rollback processes, 1-5security, 1-6
profile optionssetup, 3-5
levels, 3-5values, 3-7
System Administration setup steps, 3-5PTAEO, Glossary-4Public Sector Budgeting, 1-6
Rreconciliation and control
definition, 18-2overview, 18-2
process, 18-2process, 18-2
Oracle and non-Oracle Payroll Sources, 18-2pre-generated distributions, 18-3
reconciliation and control reports procedure, 18-3
reconciliation and control reports procedure, 18-3region, Glossary-4report parameters, Glossary-5reports
definition, 17-2Distribution Adjustment Register, 14-11, 14-22Generating Default Account Report procedure, 17-9Generating Distribution History by Award Report procedure, 17-12Generating Distribution History by Employee Report procedure, 17-11Generating Distribution History by Organization Report procedure, 17-13Generating Distribution History by Project Report procedure, 17-11Generating Employee Labor Schedule Report procedure, 17-6
Generating Employees Using Default Schedules Report procedure, 17-4Generating Organization Default Labor Schedule Report procedure, 17-8generating Suspense Account Report procedure, 17-10Organization Default Usage Encumbrance, 15-14Organization Default Usage Encumbrance , 15-19overview, 17-2
Default Account, 17-3Distribution History by Award, 17-3Distribution History by Employee, 17-3Distribution History by Organization, 17-4Distribution History by Project, 17-3Employee Labor Schedule, 17-2Employees Using Default Labor Schedules, 17-2Labor Schedules by Employee, 17-2Organization Default Labor Schedule, 17-3Suspense Account, 17-3
Printing Options windowdescription, 17-5
Suspense Charge Encumbrance, 15-13, 15-17responsibility, Glossary-5restart summarize and transfer adjustments process, 14-21retrieve distributions history
definition, 11-2Retrieve Distributions History procedure, 11-2Retrieve Distributions History process, 11-2retrieve encumbrance lines procedure, 15-16reversal, Glossary-5roll back non-Oracle payroll procedure, 12-17roll back Oracle payroll import, 8-7rolling back distribution lines procedure, 9-12RULES window
description, 6-10
Ssalary basis, Glossary-5salary cap
create distribution lines, 9-4

Index-9
Salary Cap SetupSetting Up a Generic Excess Salary Account, 9-13Setting Up an Organization Excess Salary Account, 9-15Setting Up Project Overrides, 9-14Setting Up Salary Cap Rates, 9-14
schedule line, Glossary-5schedule line period, Glossary-5schedule lines
viewing, 7-17Schedule Lines, Glossary-5Schedule Lines window
description, 7-12Schedule Summary window
description, 7-19scheduling hierarchy
definition, B-1diagram, B-4process, B-1
default labor schedule, B-2element, B-3element group, B-3employee assignments, B-3global element, B-4organization default account, B-2organization suspense account, B-2
Scheduling Summary, Glossary-5setup
auto-population lookup procedure, 6-6begin date auto-fill procedure, 4-24bypass natural account procedure, 6-14clearing account procedure, 4-26default encumbrance end date procedure, 5-5defining expenditure type auto-population rules procedure, 6-7defining natural account auto-population rules, 6-11element groups procedure, 4-22elements imported procedure, 4-18encumbrance creation options for GL procedure, 5-7encumbrance element selection procedure, 5-6encumbrance payroll and assignment selection procedure, 5-3end date auto-fill procedure, 4-25global element override procedure, 4-19
Organization Default Accounts procedure, 4-14Organization Default Labor Schedule procedure, 4-11Organization Suspense Accounts procedure, 4-7payroll sources procedure, 4-23
setup overviewlabor distribution
setup checklist, 2-2setup steps, 2-6
overview, 2-2summarize and transfer adjustments to GL and GMS process, 14-21summarize and transfer encumbrances process, 15-15summarize and transfer payroll distributions
definition, 10-2overview, 10-2
auto-population, 10-2process, 10-2
control reports, 10-4execute a prenamed procedure, 10-4select records, 10-2transfer lines and initiate import, 10-4
summarize distribution lines and transferauto-population, 10-2overview
process, 10-2process
prerequisites, 10-4recovering summarize and transfer procedure,10-6summarize distribution lines and transfer procedure, 10-4
suspense account, Glossary-5Suspense Account Report procedure, 17-10Suspense Charge Encumbrance Report, 15-13Suspense Charge Encumbrance Report procedure, 15-17System Administration setup
checklist, 3-2overview, 3-2profile options, 3-5, 3-5
levels, 3-5values, 3-7
steps, 3-5

Index-10
system profile options, Glossary-6
Vvalidation errors
labor scheduling, D-5validation rules
labor scheduling , D-2labor scheduling setup deletion, D-2labor scheduling setup end-dating, D-3
validationscreate distribution lines, D-5custom data entry, D-6other, D-5overview, D-1
validation warningslabor scheduling, D-5
viewing labor schedule lines procedure, 7-17
Wwindows
Encumbrance - Element Selection, 5-7Encumbrance History by Award, 15-18Encumbrance History by Organization, 15-18Encumbrance Suspense Charge Report, 15-17Reorder, 6-7, 6-11
workflowapproving distribution adjustments procedure, 14-20distribution adjustments
customizing, F-12item type , F-1overview, F-1process, F-3
Distribution Adjustments Approval Workflowdiagram, F-2effort report approval and certification
customizing, F-12process, F-3
Effort Report Approval and Certificationdiagram, F-2
Zzero work day, Glossary-6