oracle real-time decisions base application decision
TRANSCRIPT
Oracle® Real-Time Decisions Base ApplicationDecision Management Applications User's Guide
Release 3.1.1
E28942-01
April 2012

Oracle Real-Time Decisions Base Application Decision Management Applications User's Guide, Release 3.1.1
E28942-01
Copyright © 2011, 2012, Oracle and/or its affiliates. All rights reserved.
Primary Author: Oracle Corporation
Contributors: Oracle Real-Time Decisions development, product management, and quality assurance teams.
This software and related documentation are provided under a license agreement containing restrictions on use and disclosure and are protected by intellectual property laws. Except as expressly permitted in your license agreement or allowed by law, you may not use, copy, reproduce, translate, broadcast, modify, license, transmit, distribute, exhibit, perform, publish, or display any part, in any form, or by any means. Reverse engineering, disassembly, or decompilation of this software, unless required by law for interoperability, is prohibited.
The information contained herein is subject to change without notice and is not warranted to be error-free. If you find any errors, please report them to us in writing.
If this is software or related documentation that is delivered to the U.S. Government or anyone licensing it on behalf of the U.S. Government, the following notice is applicable:
U.S. GOVERNMENT RIGHTS Programs, software, databases, and related documentation and technical data delivered to U.S. Government customers are "commercial computer software" or "commercial technical data" pursuant to the applicable Federal Acquisition Regulation and agency-specific supplemental regulations. As such, the use, duplication, disclosure, modification, and adaptation shall be subject to the restrictions and license terms set forth in the applicable Government contract, and, to the extent applicable by the terms of the Government contract, the additional rights set forth in FAR 52.227-19, Commercial Computer Software License (December 2007). Oracle America, Inc., 500 Oracle Parkway, Redwood City, CA 94065.
This software or hardware is developed for general use in a variety of information management applications. It is not developed or intended for use in any inherently dangerous applications, including applications that may create a risk of personal injury. If you use this software or hardware in dangerous applications, then you shall be responsible to take all appropriate fail-safe, backup, redundancy, and other measures to ensure its safe use. Oracle Corporation and its affiliates disclaim any liability for any damages caused by use of this software or hardware in dangerous applications.
Oracle and Java are registered trademarks of Oracle and/or its affiliates. Other names may be trademarks of their respective owners.
Intel and Intel Xeon are trademarks or registered trademarks of Intel Corporation. All SPARC trademarks are used under license and are trademarks or registered trademarks of SPARC International, Inc. AMD, Opteron, the AMD logo, and the AMD Opteron logo are trademarks or registered trademarks of Advanced Micro Devices. UNIX is a registered trademark of The Open Group.
This software or hardware and documentation may provide access to or information on content, products, and services from third parties. Oracle Corporation and its affiliates are not responsible for and expressly disclaim all warranties of any kind with respect to third-party content, products, and services. Oracle Corporation and its affiliates will not be responsible for any loss, costs, or damages incurred due to your access to or use of third-party content, products, or services.
iii
Contents
Preface ................................................................................................................................................................. v
Audience....................................................................................................................................................... vDocumentation Accessibility ..................................................................................................................... vRelated Documents ..................................................................................................................................... vConventions ................................................................................................................................................. vi
1 Introduction to Oracle RTD Decision Management
1.1 Oracle RTD Decisioning Process Framework......................................................................... 1-11.2 Oracle RTD Decision Management Features .......................................................................... 1-21.2.1 Oracle RTD Decision Management Applications ........................................................... 1-21.2.2 Inter-Choice Relationships ................................................................................................. 1-4
2 Introduction to Oracle RTD for Marketing Optimization
2.1 Decision Management Framework .......................................................................................... 2-12.2 Introduction to Oracle RTD for Marketing Optimization..................................................... 2-92.2.1 Oracle RTD for Marketing Optimization ......................................................................... 2-92.2.2 Oracle RTD for Marketing Optimization Perspectives ............................................... 2-132.3 Using Oracle RTD for Marketing Optimization.................................................................. 2-152.3.1 Creating Projects ............................................................................................................... 2-162.3.2 Viewing and Searching for Projects ............................................................................... 2-172.3.3 Editing Projects ................................................................................................................. 2-182.3.4 Viewing, Searching and Adding Audit Trail Information for Projects .................... 2-182.3.5 Viewing, Searching and Adding Main Repository Audit Trail Information........... 2-192.3.6 Committing Projects ......................................................................................................... 2-192.3.7 Discarding Projects ........................................................................................................... 2-202.3.8 Creating Choices ............................................................................................................... 2-202.3.8.1 Discarding Choice Additions in a Project .............................................................. 2-232.3.9 Viewing and Searching for Choices ............................................................................... 2-232.3.10 Viewing, Searching and Adding to Choice Audit Trail Comments.......................... 2-242.3.11 Editing Choices ................................................................................................................. 2-252.3.11.1 Discarding Changes to a Main Repository Choice ............................................... 2-262.3.12 Deleting Choices from the Main Repository ................................................................ 2-272.3.12.1 Discarding Deletions................................................................................................. 2-282.4 Allocating Product Features to Marketing Organization Job Roles ................................. 2-292.5 Job Role Oriented Example of Oracle RTD for Marketing Optimization Tasks............. 2-31
iv
2.5.1 Project Setup ...................................................................................................................... 2-322.5.2 Create Campaign Showcase Properties......................................................................... 2-322.5.3 Create Offer Regional Offers........................................................................................... 2-352.5.4 Create Creative West Coast Properties.......................................................................... 2-362.5.5 Create Slot Type 300x600 and Update West Coast Properties................................... 2-382.5.6 Approve the Campaign Showcase Properties ............................................................. 2-402.5.7 Commit the Project ........................................................................................................... 2-41
A Decision Manager User Interface Reference
A.1 Decision Manager User Interface Schematic.......................................................................... A-1A.1.1 Example of Decision Manager Screen ............................................................................. A-2A.2 Header Area................................................................................................................................ A-3A.3 Main Repository/Project Context Area.................................................................................. A-4A.4 Panel Area ................................................................................................................................... A-5A.4.1 Perspective Panel/Bar........................................................................................................ A-6A.4.2 Project Changes Panel/Bar................................................................................................ A-8A.4.3 Search Results Panel/Bar .................................................................................................. A-8A.5 Search Options Area .................................................................................................................. A-9A.6 Detail Area ................................................................................................................................ A-12A.7 Create Project............................................................................................................................ A-12A.8 Project Details ........................................................................................................................... A-13A.9 View Projects ............................................................................................................................ A-14A.9.1 Project Information Columns.......................................................................................... A-14A.9.2 Project Information - Query By Example ...................................................................... A-15A.10 Create Choice............................................................................................................................ A-16A.11 Choice Details ........................................................................................................................... A-18A.11.1 Choice Details - Definition Tab....................................................................................... A-19A.11.2 Choice-Level Audit Trail ................................................................................................. A-20
v
Preface
Oracle Real-Time Decisions (Oracle RTD) Decision Management incorporates the Decision Manager tool, a general purpose web interface that allows business professionals to create, update, and delete objects useful for their Decision Management applications.
This guide describes how those Decision Manager features are assembled into a turn-key deployable solution for real-time inbound marketing optimization and collaborative decisions named Oracle Real-Time Decisions for Marketing Optimization (also referred to as the RTD for Marketing Optimization application). The features of this application enable business users to create and manage data for their marketing campaigns in the context of their cross-channel deployments.
This guide also describes the general web options available with the Decision Manager tool for business users of any Oracle RTD Decision Management applications.
AudienceThis document is intended for business users of the RTD for Marketing Optimization application and other Oracle RTD Decision Management applications.
Documentation AccessibilityFor information about Oracle's commitment to accessibility, visit the Oracle Accessibility Program website at http://www.oracle.com/pls/topic/lookup?ctx=acc&id=docacc.
Access to Oracle SupportOracle customers have access to electronic support through My Oracle Support. For information, visit http://www.oracle.com/pls/topic/lookup?ctx=acc&id=info or visit http://www.oracle.com/pls/topic/lookup?ctx=acc&id=trs if you are hearing impaired.
Related DocumentsFor more information, see the following documents in the Oracle Real-Time Decisions platform version 3.0 documentation set and the Oracle Real-Time Decisions Base Application Release 3.1.1 documentation set:
■ Oracle Real-Time Decisions Installation and Administration Guide
■ Oracle Real-Time Decisions Platform Developer's Guide
vi
■ Oracle Real-Time Decisions Decision Center User's Guide
■ Oracle Real-Time Decisions Release Notes
■ Oracle Real-Time Decisions Base Application Installation and Reference Guide
■ Oracle Real-Time Decisions Base Application Decision Management Installation and Configuration Guide
ConventionsThe following text conventions are used in this document:
Convention Meaning
boldface Boldface type indicates graphical user interface elements associated with an action, or terms defined in text or the glossary.
italic Italic type indicates book titles, emphasis, or placeholder variables for which you supply particular values.
monospace Monospace type indicates commands within a paragraph, URLs, code in examples, text that appears on the screen, or text that you enter.
1
Introduction to Oracle RTD Decision Management 1-1
1Introduction to Oracle RTD DecisionManagement
This chapter introduces Oracle RTD Decision Management and Oracle RTD Decision Management applications in general.
This chapter contains the following topics:
■ Section 1.1, "Oracle RTD Decisioning Process Framework"
■ Section 1.2, "Oracle RTD Decision Management Features"
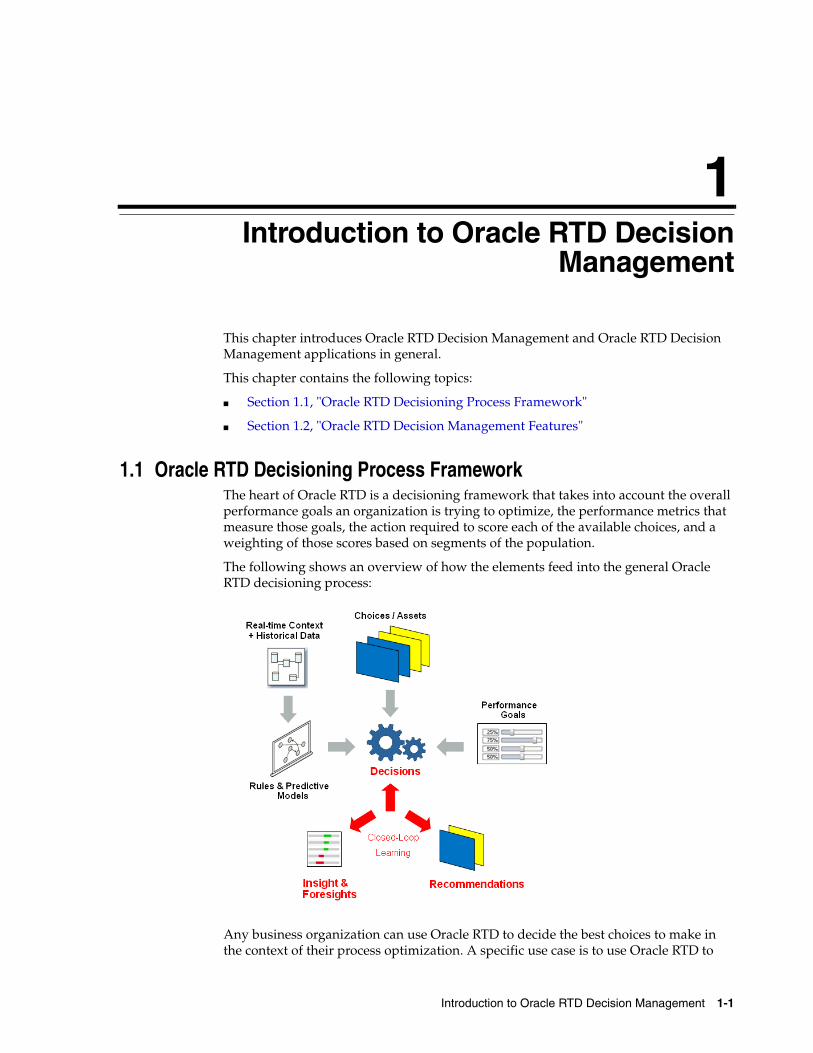
1.1 Oracle RTD Decisioning Process FrameworkThe heart of Oracle RTD is a decisioning framework that takes into account the overall performance goals an organization is trying to optimize, the performance metrics that measure those goals, the action required to score each of the available choices, and a weighting of those scores based on segments of the population.
The following shows an overview of how the elements feed into the general Oracle RTD decisioning process:
Any business organization can use Oracle RTD to decide the best choices to make in the context of their process optimization. A specific use case is to use Oracle RTD to

Oracle RTD Decision Management Features
1-2 Oracle Real-Time Decisions Base Application Decision Management Applications User's Guide
select the best product or offer to present during customer interactions, based on intelligence collected from previous campaigns and how that can be applied for different customer segments and in different demographics.
Marketing organizations, for example, could have a variety of different campaigns and offers within these campaigns. The choices are then - which campaign to recommend, and which offer within each campaign? The Oracle RTD decisioning process uses its built-in intelligence to make the best choices for the marketing recommendations.
1.2 Oracle RTD Decision Management FeaturesOracle RTD Decision Management extends the Oracle RTD decisioning framework, by providing an application development environment for creating business user friendly applications for managing the lifecycle of choices available for recommendation.
This section contains the following topics:
■ Section 1.2.1, "Oracle RTD Decision Management Applications"
■ Section 1.2.2, "Inter-Choice Relationships"
1.2.1 Oracle RTD Decision Management ApplicationsOracle RTD Decision Management applications enable business users to easily create, update, and delete the choices that they want to be made available for Oracle RTD choice recommendations in their business processes.
The Decision Management components released with Oracle RTD Base Application are as follows:
■ An Oracle RTD Decision Management general purpose application infrastructure that enables you to build and use your own Oracle RTD Decision Management applications.
■ A specific Oracle RTD Decision Management application, Oracle RTD for Marketing Optimization - with its associated Inline Service - oriented to marketing organizations. This application is also referred to as RTD for Marketing Optimization.
General Decision Management Application Design FrameworkThe Oracle RTD Decision Management general purpose application infrastructure enables you to design, build, and use your own Oracle RTD Decision Management applications with the tools provided in the Oracle RTD Decision Management framework.
The framework consists of:
■ Decision Designer
Decision Designer is the combination of design tools built on top of the Oracle JDeveloper platform and includes the metadata files that you use to create the Oracle RTD Decision Management application. In addition to the metadata configured in Decision Designer, each Oracle RTD Decision Management application also includes an Inline Service that is deployed through the Oracle RTD platform component Decision Studio.
With Decision Designer, you generate web-based enterprise applications for business users to manage their choices in external choice repositories as referential business data. Access control to the choices can be configured to enable multi-user
Oracle RTD Decision Management Features
Introduction to Oracle RTD Decision Management 1-3
concurrent update mode or to restrict access to specific job role users in your business departments.
For details of how to set up Oracle RTD Decision Management applications, see Oracle Real-Time Decisions Base Application Decision Management Installation and Configuration Guide.
■ Decision Manager
Decision Manager is an end-user oriented web tool that allows business users to control and manage their choices in the external choice repositories.
The Decision Manager interface, as set up in the Oracle RTD Decision Management application, is configured specifically to each organization's own types of choices.
Business users can read, create, update and delete choices and choice rules. When these choices are fed back to the external choice repositories, they then become available to the other applications and transactions that use Oracle RTD for choice recommendations.
Decision Manager also enables users to access select Decision Center analytic reports on their choices directly from the Decision Manager interface.
For more details of how to use general Decision Manager features and options, see Appendix A, "Decision Manager User Interface Reference."
Starting Point Application Example: Oracle RTD for Marketing Optimization To serve as an example, and as a starting point for marketing and other organizations, a specific Oracle RTD Decision Management application, RTD for Marketing Optimization, together with its associated Inline Service - is released with Oracle RTD Base Application.
The RTD for Marketing Optimization application serves as an application for any marketing organization that is interested in managing their marketing objects of interest as shown in Section 1.2.2, "Inter-Choice Relationships."
Marketing organizations, while they can use RTD for Marketing Optimization as released, can also adapt that application by configuring it to suit their own particular organization requirements.
RTD for Marketing Optimization can also serve as an example for any Decision Management application in any organization. You can build your own application by starting with a basic template, RTD_CLM_Core, also released with Oracle RTD Base Application, which contains the initial building blocks for any Decision Management application. RTD_CLM_Core is not a complete Decision Management application, but you can add and configure the elements specific to your organization by examining corresponding or similar elements in RTD for Marketing Optimization, and then adapting them to your specific requirements.
For details of how to install and configure RTD for Marketing Optimization, see Oracle Real-Time Decisions Base Application Decision Management Installation and Configuration Guide.
For details of how to use RTD for Marketing Optimization, see Section 2.3, "Using Oracle RTD for Marketing Optimization."
For more information about RTD_CLM_Core elements, see Oracle Real-Time Decisions Base Application Installation and Reference Guide.

Oracle RTD Decision Management Features
1-4 Oracle Real-Time Decisions Base Application Decision Management Applications User's Guide
1.2.2 Inter-Choice RelationshipsThis key decision framework enhancement introduces the ability to define explicit relationships between choices beyond hierarchical relationships. This enables related choices to be actioned and processed together in a way that supports customer workflow operations and procedures.
For example, a marketing organization could have planned their marketing campaigns to be publicized on a variety of external media outlets, and have a number of possible choices to make as to what to recommend, to whom, and how. The choices could be categorized under the general headings of campaigns, offers, channels, placements, and so on. These types of choices could be treated as independent, standalone categories, but that could lead to marketing opportunities being lost due to missing connections between objects during the business intelligence gathering process.
Oracle RTD Decision Management enables relationships to be defined between the choice categories, as shown in the following marketing organization example (the basis for the Oracle RTD Decision Management application that is released with Oracle RTD Base Application):
The inter-related objects shown on the right-hand side of the diagram represent and reflect the following real-world relationships:
■ Each campaign consists of zero, one, or more offers
■ Each offer must belong to exactly one campaign
■ Each offer consists of zero, one, or more creatives
A creative can be thought of as specific content used to deliver an offer. For example, text content and image content could be two types of creative for the same offer.
■ Each creative can have zero, one, or more tags, and each tag may be associated with zero, one, or more creatives
■ Each channel can have dedicated placements where the offers will be presented and each placement can break down into slots.
For example, a Web site can have a rotating panel on the top of the page, composed of three slots. A contact center page can have a dedicated placement for Next Best Action recommendations to be relayed by the agent.
Oracle RTD Decision Management Features
Introduction to Oracle RTD Decision Management 1-5
■ Slots must be of a particular slot type
■ Each channel can be related to zero, one, or more creatives
■ Each creative must belong to exactly one offer and must be associated with exactly one slot type
■ Each creative may be associated with one (and only one) channel, but does not have to be (creatives are also related to channels through their slot types, slots, and placements, when it is decided how the creatives will appear through their channels)
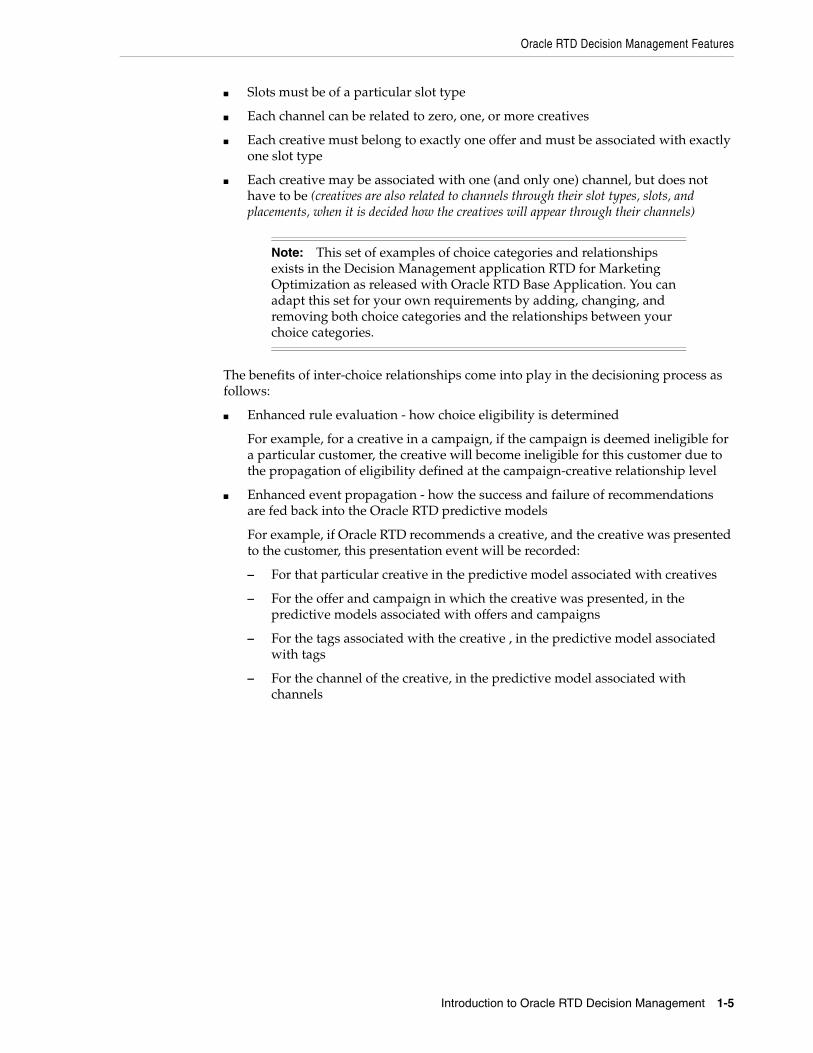
The benefits of inter-choice relationships come into play in the decisioning process as follows:
■ Enhanced rule evaluation - how choice eligibility is determined
For example, for a creative in a campaign, if the campaign is deemed ineligible for a particular customer, the creative will become ineligible for this customer due to the propagation of eligibility defined at the campaign-creative relationship level
■ Enhanced event propagation - how the success and failure of recommendations are fed back into the Oracle RTD predictive models
For example, if Oracle RTD recommends a creative, and the creative was presented to the customer, this presentation event will be recorded:
– For that particular creative in the predictive model associated with creatives
– For the offer and campaign in which the creative was presented, in the predictive models associated with offers and campaigns
– For the tags associated with the creative , in the predictive model associated with tags
– For the channel of the creative, in the predictive model associated with channels
Note: This set of examples of choice categories and relationships exists in the Decision Management application RTD for Marketing Optimization as released with Oracle RTD Base Application. You can adapt this set for your own requirements by adding, changing, and removing both choice categories and the relationships between your choice categories.

Oracle RTD Decision Management Features
1-6 Oracle Real-Time Decisions Base Application Decision Management Applications User's Guide
2
Introduction to Oracle RTD for Marketing Optimization 2-1
2Introduction to Oracle RTD for MarketingOptimization
This chapter contains the following topics:
■ Section 2.1, "Decision Management Framework"
■ Section 2.2, "Introduction to Oracle RTD for Marketing Optimization"
■ Section 2.3, "Using Oracle RTD for Marketing Optimization"
■ Section 2.4, "Allocating Product Features to Marketing Organization Job Roles"
■ Section 2.5, "Job Role Oriented Example of Oracle RTD for Marketing Optimization Tasks"
2.1 Decision Management FrameworkA Day in the Life of the Marketing/Business User
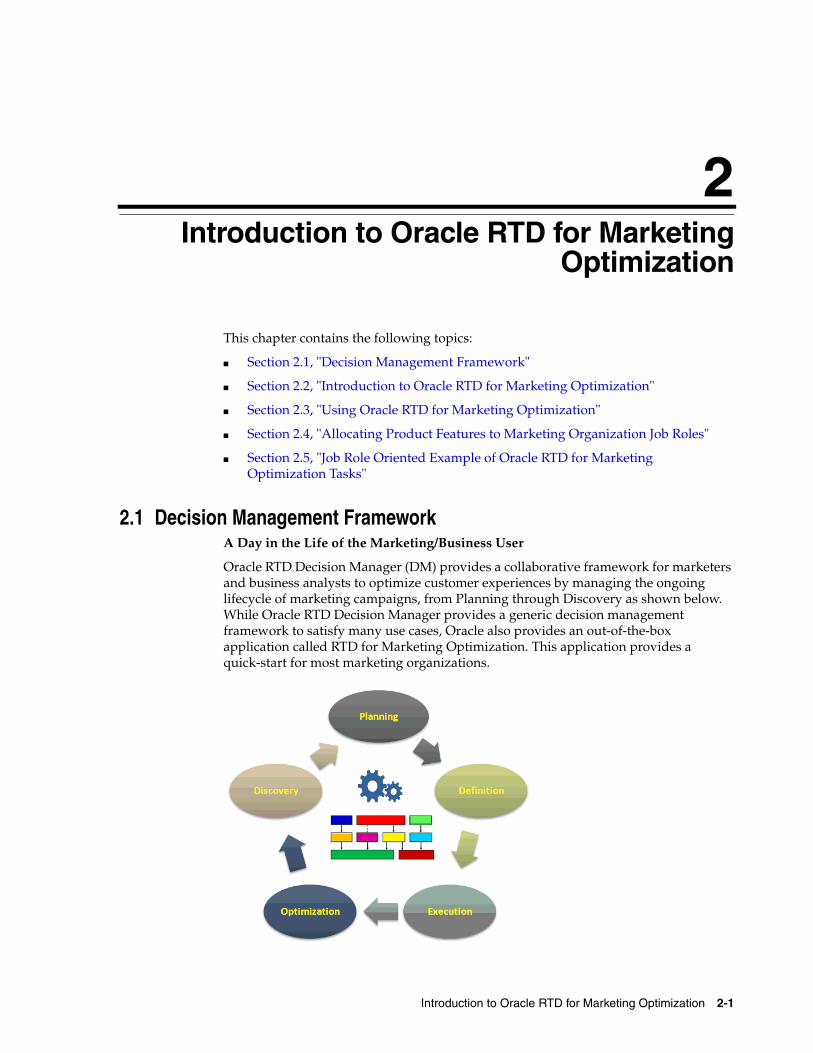
Oracle RTD Decision Manager (DM) provides a collaborative framework for marketers and business analysts to optimize customer experiences by managing the ongoing lifecycle of marketing campaigns, from Planning through Discovery as shown below. While Oracle RTD Decision Manager provides a generic decision management framework to satisfy many use cases, Oracle also provides an out-of-the-box application called RTD for Marketing Optimization. This application provides a quick-start for most marketing organizations.
Decision Management Framework
2-2 Oracle Real-Time Decisions Base Application Decision Management Applications User's Guide
More and more marketers are realizing the value of providing the "right customer experience at the right time" instead of the "right product at the right time." The decision management framework of Oracle RTD Decision Manager supports customer experience optimization by:
■ Providing a single multi-channel decision framework that optimizes all customer interactions while incorporating corporate goals and KPI's.
■ Utilizing self-learning predictive models that adapt to changing market conditions. These models support customer interaction decisioning as well as learning, and provide valuable customer intelligence.
■ Enabling marketers and business analysts to control the campaign process while minimizing reliance on IT.
The rest of this section examines each of the above stages in a campaign's lifecycle in more detail.
Stage 1: Planning
In the Planning phase, marketers collaborate to determine which campaigns are to be created or modified, as well as which customer segments, offers, creative's, channels, slots, slot types and placements are to be used for each campaign.
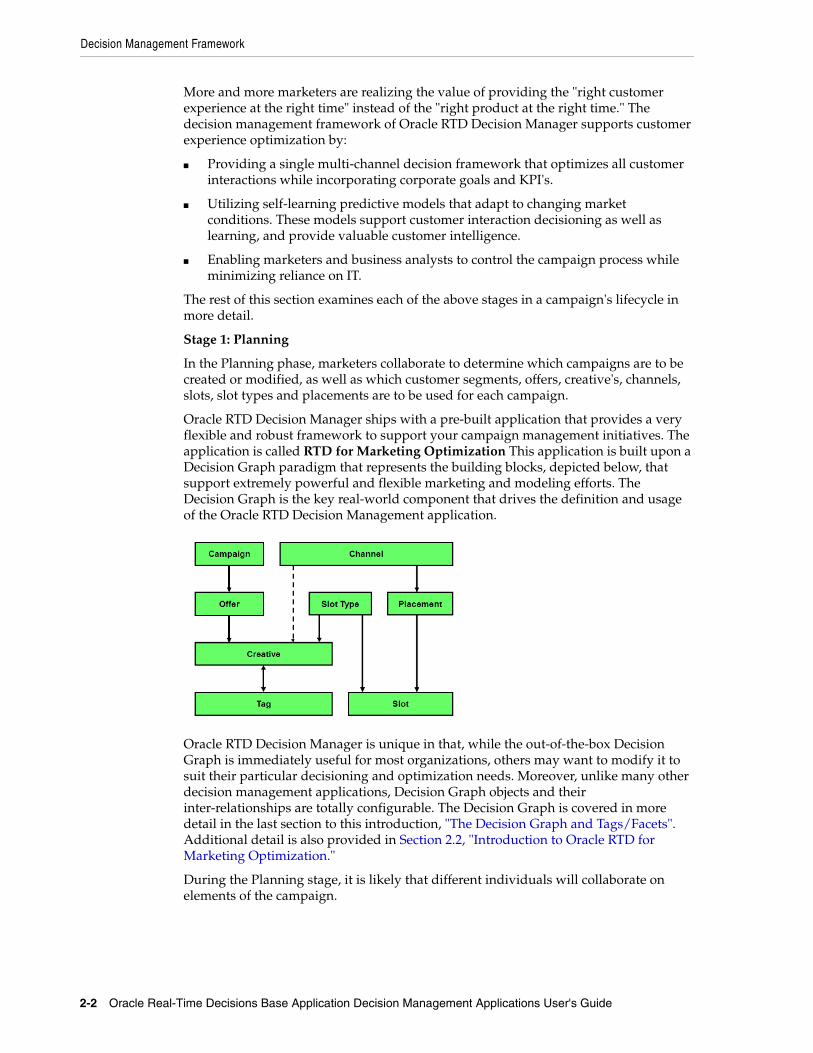
Oracle RTD Decision Manager ships with a pre-built application that provides a very flexible and robust framework to support your campaign management initiatives. The application is called RTD for Marketing Optimization This application is built upon a Decision Graph paradigm that represents the building blocks, depicted below, that support extremely powerful and flexible marketing and modeling efforts. The Decision Graph is the key real-world component that drives the definition and usage of the Oracle RTD Decision Management application.
Oracle RTD Decision Manager is unique in that, while the out-of-the-box Decision Graph is immediately useful for most organizations, others may want to modify it to suit their particular decisioning and optimization needs. Moreover, unlike many other decision management applications, Decision Graph objects and their inter-relationships are totally configurable. The Decision Graph is covered in more detail in the last section to this introduction, "The Decision Graph and Tags/Facets". Additional detail is also provided in Section 2.2, "Introduction to Oracle RTD for Marketing Optimization."
During the Planning stage, it is likely that different individuals will collaborate on elements of the campaign.
Decision Management Framework
Introduction to Oracle RTD for Marketing Optimization 2-3
Decision Manager's role-based application uses the paradigm of a project to support collaborative efforts associated with defining and managing campaigns. The collaborative nature of creating the campaign begins with the Definition stage.
Stage 2: Definition
In this stage, all of the Decision Graph objects are used in combination with decision and goal arbitration logic to complete the overall decision framework. Decision logic includes choice/offer eligibility and scoring rules as defined and input by the business user. Models and arbitration logic are defined in the Inline Service (ILS). For more information on the ILS, refer to the Oracle Real-Time Decisions Platform Developer's Guide.
As mentioned at the end of the previous section on Planning, Oracle RTD Decision Manager's role-based application uses the paradigm of a project to support collaborative efforts associated with defining and managing campaigns. Projects are used to create or modify campaigns in an offline mode. After changes to a campaign have been completed, a user with the appropriate role and privileges can review the details and commit the project. Committing the project puts the changes into production.
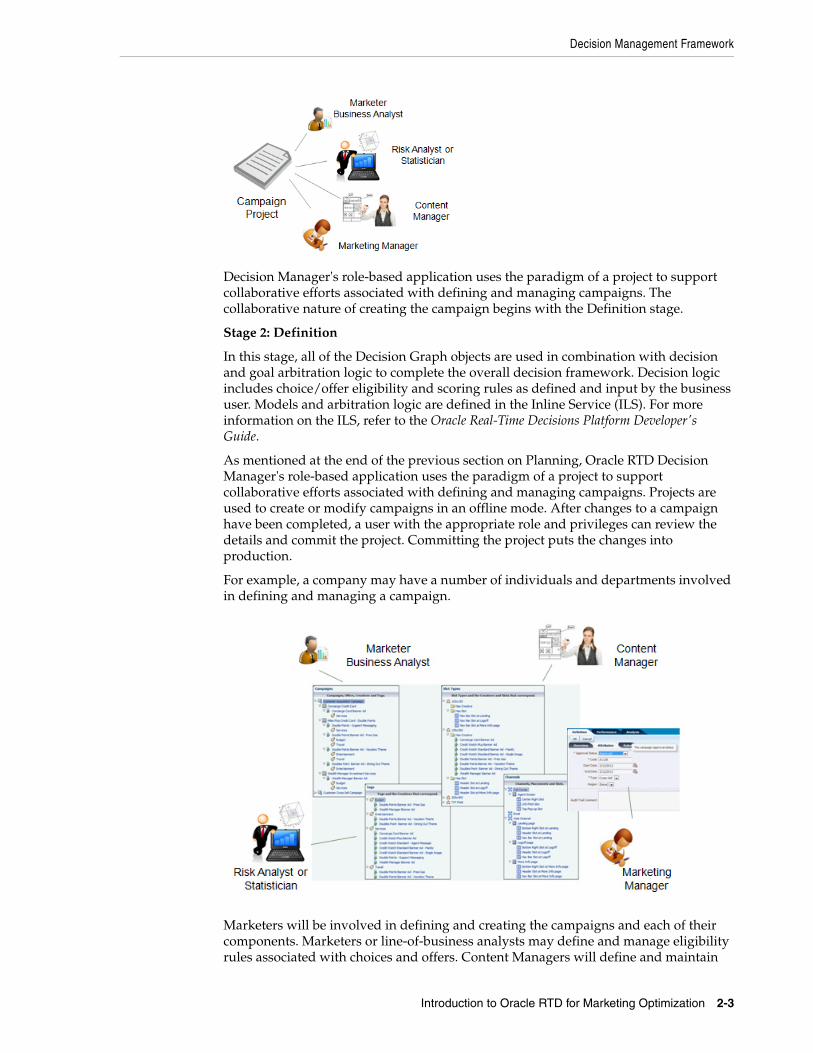
For example, a company may have a number of individuals and departments involved in defining and managing a campaign.
Marketers will be involved in defining and creating the campaigns and each of their components. Marketers or line-of-business analysts may define and manage eligibility rules associated with choices and offers. Content Managers will define and maintain
Decision Management Framework
2-4 Oracle Real-Time Decisions Base Application Decision Management Applications User's Guide
slots and relationships to content (creatives, images, scripts, and so on). Statisticians will define Tags that will enable broader and higher levels of learnings that can be used for decisioning. For example, learnings from Tags can be used not just to identify that a particular person would be interested in online bill payments, but that they are more likely to convert based on an interest in being productive as opposed to being environmentally aware. Productive and environmentally aware are two different themes that could be used to try to drive the same action. Finally, LOB managers and/or marketing management may have to review and approve changes before the campaign can go into production.
RTD for Marketing Optimization ships with standardized templates to capture metadata that supports most common marketing processes, for example, start and end dates, status (Active, Needs Approval), channel, and so on. If desired, these templates can also be configured to support your own specific needs.
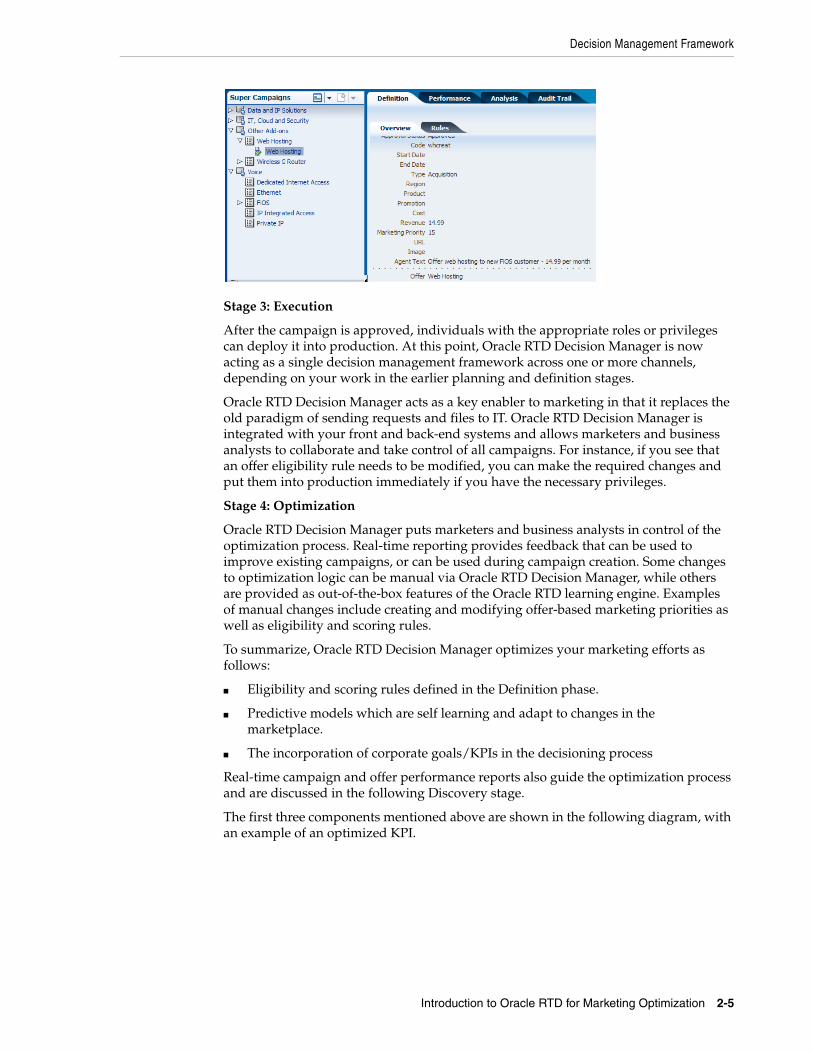
Oracle RTD Decision Manager also supports team collaboration by way of perspectives. A perspective is a view into a subset of your marketing objects of interest, which may vary by role. Each perspective represents a portion of your data that is convenient to view and process as a unit. The previous diagram shows how different users can utilize various perspectives based on their role in the campaign process.
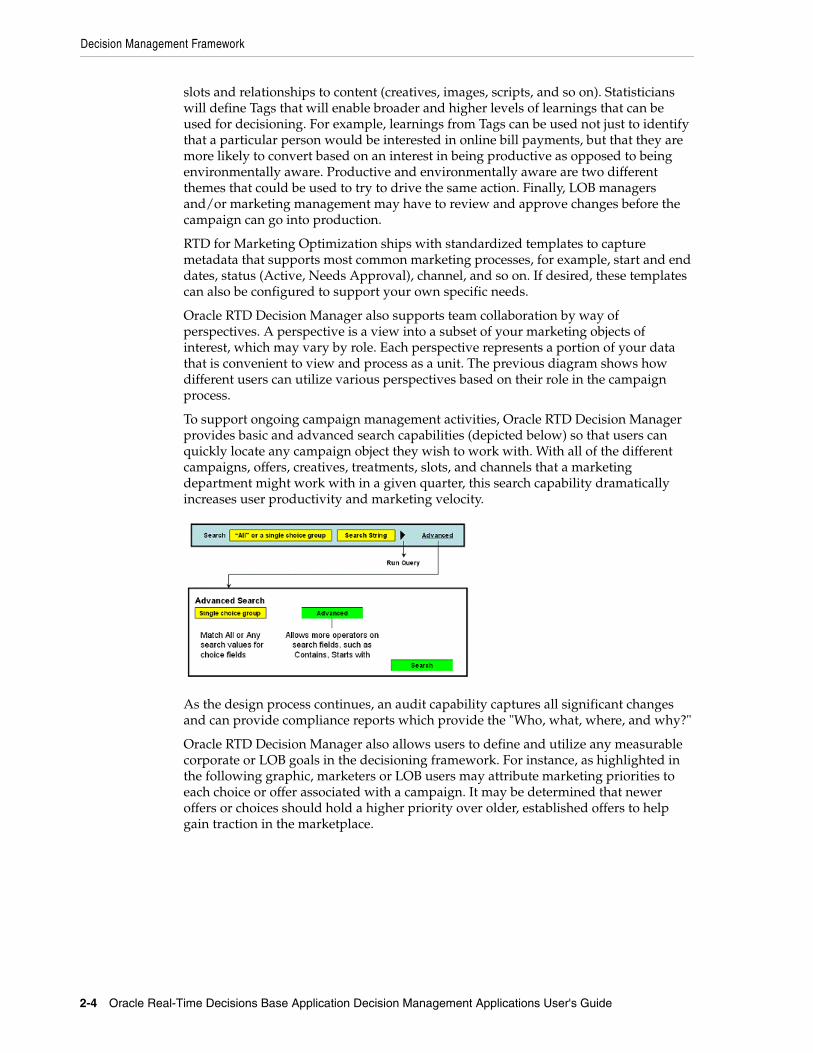
To support ongoing campaign management activities, Oracle RTD Decision Manager provides basic and advanced search capabilities (depicted below) so that users can quickly locate any campaign object they wish to work with. With all of the different campaigns, offers, creatives, treatments, slots, and channels that a marketing department might work with in a given quarter, this search capability dramatically increases user productivity and marketing velocity.
As the design process continues, an audit capability captures all significant changes and can provide compliance reports which provide the "Who, what, where, and why?"
Oracle RTD Decision Manager also allows users to define and utilize any measurable corporate or LOB goals in the decisioning framework. For instance, as highlighted in the following graphic, marketers or LOB users may attribute marketing priorities to each choice or offer associated with a campaign. It may be determined that newer offers or choices should hold a higher priority over older, established offers to help gain traction in the marketplace.
Decision Management Framework
Introduction to Oracle RTD for Marketing Optimization 2-5
Stage 3: Execution
After the campaign is approved, individuals with the appropriate roles or privileges can deploy it into production. At this point, Oracle RTD Decision Manager is now acting as a single decision management framework across one or more channels, depending on your work in the earlier planning and definition stages.
Oracle RTD Decision Manager acts as a key enabler to marketing in that it replaces the old paradigm of sending requests and files to IT. Oracle RTD Decision Manager is integrated with your front and back-end systems and allows marketers and business analysts to collaborate and take control of all campaigns. For instance, if you see that an offer eligibility rule needs to be modified, you can make the required changes and put them into production immediately if you have the necessary privileges.
Stage 4: Optimization
Oracle RTD Decision Manager puts marketers and business analysts in control of the optimization process. Real-time reporting provides feedback that can be used to improve existing campaigns, or can be used during campaign creation. Some changes to optimization logic can be manual via Oracle RTD Decision Manager, while others are provided as out-of-the-box features of the Oracle RTD learning engine. Examples of manual changes include creating and modifying offer-based marketing priorities as well as eligibility and scoring rules.
To summarize, Oracle RTD Decision Manager optimizes your marketing efforts as follows:
■ Eligibility and scoring rules defined in the Definition phase.
■ Predictive models which are self learning and adapt to changes in the marketplace.
■ The incorporation of corporate goals/KPIs in the decisioning process
Real-time campaign and offer performance reports also guide the optimization process and are discussed in the following Discovery stage.
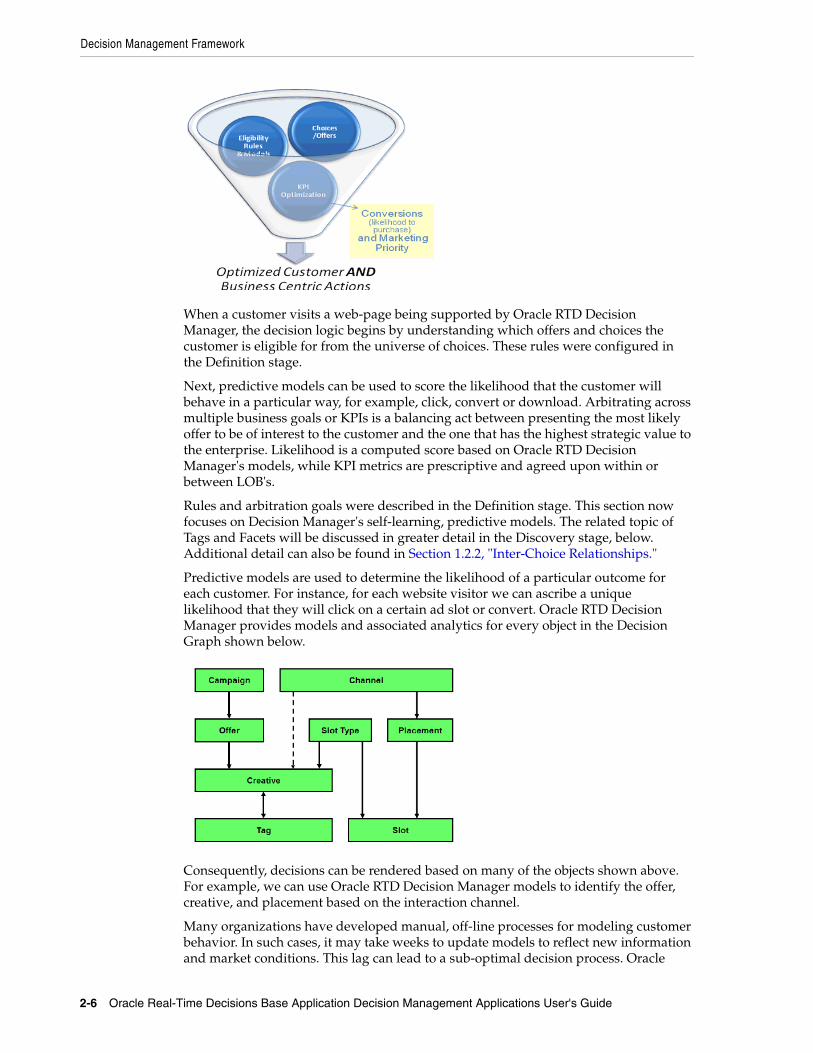
The first three components mentioned above are shown in the following diagram, with an example of an optimized KPI.
Decision Management Framework
2-6 Oracle Real-Time Decisions Base Application Decision Management Applications User's Guide
When a customer visits a web-page being supported by Oracle RTD Decision Manager, the decision logic begins by understanding which offers and choices the customer is eligible for from the universe of choices. These rules were configured in the Definition stage.
Next, predictive models can be used to score the likelihood that the customer will behave in a particular way, for example, click, convert or download. Arbitrating across multiple business goals or KPIs is a balancing act between presenting the most likely offer to be of interest to the customer and the one that has the highest strategic value to the enterprise. Likelihood is a computed score based on Oracle RTD Decision Manager's models, while KPI metrics are prescriptive and agreed upon within or between LOB's.
Rules and arbitration goals were described in the Definition stage. This section now focuses on Decision Manager's self-learning, predictive models. The related topic of Tags and Facets will be discussed in greater detail in the Discovery stage, below. Additional detail can also be found in Section 1.2.2, "Inter-Choice Relationships."
Predictive models are used to determine the likelihood of a particular outcome for each customer. For instance, for each website visitor we can ascribe a unique likelihood that they will click on a certain ad slot or convert. Oracle RTD Decision Manager provides models and associated analytics for every object in the Decision Graph shown below.
Consequently, decisions can be rendered based on many of the objects shown above. For example, we can use Oracle RTD Decision Manager models to identify the offer, creative, and placement based on the interaction channel.
Many organizations have developed manual, off-line processes for modeling customer behavior. In such cases, it may take weeks to update models to reflect new information and market conditions. This lag can lead to a sub-optimal decision process. Oracle
Decision Management Framework
Introduction to Oracle RTD for Marketing Optimization 2-7
RTD Decision Manager supports optimized decision processes by providing models which are self-learning and require no manual updates. Oracle RTD Decision Manager provides numerous integration options in the event that you desire to use your organization's offline modeling efforts.
Stage 5: Discovery
Oracle RTD Decision Manager provides a wide assortment of real-time reports that help marketers monitor campaign and offer performance. These reports are generated by Oracle RTD Decision Manager's closed-loop adaptive learning capabilities and provide real-time insights that can be used to modify existing campaign tactics, or to develop even more effective new campaigns.
Example reports:
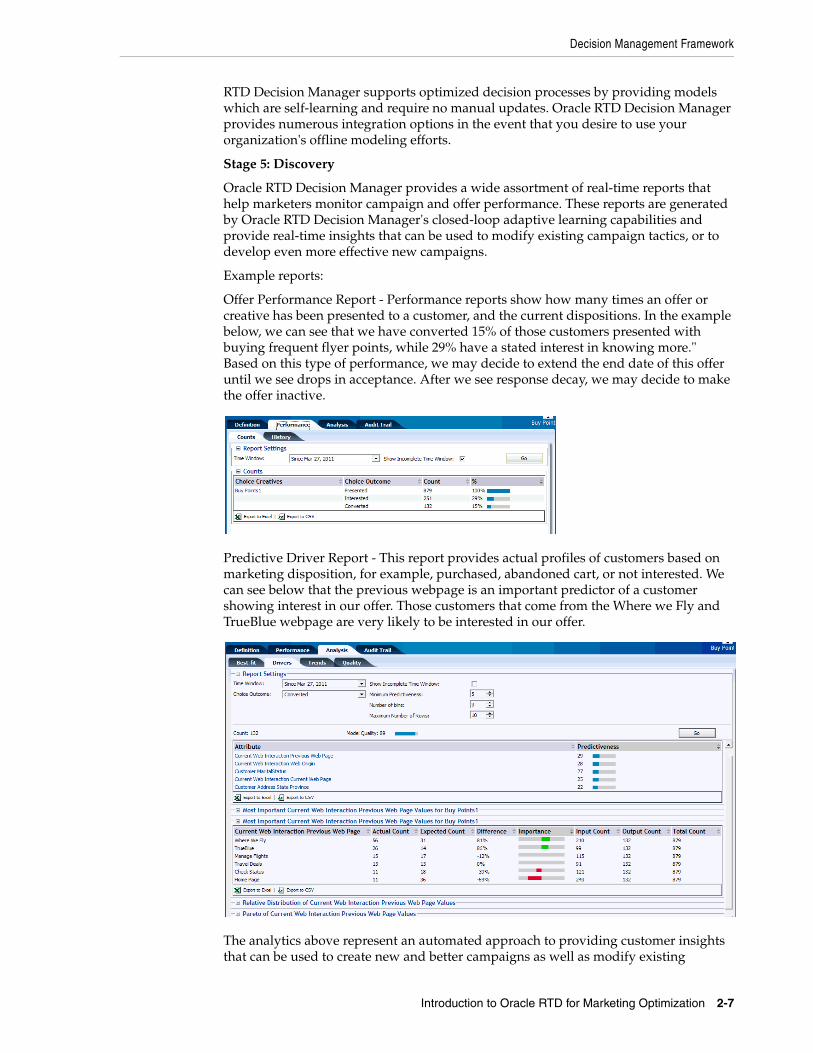
Offer Performance Report - Performance reports show how many times an offer or creative has been presented to a customer, and the current dispositions. In the example below, we can see that we have converted 15% of those customers presented with buying frequent flyer points, while 29% have a stated interest in knowing more." Based on this type of performance, we may decide to extend the end date of this offer until we see drops in acceptance. After we see response decay, we may decide to make the offer inactive.
Predictive Driver Report - This report provides actual profiles of customers based on marketing disposition, for example, purchased, abandoned cart, or not interested. We can see below that the previous webpage is an important predictor of a customer showing interest in our offer. Those customers that come from the Where we Fly and TrueBlue webpage are very likely to be interested in our offer.
The analytics above represent an automated approach to providing customer insights that can be used to create new and better campaigns as well as modify existing
Decision Management Framework
2-8 Oracle Real-Time Decisions Base Application Decision Management Applications User's Guide
campaigns on the fly as needed. The next section will introduce a new analytical capability in Oracle RTD Decision Manager that allows marketers to take the customer experience to the next level.
The Decision Graph and Tags/Facets
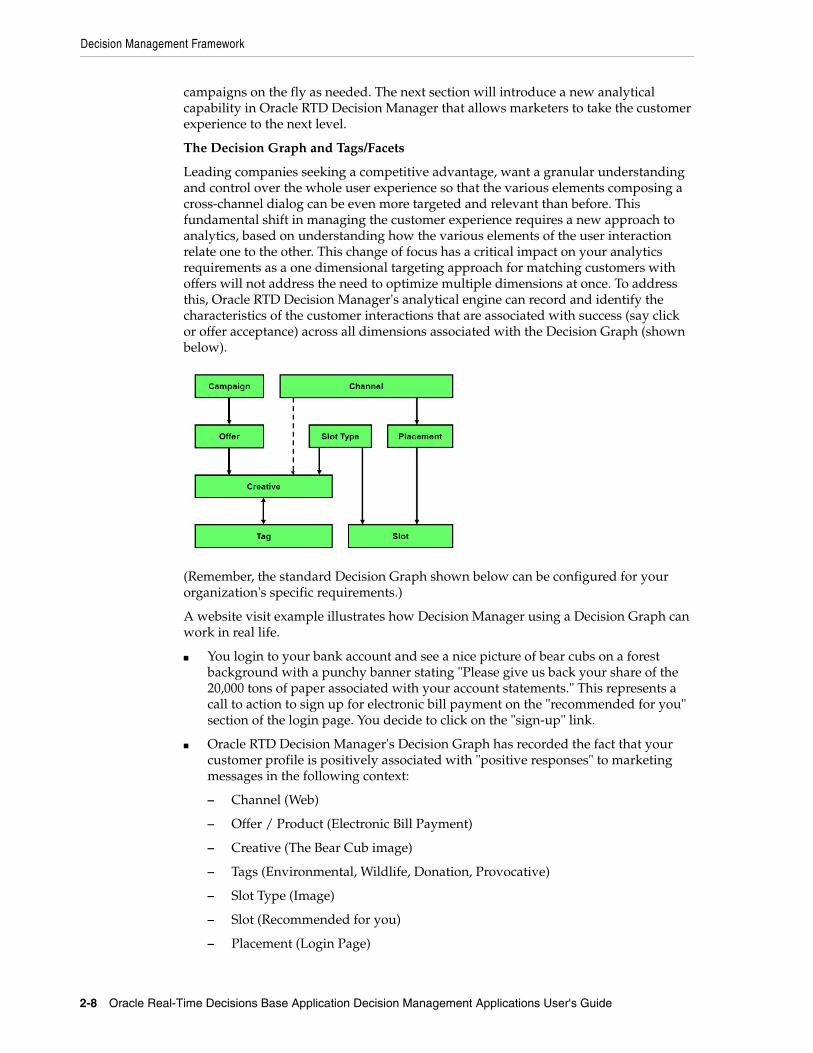
Leading companies seeking a competitive advantage, want a granular understanding and control over the whole user experience so that the various elements composing a cross-channel dialog can be even more targeted and relevant than before. This fundamental shift in managing the customer experience requires a new approach to analytics, based on understanding how the various elements of the user interaction relate one to the other. This change of focus has a critical impact on your analytics requirements as a one dimensional targeting approach for matching customers with offers will not address the need to optimize multiple dimensions at once. To address this, Oracle RTD Decision Manager's analytical engine can record and identify the characteristics of the customer interactions that are associated with success (say click or offer acceptance) across all dimensions associated with the Decision Graph (shown below).
(Remember, the standard Decision Graph shown below can be configured for your organization's specific requirements.)
A website visit example illustrates how Decision Manager using a Decision Graph can work in real life.
■ You login to your bank account and see a nice picture of bear cubs on a forest background with a punchy banner stating "Please give us back your share of the 20,000 tons of paper associated with your account statements." This represents a call to action to sign up for electronic bill payment on the "recommended for you" section of the login page. You decide to click on the "sign-up" link.
■ Oracle RTD Decision Manager's Decision Graph has recorded the fact that your customer profile is positively associated with "positive responses" to marketing messages in the following context:
– Channel (Web)
– Offer / Product (Electronic Bill Payment)
– Creative (The Bear Cub image)
– Tags (Environmental, Wildlife, Donation, Provocative)
– Slot Type (Image)
– Slot (Recommended for you)
– Placement (Login Page)
Introduction to Oracle RTD for Marketing Optimization
Introduction to Oracle RTD for Marketing Optimization 2-9
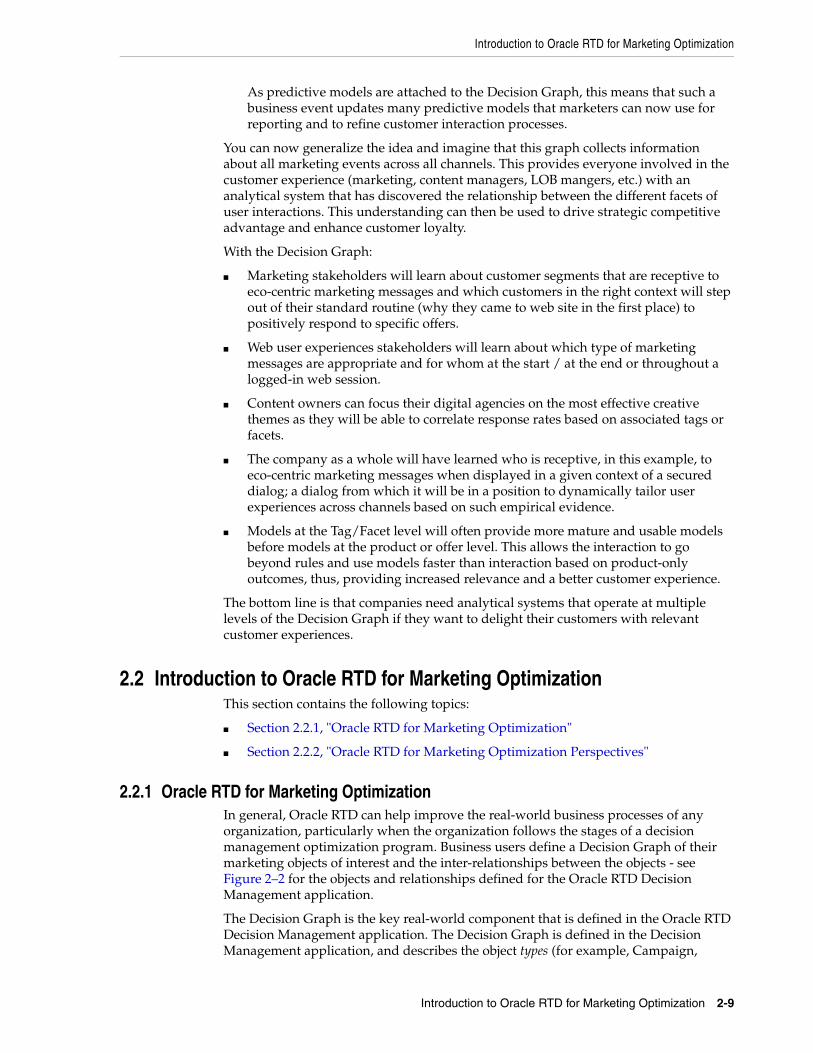
As predictive models are attached to the Decision Graph, this means that such a business event updates many predictive models that marketers can now use for reporting and to refine customer interaction processes.
You can now generalize the idea and imagine that this graph collects information about all marketing events across all channels. This provides everyone involved in the customer experience (marketing, content managers, LOB mangers, etc.) with an analytical system that has discovered the relationship between the different facets of user interactions. This understanding can then be used to drive strategic competitive advantage and enhance customer loyalty.
With the Decision Graph:
■ Marketing stakeholders will learn about customer segments that are receptive to eco-centric marketing messages and which customers in the right context will step out of their standard routine (why they came to web site in the first place) to positively respond to specific offers.
■ Web user experiences stakeholders will learn about which type of marketing messages are appropriate and for whom at the start / at the end or throughout a logged-in web session.
■ Content owners can focus their digital agencies on the most effective creative themes as they will be able to correlate response rates based on associated tags or facets.
■ The company as a whole will have learned who is receptive, in this example, to eco-centric marketing messages when displayed in a given context of a secured dialog; a dialog from which it will be in a position to dynamically tailor user experiences across channels based on such empirical evidence.
■ Models at the Tag/Facet level will often provide more mature and usable models before models at the product or offer level. This allows the interaction to go beyond rules and use models faster than interaction based on product-only outcomes, thus, providing increased relevance and a better customer experience.
The bottom line is that companies need analytical systems that operate at multiple levels of the Decision Graph if they want to delight their customers with relevant customer experiences.
2.2 Introduction to Oracle RTD for Marketing OptimizationThis section contains the following topics:
■ Section 2.2.1, "Oracle RTD for Marketing Optimization"
■ Section 2.2.2, "Oracle RTD for Marketing Optimization Perspectives"
2.2.1 Oracle RTD for Marketing OptimizationIn general, Oracle RTD can help improve the real-world business processes of any organization, particularly when the organization follows the stages of a decision management optimization program. Business users define a Decision Graph of their marketing objects of interest and the inter-relationships between the objects - see Figure 2–2 for the objects and relationships defined for the Oracle RTD Decision Management application.
The Decision Graph is the key real-world component that is defined in the Oracle RTD Decision Management application. The Decision Graph is defined in the Decision Management application, and describes the object types (for example, Campaign,
Introduction to Oracle RTD for Marketing Optimization
2-10 Oracle Real-Time Decisions Base Application Decision Management Applications User's Guide
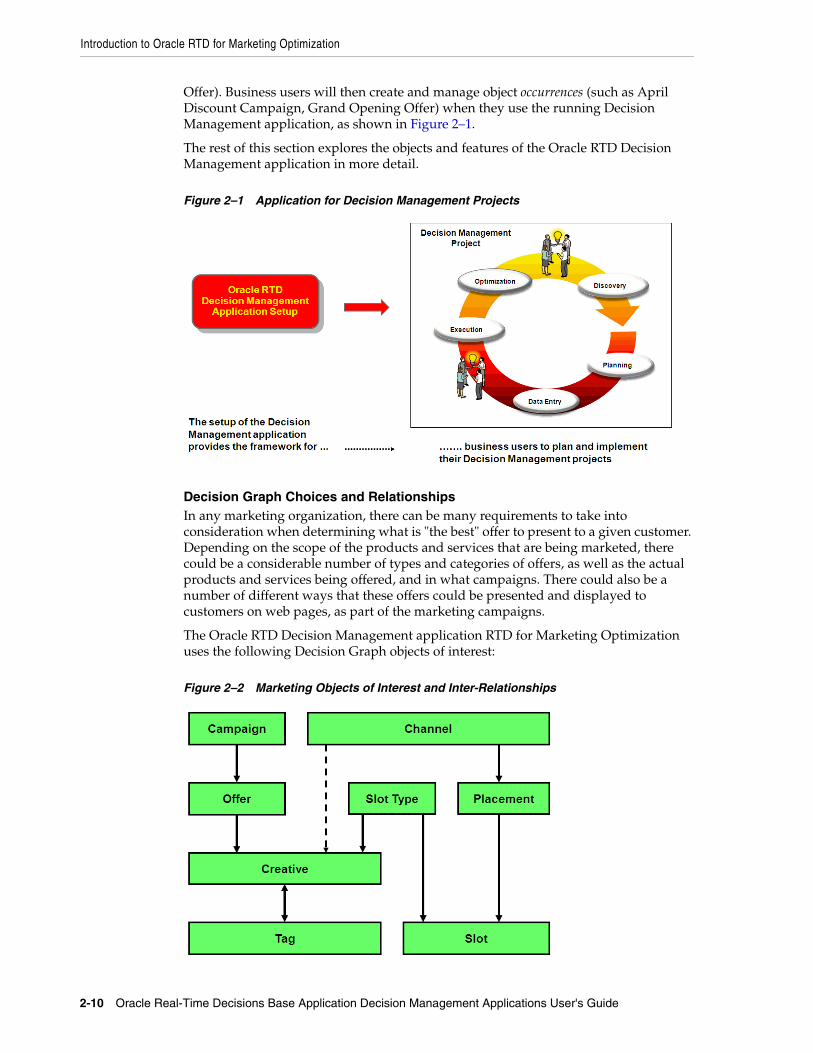
Offer). Business users will then create and manage object occurrences (such as April Discount Campaign, Grand Opening Offer) when they use the running Decision Management application, as shown in Figure 2–1.
The rest of this section explores the objects and features of the Oracle RTD Decision Management application in more detail.
Figure 2–1 Application for Decision Management Projects
Decision Graph Choices and RelationshipsIn any marketing organization, there can be many requirements to take into consideration when determining what is "the best" offer to present to a given customer. Depending on the scope of the products and services that are being marketed, there could be a considerable number of types and categories of offers, as well as the actual products and services being offered, and in what campaigns. There could also be a number of different ways that these offers could be presented and displayed to customers on web pages, as part of the marketing campaigns.
The Oracle RTD Decision Management application RTD for Marketing Optimization uses the following Decision Graph objects of interest:
Figure 2–2 Marketing Objects of Interest and Inter-Relationships
Introduction to Oracle RTD for Marketing Optimization
Introduction to Oracle RTD for Marketing Optimization 2-11
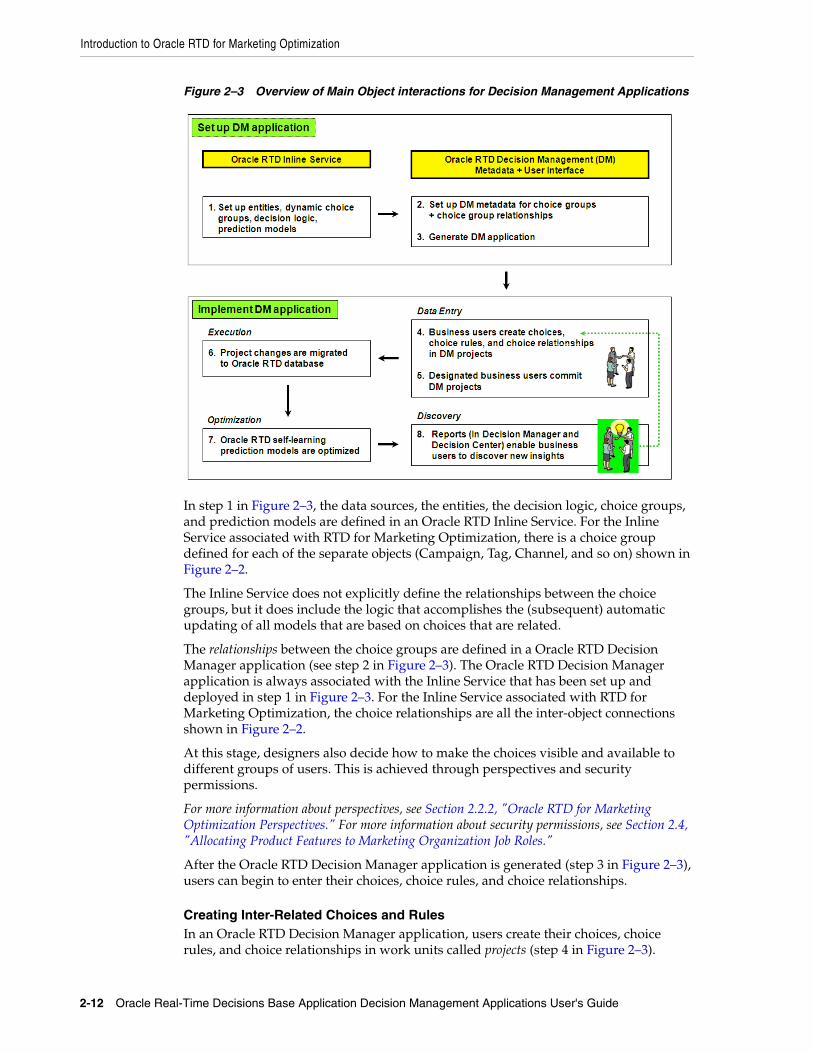
The relationships are represented by the arrowed lines, according to the following conventions:
■ In lines with a single arrow, the direction of the arrow indicates a one-to-many relationship. Double arrow lines represent many-to-many relationships.
■ A solid line represents a mandatory relationship, and a broken line represents an optional relationship
So, for example (with the relationships described as generically as possible):
■ Each campaign consists of zero, one, or more offers
■ Each offer must belong to exactly one campaign
■ Each offer consists of zero, one, or more creatives
A creative can be thought of as specific content used to deliver an offer. For example, text content and image content could be two types of creative for the same offer.
■ Each creative can have zero, one or more tags, and each tag may be associated with zero, one or more creatives
■ Each channel may be related to zero, one, or more creatives
■ Each creative must belong to exactly one offer and must be associated with exactly one slot type
■ Each creative may be associated with one (and only one) channel, but does not have to be
In addition to the choices that are the key components of any Decision Management application, business users must also decide on which data the choices are to based, such as details of customers and their preferences, together with the rules and decision logic to determine the best choice recommendations in the business applications.
Defining the Decision Management Application Components and InteractionsThe definition of all the Oracle RTD components to serve customer business applications is achieved through two components, the Oracle RTD Inline Service and the Oracle RTD Decision Management system.
The main Oracle RTD interactions are shown in Figure 2–3, and referenced in this and later sections.
Introduction to Oracle RTD for Marketing Optimization
2-12 Oracle Real-Time Decisions Base Application Decision Management Applications User's Guide
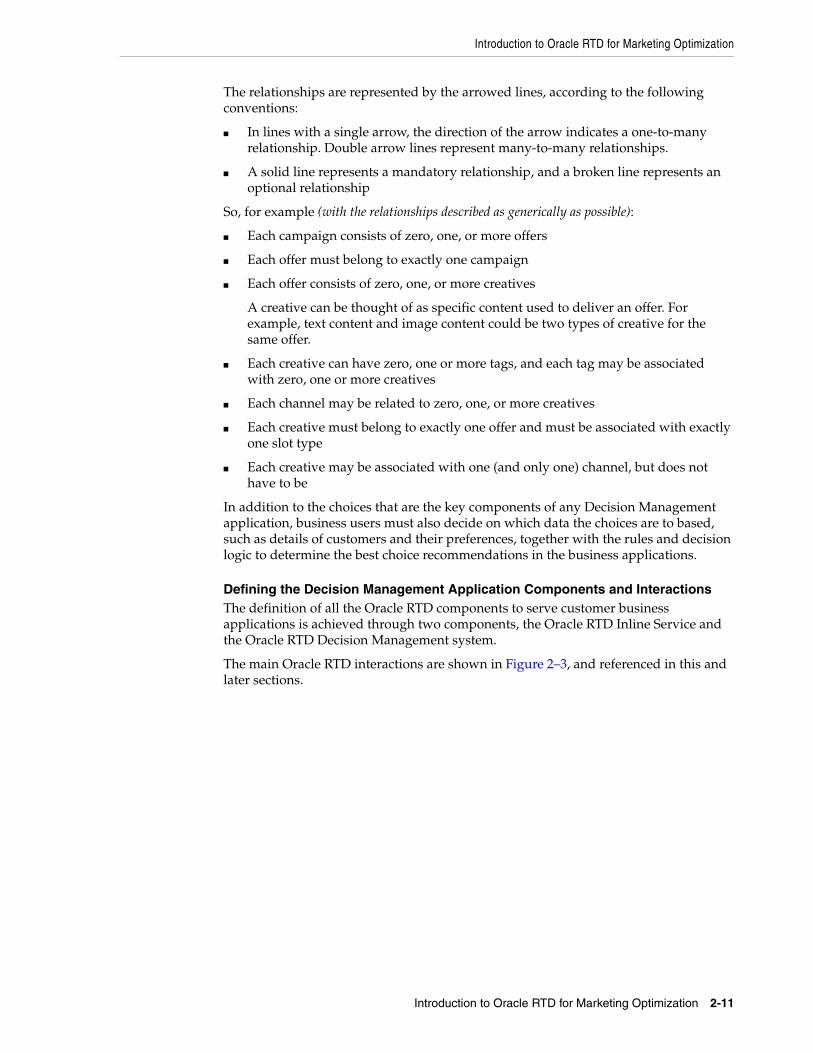
Figure 2–3 Overview of Main Object interactions for Decision Management Applications
In step 1 in Figure 2–3, the data sources, the entities, the decision logic, choice groups, and prediction models are defined in an Oracle RTD Inline Service. For the Inline Service associated with RTD for Marketing Optimization, there is a choice group defined for each of the separate objects (Campaign, Tag, Channel, and so on) shown in Figure 2–2.
The Inline Service does not explicitly define the relationships between the choice groups, but it does include the logic that accomplishes the (subsequent) automatic updating of all models that are based on choices that are related.
The relationships between the choice groups are defined in a Oracle RTD Decision Manager application (see step 2 in Figure 2–3). The Oracle RTD Decision Manager application is always associated with the Inline Service that has been set up and deployed in step 1 in Figure 2–3. For the Inline Service associated with RTD for Marketing Optimization, the choice relationships are all the inter-object connections shown in Figure 2–2.
At this stage, designers also decide how to make the choices visible and available to different groups of users. This is achieved through perspectives and security permissions.
For more information about perspectives, see Section 2.2.2, "Oracle RTD for Marketing Optimization Perspectives." For more information about security permissions, see Section 2.4, "Allocating Product Features to Marketing Organization Job Roles."
After the Oracle RTD Decision Manager application is generated (step 3 in Figure 2–3), users can begin to enter their choices, choice rules, and choice relationships.
Creating Inter-Related Choices and RulesIn an Oracle RTD Decision Manager application, users create their choices, choice rules, and choice relationships in work units called projects (step 4 in Figure 2–3).
Introduction to Oracle RTD for Marketing Optimization
Introduction to Oracle RTD for Marketing Optimization 2-13
Projects can also include modification and deletion of existing choice data and their rules and relationships.
After each project is committed (step 5 in Figure 2–3), all the changes made in that project (that is, all the new, modified, and deleted choices, choice eligibility rules, and choice relationships), are transferred on an automatic, periodic basis, to the Inline Service (step 6 in Figure 2–3).
The models defined in the Inline Service that are associated with each of the related choices are updated - in effect, the models become inter-related models.
Optimizing the RecommendationsThe inter-related models can now optimize the recommendations for the applications that use the Inline Service (step 7 in Figure 2–3).
Discovering New InsightsThrough reports available in Decision Center and Decision Manager, business users can discover new insights that enable them to optimize their business processes. They may create new Decision Management projects, to continue the process of adding new choices, choice eligibility rules, and choice relationships, and modifying their existing choice data (step 8 in Figure 2–3).
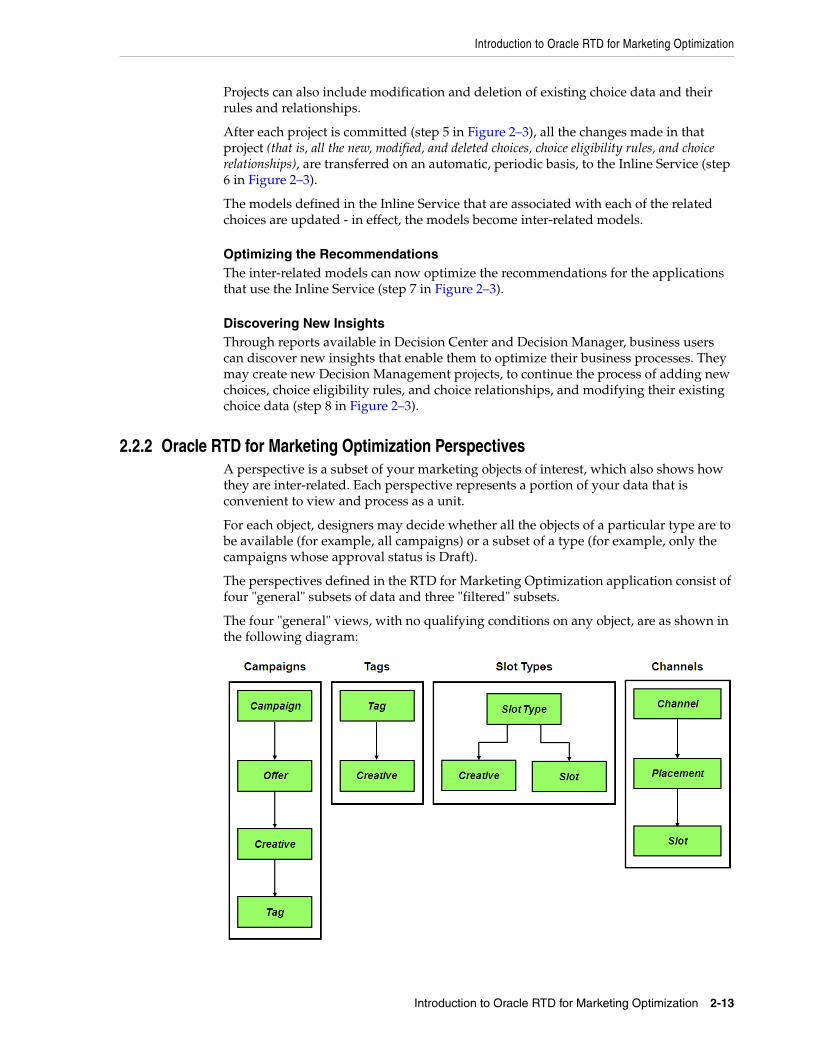
2.2.2 Oracle RTD for Marketing Optimization PerspectivesA perspective is a subset of your marketing objects of interest, which also shows how they are inter-related. Each perspective represents a portion of your data that is convenient to view and process as a unit.
For each object, designers may decide whether all the objects of a particular type are to be available (for example, all campaigns) or a subset of a type (for example, only the campaigns whose approval status is Draft).
The perspectives defined in the RTD for Marketing Optimization application consist of four "general" subsets of data and three "filtered" subsets.
The four "general" views, with no qualifying conditions on any object, are as shown in the following diagram:
Introduction to Oracle RTD for Marketing Optimization
2-14 Oracle Real-Time Decisions Base Application Decision Management Applications User's Guide
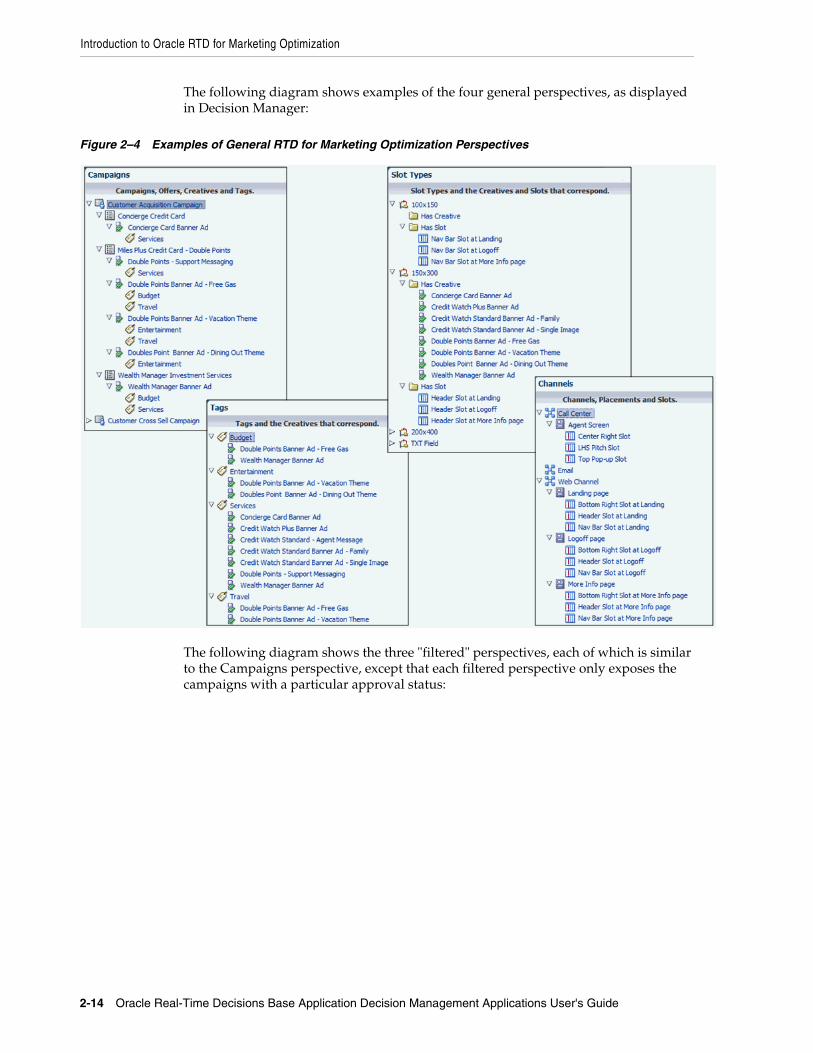
The following diagram shows examples of the four general perspectives, as displayed in Decision Manager:
Figure 2–4 Examples of General RTD for Marketing Optimization Perspectives
The following diagram shows the three "filtered" perspectives, each of which is similar to the Campaigns perspective, except that each filtered perspective only exposes the campaigns with a particular approval status:

Using Oracle RTD for Marketing Optimization
Introduction to Oracle RTD for Marketing Optimization 2-15
Users can be granted permissions to work on different perspectives. In this way, perspectives can be designed and directed towards particular functional roles in your organization. For a possible function-to-job-role breakdown in a marketing organization, see Section 2.4, "Allocating Product Features to Marketing Organization Job Roles."
2.3 Using Oracle RTD for Marketing Optimization
For each of the operations listed in this section, it is assumed that you have been granted the correct permission or permissions by your Oracle RTD Decision Management administrator to perform that operation.
For general information about the layout of the user interface screens and screen areas, see Section A.1, "Decision Manager User Interface Schematic."
Terminology: The general terms used throughout this section and other sections to cover all the marketing objects of interest are choices and choice groups.
So, campaigns, offers, channels are all different choice groups.
An individual Deep Discount campaign and an offer called Sixty-Percent-Off-Everything are examples of specific choices.
General Note: This section contains a combination of general choice management options and examples oriented to the choices available in RTD for Marketing Optimization.
The convention used in this section is that the general descriptions appear in standard font, while the examples and descriptions oriented specifically to RTD for Marketing Optimization appear in italics.
More general information is also available in Appendix A.1, "Decision Manager User Interface Schematic."
Using Oracle RTD for Marketing Optimization
2-16 Oracle Real-Time Decisions Base Application Decision Management Applications User's Guide
A Decision Management application can be set so that either multiple users can update a choice, or users can operate in a special "ownership=on" mode, which is basically a "single-user-update" mode.
In this mode, there is a provision for users who are granted the special "own" permission, such as system administrators or managers, to be able to override the single user mode and perform choice updates. In this "ownership=on" mode, the choices appear with an extra attribute Owner.
The following scenario includes the implicit provision that two different departments/users can edit the same choice. Decision Management application designers can set up applications either to allow multi-user updating of the same choice, or to enforce single-user update mode of a choice.
For more information on ownership, see the section "Config XML File" in Oracle Real-Time Decisions Base Application Decision Management Installation and Configuration Guide.
This section contains the following topics:
■ Section 2.3.1, "Creating Projects"
■ Section 2.3.2, "Viewing and Searching for Projects"
■ Section 2.3.3, "Editing Projects"
■ Section 2.3.4, "Viewing, Searching and Adding Audit Trail Information for Projects"
■ Section 2.3.5, "Viewing, Searching and Adding Main Repository Audit Trail Information"
■ Section 2.3.6, "Committing Projects"
■ Section 2.3.7, "Discarding Projects"
■ Section 2.3.8, "Creating Choices"
■ Section 2.3.9, "Viewing and Searching for Choices"
■ Section 2.3.10, "Viewing, Searching and Adding to Choice Audit Trail Comments"
■ Section 2.3.11, "Editing Choices"
■ Section 2.3.12, "Deleting Choices from the Main Repository"
2.3.1 Creating Projects
Note: A project is a unit of work processing, that stores a set of pending changes to the Main Repository.
The Main Repository is the database containing the dynamic choices that may be accessed by and used for processing Oracle RTD decisions in customer applications. This set of choices is updated each time a project is committed.
You can create, edit, and delete choices in a project. While recorded as significant actions within the project, these pending changes will only take effect in the Main Repository when you commit the project. If you discard the project (also known as deleting the project), all the changes in that project are discarded.
Using Oracle RTD for Marketing Optimization
Introduction to Oracle RTD for Marketing Optimization 2-17
[For general information about creating projects, see Section A.7, "Create Project."]
Your context can be either Main Repository or an active project.
1. Click New Project.
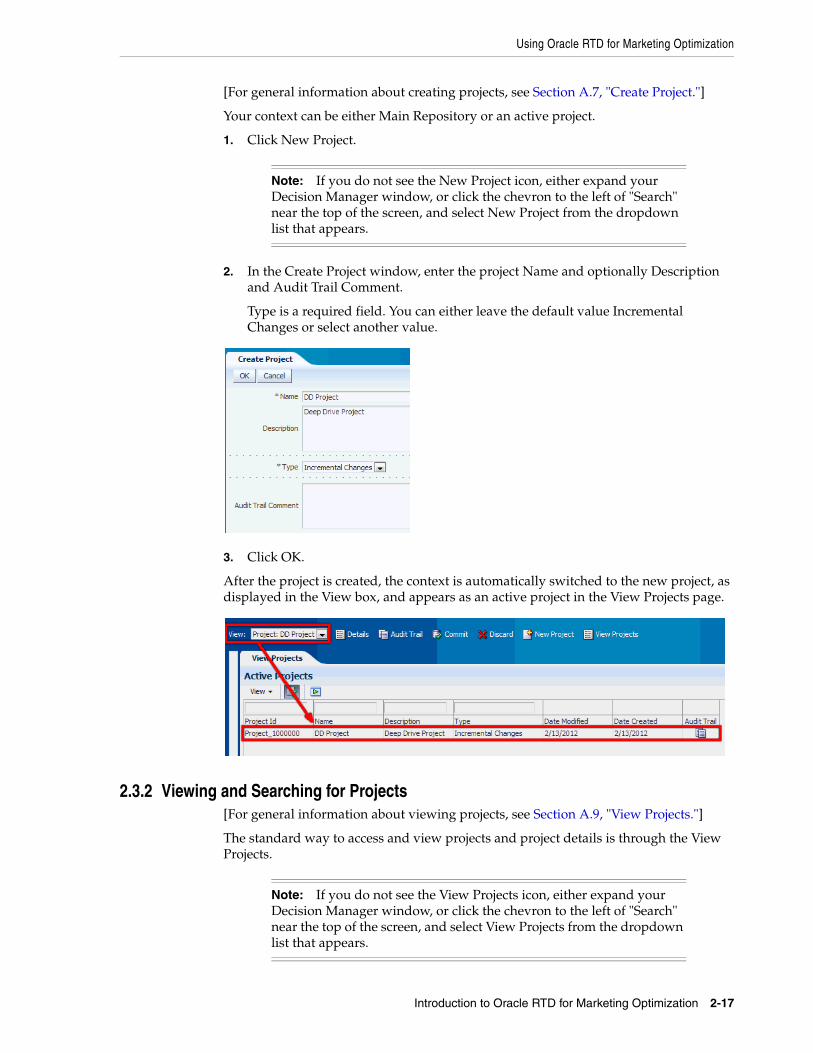
2. In the Create Project window, enter the project Name and optionally Description and Audit Trail Comment.
Type is a required field. You can either leave the default value Incremental Changes or select another value.
3. Click OK.
After the project is created, the context is automatically switched to the new project, as displayed in the View box, and appears as an active project in the View Projects page.
2.3.2 Viewing and Searching for Projects[For general information about viewing projects, see Section A.9, "View Projects."]
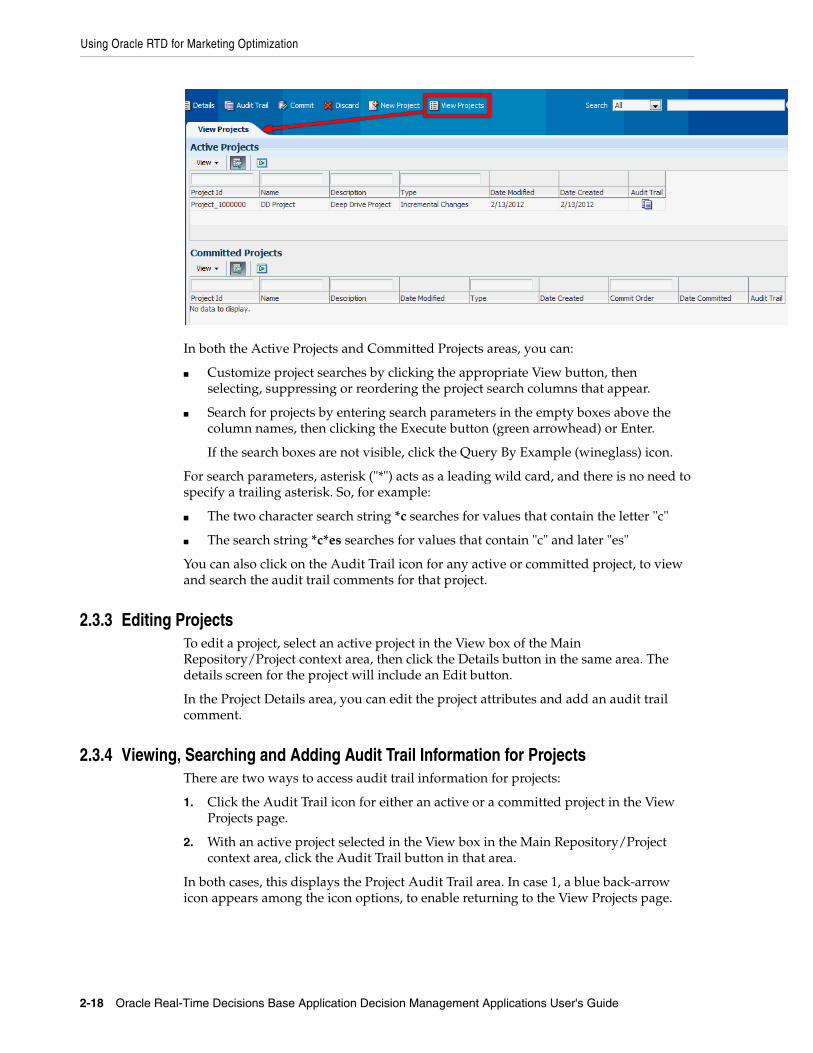
The standard way to access and view projects and project details is through the View Projects.
Note: If you do not see the New Project icon, either expand your Decision Manager window, or click the chevron to the left of "Search" near the top of the screen, and select New Project from the dropdown list that appears.
Note: If you do not see the View Projects icon, either expand your Decision Manager window, or click the chevron to the left of "Search" near the top of the screen, and select View Projects from the dropdown list that appears.
Using Oracle RTD for Marketing Optimization
2-18 Oracle Real-Time Decisions Base Application Decision Management Applications User's Guide
In both the Active Projects and Committed Projects areas, you can:
■ Customize project searches by clicking the appropriate View button, then selecting, suppressing or reordering the project search columns that appear.
■ Search for projects by entering search parameters in the empty boxes above the column names, then clicking the Execute button (green arrowhead) or Enter.
If the search boxes are not visible, click the Query By Example (wineglass) icon.
For search parameters, asterisk ("*") acts as a leading wild card, and there is no need to specify a trailing asterisk. So, for example:
■ The two character search string *c searches for values that contain the letter "c"
■ The search string *c*es searches for values that contain "c" and later "es"
You can also click on the Audit Trail icon for any active or committed project, to view and search the audit trail comments for that project.
2.3.3 Editing ProjectsTo edit a project, select an active project in the View box of the Main Repository/Project context area, then click the Details button in the same area. The details screen for the project will include an Edit button.
In the Project Details area, you can edit the project attributes and add an audit trail comment.
2.3.4 Viewing, Searching and Adding Audit Trail Information for ProjectsThere are two ways to access audit trail information for projects:
1. Click the Audit Trail icon for either an active or a committed project in the View Projects page.
2. With an active project selected in the View box in the Main Repository/Project context area, click the Audit Trail button in that area.
In both cases, this displays the Project Audit Trail area. In case 1, a blue back-arrow icon appears among the icon options, to enable returning to the View Projects page.
Using Oracle RTD for Marketing Optimization
Introduction to Oracle RTD for Marketing Optimization 2-19
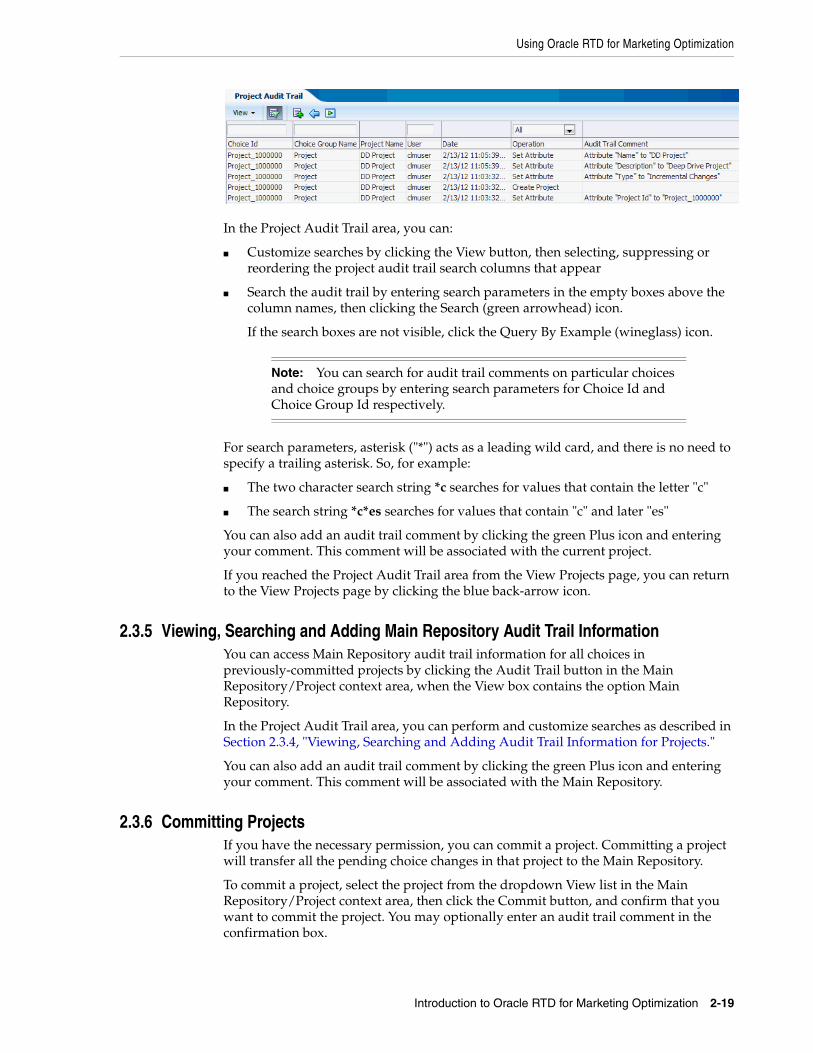
In the Project Audit Trail area, you can:
■ Customize searches by clicking the View button, then selecting, suppressing or reordering the project audit trail search columns that appear
■ Search the audit trail by entering search parameters in the empty boxes above the column names, then clicking the Search (green arrowhead) icon.
If the search boxes are not visible, click the Query By Example (wineglass) icon.
For search parameters, asterisk ("*") acts as a leading wild card, and there is no need to specify a trailing asterisk. So, for example:
■ The two character search string *c searches for values that contain the letter "c"
■ The search string *c*es searches for values that contain "c" and later "es"
You can also add an audit trail comment by clicking the green Plus icon and entering your comment. This comment will be associated with the current project.
If you reached the Project Audit Trail area from the View Projects page, you can return to the View Projects page by clicking the blue back-arrow icon.
2.3.5 Viewing, Searching and Adding Main Repository Audit Trail InformationYou can access Main Repository audit trail information for all choices in previously-committed projects by clicking the Audit Trail button in the Main Repository/Project context area, when the View box contains the option Main Repository.
In the Project Audit Trail area, you can perform and customize searches as described in Section 2.3.4, "Viewing, Searching and Adding Audit Trail Information for Projects."
You can also add an audit trail comment by clicking the green Plus icon and entering your comment. This comment will be associated with the Main Repository.
2.3.6 Committing ProjectsIf you have the necessary permission, you can commit a project. Committing a project will transfer all the pending choice changes in that project to the Main Repository.
To commit a project, select the project from the dropdown View list in the Main Repository/Project context area, then click the Commit button, and confirm that you want to commit the project. You may optionally enter an audit trail comment in the confirmation box.
Note: You can search for audit trail comments on particular choices and choice groups by entering search parameters for Choice Id and Choice Group Id respectively.
Using Oracle RTD for Marketing Optimization
2-20 Oracle Real-Time Decisions Base Application Decision Management Applications User's Guide
After the project is committed, the context is automatically switched to the Main Repository, as displayed in the View box.
If you click View Projects, the newly-committed project appears in the Committed Projects area. You can click the Audit Trail icon for the project to see a list of all the operations that occurred when the project was active, and the users that performed those operations.
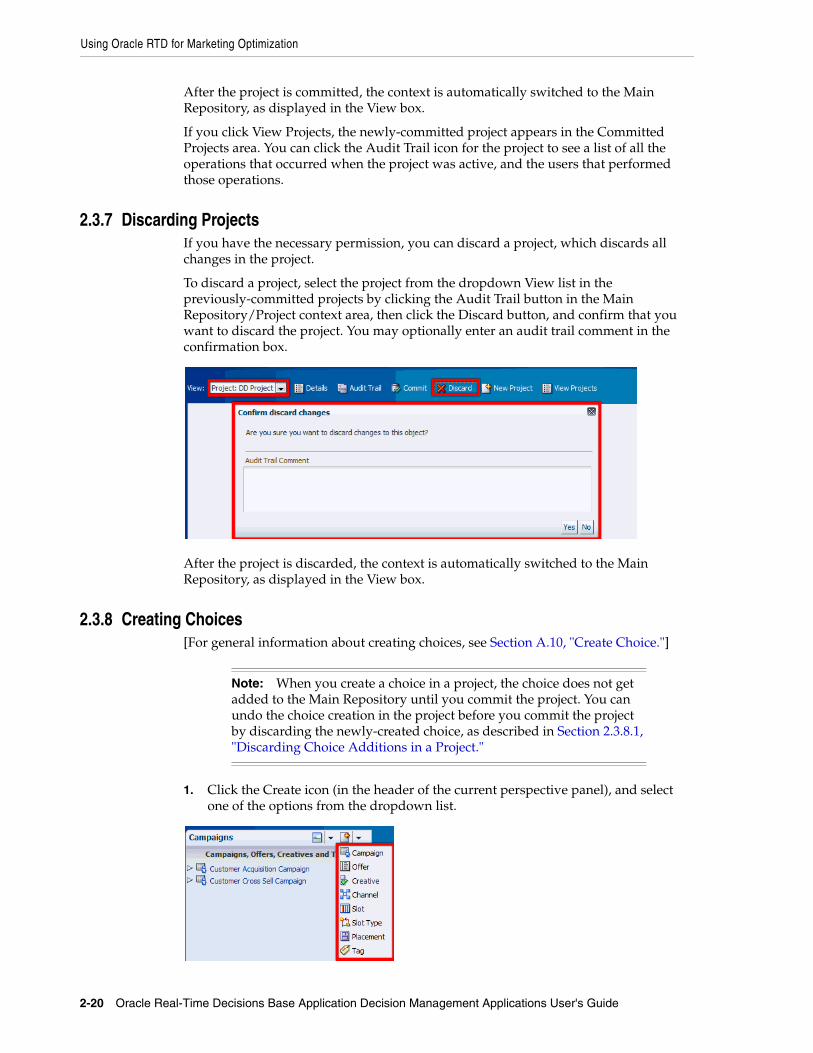
2.3.7 Discarding ProjectsIf you have the necessary permission, you can discard a project, which discards all changes in the project.
To discard a project, select the project from the dropdown View list in the previously-committed projects by clicking the Audit Trail button in the Main Repository/Project context area, then click the Discard button, and confirm that you want to discard the project. You may optionally enter an audit trail comment in the confirmation box.
After the project is discarded, the context is automatically switched to the Main Repository, as displayed in the View box.
2.3.8 Creating Choices[For general information about creating choices, see Section A.10, "Create Choice."]
1. Click the Create icon (in the header of the current perspective panel), and select one of the options from the dropdown list.
Note: When you create a choice in a project, the choice does not get added to the Main Repository until you commit the project. You can undo the choice creation in the project before you commit the project by discarding the newly-created choice, as described in Section 2.3.8.1, "Discarding Choice Additions in a Project."
Using Oracle RTD for Marketing Optimization
Introduction to Oracle RTD for Marketing Optimization 2-21
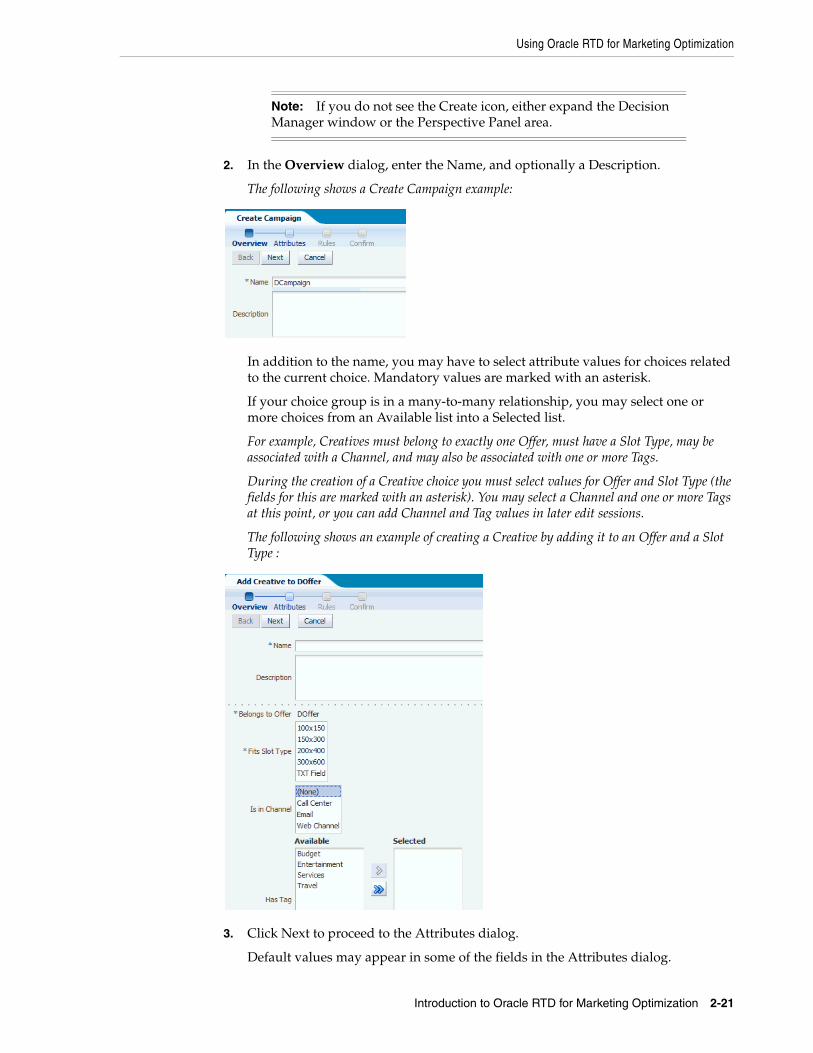
2. In the Overview dialog, enter the Name, and optionally a Description.
The following shows a Create Campaign example:
In addition to the name, you may have to select attribute values for choices related to the current choice. Mandatory values are marked with an asterisk.
If your choice group is in a many-to-many relationship, you may select one or more choices from an Available list into a Selected list.
For example, Creatives must belong to exactly one Offer, must have a Slot Type, may be associated with a Channel, and may also be associated with one or more Tags.
During the creation of a Creative choice you must select values for Offer and Slot Type (the fields for this are marked with an asterisk). You may select a Channel and one or more Tags at this point, or you can add Channel and Tag values in later edit sessions.
The following shows an example of creating a Creative by adding it to an Offer and a Slot Type :
3. Click Next to proceed to the Attributes dialog.
Default values may appear in some of the fields in the Attributes dialog.
Note: If you do not see the Create icon, either expand the Decision Manager window or the Perspective Panel area.

Using Oracle RTD for Marketing Optimization
2-22 Oracle Real-Time Decisions Base Application Decision Management Applications User's Guide
4. In the Attributes dialog, enter or select values for all mandatory fields (marked with an asterisk), and as many of the optional fields as you require.
5. Click Next to proceed to the Rules dialog.
6. In the Rules dialog, optionally enter the rules for your choice in the Rule Editor frame that appears.
For detailed information about entering rules, see Section 12.10, "Using Rule Editors" in Oracle Real-Time Decisions Platform Developer's Guide.
The following shows an example of a rule added to a Campaign, specifying that the Code must not be equal to XXX:
7. Click Next to proceed to the Confirm dialog, then click OK.
If you want to create choices that are related to your newly created choice, you can perform the following operations, either in the same session or in later sessions:
■ Repeat the complete process described in this section, selecting the new choice to create when you click the Create icon described in step 1.
■ Click the special "Add ..." buttons that appear in the details screen for your newly created choice, then perform steps 2 to 7 as described in this section. Specifically, the first step to perform is one of the following:
■ In the Campaign details screen, click Add Offer
■ In the Offer details screen, click Add Creative
■ In the Tag details screen, click Add Creative
■ In the Channel details screen, click Add Creative or Add Placement
■ In the Placement details screen, click Add Slot
■ In the Slot Type details screen, click Add Creative or Add Slot
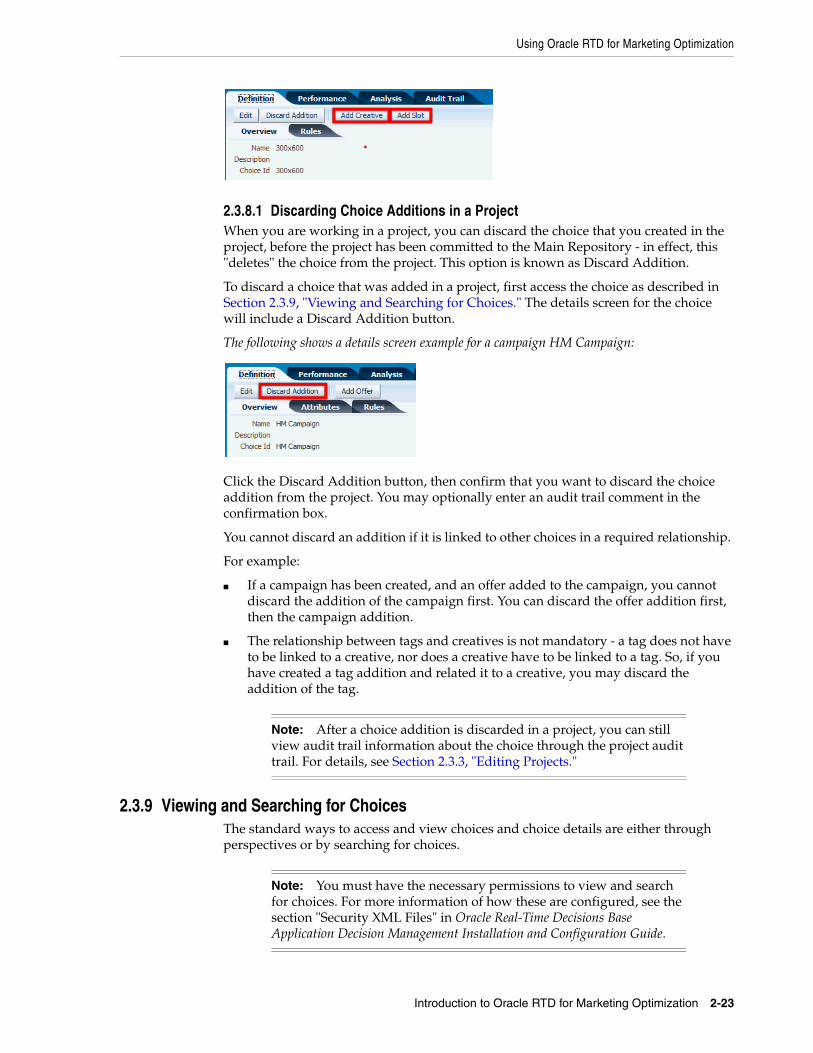
The following shows an example of the Choice details area after the successful creation of a Slot Type:
Using Oracle RTD for Marketing Optimization
Introduction to Oracle RTD for Marketing Optimization 2-23
2.3.8.1 Discarding Choice Additions in a ProjectWhen you are working in a project, you can discard the choice that you created in the project, before the project has been committed to the Main Repository - in effect, this "deletes" the choice from the project. This option is known as Discard Addition.
To discard a choice that was added in a project, first access the choice as described in Section 2.3.9, "Viewing and Searching for Choices." The details screen for the choice will include a Discard Addition button.
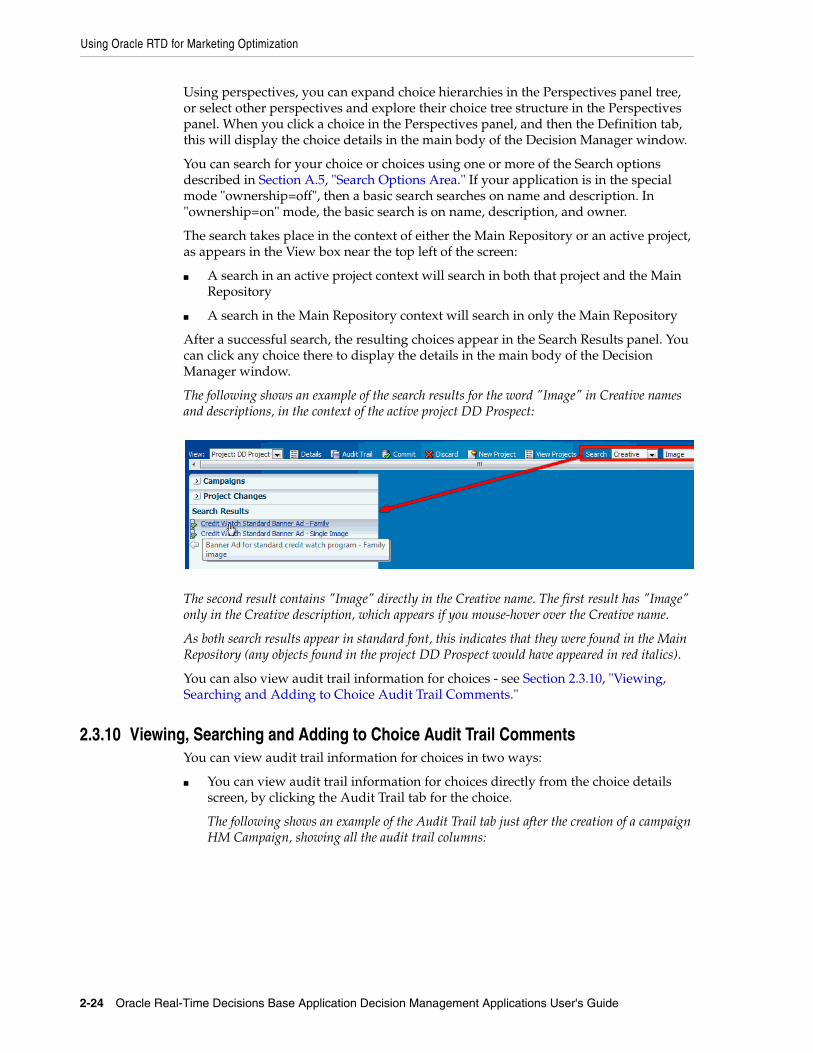
The following shows a details screen example for a campaign HM Campaign:
Click the Discard Addition button, then confirm that you want to discard the choice addition from the project. You may optionally enter an audit trail comment in the confirmation box.
You cannot discard an addition if it is linked to other choices in a required relationship.
For example:
■ If a campaign has been created, and an offer added to the campaign, you cannot discard the addition of the campaign first. You can discard the offer addition first, then the campaign addition.
■ The relationship between tags and creatives is not mandatory - a tag does not have to be linked to a creative, nor does a creative have to be linked to a tag. So, if you have created a tag addition and related it to a creative, you may discard the addition of the tag.
2.3.9 Viewing and Searching for ChoicesThe standard ways to access and view choices and choice details are either through perspectives or by searching for choices.
Note: After a choice addition is discarded in a project, you can still view audit trail information about the choice through the project audit trail. For details, see Section 2.3.3, "Editing Projects."
Note: You must have the necessary permissions to view and search for choices. For more information of how these are configured, see the section "Security XML Files" in Oracle Real-Time Decisions Base Application Decision Management Installation and Configuration Guide.
Using Oracle RTD for Marketing Optimization
2-24 Oracle Real-Time Decisions Base Application Decision Management Applications User's Guide
Using perspectives, you can expand choice hierarchies in the Perspectives panel tree, or select other perspectives and explore their choice tree structure in the Perspectives panel. When you click a choice in the Perspectives panel, and then the Definition tab, this will display the choice details in the main body of the Decision Manager window.
You can search for your choice or choices using one or more of the Search options described in Section A.5, "Search Options Area." If your application is in the special mode "ownership=off", then a basic search searches on name and description. In "ownership=on" mode, the basic search is on name, description, and owner.
The search takes place in the context of either the Main Repository or an active project, as appears in the View box near the top left of the screen:
■ A search in an active project context will search in both that project and the Main Repository
■ A search in the Main Repository context will search in only the Main Repository
After a successful search, the resulting choices appear in the Search Results panel. You can click any choice there to display the details in the main body of the Decision Manager window.
The following shows an example of the search results for the word "Image" in Creative names and descriptions, in the context of the active project DD Prospect:
The second result contains "Image" directly in the Creative name. The first result has "Image" only in the Creative description, which appears if you mouse-hover over the Creative name.
As both search results appear in standard font, this indicates that they were found in the Main Repository (any objects found in the project DD Prospect would have appeared in red italics).
You can also view audit trail information for choices - see Section 2.3.10, "Viewing, Searching and Adding to Choice Audit Trail Comments."
2.3.10 Viewing, Searching and Adding to Choice Audit Trail CommentsYou can view audit trail information for choices in two ways:
■ You can view audit trail information for choices directly from the choice details screen, by clicking the Audit Trail tab for the choice.
The following shows an example of the Audit Trail tab just after the creation of a campaign HM Campaign, showing all the audit trail columns:

Using Oracle RTD for Marketing Optimization
Introduction to Oracle RTD for Marketing Optimization 2-25
The audit trail search options are similar to those described in Section 2.3.4, "Viewing, Searching and Adding Audit Trail Information for Projects."
If you add an audit trail comment from the choice Audit Trail tab, it is automatically associated with the current choice in the choice details area.
■ You can view audit trail information for choices indirectly, by viewing project audit trail information, then using choice information as a search parameter in the Project Audit Trail tab. For more details, see Section 2.3.4, "Viewing, Searching and Adding Audit Trail Information for Projects."
2.3.11 Editing Choices
To edit a choice, access the choice as described in Section 2.3.9, "Viewing and Searching for Choices." The details screen for the choice will include an Edit button.
Click the Edit button.
The following shows an example of the Overview tab for a campaign HM Campaign, ready for editing:
Note: When you edit a choice in a project, either a newly created choice or a choice that exists in the Main Repository, all the changes you make are within the project only - they do not reach the Main Repository until you commit the project.
To change a newly created choice, you simply edit the choice. This you can do many times before project committal. If you want to prevent the new choice from going to the Main Repository, you discard the choice addition, as described in Section 2.3.8.1, "Discarding Choice Additions in a Project."
You can also edit a Main Repository choice many times before project committal. If you want to undo all the changes made to that choice in the project, you discard the choice changes, as described in Section 2.3.11.1, "Discarding Changes to a Main Repository Choice."
Using Oracle RTD for Marketing Optimization
2-26 Oracle Real-Time Decisions Base Application Decision Management Applications User's Guide
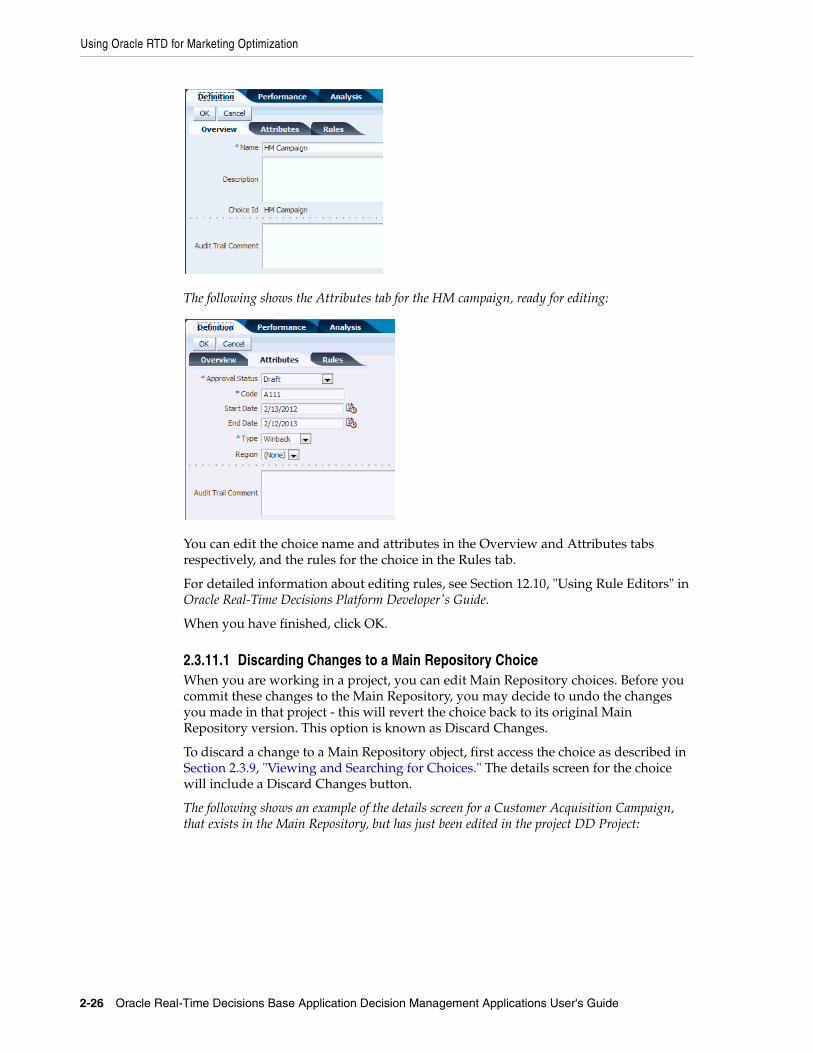
The following shows the Attributes tab for the HM campaign, ready for editing:
You can edit the choice name and attributes in the Overview and Attributes tabs respectively, and the rules for the choice in the Rules tab.
For detailed information about editing rules, see Section 12.10, "Using Rule Editors" in Oracle Real-Time Decisions Platform Developer's Guide.
When you have finished, click OK.
2.3.11.1 Discarding Changes to a Main Repository ChoiceWhen you are working in a project, you can edit Main Repository choices. Before you commit these changes to the Main Repository, you may decide to undo the changes you made in that project - this will revert the choice back to its original Main Repository version. This option is known as Discard Changes.
To discard a change to a Main Repository object, first access the choice as described in Section 2.3.9, "Viewing and Searching for Choices." The details screen for the choice will include a Discard Changes button.
The following shows an example of the details screen for a Customer Acquisition Campaign, that exists in the Main Repository, but has just been edited in the project DD Project:

Using Oracle RTD for Marketing Optimization
Introduction to Oracle RTD for Marketing Optimization 2-27
Click the Discard Changes button, then confirm that you want to discard the changes made in the project. You may optionally enter an audit trail comment in the confirmation box.
2.3.12 Deleting Choices from the Main RepositoryTo delete a choice from the Main Repository, you must first be working in an active project. You may have edited the choice in that project or not.
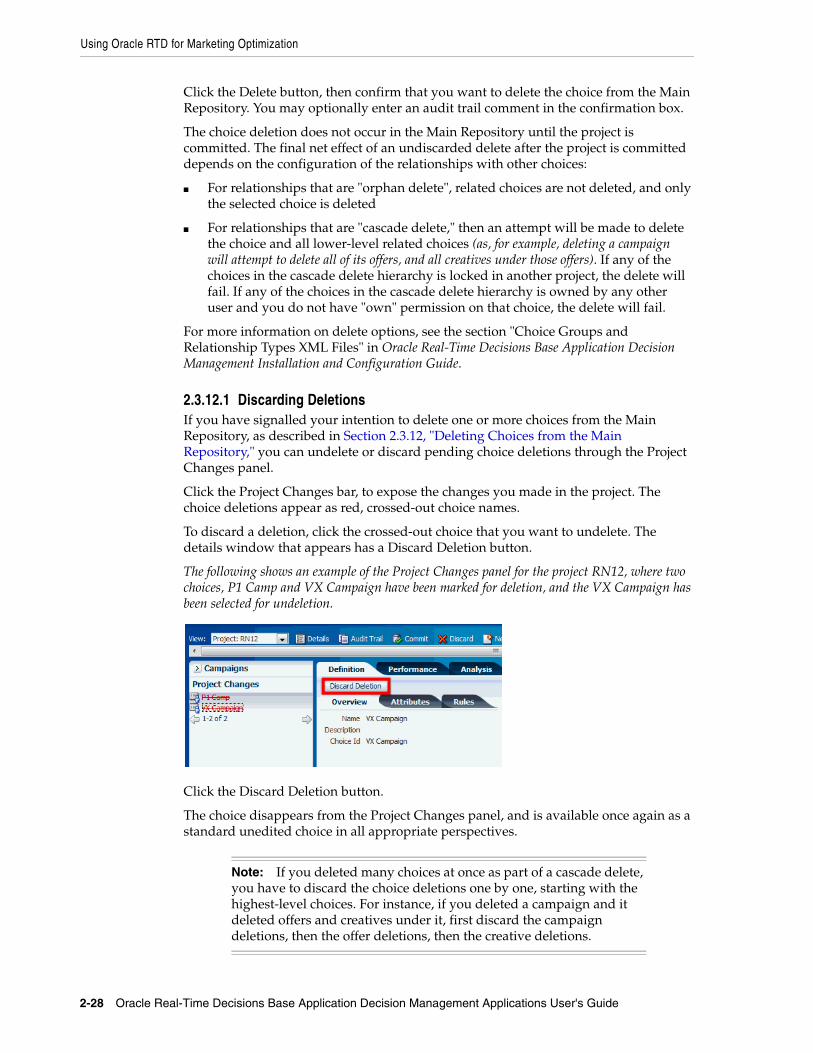
In the project, you effectively prepare to delete a choice. As with all changes in a project, the actual choice deletion does not occur in the Main Repository until you commit the project. For example, you may decide to undo your choice deletion before you commit the project (see Section 2.3.12.1, "Discarding Deletions").
To start the process of deleting the choice from the Main Repository, first access the choice as described in Section 2.3.9, "Viewing and Searching for Choices." The details screen for the choice will include a Delete button.
The following shows an example of the details screen for a Customer Cross Sell Campaign, that has not yet been edited in the project DD project:
The following shows an example of the details screen for a Customer Acquisition Campaign, after it has been edited in the project DD project:
Using Oracle RTD for Marketing Optimization
2-28 Oracle Real-Time Decisions Base Application Decision Management Applications User's Guide
Click the Delete button, then confirm that you want to delete the choice from the Main Repository. You may optionally enter an audit trail comment in the confirmation box.
The choice deletion does not occur in the Main Repository until the project is committed. The final net effect of an undiscarded delete after the project is committed depends on the configuration of the relationships with other choices:
■ For relationships that are "orphan delete", related choices are not deleted, and only the selected choice is deleted
■ For relationships that are "cascade delete," then an attempt will be made to delete the choice and all lower-level related choices (as, for example, deleting a campaign will attempt to delete all of its offers, and all creatives under those offers). If any of the choices in the cascade delete hierarchy is locked in another project, the delete will fail. If any of the choices in the cascade delete hierarchy is owned by any other user and you do not have "own" permission on that choice, the delete will fail.
For more information on delete options, see the section "Choice Groups and Relationship Types XML Files" in Oracle Real-Time Decisions Base Application Decision Management Installation and Configuration Guide.
2.3.12.1 Discarding DeletionsIf you have signalled your intention to delete one or more choices from the Main Repository, as described in Section 2.3.12, "Deleting Choices from the Main Repository," you can undelete or discard pending choice deletions through the Project Changes panel.
Click the Project Changes bar, to expose the changes you made in the project. The choice deletions appear as red, crossed-out choice names.
To discard a deletion, click the crossed-out choice that you want to undelete. The details window that appears has a Discard Deletion button.
The following shows an example of the Project Changes panel for the project RN12, where two choices, P1 Camp and VX Campaign have been marked for deletion, and the VX Campaign has been selected for undeletion.
Click the Discard Deletion button.
The choice disappears from the Project Changes panel, and is available once again as a standard unedited choice in all appropriate perspectives.
Note: If you deleted many choices at once as part of a cascade delete, you have to discard the choice deletions one by one, starting with the highest-level choices. For instance, if you deleted a campaign and it deleted offers and creatives under it, first discard the campaign deletions, then the offer deletions, then the creative deletions.
Allocating Product Features to Marketing Organization Job Roles
Introduction to Oracle RTD for Marketing Optimization 2-29
2.4 Allocating Product Features to Marketing Organization Job RolesWhile each marketing organization has its own unique departmental structure, this section illustrates one possible way by which you can allocate the tasks available for RTD for Marketing Optimization users to job roles in a marketing organization.
The basic principle is that individual users are allocated specific permissions, at several levels: perspective, project, choice group, and choice view page. Without the right permissions, you will not be able to perform particular tasks on particular objects in the application.
The details of setting up permissions are not described in this manual, but the basic principles indicate how these permissions could be used in the process of allocating tasks to job roles (for more information about how permissions are configured, see the section "Security XML Files" in Oracle Real-Time Decisions Base Application Decision Management Installation and Configuration Guide).
The basic types of permission are as follows:
■ Perspective level
You must have View permission on a perspective to see the perspective. You will need further permissions if you want to create, update, or delete choices in a perspective.
■ Choice group level
For any choice group, you need individual Read, Create, Update, and Delete permissions to perform the associated view, create, update, and delete tasks on a choice of that particular choice group.
■ Project level
The individual permissions at the project level are Create Project, Update Project, Discard Project (this allows you to delete a project, and all the changes in that project), Commit Project (this allows you to commit the project changes to the database).
■ Choice view page level
There are page permissions for each of the pages for a choice group for each of the options view, edit, and create, therefore each of the pages available when creating, viewing, and editing choices requires a page permission. You must also have the choice group level permissions to see these pages.
For instance, to see an "Attributes" create page, you must have both create permission on the choice group and create permission on the "Attributes" page.
Assume that there are four departments concerned with the overall process of creating and committing projects to add choices to your database:
■ Administration
Responsible for setting up and managing RTD for Marketing Optimization projects
■ Marketing
Responsible for setting up and managing choice content for the RTD for Marketing Optimization projects
■ Display Control
Responsible for setting up and managing the layout of the external sites that display choice information
Allocating Product Features to Marketing Organization Job Roles
2-30 Oracle Real-Time Decisions Base Application Decision Management Applications User's Guide
■ Approvals
Responsible for changing the approval statuses of choices
An example of the breakdown of the permissions for particular organization roles could be as follows:
■ The Administration department users will have the following permissions:
– Create Project, Update Project, Discard Project, Commit Project
– Read, Create, Update, and Delete permissions on all the choice groups
– Permissions to perform all actions on all choice view pages
■ The Marketing department users will have the following permissions:
– View permissions on all the perspectives
– Read, Create, Update, and Delete permissions on the choice groups Campaign, Offer, Creative, and Tag
– Permissions to perform all actions on all Campaign, Offer, Creative, and Tag choice view pages
■ The Display Control department users will have the following permissions:
– View permissions on the perspectives Channels, Slots by Slot Type, and Creatives by Slot Type
– Read, Create, Update, and Delete permissions on the choice groups Slot, Slot Type, Channel, and Placement
– Update permission on the Creative choice group
– Permissions to perform all actions on Slot, Slot Type, Channel, and Placement choice view pages
– View and update permissions on the Creative choice view pages
■ The Approvals department users will have the following permissions:
– View permissions on the perspectives Draft Campaigns, Pending Approval Campaigns, and Approved Campaigns
– Read and Update permissions on the choice groups Campaign, Offer, and Creative
– View and update permissions on the Campaign, Offer, and Creative choice view pages
Note: The following scenario includes the implicit provision that two different departments/users can edit the same choice. Decision Management application designers can set up applications either to allow multi-user updating of the same choice, or to enforce single-user update mode of a choice. For more details, see the "ownership" option in the section "Config XML File" in Oracle Real-Time Decisions Base Application Decision Management Installation and Configuration Guide.
The example here assumes that different users (in effect, different departments) can edit the same choice.
Job Role Oriented Example of Oracle RTD for Marketing Optimization Tasks
Introduction to Oracle RTD for Marketing Optimization 2-31
2.5 Job Role Oriented Example of Oracle RTD for Marketing Optimization Tasks
This section illustrates the use of some RTD for Marketing Optimization tasks, following the example of job roles and permissions described in Section 2.4, "Allocating Product Features to Marketing Organization Job Roles."
As an example, assume that the ZaxisZen Corporation wants to expand its core business of marketing large-site properties by running a test Showcase Properties campaign on the West Coast.
The ZaxisZen application design team has allocated the permissions to their specific ZXS department users as outlined in general in Section 2.4, "Allocating Product Features to Marketing Organization Job Roles," and has created the following outline specifications for how the project and choice tasks are to be performed using RTD for Marketing Optimization:
1. ZXS_Administration department (Login user clmadmin)
■ Create the Web Offers Rollout (WORP) project
2. ZXS_Marketing department (Login user clmadmin2)
■ Create Campaign Showcase Properties, with a rule that the end date is to be no later than June 28, 2013
■ Create Offer Regional Offers
■ Create Creative West Coast Properties, with slot type 200x400.
Set the approval status of all three choices to Draft
3. ZXS_Display_Control department (Login user clmauthor)
■ Create Slot Type 300x600
■ Update Creative West Coast Properties, setting slot type to 300x600
4. ZXS_Approvals department (Login user clmauthor2)
■ View the Draft campaigns perspective, and update the campaign Showcase Properties, changing the approval status to Approved
5. ZXS_Administration department (Login user clmadmin)
■ Commit the Web Offers Rollout (WORP) project changes
■ (Optionally, view audit trail information for Web Offers Rollout Project)
The rest of this section contains the following topics:
■ Section 2.5.1, "Project Setup"
■ Section 2.5.2, "Create Campaign Showcase Properties"
■ Section 2.5.3, "Create Offer Regional Offers"
■ Section 2.5.4, "Create Creative West Coast Properties"
■ Section 2.5.5, "Create Slot Type 300x600 and Update West Coast Properties"
■ Section 2.5.6, "Approve the Campaign Showcase Properties"
■ Section 2.5.7, "Commit the Project"

Job Role Oriented Example of Oracle RTD for Marketing Optimization Tasks
2-32 Oracle Real-Time Decisions Base Application Decision Management Applications User's Guide
2.5.1 Project SetupTo set up the project, a ZXS_Administration department user (for example, clmadmin) logs into RTD for Marketing Optimization, and then performs the following steps:
1. Click New Project.
Enter the Name and optionally a Description for the project.
2. Click OK.
The View box shows the new active project, which also appears in the View Projects page.
2.5.2 Create Campaign Showcase PropertiesTo create the Showcase Properties campaign, a ZXS_Marketing department user (for example, clmadmin2) logs into RTD for Marketing Optimization, and then performs the following steps:
1. For the View, select the project Web Offers Rollout Project.
2. Click the Create icon, and select Campaign.
Stage 1: Overview
3. In the Overview screen of the Create Campaign page, enter the Name for the Showcase Properties campaign.

Job Role Oriented Example of Oracle RTD for Marketing Optimization Tasks
Introduction to Oracle RTD for Marketing Optimization 2-33
4. Click Next.
Stage 2: Attributes
5. In the Attributes screen of the Create Campaign page, enter the campaign details for the Showcase Properties campaign, selecting Draft for the Approval Status.
6. Click Next.
Stage 3: Rules
The Rules screen appears, displaying the Rule Editor.
In this screen, set up the rule that the campaign End Date is to be less than or equal to June 28, 2013, as follows:
7. Click the Add Rule (leftmost) icon in the Rules Editor toolbar.
8. Click the ... button in the first box, then select Attribute, End Date, and click OK.
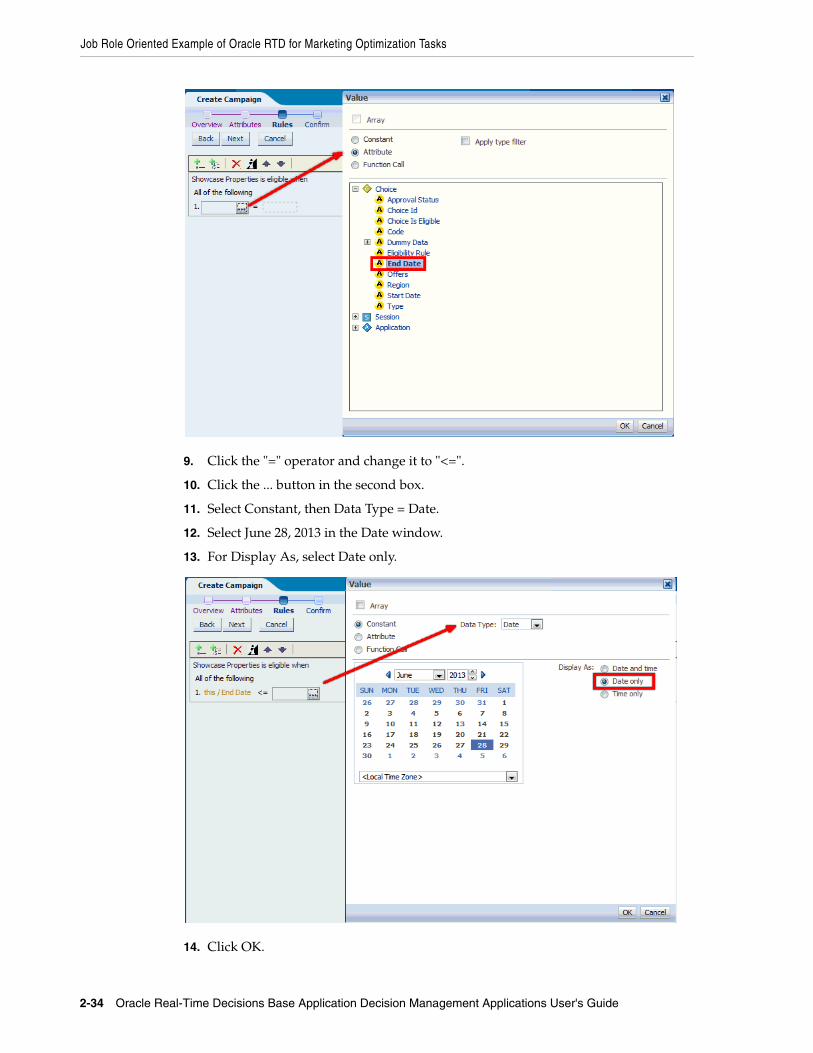
Job Role Oriented Example of Oracle RTD for Marketing Optimization Tasks
2-34 Oracle Real-Time Decisions Base Application Decision Management Applications User's Guide
9. Click the "=" operator and change it to "<=".
10. Click the ... button in the second box.
11. Select Constant, then Data Type = Date.
12. Select June 28, 2013 in the Date window.
13. For Display As, select Date only.
14. Click OK.
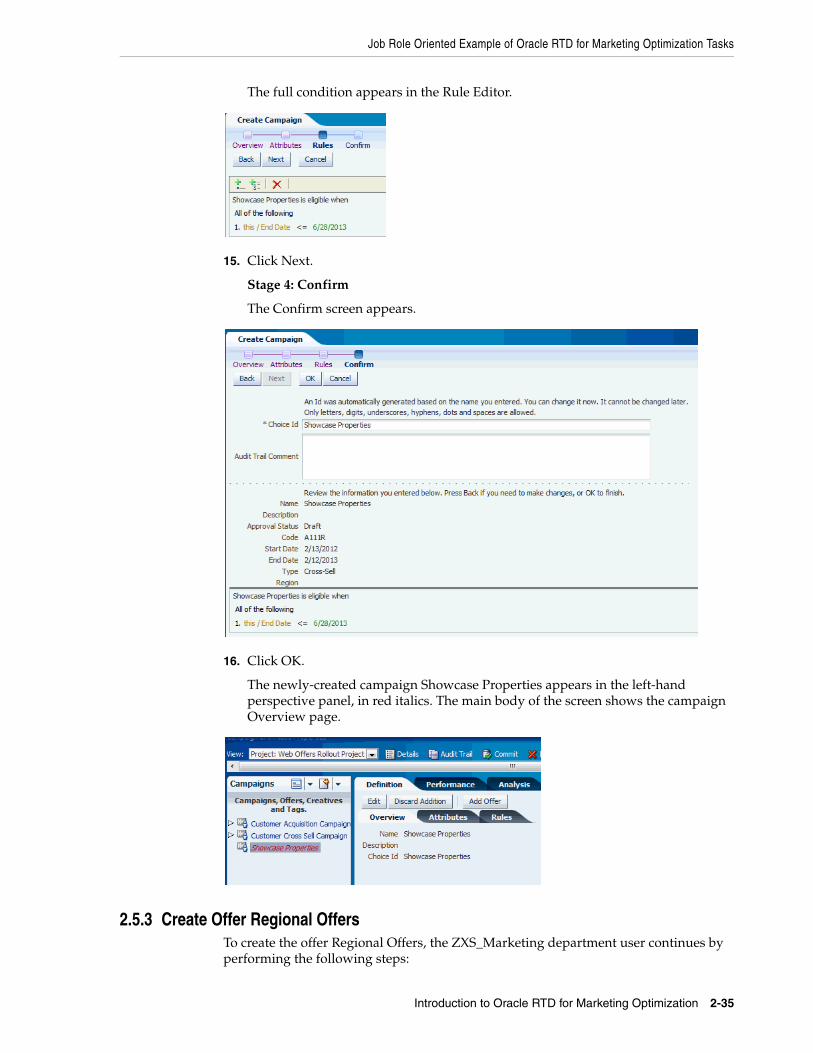
Job Role Oriented Example of Oracle RTD for Marketing Optimization Tasks
Introduction to Oracle RTD for Marketing Optimization 2-35
The full condition appears in the Rule Editor.
15. Click Next.
Stage 4: Confirm
The Confirm screen appears.
16. Click OK.
The newly-created campaign Showcase Properties appears in the left-hand perspective panel, in red italics. The main body of the screen shows the campaign Overview page.
2.5.3 Create Offer Regional OffersTo create the offer Regional Offers, the ZXS_Marketing department user continues by performing the following steps:
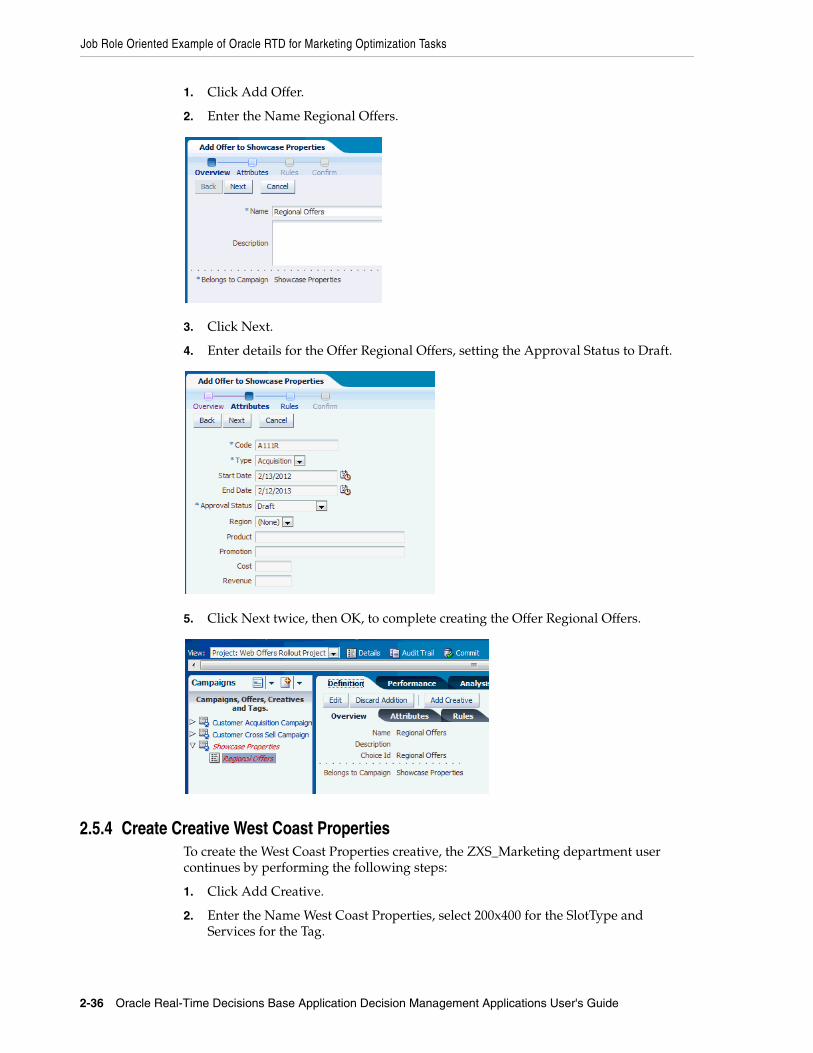
Job Role Oriented Example of Oracle RTD for Marketing Optimization Tasks
2-36 Oracle Real-Time Decisions Base Application Decision Management Applications User's Guide
1. Click Add Offer.
2. Enter the Name Regional Offers.
3. Click Next.
4. Enter details for the Offer Regional Offers, setting the Approval Status to Draft.
5. Click Next twice, then OK, to complete creating the Offer Regional Offers.
2.5.4 Create Creative West Coast PropertiesTo create the West Coast Properties creative, the ZXS_Marketing department user continues by performing the following steps:
1. Click Add Creative.
2. Enter the Name West Coast Properties, select 200x400 for the SlotType and Services for the Tag.

Job Role Oriented Example of Oracle RTD for Marketing Optimization Tasks
Introduction to Oracle RTD for Marketing Optimization 2-37
3. Click Next.
4. Enter details for the Creative West Coast Properties, setting the Approval Status to Draft.
5. Click Next twice, then OK, to complete creating the Creative West Coast Properties.

Job Role Oriented Example of Oracle RTD for Marketing Optimization Tasks
2-38 Oracle Real-Time Decisions Base Application Decision Management Applications User's Guide
2.5.5 Create Slot Type 300x600 and Update West Coast PropertiesTo create a new slot type and update the West Coast Properties creative, a ZXS_Display_Control department user (for example, clmauthor) logs into RTD for Marketing Optimization, and then performs the following steps:
1. For the View, select the project Web Offers Rollout Project.
Create Slot Type 300x600
2. Click the Create icon, and select SlotType.
3. Enter 300x600 for the Slot Type Name.
4. Click Next twice, then OK, to complete creating the Slot Type 300x600.
Change Slot Type of West Coast Properties to 300x600
5. To change the slot type of the West Coast Properties choice, first click the West Coast Properties choice in the left-hand perspective panel.

Job Role Oriented Example of Oracle RTD for Marketing Optimization Tasks
Introduction to Oracle RTD for Marketing Optimization 2-39
6. Click Edit, then select 300x600 for the SlotType.
7. Click OK.
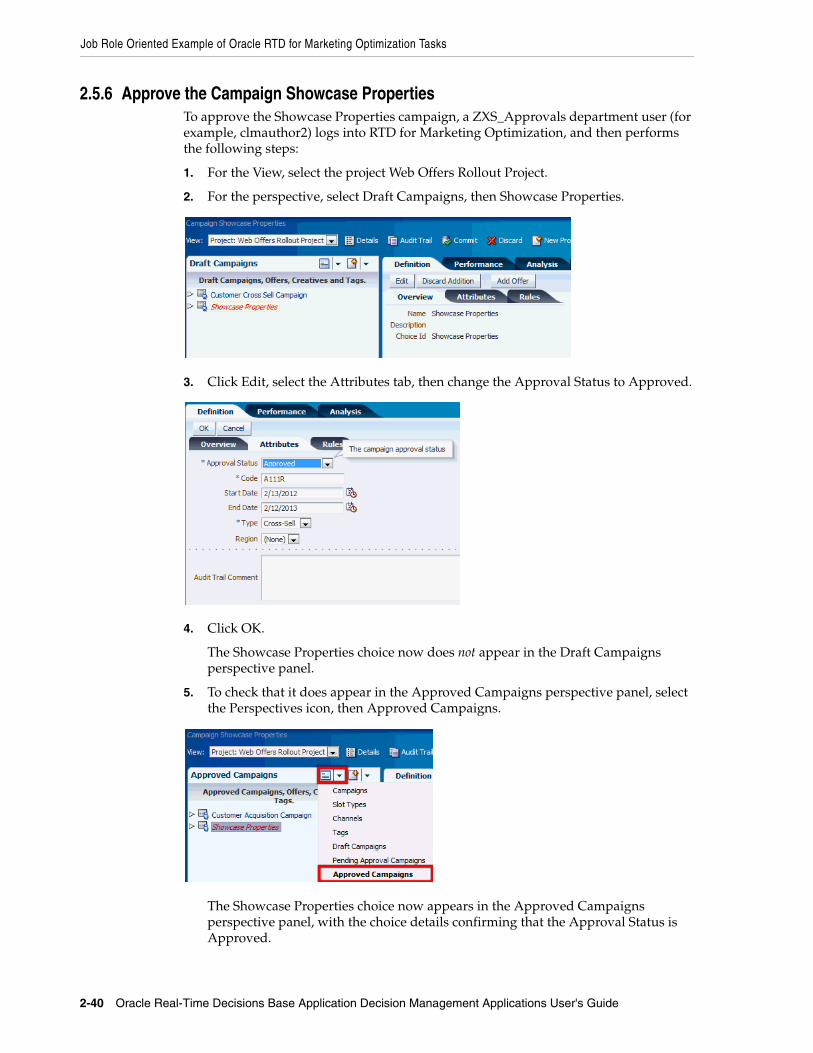
Job Role Oriented Example of Oracle RTD for Marketing Optimization Tasks
2-40 Oracle Real-Time Decisions Base Application Decision Management Applications User's Guide
2.5.6 Approve the Campaign Showcase Properties To approve the Showcase Properties campaign, a ZXS_Approvals department user (for example, clmauthor2) logs into RTD for Marketing Optimization, and then performs the following steps:
1. For the View, select the project Web Offers Rollout Project.
2. For the perspective, select Draft Campaigns, then Showcase Properties.
3. Click Edit, select the Attributes tab, then change the Approval Status to Approved.
4. Click OK.
The Showcase Properties choice now does not appear in the Draft Campaigns perspective panel.
5. To check that it does appear in the Approved Campaigns perspective panel, select the Perspectives icon, then Approved Campaigns.
The Showcase Properties choice now appears in the Approved Campaigns perspective panel, with the choice details confirming that the Approval Status is Approved.

Job Role Oriented Example of Oracle RTD for Marketing Optimization Tasks
Introduction to Oracle RTD for Marketing Optimization 2-41
2.5.7 Commit the ProjectTo commit the project, a ZXS_Administration department user (for example, clmadmin) logs into RTD for Marketing Optimization, and then performs the following steps:
1. For the View, select the project Web Offers Rollout Project, then click Commit.
After you confirm the Commit, the project is committed to the Main Repository, the View changes to Main Repository, and the newly-committed project appears in the Committed Projects area of the View Projects page.
2. To see a history of all the operations performed in Web Offers Rollout Project, click the Audit Trail icon for the project.

Job Role Oriented Example of Oracle RTD for Marketing Optimization Tasks
2-42 Oracle Real-Time Decisions Base Application Decision Management Applications User's Guide
The Audit Trail for the project displays which operations were performed on which choice, and by which user.

A
Decision Manager User Interface Reference A-1
ADecision Manager User Interface Reference
This appendix contains reference information for the main Decision Manager user interface screens and screen areas.
This appendix contains the following topics:
■ Section A.1, "Decision Manager User Interface Schematic"
■ Section A.2, "Header Area"
■ Section A.3, "Main Repository/Project Context Area"
■ Section A.4, "Panel Area"
■ Section A.5, "Search Options Area"
■ Section A.6, "Detail Area"
■ Section A.7, "Create Project"
■ Section A.8, "Project Details"
■ Section A.9, "View Projects"
■ Section A.10, "Create Choice"
■ Section A.11, "Choice Details"
A.1 Decision Manager User Interface SchematicFigure A–1 shows a general schematic for the Decision Manager user interface screen areas, after login. An annotated example of a Decision Manager screen, showing the details for a choice, appears in Section A.1.1.
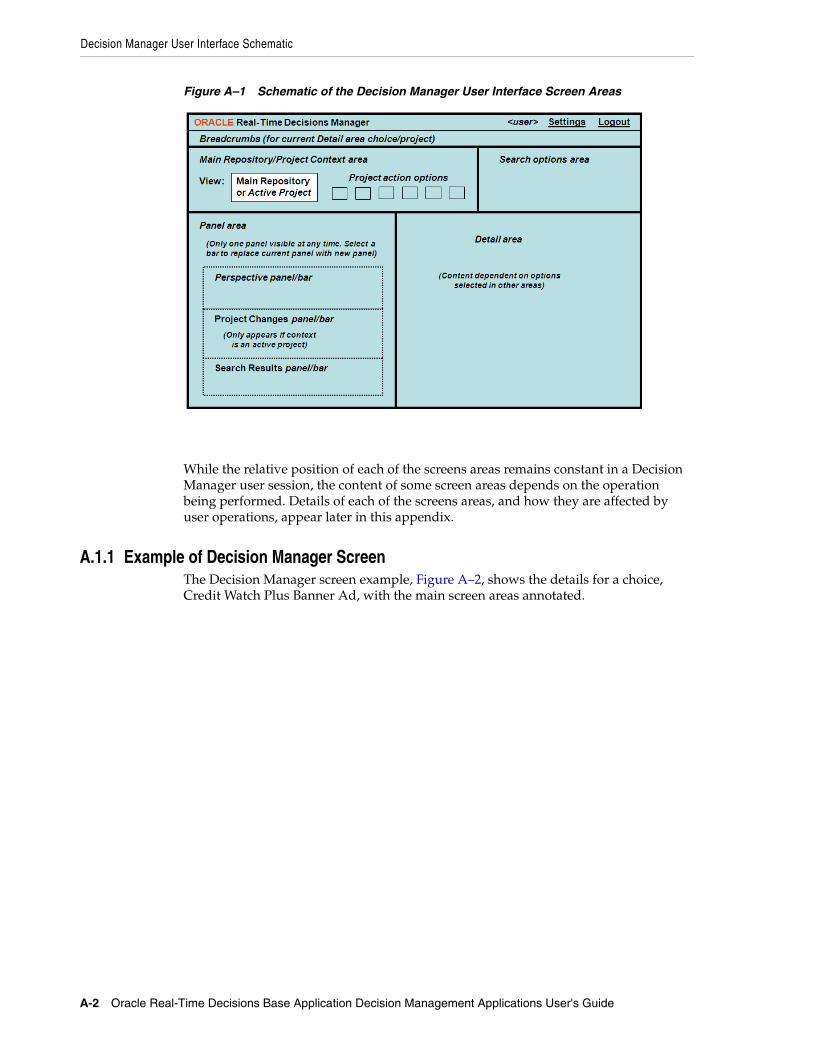
Decision Manager User Interface Schematic
A-2 Oracle Real-Time Decisions Base Application Decision Management Applications User's Guide
Figure A–1 Schematic of the Decision Manager User Interface Screen Areas
While the relative position of each of the screens areas remains constant in a Decision Manager user session, the content of some screen areas depends on the operation being performed. Details of each of the screens areas, and how they are affected by user operations, appear later in this appendix.
A.1.1 Example of Decision Manager ScreenThe Decision Manager screen example, Figure A–2, shows the details for a choice, Credit Watch Plus Banner Ad, with the main screen areas annotated.
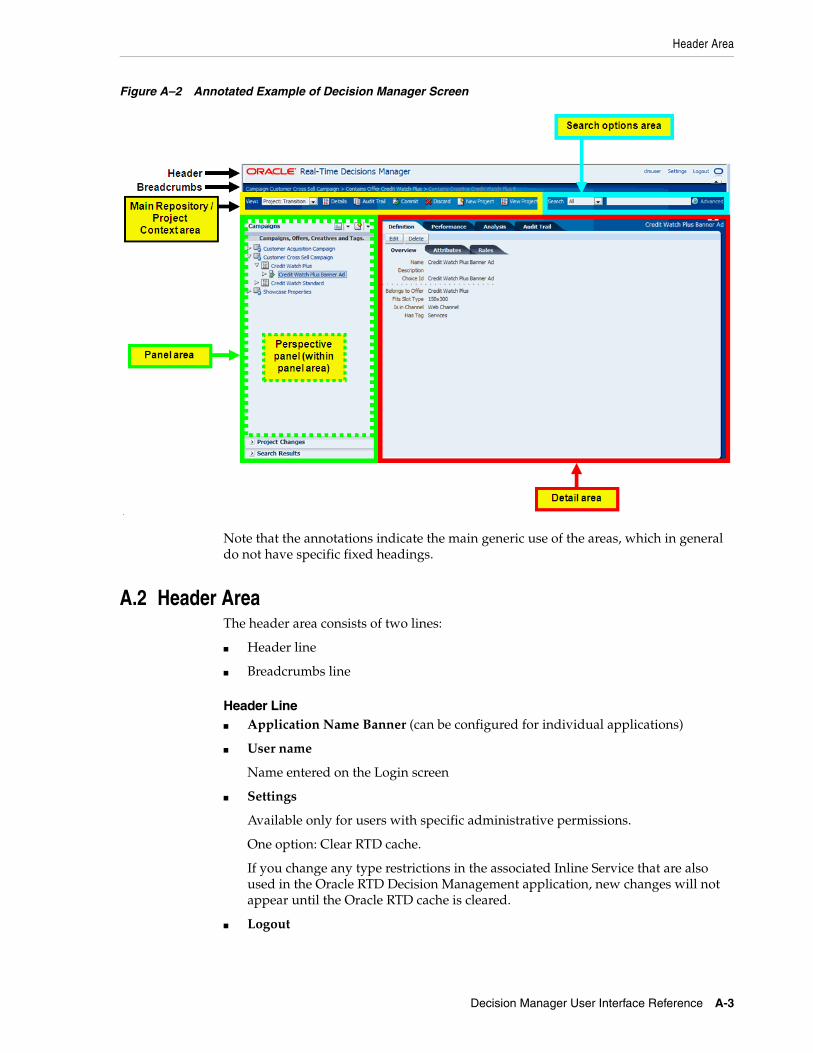
Header Area
Decision Manager User Interface Reference A-3
Figure A–2 Annotated Example of Decision Manager Screen
Note that the annotations indicate the main generic use of the areas, which in general do not have specific fixed headings.
A.2 Header AreaThe header area consists of two lines:
■ Header line
■ Breadcrumbs line
Header Line■ Application Name Banner (can be configured for individual applications)
■ User name
Name entered on the Login screen
■ Settings
Available only for users with specific administrative permissions.
One option: Clear RTD cache.
If you change any type restrictions in the associated Inline Service that are also used in the Oracle RTD Decision Management application, new changes will not appear until the Oracle RTD cache is cleared.
■ Logout
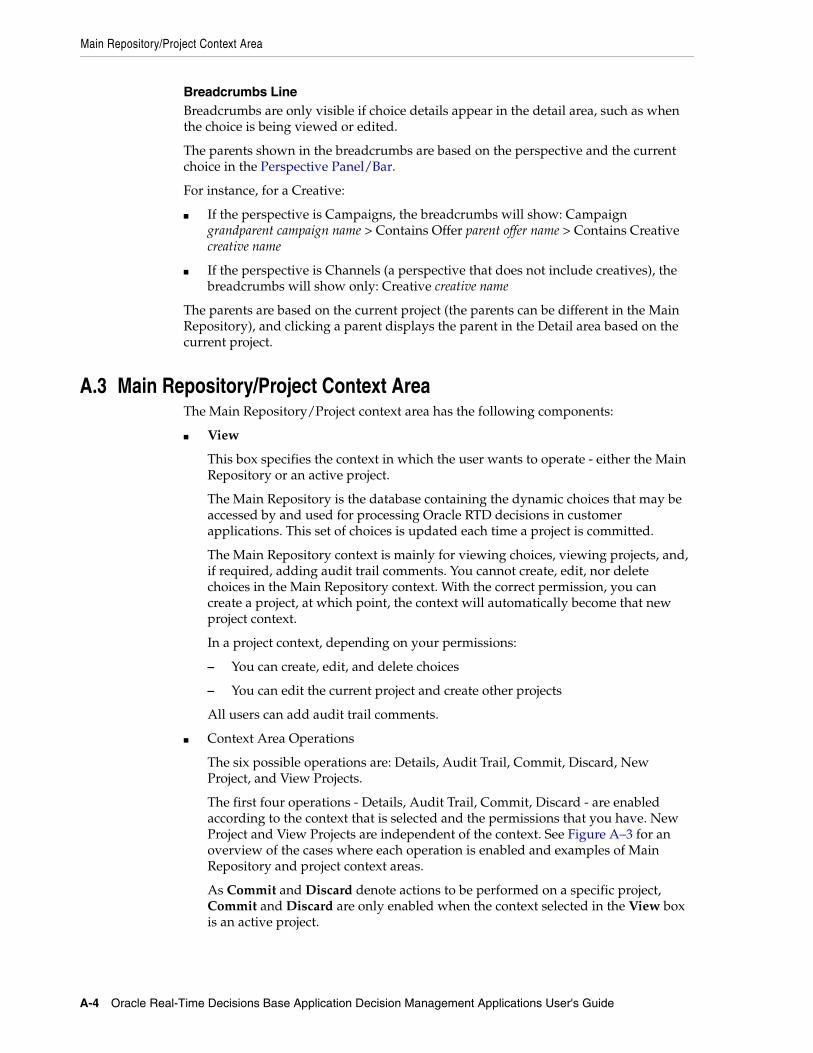
Main Repository/Project Context Area
A-4 Oracle Real-Time Decisions Base Application Decision Management Applications User's Guide
Breadcrumbs LineBreadcrumbs are only visible if choice details appear in the detail area, such as when the choice is being viewed or edited.
The parents shown in the breadcrumbs are based on the perspective and the current choice in the Perspective Panel/Bar.
For instance, for a Creative:
■ If the perspective is Campaigns, the breadcrumbs will show: Campaign grandparent campaign name > Contains Offer parent offer name > Contains Creative creative name
■ If the perspective is Channels (a perspective that does not include creatives), the breadcrumbs will show only: Creative creative name
The parents are based on the current project (the parents can be different in the Main Repository), and clicking a parent displays the parent in the Detail area based on the current project.
A.3 Main Repository/Project Context AreaThe Main Repository/Project context area has the following components:
■ View
This box specifies the context in which the user wants to operate - either the Main Repository or an active project.
The Main Repository is the database containing the dynamic choices that may be accessed by and used for processing Oracle RTD decisions in customer applications. This set of choices is updated each time a project is committed.
The Main Repository context is mainly for viewing choices, viewing projects, and, if required, adding audit trail comments. You cannot create, edit, nor delete choices in the Main Repository context. With the correct permission, you can create a project, at which point, the context will automatically become that new project context.
In a project context, depending on your permissions:
– You can create, edit, and delete choices
– You can edit the current project and create other projects
All users can add audit trail comments.
■ Context Area Operations
The six possible operations are: Details, Audit Trail, Commit, Discard, New Project, and View Projects.
The first four operations - Details, Audit Trail, Commit, Discard - are enabled according to the context that is selected and the permissions that you have. New Project and View Projects are independent of the context. See Figure A–3 for an overview of the cases where each operation is enabled and examples of Main Repository and project context areas.
As Commit and Discard denote actions to be performed on a specific project, Commit and Discard are only enabled when the context selected in the View box is an active project.
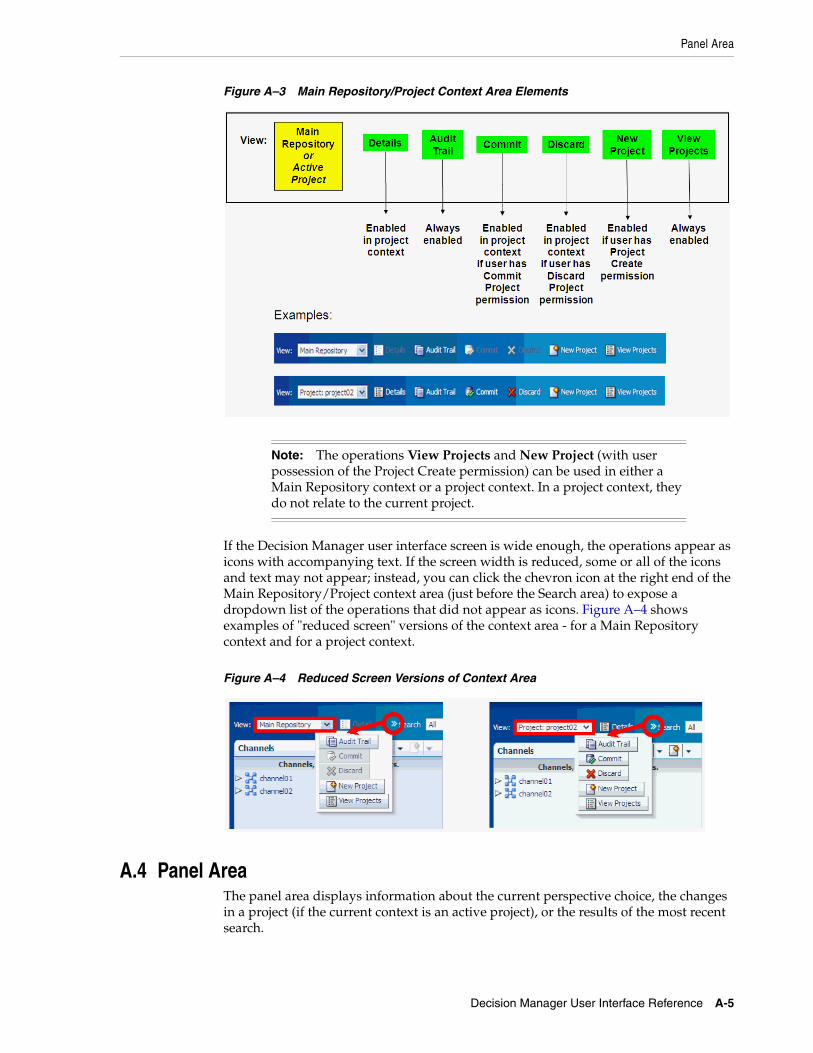
Panel Area
Decision Manager User Interface Reference A-5
Figure A–3 Main Repository/Project Context Area Elements
If the Decision Manager user interface screen is wide enough, the operations appear as icons with accompanying text. If the screen width is reduced, some or all of the icons and text may not appear; instead, you can click the chevron icon at the right end of the Main Repository/Project context area (just before the Search area) to expose a dropdown list of the operations that did not appear as icons. Figure A–4 shows examples of "reduced screen" versions of the context area - for a Main Repository context and for a project context.
Figure A–4 Reduced Screen Versions of Context Area
A.4 Panel AreaThe panel area displays information about the current perspective choice, the changes in a project (if the current context is an active project), or the results of the most recent search.
Note: The operations View Projects and New Project (with user possession of the Project Create permission) can be used in either a Main Repository context or a project context. In a project context, they do not relate to the current project.

Panel Area
A-6 Oracle Real-Time Decisions Base Application Decision Management Applications User's Guide
Details of only one option appear in a panel, the other options appear as bar entries. You can toggle between the options to select which details to show in panel form.
Typically, most of the time in most Decision Manager user sessions, the panel area displays the choices in the current perspective, and the Project Changes and Search Results options appear as bars at the foot of the panel area.
This section contains the following topics:
■ Section A.4.1, "Perspective Panel/Bar"
■ Section A.4.2, "Project Changes Panel/Bar"
■ Section A.4.3, "Search Results Panel/Bar"
A.4.1 Perspective Panel/BarPerspectives is a tree view of a subset of the choices and relationships defined in the Decision Graph for the Decision Management application.
For examples of perspectives defined for marketing organizations, see Section 2.2.2, "Oracle RTD for Marketing Optimization Perspectives."
The Perspective Panel body displays actual choices of each choice type, initially showing all the actual choices of the "top" choice type of the perspective - following the Campaigns perspective example, these are all the Campaign choices.
Folder Tree for Choice Group RelationshipsIn general, relationships between choice groups are represented by folders in the Perspective Panel through indented folders.
In the Perspective Panel body, choices can be expanded to display "lower-level" related choices, and, apart from "lowest-level" choices, collapsed as well. These options are available through right-clicking the icon immediately to the left of the choice (or the extreme right-hand side of the choice box, but not the choice itself).
An example of a Campaigns perspective illustrates the indented folders and the options to collapse and expand lower levels of the hierarchy tree:
When each choice group in a perspective relates to only one other choice group, the successive folder indentations in the Perspective Panel simply reflect the relationships between the choice groups.
Multiple relationships can also be defined for one higher-level choice group to several other immediately-lower-level choice groups (for example, Slot Type to Creative and Slot Type to Slot). If all these choice groups appear in one perspective, you can configure extra, intermediate folders to appear in the perspective tree. These extra folders typically include the names of the different choice groups, as in the following example:

Panel Area
Decision Manager User Interface Reference A-7
If you choose not to have these intermediate folders, all lower-level choices appear directly under their higher-level choice. As in all perspectives, the choice group icon that appears to the left of each choice determines which type of choice it is.
Perspectives List and Choice Creation ListFigure A–5 shows the general schematic for a perspective panel, with examples of two perspective panels, one for a Main Repository context, and one for an active project context.
The header for a Perspective panel is the perspective chosen from the Perspectives list icon. The default perspective is the first perspective in the Perspectives list.
When you want to create a choice for a choice group (which does not have to be in the current perspective), you can select your choice group from the Choice creation list.
The icons to the left of a choice enable you to expand and collapse choice hierarchies in the Perspective panael. Click the arrowhead icon (right-pointing or downward) to expand or collapse a choice, or select your Expand or Collapse option from the menu that appears when you right-click the icon immediately to the left of the choice.
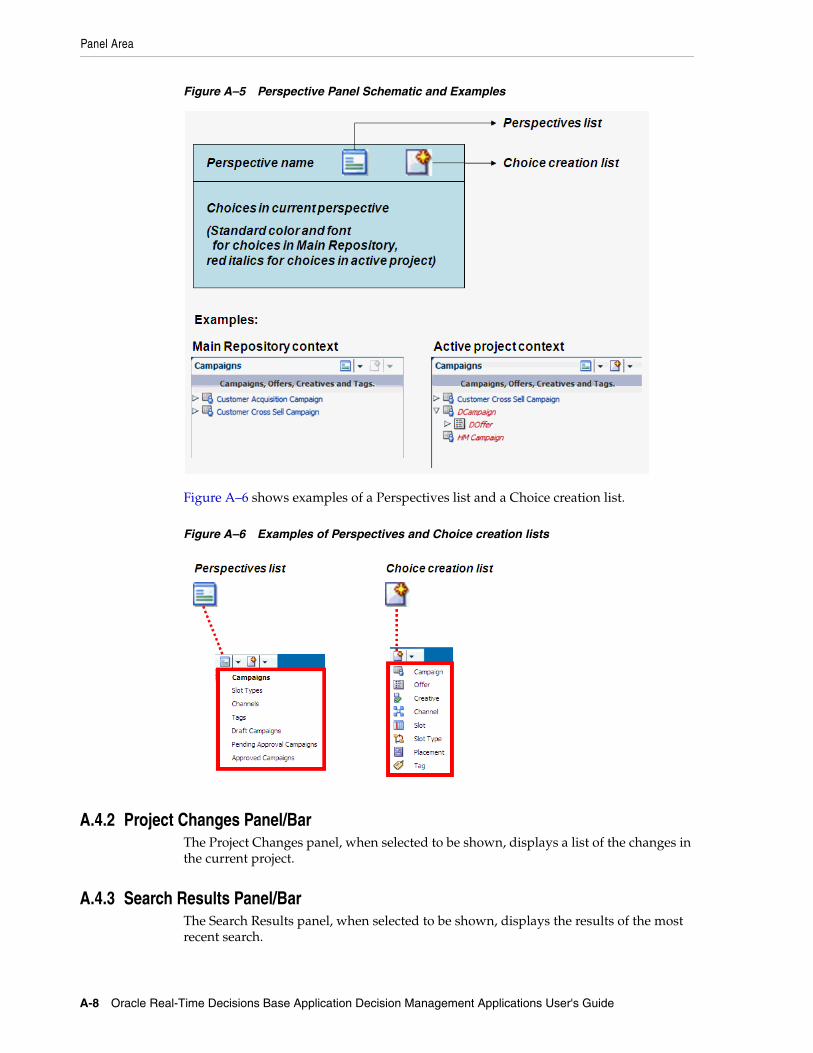
Panel Area
A-8 Oracle Real-Time Decisions Base Application Decision Management Applications User's Guide
Figure A–5 Perspective Panel Schematic and Examples
Figure A–6 shows examples of a Perspectives list and a Choice creation list.
Figure A–6 Examples of Perspectives and Choice creation lists
A.4.2 Project Changes Panel/BarThe Project Changes panel, when selected to be shown, displays a list of the changes in the current project.
A.4.3 Search Results Panel/BarThe Search Results panel, when selected to be shown, displays the results of the most recent search.

Search Options Area
Decision Manager User Interface Reference A-9
A.5 Search Options AreaThe Search options enable you to perform simple and advanced searches, as summarized in Figure A–7.
Figure A–7 Search Options Area Schematic
Results of a search appear in the Search Results panel which either opens up or refreshes in the panel area. The Detail area and the breadcrumbs are not altered by the search.
Simple SearchesSimple searches are for strings that occur in choice names or choice descriptions (if your application is in the special mode "owership=on", then the search will also search on choice owner).
The context that you are in affects the extent of the search. For Main Repository context, searches are in the Main Repository only. For active project context, searches are in the Main Repository and in the active project.
In the first search box, select "All" to select across all choice group types, or select a single choice group to restrict the search to choices of that particular choice group type.
Enter your search parameters in the second box ("%" denotes wildcard), then click the Run Query icon.
By default, any string entered in the second box without "%" is treated as a "contains" search. For example, a search string of "amp" searches for objects that contain the string "amp" in either the choice name or the choice description.
The results appear in the Search Results panel.
The following example shows the effect of two simple searches, one that is restricted to the Main Repository only, the other that is performed in the context of the active project Retention Project.
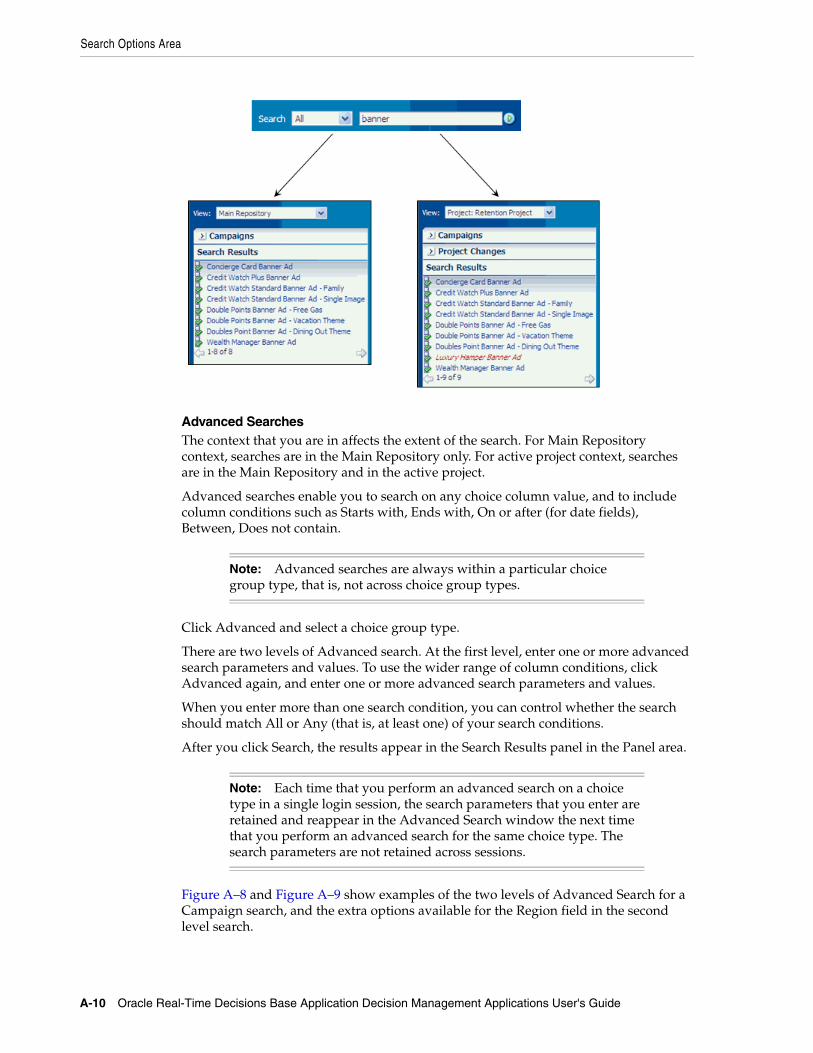
Search Options Area
A-10 Oracle Real-Time Decisions Base Application Decision Management Applications User's Guide
Advanced SearchesThe context that you are in affects the extent of the search. For Main Repository context, searches are in the Main Repository only. For active project context, searches are in the Main Repository and in the active project.
Advanced searches enable you to search on any choice column value, and to include column conditions such as Starts with, Ends with, On or after (for date fields), Between, Does not contain.
Click Advanced and select a choice group type.
There are two levels of Advanced search. At the first level, enter one or more advanced search parameters and values. To use the wider range of column conditions, click Advanced again, and enter one or more advanced search parameters and values.
When you enter more than one search condition, you can control whether the search should match All or Any (that is, at least one) of your search conditions.
After you click Search, the results appear in the Search Results panel in the Panel area.
Figure A–8 and Figure A–9 show examples of the two levels of Advanced Search for a Campaign search, and the extra options available for the Region field in the second level search.
Note: Advanced searches are always within a particular choice group type, that is, not across choice group types.
Note: Each time that you perform an advanced search on a choice type in a single login session, the search parameters that you enter are retained and reappear in the Advanced Search window the next time that you perform an advanced search for the same choice type. The search parameters are not retained across sessions.
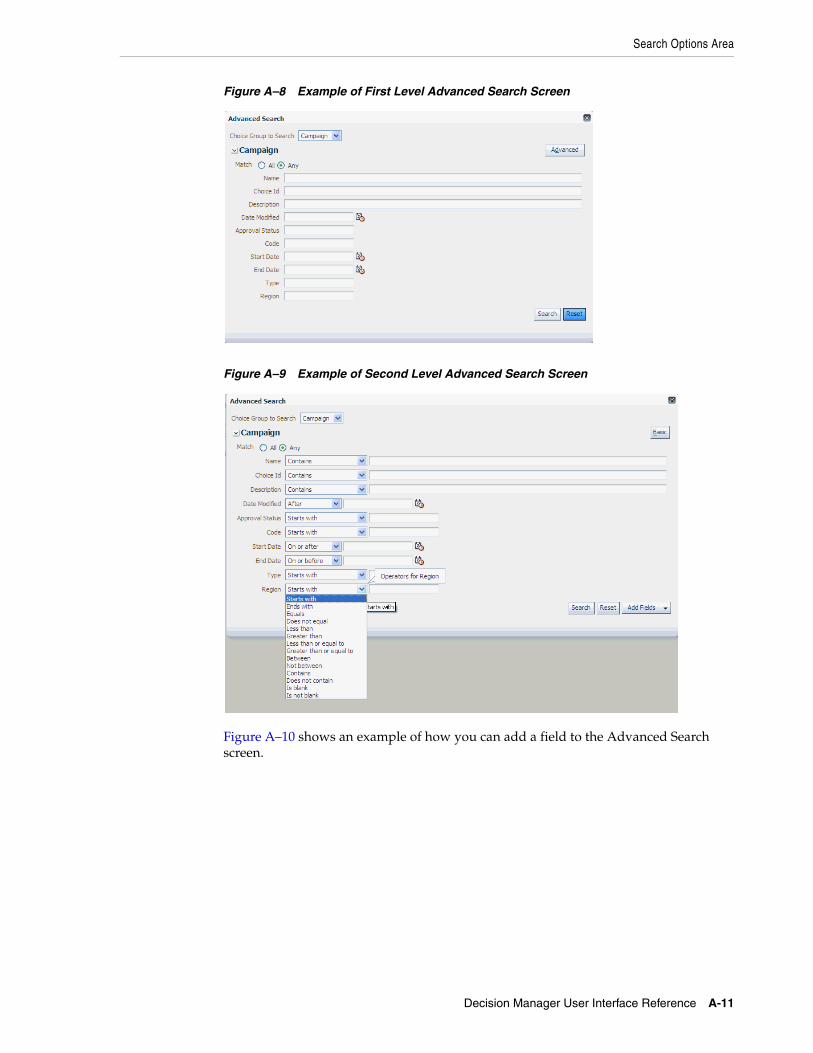
Search Options Area
Decision Manager User Interface Reference A-11
Figure A–8 Example of First Level Advanced Search Screen
Figure A–9 Example of Second Level Advanced Search Screen
Figure A–10 shows an example of how you can add a field to the Advanced Search screen.
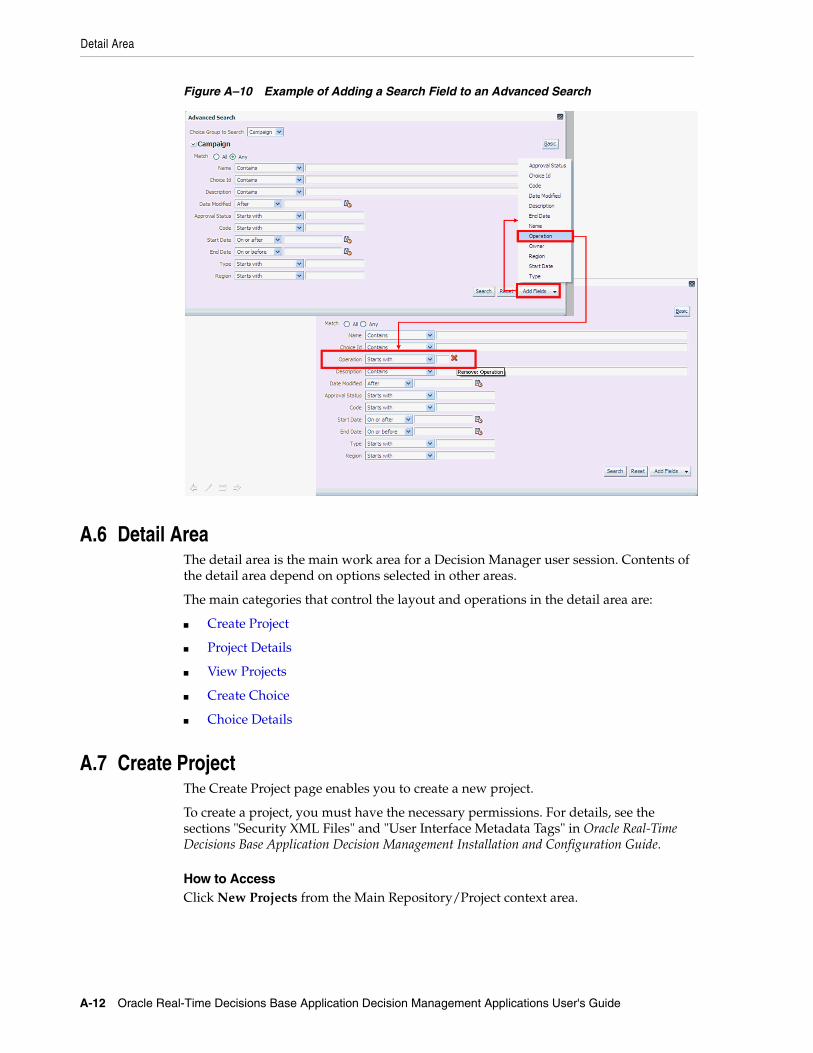
Detail Area
A-12 Oracle Real-Time Decisions Base Application Decision Management Applications User's Guide
Figure A–10 Example of Adding a Search Field to an Advanced Search
A.6 Detail AreaThe detail area is the main work area for a Decision Manager user session. Contents of the detail area depend on options selected in other areas.
The main categories that control the layout and operations in the detail area are:
■ Create Project
■ Project Details
■ View Projects
■ Create Choice
■ Choice Details
A.7 Create ProjectThe Create Project page enables you to create a new project.
To create a project, you must have the necessary permissions. For details, see the sections "Security XML Files" and "User Interface Metadata Tags" in Oracle Real-Time Decisions Base Application Decision Management Installation and Configuration Guide.
How to AccessClick New Projects from the Main Repository/Project context area.
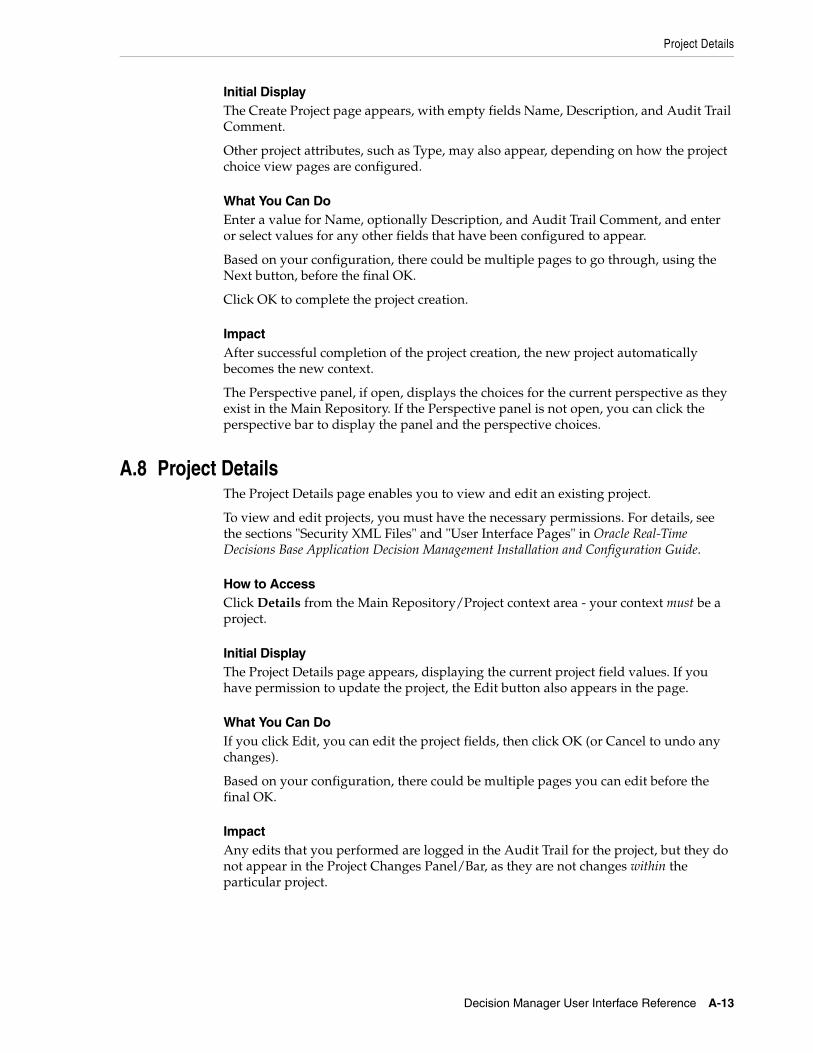
Project Details
Decision Manager User Interface Reference A-13
Initial DisplayThe Create Project page appears, with empty fields Name, Description, and Audit Trail Comment.
Other project attributes, such as Type, may also appear, depending on how the project choice view pages are configured.
What You Can DoEnter a value for Name, optionally Description, and Audit Trail Comment, and enter or select values for any other fields that have been configured to appear.
Based on your configuration, there could be multiple pages to go through, using the Next button, before the final OK.
Click OK to complete the project creation.
ImpactAfter successful completion of the project creation, the new project automatically becomes the new context.
The Perspective panel, if open, displays the choices for the current perspective as they exist in the Main Repository. If the Perspective panel is not open, you can click the perspective bar to display the panel and the perspective choices.
A.8 Project DetailsThe Project Details page enables you to view and edit an existing project.
To view and edit projects, you must have the necessary permissions. For details, see the sections "Security XML Files" and "User Interface Pages" in Oracle Real-Time Decisions Base Application Decision Management Installation and Configuration Guide.
How to AccessClick Details from the Main Repository/Project context area - your context must be a project.
Initial DisplayThe Project Details page appears, displaying the current project field values. If you have permission to update the project, the Edit button also appears in the page.
What You Can DoIf you click Edit, you can edit the project fields, then click OK (or Cancel to undo any changes).
Based on your configuration, there could be multiple pages you can edit before the final OK.
ImpactAny edits that you performed are logged in the Audit Trail for the project, but they do not appear in the Project Changes Panel/Bar, as they are not changes within the particular project.

View Projects
A-14 Oracle Real-Time Decisions Base Application Decision Management Applications User's Guide
A.9 View ProjectsThe View Projects page enables you to view details of current active and previously-committed projects.
How to AccessThe View Projects page appears when you log on to Decision Manager.
Subsequently, you can access it by clicking View Projects from the Main Repository/Project context area.
Initial DisplayThe top and bottom areas of the View Projects page display information and options for Active Projects and Committed Projects respectively, as in the following example:
Depending on your configuration, additional project attribute columns could appear in the View Projects page.
What You Can DoIn both the Active Projects and Committed Projects areas, you can search on project fields and project create and modification dates. You can also view choice-level audit trail comments on active projects or on previously-committed projects.
More details about accessing project information appear in the sections that follow:
■ Project Information Columns
■ Project Information - Query By Example
A.9.1 Project Information ColumnsFigure A–11 shows how you can control the columns that you want to appear in the Active Projects or Committed Projects areas.

View Projects
Decision Manager User Interface Reference A-15
Figure A–11 Project Search Column Control
A.9.2 Project Information - Query By ExampleFigure A–12 shows:
■ How you query projects
■ How you can toggle the project search boxes on and off
You can do this either from the View > Query By Example menu option or the Query By Example menu icon.
Figure A–12 Querying Projects
Create Choice
A-16 Oracle Real-Time Decisions Base Application Decision Management Applications User's Guide
A.10 Create ChoiceTo create choices for a choice group, you must have the necessary permissions. For details, see the sections "Security XML Files" and "User Interface Pages" in Oracle Real-Time Decisions Base Application Decision Management Installation and Configuration Guide.
To create choices, you must follow a train of process stages, that appears at the top of the Create page.
How to AccessTo create a choice, in addition to having the right privilege, you must be in an active project context.
In the Perspective panel, click the Choice creation list icon, and select the choice group for which you want to create your choice.
Note that you can select any choice group from the dropdown Choice creation list. Your selection may be in the same perspective as shown in the current perspective panel, but it does not have to be.
Initial DisplayThe initial display of any choice is a Create selected_choice_group page. Under the Create... heading, there is a "page train", which determines the sequence of pages to be displayed during the create process.
The specific pages of the train and the content of those pages depend on how the choice was configured for Decision Manager.
Typical trains may be:
■ Overview - Attributes - Rules - Confirm
■ Overview - Rules - Confirm
■ Overview - Confirm
The following description assumes that the page train for the choice group is Overview - Attributes - Rules - Confirm.
The fields in the Overview dialog for you to fill in are Name (mandatory to fill in) and Description (optional).
If your choice group is a child group in one or more relationships, the Overview page can typically also contain widgets for relationships. For each mandatory relationship, represented by a widget marked with an asterisk, you must select a value.
If your choice group is in a many-to-many relationship, you may select one or more choices from an Available list into a Selected list.
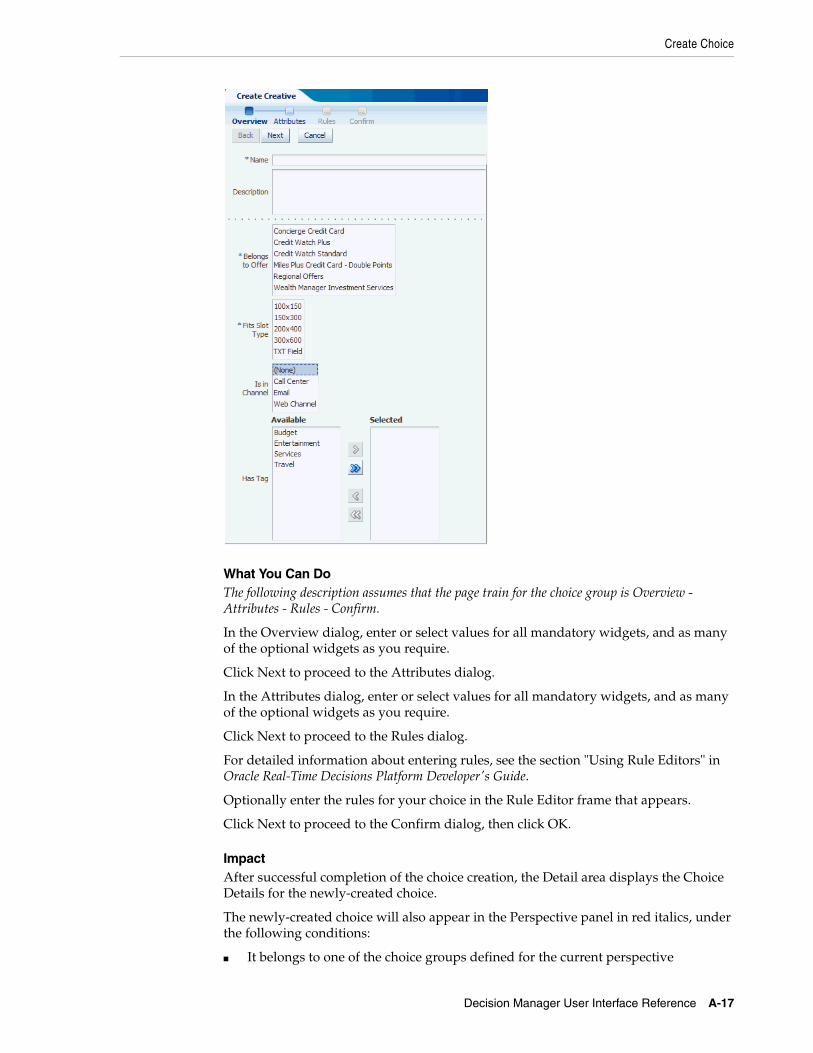
Create Choice
Decision Manager User Interface Reference A-17
What You Can DoThe following description assumes that the page train for the choice group is Overview - Attributes - Rules - Confirm.
In the Overview dialog, enter or select values for all mandatory widgets, and as many of the optional widgets as you require.
Click Next to proceed to the Attributes dialog.
In the Attributes dialog, enter or select values for all mandatory widgets, and as many of the optional widgets as you require.
Click Next to proceed to the Rules dialog.
For detailed information about entering rules, see the section "Using Rule Editors" in Oracle Real-Time Decisions Platform Developer's Guide.
Optionally enter the rules for your choice in the Rule Editor frame that appears.
Click Next to proceed to the Confirm dialog, then click OK.
ImpactAfter successful completion of the choice creation, the Detail area displays the Choice Details for the newly-created choice.
The newly-created choice will also appear in the Perspective panel in red italics, under the following conditions:
■ It belongs to one of the choice groups defined for the current perspective
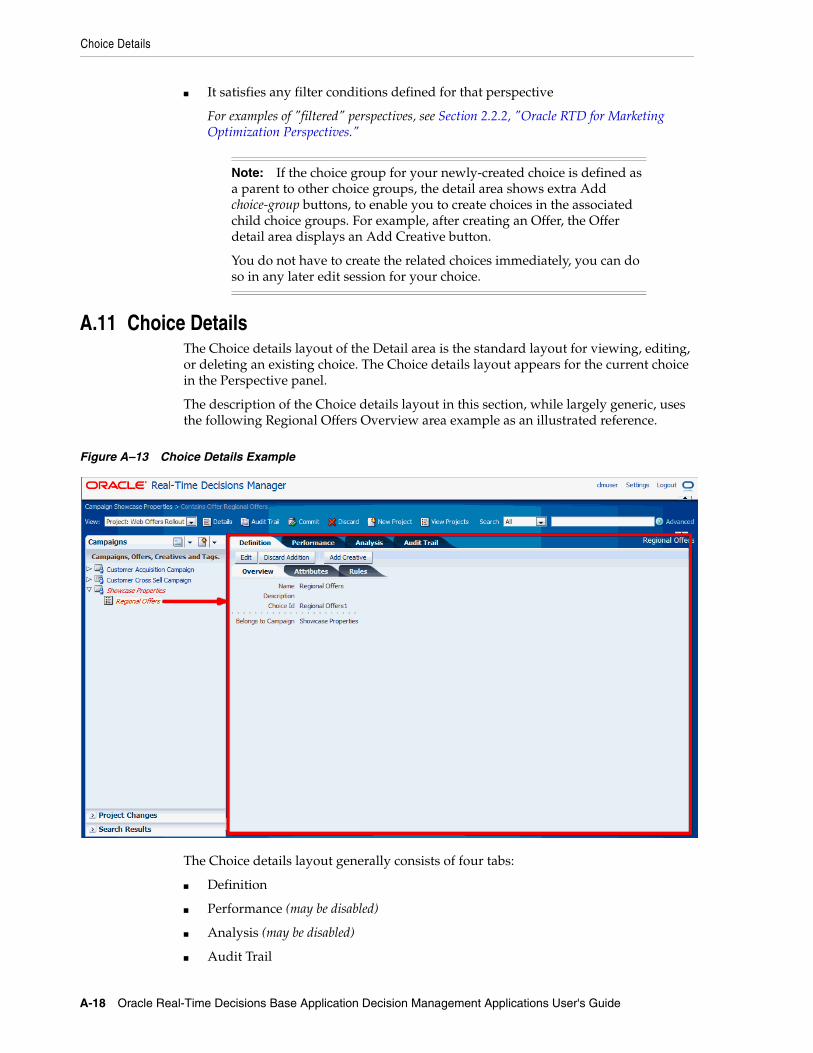
Choice Details
A-18 Oracle Real-Time Decisions Base Application Decision Management Applications User's Guide
■ It satisfies any filter conditions defined for that perspective
For examples of "filtered" perspectives, see Section 2.2.2, "Oracle RTD for Marketing Optimization Perspectives."
A.11 Choice DetailsThe Choice details layout of the Detail area is the standard layout for viewing, editing, or deleting an existing choice. The Choice details layout appears for the current choice in the Perspective panel.
The description of the Choice details layout in this section, while largely generic, uses the following Regional Offers Overview area example as an illustrated reference.
Figure A–13 Choice Details Example
The Choice details layout generally consists of four tabs:
■ Definition
■ Performance (may be disabled)
■ Analysis (may be disabled)
■ Audit Trail
Note: If the choice group for your newly-created choice is defined as a parent to other choice groups, the detail area shows extra Add choice-group buttons, to enable you to create choices in the associated child choice groups. For example, after creating an Offer, the Offer detail area displays an Add Creative button.
You do not have to create the related choices immediately, you can do so in any later edit session for your choice.
Choice Details
Decision Manager User Interface Reference A-19
The Definition tab is where you can view the attributes, relationships, and rules for the current choice, and - in an active project context only - edit them. For more details, see Choice Details - Definition Tab.
When the Performance and Analysis tabs are enabled, you can access performance and analysis reports for the current choice. Details of these reports appear in the Oracle Real-Time Decisions Decision Center User's Guide.
In the Audit Trail tab, in both Main Repository and active project context, you can view and create audit trail comments. For more details, see Section A.11.2, "Choice-Level Audit Trail."
The rest of this section contains the following topics:
■ Section A.11.1, "Choice Details - Definition Tab"
■ Section A.11.2, "Choice-Level Audit Trail"
A.11.1 Choice Details - Definition TabThe Definition tab enables you to view and, if you have the necessary permission, edit and delete choice details. Editing and deletion can only be done in the context of an active project. You can edit attributes, relationships, and rules for the current choice.
The Definition tab contains sub-tabs that display different information about the choice, by default, Overview, Attributes, and Rules. You can edit attributes, relationships, and rules for the current choice in these sub-tabs. For more details of the contents of these pages, see Section A.10, "Create Choice."
The options available to you depend on whether you have all the necessary permissions and the operation that you are trying to perform.
Assuming you have the necessary permissions, the options are made available through buttons that appear in the Definition tab in different situations, as follows:
■ Choice created (and possibly edited further) in the project:
– Edit button allows for further editing of the choice in the project.
– Discard Addition button allows for removal of the choice from the project.
■ Main Repository choice not locked in any project and not yet edited in the current project:
– Edit button allows for editing of the Main Repository choice in the project.
– Delete button allows for the (intended) deletion of the choice from the Main Repository.
■ Main Repository choice already edited in the current project:
– Edit button allows for editing of the Main Repository choice in the project.
– Discard Changes button allows for the removal of the changes made to the choice in this project only.
Note: All choice creations, edit, and delete operations made in a project are in effect pending changes to the Main Repository. They remain "in the project" and do not change the Main Repository until the project is successfully committed to the Main Repository.
Consider each change in the project as an "intention to change" in the Main Repository, until the project is committed or discarded.
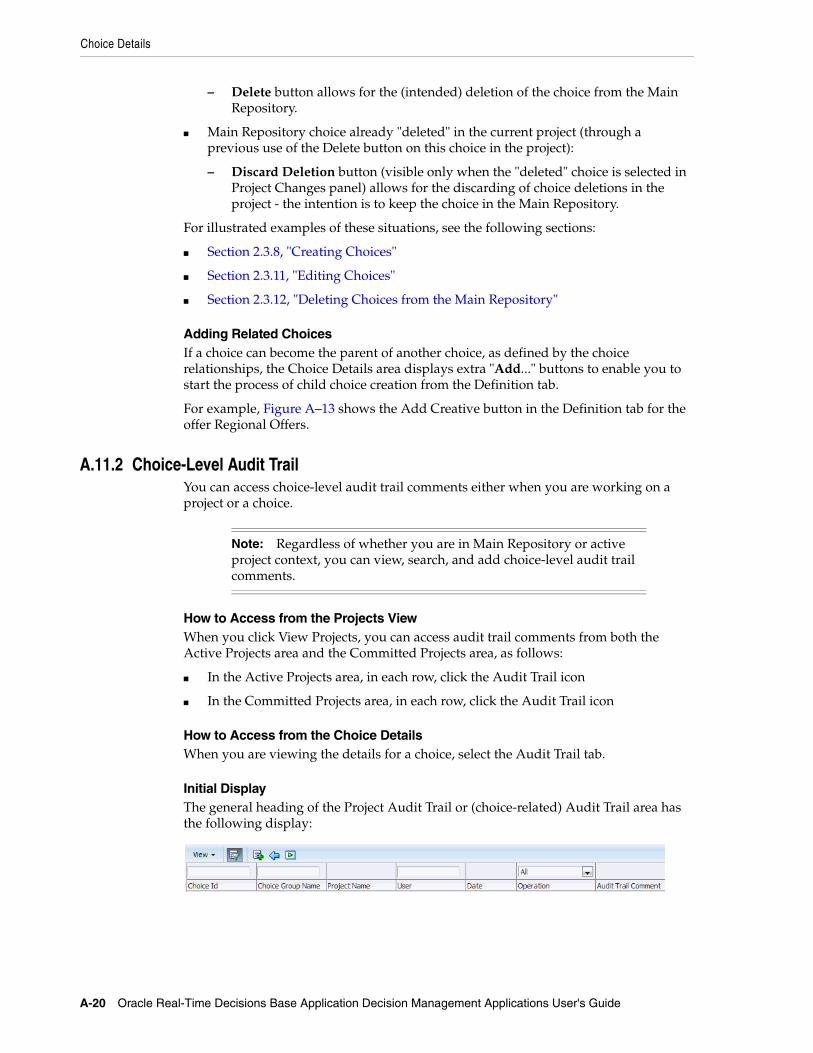
Choice Details
A-20 Oracle Real-Time Decisions Base Application Decision Management Applications User's Guide
– Delete button allows for the (intended) deletion of the choice from the Main Repository.
■ Main Repository choice already "deleted" in the current project (through a previous use of the Delete button on this choice in the project):
– Discard Deletion button (visible only when the "deleted" choice is selected in Project Changes panel) allows for the discarding of choice deletions in the project - the intention is to keep the choice in the Main Repository.
For illustrated examples of these situations, see the following sections:
■ Section 2.3.8, "Creating Choices"
■ Section 2.3.11, "Editing Choices"
■ Section 2.3.12, "Deleting Choices from the Main Repository"
Adding Related ChoicesIf a choice can become the parent of another choice, as defined by the choice relationships, the Choice Details area displays extra "Add..." buttons to enable you to start the process of child choice creation from the Definition tab.
For example, Figure A–13 shows the Add Creative button in the Definition tab for the offer Regional Offers.
A.11.2 Choice-Level Audit TrailYou can access choice-level audit trail comments either when you are working on a project or a choice.
How to Access from the Projects ViewWhen you click View Projects, you can access audit trail comments from both the Active Projects area and the Committed Projects area, as follows:
■ In the Active Projects area, in each row, click the Audit Trail icon
■ In the Committed Projects area, in each row, click the Audit Trail icon
How to Access from the Choice Details When you are viewing the details for a choice, select the Audit Trail tab.
Initial Display The general heading of the Project Audit Trail or (choice-related) Audit Trail area has the following display:
Note: Regardless of whether you are in Main Repository or active project context, you can view, search, and add choice-level audit trail comments.

Choice Details
Decision Manager User Interface Reference A-21
When you access the Audit Trail area, a query is automatically performed, and a number of audit trail rows may appear under the column headings.
Figure A–14 shows an example of the audit trail rows for a campaign Showcase Properties.
Figure A–14 Choice Audit Trail Example
What You Can DoThe icons in the Audit Trail area enable you to:
■ View, select, and reorder the search columns
■ Add an Audit Trail Comment
■ Go back to the previous display (visible only when accessed through View Projects)
■ Execute (run) the query
■ Toggle Query By Example
Switching Query By Example off means suppressing the search boxes above the column headings.
Figure A–15 shows how you can control the columns that you want to appear in the Audit Trail area.
Note: 1. The blue back-arrow icon is only visible in the Project Audit Trail area, accessed through View Projects, and enables returning to the View Projects tab.
2. While the choice-related audit trail features are common to both the Project Audit Trail and (choice-related) Audit Trail areas, this section concentrates on how to use these features in the choice-related Audit Trail area.
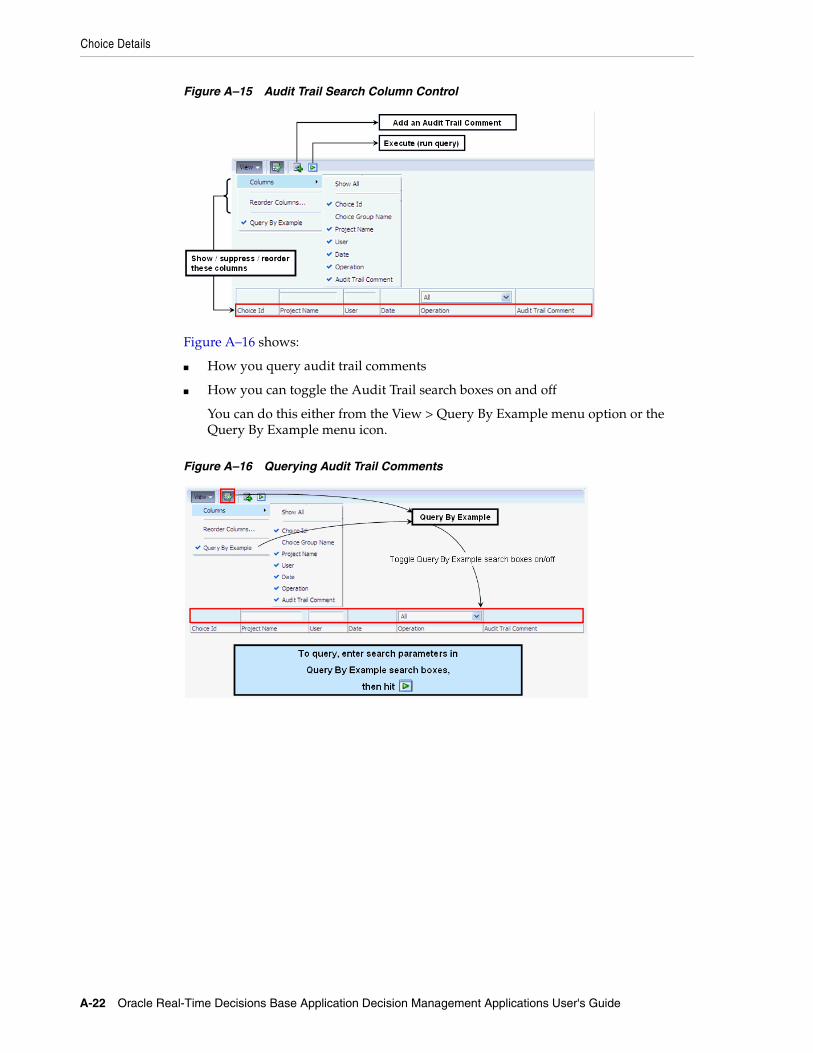
Choice Details
A-22 Oracle Real-Time Decisions Base Application Decision Management Applications User's Guide
Figure A–15 Audit Trail Search Column Control
Figure A–16 shows:
■ How you query audit trail comments
■ How you can toggle the Audit Trail search boxes on and off
You can do this either from the View > Query By Example menu option or the Query By Example menu icon.
Figure A–16 Querying Audit Trail Comments