oracle real-time scheduler 1.13 · oracle real-time scheduler 1.13.2 resource manager 4.5 user...
TRANSCRIPT

Oracle Real-Time Scheduler 1.13.2
Resource Manager 4.5
User GuideRevision 1.0
July 2010
Oracle_logo.png

User Guide Resource Manager 4.5
- 2 Copyright © 2000, 2010, Oracle. All rights reserved

User Guide Resource Manager 4.5
Copyright © 2000, 2010, Oracle. All rights reserved.
The Programs (which include both the software and documentation) contain proprietary information; they are provided under a license agreement containing restrictions on use and disclosure and are also protected by copyright, patent, and other intellectual and industrial property laws. Reverse engineering, disassembly, or decompilation of the Pro-grams, except to the extent required to obtain interoperability with other independently created software or as specified by law, is prohibited.
The information contained in this document is subject to change without notice. If you find any problems in the documentation, please report them to us in writing. This document is not warranted to be error-free. Except as may be expressly permitted in your license agreement for these Programs, no part of these Programs may be reproduced or transmit-ted in any form or by any means, electronic or mechanical, for any purpose.
If the Programs are delivered to the United States Government or anyone licensing or using the Programs on behalf of the United States Government, the following notice is applicable:
U.S. GOVERNMENT RIGHTSPrograms, software, databases, and related documentation and technical data delivered to U.S. Government customers are “commercial computer software” or “commercial tech-nical data” pursuant to the applicable Federal Acquisition Regulation and agency-specific supplemental regulations. As such, use, duplication, disclosure, modification, and adapta-tion of the Programs, including documentation and technical data, shall be subject to the licensing restrictions set forth in the applicable Oracle license agreement, and, to the extent applicable, the additional rights set forth in FAR 52.227-19, Commercial Computer Software--Restricted Rights (June 1987). Oracle USA, Inc., 500 Oracle Parkway, Red-wood City, CA 94065.
The Programs are developed for general use in a variety of information management applications. They are not developed or intended for use in any inherently dangerous applications including applications which may create a risk of personal injury. If you use the Programs in dangerous applications, then you shall be responsible to take all appropri-ate fail-safe, backup, redundancy and other measures to ensure the safe use of the Pro-grams. Oracle disclaims any liability for any damages caused by use of the Programs in dangerous applications.
The Programs may provide links to Web sites and access to content, products, and ser-vices from third parties. Oracle is not responsible for the availability of, or any content pro-vided on, third-party Web sites. You bear all risks associated with the use of such content. If you choose to purchase any products or services from a third party, the relationship is directly between you and the third party. Oracle is not responsible for: (a) the quality of third-party products or services; or (b) fulfilling any of the terms of the agreement with the third party, including delivery of products or services and warranty obligations related to purchased products or services. Oracle is not responsible for any loss or damage of any sort that you may incur from dealing with any third party.
Oracle, JD Edwards, PeopleSoft, and Siebel are registered trademarks of Oracle Corpora-tion and/or its affiliates. Other names may be trademarks of their respective owners.
- 3 Copyright © 2000, 2010, Oracle. All rights reserved

Table of contents
Chapter 1:Introduction ......................................................................................................... 1
1.1. What is Resource Manager?............................................................................................ 21.1.1 Conventions of the User Guide..................................................................................... 2
1.1.1.1 Screen Colors..................................................................................................... 21.1.1.2 Terminology and Representation ....................................................................... 2
Menu Commands 2Key Names 3Button Names 3
1.1.2 Starting Resource Manager .......................................................................................... 31.1.3 The Main Window ......................................................................................................... 5
1.1.3.1 Windows ............................................................................................................. 5Sub-windows 6Windows and Dialog Boxes 6Scroll Bars 7
1.1.3.2 Menu Bar ............................................................................................................ 7Menus 8Shortcut Menus 9
1.1.3.3 Tool Bar .............................................................................................................. 10Configuring The Tool Bar 10
1.1.4 View .............................................................................................................................. 111.1.5 Resource Manager Windows........................................................................................ 12
1.1.5.1 Basic Window Operations .................................................................................. 13Adding Windows 13Deleting Windows 13Selecting Single Data Objects 13Shortcut Menus 14
1.1.5.2 Data Entry Forms ............................................................................................... 14Data Entry Form Conventions 15Data Entry Forms and Linked Sub-windows 16
1.1.5.3 Common Address Form ..................................................................................... 18Creating a Common Address 19Selecting a Common Address 22Modifying a Common Address 23Date Edit 23
Copyright © 2000, 2010, Oracle. All rights reserved - i

Resource Manager 4.5 User Guide
Chapter 2:Windows .................................................................................................................1
2.1. Resource Manager Windows ...........................................................................................22.1.1 Engineer Form...............................................................................................................2
2.1.1.1 Using Engineer Form ..........................................................................................10Adding New Engineers 10Editing existing Engineers 10Viewing Engineers in the System 10Activating Engineers 11Deactivating Engineers 11
2.1.1.2 Maintaining Engineers Cost Profile .....................................................................11Creating Engineer Cost Profile 14
2.1.1.3 Maintaining Engineers AutoDirect Settings.........................................................14Configuring Engineer AutoDirect settings 16
2.1.1.4 Maintaining Engineer Attributes ..........................................................................16Weekly 17Creating Engineer Attribute 18Deleting Engineer Attribute 20Modifying Engineer Attribute Proficiency 20Configuring Weekly Engineer Attribute 21Daily 22
2.1.1.5 Maintaining Engineer Zones ...............................................................................24Weekly 25Daily 27
2.1.1.6 Maintaining Engineer Views................................................................................30Configuring Engineer Views 31
2.1.1.7 Maintaining Shift Templates for Engineers .........................................................312.1.1.8 Maintaining Engineer Leave................................................................................312.1.1.9 Maintaining Engineer Depots ..............................................................................32
Configuring Engineer Depots 322.1.2 Shift Template Form......................................................................................................33
2.1.2.1 Fields defining the Shift Template Profile............................................................342.1.2.2 Fields defining Shift Templates ...........................................................................36
Shift Template area 36Work Type 36General Tab 37Breaks 41Limits 42
2.1.2.3 Using Shift Template Form .................................................................................42Creating Shift Template Profile 42Editing Shift Templates Profile 43Creating Shift Templates 44Editing Shift Templates 45Deleting Shift Templates 45Maintaining Work Types 46Allow Stops with no Work Type 47Creating New Work Type 47
2.1.2.4 Shift Template Form Control Buttons..................................................................482.1.3 Vehicle Form .................................................................................................................48
2.1.3.1 Making a Vehicle Selection .................................................................................492.1.3.2 Maintaining Vehicle Attributes.............................................................................512.1.3.3 Creating Vehicle Attribute ...................................................................................522.1.3.4 Configuring Vehicle Attribute...............................................................................522.1.3.5 Using Vehicle Form.............................................................................................52
Adding New Vehicles 52Editing existing Vehicles 53
2.1.4 Vehicle Class Form .......................................................................................................53
Copyright © 2000, 2010, Oracle. All rights reserved - ii

User Guide Resource Manager 4.5
2.1.5 Shift Edit Form .............................................................................................................. 542.1.5.1 Making a Shift Selection ..................................................................................... 58
General 58Costs 61Engineer Attributes 63Shift Zones 63Scheduled Times 65Breaks 66Limits 68
2.1.5.2 Using Shift Edit Form.......................................................................................... 69Shift Work Types 70Creating Shifts 70Editing Shifts 73Deleting Shifts 74Making Shift Period Unavailable 75Creating STANDBY Shifts 75Enabling INACTIVE or STANDBY Shift Periods 76
2.1.6 Depot Form................................................................................................................... 782.1.6.1 Fields in the Depot Form .................................................................................... 792.1.6.2 Depot Time Window Form.................................................................................. 82
Creating Depot Time Window 83Editing Depot Time Windows 85Deleting Depot Time Windows 86Deactivating Depot Time Windows 87Activating Depot Time Windows 88
2.1.6.3 Depot Cutoff Editor ............................................................................................. 88Which Cutoff Profile is applied when 89
2.1.6.4 Cutoff Profiles Editor........................................................................................... 912.1.6.5 Depot Views ....................................................................................................... 94
Configuring Depot View 942.1.6.6 Using Depot Edit Form ....................................................................................... 95
2.1.7 Periods of Unavailability............................................................................................... 952.1.7.1 Periods of Unavailability tab ............................................................................... 97
Period of Unavailability Editor 97Using Period of Unavailability Editor 102
2.1.7.2 Templates tab..................................................................................................... 1052.1.7.3 Unavailability Template Form ............................................................................. 105
Using Unavailability Template From 1092.1.8 Slot Edit Form ............................................................................................................... 1132.1.9 CutOff Profiles Form ..................................................................................................... 114
2.1.9.1 Cutoff Profiles Editor........................................................................................... 1142.1.10 Engineers Calendar .................................................................................................... 116
2.1.10.1 Engineer Calendar Shortcut Menu ................................................................... 1182.1.11 Engineer Hours Graph ................................................................................................ 119
2.1.11.1 Configuring the Engineer Hours Graph ............................................................ 1222.1.11.2 Reading the Engineer Hours Graph ................................................................. 123
2.1.12 Public Holidays Table ................................................................................................. 1272.1.12.1 Public Holidays Form........................................................................................ 128
Creating a Public holiday 129Editing a Public Holiday 129Deleting a Public Holiday 130
2.1.13 Engineer Leave Table................................................................................................. 1302.1.13.1 Engineer Leave Editor ...................................................................................... 131
Creating an Engineer Leave 133Modifying an Engineer Leave 135Deleting an Engineer Leave 136
2.1.14 Monthly Calendar........................................................................................................ 1372.1.15 Yearly Calendar .......................................................................................................... 138
- iii Copyright © 2000, 2010, Oracle. All rights reserved

Resource Manager 4.5 User Guide
2.1.16 Shift Color Legend.......................................................................................................1392.1.17 Alert Window ...............................................................................................................141
Responding to Messages 141
Chapter 3:Layout ......................................................................................................................1
3.1. Resource Manager Layout Control..................................................................................23.1.1 Layout Controls .............................................................................................................2
3.1.1.1 Layout Mode .......................................................................................................2Selecting windows 2Adding windows to the Layout 2Removing windows from the Layout 2
3.1.1.2 Guide...................................................................................................................3Using Guide to Move or Resize Windows 3
3.1.1.3 Save Layout ........................................................................................................33.1.1.4 Load Layout ........................................................................................................43.1.1.5 Large Tool Buttons..............................................................................................43.1.1.6 Label Tool Buttons ..............................................................................................4
Chapter 4:Operations.............................................................................................................1
4.1. Resource Manager Operations ........................................................................................24.1.1 Operations Menu...........................................................................................................2
4.1.1.1 Switch User .........................................................................................................24.1.1.2 Change Password...............................................................................................44.1.1.3 Logout .................................................................................................................44.1.1.4 Edit Users............................................................................................................5
Adding New Users 6Editing Existing Users 7View Audit 8
4.1.1.5 Edit Access Levels ..............................................................................................9Creating an Access Level 10Editing an Access Level 12
Chapter 5: Options ..................................................................................................................1
5.1. Resource Manager Options..............................................................................................25.1.1 Options Menu ................................................................................................................2
5.1.1.1 Colours................................................................................................................2Configuring the Shift Status Colours 3Configuring the Leave Status Colours 3
5.1.1.2 Configure Engineer Hours...................................................................................3Engineer Hours - Daily Limits 4Engineer Hours - Weekly Limits 7Engineers Hours - Period Limits 9Which Limit is Applied When 11
5.1.1.3 Default Engineer Leave Configuration ................................................................115.1.1.4 Region Form .......................................................................................................125.1.1.5 Cost Control ........................................................................................................14
Cost Control Configuration Window 15Cost Control Editor 15
5.1.1.6 Hide Terminated Engineers ................................................................................245.1.1.7 Setup...................................................................................................................24
Copyright © 2000, 2010, Oracle. All rights reserved - iv

User Guide Resource Manager 4.5
AutoDirect Default 24Archive Settings 26Geocode Server Settings 26Sequence Locking Default 27BI 28Speed TW for Regions 28Time Zone 29
Chapter 6:Basic Concepts ................................................................................................. 1
6.1. Basic Concepts in Resource Manager ........................................................................... 26.1.1 Data Types.................................................................................................................... 2
6.1.1.1 Mandatory or Optional ........................................................................................ 2Resource 2Shift 2Break 3Period of Unavailability (POU) 3
6.1.2 Cost Considerations...................................................................................................... 36.1.2.1 What Are Costs .................................................................................................. 36.1.2.2 How are Costs calculated................................................................................... 4
Flat Cost 4Rate Cost 4Complex Cost 4
6.1.2.3 Global versus Relative Cost ............................................................................... 46.1.3 Setting Up the Data Objects ......................................................................................... 5
6.1.3.1 Resource ............................................................................................................ 5Resource Cost 5
6.1.3.2 Stop .................................................................................................................... 5POU Stops 6
6.1.3.3 Shift .................................................................................................................... 6Shift Types 7Shift Duration 7Shift Working Hours 7Shift Cost 8Reserve Capacity 8Load Limits 9Parcel Size 9Zones 9Attributes 10Views 10Relative Speed 10MDT (Mobile Data Terminal) 10Break 11Engineers Own Travel Time (EOTT) 12
6.1.4 Resource Manager Functions....................................................................................... 14Engineer Hours Limits in Resource Manager 14
6.1.4.1 Maintaining Engineer Details .............................................................................. 14Personal Data 15Operational Data 15
6.1.4.2 Maintaining Engineers Leaves ........................................................................... 15Default Entitlement 16Individual Engineer Entitlements 16Taking Leave 16
6.1.4.3 Maintaining Shift Profiles .................................................................................... 17Multiple Shift Templates within a Shift Profile 18Multiple Shift Profiles within Resource Manager 18
- v Copyright © 2000, 2010, Oracle. All rights reserved

Resource Manager 4.5 User Guide
Reusability of Shift Profiles 18Shift Profiles enable Shift Rotation 18
6.1.4.4 Creating New Shifts ............................................................................................19Checklist for creating Shifts 19
6.1.4.5 Maintaining Worked Hours..................................................................................19
Appendix A:Glossary .............................................................................................................1
A.1. Glossary...............................................................................................................................2
Copyright © 2000, 2010, Oracle. All rights reserved - vi

Chapter 1:Introduction
Copyright © 2000, 2010, Oracle. All rights reserved 1 - 1

Resource Manager 4.5 User Guide
1.1. WHAT IS RESOURCE MANAGER?
Resource Manager is the resource management component of the Oracle Real-Time Scheduler (ORS) product.
Its many uses are to:• Support a two way process of managing the appropriate data between itself and Oracle
Real-Time Scheduler’s scheduling component Planner• Provide consistent operational integration with Planner• Maintain a published API (database tables) for integration with your existing resource
management application (if any)• Deliver functionality over and above data management and flow, to support your
management decision processes
You can monitor the data and information on a large screen display using easy "point and click" mouse movements. The liberal usage of colors and Gantt charts on the display enables you to assimilate the availability and work schedule of Engineers at a glance. It displays both the historical and future planned work of Engineers.
The Resource Manager layout can be configured to suit individual requirements.
This User Guide describes the various Resource Manager windows, operations and controls while giving a clear understanding of how you can use the various functions to handle the creation and maintenance of Shifts and related details.
1.1.1 Conventions of the User Guide
1.1.1.1 Screen Colors
The Resource Manager software relies on color to convey a great deal of information.
Resource Manager will be initialized to display a default color set, but allows you to customize the use and hence the meaning of the colors shown on the screen.
The colors used in this User Guide for illustrating the screen displays may not exactly represent the default color set that is provided when Resource Manager is installed. In addition, the color set within your organization may already have been customized. Therefore, you can expect the colors you see to differ in some cases from those on your screen.
1.1.1.2 Terminology and Representation
1.1.1.2.1 Menu Commands
Copyright © 2000, 2010, Oracle. All rights reserved 1 - 2

User Guide Resource Manager 4.5
All references to menu commands are in bold, italic type. Commas separate strings of commands.
Example:Select Options, Colours, Shift Colours, STARTED from the main menu.
In this case you would select Options within the main menu bar, then Colours from the sub-menu, then Shift Colours from the following sub-menu and finally STARTED from the following sub-menu.
1.1.1.2.2 Key Names
All keys on the keyboard are represented in bold type.
Example:Press and hold the Alt key.
In this case you would press and hold the key labeled Alt on the keyboard.
1.1.1.2.3 Button Names
All button names are represented in bold type.
Example:Click on the OK button to save the changes.
1.1.2 Starting Resource Manager1 To start up Resource Manager from your workstation:
• Establish a connection with your database service (Oracle, SQL Server etc…)• Start the Resource Manager GUI process by clicking the Resource Manager
icon on your desktop
This will display “The Main Window” on page 1 - 5. This window will be referred to as the main window within this User Guide.2 You are required to provide a user name and password before being able to use the
Resource Manager GUI.
1 - 3 Copyright © 2000, 2010, Oracle. All rights reserved

Resource Manager 4.5 User Guide
Log in with User Name admin and Password admin, the very first time you log in after installing Resource Manager.
Immediately after this you will be prompted to change the password. You will be required to use this newly created password for all subsequent login attempts.3 Engineers and Depots are associated with Views. The Resource Manager Client has
the ability to filter Engineers and Depots by Views.
A View Selection Dialog similar to the one displayed below is opened on launching the Resource Manager Client. The Views you select on this dialog will be used to filter the Engineers and Depots for display on the rest of the Client.
4 If you wish to receive planning updates from Planner:• Run Planner and• Start the Gateway process by clicking the Resource Manager Gateway icon on
your desktop
You will now see regular updates between Resource Manager and the scheduling application.5 If you wish to exchange data between your system and Planner:
• Run Planner• Run Resource Manager GUI process• Run Resource Manager Gateway process and• Start the Web Service process by clicking the Resource Manager Web Service
icon on your desktop.
Note: Only the DEFAULT View is supplied with the Resource Manager installation. You should create the required Views from either the Engineer form or Depot Form. If there are no other user-defined Views in the system then the View Selection Dialog is not displayed.
Copyright © 2000, 2010, Oracle. All rights reserved 1 - 4

User Guide Resource Manager 4.5
1.1.3 The Main Window
The main window is the workspace from where all the Resource Manager operations are performed. This display is refreshed continuously with the updates received from Planner and the host system.
This user interface is designed to allow authorized users with little or no computer experience to make full use of the systems capabilities. Extensive use of graphical representations and point and click operations minimize the need for keyboard skills. Most operations are carried out using a mouse (or equivalent) to move a pointer around the screen.
After you move the pointer to point at a screen object, you can select or activate it using the buttons on the mouse and then perform the required resource management operation on it.
1.1.3.1 Windows
There are three main kinds of windows in Resource Manager:• Windows• Sub-windows• Dialog boxes
1 - 5 Copyright © 2000, 2010, Oracle. All rights reserved

Resource Manager 4.5 User Guide
Windows from where you are allowed to browse, edit and save data are also referred to as Data Entry Forms within this User Guide.
Most of these windows allow you to create, edit and view the data, while others display information using Gantt charts, tables and colored icon patterns.• Windows can be displayed by selecting Windows from the main menu.• Sub-windows can be displayed by selecting Layout from the main menu.• Dialog boxes are used for making choices to do with the way in which Resource
Manager shows information and for making choices about various operations.
1.1.3.1.1 Sub-windows
In the main window there are sub-windows containing specific information about one particular item. You can easily choose which type of window to display to show the information that you need, and you can open any number of sub-windows.
To open more sub-windows within the main window, select Layout from the main menu.
1.1.3.1.1.1 Moving or Resizing Sub-windowsThe basic screen layout of the main window can only be changed when you are operating in Layout mode.
To operate in Layout mode, select Layout, Layout from the main menu. The Layout option should now be checked.
When you are in Layout mode, square, black sizing-handles will appear around the selected sub-window on the main window, which can be used to re-size the sub-window.
1.1.3.1.2 Windows and Dialog Boxes
To open more windows, select Windows from the main menu.
Dialog boxes will open automatically in response to mouse clicks and command selections as described throughout this User Guide.
1.1.3.1.2.1 Moving or Resizing Windows and Dialog Boxes
To move a sub-window:
Drag the sub-window border to a new position on the screen. The entire sub-window will be re-located.
To resize a sub-window:
Drag any edge or corner handle to a new position on the screen. The window will stretch either horizontally and vertically (or both) to the new dimensions.
Copyright © 2000, 2010, Oracle. All rights reserved 1 - 6

User Guide Resource Manager 4.5
The size and position of windows and dialog boxes does not depend on operating in Layout mode and can be changed at any time.
1.1.3.1.2.3 Closing Windows and Dialog BoxesAll windows and dialog boxes have a button (a X in a box) in the top right-hand corner that can be used to close them. In addition, some dialog boxes will have a Close or Cancel button that can be used for the same purpose.
1.1.3.1.3 Scroll Bars
In windows and sub-windows a scroll bar will appear at the side and/or bottom whenever the information to be displayed in the window is greater than can be accommodated by the physical size of the window.
The total length of the scroll bar represents the total amount of information contained in the window. The length of the scroll box indicates the proportion of the total information that is displayed. The position of the scroll box indicates the position of the displayed information within the total contents.
1.1.3.2 Menu Bar
The menu bar contains a list of menus from which you may select a range of configuration and display options, or activate additional dialog boxes to facilitate specific operations.
To move a window or dialog box:
Place your mouse pointer anywhere over the blue title bar and drag it to a new position on the screen. The entire window or dialog box will be re-located.
Note: When you open a new window using the Windows option, you may find that the blue title bar is not visible. This is caused by certain configurations of the display within the operating system. In order to move the window, first use the border to re-size it and you should then be able to see the title bar at the top.
To re-size a window or dialog box:
1. Position the mouse pointer over any border of the window or dialog box. It will change to a double-headed arrow.
2. Drag the mouse pointer until you achieve the desired size.
To move the display in the window (up or down or left or right) by a small amount:
Click on the appropriate arrow button in the scroll bar.
To move the display in the window up (or down or left or right) by a larger amount:
1. Click on the appropriate scroll box and drag it with the mouse.
1 - 7 Copyright © 2000, 2010, Oracle. All rights reserved

Resource Manager 4.5 User Guide
In this User Guide, the menu on the main window's menu bar is referred to as the main menu. Where options are to be taken from other menus, this will be clearly stated.
1.1.3.2.1 Menus
All the Resource Manager menus use the same conventions to give the clues as to what will happen if a menu option is selected.
If the menu option is displayed in grey, it is not available. This is known as grayed out.
To make a choice from a menu, drag the mouse pointer over your choice and release the mouse button or simply click on the option. This will activate your chosen option, unless a secondary menu is to be displayed.
To abandon the menu without making a choice, move the mouse pointer away from the menu and release the button.
The following main menu options are available:
1.1.3.2.1.1 Activating a Menu Option
1.1.3.2.1.2 Using the MouseWhen you click on a menu name, a further set of options, called a drop-down menu, will appear.
To make a choice from the drop-down menu, click on the required option.
To abandon the drop-down menu, move the mouse pointer away from the menu and click.
Alternatively, you can select an option by clicking on the menu option then dragging the cursor to the desired option on the drop-down and releasing the mouse button. To abandon the menu, drag the cursor outside the menu and then release the button.
Main Menu Options
Option UseFile This is used for exiting from Resource Manager.
View This is used to set the systems view.
Windows This allows new windows and dialog boxes to be created.
Layout This controls Layout mode, and allows new sub-windows to be added.
Options This is used for configuring global defaults like Shift colours, AutoDirect settings, Engineer leaves, Region definitions, Cost Control settings and Working hour limits.
Operations This is used for switching users and administering user accounts and access levels.
Help This allows you to view information about the currently used version of Resource Manager.
Note:Currently no HTML help is included in the software. This feature is for future development.
Copyright © 2000, 2010, Oracle. All rights reserved 1 - 8

User Guide Resource Manager 4.5
1.1.3.2.1.3 Using the KeyboardEach menu option has an associated shortcut key, with which it can be activated. The letter in the menu name that is displayed with an underscore identifies the shortcut key for each menu.
1.1.3.2.1.3 Secondary MenusSome menu options have triangular pointers displayed at the right hand side of the label.
The triangular pointers show that further options (called a secondary menu) will be displayed when the menu option is activated. When this occurs, continue to drag the mouse pointer through the secondary menu or menus until you reach a final choice, then click to select it.
1.1.3.2.1.4 Dialog BoxesMenu options with ellipses (...) at the right hand side of the label will open a temporary dialog box on selection. These dialog boxes are not part of the main workspace, and can be dismissed anytime after use.
1.1.3.2.1.5 Selection OptionsSome menu options show whether something is currently selected or de-selected, that is, they show whether a variable or process is On or Off, Active or Inactive etc. If there is a tick to the left of the option, the option is selected. If there is no tick, the option is de-selected.
1.1.3.2.2 Shortcut Menus
Many Planner windows and icons have selectable options that are available through shortcut menus. These are a convenient way of displaying options that are available for, and relevant to, a particular window or dialog box.
To activate a menu using the shortcut key:
1. Press and hold the Alt key on the keyboard.2. Press the shortcut key for the desired menu option.3. Release the Alt key.
To select an option from the drop-down menu:
1. Use the Up Arrow or Down Arrow key to move the highlighted bar up and down the list of options.
To select a secondary menu if one exists on the currently highlighted option:
1. Use the Right Arrow key.
To select the desired option after it is highlighted: 2. Press the Enter key.
Note: Dialog boxes can also be invoked from other windows.
1 - 9 Copyright © 2000, 2010, Oracle. All rights reserved

Resource Manager 4.5 User Guide
When either of these types of shortcut menu is activated, a menu or a dialog box will be displayed from which options can be selected.
1.1.3.3 Tool Bar
The buttons in the Tool Bar can generally be used as short cuts for some of the more commonly used Menu Bar operations. When the mouse cursor is placed over the buttons, a Cue Card pop-up explains the function of the button.
The Tool Bar can be configured to display larger buttons and or button labels.
1.1.3.3.1 Configuring The Tool Bar
The buttons are activated with a Left Click.
A window shortcut menu is activated by:
Right-clicking in the body of the window.Or:
Holding Ctrl while right-clicking in the body of the window.
An icon shortcut menu is activated by:
Right-clicking on the relevant icon.
To configure the Tool Bar:
1. Select Layout, Layout Mode, to enable the Layout mode if it is not enabled already2. Select Layout, Label Tool Buttons to display the Tool Buttons Labels if not displayed
already3. Select Layout, Large Tool Buttons to enlarge the Tool Buttons from their default
display size
Tool Bar buttons (Sheet 1 of 2)
Tool Bar Buttons Use
Copyright © 2000, 2010, Oracle. All rights reserved 1 - 10

User Guide Resource Manager 4.5
1.1.4 View
The Resource Manager uses View filtering to limit data viewing capabilities for different users. Each user (for example - regional manager) only manages a subset of the Engineers as such they only need to see the subset of Engineers they are managing.
To change the view, select View, Change View option from the main menu.
- Opens the Engineer Form
- Opens the Shift Edit Form
- Opens the Vehicle Form
- Opens the Depot form
- Opens the Oracle Business Intelligence Reports
On starting the Resource Manager Client, the View selection dialog is presented only if at least one user-defined View other than the DEFAULT View
exists in the system. In order to continue, you are required to make the View selections from this dialog.
Tool Bar buttons (Sheet 2 of 2) (Continued)
1 - 11 Copyright © 2000, 2010, Oracle. All rights reserved

Resource Manager 4.5 User Guide
Select the desired view and click OK button.
If the target Engineer or Depot, for any reason, is no longer in view you will be warned and the target will be reset.
Selecting one or more Views will then filter the Engineers displayed in the rest of the Client. Engineer or Depot without a View selection is considered to be in all views.
1.1.5 Resource Manager Windows
Most of the windows described in this section can either be sub-windows or windows.
Sub-windows can only be created when you are in Layout mode and are called up by selecting Layout from the main menu. They are part of the main window and are only seen as long as the main window itself is on display.
Windows can be invoked at any time by selecting Windows from the main menu. They are independent of the main window.
Resource Manager has the following windows:
Resource Manager Windows (Sheet 1 of 2)
Window Name UseEngineer Form This is used to create or modify Engineer details.
Shift Template Form This is used to create or modify Shift Template Profiles.
Vehicle Form This is used to create or modify Vehicle details.
Vehicle Class Form This is used to create or modify Vehicle Classes.
Shift Edit Form This is used to create or modify Shifts one at a time.
Depot Form This is used to create or modify Depot details.
Periods of Unavailability This is used to create or modify the Periods of Unavailability (POU) and Unavailability Templates.
Slot Edit From This is used to create or modify slot groups and slots.
Cutoff Profile Form This is used to create or modify cutoff profiles and cutoff Triggers.
Engineer Calendar This displays the daily Shift assignments for all the Engineers in the system.
Engineer Hours Graph This displays the planned and actual Shift assignments in a period, for the selected Engineer.
Public Holiday Table This is used to create, edit and delete public Leaves.
Engineer Leave Table This is used to create, edit and delete Engineer leaves.
Monthly Calendar This displays the Engineers Shift assignments for the selected Calendar month Engineer.
Yearly Calendar This displays the Engineers Shift assignments for the selected Calendar.
Shift Color Legend This lists the color legends for the colors displayed on the Resource Manager GUI.
Copyright © 2000, 2010, Oracle. All rights reserved 1 - 12

User Guide Resource Manager 4.5
1.1.5.1 Basic Window Operations
This section describes the operations that are common to all Resource Manager windows.
1.1.5.1.1 Adding Windows
The creation of Resource Manager sub-windows is controlled from the Layout menu.
Windows created from the Windows menu are not attached to the main window.
1.1.5.1.2 Deleting Windows
Sub-windows can only be deleted while you are in Layout mode.
Windows and Dialog boxes can be dismissed by their control buttons or by using their application control menu options.
1.1.5.1.3 Selecting Single Data Objects
Most Resource Manager operations require information about an Engineer on a calendar day before execution. The easiest way to specify this information is to select that days icon associated with the Engineer before initiating the operation.
When an icon is selected, you will see that it has been selected by a change of color or shape, or a solid border around it.
Objects selected in this way are called primary selections. Also see “Selecting Groups of Data Objects“ below.
Whenever an icon is selected in any window or sub-window, other relevant windows or sub-windows will immediately update their display to reflect the selection.For example:
When you select a Shift in the Engineer Calendar window, the Monthly Calendar window and the Engineer Hours Graph window display will automatically refresh to show this Shift selection.
1.1.5.1.3.3 Selecting Groups of Data Objects
Alert Window This displays important messages and detected error conditions.
To delete a sub-window:
1. If you are not already in Layout mode, select Layout, Layout.2. Hold the Ctrl key and click on the border of the window to be deleted.
To select an icon anywhere on the screen:
1. Point the cursor at the icon.2. Click with the left mouse button.
Resource Manager Windows (Sheet 2 of 2) (Continued)
1 - 13 Copyright © 2000, 2010, Oracle. All rights reserved

Resource Manager 4.5 User Guide
Some Resource Manager operations allow or require you to specify groups of screen objects. Groups of objects can be constructed by selecting several individual objects or by selecting all objects within a sequence of objects.
Only single item selections can be made from all the Resource Manager windows other than the Engineer Calendar window.
1.1.5.1.3.2 De-selecting a GroupTo de-select an entire group, just make another primary selection.
1.1.5.1.4 Shortcut Menus
Some of the Resource Manager windows have Icon shortcut menus (specific).
Specific shortcut menus apply to data objects and can be invoked by selecting a particular object before right-clicking on it.
It is also possible to have different context menus for group selections in some windows.
1.1.5.1.4.1 Icon Shortcut MenusAn icon shortcut menu is activated by a right click on the object. When you select an option on the icon shortcut menu invoked from a single object selection, the related operation is applied only on that object.
In case of a multiple selection, the resulting operation is applied on all the objects in the selection.
Options can be selected from the icon shortcut menu with a right click or a right drag.
1.1.5.2 Data Entry Forms
All Resource Manager windows using which data can be created or modified within the system are referred to as Data Entry Forms in this User Guide.
Data entered into the Data Entry Forms are stored internally within the Resource Manager database.
Data Entry Forms are of two types: Main and Auxiliary.
Those windows from where the main resource objects are created or edited are referred to as main Data Entry Forms within this User Guide. The main resource objects are Engineer, Vehicle, Vehicle Class, Shift Template Profile, Shift, Unavailability Template, Period of Unavailability, Public Leave, Engineer Leave and Engineer Hours.
Auxiliary Data Entry Forms attach additional information to the objects being edited from the main Data Entry Forms. In most cases these are invoked from one or more of the main Data Entry Forms.
To select a group of continuous screen objects:
1. Left Click on the first object in the intended group and drag the cursor until the last object
Copyright © 2000, 2010, Oracle. All rights reserved 1 - 14

User Guide Resource Manager 4.5
1.1.5.2.1 Data Entry Form Conventions
All Resource Manager Data Entry Forms use the same conventions to give the clues as to what will happen if a Data Entry Form option is selected.
Data Entry Forms display data values on a white or grey background. The grey background represents those values that cannot be edited. Most of the values displayed on the Data Entry Forms have a reference to the internal Resource Manager database.
Text boxes into which values are typed in are rectangular areas having a white background with adjacent field labels.
Drop-down lists permit the selection of values from a pre-defined list and are represented by the down facing arrow to the right of the field name.
A double arrow to the right of a field indicates a spin button, which is used to increase or decrease the value shown in the field.
A square box to the right or left of a field label indicates a check box, which can be used to select or de-select the field variable. A tick in the check box indicates that the option is selected. If there is no tick, the option is de-selected.
In most cases a rectangular shaped raised button placed anywhere on the Data Entry Form area other than at the bottom indicates an auxiliary Data Entry Form button, which can be clicked to invoke the auxiliary Data Entry Form corresponding to the label on the button.
Record Status is displayed as Record <n> of <m> at the bottom Left hand corner of some windows. For example:
“Record 5 of 50” in the Engineer Form will indicate that the fifth record out of the 50 Engineer records in the system is currently being displayed.
Sets of raised rectangular shaped buttons that are usually placed at the bottom of the Data Entry Form area denote the navigation and command buttons.
Command buttons allow you to perform the action suggested by its label.
1 - 15 Copyright © 2000, 2010, Oracle. All rights reserved

Resource Manager 4.5 User Guide
Navigation buttons allow you to browse through the Resource Manager database.
1.1.5.2.2 Data Entry Forms and Linked Sub-windows
Resource Manager uses sub-windows to add more information to the objects that are being edited from the main Data Entry Forms. In most cases you can invoke multiple windows and sub-windows from a window. The following listing outlines the windows that can be invoked from specific windows:
Command Buttons
Command Buttons DescriptionAdd Add a new record to the database.
Insert Save the newly added record into the.
Update Save the changes made to an existing record into the database.
Delete Delete an existing record from the database.
Clear Clear all the non-default entries from the Data Entry Form.
Abort Discard all the current changes from the Data Entry Form.
Close Dismiss the Data Entry Form.
Unavailable Note:This command button is available only within the Shift Edit Form.
You can make the Shift displayed on the Shift Edit Form INACTIVE by selecting this button.
Note:The Insert button is active when a new record is being added and the Update button is active when an existing record is being edited. You must click on the appropriate Insert or Update button to save the changes into the database.
Navigation Buttons
Navigation Buttons DescriptionSelect this button to go to the first record
Select this button to go to the previous record
Select this button to go to the next record
Select this button to go to the last record
Copyright © 2000, 2010, Oracle. All rights reserved 1 - 16

User Guide Resource Manager 4.5
• Engineer Form• Shift Template Form• Vehicle Form• Common Address Form• Date Edit• Engineer Cost Profile
• Reserve Capacity Type• Communications Form• Engineer Attributes
• New Proficiency• Engineer Zones• View Editor • Engineer Leave Configuration• Engineer Depots
• Shift Template Form• Shift Template Profiles• Shift Templates• Break Templates• Work Type Restrictions• Date Edit• Common Address Form
• Vehicle Form• Vehicle Class Form• Vehicle Attributes• Date Edit
• Shift Edit Form• Shift Costs Form
• Engineer Cost Profile • Reserve Capacity Type
• Vehicle Form• Engineer Depots• Work Type Restrictions• Common Address Form• New Engineer Attribute dialog
• New Proficiency• New Engineer Zone dialog• Breaks
• Depot Edit Form• Date Edit• Common Address Form• Depot Time Window Form
• Depot Time Windows• Depot Cutoff Editor
• Cutoff Profile Editor• New Cutoff Profile
• View Editor • Period of Unavailability
• Period of Unavailability Editor
1 - 17 Copyright © 2000, 2010, Oracle. All rights reserved

Resource Manager 4.5 User Guide
• Date Edit• Common Address Form• Unavailability Template Form
• Unavailability Template Form• Date Edit• Common Address Form• Period of Unavailability Editor
• Slot Edit Form• CutOff Profiles Form• Engineer Calendar
• Shift Edit Form• Engineer Form• Engineer Leave Editor• Public Holidays Form
• Engineer Hours Graph• Shift Edit From
• Public Leaves Table• Public Leaves Form
• Engineer Leave Table• Engineer Leave Editor
The Common Address Form and Date Edit windows can be accessed from most of the Resource Manager windows.
1.1.5.3 Common Address Form
The Common Address Form is used to create, modify and Geocode addresses. Locations are stored as labeled Common Addresses within Resource Manager.
The many uses of Common Addresses within Resource Manager include specifying the:• Logon and Logoff locations within Engineer details• Logon and Logoff locations in Shift Templates and actual Shifts• Center location for Dynamic working areas• Depot locations• Period of Unavailability location
Copyright © 2000, 2010, Oracle. All rights reserved 1 - 18

User Guide Resource Manager 4.5
The items in this window are:
1.1.5.3.1 Creating a Common Address
Common Address Form Fields
Field DescriptionLocation Name
This is a valid Location label entry that is used for Geocoding purposes and uniquely identifying the common address.
Address This is an optional entry for specifying the building/road/street name.
City This is an optional entry for specifying the city name.
State This is an optional entry for specifying the State or County name.
Zip This is an optional entry for specifying the PIN code.
Country This is for specifying the country name and is mandatory when the address has to be Geocoded.
Geocode This button can be selected to establish a connection with the Geocode server. The Geocode server will return one or more sets of matching Latitude and Longitude coordinates for the values specified in the Location Name and Country fields. You can select the appropriate coordinates from this set to update the Longitude and Latitude text boxes adjacent to the Geocode button.
Search This will enable you to search and select a location from the available common addresses. The contents of the Common Address Form must be cleared before activating the Search button to be able to see all the existing addresses.
Common Addresses in the system
1 - 19 Copyright © 2000, 2010, Oracle. All rights reserved

Resource Manager 4.5 User Guide
To create a common address:
1. Click on the Clear button.
This will clear all entries from the Common Address Form window.2. Enter the new Location Name.3. Enter appropriate values into the Address, City, State/Zip and Country fields.4. Click on the Geocode button.
You can use this to substitute valid coordinates into the adjacent Longitude/Latitude fields.
5. Click on Insert to save the address.
The Insert button will be replaced with Select, to indicate that the new location has been saved and is now available for selection.
Copyright © 2000, 2010, Oracle. All rights reserved 1 - 20

User Guide Resource Manager 4.5
1.1.5.3.1.6 Geocoding a LocationShifts being sent from Resource Manager to Planner must have Geocoded addresses in the Logon/Logoff locations.
To Geocode a Location:
1. Specify the search criteria using Location Name and Country.2. Click on the Geocode button to establish a connection with the Geocode Server.
The title on the resulting window will indicate the status of the search result:• Geocoding address: Geocode server is actively performing the search.
• Geocoding Failed indicates an unsuccessful search.
1 - 21 Copyright © 2000, 2010, Oracle. All rights reserved

Resource Manager 4.5 User Guide
1.1.5.3.2 Selecting a Common Address
• Geocoding Complete indicates a successful search and returns one or more matching addresses.
3. Make a selection from the list displayed under Geocoding Complete.
This will enable the Select button.4. Click on Select to copy the address into the Common Address Form or on Cancel to
dismiss the Geocoding Complete window.5. Save the Common Address by selecting Insert/Update from the Common Address
From.
To select a common address:
1. Click on the Clear button.
This will clear all entries from the Common Address Form window.2. Click on the Search button.
All the stored common addresses will now be listed under the Search button.3. Select the required common address from the list.4. Click on the Select button.
The selected address will be copied into the main Data Entry Form that had invoked the Common Address Form.
Copyright © 2000, 2010, Oracle. All rights reserved 1 - 22

User Guide Resource Manager 4.5
1.1.5.3.3 Modifying a Common Address
1.1.5.3.4 Date Edit
The Date Edit window displays an electronic calendar using which you can make the Day, Month and Year selections for a date. All date editing fields within the Resource Manager display use this window to make accurate date selections.
Click on OK to copy the configured date into the window from which the Date Edit has been invoked or on Cancel to dismiss the date.
To modify the selected common address:
1. Click on the Clear button.
This will clear all entries from the Common Address Form window.2. Click on the Search button.
All the stored common addresses will now be listed under the Search button.3. Select the required common address from this list.4. Modify all values except Location Name.5. Click on the Geocode button if the Latitude/Longitude co-ordinates for the common
address are to be modified. See “Geocoding a Location” on page 1 - 21.6. Click on Update to save the changes or on Close to dismiss the Common Address Form
without saving the changes.
Note:You can use wild card patterns to perform complex searches on the common addresses. For example, to search for common addresses beginning with the letter b enter b% in the Location Name and select Search.
Note:The Common Address Form window can be invoked from: Engineer Form, Shift Template Form, Shift Edit Form, Unavailability Template Form and Period of Unavailability Editor.
Note:If the selected Day is not a Monday, then Resource Manager will automatically adjust it to the Monday of the selected week within the Shift Template Form and the Unavailability Template Form.
1 - 23 Copyright © 2000, 2010, Oracle. All rights reserved

Resource Manager 4.5 User Guide
Copyright © 2000, 2010, Oracle. All rights reserved 1 - 24

Chapter 2:Windows
Copyright © 2000, 2010, Oracle. All rights reserved 2 - 1

Resource Manager 4.5 User Guide
2.1. RESOURCE MANAGER WINDOWS
2.1.1 Engineer Form
Engineer details are created and modified from the Engineer form.
Typically in the field services industry, Engineers use Vehicles to perform scheduled work within the specified time frame. This information can be captured and saved into the system from the Engineer Form.
When you create a new Engineer, all fields on the Engineer Form are either cleared or reset to default values.
Copyright © 2000, 2010, Oracle. All rights reserved 2 - 2

User Guide Resource Manager 4.5
2 - 3 Copyright © 2000, 2010, Oracle. All rights reserved

Resource Manager 4.5 User Guide
The Engineer Form window contains the following fields:
To select an Engineer do any one of the following:
Make a selection from the Name drop-down list
Or
Use the navigation buttons to locate the Engineer
Or
Select the Engineer from another Resource Manager window
Engineer Form Fields (Sheet 1 of 7)
Field DescriptionGeneral details
The general Engineer details are recorded using the Name, Address, City, State/Zip, Country, Phone, Mobile, Licence and Emergency contact fields.
Use the button that is adjacent to the Licence Exp. field, to enter this value in an acceptable format.
Note:Name is mandatory and must be unique for each Engineer in the system
Copyright © 2000, 2010, Oracle. All rights reserved 2 - 4

User Guide Resource Manager 4.5
Default Location
The Logon and Logoff locations for the Engineer are specified here. These will display blank whenever the Default Locations have not been confirmed for the Engineer.
Note:You can leave the Logon and Logoff Location fields blank in the Engineer Form in order for Resource Manager to copy these values from the associated Shift Template Profile.
The Select buttons to the right of Logon and Logoff can be selected to open the Common Address Form window. You can create or configure the locations from this window before confirming the Engineers default location.
Note:Resource Manager will not generate actual Shifts from invalid Logon/Logoff locations.
Dynamic Working Area
Dynamic Work Areas is a method of keeping Engineers working as close as possible to a central point. The central point is defined as a Common Address, which can be configured from the Engineer Form by selecting the Select button adjacent to Centre Location. This Common Address is the dynamic zone Centre for all shifts belonging to this Engineer.
When the Centre Location is not defined the Shift Logon location becomes the dynamic zone Centre.
The Relative Factor enables you to selectively assign larger or smaller dynamic areas to shifts.
Each Shift inherits the Dynamic Work Area Central Location and Relative Factor from the Engineer. These fields can be modified on a Shift-by-Shift basis independent of the Engineer from the Shift Edit Form.
Engineers Own Travel
The Engineers own travel time At Start and At Finish of shift can be specified here. See the “Enable Engineers Own Travel Time” section on page 5 - 5 for more details on configuring the Engineers Own Travel time.
Note:The Engineers Own Travel fields are visible on the Engineer Form only when the Global Engineers Own Travel Time option is enabled.
Select Configure Engineer Hours, Daily Limits, Enable Engineers Own Travel Time, Engineers Based from the Options menu to see the Engineers based Own Travel Time fields on the Engineer Form.
Engineer Form Fields (Sheet 2 of 7) (Continued)
Field Description
2 - 5 Copyright © 2000, 2010, Oracle. All rights reserved

Resource Manager 4.5 User Guide
Region Resource Manager Gateway sends the related Shift, Vehicle, Depot and Job details to the appropriate Planner instance only when the Engineers Region name is the same as that of the active region.
By default all objects are associated with the default region.
Note:When a Depot is attached to the Engineer, the Region field is disabled on the Engineer Form and the Engineer automatically inherits the Depots region.
Time Zone Resource Manager has the ability to manage resources across multiple Time Zones. The default configuration recognises a single Time Zone, belonging to the Local Time Zone that the application is running in.
The Time Zone field is a drop-down list from where you can select the required Time Zone.
Note:The Time Zone field is visible on the Engineer Form only when multiple Time Zones have been configured for the installation.
Select Setup, Time Zones from the Options menu and create a name for each of the Time Zone that you require and associate these with the actual time Zone.
Relative Efficiency
Relative Efficiency can be used to either extend or shorten the job delay of a stop when being optimized for a particular Engineer. The Relative Efficiency of an Engineer is expressed as a variance to the normal value, which is equal to 1.
For Example:A "Rookie" who is, during initial deployment, taking 50% longer to complete jobs, can be cor-rectly represented in the schedule by having a setting of 1.5 as their Relative Efficiency. For a super efficient Engineer who can complete jobs 25% quicker than the average assumed "stop delay", would have a Relative Efficiency of 0.75.
The default setting for Relative Efficiency is 1 which leaves the job delay unchanged.
Engineer Form Fields (Sheet 3 of 7) (Continued)
Field Description
Copyright © 2000, 2010, Oracle. All rights reserved 2 - 6

User Guide Resource Manager 4.5
Start Date You can use the Start Date to create and configure Engineers into the system before they actually commence their employment with you. By default this is same as the date on which the Engineer is created within Resource Manager. You can change this date either into the future or into the past.New shifts are not generated before the Start Date. Templated Shifts before the Start Date are not visible on the Resource Manager GUI.
The Start Date can be configured from the Date Edit window, by clicking on the
icon adjacent to the Start Date field.Finish Date Finish Date defines the deactivation date for Engineers. By default this date is set to NULL, which
indicates that the Engineer is expected to work forever. Engineers with Finish Date in the past are removed from the display. Resource Manager deletes all shifts both planned and templated that fall after the Finish Date.
Note:A Finish Date is rejected when the Engineer has STARTED or COMPLETED shifts on days following this Date.
The Finish Date can be configured from the Date Edit window, by clicking on the icon adjacent to Finish Date.
You can clear the Finish Date by clicking on the button adjacent to Finish Date.
Note: To see all terminated Engineers on the display, turn off the Hide Terminated Engineers option from the Options menu.
Cost Profile This is the Engineer Cost Profile drop-down selection list, using which you can specify the default costs for using the Engineers Shifts. For more details, see the “Maintaining Engineers Cost Profile” section on page 2 - 11.
The Edit button to the right of the Cost drop-down button can be selected to open the Engineer Cost Profile window. Using this window you create or modify a cost profile containing different cost settings for each day of the week before applying it to the Engineer. The appropriate days cost will be applied to Engineers Shifts for the corresponding day.
Note:While the Engineer Form allows you to define the cost setting for all the Shifts associated with the Engineer, the Shift Edit Form allows you to configure the cost for a single days Shift.
Engineer Form Fields (Sheet 4 of 7) (Continued)
Field Description
2 - 7 Copyright © 2000, 2010, Oracle. All rights reserved

Resource Manager 4.5 User Guide
Vehicle This is the Vehicle drop-down selection list, which displays the Engineers default Vehicle. This will display blank whenever a Vehicle is not associated with the Engineer.
The Edit button to the right of the Vehicle drop-down button can be selected to open the Vehicle Form window. You can create or modify the Vehicle from this window before applying it to the Engineer. For more details, see the“Vehicle Form” section on page 2 - 48.
Note: The combination of an Engineer and a Vehicle is considered as a Resource in Planner. Shift is the time frame within a day when the Resource is available for work.
Shift Profile Shift Template Profiles consisting of work patterns for each day of the week can be saved and applied for multiple Engineers. You can associate the appropriate Shift Profile with the Engineer by selecting it from the Shift Profile drop-down list. This field will be blank when a Shift Profile is not associated with the Engineer.
Selecting the Edit button to the right of the Shift drop-down button will open the Shift Template Form window. You can create or modify the Shift Profile from this window before applying it to the Engineer.
For more details refer the “Shift Template Form” section on page 2 - 33.
Warning:Resource Manager does not generate actual Shifts on days without a Shift Template.
Communications The button can be selected to invoke the Communication Form window. Using this
you can configure the AutoDirect settings for the currently selected Engineer. By default the AutoDirect settings for all the Engineers in the system are set globally. For more details, see the “Maintaining Engineers AutoDirect Settings” section on page 2 - 14.
Note: The AutoDirect settings control the automatic dispatch of Jobs to Shifts. Resource Manager copies these AutoDirect settings into all the Shifts that it generates for the Engineer.
AttributesThe button can be selected to invoke the Engineer Attributes window, displaying a collective list of Engineer Attributes and associated Proficiencies in the system. Using this you can create and configure Engineer attributes with or without associated Proficiencies. For more details, see the “Maintaining Engineer Attributes” section on page 2 - 16.
Note:Resource Manager copies these attributes as Shift Attributes into all the Shifts that it generates for the Engineer. Planner can be configured so that Jobs that violate the Shifts Attributes are not scheduled for the Shift.
Engineer Form Fields (Sheet 5 of 7) (Continued)
Field Description
Copyright © 2000, 2010, Oracle. All rights reserved 2 - 8

User Guide Resource Manager 4.5
ZonesThe button can be selected to invoke the Engineer Zones window. Using this you can create and configure the Required Zones and Preferred Working Zones for the Engineer. For more details, see the “Maintaining Engineer Zones” section on page 2 - 24.
Note:Resource Manager copies these zones as Shift Zones into all the Shifts that it generates for the Engineer. Planner can be configured to restrict the Engineers from doing Jobs outside their Shifts Zones.
ViewsThe button can be selected to invoke the Engineer Views window from where you can create and configure the Engineers Views. For more details, see the “Maintaining Engineer Views” section on page 2 - 30.
Note:Resource Manager copies these views as Shift Views into all the Shifts that it generates for the Engineer. Planner can be configured, to display only those data that confirm to the Shifts View Attributes.
Leave Resource Manager allows you to keep track of individual Engineer Leave Entitlements from the
Engineer Form. The button can be selected to invoke the Engineer Leave Configuration window. From this window you can allocate a different number of Leave days for the selected Engineer. For more details, see the “Maintaining Engineer Leave” section on page 2 - 31
DepotsThe button can be selected to invoke the Engineer Depots window from where you can select the depots to be associated with the Engineer. Multiple Depots belonging to the same Region can be associated with each Engineer. If an Engineer is associated with any Depots then the Region the Engineer is associated with will be inherited from the Depot and cannot be configured. For more details, see the “Maintaining Engineer Depots” section on page 2 - 32
AddThe button allows you to create new Engineer details. On selecting this button all the fields in the Engineer form will be cleared and the Insert button will replace the Update button.
Note:A unique Engineer Name must be provided for the new Engineer. After entering the new Engineer details, Insert must be selected to save this into the system.
InsertThe button is visible only after the Add button has been selected. Insert must be selected to save the new Engineer details into the system.
Note:After the new Engineer is added into the system, the Record Status area will record an increase in the total number of Engineer records.
UpdateThe button can be selected to save the changes made to an existing Engineer. All Shifts belonging to this Engineer will be refreshed on the Resource Manager Client. The Insert button replaces this button on selecting the Add button.
AbortSelecting the button will discard all unsaved changes and revert back to the details on the window before the change.
Engineer Form Fields (Sheet 6 of 7) (Continued)
Field Description
2 - 9 Copyright © 2000, 2010, Oracle. All rights reserved

Resource Manager 4.5 User Guide
2.1.1.1 Using Engineer Form
The Engineer Form allows you to create, modify, activate and deactivate Engineers. Once created the Engineer details can only be modified and cannot be deleted from the system.
2.1.1.1.1 Adding New Engineers
2.1.1.1.2 Editing existing Engineers
2.1.1.1.3 Viewing Engineers in the System
CloseSelecting the button will discard all unsaved changes and dismiss the Engineer Form window.
Navigation Buttons
These buttons allow you to browse through the Engineer records in the system. For more details see “Navigation Buttons” on page 1 - 16.
Record Status bar
The Record Status bar displays the total number of Engineer records in the system and the record number of the currently selected Engineer.
In the above illustration there are 4 Engineer records in the system of which the 1st record is being displayed on the Engineer Form window.
To insert a new Engineer:
1. Click on the Add button.2. Type in a unique Name for the new Engineer3. Fill in the rest of the fields appropriately4. Click on the Insert button.
The Record Status will increase by one to indicate that the new Engineer has been added into the system.
To edit an existing Engineer:
1. Select the required Engineer from the Name drop-down list2. Make the desired changes to all fields except the Name field3. Click on the Update button
This will save the modified Engineer details into the system.
To browse through the Engineers in the system:
1. Select one of the “Navigation Buttons” on page 1 - 16.
The appropriate Engineer record will be brought into your view.
Engineer Form Fields (Sheet 7 of 7) (Continued)
Field Description
Copyright © 2000, 2010, Oracle. All rights reserved 2 - 10

User Guide Resource Manager 4.5
2.1.1.1.4 Activating Engineers
2.1.1.1.5 Deactivating Engineers
2.1.1.2 Maintaining Engineers Cost Profile
The Engineer Cost Profile window can be used to create and configure the Shift Cost, Overtime Cost and Reserve Capacity settings that may be common to several Engineers.
It displays a tabular view of these configurable settings on a day of the week basis.
Click on the Edit Profile button adjacent to the Cost Profile drop-down list within the Engineer Form window to invoke the Engineer Cost Profile window. Engineer
To activate deactivated Engineers:
1. Disable the Hide Terminated Engineers option from the Options menu
All deactivated Engineers will reappear on the Resource Manager display2. Select Windows, Engineer Form from the main menu
The Engineer Form will appear on the display3. Select the deactivated Engineer from the Name drop-down list on the Engineer Form
4. Click on the button adjacent to Finish Date.
The Engineer will be activated and Resource Manager will automatically generate Shifts for this Engineer on all Templated days within the scheduling horizon.
To deactivate active Engineers:
1. Select Windows, Engineer Form from the main menu.
The Engineer Form will appear on the display.2. Select the Engineer from the Name drop-down list on the Engineer Form
3. Click on the icon adjacent to Finish Date.
The Date Edit window will appear.4. Specify the date on which you want to terminate the Engineer and select OK5. Click on Update from the Engineer Form
If there are no STARTED or COMPLETED shifts after this date, the Engineer will be deactivated and Resource Manager will delete all planned and templated shifts after this date.
If this date is in the past the Engineer will be removed from the display. Resource Manager will not automatically generate Shifts for this Engineer after the specified date.
2 - 11 Copyright © 2000, 2010, Oracle. All rights reserved

Resource Manager 4.5 User Guide
The same Engineer Cost Profile can be applied on multiple Engineers having different Shift patterns.
The Resource Manager Gateway generates Shifts for all the days with Shift Templates for the Engineers. At the same time it also extracts and applies the appropriate days cost settings from the Engineers Cost Profile on the generated Shifts.
You can modify these settings for the individual Shifts from the “Shift Edit Form” on page 2 - 54.
The items in this window are:
Engineer Cost Profile Fields (Sheet 1 of 3)
Field DescriptionEngineer Cost Profile
This is a drop-down list selection of Engineer Cost Profiles. At any time it displays the name of the selected Engineer Cost Profile.
New Profile This pops-up a window into which you can enter the name of the new Engineer Cost Profile.
Click on OK to copy the name into the Engineer Cost Profile drop-down list box or on Cancel to dismiss the window.
Shift Cost This is the relative cost for activating the Shift associated with this Engineer. This value must be >=0.001.
Over-time Cost
This is the relative cost when calculating overtime cost. This entry must be >=0.001.
Copyright © 2000, 2010, Oracle. All rights reserved 2 - 12

User Guide Resource Manager 4.5
Time Cost This is the relative time cost for using this Engineers time. For example: If the Time Cost is 1.0 for Engineer A and 1.5 for Engineer B, and the primary cost is 100 for both the Engineer s, then the total cost of using A will be 100 and B will be 150.
Cost-Wait Shift
This enables or disables the idle-time costing of an Engineer, which is weighted according to the “time from now” factor. By default it is set to Yes.
Reserve Capacity
This specifies the proportion of Shift capacity that is to be reserved for the Job types specified by Reserve Capacity Type. No capacity is reserved when this value is 0 and the whole Shifts capacity is reserved if it is 1.
Reserve Capacity Type
This lists the types of jobs for which the Shifts capacity should be reserved. Reserve Capacity types must be created separately before they can be listed in this field. The Shift capacity is reserved for all the selected Job types within this list.
Reserve Capacity Lead Time
This defines the time period (in HHMM format) from the Shifts start time after which the reserved capacity will be released. If it is not specified, then the reserved capacity is not released.
Edit Reserve Capacity Type
This pops up the Reserve Capacity Type window using which you can create the Reserve Capacity Types. All the available Reserve Capacity Types are also listed in this window.
To insert a new Reserve Capacity Type:
1. Click on the New button.
This pops-up the following related window:
2. Enter a unique value into the text area next to New Reserve Capacity Type3. Click on OK to copy the entry into the Reserve Capacity Type window list. Click on
Cancel only if you want to discard this entry.
Once again you will be returned to the original Reserve Capacity Type window4. Click on Accept to save the new Reserve Capacity Type or Cancel to discard it.
Monday - Sunday
These are seven tabs using which you can configure the Engineers cost settings for each day of the week.The selected day of week tab will be highlighted in bold.
Engineer Cost Profile Fields (Sheet 2 of 3) (Continued)
2 - 13 Copyright © 2000, 2010, Oracle. All rights reserved

Resource Manager 4.5 User Guide
2.1.1.2.1 Creating Engineer Cost Profile
2.1.1.3 Maintaining Engineers AutoDirect Settings
The Communications Form can be used to configure the AutoDirect settings of individual Engineers. These settings control the automatic dispatch of Jobs to Shifts while providing extra flexibility in the timing of individual Job dispatches. Shifts inherit these
settings from the associated Engineer.Click on the button within the Engineer Form window to invoke the Communications Form window.
SaveSelecting the button will save the new Engineer Cost Profile into the system or update the changes into the existing Engineer Cost Profile.
AbortSelecting the button will discard all unsaved changes and revert back to the details on the window before the change.
CloseSelecting the button will discard all unsaved changes and dismiss the Engineer Cost Profile window.
To create a new Engineer Cost Profile:
1. Click on the New Profile button in the Engineer Cost Profile window
This will pop-up the New Profile window:
2. Enter a unique value into the text area next to New Profile3. Click on OK to copy the entry into the Engineer Cost Profile drop-down list. Click on
Cancel only if you want to discard this entry
The new profile name will now be displayed on the Engineer Cost Profile drop-down list
4. Select one of the Monday - Sunday tabs5. Configure the Engineers cost settings for the selected day of week6. Repeat steps 4 and 5 for the other days if required7. Click on Save to save the Engineer Cost Profile or Close to discard it.
Engineer Cost Profile Fields (Sheet 3 of 3) (Continued)
Copyright © 2000, 2010, Oracle. All rights reserved 2 - 14

User Guide Resource Manager 4.5
The selected Engineers name will be displayed on the window title bar. The items in this window are:
Communications Form Fields
Field DescriptionMDT This is an optional field into which a unique MDT ID can be specified. This entry
is mandatory for sending AutoDirect messages to Engineers. It uniquely identifies the MDT associated with the Shift. It enables communication between Planner and the Engineer in the vehicle carrying the MDT terminal.
Status This indicates if the Engineer is available for work or not.
Auto direct This enables or disables the Auto Directing of Jobs on the Shift.
Job Horizon This specifies the number of jobs that needs to be Auto Directed in advance. This must be set as >=1.
Auto Go Home
This defines whether automatic go home operations are allowed for the Engineers Shifts.
Auto Go Home Time
This defines the period of time the Engineer will be kept idle at the last completed Job before being Auto directed to Logoff. The default value blank, indicates that the Engineer will be automatically directed home on completion of the last Job.
OK Selecting OK will close the Communication Form and return control to the Engineer form.
2 - 15 Copyright © 2000, 2010, Oracle. All rights reserved

Resource Manager 4.5 User Guide
2.1.1.3.1 Configuring Engineer AutoDirect settings
When the AutoDirect settings are common for all the Engineers in the system, you need to set them only once as described under the “AutoDirect Default” section on page 5 - 24. These values are displayed as default on the Communications form.
2.1.1.4 Maintaining Engineer Attributes
Attributes can be physical capabilities available on a vehicle such as refrigeration or it can be intangible skills possessed by an Engineer, such as Plumber or Electrician. Both Vehicle Attributes and Engineer Attributes are associated with Shifts. For example:
The Engineer can operate a Tail Lift or a Crane, when it arrives at the customer location.
These are copied as Shift Attributes into all associated Shifts. Shifts generated by Resource Manager receive their attributes from the associated Engineer Attributes and Vehicle Attributes. Engineer Attributes are described in this section and the Vehicle Attributes are described in the “Maintaining Vehicle Attributes” section on page 2 - 51.
Engineers may have varying degrees of proficiency for a particular skill. This is supported in Resource Manager by enabling you to optionally define multiple levels of proficiencies for each Engineer Attribute.
The Engineer Attributes window can be used to create and configure the attributes (skill based) that need to be associated with Engineers.
To configure the Auto Direct settings for a Engineer:
1. Select the Engineer from the Engineer drop-down list on the Engineer Form2. Enter values into the MDT and Status fields3. Replace all defaults with alternate values4. Click on OK to save the Auto Direct settings for the Engineer
This will close the Communications Form and return the control back to the Engineer Form
5. Click on from the Engineer Form.
The AutoDirect settings will now be saved as part of the Engineer details.
Note:Changes made to the Communications Form must be saved explicitly by clicking on the Update button from the Engineer Form.
Note:Before associating an Attribute with multiple proficiencies to an Engineer, the appropriate proficiency must be selected.
Copyright © 2000, 2010, Oracle. All rights reserved 2 - 16

User Guide Resource Manager 4.5
Click on the Attributes button within the Engineer Form window to invoke the Engineer Attributes window.
Attributes can be configured on weekly or daily basis. When Weekly configuration is used the same attributes are used in every Shift for the Engineer. When Daily attributes are used the attributes can differ on each day of the week.
2.1.1.4.1 Weekly
The Weekly check box should be ticked to view or configure the weekly attributes for the selected Engineer. The weekly pane displays the collective attributes for all the Engineers on the right and the active attributes for the selected Engineer on the left.
Newly created attributes are automatically added to the available list. The active list is refreshed every time an Engineer selection is made.
2 - 17 Copyright © 2000, 2010, Oracle. All rights reserved

Resource Manager 4.5 User Guide
2.1.1.4.2 Creating Engineer Attribute
To create a new Engineer attribute from the weekly pane:
1. Select Attributes from Engineer form
This will open the Engineer Attributes form2. Tick either the Weekly or the Daily configuration box3. Select New from the Weekly frame or Create Attribute from the Daily frame to open the Engineer
Attribute Editor
The very first time that you create an Engineer Attribute; the Engineer Attribute Proficiencies check box will be unticked. If this box is ticked then the Engineer Attribute Editor will refresh to show the Engineer Attribute Proficiencies pane alongside the Engineer Attribute Editor pane as illustrated below.
After creating an Engineer Attribute you may optionally create one or more proficiencies for this attribute from the Engineer attribute Proficiencies pane.
Note:All Engineer Attributes have a default proficiency which can be renamed. While Multiple Proficiencies belonging to an Attribute are listed on the form, single Proficiency automatically becomes the default proficiency and hence is not displayed.
Copyright © 2000, 2010, Oracle. All rights reserved 2 - 18

User Guide Resource Manager 4.5
4. Select Add on the Engineer Attribute Editor to invoke the New Attribute dialog.
5. Type in the New Attribute name.6. Click on OK to save this attribute. Clicking on Cancel will discard this entry.
Note:At this point if you wish to save the Engineer Attribute without any Proficiency definition you can skip all intermediate steps and go directly to step 12.
To define proficiencies for this Attribute:
7. Tick the “Engineer Attribute Proficiencies” box.
This will make the Engineer Attribute Proficiencies pane visible on the Engineer Attribute Editor window.
8. Select Add from the Engineer Attribute Proficiencies pane to invoke the New Proficiency dialog.
9. Type in the New Proficiency name10. Click on OK to save this Proficiency definition for the Attribute. Clicking on Cancel will discard this
entry11. Repeat steps 8 to 10 to define multiple Proficiencies for the Attribute12. Select Update to save the Attribute and its proficiencies13. Select Close to quit the Engineer Attribute Editor and return to the Engineer Attribute Form
The newly created Attributes and associated Proficiencies (if more than one), will be listed on the Collective list (on the right) in the Engineer Attributes Form.
2 - 19 Copyright © 2000, 2010, Oracle. All rights reserved

Resource Manager 4.5 User Guide
2.1.1.4.3 Deleting Engineer Attribute
2.1.1.4.4 Modifying Engineer Attribute Proficiency
To delete an Engineer attribute:
1. Select Attributes from Engineer form
This will open the Engineer Attributes form2. Tick either the Weekly or the Daily configuration box3. Select New from the Weekly frame or Create Attribute from the Daily frame to open the Engineer
Attribute Editor
Note:If the Engineer Attribute Proficiencies check box is ticked then the Engineer Attribute Proficiencies pane will be displayed with the Engineer Attribute Editor pane.
4. Highlight the unwanted Engineer Attribute by clicking on it5. Select Remove on the Engineer Attribute Editor pane
If the Attribute is already assigned to an Engineer, you will not be allowed to remove it and a warning will be issued.
If the Attribute is unattached to any Engineer then it will be cleared along with all its proficiency definitions.
6. Select Update to save the change7. Select Close to quit the Engineer Attribute Editor and return to the Engineer Attribute Form.
The deleted Attributes will be removed from the Engineer Attributes Form.
To modify the proficiency definitions for an Engineer attribute:
1. Select Attributes from Engineer form
This will open the Engineer Attributes form2. Tick either the Weekly or the Daily configuration box3. Select New from the Weekly frame or Create Attribute from the Daily frame to open the Engineer
Attribute Editor4. Tick the Engineer Attribute Proficiencies check box if not already ticked, to open the Engineer
Attribute Proficiencies pane5. Select the Engineer Attribute that needs to be modified6. Select Add from the Engineer Attribute Proficiencies pane to create a new Proficiency definition for this
attribute
Or
Select Remove from the Engineer Attribute Proficiencies pane to delete an existing Proficiency definition from this attribute
Or
Select Rename from the Engineer Attribute Proficiencies pane to change the name for an existing Proficiency definition for this attribute
7. Select Update to save the change8. Select Close to quit the Engineer Attribute Editor and return to the Engineer Attribute Form.
Copyright © 2000, 2010, Oracle. All rights reserved 2 - 20

User Guide Resource Manager 4.5
2.1.1.4.5 Configuring Weekly Engineer Attribute
You can associate the same set of Engineer attributes with the Engineer, on all days of the week, from the Weekly pane.
To configure the Engineers attributes from the weekly pane:
1. Select Attributes from Engineer form2. Tick the Weekly configuration box if it is not already selected
Adding an attribute to the Engineer:3. For Attributes with only a default Proficiency, simply select the Attribute from the
collective List (on the right) and Click on the Add button
4. For Attributes with multiple Proficiency definitions, select the appropriate Proficiency listed under the Attribute on the right and Click on the Add button.
2 - 21 Copyright © 2000, 2010, Oracle. All rights reserved

Resource Manager 4.5 User Guide
2.1.1.4.6 Daily
The Daily check box should be ticked to view or configure the daily attributes for Engineers. The daily pane consists of a tabular display in which the active Attributes form the row headings and the Days-of-week form the column headings.
5. The attribute will be copied into the active List (on the left)
Note:If the attribute was selected by clicking on one of its proficiency definitions, then this Proficiency label is suffixed to the attribute label in the Active attributes list.
Removing an attribute association from the Engineer:
6. Select the attribute from the active List (on the left)7. Click on the Remove button
The attribute will be removed from the Engineers active List.
Saving or discarding the changes:
8. Select Close from the Engineer Attributes form9. Select Update from the Engineer form to save the changes or Abort to discard the
changes.
Copyright © 2000, 2010, Oracle. All rights reserved 2 - 22

User Guide Resource Manager 4.5
2.1.1.4.6.1 Configuring Daily Engineer Attribute
To configure the Engineers attributes from the daily pane:
1. Select Attributes from Engineer form2. Tick the Daily configuration box if it is not already selected
Adding an attribute to the Engineer:
3. Click on the Select Attribute button
Or
Right Click within the Daily pane and select Add Attribute from the resulting menu options.
This will open a list containing the available Attributes for all the Engineers in the system. Where multiple proficiency definitions are available for an Engineer attribute, these are listed under the attribute itself.
4. Highlight the required attribute by clicking directly on the attribute without proficiency
Or
by clicking on the proficiency where the attribute has multiple proficiency definitions.
5. Click on OK to select this attribute. Clicking on Cancel will clear the selection.
This attribute will be enabled on all the Days-of-week and added to the Daily attribute table.
Note:If the attribute was selected by clicking on one of its proficiency definitions, then this Proficiency label is suffixed to the attribute label in the selected attributes list on the Daily Engineer Attributes pane.
2 - 23 Copyright © 2000, 2010, Oracle. All rights reserved

Resource Manager 4.5 User Guide
2.1.1.5 Maintaining Engineer Zones
The Engineer Zones window can be used to create and configure the Required Zones and Preferred Working Zones that need to be associated with Engineers on weekly or daily basis.
Resource Manager makes use of the Engineer Zones to set the Zone attributes for Shifts.
Shifts associated with Engineer can be configured to have different zones on different days of the week. When Weekly configuration is used the same zones are used in every Shift for the Engineer. Where Daily zones are used the zones can differ on each day of the week.
Click on the Zones button within the Engineer Form window to invoke the Engineer Zones window. The currently selected Engineers name is suffixed to the window title.
6. Left Click in the cell belonging to the Day-of-week on which this attribute should be disabled. To re-enable this attribute, simply Left Click on the same cell once again.
Or
Make multiple Days-of-week selections by clicking on the first cell and dragging to the last cell in the range.
Then Right Click and from the resulting menu select Disable to disable or Enable to enable the attributes on the selected Days-of-week.
Removing an attribute association from the Engineer:
7. Disable all the Days-of-week flags for this attribute on the Daily Engineer Attributes pane.
Saving or discarding the changes:
8. Select Close from the Engineer Attributes form9. Select Insert or Update from the Engineer form to save the changes. Selecting Abort will
discard the changes.
Copyright © 2000, 2010, Oracle. All rights reserved 2 - 24

User Guide Resource Manager 4.5
2.1.1.5.1 Weekly
For weekly zone selection select the Weekly check box. This will disable the Daily pane and any existing Zone selections on it.
2.1.1.5.1.1 Required ZonesThe required Zones associated with an Engineer are displayed on the left side of the Required Zones pane. The collective Zones for all the Engineers in the system are displayed on the right of this pane.
From the Required Zones pane, you can add new Zones to the collective Zones list, and configure the Required Zones list.
2 - 25 Copyright © 2000, 2010, Oracle. All rights reserved

Resource Manager 4.5 User Guide
2.1.1.5.1.2 Creating Engineer Zone from the Weekly Pane
2.1.1.5.1.5 Configuring Engineers Required Zones
2.1.1.5.1.6 Preferred Working ZonesThe Required Zones are listed as selections for the Preferred Working Zones within the Preferred Working Zones pane. Only those Zones with a ticked box to their left are in the Preferred Working Zones list.
To create a new Engineer Zone from the Weekly Pane:
1. Select the Required Zones tab
This will open the Required Zones pane if it is not open already.2. Click on the New button
This will display the Engineer Zone dialog window.
3. Enter the new Zone name into this window4. Click on OK to save this Zone. Clicking on Cancel will discard this entry.
The saved Zone will now be available in the Collective Zones list (on the right).
To configure the Engineers Required Zones:
1. Select the Required Zones tab2. To add a Zone into the required Zones List (on the left), select it from the collective
Zones List (on the right) and click on the Add button3. To remove a Zone from the Required Zones List, select it and click on the Remove
button4. Select Close to close the Engineer Zones window5. Select Update from the Engineer Form to save the Engineers Zones.
Copyright © 2000, 2010, Oracle. All rights reserved 2 - 26

User Guide Resource Manager 4.5
2.1.1.5.1.7 Configuring Engineers Preferred Zones
2.1.1.5.1.6 Can work in any Zone
2.1.1.5.1.7 Configuring Engineer to Work in All Zones
2.1.1.5.2 Daily
Tick the Daily check box to enable the daily zone selection. This will disable the Weekly selection.
To configure the Engineers Preferred Working Zones:
1. Select the Preferred Working Zones tab.2. Add a Zone to the Preferred Working Zones list by clicking on the un-ticked Zone3. Remove a Zone from the Preferred Working Zones list by clicking on the ticked Zone4. Select Close to close the Engineer Zones window5. Select Update from the Engineer Form.to save the Engineers Zones.
To configure the Engineer to work in all Zones:
1. Tick the Can work in any Zone box.
This will disable all other Zone selections.2. Select Close to close the Engineer Zones window3. Select Update from the Engineer Form.to save the Engineers Zone setting.
2 - 27 Copyright © 2000, 2010, Oracle. All rights reserved

Resource Manager 4.5 User Guide
2.1.1.5.2.1 Creating Engineer Zone from the Daily Pane
To create a new Engineer Zone from the Daily Pane:
1. Click on the Create Zone button
Or
Right Click on any cell within the daily zones table to open the shortcut menu and select the Add Zone option.
This will display the Engineer Zone window.
2. Type in the New Zone name and select.OK to save this Zone.
This zone will now appear in the Collective list (on the right) of the weekly pane and on the daily section with all days being checked.
Copyright © 2000, 2010, Oracle. All rights reserved 2 - 28

User Guide Resource Manager 4.5
2.1.1.5.2.3 Configuring Engineer Zone from the Daily Pane
To configure the Engineers zones on each Day-of-Week:
1. Click Select Zone from the Daily Pane
Or
Right Click on any cell within the daily zones table to open the shortcut menu and select the Create New Zone option.
This will list all the Zones that are available in the system2. Select the required zone and Click OK.
The selected zone will be enabled on all Days-of-Week and added to the Daily Pane.
You can read the Required and Preferred zone settings on the Daily Pane as below:
• The Tick indicates that the zone is Required on that Day-of-Week.• The green background indicates that the zone is Preferred on that Day-of-Week.• The zone is disabled on all the other Days-of-Week.3. Make the Required and Preferred zone selections on the required Days-of-Week.
Left clicking on any cell within the daily zones table will cycle the cell through the three possible states:
• Zone disabled• Zone required• and Zone preferred.
Or
2 - 29 Copyright © 2000, 2010, Oracle. All rights reserved

Resource Manager 4.5 User Guide
2.1.1.6 Maintaining Engineer Views
Views in Resource Manager denote the geographical region or the Engineers skill set. The Engineer Views window can be used to create and configure the Engineers Views.
Resource Manager makes use of the Engineer Views to set the View attributes for Shifts.
Click on the Views button within the Engineer Form window to invoke the Engineer Views window.
In this window you will see the collective Engineer views on the right and the views belonging to the selected Engineer on the left.
Newly created views will automatically appear on the collective Views list (on the right). Whenever a different Engineer is selected the selected Engineers Views list (on the left) is refreshed with that Engineers views.
New Views are created using the New button and are automatically updated into the collective Views list.
Right Click on a single cell or a group of cells within the daily zones table to open the shortcut menu and then select the Required, Preferred or Disable option
4. Repeat steps 2 and 3 for each zone that you wish to associate with the Engineer 5. Select Close to close the Engineer Zones window.6. Select Update from the Engineer Form.to save the Engineers Zone setting.
Copyright © 2000, 2010, Oracle. All rights reserved 2 - 30

User Guide Resource Manager 4.5
2.1.1.6.1 Configuring Engineer Views
2.1.1.7 Maintaining Shift Templates for Engineers
Resource Manager generates Shifts for Engineers only from Shift Templates. A Shift Template must be defined for each day when work needs to be planned for the Engineer.
If a pattern can be discerned from the Engineers working times over the days in a period then a Profile of multiple Shift Templates having different planned working times for each day of the period can be created from the Shift Template Form. This Shift Template Profile can then be associated with the Engineer from the Engineer Form. Shift Templates based on this Profile will automatically be applied to the Engineer indefinitely into the future.
“Shift Template Form” is described on page 2 - 33.
2.1.1.8 Maintaining Engineer Leave
Each Engineer within an organization may be allocated a different number of Leave days. This can be configured through the Engineer Leave Configuration window opened from the Engineer Form.
This form shows not only the entitlement for the various Leave types for the Engineer but also the number of Leave days remaining in the current entitlement period.
To configure the Engineers Views:
1. Select the View from the collective Views List (on the right) and click on the Add button.
The View will be included in the Engineers Views list (on the left).2. To remove a View from the Engineers Views list select it and click on the Remove button3. Select Close then click on Update to save the changes or Abort to discard the changes.
Note:The Engineer Views window can be invoked only from the Engineer Form window.
2 - 31 Copyright © 2000, 2010, Oracle. All rights reserved

Resource Manager 4.5 User Guide
Days Remaining field and Entitlement field can be edited to customize Leave days for the particular Engineer.
Leave is only consumed after the Leave has been taken.
2.1.1.9 Maintaining Engineer Depots
Each Engineer can be associated with a number of Depots. All of the Depots selected must be within a single Region. The Engineer will inherit the Region the Depots are assigned to.
The Engineer /Depot relationship can be configured from the Engineer Form by clicking the Depots button.
This will open the Engineer Depots Form from where a number of Depots can be selected.
2.1.1.9.1 Configuring Engineer Depots
To configure the Engineers Depots:
1. Select the View from the collective Depots List (on the right) and click on the Add button.
The Depot will be included in the Engineers Depots list (on the left).2. To remove a Depot from the Engineers Depot list select it and click on the Remove
button3. Select Close then click on Update to save the changes or Abort to discard the changes.
Note:The Engineer Depots Form window can be invoked only from the Engineer Form window.
Copyright © 2000, 2010, Oracle. All rights reserved 2 - 32

User Guide Resource Manager 4.5
2.1.2 Shift Template Form
A Shift is a specified time period in a day when a Resource must be available for work. A Resource is the combination of an Engineer and a Vehicle.
The main objective of Resource Manager is to create Shifts for Engineers. Resource Manager generates actual Shifts based on Shift Templates.
Using the Shift Template Form you can define Shift Templates and store them into a Shift Template Profile.
Every Shift Template Profile:• Has a unique name• Has a period defined by number of weeks in the range of 1 to 53 and a start date • Has Zero or more Shift Templates that cycle over the number of weeks in the period and• Can have a maximum of 3 non-overlapping Shift Templates on each of the days in its
period.
Based on the operational requirement, multiple Engineers can use a single Shift Template Profile or each Engineer can use a different Shift Template Profile.
You can gather the following information from the Shift Template Form displayed above:• The Shift Template Profile labelled “general” runs over a period of one week and was
started on the 25th of February 2008.
2 - 33 Copyright © 2000, 2010, Oracle. All rights reserved

Resource Manager 4.5 User Guide
• There are three Templates in this Profile:• 10:00 - 14:00- enabled on Saturday and Sunday• 05:00 - 20:00 - enabled Monday to Friday• 15:00 - 19:00 - enabled on Saturday
Two Templates “10:00 - 14:00” and “15:00 - 19:00” are enabled on Saturday.
An Engineer using this Profile will be available for work, 10:00am to 2:00pm on Saturday and Sunday, 5:00am to 8:00pm Monday to Friday and 3:00pm to 7:00pm on Saturday. This cycle will be repeated every week until a different Shift Template Profile is associated with the Engineer.
• The selected Template is highlighted and its details can be viewed or edited on the lower half of the Shift Template Form.
2.1.2.1 Fields defining the Shift Template Profile
The Engineers working pattern in a period is established from the associated Shift Template Profile.
A Shift Template Profile is a set number of weeks of Shift Templates. It is defined using a unique name, a starting date and the number of weeks in one full cycle.
The main use of a Shift Template Profile is that, it can be used by Resource Manager to create Shifts for multiple Engineers. Once a Shift Profile is applied to an Engineer, the same pattern will be repeated indefinitely over the future weeks from the Profiles start date.
Resource Manager adheres to the following definitions while creating Shift Profiles, Shift Templates or actual Shifts:• The week number is as defined by the start date and number of weeks defined within a
Shift Profile, where weeks start on Monday and the start date of a Shift Profile will always be in its week 1. A Shift Profile can have a maximum of 53 (Most years have 52 weeks, but some have 53) weeks and a minimum of one week in a full cycle.
• Profile Start Date is always a Monday.• A week is the 7-day period, starting on Monday through to Sunday.
Note:The Template names are automatically derived from their Logon and Logoff Time.
Note:A Shift Template Profile is associated with an Engineer only from the Engineer Form window.
Copyright © 2000, 2010, Oracle. All rights reserved 2 - 34

User Guide Resource Manager 4.5
• A Shift is a single period of time, which is less than 24 hours and spans from midnight to midnight.
Field DescriptionProfile This is a Shift Template Profile Names drop-down selection list that displays the
currently selected Profiles name.
The New Profile button to the right of the Profile drop-down list button can be selected to create a new Shift Template Profile. This will invoke the Shift Template Profiles dialog window.
Enter the new profile name into this window and click on the OK button to save it into the system, or on the Cancel button to discard the Shift Template Profiles window and its contents.
Warning:There is no provision in Resource Manager to delete Shift Template Profiles.
Num. Weeks The Num. Weeks spin button can be used to increase or decrease the number of weeks over which the Shift Profile runs. By default the number of weeks in a Shift Profile is one, which can be adjusted to a maximum of 53 weeks.
The number of Template Weeks on the top right hand side of the Shift Template Form will increase or decrease dynamically based on the Num Weeks value.
Start Date Start Date records the starting date of the Shift Profile cycle. Shift Profiles always start on a Monday.
The calendar button to the right of the Start Date can be selected to open the Date Edit window. Using this you can enter the Profiles Start Date in an acceptable format.
Note:Resource Manager automatically adjusts the Start Date to be the Monday of the selected week from which the date is selected.
2 - 35 Copyright © 2000, 2010, Oracle. All rights reserved

Resource Manager 4.5 User Guide
2.1.2.2 Fields defining Shift Templates
A Shift Template is the predefined Shift setting for a particular day. Using Shift Templates you can configure different working hours on different days of the week and a maximum of three non-overlapping Templates on any single day. The same Template may be applied on multiple days within the Profile.
2.1.2.2.1 Shift Template area
The tabular display on the top right hand side of the Shift Template Form is the Shift Templates area. The number of rows in this area will be equal to the number of Templates in the Profile and the number of columns will be equal to (the number of Weeks in the period x seven (Days-of-week)). On days when the Template is enabled, you will see a tick on the intersecting cell. By default all cells are blank.
The Shift Template is defined once and is applied to one or many days in the period.
Example:As a maximum of three non-overlapping Templates can be defined on any day, a Shift Template Profile running over two weeks will have the capacity to hold 3 x 2 x 7 = 42 distinct Shift Templates.
2.1.2.2.2 Work Type
Shifts can aquire Attributes from the Resource either in the form of Engineer Attributes or Vehicle Attributes. On the other hand Work Types are attributes that are directly associated with Shifts.
The Work Type Attributes can be categorised into the following restrictions or preferences:For example: Assume that there are four Work Types: A, B, C and D.
• Allow Only, Restriction - Shift must only work a particular Work Type A. The Shift can optionally be allowed to perform Activities with no Work Type.
• Allow All Except, Restriction - Shift can perform all Activities except those of Work Type D.
Copyright © 2000, 2010, Oracle. All rights reserved 2 - 36

User Guide Resource Manager 4.5
• Preferences - Shift can perform Activity of Work Type A or B but prefers those of Work Type B. Shift can optionally be allowed to perform Activities with no Work Type.
• Preferred Restriction - Shift can perform Activities of Work Type A, B or C but prefers to not perform Activities of Work Type C.
• Combining Restrictions and Preferences - A Shift can perform Activities of Work Type A or B or C but not D. The Shift prefers to perform Activities of Work Type B and prefers not to perform Activities of Work Type C. Shift can optionally be allowed to perform Activities with no Work Type.
If no Work Types are specified, there is no constraint. Multiple Work Types are allowed.
Work Types can optionally be applied to Shift Templates and inherited into Shifts generated from the Shift Templates.
Alternatively Work Types can also be modified on the Shift independent from the Shift Template.
For more details on work Types please refer to “Maintaining Work Types” described on page 2 - 46.
2.1.2.2.3 General TabShift Template Fields under General Tab (Sheet 1 of 4)
Field DescriptionType Resource Manager allows you to create either STANDARD or ONE_WAY Shifts.
Although both Shift types commence at the Logon position and terminate at the Logoff position, the cost calculation for ONE_WAY Shifts do not include the travel distance and time between the last stop and logoff stop.
Standby Shift If this box is ticked then the Shift will be created with STANDBY status instead of the PLANNED status. STANDBY Shifts are not considered for planning requirements until they have been logged on.
2 - 37 Copyright © 2000, 2010, Oracle. All rights reserved

Resource Manager 4.5 User Guide
Max. Shift Two parameters that define the Shift timings are its Duration and Maximum Shift Length.
Duration is the time frame within which the Shift must have been started and completed. Maximum Shift Length is the total hours the Shift is allowed to work within the Duration. If this field is not set, the working hours for the Shift are assumed to be the same as the duration of the Shift.
Any Shift time that is outside either the Max Shift or Shift Duration is considered to be in Overtime.
Max. Shift specifies the Maximum Shift Length for all the Shifts that will be generated from this Shift Template.
Note: Max. Shift is disabled when Fixed Start is selected.
Resource Manager validates the Shift working time against the limits specified in “Configure Engineer Hours” section on page 5 - 3 and issues warnings if:
• Max. Shift is greater than Maximum Shift length defined under daily limits• Max. Shift is lesser than Minimum Shift length defined under daily limits
Warning:Resource Manager will reject the Max. Shift if it is greater than the Shift Time Window defined by the Logon and Logoff Time.
Fixed Start Fixed Start is a check box that controls the Fixed Shift Start Time. This is represented as Fixed Logon in the Shifts received into Planner.
When this option is enabled, Resource Manager disables Max. Shift and takes the Maximum Shift length from the Shift Time Window.
If the Shifts Fixed Logon is enabled then Planner allows it to logon only at the start of its time window. If Fixed Logon is disabled then Planner allows the Shift to find the optimal shift start time within its time window.
Despatch Sequence Locking
The Sequence Locking Mode gives you the option of locking the sequence of despatched Stops on Shifts.
• If LOCK_SEQ is selected, Planner will not introduce new stops before despatched Stops, nor change the order of despatched Stops.
• If LOCK_ORDER is selected, the order of despatched stops will not be affected but new stops may be introduce before them.
• Sequence locking is not applied on the Shift if NO_LOCKING is selected.
Shift Template Fields under General Tab (Sheet 2 of 4) (Continued)
Field Description
Copyright © 2000, 2010, Oracle. All rights reserved 2 - 38

User Guide Resource Manager 4.5
Auto Undespatch
When a despatched stop is moved outside the Despatch Horizon due to an out-of-sequence event, Planner will change its status to UNDESPATCHED, if Auto Undespatch is enabled.
For Example: Here is an instance of an out-of-sequence event.
Despatch Horizon is 3 and 3 Stops A, B & C have been despatched to a single Crew.
ASSIGNED Stop X is despatched and unexpectedly enrouted, causing Stop C to be outside the Despatch Horizon.
Shift Template Fields under General Tab (Sheet 3 of 4) (Continued)
Field Description
2 - 39 Copyright © 2000, 2010, Oracle. All rights reserved

Resource Manager 4.5 User Guide
Logon/Logoff Time, Location and Delay
The Logon/Logoff Time defines the Shift time window. The actual Shift must be started and completed within this time window. If Fixed Logon is on then Planner will start the Shift only at the specified Logon time.:
Resource Manager validates the Shift working time against the limits specified in “Configure Engineer Hours” section on page 5 - 3 and issues warnings if
• Logon time is earlier than Earliest Start Time defined under Engineer Hours Daily limits
• Logoff time is later than Latest Finish Time defined under Engineer Hours Daily limits
Warning:Resource Manager will reject the Logon/Logoff times if the resulting Shift Time Window is lesser than Max. Shift. Logoff time earlier than Logon time is also not accepted into Resource Manager.
The Logon Location specifies the address from where the Shift work will commence and the Logoff Location specifies the address at which the Shift work will finish. The Real world coordinates of geographical addresses are stored as common addresses within the Resource Manager system. The Logon/Logoff Locations can either be typed into the text boxes or can be selected from the list of Common Addresses by clicking on the Select button. See also the “Common Address Form” section on page 1 - 18.
Note:Resource Manager will not generate actual Shifts from Shift Templates having blank or invalid Logon and Logoff Locations
Resource Manager supports Shifts, which span midnight, although the Shifts are still limited to a maximum length of 24 hours. A Shift must be explicitly configured to run over midnight by selecting the Next Day checked box, which is found next to the log off time in both the Shift Edit Form.
Shifts are not removed from Planner at midnight each night. Shifts are removed from Planner a certain number of hours after the end of their log off time.
The Logon/Logoff Delay specifies the amount of time the Shift will spend logging on and logging off respectively.
Shift Template Fields under General Tab (Sheet 4 of 4) (Continued)
Field Description
Copyright © 2000, 2010, Oracle. All rights reserved 2 - 40

User Guide Resource Manager 4.5
2.1.2.2.4 Breaks
Breaks are optional and may or may not be planned in Shifts. If you do not wish to include Breaks in your Shifts, you should leave the Number of Breaks at 0. You can include up to 8 Breaks of the same Type with the same Restrictions into each Shift Template.
The following Break details are recorded in the Shift Template:
Shift Break Template Fields
Field DescriptionNumber of Breaks
determines if the Shift should be generated with or without breaks. A 0 value indicates that the Shift should be created without Breaks. A Maximum of 8 breaks of the same Type and Restriction can be included in a single Shift Template.
Type is one of SHIFT, LOGON, DRIVE or ELASPED
Restrictions By default this value is NONE to indicate that Breaks can be taken anywhere in the Shift. You can restrict Breaks of type SHIFT, LOGON and ELASPED to be taken at the Depot by setting this value to ATDEPOT. DRIVE Breaks cannot have the ATDEPOT restriction.
From specifies the start of the Break time window
To specifies the end of the Break time window
Length specifies the duration of the Break
2 - 41 Copyright © 2000, 2010, Oracle. All rights reserved

Resource Manager 4.5 User Guide
2.1.2.2.5 Limits
2.1.2.3 Using Shift Template Form
From the Shift Template Form window you can:• Create and edit Shift Template Profiles • Create, edit and delete Shift Templates• Create Work Types
2.1.2.3.1 Creating Shift Template Profile
Shift Template Limits Fields
Field Description
Job Limits This functionality enables a limit to be placed on a Shift as the value of the Jobs assigned to the Shift. Uses of this functionality include the limiting of the number of Jobs assigned to a Shift. If the value of each Job is set to 1 and the Job Limit within a Shift is set to the maximum number of Jobs then a cost will be applied when more than this number of Jobs are assigned to the Shift.
The Maximum Job Limit value can be configured from the Shift Template Form from where it is inherited into the Shift and can be configured on a Shift-by-Shift basis from within the Shift Edit Form.
Maximum Run Length
Runs, which are scheduled to take longer than the Maximum Run Length, are costed using the life-span cost. The length of a Run is measured from departure from Depot or logon until returning to a Depot or delivering all goods on board.
Copyright © 2000, 2010, Oracle. All rights reserved 2 - 42

User Guide Resource Manager 4.5
2.1.2.3.2 Editing Shift Templates Profile
To create a new Shift Templates Profile:
1. Click on the New Profile button2. Enter new profile name: into the resulting Shift Templates Profile window and click on
OK to save the profile into the system.
By default new profiles have only single week cycles and their starting date is set as the Monday of the current system week.
At this point if you select the Update button, the Profile will be saved without any Template definitions.
Alternately you can create Templates using the steps described under the “Creating Shift Templates” section on page 2 - 44.
To edit an existing Shift Templates Profile:
1. Select the required Shift Profile from the Profile drop-down list2. Edit the Num. Weeks and or Start Date values.
The number of columns in the Shift Template area is equal to Num. Weeks x 7.
Reducing the Number of Weeks in the Shift Template Profile will display the following confirmation dialog.
Selecting Yes will decrease the number of columns in the Templates area. This means, the Template will now have fewer days for use in the Profile.
3. Click on the Update button.
This will save the changes you made to the Shift Profile into the system.
Note:Shift Template Profiles cannot be deleted from Resource Manager.
2 - 43 Copyright © 2000, 2010, Oracle. All rights reserved

Resource Manager 4.5 User Guide
2.1.2.3.3 Creating Shift Templates
To create a new Shift Template:
1. Select the required Profile from the Profile drop-down list2. Select Add from the Shift Templates area.
This will append a new default Template row in the Shift Templates area. This Template will have the label “00:00 - 00:00” and it will be disabled on all the days in the Profile period.
Note:The Template names are automatically derived from their Logon and Logoff Time on selecting the Update
3. Tick the days on which you need to activate this template. Clicking on the cells that intersect the required days on the Template row will achieve this
4. Edit the Max. Shift, Fixed Start, Sequence Locking Mode, Auto Undespatch, Logon/Logoff, Break details and Limits details
5. Select Update to save the Template.
Resource Manager may pop-up confirmation dialogs on encountering data violation conflicts before actually saving the Shift Template.
All such issues must be addressed before the Template can be saved.
After the Template is saved successfully, its label will automatically update to that of the Logon and Logoff time.
Copyright © 2000, 2010, Oracle. All rights reserved 2 - 44

User Guide Resource Manager 4.5
2.1.2.3.4 Editing Shift Templates
2.1.2.3.5 Deleting Shift Templates
To edit an existing Shift Template:
1. Select the required Profile from the Profile drop-down list2. Make the Template selection by clicking on its row header in the Shift Templates area.
The selected Shift Template row will become highlighted3. You may modify the Templates availability to different days within the period. Clicking on
the cells that intersect the required days on the Template row will enable or disable them alternately
4. Modify the Max. Shift, Fixed Start, Sequence Locking Mode, Auto Undespatch, Logon/Logoff, Break details and Limits details
5. Select Update to save the Template.
Any data violation conflict that gets reported must be addressed before the Template can be saved.
After the Template is saved successfully, its label will automatically be updated to the current Logon and Logoff time.
To delete a Shift Template:
1. Select the required Profile from the Profile drop-down list2. Make the Template selection by clicking on its row header in the Shift Templates area.
The selected Shift Template row will become highlighted.3. Click on the Delete button.
The Delete confirmation window will be displayed
4. Click on Yes to delete the Shift Template.
The Shift Template will be removed from the system and the row will be deleted from the Profile.
Note:Deleting all its Templates will not delete the Shift Template Profile.
2 - 45 Copyright © 2000, 2010, Oracle. All rights reserved
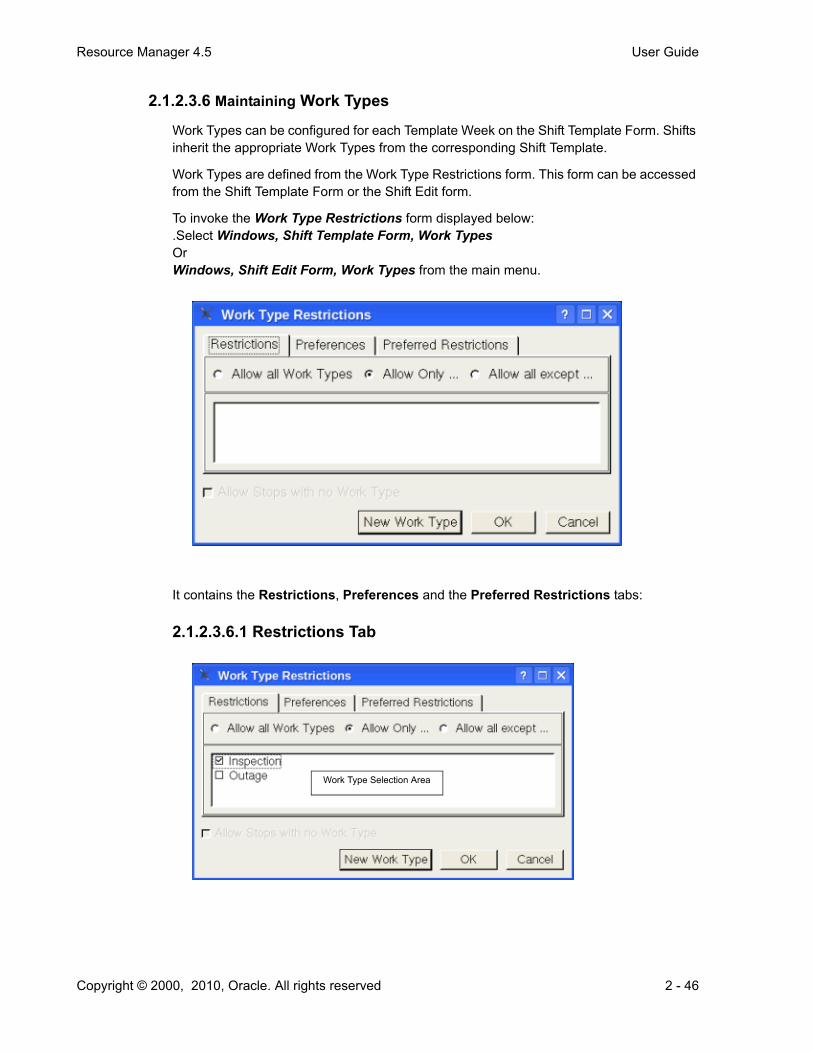
Resource Manager 4.5 User Guide
2.1.2.3.6 Maintaining Work Types
Work Types can be configured for each Template Week on the Shift Template Form. Shifts inherit the appropriate Work Types from the corresponding Shift Template.
Work Types are defined from the Work Type Restrictions form. This form can be accessed from the Shift Template Form or the Shift Edit form.
To invoke the Work Type Restrictions form displayed below: .Select Windows, Shift Template Form, Work Types Or Windows, Shift Edit Form, Work Types from the main menu.
It contains the Restrictions, Preferences and the Preferred Restrictions tabs:
2.1.2.3.6.1 Restrictions Tab
Work Type Selection Area
Copyright © 2000, 2010, Oracle. All rights reserved 2 - 46

User Guide Resource Manager 4.5
All available work types in the system are listed in the Work Types Selection Area on the Restrictions Tab. You can apply Work Type Restrictions on Shifts by ticking the required Work Types and simultaneously selecting one of the following three Radio buttons:
2.1.2.3.6.2 Preferences TabOnly those Work Types that are selected on the Restrictions Tab will be available for selection on the Preferences tab.
Note: Selections made on the Preferences Tab should not be repeated on the Preferred Restrictions Tab as these are two mutually exclusive options.
2.1.2.3.6.3 Preferred Restrictions TabOnly those Work Types that are selected on the Restrictions tab will be available for selection on the Preferred Restrictions Tab.
Note: Selections made on the Preferred Restrictions Tab should not be repeated on the Preferences Tab as these are two mutually exclusive options.
2.1.2.3.7 Allow Stops with no Work Type
This option is currently unavailable.
2.1.2.3.8 Creating New Work Type
New Work Types are created from the Work Type Restrictions form by selecting the New Work Type button.
This will display the Work Type Restrictions <2> dialog into which you can type in the new Work Type name.
Click OK to save the New Work Type.
Radio Buttons on the Work Types Restrictions Tab
Radio Button DescriptionAllow all Work Types All available Work Types are selected automatically. Shift has no Work
Type Restrictions
Allow Only ... Only those Stops that have the selected Work Types are allowed on the Shift.
Allow all except .... All stops with work Types other than the selected Work Types are allowed on the Shift
2 - 47 Copyright © 2000, 2010, Oracle. All rights reserved

Resource Manager 4.5 User Guide
2.1.2.4 Shift Template Form Control Buttons
2.1.3 Vehicle Form
The Vehicle Form is the main Data Entry Form from which Vehicle details are created and modified in Resource Manager.
In the Field service sector, Engineers use Vehicles to perform Shift work. The Vehicle and Shift details are associated with the Engineer that is currently selected on the “Engineer Form” described on page 2 - 2.
Shift Template Form Control Buttons
Control Buttons Description
Update Use to save new Template definitions and the changes made to existing Shift Template Profiles and Shift Templates.
Delete Use to delete the selected Shift Template from the system. Resource Manager will confirm the request for delete before performing the actual delete.
Abort Use to discard all unsaved changes and revert back to the details on the window before the change.
Close Use to discard all unsaved changes and dismiss the Shift Template Form window.
Note:The Shift Template Form window can be invoked both from the Engineer Form window and Windows menu.
Copyright © 2000, 2010, Oracle. All rights reserved 2 - 48

User Guide Resource Manager 4.5
2.1.3.1 Making a Vehicle Selection
The Vehicle Form window contains the following fields:
To select a Vehicle:
Make a selection from the Vehicle Id. drop-down list
Or:
Use the navigation buttons to browse through to the Vehicle
Or:
From the Engineer Form window, select a different Vehicle and click on the Edit Vehicle button
Vehicle Form Fields (Sheet 1 of 3)
Field DescriptionVehicle Id. This is the drop-down selection list of Ids of the Vehicles in the system and displays
the currently selected Vehicles ID.
Note:The combination of an Engineer and a Vehicle is considered as a Resource in Planner. Shift is the time frame within a day when the Resource is available for work.
Vehicle Class The Vehicles running cost, relative speed and carrying capacity are decisive parameters used by Planner in scheduling of Shifts using the Vehicle. Vehicle Class categorizes different types of Vehicles on these parameters.
The Edit Class button to the right of the Vehicle Class drop-down button can be selected to open the Vehicle Class Form window. You can create or modify the Vehicle Class from this window before associating it with a Vehicle. Please see “Vehicle Class Form” section on page 2 - 53 for more details.
Vehicle Description
This is an optional field that can be used to describe the Vehicle.
2 - 49 Copyright © 2000, 2010, Oracle. All rights reserved

Resource Manager 4.5 User Guide
Attributes Vehicle Attributes are copied as Shift Attributes into all associated Shifts.
The Edit button can be selected to invoke the Vehicle Attributes window. Using this you can create new Vehicle attributes to be stored into a collective list and then use attributes from this list to configure the selected Vehicles Attributes. For more details, see the “Maintaining Vehicle Attributes” section on page 2 - 51.
Note:Resource Manager copies these attributes as Shift Attributes into all the Shifts that it generates for the Engineer. Planner can be configured such that Jobs that violate the Shifts Attributes will not be scheduled for the Shift.
Miscellaneous details
Tag No., Tag State, Tag Exp., Make, Year and Model are miscellaneous values that can be included in the Vehicle details.
AddThe button allows you to create new Vehicles into the system. On selecting this button all the fields in the Vehicle form will be cleared and the Insert button will replace the Update button.
A unique Vehicle Id. must be provided for the new Vehicle. After entering the new Vehicle details, Insert must be selected to save this into the system.
InsertThe button is visible only after the Add button has been selected. Insert must be selected to save the new Vehicle details into the system.
After the new Vehicle is added into the system, the Record Status area will record an increase in the total number of Vehicle records.
UpdateThe button can be selected to save the changes made to an existing Vehicle. The Insert button replaces this button on selecting the Add button.
AbortSelecting the button will discard all unsaved changes and revert back to the details on the window before the change.
CloseSelecting the button will discard all unsaved changes and dismiss the Vehicle Form window.
Vehicle Form Fields (Sheet 2 of 3) (Continued)
Field Description
Copyright © 2000, 2010, Oracle. All rights reserved 2 - 50

User Guide Resource Manager 4.5
2.1.3.2 Maintaining Vehicle Attributes
Attributes describe the permanent skills or properties possessed by the Resource, and can be used to make sure that the Resource has the right tools, such as a Tail Lift or Union Ticket, when it arrives at the customer location. The set of Resource attribute names used is arbitrary, but must be the same as the set of Resource attribute names used when defining the Stop data. If no Resource attributes are specified, then it is assumed that none are possessed by the Resource.
The Vehicle Attributes window is used for creating and configuring the physical attributes of Vehicles. In this window you will see the collective Vehicle Attributes on the right and the attributes belonging to the currently selected Vehicle on the left.
Newly created attributes will automatically appear on the collective list (on the right). Whenever a different Vehicle is selected the Selected list (on the left) is refreshed with that Vehicles attributes.
Navigation Buttons
Navigation Buttons allow you to browse through the Vehicles in the system.
Record Status bar
The Record Status bar displays the total number of Vehicles in the system and the record number of the currently selected Vehicle. In the above illustration there are 13 Vehicle records in the system of which the 4th record is being displayed on the Vehicle Form window.
Vehicle Form Fields (Sheet 3 of 3) (Continued)
Field Description
2 - 51 Copyright © 2000, 2010, Oracle. All rights reserved

Resource Manager 4.5 User Guide
2.1.3.3 Creating Vehicle Attribute
2.1.3.4 Configuring Vehicle Attribute
2.1.3.5 Using Vehicle Form
The Engineer Form allows you to add new Engineers into the system, modify existing Engineers details and view all the Engineers in the system. Once created the Engineer details can only be modified and cannot be deleted from the system.
2.1.3.5.1 Adding New Vehicles
To create a new Vehicle attribute:
1. Click on the New button
A Vehicle Attribute dialog window is popped-up2. Enter the New Attribute name into this window3. Click on OK to save this attribute. Clicking on Cancel will discard this entry
The new attribute will appear in the collective list (on the right)
To configure the selected Vehicles attributes:
Add an attribute to the selected Vehicle:
1. Click on the attribute from the collective List (on the right)2. Click on the Add button
The attribute will now appear in the selected List (on the left).
Remove an attribute from the selected Vehicle:
1. Click on the attribute from the selected List (on the left)2. Click on the Remove button
The attribute will be removed from the selected List (on the left).
Save or discard the changes:
3. Select Close then click on Update to save the changes or Abort to discard the changes.
Note:The Vehicle Attributes window can be invoked only from the Vehicle Form window.
To create a new Vehicle:
1. Click on the Add button2. Type in a unique Vehicle Id. for the new Vehicle3. Fill in the rest of the fields appropriately4. Click on the Insert button.
The Record Status will increase by one to indicate that the new Vehicle has been added into the system.
Copyright © 2000, 2010, Oracle. All rights reserved 2 - 52

User Guide Resource Manager 4.5
2.1.3.5.2 Editing existing Vehicles
2.1.4 Vehicle Class Form
The Vehicle Class Form window is used for creating and modifying Vehicle Classes. Using this you can classify Vehicles on their running cost, relative speed and load carrying capacity.
The Vehicle Class Form contains the following fields:
To edit an existing Vehicle:
1. Select the required Vehicle from the Vehicle Id. drop-down list2. Make the desired changes to all fields except the Vehicle Id. field3. Click on the Update button
This will save the changes you made to the Vehicle, into the system.
Note:The Vehicle Form window can be invoked from the Engineer Form window, Shift Edit Form window and Windows menu.
Vehicle Class Form Fields (Sheet 1 of 2)
Field DescriptionVehicle Class This is the unique name by which a particular class of Vehicle will be identified.
Description This is a general description for Vehicles in this class.
Dist. Cost This is the cost for using Vehicles in this class.
Rel. Speed This is the relative speed for Vehicles in this class.
2 - 53 Copyright © 2000, 2010, Oracle. All rights reserved

Resource Manager 4.5 User Guide
2.1.5 Shift Edit Form
The Shift Edit Form is used to create, edit and delete actual Shifts belonging to a particular Engineer. The Shifts inherit all the field values from the Shift Template Profile associated with the Engineer. These values can be customized from the Shift Edit Form.
Max. Weight This is the maximum weight that Vehicles in this class can carry.
Max. Volume This is the maximum volume that Vehicles in this class can contain.
Max. Size This is the maximum size that Vehicles in this class can accommodate.
Add This allows you to create new Vehicles into the system. On selecting this button all the fields in the Vehicle Class form will be cleared and the Insert button will replace the Update button.
A unique Class name must be provided for the new Vehicle Class. After entering the new Vehicle Class details, Insert must be selected to save this into the system.
Insert This button is visible only after the Add button has been selected. Insert must be selected to save the new Vehicle Class into the system.
After the new Vehicle Class is added into the system, the Record Status area will record an increase in the total number of Vehicle Class records.
Update This button can be selected to save the changes made to an existing Vehicle Class. The Insert button replaces this button on selecting the Add button.
Abort Selecting this button will discard all unsaved changes and revert back to the details on the window before the change.
Close Selecting this button will discard all unsaved changes and dismiss the Vehicle Class Form window.
Navigation Buttons
Navigation Buttons allow you to browse through the Vehicle Classes in the system.
Record Status bar
The Record Status bar displays the total number of Vehicle Classes in the system and the record number of the currently selected Vehicle Class.
Note:The Vehicle Class Form window can be invoked both from the Vehicle Form window and Windows menu.
Vehicle Class Form Fields (Sheet 2 of 2) (Continued)
Field Description
Copyright © 2000, 2010, Oracle. All rights reserved 2 - 54

User Guide Resource Manager 4.5
You can configure the Shifts on an Engineer-by-Engineer basis from this Form. It contains both Shifts and Shift Templates. Shift Templates are displayed indefinitely into the future. Resource Manager Gateway automatically generates Shifts on all those days within the Shift Horizon when there are Shift Templates. Alternately you can manually create Shifts on days outside the horizon for planning ahead.
Using this Form you can also create One-off Shifts on days without Templates as well as modify the Shifts to be different from their Templates.
The top right hand corner displays the calendar for the selected month. Distinct colors are used to display the status of Shifts belonging to the Engineer during the selected calendar Month.
Resource Manager supports Multiple Shifts Per Day (MSPD) per Engineer. With MSPD a maximum of 3 non-overlapping Shifts can be configured for an Engineer on any day. Additional Shifts can be added via the Add button in the bottom left of the Form. A Shift can be removed via the Remove button in the lower left of the Form. Any changes made in the form are not committed until the entire form is updated via the Insert/Update button.
2 - 55 Copyright © 2000, 2010, Oracle. All rights reserved

Resource Manager 4.5 User Guide
When multiple Shift Templates are available for the Engineer on a day, Shifts will be created for all and not just for a subset of the available Templates. Once a single Shift has been created for a date, Resource Manager will not automatically generate any additional Shift on that date.
The values identifying a Shift are:• Engineer• Date and• Shift Tab Number (0 to 2 from the leftmost tab)
Example: Resource Manager automatically creates the Ident “Roger-20080902-0” for the Shift associated with the first Shift tab on the 2nd of September 2008 for Engineer Roger, and sends it to Planner.
Fields Identifying the Shift on Shift Edit Form (Sheet 1 of 2)
Field DescriptionEngineer The Shifts belonging to the selected Engineer can be manipulated from the Shift
Edit Form.
You can select the required Engineer from the Engineer drop-down selection list.
Year, Month and Day
Shifts belonging to the Engineer for a whole month can be manipulated one day at a time from the Shift Edit Form. The Engineer, Date and Shift Tab number values are shown as unique Ids on the actual Shifts that are generated by Resource Manager.
Copyright © 2000, 2010, Oracle. All rights reserved 2 - 56

User Guide Resource Manager 4.5
Shift Tab MSPDs containing a maximum of 3 non-overlapping Shifts can be defined for an Engineer on any day. This feature will be referred to, as MSPD throughout this User Guide. The Shift Edit Form will display each Shift for the selected date under a separate tab.
The Shift tabs are automatically labelled based on their Logon and Logoff time. When the Shift is being modified, an asterisk is prefixed to the Shift tab label.
Status
The current Status of the Shift is displayed here. This value is automatically updated by the Resource Manager Gateway and cannot be edited from the Shift Edit Form. The following Shift Status values are displayed on the Shift Edit Form:
• INACTIVE -Shift exists, but has been disabled• PLANNED -Shift has been scheduled and now has a planned start and end
time• STARTED -Shift has started• COMPLETED -Shift is completed• TEMPLATE -Shift Template exists on this day• UNUSED -Shift was planned but was not used• -Blank indicates that neither a Shift nor a Shift Template exists for the
Engineer on the day.
Type
Type determines the conditions under which the Resource is expected to start and finish the Shift. Resource Manager supports the following two Shift types:
• STANDARD - The Shift commences at the Logon position and terminates at the Logoff position. No goods may remain on the Resource at the Logoff position.
• ONE_WAY - The Shift commences at the Logon position and terminates at the Logoff position. But the total cost calculation for the shift does not include the travel distance and time between the last stop and Logoff stop. No goods may remain on the Resource after it finishes at the Last Stop.
Fields Identifying the Shift on Shift Edit Form (Sheet 2 of 2) (Continued)
Field Description
2 - 57 Copyright © 2000, 2010, Oracle. All rights reserved

Resource Manager 4.5 User Guide
2.1.5.1 Making a Shift Selection
2.1.5.1.1 General
To select a Shift:
1. Select the Engineer from the Engineer drop-down selection list2. Select the Year using the Year spin button3. Select the Month from the Month drop-down selection list4. Select the Day by clicking in the required calendar day button5. If the required Shift is a MSPD Shift, then select the appropriate Shift Tab
The Shift will become selected.
Shift Edit Form, General Tab Fields (Sheet 1 of 4)
Field DescriptionRegion Association
A Shift must be associated with a single Region. Shifts inherit the Engineers Region.
You can make a different Region selection for the Shift from the Region drop-down list.
Note:If a Depot is associated with the Shift, the Shift will inherit the Depots Region and the Region selection will be disabled on the Shift Edit form.
Time Zone Resource Manager has the ability to manage resources across multiple Time Zones. The default configuration recognises a single Time Zone, belonging to the Local Time Zone that the application is running in.
Note:The Time Zone field is visible on the shift Edit Form only when multiple Time Zones have been configured for the installation. Select Setup, Time Zones from the Options menu and create a name for each of the Time Zone that you require and associate these with the actual time Zone.
The Time Zone field is a drop-down list from where you can select the required Time Zone. The Shift Edit Form inherits the Engineer Form Time Zone by default, which can be edited to a different value.
Copyright © 2000, 2010, Oracle. All rights reserved 2 - 58

User Guide Resource Manager 4.5
Depot Association
A Shift may be associated with one or more Depots belonging to the same Region. Shifts inherit the Engineers Depots.
You can make different Depot selections for the Shift from the Depot drop-down list.
Note:When the Depot association is changed for an Engineer, it is reflected only on the associated TEMPLATED Shifts and not on any actual Shifts.
Vehicle A Shift may be associated with a Vehicle. Shifts inherit their Engineers Vehicle.
You can make different Vehicle selection for the Shift from the Vehicle drop-down selection list.
The Edit Vehicle button to the right of the Vehicle drop-down list can be selected to open the Vehicle Form window. You can create or modify the Vehicle from this window before associating it with the Shift.
Note:The Vehicle displayed on the Shift Edit Form will be the same as the one specified on the Engineer Form. If no Vehicle is associated with the Engineer in the Engineer Form, this value will be left blank on the Shift Edit Form.
Max. Shift Two parameters that define the Shift timings are its Duration and Maximum Shift Length. Duration is the time frame within which the Shift must have been started and completed. Maximum Shift Length is the total hours the Shift is allowed to work within the Duration. If this field is not set, the working hours for the Shift are assumed to be the same as the duration of the Shift.
Any Shift time that is outside either the Max Shift or Shift Duration is considered to be in Overtime.
Max. Shift specifies the Maximum Shift Length for the Shift and is the same as specified on the corresponding Shift Template in the Shit Template Profile window.
Note:Max. Shift is disabled when Fixed Start is selected.
Resource Manager validates the Shift working time against the limits specified in “Configure Engineer Hours” section on page 5 - 3 and issues warnings if:
• Max. Shift is greater than Maximum Shift length defined under daily limits• Max. Shift is lesser than Minimum Shift length defined under daily limits
Warning:Resource Manager will reject the Max. Shift if it is greater than the Shift Time Window defined by the Logon and Logoff Time.
Shift Edit Form, General Tab Fields (Sheet 2 of 4) (Continued)
Field Description
2 - 59 Copyright © 2000, 2010, Oracle. All rights reserved

Resource Manager 4.5 User Guide
Fixed Start Fixed Start is a check box that controls the Fixed Shift Start Time. This is represented as Fixed Logon in the Shifts received into Planner.
When this option is enabled, Resource Manager disables Max. Shift and takes the Maximum Shift length from the Shift Time Window.
If the Shifts Fixed Logon is enabled then Planner allows it to logon only at the start of its time window. If Fixed Logon is disabled then Planner allows the Shift to find the optimal shift start time within its time window.
Despatch Sequence Locking
The Sequence Locking Mode gives you the option of locking the sequence of despatched Stops on Shifts.
• If LOCK_SEQ is selected, Planner will not introduce new stops before despatched Stops, nor change the order of despatched Stops.
• If LOCK_ORDER is selected, the order of despatched stops will not be affected but new stops may be introduced before them.
• Sequence locking is not applied on the Shift if NO_LOCKING is selected.
Auto Undespatch
When a despatched stop is moved outside the Despatch Horizon due to an out-of-sequence event, Planner will change its status to UNDESPATCHED if Auto Undespatch is enabled.
Here is an instance of an out-of-sequence event.
Despatch Horizon is 3 and 3 Stops A, B & C have been despatched to a single Crew. ASSIGNED Stop X is despatched and unexpectedly enrouted, causing Stop C to be outside the Despatch Horizon.
Shift Edit Form, General Tab Fields (Sheet 3 of 4) (Continued)
Field Description
Copyright © 2000, 2010, Oracle. All rights reserved 2 - 60

User Guide Resource Manager 4.5
2.1.5.1.2 Costs
If a Cost Profile is associated with the Engineer then it can be accessed from the Shift Edit Forms Costs tab. Shifts inherit the Cost settings for the Day-of-week from the cost Profile associated with the Engineer. These values can be modified from the Shift Edit form.
Using the Costs option, you can also configure the Cost settings for the Shift from scratch.
Logon/Logoff Time, Location and Delay
The Logon/Logoff Time defines the Shift time window. The actual Shift must be started and completed within this time window. If Fixed Start is on then Planner will start the Shift only at the specified Logon time.
Resource Manager validates the Shift working time against the limits specified in “Configure Engineer Hours” section on page 5 - 3 and issues warnings if:
• Logon time is earlier than Earliest Start Time defined under Engineer Hours Daily limits
• Logoff time is later than Latest Finish Time defined under Engineer Hours Daily limits
Warning:Resource Manager will reject the Logon/Logoff times if the resulting Shift Time Window is lesser than Max. Shift. Logoff time, earlier than Logon time is also not accepted into Resource Manager.
The Logon Location specifies the address from where the Shift work will commence and the Logoff Location specifies the address at which the Shift work will finish. The Real world coordinates of geographical addresses are stored as common addresses within the Resource Manager system. The Logon/Logoff Locations can either be typed into the text boxes or can be selected from the list of Common Addresses by clicking on the Select button. See also the“Common Address Form” section on page 1 - 18.
Resource Manager supports Shifts, which span midnight, although the Shifts are still limited to a maximum length of 24 hours. A Shift must be explicitly configured to run over midnight by selecting the Next Day checked box, which is found next to the log off time in both the Shift Edit Form. Shifts are removed from Planner a certain number of hours after the end of their log off time.
The Logon/Logoff Delay specifies the amount of time the Shift will spend logging on and logging off respectively.
Shift Edit Form, General Tab Fields (Sheet 4 of 4) (Continued)
Field Description
2 - 61 Copyright © 2000, 2010, Oracle. All rights reserved

Resource Manager 4.5 User Guide
Shift Edit Form, Costs Tab Fields
Field DescriptionShift Cost This is the relative cost for activating this Shift. This entry must be >=0.001.
Over-time Cost
This is the relative cost when calculating the overtime cost for this Shift. This entry must be >=0.001.
Time Cost This is the relative time cost for using this Shift.
Cost-Wait Shift
This enables or disables the idle-time costing of this Shift, which is weighted according to the “time from now” factor. By default it is set to Yes.
Reserve Capacity
This specifies the proportion of Shift capacity that is to be reserved for the Job types specified by Reserve Capacity Type. No capacity is reserved when this value is 0 and the whole Shift capacity is reserved if it is 1.
Reserve Capacity Type
This lists the types of jobs for which the Shifts capacity should be reserved. Reserve Capacity types must be created separately before they can be listed in this field. Shift capacity will be reserved for all the selected Job types within this list.
Reserve Capacity Lead Time
This defines the time period (in HHMM format) from the Shifts start time after which the reserved capacity will be released. If it is not specified, then the reserved capacity is not released.
Profile The Engineer Cost Profile window can be used to create and configure the Shift Cost, Overtime Cost and Reserve Capacity settings that may be common to several Engineers.
The name of the Cost Profile associated with the Engineer Form will appear in the Profile text box and you can open this Profile in the Engineer Cost Profile window by clicking the Edit button. The Profile text box will be empty and the Edit button will be disabled if the shift does not have any associated Cost Profile. For more details on this see “Maintaining Engineers Cost Profile” section on page 2 - 11.
Copyright © 2000, 2010, Oracle. All rights reserved 2 - 62

User Guide Resource Manager 4.5
2.1.5.1.3 Engineer Attributes
Attributes describe the permanent skills or properties possessed by the Shift, and can be used to make sure that the Shift has the right tools, such as a Tail Lift or Union Ticket, when it arrives at the customer location. You may use arbitrary names to define Shift attributes, but the same set of Shift attribute names should be used when defining the Stop data.
Shifts may or may not have Attributes. Resource Manager allows you to configure Attributes for each of the Days-of-Week for the Engineer from the Engineer Form. Shifts inherit the appropriate Day-of-week Attributes from their Engineer.
You can create Attributes and modify Attribute selections on a Shift-by-Shift basis from the Engineer Attrs tab. For more information about Engineer Attributes see “Maintaining Engineer Attributes” section on page 2 - 16.
2.1.5.1.4 Shift Zones
Zone preferences can be used to specify a preferred geographical region for work. Zones may be used to reflect a Engineers familiarity with a particular region or maybe just a radio transmission area. You may use arbitrary names to define Shift zones, but the same set of zone names should be used when defining the Stop data.
Resource Manager enables the definition of both Required and Preferred zones from the Shift Edit Form.
Note:While the Shift Edit Form allows you to configure the cost for a single Shift, the Engineer Form allows you to define the cost setting for all the Shifts associated with the Engineer.
Note:While the Shift Edit Form allows you to configure the attributes for a single Shift, the Engineer Form allows you to define attributes for all the Shifts associated with the Engineer.
2 - 63 Copyright © 2000, 2010, Oracle. All rights reserved

Resource Manager 4.5 User Guide
Zone selections made in the Shift Edit Forms, Req. Zones tab are sent as the Shifts “Must Work Zone” values to Planner. Only Stops having the same zone definition can be assigned to these Shifts.
Zone selections made in the Shift Edit Forms, Pref. Zones tab are sent as the Shifts “Preferred Work Zone” values to Planner. These Shifts may be assigned Stops outside the preferred zone, but only if the solution is efficient.
If no zones are specified, there is no constraint. Multiple zones are allowed.
Zones can be configured for each of the Days-of-Week for the Engineer from the Engineer Form. Shifts inherit the appropriate Day-of-week Zones from their Engineer.
2.1.5.1.4.1 Required ZonesYou can make different Required Zone selections for the Shift from the Req. Zones tab.
This tab can be used to create and configure the Required Zones that need to be associated with Engineer for the particular Shift.
The Required Zones associated with an Engineer are displayed on the left side of the Required Zones pane. The Collective Zones for all the Engineers in the system are displayed on the right of this pane.
From the Required Zones pane, you can add new Zones to the Collective Zones list, and configure the Required Zones list.
2.1.5.1.4.1.1 Can work in any ZoneThis option is selected when the Engineer is allowed to work in all the Zones.The Required Zones selections are disabled when this option is enabled.
Copyright © 2000, 2010, Oracle. All rights reserved 2 - 64

User Guide Resource Manager 4.5
2.1.5.1.4.2 Preferred Zones
Selections made under the Required Zones tab are listed as options on the Preferred Working Zones tab. The ticked Zones are the active Preferred Working Zones.
2.1.5.1.5 Scheduled Times
Shift Edit Form, Sched. Times Tab fields (Sheet 1 of 2)
Field DescriptionPlanned Start and Complete Time
Planner schedules the actual Shifts it receives from Resource Manager Gateway and sends back their planned logon and logoff time to Resource Manager. The Planned logon time and logoff time are displayed as Planned Start Time and Planned Complete Time respectively on the Shift Edit Form. These values cannot be edited from the Resource Manager GUI.
2 - 65 Copyright © 2000, 2010, Oracle. All rights reserved

Resource Manager 4.5 User Guide
2.1.5.1.6 Breaks
Breaks are optional and may or may not be planned in Shifts. Selecting the Breaks tab on the Shift Edit Form controls this feature. You can include up to 8 Breaks of the same Type and Restriction into each Shift.
The Number of Breaks will be 0 when there are no Breaks in the Shift.
Actual Start and Complete Time
Once the Shift has been started or completed in Planner these event times are sent to Resource Manager, where it is displayed on the Shift Edit Form as Start Time and Complete Time respectively. You can manually start or complete Shifts from the Shift Edit Form by specifying the Start Time and selecting Start Shift or by specifying the Complete Time and selecting Complete Shift.
Resource Manager Gateway then updates these changes into Planner.
Time Worked Time Worked is the shift work time between actual Logon and Logoff. This does not include the Engineers Own Travel time at start and finish. Please refer to the “Engineers Own Travel Time (EOTT)” section on page 6 - 12.
Closed The Closed flag on the Shift Edit Form is enabled or disabled automatically based on the Shift status received from Planner. This flag cannot be edited from Resource Manager. The Closed status indicates that either the Shift is completed or it will not be recommended for additional work. The relationship between the Closed flag status and the corresponding Shift status in Resource Manager and Planner can be observed in the “Shift Status corresponding to the Closed flag status” on page 2 - 66
Shift Status corresponding to the Closed flag status
RM Shift Status Planner Shift Status
RM Closed = N RM Closed = Y PLANNED PLANNED CLOSED
STARTED STARTED COMPLETING
COMPLETED COMPLETED COMPLETED
Shift Edit Form, Sched. Times Tab fields (Sheet 2 of 2) (Continued)
Field Description
Copyright © 2000, 2010, Oracle. All rights reserved 2 - 66

User Guide Resource Manager 4.5
Breaks are Shift dependent objects. The following static Break details can be edited from the Shift Edit Form:
Shift Edit Form, Break Tab fields
Field DescriptionBreak Type is one of SHIFT, LOGON, DRIVE or ELASPED
Number of Breaks
can include up to 8 breaks of the same type in a single Shift Template
Restrictions can restrict the Break to be taken only at the Depot
From specifies the start of the planned Break time window
To specifies the end of the planned Break time window
Length specifies the duration of the Break
The following scheduled Break details are received from Planner and cannot be edited from the Shift Edit Form:
Status is one of PLANNED, SCHEDULED, DESPATCHED, STARTED, COMPLETED or INACTIVE.
Start Time specifies the date and time when the Break was started
Complete Time
specifies the date and time when the Break was completed
Note:The number of Breaks in a Shift can be increased, decreased or edited even after the Shift has been created.
2 - 67 Copyright © 2000, 2010, Oracle. All rights reserved

Resource Manager 4.5 User Guide
2.1.5.1.7 Limits
Each Shift inherits the Dynamic Work Area Central Location and Relative Factor from the Engineer. These fields can be modified on a Shift-by-Shift basis from the Shift Edit Form.
Shift Edit Form, Job Limits Tab fields
Field DescriptionJob Limits This functionality enables a limit to be placed on a Shift as the value of the Jobs
assigned to the Shift. Uses of this functionality include the limiting of the number of Jobs assigned to a Shift. If the value of each Job is set to 1 and the Job Limit within a Shift is set to the maximum number of Jobs then a cost will be applied when more than this number of Jobs are assigned to the Shift.
The Maximum Job Limit value can be configured on a Shift-by-Shift basis from within the Shift Edit Form.
Maximum Run Length
Runs, which are scheduled to take longer than the Maximum Run Length, are costed using the life-span cost. The length of a Run is measured from departure from Depot or logon location till returning to a Depot or delivering all goods on board.
Dynamic Work Area
Dynamic Work Areas is a method of keeping Engineers working as close as possible to a central point. The central point is defined as a Common Address and can be configured by selecting the Select button adjacent to Centre Location.
Centre Location
This Common Address is the dynamic zone Centre for the Shift. When the Centre Location is not defined the Shift Logon location becomes the dynamic zone Centre.
Relative Factor
The Relative Factor enables you to selectively assign larger or smaller dynamic areas to shifts.
Copyright © 2000, 2010, Oracle. All rights reserved 2 - 68

User Guide Resource Manager 4.5
2.1.5.2 Using Shift Edit Form
From the Shift Edit Form you can create, modify and delete Actual Shifts.
Shift Edit Form Controls (Sheet 1 of 2)
Field Description
Add Using the Add button, you can add a maximum of three MSPD Shifts for the Engineer on the selected date. After adding the third MSPD Shift the Add button becomes disabled. Each of these Shifts is displayed on a separate tab on the selected date. The label of the tab is automatically derived from the logon and logoff time defined for the Shift. An asterisk prefixed to the tab label indicates that the Shift has been modified.
Note:Changes made to the Shift as a result of using the Add button, are not saved until the entire Shift Edit Form is updated using the Insert button.
Remove The Remove button is enabled only on days with two or three MSPD Shift Templates for the Engineer. Using this button you can remove all but the last Template, for the Engineer on the selected date, at which point this button is disabled.
Note:Changes made to the Shift as a result of using the Remove button, are not saved until the entire Shift Edit Form is updated using the Update button.
Insert The Insert button must be selected to save the new Shift into the system. This button is enabled on Templated days and on days without any Template or actual Shift. You may either select the Insert button each time you add a MSPD Shift or just once after adding all the three MSPD Shifts.
Update The Update button must be selected to save the changes made to an existing Shift. This button is visible only when an existing Shift is selected. You may either select the Update button each time you edit a MSPD Shift or just once after editing all the three MSPD Shifts.
Delete The Delete button can be selected to delete the selected Shift from the system. Resource Manager will confirm the delete request before performing the actual delete. The Delete button must be applied separately for each of the MSPD Shifts belonging to the Engineer on the day.
Note:Changes made to the Shift as a result of using the Delete button, are not saved until the entire Shift Edit Form is updated using the Update button.
Standby If this box is ticked then the Shift will be created with STANDBY status instead of the PLANNED status. STANDBY Shifts are not considered for planning requirements until they have been logged on. The Standby button must be applied separately for each of the MSPD Shifts belonging to the Engineer on the day.
Note:Changes made to the Shift as a result of using the Standby button, are not saved until the entire Shift Edit Form is updated using the Insert or Update button.
Unavailable The Unavailable button can be selected to disable Shifts. Disabled Shifts have INACTIVE status. A disabled Shift can be enabled once again by selecting the Update or Insert button. The Unavailable button must be applied separately for each of the MSPD Shifts belonging to the Engineer on the day.
Note:Changes made to the Shift as a result of using the Unavailable button, are not saved until the entire Shift Edit Form is updated using the Insert or Update button.
2 - 69 Copyright © 2000, 2010, Oracle. All rights reserved

Resource Manager 4.5 User Guide
2.1.5.2.1 Shift Work Types
Shifts can aquire Attributes from the Resource either in the form of Engineer Attributes or Vehicle Attributes. On the other hand Work Types are attributes that are directly associated with Shifts.
The Work Type Attributes can be categorised into the following restrictions or preferences:For example: Assume that there are four Work Types: A, B, C and D.
• Allow Only, Restriction - Shift must only work a particular Work Type A. The Shift can optionally be allowed to perform Activities with no Work Type.
• Allow All Except, Restriction - Shift can perform all Activities except those of Work Type D.
• Preferences - Shift can perform Activity of Work Type A or B but prefers those of Work Type B. Shift can optionally be allowed to perform Activities with no Work Type.
• Preferred Restriction - Shift can perform Activities of Work Type A, B or C but prefers to not perform Activities of Work Type C.
• Combining Restrictions and Preferences - A Shift can perform Activities of Work Type A or B or C but not D. The Shift prefers to perform Activities of Work Type B and prefers not to perform Activities of Work Type C. Shift can optionally be allowed to perform Activities with no Work Type.
If no Work Types are specified, there is no constraint. Multiple Work Types are allowed.
Work Types can optionally be applied to Shift Templates and inherited into Shifts generated from the Shift Templates.
Alternatively Work Types can also be modified on the Shift independent from the Shift Template.
For more details on work Types please refer to “Maintaining Work Types” described on page 2 - 46.
2.1.5.2.2 Creating Shifts
Resource Manager automatically generates actual Shifts from Templates except on days:• That fall outside the Shift Horizon• That fall on Public Holidays• That are specified as Engineer Leaves• Where the Shift has been diminished to maintain the Engineer Hours limits and
Abort Selecting the Abort button will discard all unsaved changes and revert back to the details on the window before the change.
Close Selecting the Close button will discard all unsaved changes and dismiss the Shift Edit Form window.
Note:The Shift Edit Form window can be invoked from the Engineer Form window, Engineer Calendar window, Engineer Hours Graph window and Windows menu.
Shift Edit Form Controls (Sheet 2 of 2) (Continued)
Field Description
Copyright © 2000, 2010, Oracle. All rights reserved 2 - 70

User Guide Resource Manager 4.5
• Without Shift Templates.
Using the Shift Edit Form you can manually create Shifts on those days when Resource Manager is unable to create them. A maximum of three non-overlapping Shifts can be created for an Engineer on any day.
2 - 71 Copyright © 2000, 2010, Oracle. All rights reserved

Resource Manager 4.5 User Guide
To create a new Shift:
1. Select the Engineer from the drop-down list2. Using the Year, Month and Day selections on the calendar, select a Date with TEMPLATE or
EMPTY status.
Note: You can identify the availability or non-availability of Shifts and Templates on any date by the status field label and the icon color on the Shift Edit Forms calendar:
3. Select the required MSPD Shift tab.
Using the Add button, you can add a maximum of three MSPD Shifts for the Engineer on the selected date. Each of these Shifts is displayed on a separate tab on the selected date. The tab label is automatically derived from the logon and logoff time defined for the Shift. An asterisk prefixed to the tab label indicates that the Shift has been modified.
The Remove button is enabled as soon as the second MSPD is added and remains enabled until the Shift is saved using the Insert button. Using this button you can remove all but the last unsaved MSPD Shift belonging to the Engineer on the selected date.
4. To create the Shift from the Template without any modifications, simply perform step 6 to 8.
Or
To create the Shift after modifying the Template, perform steps 5 to 8.
Or
To create the Shift from scratch, perform steps 5 to 8.5. You may either supply all the field values, or only the mandatory field values like Logon/Logoff
Time and Location6. Click on the Insert button.
This will save the new Shift into the system. You may either select the Insert button each time you add a MSPD Shift or just once after adding all the three MSPD Shifts.
7. Address any warnings that Resource Manager may issue if the Max. Shift, Logon Time and Logoff Time values violate the Engineer Hours Limits settings
8. You may either select Yes to ignore the limits and create the Shift outside the Engineer Hours Limits or select No to adjust the violating values and create the Shift within the Engineer Hours Limits.
The Shift will be created, its status will change to PLANNED, the Insert button will be replaced with Update, the Shift icon color will reflect Planned Shift color and if the Resource Manager Gateway is running then this Shift will be sent to Planner where it will be scheduled and the planned Start and Complete time will be updated back into the Shift Edit Form.
Note: It is not possible to create a single MSPD Shift for a date while leaving the other two as templates. Once a single Shift has been created for a date, Resource Manager will not automatically generate additional MSPD Shifts on this date.
Warning:Resource Manager will not generate actual Shifts without valid values in the logon/logoff locations.
Copyright © 2000, 2010, Oracle. All rights reserved 2 - 72

User Guide Resource Manager 4.5
2.1.5.2.3 Editing Shifts
To edit an existing Shift:
1. Select the Engineer from the drop-down list2. Using the Year, Month and Day selections on the calendar, select the Date on which the Shift has
been created.
Note:You can identify the availability or non-availability of Shifts and Templates on any date by the status field label and the icon color on the Shift Edit Forms calendar.
3. Select the required MSPD Shift tab.
Each of the MSPD Shifts is displayed on a separate tab on the Shift Edit Form. The tab label is automatically derived from the logon and logoff time defined for the Shift. An asterisk prefixed to the tab label indicates that the Shift has been modified.
4. You may either edit the Shift details
Or
Select the Standby button to change the Shifts status to STANDBY
Or
Select the Unavailable button to change the Shifts status to INACTIVE
Or
Select the Delete button and select Yes in the delete confirmation dialog to delete the Shift.
5. Click on the Update button.6. Address any warnings that Resource Manager may issue if the Max. Shift, Logon Time and Logoff
Time values violate the Engineer Hours Limits settings.7. You may either select Yes to ignore the limits and update the Shift outside the Engineer Hours Limits
or select No to adjust the violating values and update the Shift within the Engineer Hours Limits.
This will save the changes made to the Shifts. You may either select the Update button each time you edit a MSPD Shift or just once after editing all three MSPD Shifts.
2 - 73 Copyright © 2000, 2010, Oracle. All rights reserved

Resource Manager 4.5 User Guide
2.1.5.2.4 Deleting Shifts
To delete a Shift:
1. Select the Engineer from the drop-down list.2. Using the Year, Month and Day selections on the calendar, select the Shift that should
be deleted3. Click on the Delete button.
Resource Manager will display the following Delete confirmation window if the Shift is not in use.
Click on Yes to delete the Shift. If you select No the request to Delete the Shift will be ignored.
If the Shift is in use and has at least one started Stop on it, then Resource Manager will not permit the delete and will display a Delete confirmation window similar to the one below.
If the deleted Shift was generated automatically from a Shift Template, then this Shift Template will be displayed after the delete. If the deleted Shift was created manually then the original public Leave, Engineer Leave or diminished Shift will be displayed after the delete. If the deleted Shift was created manually on a day without a Shift Template then nothing will be displayed on the Shift Edit Form after the delete.
Warning:When deleting Shifts in Resource Manager, that have already been created and sent to Planner, Resource Manager Gateway will delete these Shifts from Planner as well.
Copyright © 2000, 2010, Oracle. All rights reserved 2 - 74

User Guide Resource Manager 4.5
2.1.5.2.5 Making Shift Period Unavailable
By default Resource Manager automatically generates Shifts on all days with Shift Templates except on Engineer Leave days, Public Holidays or days with diminished Shifts. You can modify this default behaviour by disabling the Shift period.
2.1.5.2.6 Creating STANDBY Shifts
Shifts can be configured as STANDBY Shifts within the Shift Template Form. Shifts created from these Templates will have STANDBY status on the Shift Edit Form. Work is only scheduled to a STANDBY Shift once the Driver has logged onto the Shift.
To make a Shift unavailable:
1. Select the Engineer from the drop-down list2. Using the Year, Month and Day selections on the calendar, select the Date on which the
Shift should be disabled.
MSPD Shifts will be displayed on a separate tab on the Shift Edit Form. 3. Select the required MSPD Shift tab4. Click on the Unavailable button.
Depending on the availability of Shifts or Templates on the selected date, the Shift Edit Form may display either the Insert or the Update button.
5. Click on the Update button to disable an Actual Shift
Or
Click on the Insert button to create an INACTIVE Shift from scratch or from a Template.
Note:You may either select the Update/Insert button each time you disable a MSPD Shift or just once after disabling all the three MSPD Shifts.
6. Address any warnings that Resource Manager may issue if the Max. Shift, Logon Time and Logoff Time values violate the Engineer Hours Limits settings.
7. You may either select Yes to ignore the limits and update the Shift outside the Engineer Hours Limits or select No to adjust the violating values and update the Shift within the Engineer Hours Limits.
This will save the changes made to the Shifts.
If a Shift existed on the selected date, it will be disabled and saved in Resource Manager with INACTIVE status and will also be deleted from Planner.
If only a Shift Template existed on the selected date then a Shift will be created based on this Template. This Shift will be disabled and saved in Resource Manager with the INACTIVE status, but it will not be sent to Planner.
Warning:When disabling Shifts in Resource Manager, that have already been created and sent to Planner, these Shifts will be deleted from Planner as well.
2 - 75 Copyright © 2000, 2010, Oracle. All rights reserved

Resource Manager 4.5 User Guide
2.1.5.2.7 Enabling INACTIVE or STANDBY Shift Periods
INACTIVE or STANDBY Shifts periods in Resource Manager can be made available again by deleting and leaving the period free for the recreation of new Shifts either manually or from existing Templates.
To create a STANDBY Shift:
1. Select the Engineer from the drop-down list.2. Using the Year, Month and Day selections on the calendar, select the Date on which the
Shift should be disabled.
MSPD Shifts will be displayed on a separate tab on the Shift Edit Form. 3. Select the required MSPD Shift tab.4. Click on the Standby button.
Depending on the availability of Shifts or Templates on the selected date, the Shift Edit Form may either display the Insert or the Update button.
5. Click on the Update button to change the status of an Actual Shift to STANDBY
Or
Click on the Insert button to create a STANDBY Shift from scratch or from the Template.
Note:You may either select the Update/Insert button each time you apply the Standby operation on an MSPD Shift or just once after applying the Standby operation on all three MSPD Shifts.
6. Address any warnings that Resource Manager may issue if the Max. Shift, Logon Time and Logoff Time values violate the Engineer Hours Limits settings.
7. You may either select Yes to ignore the limits and update the Shift outside the Engineer Hours Limits or select No to adjust the violating values and update the Shift within the Engineer Hours Limits.
This will save the changes made to the Shifts.
If a Shift existed on the selected date, its status will be changed to STANDBY both in Resource Manager and Planner.
If only a Shift Template existed on the selected date, then a Shift is created from this Template with the status STANDBY, which is then saved in Resource Manager and sent to Planner.
Copyright © 2000, 2010, Oracle. All rights reserved 2 - 76

User Guide Resource Manager 4.5
To enable a disabled or Standby Shift period:
1. Select the Engineer from the drop-down list.2. Using the Year, Month and Day selections on the calendar, select the Date on which
the Shift is either disabled or Standby.
MSPD Shifts are displayed using separate tabs on the Shift Edit Form.3. Select the required MSPD Shift tab.4. Click on the Delete button.
This will open the Delete confirmation window.
Click on Yes to delete the Shift.5. Now select Update on the Shift Edit Form.
Note:You may either select the Update button each time you delete an INACTIVE or STANDBY MSPD Shift or just once after deleting all three INACTIVE or STANDBY MSPD Shifts belonging to the Engineer on the selected date.
6. Address any warnings that Resource Manager may issue if the Max. Shift, Logon Time and Logoff Time values violate the Engineer Hours Limits settings.
7. You may either select Yes to ignore the limits and update the Shift outside the Engineer Hours Limits or select No to adjust the violating values and update the Shift within the Engineer Hours Limits.
If the deleted Shift was generated automatically from a Shift Template, then this Shift Template will be displayed after the delete. If the deleted Shift was created manually then the original public Leave, Engineer Leave or diminished Shift will be displayed after the delete. If the deleted Shift was created manually on a day without a Shift Template then nothing will be displayed on the Shift Edit Form after the delete.
Note:On enabling INACTIVE or STANDBY Shifts, the corresponding Shift tabs are removed from the Shift Edit Form if there are other MSPD Shifts for the Engineer on the date. This is to confirm to the rule that Resource Manager cannot create a single MSPD Shift for a date and leave any other Shifts as templates.
2 - 77 Copyright © 2000, 2010, Oracle. All rights reserved

Resource Manager 4.5 User Guide
2.1.6 Depot Form
Depot details are created and modified from the Depot Edit form. Resource Manager creates and maintains Depot Time Windows in a rolling schedule, automatically creating and deleting Depot Time Windows as required within the scheduling horizon.
Within Planner, Depots must either have Distribution or Collection capabilities. The configurations of these two capabilities have been combined into a single Depot entity within Resource Manager. As a result, the configuration of various Depot parameters is shared between the Distribution and Collection Depots.
In situations where the Depot handles both distribution and collection during a common Time Frame, you may create both the Depots at once. Alternately you may create the collection and distribution Depots separately.
Copyright © 2000, 2010, Oracle. All rights reserved 2 - 78

User Guide Resource Manager 4.5
2.1.6.1 Fields in the Depot FormDepot Form Fields (Sheet 1 of 4)
Field DescriptionDepot This is a drop-down list displaying the Idents of all Depots in the system. Depot Idents should
be unique. In order to edit a Depot you should first make a selection from this list.
At the time of creating a new Depot, this field will be cleared for you to enter the new Ident.
Display Name This is a descriptive name for the Depot and is a mandatory value.
Region Each Depot is associated with a single Region. The Region a Depot is associated with can be changed from the Resource Manager Client.
You can do this by making a selection from the Region drop-down list and then clicking the Update button to save the changes.
Note:Changing the Depots Region is not permitted if it is one of the multiple depots associated with an Engineer or Shift. Engineers inherit the Region associated with their Depots. As multiple Regions cannot be associated with an object, all Depots associated with an Engineer or Shift should belong to the same Region.
After changing the Region for a Depot, the Resource Manager Client moves all associated Engineers, Shifts and Stops to the new Region. The Resource Manager Gateway removes the Engineers, Shifts and Stops from the old Region and resents them to the new Region. The Depot is marked foreign in the old Region and sent as a normal Depot to the new Region. The schedule information for all Stops and Shifts associated with the Depot remains unchanged.
Note:A Depot can only be associated with a single Region. Any object (Engineer or Shift) that is associated with a Depot will automatically inherit the Depots Region.
Time Zone Resource Manager has the ability to manage resources across multiple Time Zones. The default configuration recognises a single Time Zone, belonging to the Local Time Zone that the application is running in.
Note:The Time Zone field is visible on the Depot Form only when multiple Time Zones have been configured for the installation. Select Setup, Time Zones from the Options menu and create a name for each of the Time Zone that you require and associate these with the actual time Zone.
The Time Zone field is a drop-down list from where you can select the required Time Zone.
2 - 79 Copyright © 2000, 2010, Oracle. All rights reserved

Resource Manager 4.5 User Guide
Location The Depot address is stored here. This value is mandatory and must belong to valid geocoded co-ordinates. In case the Location is blank or consists of an invalid address, then you will be presented with appropriate warnings.
The Real world coordinates of geographical addresses are stored as common addresses within the Resource Manager system. The Depot Location can either be typed into the text box or can be selected from the list of Common Addresses by clicking on the Select button. See also the “Common Address Form” section on page 1 - 18.
Type This option enables you to configure the Distribution or Collection capabilities of a Depot either jointly or separately.
Note:Within Planner, Depots must either have Distribution or Collection capabilities. Within Resource Manager the configuration of these two capabilities are combined into a single Depot entity.
The configurations of the following Depot parameters are shared between the Distribution and Collection Depots:
• Display Name• Region• Location• Time Windows• and Views
When you enable both the Distribution and Collection flags, Resource Manager will generate two distinct Depots using the common details. When only one of Distribution or Collection flag is enabled, only a single Depot with the corresponding capability is generated.
Delay All stops visiting the Depot may be delayed by a certain amount of time to account for security checks, signing in etcetera at the time of entering or leaving the Depot. This fixed delay for either Collection or Distribution capabilities can be configured using the Delay field. This value is independent of any time delay resulting from the loading or unloading of individual Jobs at Depots.
Note:The Delay field will be enabled only when the associated Type (Distribution or Collection) flag is enabled.
Earliest Departure
The scheduler locks Distribution Runs some time before their planned execution, to allow time for the picking and packing of goods. This is represented in Planner as ERD_DATE and in Resource Manager as Earliest Departure.
Earliest Departure defines the earliest time the Optimiser can schedule a non-closed Run to depart from a Distribution Depot.
Note:The Distribution Type flag should be enabled for the Earliest Departure field to be enabled.
Depot Form Fields (Sheet 2 of 4) (Continued)
Field Description
Copyright © 2000, 2010, Oracle. All rights reserved 2 - 80

User Guide Resource Manager 4.5
Time Windows (without Advanced Options)
This option enables you to create and configure multiple non-overlapping Depot Time Window Templates for each Day of the week. From these Templates, the actual Depot Time Windows are generated for days within the scheduling horizon. Actual Depot Time windows are viewed and edited from the “Depot Time Window Form” described on page 2 - 82.
Time Windows are displayed in a tabular format with the rows representing the individual Depot Time windows and the columns representing the seven Days of week. To activate the Time Window on any Day of week you should tick the intersecting cell by clicking on it.
Time Windows (with Advanced Options)
Enabling the Advanced Options will expand the Time Window section of the Depot Edit Form with the Type, Cost and Capacity options.
• Type - Determines the type of Time Window • ACCESS - Resources must access the Depot only within these Time Windows. • SLA - It is preferred that Resources access the Depot within these Time Windows.
The Cost and Capacity options are disabled for SLA Time windows.
Note:SLA Time windows cannot be created on Days without an ACCESS Time Window.
• Window Cost - Cost of using the Depot within this time window• Late Cost - Cost of using the Depot outside this time window• Maximum Distribution Weight - Maximum accumulated weight for Jobs being distributed
from the Depot within this Time Window. Only applies to ACCESS Time Windows.• Maximum Collection Weight - Maximum accumulated weight for Jobs being collected at
the Depot within this Time Window. Only applies to ACCESS Time Windows.• Maximum Distribution Volume - Maximum accumulated volume for Jobs being distributed
from the Depot within this Time Window. Only applies to ACCESS Time Windows.• Maximum Collection Volume - Maximum accumulated volume for Jobs being collected at
the Depot within this Time Window. Only applies to ACCESS Time Windows.
Depot Form Fields (Sheet 3 of 4) (Continued)
Field Description
2 - 81 Copyright © 2000, 2010, Oracle. All rights reserved

Resource Manager 4.5 User Guide
2.1.6.2 Depot Time Window Form
The Depot Time Window Form is invoked by selecting the Depot Calendar button from the Depot Form.
Depot Calendar
Select the Depot Calendar button to access the Depot Time Window Form from where you can view and edit the actual Depot Time Windows. You can configure the Time windows on each Day of week to be different from their templates. This configuration of actual Time Windows is explained in detail under the “Depot Time Window Form” section on page 2 - 82.
Depot Cutoff CutOff Profiles determine when to trigger the Depot CutOff process and how far in advance to close the Runs.
The Depot Cutoff option enables you to configure the cutoff process on a Depot-by-Depot basis. Selecting this option will open the Depot cutoff Editor from where multiple CutOff Profiles to be used at different times, can be configured for the Depot.
All CutOff Profiles that are associated with the Depot are displayed on the Depot Cutoff Editor. See “Depot Cutoff Editor” section on page 2 - 88 for more details.
Views This option can be selected to invoke the View Editor window from where you can create Views and configure the Depot views. See “Depot Views” section on page 2 - 94 for more details.
Add The Add button allows you to create new Depots into the system. All fields on the Depot form are cleared on selecting this option and the Update button is replaced with the Insert button.
A unique Depot Ident. must be provided for the new Depot.
Insert Select this button to save the new Depot details into the system. The Insert button is visible only after the Add button is selected.
After the new Depot is added into the system, the Record Status area will record an increase in the total number of Depot records.
Update The Update button can be selected to save the changes made to an existing Depot.
The Insert button replaces this button on selecting the Add button.
Abort Selecting the button will discard all unsaved changes and revert back to the details on the window before the change.
Close Selecting the Close button will discard all unsaved changes and dismiss the Depot Edit Form.
Navigation Buttons
These buttons allow you to browse through the Depots in the system.
Record Status bar
The Record Status bar displays the total number of Depots in the system and the currently selected record number.
Depot Form Fields (Sheet 4 of 4) (Continued)
Field Description
Copyright © 2000, 2010, Oracle. All rights reserved 2 - 82

User Guide Resource Manager 4.5
Note: Throughout this User Guide “Actual Depot Time Windows” will be referred as “Depot Time Windows”.
You can configure the Depot Time Windows on a Depot-by-Depot basis from this Form. It contains both Depot Time Windows and Depot Time Window Templates. Depot Time Windows are automatically generated from Templates for the days within the Scheduling horizon. Depot Time Window Templates are displayed indefinitely into the future. Alternately you can manually create Depot time Windows on days outside the horizon for planning ahead.
Using this Form you can create One-off Depot Time Windows on days without Templates. Depot Time Windows can be configured differently from their Templates on each day of the week. Distribution and Collection Depots can only be configured one at a time from this Form.
2.1.6.2.1 Creating Depot Time Window
Using the Depot Time Window Form you can manually create Depot Time Windows on those days when Resource Manager is unable to create them.
2 - 83 Copyright © 2000, 2010, Oracle. All rights reserved

Resource Manager 4.5 User Guide
To create a Depot Time Window:
1. Select the Depot from the drop-down list.2. Select the required Depot Type tab (either Distribution or Collection).3. Using the Year, Month and Day of Week selections on the calendar, select a Date with
TEMPLATE or EMPTY status.
Note:You can identify the availability or non-availability of Depot Time Windows and Templates on any date by the status field label and the color on the Depot Time Window Form calendar:
• Dates containing Depot time windows are coloured in green and display the ACTUAL status label
• Dates containing only Depot Time Window Templates are coloured in cyan and display the TEMPLATE status.
• Dates without Depot Time windows or Depot Time Window Templates are coloured in grey and display the status label, EMPTY.
4. To create the Depot Time Window purely based on the Template without any modifications, simply perform step 7.
Or
To create the Depot Time Window from the Template but with modifications, Click the Template row and perform steps 5 to 7.
Or
To create the Depot Time Window from scratch, Click on the first blank row and perform steps 5 to 7 to.
5. Enter the From, To and Type values.
Time Window Type can be either ACCESS or SLA. Additional options related to the Window Cost, Late Cost, Maximum Weight and Maximum Volume values could be enabled for configuration when the Type is ACCESS. These options are not available when the Type is SLA.
6. To create multiple Depot Time Windows on the selected Date, click on the next blank row and repeat step 5.
Note:SLA Time Windows that overlap ACCESS Time Windows are permitted on the same day, but Overlapping Time Windows of the same Type are not. Resource Manager issues appropriate warnings when this rule is violated.
7. Select Insert to save the Time Window.
This will create the Depot Time Window. If the Resource Manager Gateway is running then the Depot Time Window is sent to Planner for scheduling and its Remaining Weight and Remaining Volume are updated back into the Depot Time Window Form.
Copyright © 2000, 2010, Oracle. All rights reserved 2 - 84

User Guide Resource Manager 4.5
2.1.6.2.2 Editing Depot Time Windows
To edit an existing Depot Time Window:
1. Select the Depot from the drop-down list.2. Select the required depot Type tab (either Distribution or Collection).3. Using the Year, Month and Day of Week selections on the calendar, select a Date with
ACTUAL status.
The Time Window definition area will display the selected Depot Time Window details.
4. Edit the From, To and Type values.
Time Window Type can be either ACCESS or SLA. Additional options related to the Window Cost, Late Cost, Maximum Weight and Maximum Volume values can optionally be configured for ACCESS Depot time windows.
5. To add another Depot Time Window on the selected Date, click on the next blank row and repeat step 4.
Note:SLA Time Windows that overlap ACCESS Time Windows are permitted on the same day, but Overlapping Time Windows of the same Type are not. Resource Manager issues appropriate warnings when this rule is violated.
6. To delete an existing Depot Time Window, Click on its row header and select the Remove Time Window button.
The Depot Time Window will be removed from the list.7. Select Update to save the changes.
If the Resource Manager Gateway is running then the modified Depot Time Window is sent to Planner for scheduling and its Remaining Weight and Remaining Volume are updated back into the Depot Time Window Form.
2 - 85 Copyright © 2000, 2010, Oracle. All rights reserved

Resource Manager 4.5 User Guide
2.1.6.2.3 Deleting Depot Time Windows
To delete an existing Depot Time Window:
1. Select the Depot from the drop-down list.2. Select the required depot Type tab (either Distribution or Collection).3. Using the Year, Month and Day of Week selections on the calendar, select a Date with
ACTUAL status.
All Depot Time Windows for the selected Depot Type on this date will be listed here.
4. Select the Depot Time Window that you wish to remove, by Clicking on its row header and select the Remove Time Window button.
The Depot Time Window will be removed from the list.5. Repeat step 4 to delete other Depot Time Widows on this date.
Note:Depending on the availability or non-availability of Templates on the selected date, the status field value may change from ACTUAL to TEMPLATE or from ACTUAL to EMPTY, when all the Depot Time Windows on this date are deleted.
6. Select Update to save the changes.
If Resource Manager Gateway is running then appropriate instructions are also sent to delete these Depot Time Windows from Planner.
Copyright © 2000, 2010, Oracle. All rights reserved 2 - 86

User Guide Resource Manager 4.5
2.1.6.2.4 Deactivating Depot Time Windows
If a Depot is to be closed or made INACTIVE on a particular day, the required Depot Type (Distribution or Collection) and the date should be selected, followed by the Inactive button. Resource Manager Gateway identifies the dates on which the Depot is disabled and will not generate Depot Time Windows on these dates for the Depot. Removing their Time Windows will not disable depots, as the gateway would simply re-create them.
To make a Depot unavailable:
1. Select the Depot from the drop-down list on the Depot Time Window Form.2. Select the Type tab (either Distribution or Collection).3. Using the Year, Month and Day of Week selections on the calendar, select the Date on
which the Depot should be disabled.4. Select the INACTIVE button.
All the Depot time windows and Templates for the selected Depot Type will be disabled for the day.
The Update button will be enabled if the selected date has either an EMPTY or ACTUAL status.
The Insert button will be enabled if the selected date has the TEMPLATE status.
5. Select the Insert or Update button
This will clear all the disabled Depot Time Windows and Templates on the day and leave the Depot as disabled for the day. The INACTIVE button will change to ACTIVE.
6. The calendar in the "Depot Time Window Form" will colour INACTIVE dates for the selected depot type (Distribution or Collection) only and not the whole day.
The Depot Time Windows that are cleared on the disabled date are also removed from Planner on receiving corresponding instructions from Resource Manager Gateway.
2 - 87 Copyright © 2000, 2010, Oracle. All rights reserved

Resource Manager 4.5 User Guide
2.1.6.2.5 Activating Depot Time Windows
Clicking on ACTIVE will clear disabled Depot Tws and enable the depot for the day. You can now define Tws for the day.
2.1.6.3 Depot Cutoff Editor
The Cutoff profile is a separate and independent entity that can be shared by multiple Depots. Cutoff Profiles are associated with Distribution Depots.
Selecting Depot Cutoff from the Depot Form will open the Depot Cutoff Editor. All Cutoff Profiles that are currently applied to the Depot will be listed here.
Multiple Cutoff Profiles can be associated with each Depot. The active Depot name is displayed just below the Window title bar.
Open-ended Profiles without the To date can be configured for the Depot to run indefinitely into the future. Alternately Profiles that are applied only during a specific time-period can also be applied to depots.
To enable a Depot:
1. Select the Depot from the drop-down list on the Depot Time Window Form.2. Select the required depot Type tab (either Distribution or Collection).3. Using the Year, Month and Day of Week selections, select the Date on which the Depot
is INACTIVE.
Note:INACTIVE dates are coloured for the selected depot type (Distribution or Collection) only on the calendar in the "Depot Time Window Form and not for the whole day.
4. Select the ACTIVE button.5. Select the Update button.
If Depot Time Window Templates exists on the enabled days then these will be displayed and the Insert button will be enabled. Actual Depot Time Windows can be created from these Templates by selecting the Insert button.
If neither Depot time Windows nor Templates exist on the enabled days then nothing will be displayed and the status will show EMPTY.
The ACTIVE button will change to INACTIVE.
Copyright © 2000, 2010, Oracle. All rights reserved 2 - 88

User Guide Resource Manager 4.5
For example:In the Depot Cutoff Editor window above, the Cutoff Profile “General” will be used as the default profile. The “Christmas” Cutoff Profile has been configured for use over the Christmas period when Cutoff may occur more frequently. As the “Gen-eral” cutoff Profile is open-ended, it will be used again after the Christmas period is over.
Each row in the Depot Cutoff Editor represents a Cutoff Profile and the period when it will be active. This information is recorded in the following three columns:• Cut-Off Profile- drops-down a list of Cutoff Profile names from which you can make a
selection.
• From- defines the Date from which the Cutoff Profile will be applied for the Depot. You can use the calendar icon to configure this date.
• To- defines the Date until which the Cutoff Profile will be applied for the Depot. This field can be left blank to create an open-ended profile running indefinitely into the future. You can configure this date using the calendar icon. When this field is populated, the Clear button replaces the calendar button, using which the To date can be cleared.
2.1.6.3.1 Which Cutoff Profile is applied when
Note:Cutoff Profiles are sorted alphanumerically and listed in the drop-down list.
Depot Cutoff Editor Controls
Control DescriptionRemove Use this button to remove a Cutoff Profile associated with the Depot.
Edit Profile Use this button to invoke the Cutoff Profiles Editor from where you can edit the selected Cutoff Profile.
Abort Selecting the Abort button will discard all unsaved changes and revert to the details on the window before the change.
Close Selecting the Close button will discard all unsaved changes and dismiss the Depot Cutoff Editor.
2 - 89 Copyright © 2000, 2010, Oracle. All rights reserved

Resource Manager 4.5 User Guide
When multiple Cutoff Profiles are configured for a Depot, their activation is based on the following rules:• Open-ended Profiles are applied until another open-ended Profile is applied.• Overlapping Profiles are layered starting from their From Date.• When there are multiple eligible Profiles, the one with the latest From Date is applied.
This is explained in more detail below:
In the following examples, five Cutoff Profiles (A, B, C, D and E) are associated with a Depot. Both From and To dates are defined for Profiles A, C and D while only the From date is defined for Profiles B and E.
Example: 1In this example, NOW (or the Current time) is falling before the From date of all five Profiles. Hence, none of these Profiles will be applied.
Example: 2In this example, NOW (or the Current time) is intersecting two of the Profiles, A and B. As illustrated below, overlapping Profiles are layered by the From date. Hence, Profile B with the latest From date will be applied.
Copyright © 2000, 2010, Oracle. All rights reserved 2 - 90

User Guide Resource Manager 4.5
Example: 3In this example, NOW (or the Current time) is intersecting Profiles A, B and D and Profile C is in the past. As Profile D has the latest From time, this Profile will be applied.
Example: 4In this example, NOW (or the Current time) is intersecting the open-ended Profiles B and E, while the remaining Profiles are all in the past. Profile E will be applied as it has the latest From time.
2.1.6.4 Cutoff Profiles Editor
The Cutoff Profiles Editor enables you to create, modify and delete cutoff triggers and Profiles. Cutoff triggers are grouped under Cutoff Profiles. Cutoff triggers belonging to the currently selected profile are displayed on the Cutoff Profiles Editor at any time. Resource Manager automatically activates the most appropriate trigger within the scheduling horizon and sends it to Planner. Old triggers are removed and new triggers are activated on a timely basis.
2 - 91 Copyright © 2000, 2010, Oracle. All rights reserved

Resource Manager 4.5 User Guide
A Cutoff profile is an independent entity that can be associated with zero or more Depots. These Profiles cycle over the period of a week. Each day of the week can have different cutoff and trigger times. Each trigger can be applied to multiple days of the week.
You can configure the time at which the Depot Cutoff is to occur and the time that will be used to Cutoff the Depot.For example:
The Triggers in the following image can be read as:• At 4 am on the selected Days-of-week, the morning trigger will cutoff all non-
closed Runs, that are scheduled to depart the Depot before 12 noon the same day.
• At 10 am on the selected Days-of-week, the midday trigger will cutoff all non-closed Runs, that are scheduled to depart the Depot before 4 pm the same day.
• At 3 pm on the selected Days-of-week, the evening trigger will cutoff all non-closed Runs, that are scheduled to depart the Depot before 8 am the next day.
In all cases picking and packing of the closed Runs could be done during the interval between Trigger time and Cut-off time.
Copyright © 2000, 2010, Oracle. All rights reserved 2 - 92

User Guide Resource Manager 4.5
The Cutoff Profiles Editor contains the following controls and or fields:
Cutoff Profile Editor Fields (Sheet 1 of 2)
Control/Field Description
Profile selection drop-down list
This is a drop-down list from where you can select the Cutoff Profile. This list will be empty if there are no Profiles in the system.
New Profile Select this button to create a new Cutoff Profile. This will open the dialog in which you can type the new cutoff Profile name. Duplicate Profile names are not accepted.
Usage The functionality associated with the Usage button has not yet been implemented. This button is intended to show all the associations with this Cutoff Profile.
For Example:To list down the Depots for which this is the default Profile and for what all-exceptional situations this Profile is used.
Description You can provide a brief description for the Cutoff Profile in this mandatory field.
Trigger Name This is where you specify a unique name for the cutoff trigger.
Trigger Time The Depot Cutoff is performed at this time. The actual cutoff time is derived from the Trigger Time and Offset values. For all the Depots associated with this Cutoff Profile, the scheduler will close any non-closed Runs originating from these Depots, which are scheduled to depart before the actual cutoff time.
Note:Trigger time should be unique within a Profile.
Offset This is the time duration using which the "Actual cutoff time" is derived in relation to the "Trigger time".
Cut-off Time This is the actual Cutoff Time that is derived from the Trigger time and Offset values. Cutoff Time automatically adjusts to changes in the Trigger time and Offset values. You cannot edit this value. At Trigger time, the Scheduler closes all non-closed Distribution Runs originating from the Depot that are scheduled to depart before the actual Cutoff Time.
Note:Cut-off time should be unique within a Profile.
Days-of-week These flags can be used to enable or disable the Trigger on the selected days-of-week. Triggers can be reused on multiple days-of-week.
Note:A Trigger is in use when it is enabled on at least one of the Days-of-week. Cutoff Profiles containing unused Triggers are not saved.
Remove Use this button to delete the selected Trigger from the Cutoff Profile.
2 - 93 Copyright © 2000, 2010, Oracle. All rights reserved

Resource Manager 4.5 User Guide
2.1.6.5 Depot Views
Views in Resource Manager denote the geographical region or the set of special characteristics. The Views Editor window can be used to create and configure the Depot Views.
Click on the Views button within the Depot Edit Form window to invoke the Views Editor window.
In this window you will see the collective Depot views on the right and the views belonging to the selected Depot on the left.
Newly created views will automatically appear on the collective Views list (on the right). Whenever a different Depot is selected the selected Depot Views list (on the left) is refreshed with that Depot views.
New Views are created using the New button and are automatically updated into the collective Views list.
2.1.6.5.1 Configuring Depot View
Update The button should be selected to save the changes made to the Cutoff Profile.
Abort Selecting the Abort button will discard all unsaved changes and revert to the details on the window before the change.
Close Selecting the Close button will discard all unsaved changes and dismiss the Cutoff Profiles Editor.
To configure the Depot Views:
1. Select the View from the collective Views List (on the right) and click on the Add button.
The View will be included in the Engineers Views list (on the left).1. To remove a View from the Engineers Views list select it and click on the Remove
button.2. Select Close then click on Update to save the changes or Abort to discard the changes.
Cutoff Profile Editor Fields (Sheet 2 of 2) (Continued)
Control/Field Description
Copyright © 2000, 2010, Oracle. All rights reserved 2 - 94

User Guide Resource Manager 4.5
2.1.6.6 Using Depot Edit Form
From the Depot Edit Form you can create and modify Depots.
2.1.7 Periods of Unavailability
Periods of Unavailability (POU) are Resource Manager objects that are used to block out specific amount of time from Shifts for specific reason. For example:
Team meeting for 2 hours or reconciling van stocks for 4 hours.
POUs consume available Shift time and hence Jobs cannot be scheduled during these time periods.
Resource Manager creates and maintains:• POUs from the Period of Unavailability Editor window and• POU Templates from the Unavailability Template Form
Both these windows are accessible, only from the Periods of Unavailability window.
Note:The Depot Views window can be invoked only from the Depot Form window.
Control descriptionInsert
The button must be selected to save the new Depot into the system. This button is visible only when you are creating new Depot.
UpdateThe button must be selected to save the changes made to an existing Depot. This button is visible only when any changes have been made to an existing Depot.
AbortSelecting the button will discard all unsaved changes and revert back to the details on the window before the change.
CloseSelecting the button will discard all unsaved changes and dismiss the Depot Edit Form window.
Navigation Buttons
These buttons allow you to browse through the Depots in the View.
Record Status bar
The Record Status bar displays the total number of Depots in the View and the record number of the currently selected Depot.
Note:The Depot Form window can be invoked only from the Windows menu.
2 - 95 Copyright © 2000, 2010, Oracle. All rights reserved

Resource Manager 4.5 User Guide
Selecting Windows, Periods of Unavailability from the main menu, invokes the Periods of Unavailability window.
The Periods of Unavailability window has two tabs:• Periods of Unavailability -lists all Periods of Unavailability defined within the system.• Templates-lists all Periods of Unavailability Templates defined within the system.
POUs on the Periods of Unavailability window and Templates on the POU Template window can be filtered by Engineer. Selecting an Engineer from the Filter drop down list will refresh the display such way that only POU's or POU Templates relevant to the selected Engineer will be displayed.
Selecting the Close button will close the Periods of Unavailability window.
Copyright © 2000, 2010, Oracle. All rights reserved 2 - 96

User Guide Resource Manager 4.5
2.1.7.1 Periods of Unavailability tab
The Periods of Unavailability tab lists all POUs in the system sorted by their date. Each row contains the Date, Name and Description belonging to a single POU
By default only the current and future POUs are visible. In order to see past POUs you must tick ON the View old flag.
• Click the button to create a new POU from the Period of Unavailability Editor. For more information, see the “Period of Unavailability Editor” section on page 2 - 97.
• Select a POU from the list and click the button to modify the POU.
• Select a POU from the list and click the button to delete the POU.
2.1.7.1.1 Period of Unavailability Editor
The Period of Unavailability Editor is used to create and edit the actual Periods of Unavailability. POU is the acronym used for “Period of Unavailability” in this User Guide.
Periods of Unavailability are sent as Stop objects to Planner.
The POU Editor can be opened either from the POU window or from the Unavailability Templates Form.
Selecting Windows, Periods of Unavailability from the main menu, opens the POU window. From the POU window you can select Add or Edit from the POU tab or Use from the Template tab to open the POU Editor.
2 - 97 Copyright © 2000, 2010, Oracle. All rights reserved

Resource Manager 4.5 User Guide
From the Unavailability Templates form select Use Template to open the POU Editor.
The Period of Unavailability Editor displays all the details relating to an actual instance of a POU. It contains the following fields:
POU Editor Fields (Sheet 1 of 4)
Field DescriptionName
This is the name by which the POU is identified. POUs can be created either from a POU Template or as a one-off POU. If the POU is generated from a POU Template then the grey box to the right of the Name field displays the name of this POU Template or it remains a blank.
Description This is a brief description that will be included in the details sent with the POU job and subsequently to each Engineer in the POU.
Date This specifies the date when the POU is to take place.
The Date Edit window is popped-up by selecting the button. Using this you can specify the POU date. The current system date is the default POU date.
Copyright © 2000, 2010, Oracle. All rights reserved 2 - 98

User Guide Resource Manager 4.5
Day The Day of Week derived from the Date field is displayed here. This cannot be edited.
Time This is the time of day at which the POU is scheduled to start.
Offset The Offset flag enables you to create POU Templates and POUs that can be taken a certain time after the start of the Shift they are associated with.
For Example:Consider an Engineer having a Shift profile that starts at 8am in week 1 and at 2pm in week 2. In each case a POU is required to be taken in 3 hours from the start of the Shift. Tick-ing the Offset from Shift start Flag ON and setting Time to 03:00 configures this.
Note:When Offset from Shift Start is checked the Time becomes an offset from the start of the Shift rather than an actual time of day.
When multiple Engineers are associated with a single POU the Time Windows for the actual POU Stops may differ depending on the start time of the Shifts they are associated with.
Duration This is the length of time the Engineer(s) associated with the POU will be unavailable for regular Shift work.
POU type This is a drop down list from which you can either select the POU type as POU or MEETING.
When the POU type is set to MEETING, the following fields are disabled on the Periods of Unavailability Editor:
• Early Margin• Late Margin• Offset from Shift start
Relative Late Cost
Resource Manager allows the Relative Late Cost of a POU to be configured. If the Relative Late Cost for a POU is increased to a significant number the Optimizer will prefer to schedule the POU on time rather than an alternate Job. In particular this is relevant to preventing high priority Jobs pushing out a POU.
The weight of the Relative Late Cost for a POU value (1 is the default) is the same as for a regular Stop.
Time Zone Resource Manager has the ability to manage resources across multiple Time Zones. The default configuration recognises a single Time Zone, belonging to the Local Time Zone that the application is running in.
Note:The Time Zone field is visible on the Periods of Unavailability Editor only when multiple Time Zones have been configured for the installation. Select Setup, Time Zones from the Options menu and create a name for each of the Time Zone that you require and associate these with the actual time Zone.
The Time Zone field is a drop-down list from where you can select the required Time Zone. The Periods of Unavailability Editor inherits the Time Zone from its associated Unavailability Template by default. This value can be edited differently.
POU Editor Fields (Sheet 2 of 4) (Continued)
Field Description
2 - 99 Copyright © 2000, 2010, Oracle. All rights reserved

Resource Manager 4.5 User Guide
Early Margin This is the number of minutes before the POU start time that the time window of the actual POU stop should start.
Late Margin This is the number of minutes after the POU start time that the time window of the actual POU stop should finish.
Location This specifies the place where the POU is to take place. The Engineer (s) will travel to this location to take part in the POU.
The Select button to the right of Location can be selected to open the Common Address Form window. From this window, you can either create a new address and then select it as the POU location or make a selection from the list of available common addresses.
Engineers If Engineers are associated with the POU then their names will be listed in this area. POU stops associated with these Engineers are sent to Planner. As the POU stops are arrived at or started or completed, Planner sends the time of these events along with their current stop status into Resource Manager. These details appear along side the Engineer name in this area. The POU statuses are listed under the section, “POU Statuses” on page 2 - 101.
Multiple Engineers gathering at the same location for the same agenda can be
associated with a single POU. The button can be selected to associate Engineers with the POU. POUs are automatically generated when an associated Engineers Shift is generated.
The button can be selected to remove Engineers already associated with the POU.
Edit Template If the POU was generated from a template then that template can be accessed
and edited from the Unavailability Template Form by clicking the button.
SaveSelecting the button will save the new POU into the system or update the changes into the existing POU.
POU Editor Fields (Sheet 3 of 4) (Continued)
Field Description
Copyright © 2000, 2010, Oracle. All rights reserved 2 - 100

User Guide Resource Manager 4.5
2.1.7.1.1.1 POU StatusesThe POU statuses are:
AbortSelecting the button will discard all unsaved changes and revert back to the details on the window before the change.
CloseSelecting the button will discard all unsaved changes and dismiss the Period of Unavailability Editor window.
POU statuses
Status DescriptionPENDING POU has yet to be sent to Planner
FREE POU has been sent to Planner but has not yet been included in the schedule.
PLANNED POU has been sent to Planner and is in the schedule.
PENDING_DESP Applicable only to multi-stop POU Jobs.
A POU is PENDING_DESPATCHED when it is not scheduled within the Despatch Horizon, and another Stop belonging to the same Job is DESPATCHED or higher. Generally PENDING_DESPATCHED Stops remains in this state until they enters the Despatch Horizon and go to
DESPATCHED.
DESPATCHED From Planner s point of view, the POU has been despatched. That is, the transmission of POU Stop-details is in progress.
UNDESPATCHED The status of a Job which was previously despatched and subject to Sequence Locking, but is now unlocked due to an out-of-sequence event.
Planner treats this Stop as PENDING_DESPATCH until its status is changed.
ACKNOWLEDGED As DESPATCHED, and the Engineer has acknowledged the Job.
ENROUTE As PLANNED, but the Engineer will visit this Stop next.
ARRIVED Engineer has Arrived at POU
STARTED Engineer has Started POU
COMPLETED Engineer has Completed POU
POU Editor Fields (Sheet 4 of 4) (Continued)
Field Description
2 - 101 Copyright © 2000, 2010, Oracle. All rights reserved

Resource Manager 4.5 User Guide
2.1.7.1.2 Using Period of Unavailability Editor
A POU is a period of time that is blocked out of the Engineers regular Shift hours. To create actual POUs Resource Manager must have:• A valid Location• A start date, time and duration and• Engineers Shifts that will be utilized by the POU
POU details are sent along with associated Shifts to Planner. POU details are also sent to Planner whenever the POU is changed within Resource Manager.
One-Off POUs can be created and edited using the POU Editor.
Copyright © 2000, 2010, Oracle. All rights reserved 2 - 102
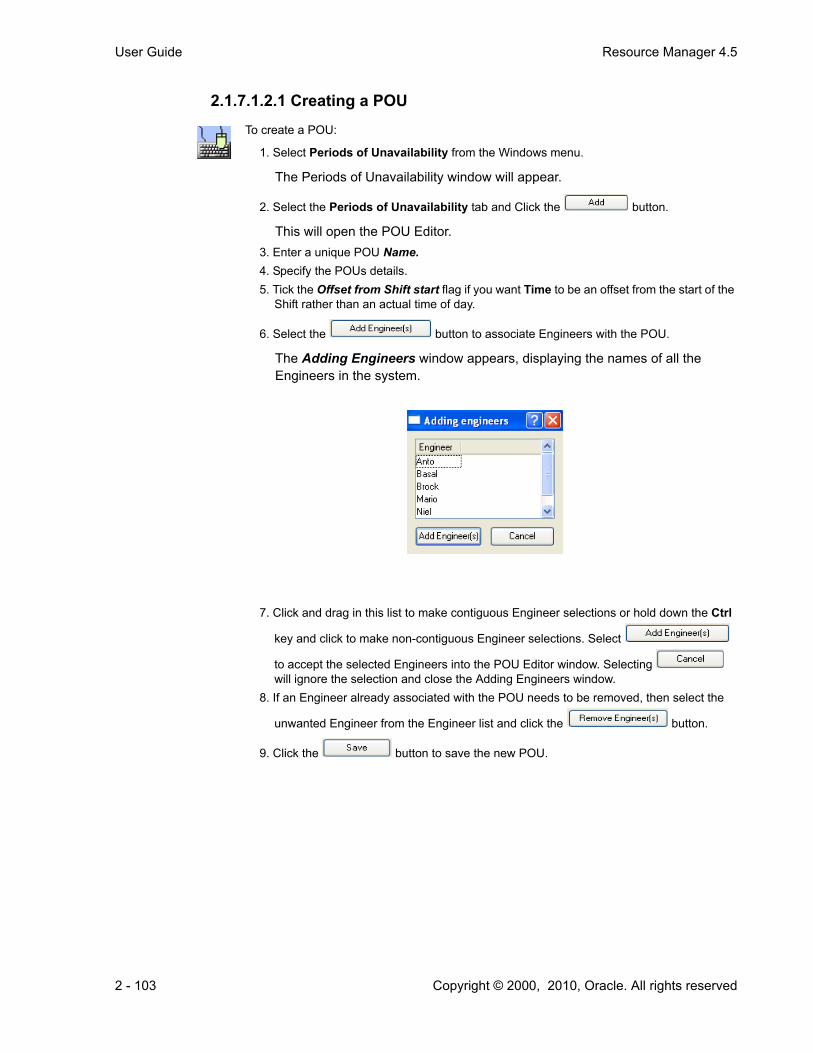
User Guide Resource Manager 4.5
2.1.7.1.2.1 Creating a POU
To create a POU:
1. Select Periods of Unavailability from the Windows menu.
The Periods of Unavailability window will appear.
2. Select the Periods of Unavailability tab and Click the button.
This will open the POU Editor.3. Enter a unique POU Name.4. Specify the POUs details.5. Tick the Offset from Shift start flag if you want Time to be an offset from the start of the
Shift rather than an actual time of day.
6. Select the button to associate Engineers with the POU.
The Adding Engineers window appears, displaying the names of all the Engineers in the system.
7. Click and drag in this list to make contiguous Engineer selections or hold down the Ctrl
key and click to make non-contiguous Engineer selections. Select
to accept the selected Engineers into the POU Editor window. Selecting will ignore the selection and close the Adding Engineers window.
8. If an Engineer already associated with the POU needs to be removed, then select the
unwanted Engineer from the Engineer list and click the button.
9. Click the button to save the new POU.
2 - 103 Copyright © 2000, 2010, Oracle. All rights reserved

Resource Manager 4.5 User Guide
2.1.7.1.2.10 Editing a POU
To edit a POU:
1. Select Periods of Unavailability from the Windows menu.
The Periods of Unavailability window will appear.2. Select the Periods of Unavailability tab.3. Select the POU from the list of available POUs.4. Click on the Edit button.
The POU Editor window will appear displaying the details of the selected POU.5. Modify one or all of the POUs values.
6. Select the button to associate Engineers with the POU.
The Adding Engineers window appears, displaying the names of all the Engineers in the system.
7. Click and drag in this list to make contiguous Engineer selections or hold down the Ctrl
key and click to make non-contiguous Engineer selections. Select
to accept the selected Engineers into the POU Editor window. Selecting will ignore the selection and close the Adding Engineers window.
8. If an Engineer already associated with the POU needs to be removed, then select the
unwanted Engineer from the Engineer list and click the button.
9. Click the button to update the POU.
Note:The Periods of Unavailability Editor window can be invoked both from the Period of Unavailability window and Unavailability Template Form window.
Copyright © 2000, 2010, Oracle. All rights reserved 2 - 104

User Guide Resource Manager 4.5
2.1.7.2 Templates tab
The Templates tab lists all the POU Templates in the system sorted by their name. Each row contains the Name and Description for a single POU Template.
Select a POU Template from the list and click the button to modify this POU Template.
Click the button to create a new POU Template from the Unavailability Template Form.
Select a POU Template from the list and click the button to delete the POU Template.
Select a POU Template from the list and click the button to create a one-off POU from this POU Template.
2.1.7.3 Unavailability Template Form
The Unavailability Template Form is used to create and edit the Periods of Unavailability Templates. Resource Manager automatically generates POUs from the POU Templates. POUs can also be created independently from the POU Editor.
In addition to the fields in the POU Editor, the Unavailability Template Form has fields to specify the date when the template should begin generating POUs, when it should cease generating POUs and the number of weeks in between each POU generation.
Resource Manager will automatically generate POUs from active POU Templates with associated Engineers. You can use disabled POU Templates to manually create One-Off POUs.
2 - 105 Copyright © 2000, 2010, Oracle. All rights reserved

Resource Manager 4.5 User Guide
The Unavailability Template Form has the following fields:
Unavailability Template Form Fields (Sheet 1 of 3)
Field Description
Name
This is the name by which the POU Template will be identified. Resource Manager automatically generates a unique ident for each POU Template in the system. This ident is displayed in the grey text box to the right of the Name field.
Description This is the description for the POU Template.
Copyright © 2000, 2010, Oracle. All rights reserved 2 - 106

User Guide Resource Manager 4.5
Day of Week This allows you to apply the Period of Unavailability Templates on any combination of days of the week.
For Example:A meeting that occurs every weekday can be controlled from a single POU Template by ticking each of the Monday to Friday
check boxes. Click the button to enable all the seven days of the week check boxes at once.
Time This is the time of day at which the POU will be scheduled to start if the Offset from Shift start option is toggled off. This Time becomes an offset from the start of the Shift rather than an actual time of day when the Offset from Shift start option is toggled on.
Offset from Shift start
This option can be toggled on to create POU Templates and POUs that must be taken a certain time after the start of their associated Shift.
For Example:Consider Engineers having a Shift profile that starts at 8am in week 1 and at 2pm in week 2. In each case a POU is required to be taken within 3 hours from the start of the Shift. This is configured by checking Offset from Shift start, setting Time to 00:00, and setting Late margin as 03:00.
Note:When Offset from Shift Start is checked, the Time becomes an offset from the start of the Shift rather than an actual time of day.
Duration This is the length of time the Engineer (s) associated with the POU will be unavailable for regular Shift work.
Early Margin This is the number of minutes before the POU start time that the time window of the actual POU stop should start.
Late Margin This is the number of minutes after the POU start time that the time window of the actual POU stop should finish.
POU Type This is a drop down list from which you can either select the POU type as POU or MEETING.
When POU type is MEETING, the following fields are disabled on the Unavailability Templates form:
• Early Margin• Late Margin• Offset from Shift start
Relative Late Cost
Using this field value you can configure the Relative Late Cost of a POU. When this value is increased to a significant number the Optimizer will prefer to schedule the POU on time instead of an alternate Job. This prevents high priority Jobs from pushing out a POU.
As with a regular Stop, the default Relative Late Cost for a POU is 1.
Unavailability Template Form Fields (Sheet 2 of 3) (Continued)
Field Description
2 - 107 Copyright © 2000, 2010, Oracle. All rights reserved

Resource Manager 4.5 User Guide
Time Zone Resource Manager has the ability to manage resources across multiple Time Zones. The default configuration recognises a single Time Zone, belonging to the Local Time Zone that the application is running in.
Note:The Time Zone field is visible on the Unavailability Template Form only when multiple Time Zones have been configured for the installation. Select Setup, Time Zones from the Options menu and create a name for each of the Time Zone that you require and associate these with the actual time Zone.
The Time Zone field is a drop-down list from where you can select the required Time Zone.
Location This specifies the place where the POU is to take place. The Engineer (s) will travel to this location to take part in the POU.
The Select button to the right of Location can be selected to open the Common Address Form window. In this window, you can either create a new address and then select it as the POU location or make a selection from the list of available common addresses.
Start Week Commencing
This is the Monday in the week the Template should begin creating POUs. This
date can be configured from the Date Edit window by clicking the button located to the right of the Start Week Commencing field.
Stop Week Commencing
This is the Monday in the week the Template should cease creating POUs. This
date can be configured from the Date Edit window by clicking the button located to the right of the Stop Week Commencing field. The Stop Week Commencing field will be disabled if the Perpetual option is checked.
Note:POUs will not be created after the Stop Week Commencing date if the Perpetual option is flagged off.
Weeks This can be set to configure the number of weeks in the POU cycle.
When Week is set to 2, the POUs will be generated once every two weeks.
Perpetual Resource Manager ignores the Stop Week Commencing date and continues to create POUs forever when the Perpetual option is checked.
Active/Disabled
POU Templates can either be ACTIVE or DISABLED. By default all POU Templates are Active. Resource Manager does not generate POUs from DISABLED POU Templates.
Unavailability Template Form Fields (Sheet 3 of 3) (Continued)
Field Description
Copyright © 2000, 2010, Oracle. All rights reserved 2 - 108

User Guide Resource Manager 4.5
2.1.7.3.1 Using Unavailability Template From
POU Templates are created for recurring POUs. Recurring POUs occur a number of weeks apart and can start some time in the future.
Resource Manager looks at the POU Templates and creates actual POUs based on the data in the Template.
Engineers This displays the list of Engineers that will be associated with the POUs generated from this POU Template.
Multiple Engineers gathering at the same location for the same agenda can be
associated with a single POU Template. The button can be selected to associate Engineers with the POU Template. POUs are automatically generated when an associated Engineers Shift is generated.
The button can be selected to remove Engineers already associated with the POU Template.
Note:POU Templates can be created without any Engineer association. Such Templates can only be used for manually creating the POUs and not for the automatic generation of POUs.
Use Template You can create a one-Off POU from the Period of Unavailability Editor by clicking
the button. Leaving the POU Name blank, all other values from the POU Template currently selected on the Unavailability Templates Form are copied into the Period of Unavailability Editor. These values can be edited or saved as it is into the one-Off POU. For more details see the “Using Period of Unavailability Editor” section on page 2 - 102.
SaveClicking the button will save the new POU Template into the system or update the changes into the existing POU Template.
AbortClicking the button will discard all unsaved changes and revert back to the last saved details before the change.
CloseClicking the button will discard all unsaved changes and dismiss the Unavailability Template Form.
2 - 109 Copyright © 2000, 2010, Oracle. All rights reserved

Resource Manager 4.5 User Guide
POU Templates can be created and edited from the Unavailability Template Form window.
2.1.7.3.1.1 Creating a POU Template
To create a POU Template:
1. Select Periods of Unavailability from the Windows menu.
The Periods of Unavailability window will appear.
2. Select the Templates tab and click the button.
This will open the Unavailability Template Form.3. Enter a unique POU Template Name.4. Enter the Description and check the required Day of Week boxes.5. Set the Time, Duration, Early Margin and Late Margin.6. Tick the Offset from Shift start flag if you want Time to be an offset from the start of the
Shift rather than an actual time of day.
7. Select a Location from the Common Address Form by clicking the button adjacent to the Location field.
8. Configure the Start Week Commencing date from the Date Edit window by clicking the
button located to the right of the Start Week Commencing field.9. Configure the Stop Week Commencing date from the Date Edit window by clicking the
button located to the right of the Stop Week Commencing field.
This field is enabled only when the Perpetual option is un-checked.10. Set the number of Weeks in the POU cycle.11. Tick the Perpetual box to allow Resource Manager to create POUs indefinitely into the
future using this template.
This will disable the Stop Week Commencing field.
12. Select one of ACTIVE/DISABLED from the drop-down list box.
By default all POU Templates are Active. Resource Manager does not generate POUs from DISABLED POU Templates.
Copyright © 2000, 2010, Oracle. All rights reserved 2 - 110

User Guide Resource Manager 4.5
13. Select the button to associate Engineers with the POU Template.
The Adding Engineers window appears displaying the names of all the Engineers in the system
14. Click and drag in this list to make contiguous Engineer selections or hold down the Ctrl
key and click to make non-contiguous Engineer selections. Select to accept the selected Engineers into the Unavailability Template Form. Selecting
will ignore the selection and close the Adding Engineers window.15. To remove an Engineer from the POU Template, select the Engineer from the Engineer
list and click on the button. 16. Click the Save button to save the new POU Template.
Note:The Unavailability Template Form window can be invoked both from the Periods of Unavailability window and Period of Unavailability Editor window.
2 - 111 Copyright © 2000, 2010, Oracle. All rights reserved

Resource Manager 4.5 User Guide
2.1.7.3.1.17 Editing a POU Template
To edit a POU Template:
1. Select Periods of Unavailability from the Windows menu.2. Select the Templates tab from the resulting Periods of Unavailability window.3. Make a selection from the list of available POU Templates.4. Click on the Edit button.
The Unavailability Template Form will appear displaying the details of the selected POU Template.
5. Modify one or all of the values.6. Add or remove Engineer association with the POU Template.7. Click Save to save the changes to the POU Template.
The following confirmation pop-up will appear
8. Select Yes to update existing POUs associated with the Template. Selecting No will update the POU Template without updating the changes into existing POUs associated with the Template.
For POUs in DESPATCHED state or later, Resource Manager issues a warning similar to:
“The POU has already been despatched. It will not be modified.”
After modifying the POU Template if a previously checked Day of Week is un-checked now, the following confirmation pop-up will appear
9. Select Yes to delete these POUs. Selecting No will leave the POUs in the system.
Copyright © 2000, 2010, Oracle. All rights reserved 2 - 112

User Guide Resource Manager 4.5
2.1.8 Slot Edit Form
The Slot Edit Form enables you to create, modify and delete Slot Templates and Slot Groups. Slot Templates are grouped under Slot Groups.
Slot Templates belonging to the currently selected slot group are displayed on the slot edit form at any one time. Resource Manager automatically creates actual Slots from Slot Templates within the scheduling horizon and sends it to Planner. Old Slots are removed and new Slots are created.
You can create different sets of Slots on different days of the week. For example:
You may not want to offer hourly Slots on the weekend but only the all day Slots. This is illustrated in the image below where only the "weekend" Slots are available on Saturdays and Sundays.
Selecting Windows, Slot Edit Form from the main menu, invokes the Slot Edit Form window.
The Time Zone field is a drop-down list that will be visible on the Slot Edit Form only when multiple Time Zones have been configured for the installation.
Slot Templates are identified by their Name. All Slot Templates in a Slot Group must have unique names. Identical Slot Templates cannot be created in a single Slot Group.
Clicking the button and typing in a unique Slot Group name into the resulting pop-up window creates a new Slot Group.
Note:Select Setup, Time Zones from the Options menu and create a name for each of the Time Zone that you require and associate these with the actual time Zone.
2 - 113 Copyright © 2000, 2010, Oracle. All rights reserved

Resource Manager 4.5 User Guide
Typing into the Name field on the last row of the Slot table will create a new Slot, which can then be configured as required.
If a Slot is selected for any day of the week it will be removed from Resource Manager.
Selecting a Slot Template and clicking the button will delete the selected Slot Template.
Updating a Slot Group after deleting all its Slot Templates will delete the Slot Group.
If all Slots within a Slot Group are removed the Slot Group itself will also be removed. You will be warned when committing the change that the Slot Group will be removed.
2.1.9 CutOff Profiles Form
The CutOff Profiles Form opens the Cutoff Profiles Editor from where you can create, modify and delete cutoff triggers and Profiles.
2.1.9.1 Cutoff Profiles Editor
Selecting Windows, CutOff Profiles Form from the main menu, invokes the Cutoff Profiles Editor window.
Copyright © 2000, 2010, Oracle. All rights reserved 2 - 114

User Guide Resource Manager 4.5
Cutoff triggers are grouped under Cutoff Profiles. Cutoff triggers belonging to the currently selected profile are displayed on the Cutoff Profiles Editor at any time. Resource Manager automatically activates the most appropriate trigger within the scheduling horizon and sends it to Planner. Old triggers are removed and new triggers are activated on a timely basis.
A Cutoff profile is an independent entity that can be associated with zero or more Depots. These Profiles cycle over the period of a week. Each day of the week can have different cutoff and trigger times. Each trigger can be applied to multiple days of the week.
You can configure the time at which the Depot Cutoff is to occur and the time that will be used to Cutoff the Depot.For example:
The Triggers in the following image can be read as:• At 4 am on the selected Days-of-week, the morning trigger will cutoff all non-
closed Runs, that are scheduled to depart the Depot before 12 noon the same day.
• At 10 am on the selected Days-of-week, the midday trigger will cutoff all non-closed Runs, that are scheduled to depart the Depot before 4 pm the same day.
• At 3 pm on the selected Days-of-week, the evening trigger will cutoff all non-closed Runs, that are scheduled to depart the Depot before 8 am the next day.
In all cases picking and packing of the closed Runs could be done during the interval between Trigger time and Cut-off time.
The Cutoff Profiles Editor has the following fields and controls:
Cutoff Profiles Editor (Sheet 1 of 2)
Field Description
Profile selection drop-down list
This is a drop-down list from where you can select the Cutoff Profile. This list will be empty if there are no Profiles in the system.
New Profile Select this button to create a new Cutoff Profile. This will open the dialog in which you can type the new cutoff Profile name. Duplicate Profile names are not accepted.
2 - 115 Copyright © 2000, 2010, Oracle. All rights reserved

Resource Manager 4.5 User Guide
2.1.10 Engineers Calendar
The Engineers Calendar window displays the comparative summarized view of future committed Shifts, belonging to all the Engineers in the system in the form of a Gantt chart. This view can be used to support the management decision processes within your operations.
Usage The functionality associated with the Usage button has not yet been implemented. This button is intended to show all the associations with this Cutoff Profile.
For Example:To list down the Depots for which this is the default Profile and for what all-exceptional situations this Profile is used.
Description You can provide a brief description for the Cutoff Profile in this mandatory field.
Trigger Name This is where you specify a unique name for the cutoff trigger.
Trigger Time The Depot Cutoff is performed at this time. The actual cutoff time is derived from the Trigger Time and Offset values. For all the Depots associated with this Cutoff Profile, the scheduler will close any non-closed Runs originating from these Depots, which are scheduled to depart before the actual cutoff time.
Note:Trigger time should be unique within a Profile.
Offset This is the time duration using which the "Actual cutoff time" is derived in relation to the "Trigger time".
Cut-off Time This is the actual Cutoff Time that is derived from the Trigger time and Offset values. Cutoff Time automatically adjusts to changes in the Trigger time and Offset values. You cannot edit this value. At Trigger time, the Scheduler closes all non-closed Distribution Runs originating from the Depot that are scheduled to depart before the actual Cutoff Time.
Note:Cut-off time should be unique within a Profile.
Days-of-week These flags can be used to enable or disable the Trigger on the selected days-of-week. Triggers can be reused on multiple days-of-week.
Note:A Trigger is in use when it is enabled on at least one of the Days-of-week. Cutoff Profiles containing unused Triggers are not saved.
Remove Use this button to delete the selected Trigger from the Cutoff Profile.
Update The button should be selected to save the changes made to the Cutoff Profile.
Abort Selecting the Abort button will discard all unsaved changes and revert to the details on the window before the change.
Close Selecting the Close button will discard all unsaved changes and dismiss the Cutoff Profiles Editor.
Cutoff Profiles Editor (Sheet 2 of 2) (Continued)
Field Description
Copyright © 2000, 2010, Oracle. All rights reserved 2 - 116

User Guide Resource Manager 4.5
The Engineers Calendar Window can be invoked by selecting Layout, Engineer Calendar or Windows, Engineer Calendar from the main menu.
The display on the Engineer Calendar window is grouped by weeks. By default the current week, the week before the current week and two weeks following the current week are displayed on the Engineer Calendar window.
The buttons fixed to the bottom of the Engineer Calendar window allows you to navigate through the weeks in the Engineer Calendar. To view the Engineers Calendar week just before the leftmost week displayed on the Engineer Calendar window, click on the left arrow. To view the Engineers Calendar week following the rightmost week displayed on the Engineer Calendar window, click on the right arrow. To come back to the default display, click on the diamond shaped button.
The Monday date for each weekly block appears on the top row followed by the days of week label starting from Monday in order in the following row.
Pressing Crtl while clicking the Right mouse button within the Engineer Calendar window will pop-up a menu from where you can optionally enable the Available Shifts and Planned Shifts option. By default these options are disabled.
2 - 117 Copyright © 2000, 2010, Oracle. All rights reserved

Resource Manager 4.5 User Guide
The number of Engineers that are actually available for work on each day are displayed on the Available Shifts row. Engineers on leave or having diminished Shifts are not included in this count.
The number of Shifts with templates set for them for each day is displayed on the Planned Shifts row. This count includes templated days on which the Engineers are on leave.
An Engineer name is displayed at the beginning of each of the following rows in the Engineer Calendar window. Shift boxes representing the Engineers Shifts are grouped into connected blocks in their respective rows. Different Shift statuses are represented using distinct colors. See “Shift Color Legend” section on page 2 - 139.
The Horizontal and vertical scroll bars are activated automatically whenever the data to be displayed exceeds the display area.
2.1.10.1 Engineer Calendar Shortcut Menu
The Engineer Calendar Shortcut menu contains options using which you can manipulate the selected Engineers Shift or Leave statuses for the selected days.
The available menu options are:
Engineer Calendar Shortcut Menu Options (Sheet 1 of 2)
Menu option Description
Edit Shift The Edit Shift option is enabled only when a single Shift icon is selected. You can select this option to open the highlighted Shift on the Shift Edit Form.
Shift Unavailable
You can select the Shift Unavailable option to disable Shifts. Disabled Shifts have INACTIVE status. When you disable a Shift from Resource Manager it is also deleted from any connected Planner. You can disable multiple Shifts in a single step.
Delete Shift As only existing Shifts or Shift Templates can be deleted, this option will be disabled within the Local Menus invoked from icons without a predefined Shift Template. You can use this option to delete Shifts from the system. You can delete multiple Shifts in a single step.
Copyright © 2000, 2010, Oracle. All rights reserved 2 - 118

User Guide Resource Manager 4.5
All the options are enabled for a single icon selection made within the Engineer Calendar window.
Edit Shift and Add/Edit Public Leave are disabled when adjacent icons in a Row (multiple days) are selected.
Edit Shift and Add/Edit Engineer Leave are disabled when adjacent icons in a Column (multiple Engineers) are selected
Edit Shift, Add/Edit Public Leave and Add/Edit Engineer Leave are disabled when adjacent Rows (multiple Engineers) and Columns (multiple days) are selected.
2.1.11 Engineer Hours Graph
The Engineer Hours Graph provides an operational view of Engineer Shifts within a small time frame covering past, present and future committed Shifts in the form of a Gantt chart. The chart is arranged into blocks of days in a week. The Shifts are displayed as overlaid time blocks of, scheduled, planned and actual Shift hours. The time blocks are displayed using distinct colors to represent the different Shift states.
You can use the information displayed on the Engineer Hours Graph to:• Reduce the workload on overworked Engineers• Allocate more work to under-utilized Engineers• Identify unused, diminished, planned and scheduled Shifts in a period• Manipulate the working hours for Engineers within the Engineer hours Limits.
Add/Edit Public Leave
The Engineer Calendar Shortcut menu displays the Edit Public Holiday option on days with an existing public Leave record and the Add Public Leave option on days without a public Leave definition. Selecting this option will invoke the Public Leaves Form from where you can then create or modify the Public Leave for the highlighted day. This option is disabled on Shortcut menus invoked from multiple day selections.
Add/Edit Engineer Leave
The Engineer Calendar Shortcut menu displays the Edit Engineer Leave option on days with an existing Leave record for the selected Engineer and the Add Engineer Leave option on days when no leave is defined for the Engineer. Selecting this option will invoke the Engineer Leaves Form from where you can then create or modify the Engineers leave on the highlighted day. This option is disabled on Shortcut menus invoked from multiple Engineer selections.
Note:The Shift Edit Form can also be invoked from the Engineer Calendar window with a Double Left Click on the Shift icons.
Engineer Calendar Shortcut Menu Options (Sheet 2 of 2) (Continued)
Menu option Description
2 - 119 Copyright © 2000, 2010, Oracle. All rights reserved

Resource Manager 4.5 User Guide
The Engineer Hours Graph Window has the following layout:• Engineer - this is the selectable Engineer drop-down list displaying the selected
Engineers Id. The Gantt chart displays the selected Engineers Shift work. • Time block label -this identifies the time blocks in the day. Each day is represented as
time blocks of equal number of hours. For example:
Time blocks of two-hour duration are labeled as; 02:00, 04:00, 06:00 and so on.• Date Header forms the two header rows for the graph. The First row displays the start
date of the week block, which is always the Monday of the week and the second row displays the day of the week.
• The planned Shift hours for each day except for public leave or Engineer leave is displayed on the 02:00 time block.
• The cumulative planned or actual Shift hours (latest of the two) for each day in the week block is displayed on the row labeled Week. No time is displayed on public Leave or Engineer leave days.
• The cumulative planned or actual Shift hours (latest of the two) for each day in the period is displayed on the row labeled Period. The Engineer Hours Limits are applied on the days or weeks defined within a period. Please refer, “Defining the Period” section on page 5 - 9.
• The Scheduled Shift hours in a week block is displayed as the sum of Max. Shift for all the Shifts in that week.
• The Planned Shift hours in a week block is displayed as (actual hours in past + planned or actual current hours + planned hours in the future - leave hours) for all the Shifts in that week.
Copyright © 2000, 2010, Oracle. All rights reserved 2 - 120

User Guide Resource Manager 4.5
• The maximum hours the Engineer is allowed to work in a period is displayed as the Maximum Hours on this window. See “Engineers Hours - Period Limits” section on page 5 - 9 for more details on setting the Engineer working hour limits.
• The total hours the Engineer had already worked within the period is displayed as Hours Worked on this window. This is the sum of completed Shift hours only.
• Resource Manager compares the sum of Max. Shift for all the Shifts in the period with the sum of planned hours for all the Shifts in the period and displays the greater of the two as Hours Planned on the Engineer Hours Graph window. The planned hours is the time from the Shifts Logon to Logoff and may be different from Max. Shift. This is the sum of all planned hours in the period.
• The sum of Max. Shift for all the Shift Templates in the period is displayed as Hours Scheduled on the Engineer Hours Graph window. This will be zero if there are no Shift templates within the period.
• Remaining Hours is the available working hours in the period, which is arrived at by removing the Hours Worked from the Maximum Hours.
The Engineer Hours Graph displayed in the above image can be interpreted as below:
MSPD Shifts exist for this Engineer on all days from Monday (Sep 22 2008) to Thursday (Sep 25 2008).
As In the above image, there are three MSPD Shifts on all four days from Monday to Friday. All three Shifts are INACTIVE on Monday.
Note:As displayed in the following image, MSPD Shifts belonging to the Engineer on a given date are displayed as vertically divided sub sections of the single day, on the Engineer Hours Graph.
2 - 121 Copyright © 2000, 2010, Oracle. All rights reserved

Resource Manager 4.5 User Guide
2.1.11.1 Configuring the Engineer Hours Graph
The Engineer Hours Graph display is directed by the Engineer Hours Limits setting. See “Configure Engineer Hours” section on page 5 - 3 for details on configuring the Engineer Hours Limits. The Engineer Hours Limits provide the period, the daily limits, the weekly limits and the Period limits for the Engineer Hours Graph display.
The public Leaves and Engineer leaves in this period must be updated for a valid representation of the Engineers actual and eligible working hours in the Engineer Hours Graph.
Appropriate Shift Templates Profile must be associated with the Engineer.
Shifts violating the Engineer Hours Limits must be manipulated from the Shift Edit Form.
The Resource Manager Gateway must be connected to Planner to receive the real time Shift events such as Shift started and completed time.
In short, to configure the Engineer Hours Graph display you will need to set up global and Engineer specific parameters from the following windows:• Engineer Hours window - to specify the period and to configure the Global or Engineer
based working hour limits within the period• Public Leaves Form window - to update the public Leaves within the period• Engineer Leaves Form window - to update the Engineer leaves within the period• Edit Shift Form window - to adjust parameters that affect Engineer Hours limits within
individual Shifts
Copyright © 2000, 2010, Oracle. All rights reserved 2 - 122

User Guide Resource Manager 4.5
2.1.11.2 Reading the Engineer Hours Graph
You will know to read an Engineer Hours Graph by the end of this section. The Engineer Hours limits have been configured using the following values and the resulting Engineer Hours Graph has been illustrated below it: The sample Engineer Hours Graph illustrated below has been configured using the following Engineer Hours Limits (See “Configure Engineer Hours” section on page 5 - 3 for more details on configuring the Limits):• Daily, weekly and period limits are enabled.• There are two weeks in the period.• The Maximum Shift Length is 8 hours and 30 minutes.
To configure the Engineer Hours Graph display:
1. Select Windows, Engineer Hours Graph from the main menu to invoke the Engineer Hours Graph window.
• Select the Engineer whose Engineer Hours you wish to see, from the Engineer drop-down list.
2. Select Options, Configure Engineer Hours from the main menu to open the Engineer Hours window.
• Select the Period Limits tab. • Select Enable Limits • Set the Weeks in Period
The Engineer Hours Graph will only display the Engineer Working Hours for the number of weeks in the Period.
• Click the OK button to apply the Engineer Hours Limits.
Please refer to the “Configure Engineer Hours” section on page 5 - 3 for making further adjustments to the daily, weekly and period limits. These limits have a direct effect on the Maximum Hours, Remaining Hours and Shift Statuses displayed on the Engineer Hours Graph.
Resource Manager enforces Engineer Hours limits by diminishing those Shifts, which are scheduled/planned for the future and are violating the limits.
3. Select Options, Colours, Shift Colours from the main menu to configure the colour of one or more Shift statuses.
4. Select Windows, Public Leave Table from the main menu to edit or create public Leaves within the period.
5. Select Windows, Engineer Leave Table from the main menu to edit or create Engineer leaves within the period.
Public and Engineer Leave hours are not included in the Engineer working hours calculation.
6. Invoke the Shift Edit Form by double clicking on the Shift within the Engineer Hours Graph.
Using the Shift Edit Form you can manually adjust the Shifts duration and maximum length to be within the Engineer Hours limits.
The Engineer Hours Graph display will automatically reflect the changes from the above steps.
2 - 123 Copyright © 2000, 2010, Oracle. All rights reserved

Resource Manager 4.5 User Guide
• The Minimum Shift Length is 4 hours.• The Maximum Hours the Engineer is allowed to work in each week is 40 hours.• The Maximum Hours the Engineer is allowed to work in the period is 60 hours• The first day in the period is Monday the 24th of October 2005.
The colors on the Engineer Hours Graph indicate the following Shift and Leave statuses:
Using these colors the Engineer Hours Graph will read as:
• The maximum Shift length on all the days in the period except on the 28th of October is 8 hours and 30 minutes.
• There are no Shifts or Shift Templates on weekends.• Shifts on 24, 25 and 26 October have been completed. The actual Shift hours on the
24th and 26th of October is 30 minutes lesser than maximum Shift length and more by 3 hours and 30 minutes on the 25th of October. The actual hours color layer overlays the planned hours color layer.
• The Shift was not used on 27th October. Unused Shift hours are not included in the Engineer Hours calculations.
• Maximum Shift length on the 28th of October is 6:00 hours and the Shift has been started. As this is not a diminished Shift it can be assumed that its maximum Shift length has been adjusted manually from the Shift Edit Form so as not to exceed the weekly limit of 40 hours.
Copyright © 2000, 2010, Oracle. All rights reserved 2 - 124
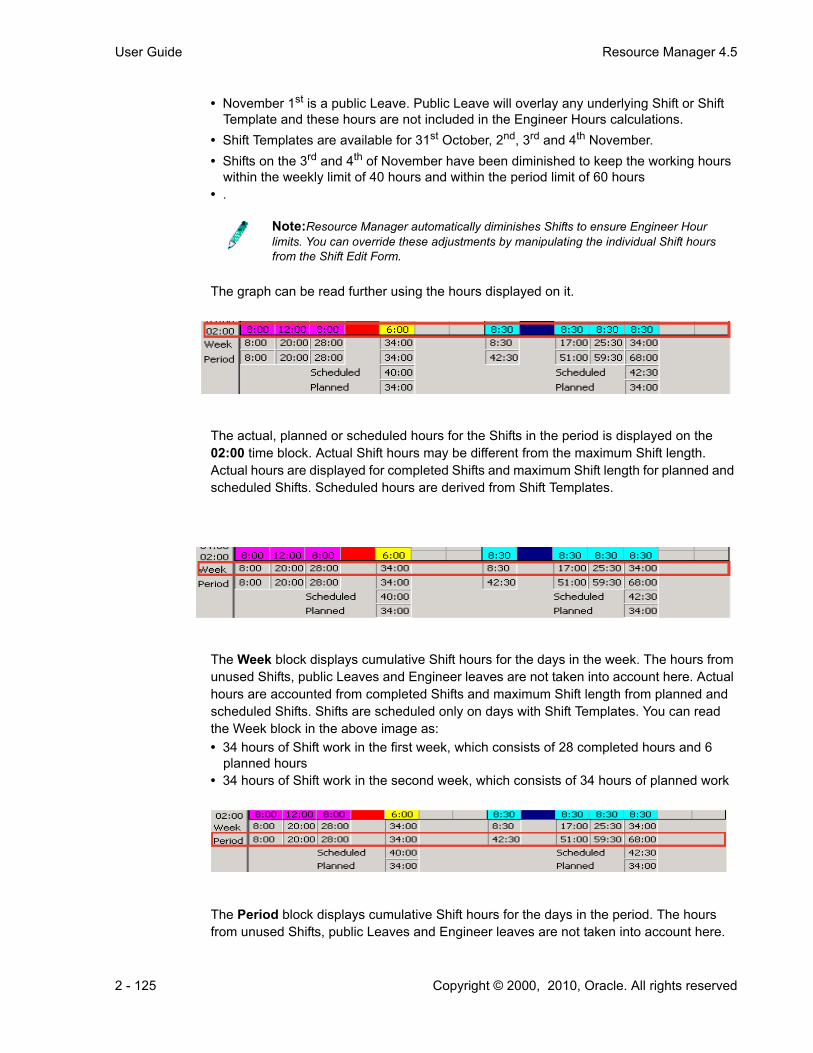
User Guide Resource Manager 4.5
• November 1st is a public Leave. Public Leave will overlay any underlying Shift or Shift Template and these hours are not included in the Engineer Hours calculations.
• Shift Templates are available for 31st October, 2nd, 3rd and 4th November.• Shifts on the 3rd and 4th of November have been diminished to keep the working hours
within the weekly limit of 40 hours and within the period limit of 60 hours• .
The graph can be read further using the hours displayed on it.
The actual, planned or scheduled hours for the Shifts in the period is displayed on the 02:00 time block. Actual Shift hours may be different from the maximum Shift length. Actual hours are displayed for completed Shifts and maximum Shift length for planned and scheduled Shifts. Scheduled hours are derived from Shift Templates.
The Week block displays cumulative Shift hours for the days in the week. The hours from unused Shifts, public Leaves and Engineer leaves are not taken into account here. Actual hours are accounted from completed Shifts and maximum Shift length from planned and scheduled Shifts. Shifts are scheduled only on days with Shift Templates. You can read the Week block in the above image as:• 34 hours of Shift work in the first week, which consists of 28 completed hours and 6
planned hours• 34 hours of Shift work in the second week, which consists of 34 hours of planned work
The Period block displays cumulative Shift hours for the days in the period. The hours from unused Shifts, public Leaves and Engineer leaves are not taken into account here.
Note:Resource Manager automatically diminishes Shifts to ensure Engineer Hour limits. You can override these adjustments by manipulating the individual Shift hours from the Shift Edit Form.
2 - 125 Copyright © 2000, 2010, Oracle. All rights reserved

Resource Manager 4.5 User Guide
Actual hours are accounted from completed Shifts and maximum Shift length from planned and scheduled Shifts. Shifts are scheduled only on days with Shift Templates. You can read the Period block in the above image as:• 68 hours of Shift work in the period, which consists of 28 completed hours and 40
planned hours
The Scheduled hours in each week is the sum of all its maximum Shift lengths. Maximum Shift lengths are available from actual Shifts or from Shift Templates. The Scheduled hours will be zero if there are no Shift Templates in the week. Maximum Shift length from unused Shifts, and from Shift Templates on public leaves and Engineer leaves are included in the Scheduled hours. You can read the weekly Scheduled hours in the above image as:• 8:30+8:30+8:30+8:30+6:00 = 40 hours of Scheduled hours in the first week• 8:30+8:30+8:30+8:30+8:30 = 42:30 hours of Scheduled hours in the second week
The Planned hours in each week is the sum of all its Shifts hours. The hours from unused Shifts, public Leaves and Engineer leaves are not taken into account here. Actual hours are accounted from completed Shifts and maximum Shift length from planned and scheduled Shifts. Shifts are scheduled only on days with Shift Templates. You can read the weekly Planned hours in the above image as:• 8:00+12:00+8:00+0 hours from unused Shift+6:00 = 34 hours of Planned hours in the
first week• 8:30+0 hours from public Leave+8:30+8:30+8:30 = 34 hours of Planned hours in the
second week
The Engineers working Hours within the period limits are summarized at the bottom of the Engineer Hours Graph window. You can read the summary in the above image as:
Copyright © 2000, 2010, Oracle. All rights reserved 2 - 126

User Guide Resource Manager 4.5
• Maximum Hours is 60. This is the total time the Engineer is allowed to work in the period and is the same as that defined by the Engineer Hours Period Limits.
• Hours Worked is 28. This is sum of all completed Shift hours in the period. • Hours Planned is 6. This is sum of Maximum Shift Length of all actual Shifts in the
period. Actual Shifts are those that have already been generated by Resource Manager.• Hours Scheduled is 26. This is the sum of Maximum Shift Length of all those future
planned Shifts in period for which Resource Manager has yet to generate actual Shifts. Resource Manager will diminish the appropriate number of Shifts from the end of the period to keep the Engineers working hours within the Maximum Hours.
In extreme situations Resource Manager can diminish Shifts to 0 hours.
In this sample the cumulative planned hours on the last day of the period (Friday the 4th of November) reaches 68, which exceeds the Maximum Hours in period limit by 8 hours. If this Shift is diminished by 8 hours then it violates the Minimum Shift Length restriction of 4 hours. Hence Resource Manager diminishes both the 3rd and 4th November Shifts.
In the specified two-week period there are actual Shifts remaining to be generated only during the second week. Of the 34 hours of planned hours in the second week 8 hours worth of Shift work have been diminished. This leaves 34 - 8 = 26 hours of scheduled work in the period, which is displayed as Hours Scheduled within the Engineer Hours Graph.• Remaining Hours is 32. This is sum of Hours Planned and Hours Scheduled in the
period.
2.1.12 Public Holidays Table
Resource Manager does not generate Shifts for Engineers on days that fall on Public Holidays. You can use the Shift Edit From to manually create a Shift on Public Holiday.
All Public Holidays within a period must be available in Resource Manager prior to Shift generation.
Resource Manager creates and maintains Public Holiday from the Public Holidays Form.
Selecting Windows, Public Leaves Table from the main menu, invokes the Public Holidays window.
2 - 127 Copyright © 2000, 2010, Oracle. All rights reserved

Resource Manager 4.5 User Guide
The name and date of all public holidays in the system are sorted date wise and listed in this table
The Add or Edit button can be selected for creating or editing, respectively, a public holiday. The Public Holidays Form will be invoked.
To delete the selected public holiday click Delete button.
2.1.12.1 Public Holidays Form
The Public Holidays Form is used to create, edit and delete Public Holidays.
The Public Holidays Form has the following fields:
Field DescriptionName This is name of the Public Holiday.
Date This is the date of the Public Holiday.
The Date Edit window is popped-up by selecting the button. Using this you can select the Date of the public holiday.
Insert The Insert Button is displayed when a new Public Leave is being created. This button must be selected to save the holiday into the system.
Copyright © 2000, 2010, Oracle. All rights reserved 2 - 128

User Guide Resource Manager 4.5
2.1.12.1.1 Creating a Public holiday
2.1.12.1.2 Editing a Public Holiday
Update The Update Button is displayed when an existing Public Holiday is being edited.
This button must be selected to save the changes into the system.
Delete The Delete Button must be selected to delete the selected Public Holiday.
Cancel Selecting Cancel will dismiss the Public Holidays Form.
To create a Public Holiday:
1. Open the Public Holidays Form window either by:
Right clicking on a working day icon within the Engineer Calendar window and selecting Add Public Holiday from the Engineer Calendar Shortcut menu.
Or:
Selecting Public Holidays Table from the Windows menu and clicking on the Add button from the resulting Public Holidays window.
2. Enter the Name and Date for the new Public Holidays.3. Click on Insert to save the new Public Holiday.
To edit a Public Holiday:
1. Open the Public Holidays Form window either by:
Right clicking on a public holiday icon within the Engineer Calendar window and selecting Edit Public Holiday from the Engineer Calendar Shortcut menu.
Or:
Selecting Public Holidays Table from the Windows menu, selecting a public Leave from the list in the Public Holidays window and clicking on the Edit button.
The details of the selected Public Holiday will be displayed on the Public Holidays Form window.
2. Modify the Name field.3. Click on Update to save the change.
Field Description
2 - 129 Copyright © 2000, 2010, Oracle. All rights reserved

Resource Manager 4.5 User Guide
2.1.12.1.3 Deleting a Public Holiday
2.1.13 Engineer Leave Table
Resource Manager does not generate Shifts for Engineers on their leave days. Shift can be manually created on Engineer leave days from the Shift Edit Form.
All Engineer Leaves within a period must be available in Resource Manager prior to Shift generation.
You can create and maintain Engineer Leaves within the system using the Engineer Leave Table.
To delete a Public Holiday:
1. Open the Public Holidays Form window either by:
Right clicking on a public holiday icon within the Engineer Calendar window and selecting Edit Public Holiday from the Engineer Calendar Shortcut menu.
Or:
Selecting Public Holidays Table from the Windows menu, selecting a public holiday from the list in the Public Holidays window.
2. Click on Delete.
This will display the following delete confirmation dialog.
Selecting Yes will remove the public holiday from the.
Note:The Public Holidays Form window can be invoked both from the Engineer Calendar window and the Public Holidays window.
Copyright © 2000, 2010, Oracle. All rights reserved 2 - 130

User Guide Resource Manager 4.5
Selecting Windows, Engineer Leave Table from the main menu, invokes the Engineer Leave window.
All Leave periods associated with the Engineer are listed in the Engineer Leave window. The following details are recorded against each Engineer leave:• From -is the leave start date• To -is the leave end date• Type -is the leave type, which is one of (ADMIN, TRAINING, HOLIDAY, SICK,
OTHER_LEAVE)• Notes -are optional comments on the leave.
The Engineer drop-down selection allows you to select the Engineer.
You can add a new leave period by clicking the button. On selecting an
existing leave entry from the list, you can edit it by clicking the button or delete
it by clicking the button. Both the Add and Edit buttons will open the Engineer Leave Editor.
2.1.13.1 Engineer Leave Editor
Engineer Leaves can be created, edited and deleted from the Engineer Leave Editor.
2 - 131 Copyright © 2000, 2010, Oracle. All rights reserved

Resource Manager 4.5 User Guide
The Engineer name displayed on the Engineer Leave Editor cannot be edited. By default it is the name of the Engineer who is currently selected on the Resource Manager Client. If a leave period for another Engineer is to be edited then the Engineer must be selected outside of the Engineer Leave Editor.
Leave Type can be one of ADMIN, TRAINING, HOLIDAY, SICK and OTHER_LEAVE.
The Leave period is defined in the two date fields following the Leave Type field. You can
set the Leave start date from the Date Edit window by clicking the left button and the
Leave end date from the Date Edit window by clicking the right button.
The number of leave days already used by the Engineer is displayed as Days Used.
The number of leave days available for the Engineer, including any leave periods that have not yet been taken is displayed as Days Available.
Additional comments are specified in Notes. For example: the reason for leave.
The button is available when you are creating a new Leave Period. This button
changes to when you are editing an existing Leave Period.
The button is enabled on the Engineer Leave Editor only when an existing Leave Period is being edited.
Clicking the button will dismiss the Engineer Leave Editor without saving any changes.
Note:Days Used and Days Available are display only value and cannot be edited.
Note:Resource Manager seeks confirmation to delete Shifts existing in the intended Leave Period before actually creating the Leave. The Leave is not created if there are STARTED or COMPLETED Shifts within the Leave Period.
Copyright © 2000, 2010, Oracle. All rights reserved 2 - 132

User Guide Resource Manager 4.5
2.1.13.1.1 Creating an Engineer Leave
To create an Engineer Leave Period:
1. Open the Engineer Leave Editor by either selecting Add Engineer Leave from the Engineer Calendar Shortcut menu
Or:
Selecting Windows, Engineer Leave Table, from the main menu and
clicking on the button from the resulting Engineer Leave window.2. Select the Leave Type, configure the Leave Period and optionally put in additional
comments into the Notes field.
3. Click the button to save the new Leave Period for the Engineer.
Resource Manager will create the Engineer Leave and close the Engineer Leaves Editor if the number of days in the Leave Period is less than the Leave Days that are available for the Engineer and there are no actual Shifts within the Leave Period.
If the number of days in the Leave Period is more than the Leave Days Available for the Engineer, then Resource Manager will seek confirmation before proceeding further.
4. Select Yes to over allocate the Leave for this Engineer and to continue with the Leave creation. Selecting Cancel will quit the Leave creation and take you back to the Engineer Leaves Editor.
If actual Shifts with STARTED or COMPLETED status exist within this Leave Period a warning is displayed and the Leave is not created.
2 - 133 Copyright © 2000, 2010, Oracle. All rights reserved
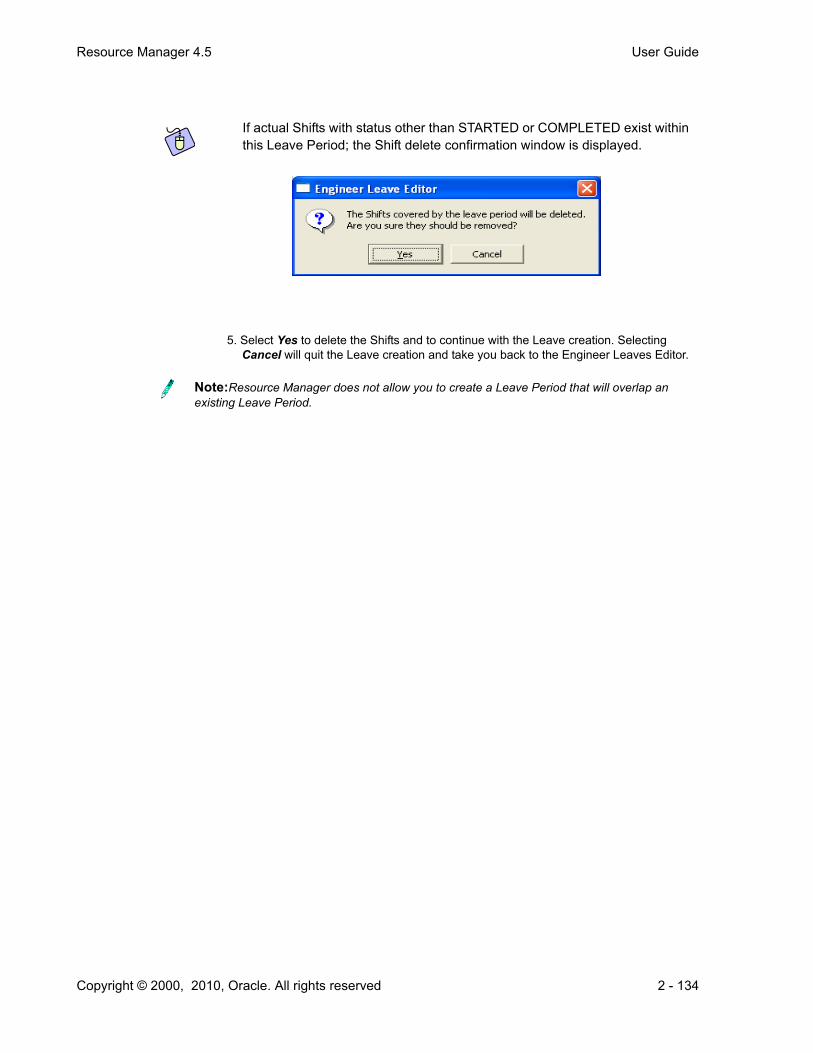
Resource Manager 4.5 User Guide
If actual Shifts with status other than STARTED or COMPLETED exist within this Leave Period; the Shift delete confirmation window is displayed.
5. Select Yes to delete the Shifts and to continue with the Leave creation. Selecting Cancel will quit the Leave creation and take you back to the Engineer Leaves Editor.
Note:Resource Manager does not allow you to create a Leave Period that will overlap an existing Leave Period.
Copyright © 2000, 2010, Oracle. All rights reserved 2 - 134

User Guide Resource Manager 4.5
2.1.13.1.2 Modifying an Engineer Leave
To edit an Engineer Leave:
1. Open the Engineer Leaves Editor by either selecting Edit Engineer Leave from the Engineer Calendar Shortcut menu which has been invoked off an existing Leave Period
Or:
Selecting Windows, Engineer Leave Table, from the main menu; selecting a Leave Period from the list on the Engineer Leaves window and clicking on the
button.2. Select the Leave Type, configure the Leave Period and optionally put in additional
comments into the Notes field.
3. Click the button to save the changes.
Resource Manager will update the Engineer Leave and close the Engineer Leaves Form if the number of days in the modified Leave Period is less than the Leave Days that are available for the Engineer and there are no actual Shifts within the Leave Period.
If the number of days in the modified Leave Period is more than the Leave Days Available for the Engineer, then Resource Manager will seek confirmation before proceeding any further.
4. Select Yes to over allocate the Leave for this Engineer and to continue with the Leave modification. Selecting Cancel will quit the Leave modification and take you back to the Engineer Leaves Form.
If a future Leave Period exists for this Engineer, then another confirmation window is displayed.
2 - 135 Copyright © 2000, 2010, Oracle. All rights reserved

Resource Manager 4.5 User Guide
2.1.13.1.3 Deleting an Engineer Leave
5. Select Yes to over allocate and continue with the leave modification.
If actual Shifts with STARTED or COMPLETED status exist within this Leave Period a warning is displayed and the Leave is not created.
If actual Shifts with status other than STARTED or COMPLETED exist within the modified Leave Period then the Shift delete confirmation window will appear.
6. Select Yes to delete the Shifts and to continue with the Leave modification. Selecting Cancel will quit the Leave modification and take you back to the Engineer Leaves Editor.
To delete an Engineer Leave:
1. Open the Engineer Leaves Editor by either Select Windows, Engineer Leave Table from the main menu; select a Leave Period from the list on the Engineer Leaves
window and click on the button.
Or:
Selecting Edit Engineer Leave from the Engineer Calendar Shortcut menu which has been invoked off an existing Leave Period
2. Click the button.
The Engineer Leave Period will be deleted from the system.
Copyright © 2000, 2010, Oracle. All rights reserved 2 - 136

User Guide Resource Manager 4.5
2.1.14 Monthly Calendar
The Monthly Calendar window displays the Shift work associated with an Engineer in a calendar month. You can invoke this window by selecting Windows, Monthly Calendar from the main menu. A Shift is a combination of an Engineer and a date. This window will always display the Engineer, Year, Month and Day corresponding to the currently selected Shift.
Shift, Engineer, Year and Month selections from this window will also become the active selections within other related Resource Manager windows.
Distinct colors are used to display the historic, current and future Shift work associated with the Engineer. The items in this window are:• Engineer - use this to select the Engineer whose Shifts for the calendar month you wish
to see.• Year - use this to select the Shift year.• Month - use this to select the Shift month.• Mon-Sun - select the Shift day from the listed calendar days.• Planned Start Time - displays the Shifts planned start time.• Planned End Time - displays the Shifts planned finish time.• Start Time - displays the Shifts actual start time (Resource Manager Gateway updates
this field as soon as the Shift is started).• End Time - displays the Shifts actual end time (Resource Manager Gateway updates
this field as soon as the Shift is completed).
2 - 137 Copyright © 2000, 2010, Oracle. All rights reserved

Resource Manager 4.5 User Guide
Planned Start Time, Planned End Time, Start Time and End Time are display only fields and cannot be edited.
2.1.15 Yearly Calendar
The Yearly Calendar window displays the Shift work associated with an Engineer for a whole Year. You can invoke this window by selecting Windows, Yearly Calendar from the main menu. A Shift is a combination of an Engineer and a date. This window will always display the Engineer, Year, Month and Day corresponding to the currently selected Shift.
Shift, Engineer, Year and Month selections from this window will also become the active selections within other related Resource Manager windows.
Note:On days with MSPD Shifts for the Engineer, the Monthly Calendar Shift icon may be divided into two or three sections, depending on the number of available Shifts or Shift Templates. The colour of each section will reflect the status of the corresponding Shift. This is illustrated in the following image.
Copyright © 2000, 2010, Oracle. All rights reserved 2 - 138

User Guide Resource Manager 4.5
Distinct colors are used to display the historic, current and future Shift work associated with the Engineer. The items in this window are:• Engineer - use this to select the Engineer whose Shifts for the calendar year, you wish to
see.• Year - use this to select the Shift year.
This window displays all the calendar months in the year. The selected Shift button will remain pressed down.
2.1.16 Shift Color Legend
Colors are one of the main features on the Resource Manager Client. The colors correspond to Shift statuses at any point of time. Information on Engineer availability and Shift Statuses can be acquired at a glance by identifying the colors appropriately.
Note:On days with MSPD Shifts for the Engineer, the Yearly Calendar Shift icon may be divided into two or three sections, depending on the number of available Shifts or Shift Templates. The colour of each section will reflect the status of the corresponding Shift.
2 - 139 Copyright © 2000, 2010, Oracle. All rights reserved

Resource Manager 4.5 User Guide
Resource Manager provides a Legend, to convey the meaning of colors displayed on the Client.
You can see the colour legends by selecting Windows, Shift Color Legend from the main menu.
The colors of the following Shift Statuses can be configured using Options, Colours from the main menu (described in “Colours” section on page 5 - 2).
Shift Colour Legend (Sheet 1 of 2)
Shift status Description
INACTIVE Shift exists but is disabled
STARTED Shift exists and has been started
COMPLETED Shift exists and has been completed
PLANNED Shift exists and has been scheduled
UNUSED Shift existed in the past but was not used
TEMPLATE Shift Template exists and corresponding Shift is not generated yet
DIMINISHED Shift exists but its length has been reduced by Resource Manager
PUBLIC HOLIDAY
it is a public Leave
STANDBY Shift exists but can not be automatically scheduled until it changes status to STARTED
ADMIN Engineer is on administrative duties (meetings etc) and cannot do Shift
HOLIDAY Engineer is on leave
Copyright © 2000, 2010, Oracle. All rights reserved 2 - 140

User Guide Resource Manager 4.5
2.1.17 Alert Window
The Alert window is used to display important messages, or to alert you to any unusual or erroneous conditions detected by Resource Manager.
The Alert window is displayed by default whenever there is a warning message or an error message, unless the Automatically Show Window option is toggled off. You can open this window at any time to see any messages since the last Clear operation by selecting Windows, Alert Window from the main menu.
Two Control buttons are available:
2.1.17.0.4 Responding to Messages
The messages displayed in the Alert window are designed to be as self-explanatory as possible, describing the situation in simple terms.
You must observe all the messages as they appear, and take appropriate action for the completion of the schedule.
OTHER LEAVE
Engineer is on leave of unspecified type
SICK Engineer is on sick leave
TRAINING Engineer is undergoing training and is not available for Shift work
Note:This window is not available as a sub-window.
Control Button
Description
Clear This will clear all messages, but leave the Alert window on display.
Close This will close the Alert window, but will not clear existing messages.
Shift Colour Legend (Sheet 2 of 2) (Continued)
Shift status Description
2 - 141 Copyright © 2000, 2010, Oracle. All rights reserved

Resource Manager 4.5 User Guide
Copyright © 2000, 2010, Oracle. All rights reserved 2 - 142
Chapter 3:Layout
Copyright © 2000, 2010, Oracle. All rights reserved 3 - 1

Resource Manager 4.5 User Guide
3.1. RESOURCE MANAGER LAYOUT CONTROL
3.1.1 Layout Controls
Default layout control files are available in each Resource Manager installation. You can use one of the default layout files or create your own layout file, save it and reload it on your Resource Manager Client. The main window will be displayed blank, when the start-up process is unable to detect a valid layout file.
You can perform Layout control using options from the Layout Menu.
3.1.1.1 Layout Mode
The Layout mode must be enabled before you can adjust the main window's screen layout.
When the Layout option is disabled, all the Layout menu options are also disabled. All mouse events are interpreted as scheduling events. For example, push-button activations or object selections.
3.1.1.1.1 Selecting windows
When the Layout mode is enabled, you can select a sub-window by Left Clicking on its border. The handles will automatically be displayed on the selected sub-window.
3.1.1.1.2 Adding windows to the Layout
You can add windows to your Layout by selecting the required options from the Windows menu.
You can add sub-windows to your Layout by selecting the required window option from the Layout menu.
These windows can be positioned anywhere on your display screen and their position will be remembered within the Layout file.
3.1.1.1.3 Removing windows from the Layout
To enable the Layout mode:
1. Select Layout from the Layout menu.
This will enable all the options in the Layout menu. You can now adjust the column widths in any windows or sub-windows. Clicking on sub-window borders will display handles, which can be used to move or resize these sub-windows. All mouse events that you perform near the sub-window borders or handles are interpreted as window layout manipulation events.
Copyright © 2000, 2010, Oracle. All rights reserved 3 - 2

User Guide Resource Manager 4.5
You can remove windows from your Layout by selecting Close form the Window control menu.
To remove a sub-window, press the Ctrl button while left clicking on it border.
3.1.1.2 Guide
This option can be used to identify sub-windows and to move or resize them using exact values.
3.1.1.2.1 Using Guide to Move or Resize Windows
3.1.1.3 Save Layout
To use Guide:
1. Enable the Layout mode by selecting Layout from the Layout menu.
This will enable all the options in the Layout menu.2. Select Guide from the Layout menu.
This will open a pop-up window. If a sub-window is selected then its name will be displayed on the Guide pop-up window
3. To move the selected sub-window increase or decrease the spin controls associated with the Top and Left fields. You can also type in the exact co-ordinates into these fields.
4. To resize the selected sub-window increase or decrease the spin controls associated with the Width and Height fields. You can also type in the exact values into these fields.
5. Click on Close to close the Guide window.
To save the current screen layout to a disk file:
1. Enable the Layout mode by selecting Layout from the Layout menu.
This will enable all the options in the Layout menu.2. Select Save Layout from the Layout menu.
This will open the file selector pop-up window. 3. Specify the path and a file-name for your layout file. By default the .lyt extension will be
suffixed to this file name.4. Click on Save to save the layout file and close the window.5. Click on Cancel to close the file selector window without saving the layout.
3 - 3 Copyright © 2000, 2010, Oracle. All rights reserved

Resource Manager 4.5 User Guide
3.1.1.4 Load Layout
3.1.1.5 Large Tool Buttons
Select Large Tool Buttons from the Layout menu to toggle the display of Tool Bar buttons in large size or normal size.
3.1.1.6 Label Tool Buttons
Select Label Tool Buttons from the Layout menu to show or hide the text labels under the Tool Bar buttons.
To load a saved layout file from the disk:
1. Enable the Layout mode by selecting Layout from the Layout menu.
This will enable all the options in the Layout menu.2. Select Load Layout from the Layout menu.
This will open the file selector pop-up window. 3. Select the required layout file4. Click on Open to apply this layout file to your display and close the window.5. Click on Cancel to close the file selector window without applying any changes to the
current layout.
Copyright © 2000, 2010, Oracle. All rights reserved 3 - 4

Chapter 4:Operations
Copyright © 2000, 2010, Oracle. All rights reserved 4 - 1

Resource Manager 4.5 User Guide
4.1. RESOURCE MANAGER OPERATIONS
4.1.1 Operations Menu
The Resource Manager Client requires you to provide a user name and password before allowing you to use the Client.
An administrator user with a user name admin and password admin is automatically added with the initial running of the updates/creation scripts.
Resource Manager enforces the first person that logs in with this user name to update this password.
The administrator user is the only user who can create and modify other users.
The options available from the Operations Menu are discussed below.
4.1.1.1 Switch User
The Switch User option allows you to login as a different user. This is useful when performing administration tasks.
Copyright © 2000, 2010, Oracle. All rights reserved 4 - 2

User Guide Resource Manager 4.5
To log in as a different user:
1. Select Operations, Switch User from the main menu.
This will bring the User Login window.
2. Specify the User Name and Password and select OK.
If the password is expired, you will see the following pop-up window.
Select OK.
The following window is displayed in which you can confirm your existing User Name, Password and specify the New Password.
Repeat New Password and select OK.3. You will now be logged in as this new user.
4 - 3 Copyright © 2000, 2010, Oracle. All rights reserved

Resource Manager 4.5 User Guide
4.1.1.2 Change Password
Change Password allows you to modify your password. You will be required to provide both your old password as well as a new password.
The same dialog is presented when your password has expired.
4.1.1.3 Logout
Logout clears all data from the Client and presents you with the login screen. You must login again before you can proceed.
To change your password:
1. Select Operations, Change Password from the main menu.
The following window in displayed in which you can confirm your existing User Name, Password and specify the New Password.
2. Repeat New Password and select OK.
Note:Resource Manager also presents the Change Password Window immediately after you login if your password is expired.
Copyright © 2000, 2010, Oracle. All rights reserved 4 - 4

User Guide Resource Manager 4.5
4.1.1.4 Edit Users
Only the administrator user has access to the Edit User Form. All the users who are configured to access the system will be listed on this form.
4 - 5 Copyright © 2000, 2010, Oracle. All rights reserved

Resource Manager 4.5 User Guide
4.1.1.4.1 Adding New Users
The Add User button on the User Edit Form can be used to create new users.
To create a new user:
1. Select Add User from the User Edit Form.
The Edit User window will appear on the display:
2. Supply the following details belonging to the new user:• User ID - unique identifier for this user• User Name - the display name • Active - tick to enable and untick to disable user.
Disabled Users cannot log into the system. Currently logged in Users are not automatically logged out on being disabled. When enabling a disabled user you are required to supply a new password.
• Password - mandatory for ACTIVE users
The Password is always encrypted and displayed on the screen • Password Exp - by default the Password will expire 30 days from the date of creation.
You can specify an expiry date different to this default value.• Access Level - use this to restrict the user access to certain operations
The DEFAULT access level is automatically associated with all new users. Either the admin user or any user with the Edit Access Levels permission can create new Access Levels. You can associate a different access level with the user by making the required selection from the Access Level pull-down list.
• View - use this to set the data visibility for the user.
All Views available in the system are listed here as check boxes. Tick the Views that you wish to enable for the user. Only these Views will be made available for the user after logging in.
3. Select Update to save the changes and exit the User Edit Form.
You will loose all unsaved changes if you select Cancel.
Copyright © 2000, 2010, Oracle. All rights reserved 4 - 6

User Guide Resource Manager 4.5
4.1.1.4.2 Editing Existing Users
The Edit User button on the User Edit Form can be used to modify the selected user details.
To edit an existing user:
1. Select the user from the User Edit Form2. Select Edit User.
The Edit User window will appear on the display:
3. Modify the following details belonging to the selected user:• User ID - this value cannot be modified for existing users• User Name - the display name • Active - tick to enable and untick to disable user
Disabled Users cannot log into the system. Currently logged in Users are not automatically logged out on being disabled. When enabling a disabled user you are required to supply a new password.
• Password - mandatory for ACTIVE users
Passwords are always encrypted and displayed on the screen. If this field is left blank the password will not be changed. Simply enter the new password here to change the password.
• Password Exp - by default the Password will expire 30 days from the date of creation.
You can specify an expiry date different to this default value.• Access Level - use this to restrict the user access to certain operations
The DEFAULT access level is automatically associated with all new users. Either the admin user or any user with the Edit Access Levels permission can create new Access Levels. You can associate a different access level with the user by making the required selection from the Access Level pull-down list.
4 - 7 Copyright © 2000, 2010, Oracle. All rights reserved
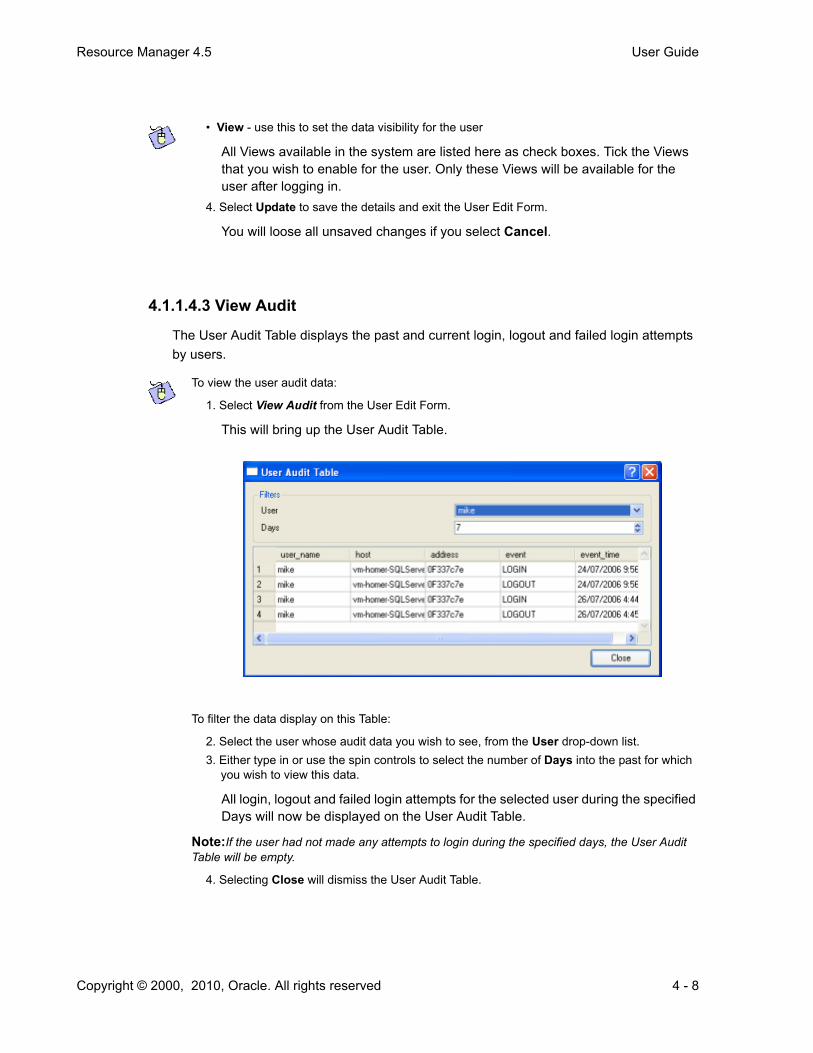
Resource Manager 4.5 User Guide
4.1.1.4.3 View Audit
The User Audit Table displays the past and current login, logout and failed login attempts by users.
• View - use this to set the data visibility for the user
All Views available in the system are listed here as check boxes. Tick the Views that you wish to enable for the user. Only these Views will be available for the user after logging in.
4. Select Update to save the details and exit the User Edit Form.
You will loose all unsaved changes if you select Cancel.
To view the user audit data:
1. Select View Audit from the User Edit Form.
This will bring up the User Audit Table.
To filter the data display on this Table:
2. Select the user whose audit data you wish to see, from the User drop-down list.3. Either type in or use the spin controls to select the number of Days into the past for which
you wish to view this data.
All login, logout and failed login attempts for the selected user during the specified Days will now be displayed on the User Audit Table.
Note:If the user had not made any attempts to login during the specified days, the User Audit Table will be empty.
4. Selecting Close will dismiss the User Audit Table.
Copyright © 2000, 2010, Oracle. All rights reserved 4 - 8
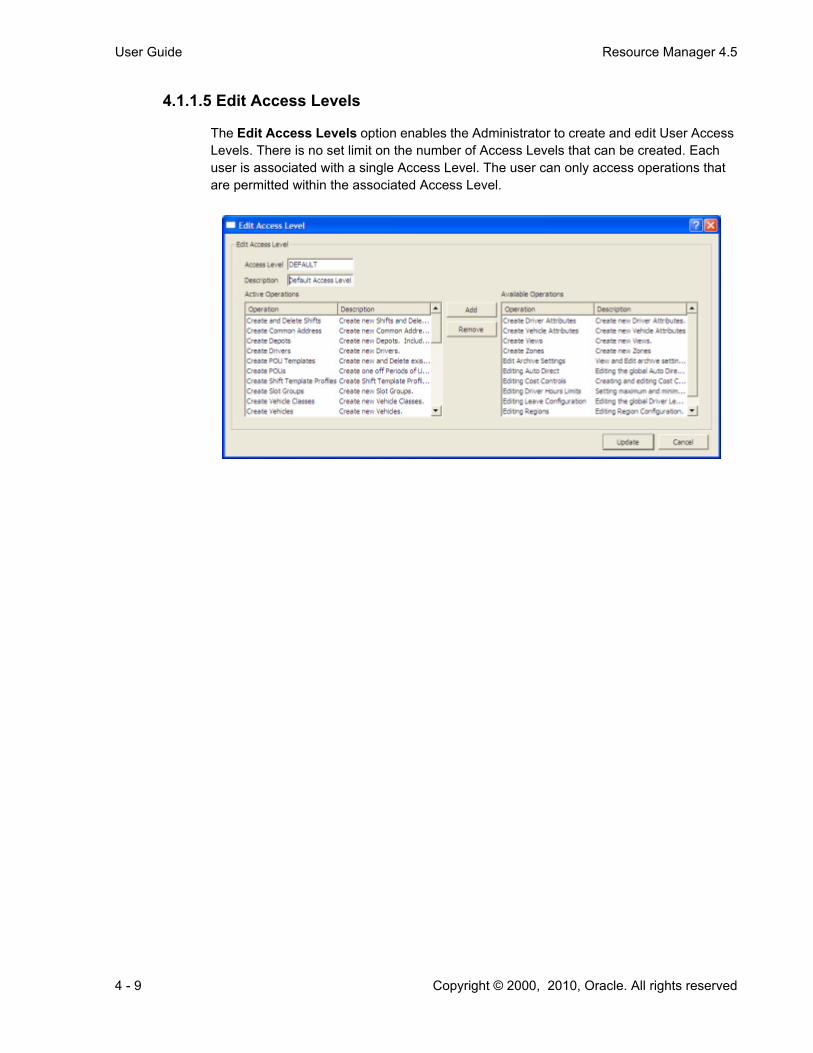
User Guide Resource Manager 4.5
4.1.1.5 Edit Access Levels
The Edit Access Levels option enables the Administrator to create and edit User Access Levels. There is no set limit on the number of Access Levels that can be created. Each user is associated with a single Access Level. The user can only access operations that are permitted within the associated Access Level.
4 - 9 Copyright © 2000, 2010, Oracle. All rights reserved

Resource Manager 4.5 User Guide
4.1.1.5.1 Creating an Access Level
To create an Access Level:
1. Select Operations, Edit Access Levels from the main menu.
This will open the Access Level Edit Form. All existing Access Levels and their Description will be displayed here.
2. Select the Add Access Level button.
This will open the Edit Access Level form. All fields other than the “Available Operations” list will be blank on this form.
3. Specify a unique Access Level label and a related Description.
Now add operations to this Access Level:4. Click the operation from under the Available Operations list and select Add. This step
should be repeated for each Operation that you wish to add to the Access Level.
The selected operation and all its derived operations (if any) will be moved from the Available Operations list to the Active Operations list.
Note:When an Operation, constructed from derived Operations is added to an Access Level, all its derived Operations and any Operations derived from these and so on, will automatically be added to this Access Level.
Copyright © 2000, 2010, Oracle. All rights reserved 4 - 10

User Guide Resource Manager 4.5
To remove an Operation from this Access Level
5. Click on the operation from the Active Operations list and select Remove. This step should be repeated for each Operation that needs to be removed from the Access Level.
If the operation that you wish to remove is used by other Active Operations then a confirmation window similar to the one below is displayed. Selecting Yes will remove all the linked operations. Selecting Cancel will keep the operation.
6. Select Insert to save the new Access Level
Or
Select Cancel to dismiss all changes.
Note:On changing the Access Level for a currently logged in User, the changes become effective only after the User logs in again.
4 - 11 Copyright © 2000, 2010, Oracle. All rights reserved

Resource Manager 4.5 User Guide
4.1.1.5.2 Editing an Access Level
To edit an Access Level:
1. Select Operations, Edit Access Levels from the main menu.
This will open the Access Level Edit Form. All existing Access Levels and their Description will be displayed here.
2. Highlight the Access Level that needs to be edited by clicking on it.3. Select the Edit Access Level button.
This will open the Edit Access Level form in which the details of the selected Access Level will be displayed. You can edit all these details other than the Access Level label.
Copyright © 2000, 2010, Oracle. All rights reserved 4 - 12
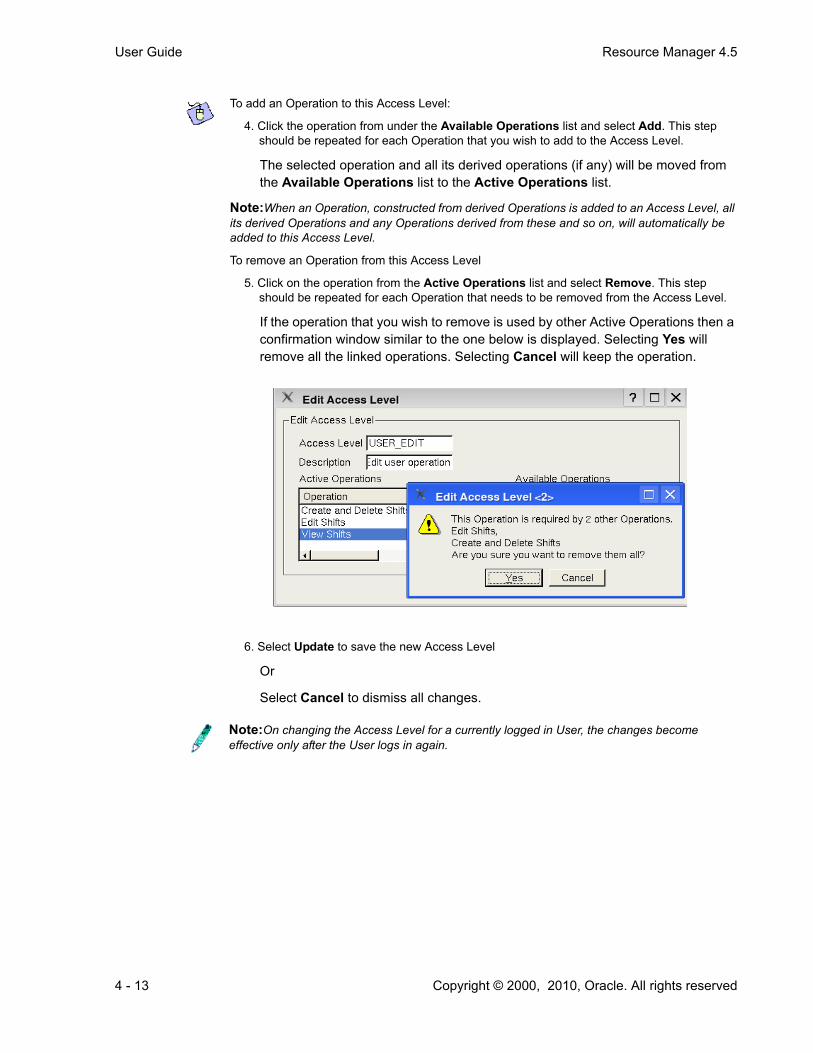
User Guide Resource Manager 4.5
To add an Operation to this Access Level:
4. Click the operation from under the Available Operations list and select Add. This step should be repeated for each Operation that you wish to add to the Access Level.
The selected operation and all its derived operations (if any) will be moved from the Available Operations list to the Active Operations list.
Note:When an Operation, constructed from derived Operations is added to an Access Level, all its derived Operations and any Operations derived from these and so on, will automatically be added to this Access Level.
To remove an Operation from this Access Level
5. Click on the operation from the Active Operations list and select Remove. This step should be repeated for each Operation that needs to be removed from the Access Level.
If the operation that you wish to remove is used by other Active Operations then a confirmation window similar to the one below is displayed. Selecting Yes will remove all the linked operations. Selecting Cancel will keep the operation.
6. Select Update to save the new Access Level
Or
Select Cancel to dismiss all changes.
Note:On changing the Access Level for a currently logged in User, the changes become effective only after the User logs in again.
4 - 13 Copyright © 2000, 2010, Oracle. All rights reserved

Resource Manager 4.5 User Guide
Copyright © 2000, 2010, Oracle. All rights reserved 4 - 14

Chapter 5: Options
Copyright © 2000, 2010, Oracle. All rights reserved 5 - 1

Resource Manager 4.5 User Guide
5.1. RESOURCE MANAGER OPTIONS
5.1.1 Options Menu
5.1.1.1 Colours
The Resource Manager Client makes liberal use of colours to enable you to quickly identify the various Shift states.
Copyright © 2000, 2010, Oracle. All rights reserved 5 - 2

User Guide Resource Manager 4.5
5.1.1.1.1 Configuring the Shift Status Colours
You can customize all the Shift status colors to suit your requirement.
5.1.1.1.2 Configuring the Leave Status Colours
You can customize all the Leave status colors to suit your requirement.
5.1.1.2 Configure Engineer Hours
The Engineer Hours window is used to configure the working hours limits for Engineers on a Daily, Weekly and periodic basis. Resource Manager generates Shifts for all the days
To configure a Shift status color:
1. Select the Shift status from the Options, Colours, Shift Colours pop-up list.
2. From the resulting Select Colour pop-up window select the desired color and press OK.
The Resource Manager display will refresh itself to display the modified Shift status color.
To configure a Shift status color:
1. Select the Shift status from the Options, Colours, Leave Colours pop-up list.
2. From the resulting Select Colour pop-up window select the desired color and press OK.
The Resource Manager display will refresh itself to display the modified Shift status color.
5 - 3 Copyright © 2000, 2010, Oracle. All rights reserved

Resource Manager 4.5 User Guide
with an associated Shift Template if these limits are disabled and only within these limits if the Engineer Hours Limits is enabled.
Resource Manager adheres to one or all of the following rules, while generating Shifts with the Engineer Hours Limits enabled:• Does not generate Shifts, if the Engineer Hours Limits will be exceeded.• Diminishes (reduces the Shift length) Shifts to keep the planned working hours within
the Engineer Hours limits. • Diminishes multiple Shifts, to avoid reducing Shifts beyond the minimum Shift Length
value.
The Engineer Hours window can be invoked by selecting Options, Configure Engineer Hours from main menu.
It has three panels; one each to configure the Daily, Weekly and Periodic working hours limits.
5.1.1.2.1 Engineer Hours - Daily Limits
The Daily Limits panel is used to set the Engineers working hours limit for a day.
From this panel you can:• Configure the Available Working Hours
• Configure the Daily Working Hours
and• Enable/disable the Engineers Own Travel Time
You can activate this panel by clicking on the Daily Limits tab.
Copyright © 2000, 2010, Oracle. All rights reserved 5 - 4

User Guide Resource Manager 4.5
5.1.1.2.1.1 Available Working Hours“Available Working Hours” represent the time frame during which the Engineer is available for work, which may or may not be equal to the hours actually worked by the Engineer.
You can define this time frame by setting the Start and Finish values.For example:
Start - 07:00, Finish - 16:00
Resource Manager makes use of the Start and Finish values respectively to validate the Logon and Logoff time in Shift Templates (see “Shift Edit Form” on page 2 - 54) and Shift Template Profiles (see “Shift Template Form” on page 2 - 33) and issues a warning whenever Logon is earlier than Start or Logoff is later than Finish.
5.1.1.2.1.2 Daily Working Hours“Daily Working Hours” represent the maximum and minimum hours, beyond which the Engineer is not allowed to work.
You can define this by setting the Maximum Shift Length and Minimum Shift Length values.
Resource Manager validates the Max. Shift value in Shift Templates (see “Shift Edit Form” on page 2 - 54) and Shift Template Profiles (see “Shift Template Form” on page 2 - 33) against the Daily Working Hours and issues a warning whenever Max. Shift is greater than Maximum Shift Length or lesser than Minimum Shift Length.
5.1.1.2.1.3 Enable Engineers Own Travel TimeEngineers Own Travel Time is a period of time before the start and after the finish of the Shift during which Engineers are allowed to travel on their own time. The Engineers Own Travel Time at start enables Engineers to start on the Job at the start of their Shifts time window so long as the time to the Job is less than the Own Travel Time from their Logon location. The Engineers Own Travel Time at finish enables Engineers to work right up to
Note:Resource Manager will ignore the Minimum Shift Length limit and diminish the Shifts length to 0 (that is; will not generate the Shift) whenever there is the risk of exceeding the Engineer Hours Limits.
5 - 5 Copyright © 2000, 2010, Oracle. All rights reserved

Resource Manager 4.5 User Guide
the end of their Shift time window so long as the last job is within the Own Travel Time from their Logoff location.
The Engineers Own Travel Time can either be set globally for all the Engineers in the system or on an Engineer-by-Engineer basis.
5.1.1.2.1.4 Engineer Based The Engineers Own Travel Time can be set on an Engineer-by-Engineer basis by enabling the Engineer Based option.
The Maximum Start Travel and Maximum Finish Travel values represent the upper limits that will be applied on the Engineers Own Travel Time At Start and At Finish values respectively within the Engineer form.
5.1.1.2.1.5 Setting Engineers Own Travel Time
5.1.1.2.1.8 Global The same period of Engineers Own Travel Time is set at once for all the Engineers in the system if the Global option is enabled.
To set the Engineers Own Travel Time for a Engineer:
1. Enable Engineers Based option from the Daily Limits panel.2. Set the Maximum Start Travel and Maximum Finish Travel values.3. Click on OK to save the Daily Limits settings.4. Select Windows, Engineer Form from the main menu.
The Engineer Form window will appear (See “Engineer Form” on page 2 - 2).5. Select the Engineer.6. Enter appropriate values into the Engineers Own Travel Time:• At Start (not allowed to exceed the Maximum Start Travel)• At Finish (not allowed to exceed the Maximum Finish Travel)7. Click on Update to save the Engineer details.
Note:Disabling the Engineers Based option will hide the Engineers Own Travel Time fields from the Engineer Form window (See “Engineer Form” on page 2 - 2).
Copyright © 2000, 2010, Oracle. All rights reserved 5 - 6

User Guide Resource Manager 4.5
The At Start and At Finish values represent the Engineers Own Travel Time at start and finish respectively.
The Resource Manager Gateway updates the EOTT at Start and EOTT at Finish fields in all the Shifts.
5.1.1.2.2 Engineer Hours - Weekly Limits
The Weekly Limits panel is used to set the maximum hours that Engineers are allowed to work in a week.
You can activate this panel by clicking on the Weekly Limits tab.
Note:Daily Limits are enabled always and are applied to the Shift Templates and Shifts when they are created.
5 - 7 Copyright © 2000, 2010, Oracle. All rights reserved

Resource Manager 4.5 User Guide
In order to configure the Weekly Limits you must first enable the Enable Limits option and then set the maximum hours that Engineers can work in a week as:• Total Hours
Or• Average Daily Hours
To set Weekly Limits as Total Hours:
1. Enable the Total Hours option.2. Set the Maximum Hours to a value within 168 hours.3. Click on OK to save the settings or on Cancel to discard the settings.
To set Weekly Limits as Average Daily Hours:
1. Enable the Average Daily Hours option.2. Use the Days in Week spin button to set the number of days in the week.3. Use the Hours in Day spin button to set the average daily hours in the week.
Maximum Hours will automatically be calculated and displayed as the product of Days in Week and Hours in Day.
4. Click on OK to save the settings or on Cancel to discard the settings.
Note:Resource Manager will not apply the Weekly Limits restriction while generating Shifts, if the "Enable Limits" option is disabled.
Copyright © 2000, 2010, Oracle. All rights reserved 5 - 8

User Guide Resource Manager 4.5
5.1.1.2.3 Engineers Hours - Period Limits
The Period Limits panel is used to set the maximum hours that Engineers are allowed to work in a specified period.
You can activate this panel by clicking on the Period Limits tab.
In order to configure the Period Limits you must first enable the Enable Limits option, define the period and finally set the maximum hours that Engineers can work in the period.
5.1.1.2.3.1 Defining the Period
To define the period:
1. Use the Weeks in Period spin buttons to set the number of weeks in the period as a value between 1 and 53.
2. Click on to set the Start Date for the period.
This will invoke the “Date Edit” described on page 1 - 23 using which you can select the date value. All the Engineers Hours limits calculations in a Period are based on its Start Date. If the given Start Date is not on a Monday then the Start Date will be automatically adjusted to that of the Monday of the selected week.
5 - 9 Copyright © 2000, 2010, Oracle. All rights reserved

Resource Manager 4.5 User Guide
After defining the period you can set the period limits as:• Total Hours - use this to set the period limits as a total number of hours, while
disregarding the daily or weekly working hours in the period.• Average Weekly Hours - use this to derive the period limits if the number of working
Hours is uniform across the weeks in the period
Or• Average Daily Hours - use this to derive the period limits if the number of working Hours
is uniform across the days in the period
5.1.1.2.3.3 Period Limit as Total Hours
5.1.1.2.3.4 Period Limit as Average Weekly Hours
5.1.1.2.3.4 Period Limit as Average Daily Hours
To set the Period Limits as Total Hours:
1. Enable the Total Hours option.2. Use the Maximum Hours spin button to set an appropriate value.3. Click on OK to save the settings or on Cancel to discard the settings.
To set the Period Limits as Average Weekly Hours:
1. Enable the Average Weekly Hours option.2. Use the Hours per Week spin button to set the average weekly hours in the period.
Maximum Hours will automatically be calculated as ((Hours Per Week) x (Weeks in Period)).
• If Hours Per Week = 40 and Weeks in Period = 4, then Maximum Hours = 160.3. Click on OK to save the settings or on Cancel to discard the settings.
To set the Period Limits as Average Daily Hours:
1. Enable the Average Daily Hours option.2. Use the Days in Week spin button to set the number of days in a week in the period.3. Use the Hours in Day spin button to set the average daily hours in the week.
Maximum Hours will automatically be calculated as ((Days in Week) x (Hours in Day) x (Weeks in Period)). For example:
• If Days in Week=5, Hours in Day = 8 and Weeks in Period = 4, then Maximum Hours = 160.
4. Click on OK to save the settings or on Cancel to discard the settings.
Note:Resource Manager will not apply the Period Limits restriction at the time of generating Shifts, if the "Enable Limits" option is disabled.
Copyright © 2000, 2010, Oracle. All rights reserved 5 - 10

User Guide Resource Manager 4.5
5.1.1.2.4 Which Limit is Applied When
Resource Manager always adheres to the daily limits while generating Shifts. You can choose to disable the weekly and period limits or enable either one or both of them. When a combination of these limits are enabled, the Engineers Hours Limits are applied based on the following rules:• When weekly limit is enabled and period limit is disabled the daily limits are applied first
followed by the weekly limits• When weekly limit is disabled and period limit is enabled the daily limits are applied
followed by the period limits.• When both weekly and period limits are enabled, the daily limits are applied first, then
weekly and finally period limits.• Only daily limit is applied when weekly and period limits are disabled.
5.1.1.3 Default Engineer Leave Configuration
The Default Engineer Leave configuration window allows you to globally configure the leave entitlement period, the number of entitled leave days in this period and the ability to carry over unused leave days from one period to the next for each leave type. These values are automatically applied to any new Engineer that is added to the System.
For instance, the following image can be interpreted as; each Engineer is entitled to 20 days of Holiday every 12-month period starting in January, with any unused leave from one period being carried over to the next period. To change the entitlement to10 days every 6 months the Leave Cycle should be changed to 6 months and the Default Entitlement to 10 days.
Unused leave at the end of a period will be lost if the Carry Leave Over box is not checked.
Note:Resource Manager will never generate Shifts that exceed the Engineers Hours limits, but will allow you to manually exceed these limits after issuing appropriate warnings.
5 - 11 Copyright © 2000, 2010, Oracle. All rights reserved

Resource Manager 4.5 User Guide
5.1.1.4 Region Form
A Region defines the set of data (Depots, Drivers and Shifts), which are sent to Planner. Crossover scheduling between Regions is not permitted. For example: Jobs belonging to the same Region as that of the Shift can only be scheduled to the Shift.
A Region can be defined as a geographical area or a commercial or operational area. The definition of Regions allows larger operations to use Planner, while sourcing and maintaining data in a single database.
By default the Resource Manager update and creation scripts supplied with the ORS package defines a "default" Region.
These options can be configured from the Region Form, which can be opened by the -Administrator user from the Options menu.
The Connection tab in the Region Form allows the parameters, which control how the Gateway connects to Planner, to be configured.
Scheduling Horizon - The scheduling horizon limits the number of days worth of data to send to Planner.
Hosts - The Host table allows multiple potential hosts to be defined that could be running the primary instance of Planner. Multiple entries are required when using either failover or redundant network interfaces.
Note:At least one host address should be associated with a Region before it can be created.
Copyright © 2000, 2010, Oracle. All rights reserved 5 - 12

User Guide Resource Manager 4.5
Sync. Port - This is the usual communication port with Planner. When using the SMAUTO interface this is the only port that is used. When using the SWITCH interface this port is used in all instances after the initial load of data.
Load Port - The Load Port is only used with the SWITCH interface when initially loading data into the Planner Switch.
App.Server Port - This is the port, which Resource Manager Web Service uses to communicate with Planner.
Database is master data repository - This option comes into play when the connection between Resource Manager and Planner is lost. If Resource Manager database is master then the data within Resource Manager is treated as correct, if Resource Manager database is not the master then it may accept some or all of the data from Planner when a connection is re-established.
If Resource Manager database is master then when a connection is established it will push the current state of the database to Planner.
The Advanced tab in the Region Form allows the configuration of parameters that are not changed normally.
Protocol - this determines the Planner process (either SMAUTO or SWITCH) to which Resource Manager Gateway will communicate. The SMAUTO protocol should only be used where the Planner Switch is not in use.
Note:The Database is master data repository option should be checked, if Resource Manager Web Service is used as the external interface, especially when updating data.
5 - 13 Copyright © 2000, 2010, Oracle. All rights reserved

Resource Manager 4.5 User Guide
History Retention - this defines how many hours after the scheduled end of a Shift, the Shift should be retained with Planner. This allows for a certain amount of overtime to occur and manual analysis after the completion of a Shift.
Remove Unknown Objects (Engineer, Shifts, Breaks, Stops, POUs, Depots, slots) - these options set how the Resource Manager Gateway will behave if it detects an unknown object in Planner. It is recommended that Resource Manager have full authority over all data object that could be defined with it. For example; If for some reason the Slot configuration is to occur outside of Resource Manager, the "Remove Unknown Slots" would need to be disabled so that the Gateway would not delete all the Slots as unknown objects.
Allow Stop Updates from Planner - with this option selected, Resource Manager will accept any manual changes made to the Stop data within Planner.
Allow New Stops from Planner - with this option selected, Resource Manager will accept new Stops from Planner.
5.1.1.5 Cost Control
This tool will help you to create and manage appropriate Cost Controls for Planner. Many Cost Control Profiles can be created within Resource Manager. Each profile can be associated with multiple Regions. A Region can only be assigned to a single Cost Control Profile. Editing the Cost Control Profile that a Region is assigned to will dynamically update the Cost Control settings within Planner.
Note:The Remove Unknown Stops option will be disabled if the Allow New Stops from Planner option is enabled and vice-versa.
Note:The Allow New Stops from Planner option will be disabled if the Remove Unknown Stops option is enabled and vice-versa.
Copyright © 2000, 2010, Oracle. All rights reserved 5 - 14

User Guide Resource Manager 4.5
5.1.1.5.1 Cost Control Configuration Window
Cost Profiles are created and modified from this Window. You can also create or remove Region and Cost Profile association from this window.
5.1.1.5.1.1 Associating Region with Cost Profile
5.1.1.5.1.2 Dissociating Region from Cost Profile
5.1.1.5.2 Cost Control Editor
The Cost Control Editor displays a graphical representation of the Cost curve. As the parameters controlling the Cost are adjusted, the display automatically reflects these changes. By clicking on the graphical display the cost associated with the position
Cost Control configuration Window Controls
Control Buttons
Description
Add Cost Profile
Use this to create a Cost Profile from scratch
Copy Cost Profile
Use this to a create a Cost Profile from an existing Profile
Edit Cost Profile
Use this to modify an existing Cost Profile
UpdateUse the button to save changes made to Cost Profiles.
AbortSelecting the button will discard all unsaved changes and refresh the window with details from before the change.
CloseSelecting the button will discard all unsaved changes and dismiss the Cost Control Configuration window
Regions without any Cost Profile association are located under the Unassigned Cost Profile.
To assign an unassigned Region to a Cost Profile:
1. Click and Drag the Region from under the Unassigned cost profile and Drop it on the desired Cost Profile.
To reassign a Region to a different Cost Profile:
1. Click and Drag the Region from under its current Cost Profile and Drop it on the desired Cost Profile.
Regions without any Cost Profile association are located under the Unassigned Cost Profile.
To unassign a Region from the Cost Profile:
1. Click and Drag the Region from the Cost Profile and Drop it on the Unassigned Cost Profile.
5 - 15 Copyright © 2000, 2010, Oracle. All rights reserved

Resource Manager 4.5 User Guide
selected on the graph is displayed as a red horizontal line. This cost is also displayed on the left-hand side of the window along with a comparative listing of all the selected costs in their native units. This display can be used to ensure that the comparative costs resulting from your cost settings, match real world tide offs.
Copyright © 2000, 2010, Oracle. All rights reserved 5 - 16

User Guide Resource Manager 4.5
5.1.1.5.2.1 Adding Cost Parameters to the Cost Profile
5.1.1.5.2.5 Removing Cost Parameters from the Cost Profile
To add cost parameters to the Cost Profile:
1. Select the Add button.
This will open a window, in which all unselected Costs and their Description are listed.
2. Click on the required Cost Parameter and select Add.
This Parameter will now appear on the Cost Control Editor. The Parameter will not be added to the Cost Profile if the Cancel button is selected.
3. Repeat steps 1 and 2 for each Cost Parameter that you need to add to the Cost Profile.4. Finally select Update on the Cost Control Editor to save the Cost Profile. Selecting Cancel
will ignore all unsaved changes made to the Cost Profile.
To remove cost parameters from the Cost Profile:
1. Select the Parameter from the Cost Control Editor by clicking on it.2. Select the Remove button.
The Parameter will be removed from the Cost Profile.3. Repeat steps 1 and 2 for each Parameter that must be removed from the Cost Profile.4. Finally select Update on the Cost Control Editor to save the Cost Profile.. Selecting Cancel
will ignore all unsaved changes made to the Cost Profile.
Note:Parameters that are removed from the Cost Profile will once again be available for selection from the Cost control Editor on selecting the Add button.
5 - 17 Copyright © 2000, 2010, Oracle. All rights reserved

Resource Manager 4.5 User Guide
5.1.1.5.2.5 CostsCost Parameters (Sheet 1 of 2)
Cost DescriptionAllocation Priority
Cost for leaving a Stop with allocation priority out of the plan, i.e. on the “free”-list. Cost for introducing a Stop to the plan must be less than its allocation priority cost.
Break Late Cost applied for scheduling a late break.
Depot Late Cost associated with arriving late (after time window) at a Depot. Costed as the number of seconds late.
Depot SLA Time Window
Controls the maximum strength of the Depot SLA Time Window Cost. Cost of allocating Depot Stop outside Depot SLA Window.
Depot Time Window Capacity - Volume
Cost applied when the capacity (volume) of a Depot within its Time Window is exceeded.
Depot Time Window Capacity - Weight
Cost applied when the capacity (weight) of a Depot within its Time Window is exceeded.
Drop Service Cost used to bias a Drop Stop to be scheduled earlier in its Time Window. Biases towards early Distribution.
Dynamic Working Area
Cost applied when a Stop is scheduled to a Shift that is not the closest (by travel time).
Empty Travel Cost applied for travelling without any load to a Stop. Cost is divided by Job value, so a higher value Job allows more travel.
Haul Cost for using a Haul. A Haul is defined as a series of linked Shifts.
Idle Time Costing Shifts Idle time (in seconds).
Job Attribute Cost of a Job attribute preference mismatch. Number of times a stop violates one or more preferred job attribute restrictions.
Jobs Limit Cost applied when the value of the Jobs assigned to a Shift exceeds the maximum desired. For example: This cost can be used to restrict the maximum number of Jobs that are assigned to an Engineer in a single shift.
Lifespan Cost applied when a Job is left onboard for too long.
Over Volume Cost applied when the Shifts actual Volume exceeds its designated maximum volume.
Over Weight Cost applied when the Shifts actual Weight exceeds its designated maximum weight.
Overtime Cost associated with working either after the end of the Shifts Time Window or more than the Maximum Shift length.
Pick-up Service
Cost used to bias a Pick-up Stop to be scheduled earlier in its Time Window.
Product Depot Controls the strength of preferring to source a Product from one Depot over another.
Copyright © 2000, 2010, Oracle. All rights reserved 5 - 18

User Guide Resource Manager 4.5
Resource Attribute
Cost of a Resource attribute preference mismatch. Number of times a stop violates one or more preference attributes.
Resource Usage
Cost against the number of Drivers/Engineers used.
Run Cost against the number of runs that are generated. Cost of activating a run.
Run Separation
Compares the capacity consumed, by overlapping stop, by the remaining capacity.
Shift Promotion
Promotes the use of one Shift over another. This cost is only relevant in conjunction with TDC settings.
Shift Usage Cost against the number of Shifts used.
Site Visits Cost against the number of site visits.
Stop Late Cost associated with arriving late (after time window) at a Stop. Costed as number of seconds late.
Stop SLA Time Window
Controls the maximum strength of the Stop SLA Time Window Cost. Cost of doing Job outside Stop SLA Window.
Time Costing Shift time (in seconds), includes travel, work and break time. Cost of time the Engineer spends "working" or taking break. Time spent at depot, logon, logoff (unless on break) is excluded. Any delays at Depot (loading, waiting) is not costed.
Time Window Invoked when a Time Window with a non-zero factor is used. Cost of using a Time Window.
Travel Distance
Cost of travel in kilometers.
Wait Time Cost applied on idle time to next undespatched Job.
Zone Number of times a shift violates one or more preferred zones. Flat cost for each Stop outside the Shifts zone.
Cost Parameters (Sheet 2 of 2) (Continued)
Cost Description
5 - 19 Copyright © 2000, 2010, Oracle. All rights reserved

Resource Manager 4.5 User Guide
5.1.1.5.2.6 Cost Curve
You can control the Cost curve by adjusting the A, B or C cost function parameters.
The Initial Slope, Doubling Rate and sometimes Step Value (if applicable) can be adjusted when the selected Cost represents an exponential function.
If the selected Cost belongs to a linear function then only the Slope can be adjusted.
• A represents the Initial Slope (initial steepness of the graph)• B represents the Doubling Rate (the slope of the function doubles each B).• C represents the Step Value (a flat additional cost), creating an initial step.
5.1.1.5.2.7 Time Dependent FactorsWhen scheduling over multiple days it is desirable to apply different cost models on different days.
Copyright © 2000, 2010, Oracle. All rights reserved 5 - 20

User Guide Resource Manager 4.5
When Time Dependent Factors are applied, it is shown as a grey line on the main graph area. The main graph is displayed directly above the Time Dependent Cost Factors (TDC) graph area.
In order to configure the TDC Factors, the Time Dependent Cost Factors (TDC) flag should be enabled. All Costs are not supplemented by TDC and in such situations the TDC Factors A, B, C, D, E and F will be disabled.
The configuration of the Time Dependent Cost (TDC) Factors is quite complex. There are three distinct curves, which can be defined individually. The initial curve (C1) is always flat. The second curve (C2) is either convex or concave. The final curve (C3) is always a straight line into infinity. In order to define this shape 6 independent variables are required.
5 - 21 Copyright © 2000, 2010, Oracle. All rights reserved

Resource Manager 4.5 User Guide
TDC Factor Description
TDC A Initial factor.
TDC B Point at which the function changes from flat to curved.
TDC C Value which defines the shape of the curve.
TDC D Point at which function changes from curved to linear
TDC E Factor at the point at which the function changes from curved to linear.
TDC F Slope of linear function
Copyright © 2000, 2010, Oracle. All rights reserved 5 - 22

User Guide Resource Manager 4.5
5.1.1.5.2.8 Configuring TDC Factors
To configure the TDC Factors;
1. Open the Cost Control Configuration window by selecting Options, Cost Controls from the Main Menu.
Existing Cost Profiles (if any) will be listed in the resulting Cost Control Configuration window.
2. Open the Cost Control Editor either by selecting an existing Cost Profile and selecting the Edit Cost Profile button
or
by selecting the Add Cost Profile button, specifying a new Cost Profile name in the resulting window and selecting the Add button.
The “Travel Distance” Cost will always be selected on the Cost Control Editor and will be the only default cost selection in a new Cost Profile.
3. Select the required Cost Name.4. Enable the Time Dependent Cost Factors (TDC) flag.5. Configure the TDC Factors A, B, C, D and E.6. Select Update to save the changes into the Cost Profile.
The resulting pop-up window will direct you to specify the reason for changing the Cost Profile.
7. Specify your reason and select OK to save the Cost Profile.
The Cost Profile will be saved and control will be returned to the Cost Control Configuration window.
Or
Select Cancel to discard all unsaved changes made on the Cost Profile and return control to the Cost Control Configuration window.
Note:Disabled TDC Factors can identify Costs that are not supplemented by TDC.
5 - 23 Copyright © 2000, 2010, Oracle. All rights reserved

Resource Manager 4.5 User Guide
5.1.1.6 Hide Terminated Engineers
When the Finish Date for Engineer is set Resource Manager will remove all Shifts, which fall after this date and not allow any new Shifts to be created after the finish date. After the Finish Date the Engineer is terminated and is no longer shown in the Resource Manager Client. You can see all the terminated Engineers by turning off the Hide Terminated Engineers option from the Options menu.
5.1.1.7 Setup
The following configuration dialogs are grouped under the setup option:• Auto Direct• Archiving• Geocoding• Sequence Locking• BI• Speed TW for Regions• Time Zones
5.1.1.7.1 AutoDirect Default
Planner makes use of the AutoDirect functionality to automatically despatch the jobs in Shifts to Engineers. When Auto Direct is enabled the details of the next Job are automatically sent to the Engineers via their MDTs. This feature is effective only where vehicles with MDT are associated with Engineers for communication.
Select Options, Setup from the main menu followed by the Auto Direct tab to open the Auto Direct Default pane. Here you can set the AutoDirect values globally for all the Engineers in the system. You can configure these values individually for the Engineers, using the “Maintaining Engineers AutoDirect Settings” described on page 2 - 14.
Copyright © 2000, 2010, Oracle. All rights reserved 5 - 24

User Guide Resource Manager 4.5
Resource Manager overrides the global AutoDirect settings with the Engineers AutoDirect settings.
The values in the AutoDirect Default pane can be set to enable or disable the AutoDirect functionality.
Autodirect Parameters Description
Auto direct This enables or disables the Auto Direct functionality of all the Shifts in the system.
Job Horizon This specifies the number of jobs that needs to be Auto Directed in advance for all the Shifts in the system. This must be set as >=1.
Auto Go Home This enables or disables the automatic go home operations for all the Shifts in the system.
Auto Go Home Time
This is the time that the Shifts in the system are to be kept idle at their last completed Job before being Auto directed to Logoff. The default value blank, indicates that the Shifts will be automatically directed home on completion of their last Job.
5 - 25 Copyright © 2000, 2010, Oracle. All rights reserved

Resource Manager 4.5 User Guide
5.1.1.7.2 Archive Settings
When Planner is not functioning in Real-time mode, the Stops are not automatically despatched, arrived, started or completed. By default only COMPLETED Stops are archived in Resource Manager.
Select Options, Setup from the main menu followed by the Archiving tab to open the Archive settings pane. Here you can configure Resource Manager to archive either COMPLETED or CLOSED stops.
5.1.1.7.3 Geocode Server Settings
The Geocode Server is used to look up the latitude and longitude of street addresses. The Resource Manager and Resource Manager Web Service processes use the Geocode
Copyright © 2000, 2010, Oracle. All rights reserved 5 - 26

User Guide Resource Manager 4.5
Server to determine the Latitude and Longitude co-ordinates of non-geocoded locations received in objects (Shifts, Stops) and Web Service requests.
Select Options, Setup from the main menu followed by the Geocoding tab to open the Geocode Server Settings pane. You can create or edit the Geocode Servers Host and Port values from this pane. Host is the name of the computer running the Geocode Server. Port the specified Host is the computer name
5.1.1.7.4 Sequence Locking Default
Resource Manager supports the configuration of the Despatch Sequence Locking configuration parameters of Shifts.
5.1.1.7.4.1 Sequence Locking ModeThe Sequence Locking Mode controls if the sequence of Stops, once despatched, will be locked for a Shift.• If LOCK_SEQ is set, Smauto will not introduce new stops before despatched Stops, nor
change the order of despatched Stops.• If LOCK_ORDER is set, the order of dispatched stops will not be affected but new stops
may be introduced before them.• NO_LOCKING should be selected to disable dispatch sequence locking.
5.1.1.7.4.2 Auto UndespatchIf set to YES, on encountering an out-of sequence event for this Shift, Planner would change the state of any despatched Stops outside the Despatch Horizon to UNDESPATCHED.
5 - 27 Copyright © 2000, 2010, Oracle. All rights reserved

Resource Manager 4.5 User Guide
5.1.1.7.5 BI
Oracle BI is a reporting tool, which can generate dynamic graphs, tables etc based on various elements of data, most of which are available in the Resource Manager database.
Select Options, Setup from the main menu followed by the BI tab to open the Business Intelligence Reports pane. Here you can configure the URL of the BI Reports. This setting applies to all users of Resource Manager.
After specifying the URL, click the button on Tool Bar to invoke the Bi Reports.
5.1.1.7.6 Speed TW for Regions
Copyright © 2000, 2010, Oracle. All rights reserved 5 - 28

User Guide Resource Manager 4.5
When the map is installed in Planner, the travel paths (Links) are assigned a speed that is assumed to remain constant throughout the day.
Within Planner you can modify the travel speeds given in the map by a factor that varies according to the time of day and then save them as Speed Time Windows. These Speed Time Windows are stored within the Resource Manager database. Changes made to the Speed Time Windows can be either applied to a single Region or else propagated, by Resource Manager, to all regions.
This propagation configuration is controlled via the Setup configuration within the Options menu.
Select Options, Setup from the main menu followed by the Speed TW for Regions tab to open the Time Windows for Regions pane.
5.1.1.7.6.1 Common Speed Time WindowsSet to yes, to send changes made to the Speed Time Windows to all the Regions.
Set to no, to send the changes only to the active Region.
5.1.1.7.7 Time Zone
Resource Manager has the ability to manage resources across multiple Time Zones.
The default configuration is for a single Time Zone, the Local Time Zone the application is running in.
Where multiple Time Zones are used, the following Forms are also refreshed to have configurable Time Zones:• Engineer Form• Shift Edit form to Driver Time Zone but can be edited• Depot Form• Unavailability Template form
5 - 29 Copyright © 2000, 2010, Oracle. All rights reserved

Resource Manager 4.5 User Guide
• POU editor - defaults to POU Template Time Zone but can be edited• Slot Edit Form
Select Options, Setup from the main menu followed by the Time Zones tab to open the Time Zone Configuration Form pane.
You can configure the required list of Time Zones that should be made available for selection in the various Resource Manager Forms from this pane. You can do this by assigning a Label to each Time Zone and selecting the actual Time Zone.
Copyright © 2000, 2010, Oracle. All rights reserved 5 - 30

Chapter 6:Basic Concepts
Copyright © 2000, 2010, Oracle. All rights reserved 6 - 1

Resource Manager 4.5 User Guide
6.1. BASIC CONCEPTS IN RESOURCE MANAGER
6.1.1 Data Types
Resource Manager provides most of the data types required by Planner. The data entry forms enables you to create and maintain these data types.
6.1.1.1 Mandatory or Optional
Because of the ability of Planner to be flexibly configured to suit a particular scheduling task, the data types can be divided into two groups: • Mandatory Objects - must always be provided by Resource Manager.• Optional Objects - are additional information to suit the scheduling task, which may be
provided by Resource Manager.
Planner must always know about the basic properties of the load carriers (Resources, Shifts), the goods to be carried (Jobs) and the travel parameters relevant to the geographical region of operation (Map). The Optional objects are used to configure the scheduling task according to the nature of the operation. For example, for a courier-like operation, only the basic objects are required; for a more complex operation it may be necessary to provide information about the Shift attributes (Engineer Attributes, Vehicle Attributes), union rules regarding work periods (Breaks) and periods of unavailability (POU). Each of these data objects is defined using multiple data fields. Some of these data fields are Mandatory and others are Optional. If the Mandatory data fields are not defined, then an ERROR is reported and the object is not included in the schedule.
Resource Manager ensures that all the data objects that it supplies to Planner are error free.
6.1.1.1.1 Resource
A Resource is a combination of Vehicle and Engineer that will be available for work during a specified work period called a Shift. Work is allocated to Resources during the work periods defined in it associated Shifts.
The Resource Manager Gateway creates the Resource objects from the Engineer and Vehicle details and sends it to Planner.
6.1.1.1.2 Shift
A Shift specifies a set of defining attributes and a period of time. These are used to describe the suitability and the availability of a Resource. A Shift may contain multiple Break periods and Periods on Unavailability.
The Resource Manager Gateway creates the Shift objects from the Shift Templates after considering the Engineer Hours Limits, Public Leaves and Engineer Leave details and then sends it to Planner.
Copyright © 2000, 2010, Oracle. All rights reserved 6 - 2

User Guide Resource Manager 4.5
6.1.1.1.3 Break
A Break is a specified time period in a Shift during which the Shift may not carry out any work or travel between Stops. Breaks can be of different forms, for example, Breaks, which are dependent on driving time, elapsed time or time of day.
Breaks are optional objects.
As Breaks are defined within Shifts, Resource Manager provides data entry options for Breaks within the “Shift Template Form” described on page 2 - 33 and the “Shift Edit Form” described on page 2 - 54. If Breaks are defined within the Shift data then actual Breaks are created along with Shifts at the time of Shift generation.
6.1.1.1.4 Period of Unavailability (POU)
A POU is a specified time period that is blocked out from a Shift for a specific reason. For example, team meeting for 2 hours, reconciling van stocks for 4. POUs consume available Shift time and prevent Jobs from being scheduled during its time period.
POUs are optional objects that are sent to Planner as Stops of type POU.
The Resource Manager Gateway creates POUs from POU Templates whenever it is restarted and when the time crosses over from midnight.
POUs are generated from individual POU Templates whenever these templates are created or modified. Existing POUs from these Templates are not modified.
6.1.2 Cost Considerations
6.1.2.1 What Are Costs
Planner uses the idea of a notional cost for every arrangement of the Resources and Stops that combine together to form a schedule solution. The costs are not actual money costs, although thinking of them in that way may be helpful in understanding how they work. For example, Resources may be assigned running costs and standing costs in real money terms, while the cost for being late at a pickup or delivery is an estimated cost to you for not serving the customer properly.
These notional costs are the penalty incurred by a particular arrangement of the solution for retaining an arrangement that is undesirable. For example, using three Resources for a particular task may have a higher notional cost than using one Resource for the same task. For example, a task that can be completed in three hours may have a lower notional cost than completing the same task in four hours.
Costs are applied to all the elements of the arrangement of the schedule solution, and you can vary the default values to alter the way in which Planner arranges all the Resources, Shifts and Stops. Usually these costs are predetermined, and you will not need to change them. However, altering these costs and comparing the different resulting schedules, can answer a lot of operational questions about a data set.
6 - 3 Copyright © 2000, 2010, Oracle. All rights reserved

Resource Manager 4.5 User Guide
The elements to which costs are applied are found in the cost rules, and they may relate directly to measurable quantities (like travel time and travel distance) or may be used to encourage performance requirements (such as customer service quality or geographical zoning).
6.1.2.2 How are Costs calculated
Costs are calculated differently depending on the objects to which they are being applied.
Generally, the cost functions are open ended, that is, they do not impose conditions that will prohibit a particular arrangement but simply apply an increasing cost to an arrangement that will discourage its use in the solution.
6.1.2.2.1 Flat Cost
There are some costs that are applied only once, called Flat costs. For example, the cost associated with activating an additional Shift (standing cost) is a Flat cost which is applied only once when the Shift logs on, and would be removed when it logs off.
6.1.2.2.2 Rate Cost
Some of the costs are applied as a flat rate. For example, travel time or travel distance costs are applied as a flat cost per unit (running cost).
6.1.2.2.3 Complex Cost
Other costs are more complex, and are applied according to the mathematical function described by a group of three cost control parameters. For example, if a Shift is working beyond its maximum Shift length, then the cost will be calculated according to a non-linear function described by the cost control parameters - OFFLATE_A, OFFLATE_B and OFFLATE_C.
6.1.2.3 Global versus Relative Cost
Global costs are applied to the entire solution. All the relevant data objects incur these costs in the plan. These costs should be applied when you want to bias the schedule to achieve a certain goal.
For example, Shift cost can be set to a very high value if it is required to use minimal number of Shifts in the plan. A high Overtime cost can be set to ensure that actual Shift length does not exceed the Maximum Shift length even if it means activating more Shifts. A high zone cost would ensure that all vehicles do jobs in their respective zones only.
Relative costs are costs, which can be applied differently to particular objects. These individual cost multipliers are used to moderate the costs resulting from using that particular object in comparison with other objects of the same type.
Examples:
Copyright © 2000, 2010, Oracle. All rights reserved 6 - 4

User Guide Resource Manager 4.5
• With three Resources A, B and C where Resource A has a trailer attached to it, a comparatively higher running cost can be expected for A than for B and C. Planner can be made aware of this fact by specifying a high relative Resource cost for A.
• Shifts done over weekends or public Leaves may incur a higher cost. This can be defined by specifying higher Shift Cost within these Shift objects.
6.1.3 Setting Up the Data Objects
Resource is the object that identifies the basic load carrying mobile in Planner. It is a mandatory object. It is basically a combination of Vehicle and Engineer, both of which should be available during a specified work period called a Shift.
A Resource can be associated with several different Shifts to simulate a continuous operating environment, if required.
The capabilities of the Resource can be defined in the Shift data. They are assumed to exist only for the duration of the Shift even though some of them (for example, maximum weight, Relative Speed, Vehicle Attributes) are fixed and some of them are transient (such as the capabilities or attributes of the Engineer).
You can define multiple idle periods (Breaks) and multiple periods of unavailability (POUs) in each Shift, which will automatically be scheduled into the solution.
6.1.3.1 Resource
The Resource Data Object contains mandatory information that uniquely identifies the Resource and specifies its location (place and time) at the start of scheduling. The specified location is usually the place at which the Vehicle is garaged. This may be different from the location at which the Resource is expected to Logon. This information is used for travel time calculations.
6.1.3.1.1 Resource Cost
The running cost of the Resource can be considered as the standing cost associated with the use of the Resource. This cost can be used to determine how frequently the resource will be used while scheduling.
6.1.3.2 Stop
A Stop is a place to be visited by a Resource. The visit may involve a Collection or Distribution. It may also be a period when the Resource must be available for a scheduled meeting at the place.
Stops are expected to be completed during one of the specified Stop Time Windows. Planner will try to schedule the arrival of the Resource to be within a Stop Time Window
Note:Relative Shift cost, for all the Shifts associated with an Engineer can be set from the Shift Cost Profile window.
6 - 5 Copyright © 2000, 2010, Oracle. All rights reserved

Resource Manager 4.5 User Guide
but, if this cannot be achieved, it will schedule the arrival of the Resource as close as possible to a Stop Time window.
Stops are subdivided into three basic types:• Distribution Stops -these are associated with a distribution task from a Depot.• Collection Stops -these are associated with a collection task for a Depot.• Stops -these are not associated with any Depot. Point-to-Point (PTP) and Period of
Unavailability (POU) Stops are under this category.
In addition to the above, special types of Stops such as Depot, Logon, Logoff, and Break are automatically created by Planner at the time of creating a schedule.
Resource Manager associates Periods of Unavailability with Engineers. A POU Stop is created for each Engineer associated with a POU. This POU Stop will be fixed (same as ALLOCATED) to the Engineers Shift so that Planner will not then reassign it to a Shift belonging to a different Engineer.
6.1.3.2.1 POU Stops
Resource Manager allows you to plan for an Engineer to be unavailable for work at a certain location for a specified period of time. This is represented in Resource Manager as POUs and in Planner as POU Stops.
POU objects are defined by:• The time of day at which an Engineer is unavailable• The amount of time that the Engineer is unavailable for• The location where the Engineer is for the duration of unavailability
Resource Manager can associate Multiple Engineers to the same POU. For example, all Engineers from the maintenance department will be at the Head office today to attend a two-hour meeting commencing at 14:00 hours. Resource Manager will create actual POUs consisting of the same time of day, duration and location of unavailability for all the Engineers. Then these POUs will be fixed to the appropriate Shifts and sent into Planner. On receiving the Shifts with their allocated POU Stops, Planner will route the Engineers such that the Engineers will be at the location and time specified within the POUs.
Based on the way you configure the POUs Resource Manager will create them either only once or repeatedly for a number of weeks, or indefinitely in the future.
6.1.3.3 Shift
The Shift Data Object contains mandatory information that uniquely identifies the Shift, and defines a work period for the associated Resource (Engineer and Vehicle). There must be a separate Shift Data Object for every work period definition as Shifts cannot be used multiple times.
Note:At present Resource Manager supports only POU Stops.
Note:Resource Manager constructs an actual Shift from the values defined in related Shift Template, Engineer and Vehicle data.
Copyright © 2000, 2010, Oracle. All rights reserved 6 - 6

User Guide Resource Manager 4.5
6.1.3.3.1 Shift Types
Planner recognizes the nature of the operation to be carried out on Shifts by their types. The Shift type defines continuous, discontinuous or long haul operations. This, in turn determines the conditions under which the Resource is expected to start and finish the Shift. The Shift types are:• STANDARD-The Shift commences at the Logon position and terminates at the Logoff
position. No goods may remain on the Resource at the Logoff position.• ONE_WAY-The Shift commences at the Logon position and terminates at the Logoff
position. But the total cost calculation for the Shift does not include the travel distance and time between the last stop and Logoff stop. No goods may remain on the Resource after it finishes at the Last Stop.
6.1.3.3.2 Shift Duration
The mandatory Start and Finish Time and Maximum Shift, described in “Engineer Hours - Daily Limits” section on page 5 - 4 defines the time window within which the Shift should be started and completed. Planner finds the optimal Logon and Logoff times for Shifts within this time window.
6.1.3.3.3 Shift Working Hours
The Max Shift value defines the maximum time period of work for the Resource within the time window. If this field is not set, the working hours for the Shift are assumed to be the same as the duration of the Shift.
Note:All references to Shifts in this User Guide are for STANDARD Shifts only as this is the only Shift type generated by Resource Manager.
6 - 7 Copyright © 2000, 2010, Oracle. All rights reserved

Resource Manager 4.5 User Guide
Overtime (that is, work outside either the Max Shift or Shift Duration), can be discouraged by increasing the Shifts relative Overtime Cost. If this value is not set, then overtime will not be discouraged.
6.1.3.3.4 Shift Cost
The Shift object contains some values that can be used to alter the instantiating and running costs (Shift Cost, Overtime Cost, Time Cost) of a Shift relative to the other Shifts in the system.
These costs can be varied to encourage or discourage the use of a particular Shift for things such as discouraging the use of contractors or encouraging the use of more efficient vehicles first.
6.1.3.3.5 Reserve Capacity
Reserve Capacity reserves the Shift capacity for specific types of jobs. This ensures that advance bookings do not consume the entire Shift capacity, but reserves a percentage of its capacity to service hi-priority jobs that may be generated later.
For example, at Britvic (the leading soft drinks manufacturers in Great Britain) installation jobs are booked well in advance, but Shift capacity to service emergency and other hi-priority jobs that need immediate attention must be maintained.
Reserve Capacity is implemented in Planner as follows:
1. First the Reserve Capacity Types for which capacity needs to be reserved is specified. This is specified in the CAPACITY_ID field in the Stop object. Multiple Stops can belong to the same Capacity Type. Multiple Capacity Types can exist in the system.
2. Then the Shifts for which capacity must be reserved are specified. A Shift can reserve capacity for multiple Capacity Types. This is specified in the Shifts CAPACITY_TYPE field. The CAPACITY_TYPE should
Copyright © 2000, 2010, Oracle. All rights reserved 6 - 8
User Guide Resource Manager 4.5
be set to an id matching the CAPACITY_ID of Stops. Stops with matching CAPACITY_TYPE can use the reserved capacity. If there is no match, capacity will simply remain unused until it is released.
3. Then the amount of capacity to reserve is specified. This is expressed as a fraction of the maximum length of the Shift by inserting a number in between 0 and 1 in the Shifts RESERVE_CAPACITY field.
4. Then the time to release the Reserve Capacity is specified. All reserved capacity will be released before the start of the Shift. Exactly when is expressed as an offset from the shift's start-time, which is written into the Shift's CAPACITY_LEADTIME field. For example, if CAPACITY_LEADTIME has the value "430", capacity will be released 4.5 hours before the scheduled start of the Shift. It is not possible to delay the release of reserved capacity until after the start of the Shift.
5. Finally set up the cost control for reserve capacity. Reserve capacity is costed for each second that reserve capacity is less than specified in the Shift's RESERVE_CAPACITY field.
6.1.3.3.6 Load Limits
The Max. Weight and Max. Volume fields described in “Vehicle Class Form” section on page 2 - 53 are used to specify the Resource. If these fields are not specified, the Resource is a bottomless pit. The units by which loads and capacities are described must be used consistently in all Vehicle Objects.
6.1.3.3.7 Parcel Size
The Max. Size value described in “Vehicle Class Form” section on page 2 - 53 specifies the maximum size of any individual parcels (partial load) that can reasonably be handled by the Resource. For example, it might be set to the maximum size that an Engineer can carry. The Shift will not be considered for Stops that have a size specified that is greater than Max. Size. When Max. Size is not set; it is assumed that all parcels irrespective of parcel size can be handled properly. The units by which loads and capacities are described must be used consistently in all Vehicle Objects.
6.1.3.3.8 Zones
Zone preferences can be used to specify a preferred geographical region for work. Zones may be used to reflect an Engineers familiarity with a particular region or maybe just a radio transmission area. The set of zone names used is arbitrary, but must be the same as the set of zone names used when defining the Stop Objects.
If a zone name is specified in the Shifts Required zone, then only Stops belonging to that zone can be assigned to the Shift. If a zone name is specified in the Shifts Preferred zone, then the Shift may be assigned Stops which lie outside the specified zone, but only if the solution is efficient. If no zones are specified, there is no constraint. Shifts can have Multiple Required and Preferred zones. Preferred zones are always a subset of Required zones. Zones are associated with Engineers in Resource Manager and are defined in the “Maintaining Engineer Zones” section on page 2 - 24.
6 - 9 Copyright © 2000, 2010, Oracle. All rights reserved

Resource Manager 4.5 User Guide
6.1.3.3.9 Attributes
Attributes describe the permanent skills or properties possessed by the Resource, and can be used to make sure that the Resource has the right tools, such as a Tail Lift or Union Ticket, when it arrives at the customer location. The set of Resource attribute names used is arbitrary, but must be the same as the set of Resource attribute names used when defining the Stop Object.
If no Resource attributes are specified, then the Resource is assumed to have none.
Resource Manager constructs the Shifts Attributes from both the Engineer Attributes and Vehicle Attributes. “Maintaining Engineer Attributes” is described on page 2 - 16 and “Maintaining Vehicle Attributes” is described on page 2 - 51.
6.1.3.3.10 Views
Views allow you to see a specific set of Shifts and the objects associated with them.
Resource Manager attaches Views to Engineers and Depots, which are passed as View-Attributes to Planner. “Maintaining Engineer Views” is described on page 2 - 30. “Depot Views” is described on page 2 - 94.
All objects have a default view, which is applied whenever the object is not associated with a Shift. As soon as the object is associated with a Shift it assumes the Shifts view.
All the views in the system are active if none are selected.
The following rules govern the visibility of various objects in Planner:• ShiftA Shift is visible when it matches the selected view.• Job/StopWhen assigned, a Job or Stop is visible when the assigned Shift is visible.
When Free, a Job or Stop is visible when it matches the selected view.• ResourceA Resource is visible when any of its Shifts is visible or when it matches the
selected view.
6.1.3.3.11 Relative Speed
The travel speed of the Resource, relative to the travel speed specified in the map, can be modified using the Rel. Speed value described in “Vehicle Class Form” on page 2 - 53. It is used to reflect a slower or faster vehicle, or an Engineer with more or less experience. As travel speed of the Resource is used by Planner to compute the arrival times at the Stops, Rel. Speed must reflect a value that properly describes the Resource travel.
Rel. Speed cannot be set to a value lower than 0.01.
6.1.3.3.12 MDT (Mobile Data Terminal)
The MDT field in the “Maintaining Engineers AutoDirect Settings” section on page 2 - 14 is an optional field where a unique identifier for the MDT can be specified. It uniquely identifies the MDT associated with the Shift. It enables communication between Planner and the Engineer in the Vehicle carrying the MDT terminal.
Copyright © 2000, 2010, Oracle. All rights reserved 6 - 10

User Guide Resource Manager 4.5
6.1.3.3.13 Break
Break Data is an optional object that defines the idle period of rest time associated with the Shift. A Shift can have multiple Breaks. There must be a separate Break Object to define each rest period. Resource Manager allows you to define Breaks along with the Shift definitions from its “Shift Template Form” described on page 2 - 33 and the “Shift Edit Form” described on page 2 - 54. The following Break details are mandatory before Planner can schedule the Breaks:• Type• Delay• Offset• Duration
Delay defines the length of the rest period, while Type, Offset and Duration defines the Time within which the Break must be commenced.
Type specifies the previous event from which Break timing is calculated. For the various Break types, the specified OFFSET time is interpreted as:• SHIFT- elapsed time from the earliest possible start of the Shift• LOGON - elapsed time from the predicted or actual time of Logon• ELAPSED - elapsed time from the predicted or actual start of the previous Break or
Logon• Engineer - accumulated driving time from the predicted or actual start of the previous
Break or Logon
The calculated Time Window is used by Planner to position the Break Stop at the most efficient position in the Shift.
6.1.3.3.13.1 Break OrderThe Break Order sets the order of execution of Breaks within a Shift containing multiple Breaks. If this value is not set then the order of execution of all the Breaks in the Shift will be set by the order in which they are received by Planner. Resource Manager sets the Order number in all the Breaks that it generates.
6.1.3.3.13.2 Restricted BreakPlanner can schedule Breaks in two ways:• DepotBreaks -these are taken only at the Depot location• RoadSideBreaks -these can be taken anywhere
6 - 11 Copyright © 2000, 2010, Oracle. All rights reserved

Resource Manager 4.5 User Guide
The Restrict flag must be set for all DepotBreaks.
If the Shift associated with the DepotBreaks is attached to a Depot then the Brakes are taken only at that Depot.
DepotBreaks are taken only when the Vehicle has no goods on board. In other words, DepotBreaks will be scheduled in between arrival at Depot and loading of the Vehicle for the next run.
6.1.3.3.13.3 Break Early Extend TimePlanner has the flexibility of starting Breaks <NN> minutes earlier that the start of their time windows by specifying the Break Early Extend Time.
All Breaks are scheduled within a specified time-window. The range of times that a Break may be started is specified as single time-window with a fixed earliest time-of-day and a fixed latest time-of-day. Planner normally schedules Breaks to be started within these two bounds.
In case of DepotBreaks it may not always be possible to schedule a break both at Depot and within the prescribed time-window. In such cases the Break must be scheduled at Depot, and may be scheduled earlier than the start time. For example, Engineers must have a break at least every 5 hours, but the windows can be extended so that breaks up to an hour before the break window start time are acceptable.
Breaks scheduled within their time window are not costed. Breaks scheduled during the Break Early Extend Time incur a lower cost than those scheduled after their time window.
6.1.3.3.14 Engineers Own Travel Time (EOTT)
EOTT specifies the time that Engineers travel at own expense from home to the first job and from the last job to home. EOTT is not included in the Shifts Travel time but contributes towards reducing its Overtime.
Example:• If EOTT at start and finish of Shift is set to one hour each;
if travel to first job requires 45 minutes, then the travel unto the job is on the Engineers own expense with the Shift Travel time commencing on arrival at Job.
Note:When setting up Break time windows, you must be aware that Breaks are scheduled to be taken as late in the time window as possible and will not be scheduled earlier than the Break Early Extend Time.
Copyright © 2000, 2010, Oracle. All rights reserved 6 - 12

User Guide Resource Manager 4.5
However if travel to first job requires 90 minutes then Shift Travel time commences after 60 minutes. The same applies at the end of day.
EOTT is implemented in Planner as:• Maximum EOTT at start of Shift- is the maximum time the Engineer travels from home to
first job at his own expense.• Maximum EOTT at finish of Shift- is the maximum time the Engineer travels from last job
to home at his own expense.• Used EOTT at start of Shift - is the actual time the Engineer travels from home to first job
at his own expense.• Used EOTT at finish of Shift - is the actual time the Engineer travels from last job to
home at his own expense.• Total EOTT used in Shift - is the total time the Engineer actually travels at his own
expense during the Shift and is calculated as (“Used EOTT at start of Shift”+ (“Used EOTT at finish of Shift”).
Resource Manager allows you to set EOTT globally for all the Engineers in the system at once or individually for each Engineer. This is described in the “Enable Engineers Own Travel Time” section on page 5 - 5.
EOTT can be configured from the Engineer Hours window as per the instructions on the “Engineer Hours - Daily Limits” section on page 5 - 4.
Select Options, Engineer Hours from the main menu to access the Engineer Hours window. The EOTT parameters are configured within the Daily Limits panel within this window. The Resource Manager Gateway reads this configuration and attaches the appropriate EOTT values to the Shifts before sending the Shifts to Planner.
When EOTT is disabled the corresponding details are left blank in the Shifts.
When Engineer based EOTT is enabled the Engineers EOTT at start and EOTT at finish values are copied into the Shifts generated for the Engineer.
When Global EOTT is enabled the global EOTT at start and EOTT at finish values are copied into all the Shifts generated from the system.
6 - 13 Copyright © 2000, 2010, Oracle. All rights reserved

Resource Manager 4.5 User Guide
6.1.4 Resource Manager Functions
Resource Manager functions can be summarized as:• Maintaining Engineer Hours Limits• Maintaining Engineer Details • Maintaining Public Leaves and Engineer Leaves• Maintaining Shift Patterns• Maintaining Unavailability Patterns• Creating New Shifts for • Maintaining Worked Hours
Resource Manager is not a stand-alone product and needs to be deployed alongside the ORS scheduling component called Planner. Please refer to the accompanying Resource Manager system guide for related details.
6.1.4.0.15 Engineer Hours Limits in Resource Manager
You can set the Engineer Hours limits within Resource Manager using instructions from the “Configure Engineer Hours” section on page 5 - 3 and the “Engineer Leave Editor” section on page 2 - 131.
The Engineer Hours window will enable you to set the Engineers working hours limits and the Engineer Leaves Form will allow you to plan the Engineers annual leaves options.
Resource Manager will then generate Shifts within these working hours limits and only for those days when the Engineer is not on leave. If required you can configure Planner to override these limits and to schedule the Shifts outside these limits.
The “Engineer Hours Graph” described on page 2 - 119 displays a graphical representation of the consumption of Shift hours per day for an Engineer. You can make use of this display to plan the Engineer Shift hours accurately.
The following steps will outline the implementation of Engineer Hours Limits in Resource Manager:1. First you set the Engineer Hours Limits.2. Then you save these limits into the Shift Template Profiles3. Now you apply these Profiles to the Engineers.4. Resource Manager will now generate Shifts for the Engineers from these Templates
so that the Engineer Hour Limits are not violated.5. From the Engineer Hours Graph display you can identify those Shifts, which has been
diminished to meet the Engineer Hours limits. 6. Finally you can adjust the length of each of these diminished Shifts from the Shift Edit
Form. See also “Shift Edit Form” section on page 2 - 54.
6.1.4.1 Maintaining Engineer Details
Almost all the Resource Manager operations are based on Engineer details. These are created and maintained from the “Engineer Form” described on page 2 - 2.
Engineer details can be classified as:
Copyright © 2000, 2010, Oracle. All rights reserved 6 - 14

User Guide Resource Manager 4.5
• Personal Data
And• Operational Data
6.1.4.1.1 Personal Data
The Engineers personal details are:• Name - used in all associated Shift names• Address• Licence details• Emergency contact details
All Engineers within the Resource Manager system have a unique Name. When the Shifts are created they are given a Shift Ident in the form of <Engineer_id>-<date.
The remaining details are optional and are not used for purposes.
6.1.4.1.2 Operational Data
Operational details influence the way Shifts will be scheduled by the application. All these details are maintained by invoking the auxiliary Data Entry Forms from the Engineer Form. The Engineers operational data are:• Default Logon/Logoff Location - sets the Logon/Logoff locations in all associated Shifts• Own Travel Time at Start/Finish - sets the EOTT at Start/Finish in all associated Shifts• AutoDirect - sets the AutoDirect values in associated Shifts• Zones - sets the Preferred Work Zone and Must Work Zone attributes in associated
Shifts• Views - sets the View attributes in associated Shifts• Engineer Attributes - sets the Shift attributes in associated Shifts• Vehicle Attributes - sets the Shift attributes in associated Shifts• Vehicle Class - sets the maximum capacity in terms of weight, volume and size in all
associated Shifts• Costs - sets the Shift cost, Overtime Cost, Time Cost, and Reserve Capacity settings for
all associated Shifts
6.1.4.2 Maintaining Engineers Leaves
Resource Manager does not create Shifts for Engineers on Public Leaves and Engineer Leaves.
Public Leaves are applied uniformly to all the Engineers in the system and are maintained from the “Public Holidays Form” described on page 2 - 128.
Engineer Leaves are applied individually for Engineers and are maintained from the “Engineer Leave Editor” described on page 2 - 131.
Using the details maintained within the Public and Engineer Leave tables, Resource Manager derives the following values for the Engineer:• Leaves consumed in a period• Committed Leaves in a period
6 - 15 Copyright © 2000, 2010, Oracle. All rights reserved

Resource Manager 4.5 User Guide
• Approved additional days in a period• Annually allowed Leaves (including carry over)
Resource Manager keeps track of individual Engineer Leave Entitlements as well as consumed Leave.
6.1.4.2.1 Default Entitlement
The default entitlement described in “Default Engineer Leave Configuration” section on page 5 - 11.
6.1.4.2.2 Individual Engineer Entitlements
Each Engineer within an organization may be allocated a different number of Leave days. This can be configured through the Engineer Leave Configuration window opened from the Engineer Form.
This forms shows not only the Entitlement for the various Leave types for the Engineer but also the number of Leave Days Remaining in the current entitlement Period. Leave is only consumed after the Leave has been taken.
6.1.4.2.3 Taking Leave
When creating a new Leave Period the dialog shown below is opened. This form shows the number of leave days that would be used by this leave period in the Days Used section as well as the number of days available to the Engineer in the Days Available field. It is possible for the Operator to over allocate leave but they will be warned. The Days Available may not represent the same value as displayed in the Days Remaining
Copyright © 2000, 2010, Oracle. All rights reserved 6 - 16

User Guide Resource Manager 4.5
from the Engineer Form as the Days Available will take into account any leave periods which have not yet been taken.
When Leave is not carried over from one period to the next Resource Manager will create two leave periods when request to take a leave period which crosses the entitlement boundary. The leave used and available is shown for each of the entitlement periods as seen in the image below. Resource Manager will not allow a leave period to be created that would cross the boundary of three entitlement periods.
6.1.4.3 Maintaining Shift Profiles
A Shift Profile is a predefined pattern of specific working calendar days within a working period.
Shift Profiles are maintained from the “Shift Template Form” described on page 2 - 33.
Shift Profiles have the following features:• Multiple Shift Templates • Can be created and maintained in multiples within the system • Can be reused• Enables Shift Rotation
6 - 17 Copyright © 2000, 2010, Oracle. All rights reserved

Resource Manager 4.5 User Guide
6.1.4.3.1 Multiple Shift Templates within a Shift Profile
A Shift Profile is a collection of Shift Templates spread across a period defined by one or more weeks. It is not mandatory to have Shift Templates for all the days covered by the Shift Profile. Each Shift Template contains the specifications for that days Shift. The specifications for a days Shift are stored within that days Shift Template. Resource Manager makes use of these specifications to generate actual Shifts and hence cannot create Shifts for those days without Shift Templates.
The Templates in a Shift Profile represent a full cycle of Shift pattern. When a Shift Profile is applied to an Engineer, this Shift pattern is established for this Engineer indefinitely into the future until a different Profile is reassigned to this Engineer.
Shift Templates record the following Shift specifications:• Maximum Shift length - this is the maximum working length for the associated Shift.
Shifts working beyond this limit are considered to be in overtime by Planner. The "Maximum Shift Length" defined within the “Engineer Hours - Daily Limits” section on page 5 - 4 is automatically reflected as the “Max. Shift” on all the Templates in the Profile.
• Shift Time Window - this is the time frame within which the associated Shift must start and complete its work. The Shift Time Window must be greater than or equal to the Maximum Shift length. Planner will not start a Shift before its Logon time and will consider any time after the Logoff as overtime and will try to minimize it. The “Start and End” times defined within the “Available Working Hours” section on page 5 - 5 is automatically reflected as the Logon and Logoff times on all the Templates in the Profile.
• Log On and Log Off Locations - A Shift Template has a Logon and Logoff location associated with it. Only Shifts with valid Logon and Logoff locations will be scheduled by Planner. It is mandatory to specify valid Geocoded (that is real world Lat/Long co-ordinates) addresses as the Logon and Logoff locations within Shift Templates.
• Breaks - Breaks define idle periods of rest time associated with the Shift. A Shift can have multiple Breaks. There must be a separate Break Object to define each rest period.
• Fixed logon - Fixed Logon enables fixed Shift start time. When this is enabled the Max Shift entry will be disabled. Max Shift will still be sent through to Planner but it will be derived from the start and end time of the Shift.
6.1.4.3.2 Multiple Shift Profiles within Resource Manager
A Shift Template Profile is a specified number of weeks of Shift Templates. Multiple Shift Template Profiles can be created and stored within Resource Manager such that different Engineers can use different Shift Template Profiles.
6.1.4.3.3 Reusability of Shift Profiles
When many Engineers in the system follow the same Shift pattern, you can define a Shift Template Profile to address this Shift Pattern and then apply it on the Engineers.
6.1.4.3.4 Shift Profiles enable Shift Rotation
The number of weeks defined within a Shift Template Profile corresponds to the number of weeks of Shifts within a full cycle. The same cycle of Shift patterns will be repeated
Copyright © 2000, 2010, Oracle. All rights reserved 6 - 18

User Guide Resource Manager 4.5
indefinitely into the future once the Shift Template Profile is applied to an Engineer and hence can also be termed as Shift Rotation. The Shift Rotation can start from any week within the cycle and not necessarily from the first week of the Shift Template Profile.
For example: A Shift Template Profile consisting of three weeks in its cycle has the following Shift pattern:• Week1 - Shift Templates with Logon time as 8:00 am and Logoff time as 5:00 pm, exist
from Monday to Saturday. • Week2 - Shift Templates with Logon time as 9:00 am and Logoff time as 6:00 pm, exist
from Tuesday to Friday.• Week3 - Shift Templates with Logon time as 10:00 am and Logoff time as 9:00 pm exist
from Monday to Thursday.
If a Engineer started the period from week1 then at the end of week3 he completes a full cycle and on week4 he reverts back to week1 Shifts pattern and so on. However the Engineer may start his cycle by working the week2 template in the first week and so on.
6.1.4.4 Creating New Shifts
New Shifts are generated by Resource Manager at the start of each day and sent into ORSs component called Planner through the Resource Manager Gateway interface.
Resource Manager takes the following into consideration before generating Shifts:• Shift Templates -Shifts are generated only on days with Shift Templates.• Public Leaves -Shifts are not generated on Public Leaves• Engineer Leaves -Shifts are not generated on days when the Engineer is on leave
6.1.4.4.1 Checklist for creating Shifts
Listed below is a checklist, which will help you in creating Shifts using Resource Manager.• Engineer Hours limits must be set.• POUs have been created• Public Leaves and Engineer Leaves have been updated• Break details are included• Logon/Logoff locations have valid co-ordinates• Set the Shift Horizon before starting Resource Manager (Resource Manager Gateway
generates Shifts for the number of days specified in the Shift Horizon).• Shift Templates exist for the days on which you want Resource Manager to generate
Shifts.
6.1.4.5 Maintaining Worked Hours
Resource Manager generates Shifts and sends it to Planner for scheduling. Planner schedules the Shifts and sends the Planned data (that is the Planned Start and End time of Shifts) back to Resource Manager. In the future as the Shifts are Started and or
Note:In addition to populating Planner with the Shifts generated by Resource Manager at the start of each day, the Resource Manager Gateway also updates Planner with all further modifications on the Shifts.
6 - 19 Copyright © 2000, 2010, Oracle. All rights reserved

Resource Manager 4.5 User Guide
Completed the actual Start and End time of the Shifts are also sent from Planner to Resource Manager.
Resource Manager maintains the planned and actual worked hours received from Planner within its database and displays it within the Shift Edit Form and Monthly Calendar Window using the following variables: • Planned Start Time -is the planned logon time for the Shift• Planned Complete Time -is the planned logoff time for the Shift• Start Time -is the time the Shift had actually logged on• Complete Time -is the time the Shift had actually logged off• Time Worked-is the time from actual logon to logoff excluding any Engineers Own Travel
Time.
Copyright © 2000, 2010, Oracle. All rights reserved 6 - 20

Appendix A:Glossary
Copyright © 2000, 2010, Oracle. All rights reserved A - 1

Resource Manager 4.5 User Guide
A.1. GLOSSARY
Term DefinitionHost System External resource of information used by Resource Manager
Icon A name for a screen displayed object
In Resource Manager these are generally coloured buttons or text fields organized into row or column displays.
Gateway An interface between Resource Manager and a host system
Hip File A file in ASCII format, local to Resource Manager, which can be used to store intermediate or temporary scheduling solutions
Hip files can be reloaded.
Vehicle A means of transport known to Resource Manager
Resource A combination of human resource and vehicle that will be controlled by Resource Manager
A human resource could be an engineer, a surveyor, a driver, etc.
Shift A combination of a resource and a time period of availability
Haul A number of consecutive shifts to be executed by the same resource
Stop A place to be visited by a resource
The visit may involve a pickup, a delivery, a service visit or more than one of these. Special types of stops are Log On, Log Off, Distribution, Collection and Break.
Stop Time Window
One or more time intervals during which the Stop should be completed
Group A group is a number of jobs linked together and treated by the optimiser in the same way as a job.
Depot A place at which goods can be sourced or deposited
Depot Time Window
One or more time intervals during which the depot allows access to resources
Trip The travel by a resource from its Log On Stop to its Log Off Stop (travel during its Shift)
Run The travel by a resource from and to a depot Stop
It applies only to the travel associated with collection or distribution from a depot.
For example, a run could involve picking things up from a depot and delivering them. The run would exist from the collection from the depot to the last delivery point.
Alternatively, a run could involve picking things up and delivering them at a depot. The run would exist from the first pickup point to the drop-off at the depot.
Route A route consists of everything from the Log On Stop to Log Off Stop. It could contain multiple runs.
Copyright © 2000, 2010, Oracle. All rights reserved A - 2

User Guide Resource Manager 4.5
MDT A Mobile Data Terminal is a small data display terminal used by the driver in the vehicle to communicate with the scheduler.
Oracle Real-Time Scheduler
The Oracle Real-Time Scheduler application consisting of the Planner and Resource Manager sub systems
Web Service A Web Service is a software system designed to support interoperable Machine to Machine interaction over a network. Web Services are frequently just Web APIs that can be accessed over a network such as the Internet and executed on a remote system hosting the requested services.
Resource Manager Web Service
The Resource Manager Web Service system that supports inter-operable machine-to-machine interaction between the host system and Planner over a network. The interchange is established using SOAP/XML messaging
Planner The automated scheduling package in Oracle Real-Time Scheduler
Resource Manager
Resource management package tailored to use with Oracle Real-Time Scheduler
The Host System
A computer system that controls the administration of the business enterprise
Region A subset of the schedule that may be scheduled independently of the remainder of the Schedule. In other words, Orders belonging to region A can only be assigned to Crews belonging to region A. Neither Orders nor Crews can belong to more than one region
Schedule Information describing which resources pick-up/drop-off which Orders, in what sequence and at what time
Error/Warning The concept of advising an Operator that a requested operation could not be performed (error) or violates specified restrictions (warning)
An example of (Error) is an attempt to allocate an Order that could not be geo-coded.
An example of (Warning) is the allocation of an Order to an Engineer with insufficient skills.
Break A rest-period for the Engineer. Until taken, Breaks have no specific location
Compatibility An Order and a Shift are compatible when there are no conditions that would normally preclude the Shift from performing the Order. Examples of such conditions are mismatching zone, attributes or even time-windows
Job The task of visiting a customer. It can also be a linked set of tasks.
Attribute Can be a fixed capability in a Resource. For example: Inbuilt refrigerator.
Can be a skill associated with an Engineer. For example: Electrician
Crew Group of one or more Engineers
Driver Is an entity with the ability to carry out work. Usually a field service Engineer
Skill The ability of an Engineer to perform a certain type of work
Proficiency Is a defined hierarchy of levels of ability within a Skill. Jobs that are more difficult can be completed using higher proficiency levels
Term Definition
A - 3 Copyright © 2000, 2010, Oracle. All rights reserved

Resource Manager 4.5 User Guide
Term Definition
Copyright © 2000, 2010, Oracle. All rights reserved A - 4

INDEX
AAbort ............................................................................... 70ACCESS ........................................................................ 81Access Level .................................................................... 6Access Levels ........................................................... 9, 10ACCESS Time Windows ................................................ 84ACKNOWLEDGED ...................................................... 101active Engineers ............................................................. 11Active/Disabled ............................................................ 108actual Shifts ............................................................. 54, 70Actual Start and Complete Time .................................... 66add cost parameters ...................................................... 17Add/Edit Engineer Leave ............................................. 119Add/Edit Public Leave .................................................. 119Administrator .................................................................... 9Alert window ................................................................. 141API ................................................................................... 2archived .......................................................................... 26ARRIVED ..................................................................... 101Attribute Proficiencies .................................................... 18Attributes ................................................................. 16, 10Auto direct ............................................................... 15, 25Auto Go Home ........................................................ 15, 25Auto Go Home Time ............................................... 15, 25Auto Undespatch ..................................................... 39, 60AutoDirect setting ........................................................... 16AutoDirect Settings ........................................................ 14Available Working Hours .................................................. 5
BBreak ................................................................................ 3Break Order .................................................................... 11Breaks ..................................................................... 41, 66Business Intelligence ..................................................... 28
Ccarried over .................................................................... 17Centre Location .............................................................. 68Change Password ............................................................ 4change your password ..................................................... 4check box ....................................................................... 15
Copyright © 2000, 2010, Oracle. All rights reserved
Close ...............................................................................70Closed .............................................................................66Closed flag ......................................................................66Collection ...................................................................78, 6collective Views List ........................................................31Collective Zones list ........................................................64color ..................................................................................2Colors ...........................................................................139colours ..............................................................................2Common Address Form ..................................................18Communication Form window ..........................................8COMPLETED ...............................................................101configure the Auto Direct settings ...................................16configure the Depot Views ..............................................94configure the Engineers Depots .....................................32configure the TDC Factors ..............................................23Cost Control Editor .........................................................15Cost Controls ..................................................................14Cost Profile ................................................................7, 61Cost Profiles ...................................................................15Cost-Wait Shift ................................................................13create a new Engineer attribute ......................................18create a new Engineer Zone ...........................................26create a POU ................................................................103create a POU Template ................................................110create a Public Holiday .................................................129create an Engineer Leave Period .................................133Cutoff profile ..........................................................88, 115CutOff Profiles ..............................................................114Cut-off Time ....................................................................93Cutoff triggers ...............................................................115
Ddaily attributes .................................................................22Daily Limits panel ..............................................................4Daily Working Hours .........................................................5data display .......................................................................8Data Entry Forms ............................................................14data types .........................................................................2Date Edit window ............................................................23deactivated .....................................................................11default color ......................................................................2default entitlement ..........................................................16
- 1

Resource Manager 4.5 User Guide
define the period .............................................................. 9Delay .............................................................................. 80delete a Public Holiday ................................................. 130delete a Shift .................................................................. 74delete a Shift Template .................................................. 45delete an Engineer attribute ........................................... 20delete an Engineer Leave ............................................ 136Delete confirmation ........................................................ 74Depot ............................................................................. 79Depot Association .......................................................... 59Depot Calendar .............................................................. 82Depot Cutoff ................................................................... 82Depot Cutoff Editor ........................................................ 88Depot Edit form .............................................................. 78Depot unavailable .......................................................... 87DepotBreaks .................................................................. 11Depot-by-Depot .............................................................. 83Description ..................................................................... 53Despatch Sequence Locking ........................... 38, 60, 27DESPATCHED ............................................................. 101Dialog boxes .................................................................... 5Display Name ................................................................. 79Dist. Cost ....................................................................... 53Distribution ................................................................ 78, 6Drop-down lists .............................................................. 15Duration ......................................................................... 99Dynamic Work Area ....................................................... 68Dynamic Work Areas ....................................................... 5
EEarliest Departure .......................................................... 80Early Margin ........................................................ 100, 107edit a POU ................................................................... 104edit a POU Template .................................................... 112edit a Public Holiday
129edit an Engineer Leave ................................................ 135Edit Reserve Capacity Type ........................................... 13Edit Template ............................................................... 100Edit User Form ................................................................. 5enable a Depot ............................................................... 88Engineer ........................................................................... 2Engineer Attributes .......................................................... 8Engineer Calendar Shortcut ......................................... 118Engineer Cost Profile ..................................................... 11Engineer Depots ....................................................... 9, 32Engineer Hours ................................................................ 3Engineer Leave ................................................................ 9Engineer Leaves .......................................................... 130Engineer Views ......................................................... 9, 30Engineer Zones ......................................................... 9, 24Engineer-by-Engineer ...................................................... 6Engineers ..................................................................... 100Engineers Calendar ..................................................... 116Engineers Own Travel Time ........................................ 5, 6Engineers own travel time ................................................ 5ENROUTE .................................................................... 101EOTT ............................................................................. 12existing Engineer ........................................................... 10existing Shift Template ................................................... 45
Copyright © 2000, 2010, Oracle. All rights reserved
FFinish Date ........................................................................7Fixed Start ......................................................................60FREE ............................................................................101From ...............................................................................41
Ggenerated automatically ..................................................74generates Shifts ..............................................................31Geocode a Location ........................................................21Geocode Server ..............................................................26Geocoding address .........................................................21Geocoding Complete ......................................................22Geocoding Failed ............................................................21Global costs ......................................................................4grayed ...............................................................................8
HHistory Retention ............................................................14
Iicon shortcut menu .........................................................14INACTIVE ................................................................75, 76integration .........................................................................2
JJob Horizon ..............................................................15, 25Job Limits .................................................................42, 68
LLate Margin ..........................................................100, 107Layout ...............................................................................6layout ................................................................................2Layout mode .....................................................................2Leave status colors ...........................................................3Length .............................................................................41Load Layout ......................................................................4log in as a different user ...................................................3login ..................................................................................2Logon/Logoff Time, Location and Delay .........................61Logout ...............................................................................4
MMain Window ....................................................................5main window .....................................................................3mandatory field ...............................................................72Mandatory Objects ............................................................2manually .........................................................................71Max. Shift ........................................................................59Max. Size ........................................................................54Max. Volume ...................................................................54Max. Weight ....................................................................54Maximum Collection Volume ..........................................81
- 2

User Guide Resource Manager 4.5
Maximum Collection Weight ........................................... 81Maximum Distribution Volume ....................................... 81Maximum Distribution Weight ........................................ 81Maximum EOTT ............................................................. 13Maximum Finish Travel .................................................... 6Maximum Run Length ............................................. 42, 68Maximum Start Travel ...................................................... 6MDT ........................................................................ 15, 10menu bar .......................................................................... 7messages ..................................................................... 141modify ............................................................................. 23modify the proficiency .................................................... 20Monthly Calendar window ............................................ 137MSPD ............................................................................. 72Multiple Shifts Per Day ................................................... 55multiple Time Zones ....................................................... 29Must Work Zone ............................................................. 64
NNavigation Buttons ......................................................... 10new Engineer ................................................................. 10new Engineer Cost Profile .............................................. 14new Leave Period .......................................................... 16New Profile ..................................................................... 43new Shift Template ........................................................ 44New Stops from Planner ................................................ 14new Vehicle .................................................................... 52new Vehicle attribute ...................................................... 52Num. Weeks ................................................................... 35Number of Breaks .......................................................... 41
OOffset ....................................................................... 93, 99Offset from Shift start ................................................... 107ONE_WAY ..................................................................... 37One-off Depot Time Windows ........................................ 83One-Off POUs .............................................................. 102One-off Shifts ................................................................. 55Open-ended Profiles ...................................................... 88Optional Objects ............................................................... 2overlap ........................................................................... 84Over-time Cost ............................................................... 12
PPassword ......................................................................... 6password ..................................................................... 3, 2Password Exp .................................................................. 6PENDING ..................................................................... 101PENDING_DESP ......................................................... 101Period Limits .................................................................... 9Period Limits as Average Weekly Hours ........................ 10Period Limits as Total Hours .......................................... 10Period of Unavailability Editor ................................. 97, 98Periods of Unavailability ................................................. 95Periods of Unavailability tab ........................................... 97Periods of Unavailability window .................................... 96Perpetual ...................................................................... 108PLANNED .................................................................... 101Planned Start and Complete Time ................................. 65
- 3 C
Planner .............................................................................2planning updates ..............................................................4POU ..................................................................97, 102, 3POU Templates ............................................................105POU Type .....................................................................107POU type ........................................................................99Preferred Work Zone ......................................................64Preferred Working Zones ................................................26Profile ..............................................................................35Profile Start Date ............................................................34Profiles cycle ...................................................................92Protocol ...........................................................................13Public Holidays Form ....................................................127
RRecord Status bar ...........................................................10Recurring POUs ............................................................109Region .......................................................................6, 79Region Association .........................................................58Rel. Speed ...............................................................53, 10Relative Efficiency ............................................................6Relative Factor ...........................................................5, 68Relative Late Cost .................................................99, 107Remaining Volume .........................................................85Remaining Weight ..........................................................85remove an Operation ......................................................11remove cost parameters .................................................17Remove Unknown Objects .............................................14required Zones ................................................................25Reserve Capacity ......................................................13, 8Reserve Capacity Lead Time .........................................13Reserve Capacity Type ..................................................13Resource ..........................................................................2Resource Manager ...........................................................2Restrictions .....................................................................41RoadSideBreaks .............................................................11Run Planner ......................................................................4
SSave Layout ......................................................................3scroll bar ...........................................................................7secondary menu ...............................................................9select a Shift ...................................................................58select a Vehicle ...............................................................49select an Engineer ............................................................4Sequence Locking Mode ................................................27Shift ............................................................................35, 2Shift Attributes ................................................................16Shift Cost ........................................................................12Shift Data Object ...............................................................6Shift Edit Forms Costs tab ..............................................61Shift status color ...............................................................3Shift Tab .........................................................................57Shift Template .................................................................36Shift Template Form .......................................................33Shift Template Profiles ......................................................8Shift Templates area .......................................................36Shift Unavailable ...........................................................118Shift unavailable .............................................................75Shift-by-Shift ...................................................................63
opyright © 2000, 2010, Oracle. All rights reserved

Resource Manager 4.5 User Guide
Shifts Required zone ........................................................ 9shortcut ............................................................................ 9shortcut menus ................................................................ 9SLA ................................................................................ 81SLA Time Windows ........................................................ 84Slot Edit Form .............................................................. 113Slot Groups .................................................................. 113Slot Templates ............................................................. 113Speed Time Windows .................................................... 29spin button ..................................................................... 15STANDARD ................................................................... 37STANDBY ............................................................... 75, 76Standby ................................................................... 69, 77Start Date .................................................................. 7, 35Start Week Commencing ............................................. 108STARTED .................................................................... 101Status ...................................................................... 15, 57Stop .................................................................................. 5Stop Updates from Planner ............................................ 14Stop Week Commencing ............................................. 108Stops ................................................................................ 6Sub-windows .................................................................... 5
Tterminated ...................................................................... 24Text boxes ..................................................................... 15Time Cost ....................................................................... 13Time Windows (with Advanced Options) ....................... 81Time Windows (without Advanced Options) .................. 81Time Worked .................................................................. 66Time Zone ................................................................. 6, 99To ................................................................................... 41Tool Bar ......................................................................... 10Total EOTT .................................................................... 13Trigger Time ................................................................... 93Type ................................................................. 41, 57, 80
UUnassigned Cost Profile ................................................. 15Unavailability Template Form ....................................... 105Unavailable .................................................................... 69UNDESPATCHED ................................................ 101, 27use Guide ......................................................................... 3Use Template ............................................................... 109Used EOTT .................................................................... 13user name ................................................................... 3, 2
VVehicle ............................................................... 8, 48, 59Vehicle Attributes ........................................................... 50Vehicle Attributes window .............................................. 51Vehicle Class ................................................................. 49Vehicle Classes .............................................................. 53Vehicle Description ........................................................ 49Vehicles ........................................................................... 2View ................................................................................. 6View Audit ........................................................................ 8View filtering ................................................................... 11Views .......................................................... 4, 82, 94, 10
Copyright © 2000, 2010, Oracle. All rights reserved
Wweek ...............................................................................34week number ..................................................................34weekly attributes .............................................................17Weekly Limits as Average Daily Hours .............................8Weekly Limits as Total Hours ...........................................8weekly zone selection .....................................................25Windows ...........................................................................5
YYearly Calendar window ...............................................138
ZZone preferences ..............................................................9
- 4