oracle universal records management adapter for content server
TRANSCRIPT
Cover Page
Oracle Universal Records Management Adapter for Content Server Administration Guide10g Release 3 (10.1.3.3.1)
May 2007

Oracle Universal Records Management Adapter for Content Server Administration Guide, 10g Release 3 (10.1.3.3.1)Copyright © 2007, Oracle. All rights reserved.
Contributing Authors:Deanna Burke
Contributors: Stuart Edeal, Lisa Zitek-Jones, Jean Wilson
The Programs (which include both the software and documentation) contain proprietary information; they are provided under a license agreement containing restrictions on use and disclosure and are also protected by copyright, patent, and other intellectual and industrial property laws. Reverse engineering, disassembly, or decompilation of the Programs, except to the extent required to obtain interoperability with other independently created software or as specified by law, is prohibited.
The information contained in this document is subject to change without notice. If you find any problems in the documentation, please report them to us in writing. This document is not warranted to be error-free. Except as may be expressly permitted in your license agreement for these Programs, no part of these Programs may be reproduced or transmitted in any form or by any means, electronic or mechanical, for any purpose.
If the Programs are delivered to the United States Government or anyone licensing or using the Programs on behalf of the United States Government, the following notice is applicable:
U.S. GOVERNMENT RIGHTS Programs, software, databases, and related documentation and technical data delivered to U.S. Government customers are "commercial computer software" or "commercial technical data" pursuant to the applicable Federal Acquisition Regulation and agency-specific supplemental regulations. As such, use, duplication, disclosure, modification, and adaptation of the Programs, including documentation and technical data, shall be subject to the licensing restrictions set forth in the applicable Oracle license agreement, and, to the extent applicable, the additional rights set forth in FAR 52.227-19, Commercial Computer Software--Restricted Rights (June 1987). Oracle USA, Inc., 500 Oracle Parkway, Redwood City, CA 94065.
The Programs are not intended for use in any nuclear, aviation, mass transit, medical, or other inherently dangerous applications. It shall be the licensee's responsibility to take all appropriate fail-safe, backup, redundancy and other measures to ensure the safe use of such applications if the Programs are used for such purposes, and we disclaim liability for any damages caused by such use of the Programs.
Oracle, JD Edwards, PeopleSoft, and Siebel are registered trademarks of Oracle Corporation and/or its affiliates. Other names may be trademarks of their respective owners.
The Programs may provide links to Web sites and access to content, products, and services from third parties. Oracle is not responsible for the availability of, or any content provided on, third-party Web sites. You bear all risks associated with the use of such content. If you choose to purchase any products or services from a third party, the relationship is directly between you and the third party. Oracle is not responsible for: (a) the quality of third-party products or services; or (b) fulfilling any of the terms of the agreement with the third party, including delivery of products or services and warranty obligations related to purchased products or services. Oracle is not responsible for any loss or damage of any sort that you may incur from dealing with any third party.

T a b l e o f C o n t e n t s
Chapter 1: IntroductionOverview . . . . . . . . . . . . . . . . . . . . . . . . . . . . . . . . . . . . . . . . . . . . . . . . . . .1-1
About This Guide . . . . . . . . . . . . . . . . . . . . . . . . . . . . . . . . . . . . . . . . . . . . .1-1Product Overview . . . . . . . . . . . . . . . . . . . . . . . . . . . . . . . . . . . . . . . . .1-1Audience . . . . . . . . . . . . . . . . . . . . . . . . . . . . . . . . . . . . . . . . . . . . . . . .1-2Standard Installation Architecture . . . . . . . . . . . . . . . . . . . . . . . . . . . . .1-2
About the Adapter . . . . . . . . . . . . . . . . . . . . . . . . . . . . . . . . . . . . . . . . . . . .1-3Overview of URM and the Adapter . . . . . . . . . . . . . . . . . . . . . . . . . . . .1-3Overview of the Retention Functions. . . . . . . . . . . . . . . . . . . . . . . . . . .1-4
Software Requirements . . . . . . . . . . . . . . . . . . . . . . . . . . . . . . . . . . . . . . . .1-6Compatibility with Content Server . . . . . . . . . . . . . . . . . . . . . . . . . . . . .1-6Supported Operating Systems. . . . . . . . . . . . . . . . . . . . . . . . . . . . . . . .1-7Supported Databases . . . . . . . . . . . . . . . . . . . . . . . . . . . . . . . . . . . . . .1-7
Conventions . . . . . . . . . . . . . . . . . . . . . . . . . . . . . . . . . . . . . . . . . . . . . . . . .1-8
Chapter 2: InstallationOverview . . . . . . . . . . . . . . . . . . . . . . . . . . . . . . . . . . . . . . . . . . . . . . . . . . .2-1
Installation Summary . . . . . . . . . . . . . . . . . . . . . . . . . . . . . . . . . . . . . . . . . .2-2
Preparing a DB2 Database . . . . . . . . . . . . . . . . . . . . . . . . . . . . . . . . . . . . .2-2
Installing the Common Utilities Bundle. . . . . . . . . . . . . . . . . . . . . . . . . . . . .2-4Installing the Common Utilities Bundle using Component Manager . . .2-4Installing the Common Utilities Bundle using Component Wizard. . . . .2-5
Installing the Adapter . . . . . . . . . . . . . . . . . . . . . . . . . . . . . . . . . . . . . . . . . .2-6Installing the Adapter using Component Manager. . . . . . . . . . . . . . . . .2-6Installing the Adapter using Component Wizard . . . . . . . . . . . . . . . . . .2-7
Restarting Content Server . . . . . . . . . . . . . . . . . . . . . . . . . . . . . . . . . . . . . .2-8
Rebuilding the Content Server Index . . . . . . . . . . . . . . . . . . . . . . . . . . . . . .2-9
Post-Installation Steps . . . . . . . . . . . . . . . . . . . . . . . . . . . . . . . . . . . . . . . .2-10
Oracle Universal Records Management Adapter for Content Server Administration Guide iii

Table of Contents
Defining an Outgoing Provider. . . . . . . . . . . . . . . . . . . . . . . . . . . . . . .2-10Variable Settings for Unregistering a Source. . . . . . . . . . . . . . . . . . . .2-10
Uninstalling the Adapter . . . . . . . . . . . . . . . . . . . . . . . . . . . . . . . . . . . . . . .2-11Components To Be Uninstalled . . . . . . . . . . . . . . . . . . . . . . . . . . . . . .2-11Uninstalling the Adapter using Component Manager . . . . . . . . . . . . .2-12Uninstalling the Adapter using Component Wizard . . . . . . . . . . . . . . .2-13Post-Uninstallation Steps. . . . . . . . . . . . . . . . . . . . . . . . . . . . . . . . . . .2-14
Disabling the Adapter Metadata Fields . . . . . . . . . . . . . . . . . . . . .2-14Deleting the Adapter Metadata Fields. . . . . . . . . . . . . . . . . . . . . .2-15
Chapter 3: ConfigurationOverview . . . . . . . . . . . . . . . . . . . . . . . . . . . . . . . . . . . . . . . . . . . . . . . . . . .3-1
About Content Retention Management . . . . . . . . . . . . . . . . . . . . . . . . . . . .3-2The External URM Source. . . . . . . . . . . . . . . . . . . . . . . . . . . . . . . . . . .3-3External URM Source Registration . . . . . . . . . . . . . . . . . . . . . . . . . . . .3-3
Configuring the Adapter . . . . . . . . . . . . . . . . . . . . . . . . . . . . . . . . . . . . . . . .3-3Defining the Adapter’s Outgoing Provider . . . . . . . . . . . . . . . . . . . . . . .3-4Editing the Adapter’s Outgoing Provider . . . . . . . . . . . . . . . . . . . . . . . .3-5Disabling the Adapter’s Outgoing Provider . . . . . . . . . . . . . . . . . . . . . .3-5Deleting the Adapter’s Outgoing Provider . . . . . . . . . . . . . . . . . . . . . . .3-6Registering the External URM Source. . . . . . . . . . . . . . . . . . . . . . . . . .3-6Unregistering the External URM Source . . . . . . . . . . . . . . . . . . . . . . . .3-7Adding a URM Custom Metadata Field . . . . . . . . . . . . . . . . . . . . . . . . .3-7Editing an Existing URM Custom Metadata Field . . . . . . . . . . . . . . . . .3-8Configuring/Editing Disposition Actions . . . . . . . . . . . . . . . . . . . . . . . . .3-9Scheduling Events to Run Automatically . . . . . . . . . . . . . . . . . . . . . . . .3-9Running Scheduled Events Manually . . . . . . . . . . . . . . . . . . . . . . . . . .3-9Viewing the Configuration Settings for the External URM Source. . . .3-10Viewing the Configuration Settings for the Outgoing Provider. . . . . . .3-10
The Adapter User Interface . . . . . . . . . . . . . . . . . . . . . . . . . . . . . . . . . . . .3-10Add Provider Screen . . . . . . . . . . . . . . . . . . . . . . . . . . . . . . . . . . . . . .3-11Register Source Screen. . . . . . . . . . . . . . . . . . . . . . . . . . . . . . . . . . . .3-12Configure Custom Fields Screen. . . . . . . . . . . . . . . . . . . . . . . . . . . . .3-13Add Custom Field Screen . . . . . . . . . . . . . . . . . . . . . . . . . . . . . . . . . .3-15Edit Custom Field Screen . . . . . . . . . . . . . . . . . . . . . . . . . . . . . . . . . .3-17Configure Disposition Actions Screen . . . . . . . . . . . . . . . . . . . . . . . . .3-18Configure Scheduled Events Screen. . . . . . . . . . . . . . . . . . . . . . . . . .3-20
Source Information Toolbar Menus . . . . . . . . . . . . . . . . . . . . . . . . . . . . . .3-21Configure Menu Options . . . . . . . . . . . . . . . . . . . . . . . . . . . . . . . . . . .3-22Batch Services Menu Options . . . . . . . . . . . . . . . . . . . . . . . . . . . . . . .3-23
iv Oracle Universal Records Management Adapter for Content Server Administration Guide

Table of Contents
Info Menu Options . . . . . . . . . . . . . . . . . . . . . . . . . . . . . . . . . . . . . . . .3-23Source Information Screen . . . . . . . . . . . . . . . . . . . . . . . . . . . . . .3-24Outgoing Provider Information Screen . . . . . . . . . . . . . . . . . . . . .3-25
Unregister Source Action. . . . . . . . . . . . . . . . . . . . . . . . . . . . . . . . . . .3-25
Chapter 4: Browsing the Retention ScheduleOverview . . . . . . . . . . . . . . . . . . . . . . . . . . . . . . . . . . . . . . . . . . . . . . . . . . .4-1
About Retention Schedules . . . . . . . . . . . . . . . . . . . . . . . . . . . . . . . . . . . . .4-2Retention Schedule Hierarchy . . . . . . . . . . . . . . . . . . . . . . . . . . . . . . . .4-2Retention Schedule Navigation . . . . . . . . . . . . . . . . . . . . . . . . . . . . . . .4-3
Accessing Retention Schedules Using the Browse Content Tray. .4-4Accessing Retention Schedules Using a Search Result . . . . . . . . .4-4Accessing Retention Schedules Using Breadcrumb Trails . . . . . . .4-5
Accessing Retention Schedule Information . . . . . . . . . . . . . . . . . . . . . . . . .4-5Viewing the Information Page for a Series . . . . . . . . . . . . . . . . . . . . . .4-5Viewing the Information Page for a Retention Category . . . . . . . . . . . .4-6Viewing Metadata History for a Retention Category . . . . . . . . . . . . . . .4-7Viewing Disposition Information for a Retention Category . . . . . . . . . .4-8Viewing the Content Information of a Retained Item . . . . . . . . . . . . . . .4-8Generating a Retention Schedule Report . . . . . . . . . . . . . . . . . . . . . . .4-9
The Retention Schedule User Interface . . . . . . . . . . . . . . . . . . . . . . . . . . .4-10Retention Schedule Menu Options . . . . . . . . . . . . . . . . . . . . . . . . . . .4-10
Toolbar Menus . . . . . . . . . . . . . . . . . . . . . . . . . . . . . . . . . . . . . . .4-10Action Icon Menus. . . . . . . . . . . . . . . . . . . . . . . . . . . . . . . . . . . . .4-11
Content Information Page for Retained Items . . . . . . . . . . . . . . . . . . .4-12Toolbar Menus . . . . . . . . . . . . . . . . . . . . . . . . . . . . . . . . . . . . . . .4-12Content Information Area . . . . . . . . . . . . . . . . . . . . . . . . . . . . . . .4-13Correspondence Fields Area. . . . . . . . . . . . . . . . . . . . . . . . . . . . .4-13Links Area . . . . . . . . . . . . . . . . . . . . . . . . . . . . . . . . . . . . . . . . . . .4-14Revision History Area . . . . . . . . . . . . . . . . . . . . . . . . . . . . . . . . . .4-14
Chapter 5: Checking In Content for RetentionOverview . . . . . . . . . . . . . . . . . . . . . . . . . . . . . . . . . . . . . . . . . . . . . . . . . . .5-1
Creating Non-Record Content Using the Main Menu. . . . . . . . . . . . . . . . . .5-2Checking In Content Items . . . . . . . . . . . . . . . . . . . . . . . . . . . . . . . . . .5-2Checking In E-Mail for Retention . . . . . . . . . . . . . . . . . . . . . . . . . . . . . .5-3Checking In an Individual E-Mail as a Retained Item . . . . . . . . . . . . . .5-3Checking In Correspondence From a Non-Outlook E-Mail Client . . . . .5-4
Main Menu Check In Page. . . . . . . . . . . . . . . . . . . . . . . . . . . . . . . . . . . . . .5-4Check In Page Metadata Fields. . . . . . . . . . . . . . . . . . . . . . . . . . . . . . .5-5Vital Review Fields . . . . . . . . . . . . . . . . . . . . . . . . . . . . . . . . . . . . . . . .5-7
Oracle Universal Records Management Adapter for Content Server Administration Guide v

Table of Contents
Correspondence Fields . . . . . . . . . . . . . . . . . . . . . . . . . . . . . . . . . . . . .5-8Date Fields. . . . . . . . . . . . . . . . . . . . . . . . . . . . . . . . . . . . . . . . . . . . . . .5-9
Chapter 6: Searching for Retained ContentOverview . . . . . . . . . . . . . . . . . . . . . . . . . . . . . . . . . . . . . . . . . . . . . . . . . . .6-1
Main Menu Search Page . . . . . . . . . . . . . . . . . . . . . . . . . . . . . . . . . . . . . . .6-1Search Forms Menu Options (Main Menu) . . . . . . . . . . . . . . . . . . . . . .6-2Metadata Search Fields. . . . . . . . . . . . . . . . . . . . . . . . . . . . . . . . . . . . .6-2Vital Review Fields . . . . . . . . . . . . . . . . . . . . . . . . . . . . . . . . . . . . . . . .6-4Correspondence Fields . . . . . . . . . . . . . . . . . . . . . . . . . . . . . . . . . . . . .6-5Date Fields. . . . . . . . . . . . . . . . . . . . . . . . . . . . . . . . . . . . . . . . . . . . . . .6-6
Viewing Search Results . . . . . . . . . . . . . . . . . . . . . . . . . . . . . . . . . . . . . . . .6-6Search Forms Menu Options (Results Page) . . . . . . . . . . . . . . . . . . . .6-7
Search Within Option . . . . . . . . . . . . . . . . . . . . . . . . . . . . . . . . . . .6-7Save Search Option . . . . . . . . . . . . . . . . . . . . . . . . . . . . . . . . . . . .6-8
Action Icon Menu Options . . . . . . . . . . . . . . . . . . . . . . . . . . . . . . . . . . .6-8
Appendix A: Metadata FieldsOverview . . . . . . . . . . . . . . . . . . . . . . . . . . . . . . . . . . . . . . . . . . . . . . . . . . A-1
Created Metadata Fields . . . . . . . . . . . . . . . . . . . . . . . . . . . . . . . . . . . . . . A-1
Mapped Metadata Fields . . . . . . . . . . . . . . . . . . . . . . . . . . . . . . . . . . . . . . A-3
Custom Metadata Fields . . . . . . . . . . . . . . . . . . . . . . . . . . . . . . . . . . . . . . A-3Internal Custom Metadata Fields. . . . . . . . . . . . . . . . . . . . . . . . . . . . . A-3Exported Custom Metadata Fields . . . . . . . . . . . . . . . . . . . . . . . . . . . A-4
Appendix B: Third Party LicensesOverview . . . . . . . . . . . . . . . . . . . . . . . . . . . . . . . . . . . . . . . . . . . . . . . . . . B-1
Apache Software License . . . . . . . . . . . . . . . . . . . . . . . . . . . . . . . . . . . . . B-1
W3C® Software Notice and License . . . . . . . . . . . . . . . . . . . . . . . . . . . . . B-2
Zlib License . . . . . . . . . . . . . . . . . . . . . . . . . . . . . . . . . . . . . . . . . . . . . . . . B-4
General BSD License. . . . . . . . . . . . . . . . . . . . . . . . . . . . . . . . . . . . . . . . . B-5
General MIT License . . . . . . . . . . . . . . . . . . . . . . . . . . . . . . . . . . . . . . . . . B-5
Unicode License. . . . . . . . . . . . . . . . . . . . . . . . . . . . . . . . . . . . . . . . . . . . . B-6
Miscellaneous Attributions . . . . . . . . . . . . . . . . . . . . . . . . . . . . . . . . . . . . . B-7
Index
vi Oracle Universal Records Management Adapter for Content Server Administration Guide

C h a p t e r
1.INTRODUCTION
OVERVIEWThis section contains the following topics:
About This Guide on page 1-1
About the Adapter on page 1-3
Software Requirements on page 1-6
Conventions on page 1-8
ABOUT THIS GUIDEThis section contains the following topics:
Product Overview on page 1-1
Audience on page 1-2
Standard Installation Architecture on page 1-2
Product OverviewOracle Universal Records Manager (URM) provides the ability to perform records management, retention management, and litigation support across the entire enterprise. From a single Oracle URM server, organizations can define all their policies for records and retention management, as well as perform legal searches and apply litigation holds.
Oracle Universal Records Management Adapter for Content Server Administration Guide 1-1

Introduction
The Oracle URM Adapter for Content Server (hereafter abbreviated as the Adapter) obtains these policies from the URM server and applies them to the content items stored in the Content Server Vault.
The Adapter provides the bridge between URM which manages the content management policies and the Adapter server’s content vault which stores the content. The Adapter enables corporations to manage records and retention policies and legal holds across multiple Content Servers from a single location. The Adapter sends information back to the URM server, so it can maintain an up-to-date catalog of the enterprise's important content. Thus, companies can apply their records and retention policies to more content, more consistently, with less administrative effort, and less disruption for users. These same benefits apply to litigation searches and holds.
AudienceThis administration guide is intended for system administrators who need to install and configure the Adapter. System administrators will also use this guide to manage retention functions using the combined user interface for the Adapter and Records Manager (RM). This guide assumes that the product has been installed correctly and that you are familiar with Oracle products in general and the overall architecture of Content Server.
Standard Installation ArchitectureThis section provides a general overview of the relationships between the primary products.
Content Server has a vault, in which content is stored and managed. The Content Server adapter, when registered, passes the retention schedule from URM to the content in the Content Server vault.
Figure 1-1 Standard Adapter Installation Architecture
1-2 Oracle Universal Records Management Adapter for Content Server Administration Guide

Introduction
The major components involved in a typical installation include:
URM—Enables organizations to manage their records and retention policies, disposition processes and litigation or audit holds in a central repository known as a URM Server. These policies, dispositions, and holds are applied to repository content through the Adapter.
RM—Enables organizations to effectively manage both record and non-record content items on a retention schedule. The focus of records management tends to be the preservation of records for historical or archival purposes. Conversely, the focus of retention management of non-record content items tends to be the scheduled elimination of content in which the costs of retaining content outweighs the value of keeping it.
Content Server—Stores and manages content in a repository.
Oracle URM Adapter for Content Server—Communicates between URM and the Adapter server’s content vault. The Adapter enables corporations to control content retention in the Adapter server’s content vault through URM which deploys the enterprise’s policies. The Adapter provides common retention functionality as follows:
• Identifying the content in the repository that is of interest to URM.
• Performing searches and declaring the applicable content items to URM.
• Performing disposition actions on the existing content items when their retention periods end.
• Establishing and removing holds and freezes on the content items, as necessary.
ABOUT THE ADAPTERThis section contains the following topics:
Overview of URM and the Adapter on page 1-3
Overview of the Retention Functions on page 1-4
Overview of URM and the AdapterUniversal Records Management (URM) allows organizations to manage their records and retention policies, disposition processes, and litigation holds or freezes in a central repository known as a Universal Records Management (URM) server. They can then apply those policies, dispositions, and holds to content stored in multiple repositories
Oracle Universal Records Management Adapter for Content Server Administration Guide 1-3
Introduction
through URM Adapters. The repositories may be any server or application that holds content whose retention is to be controlled.
In this case, the Adapter server’s content vault holds records and non-record content that needs to be preserved for a retention period, specified in a corporate retention schedule, and then destroyed according to a corporate disposition process. The records are preserved in place since the Adapter server’s content vault has the ability to ensure that the record will remain unalterable during the retention period. Upon request, the Adapter server’s content vault is also able to purge the records at the end of the retention period.
The Adapter server’s content vault may also hold content that is not considered business records (non-records). There is no requirement that the content be preserved for the retention period although it may be desirable for various reasons. When retention of this content is no longer necessary, it can be disposed of according to the disposition processes stored within URM. With both records and non-records, there is an obligation to ensure that any material that is subject to a litigation or audit hold (freeze) is not deleted, either by a user or as part of a disposition process. The Adapter enables URM to ensure that deletion does not happen.
Overview of the Retention FunctionsThe Adapter is the intermediary between URM and the Adapter server’s content vault and manages their intercommunications. Content is stored in and remains in the Adapter server’s content vault while URM simultaneously enforces corporate retention policies, disposition processes, and legal holds on the stored content.
Note: Content items that are non-records and are not subject to a litigation or audit hold are not transferred to URM. Instead, these documents remain in the Adapter server’s content vault and only their metadata is stored in URM.
1-4 Oracle Universal Records Management Adapter for Content Server Administration Guide

Introduction
Figure 1-2 Adapter Retention Functions Overview
The Adapter provides the following basic retention functions:
Registration—The Adapter registers itself with URM. This ensures that URM knows about the Adapter server’s content vault and is ready to manage the stored content within the repository.
Configuration—The Adapter handles all configuration requirements. This includes collecting the proper identification and credentials information for URM security and communications. Configuration information also includes mapping metadata fields and defining searches.
Query URM—The Adapter queries URM for certain information. For example, it may need to retrieve retention schedules for specific items of interest. Or, the Adapter may need to request URM metadata for content items and obtain lifecycle information.
Manage Communications—The Adapter monitors batch processes, handles communication errors with URM, and handles large work requests by grouping them into communication blocks and processing the response in chunks.
Repository Monitoring and Batch Declare—The Adapter monitors the Adapter server’s content vault by periodically searching the repository and informing URM of any changes in the repository that affect disposition processes or audit holds. For example, the Adapter will inform URM about new content checkins that need to be managed.
Oracle Universal Records Management Adapter for Content Server Administration Guide 1-5

Introduction
Perform URM Tasks—The Adapter periodically asks URM for tasks that need to be performed within the repository. These tasks enable URM to abide by the corporate retention policies and disposition processes. Typical tasks include:
• URM may want the Adapter to perform a search within the Adapter server’s content vault and provide a list of items matching the search criteria.
• As part of a scheduled disposition process, URM may want the Adapter to purge (or use another disposition method) an item that is stored in the Adapter server’s content vault.
• When a litigation hold applies to managed content within the Adapter server’s content vault, URM may want the Adapter to retrieve a list of affected items and preserve them to ensure that they are not edited or destroyed.
• When a litigation hold is removed, URM may want the Adapter to stop preserving the affected items and dispose of them according to retention schedule disposition rules and instructions.
Logging and Auditing—The Adapter provides consistent logging for the activities it coordinates. The Adapter contributes event information to the log files that are then uploaded to URM, consolidated, and stored.
SOFTWARE REQUIREMENTSThis section contains the following topics:
Compatibility with Content Server on page 1-6
Supported Operating Systems on page 1-7
Supported Databases on page 1-7
Compatibility with Content ServerCurrently, the Oracle URM Adapter for Content Server 10gR3 communicates with Oracle Universal Records Manager 10gR3. Currently, this version of URM is supported only on Oracle Content Server versions 10gR3.
1-6 Oracle Universal Records Management Adapter for Content Server Administration Guide

Introduction
Supported Operating SystemsThe current version of the Adapter supports the same operating systems as does Content Server 10gR3 and Records Manager Corporate Edition 10gR3:
Microsoft Windows 2000 Server with Service Pack 4
Microsoft Windows Server 2003, Standard Edition
Microsoft Windows Server 2003, Web Edition
Microsoft Windows Server 2003, Enterprise Edition (32-bit)
Sun Solaris 9
HP-UX 11i
IBM AIX 5L version 5.2 or 5.3
Red Hat Enterprise Linux 3.0 (AS or ES)
SuSe Linux 8 or 9
Supported DatabasesThe current version of the Adapter supports the same databases as does Content Server 10gR3 and Records Manager Corporate Edition 10gR3:
The following databases are supported:
Microsoft SQL Server 2000 with Service Pack 3a or higher
IBM DB2 8.1
Oracle 9i (version 9.2) or Oracle 10g
Note: For more detailed information about the operating systems supported, as well as special considerations for specific operating systems, refer to the Content Server installation guides.
Important: Oracle 9i versions prior to 9.2 are not supported. There is a known issue with these versions involving update statements with date fields that can corrupt rows of data (Oracle issue 2446039).
Important: If you are using IBM DB2 as the database, you may need to create additional tablespace to handle a 32K page size. See Preparing a DB2 Database (page 2-2) for further details.
Oracle Universal Records Management Adapter for Content Server Administration Guide 1-7

Introduction
CONVENTIONSThe following conventions are used throughout this guide:
The notation <Install_Dir>/ is used to refer to the location on your system where the content server instance is installed.
Forward slashes (/) are used to separate the directory levels in a path name. A forward slash will always appear after the end of a directory name.
Notes, technical tips, important notices, and cautions use these conventions:
Symbols Description
This is a note. It is used to bring special attention to information.
This is a technical tip. It is used to identify information that can be used to make your tasks easier.
This is an important notice. It is used to identify a required step or required information.
This is a caution. It is used to identify information that might cause loss of data or serious system problems.
1-8 Oracle Universal Records Management Adapter for Content Server Administration Guide

C h a p t e r
2.INSTALLATION
OVERVIEWThis section covers the following topics:
Installation Summary on page 2-2
Preparing a DB2 Database on page 2-2
Installing the Common Utilities Bundle on page 2-4
Installing the Adapter on page 2-6
Restarting Content Server on page 2-8
Rebuilding the Content Server Index on page 2-9
Post-Installation Steps (page 2-10)
Defining an Outgoing Provider on page 2-10
Variable Settings for Unregistering a Source (page 2-10)
Uninstalling the Adapter on page 2-11
Oracle Universal Records Management Adapter for Content Server Administration Guide 2-1

Installation
INSTALLATION SUMMARYBefore installing the Adapter software, the following pre-installation tasks and considerations should be taken into account:
You must ensure that Universal Records Manager, which includes Content Server, is installed on the URM server. For more information about the basic Adapter architecture, see Standard Installation Architecture on page 1-2. For installation information about URM, refer to the Oracle Universal Records Manager Installation Guide.
If you are using DB2 as your database, some configuration changes may be necessary. See Preparing a DB2 Database on page 2-2.
Before you install the Adapter, you must install the Common Utilities Bundle. See Installing the Common Utilities Bundle on page 2-4.
After you have installed the Common Utilities Bundle, you will need to install the Adapter. See Installing the Adapter on page 2-6.
After you have installed the Adapter, you will need to restart Content Server. See Restarting Content Server on page 2-8.
After you have restarted Content Server, you may need to rebuild the Content Server Search Index. See Rebuilding the Content Server Index on page 2-9.
After you have rebuilt the search index, you will need to define an outgoing provider. See Defining an Outgoing Provider (page 2-10).
PREPARING A DB2 DATABASEIf you are using DB2 as the database, you may need to make some configuration changes. DB2 has a default page size of 4K, while the Adapter requires a 32K page size. If you are using DB2’s default page size, you will need to create additional tablespace that can handle a 32K page size.
Caution: You CAN NOT install the Adapter for Content Server on a system that has either Records Manager Corporate Edition or Records Manager DoD Edition installed. Updating your system with the Adapter for Content Server IS NOT supported if you already have a Records Manager product installed.
2-2 Oracle Universal Records Management Adapter for Content Server Administration Guide

Installation
To create additional tablespace for the DB2 database, complete the following steps:
1. In the DB2 command-line processor, create a BufferPool that has a 32K page size:CONNECT TO <db_name> USER <user_name> USING <password>CREATE BUFFERPOOL WIDE SIZE 250 PAGESIZE 32kDISCONNECT <db_name>
2. Reload the Oracle database to activate the newly created BufferPool:
If the Oracle database is the only database in the DB2 instance, use the following commands to reload the database:FORCE APPLICATION ALLDEACTIVATE DATABASE <db_name>ACTIVATE DATABASE <db_name>
If there is more than one database in the DB2 instance, use the following commands to reload the database:
a. Find the applications that are connected to the Oracle database using the following command:LIST APPLICATIONS FOR DATABASE <db_name>
b. Close each application connection using the following command:FORCE APPLICATION <application-handle>
c. Reload the database using the following commands:DEACTIVATE DATABASE <db_name>ACTIVATE DATABASE <db_name>
3. Create the tablespace, temporary tablespace, and system temporary tablespace using the following commands:CONNECT TO <db_name> USER <user_name> USING <password>CREATE TABLESPACE WIDE_TBSP PAGESIZE 32K MANAGED BY SYSTEM USING ('<absolute_dir_path_for_tablespace>') BufferPool WIDECREATE TEMPORARY TABLESPACE TEMP_WIDE_TBSP PAGESIZE 32K MANAGED BY SYSTEM USING ('<absolute_dir_path_for_temp_tablespace>') BufferPool WIDECREATE SYSTEM TEMPORARY TABLESPACE TEMP_SYS_W_TBSP PAGESIZE 32K MANAGED BY SYSTEM USING ('<absolute_dir_path_for_system_tabspace>') BufferPool WIDE DISCONNECT <db_name>
Note: If any of the FORCE, DEACTIVATE, or ACTIVATE commands doesn’t return DB20000I, finish all three commands and then run them again.
Note: Make sure that the <user_name> and <password> match Oracle’s JdbcUser and JdbcPassword configuration entries. If they do not match, you will need to grant rights to Oracle’s JdbcUser on these newly created tablespaces.
Oracle Universal Records Management Adapter for Content Server Administration Guide 2-3
Installation
4. Make sure there are no tables in the default tablespace.
5. Use the following commands to drop the default tablespace:CONNECT TO <db_name> USER <user_name> USING <password>DROP TABLESPACE USERSPACE1DISCONNECT <db_name>
INSTALLING THE COMMON UTILITIES BUNDLEYou can install and enable the Common Utilities Bundle components using either of the following methods:
Installing the Common Utilities Bundle using Component Manager on page 2-4
Installing the Common Utilities Bundle using Component Wizard on page 2-5
Installing the Common Utilities Bundle using Component ManagerTo install the Common Utilities Bundle using Component Manager:
1. Log in to Content Server as an administrator.
2. Select Admin Server from the Administration menu.
3. Click the applicable Content Server instance button.
4. Click the Component Manager link.
The Component Manager page is displayed.
5. Click Browse, navigate to the CommonUtilitiesBundle.zip file, select it, and click Open.
The path is displayed in the Install New Component field.
6. Click Install.
A list of component items that will be installed is displayed.
Important: If tables exist, you should migrate data before dropping the default tablespace. Otherwise, you could lose data when performing the next step.
2-4 Oracle Universal Records Management Adapter for Content Server Administration Guide

Installation
7. Click Continue.
Component Manager asks if you want to immediately enable the Common Utilities Bundle or return to the Component Manager. Select the option to enable the Common Utilities Bundle.
8. Restart Content Server to apply the updated installation parameters. See Restarting Content Server on page 2-8.
Installing the Common Utilities Bundle using Component WizardTo install the Common Utilities Bundle using Component Wizard:
1. Start Component Wizard:In Windows, choose Start—Programs—Content Server—<install_dir>—Utilities—Component Wizard.In UNIX, navigate to the <install_dir>/bin directory, where <install_dir> refers to the Content Server installation directory. At the command prompt, type ComponentWizard.
The Component Wizard main screen and the Component List screen are displayed.
2. On the Component List screen, click Install.
The Install screen is displayed.
3. Click Select.
The Zip File Path screen is displayed.
4. Navigate to the CommonUtilitiesBundle.zip file and select it.
5. Click Open.
The zip file contents that will be installed are added to the Install screen list.
6. Click OK.
Component Wizard asks if you want to enable the Common Utilities Bundle.
7. Click Yes.
The Common Utilities Bundle is listed as enabled on the Component List screen.
8. Exit the Component Wizard.
9. Restart Content Server to apply the updated installation parameters. See Restarting Content Server on page 2-8.
Oracle Universal Records Management Adapter for Content Server Administration Guide 2-5

Installation
INSTALLING THE ADAPTERYou can install and enable the Adapter component using either of the following methods:
Installing the Adapter using Component Manager on page 2-6
Installing the Adapter using Component Wizard on page 2-7
Installing the Adapter using Component ManagerTo install the Adapter using Component Manager:
1. Log in to Content Server as an administrator.
2. Select Admin Server from the Administration menu.
3. Click the applicable Content Server instance button.
4. Click the Component Manager link.
The Component Manager page is displayed.
5. Click Browse, navigate to the UrmAgent.zip file, select it, and click Open.
The path is displayed in the Install New Component field.
6. Click Install.
A list of component items that will be installed is displayed.
7. Click Continue.
The Install Settings dialog is displayed and you are prompted to enable or disable the Retention Manager Email option. If you select this option, the Retention Manager Email component is installed.
This component allows automatic capturing of e-mail information. It is used in conjunction with the Outlook Integration portion of the Desktop Integration Suite. For new installations, this option is enabled by default.
The Retention Manager Email component is installed in the following directory:
<install_dir>/custom/RmaEmail
8. Click Continue.
Component Manager asks if you want to immediately enable the Adapter or return to the Component Manager. Select the option to enable the Adapter.
2-6 Oracle Universal Records Management Adapter for Content Server Administration Guide

Installation
9. Restart Content Server to apply the updated installation parameters. See Restarting Content Server on page 2-8.
Installing the Adapter using Component WizardTo install the Adapter using Component Wizard:
1. Start Component Wizard:In Windows, choose Start—Programs—Content Server—<install_dir>—Utilities—Component Wizard.In UNIX, navigate to the <install_dir>/bin directory, where <install_dir> refers to the Content Server installation directory. At the command prompt, type ComponentWizard.
The Component Wizard main screen and the Component List screen are displayed.
2. On the Component List screen, click Install.
The Install screen is displayed.
3. Click Select.
The Zip File Path screen is displayed.
4. Navigate to the UrmAgent.zip file and select it.
5. Click Open.
The zip file contents that will be installed are added to the Install screen list.
6. Click OK.
The Edit Preference Prompt dialog is displayed and you are prompted to enable or disable the Retention Manager Email option. If you select this option, the Retention Manager Email component is installed.
This component allows automatic capturing of e-mail information. It is used in conjunction with the Outlook Integration portion of the Desktop Integration Suite. For new installations, this option is enabled by default.
The Retention Manager Email component is installed in the following directory:
<install_dir>/custom/RmaEmail
7. Click OK.
Component Wizard asks if you want to enable the Adapter.
Oracle Universal Records Management Adapter for Content Server Administration Guide 2-7

Installation
8. Click Yes.
The Adapter is listed as enabled on the Component List screen.
9. Exit the Component Wizard.
10. Restart Content Server to apply the updated installation parameters. See Restarting Content Server on page 2-8.
RESTARTING CONTENT SERVERWhenever you add and enable a new component, you need to restart Content Server. If you prefer or require any down time, you may also choose to stop and then start Content Server with two separate commands.
You can restart Content Server by reinitiating the services (Windows) or by reinitiating the processes (UNIX).
You can also restart Content Server by using the Admin Server. You need to have the ‘sysmanager’ role to access a content server through Admin Server.
To restart Content Server using the Admin Server, complete the following steps:
1. Log into Content Server as a system administrator.
2. Go to the Administration Applets page and click the Admin Server link.
3. On the Content Admin Server page, click the button of the content server instance that you want to restart.
The status page for the content server instance is displayed.
4. In the option list for the server instance, click the Component Manager link. Verify that the Adapter component is displayed in the Enabled Components box.
5. In the option list for the server instance, click the Start/Stop Content Server link.
6. Restart the content server by clicking the restart icon.
2-8 Oracle Universal Records Management Adapter for Content Server Administration Guide

Installation
REBUILDING THE CONTENT SERVER INDEX
A new installation of the Adapter10gR3 adds custom metadata fields to the content server. For an overview of these fields, see Appendix A (Metadata Fields). After installing the Adapter for the first time, you need to rebuild the Verity search index.
Please note the following:
After installing the Adapter for the first time, you must rebuild the search index to ensure the Adapter functions properly. If you do not, security is not applied to search results. This means that users can see content items in the search results list that they do not have access to. If they try to access these content items, an “access denied” error is displayed. This may interfere with your organization’s security model as users will be able to see some metadata information about the content items (for example, their title).
Rebuilding the search index may be a very time-consuming process, depending on the number of content items managed by your content server instance. It is therefore recommended that you rebuild the index during off-peak hours of Content Server use, which is typically at night or on a weekend.
To rebuild the search index, complete the following steps:
1. Log into Content Server as a system administrator.
2. Go to the Administration Applets page and click the Repository Manager link.
The Repository Manager utility is started. (You may be prompted to log in.)
3. In Repository Manager, open the Indexer tab.
4. In the Collection Rebuild Cycle area (bottom half), click the Start button.
The index is now rebuilt. During the rebuild process, the Start button in the Collection Rebuild Cycle area is grayed out and cannot be clicked. The process is completed when the Start button is available again.
5. Exit the Repository Manager utility.
Important: This step is only required if your Content Server is using Verity as the search/index engine. If you are using database searching/indexing, you do not need to rebuild the search index.
Oracle Universal Records Management Adapter for Content Server Administration Guide 2-9

Installation
POST-INSTALLATION STEPSThis section covers the following topics:
Defining an Outgoing Provider (page 2-10)
Variable Settings for Unregistering a Source (page 2-10)
Defining an Outgoing ProviderAfter you have successfully installed the Adapter, you will need to set up an outgoing provider on the Adapter server that enables the Adapter to connect to the URM server. You will be prompted to set up the outgoing provider when you access the URM Agent Administration application. See Defining the Adapter’s Outgoing Provider (page 3-4) and the Add Provider Screen (page 3-11).
Variable Settings for Unregistering a SourceThe value of the IsUrmAgentAllowUnregister variable determines if the Unregister Source Action menu will appear on the Source Information toolbar. For additional information on Unregistering a Source, see Unregistering the External URM Source (page 3-7) . The format for the variable is:
IsUrmAgentAllowUnregister=1 allows the Unregister Source Action menu to be visible on the Source Information toolbar.
To set these Content Server configuration variable, complete the following steps:
1. Open a new browser window and log into Content Server as a system administrator.
2. Click the Admin Server link in the Administration tray.
3. On the Content Admin Server page, click the button of the content server instance where URM is installed. The status page for the content server instance is displayed.
4. In the option list for the server instance, click the General Configuration link. The General Configuration page is displayed.
5. To allow the Unregister Source Action menu to be visible, add this variable in the Additional Configuration Variables field and set the value to 1 (true):IsUrmAgentAllowUnregister=1
6. Click Save.
7. Restart the content server.
2-10 Oracle Universal Records Management Adapter for Content Server Administration Guide

Installation
UNINSTALLING THE ADAPTERUninstalling the Adapter software consists of the following steps:
Determine the components to be uninstalled. See Components To Be Uninstalled on page 2-11.
Uninstall the component in either of two ways:
• Uninstalling the Adapter using Component Manager on page 2-12.
• Uninstalling the Adapter using Component Wizard on page 2-13.
Perform any post-installation steps. See Post-Uninstallation Steps on page 2-14.
Components To Be UninstalledDepending on the options selected during the Adapter installation, the components associated with the Common Utilities Bundle and the Adapter for Content Server may need to be uninstalled.
Common Utilities Bundle components:• CommonUtilitiesBundle• ComponentDBInstall• CustomSecurityRights• Helper• JavascriptLibrary• MetadataSet• MultiSort• ScheduledTimeEvents• SimpleProfilesAdapter for Content Server components:• AdvancedOptionsLists• CheckSCSHealth• ConfigMigrationUtility• FileResultSetComponent• NativeOsUtils• PopUpCalendar• RecordsManagement• RelatedContent• ReportMaker
Tech Tip: While it is recommended that you set Content Server configuration variables using Admin Server, Content Server configuration variables can also be set by editing the config.cfg file located in the <install_dir>/config directory.
Oracle Universal Records Management Adapter for Content Server Administration Guide 2-11

Installation
• RetentionManager• RmaEmail• SearchAndTag• UIEnhancements• UrmAgent• WebUrlMapPlugin• WsdlGenerator• YahooUserInterfaceLibrary• Comptool
Uninstalling the Adapter using Component ManagerTo uninstall the Adapter components using Component Manager, complete the following steps:
1. Log in to Content Server as a system administrator.
2. Go to the Administration Applets page and click the Admin Server link.
3. On the Content Admin Server page, click the button of the Content Server instance where you want to uninstall the Adapter and supplemental components.
The status page for the Content Server instance is displayed.
4. In the option list for the server instance, click the Component Manager link.
The Component Manager page is displayed.
5. Select the component in the Enabled Components list that you want to uninstall. See Components To Be Uninstalled (page 2-11):
6. Click the Disable button to move the selected component to the Disabled Components list.
7. Click the Start/Stop Content Server link on the Component Manager page.
The Content Admin Server <instance_name> page is displayed.
8. Restart Content Server. See Restarting Content Server (page 2-8).
9. Click the Component Manager link.
10. Select the disabled component to be uninstalled in the Uninstall Component drop-down list, and click Uninstall.
A prompt is displayed asking you to confirm the uninstallation process.
11. Click OK to confirm.
2-12 Oracle Universal Records Management Adapter for Content Server Administration Guide
Installation
Component Manager displays a message that the component was uninstalled successfully.
12. Click the link to return to Component Manager.
The Component Manager page is displayed.
13. Click Start/Stop Content Server link on the Component Manager page.
The Content Admin Server <instance_name> page is displayed.
14. Restart Content Server to apply the changes. See Restarting Content Server (page 2-8).
15. Repeat steps 5 through 14 for each Adapter component that you want to uninstall. See Components To Be Uninstalled on page 2-11.
Uninstalling the Adapter using Component WizardTo uninstall the Adapter components using Component Wizard, complete the following steps:
1. Start Component Wizard:In Windows, choose Start—Programs—Content Server—<install_dir>—Utilities—Component Wizard.In UNIX, navigate to the <install_dir>/bin directory, where <install_dir> refers to the Content Server installation directory. At the command prompt, type ComponentWizard.
The Component Wizard main screen and the Component List screen are displayed.
2. On the Component List screen, select the component that you want to disable. See Components To Be Uninstalled (page 2-11).
3. Click Disable.
The selected component’s status is changed to disabled.
4. Restart Content Server. See Restarting Content Server on page 2-8.
5. On the Component List screen, select the component to be uninstalled.
6. Click Uninstall.
A prompt is displayed asking you to confirm the uninstallation process.
7. Click Yes to confirm.
Oracle Universal Records Management Adapter for Content Server Administration Guide 2-13

Installation
The Uninstall screen is displayed and lists the zip file contents that will be uninstalled.
8. Click OK.
The component is removed from the Component List screen.
9. Repeat steps 2 to 8 for each Adapter component that you want to uninstall.
10. After uninstalling the last component, exit the Component Wizard.
11. Restart Content Server to apply the changes. See Restarting Content Server (page 2-8).
Post-Uninstallation StepsAfter the Adapter components have been uninstalled, the metadata fields remain in the Content Server user interface. If you want to disable or delete the fields, you can use Content Server’s Configuration Manager utility. Disabling the fields hides the fields on the user interface while deleting the fields deletes the fields from the user interface, the database tables, and the search index. To see an overview of all metadata fields related to content retention management, see Appendix A (Metadata Fields).
You can remove or hide the Adapter metadata fields using one of the following methods:
Disabling the Adapter Metadata Fields (page 2-14)
Deleting the Adapter Metadata Fields (page 2-15)
Disabling the Adapter Metadata FieldsTo disable the Adapter metadata fields, complete the following steps:
1. Start Configuration Manager:
In Windows, choose Start—Programs—Content Server—<install_dir>—Configuration Manager.
In UNIX, navigate to the <install_dir>/bin directory, where <install_dir> refers to the Content Server installation directory. At the command prompt, type ConfigurationManager.
The Configuration Manager applet is displayed.
2. Open the Information Fields tab.
The Field Info box lists all of the custom information fields.
3. Select a field you want to disable and click Edit.
2-14 Oracle Universal Records Management Adapter for Content Server Administration Guide

Installation
The Edit Custom Info field is displayed.
4. Clear the Enable on User Interface check box and click OK. The Enabled column in the Field Info list now displays “No.” You must disable the fields one field at a time. Repeat steps 3 and 4 for each field you want to disable.
5. When you complete disabling the information fields, click Update Database Design. You may need to rebuild your search engine. If necessary, the Rebuild Search Index button becomes available.
6. Click Rebuild Search Index. When the rebuild completes, close the Configuration Manager applet and restart the Content Server.
Deleting the Adapter Metadata FieldsTo delete the Adapter metadata fields from the database, complete the following steps:
1. Start Configuration Manager:
In Windows, choose Start—Programs—Content Server—<install_dir>—Configuration Manager.
In UNIX, navigate to the <install_dir>/bin directory, where <install_dir> refers to the Content Server installation directory. At the command prompt, type ConfigurationManager.
The Configuration Manager applet is displayed.
2. Open the Information Fields tab.
The Field Info box lists all of the custom information fields.
3. Select a field you want to delete and click Delete. You must delete the fields one field at a time.
4. When you complete deleting the information fields, click Update Database Design. When the update is complete, the Rebuild Search Index button becomes available.
5. Click Rebuild Search Index. When the rebuild completes, close the Configuration Manager applet and restart the content server.
Caution: Rebuilding the search index may be a very time-consuming process, depending on the number of content items managed by your content server instance. It is therefore recommended that you rebuild the index during off-peak hours of Content Server use, which is typically at night or on a weekend.
Oracle Universal Records Management Adapter for Content Server Administration Guide 2-15

Installation
Caution: Rebuilding the search index may be a very time-consuming process, depending on the number of content items managed by your content server instance. It is therefore recommended that you rebuild the index during off-peak hours of Content Server use, which is typically at night or on a weekend.
2-16 Oracle Universal Records Management Adapter for Content Server Administration Guide
C h a p t e r
3.CONFIGURATION
OVERVIEWThis section covers the following topics:
ConceptsAbout Content Retention Management (page 3-2)
The External URM Source (page 3-3)
External URM Source Registration (page 3-3)
TasksDefining the Adapter’s Outgoing Provider (page 3-4)
Editing the Adapter’s Outgoing Provider (page 3-5)
Disabling the Adapter’s Outgoing Provider (page 3-5)
Deleting the Adapter’s Outgoing Provider (page 3-6)
Registering the External URM Source (page 3-6)
Unregistering the External URM Source (page 3-7)
Adding a URM Custom Metadata Field (page 3-7)
Editing an Existing URM Custom Metadata Field (page 3-8)
Configuring/Editing Disposition Actions (page 3-9)
Scheduling Events to Run Automatically (page 3-9)
Oracle Universal Records Management Adapter for Content Server Administration Guide 3-1

Configuration
Running Scheduled Events Manually (page 3-9)
Viewing the Configuration Settings for the External URM Source (page 3-10)
Viewing the Configuration Settings for the Outgoing Provider (page 3-10)
InterfaceAdd Provider Screen (page 3-11)
Register Source Screen (page 3-12)
Configure Custom Fields Screen (page 3-13)
Add Custom Field Screen (page 3-15)
Edit Custom Field Screen (page 3-17)
Configure Disposition Actions Screen (page 3-18)
Configure Scheduled Events Screen (page 3-20)
Configure Menu Options (page 3-22)
Batch Services Menu Options (page 3-23)
Info Menu Options (page 3-23)
Source Information Screen (page 3-24)
Outgoing Provider Information Screen (page 3-25)
Unregister Source Action (page 3-25)
ABOUT CONTENT RETENTION MANAGEMENTThis section covers the following topics:
The External URM Source (page 3-3)
External URM Source Registration (page 3-3)
3-2 Oracle Universal Records Management Adapter for Content Server Administration Guide

Configuration
The External URM SourceThe external URM source is from URM's perspective. The term ‘source’ is intended to represent an external repository that stores documents. In this case, the source is the Adapter server’s repository. The documents in this source (repository) are allocated for retention management under URM. For the Adapter server’s repository, there is a single external URM Source that is designated for the entire Adapter system.
Presumably, the Adapter server’s repository contains a wide variety of documents. Consequently, when the documents are classified into similar groups, there will be a wide variety of retention categories associated with the content items in the external URM Source. Thus, the content items in the URM Source share two characteristics: they are all derived from one repository and they all have the same default Mapped Metadata Fields on page A-3.
External URM Source RegistrationAfter you have created the outgoing provider on the Adapter server, the URM Agent Administration application automatically displays the Register Source Screen (page 3-12).
The following events occur after you register the external URM source:
A current retention schedule is downloaded from the URM server and incorporated into Adapter server’s content retention management system.
The content items in the Adapter server’s repository prior to installing the Adapter are not automatically assigned to retention categories. This must be done manually using the Content Server’s Batch Loader and/or Archiver. For more detailed information about these utilities, refer to Content Server’s Managing Repository Content guide.
New content items checked into the Adapter server can be assigned to appropriate retention schedules during the checkin process.
CONFIGURING THE ADAPTERThis section covers the following topics:
Defining the Adapter’s Outgoing Provider (page 3-4)
Editing the Adapter’s Outgoing Provider (page 3-5)
Disabling the Adapter’s Outgoing Provider (page 3-5)
Oracle Universal Records Management Adapter for Content Server Administration Guide 3-3

Configuration
Deleting the Adapter’s Outgoing Provider (page 3-6)
Registering the External URM Source (page 3-6)
Unregistering the External URM Source (page 3-7)
Adding a URM Custom Metadata Field (page 3-7)
Editing an Existing URM Custom Metadata Field (page 3-8)
Configuring/Editing Disposition Actions (page 3-9)
Scheduling Events to Run Automatically (page 3-9)
Running Scheduled Events Manually (page 3-9)
Viewing the Configuration Settings for the External URM Source (page 3-10)
Viewing the Configuration Settings for the Outgoing Provider (page 3-10)
Defining the Adapter’s Outgoing ProviderAfter you have completed the Adapter installation process, you must define an outgoing provider on the Adapter server that enables the Adapter to connect to the URM server. If you
To define an outgoing provider:
1. In the Administration tray, select URM Agent Administration.
If this is the first time that you have accessed the URM Agent Administration application, the Add Provider Screen (page 3-11) is displayed.
Otherwise, if you have already defined the outgoing provider and registered the external URM source, the Source Information Screen (page 3-24) is displayed. In this case, you will need to edit the existing outgoing provider. See Editing the Adapter’s Outgoing Provider (page 3-5).
2. On the Add Provider screen, enter the required information in the applicable fields.
3. Click Add to save the configured settings.
Note: Optionally, you can click the Show Expanded View link that will open the Content Server’s full Add Outgoing Provider page. This page offers you additional configuration options for the Adapter server’s outgoing provider. For more detailed information about outgoing providers in general and the Add Outgoing Provider page, refer to the Content Server’s Managing System Settings and Processes guide.
3-4 Oracle Universal Records Management Adapter for Content Server Administration Guide

Configuration
Editing the Adapter’s Outgoing ProviderTo edit an existing outgoing provider on the Adapter server:
1. In the Administration tray, select URM Agent Administration.
The Source Information Screen (page 3-24) is displayed.
2. Select Provider Information from the Info drop-down menu on the toolbar.
The Outgoing Provider Information Screen (page 3-25) is displayed.
3. Click Edit.
The populated Edit Provider screen is displayed.
4. Change the field values as necessary.
5. Click Save.
Disabling the Adapter’s Outgoing ProviderTo disable an existing outgoing provider on the Adapter server:
1. In the Administration tray, select URM Agent Administration.
The Source Information Screen (page 3-24) is displayed.
2. Select Provider Information from the Info drop-down menu on the toolbar.
The Outgoing Provider Information Screen (page 3-25) is displayed.
3. Click Disable.
You are prompted to confirm your choice.
4. Click OK.
The outgoing provider is disabled.
Oracle Universal Records Management Adapter for Content Server Administration Guide 3-5

Configuration
Deleting the Adapter’s Outgoing Provider
To delete an existing outgoing provider on the Adapter server:
1. In the Administration tray, select URM Agent Administration.
The Source Information Screen (page 3-24) is displayed.
2. Select Provider Information from the Info drop-down menu on the toolbar.
The Outgoing Provider Information Screen (page 3-25) is displayed.
3. Click Delete.
You are prompted to confirm your choice.
4. Click OK.
The outgoing provider is removed from the Content Server’s Providers table. Refer to the Content Server’s Managing System Settings and Processes guide.
Registering the External URM SourceTo register the external URM source:
1. In the Administration tray, select URM Agent Administration.
The Register Source Screen (page 3-12) is displayed.
2. Specify the Provider Name.
3. Specify the Source Name.
4. Specify the Source Display Name.
5. Specify the Source Table Name.
6. Click Register.
The Configure Custom Fields Screen (page 3-13) is displayed.
7. Specify whether to configure custom metadata fields, and click the right arrow to progress through the wizard.
The Configure Disposition Actions Screen (page 3-18) is displayed.
Note: The Adapter does not allow you to delete the outgoing provider if it is linked to an external URM source. You must first undo this link before deleting the outgoing provider.
3-6 Oracle Universal Records Management Adapter for Content Server Administration Guide

Configuration
8. Specify disposition actions, and click the right arrow to progress through the wizard.
The Configure Scheduled Events Screen (page 3-20) is displayed.
9. Click Save.
Unregistering the External URM Source
To unregister (delete) the external URM source:
1. In the Administration tray, select URM Agent Administration.
The Source Information Screen (page 3-24) is displayed.
2. Select the Unregister Source action item on the toolbar.
The external URM source is deleted. The next time you access the URM Agent Administration application, the Register Source Screen (page 3-12) is displayed.
Adding a URM Custom Metadata FieldTo add a URM custom metadata field:
1. In the Administration tray, select URM Agent Administration.
The Source Information Screen (page 3-24) is displayed.
2. Select Custom Fields from the Configure drop-down menu on the toolbar.
The Configure Custom Fields Screen (page 3-13) is displayed.
3. Click Add.
The Add Custom Field Screen (page 3-15) is displayed.
4. Enter the required information in the applicable fields and specify whether the custom metadata fields is required, enabled, and searchable.
5. Click Add.
The custom metadata field is added to the list of custom metadata fields on the Configure Custom Fields screen.
Caution: You must make sure that you want to delete your registered external URM source. When you click this action option on the Source Information toolbar, the Adapter prompts you to confirm whether you want to unregister (delete) the source. When you confirm your choice, the Adapter immediately deletes the current external URM source. The unregistration (deletion) process is permanent—it cannot be reversed.
Oracle Universal Records Management Adapter for Content Server Administration Guide 3-7

Configuration
Editing an Existing URM Custom Metadata FieldTo edit a URM custom metadata field:
1. In the Administration tray, select URM Agent Administration.
The Source Information Screen (page 3-24) is displayed.
2. Select Custom Fields from the Configure drop-down menu on the toolbar.
The Configure Custom Fields Screen (page 3-13) is displayed.
3. Select a metadata field from the list, and click Edit.
The Edit Custom Field Screen (page 3-17)is displayed.
4. Enter the required information in the applicable fields and specify whether the custom metadata fields is required, enabled, and searchable.
5. Click Update.
The changed configuration settings for the existing custom metadata field are saved. and the Configure Custom Fields screen is displayed.
6. Reorder the fields as necessary, and click Save.
3-8 Oracle Universal Records Management Adapter for Content Server Administration Guide
Configuration
Configuring/Editing Disposition ActionsTo configure disposition actions:
1. In the Administration tray, select URM Agent Administration.
The Source Information Screen (page 3-24) is displayed.
2. Select Disposition Actions from the Configure drop-down menu on the toolbar.
The Configure Disposition Actions Screen (page 3-18) is displayed.
3. Enable the check boxes to specify the disposition actions.
4. Click Save.
Scheduling Events to Run AutomaticallyTo schedule events to automatically run at predetermined times:
1. In the Administration tray, select URM Agent Administration.
The Source Information Screen (page 3-24) is displayed.
2. Select Scheduled Events from the Configure drop-down menu on the toolbar.
The Configure Scheduled Events Screen (page 3-20) is displayed.
3. Specify the number of days and the time for which the specified tasks should be scheduled.
4. Click Save.
Running Scheduled Events ManuallyTo manually run scheduled events:
1. In the Administration tray, select URM Agent Administration.
The Source Information Screen (page 3-24) is displayed.
2. In the Batch Services drop-down menu on the toolbar, select the specific service you want to run. See Batch Services Menu Options (page 3-23).
The Adapter immediately runs the selected service.
Oracle Universal Records Management Adapter for Content Server Administration Guide 3-9

Configuration
Viewing the Configuration Settings for the External URM SourceTo view the external URM source configuration settings:
1. In the Administration tray, select URM Agent Administration.
The Source Information Screen (page 3-24) is displayed.
2. Select Source Information from the Info drop-down menu on the toolbar.
The Source Information Screen (page 3-24) is displayed.
Viewing the Configuration Settings for the Outgoing ProviderTo view and/or edit the outgoing provider configuration settings:
1. In the Administration tray, select URM Agent Administration.
The Source Information Screen (page 3-24) is displayed.
2. Select Provider Information from the Info drop-down menu on the toolbar.
The Outgoing Provider Information Screen (page 3-25) is displayed.
3. To edit, disable, or delete the current outgoing provider, see Editing the Adapter’s Outgoing Provider (page 3-5), Disabling the Adapter’s Outgoing Provider (page 3-5), and Deleting the Adapter’s Outgoing Provider (page 3-6), respectively.
THE ADAPTER USER INTERFACEThis section covers the following topics:
Add Provider Screen (page 3-11)
Register Source Screen (page 3-12)
Configure Custom Fields Screen (page 3-13)
Add Custom Field Screen (page 3-15)
Edit Custom Field Screen (page 3-17)
Configure Disposition Actions Screen (page 3-18)
Configure Scheduled Events Screen (page 3-20)
3-10 Oracle Universal Records Management Adapter for Content Server Administration Guide

Configuration
Add Provider Screen
Use the Add Provider screen to define the outgoing provider that enables the Adapter server to connect to the URM server. This screen is a shortened version of Content Server’s full Outgoing Provider page. If you prefer to define the Adapter server’s outgoing provider using the full Outgoing Provider page, click the Show Expanded View link.
Feature Description
Provider Name field
The name of the outgoing provider for the Adapter server.
Note: All special characters and hyphens are illegal characters for the outgoing provider’s name.
Show Expanded View link
This link opens the Content Server’s full Add Outgoing Provider page. This page offers you additional configuration options for the Adapter server’s outgoing provider. For more detailed information about outgoing providers in general and the Add Outgoing Provider page, refer to the Content Server’s Managing System Settings and Processes guide.
Server Host Name fieldThe server host name of the content server instance on the URM server.
Server Port fieldThe port on which the provider communicates with the content server instance on the URM server.
Oracle Universal Records Management Adapter for Content Server Administration Guide 3-11

Configuration
Register Source Screen
Use the Register Source screen to register the external URM source. As soon as you register the external URM source, the URM server’s retention schedule is downloaded and integrated into the Adapter server’s retention management system. For more information about the external URM source and registration events, see The External URM Source on page 3-3 and External URM Source Registration (page 3-3).
Instance Name fieldThe instance name of the content server instance on the URM server.
Relative Web Root fieldThe relative web root of the content server instance on the URM server
Add buttonSaves the configuration settings and adds the outgoing provider to the Content Server’s Providers table.
Reset buttonClears any populated fields on the screen and resets the screen fields to their initial default settings.
Feature Description
Note: You can only register one source for an Adapter instance. If you need to change the configuration settings of the registered source, you must delete (unregister) the current source and register a new source.
3-12 Oracle Universal Records Management Adapter for Content Server Administration Guide
Configuration
Configure Custom Fields Screen
Feature Description
Provider Name fieldThe name of the outgoing provider that was configured for communication between the Adapter server and the URM server. See Provider Name field on page 3-11.
Source Name fieldThe name of the URM source to be created on the URM server.
Source Display Name field
The descriptive name used to identify the URM source. It is displayed on the content server’s Search <source_name> page on the URM server. If you do not supply a display name value, then, by default, the value in the Source Name field is used.
Source Table Name fieldThe prefix of the database tables that are created for the URM source. If you do not supply a prefix name, then, by default, the value in the Source Name field is used.
Register button
Registers the Adapter with URM. Registration ensures that URM is aware of the Adapter and is ready to manage the stored content in the Adapter server’s repository.
Reset buttonClears any populated fields on the screen and resets the screen fields to their initial default settings.
Oracle Universal Records Management Adapter for Content Server Administration Guide 3-13

Configuration
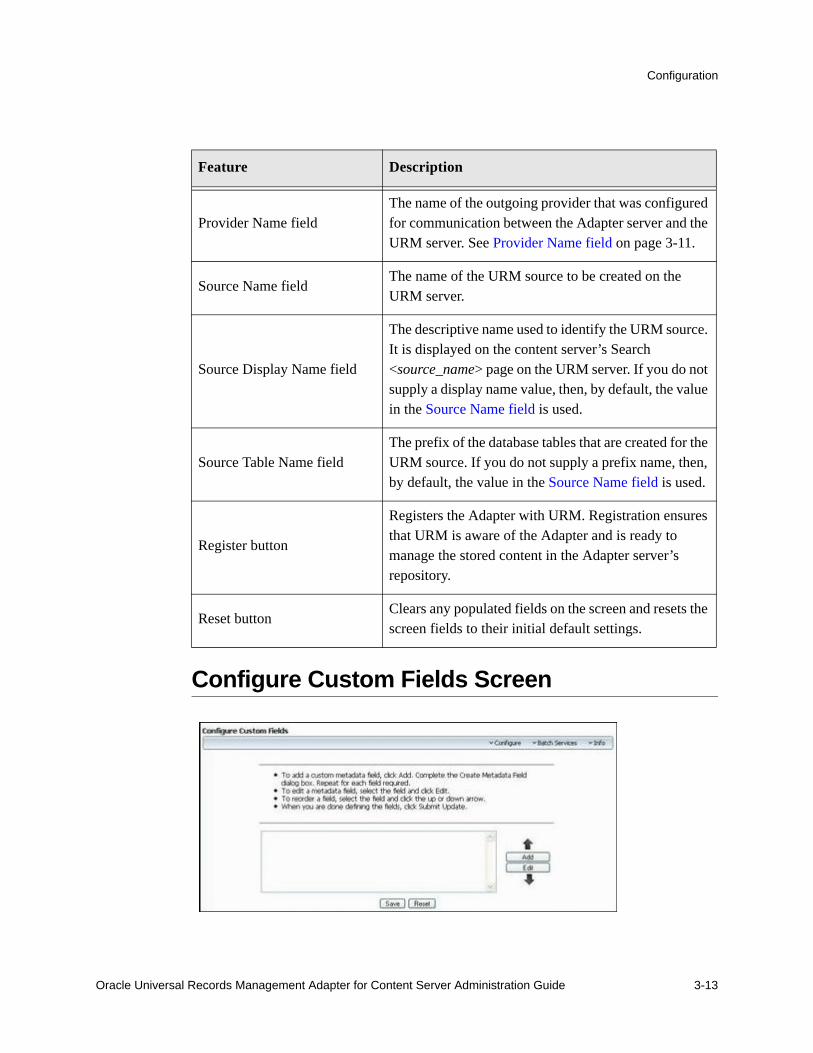
Use the Configure Custom Fields screen to create and define URM custom metadata fields for the URM source. The custom metadata fields enable you to include supplemental information about retained items in addition to the values of the default mapped metadata fields. For more information about the default mapped metadata fields and custom metadata fields, see Mapped Metadata Fields (page A-3) and Custom Metadata Fields (page A-3).
Feature Description
Configure toolbar menu Displays the Configure Menu Options (page 3-22).
Batch Services toolbar menuDisplays the Batch Services Menu Options (page 3-23).
Info toolbar menu Displays the Info Menu Options (page 3-23).
URM custom metadata fields pane
Lists the available URM custom metadata fields that can be edited or deleted, as necessary.
Add buttonDisplays the Add Custom Field Screen on page 3-15. Used to create new URM custom metadata fields.
Edit buttonDisplays the Edit Custom Field Screen on page 3-17 for an existing URM custom metadata field and enables you to modify the settings.
Up/down arrows
Used to adjust the specific placement order of the selected URM custom metadata field. The position of each custom field in the list is relevant to its priority on the Item Information page in URM.
Save buttonSaves the configured settings for all of the URM custom metadata fields listed in the URM custom metadata fields pane.
Reset buttonClears any populated fields on the screen and resets the screen fields to their initial default settings.
3-14 Oracle Universal Records Management Adapter for Content Server Administration Guide

Configuration
Add Custom Field Screen
Use the Add Custom Field screen to define new URM custom metadata fields. This screen is displayed when you click the Add button on the Configure Custom Fields Screen (page 3-13).
Feature Description
Name fieldEnter the name of the URM custom metadata field to be created.
Internal Name drop-down list
Lists the Adapter’s available custom metadata fields that can be mapped to URM custom metadata fields.
Note: You can either select a metadata field in the drop-down list or enter a different name. If you enter a new name, the Adapter automatically creates a corresponding custom metadata field for the name.
Caption fieldThe descriptive name of the URM custom metadata field that is displayed on the Item Information page in URM.
Oracle Universal Records Management Adapter for Content Server Administration Guide 3-15

Configuration
Type drop-down listLists the available classification types of information that can be used as the value for this URM custom metadata field. Possible values include:
Default Value fieldThe assigned value for the URM custom metadata field.
Required check box
Selected—Prevents content from being accepted into URM if users do not enter a value for the URM custom metadata field.Clear—Allows content to be accepted into URM without entering a value for the URM custom metadata field. This is the default value.
Enabled check box
Selected—Configures the URM custom metadata field to be displayed on the Item Information page in URM. This is the default value.Clear—Ensures that the URM custom metadata field is not displayed on the Item Information page in URM.
Searchable check box
Selected—Enables users to use the URM custom metadata field as search criteria. This is the default value.Clear—The URM custom metadata field cannot be used as search criteria.
Add button
Saves the settings and adds the new URM custom metadata field to the URM custom metadata fields pane (page 3-14) on the Configure Custom Fields Screen (page 3-13).
Reset buttonClears any populated fields on the screen and resets the screen fields to their initial default settings.
Feature Description
3-16 Oracle Universal Records Management Adapter for Content Server Administration Guide

Configuration
Edit Custom Field Screen
Use the Edit Custom Field screen to change the settings of existing URM custom metadata fields. This screen is displayed when you click the Edit button on the Configure Custom Fields Screen (page 3-13).
Feature Description
Name fieldThe name of the URM custom metadata field to be created. This field is not editable.
Internal Name drop-down list
Lists the Adapter’s available custom metadata fields that can be mapped to URM custom metadata fields.
Note: You can either select a metadata field in the drop-down list or enter a different name. If you enter a new name, the Adapter automatically creates a corresponding custom metadata field for the name.
Caption fieldThe descriptive name of the URM custom metadata field that is displayed on the Item Information page in URM.
Type drop-down listLists the available classification types of information that can be used as the value for this URM custom metadata field. Possible values include:
Oracle Universal Records Management Adapter for Content Server Administration Guide 3-17

Configuration
Configure Disposition Actions Screen
Default Value fieldThe assigned value for the URM custom metadata field.
Required check box
Selected—Prevents content from being accepted into URM if users do not enter a value for the URM custom metadata field.Clear—Allows content to be accepted into URM without entering a value for the URM custom metadata field. This is the default value.
Enabled check box
Selected—Configures the URM custom metadata field to be displayed on the Item Information page in URM. This is the default value.Clear—Ensures that the URM custom metadata field is not displayed on the Item Information page in URM.
Searchable check box
Selected—Enables users to use the URM custom metadata field as search criteria. This is the default value.Clear—The URM custom metadata field cannot be used as search criteria.
Update buttonSaves the changed settings for the existing URM custom metadata field.
Reset buttonClears any populated fields on the screen and resets the screen fields to their initial default settings.
Feature Description
3-18 Oracle Universal Records Management Adapter for Content Server Administration Guide

Configuration
Use the Configure Source Disposition Actions screen to specify the disposition actions for the Adapter to mark complete. For example, if you select the Expire disposition action, the Adapter sets the expiration date on the associated content item.
When using URM, if a disposition comes up for action, you must approve it and then the action is processed. When using the adapter with URM, if you mark one of these actions, you must run a Mark Complete action on the adapter in order for the actions to be processed.
Feature Description
Configure toolbar menu Displays the Configure Menu Options (page 3-22).
Batch Services toolbar menuDisplays the Batch Services Menu Options (page 3-23).
Info toolbar menu Displays the Info Menu Options (page 3-23).
Approve Deletion This action sets the approved delete date of the content item. Select this action if you want the adapter to maintain the approved delete date.
CutoffThis action sets the cutoff date of the content item. Select this action if you want the adapter to maintain the cutoff date.
ExpireThis action sets the expiration date of the content item. Select this action if you want the adapter to maintain the expiration date.
No ActionThis action acknowledeges that the disposition milestone has passed and the next step in the disposition has begun.
Notify Authors This action notifies the original content authors.
Check In New RevisionThis action will check in a new revision of the content item.
ActivateThis action sets the activation date of the content item. Select this action if you want the adapter to maintain the activation date.
Oracle Universal Records Management Adapter for Content Server Administration Guide 3-19

Configuration
Configure Scheduled Events Screen
Use the Configure Scheduled Times screen to establish the frequency and times that the Adapter must perform the management actions. You can schedule the Adapter to perform each function on a daily or hourly basis and set the specific range of hours.
In addition to scheduling specific intervals for the Adapter to run these events, you can also run each event manually. For more information about manually running these events, see Batch Services Menu Options (page 3-23) and Running Scheduled Events Manually (page 3-9).
ObsoleteThis action sets the obsolete date of the content item. Select this action if you want the adapter to maintain the obsolete date.
Save button Saves the selected settings.
Reset buttonClears any populated fields on the screen and resets the screen fields to their initial default settings.
Feature Description
3-20 Oracle Universal Records Management Adapter for Content Server Administration Guide
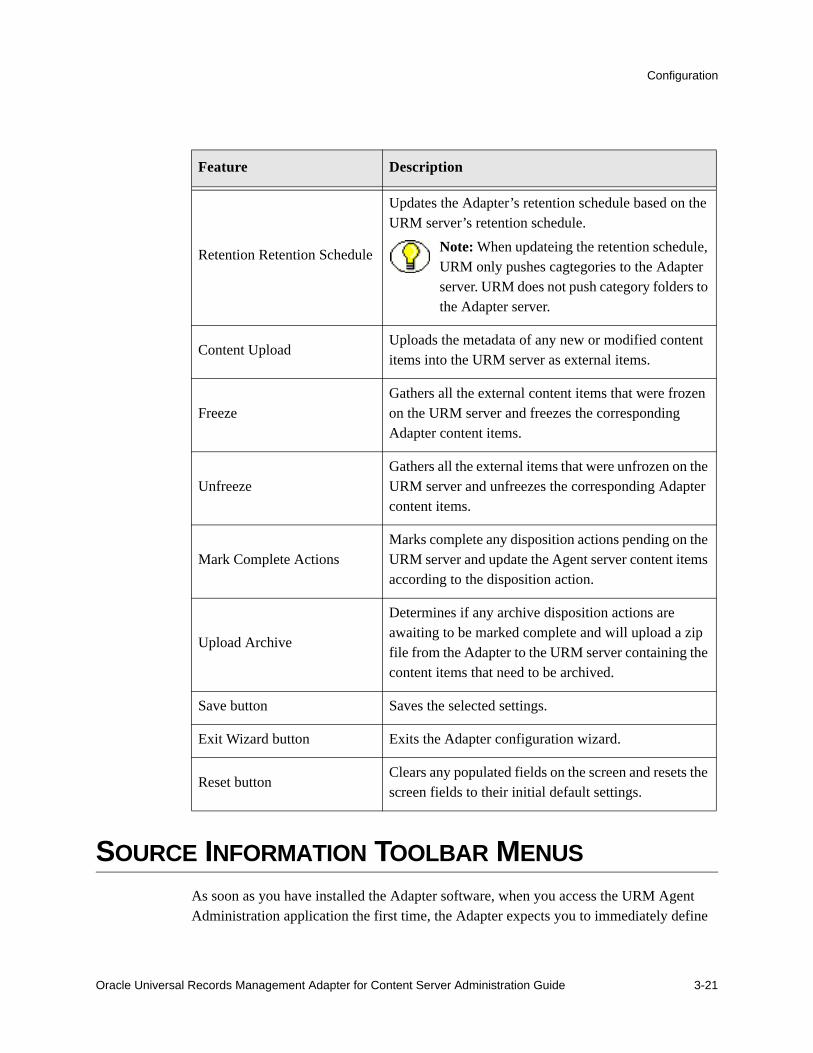
Configuration
SOURCE INFORMATION TOOLBAR MENUSAs soon as you have installed the Adapter software, when you access the URM Agent Administration application the first time, the Adapter expects you to immediately define
Feature Description
Retention Retention Schedule
Updates the Adapter’s retention schedule based on the URM server’s retention schedule.
Note: When updateing the retention schedule, URM only pushes cagtegories to the Adapter server. URM does not push category folders to the Adapter server.
Content UploadUploads the metadata of any new or modified content items into the URM server as external items.
FreezeGathers all the external content items that were frozen on the URM server and freezes the corresponding Adapter content items.
UnfreezeGathers all the external items that were unfrozen on the URM server and unfreezes the corresponding Adapter content items.
Mark Complete ActionsMarks complete any disposition actions pending on the URM server and update the Agent server content items according to the disposition action.
Upload Archive
Determines if any archive disposition actions are awaiting to be marked complete and will upload a zip file from the Adapter to the URM server containing the content items that need to be archived.
Save button Saves the selected settings.
Exit Wizard button Exits the Adapter configuration wizard.
Reset buttonClears any populated fields on the screen and resets the screen fields to their initial default settings.
Oracle Universal Records Management Adapter for Content Server Administration Guide 3-21

Configuration
an outgoing provider and register the external URM source. Once these tasks are complete, the next time you access the URM Agent Administration application, the Source Information Screen (page 3-24) and its toolbar menus are displayed.
The Adapter’s Source Information toolbar provides the following toolbar menus:
Configure Menu Options (page 3-22)
Batch Services Menu Options (page 3-23)
Info Menu Options (page 3-23)
Unregister Source Action (page 3-25)
Configure Menu Options
The Configure toolbar menu enables you to edit the previous configuration values that you set on the Configure Custom Fields Screen (page 3-13), the Configure Disposition Actions Screen (page 3-18), and the Configure Scheduled Events Screen (page 3-20).
This menu also provides options that enable you to:
Create and update new or existing content profiles. You can use content profiles to customize the displayed metadata fields on Content Server’s Check In, Update, Content Information, and Search pages. For more detailed information about content profiles, refer to the Simple Profiles Component Guide and the Managing Repository Content guide.
Add or edit new or existing related content link types. The Related Content component enables you to create links between individual content items. For more detailed information about related content link types, refer to the Related Content Component Administration Guide.
See also:
Adding a URM Custom Metadata Field (page 3-7)
Editing an Existing URM Custom Metadata Field (page 3-8)
Configuring/Editing Disposition Actions (page 3-9)
3-22 Oracle Universal Records Management Adapter for Content Server Administration Guide

Configuration
Scheduling Events to Run Automatically (page 3-9)
Running Scheduled Events Manually (page 3-9)
Batch Services Menu Options
The Batch Services toolbar menu enables you to manually run any of the batch services included on the Scheduled Events screen—see Configure Scheduled Events Screen (page 3-20). If you choose to manually perform a service by selecting it from the Batch Services menu, the Adapter executes the selected service immediately.
Info Menu Options
The Info toolbar menu enables you to view the configuration settings for the:
External URM source—Source Information Screen (page 3-24).
Current outgoing provider—Outgoing Provider Information Screen (page 3-25).
Note: Manually running a batch service from the toolbar menu is in addition to the scheduled event and does not override the previously scheduled services. The Adapter runs all of the scheduled batch services as configured whether or not they are run manually. See also Running Scheduled Events Manually (page 3-9).
Oracle Universal Records Management Adapter for Content Server Administration Guide 3-23

Configuration
Source Information Screen
After you have defined an outgoing provider and configured the external URM source, the next time you access the URM Agent Administration application, the Source Information screen is displayed. It enables you to view the configuration settings for the external URM source and includes the toolbar menus and their respective menu options:
Configure Menu Options (page 3-22)
Batch Services Menu Options (page 3-23)
Info Menu Options (page 3-23)
Unregister Source Action (page 3-25)
Note: The Unregister Source Action menu will not appear if the IsUrmAgentAllowUnregister configuration variable has not been set. For additional information, see Variable Settings for Unregistering a Source (page 2-10) .
3-24 Oracle Universal Records Management Adapter for Content Server Administration Guide

Configuration
Outgoing Provider Information Screen
The Provider Information screen enables you to view the configuration settings for the outgoing provider. The outgoing provider is configured on the Adapter server and enables the Adapter to connect to the URM server. After defining the initial outgoing provider, you can use this screen to reconfigure it by:
Editing the Adapter’s Outgoing Provider (page 3-5)
Disabling the Adapter’s Outgoing Provider (page 3-5)
Deleting the Adapter’s Outgoing Provider (page 3-6)
Unregister Source ActionThe Unregister Source action item on the toolbar enables you to immediately delete (unregister) the external URM source.
Caution: You must make sure that you want to delete your registered external URM source. When you click this action option on the Source Information toolbar, the Adapter prompts you to confirm whether you want to unregister (delete) the source. When you confirm your choice, the Adapter immediately deletes the current external URM source. The unregistration (deletion) process is permanent—it cannot be reversed.
Oracle Universal Records Management Adapter for Content Server Administration Guide 3-25


C h a p t e r
4.BROWSING THE RETENTIONSCHEDULE
OVERVIEWThis section covers the following topics:
ConceptsAbout Retention Schedules on page 4-2
Retention Schedule Hierarchy (page 4-2)
Retention Schedule Navigation (page 4-3)
TasksViewing the Information Page for a Series (page 4-5)
Viewing the Information Page for a Retention Category (page 4-6)
Viewing Metadata History for a Retention Category (page 4-7)
Viewing Disposition Information for a Retention Category (page 4-8)
Viewing the Content Information of a Retained Item (page 4-8)
Generating a Retention Schedule Report (page 4-9)
Oracle Universal Records Management Adapter for Content Server Administration Guide 4-1

Browsing the Retention Schedule
InterfaceRetention Schedule Menu Options (page 4-10)
Content Information Page for Retained Items (page 4-12)
ABOUT RETENTION SCHEDULESA retention schedule is an organized hierarchy of series and categories that enables you to cluster retained items into similar groups, each with its own retention and disposition characteristics. In the Adapter, there can be as many retention schedules as necessary for the requirements mandated by your organization. Retention schedules are set up to make it easy for you to accurately manage retained items.
When you file a retained item into a retention schedule, the disposition of that retained item is determined by the category into which it is filed. Additionally, the category into which the content item is filed determines the security access and status of the retained item (for example, whether or not the retained item is subject to review, or whether the record is permanent).
If you do not want the retained item to inherit the security and status of the category, but want the retained item or record to be filed in a specific location, you can change the security or status either while you are filing it or after it has been filed.
This section covers the following topics:
Retention Schedule Hierarchy on page 4-2
Retention Schedule Navigation on page 4-3
Retention Schedule Hierarchy
4-2 Oracle Universal Records Management Adapter for Content Server Administration Guide

Browsing the Retention Schedule
A typical hierarchy of a retention schedule consists of:
Series on page 4-3
Retention Category on page 4-3
SeriesA series is an optional organizational construct in the retention schedule which enables you to organize categories into functional groups. This is especially useful if you have a multitude of categories. Series cannot contain content items. A series can be nested, which means a series may contain other series.
Retention CategoryA retention category is a set of security settings and disposition instructions in the retention schedule hierarchy, below a series. This enables you to organize content into groups with the same retention and disposition characteristics. Categories define the disposition instructions of the retained items.
A retention category may contain one or more content items, which then typically follow the security settings and disposition rules associated with that retention category. Categories can be created within a series, but a category cannot be contained within another category, which means a retention category cannot contain other retention categories. Retention categories cannot be nested because the disposition rules for each category may conflict.
Retention Schedule NavigationYou can browse content and navigate the hierarchy in the retention schedule using various techniques. Your permissions and security configuration determine what portions of the schedule you can view. You can navigate by:
Accessing Retention Schedules Using the Browse Content Tray (page 4-4)
Accessing Retention Schedules Using a Search Result (page 4-4)
Accessing Retention Schedules Using Breadcrumb Trails (page 4-5)
Oracle Universal Records Management Adapter for Content Server Administration Guide 4-3

Browsing the Retention Schedule
Accessing Retention Schedules Using the Browse Content Tray
When you click the objects in the Browse Content area in Content Server, the tree expands or collapses. By default, retained items and records can be accessed in the retention schedule object. The search page displays the contents of the selected series or category.
Accessing Retention Schedules Using a Search Result
You can click the link in the Name column on a search results page to navigate to child objects. For example, clicking on the link “URMrtmTestnrc1” shown in the figure above enables you to open the corresponding Exploring Retention Category page (for example, see the figure in Accessing Retention Schedules Using Breadcrumb Trails on page 4-5).
Hover the mouse pointer over the name of a category to quickly view its description. Descriptions over 100 characters are truncated in the popup for easier viewing within the screen. To view the full description of a category, you must view it on the relevant information page. For more information, see Viewing the Information Page for a Retention Category (page 4-6). Series do not have descriptions.
4-4 Oracle Universal Records Management Adapter for Content Server Administration Guide

Browsing the Retention Schedule
Accessing Retention Schedules Using Breadcrumb Trails
The breadcrumb trail provides a convenient means of navigating a retention schedule. It shows where you are in the schedule hierarchy, and provides links that you can click to quickly move between parent and child levels.
For example, clicking “Series 0031 Combatant Command, etc. Correspondence” in the figure above opens the Exploring screen at the series level.
ACCESSING RETENTION SCHEDULE INFORMATIONThis section covers the following topics:
Viewing the Information Page for a Retention Category on page 4-6
Viewing Metadata History for a Retention Category on page 4-7
Viewing Disposition Information for a Retention Category on page 4-8
Viewing the Content Information of a Retained Item on page 4-8
Generating a Retention Schedule Report on page 4-9
Viewing the Information Page for a Series
Oracle Universal Records Management Adapter for Content Server Administration Guide 4-5

Browsing the Retention Schedule
The Series Information page shows relevant information about the selected series.
To view information about a series in the retention schedule, complete the following steps:
1. Open the Browse Content tray on the left and click the Retention Schedules link.
The Exploring Series “Retention Schedules” page is displayed.
2. Navigate to the series for which to see information.
3. In the row for the series, do either of the following:
• Click the Info icon.
• Click the Actions icon, and choose Series Information from the popup.
The Series Information page is displayed.
4. When you are done viewing the disposition information, click OK.
Viewing the Information Page for a Retention Category
The Category Information page provides relevant information about the selected retention category.
To view category information about a retention category, complete the following steps:
1. Open the Browse Content tray on the left and click the Retention Schedules link.
2. Navigate to the category for which to see information.
4-6 Oracle Universal Records Management Adapter for Content Server Administration Guide

Browsing the Retention Schedule
3. In the row for the category, do either of the following:
• Click the Info icon
• Click the Actions icon, and choose Category Information from the popup menu.
The Category Information page is displayed.
4. When you are done viewing the metadata history information, click OK.
Viewing Metadata History for a Retention Category
The Metadata History page provides the metadata history of a retention category (i.e., a list of all changes to the metadata of that retention category).
To view the metadata history for a retention category, complete the following steps:
1. Open the Browse Content tray and click the Retention Schedules link.
The Exploring Series “Retention Schedules” page is displayed.
2. Navigate to the retention category for which to view disposition information.
3. In the row for the retention category, click the Actions icon, and choose Metadata History from the popup menu.
The Metadata History page is displayed.
4. When you are done viewing the disposition information, click OK.
Oracle Universal Records Management Adapter for Content Server Administration Guide 4-7

Browsing the Retention Schedule
Viewing Disposition Information for a Retention Category
The disposition instructions for a retention category define how retained items in that category are handled and what actions should be taken on them (for example, when and how they should be disposed of).
To view disposition information for a retention category, complete the following steps:
1. Open the Browse Content tray and click the Retention Schedules link.
The Exploring Series “Retention Schedules” page is displayed.
2. Navigate to the retention category for which to view disposition information.
3. In the row for the retention category, click the Actions icon, and choose Disposition Information from the popup menu.
The Disposition Information page is displayed.
4. When you are done viewing the disposition information, click OK.
Viewing the Content Information of a Retained ItemTo view the content information of a retained item, complete the following steps:
1. Locate the retained item whose review history you want to view, either by browsing or searching.
2. In the row for the record to view, do either of the following:
• Click the Info icon.
• Click the Actions icon, and choose Content Information from the popup menu.
Note: The field captions on the disposition information may differ depending on whether your system administrator enabled user-friendly captions.
4-8 Oracle Universal Records Management Adapter for Content Server Administration Guide

Browsing the Retention Schedule
The Content Information page for the retained item is displayed. For more detailed information about the Content Information page, see Content Information Page for Retained Items on page 4-12.
Generating a Retention Schedule Report
You can generate a report for retained items at any time for any portion of the retention schedule to which you have permissions.
To generate a report, complete the following steps:
1. Open the Browse Content tray on the left and click the Retention Schedules link.
The Exploring Series “Retention Schedules” page is displayed.
2. Check the box corresponding to the item for which to run a report.
3. Navigate to the series or category to create a report for.
4. In the row for the series or category, click the Actions icon, and choose Retention Schedule Report from the popup menu.
Oracle Universal Records Management Adapter for Content Server Administration Guide 4-9

Browsing the Retention Schedule
A retention schedule report is generated. You can choose to display the report in a new browser window or save it as a PDF file that you can print at a later time.
5. Close the browser window when done.
THE RETENTION SCHEDULE USER INTERFACEThis section covers the following topics:
Retention Schedule Menu Options (page 4-10)
Content Information Page for Retained Items (page 4-12)
Retention Schedule Menu OptionsThis section covers the following topics:
Toolbar Menus on page 4-10
Action Icon Menus on page 4-11
Toolbar Menus
Note: The report is generated in either PDF or HTML form, depending on how your system administrator configured the system. If the generated file is in PDF format, it cannot be viewed using Adobe Acrobat 5.x or earlier. You need at least version 6.0 of the Acrobat software.
4-10 Oracle Universal Records Management Adapter for Content Server Administration Guide

Browsing the Retention Schedule
At the retention schedule level in the hierarchy (first insert above), the toolbar menu located in the top right corner of the search results page provides an option that enables you to print a retention schedule report for a selected series listed on the search results page. Or, you can generate a retention schedule using the Action icon Popup menu.
At the series/category level in the hierarchy (second insert above), the toolbar menu located in the top right corner of the search results page provides an Information drop-down menu. You can view the information page for a selected series or generate its retention schedule.
See also:
Viewing the Information Page for a Series on page 4-5
Generating a Retention Schedule Report on page 4-9
Action Icon Menus on page 4-11
Action Icon Menus
The Actions icon menu for a series enables you to view the information page for the selected series or generate its retention schedule report. The Actions icon menu for a selected category enables you to view its information page, metadata history, or disposition information. You can also generate its retention schedule report.
See also:
Viewing the Information Page for a Series on page 4-5
Viewing the Information Page for a Retention Category on page 4-6
Viewing Metadata History for a Retention Category on page 4-7
Viewing Disposition Information for a Retention Category on page 4-8
Oracle Universal Records Management Adapter for Content Server Administration Guide 4-11

Browsing the Retention Schedule
Generating a Retention Schedule Report on page 4-9
Toolbar Menus on page 4-10
Content Information Page for Retained ItemsThe page has the following main features:
Toolbar Menus (page 4-12)
Content Information Area (page 4-13)
Correspondence Fields Area (page 4-13)
Links Area (page 4-14)
Revision History Area (page 4-14)
Toolbar Menus
The Content Actions drop-down menu in the top right corner of the information page provides access to a number of tasks that can be performed on the current retained item. The available tasks depend on a number of factors such as the retained item properties, classification level, security restrictions, etc. A typical user will generally have the following options:
Checking out a retained item properties (see the Content Server User Guide)
Updating the retained item (see the Content Server User Guide)
Checking in a similar retained item (see the Content Server User Guide)
Subscribing to the current retained item (see the Content Server User Guide)
Sending link by e-mail (see the Content Server User Guide)
4-12 Oracle Universal Records Management Adapter for Content Server Administration Guide
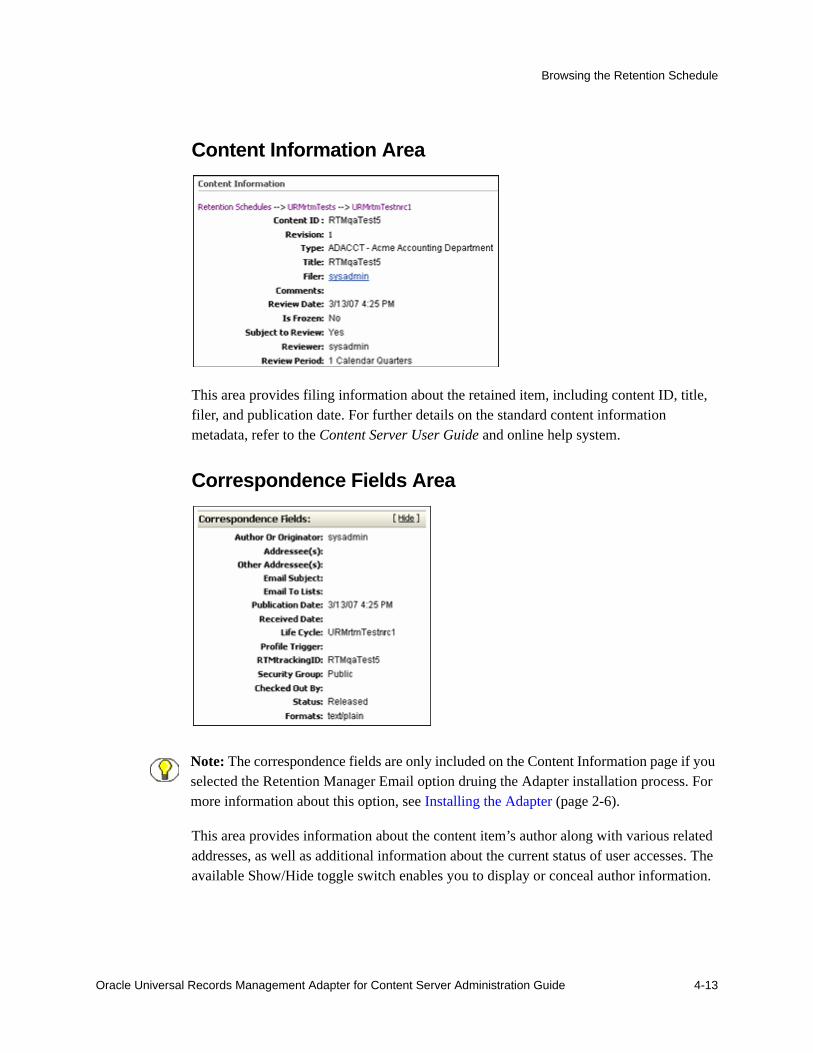
Browsing the Retention Schedule
Content Information Area
This area provides filing information about the retained item, including content ID, title, filer, and publication date. For further details on the standard content information metadata, refer to the Content Server User Guide and online help system.
Correspondence Fields Area
This area provides information about the content item’s author along with various related addresses, as well as additional information about the current status of user accesses. The available Show/Hide toggle switch enables you to display or conceal author information.
Note: The correspondence fields are only included on the Content Information page if you selected the Retention Manager Email option druing the Adapter installation process. For more information about this option, see Installing the Adapter (page 2-6).
Oracle Universal Records Management Adapter for Content Server Administration Guide 4-13

Browsing the Retention Schedule
Links Area
This area provides links to the native and web-viewable retained item, as well as a number of retention management links.
Revision History Area
This area provides release information about the current retained item.
4-14 Oracle Universal Records Management Adapter for Content Server Administration Guide

C h a p t e r
5.CHECKING IN CONTENT FORRETENTION
OVERVIEWThis section covers the following topics:
TasksChecking In Content Items (page 5-2)
Checking In E-Mail for Retention (page 5-3)
Checking In an Individual E-Mail as a Retained Item (page 5-3)
Checking In Correspondence From a Non-Outlook E-Mail Client (page 5-4)
InterfaceCheck In Page Metadata Fields (page 5-5)
Vital Review Fields (page 5-7)
Correspondence Fields (page 5-8)
Date Fields (page 5-9)
Oracle Universal Records Management Adapter for Content Server Administration Guide 5-1

Checking In Content for Retention
CREATING NON-RECORD CONTENT USING THE MAIN MENU
You can create non-record content from the main menu of Content Server, or you can mark existing content within the content server as a record.
This section covers the following topics:
Checking In Content Items (page 5-2)
Checking In E-Mail for Retention (page 5-3)
Checking In an Individual E-Mail as a Retained Item (page 5-3)
Checking In Correspondence From a Non-Outlook E-Mail Client (page 5-4)
Checking In Content ItemsUse this procedure to check in new content. Content items can be checked into a category.
To check in from the main menu, complete the following steps:
1. Click New Check In on the toolbar or under the Content Management tray.
The applicable checkin page is displayed.
2. Enter optional information pertinent to the content item. See Check In Page Metadata Fields (page 5-5) for information about metadata fields.
3. After you enter all the appropriate metadata values, click Check In.
Upon successful check-in, the check-in confirmation page is displayed.
For more detailed information on checking in content, refer to the online help or the Content Server User Guide.
Tech Tip: Use this method of filing content items when you are filing items to disparate locations and have to navigate to a different location within the retention schedule with each check in.
5-2 Oracle Universal Records Management Adapter for Content Server Administration Guide

Checking In Content for Retention
Checking In E-Mail for RetentionThis functionality is only available if the applicable option was selected and enabled during the installation process. You can check in e-mail messages as content with the Oracle Outlook Integration for Microsoft Outlook.
You must have the Outlook Integration Suite application installed and configured on your client machine. For assistance with setting up your server, see the online Help for Oracle Outlook Integration.
Outlook Integration ToolbarThe Outlook Integration toolbar enables you to configure virtual servers for checking in content with disparate metadata. To display the Outlook toolbar in Microsoft Outlook, click View—Toolbars—Oracle Outlook Integration.
Checking In an Individual E-Mail as a Retained ItemUse this procedure to check in an individual e-mail as an individual retained item.
To check in an e-mail message as a content item, complete the following steps:
1. Open your Microsoft Outlook e-mail client.
2. In the Server list, select the server into which to check in e-mail content.
3. In your Inbox, select the e-mail to check in. The e-mail message becomes highlighted.
4. In the Outlook Integration toolbar, click Checkin Mail Item. An Outlook message prompts you to allow access into your e-mail application.
5. Click Yes. The Content Check In Form is displayed.
Important: Checking in batch e-mail removes the mail from your Inbox. Checking in an individual e-mail leaves the mail in your Inbox.
Important: Checking in an individual e-mail leaves the mail in your Inbox. You must manually delete the e-mail to remove it from your mailbox.
Oracle Universal Records Management Adapter for Content Server Administration Guide 5-3

Checking In Content for Retention
6. Select the Is Correspondence check box. The e-mail fields are displayed, some of which are prepopulated for you:
a. Addressee(s)
b. Other Addressees(s)
c. Email Subject
d. Email To Lists
7. To preview the life cycle of the or retained item before actually checking it into the content server, click Lifecycle Preview at the bottom of the content check-in page. This will open a page showing the life cycle that the retained item will go through based on the current selections on the content check-in page.
8. Click Check In.
Checking In Correspondence From a Non-Outlook E-Mail ClientUse this procedure to check in correspondence as a retained item if you do not use the Outlook Integration.
To check in e-mail from a client other than the Outlook Integration:
1. Open the e-mail client and save the e-mail messages in a text format or HTML.
2. Click New Check In.
The Content Check In Form is displayed.
3. Check in the content, making sure you select Is Correspondence check boxes.
4. Be sure to complete the Correspondence fields, as they are not prepopulated for you if you are not using Outlook Integration.
MAIN MENU CHECK IN PAGEThis section covers the following topics:
Check In Page Metadata Fields (page 5-5)
Vital Review Fields (page 5-7)
Correspondence Fields (page 5-8)
Date Fields (page 5-9)
5-4 Oracle Universal Records Management Adapter for Content Server Administration Guide

Checking In Content for Retention
Check In Page Metadata FieldsThe metadata fields that are included in the selected check in form are dependent on the components that are enabled and the profiles that are used. The metadata fields included and described in the following table are representative of those that may be included in the check in form that you select.
Note: To ensure that the Adapter manages content with a disposition plan, note that a Life Cycle field is available on the lower portion of the check-in page. The Life Cycle field enables you to specify disposition instructions. You can only access those life cycles which you have been given permission to work with.
Field Description
Content ID field* The unique identifier for the content item.Duplicate names are not allowed.Maximum length is 30 characters.The following are not acceptable: spaces, tabs, linefeeds, carriage returns, and symbols ; ^ ? : @ & + " # % < > * ~ |
Note: If a content ID is already filled in or if this field is not displayed, the system is set up to automatically generate content IDs.
Type field* The type (department) of the file. You must select from a list of predefined values. This is required, but is pre-filled.
Title field* A descriptive name identifying the revision.Maximum length 80 characters.Required
Filer field* The user who created or revised the content item.Depending on how your system is set up, you might be able to select from a list of users. This value can be changed only if you have administrative permission.Required.
Oracle Universal Records Management Adapter for Content Server Administration Guide 5-5

Checking In Content for Retention
Security Group field* The security group is a set of files with the same access permission.
Primary File field* The path and file name of the native file being checked in.
Maximum length is 80 characters.The maximum file extension length (after the period) is eight characters.Click the Browse button to navigate to and select the file.
Alternate File field The path and file name of an alternate web-viewable file or a file that can be converted to web-viewable format.
The file extension (after the period) cannot be the same as that of the Primary file (for example, both files cannot end in .doc).Maximum length is 80 characters.The maximum file extension length (after the period) is eight characters.Click the Browse button to navigate to and select the file.Optional.
Revision field* The revision increments automatically with each check-in of the content item, so generally, you should not change this value.
Comments field Additional notes about the file.Maximum length is 255 characters.Optional.
Vital Review fields The Vital Review Fields (page 5-7) are displayed.
Correspondence fields When expanded, the Correspondence Fields (page 5-8) are displayed.
Field Description
5-6 Oracle Universal Records Management Adapter for Content Server Administration Guide

Checking In Content for Retention
Vital Review Fields
All of the check-in forms include the following vital review-related fields:
Date fields The Date Fields (page 5-9) are displayed.
Life Cycle When checking in items from the main menu, the Life Cycle drop-down list is activated. However, the option list contains only non-record categories when a new content item is checked in.The Life Cycle field enables you to specify disposition instructions to determine how the content will be handled. You can only access those life cycles which you have been given permission to work with.
Profile Trigger Searches for the specified trigger value that has been configured for a defined profile.
Custom fields Any custom metadata fields for your system are displayed on this page.
* = Depending on the type of check-in form that you are using, these fields are required.
Field Description
Subject to Review Select this check box if the item is subject to review. Selecting this check box enables the Reviewer and Review Period fields.Review items are defined by your organization as needing to be reviewed by a specified person within a specified time frame. Do not select the check box if this is not considered an item which must be reviewed.
Field Description
Oracle Universal Records Management Adapter for Content Server Administration Guide 5-7

Checking In Content for Retention
Correspondence Fields
The Correspondence Fields section is only displayed if the applicable option was selected and enabled during the installation process. All of the check-in forms include the following correspondence-related fields:
Reviewer Select a reviewer from the list. The reviewer list is a list of people, defined by your administrator, who have access to this review item. The reviewer receives notifications.
Review Period Select the period from the list.
Field Description
Note: The correspondence fields are only included on the Check In page if you selected the Retention Manager Email option druing the Adapter installation process. For more information about this option, see Installing the Adapter (page 2-6).
Field Description
Is Correspondence Enabling displays additional metadata fields. Used if a content item is an e-mail being checked in via Outlook Integration.
Author or Originator Specifies from whom the e-mail was sent. If the Is Correspondence check box is disabled, enter the content author or originator.
5-8 Oracle Universal Records Management Adapter for Content Server Administration Guide

Checking In Content for Retention
Date Fields
The Date fields section is only displayed if the applicable option was selected and enabled during the installation process. All of the check-in forms include the following date-related fields:
Addressee(s) Specifies to whom the e-mail was sent.
Other Addressee(s) Specifies any additional people who were copied on the original e-mail.
Email Subject Displays the subject line of the original e-mail.
Email To Lists Displays any alias lists used in the original e-mail.
Field Description
Publication Date Displays the date an e-mail was initially sent.
Received Date Displays the date an e-mail was received.
Release Date The date and time that the revision is available for viewing. This is required but is pre-filled.
Defaults to the date and time the file is checked in.
If another date is entered, the revision remains in DONE status until the specified date.
The date is required; the time is optional.
Field Description
Oracle Universal Records Management Adapter for Content Server Administration Guide 5-9

Checking In Content for Retention
Expiration Date The date and time that the revision will no longer be available for viewing in the content server.
Upon expiration, the revision is not deleted.
If a value is entered, the date is required; the time is optional.
Field Description
5-10 Oracle Universal Records Management Adapter for Content Server Administration Guide

C h a p t e r
6.SEARCHING FOR RETAINEDCONTENT
OVERVIEWContent Server offers a variety of ways to search for content. See the Content Server online help for information on using the Search tray, the Quick Search field, library query folders, case-sensitivity, using wild cards, and using search operators.
This section covers the following topics:
Main Menu Search Page (page 6-1)
Viewing Search Results (page 6-6)
MAIN MENU SEARCH PAGEThe main menu search page has the following main features:
Search Forms Menu Options (Main Menu) (page 6-2)
Metadata Search Fields (page 6-2)
Vital Review Fields (page 6-4)
Correspondence Fields (page 6-5)
Date Fields (page 6-6)
Oracle Universal Records Management Adapter for Content Server Administration Guide 6-1

Searching for Retained Content
Search Forms Menu Options (Main Menu)
When you install the Adapter, the Search menu options in Content Server are changed. You can use these menu options to quickly narrow down and optimize your searches.
Expanded Search FormAfter you have accessed the search page, you can choose to use the expanded version of the form or build a custom search query based on the selected form. By default, several metadata fields on the search form are included in a section that is displayed using the collapsed format. When you select the expanded version of the search form, that section is displayed in the expanded format. For more detailed information and descriptions of each metadata field included on the search form, see Metadata Search Fields (page 6-2), Vital Review Fields (page 6-4), Correspondence Fields (page 6-5), and Date Fields (page 6-6).
Query Builder FormThe Query Builder form is available from the Search Forms drop-down menu on the search page. It enables you to easily build and save complex queries by selecting options from a series of drop-down lists and operator fields. Once a query is built using the Query Builder from, you may edit the query directly, perform the search, or save the query for easy access from your saved queries or through a targeted quick search. For comprehensive information about the Query Builder form, refer to the Content Server User Guide. All of the available drop-down lists and operator fields are described in more detail.
Metadata Search FieldsAlthough the Search tray and Quick Search field offer convenient search options, the search pages for the Records, Non Records, and Standard Search menu options provide the most comprehensive way to search for content. The metadata fields included and described in the following table are representative of those that may be included in the search form that you select. The actual metadata fields that display are dependent on the components that are enabled and the profiles that are used. See your system administrator for more details.
6-2 Oracle Universal Records Management Adapter for Content Server Administration Guide

Searching for Retained Content
Field Description
Content ID Searches for the unique identifier for a content item.Duplicate names are not allowed.Maximum length is 30 characters.The following are not acceptable: spaces, tabs, linefeeds, carriage returns, and the symbols ; ^ ? : @ & + " # % < > * ~ |
Title Searches the descriptive name entered when a content item was filed.
Maximum length is 80 characters.Double quotation marks " cannot be used when searching.
Type Searches for content items belonging to the specified category. It is best to select from a list of predefined values.
Security Group Searches for content items belonging to the specified security group.
Filer Searches for content items authored by the specified person. By default, the author is the last person who filed the record.
Release Date Searches for content items that were released and available for viewing during the specified dates.
Expiration Date Searches for content items that will expire during the specified date range. Expired content is no longer available for viewing.
Comments Searches for the specified keywords in the additional notes entered when a content item was checked in. A comments maximum length is 255 characters.
Email ID Searches for the unique identifier for an email content item.
Oracle Universal Records Management Adapter for Content Server Administration Guide 6-3

Searching for Retained Content
Vital Review Fields
The Records, Non Records, and Standard Search forms include the following vital review-related fields:
Profile Trigger Searches for the specified trigger value that has been configured for a defined profile.
Custom fields Any custom metadata fields for your system are displayed on this page. These fields vary by organization.
Life Cycle Content is assigned the disposition instructions associated with the retention category selected in the drop-down list.
Field Description
Review Date Searches for records that have been reviewed during the specified date range.
Subject to Review Select an option from the available options list:Null (Default)—Searches for all content items, whether flagged as subject for review or not.0—Searches for content items that have not been flagged as subject for review.1—Searches for content items that have been flagged as subject to review.
Reviewer Searches for content items flagged as subject to review which are reviewed by the specified person.
Field Description
6-4 Oracle Universal Records Management Adapter for Content Server Administration Guide

Searching for Retained Content
Correspondence Fields
The Records, Non Records, and Standard Search forms include the following correspondence-related fields:
Review PeriodSearches for content items flagged as subject to review which are reviewed during the specified period.
Review Period UnitsSearches for content items flagged as subject to review at the specified period intervals.
Field Description
Note: The correspondence fields are only included on the Search page if you selected the Retention Manager Email option druing the Adapter installation process. For more information about this option, see Installing the Adapter (page 2-6).
Field Description
Is Correspondence Searches for e-mail content checked in via Outlook Integration.
Author or Originator Searches for e-mail messages sent by specified person.
Addressee(s)Searches for e-mail messages sent to the specified person.
Other Addressee(s) Searches for e-mail messages copied to the specified person.
Oracle Universal Records Management Adapter for Content Server Administration Guide 6-5

Searching for Retained Content
Date Fields
The Records, Non Records, and Standard Search forms include the following related-related fields:
VIEWING SEARCH RESULTSAfter selecting your search criteria on the Advanced Search page, or after using any of the other Content Server search options, the results of your search are displayed on a search results page. What information is displayed and how it is formatted can be changed using the Actions choice list on the search results page, or by setting a default search result template option on the User Profile page.
This section covers the following topics:
Search Forms Menu Options (Results Page) (page 6-7)
Action Icon Menu Options (page 6-8)
Email Subject Searches for the specified keywords in the subject lines of e-mail messages.
Email To Lists Searches for e-mail messages sent to a specified alias list.
Field Description
Publication Date Searches for content items that were published on the specified date.
Received Date Searches for content items that were received on the specified date.
Field Description
6-6 Oracle Universal Records Management Adapter for Content Server Administration Guide

Searching for Retained Content
Search Forms Menu Options (Results Page)
When you install the Adapter, the Query Actions menu options on the Search Results page toolbar enable you to narrow down and/or save your search queries.
The options include:
Search Within Option (page 6-7)
Save Search Option (page 6-8)
Search Within Option
The Search Within option enables you to refine your search results by searching through the initial returned results using additional or more specific metadata values. The insert above illustrates how searching within returned results can optimize the search process. In this case, more specific metadata values reduced the number of items from 16 to three.
Oracle Universal Records Management Adapter for Content Server Administration Guide 6-7

Searching for Retained Content
Save Search OptionThe Save Search option enables you to store a link to the most recent revision of any content item in Content Server. This is done by searching for the item’s content ID, then selecting Save Search from the Query Actions drop-down list on the search results page. this saves the search as a link in the My Saved Queries folder in your My Content Server tray. Click the saved search link to always access the most recent revision of a content item. For more information, refer to the Content Server User Guide.
Action Icon Menu Options
The content item Action menu pulls down from the Actions icon. The menu lists actions that pertain to the associated content item. For example, some of the options in the item action menu for a content item displayed on the search results page include links to check out the item or view the item’s content information.
6-8 Oracle Universal Records Management Adapter for Content Server Administration Guide

A p p e n d i x
A.METADATA FIELDS
OVERVIEWThis section covers the following topics:
Created Metadata Fields (page A-1)
Mapped Metadata Fields (page A-3)
Custom Metadata Fields (page A-3)
CREATED METADATA FIELDSThis section lists the metadata fields created by the Adapter during installation. You can view the field definitions using the Configuration Manager utility.
Information Field Name Field Type Field Caption
CategoryID Long Text Category ID
DistributionList Text Distribution List
EmailCC Memo Other Addressee(s)
EmailFrom Text Author Or Originator
Emailid Text wwxEmailid
Oracle Universal Records Management Adapter for Content Server Administration Guide A-1
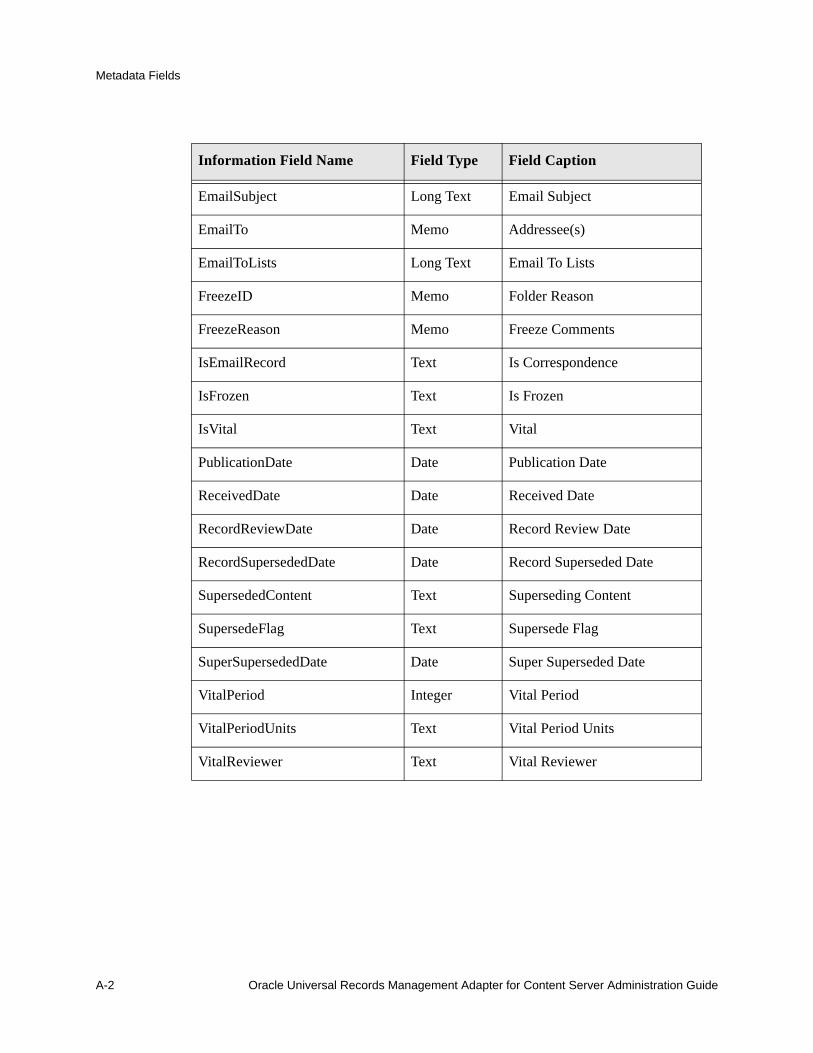
Metadata Fields
EmailSubject Long Text Email Subject
EmailTo Memo Addressee(s)
EmailToLists Long Text Email To Lists
FreezeID Memo Folder Reason
FreezeReason Memo Freeze Comments
IsEmailRecord Text Is Correspondence
IsFrozen Text Is Frozen
IsVital Text Vital
PublicationDate Date Publication Date
ReceivedDate Date Received Date
RecordReviewDate Date Record Review Date
RecordSupersededDate Date Record Superseded Date
SupersededContent Text Superseding Content
SupersedeFlag Text Supersede Flag
SuperSupersededDate Date Super Superseded Date
VitalPeriod Integer Vital Period
VitalPeriodUnits Text Vital Period Units
VitalReviewer Text Vital Reviewer
Information Field Name Field Type Field Caption
A-2 Oracle Universal Records Management Adapter for Content Server Administration Guide

Metadata Fields
MAPPED METADATA FIELDSThe content items in the Adapter server’s repository are preserved in place because its Content Server can ensure that the content will remain unalterable during the retention period. Therefore, rather than checking the content items into URM, only the values of specific metadata fields for the retained items are uploaded and stored in URM.
When you install the Adapter and register the external URM source, the retention schedule is automatically downloaded from URM and applied to the Adapter’s retention schedule. To accommodate the retention schedule synchronization, specific Adapter metadata fields are automatically mapped to the same metadata fields that are used in URM. By default, the following Adapter metadata fields are mapped to the corresponding fields in URM:
dDocTitle
dDocName
dSecurityGroup
dDocAuthor
dDocAccount
CategoryID (page A-1)
CUSTOM METADATA FIELDSThis section covers the following topics:
Internal Custom Metadata Fields (page A-3)
Exported Custom Metadata Fields (page A-4)
Internal Custom Metadata FieldsYou can customize the Adapter by creating your own custom metadata fields using the Configuration Manager. You can define these fields to be indexed and searchable. You can also choose to display them on the Adapter’s Check In page, Search page, and Content Information page.
Note: Except for the CategoryID field, the other metadata fields are predefined in Content Server. For more detailed information about them, refer to the Managing Repository Content guide.
Oracle Universal Records Management Adapter for Content Server Administration Guide A-3

Metadata Fields
However, the values of these fields are not exported to URM in addition to the Mapped Metadata Fields (page A-3). These custom fields are only used within the Adapter system. For more detailed information about the Configuration Manager and these types of custom metadata fields, refer to the Managing Repository Content guide.
Exported Custom Metadata Fields
By default, the only information pertaining to the retention schedule that is transferred to URM are the values from the Mapped Metadata Fields (page A-3) that are automatically mapped when you install the Adapter. However, you can define custom metadata fields for the Adapter server’s retained content. The default value that you assign to these custom fields is forwarded to URM and included on the Item Information page in URM. This is the only way that supplementary data can be transferred to URM in addition to the values from the mapped metadata fields.
For example, you can use the Configure Custom Fields Screen (page 3-13) to create a custom metadata field for the Adapter such as RTM Comments. Then, using the Add Custom Field Screen (page 3-15), you can assign a default value for this field (such as, Mydefault comment). The populated custom metadata field is transferred to URM and is included on the content item’s Item Information page. Thus, in addition to the mapped metadata field values, this custom metadata field value is included in the exported retention schedule information.
A-4 Oracle Universal Records Management Adapter for Content Server Administration Guide

Metadata Fields
Important: When you configure these custom metadata fields, you must specify a default value for the field. If the custom metadata field is not populated, the value will not be transferred to URM with the information from the mapped metadata fields. This method is the only way to include supplementary content item information.
Oracle Universal Records Management Adapter for Content Server Administration Guide A-5


A p p e n d i x
B.THIRD PARTY LICENSES
OVERVIEWThis appendix includes a description of the Third Party Licenses for all the third party products included with this product.
Apache Software License (page B-1)
W3C® Software Notice and License (page B-2)
Zlib License (page B-4)
General BSD License (page B-5)
General MIT License (page B-5)
Unicode License (page B-6)
Miscellaneous Attributions (page B-7)
APACHE SOFTWARE LICENSE* Copyright 1999-2004 The Apache Software Foundation.
* Licensed under the Apache License, Version 2.0 (the "License");
* you may not use this file except in compliance with the License.
* You may obtain a copy of the License at
* http://www.apache.org/licenses/LICENSE-2.0
*
Oracle Universal Records Management Adapter for Content Server Administration Guide B-1

Third Party Licenses
* Unless required by applicable law or agreed to in writing, software
* distributed under the License is distributed on an "AS IS" BASIS,
* WITHOUT WARRANTIES OR CONDITIONS OF ANY KIND, either express or implied.
* See the License for the specific language governing permissions and
* limitations under the License.
W3C® SOFTWARE NOTICE AND LICENSE* Copyright © 1994-2000 World Wide Web Consortium,
* (Massachusetts Institute of Technology, Institut National de
* Recherche en Informatique et en Automatique, Keio University).
* All Rights Reserved. http://www.w3.org/Consortium/Legal/
*
* This W3C work (including software, documents, or other related items) is
* being provided by the copyright holders under the following license. By
* obtaining, using and/or copying this work, you (the licensee) agree that
* you have read, understood, and will comply with the following terms and
* conditions:
*
* Permission to use, copy, modify, and distribute this software and its
* documentation, with or without modification, for any purpose and without
* fee or royalty is hereby granted, provided that you include the following
* on ALL copies of the software and documentation or portions thereof,
* including modifications, that you make:
*
* 1. The full text of this NOTICE in a location viewable to users of the
* redistributed or derivative work.
*
* 2. Any pre-existing intellectual property disclaimers, notices, or terms
B-2 Oracle Universal Records Management Adapter for Content Server Administration Guide
Third Party Licenses
* and conditions. If none exist, a short notice of the following form
* (hypertext is preferred, text is permitted) should be used within the
* body of any redistributed or derivative code: "Copyright ©
* [$date-of-software] World Wide Web Consortium, (Massachusetts
* Institute of Technology, Institut National de Recherche en
* Informatique et en Automatique, Keio University). All Rights
* Reserved. http://www.w3.org/Consortium/Legal/"
*
* 3. Notice of any changes or modifications to the W3C files, including the
* date changes were made. (We recommend you provide URIs to the location
* from which the code is derived.)
*
* THIS SOFTWARE AND DOCUMENTATION IS PROVIDED "AS IS," AND COPYRIGHT HOLDERS
* MAKE NO REPRESENTATIONS OR WARRANTIES, EXPRESS OR IMPLIED, INCLUDING BUT
* NOT LIMITED TO, WARRANTIES OF MERCHANTABILITY OR FITNESS FOR ANY PARTICULAR
* PURPOSE OR THAT THE USE OF THE SOFTWARE OR DOCUMENTATION WILL NOT INFRINGE
* ANY THIRD PARTY PATENTS, COPYRIGHTS, TRADEMARKS OR OTHER RIGHTS.
*
* COPYRIGHT HOLDERS WILL NOT BE LIABLE FOR ANY DIRECT, INDIRECT, SPECIAL OR
* CONSEQUENTIAL DAMAGES ARISING OUT OF ANY USE OF THE SOFTWARE OR
* DOCUMENTATION.
*
* The name and trademarks of copyright holders may NOT be used in advertising
* or publicity pertaining to the software without specific, written prior
* permission. Title to copyright in this software and any associated
* documentation will at all times remain with copyright holders.
*
Oracle Universal Records Management Adapter for Content Server Administration Guide B-3
Third Party Licenses
ZLIB LICENSE* zlib.h -- interface of the 'zlib' general purpose compression library
version 1.2.3, July 18th, 2005
Copyright (C) 1995-2005 Jean-loup Gailly and Mark Adler
This software is provided 'as-is', without any express or implied
warranty. In no event will the authors be held liable for any damages
arising from the use of this software.
Permission is granted to anyone to use this software for any purpose,
including commercial applications, and to alter it and redistribute it
freely, subject to the following restrictions:
1. The origin of this software must not be misrepresented; you must not
claim that you wrote the original software. If you use this software
in a product, an acknowledgment in the product documentation would be
appreciated but is not required.
2. Altered source versions must be plainly marked as such, and must not be
misrepresented as being the original software.
3. This notice may not be removed or altered from any source distribution.
Jean-loup Gailly [email protected]
Mark Adler [email protected]
B-4 Oracle Universal Records Management Adapter for Content Server Administration Guide

Third Party Licenses
GENERAL BSD LICENSECopyright (c) 1998, Regents of the University of California
All rights reserved.
Redistribution and use in source and binary forms, with or without modification,
are permitted provided that the following conditions are met:
"Redistributions of source code must retain the above copyright notice, this
list of conditions and the following disclaimer.
"Redistributions in binary form must reproduce the above copyright notice, this
list of conditions and the following disclaimer in the documentation and/or other
materials provided with the distribution.
"Neither the name of the <ORGANIZATION> nor the names of its contributors may be
used to endorse or promote products derived from this software without specific
prior written permission.
THIS SOFTWARE IS PROVIDED BY THE COPYRIGHT HOLDERS AND CONTRIBUTORS "AS IS" AND ANY
EXPRESS OR IMPLIED WARRANTIES, INCLUDING, BUT NOT LIMITED TO, THE IMPLIED
WARRANTIES OF MERCHANTABILITY AND FITNESS FOR A PARTICULAR PURPOSE ARE DISCLAIMED.
IN NO EVENT SHALL THE COPYRIGHT OWNER OR CONTRIBUTORS BE LIABLE FOR ANY DIRECT,
INDIRECT, INCIDENTAL, SPECIAL, EXEMPLARY, OR CONSEQUENTIAL DAMAGES (INCLUDING, BUT
NOT LIMITED TO, PROCUREMENT OF SUBSTITUTE GOODS OR SERVICES; LOSS OF USE, DATA, OR
PROFITS; OR BUSINESS INTERRUPTION) HOWEVER CAUSED AND ON ANY THEORY OF LIABILITY,
WHETHER IN CONTRACT, STRICT LIABILITY, OR TORT (INCLUDING NEGLIGENCE OR OTHERWISE)
ARISING IN ANY WAY OUT OF THE USE OF THIS SOFTWARE, EVEN IF ADVISED OF THE
POSSIBILITY OF SUCH DAMAGE.
GENERAL MIT LICENSECopyright (c) 1998, Regents of the Massachusetts Institute of Technology
Permission is hereby granted, free of charge, to any person obtaining a copy of this
software and associated documentation files (the "Software"), to deal in the
Software without restriction, including without limitation the rights to use, copy,
modify, merge, publish, distribute, sublicense, and/or sell copies of the Software,
and to permit persons to whom the Software is furnished to do so, subject to the
following conditions:
Oracle Universal Records Management Adapter for Content Server Administration Guide B-5

Third Party Licenses
B-6 Oracle Universal Records Management Adapter for Content Server Administration Guide
The above copyright notice and this permission notice shall be included in all
copies or substantial portions of the Software.
THE SOFTWARE IS PROVIDED "AS IS", WITHOUT WARRANTY OF ANY KIND, EXPRESS OR IMPLIED,
INCLUDING BUT NOT LIMITED TO THE WARRANTIES OF MERCHANTABILITY, FITNESS FOR A
PARTICULAR PURPOSE AND NONINFRINGEMENT. IN NO EVENT SHALL THE AUTHORS OR COPYRIGHT
HOLDERS BE LIABLE FOR ANY CLAIM, DAMAGES OR OTHER LIABILITY, WHETHER IN AN ACTION OF
CONTRACT, TORT OR OTHERWISE, ARISING FROM, OUT OF OR IN CONNECTION WITH THE SOFTWARE
OR THE USE OR OTHER DEALINGS IN THE SOFTWARE.
UNICODE LICENSEUNICODE, INC. LICENSE AGREEMENT - DATA FILES AND SOFTWARE
Unicode Data Files include all data files under the directories
http://www.unicode.org/Public/, http://www.unicode.org/reports/, and
http://www.unicode.org/cldr/data/ . Unicode Software includes any source code
published in the Unicode Standard or under the directories
http://www.unicode.org/Public/, http://www.unicode.org/reports/, and
http://www.unicode.org/cldr/data/.
NOTICE TO USER: Carefully read the following legal agreement. BY DOWNLOADING,
INSTALLING, COPYING OR OTHERWISE USING UNICODE INC.'S DATA FILES ("DATA FILES"),
AND/OR SOFTWARE ("SOFTWARE"), YOU UNEQUIVOCALLY ACCEPT, AND AGREE TO BE BOUND BY,
ALL OF THE TERMS AND CONDITIONS OF THIS AGREEMENT. IF YOU DO NOT AGREE, DO NOT
DOWNLOAD, INSTALL, COPY, DISTRIBUTE OR USE THE DATA FILES OR SOFTWARE.
COPYRIGHT AND PERMISSION NOTICE
Copyright © 1991-2006 Unicode, Inc. All rights reserved. Distributed under the
Terms of Use in http://www.unicode.org/copyright.html.
Permission is hereby granted, free of charge, to any person obtaining a copy of the
Unicode data files and any associated documentation (the "Data Files") or Unicode
software and any associated documentation (the "Software") to deal in the Data
Files or Software without restriction, including without limitation the rights to
use, copy, modify, merge, publish, distribute, and/or sell copies of the Data Files
or Software, and to permit persons to whom the Data Files or Software are furnished
to do so, provided that (a) the above copyright notice(s) and this permission notice
appear with all copies of the Data Files or Software, (b) both the above copyright
notice(s) and this permission notice appear in associated documentation, and (c)
there is clear notice in each modified Data File or in the Software as well as in
the documentation associated with the Data File(s) or Software that the data or
software has been modified.

Third Party Licenses
THE DATA FILES AND SOFTWARE ARE PROVIDED "AS IS", WITHOUT WARRANTY OF ANY KIND,
EXPRESS OR IMPLIED, INCLUDING BUT NOT LIMITED TO THE WARRANTIES OF MERCHANTABILITY,
FITNESS FOR A PARTICULAR PURPOSE AND NONINFRINGEMENT OF THIRD PARTY RIGHTS. IN NO
EVENT SHALL THE COPYRIGHT HOLDER OR HOLDERS INCLUDED IN THIS NOTICE BE LIABLE FOR
ANY CLAIM, OR ANY SPECIAL INDIRECT OR CONSEQUENTIAL DAMAGES, OR ANY DAMAGES
WHATSOEVER RESULTING FROM LOSS OF USE, DATA OR PROFITS, WHETHER IN AN ACTION OF
CONTRACT, NEGLIGENCE OR OTHER TORTIOUS ACTION, ARISING OUT OF OR IN CONNECTION WITH
THE USE OR PERFORMANCE OF THE DATA FILES OR SOFTWARE.
Except as contained in this notice, the name of a copyright holder shall not be used
in advertising or otherwise to promote the sale, use or other dealings in these Data
Files or Software without prior written authorization of the copyright holder.
________________________________________Unicode and the Unicode logo are trademarks
of Unicode, Inc., and may be registered in some jurisdictions. All other trademarks
and registered trademarks mentioned herein are the property of their respective
owners
MISCELLANEOUS ATTRIBUTIONSAdobe, Acrobat, and the Acrobat Logo are registered trademarks of Adobe Systems Incorporated.
FAST Instream is a trademark of Fast Search and Transfer ASA.
HP-UX is a registered trademark of Hewlett-Packard Company.
IBM, Informix, and DB2 are registered trademarks of IBM Corporation.
Jaws PDF Library is a registered trademark of Global Graphics Software Ltd.
Kofax is a registered trademark, and Ascent and Ascent Capture are trademarks of Kofax Image Products.
Linux is a registered trademark of Linus Torvalds.
Mac is a registered trademark, and Safari is a trademark of Apple Computer, Inc.
Microsoft, Windows, and Internet Explorer are registered trademarks of Microsoft Corporation.
MrSID is property of LizardTech, Inc. It is protected by U.S. Patent No. 5,710,835. Foreign Patents Pending.
Oracle is a registered trademark of Oracle Corporation.
Portions Copyright © 1994-1997 LEAD Technologies, Inc. All rights reserved.
Portions Copyright © 1990-1998 Handmade Software, Inc. All rights reserved.
Portions Copyright © 1988, 1997 Aladdin Enterprises. All rights reserved.
Oracle Universal Records Management Adapter for Content Server Administration Guide B-7

Third Party Licenses
Portions Copyright © 1997 Soft Horizons. All rights reserved.
Portions Copyright © 1995-1999 LizardTech, Inc. All rights reserved.
Red Hat is a registered trademark of Red Hat, Inc.
Sun is a registered trademark, and Sun ONE, Solaris, iPlanet and Java are trademarks of Sun Microsystems, Inc.
Sybase is a registered trademark of Sybase, Inc.
UNIX is a registered trademark of The Open Group.
Verity is a registered trademark of Autonomy Corporation plc
B-8 Oracle Universal Records Management Adapter for Content Server Administration Guide

I n d e x
Aaccessing retention schedule
using breadcrums trails, 4-5from Browse Content tray, 4-4from search results page, 4-4
action icon menufor retained items, 4-11
Adapter for Content Serverinstallation summary, 2-2installing, 2-6primary component of installation architecture, 1-3software requirements, 1-6uninstalling, 2-12
Add Custom Field screenoverview and feature diescriptions, 3-15
Add Provider screenoverview and feature diescriptions, 3-11
audience, 1-2audit trails
retention function overview, 1-6auditing
retention function overview, 1-6
Bbatch declarations
retention function overview, 1-5Batch Services menu options
descriptions, 3-23breadcrumb trails in retention schedule, 4-5
Ccategories
definition, 4-3viewing disposition information, 4-8viewing retentin schedule information, 4-6
Check In pageCorrespondence fields, 5-8Date fields, 5-9
metadata fields, 5-5Vital Review fields, 5-7
checking ine-mail as records, 5-4
Common Utilities Bundleinstallation summary item, 2-2installing, 2-4
Component Wizarduninstalling product using, 2-13
componentsto be uninstalled, 2-11
configurationretention function overview, 1-5
Configure Custom Fields screenoverview and feature diescriptions, 3-14
Configure Disposition Actions screenoverview and feature diescriptions, 3-19
Configure menu optionsdescriptions, 3-22
Configure Scheduled Events screenoverview and feature diescriptions, 3-20
Content Actionstoolbar menu for retained items, 4-12
Content Information pageContent Information area, 4-13Correspondence Fields Area, 4-13Links area, 4-14Revision History area, 4-14viewing information about retained item, 4-8
content itemschecking in for retention, 5-2
Content Servercompatibility with the adapter, 1-6installation summary item, 2-2primary component of installation architecture, 1-3rebuilding the index, 2-9restarting, 2-8
conventionsused in this document, 1-8
correspondencechecking in for retention, 5-4
correspondence fields
Oracle Universal Records Management Adapter for Content Server Administration Guide Index-1

Index
on Check In page, 5-8custom metadata field
adding, 3-7editing, 3-8
Ddatabases
software requirements, 1-7date fields
on Check In page, 5-9DB2
installation summary item, 2-2preparing the database, 2-2
declarationsretention function overview, 1-5
definitionretention category, 4-3series, 4-3
disposition actionsconfiguring and editing, 3-9
disposition information for categories, 4-8Disposition Information page
viewing information about retention category, 4-8dispositions
retention function overview, 1-6
Ee-mail
checking in as records, 5-4checking in for retention, 5-3checking in from non-Outlook e-mail clients, 5-4individual - checking in for retention, 5-3
Edit Custom Field screenoverview and feature diescriptions, 3-17
eventsrunning manually, 3-9scheduling to run periodically, 3-9
Expanded Search formmenu option for Search page, 6-2
external URM sourceoverview, 3-3registering, 3-6registration events, 3-3unregister toolbar action, 3-25unregistering or deleting, 3-7viewing configuration settings, 3-10
Ffreezes
retention function overview, 1-6
Hholds
retention function overview, 1-6
IInfo menu options
descriptions, 3-23information
series, 4-5information pages
series, 4-5installation architecture
primary components, 1-2installation summary
for the Adapter, 2-2
Llog files
retention function overview, 1-6logging
retention function overview, 1-6
Mmanage communications
retention function overview, 1-5Metadata History page
viewing information about retention category, 4-7
Nnavigating
retention schedule, 4-3
Ooperating systems
software requirements, 1-7outgoing provider
defining, 2-10, 3-4deleting, 3-6disabling, 3-5editing, 3-5viewing configuration settings, 3-10
Outgoing Provider Information screen
Index -2 Oracle Universal Records Management Adapter for Content Server Administration Guide

Index
overview, 3-25overview
about the adapter, 1-1retention functions, 1-4URM and the adapter, 1-3
Pproduct overview, 1-1
QQuery Action menu
save search option, 6-8search within option, 6-7
Query Builder formmenu option for Search page, 6-2
query URMretention function overview, 1-5
Rrecords
checking in e-mail as, 5-4Records Manager Corporate Edition
primary component of installation architecture, 1-3Register Source screen
overview and feature diescriptions, 3-12registration
retention function overview, 1-5repository
searching - retention function overview, 1-6repository monitoring
retention function overview, 1-5retained items
action icon menu options, 6-8action items, 4-11generating retention schedule report, 4-9toolbar menus, 4-12viewing content information, 4-8
retention categoryconstruct of retention schedule, 4-3viewing disposition information, 4-8viewing information, 4-6viewing metadata history, 4-7
Retention Category Information pageviewing information about, 4-6
retention itemschecking content items in for retention, 5-2checking in correspondence for retention, 5-4checking in e-mail for retention, 5-3checking in individual e-mail for retention, 5-3
retention managementoverview of retention functions, 1-4
retention schedulemenu options, 4-11navigation methods, 4-3overview of hierarchy, 4-2retention category construct, 4-3series construct, 4-3
retention schedule information for categories, 4-6retention schedule report
generating for retained items, 4-9RM
primary component of installation architecture, 1-3
Ssave search
Query Action menu, 6-8Search page
correspondence fields, 6-5date fields, 6-6metadata fields, 6-2Search Forms menu options, 6-2vital review fields, 6-4
search results, 6-6Search Results page
viewing results, 6-6search within
Query Action menu, 6-7series
construct of retention schedule, 4-3definition, 4-3viewing information, 4-6viewing information about --, 4-5
Series Information pageviewing information about, 4-6
software requirementsfor the Adapter, 1-6operating systems, 1-7supported databases, 1-7with Content Server, 1-6
Source Information screenoverview, 3-24
Ttoolbar menus
Batch Services menu, 3-23Configure menu, 3-22Info menu, 3-23Query Actions options, 6-7Search Forms, 6-2
Oracle Universal Records Management Adapter for Content Server Administration Guide Index-3
Index
Uuninstallation
components to uninstall, 2-11deleting metadata fields, 2-15, 2-15disabling metadata fields, 2-14, 2-14process summary, 2-11the Adapter, 2-12
Universal Records Managerinstallation summary item, 2-2primary component of installation architecture, 1-3
Unregister Sourcetoolbar action, 3-25
URMinstallation summary item, 2-2overview, 1-3primary component of installation architecture, 1-3
Vviewing information
series, 4-5viewing search results, 6-6vital review fields
on Check In page, 5-7
Index -4 Oracle Universal Records Management Adapter for Content Server Administration Guide