oracle webcenter portal: moving custom portal content between content ... · - 2 - for example, if...
TRANSCRIPT
- 1 -
Oracle WebCenter Portal: Moving Custom Portal
Content Between Content Servers
Oracle WebCenter Portal applications are tightly integrated with Oracle WebCenter Content, where
the application’s documents, images, and other files are stored. This content is displayed on the
application’s pages using content integration task flows.
In this tutorial we discuss how to export the application’s content from one WebCenter Content
Server and import it into another server, preserving information that is needed by the application.
Here we do not intend to fully document the archiving process; we will show only a simple, but
typical example. For details on archiving, read Chapter 8 Managing System Migration and Archiving
of the document Oracle® WebCenter Content System Administrator's Guide for Content Server 11g
Release 1.
This document outlines the recommended procedure for custom Oracle Webcenter Portal
applications. For Oracle WebCenter Portal: Spaces we recommend a different procedure, which is
documented in Chapter 39.1.3.9 Exporting Oracle Content Server Data of the document Oracle®
Fusion Middleware Administrator's Guide for Oracle WebCenter Portal 11g Release 1.
Prerequisites
In this tutorial we assume that you have installed two Oracle WebCenter Content Servers on two
different hosts. The two servers should be configured identically. For the details of installing and
configuring the content servers, see our training module: Installing and Configuring Enterprise
Content Management for Oracle WebCenter Portal: Spaces. It is important that you have installed
and enabled the FolderStructureArchive component.
If you created user attributes, content types, and/or security groups in the source server, you have to
create the same artifacts in the target server or use the Configuration Migration utility.
We assume that both servers are connected to the same user repository, typically an external LDAP
server; otherwise you have to create the same set of users in both servers.
Overview
Typically Oracle WebCenter Content Server stores all the content used by a WebCenter Portal
application. Content Server stores these documents and their attributes. Attributes can be system-
generated or custom. Each document also has a unique identifier.
In traditional applications, where the content is stored in the server’s file system, we usually arrange
the content into hierarchical folders. When using WebCenter Content Server these folders are not
strictly necessary since one can look up or access the documents using the unique document identifier
or using queries based on the attribute values. Still it is customary with WebCenter Portal application
developers to arrange documents into a folder hierarchy.
When a content item needs to be accessed or rendered on a WebCenter Portal application page, the
developer has several choices of using ADF Faces tags or prebuilt task flows. Some of these methods
rely on the document’s location in the folder hierarchy, others use the unique ID, and some require
writing a dynamic query.
- 2 -
For example, if you want to display an image stored in WebCenter Content, you have the following
options:
You can display an image stored in WebCenter Content as an ADF Image. You will get the
following code fragment. Note the bold text - the source attribute refers to the path for the file.
<af:inlineFrame id="inlineFrame1"
source="/content/conn/UCM/path/Contribution%20Folders/ElPiju/Materials/
Adobe/pictures/adobe.jpg"/>
In WebCenter Portal 11.1.1.6.0 release this code will work, but JDeveloper will create another
style source attribute, that uses the document’s unique name assigned by the Content Server.
<af:image id="image1"
source="#{documentsService.latestReleasedVersionURL['UUCM#dDocName:DADV
MC0302USOR002205']}"/>
You can display the image in an instance of a Content Presenter task flow. You will get the
following source code fragment.
<af:region value="#{bindings.doclibcontentpresenter1.regionModel}"
id="r2"/>
Here is the page definition file fragment. Note that the datasource attribute refers to the
internal, unique document name.
<taskFlow id="doclibcontentpresenter1"
taskFlowId="/oracle/webcenter/doclib/view/jsf/taskflows/presenter/conte
ntPresenter.xml#doclib-content-presenter"
activation="deferred"
xmlns="http://xmlns.oracle.com/adf/controller/binding">
<parameters>
<parameter id="taskFlowInstId"
value="${'c05de200-e660-43dc-911f-b4c613d6b3ba'}"/>
<parameter id="datasourceType" value="${'dsTypeSingleNode'}"/>
<parameter id="datasource"
value="${'UCM#dDocName:DADVMC0302USOR002205'}"/>
<parameter id="templateCategory" value="${''}"/>
<parameter id="templateView" value="${''}"/>
<parameter id="maxResults" value="${''}"/>
</parameters>
</taskFlow>
Other task flows, like the Document Manager task flow use the path.
<af:region value="#{bindings.doclibdocumentlibrary1.regionModel}"
id="r3"/>
And the page definition file:
<taskFlow id="doclibdocumentlibrary1"
taskFlowId="/oracle/webcenter/doclib/view/jsf/taskflows/mainView.xml#do
clib-document-library"
activation="deferred"
xmlns="http://xmlns.oracle.com/adf/controller/binding">
<parameters>
<parameter id="connectionName" value="${'UCM'}"/>
<parameter id="startFolderPath"
value="${'/Contribution Folders/ElPiju/Materials/Adobe'}"/>
- 3 -
<parameter id="resourceId" value="${''}"/>
<parameter id="readOnly" value="${false}"/>
<parameter id="featuresOff" value="${''}"/>
<parameter id="layout" value="${'explorer'}"/>
</parameters>
</taskFlow>
Finally you can use the Content Presenter task flow with a query. For example:
<af:region value="#{bindings.doclibdocumentlibrary1.regionModel}"
id="r3"/>
<taskFlow id="doclibcontentpresenter1"
taskFlowId="/oracle/webcenter/doclib/view/jsf/taskflows/presenter/conte
ntPresenter.xml#doclib-content-presenter"
activation="deferred"
xmlns="http://xmlns.oracle.com/adf/controller/binding">
<parameters>
<parameter id="taskFlowInstId"
value="${'c05de200-e660-43dc-911f-b4c613d6b3ba'}"/>
<parameter id="datasourceType" value="${'dsTypeQueryExpression'}"/>
<parameter id="datasource"
value="${'select * from cmis:document where cmis:name
like \'adobe%.jpg\''}"/>
<parameter id="templateCategory" value="${''}"/>
<parameter id="templateView" value="${''}"/>
<parameter id="maxResults" value="${''}"/>
</parameters>
</taskFlow>
Therefore in any exporting and importing process it is essential that it preserves not only the folder
hierarchy but all the document’s and folder’s attributes, including their unique document ID or
document name.
Exporting the Content
You will use the Archiver and Folder Structure Archiver components combined to archive the
required content and folders.
1. Create a new archive.
a. Use a Web browser and access the WebCenter Content Server Web User Interface. The URL
depends on your configuration, the default URL is:
http://<server>:16200/cs
b. Log in to WebCenter Content Server with administrative privileges. For example use
weblogic as the user.
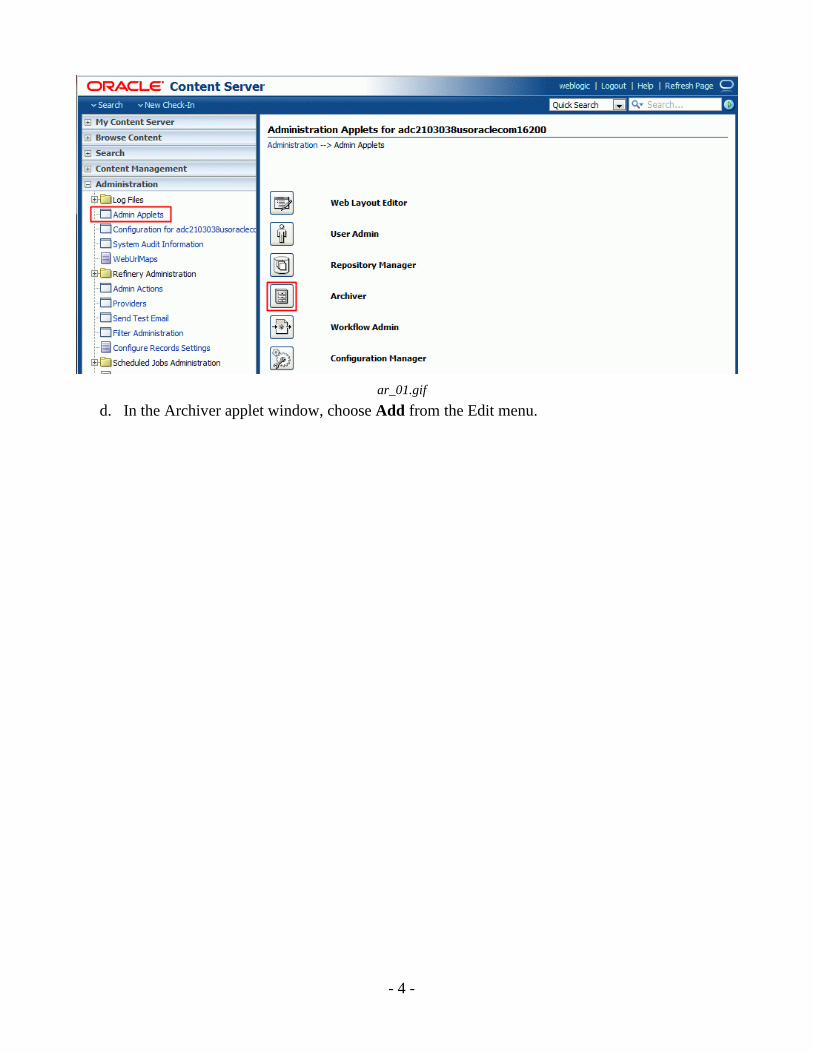
c. Expand the Administration node and open the Admin Applets page. Select Archiver from
the applets.
- 4 -
ar_01.gif
d. In the Archiver applet window, choose Add from the Edit menu.

- 5 -
ar_02.gif
e. Define the new archive’s name. Do not use spaces or special characters in the name. You can
use mixed case characters, but the resulting archive directory’s name will be all lower case.
You may add a description to the archive. Click OK.
ar_03.gif
2. Define the folders.
- 6 -
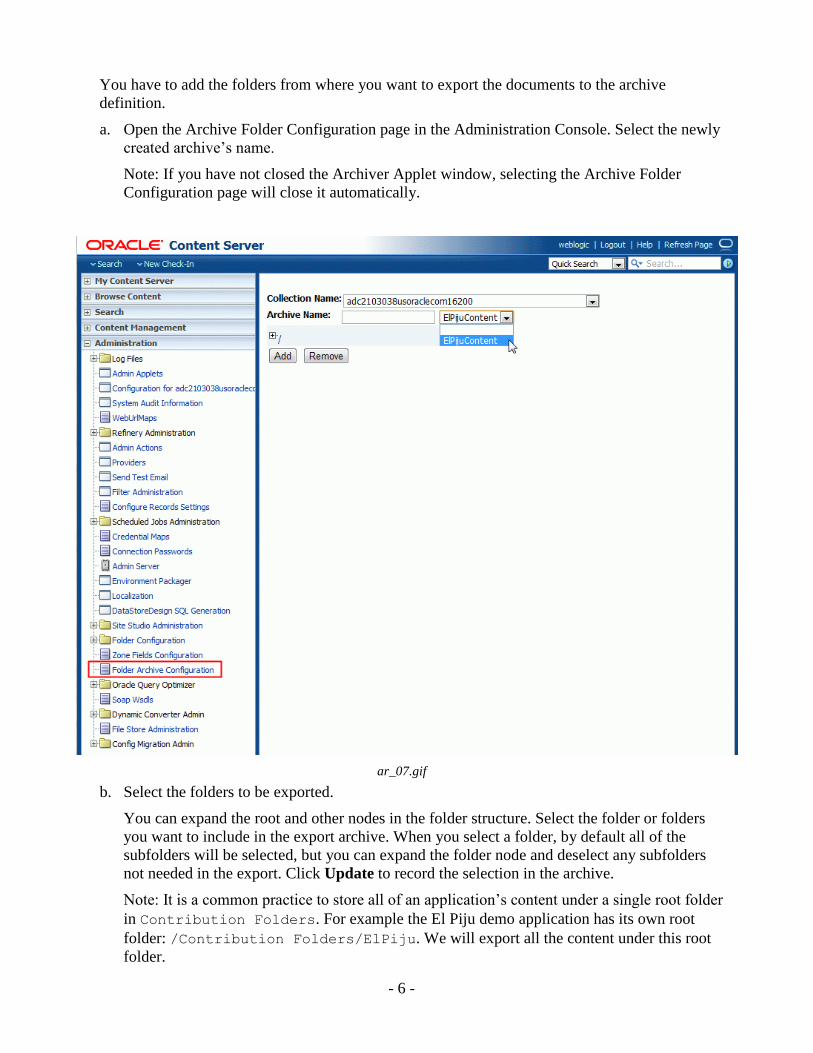
You have to add the folders from where you want to export the documents to the archive
definition.
a. Open the Archive Folder Configuration page in the Administration Console. Select the newly
created archive’s name.
Note: If you have not closed the Archiver Applet window, selecting the Archive Folder
Configuration page will close it automatically.
ar_07.gif
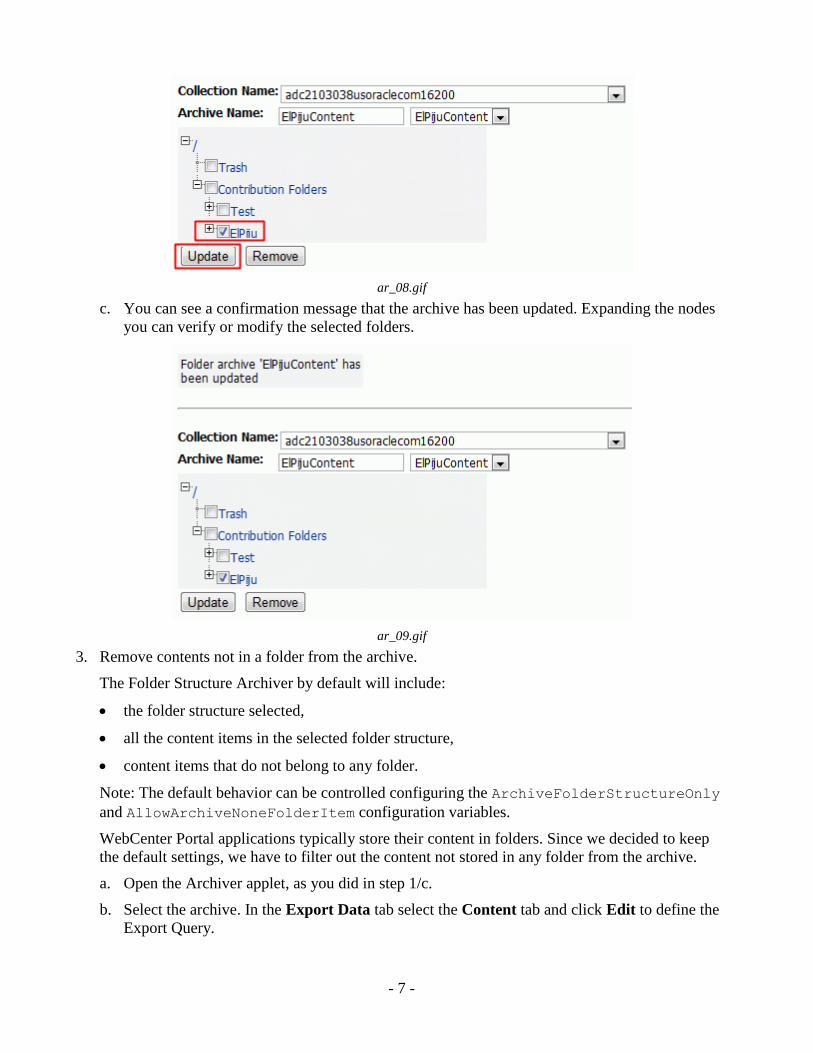
b. Select the folders to be exported.
You can expand the root and other nodes in the folder structure. Select the folder or folders
you want to include in the export archive. When you select a folder, by default all of the
subfolders will be selected, but you can expand the folder node and deselect any subfolders
not needed in the export. Click Update to record the selection in the archive.
Note: It is a common practice to store all of an application’s content under a single root folder
in Contribution Folders. For example the El Piju demo application has its own root
folder: /Contribution Folders/ElPiju. We will export all the content under this root
folder.
- 7 -
ar_08.gif
c. You can see a confirmation message that the archive has been updated. Expanding the nodes
you can verify or modify the selected folders.
ar_09.gif
3. Remove contents not in a folder from the archive.
The Folder Structure Archiver by default will include:
the folder structure selected,
all the content items in the selected folder structure,
content items that do not belong to any folder.
Note: The default behavior can be controlled configuring the ArchiveFolderStructureOnly
and AllowArchiveNoneFolderItem configuration variables.
WebCenter Portal applications typically store their content in folders. Since we decided to keep
the default settings, we have to filter out the content not stored in any folder from the archive.
a. Open the Archiver applet, as you did in step 1/c.
b. Select the archive. In the Export Data tab select the Content tab and click Edit to define the
Export Query.

- 8 -
ar_04.gif
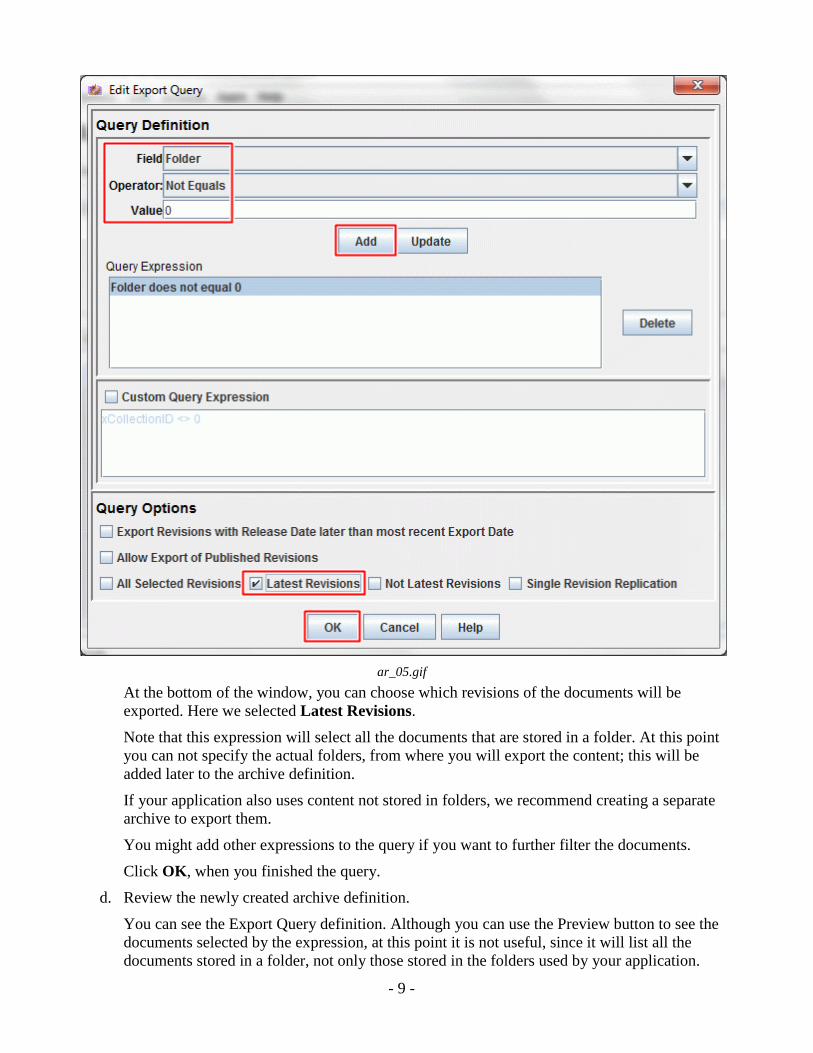
c. In the Query Definition window select Folder for Field, Not Equals for Operator and set
Value to 0, then click Add. Note: If a document does not belong to a folder, the Folder
attribute’s value will be zero.
The new query will be displayed as words (Folder does not equal 0) in the Query Expression
field and as an expression (xCollectionID <> 0) in the Custom Query Expression field.
- 9 -
ar_05.gif
At the bottom of the window, you can choose which revisions of the documents will be
exported. Here we selected Latest Revisions.
Note that this expression will select all the documents that are stored in a folder. At this point
you can not specify the actual folders, from where you will export the content; this will be
added later to the archive definition.
If your application also uses content not stored in folders, we recommend creating a separate
archive to export them.
You might add other expressions to the query if you want to further filter the documents.
Click OK, when you finished the query.
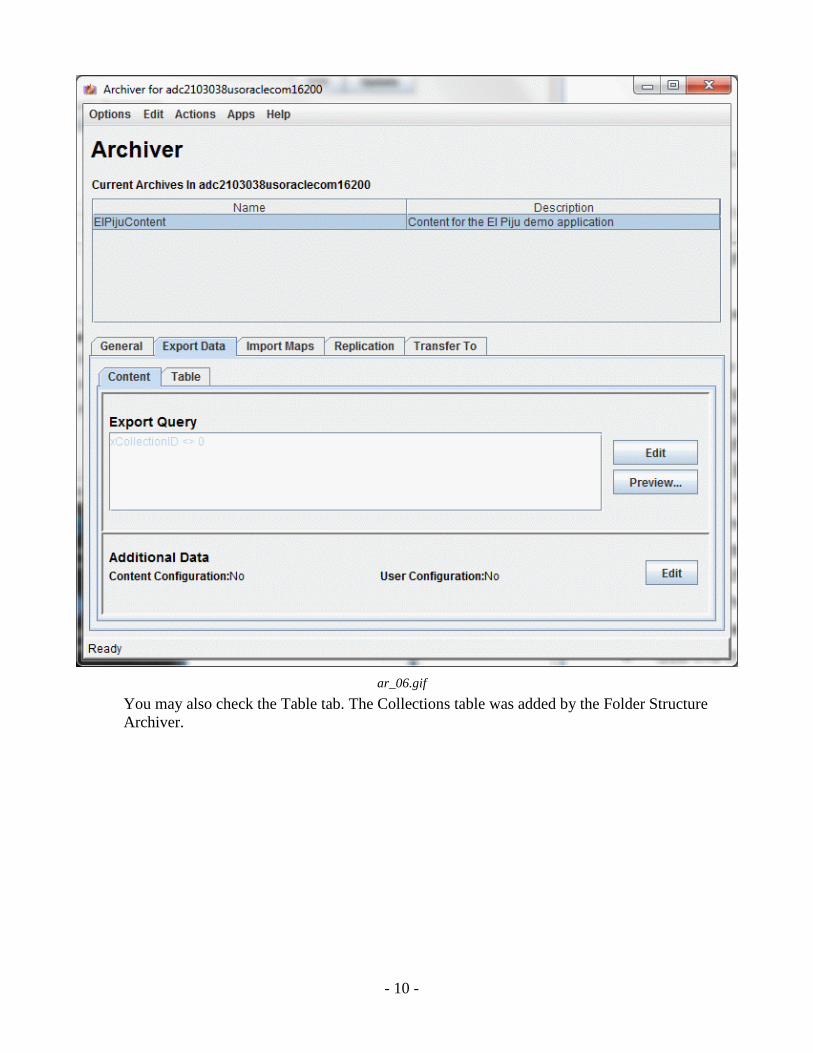
d. Review the newly created archive definition.
You can see the Export Query definition. Although you can use the Preview button to see the
documents selected by the expression, at this point it is not useful, since it will list all the
documents stored in a folder, not only those stored in the folders used by your application.
- 10 -
ar_06.gif
You may also check the Table tab. The Collections table was added by the Folder Structure
Archiver.
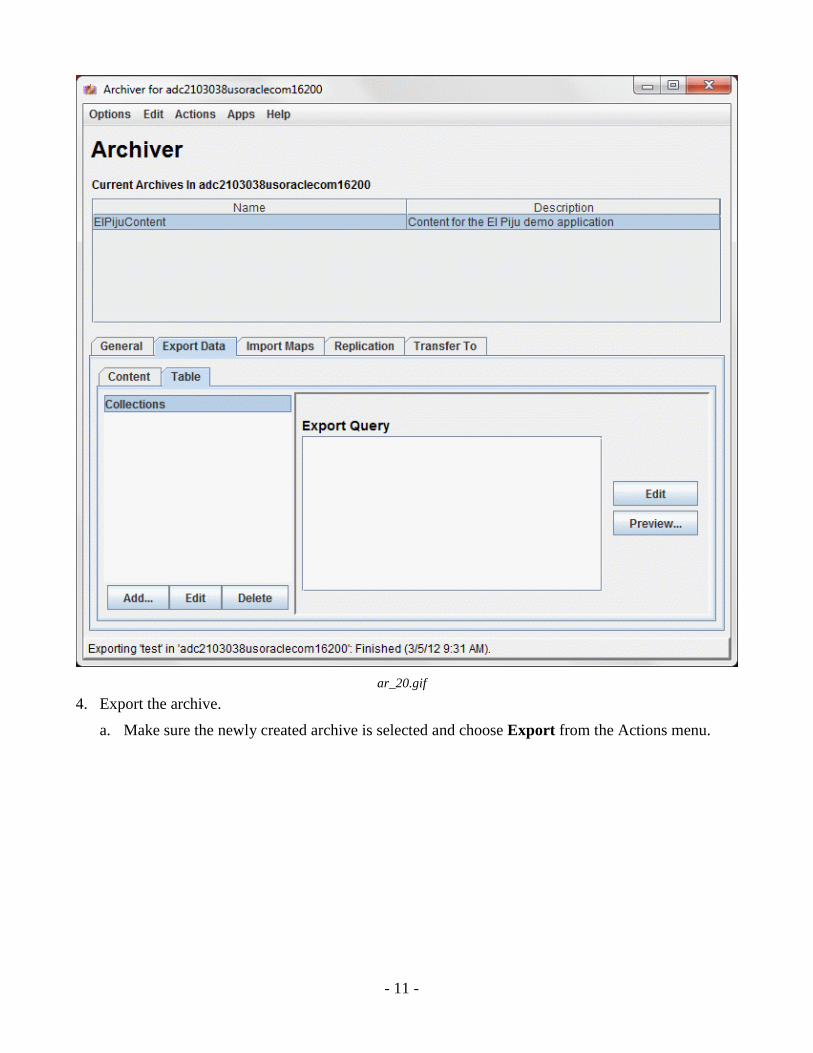
- 11 -
ar_20.gif
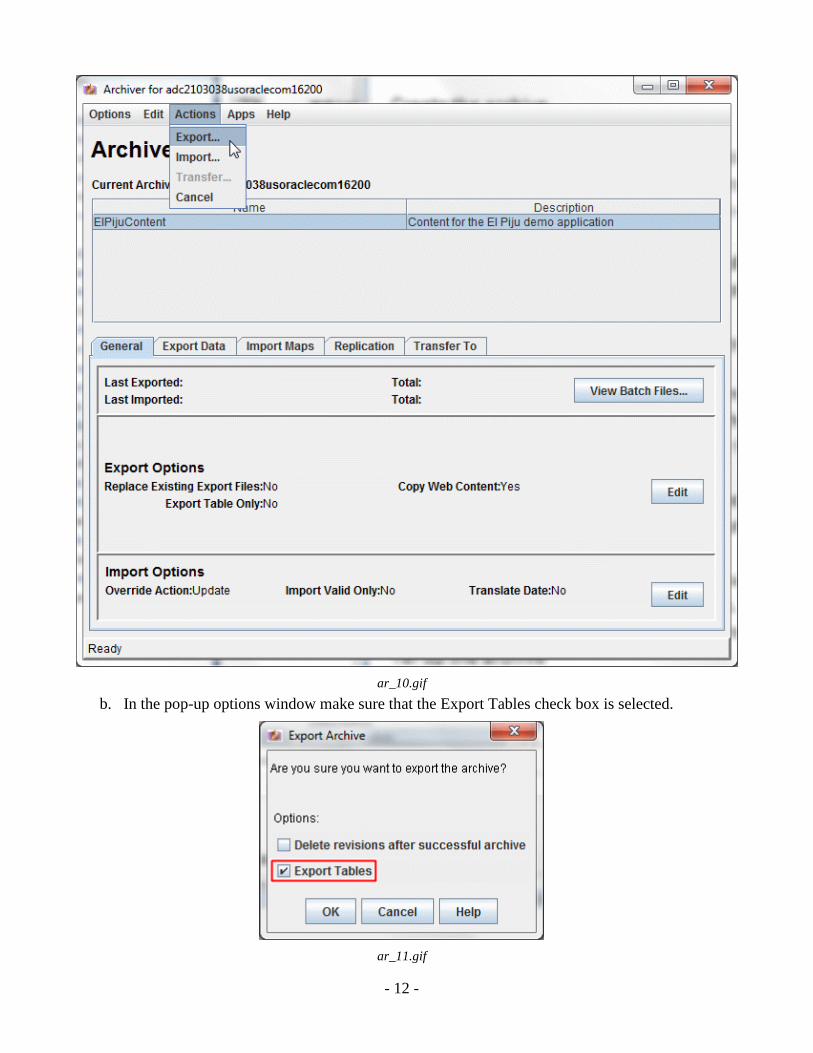
4. Export the archive.
a. Make sure the newly created archive is selected and choose Export from the Actions menu.
- 12 -
ar_10.gif
b. In the pop-up options window make sure that the Export Tables check box is selected.
ar_11.gif

- 13 -
c. You can follow the progress of the export in the status line of the window. Wait till it finishes.
ar_12.gif
d. Verify the export. Click the View Batch Files button. You should see two batch files created
during the export. The first one exported the folders, 49 in our case; the second one was used
for exporting the documents, 143 in our example.
- 14 -
ar_13.gif
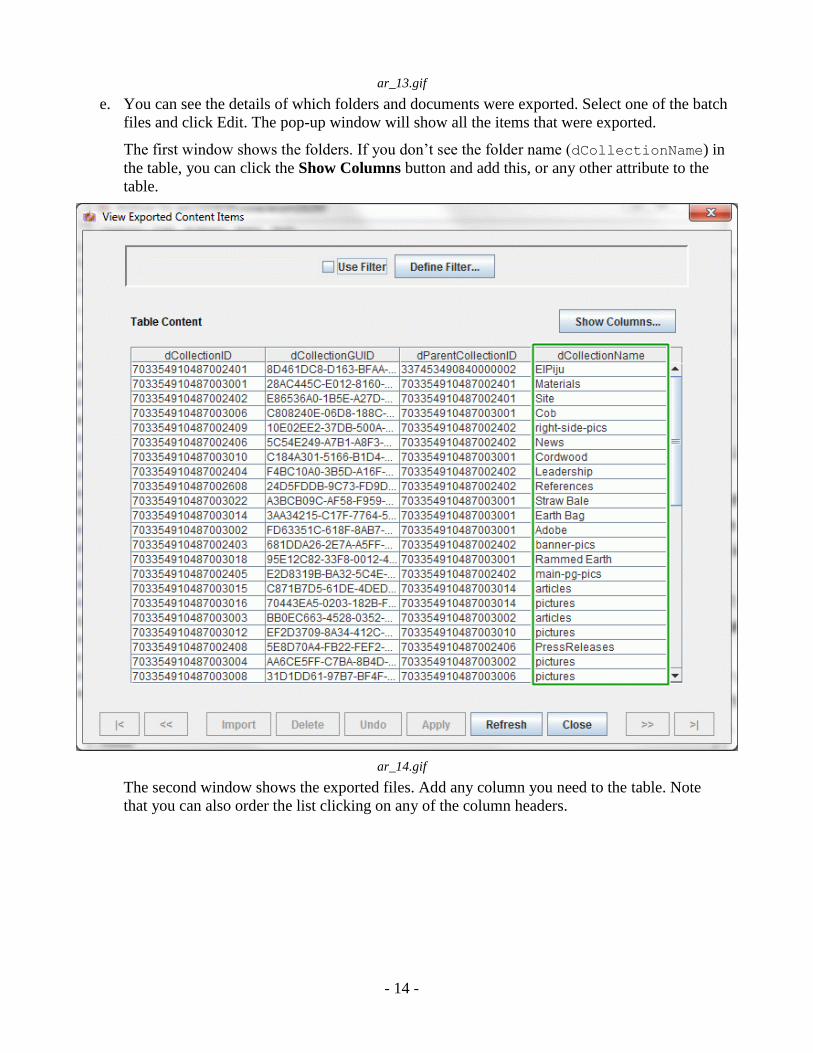
e. You can see the details of which folders and documents were exported. Select one of the batch
files and click Edit. The pop-up window will show all the items that were exported.
The first window shows the folders. If you don’t see the folder name (dCollectionName) in
the table, you can click the Show Columns button and add this, or any other attribute to the
table.
ar_14.gif
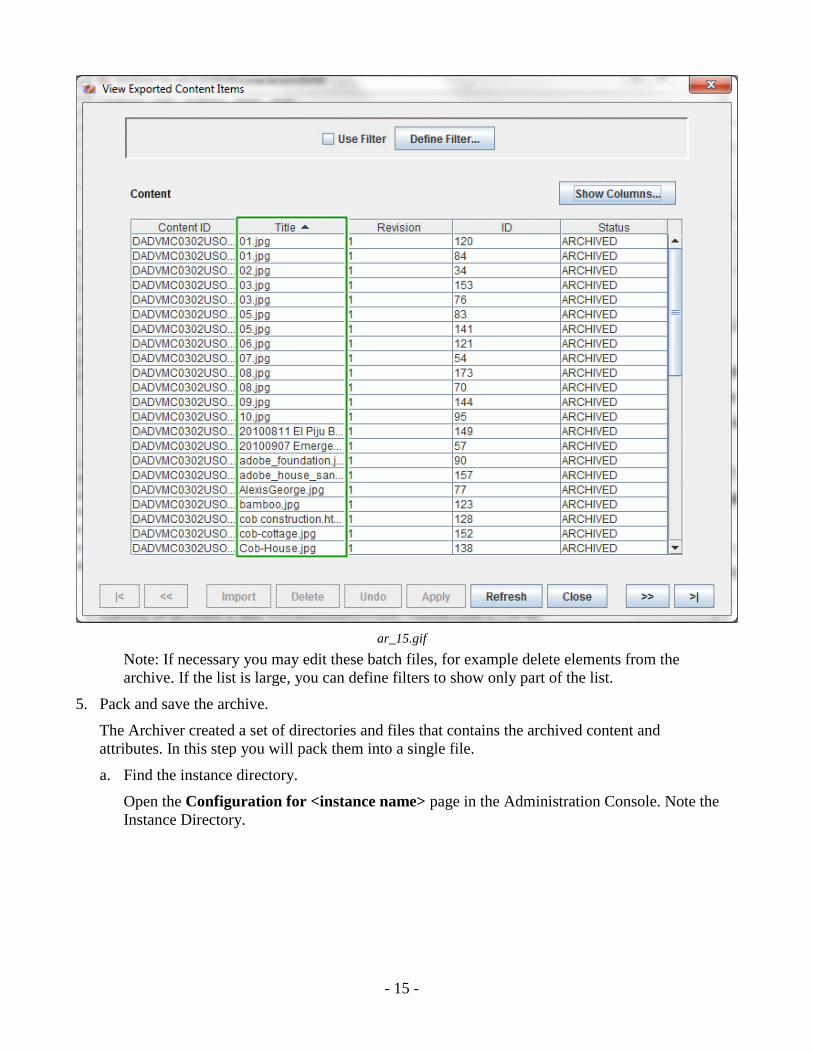
The second window shows the exported files. Add any column you need to the table. Note
that you can also order the list clicking on any of the column headers.
- 15 -
ar_15.gif
Note: If necessary you may edit these batch files, for example delete elements from the
archive. If the list is large, you can define filters to show only part of the list.
5. Pack and save the archive.
The Archiver created a set of directories and files that contains the archived content and
attributes. In this step you will pack them into a single file.
a. Find the instance directory.
Open the Configuration for <instance name> page in the Administration Console. Note the
Instance Directory.
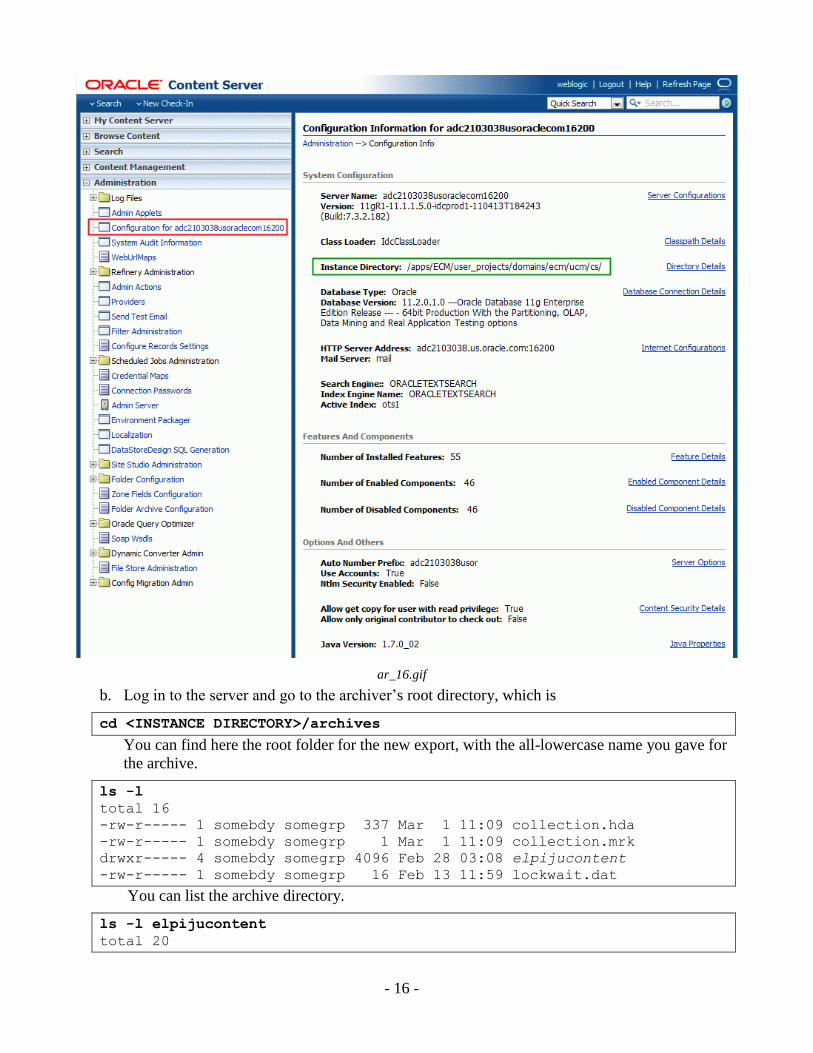
- 16 -
ar_16.gif
b. Log in to the server and go to the archiver’s root directory, which is
cd <INSTANCE DIRECTORY>/archives
You can find here the root folder for the new export, with the all-lowercase name you gave for
the archive.
ls -l
total 16
-rw-r----- 1 somebdy somegrp 337 Mar 1 11:09 collection.hda
-rw-r----- 1 somebdy somegrp 1 Mar 1 11:09 collection.mrk
drwxr----- 4 somebdy somegrp 4096 Feb 28 03:08 elpijucontent
-rw-r----- 1 somebdy somegrp 16 Feb 13 11:59 lockwait.dat
You can list the archive directory.
ls -l elpijucontent
total 20

- 17 -
drwxr----- 2 somebdy somegrp 4096 Feb 28 03:08 12-feb-
28_03.08.42_014_01
drwxr----- 3 somebdy somegrp 4096 Feb 28 03:08 12-feb-
28_03.08.42_014_02
-rw-r----- 1 somebdy somegrp 913 Feb 28 03:08 archive.hda
-rw-r----- 1 somebdy somegrp 438 Feb 28 03:08 exports.hda
-rw-r----- 1 somebdy somegrp 16 Feb 28 02:49 lockwait.dat
c. You should pack this directory, elpijucontent, into a single file. You could use either a
compressed tar, or a zip file. For example:
tar -cvzf ec.taz elpijucontent
or
zip -r ec.zip elpijucontent
d. Save this file, ec.taz or ec.zip. In the next step you will copy or FTP it to the target
system.
Importing the Content
We assume that you want to import the archive into another WebCenter Content Server instance,
running on a different machine.
6. Create a new archive with identical name.
a. Log in to the target WebCenter Content Server Web user interface, invoke the Archiver
applet, and create a new archive with identical name as the exported archive. See step 1.
This will register the new archive for the Content Server’s administration purposes. You will
not define folders or an export query for this archive. In the next step you will simply
override the archive’s content with the previously saved archive.
b. In the Web Administration console write down the instance directory, as you did step 5/a.
c. Log in to the server and go to the Archiver’s root directory, as in step 5/b.
d. Remove the directory that was created for the archive.
rm –rf elpijucontent
e. Copy or FTP the saved archive to this directory and unpack it. For example:
tar -cvzf ec.taz elpijucontent
or
unzip -x ec.zip
This will recreate the elpijucontent directory and its original content.
7. Import the archive.
a. Open the Archiver applet, select Import from the Actions menu.
Note: Before importing, you might apply several changes. For example in the Import Options
you can define how overrides will be handled, or if the dates are converted to the target
system’s time zone. In the Import Maps tab you can create complex mappings of content

- 18 -
attributes or even change value of these attributes. In this tutorial we assume that you do not
need to configure any such import processing.
ar_17.gif
In the pop-up window make sure that the Import Tables check box is selected. Click OK, then
wait for the finished message in the applet’s status line.
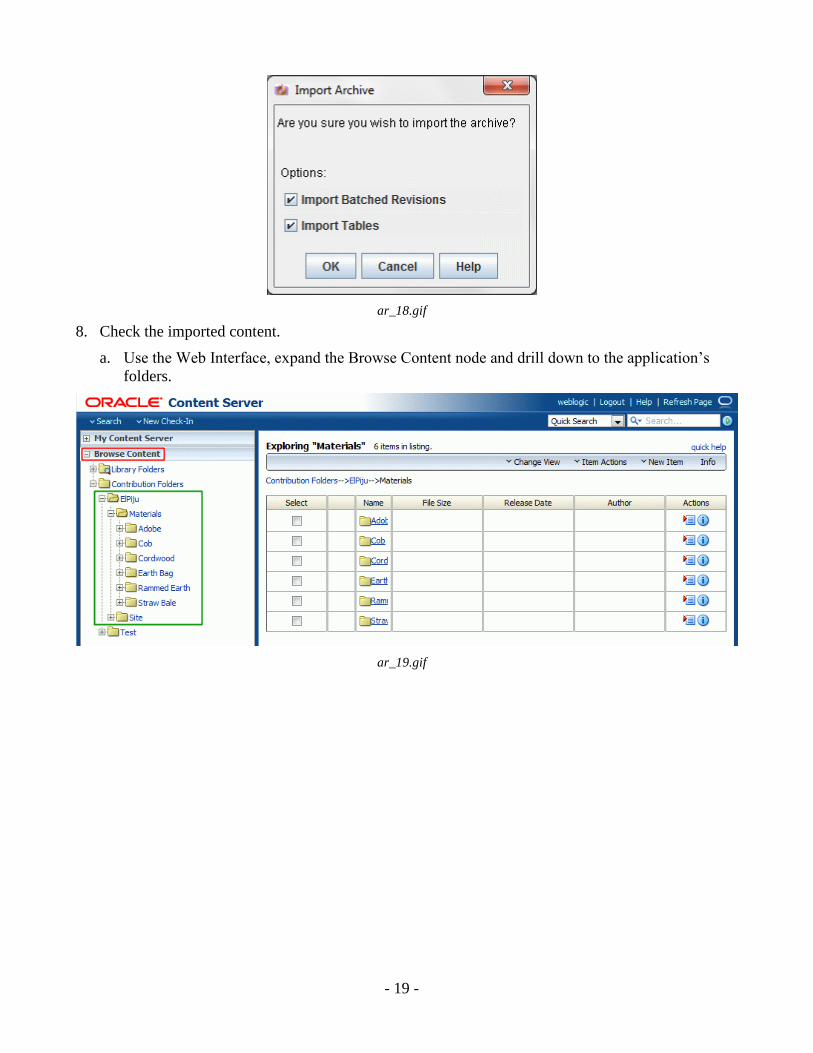
- 19 -
ar_18.gif
8. Check the imported content.
a. Use the Web Interface, expand the Browse Content node and drill down to the application’s
folders.
ar_19.gif