original recipe - united notions · original recipe can be found at original recipe jelly roll...
TRANSCRIPT

Original Recipe can be found at www.modabakeshop.com
Original Recipe
Jelly Roll Floor Pillows by Val Campbell
Hi everyone! It’s Val over at PinkPlease! {howaboutpinkplease.blogspot.com} bringing you another double recipe. Taking a spin off my last Moda Bake Shop recipe, Just Playin’ Around Baby Changing Pad & Matching Play Mat {modabakeshop.com/2011/03/just-playin-round.html}, I wanted to show you another fun creation you can make using the circular quilt pattern. With just one Jelly Roll (plus some extra fabric for the back and piping), you can make two matching oversized floor pillows. I am teaming up with the Fat Quarter Shop {fatquartershop.com} to help you with your Sherbet Pips collection (or any other Moda fabric) so that you can make a few pillows of your very own. If you'd like a chance to win a $25 gift certificate to The Fat Quarter Shop, stop on over to my blog for a giveaway today!
One Sherbet Pips Jelly Roll by Aneela Hoey 2 1/2 yards of fabric for the pillow bottom 1/2 yard of fabric for the piping

Original Recipe can be found at www.modabakeshop.com
6/32" Cotton Piping (95" long for the small pillow and 140" long for the larger pillow)
2 packages of 1 ½” Cover Button Kits (You will need to make 4 fabric covered buttons)
Stuffing (4 bags of 24oz. poly-fil will fill both pillows. If you are just making the large pillow, you will need 3 bags.)
Fishing Wire or Super Strong Beading Thread. One Extra Long Needle (I used a darning needle)
***Most seam allowances are a ¼”, unless indicated.*** ***Read the entire recipe before starting. By doing this, you will learn how to use the scraps of the larger pillow to make the top of the smaller pillow. ***You may want to use a stronger needle (90/14) since it gets pretty crowded in the middle as you finish up the pillow top. If all you have is an 80/12 needle, you should be fine, just go slowly when you are going through the thick center, so your needle doesn't break and fly at you.*** Creating the large pillow
1. Cut the entire Jelly Roll in half, creating 80 (2 1/2" x 22") strips.

Original Recipe can be found at www.modabakeshop.com
2. Set out all your strips in a circular pattern to decide how you'd like your pillow to look. You will need approx. 68-74 strips.
3. Choose your first strip and lay it right side up on your cutting mat.
4. Cut the strip diagonally lengthwise starting at the top right corner and cutting to 1/4" over from the bottom left corner (see close-up photo). This 1/4" provides the necessary seam allowance for attaching the next strip. Make sure the selvage is always the widest part of your strip (this will be the outside edge of your pillow top).

Original Recipe can be found at www.modabakeshop.com
5. Here is what the first piece looks like after it's cut. The piece on the left will be used for the large pillow top. Save the scrap you just cut on the right! This will be used to make the smaller pillow top. 6. With right sides together, pin (if you choose) and sew your second full uncut strip to the first diagonal piece, sewing from the outside (selvage end) of the strip to the middle/inside.

Original Recipe can be found at www.modabakeshop.com
7. Press seams open.
8. Place the two pieces you've sewn together right side up on your cutting mat. Cut the second strip (on the right) as you did in Step 4 (above), starting from the top right corner and cutting on the diagonal down the length of the strip to 1/4" over from the bottom left corner of the second strip.
9. With right sides together, sew the third full strip to the second diagonal piece.

Original Recipe can be found at www.modabakeshop.com
10. Press seams open and trim that strip as you did in steps 4 & 8.
UPDATE!!!!! I have added the next two pictures after a few readers have made the pillows and have gotten a small hole in the middle of their pillow after they have sewn all the way around the circle. To avoid this hole, it is imperative that you do this next step.
10a. As you begin to sew around the pillow, you may notice that the strips don't always line up perfectly in the middle. (Usually after about 10 or so strips). You will need to trim it up starting at the outside edge of the pillow and coming right to the center of the pillow. Below, I have drawn a line where I "trimmed it up" once and another line where I still need to "trim it up." Even though it looks like you are ruining the pillow by chopping off some of the center, you will never be able to tell once the pillow is complete. I promise!

Original Recipe can be found at www.modabakeshop.com
11. Repeat this adding/cutting process with the remainder of the strips all the way around the circle. 12. When it is time to sew the final seam connecting the last diagonally cut strip to the beginning first strip, I have found that it is most effective to sew this strip starting from the center of the pillow top and sewing toward the outside to make sure everything lines up nicely. Sew slowly, so your needle can get through all those layers without breaking (and taking out an eye!) 13. After you have sewn the last strip to the first, press the final seam open. As you will notice, the middle gets a little crazy. When pressing, don't worry about the middle so much. Let it go where it wants to go. Just make sure to press the seams open as well as you can on the outer portion of the pillow top.
14. When your pillow top is complete, it may be a little wonky at the outside edge. An easy way to trim it up is to fold in half and then fold that half in half. You will now have 1/4 of a circle.
15. Find a ruler, a piece of string, or a ribbon (whatever you have close by). Holding it at the center of the circle, measure the shortest distance to the outside edge of the pillow top. I cut a ribbon to the shortest distance and dragged it across the edge of the 1/4 circle marking where I will need to trim.
16. Use the ribbon or ruler as if it were a protractor, marking the distance all the way across the ¼ circle so the when you cut along the line, it will be a perfect circle. Trim along the line.

Original Recipe can be found at www.modabakeshop.com
17. Create your pillow bottom. You can either piece together scraps, use one large piece, or create another “pillow top” and make this a reversible pillow. I pieced together strips from the gray Sherbet Pips colorway.
18. Lay the pillow bottom face up on the floor. Next, lay your pillow top face down directly on top of the pillow bottom.
19. Trim the pillow bottom to match the pillow top.
20. Now it is time to make the piping. Piece together a strip of fabric that is 3”x 140". Lay the cotton piping on top of the strip.
Original Recipe can be found at www.modabakeshop.com
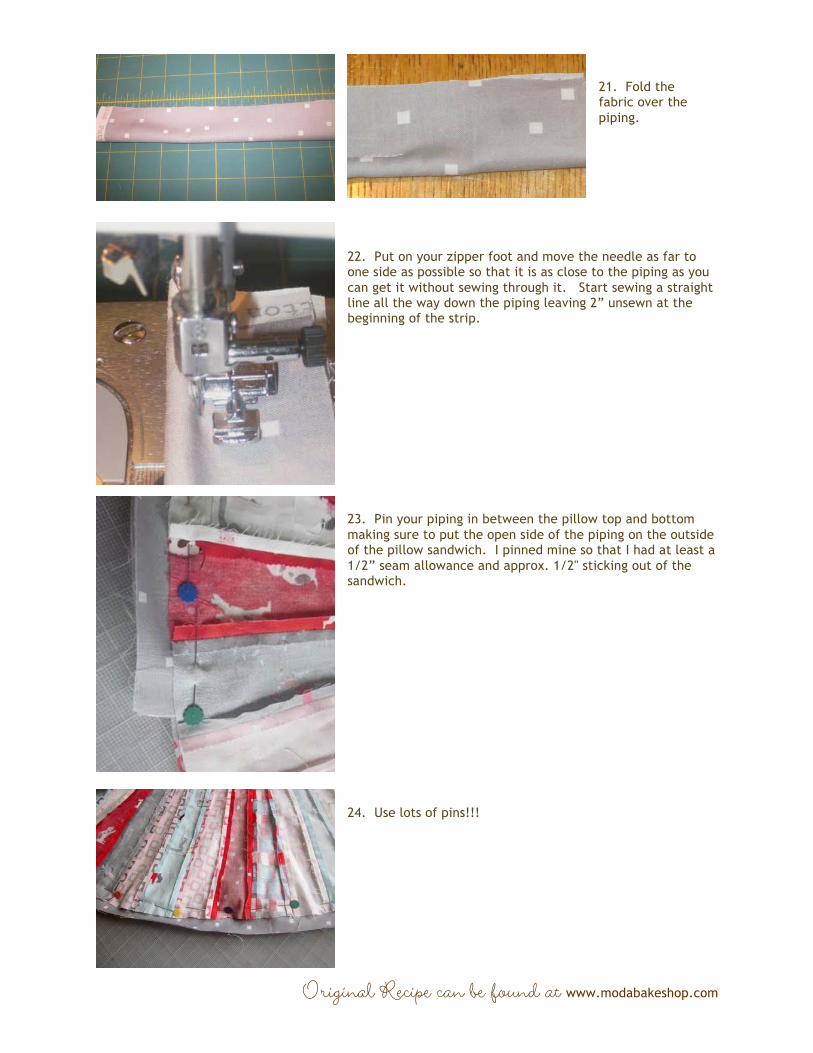
21. Fold the fabric over the piping.
22. Put on your zipper foot and move the needle as far to one side as possible so that it is as close to the piping as you can get it without sewing through it. Start sewing a straight line all the way down the piping leaving 2” unsewn at the beginning of the strip.
23. Pin your piping in between the pillow top and bottom making sure to put the open side of the piping on the outside of the pillow sandwich. I pinned mine so that I had at least a 1/2” seam allowance and approx. 1/2" sticking out of the sandwich.
24. Use lots of pins!!!

Original Recipe can be found at www.modabakeshop.com
25. Take a look at the pillow bottom to make sure you pinned the fabric far enough in on the back that you catch the fabric plus have extra fabric to trim away in step 30. You don't want to sew around the entire pillow and then realize that you've missed a part of the back and have to redo. It is best to catch it now!
26. After pinning all the way around the circle, stop when you have about 3 jelly roll strips left. (This will be the opening to stuff your pillow). Leave the remaining piping dangling. It is good if you have more than enough left there to finish up the circle. We will cut it down later.
27. Begin sewing 2" in from where you put your first pin (don’t forget to backstitch a few stitches to lock in your seam so that when you are stuffing the pillow, the thread won’t come out). The reason you leave a little bit of it unsewn at the beginning is to make it easier to finish the piping after you have stuffed your pillow.
28. Keeping your zipper foot on, put your needle all the way to the left in order to sew as close to the piping as possible. I like to put my finger right in front of where I am about to sew in order to help the needle get super close to the piping.
29. Sew all the way around the circle as close to the piping as possible. When you get to your last pin, back stitch a few stitches and cut your thread (leaving the 3 jelly roll strips still open).

Original Recipe can be found at www.modabakeshop.com
30. Now trim off all excess fabric around your circle leaving 1/4” of fabric on the outside of your seam. I used pinking shears, but this is not necessary. Don't cut too close to your seam or the seam may come out at that spot. It is better to leave more fabric on the outside edge than not enough.
31. Turn your pillow right side out through the hole that you left open.
32. Stuff your pillow. I used 2 ¾ (24oz.) bags of Silky Soft poly-fil. This stuffing is seriously soft! Use whatever you can find though…stuffing from old pillows, bean bag filling, etc. (However, if you do bean bag filling, you may need to make an inner liner to hold them all in.) 33. When you are ready to sew the pillow shut, you will want to bring the two sides of the piping together because you should have extra piping that needs to be trimmed down.

Original Recipe can be found at www.modabakeshop.com
34. Trim off the excess piping, but leave the fabric that was wrapped around it.
35. Fold in the edge of the excess fabric to give it a finished look, and then wrap it over the other side of the piping to complete the circle and pin it shut. (If your piping doesn't meet perfectly together, no one will anyone ever notice!)
36. Now, you can either blind stitch the pillow shut by hand or use the zipper foot again to top stitch it closed. I took the lazy quick route and sewed the pillow closed. I used the right side of the zipper foot this time, moving my needle all the way to the right.
37. Now the fun part….time to make your covered buttons! For each pillow you will need two buttons. I used Dritz’ Cover Button Kit (size 1 ½”) which was the largest button I could find at Joann Fabrics. 38. These are super simple to make. Especially the large buttons. Just follow the instructions on the back of the kit. The kit has everything you need in it to make the button (other than the fabric that you want to add to it).

Original Recipe can be found at www.modabakeshop.com
39. Taking the largest needle you have, I used a Darning needle (but I am sure there are larger ones out there that I don't know about), thread it with strong beading thread or fishing wire. I originally tried it with regular polyester thread, but it broke when I pulled the thread tight. 40. Attach your thread to the button that you want on the front of the pillow. Doubling up the thread wouldn't be a bad idea! Send your needle through the center of the pillow top.
41. Pull the needle out on the bottom of the pillow and send your needle through the hoop of the back of the 2nd button. Send the needle back up to the top and go back through the hook on the top button. Do this over and over (about 3-5 times). When you think it is secure enough, pull the thread tight in order to tuft the pillow in the middle. 42. When you are ready to tie off the thread, first wrap your thread around the bottom of the button a few times to make a shank. Then knot your thread and cut. Ta Dah!
You just finished a beautiful jelly roll pillow!
Creating the smaller pillow Now, using all the scraps that you just cut off from the first pillow, let’s make another pillow! This is going to use the same process, only it will be much faster because you’ve already cut all your strips. Take your first two strips and sew them right sides together.

Original Recipe can be found at www.modabakeshop.com
Press open.
Add next strip and press open.
Trim up your strips.
Continue all the way around the circle. Repeat the exact same steps to make the smaller pillow as you did above to make the larger one.

Original Recipe can be found at www.modabakeshop.com
There you have it... two pillows with one jelly roll!
One floor pillow measuring 40" in diameter and a smaller pillow measuring 28" in diameter.
I really hope you are able to follow along with this tutorial. I can’t wait to see your creations. Don’t forget to stop by my blog for a Giveaway sponsored by The Fat Quarter Shop.
Val Campbell {howaboutpinkplease.blogspot.com}