os10 open edition programmability guide release 10.2 · linux ip stack. rich feature set provided...
TRANSCRIPT

OS10 Open Edition Programmability GuideRelease 10.2.0B

2016 - 10
Rev. A02

Contents
1 Getting Started.............................................................................................................................................. 7Solutions.............................................................................................................................................................................. 7Dell Platforms......................................................................................................................................................................7Components and Services................................................................................................................................................8
Convergence of Networking, Servers, and Storage............................................................................................... 8OS10 Programmability................................................................................................................................................. 8Open Platform Abstraction.........................................................................................................................................8System Hardware Integration with Standard Linux APIs........................................................................................8Disaggregated Hardware and Software....................................................................................................................9
Architecture .......................................................................................................................................................................9Linux Infrastructure..................................................................................................................................................... 9Control Plane Services (CPS).................................................................................................................................. 10Switch Abstraction Interface (SAI)..........................................................................................................................10Network Adaptation Service (NAS)........................................................................................................................ 10System Device Interface (SDI)................................................................................................................................. 10Platform Adaptation Service (PAS)..........................................................................................................................11Dell Applications and Tools ........................................................................................................................................11
Run-Time Components....................................................................................................................................................12NAS Linux Adaptation — Integration with Standard Linux APIs......................................................................... 12CPS Services ............................................................................................................................................................. 13File System Organization........................................................................................................................................... 13System Startup ..........................................................................................................................................................13
2 Installation ...................................................................................................................................................14System Setup....................................................................................................................................................................14Install OS10........................................................................................................................................................................ 14Automatic Installation.......................................................................................................................................................15Manual Installation............................................................................................................................................................ 15USB Installation.................................................................................................................................................................16OS10 Boot Sequence....................................................................................................................................................... 16Log into Switch................................................................................................................................................................. 17
3 Administration.............................................................................................................................................. 18System Defaults................................................................................................................................................................18Remote Access................................................................................................................................................................. 18System Utility Commands .............................................................................................................................................. 18Default XML Configuration Files.....................................................................................................................................19Operations........................................................................................................................................................................ 20
Configure Management Interface IP Address....................................................................................................... 20Secure Management Interface................................................................................................................................ 20Configure Physical Port............................................................................................................................................ 20Create User Accounts...............................................................................................................................................20
Contents 3

Configure Time and Date..........................................................................................................................................20OS10 Commands.............................................................................................................................................................. 21LED Control...................................................................................................................................................................... 23Maintenance.....................................................................................................................................................................23
Manage Linux Packages........................................................................................................................................... 23System Services.........................................................................................................................................................24
Upgrade OS10.................................................................................................................................................................. 24Upgrade OS10 Image.................................................................................................................................................25
Boot to Different ONIE Mode........................................................................................................................................ 25Puppet Open Source.......................................................................................................................................................26
Sample Puppet Configuration.................................................................................................................................. 26Nagios Open Source........................................................................................................................................................28
Configure OS10 as Nagios Client.............................................................................................................................28Configure Nagios Server to Monitor System and Services................................................................................. 29
4 Network Configuration.................................................................................................................................31Linux Command/Open Source Application...................................................................................................................31CPS API Configuration.....................................................................................................................................................31Dell-Provided Commands................................................................................................................................................ 31Configure Interfaces........................................................................................................................................................32
Map Ports to Linux Interfaces..................................................................................................................................32Map CPU Port to Linux Interface............................................................................................................................33Physical Ports.............................................................................................................................................................33Fanout (4x10G) Interfaces....................................................................................................................................... 33Port Channel/Bond Interfaces.................................................................................................................................34VLAN Interfaces.........................................................................................................................................................35
VLAN Bridging..................................................................................................................................................................35Add Untagged Member to VLAN............................................................................................................................ 36Add Port to Multiple VLAN Domains....................................................................................................................... 37Add Linux Bond Interface to VLAN Domain........................................................................................................... 37Remove VLAN Member from a VLAN.................................................................................................................... 37Delete VLAN............................................................................................................................................................... 37
Spanning Tree.................................................................................................................................................................. 38Link Layer Discovery Protocol........................................................................................................................................39MAC Address Forwarding ............................................................................................................................................. 39Layer 3...............................................................................................................................................................................39IPv4 Routing.....................................................................................................................................................................40IPv6 Routing.....................................................................................................................................................................40ARP and Neighbor Table Entries.................................................................................................................................... 41ECMP Next-Hop Routing................................................................................................................................................41L3 Routing Topology....................................................................................................................................................... 42Quagga Routing............................................................................................................................................................... 43Port Mirroring...................................................................................................................................................................45sFlow Provisioning........................................................................................................................................................... 46Port Statistics...................................................................................................................................................................46Access Control Lists........................................................................................................................................................49
4 Contents

Quality of Service.............................................................................................................................................................49BGP Routing using Quagga............................................................................................................................................50
Verify Spine/Leaf Configuration..............................................................................................................................52
5 Programmability.......................................................................................................................................... 55Client and Server Applications....................................................................................................................................... 55CPS Keys.......................................................................................................................................................................... 56
Optional Component................................................................................................................................................. 57Build CPS Key.............................................................................................................................................................57
CPS Qualifiers...................................................................................................................................................................57Observed vs. Real-Time Qualifiers...........................................................................................................................57Target vs. Observed Qualifiers................................................................................................................................ 58
Objects and Attributes....................................................................................................................................................58Object Attributes....................................................................................................................................................... 58
Publish/Subscribe............................................................................................................................................................58CPS API Operations........................................................................................................................................................ 59
get Requests.............................................................................................................................................................. 59Transactions............................................................................................................................................................... 59Blocking.......................................................................................................................................................................60CPS API Functions.................................................................................................................................................... 60Object Model Representation.................................................................................................................................. 60API Language Support.............................................................................................................................................. 60
YANG Modeling Objects................................................................................................................................................. 60Object Dictionary Support...............................................................................................................................................61YANG Model C Header....................................................................................................................................................61sFlow using YANG and Python...................................................................................................................................... 64YANG Model Reference................................................................................................................................................. 65Application Examples.......................................................................................................................................................65
VLAN Application Examples..................................................................................................................................... 66IP Address Application Examples............................................................................................................................. 70Route Application Examples..................................................................................................................................... 72ACL Application Examples........................................................................................................................................ 75MAC Address Table Application Examples..............................................................................................................81Event Application Examples..................................................................................................................................... 88
Application Templates......................................................................................................................................................91Python Templates...................................................................................................................................................... 91C/C++ Templates...................................................................................................................................................... 91CPS Server Application Templates..........................................................................................................................92CPS Client Application Templates........................................................................................................................... 97CPS Event Publisher Application Templates..........................................................................................................99CPS Event Subscriber Application Templates......................................................................................................100
CPS API Reference.........................................................................................................................................................101
6 Troubleshooting......................................................................................................................................... 102Packet Analysis...............................................................................................................................................................102Coredumps......................................................................................................................................................................102
Contents 5

Firmware Versions..........................................................................................................................................................102Transceivers....................................................................................................................................................................102Debug Port Interfaces................................................................................................................................................... 103
Troubleshoot Error Condition on Physical Port....................................................................................................103Troubleshoot Interfaces.......................................................................................................................................... 103
Layer 2 Troubleshooting................................................................................................................................................103Enable NAS and SAI Layer 2 Logging.................................................................................................................... 103View Layer Status in the NPU................................................................................................................................103
Layer 3 Troubleshooting................................................................................................................................................104Verify Routing-Related Tables................................................................................................................................104Troubleshoot Routing Issues in the NPU.............................................................................................................. 104Enable NAS and SAI Layer 3 Logging.................................................................................................................... 104
Log Management........................................................................................................................................................... 104Enable and Display Application Logs (except SAI)...............................................................................................105Enable and Display SAI Application Log.................................................................................................................106
Manage CPS API Objects............................................................................................................................................. 107get Object .................................................................................................................................................................107set Object.................................................................................................................................................................. 107Event Trace...............................................................................................................................................................108
Password Recovery....................................................................................................................................................... 108Port Statistics................................................................................................................................................................. 109sosreport Plugins............................................................................................................................................................109Troubleshoot Connectivity.............................................................................................................................................110
Packet Drops............................................................................................................................................................. 110
7 Dell Networking Support..............................................................................................................................111
6 Contents
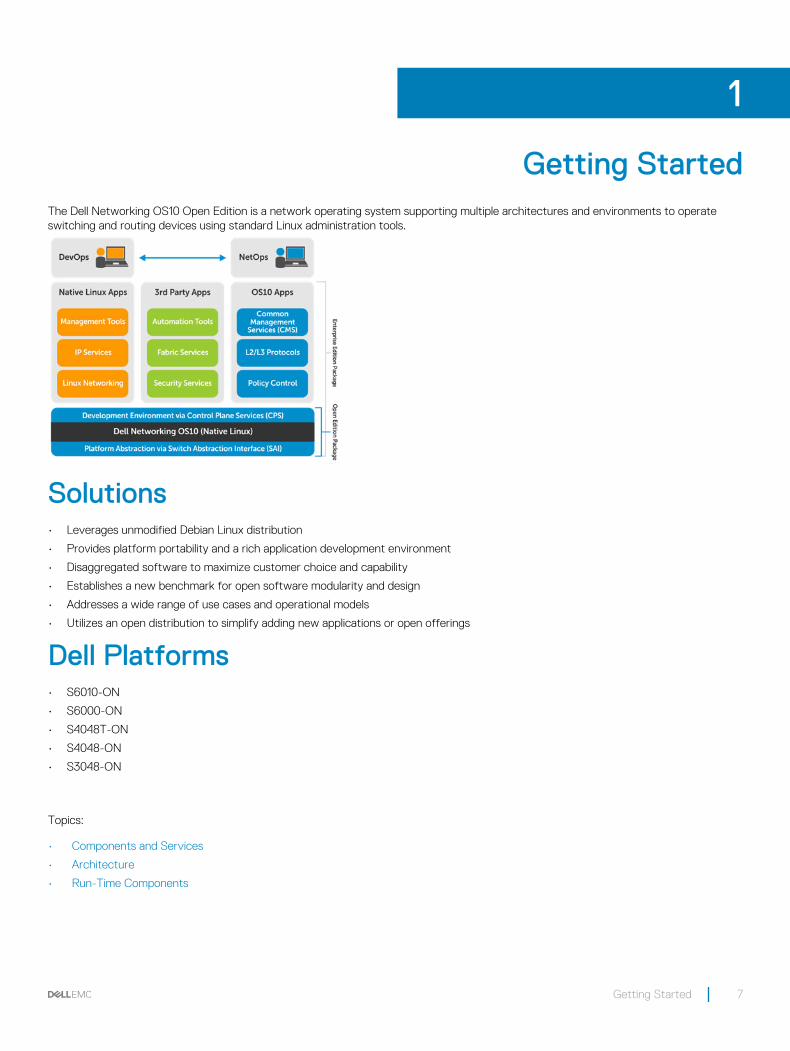
Getting StartedThe Dell Networking OS10 Open Edition is a network operating system supporting multiple architectures and environments to operate switching and routing devices using standard Linux administration tools.
Solutions• Leverages unmodified Debian Linux distribution
• Provides platform portability and a rich application development environment
• Disaggregated software to maximize customer choice and capability
• Establishes a new benchmark for open software modularity and design
• Addresses a wide range of use cases and operational models
• Utilizes an open distribution to simplify adding new applications or open offerings
Dell Platforms• S6010-ON
• S6000-ON
• S4048T-ON
• S4048-ON
• S3048-ON
Topics:
• Components and Services
• Architecture
• Run-Time Components
1
Getting Started 7

Components and ServicesOS10 is implemented using a standard Linux distribution (Debian Jessie). OS10 is binary-compatible with Debian Linux packages.
Compared to deploying a vendor-built Linux distribution, OS10 provides important advantages:
• Install any Debian package from a standard repository without rebuilding the package.
• Develop applications using the standard Debian development environment — no longer constrained by or locked into hardware vendor-specific development environment.
• Rapidly deploy updates to Debian software packages (such as security patches) as they become available.
• Securely upgrade OS10 using standard Linux tools (such as apt-get and dpkg) from repositories.
Linux Kernel Unmodified Linux kernel included with Debian distribution provides a robust base to support current state-of-the-art and future networking.
Linux IP Stack Rich feature set provided by the Linux standard IP stack without vendor-specific changes.
Linux Tools Standard Linux system administration tools are factory-installed in OS10, or can be easily installed from standard Debian repositories.
Convergence of Networking, Servers, and StorageThe use of Linux as an operating system provides a solid foundation for the convergence of networking, server, and storage solutions. OS10 allows you to easily deploy the management and orchestration solutions that are typically available for Linux servers and storage systems.
OS10 ProgrammabilityOS10 provides an object-centric API for application development — implement your own applications using a well-defined object model and set of programmatic APIs. The object model is defined using the YANG modeling language, and OS10 APIs support Python and C/C++. A set of standard Debian software development packages is provided to allow you to develop applications for OS10.
Open Platform AbstractionOS10 implements a new, open object-centric application programming interface called the control plane service (CPS) application programming interface (API). The CPS API allows customer-developed applications to be independent of any underlying hardware or software technology. OS10 internally uses the switch abstraction interface (SAI) which Dell and partner companies contributed to the Open Compute Project. The SAI API allows OS10 to be completely independent of any network processor/switch hardware technology. For more information about SAI, see opencompute.org.
System Hardware Integration with Standard Linux APIsOS10 integrates standard Linux networking APIs with the hardware functionality provided by networking devices (system and network processors). You can download and use open source software (such as Quagga and Nagios) on any OS10 platform.
8 Getting Started

Disaggregated Hardware and SoftwareOS10 provides an environment in which hardware and software are fully modular. You can select the software modules you want to install, as well as the hardware platforms you would like to use for your networking needs.
Architecture The main OS10 software components include:
• Linux infrastructure
• Control plane services (CPS)
• Switch abstraction interface (SAI)
• Network adaptation service (NAS)
• System device interface (SDI)
• Platform adaptation service (PAS)
• Dell applications and tools
Using well-defined APIs allow OS10 to provide full software modularity and abstraction of the hardware and software platforms.
Software partitioning
Software is partitioned into subcomponents that are organized as Linux packages — each package contains only related functionality.
Software layering System components depend only on the components that logically support them.
Hardware and software platform abstraction
The SDI, SAI modules, and platform startup scripts are the only hardware-specific components in OS10 — all other modules are hardware-independent. Hardware-specific variations (such as number and names of physical ports, or number of power supplies) are defined using platform definition files. OS10 uses portable operating system interface (POSIX) APIs. Software platform implementation-specific details are abstracted using OS10 run-time libraries (common utilities and logging) as necessary.
Open API User applications interact with OS10 software modules using the CPS API, and OS10 provides an object-centric API in the control plane services (CPS) component.
Linux InfrastructureThe infrastructure consists of a collection of Linux services, libraries, and utilities preinstalled in an OS10 image. Together with the Linux kernel, these components provide the foundation for the implementation of OS10-specific software components.
Getting Started 9

Control Plane Services (CPS)CPS is at the core of the architecture, providing an object-centric framework that mediates interactions between OS10 applications and allows customer applications to interact with OS10 software components.
There are two sets of application roles — clients and servers:
Client applications Execute, create, set, get, and delete operations on individual objects or lists of objects.
Server applications Execute operations requested by CPS client applications. Because client applications operate on objects, they are not aware of the location or name of the CPS server application that executes a requested operation.
The CPS framework supports a publisher/subscriber mode, and server applications can publish relevant events, while client applications can subscribe (register) for specific events and objects. CPS client applications can register for events when objects are created, modified, or deleted. The publisher/subscriber approach and object-centric operations allow for the independent operation of client and server applications.
The CPS API object model provides disaggregation between client and server applications. The client and server are unaware of one other — they communicate only through a CPS API object (see Client and Server Applications).
Custom-written applications use the CPS API to communicate with OS10 components. The OS10 provides both C/C++ and Python programming interfaces. The object model provided by the CPS layer is defined using YANG models which are used to generate C header files — providing a programmatic representation of objects and their attributes. The header files are shared between client and server applications — the C/C++ representation of objects and their attributes is designed to ensure compatibility between multiple versions of the object model.
Switch Abstraction Interface (SAI)The OS10 SAI implements an API for network processor units (NPUs) supported on Dell platforms. The SAI API is an open interface that abstracts vendor-specific NPU behavior. The SAI API is the result of a joint effort of multiple NPU vendors and user companies, who contributed the SAI to the Open Compute Platform. OS10 is NPU-independent and not locked into specific NPU hardware. If a new NPU is used in an OS10 platform, the only component that Dell engineers replace is the SAI.
Network Adaptation Service (NAS)The NAS manages the high-level NPU abstraction and adaptation, and aggregates the core functionality required for networking access at Layer 1 (physical layer), Layer 2 (VLAN, link aggregation), Layer 3 (routing), ACL, QoS, and network monitoring (mirroring and sFlow).
The NAS provides adaptation of low-level switch abstraction provided by the SAI to standard Linux networking APIs and interfaces, and to software CPS API functionality. The NAS manages the middleware that associates physical ports to Linux interfaces — also provides packet I/O services, using the Linux kernel IP stack.
System Device Interface (SDI)All hardware components except for NPUs are abstracted as system devices. The SDI API defines a low-level platform-independent abstraction for all types of system devices. Only system device drivers that implement the SDI API are hardware-specific — the API itself is hardware-independent. Following is a list of example system devices.
• Fan devices
10 Getting Started

• Power supplies
• Temperature sensors
• LEDs
• EEPROM
• Programmable devices
• Transceivers
Platform Adaptation Service (PAS)The PAS provides a higher-level abstraction and aggregation of the functionality provided by the SDI component, and implements the CPS object models associated with system devices. The PAS monitors the status of system devices and reports changes or faults as CPS events. The PAS also allows applications to retrieve current status information and set control variables of system devices.
• Read current temperature values reported by temperature sensors
• Get and set fan speed values
• Set a LED state
• Read power levels reported by PSUs
• Get system inventory and EEPROM information
• Set and get operations on transceivers
The PAS detects:
• Insertion and removal of common field replaceable units (FRUs), such as PSUs and fans
• Over-temperature based on pre-defined thresholds
• Media insertion on physical ports
PAS is responsible for:
• Monitoring the status of system devices
• Allowing applications to retrieve current status information
• Reporting status changes or faults as CPS events
• Allowing applications to set the control variables of system devices
Platform Description Infrastructure
The platform description infrastructure provides a means to describe specific per-platform configuration parameters, such as the number of ports per system, supported transceiver modules, mapping of Linux interfaces to physical ports, and number of fans and PSUs. This component contains the platform-specific system startup configuration and scripts.
Dell Applications and Tools OS10 provides a set of tools and commands that allow system administrators to manage Dell-specific software and hardware functionality (such as software upgrades, physical port, media information, and system inventory). OS10 provides a Dell-implemented thermal control application which prevents damage of hardware components in case of overheating and/or fan failure.
CAUTION: Do not disable the thermal control application, as hardware damage may result.
Getting Started 11

Run-Time ComponentsThe following shows the OS10 run-time components.
OS10 Processes
• cps_api_svc — Executes the CPS broker which mediates all operations and events.
• base_pas_svc — PAS daemon which executes PAS functionality.
• base_nas_svc — NAS daemon which executes NAS functionality.
Applications Which Manage Components of the OS10 System
• base_env_tmpctl_svc — Manages the environment temperature control and executes the thermal control algorithm.
• base_nas_front_panel_ports_svc — Manages physical port mapping to Linux interfaces.
• base_nas_phy_media_config_svc — Manages configuration of physical media.
• base_nas_monitor_phy_media_svc — Monitors physical media (SFP) events generated by PAS when you insert a pluggable module — automatically configures port parameters.
• base_ip_svc — Gets/sets IP address parameters using the CPS API.
• base_interface_svc — Gets/sets interface parameters using the CPS API.
• base_nas_shell_svc — Runs NPU shell commands.
CAUTION: Do not disable the base_env_tmpctl_svc process, as hardware damage may result.
NAS Linux Adaptation — Integration with Standard Linux APIsThe OS10 NAS daemon seamlessly integrates standard Linux network APIs with NPU hardware functionality. The NAS daemon registers and listens to networking (netlink) events. When it receives an event, the NAS daemon processes the event contents and programs the NPU with relevant information (such as enabling/disabling an interface, adding/removing a route, or adding/deleting a VLAN).
Linux Interfaces Associated with Physical Ports
OS10 uses internal Linux tap devices to associate physical ports on the NPU with Linux interfaces. When a change in physical port status (up/down) occurs, the NAS daemon propagates the new port status to the associated tap device.
Packet I/O
Packet I/O describes control plane packet forwarding between physical ports and associated Linux interfaces — implemented as a standalone thread of the NAS daemon. Packets received by the NPU are forwarded to the CPU, and the packet I/O thread receives the
12 Getting Started

packet through a SAI API callback. Each received packet contains the identity of the source physical port. The packet I/O module then injects the packet to the tap device associated with the source physical port. Applications receive packets from the Linux IP stack using standard sockets.
Applications use tap devices to transmit packets, and the packet I/O receives the transmitted packet from the Linux IP stack. Based on the source tap device of the packet, the transmitted packet is forwarded to the associated physical port.
CPS Services The NAS daemon registers with the CPS as a server application to provide CPS programmability of the packet NPU. The NAS performs create, delete, set, and get operations for objects which model the networking functionality defined by OS10. The PAS daemon also registers with CPS as a server application to provide CPS programmability for system devices.
File System OrganizationOS10 uses a standard Linux file system. The OS10-specific system tools and configuration files are maintained under the following directory structure:
• /opt/dell/os10 contains binaries, libraries, and YANG models.
• /etc/opt/dell/os10 contains platform description files and default configuration files.
Platform Description Files
The platform files contain a description of hardware modules that apply to the current platform, such as number of physical ports, fans, and power supplies.
Default Configuration Files
The default configuration files contain initialization information applicable to the current platform, such as the initial SAI configuration and system ACL rules to be applied at initialization.
System Startup OS10 leverages the systemd framework for the startup of OS10-specific processes. The systemd framework is enabled by default
under Debian Jesse. For more information, see www.freedesktop.org/wiki/Software/systemd
Getting Started 13

Installation You can install OS10 using an industry-standard open network install environment (ONIE) software image with autodiscovery, manually, or from a USB device.
For detailed information about ONIE installation, see opencompute.org.
ONIE supports two types of installation:
• Automatic (zero-touch) installation — ONIE discovers network information including the DHCP server, connects to an image server, options to point to the server for the image, and downloads and installs an image automatically.
• Manual installation — Manually configure your network information if a DHCP server is not available (see Manual Installation).
System SetupVerify the system is connected correctly before installation:
• Connect a serial cable and terminal emulator to the console serial port — required serial port settings are 115200, 8 data bits, and no parity.
• Connect the Management port to the network if you prefer downloading an image over a network. To locate the Console port and Management port, see the Getting Started Guide shipped with your switch or the platform-specific Installation Guide at Dell.com/support.
Install OS10If there is a current OS installed, power up the switch to access the ONIE boot menu. The boot menu displays on the console.
+--------------------------------------------------------+ |*ONIE: Install OS | | ONIE: Rescue | | ONIE: Uninstall OS | | ONIE: Update ONIE | | ONIE: Embed ONIE | | ONIE: Diag ONIE | +--------------------------------------------------------+
Available ONIE modes:
• Install OS — Installs an OS10 image.
2
14 Installation

• Rescue — Reboots the system into ONIE for repair, debugging, and forensics.
• Uninstall OS — Deletes the contents of all disk partitions except ONIE.
• Update ONIE — Installs a new ONIE version.
• Embed ONIE — Formats an empty disk and installs ONIE.
• Diag ONIE — Runs system diagnostics.
CAUTION: During an automatic or manual OS10 installation, if an error condition occurs that results in an unsuccessful installation, perform Uninstall OS first to clear the partitions if there is an existing OS on the switch. If the problem persists, contact Dell Technical Support.
Topics:
• Automatic Installation
• Manual Installation
• USB Installation
• OS10 Boot Sequence
• Log into Switch
Automatic InstallationYou can automatically (zero-touch) install an OS10 image on a new switch. Once your switch successfully boots to ONIE Install, the auto discovery process attempts to obtain the hostname, domain name, Management interface IP address, as well as the IP address of one or more DNS name servers on your network from your DHCP server and DHCP options.
For complete image discovery information, see Github.com/opencomputeproject/onie.
If a USB drive is inserted, auto discovery searches the USB storage supporting FAT or EXT2 file systems. It also searches HTTP, FTP, or TFTP servers with the default DNS name of ONIE server. DHCP options are not used to provide the server IP, and the auto discovery method repeats until a successful software image installation occurs.
Manual InstallationIf a DHCP server is not available, you can manually install an OS10 software image. If ONIE does not obtain an IP address for the Management port (eth0) , ONIE sets the IP address to 192.168.3.10. You must manually configure the Management port and specify the software image file to start installation.
1 Download the software from Dell.com/support, then save the software image file to an HTTP/TFTP/FTP server.
2 Power up the system and select ONIE: Rescue OS for manual installation.
3 (Optional) Stop the DHCP discovery if the switch boots to ONIE: Install OS.
$ onie-discovery-stop4 Assign a unique IP address to the Management port, where x.x.x.x represents your internal IP address.
$ ifconfig eth0 x.x.x.x netmask 255.55.0.0 up5 Install the software on the device — the installation command accesses the software image from the provided server location,
creates partitions, verifies installation, and reboots itself.
$ onie-nos-install url_server_image_location
The ONIE installer creates two partitions — OS10-A (active and default) and OS10-B (standby) — and installs the software image.
Installation 15

Once installation completes, the system automatically loads the new software image and reboots.
USB InstallationYou can also manually install the OS10 software image using USB media. Verify that the USB storage device supports a FAT or EXT2 file system. Plug the USB storage device into the USB storage port on the switch.
1 Power up the system. It automatically boots up with the ONIE: Rescue option.
2 (Optional) Stop the ONIE discovery process if the switch boots to ONIE: Install.
$ onie-discovery-stop3 Create a USB mount location on the system.
$ mkdir /mnt/media4 Mount the USB media plugged in the USB port on the switch.
$ mount —t vfat /dev/sdb /mnt/media5 Install the software from the USB, where /mnt/media specifies the path where the USB partition is mounted.
$ onie-nos-install /mnt/media/image_file
The ONIE autodiscovery process discovers the image file at the specified USB path, loads the software image, and reboots the switch.
OS10 Boot SequenceAfter you install an OS10 image, the system automatically loads the image and boots.
16 Installation

1 Once the switch powers up or reboots, the boot menu displays. After a short delay, the system auto boots by loading the image — in this case OS10-A partition. If necessary, during the delay you can interrupt the auto boot and select other options to select OS10-B to load another software image, or go back to ONIE for upgrades, system recovery, and so on.
+--------------------------------------------------------+| *OS10-A || OS10-B || ONIE |+--------------------------------------------------------+
2 Linux boots from the OS10-A partition on the disk and starts the systemd daemon in the root file system as part of the initial setup before the Linux login displays.
The systemd daemon starts custom services during system initialization:
• PAS service initializes the platform and devices on the system.
• NAS service initializes the NPU and system interfaces.
• Other OS10 services create Linux interfaces that map to physical, front-panel ports on the switch.
After OS10 custom services run successfully and the system boots up, the Linux prompt displays on the console for you to log in.
NOTE: If the service that creates internal Linux interfaces is unsuccessful, the system bootup waits 300 seconds before timing out and displays the Linux login prompt. Log into OS10 and use the troubleshooting steps to determine the cause of the failure. You can use the systemctl command to determine if any services have failed, and the journalctl command to inspect the log contents.
Log into SwitchThe first time OS10 boots up on a switch, use linuxadmin as the default username and linuxadmin as the password to log in.
The default username is created for OS10 administrator activities on the system, and is part of the Linux sudo group which can execute
privileged commands. The first time you log into OS10, you must change the default linuxadmin password for security reasons — the
new password is saved for future logins.
========================>linuxadmin/linuxadmin<=======================
Dell Networking Operating System (OS10)
OS10 login: linuxadminPassword: linuxadmin >> only for first-time login You are required to change your password immediately (root enforced)Changing password for linuxadmin.(current) UNIX password: >>> linuxadminEnter new UNIX password:>>> user-preferred passwordRetype new UNIX password: >>> re-enter user-preferred passwordLinux OS10 3.16.7-ckt11 #1 SMP Wed Feb 3 17:43:04 PST 2016 x86_64The programs included with the Debian GNU/Linux system are free software;the exact distribution terms for each program are described in theindividual files in /usr/share/doc/*/copyright.Debian GNU/Linux comes with ABSOLUTELY NO WARRANTY, to the extentpermitted by applicable law.
-*-*-*-*-*-*-*-*-*-*-*-*-*-*-*-*-*-*-*-*-*-*-*-*-*-*-*-*-*-*-*-*--* Dell Networking Operating System (OS10) *--* *--* Copyright (c) 1999-2016 by Dell Inc. All Rights Reserved. *--* *--*-*-*-*-*-*-*-*-*-*-*-*-*-*-*-*-*-*-*-*-*-*-*-*-*-*-*-*-*-*-*-*-
This product is protected by U.S. and international copyright andintellectual property laws. Dell and the Dell logo are trademarksof Dell Inc. in the United States and/or other jurisdictions. Allother marks and names mentioned herein may be trademarks of theirrespective companies.
linuxadmin@OS10:~$
Installation 17

AdministrationThis information covers tasks needed to properly maintain and upgrade the system running OS10 including system defaults, configuring interfaces, installing Linux packages, logging, and upgrades.
System DefaultsWhen the system boots up, default system configuration is applied:
• All Linux interfaces are created and mapped to physical ports.
• All Linux interfaces are in an Administratively Down state.
• The Management interface is eth0, and the management IP address is dynamically assigned using DHCP.
• OS10 processes are activated after system boot up (see Run-Time for a list of processes).
• ACL entries are installed to direct control plane packets for protocols (such as LLDP and OSPF) directly to interfaces associated with physical ports (see Default XML Configuration Files for a list of ACL entries).
• QoS initialization sets up the default scheduler hierarchy and maps all packets to Queue 0.
Remote AccessAccess the system remotely via SSH, and ensure that the IP address of the Management interface is configured.
Using SSH
By default, SSH service is enabled. The username and password are both linuxadmin.
$ ssh linuxadmin@management_ipaddress
Topics:
• System Utility Commands
• Default XML Configuration Files
• Operations
• OS10 Commands
• LED Control
• Maintenance
• Upgrade OS10
• Boot to Different ONIE Mode
• Puppet Open Source
• Nagios Open Source
System Utility Commands There are six system utility commands available:
• os10-ethtool — Displays interface statistics and transceiver information (see Statistics).
• os10-show-stats — Displays detailed statistics of a physical port (see Port Statistics).
3
18 Administration

• os10-config-fanout — Fans out native 40G ports to 4x10G interfaces (see Physical Ports).
• os10-switch-shell — Runs NPU commands (see Debug Port Interfaces).
• os10-config-switch — Sets and gets values of different switching entities.
• os10–show-transceivers — Displays information about the transceiver type present.
Retrieve Switch Values
$ os10-config-switch showKey: 1.30.1966121.base-switch/switching-entities/switch-count = 1Key: 1.30.1966121.1966082.1966085.base-switch/switching-entities/switching-entity/bridge-table-size = 163840base-switch/switching-entities/switching-entity/acl-table-max-priority = 11base-switch/switching-entities/switching-entity/acl-entry-min-priority = 0base-switch/switching-entities/switching-entity/acl-table-min-priority = 0base-switch/switching-entities/switching-entity/ecmp-hash-fields = 8,9,5,3,10,4,2,1,7,6base-switch/switching-entities/switching-entity/npu-identifiers = 0base-switch/switching-entities/switching-entity/mac-age-timer = 1800base-switch/switching-entities/switching-entity/lag-hash-algorithm = 2base-switch/switching-entities/switching-entity/switch-id = 0base-switch/switching-entities/switching-entity/temperature = 45base-switch/switching-entities/switching-entity/switch-mode = 2base-switch/switching-entities/switching-entity/lag-hash-fields = 8,9,5,3,10,4,2,1,7,6base-switch/switching-entities/switching-entity/max-ecmp-entry-per-group = 64base-switch/switching-entities/switching-entity/ecmp-hash-algorithm = 2base-switch/switching-entities/switching-entity/acl-entry-max-priority = 2147483647base-switch/switching-entities/switching-entity/default-mac-address = 90:b1:1c:f4:aa:81base-switch/switching-entities/switching-entity/max-mtu = 9216Reconfigure MAC Age-Timer
$ os10-config-switch set switch-id=0 mac-age-timer=1900SuccessView Installed Transceivers Summary
$ os10-show-transceivers summaryFront Panel Port Media Type Part Number Serial Number DellQualified1 QSFP 40GBASE SR4 AFBR-79E4Z-D-FT1 7503832L005V Yes2 QSFP 40GBASE SR4 AFBR-79EQDZ-FT1 482943B200GW Yes3 QSFP 40GBASE CR4 3M 616750003 CN0FC6KV35D6864 Yes4 Not Present5 Not Present...32 Not Present
Default XML Configuration FilesXML configuration files are stored in the /etc/opt/dell/os10 directory and used for setting configuration defaults. Modify these files according to your network needs.
CAUTION: Modifying configuration files may negatively affect the default system behavior.
XML configuration files:
• base_qos_init.xml — Specifies the default QoS entries applied to the NPU during system bootup as part of the systemd service.
• base_port_physical_mapping_table.xml — Creates a mapping between physical ports and Linux interfaces — all interfaces are created during system bootup.
• core_rotate_config.xml — Contains the core rotation configuration used by the script that performs the core rotation as part of the CRON daemon service.
• dn_nas_default_init_config.xml — Contains the default configuration of objects, such as mirroring, sFlow, and VLANs created during system bootup as part of the systemd service.
• dn_nas_fanout_init_config.xml — Specifies the interfaces that are fanned out during system bootup.
Administration 19

• env_tmpctl_config.xml — Specifies environmental parameters, such as sensor names and the algorithm for the temperature control module.
• init.xml — Specifies NPU-related settings during system bootup, such as physical port settings and hashing algorithms.
• mgmt-intf.xml — Specifies management interface settings.
• nas_master_list.xml — Lists all ACL entries installed during bootup.
• nas_detail_list.xml — Specifies all fields for ACL entries in the nas_master_list.xml file.
• phy_media_default_npu_setting.xml — Specifies transceiver information, such as transceiver type and speed.
OperationsThis information describes the configuration required for OS10 operation.
Configure Management Interface IP AddressEdit the /etc/network/interfaces file to configure the Management IP address.
$ cat /etc/network/interfaces# interfaces(5) file used by ifup(8) and ifdown(8)# Include files from /etc/network/interfaces.d:auto eth0 iface eth0 inet static address 10.11.133.40 netmask 255.255.0.0 gateway 10.11.133.254$ service networking restart
Secure Management InterfaceIf extra security is desired other than what is provided by SSH, use iptables to enable Linux firewall features. You can also set up rate
limiting for incoming traffic to prevent denial of service attacks.
Configure Physical PortSee Configure Interfaces to configure physical port attributes.
Create User AccountsUse standard Linux commands to manage user accounts. Example Linux commands include useradd, userdel, usermod, and
passwd. Configure access privileges with the usermod command.
Configure Time and DateUse the date command or NTP to configure the time and date.
$ date -s "16 FEB 2016 13:12:00"Tue Feb 16 13:12:00 UTC 2016
20 Administration

OS10 Commandsos10-show-version
Displays software and system information.
$ os10-show-versionDELL_Networking_OS10_Software_Version=10.0.0B.1368NAME="OS10-Base"LONGNAME="Dell Networking OS10-Base"VERSION="10.0.0B.1368"PLATFORM="S6000"ARCHITECTURE="x86_64"BUILT_FROM="S6000 Base only Blue Print 0.1.0"BUILD_DATE="2016-02-11T12:00:00.912-08:00"COPYRIGHT="Copyright (c) 1999-2016 by Dell Inc. All Rights Reserved."SYSTEM_UPTIME="4 days, 18 hours, 3 minutes"os10-logging
Enables logging — log information is maintained the var/log/syslog file.
$ os10-logging=============================================================================================================[show-id] - displays ids of modules, log-levels and sublevels[show] [all] | [module-id] {log-level} {log-sub-level} - displays current logging status for all/given sub-system/given module and log-level/given module, log-level and sub-log-level[enable] [all] | [module-id] {log-level } {log-sub-level} - Enables logging status for all/given sub-system/given module and log-level/given module, log-level and sub-log-level[disable] [all] | [module-id] {log-level } {log-sub-level} - Disables logging status for all/given sub-system/given module and log-level/given module, log-level and sub-log-level
NOTE : 1. For enable and disable log-level and log-sub-level is optional when using module-id. If only module-id is given it will enable/disable all log-levels and log-sub-levels for that module-id, similarly if module-id and log-level is given, it will enable all log-sublevel for the module-id and log-level 2. Instead of Module Ids now you can use the module name as a string as well, for eg. os10-logging enable L3_SERVICES=============================================================================================================$ os10-logging enable allos10-show-env
Displays environmental system hardware information.
$ os10-show-env
Node Vendor name: Dell Service tag: 69Y8VS1 PPID: CN-08YWFG-28298-3AR-0087-A00 Platform name: Product name: S6000 Hardware version: Number of MAC addresses: 129 Base MAC address: 90:b1:1c:f4:a8:30 Operating status: FailPower supplies Slot 1 Present: Yes Vendor name:
Administration 21

Service tag: PPID: CN0T9FNW282983AR020 Platform name: Product name: CN0T9FNW282983AR020 Hardware version: Operating status: Up Input: AC Fan airflow: Normal Slot 2 Present: Yes Vendor name: Service tag: PPID: Platform name: Product name: Hardware version: Operating status: Up Input: Invalid Fan airflow: InvalidFan trays Slot 1 Present: Yes Vendor name: Service tag: PPID: CN0MGDH8282983AR028 Platform name: Product name: CN0MGDH8282983AR028 Hardware version: Operating status: Up Fan airflow: Reverse Slot 2 Present: Yes Vendor name: Service tag: PPID: CN0MGDH8282983AR028 Platform name: Product name: CN0MGDH8282983AR028 Hardware version: Operating status: Up Fan airflow: Reverse Slot 3 Present: Yes Vendor name: Service tag: PPID: CN0MGDH8282983AR028 Platform name: Product name: CN0MGDH8282983AR028 Hardware version: Operating status: Up Fan airflow: ReverseFans Fan 1, PSU slot 1 Operating status: Up Speed (RPM): 6720 Speed (%): 37 Fan 1, Fan tray slot 1 Operating status: Up Speed (RPM): 6916 Speed (%): 38 Fan 2, Fan tray slot 1 Operating status: Up Speed (RPM): 6803 Speed (%): 37 Fan 1, Fan tray slot 2 Operating status: Up Speed (RPM): 7188 Speed (%): 39 Fan 2, Fan tray slot 2 Operating status: Up
22 Administration
Speed (RPM): 7175 Speed (%): 39 Fan 1, Fan tray slot 3 Operating status: Up Speed (RPM): 7201 Speed (%): 40 Fan 2, Fan tray slot 3 Operating status: Up Speed (RPM): 6698 Speed (%): 37Temperature sensors Sensor T2 temp sensor, Card slot 1 Operating status: Up Temperature (degrees C): 33 Sensor system-NIC temp sensor, Card slot 1 Operating status: Up Temperature (degrees C): 25 Sensor Ambient temp sensor, Card slot 1 Operating status: Up Temperature (degrees C): 27 Sensor NPU temp sensor, Card slot 1 Operating status: Up Temperature (degrees C): 46
LED ControlSet the LED state for the power supply unit (PSU), fan tray, and other hardware information.
$ os10-env-set-led [--entity-type [psu | fantray | card [--slot slot]] led-name [on | off]
• --entity-type — (Optional) Select the entity type:
• psu — (Optional) Enter the keyword to set the LED state to the power supply unit.
• fantray — (Optional) Enter the keyword to set the LED state to the fan tray.
• card --slot slot — (Optional) Enter the keywords and the slot information to set the LED state to the card.
• led-name — Enter the name of the LED.
• on — (Optional) Enter the keyword to turn the LED state to on.
• off — (Optional) Enter the keyword to turn the LED state to off.
MaintenanceThis information describes how to manage Linux packages and system services.
Manage Linux PackagesUse standard Linux utilities to manage Linux packages. These utilities provide a simple way to retrieve and install packages from multiple sources using the Linux command line.
Before installing a package, you must first configure the IP address of the Management port (see Operations).
NOTE: Ensure that the URLs in the sources list configuration files point to the proper repository before installing a Linux package.
Use the apt-get update command before installing a package, and use the dpkg —s package_name command to check the
installation status of a particular package.
Administration 23

System ServicesTo check the status of a service, use the service service_name status command to check if the service is up and running, or
inactive.
Check Service Status
$ service snmpd status snmpd.service - LSB: SNMP agents Loaded: loaded (/etc/init.d/snmpd) Active: active (running) since Wed 2016-02-17 02:16:06 UTC; 2h 39min ago CGroup: /system.slice/snmpd.service └─930 /usr/sbin/snmpd -Lsd -Lf /dev/null -u snmp -g snmp -I -smux ... Stop Service
$ service snmpd stop$ service snmpd status snmpd.service - LSB: SNMP agents Loaded: loaded (/etc/init.d/snmpd) Active: inactive (dead) since Wed 2016-02-17 05:00:27 UTC; 3s ago Process: 3370 ExecStop=/etc/init.d/snmpd stop (code=exited, status=0/SUCCESS)Start Service
$ service snmpd start$ service snmpd status snmpd.service - LSB: SNMP agents Loaded: loaded (/etc/init.d/snmpd) Active: active (running) since Wed 2016-02-17 05:00:39 UTC; 1s ago Process: 3370 ExecStop=/etc/init.d/snmpd stop (code=exited, status=0/SUCCESS) Process: 3395 ExecStart=/etc/init.d/snmpd start (code=exited, status=0/SUCCESS) CGroup: /system.slice/snmpd.service └─3399 /usr/sbin/snmpd -Lsd -Lf /dev/null -u snmp -g snmp -I -smux...Restart Service
$ service snmpd restart$ service snmpd status snmpd.service - LSB: SNMP agents Loaded: loaded (/etc/init.d/snmpd) Active: active (running) since Wed 2016-02-17 05:00:46 UTC; 1s ago Process: 3407 ExecStop=/etc/init.d/snmpd stop (code=exited, status=0/SUCCESS) Process: 3412 ExecStart=/etc/init.d/snmpd start (code=exited, status=0/SUCCESS) CGroup: /system.slice/snmpd.service └─3416 /usr/sbin/snmpd -Lsd -Lf /dev/null -u snmp -g snmp -I -smux...
Upgrade OS10Release images are ONIE installers that contain a software image. Use the os10-image script to validate the image and extract the image into the standby partition. Use the osimage -s command to switch between active and standby partitions during installation.
CAUTION: During software upgrade, all existing files on the standby partition will be erased. You must manually backup and restore all configuration files, including interfaces and hostnames.
24 Administration

Upgrade OS10 Image1 Backup the active configuration and copy the files to a persistent location, then verify all files successfully copied.
$ cp /etc/snmp/snmpd.conf /config/$ /config# ls etc lost+found snmpd.conf
2 Download the new software image to a server or USB media, then verify the download.
$ wget http://URL/......../OS10.bin$ lsOS10.bin
NOTE: You must configure the Management interface IP address before you download a new software image. The image files are in .bin format. Ensure that there is enough disk space before downloading the image.
3 Install the new software image in standby partition.
$ os10-image -i path OS10.bin4 View the software image version to determine which partition to be used for the next reboot.
$ os10-image -gActive image version 10.0.0BStandby image version 10.0.1BActive image will be loaded for next reboot $
5 Configure the next boot partition. The old standby partition becomes the new active partition after system reboot. Use the os10-image script with the -c option to cancel the change.
$ os10-image -s standbySuccess setting boot image to standby
6 Reboot the system with the new software image.
$ reboot7 Restore the saved configuration files from the persistent location into the active partition, and verify all files copied successfully.
$ cp /config/snmpd.conf /etc/snmp/snmpd.conf$ lssnmp.conf snmpd.conf
Boot to Different ONIE ModeUse the os10-image script with the -o option to boot into ONIE install, uninstall or rescue mode, or cancel next boot to ONIE.
Change Next Boot to ONIE Install Mode
$ os10-image -o installWARNING: OS install requestedWARNING: This will erase all dataAre you sure (y/N)? ySuccess setting boot mode to OS installReboot required to take effect
$ os10-image -gActive image version 10.0.0B.1400Standby image version 10.0.0B.1401OS install mode will be loaded on next rebootChange Next Boot to ONIE Uninstall Mode
$ os10-image -o uninstallWARNING: OS uninstall requestedWARNING: This will erase all dataAre you sure (y/N)? ySuccess setting boot mode to OS uninstallReboot required to take effect
$ os10-image -g
Administration 25

Active image version 10.0.0B.1400Standby image version 1.0.0.1401OS uninstall mode will be loaded on next reboot.Change Next Boot to ONIE Rescue Mode
$ os10-image -o rescueWARNING: Rescue boot requestedAre you sure (y/N)? ySuccess setting boot mode to Rescue bootReboot required to take effect
$ os10-image -gActive image version 10.0.0B.1400Standby image version 10.0.0B.1401OS rescue mode will be loaded on next rebootCancel Next Boot to ONIE Mode
$ os10-image -c
Cancelled pending uninstall mode at next reboot
$ os10-image -gActive image version 10.0.0B.1400Standby image version 10.0.0B.1401Active image will be loaded on next reboot
Puppet Open SourceThis use case describes how to use Puppet to configure systems — each system is connected to a server.
1 Install the Puppet master on an external server and configure it to manage systems running the software by following the instructions at Puppetlabs.com.
2 Install and configure the Puppet agent on both systems by following the instructions at Puppetlabs.com.
3 Verify if the Puppet master can communicate with the Puppet agents through the management network.
Sample Puppet ConfigurationManifest Managing Two Systems
node 'R1.dell.com' { $int_enabled = true $int_loopback = '2.2.2.2' $int_layer3 = { e101-019-0 => {'int'=>'e101-019-0', 'address' => '19.0.0.1', 'netmask' => '255.255.255.0', 'cidr_netmask' => 24}, e101-020-0 => {'int'=>'e101-020-0', 'address' => '20.0.0.1', 'netmask' => '255.255.255.0', 'cidr_netmask' => 24},
26 Administration

}
$bgp = { myasn => 65000, peergroupv4 => [ { name => 'R2', asn => 65000, peers => [ '19.0.0.2','20.0.0.2' ] } ] } include ibgp::switch}
node 'R2.dell.com' { $int_enabled = true $int_loopback = '3.3.3.3' $int_layer3 = { e101-019-0 => { 'int'=> 'e101-019-0', 'address' => '19.0.0.2', 'netmask' => '255.255.255.0', 'cidr_netmask' => 24 }, e101-020-0 => { 'int'=> ' e101-020-0','address' => '21.0.0.1', 'netmask' => '255.255.255.0', 'cidr_netmask' => 24 }, }
$bgp = { myasn => 65000, peergroupv4 => [ { name => 'R1', asn => 65000, peers => [ '19.0.0.1','20.0.0.1' ] } ] } include ibgp::switch}Class Definitions
class ibgp::switch { include ibgp::quagga}
class ibgp::quagga { service { 'quagga': ensure => running, hasstatus => false, enable => true, }
file { '/etc/quagga/daemons': owner => quagga, group => quagga, source => 'puppet:///modules/ibgp/quagga_daemons', notify => Service['quagga'] }
file { '/etc/quagga/Quagga.conf': owner => root, group => quaggavty, mode => '0644', content => template('ibgp/Quagga.conf.erb'), notify => Service['quagga'] }}Quagga Configuration File
! This file is managed by Puppet
hostname zebralog file /var/log/quagga/zebra.loghostname ospfdlog file /var/log/quagga/ospfd.loglog timestamp precision 6hostname bgpdlog file /var/log/quagga/bgpd.log!password cn321enable password cn321
Administration 27

!<% @int_layer3.each_pair do |layer3, options| -%>interface <%= options["int"] %>ip address <%=options["address"]%>/<%=options["cidr_netmask"] %>no shutdown<% end -%>
route-id <%= @int_loopback %><% if @bgp -%>router bgp <%= @bgp["myasn"] %> maximum-paths ibgp 4 bgp router-id <%= int_loopback %> bgp log-neighbor-changes network <%= @int_loopback %>/32<% @int_bridges.each_pair do |bridge, options| -%> network <%= options["address"] %>/<%= options["cidr_netmask"] %><% end -%><% @bgp["peergroupv4"].each do |peergroup| -%> neighbor <%= peergroup["name"] %> peer-group neighbor <%= peergroup["name"] %> remote-as <%= peergroup["asn"] %><% if peergroup["name"]["routereflectorclient"] -%> neighbor <% peergroup["name"] %> route-reflector-client<% end -%><% peergroup["peers"].each do |peer| -%> neighbor <%= peer %> peer-group <%= peergroup["name"] %><% end -%><% end -%><% end -%>!<% if @int_unnumbered -%><% @int_unnumbbers.each do |interface| -%> no passive-interface <%= interface %><% end -%> network <%= @int_loopback %>/32 area 0.0.0.0<% if @hostnetranges and @is_leaf -%><% @hostnetranges.each do |hostnetrange| -%> network <%= hostnetrange %> area 0.0.0.0<% end -%><% end-%> <% end -%>Quagga Daemons File
zebra=yesbgpd=yesospfd=noospf6d=noripd=noripngd=noisisd=nobabeld=no
Nagios Open SourceNagios provides remote monitoring using a remote plugin executor (NRPE), which communicates with the check_nrpe plugin in the Nagios server.
This use case describes how to set up a system running the software as a Nagios client (see nagios-plugins for complete information).
Configure OS10 as Nagios ClientTo set up a system running OS10 as a Nagios client, install the Nagios NRPE server and Nagios plugins. The Nagios NRPE server is the agent which allows remote system monitoring.
28 Administration
1 Install the Nagios NRPE server on an OS10 system.
$ apt-get install nagios-nrpe-server2 Edit the allowed hosts to include the Nagios server IP address. After the Nagios NRPE server successfully installs, edit the allowed
hosts field in the /etc/nagios/nrpe.cfg file and include the Nagios server IP address.
$ cat nrpe.cfg# ALLOWED HOST ADDRESSES# This is an optional comma-delimited list of IP address or hostnames# that are allowed to talk to the NRPE daemon. Network addresses with a bit mask# (i.e. 192.168.1.0/24) are also supported. Hostname wildcards are not currently supported.# Note: The daemon only does rudimentary checking of the client's IP# address. I would highly recommend adding entries in your /etc/hosts.allow# file to allow only the specified host to connect to the port# you are running this daemon on.## NOTE: This option is ignored if NRPE is running under either inetd or xinetdallowed_hosts=10.11.96.94
3 Restart the Nagios NRPE server on the system for the allowed host changes to take effect.
$ service nagios-nrpe-server restart$ service nagios-nrpe-server status nagios-nrpe-server.service - LSB: Start/Stop the Nagios remote plugin execution daemon Loaded: loaded (/etc/init.d/nagios-nrpe-server) Active: active (running) since Wed 2016-02-17 22:27:57 UTC; 4s ago Process: 8340 ExecStop=/etc/init.d/nagios-nrpe-server stop (code=exited, status=0/SUCCESS) Process: 8345 ExecStart=/etc/init.d/nagios-nrpe-server start (code=exited, status=0/SUCCESS) CGroup: /system.slice/nagios-nrpe-server.service └─8348 /usr/sbin/nrpe -c /etc/nagios/nrpe.cfg -d
[...]4 Install the Nagios plugins. Nagios plugins are extensions to the Nagios Core (Nagios Core is the daemon running on the Nagios
server). A plugin monitors the services and resources on an OS10 system and returns the results to the Nagios server. For more information, see Nagios.org.
$ apt-get install nagios-plugin
Configure Nagios Server to Monitor System and Services1 Update the clients.cfg file on the Nagios server with the system IP address to enable monitoring.
define host{ use linux-server host_name Dell_OS10 alias client address 10.x.x.x }
2 Enter check commands in the commands.cfg file on the Nagios server to reference the host, service, and contact definitions.
define command{ command_name check_nrpe command_line $USER1$/check_nrpe -H $HOSTADDRESS$ -c $ARG1$ }
define command{ command_name check_remote_disk command_line $USER1$/check_disk -w $ARG1$ -c $ARG2$ -p $ARG3$ }
define command{ command_name check_remote_procs command_line $USER1$/check_procs -w $ARG1$ -c $ARG2$ -s $ARG3$ }
Administration 29

3 Edit the clients.cfg file on the Nagios server to configure services to be monitored on the system.
define service{ use generic-service host_name Dell_OS10 service_description Current Processes check_command check_nrpe!check_total_procs }
define service{ use generic-service host_name Dell_OS10 service_description Current Disk Space check_command check_nrpe!check_remote_disk }
30 Administration

Network ConfigurationOS10 supports the ability to model and configure various networking features in the network processing unit (NPU) using two methods — Linux commands and CPS APIs.
This information describes how to program networking features using Linux commands and open source applications. See Programmability for a description of the CPS framework, and detailed information on using the CPS API for configuration.
OS10 network functionality is handled by the network adaptation service (NAS) which listens to netlink events for Layer 2 and Layer 3 configurations, and programs the NPU.
Linux Command/Open Source Application• Interfaces — Physical, link aggregation (LAG), VLAN
• Layer 2 Bridging — LLDP, STP, VLAN
• Layer 3 Routing — ECMP, IPv4, IPv6, unicast
CPS API Configuration• Interfaces — Physical, link aggregation (LAG), VLAN, Fanout (script)
• Layer 2 Bridging — MAC address table, STP, VLAN
• Layer 3 Routing — ECMP, IPv4, IPv6, unicast
• Security — QoS and ACL
• Monitoring — Port mirroring, sFlow, and port and VLAN statistics
NOTE: Layer 2 LLDP configuration is not available when using the CPS API.
Dell-Provided CommandsThese features are not supported using standard Linux commands but can be configured using the Dell-provided utilities.
• Fanout (4x10G) interface configuration
• Layer 2 MAC address table configuration
• QoS and ACL configuration
• Port monitoring, sFlow configuration, and port and VLAN statistics
Topics:
• Configure Interfaces
• VLAN Bridging
• Spanning Tree
• Link Layer Discovery Protocol
• MAC Address Forwarding
• Layer 3
• IPv4 Routing
4
Network Configuration 31

• IPv6 Routing
• ARP and Neighbor Table Entries
• ECMP Next-Hop Routing
• L3 Routing Topology
• Quagga Routing
• Port Mirroring
• sFlow Provisioning
• Port Statistics
• Access Control Lists
• Quality of Service
• BGP Routing using Quagga
Configure InterfacesCreate and manage physical and virtual interfaces — physical port interfaces are ports on the NPU and do not include the Management port. Each physical port on the NPU maps to a data port on the front panel of the device.
Applications access physical and virtual ports using mapped Linux interfaces. The software allocates an ifindex for each Linux interface,
and the value is used in CPS APIs to refer to a Linux interface.
Map Ports to Linux InterfacesEach physical port is mapped to an internal Linux interface.
eNSS-PPP-F.vvv
• e — Ethernet port.
• N — Node ID (set to 1).
• SS — Slot number (set to 01).
• PPP — Port number (1 to 999).
• F — Number of a 4x10G fanout port (0 to 9).
• vvv — VLAN ID number (0 to 4095).
The e101-031-0 interface refers to physical port 31 without a fanout — e101-005-4 identifies fanout port 4 on physical port 5, and
e101-001-2 identifies fanout port 2 on physical port 1.
Interfaces are created during system bootup and represent the physical ports on the NPU in a one-to-one mapping.
Internal interfaces allow applications to configure physical port parameters, such as MTU, port state, and link state. Interfaces also provide packet input/output functionality and support applications sending and receiving control plane packets.
32 Network Configuration

Map CPU Port to Linux InterfaceThe software creates a dedicated interface (npu0) that maps to the CPU port. Configure control plane policy (CoPP) queue rates by
specifying npu0 as the port in the QoS CPS API.
Physical PortsPhysical ports are administratively down by default. Each interface has a reserved MAC hardware address derived from the system MAC address. Use standard Linux commands to configure physical interface parameters.
Set MTU
$ ip link set dev e101-002-0 mtu 1400Show MTU
$ ip link show e101-002-0
17: e101-002-0: <BROADCAST,MULTICAST> mtu 1400 qdisc noop state DOWN mode DEFAULT group default qlen 500 link/ether 90:b1:1c:f4:ab:f2 brd ff:ff:ff:ff:ff:ff alias NAS## 0 29Configure L3 IPv4 Address
$ ip addr add 10.1.1.1/24 dev e101-001-0Configure L3 IPv6 Address
$ ip -6 addr add 2000::1/64 dev e101-001-0View Interface Parameters
$ ip addr show e101-001-0
16: e101-001-0: <BROADCAST,MULTICAST> mtu 1500 qdisc noop state DOWN group default qlen 500 link/ether 90:b1:1c:f4:ab:ee brd ff:ff:ff:ff:ff:ff inet 10.1.1.1/24 scope global e101-001-0 valid_lft forever preferred_lft forever inet6 2000::1/64 scope global tentative valid_lft forever preferred_lft foreverFor examples of how to program physical port configuration using the CPS API, see Application Examples.
Fanout (4x10G) InterfacesUsing a breakout cable, you can split a 40GbE physical port into four (quad) 10GbE SFP+ ports (if supported by the NPU). Each 4x10G port is represented by a Linux interface with a fanout field in the interface name that identifies the 4x10G port.
Use the os10-config-fanout script to configure fanout interfaces. This script allows you to fan out a 40GbE port or disable the
fanned-out 4x10G configuration and return the physical port to 40G operation.
Script syntax: os10-config-fanout [linux-interface] [true | false]
• true enables 4x10G fanout on a 40GbE port.
• false disables 4x10G fanout on a 40GbE port.
Network Configuration 33

Configure Fanout Interface
$ os10-config-fanout e101-005-0 trueKey: 1.20.1310766.1310754.1310755.1310756.1310757.base-port/physical/unit-id = 0base-port/physical/phy-media = 1base-port/physical/front-panel-number = 0base-port/physical/loopback = 0base-port/physical/hardware-port-id = 45base-port/physical/npu-id = 0base-port/physical/fanout-mode = 4base-port/physical/breakout-capabilities = 4,2base-port/physical/port-id = 45base-port/physical/slot-id = 0Deleting.. e101-005-0Completed...
Creating interface e101-005-1Creating interface e101-005-2Creating interface e101-005-3Creating interface e101-005-4Successfully created interfaces...
Port Channel/Bond InterfacesA port channel or link aggregation group (LAG) corresponds to a bond interface, which aggregates multiple physical interfaces into one virtual interface for load-balancing and link failovers. A LAG and a bond interface both refer to a link aggregation group.
LAG refers to an NPU configuration, while bond interface refers to a Linux configuration.
NOTE: A Linux bond interface must be up before you can add member ports.
Create Bond Interface (LAG)
$ ip link add bond1 type bond mode balance-rr miimon 50Bring Up Bond Interface
$ ip link set dev bond1 up$ ip link show|grep bond1 50: bond1: <BROADCAST,MULTICAST,MASTER,UP,LOWER_UP> mtu 1500 qdisc noqueue state UNKNOWN mode DEFAULT group defaultAdd Port to Bind Interface
$ ip link set e101-010-0 master bond1$ ip link show | grep bond112: e101-010-0: <BROADCAST,MULTICAST,SLAVE,UP,LOWER_UP> mtu 1500 qdisc mq master bond1 state UP mode DEFAULT group default qlen 50050: bond1: <BROADCAST,MULTICAST,MASTER,UP,LOWER_UP> mtu 1500 qdisc noqueue state UP mode DEFAULT group defaultConfigure IP Address on Bond Interface
$ ip addr add 20.1.1.1/24 dev bond1$ ifconfig bond1bond1 Link encap:Ethernet HWaddr 90:b1:1c:f4:9d:60 inet addr:20.1.1.1 Bcast:0.0.0.0 Mask:255.255.255.0 inet6 addr: fe80::8480:fcff:fe2f:d93b/64 Scope:Link UP BROADCAST RUNNING MASTER MULTICAST MTU:1500 Metric:1 RX packets:66 errors:0 dropped:1 overruns:0 frame:0 TX packets:77 errors:0 dropped:0 overruns:0 carrier:0 collisions:0 txqueuelen:0 RX bytes:4224 (4.1 KiB) TX bytes:15648 (15.2 KiB)
34 Network Configuration

Delete Port from Bond Interface
$ ip link set e101-010-0 nomaster$ ip link show | grep bond149: bond1: <NO-CARRIER,BROADCAST,MULTICAST,MASTER,UP> mtu 1500 qdisc noqueue state DOWN mode DEFAULT group defaultDelete Bond Interface
$ ip link delete bond1$ ip link show | grep bond1For more information about how to use bond interfaces, see kernel.org. For more information on programming a bond interface using the CPS API, see Application Examples.
VLAN InterfacesVirtual LANs (VLANs) define broadcast domains in a Layer 2 network, and an NPU VLAN entity is modeled as a separate Linux bridge instance.
NPU entities (VLANs) are mapped to Linux entities (bridges). An NPU VLAN entity uses the MAC address from the first port added as its member port. The bridge interface is operationally up when at least one of its member interfaces is up. You can assign IP addresses to multiple bridge interfaces to create an inter-VLAN routing domain.
Configure IP Address on Bridge Interface
s$ brctl show
bridge name bridge id STP enabled interfacesbr100 8000.90b11cf49d3c no e101-001-0.100
$ ip addr add 100.1.1.1 dev br100$ ifconfig br100br100 Link encap:Ethernet HWaddr 90:b1:1c:f4:9d:3c inet addr:100.1.1.1 Bcast:0.0.0.0 Mask:255.255.255.255 inet6 addr: fe80::92b1:1cff:fef4:9d3c/64 Scope:Link UP BROADCAST RUNNING MULTICAST MTU:1500 Metric:1 RX packets:0 errors:0 dropped:0 overruns:0 frame:0 TX packets:7 errors:0 dropped:0 overruns:0 carrier:0 collisions:0 txqueuelen:0 RX bytes:0 (0.0 B) TX bytes:738 (738.0 B)
VLAN BridgingOS10 supports Layer 2 VLAN bridging by modeling each NPU VLAN entity as a separate Linux bridge instance. Each physical or LAG port that is a VLAN member is modeled by adding its corresponding Linux interface to the bridge instance.
For more information on creating a VLAN and assigning members, see Application Examples.
To create a VLAN using the Linux bridge, create the bridge instance and then add a tagged member to the new bridge instance. OS10 determines the VLAN ID associated with each bridge instance using the VLAN ID of the first tagged member port assigned to the bridge instance. The VLAN is created only after you add the first tagged member to the bridge.
Network Configuration 35

1 Create a bridge instance for the VLAN — br100 is the name of the bridge instance used to model the VLAN, and OS10 does not derive the VLAN ID from the name.
$ brctl addbr br1002 Add a tagged port to the VLAN to ensure that the Linux interface mapped to the port being added does not have an IP address.
$ ifconfig e101-001-0e101-001-0 Link encap:Ethernet HWaddr 90:b1:1c:f4:9d:3c inet addr:1.1.1.1 Bcast:1.1.1.255 Mask:255.255.255.0 BROADCAST MULTICAST MTU:1500 Metric:1 RX packets:0 errors:0 dropped:0 overruns:0 frame:0 TX packets:2221 errors:0 dropped:0 overruns:0 carrier:0 collisions:0 txqueuelen:500 RX bytes:0 (0.0 B) TX bytes:523446 (511.1 KiB)If the interface already has an IP address, remove the IP address before continuing to the next step.
$ ip addr flush dev e101-001-0 3 Create a tagged virtual link — a Linux interface can only belong to a single bridge instance. To add the same interface to multiple
VLAN domains, create a separate Linux virtual link for each VLAN in which the port is a member. Create a virtual tagged link for the e101-001-0 Linux interface in VLAN 100 — the .100 suffix in the Linux interface name indicates that the interface is VLAN tagged.
$ ip link add link e101-001-0 name e101-001-0.100 type vlan id 1004 Add the tagged virtual link to the VLAN to add the newly created virtual link to the Linux bridge instance created in Step 1. OS10
creates the VLAN and adds the physical port mapped to the e101-001-0 Linux interface as a tagged member of the VLAN.
$ brctl addif br100 e101-001-0.1005 Verify the VLAN configuration.
$ brctl showbridge name bridge id STP enabled interfacesbr100 8000.90b11cf49d3c no e101-001-0.100
Add Untagged Member to VLANYou can add a Linux interface directly to a Linux bridge without creating a separate VLAN-specific virtual link. Note that in the example the interface does not have the .100 suffix, which means the interface is an untagged VLAN member.
$ brctl addif br100 e101-002-0
A physical port can be an untagged member of only a single VLAN — a physical port can be added as a tagged member of multiple VLANs.
$ brctl showbridge name bridge id STP enabled interfacesbr100 8000.90b11cf49d3c no e101-001-0.100 e101-002-0
36 Network Configuration

Add Port to Multiple VLAN DomainsTo add the same port to a second VLAN, create another VLAN tagged virtual link on the e101-001-0 interface, then add the new virtual
link to the Linux bridge instance.
$ brctl addbr br200$ ip link add link e101-001-0 name e101-001-0.200 type vlan id 200$ brctl addif br200 e101-001-0.200
NOTE: All interfaces in a bridge instance must be either untagged or have the same tagged VLAN ID — you cannot configure e101-001-0.100 and e101-002-0.200 in the same Linux bridge instance.
$ brctl showbridge name bridge id STP enabled interfacesbr100 8000.90b11cf49d3c no e101-001-0.100 e101-002-0br200 8000.90b11cf49d3c no e101-001-0.200
Add Linux Bond Interface to VLAN DomainAdd a Linux bond interface to a VLAN domain — bond1 is a Linux interface that maps to a LAG port in the NPU. Use the command to
add the LAG port to the VLAN associated with the bridge instance in the NPU.
$ ip link add link bond1 name bond1.200 type vlan id 200$ brctl addif br200 bond1.200
The illustration shows the results of these commands.
Remove VLAN Member from a VLANTo remove a port member from a VLAN, remove the ,ember from the bridging instance.
$ brctl delif br200 e101-001-0.100
Delete VLANDelete a VLAN by removing the bridging instance.
$ brctl delbr br200
Network Configuration 37

Spanning TreeOS10 supports spanning tree provisioning using the CPS API including:
• Create a new spanning tree group
• Add VLANs to a spanning tree group
• Remove VLANs from a spanning tree group
• Change the STP state of ports mapped to a spanning-tree group
• Delete a spanning tree group
This enables OS10 users to run any of the spanning tree protocols such as STP, RSTP, PVST, and MSTP.
NOTE: OS10 does not support RSTP, MSTP, and RPVST in a Linux bridge due to a Linux kernel limitation. STP is not supported on a bridge which has multiple member interfaces with different VLAN IDs.
Refer to the dell-base-stp.yang model for the supported STP parameters (see YANG Model Reference).
Linux STP does not support the concept of spanning tree groups. In Linux, you can enable spanning tree independently in each bridge instance. OS10 treats STP enabled in a bridge instance as a separate spanning tree group for each VLAN. If a Linux bridge contains only untagged ports, the software does not support STP on the bridge.
1 Create a VLAN in the Linux bridge (see VLAN Bridging).
2 Enable STP on the bridge, then view the configuration.
$ brctl stp br100 on$ brctl show br100bridge name bridge id STP enabled interfacesbr100 8000.90b11cf4a918 yes e101-001-0.100
$ brctl showstp br100br100bridge id 8000.90b11cf4a918designated root 8000.90b11cf4a918root port 0 path cost 0max age 20.00 bridge max age 20.00hello time 2.00 bridge hello time 2.00forward delay 15.00 bridge forward delay 15.00ageing time 300.00hello timer 0.00 tcn timer 0.00topology change timer 0.00 gc timer 0.00flags
e101-001-0.100 (1)port id 8001 state disableddesignated root 8000.90b11cf4a918 path cost 100designated bridge 8000.90b11cf4a918 message age timer 0.00designated port 8001 forward delay timer 0.00designated cost 0 hold timer 0.00flags
Disable STP on Bridge
$ brctl stp br100 offView Bridge Configuration
$ brctl show br100bridge name bridge id STP enabled interfacesbr100 8000.90b11cf4a918 no e101-001-0.100
38 Network Configuration

When you enable STP on a bridge which has tagged VLAN interfaces, OS10 creates a new spanning tree group and associates the VLAN ID of the bridge with the newly created spanning tree group. When you delete a bridge from the Linux kernel, the corresponding NPU spanning tree group is deleted.
Link Layer Discovery ProtocolOS10 supports the link layer discovery protocol (LLDP) daemon on Linux interfaces.
LLDP Daemon
$ lldpcli show neighbors---------------------------------------------------------------------LLDP neighbors:---------------------------------------------------------------------Interface: e101-003-0, via: LLDP, RID: 3, Time: 0 day, 01:17:18 Chassis: ChassisID: mac 90:b1:1c:f4:9d:3b SysName: OS10 Capability: Repeater, on Capability: Bridge, on Capability: Router, on Port: PortID: ifalias ethernet1/1/3----------------------------------------------------------------------
MAC Address Forwarding OS10 provides a CPS data model for configuring and managing the MAC forwarding database using the CPS API.
For more information on using YANG models to configure the MAC address forwarding database, see Application Examples).
Layer 3OS10 supports unicast routing over Linux interfaces using routes in the Linux kernel routing table. Applications can also use the CPS API to configure routes. This information describes how to configure Layer 3 unicast routing to provision the NPU.
The OS10 routing subsystem manages the forwarding information base (FIB). The routing subsystem programs routes with resolved next hops using ARP/Neighbor table entries received from the Linux kernel.
Network Configuration 39

IPv4 RoutingUse the iproute command to create a route. A routing table entry consists of a destination IP address prefix and at least one next-hop address or a Linux interface.
Configure Static Route
$ ip route showdefault dev eth0 scope link3.3.3.0/24 dev e101-003-0 proto kernel scope link src 3.3.3.1$ ip route add 11.10.10.0/24 dev e101-003-0$ ip route showdefault dev eth0 scope link3.3.3.0/24 dev e101-003-0 proto kernel scope link src 3.3.3.111.10.10.0/24 dev e101-003-0 scope linkConfigure Static Route with Next-Hop
$ ip route add 30.30.30.0/24 via 3.3.3.3$ ip route showdefault dev eth0 scope link3.3.3.0/24 dev e101-003-0 proto kernel scope link src 3.3.3.130.30.30.0/24 via 3.3.3.3 dev e101-003-0Delete Static Route
$ ip route delete 11.10.10.0/24$ ip route showdefault dev eth0 scope link3.3.3.0/24 dev e101-003-0 proto kernel scope link src 3.3.3.1To add a persistent static route that is saved after a reboot, configure the route in the /etc/network/interfaces configuration file.
For more information on how to configure routing using the CPS API, see Application Examples.
IPv6 RoutingAdd, delete, or modify IPv6 routes and next-hops in the routing table.
Add IPv5 Route
$ ip -6 route add 5::5/64 via 3::3View IPv6 Route
$ ip -6 route show3::/64 dev e101-003-0 proto kernel metric 2565::/64 via 3::3 dev e101-003-0 metric 1024Monitor IPv6 Routing
$ ip monitor30.30.30.0/24 via 3.3.3.3 dev e00-33::/64 via 3::3 dev e101-003-0 metric 10245::/64 via 3::3 dev e101-003-0 metric 1024For more information on how to configure routing using the CPS API, see Application Examples.
40 Network Configuration

ARP and Neighbor Table EntriesOS10 uses ARP and neighbor table entries to resolve adjacencies by using the host IP address-to-MAC address binding. The ARP table is used for IPv4 routing — the neighbor table is used for IPv6 routing.
View Kernel ARP Table Entries
$ arp -nAddress HWtype HWaddress Flags Mask Iface 3.3.3.4 ether 90:b1:1c:f4:9d:44 C e101-003-0View IPv6 Neighbor Table
$ ip -6 neighborConfigure IPv6 Address
$ ifconfig e101-003-0 inet6 add 3::1/64$ ifconfig e101-003-0e101-003-0 Link encap:Ethernet HWaddr 90:b1:1c:f4:a8:eainet addr:3.3.3.1 Bcast:3.3.3.255 Mask:255.255.255.0inet6 addr: 3::1/64 Scope:Globalinet6 addr: fe80::92b1:1cff:fef4:a8ea/64 Scope:LinkUP BROADCAST RUNNING MULTICAST MTU:1500 Metric:1RX packets:532 errors:0 dropped:0 overruns:0 frame:0TX packets:173 errors:0 dropped:0 overruns:0 carrier:0collisions:0 txqueuelen:500RX bytes:46451 (45.3 KiB) TX bytes:25650 (25.0 KiB)View IPv6 Neighbor Table
$ ip -6 neighbor show3::3 dev e101-003-0 lladdr 90:b1:1c:f4:9d:44 router REACHABLECheck Connectivity to IPv6 Neighbor
$ ping6 3::3PING 3::3(3::3) 56 data bytes64 bytes from 3::3: icmp_seq=1 ttl=64 time=1.74 ms$ tcpdump -i e101-003-0tcpdump: verbose output suppressed, use -v or -vv for full protocol decodelistening on e101-003-0, link-type EN10MB (Ethernet), capture size 262144 bytes04:30:17.053115 IP6 3::1 > 3::3: ICMP6, echo request, seq 8, length 64
ECMP Next-Hop RoutingThe Linux networking stack supports ECMP by adding multiple next-hops to a route, and the kernel provides limited support for IPv6 multipath routing.
Configure Next-Hop Routing
$ ip route add 40.40.40.0/24 nexthop via 3.3.3.6 nexthop via 4.4.4.7View ECMP Configuration
$ ip route showdefault dev eth0 scope link3.3.3.0/24 dev e101-003-0 proto kernel scope link src 3.3.3.140.40.40.0/24 nexthop via 3.3.3.6 dev e101-003-0 weight 1 nexthop via 4.4.4.7 dev e101-004-0 weight 1
Network Configuration 41

L3 Routing TopologyUse ip addr add or ifconfig to configure an interface.
For more information on how to configure routing using the CPS API, see Application Examples.
Configure IP Address on R1
$ ip addr add 10.1.1.1/24 dev e101-007-0$ ip addr add 11.1.1.1/24 dev e101-001-0Configure IP Address on R2
$ ip addr add 10.1.1.2/24 dev e101-007-0$ ip addr add 12.1.1.1/24 dev e101-001-0Verify Configuration on R1
$ ip addr show e101-007-016: e101-007-0: <BROADCAST,MULTICAST,UP,LOWER_UP> mtu 1500 qdisc mq state UP group default qlen 500 link/ether 74:e6:e2:f6:af:87 brd ff:ff:ff:ff:ff:ff inet 10.1.1.1/24 scope global e101-007-0 valid_lft forever preferred_lft forever inet6 fe80::76e6:e2ff:fef6:af87/64 scope link valid_lft forever preferred_lft forever$ ip addr show e101-001-010: e101-001-0: <BROADCAST,MULTICAST,UP,LOWER_UP> mtu 1500 qdisc mq state UP group default qlen 500 link/ether 74:e6:e2:f6:af:81 brd ff:ff:ff:ff:ff:ff inet 11.1.1.1/24 scope global e101-001-0 valid_lft forever preferred_lft forever inet6 fe80::76e6:e2ff:fef6:af81/64 scope link valid_lft forever preferred_lft foreverVerify Configuration on R2
$ ip addr show e101-007-016: e101-007-0: <BROADCAST,MULTICAST,UP,LOWER_UP> mtu 1500 qdisc mq state UP group default qlen 500 link/ether 74:e6:e2:f6:ba:87 brd ff:ff:ff:ff:ff:ff inet 10.1.1.2/24 scope global e101-007-0 valid_lft forever preferred_lft forever inet6 fe80::76e6:e2ff:fef6:ba87/64 scope link valid_lft forever preferred_lft forever$ ip addr show e101-001-010: e101-001-0: <BROADCAST,MULTICAST,UP,LOWER_UP> mtu 1500 qdisc mq state UP group default qlen 500 link/ether 74:e6:e2:f6:ba:81 brd ff:ff:ff:ff:ff:ff inet 12.1.1.1/24 scope global e101-001-0 valid_lft forever preferred_lft forever inet6 fe80::76e6:e2ff:fef6:ba81/64 scope link valid_lft forever preferred_lft foreverEnable Interfaces on R1 and R2
$ ip link set dev e101-007-0 up $ip link set dev e101-001-0 up
42 Network Configuration

Configure Static Route to Server on R1
$ ip route add 12.1.1.0/24 via 10.1.1.2Configure Static Route to Server on R2
$ ip route add 11.1.1.0/24 via 10.1.1.1Check Connectivity from Server 2
$ ping 11.1.1.2PING 11.1.1.2 (11.1.1.2) 56(84) bytes of data.64 bytes from 11.1.1.2: icmp_seq=1 ttl=64 time=0.922 ms^C--- 11.1.1.2 ping statistics ---1 packets transmitted, 1 received, 0% packet loss, time 0msrtt min/avg/max/mdev = 0.922/0.922/0.922/0.000 ms$ping 10.1.1.2PING 10.1.1.2 (10.1.1.2) 56(84) bytes of data.64 bytes from 10.1.1.2: icmp_seq=1 ttl=64 time=0.709 ms^C--- 10.1.1.2 ping statistics ---1 packets transmitted, 1 received, 0% packet loss, time 0msrtt min/avg/max/mdev = 0.709/0.709/0.709/0.000 msView ARP Table on R1
$ arp -nAddress HWtype HWaddress Flags Mask Iface11.1.1.2 ether 00:00:00:1d:9a:bd C e101-001-010.1.1.2 ether 74:e6:e2:f6:ba:87 C e101-007-0View ARP Table on R2
$ arp -nAddress HWtype HWaddress Flags Mask Iface10.1.1.1 ether 74:e6:e2:f6:af:87 C e101-007-012.1.1.2 ether 00:00:00:1d:9a:be C e101-001-0
Quagga RoutingQuagga is an open-source routing application that provides OSPFv2, OSPFv3, RIPv1 and v2, RIPng, and BGP-4 functionality.
The Quagga architecture consists of a core daemon zebra, which acts as an abstraction layer to the underlying Linux kernel and presents a Zserv API over a Unix or TCP socket to Quagga clients. The Zserv clients implement a routing protocol and communicate routing updates to the zebra daemon.
For complete information about Quagga, see https://github.com/opensourcerouting/quagga.
Network Configuration 43

Install Quagga
$ apt-get install -y quaggaReading package lists... DoneBuilding dependency treeReading state information... DoneThe following NEW packages will be installed: quagga0 upgraded, 1 newly installed, 0 to remove and 0 not upgraded.Need to get 1217 kB of archives.After this operation, 6323 kB of additional disk space will be used.Get:1 http://10.11.56.31/debian/ jessie/main quagga amd64 0.99.23.1-1 [1217 kB]Fetched 1217 kB in 0s (12.2 MB/s)Preconfiguring packages ...Selecting previously unselected package quagga.(Reading database ... 46597 files and directories currently installed.)Preparing to unpack .../quagga_0.99.23.1-1_amd64.deb ...Unpacking quagga (0.99.23.1-1) ...Processing triggers for systemd (215-17) ...Processing triggers for man-db (2.7.0.2-5) ...Setting up quagga (0.99.23.1-1) ...Processing triggers for systemd (215-17) ...Processing triggers for libc-bin (2.19-18) ...Quagga daemons and the debian.conf file are stored in the /etc/quagga directory. All routing protocol daemons installed with
Quagga are disabled by default. You must enable the zebra daemon to install the routes in the kernel routing table.
1 Open the daemons file for editing and change the daemon status to yes.
$ vim /etc/quagga/daemonszebra=yesbgpd=yesospfd=noospf6d=noripd=noripngd=noisisd=nobabeld=no
2 Create the vtysh.conf and Quagga.conf configuration files.
$ cp /usr/share/doc/quagga/examples/vtysh.conf.sample /etc/quagga/vtysh.conf touch /etc/quagga/Quagga.conf
3 Restart the Quagga service.
$ /etc/quagga# service quagga restart4 View the status of Quagga protocol daemons.
$ /etc/quagga# service quagga status? quagga.service - LSB: start and stop the Quagga routing suite Loaded: loaded (/etc/init.d/quagga) Active: active (running) since Tue 2016-02-16 17:47:25 UTC; 4s ago Process: 5078 ExecStop=/etc/init.d/quagga stop (code=exited, status=0/SUCCESS) Process: 5097 ExecStart=/etc/init.d/quagga start (code=exited, status=0/SUCCESS) CGroup: /system.slice/quagga.service ??5111 /usr/lib/quagga/zebra --daemon -A 127.0.0.1 ??5115 /usr/lib/quagga/bgpd --daemon -A 127.0.0.1 ??5121 /usr/lib/quagga/watchquagga --daemon zebra bgpd
Feb 16 17:47:25 OS10 quagga[5097]: Loading capability module if not yet done.Feb 16 17:47:25 OS10 quagga[5097]: Starting Quagga daemons (prio:10): zebra...d.Feb 16 17:47:25 OS10 quagga[5097]: Starting Quagga monitor daemon: watchquagga.Feb 16 17:47:25 OS10 watchquagga[5121]: watchquagga 0.99.23.1 watching [zebr...]Feb 16 17:47:25 OS10 systemd[1]: Started LSB: start and stop the Quagga rou...e.Feb 16 17:47:25 OS10 watchquagga[5121]: bgpd state -> up : connect succeededFeb 16 17:47:25 OS10 watchquagga[5121]: zebra state -> up : connect succeededHint: Some lines were ellipsized, use -l to show in full
44 Network Configuration
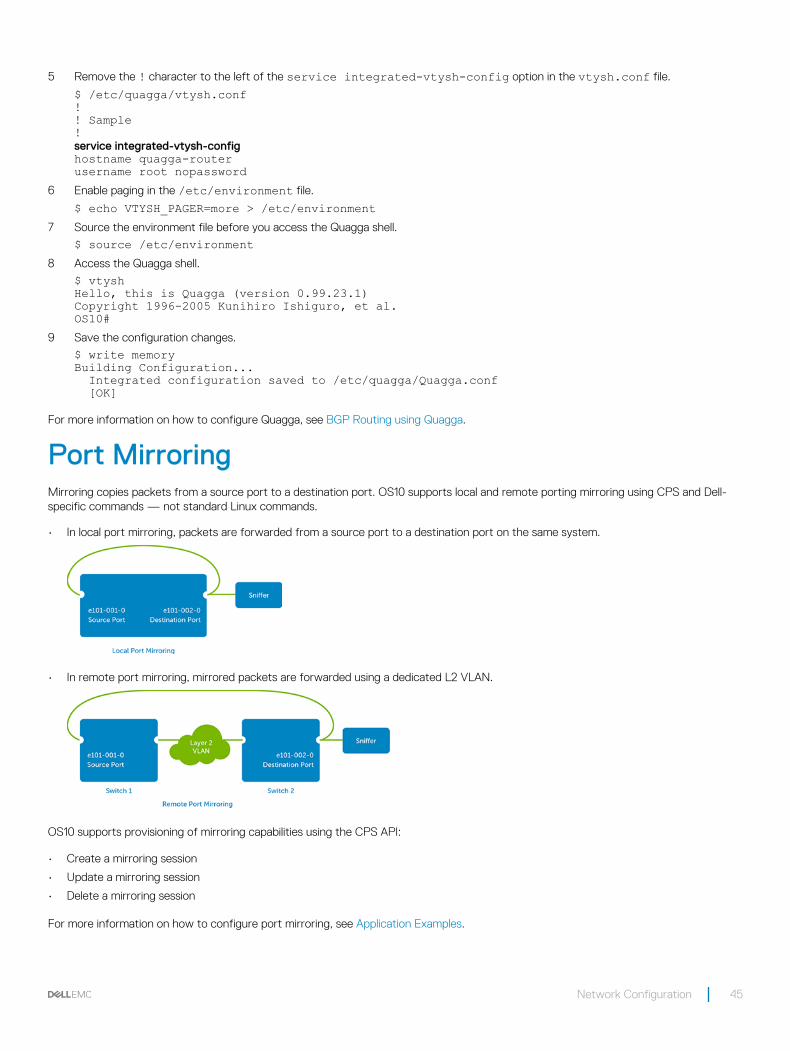
5 Remove the ! character to the left of the service integrated-vtysh-config option in the vtysh.conf file.
$ /etc/quagga/vtysh.conf!! Sample!service integrated-vtysh-confighostname quagga-routerusername root nopassword
6 Enable paging in the /etc/environment file.
$ echo VTYSH_PAGER=more > /etc/environment7 Source the environment file before you access the Quagga shell.
$ source /etc/environment8 Access the Quagga shell.
$ vtyshHello, this is Quagga (version 0.99.23.1)Copyright 1996-2005 Kunihiro Ishiguro, et al.OS10#
9 Save the configuration changes.
$ write memoryBuilding Configuration... Integrated configuration saved to /etc/quagga/Quagga.conf [OK]
For more information on how to configure Quagga, see BGP Routing using Quagga.
Port MirroringMirroring copies packets from a source port to a destination port. OS10 supports local and remote porting mirroring using CPS and Dell-specific commands — not standard Linux commands.
• In local port mirroring, packets are forwarded from a source port to a destination port on the same system.
• In remote port mirroring, mirrored packets are forwarded using a dedicated L2 VLAN.
OS10 supports provisioning of mirroring capabilities using the CPS API:
• Create a mirroring session
• Update a mirroring session
• Delete a mirroring session
For more information on how to configure port mirroring, see Application Examples.
Network Configuration 45

sFlow ProvisioningsFlow monitors network traffic by sampling incoming and outgoing packets on physical ports. OS10 supports sFlow provisioning using the CPS API:
• Enable packet sampling on a physical port
• Disable packet sampling on a physical port
• Set the sampling interval rate
• Forward the sampled packet to an IP address/port
For more information on how to configure sFlow using the CPS API, see Application Examples.
Port StatisticsOS10 provides scripts to view statistical information about ports, VLANs, and installed transceivers.
• Display port statistics for all or a specified Linux interface which maps to physical ports. Enter a filter_list value to display specified statistics.
$ os10-show-stats if_stat [iface_name] {filter_list}• Display statistics and media information from a Linux interface which maps to a physical port. The output is a subset of the os10-
show-stats output for the same physical port interface.
$ os10-ethtool [-v | -e | -s | -S]• -v — Displays version information.
• -e — Displays media information from EEPROM.
• -s — Displays port speed, duplex, and auto-negotiation settings.
• -S — Displays port statistics.
• Display statistics from all or a specified VLAN. Enter a filter_list value to display specified statistics.
$ os10-show-stats vlan_stat [vlan_ifname] {filter_list}• Delete port statistics for all or a specified Linux interface — command does not support deleting VLAN statistics.
$ os10-show-stats clear [iface_name]
Clear Port Statistics
$ os10-show-stats clear e101-001-0Success View e101–001–0 Port Statistics
$ os10-show-stats if_stat e101-001-0Key:base-stats/interface/ip/in-discards = 0base-stats/interface/ether-octets = 13442942147base-stats/interface/ether-out/pkts-64-octets = 0base-stats/interface/ether-collisions = 0base-stats/interface/ether-in/pkts-4096-to-9216-octets = 0base-stats/interface/ether-in/pkts-1024-to-1518-octets = 0base-stats/interface/ipv6-out-mcast-pkts = 0base-stats/interface/if/in-octets = 0base-stats/interface/ether-jabbers = 0base-stats/interface/if-out-multicast-pkts = 36295base-stats/interface/ether-out/pkts-256-to-511-octets = 0base-stats/interface/if-out-errors = 0base-stats/interface/ether-rx-no-errors = 0base-stats/interface/ether/pkts-512-to-1023-octets = 0base-stats/interface/ether/pkts-64-octets = 0base-stats/interface/ether/pkts-1024-to-1518-octets = 13125220base-stats/interface/ipv6/out-discards = 0base-stats/interface/if/out-octets = 13442942147
46 Network Configuration

base-stats/interface/ether-in/pkts-256-to-511-octets = 0base-stats/interface/if/out-ucast-pkts = 13125220base-stats/interface/ether-fragments = 0base-stats/interface/ether-crc-align-errors = 0base-stats/interface/ipv6-in-mcast-pkts = 0base-stats/interface/ether-out/pkts-65-to-127-octets = 34014base-stats/interface/if-out-broadcast-pkts = 0base-stats/interface/ether-drop-events = 0base-stats/interface/if/in-ucast-pkts = 0base-stats/interface/ether-out/pkts-128-to-255-octets = 2281base-stats/interface/ether-in/pkts-2048-to-4095-octets = 0base-stats/interface/ether-tx-oversize-pkts = 0base-stats/interface/ether/pkts-256-to-511-octets = 0base-stats/interface/ether-multicast-pkts = 36295base-stats/interface/ether-out/pkts-4096-to-9216-octets = 0base-stats/interface/ether/pkts-128-to-255-octets = 2281base-stats/interface/ether-in/pkts-128-to-255-octets = 0base-stats/interface/time-stamp = 1455586392base-stats/interface/ip-in-receives = 0base-stats/interface/ether-rx-oversize-pkts = 0base-stats/interface/ether-oversize-pkts = 0base-stats/interface/ether-out/pkts-1024-to-1518-octets = 13125220base-stats/interface/if-in-errors = 0base-stats/interface/ether-out/pkts-512-to-1023-octets = 0base-stats/interface/if/in-non-ucast-pkts = 0base-stats/interface/ether-in/pkts-65-to-127-octets = 0base-stats/interface/ether/pkts-65-to-127-octets = 34014base-stats/interface/if/in-discards = 0base-stats/interface/ipv6-in-receives = 0base-stats/interface/if/out-non-ucast-pkts = 36295base-stats/interface/ipv6/in-discards = 0base-stats/interface/ether-tx-no-errors = 13161515base-stats/interface/ether-broadcast-pkts = 0base-stats/interface/if-in-broadcast-pkts = 0base-stats/interface/if/out-discards = 0base-stats/interface/ether-out/pkts-1519-to-2047-octets = 0base-stats/interface/ether-out/pkts-2048-to-4095-octets = 0base-stats/interface/ether-pkts = 13161515base-stats/interface/ether-in/pkts-1519-to-2047-octets = 0base-stats/interface/ether/pkts-4096-to-9216-octets = 0base-stats/interface/ether-undersize-pkts = 0base-stats/interface/if-in-unknown-protos = 0base-stats/interface/if-out-qlen = 0base-stats/interface/if-in-multicast-pkts = 0base-stats/interface/ether-in/pkts-64-octets = 0base-stats/interface/ether-in/pkts-512-to-1023-octets = 0 View VLAN Statistics
$ os10-show-stats vlan_stat br1Key:base-stats/vlan/time-stamp: 1455586573base-stats/vlan/in-octets: 16381983058base-stats/vlan/in-pkts: 16101053base-stats/vlan/out-octets: 55146334258base-stats/vlan/out-pkts: 67419926 View Port Statistics
$ os10-ethtool -S e101-001-0Statistics for interface e101-001-0 Ether statistics: rx_bytes: 9185614848 rx_no_errors: 0 tx_no_errors: 9003181 tx_total_collision: 0 rx_undersize_packets: 0 rx_jabbers: 0 rx_fragments: 0
Network Configuration 47

rx_align_errors: 0 rx_discards: 0 rx_mcast_packets: 35445 rx_bcast_packets: 0 rx_oversize_packets: 0 tx_oversize_packets: 0 rx_64_byte_packets: 0 rx_65_to_127_byte_packets: 0 rx_128_to_255_byte_packets: 0 rx_256_to_511_byte_packets: 0 rx_512_to_1023_byte_packets: 0 rx_1024_to_1518_byte_packets: 0 rx_1519_to_2047_byte_packets: 0 rx_2048_to_4095_byte_packets: 0 rx_4096_to_9216_byte_packets: 0 tx_64_byte_packets: 0 tx_65_to_127_byte_packets: 33217 tx_128_to_255_byte_packets: 2228 tx_256_to_511_byte_packets: 0 tx_512_to_1023_byte_packets: 0 tx_1024_to_1518_byte_packets: 8967736 tx_1519_to_2047_byte_packets: 0 tx_2048_to_4095_byte_packets: 0 tx_4096_to_9216_byte_packets: 0 View Transceiver Statistics
$ os10-ethtool -e e101-001-0Show media info for e101-001-0if_index is 17Key: 2.19.1245389.1245248.1245249.1245250.base-pas/media/rate-identifier = 0base-pas/media/oper-status = 0base-pas/media/category = 3base-pas/media/voltage-state = 1base-pas/media/bias-low-warning-threshold =base-pas/media/vendor-pn = 568400002base-pas/media/current-temperature = ??base-pas/media/insertion-cnt = 0base-pas/media/voltage-low-warning-threshold =base-pas/media/cc_ext = 162base-pas/media/length-om2 = 0base-pas/media/length-om3 = 0base-pas/media/rx-power-low-alarm-threshold =base-pas/media/length-om1 = 0base-pas/media/vendor-id = APbase-pas/media/media-category/sfp-plus/br-max = 0base-pas/media/connector = 33base-pas/media/ext-transceiver = 0base-pas/media/vendor-Specific = ffffffffffffff00000000000000000000000000000000000000000000000000base-pas/media/media-category/sfp-plus/br-min = 0base-pas/media/encoding = 0base-pas/media/tx-power-high-warning-threshold =base-pas/media/vendor-name = Amphenolbase-pas/media/rx-power-low-warning-threshold =base-pas/media/slot = 1base-pas/media/port = 1base-pas/media/vendor-rev = 4700base-pas/media/slot = 1base-pas/media/port = 1base-pas/media/tx-power-low-alarm-threshold =base-pas/media/bias-low-alarm-threshold =base-pas/media/capability = 6base-pas/media/media-category/sfp-plus/sff-8472-compliance = 0base-pas/media/diag-mon-type = 0base-pas/media/temp-state = 1base-pas/media/type = 43base-pas/media/media-category/qsfp-plus/wavelength-tolerance = 0
48 Network Configuration

base-pas/media/ext-identifier = 0base-pas/media/temp-low-warning-threshold =base-pas/media/voltage-high-warning-threshold =base-pas/media/temp-high-alarm-threshold =base-pas/media/length-sfm = 0base-pas/media/rate-select-state = 0base-pas/media/rx-power-measurement-type = 0base-pas/media/wavelength = 0base-pas/media/cc_base = 54base-pas/media/temp-low-alarm-threshold =base-pas/media/tx-power-low-warning-threshold =base-pas/media/insertion-timestamp = 0base-pas/media/current-voltage =base-pas/media/bias-high-alarm-threshold =base-pas/media/high-power-mode = 1base-pas/media/br-nominal = 0base-pas/media/options = 0base-pas/media/rx-power-high-warning-threshold =base-pas/media/date-code = 3131303632322000base-pas/media/present = 1base-pas/media/transceiver = 0000000000000000205cbase-pas/media/length-cable = 2base-pas/media/voltage-high-alarm-threshold =base-pas/media/identifier = 12base-pas/media/voltage-low-alarm-threshold =base-pas/media/dell-qualified = 0base-pas/media/length-sfm-km = 0base-pas/media/rx-power-high-alarm-threshold =base-pas/media/admin-status = 0base-pas/media/serial-number = APF11240020140base-pas/media/tx-power-high-alarm-threshold =base-pas/media/temp-high-warning-threshold =base-pas/media/bias-high-warning-threshold =base-pas/media/enhanced-options = 0base-pas/media/media-category/qsfp-plus/max-case-temp = 70
Access Control ListsAccess control lists (ACLs) are flexible, hardware-accelerated sets of rules that match packets using packet header criteria and perform actions on selected packets. Configure an ACL on a physical port (NPU) only by using the CPS API.
• Ingress and egress ACL rules.
• Match packet header fields, including MAC address, Ethertype, IP address, IP protocol, TCP/ UDP port numbers, and In Port.
• Packet actions including drop, trap/forward to the CPU, redirect to port, change packet fields, and meter.
• Group ACL rules to enable multiple rule match for a single packet.
For more information on how to configure ACLs using the CPS API, see Application Examples.
Quality of ServiceUse the dell-base-qos.yang model to configure the software to provision quality of service (QoS) parameters. QoS provisioning includes:
• Assign packet to traffic classes using packet 802.1p, DSCP or more advanced ACL rules
• Mark packets
• Ingress rate policing using ACLs
• Map traffic classes to queues
• Egress queue rate shaping
• Weighted random early detection (WRED)
• Hierarchical scheduling
• Egress port-level shaping
Network Configuration 49

• CoPP support for configuring CPU rate-limits
For more information on how to configure QoS using the CPS API, see Programmability.
BGP Routing using QuaggaThis use case describes how to configure BGP using Quagga in a spine/leaf network.
For complete information, see https://github.com/opensourcerouting/quagga.
Link Network Nodes in Link BGP AS Number
Leaf1-to-Spine1 10.1.1.0/24 Leaf1 64501
Spine1 64555
Leaf1-to-Spine2 20.1.1.0/24 Leaf1 64501
Spine2 64555
Leaf2-to-Spine1 40.1.1.0/24 Leaf2 64502
Spine1 64555
Leaf2-to-Spine2 30.1.1.0/24 Leaf2 64502
Spine2 64555
Leaf1-to-Server1 11.1.1.0/24 Leaf1 64501
Leaf2-to-Server2 12.1.1.0/24 Leaf2 64502
1 Configure the IP addresses to Spine1, Spine2, and Server1 from Leaf1.
leaf1(config)# interface e101-049-0leaf1(conf-if-e101-049-0)# ip address 10.1.1.1/24leaf1(conf-if-e101-049-0)# no shutdownleaf1(conf-if-e101-049-0)# exit
leaf1(config)# interface e101-051-0leaf1(conf-if-e101-051-0)# ip address 20.1.1.1/24leaf1(conf-if-e101-051-0)# no shutdownleaf1(conf-if-e101-051-0)# exit
leaf1(config)# interface e101-001-0leaf1(conf-if-e101-001-0)# ip address 11.1.1.1/24leaf1(conf-if-e101-001-0)# no shutdown
2 Configure the IP addresses to Spine1, Spine2, and Server2 from Leaf2.
leaf2(config)# interface e101-032-0leaf2(conf-if-e101-032-0)# ip address 30.1.1.1/24leaf2(conf-if-e101-032-0)# no shutdownleaf2(conf-if-e101-032-0)# exit
leaf2(config)# interface e101-020-0leaf2(conf-if-e101-020-0)# ip address 40.1.1.1/24leaf2(conf-if-e101-020-0)# no shutdownleaf2(conf-if-e101-020-0)# exit
50 Network Configuration

leaf2(config)# interface e101-001-0leaf2(conf-if-e101-001-0)# ip address 12.1.1.1/24leaf2(conf-if-e101-001-0)# no shutdown
3 Configure the IP addresses to Leaf1 and Leaf2 from Spine1.
spine1(config)# interface e101-027-1spine1(conf-if-e101-027-1)# ip address 10.1.1.2/24spine1(conf-if-e101-027-1)# no shutdownspine1(conf-if-e101-027-1)# exit
spine1(config)# interface e101-010-1spine1(conf-if-e101-010-1)# ip address 40.1.1.2/24spine1(conf-if-e101-010-1)# no shutdown
4 Configure the IP addresses to Leaf1 and Leaf2 from Spine2.
spine2(config)# interface e101-027-1spine2(conf-if-e101-027-1)# ip address 20.1.1.2/24spine2(conf-if-e101-027-1)# no shutdownspine2(conf-if-e101-027-1)# exit
spine2(config)# interface e101-018-1spine2(conf-if-e101-018-1)# ip address 30.1.1.2/24spine2(conf-if-e101-018-1)# no shutdownspine2(conf-if-e101-018-1)# exit
5 Configure BGP to Spine1 and Spine2 from Leaf 1.
leaf1(config)# router bgp 64501leaf1(conf-router-bgp-64501)# neighbor 10.1.1.2 remote-as 64555leaf1(conf-router-bgp-64501)# neighbor 20.1.1.2 remote-as 64555leaf1(conf-router-bgp-64501)# network 10.1.1.0/24leaf1(conf-router-bgp-64501)# network 20.1.1.0/24leaf1(conf-router-bgp-64501)# network 11.1.1.0/24
6 Configure BGP to Spine1 and Spine2 from Leaf 2.
leaf2(config)# router bgp 64502leaf2(conf-router-bgp-64502)# neighbor 30.1.1.2 remote-as 64555leaf2(conf-router-bgp-64502)# neighbor 40.1.1.2 remote-as 64555leaf2(conf-router-bgp-64502)# network 12.1.1.0/24leaf2(conf-router-bgp-64502)# network 30.1.1.0/24leaf2(conf-router-bgp-64502)# network 40.1.1.0/24
7 Configure BGP to Leaf1 and Leaf2 from Spine1.
spine1(config)# router bgp 64555spine1(conf-router-bgp-64555)# neighbor 10.1.1.1 remote-as 64501spine1(conf-router-bgp-64555)# neighbor 40.1.1.1 remote-as 64502spine1(conf-router-bgp-64555)# network 10.1.1.0/24spine1(conf-router-bgp-64555)# network 40.1.1.0/24
8 Configure BGP to Leaf1 and Leaf2 from Spine 2.
spine2(config)# router bgp 64555spine2(conf-router-bgp-64555)# neighbor 30.1.1.1 remote-as 64502spine2(conf-router-bgp-64555)# neighbor 20.1.1.1 remote-as 64501spine2(conf-router-bgp-64555)# network 30.1.1.0/24spine2(conf-router-bgp-64555)# network 20.1.1.0/24
9 Configure ECMP from Leaf1 and Leaf2.
leaf1(config)# router bgp 64501leaf1(conf-router-bgp-64501)# maximum-paths 16
leaf2(config)# router bgp 64502leaf2(conf-router-bgp-64502)# maximum-paths 16
Network Configuration 51

Verify Spine/Leaf Configuration1 Verify BGP neighbors from Leaf1 and Leaf2.
leaf1# show ip bgp sumBGP router identifier 20.1.1.1, local AS number 64501RIB entries 11, using 1232 bytes of memoryPeers 2, using 9136 bytes of memory
Neighbor V AS MsgRcvd MsgSent TblVer InQ OutQ Up/Down State/PfxRcd10.1.1.2 4 64555 196 201 0 0 0 02:39:02 420.1.1.2 4 64555 195 206 0 0 0 02:38:57 4
Total number of neighbors 2
leaf2# show ip bgp sumBGP router identifier 40.1.1.1, local AS number 64502RIB entries 11, using 1232 bytes of memoryPeers 2, using 9136 bytes of memory
Neighbor V AS MsgRcvd MsgSent TblVer InQ OutQ Up/Down State/PfxRcd30.1.1.2 4 64555 196 197 0 0 0 02:39:45 440.1.1.2 4 64555 192 204 0 0 0 02:39:42 4
Total number of neighbors 22 Verify BGP neighbors from Spine1 and Spine 2.
spine1# show ip bgp sumBGP router identifier 40.1.1.2, local AS number 64555RIB entries 11, using 1232 bytes of memoryPeers 2, using 9136 bytes of memory
Neighbor V AS MsgRcvd MsgSent TblVer InQ OutQ Up/Down State/PfxRcd10.1.1.1 4 64501 199 201 0 0 0 02:40:55 340.1.1.1 4 64502 202 198 0 0 0 02:41:01 3
Total number of neighbors 2
spine2# show ip bgp sumBGP router identifier 30.1.1.2, local AS number 64555RIB entries 11, using 1232 bytes of memoryPeers 2, using 9136 bytes of memory
Neighbor V AS MsgRcvd MsgSent TblVer InQ OutQ Up/Down State/PfxRcd20.1.1.1 4 64501 206 206 0 0 0 02:43:06 330.1.1.1 4 64502 197 203 0 0 0 02:43:20 3
Total number of neighbors 23 Verify BGP neighbors from Spine1 and Spine2.
spine1# show ip bgp sumBGP router identifier 40.1.1.2, local AS number 64555RIB entries 11, using 1232 bytes of memoryPeers 2, using 9136 bytes of memory
Neighbor V AS MsgRcvd MsgSent TblVer InQ OutQ Up/Down State/PfxRcd10.1.1.1 4 64501 199 201 0 0 0 02:40:55 340.1.1.1 4 64502 202 198 0 0 0 02:41:01 3
Total number of neighbors 2
spine2# show ip bgp sumBGP router identifier 30.1.1.2, local AS number 64555RIB entries 11, using 1232 bytes of memoryPeers 2, using 9136 bytes of memory
52 Network Configuration

Neighbor V AS MsgRcvd MsgSent TblVer InQ OutQ Up/Down State/PfxRcd20.1.1.1 4 64501 206 206 0 0 0 02:43:06 330.1.1.1 4 64502 197 203 0 0 0 02:43:20 3
Total number of neighbors 24 Verify that the server route is ECMP in the routing table from Leaf1 and Leaf2.
leaf1# show ip routeCodes: K - kernel route, C - connected, S - static, R - RIP, O - OSPF, I - IS-IS, B - BGP, A - Babel, > - selected route, * - FIB route
C>* 10.1.1.0/24 is directly connected, e101-049-0C>* 11.1.1.0/24 is directly connected, e101-001-0B>* 12.1.1.0/24 [20/0] via 10.1.1.2, e101-049-0, 02:44:45 * via 20.1.1.2, e101-051-0, 02:44:45C>* 13.1.1.0/24 is directly connected, e101-002-0C>* 20.1.1.0/24 is directly connected, e101-051-0B>* 30.1.1.0/24 [20/0] via 20.1.1.2, e101-051-0, 02:09:44B>* 40.1.1.0/24 [20/0] via 10.1.1.2, e101-049-0, 02:11:50C>* 127.0.0.0/8 is directly connected, lo
leaf2# show ip routeCodes: K - kernel route, C - connected, S - static, R - RIP, O - OSPF, I - IS-IS, B - BGP, A - Babel, > - selected route, * - FIB route
B>* 10.1.1.0/24 [20/0] via 40.1.1.2, e101-020-0, 02:12:43B>* 11.1.1.0/24 [20/0] via 30.1.1.2, e101-032-0, 02:45:14 * via 40.1.1.2, e101-020-0, 02:45:14 C>* 12.1.1.0/24 is directly connected, e101-001-0B>* 20.1.1.0/24 [20/0] via 30.1.1.2, e101-032-0, 02:10:16C>* 30.1.1.0/24 is directly connected, e101-032-0C>* 40.1.1.0/24 is directly connected, e101-020-0C>* 127.0.0.0/8 is directly connected, lo
5 Verify that the server route is ECMP in the Linux routing table from Leaf1 and Leaf2.
$ ip route show10.1.1.0/24 dev e101-049-0 proto kernel scope link src 10.1.1.111.1.1.0/24 dev e101-001-0 proto kernel scope link src 11.1.1.112.1.1.0/24 proto zebra nexthop via 10.1.1.2 dev e101-049-0 weight 1 nexthop via 20.1.1.2 dev e101-051-0 weight 1 13.1.1.0/24 dev e101-002-0 proto kernel scope link src 13.1.1.120.1.1.0/24 dev e101-051-0 proto kernel scope link src 20.1.1.130.1.1.0/24 via 20.1.1.2 dev e101-051-0 proto zebra40.1.1.0/24 via 10.1.1.2 dev e101-049-0 proto zebra
$ ip route show10.1.1.0/24 via 40.1.1.2 dev e101-020-0 proto zebra11.1.1.0/24 proto zebra nexthop via 30.1.1.2 dev e101-032-0 weight 1 nexthop via 40.1.1.2 dev e101-020-0 weight 1 12.1.1.0/24 dev e101-001-0 proto kernel scope link src 12.1.1.120.1.1.0/24 via 30.1.1.2 dev e101-032-0 proto zebra30.1.1.0/24 dev e101-032-0 proto kernel scope link src 30.1.1.140.1.1.0/24 dev e101-020-0 proto kernel scope link src 40.1.1.1
6 Verify that the server route is ECMP in the NPU routing table from Leaf1 and Leaf2.
$ hshell -c 'l3 defip show'Unit 0, Total Number of DEFIP entries: 16384# VRF Net addr Next Hop Mac INTF MODID PORT PRIO CLASS HIT VLAN4096 0 10.1.1.0/24 00:00:00:00:00:00 100002 0 0 0 0 y4096 0 20.1.1.0/24 00:00:00:00:00:00 100002 0 0 0 0 y4097 0 11.1.1.0/24 00:00:00:00:00:00 100002 0 0 0 0 y4097 0 13.1.1.0/24 00:00:00:00:00:00 100002 0 0 0 0 n4098 0 12.1.1.0/24 00:00:00:00:00:00 200000 0 0 0 0 n (ECMP) 4098 0 40.1.1.0/24 00:00:00:00:00:00 100004 0 0 0 0 n
Network Configuration 53

4099 0 30.1.1.0/24 00:00:00:00:00:00 100005 0 0 0 0 n
$ hshell -c 'l3 multipath show'
Multipath Egress Object 200000Interfaces: 100004 100005Reference count: 1
$ hshell -c 'l3 defip show'
Unit 0, Total Number of DEFIP entries: 16384# VRF Net addr Next Hop Mac INTF MODID PORT PRIO CLASS HIT VLAN4096 0 30.1.1.0/24 00:00:00:00:00:00 100002 0 0 0 0 y4096 0 40.1.1.0/24 00:00:00:00:00:00 100002 0 0 0 0 y4097 0 12.1.1.0/24 00:00:00:00:00:00 100002 0 0 0 0 y4097 0 11.1.1.0/24 00:00:00:00:00:00 200000 0 0 0 0 n (ECMP) 4098 0 10.1.1.0/24 00:00:00:00:00:00 100004 0 0 0 0 n4098 0 20.1.1.0/24 00:00:00:00:00:00 100005 0 0 0 0 n
$ hshell -c 'l3 multipath show'
Multipath Egress Object 200000Interfaces: 100004 100005 Reference count: 1
54 Network Configuration

ProgrammabilityThe Control Plane Service (CPS) infrastructure is at the core of system programmability. The CPS supports the definition of a well-defined, data-centric application programming interface (CPS API) that allows customer applications to interact with system services. System applications also use the CPS API to communicate with one another.
The CPS infrastructure provides:
• A distributed framework for application interaction• Database-like API semantics, for create, delete, set, commit, and get operations• Publish/subscribe semantics• Object addressability based on object keys• Introspection
Topics:• Client and Server Applications• CPS Keys• CPS Qualifiers• Objects and Attributes• Publish/Subscribe• CPS API Operations• YANG Modeling Objects• Object Dictionary Support• YANG Model C Header• sFlow using YANG and Python• YANG Model Reference• Application Examples• Application Templates• CPS API Reference
Client and Server ApplicationsCPS client applications operate on objects and subscribe to events published by CPS server applications. CPS server applications register for the ownership of CPS objects and implement CPS operations, such as object create, set, get, and delete.
A temperature control (TC) application is a simple OS10 implementation that shows how the CPS API object model disaggregates client and server applications. The client is the TC application, and the server is the platform adaptation services (PAS) component.
5
Programmability 55

The TC application increases the speed of a system fan when the value reported by a temperature sensor exceeds a predefined threshold — it decreases the fan speed when the temperature falls below the threshold. The TC application needs to subscribe to temperature threshold crossing events published by the OS10 Platform Adaptation Service (PAS), and invoke a set request to change the speed of the fan object. Neither the TC application nor the OS10 PAS are part of the CPS infrastructure — they function as user applications of the CPS infrastructure.
• Entities handled by the CPS infrastructure are called CPS objects (referred to as objects) — the temperature sensor and the fan are both modeled as objects.
• Objects have attributes; for example, temperature value and fan speed.
• CPS applications can publish events; when and how events are generated is controlled by the application implementation. For example, an application can publish an event when the value of an attribute changes or when the value of an attribute crosses a threshold.
• CPS applications can subscribe to (listen for) events.
• CPS applications can request operations to be performed on objects — a set operation. The CPS service, which registers for the ownership of the specific object category, performs the operation.
• The CPS API provides database-like semantics — services that implement CPS operations (object owners) do not persistently store attribute values.
The PAS registers for ownership of both the temperature sensor and fan object types. The PAS application periodically reads the value of a temperature sensor. When the temperature is greater than a pre-defined threshold, the PAS creates a CPS over-temperature event. The event contains the identity of the temperature sensor object and possibly the new temperature value.
The PAS then publishes the event using one of the CPS API functions. The CPS infrastructure determines the applications that have subscribed for the event and object type, and provides the applications (TC application) with the contents of the event.
The publisher of the event (PAS) does not have any knowledge of the applications that have subscribed for an event. Conversely, the subscriber application (TC application) has no knowledge of the application that has published the event.
When the TC application receives the temperature event, it increases the fan speed — it creates a simple CPS transaction in which a set operation requests a change in the speed attribute value of the fan object. CPS API functions perform the transaction. When the transaction is committed, the CPS infrastructure finds the owner of the fan object category — the application that has registered to execute operations requested for fan objects (PAS).
The CPS infrastructure invokes the function registered by PAS to execute the set operation for fans. PAS simply invokes the set operation for low-level fan speed provided by the System Device Interface (SDI), which acts on the fan hardware and changes its speed.
CPS KeysAll CPS objects require a key — the concept of a CPS key is central to the CPS infrastructure. An application uses a key to register for object events, perform get requests, and perform transactions. A CPS key has two components — a fixed key component represented as a sequence (array) of numeric values, and an optional (dynamic) key component.
The fixed part of a CPS key consists of:
• Qualifier — target, observed, real-time
• Attribute identifiers that describe the object name and hierarchy — object category and subcategory. An object category refers to a class of objects, such as interfaces, and object subcategories are defined relative to categories — LAG interface and VLAN interface which are subcategories of interfaces.
Table 1. CPS Key Qualifiers
Qualifier C enum Symbol String Form Applicability Description
Target cps_api_qualifier_TARGET target Configurable attributes Current running-configuration
Observed cps_api_qualifier_OBSERVED
observed Configurable attributes and hardware status attributes
Configuration applied to hardware components or current status (provided by monitoring service — can be cached)
56 Programmability

Qualifier C enum Symbol String Form Applicability Description
Real-Time cps_api_qualifier_REALTIME realtime Hardware status attributes and hardware counters
Requests values immediately queried from hardware (no caching)
Registrations cps_api_qualifier_REGISTRATION
objreg Internal to CPS infrastructure
Qualifier used when publishing events associated to object registrations
Proposed cps_api_qualifier_PROPOSED
proposed Not applicable Reserved
Represent the fixed component of a key in either binary (array of bytes) or string form. Express a string form either in numerical format (1.34.2228241.2228246.2228236) or using a name alias (target/base-ip/ipv4/vrf-id/ifindex).
Optional ComponentThe optional (dynamic) component of a CPS key consists of a series of attribute values stored in the CPS object itself. This key component is created by adding the relevant attributes to the object.
Build CPS KeyUse the cps_api_key_from_attr_with_qual function to build a CPS key. Create a key by specifying the object name and CPS
qualifier.
cps_api_key_from_attr_with_qual(cps_api_object_key(the_object), object_name, cps_api_qualifier_TARGET);The cps_api_key_from_attr_with_qual function looks up the dynamic portion of the key and copies it into the key using the
qualifier target. To add the dynamic portion of the key, add attributes using the standard object attribute function.
CPS QualifiersA CPS qualifier provides the type of object data to retrieve or act upon.
In the temperature control example (see Client and Server Applications), a client application specifies the target qualifier in the CPS key of the fan object used to set the fan speed. This qualifier tells the PAS application to apply the specified speed to the fan (hardware) device. Applications can only use the target qualifier for create or set operations. In a get operation, an application can use any supported qualifier: target, observed, or real-time.
Target qualifier Indicates that the server application (object owner) returns the values of attributes previously specified in a set operation.
Observed qualifier Indicates that the server application (object owner) returns the values of the attributes already successfully applied to hardware entities (for user-configurable attributes), or the last retrieved hardware status information values.
Real-time qualifier Indicates that the server application (object owner) reads the current status of the hardware entity to return the value of a requested attribute.
Observed vs. Real-Time QualifiersIn the temperature control example, when an application uses the observed qualifier to perform a get operation on the temperature sensor object, the PAS returns the last value ready from the sensor (cached value). When the real-time qualifier is used, the PAS reads the current value of the sensor and returns the current, instead of the cached value. Using real-time instead of observed qualifiers only
Programmability 57
produces different results when the server application maintains cached values. If the application always reads the current hardware status when it performs a get operation, the results are identical.
Target vs. Observed QualifiersWhen an application gets an attribute value after a set operation, target and observed qualifiers may produce different results. In the temperature control example, the set operation to change the fan speed uses the target qualifier. Because it takes a few seconds for the fan speed to reach the specified value, an immediate get operation using an observed qualifier may return a fan speed value different from a get operation that uses a target qualifier for the fan object key.
Objects and AttributesCPS objects and object lists are used in the infrastructure. An object consists of a key which uniquely identifies the object, and zero or more object attributes.
A CPS object:
• Contains a variable number of attributes
• Can embed other objects
• Can be easily serialized — written to, read from, or a persistent or temporary storage device
• Supports attribute types:
• uint8_t• uint16_t• uint32_t• uint64_t• char []• Attributes that contain other attributes
Object AttributesCPS object attributes are identified by a 64-bit ID tag (attribute identifier) and represented using a type, length, value (TLV) format. The attribute value consists of a sequence of octets.
When an attribute contains a zero-terminated string, the terminating octet must be included in the length field. The total length of the string "Dell" must be set to 5 to include the zero terminating octet.
NOTE: Although the Python implementation automatically adds a zero octet to all string values, the C/C++ implementation does not. You must take into account the zero-terminating octet when you use a C/C++ application to set the length of an attribute.
Publish/SubscribeThe CPS infrastructure provides a subscription mechanism for receiving and publishing object events. An application registers to receive objects using an object key. The CPS key identifies a set of objects in an object category.
An application can register for:
• All events for a given object category
• All events for an object name
When an application publishes an event, subscriber applications receive the event if they have registered a key that has a prefix match with the key associated to the published object.
If you publish a target IPv4 address object that has base-ip/ipv4/address:
58 Programmability

• The object key is {target, base-ip, ipv4, address}• The CPS qualifier (target) is a mandatory part of the key.
• Any application that subscribes for objects that match any of the keys receives the event:
• Key 1 {Target, base-ip} — Receives all events for objects under base-ip.
• Key 2 {Target, base-ip,ipv4} — Receives all events for objects under IPv4.
• Key 3 {Target, base-ip,ipv4,address} — Receives all IPv4 address objects.
• Multiple applications can subscribe for events that match a specified key.
The infrastructure generates events for CPS-specific conditions when new object owners (server applications) register with the CPS, or objects deregister from the CPS. The object key contains the registration qualifier cps_api_qualifier_REGISTRATION in which the
registration or deregistration event refers to. The key also indicates if the event represents a new object registration or deregistration.
CPS API OperationsThe CPS infrastructure supports database-like requests for creating, updating, deleting, and retrieving one or more objects in a single operation. The CPS API defines the get request and transaction functionality. The CPS API also defines an action operation to allow applications to perform certain functions without affecting object states.
get RequestsCPS get operations operate on lists of keys or an object filter that specifies the keys of objects to retrieve. An object filter can specify an instance or a range of objects.
Get requests are blocking. When a get operation completes, the client application receives the list of retrieved objects or an error code if there is a failure.
TransactionsCPS transactions are required for create, delete, and set operations. The CPS API provides functions to start, commit, and abort transactions. To perform a transaction, a CPS application must start a transaction, and then add operations (create, delete, set, or action) and their associated objects to the transaction. A transaction must be committed to complete.
Operations on the different objects added to a transaction are not necessarily executed in the order in which they are specified in the transaction. The transactions requested by an application thread are always executed in order.
When a transaction is committed, the CPS infrastructure sends all transaction operations to their appropriate handlers, and the result of the request is returned. In order for a result to be returned, the transaction must be valid and all operations must be received by the registered applications. The semantics of a transaction allows any create/set/delete operation associated with the transaction to be completed in a way that allows future CPS calls to use the object data updated as a result of committing the transaction.
Although it is not necessary for all functions in the transaction are completed, it is necessary that all operations in the transaction are accepted by the registered applications and scheduled for processing. For example, if you add 100,000 routes in a transaction, the result of the commit request is:
• All 100,000 route objects are valid to be created
• The application that creates the route objects completes the request
Transaction Commit Result
The transaction commit function returns a success or a failure code. If a transaction commit fails, the entire transaction fails. In this case, the CPS infrastructure automatically calls the rollback functions provided by the CPS server applications. It is the responsibility of the
Programmability 59

server applications (object-owner applications) to roll back any incremental changes that have already been performed as part of the transaction.
BlockingThe CPS infrastructure is middleware that facilitates communication between components. The blocking nature of any CPS transaction or duration is not determined by the CPS infrastructure, but by the implementation of applications registered to perform the requested operations (object owners).
CPS API FunctionsThe CPS API provides functions for:
• Initialization of the CPS services in the context of the calling process
• Key management
• Object and object attribute handling
• CPS event handling and CPS operations
Object Model RepresentationOS10 uses YANG to represent the OS10 object model. YANG object-model files are converted to C object-model header files, which you use to develop CPS applications.
API Language SupportCPS provides Python and C/C++ application programming interfaces.
YANG Modeling ObjectsYANG data models are used to define the content of CPS objects to configure and retrieve information from the software. A YANG model consists of types (typedef, groupings, and enums), containers (container, list, choice, and case), and properties (leaf and leaf-list).
Each property in the YANG container is a CPS object attribute. List containers nested in a YANG model are treated as multiple instances of embedded attributes. CPS also supports defining a separate CPS object from each nested container.
Using YANG-modeled data, the CPS YANG parser generates:
• C/C++ header file containing:
• YANG model name
• typedefs extracted from the model
• Enumerations found in the model
• Enumeration of any YANG container or properties (leaf, leaf-list, container, list, and so on) found in the model
• A Python C extension library containing CPS object metadata and YANG name-to-CPS ID mapping information.
Include the generated C header to use the CPS object name and attribute identifiers to create or delete CPS objects and set values for each attribute in a C/C++ application.
Use the YANG module, and object and attribute names directly in a Python application. The CPS Python engine automatically uses the extension library to derive the corresponding identifiers for these names.
60 Programmability

Python values are present in the top-level dictionary:
data A Python dictionary containing the actual values of an object. Each element in the dictionary is a key-value pair, where the key is an attribute name and the value is a byte array or another dictionary. Depending on the object, the data dictionary may contain other dictionaries and a CPS key_data attribute that contains the instance keys for the object.
key A string that indicates the CPS key as a string or an alias.
operation Indicates if an object is related to a set, delete, create or action transaction — used when events are received.
Object Dictionary SupportThe CPS object dictionary APIs access the metadata for each YANG model. The dictionary contains items for each YANG class or attribute:
• Static key of the element including the elements hierarchy
• Type of element
• Information associated with the element
• Model type — attribute, attribute-list, or object
• Unique attribute identifier
Access the CPS object dictionary in both C/C++ and Python. For more information, see CPS API Reference.
YANG Model C HeaderThis example shows the C header file generated from the sFlow YANG model by the CPS YANG parser.
The sFlow YANG model has two top-level containers:
• YANG list named entry• YANG container named socket-address
module dell-base-sflow { namespace "http://www.dell.com/networking/dell-ops/dell-base-sflow"; prefix "base-sflow";
import dell-base-common { prefix "base-cmn"; }
organization "Dell Inc";
contact "http://www.dell.com/support/softwarecontacts";
description "This module contains a collection of YANG definitions provided by platfrom to manage sflow objects";
revision 2014-02-11 { description "Initial revision"; }
typedef traffic-path { type enumeration { enum "ingress" { value 1; description "Enable sampling on Ingress packets";
Programmability 61

} enum "egress" { value 2; description "Enable sampling of Egress packets"; } enum "ingress-egress" { value 3; description "Enable sampling of Ingress and Egress packets"; } } default "ingress-egress"; }
list entry {
key "id";
description "sflow session attributes";
leaf id{ type uint32; description "Session id to uniquely identify a sflow session"; }
leaf ifindex { type base-cmn:logical-ifindex; mandatory true; description "Interface index which uniquely identifies physical interface in the switch where packet sampling needs to to be enabled"; }
leaf direction { type base-sflow:traffic-path; mandatory true; description "Direction of packets in which sampling needs to be enabled"; }
leaf sampling-rate{ type uint32; mandatory true; description "Rate at which packets sampling needs to be enabled"; } }
container socket-address { description "Address that sFlow Applications need to open UDP socket on to receive sampled packets. Sampled packets from all sFlow sessions are sent to a single UDP socket.";
leaf ip { type base-cmn:ipv4-address; default 127.0.0.1; } leaf udp-port { type uint16; default 20001; } }}
62 Programmability

The CPS YANG parser generates a C header for this model — the header includes the C definitions for the YANG entities:
• Category for the YANG model is cps_api_obj_CAT_BASE_SFLOW• Subcategory for each YANG container:
• BASE_SFLOW_ENTRY_OBJ• BASE_SFLOW_SOCKET_ADDRESS_OBJ
• Attribute IDs for each property in each YANG container:
• BASE_SFLOW_ENTRY_IFINDEX• BASE_SFLOW_ENTRY_DIRECTION
/** source file : dell-base-sflow.h*/
/** Copyright (c) 2015 Dell Inc.** Licensed under the Apache License, Version 2.0 (the "License"); you may* not use this file except in compliance with the License. You may obtain* a copy of the License at http://www.apache.org/licenses/LICENSE-2.0** THIS CODE IS PROVIDED ON AN *AS IS* BASIS, WITHOUT WARRANTIES OR* CONDITIONS OF ANY KIND, EITHER EXPRESS OR IMPLIED, INCLUDING WITHOUT* LIMITATION ANY IMPLIED WARRANTIES OR CONDITIONS OF TITLE, FITNESS* FOR A PARTICULAR PURPOSE, MERCHANTABLITY OR NON-INFRINGEMENT.** See the Apache Version 2.0 License for specific language governing* permissions and limitations under the License.*/#ifndef DELL_BASE_SFLOW_H#define DELL_BASE_SFLOW_H
#include "cps_api_operation.h"#include "dell-base-common.h"#include <stdint.h>#include <stdbool.h>
#define cps_api_obj_CAT_BASE_SFLOW (27)
#define DELL_BASE_SFLOW_MODEL_STR "dell-base-sflow"
/*Enumeration base-sflow:traffic-path */typedef enum { BASE_SFLOW_TRAFFIC_PATH_INGRESS = 1, /*Enable sampling on Ingress packets*/ BASE_SFLOW_TRAFFIC_PATH_EGRESS = 2, /*Enable sampling of Egress packets*/ BASE_SFLOW_TRAFFIC_PATH_INGRESS_EGRESS = 3, /*Enable sampling of Ingress and Egress packets*/} BASE_SFLOW_TRAFFIC_PATH_t;
/*Object base-sflow/entry */typedef enum {/*type=uint32*//*Session id to uniquely identify a sflow session*/ BASE_SFLOW_ENTRY_ID = 1769474,
/*type=base-cmn:logical-ifindex*//*Interface index which uniquely identifies physicalinterface in the switch where packet sampling needs toto be enabled*/ BASE_SFLOW_ENTRY_IFINDEX = 1769475,
/*type=base-cmn:traffic-path*/
Programmability 63

/*Direction of packets in which sampling needs to be enabled*/ BASE_SFLOW_ENTRY_DIRECTION = 1769476,
/*type=uint32*//*Rate at which packets sampling needs to be enabled*/ BASE_SFLOW_ENTRY_SAMPLING_RATE = 1769477,
} BASE_SFLOW_ENTRY_t;
/*Object base-sflow/socket-address */typedef enum {/*type=base-cmn:ipv4-address*/ BASE_SFLOW_SOCKET_ADDRESS_IP = 1769479,
/*type=uint16*/ BASE_SFLOW_SOCKET_ADDRESS_UDP_PORT = 1769480,
} BASE_SFLOW_SOCKET_ADDRESS_t;
/* Object subcategories */typedef enum{/*sflow session attributes*/ BASE_SFLOW_ENTRY = 1769478, BASE_SFLOW_ENTRY_OBJ = 1769478,
/*Address that sFlow Applications need to open UDP socket onto receive sampled packets. Sampled packets from all sFlowsessions are sent to a single UDP socket.*/ BASE_SFLOW_SOCKET_ADDRESS = 1769481, BASE_SFLOW_SOCKET_ADDRESS_OBJ = 1769481,
} BASE_SFLOW_OBJECTS_t;
#endif
sFlow using YANG and PythonThis Python example shows how to use a YANG model to configure a new sFlow entry. The Python utility cps_utils is used to create CPS objects and CPS transactions.
For information about how to write an application using the CPS API, see Application Templates.
import cps_utilsimport nas_os_utils
# Create a CPS object for the YANG container named 'entry'cps_obj = cps_utils.CPSObject(module='base-sflow/entry')
# Add each property in the YANG container as an attribute to the CPS Objectcps_obj.add_attr ("ifindex", nas_os_utils.if_nametoindex('e101-003-0'))cps_obj.add_attr ("direction", 1)cps_obj.add_attr ("sampling-rate", 5000)
# Pair the CPS object with a CPS Operation - in this case it is a Create operation.cps_update = ('create',cps_obj.get())
# Add the pair to the list of updates in a CPS transactioncps_trans = cps_utils.CPSTransaction ([cps_update])
# Commit the transactionr = cps_trans.commit()
if not r: print "Error"else: print "Success"
64 Programmability

The cps_get_oid is a Python utility that executes a GET API on a YANG container. The result displays the values configured in the
software for all attributes in the YANG container.
$ cps_get_oid.py 'base-sflow/entry' Key: 1.27.1769478.1769474. base-sflow/entry/ifindex = 16 base-sflow/entry/direction = 1 base-sflow/entry/sampling-rate = 5000 base-sflow/entry/id = 1
YANG Model ReferenceOS10 provides the following YANG models to configure networking- and platform-related functions. These YANG models are defined by the Network Adaptation and Platform Adaptation Services.
dell-base-acl.yang Access control lists (ACLs)
dell-base-common.yang
Common definitions
dell-base-interface-common.yang
Interfaces
dell-base-l2-mac.yang
Layer 2 MAC address
dell-base-lag.yang Port channels/link aggregation groups (LAGs)
dell-base-mirror.yang
Port mirroring
dell-base-phy-interface.yang
Layer 1/physical layer (PHY) interfaces
dell-base-port-security.yang
Port security protocols
dell-base-qos.yang Quality of service (QoS)
dell-base-routing.yang
Routing protocols
dell-base-sflow.yang sFlow
dell-base-statistics.yang
Diagnostic/statistical information
dell-base-stp.yang STP protocols
dell-base-switch-element.yang
Global configuration parameters for NPU
dell-base-vlan.yang VLAN
dell-base-env-tempctl.yang
Temperature control (TC)
dell-base-pas.yang Platform adaptation service (PAS)
dell-base-platform-common.yang
Common platform definitions
Application ExamplesThis information contains links which describe how to write Python and C/C++ applications using the CPS API application examples. These links contain complete instructions, as well as links to directly view example application files.
• VLAN — contains Python application examples
• IP address — contains Python application examples
• Route — contains Python application examples
Programmability 65

• ACL — contains Python application examples
• MAC address table — contains Python and C/C++ application examples
• Event — contains Python and C/C++ application examples
VLAN Application Examples
Create VLAN using Python
NOTE: VLAN refers to an NPU VLAN object which is modeled as a Linux bridge.
1 Import the CPS and CPS object Python library.
import cpsimport cps_object
2 Create a CPS object.
cps_obj = cps_object.CPSObject('dell-base-if-cmn/if/interfaces/interface')3 Define the VLAN ID.
VLAN_ID=100cps_obj.add_attr("base-if-vlan/if/interfaces/interface/id",VLAN_ID)
4 Define the VLAN type with a L2 or L2 VLAN ID.
cps_obj.add_attr('if/interfaces/interface/type','ianaift:l2vlan')5 Associate a create operation with the CPS object to create a new VLAN.
cps_update = {'change':cps_obj.get(),'operation': 'create'}6 Add the CPS operation and object pair to a new CPS transaction.
transaction = cps.transaction([cps_update])7 Verify the return value.
ret = transaction.commit()if not transaction: raise RuntimeError ("Error creating Vlan")print "Successfully created"
create_vlan.py
# Python code block to create VLANimport cpsimport cps_object# Create CPS Objectcps_obj = cps_object.CPSObject('dell-base-if-cmn/if/interfaces/interface')# Populate the attributes for the CPS Objectcps_obj.add_attr("base-if-vlan/if/interfaces/interface/id",100)cps_obj.add_attr('if/interfaces/interface/type','ianaift:l2vlan')# Associate a CPS Operation with the CPS Objectcps_update = {'change':cps_obj.get(),'operation': 'create'}# Add the CPS Operation,Obj pair to a new CPS Transactiontransaction = cps.transaction([cps_update])# Check for failureret = transaction.commit()if not transaction: raise RuntimeError ("Error creating Vlan")print "Successfully created"Verify VLAN Creation using CPS get
# cps_get_oid.py dell-base-if-cmn/if/interfaces/interface if/interfaces/interface/type=ianaift:l2vlan
Key: 1.19.44.2883617.2883612.2883613.dell-base-if-cmn/if/interfaces/interface/if-index = 40
66 Programmability

dell-if/if/interfaces/interface/phys-address = base-if-vlan/if/interfaces/interface/id = 100if/interfaces/interface/name = br100dell-if/if/interfaces/interface/learning-mode = 1if/interfaces/interface/enabled = 0
Key: 1.19.44.2883617.2883612.2883613.dell-base-if-cmn/if/interfaces/interface/if-index = 3dell-if/if/interfaces/interface/phys-address = 90:b1:1c:f4:ab:edbase-if-vlan/if/interfaces/interface/id = 0if/interfaces/interface/name = docker0dell-if/if/interfaces/interface/learning-mode = 1if/interfaces/interface/enabled = 0
NOTE: OS10 allocates an ifindex for each VLAN created and further CPS set and get operations can use the ifindex as the
key.
Verify VLAN Creation using Linux
$ brctl showbridge name bridge id STP enabled interfacesbr100 8000.000000000000 no
Add VLAN Port using Python
1 Import the CPS and CPS object Python library.
import cpsimport cps_object
2 Create a CPS object.
cps_obj = cps_object.CPSObject('dell-base-if-cmn/if/interfaces/interface')3 Define the VLAN interface name.
VLAN_IF_NAME='br100'cps_obj.add_attr('if/interfaces/interface/name',VLAN_IF_NAME)
4 Define the untagged port to add to the VLAN.
if_port_list=['e101-001-0'] cps_obj.add_attr('dell-if/if/interfaces/interface/untagged-ports',if_port_list)
5 Associate a set operation with the CPS object to modify the property of an existing VLAN.
cps_update = {'change':cps_obj.get(),'operation': 'set'}6 Add the CPS operation and object pair to a new CPS transaction.
transaction = cps.transaction([cps_update])7 Verify the return value.
ret = transaction.commit()if not transaction: raise RuntimeError ("Error in adding port to Vlan")print "successful"
add_vlan_port.py
# Python code block to add port to VLANimport cpsimport cps_object# Create CPS Objectcps_obj = cps_object.CPSObject('dell-base-if-cmn/if/interfaces/interface')# Populate the VLAN attributes VLAN_ID='br100'VLAN_ID='br100'cps_obj.add_attr('if/interfaces/interface/name',VLAN_ID)# Add one or more ports to the untagged-ports property of the VLANif_port_list=['e101-001-0','e101-002-0','e101-003-0']cps_obj.add_attr('dell-if/if/interfaces/interface/untagged-ports',if_port_list)# Associate a CPS Set Operation with the CPS Objectcps_update = {'change':cps_obj.get(),'operation': 'set'}# Add the CPS operation,obj pair to a new CPS Transactiontransaction = cps.transaction([cps_update])
Programmability 67

# Check for failureret = transaction.commit()if not transaction: raise RuntimeError ("Error in adding port to Vlan")print "successful"Verify VLAN Port Addition using CPS get
# cps_get_oid.py dell-base-if-cmn/if/interfaces/interface if/interfaces/interface/type=ianaift:l2vlan
Key: 1.19.44.2883617.2883612.2883613.dell-base-if-cmn/if/interfaces/interface/if-index = 43dell-if/if/interfaces/interface/phys-address =dell-if/if/interfaces/interface/untagged-ports = e101-003-0,e101-002-0,e101-001-0base-if-vlan/if/interfaces/interface/id = 100if/interfaces/interface/name = br100dell-if/if/interfaces/interface/learning-mode = 1if/interfaces/interface/enabled = 0
Key: 1.19.44.2883617.2883612.2883613.dell-base-if-cmn/if/interfaces/interface/if-index = 3dell-if/if/interfaces/interface/phys-address = 90:b1:1c:f4:ab:edbase-if-vlan/if/interfaces/interface/id = 0if/interfaces/interface/name = docker0dell-if/if/interfaces/interface/learning-mode = 1if/interfaces/interface/enabled = 0Verify VLAN Port Addition using Linux
$ brctl showbridge name bridge id STP enabled interfacesbr100 8000.90b11cf4abee no e101-001-0 e101-002-0 e101-003-0
Delete VLAN Port using Python
1 Import the CPS and CPS object Python library.
import cpsimport cps_object
2 Create a CPS object.
cps_obj = cps_object.CPSObject('dell-base-if-cmn/if/interfaces/interface')3 Define the VLAN interface name.
VLAN_IF_NAME='br100'cps_obj.add_attr('if/interfaces/interface/name',VLAN_IF_NAME)
4 Associate a set operation with the CPS object to modify the property of an existing VLAN.
cps_update = {'change':cps_obj.get(),'operation': 'set'}5 Add the CPS operation and object pair to a new CPS transaction.
transaction = cps.transaction([cps_update])6 Verify the return value.
ret = transaction.commit()if not transaction: raise RuntimeError ("Error in deleting ports to Vlan")print "successful"
delete_ports_vlan.py
# Python code block to delete port to VLANimport cpsimport cps_object# Create CPS Objectcps_obj = cps_object.CPSObject('dell-base-if-cmn/if/interfaces/interface')
68 Programmability

# Populate the Vlan attributes VLAN_ID='br100'VLAN_ID='br100'cps_obj.add_attr('if/interfaces/interface/name',VLAN_ID)# Delete the untagged-ports from VLAN, include the ports which is needed in the if_port_listif_port_list=['e101-002-0']cps_obj.add_attr('dell-if/if/interfaces/interface/untagged-ports',if_port_list)# Associate a CPS Set Operation with the CPS Objectcps_update = {'change':cps_obj.get(),'operation': 'set'}# Add the CPS operation,obj pair to a new CPS Transactiontransaction = cps.transaction([cps_update])# Check for failureret = transaction.commit()if not transaction: raise RuntimeError ("Error in deleting ports to Vlan")print "successful"Verify VLAN Port Deletion using CPS get
# cps_get_oid.py dell-base-if-cmn/if/interfaces/interface if/interfaces/interface/type=ianaift:l2vlan
Key: 1.19.44.2883617.2883612.2883613.dell-base-if-cmn/if/interfaces/interface/if-index = 47dell-if/if/interfaces/interface/phys-address =dell-if/if/interfaces/interface/untagged-ports = e101-002-0base-if-vlan/if/interfaces/interface/id = 100if/interfaces/interface/name = br100dell-if/if/interfaces/interface/learning-mode = 1if/interfaces/interface/enabled = 0
Key: 1.19.44.2883617.2883612.2883613.dell-base-if-cmn/if/interfaces/interface/if-index = 3dell-if/if/interfaces/interface/phys-address = 90:b1:1c:f4:ab:edbase-if-vlan/if/interfaces/interface/id = 0if/interfaces/interface/name = docker0dell-if/if/interfaces/interface/learning-mode = 1if/interfaces/interface/enabled = 0Verify VLAN Port Deletion using Linux
$ brctl showbridge name bridge id STP enabled interfacesbr100 8000.000000000000 no e101-002-0
Delete VLAN using Python
1 Import CPS and CPS object Python library.
import cpsimport cps_object
2 Create a CPS object.
cps_obj = cps_object.CPSObject('dell-base-if-cmn/if/interfaces/interface')3 Define the name of the VLAN interface to delete.
VLAN_IF_NAME='br100'cps_obj.add_attr('if/interfaces/interface/name',VLAN_IF_NAME)
4 Associate a delete operation with the CPS object to delete an existing VLAN.
cps_update = {'change':cps_obj.get(),'operation': 'delete'}5 Add the CPS operation and object pair to a new CPS transaction.
transaction = cps.transaction([cps_update])6 Verify the return value.
ret = transaction.commit()if not transaction:
Programmability 69

raise RuntimeError ("Error in deleting Vlan")print "successful"
delete_vlan.py
# Python code block to delete VLANimport cpsimport cps_object# Create CPS Objectcps_obj = cps_object.CPSObject('dell-base-if-cmn/if/interfaces/interface')# Populate the Vlan attributes VLAN_ID='br100'VLAN_ID='br100'cps_obj.add_attr('if/interfaces/interface/name',VLAN_ID)# Associate a CPS Set Operation with the CPS Objectcps_update = {'change':cps_obj.get(),'operation': 'delete'}# Add the CPS operation,obj pair to a new CPS Transactiontransaction = cps.transaction([cps_update])# Check for failureret = transaction.commit()if not transaction: raise RuntimeError ("Error in deleting Vlan")print "successful"Verify VLAN Deletion using CPS get
# cps_get_oid.py dell-base-if-cmn/if/interfaces/interface if/interfaces/interface/type=ianaift:l2vlan
Key: 1.19.44.2883617.2883612.2883613.dell-base-if-cmn/if/interfaces/interface/if-index = 3dell-if/if/interfaces/interface/phys-address = 90:b1:1c:f4:ab:edbase-if-vlan/if/interfaces/interface/id = 0if/interfaces/interface/name = docker0dell-if/if/interfaces/interface/learning-mode = 1if/interfaces/interface/enabled = 0Verify VLAN Deletion using Linux
$ brctl show br100
IP Address Application Examples
Configure IP Address using Python
1 Import the CPS utility Python library.
import cps_utils2 Define the ifindex and prefix length of the interface to set the IP address.
ifindex=16 ip_addr="10.0.0.1" pfix_len=16 ip_attributes = {"base-ip/ipv4/ifindex": ifindex,"ip":ip_addr,"prefix-length":pfix_len}
3 Define the attribute type to convert the IP address between string and byte-array format.
cps_utils.add_attr_type('base-ip/ipv4/address/ip',"ipv4") cps_obj=cps_utils.CPSObject('base-ip/ipv4/address',data=ip_attributes)
4 Create the CPS transaction.
cps_update = ('create', cps_obj.get())5 Add the CPS operation and object pair to a new transaction.
transaction = cps_utils.CPSTransaction([cps_update])
70 Programmability

6 Verify the return value.
ret = transaction.commit()if not ret: raise RuntimeError ("Error configuring IP Address")
configure-ip-address.py
# Python code block to set ip addressimport cps_utils# Populate the attributes for the CPS Objectifindex=16ip_addr="10.0.0.1"pfix_len=16ip_attributes = {"base-ip/ipv4/ifindex": ifindex,"ip":ip_addr,"prefix-length":pfix_len}# Create CPS Objectcps_utils.add_attr_type('base-ip/ipv4/address/ip',"ipv4")cps_obj=cps_utils.CPSObject('base-ip/ipv4/address',data=ip_attributes)# Create the CPS Transaction for object createcps_update = ('create', cps_obj.get())transaction = cps_utils.CPSTransaction([cps_update])# Check for failureret = transaction.commit()if not ret: raise RuntimeError ("Error ")Verify IP Address using CPS get
# cps_get_oid.py 'base-ip/ipv4/address'
Key: 1.34.2228241.2228246.2228236.2228240.2228228.base-ip/ipv4/address/prefix-length = 16base-ip/ipv4/vrf-id = 0base-ip/ipv4/name = e101-001-0base-ip/ipv4/ifindex = 16base-ip/ipv4/address/ip = 0a000001Verify IP Address using Linux
$ ip addr show e101-001-016: e101-001-0: <BROADCAST,MULTICAST> mtu 1500 qdisc noop state DOWN group default qlen 500 link/ether 90:b1:1c:f4:aa:b3 brd ff:ff:ff:ff:ff:ffinet 10.0.0.1/16 scope global e101-001-0 valid_lft forever preferred_lft forever
Delete IP Address using Python
1 Import the CPS utility Python library.
import cps_utils2 Define the ifindex, IP address, and prefix length of the interface to delete.
idx=16 ip_addr="10.0.0.1" pfix_len=16 ip_attributes = {"base-ip/ipv4/ifindex":idx,"ip":ip_addr,"prefix-length":pfix_len}
3 Define the attribute type to convert the IP address between string and byte-array format.
cps_utils.add_attr_type('base-ip/ipv4/address/ip',"ipv4") cps_obj=cps_utils.CPSObject('base-ip/ipv4/address',data=ip_attributes)
4 Create the CPS transaction.
cps_update = ('create', cps_obj.get())5 Add the object pair to a new CPS transaction.
transaction = cps_utils.CPSTransaction([cps_update])6 Verify the return value.
ret = transaction.commit()if not ret: raise RuntimeError ("Error creating Vlan")
Programmability 71

delete-ip-address.py
# Python code block to delete ip addressimport cps_utils# Populate the attributes for the CPS objectidx=16ip_addr="10.0.0.1"pfix_len=16ip_attributes = {"base-ip/ipv4/ifindex":idx,"ip":ip_addr,"prefix-length":pfix_len}# Create CPS Objectcps_utils.add_attr_type('base-ip/ipv4/address/ip',"ipv4")cps_obj=cps_utils.CPSObject('base-ip/ipv4/address',data=ip_attributes)# Create the CPS Transaction to delete the CPS Objectcps_update = ('delete', cps_obj.get())transaction = cps_utils.CPSTransaction([cps_update])# Check for failureret = transaction.commit()if not ret: raise RuntimeError ("Error ")Verify IP Address Deletion using GET
$ cps_get_oid.py 'base-ip/ipv4/address'The return indicates that e101-001-0 has no IP address.
Verify IP Address Deletion
$ ip addr show e101-001-016: e101-001-0: <BROADCAST,MULTICAST> mtu 1500 qdisc noop state DOWN group default qlen 500 link/ether 90:b1:1c:f4:aa:b3 brd ff:ff:ff:ff:ff:ff
Route Application Examples
Create Routing using Python
NOTE: Refer to the dell-base-route.yang model which defines the route object and attributes before you configure route
settings.
1 Import the CPS utility and netaddr Python library.
import cps_utilsimport socketimport netaddr as net
2 Define the protocol version, route prefix, and prefix length of the route attributes.
version = 'ipv4' route_ip = '70.5.5.0' obj = cps_utils.CPSObject('base-route/obj/entry') obj.add_attr("vrf-id", 0) if version == 'ipv4': obj.add_attr("af", socket.AF_INET) elif version == 'ipv6': obj.add_attr("af", socket.AF_INET6) ip = net.IPNetwork(route_ip)obj.add_attr_type("route-prefix", version) obj.add_attr("route-prefix", str(ip.network)) obj.add_attr("prefix-len", int(ip.prefixlen))
3 Define the next-hop attributes and create the CPS object, then add multiple next-hop attributes to create ECMP routes.
nh_addr = '1.1.1.2'lst = ["nh-list", "0", "nh-addr"] obj.add_embed_attr(lst, nh_addr) obj.add_attr("nh-count", 1)
72 Programmability

4 Create the CPS object.
cps_update = ('create', obj.get()) transaction = cps_utils.CPSTransaction([cps_update])
5 Verify the return value.
ret = transaction.commit()if not ret: raise RuntimeError ("Error creating Route")
route-create.py
# Python block code to create a routeimport cps_utilsimport socketimport netaddr as net# Populate the attributesversion = 'ipv4'route_ip = '70.5.5.0'obj = cps_utils.CPSObject('base-route/obj/entry')obj.add_attr("vrf-id", 0)if version == 'ipv4': obj.add_attr("af", socket.AF_INET)elif version == 'ipv6': obj.add_attr("af", socket.AF_INET6)ip = net.IPNetwork(route_ip)obj.add_attr_type("route-prefix", version)obj.add_attr("route-prefix", str(ip.network))obj.add_attr("prefix-len", int(ip.prefixlen))
nh_addr = '1.1.1.2' lst = ["nh-list", "0", "nh-addr"]obj.add_embed_attr(lst, nh_addr)obj.add_attr("nh-count", 1)print obj.get()
# Create transactioncps_update = ('create', obj.get())transaction = cps_utils.CPSTransaction([cps_update])# Commit and verify resultret = transaction.commit()if not ret: raise RuntimeError ("Error creating Route")Verify Route Creation
$ ip route1.1.1.0/24 dev e101-001-0 proto kernel scope link src 1.1.1.170.5.5.0 via 1.1.1.2 dev e101-001-0 proto none
Delete Route using Python
1 Import the CPS utility and netaddr Python library.
import cps_utilsimport socketimport netaddr as net
2 Define the protocol version, route prefix, and prefix length of the route attributes.
version = 'ipv4'route_ip = '70.5.5.0'obj = cps_utils.CPSObject('base-route/obj/entry')obj.add_attr("vrf-id", 0)if version == 'ipv4': obj.add_attr("af", socket.AF_INET)elif version == 'ipv6': obj.add_attr("af", socket.AF_INET6)ip = net.IPNetwork(route_ip)
Programmability 73

obj.add_attr_type("route-prefix", version)obj.add_attr("route-prefix", str(ip.network))obj.add_attr("prefix-len", int(ip.prefixlen))print obj.get()
3 Create the CPS object and create the transaction.
cps_update = ('delete', obj.get())transaction = cps_utils.CPSTransaction([cps_update])
4 Verify the return value.
ret = transaction.commit() if not ret: raise RuntimeError ("Error creating Route")
route-delete.py
# Python code block to delete a routeimport cps_utilsimport socketimport netaddr as net# Define the route attributesversion = 'ipv4'route_ip = '70.5.5.0'obj = cps_utils.CPSObject('base-route/obj/entry')obj.add_attr("vrf-id", 0)if version == 'ipv4': obj.add_attr("af", socket.AF_INET)elif version == 'ipv6': obj.add_attr("af", socket.AF_INET6)ip = net.IPNetwork(route_ip)
obj.add_attr_type("route-prefix", version)obj.add_attr("route-prefix", str(ip.network))obj.add_attr("prefix-len", int(ip.prefixlen))print obj.get()# Create CPS object and create transactioncps_update = ('delete', obj.get())transaction = cps_utils.CPSTransaction([cps_update])
# Commit and verify resultret = transaction.commit()if not ret: raise RuntimeError ("Error deleting Route")Verify Route Deletion
$ ip route1.1.1.0/24 dev e101-001-0 proto kernel scope link src 1.1.1.170.5.5.0 via 1.1.1.2 dev e101-001-0 proto none
$ python route-delete{'data': {'base-route/obj/entry/prefix-len': bytearray(b' \x00\x00\x00'), 'base-route/obj/entry/vrf-id': bytearray(b'\x00\x00\x00\x00'), 'base-route/obj/entry/af': bytearray(b'\x02\x00\x00\x00'), 'base- route/obj/entry/route-prefix': 'F\x05\x05\x00'}, 'key':'1.26.1704016.1703992.1703995.1703980.1703978.1703979.'}
$ ip route1.1.1.0/24 dev e101-001-0 proto kernel scope link src 1.1.1.1
74 Programmability

ACL Application Examples
Configure ACL using Python
NOTE: Refer to the dell-base-acl.yang model which defines an ACL object and attributes before you configure ACL
settings.
1 Import the CPS utility Python library.
import cps_utils2 Define the enum map.
NOTE: A CPS Python application does not automatically map the YANG model enum name to a number.
e_stg = {'INGRESS': 1, 'EGRESS': 2}e_ftype = {'SRC_MAC': 3, 'DST_MAC': 4, 'SRC_IP': 5, 'DST_IP': 6, 'IN_PORT': 9, 'DSCP': 21}e_atype = {'PACKET_ACTION': 3, 'SET_TC': 10}e_ptype = {'DROP': 1}
3 Register the attribute type with the CPS utility for attributes with non-integer values.
type_map = { 'base-acl/entry/SRC_MAC_VALUE/addr': 'mac', 'base-acl/entry/SRC_MAC_VALUE/mask': 'mac',}for key,val in type_map.items(): cps_utils.cps_attr_types_map.add_type(key, val)
configure-acl.py
# Python code block to configure ACLimport cps_utils# Define enum mape_stg = {'INGRESS': 1, 'EGRESS': 2}e_ftype = {'SRC_MAC': 3, 'DST_MAC': 4, 'SRC_IP': 5, 'DST_IP': 6, 'IN_PORT': 9, 'DSCP': 21}e_atype = {'PACKET_ACTION': 3, 'SET_TC': 10}e_ptype = {'DROP': 1}# Tell CPS utility about the type of each attributetype_map = { 'base-acl/entry/SRC_MAC_VALUE/addr': 'mac', 'base-acl/entry/SRC_MAC_VALUE/mask': 'mac',}for key,val in type_map.items(): cps_utils.cps_attr_types_map.add_type(key, val)
Create ACL Table using Python
An ACL table groups entries and allows a packet to match one of the entries in the group. A packet can simultaneously match ACL entries in different tables. The table priority determines the order in which match criteria are applied.
NOTE: Refer to the dell-base-acl.yang model which defines an ACL object and attributes before you configure ACL
settings.
1 Import the CPS utility Python library.
import cps_utilsimport nas_os_utils
2 Define the enum map.
NOTE: A CPS Python application does not automatically map the YANG model enum name to a number.
e_stg = {'INGRESS': 1, 'EGRESS': 2}e_ftype = {'SRC_MAC': 3, 'DST_MAC': 4, 'SRC_IP': 5, 'DST_IP': 6, 'IN_PORT': 9, 'DSCP': 21}
Programmability 75

e_atype = {'PACKET_ACTION': 3, 'SET_TC': 10}e_ptype = {'DROP': 1}
3 Register the attribute type with the CPS utility for attributes with non-integer values.
type_map = { 'base-acl/entry/SRC_MAC_VALUE/addr': 'mac', 'base-acl/entry/SRC_MAC_VALUE/mask': 'mac',}for key,val in type_map.items(): cps_utils.cps_attr_types_map.add_type(key, val)
4 Create the CPS object and populate the attributes.
cps_obj = cps_utils.CPSObject(module='base-acl/table')5 Set the stage and priority.
cps_obj.add_attr ('stage', e_stg['INGRESS'])cps_obj.add_attr ('priority', 99)The allowed-match-list attribute is a YANG leaf list, which takes multiple values provided with a Python list.
cps_obj.add_list ('allowed-match-fields', [e_ftype['SRC_MAC'], e_ftype['DST_IP'], e_ftype['DSCP'], e_ftype['IN_PORT']])
6 Define the CPS object.
cps_update = ('create', cps_obj.get())7 Define an add operation and object pair to the CPS transaction.
NOTE: Each CPS transaction can hold multiple CPS operation and object pairs.
cps_trans = cps_utils.CPSTransaction([cps_update])8 Verify the return value.
ret = cps_trans.commit()if not ret: raise RuntimeError ("Error creating ACL Table")
9 Retrieve the CPS object ID from the ACL table — this ID is used for all operations on the ACL table.
ret = cps_utils.CPSObject (module='base-acl/table', obj=r[0]['change'])tbl_id = cps_get_val.get_attr_data ('id')print "Successfully created ACL Table " + str(tbl_id)
create-acl.py
# Python code block to create ACL /usr/bin/python"""Simple Base ACL CPS config using the generic CPS Python module and utilities.Create ACL TableCreate ACL Entry to Drop all packets received on specific port from specific Src MAC"""import cps_utilsimport nas_os_utils# Yang Enum name to number mape_stg = {'INGRESS': 1, 'EGRESS': 2}e_ftype = {'SRC_MAC': 3, 'DST_MAC': 4, 'SRC_IP': 5, 'DST_IP': 6, 'IN_PORT': 9, 'DSCP': 21}e_atype = {'PACKET_ACTION': 3, 'SET_TC': 10}e_ptype = {'DROP': 1}# Teach CPS utility about the type of each attributetype_map = { 'base-acl/entry/SRC_MAC_VALUE/addr': 'mac', 'base-acl/entry/SRC_MAC_VALUE/mask': 'mac',}for key,val in type_map.items(): cps_utils.cps_attr_types_map.add_type(key, val)
# Create ACL Table# Create CPS Object and fill leaf attributescps_obj = cps_utils.CPSObject(module='base-acl/table')cps_obj.add_attr ('stage', e_stg['INGRESS'])cps_obj.add_attr ('priority', 99)# Populate the leaf-list attribute
76 Programmability

cps_obj.add_list ('allowed-match-fields', [e_ftype['SRC_MAC'], e_ftype['DST_IP'], e_ftype['DSCP'], e_ftype['IN_PORT']])# Associate the CPS Object with a CPS operationcps_update = ('create', cps_obj.get())# Add the CPS object to a new CPS Transactioncps_trans = cps_utils.CPSTransaction([cps_update])# Commit and verify the CPS transactionret = cps_trans.commit()if not ret: raise RuntimeError ("Error creating ACL Table")ret = cps_utils.CPSObject (module='base-acl/table', obj=r[0]['change'])# Retrieve CPS object IDcps_get_val = cps_utils.CPSObject (module='base-acl/table', obj=r[0]['change'])tbl_id = ret.get_attr_data ('id')print "Successfully created ACL Table " + str(tbl_id)Verify ACL Table Creation using CPS get
# cps_get_oid.py 'base-acl/table'
Key: 1.25.1638504.1638499.base-acl/table/npu-id-list = 0 base-acl/table/stage = 1base-acl/table/priority = 99base-acl/table/allowed-match-fields = 3,6,9,21 base-acl/table/id = 2
Create ACL Entry using Python
An ACL entry is a rule that consists of a set of filters that define packets to be matched, and a set of actions to be performed on the matched packets.
1 Import the CPS utility Python library.
import cps_utilsimport nas_os_utils
2 Define the enum map.
NOTE: A CPS Python application does not automatically map the YANG model enum name to a number.
e_stg = {'INGRESS': 1, 'EGRESS': 2}e_ftype = {'SRC_MAC': 3, 'DST_MAC': 4, 'SRC_IP': 5, 'DST_IP': 6, 'IN_PORT': 9, 'DSCP': 21}e_atype = {'PACKET_ACTION': 3, 'SET_TC': 10}e_ptype = {'DROP': 1}
3 Register the attribute type with the CPS utility for attributes with non-integer values.
type_map = { 'base-acl/entry/SRC_MAC_VALUE/addr': 'mac', 'base-acl/entry/SRC_MAC_VALUE/mask': 'mac',}for key,val in type_map.items(): cps_utils.cps_attr_types_map.add_type(key, val)
4 Create the CPS object based on the dell-base-acl.yang model, then define the leaf attributes.
cps_obj = cps_utils.CPSObject(module='base-acl/table)5 Define the ACL table ID to indicate the group to which this ACL entry belongs to. The priority value determines the sequence of the
ACL rule lookup in the ACL table group.
cps_obj.add_attr ('table-id', tbl_id) cps_obj.add_attr ('priority', 512)6 Define the filters that the packets are matched to — filter attribute is a YANG nested list. The add_embed_attr() function is
used to create multiple instances for nested lists. Each filter instance is made up of two attributes — match-type and match-value.
NOTE: Use the correct match-value attribute name depending on the value assigned to the match-type. Use the attribute name src_mac_value when match-type is src_mac.
Programmability 77

Filter 1 — Match packets with a specific source MAC address
cps_obj.add_embed_attr (['match','0','type'], e_ftype['SRC_MAC'])cps_obj.add_embed_attr (['match','0','SRC_MAC_VALUE','addr'], '50:10:6e:00:00:00', 2)Filter 2 — Match packets received on a specific port
cps_obj.add_embed_attr (['match','1','type'], e_ftype['IN_PORT'])cps_obj.add_embed_attr (['match','1','IN_PORT_VALUE'], nas_os_utils.if_nametoindex('e101-001-0'))
7 Define actions to apply on matched packets — action attribute is a YANG nested list. The add_embed_attr() function is used to create multiple instances for nested lists. Each action instance is made up of two attributes — action-type and action-value.
NOTE: Use the correct action-value attribute name depending on the value assigned to the action-type. Use attribute name packet_action_value when action-type is packet_action.
Action — Drop
cps_obj.add_embed_attr (['action','0','type'], e_atype['PACKET_ACTION'])cps_obj.add_embed_attr (['action','0','PACKET_ACTION_VALUE'], e_ptype['DROP'])
8 Associate the CPS object an operation.
cps_update = ('create', cps_obj.get())9 Add the CPS operation and object pair to a new transaction. Each CPS transaction holds multiple pairs of CPS operation and object
updates.
cps_trans = cps_utils.CPSTransaction([cps_update])10 Verify the return value.
ret = cps_trans.commit()if not ret: raise RuntimeError ("Error creating MAC ACL Entry")
11 Retrieve the CPS object ID from the ACL table. This ID is used for all operations on the ACL table.
cps_get_val = cps_utils.CPSObject (module='base-acl/entry', obj=r[0]['change'])mac_eid = cps_get_val.get_attr_data ('id')print "Successfully created MAC ACL Entry " + str(mac_eid)
create-acl-table.py
# Python code block to create ACL table entry /usr/bin/python"""Simple Base ACL CPS config using the generic CPS Python module and utilitiesCreate ACL TableCreate ACL Entry to Drop all packets received on specific port from specific Src MAC"""import cps_utilsimport nas_os_utils# Yang Enum name to number mape_stg = {'INGRESS': 1, 'EGRESS': 2}e_ftype = {'SRC_MAC': 3, 'DST_MAC': 4, 'SRC_IP': 5, 'DST_IP': 6, 'IN_PORT': 9, 'DSCP': 21}e_atype = {'PACKET_ACTION': 3, 'SET_TC': 10}e_ptype = {'DROP': 1}# Inform CPS utility about the type of each attributetype_map = { 'base-acl/entry/SRC_MAC_VALUE/addr': 'mac', 'base-acl/entry/SRC_MAC_VALUE/mask': 'mac',}for key,val in type_map.items(): cps_utils.cps_attr_types_map.add_type(key, val)
# Create ACL Table# Create CPS object and fill leaf attributescps_obj = cps_utils.CPSObject(module='base-acl/table')cps_obj.add_attr ('stage', e_stg['INGRESS']) cps_obj.add_attr ('priority', 99)# Populate the leaf-list attributecps_obj.add_list ('allowed-match-fields', [e_ftype['SRC_MAC'], e_ftype['DST_IP'], e_ftype['DSCP'], e_ftype['IN_PORT']])
78 Programmability

# Associate the CPS Object with a CPS operationcps_update = ('create', cps_obj.get())# Add the CPS object to a new CPS Transactioncps_trans = cps_utils.CPSTransaction([cps_update])# Commit the CPS transaction and verify returnret = cps_trans.commit()if not ret: raise RuntimeError ("Error creating ACL Table")# Retrieve CPS Object IDret = cps_utils.CPSObject (module='base-acl/table', obj=r[0]['change'])tbl_id = ret.get_attr_data ('id')print "Successfully created ACL Table" + str(tbl_id)
# Create ACL table entry# Drop all packets received on specific port from specific range of MACs# Create CPS Object and fill leaf attributescps_obj = cps_utils.CPSObject(module='base-acl/entry')cps_obj.add_attr ('table-id', tbl_id)cps_obj.add_attr ('priority', 512)
# Filters# Match Filter 1 - Src MACcps_obj.add_embed_attr (['match','0','type'], e_ftype['SRC_MAC'])# The 2 at the end indicates that the type should be deducted from the last 2 attrs (SRC_MAC_VALUE,addr)cps_obj.add_embed_attr (['match','0','SRC_MAC_VALUE','addr'], '50:10:6e:00:00:00', 2)# Match Filter 2 - Rx Portcps_obj.add_embed_attr (['match','1','type'], e_ftype['IN_PORT'])cps_obj.add_embed_attr (['match','1','IN_PORT_VALUE'], nas_os_utils.if_nametoindex('e101-001-0'))# Action - Dropcps_obj.add_embed_attr (['action','0','type'], e_atype['PACKET_ACTION'])cps_obj.add_embed_attr (['action','0','PACKET_ACTION_VALUE'], e_ptype['DROP'])
# Associate the CPS Object with a CPS operation cps_update = ('create', cps_obj.get())# Add the CPS object to a new CPS Transaction cps_trans = cps_utils.CPSTransaction([cps_update])# Commit the CPS transaction and verify returnret = cps_trans.commit()if not ret: raise RuntimeError ("Error creating MAC ACL Entry")# Return CPS Object IDret = cps_utils.CPSObject (module='base-acl/entry', obj=r[0]['change'])mac_eid = ret.get_attr_data ('id')print "Successfully created MAC ACL Entry" + str(mac_eid)Verify ACL Entry Creation using CPS get
# cps_get_oid.py 'base-acl/entry'
Key: 1.25.1638505.1638428.1638429. base-acl/entry/table-id = 2base-acl/entry/id = 1base-acl/entry/match/IN_PORT_VALUE = 23base-acl/entry/match/type = 9base-acl/entry/match/SRC_MAC_VALUE/mask = ffffff000000base-acl/entry/match/SRC_MAC_VALUE/addr = 50106e000000base-acl/entry/match/type = 3base-acl/entry/action/PACKET_ACTION_VALUE = 1base-acl/entry/action/type = 3base-acl/entry/npu-id-list = 0base-acl/entry/priority = 512Verify NPU ACL Entry Creation
EID 0x00000018: gid=0x2, slice=1, slice_idx=0, part =0 prio=0x200, flags=0x10202, Installed, Enabled tcam: color_indep=0,StageStageIngressInPort
Programmability 79

DATA=0x0000000000000000000000000000000000000000000000000002000000000000 MASK=0x00000000000000000000000000000000000001ffffffffffffffffffffffffffSrcMac Offset0: 241 Width0: 48 DATA=0x00005010 6e000000 MASK=0x0000ffff ff000000 action={act=Drop, param0=0(0), param1=0(0), param2=0(0), param3=0(0)} policer= statistics=NULL
Delete ACL Entry using Python
1 Import the CPS utility Python library.
import cps_utils2 Define the enum map.
NOTE: A CPS Python application does not automatically map the YANG model enum name to a number.
e_stg = {'INGRESS': 1, 'EGRESS': 2}e_ftype = {'SRC_MAC': 3, 'DST_MAC': 4, 'SRC_IP': 5, 'DST_IP': 6, 'IN_PORT': 9, 'DSCP': 21}e_atype = {'PACKET_ACTION': 3, 'SET_TC': 10}e_ptype = {'DROP': 1}
3 Register the attribute type with the CPS utility for attributes with non-integer values.
type_map = { 'base-acl/entry/SRC_MAC_VALUE/addr': 'mac', 'base-acl/entry/SRC_MAC_VALUE/mask': 'mac',}for key,val in type_map.items(): cps_utils.cps_attr_types_map.add_type(key, val)
4 Define the table and entry ID key values and create the CPS object.
cps_obj = cps_utils.CPSObject(module='base-acl/entry', data={'table-id': 'id': mac_eid})5 Associate the object with a CPS operation.
cps_update = ('delete', cps_obj.get())6 Add the operation and object pair to a new CPS transaction.
cps_trans = cps_utils.CPSTransaction([cps_update])7 Verify the return value.
ret = cps_trans.commit()if not ret: raise RuntimeError ("Error deleting ACL Entry")
delete-acl.py
# Python code block to delete ACL entryimport cps_utils# Create the CPS Object and fill the table-id and entry-id key valuescps_obj = cps_utils.CPSObject(module='base-acl/entry', data={'table-id': 2, 'id': 1})# Associate the CPS Object with a CPS operationcps_update = ('delete', cps_obj.get())# Add the CPS object to a new CPS Transactioncps_trans = cps_utils.CPSTransaction([cps_update])# Commit the CPS transaction and verify returnret = cps_trans.commit()if not ret: raise RuntimeError ("Error deleting ACL Entry")
80 Programmability

MAC Address Table Application ExamplesThis information includes both Python and C/C++ application examples.
Create MAC Address Table Entry
NOTE: Refer to the dell-base-l2-mac.yang model that defines the MAC object and attributes before creating a MAC
address table entry.
1 Import the CPS utility Python library.
import cps_utils 2 Register the mac-address attribute type as mac-address to convert between the string and byte-array formats.
cps_utils.add_attr_type("base-mac/table/mac-address", "mac") 3 Create a new MAC entry by entering the MAC address, interface index, and VLAN attributes.
d = {"mac-address": "00:0a:0b:cc:0d:0e","ifindex": 18,"vlan": "100"}4 Create a CPS object.
obj = cps_utils.CPSObject('base-mac/table',data= d)5 Add the operation to the object.
tr_obj = ('create', obj.get())6 Create a transaction object.
transaction = cps_utils.CPSTransaction([tr_obj])7 Verify the return value.
ret = transaction.commit()if not ret: raise RuntimeError ("Error creating MAC Table Entry")
create-mac-table-entry.py
# Python block code to create MAC Table entryimport cps_utils# Register attribute typecps_utils.add_attr_type("base-mac/table/mac-address", "mac")# Define VLAN attributesd = {"mac-address": "00:0a:0b:cc:0d:0e","ifindex": 18,"vlan": "100"}# Create CPS objectobj = cps_utils.CPSObject('base-mac/table',data= d)# Associate operation to CPS objecttr_obj = ('create', obj.get())# Create transaction objecttransaction = cps_utils.CPSTransaction([tr_obj])# Commit transaction and verify returnret = transaction.commit()if not ret: raise RuntimeError ("Error creating MAC Table Entry") If you do not specify a qualifier value for a key, target is used by default to create the object. To use a non-default qualifier, enter obj = cps_utils.CPSObject('base-mac/table',qual='observed',data= d).
create-mac-table-entry.c
// C application example to create a MAC address table entry
#include "cps_api_object.h"#include "dell-base-l2-mac.h"#include "cps_class_map.h"#include "cps_api_object_key.h"
Programmability 81

#include <stdint.h>#include <net/if.h>
bool cps_create_mac(){
// Create and initialize the transaction object cps_api_transaction_params_t tran;
if (cps_api_transaction_init(&tran) != cps_api_ret_code_OK ){ return false; }
// Create and initialize the key cps_api_key_t key; cps_api_key_from_attr_with_qual(&key, BASE_MAC_TABLE_OBJ, cps_api_qualifier_TARGET);
// Create the object cps_api_object_t obj = cps_api_object_create();
if(obj == NULL ){ cps_api_transaction_close(&tran); return false; }
// Set the key for the object cps_api_object_set_key(obj,&key);
// Add attributes mandatory to create MAC address entry uint8_t mac_addr[6] = {0x0,0xa,0xb,0xc,0xd,0xe}; uint16_t vlan_id = 100;
cps_api_object_attr_add(obj,BASE_MAC_TABLE_MAC_ADDRESS, mac_addr, sizeof(hal_mac_addr_t)); cps_api_object_attr_add_u32(obj,BASE_MAC_TABLE_IFINDEX,if_nametoindex("e101-001-0"));
// Add MAC table VLAN ID cps_api_object_attr_add_u16(obj,BASE_MAC_TABLE_VLAN,vlan_id);
// Add the object along with the operation to transaction if(cps_api_create(&tran,obj) != cps_api_ret_code_OK ){ cps_api_object_delete(obj); return false; }
// Commit the transaction if(cps_api_commit(&tran) != cps_api_ret_code_OK ) { cps_api_transaction_close(&tran); return false; }
// Cleanup the Transaction cps_api_transaction_close(&tran);
return true;}Verify MAC Address Table Entry Creating using CPS get
# cps_get_oid.py base-mac/query
Key: 1.16.1048594.base-mac/query/ifindex = 18base-mac/query/actions = 2base-mac/query/static = 1base-mac/query/mac-address = 000a0bcc0d0ebase-mac/query/vlan = 100
82 Programmability

Request MAC Address Table Entry
1 Import the CPS and CPS utility Python library.
import cpsimport cps_utils
2 Register the attribute type to convert between string and byte-array format.
cps_utils.add_attr_type("base-mac/query/mac-address", "mac") 3 Define the MAC address request type.
d = {"mac-address": "00:0a:0b:cc:0d:0e","request-type":"2"}4 Associate a get operation with the CPS object.
obj = cps_utils.CPSObject('base-mac/query',data= d)5 Create an object filter list.
filter_list = []6 Add the filter object.
filter_list.append(obj.get())7 Create a list for the response.
lst = []8 Verify objects returned.
if cps.get(filter_list,lst):
# Check if get returned objects in the response listif lst: for ret_obj in lst: # Print the returned Objects cps_utils.print_obj(ret_obj) else: # Empty list else: print "No objects found" raise RuntimeError ("Error Getting MAC Table Entries")
get-mac-table-entry.py
# Python code block to request MAC address table entryimport cpsimport cps_utils# Register attribute typecps_utils.add_attr_type("base-mac/query/mac-address", "mac")# Define MAC address request typed = {"mac-address": "00:0a:0b:cc:0d:0e","request-type":"2"}# Associate get operation with CPS objectobj = cps_utils.CPSObject('base-mac/query', data= d)# Create object filter listfilter_list = [] # Add the filter objectfilter_list.append(obj.get()) # Create list for responselst = []# Verify objects returnedif cps.get(filter_list,lst): if lst: for ret_obj in lst: cps_utils.print_obj(ret_obj) else: print "No objects found" else: print "No objects found" raise RuntimeError ("Error Getting MAC Table Entries")
Programmability 83

get-mac-table-entry.c
// C application example to request a MAC address table entry
#include "cps_api_object.h"#include "dell-base-l2-mac.h"#include "cps_class_map.h"#include "cps_api_object_key.h"
#include <stdio.h>
bool cps_get_mac(){
// Create and initialize the Get object cps_api_get_params_t gp; cps_api_get_request_init(&gp);
// Create a new object and append it to get request's filter object list cps_api_object_t obj = cps_api_object_list_create_obj_and_append(gp.filters); if(obj == NULL){ cps_api_get_request_close(&gp); return false; }
// Create, initialize and set the key for object cps_api_key_t key; cps_api_key_from_attr_with_qual(&key, BASE_MAC_QUERY_OBJ, cps_api_qualifier_TARGET); cps_api_object_set_key(obj,&key);
//Perform a get request bool rc=false; if (cps_api_get(&gp)==cps_api_ret_code_OK) { rc = true; size_t mx = cps_api_object_list_size(gp.list); for (size_t ix = 0; ix < mx; ++ix ) { cps_api_object_t obj = cps_api_object_list_get(gp.list,ix); cps_api_object_attr_t vlan_id = cps_api_object_attr_get(obj,BASE_MAC_QUERY_VLAN); cps_api_object_attr_t ifindex = cps_api_object_attr_get(obj,BASE_MAC_QUERY_IFINDEX); cps_api_object_attr_t mac_addr = cps_api_object_attr_get(obj,BASE_MAC_QUERY_MAC_ADDRESS);
printf("VLAN ID %d\n",cps_api_object_attr_data_u16(vlan_id)); printf("Ifindex %d\n",cps_api_object_attr_data_u32(ifindex)); char mt[6]; char mac_string[20]; memcpy(mt, cps_api_object_attr_data_bin(mac_addr), 6); sprintf(mac_string, "%x:%x:%x:%x:%x:%x", mt[0], mt[1], mt[2], mt[3], mt[4], mt[5]); printf("MAC Address %s\n",mac_string); } }
// Close the get the request cps_api_get_request_close(&gp); return rc;}
Delete MAC Address Table Entry
1 Import the CPS utility Python library.
import cps_utils2 Register the attribute type to convert between string and byte-array format.
cps_utils.add_attr_type("base-mac/table/mac-address", "mac") 3 Define the MAC address, interface index, and VLAN to delete the static address entry.
d = {"mac-address": "00:0a:0b:cc:0d:0e", "ifindex": 18, "vlan": "100"}
84 Programmability

4 Create a CPS object.
obj = cps_utils.CPSObject('base-mac/table',data= d)5 Add the operation to the object.
tr_obj = ('delete', obj.get())6 Create a transaction object.
transaction = cps_utils.CPSTransaction([tr_obj])7 Verify the return value.
ret = transaction.commit()if not ret: raise RuntimeError("Error deleting entry from MAC Table")
delete-mac-table-entry.py
# Python block code to delete MAC address table entryimport cps_utils# Register attribute typecps_utils.add_attr_type("base-mac/table/mac-address", "mac")# Define MAC addressd = {"mac-address": "00:0a:0b:cc:0d:0e", "ifindex": 18, "vlan": "100"}# Create CPS objectobj = cps_utils.CPSObject('base-mac/table',data=d)# Add operation to objecttr_obj = ('delete', obj.get())# Create transaction objecttransaction = cps_utils.CPSTransaction([tr_obj])# Commit transaction and verify returnret = transaction.commit()if not ret: raise RuntimeError("Error deleting entry from MAC Table")delete-mac-table-entry.c
// C application example to delete a MAC address table entry
#include "cps_api_object.h"#include "dell-base-l2-mac.h"#include "cps_class_map.h"#include "cps_api_object_key.h"
#include <stdint.h>#include <net/if.h>
bool cps_delete_mac(){// Create and initialize the transaction object cps_api_transaction_params_t tran;if (cps_api_transaction_init(&tran) != cps_api_ret_code_OK ){return false;}
// Create and initialize the key cps_api_key_t key;cps_api_key_from_attr_with_qual(&key, BASE_MAC_TABLE_OBJ, cps_api_qualifier_TARGET);
// Create the objectcps_api_object_t obj = cps_api_object_create();
if(obj == NULL ){ cps_api_transaction_close(&tran); return false;}
// Set the key for the objectcps_api_object_set_key(obj,&key);
// Add attributes mandatory to create MAC address entryuint8_t mac_addr[6] = {0x0,0xa,0xb,0xc,0xd,0xe};
uint16_t vlan_id = 131;
cps_api_object_attr_add(obj,BASE_MAC_TABLE_MAC_ADDRESS, mac_addr, sizeof(hal_mac_addr_t));
Programmability 85

cps_api_object_attr_add_u32(obj,BASE_MAC_TABLE_IFINDEX,if_nametoindex("e101-001-0") ); cps_api_object_attr_add_u16(obj,BASE_MAC_TABLE_VLAN,vlan_id);
// Add the object along with the operation to transaction if(cps_api_delete(&tran,obj) != cps_api_ret_code_OK ){cps_api_delete_object(obj);return false;}
// Commit the transactionif(cps_api_commit(&tran) != cps_api_ret_code_OK ) {cps_api_transaction_close(&tran);return false;}
// Cleanup the Transactioncps_api_transaction_close(&tran);
return true;}Delete MAC Address for All VLANs
To delete the MAC address from all VLANs, specify the vlan attribute and its value in the object. To delete all MAC entries from an
interface, specify the ifindex attribute and its value in the object. To delete MAC entries from both a VLAN and member interface,
specify the vlan and ifindex attributes and their values in the object.
NOTE: Deletion of static entries based only on VLAN, interface or a VLAN/interface combination is not supported. To delete a static entry, you must add the mac-address, vlan, and ifindex attributes and their values to the object.
Delete MAC Address Table Entries from Multiple VLANs
1 Import the CPS utility Python library.
import cps_utils2 Define the VLANs to remove MAC address entries from.
vlan_list=[1,2,3,4,5]3 Create the CPS object.
obj = cps_utils.CPSObject('base-mac/flush')4 Add the VLAN list to the CPS object.
count = 0el = ["input/filter","0","vlan"]for vlan in vlan_list: obj.add_embed_attr(el, vlan) count = count + 1el[1] = str(count)
5 Associate the operation to the object.
tr_obj = ('rpc', obj.get())6 Create a transaction object.
transaction = cps_utils.CPSTransaction([tr_obj])7 Verify the return value.
ret = transaction.commit()if not ret: raise RuntimeError("Error Flushing entries from MAC Table")
remove-mac-table-entries-from-multiple-vlans.py
# Python block code to remove MAC table entries from multiple VLANSimport cps_utils# Define VLANSvlan_list =[1,2,3,4,5]# Create CPS object
86 Programmability

obj = cps_utils.CPSObject('base-mac/flush')# Add VLAN list to CPS objectcount = 0el = ["input/filter","0","vlan"]for vlan in vlan_list: obj.add_embed_attr(el, vlan) count = count + 1el[1] = str(count)# Associate operation to objecttr_obj = ('rpc', obj.get())# Create transaction objecttransaction = cps_utils.CPSTransaction([tr_obj])# Commit transaction and verify return valueret = transaction.commit()if not ret: raise RuntimeError("Error Flushing entries from MAC Table")remove-mac-table-entries-from-multiple-vlans.c
// C application example to remove MAC address table entries from multiple VLANs
#include "cps_api_object.h"#include "dell-base-l2-mac.h"#include "cps_class_map.h"#include "cps_api_object_key.h"
#include <stdint.h>#include <net/if.h>
bool cps_flush_mac(){
// Create and initialize the transaction object cps_api_transaction_params_t tran; if (cps_api_transaction_init(&tran) != cps_api_ret_code_OK ){ return false; }
// Create and initialize the key cps_api_key_t key; cps_api_key_from_attr_with_qual(&key, BASE_MAC_FLUSH_OBJ, cps_api_qualifier_TARGET);
// Create the object cps_api_object_t obj = cps_api_object_create();
if(obj == NULL ){ cps_api_transaction_close(&tran); return false; }
// Set the key for the object cps_api_object_set_key(obj,&key);
// Add attributes to flush MAC entries cps_api_attr_id_t ids[3] = {BASE_MAC_FLUSH_INPUT_FILTER,0, BASE_MAC_FLUSH_INPUT_FILTER_VLAN }; const int ids_len = sizeof(ids)/sizeof(ids[0]);
uint16_t vlan_list[3]={1,2,3}; for(unsigned int ix=0; ix<sizeof(vlan_list)/sizeof(vlan_list[0]); ++ix) { ids[1]=ix; cps_api_object_e_add(obj,ids,ids_len,cps_api_object_ATTR_T_U16,&(vlan_list[ix]),sizeof(vlan_list[ix])); }
unsigned int ifindex_list[] = { if_nametoindex("e101-001-0"),if_nametoindex("e101-002-0"), if_nametoindex("e101-003-0")};
Programmability 87

ids[2]=BASE_MAC_FLUSH_INPUT_FILTER_IFINDEX; for(unsigned int ix=0; ix<sizeof(ifindex_list)/sizeof(ifindex_list[0]); ++ix){ ids[1]=ix;
cps_api_object_e_add(obj,ids,ids_len,cps_api_object_ATTR_T_U16,&ifindex_list[ix],sizeof(ifindex_list[ix])); }
// Add the object along with the operation to transaction if(cps_api_action(&tran,obj) != cps_api_ret_code_OK ){ cps_api_object_delete(obj); return false; }
// Commit the transaction if(cps_api_commit(&tran) != cps_api_ret_code_OK ) { cps_api_transaction_close(&tran); return false; }
// Cleanup the Transaction cps_api_transaction_close(&tran);
return true;}
Event Application Examples
Register Events
1 Import the CPS object Python library.
import cps 2 Create a handle to connect to event service.
handle = cps.event_connect() 3 Register a key with the event service to receive notification when an event for the key is published.cps.event_register(handle, cps.key_from_name('observed','base-port/interface'))while True: # wait for the event o = cps.event_wait(handle) print o register-for-events.py
# Python block code to register for eventsimport cps# Create handle to connect to event servicehandle = cps.event_connect()# Register key with event servicecps.event_register(handle, cps.key_from_name('observed','base-port/interface'))while True: o = cps.event_wait(handle) print o register-for-events.c
// C application example to register for events
#include "cps_api_events.h"#include "cps_api_object.h"#include "dell-base-phy-interface.h"
88 Programmability

#include "cps_class_map.h"#include "cps_api_object_key.h"
#include <stdlib.h> #include <stdio.h>#include <unistd.h>
// Callback for the interface event handlingstatic bool cps_if_event_cb(cps_api_object_t obj, void *param){
char buf[1024]; cps_api_object_to_string(obj,buf,sizeof(buf)); printf("Object Received %s \n",buf); return true;}
bool cps_reg_intf_events(){
// Initialize the event service if (cps_api_event_service_init() != cps_api_ret_code_OK) { return false; } // Initialize the event handling thread if (cps_api_event_thread_init() != cps_api_ret_code_OK) { return false; }
// Create and initialize the key cps_api_key_t key; cps_api_key_from_attr_with_qual(&key, BASE_PORT_INTERFACE_OBJ, cps_api_qualifier_OBSERVED);
// Create the registration object cps_api_event_reg_t reg; memset(®,0,sizeof(reg));
reg.number_of_objects = 1; reg.objects = &key;
// Register to receive events for key created above if (cps_api_event_thread_reg(®, cps_if_event_cb,NULL)!=cps_api_ret_code_OK) { return false; }
// Wait for the events while(1){ sleep(1); }
return true;
}
Publish Events
1 Import the CPS and CPS utlity Python library.
import cpsimport cps_utils
2 Create a handle to connect to the event service.
handle = cps.event_connect()3 Create a CPS object.
obj = cps_utils.CPSObject('dell-base-if-cmn/if/interfaces/interface',qual='observed', data= {"ifindex":23})
Programmability 89

4 Publish the object.
cps.event_send(handle, obj.get())
publish-events.py
# Python block code to publish eventsimport cpsimport cps_utils# Create handle to connect to event servicehandle = cps.event_connect()# Create CPS objectobj = cps_utils.CPSObject('base-port/interface',qual='observed', data= {"ifindex":23})# Publish the objectcps.event_send(handle, obj.get()) publish-events.c
// C application example to publish events
#include "cps_api_events.h"#include "cps_api_object.h"#include "dell-base-phy-interface.h"#include "cps_class_map.h"#include "cps_api_object_key.h"
#include <stdio.h>#include <net/if.h>
bool cps_pub_intf_event() {
static cps_api_event_service_handle_t handle; if (cps_api_event_service_init() != cps_api_ret_code_OK) { return false; } if (cps_api_event_client_connect(&handle) != cps_api_ret_code_OK) { return false; }
// Create and intialize the key cps_api_key_t key; cps_api_key_from_attr_with_qual(&key, BASE_PORT_INTERFACE_OBJ, cps_api_qualifier_OBSERVED);
// Create the object cps_api_object_t obj = cps_api_object_create();
if(obj == NULL){ return false; }
// Add attributes to the object cps_api_object_attr_add_u32(obj,BASE_PORT_INTERFACE_IFINDEX, if_nametoindex("e101-001-0"));
// Set the key to the object cps_api_object_set_key(obj,&key);
/ /Publish the object if(cps_api_event_publish(handle,obj)!= cps_api_ret_code_OK){ cps_api_object_delete(obj); return false; } // Delete the object cps_api_object_delete(obj); return true;
}
90 Programmability

Application TemplatesProvided are templates to develop applications in Python and C/C++ for server and client applications, and event publishers and event subscribers.
Client applications subscribe to events — server applications publish events, and applications can act as both clients and servers.
Event Flow between CPS Client and Server Applications
Event Flow between a CPS Event Subscriber and Publisher
Python Templates• Server Application — Template for the structure of a server (object owner), including the transaction callback handler for set, create,
delete, action operations and a separate handler for get operations.
• Client Application — Template for the structure of a client application including the execution of a get request.
• Event Publisher Application — Template for the structure of an event publisher.
• Event Subscriber Application — Template for the structure of an event subscriber. The application registers for events, and waits for events in a loop.
C/C++ Templates• Server Application — Template for the structure of a CPS server (object owner) including read and write functions for get operations
(xyz_read) — set, create, delete, action operations (xyz_write), and rollback of failed transactions (xyz_rollback).
• Client Application — Template for the structure of a CPS client including read and write functions for get requests (building keys and object lists), and set requests (using a transaction).
• Event Publisher Application — Template for the structure of a CPS event publisher including initialization of the event service, connection to the object library, and the event publish operation.
• Event Subscriber Application — Template for the structure of a CPS event subscriber including initialization of the event service and event processing thread, and registration of the event handler function, and event processing callback. The key list specified in the registration is used to determine the events delivered to the application — list contains a single element.
Programmability 91

CPS Server Application TemplatesThis information includes templates for the structure of a CPS server (object owner), including the transaction callback handler for set, create, and delete action operations, and a separate handler for get operations.
python-server-template.py
# Python code block for CPS server applicationimport time import cpsimport cps_utils
# Define the get callback handler function def get_callback(methods, params):
# Append object to the response, echoing back the key# from the request, and supplying some attributes
params[ list ].append({ key : params[ filter ][ key ], data : { attr_1 : value_1 , attr_n : value_n } } )
return True
# Define the transaction callback handler functiondef transaction_callback(methods, params): if params[ operation ] == set : # Set operation requested # Extract attributes from request object attr_1 = params[ change ][ data ][ attr_1 ] attr_n = params[ change ][ data ][ attr_n ]
# Do something with them -- program hardware, # Update the configuration, etc. return True if params[ operation ] == create : return True
if params[ operation ] == delete : return True
if params[ operation ] == action : return True return False
# Obtain handle to CPS API service handle = cps.obj_init()
# Register above handlers to be run when a request is received# for given keycps.obj_register(handle, key, { get : get_callback, transaction : transaction_callback } )
# Let the handlers runwhile True: time.sleep(1000)
92 Programmability

c-template-server-application.c
/******************************************************************Template CPS API object server read handler functionThis function is invoked by the CPS API service when a GET requestis placed for a registered CPS API object. The binding of CPSAPI object key to the read handler function is done below.*******************************************************************/
cps_api_return_code_t xyz_read( void *context, cps_api_get_params_t *param, size_t key_idx ){ /* Allocate a response object, and add to response */ cps_api_object_t response_obj; response_obj = cps_api_object_list_create_obj_and_append( param->list );
if (response_obj == CPS_API_OBJECT_NULL) { /* Failed to allocate response object => Indicate an error */ return (cps_api_ret_code_ERR); }
/* Fill in response object */ cps_api_key_from_attr_with_qual(cps_api_object_key(response_obj), ... );
cps_api_set_key_data(response_obj, ...); ... cps_api_set_key_data(response_obj, ...);
cps_api_object_attr_add_...(response_obj, ...);
... cps_api_object_attr_add_...(response_obj, ...);
/* Indicate GET response successful */ return (cps_api_ret_code_OK);}
/******************************************************************Template CPS API object server write handler functionThis function is invoked by the CPS API service when a SET requestis placed for a registered CPS API object. The binding of CPSAPI object key to the write handler function is done below.*******************************************************************/
cps_api_return_code_t xyz_write( void *context, cps_api_transaction_params_t *param, size_t index_of_element_being_updated )
{ /* Extract the object given in the request */ cps_api_object_t request_obj; request_obj = cps_api_object_list_get( param->change_list, index_of_element_being_updated );
if (request_obj == CPS_API_OBJECT_NULL) { /* Failed to extract request object
Programmability 93

=> Indicate error */ return (cps_api_ret_code_ERR); }
/* Assume error response */ cps_api_return_code_t result = cps_api_ret_code_ERR;
/* Determine the type of write operation */ switch (cps_api_object_type_operation( cps_api_object_key(request_obj) ) ) {
case cps_api_oper_SET:
/* SET operation requested */ /* Create the rollback object, i.e. an object to return containing the old values for any attributes set, and add to transaction */
cps_api_object_t rollback_obj; rollback_obj = cps_api_object_list_create_obj_and_append( param->prev );
if (rollback_obj == CPS_API_OBJECT_NULL) { /* Failed to create rollback object */ break;
}
/* Assume SET successful */ result = cps_api_ret_code_OK;
/* For each attribute given in the request, */ cps_api_object_it_t attr_iter;
cps_api_object_it_begin(request_obj, &attr_iter); while (cps_api_object_it_valid(&attr_iter)) {
/* Get the attribute id from the attribute iterator */ cps_api_attr_id_t attr_id;
attr_id = cps_api_object_attr_id(attr_iter.attr);
/* Update the rollback object with the old value of the attribute */
cps_api_object_attr_add_...(rollback_obj, attr_id, );
/* Extract the attribute from the request object */ cps_api_object_attr_t attr;
attr = cps_api_object_attr_get(request_obj, attr_id);
if (attr == CPS_API_ATTR_NULL)) { /* Failed to extract attribute => Indicate error */ result = cps_api_ret_code_ERR; continue; }
94 Programmability

/* Extract the value of the attribute in the request object */ value = cps_api_object_attr_data_....(attr);
/* Validate the requested attribute value, its consistency with other attributes and/or existing configuration, etc. */
}
/* If the whole request has been validated, do something with the extracted values program hardware, take some action, etc. */ break;
case cps_api_oper_CREATE: /* CREATE operation requested */ break;
case cps_api_oper_DELETE: /* DELETE operation requested */ break;
case cps_api_oper_ACTION: /* ACTION operation requested */ break;
default: /* Invalid SET request type */ break; }
return (result);
}
/**********************************************************Template CPS API object server rollback handler function*******************************************************************/cps_api_return_code_t xyz_rollback( void *context, cps_api_transaction_params_t *param, size_t index_of_element_being_updated ){ /* Extract object to be rolled back */ cps_api_object_t rollback_obj; rollback_obj = cps_api_object_list_get( param->prev, index_of_element_being_updated );
if (rollback_obj == CPS_API_OBJECT_NULL) { /* Failed to extract rollback object => Indicate failure */
return (cps_api_ret_code_ERR);
}
/* For each attribute to be rolled back, */ cps_api_object_it_t attr_iter;
cps_api_object_it_begin(rollback_obj, &attr_iter); while (cps_api_object_it_valid(&attr_iter)) {
Programmability 95

/* Get the attribute id from the attribute iterator */ cps_api_attr_id_t attr_id;
attr_id = cps_api_object_attr_id(attr_iter.attr); /* Extract the attribute from the rollback object */
cps_api_object_attr_t attr;
attr = cps_api_object_attr_get(rollback_obj, attr_id);
if (attr == CPS_API_ATTR_NULL)) {
/* Failed to extract attribute => Indicate error */
result = cps_api_ret_code_ERR; continue;
}
/* Extract the value of the attribute in the rollback object */ value = cps_api_object_attr_data_....(attr);
/* Apply attribute value */
}
return (result);}
/******************************************************************Template mainline function for a CPS API object serverThis function registers with the CPS API service, and registers handlerfunctions to be invoked by the CPS API service when CPS API requestsare made for certain CPS API objects.*******************************************************************/
cps_api_return_code_t init(void){ /* Obtain a handle for the CPS API service */
cps_api_operation_handle_t cps_hdl;
if (cps_api_operation_subsystem_init(&cps_hdl, 1) != cps_api_ret_code_OK ) {
/* Failed to obtain handle for CPS API service => Indicate an error */ return (cps_api_ret_code_ERR); }
/* Allocate a CPS API object registration structure */ cps_api_registration_functions_t reg;
/* Assign the key of the CPS API object to be registered */ cps_api_key_init(®.key, );
/* Assign the handler functions to be invoked for this object */ reg._read_function = xyz_read; reg._write_function = xyz_write; reg._rollback_function = xyz_rollback;
/* Use obtained handle for CPS API service */ reg.handle = cps_hdl;
96 Programmability

/* Perform the object registration */ if (cps_api_register(®) != cps_api_ret_code_OK) {
/* Failed to register handler function with CPS API service => Indicate an error */ return (cps_api_ret_code_ERR); }
/* All done */ return (cps_api_ret_code_OK);}
CPS Client Application TemplatesThis information includes templates for the structure of a CPS client application, including the execution of a get request.
python-client-application-template.py
# Python code block for CPS client applicationimport cpsimport cps_utils
# Example GET request cps_get_response = []cps.get([cps.key_from_name('observed','base-pas/chassis')], cps_get_response)
chassis_vendor_name = cps_attr_get(cps_get_response[0]['data'],'base-pas/chassis/vendor-name')
c-client.template.c
/****************************************************************** Template to perform a CPS API GET request.*******************************************************************/cps_api_return_code_t do_get_request(){ /* Allocate and initialize the get request structure */ cps_api_get_params_t get_req;
if (cps_api_get_request_init(&get_req) != cps_api_ret_code_OK) { /* Failed to initialize get request => Indicate error */
return (cps_api_ret_code_ERR); }
/* Assume failure response */ cps_api_return_code_t result = cps_api_ret_code_ERR; do { /* Allocate the request object and add it to the get request */ cps_api_object_t request_obj; request_obj = cps_api_object_list_create_obj_and_append( get_req.filters ); if (request_obj == CPS_API_OBJECT_NULL) { /* Failed to allocate response object and add it to get request */ break; }
Programmability 97

/* Set the key and key attributes for the request object. The actual object key and key attribute ids, types and values will of course depend on which object is being requested; such dependent values are indicated by ellipses ... below. Consult the data model for the desired object. */
cps_api_key_from_attr_with_qual(cps_api_object_key( request_obj ), ... );
cps_api_set_key_data(request_obj, ...); ... cps_api_set_key_data(request_obj, ...);
cps_api_object_attr_add_...(request_obj, ...); ... cps_api_object_attr_add_...(request_obj, ...);
/* Do the GET request */ if (cps_api_get(&get_req) != cps_api_ret_code_OK) { /* GET request failed */ break; }
/* Extract the response object */ cps_api_object_t response_obj;
response_obj = cps_api_object_list_get(get_req.list, 0); if (response_obj == CPS_API_OBJECT_NULL) { /* Failed to extract the response object */ break; }
/* Extract the desired object attributes from the response object. (The actual object attributes will depend on the nature of the response object; such dependent values are indicated by ellipses below. Consult the appropriate data model for details.) */
cps_api_object_attr_t attr; attr = cps_api_object_attr_get(response_obj, ); if (attr == CPS_API_ATTR_NULL) { /* Failed to extract expected attribute */ break; }
/* Get the value for the attribute */ = cps_api_object_attr_data_...(attr);
/* Do something with the extracted value */
/* Indicate success */ result = cps_api_ret_code_OK; } while (0);
cps_api_get_request_close(&get_req); return (result);}
98 Programmability

/****************************************************************** Template to perform a CPS API SET*******************************************************************/
cps_api_return_code_t do_set_request(){ cps_api_transaction_params_t xact ; if (cps_api_transaction_init(&xact) != cps_api_ret_code_OK) { return (cps_api_ret_code_ERR); }
cps_api_return_code_t result = cps_api_ret_code_ERR; do { cps_api_object_t request_obj;
request_obj = cps_api_object_create() ; if (request_obj == CPS_API_OBJECT_NULL) { break; }
/* Set key and attributes in request object */ cps_api_key_from_attr_with_qual(cps_api_object_key( request_obj ), );
cps_api_set_key_data(request_obj, ...); ... cps_api_set_key_data(request_obj, ...);
cps_api_object_attr_add_...(request_obj, ...); ... cps_api_object_attr_add_...(request_obj, ...);
if (cps_api_set(&xact, request_obj) != cps_api_ret_code_OK) { cps_api_object_delete(request_obj);
break; }
result = cps_api_commit(&xact); } while (0);
cps_api_transaction_close(&xact);
return (result);}
CPS Event Publisher Application TemplatesThis information includes templates for the structure of a CPS event publisher.
python-event-publisher-application.py
# Python code block for CPS event publisher applicationimport cps
Programmability 99

import cps_utils
handle = cps.event_connect()
obj = cps_utils.CPSObject('base-port/interface',qual='observed', data= {"ifindex":23})
cps.event_send(handle, obj.get())
c-template-event-publisher-application.c
/****************************************************************** Template for an event publish function.*******************************************************************/
cps_api_return_code_t event_publish(cps_api_object_t event_obj){ static bool init_flag = false; static cps_api_event_service_handle_t handle;
if (!init_flag) { /* Not initialized => Connect to CPS event subsystem */ if (cps_api_event_service_init() != cps_api_ret_code_OK) { return (cps_api_ret_code_ERR); }
if (cps_api_event_client_connect(&handle) != cps_api_ret_code_OK ) { return (cps_api_ret_code_ERR); }
/* Mark as initialized */ init_flag = true; }
cps_api_return_code_t result;
/* Publish the given object */ result = cps_api_event_publish(handle, event_obj);
/* Consume the given object */ cps_api_object_delete(event_obj);
return (result);}
CPS Event Subscriber Application TemplatesThis information includes templates for the structure of a CPS event subscriber. It illustrates the initialization of the event service and event processing thread, registration of the event handler function and event processing callback. The key list specified in the registration is used to determine the events that are delivered to this application (in this case, the list contains a single element).
python-event-subscriber-application.py
# Python block code for CPS event subscriber applicationimport cpsimport cps_utils
100 Programmability

handle = cps.event_connect()
cps.event_register(handle, cps_api_object_key)
while True: ev = cps.event_wait(handle)
if ev[‘key’] == ...: ... elif ev['key'] == ...: ...
c-template-event-subscriber-application.c
/****************************************************************** Template for an event subscriber application.*******************************************************************/
bool event_handler(cps_api_object_t object, void *context){ /* Extract key and attributes of received object */ /* Do something with that information */
}
cps_api_return_code_t event_subscribe(){ /* Connect to the CPS API event service */
if (cps_api_event_service_init() != cps_api_ret_code_OK) { return (cps_api_ret_code_ERR); }
if (cps_api_event_thread_init() != cps_api_ret_code_OK) { return (cps_api_ret_code_ERR); }
/* Register the event handler function */ cps_api_key_t key; cps_api_key_init(&key, ); cps_api_event_reg_t reg; reg.objects = key; reg.number_of_objects = 1;
if (cps_api_event_thread_reg(®, event_handler, 0) != cps_api_ret_code_OK ) { /* Failed to register handler */
return (cps_api_ret_code_ERR); }
/* Indicate success */ return (cps_api_reg_code_OK);}
CPS API ReferenceTo access the Python and C/C++ CPS API reference guides, see the README file in included with the software image. The YANG model files and C header files derived from the YANG models are included in the development packages and downloaded with the software image.
Programmability 101

TroubleshootingYou can use methods and tools available for gathering information and debugging OS10 including packet analysis, coredumps, port statistics, firmware versions, and so on.
Packet AnalysisUse the tcpdump command to capture packets on any network interface. Only a privileged user can run the command. For more options
and support, see Linux.about.com/tcpdump.
$ tcpdump -i e101-003-0
tcpdump: verbose output suppressed, use -v or -vv for full protocol decodelistening on e101-003-0, link-type EN10MB (Ethernet), capture size 262144 bytes01:39:22.457185 IP 3.3.3.1 > 3.3.3.4: ICMP echo request, id 5320, seq 26, length 6401:39:22.457281 IP 3.3.3.1 > 3.3.3.4: ICMP echo reply, id 5320, seq 26, length 64
CoredumpsCore image files are saved in the /var/coredumps directory.
Firmware VersionsTo display version information about installed firmware, open the /var/log/firmware_versions file.
Transceivers$ os10-show-transceivers summary
Front Panel Port Media Type Part Number Serial Number DellQualified 1 QSFP 40GBASE SR4 FTL410QE1C MLJ004C No
Topics:
• Debug Port Interfaces
• Layer 2 Troubleshooting
• Layer 3 Troubleshooting
• Log Management
• Manage CPS API Objects
• Password Recovery
• Port Statistics
• sosreport Plugins
• Troubleshoot Connectivity
6
102 Troubleshooting

Debug Port InterfacesDuring system startup, physical ports map to Linux network interfaces. For information about the naming convention of Linux network interfaces, see Physical Ports.
Troubleshoot Error Condition on Physical Port• os10-switch-shell ps — Displays all ports created in the NPU.
• os10-switch-shell “ps npu_port” — Displays the administrative and operating status of a physical port on the NPU.
os10-switch-shell "ps xe4"
ena/ speed/ link auto STP lrn inter max loopport link duplex scan neg? state pause discrd ops face frame back xe4 !ena 40G FD SW No Forward None FA XGMII 1528• !ena — Port is administratively down.
• up — Port is administratively up and operationally up (connected).
• down — Port is administratively up and operationally down (disconnected).
• hshell — Accesses the SAI CLI and verifies the administrative and operational status of physical ports.
Troubleshoot Interfaces• If Linux network interfaces are not created:
• Check that the NAS process is running, and check the /var/log/syslog file for errors.
• If the NAS is not running, check if other processes on which NAS depends are running.
• If physical port interfaces are not enabled (administratively up) in the NPU, check that the SAI/NPU SDK has initialized correctly. You can also check the /var/log/syslog file for errors.
Layer 2 TroubleshootingUse Linux commands to troubleshoot Layer 2, and see the ip link show command to verify that all Linux network interfaces are created.
Enable NAS and SAI Layer 2 Logging• os10–logging enable NAS_L2• os10–logging enable INTERFACE• os10–logging enable L2MAC• os10–logging enable SAI_FDB• os10–logging enable SAI_STP
View Layer Status in the NPU• os10–switch-shell “l2 show”• os10–switch-shell “stp show”• os10–switch-shell “vlan show”
Troubleshooting 103

Layer 3 TroubleshootingUse os10-logging commands to view the contents of NPU log files in Layer 3.
Verify Routing-Related Tables• ip route show• arp -aIPv6 Debugging
• ip -6 neighbor show• ip -6 route show
Troubleshoot Routing Issues in the NPU• os10-switch-shell "l3 defip show"• os10-switch-shell "l3 l3table show"• os10-switch-shell "l3 egress show"IPv6 routes:
• os10-switch-shell "l3 ip6route show"• os10-switch-shell "l3 ip6host show"Multi-path routes:
• os10-switch-shell "l3 multipath show"• os10-switch-shell "l3 egress show"Traffic:
• os10-switch-shell "show c"
Enable NAS and SAI Layer 3 Logging• os10-logging enable ROUTE• os10-logging enable INTERFACE• os10-logging enable NETLINK• os10-logging enable SAI_NEXT_HOP• os10-logging enable SAI_ROUTE
Log ManagementOS10 utilizes primary systemd-journald for all system logging. Log entries captured by journald can be viewed by the journalctl command.
Support for traditional syslog is used for tracking and logging many types of system messages, including error and critical. Logging for all OS10 application modules is routed to /var/log/syslog.
Application Logging Format
104 Troubleshooting

The Syslog format for logging application events is date timestamp hostname severity process_name filename function_name line_number string.
PAS Logging
Feb 16 18:16:52 OS10 pas_svc: [PAS:PAS]:pas_entity.c:dn_entity_poll:366, PSU 1 is presentFeb 16 18:16:52 OS10 pas_svc: [PAS:PAS]:pas_entity.c:dn_entity_poll:366, Fan Tray 1 is presentNAS Logging
Jan 24 18:49:18 OS10 nas_svc: [INTERFACE:INT-CREATE]:port/nas_int_port.cpp:nas_int_port_create:347, Interface created 0:29:e101-021-0 - 22Jan 24 18:49:18 OS10 nas_svc: [INTERFACE:NAS-INT-CREATE], Interface e101-021-0 initial link state is 2Jan 24 18:49:18 OS10 nas_svc: [INTERFACE:INT-STATE]:port/nas_int_port.cpp:nas_int_port_link_change:312, Interface state change 0:29 to 2
Enable and Display Application Logs (except SAI)Use the os10-logging command to enable/disable logging and display logged events for OS10 applications, except SAI. In the following
os10-logging commands, OS10 applications are identified by a module-id value. Valid values for module-id are either the module ID
numbers or the modules names (for example, L3_SERVICES) shown in the os10-logging show-id command output.
• os10-logging show-id — Displays the ID numbers of OS10 application modules, log information levels, and log information sublevels.
Module IDs========================================NULL 0NPU 1BOARD 2SYSTEM 3QOS 4COM 5INTERFACE 6NETLINK 7ROUTE 8ACL 9SFP 10MGMT 11DSAPI 12DB_SQL 13NDI 14SAI_FDB 15SAI_VLAN 16SAI_PORT 17SAI_SWITCH 18SAI_ROUTER 19SAI_ROUTER_INTF 20SAI_NEIGHBOR 21SAI_NEXT_HOP 22SAI_NEXT_HOP_GROUP 23SAI_ROUTE 24SAI_MIRROR 25NAS_L2 26NAS_COM 27SAI_LAG 31L2MAC 36L2CMN 37NAS_OS 38SAI_STP 39BGP 40RTM 43L3CMN 44PAS 47
Troubleshooting 105

PAS_FUSE 48PAS_TIMER 49SAI_SAMPLEPACKET 50ENV_TMPCTL 51SAI_HOSTIF 59SAI_QUEUE 60SAI_MAPS 61SAI_POLICER 62SAI_WRED 63SAI_SCHEDULER 64SAI_SCHEDULER_GRP 65SAI_QOS 66SERV_HW 67DATASTORE 68L3_SERVICES 69IPM 70MGMT_INTF 71FWD_SVCS_SFLOW 73SAI_UDF 78SAI_BUFFERS 79SWITCH_RES_MGR 80============================
Log Level IDs========================================ERR 3INFO 6DEBUG 7
Log Sub Level IDs========================================CRITICAL 0MAJOR 1MINOR 2WARNING 3
• os10-logging show [all | module-id] {log-level} {log-sub-level} — Displays the current log for all, or a specified, OS10 application modules with information at a specified level and sublevel.
• os10-logging {enable | disable} {all log-level log-sub-level | module-id [log-level log-sub-level] — Enables or disables logging for all OS10 application modules at all levels or for a specified OS10 application module at all levels or a specified level and sublevel.
If you enter only a module ID, all log levels and log sublevels are enabled or disabled; if you enter only a module ID and log level, all log sublevels are enabled or disabled.
Enable and Display SAI Application LogThe SAI application module has its own specific logging. To enable SAI-specific logs, enter the os10-switch-log set command:
os10-switch-log set [module_name] [level_name]where:
• module_name specifies a SAI module:
• WRED• FDB• ROUTE• VLAN• HOST_INTERFACE• ACL
106 Troubleshooting

• MIRROR• QOS_QUEUE• SCHEDULER_GROUP• PORT• VIRTUAL_ROUTER• NEXT_HOP_GROUP• SWITCH• POLICER• NEIGHBOR• UNSPECIFIED• SAMPLEPACKET• QOS_MAPS• ALL• STP• LAG• ROUTER_INTERFACE• NEXT_HOP• SCHEDULER
• level_name sets the SAI logging level to debug, info, notice, warning, critical, or error.
Manage CPS API ObjectsCommon commands used to manage CPS API objects are included.
For detailed information, see CPS API Programmability.
get Object Retrieve and view the contents of a CPS API object.
cps_get_oid.py category/subcategory [key=value] [key=value ] ...
• category/subcategory — Category and subcategory of the requested CPS API object.
• key=value — Name of an object key attribute and its value — enter extra settings by leaving a space between each entry.
Retrieve Entity Object for Slot 1 PSU
cps_get_oid.py base-pas/entity entity-type=1 slot=1
set ObjectSet one or more attributes of a CPS API object.
cps_set_oid.py category/subcategory [key=value] ... [attr=value] ...
• category/subcategory — Category and subcategory of the target CPS API object.
• key=value — Name of an object key attribute and its value — enter additional settings by leaving a space between each entry.
• attr=value — Name of an attribute to set and its new value — enter additional settings by leaving a space between each entry.
Troubleshooting 107

Turn on Beacon LED
cps_set_oid.py base-pas/led entity-type=3 slot=1 name=Beacon on=1
Event TraceView CPS API events as they occur — enter the command as a CPS API key in A.B.C.D format. For information about how to build a key, and the appropriate header files for actual key values, see CPS Keys.
cps_trace_events.py qualifier.categorywhere:
• qualifier is the numeric qualifier of the CPS API object to trace.
• category is the category of the CPS API object.
Print All CPS API Events Generated by the PAS Service
cps_trace_events.py 2.19
Password RecoveryYou may need to recovery a lost password.
1 Connect to the serial console port and verify that the serials settings are 115200 baud, 8 data bits, no parity.
2 Reboot or power up the system, then press ESC at the GNU GRUB prompt to view the boot menu.
+----------------------------------------------------------------------------+|*OS10-A || OS10-B || ONIE |+----------------------------------------------------------------------------+
3 Press e to open the OS10 GRUB editor.
4 Use the arrow keys to highlight the line that starts with linux. At the end of the line, add init=/bin/bash.
+----------------------------------------------------------------------------+|setparams 'OS10-A' || || set root='(hd0,gpt7)' || echo 'Loading OS10 ...' || linux (hd0,gpt7)/boot/os10.linux console=ttyS0,115200 root=/dev/sda7 \| |rw init=/bin/bash || initrd (hd0,gpt7)/boot/os10.initrd |+----------------------------------------------------------------------------+
5 Press Ctrl+x to reboot the system to a password-less root shell.
6 Enter the root password and username.
root@OS10:/# passwd linuxadmin7 Enter a new password to change the default linuxadmin password.
root@OS10:/# passwd linuxadminEnter new UNIX password: xxxxxxxxxRetype new UNIX password: xxxxxxxxxxpasswd: password updated successfully
8 Reboot the system to load the OS10, then enter the new password.
root@OS10:/# reboot -fRebooting.[ 822.327073] sd 0:0:0:0: [sda] Synchronizing SCSI cache
[ 822.340656] reboot: Restarting system
108 Troubleshooting

[ 822.344339] reboot: machine restartBIOS (Dell Inc) Boot SelectorS6000-ON 3.20.0.0 (32-port TE/FG)
Port StatisticsUse the os10-show-stats command to perform a dump of port and VLAN interface statistics.
• os10-show-stats if_stat [iface_name] [filter_list] — Retrieves statistics for all (or a specified) port interfaces, where:
• iface_name specifies a physical port; for example, os10-show-stats if_stat e101-001-0.
• filter_list specifies the filters to use to retrieve desired statistics. By default, no filters are applied.
• os10-show-stats vlan_stat [vlan_ifindex] [filter_list] — Retrieves statistics for all (or a specified) VLAN interfaces, where:
• vlan_ifindex specifies a VLAN using its interface index.
• filter_list specifies the filters to use to retrieve desired statistics. By default, no filters are applied.
• os10-show-stats clear [iface_name | vlan_ifindex] — Deletes statistics for all (or a specified) port or VLAN interfaces.
For more information about the os10-show-stats command, see Statistics.
sosreport PluginsOS10 provides an sosreport plugin to extend the reporting mechanism for the Linux system. OS10-specific plugins collect information about OS10 hardware and software components.
• Use the sosreport -h command to view the available sosreport functionality.
• Use the sosreport -l command to view the currently installed plugins and profiles.
• Use the sosreport --batch -a command to run sosreport with all plugins enabled.
# sosreport --batch -aCreating compressed archive...Your sosreport has been generated and saved in:/tmp/sosreport-OS10-20160219191403.tar.gzThe checksum is: a6d3508bde238e46c8cc7923f10c861c
The sosreport --batch -a command generates a compressed tar file (.tar.gz) file as output. The tar filename and path display in
the command output — /tmp/sosreport-OS10-20160219191403.tar.gz.
The generated sosreport --batch -a tar file contains standard Linux diagnostic and configuration information, coredumps, and
OS10-specific information:
• Software version
• ACL counters and statistics
• ACL table contents
• Port mirroring setup
• Physical port setup
• sFlow setup
• STP setup
• Transceiver status and setup
• Linux interface setup and statistics
• Hardware platform information
• NPU low-level setup information
Troubleshooting 109

Troubleshoot ConnectivityYou can use standard Linux tools to troubleshoot network connectivity.
Packet Drops$ sudo portstatIface RX_OK RX_RATE RX_UTIL RX_ERR RX_DRP RX_OVR TX_OK TX_RATE TX_UTIL TX_ERR TX_DRP TX_OVR---------- ------ ------- ------- ------ ------ ------ ----- ------- ------- ------ ------ ------Ethernet0 582523 N/A N/A 0 533446 0 82636 N/A N/A 0 0 0Ethernet4 582523 N/A N/A 0 533446 0 82635 N/A N/A 0 0 0Ethernet12 533446 N/A N/A 0 540582 0 82635 N/A N/A 0 0 0
110 Troubleshooting

Dell Networking SupportThe OS10 Open Edition software is supported only on an Dell ONIE-enabled switch. Dell does not provide support for third-party software/drivers, community projects, code development, or implementation and development of security rules/policies.
For a complete list of supported Dell switches, see https://www.dell.com/support/.
7
Dell Networking Support 111