oshpd e-services portal oshpd e-services portal . public user guide version number: 8.0 . section 5...
TRANSCRIPT

OSHPD e-Services Portal
Public User Guide
Version Number: 8.1
Section 5 – Applications for
New Projects

eCA User Guide – Section 5: Applications for New Projects 1
1 Introduction Welcome to OSHPD Electronic Services Portal Client Access (eCA) User Guide
This section details the step-by-step instructions for creating and submitting an application for a new OSHPD construction project using eCA.
Remember: Help is available throughout the application. Wherever you see a help icon, click on the question mark to open help and instructions for that item in the application.
2 Project Applications
2.1 Page Flow Overview The predefined steps to create and submit project applications are detailed in this guide. The steps involved in submitting an Application for a New Project, or AFNP, is slightly different from those in submitting for a PADs and Building Permits. Below is an illustration of the page flow steps.
Table 1: eCA Pageflow
Page No. Page Title Description Application for New Project
1 Record Type
Select Application for New Project on this step; to create an Expedited Building Permit for Skilled Nursing Facilities, refer to user guide #8.
2 Facility Information
Look up and select the facility from OSHPD’s facility database. eCA auto-populates the facility, address, and facility owner information.
3 Professionals and Contacts
Look up and identify each Licensed Professional(s) and Contact(s) specific to the application. eCA auto-populates the LP’s information.
4 Project Details Record the Project Name, Scope, and other project details specific to the project.
5 Table Information
Enter estimated Project Costs, list all Enclosures, identify any Deferred Approval Items and specify the Structural Software used.
4 Facility Authorization
Enter a valid Facility PIN code. Usually entered by Facility Representative but may be entered by any user with the valid PIN.
5 Payment Options
Selects one of the application fee payment options: “Pay Now” or “Invoice Me”.
6 Review Final review opportunity of all the data entered on the application for accuracy; edits can still be made if necessary.
7 Pay Fees If the “Pay Now” option is selected, you must pay the outstanding fee by credit card.
8 Confirmation Project application is submitted to OSHPD and eCA issues a project ID number. You may print project summary sheet, preliminary invoice or payment receipt as needed.

eCA User Guide – Section 5: Applications for New Projects 2
2.2 Basic rules of page flow Below are some basic rules of submitting an application using the eServices Portal:
When creating an application for a new project, follow the page flow in order to avoid errors or missed data.
When resuming an existing in-progress application, you will be given the option to start from the beginning or continue where the application was left off.
You can navigate back and forth within the completed pages. You must click on Continue Application or Save pending submittal button to save the data
entered on the page. If a page contains a section that allows for multiple records to be added, for example multiple
licensed professional or multiple contacts, eCA will automatically Save the selection. If any edits are needed, click the Edit link for the individual (such as setting the Responsible Primary Licensed Professional). To add the next record, click Look Up or Add New as applicable.
It is recommended that you click the Save pending submittal button as needed to prevent data loss due to data entry errors.
If any required data is missing from the page, when the Continue Application button is clicked, an error message is displayed on the top of the page. You must correct any errors before continuing to the next page flow screen.
2.3 Create and Submit an AFNP The following information will guide you through the steps necessary to create an Application for New Project (or AFNP).
Step 1. Start Create an ANFP
Only registered users may create an Application for a New Project. Navigate to the Home or Projects tab and begin by clicking on the Create an Application link.

eCA User Guide – Section 5: Applications for New Projects 3
Step 2. Accept OSHPD Privacy Policy
Click on the link in the window to review the privacy policy. Check “I have read and accepted the above terms” then click the Continue Application button.
Step 3. Select a License If you are a Licensed Professional (Architect, Engineer, Contractor, IOR), you will be given the opportunity to select your license and have it automatically added to the Professionals section. To do this, click the down arrow and select your license; if you do not want your license listed on this application, select None Applicable. If you are not a Licensed Professional (or if your license has not been associated to your Public User account), this option will not be available.
Step 4. Select Record Type
Select “Application for New Project” then click the Continue Application button. Expedited Building Permits is a special program permitted by law for single-story Skilled Nursing Facilities or Intermediate Care Facilities that are of wood frame construction. To complete an Application for Expedited Building Permit, refer to User Guide #8; for more information regarding projects eligible for the Expedited Building Permit, see ‘How To Guides’ at: http://oshpd.ca.gov/FDD/SNF-ICF.

eCA User Guide – Section 5: Applications for New Projects 4
Click Continue Application to proceed with application.
Step 5. Enter Facility Information
Enter the OSHPD Facility ID or Facility Name then click the Search button. If the facility is found, the facility information, address, and owner fields will be automatically populated and become read-only. Notify OSHPD of any errors. To search for another facility, click the Clear button in Facility section. This clears the previous entered facility. To advance to the next page flow step, click Continue Application.
eCA User Guide – Section 5: Applications for New Projects 5
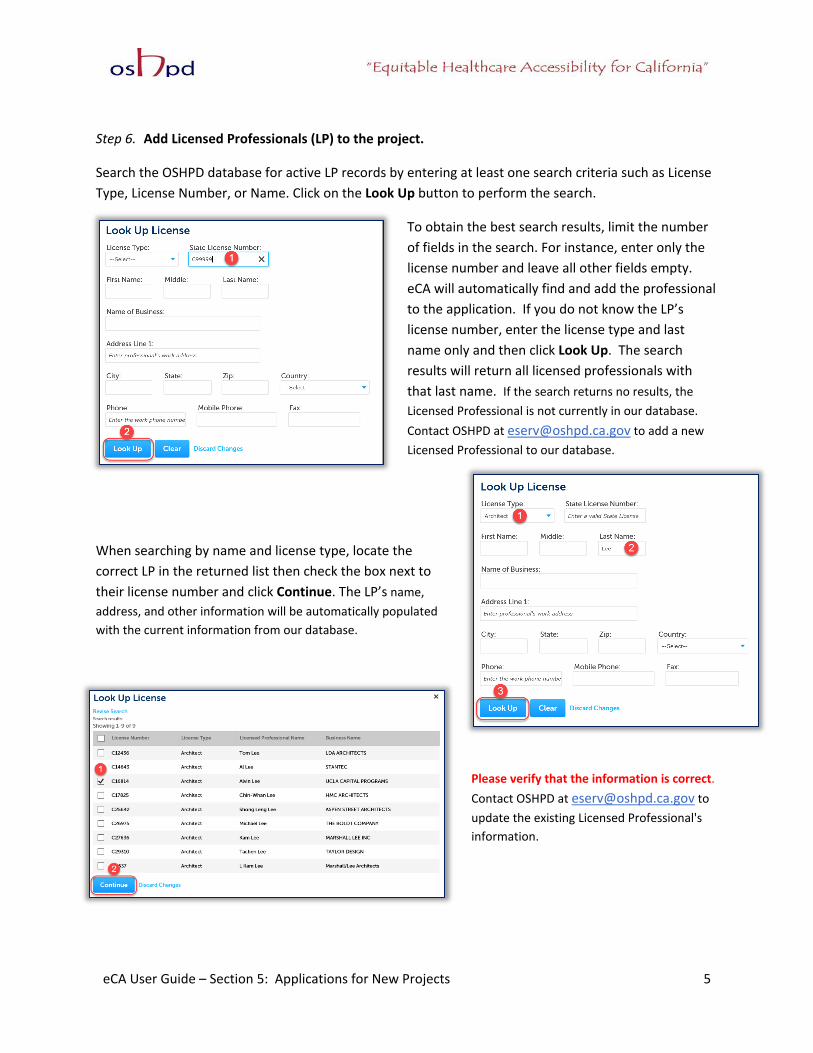
Step 6. Add Licensed Professionals (LP) to the project.
Search the OSHPD database for active LP records by entering at least one search criteria such as License Type, License Number, or Name. Click on the Look Up button to perform the search.
To obtain the best search results, limit the number of fields in the search. For instance, enter only the license number and leave all other fields empty. eCA will automatically find and add the professional to the application. If you do not know the LP’s license number, enter the license type and last name only and then click Look Up. The search results will return all licensed professionals with that last name. If the search returns no results, the Licensed Professional is not currently in our database. Contact OSHPD at [email protected] to add a new Licensed Professional to our database.
When searching by name and license type, locate the correct LP in the returned list then check the box next to their license number and click Continue. The LP’s name, address, and other information will be automatically populated with the current information from our database.
Please verify that the information is correct. Contact OSHPD at [email protected] to update the existing Licensed Professional's information.

eCA User Guide – Section 5: Applications for New Projects 6
To indicate which licensed professional is the ‘Design Professional in Responsible Charge’ of the project, click the Edit link to the right of the screen and set the “Responsible Primary (eCA)’ button to Yes.
To add additional Licensed Professionals, repeat the steps above; continue these steps to add all Licensed Professionals (Delegates and Alternates) to the project. Click the Edit link for each licensed professional to indicate his or her role on the project – Alternate or Delegate. Delegates should include the area of responsibility, such as ‘Structural’ or ‘Anchorage & Bracing’, etc. You can always delete the Licensed Professional(s) by clicking on the Delete link at the end of the record line.
Click Continue Application to proceed to the next page flow screen.
Step 7. Add Contacts to this project.
A Contact is the individual representing the Facility to whom correspondence will be copied. At least one Contact must be included for every project. Unlike adding Licensed Professionals, a search function is not available for Contacts and they must be added by clicking the Add New button and completing each applicable field OR by clicking the Select from Account button to use information contained in your Public User account. You must select a Contact Type and click on the Continue button to save the selected contact. When complete, click Continue to copy the information to the Contacts List. Multiple Contacts may be added to the project.

eCA User Guide – Section 5: Applications for New Projects 7
Click Continue Application to proceed to the next page flow screen.
Step 8. Enter Project Details and Additional Details.
Enter the record/project name and enter a detailed description of the work to be performed.
Complete the addition details specific to the project. For a brief description of each field, see below:

eCA User Guide – Section 5: Applications for New Projects 8
• Submittal Type: Indicate the type of project that is being submitted for review: o AB 2632 – maintenance or repair project for SNFs and ICFs o Phased or Collaborative Review Requested – projects over $20 million o Examination – Clinics and other projects reviewed on a T&M fee basis o Final – 100% Construction Documents review o Geotech Only – Geotechnical Report review by Engineering Geologist o Preliminary – Architectural and Fire & Life Safety review of preliminary plans o SB 1838 – Projects of $50,000 or less – exempt from plan review
• Kind of Project: Indicate which kind of project is being submitted for review: • Addition – projects which increases the floor or roof area • Maintenance – projects necessary to repair systems or equipment, or that are
undertaken for routine maintenance purposes • New Building • Remodel • ROCC – Re-open a closed project to close it in compliance in accordance with PIN 56
• Total Beds Before & After Construction: Enter the total bed count before construction and after construction. If the bed count is not being affected by this project, this information is not required.
• Square Footage of Project – enter the area of the project in square feet; this is a required field. See help for additional information
• Use Annual Building Permit: Indicate if this project will be under the facility Annual Building Permit. You cannot answer “Yes” to the question “Use Annual Building Permit” unless you have an active Annual Building Permit for the current fiscal year.
• Managed Project Requested: Managed projects are projects where schedules and deadlines relating to plan review and construction are negotiated between the Office and the Applicant. These projects will not follow the traditional 60-day or 80-day review goal.
• Seismic Compliance Construction Project: Indicate if the project is a Seismic Compliance Construction Project. If yes, the Seismic Compliance section must be completed.
• Seismic Extension Qualifying Project: Select 'SB 90 Extension' if this project is a Seismic Extension Qualifying Project. Select 'N/A' if not a qualifying project. Selecting any other values will display an error message and will block continue this application.
• Article 10 Mitigation Project: SPC-1 buildings that did not meet the January 1, 2015 Seismic Compliance deadline are prohibited from any new remodel projects except Seismic Compliance projects, maintenance and emergency repairs.
• Project includes primary gravity and/or lateral load elements/systems: Indicate if the project includes primary gravity and/or lateral load elements/systems. When “Yes” is selected, the project will be created as an “H” project; when “No” is selected, the project will be created as an “S” project.
• OSHPD Building Number: Enter the OSHPD Building Number for each building that this project affects. Building numbers are available for look-up at http://www.oshpd.ca.gov/FDD/Forms/Keyplans/index.html
• Field Review Requested: Select Yes if you are requesting the project to be reviewed by OSHPD Field Staff at the project site during their normal visits. If field review is requested, you must contact the OSHPD field staff to schedule review of all documents.
Click Continue Application to proceed to the next step.

eCA User Guide – Section 5: Applications for New Projects 9
Step 9. Enter Project Tabular Information.
Costs The project estimated construction costs are entered on this step and you must enter one Costs row. To add one Costs row, click the Add a Row button in the COSTS section.
On the pop-up window, enter the estimated Construction Costs, Fixed Equipment Costs and Imaging Equipment Costs, then click the Submit button to copy form to Costs Table. For more info, click
Enclosures For each type of Enclosure, click Add a Row to create a new entry in the Enclosure table or click the down arrow to add up to 10 rows simultaneously.

eCA User Guide – Section 5: Applications for New Projects 10
In the pop-up window, enter the number of copies submitted, and select the Type from the dropdown list and provide a brief description of the submittal in the Enclosure Description in the text field if necessary. Enter the Date Sent, select the Method of Transmittal (Courier, Electronic, In Person, Mail), and the Courier name (FedEx, UPS, GSO, etc.). Click Submit to copy form to Enclosures Table.
Deferred Items Where a portion of the design cannot be fully detailed on the approved construction documents because of variations in product design and manufacture, the approval of the construction documents for such portion may be deferred until the material suppliers are selected. OSHPD has sole discretion as to the portions of the design that may be deferred. All deferred items allowed by OSHPD must be clearly described on the construction documents. Deferred submittals must comply with Title 24, California Administrative Code Section 7-126.
For each type of Deferred Submittal Item, click Add a Row to create a new entry in the Deferred Items Table or click the down arrow to add up to 10 rows simultaneously.

eCA User Guide – Section 5: Applications for New Projects 11
In the pop-up window, enter the discipline specific to the deferred item, i.e. Fire & Life Safety for a fire alarm deferred submittal item, enter the tracking number that will be used by the Applicant and provide a brief description of the deferred submittal item.
Structural Analysis Software When applicable, indicate the type of structural design software used in the preparation of the design.
For each type of structural analysis software, click Add a Row to create a new entry in the Structural Analysis Software Table or click the down arrow to add up to 10 rows simultaneously.
In the pop-up window, enter the Structural Analysis Software used.
Note: If your designs were not prepared using software listed in this area, please be advised that plan review may be delayed while OSHPD develops a work-around, or purchases the software indicated.
When finished, click Continue Application to proceed to the next page flow screen.

eCA User Guide – Section 5: Applications for New Projects 12
Step 10. Enter Facility PIN code or Save pending submittal.
Before entering the Facility PIN Code, it is recommended that you have clicked on “Save pending submittal” at least once!
If you are authorized by the facility and have obtained a valid Facility PIN, enter it on the screen, then click Continue Application button to proceed to the next page flow screen.
If you do not have a valid Facility PIN code, click the Save pending submittal button to save the record.
If you click the “Save pending submittal” button, the application process stops and you will be redirected to the Project List page. eCA issues a temporary Project ID and displays the application in the Project list. You or other authorized users can “Resume Application” at a later time.
If you enter an invalid Facility PIN, eCA displays an error message at the review step and prevents you from completing the application. You may return to the Security page and re-enter the correct PIN; however, after 3 times entering an incorrect PIN, the application will be locked.

eCA User Guide – Section 5: Applications for New Projects 13
Step 11. Select Payment Option.
After entering a valid Facility PIN code, select one of the payment options. The description of each payment options is as follows:
• Invoice Me: OSHPD will mail an invoice to the facility billing address on file. • Pay Now: facility intends to make an immediate online payment using a credit card on the next
screen before the application is submitted.
If you do not select a payment type and proceed to complete the application, the Facility PIN will be visible on the review page to any authorized user when the application is resumed later. To prevent the Facility PIN from being displayed, you must complete this step by selecting a payment type and completing the application. When this step is completed, the Facility PIN is hidden from all users.
Click Continue Application to proceed to the next page flow screen.
Step 12. Review the data entered and makes edits if needed.
On this screen, click the Edit button in each application step to make necessary changes.
Once all data is verified, click Continue Application to proceed to the next page flow screen.
If you selected the “Invoice Me” option, skip to step 14 below.

eCA User Guide – Section 5: Applications for New Projects 14
Step 13. Pay Application Fees online.
If you selected “Pay Now” option, this screen displays the total fees to be paid with a credit card.
Click on “Continue Application” to proceed to the payment screen.
Step 14. Submit online payment.
On this screen, enter the accurate credit card information then click on Submit Payment button.

eCA User Guide – Section 5: Applications for New Projects 15
Step 15. Project submission confirmation.
On this final screen, eCA display a project submission confirmation including the project record number. You may print a project record summary from this screen, and if the fees were paid with a credit card, a payment receipt can be printed. These documents open in a PDF format sand may be saved or emailed. You can also view the detailed information about the project by clicking on View Record Details button.
Email confirmation is automatically sent to the Public User that started the application (Design Professional) and to the Public User that approved the application by entering the PIN (Owner Representative).
Congratulations! You have successfully submitted an Application for a New Project to OSHPD!

eCA User Guide – Section 5: Applications for New Projects 16
3 Submit Construction Documents to OSHPD When the Design Professional receives the confirmation email, they must log in to eCA and click the Projects tab. The most recent project will be at the top of the list.
eCA User Guide – Section 5: Applications for New Projects 17
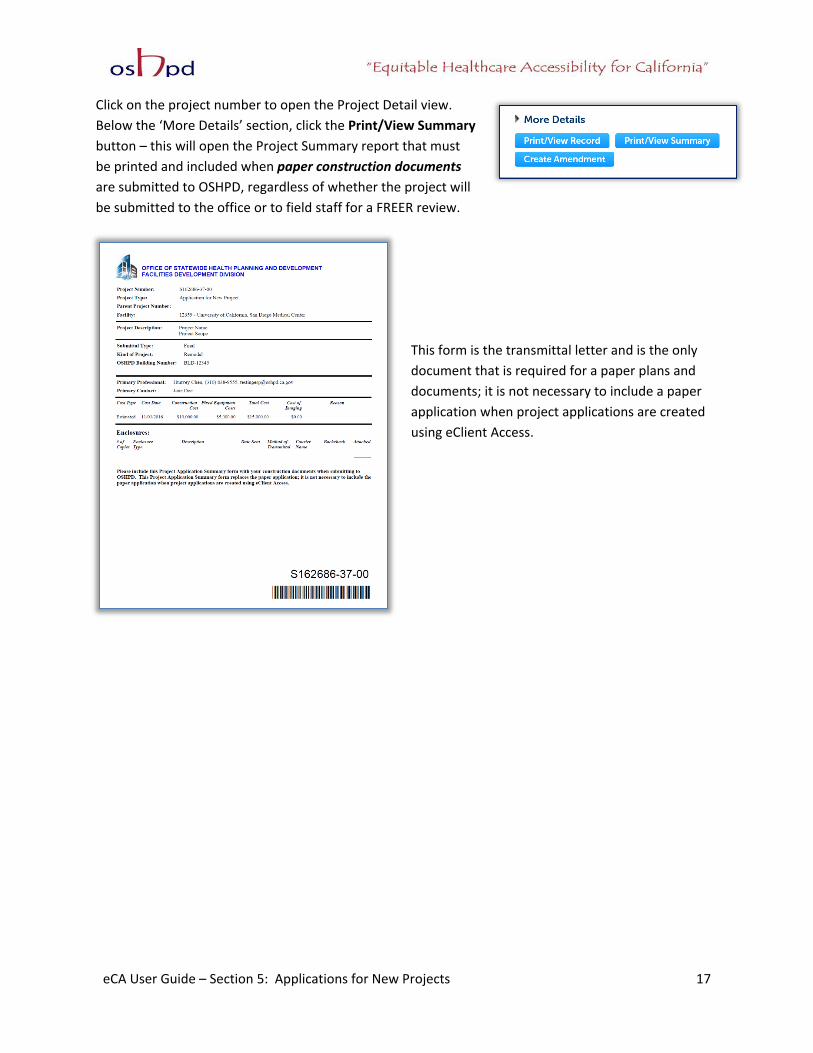
Click on the project number to open the Project Detail view. Below the ‘More Details’ section, click the Print/View Summary button – this will open the Project Summary report that must be printed and included when paper construction documents are submitted to OSHPD, regardless of whether the project will be submitted to the office or to field staff for a FREER review.
This form is the transmittal letter and is the only document that is required for a paper plans and documents; it is not necessary to include a paper application when project applications are created using eClient Access.

eCA User Guide – Section 5: Applications for New Projects 18
For electronic plan submittal and electronic plan check, click the Dropdown menu Record Info and select Attachments.
Follow the instructions in User Guide #10 to attach plans and construction documents to this record for instantaneous submittal to OSHPD. Also see User Guide #11 for specific information on how to format the electronic documents prior to uploading.
Congratulations! Your Application for a New Project is ready to be reviewed by OSHPD!