outlook 2010 – archiving email - chaffey · pdf fileoutlook 2010 – archiving email...
TRANSCRIPT
Outlook 2010 – Archiving Email CPAC Workshop Summer 2014
Presenters: Kaleo Kelikani and Linda Holdzkom, ITS Technical Services
Contents
Tips and Tools for the Desktop Version of Outlook Page 2-4
What is a .pst? Page 2
Windows 7 with Outlook 2010 Page 2
How to View the Size of your Mailbox Page 3
How to Quickly Reduce the Size of Your Mailbox Page 4
Windows 7 – How to see file type extensions Page 5
Outlook 2010: How to Create a New Outlook Data File (.pst) Page 6-7
How to Identify the Name and Location of Your Personal Folders/.Pst Files Page 7
How to Open Or Close a Personal Folder/.Pst File Page 8
Outlook 2010: How to Turn Off Auto Archiving Page 9
Outlook 2010: How to Use the Manual Archive Tool Page 10-13
How to Rename the Archives display name Page 13

CPAC Outlook 2010 Archiving Email Page 2 of 13
Outlook 2010 – Archiving Email
Tips and Tools for the Desktop Version of Outlook
Like a Chaffey class prereq, a basic understanding of Windows File Management is necessary to be able to create, locate, search, maintain, and back up archive folders. The location and real file name of an Outlook archive folder can be seen in the full file path. What is a .pst?
All terms for one and the same thing: Archive folder = Outlook Personal Folder = .pst file = Outlook data file
.pst = personal storage table. It is the file extension type for all Outlook data files. When you archive Outlook information (messages, calendars, contacts) items are saved in a .pst file.
.pst file is a different kind of file than other MS Office file types (.docx, .xslx, .pptx and .mdb) • The applications for Word, Excel, PowerPoint, and Access will all open when you open a specific
file.
• A .pst file will not launch the Outlook application. A .pst file must be accessed and opened after launching Outlook: Home ribbon/New Items/More Items/Outlook Data File . . .
• Outlook must be closed if changes to the .pst are needed such as moving the file or renaming it.
• Settings in the Control Panel/Folder Options may need to be changed to see the .pst file extension and a complete file path. Steps to make those changes are included in this document under the heading Windows 7 – How to see file type extensions.
• Closing Outlook and re-opening Outlook is a good tip in general for certain kinds of problems.
• Archive folders cannot be created or accessed in the Internet version of Outlook Web App.
Windows 7 with Outlook 2010
• The first .pst file created in Outlook 2010 will also create a default folder named Outlook Files in the user's My Documents folder. The path is: C:\Users\firstname.lastname\Documents\Outlook Files.
• The default name of a new .pst file is My Outlook Data File(#).pst. The user should change that to something like their name and year or a specific category for messages that will be stored in this .pst file.
• A user can accidentally move or save a .pst to a different location. This is when searching for a *.pst file may have to be done to find it. This is easier if the .pst file extension is visible in a list.

CPAC Outlook 2010 Archiving Email Page 3 of 13
• You will see this message from Microsoft Outlook in your inbox when it is time to clean it up. If the size is over 200 MB on the MS Exchange server, then you cannot send emails. In this situation, sent emails may be in the Outbox folder.
• There are several ways to view the size of your mailbox in Outlook. Below are screenshots of what you can see for a mailbox below the size of 175 MB, over the size of 175 MB, and over the size of 200 MB. Click on the File Tab and you will see something similar to one of these:
This is visible in the lower left corner of the Inbox page. If you do not see it, put a checkmark in the Quota Information box. Right click on the bottom status bar to see this Status Bar menu:

CPAC Outlook 2010 Archiving Email Page 4 of 13
Visible in your Inbox when you are over the size:
File tab/Info/Mailbox Cleanup/ View Mailbox Size
To quickly reduce the size of your mailbox on the server, sort emails by size in your inbox and sent folder. The MB size files are the ones to delete or remove to an archive/.pst folder first. Finish by emptying your deleted items folder. Items can be recovered that were not deleted more than 7 days ago. To see the recoverable items, choose the Folder tab and click on Recover Deleted Items. You can restore from the list.

CPAC Outlook 2010 Archiving Email Page 5 of 13
Windows 7 – How to see file type extensions (.pst, .xlsx, .docx, .ppt, .pdf, etc., in a Windows list.)
From the Start menu: 1. Click Control Panel. View by: Small icons, then double click the Folder Options icon to see the
screen. 2. Click on the View tab. If there is a checkmark in the Hide extensions for known file types,
remove it. 3. With the checkmark removed, you can see all file extensions in a Windows list, e.g.,

CPAC Outlook 2010 Archiving Email Page 6 of 13
Outlook 2010: How to Create a New Outlook Data File (.pst)
If you wish to create a personal folder for storing Outlook items on your computer, here are the steps to take to create a new Outlook data file quickly and easily.
1. Open Outlook.
2. Go to the Ribbon and select the Home tab.
3. In the New section, select New Items.
4. When the menu appears, select More Items followed by Outlook data file.

CPAC Outlook 2010 Archiving Email Page 7 of 13
5. When the Create or Open Outlook Data File window appears, browse to the location where the file is to be located. The default location in Windows 7 for Outlook 2010 is: C:\Users\firstname.lastname\Documents\Outlook Files. Go to the File name field and replace My Outlook Data File(1) with a unique desired name for the .pst file. That name will also display in Outlook. If you wish to add a password to the file, check the Add Optional Password checkbox.
6. Click the OK button.
How to Identify the Name and Location of Your Personal Folders/.Pst Files
Microsoft Outlook 2010 1. Start Outlook 2010. 2. Click the File tab in the Ribbon, and then click the Info tab on the menu. 3. Click the Account Settings tab. 4. Click Account Settings again. 5. Click Data Files. Or, just as easy 6. You can also see the name and location in the file path with a right click on the archive folder in
Outlook and choosing Open File Location. 7. You can also see the name and location in the file path with a right click on the archive folder in
Outlook and choosing Data File Properties. Click on the Advanced button. See the file path and display name of the .pst in the filename field.
8. You can also see the name and location by clicking on the File tab/Open/Open Outlook Data File to see your list of .pst files.

CPAC Outlook 2010 Archiving Email Page 8 of 13
Note the path and file name of your .pst file. For example, in Windows 7, it would look something like this: C:\Users\user name\Documents\Outlook Files\Maria 2014.pst
How to copy your personal folders file
1. On the Start menu, point to Programs, and then click Windows Explorer. 2. Browse through the files to the location of your .pst file. 3. Copy your .pst file to the location that you want. An example for this would be to copy it
to a flash drive if the .pst file needs to be viewed on a different computer. Suggestion: Remember that the original is the one to use for adding more items from Outlook.
How to Open Or Close a Personal Folder/.Pst File
After a .pst file is created, it can be closed if you do not use it often and re-opened later. Closing it may speed up performance in Outlook. A closed file still resides on your computer. It has not been deleted. To close an Outlook Data File (aka .pst file, archive folder, Outlook personal folder) 1. First, right click on the file name and select Open File Location to view and confirm the file
location. Reminder: the default location and best location for all .pst files in Windows 7 is: C:\Users\firstname.lastname\Documents\Outlook Files.
Files created in previous versions of Outlook (2003 or 2007) may be saved in a different location in a hidden folder. Windows 7 and Windows Vista C:\Users\user\AppData\Local\Microsoft\Outlook Windows XP drive:\Documents and Settings\user\Local Settings\Application Data\Microsoft\Outlook
2. After you see its location, close the window. 3. Right click again on the archive folder name and select close “filename . . .” This will cause the
display name to disappear from your view in Outlook, but the .pst file is still located in the file location you just confirmed in step 1. Example:
To re-open a closed Outlook Data File: 1. Open the Inbox 2. Choose the Home Tab 3. Click on New Items, More Items, Outlook Data File. The previously confirmed file location should
open and you can select the specific .pst to open. Click OK.
4. or
5. Click on File Tab, Open, Open Outlook Data File, and select the specific .pst file to open. Click OK.
CPAC Outlook 2010 Archiving Email Page 9 of 13
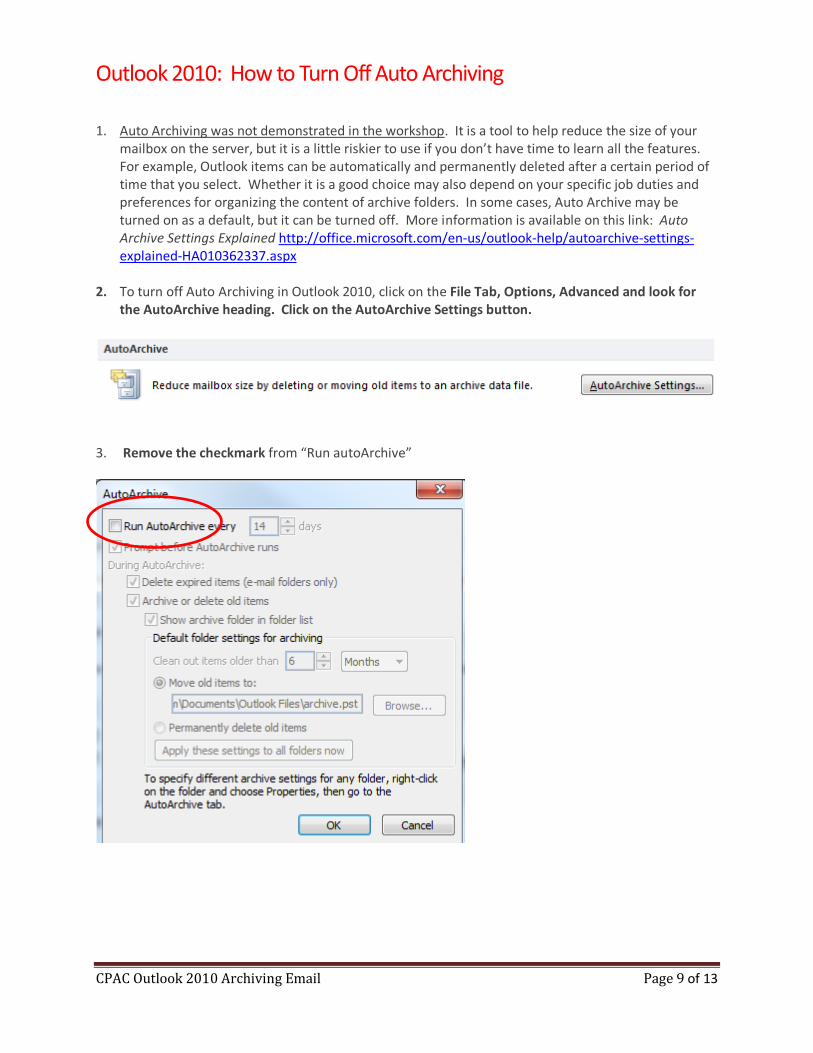
Outlook 2010: How to Turn Off Auto Archiving 1. Auto Archiving was not demonstrated in the workshop. It is a tool to help reduce the size of your
mailbox on the server, but it is a little riskier to use if you don’t have time to learn all the features. For example, Outlook items can be automatically and permanently deleted after a certain period of time that you select. Whether it is a good choice may also depend on your specific job duties and preferences for organizing the content of archive folders. In some cases, Auto Archive may be turned on as a default, but it can be turned off. More information is available on this link: Auto Archive Settings Explained http://office.microsoft.com/en-us/outlook-help/autoarchive-settings-explained-HA010362337.aspx
2. To turn off Auto Archiving in Outlook 2010, click on the File Tab, Options, Advanced and look for the AutoArchive heading. Click on the AutoArchive Settings button.
3. Remove the checkmark from “Run autoArchive”

CPAC Outlook 2010 Archiving Email Page 10 of 13
Outlook 2010: How to Use the Manual Archive Tool
1. The manual archive tool is a good one to manage your mailbox. From Office.Microsoft.com: “Manual archiving provides flexibility, and allows you to specify exactly which folders are included in the archive, and which archive Outlook Data File (.pst) is used. “
2. Click on the File tab on the top horizontal bar.
3. Select Cleanup Tools from the options.

CPAC Outlook 2010 Archiving Email Page 11 of 13
4. Click on the Archive option.
5. Select the choice to archive this folder and all subfolders, in the dialog box.

CPAC Outlook 2010 Archiving Email Page 12 of 13
6. Choose the mailbox folder you would like to save and archive in the browser window. You can archive each folder one at a time, or select the top level to archive the entire mailbox.
7. Choose a date when Outlook will decide items should be archived.

CPAC Outlook 2010 Archiving Email Page 13 of 13
8. Select the location and unique name of your archive file. It may be automatically saved in an
Archive folder under "Outlook Files"; however, you can use the browser function to choose any location on your computer or a removable disc.
9. Press the OK button to archive your items.
10. After the manual auto archive, you will see in Outlook a folder called Archives.
How to rename the Archives display name of the .pst file: Right click on the Archives folder and select: 1. Data File Properties 2. Click on the Advanced button 3. Click in the Filename field and hit the end button on your keyboard. Highlight the filename, copy
it, and paste it in the Name: field to replace “Archives.” Click OK. The display will change to: