outlook online - barnardo's
TRANSCRIPT
1 Outlook Online Guide
Outlook Online
(to navigate to a specific section, press CTRL key and click on the name of the section)
Contents GETTING STARTED ................................................................................................................................... 3
EMAILS ..................................................................................................................................................... 6
NEW MESSAGE..................................................................................................................................... 6
To and CC: ........................................................................................................................................ 6
BCC: .................................................................................................................................................. 7
Commands: .......................................................................................................................................... 7
Send: ................................................................................................................................................ 7
Attach:.............................................................................................................................................. 8
Discard: ..........................................................................................................................................11
Save draft: ......................................................................................................................................11
Set permissions ..............................................................................................................................11
Set importance...............................................................................................................................11
Show message options ..................................................................................................................11
Check for accessibility issues: ........................................................................................................11
Lower Taskbar: ...................................................................................................................................11
Send later .......................................................................................................................................12
Templates: .....................................................................................................................................12
RECEIVING YOUR EMAILS ..................................................................................................................13
Delete and Archive: .......................................................................................................................13
Sweep:............................................................................................................................................13
Move to: .........................................................................................................................................14
Categorise: .....................................................................................................................................14
Snooze:...........................................................................................................................................16
Undo: .............................................................................................................................................16
Create rule .....................................................................................................................................17
Show in immersive reading ...........................................................................................................17
RECEIVING AN EMAIL WITH A SHARED DOCUMENT .........................................................................18
SETTINGS (Email screen) ....................................................................................................................19
Common functions ........................................................................................................................19
View all Outlook settings ...............................................................................................................19
Compose and reply: ...................................................................................................................19
2 Outlook Online Guide
Customise actions: .....................................................................................................................20
Quick actions:.........................................................................................................................20
Message surface ....................................................................................................................20
Toolbar: ..................................................................................................................................20
My Day ...............................................................................................................................................21
What’s New and Help ........................................................................................................................22
CALENDAR ..............................................................................................................................................23
View ...................................................................................................................................................23
Share ..................................................................................................................................................23
Add Calendar .....................................................................................................................................24
Personal calendars: ........................................................................................................................24
Add from Directory: .......................................................................................................................25
New Event ..........................................................................................................................................25
Creating an appointment:..............................................................................................................25
Categories ..................................................................................................................................26
Creating meetings ..........................................................................................................................27
Response options ...........................................................................................................................28
Scheduling Assistant ......................................................................................................................28
SETTINGS (on Calendar screen) .........................................................................................................29
Common functions ........................................................................................................................29
View all Outlook settings ...............................................................................................................29
Events and Invitations................................................................................................................29
FILES .......................................................................................................................................................30
Settings (on Files screen) ...................................................................................................................31
Notifications ...................................................................................................................................31
Accessibility ....................................................................................................................................31
TO DO .....................................................................................................................................................32
My Day ...........................................................................................................................................32
Tasks ...............................................................................................................................................32
Flagged Emails ................................................................................................................................33
Assigned to you:.............................................................................................................................34
PEOPLE ...................................................................................................................................................35
New Contact: .............................................................................................................................36
Create new contact list: .............................................................................................................36
Settings (in People screen) ........................................................................................................37
3 Outlook Online Guide
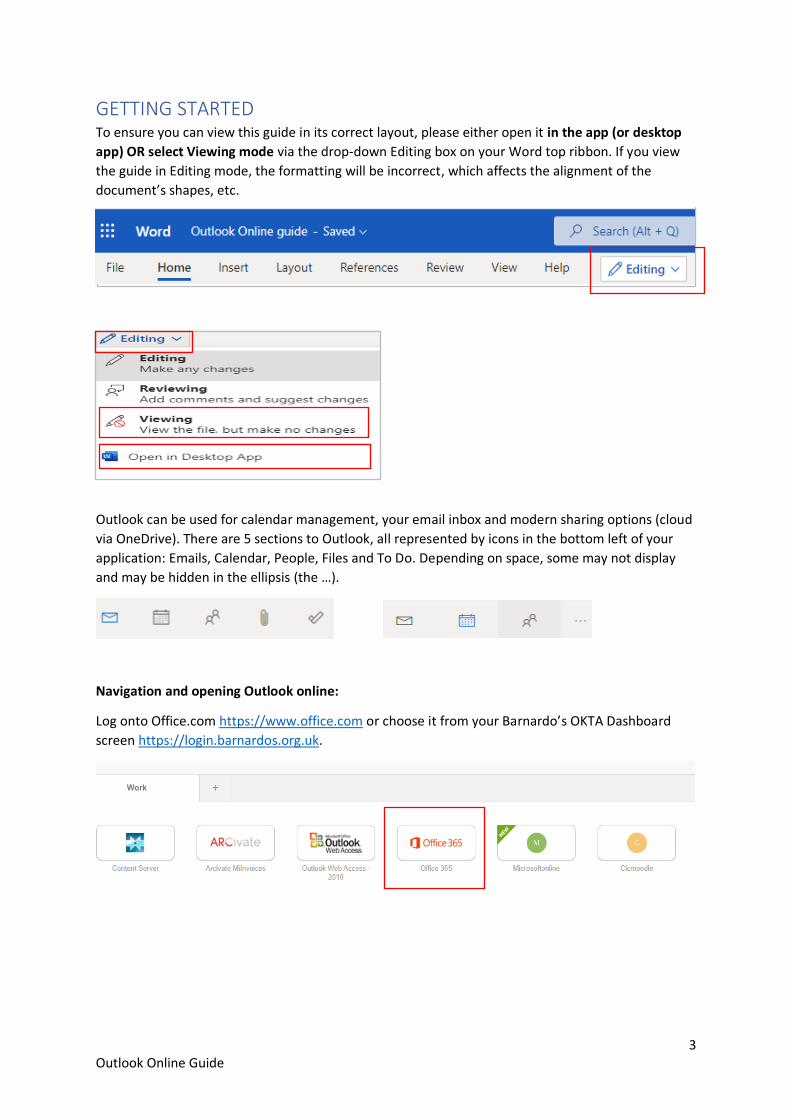
GETTING STARTED To ensure you can view this guide in its correct layout, please either open it in the app (or desktop
app) OR select Viewing mode via the drop-down Editing box on your Word top ribbon. If you view
the guide in Editing mode, the formatting will be incorrect, which affects the alignment of the
document’s shapes, etc.
Outlook can be used for calendar management, your email inbox and modern sharing options (cloud
via OneDrive). There are 5 sections to Outlook, all represented by icons in the bottom left of your
application: Emails, Calendar, People, Files and To Do. Depending on space, some may not display
and may be hidden in the ellipsis (the …).
Navigation and opening Outlook online:
Log onto Office.com https://www.office.com or choose it from your Barnardo’s OKTA Dashboard
screen https://login.barnardos.org.uk.
4 Outlook Online Guide
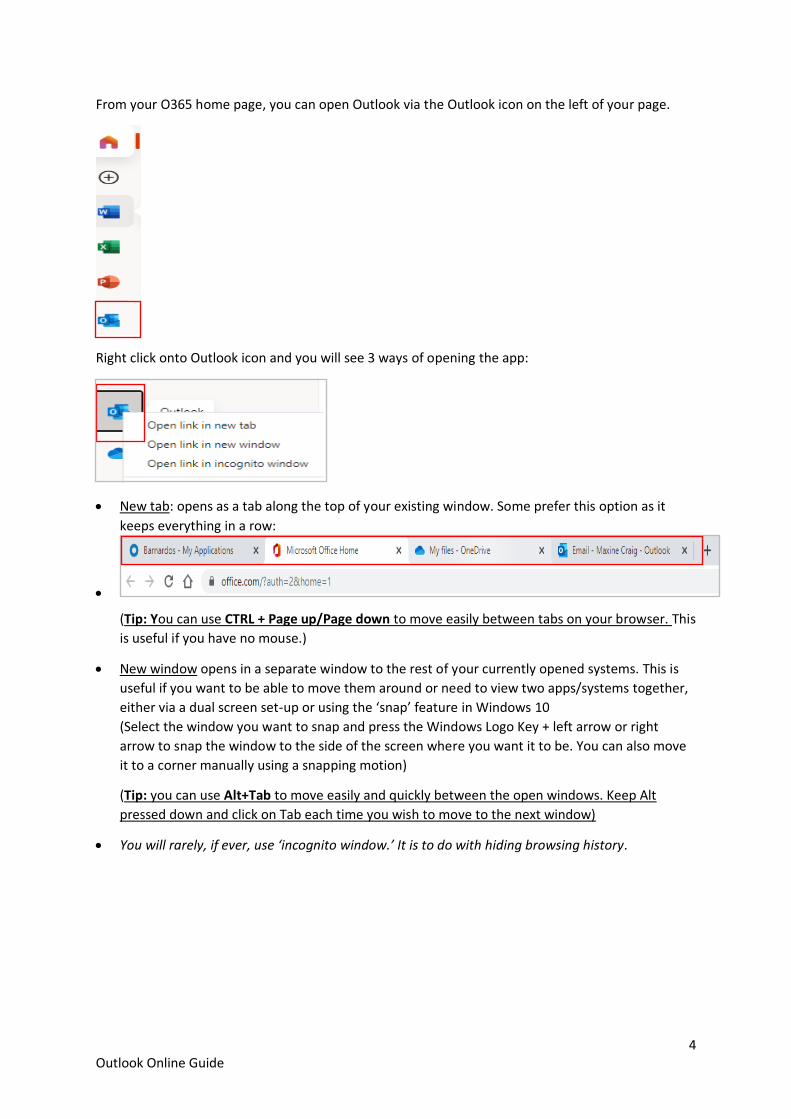
From your O365 home page, you can open Outlook via the Outlook icon on the left of your page.
Right click onto Outlook icon and you will see 3 ways of opening the app:
• New tab: opens as a tab along the top of your existing window. Some prefer this option as it
keeps everything in a row:
•
(Tip: You can use CTRL + Page up/Page down to move easily between tabs on your browser. This
is useful if you have no mouse.)
• New window opens in a separate window to the rest of your currently opened systems. This is
useful if you want to be able to move them around or need to view two apps/systems together,
either via a dual screen set-up or using the ‘snap’ feature in Windows 10
(Select the window you want to snap and press the Windows Logo Key + left arrow or right
arrow to snap the window to the side of the screen where you want it to be. You can also move
it to a corner manually using a snapping motion)
(Tip: you can use Alt+Tab to move easily and quickly between the open windows. Keep Alt
pressed down and click on Tab each time you wish to move to the next window)
• You will rarely, if ever, use ‘incognito window.’ It is to do with hiding browsing history.

5 Outlook Online Guide
Navigation tip: when you are in any Office 365 application, you can open another application by
using the O365 app launcher. This box of ‘dots’ appears in the top left corner of all O365
applications:
Note: If you click straight onto one of these app icons below, it will open the new app in place of
the one you are in. However, if you click onto the 3 dots, you can open the new app in a new tab.
Screenshot/snip tip: if you need to grab a screenshot or grab part of your screen to send by email,
you can use the keys Shift+Windows+S to open a box that allows you to take a rectangular snip, a
freeform snip, a Window snip or a full screen snip.
Choosing the freeform or rectangular snips allows you to ‘draw’ around the piece of work you wish
to snip. Then use CTRL+V to paste it onto your chosen place.
Typing tip: If you hit the Caps Lock in error and continue to type in capitals without realising, use
the Shift+F3 keys to change your text back to lower case. On the new laptop, you will need to press
your Fn key first so it lights, then highlight the text, press Shift+F3, and it will run through lower
case, upper case or capitals on each word. The Fn key is bottom left on your keyboard.
6 Outlook Online Guide
EMAILS
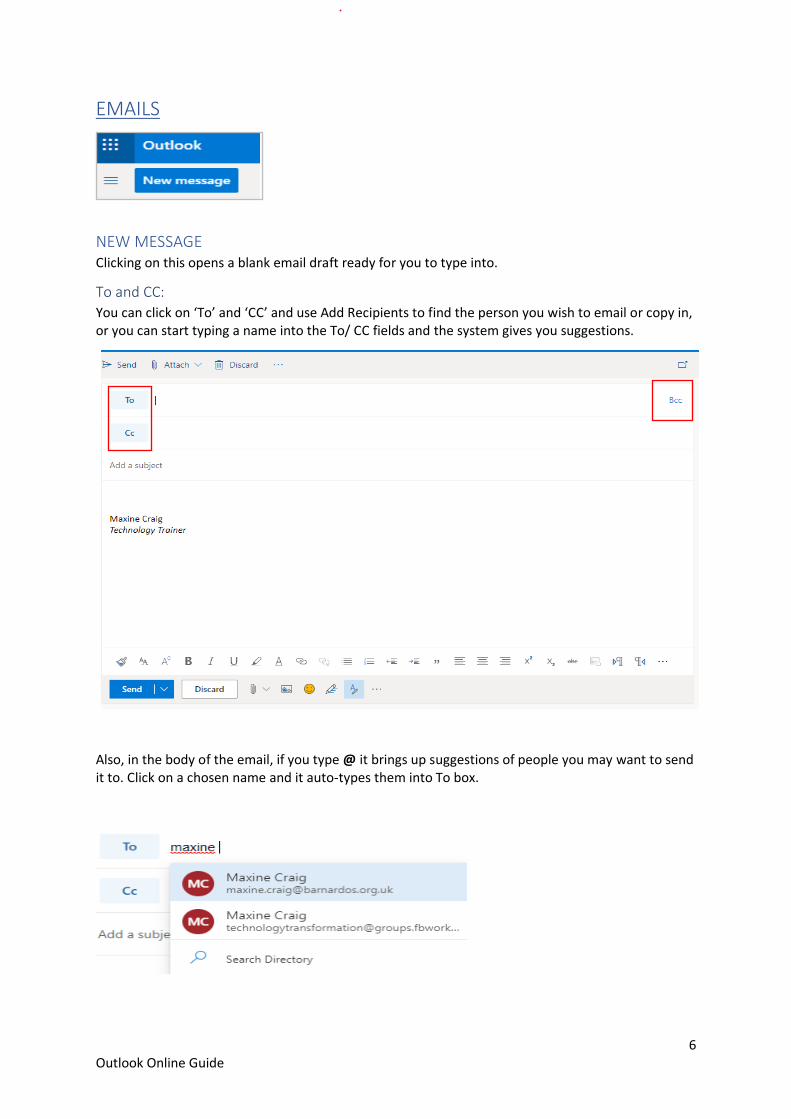
NEW MESSAGE Clicking on this opens a blank email draft ready for you to type into.
To and CC:
You can click on ‘To’ and ‘CC’ and use Add Recipients to find the person you wish to email or copy in, or you can start typing a name into the To/ CC fields and the system gives you suggestions.
Also, in the body of the email, if you type @ it brings up suggestions of people you may want to send it to. Click on a chosen name and it auto-types them into To box.
7 Outlook Online Guide
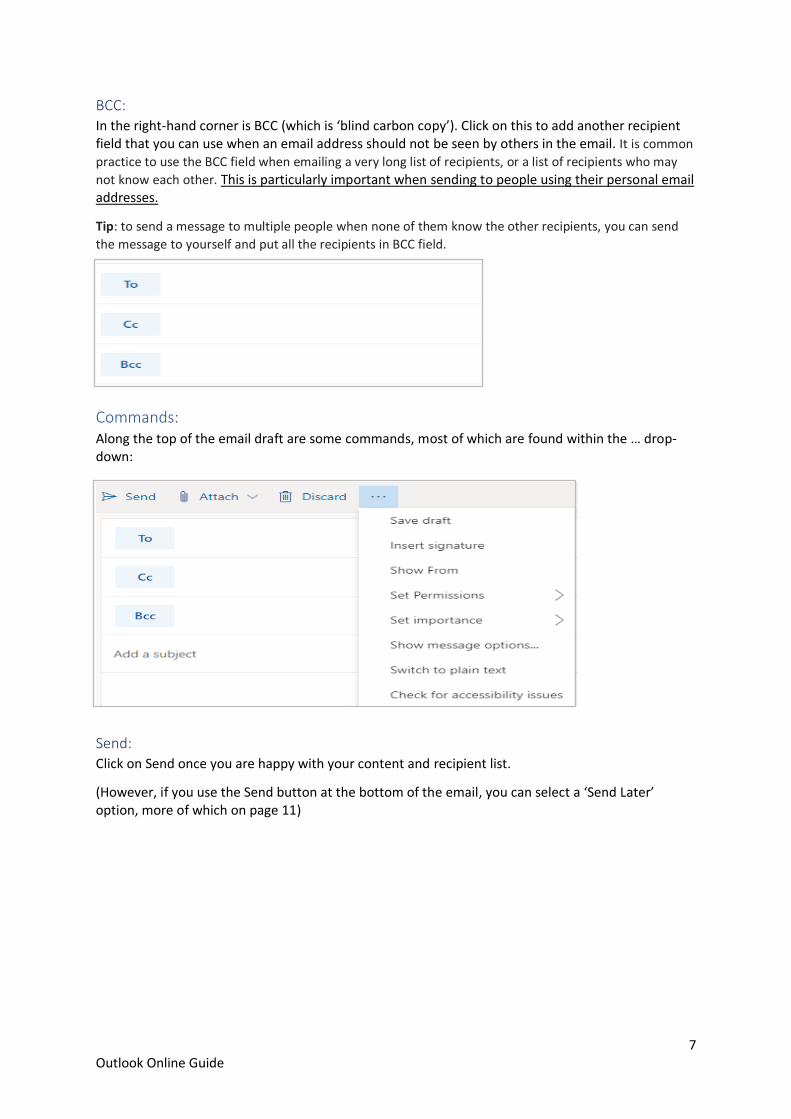
BCC: In the right-hand corner is BCC (which is ‘blind carbon copy’). Click on this to add another recipient field that you can use when an email address should not be seen by others in the email. It is common
practice to use the BCC field when emailing a very long list of recipients, or a list of recipients who may
not know each other. This is particularly important when sending to people using their personal email addresses.
Tip: to send a message to multiple people when none of them know the other recipients, you can send
the message to yourself and put all the recipients in BCC field.
Commands: Along the top of the email draft are some commands, most of which are found within the … drop-down:
Send:
Click on Send once you are happy with your content and recipient list.
(However, if you use the Send button at the bottom of the email, you can select a ‘Send Later’ option, more of which on page 11)
8 Outlook Online Guide
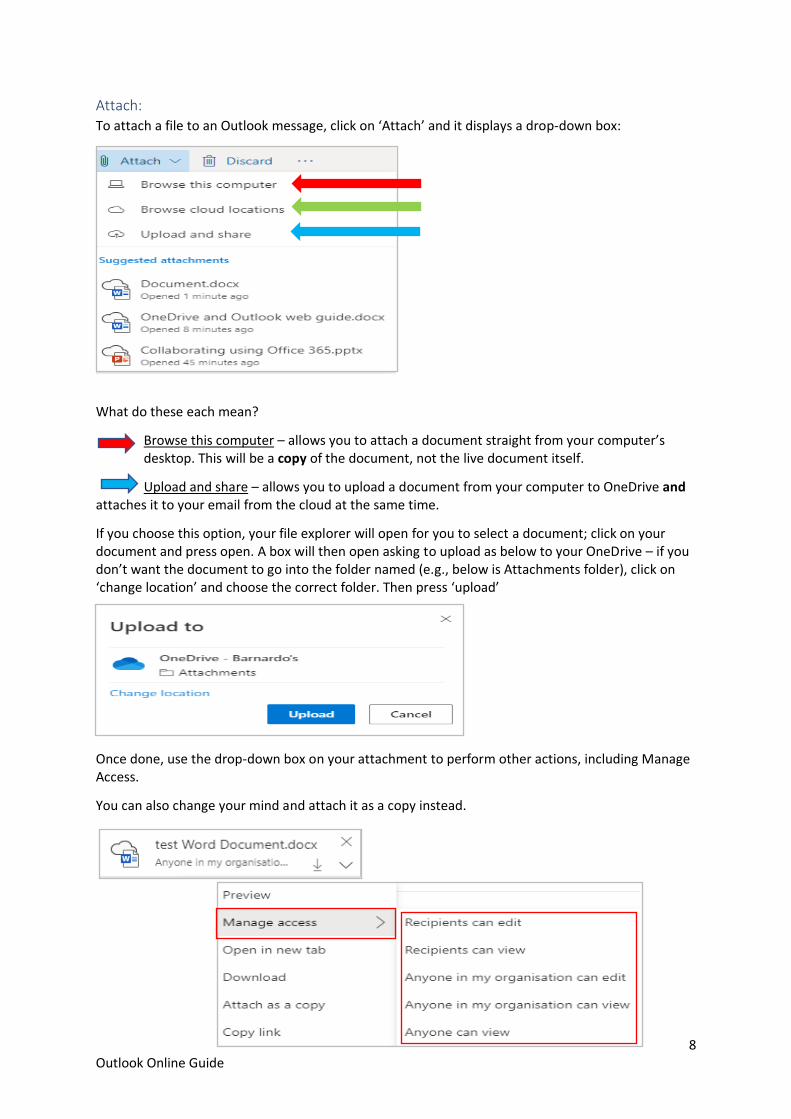
Attach: To attach a file to an Outlook message, click on ‘Attach’ and it displays a drop-down box:
What do these each mean?
Browse this computer – allows you to attach a document straight from your computer’s desktop. This will be a copy of the document, not the live document itself.
Upload and share – allows you to upload a document from your computer to OneDrive and attaches it to your email from the cloud at the same time.
If you choose this option, your file explorer will open for you to select a document; click on your document and press open. A box will then open asking to upload as below to your OneDrive – if you don’t want the document to go into the folder named (e.g., below is Attachments folder), click on ‘change location’ and choose the correct folder. Then press ‘upload’
Once done, use the drop-down box on your attachment to perform other actions, including Manage Access.
You can also change your mind and attach it as a copy instead.

9 Outlook Online Guide
Browse cloud locations – allows you to share documents currently online. It will open a list of your OneDrive documents. Click against the document you want to attach, then it will display Next at the bottom of the page. Click on Next and you get a choice of how to attach:
What is the difference?
Attach as a copy does take up space on your email because it attaches a physical copy to it. This is a copy, NOT a live version so it’s important to remember that this means each recipient gets their ‘own’ copy. Current Outlook limit for file size is 20mb.
Share as a OneDrive link takes up no space on your email because it simply attaches the link to your LIVE document. This way, your recipients can collaborate on it in real time. The attachment size limit for OneDrive files is 2GB.
To clarify, it displays your attachment with a cloud icon –
If you have chosen ‘share as a OneDrive link’, you can use the drop-down box to manage its access before you send the email.
For example, choose ‘recipients can edit’ and the permission under the document name will amend itself:
As you can see, you can also easily switch to ‘attach as a copy’ if you change your mind.
10 Outlook Online Guide
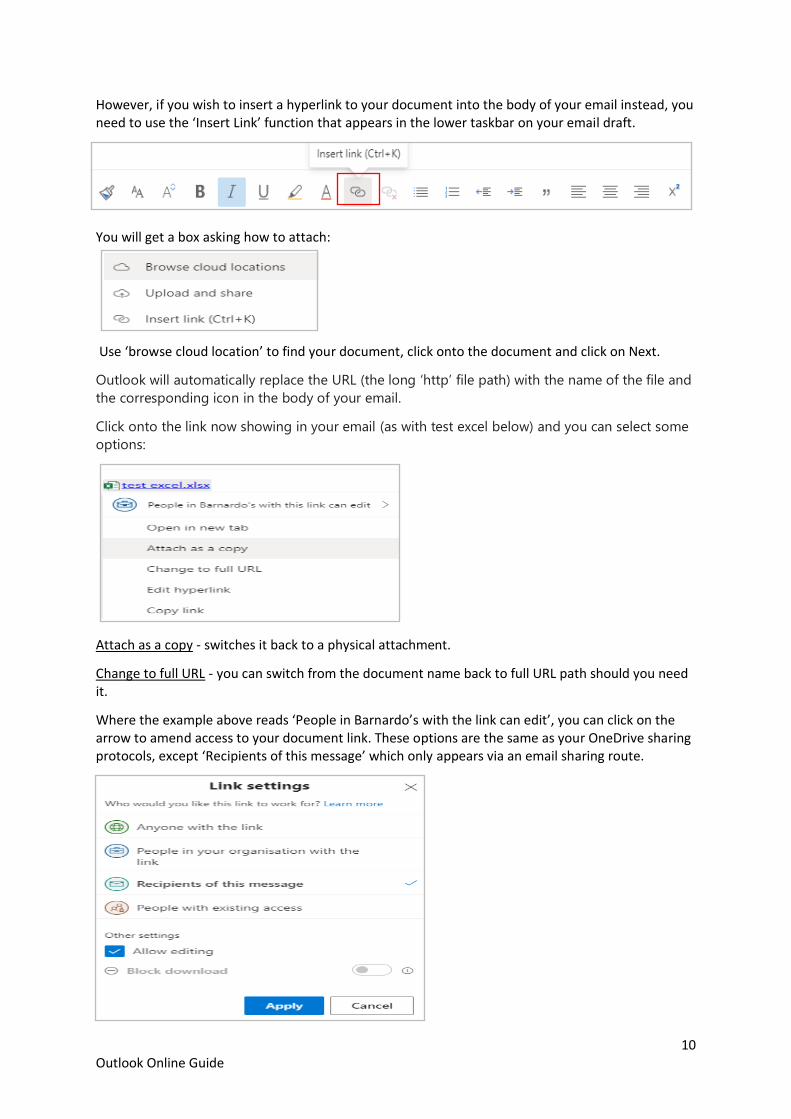
However, if you wish to insert a hyperlink to your document into the body of your email instead, you need to use the ‘Insert Link’ function that appears in the lower taskbar on your email draft.
You will get a box asking how to attach:
Use ‘browse cloud location’ to find your document, click onto the document and click on Next.
Outlook will automatically replace the URL (the long ‘http’ file path) with the name of the file and
the corresponding icon in the body of your email.
Click onto the link now showing in your email (as with test excel below) and you can select some
options:
Attach as a copy - switches it back to a physical attachment.
Change to full URL - you can switch from the document name back to full URL path should you need it.
Where the example above reads ‘People in Barnardo’s with the link can edit’, you can click on the arrow to amend access to your document link. These options are the same as your OneDrive sharing protocols, except ‘Recipients of this message’ which only appears via an email sharing route.
11 Outlook Online Guide
Discard: deletes your draft. If you have typed nothing into the draft email, it deletes it immediately but if you have input a recipient’s name in the To field or typed something in the email body, a box will appear to ask if you are sure you wish to discard. Click OK or Cancel.
Save draft: allows you to save your draft email so you can go back to it later. Go into Draft folder, click onto the email and continue to type what you need to finish it.
Insert signature: adds your auto signature if it is not already there.
Show from: you can hide/unhide the From field which shows your email address.
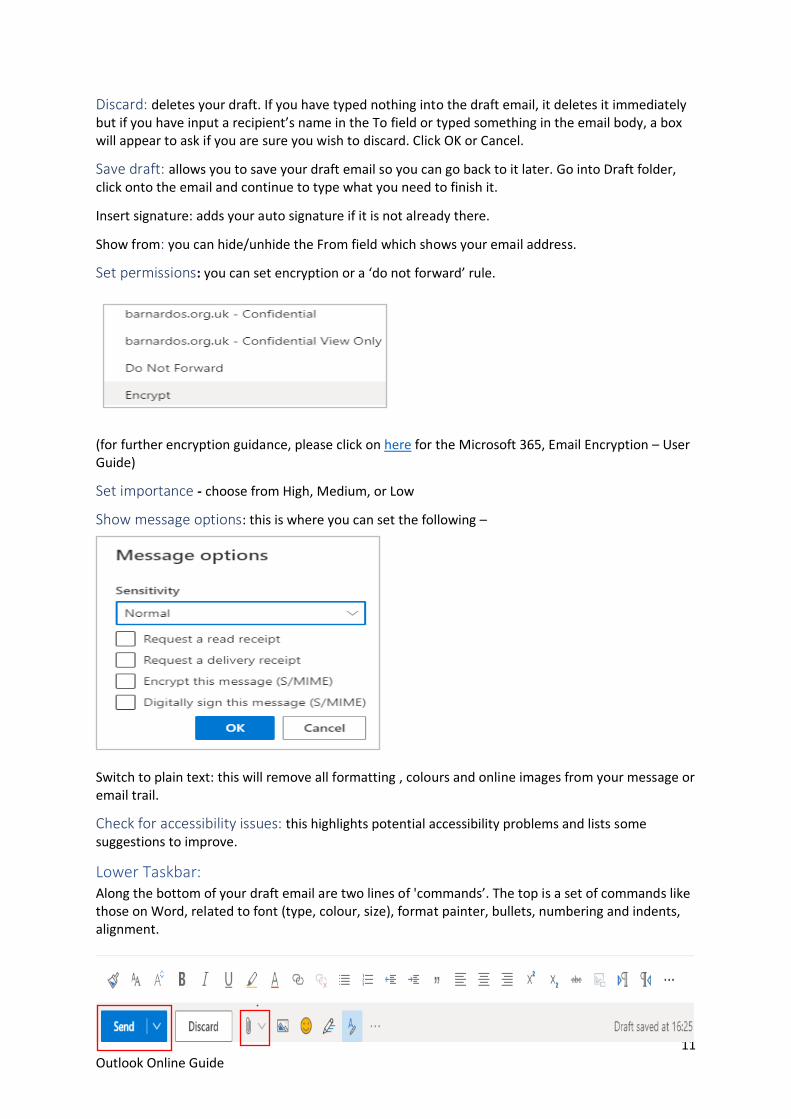
Set permissions: you can set encryption or a ‘do not forward’ rule.
(for further encryption guidance, please click on here for the Microsoft 365, Email Encryption – User Guide)
Set importance - choose from High, Medium, or Low
Show message options: this is where you can set the following –
Switch to plain text: this will remove all formatting , colours and online images from your message or email trail.
Check for accessibility issues: this highlights potential accessibility problems and lists some suggestions to improve.
Lower Taskbar: Along the bottom of your draft email are two lines of 'commands’. The top is a set of commands like those on Word, related to font (type, colour, size), format painter, bullets, numbering and indents, alignment.
12 Outlook Online Guide
Along the second line as seen above, are Send, Discard and Attach (the paperclip) plus the ability to add pictures and emojis. Within the ellipsis (the ...) are the same options as are shown in the ellipsis at the top of your email – this is just a preference thing. However, via this bottom set you can also set a poll, arrange a Google Meet, and view/manage your Outlook templates. In addition, the Send button here has a ’send later’ feature.
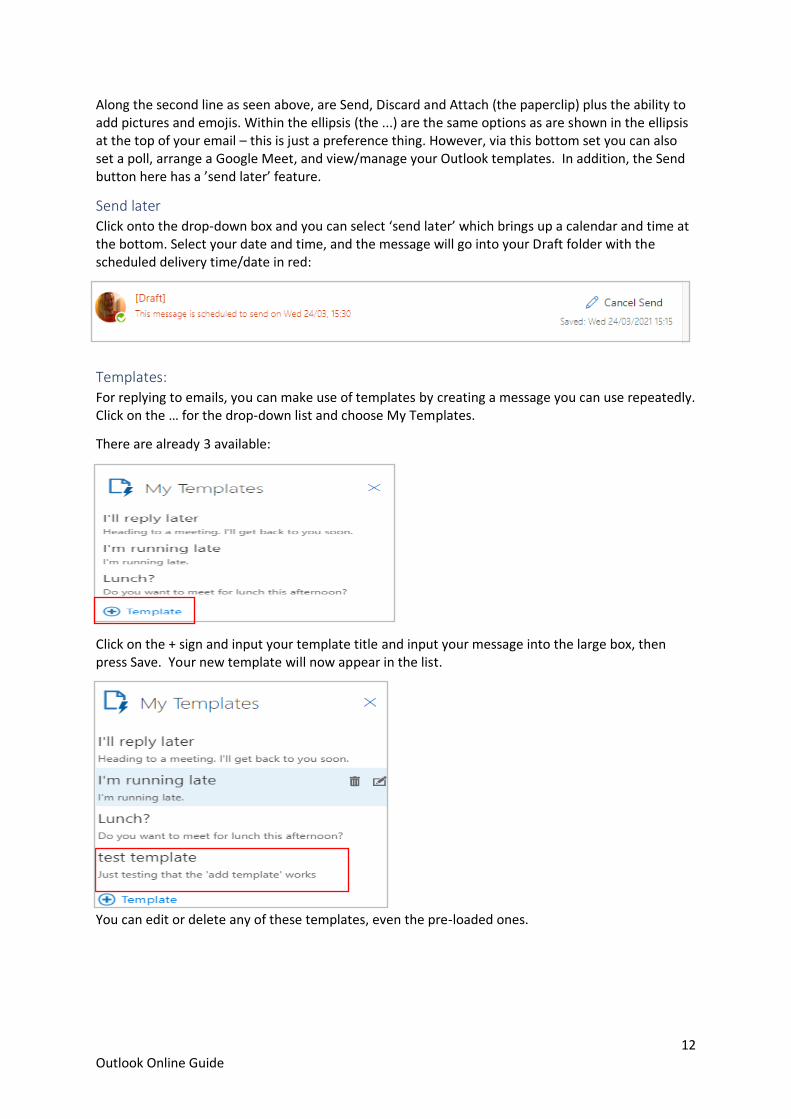
Send later Click onto the drop-down box and you can select ‘send later’ which brings up a calendar and time at the bottom. Select your date and time, and the message will go into your Draft folder with the scheduled delivery time/date in red:
Templates:
For replying to emails, you can make use of templates by creating a message you can use repeatedly. Click on the … for the drop-down list and choose My Templates.
There are already 3 available:
Click on the + sign and input your template title and input your message into the large box, then press Save. Your new template will now appear in the list.
You can edit or delete any of these templates, even the pre-loaded ones.

13 Outlook Online Guide
RECEIVING YOUR EMAILS Once you click on the button against an email you have received, another line of commands appears, including several inside the … drop-down box as shown below.
Delete and Archive: Choosing one of these will immediately move the email into the delete or archive folder; it does not
ask ‘are you sure’. If you move an email by accident, don’t panic- just go into the ‘delete’ or ‘archive’
folder, find the email you moved in error, and drag it back into the inbox. For Archive, there is
actually no difference in the retention period of emails either within the Archive folder or
Inbox (including subfolders); there is a default 2yr retention period across all emails in a
user’s mailbox.
Junk: Moves an email into your Junk folder but also gives you an option to report the sender to
Microsoft.
Sweep: This gives you options to move emails from a particular sender into another folder in one ‘sweep’.
It defaults to Deleted Items folder, but using the drop-down box allows you to choose which folder. If you click onto ‘Move to a different folder’ it displays more of your Outlook folders.
14 Outlook Online Guide
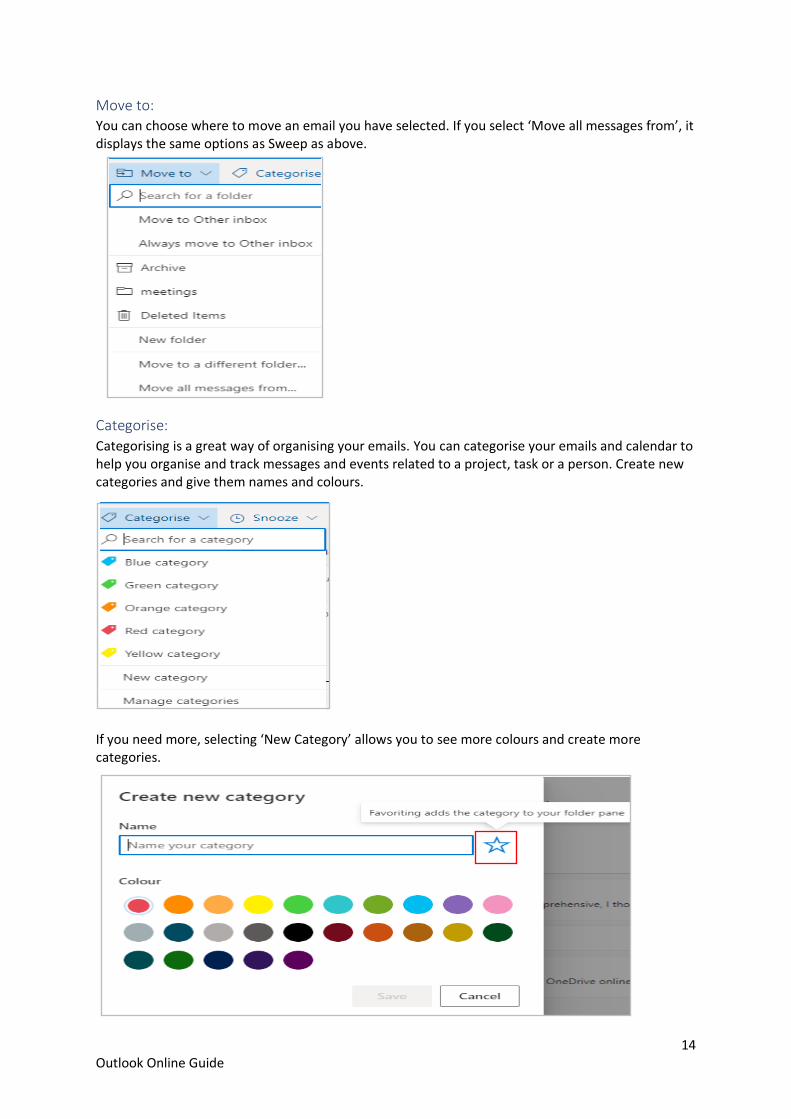
Move to: You can choose where to move an email you have selected. If you select ‘Move all messages from’, it displays the same options as Sweep as above.
Categorise:
Categorising is a great way of organising your emails. You can categorise your emails and calendar to help you organise and track messages and events related to a project, task or a person. Create new categories and give them names and colours.
If you need more, selecting ‘New Category’ allows you to see more colours and create more categories.
15 Outlook Online Guide
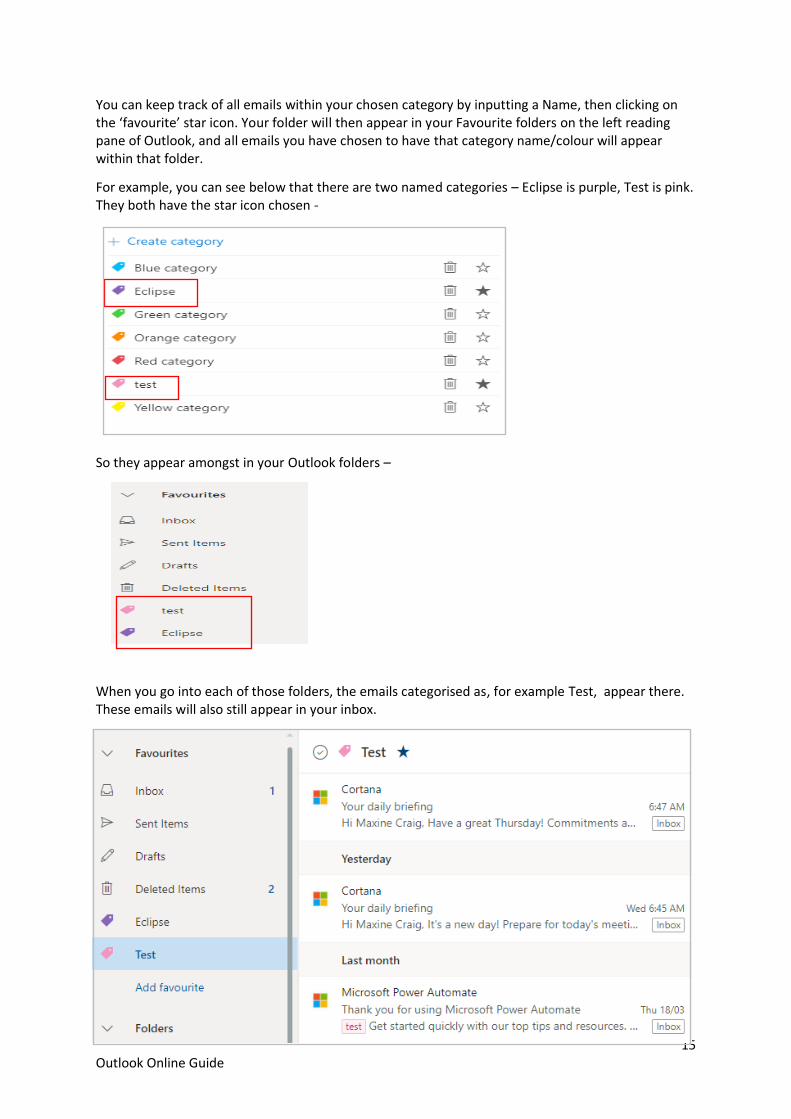
You can keep track of all emails within your chosen category by inputting a Name, then clicking on the ‘favourite’ star icon. Your folder will then appear in your Favourite folders on the left reading pane of Outlook, and all emails you have chosen to have that category name/colour will appear within that folder.
For example, you can see below that there are two named categories – Eclipse is purple, Test is pink. They both have the star icon chosen -
So they appear amongst in your Outlook folders –
When you go into each of those folders, the emails categorised as, for example Test, appear there. These emails will also still appear in your inbox.
16 Outlook Online Guide
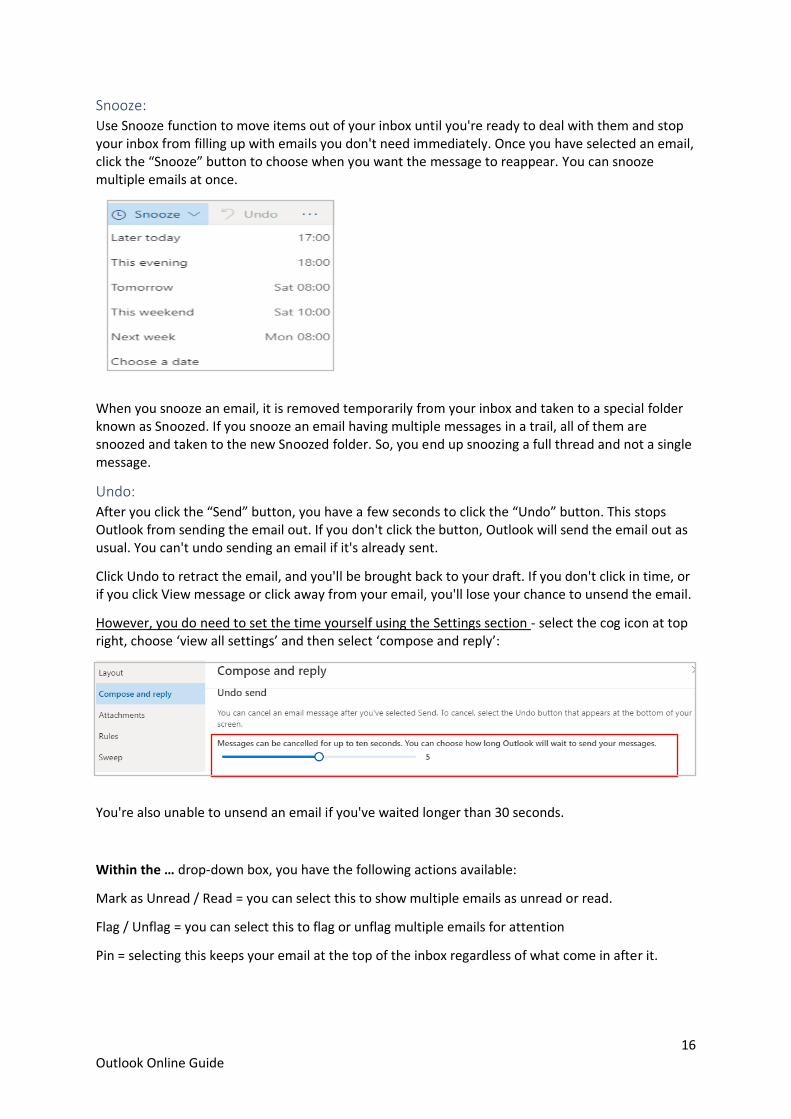
Snooze: Use Snooze function to move items out of your inbox until you're ready to deal with them and stop your inbox from filling up with emails you don't need immediately. Once you have selected an email, click the “Snooze” button to choose when you want the message to reappear. You can snooze multiple emails at once.
When you snooze an email, it is removed temporarily from your inbox and taken to a special folder known as Snoozed. If you snooze an email having multiple messages in a trail, all of them are snoozed and taken to the new Snoozed folder. So, you end up snoozing a full thread and not a single message.
Undo:
After you click the “Send” button, you have a few seconds to click the “Undo” button. This stops Outlook from sending the email out. If you don't click the button, Outlook will send the email out as usual. You can't undo sending an email if it's already sent.
Click Undo to retract the email, and you'll be brought back to your draft. If you don't click in time, or if you click View message or click away from your email, you'll lose your chance to unsend the email.
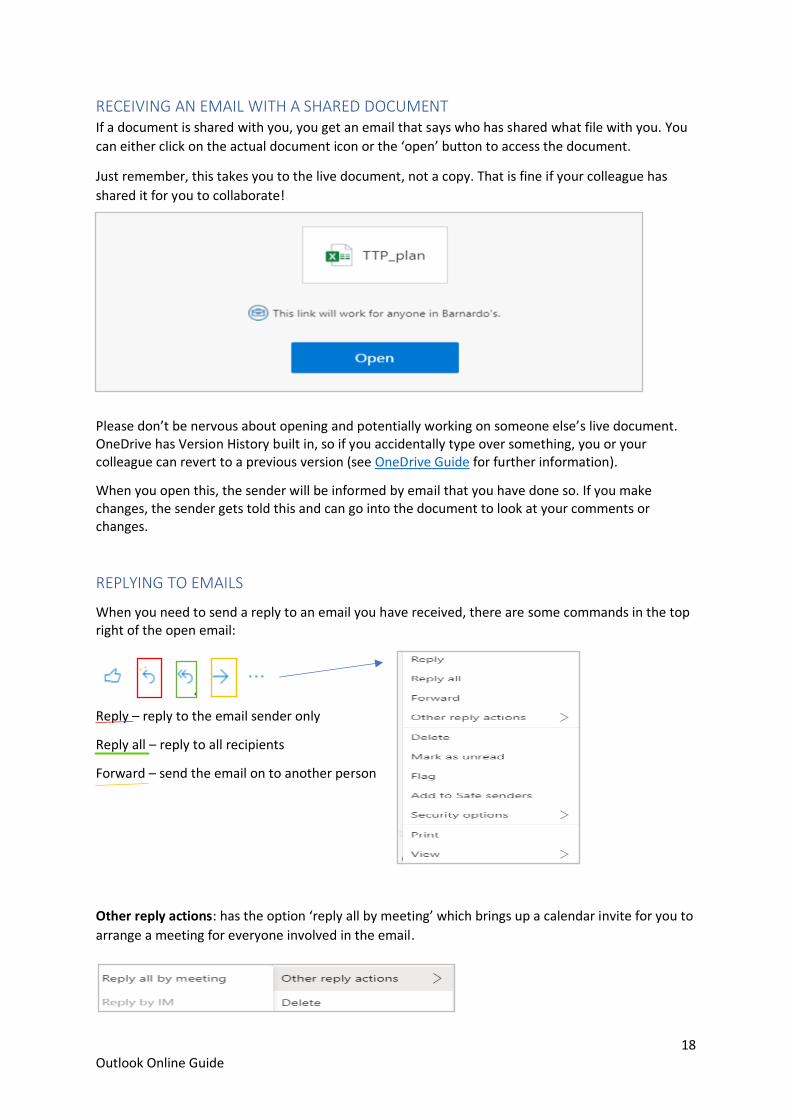
However, you do need to set the time yourself using the Settings section - select the cog icon at top right, choose ‘view all settings’ and then select ‘compose and reply’:
You're also unable to unsend an email if you've waited longer than 30 seconds.
Within the … drop-down box, you have the following actions available:
Mark as Unread / Read = you can select this to show multiple emails as unread or read.
Flag / Unflag = you can select this to flag or unflag multiple emails for attention
Pin = selecting this keeps your email at the top of the inbox regardless of what come in after it.

17 Outlook Online Guide
Create rule = you can set up a rule to move emails from certain recipients straight into another folder.
If you click on More Options, you can Add a Condition(s) such as
• My name is in ‘To’ line or ‘CC’ line. • Subject includes • Keywords (in subject line or body of email) • Marked with (Important, Sensitivity) • Received (before, after)
You can also click on ‘Add an exception’ to set an exception to any of your conditions.
Print (you can print the email to PDF using this)
Show in immersive reading = Immersive Reader is an accessibility tool for reading emails. If you choose this option, you can:
• press the play button at the bottom and it reads the email for you (with a choice of male or female voice and voice speed control).
• Choose Text Preferences for options for reading the text (size of font, spacing) or changes to font (including different background colours).
• Select Reading Preferences, including switching languages and line focus. • Choose Grammar Options for it to help you to understand sentence structures (nouns,
verbs, adjectives, adverbs)
Assign policy: the default policy at Barnardo’s will be to retain emails for two years.
18 Outlook Online Guide
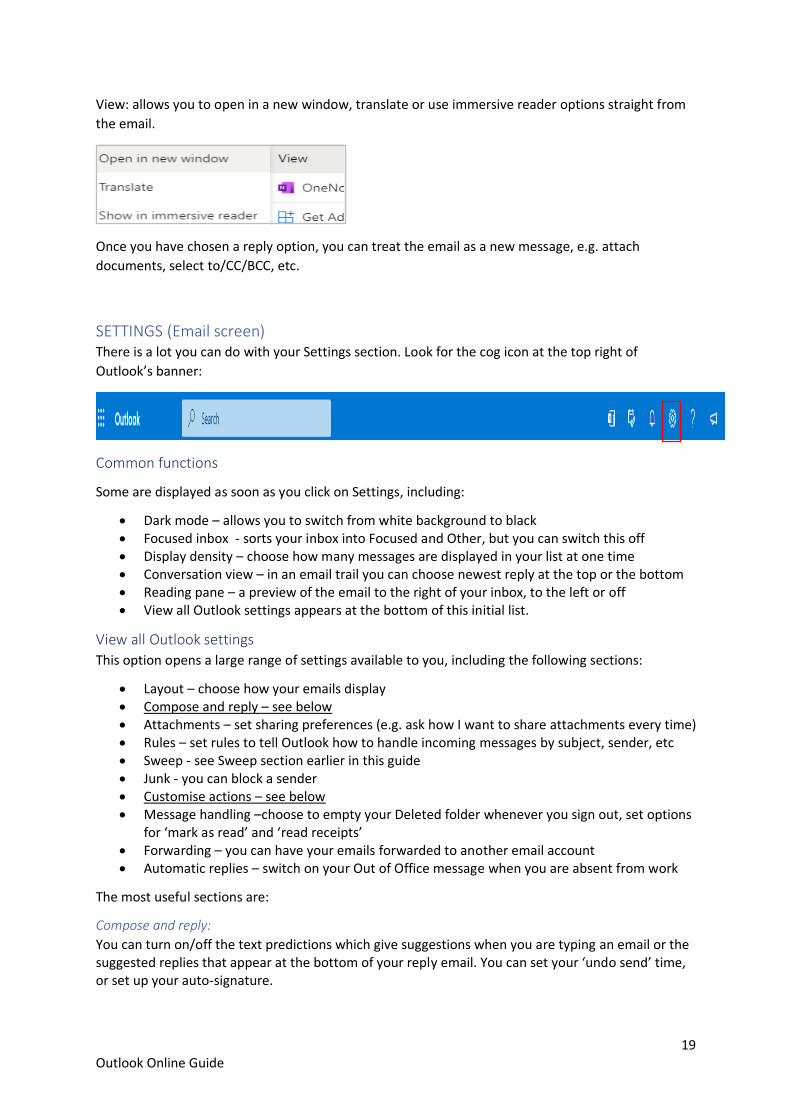
RECEIVING AN EMAIL WITH A SHARED DOCUMENT If a document is shared with you, you get an email that says who has shared what file with you. You
can either click on the actual document icon or the ‘open’ button to access the document.
Just remember, this takes you to the live document, not a copy. That is fine if your colleague has
shared it for you to collaborate!
Please don’t be nervous about opening and potentially working on someone else’s live document. OneDrive has Version History built in, so if you accidentally type over something, you or your colleague can revert to a previous version (see OneDrive Guide for further information).
When you open this, the sender will be informed by email that you have done so. If you make changes, the sender gets told this and can go into the document to look at your comments or changes.
REPLYING TO EMAILS
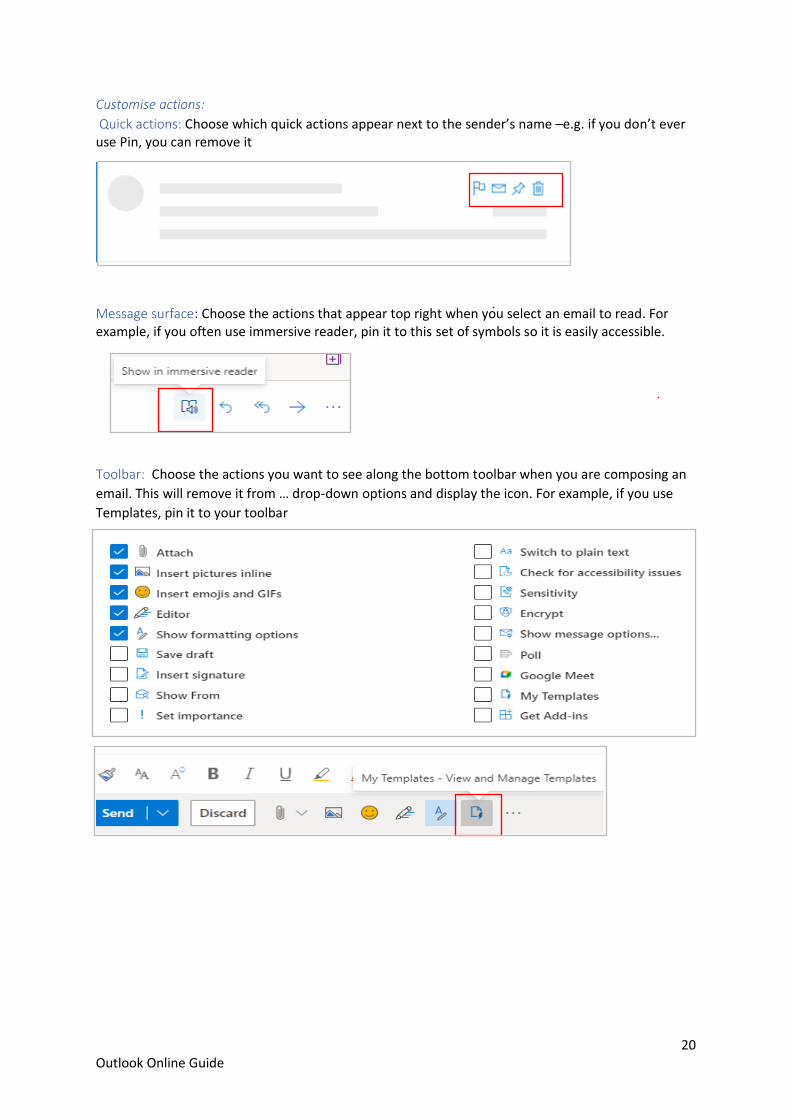
When you need to send a reply to an email you have received, there are some commands in the top right of the open email:
Reply – reply to the email sender only
Reply all – reply to all recipients
Forward – send the email on to another person
Other reply actions: has the option ‘reply all by meeting’ which brings up a calendar invite for you to
arrange a meeting for everyone involved in the email.
19 Outlook Online Guide
View: allows you to open in a new window, translate or use immersive reader options straight from
the email.
Once you have chosen a reply option, you can treat the email as a new message, e.g. attach
documents, select to/CC/BCC, etc.
SETTINGS (Email screen) There is a lot you can do with your Settings section. Look for the cog icon at the top right of
Outlook’s banner:
Common functions
Some are displayed as soon as you click on Settings, including:
• Dark mode – allows you to switch from white background to black • Focused inbox - sorts your inbox into Focused and Other, but you can switch this off • Display density – choose how many messages are displayed in your list at one time • Conversation view – in an email trail you can choose newest reply at the top or the bottom • Reading pane – a preview of the email to the right of your inbox, to the left or off • View all Outlook settings appears at the bottom of this initial list.
View all Outlook settings
This option opens a large range of settings available to you, including the following sections:
• Layout – choose how your emails display • Compose and reply – see below • Attachments – set sharing preferences (e.g. ask how I want to share attachments every time) • Rules – set rules to tell Outlook how to handle incoming messages by subject, sender, etc • Sweep - see Sweep section earlier in this guide • Junk - you can block a sender • Customise actions – see below • Message handling –choose to empty your Deleted folder whenever you sign out, set options
for ‘mark as read’ and ‘read receipts’ • Forwarding – you can have your emails forwarded to another email account • Automatic replies – switch on your Out of Office message when you are absent from work
The most useful sections are:
Compose and reply:
You can turn on/off the text predictions which give suggestions when you are typing an email or the suggested replies that appear at the bottom of your reply email. You can set your ‘undo send’ time, or set up your auto-signature.
20 Outlook Online Guide
Customise actions:
Quick actions: Choose which quick actions appear next to the sender’s name –e.g. if you don’t ever use Pin, you can remove it
Message handling:
Message surface: Choose the actions that appear top right when you select an email to read. For example, if you often use immersive reader, pin it to this set of symbols so it is easily accessible.
Toolbar: Choose the actions you want to see along the bottom toolbar when you are composing an
email. This will remove it from … drop-down options and display the icon. For example, if you use
Templates, pin it to your toolbar
21 Outlook Online Guide
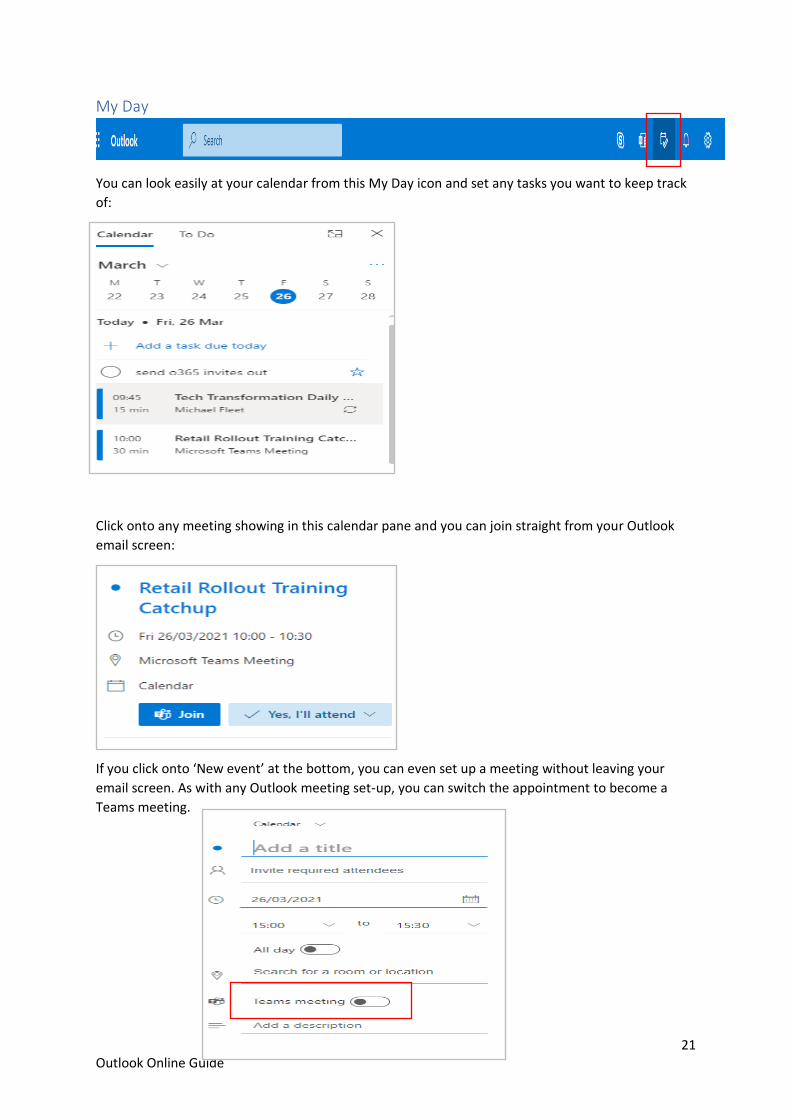
My Day
You can look easily at your calendar from this My Day icon and set any tasks you want to keep track
of:
Click onto any meeting showing in this calendar pane and you can join straight from your Outlook
email screen:
If you click onto ‘New event’ at the bottom, you can even set up a meeting without leaving your
email screen. As with any Outlook meeting set-up, you can switch the appointment to become a
Teams meeting.
22 Outlook Online Guide
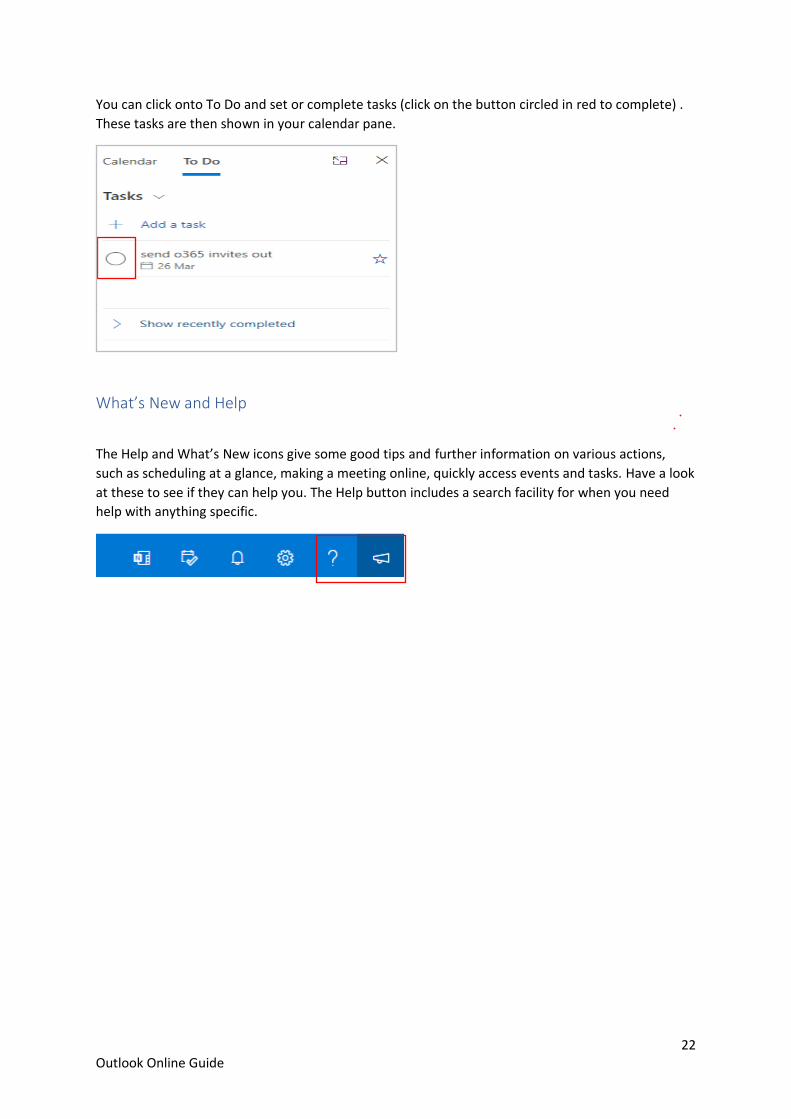
You can click onto To Do and set or complete tasks (click on the button circled in red to complete) .
These tasks are then shown in your calendar pane.
What’s New and Help
The Help and What’s New icons give some good tips and further information on various actions,
such as scheduling at a glance, making a meeting online, quickly access events and tasks. Have a look
at these to see if they can help you. The Help button includes a search facility for when you need
help with anything specific.
23 Outlook Online Guide
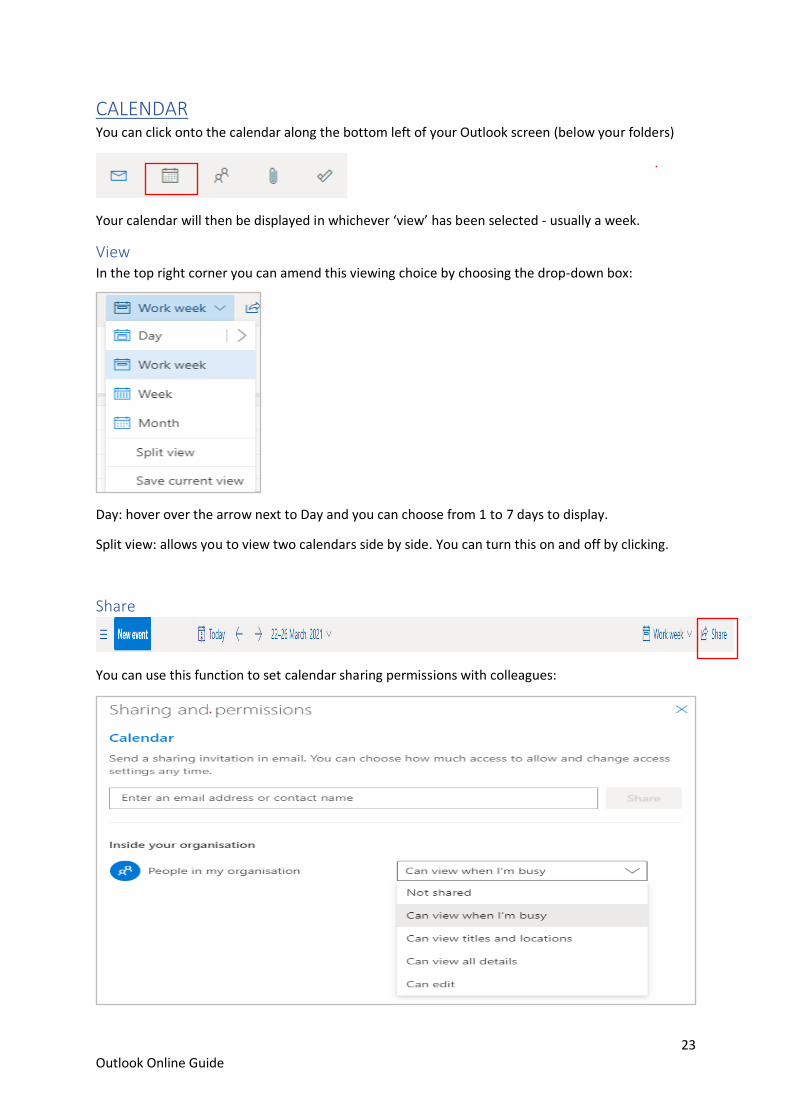
CALENDAR You can click onto the calendar along the bottom left of your Outlook screen (below your folders)
Your calendar will then be displayed in whichever ‘view’ has been selected - usually a week.
View In the top right corner you can amend this viewing choice by choosing the drop-down box:
Day: hover over the arrow next to Day and you can choose from 1 to 7 days to display.
Split view: allows you to view two calendars side by side. You can turn this on and off by clicking.
Share
You can use this function to set calendar sharing permissions with colleagues:

24 Outlook Online Guide
Add Calendar On the left pane, under your calendar, you can add other calendars, set UK holidays to display on
your calendar schedule, and see the calendar of any group you are part of.
Click onto Add Calendar and you get your options.
Personal calendars: You can add your own calendar to keep them in one place.
Edit calendar: allows you to rename or customise any of your calendars using colours and charms.
You can also share your calendar this way, which brings up the same box as the Share icon.
Blank calendar: you can create a blank calendar that will not be visible to others.
25 Outlook Online Guide
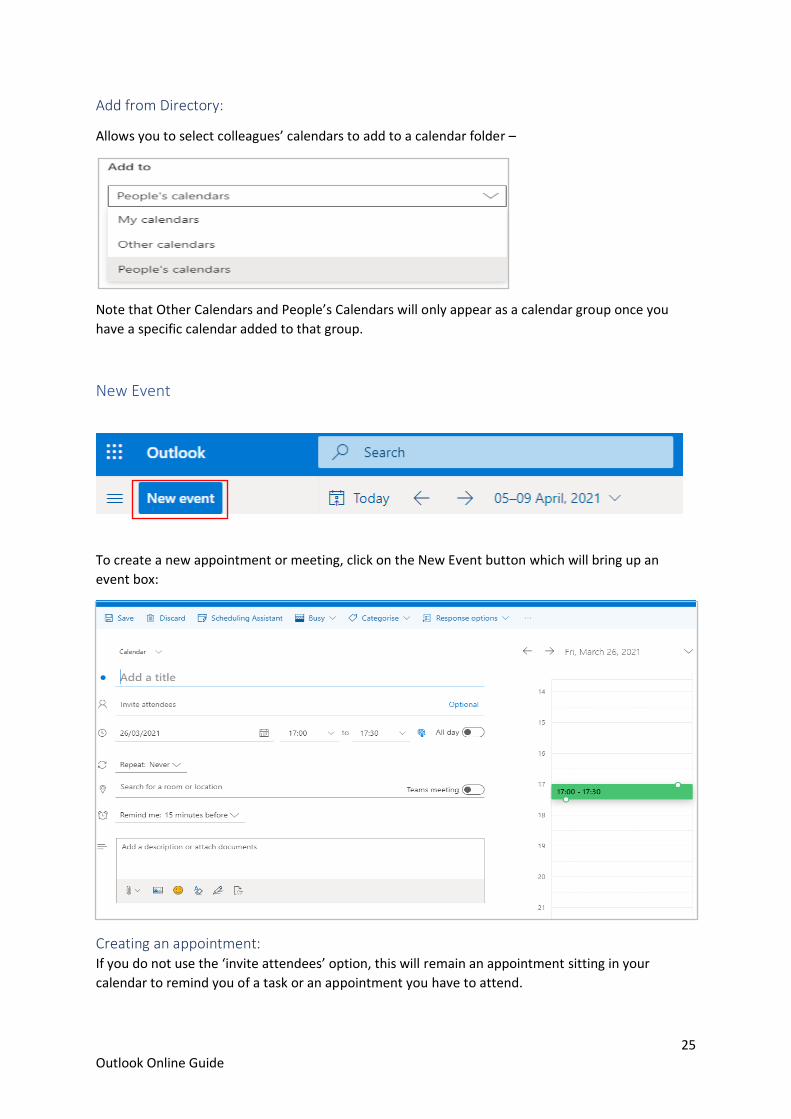
Add from Directory:
Allows you to select colleagues’ calendars to add to a calendar folder –
Note that Other Calendars and People’s Calendars will only appear as a calendar group once you
have a specific calendar added to that group.
New Event
To create a new appointment or meeting, click on the New Event button which will bring up an
event box:
Creating an appointment: If you do not use the ‘invite attendees’ option, this will remain an appointment sitting in your
calendar to remind you of a task or an appointment you have to attend.
26 Outlook Online Guide
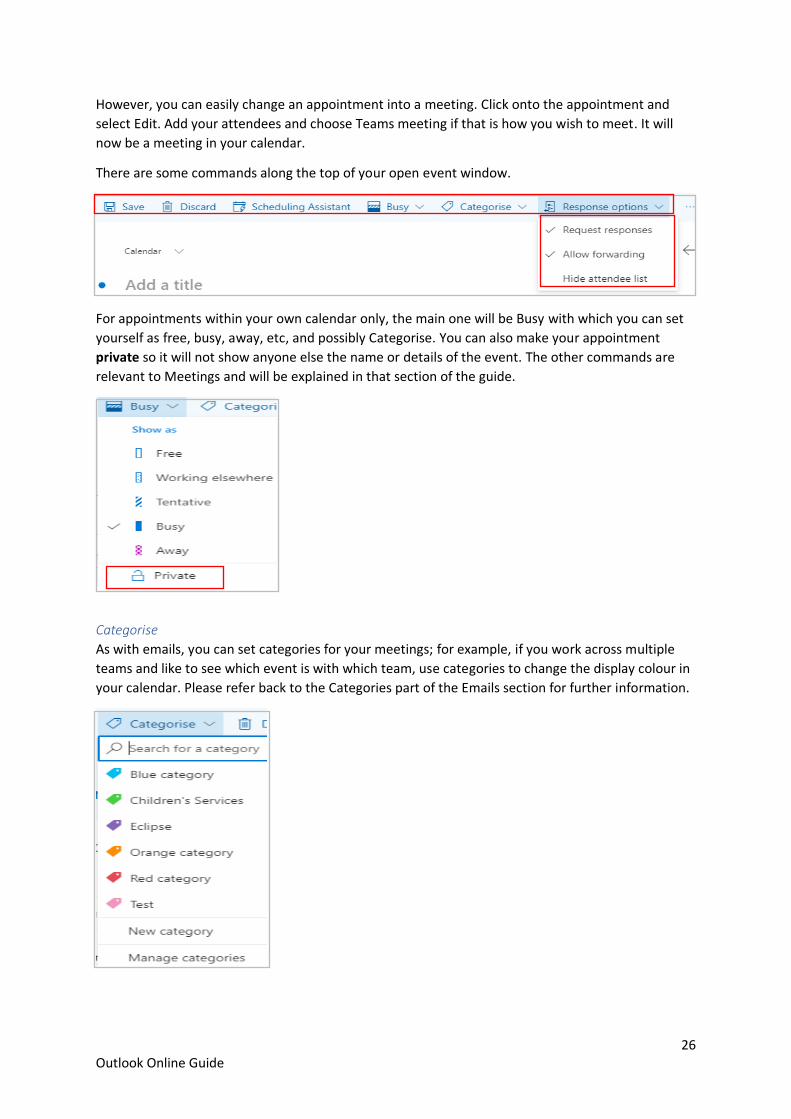
However, you can easily change an appointment into a meeting. Click onto the appointment and
select Edit. Add your attendees and choose Teams meeting if that is how you wish to meet. It will
now be a meeting in your calendar.
There are some commands along the top of your open event window.
For appointments within your own calendar only, the main one will be Busy with which you can set
yourself as free, busy, away, etc, and possibly Categorise. You can also make your appointment
private so it will not show anyone else the name or details of the event. The other commands are
relevant to Meetings and will be explained in that section of the guide.
Categorise
As with emails, you can set categories for your meetings; for example, if you work across multiple
teams and like to see which event is with which team, use categories to change the display colour in
your calendar. Please refer back to the Categories part of the Emails section for further information.
27 Outlook Online Guide
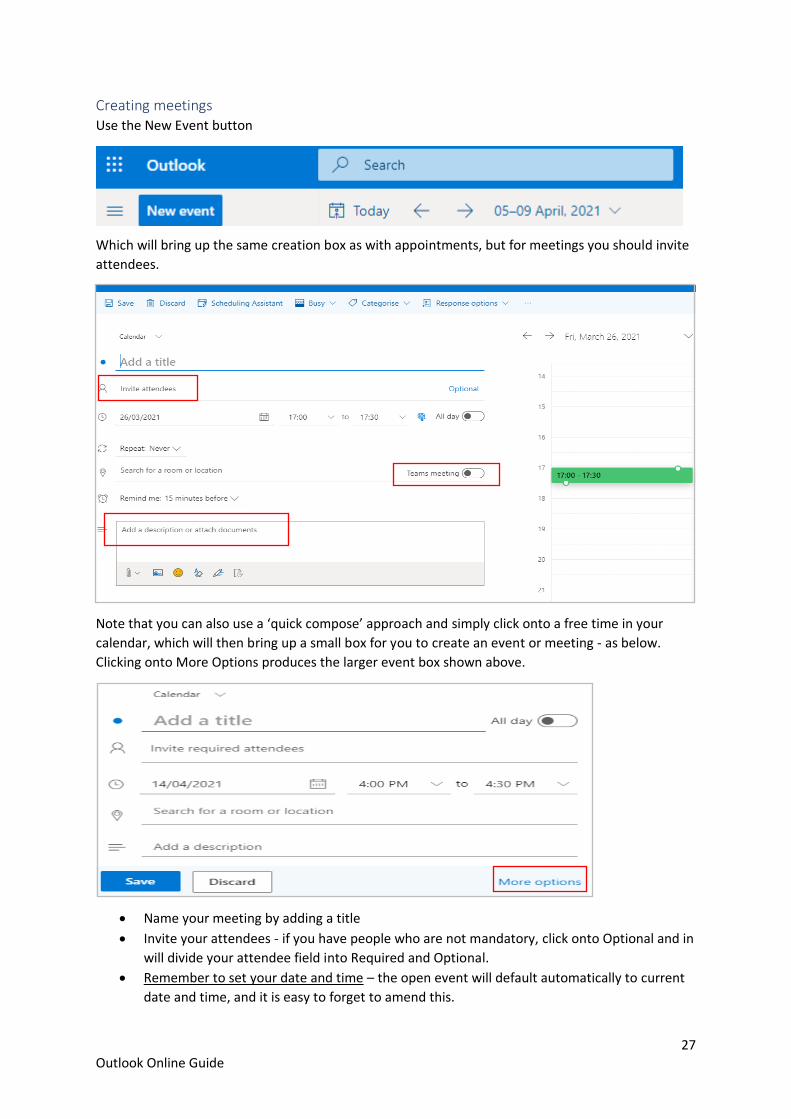
Creating meetings Use the New Event button
Which will bring up the same creation box as with appointments, but for meetings you should invite
attendees.
Note that you can also use a ‘quick compose’ approach and simply click onto a free time in your
calendar, which will then bring up a small box for you to create an event or meeting - as below.
Clicking onto More Options produces the larger event box shown above.
• Name your meeting by adding a title
• Invite your attendees - if you have people who are not mandatory, click onto Optional and in
will divide your attendee field into Required and Optional.
• Remember to set your date and time – the open event will default automatically to current
date and time, and it is easy to forget to amend this.
28 Outlook Online Guide
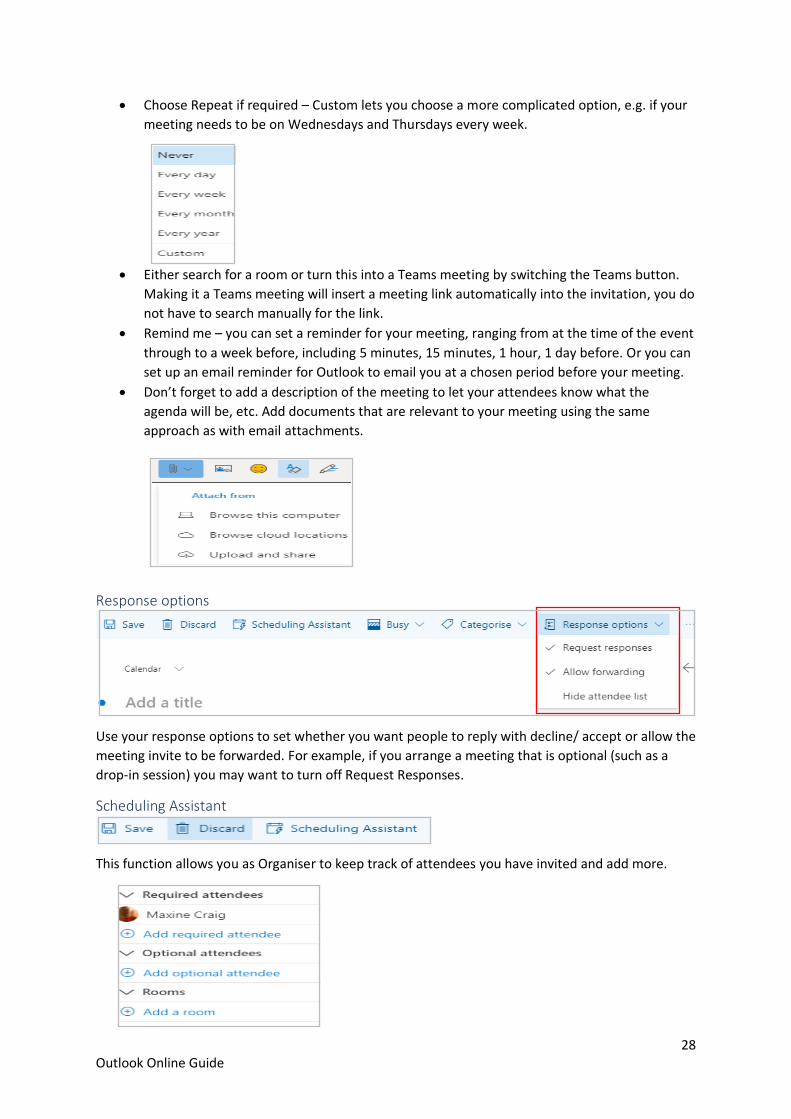
• Choose Repeat if required – Custom lets you choose a more complicated option, e.g. if your
meeting needs to be on Wednesdays and Thursdays every week.
• Either search for a room or turn this into a Teams meeting by switching the Teams button.
Making it a Teams meeting will insert a meeting link automatically into the invitation, you do
not have to search manually for the link.
• Remind me – you can set a reminder for your meeting, ranging from at the time of the event
through to a week before, including 5 minutes, 15 minutes, 1 hour, 1 day before. Or you can
set up an email reminder for Outlook to email you at a chosen period before your meeting.
• Don’t forget to add a description of the meeting to let your attendees know what the
agenda will be, etc. Add documents that are relevant to your meeting using the same
approach as with email attachments.
Response options
Use your response options to set whether you want people to reply with decline/ accept or allow the
meeting invite to be forwarded. For example, if you arrange a meeting that is optional (such as a
drop-in session) you may want to turn off Request Responses.
Scheduling Assistant
This function allows you as Organiser to keep track of attendees you have invited and add more.
29 Outlook Online Guide
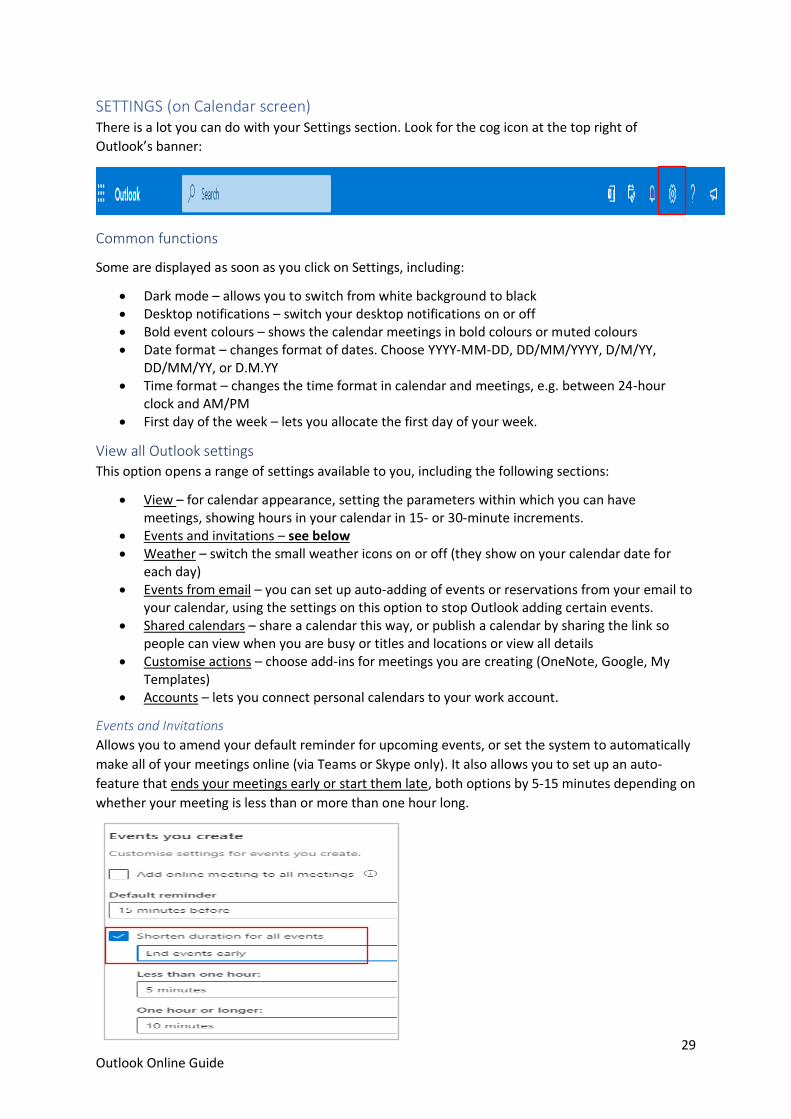
SETTINGS (on Calendar screen) There is a lot you can do with your Settings section. Look for the cog icon at the top right of
Outlook’s banner:
Common functions
Some are displayed as soon as you click on Settings, including:
• Dark mode – allows you to switch from white background to black • Desktop notifications – switch your desktop notifications on or off • Bold event colours – shows the calendar meetings in bold colours or muted colours • Date format – changes format of dates. Choose YYYY-MM-DD, DD/MM/YYYY, D/M/YY,
DD/MM/YY, or D.M.YY • Time format – changes the time format in calendar and meetings, e.g. between 24-hour
clock and AM/PM • First day of the week – lets you allocate the first day of your week.
View all Outlook settings This option opens a range of settings available to you, including the following sections:
• View – for calendar appearance, setting the parameters within which you can have meetings, showing hours in your calendar in 15- or 30-minute increments.
• Events and invitations – see below • Weather – switch the small weather icons on or off (they show on your calendar date for
each day) • Events from email – you can set up auto-adding of events or reservations from your email to
your calendar, using the settings on this option to stop Outlook adding certain events. • Shared calendars – share a calendar this way, or publish a calendar by sharing the link so
people can view when you are busy or titles and locations or view all details • Customise actions – choose add-ins for meetings you are creating (OneNote, Google, My
Templates) • Accounts – lets you connect personal calendars to your work account.
Events and Invitations
Allows you to amend your default reminder for upcoming events, or set the system to automatically
make all of your meetings online (via Teams or Skype only). It also allows you to set up an auto-
feature that ends your meetings early or start them late, both options by 5-15 minutes depending on
whether your meeting is less than or more than one hour long.

30 Outlook Online Guide
FILES At the bottom left of Outlook is a Files option – the paperclip.
Clicking onto this will give you a list of all attachments that have either been sent to you via email or
that you have sent out via email.
You can split it into Inbox, Sent, etc, by selecting the relevant folder from the list of the left of the
screen:
31 Outlook Online Guide
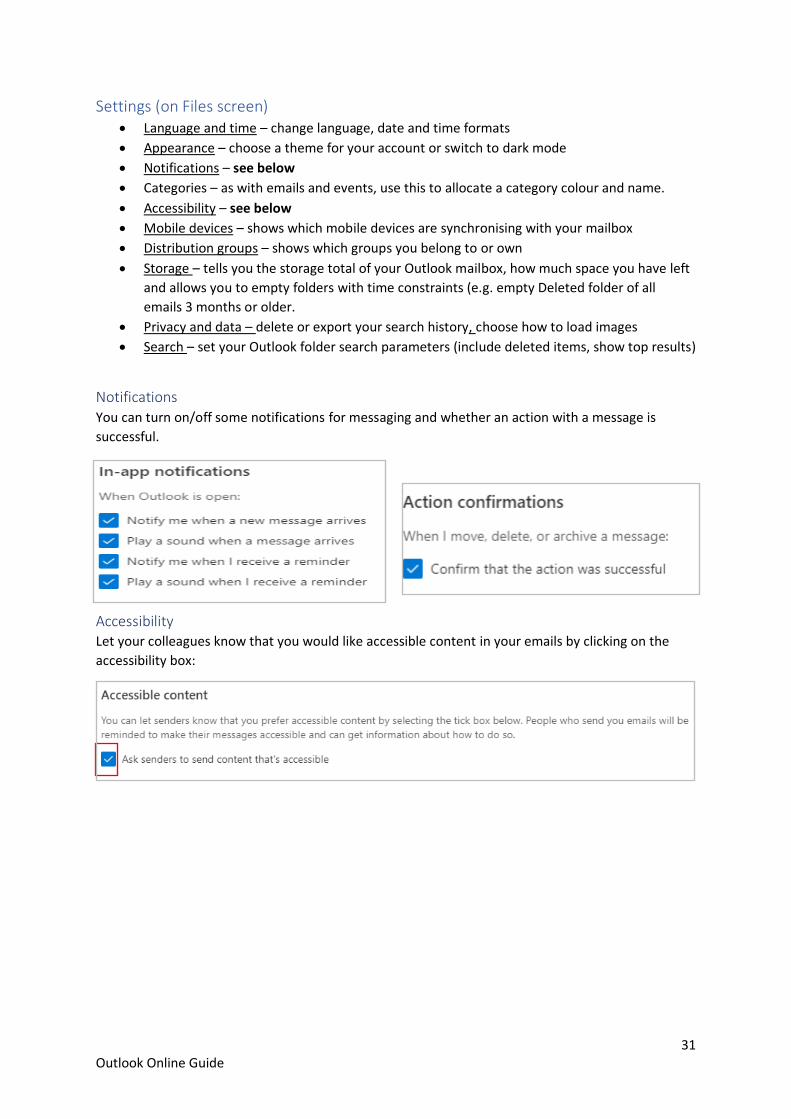
Settings (on Files screen) • Language and time – change language, date and time formats
• Appearance – choose a theme for your account or switch to dark mode
• Notifications – see below
• Categories – as with emails and events, use this to allocate a category colour and name.
• Accessibility – see below
• Mobile devices – shows which mobile devices are synchronising with your mailbox
• Distribution groups – shows which groups you belong to or own
• Storage – tells you the storage total of your Outlook mailbox, how much space you have left
and allows you to empty folders with time constraints (e.g. empty Deleted folder of all
emails 3 months or older.
• Privacy and data – delete or export your search history, choose how to load images
• Search – set your Outlook folder search parameters (include deleted items, show top results)
Notifications You can turn on/off some notifications for messaging and whether an action with a message is
successful.
Accessibility Let your colleagues know that you would like accessible content in your emails by clicking on the
accessibility box:
32 Outlook Online Guide
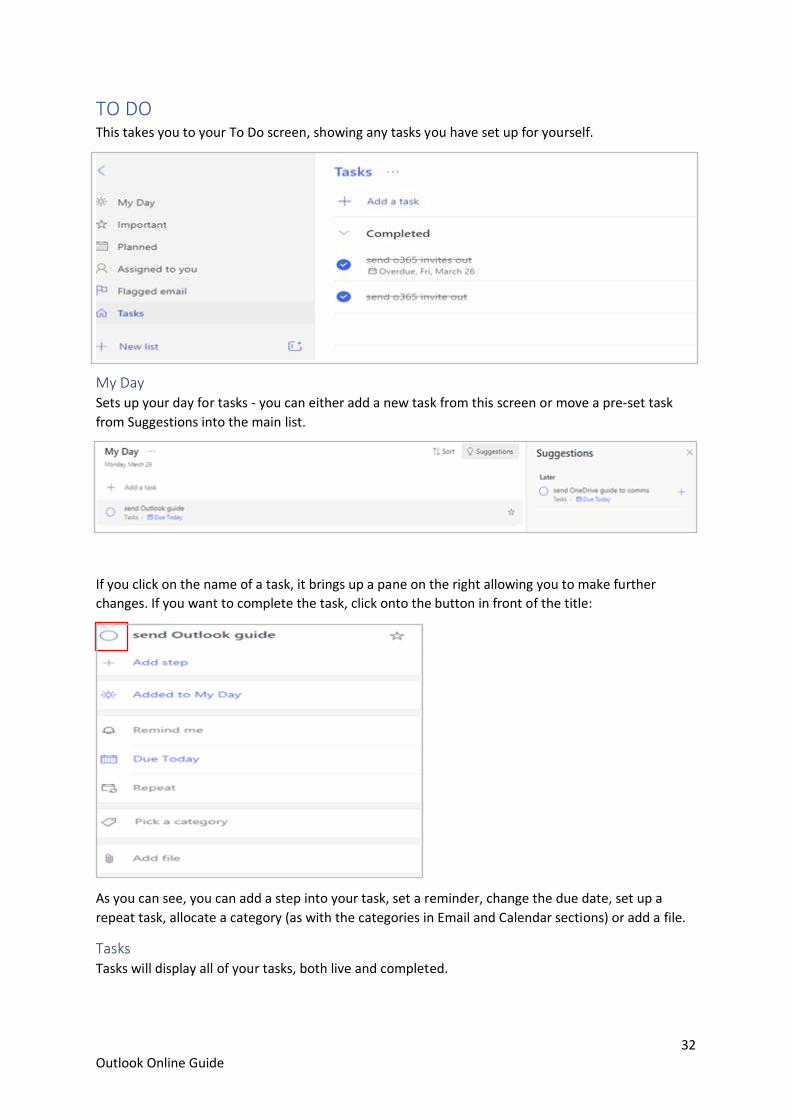
TO DO This takes you to your To Do screen, showing any tasks you have set up for yourself.
My Day Sets up your day for tasks - you can either add a new task from this screen or move a pre-set task
from Suggestions into the main list.
If you click on the name of a task, it brings up a pane on the right allowing you to make further
changes. If you want to complete the task, click onto the button in front of the title:
As you can see, you can add a step into your task, set a reminder, change the due date, set up a
repeat task, allocate a category (as with the categories in Email and Calendar sections) or add a file.
Tasks Tasks will display all of your tasks, both live and completed.
33 Outlook Online Guide
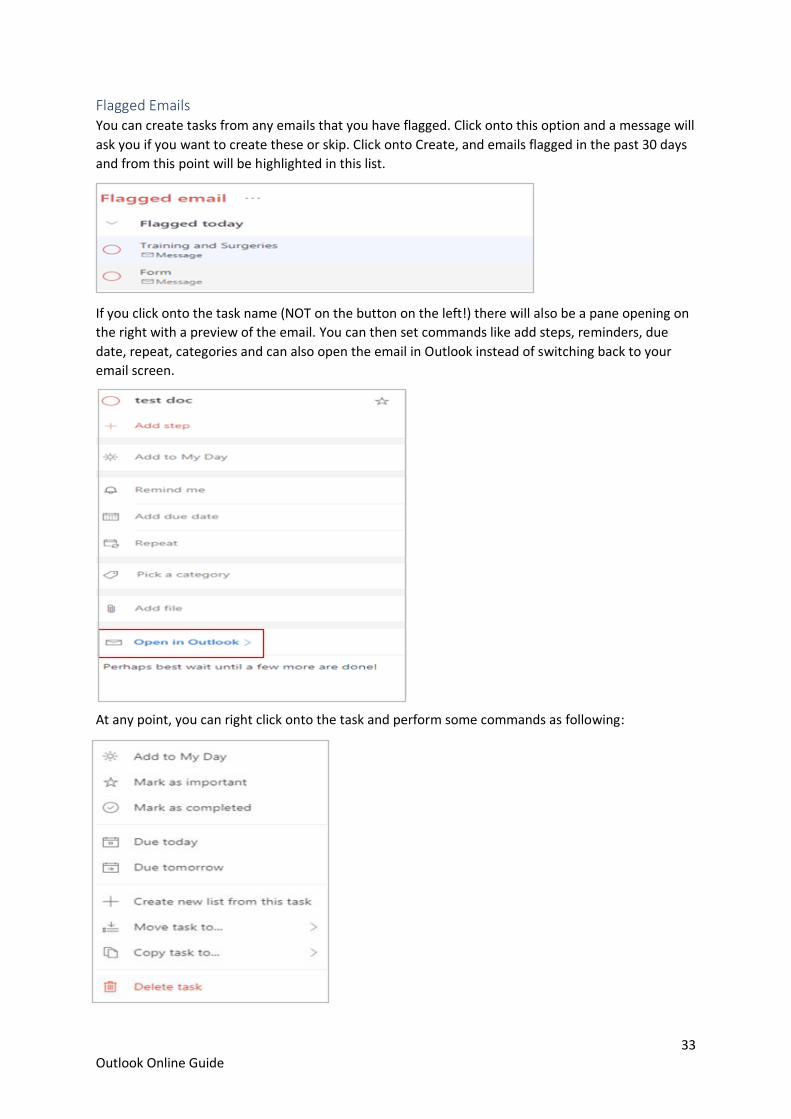
Flagged Emails You can create tasks from any emails that you have flagged. Click onto this option and a message will
ask you if you want to create these or skip. Click onto Create, and emails flagged in the past 30 days
and from this point will be highlighted in this list.
If you click onto the task name (NOT on the button on the left!) there will also be a pane opening on
the right with a preview of the email. You can then set commands like add steps, reminders, due
date, repeat, categories and can also open the email in Outlook instead of switching back to your
email screen.
At any point, you can right click onto the task and perform some commands as following:
34 Outlook Online Guide
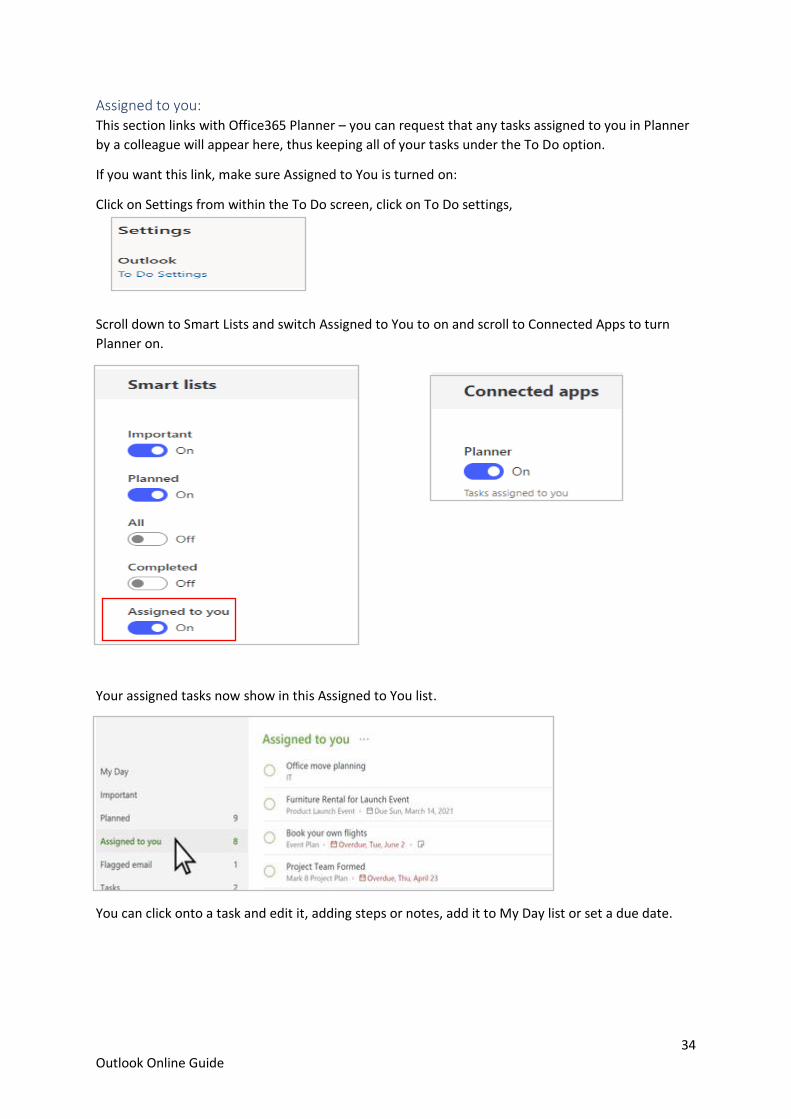
Assigned to you: This section links with Office365 Planner – you can request that any tasks assigned to you in Planner
by a colleague will appear here, thus keeping all of your tasks under the To Do option.
If you want this link, make sure Assigned to You is turned on:
Click on Settings from within the To Do screen, click on To Do settings,
Scroll down to Smart Lists and switch Assigned to You to on and scroll to Connected Apps to turn
Planner on.
Your assigned tasks now show in this Assigned to You list.
You can click onto a task and edit it, adding steps or notes, add it to My Day list or set a due date.
35 Outlook Online Guide
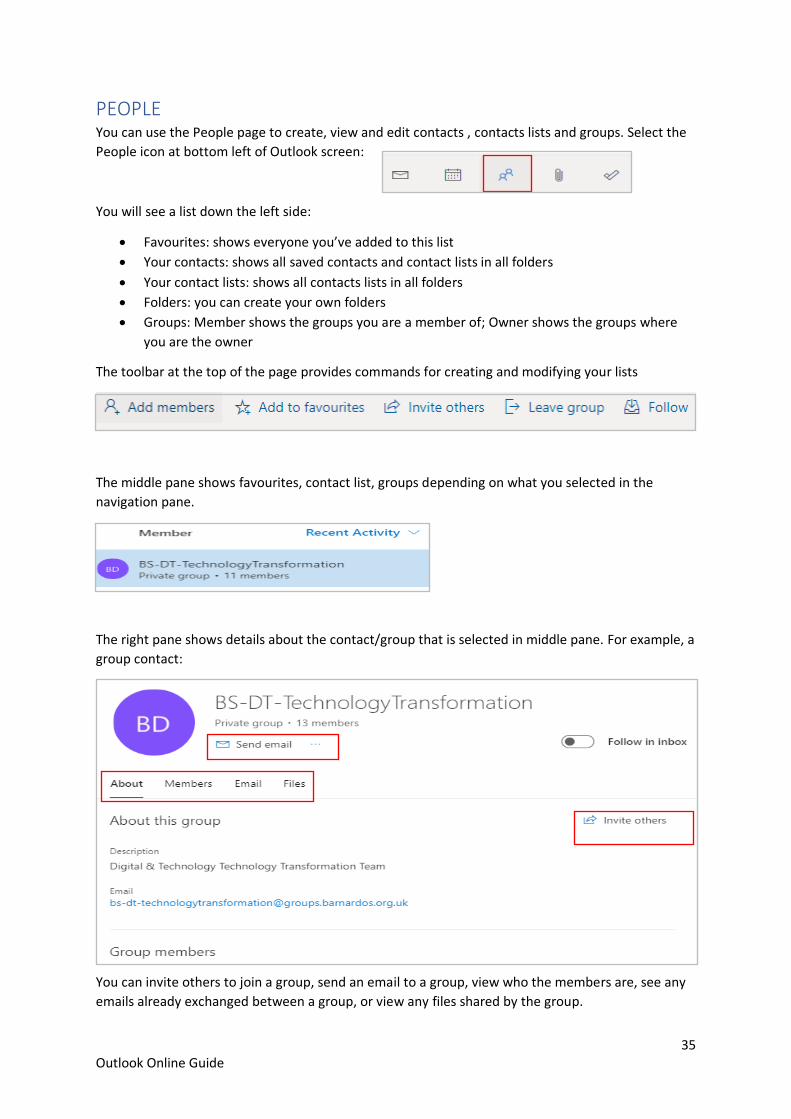
PEOPLE You can use the People page to create, view and edit contacts , contacts lists and groups. Select the
People icon at bottom left of Outlook screen:
You will see a list down the left side:
• Favourites: shows everyone you’ve added to this list
• Your contacts: shows all saved contacts and contact lists in all folders
• Your contact lists: shows all contacts lists in all folders
• Folders: you can create your own folders
• Groups: Member shows the groups you are a member of; Owner shows the groups where
you are the owner
The toolbar at the top of the page provides commands for creating and modifying your lists
The middle pane shows favourites, contact list, groups depending on what you selected in the
navigation pane.
The right pane shows details about the contact/group that is selected in middle pane. For example, a
group contact:
You can invite others to join a group, send an email to a group, view who the members are, see any
emails already exchanged between a group, or view any files shared by the group.

36 Outlook Online Guide
For a single contact from Your Contacts, you can send an email, start a chat, view files you have
shared, view emails between you, view organisational structure, and view their contact details:
New Contact:
You can create a new contact by clicking onto the New Contact button at top left:
A box appears for you to complete details like name, contact info and notes. If you want to add more
information such as address, click on Add More. Click Create to save this new contact.
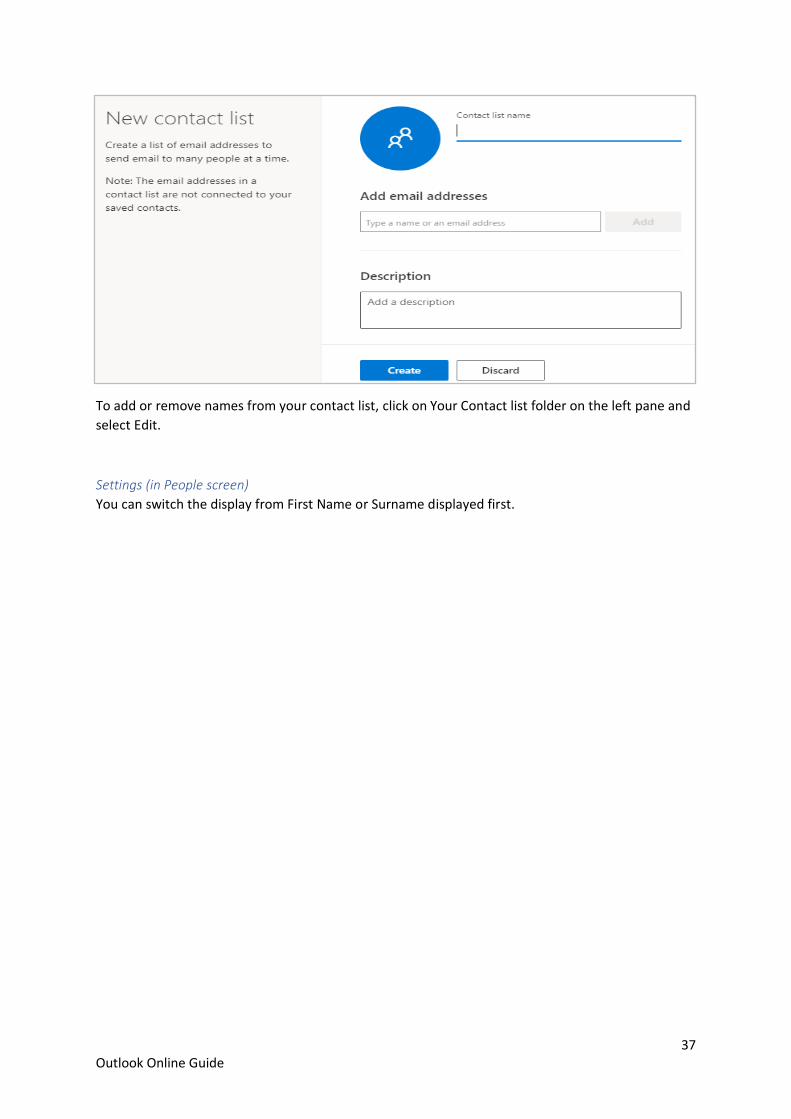
Create new contact list:
A contact list is a collection of email addresses, useful for sending email to a group of people.
Contact lists are sometimes referred to as distribution lists.
Click the New Contact drop-down arrow:
Name your list and start to add the contact names you need to be in your list. Click Create when
done.
37 Outlook Online Guide
To add or remove names from your contact list, click on Your Contact list folder on the left pane and
select Edit.
Settings (in People screen)
You can switch the display from First Name or Surname displayed first.