owner manual - lazer helmets - protect your freedom · please read this manual carefully before...
TRANSCRIPT
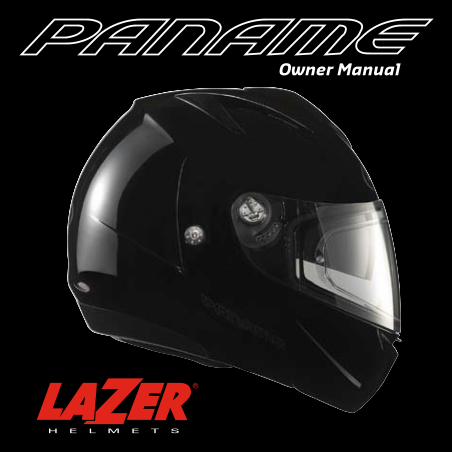
Owner Manual


WARNING- No helmet can protect the wearer against all possible impacts.- For maximum protection, the helmet must fit firmly on the head, and all retention straps must be securely fastened. With the chin-strap comfortably but firmly adjusted, it should not be possible, in most cases, for the helmet to be removed from the head when pulled at the rear in an upward direction.- The helmet is designed to be retained by a strap under the chin.- The helmet may be used with goggles.- No attachments should be made to the helmet except those recommended by the helmet manufacturer. Do not drill or cut the shell.- The helmet is designed to absorb shock by partial destruction of the shell and liner. This damage may not be visible. Therefore if subjected to a severe blow, the helmet should be replaced even if it is apparently undamaged.- The liner is essential to the intended performance of the helmet.- The helmet may be damaged and rendered ineffective by petroleum products, cleaning agents, paints, adhesives, etc., without the damage beeing visible to the user. Use only warm soapy water to clean the helmet surface.DOT
IMPORTANTPlease read this manual carefully BEFORE using your helmet for the first time.Following the instructions will keep your helmet effective and SAFE.Remember to keep the manual in a safe place. It contains instructions, which are EXTREMELY IMPORTANT for your safety.PLEASE REMEMBER!!! We have done our best to be as clear and explicit as possible, However, should you find the instructions unclear, or have any questions or require further information, please do not hesitate to contact us by post or e-mail.
IMPORTANTNous vous prions de lire avec attention ce manuel AVANT d’utiliser votre casque pour la première fois.Suivre les instructions, maintiendra votre casque dans un état lui assurant efficacité et SECURITE.Prenez soin de conserver ce manuel dans un endroit vous permettant de le retrouver facilement. Il contient des instructions de sécurité EXTREMEMENT IMPORTANTES.SOUVENEZ VOUS-EN !!! Nous avons fait le maximum pour être le plus clair et le plus explicite possible. Cependant, si des instructions ne vous semblent pas claires, si vous avez des questions ou besoin d’informations, n’hésitez pas à nous contacter par courrier ou par e-mail.
BELANGRIJKGelieve deze handleiding aandachtig te lezen VOOR de helm de eerste maal in gebruik te nemen.Onderstaande instructies helpen u de helm efficiënt en veilig te houden.Bewaar deze handleiding zodat u die te allen tijde gemakkelijk kan raadplegen. Deze bevat instructies die HEEL BELANGRIJK zijn voor uw veiligheid. OPGELET!!! Wij hebben onze uiterste best gedaan om zo duidelijk mogelijk te zijn. Indien sommige instructies niet duidelijk zijn of hebt u nog andere vragen, aarzel niet met ons contact op te nemen per post of per e-mail.
WICHTIG Bitte lesen Sie diese Gebrauchsanweisung VOR der ersten Benutzung Ihres Helms.Wenn Sie sich an die Anweisungen halten, wird Ihr Helm in einem Zustand bleiben, der seine Wirksamkeit und SICHERHEIT gewährleistet.Bitte bewahren Sie diese Gebrauchsanweisung an einem Ort auf, an dem sie leicht wieder aufzufinden ist. Sie enthält EXTREM WICHTIGE Sicherheitsanweisungen.NICHT VERGESSEN !!! Wir haben alles unternommen, so klar und so deutlich wie nur möglich zu sein. Wenn allerdings gewisse Anweisungen Ihrer Meinung nach unklar sind, oder falls Sie Fragen haben oder Informationen benötigen sollten, dann nehmen Sie doch bitte, per Post oder E-Mail, Kontakt mit uns auf.
IMPORTANTE Lea con atención este manual ANTES de utilizar su casco por primera vez.Si sigue las instrucciones, mantendrá su casco en un estado que le garantizará eficacia y SEGURIDAD.Guarde este manual en un lugar en el que pueda encontrarlo fácilmente. Contiene instrucciones de seguridad SUMAMENTE IMPORTANTES.¡RECUERDE! Hemos procurado ser lo más claros y explícitos posible. Sin embargo, si las instrucciones no le parecen claras, si desea hacer preguntas o si necesita información, no dude en ponerse en contacto con nosotros por correo ó por correo electrónico.
IMPORTANTEPor favor, leia com atenção este manual ANTES de utilizar o seu capacete pela primeira vez.Seguindo as instruções, será possível manter seu capacete com SEGURANÇA e efetivo.Lembre-se de guardar o manual em local seguro. Nele contem instruções EXTREMAMENTE IMPORTANTES para sua segurança.POR FAVOR, LEMBRE-SE!!! Procuramos ser o mais claro e objetivos possível, no entanto, caso ainda permaneçam dúvidas sobre as informações deste produto, não hesite em entrar em contato conosco por e-mail, telefone ou correio.
IMPORTANTELeggere attentamente questo manuale prima di utilizzare il casco per la prima volta.Seguire le istruzioni manterrà il vostro casco nello stato ottimale in modo che assicuri efficienza e SICUREZZAConservare il manuale in un luogo sicuro. Contiene informazioni FONDAMENTALI per la vostra SICUREZZA.ATTENZIONE! Abbiamo cercato di realizzare un manuale che potesse essere il più semplice e chiaro possibile. Nel caso riteniate che le istruzioni non siano sufficientemente chiare, o abbiate delle domande o vogliate chiedere ulteriori spiegazioni potete contattarci direttamente via e-mail o posta.
INFORMATION FOR USERS- To insure an adequate protection, this helmet must fit closely and be securely attached.- Any helmet that has sustained a violent impact should be replaced.- Warning! Do not apply paint, stickers, petrol or other solvents to this helmet. Use only warm soapy water to clean the helmet surface.ECE 22.05
MISE EN GARDE- Pour assurer une protection suffisante, ce casque doit être bien ajusté et être solidement attaché.- Tout casque qui a été soumis à un choc violent est à remplacer.- Attention : N’appliquer sur ce casque ni peinture, ni autocollant, ni essence, ni aucun autre solvant. N’utilisez que de l’eau chaude et savonneuse pour nettoyer le casque.ECE 22.05
WAARSCHUWING- Om een voldoende bescherming te waarborgen moet deze helm goed passen en tevens een goed zijdelings zicht mogelijk maken.- Iedere helm die een hevige klap heeft opgevangen dient te worden vervangen, zelfs al is de geleden schade op het eerste zicht niet merkbaar.- Niet verven, noch reinigen met bijtende producten. Gebruik warm water en zeep voor het reinigen van de helm.ECE 22.05
WARNUNG- Um einen ausreichenden Schutz zu ermöglichen muss dieser Helm genau passen und außerdem eine gute seitliche Sicht garantieren.- Jeder Helm, der einem heftigen Stoss ausgesetzt wurde, ist unbedingt zu ersetzen, auch wenn der Helm unbeschädigt scheint und keine sichtbaren Schäden aufweist. Der Helm darf weder mit Farbe bestrichen noch mit Beizmitteln gereinigt werden.ECE 22.05
AVISO - Para garantizar una protección suficiente, su casco tiene que estar bien ajustado y tiene que asegurar al mismo tiempo una buena visión lateral.- Cada casco que haya sido expuesto a un golpe violento tiene que substituirse por otro.- Atención ! no se puede aplicar pintura, pegatinas, gasolina o productos agresivos en el casco. Use agua caliente y jabón para limpiar la superficie del cascoECE 22.05
AVISO- Para garantir a proteção adequada, este capacete tem que estar bem ajustado e com boa visão lateral.- Todo capacete que tenha sofrido qualquer tipo de impacto deve ser trocado.- Atenção! Não aplique pinturas, adesivos, derivados de petróleo ou qualquer tipo de solvente neste capacete. Use somente água morna com sabão neutro para limpar a superfície do mesmo.ECE 22.05
ATTENZIONE- Per garantire una protezione sufficiente, questo casco deve essere ben calzato sulla testa e saldamente allacciato.- Il casco che ha subito un urto violento deve essere sostituito.- Attenzione! Non utilizzare vernici, benzina o altri prodotti chimici. Non applicare adesivi. Pulire il casco esclusivamente con un panno morbido umido e sapone neutro.ECE - R22.05
WARNINGNo helmet can protect the wearer against all possible impacts.For maximum protection the helmet must fit firmly on the head, and the reten-tion system must be securely fastened. With the retention system comfortably but firmly adjusted, it should not be possible for the helmet to be removed from the head when pulled at the rear in an upward and forward direction.Ensure that any visor attached to the helmet meets the requirements of AS 1609.The helmet is unsuitable for use with goggles.The helmet is unsuitable for use with communications devices. (if suitable for use with communications devices, list the appropriate devices.)No attachments should be made to the helmet except those recommended by the helmet manufacturer. Do not drill or cut the shell.The helmet is designed to absorb shock by partial destruction of the shell and liner. This damage may not be visible. Therefore if subjected to a severe blow, the helmet should be replaced even if it is apparently undamaged.The liner is essential to the intended performance of the helmet.The helmet has a limited lifespan in use and should be replaced when it shows obvious signs of wear, e.g. change of fit, cracks, rust or fraying.
THE PROTECTION OF THIS HELMET MAY BE SEVERELY REDUCED BY THE APPLICATION OF PAINT, ADHESIVE STICKERS OR TRANSFERS, CLEANING FLUIDS OR OTHER SOLVENTS.USE ONLY MATERIALS RECOMMENDED BY THE HELMET MANUFACTURER.
AS-NZS 1698: 2006
When riding a motorcycle, your life could depend on a clear vision. Keep it unhindered by observing theses basic rules:- Use only genuine face shields.- Tinted face shields are for daytime use only.- Always keep your face shield clean scratch free.- Always keep your field of vision unobstructed.
A moto, la vue, c’est la vie. Veillez toujours à optimaliser votre vision en respectant les règles élémentaires suivantes :- Utilisez l’écran d’origine.- N’utilisez un écran fumé qu’en plein jour.- Gardez votre écran propre et sans rayures.- N’obstruez pas votre champ de vision.
Bij het rijden met een motor is een goed zicht van levensbelang.Respecteer volgende elementaire regels:- Gebruik enkele originele schermen.- Gebruik enkel getinte schermen overdag.- Houdt altijd uw scherm proper en krasvrij.- Houdt uw gezichtsveld vrij.
Beim Motorradfahren kann Ihr Leben von der klaren Sicht abhängen. Bei Beachtung der folgenden Punkte behalten Sie immer klare Sicht:- Benützen Sie nur ein Original Visier.- Ein getöntes Visier sollten Sie nur bei Tageslicht verwenden.- Halten Sie Ihr Visier immer sauber und schützen Sie es vor Kratzern, damit die Sicht nicht beeinträchtig wird.
En moto, la vista es la vida. Cuide siempre su vista e optimizela respetando las siguientes reglas básicas:- Utilize la pantalla original. - Utilize la pantalla ahumada sólo a la luz del día.- Conserve la pantalla limpia y sin rayas.- No obstruya su campo de visión.
Ao pilotar uma motocicleta, sua vida pode depender de uma visibilidade clara. Cuide sempre de sua segurança, respeitando as regras abaixo:- Use somente lentes originais.- Lentes escuras e espelhadas são apenas para uso diurno.- Conserve as lentes limpas e sem arranhões.- Não obstrua o seu campo de visão.
In moto, una visione corretta è indispensabile per la tua vita. Accertarsi sempre che la vista sia ottimale, rispettando le seguenti regole di base: - Utilizzare la visiera originale.- Utilizzare visiere scure soltanto in pieno giorno.- Mantenere la visiera pulita e senza rigature.- Non ostruire in alcun modo il campo visivo.
- Your helmet will be useless if it’s too big or not properly fastened. Always buy a helmet to your exact size and always fasten it properly.
- Votre casque sera inutile s’il est trop grand ou s’il est mal attaché. Veillez donc à l’acheter à la bonne taille et à toujours fixer sa jugulaire.
- Uw helm is nutteloos als hij te groot is en niet correct gesloten is. Koop steeds een helm die perfect past en sluit de helm telkens op de correcte manier.
- Ihr Helm ist nutzlos, wenn er zu groß oder nicht richtig verschlossen ist. Kaufen Sie nur einen Helm, der Ihnen optimal passt und schliessen Sie ihn sorgfaltig.
- Su casco no le será de gran utilidad si resulta demasiado grande ó si estuviera mal abrochado. Compruebe que compra la talla adecuada y no olvide atarse la correa debajo de la barbilla.
- Seu capacete não terá utilidade se estiver muito grande ou mal ajustado. Sempre utilize um capacete adequado ao tamanho de sua cabeça, ajustando-o de maneira apropriada.
- Il casco è inutile se troppo grande o non allacciato correttamente. Accertarsi pertanto di allacciarlo sempre saldamente ed in maniera corretto.
- Never modify your helmet in any way. Modifications could result in lowering the effectiveness of your helmet.
- Il est formellement déconseillé d’apporter quelque modification que ce soit à votre casque. Cela pourrait impliquer des dégradations qui diminueraient l’efficacité de votre casque.
- Het is ten strengste verboden om wijzigingen aan te brengen aan de helm. Wijzigingen kunnen een mindere efficiëntie van uw helm te weeg brengen.
- Manipulieren Sie nicht an Ihren Helm. Veränderungen stellen die Wirksamkeit und Sicherheit in Frage.
- Desaconsejamos realizar cualquier modificación a su casco. El hacerlo podría acarrear una degradación que disminuiría la eficacia de su casco.
- Nunca modifique a configuração de seu capacete. Modificações podem resultar na redução da eficácia da segurança do seu capacete.
- Si sconsiglia fortemente di apportare qualsiasi modifica al casco. Ciò potrebbe comportare alterazioni che ridurrebbero l’efficacia del casco.
Vision
Vision
Zichtbaarheid
Sicht
Visión
Visibilidade
Visione
1 23
Fastening
Fermeture
Sluiting
Verschluß
Cierre
Retenção
Chiusura
Modifications
Modifications
Wijzigingen
Veränderungen
Modificaciones
Modificações
Modifiche
Advices - Conseils – Aanbeveling - Empfehlungen Consejos de uso - Sugestões de Uso - Consigli
- When your helmet sustains a severe shock, part of its structure and lining may have been deteriorated by absorbing the energy of the impact. These damages may not visible to the eye. In this case, do not hesitate to replace it.
- Lorsque votre casque subit un choc important, une partie de sa structure et de son rembourrage se détériore en absorbant l’énergie du choc; il se peut que cette détérioration reste invisible à l’oeil nu, dans ce cas remplacez-le.
- Als uw helm een hevige klap heeft geïncasseerd, kan de buiten - en/of binnenschaal gedeeltelijk beschadigd zijn door de impact van de klap. De beschadiging is niet altijd uiterlijk zichtbaar. In dat geval dient u uw helm te vervangen.
- Nach einem schweren Aufschlag können Teile der Schale (Helmstruktur) oder der Verkleidung beschädigt sein, weil sie die Aufschlagsenergie absorbiert haben. Solche Beschädigungen müssen nicht unbedingt (für das Auge) sichtbar sein. Bitte zögern Sie im Zweifelsfall nicht, den beschädigten Helm durch einen Neuen zu ersetzen.
- En el momento en el que su casco sufra un choque importante, se deteriora una parte de su estructura y de su relleno ya que absorbe la energía del choque. Es posible que dicho deterioro resulte invisible a simple vista. Este caso, sustituya el casco por uno nuevo.
- No momento em que o seu capacete sofrer um choque importante, parte de sua estrutura e superfície é deteriorada pela absorção do impacto causado. Estes danos podem ser imperceptíveis ao olho humano e somente o fabricante poderá determinar se este capacete ainda possui condições de segurança apropriadas. Em caso de dúvida, substitua o mesmo por um novo.
- Quando o seu capacete absorve um impacto severo, parte de sua estrutra e forro podem ter sidos deteriorados pela absorção da energia do impacto. Estas avarias podem não ser visíveis ao olho humano. Neste caso, não hesite em substituir o capacete.
- In caso di urto calotta esterna e componenti interne del casco possono modificarsi per assorbire l’energia dovuta all’urto stesso. Questa alterazione potrebbe essere invisibile a occhio nudo. In tal caso, sostituire il casco.
CARE AND MAINTENACEClean the outside and inside of your helmet regularly.Use a soft cloth and warm or slightly soapy water.NEVER USE GAS OIL, SOLVENTS, PETROL OR OTHER AGGRESSIVE PRODUCTS.The padding is removable to make it easy to clean. Again, only use warm or slightly soapy water.Hand wash and drip dry.To clean the visor (shield), dip it in lukewarm soapy water. Wipe it in a lint free cloth from the top to the bottom avoiding any circular motion.After correctly cleaning the vents and the visor mechanism, it is a good idea to lubricate them from time to time with white or silicone grease to maximise their durability.
SOIN ET ENTRETIEN. Nettoyez régulièrement l’extérieur et l’intérieur du casque. Utilisez un chiffon doux et une solution d’eau tiède pure ou légèrement savonnée.NE JAMAIS UTILISER DE GASOIL , DILUANTS, ESSENCES ET AUTRES PRODUITS AGRESSIFS.Les garnitures de confort se démontent afin de faciliter leur nettoyage. Là encore, n’utilisez que de l’eau tiède pure ou légèrement savonnée.Les laver à la main et ensuite faire sécher à l’air. Pour nettoyer votre écran, laissez-le tremper dans un peu d’eau tiède légèrement savonnée, puis essuyez-le à l’aide d’un chiffon doux non pelucheux, de haut en bas en évitant les rotations. La durée de vie de votre écran en sera prolongée.Après avoir correctement nettoyé les deux ventilations arrière ainsi que l’écran, il est conseillé de les lubrifier de temps en temps avec une graisse blanche ou graisse silicone. Ceci afin d’assurer leur longévité.
ONDERHOUDReinig geregeld de buiten- en binnenkant van uw helm. Gebruik enkel een zachte doek en warm water met eventueel wat zeep.GEBRUIK NOOIT BIJTENDE PRODUCTEN. De binnenvoering is makkelijk te verwijderen. Deze kan je eveneens met de hand wassen in warm water met zeep en laten drogen (geen droogkast).Voor het scherm gebruikt u eveneens een natte zachte doek met eventueel wat zeep. Veeg het scherm proper van boven naar onder zonder draaiende bewegingen. Het is aangewezen om af en toe na het reinigen van de ventilaties en het schermmechanisme deze in te smeren met een doorzichtige of siliconenolie. Dit verhoogt de duurzaamheid van het mechanisme.
PFLEGE UND WARTUNG.Reinigen Sie Ihren Helm regelmäßig innen und außen.Verwenden Sie einen weichen Lappen mit lauwarmem Wasser (entweder reines Wasser oder Seifenlauge).NIEMALS KFZ-KRAFTSTOFFE, VERDÜNNUNGSMITTEL ODER ANDERE ÄTZENDE MITTEL VERWENDEN.Die Komfort-Innenausstattungen sind leicht herauszunehmen, um ihre Reinigung zu erleichtern. Auch hierfür darf nur reines Wasser oder leichte Seifenlauge verwendet werden.Mit der Hand waschen und frei trocknen lassen.Zum Reinigen tauchen Sie das Visier in lauwarmes Seifenwasser; anschließend mit einem fusselfreien Tuch von oben nach unten und ohne Kreisbewegungen trocknen. Dadurch wird die Haltbarkeit des Visiers verlängert.Nach der angemessenen Reinigung der zwei hinteren Lüftungen sowie des Visiers, wird empfohlen, sie von Zeit zu Zeit mit weißem Fett oder Silikonfett einzuschmieren. Dadurch wird ihre Haltbarkeit verlängert.
CUIDADOS Y LIMPIEZA Limpie regularmente el exterior y el interior del casco. Utilize un trapo suave y agua templada pura o ligeramente jabonosa.NO UTILIZE NUNCA GASOIL, DILUYENTES, GASOLINAS U OTROS PRODUCTOS AGRESIVOS.Los interiores de confort se desmontan para facilitar su limpieza. En este caso también, utilize agua templada pura o ligeramente jabonosa. Lávelas a mano y después déjelas secar al aire.Para limpiar su pantalla, debe lavarla en un poco de agua templada pura ó ligeramente jabonosa y después la tiene que secar con un trapo suave y que no suelte pelusa. La pantalla se tiene que secar de arriba hacia abajo, evitando hacer círculos con el trapo. Así su pantalla durará más tiempo. Después de haber limpiado bien las dos ventilaciones traseras y la pantalla, se recomienda lubricarlas de vez en cuando con una grasa blanca o una grasa de silicona para garantizar su longevidad.
4Damaged Helmet
Casque endommagé
Beschadigingen
Beschädigungen
Casco dañado
Capacete Danificado
Casco danneggiato
CUIDADOS E LIMPEZALimpe a parte interna e externa de seu capacete com freqüência.Use um pano macio com água morna e sabão neutro.NUNCA UTILIZE DERIVADOS DE PETROLEO, SOLVENTES OU PRODUTOS AGRESSIVOS.O forro interno é removível para facilitar a limpeza. Novamente, use somente água morna e sabão neutro.Lave com as mãos e deixe secar naturalmente.Para limpar a lente (viseira), mergulhe a mesma em água morna e sabão neutro. Em seguida utilize um pano limpo e macio, do topo para a base, evitando qualquer marca circular.Após limpar corretamente a viseira e o mecanismo de fixação, é recomendado que lubrifique frequentemente este mecanismo com graxa de silicone branco, maximizando a durabilidade.
CURA E MANUTENZIONEPulire regolarmente calotta esterna ed interni del casco. Utilizzare un panno morbido inumidito con acqua tiepida ed eventualmente del sapone neutro. NON UTILIZZARE MAI BEZINA, BENZENE, PRODOTTI DILUENTI ED ALTRI PRODOTTI AGGRESSIVI o CORROSIVI. Gli interni possono essere rimossi per favorire la pulizia del casco. Anche in questo caso utilizzare acqua tiepida o con sapone neutro. Lavare a mano e lasciare asciugare. Per pulire la visiera, immergetela in acqua tiepida con sapone neutro ed asciugatela, procedendo dall’alto verso il basso con un panno morbido. Evitate di compiere movimenti circolari. Dopo aver correttamente pulito prese d’aria e meccanismo visiera, potete lubrificarli di tanto in tanto con grasso bianco o di silicone per aumentarne la durata.
STORAGEAfter washing your helmet, store it inside a bag, in a dry temperate place. Avoid prolonged storage in a very illuminate place.
STOCKAGE Après avoir nettoyé votre casque, stockez-le à l’intérieur d’une housse, dans un endroit sec et tempéré. Evitez un stockage prolongé exposé à la lumière.
BEWARINGNadat u uw helm heeft schoongemaakt, bewaart u hem best in de hoes op een droge plaats met gemiddelde temperatuur. Bewaar uw helm niet op een plaats waar hij is blootgesteld aan zonlicht.
AUFBEWAHRUNGNach dem Reinigen Ihres Helms, bewahren Sie diesen in einer Helmtasche, an einem trockenen, wohltemperierten Ort auf. Ein langes Aufbewahren im Licht ist zu vermeiden.
ALMACENAJEDespués de haber limpiado su casco, tenéis que colocarlo dentro de su bolsa de transporte y en un lugar seco. Evitar de dejarlo durante mucho tiempo en un lugar expuesto a la luz.
ARMAZENAGEMApos lavar o seu capacete, guarde o mesmo dentro da sacola, em um local seco e arejado.Evite guarda-lo por muito tempo em local de iluminacao intensa
MANUTENZIONEDopo aver pulito il vostro casco, riponetelo in una sacca, in un luogo asciutto a temperatura ambiente. Evitate di tenerlo per un lungo tempo esposto alla luce.
DURABILITYAs time goes by, some wearing marks can appear on safety elements of your helmet, such as: wearing or fraying of the strap, malfunction of the buckle, cracking or crumbling of the inner liner, cracking of the shell, … In this case, contact your dealer to check or replace your helmet.
LONGEVITEAvec l’âge, certains signes d’usure peuvent apparaître sur les éléments de sécurité de votre casque, tels que: sangle usée ou effilochée, disfonctionnement de la boucle, craquelures ou effritement du rembourrage protecteur intérieur, fissures de la calotte….Dans ce cas, contactez votre revendeur pour inspection ou remplacez votre casque.
DUURZAAMHEIDNa veelvuldig gebruik, kunnen sommige onderdelen tekenen van slijtage vertonen, zoals bijvoorbeeld uitrafelende riempjes, een slecht functionerende sluiting, scheurende of afbrokkelende binnenbekleding of bartsen in de schelp van uw helm. Contacteer in dat geval uw verkoper om de veiligheid van uw helm te onderzoeken of vervang uw helm.
LANGLEBIGKEITMit dem Alter können Verschleißerscheinungen an den Sicherheitselementen Ihres Helms auftreten, wie z.B.: Verschleiß oder Zerfasern der Kinnriemen, Funktionsstörung der Schnalle, Risse oder Zerfall der inneren Schutzpolsterung, Risse in der Helmschale,... In solch einem Fall, kontaktieren Sie bitte Ihren Fachhändler zur Kontrolle oder ersetzen Sie Ihren Helm.
LONGEVIDADCon el tiempo, pueden aparecer signos de deterioro en los elementos de seguridad de su casco, como, por ejemplo : banda gastada o deshilachada, mal funcionamiento de la hebilla, resquebrajaduras o desgaste del relleno protector interior, fisuras del casco…En este caso, póngase en contacto con su distribuidor para que lo revise o cambie de casco.
DURABILIDADECom o passar do tempo, algumas marcas podem aparecer no itens de segurança de seu capacete, como: desgaste da cinta jugular, mal funcionamento da trava jugular, trincas no forro interno, trinca no casco externo,... Neste caso, entre em contato com sua revenda para verificá-lo ou substituí-lo.
DURATA DEL CASCOCon il passare degli anni, su alcuni punti di sicurezza del vostro casco potrebbero apparire dei segni di usura, come: il cinturino consumato o sfilacciato, mal funzionamento della fibbia, scheggiatura o screpolatura dell’imbottitura protettiva interna, fessure nella calotta....In tal caso, contattare il vostro rivenditore per controllare o sostituire il casco.

ADJUSTING AND USING THE MICROMETRIC BUCKLE 1. First, adjust the length of the strap by rolling it through the plastic adjustable strap (A)2. To close the buckle, insert the ratcheted tongue (B) into the casing (C). When you hear a “click”, the buckle is closed. The multi-notching allows for minute adjustments in order to obtain perfect comfort and fit with the buckle. 3. If necessary, go back and repeat Step 1.4. To open the buckle, pull on the red strap (D) and draw back the ratcheted tongue using your other hand.
AJUSTEMENT ET UTILISATION DE LA BOUCLE MICROMETRIQUE1. Ajustez d’abord la longueur de la sangle en la faisant glisser autour de l’attache en plastique coulissante (A)2. Pour fermer votre boucle, introduisez la languette à cliquets (B) dans le boîtier (C). Vous entendez “clic”, votre boucle est fermée. Le multi crantage vous permet un réglage plus fin et d’obtenir ainsi une tension parfaite et confortable de la sangle.3. Au besoin, revenez au point # 1.4. Pour ouvrir votre boucle, tirez sur la lanière rouge (D) et retirez la languette à cliquets à l’aide de l’autre main.
INSTELLING EN GEBRUIK VAN DE MICROMETRISCHE GESP1. Stel eerst de lengte van de kinriem grof in, door die te laten glijden over de schuivende plastic klem (A).2. Om uw gesp te sluiten steekt u vervolgens de gekartelde lip (B) in de sluiting (C). Als u een “klik” hoort, is uw gesp gesloten. De meervoudige inkepingen maken het mogelijk de instelling fijner af te stellen en zo een perfecte, comfortabele spanning van de riem te bekomen. 3. Indien nodig herbegint u bij punt # 1.4. Om uw gesp te openen trekt u aan het rode riempje (D) en trekt u er de gekartelde lip (B) uit met de andere hand.
EINSTELLUNG UND VERWENDUNG DER KINNRIEMENSICHERUNG MIT FEINER SPERRZAHNUNG 1. Stellen Sie zunächst die Länge des Riemens richtig ein. Führen Sie ihn dazu durch den Kinnriemen- Verschlussteil aus gleitfähigem Kunststoff (A).2. Zum Schließen der Kinnriemensicherung führen Sie die Lasche mit Sperrzahnung (B) in den Schnellverschluss (C) ein. Dabei ertönt ein Klicken, das Ihnen anzeigt, dass die Kinnriemensicherung richtig geschlossen ist. Die feine Sperrzahnung ermöglicht die optimale Feinanpassung, wodurch der Riemen perfekt, sicher und dennoch bequem sitzt.3. Bei Bedarf ändern Sie die Länge nochmals, wie unter Punkt 1 beschrieben.4. Zum Öffnen der Kinnriemensicherung halten Sie die Lasche mit Sperrzahnung mit der einen Hand fest und ziehen mit der anderen Hand an dem roten Riemen (D).
AJUSTE Y UTILIZACIÓN DE LA HEBILLA MICROMÉTRICA1. Primero ajuste la longitud de la cincha desplazando ésta alrededor de la sujeción deslizante de plástico (A).2. Para cerrar la hebilla, introduzca la lengüeta con las retenciones (B) en el enganche (C). Oirá un “clic” y la hebilla estará cerrada. Su festoneado le permite una regulación más precisa y así poder obtener la tensión perfecta y más confortable de la cincha.3. Si fuera necesario, regrese al punto # 1.4. Para abrir la hebilla, tire de la cinta roja (D) y retire la lengüeta con las retenciones ayudándose con la otra mano.
USO E AJUSTE DO SISTEMA MICROMÉTRICO DE TRAVA1. Inicialmente, regule o comprimento da cinta no ponto ajustável (A)2. Para fechar a trava, insira a ponta plástica (B) dentro da casa (C). Ao ouvir um “click”, a trava está fechada. O sistema dentado permite ajustes milimétricos com o objetivo de oferecer melhor conforto e ajuste perfeito.3. Caso necessário, volte e repita o passo 1.4. Para abrir a trava, puxe a lingueta vermelha (D) e deslize a ponta plástica para fora com a outra mão.
REGOLAZIONE ED USO DELLA CINTURA MICROMETRICA1. Innanzitutto regolare la lunghezza della cinghia e farla scorrere attorno all’attacco in plastica scorrevole (A)2. Per fermare la fibbia, introdurre la linguetta a scatto (B) nella capsula (C). Quando si sente “clic”, la fibbia è chiusa. Le tacche multiple consentono una regolazione più precisa e così è possibile ottenere una tensione perfetta e confortevole della cinghia.3. All’occorrenza, ritornare al punto n. 1.4. Per aprire la vostra fibbia, tirare dalla striscia rossa (D) e togliere la linguetta a scatto con l’altra mano.
BUCKLE - BOUCLE - SLUITING - SCHNALLE – HEBILLA - TRAVA - FIBBIAA B
C
D
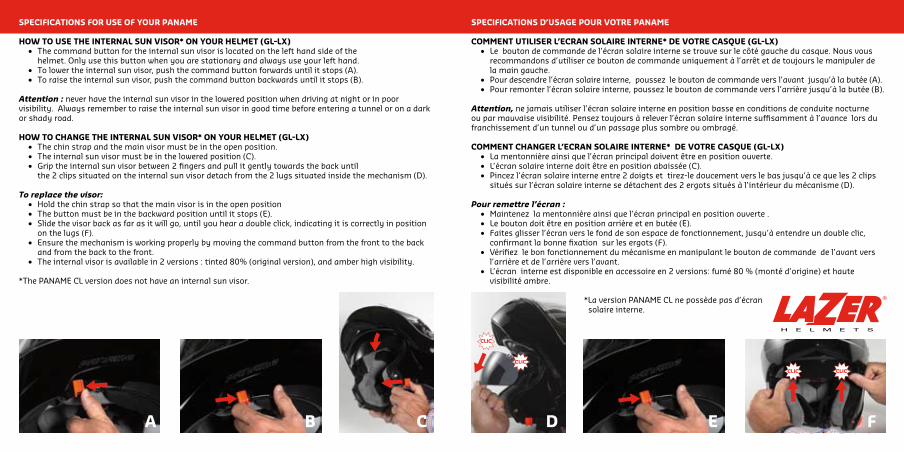
SPECIFICATIONS FOR USE OF YOUR PANAME
HOW TO USE THE INTERNAL SUN VISOR* ON YOUR HELMET (GL-LX) • The command button for the internal sun visor is located on the left hand side of the helmet. Only use this button when you are stationary and always use your left hand. • To lower the internal sun visor, push the command button forwards until it stops (A). • To raise the internal sun visor, push the command button backwards until it stops (B).
Attention : never have the internal sun visor in the lowered position when driving at night or in poor visibility. Always remember to raise the internal sun visor in good time before entering a tunnel or on a dark or shady road.
HOW TO CHANGE THE INTERNAL SUN VISOR* ON YOUR HELMET (GL-LX) • The chin strap and the main visor must be in the open position. • The internal sun visor must be in the lowered position (C). • Grip the internal sun visor between 2 fingers and pull it gently towards the back until the 2 clips situated on the internal sun visor detach from the 2 lugs situated inside the mechanism (D).
To replace the visor: • Hold the chin strap so that the main visor is in the open position • The button must be in the backward position until it stops (E). • Slide the visor back as far as it will go, until you hear a double click, indicating it is correctly in position on the lugs (F). • Ensure the mechanism is working properly by moving the command button from the front to the back and from the back to the front. • The internal visor is available in 2 versions : tinted 80% (original version), and amber high visibility.
*The PANAME CL version does not have an internal sun visor.
SPECIFICATIONS D’USAGE POUR VOTRE PANAME
COMMENT UTILISER L’ECRAN SOLAIRE INTERNE* DE VOTRE CASQUE (GL-LX) • Le bouton de commande de l’écran solaire interne se trouve sur le côté gauche du casque. Nous vous recommandons d’utiliser ce bouton de commande uniquement à l’arrêt et de toujours le manipuler de la main gauche. • Pour descendre l’écran solaire interne, poussez le bouton de commande vers l’avant jusqu’à la butée (A). • Pour remonter l’écran solaire interne, poussez le bouton de commande vers l’arrière jusqu’à la butée (B).
Attention, ne jamais utiliser l’écran solaire interne en position basse en conditions de conduite nocturne ou par mauvaise visibilité. Pensez toujours à relever l’écran solaire interne suffisamment à l’avance lors du franchissement d’un tunnel ou d’un passage plus sombre ou ombragé.
COMMENT CHANGER L’ECRAN SOLAIRE INTERNE* DE VOTRE CASQUE (GL-LX) • La mentonnière ainsi que l’écran principal doivent être en position ouverte. • L’écran solaire interne doit être en position abaissée (C). • Pincez l’écran solaire interne entre 2 doigts et tirez-le doucement vers le bas jusqu’à ce que les 2 clips situés sur l’écran solaire interne se détachent des 2 ergots situés à l’intérieur du mécanisme (D).
Pour remettre l’écran : • Maintenez la mentonnière ainsi que l’écran principal en position ouverte . • Le bouton doit être en position arrière et en butée (E). • Faites glisser l’écran vers le fond de son espace de fonctionnement, jusqu’à entendre un double clic, confirmant la bonne fixation sur les ergots (F). • Vérifiez le bon fonctionnement du mécanisme en manipulant le bouton de commande de l’avant vers l’arrière et de l’arrière vers l’avant. • L’écran interne est disponible en accessoire en 2 versions: fumé 80 % (monté d’origine) et haute visibilité ambre.
*La version PANAME CL ne possède pas d’écran solaire interne.
A B C D E F
CLIC CLIC
CLIC
CLIC
GEBRUIKSAANWIJZING VAN UW PANAME
HET GEBRUIK VAN HET INTERNE* ZONNESCHERM VAN UW HELM • Debedieningsknopvanhetinternezonneschermbevindtzichaandelinkerzijdevandehelm.Wijraden aan deze knop alleen te gebruiken terwijl u stilstaat en hem alleen met de linkerhand te bedienen. • Omhetinternezonneschermneertelaten,debedieningsknopvooruitduwentotdeaanslag(A). • Omhetinternezonneschermweeroptehalen,debedieningsknopachteruitduwentotdeaanslag(B).
Let wel! Het interne zonnescherm nooit in de lage stand plaatsen tijdens een nachtelijke rit of bij slechte zichtbaarheid. Denk er altijd aan het interne zonnescherm tijdig op te halen vooraleer u een tunnel of een donkere of schaduwrijke zone inrijdt.
HET INTERNE* ZONNESCHERM VAN UW HELM VERVANGEN • Dekinriemenhethoofdschermmoetenindegeopendestandstaan. • Hetinternezonneschermmoetindeneergelatenstandstaan(C). • Hetinternezonneschermmet2vingersvastgrijpenenhetomlaagtrekkentotde2clipsvanhetinterne zonnescherm losklikken uit de 2 klauwen binnenin het mechanisme (D).
Om het scherm terug te plaatsen : • Dekinriemenhethoofdschermindegeopendestandhouden. • Debedieningsknopmoetzichindegeopendestand,tegendeaanslagbevinden(E). • Hetschermtotdeuiterstestandvandebewegingsruimteverschuiven,totueendubbeleklikhoort, waardoor de goede bevestiging aan de beide klauwen wordt bevestigd(F). • Degoedewerkingvanhetmechanismecontrolerendoordebedieningsknopvanvoornaarachterenvan achter naar voor te verschuiven. • Hetinterneschermisalsaccessoirebeschikbaarin2versies:rookkleurig80%(oorspronkelijk gemonteerd) en amberkleurig met hoge zichtbaarheid.
* De versie PANAME CL heeft geen intern zonnescherm.
BENUTZUNGSHINWEISE FÜR IHREN PANAME
VERWENDUNG DES SONNENSCHUTZINNENVISIERS* AN IHREM HELM • DerBedienknopffürdasSonnenschutzinnenvisierbefindetsichaufderlinkenSeitedesHelms.Dieser Bedienknopf sollte immer mit der linken Hand betätigt und unseren Empfehlungen zufolge niemals während der Fahrt werden. • ZumAbsenkendesSonnenschutzinnenvisiersdenBedienknopfbiszumAnschlagnachvorneschieben(A). • ZumAnhebendesSonnenschutzinnenvisiersdenBedienknopfbiszumAnschlagnachhintenschieben(B).
Vorsicht! Niemals bei Nacht oder schlechten Sichtverhältnissen mit herunter gelassenem Sonnenschutzinnenvisier fahren. Achten Sie immer darauf, das Sonnenschutzinnenvisier rechtzeitig vor der Einfahrt in einen Tunnel bzw. vor einer schattigeren oder dunkleren Teilstrecke anzuheben.
DAS AUSWECHSELN DES SONNENSCHUTZINNENVISIERS* AN IHREM HELM • KinnschutzsowieHauptvisiermüssengeöffnetsein. • DasSonnenschutzinnenvisiermussgeschlossen(abgesenkt)sein(C) • NehmenSiedasSonnenschutzinnenvisierzwischen2FingerundziehenSieesvorsichtigherunter,bis die 2 Clips auf dem Sonnenschutzinnenvisier sich von den 2 Zapfen im Innern der Mechanik lösen (D).
Das wieder Einsetzen des Visiers : • KinnschutzsowieHauptvisiersindweiterhingeöffnet. • DerKnopfmussbiszumAnschlagaufÖffnenstehen(E) • DasVisiersoweitwiemöglichnachhintenschieben,biseinDoppelklickzuhörenist,deranzeigt,dasses richtig eingerastet ist (F). • VergewissernSiesich,dassdieMechanikrichtigfunktioniert,indemSiedenBedienknopfvonvornenach hinten und von hinten nach vorne schieben. • DasInnenvisieristalsZubehörin3Ausführungenerhältlich:80%getönt(Originalausführung)undfür beste Durchsicht bernsteinfarben.
*Die Ausführung PANAME CL enthält kein Sonnenschutzinnenvisier.
A B C D E F
CLIC CLIC
CLIC
CLIC

ESPECIFICACIONES DE USO PARA SU PANAME
CÓMO UTILIZAR LA PANTALLA SOLAR INTERNA* DE SU CASCO • Elbotóndemandodelapantallasolarinternaseencuentraenelladoizquierdodelcasco.Le recomendamos utilizar este botón de mando únicamente estando parado y manipularlo siempre con la mano izquierda. • Parahacerdescenderlapantallasolarinterna,pulsarelbotóndemandohaciaadelanteyhastael máximo (A). • Parahacersubirlapantallasolarinterna,pulsarelbotóndemandohaciaatrásyhastaelmáximo(B).
Atención: no utilice nunca la pantalla solar interna en la posición baja en condiciones de conducción nocturna o con mala visibilidad. Recuerde siempre levantar la pantalla solar interna con suficiente anticipación al pasar por un túnel o un pasaje más oscuro o sombrío.
CÓMO CAMBIAR LA PANTALLA SOLAR INTERNA* DE SU CASCO • Tantolamentoneracomolapantallaprincipaldebenestarenposiciónabierta. • Lapantallasolarinternadebeestarenposiciónbajada(C). • Sujetarlapantallasolarinternacondosdedosytirarsuavementehaciaabajohastaquelosdosclips situados sobre dicha pantalla solar se suelten de las dos guías situadas en el interior del mecanismo (D).
Para volver a colocar la pantalla : • Mantengalamentonera,asícomolapantallaprincipalenposiciónabierta. • Elbotóndebeestarenposiciónabiertayeneltope(E). • Desplazarlapantallahastaelfondodesuespaciodefuncionamiento,hastaoírundobleclicque confirme que ha quedado bien fija sobre las guías (F). • Comprobarqueelmecanismofuncionacorrectamentemanipulandoelbotóndemandodedelantehacia atrás y de detrás hacia delante. • Lapantallainternaestádisponiblecomoaccesorioentresversiones:ahumada80%(lamontada originalmente) y ámbar de gran visibilidad.
*La versión PANAME CL no incluye una pantalla solar interna.
ESPECIFICAÇÕES DE USO DO SEU PANAME
COMO UTILIZAR A LENTE SOLAR INTERNA DO SEU CAPACETE (GL-LX) • Obotãodecomandodalentesolarinternaestálocalizadodoladoesquerdodoseucapacete.Aoutilizar este botão, esteja parado e utilize sempre a mão esquerda. • Paraabaixaralentesolarinterna,empurreobotãoparafrenteatéoponto(A). • Parasubiralentesolarinterna,empurreobotãoparatrazatéoponto(B).
Atenção: nunca utilize a lente solar interna abaixada ao dirigir a noite ou em condições de baixa visibilidade. Lembre-se sempre de levantar a lente solar interna em tempo bom antes de entrar em um túnel ou rodovia escura.
COMO TROCAR A LENTE SOLAR INTERNA DO SEU CAPACETE (GL-LX) • Acintajugularealenteprincipaldevemestarnaposição“aberta”. • Alentesolarinternadeveestarnoposição“abaixada”(C). • Seguroalentesolarinternacomdoisdedosepuxegentilmentenosentidocontrariodos2clipssituados na lente solar interna, desplugando das 2 travas situadas no mecanismo (D).
Para substituir a lente: • Segureacintajugularparaquealentefiquenaposição“aberta”. • Obotãodeveestarnaposiçãoinicialatésuaparada(E). • Deslizealenteparatrásatéofinaldocurso,aoouvirumduploclick,indicaráqueomesmoestá corretamente posicionado (F). • Tenhacertezadequeomecanismoestáfuncionandocorretamente,movendoobotãodecomandoda frente para trás e de trás para frente. • Alenteinternaestádisponívelemduasversões:80%declaridade(versãooriginal),elentetransparente de longa visibilidade.
*A versão PANAME CL não possui lente solar interna.
A B C D E F
CLIC CLIC
CLIC
CLIC

SPECIFICHE D’USO PER IL VOSTRO PANAME
COME UTILIZZARE LA VISIERA SOLARE INTERNA* DEL VOSTRO CASCO • Ilpulsantedicomandodellavisierasolareinternasitrovasullatosinistrodelcasco.Viconsigliamodi utilizzare questo pulsante di comando soltanto da fermi e di usare sempre la mano sinistra. • Perabbassarelavisierasolareinterna,spingereilpulsantedicomandoinavantifinoalsuoarresto(A). • Perrialzarelavisierasolareinterna,spingereilpulsantedicomandoall’indietrofinoalsuoarresto(B).
Attenzione, non usare mai la visiera solare interna in posizione abbassata in caso di guida notturna o in condizioni di scarsa visibilità. Ricordate sempre di rimuovere la visiera solare interna con sufficiente anticipo in caso di attraversamento di una galleria e di un passaggio in zone più buie o ombreggiate.
COME SOSTITUIRE LA VISIERA SOLARE INTERNA * DEL VOSTRO CASCO • Lamentonieraelavisieraprincipaledevonoessereinposizioneaperta • Lavisierasolareinternadeveessereinposizioneabbassata(C). • Afferrarelavisierasolareinternatradueditaetirarladelicatamenteversoilbassofinoaquando i 2 bottoni di fissaggio situati sulla visiera solare interna si staccano dai 2 perni situati all’interno del mecanismo (D).
Per riposizionare la visiera: • Sistematelamentonieraeelavisieraprincipaleinposizioneaperta. • Ilpulsantedevetrovarsiinposizioneapertaediarresto(E). • Farescivolareelavisieraversoilfondodelsuoalloggiamento,finoasentireundoppioclicchene conferma il corretto fissaggio sui perni (F). • Verificareilcorrettofunzionamentodelmeccanismomuovendoilpulsantedicomandoall’indietroepoi in avanti. • Lavisierainternaèunaccessoriodisponibilein3versioni:oscurato80%(dotazioneoriginale),ecolor ambra ad alta visibilità.
*La versione PANAME CL non è dotata di visiera solare interna.
A B C D E F
CLIC CLIC
CLIC
CLIC

HOW TO CHANGE THE MAIN VISOR ON YOUR HELMET • First of all, the main visor must be in the open position. • Loosen the “butterfly” screws and unscrew them, turning the screws anticlockwise a quarter turn (G-H). • Next, separate the visor and its screw in order that the latter is removed from its threaded insert and that of both sides. PLEASE NOTE, the screws are not attached to the visor, so take care not lose them (I).
To replace the visor : • Hold the visor in the closed position. • Place the visor correctly over the visor holders. • Fit the screws into their threaded inserts and turn the screws clockwise a quarter turn (J). • The screw is correctly locked as shown on the picture (K). • Fold down the 2 wings of the 2 butterfly screws • Check that the whole mechanism works properly. PLEASE NOTE : it is normal for the screws to rotate slightly with the movement of the visor.
COMMENT CHANGER L’ECRAN PRINCIPAL DE VOTRE CASQUE • Avant tout, l’écran principal doit être en position ouverte. • Ouvrez les vis “papillon” et déverrouillez-les, en tournant les vis d’1/4 de tour dans le sens anti-horlogique (G-H). • Ecartez ensuite l’écran et sa vis de façon à dégager celle-ci de son logement et ce des deux côtés. ATTENTION : les vis ne sont pas solidaires de l’écran, veuillez donc à ne pas les perdre (I).
Pour remettre l’écran : • Maintenez l’écran en position fermée. • Positionnez l’écran correctement au niveau des crémaillères. • Emboîtez les vis dans leurs logements et verrouillez-les, en tournant les vis d’1/4 de tour dans le sens horlogique (J). • La vis est correctement verrouillée telle que présentée sur la photo (K). • Rabattez vers le bas les ailettes des 2 vis papillon • Vérifiez le bon fonctionnement de l’ensemble. ATTENTION : il est normal que les vis tournent légèrement en suivant les mouvements de l’écran.
HET HOOSCHERM VAN UW HELM VERVANGEN • Eerst en vooral moet het hoofdscherm geopend worden . • De vleugelschroeven openen en ze ontgrendelen door de schroeven 1/4 draai te verdraaien in tegenwijzerzin (G-H). • Door deze schroeven uit te nemen kunt u het scherm verwijderen. LET WEL : de schroeven zijn een apart onderen en maken geen deel uit van het scherm, verlies ze dus niet (I).
Het scherm weer bevestigen : • Het scherm gesloten houden. • Het scherm correct in de bevestigingen plaatsen. • De schroeven in de schroefgaten steken door de schroeven 1/4 draai te verdraaien in wijzerzin (J). • De schroef is correct vergrendeld zoals aangeduid op de foto (K). • Klap de 2 vleugels van de beide vleugelmoeren neer. • Controleren of alles goed werkt. LET WEL : het is normaal dat de schroeven wat meebewegen en iets de bewegingen van het scherm volgen.
DAS AUSWECHSELN DES HAUPTVISIERS AN IHREM HELM • Achten Sie darauf, dass das Hauptvisier geöffnet ist. • Lösen Sie die Flügelschrauben, indem Sie sie um eine Viertelumdrehung gegen den Uhrzeigersinn drehen (G-H). • Daraufhin das Visier und seine Schrauben herausnehmen, indem letztere aus ihrem, auf beiden Seiten befindlichen Lager herausgezogen werden. ACHTUNG: die Schrauben haften nicht am Visier. Achten Sie bitte deshalb darauf, diese Schrauben nicht zu verlieren (I).
Um das Visier wieder anzubringen : • Das Visier in geschlossener Stellung halten. • Das Visier richtig auf der Höhe der Visiermechanik positionieren. • Führen Sie die Schrauben in die vorgesehenen Gewinde ein und fixieren Sie sie, indem Sie sie um eine Viertelumdrehung im Uhrzeigersinn anziehen (J). • Die Schraube ist richtig angezogen so wie auf Foto (K) dargestellt. • Drehen Sie die beiden Flügel der 2 Flügelschrauben nach unten • Die einwandfreie Funktionstüchtigkeit der gebildeten Einheit überprüfen. ACHTUNG: es ist normal, dass die Schrauben bei Bewegungen des Visiers leicht mitdrehen.
G H I J K
UnlockedLocked

G H I J K
UnlockedLocked
CÓMO CAMBIAR LA PANTALLA PRINCIPAL DE SU CASCO • La pantalla principal deberá estar colocada en posición abierta. • Abrir los tornillos de “mariposa” y desbloquearlos girando los tornillos 1/4 de vuelta en el sentido antihorario (G-H). • Desjues separe el tornillo de la pantalla de forma que se pueda sacar éste por los dos lados. Ojo ! Los tornillos no están pegados a la pantalla, intente no perderlos. (I).
Para volver a colocar la pantalla : • Mantenga la pantalla cerrada. • Coloque la pantalla correctamente al nivel de los mecanismos. • Encaje los tornillos en su sitio y atorníllelos, girando los tornillos 1/4 de vuelta en el sentido horario (J). • El tornillo está cerrado correctamente cuando se presenta como demostrado en la foto (K). • Desplazar hacia abajo las 2 aletas de ambos tornillos de mariposa. • Verificar el buen funcionamiento del conjunto. Ojo ! Es normal que los tornillos giren un poco al mover la pantalla.
COMO TROCAR A LENTE PRINCIPAL DO SEU CAPACETE • Inicialmente, a lente principal deve estar na posição “aberta”. • Afroxe o parafuso “butterfly” e remova os mesmos, girando os parafusos no sentido anti-horário em um quarto de volta. (G-H). • Em seguida, separe a lente dos parafusos para que posteriormente a mesma seja retirada de seu encaixes laterais. ATENÇÃO, os parafusos não são fixados a lente, portanto tome cuidado para não perdê-los.
Substituindo a lente: • Coloque a lente na posição “fechada”. • Posicione a lente corretamente sobre os seus suportes. • Ajuste os parafusos dentro de suas posições e gire os mesmo no sentido horário, em um quarto de volta. (J). • Os parafusos devem estar corretamente travados conforme a figura (K). • Abaixe as duas aletas dos dois parafusos “butterfly”. • Verifique se o mecanismo está funcionando corretamente. ATENÇÃO: é normal que os parafusos se movam levemente com o movimento da lente.
COME SOSTITUIRE LA VISIERA PRINCIPALE DEL SUO CASCO • Innanzitutto, la visiera principale deve essere in posizione aperta. • Aprire le viti a “farfalla” e sbloccarle, svitandole di 1/4 di giro in senso anti-orario (G-H). • Rimuovere poi la vite dalla visiera liberandola dalla sua sede, procedendo dai due lati. ATTENZIONE: le viti non sono fissate alla visiera, attenzione a non perderle. (I)
Per rimontare la visiera : • Tenere la visiera in posizione chiusa. • Posizionare la visiera correttamente a livello delle cremagliere. • Inserire le viti nelle loro sedi e bloccare, avvitandole di 1/4 di giro in senso orario (J). • La vite è chiusa correttamente quando si presenta come nella foto (K). • Abbassare le due alette delle due viti a farfalla. • Verificare il corretto funzionamento dell’insieme. ATTENZIONE: è normale che le viti ruotino leggermente seguendo il movimento della visiera.

HOW TO REPLACE THE VISOR HOLDERS • Remove the visor from the helmet. (See instructions given above). • Insert a screwdriver into hole in the centre of the visor holder as shown in the diagram in order to lift it out of its housing (L). • Next, remove the visor holder, which is held in place by two pins, completely (M). • Fit the new visor holder taking care to put each one in the appropriate side and ensuring that the pins are clipped securely into place (N). • Replace the visor (see instructions given above).
HOW TO REMOVE AND RE-INSTALL CHEEK PADS • Detach the two buttons to remove the both cheek pads (O).
HOW TO REMOVE AND RE-INSTALL TOP PAD (GL & LX) • It is recommended to remove the cheek pads (see above procedure). • The pad is maintained in position by the strip inserted in the 3 prongs • Lightly pull on the left or right end of the front part, towards the interior with regard to the edge of the helmet. In doing so you are detaching the strip from its front fitting (P). • Next, pull lightly on the left or right angle of the rear part, towards the interior. You are now detaching the rear strip (Q). • Remove the entire pad from the helmet.
To re-install the pad : • Then fix the side and back strips between the edge of the shell and polystyrene. • Insert the front strip making sure that it is set properly between the 3 fixing prongs (P). • The pad sets itself easily. • Re-install cheek pads.
HOW TO REMOVE THE CHIN CURTAIN OF YOUR HELMET • Place your helmet reversed. • Draw the chin curtain by rigid support, horizontally, towards the interior of the helmet (R).
HOW TO REPLACE THE CHIN CURTAIN OF YOUR HELMET • Place your helmet reversed. • Introduce the rigid support of the chin curtain between the chin pad and the chin it self (S). • Strongly push it with the fingers towards the front of the helmet and ear the “clac” (S). • The chin curtain is well placed when centred (T).
COMMENT REMPLACER LES CREMAILLERES • Enlevez l’écran du casque (voir instructions ci-dessus). • Insérez un tournevis dans le trou central de la crémaillère comme indiqué sur le dessin, afin de soulever la crémaillère de son logement (L). • Retirez ensuite complètement la crémaillère qui est maintenue par deux ergots (M). • Replacez la nouvelle crémaillère en veillant à respecter le bon côté et en veillant à ce que les ergots soient bien clipsés (N). • Remontez l’écran (voir instructions ci-dessus).
COMMENT ENLEVER ET REMETTRE LES COUSSINETS DE JOUES • Détachez les deux boutons pour enlever les coussinets de joue (O).
COMMENT ENLEVER ET REMETTRE LA COIFFE INTERIEURE • Premièrement il vous est conseillé d’enlever les coussinets de joues. (Voir procédure précédente). • La coiffe est maintenue en place au front grâce au maintien de la languette par 3 ergots. • Tirez doucement sur le coin gauche ou droit de la partie avant, vers l’intérieur par rapport à la bordure du casque. Vous détacherez ainsi la languette de fixation avant (P). • Ensuite, tirer doucement sur le coin gauche ou droit de la partie arrière, vers l’intérieur par rapport à la bordure du casque. Vous détacherez ainsi les deux boutons de fixation arrière (Q). • Retirez l’ensemble de la garniture.
Pour remettre la coiffe : • Fixez alors les languettes latérales et arrière entre la bordure du casque et le polystyrène. • Introduisez ensuite la languette avant en veillant à l’insérer correctement entre les 3 ergots de fixation (P). • La coiffe se met en place toute seule. • Remettez les coussinets de joues en place.
COMMENT ENLEVER LA BAVETTE DE VOTRE CASQUE • Disposez votre casque renversé. • Tirez fortement la bavette par son support rigide, horizontalement, vers l’intérieur du casque (R).
COMMENT REMETTRE LA BAVETTE DE VOTRE CASQUE • Disposez votre casque renversé. • Introduisez le support rigide de la bavette entre la mentonnière et la contre-mentonnière (S). • Poussez fortement avec les doigts vers l’avant du casque jusqu’à entendre le clac (S). • La bavette est bien placée lorsqu’elle est centrée (T).
CLIC
CLIC
L M N O P Q R S T

CLIC
CLIC
L M N O P Q R S T
DE BEVESTIGINGEN VERVANGEN • Het scherm van de helm afnemen (zie bovenstaande richtlijnen). • Een schroevendraaier in het middelste gat van de bevestiging steken zoals op de tekening aangegeven, om de bevestiging te demonteren (L). • De bevestiging, die door twee pennetjes wordt vastgehouden, vervolgens volledig uitnemen (M). • De nieuwe bevestiging aan de juiste zijde aanbrengen en erop letten dat de pennetjes goed vastklikken (N). • Het scherm weer bevestigen (zie bovenstaande richtlijnen).
DE WANGSTUKKEN UITNEMEN EN WEER AANBRENGEN • Maak de 2 knoppen los om de wangkussens weg te nemen (O).
DE BINNENVOERING UITNEMEN EN WEER AANBRENGEN (GL & LX) • Het verdient aanbeveling om eerst de wangstukken af te nemen. Zie de bovenstaande werkwijze. • De binnenvoering is vooraan bevestigd met het lipje en 3 pennetjes. • Trek de linker- of rechterhoek van het voorste deel zachtjes naar binnen ten opzichte van de rand van de helm. Zo maakt u het voorste bevestigingslipje los (P). • Trek vervolgens de linker- of rechterhoek van het achterste deel zachtjes naar binnen ten opzichte van de rand van de helm. Zo maakt u het achterste bevestigingslipje los (Q). • Neem de gehele voering uit.
De binnenvoering weer aanbrengen : • Breng de lipjes, die je op de zijkanten en achterkant kan terugvinden, aan tussen de boord van de helm en de polystyreenlaag. • Maak vervolgens het voorste lipje vast en zorg ervoor dat de 3 bevestigingspennetjes goed op hun plaats zitten (P). • De binnenvoering gaat dan vanzelf op de juiste plaats zitten. • Breng de wangstukken weer aan.
HOE DE KINBESCHERMING VERVANGEN • Plaats uw helm omgedraaid voor u (met de holte naar boven). • Trek horizontaal aan het harde stuk van de kinflap in de richting van de binnenzijde van de helm (R).
HOE DE KINBESCHERMING TERUG PLAATSEN • Plaats uw helm omgedraaid voor u (met de holte naar boven). • Breng het harde deel van de kinflap aan tussen de 2 kindelen van de helm (S). • Druk deze stevig aan met de vingers in de richting van de voorzijde van de helm tot wanneer je een klik hoort (S). • De kinbescherming is goed aangebracht wanneer deze goed gecentreerd zit (T).
DAS AUSWECHSELN DER VISIERMECHANIK • Das Visier vom Helm entfernen (siehe Anleitung oben). • Einen Schraubenzieher in die zentrale Öffnung der Mechanik gemäß den Angaben auf der Abbildung einführen, um die Visiermechanik aus ihrer Halterung zu heben (L). • Daraufhin die durch zwei Haken gehaltene Visiermechanik vollständig aus ihrer Halterung herausnehmen (M). • Die neue Visiermechanik einsetzen und dabei darauf achten, die Seiten nicht zu verwechseln und ebenfalls darauf achten, dass die Haken richtig einrasten (N). • Das Visier wieder anbringen (siehe Anleitung oben).
ENTFERNEN UND WIEDEREINSETZEN DER WANGENPOLSTER (GL & LX) • Lösen Sie die beiden Knöpfe um die Wangenpolster herauszunehmen (O).
ENTFERNEN UND WIEDEREINSETZEN DES RUNDUMPOLSTERS (GL & LX) • Zuerst wird angeraten, die Wangenpolster zu entfernen. Siehe vorausgehenden Vorgang. • Das Rundumpolster ist stirnseitig dank der durch 3 Druckknöpfe gehaltenen Lasche befestigt. • Behutsam an der linken oder rechten Seite des Vorderteils, in entgegengesetzter Richtung zum Helmrand, nach innen ziehen. Auf diese Weise lösen Sie die vordere Befestigungslasche (P). • Daraufhin behutsam an der linken oder rechten Seite des hinteren Teils, in entgegengesetzter Richtung zum Helmrand, nach innen ziehen. Auf diese Weise lösen Sie die hintere Befestigungslasche (Q). • Die komplette Innenausstattung entfernen.
Wiedereinsetzen des Rundumpolsters: • Befestigen Sie dann die seitlichen und hinteren Laschen zwischen dem Helmrand und dem Styropor. • Daraufhin die vordere Lasche einfügen und dabei darauf achten, sie zwischen den 3 Druckknöpfen richtig anzubringen (P). • Das Rundumpolster nimmt von selbst die richtige Stellung ein. • Die Wangenpolster wieder einsetzen.
ENTFERNEN DES KINNWINDABWEISERS • Drehen Sie Ihren Helm auf den Kopf. • Ziehen Sie den Kinnwindabweiser anhand der Halterung waagerecht nach innen (R).
WIEDEREINSETZEN DES KINNWINDABWEISERS • Drehen Sie Ihren Helm auf den Kopf. • Führen Sie die Halterung des Kinnwindabweisers zwischen die beiden Kinnteile (S). • Drücken Sie feste mit den Fingern in Richtung Vorderseite des Helmes, bis Sie ein „Klicken“ hören (S). • Der Kinnwindabweiser ist richtig befestigt wenn er zentriert ist (T).

CÓMO SUSTITUIR LAS CREMALLERAS • Quite la pantalla del casco (ver instrucciones a continuación). • Inserte un tornillo en el agujero central del mecanismo como se indica en el dibujo, con el fin de alzar el mecanismo de su sitio (L). • A continuación retire completamente el mecanismo sostenido por dos espolones (M). • Desplace el nuevo mecanismo correctamente y procurando que los espolones estén bien sujetos (N). • Volver a montar la pantalla (ver instrucciones a continuación).
CÓMO QUITAR Y VOLVER A PONER LOS LATERALES • Soltar los dos botones para quitar los cojines en la mejilla (O).
CÓMO QUITAR Y VOLVER A PONER EL INTERIOR DE CABEZA (GL & LX) • Se aconseja primero quitar los laterales. Ver el procedimiento precedente. • El interior de cabeza está mantenido gracias al mantenido de la banda por 3 espolones. • Tirar ligeramente sobre el lado izquierdo o derecho de la parte anterior hacia el interior con relación a la bordura del casco.Usted separará así la banda de fijación delantera (P). • Luego, tirar ligeramente sobre la esquina derecha o izquierda de la parte trasera hacia el interior con relación a la bordura del casco.Usted separará así la banda de fijación trasera (Q). • Quitar toda la guarnición.
Para volver a poner el interior de cabeza • Colocar entonces las tiras laterales y posteriores entre el borde del casco y el poliestireno. • Introducir la banda delantera teniendo cuidado a incorporarla correctamente entre los 3 espolones de fijación (P). • El interior de cabeza se coloca a solas, por semisma. • Volver a poner los laterales en su sitio.
CÓMO RETIRAR EL BABERO DE SU CASCO (GL& LX) • Disponer su casco echado abajo • Arrancar mucho el babero en su apoyo rígido, horizontalmente, hacia el interior del casco (R).
CÓMO VOLVER A PONER EL BABERO DE SU CASCO • Colocar su casco echado abajo. • Introducir el apoyo rígido del babero entre la mentonera y la contra-mentonera (S). • Empujar con los dedos hacia la parte frontal del casco hasta oír un clic (S). • El babero, se considera bien colocado cuando está centrado (T).
COMO SUBSTITUIR O SUPORTE DE LENTE • Remova a lente do capacete. (veja instruções acima) • Insira a chave de fenda no local adequado, no centro do suporte da lente, como demonstrado na figura, para que o sistema seja removido de seu local (L). • Em seguida, remova completamente o suporte da lente, que é segurado por dois pinos de encaixe. • Encaixe o novo suporte de lente garantindo que cada um esteja devidamente colocados em seu lado correto e que os pinos estejam travados em seus locais. • Substitua a lente (veja instruções acima).
COMO REMOVER E RE-INSTALAR O FORRO DO QUEIXO • Destrave os dois botões de encaixe e remova os forros do queixo (O).
COMO REMOVER E RE-INSTALAR O FORRO SUPERIOR (GL & LX) • Recomendamos remover também o forro do queixo (veja procedimento acima). • O forro é fixado em sua posição por cintas inseridas nos 3 dentes. • Puxe levemente na ponta final direita ou esquerda da parte frontal, no sentido do interior do capacete. Ao fazer isso você estará desatando as cintas do forro de seus suportes (P). • Em seguida, puxe levemente a parte direita ou esquerda traseira, no sentido interior do capacete. Ao fazer isso vocês estará desatando a parte traseira do forro (Q). • Remove completamente o forro do capacete.
Para re-instalar o forro: • Fixe a lateral e cinta traseira entre o fundo do casco e o polyester. • Insira a cinta frontal garantindo que esteja posicionada corretamente entre o 3 pontos de fixação (P). • O forro de auto ajustará facilmente. • Re-instale os forros do queixo.
COMO REMOVER A CORTINA DO QUEIXO DE SEU CAPACETE • Posicione seu capacete de ponta cabeça. • Retire a cortina do queixo do suporte rígido, horizontalmente, no sentido do interior do capacete (R).
COMO SUBSTITUIR A CORTINA DO QUEIXO DE SEU CAPACETE • Posicione o seu capacete de ponta cabeça. • Introduza o suporte fixo da cortina do queixo entre o forro do queixo e o queixo (S). • Empurre firmemente com os dedos em direção a frente do capacete, até ouvir um “clac” (S). • A cortina do queixo está corretamente colocada quando centralizada (T).
CLIC
CLIC
L M N O P Q R S T
CLIC
CLIC
L M N O P Q R S T
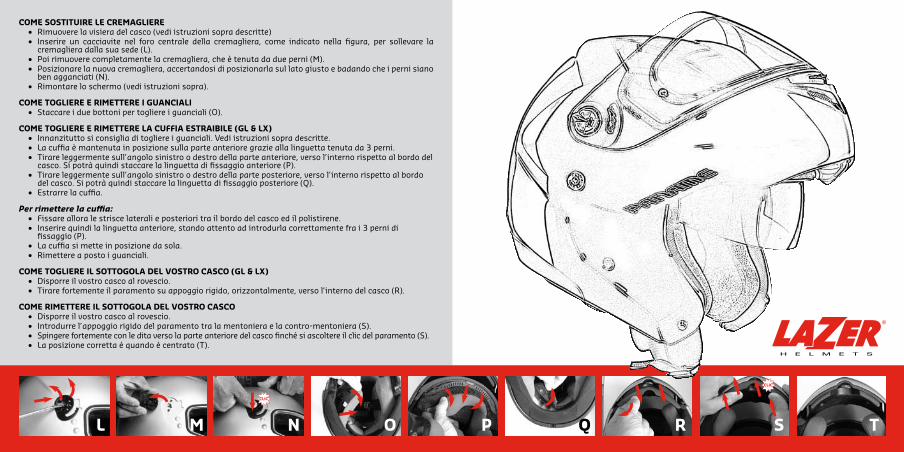
COME SOSTITUIRE LE CREMAGLIERE • Rimuovere la visiera del casco (vedi istruzioni sopra descritte) • Inserire un cacciavite nel foro centrale della cremagliera, come indicato nella figura, per sollevare la cremagliera dalla sua sede (L). • Poi rimuovere completamente la cremagliera, che è tenuta da due perni (M). • Posizionare la nuova cremagliera, accertandosi di posizionarla sul lato giusto e badando che i perni siano ben agganciati (N). • Rimontare lo schermo (vedi istruzioni sopra).
COME TOGLIERE E RIMETTERE I GUANCIALI • Staccare i due bottoni per togliere i guanciali (O).
COME TOGLIERE E RIMETTERE LA CUFFIA ESTRAIBILE (GL & LX) • Innanzitutto si consiglia di togliere i guanciali. Vedi istruzioni sopra descritte. • La cuffia è mantenuta in posizione sulla parte anteriore grazie alla linguetta tenuta da 3 perni. • Tirare leggermente sull’angolo sinistro o destro della parte anteriore, verso l’interno rispetto al bordo del casco. Si potrà quindi staccare la linguetta di fissaggio anteriore (P). • Tirare leggermente sull’angolo sinistro o destro della parte posteriore, verso l’interno rispetto al bordo del casco. Si potrà quindi staccare la linguetta di fissaggio posteriore (Q). • Estrarre la cuffia.
Per rimettere la cuffia: • Fissare allora le strisce laterali e posteriori tra il bordo del casco ed il polistirene. • Inserire quindi la linguetta anteriore, stando attento ad introdurla correttamente fra i 3 perni di fissaggio (P). • La cuffia si mette in posizione da sola. • Rimettere a posto i guanciali. COME TOGLIERE IL SOTTOGOLA DEL VOSTRO CASCO (GL & LX) • Disporre il vostro casco al rovescio. • Tirare fortemente il paramento su appoggio rigido, orizzontalmente, verso l’interno del casco (R).
COME RIMETTERE IL SOTTOGOLA DEL VOSTRO CASCO • Disporre il vostro casco al rovescio. • Introdurre l’appoggio rigido del paramento tra la mentoniera e la contro-mentoniera (S). • Spingere fortemente con le dita verso la parte anteriore del casco finché si ascoltere il clic del paramento (S). • La posizione corretta é quando è centrato (T).

Cross HM SA
Rue André Dumont, 3 - 1435 Mont-St-Guibert - BelgiumTel : +32 (0) 10 300 300 - Fax : +32 (0) 10 300 339
Mail : [email protected]
www.lazerhelmets.com Pan
ame
- 0
9/0
8