owner‘s manual led flood panel 150 · led flood panel 150 3 safety notes read all safety notes...
TRANSCRIPT
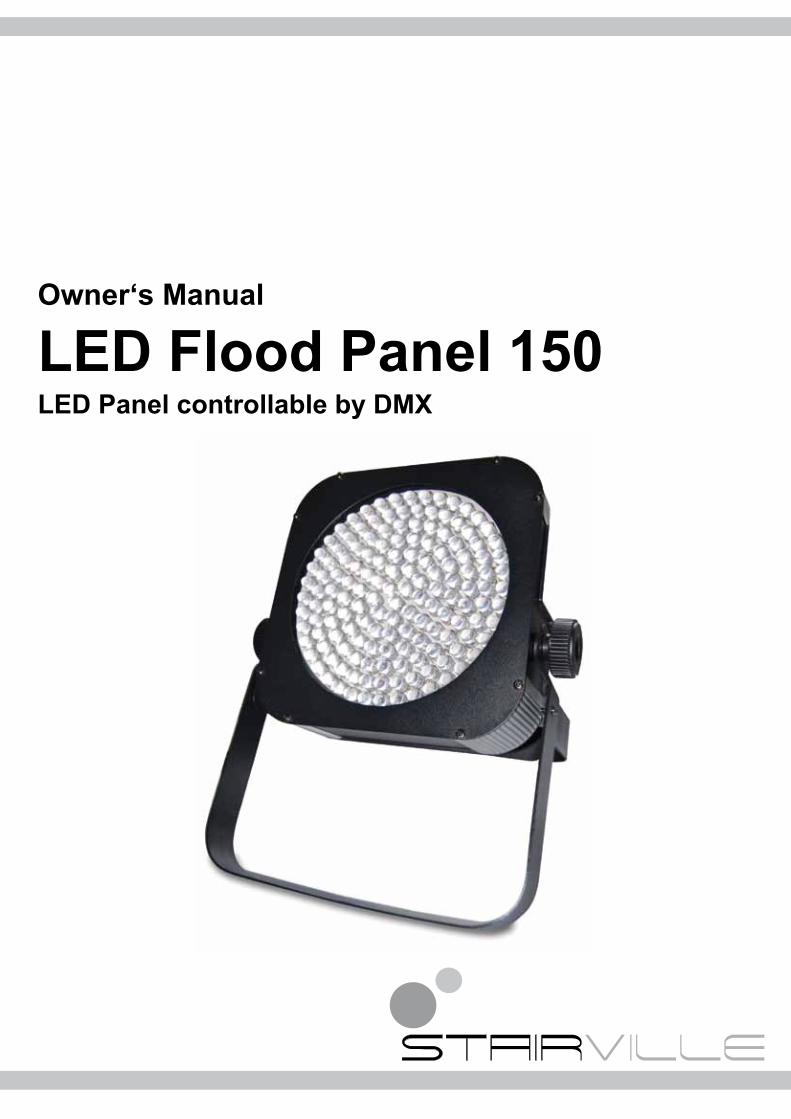
LED Flood Panel 150
Owner‘s Manual
LED Flood Panel 150LED Panel controllable by DMX

LED Flood Panel 1502
Contents
Safety notes ........................................................................................................................................3Power supply .............................................................................................................................3Operating conditions ..................................................................................................................3
Installation ...........................................................................................................................................4
Setup ...................................................................................................................................................4Connections in DMX mode ........................................................................................................4Connections in Master/Slave mode ...........................................................................................4DMX sockets ..............................................................................................................................4
Components and functions .................................................................................................................5Front and rear side .....................................................................................................................5Operation panel and connectors ................................................................................................5
Operation ............................................................................................................................................6Main menu .................................................................................................................................6Built-in programs mode ..............................................................................................................6Settings for program 01 .............................................................................................................6Settings for programs 02…10 ....................................................................................................6Auto show mode ........................................................................................................................7Master/Slave mode ....................................................................................................................7Sound mode ..............................................................................................................................7DMX mode .................................................................................................................................7Functions in 3-channel DMX mode ...........................................................................................7Functions in 4-channel DMX mode ...........................................................................................7Functions in 8-channel DMX mode ...........................................................................................8
Menu diagram ...................................................................................................................................10
Troubleshooting ................................................................................................................................ 11The device does not work at all ............................................................................................... 11No response to the DMX controller .......................................................................................... 11
Cleaning ............................................................................................................................................ 11
Technical data ...................................................................................................................................12
Protecting the environment ...............................................................................................................12Disposal of the packaging material ..........................................................................................12Disposal of your old device ......................................................................................................12
www.thomann.deLED Flood Panel 150 3
Safety notes
Read all safety notes and all instructions. Failure to follow the notes and instructions may result in electric shock, fire or serious injury.Save this manual for future reference.
DANGERElectric shock caused by high voltages inside! Within the unit there are areas where high voltages may be present. To reduce the risk of electric shock do not remove any covers unless the AC mains power cord is removed. Cov-ers should be removed by qualified service personnel only.There are no user-serviceable parts inside.
DANGERElectric shock caused by short circuit!Always use proper ready-made insulated mains cabling (power cord) with a protective con-tact plug. Do not modify the mains cable or the plug. Failure to do so could result in electric shock/death or fire. If in doubt, seek advice from a registered electrician.
WARNINGEye damage caused by high intensity! Never look directly into the light source.
WARNINGRisk of epileptic shock! Strobe lighting can trigger seizures in photosensitive epilepsy. Sensitive persons should avoid looking at strobe lights.
Power supply
NoticeMalfunction or damage to equipment!• Ensure that the input voltage (AC outlet) matches the voltage rating of the product. Failure to do so could
result in damage to the product and possibly the user. • Unplug the unit before electrical storms occur and when unused for long periods of time.
Operating conditions
Always install and use the device in accordance with these instructions.
NoticeMalfunction or damage to equipment!• This device has been designed for indoor use only. Do not expose the device to any liquid or moisture. • Do not install the unit near any direct heat source. Keep the unit away from naked flames. • Do not block areas of ventilation. Failure to do so could result in fire.
LED Flood Panel 1504
Installation
You can install the device on the wall, the ceiling or on the ground.
WARNINGInjuries caused by falling parts! Make sure that the installation complies with the standards and rules that apply in your coun-try. Always secure the device with a secondary safety attachment, such as a safety cable or a safety chain.
Setup
The required connections depend on the operation mode of the device.
NoticeMalfunction or damage to equipment!• For failure-free operation of the DMX chain use dedicated DMX cables. Never use ordinary microphone
cables. • Never connect the DMX output to audio devices such as mixers or amplifiers. The voltages used on the
DMX lines may severely damage the audio input circuits.
Connections in DMX mode
Connect the DMX input of the device to the DMX output socket of a DMX controller or another DMX device. Connect the output of the first DMX device to the input of the second one, and so on to form a daisy chain. Always ensure that the output of the last DMX device in the daisy chain is terminated with a 120-Ω resistor.When the device is configured for DMX mode, but no DMX signal is being received, the DMX indicator flashes. If no DMX cable is connected, the DMX indicator is constantly on.
Connections in Master/Slave mode
Connect the DMX output of the master device to the DMX input of the first slave device. Leave the DMX input of the master device open. Then connect the DMX output of the first slave device to the DMX input of the sec-ond slave device and so on.
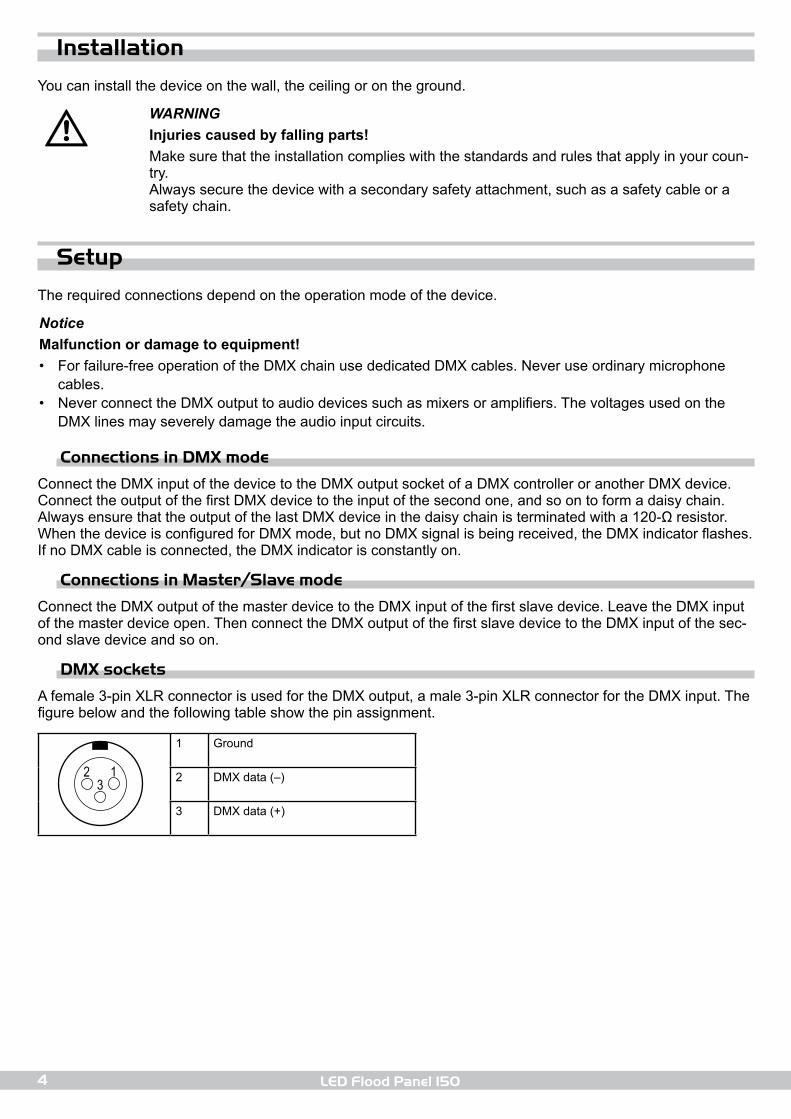
DMX sockets
A female 3-pin XLR connector is used for the DMX output, a male 3-pin XLR connector for the DMX input. The figure below and the following table show the pin assignment.
312
1 Ground
2 DMX data (–)
3 DMX data (+)
www.thomann.deLED Flood Panel 150 5
Components and functions
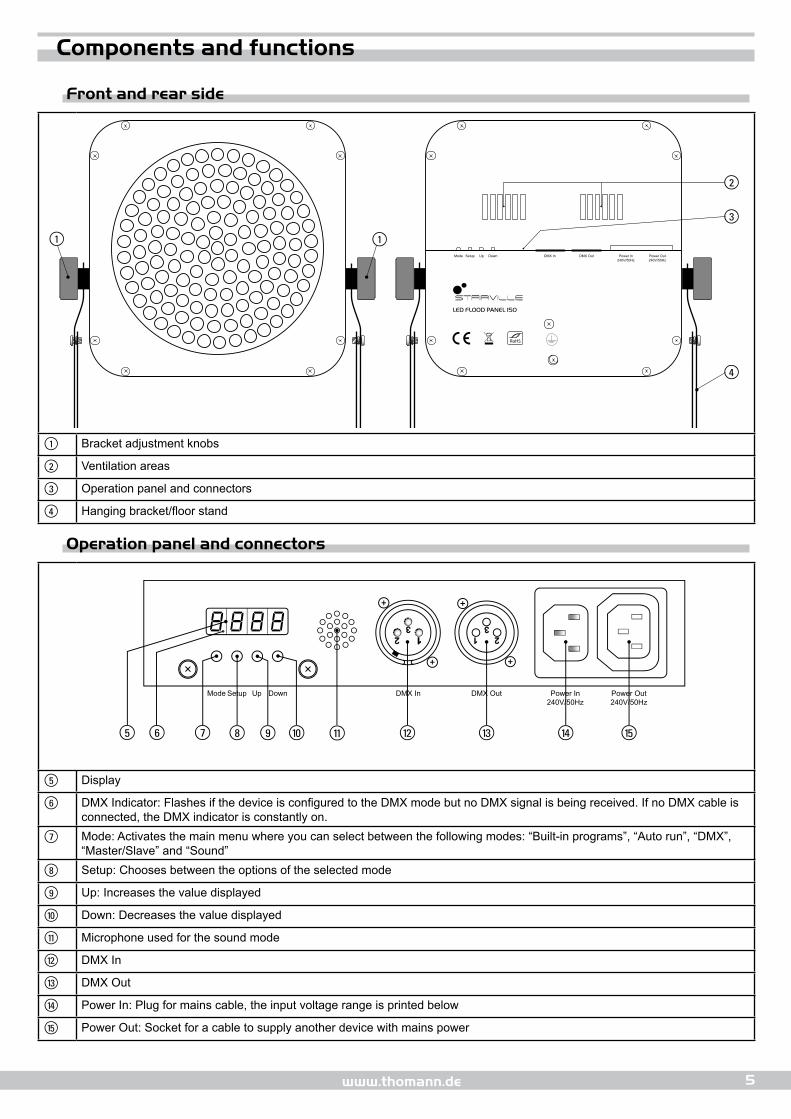
Front and rear side
öö
#
LED FLOOD PANEL 150
RoHS
Mode Setup Up Down DMX In DMX Out Power In240V/50Hz
Power Out240V/50Hz
$
%
ö Bracket adjustment knobs
# Ventilation areas
$ Operation panel and connectors
% Hanging bracket/floor stand
Operation panel and connectors
8 8 8 8
Mode Setup Up Down DMX In DMX Out Power In240V/50Hz
Power Out240V/50Hz
& ' ( ) * + - . / 0,
& Display
' DMX Indicator: Flashes if the device is configured to the DMX mode but no DMX signal is being received. If no DMX cable is connected, the DMX indicator is constantly on.
( Mode: Activates the main menu where you can select between the following modes: “Built-in programs”, “Auto run”, “DMX”, “Master/Slave” and “Sound”
) Setup: Chooses between the options of the selected mode
* Up: Increases the value displayed
+ Down: Decreases the value displayed
, Microphone used for the sound mode
- DMX In
. DMX Out
/ Power In: Plug for mains cable, the input voltage range is printed below
0 Power Out: Socket for a cable to supply another device with mains power

LED Flood Panel 1506
Operation
To operate the device, connect it to the mains. The display indicates a system reset. After a few seconds, the device is operational.
Main menu
Press “Mode” to activate the main menu and to select one of the operation modes. If you do not press any button for 20 seconds, the menu will be deactivated again. If you press any button, it re-opens in the previous state. All settings that were made previously are kept, even if you disconnect the device from the power supply.
Built-in programs mode
PÂ01 Press “Mode” until the display shows “Pr.xx”. You can now select one of ten different built-in pro-grams. Press “Setup”, then “Up” or “Down” to select one of the programs “Pr.01” to “Pr.10” described
in the table below.
Program DescriptionPr.01 Static colourPr.02 7-colour fadingPr.03 3-colour fadingPr.04 7-colour jumping changePr.05 3-colour jumping changePr.06 Colour dreaming 1Pr.07 Colour dreaming 2Pr.08 Red fadingPr.09 Green fadingPr.10 Blue fading
Settings for program 01
The first selection specifies the static colour. Here, the following values are possible:
Value Meaning1.--r Red
2.-rg Red + Green
3.--g Green
4.-gb Green + Blue
5.--b Blue
6.-rb Red + Blue
7.rgb Red + Green + Blue
Press “Setup” again. You can now enter the desired intensity of the static colour with the “Up” and “Down” but-tons. If the static colour is a mix of RGB colours, you can adjust the intensity of each component separately.Press “Setup” again. You can now enter the desired flash value for the static colour using the “Up” and “Down” buttons. Select a value between “FS00” and “FS99”.
Settings for programs 02…10
Press “Setup”. You can now set the value for the change speed. Select a value between “SP.01” (slow) and “SP.99” (fast) or “SP.FL” (flashing) using the “Up” and “Down” buttons. Press “Setup” again. You can now set the desired flash value using the “Up” and “Down” buttons. Select a value between “FS00” and “FS99”.

www.thomann.deLED Flood Panel 150 7
Auto show mode
AUT0 Press “Mode” until the display shows “Auto”. In this mode, the device runs the built-in programs one after another in a continuous loop.
Press “Setup”. You can now set the value for the speed. Select a value between “SP.01” (slow) and “SP.99” (fast) or “SP.FL” (flashing) using the “Up” and “Down” buttons. Press “Setup” again. You can now enter the desired flash value using the “Up” and “Down” buttons. Select a value between “FS00” and “FS99”. Press “Setup” again. You can now enter the desired fading value using the “Up” and “Down” buttons. Select a value between “Fd00” and “Fd99”.
Master/Slave mode
SLAu Press “Mode” until the display shows “SLAv”. The master and the slave devices will operate synchro-nously.
Sound mode
Sï25 Press “Mode” until the display shows “SU.xx”. Press “Setup”. You can now set the value for the sound sensitivity using the “Up” and “Down” buttons. Select a value between “SU.00” and “SU.31”
DMX mode
û001 Press “Mode” until the display shows “d.xxx”. Set the number of the first DMX channel of the device using the “Up” and “Down” buttons. Select a value between “d.001” and “d.512”. Ensure that this
channel number fits to the configuration of your DMX controller. The following table shows the highest usable channel number for the different modes.
Mode Highest usable DMX address3-ch 510
4-ch 509
8-ch 505
Press “Setup” again. Using the “Up” and “Down” buttons, you can now select one of the three possible DMX configurations: “3-ch”, “4-ch”, “8-ch”.
Functions in 3-channel DMX mode
Channel Value Function1 0…255 Intensity of red (0 to 100 %)
2 0…255 Intensity of green (0 to 100 %)
3 0…255 Intensity of blue (0 to 100 %)
Functions in 4-channel DMX mode
Channel Value Function1 0…255 Master dimmer (0 to 100 %)
2 0…255 Intensity of red (0 to 100 %)
3 0…255 Intensity of green (0 to 100 %)
4 0…255 Intensity of blue (0 to 100 %)
LED Flood Panel 1508
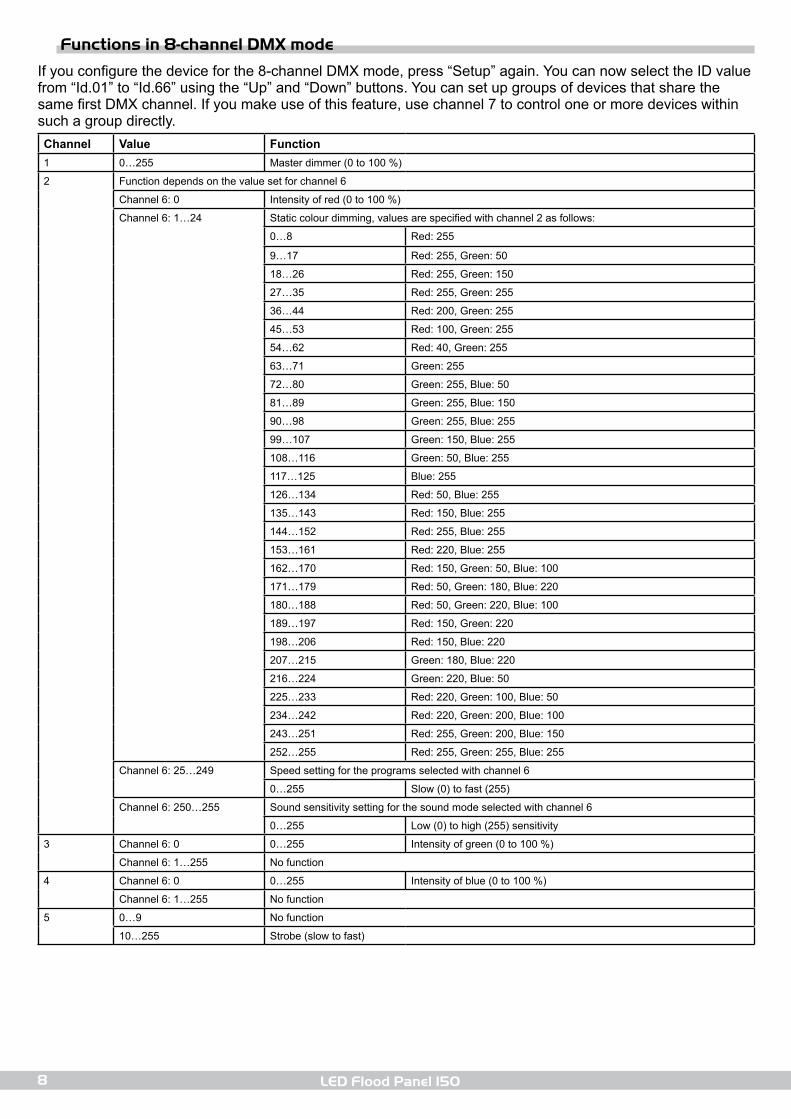
Functions in 8-channel DMX mode
If you configure the device for the 8-channel DMX mode, press “Setup” again. You can now select the ID value from “Id.01” to “Id.66” using the “Up” and “Down” buttons. You can set up groups of devices that share the same first DMX channel. If you make use of this feature, use channel 7 to control one or more devices within such a group directly. Channel Value Function1 0…255 Master dimmer (0 to 100 %)
2 Function depends on the value set for channel 6
Channel 6: 0 Intensity of red (0 to 100 %)
Channel 6: 1…24 Static colour dimming, values are specified with channel 2 as follows:
0…8 Red: 255
9…17 Red: 255, Green: 50
18…26 Red: 255, Green: 150
27…35 Red: 255, Green: 255
36…44 Red: 200, Green: 255
45…53 Red: 100, Green: 255
54…62 Red: 40, Green: 255
63…71 Green: 255
72…80 Green: 255, Blue: 50
81…89 Green: 255, Blue: 150
90…98 Green: 255, Blue: 255
99…107 Green: 150, Blue: 255
108…116 Green: 50, Blue: 255
117…125 Blue: 255
126…134 Red: 50, Blue: 255
135…143 Red: 150, Blue: 255
144…152 Red: 255, Blue: 255
153…161 Red: 220, Blue: 255
162…170 Red: 150, Green: 50, Blue: 100
171…179 Red: 50, Green: 180, Blue: 220
180…188 Red: 50, Green: 220, Blue: 100
189…197 Red: 150, Green: 220
198…206 Red: 150, Blue: 220
207…215 Green: 180, Blue: 220
216…224 Green: 220, Blue: 50
225…233 Red: 220, Green: 100, Blue: 50
234…242 Red: 220, Green: 200, Blue: 100
243…251 Red: 255, Green: 200, Blue: 150
252…255 Red: 255, Green: 255, Blue: 255
Channel 6: 25…249 Speed setting for the programs selected with channel 6
0…255 Slow (0) to fast (255)
Channel 6: 250…255 Sound sensitivity setting for the sound mode selected with channel 6
0…255 Low (0) to high (255) sensitivity
3 Channel 6: 0 0…255 Intensity of green (0 to 100 %)
Channel 6: 1…255 No function
4 Channel 6: 0 0…255 Intensity of blue (0 to 100 %)
Channel 6: 1…255 No function
5 0…9 No function
10…255 Strobe (slow to fast)

www.thomann.deLED Flood Panel 150 9
Channel Value Function6 0 Static RGB mix as defined with channels 2, 3 and 4
1…24 Static colour, as defined with channel 2
25…49 Sets Pr02 (7-colour fading)
50…74 Sets Pr03 (3-colour fading)
75…99 Sets Pr04 (7-colour jumping change)
100…124 Sets Pr05 (3-colour jumping change)
125…149 Sets Pr06 (fantasy change 1)
150…174 Sets Pr07 (fantasy change 2)
175…199 Sets Pr08 (red fading)
200…224 Sets Pr09 (green fading)
225…249 Sets Pr10 (blue fading)
250…255 Sets the sound active mode
7 If two or more devices share the same first DMX channel, the value of channel 7 selects one or more devices within such a group.
0…9 All IDs (ID1…ID66)
10…19 ID1
20…29 ID2
30…39 ID3
40…49 ID4
50…59 ID5
60…69 ID6
70…79 ID7
80…89 ID8
90…99 ID9
100…109 ID10
110…119 ID11
120…129 ID12
130…139 ID13
140…149 ID14
150…159 ID15
160…169 ID16
170…179 ID17
180…189 ID18
190…199 ID19
200…209 ID20
210 ID21
211 ID22
212 ID23
254 ID65
255 ID66
8 0…250 Instant fader response for channel 1, 2, 3, 4
251…255 Delayed fader response for channel 1, 2, 3, 4

LED Flood Panel 15010
Menu diagram
SLAu
SU.25
d.001 d.001
d.5123-ch
Fd00
Fd99
FS00
FS99
4-ch
8-ch
Aut SP.00
SP.99
Pr.01 Pr.01
Pr.10
SP.FL
SU.00
SU.31
Id.01
Id.66
Built-in programs mode
Auto show mode
DMX mode
Master/Slave mode
Sound mode
www.thomann.deLED Flood Panel 150 11
Troubleshooting
A few common problems that may occur during operation are shown in the following. Here are some sugges-tions for easy troubleshooting:
The device does not work at all
1. Check the power connection and main fuse.
No response to the DMX controller
1. If the device is configured to the DMX mode, but no DMX signal is being received, the DMX indicator flashes. If no DMX cable is connected, the DMX indicator is constantly on. Check the DMX connectors and cables to see if they are properly linked. Try out other DMX cables if necessary.
2. If the DMX indicator is off and there is no response, check the address settings and DMX polarity.3. Try out another DMX controller. 4. Check if the DMX cables run near or alongside high-voltage cables that may cause damage or interference
to DMX interface circuit.5. Always ensure that the output of the last DMX device in the daisy chain is terminated with a 120-Ω resistor.
If the procedures recommended above do not succeed, please contact our Service Center. You can find the contact information at www.thomann.de.
Cleaning
Clean the optical lenses which are accessible from the outside periodically to optimise light output. The clean-ing frequency depends on the environment in which the device operates: damp, smoky or particularly dirty sur-rounding can cause greater accumulation of dirt on the unit’s optics. Clean with soft cloth using normal glass cleaning fluid.• Always dry the parts carefully.• Clean the external optics at least every 20 days.
© 2011 • Musikhaus Thomann e. K. • Treppendorf 30 • 96138 Burgebrach • Germany • www.thomann.de
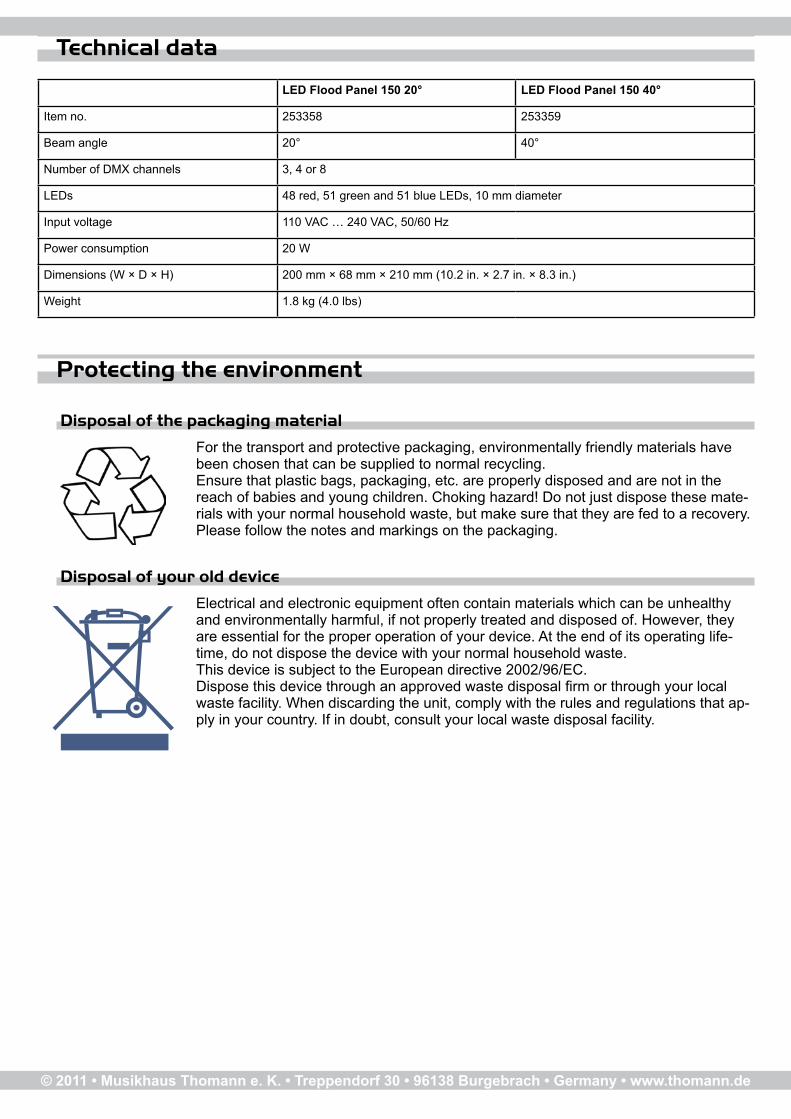
Technical data
LED Flood Panel 150 20° LED Flood Panel 150 40°
Item no. 253358 253359
Beam angle 20° 40°
Number of DMX channels 3, 4 or 8
LEDs 48 red, 51 green and 51 blue LEDs, 10 mm diameter
Input voltage 110 VAC … 240 VAC, 50/60 Hz
Power consumption 20 W
Dimensions (W × D × H) 200 mm × 68 mm × 210 mm (10.2 in. × 2.7 in. × 8.3 in.)
Weight 1.8 kg (4.0 lbs)
Protecting the environment
Disposal of the packaging material
For the transport and protective packaging, environmentally friendly materials have been chosen that can be supplied to normal recycling.Ensure that plastic bags, packaging, etc. are properly disposed and are not in the reach of babies and young children. Choking hazard! Do not just dispose these mate-rials with your normal household waste, but make sure that they are fed to a recovery. Please follow the notes and markings on the packaging.
Disposal of your old device
Electrical and electronic equipment often contain materials which can be unhealthy and environmentally harmful, if not properly treated and disposed of. However, they are essential for the proper operation of your device. At the end of its operating life-time, do not dispose the device with your normal household waste.This device is subject to the European directive 2002/96/EC.Dispose this device through an approved waste disposal firm or through your local waste facility. When discarding the unit, comply with the rules and regulations that ap-ply in your country. If in doubt, consult your local waste disposal facility.