owner’s manual - samsontech.com · the carbon 49 features a 49-key velocity-sensitive...
TRANSCRIPT

OWNER’S MANUAL

Copyright 2012 - Samson Technologies V3 Samson Technologies 45 Gilpin Avenue Hauppauge, New York 11788-8816 Phone: 1-800-3-SAMSON (1-800-372-6766) Fax: 631-784-2201 www.samsontech.com
Apple, Mac, Mac OS, and iPad are trademarks of Apple Inc., registered in the U.S. and other countries.
IOS is a trademark or registered trademark of Cisco in the U.S. and other countries and is used under license.
Native Instruments, NI and Komplete Elements are trademarks or registered trademarks of Native Instruments GmbH.

Important Safety Information
CAUTION: TO REDUCE THE RISK OF ELECTRIC SHOCK, DO NOT REMOVE COVER (OR BACK). NO USER-SERVICEABLE PARTS INSIDE. REFER SERVICING TO QUALIFIED SERVICE PERSONNEL.This lightning flash with arrowhead symbol within an equilateral triangle is intended to alert the user to the presence of non-insulated “dangerous volt-age” within the product’s enclosure that may be of sufficient magnitude to constitute a risk of electric shock.
The exclamation point within an equilateral triangle is intended to alert the user to the presence of important operating and maintenance instructions in the literature accompanying the appliance.
If you want to dispose this product, do not mix it with general household waste. There is a separate collection system for used electronic products in accordance with legislation that requires proper treatment, recovery and recycling.
Private household in the 25 member states of the EU, in Switzerland and Norway may return their used electronic products free of charge to designated collection facilities or to a retailer (if you purchase a similar new one).
For Countries not mentioned above, please contact your local authorities for a correct method of disposal.
By doing so you will ensure that your disposed product undergoes the necessary treatment, recovery and recycling and thus prevent potential negative effects on the environment and human health.
ATTENTIONRISQUE D’ÉLECTROCUTION !
NE PAS OUVRIR !
WARNINGTO PREVENT FIRE OR SHOCK HAZARD. DO NOT USE THIS PLUG WITH AN EXTENSION CORD, RE-CEPTACLE OR OTHER OUTLET UNLESS THE BLADES CAN BE FULLY INSERTED TO PREVENT BLADE EXPOSURE. TO PREVENT FIRE OR SHOCK HAZARD. DO NOT EXPOSE THIS APPLIANCE TO RAIN OR MOISTURE. TO PREVENT ELECTRICAL SHOCK, MATCH WIDE BLADE PLUG TO WIDE SLOT AND FULLY INSERT.

CAUTIONAny changes or modifications to the construction of this device which are not express-ly approved by the party responsible for compliance could void the user’s authority to operate the equipment.
NOTE: This equipment has been tested and found to comply with the limits for a Class B digital device, pursuant to Part 15 of the FCC Rules. These limits are designed to provide reasonable protection against harmful interference in a residential installation. This equipment generates, uses, and can radiate radio frequency energy and, if not installed and used in accordance with the instructions, may cause harmful interference to radio communications. However, there is no guarantee that interference will not occur in a particular installation. If this equipment does cause harmful interference to radio or television reception, which can be determined by turning the equipment off and on, the user is encouraged to try to correct the interference by one or more of the following measures.
• Reorient or relocate the receiving antenna.• Increase the separation between the equipment and receiver.• Connect the equipment to an outlet on a circuit different from that to which the
receiver is connected.• Consult the dealer or an experienced radio/TV technician for help.
This equipment has been tested and found to comply with the limits for the following standards:EN55022-2006EN55024:1998/+A1:2001/+A2:2003EN55013:2001/+A1:2003/+A3:2006EN61000-3-2:2006EN61000-3-3:1995/+A1:2001/+A2:2003

Important Safety Information
1. Read these instructions.
2. Keep these instructions.
3. Heed all warnings.
4. Follow all instructions.
5. Do not use this apparatus near water.
6. Clean only with dry cloth.
7. Do not block any ventilation openings. Install in accordance with the manufac-turer’s instructions.
8. Do not install near any heat sources such as radiators, heat registers, stoves, or other apparatus (including amplifiers) that produce heat.
9. Only use attachments/accessories specified by the manufacturer.
10. Use only with the cart, stand, tripod, bracket, or table specified by the manufacturer, or sold with the apparatus. When a cart is used, use caution when moving the cart/apparatus combination to avoid injury from tip-over.
11. Unplug the apparatus during lightning storms, or when unused for long periods of time.
12. Refer all servicing to qualified personnel. Service is required when the apparatus has been damaged in any way, such as power supply cord or plug is damaged, liquid has been spilled or objects have fallen into the apparatus has been exposed to rain or moisture, does not operate normally, or has been dropped.
13. This appliance shall not be exposed to dripping or splashing water and that no object filled with liquid such as vases shall be placed on the apparatus.
14. Caution-to prevent electrical shock, match wide blade plug wide slot fully insert.
15. Please keep a good ventilation environment around the entire unit.
16. Always unplug cables by gripping the plug firmly, not by pulling on the cable.

6
ContentsIntroduction. . . . . . . . . . . . . . . . . . . . . . . . . . . . . . . . . . . . . . . . . . . . . 7
Carbon 49 Features . . . . . . . . . . . . . . . . . . . . . . . . . . . . . . . . . . . . . . . . 8
System Components . . . . . . . . . . . . . . . . . . . . . . . . . . . . . . . . . . . . . . . 8
Minimum System Requirements . . . . . . . . . . . . . . . . . . . . . . . . . . . . . . . . 8
Front Panel Controls and Functions . . . . . . . . . . . . . . . . . . . . . . . . . . . . . . 9
Rear Panel Controls and Functions . . . . . . . . . . . . . . . . . . . . . . . . . . . . . 10
Quick Start. . . . . . . . . . . . . . . . . . . . . . . . . . . . . . . . . . . . . . . . . . . . . 11
Basic Operation . . . . . . . . . . . . . . . . . . . . . . . . . . . . . . . . . . . . . . . . . 12
Edit Mode . . . . . . . . . . . . . . . . . . . . . . . . . . . . . . . . . . . . . . . . . . . . . 14
MIDI Continuous Controller (CC) List . . . . . . . . . . . . . . . . . . . . . . . . . . . . 18
MIDI Note Numbers . . . . . . . . . . . . . . . . . . . . . . . . . . . . . . . . . . . . . . . 20
Specifications . . . . . . . . . . . . . . . . . . . . . . . . . . . . . . . . . . . . . . . . . . . 21

7
Carbon 49 · USB/MIDI Keyboard Controller
ENG
LISH
FRA
NÇA
ISD
EUTS
CHE
ESPA
ÑO
LIT
ALI
AN
O
IntroductionThank you for purchasing the Samson Carbon 49, 49-key USB keyboard controller! The Carbon 49 can easily integrate with your Windows or Mac digital production worksta-tion. The keyboard can also be powered directly by an Apple iPad (using the Apple iPad Camera Connection Kit, not included), and can be used to control many iOS MIDI apps, like GarageBand. The Carbon 49 features a 49-key velocity-sensitive semi-weight-ed keyboard, an assignable fader, a data knob, pitch bend and modulation wheels, and a 3-digit LED display.
The Carbon 49 is the perfect addition to your DAW or controlling virtual instrument software. To get you started making music immediately, we have included Native Instruments Komplete Elements, which contains over 1000 sounds and effects.
In these pages, you’ll find a detailed description of the features of the Carbon 49 keyboard controller, as well as a guided tour of its control panel, and inst ructions for setup and use. You’ll also find a warranty card enclosed. Please don’t forget to fill it out and mail it in so that you can receive online technical support, and so that we can send you updated information about these and other Samson products in the future.
We recommend you record your serial number in the space provided below, for future reference.
Serial number: ____________________________________________
Date of purchase: __________________________________________
With proper care and maintenance, your Carbon 49 will operate trouble-free for many years. Should your keyboard ever require servicing, a Return Authorization (RA) num-ber must be obtained before shipping your unit to Samson. Without this number, the unit will not be accepted. Please call Samson at 1-800-3SAMSON (1-800-372-6766) for an RA number prior to shipping your unit. Please retain the original packing materials and, if possible, return the unit in its original carton. If your Carbon 49 was purchased outside of the United States, contact your local distributor for warranty details and service information. Also, be sure to check out our website (www.samsontech.com) for information about our full product line.

8
Carbon 49 Features
System Components
Minimum System Requirements
The Samson Carbon 49 utilizes state-of-the-art technology and is engineered to the finest detail. Here are some of its main features:
• 49-key, velocity-sensitive, semi-weighted, keyboard
• Assignable Data encoder and Volume fader
• Pitch Bend and assignable Modulation wheels
• 3-digit, 7-segment LED display which provides real-time feedback
• Dedicated Octave up/down buttons
• Transpose up/down buttons, assignable to Program and MIDI Channel up/down
• Edit key for adjusting up to 14 MIDI and control parameters
• Sustain Pedal Input
• USB connection for power and MIDI
• 5-pin MIDI Out to connect to standard external MIDI devices
• Integrated iPad stand
• Includes Native Instruments Komplete Elements software
• Samson Carbon 49 USB Keyboard
• USB Cable
• Two iPad rubber shoe adaptors
• Native Instruments Komplete Elements installation DVD
• Carbon 49 Owner’s Manual
Windows (PC)
• Windows XP/Vista/Win7
• 800MHz or higher, 256MB RAM or larger, USB port
Mac OS
• Mac OS X 10.4.9 or higher
• 733MHz or higher, 512MB RAM or larger, USB port
Apple iPad
• iOS v4.2 or higher
We recommend that you also check the minimum system requirements for the soft-ware you are using with your Carbon 49, as they may be greater than the above.

9
Carbon 49 · USB/MIDI Keyboard Controller
ENG
LISH
FRA
NÇA
ISD
EUTS
CHE
ESPA
ÑO
LIT
ALI
AN
O
4 5
67
8 9
10
321
1234
Front Panel Controls and Functions
1. Display - 3 x 7-segment LED display shows controller data in real-time in Perfor-mance mode, and the adjustable parameters in Edit mode
2. VOLUME Fader - This fader is preset from the factory to send MIDI volume (CC #7) messages. The VOLUME fader can be assigned to control different MIDI parameters in Edit Mode (see p.14 for more information).
3. DATA Knob - This endless rotary encoder is preset from the factory to send MIDI pan (CC #10) messages. The DATA knob can be assigned to control different MIDI parameters in Edit Mode (see p.14 for more information).
4. EDIT Button - Press this button to enter Edit Mode. In Edit Mode, you can adjust the keyboard’s parameters (see p.14 for more information).
5. iPad Holder - Place an Apple iPad horizontally in this slot. Use the included rubber shoes to securely hold your iPad in place (see p.11 for more information).
6. OCTAVE +/– Buttons - Press the OCTAVE buttons to shift the octave of the key-board up or down up to four octaves, to extend the range of the keyboard. Each time you press the OCTAVE button, the range of the keyboard shifts up or down 12 notes.
7. TRANSPOSE +/– Buttons - Press the TRANSPOSE buttons to shift the range of the keyboard up or down up to 12 semitones (half-steps). The TRANSPOSE buttons can also be assigned to send MIDI Program and MIDI Channel messages (see p.14 for more information).
8. PITCH BEND Wheel - Use this wheel to raise or lower the pitch of notes played on the keyboard.
9. MODULATION Wheel - This wheel is usually used to add modulation (CC #1) to the sound being played. The MODULATION wheel can be assigned to send differ-ent MIDI parameters in Edit Mode (see p.14 for more information).
10. Function Keys - In Edit Mode, the first 25 keys of the keyboard are assigned to functions and numerical digits 0–9 (see p.14 for more information).

10
4 5
67
8 9
10
321
1234
Rear Panel Controls and Functions
1. POWER Switch - Slide this switch to turn the keyboard on and off.
2. USB Connection - Connect a standard USB cable from this port to the USB con-nection on a computer or iPad to provide power to the keyboard, as well as to send and receive MIDI data.
3. MIDI OUT - Use a 5-pin MIDI cable to connect the Carbon 49 to an external MIDI device.
4. SUSTAIN Pedal Input - Connect a ¼” sustain or expression pedal to this input. This input is preset from the factory to send MIDI sustain (CC #64) messages. The SUS-TAIN pedal input can be assigned to send different MIDI parameters in Edit Mode (see p.14 for more information).

11
Carbon 49 · USB/MIDI Keyboard Controller
ENG
LISH
FRA
NÇA
ISD
EUTS
CHE
ESPA
ÑO
LIT
ALI
AN
O
Quick Start
1. Connect the Carbon 49 to your computer or iPad using the supplied USB cable. The unit will receive power and transmit MIDI data via the USB connection. Slide the POWER switch to the left to turn on the keyboard.
Note: To connect directly to an iPad, you will need to use the Apple iPad Camera Connection Kit (not included).
2. Launch your DAW or virtual instrument software, and set the Carbon 49 as the MIDI Input device.
3. To use the Carbon 49 with an external MIDI device (such as a sound module), connect a 5-pin MIDI cable to the MIDI OUT on the rear of the Carbon 49, and to the MIDI IN of the external device.
On Off
3 4 5
67
8 9
10
1 2
3 41 2
On Off
3 4 5
67
8 9
10
1 2
3 41 2
The Carbon 49 iPad holder is designed to accommodate the original iPad, as well as the iPad 2. To securely fit your iPad, we have included two rubber shoe adaptors. The adaptors are stored in the bottom of the Carbon 49.
Connecting an iPad
Insert the rubber shoes into the left and right corners of the iPad holder (as shown in the above illustration). Then, slide your iPad into the rubber shoes. Plug the Apple iPad Camera Connection Kit adaptor to the iPad, and connect the iPad to the keyboard via the included USB cable.

12
Basic Operation
The Carbon 49 has two operation modes: Performance Mode and Edit Mode.
Performance Mode - In this mode, the 49 velocity-sensitive keys transmit note and velocity information via the USB or MIDI output. The assignable controllers, pitch bend and modulation wheels all transmit continuous controller information.
Edit Mode - In this mode, use the first 25 keys on the keyboard to access functions and enter numerals 0-9. The rest of the keyboard will transmit note and velocity informa-tion. This mode is activated by pressing the EDIT button. Refer to the section on Edit Mode (p.14) for details. Note: The factory default for transmitting control information is channel 1. The key-board can be assigned to transmit on another MIDI channel in Edit Mode.
Modes
Performance ParametersOCTAVE ButtonsThe OCTAVE buttons shift the octave of the keyboard up or down 12 notes at a time, to extend the range of the keyboard. They can be used to shift the octave up or down a maximum of four octaves. As you press these buttons, the octave shift value will be shown on the display. The default value is 0.
The OCTAVE “-” button will shift the keyboard down one octave each time the but-ton is pressed, and will light red when the keyboard range is below the 0 value.
The OCTAVE “+” button will shift the keyboard up one octave each time the button is pressed, and will light red when the keyboard range is above the 0 value.
Press both OCTAVE buttons together to reset the keyboard range to 0.
TRANSPOSE ButtonsThe TRANSPOSE buttons shift the range of the keyboard up or down by one semi-tone (half-step). They can be used to transpose notes up or down by a maximum of 12 semitones. As you press these buttons, the shift value will be shown on the display. The default value is 0.
The TRANSPOSE “-” button will shift the keyboard down one semitone each time the button is pressed, and will light red when the keyboard range is below the 0 value.
The TRANSPOSE “+” button will shift the keyboard up one semitone each time the button is pressed, and will light red when the keyboard range is above the 0 value.
You can also set the TRANSPOSE buttons to send Program +/- or MIDI Channel +/- information. Refer to the section Edit Mode (p.14) for details.
MODULATION WheelThe MODULATION wheel is usually used to add vibrato effects to tones you are playing. The data range of the MODULATION wheel is 0–127. The default MIDI con-troller number is CC #1. You can assign another controller number to the modula-tion wheel in Edit Mode. Refer to the section Edit Mode (p.14) for details.

13
Carbon 49 · USB/MIDI Keyboard Controller
ENG
LISH
FRA
NÇA
ISD
EUTS
CHE
ESPA
ÑO
LIT
ALI
AN
O
VOLUME FaderThe VOLUME fader sends MIDI information to control the performance of the de-vice that is connected to the keyboard. The factory setting is channel volume, but can be assigned to another parameter in Edit Mode. Refer to the section Edit Mode (p.14) for details.
DATA KnobThe DATA knob sends MIDI information to control the performance of the device that is connected to the keyboard. The factory setting is pan control, but can be assigned to another parameter in Edit Mode. Refer to the section Edit Mode (p.14) for details.
PITCH BEND WheelThe PITCH BEND wheel is used to bend notes played on the keyboard by raising or lowering the pitch. The response and range of this controller is based on the patch or sound source that is being controlled. The pitch bend wheel is spring-mounted and will return to the center position when it is released.
SUSTAIN Pedal InputYou can connect a momentary footswitch or damper pedal to the rear panel SUS-TAIN Pedal input. The default setting for the pedal input is sustain (CC #64). You can assign another function to the pedal input in Edit Mode. Refer to the section Edit Mode (p.14) for details.
When the keyboard is powered on, it will detect the polarity of a connected pedal. To reverse the pedal’s polarity, press the pedal when powering on the keyboard.
Basic Operation

14
Edit Mode is where you can access and adjust the parameters of the Carbon 49 to suit your needs. To access Edit Mode, press the EDIT button on the top panel of the keyboard. The button will light red, and the display will read “Set” to indicate that you are in Edit Mode. In Edit Mode, the first 25 keys on the keyboard become function and numerical keys, and will not transmit any note data. The last 24 keys will continue to transmit note information in Edit Mode, so you can see, in real time, how your changes have affected the performance. The VOLUME fader, PITCH and MODULATION wheels will also continue to function normally, but their performance data will not be shown on the display. To exit Edit Mode, and return to Performance Mode, press the EDIT but-ton a second time. The button will no longer light red once in Performance Mode.
Edit Mode
MIDI FunctionsPROG (Program Change) When pressed, the current program number flashes on the display. To change the program, either rotate the DATA knob, or enter the new program number using the numerical keys (0–9). You can enter a program number ranging from 0-127. After you enter the desired program number, press the ENTER key. The Carbon 49 will transmit the program change, and the display will stop flashing. If the number entered is out of range, an “-E-” (error) will display for three seconds, and then return to the last set program number (no information will be transmitted).
CHANNEL (MIDI Channel) When pressed, the current MIDI channel number flashes on the display. To change the MIDI channel that the Carbon 49 is transmitting on, either rotate the DATA knob, or enter the new program number using the numerical keys. You can enter a number ranging from 1–16. When you reach the desired channel number, press the ENTER key. The Carbon 49 will be set to transmit on the new channel, and the display will stop flashing. If the number is out of range, “-E-” (error) will be displayed for three seconds, and then return to the last set channel number.

15
Carbon 49 · USB/MIDI Keyboard Controller
ENG
LISH
FRA
NÇA
ISD
EUTS
CHE
ESPA
ÑO
LIT
ALI
AN
O
Edit Mode
Assigning Controllers
BANK MSB & LSB In order to store more than the 128 patches, devices generally arrange patches into multiple banks. To access the different banks, MIDI requires an identifier made up of two MIDI messages: Most Significant Byte (MSB) and Least Significant Byte (LSB). These two messages, along with a program change command, will allow you to select a bank, and a patch within that bank. Consult your device’s manual for a list of corre-sponding MSB’s and LSB’s related to different banks. To set the BANK MSB or BANK LSB, press the corresponding function key, and the cur-rent MSB or LSB will flash on the display. Rotate the DATA knob or type in the desired MSB or LSB number, and press ENTER. You can input numbers ranging from 0-127. The Carbon 49 will transmit the new MSB or LSB to your device. If the number is out of range, “-E-” (error) will flash on the screen for three seconds, and then return to the last set number. Note: To recall a new patch, a bank change must be followed by a program change.
VELOCITY CURVE The velocity curve is how the keyboard interprets the speed with which a particular key is pressed, and the relative MIDI velocity number it transmits. The Carbon 49 has four different curves you can utilize (1–4, described below). To change the velocity curve, press the key assigned to VELOCITY CURVE. The current selection will flash on the display. Rotate the DATA knob or use the numerical keys to select the desired curve. Press the ENTER key to confirm the selection, and the keyboard will be set to the new velocity curve. It you choose a number out of range, “-E-” (error) will flash on the display for three seconds, and then return to the last set velocity number. Available Velocity Curves
No. Type Description
1 Normal Linear type curve - Default
2 Soft Results in a lower transmitted velocity (and corresponding volume)
3 Hard Results in a higher transmitted velocity (and corresponding volume)
4 Fixed Note velocity is fixed to 127 1 - Normal 2 - Soft 3 - Hard 4 - Fixed

16
Edit ModeASSIGN TRANS Press the ASSIGN TRANS key to change the function that the TRANSPOSE “+” and “-” buttons control. There are three parameters that can be assigned: 1 - Transpose 2 - Program Change 3 - MIDI Channel When pressed, the current function number will flash on the display. Rotate the DATA knob, or enter the control code using the numerical keys. Press the ENTER key to con-firm the selection. If the number input is out of range, the display will flash “-E-” (error) for three seconds, and then return to the last set function number. Note: When the TRANSPOSE button is set to 2 (program change) or 3 (MIDI chan-nel), the indicators will not work. In addition, when the TRANSPOSE button is set to 2 (program change), the button has an accelerate feature (when the button is pressed and held down, the number will rapidly change so that you can access higher program numbers more quickly).
ASSIGN FADER Press the ASSIGN FADER function key to adjust the controller number assigned to the VOLUME fader. When pressed, the current controller number will flash on the display. Rotate the DATA knob, or enter the controller number (0–148) using the numerical keys. Refer to the MIDI Continuous Controller (CC) List on p.18 for a list of codes and their corresponding functions. Press the ENTER key to confirm your selection. If the number input is out of range, the display will flash “-E-” (error) for three seconds, before returning to the last set CC number.
ASSIGN KNOB Press the ASSIGN KNOB function key to adjust the controller number assigned to the DATA knob. When pressed, the current controller number will flash on the display. Ro-tate the DATA knob, or enter the controller number (0–148) using the numerical keys. Refer to the MIDI Continuous Controller (CC) List on p.18 for a list of codes and their corresponding functions. Press the ENTER key to confirm your selection. If the number input is out of range, the display will flash “-E-” (error) for three seconds, before return-ing to the last set CC number.
ASSIGN MOD Press the ASSIGN MOD function key to adjust the controller number assigned to the MODULATION wheel. When pressed, the current controller number will flash on the display. Rotate the DATA knob, or enter the controller number (0–148) using the nu-merical keys. Refer to the MIDI Continuous Controller (CC) List on p.18 for a list of codes and their corresponding functions. Press the ENTER key to confirm your selection. If the number input is out of range, the display will flash “-E-” (error) for three seconds, before returning to the last set CC number.

17
Carbon 49 · USB/MIDI Keyboard Controller
ENG
LISH
FRA
NÇA
ISD
EUTS
CHE
ESPA
ÑO
LIT
ALI
AN
O
RESET ALL The RESET ALL function sets all of the Carbon 49 controller values to their defaults. When you press the RESET ALL function key, the display will first show “No” (indicating that you do not want to reset all functions). If you do want to reset all controllers, press the numerical key 1, or rotate the DATA knob until “Yes” appears on the display. Press the ENTER key to confirm, and all controllers will be reset instantly. If you press the ENTER key while the display shows “No”, the reset will be cancelled.
ALL NOTES OFF The ALL NOTES OFF function sends an “all notes off” message in order to stop any stuck notes. Press the ALL NOTES OFF function key and the keyboard will instantly send the “all notes off” message, and any sustaining notes should stop.
DEFAULT The DEFAULT function returns all of the Carbon 49 parameters to the original factory settings. Press the DEFAULT function key, and the display will show “No” (indicating that you do not want to reset to all default, factory settings). If you do want to reset all controllers to their factory settings, press the numerical key 1, or rotate the DATA knob until “Yes” appears on the display. Press the ENTER key to confirm, and all controllers will be reset instantly. If you press the ENTER key while the display shows “No”, the reset will be cancelled.
SNAPSHOT The SNAPSHOT function transmits all of the current controller values for the VOLUME fader, DATA knob, PITCH BEND wheel, program number, and channel number at once, so that you can get a full picture of your current settings. Press the SNAPSHOT key to view these values.
Edit Mode
Keyboard Settings
ASSIGN PEDAL Press the ASSIGN PEDAL function key to adjust the controller number assigned to the SUSTAIN PEDAL input. The default setting is CC #64. When pressed, the current con-troller number will flash on the display. Rotate the DATA knob, or enter the controller number (0–148) using the numerical keys. Refer to the MIDI Continuous Controller (CC) List on p.18 for a list of codes and their corresponding functions. Press the ENTER key to confirm your selection. If the number input is out of range, the display will flash “-E-” (error) for three seconds, before returning to the last set CC number.

18
MIDI Continuous Controller (CC) List0 Bank Select1 Modulation wheel2 Breath control 3 Undefined4 Foot controller5 Portamento time6 Data Entry 7 Channel Volume8 Balance9 Undefined10 Pan11 Expression12 Effect control 1 13 Effect control 2 14 Undefined15 Undefined16 General Purpose #117 General Purpose #218 General Purpose #319 General Purpose #420 Undefined21 Undefined22 Undefined23 Undefined24 Undefined25 Undefined26 Undefined27 Undefined28 Undefined29 Undefined30 Undefined31 Undefined32 Bank Select33 Modulation wheel 34 Breath control 35 Undefined36 Foot controller37 Portamento time38 Data entry 39 Channel Volume40 Balance41 Undefined
42 Pan43 Expression44 Effect control 1 45 Effect control 2 46 Undefined47 Undefined48 General Purpose #149 General Purpose #250 General Purpose #351 General Purpose #452 Undefined53 Undefined54 Undefined55 Undefined56 Undefined57 Undefined58 Undefined59 Undefined60 Undefined61 Undefined62 Undefined63 Undefined64 Sustain pedal65 Portamento on/off66 Sostenuto on/off 67 Soft pedal on/off68 Legato Footswitch69 Hold 2 70 Sound Variation71 Timbre/Harmonic Intens.72 Release Time73 Attack Time74 Brightness75 Decay Time76 Vibrato Rate77 Vibrato Depth78 Vibrato Delay79 Sound Cont.80 General Purpose #581 General Purpose #682 General Purpose #783 General Purpose #8

19
Carbon 49 · USB/MIDI Keyboard Controller
ENG
LISH
FRA
NÇA
ISD
EUTS
CHE
ESPA
ÑO
LIT
ALI
AN
O
MIDI Continuous Controller (CC) List84 Portamento Control 85 Undefined86 Undefined87 Undefined88 Undefined89 Undefined90 Undefined91 Reverb Send Level92 Tremolo Depth93 Chorus Send Level94 Celeste/Detune Depth95 Phaser Depth96 Data entry +197 Data entry -198 NRPN LSB99 NRPN MSB100 RPN LSB101 RPN MSB102 Undefined103 Undefined104 Undefined105 Undefined106 Undefined107 Undefined108 Undefined109 Undefined110 Undefined111 Undefined112 Undefined113 Undefined114 Undefined115 Undefined116 Undefined117 Undefined118 Undefined119 Undefined120 All Sound Off121 Reset All Controllers122 Local control on/off 123 All notes off124 Omni mode off125 Omni mode on
126 Poly mode off127 Poly mode on
RPN/NRPN Messages128 Pitch Bend Sensitivity129 Fine Tuning130 Coarse Tuning131 Vibrato Rate132 Vibrato Depth133 Vibrato Delay134 Low Pass Filter Cutoff Frequency135 Low Pass Filter Resonance 136 High Pass Filter Cutoff Frequency137 EQ Low Gain 138 EQ High Gain 139 EQ Low Frequency 140 EQ High Frequency 141 EG Attack Time 142 EG Decay Time 143 EG Release Time
144 Channel Pressure (Aftertouch)145 Program Change146 Song Select(Song #)
SysEx Meesages147 Master Volume148 Master Balance

20
Octave
Note Numbers
C C# D D# E F F# G G# A A# B
-1 0 1 2 3 4 5 6 7 8 9 10 11
0 12 13 14 15 16 17 18 19 20 21 22 23
1 24 25 26 27 28 29 30 31 32 33 34 35
2 36 37 38 39 40 41 42 43 44 45 46 47
3 48 49 50 51 52 53 54 55 56 57 58 59
4 60 61 62 63 64 65 66 67 68 69 70 71
5 72 73 74 75 76 77 78 79 80 81 82 83
6 84 85 86 87 88 89 90 91 92 93 94 95
7 96 97 98 99 100 101 102 103 104 105 106 107
8 108 109 110 111 112 113 114 115 116 117 118 119
9 120 121 122 123 124 125 126 127
MIDI Note NumbersInternational Organization Standardization system of MIDI note numbers. Middle C is MIDI note number 60 (C4).

21
Carbon 49 · USB/MIDI Keyboard Controller
ENG
LISH
FRA
NÇA
ISD
EUTS
CHE
ESPA
ÑO
LIT
ALI
AN
O
SpecificationsKeyboard 49-key, semi-weighted, velocity sensitive
Display 3-digit, 7-segment
Controls Volume Fader, Data Knob, Edit Button, Octave +/- buttons, Transpose +/- buttons, Pitch Bend Wheel, Modulation Wheel
Functions Program Number, Reset All, MIDI Channel, All Notes Off, Bank MSB, Bank LSB, Velocity Curve, Default, Assign Trans, Assign Fader, Assign Knob, Assign Mod, Assign Pedal, Snapshot
Pedal Input 1/4” TRS
MIDI MIDI over USB, 5-Pin MIDI OUT
Power USB Bus Power
Accessories USB Cable iPad rubber shoes Native Instruments Komplete Elements DVD
Dimensions 31.2” x 8.5” x 3” 792 mm x 217 mm x 78 mm
Weight 6.2 lbs 2.8 kgs

Apple, Mac, Mac OS, et iPad sont des marques déposées d’Apple Inc., aux USA et dans d’autres pays.
IOS est une marque déposée par Cisco aux USA et dans d’autres pays. Elle fait l’object d’un contract de licence.
Native Instruments, NI et Komplete Elements sont des marques déposées par Native Instruments GmbH.

ATTENTION POUR ÉVITER TOUT RISQUE D’INCENDIE OU D’ÉLECTROCUTION, VÉRIFIEZ QUE LES PLOTS DE LA FICHE SECTEUR SOIENT COMPLÈTEMENT INSÉRÉS DANS LA RALLONGE, MULTI-PRISE OU TOUTE AUTRE PRISE SECTEUR. POUR ÉVITER TOUT RISQUE D’INCENDIE OU D’ÉLECTROCUTION, N’EXPOSEZ JAMAIS CET APPAREIL À LA PLUIE OU À L’HUMIDITÉ. POUR ÉVITER TOUT RISQUE D’INCENDIE OU D’ÉLECTROCUTION, INSÉREZ LA FICHE SECTEUR COMPLÈTEMENT DANS LA PRISE SECTEUR FEMELLE
Ce produit ne doit pas être jeté avec les ordures ménagères. I l existe un service decollecte séparé pour les produits électroniques usés. Ce service respecte les législations sur le traitement approprié, la récupération et le recyclage.
Les consommateurs des 25 pays membres de l’Union européenne, de la Suisse et de la Norvège peuventse départir gratuitement de leurs produits électroniques usagés dans des points de collecte désignés, ou auprèsd’un revendeur (lorsqu’un nouveau produit est acheté).
Pour les autres pays, veuillez contacter votre administration locale pour connaître la méthode de mise au rebutappropriée.
En procédant ainsi, vous êtes assuré que votre produit sera correctement traité, récupéré et recycléafin de prévenir les effets négatifs possibles sur l’environnement et la santé.
Consignes de sécurité importantes
ATTENTION : POUR ÉVITER TOUT RISQUE D’ÉLECTROCUTION, NE RETIREZ PAS LES VIS. TOUTE RÉPARATION DOIT ÊTRE
CONFIÉE À UN PERSONNEL QUALIFIÉ.
Le symbole de l’éclair prévient l’utilisateur de la présence de tensions “dan-gereuses” et non isolées dans l’appareil, d’une amplitude suffisante pour présenter un risque d’électrocution.
Le symbole du point d’exclamation prévient l’utilisateur de la présence d’instructions importantes sur le fonctionnement et la maintenance de ce produit dans le mode d’emploi fourni.
ATTENTION RISQUE D’ÉLECTROCUTION !
NE PAS OUVRIR !

24
Table des matièresIntroduction. . . . . . . . . . . . . . . . . . . . . . . . . . . . . . . . . . . . . . . . . . . . 25
Carbon 49 — Fonctions . . . . . . . . . . . . . . . . . . . . . . . . . . . . . . . . . . . . 26
Éléments système . . . . . . . . . . . . . . . . . . . . . . . . . . . . . . . . . . . . . . . . 26
Systèmes requis . . . . . . . . . . . . . . . . . . . . . . . . . . . . . . . . . . . . . . . . . 26
Réglages et fonctions de face avant. . . . . . . . . . . . . . . . . . . . . . . . . . . . . 27
Réglages et fonctions de la face arrière. . . . . . . . . . . . . . . . . . . . . . . . . . . 28
Mise en œuvre rapide. . . . . . . . . . . . . . . . . . . . . . . . . . . . . . . . . . . . . . 29
Utilisation élémentaire . . . . . . . . . . . . . . . . . . . . . . . . . . . . . . . . . . . . . 30
Mode d’édition . . . . . . . . . . . . . . . . . . . . . . . . . . . . . . . . . . . . . . . . . . 32
Liste des Contrôleurs Continus MIDI (CC) . . . . . . . . . . . . . . . . . . . . . . . . . 36
Numéros de notes MIDI . . . . . . . . . . . . . . . . . . . . . . . . . . . . . . . . . . . . 38
Caractéristiques techniques. . . . . . . . . . . . . . . . . . . . . . . . . . . . . . . . . . 39

25
Carbon 49 · USB/MIDI Keyboard Controller
ENG
LISH
FRA
NÇA
ISD
EUTS
CHE
ESPA
ÑO
LIT
ALI
AN
O
IntroductionMerci d’avoir choisi le clavier contrôleur MIDI USB Samson Carbon 49, à 49 touches ! Le Carbon 49 peut aisément s’intégrer à votre station de travail audionumérique sous Windows ou sous Mac. Le clavier peut être alimenté directement par un iPad Apple (en utilisant le kit de connexion iPad d’Apple, non fourni), et il peut être utilisé pour contrôler de nombreuses applications iOS MIDI, comme GarageBand. Le Carbon 49 est équipé de 49 touches semi-lestées et sensibles à la vélocité, d’un Fader affectable, d’un bouton de données, de molettes de Pitch bend et de modulation, et d’un triple afficheur à Leds.
Le Carbon 49 est le complément idéal de votre logiciel d’enregistrement audionumé-rique sur ordinateur et vous permet d’utiliser vos logiciels d’instruments virtuels. Pour que vous puissiez jouer tout de suite, nous vous fournissons les instruments virtuels Native Instruments Komplete Elements, avec plus de 1.000 sons et effets.
Dans ces pages, vous trouverez la description détaillée des fonctions du clavier/contrôleur Carbon 49, un tour d’horizon des réglages, et les inst ructions de mise en œuvre et d’utilisation. Vous trouverez également une carte de garantie. N’oubliez pas de la remplir et de nous la renvoyer pour recevoir l’aide technique en ligne, et pour que nous puissions vous envoyer à l’avenir les dernières informations sur les produits Samson.
Nous vous conseillons de noter le numéro de série de ce produit ci-dessous, pour toute référence ultérieure.
Numéro de série : ____________________________________________
Date d’achat : __________________________________________
REMARQUE pour nos clients US : En cas de réparation du Carbon 49, vous devez obtenir une autorisation de retour. Sans cette autorisation, nous n’accepterons pas le produit. Appelez Samson au 1-800-372-6766 pour obtenir cette autorisation. Renvoyez si possible, l’appareil dans son emballage original. Si vous avez acheté votre Carbon 49 hors des USA, contactez votre distributeur pour toute information. N’ou-bliez pas de consulter notre site Internet (www.samsontech.com) pour en savoir plus sur tous nos produits.

26
Carbon 49 — Fonctions
Éléments système
Systèmes requis
Le Samson Carbon 49 utilise des technologies de pointe. Il a été fabriqué avec le plus grand sens du détail. Voici quelques unes des fonctions principales :
• 49 touches semi-lestées et sensibles à la vélocité
• Codeur de données affectable et Fader de Volume
• Molettes de Pitch Bend et de modulation affectables
• Écran à 3 Leds 7-segments affichant les informations en temps réel
• Touches d’octave haut/bas
• Touches de transposition haut/bas affectables en n° +/- de programme et de canal MIDI
• Touche d’édition pour la gestion de 14 paramètres MIDI
• Entrée pour pédale de Sustain
• Connexion USB pour l’alimentation et l’échange des données MIDI
• Sortie MIDI Out à 5 broches pour la connexion aux équipements MIDI externes
• Pied pour iPad intégré
• Fourni avec le logiciel Native Instruments Komplete Elements
• Clavier Samson Carbon 49 USB
• Cordon USB
• Deux adaptateurs de support iPad en caoutchouc
• DVD d’installation Native Instruments Komplete Elements
• Mode d’emploi du Carbon 49
Windows (PC)
• Windows XP/Vista/Win7
• 800 MHz ou plus rapide, 256 Mo RAM ou plus, port USB
Mac OS
• Mac OS X 10.4.9 ou plus récent
• 733 MHz ou plus rapide, 512 Mo RAM ou plus, port USB
iPad Apple
• iOS v4.2 ou plus récent.
Vérifiez que vos équipements informatiques répondent au minimum aux exigences mentionnées ci-dessus pour utiliser le Carbon 49.

27
Carbon 49 · USB/MIDI Keyboard Controller
ENG
LISH
FRA
NÇA
ISD
EUTS
CHE
ESPA
ÑO
LIT
ALI
AN
O
4 5
67
8 9
10
321
1234
Réglages et fonctions de face avant
1. Écran - Écran à 3 Leds 7-segments affichant en temps réel les données de contrô-leurs en mode de jeu, et les paramètres réglables en mode d’édition
2. Fader de VOLUME - Ce Fader est réglé d’usine pour transmettre les messages MIDI de volume (CC n° 7). Le Fader de VOLUME peut être affecté à la gestion d’autres paramètres MIDI en mode d’édition (voir en p. 14 pour de plus amples informations).
3. Bouton DATA - Ce codeur rotatif sans fin est réglé d’usine pour transmettre les messages MIDI de panoramique (CC n° 10). Le bouton DATA peut être affecté à la gestion d’autres paramètres (voir en p. 14 pour de plus amples informations).
4. Bouton EDIT - Appuyez pour passer en mode d’édition. Vous pouvez alors régler les paramètres du clavier (voir en p. 14).
5. Support d’iPad - Placez votre iPad Apple horizontalement sur ce support. Utilisez les socles en caoutchouc fournis pour ancrer l’iPad (voir en p. 11 pour de plus amples informations).
6. Touches OCTAVE +/– - Appuyez sur les touches OCTAVE pour changer la tessiture du clavier vers le haut ou vers le bas (quatre octaves maximum). Chaque pression sur la touche OCTAVE transpose le clavier de 12 notes à la fois vers le haut ou vers le bas.
7. Touches TRANSPOSE +/– - Appuyez sur les touches TRANSPOSE pour transposer le clavier vers le haut ou vers le bas (12 demi-tons maximum). Les touches TRANS-POSE peuvent aussi être affectées à la transmission de messages de programme MIDI Program et de canal MIDI (voir en p. 14 pour de plus amples informations).
8. Molette de PITCH BEND - Utilisez cette molette pour modifier la hauteur des notes jouées sur le clavier.
9. Molette de MODULATION - Cette molette sert en général à ajouter de la modu-lation (CC n° 1) au son. La molette de MODULATION peut également transmettre des paramètres MIDI différents en mode d’édition (voir en p. 14 pour de plus amples informations).
10. Touches de fonction - En mode d’édition, les 25 premières touches du clavier correspondent à des fonctions et aux numéros 0–9 (voir en p. 14).

28
4 5
67
8 9
10
321
1234
Réglages et fonctions de la face arrière
1. Interrupteur POWER - Place le clavier sous/hors tension.
2. Embase USB - Connectez un câble USB standard entre ce port et l’embase USB de votre ordinateur ou de votre iPad pour alimenter le clavier, ainsi que pour trans-mettre et recevoir les données MIDI.
3. MIDI OUT - Utilisez un câble MIDI à 5 broches pour relier le Carbon 49 à un équi-pement MIDI externe.
4. Embase pour pédale de SUSTAIN - Connectez une pédale d’expression ou de Sustain en Jack 6,35 mm à cette entrée. D’usine cette embase est configurée pour transmettre les messages MIDI de Sustain (CC n° 64). L’entrée SUSTAIN peut être configurée pour transmettre d’autres paramètres MIDI en mode d’édition (voir en p. 14 pour de plus amples informations).

29
Carbon 49 · USB/MIDI Keyboard Controller
ENG
LISH
FRA
NÇA
ISD
EUTS
CHE
ESPA
ÑO
LIT
ALI
AN
O
Mise en œuvre rapide
1. Connectez le Carbon 49 à votre ordinateur ou à votre iPad avec le cordon USB fourni. Le clavier reçoit et transmet les données MIDI par la connexion USB. Placez l’interrupteur POWER en position gauche sur le clavier.
Remarque : Pour vous connecter directement à un iPad, utilisez le kit de connexion Apple iPad Camera Connection Kit (non fourni).
2. Lancez votre logiciel d’enregistrement ou d’instrument virtuel, et sélectionnez le Carbon 49 comme périphérique d’entrée MIDI.
3. Pour utiliser le Carbon 49 avec un équipement MIDI externe (expandeur, etc.), reliez un cordon MIDI à 5 broches entre la sortie MIDI OUT située à l’arrière du Carbon 49 et l’entrée MIDI IN de l’équipement MIDI externe.
On Off
3 4 5
67
8 9
10
1 2
3 41 2
On Off
3 4 5
67
8 9
10
1 2
3 41 2
Le support pour iPad du Carbon 49 a été conçu pour l’iPad 1 et l’iPad 2. Pour installer votre iPad, nous vous fournissons deux sup-ports en caoutchouc. Les supports sont rangés sous le Carbon 49. Insérez les pieds en caoutchouc dans les extrémités gauche et
Connexion d’un iPad
droite du support de l’iPad (comme indiqué sur l’illustration ci-dessus). Faite ensuite glisser l’iPad dans les supports en caoutchouc. Connectez le kit Camera Connection Kit d’Apple à l’iPad, puis reliez l’iPad au clavier avec le cordon USB fourni.

30
Utilisation élémentaire
Le Carbon 49 possède deux modes de fonctionnement : le mode de jeu et le mode d’édition.
Mode de jeu - Dans ce mode, les 49 touches sensibles à la vélocité transmettent les informations de note et de vélocité par la sortie USB ou MIDI. Les contrôleurs affec-tables, les molettes de hauteur et de modulation transmettent des informations de contrôleur continu.
Mode d’édition - Dans ce mode, utilisez les 25 premières touches du clavier pour accéder aux fonctions et saisir les valeurs de 0 à 9. Le reste du clavier transmet les infor-mations de note et de vélocité. Ce mode est activé en appuyant sur la touche EDIT. Consultez les explications du mode d’édition en page 14.
Modes
Paramètres de jeuRemarque : Par défaut, le clavier transmet les informations de contrôle sur le canal 1. Le clavier peut être configuré pour transmettre les données sur un autre canal MIDI en mode d’édition.
Touches OCTAVELes touches OCTAVE transposent le clavier de 12 notes à la fois, pour étendre sa tessiture. La transposition maximale est de quatre octaves. Lorsque vous appuyez sur ces touches, la valeur de l’octave transposée s’affiche à l’écran. La valeur par défaut est de 0.
La touche OCTAVE “-” transpose le clavier d’une octave inférieure à chaque pres-sion sur la touche. Elle s’allume en rouge dès que le clavier est transposé sous la valeur 0.
La touche OCTAVE “+” transpose le clavier d’une octave supérieure à chaque pres-sion sur la touche. Elle s’allume en rouge dès que le clavier est transposé au-dessus la valeur 0.
Appuyez sur les deux touches OCTAVE pour initialiser la transposition sur 0.
Touches TRANSPOSELes touches TRANSPOSE transposent le clavier par demi-tons. La transposition maximale est de 12 demi-tons vers le haut et vers le bas. Lorsque vous appuyez sur ces touches, la valeur de la transposition s’affiche à l’écran. La valeur par défaut est de 0.
La touche TRANSPOSE “-” transpose le clavier d’un demi-ton supérieur à chaque pression sur la touche. Elle s’allume en rouge dès que la valeur de transposition n’est pas de 0.
La touche TRANSPOSE “+” transpose le clavier d’un demi-ton inférieur à chaque pression sur la touche. Elle s’allume en rouge dès que la valeur de transposition n’est pas de 0.
Vous pouvez également configurer les touches TRANSPOSE pour qu’elles trans-mettent des informations de Program +/- ou de canal MIDI +/-. Consultez les expli-cations du mode d’édition en page 14.

31
Carbon 49 · USB/MIDI Keyboard Controller
ENG
LISH
FRA
NÇA
ISD
EUTS
CHE
ESPA
ÑO
LIT
ALI
AN
O
Molette de MODULATIONLa molette de MODULATION est généralement utilisée pour ajouter des effets de vibrato à votre son. La plage de données de la molette de MODULATION est de 0–127. Son numéro de contrôleur MIDI par défaut est le CC n° 1. Vous pouvez affec-ter un autre numéro de contrôleur à la molette de modulation en mode d’édition. Consultez les explications du mode d’édition en page 14.
Fader de VOLUMELe Fader de VOLUME transmet les informations MIDI pour contrôler l’appareil connecté au clavier. Par défaut le Fader gère le volume du canal, mais il peut être affecté à un autre paramètre en mode d’édition. Consultez les explications du mode d’édition en page 14.
Bouton DATA Le bouton DATA transmet les informations MIDI pour contrôler l’appareil connecté au clavier. Par défaut le Fader gère le panoramique, mais il peut être affecté à un autre paramètre en mode d’édition. Consultez les explications du mode d’édition en page 14.
Molette de PITCH BENDLa molette de PITCH BEND Permet de modifier en temps réel la hauteur des notes jouées au clavier (vers le bas ou vers le haut). La réponse et la plage de ce contrô-leur dépendent de la source sonore contrôlée. La molette de hauteur utilise un ressort de rappel qui la ramène toujours en position centrale.
Entrée pour pédale de SUSTAINVous pouvez connecter un contacteur au pied de type poussoir ou une pédale de sourdine à l’entrée SUSTAIN Pedal de la face arrière. Par défaut, l’entrée est confi-gurée pour les messages de la pédale de Sustain (CC n° 64). Vous pouvez affecter un autre paramètre à cette entrée en mode d’édition. Consultez les explications du mode d’édition en page 14.
Lors de la mise sous tension du clavier, la polarité de la pédale connectée est détec-tée. Pour inverser la polarité de la pédale, appuyez sur la pédale pendant la mise sous tension du clavier.
Utilisation élémentaire

32
Le mode d’édition vous permet de modifier les paramètres du Carbon 49 en fonction de vos besoins. Pour accéder au mode d’édition, appuyez sur la touche EDIT de la face supérieure du clavier. La touche s’allume en rouge et l’écran affiche “Set”, ce qui indique que vous êtes en mode d’édition. En mode d’édition, les 25 première touches du clavier servent de touches de fonctions et de touches de numéros, sans transmettre de données MIDI. Les 24 dernières touches continuent de transmettre les informations MIDI de notes, ce qui vous permet de vérifier en temps réel les modifications appor-tées. Le Fader de VOLUME, les molettes de PITCH et de MODULATION fonctionnent normalement, mais leurs données ne sont pas affichées. Pour quitter le mode d’édition et passer en mode de jeu, appuyez sur EDIT (la touche n’est plus rouge).
Mode d’édition
Fonctions MIDIPROG (Program Change) Lorsque vous appuyez, le numéro du programme actuel clignote à l’écran. Pour chan-ger de programme, tournez la molette DATA, ou saisissez le numéro du programme avec les touches 0–9. Vous pouvez saisir un numéro de programme de 0 à 127. Une fois que vous avez saisi le numéro du programme souhaité, appuyez sur la touche ENTER. Le Carbon 49 transmet le Program Change, et l’écran cesse de clignoter. Si la valeur saisie n’est pas possible la lettre “-E-” (Erreur) s’affiche pendant 3 secondes, et l’écran revient au dernier numéro de programme valide utilisé (aucune information n’est transmise).
CHANNEL (canal MIDI) Lorsque vous appuyez, le numéro du canal MIDI actuel clignote à l’écran. Pour modifier le numéro du canal MIDI sur lequel transmet le Carbon 49, tournez la molette DATA, ou saisissez le numéro du canal avec les touches 0–9. Vous pouvez saisir un numéro de canal de 1 à 16. Une fois que vous avez saisi le numéro de canal, appuyez sur la touche ENTER. Le Carbon 49 transmet sur le nouveau canal défini et l’écran cesse de clignoter. Si la valeur saisie n’est pas possible la lettre “-E-” (Erreur) s’affiche pendant 3 secondes, et l’écran revient au dernier canal MIDI valide utilisé et aucune information n’est trans-mise.

33
Carbon 49 · USB/MIDI Keyboard Controller
ENG
LISH
FRA
NÇA
ISD
EUTS
CHE
ESPA
ÑO
LIT
ALI
AN
O
Mode d’édition
Affectation des contrôleurs
BANK MSB & LSB Pour sauvegarder plus de 128 Patches, les équipements MIDI utilisent plusieurs banques. Pour accéder aux banques, la norme MIDI utilise un identifiant avec deux messages : le MSB (Most Significant Byte) et le LSB (Least Significant Byte). Ces deux messages, accompagnés d’un Program Change, sélectionnent la banque, et un Patch de cette banque. Consultez le mode d’emploi de vos équipements pour obtenir la liste des messages de MSB et de LSB correspondant aux banques. Pour définir les valeurs BANK MSB et BANK LSB, appuyez sur la touche de fonction correspondante, et les valeurs courantes de MSB ou de LSB clignotent à l’écran. Tournez le bouton DATA ou saisissez la valeur de MSB ou de LSB, et appuyez sur ENTER. Vous pouvez saisir des valeurs comprises entre 0 et 127. Le Carbon 49 transmet les nouvelles valeurs de MSB et de LSB. Si la valeur saisie n’est pas possible la lettre “-E-” (Erreur) s’affiche pendant 3 secondes, et l’écran revient aux dernières valeurs valides utilisées. Remarque : Pour charger un nouveau Patch, vous devez faire suivre le numéro de banque par un Program Change.
COURBE DE VÉLOCITÉ La courbe de vélocité détermine comment la touche répond à la pression du musicien, et la valeur MIDI correspondant à cette vélocité est transmise. Le Carbon 49 vous offre 4 courbes de vélocité (1–4, décrites ci-dessous). Pour modifier la courbe de vélocité, appuyez sur la touche affectée à la COURBE DE VÉLOCITÉ. La sélection clignote à l’écran. Tournez le bouton DATA ou utilisez les touches 1-9 pour sélectionner la courbe. Appuyez sur ENTER pour confirmer la sélection. Si la valeur saisie n’est pas possible la lettre “-E-” (Erreur) s’affiche pendant 3 secondes, et l’écran revient aux dernières valeurs valides utilisées. Courbes de vélocité disponibles
N° Type Description
1 Normal Courbe linéaire — valeur par défaut
2 Douce Vélocité (et volume) réduite
3 Dure Vélocité de jeu (et volume) accentuée
4 Fixe Vélocité fixée à 127 1 - Normal 2 - Douche 3 - Dure 4 - Fixe

34
Mode d’éditionASSIGN TRANS Appuyez sur la touche ASSIGN TRANS pour modifier la fonction des touches TRANS-POSE “+” et “-”. Vous pouvez affecter trois paramètres : 1 - Transposition 2 - Program Change 3 - Canal MIDI Lorsque vous appuyez sur la touche, le numéro de la fonction actuelle clignote à l’écran. Tournez le bouton DATA, ou saisissez le code du contrôleur avec les touches 1-9. Appuyez sur ENTER pour confirmer. Si la valeur saisie n’est pas possible la lettre “-E-” (Erreur) s’affiche pendant 3 secondes, et l’écran revient aux dernières valeurs valides utilisées. Remarque : Lorsque la fonction TRANSPOSE est réglée sur 2 (Program Change) ou 3 (canal MIDI), les témoins sont inopérants. De plus, lorsque la fonction TRANSPOSE est réglée sur 2 (Program Change), la touche possède une fonction d’accélération (mainte-nez la touche enfoncée pour accélérer le défilement des numéros de programmes).
ASSIGN FADER Appuyez sur la touche ASSIGN FADER pour modifier la fonction du Fader de VOLUME. Lorsque vous appuyez sur la touche, le numéro de la fonction actuelle clignote à l’écran. Tournez le bouton DATA, ou saisissez le code du contrôleur (0–148) avec les touches 1-9. Consultez la liste des CC MIDI en p. 18. Appuyez sur ENTER pour confirmer. Si la valeur saisie n’est pas possible la lettre “-E-” (Erreur) s’affiche pendant 3 secondes, et l’écran revient aux dernières valeurs de CC valides utilisées.
ASSIGN KNOB Appuyez sur la touche ASSIGN KNOB pour modifier la fonction du bouton DATA. Lorsque vous appuyez sur la touche, le numéro de la fonction actuelle clignote à l’écran. Tournez le bouton DATA, ou saisissez le code du contrôleur (0–148) avec les touches 1-9. Consultez la liste des CC MIDI en p. 18. Appuyez sur ENTER pour confirmer. Si la valeur saisie n’est pas possible la lettre “-E-” (Erreur) s’affiche pendant 3 secondes, et l’écran revient aux dernières valeurs de CC valides utilisées.
ASSIGN MOD Appuyez sur la touche ASSIGN MOD pour modifier la fonction de la molette de MODULATION. Lorsque vous appuyez sur la touche, le numéro de la fonction actuelle clignote à l’écran. Tournez le bouton DATA, ou saisissez le code du contrôleur (0–148) avec les touches 1-9. Consultez la liste des CC MIDI en p. 18. Appuyez sur ENTER pour confirmer. Si la valeur saisie n’est pas possible la lettre “-E-” (Erreur) s’affiche pendant 3 secondes, et l’écran revient aux dernières valeurs de CC valides utilisées.

35
Carbon 49 · USB/MIDI Keyboard Controller
ENG
LISH
FRA
NÇA
ISD
EUTS
CHE
ESPA
ÑO
LIT
ALI
AN
O
RESET ALL La fonction RESET ALL rétablit tous les contrôleurs du Carbon 49 sur ses valeurs par défaut. Lorsque vous appuyez sur la touche RESET ALL, l’écran affiche “No” (indiquant que vous ne souhaitez pas initialiser toutes les fonctions). Si vous ne souhaitez pas initialiser tous les contrôleurs, appuyez sur la touche 1, ou tournez le bouton DATA jusqu’à ce que “Yes” s’affiche. Appuyez sur ENTER pour valider et initialiser tous les contrôleurs. Si vous appuyez sur ENTER après que “No” s’affiche, l’initialisation s’annule.
ALL NOTES OFF La fonction ALL NOTES OFF transmet un message d’ arrêt de toutes les notes (“all notes off”) pour couper toutes les notes. Appuyez sur la touche ALL NOTES OFF pour transmettre immédiatement le message de “all notes off” — toutes les notes doivent s’arrêter.
DEFAULT La fonction DEFAULT fait revenir tous les paramètres du Carbon 49 sur leurs valeurs d’usine. Appuyez sur la touche DEFAULT : l’écran, affiche “No” (indiquant que vous ne souhaitez pas initialiser toutes les fonctions). Si vous ne souhaitez pas initialiser tous les contrôleurs, appuyez sur la touche 1, ou tournez le bouton DATA jusqu’à ce que “Yes” s’affiche. Appuyez sur ENTER pour valider et initialiser tous les contrôleurs. Si vous appuyez sur ENTER après que “No” s’affiche, l’initialisation s’annule.
SNAPSHOT La fonction SNAPSHOT transmet en même temps toutes les valeurs du fader de VOLUME, du bouton DATA, de la molette PITCH BEND, de programme, et de numéro de canal, ce qui vous permet de consulter tous vos réglages. Appuyez sur SNAPSHOT pour afficher ces valeurs.
Mode d’édition
Réglages du clavier
ASSIGN PEDAL Appuyez sur la touche ASSIGN PEDAL pour modifier la fonction de l’entrée de la pédale de SUSTAIN. La valeur par défaut est le CC n° 64. Lorsque vous appuyez sur la touche, le numéro de la fonction actuelle clignote à l’écran. Trournez le bouton DATA, ou saisissez le code du contrôleur (0–148) avec les touches 1-9. Consultez la liste des CC MIDI en p.18. Appuyez sur ENTER pour confirmer. Si la valeur saisie n’est pas possible la lettre “-E-” (Erreur) s’affiche pendant 3 secondes, et l’écran revient aux dernières valeurs de CC valides utilisées.

36
Liste des Contrôleurs Continus MIDI (CC) 0 Bank Select1 Modulation wheel2 Breath control 3 Non défini4 Foot controller5 Portamento time6 Data Entry 7 Channel Volume8 Balance9 Non défini10 Pan11 Expression12 Effect control 1 13 Effect control 2 14 Non défini15 Non défini16 General Purpose #117 General Purpose #218 General Purpose #319 General Purpose #420 Non défini21 Non défini22 Non défini23 Non défini24 Non défini25 Non défini26 Non défini27 Non défini28 Non défini29 Non défini30 Non défini31 Non défini32 Bank Select33 Modulation wheel 34 Breath control 35 Non défini36 Foot controller37 Portamento time38 Data entry 39 Channel Volume40 Balance41 Non défini
42 Pan43 Expression44 Effect control 1 45 Effect control 2 46 Non défini47 Non défini48 General Purpose #149 General Purpose #250 General Purpose #351 General Purpose #452 Non défini53 Non défini54 Non défini55 Non défini56 Non défini57 Non défini58 Non défini59 Non défini60 Non défini61 Non défini62 Non défini63 Non défini64 Sustain pedal65 Portamento on/off66 Sostenuto on/off 67 Soft pedal on/off68 Legato Footswitch69 Hold 2 70 Sound Variation71 Timbre/Harmonic Intens.72 Release Time73 Attack Time74 Brightness75 Decay Time76 Vibrato Rate77 Vibrato Depth78 Vibrato Delay79 Sound Cont.80 General Purpose #581 General Purpose #682 General Purpose #783 General Purpose #8

37
Carbon 49 · USB/MIDI Keyboard Controller
ENG
LISH
FRA
NÇA
ISD
EUTS
CHE
ESPA
ÑO
LIT
ALI
AN
O
Liste des Contrôleurs Continus MIDI (CC) 84 Portamento Control 85 Non défini86 Non défini87 Non défini88 Non défini89 Non défini90 Non défini91 Reverb Send Level92 Tremolo Depth93 Chorus Send Level94 Celeste/Detune Depth95 Phaser Depth96 Data entry +197 Data entry -198 NRPN LSB99 NRPN MSB100 RPN LSB101 RPN MSB102 Non défini103 Non défini104 Non défini105 Non défini106 Non défini107 Non défini108 Non défini109 Non défini110 Non défini111 Non défini112 Non défini113 Non défini114 Non défini115 Non défini116 Non défini117 Non défini118 Non défini119 Non défini120 All Sound Off121 Reset All Controllers122 Local control on/off 123 All notes off124 Omni mode off125 Omni mode on
126 Poly mode off127 Poly mode on
Messages RPN/NRPN128 Pitch Bend Sensitivity129 Fine Tuning130 Coarse Tuning131 Vibrato Rate132 Vibrato Depth133 Vibrato Delay134 Low Pass Filter Cutoff Frequency135 Low Pass Filter Resonance 136 High Pass Filter Cutoff Frequency137 EQ Low Gain 138 EQ High Gain 139 EQ Low Frequency 140 EQ High Frequency 141 EG Attack Time 142 EG Decay Time 143 EG Release Time
144 Channel Pressure (Aftertouch)145 Program Change146 Song Select(Song #)
Messages SysEx147 Master Volume148 Master Balance

38
Octave
Numéros de notes
C C# D D# E F F# G G# A A# B
-1 0 1 2 3 4 5 6 7 8 9 10 11
0 12 13 14 15 16 17 18 19 20 21 22 23
1 24 25 26 27 28 29 30 31 32 33 34 35
2 36 37 38 39 40 41 42 43 44 45 46 47
3 48 49 50 51 52 53 54 55 56 57 58 59
4 60 61 62 63 64 65 66 67 68 69 70 71
5 72 73 74 75 76 77 78 79 80 81 82 83
6 84 85 86 87 88 89 90 91 92 93 94 95
7 96 97 98 99 100 101 102 103 104 105 106 107
8 108 109 110 111 112 113 114 115 116 117 118 119
9 120 121 122 123 124 125 126 127
Numéros de notes MIDINorme internationnale de numérotation des notes MIDI. Le Do central correspond à la note MIDI 60 (C4).

39
Carbon 49 · USB/MIDI Keyboard Controller
ENG
LISH
FRA
NÇA
ISD
EUTS
CHE
ESPA
ÑO
LIT
ALI
AN
O
Caractéristiques techniquesClavier 49 touches semi-lestées et sensibles à la vélocité
Écran 3 Leds à 7-segments
Réglages Fader de Volume, bouton Data, bouton Edit, touches Octave +/- , touches Transpose +/-, molettes de Pitch Bend et de Modulation
Fonctions Program Number, Reset All, MIDI Channel, All Notes Off, Bank MSB, Bank LSB, courbe de vélocité, Default, Assign Trans, Assign Fader, As-sign Knob, Assign Mod, Assign Pedal, Snapshot
Entrée pédale Jacks stéréo 6,35 mm
MIDI MIDI par USB, sortie DIN à 5 broches
Alimentation Par liaison USB
Accessoires Cordon USB Supports caoutchouc pour iPad DVD Native Instruments Komplete Elements
Dimensions 792 mm x 217 mm x 78 mm
Poids 2,8 kgs

Apple, Mac, Mac OS und iPad sind in den USA und anderen Ländern eingetragene Warenzeichen von Apple Inc.
IOS ist ein Warenzeichen oder ein in den USA und anderen Ländern eingetragenes Warenzeichen von Cisco, das unter Lizenz verwendet wird.
Native Instruments, NI und Komplete Elements sind Warenzeichen oder eingetragene Warenzeichen der Native Instruments GmbH.

DIESES GERÄT ENTSPRICHT PART 15 DER FCC-VORSCHRIFTEN CLASS B. DER BETRIEB UNTERLIEGT FOLGENDEN ZWEI BEDINGUNGEN: (1) DIESES GERÄT DARF KEINE STÖRUNGEN VERURSACHEN UND (2) ES MUSS ALLE EMPFANGENEN STÖRUNGEN AUFNEHMEN KÖNNEN, AUCH SOLCHE, DIE DIE FUNKTION BEEINTRÄCHTIGEN. GEEIGNET FÜR PRIVAT- UND BÜROANWENDUNGEN.
Wichtige Sicherheitshinweise
Der Blitz mit Pfeilspitze im gleichseitigen Dreieck soll den Anwender vor nichtisolierter, gefährlicher Spannung im Geräteinnern warnen. Diese Spannung kann so hoch sein, dass die Gefahr eines Stromschlags besteht.
Das Ausrufezeichen im gleichseitigen Dreieck soll den Anwender auf wich-tige Bedienungs- und Wartungsanleitungen aufmerksam machen, die im mitgelieferten Informationsmaterial näher beschrieben werden.
Dieses Produkt darf nicht mit dem normalen Hausmüll entsorgt werden. Es gibt ein separates Entsorgungssystem für gebrauchte elektronische Produkte, das die gesetzlichen Vorschriften zur korrekten Behandlung, Verarbeitung und Wiederaufbereitung erfüllt.
Private Haushalte in den 25 Mitgliedstaaten der EU, in der Schweiz und Norwegen können ihre gebrauchten elektronischen Produkte kostenlos bei ausgewiesenen Sammelstellen oder Einzelhändlern (bei Kauf eines ähnlichen neuen Produkts) abgeben.
In Ländern, die nicht oben erwähnt wurden, informieren Sie sich bitte bei Ihrer Gemeindeverwaltung übereine korrekte Entsorgungsmöglichkeit. Auf diese Weise stellen Sie sicher, dass Ihr entsorgtes Produkt sachgemäß behandelt, verarbeitet und wiederaufbereitet wird und potentielle negative Auswirkungen auf die Umwelt und menschlicheGesundheit vermieden werden.
ATTENTIONRISQUE D’ÉLECTROCUTION !
NE PAS OUVRIR !
VORSICHTUM BRÄNDE ODER STROMSCHLÄGE ZU VERHINDERN, VERWENDEN SIE DIESEN STECKER NICHT MIT VERLÄNGERUNGSKABELN, STECKDOSEN ODER ANDEREN NETZANSCHLÜSSEN, WENN MAN DIE POLE NICHT GANZ EINSTECKEN KANN, DAMIT SIE UNZUGÄNGLICH SIND. SETZEN SIE DAS GERÄT WEDER REGEN NOCH FEUCHTIGKEIT AUS. STECKEN SIE DEN BREITEN POL GANZ IN DEN BREITEN SCHLITZ.
VORSICHT: UM DIE GEFAHR EINES STROMSCHLAGS ZU VERRINGERN, ENTFERNEN SIE NICHT DIE VORDER- ODER RÜCKSEITE DES GERÄTS. IM INNERN BEFINDEN SICH KEINE VOM ANWENDER WARTBAREN BAU TEILE. ÜBERLASSEN SIE DIE WARTUNG QUALIFIZIERTEM FACHPERSONAL.

42
InhaltEinleitung . . . . . . . . . . . . . . . . . . . . . . . . . . . . . . . . . . . . . . . . . . . . . 43
Carbon 49 Features . . . . . . . . . . . . . . . . . . . . . . . . . . . . . . . . . . . . . . . 44
Systemkomponenten. . . . . . . . . . . . . . . . . . . . . . . . . . . . . . . . . . . . . . 44
Mindestanforderungen ans System . . . . . . . . . . . . . . . . . . . . . . . . . . . . . 44
Vorderseitige Regler und Funktionen. . . . . . . . . . . . . . . . . . . . . . . . . . . . 45
Rückseitige Regler und Funktionen . . . . . . . . . . . . . . . . . . . . . . . . . . . . . 46
Schnellstart . . . . . . . . . . . . . . . . . . . . . . . . . . . . . . . . . . . . . . . . . . . . 47
Standardbetrieb . . . . . . . . . . . . . . . . . . . . . . . . . . . . . . . . . . . . . . . . . 48
Edit-Modus . . . . . . . . . . . . . . . . . . . . . . . . . . . . . . . . . . . . . . . . . . . . 50
MIDI Continuous Controller (CC) Liste . . . . . . . . . . . . . . . . . . . . . . . . . . . 54
MIDI Notennummern . . . . . . . . . . . . . . . . . . . . . . . . . . . . . . . . . . . . . . 56
Technische Daten . . . . . . . . . . . . . . . . . . . . . . . . . . . . . . . . . . . . . . . . 57

43
Carbon 49 · USB/MIDI Keyboard Controller
ENG
LISH
FRA
NÇA
ISD
EUTS
CHE
ESPA
ÑO
LIT
ALI
AN
O
EinleitungHerzlichen Dank für den Kauf eines Samson Carbon 49 USB Keyboard Controllers mit 49 Tasten! Der Carbon 49 integriert sich perfekt in Ihre Digital Production Worksta-tion für Windows oder Mac. Das Keyboard kann auch direkt von einem Apple iPad mit Spannung versorgt (via optionalem Apple iPad Camera Connection Kit) und zur Steuerung vieler iOS MIDI Apps, wie GarageBand, verwendet werden. Der Carbon 49 verfügt über eine anschlagdynamische, leicht gewichtete 49-er Tastatur, einen zuweisbaren Fader, ein Datenrad sowie Pitch Bend- und Modulations-Räder und ein 3-stelliges LED-Display.
Der Carbon 49 ist die perfekte Ergänzung für Ihre DAW oder Ihre virtuelle Instrumen-tensteuerungssoftware. Damit Sie Ihrer musikalischen Kreativität sofort freien Lauf lassen können, haben wir Native Instruments Komplete Elements beigelegt, das mehr als 1000 Sounds und Effekte enthält.
Auf diesen Seiten finden Sie eine detaillierte Beschreibung der vielen Funktionen Ihres Carbon 49 Keyboard Controllers sowie eine Führung durch sein Bedienfeld sowie Anleitungen für die Einrichtung und Anwendung. Bitte vergessen Sie nicht, die beiliegende Garantiekarte ausgefüllt an uns zurückzusenden, damit Sie online technischen Support erhalten und wir Ihnen zukünftig aktualisierte Informationen über dieses und andere Samson-Produkte zukommen lassen können.
Die Seriennummer Ihres Geräts sollten Sie vorsorglich in der Zeile unten eintragen.
Seriennummer:_______________________________
Kaufdatum:__________________________________
Bei sorgfältiger Pflege und Wartung wird Ihr Carbon 49 über Jahre störungsfrei funk-tionieren. Wenn Ihr Gerät einmal gewartet werden muss, besorgen Sie sich vor der Rücksendung an Samson bitte eine Return Authorization Number (RA) (Rücksende-berechtigungs nummer). Ohne diese Nummer wird das Gerät nicht angenommen. Bitte rufen Sie Samson unter der Nummer 1-800-3SAMSON (1-800-372-6766) an, um eine RA-Nummer vor der Rücksendung zu erhalten. Heben Sie das Originalverpack-ungsmaterial auf und schicken Sie das Gerät möglichst im originalen Karton und Verpackungsmaterial zurück. Wenn Sie Ihren Carbon 49 außerhalb der USA gekauft ha-ben, setzen Sie sich bezüglich Garantiebedingungen und Wartung bitte mit unserem lokalen Vertriebspartner in Verbindung. Besuchen Sie unbedingt auch unsere Website (http://www.samsontech.com), auf der Sie vollständige Informationen über unsere ganze Produktlinie finden.

44
Carbon 49 Features
Systemkomponenten
Mindestanforderungen ans System
Der Samson Carbon 49 verwendet modernste Technologie und ist bis ins kleinste Detail mit größter Sorgfalt gefertigt. Zu seinen wichtigsten Features zählen:
• 49 anschlagdynamische, leicht gewichtete Tasten
• Datenrad und Volume-Fader zuweisbar
• Pitch Bend-Rad und zuweisbares Modulations-Rad
• 3-stelliges, 7-Segment LED-Display für Rückmeldungen in Echtzeit
• Spezielle Octave Auf/Ab-Tasten
• Transpose Auf/Ab-Tasten zuweisbar zu Program und MIDI Channel Auf/Ab
• Edit-Taste zum Einstellen von bis zu 14 MIDI- und Steuerparametern
• Sustain Pedal-Eingang
• USB-Anschluss für Betriebsspannung und MIDI
• 5-Pol MIDI Out zum Anschließen von externen standard MIDI-Geräten
• Integrierter iPad-Ständer
• Native Instruments Komplete Elements-Software inklusive
• Samson Carbon 49 USB Keyboard
• USB-Kabel
• Zwei iPad Gummifuß-Adapter
• Native Instruments Komplete Elements Installations-DVD
• Carbon 49 Bedienungshandbuch
Windows (PC)
• Windows XP/Vista/Win7
• 800 MHz oder höher, 256 MB RAM oder mehr, USB-Port
Mac OS
• Mac OS X 10.4.9 oder höher
• 733 MHz oder höher, 512 MB RAM oder mehr, USB-Port
Apple iPad
• iOS v4.2 oder höher
Sie sollten auch die Mindestanforderungen der mit dem Carbon 49 verwendeten Soft-ware überprüfen, da diese höher als die oben beschriebenen sein können.

45
Carbon 49 · USB/MIDI Keyboard Controller
ENG
LISH
FRA
NÇA
ISD
EUTS
CHE
ESPA
ÑO
LIT
ALI
AN
O
4 5
67
8 9
10
321
1234
Vorderseitige Regler und Funktionen
1. Display - 3 x 7-Segment LED-Display zeigt im Performance-Modus die Controller-Daten in Echtzeit und im Edit-Modus die einstellbaren Parameter an.
2. VOLUME-Fader - Dieser Fader ist werkseitig auf die Übertragung von MIDI Vol-ume-Meldungen (CC #7) voreingestellt. Im Edit-Modus kann man dem VOLUME-Fader die Steuerung verschiedener MIDI-Parameter zuweisen (weitere Infos auf Seite14).
3. DATA-Rad - Dieses Endlosrad ist werkseitig auf die Übertragung von MIDI Pan-Meldungen (CC #10) voreingestellt. Im Edit-Modus kann man dem DATA-Rad die Steuerung verschiedener MIDI-Parameter zuweisen (weitere Infos auf Seite14).
4. EDIT-Taste - Damit schalten Sie in den Edit-Modus. Im Edit-Modus können Sie Keyboard-Parameter einstellen (weitere Infos auf Seite14).
5. iPad-Halterung - Stecken Sie das Apple iPad horizontal in diesen Schacht. Die mitgelieferten Gummifüße stellen sicher, dass das iPad fest sitzt (weitere Infos auf Seite11).
6. OCTAVE +/– Tasten - Damit verschieben Sie die Oktavlage der Tastatur um bis zu vier Oktaven nach oben oder unten, um den Spielbereich zu erweitern. Mit jedem Druck auf die OCTAVE-Taste wird der Tastaturbereich um 12 Halbtöne nach oben oder unten verschoben.
7. TRANSPOSE +/– Tasten - Mit den TRANSPOSE-Tasten verschieben Sie den Tastaturbereich um bis zu 12 Halbtöne nach oben oder unten. Man kann den TRANSPOSE-Tasten auch die Übertragung von MIDI Program- und MIDI Channel-Meldungen zuweisen (weitere Infos auf Seite14).
8. PITCH BEND-Rad - Damit erhöhen oder verringern Sie die Tonhöhe der auf der Tastatur gespielten Töne.
9. MODULATIONS-Rad - Damit fügen Sie dem gespielten Klang normalerweise Modulationen (CC #1) hinzu. Im Edit-Modus kann man dem MODULATIONS-Rad die Übertragung verschiedener MIDI-Parameter zuweisen (weitere Infos auf Seite14).
10. Funktionstasten - Im Edit-Modus sind die ersten 25 Tasten der Tastatur bestim-mten Funktionen und den Zahlen 0 – 9 zugewiesen (weitere Infos auf Seite14).

46
4 5
67
8 9
10
321
1234
Rückseitige Regler und Funktionen
1. POWER-Schiebeschalter - Damit schalten Sie das Keyboard ein und aus.
2. USB-Anschluss - Verbinden Sie diesen Port über ein standard USB-Kabel mit dem USB-Anschluss eines Computers oder iPads, um das Keyboard mit Spannung zu versorgen sowie MIDI-Daten zu senden und zu empfangen.
3. MIDI OUT - Hier verbinden Sie den Carbon 49 über ein 5-Pol MIDI-Kabel mit einem externen MIDI-Gerät.
4. SUSTAIN Pedal-Eingang - Hier schließen Sie ein Sustain- oder Expressionpedal über ein 6,35 mm Klinkenkabel an den Carbon 49 an. Dieser Eingang ist werkseitig auf die Übertragung von MIDI Sustain-Meldungen (CC #64) voreingestellt. Im Edit-Modus kann man dem SUSTAIN-Pedaleingang die Übertragung verschiedener MIDI-Parameter zuweisen (weiter Infos auf Seite 14).

47
Carbon 49 · USB/MIDI Keyboard Controller
ENG
LISH
FRA
NÇA
ISD
EUTS
CHE
ESPA
ÑO
LIT
ALI
AN
O
Schnellstart
1. Verbinden Sie den Carbon 49 über das mitgelieferte USB-Kabel mit Ihrem Com-puter oder iPad. Das Keyboard kann über den USB-Anschluss mit Spannung versorgt werden und MIDI-Daten übertragen. Schieben Sie den POWER-Schalter nach links, um das Keyboard einzuschalten.
Hinweis: Für den Direktanschluss ans iPad benötigen Sie das Apple iPad Camera Connection Kit (optional).
2. Starten Sie Ihre DAW- oder Virtual Instrument-Software und wählen Sie den Carbon 49 als MIDI Input-Gerät.
3. Um den Carbon 49 mit einem externen MIDI-Gerät (z. B. Soundmodul) zu verwen-den, verbinden Sie den rückseitigen MIDI OUT-Anschluss des Carbon 49 über ein 5-Pol MIDI-Kabel mit dem MIDI IN-Anschluss des externen Geräts.
On Off
3 4 5
67
8 9
10
1 2
3 41 2
On Off
3 4 5
67
8 9
10
1 2
3 41 2
Die iPad-Halterung des Carbon 49 kann das original iPad und das iPad 2 aufnehmen. Zur sicheren Befestigung des iPad haben wir zwei Gummifuß-Adapter mitgeliefert. Die Adapter sind in der Un-terseite des Carbon 49 verstaut.
iPad anschließen
Stecken Sie die Gummifüße in die linke und rechte Ecke der iPad-Halterung (siehe Abb. oben). Schieben Sie dann das iPad in die Gummifüße. Verbinden Sie den Apple iPad Camera Connection Kit-Adapter mit dem iPad und verbinden Sie das iPad über das mitgelieferte USB-Kabel mit dem Keyboard.

48
Standardbetrieb
Der Carbon 49 bietet zwei Betriebsarten: Performance-Modus und Edit-Modus.
Performance-Modus - In diesem Modus übertragen die 49 anschlagdynamischen Tasten Noten- und Dynamikinformationen über den USB- oder MIDI-Ausgang. Die zuweisbaren Controller, Pitch Bend- und Modulationsräder übertragen alle Continuous Controller-Informationen.
Edit-Modus - In diesem Modus können Sie mit den ersten 25 Tasten der Tastatur auf Funktionen zugreifen und die Zahlen 0 - 9 eingeben. Die restliche Tastatur überträgt Noten- und Dynamikinformationen. Dieser Modus wird mit der EDIT-Taste aktiviert. Weitere Infos im Abschnitt “Edit-Modus” (Seite 14). Hinweis: Die Übertragung von Steuerinformationen ist werkseitig auf Kanal 1 vorein-gestellt. Im Edit-Modus kann man hierfür einen anderen MIDI-Kanal wählen.
Modi
Performance-ParameterOCTAVE-TastenDie OCTAVE-Tasten verschieben die Oktavlage der Tastatur um jeweils 12 Halb-töne nach oben oder unten, um den Tastaturbereich zu erweitern. Die Oktavlage kann um maximal vier Oktaven nach oben oder unten verschoben werden. Beim Drücken dieser Tasten wird die Oktavverschiebung auf dem Display angezeigt. Der Wert 0 ist voreingestellt.
Die OCTAVE “-” Taste verschiebt die Tastatur mit jedem Tastendruck um eine Ok-tave nach unten. Sie leuchtet rot, wenn der Tastaturbereich unter dem Wert 0 liegt.
Die OCTAVE “+” Taste verschiebt die Tastatur mit jedem Tastendruck um eine Ok-tave nach oben. Sie leuchtet rot, wenn der Tastaturbereich über dem Wert 0 liegt.
Drücken Sie gleichzeitig beide OCTAVE-Tasten, um den Tastaturbereich auf 0 zurückzusetzen.
TRANSPOSE-TastenDie TRANSPOSE-Tasten verschieben den Tastaturbereich um einen Halbton nach oben oder unten. Man kann damit Noten um maximal 12 Halbtöne nach oben oder unten transponieren. Beim Drücken dieser Tasten wird die Stärke der Verschiebung auf dem Display angezeigt. Der Wert 0 ist voreingestellt.
Die TRANSPOSE “-” Taste verschiebt die Tastatur mit jedem Tastendruck um einen Halbton nach unten. Sie leuchtet rot, wenn der Tastaturbereich unter dem Wert 0 liegt.
Die TRANSPOSE “+” Taste verschiebt die Tastatur mit jedem Tastendruck um einen Halbton nach oben. Sie leuchtet rot, wenn der Tastaturbereich über dem Wert 0 liegt. Man kann die TRANSPOSE-Tasten auch auf die Übertragung von Program +/- oder MIDI Channel +/- Informationen einstellen. Weitere Infos im Abschnitt “Edit-Modus” (Seite 14).

49
Carbon 49 · USB/MIDI Keyboard Controller
ENG
LISH
FRA
NÇA
ISD
EUTS
CHE
ESPA
ÑO
LIT
ALI
AN
O
MODULATION-RadMit dem MODULATIONS-Rad fügt man den gespielten Tönen normalerweise Vibrato-Effekte hinzu. Der Datenbereich des MODULATIONS-Rads beträgt 0 – 127. Die MIDI Controller-Nummer CC #1 ist voreingestellt. Im Edit-Modus kann man dem Modulationsrad eine andere Controller-Nummer zuweisen. Weitere Infos im Abschnitt “Edit-Modus” (Seite 14).
VOLUME-FaderDer VOLUME-Fader sendet MIDI-Informationen zur Steuerung der Performance des Geräts, das an das Keyboard angeschlossen ist. Werkseitig ist Channel Volume voreingestellt, aber man kann im Edit-Modus einen anderen Parameter zuweisen. Weitere Infos im Abschnitt “Edit-Modus” (Seite 14).
DATA-RadDas DATA-Rad sendet MIDI-Informationen zur Steuerung der Performance des Geräts, das an das Keyboard angeschlossen ist. Werkseitig ist Pan Control vorein-gestellt, aber man kann im Edit-Modus einen anderen Parameter zuweisen. Weitere Infos im Abschnitt “Edit-Modus” (Seite 14).
PITCH BEND-RadMit dem PITCH BEND-Rad kann man die auf der Tastatur gespielten Noten “ziehen”, indem man deren Tonhöhe stufenlos erhöht oder verringert. Ansprache und Be-reich dieses Controllers richten sich nach dem Soundprogramm (Patch) oder der zu steuernden Klangquelle. Das Pitch Bend-Rad ist mit einer Feder bestückt und kehrt beim Loslassen in die Mittestellung zurück.
SUSTAIN Pedal-EingangAn den rückseitigen SUSTAIN Pedal-Eingang kann man einen nichtrastenden Fußschalter oder ein Sustain-Pedal anschließen. Werkseitig ist der Pedal-Eingang auf Sustain (CC #64) voreingestellt. Im Edit-Modus kann man dem Pedal eine an-dere Funktion zuweisen. Weitere Infos im Abschnitt “Edit-Modus” (Seite 14).
Beim Einschalten des Keyboards erkennt dieses die Polarität eines angeschlos-senen Pedals. Um die Pedal-Polarität umzukehren, halten Sie beim Einschalten des Keyboards das Pedal gedrückt.
Standardbetrieb

50
Im Edit-Modus können Sie die Parameter des Carbon 49 aufrufen, einstellen und an Ihre Wünsche anpassen. Drücken Sie hierzu die EDIT-Taste auf dem oberen Bedienfeld des Keyboards. Die Taste leuchtet rot und auf dem Display wird “Set” angezeigt. Jetzt sind Sie im Edit-Modus. Die ersten 25 Tasten der Tastatur werden zu Funktions- und Zahlentasten und übertragen keine Notendaten. Die letzten 24 Tasten übertragen auch im Edit-Modus weiterhin Noteninformationen, damit Sie in Echtzeit verfolgen können, wie Ihre Änderungen auf die Performance wirken. Auch der VOLUME-Fader sowie die PITCH- und MODULATIONS-Räder funktionieren normal, aber ihre Betriebs-daten werden nicht auf dem Display angezeigt. Um den Edit-Modus zu verlassen und zum Performance-Modus zurückzukehren, drücken Sie nochmals die EDIT-Taste, damit sie nicht mehr rot leuchtet.
Edit-Modus
MIDI-FunktionenPROG (Program Change) Wenn Sie diese Taste drücken, blinkt die aktuelle Programmnummer auf dem Display. Um das Programm zu wechseln, drehen Sie entweder das DATA-Rad oder geben Sie die neue Programmnummer über die Zahlentasten (0 – 9) ein. Sie können eine Programmnummer im Bereich 0 - 127 eingeben. Drücken Sie nach der Eingabe die ENTER-Taste. Der Carbon 49 überträgt die Program Change-Meldung und das Display blinkt nicht mehr. Wenn die eingegebene Nummer nicht im zulässigen Bereich liegt, wird drei Sekunden lang ein “-E-” (Error) angezeigt und dann zur letzten eingestellten Programmnummer zurückgekehrt. (Es werden keine Informationen übertragen).
CHANNEL (MIDI Channel) Wenn Sie diese Taste drücken, blinkt die aktuelle MIDI-Kanalnummer auf dem Display. Um den MIDI-Kanal, auf dem der Carbon 49 sendet, zu ändern, drehen Sie entweder das DATA-Rad oder Sie geben die neue Kanalnummer über die Zahlentasten ein. Sie können die Nummer 1 – 16 eingeben. Drücken Sie zur Bestätigung die ENTER-Taste. Der Carbon 49 sendet jetzt auf dem neuen Kanal und das Display blinkt nicht mehr. Wenn die eingegebene Nummer nicht im zulässigen Bereich liegt, wird drei Sekun-den lang ein “-E-” (Error) angezeigt und dann zur letzten eingestellten Kanalnummer zurückgekehrt.

51
Carbon 49 · USB/MIDI Keyboard Controller
ENG
LISH
FRA
NÇA
ISD
EUTS
CHE
ESPA
ÑO
LIT
ALI
AN
O
Edit-Modus
Controller zuweisen
BANK MSB & LSB Um mehr als 128 Soundprogramme zu speichern, werden diese normalerweise in mehreren Banken angeordnet. Um auf die verschiedenen Banken zuzugreifen, benötigt MIDI eine Kennung, die aus zwei MIDI-Meldungen besteht: Das Most Signifi-cant Byte (MSB) und das Least Significant Byte (LSB). Mit diesen beiden Meldungen und einem Program Change-Befehl können Sie eine Bank und dann ein Programm in dieser Bank wählen. Schlagen Sie im Handbuch des betreffenden Geräts die entspre-chenden MSBs und LSBs der verschiedenen Banken nach. Zum Einstellen des BANK MSB oder BANK LSB drücken Sie die entsprechende Funk-tionstaste, woraufhin die aktuelle MSB oder LSB auf dem Display blinkt. Drehen Sie das DATA-Rad oder geben Sie die gewünschte MSB- oder LSB-Nummer ein. Drücken Sie ENTER. Sie können Nummern im Bereich 0 - 127 eingeben. Der Carbon 49 überträgt die neue MSB oder LSB zu Ihrem Gerät. Wenn die eingegebene Nummer nicht im zulässigen Bereich liegt, wird drei Sekunden lang ein “-E-” (Error) angezeigt und dann zur letzten eingestellten Nummer zurückgekehrt. Hinweis: Um ein neues Soundprogramm aufzurufen, muss auf die Bank Change-Mel-dung eine Program Change-Meldung folgen.
VELOCITY CURVE Anhand der Velocity-Kurve interpretiert das Keyboard die Geschwindigkeit, mit der eine bestimmte Taste angeschlagen wird, und errechnet daraus die relative MIDI Velocity-Nummer, die es überträgt. Mit dem Carbon 49 können Sie vier verschiedene Kurven verwenden (1 – 4, siehe unten). Um die Velocity-Kurve zu ändern, drücken Sie die Taste für VELOCITY CURVE. Die aktuelle Wahl blinkt auf dem Display. Wählen Sie die gewünschte Kurve mit dem DATA-Rad oder den Zahlentasten. Drücken Sie zur Bestä-tigung die ENTER-Taste. Die Tastatur ist jetzt auf die neue Velocity-Kurve eingestellt. Wenn die gewählte Zahl nicht im zulässigen Bereich liegt, wird drei Sekunden lang ein “-E-” (Error) angezeigt und dann zur letzten Velocity-Nummer zurückgekehrt. Verfügbare Velocity-Kurven
Nr. Typ Beschreibung
1 Normal Lineare Kurve - Voreinstellung
2 Soft Geringere Anschlagsdynamik (und geringere Lautstärkedifferenz)
3 Hard Höhere Anschlagsdynamik (und höhere Lautstärkedifferenz)
4 Fixed Anschlagdynamik fest auf 127 eingestellt 1 - Normal 2 - Soft 3 - Hard 4 - Fixed

52
Edit-ModusASSIGN TRANS Mit einem Druck auf die ASSIGN TRANS-Taste können Sie die Funktion wechseln, die von den TRANSPOSE “+” und “-” Tasten gesteuert wird. Es lassen sich drei Parameter zuweisen: 1 - Transpose 2 - Program Change 3 - MIDI Channel Beim Drücken der Taste blinkt die aktuelle Funktionsnummer auf dem Display. Geben Sie den Steuercode mit dem DATA-Rad oder den Zahlentasten ein. Bestätigen Sie Ihre Wahl mit der ENTER-Taste. Wenn die Nummer nicht im zulässigen Bereich liegt, wird drei Sekunden lang ein “-E-” (Error) angezeigt und dann zur zuletzt eingestellten Funk-tionsnummer zurückgekehrt. Hinweis: Wenn die TRANSPOSE-Taste auf 2 (Program Change) oder 3 (MIDI Channel) eingestellt ist, funktionieren die Anzeigen nicht. Wenn die TRANSPOSE-Taste auf 2 (Pro-gram Change) eingestellt ist, bietet die Taste zudem eine Beschleunigungsfunktion. (Bei gedrückt gehaltener Taste ändern sich die Nummern im Schnelldurchlauf ).
ASSIGN FADER Mit einem Druck auf die ASSIGN FADER-Funktionstaste können Sie die Controller-Nummer ändern, die dem VOLUME-Fader zugewiesen ist. Beim Drücken der Taste blinkt die aktuelle Controller-Nummer auf dem Display. Geben Sie die Controller-Num-mer (0 – 148) mit dem DATA-Rad oder den Zahlentasten ein. Eine Liste der Codes und zugehörigen Funktionen finden Sie auf Seite 18 in der “MIDI Continuous Controller (CC) Liste”. Bestätigen Sie Ihre Wahl mit der ENTER-Taste. Wenn die Nummer nicht im zulässigen Bereich liegt, wird drei Sekunden lang ein “-E-” (Error) angezeigt und dann zur zuletzt eingestellten CC-Nummer zurückgekehrt.
ASSIGN KNOB Mit einem Druck auf die ASSIGN KNOB-Funktionstaste können Sie die Controller-Nummer ändern, die dem DATA-Rad zugewiesen ist. Beim Drücken der Taste blinkt die aktuelle Controller-Nummer auf dem Display. Geben Sie die Controller-Nummer (0 – 148) mit dem DATA-Rad oder den Zahlentasten ein. Eine Liste der Codes und zugehöri-gen Funktionen finden Sie auf Seite 18 in der “MIDI Continuous Controller (CC) Liste”. Bestätigen Sie Ihre Wahl mit der ENTER-Taste. Wenn die Nummer nicht im zulässigen Bereich liegt, wird drei Sekunden lang ein “-E-” (Error) angezeigt und dann zur zuletzt eingestellten CC-Nummer zurückgekehrt.
ASSIGN MOD Mit einem Druck auf die ASSIGN MOD-Funktionstaste können Sie die Controller-Nummer ändern, die dem MODULATIONS-Rad zugewiesen ist. Beim Drücken der Taste blinkt die aktuelle Controller-Nummer auf dem Display. Geben Sie die Controller-Num-mer (0 – 148) mit dem DATA-Rad oder den Zahlentasten ein. Eine Liste der Codes und zugehörigen Funktionen finden Sie auf Seite 18 in der “MIDI Continuous Controller (CC) Liste”. Bestätigen Sie Ihre Wahl mit der ENTER-Taste. Wenn die Nummer nicht im zulässigen Bereich liegt, wird drei Sekunden lang ein “-E-” (Error) angezeigt und dann zur zuletzt eingestellten CC-Nummer zurückgekehrt.

53
Carbon 49 · USB/MIDI Keyboard Controller
ENG
LISH
FRA
NÇA
ISD
EUTS
CHE
ESPA
ÑO
LIT
ALI
AN
O
RESET ALL Die RESET ALL-Funktion setzt alle Controller-Werte des Carbon 49 auf ihre Voreinstel-lungen zurück. Beim Drücken der RESET ALL-Funktionstaste wird auf dem Display zuerst “No” angezeigt (d. h., Sie möchten alle Funktionen NICHT zurücksetzen). Um alle Controller zurückzusetzen, drücken Sie Zahlentaste 1 oder drehen das DATA-Rad, bis auf dem Display “Yes” erscheint. Nach Ihrer Bestätigung mit der ENTER-Taste werden alle Controller sofort zurückgesetzt. Wenn beim Drücken der ENTER-Taste “No” an-gezeigt wird, wird das Reset-Verfahren abgebrochen.
ALL NOTES OFF Die ALL NOTES OFF-Funktion überträgt eine “All Notes Off” Meldung, um alle “hängen-den” Noten zu beenden. Durch Drücken der ALL NOTES OFF-Funktionstaste sendet das Keyboard sofort eine “All Notes Off” Meldung, die alle klingenden Noten ausschaltet.
DEFAULT Die DEFAULT-Funktion setzt alle Carbon 49 Parameter auf die ursprünglichen Werksein-stellungen zurück. Beim Drücken der DEFAULT-Funktionstaste wird auf dem Display zuerst “No” angezeigt (d. h., Sie möchten alle Werte NICHT zurücksetzen). Um alle Pa-rameter zurückzusetzen, drücken Sie Zahlentaste 1 oder drehen das DATA-Rad, bis auf dem Display “Yes” erscheint. Nach Ihrer Bestätigung mit der ENTER-Taste werden alle Parameter sofort zurückgesetzt. Wenn beim Drücken der ENTER-Taste “No” angezeigt wird, wird das Reset-Verfahren abgebrochen.
SNAPSHOT Die SNAPSHOT-Funktion überträgt alle aktuellen Controller-Werte für VOLUME-Fader, DATA-Rad, PITCH BEND-Rad, Programm-Nummer und Kanal-Nummer auf einmal, damit Sie ein vollständiges Bild Ihrer aktuellen Einstellungen bekommen. Drücken Sie die SNAPSHOT-Taste, um die Werte zu sehen.
Edit-Modus
Keyboard-Einstellungen
ASSIGN PEDAL Mit einem Druck auf die ASSIGN PEDAL-Funktionstaste können Sie die Controller-Nummer ändern, die dem SUSTAIN PEDAL-Eingang zugewiesen ist. CC #64 ist vorein-gestellt. Beim Drücken der Taste blinkt die aktuelle Controller-Nummer auf dem Display. Geben Sie die Controller-Nummer (0 – 148) mit dem DATA-Rad oder den Zahlen tasten ein. Eine Liste der Codes und zugehörigen Funktionen finden Sie auf Seite 18 in der “MIDI Continuous Controller (CC) Liste”. Bestätigen Sie Ihre Wahl mit der ENTER-Taste. Wenn die Nummer nicht im zulässigen Bereich liegt, wird drei Sekunden lang ein “-E-” (Error) angezeigt und dann zur zuletzt eingestellten CC-Nummer zurück-gekehrt.

54
MIDI Continuous Controller (CC) Liste0 Bank Select1 Modulation wheel2 Breath control 3 Undefiniert4 Foot controller5 Portamento time6 Data Entry 7 Channel Volume8 Balance9 Undefiniert10 Pan11 Expression12 Effect control 1 13 Effect control 2 14 Undefiniert15 Undefiniert16 General Purpose #117 General Purpose #218 General Purpose #319 General Purpose #420 Undefiniert21 Undefiniert22 Undefiniert23 Undefiniert24 Undefiniert25 Undefiniert26 Undefiniert27 Undefiniert28 Undefiniert29 Undefiniert30 Undefiniert31 Undefiniert32 Bank Select33 Modulation wheel 34 Breath control 35 Undefiniert36 Foot controller37 Portamento time38 Data entry 39 Channel Volume40 Balance41 Undefiniert
42 Pan43 Expression44 Effect control 1 45 Effect control 2 46 Undefiniert47 Undefiniert48 General Purpose #149 General Purpose #250 General Purpose #351 General Purpose #452 Undefiniert53 Undefiniert54 Undefiniert55 Undefiniert56 Undefiniert57 Undefiniert58 Undefiniert59 Undefiniert60 Undefiniert61 Undefiniert62 Undefiniert63 Undefiniert64 Sustain pedal65 Portamento on/off66 Sostenuto on/off 67 Soft pedal on/off68 Legato Footswitch69 Hold 2 70 Sound Variation71 Timbre/Harmonic Intens.72 Release Time73 Attack Time74 Brightness75 Decay Time76 Vibrato Rate77 Vibrato Depth78 Vibrato Delay79 Sound Cont.80 General Purpose #581 General Purpose #682 General Purpose #783 General Purpose #8

55
Carbon 49 · USB/MIDI Keyboard Controller
ENG
LISH
FRA
NÇA
ISD
EUTS
CHE
ESPA
ÑO
LIT
ALI
AN
O
MIDI Continuous Controller (CC) Liste84 Portamento Control 85 Undefiniert86 Undefiniert87 Undefiniert88 Undefiniert89 Undefiniert90 Undefiniert91 Reverb Send Level92 Tremolo Depth93 Chorus Send Level94 Celeste/Detune Depth95 Phaser Depth96 Data entry +197 Data entry -198 NRPN LSB99 NRPN MSB100 RPN LSB101 RPN MSB102 Undefiniert103 Undefiniert104 Undefiniert105 Undefiniert106 Undefiniert107 Undefiniert108 Undefiniert109 Undefiniert110 Undefiniert111 Undefiniert112 Undefiniert113 Undefiniert114 Undefiniert115 Undefiniert116 Undefiniert117 Undefiniert118 Undefiniert119 Undefiniert120 All Sound Off121 Reset All Controllers122 Local control on/off 123 All notes off124 Omni mode off125 Omni mode on
126 Poly mode off127 Poly mode on
RPN/NRPN-Meldungen128 Pitch Bend Sensitivity129 Fine Tuning130 Coarse Tuning131 Vibrato Rate132 Vibrato Depth133 Vibrato Delay134 Low Pass Filter Cutoff Frequency135 Low Pass Filter Resonance 136 High Pass Filter Cutoff Frequency137 EQ Low Gain 138 EQ High Gain 139 EQ Low Frequency 140 EQ High Frequency 141 EG Attack Time 142 EG Decay Time 143 EG Release Time
144 Channel Pressure (Aftertouch)145 Program Change146 Song Select(Song #)
SysEx-Meldungen147 Master Volume148 Master Balance

56
Oktave
Notennummern
C C# D D# E F F# G G# A A# B
-1 0 1 2 3 4 5 6 7 8 9 10 11
0 12 13 14 15 16 17 18 19 20 21 22 23
1 24 25 26 27 28 29 30 31 32 33 34 35
2 36 37 38 39 40 41 42 43 44 45 46 47
3 48 49 50 51 52 53 54 55 56 57 58 59
4 60 61 62 63 64 65 66 67 68 69 70 71
5 72 73 74 75 76 77 78 79 80 81 82 83
6 84 85 86 87 88 89 90 91 92 93 94 95
7 96 97 98 99 100 101 102 103 104 105 106 107
8 108 109 110 111 112 113 114 115 116 117 118 119
9 120 121 122 123 124 125 126 127
MIDI NotennummernSystem für MIDI-Notennummern der International Organization for Standardization. Das mittlere C entspricht der MIDI-Notennummer 60 (C4).

57
Carbon 49 · USB/MIDI Keyboard Controller
ENG
LISH
FRA
NÇA
ISD
EUTS
CHE
ESPA
ÑO
LIT
ALI
AN
O
Technische DatenTastatur 49 leicht gewichtete anschlagdynamische
Tasten
Display 3-stellig, 7 Segmente
Regler Volume-Fader, Data-Rad, Edit-Taste, Octave +/- Tasten, Transpose +/- Tasten, Pitch Bend-Rad, Modulationsrad
Funktionen Program Number, Reset All, MIDI Channel, All Notes Off, Bank MSB, Bank LSB, Velocity Curve, Default, Assign Trans, Assign Fader, Assign Knob, Assign Mod, Assign Pedal, Snapshot
Pedal-Eingang 6,35 mm TRS
MIDI MIDI über USB, 5-Pol MIDI OUT
Spannungsversorgung via USB-Bus
Zubehör USB-Kabel iPad Gummifuß-Adapter Native Instruments Komplete Elements DVD
Abmessungen 792 mm x 217 mm x 78 mm 31,2” x 8,5” x 3”
Gewicht 2,8 kg 6,2 lbs

Apple, Mac, Mac OS e iPad son marcas comerciales de Apple Inc., registradas en Estados Unidos así como en otros países.
IOS es una marca comercial o marca registrada de Cisco en Estados Unidos así como en otros países y es usada aquí bajo licencia.
Native Instruments, NI y Komplete Elements son marcas comerciales o marcas registradas de Native Instruments GmbH.

Instrucciones importantes de seguridad
A la hora de deshacerse de este aparato, no lo elimine junto con la basura orgánica. Existe unprocedimiento de eliminación de aparatos electrónicos usados que cumple con la legislaciónactual sobre tratamiento, recuperación y reciclaje de elementos electrónicos.
Todos los usuarios no profesionales y que sean ciudadanos de uno de los 25 países miembros de la EU, Suiza y Noruega, pueden devolver sus aparatos electrónicos usados, sin coste alguno, al comercio en el que fueron adquiridos (si adquiere allí otro aparato similar) o en determinados puntos limpios designados
En el caso de cualquier otro país distinto a los anteriores, póngase en contacto con las autoridades locales para que le informen del método adecuado para deshacerse de este aparato. El hacer lo anterior le asegurará que este aparato sea eliminado siguiendo las normas actuales de tratamiento, recuperación y reciclaje de materiales, evitando los posibles efectos negativos para el medio ambiente y la salud.
ATTENTIONRISQUE D’ÉLECTROCUTION !
NE PAS OUVRIR !
ATENCIÓN: PARA REDUCIR EL RIESGO DE DESCARGAS ELÉCTRICAS, NO DESMONTE LA TAPA (NI EL CHASIS). DENTRO DE ESTE APARATO NO HAY PIEZAS SUSCEPTIBLES DE SER REPARADAS POR EL PROPIO USUARIO. DIRIJA CUALQUIER REPARACIÓN AL SERVICIO TÉCNICO OFICIAL.
El símbolo del rayo dentro de un triángulo equilátero pretende advertir al usuario de la presencia de “voltajes peligrosos” no aislados dentro de la carcasa del producto, que pueden ser de suficiente magnitud como para suponer un riesgo de descarga eléctrica.
El símbolo de exclamación dentro de un triángulo equilátero pretende advertir al usuario de la existencia de instrucciones de manejo y mantenimiento importantes en los documentos que vienen con el aparato.
ATENCIÓNPARA EVITAR EL RIESGO DE INCENDIOS O DESCARGAS ELÉCTRICAS, NO USE EL ENCHUFE DE ESTE APARATO CON UNA REGLETA, RECEPTÁCULO O SALIDA DE CORRIENTE SALVO QUE LOS BORNES DEL MISMO QUEDEN COMPLETAMENTE INTRODUCIDOS Y NO QUEDEN PARTES DE LOS MISMOS AL DESCUBIERTO. PARA EVITAR EL RIESGO DE INCENDIOS O DESCARGAS ELÉCTRICAS, NO PERMITA QUE ESTE APARATO QUEDE EXPUESTO A LA LLUVIA O LA HUMEDAD. PARA EVITAR DESCARGAS ELÉCTRICAS, COLOQUE E INTRODUZCA CORRECTAMENTE EL ENCHUFE EN LA UNIDAD.

60
ÍndiceIntroducción . . . . . . . . . . . . . . . . . . . . . . . . . . . . . . . . . . . . . . . . . . . 61
Características del Carbon 49 . . . . . . . . . . . . . . . . . . . . . . . . . . . . . . . . . 62
Componentes del sistema . . . . . . . . . . . . . . . . . . . . . . . . . . . . . . . . . . . 62
Requisitos mínimos del sistema . . . . . . . . . . . . . . . . . . . . . . . . . . . . . . . 62
Controles y funciones del panel frontal . . . . . . . . . . . . . . . . . . . . . . . . . . 63
Controles y funciones del panel trasero . . . . . . . . . . . . . . . . . . . . . . . . . . 64
Puesta en marcha . . . . . . . . . . . . . . . . . . . . . . . . . . . . . . . . . . . . . . . . 65
Funcionamiento básico . . . . . . . . . . . . . . . . . . . . . . . . . . . . . . . . . . . . 66
Modo de edición . . . . . . . . . . . . . . . . . . . . . . . . . . . . . . . . . . . . . . . . . 68
Listado de controladores continuos MIDI (CC) . . . . . . . . . . . . . . . . . . . . . . 72
Números de notas MIDI . . . . . . . . . . . . . . . . . . . . . . . . . . . . . . . . . . . . 74
Especificaciones técnicas . . . . . . . . . . . . . . . . . . . . . . . . . . . . . . . . . . . 75

61
Carbon 49 · USB/MIDI Keyboard Controller
ENG
LISH
FRA
NÇA
ISD
EUTS
CHE
ESPA
ÑO
LIT
ALI
AN
O
Introducción ¡Felicidades y gracias por su compra del teclado controlador USB de 49 teclas Samson Carbon 49! El Carbon 49 puede integrarse fácilmente con su workstation de producción digital Windows o Mac. El teclado también puede recibir corriente directamente desde un Apple iPad (usando el kit de conexión de cámara Apple iPad, opcional) y puede usarlo para controlar muchas apps iOS MIDI, como el GarageBand. El Carbon 49 dispone de un teclado de 49 teclas sensibles a la velocidad y semi-contrapesadas, un fader asignable, un mando de datos, ruedas de inflexión tonal y modulación y una pantalla LED de 3 dígitos.
El Carbon 49 es el añadido perfecto para su DAW o software de control de instrumentos virtuales. Para que pueda empezar a crear música de forma inmediata, hemos incluido el Native Instruments Komplete Elements, que contiene unos 1.000 sonidos y efectos.
En estas páginas encontrará una descripción detallada de las características del teclado controlador Carbon 49, así como un recorrido guiado por su panel de control e instrucciones paso-a-paso para su configuración y uso. También encontrará una tarjeta de garantía—no se olvide cumplimentarla y devolvérnosla para que podamos ofrecerle soporte técnico online y para que le podamos facilitar la información más actualizada sobre este y otros productos Samson en el futuro.
Le recomendamos que apunte el número de serie y la fecha de compra en los espacios reservados para ello por si tiene que hacer cualquier consulta en el futuro.
Número de serie: ____________________________________________
Fecha de compra: __________________________________________
Con unos cuidados adecuados, su Carbon 49 le dará largos años de funcionamiento sin problemas. En el improbable caso de que este aparato deba ser reparado, deberá solicitarnos un número de autorización de devolución (RA) antes de devolver esta unidad a Samson. Sin este número, ninguna unidad será aceptada. Póngase en contacto con Samson en el 1-800-3SAMSON (1-800-372-6766) para que le facilitemos el número de autorización de devolución antes de devolvernos la unidad. Trate de utilizar para el envío el embalaje y las protecciones originales. SI ha adquirido este producto Samson fuera de los Estados Unidos, póngase en contacto con su distribuidor local para que le informe de los términos de la garantía y condiciones de servicio aplicables. Además, asegúrese de acceder a nuestra página web (www.samsontech.com) para ver toda la información disponible relacionada con toda nuestra gama de productos.

62
Características del Carbon 49
Componentes del sistema
Requisitos mínimos del sistema
El Samson Carbon 49 utiliza la tecnología más avanzada y ha sido diseñado con la máxima precisión. Estas son algunas de sus características principales:
• Teclado de 49 teclas sensibles a la velocidad y semi-contrapesadas
• Mando de datos y fader de volumen asignables
• Rueda de inflexión tonal y rueda asignable de modulación
• Pantalla LED de 3 dígitos y 7 segmentos para información en tiempo real
• Botones específicos de octava arriba/abajo
• Botones de trasposición arriba/abajo, asignables a cambio de programa y canal MIDI
• Tecla Edit que le permite el ajuste de hasta 14 parámetros MIDI y de control
• Entrada de pedal de sustain
• Conexión USB para alimentación y MIDI
• Salida MIDI de 5 puntas para la conexión a dispositivos MIDI standard
• Soporte para iPad integrado
• Incluye el software Native Instruments Komplete Elements
• Teclado USB Samson Carbon 49
• Cable USB
• Dos zapatas de goma para iPad
• DVD de instalación del software Native Instruments Komplete Elements
• Manual de instrucciones del Carbon 49
Windows (PC)
• Windows XP/Vista/Win7
• 800 MHz o más, 256 MB de RAM o superior, puerto USB
Mac OS
• Mac OS X 10.4.9 o posterior
• 733 MHz o más, 512 MB de RAM o superior, puerto USB
Apple iPad
• iOS v4.2 o posterior
Le recomendamos que compruebe también los requisitos mínimos del software que use con el Carbon 49, ya que pueden ser superiores a los indicados anteriormente.

63
Carbon 49 · USB/MIDI Keyboard Controller
ENG
LISH
FRA
NÇA
ISD
EUTS
CHE
ESPA
ÑO
LIT
ALI
AN
O
4 5
67
8 9
10
321
1234
Controles y funciones del panel frontal
1. Pantalla - Pantalla LED de 3 x 7 segmentos que muestra los datos de controlador en tiempo real en el modo de interpretación, y los parámetros ajustables en el de edición
2. Fader VOLUME - Este fader viene prefijado de fábrica para enviar mensajes MIDI de volumen (CC #7), pero puede asignarlo para controlar distintos parámetros MIDI en el modo de edición (vea p. 14 para más información).
3. Mando DATA - Este mando giratorio continuo viene prefijado de fábrica para enviar mensajes MIDI de panorama (CC #10), pero puede asignarlo para controlar distintos parámetros MIDI en el modo de edición (vea p. 14 para más información).
4. Botón EDIT - Pulse este botón para acceder al modo de edición. En el modo de edición, puede ajustar los parámetros del teclado (vea p. 14 para más información).
5. Soporte para iPad - Coloque un Apple iPad horizontalmente en esta ranura. Use las zapatas de goma incluidas para sujetar el iPad de forma segura en su sitio (vea p.11 para más información).
6. Botones OCTAVE +/– - Pulse los botones OCTAVE para cambiar la octava del teclado hacia arriba o abajo en un máximo de cuatro octavas, para ampliar así el rango del teclado. Cada vez que pulse un botón OCTAVE, el rango del teclado cambiará hacia arriba o abajo en 12 notas.
7. Botones TRANSPOSE +/– - Pulse estos botones para cambiar el rango del teclado arriba o abajo en un máximo de 12 semitonos (medias notas o pasos). Estos botones también pueden ser asignados para enviar mensajes de cambio de programa y canal MIDI (vea p. 14 para más información).
8. Rueda PITCH BEND - Use esta rueda para producir una inflexión tonal arriba o abajo de las notas tocadas en el teclado.
9. Rueda MODULATION - Esta rueda se suele usar para añadir modulación (CC #1) al sonido tocado, pero puede asignarla para el envío de otros parámetros MIDI en el modo de edición (vea p. 14 para más información).
10. Teclas de función - En el modo de edición, las 25 primeras teclas del teclado están asignadas para actuar como dígitos numéricos 0–9 (vea p. 14 para más información).

64
4 5
67
8 9
10
321
1234
Controles y funciones del panel trasero
1. Interruptor POWER - Deslícelo a un lado u otro para encender o apagar el teclado.
2. Conexión USB - Conecte un cable USB standard desde este puerto a la conexión USB de un ordenador o iPad para pasar alimentación eléctrica al teclado y para el envío y recepción de datos MIDI.
3. MIDI OUT - Use un cable MIDI de 5 puntas para conectar el Carbon 49 a un dispositivo MIDI exterior.
4. Entrada de pedal SUSTAIN - Conecte a esta entrada un pedal sustain o de expresión que disponga de una clavija de 6,3 mm. Esta entrada viene prefijada de fábrica para enviar mensajes MIDI sustain (CC #64), pero esta entrada también puede ser asignada para enviar distintos parámetros MIDI en el modo de edición (vea p. 14 para más información).

65
Carbon 49 · USB/MIDI Keyboard Controller
ENG
LISH
FRA
NÇA
ISD
EUTS
CHE
ESPA
ÑO
LIT
ALI
AN
O
Puesta en marcha
1. Conecte el Carbon 49 a su ordenador o iPad usando el cable USB incluido. La unidad recibirá corriente y transmitirá datos MIDI a través de esta conexión USB. Deslice el interruptor POWER a la izquierda para encender el teclado.
Nota: Para conectar la unidad directamente al iPad, necesitará usar el kit de conexión de cámara del Apple iPad (opcional).
2. Ejecute su software DAW o de instrumento virtual y configure el Carbon 49 como el dispositivo de entrada MIDI.
3. Para usar el Carbon 49 con un dispositivo MIDI exterior (como un módulo de sonido), conecte un cable MIDI de 5 puntas a la toma MIDI OUT del panel trasero del Carbon 49 y a la toma MIDI IN del dispositivo externo.
On Off
3 4 5
67
8 9
10
1 2
3 41 2
On Off
3 4 5
67
8 9
10
1 2
3 41 2
El soporte para iPad del Carbon 49 ha sido diseñado para que coloque el iPad original, así como también el iPad 2. Para fijar de forma segura el iPad, hemos incluido dos zapatas de goma. Estas zapatas están colocadas en la parte inferior del Carbon 49.
Conexión de un iPad
Coloque las zapatas en las esquinas izquierda y derecha del soporte para iPad (como le mostramos en el gráfico de arriba) y después deslice su iPad en esas zapatas. Conecte el kit de conexión de cámara del Apple iPad en su iPad y conecte después el iPad al teclado por medio del cable USB incluido.

66
Funcionamiento básico
El Carbon 49 tiene dos modos operativos: Interpretación y Edición.
Modo de interpretación - En él, las 49 teclas sensibles a la velocidad transmiten información de velocidad y notas a través de la salida USB o MIDI. Los controladores asignables, ruedas de inflexión tonal y modulación transmiten información de controladores continuos.
Modo de edición - En él, use las 25 primeras teclas del teclado para acceder a funciones e introducir valores numéricos 0-9. El resto del teclado transmitirá información de notas y velocidad. Este modo se activa al pulsar el botón EDIT. Consulte la sección del modo de edición (p.14) para más detalles. Nota: Por defecto, la unidad transmite información de control en el canal 1. Puede asignar el teclado para transmitir datos en otro canal MIDI en el modo de edición.
Modos
Parámetros de interpretaciónBotones OCTAVEEstos botones cambian la octava del teclado en 12 notas arriba o abajo cada vez que los pulse, para ampliar así el rango del teclado. Puede usarlos para cambiar hasta un máximo de cuatro octavas. Conforme pulse estos botones, la octava cambiará su valor tal como le mostrará el teclado. El valor por defecto es 0.
El botón OCTAVE “-” cambiará el teclado una octava abajo cada vez que lo pulse y se iluminará en rojo cuando el rango del teclado esté por debajo del valor 0.
El botón OCTAVE “+” cambiará el teclado una octava arriba cada vez que lo pulse y se iluminará en rojo cuando el rango del teclado esté por encima del valor 0.
Pulse a la vez ambos botones OCTAVE para reiniciar el rango del teclado a 0.
Botones TRANSPOSEEstos botones cambian el rango del teclado en un semitono (media nota o tono) arriba o abajo con cada pulsación. Puede usarlos para trasponer notas arriba o abajo en un máximo de 12 semitonos. Conforme pulse estos botones, el valor de cambio será mostrado en pantalla. El valor por defecto es 0.
El botón TRANSPOSE “-” cambiará el teclado un semitono abajo cada vez que lo pulse y se iluminará en rojo cuando el rango del teclado esté por debajo del valor 0.
El botón TRANSPOSE “+” cambiará el teclado un semitono arriba cada vez que lo pulse y se iluminará en rojo cuando el rango del teclado esté por encima del valor 0.
También puede configurar estos botones TRANSPOSE para enviar información de cambio de canal o programa MIDI +/-. Consulte la sección sobre el modo de edición (p.14) para más detalles.
Rueda MODULATIONEsta rueda se suele usar para añadir efectos de vibrato a las notas que esté tocando. El rango de datos de esta rueda MODULATION es 0–127. El número de controlador MIDI por defecto es el CC #1. Puede asignar otro número de controlador a la rueda de modulación en el modo de edición. Consulte la sección sobre el modo de edición (p.14) para más detalles.
67
Carbon 49 · USB/MIDI Keyboard Controller
ENG
LISH
FRA
NÇA
ISD
EUTS
CHE
ESPA
ÑO
LIT
ALI
AN
O
Fader VOLUMEEste fader envía información MIDI para el control de la interpretación del dispositivo que esté conectado al teclado. El valor de fábrica es el volumen de canal, pero puede asignarlo a otro parámetro en el modo de edición. Consulte la sección sobre el modo de edición (p.14) para más detalles.
Mando DATAEste mando envía información MIDI para el control de la interpretación del dispositivo que esté conectado al teclado. El valor de fábrica es el control del panorama, pero puede asignarlo a otro parámetro en el modo de edición. Consulte la sección sobre el modo de edición (p.14) para más detalles.
Rueda PITCH BENDEsta rueda se usa para controlar la inflexión tonal de las notas tocadas en el teclado y subir o bajar su tono. La respuesta y rango de este controlador se basa en el programa o fuente de sonido que esté siendo controlada. La rueda de inflexión tonal dispone de un resorte que hará que vuelva a su posición central en cuanto la suelte.
Entrada de pedal SUSTAINPuede conectar un pedal de disparo momentáneo o un pedal damper o sordina a la entrada de pedal SUSTAIN del panel trasero. El ajuste por defecto para esta entrada es sustain (CC #64), pero puede asignarlo a otro parámetro en el modo de edición. Consulte la sección sobre el modo de edición (p.14) para más detalles.
Cuando encienda el teclado, la unidad detectará la polaridad del pedal conectado. Para invertir la polaridad del pedal, púlselo mientras enciende el teclado.
Funcionamiento básico
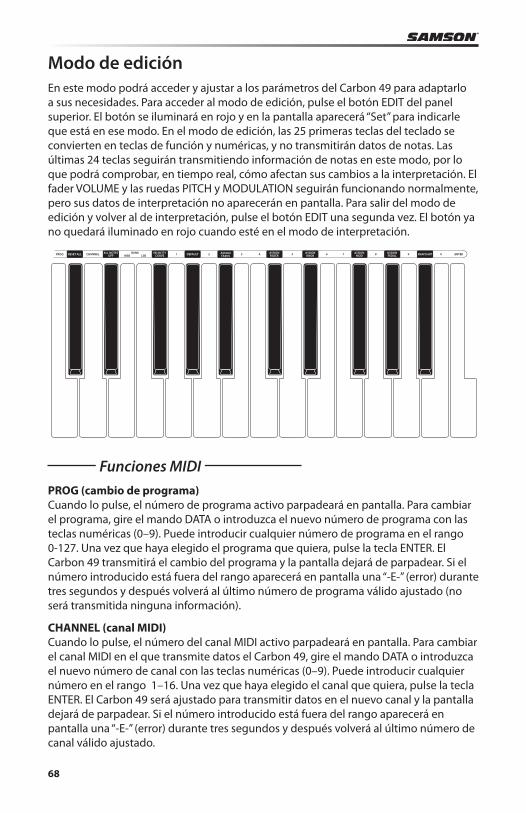
68
En este modo podrá acceder y ajustar a los parámetros del Carbon 49 para adaptarlo a sus necesidades. Para acceder al modo de edición, pulse el botón EDIT del panel superior. El botón se iluminará en rojo y en la pantalla aparecerá “Set” para indicarle que está en ese modo. En el modo de edición, las 25 primeras teclas del teclado se convierten en teclas de función y numéricas, y no transmitirán datos de notas. Las últimas 24 teclas seguirán transmitiendo información de notas en este modo, por lo que podrá comprobar, en tiempo real, cómo afectan sus cambios a la interpretación. El fader VOLUME y las ruedas PITCH y MODULATION seguirán funcionando normalmente, pero sus datos de interpretación no aparecerán en pantalla. Para salir del modo de edición y volver al de interpretación, pulse el botón EDIT una segunda vez. El botón ya no quedará iluminado en rojo cuando esté en el modo de interpretación.
Modo de edición
Funciones MIDIPROG (cambio de programa) Cuando lo pulse, el número de programa activo parpadeará en pantalla. Para cambiar el programa, gire el mando DATA o introduzca el nuevo número de programa con las teclas numéricas (0–9). Puede introducir cualquier número de programa en el rango 0-127. Una vez que haya elegido el programa que quiera, pulse la tecla ENTER. El Carbon 49 transmitirá el cambio del programa y la pantalla dejará de parpadear. Si el número introducido está fuera del rango aparecerá en pantalla una “-E-” (error) durante tres segundos y después volverá al último número de programa válido ajustado (no será transmitida ninguna información).
CHANNEL (canal MIDI) Cuando lo pulse, el número del canal MIDI activo parpadeará en pantalla. Para cambiar el canal MIDI en el que transmite datos el Carbon 49, gire el mando DATA o introduzca el nuevo número de canal con las teclas numéricas (0–9). Puede introducir cualquier número en el rango 1–16. Una vez que haya elegido el canal que quiera, pulse la tecla ENTER. El Carbon 49 será ajustado para transmitir datos en el nuevo canal y la pantalla dejará de parpadear. Si el número introducido está fuera del rango aparecerá en pantalla una “-E-” (error) durante tres segundos y después volverá al último número de canal válido ajustado.

69
Carbon 49 · USB/MIDI Keyboard Controller
ENG
LISH
FRA
NÇA
ISD
EUTS
CHE
ESPA
ÑO
LIT
ALI
AN
O
Modo de edición
Asignación de controladores
BANK MSB y LSB Para poder almacenar más de 128 programas, los dispositivos los distribuyen por lo general en varios bancos. Para acceder a los distintos bancos, el MIDI requiere un identificador formado por dos mensajes MIDI: el byte más significativo (MSB) y el menos significativo (LSB). Estos dos mensajes, junto con una orden de cambio de programa, le permiten elegir un banco y un programa dentro de él. Consulte el manual de su dispositivo para ver los MSB y LSB correspondientes a cada banco. Para ajustar el BANK MSB o BANK LSB, pulse la tecla de función correspondiente y el MSB o LSB activo parpadearán en pantalla. Gire el mando DATA o teclee directamente el número MSB o LSB que quiera y pulse ENTER. Puede introducir números en el rango de 0-127. El Carbon 49 transmitirá el nuevo MSB o LSB a su dispositivo. Si el número está fuera de rango, en pantalla parpadeará una “-E-” (error) durante tres segundos y la unidad volverá después al último número válido ajustado. Nota: Para cargar un nuevo programa, el cambio de banco deberá ir seguido por un cambio de programa.
VELOCITY CURVE La curva de velocidad es la forma en la que el teclado interpreta la velocidad con la que es pulsada cada tecla y el valor de velocidad MIDI relativo que transmite. El Carbon 49 tiene cuatro curvas distintas que puede utilizar (1–4, descritas abajo). Para cambiar esta curva, pulse la tecla asignada a VELOCITY CURVE. La selección activa parpadeará en pantalla. Gire el mando DATA o use las teclas numéricas para elegir el valor que quiera. Pulse la tecla ENTER para confirmar la elección y después el teclado será ajustado a la nueva curva de velocidad. Si elige un valor fuera de rango, aparecerá una “-E-” (error) parpadeando en pantalla durante 3 segundos y después la unidad volverá al último valor válido de velocidad ajustado. Curvas de velocidad disponibles
Nº Tipo Descripción
1 Normal Curva de tipo lineal - valor por defecto
2 Soft Produce una velocidad de transmisión menor (y el volumen correspondiente)
3 Hard Velocidad (y su correspondiente volumen) mayor
4 Fixed La velocidad de las notas está fijada a 127 1 - Normal 2 - Soft 3 - Hard 4 - Fixed

70
Modo de ediciónASSIGN TRANS Pulse la tecla de función ASSIGN TRANS para cambiar la función controlada por los botones TRANSPOSE “+” y “-”. Dispone de tres parámetros que puede asignar: 1 - Trasposición 2 - Cambio de programa 3 - Canal MIDI Cuando la pulse, el número de la función activa parpadeará en pantalla. Gire el mando DATA o introduzca el valor usando el teclado numérico. Pulse la tecla ENTER para confirmar su selección. Si el número está fuera de rango, en pantalla parpadeará una “-E-” (error) durante tres segundos y la unidad volverá después al último número válido ajustado. Nota: Cuando el botón TRANSPOSE esté ajustado a 2 (cambio de programa) o 3 (canal MIDI), los indicadores no funcionarán. Además, cuando el botón TRANSPOSE esté ajustado al valor 2 (cambio de programa), el botón le ofrecerá una función de aceleración (cuando mantenga pulsado el botón, el número irá cambiando más rápidamente para acceder a los números de programas altos más rápido).
ASSIGN FADER Pulse esta tecla de función para ajustar el número de controlador asignado al fader VOLUME. Cuando la pulse, el número de controlador activo parpadeará en pantalla. Gire el mando DATA o introduzca el número de controlador (0–148) que quiera usando las teclas numéricas. Consulte en el listado de controladores continuos MIDI (CC) en p.18 un listado de los códigos y sus funciones correspondientes. Pulse la tecla ENTER para confirmar su selección. Si el número está fuera de rango, en pantalla parpadeará una “-E-” (error) durante tres segundos y la unidad volverá después al último número válido ajustado.
ASSIGN KNOB Pulse esta teclado de función para ajustar el número de controlador asignado al mando DATA. Cuando lo pulse, el número de controlador activo parpadeará en pantalla. Gire el propio mando DATA o introduzca el número de controlador (0–148) usando las teclas numéricas. Consulte en el listado de controladores continuos MIDI (CC) en p.18 un listado de los códigos y sus funciones correspondientes. Pulse la tecla ENTER para confirmar su selección. Si el número está fuera de rango, en pantalla parpadeará una “-E-” (error) durante tres segundos y la unidad volverá después al último número válido ajustado.
ASSIGN MOD Pulse esta tecla de función para ajustar el número de controlador asignado a la rueda MODULATION. Cuando la pulse, el número de controlador activo parpadeará en pantalla. Gire el mando DATA o introduzca el número de controlador (0–148) que quiera usando las teclas numéricas. Consulte en el listado de controladores continuos MIDI (CC) en p.18 un listado de los códigos y sus funciones correspondientes. Pulse la tecla ENTER para confirmar su selección. Si el número está fuera de rango, en pantalla parpadeará una “-E-” (error) durante tres segundos y la unidad volverá después al último número válido ajustado.

71
Carbon 49 · USB/MIDI Keyboard Controller
ENG
LISH
FRA
NÇA
ISD
EUTS
CHE
ESPA
ÑO
LIT
ALI
AN
O
RESET ALL Esta función ajusta todos los valores de controlador del Carbon 49 a sus valores por defecto. Cuando pulse esta tecla de función, en pantalla aparecerá inicialmente “No” (para indicarle que no quiere reiniciar todas las funciones). Si realmente quiere reiniciar todos los controladores, pulse la tecla numérica 1 o gire el mando DATA hasta que en pantalla aparezca “Yes” . Pulse la tecla ENTER para confirmar la acción y todos los controladores serán reiniciados de forma inmediata. Si pulsa la tecla ENTER mientras en pantalla aparece la indicación “No”, el reset será cancelado.
ALL NOTES OFF Esta función envía un mensaje de “todas las notas off” que le permite detener cualquier nota que se haya quedado colgada. Pulse la tecla de función ALL NOTES OFF y el teclado enviará de forma inmediata un mensaje “todas las notas off” y cualquier nota que esté sonando de forma continuada se detendrá.
DEFAULT Esta función devuelve todos los parámetros del Carbon 49 a los valores de fábrica originales. Pulse la tecla de función DEFAULT y en pantalla aparecerá inicialmente “No” (para indicarle que no quiere reiniciar todos los valores). Si realmente quiere reiniciar todos los controladores a sus valores iniciales, pulse la tecla numérica 1 o gire el mando DATA hasta que en pantalla aparezca “Yes” . Pulse la tecla ENTER para confirmar la acción y todos los controladores serán reiniciados de forma inmediata. Si pulsa la tecla ENTER mientras en pantalla aparece la indicación “No”, el reset será cancelado.
SNAPSHOT Esta función transmite todos los valores de controladores activos del fader VOLUME, mando DATA, rueda PITCH BEND, número de programa y número de canal de forma simultánea (realiza una “instantánea”) para que tenga una imagen completa de sus ajustes activos. Pulse la tecla SNAPSHOT para comprobar esos valores.
Modo de edición
Ajustes de teclado
ASSIGN PEDAL Pulse esta tecla de función para ajustar el número de controlador asignado a la entrada SUSTAIN PEDAL. El valor por defecto es CC #64. Cuando la pulse, el número de controlador activo parpadeará en pantalla. Gire el mando DATA o introduzca el número de controlador (0–148) que quiera usando las teclas numéricas. Consulte en el listado de controladores continuos MIDI (CC) en p.18 un listado de los códigos y sus funciones correspondientes. Pulse la tecla ENTER para confirmar su selección. Si el número está fuera de rango, en pantalla parpadeará una “-E-” (error) durante tres segundos y la unidad volverá después al último número válido ajustado.

72
Listado de controladores continuos MIDI (CC)0 Selección de banco1 Rueda de modulación2 Control de soplo 3 No definido4 Controlador de pie5 Tiempo de portamento6 Entrada de datos 7 Volumen de canal8 Balance9 No definido10 Panorama11 Expresión12 Control de efecto 1 13 Control de efecto 2 14 No definido15 No definido16 Uso general 117 Uso general 218 Uso general 319 Uso general 420 No definido21 No definido22 No definido23 No definido24 No definido25 No definido26 No definido27 No definido28 No definido29 No definido30 No definido31 No definido32 Selección de banco33 Rueda de modulación 34 Control de soplo 35 No definido36 Controlador de pie37 Tiempo de portamento38 Entrada de datos 39 Volumen de canal40 Balance41 No definido
42 Panorama43 Expresión44 Control de efecto 1 45 Control de efecto 2 46 No definido47 No definido48 Uso general 149 Uso general 250 Uso general 351 Uso general 452 No definido53 No definido54 No definido55 No definido56 No definido57 No definido58 No definido59 No definido60 No definido61 No definido62 No definido63 No definido64 Pedal de sustain65 Portamento on/off66 Sostenuto on/off 67 Sordina on/off68 Pedal de disparo legato69 Mantenimiento 2 70 Variación de sonido71 Intensidad timbre/armónico72 Tiempo de salida73 Tiempo de ataque74 Brillo75 Tiempo decaimiento76 Velocidad vibrato77 Profundidad vibrato78 Retardo vibrato79 Controlador de sonido80 Uso general 581 Uso general 682 Uso general 783 Uso general 8

73
Carbon 49 · USB/MIDI Keyboard Controller
ENG
LISH
FRA
NÇA
ISD
EUTS
CHE
ESPA
ÑO
LIT
ALI
AN
O
Listado de controladores continuos MIDI (CC)84 Control de portamento 85 No definido86 No definido87 No definido88 No definido89 No definido90 No definido91 Nivel de envío reverb92 Profundidad tremolo93 Nivel de envío chorus94 Profundidad celeste/desafinación95 Profundidad modulación de fase96 Entrada de datos +197 Entrada de datos -198 NRPN LSB99 NRPN MSB100 RPN LSB101 RPN MSB102 No definido103 No definido104 No definido105 No definido106 No definido107 No definido108 No definido109 No definido110 No definido111 No definido112 No definido113 No definido114 No definido115 No definido116 No definido117 No definido118 No definido119 No definido120 Todos los sonidos off121 Reset de todos los controladores122 On/off de control local123 Todas las notas off124 Modo omni off125 Modo omni on
126 Modo poly off127 Modo poly on
Mensajes RPN/NRPN128 Sensibilidad de inflexión tonal129 Afinación precisa130 Afinación amplia131 Velocidad de vibrato132 Profundidad de vibrato133 Retardo de vibrato134 Frecuencia corte filtro pasabajos135 Resonancia filtro pasabajos 136 Frecuencia corte filtro pasa-altos137 Ganancia EQ graves 138 Ganancia EQ agudos 139 Frecuencia EQ graves 140 Frecuencia EQ agudos 141 Tiempo ataque envolvente 142 Tiempo decaimiento envolvente 143 Tiempo salida envolvente
144 Presión de canal (Aftertouch)145 Cambio de programa146 Selección de canción (nº canción)
Mensajes SysEx147 Volumen master148 Balance master

74
Octava
Números de nota
C C# D D# E F F# G G# A A# B
-1 0 1 2 3 4 5 6 7 8 9 10 11
0 12 13 14 15 16 17 18 19 20 21 22 23
1 24 25 26 27 28 29 30 31 32 33 34 35
2 36 37 38 39 40 41 42 43 44 45 46 47
3 48 49 50 51 52 53 54 55 56 57 58 59
4 60 61 62 63 64 65 66 67 68 69 70 71
5 72 73 74 75 76 77 78 79 80 81 82 83
6 84 85 86 87 88 89 90 91 92 93 94 95
7 96 97 98 99 100 101 102 103 104 105 106 107
8 108 109 110 111 112 113 114 115 116 117 118 119
9 120 121 122 123 124 125 126 127
Números de notas MIDISistema de la International Organization Standardization de números de notas MIDI. La C (do) central es el número de nota MIDI 60 (C4).

75
Carbon 49 · USB/MIDI Keyboard Controller
ENG
LISH
FRA
NÇA
ISD
EUTS
CHE
ESPA
ÑO
LIT
ALI
AN
O
Especificaciones técnicasTeclado 49 teclas, sensibles a la velocidad y semi-
contrapesadas
Pantalla 3 dígitos, 7 segmentos
Controles Fader de volumen, mando de datos, botón de edición, botones de octava +/-, botones de trasposición +/-, rueda de inflexión tonal, rueda de modulación
Funciones Número de programa, reset total, canal MIDI, todas las notas off, MSB de banco, LSB de banco, curva de velocidad, valor por defecto, asignación de trasposición, asignación de fader, asignación de mando, asignación de pedal, instantánea
Entrada de pedal TRS de 6,3 mm
MIDI MIDI vía USB, MIDI OUT de 5 puntas
Alimentación Alimentación por bus USB
Accesorios Cable USB Zapatas de goma para iPad DVD de Native Instruments Komplete Elements
Dimensiones 792 x 217 x 78 mm
Peso 2.8 kgs

Apple, Mac, Mac OS, e iPad sono marchi di Apple Inc., registrati negli USA e in altri Paesi.
IOS è un marchio o un marchio registrato di Cisco negli USA e in altri Paesi, concesso in licenza d’uso.
Native Instruments, NI e Komplete Elements sono marchi o marchi registrati di Native Instruments GmbH.

Informazioni importanti sulla sicurezza
ATTENZIONE: PER RIDURRE IL PERICOLO DI SCOSSE ELETTRICHE NON RIMUOVERE LA COPERTURA SUPERIORE (O LA SEZIONE POSTERIORE). ALL’INTERNO NON CI SONO PARTI RIPARABILI DALL’UTENTE. PER LE RIPARAZIONI, RIVOLGERSI A PERSONALE QUALIFICATO.
Il simbolo del fulmine con la punta a freccia all’interno di un triangolo equilatero è da intendersi come avvertimento della presenza di voltaggio pericoloso non isolato all’interno dello chassis del prodotto, che potrebbe essere di intensità sufficiente per costituire un rischio di scosse elettriche.
Il simbolo del punto esclamativo all’interno di un triangolo equilatero segnala la presenza di importanti istruzioni operative e di manutenzione nei documenti che accompagnano il prodotto.
If you want to dispose this product, do not mix it with general household waste. There is a separate collection system for used electronic products in accordance with legislation that requires proper treatment, recovery and recycling.
Private household in the 25 member states of the EU, in Switzerland and Norway may return their used electronic products free of charge to designated collection facilities or to a retailer (if you purchase a similar new one).
For Countries not mentioned above, please contact your local authorities for a correct method of disposal.
By doing so you will ensure that your disposed product undergoes the necessary treatment, recovery and recycling and thus prevent potential negative effects on the environment and human health.
ATTENTIONRISQUE D’ÉLECTROCUTION !
NE PAS OUVRIR !
AVVERTIMENTOPER EVITARE IL RISCHIO DI INCENDI O SCOSSE ELETTRICHE. UTILIZZARE QUESTA SPINA ESCLUSIVAMENTE CON PROLUNGHE E PRESE IN CUI LE LAME POSSANO ESSERE INSERITE COMPLETAMENTE, PER EVITARE CHE RESTINO ESPOSTE. PER EVITARE IL RISCHIO DI INCENDI O SCOSSE ELETTRICHE. NON ESPORRE L’UNITÀ A PIOGGIA O UMIDITÀ. PER EVITARE IL RISCHIO DI SCOSSE ELETTRICHE, FAR COMBACIARE LA LAMA LARGA DELLA SPINA ALLO SLOT LARGO E INSERIRLA COMPLETAMENTE.

78
IndiceIntroduzione . . . . . . . . . . . . . . . . . . . . . . . . . . . . . . . . . . . . . . . . . . . 79
Caratteristiche di Carbon 49. . . . . . . . . . . . . . . . . . . . . . . . . . . . . . . . . . 80
Componenti del sistema . . . . . . . . . . . . . . . . . . . . . . . . . . . . . . . . . . . . 80
Requisiti minimi di sistema . . . . . . . . . . . . . . . . . . . . . . . . . . . . . . . . . . 80
Funzioni e controlli del pannello frontale . . . . . . . . . . . . . . . . . . . . . . . . . 81
Funzioni e controlli del pannello posteriore. . . . . . . . . . . . . . . . . . . . . . . . 82
Guida rapida . . . . . . . . . . . . . . . . . . . . . . . . . . . . . . . . . . . . . . . . . . . 83
Funzionamento di base . . . . . . . . . . . . . . . . . . . . . . . . . . . . . . . . . . . . 84
Modalità Edit . . . . . . . . . . . . . . . . . . . . . . . . . . . . . . . . . . . . . . . . . . . 86
Lista Continuous Controller (CC) MIDI . . . . . . . . . . . . . . . . . . . . . . . . . . . 90
Numeri delle note MIDI. . . . . . . . . . . . . . . . . . . . . . . . . . . . . . . . . . . . . 92
Specifiche . . . . . . . . . . . . . . . . . . . . . . . . . . . . . . . . . . . . . . . . . . . . . 93

79
Carbon 49 · USB/MIDI Keyboard Controller
ENG
LISH
FRA
NÇA
ISD
EUTS
CHE
ESPA
ÑO
LIT
ALI
AN
O
IntroduzioneGrazie per aver acquistato la tastiera controller a 49 tasti Samson Carbon 49. Potrai integrarla con la tua workstation di produzione digitale Windows o Mac. Inoltre la tastiera può essere alimentata direttamente da un Apple iPad (con un Apple iPad Camera Connection kit, non incluso) e usata per controllare varie app MIDI per iOS, come GarageBand. Carbon 49 ha una tastiera a 49 tasti semi-pesati sensibili alla velocity, un fader assegnabile, una manopola “data”, rotelle pitch bend e modulation e display LED a 3 caratteri.
È il complemento perfetto per la tua DAW o per controllare i software di strumenti virtuali. Per permetterti di iniziare subito a fare musica abbiamo incluso Komplete Elements di Native Instruments, che offre più di 1000 suoni ed effetti.
Queste pagine forniscono una descrizione dettagliata delle caratteristiche della tastiera controller Carbon 49, un tour guidato del pannello di controllo e istruzioni per il collegamento e l’uso. Troverai inclusa anche una cartolina di garanzia. Non dimenticare di compilarla e spedirla per poter ricevere supporto tecnico online e informazioni aggiornate su questo e altri prodotti Samson.
Ti raccomandiamo di annotare qui sotto il numero di serie come futuro riferimento.
Numero di serie: ____________________________________________
Data d’acquisto: __________________________________________
Trattato con la giusta cura, Carbon 49 funzionerà per molti anni senza problemi. Se la tastiera necessitasse di riparazione, prima di spedirla a Samson dovrai ottenere un numero di Autorizzazione Reso. In sua assenza, l’unità non verrà accettata. Contatta Samson al numero 1-800-3SAMSON (1-800-372-6766) per richiedere il numero di autorizzazione prima di procedere alla spedizione. Conserva l’imballaggio originale e, se possibile, utilizzalo per spedire l’unità. Se il prodotto è stato acquistato al di fuori degli Stati Uniti, contatta il tuo distributore di zona per tutti i dettagli sulla garanzia e l’assistenza. Ti invitiamo anche a visitare il nostro sito web (www.samsontech.com) per informazioni complete sulla nostra intera linea di prodotti.

80
Caratteristiche di Carbon 49
Componenti del sistema
Requisiti minimi di sistema
Il controller Samson Carbon 49 è studiato nei minimi dettagli e realizzato con tecnologie all’avanguardia. Alcune delle sue caratteristiche comprendono:
• Tastiera semi-pesata a 49 tasti sensibili alla velocity.
• Encoder Data e fader Volume assegnabili.
• Rotelle Pitch Bend e Modulation assegnabili.
• Display a 3 caratteri / 7 segmenti per feedback in tempo reale.
• Pulsanti dedicati per ottava su/giù.
• Pulsanti Transpose su/giù assegnabili a Program e canale MIDI su/giù.
• Pulsante Edit per regolare fino a 14 parametri MIDI e di controllo.
• Ingresso per pedale Sustain.
• Connessione USB per alimentazione e MIDI.
• Porta MIDI Out a 5 pin per il collegamento di dispositivi esterni standard MIDI.
• Alloggiamento per iPad integrato.
• Software Komplete Elements di Native Instruments incluso.
• Tastiera USB Samson Carbon 49
• Cavo USB
• Due piedini adattatori in gomma per iPad
• DVD di installazione Komplete Elements di Native Instruments
• Manuale utente di Carbon 49
Windows (PC)
• Windows XP/Vista/Win7
• 800 MHz o superiore, almeno 256 MB di RAM, porta USB
Mac OS
• Mac OS X 10.4.9 o successivo
• 733 MHz o superiore, almeno 512 MB di RAM, porta USB
Apple iPad
• iOS v4.2 o successiva
Inoltre ti consigliamo di verificare i requisiti minimi di sistema del software che intendi usare con Carbon 49, perché potrebbero essere superiori a quelli specificati sopra.

81
Carbon 49 · USB/MIDI Keyboard Controller
ENG
LISH
FRA
NÇA
ISD
EUTS
CHE
ESPA
ÑO
LIT
ALI
AN
O
4 5
67
8 9
10
321
1234
Funzioni e controlli del pannello frontale
1. Display LED - 3x7 segmenti, mostra i dati del controller in tempo reale in modalità Performance, e i parametri regolabili in modalità Edit.
2. Fader VOLUME - Questo fader è impostato dalla fabbrica per inviare messaggi di volume MIDI (CC #7). Può essere assegnato al controllo di parametri MIDI diversi in modalità Edit (vedi pag. 14 per maggiori dettagli).
3. Manopola DATA - Questo encoder di tipo endless è impostato dalla fabbrica per inviare messaggi MIDI pan (CC #10). Può essere assegnato al controllo di parametri MIDI diversi in modalità Edit (vedi pag. 14 per maggiori dettagli).
4. Pulsante EDIT - Premi questo pulsante per attivare la modalità Edit, da cui puoi regolare i parametri della tastiera (vedi pag. 14 per maggiori dettagli).
5. Alloggiamento iPad - Posiziona qui un iPad, in orizzontale. Usa i piedini di gomma inclusi per bloccare l’iPad (vedi pag. 11 per maggiori dettagli).
6. Pulsanti OCTAVE +/– - Premi i pulsanti OCTAVE per aumentare l’estensione della tastiera, spostando fino a 4 ottave su o giù. Ogni volta che premi un pulsante OCTAVE, l’estensione della tastiera si sposta su o giù di 12 note.
7. Pulsanti TRANSPOSE +/– - Premi i pulsanti TRANSPOSE per spostare l’estensione della tastiera su o giù fino a 12 semitoni. Possono anche essere assegnati per inviare messaggi Program MIDI e canale MIDI (vedi pag. 14 per maggiori dettagli).
8. Rotella PITCH BEND - Usa questa rotella per aumentare o diminuire l’intonazione delle note suonate sulla tastiera.
9. Rotella MODULATION - Questa rotella è solitamente usata per aggiungere modulazione (CC #1) al suono. Può essere assegnata per inviare parametri MIDI diversi in modalità Edit (vedi pag. 14 per maggiori dettagli).
10. Tasti funzione - In modalità Edit i primi 25 tasti della tastiera sono assegnati a funzioni e numeri da 0 a 9 (vedi pag. 14 per maggiori dettagli).

82
4 5
67
8 9
10
321
1234
Funzioni e controlli del pannello posteriore
1. Interruttore POWER - Spostalo per accendere o spegnere l’unità.
2. Collegamento USB - Collega un cavo USB standard da questa porta a quella sul computer o iPad per alimentare la tastiera e per trasmettere e ricevere dati MIDI.
3. MIDI OUT - Usa un cavo MIDI a 5 pin per collegare Carbon 49 a un dispositivo MIDI esterno.
4. Ingresso per pedale SUSTAIN - Collega qui un pedale di espressione o sustain con connessione da 6,3 mm. Questo ingresso è impostato dalla fabbrica per inviare messaggi MIDI sustain (CC #64). Può essere assegnato per l’invio di parametri MIDI diversi in modalità Edit (vedi pag. 14 per maggiori dettagli).

83
Carbon 49 · USB/MIDI Keyboard Controller
ENG
LISH
FRA
NÇA
ISD
EUTS
CHE
ESPA
ÑO
LIT
ALI
AN
O
Guida rapida
1. Collega Carbon 49 al tuo computer o iPad tramite il cavo USB fornito. L’unità verrà alimentata e trasmetterà dati MIDI attraverso la connessione USB. Sposta l’interruttore POWER verso sinistra per accendere la tastiera.
Nota: per collegare direttamente un iPad, dovrai usare l’Apple iPad Camera Connection Kit (non incluso).
2. Apri la tua DAW o il software virtual instrument e imposta Carbon 49 come dispositivo di ingresso MIDI.
3. Per usare Carbon 49 con un dispositivo MIDI esterno (ad esempio un modulo sonoro) collega un cavo MIDI a 5 pin alla porta MIDI OUT sul retro del Carbon 49 e alla porta MIDI IN del dispositivo esterno.
On Off
3 4 5
67
8 9
10
1 2
3 41 2
On Off
3 4 5
67
8 9
10
1 2
3 41 2
L’alloggiamento per iPad di Carbon 49 è progettato per ospitare un iPad originale o un iPad 2. Per fissare il tuo iPad abbiamo incluso due piedini adattatori gommati. Gli adattatori si trovano sul fondo del Carbon 49.
Collegare un iPad
Inserisci i piedini di gomma negli angoli destro e sinistro dell’alloggiamento per iPad come mostrato qui sopra. Quindi inserisci l’iPad nei piedini di gomma. Collega l’Apple iPad Camera Connection Kit all’iPad, e collega l’iPad alla tastiera tramite il cavo USB incluso.

84
Funzionamento di base
Carbon 49 ha due modalità operative: Performance e Edit.
Modalità Performance - In questa modalità i 49 tasti sensibili alla velocity inviano informazioni relative a note e velocity tramite l’uscita USB o MIDI. I controlli assegnabili, le rotelle pitch bend e modulation trasmettono tutti informazioni di controlli continui.
Modalità Edit - In questa modalità, utilizza i primi 25 tasti per accedere alle funzioni e inserire numeri (0-9). Il resto della tastiera trasmetterà informazioni su note e velocity. Questa modalità si attiva premendo il pulsante EDIT. Per maggiori dettagli vai alla sezione Modalità Edit (pag. 14). Nota: il canale preimpostato per trasmettere le informazioni di controllo è il canale 1.
Modalità
Parametri di esecuzioneIn modalità Edit puoi assegnare la tastiera per trasmettere su un altro canale MIDI.
Pulsanti OCTAVEI pulsanti OCTAVE aumentano l’estensione della tastiera, spostandola in su o in giù di 12 note per volta. Usali per spostare l’ottava su o giù fino a un massimo di 4 ottave. Mentre li premi, il valore dello spostamento compare sul display. Il valore iniziale è 0.
Ogni volta che lo premi, il pulsante OCTAVE “-” sposta la tastiera in giù di un’ottava e diventa rosso quando l’estensione della tastiera è sotto al valore 0.
Ogni volta che lo premi, il pulsante OCTAVE “+” sposta la tastiera in su di un’ottava e diventa rosso quando l’estensione della tastiera è sopra al valore 0.
Premi i pulsanti OCTAVE insieme per reimpostare l’estensione della tastiera su 0.
Pulsanti TRANSPOSEI pulsanti TRANSPOSE spostano l’estensione della tastiera su o giù di un semitono (mezzo step). Usali per trasportare le note su o giù fino a un massimo di 12 semitoni. Quando li premi, il valore dello spostamento compare sul display. Il valore iniziale è 0.
Ogni volta che lo premi, il pulsante TRANSPOSE “-” sposta la tastiera in giù di un semitono e diventa rosso quando l’estensione della tastiera è sotto al valore 0.
Ogni volta che lo premi, il pulsante TRANSPOSE “+” sposta la tastiera in su di un semitono e diventa rosso quando l’estensione della tastiera è sopra al valore 0.
Puoi impostare i pulsanti TRANSPOSE per inviare informazioni Program +/- o canale MIDI +/-. Per maggiori dettagli vai alla sezione Modalità Edit (pag. 14).
Rotella MODULATIONLa rotella MODULATION è usata solitamente per aggiungere l’effetto vibrato alle note che stai suonando. L’intervallo di dati della MODULATION wheel va da 0 a 127. Il numero di controller MIDI preimpostato è CC #1. In modalità Edit puoi assegnare alla rotella MODULATION un altro numero di controller. Per maggiori dettagli vai alla sezione Modalità Edit (pag. 14).

85
Carbon 49 · USB/MIDI Keyboard Controller
ENG
LISH
FRA
NÇA
ISD
EUTS
CHE
ESPA
ÑO
LIT
ALI
AN
O
Fader VOLUMEIl fader VOLUME invia informazioni MIDI per controllare l’esecuzione del dispositivo MIDI collegato alla tastiera. È impostato in fabbrica per controllare il volume del canale, ma in modalità Edit puoi assegnarlo al controllo di un altro parametro. Per maggiori dettagli vai alla sezione Modalità Edit (pag. 14).
Manopola DATALa manopola DATA invia informazioni MIDI per controllare l’esecuzione del dispositivo MIDI collegato alla tastiera. La manopola è impostata dal produttore per controllare il pan del canale, ma in modalità Edit puoi assegnarla al controllo di un altro parametro. Per maggiori dettagli vai alla sezione Modalità Edit (pag. 14).
Rotella PITCH BENDLa rotella PITCH BEND viene usata per alzare o abbassare (“bending”) l’intonazione delle note suonate sulla tastiera. La risposta e l’estensione di questo controllo si basano sul preset o sulla sorgente sonora che stai controllando. La rotella pitch bend ha un montaggio a molla: se rilasciata, tornerà in posizione centrale.
Ingresso per pedale SUSTAINPuoi collegare temporaneamente un interruttore a pedale o un pedale damper all’ingresso SUSTAIN sul retro. L’impostazione iniziale per l’ingresso del pedale è sustain (CC #64). In modalità Edit puoi assegnare un’altra funzione a questo ingresso. Per maggiori dettagli vai alla sezione Modalità Edit (pag. 14).
All’accensione la tastiera determina la polarità del pedale collegato. Per invertire la polarità del pedale premilo mentre accendi la tastiera.
Funzionamento di base

86
In modalità Edit puoi accedere ai parametri del Carbon 49 e modificarli secondo le tue esigenze. Per attivare la modalità Edit premi il pulsante EDIT sul pannello superiore della tastiera. Il pulsante diventerà rosso e il display mostrerà la scritta “Set” a indicare che sei in modalità Edit. In questa modalità i primi 25 tasti diventano tasti numerici e di funzione, e non trasmettono nessuna nota. Gli ultimi 24 tasti continuano a trasmettere note, per consentirti di verificare in tempo reale l’effetto dei tuoi cambiamenti sulla performance. Il fader VOLUME e le rotelle PITCH e MODULATION continueranno a funzionare normalmente, ma i loro valori non compariranno sul display. Per uscire dalla modalità Edit e tornare in modalità Performance premi di nuovo il pulsante EDIT. Una volta in modalità Performance il pulsante non sarà più illuminato in rosso.
Modalità Edit
Funzioni MIDIPROG (Program Change) Quando premuto, il numero di program attuale lampeggia sul display. Per cambiare il program, ruota la manopola DATA o inserisci il nuovo numero di program tramite i tasti numerici (0–9). Puoi inserire un numero nell’intervallo da 0 a 127. Dopo aver inserito il numero premi il pulsante ENTER. Carbon 49 trasmetterà il messaggio program change e il display smetterà di lampeggiare. Se il numero inserito è fuori dall’intervallo disponibile, il display mostrerà per tre secondi “-E-” (errore), e poi tornerà all’ultimo numero di program impostato (non verrà trasmessa alcuna informazione).
CHANNEL (canale MIDI) Quando premuto, il numero di canale MIDI attuale lampeggia sul display. Per cambiare il canale MIDI su cui il Carbon 49 sta trasmettendo, ruota la manopola DATA o inserisci il nuovo numero di canale tramite i tasti numerici. Puoi inserire un numero nell’intervallo da 1 a 16. Una volta inserito il numero di canale premi il pulsante ENTER. Carbon 49 sarà impostato per trasmettere sul nuovo canale e il display smetterà di lampeggiare. Se il numero inserito è fuori dall’intervallo disponibile, il display mostrerà per tre secondi “-E-” (errore), e poi tornerà all’ultimo numero di canale impostato.

87
Carbon 49 · USB/MIDI Keyboard Controller
ENG
LISH
FRA
NÇA
ISD
EUTS
CHE
ESPA
ÑO
LIT
ALI
AN
O
Modalità Edit
Assegnazione dei controller
BANK MSB e LSB Per memorizzare più di 128 patch, i dispositivi di solito li organizzano in diversi banchi. Per accedere ai diversi banchi, il protocollo MIDI richiede un’identificazione composta da due messaggi MIDI: Most Significant Byte (MSB) e Least Significant Byte (LSB). Questi due messaggi, insieme a un comando program change, ti consentono di selezionare un banco e un patch al suo interno. Consulta il manuale del tuo dispositivo per una lista dei messaggi MSB e LSB relativi ai diversi banchi. Per impostare i comandi BANK MSB o BANK LSB premi i relativi tasti funzione, e i dati MSB o LSB attuali lampeggeranno sul display. Ruota la manopola DATA o inserisci il numero MSN o LSB desiderato e premi ENTER. Puoi inserire un numero nell’intervallo da 1 a 127. Carbon 49 trasmetterà il nuovo MSB o LSB al tuo dispositivo. Se il numero inserito è fuori dall’intervallo disponibile, sul display lampeggerà “-E-” (errore) per tre secondi, e poi tornerà all’ultimo numero impostato. Nota: per richiamare un nuovo patch, un messaggio di bank change deve essere seguito da uno di program change.
CURVA DELLA VELOCITY La curva della velocity è il modo in cui la tastiera interpreta la velocità con cui è premuto un particolare tasto e il relativo numero di velocity MIDI da trasmettere. Carbon 49 dispone di quattro diverse curve utilizzabili (da 1 a 4, descritte di seguito). Per cambiare la curva della velocity premi il tasto assegnato a VELOCITY CURVE. La selezione attuale lampeggerà sul display. Ruota la manopola DATA o usa i tasti numerici per selezionare una curva. Premi ENTER per confermare la selezione: la tastiera sarà impostata per rispondere con la nuova curva di velocity. Se scegli un numero fuori dall’intervallo disponibile, sul display lampeggerà “-E-” (errore) per tre secondi, e poi tornerà all’ultimo numero di velocity impostato. Curve di velocity disponibili
N. Tipo Descrizione
1 Normal Curva di tipo lineare - Default
2 Soft Trasmissione di una velocity (e del relativo volume) più bassa.
3 Hard Trasmissione di una velocity (e del relativo volume) più alta.
4 Fixed La velocity delle note è fissata a 127. 1 - Normal 2 - Soft 3 - Hard 4 - Fixed

88
Modalità EditASSIGN TRANS Premi il tasto ASSIGN TRANS per cambiare la funzione controllata dai pulsanti TRANSPOSE “+” e “-”. Possono essere assegnati tre parametri: 1 - Transpose 2 - Program Change 3 - Canale MIDI Quando premuto, il numero della funzione attuale lampeggerà sul display. Ruota la manopola DATA o inserisci il codice del controllo con i tasti numerici. Premi il pulsante ENTER per confermare la selezione. Se il numero inserito è fuori dall’intervallo, sul display lampeggerà “-E-” (errore) per tre secondi, e poi tornerà all’ultimo numero di funzione impostato. Nota: quando il pulsante TRANSPOSE è impostato su 2 (program change) o 3 (canale MIDI), gli indicatori non funzioneranno. Inoltre, se impostato su 2 (program change), il pulsante TRANSPOSE ha una funzione di accelerazione (quando è tenuto premuto, il numero cambia rapidamente in modo che tu possa impostare numeri alti più velocemente).
ASSIGN FADER Premi il tasto funzione ASSIGN FADER per modificare il numero di controller assegnato al fader VOLUME. Quando premuto, il numero di controller corrente lampeggerà sul display. Ruota la manopola DATA o inserisci il numero di controller (0–148) con i tasti numerici. Fai riferimento alla lista dei MIDI Continuous Controller (CC) a pag. 18 per un elenco dei codici e delle relative funzioni. Premi il pulsante ENTER per confermare la selezione. Se il numero inserito è fuori dall’intervallo, sul display lampeggerà “-E-” (errore) per tre secondi, prima di tornare all’ultimo numero CC impostato.
ASSIGN KNOB Premi il tasto funzione ASSIGN KNOB per modificare il numero di controller assegnato alla manopola DATA. Quando premuto, il numero di controller corrente lampeggerà sul display. Ruota la manopola DATA o inserisci il numero di controller (0–148) con i tasti numerici. Fai riferimento alla lista dei MIDI Continuous Controller (CC) a pag. 18 per un elenco dei codici e delle relative funzioni. Premi il pulsante ENTER per confermare la selezione. Se il numero inserito è fuori dall’intervallo, sul display lampeggerà “-E-” (errore) per tre secondi, prima di tornare all’ultimo numero CC impostato.
ASSIGN MOD Premi il tasto funzione ASSIGN MOD per modificare il numero di controller assegnato alla rotella MODULATION. Quando premuto, il numero di controller corrente lampeggerà sul display. Ruota la manopola DATA o inserisci il numero di controller (0–148) con i tasti numerici. Fai riferimento alla lista dei MIDI Continuous Controller (CC) a pag. 18 per un elenco dei codici e delle relative funzioni. Premi il pulsante ENTER per confermare la selezione. Se il numero inserito è fuori dall’intervallo, sul display lampeggerà “-E-” (errore) per tre secondi, prima di tornare all’ultimo numero CC impostato.

89
Carbon 49 · USB/MIDI Keyboard Controller
ENG
LISH
FRA
NÇA
ISD
EUTS
CHE
ESPA
ÑO
LIT
ALI
AN
O
RESET ALL La funzione RESET ALL imposta tutti i i controller di Carbon 49 ai loro valori iniziali. Quando premi il tasto funzione RESET ALL il display mostrerà inizialmente “No” (per indicare la decisione di non voler resettare tutte le funzioni). Se vuoi veramente resettare tutti i controller, premi il tasto numerico 1 o ruota la manopola DATA finché “Yes” appare sul display. Premi il pulsante ENTER per confermare: tutti i controller saranno resettati all’istante. Se premi ENTER mentre il display mostra “No”, il reset verrà annullato.
ALL NOTES OFF La funzione ALL NOTES OFF invia un messaggio “all notes off” per fermare qualsiasi nota inceppata. Premi il tasto funzione ALL NOTES OFF e la tastiera invierà immediatamente il messaggio “all notes off”: ogni nota sostenuta dovrebbe fermarsi.
DEFAULT La funzione DEFAULT fa tornare tutti i parametri del Carbon 49 alle impostazioni di fabbrica originali. Se premi il tasto funzione DEFAULT il display mostrerà “No” (a indicare la decisione di non voler riportare tutte le funzioni alle impostazioni iniziali). Se vuoi veramente resettare tutti i controller alle impostazioni di fabbrica, premi il tasto numerico 1 o ruota la manopola DATA finché “Yes” appare sul display. Premi il pulsante ENTER per confermare: tutti i controller saranno resettati all’istante. Se premi ENTER mentre il display mostra “No”, il reset verrà annullato.
SNAPSHOT La funzione SNAPSHOT trasmette tutti i valori attuali dei controller fader VOLUME, manopola DATA, rotella PITCH BEND, numero program e numero di canale in una volta sola, per darti una panoramica sulle impostazioni attuali. Premi il tasto SNAPSHOT per vedere questi valori.
Modalità Edit
Impostazioni della tastiera
ASSIGN PEDAL Premi il tasto funzione ASSIGN PEDAL per modificare il numero di controller assegnato all’ingresso SUSTAIN PEDAL. Il valore iniziale è CC #64. Quando premuto, il numero di controller corrente lampeggerà sul display. Ruota la manopola DATA o inserisci il numero di controller (0–148) con i tasti numerici. Fai riferimento alla lista dei MIDI Continuous Controller (CC) a pag. 18 per un elenco dei codici e delle relative funzioni. Premi il pulsante ENTER per confermare la selezione. Se il numero inserito è fuori dall’intervallo, sul display lampeggerà “-E-” (errore) per tre secondi, prima di tornare all’ultimo numero CC impostato.

90
Lista Continuous Controller (CC) MIDI0 Selezione banco1 Rotella Modulation2 Controllo Breath 3 Non definito4 Controllo pedale5 Tempo Portamento6 Immissione dati 7 Volume canale8 Bilanciamento9 Non definito10 Pan11 Espressione12 Controllo effetto 1 13 Controllo effetto 2 14 Non definito15 Non definito16 Uso generico #117 Uso generico #218 Uso generico #319 Uso generico #420 Non definito21 Non definito22 Non definito23 Non definito24 Non definito25 Non definito26 Non definito27 Non definito28 Non definito29 Non definito30 Non definito31 Non definito32 Selezione banco33 Rotella Modulation 34 Controllo Breath 35 Non definito36 Controllo pedale37 Tempo Portamento38 Immissione dati 39 Volume canale40 Bilanciamento41 Non definito
42 Pan43 Espressione44 Controllo effetto 1 45 Controllo effetto 2 46 Non definito47 Non definito48 Uso generico #149 Uso generico #250 Uso generico #351 Uso generico #452 Non definito53 Non definito54 Non definito55 Non definito56 Non definito57 Non definito58 Non definito59 Non definito60 Non definito61 Non definito62 Non definito63 Non definito64 Pedale Sustain65 Portamento on/off66 Sostenuto on/off 67 Pedale soft on/off68 Interruttore a pedale Legato69 Hold 2 70 Variazione suono71 Intensità timbro/armonica72 Tempo di rilascio73 Tempo di attacco74 Luminosità75 Tempo di decadimento76 Frequenza Vibrato77 Profondità Vibrato78 Ritardo Vibrato79 Cont. suono80 Uso generico #581 Uso generico #682 Uso generico #783 Uso generico #8

91
Carbon 49 · USB/MIDI Keyboard Controller
ENG
LISH
FRA
NÇA
ISD
EUTS
CHE
ESPA
ÑO
LIT
ALI
AN
O
Lista Continuous Controller (CC) MIDI84 Controllo Portamento 85 Non definito86 Non definito87 Non definito88 Non definito89 Non definito90 Non definito91 Livello mandata riverbero92 Profondità Tremolo93 Livello mandata Chorus94 Profondità Detune/Celeste95 Profondità phaser96 Immissione dati +197 Immissione dati -198 NRPN LSB99 NRPN MSB100 RPN LSB101 RPN MSB102 Non definito103 Non definito104 Non definito105 Non definito106 Non definito107 Non definito108 Non definito109 Non definito110 Non definito111 Non definito112 Non definito113 Non definito114 Non definito115 Non definito116 Non definito117 Non definito118 Non definito119 Non definito120 Tutti i suoni off121 Ripristina tutti i controlli122 Controllo locale on/off 123 Tutte le note off124 Modalità Omni off125 Modalità Omni on
126 Modalità Poly off127 Modalità Poly on
Messaggi RPN/NRPN128 Sensibilità Pitch Bend129 Fine Tuning130 Coarse Tuning131 Frequenza Vibrato132 Profondità Vibrato133 Ritardo Vibrato134 Frequenza cutoff filtro passa-basso135 Risonanza filtro passa-basso 136 Frequenza cutoff filtro passa-alto137 Guadagno equalizzatore bassi 138 Guadagno equalizzatore alti 139 Frequenza equalizzatore bassi 140 Frequenza equalizzatore alti 141 Tempo di attacco EG 142 Tempo di decadimento EG 143 Tempo di rilascio EG
144 Pressione canale (Aftertouch)145 Program Change146 Selezione brano(brano #)
Messaggi SysEx147 Volume Master148 Bilanciamento Master

92
Ottava
Numeri delle note
C C# D D# E F F# G G# A A# B
-1 0 1 2 3 4 5 6 7 8 9 10 11
0 12 13 14 15 16 17 18 19 20 21 22 23
1 24 25 26 27 28 29 30 31 32 33 34 35
2 36 37 38 39 40 41 42 43 44 45 46 47
3 48 49 50 51 52 53 54 55 56 57 58 59
4 60 61 62 63 64 65 66 67 68 69 70 71
5 72 73 74 75 76 77 78 79 80 81 82 83
6 84 85 86 87 88 89 90 91 92 93 94 95
7 96 97 98 99 100 101 102 103 104 105 106 107
8 108 109 110 111 112 113 114 115 116 117 118 119
9 120 121 122 123 124 125 126 127
Numeri delle note MIDIQuesta tabella mostra i numeri delle note MIDI secondo lo standard ISO. Il Do centrale (C centrale) è il numero di nota MIDI 60 (C4).

93
Carbon 49 · USB/MIDI Keyboard Controller
ENG
LISH
FRA
NÇA
ISD
EUTS
CHE
ESPA
ÑO
LIT
ALI
AN
O
SpecificheTastiera 49 tasti, semi-pesata, sensibile alla velocity
Display 3 caratteri, 7 segmenti
Controlli Fader Volume, manopola Data, pulsante Edit, pulsanti Octave +/-, pulsanti Transpose +/-, rotella Pitch Bend, rotella Modulation
Funzioni Program Number, Reset All, MIDI Channel, All Notes Off, Bank MSB, Bank LSB, Velocity Curve, Default, Assign Trans, Assign Fader, Assign Knob, Assign Mod, Assign Pedal, Snapshot
Ingresso pedale TRS da 6,3 mm
MIDI MIDI su USB, MIDI OUT a 5 pin
Alimentazione Tramite bus USB
Accessori Cavo USB Piedini in gomma per iPad DVD Native Instruments Komplete Elements
Dimensioni 792 mm x 217 mm x 78 mm
Peso 2,8 kg


Samson Technologies45 Gilpin Avenue
Hauppauge, New York 11788-8816Phone: 1-800-3-SAMSON (1-800-372-6766)
Fax: 631-784-2201 www.samsontech.com