owner’s manual air-to-water
TRANSCRIPT

www.lg.comMFL67086810Rev.04_021020
Please read this manual carefully before operating your set and retain it for future reference.
OWNER’S MANUAL
AIR-TO-WATERHEAT PUMP
[Representative] LG Electronics Inc. EU Representative : LG Electronics European Shared Service Center B.V. Krijgsman 1, 1186 DM Amstelveen, The Netherlands
[Manufacturer] LG Electronics Inc. Changwon 2nd factory 84, Wanam-ro, Seong-san-gu, Changwon-si, Gyeongsangnam-do, KOREA
Original instruction
Hydro Kit (For Medium Temperature)
Copyright © 2018 - 2020 LG Electronics Inc. All Rights Reserved.
ENG
LISH
РУССКИЙ ЯЗЫК
ITALIA
NO
ESP
AÑ
OL
FRAN
ÇAIS
DEU
TSC
HΕΛΛΗΝΙΚΆ
ČEŠ
TINA
NEDERLANDSP
OLS
KI
LIMBA ROMÂNĂ

Table of contents
2 Hydro Kit
3 SAFETY INSTRUCTIONS
8 PRODUCT INTRODUCTION8 Typical Installation Scene
9 Remote Controller
10 OPERATION SETTING10 Operation mode
10 AI / Auto operation
12 TEMPERATURE SETTING13 DHW Heating Operation
14 View Temperature
15 LOW NOISE MODE
17 WI-FI PAIRING
19 DEFROST MODE
21 LOCK SETTING21 Lock setting – all, on/off, mode, DHW lock
23 DATE SETTING
24 TIMER SETTING25 Simple timer
26 Turn-off Reservation
27 Turn-on Reservation
28 SCHEDULE SETTING28 How to enter schedule
28 Daily Schedule
29 Schedules & Edit
29 Schedules & Edit – Add schedule
29 Exception day
29 DHW Tank Heating & DHW Tank Heater Operation
30 USING THERMOSTAT30 How to use Thermostat
31 Emergency Operation
33 MAINTENANCE AND SERVICE33 Maintenance activities
33 When the unit is not going....
33 Call the service immediately in the following situations
34 Operational instructions
35 Troubleshooting Tips! Save time and money!
TABLE OF CONTENTS

Safety Instructions
Owner’s Manual 3Hydro Kit
ENG
LISH
Safety Instructions
• Always ground the product.- There is a risk of electric shock.
• Do not use a defective or underrated circuit breaker. Use this applianceon a dedicated circuit.- There is risk of fire or electric shock.
• Do not use a multi outlet. Always use this appliance on a dedicatedcircuit and breaker.- It can cause electric shock or fire.
• For electrical work, contact the dealer, seller, a qualified electrician, oran Authorized Service Center. Do not disassemble or repair theproduct by yourself.- There is risk of fire or electric shock.
• Always ground the product as per the wiring diagram. Do not connectthe ground wire to gas or water pipes lightening rod or telephoneground wire.- There is risk of fire or electric shock.
WARNING!
The following safety guidelines are intended to prevent unforeseenrisks or damage from unsafe or incorrect operation of the appliance.The guidelines are separated into ‘WARNING’ and ‘CAUTION’ asdescribed below.
WARNINGThis indicates that the failure to follow the instructions can causeserious injury or death.
CAUTIONThis indicates that the failure to follow the instructions can causethe minor injury or damage to the product.
!
!
This symbol is displayed to indicate matters and operationsthat can cause risk. Read the part with this symbol carefully and follow theinstructions in order to avoid risk.
!

4 Hydro Kit
Safety Instructions
• Install the panel and the cover of control box securely. - There is risk of fire or electric shock due to dust , water etc.
• Use the correctly rated breaker or fuse. - There is risk of fire or electric shock.
• Do not modify or extend the power cable. If the power cable or cordhas scratches or skin peeled off or deteriorated then it must bereplaced.- There is risk of fire or electric shock.
• For installation, removal or reinstallation , always contact the dealer oran Authorized Service Center.- There is risk of fire, electric shock, explosion, or injury.
• Do not install the product on a defective installation stand. Be sure thatthe installation area does not deteriorate with age. - It may cause product to fall.
• Never install the outdoor unit on a moving base or a place from whereit can fall down.- The falling outdoor unit can cause damage or injury or even death of
a person.• When the product is soaked (flooded or submerged) in water, contact
an Authorized Service Center for repair before using it again.- There is risk of fire or electric shock.
• Be sure to check the refrigerant to be used. Please read the label onthe product.- Incorrect refrigerant can prevent the normal operation of the unit.
• Don't use a power cord, a plug or a loose socket which is damaged.- Otherwise it may cause a fire or electrical shock.
• Do not touch , operate, or repair the product with wet hands. - There is risk of electric shock or fire.
• Do not place a heater or other heating appliances near the powercable.- There is risk of fire and electric shock.
• Do not allow water to run into electric parts. Install the unit away fromwater sources.- There is risk of fire, failure of the product, or electric shock.
• Do not store or use or even allow flammable gas or combustibles nearthe product. - There is risk of fire.

Owner’s Manual 5Hydro Kit
Safety InstructionsEN
GLIS
H
• Indoor/outdoor wiring connections must be secured tightly and thecable should be routed properly so that there is no force pulling thecable from the connection terminals.- Improper or loose connections can cause heat generation or fire.
• Safely dispose off the packing materials. Like screws, nails, batteries,broken things etc after installation or service and then tear away andthrow away the plastic packaging bags.
- Children may play with them and cause injury.• Make sure to check that the power device is not dirty, loose or broken
and then Turn on the power. - Dirty, loose or broken power device can cause electric shock or fire.
• In outdoor unit the step-up capacitor supplies high voltage electricity tothe electrical components. Be sure to discharge the capacitorcompletely before conducting the repair work.- An charged capacitor can cause electrical shock.
• When installing the unit, use the installation kit provided with theproduct.- Otherwise the unit may fall and cause severe injury.
• Be sure to use only those parts which are listed in the service parts list.Never attempt to modify the equipment. - The use of inappropriate parts can cause an electrical shock,
excessive heat generation or fire.• Do not use the product in a tightly closed space for a long time.
Perform ventilation regularly.- Oxygen deficiency could occur and hence harm your health.
• Do not open the front cover or grille of the product during operation.(Do not touch the electrostatic filter, if the unit is so equipped.) - There is risk of physical injury, electric shock, or product failure.
• If strange sounds, smell or smoke comes from product, immediatelyturn the breaker off or disconnect the power supply cable.- There is risk of electric shock or fire.
• Ventilate the product room from time to time when operating it togetherwith a stove, or heating element etc.- Oxygen deficiency can occur and hence harm your health.
• Turn the main power off when cleaning or repairing the product.- There is risk of electric shock.
• Take care to ensure that nobody especially kids could step on or fallonto the outdoor unit. - This could result in personal injury and product damage.

Safety Instructions
6 Hydro Kit
• Take care to ensure that power cable could not be pulled out ordamaged during operation.- There is risk of fire or electric shock.
• Do not place anything on the power cable.- There is risk of fire or electric shock.• When flammable gas leaks, turn off the gas and open a window for
ventilation before turning the product on. - Do not use the telephone or turn switches on or off. There is risk of
explosion or fire.
• Two or more people must lift and transport the product. - Avoid personal injury.
• Do not install the product where it will be exposed to sea wind (saltspray) directly.- It may cause corrosion on the product.
• Keep level even when installing the product.- To avoid vibration or noise.
• Do not install the product where the noise or hot air from the outdoorunit could damage or disturb the neighborhoods.- It may cause a problem for your neighbors and hence dispute.
• Always check for gas (refrigerant) leakage after installation or repair ofproduct.- Low refrigerant levels may cause failure of product.
• Do not use the product for special purposes, such as preserving foods,It is not a precision refrigeration system. - There is risk of damage or loss of property.
• Do not block the inlet or outlet of air flow.- It may cause product failure.
• Use a soft cloth to clean. Do not use harsh detergents, solvents orsplashing water etc . - There is risk of fire, electric shock, or damage to the plastic parts of
the product.• Do not step on or put anything on the product. (outdoor units)
- There is risk of personal injury and failure of product.
CAUTION!

Safety Instructions
Owner’s Manual 7Hydro Kit
ENG
LISH
• Do not insert hands or other objects through the air inlet or outlet whilethe product is operating.- There are sharp and moving parts that could cause personal injury.
• Be cautious when unpacking and installing the product.- Sharp edges could cause injury.
• If the refrigerant gas leaks during the repair, do not touch the leakingrefrigerant gas.- The refrigerant gas can cause frostbite (cold burn)
• Do not tilt the unit when removing or uninstalling it.- The condensed water inside can spill.
• If the refrigerant gas leaks during the installation, ventilate the areaimmediately.- Otherwise it can be harmfull for your health.
• Dismantling the unit, treatment of the refrigerant oil and eventual partsshould be done in accordance with local and national standards.
• Do not expose your skin or kids or plants to the cool or hot air draft.- This could harm to your health.
• Use a firm stool or ladder when cleaning, maintaining or repairing theproduct at an height.- Be careful and avoid personal injury.
• This appliance can be used by children aged from 8 years and aboveand persons with reduced physical, sensory or mental capabilities orlack of experience and knowledge if they have been given supervisionor instruction concerning use of the appliance in a safe way andunderstand the hazards involved. Children shall not play with theappliance. Cleaning and user maintenance shall not be made bychildren without supervision.
• Children should be supervised to ensure that they do not play with theappliance.
• If anyone other than a licensed professional installs, repairs, or altersLG Electronics air conditioning products, the warranty is voided.- All costs associated with repair are then the full responsibility of the
owner.

Product Introduction
Typical Installation Scene
Water Out
Gas side
Liquid side
Drain
Water In
Water OutCommunicationCablePower CableGas SideLiquid SideWater In
Water Out
CommunicationCable
Power Cable
Gas Side
Liquid Side
Water In
CAUTIONUse of power supply separate power for the indoor unit. (Do not connect and usefrom the power terminal of the outdoor unit.)
!
8 Hydro Kit
<Type 1>
<Type 2>
Product Introduction

Remote Controller
Owner’s Manual 9Hydro Kit
Product IntroductionEN
GLIS
H
OK On/Off Button
Down Button
Up Button
Right Button
Back button
Left button
OK Button
Operation display window
50
Operation display window Operation and Settings status display
Back button When you move to the previous stage from the menu’ssetting stage
Up/down/left/right button When you change the menu’s setting value
OK button When you save the menu’s setting value
On/Off button When you turn ON/OFF the air conditioner

Operation Setting
10 Hydro Kit
You can easily control the desired operation mode.In the main screen, press [<, > (left/right)] button to select the operation mode or home leave or holdcategory, and press [∧ , ∨ (up/down)] button to set the operation mode.※ Some products may not support some operation modes.
This mode is only applied to heating.In order to save energy and to give highest comfort, setting temperature will follow outsidetemperature. If outdoor temperature decreases, heating capacity for the house will increaseautomatically in order to keep same room temperature. All parameters will be set by installer duringstart-up procedure and will be adapted to the site characteristic.
1. Select AI / Auto mode.
AI / Auto operation
Mode Description
Cool The product yields cool water to use in FCU cooling.
Heat The product yields hot water to use in under floor heating or FCU heating.
AI / AutoIn this mode, heating setpoint is automatically determined by pre-definedtemperature profile.
Operation mode
Operation Setting

Operation Setting
Owner’s Manual 11Hydro Kit
ENG
LISH
h NoteDecreasing temperature profile by 3°C (based on room air temperature)<Temperature adjust step (unit : °C)>-5, -4, -3, -2, -1, 0, 1, 2, 3, 4, 5� Cold Hot �
2. Select the desired temperature category
3. Adjust the desired temperature level by press [∧ , ∨ (up/down)] button.

Temperature Setting
12 Hydro Kit
You can easily control to the desired temperature.• In the main screen, press [<, > (left/right)] button to select the desired temperature category, and
press [∧ , ∨ (up/down)] button to set the desired temperature.- In the cooling, heating, and AI/auto mode, the desired temperature control is possible.
Temperature Setting
Mode Description
Roomtemperature
Room temperature setting is available when remote room air sensor (soldseparately) is installed
Leaving watertemperature
If the desired temperature is lower than the water temperature, the heatingis not performed.Set the desired temperature higher than the water temperature.
DHW tanktemperature
DHW tank temperature setting is available when DHW tank is installed.
Water inlettemperature
This operation is changed to the temperature sensor only, the inlettemperature sensor, and temperature control logic is the same as theleaving water temperature operation.

Temperature Setting
Owner’s Manual 13Hydro Kit
ENG
LISH
<Note>• This function is not used when the DHW tank is not installed.• If you want to know more information, refer function on installation information section.
Funtion to set whether or not to use a installed DHW tank
DHW Heating Operation
Temperature Setting
14 Hydro Kit
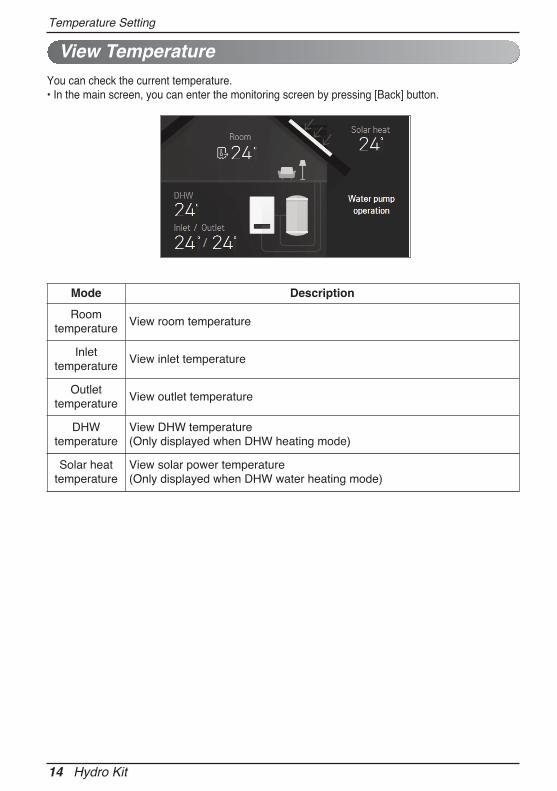
You can check the current temperature.• In the main screen, you can enter the monitoring screen by pressing [Back] button.
View Temperature
Mode Description
Roomtemperature
View room temperature
Inlettemperature
View inlet temperature
Outlettemperature
View outlet temperature
DHWtemperature
View DHW temperature(Only displayed when DHW heating mode)
Solar heattemperature
View solar power temperature(Only displayed when DHW water heating mode)

Low Noise mode
Owner’s Manual 15Hydro Kit
ENG
LISHLow Noise mode is that the unit works at reduced capacity so that the noise produced by the unit
drops.
1. In the menu screen, press [<, > (left/right)] button to select “setting” category, and press [OK]button to move to the setting list screen.
Low Noise mode
OK

Low Noise mode
16 Hydro Kit
This implies that the heating and cooling capacity will also drop. Beware of this when acertain level of heating or cooling is required.
Low Noise mode operation may not work while the product is proceeding higher priorityoperation such as defrost operation, anti-freezing operation, and etc.
3. Press [<, > (left/right)] button to select the parts and press [∧ , ∨ (up/down)] button to adjust thetime
2. In the setting list, if you press [∧ , ∨ (up/down)] button, you can turn on/off Low Noise Mode.
OK

Wi-Fi pairing
Owner’s Manual 17Hydro Kit
ENG
LISHThis function is only available on some products.
Wi-Fi pairing is the activation of the AP mode function of the Wi-Fi module connected to the indoorunit.
1. In the menu screen, press [<, > (left/right)] button to select “setting” category, and press [OK]button to move to the setting list screen.
Wi-Fi pairing
OK

Wi-Fi pairing
18 Hydro Kit
2. In the setting list, if you press [∧ , ∨ (up/down)] button, you can turn on/off Wi-Fi pairing.
OK
OK

Defrost Mode
Owner’s Manual 19Hydro Kit
ENG
LISHDefrost Mode is the function to set defrost mode operation of outdoor unit.
1. In the menu screen, press [<, > (left/right)] button to select “setting” category, and press [OK]button to move to the setting list screen.
Defrost Mode
OK

Defrost Mode
20 Hydro Kit
2. In the setting list, if you press [∧ , ∨ (up/down)] button, you can turn on/off Defrost Mode.
Setting value:- Not use (STEP0)- Forced snow removal (STEP1)- Fast defrost setting (STEP2)- Forced snow removal + fast defrost (STEP3)
OK

Lock Setting
Owner’s Manual 21Hydro Kit
ENG
LISH
• It is the function to lock the button operation of the remote controller so that children or otherpersons cannot use it without permission.
• It is the function to limit the desired temperature range that can be set in the wired remote controller.
1. In the menu screen, press [<, > (left/right)] button to select “lock setting” category, and press [OK]button to move to the lock setting list screen.
Lock setting – all, on/off, mode, DHW lock
OK
Lock Setting

Lock Setting
22 Hydro Kit
2. In the lock setting list, if you press [∧ , ∨ (up/down)] button, you can turn on/off the correspondinglock function.
Mode Description
All lock It locks all button operation of the remote controller.
On/Off lock It locks the On/Off button operation of the remote controller.
DHW lock It locks the DHW On/Off button operation of the remote controller.
Mode lock It locks the operation mode button operation of the remote controller.

Date setting
Owner’s Manual 23Hydro Kit
ENG
LISHSet the date displayed on the remote controller.
• In the user setting list, select the date category, and press [OK] button to move to the detail screen.• After the setting, if you press [OK] button, the setting is saved and moves to the previous screen.
OK
Date setting

Timer Setting
24 Hydro Kit
Set the time displayed on the remote controller.• In the user setting list, select the time category, and press [OK] button to move to the detail screen.• After the setting, if you press [OK] button, the setting is saved and moves to the previous screen.• In the screen, Time display can be presented in the form of AM / PM or 24 hours standard.
OK
Timer Setting
Timer Setting
Owner’s Manual 25Hydro Kit
ENG
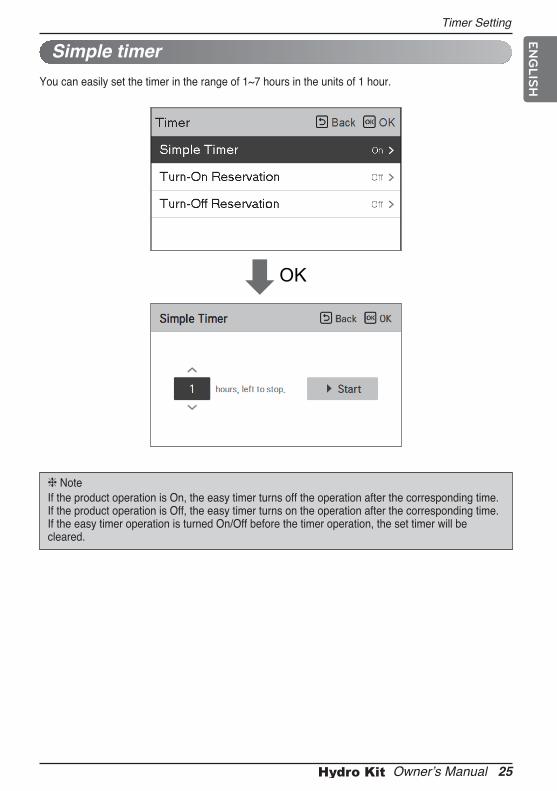
LISHYou can easily set the timer in the range of 1~7 hours in the units of 1 hour.
h NoteIf the product operation is On, the easy timer turns off the operation after the corresponding time.If the product operation is Off, the easy timer turns on the operation after the corresponding time.If the easy timer operation is turned On/Off before the timer operation, the set timer will becleared.
OK
Simple timer

Timer Setting
26 Hydro Kit
The product is automatically turned Off at the set timer time.
It provides 2 Time formats, 12Hours(AM/PM) or 24Hours reference.
h NoteEven if the Turn-off Reservation operation is turned On/Off after the setting and before the timeroperation, the set timer is not cleared.
Turn-off Reservation
Timer Setting
Owner’s Manual 27Hydro Kit
ENG
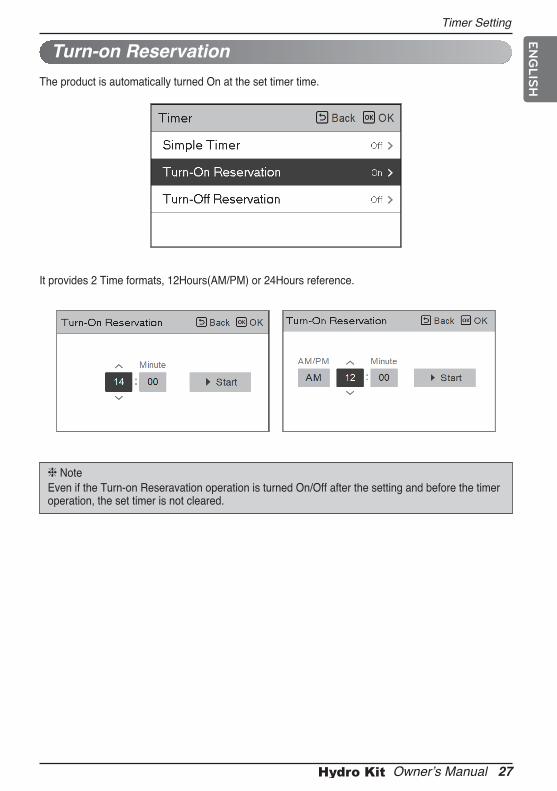
LISHThe product is automatically turned On at the set timer time.
It provides 2 Time formats, 12Hours(AM/PM) or 24Hours reference.
h NoteEven if the Turn-on Reseravation operation is turned On/Off after the setting and before the timeroperation, the set timer is not cleared.
Turn-on Reservation

Schedule Setting
28 Hydro Kit
It is the function that can check the status of the timer (schedule) saved in the remote controller.• In the schedule list, select the daily schedule status category, and press [OK] button to move to the
detail daily schedule status screen.• You can use the remote controller’s [<, > (left/right)] button to check the timer information of other
dates.• You can use the remote controller’s [∧ , ∨ (up/down)] button to check the corresponding date’s
other timer information.• Select the timer information, and press [OK] button to move to the corresponding timer’s edit
screen.
Daily Schedule
• In the menu screen, press [<, >(left/right)] button so select the schedule category, and press [OK]button to move to the schedule setting list screen.
• In the schedule setting list screen, press [∧ , ∨ (up/down)] button to select the menu to set, andpress [OK] button to move to the detail screen.
OK
How to enter schedule
Schedule Setting

Schedule Setting
Owner’s Manual 29Hydro Kit
ENG
LISH
It is the function to automatically stop the operation on the set timer day.• In the schedule list, select the exception day category, and press [OK] button to move to the
Exception day designation detail screen.• In the exception day, you can check, and add/change/delete the exception day information saved in
the remote controller.- To add an exception day, in the Exception day registration detail screen, designate
year/month/day, and press [OK] button to save the Exception day.- Select the Exception day to edit using [∧ , ∨ (up/down)] button, and press [OK] button to move to
the edit screen.- In the exception day edit screen, you can check, delete/change the corresponding exception day’s
setting contents.- When you change the exception day information, you need to save it after the change.
This function is schedule programming about DHW tank heating and DHW tank heater operation.Two schedule programming for DHW tank heating and another Two schedule programming for DHWtank heater operation are possible.
DHW Tank Heating & DHW Tank Heater Operation
Exception day
Description of each stage in Add scheduleIn ‘Stage 1’, it sets the period to perform the timer.In ‘Stage 2’, it sets the day of week to perform the timer.- You can select ‘Everyday / Weekend / Weekdays / Individual selection’.
In ‘Stage 3’, it sets the start time for the timer.In ‘Stage 4’, it sets the timer operation information.
- If ‘Stop’ is selected, you cannot set the mode / temperature / fan speed.When stages 1~4 are completed, along with the message of ‘schedule is added’, it moves to Viewand edit schedule screen.
Schedules & Edit – Add schedule
It is the function that can check the status of the timer (schedule) saved in the remote controller.• In the schedule list, select the daily schedule status category, and press [OK] button to move to the
daily schedule status detail screen.• You can use the remote controller’s [<, > (left/right)] button to check other date’s timer information.• You can edit the saved schedule’s timer information.
- Select the schedule to edit using [∧ , ∨ (up/down)] button, and press [OK] button to move to theedit screen.
• Select the timer information, and press [OK] button to move to the corresponding timer’s editscreen.
Schedules & Edit

Using Thermostat
30 Hydro Kit
The term "thermostat", which is widely used in this chapter, is a kind of 3rd party accessory. LG Electronics does not supply thermostat and it should be supplied 3rd party manufacturers.Room thermostat can be used for easy and convenience control. To utilize thermostat moreefficiently and correctly, this chapter presents information about using thermostat.
CAUTION1. Some electro-mechanical type thermostat has internal delay time to protect compressor. In that
case, mode change can takes time more than user's expectation. Please read thermostat manualcarefully if the product does not response quickly.
2. Setting temperature range by thermostat can be different with that of the product. The heating orcooling set temperature should be chosen within the setting temperature range of the product.
!
How to use ThermostatTo find how to turn on and off, how to set target temperature, how to change operating mode, etc,please refer thermostat operating manual provided by thermostat manufacturer.
Using Thermostat

Using Thermostat
Owner’s Manual 31Hydro Kit
ENG
LISH
Emergency Operation• Definition of terms
- Trouble : a problem which can stop system operation, and can be resumed temporally underlimited operation without certificated professional's assist.
- Error : problem which can stop system operation, and can be resumed ONLY after certificatedprofessional's check.
- Emergency mode : temporary heating operation while system met trouble.
• Objective of introducing 'Trouble'
- Not like airconditioning product, Air-to-Water heat pump is generally operation in whole winterseason without any system stopping.
- If system found some problem, which is not critical to system operating for yielding heatingenergy, the system can temporarily continue in emergency mode operation with end user'sdecision.
• Classified trouble
- Trouble is classified two levels according to the seriousness of the problem. : Slight trouble andHeavy trouble
- Slight trouble : Sensor trouble. In most case, this trouble is concerned with sensor problems. The unit is operating under emergency mode operation(level 1).
- Heavy trouble : Compressor cycle trouble. Emergency mode operation(level 2) is performed byoptional electric heater.
- Option trouble : a problem is found for option operation such as water tank heating. In this trouble,the troubled option is assumed as if it is not installed at the system.
• Emergency operation level
- When system met trouble, it stops operation and wait for user’s decision : Calling service center orstarting emergency operation.
- To start emergency operation, user simply push ON / OFF button once more.
- Two different levels are prepared for emergency operation : High temperature cycle and lowtemperature cycle.
- In emergency operation mode, user can not adjust target temperature.
※ It can not be operated, if the electric heater accessory is not installed.
DIPSwitch
TargetLeaving WaterTemperature
TargetRoom Air
Temperature
TargetSanitary WaterTemperature
High temperature cycle OFF 50℃(122℉) 24℃(75℉) 50℃(122℉)
Low temperature cycle ON 30℃(86℉) 19℃(66℉) 50℃(122℉)
Using Thermostat
32 Hydro Kit
• Duplicated trouble : Option trouble with slight or heavy trouble
- If option trouble is occurred with slight (or heavy) trouble at the same time, the system puts higherpriority to slight (or heavy) trouble and operates as if slight (or heavy) trouble is occurred.
- Therefore, sometimes sanitary water heating can be impossible in emergency operation mode.When sanitary water is not warming up while emergency operation, please check if sanitary watersensor and related wiring are all Ok.
• Emergency operation is not automatically restarted after main electricity power is reset.
- In normal condition, the product operating information is restored and automatically restarted aftermain electricity power is reset.
- But in emergency operation, automatic re-start is prohibited to protect the product.
- Therefore, user must restart the product after power reset when emergency operation has beenrunning.

Maintenance and Service
Owner’s Manual 33Hydro Kit
ENG
LISH
In order to ensure optimal availability of the unit, a number of checks and inspections on the unit andthe field wiring have to be carried out at regular intervals, preferably yearly. This maintenance shouldbe carried out by your local agreed technician.
Call the service immediately in the following situations
1. Anything abnormal such as burning smell, loud noise etc. happen. Stop the unit and turn thebreaker off. Never try to repair by yourself or restart the system in such cases.
2. Main power cord is too hot or damaged.3. Error code is generated by self diagnosis.4. Water leaks from indoor unit.5. Any switch, breaker (safety, earth) or fuse fails to work properly
User must carry routine checkup & cleaning to avoid unit’s poor performance.In case of special situation, the job must be carried out by the only service person.
CAUTION• If the product is not used for long time, we strongly recommend
NOT TO SWITCH OFF THE POWER SUPPLY to the product.• If power is not supplied, some special product-protecting actions
(such as water pump anti-locking) will not performed.
!
When the unit is not going....
Maintenance activities
Maintenance and Service
Maintenance and Service
34 Hydro Kit
Operational instructions
n Do not disconnect the power supply of Hydro Kit during the operation. Stop the Hydro Kit followed by outdoor unit and then only remove the power supply.
WARNINGIf you remove the power supply of the Hydro Kit in the mid of operation, it will leads to damage ofthe product by freezing and bursting of Plate type Heat Exchanger.
n Do not remove the power supply even at the occurrence of “CH14” Error. As the error is due to the shortage of water flow, please eliminate any sludge and scales inside thewater tubes to ensure free water pumping, remove foreign particles(dust, sand, trash, rustedpieces) from the water tubes along with cleaning the strainer. After cleaning the strainer, to remove the error message (not displayed), turn off the outdoor unitfollowed by Hydro Kit and then disconnect power supply of Hydro Kit. And then connect powersupply and restart the unit for the normal operation.
WARNINGThe service will be charged if the system failure is due to strainer blockage. Strainer cleaning period: Once in every 3 months and whenever CH14 error occurs.
n If the system stopped and displaying any error message(CH**) please follow below procedure. Donot remove the power supply of the Hydro Kit. Contact L.G service centre.
n Do not change the water pipes randomly. When changing the water pipes there is a possibility offoreign material entry and bubble formation as well. This leads to freezing of Plate type heatexchanger of Hydro Kit. When it is essential to change the water pipes, proceed only after separating the pipes from HydroKit. The inner side of the new pipes must be washed thoroughly to remove the foreign materialsand then connect the pipes with the Hydro Kit.
!
!

Maintenance and Service
Owner’s Manual 35Hydro Kit
ENG
LISH
Troubleshooting Tips! Save time and money!Check the following points before requesting repairs or service.... If the malfunction persist, pleasecontact your dealer.
Case Explanation
Hydro Kit does not operate.• Have you made a mistake in timer operation?
• Has the fuse blown or has the circuit breaker been tripped?
The room has a peculiar odor. • Check that this is not a damp smell exuded by the walls, carpet,furniture or cloth items in the room.
Hydro Kit does not operate forabout 3 minutes when restart.
• This is the protector of the mechanism.
• Wait about three minutes and operation will begin.
Does not cool or heat effectively.
• The room may have been very hot when the Hydro Kit was firstturned on. Allow time for it to cool down.
• Has the setting temperature been set incorrectly?
The unit operation is noisy.
• Refrigerant flow sound - While the system is being started or stopping, sound from the
refrigerant flow may be heard.
• Sound for the indoor unit heat exchanger - During the cooling operation, a sound may be heard from the
indoor unit heat exchanger due to water freezing or melting.
• Water noise - During starting or stopping of the unit, noise can appear in
water piping
• During defrost - Noise can appear in unit due to defrosting of water.
Steam is raised in outdoor unit.• Steam from outdoor heat exchanger
- During defrosting operation, ice on the outdoor heat exchangeris melted, resulting in making steam.
Remote controller display is faint,or no display at all.
• Has the circuit breaker been tripped?
h Note- Max Allowable pressure High side : 4.2 MPa / Low Side : 2.4 MPa- Max Allowable water temperature High side : 80 °C / Low side : 10 °C- Max Allowable water pressure : 0.98 Mpa (0.3 ~ 10 kgf/cm²)

36 Hydro Kit
