owner’s manual - brother international - at your side for all
TRANSCRIPT

FAX 750FAX 770
®
������������������������������������������������������������������
OWNE
R’S
MANU
AL

©1996-1999 Brother Industries, Ltd.
Year 2000 Compliant
Brother is addressing the Year 2000 related issues for allBrother fax machines and multi-function centers. Ourfocus is to ensure that our bundled third party softwarewill continue to properly process date/time data afterJanuary 1, 2000.
Brother fax machines and multi-function centers willfunction properly after January 1, 2000, provided thatall non-Brother hardware, software and firmware usedby our customers in connection or combination withBrother fax machines, and bundled software, accuratelyexchange date data with the Brother products.
Please continue to check our Web page for updates athttp://www.brother.com . All remedies will be providedto individual customers via software patches throughsoftware download or from Brother Customer Service.
If You Need to Call Customer Service
Please complete the following information for futurereference:
Model: FAX750 FAX770(Circle your model number)
Serial Number:*
Date of Purchase:
Place of Purchase:
*The serial number is on the back of the unit. Retainthis Quick-Start Manual with your sales receipt as apermanent record of your purchase, in the event ofa theft, fire or warranty service.

i
Brother NumbersBrother fax-back systemBrother Customer Service has installed an easy-to-use fax-back system, soyou can get instant answers to common technical questions and productinformation for all Brother products. This system is available 24 hours aday, 7 days a week. You can use the system to send faxes to any faxmachine, not just the one from which you are calling.
If you can’t resolve difficulty with your fax machine using this manual, callour fax-back system, and follow the voice prompts to receive faxedinstructions about using the system, and an index of fax-back subjects.
USA: 1-800-521-2846
From within Canada: 1-800-681-9838
The Brother fax-back system number (USA only) has been preprogrammedon One Touch key 1 .
Frequently Asked Questions (FAQs)You can find more information about Brother products on the World WideWeb. From product specification sheets to Frequently Asked Questions(FAQs), it is all there. Visit us at:
http://www.brother.com
Brother Bulletin BoardBrother’s Bulletin Board Numbers are
USA: 1-888-298-3616
From within Canada: 1-514-685-2040
For Customer ServiceUSA: 1-800-284-4329 (voice)
1-908-575-8790 (fax)
From within Canada: 1-800-853-6660 (voice)
1-514-685-4898 (fax)
From within Montreal: 1-514-685-6464 (voice)

ii
For the best quality results use only genuine Brother accessories, availableat most Brother retailers. If you cannot find the accessory you need and youhave a Visa, MasterCard, Discover or American Express credit card, you canorder accessories directly from Brother.
USA: 1-888-879-3232 (voice)
1-800-947-1445 (fax)
From within Canada: 1-800-668-2768 (voice)
DESCRIPTION ITEMThermal Printing Cartridge PC301
1-PK Refill Roll (For Canada Only) PC300RF
2-PK Refill Rolls PC302RF
4-PK Refill Rolls PC304RF
Telephone Line Cord Tell the Brother Representativeyour Model number so you getthe appropriate color.
Telephone Handset Tell the Brother Representativeyour Model number so you getthe appropriate color.
Handset Curled Cord Tell the Brother Representativeyour Model number so you getthe appropriate color.
Paper Wire Extension UF5607000
Document Support UF9869001
Paper Support UF9987001
Owner’s Manual UF9927001
Multi-Function Link/Missing Link Option PCI-1
Surge Protection Device with Telephone QPD 120Line Protection (2 outlets)
Surge Protection Device with Telephone FX 120Line Protection (8 outlets)
OrderingAccessories andSupplies

iii
Notice – Disclaimer of WarrantiesBROTHER’S LICENSOR(S), AND THEIR DIRECTORS, OFFICERS,EMPLOYEES OR AGENTS (COLLECTIVELY BROTHER’S LICENSOR)MAKES NO WARRANTIES, EXPRESS OR IMPLIED, INCLUDINGWITHOUT LIMITATION THE IMPLIED WARRANTIES OFMERCHANTABILITY AND FITNESS FOR A PARTICULAR PURPOSE,REGARDING THE SOFTWARE. BROTHER’S LICENSOR(S) DOES NOTWARRANT, GUARANTEE OR MAKE ANY REPRESENTATIONSREGARDING THE USE OR THE RESULTS OF THE USE OF THESOFTWARE IN TERMS OF ITS CORRECTNESS, ACCURACY,RELIABILITY, CURRENTNESS OR OTHERWISE. THE ENTIRE RISKAS TO THE RESULTS AND PERFORMANCE OF THE SOFTWARE ISASSUMED BY YOU. THE EXCLUSION OF IMPLIED WARRANTIES ISNOT PERMITTED BY SOME STATES. THE ABOVE EXCLUSION MAYNOT APPLY TO YOU.IN NO EVENT WILL BROTHER’S LICENSOR(S) BE LIABLE TO YOUFOR ANY CONSEQUENTIAL, INCIDENTAL OR INDIRECT DAMAGES(INCLUDING DAMAGES FOR LOSS OF BUSINESS PROFITS,BUSINESS INTERRUPTION, LOSS OF BUSINESS INFORMATION,AND THE LIKE) ARISING OUT OF THE USE OR INABILITY TO USETHE SOFTWARE EVEN IF BROTHER’S LICENSOR HAS BEENADVISED OF THE POSSIBILITY OF SUCH DAMAGES. BECAUSESOME STATES DO NOT ALLOW THE EXCLUSION OR LIMITATIONOF LIABILITY FOR CONSEQUENTIAL OR INCIDENTAL DAMAGES,THE ABOVE LIMITATIONS MAY NOT APPLY TO YOU. IN ANYEVENT BROTHER’S LICENSOR’S LIABILITY TO YOU FOR ACTUALDAMAGES FROM ANY CAUSE WHATSOEVER, AND REGARDLESSOF THE FORM OF THE ACTION (WHETHER IN CONTRACT, TORT(INCLUDING NEGLIGENCE), PRODUCT LIABILITY OROTHERWISE), WILL BE LIMITED TO $50.
Compilation and Publication NoticeUnder the supervision of Brother Industries, Ltd., this manual has beencompiled and published, covering the latest product descriptions andspecifications.
The contents of this manual and the specifications of this product aresubject to change without notice.
Brother reserves the right to make changes without notice in thespecifications and materials contained herein and shall not be responsiblefor any damages (including consequential) caused by reliance on thematerials presented, including but not limited to typographical and othererrors relating to the publication.

iv
This warranty gives you certain rights andyou may also have other rights that mayvary from state to state.
This warranty is given only to the end-usepurchaser of the accompanying product(referred to in this warranty as “thisProduct”).
What is covered: Brother warrants to youfor the Warranty Period that there are nodefects in the materials, workmanship orYear 2000 compliance of this Product. The“Warranty Period” is 90 days from the dateyou purchased this product.
What is NOT covered: This warranty isVOID — that is, this Product has nowarranty — if: (1) you did not purchase thisProduct from an authorized Brother resellerwithin the United States, (2) this Producthas been serviced, modified or tamperedwith by anyone other than an AuthorizedService Representative of Brother, (3) theserial number has been modified, defaced orremoved from this Product, (4) this Producthas been abused or damaged, or (5) nonBrother®-brand or non Brother approvedparts, supplies, or other accessories havebeen used with this Product.
What to do if you think your Product isdefective:
Call our Customer Service Hotline at 1-800-284-4329, or if you suspect a defect inmaterials or workmanship in this Product,you can report it to a Brother AuthorizedService Center. During the Warranty Period,supply Brother’s representative with a copyof your dated bill of sale showing that thisProduct was purchased within the UnitedStates. For the name of your BrotherAuthorized Service Center, call 1-800-521-2846. After contacting the Brother AuthorizedService Center, you may be required todeliver or send the Product properlypackaged, freight prepaid, to the AuthorizedService Center together with a photocopy ofyour bill of sale.
BROTHER FACSIMILE 90 DAY REPLACEMENT WARRANTYA LIMITED WARRANTY
(For USA Only)
What Brother will do: Brother (or itsAuthorized Service Center) will evaluate yourreport of a possible defect to determinewhether a defect exists, and if it does exist,Brother (or its Authorized Service Center) willrepair or (at Brother’s option) replace theProduct with a product that performs thesame functions and performs as well as theoriginal Product. Brother reserves the rightto supply refurbished or remanufacturedreplacement products provided that thereplacement products conform to themanufacturer’s specifications for new products.The repaired or replacement product will bereturned to you at no cost.
Exchange Service:
Exchange service will expedite, in mostinstances by the next business day, theexchange of your non working Product witha supply refurbished or remanufacturedproduct that conform to the manufacturer’sspecifications for new products. The supplyrefurbished or remanufactured Product youreceive will be covered by the balance ofthe limited warranty period remaining on theoriginal Product, plus an additional thirty (30)days. You will keep the replacementProduct that is sent to you and must return(or be billed up to the cost of a newproduct) your original non working product,which shall become the property of Brother.You must call Brother Customer Service andif the representative cannot correct theproduct’s malfunction over the telephone andyou elect the exchange service, you mustprovide information pertaining to this Productand you must also provide a valid majorcredit card number. Your credit card will becharged up to the cost of a new Product if:(i) you do not return your original Product toBrother within five (5) business days; (ii) themalfunctions of your original Product are notcovered by the limited warranty; (iii) theproper packaging instructions are not followedand has caused damage to the product; or(iv) the warranty period on your original

v
Product has expired or has not beensufficiently validated with a copy of the proofof purchase (bill of sale). The BrotherCustomer Service Representative will ship theexchange Product with return instructions andprepaid return airbill. Follow the returninstructions. You must return the originalProduct in the same shipping carton inwhich the exchanged Product was receivedand include a copy of proof of purchase(bill of sale). Retain your original accessoryitems and a copy of the return airbill,signed by the courier.
Limitations:
Repair or replacement as described above isyour sole and exclusive (that is, your only)remedy if this Product is defective. Brotheris not responsible for damage to or loss ofany equipment, media, programs or datarelated to the use of this Product. Exceptfor that repair or replacement, Brother shallnot be liable for any direct, indirect,incidental or consequential damages orspecific relief. Because some states do notallow the exclusion or limitation ofconsequential or incidental damages, theabove limitation may not apply to you.
THIS WARRANTY IS GIVEN IN LIEU OFALL OTHER WARRANTIES, WRITTEN ORORAL, WHETHER EXPRESSED BYAFFIRMATION, PROMISE, DESCRIPTION,DRAWING, MODEL OR SAMPLE. ANYAND ALL WARRANTIES OTHER THANTHIS ONE, WHETHER EXPRESS ORIMPLIED, INCLUDING IMPLIED WARRANTIES OF MERCHANTABILITY AND FITNESSFOR A PARTICULAR PURPOSE, AREHEREBY DISCLAIMED.
BROTHER FACSIMILE 90 DAY REPLACEMENT WARRANTYA LIMITED WARRANTY
(For USA Only)
This Limited Warranty is the only warrantythat Brother is giving for this Product. It isthe final expression and the exclusive andonly statement of Brother’s obligations toyou. It replaces all other agreements andunder-standings that you may have withBrother or its representatives.
This Limited Warranty (and Brother’sobligation to you) may not be changed inany way unless you and Brother sign thesame piece of paper in which we (1) referto this Product and your bill of sale date,(2) describe the change to this warranty and(3) agree to make that change.
Product Support: Toll-free customer serviceand technical support is available forhardware operational assistance at 1-800-284-4329. At any time, free technical support inthe form of Frequently Asked Questions,troubleshooting tips and service center locatoris available through our fax back system at1-800-521-2846 or Brother’s Internet WebSite (www.brother.com).
BROTHER INTERNATIONAL CORPORATION100 SOMERSET CORPORATE BLVD.BRIDGEWATER, NEW JERSEY 08807-0911
Please record your model and serial numberand your date and location of Purchasebelow for your records. Keep this informationwith your proof of purchase (bill of sale) incase your Product is lost, stolen or requiresservice.Model # ______________________________Serial #_______________________________Date of purchase: ______________________Store where purchased: _________________Location of store: ______________________
Important: We recommend that you keep alloriginal packing materials, in the event thatyou ship this product.

vi
BROTHER MULTIFUNCTION CENTER/FACSIMILE MACHINE LIMITED WARRANTY
(For Canada Only)Pursuant to this limited warranty of 1 year from the date of purchase for labour andparts, Brother International Corporation (Canada) Ltd. (“Brother”), or its Authorized ServiceCenters, will repair this MFC/Facsimile machine free of charge if defective in material orworkmanship. This Limited Warranty does not include cleaning, consumables (including,without limitation, print cartridges, print head, toner and drum) or damage caused byaccident, neglect, misuse or improper installation or operation, any damage caused fromservice, maintenance, modifications, or tampering by anyone other than a BrotherAuthorized Service Representative, or from the use of supplies or consumable items thatare non-Brother products. Operation of the MFC/Facsimile machine in excess of thespecifications or with the Serial Number or Rating Label removed shall be deemedabuse and all repairs thereafter shall be the sole liability of the end-user/purchaser. Inorder to obtain warranty service, the MFC/Facsimile machine must be delivered orshipped freight prepaid by the end user/purchaser to a “Brother” Authorized ServiceCenter, together with your Proof of Purchase in the form of a Sales Receipt.
For laser products: Failure to remove the Toner Cartridge (and Toner Drum Unit onapplicable models) during shipping will cause severe damage to the MFC/Facsimile andwill VOID the Warranty. (Refer to your Operation Manual for proper packaging.)
For ink-jet products: Do not remove the ink cartridges during shipping. Damage to yourprint head resulting from packing without the ink cartridges will VOID your warranty.(Refer to your Operation Manual for proper packaging.)
BROTHER DISCLAIMS ALL OTHER WARRANTIES EXPRESSED OR IMPLIEDINCLUDING, WITHOUT LIMITATION, ANY IMPLIED WARRANTIES OFMERCHANTABILITY OR FITNESS FOR A PARTICULAR PURPOSE, EXCEPT TO THEEXTENT THAT ANY WARRANTIES IMPLIED BY LAW CANNOT BE VALIDLY WAIVED.
No oral or written information, advice or representation provided by Brother, itsAuthorized Service Centers, Distributors, Dealers, Agents or employees, shall createanother warranty or modify this warranty. This warranty states Brother’s entire liabilityand your exclusive remedy against Brother for any failure of the MFC/Facsimile machineto operate properly.
Neither Brother nor anyone else involved in the development, production, or delivery ofthis MFC/Facsimile machine shall be liable for any indirect, incidental, special,consequential, exemplary, or punitive damages, including lost profits, arising from the useof or inability to use the product, even if advised by the end user/purchaser of thepossibility of such damages. Since some Provinces do not allow the above limitation ofliability, such limitation may not apply to you.
This Limited Warranty gives you specific legal rights and you may also have otherrights which vary from Providence to Providence.
Warranty Service is available at Brother Authorized Service Centers throughoutCanada. For Technical Support or for the name and location of your nearestAuthorized Service Center call 1-800-853-6660. Within Montreal, please call 685-6464.Internet support: [email protected] or browseBrother’s Web Site: www.brother.com
Brother International Corporation (Canada) Ltd.1 Rue Hôtel de VilleDollard-Des-Ormeaux, QC H9B 3H6

Table of Contentsvii
1Introduction Using This Manual ............................................................................................. 1
About Fax Machines........................................................................................... 1
Control Panel Overview..................................................................................... 3
2Location and Connections
Caution ................................................................................................................ 4
Choosing a Location........................................................................................... 4
Connections......................................................................................................... 6
3On-ScreenProgramming
User-Friendly Programming ........................................................................... 12
4Initial Setup Getting Started.................................................................................................. 16
5Setup Receive Basic Receiving Operations............................................................................. 22
Advanced Receiving Operations..................................................................... 26
Copy Functions................................................................................................. 30
6Setup Send Before You Begin............................................................................................... 32
Basic Sending Operations................................................................................ 34
Advanced Sending Operations........................................................................ 35
7Setup Auto DialNumbers
Storing Numbers for Easy Dialing.................................................................. 39
8Telephone (Voice) Operation
Making Voice Calls ........................................................................................... 43
9Printing Reports Fax Machine Settings and Activity................................................................. 45
10ImportantInformation
Standard Telephone and FCC Notices............................................................ 47

viii T A B L E O F C O N T E N T S
11Troubleshootingand Maintenance
Troubleshooting ................................................................................................ 52
Routine Maintenance....................................................................................... 59
12Multi-FunctionLink® (option)
Multi-Function Link ® (option) ........................................................................ 60
13Specifications Specifications..................................................................................................... 61
Index .................................................................................................................. 62
Remote Fax Options (For FAX 770 Only).................................................... R-1
TrademarksThe Brother logo is a registered trademark of Brother Industries, Ltd.Brother is a registered trademark of Brother Industries, Ltd.IBM, IBM PC, MWAVE and IBM Aptiva are registered trademarks ofInternational Business Machines Corporation.Visioneer PaperPort is a registered trademark of Visioneer, Inc.Microsoft and MS-DOS are registered trademarks of MicrosoftCorporation.Windows and Windows NT are registered trademarks of Microsoft in theU.S. and other countries.All other terms and brand and product names mentioned in this manualare registered trademarks of their respective companies.

1
Using This ManualThank you for purchasing a Brother fax machine (FAX). This fax machinehas been designed to be simple to use, with LCD screen prompts to guideyou through functions. However, you can use your fax machine to its fullestpotential by taking a few minutes to read this manual.
Additionally, your fax machine has a Help Key. Press Help/Q.Scan to print alist of basic operational steps and functions.
Finding InformationAll chapter headings and subheadings are listed in the Table of Contents.You will be able to find information about a specific feature or function bychecking the Index at the back of this manual. Also, throughout thismanual, you’ll see special symbols alerting you to important information,cross-references, and warnings. Illustrations of some screen displays alsohelp you choose the correct key-presses.
About Fax MachinesIf you’re a first-time fax machine user, fax operation might seem a littlemysterious. You’ll soon get used to the unusual fax tones on your phoneline, and be able to send and receive faxes easily.
1Introduction

2 C H A P T E R O N E
Fax Tones and HandshakeWhen someone is sending a fax, the fax machine sends fax calling tones (CNGtones)—soft, intermittent beeps at 4-second intervals. You’ll hear them whenyou dial and press Start , and they continue for about 40 seconds after dialing.During that time, the sending machine must begin the “handshake” with thereceiving machine. Each time you use automatic procedures to send a fax, youare sending CNG tones over the phone line. You’ll soon learn to listen for thesesoft beeps each time you answer a phone on your fax line, so you know if youare receiving a fax message.
The receiving fax responds with fax receiving tones—loud, chirping sounds.A receiving fax chirps for about 40 seconds over the phone line, and thescreen displays RECEIVE. If your fax machine is set to the FAX ONLYMode, it will answer every call automatically with fax receiving tones. Evenif the other party hangs up, your fax machine continues to send the “chirps”for about 40 seconds, and the screen continues to display “RECEIVE.” Tocancel the receiving mode, press Stop .
When your fax machine answers in FAX/TEL Mode, the fax machine listensfor CNG tones and then responds with receiving tones.
The fax “handshake” is the time in which the sending machine’s CNG tonesand the receiving machines “chirps” overlap. This must be for at least 2 to 4seconds, so the machines can understand how each is sending and receiving thefax. The handshake cannot begin until the call is answered, and the CNG tonesonly last for about 40 seconds after the number is dialed. Therefore, it’simportant for the receiving machine to answer the call in as few rings aspossible.
When you have an external telephone answering device (TAD) on your fax line,your TAD will determine the number of rings before the call is answered. Payspecial attention to the directions in the Installation chapter for connecting aTAD to your fax machine.
ECM (Error Correction Mode)The Error Correction Mode (ECM) is a way for the fax machine to checkthe integrity of a fax transmission while it is in progress. ECMtransmissions are possible only between machines that both have the ECMfeature. If they do, you may send and receive fax messages that arecontinuously checked for their integrity.
Sufficient memory must be available in your fax machine for this feature towork.

3I N T R O D U C T I O N
Control Panel OverviewFAX 750 and FAX 770
5
5
6
18
17
9
8
7
8
12
10
161718 15 13
2
2
3
3
4
4
1
1
16
15
13
14
19
14
109
11
19
HookLets you dial telephone and fax numbers without lifting the handset.
HoldLets you put calls on hold.
Redial / PauseRe-dials the last number called. Also inserts a pause in autodial numbers.
Speed DialLets you dial stored phone numbers by pressing a two-digit number.
Dials phone and fax numbers, and can be used as a keyboard for entering information into the fax machine.
(Left Arrow)(Right Arrow)
Moves the LCD cursor to the left or right. Adjusts speaker, ring and handset volume.
SetStores a function setting into the fax machine.
CopyMakes a copy.
StopStops a fax, cancels an operation or exits from function mode.
StartStarts an operation, such as sending a fax.
11 One TouchDial KeysThese eight keys give you instant access to previously stored phone numbers.
Help/Q. ScanPrints a quick reference Help List.Also, lets you take advantage of memory transmission.
ModeUse to select how fax machine will handle incoming calls.
ResolutionSets the resolution when you send a fax or make a copy.
FunctionLets you access the function and programming mode.
Tel-index
Volume
Lets you look up numbers stored in the dialing memory. Liquid Crystal Display
Displays messages to help you set up and operate your fax machine.
12
Dial Pad
Use this key when you want multiple copies of a multiple page original copied in order.
Sort
Use this key to enlarge or reduce copies depending on the ratio you select: 150%, 125%, 120%, 100%, 93%, 87%, 75% or 50%. To reduce the image size automatically, select AUTO.
Enlarge/Reduce
76
HOME/OFFICE PLAIN PAPER FACSIMILEHOME/OFFICE PLAIN PAPER FACSIMILE770

2Location andConnections
4
Caution1 Never install telephone wiring during a lightning storm.
2 We recommend that this product be used with a surge protection deviceto protect the product against lightning storms.
3 Never install a telephone jack in a wet location unless the jack isspecifically designed for a wet location.
4 Never touch telephone wires or terminals that are not insulated unlessthe telephone line has been disconnected at the network interface.
5 Use caution when installing or modifying telephone lines.
6 Avoid using a telephone (other than a cordless type) during an electricalstorm. There may be a remote risk of electric shock from lightning.
7 Do not use the telephone to report a gas leak in the vicinity of the leak.
8 For PLUGGABLE EQUIPMENT, the socket-outlet should be installednear the equipment and should be easily accessible.
Choosing a LocationPlace your fax machine on a flat, stable surface, such as a desk. Select aplace that is free of vibration and shocks. Locate the fax machine near atelephone jack and a standard, grounded power outlet.
Avoid placing your machine in a high-traffic area. Do not place nearheaters, air conditioners, water, chemicals or refrigerators. Do not exposethe fax machine to direct sunlight, excessive heat, moisture or dust. Do notconnect your machine to electrical outlets controlled by wall switches orautomatic timers. Disruption of power can wipe out information in theunit’s memory. Do not connect your machine to electrical outlets on thesame circuit as large appliances or other equipment that might disrupt thepower supply. Avoid interference sources, such as speakers or the base unitsof cordless phones.

5L O C A T I O N A N D C O N N E C T I O N S
Load the PaperThe paper cassette can hold about 100 sheets of 20-lb. paper.
1 Open the paper cover.
2 Place up to 100 sheets of paper in the paper holder. Do not allow thelevel of paper to pass maximum paper line on the paper guides.
3 Close the paper cover.
Paper Guides
Maximum Paper Line
Acceptable PaperSize: Letter, Legal and A4Weight: 17 lb. – 24 lb.Thickness: .0031 inches – .0039 inches

6 C H A P T E R T W O
ConnectionsConnecting the Power CordWhen you connect the power, the screen displays 01/01 00:00 FAX.
NOTICE:
1) This fax must be grounded using a three-prong plug.
2) Since the fax machine is grounded through the power outlet, you canprotect yourself from potentially hazardous electrical conditions on thetelephone network by keeping the power to your machine on when youconnect it to a telephone line. Similarly, you can protect yourself whenyou want to move your machine, by disconnecting the telephone linefirst, and then the power cord.
3) Lightning and power surges can damage this product! We recommend thatyou use a quality surge protection device on the AC power line as well ason the telephone line, or unplug the telephone line and electrical cordsduring a lightning storm.
Connecting the Telephone LineConnect one end of the telephone line cord to the jack labeled LINE on theleft side of the fax machine. Connect the other end to a modular wall jack.
Special Line Considerations
Roll Over Phone LinesA roll over phone system is a group of two or more separate telephone linesthat pass incoming calls to each other if they are busy. The calls are usuallypassed down or “rolled over” to the next available phone line in a preset order.
Your fax machine can work in a roll over system as long as it is the lastnumber in the sequence, so the call cannot roll away. Do not put thefax machine on any of the other numbers; when the other lines are busy and asecond fax call is received, the fax call is transferred to a line that does nothave a fax machine. Your fax machine will work best on a dedicated line.

7L O C A T I O N A N D C O N N E C T I O N S
Two-Line Phone SystemA two-line phone system is nothing more than two separate phone numberson the same wall outlet. The two phone numbers can be on separate jacks(RJ11) or combined into one jack (RJ14). Your machine must be pluggedinto an RJ11 jack. RJ11 and RJ14 jacks may be equal in size andappearance and both may contain four wires (black, red, green, yellow). Totest the type of jack, plug in a two-line phone and see if it can access bothlines. If it can, you must separate the line for your machine.
Converting Telephone Wall OutletsThere are three ways to convert to an RJ11 receptacle. The first two waysmay require assistance from the telephone company. You can change thewall outlets from one RJ14 jack to two RJ11 jacks. Or, you can have anRJ11 wall outlet installed and slave or jump one of the phone numbers to it.
The third way is the easiest: Buy a triplex adapter. You can plug a triplexadapter into an RJ14 outlet. It separates the wires into two separate RJ11jacks (Line 1, Line 2) and a third RJ14 jack (Lines 1 and 2). If your Brothermachine is on Line 1, plug the machine into L1 of the triplex adapter. Ifyour machine is on Line 2, plug it into L2 of the triplex adapter.
RJ14
RJ11
Triplex Adapter
RJ14

8 C H A P T E R T W O
Installing Brother Machine, External Two-Line TAD,and Two-Line TelephoneWhen you are installing an external two-line telephone answering device(TAD) and a two-line telephone, your machine must be isolated on one lineat both the wall jack and at the TAD. The most common connection is to putthe Brother machine on Line 2, which is our assumption in the followingsteps. The back of the two-line TAD must have two telephone jacks: onelabeled L1 or L1/L2, and the other labeled L2. You will need at least threetelephone line cords, the one that came with your machine and two for yourexternal two-line TAD. You will need a fourth line cord if you add a two-line telephone.
1 Place the two-line TAD and two-line telephone next to yourBrother machine.
2 Plug one end of the telephone line cord for your machine into the L2jack of the triplex adapter. Plug the other end into the LINE jack on theleft side of the machine.
3 Plug one end of the first telephone line cord for your TAD into the L1jack of the triplex adapter. Plug the other end into the L1 or L1/L2 jackof the two-line TAD.
4 Plug one end of the second telephone line cord for your TAD into theL2 jack of the two-line TAD. Plug the other end into the EXT. jack onthe left side of the machine.
Triplex AdapterTwo Line Phone
Two Line External TAD Brother Machine
You can keep two-line telephones on other wall outlets as always. There aretwo ways to add a two-line telephone to the fax machine’s wall outlet. Youcan plug the telephone line cord from the two-line telephone into the L1+L2jack of the triplex adapter. Or, you can plug the two-line telephone into theTEL jack of the two-line TAD.

9L O C A T I O N A N D C O N N E C T I O N S
Multi-Line Connections (PBX)Most offices use a central telephone system. While it is often relativelysimple to connect the fax machine to a key system or a PBX (Private BranchExchange), we suggest that you contact the company that installed yourtelephone system and ask them to connect the fax machine for you. It isadvisable to have a separate line for the fax machine. You can then leave thefax machine in FAX ONLY Mode to receive faxes any time of day or night.
If the fax machine is to be connected to a multi-line system, ask yourinstaller to connect the unit to the last line on the system. This prevents theunit from being activated each time a telephone call is received.
As with all fax units, this machine must be connected to a two wire system. Ifyour line has more than two wires, proper connection of the fax machinecannot be made.
If you are installing the fax machine to work with a PBX:
1 It is not guaranteed that the unit will operate correctly under allcircumstances with a PBX. Any cases of difficulty should be reportedfirst to the company that handles your PBX.
2 If all incoming calls will be answered by a switchboard operator, it isrecommended that the Answer Mode be set to MANUAL. All incomingcalls should initially be regarded as telephone calls.
3 The unit may be used with either pulse or tone dialing telephone service.
Custom Features on Your Phone LineTo learn how custom features may affect your faxing operations, pleaserefer to the Troubleshooting chapter, p. 52.
SeeEasy Receive
p. 24

10 C H A P T E R T W O
Connecting an ExternalTelephone Answering Device (TAD)
SequenceYou might choose to connect an additional answering system. When youhave an external TAD on the same telephone line as the fax machine, theTAD answers all calls. The fax machine “listens” for fax calling (CNG)tones. If it hears them, the fax machine takes over the call and receives thefax. If it doesn’t hear CNG tones, the fax machine lets the TAD continueplaying your outgoing message so your caller can leave you a voicemessage.
The TAD must answer within four rings (the recommended setting is tworings). The fax machine cannot hear CNG tones until the TAD has answeredthe call, and with four rings there are only 8–10 seconds of CNG tones leftfor the fax “handshake.” Make sure you carefully follow instructions in thismanual for recording your outgoing message. We do not recommend usingthe toll saver feature on your external answering machine if it exceeds 4rings.
Do not connect a TAD elsewhere on the same phone line—your fax machineand TAD will both try to control the line.

11L O C A T I O N A N D C O N N E C T I O N S
ConnectionsThe external TAD must be plugged into the left side of the fax machine, intothe jack labeled EXT. Your fax machine cannot work properly if you plugthe TAD into a wall jack.
1 Plug the telephone line cord from the wall jack into the left side of thefax machine, in the jack labeled LINE.
2 Plug the telephone line cord from your TAD into the left side of thefax machine, in the jack labeled EXT. (Make sure this cord is connectedto the TAD at the TAD’s telephone line jack (not to telephone set jack).)
3 Set your external TAD to four rings or less. (The fax machine’s RingDelay setting does not apply).
4 Record the outgoing message (see below).
5 Set the TAD to answer calls.
6 Set the Answer Mode to TAD:ANSWER MACH.
Outgoing Message (OGM)Timing is important in recording this message. The message sets up theways to handle both manual and automatic fax reception.
1 Record 5 seconds of silence at the beginning of your message. (Thisallows your fax machine time to listen for the fax CNG tones ofautomatic transmissions before they stop.)
2 Limit your speaking to 20 seconds.
3 End your 20-second message by giving your Fax Receive Code forpeople sending manual faxes. For example:“After the beep, leave a message or send a fax by pressing 5 1 andStart.”
Connecting an External TelephoneYour fax machine is equipped with a handset that you can use as a regularphone. However, you can also connect a separate telephone (or telephoneanswering device) directly to your fax machine.
Connect the modular plug on the telephone’s line cord to the jack labeledEXT. on the left side of the fax machine.
Whenever this phone (or TAD) is in use, the screen displays EXT. TEL INUSE, and, if the fax machine handset is lifted, an alarm sounds. Todisconnect the call and switch to the fax machine, press Hook .

User-Friendly ProgrammingWe have designed your fax machine with on-screen programming and aHelp key. User-friendly programming helps you take full advantage of allthe functions your fax machine has to offer.
Since your fax programming is done on the LCD, we created step-by-stepon-screen prompts to help you program your fax machine. All you need todo is follow the prompts as they guide you through the function menuselections and programming options and settings.
Function ModeYou can access the function mode by pressing Function . When you enter thefunction mode, your fax machine displays a list of main menu options fromwhich you can choose. These options appear one after the other on the display.Select an option by pressing Set when the option appears on the screen.
You can “scroll” more quickly through options by pressing . When thescreen displays your selection, press Set . (Use to scroll backward if youpassed your choice or to save key strokes. Both arrow keys show all options,in the opposite order.)
Before you press Set after entering information in a field using the dial pad,you can correct a mistake. Use to back up and then type over theincorrect characters.
When you finish a function, the screen displays ACCEPTED.
If you want to exit the Function Mode, press Stop .
See Using This
Manualp. 1
3On-ScreenProgramming
12

13O N - S C R E E N P R O G R A M M I N G
Alternating DisplaysWhen you see alternating displays, the LCD sometimes alternates betweenthe currently selected option, and a help message giving brief instructionsabout how to proceed. The display you’ll probably see most often is shownbelow, showing you, when you place a document in the feeder, that you candial a number and send a fax, or you can make a copy.
FAX: NO. & START
COPY: PRESS COPY
Function Selection TableIf you have a basic understanding of how to program your fax machine, youcan perform most of the programming settings without the Owner’s Manual.To help you understand the function selections, options, and settings thatare found in your fax programs, use the Function Selection Table below.
1. INITIAL SETUP
Function Description Factory Set More Info1. DATE/TIME Enter date and time for LCD 2000 1/1 00:00 pp. 16
display and to print ontransmissions.
2. STATION ID Program name, fax number and — p. 16, 17telephone number to appear oneach transmitted page.
3. BEEPER Adjust volume level of beeper. LOW p. 19
4. VOLUME AMPLIFY For the hearing-impaired, you OFF p. 20can set the volume toAMPLIFY:ON, or either apermanent or temporary basis.
5. TONE/PULSE Selects dialing mode. TONE p. 17(For Canada Only)

14 C H A P T E R T H R E E
4. CANCEL JOB
Function Description Factory Set More InfoCancel a delayed fax or polling job. p. 37
3. SETUP SEND
Function Description Factory Set More Info1. COVERPG SETUP Automatically sends a cover page OFF p. 38
you program.
2. COVERPAGE MSG Program customized message for — p. 38fax cover page.
3. CONTRAST Change lightness or darkness of a AUTO p. 34fax you are sending.
4. RESOLUTION Allows you to change resolutions STANDARD p. 34page by page.
5. OVERSEAS MODE Adjusts for sometimes difficult OFF p. 35overseas transmissions
6. CALL RESERVE You can send a fax, then speak. OFF p. 38
7. DELAYED FAX Send documents later. — p. 36
8. POLLED TX Sets up your fax machine with a OFF p. 37document to be retrieved byanother fax machine.
6. PAPER Selects size of paper for fax receiving. LETTER p. 257. POLLING RX Sets up your fax machine to poll OFF p. 27
another fax machine.
8. MF LINK Fax Receive Only/PC Primary/PC PC Primary p. 60(only available if you Receive Only.have purchased Multi-Function Link option)
2. SETUP RECEIVE
Function Description Factory Set More Info1. RING DELAY Number of rings before fax RING DELAY: 04 p. 23
machine answers in FAX/TEL orFAX mode.
2. F/T RING TIME Sets the time for “double ring” in 20 pp. 23, 24FAX/TEL mode.
3. EASY RECEIVE Receive fax messages without ON p. 24pressing the Start key.
4. REMOTE CODE Enter code to activate or deactivate ON (51, #51) pp. 26, 27machine from a remote location.
5. REDUCTION Reduces size of image. AUTO pp. 24, 25

15O N - S C R E E N P R O G R A M M I N G
8. REMOTE FAX OPT (For FAX 770 Only)
Function Description Factory Set More Info1. FAX FWD/PAGING Set fax machine to forward OFF p. R-3
fax/message––OR––to call yourpager.
2. FAX STORAGE Store incoming fax in memory for OFF p. R-3remote retrieval.
3. REMOTE ACCESS Set code for retrieving faxes. 159 p. R-3
4. PRINT FAX Print incoming faxes stored in the — p. 27memory.
7. PRINT REPORTS
Function Description Factory Set More Info1. XMIT REPORT OFF pp. 45–46
2. ACT.REPORT INTERVAL: OFF pp. 45–46
3. ALL DIAL Print lists and reports of activity. — pp. 45–46
4. TEL. INDEX (Details in Chapter 9) — p. 455. USER SETTINGS — pp. 45–46
6. MEMORY STATUS — pp. 45–46
6. SET AUTO DIAL
Function Description Factory Set More Info1. ONE-TOUCH DIAL Dial numbers stored in memory — p. 39
by pressing only one key.2. SPEED-DIAL Dial numbers stored in memory — p. 41
by pressing only three keys.
3. SETUP GROUPS Set up a Group number for — p. 42broadcasting.
0. TEL SERVICE
Function Description Factory Set More Info1. DISTINCTIVE Use with phone company distinctive OFF pp. 27–29
ringing service to register the ringpattern with fax machine.
2. CALLER ID View or print a list of the last 30 — pp. 29–30Caller IDs stored in memory.
5. INTERRUPT
Function Description Factory Set More InfoSend a fax now, even if you have the p. 37machine set to send a fax later, or ifyou have it set for Polling.

Getting StartedAfter you have assembled your machine using the Brother StartCard,continue the initial setup by programming the rest of the initial settings.
Setting Date and TimeYour fax machine displays the date and time, and prints it on every fax yousend.
In the event of a power failure, the fax machine maintains date and timeinformation for up to two hours. All other settings remain unaffected.
1 Press Function , 1 , 1 .
ENTER YEAR:XX
2 Enter the last two digits of the year and press Set .
ENTER MONTH:XX
3 Enter two digits for the month and press Set . (For example, enter 09 forSeptember, or 10 for October)
ENTER DAY:XX
4 Enter two digits for the day and press Set . (For example, 06)
ENTER TIME:XX:XX
5 Enter the time in 24-hour format and press Set . (For example, enter15:25 for 3:25 PM)
6 Press Stop . The screen now displays the date and time you set, anddisplays it whenever the fax machine is standing by.
Setting Station IDYou can store your name, fax number, and telephone number to be printedon all fax pages.
1 Press Function , 1 , 2 .
FAX:
4Initial Setup16

17I N I T I A L S E T U P
2 Enter your fax number (up to 20 digits) and press Set .
TEL:
3 Enter your telephone number (up to 20 digits) and press Set . If yourtelephone number and fax number are the same, enter the same numberagain. The screen displays your entry.
NAME:
4 Use the dial pad to enter your name (up to 20 characters) and press Set .(You can use the chart on next page to help you enter letters.)
5 Press Stop . The screen returns to the date and time.
Setting Dialing Mode (Tone/Pulse) (For Canada Only)Your fax machine comes set to accommodate tone (multi-frequency) dialingservice. If you have pulse (rotary) dialing service, you need to change thedialing mode.
1 Press Function , 1 , 5 .
DIALING:TONE?
DIALING:PULSE?
2 Use or to select TONE or PULSE and press Set .
3 Press Stop to exit.
Details for Entering TextWhen you are setting certain functions, such as the Station ID, you mayneed to enter text into the fax machine. Most keys on the dial pad have threeor four letters printed above them. The keys for 0, # and don’t haveprinted letters because they are used for special characters.
By pressing the appropriate number on the dial pad the correct number oftimes, you can access the character you want.

18 C H A P T E R F O U R
Press Key one time two times three times four times
2 A B C
3 D E F
4 G H I
5 J K L
6 M N O
7 P Q R S
8 T U V
9 W X Y Z
Inserting spaces
If you want to enter a blank space, press twice.
Making corrections
If you entered a letter incorrectly and want to change it, press to movethe cursor after the last correct letter. Then press Stop ; the letters above andto the right of the cursor are deleted. Re-enter the correct text and/or digits.You can also back up and type over incorrect letters.
Repeating letters
If you need to enter a character assigned to the same key as the previouscharacter, press to move the cursor to the right.
Special characters and symbols
Press for (space) ! “ # $ % & ’ ( ) * + , - . /
Press # for : ; < = > ? @ [ ] ^ _
Press Ø for É À È Ê Î Ç Ë Ö 0

19I N I T I A L S E T U P
NOTICEThe Telephone Consumer Protection Act of 1991 makes itunlawful for any person to use a computer or electronic deviceto send any message via a telephone fax machine unless suchmessages clearly contain, in a margin at the top or bottom ofeach transmitted page, or on the first page of the transmission,the date and time it is sent and an identification of the businessor other entity or other individual sending the message and thetelephone number of the sending machines or such business,other entity or individual.
In order to program this information into your fax machine, youshould complete the steps described on page 16 and 17.
■ The telephone number you enter is used only for Call Back Messageand Cover Page features.
■ If you do not enter a fax number, no additional information can beentered.
■ To enter a space, press once between numbers and twice betweencharacters.
■ If your Station ID has already been programmed, the screen prompts“1” to make a change, or “2” to exit without changing.
Setting Beeper VolumeYou can set the beeper to LOW, HIGH or OFF. The default setting is LOW .When the beeper is set to LOW or HIGH, the fax machine beeps every timeyou press a key or make an error, and at the end of fax sending or receiving.
1 Press Function , 1 , 3 .
2 Press or to select your setting and press Set .
3 Press Stop to exit.

20 C H A P T E R F O U R
Setting the Handset VolumeBefore you begin to use the fax machine, you must decide if you need to setthe handset volume to AMPLIFY:ON for a user who is hearing-impaired.The AMPLIFY volume level complies with FCC standards.
VOLUME AMPLIFY: OFF
This default setting is appropriate if none of the users are hearing-impaired.During a conversation, users can press or on the control panel toadjust the volume. When the handset is replaced, the handset volume remainuntil you change it again.
VOLUME AMPLIFY: ON–TEMPORARY
This setting is appropriate if some of the users are hearing-impaired. Duringa conversation, users can press or on the control panel to adjustthe volume to LOW, HIGH or AMPLIFY. When the handset is replaced, thehandset volume will returns to the default setting of LOW.
VOL AMPLIFY:ON–PERMANENT
Choose VOL AMPLIFY:ON–PERMANENT if all of the users are hearing-impaired. During a conversation, users can press or on the controlpanel to adjust the volume to LOW, HIGH or AMPLIFY. When the handsetis replaced, the handset volume returns to the default setting of AMPLIFY.
When you press or on the control panel to adjust the volume, thedisplay shows the setting you are choosing. Each key press changes thevolume to the next setting.
It is important that you do not choose PERMANENT unless all usersare hearing-impaired. Otherwise, the default setting of AMPLIFY maydamage the hearing of some users.
Setting Volume AmplifyPlease carefully read “Setting the Handset Volume” before you do thefollowing steps:
1 Press Function , 1 , 4 .
SELECT <- -> & SET
VOL AMPLIFY:OFF?

21I N I T I A L S E T U P
2 Press or to select VOL AMPLIFY:OFF? if none of the users arehearing-impaired and go to Step 4—OR—If some or all of the users arehearing-impaired, select VOL AMPLIFY:ON? .
SELECT <- -> & SET
PERMANENT?
3 Press or to select PERMANENT? if all the users are hearing-impaired—OR—Select TEMPORARY? if only some of the users arehearing-impaired.
4 Press Set .
5 Press Stop to exit.
Setting the Speaker VolumeYou can adjust the speaker volume when your fax machine is onhook (afteryou pressed Hook ), by selecting a speaker volume level.
Press or to adjust the volume level. The display shows the settingyou are choosing. Each key press changes the volume to the next setting.The new setting will remain until you change it again.
Setting the Ring VolumeYou can adjust the ring volume when your fax machine is idle. You canselect a ring volume level or press until the ring is off.
Press or to adjust the volume level. With each key press, thefax machine rings so you can hear the current setting and the display showsthe setting you are choosing. Each key press changes the volume to the nextsetting. The new setting will remain until you change it again.
Memory StorageIn the event of a power failure, all settings in the INITIAL SETUP, SETUPRECEIVE, SET AUTO DIAL and REMOTE FAX OPT plus the COVERPGSETUP and COVERPAGE MSG (from SETUP SEND) functions are storedpermanently. You may have to reset the date and time.

Basic Receiving OperationsSelect Answer ModeMANUAL —You must answer all calls yourself. If you hear fax tones, pressStart to begin receiving the fax, then hang up. You can use this mode withDistinctive Ringing.
FAX ONLY —The fax machine automatically answers every call as a faxcall. You cannot receive a voice call, but you can dial out and make a voicecall.
FAX/TEL —The fax machine automatically answers every call. If the call isa fax, it prints the fax. If the call is not a fax, it signals you with a doublering (ring-ring), different from the phone company ringing, to alert you topick up the call. If you select this setting, you’ll need to set the Ring Delayand F/T Ring Time features (on the following pages). If you have extensionphones on the same line as the fax machine, set Ring Delay to 4.
TAD—This is the only setting in which you can use an external answeringmachine. Your telephone answering device is connected to your FAX, andanswers every call. Once the TAD answers, the FAX listens for fax tones.If it detects fax tones, it prints the fax.
The TAD setting works only with an external telephone answering device(TAD); it does not work with telephone company voice mail. Ring Delayand F/T Ring Time do not work in this setting.
09/06 15:25 FAX
CurrentAnswer Mode
SeeDistinctive
Ringp. 27
SeeFor FAX/TEL
Mode Onlyp. 26
5Setup Receive22

23S E T U P R E C E I V E
To select or change your Answer Mode
1 Press Mode . The screen displays your current selection.
FAX ONLY
FAX/TEL
TAD:ANSWER MACH.
MANUAL
2 Continue to press Mode until your new selection appears. After 2seconds, the screen returns to the date and time display, along with yournew Answer Mode setting.
If you’re changing Answer Mode while in another operation, the screenreturns to the current operation display.
Setting Ring DelayThe Ring Delay setting determines the number of times the fax machinerings before it answers. If you have extension phones on the same line asthe fax machine, keep the Ring Delay default setting of 4.
1 Press Function , 2 , 1 .
2 Press or to select how many times the line rings before thefax machine answers (00 – 04) and press Set . If you select 00, the linedoesn’t ring at all.
3 Press Stop to exit.
Setting F/T Ring TimeYou need to determine how long the fax machine will notify you with itsspecial double ring when you have a voice call. This ringing happens afterthe initial ringing from the phone company. Only the fax machine rings, for20, 30, 40 or 70 seconds; no other phones on the same line ring the specialdouble ring. However, you can answer the call on any phone on the sameline as the fax machine.
1 Press Function , 2 , 2 .
2 Press or to select how long the fax machine will ring to alert youthat you have a voice call and press Set .
RING TIME:20 SEC
3 Press Stop to exit.
SeeEasy Receive
p. 24and
Operation fromExtensionTelephone
p. 26and
For FAX/TELMode Only
p. 26

24 C H A P T E R F I V E
Now, when a call comes in and the machine is set to FAX/TEL Mode, allphones on this line will ring the number of times you selected in RingDelay.
You can let the fax machine pick up and detect if it’s a fax or voice call. Ifit’s a fax call, the machine prints the fax. If it’s a voice call, the machinesignals you with a double ring for the length of time you selected in F/TRing Time.
Even if the caller hangs up during the double ringing, the fax machinecontinues for the set time.
Easy ReceiveWhen you use this feature, you don’t have to press Start when you answer afax call and hear calling beeps. Just hold the handset and wait a fewseconds. When you see RECEIVE on the fax screen or when you hear“chirps” through the handset of an extension phone connected to anotherwall jack, just replace the handset, and your machine does the rest.Selecting ON allows the fax machine to receive fax calls automatically,even if you lift the handset of an extension or external phone. SelectingSEMI lets the machine receive the call only if you’ve answered it at the faxmachine. Selecting OFF means you’ll have to activate the fax machineyourself, by pressing Start or by pressing 5 1 if you are not at yourmachine.
If you’ve set the feature to ON, but your fax machine doesn’t automaticallyconnect a fax call when you lift an external or extension phone handset,press the Fax Receive code 5 1 . At the fax machine, lift the handsetand press Start .
1 Press Function , 2 , 3 .
2 Use or to select ON, SEMI or OFF and press Set .
3 Press Stop to exit.
Printing a Reduced Incoming DocumentYou can always reduce the size of an incoming fax to a fixed percentage,regardless of the size of the paper (up to legal) in your fax machine. If youchoose AUTO, your machine chooses the level of reduction for you.
1 Press Function , 2 , 5 .
5.REDUCTION
SeeOperation from
ExtensionTelephone
p. 26and
For FAX/TELMode Only
p. 26

25S E T U P R E C E I V E
2 Use or to select the reduction ratio you want (AUTO, 93%, 87%or 75%) and press Set . Choose 100% if you don't want a reduction.
3 Press Stop to exit.
Recommended ReductionsIf your paper is letter size (8.5" x 11"), and the incoming fax is
letter size, select 93%
A4, select 87%
legal size, select 75%.
If your paper is A4 (8.2" x 11.6"), and the incoming fax is
letter size, select 100%
A4, select 93%
If your paper is legal size (8.5" x 14"), and the incoming fax is
letter size, select 100%
A4, select 100%
legal size, select 93%.
Setting Paper SizeYou can use three sizes of paper for printing your faxes—letter, legal andA4. When you change the kind of paper you have loaded in the faxmachine, you will need to change the setting for paper size, so yourmachine will know how to fit the incoming fax on the page. You can alsoselect the level of page reduction to fit on the paper in your machine.
1 Press Function , 2 , 6 .
6.PAPER
2 Use or to select LETTER, LEGAL or A4 and press Set .
1.YES 2.NO
CHANGE REDUCTION
3 Press 1 if you want to change the reduction setting—OR—Press 2to go to Step 5.
4 Use or to select AUTO , 100%, 93%, 87% or 75% and pressSet .
5 Press Stop to exit.

26 C H A P T E R F I V E
Advanced Receiving OperationsOperation from External or Extension TelephoneIf you answer a fax call on an extension phone or on an external phone inthe EXT. jack, you can make your fax machine take over by using the FaxReceive Code. When you press the Fax Receive Code 5 1 , the faxmachine starts to receive a fax.
If the fax machine answers a voice call and double-rings for you to takeover, use the Telephone Answer Code 5 1 to take the call at anextension phone.
If you answer a call, and no one is on the line, assume you’re receiving afax. At the fax machine phone, press Start , then hang up. At an extensionphone, press 5 1 , wait for fax receiving tones (chirps), then hang up.At an external phone, press 5 1 and wait for the phone to bedisconnected (the screen displays RECEIVE) before you hang up. (Yourcaller will have to press Start to send the fax.)
For FAX/TEL Mode OnlyWhen the fax machine is in FAX/TEL mode, it will use the F/T Ring Time(double ringing) to alert you to a voice call. If you’re at the fax machine,you can lift the handset to answer.
If you’re at an extension phone, you’ll need to lift the handset during theF/T Ring Time and press 5 1 between the double rings. If no one ison the line, or if someone wants to send you a fax, send the call back to thefax machine by pressing 5 1 .
Changing Remote CodesRemote Codes might not work with some telephone systems. The preset FaxReceive Code is 5 1 . The preset Telephone Answer Code is
5 1 .
If you are always disconnected when accessing your external TAD remotely,try changing the Fax Receive Code from 5 1 to and theTelephone Answer Code from 5 1 to 9 9 9 .
SeeSetting F/TRing Time
p. 23
SeeEasy Receive
p. 24

27S E T U P R E C E I V E
To change Remote Codes
1 Press Function , 2 , 4 .
2 Press or to select ON (or OFF) and press Set .
REMOTE ACT.:ON?
3 If you want to, enter a new Fax Receive Code, then press Set .
FAX RECEIVE:*51
4 If you want to, enter a new Telephone Answer Code, then press Set .
TEL ANSWER:#51
5 Press Stop to exit.
Printing a Fax in Memory (For FAX 770 Only)If you have Fax Storage ON for remote retrieval, you can still print a fax inthe memory when you are at your machine:
1 Press Function , 8 , 4 .
2 Press Start .
3 Press Stop .
PollingPolling is the process of retrieving faxes from another fax machine. You canuse your fax machine to “poll” other machines, or you can have someonepoll your machine. All parties involved in polling need to set up their faxmachines to accommodate polling. When someone polls your machine toreceive a fax, they pay for the call; if you poll someone’s fax machine toreceive a fax, you pay for the call.
For more information call our fax-back system 1-800-521-2846 (USA),1-800-681-9838 (From within Canada) and request Document #: 21700.
Some fax machines do not respond to the polling function.
Distinctive RingThis fax machine feature lets you use the Distinctive Ring subscriberservice offered by some telephone companies, which allows you to haveseveral telephone numbers on one phone line. Each phone number has itsown Distinctive Ring pattern, so you know which phone number is ringing.This is one way you can have a separate phone number for your faxmachine.
SeeTurning on Fax
Storagein Remote Fax
Options
SeeCanceling a
Scheduled Jobp. 37

28 C H A P T E R F I V E
Your fax machine has a Distinctive Ring function, allowing you to dedicateone phone number just for receiving faxes. You’ll need to follow thedirections below to “register” the new Distinctive Ring pattern, that wasassigned by the Telephone Company, so your fax machine can recognize itsincoming calls.
You can change or cancel the Distinctive Ring pattern at any time. You canswitch it off temporarily, then turn it back on. When you get a new faxnumber, make sure you reset this function.
You can register only one Distinctive Ring pattern with the fax machine.Some ringing patterns cannot be registered.
■ The fax machine will answer only calls to its registered number.
■ To have your TAD answer only the main number, the fax machine mustbe in Manual Mode.
■ In FAX/TEL or FAX ONLY mode, the fax machine will answer allnumbers on the phone line.
Registering the Distinctive Ring Pattern
1 Disconnect the fax machine from any TAD or telephone company voicemail.
2 Set the fax machine to MANUAL mode.
3 Press Function , 0 , 1 .
4 Press or to select DISTINCTIVE:SET? and press Set .
5 Press or to select the prestored ring pattern you want to assignand press Set . (You will hear each pattern as you scroll through the fourpatterns.) Be sure to choose the pattern assigned by the TelephoneCompany.
RingPattern
1
2
3
4
Rings
long - long
short - long - short
short - short - long
very long (normal pattern)
6 Press Stop to exit.

29S E T U P R E C E I V E
Once you’ve registered the Distinctive Ring pattern in your fax machine,you can turn this feature ON (or OFF), by following Steps 1 to 4 on theprevious page.
Caller IDThe Caller ID feature of this fax machine lets you use the Caller IDsubscriber service offered by many local phone companies. After a fewrings, the screen displays the telephone number of your caller (or name, ifavailable). Once you pick up the handset, the Caller ID informationdisappears from the screen, but the call information remains stored in theCaller ID memory.
■ You will see the first 16 characters of the number or name.
■ OUT-OF-AREA display means call originates outside your Caller IDservice area.
■ PRIVATE CALL display means the caller has intentionally blockedtransmission of information.
■ CALL PICKUP display remains on screen when no Caller IDinformation was transmitted.
If both the name and number are received, the screen displays only the name.You can print a list of Caller ID information received by your fax machine.
Caller ID service varies with different carriers. Call your local phonecompany to determine what kind of service is available in your area.
Viewing Caller ID ListCaller ID memory stores information for up to thirty calls; when the thirty-firstcall comes in, information about the first call is erased. You can scroll throughCaller ID information to review those calls made to your fax machine.
1 Press Function , 0 , 2 .
2 Press or to select DISPLAY #? and press Set .The screen displays the ID of the most recent call. If the name was notreceived, it will not be displayed.
3 Press or to scroll through the Caller ID memory and select theCaller ID you want to view and press Set .The screen shows the caller’s name and number and the date and timeof the call.
4 Press or to return to the Caller ID listing—OR—Press Stop to exit.
SeePrinting Caller
ID Listp. 30

30 C H A P T E R F I V E
Printing Caller ID List
1 Press Function , 0 , 2 .
2 Press or to select PRINT REPORT? and press Set .
3 Press Start .
Call Waiting Caller IDThe Call Waiting Caller ID feature lets you use the Call Waiting Caller IDservice offered by many local telephone companies. This feature displaysthe telephone number (or name, if available) of Call Waiting callers on yourfax machine’s screen.
1 To answer a Call Waiting signal while you’re talking on the phone, askthe other party if you can put them on Hold to catch the other call. Thescreen displays the Caller ID.
2 Press Speed Dial to switch to the second call.
3 To switch back to the first call, press Speed Dial again.
Either caller can hang up at any time. However, if you hang up you willdisconnect both callers.
Copy FunctionsYour fax machine cannot scan anything closer than one-eighth inch from theedge of the paper. The default resolution for a single copy is Super Fine.Set the resolution to PHOTO for photographs.
1 Place document face down in the feeder.
2 Press Copy . (Wait 5 seconds or press Copy for faster response.)
To cancel, press Stop .
Do NOT pull on the paper while copying is in progress.

31S E T U P R E C E I V E
Multiple CopiesYou can make multiple copies using your fax machine, and you can choosewhether the copies will be STACKED (all copies of page 1, then all copiesof page 2, etc.) or SORTED (collated). The default resolution for multiplecopies is Fine.
1 Place the document face down in the feeder.
2 If you want copies “stacked,” press Copy —OR—If you want copies“sorted” (collated), press Sort .
3 Enter the number (1–99) of copies you want.
4 Press Copy .
If you selected Sort or STACK after pressing Copy and get a MEMORYFULL message while you are scanning the first page, press Stop to cancelthe job and restart to make a single copy. If you selected Sort and theMEMORY FULL message appears while scanning subsequent pages, youcan press Copy to copy the portion that is in memory, or press Stop to cancel.To restart the copy job using less memory, press Copy for stacked copies.
Reducing and Enlarging CopiesWhen making copies, you can reduce or enlarge the size of the printed image.To reduce to the size of your selected paper automatically, select AUTO . Toselect a reduction ratio, choose 93%, 87%, 75% or 50%. To enlarge adocument, select 150%, 125% or 120%. To print a document at its originalsize, select 100%.
1 Insert the document face down in the feeder.
2 Press Enlarge/Reduce .
3 Use or to choose a reduction ratio setting.
4 Press Copy —OR— Sort , if you want sorted copies.
5 Enter the number (1–99) of copies you want. For example, press 9 fornine copies.
6 Press Copy .

32
Before You Begin■ Documents must be between 5.8 and 8.5 inches wide, and 5.9 and 23.7
inches long. Your fax machine can only scan an image 8.2 inches wide,regardless of how wide the paper is.
■ Make sure you insert documents face down, top edge first.
■ Adjust the paper guides to fit the width of your document.
Paper Guides
■ The automatic document feeder (ADF) can hold up to 10 pages, feedingeach one individually through the fax machine. Use standard(17 lb–24 lb) paper when using the ADF; if you’re using heavier paper,feed each sheet individually to prevent paper jams.
■ Press Resolution (before you send the fax) to select the resolution for thedocument you’re sending.
■ DO NOT use curled, wrinkled, folded or ripped paper, or paper withstaples, paper clips, paste or tape attached. DO NOT use cardboard,newspaper or fabric.
■ Make sure documents written with ink are completely dry.
6Setup Send
SeeResolution
p. 34

33S E T U P S E N D
Manual TransmissionManual transmission lets you hear the dial tone, ringing and fax receivingtones before sending the fax.
1 Insert the document face down in the feeder.
2 Pick up the handset and listen for a dial tone—OR—press Hook and listen for a dial tone.
3 Enter the fax number you want to call (you can enter the digits usingthe dial pad, or you can enter a One Touch or Speed Dial number or youcan call from the Tel-index).
4 When you hear the fax tone, press Start .
5 If you’re using the handset, hang up.
Automatic TransmissionThis is the easiest way to send a fax. IMPORTANT: Do not pick up thehandset, or press Hook .
1 Insert the document face down in the feeder.
2 Enter the fax number from One Touch, Speed Dial, Tel-index or thedial pad.
3 Press Start .
Manual and Automatic Fax RedialIf you’re sending a fax manually and the line is busy, press Redial/Pause toretry the number.
If you’re sending a fax automatically and the line is busy, the fax machinewill redial automatically up to three times at 5 minute intervals.
SeeSpeed Dialing
p. 44
SeeOne-Touch
Dialingp. 43

34 C H A P T E R S I X
Basic Sending OperationsContrastIf your document is very light or very dark, you might want to set thecontrast accordingly. Use S.LIGHT to send a very light document. UseS.DARK to send a very dark document.
1 Insert the document, face down, in the feeder.
2 Press Function , 3 , 3 .
3 Use or to select AUTO, S.LIGHT or S.DARK and press Set .
4 Press 2 if you are finished choosing settings, and go to Step 5—OR—Press 1 if you want to select additional settings. The display returns tothe Setup Send menu.
5 Enter a fax number and press Start to send a fax—OR—Press Copy tomake a copy.
ResolutionWhen you have a document in the feeder, you can use the Resolution key.Press Resolution continuously until you see your selection on the screen.
Standard—suitable for most typed documents.
Fine—good for small print; transmits a little slower than standardresolution.
Super Fine—good for small print or artwork; transmits slower than fineresolution.
Photo—use when document has varying shades of gray; slowest transmissiontime.

35S E T U P S E N D
Advanced Sending OperationsOverseas ModeIf you have difficulty sending a fax overseas, use the Overseas mode.
After you send a fax using this feature, the feature turns itself off.
1 Insert document.
2 Press Function , 3 , 5 .
5.OVERSEAS MODE
3 Press or to select ON (or OFF) and press Set .
4 Press 1 if you want to select additional settings. The display returns tothe Setup Send menu—OR—Press 2 if you are finished choosingsettings and go to Step 5.
5 Enter the fax number you’re calling.
6 Press Start .
Quick Scan Fax TransmissionYou can scan a fax into the fax machine’s memory to be sent as soon as thescan is complete. This way, you don’t have to wait for the entire fax to betransmitted before you retrieve your original.
If you get a MEMORY FULL message while scanning the first page of afax, press Stop to cancel the scan. If you get a MEMORY FULL messagewhile scanning in a subsequent page, you’ll have the option to press Start totransmit the pages scanned so far, or to press Stop to cancel the Quick Scanoperation.
1 Insert the document in the feeder.
2 Press Help/Q.Scan . The screen indicates how much memory is available.
3 Enter the fax number.
4 Press Start to begin scanning the document into memory. Oncescanning is completed, the fax machine dials the call.

36 C H A P T E R S I X
Delayed FAXYou can use this function to send a fax up to 24 hours later.
1 Insert the document in the feeder.
2 You can press Help/Q.Scan to use memory transmission––OR––Leave thedocument in the feeder to be scanned at the specified time.
3 Press Function , 3 , 7 .
4 Enter the time you want the fax to be sent, in 24-hour format and pressSet . (For example, enter 19:45 for 7:45 PM)
5 Press 1 if you want to select additional settings. The display returns tothe Setup Send menu—OR—Press 2 if you are finished choosingsettings and go to Step 6.
MEMORY 100%
ENTER FAX NO.
6 Enter the fax number.
7 Press Start . The fax machine will wait until the time you have entered tosend the fax.
BroadcastingUsing the numbers you have stored in Groups, One Touch and Speed Dialmemory, you can “broadcast” faxes automatically to a maximum of 47different locations in a few simple steps.After the Broadcast is completed, a Broadcast Report will be printedautomatically to let you know the results.
1 Insert the document in the feeder.
2 Press Help/Q.Scan . The screen displays how much memory is available.
3 Enter the One Touch and Speed Dial numbers (one after the other) or aGroup Number you have stored.
4 Press Start . The fax machine stores the document in memory, thentransmits it to all the numbers you entered. If the line is busy, yourmachine will retry.
Press Stop during transmission to cancel the current fax broadcast.
SeeSetting Up
Groups forBroadcasting
p. 42

37S E T U P S E N D
Setting Up for Polling TransmitPolling Transmit is when you set up your fax machine to wait with adocument so another fax machine can retrieve it.
For more information call our fax-back system at 1-800-521-2846 (USA),1-800-681-9838 (From within Canada) and request Document #: 21700.
Canceling a Scheduled JobYou can cancel tasks you’ve scheduled, such as Delayed Fax or PollingTransmit.
1 Press Function , 4 . Any waiting jobs appear on the display. If there areno jobs waiting, the screen displays NO JOB WAITING.
4.CANCEL JOB
2 If you have more than two jobs waiting, use or to select the jobyou want to cancel and press Set .—OR—If you have only one job waiting, go to Step 3.
3 Press 1 to cancel—OR—Press 2 to exit without canceling.
4 Press Stop to exit.
Interrupting Delayed Fax and Polling Transmit JobsYou can send a fax or make a copy now, even if you have the fax machineset to send a fax later, or if you have it set to be polled. However, you cannotuse automatic redial or the function mode.
1 Press Function , 5 .
2 Wait 2 seconds, then remove the documents that are waiting in thefeeder.
INSERT DOCUMENT
3 Place the document you want to send now in the feeder.
4 Enter the number for the fax you want to send now.
5 Press Start .
6 After the transmission is finished, return the first document to thefeeder.
7 Press Function , 5 to restore the Delayed Fax and/or Polling.
If you set up a Delayed Fax or Polling Transmit job in memory usingHelp/Q.Scan , you don’t have to interrupt it to send a fax or make a copy.

38 C H A P T E R S I X
More Advanced Features(Call Brother fax-back system)Your machine has additional advanced features and functions that are notincluded in this manual. To receive faxed instructions, please call ourautomated Brother fax-back system at 1-800-521-2846 and enter theDocument Numbers for the following scripts:
• Polling (Doc #: 21700)
• Cover Page (Doc #: 20917)
• Call Reservation (Doc #: 21701)
• Print Sample Call Back Message (Doc #: 21702)
• Next Fax Reservation (Doc #: 21703)
• Multiple Resolution Transmission (Doc #: 21704)
• Glossary (Doc #: 21705)

Storing Numbers for Easy DialingYou can set up your fax machine to do three types of easy dialing:One Touch, Speed Dial, and Groups for Broadcasting of faxes.
Storing One Touch Dial NumbersYou can store eight fax/phone numbers that you can dial by pressing one key.You also can store names with these numbers. When you press a One Touchdial location, the screen displays the name or number as the call is dialed.
One Touch keys are not the dial pad keys. They are the eight keys (numbers01–08) located to the right of the dial pad.
1 Press Function , 6 , 1 .
2 Press the One Touch key where you want to store a number. (One Touchkey 1 is pre-programmed for Brother Fax-Back System, USA only.You can override it if you wish.) The screen displays the location youselected.
3 Enter a number (up to 20 digits) and press Set . If you want to enter apause in the dialing sequence (to wait for an “outside line,” forexample), press Redial/Pause as you’re entering digits. PressingRedial/Pause enters a 3.5-second pause when the number is dialed, and adash appears on the screen.
NAME:
4 Use the dial pad to enter the name or company (up to 15 characters) andpress Set . You can use the chart on page 17 to help you enter letters—OR—Go to Step 5 to store the number without a name.
5 Use or to select the type of number and press Set .
FAX a fax only number
TEL a telephone (voice) number
FAX/TEL both a fax and telephone (voice) number
CHAIN a number (usually an access code) for chain dialing.
6 Return to Step 2 to store another One-Touch number—OR—Press Stop to exit.
SeeOne Touch
Dialingp. 43
7Setup Auto DialNumbers
39
SeeEntering Text
p. 17

40 C H A P T E R S E V E N
When you dial an AUTO DIAL number, the screen displays the nameyou’ve stored, or, if you haven’t stored a name, the number you’ve stored.
If you must wait for another dial tone at any point in the dialing sequence,store a pause at that place in the number by pressing Redial/Pause . Each keypress adds a 3.5 second pause.
You can use chain dialing to store long dialing sequences. For example, to store9 1 201 555 1234 987 65 4321, divide the number into two parts. Store the firstpart as a Chain type number (this tells the system that the dialing sequence isnot complete).
CHAIN—9 1 201 555 1234
The last part of the One Touch number must be stored as any of the otherfollowing three types.
FAX or FAX/TEL or TEL—987 65 4321
Now, when you dial, just press the two keys (one after the other, in order)where you’ve stored the two parts of the number.
41S E T U P A U T O D I A L N U M B E R S
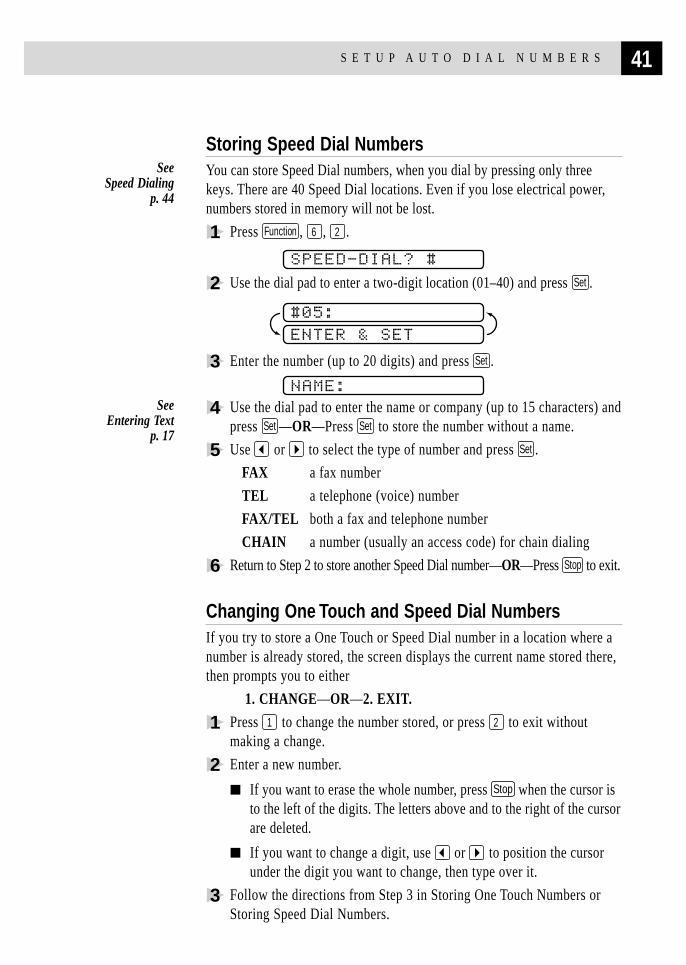
Storing Speed Dial NumbersYou can store Speed Dial numbers, when you dial by pressing only threekeys. There are 40 Speed Dial locations. Even if you lose electrical power,numbers stored in memory will not be lost.
1 Press Function , 6 , 2 .
SPEED-DIAL? #
2 Use the dial pad to enter a two-digit location (01–40) and press Set .
#05:
ENTER & SET
3 Enter the number (up to 20 digits) and press Set .
NAME:
4 Use the dial pad to enter the name or company (up to 15 characters) andpress Set —OR—Press Set to store the number without a name.
5 Use or to select the type of number and press Set .
FAX a fax number
TEL a telephone (voice) number
FAX/TEL both a fax and telephone number
CHAIN a number (usually an access code) for chain dialing
6 Return to Step 2 to store another Speed Dial number—OR—Press Stop to exit.
Changing One Touch and Speed Dial NumbersIf you try to store a One Touch or Speed Dial number in a location where anumber is already stored, the screen displays the current name stored there,then prompts you to either
1. CHANGE—OR—2. EXIT.
1 Press 1 to change the number stored, or press 2 to exit withoutmaking a change.
2 Enter a new number.
■ If you want to erase the whole number, press Stop when the cursor isto the left of the digits. The letters above and to the right of the cursorare deleted.
■ If you want to change a digit, use or to position the cursorunder the digit you want to change, then type over it.
3 Follow the directions from Step 3 in Storing One Touch Numbers orStoring Speed Dial Numbers.
SeeEntering Text
p. 17
SeeSpeed Dialing
p. 44

42 C H A P T E R S E V E N
Setting Up Groups for BroadcastingGroups allow you to send the same fax message to many fax numbers bypressing only one One Touch key (Broadcasting). First , you’ll need to storeeach fax number as a One Touch or Speed Dial number. Then, you cancombine them into a Group. Each Group uses up a One Touch key. Finally,you can have up to six small Groups, or you can assign up to 47 numbers toone large Group.
1 Press Function , 6 , 3 .
SELECT ONE-TOUCH
2 Select a One Touch key where you wish to store the number. (Forexample, press One Touch key 2 to store a Group.)
3 Use the dial pad to identify the Group with a number and press Set .(For example, press 1 for Group 1.)
SETUP GROUP:GO
ENTER & SET
4 To include One Touch or Speed Dial numbers in the Group, enter themas if you were dialing. For example, for One Touch key 5, press OneTouch key 5 . For Speed Dial location 09, press Speed Dial , then press
0 , 9 on the dial pad. The LCD shows 05, #09.
G01:*O5#O9
5 Press Set to accept the numbers for this group.
NAME:
ENTER & SET
6 Use the dial pad to enter a name for the group and press Set . (Forexample, NEW CLIENTS)
7 Press Stop to exit.
You can print a list of all One Touch and Speed Dial numbers. See Chapter9, Printing Reports.
SeeEntering Text
p. 17
SeeStoring
One Touch DialNumbers
p. 39and
Storing SpeedDial Numbers
p. 41and
Broadcastingp. 36

Making Voice CallsYou can use your fax machine to make voice telephone calls, by dialingmanually, or by using Tel-index, One Touch or Speed Dial memory. You canuse the handset to make and receive calls.
Manual DialingManual dialing is simply pressing all of the digits of the phone number.
1 Pick up the handset—OR—Press Hook .
2 When you hear a dial tone, dial the call using the dial pad.
3 If you pressed Hook to dial the call, pick up the handset when the otherparty answers. (The speaker works only one way; the other party won’tbe able to hear you unless you pick up the handset.)
4 To hang up, replace the handset.
One Touch Dialing1 Pick up the handset—OR—Press Hook .
2 When you hear a dial tone, press the One Touch key of the location youwant to call.
3 If you pressed Hook to dial the call, pick up the handset when the otherparty answers. (The speaker works only one way; the other party won’tbe able to hear you unless you pickup the handset.)
4 To hang up a voice call, replace the handset.
If you try to use a One Touch location with no number stored in it, you heara warning sound, and screen displays NOT REGISTERED. The displayreturns to normal after 2 seconds.
If you are sending a fax, press Start after pressing the One Touch key. If youpicked up the handset, press Start when the receiving fax machine answerswith fax tones.
PausePress Redial/Pause to insert a pause between numbers. Each key press adds a3.5 seconds delay.
8Telephone (Voice)Operation
43
SeeStoring OneTouch Dial
Numbersp. 39

44 C H A P T E R E I G H T
Speed Dialing1 Pick up the handset—OR—Press Hook .
2 When you hear a dial tone, press Speed Dial , then press the two-digitSpeed Dial number.
3 If you pressed Hook to dial the call, pick up the handset when the otherparty answers. (The speaker works only one way; the other party won’tbe able to hear you unless you pickup the handset.)
4 To hang up a voice call, replace the handset.
If you are sending a fax, press Start after entering the Speed Dial number. Ifyou picked up the handset, press Start when the receiving fax machineanswers with fax tones.
Hold1 Press Hold to put a call on Hold.
2 You can put down the handset without disconnecting the call.
3 Pick up the fax machine handset to release the call from Hold. Pickingup an extension handset will not release the call from Hold.
Tone/Pulse (For Canada Only)If you have pulse dialing service, but need to send tone signals (fortelephone banking, for example), follow the directions below. If you havetouch tone service, you do not need this feature to send tone signals.
1 Lift the handset.
2 Press . Any digits dialed after this send tone signals.
3 When you hang up, the fax machine returns to pulse dialing service.
Searching Telephone IndexYou can search for names you have stored in One Touch and Speed Dialmemories. Names are stored alphabetically.
1 Press Tel-index , then enter the first letter of the name you’re looking for.
2 Press or to search the memory.
3 When the screen displays the name you want to call, pick up thehandset for a voice call.
4 Press Start to begin dialing.
5 If you pressed Hook to dial the call, pick up the handset when the otherparty answers. (The speaker works only one way; the other party won’tbe able to hear you unless you pickup the handset.)
6 When the call is over, hang up to cancel the call.
SeeStoring SpeedDial Numbers
p. 41
SeeStoring OneTouch Dial
Numbersp. 39and
Storing SpeedDial Numbers
p. 41
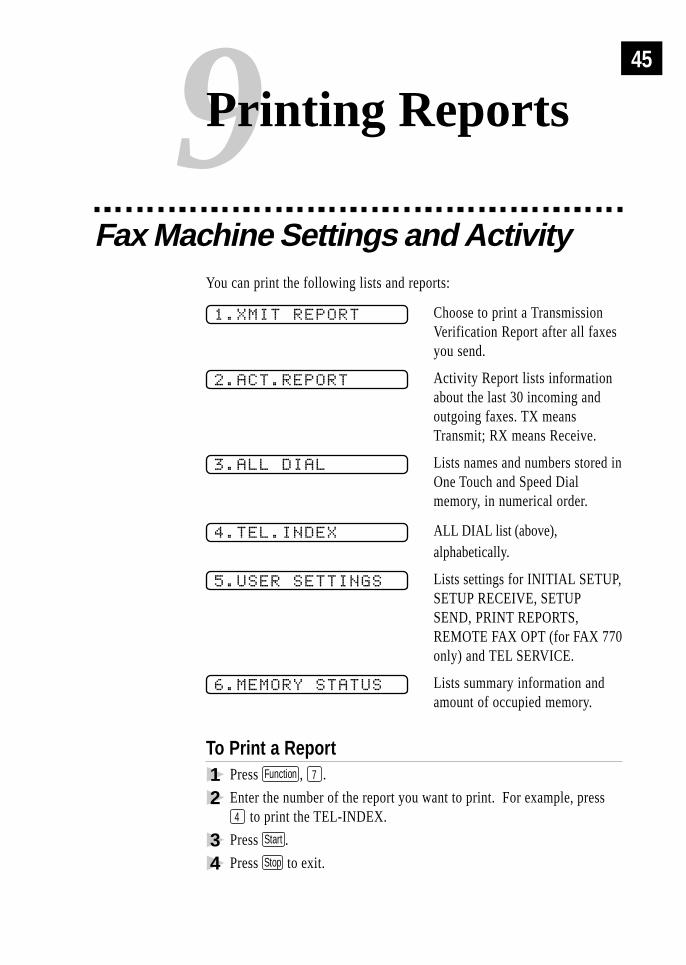
Fax Machine Settings and ActivityYou can print the following lists and reports:
1.XMIT REPORT Choose to print a TransmissionVerification Report after all faxesyou send.
2.ACT.REPORT Activity Report lists informationabout the last 30 incoming andoutgoing faxes. TX meansTransmit; RX means Receive.
3.ALL DIAL Lists names and numbers stored inOne Touch and Speed Dialmemory, in numerical order.
4.TEL.INDEX ALL DIAL list (above),alphabetically.
5.USER SETTINGS Lists settings for INITIAL SETUP,SETUP RECEIVE, SETUPSEND, PRINT REPORTS,REMOTE FAX OPT (for FAX 770only) and TEL SERVICE.
6.MEMORY STATUS Lists summary information andamount of occupied memory.
To Print a Report1 Press Function , 7 .
2 Enter the number of the report you want to print. For example, press4 to print the TEL-INDEX.
3 Press Start .
4 Press Stop to exit.
9Printing Reports45

46 C H A P T E R N I N E
Transmission Verification (Xmit) ReportYou can use the Xmit Report as proof that you sent a fax. This report liststhe name or fax number of the receiving party, the time and date oftransmission, and if the transmission was successful.
When the feature is OFF, the report is printed automatically only if there’s anerror during transmission. If the report indicates NG, send the document again.If the report indicates you should check the readability of certain pages, resendthose pages.
When the feature is ON, the report is printed with every fax you send.
1 Press Function , 7 , 1 .
2 Press or to select ON (or OFF) and press Set .
3 Press Stop to exit.
Activity Report IntervalYou can set the fax machine to print activity reports at specific intervals (6,12, 24 hours, 2, 4 or 7 days). If you set the interval to OFF, you can printthe report by following the steps in the previous section.
1 Press Function , 7 , 2 .
2 Press or to display:
INTERVAL?
and press Set .
3 Press or to choose your setting and press Set . If you choose 7days, the screen prompts you to choose a day at which to begin the 7-day countdown.
4 Enter the time to begin printing, in 24-hour format and press Set . (Forexample, enter 19:45 for 7:45 PM)
5 Press Stop to exit.

10Standard Telephone and FCC Notices
These notices are in effect on models sold and used inthe United States only.This equipment is hearing aid and volume control compatible.
When programming emergency numbers and/or making test calls toemergency numbers:
■ Remain on the line and briefly explain to the dispatcher the reason forthe call before hanging up.
■ Perform such activities in the off-peak hours, such as early morning orlate evening.
This equipment complies with Part 68 of FCC Rules. On the rear panel ofthis equipment is a label that contains, among other information, the FCCRegistration Number and Ringer Equivalence Number (REN) for thisequipment. You must, upon request, provide this information to yourtelephone company.
You may safely connect this equipment to the telephone line by means of astandard modular jack, USOC RJ11C.
An FCC compliant telephone cord with a modular plug is provided with thisequipment. This equipment is designed to be connected to the telephone lineor premise’s wiring using a compatible modular jack that is Part 68compliant. See the Installation section of this manual for details.
The REN is useful to determine the quantity of devices you may connect toyour telephone line and still have those devices ring when your telephonenumber is called. In most, but not all areas, the sum of the RENs of alldevices connected to one line should not exceed five (5). To be certain ofthe number of devices you may connect to your line, as determined by theREN, you should contact your local telephone company to determine themaximum REN for your calling area. If your fax damages the telephoneline, the telephone company may discontinue your service temporarily. Ifpossible, they will notify you in advance. But if advance notice is notpractical, you will be notified as soon as possible. You will be informed ofyour right to file a complaint with the FCC.
47
ImportantInformation

48 C H A P T E R T E N
Your telephone company may make changes to its facilities, equipment,operations or procedures that could affect the proper functioning of yourequipment. If they do, you will be notified in advance to give you anopportunity to maintain uninterrupted telephone service.
If you experience trouble with this fax machine, please contact themanufacturer’s authorized service agency for information on obtainingservice or repair. The telephone company may ask that you disconnect thisequipment from the line until the problem has been corrected or until youare sure that the equipment is not malfunctioning.
If you are not able to solve a problem with your fax machine, contactBrother Customer Service. (See Brother Numbers, page i.)
International Energy Star Compliance Statement
The purpose of the International Energy Star Program is to promote thedevelopment and popularization of energy-efficient office equipment, whichincludes computers, monitors, printers, facsimile receivers and copy machinesworld-wide. As an International Energy Star partner, Brother Industries, Ltd.has decided that this product meets the guideline of the program.
Industry Canada Compliance Statement (For Canada Only)This Class B digital apparatus meets all requirements of the CanadianInterference-Causing Equipment Regulations.
Cet appareil numérique de la classe B respecte toutes les exigences duRèglement sur la matériel brouilleur du Canada.

49I M P O R T A N T I N F O R M A T I O N
Federal Communications Commission Compliance Notice(For USA Only)This equipment has been tested and found to comply with the limits for aClass B digital device, pursuant to Part 15 of the FCC Rules. These limitsare designed to provide reasonable protection against harmful interferencein a residential installation. This equipment generates, uses, and can radiateradio frequency energy and, if not installed and used in accordance with theinstructions, may cause harmful interference to radio communications.However, there is no guarantee that interference will not occur in aparticular installation. If this equipment does cause harmful interference toradio or television reception, which can be determined by turning theequipment off and on, the user is encouraged to try to correct theinterference by one or more of the following measures:
■ Reorient or relocate the receiving antenna.
■ Increase the separation between the fax equipment and the receiver.
■ Connect the fax equipment on a separate circuit.
■ Consult the dealer or an experienced radio/TV technician for help.
WARNINGFor protection against the risk of electrical shock, always disconnect allcables from the wall outlet before servicing, modifying or installing theequipment.
This equipment may not be used on coin service lines provided by thetelephone company or connected to party lines.
Brother cannot accept any financial or other responsibilities that may be theresult of your use of this information, including direct, special orconsequential damages. There are no warranties extended or granted by thisdocument.

50 C H A P T E R T E N
Important Safety Instructions
1 Read all of these instructions.
2 Save them for later reference.
3 Follow all warnings and instructions marked on the product.
4 Unplug this product from the wall outlet before cleaning. Do not useliquid or aerosol cleaners. Use a damp cloth for cleaning.
5 Do not use this product near water.
6 Do not place this product on an unstable cart, stand, or table. Theproduct may fall, causing serious damage to the product.
7 Slots and openings in the cabinet and the back or bottom are providedfor ventilation; to ensure reliable operation of the product and toprotect it from overheating, these openings must not be blocked orcovered. The openings should never be blocked by placing the producton a bed, sofa, rug, or other similar surface. This product should neverbe placed near or over a radiator or heater. This product should never beplaced in a built-in installation unless proper ventilation is provided.
8 This product should be operated from the type of power sourceindicated on the label. If you are not sure of the type of poweravailable, consult with your dealer or local power company.
9 This product is equipped with a 3-wire grounding type plug, a plughaving a third (grounding) pin. This plug will fit into only a grounding-type power outlet. This is a safety feature. If you are unable to insertthe plug into the outlet, contact your electrician to replace yourobsolete outlet. Do not defeat the purpose of the grounding-type plug.
10 Do not allow anything to rest on the power cord. Do not place thisproduct where people can walk on the cord.
11 If an extension cord is used with this product, make sure that the totalampere ratings on the products plugged into the extension cord do notexceed the extension cord ampere rating. Also, make sure that the totalof all products plugged into the wall outlet does not exceed 15 amperes(USA only).
12 Do not place anything in front of the fax machine that will blockreceived faxes. Do not place anything in the path of received faxes.
13 Do not touch a document during printing.

51I M P O R T A N T I N F O R M A T I O N
14 Never push objects of any kind into this product through cabinet slots,since they may touch dangerous voltage points or short out partsresulting in a risk of fire or electric shock. Never spill liquid of anykind on the product.
15 Do not attempt to service this product yourself, as opening or removingcovers may expose you to dangerous voltage points and/or other risks,and may void your warranty. Refer all servicing to a BrotherAuthorized Service Center. A list of Brother Authorized ServiceCenters has been included for your convenience, or you may contactthe Brother Customer Service for your nearest Brother AuthorizedService Center. (See Brother Numbers, page i.)
16 Unplug this product from the wall outlet and refer servicing to aBrother Authorized Service Center under the following conditions:
A When the power cord is damaged or frayed.
B If liquid has been spilled into the product.
C If the product has been exposed to rain or water.
D If the product does not operate normally when the operatinginstructions are followed. Adjust only those controls that arecovered by the operating instructions. Improper adjustment of othercontrols may result in damage and will often require extensive workby a qualified technician to restore the product to normal operation.
E If the product has been dropped or the cabinet has been damaged.
F If the product exhibits a distinct change in performance, indicatinga need for service.
17 To protect your product against power surges, we recommend the use ofa power protection device (Surge Protector).

11Troubleshooting
If you can’t resolve a difficulty with your fax machine using this manual,please see page i for Brother Numbers to call for assistance.
Error MessagesYou may occasionally encounter a difficulty with your fax machine ortelephone line. If this happens, your fax machine often identifies theproblem and displays an error message. The list below explains the mostcommon error messages.If you need additional help, call the Brother fax-back system. (See “BrotherNumbers,” page i.)
CHECK PAPER
The fax machine is out of paper, or the paper is not properly loaded, or thepaper is jammed in the fax machine.
1 Open the paper cover and remove any paper that is not jammed.
Paper Cover
52
Troubleshootingand Maintenance

53T R O U B L E S H O O T I N G A N D M A I N T E N A N C E
2 Open the front cover.
3 Then open the top cover by pressing the blue levers on both sides of thetop cover.
Blue Lever
Front Cover
Top Cover
4 Pull the jammed paper gently from the paper feeder toward the back ofthe fax machine. If the paper remains jammed, then pull it toward thefront of the machine.
Front Cover
Top Cover
5 Remove the printing cartridge and turn the spool to tighten the ribbon.
6 Install the cartridge.
7 Close the top cover.
8 Close the front cover.
9 Load the paper.

54 C H A P T E R E L E V E N
CLEAN UP SCANNER
The scanner is dirty. See “Routine Maintenance” on p. 59.
COMM.ERROR
A poor quality phone line resulted in a communications error. Try the callagain.
CONNECTION FAIL
You have requested a polling call from another party, but the other faxmachine is not in Poll Waiting mode.
DISCONNECTED
The other party has disconnected during a fax. Try calling the other party.
DOCUMENT JAM
The documents were not inserted or fed properly, or were too long or tooshort.
1 Remove any paper that is not jammed from the document feeder.
2 Open the front cover.
3 Pull the document toward the front of the fax machine.
4 Close the cover and press Stop .

55T R O U B L E S H O O T I N G A N D M A I N T E N A N C E
MACHINE ERROR XXand
PRESS STOP KEY
Contact Brother Customer Service at
USA: 1-800-284-4329 (voice)
From within Canada: 1-800-853-6660 (voice)
From within Montreal: 1-514-685-6464 (voice)
NO RESPONSE/BUSY
The number you called does not answer or is busy. You may also havereached a number not connected to a fax. Check the number and call again.
NOT REGISTERED
You’ve tried accessing a One Touch or Speed Dial location with no numberassigned to it. See pages 39–41 for information about storing One Touch orSpeed Dial numbers.
PRINTER FAULT
The print head has overheated. Unplug the fax machine and wait 30 minutesfor it to cool.
SCANNER ERROR
Try cleaning the white tape and the glass strip under the tape. Duringcleaning, we recommend you unplug the power cord. See “RoutineMaintenance” on p. 59.If you still get a scanner error, contact Brother Customer Service at
USA: 1-800-284-4329 (voice)
From within Canada: 1-800-853-6660 (voice)
From within Montreal: 1-514-685-6464 (voice)
TOP COVER OPEN
The top cover is not completely closed.

56 C H A P T E R E L E V E N
If You Are Having Difficulty with Your Fax MachineIf you think there is a problem with your fax machine, make a copy first. Ifthe copy looks good, the problem is probably not your fax machine. Checkthe difficulties below and follow the troubleshooting tips.
Printing or Receiving FaxesCondensed Print and Horizontal Streaks;Top and Bottom of Sentences Cut Off
If your copy looks good, you probably had a bad connection, with staticor interference on the phone line. If the copy looks bad, clean thescanner area. If there is still a problem, call Brother Customer Serviceat 1-800-284-4329 (USA), 1-800-853-6660 (from within Canada) and1-514-685-6464 (from within Montreal).
Vertical Black Lines When Receiving
The sender’s scanner may be dirty. Ask the sender to make a copy to seeif the problem is with the sending machine. Try receiving from anotherfax machine. If the problem continues, call Brother Customer Service at1-800-284-4329 (USA) or 1-800-853-6660 (from within Canada).
Phone Line or ConnectionsFax Machine Does Not Answer When Called
Make sure the fax machine is in the correct receiving mode for your setup(either FAX, FAX/TEL or TAD). Check for dial tone. If possible, callyour fax machine to hear it answer. If there is still no answer, check thetelephone line cord connection. Connect a standard telephone handset tothe fax machine telephone jack. If there is no ringing when you call yourfax machine, call your Telephone Company to check the line.
No Dial Tone on the Handset
Press Hook —OR—Lift the handset. If you don’t hear a dial tone, checktelephone line cord connections at the fax machine and wall jack. Checkthat the handset is connected to the fax machine’s handset jack. Test thewall jack with another single line telephone. If there is no dial tone at thewall outlet, call your Telephone Company.
The Caller ID does not display after the Call Waiting Signal
The Caller ID signal is sent ten seconds after the Call Waiting Signaland speaking may interfer with it. When you hear the Call Waitingsignal, ask the other party to hold while you answer the call. Then stopspeaking until you see the Caller ID on the LCD.

57T R O U B L E S H O O T I N G A N D M A I N T E N A N C E
Sending Faxes
Poor Transmitting Quality
Try changing your resolution to FINE or SUPERFINE (see “Resolution”p. 34). Make a copy to verify the fax machine’s scanner operation.
Dialing Does Not Work
Check all line cord connections, and make sure the curled handset cordis not in the EXT jack.
Check power cord connection.
Send a manual fax by pressing Hook —OR—Lifting the handset, anddialing the number. Wait to hear fax receiving tones before pressingStart .
Vertical Black Lines When Sending
Use your fax machine to make a copy. If the copy shows the sameproblem, the scanner area is dirty. Lift the front cover and check thedocument path. Clean the scanner’s white tape and the glass strip underthe tape using isopropyl alcohol and a lint-free cloth (see p. 59).
Handling Incoming Calls
Double Ring in FAX/TEL Mode
The fax machine knows the incoming call is not a fax so it is signalingyou to answer the telephone call. Pick up the fax machine handset oranswer from an extension phone and press your fax machine’sTelephone Answer Code (default setting is #51).
Transferring a Call to the Fax Machine
If you have answered the fax machine handset, press Start , and hang upimmediately.
If you answered at an extension phone, press your three-digit FaxReceive Code (the factory setting is 51). When your fax machineanswers, hang up.
Fax Machine “Hears” Voice as CNG Tone
If your fax machine is set to Easy Receive ON, and it answers voicecalls by trying to receive a fax, try turning Easy Receive to OFF.
SeeFor FAX/TEL
Mode Onlyp. 26
SeeEasy Receive
p. 24

58 C H A P T E R E L E V E N
Transmission Verification Report Prints “Result: NG”
There is probably temporary noise or static on the phone line. Trysending the fax again. If the problem continues, call the TelephoneCompany to check your phone line.
Custom Features on a Single Line
If you have Call Waiting, Caller ID, Call Waiting/Caller ID, RingMaster, Voice Mail, an answering machine, alarm system or any othercustom feature on a single phone line with your fax machine, it maycreate a problem sending or receiving fax data.
Example #1:
If you are having a telephone conversation and a faxcommunication signal comes through on your Call Waiting CallerID feature, you can verify that the second call is a fax by switchingto it. You have the option to receive the fax call, by asking the firstcaller to hang up to clear the line.
Example #2:
If you are sending or receiving a fax message while a Call WaitingCaller ID (or other custom feature) signal comes through on theline, the signal can temporarily interrupt or disrupt the fax data.Brother’s ECM feature should help overcome this problem. Thiscondition is related to the telephone system industry, and iscommon to all devices that send and receive information on asingle, shared line with custom features. If avoiding a slightinterruption is crucial to your business, a separate line with nocustom features is recommended.
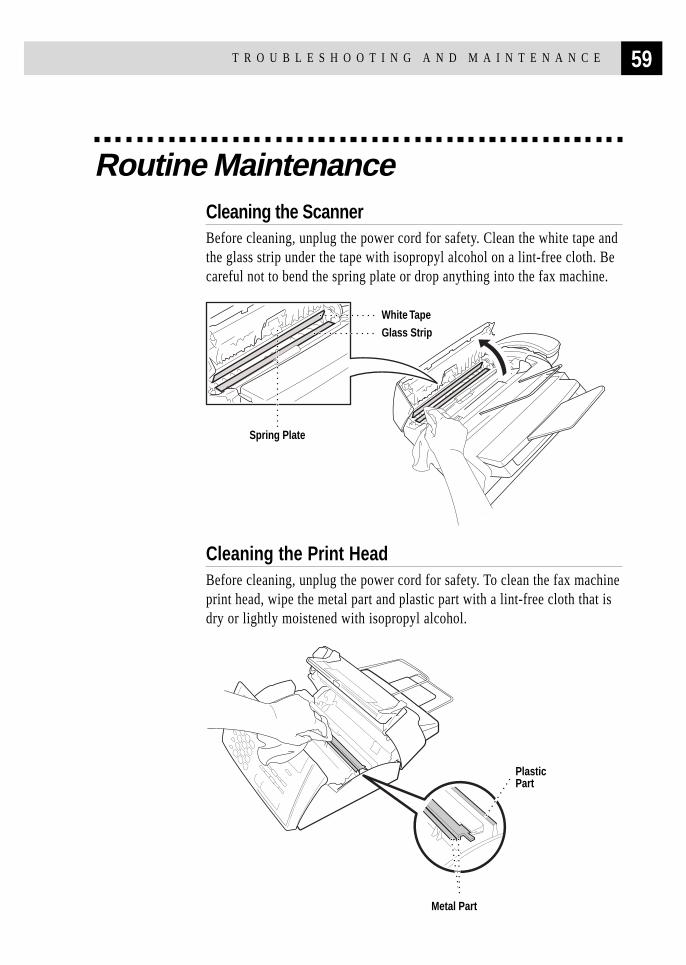
59T R O U B L E S H O O T I N G A N D M A I N T E N A N C E
Routine MaintenanceCleaning the ScannerBefore cleaning, unplug the power cord for safety. Clean the white tape andthe glass strip under the tape with isopropyl alcohol on a lint-free cloth. Becareful not to bend the spring plate or drop anything into the fax machine.
White TapeGlass Strip
Spring Plate
Cleaning the Print HeadBefore cleaning, unplug the power cord for safety. To clean the fax machineprint head, wipe the metal part and plastic part with a lint-free cloth that isdry or lightly moistened with isopropyl alcohol.
PlasticPart
Metal Part

You can purchase the optional Multi-Function Link® package (also called“Missing Link”). Multi-Function Link® turns your fax machine into a multi-function center, by enabling you to use your fax machine as a printer and ascanner and to use it to fax messages from Windows® applications in yourcomputer.
Multi-Function Link® is available at most Brother retailers. If you cannotfind it, you can order Multi-Function Link® directly from Brother. The itemnumber is PCI-1.
Installation instructions will be included with PCI-1. However, it isimportant that you hook up your fax machine to your computer before youinstall the software.
Setting Multi-Function Link ® Mode(With Multi-Function Link ® (option) Only)If you connect your fax machine to your PC, you can receive faxes into yourPC. After completing all setup for Multi-Function Link®, you can selectMulti-Function Link® Mode (PC Primary/PC Receive Only/Fax ReceiveOnly) for routing incoming faxes.
1 Press Function , 2 , 8 .
8.MF LINK
2 Press or to select PC PRIMARY, PC RECEIVE ONLY orFAX RECEIVE ONLY and press Set .
3 Press Stop to exit.
60 12Multi-FunctionLink ® (option)

Type Desktop facsimile transceiver
Compatibility ITU-TS Group 3
Coding System Modified Huffman (MH)
Modem Speed 9600/7200/4800/2400; Automatic Fallback
Document Input Width 5.8 inches to 8.5 inches (148 mm to 216 mm)
Scanning/Printing Width 8.2 inches (208 mm)
Paper Cassette 100 Sheets (20 lb.)
Printer Type Line Thermal with Ribbon
Gray Scale 64 levels (Dithered)
Display LCD, 16 characters
Polling Types Standard, Sequential
Contrast Control Automatic/Super Light/Super Dark (manual setting)
Resolution • Horizontal 203 dot/inch (8 dot/mm)
• Vertical Standard—98 line/inch (3.85 line/mm)
Fine, Photo—196 line/inch (7.7 line/mm)
Superfine, Photo (copy)—392 line/inch (15.4 line/mm)
Memory Capacity 512 KB (up to 20 pages*)
One Touch Dial 8
Speed Dial 40 stations
Automatic Redial 3 times at 5 minute intervals
Speaker Type Monitor
Auto Answer 0, 1, 2, 3 or 4 rings
Communication Source Public switched telephone network
Operating Environment 41 - 95° F
Power Source 120V AC 50/60Hz (U.S.A., Canadian Version Only)
Power Consumption Standby: under 5 watts — Peak: under 170 watts
Dimensions 12.1 x 13.4 x 7.2 (inches)/ 307 x 341 x 182 (mm)
Weight 9.48 lb / 4.3 kg
* “Pages” refers to the “Brother Standard Chart No. 1” (a typical business letter, Standardresolution). Specifications are subject to change for improvement without prior notice.
13Specifications61

A
Accessories ........................................................ iiACT. REPORT ................................................ 45Activity Report ................................................ 46ALL DIAL ....................................................... 45Alternating Displays ........................................ 13Answer Mode .................................................. 22Answering Machine......................................... 10Automatic Transmission .................................. 33
B
Beeper Volume................................................. 19Broadcasting .................................................... 36Broadcasting (Set Up Groups) ......................... 42Brother Numbers ................................................ i
C
CALL PICKUP ............................................... 29Call Waiting Caller ID ..................................... 30Caller ID .......................................................... 29Caller ID (Printing List) .................................. 30Caller ID (Viewing List) .................................. 29Canceling Job .................................................. 37Chain Dialing................................................... 40CHECK PAPER .............................................. 52CLEAN UP SCANNER .................................. 54COMM. ERROR ............................................. 54Connect (External Telephone Answering
Machine) ...................................................... 10Connect (External Telephone) ......................... 11Connect (Power Cord) ....................................... 6Connect (Telephone Line) ................................. 6CONNECTION FAIL...................................... 54Contrast ............................................................ 34Control Panel ..................................................... 3
Copy (Enlarging) ............................................. 31Copy (Multiple) ............................................... 31Copy (Reducing) ............................................. 31Copy (Sorted) .................................................. 31Copy (Stacked) ................................................ 31Corrections (Entering Text) ............................. 18Customer Service................................................ i
D
Date and Time.................................................. 16Delayed FAX ................................................... 36Dialing Mode ................................................... 17DISCONNECTED .......................................... 54Distinctive Ring ............................................... 27DOCUMENT JAM .......................................... 54Documents (Size) ............................................ 32
E
Easy Receive .................................................... 24ECM (Error Correction Mode) .......................... 2Entering Text ................................................... 17External Telephone .......................................... 11External Telephone Answering Device ........... 10
F
F/T (FAX/TEL) Mode ..................................... 22F/T Ring Time ................................................. 23FAX ONLY Mode ........................................... 22Fax Receive Code ............................................ 26Fax Tones and Handshake ................................. 2Fax-Back System ................................................ iFine (Resolution) ............................................. 34Function Mode................................................. 12Function Selection Table ................................. 13
Index62

63I N D E X
G
Gray Scale ....................................................... 61
H
Handset Volume ............................................... 20Help ................................................................... 1Hold ............................................................. 3, 44
I
Inserting Spaces ............................................... 18International Calls ........................................... 35Interrupting ...................................................... 37
M
Maintenance .................................................... 59Manual Dialing ................................................ 43MANUAL Mode ............................................. 22Manual Transmission....................................... 33MEMORY STATUS ........................................ 45Memory Storage .............................................. 21Multi-Function Link® ...................................... 60Multi-Line Connections..................................... 9
O
On-Screen Programming ................................. 12One Touch Dial (Changing) ............................ 41One Touch Dial (Storing) ................................ 39One Touch Dialing ........................................... 43Outgoing Message (External TAD) ................. 11Overseas Mode ................................................ 35
P
Paper Size ........................................................ 25Pause ................................................................ 43PBX ................................................................... 9Photo (Resolution) ........................................... 34Polling (Receive) ............................................. 27
Polling (Transmit) ............................................ 37Power Consumption ........................................ 61Print (a Fax in Memory) .................................. 27Print (Caller ID List) ....................................... 30Print (Report) ................................................... 45Print Head (Cleaning) ...................................... 59PRINTER FAULT ........................................... 55Pulse ................................................................ 17
Q
Quick Scan....................................................... 35
R
Redial (Automatic) .......................................... 33Redial (Manual) ............................................... 33Reduction (Printing) ........................................ 24Reduction (Recommended Size) ..................... 25Remote Codes (Changing) .............................. 26Resolution ........................................................ 34Ring Delay ....................................................... 23Ring Volume .................................................... 21Roll Over Phone Lines ...................................... 6
S
Safety Instructions ........................................... 50Scanner (Cleaning) .......................................... 59SCANNER ERROR ........................................ 55Scroll ................................................................ 12Speaker Volume ............................................... 21Special Characters ........................................... 18Speed Dial (Changing) .................................... 41Speed Dial (Storing) ........................................ 41Speed Dialing .................................................. 44Standard (Resolution) ...................................... 34Station ID......................................................... 16Storing Telephone Numbers ............................ 39Super Fine (Resolution) ................................... 34

64 I N D E X
T
TAD ................................................................. 10TAD (Mode) .................................................... 22TEL. INDEX ................................................... 45Telephone Answer Code .................................. 26Telephone Index .............................................. 44Telephone Numbers ......................................... 39Tone ................................................................. 17Tone (Send Signals) ......................................... 44TOP COVER OPEN ........................................ 55Transmission Verification (Xmit) Report ........ 46Troubleshooting ............................................... 52Two-Line Phone System .................................... 7
U
USER SETTINGS ........................................... 45
V
Verification Report .......................................... 45Voice Calls ....................................................... 43Volume Amplify .............................................. 20
W
WARNING ...................................................... 49
X
XMIT REPORT ............................................... 45

65I N D E X
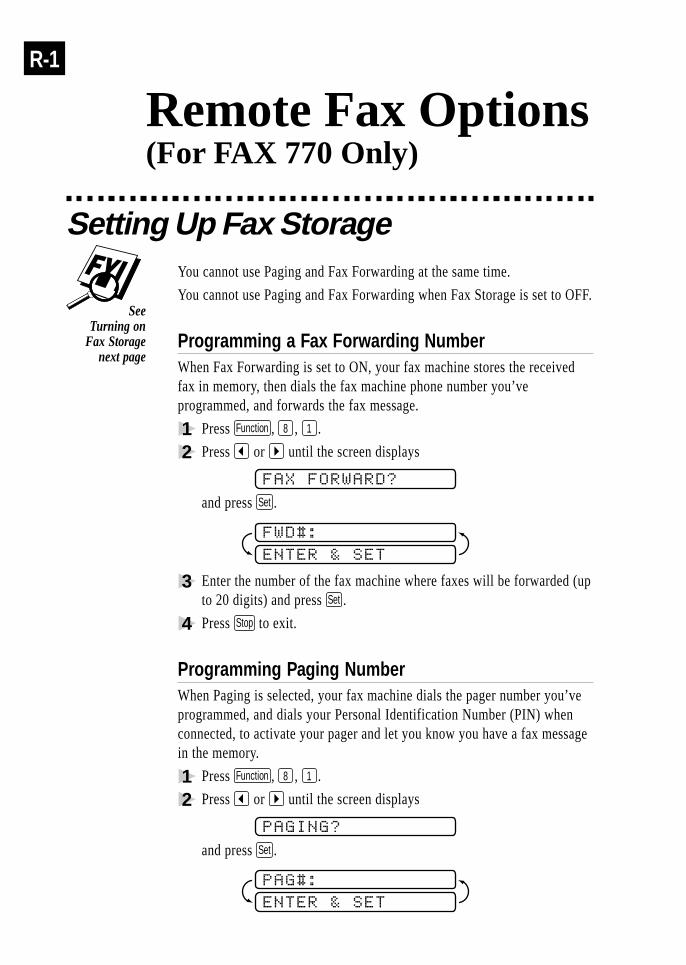
R-1
Setting Up Fax StorageYou cannot use Paging and Fax Forwarding at the same time.
You cannot use Paging and Fax Forwarding when Fax Storage is set to OFF.
Programming a Fax Forwarding NumberWhen Fax Forwarding is set to ON, your fax machine stores the receivedfax in memory, then dials the fax machine phone number you’veprogrammed, and forwards the fax message.
1 Press Function , 8 , 1 .
2 Press or until the screen displays
FAX FORWARD?
and press Set .
FWD#:
ENTER & SET
3 Enter the number of the fax machine where faxes will be forwarded (upto 20 digits) and press Set .
4 Press Stop to exit.
Programming Paging NumberWhen Paging is selected, your fax machine dials the pager number you’veprogrammed, and dials your Personal Identification Number (PIN) whenconnected, to activate your pager and let you know you have a fax messagein the memory.
1 Press Function , 8 , 1 .
2 Press or until the screen displays
PAGING?
and press Set .
PAG#:
ENTER & SET
SeeTurning on
Fax Storagenext page
Remote Fax Options(For FAX 770 Only)

R-2
3 Enter your pager phone number (up to 20 digits) followed by and press Set . Do not include the area code if it is the same as that ofyour fax machine. For example,
1 8 0 0 5 5 5 1 2 3 4 .
4 If your pager requires a PIN, enter the PIN, press , press Redial/Pause ,enter your fax number, then press and press Set . For example,
1 2 3 4 5 Redial/Pause 1 8 0 0 5 2 1 2 8 4 6 .
—OR—
If you do not need a PIN, press Redial/Pause , enter your fax number, thenpress and press Set . For example,Redial/Pause 1 8 0 0 5 2 1 2 8 4 6 .
5 Press Stop to exit.
You cannot change a Paging number or PIN remotely.
Turning On Fax StorageIf you set Fax Storage to ON, you will be able to retrieve fax messages fromanother location, using Fax Forwarding, Paging, or Remote Retrievalfunctions. The screen will indicate when you have a fax stored in memory.
1 Press Function , 8 , 2 .
FAX STORAGE:OFF?
SELECT & SET
2 Press or to select ON (or OFF) and press Set .
3 Press Stop to exit.
If there are faxes in memory when you turn the Fax Storage OFF, thescreens prompts you to erase any faxes in memory.
ERASE ALL FAX?
1.YES 2.NO
If you press 1 , all fax data is erased and Fax Storage is turned off. If youpress 2 , data is not erased, and Fax Storage remains on.
SeePrinting a
Fax in Memory(For FAX 770 Only)
p. 27

R-3
Changing Remote Access CodeEnter your Remote Access Code when the fax machine picks up your call,so you can access features remotely. The access code is preset to 1 5 9 ,but you can change this.
1 Press Function , 8 , 3 .
2 Enter a three-digit number from 000 to 999. The “” cannot bechanged.Do not use the same digits that appear in your Fax Receive orTelephone Answer Code.
3 Press Set .
4 Press Stop to exit.
SeeOperation from
ExtensionTelephone
p. 26
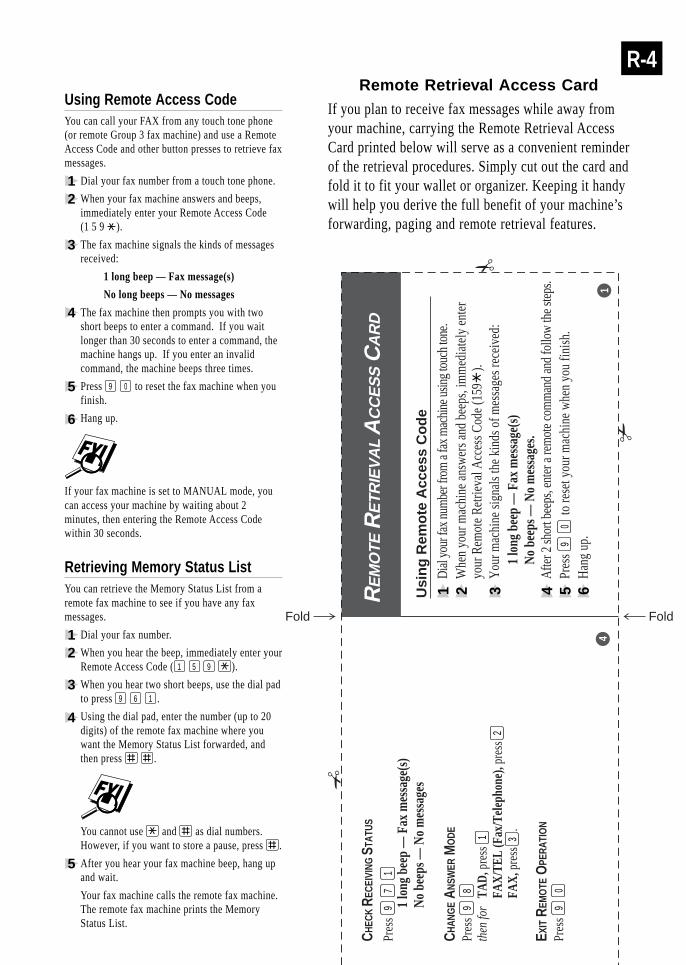
R-4
Usi
ng
Rem
ote
Acc
ess
Co
de
1Di
al yo
ur fa
x num
ber f
rom
a fa
x mac
hine
usin
g tou
ch to
ne.
2W
hen
your
mac
hine
ans
wer
s and
bee
ps, i
mm
edia
tely
ent
eryo
ur R
emot
e Re
triev
al A
cces
s Cod
e (1
59
).3
You
r mac
hine
sign
als t
he k
inds
of m
essa
ges r
ecei
ved:
1 lo
ng b
eep
— F
ax m
essa
ge(s
)N
o be
eps —
No
mes
sage
s.4
Afte
r 2 sh
ort b
eeps
, ent
er a
rem
ote c
omm
and
and
follo
w th
e ste
ps.
5Pr
ess
t
o re
set y
our m
achi
ne w
hen
you
finish
.9
0
6H
ang
up.
14
Pres
s 9
71
1 lo
ng b
eep
— F
ax m
essa
ge(s
)N
o be
eps —
No
mes
sage
s
CHAN
GE A
NSW
ER M
ODE
Pres
s 9
8th
en fo
r TA
D, p
ress
1FA
X/T
EL (F
ax/T
elep
hone
), pr
ess
2FA
X, p
ress
.3
EXIT
REM
OTE
OPE
RATI
ON
Pres
s 9
0
CHEC
K RE
CEIV
ING
STA
TUS
RE
MO
TER
ETR
IEV
AL
AC
CE
SS
CA
RD
Fold Fold
Remote Retrieval Access CardIf you plan to receive fax messages while away fromyour machine, carrying the Remote Retrieval AccessCard printed below will serve as a convenient reminderof the retrieval procedures. Simply cut out the card andfold it to fit your wallet or organizer. Keeping it handywill help you derive the full benefit of your machine’sforwarding, paging and remote retrieval features.
Using Remote Access CodeYou can call your FAX from any touch tone phone(or remote Group 3 fax machine) and use a RemoteAccess Code and other button presses to retrieve faxmessages.
1 Dial your fax number from a touch tone phone.
2 When your fax machine answers and beeps,immediately enter your Remote Access Code(1 5 9 ).
3 The fax machine signals the kinds of messagesreceived:
1 long beep — Fax message(s)
No long beeps — No messages
4 The fax machine then prompts you with twoshort beeps to enter a command. If you waitlonger than 30 seconds to enter a command, themachine hangs up. If you enter an invalidcommand, the machine beeps three times.
5 Press 9 0 to reset the fax machine when youfinish.
6 Hang up.
If your fax machine is set to MANUAL mode, youcan access your machine by waiting about 2minutes, then entering the Remote Access Codewithin 30 seconds.
Retrieving Memory Status ListYou can retrieve the Memory Status List from aremote fax machine to see if you have any faxmessages.
1 Dial your fax number.
2 When you hear the beep, immediately enter yourRemote Access Code (1 5 9 ).
3 When you hear two short beeps, use the dial padto press 9 6 1 .
4 Using the dial pad, enter the number (up to 20digits) of the remote fax machine where youwant the Memory Status List forwarded, andthen press .
You cannot use and as dial numbers.However, if you want to store a pause, press .
5 After you hear your fax machine beep, hang upand wait.
Your fax machine calls the remote fax machine.The remote fax machine prints the MemoryStatus List.
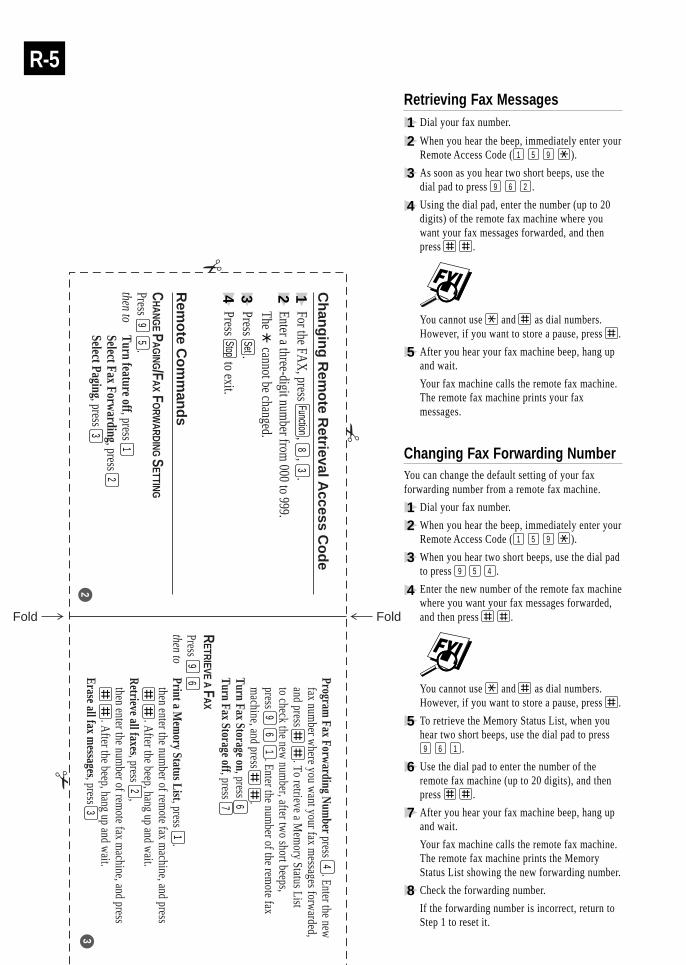
R-5
fax number w
here you want your fax m
essages forwarded,
and press . To retrieve a Mem
ory Status Listto check the new
number, after tw
o short beeps ,press . Enter the num
ber of the remote fax
machine, and press .
Program Fax Forw
arding Num
ber press . Enter the new4
9
6
1
Turn Fax Storage on, press6
Turn Fax Storage off, press7
RETRIEVE A F
AX
Press 9
6then to
Print a Mem
ory Status List, press .1
then enter the number of rem
ote fax machine, and press
. After the beep, hang up and w
ait.R
etrieve all faxes, press ,2
then enter the number of rem
ote fax machine, and press
. After the beep, hang up and w
ait.Erase all fax m
essages, press3
3
For the FAX
, press , , .
Ch
ang
ing
Rem
ote R
etrieval Access C
od
e
1Function
83
2Enter a three-digit num
ber from 000 to 999.
The cannot be changed.
3Press .
Set
4Press to exit.
Stop
Rem
ote C
om
man
ds
CHANG
E PAG
ING/FAX F
ORW
ARDING S
ETTINGPress .
9
5then to
Turn feature off, press1
Select Fax Forwarding, press
2Select Paging, press
32
Fold Fold
Retrieving Fax Messages1 Dial your fax number.
2 When you hear the beep, immediately enter yourRemote Access Code (1 5 9 ).
3 As soon as you hear two short beeps, use thedial pad to press 9 6 2 .
4 Using the dial pad, enter the number (up to 20digits) of the remote fax machine where youwant your fax messages forwarded, and thenpress .
You cannot use and as dial numbers.However, if you want to store a pause, press .
5 After you hear your fax machine beep, hang upand wait.
Your fax machine calls the remote fax machine.The remote fax machine prints your faxmessages.
Changing Fax Forwarding NumberYou can change the default setting of your faxforwarding number from a remote fax machine.
1 Dial your fax number.
2 When you hear the beep, immediately enter yourRemote Access Code (1 5 9 ).
3 When you hear two short beeps, use the dial padto press 9 5 4 .
4 Enter the new number of the remote fax machinewhere you want your fax messages forwarded,and then press .
You cannot use and as dial numbers.However, if you want to store a pause, press .
5 To retrieve the Memory Status List, when youhear two short beeps, use the dial pad to press
9 6 1 .
6 Use the dial pad to enter the number of theremote fax machine (up to 20 digits), and thenpress .
7 After you hear your fax machine beep, hang upand wait.
Your fax machine calls the remote fax machine.The remote fax machine prints the MemoryStatus List showing the new forwarding number.
8 Check the forwarding number.
If the forwarding number is incorrect, return toStep 1 to reset it.

These machines are made for use in the USA or CANADA only. We can not recommendusing them overseas because it may violate the Telecommunications Regulations of thatcountry and the power requirements of your fax machine may not be compatible with thepower available in foreign countries. Using USA or CANADA models overseas is at yourown risk and will void your warranty.
UU03050013PRINTED IN MALAYSIA
BROTHER INTERNATIONAL CORPORATION100 SOMERSET CORPORATE BOULEVARD
P.O. BOX 6911BRIDGEWATER, NJ 08807-0911 USA
BROTHER INTERNATIONAL CORPORATION(CANADA) LTD.
1 RUE HÔTEL DE VILLE,DOLLARD-DES-ORMEAUX, QC, CANADA H9B
3H6
Visit us on the World Wide Webhttp://www.brother.com