owner’s manual - orange amps
TRANSCRIPT


1
Important Safety Instructions:
1) Read these instructions. 2) Keep these instructions. 3) Heed all warnings. 4) Follow all instructions. 5) Do not use this apparatus near water. 6) Clean only with dry cloth. 7) Do not block any ventilation openings. Install in accordance with the manufacturer’s instructions. 8) Do not install near any heat sources such as radiators, heat registers, stoves, or other apparatus (including amplifiers) that produce heat. 9) Do not defeat the safety purpose of the polarized or grounding-type plug. A polarized plug has two blades with one wider than the other. A grounding type plug has two blades and a third grounding prong. The wide blade or the third prong are provided for your safety. If the provided plug does not fit into your outlet, consult an electrician for replacement of the obsolete outlet. 10) Protect the power cord from being walked on or pinched particularly at plugs, convenience receptacles, and the point where they exit from the apparatus. 11) Only use attachments/accessories specified by the manufacturer. 12) Use only with the cart, stand, tripod, bracket, or table specified by the manufacturer, or sold with the apparatus. When a cart is used, use caution when moving the cart/apparatus combination to avoid injury from tip-over. 13) Unplug this apparatus during lightning storms or when unused for long periods of time. 14) Refer all servicing to qualified service personnel. Servicing is required when the apparatus has been damaged in any way, such as power-supply cord or plug is damaged, liquid has been spilled or objects have fallen into the apparatus, the apparatus has been exposed to rain or moisture, does not operate normally, or has been dropped. EMC This device complies with Part 15 of the FCC rules. Operation is subject to the following two conditions: 1) This device may not cause harmful interference 2) This device must accept any interference received, that may cause undesired operation. Note: This equipment has been tested and found to comply with the limits for Class B digital device, pursuant to Part 15 of the FCC Rules. These limits are designed to provide reasonable protection against harmful interference in a residential installation. This equipment generates, uses and can radiate radio frequency energy and if not installed and used in accordance with the instructions, may cause harmful interference to radio communications. However, there is no guarantee that interference will not occur in a particular installation. If this equipment does cause harmful interference to radio or television reception, which can be determined by turning the equipment off and on, the user is encouraged to try and correct the interference by one or more of the following measures:
• Reorient or relocate the receiving antenna. • Increase the separation between the equipment and receiver. • Connect the equipment into an outlet on a circuit different from that to which the receiver is connected. • Consult the dealer or an experienced radio/television technician for help.
This Class B digital apparatus complies with Canadian ICES-3(B). Cet appareil numérique de la classe B est conforme à la norme NMB-3(B) du Canada.

2
Batteries. • The battery is type 18650 4000mAh 3.7V Li-ion • When the battery runs down it should be removed from the wand and charged
up using the battery charger supplied. • It is recommended that a spare battery is kept charged as this can be fitted immediately whilst the other battery is placed on charge. - Do not expose the battery pack to excessive heat
and/or to extremely low air pressure. Doing so may result in an explosion or the leakage of flammable liquid or gas;
- Danger of explosion if battery is incorrectly replaced. Replace only with the same
or equivalent type. - Disposal: Do not dispose of the battery pack with household waste. Contact your local authority for
information on disposal of lithium-ion (li-ion) batteries. Do not dispose of a battery into fire or a hot oven, or mechanically crush or cut the battery. Doing so can result in an explosion. For the State of California, U.S.A. only: Perchlorate Material - special handling may apply. See www.dtsc.ca.gov/hazardouswaste/perchlorate. This product’s lithium-ion battery may contain Perchlorate Material and may require special handling when recycled or disposed of in California.
Wireless. Bluetooth Receiver v4.0, with aptX Transmission distance of approx. 10-12meters. 12 hours playback from a 2hr charge NFC - Near Field Communication

3
Congratulations on your purchase of the ORANGE Musicboard.
It is the first classroom tool to make music theory a truly interactive experience allowing students to engage with harmonies, notes, rhythms, chords and transposition in both visual and audible ways.
With its innovative patented technology, this fully interactive educational tool makes music theory a priority in a fun ‘hands on’ way inspiring a new generation of students to excel in music theory lessons.
Key benefits:
• Radically improves learning time • Delivers considerably better examination results • Makes teaching easier • Helps prioritise learning of music theory • Makes learning theory fun and entertaining • Improves class interaction
For further information, including videos showing the Musicboard in action, please visit:
www.orangeamps.com/ome
We hope you enjoy using your new Musicboard!
Index
Your MUSICBOARD: 4
How to set up the Music Board: 5
How to use the Metronome: 6
How to Change Key: 7
How to Change Clef: 8
How to turn display on/off: 9
How to use Bluetooth: 10
How to use the Tuner: 11
How to control Volume: 12
How to use an Electric Guitar: 13
Connecting to an external speaker: 14
How to use Wands: 15
How to clean the MUSICBOARD: 16

4 5 www.orangeamps.com/ome www.orangeamps.com/ome
4
Your MUSICBOARD:
MUSICBOARD - Features
The MUSICBOARD incorporates integrated microcontroller technology and patented software algorithms for:
Stave and note sensing and detection using remote wand Clef transposition - Each of the three Staves can be allotted to either Treble, Alto, Tenor or Bass Clef Key transposition – Within each Clef, all notes may be transposed into any Key Metronome implementation fully programmable via the remote wand Large display indication for each Stave, indicating current Key signature and Clef; also current display of metronome speed Physical 49 note fully polyphonic weighted keyboard for physical demonstration of hand playing positions Polyphonic multi-voice implementation using MIDI control Full implementation of MIDI IN/OUT using on-board processors Guitar input with CLEAN / OVERDRIVE facility Large display Guitar tuner Digital data input allowing audio streaming to the MUSICBOARD via BLUETOOTH link from Smartphone or media device
Hardware functions
Switchable microphone for voice / acoustic instrument tuning Headphone Jack Stereo power amplifier and speakers allowing high quality reproduction of inbuilt and external music functions
How to set up the Music Board:
• Using your power supply that comes with your Music Board, plug in
to the input located to the left hand side of the Music Board.
• Switch on at the wall and then at the switch to the side of the Music Board
• Wait for the OME loading lights to illuminate
• After which you can now use your board.
• Adjust the Master volume knob on the side panel of the music board to a comfortable volume. We recommend half way as a good indicator.
Keyboard______________________
Interactive Staves__________
Tuner
Wand

6 7 www.orangeamps.com/ome www.orangeamps.com/ome
5
How to use the Metronome:
• Tap [METRO] with wand 1 time so you hear the activation click. The
metronome will start clicking and the tempo number will show across 3 staves
To change tempo the next set of instructions must be started within 6 seconds of activating the metronome, before the tempo speed lights go out.
• To increase(+) tempo, tap the wand on the top line of the top
stave until the desired speed is reached. • To decrease(-) tempo, tap the wand on the top space of the
top stave until the desired speed is reached. • Once desired speed is set either wait 6 seconds for speed
lights to disappear or tap [METRO] 1 time so you can hear the confirmation click.
• If the tempo lights go out before you are able to change
tempo then tap [METRO] with wand 1 time to hear confirmation click and then tap [METRO] 1 more time to reactivate metronome sequence.
How to Change Key:
• Tap [KEY] with wand 1 time so you hear the activation click.
• Select the stave and note you wish to change to by tapping the wand 1 time on your selected note on or below the middle line.
• The key note you have chosen will flash
• To choose between ‘#’ or ‘b’ tap the top line of the top stave until
the desired accidental is chosen. The ‘#’ or ‘b’ light will illuminate with your choice
• To choose between Major or minor tap the top space of the top
stave until the desired accidental is chosen. The ‘M’ or ‘m’ light will illuminate with your choice
• To confirm your new key tap [KEY] with wand 1 time so you hear
the confirmation click.
The Key note will stop flashing and lights will stay illuminated on your choices.

8 9 www.orangeamps.com/ome www.orangeamps.com/ome
6
How to Change Clef: How to turn display on/off:
• Tap [CLEF] with wand 1 time so you hear the activation click.
• Select the stave you wish to change by tapping the wand 1 time on or below the middle line.
• A blue light will flash next to the current clef for that stave.
• To change clef tap the wand on the top line of the top stave to go
up through the clef choices.
• The blue light will flash next to your desired clef.
• Tap the [CLEF] with wand 1 time so you hear the confirmation click.
The blue light will stop flashing and lights will stay illuminated on your desired clef.
• To turn off the display lights, tap [DISPLAY] with wand 1 time so you hear the activation click.
• The lights displayed on the board will go out.
• To turn on the display lights, tap [DISPLAY] with wand 1 time so you hear the activation click.
• The lights on the board will illuminate.
10 11 www.orangeamps.com/ome www.orangeamps.com/ome
7
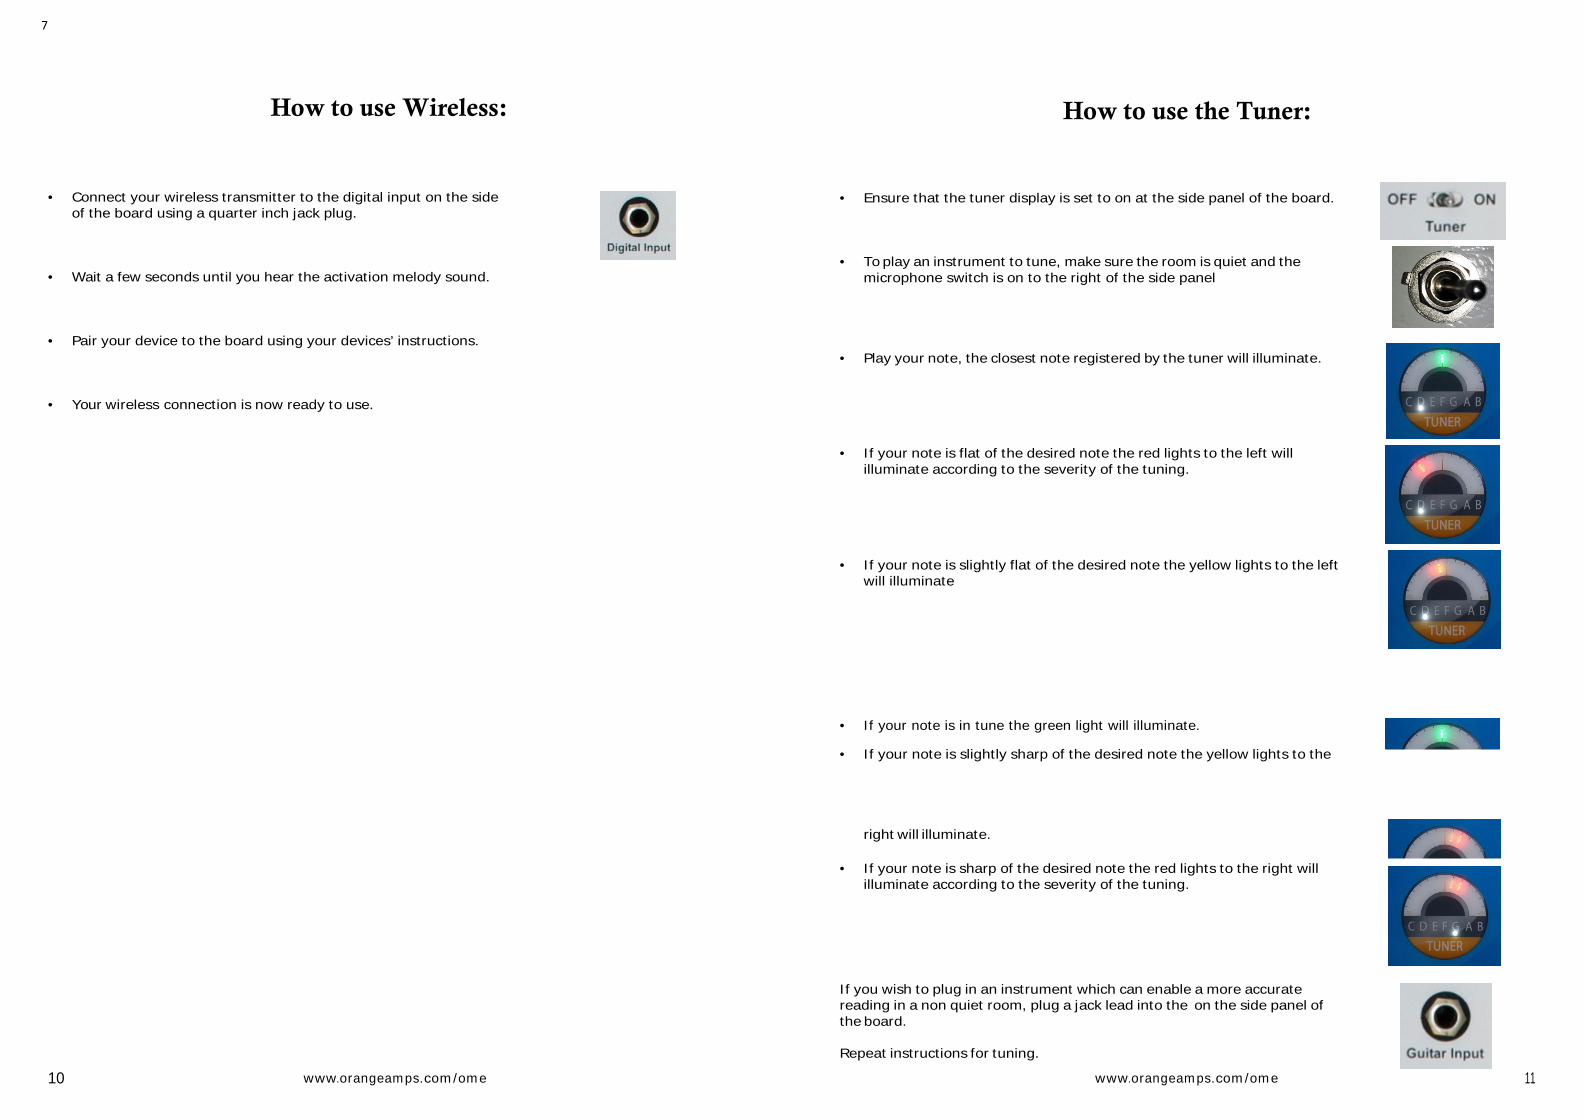
How to use Wireless: How to use the Tuner:
• Connect your wireless transmitter to the digital input on the side of the board using a quarter inch jack plug.
• Wait a few seconds until you hear the activation melody sound.
• Pair your device to the board using your devices’ instructions.
• Your wireless connection is now ready to use.
• Ensure that the tuner display is set to on at the side panel of the board. • To play an instrument to tune, make sure the room is quiet and the
microphone switch is on to the right of the side panel
• Play your note, the closest note registered by the tuner will illuminate.
• If your note is flat of the desired note the red lights to the left will illuminate according to the severity of the tuning.
• If your note is slightly flat of the desired note the yellow lights to the left
will illuminate
• If your note is in tune the green light will illuminate.
• If your note is slightly sharp of the desired note the yellow lights to the
right will illuminate.
• If your note is sharp of the desired note the red lights to the right will illuminate according to the severity of the tuning.
If you wish to plug in an instrument which can enable a more accurate reading in a non quiet room, plug a jack lead into the on the side panel of the board.
Repeat instructions for tuning.

12 13 www.orangeamps.com/ome www.orangeamps.com/ome
8
How to control Volume: How to use an Electric Guitar:
• To adjust the guitar input volume of the music board use the ‘Guitar Volume’ knob on the side panel of the music board.
• To adjust the master volume for the music board use the ‘Music
Board Volume’ knob on the side panel of the music board.
• To use your electric guitar with the music board ensure the guitar volume knob is turned down on the board to avoid damage to the music board’s speakers.
• Plug your guitar in to the guitar input jack on the side panel of the
board. • Check the volume on your guitar is turned up and then increase
the guitar volume on the board until level is sufficient. Ensure the Master volume of the board is not set to Zero.
• To add overdrive to your guitar sound, once the guitar is plugged
in switch the guitar overdrive switch to ‘on’ on the side panel of the music board.
• When removing your guitar from the board, make sure the guitar
volume on the side panel of the board is at Zero. You can then safely remove your guitar jack input without damage to the music board speakers.

14 15 www.orangeamps.com/ome www.orangeamps.com/ome
9
Connecting to an external speaker: How to use Wands:
• To connect the board to external speakers plug a quarter inch jack into the Line Out plug on the side panel of the board.
• The Orange Music wand is switched on by depressing the button on the bottom of the wand. The Orange light will illuminate. Pressing it again will turn the wand off. The light will go off.
• The wand has an automated switch off mechanism so if the wand
is left on and stationary for a prolonged period it will go into sleep mode to save battery. Once the wand is picked up it will wake itself up.
IMPORTANT: Do not try to undo the wand as this will harm its circuitry.
• To use the wand with the board, gently tap the end of the wand on
the board.
Located on the left hand side of the board is the Board Sensitivity Adjuster which includes the power input and power on/off function. Using a pen or similar pointed object, to adjust the sensitivity of the wand as it touches the front fascia of the musicboard: For staves: 1. Hold the 'on/off select' switch down for 3 seconds or until the front fasica led's light up with a flashing number as shown...( image to be created) 2. To increase wand sensitivity press the '+' button. The highest number being 9. 3. To decrease sensitivity press the '-' button. The lowest number being 1. For the 8 front fascia board commands: 1. Hold the 'on'off select' switch down for 3 seconds or until the front fascia led's light up with a flashing number as shown...(image to be created) 2. Press the 'on/off switch' button again until the top stave lights change. 3. To increase wand sensitivity press the '+' button. The highest number being 9. 4. To decrease sensitivity press the '-' button. The lowest number being 1. Once you have completed the sensitivity changes hold down the 'on/off switch' until the front panel led's say 'ok' Data IN port is for engineer use only.
16 17 www.orangeamps.com/ome www.orangeamps.com/ome
10
How to clean the MUSICBOARD: Notes:
• After using board pens with the Board Fascia it is advised to rub off using a white board rubber to avoid any unnecessary markings.
• A white board cleaner can be used to revive the music board fascia after heavy use.
• DO NOT use water.
• DO NOT use any corrosives.

OMEC 108 Ripon Way Borehamwood Hertfordshire
United Kingdom WD6 2JA
Tel: 0208 905 2828
www.orageamps.com/ome
Enquiries please email: [email protected]