owner’s manual - xterra fitness - your adventure … · owner’s manual. xterra fs420e...
TRANSCRIPT

OWNER’S MANUAL

Xterra FS420e Elliptical1
Product Registration ..2
Important Safety Instructions 3
Important Electrical Information 4
Important Operation Instructions ..4
Assembly Instructions .5
Features ..13
Operation of Your New Elliptical ..14
Maintenance 20
Manufacturer s Limited Warranty .21
Table of Contents
Serial Number Sticker Location

Xterra FS420e Elliptical2
Thank you for your purchase of this quality elliptical trainer from Xterra. Your newelliptical has been manufactured by one of the leading fitness manufacturers in the worldand is backed by one of the most comprehensive warranties available. Xterra will do allwe can to make your ownership experience as pleasant as possible for many years tocome.
If you have questions, or if parts are missing or damaged, or you require customerservice, call (870) 935-1107. Please have your Model number and serial number handywhen you call.
Please take a moment at this time to record below the name of the store, their telephonenumber, and the date of purchase for easy contact in the future. We appreciate yourconfidence in Xterra and we will always remember that you are the reason that we are inbusiness. Please complete and mail your registration card today and enjoy your newelliptical.
Yours in Health,The folks at Xterra Fitness
Name of Dealer______________________________________Telephone Number of Dealer___________________________Purchase Date_______________________________________
RECORD YOUR SERIAL NUMBERPlease record the Serial Number of this fitness product in the space provided below.
Serial Number_______________________________________
REGISTER YOUR PURCHASEThe self-addressed product registration card must be completed in full and returned to Xterrafitness, or visit: www.xterrafitness.com to register online.
FS420e_Ver.A
Product Registration
CONGRATULATIONS ON YOURNEW ELLIPTICAL AND WELCOME
TO THE XTERRA FAMILY!

Xterra FS420e Elliptical3
WARNING - Read all instructions before using this appliance.
Do not operate elliptical on deeply padded, plush or shag carpet. Damage to both carpet andelliptical may result.
Before beginning this or any exercise program, consult a physician. This is especiallyimportant for persons over the age of 35 or persons with pre-existing health conditions.
Keep children away from the elliptical. There are obvious pinch points and other caution areasthat can cause harm.
Keep hands away from all moving parts.
Never operate the elliptical if it has a damaged cord or plug. If the elliptical is not workingproperly, call your dealer.
Keep the cord away from heated surfaces.
Do not operate where aerosol spray products are being used or where oxygen is beingadministered. Sparks from the motor may ignite a highly gaseous environment.
Never drop or insert any object into any openings.
Do not use outdoors.
To disconnect, turn all controls to the off position, then remove the plug from the outlet.
Do not attempt to use your elliptical for any purpose other than for the purpose it is intended.
The hand pulse sensors are not medical devices. Various factors, including the user smovement, may affect the accuracy of heart rate readings. The pulse sensors are intendedonly as exercise aids in determining heart rate trends in general.
Wear proper shoes. High heels, dress shoes, sandals or bare feet are not suitable for use onyour elliptical. Quality athletic shoes are recommended to avoid leg fatigue.
SAVE THESE INSTRUCTIONS - THINK SAFETY!
Important Safety Instructions

Xterra FS420e Elliptical4
WARNING!NEVER remove any cover without first disconnecting AC power supply.If A.C. voltage varies by ten percent (10%) or more, the performance of your elliptical may beaffected. Such conditions are not covered under your warranty. If you suspect the voltageis low, contact your local power company or a licensed electrician for proper testing.NEVER expose this elliptical to rain or moisture. This product is NOT designed for Useoutdoors, near a pool or spa, or in any other high humidity environment. Maximumenvironmental ratings are 40-120 degrees Fahrenheit, 95% humidity non-condensing (nowater droplets forming on surfaces).
NEVER operate this elliptical without reading and completely understanding the results of anyoperational change you request from the computer.Understand that changes in resistance do not occur immediately. Set your desired level on thecomputer console and release the adjustment key. The computer will obey the commandgradually.NEVER use your elliptical during an electrical storm. Surges may occur in your householdpower supply that could damage elliptical components.Use caution while participating in other activities while using your elliptical such as watchingtelevision, reading, etc. These distractions may cause you to lose balance, resulting in seriousinjury.Always hold on to a handrail or hand bar while making control changes.
Your new elliptical is engineered and manufactured to the strictest industry standards andtolerances. All Elliptical trainers, no matter who the manufacturer, have a multitude of movinglinkages and parts. Be aware that even with the tightest mechanical tolerances there still couldbe a slight amount of play between some parts. This inherent play can result in slight noisesduring use such as clicks and small thumps. Please expect that the elliptical will not becompletely silent.
Important Electrical Information
Important Operation Instructions
Things To Know

Xterra FS420e Elliptical5
ASSEMBLY PACK CHECK LISTStep 1
#112 - 3/8" x 1-1/2"Hex Head Bolt (2pcs)
#152 - 3/8" x 19mmFlat Washer (2pcs)
#149 - 5/16" x 23mmFlat Washer (4pcs)
#124 - M5 x 10mmPhillips Head Screw (4pcs)
#158 - 3/8"Split Washer (1pc)
#110 - 5/16" x 2-1/4"Hex Head Bolt (4pcs)
#111 - 3/8" x 3/4"Hex Head Bolt (2pcs)
#157 - 5/16"Split Washer (4pcs)
#159 - 5/16"Star Washer (4pcs)
#139 - 3/8"Nyloc Nut (2pcs)
#113 - 3/8" x 2-1/4"Hex Head Bolt (1pc)
#156 - 3/8" x 23mmCurved Washer (2pcs)

Xterra FS420e Elliptical6
#149 - 5/16" x 23mmFlat Washer (2pcs)
#107 - 5/16" x 15mmHex Head Bolt (2pcs)
#155 17mmWave Washer (2pcs)
#128 - 3.5mm x 12mmSheet Metal Screw (6pcs)
Step 3
Step 4
#128 - 3.5mm x 12mmSheet Metal Screw (8pcs)
#125 - M5 x 15mmPhillips Head Screw (18pcs)
#109 - 5/16 x 1-1/4Hex Head Bolt (2pcs)
#137 - 5/16"Nyloc Nut (2pcs)
#149 - 5/16" x 23mm Flat Washer (2pcs)
ASSEMBLY PACK CHECK LIST
Step 2
#126 - M6 x 10mmPhillips Head Screw (4pcs)
Xterra FS420e Elliptical7
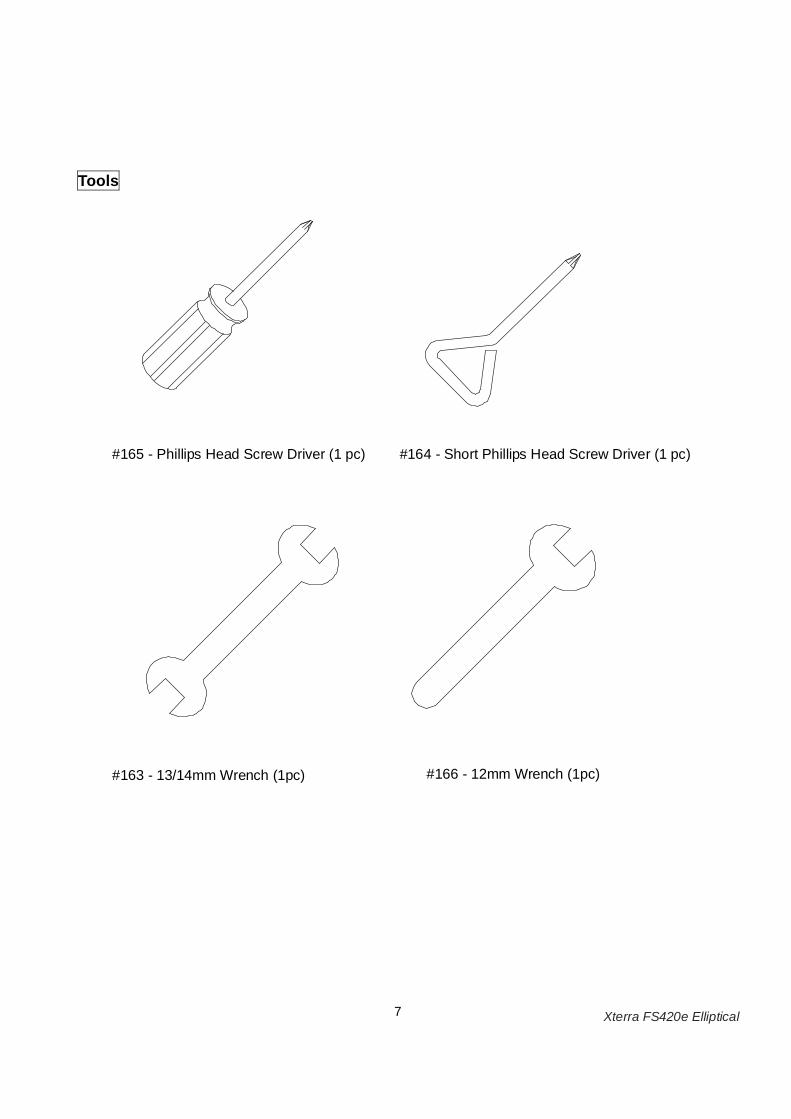
#165 - Phillips Head Screw Driver (1 pc)
#166 - 12mm Wrench (1pc)#163 - 13/14mm Wrench (1pc)
Tools
#164 - Short Phillips Head Screw Driver (1 pc)

Xterra FS420e Elliptical8
STEP 1: RAIL ASSEMBLY & CONSOLE MAST1. Set the main body of the elliptical on the floor and slide the rear rail assembly (2) into the
bracket on the stabilizer of the main body. Position the rail assembly so the mountingholes line up with the holes in the stabilizer bracket of the main body.
2. Install the four 5/16 X 2-1/4 bolts (110), 5/16 split washers (157), 5/16 flat washers(149) and 5/16 star washers (159) through the top of the stabilizer first. Make sure thewashers are installed on the bolt in the correct order: the split washer is put onfirst, the flat washer, and the star washer last. The star washer needs to be incontact with the painted surface of the rail frame to ensure a good ground.Hand-tighten them only at this point until the other two bolts are installed. Install the two3/8 X 1-1/2 bolts (112) and 3/8 flat washers (152) through the sides of the stabilizerbracket. Hand-tighten them at first until both bolts have been started, then tighten all sixbolts as tight as possible.
3. At the top opening of the main body locate the Computer Cable (51). Unravel the cableand feed the Computer Cable into the bottom of the Console Mast tube and out of the topopening. Install the Console Mast into the receiving bracket on the top of the main body,pulling slightly on the computer cable at the top of the mast while installing; this willensure the cable does not get pinched and shorted out during assembly. There is onebolt that is pre-installed in the receiving tube that will slide into the slots at the bottom ofthe mast.
4. Install the two 3/8 X ¾ bolts (111) and curved washers (156) through the front of theconsole mast; just hand tighten for now. Install the 3/8 X 2-1/4 bolt (113) and splitwasher (158) through the left side of the console mast then tighten all three installedbolts, and the pre-installed bolt, as tight as possible.NOTE: The Computer Cable runs through the Console Mast tube. Be careful not todamage or pinch this cable during this procedure as damage to the Console Assemblycould result.
5. There are four connectors at the top opening of the console mast (12), two Hand pulsewires (56), resistance switch wire (59) and one Computer Cable (51). Connect these tothe mating connectors on the back of the Console Assembly (50). Store the excess wiringback into the Console Mast (12) as you carefully install the Console Assembly onto themounting plate of Console Mast. Secure the console with four M5 x 10mm screws (124).Be careful not to pinch any wires.
6. Install the water bottle holder onto the handlebar in any position you like.
Assembly Instructions for Xterra FS420e

Xterra FS420e Elliptical9

Xterra FS420e Elliptical10
STEP 2: Swing Arms1. Install the two halves of the console mast cover (80 & 81) with the six 3.5 X 12mm sheet
metal screws (128).2. Install the wave washers (121) onto the swing arm axles. Slide the swing arms (4 Left, 5
Right) onto the axles and secure with the two 5/16 X 15mm bolts (85) and 5/16 flatwashers (116). Do not force the swing arms onto the axle. They should slide on,but you may need to jiggle them to get them lined up properly. The swing armshave been previously installed at the factory so they do fit properly.
Xterra FS420e Elliptical11
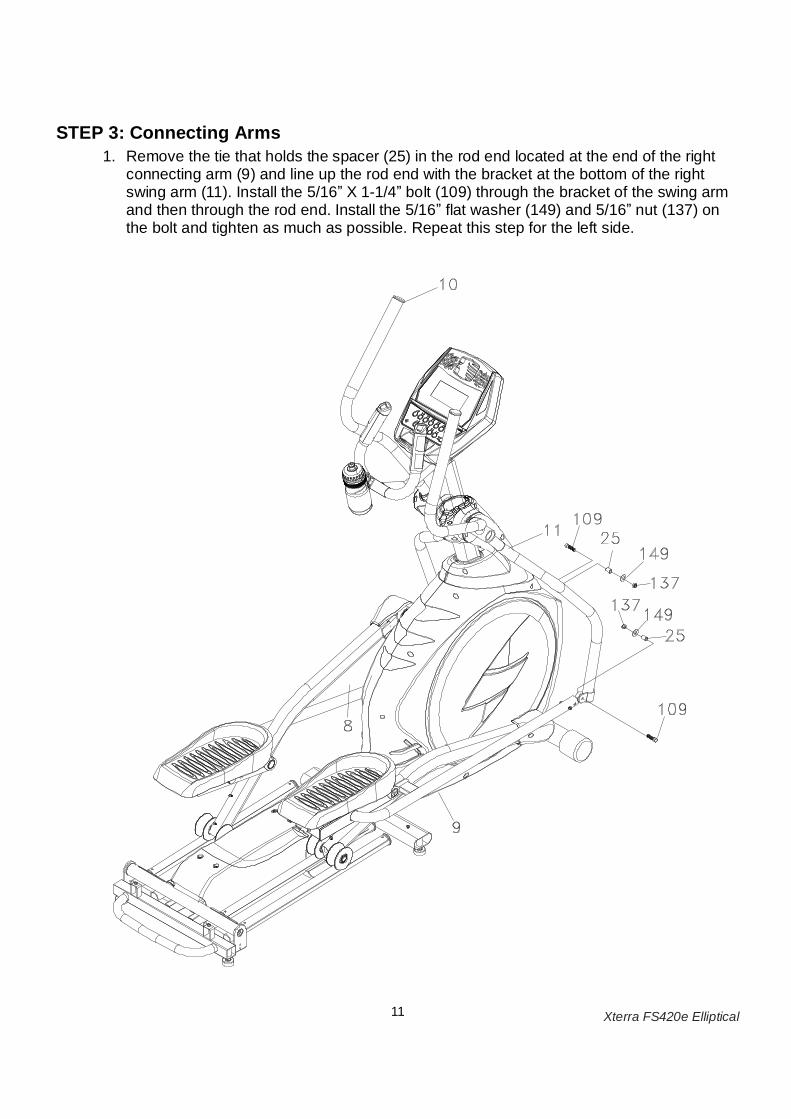
STEP 3: Connecting Arms1. Remove the tie that holds the spacer (25) in the rod end located at the end of the right
connecting arm (9) and line up the rod end with the bracket at the bottom of the rightswing arm (11). Install the 5/16 X 1-1/4 bolt (109) through the bracket of the swing armand then through the rod end. Install the 5/16 flat washer (149) and 5/16 nut (137) onthe bolt and tighten as much as possible. Repeat this step for the left side.

Xterra FS420e Elliptical12
STEP 4: Beauty Covers1. Install the two wheel covers (94) with four M5 X 15mm screws (125).2. Install the stabilizer covers (99 Left & 100 Right & 95 center) with six M5 X 15mm screws (125).
You need to raise the incline to position three to install the center cover.3. Install the four covers (92 & 93 x 2 each side) at the bottom of the swing arms with the two
3.5mm X 12mm sheet metal screws (128) and four M5 X 15mm screws (125).4. Install the swing arm end cap covers (88 & 89 left, 90 & 91 right) with the six 3.5mm X 12mm
sheet metal screws (128).5. Install the two shaped metal brackets (27) as shown with four M6 X 10mm screws (126). The
Z brackets should be installed so the tab with the tapped hole is pointing toward the rear.6. Install the rear incline cover (97) with two M5 X 15mm screws (125). Install the rear stabilizer
cover (98) with four M5 X 15mm screws (125).

Xterra FS420e Elliptical13
Correctly aligned orthopedic foot pads
Through research performed with a leading sports scientist and physical rehabilitation expert, Xterraengineering has developed a breakthrough in pedal design. No other elliptical at any price offers theseunique features. The history of elliptical use over the past few years tells us that many users suffer fromnumb toes while working out on elliptical trainers. Many other users complain of ankle, Achilles tendon, kneeand/or hip pain. While researching a solution to these common problems Xterra engineers consultedRichard DeKok, P.T., M.T.C., of St. Bernard s Industrial Rehabilitation Center in Jonesboro Arkansas.
Together we identified inherent problems found in elliptical designs and developed solutions to solve theproblems. What we found is that when you use an elliptical you tend to push outward during the powerstroke and not just straight back. This causes stress on the outer part of the foot and throws off the naturalalignment of the joints. The solution was to add a 2-degree inward angle to the footpads. This might soundsimple but what it does is straighten the user s joints back into a neutral alignment. This eases the overstressing of the ankles, knees and hips.
The second problem we identified is Numb toe syndrome where the toes become numb after using theelliptical for extended periods. This problem can be rectified by standing upright and not leaning forwardduring use or changing foot position on the pedals frequently. We discovered that some users stillexperience numb toes so we added an adjustment that allows the angle of the footpad to be changed.Because everybody is different, and there are as many styles to pedal an elliptical as there are people, wefound there is no one angle that fit every user. Some users would be up on the balls of their feet, resultingin numb toes, so we decided to let the user adjust the back of the foot pad upward to support the heel,taking the pressure off of the nerves in the balls of the feet and the Achilles tendon. The result was nomore numb toes. Some users are uncomfortable at this angle so for them we designed in three differentadjustable angles so they could find one that feels best for them. There are three settings available bypulling on the red quick release handle under the rear of each footpad. The lowest setting will set thefootpads at zero (0) degrees, or flat, at the bottom of the elliptical stroke. The second position sets thefootpad to five (5) degrees and the top position sets the footpads to ten (10) degrees.
Incline RampThe FS420e has an exciting new ramp incline feature that will further increase the variety of yourworkouts. When the incline is at its lowest position you get a normal elliptical workout. As the inclineincreases you will feel your knees rise higher with each step; which means you are involving moremuscle groups.
The manual incline operates by lifting the bar at the front area of the incline rails. The incline is aratchet type and will click into place as you raise it. There are 3 positions in total. At the top positionlifting the incline one more click will allow it to go back to the bottom.
TransportationThe elliptical is equipped with two transport wheels, which are engaged when the rear of the Elliptical islifted.
Features

Xterra FS420e Elliptical14
Power upThe Elliptical is supplied with an external power supply. When power is connected to the Elliptical, theconsole will automatically power up. If there is no input to the console for 20 minutes the console will go tostand-by mode to save energy. To turn the console on press any key.
When initially powered on the console will perform an internal self-test. During this time all the lights will turnon. When the lights go off the dot matrix display will show a software version (i.e.: VER 1.0) and the timeand distance windows will display an odometer reading. The odometer reading displays how many hours theelliptical has been used and how many virtual miles the elliptical has gone. The odometer will remaindisplayed for only a few seconds then the console will go to the start up display. The dot matrix display willbe scrolling through the different workout profiles of the programs and the message window will be scrollingan instructional message. You may now begin to use the console.
POWER CONNECTION Front left of machine
Operation of Your Elliptical

Xterra FS420e Elliptical15
Console Operation
Quick Start modeThis is the quickest way to start a workout. After the console powers up you just press the Start keyto begin. In Quick Start the Time will count up from zero and the workload may be adjustedmanually by pressing the Up or Down keys. The dot matrix display will show a work profile with a ¼mile track around it and a lap counter to the left. Pressing the Enter key will switch the display fromtrack to a hill type profile. To the right of the dot matrix is a number that indicates your work level.
Basic information and functions:
The Data displays:• Pulse indicates your heart rate if you are grasping the hand pulse sensors.• Time shows elapsed time unless you set the timer to count down.• Distance displays accumulated mileage.• Calories show an accumulation of calories burned (Kcal). The number shown is just an
estimate; your actual calorie burn most likely will be different. The only way to get anaccurate calorie reading is in a laboratory setting connected to a host of machines.
Message Window: Instructions are displayed to assist in programming the console and during aworkout the message window will display workout data as described below.
• Speed shows your speed in miles per hour if there is an displayed to the left of thetrack/profile window, and kilometers per hour if Km is displayed. Press the Enter key toswitch the display to see your Speed in RPM.
• Level Pressing the enter key again will switch the display to show your current work level.
The Elliptical has a built in heart rate monitoring system. Simply grasping the hand pulse sensorson the stationary handle bars will start the heart Icon blinking (this may take a few seconds). ThePulse Display Window will display your heart rate in beats per minute.
The Stop/Reset button performs several functions. Pressing the Stop/Reset key once during aprogram will Pause the program for 5 minutes. If you need to get a drink, answer the phone or anyof the many things that could interrupt your workout, this is a great feature. To resume your workoutduring Pause just press the Start key. If the Stop/Reset button is pressed twice during a workout theprogram will end and a summary of your workout is displayed. If the Stop/Reset key is held downfor 3 seconds the console will perform a complete Reset. Pressing the stop key while you aresetting up a program will take you back one step to the previous screen.
There is an Audio Input Jack on the front of the console and built-in speakers. You may plug anylow-level audio source signal into this port. Audio sources include MP3, Ipod, portable radio, CDplayer or even a TV or computer audio signal.Programming the consoleEach of the programs can be customized with your personal information and changed to suit yourneeds. Some of the information asked for during programming is necessary to ensure the readoutsare correct. You will be asked for your Age and Weight. Entering your Age is necessary during theHeart Rate control program to ensure the correct settings are entered in the program. Entering yourWeight aides in calculating a more correct Calorie reading; although we cannot provide an exactcalorie count we do want to be as close as possible.
Xterra FS420e Elliptical16
A message about Calories: Calorie readings on every piece of exercise equipment, whether it isin a gym or at home, are not accurate and tend to vary widely. They are meant only as a guide tomonitor your progress from workout to workout. The only way to measure your calorie burnaccurately is in a clinical setting connected to a host of machines. This is because every person isdifferent and burns calories at a different rate.
Entering a program/Changing SettingsPress the program keys to scroll through the program selections. The profile for each program willbe displayed in the dot matrix window. Press the enter key to select a program and begincustomizing the settings. If you want to workout without entering new settings then just press theStart key. This will bypass the programming of data and take you directly to the start of yourworkout. If you want to change the personal settings then just follow the instructions in themessage window. If you start a program without changing the settings, the default settings will beused.NOTE: Age and Weight default settings will change when you enter a new number. So the last Ageand Weight entered will be saved as the new default settings. If you enter an age and weight thefirst time you use the Elliptical you will not have to enter it every time you work out unless eitheryour age or weight changes or someone else enters a different age and weight.
Programming:
ManualThe Manual program works as the name implies, manually. This means that you control theworkload yourself and not the computer.
1. Press the Manual program button then press the Enter key.2. The message window will ask you to enter your Weight. You may adjust the weight setting
using the Up and Down keys, then press enter to continue.3. The message window will ask you to enter your Age. You may adjust the age setting using
the Up and Down keys, then press the Enter key to accept the new number and proceed onto the next screen.
4. Next is the Time. You may adjust the Time and press enter to continue.5. Now you are finished editing the settings and can begin your workout by pressing the Start
key.6. Once the program starts the elliptical will be set to level one. This is the easiest level and it is
a good idea to stay at level one for a while to warm up. If you want to increase the work loadat any time press the Up key; the Down key will decrease the workload.
7. When the program ends the message window will show a summary of your workout. Thesummary will be displayed for a short time then the console will return to the start-up display.
Preset ProgramsThe Elliptical has seven different programs that have been designed for a variety of workouts.These seven programs have factory preset profiles for achieving different goals.
Xterra FS420e Elliptical17
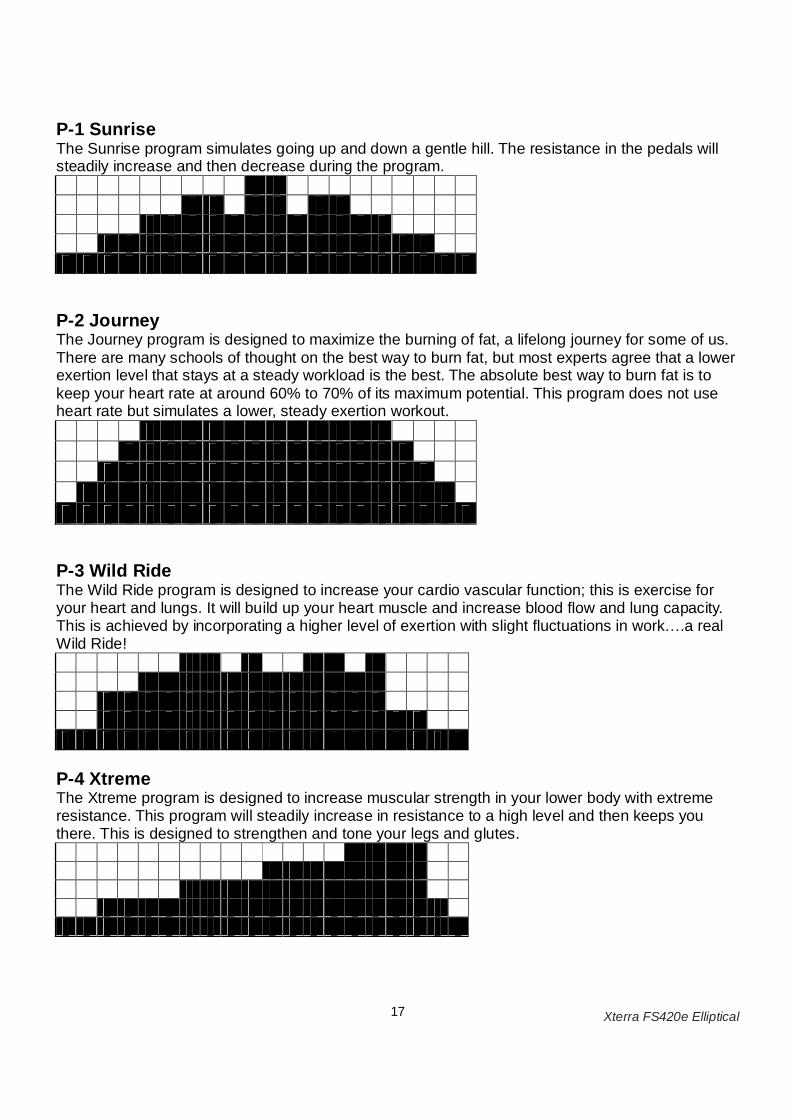
P-1 SunriseThe Sunrise program simulates going up and down a gentle hill. The resistance in the pedals willsteadily increase and then decrease during the program.
P-2 JourneyThe Journey program is designed to maximize the burning of fat, a lifelong journey for some of us.There are many schools of thought on the best way to burn fat, but most experts agree that a lowerexertion level that stays at a steady workload is the best. The absolute best way to burn fat is tokeep your heart rate at around 60% to 70% of its maximum potential. This program does not useheart rate but simulates a lower, steady exertion workout.
P-3 Wild RideThe Wild Ride program is designed to increase your cardio vascular function; this is exercise foryour heart and lungs. It will build up your heart muscle and increase blood flow and lung capacity.This is achieved by incorporating a higher level of exertion with slight fluctuations in work .a realWild Ride!
P-4 XtremeThe Xtreme program is designed to increase muscular strength in your lower body with extremeresistance. This program will steadily increase in resistance to a high level and then keeps youthere. This is designed to strengthen and tone your legs and glutes.

Xterra FS420e Elliptical18
P-5 CanyonsThe Canyons program takes you through high levels of intensity followed by periods of low intensity.This program increases your endurance by depleting your oxygen level followed by periods ofrecovery to replenish oxygen. Your cardio vascular system gets programmed to use oxygen moreefficiently this way.
P-6 Thrill HillThe Thrill Hill program combines a few types of workout in one, with variations of cardio andstrength portions to give you a thrill.
P-7 X-CountryThe X-Country program simulates a cross country run across uneven terrain.
Programming Preset Programs:1. Select the desired program then press the Enter key.2. The message window will ask you to enter your Weight. You may adjust the weight setting, using the
Up and Down keys, then press the Enter key to accept the new number and proceed on to the nextscreen.
3. You are now asked to enter your Age. You may adjust the age number using the Up and Down keys,then press enter to continue.
4. Next is Time. You may adjust the Time and press enter to continue.5. Now you are asked to adjust the Max Level. This is the peak exertion level you will experience during
the program (work level at the top of the hill). Adjust the level and then press enter.6. Now you are finished editing the settings and can begin your workout by pressing the Start key.7. If you want to increase or decrease the workload at any time during the program press the Up or Down
key. This will change only the work level during the current segment.8. During the program you will be able to switch between a quarter mile track or profile display in the
dot matrix window.9. When the program ends the message window will show a summary of your workout. The summary will
be displayed for a short time then the console will return to the start-up display.
Xterra FS420e Elliptical19
Custom User Defined ProgramsThe customizable User programs allow you to build and save your own workout. You can build yourown custom program by following the instructions below.1. Select the User program (U1 or U2) then press enter.2. When you press enter, the message window will show Welcome .press start if there is no
name saved. If the name David had been previously saved the message window will showWelcome David and the D will be blinking. If there is a name saved you can change it or
you may press the Stop key to keep the name and continue to the next step. If you want toenter a new name press enter. Then use the Up and/or the Down key to change the first letterand press Enter to save the first letter and continue to the next letter. When you have finishedentering the name press the Stop key to save the name and continue to the next step.
3. The message window will ask you to enter your Weight. You may enter your weight using theUp and Down keys, then press the Enter key to accept the new number and proceed on to thenext screen.
4. You are now asked to enter your Age. You may adjust the age number using the Up and Downkeys, then press enter to continue.
5. Next is Time. You may adjust the total program time and press enter to continue.6. Now the message window will ask you to adjust the first segment level; use the up & down
keys to adjust. When you finish adjusting the first segment, or if you don t want to change it,then press enter to continue to the next segment.
7. The next segment will show the same level as the previously adjusted segment. Repeat thesame process as the last segment then press enter. Continue this process until all twentysegments have been set.
8. The message window will ask you to press start, which will start the program and also save theprogram in memory.
9. If you want to increase or decrease the workload at any time during the program press the Upor Down key. This will only affect the workload for the present position in the profile. When theprofile changes to the next column it will return to the preset work level.
10. When the program ends the message window will show a summary of your workout. Thesummary will be displayed for a short time then the console will return to the start-up display.
Heart Rate Control Program operationTo start the HRC program follow the instructions below or just select the HRC program then theEnter button and follow the directions in the message window.
1. Select the HRC program then press the Enter key.2. The message window will ask you to enter your Weight. You may enter your weight using the
Up and Down keys then press the Enter key to accept the new number and proceed.3. You are now asked to enter your Age. You may adjust the age number using the Up and Down
keys then press enter to continue.4. You are now asked to select the target heart rate (THR) level. This is the heart rate level you will
experience during the program. Adjust the level and then press enter.5. Next is Time. You may adjust the Time and press enter to continue.6. Now you are finished editing the settings and can begin your workout by pressing the Start key.7. If you want to change the THR at any time during the program press the Up or Down key.
When the program ends the message window will show a summary of your workout. The summarywill be displayed for a short time then the console will return to the start-up display

Xterra FS420e Elliptical20
Maintenance:
1. Wipe down all areas in the sweat path with a damp cloth after each workout.2. If a squeak, thump, clicking or rough feeling develops the main cause is most likely one of two
reasons:i. The hardware was not sufficiently tightened during assembly. All bolts that were
installed during assembly need to be tightened as much as possible. It may benecessary to use a larger wrench than the one provided if you cannot tighten the boltssufficiently. I cannot stress this point enough; 90% of calls to the service departmentfor noise issues can be traced to loose hardware or the rear rails being dirty.
ii. Dirt build-up on the rear rails and polyurethane wheels are also a source of noise.Noise from build-up on the rails can cause a thumping sound that you would swear iscoming from inside the main body of the machine because noise travels, and isamplified in the tubing of the frame. Clean the rails and wheels with a lint free clothand rubbing alcohol. Stubborn build-up can be removed with your thumbnail or anon-metallic scraper, like the back edge of a plastic knife. After cleaning, apply asmall amount of lubricant on the rails with your fingers or a lint free cloth. You onlyneed a thin coat of lubrication, wipe off any excess.
3. If squeaks or other noises persist, check that the unit is properly leveled before calling theservice department.
Maintenance Menu in console software:
The console has built in maintenance/diagnostic software. The software will allow you to changethe console settings from English to Metric and turn off the beeping of the speaker when a key ispressed for example. To enter the Maintenance menu (may be called Engineering mode,depending on version) press and hold down the Start, Stop and Enter keys. Keep holding the keysdown for about 5 seconds and the message window will display Engineering mode . Press theenter button to access the menu below. Press the up and down keys to navigate the menu.
a. Key test (will allow you to test all the keys to make sure they are functioning)b. Functions (Press enter to access settings, use up/dn keys to scroll)
i. ODOMETER reset (reset the odometer)ii. Units (Set to English or Metric display readings)iii. Bike or Elliptical (changes settings so the console can be used on an Xterra
bike or elliptical)iv. Sleep mode Turns on/off sleep mode.v. Motor test (continually runs the tensioning gear motor)vi. Manual (Allows stepping of the gear motor)vii. Key tone (Turn on or off the beep when a key is pressed)viii. Clear EEPROM for engineering use only
c. Security (Allows you to lock the keypad so no unauthorized use is allowed) Whenthe child lock is enabled, the console will not allow the keypad to operate unlessyou press and hold the Start and Enter buttons for 3 seconds to unlock theconsole.

Xterra FS420e Elliptical21
Effective July 15, 2009ELLIPTICAL LIMITED WARRANTY
Xterra Fitness Inc. warrants all its home use treadmills parts for a period of time listed below, from the date of retail sale, as determined by a sales receipt or inthe absence of a sales receipt, eighteen (18) months from the original factory shipping date. Xterra s responsibilities include providing new or remanufacturedparts, at Xterra s option, and technical support to our independent dealers and servicing organizations. In the absence of a dealer or service organization,these warranties will be administered by Xterra Fitness directly to a consumer. The warranty period applies to the following components: Xterra Fitness Inc.warrants all its home use treadmills parts for a period of time listed below, from the date of retail sale, as determined by sale receipt, or
Home Use Limited WARRANTYFrame and Brake LifetimeAll Other Components 5 YearsLabor 1 Year
NORMAL RESPONSIBILITIES OF THE CONSUMERThis warranty applies only to products in ordinary household use. The consumer is responsible for the items listed below:1. The warranty registration card must be completed and returned to the address listed on the card within 10 days of the original purchase to validate themanufacturer s limited warranty or register online at www.xterrafitness.com2. Proper use of the elliptical in accordance with the instructions provided in this manual, including maintenance.3. Proper connection to a power supply of sufficient voltage, replacement of blown fuses, repair of loose connections or defects in house/facility wiring.4. Expenses for making the elliptical accessible for servicing, including any item that was not part of the elliptical at the time it was shipped from the factory.5. Damages to the elliptical finish during shipping, installation or following installation.
EXCLUSIONSThis warranty does not cover the following:1. CONSEQUENTIAL, COLLATERAL, OR INCIDENTAL DAMAGES SUCH AS PROPERTY DAMAGE AND INCIDENTAL EXPENSESRESULTING FROM ANY BREACH OF THIS WRITTEN OR ANY IMPLIED WARRANTY.Note: Some states do not allow the exclusion or limitation of incidental or consequential damages, so this limitation or exclusion may not apply to you.2. Service call reimbursement to the consumer. Service call reimbursement to the dealer that does not involve malfunction or defects in workmanship ormaterial, for units that are beyond the warranty period, for units that are beyond the service call reimbursement period, for ellipticals not requiring componentreplacement, or ellipticals not in ordinary household use.3. Damages caused by services performed by persons other than authorized Xterra Fitness service companies, use of parts other than original Xterra parts, orexternal causes such as alterations, modifications, abuse, misuse, accident, improper maintenance, inadequate power supply, or acts of God.4. Products with original serial numbers that have been removed or altered.5. Products that have been; sold, transferred, bartered, or given to a third party.6. Products that are used as store display models.7. Products that do not have a warranty registration on file at Xterra Fitness, inc. Xterra Fitness reserve the right to request proof of purchase if no warrantyrecord exists for the product.8. THIS WARRANTY IS EXPRESSLY IN LIEU OF ALL OTHER WARRANTIES EXPRESSED OR IMPLIED, INCLUDING THE WARRANTIES OFMERCHANTABILITY AND/OR FITNESS FOR A PARTICULAR PURPOSE.
SERVICEKeep your bill of sale. Twelve (12) months from the date on the bill of sale or eighteen (18) months from the date of factory shipping as determined by the serialnumber establishes the warranty period should service be required. If service is performed, it is in your best interest to obtain and keep all receipts. This writtenwarranty gives you specific legal rights. You may also have other rights that vary from state to state. Service under this warranty must be obtained by followingthese steps, in order:1. Contact your selling authorized Xterra Fitness dealer. OR2. Contact your local authorized Xterra Fitness service organization.3. If there is a question as to where to obtain service, contact our service department at (870) 935-1107.4. Xterra s obligation under this warranty is limited to repairing or replacing, at Xterra s option, the product through one of our authorized service centers. Allrepairs must be preauthorized by Xterra. If the product is shipped to a service center freight charges to and from the service center will be the customer sresponsibility. For replacement parts shipped while the product is under warranty, the customer will be responsible for shipping and handling charges. Forin-home service, the customer will be responsible for a trip charge. There will be an additional trip charge if the customer is located over 100 miles from thenearest service center.5. The owner is responsible for adequate packaging upon return to Xterra. Xterra is not responsible for damages in shipping. Make all freight damage claimswith the appropriate freight carrier. DO NOT SHIP ANY UNIT TO OUR FACTORY WITHOUT A RETURN AUTHORIZATION NUMBER. All units arrivingwithout a return authorization number will be refused.6. For any further information, or to contact our service department by mail, send your correspondence to:
Xterra Fitness, Inc.P.O. Box 2037
Jonesboro, AR 72402-2037
Product features or specifications as described or illustrated are subject to change without notice. All warranties are made byXterra Fitness, Inc. This warranty applies only in the 50 states of the U.S.A.
Manufacturer’s Limited Warranty