p-stat · p-stat holds related information in a rectangular format called a “p-stat system...
TRANSCRIPT
$C.1
P-STAT An Introductory
®
Guide for
P-STAT®
Windows Users

P-STAT: Introductory Guide For Windows Users
June 2013
This publication corresponds to P-STAT Version 3 Revision 5, June 2013 This publication is designed toprovide a general introduction to the P-STAT system as implemented under PC/Windows.
Please direct any questions to:
P-STAT, Inc.230 Lambertville-Hopewell Rd.Hopewell, New Jersey 08525-2809U.S.A.
Telephone: 609-466-9200
Fax: 609-466-1688
Internet: [email protected]
Web Page URL: http://www.pstat.com
All rights reserved. Except as permitted under the United States Copyright Act of 1976, no part of this pub-lication may be reproduced or distributed in any form or by any means, electronic or mechanical, includingphotocopying, recording, or any information storage and retrieval system without the prior written permis-sion of P-STAT, Inc.
P-STAT is a registered trademark of P-STAT, Inc. Windows is a registered trademark of MicroSoft Corp.Copyright © 2006-2013 P-STAT, Inc. Printed in the US. Published by P-STAT, Inc.

CONTENTS
Features and Statistics
P-STAT’S CAPABILITIES . . . . . . . . . . . . . . . . . . . . . . . . . . . . . . . . . . . . . . . . . . . .1.1
USER FEATURES . . . . . . . . . . . . . . . . . . . . . . . . . . . . . . . . . . . . . . . . . . . . . . . . . . .1.3
LEARNING TO USE P-STAT. . . . . . . . . . . . . . . . . . . . . . . . . . . . . . . . . . . . . . . . . .1.4
P-STAT DOCUMENTATION. . . . . . . . . . . . . . . . . . . . . . . . . . . . . . . . . . . . . . . . . .1.6
INSTALLATION . . . . . . . . . . . . . . . . . . . . . . . . . . . . . . . . . . . . . . . . . . . . . . . . . . . .1.7
MIGRATE . . . . . . . . . . . . . . . . . . . . . . . . . . . . . . . . . . . . . . . . . . . . . . . . . . . . . . . . .1.9
SUMMARY. . . . . . . . . . . . . . . . . . . . . . . . . . . . . . . . . . . . . . . . . . . . . . . . . . . . . . .1. 10
Getting Started
GETTING STARTED . . . . . . . . . . . . . . . . . . . . . . . . . . . . . . . . . . . . . . . . . . . . . . . .2.1
OVERVIEW OF THE MAIN MENU . . . . . . . . . . . . . . . . . . . . . . . . . . . . . . . . . . . .2.1
ORGANIZATION OF INFORMATION. . . . . . . . . . . . . . . . . . . . . . . . . . . . . . . . . .2.4
CREATING A P-STAT SYSTEM FILE . . . . . . . . . . . . . . . . . . . . . . . . . . . . . . . . . .2.7
MORE FEATURES . . . . . . . . . . . . . . . . . . . . . . . . . . . . . . . . . . . . . . . . . . . . . . . . .2.13
SUMMARY . . . . . . . . . . . . . . . . . . . . . . . . . . . . . . . . . . . . . . . . . . . . . . . . . . . . . .2. 15
A Single Project
EXPORTING THE DATA FROM EXCEL. . . . . . . . . . . . . . . . . . . . . . . . . . . . . . . .3.1
PREPARING P-STAT . . . . . . . . . . . . . . . . . . . . . . . . . . . . . . . . . . . . . . . . . . . . . . . .3.1
IMPORTING THE TAB DELIMITED FILE INTO P-STAT . . . . . . . . . . . . . . . . . .3.2
EXECUTING THE TURF COMMAND . . . . . . . . . . . . . . . . . . . . . . . . . . . . . . . . . .3.2
PRINTING THE RESULTS. . . . . . . . . . . . . . . . . . . . . . . . . . . . . . . . . . . . . . . . . . . .3.8
OTHER TURF IDENTIFIERS. . . . . . . . . . . . . . . . . . . . . . . . . . . . . . . . . . . . . . . . .3.11
HELP OPTIONS. . . . . . . . . . . . . . . . . . . . . . . . . . . . . . . . . . . . . . . . . . . . . . . . . . . .3.12
OTHER DATA INPUT . . . . . . . . . . . . . . . . . . . . . . . . . . . . . . . . . . . . . . . . . . . . . .3.13
The Editor
i

THE EDITOR’S MAIN MENU . . . . . . . . . . . . . . . . . . . . . . . . . . . . . . . . . . . . . . . . .4.2
AN EXAMPLE WITH A COMMAND FILE . . . . . . . . . . . . . . . . . . . . . . . . . . . . . .4.4
MORE COMMAND EDITOR FEATURES . . . . . . . . . . . . . . . . . . . . . . . . . . . . . . .4.8
A Larger Project
A WEIGHTED ANALYSIS. . . . . . . . . . . . . . . . . . . . . . . . . . . . . . . . . . . . . . . . . . . .5.1
COMBINATIONS . . . . . . . . . . . . . . . . . . . . . . . . . . . . . . . . . . . . . . . . . . . . . . . . . .5.10
EFFICIENT PROCESSING . . . . . . . . . . . . . . . . . . . . . . . . . . . . . . . . . . . . . . . . . . .5.12
ii

FIGURES
The P-STAT Main Window . . . . . . . . . . . . . . . . . . . . . . . . . . . . . . . . . . . . . . . . . . . 1.5
The Information (Data) for the File . . . . . . . . . . . . . . . . . . . . . . . . . . . . . . . . . . . . . 2.5
Elements of a P-STAT System File . . . . . . . . . . . . . . . . . . . . . . . . . . . . . . . . . . . . . 2.5
Displaying Autosave and External File names . . . . . . . . . . . . . . . . . . . . . . . . . . . . 2.12
Turf Report . . . . . . . . . . . . . . . . . . . . . . . . . . . . . . . . . . . . . . . . . . . . . . . . . . . . . . . . 3.7
Turf: Reach.results Output File . . . . . . . . . . . . . . . . . . . . . . . . . . . . . . . . . . . . . . . . 3.8
REACH.STATS : All possible statistics . . . . . . . . . . . . . . . . . . . . . . . . . . . . . . . . 3.10
REACH.STATS Controls the Rows. SHOW Controls Columns . . . . . . . . . . . . . . 3.10
An Empty Editor File . . . . . . . . . . . . . . . . . . . . . . . . . . . . . . . . . . . . . . . . . . . . . . . . 4.1
Import an Existing Editor File . . . . . . . . . . . . . . . . . . . . . . . . . . . . . . . . . . . . . . . . . 4.5
An Editor File . . . . . . . . . . . . . . . . . . . . . . . . . . . . . . . . . . . . . . . . . . . . . . . . . . . . . . 4.7
The COUNTS Command . . . . . . . . . . . . . . . . . . . . . . . . . . . . . . . . . . . . . . . . . . . . . 5.3
Generate Weight: the Command . . . . . . . . . . . . . . . . . . . . . . . . . . . . . . . . . . . . . . . . 5.8
Weighted TURF Report . . . . . . . . . . . . . . . . . . . . . . . . . . . . . . . . . . . . . . . . . . . . . 5.10
A File of Commands . . . . . . . . . . . . . . . . . . . . . . . . . . . . . . . . . . . . . . . . . . . . . . . . 5.13
Macro with Subfiles . . . . . . . . . . . . . . . . . . . . . . . . . . . . . . . . . . . . . . . . . . . . . . . . 5.14
A Macro With Arguments . . . . . . . . . . . . . . . . . . . . . . . . . . . . . . . . . . . . . . . . . . . 5.16
iii


1
Features and Statistics
P-STAT is a computing system for data analysis and information management and display. “PSTAT: Introduc-tory Manual” contains a complete introduction to the P-STAT program and is the basic reference manual for allusers. . This manual is designed primarily for the new user running P-STAT on PC/windows. This chapter givesa brief introduction to the full capabilities of the P-STAT program. The rest of this book covers the features thatare supported with menus .
1.1 P-STAT’S CAPABILITIES
P-STAT capabilities include:
• retrieval of numeric and character information;
• file management;
• data modification;
• data display;
• statistical analyses;
• in-stream and block macros;
• interactive and batch processing.
1.2 Storage and Retrieval of Data
P-STAT accepts information in many different forms. Information may be numeric, as is average yearly rainfallor total automobile production, or it may be text or character, as is a name or an address. P-STAT accepts infor-mation from a variety of sources, including disk and the user’s terminal. The information may be formatted orunformatted. It may be produced by another software system. Tab delimited files from Excel and SPSS portablefiles, may be input to P-STAT.
P-STAT holds related information in a rectangular format called a “P-STAT system file”. This file may con-tain both numeric and character information and is stored in a form that P-STAT can read, write and manipulatequickly. Information may be missing, and representations for three different types of missing data are available.P-STAT system files are packed to reduce storage requirements and automatically saved. Once a file is changed,a backup version exists and is available in case the current version is lost or incorrectly modified.
Other types of files used by P-STAT may be made either within P-STAT or within the host computer oper-ating system. They hold value labels, command sequences, edit files, and data resulting from modifications oranalyses.
1.3 File Management
Many commands permit two or more files to be accessed simultaneously. There are commands to join and mergefiles with either direct or hierarchical linkages. These commands provide most of the capabilities normally asso-ciated with a relational database system. In addition, files can be sorted, divided into subsets, concatenated,

1.2 Features and Statistics
interleaved, updated and transposed. Duplicate cases may be detected and deleted, or summarized into one case.There are also commands to do matrix operations and aggregation.
A utility command, SHOWBYTES, is available to display the exact contents of an external file. Another util-ity command, REFORMAT, can be used to change fields in an external file. EXAMINE reads an external file andcounts how many times each type of ASCII byte occurs.
1.4 Data Modification
The P-STAT Programming Language (PPL) is a powerful tool for modifying existing variables, generating newvariables, and selecting cases or variables. PPL can be applied to any P-STAT system file as it is read by anyP-STAT command. It can be used on the variables within a single case or across groups of related cases.
The ability to perform data modification across successive cases means that complex operations, which inmost systems would require multiple passes through a file, can be done with a single pass using PPL. For instance,given a file of people arranged in household order, it takes only a single step to calculate family size and appendthat information to the record of each member in that household.
Operators and functions include:
1. wildcards and masks in variable selection;
2. DO loops for repeated calculations;
3. logical testing with IF statements and IF/THEN/ELSE blocks;
4. recoding of data values;
5. system values such as .DATE., the current date;
6. scratch variables and user-defined arrays permit cross-case and cross-command manipulations.;
7. splitting and collecting of cases.
Special functions for character variables permit calculation of the length and position of character strings, forma-tion of substrings, conversion of character variables to numeric variables, and location and compression of specificcharacters. Only a few of the basic PPL features are available in the menus. The more advanced features can beaccessed using the command language.
1.5 Data Display
Report writing is straightforward with the LIST and TITLES commands. Options exist for page layout, data for-matting, subgrouping, hierarchical arrangement of variables, headings and summary statistics. Multiple top titlesand bottom titles are possible. Simple lists are automatically formatted appropriately for the output device in use.Different output devices with varying attributes may be defined.
The TEXTWRITER command produces reports with precision formatting and complex layouts. In addition,information in P-STAT files may be tested and differentially incorporated in the reports. All PPL instructions andfunctions for data selection and modification may be used in TEXTWRITER. TEXTWRITER output can be usedwith PostScript controls to produce camera-ready copy with control over the page layout including choice of fontand color.
The crosstabulation command, SURVEY, may be used to process both numeric and character questionnairedata. It produces stub and banner reports, with titles, multiple banners, nested banners, nets, and other featuresfamiliar to survey researchers. Extensive options provide for multiple response tables including nets and subtotals.Other options provide for cells with counts, different percentages, means and sums, flexible formats and layouts,and weighting. SURVEY supports PostScript printers and offers a variety of font choices when PostScript isavailable.
Auxiliary commands for the market research analyst include:

Features and Statistics 1.3
1. BALANCE: a command which uses sample balancing techniques to produce weights which havethe least impact on cell counts.
2. SAMPLE: a command to produce a random sample from a larger file. By variables can be suppliedto assure that the sample matches the larger file in critical ways.
3. TURF: a command to do Total Unduplicated Reach and Frequency analysis. The TURF.SCOREScommand is a tool that can be used to identify the cases which contributed most to the TURF output.
1.6 Statistical Analyses
P-STAT provides a wide range of statistical procedures from simple descriptive statistics to complex multivariateprocedures. Description files give means, standard deviations, highs, lows, and counts of good and missing dataitems. The COUNTS command provides an initial overview of data. It produces frequencies and percentages ofall unique values of character and numeric variables, as well as a multitude of summary statistics. COUNTS canalso be used to produce frequency distributions for subgroups. COUNTS output can optionally be saved in aP-STAT system file. The PERCENTILES command provides medians, quartiles, deciles, centiles or arbitrarilyspecified quantiles.
Groups of independent or paired data may be tested using t tests. When the measurements are not qualitativedata, nonparametric tests may be used. Correlations for continuous, dichotomous, and ranked variable pairs maybe requested, as well as significance values and corrections for grouping errors. Canonical correlation is a multi-variate procedure that analyzes the relationship between two sets or groups of variables.
Multiple regression analysis can fit linear equations to observed data values, predict dependent values andcalculate residuals. The analysis may be a forward stepwise regression, with stepping either program or user con-trolled, or it may be non-stepwise.
Analysis of variance (ANOVA) determines the effects of multiple treatments in both balanced and unbalanceddesigns, and detects and reports confounding of effects. Designs may be modified interactively, and error termsand blocks specified. Factorial, block, nested, split-plot and repeated measures designs may be analyzed. Covari-ates and partitioning of sums of squares may be specified with a cohesive algebraic notation.
Survival analysis is used to analyze lifetime (survival time) data. Both the lifetable (actuarial) and productlimit methods are supported. Cluster analysis puts cases into a specified number of groups. The cases may beweighted. Discriminant and factor analyses permit identification of significant groups and factors. Various factormatrix rotations may be requested. In addition, matrix operator commands and a macro facility, used in conjunc-tion with the programming language, permit a user to define statistical procedures not included in the P-STATsystem.
1.7 USER FEATURES
P-STAT user features include:
• same command language in both interactive and batch modes;
• in-stream and block macros for frequently used activities;
• ease of use with menus on PC/Windows;
• English-like language;
• available on PC/Windows, Linux and SUN Solaris.
1.8 Interactive and Batch Computing
P-STAT can be used in either batch or interactive computing environments. Batch computing describes an envi-ronment where the entire job is prepared and then submitted to the computer for execution. When the run iscomplete, the results are printed or written in a disk file. If errors are found, the commands or data must be cor-rected and the job resubmitted for execution. If an entire job is sent to the computer and the results come backlater, it is a batch job.

1.4 Features and Statistics
In interactive computing, each step is entered and executed immediately. Then, depending on the results ofthat step, the next step is entered. If an error is made, it may be corrected immediately. If a required file name isnot supplied, the user is prompted for it. If a command name is misspelled, it may be spelled correctly withoutreentering the rest of the command. The job proceeds with corrections and additions made when necessary. Theresults of each step are displayed after each step instead of at the end of the entire job.
P-STAT is designed to be an interactive system, although it may also be used in batch mode. It requires cer-tain “commands” or instructions that P-STAT recognizes in order to process information. These commands tellP-STAT exactly what process the user expects P-STAT to perform. Most new users work interactively so theymay correct errors as they occur — they prepare batch jobs when they are more experienced. The menu systemmakes learning P-STAT easier. Selecting menu options causes P-STAT to write the corresponding command,which is then executed. Regardless of whether you type the command directly or P-STAT writes the commandbased on menu selections, an English-like command results. P-STAT processes the command, following the in-structions contained in it, and produces any requested output.
This manual is designed to illustrate the use of menus on PC/Windows. The most frequently used commandsand the basic elements of the P-STAT Programming Language are supported in the menu system.
Even if you are running a version of P-STAT with front end menus, you may find that you need to enter acommand that is not supported by the windows system. P-STAT expects to find command input in single linesthat are no longer than 80 characters. A command can be entered on multiple lines (separated by the carriage-return character) until the end of command is signalled by a single “$”. Do not enter the carriage return in themiddle of a name or token. If you are entering the command from the P-STAT main window, it is easy to see ifyou are approaching the 80 character limit in time to press the enter key and move to the next line. If you areworking from a text editor, turn off the word wrap feature which automatically moves the cursor to the next lineand work from a text window that is no wider than 80 characters.
1.9 Macros
P-STAT macros contain P-STAT instructions or data. They can be used anywhere to hold any part of a P-STATcommand stream. However, they are usually used to hold pieces of P-STAT code or command sequences that arefrequently used. All macros can have arguments which may or may not have default values. When a macro isused any values that do not have default definitions must be supplied. Macros can call macros which can then callother macros. There are two basic types of macros: block macros and in-stream macros.
Block macros contain one or more P-STAT commands. When the macro is executed the commands in themacro are executed one after the other. Special features of macros that are not available in a normal job stream are:
1. SUBFILES which provide the ability to execute the commands in the macro for each subgroup spec-ified by the SUBFILES command;
2. Logic which permits you not only to skip commands but also to loop back and re-execute earliercommands.
In-stream macros are not complete commands but can be any part of the command except the command nameitself. They can appear within the command text, within programming language statements, and within subcom-mand or data records. Like block macros, in-stream macros can have key word or positional arguments. Thearguments must have values supplied either as defaults in the definition or as argument values when the macro isused.
1.10 LEARNING TO USE P-STAT
It is not difficult to learn the basics of P-STAT despite the fact that it is a large system with extensive capabilities.This manual is intended to provide enough information and illustrations to help a new user get started. There arealso some features which even those users who are adept at using a command language will find helpful such as:
1. full screen editing of command input and error correction;

Features and Statistics 1.5
2. access to the Print Manager for printing.
A basic understanding of the way the P-STAT language works and the use of files is helpful even for userswith simple needs that can be handled completely by the front end menus. P-STAT is a language and there aresome basic rules and some required punctuation when using the language. One way to be come familiar with therules is to look at the commands that are created by menu requests.
P-STAT commands require that the data they are given be in the form of a P-STAT system file. These filescontain information about the variables and pack the data into a compressed, binary form that can only be read byP-STAT. This means that you must learn how to:
1. Convert your data into a P-STAT system file. If you have raw data, you may use the MAKE com-mand to provide your own variable names or possibly TEXTFILE.IN if generated names areacceptable. If you have data in another system such as Excel, it can be exported from that systemand then imported into P-STAT. (See IN/OUT in the menu headers.)
2. How to process that data. The menu system supports a number of commands to perform statisticsand display the data.
3. How to get the data back out, perhaps to a printer. Since a P-STAT system file is in a binary formthat cannot be read by other programs, a P-STAT command such as LIST or a command to createthe appropriate form for another package must be used. If the input to the P-STAT PRINT commandis a P-STAT system file, a LIST command is automatically generated and that output sent to theprinter.
1.11 P- STAT Under PC/Windows
P-STAT in a windows environment is basically identical to P-STAT in an environment where windows are notavailable in the sense that the underlying command structure and the total capabilities are not changed by the win-dowing environments.
___________________________________________________________________________
Figure 1.1 The P-STAT Main Window
P-STAT, version 3.01, rev 5 ( Apr 19, 2013) WHOPPER 2 (6,000)variable) size with storage options 222. Copyright (c) 1972 to 2012, P-STAT Inc Use HELP NEWS$ for general news about this version
P-STAT starting...11:14:05 July 6, 2013 Enter a command
___________________________________________________________________________
P-STAT Main Window
FILE EDITOR HELP DISPLAY UTILITIES STATISTICS IN/OUT FILE QUIT BROWSE COMMAND MANAGE PRINT
.This area is at the bottom of the screen. It is often used for informative messages.

1.6 Features and Statistics
1.12 Basic Information: Data values and Names
In P-STAT data values are either numeric or character. Numeric values are always entered in double precisionand numeric operations are always double precision. This permits great accuracy when calculations areperformed.
A single character datum can have up to 50,000 characters. When a character value is created in P-STAT itis assumed to contain 40 characters unless a different value is specified. Specialized variables such as date andtime values can be stored as character values and manipulated with one of more than 50 date functions and com-mands. Character values that have one or more internal blanks must be enclosed in quotes.
Names for external files can be arbitrarily long and depend on the operating system. Under PC/Windows thenames can be entered and referenced using upper or lower case characters. Under Linux or Sun Solaris, file namesare case sensitive. Within P-STAT, file and variable names are NOT case sensitive. The program remembers theoriginal use of the name and uses that for displays and printout even though the name can be referenced in what-ever is the most convenient form.
P-STAT system files store file names, variable names, and a notation of the command which created them, aswell as the data values. File names can be up to 16 characters long and can contain only letters, numbers and dec-imal points. The first character MUST be a letter. Case is unimportant. P-STAT remembers the file name as it isfirst entered and uses that representation in all reports. Whatever, the name of a P-STAT system file, it is AL-WAYS stored on the disk in upper case characters with a 3 character extension. The default extension is “PS”followed by either a 1 or a 2.
Each variable has a unique name which may be up to 64 characters and contain letters, numbers, decimalpoints, and underscores. The use of a double colon (::) is allowed to divide the variable name into 2 parts: the firstup to 16 characters is known as the “tag”, followed by the double colon (::) and finally additional text for a max-imum of 64 characters. Not only must the variable have a unique name, tags, if they are used, must also be unique.If you do not provide a name, P-STAT generates a name in the form of “VARn” where n is the variable number.
It can be awkward when you wish to use the P-STAT Programming Language (PPL) to reference a variableif all 64 characters are needed.
IF q33::this.is.my.very.long.variable.name = 1, DELETE;
If you choose to use long variable names, TAGS and wildcards are an essential feature when using PPL.
IF q33 = 1, DELETE
or, for a variable such as Age.oldest.child
IF Age.o? GT 21, DELETE
1.13 P-STAT DOCUMENTATION
The following manuals describing the P-STAT system are currently available and can be downloaded from ourweb page (www.pstat.com) in Acrobat format that has been zipped to save space.
1. P-STAT: Introductory Manual (psintro.zip)This manual covers the basic features of the system with the emphasis on the command language.The command language is identical on all supported computers. It also covers basic commands suchas MAKE, TEXTFILE.IN, LIST, COUNTS and TURF analysis.
2. P-STAT: An Introductory Guide for PC/Windows (pcintro.zip) This manual covers the Menu system and provides an example using TURF to illustrate a run fromdata entry through examination of the results. In addition full screen usage of the P-STAT editor isdescribed.
3. P-STAT: File Management (psmang.zip)This manual covers the commands used to bring your data into P-STAT and how to write it out soother commands can use it. The MAKE and MAKE.FIXED commands are covered in detail.

Features and Statistics 1.7
4. P-STAT: Utility Commands (psutil.zip). This includes the features of the P-STAT editor.
5. P-STAT: A Guide to the P-STAT Programming Language (PPL) (psppl.zip). The final sections dis-cuss the TEXTWRITER command and P-STAT Macros.
6. P-STAT: The Survey Command, BALANCE and SAMPLE (pssurv.zip)
7. P-STAT: Basic Statistics (psstat1.zip)
8. P-STAT: Advanced Statistics (psstat2.zip)
9. P-STAT: Plots, Graphs and Postscript.support (psplot.pdf)
10. P-STAT: Master Index (pstatIX.zip)
1.14 INSTALLATION
The actual process of installation depends on the computer system. Each CD is sent with instructions that areappropriate for that system. In general:
• 1A. Web page download: Place the downloaded files into a temporary directory such as c:\temp.For the standard release, click on W6FILES.EXE. You need a password do begin the installation.This password can be requested by filling out the form on the P-STAT web site and providing uswith a name and an email address. This is all that is needed for an installation that permits you touse your own small (20 X 200) data files.
• 1B. CD install: move to the pstwin folder on the cd. It will have a name such as pstwin.3.01
• 2. Click on PSINSTALL.EXE. You will be given a chance to select the directory and supply thefolder for the P-STAT module. The default installation folder is “C:\Program Files\PSTAT”.
There are several environment variables that can be set which make it easier to locate data sets. Most of the in-formation that is contained in these variables can be supplied or changed later by P-STAT commands. The onlyenvironment variables that have no equivalent command form are PSKEY and PSTART.
1. PSKEY The PSKEY is not required for the basic demo version. The demo version permits allP-STAT commands to be used with a reduced file size. Your PSKEY is supplied whenyou order a full version of P-STAT.
2. PSHELP supplies the name and location of the P-STAT help file. This is necessary if the on-line help file is to be used. Since this location is determined at installation time, itmakes sense to set it once with an environment variable and forget about it. On the PC,this information is automatically stored in PSTAT.INI at install time.
3. PSFILES supplies the name of the home or current working directory. This is where P-STATexpects to find or create all files except those explicitly located elsewhere. If this in-formation is not available, P-STAT considers the directory from which P-STAT isinvoked to be the current working directory. If P-STAT is invoked from the programmanager, the assumed working directory is the directory where P-STAT is installed.
There are three types of files to be located: 1) P-STAT system files (PSAUTO) createdby P-STAT commands, 2) temporary work files (PSTEMP) used by P-STAT com-mands such as SORT, and 3) external data files (PSDATA) including your data input,labels files, command files and files exported to and from other systems.
PSFILES sets values for PSAUTO, PSDATA and PSTEMP. PSAUTO, PSDATA andPSTEMP, if used, take precedence over the PSFILES setting. If PSFILES is used afterthe start of the run, PSTEMP will not be changed. PSFILES can be accessed in thefront end menus under “Utilities”.

1.8 Features and Statistics
4. PSAUTO provides the full path to a directory where P-STAT system files are located. If PSAU-TO is not specified, system files will be written to and read from the current directory.What determines the current directory depends on the operating system. PSAUTO canbe changed any time during a P-STAT session.
5. PSTEMP proves the full path to a directory where temporary files are to be placed. PSTEMPmay be executed only at the beginning of the P-STAT session.
6. PSDATA provides the full path to the directory where other external files are located. This in-cludes raw data files, command files, value label files and files to be exported orimported into spreadsheets or other packages. PSDATA, like PSAUTO can bechanged any time during a P-STAT session.
7. PSTART provides the full path and the name of a file which contains P-STAT commands to beexecuted as the run begins. The PSTART file may contain any P-STAT command in-cluding PSHELP. A command in the PSTART file takes precedence over theequivalent environment variable.
The PSTART environment variable is not automatically installed by the Windows IN-STALL program. If the PSTART environment variable is set and points to an existingfile, the commands in that file will always be executed at the beginning of a P-STATsession.
If there is no PSTART environment variable, P-STAT looks for a file named PSTARTin the PSDATA directory. If the PSDATA directory has not been specified by eithera PSFILES or PSDATA environment variable, P-STAT looks for PSTART in the cur-rent working directory. PSTART is fully described in the manual “P-STAT: UtilityCommands”.
1.15 Examples of the Three Different Types of FIles
The three different file types are:
1. P-STAT system files created by P-STAT commands;
2. External raw data files including label files and files containing P-STAT commands;
3. Temporary files which are used by individual commands to hold intermediate results.
Suppose these environment variables are set:
1. PSAUTO to 'C:\olddata'
2. PSDATA to 'D:\input'
3. PSTEMP to 'C:\tempdir'
The command:
TABFILE.IN X, READ 'ABC.TXT' $
uses the following files:
1. X is the name for the P-STAT system file (an autosave file) which is created by the TABFILE.INcommand. It is written to the PSAUTO directory as:
C:\olddata\X.PS1
Note: P-STAT uses extensions of PS1 and PS2 on system file names. The pathname and the exten-sions are NEVER used in P-STAT commands. File X.PS1 is always referred to as “X”. TheP-STAT system files on disk are ALWAYS stored with their names in uppercase characters.

Features and Statistics 1.9
2. ABC.TXT is an external file being read. When it does not have its own path it defaults to a PSDA-TA path and is read as:
D:\input\ABC.TXT
3. TABFILE.IN also creates and then erases several temporary files which have, in all likelihood,unique names. Given the definition of PSTEMP in the example above, a name for such a file on PC/Windows would be something like
C:\tempdir\P_0Z7CR29J2$$$$.TMP
1.16 MIGRATE
P-STAT Version 3 on the PC cannot read binary (unformatted) files created by P-STAT Version 2. This does notmatter with P-STAT system files which are automatically converted to Version 3. However, P-STAT edit filesare NOT automatically converted. The new MIGRATE command is available on the PC only and does the con-version for you.
MIGRATE "c:\myfile\test.edt", OUT "c:\newstuff\test.edt" $
If you do not know the origin of your P-STAT files, use the FILETYPE command.
FILETYPE $
This examines a file and simply reports if the file is LF90 unformatted, LF95 unformatted, CR-LF formatted, orunknown.
1.10 Features and Statistics
SUMMARY
Environment variables may be created which tell P-STAT where it should find existing files or write new files.On the PC under windows operating systems such as WINDOWS 7 the INSTALL program will create the envi-ronment variables for you. They are stored in a file named PSTAT.INI which is stored in the directory associatedwith the system environment variable WINDIR. This is usually C:\WINDOWS. This file can be edited in an or-dinary text editor or updated with PSTATINI.EXE which is provided as part of the P-STAT installation.
PSKEY key value
PSKEY is required for all except demo installations.
PSHELP full path and file name
PSHELP provides the complete path and name of the PSTAT help file. The following assumes that theP-STAT module is on the C drive in the PSTAT directory.
SET PSHELP=C:\PSTAT\PSTAT.HLP
PSTART full path and file name
PSTART provides the complete path and name of a start-up file of P-STAT initialization commands.
SET PSTART=d:\joe\psinit.trn
If the PSTART environment variable exists, the contents of the file it cites will be executed at the begin-ning of any P-STAT session.
PSFILES full path
PSFILES provides the complete path to a directory for PSAUTO, PSTEMP and PSDATA if they are notindividually specified. If PSFILES is used after the start of the current P-STAT session, only PSAUTOand PSDATA are changed.
SET PSFILES=C:\susie\study32
PSAUTO full path
PSAUTO provides the complete path to a directory where P-STAT system files are located and new sys-tem files are to be written. It takes precedence over the PSFILES directory.
SET PSAUTO=C:\susie\study32\mypsf
PSDATA full path
PSDATA provides the complete path to a directory where external data files are located.
SET PSDATA=E:\proj32\data
PSTEMP full path
PSTEMP provides the complete path to a directory where temporary work files are stored. These filesare automatically erased when P-STAT runs are terminated with an END$ command.
SET PSTEMP=C:\TEMP

2 Getting Started
This chapter is an introduction for users who are not familiar with P-STAT or its implementation on PC/Windows.The first part of this chapter provides an overview of the menus. The second part discusses the way the informa-tion is organized in P-STAT. The rest of the chapter provides illustrations to help you get your data into P-STATand to display that input. Chapter 3 illustrates a single project from beginning to end.
2.1 GETTING STARTED
The first step in using P-STAT is getting the P-STAT computer package running. You can either click on theP-STAT icon that is created at installation time or you can access the P-STAT module using the system “RUN”facility.
If the initial greeting message:
P-STAT, version ....
does not appear, see the local person who installed P-STAT on your system or refer to the installation instructionsthat came with the software. The usual reason for such a problem is that P-STAT has been installed in an unusuallocation or that the P-STAT icon was not created.
2.2 OVERVIEW OF THE MAIN MENU
The two lines at the top of the screen are used for the highest level menu. The top line contains the elevenmajor menu entries. Seven of these items have sub-menus which lead directly to commands. To select an itemmove the mouse to that item and click the left mouse button. To see the contents of the sub-menus hold the leftmouse button down and move the mouse slowly across the area without making a selection. As you move downthe submenus, the status bar at the bottom of the screen contains a brief description of each menu item.
The four items which do not have sub-menus are:
1. Editor which places you directly in the full screen P-STAT editor. This editor has its own top menu.
2. Quit which cancels the action in progress and returns control back to the P-STAT main window.
3. Browse which brings up a scrolling window that contains up to 1024 lines of input and output.
4. Command Print which causes the output from the most recent command to go to the print manager.You then have your choice of printer and print setup.
The File menu contains eleven entries.
1. System Files displays the names of the P-STAT system files stored on your currentsystem file directory.
P-STAT Main Window
FILE EDITOR HELP DISPLAY UTILITIES STATISTICS IN/OUT FILE QUIT BROWSE COMMAND MANAGE PRINT

2.2 Getting Started
2. Active Files displays the names of all the P-STAT system files that you have refer-enced in the current P-STAT job.
3. Status displays settings such as the output width and the active printdestinations.
4. Show Contents displays the variables in an existing P-STAT system file.
5. Examine a file examines the bytes in an external file. An optional output P-STAT sys-tem file contains counts for each character that is found.
6. Show the bytes displays the bytes in a file.
7. Reformat allows you to create a new external file with selected fields altered. Thiscan be used, for example, to change a PC file to MAC or Unix format.
8. Define Print File sets the attributes of a print destination. This includes the output width,lines per page, and the page change character.
9. Select Print File specifies which print destination is to become the current printer. Allprinted output will be directed to this destination until another print des-tination is selected.
10. Print invokes the print manager to print either a P-STAT system file or a diskfile of print output (see “Define Print File” and “Select Print File”above.) If you select “P-STAT system file”, a LIST command is first ex-ecuted to create an ASCII text file for the printer. In either case you haveyour choice of printer and can tune the printer’s setup. If the file is anactive print file in P-STAT, it is closed before printing so that you do notlose the final print buffer.
11. Exit P-STAT ends the run by submitting an END$ command.
The Help menu contains two entries:
1. Menu Help Items opens your default browser with entries for all the commands that are in-cluded in the menu system.
2. Help File opens a browser with entries for all the topics and commands that arecovered in the full P-STAT help file. The Display menu contains fouritems
The Display menu contains four entries:
1. Save Labels saves value labels in an external file so they can be used by commandssuch as LIST and SURVEY. Value labels provide text to replace valuesin reports and tables.
2. Define Titles provide titles for use in reports and tables.
3. List a file lists a P-STAT system file with a variety of format controls.
4. Produce Tables With Surveyproduces tables. It has extensive controls for labels, titles, cell contentsand the arrangement of the rows and columns.
The Utilities menu contains fourteen items:
1. Check file checks the status of a P-STAT system file. In addition to verifying thatit is readable, it reports the number of variables and the number of cases.
2. Compare two files compares two P-STAT system files and saves the differences in a file.

Getting Started 2.3
3. Locate a File provide a link to a P-STAT system file that is not located in the currentPSAUTO directory
4. Erase current erases the current version of a P-STAT system file (only if there is a pre-vious version).
5. Erase previous erases the previous version of a P-STAT system file (only if there is acurrent version).
6. Erase erases both current and previous versions of a P-STAT system file.
7. Erase external erases an external file such as a labels file or a raw data file.
8. Change all Folders (PSFILES) issues a PSFILES command. This makes the designated folder thedefault for all files at the start of the run. After the run has begun PS-FILES changes only the PSAUTO and PSDATA directories.
9. Change Save Folder (PSAUTO) specifies the directory where P-STAT system files are to be foundand saved if they are not specifically located elsewhere.
10. Change Data Folder (PSDATA) specifies a directory for external data such as labels files, transferfiles and data exported from other programs.
11. Show Pathnames prints the names of all the defined/assumed pathnames.
12. Transfer file specifies the name of a file containing P-STAT commands to beexecuted.
13. Run a Macro causes a popup menu of all the currently defined macros and generatesan appropriate macro RUN command.
14. Open and run a macro uses the file manager to list all files with extensions such as .txt and .macwhich might be macros, executes the macro to make it active and gener-ates the macro RUN command.
The Statistics menu contains seven items:
1. Frequencies use the COUNTS command to produce counts, percentages and univari-ate statistics for the variables in a P-STAT system file.
2. Description file produces summary statistics for a P-STAT system file in P-STAT systemfile format. This uses the MODIFY command.
3. Correlate produces correlation coefficients for the numeric variables in a P-STATsystem file.
4. Regression does stepwise regressions.
5. TTest produces t-tests and stores the results in a P-STAT system file.
6. Turf produces Total Unduplicated Reach and Frequency output.
7. Combinations produces the number of combinations of N items taken N at a time. Arange of sizes can be provided.
The In/Out menu contains seven items:
1. Textfile input creates a P-STAT system file from text with a choice of delimiter.
2. Tabfile input creates a P-STAT system file from text with tabs as delimiters.
3. SPSS portable file input creates a P-STAT system file from an SPSS export file.
4. Textfile output causes a P-STAT system file to be written out as a textfile with a choiceof delimiter.

2.4 Getting Started
5. Tabfile output causes a P-STAT file to be written as a text file with tabs as delimiters
6. SPSS format output causes a P-STAT file to be written in SPSS export format.
7. Unmake file creates an ASCII file that has all the information needed to move aP-STAT system file to another operating system.
The Manage menu contains six items:
1. Modify a file modify a P-STAT system file, selecting variables and cases to create anew system file and an optional description file.
2. Concatenate files joins as many as 20 files sequentially. The variables in the output file area super set of all the variables found in the input files. The number ofcases in the output file is the total of the cases found in the input files.
3. Lookup table files joins the cases in one file to the cases in one or more tables files. Theoutput file contains all the variables in the input file plus any new vari-ables in the table files. The default is to have a row in the output file forevery row in the input file even if there is no matching row in the tablefiles.
4. Sort creates an output file that is arranged in sort order by one or more numer-ic or character variables. The output file can be in either ascending(assumed) or descending order on the BY variables.
5. Aggregate (summarize) produces means, sums, standard deviations, minimum scores, maximumscores and counts for an entire file or for subgroups as defined by “BY”variables. The file must be sorted or ordered on the BY variables.
6. Duplicate detection checks a file for extra (duplicate) entries. The contents of the output filedepend on the selection criteria. For example, the first case or the lastcase in a group might be selected. Groups are defined by their values on“BY” variables. The file must be sorted or ordered on the BY variables.
Additional features cause an output file to have all the cases in the inputfile with additional variables for the size of each group and the sequencenumber of each case within the group.
2.3 ORGANIZATION OF INFORMATION
Computer programs use information stored in files. A file drawer in an office may contain many different files,each with information about a different subject, and each organized in a particular fashion. Similarly, a collectionof files in a computer may differ both in their content and in their organization.
External files are files which contain the labels or the data that you are bringing into P-STAT. When yourequest an external file, the program manager is displayed and you select your file from files that are listed.
2.4 Basic Elements of a P-STAT System File
The basic unit handled by the P-STAT system is a single piece of information. This may be a number or a char-acter string. If it is a number, it may be an integer or a real number of any size. If it is a character string, it maybe anywhere from 1 to 50,000 characters in length. The information or data shown in Figure 2.1 has both numbersand character strings.
A P-STAT system file is a rectangular arrangement of data. In addition to the data, the name of the file, thenames of the variables and the data type of each variable are contained in the P-STAT system file. Figure 2.2illustrates the different elements of a P-STAT system file.

Getting Started 2.5
The name of this file is “Tennis”. Each P-STAT system file has a name. There are five categories of infor-mation in the Tennis file.
They are Last Name, First Name, Sex, Age and USTA (United States Tennis Association) Rating. These arevariables because the information in each of these categories varies or is different for each person. Each line inthe file is a case. There are three cases in this file.
__________________________________________________________________________
Figure 2.1 The Information (Data) for the File
Allen Robert m - 4.5 Jones Karen f 13 3.0 Prince Susan f 14 3.5
__________________________________________________________________________
The information that a secretary places in a file comes from some source that is external to the file itself. Sim-ilarly, the material that P-STAT puts into a file comes from some external source: a terminal, a disk or a tape.Just as the secretary must be supplied with the information to place in a file, P-STAT must similarly be told wherethe input data can be found. Sometimes the data may exist only on a piece of paper or in your head. Since mostcomputers can’t mind read, the data must be made readable — it must be typed on the terminal or in a file.Figure 2.1 shows raw data for a file as it might appear on a piece of paper or in a file on disk.
P-STAT system files and external data files are the two types of files that are accessed through these menus.P-STAT system files are files created by P-STAT commands. P-STAT system files are discussed more fully laterin the next section of this chapter. When the menu item expects an existing P-STAT system file, you are given alist of the existing system files to choose from. When the menu item expects a new P-STAT system file you areprompted for a name and a check is made to ensure that this name is a legal name for a P-STAT file. A similarprocedure is used when a variable name is expected.
__________________________________________________________________________
Figure 2.2 Elements of a P-STAT System File
File Name: Tennis Variable Last First USTA Names: Name Name Sex Age Rating Data: Allen Robert m - 4.5 Jones Karen f 13 3.0 Prince Susan f 14 3.5
__________________________________________________________________________
P-STAT system files are arranged in this rectangular case-by-variable format. The variables are the columnsand the cases are the rows. These files are said to be in a rectangular format because each case contains the samenumber of variables, in the same order. The cases generally correspond to persons, subjects, measurements, orother similar items. The variables are information about varying aspects of the cases. There may be many vari-ables for each case and there may be many cases. A P-STAT system file can have an unlimited number of casesand 6,000 to 250,000 variables, depending upon the size of the P-STAT system being used.
P-STAT system files are written in a form that cannot be read by any program except P-STAT. The data arepacked to conserve space and the amount of I/O (input/output) that is needed to read them. P-STAT system files

2.6 Getting Started
are referenced by name. The name can be up to 16 characters long. It must start with a letter and it can containonly letters, numbers and decimal points. The case of the letters does not matter. Enter it the way that you wantit to print. Then you may use either upper or lower case when you refer to it.
2.5 Missing Data
Sometimes information is missing. This can happen in a survey when a person refuses to answer a question or inmedical research when a patient misses a visit. Missing data are permitted for both numeric and charactervariables.
Three different missing values may be defined for different types of missing data. This makes it possible todistinguish, for example, among the person who was not asked the question, the person who refused to answer,and the person who replied, “I don’t know”. The three types of missing data are represented by dashes: in theprinted output
MISSING1 - MISSING2 -- MISSING3 ---
Robert’s age is not known (see Figure 2.2), so a dash is used to indicate missing data. Similarly, if Karen’ssex were missing, one, two or three dashes would be used to represent the data value for that variable.
2.6 Legal Names
Each file and each variable in the file must have a name. P-STAT only recognizes certain names, and these arereferred to as “legal names” .Legal file names must:
1. start with a letter,
2. have no more than 16 characters, and
3. contain only letters, numbers, and decimal points.
Legal variable names must:
1. start with a letter,
2. have no more than 64 characters, and
3. contain only letters, numbers, decimal points, and underscores.
4. may have an optional 16 character tag delimited by a double colon (::)
Test1::English_compositionTest2::Introduction_to_algebra
Variables can be referenced by either their tags, their full names or by using the wildcard (?) to construct a short-cut. In printout you can select whether the variable should be represented by its TAG, its TEXT or the full name.You can also select the way variable names are to be presented in the printout. Not all commands behave the sameway with variable names. Commands that print numeric matrices may print only short names while the SURVEYcommand has subcommand controls that permit selective labelling. For example, banner points can to be labelledwith TAGS while stub variables are labelled with the full TEXT. The menus will often display TAGS when thefull name cannot fit the display area.
Most names are one or more “words” that describe the variable — however, the words must be connected bya decimal point or underscore to form a single name without any embedded spaces. “Last.Name” or “Last_Name”is correct. When the file is listed, P-STAT omits the decimal point or underscore.
There are 2 other special variables: system variables and scratch variables. System variables have similarrules except they are limited to 16 characters and always begin and end with a decimal point. Scratch variableshave similar rules except that they are limited to 16 characters and always begin with one or two pound (#) signs.For example, .DATE. is the system variable for the current date and ##counter is a permanent scratch variablecreated by the user to hold a single number. Since system variables and scratch variables are limited to 16 char-

Getting Started 2.7
acters, they cannot have tags. Scratch variables which begin with a single # sign exist only for the duration of thecurrent command. Scratch variables which begin with double ## signs exist for the duration of the currentP-STAT job..
The keyword TO is a reserved word in P-STAT and may not be used for a variable or a file name. The useof reserved words simplifies the P-STAT language. It would be wise not to use BY, OUT, or any common prep-ositions as variable or file names because it is possible they may become reserved words in the future.
It is also a good idea not to use single letter names for variables, especially the letters H, Q, E and V. In somesituations, confusion may exist because these letters have special meanings in P-STAT as abbreviations for HELP,QUIT, EDITOR and VARIABLE.
The names in P-STAT may be any combination of upper case and lower case characters. P-STAT remembersthe way the names are entered and uses those representations when printing them. However, references to thename may be made in upper case, lower case or mixed case, regardless of how the name was entered originally.Thus, a P-STAT system file with the name Myfile can be referred to as “myfile”, “MYFILE”, or even as“myFILe”.
The next step in using P-STAT is to create one or more P-STAT system files from your data. The easiest wayfor new users to get started is to use the menus. These menus create P-STAT commands in a command languageformat.
2.7 CREATING A P-STAT SYSTEM FILE
If your data are stored in Excel use “Save As” and select the type as “Text (tab delimited)(*.txt)”. Provide a namefor the file and be sure that Excel stores this data in the folder that you will use for your P-STAT run. If your dataare stored in a text file created by some other program or editor, note where the file is stored and the character thatis used to delimit each variable (tab, comma, blank).
One important feature of the data which has not been discussed is the difference between variables that con-tain just numbers and variables that contain other characters. The TEXTFILE.IN command looks at the data anddetermines the mode (numeric or character) for each of the variables. The MAKE command, which can handlemore complex data files, must be told the data type for each variable. Similarly, if you use PPL (the P-STAT Pro-gramming Language) to create a new variable, character data must be explicitly declared when the new variableis created.
2.8 The First Step
1. Click on the P-STAT icon or use RUN to point to the P-STAT module.
2. In the top menus click on Utilities.
3. Click on “Change All Folders (PSFILES). This causes the “Select Directory” dialog box to appear.Use the mouse to move to the disk and the folder that is to be the working directory for your currentproject. This should be the folder (directory) where your input data file is stored.
In the illustration on the next page,, the initial folder is C:\PROJECT. It contains 3 folders. If youclick on OK at this moment, the folder that is selected for the PSFILES command is “C:\PROJECT”.You can move down the tree of folders by selecting one of the sub-folders and using a double clickof the left mouse button. If that folder itself contains folders, you may select one of them. If youwish to move up the tree, select (double click) the line with the double dots (..).
Do NOT select “OK” until the complete path to the folder you want is echoed in the line to theleft of the “OK” button.
You will now see echoed in the P-STAT window a line such as:
PSFILES 'C:\PROJECT\TURF_0503' $

2.8 Getting Started
In the top P-STAT menu click on “IN/OUT” and then on “Tabfile Input”. The process of creating a TABFILE.INcommand begins when you select (click on) the command.
OK
Cancel
Select Directory
C:\PROJECT\turf_0503
. .
[-C-]
P-STAT Main Window
FILE EDITOR HELP DISPLAY UTILITIES STATISTICS IN/OUT FILE QUIT BROWSE COMMAND MANAGE PRINT
Textfile inputTabfile inputSPSS input file
Textfile outputTabfle outputSPSS output fileUnmake file
OK
Cancel
Select Directory
C:\PROJECT
. . stats_1002 survey_0103 turf_0503
[-C-]

Getting Started 2.9
You are first asked to provide a name for the new P-STAT system file that TABFILE.IN will create. Thisname must follow the rules for legal names described earlier in this chapter.
The TABFILE.IN command also needs to know the name of the data file that you exported from EXCEL Ifthe folder you selected is the one where you stored your tab delimited data, you will see it listed in the file managerdialog box that is now displayed. Select the desired file and click on “Open”.
Finally P-STAT needs to know whether the file that you exported from Excel had a first line with variable names(labels) or whether P-STAT must create them. This is a required identifier. Since “Labels” is highlighted youneed only press the “OK” button if the first row of your data has variable names. If these names do not conformto the P-STAT rules for variable names, they will be truncated and characters converted as needed to make legallabels.
If your data file has no labels, select “No labels and press the “OK” button. The P-STAT generated labelswill be in the form of “var1”, ‘var2”, etc..
Enter the name for a new P-STATsystem OK Cancel file
P0503
Select the external file which contains the TABFILE.IN data
Look in turf_0503
Files of
File
Text
testturf.txt test0303.prt
turfdat.txt
turfdat.txt
Cancel
Open
2.10 Getting Started
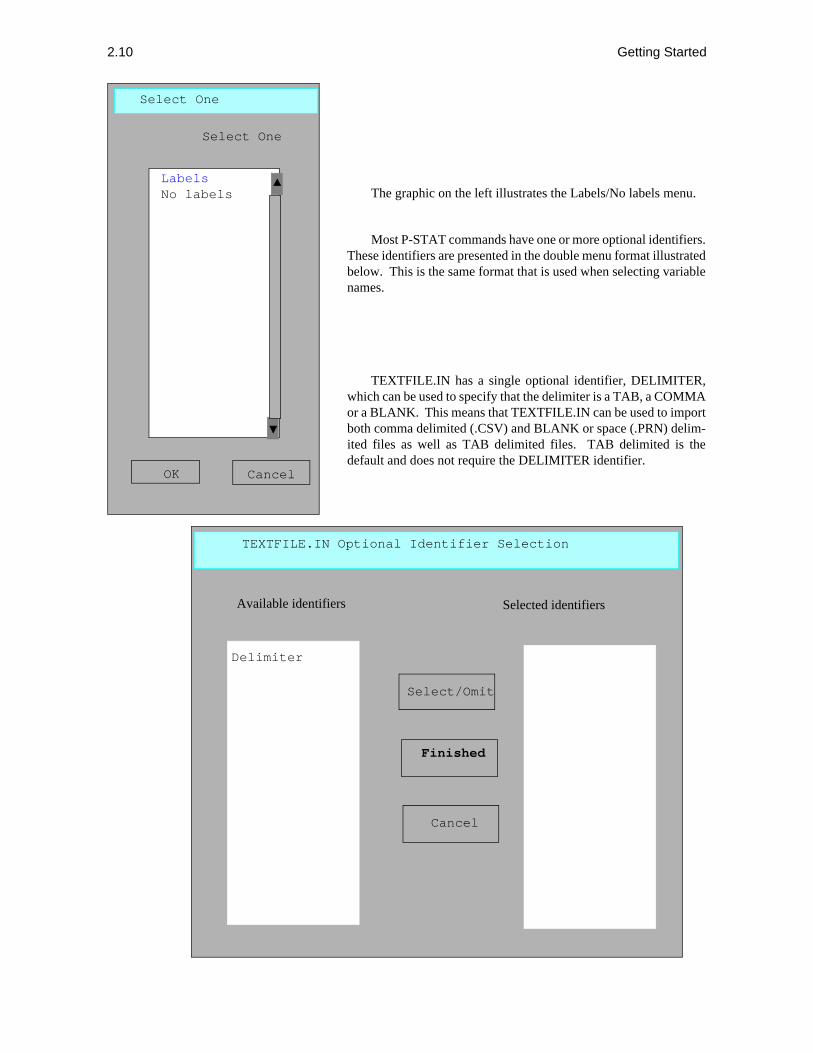
The graphic on the left illustrates the Labels/No labels menu.
Most P-STAT commands have one or more optional identifiers.These identifiers are presented in the double menu format illustratedbelow. This is the same format that is used when selecting variablenames.
TEXTFILE.IN has a single optional identifier, DELIMITER,which can be used to specify that the delimiter is a TAB, a COMMAor a BLANK. This means that TEXTFILE.IN can be used to importboth comma delimited (.CSV) and BLANK or space (.PRN) delim-ited files as well as TAB delimited files. TAB delimited is thedefault and does not require the DELIMITER identifier.
Select One
OK Cancel
Labels No labels
Select One
TEXTFILE.IN Optional Identifier Selection
Available identifiers Selected identifiers
Select/Omit
Finished
Cancel
Delimiter

Getting Started 2.11
When you have finished making your selections, you will see on your screen the completed command textwhich will look something like:
TABFILE.IN p0503, READ 'C:\PROJECT\TURF_0503\turfdat.txt', LABELS $
“p0503” is the name you supplied for your P-STAT system file. The argument for the identifier READ is the fold-er you selected with the PSFILES command and the file that you selected from the file manager. In addition youwill see either “Labels” or “No labels”. The TABFILE.IN command is automatically submitted for executionand results are written on your terminal. The file “p0503” is now available for use in a P-STAT command suchas TURF, SURVEY or LIST.
2.9 The LIST Command
LIST is the command that displays P-STAT system files. It lists the most recently referenced file, unless it is givena specific file name as its argument. The steps to list the file you have just created are:
1. Select Display from the top menu
2. Select List from the drop down menu
3. Select the desired file from the list of files.
Click on OK
See the next chapter for a real projectwith an example of modification andinformation on printing the results
4. Click on the “Finished” button in theLIST Optional Identifier selection dialog box. The optional LIST identifiers are not needed for this exercise.
The following listing appears on your terminal
Last First USTA Name Name Sex Age Rating
Allen Robert m -- 4.5 Jones Karen f 13 3.0 Prince Susan f 14 3.5
LIST automatically sets the proper spacing between the variables so that the listing is easy to read and yetconcise.
LIST has many optional identifiers that allow the user to control spacing, layout and data format. To directthe listing of a file to a diskfile, select the optional PR identifier and provide a name for the file on disk beforeselecting Finish.
It is a good idea to be selective in the extensions that you use for external file names. “.txt” is a good extensionfor an ASCII input file. “.lab” is a good extension for a labels file. Printfile extensions of “.prt” or “.txt” are bothgood extensions for print files stored on disk. Consistency in selecting these extensions will simplify housekeep-
Select a file
Modification/PPL
OK Cancel
TennisP0503
2.12 Getting Started
ing of your directories. P-STAT uses “.TMP” as the extension for temporary files. P-STAT uses “.PS1” and“.PS2” as the extensions for P-STAT system files. Do NOT rename the P-STAT system files or P-STAT will notbe able to access the data stored in those files.
2.10 Ending the Run
To end the P-STAT session:
1. Move the mouse to the top menu
2. Select button in the top right-hand corner of the “P-STAT Main Window” line
Any temporary files are now erased.
The P-STAT window may be minimized (become an icon though still active) and be maximized (use the en-tire screen). The exit button is only enabled in the main window. It is not in effect in sub-windows such as theP-STAT editor.
2.11 Autosave and External Files
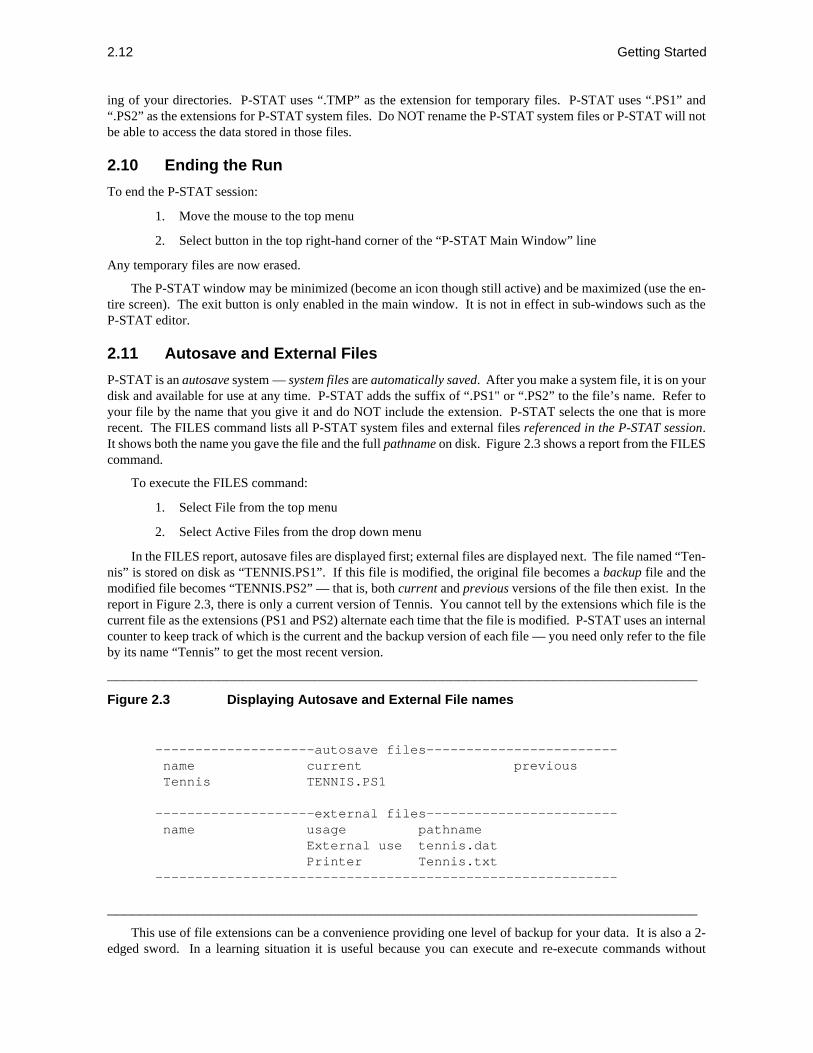
P-STAT is an autosave system — system files are automatically saved. After you make a system file, it is on yourdisk and available for use at any time. P-STAT adds the suffix of “.PS1" or “.PS2” to the file’s name. Refer toyour file by the name that you give it and do NOT include the extension. P-STAT selects the one that is morerecent. The FILES command lists all P-STAT system files and external files referenced in the P-STAT session.It shows both the name you gave the file and the full pathname on disk. Figure 2.3 shows a report from the FILEScommand.
To execute the FILES command:
1. Select File from the top menu
2. Select Active Files from the drop down menu
In the FILES report, autosave files are displayed first; external files are displayed next. The file named “Ten-nis” is stored on disk as “TENNIS.PS1”. If this file is modified, the original file becomes a backup file and themodified file becomes “TENNIS.PS2” — that is, both current and previous versions of the file then exist. In thereport in Figure 2.3, there is only a current version of Tennis. You cannot tell by the extensions which file is thecurrent file as the extensions (PS1 and PS2) alternate each time that the file is modified. P-STAT uses an internalcounter to keep track of which is the current and the backup version of each file — you need only refer to the fileby its name “Tennis” to get the most recent version.
__________________________________________________________________________
Figure 2.3 Displaying Autosave and External File names
--------------------autosave files------------------------ name current previous Tennis TENNIS.PS1
--------------------external files------------------------ name usage pathname External use tennis.dat Printer Tennis.txt ----------------------------------------------------------
__________________________________________________________________________
This use of file extensions can be a convenience providing one level of backup for your data. It is also a 2-edged sword. In a learning situation it is useful because you can execute and re-execute commands without

Getting Started 2.13
change. However, if you use this feature with your working data and make an error, you may accidently deleteyour backup.
External files are displayed after the autosave files. External files include raw data files such as “tennis.dat”and printer files such as “Tennis.txt”. Other external files that might appear in the FILES report are labels files,edit files, and files containing P-STAT commands which are referred to as “transfer” files. These files are dis-cussed later in this manual.
When you use P-STAT in a subsequent session, select the file you want from the list of P-STAT system files.These are the files that are located in your autosave directory. Your autosave directory depends on whether youhave set PSFILES or PSAUTO environment variables and the way that you invoke the P-STAT command.
1. If you invoke P-STAT using the system RUN command or by clicking on the P-STAT icon and haveno environment variables defined, the assumed autosave directory is either the directory where theP-STAT module is stored or your user folder under the “Documents and Settings” folder.
2. If you open a command window and invoke P-STAT from that window, the assumed autosave di-rectory is the folder you were in when you invoked the P-STAT module.
3. If you have a PSFILES or PSAUTO environment variable set, that takes precedence no matter howyou invoke the P-STAT module.
4. If you have a PSTART file in the folder where the run begins and that PSTART file has either a PS-FILES or PSAUTO command, that takes precedence over any environment variables.
A good way to begin the run with the certainty that P-STAT can find your files and that P-STAT will writeany new files where you want them is to:
1. If you think that you have PSFILES correctly set, you can check the settings by selecting the “Util-ities” menu and clicking on “Show Pathnames” $
2. If the report is not what you expect, Select “Utilities” and then select “Change All Folders (PS-FILES) and provide the correct path.
You can change the assumed locations for your P-STAT system files (PSAUTO) and for your external datafiles (PSDATA) any time during the P-STAT session. You may want to store your P-STAT system files in a folderother than the folder where you have your input data. Any time that you are unsure where P-STAT is writing itsoutput or cannot figure why P-STAT cannot find your data, the PATHNAMES command is useful.
2.12 MORE FEATURES
The explanations in this introductory chapter are not complete, but they are sufficient to allow a new user to beginusing P-STAT. There are other ways to create files, and there are many optional identifiers to control various waysin which commands operate. If your data have already been entered into a PC program, you need not reenter it.Most PC programs can export data in tab delimited text formats. If your data are in SPSS export format you canimport them into P-STAT using the same steps used for TABFILE.IN:
1. Select IN/OUT from the top menu
2. Select the appropriate format from the menu
3. Supply a name for the P-STAT file and the name of the file where your program has stored the data.
Perhaps the best way to learn how to use the P-STAT system is to create small files like the one shown in thischapter and experiment. Cycle through the top menus and their sub-menus and try each item in turn. For advancedfeatures consult the manuals and the on-line help file.
The on-line help file contains information on both commands and general topics. The help file can be ac-cessed by using the Help button on the top menu. There are two choices. The first entry brings up the table ofcontents for a helpfile which has just the commands supported by the top menus. The second gives you the key-word names for the full P-STAT HELP file.
2.14 Getting Started
To get help on the current release:
1. Select Help from the top menu
2. Select “Full Help File”
3. Select “Utility Topics”
4. Select “NEWS”
The NEWS feature is important because P-STAT is an evolving system — enhancements are made regular-ly. They are included in the latest version, and new versions are available on-line for those P-STAT sites that areunder maintenance. The NEWS contains information about new features and instructions on how to use them.
Getting Started 2.15
SUMMARY
P-STAT MENUS
1. P-STAT menus can be accessed from the bar at the top of the P-STAT window. The items in thistop menu are:
File Editor Help Display Utilities Statistic In/Out File Manage Quit Browse Command Print
7 of these items have their own menus which create P-STAT commands. Editor transfers control toP-STAT’s internal full screen editor. Quit is used to interrupt runaway printout on the screen.Browse is used to search through and edit the most recent 1000 lines that have scrolled off the screen.Command Print sends the output from the most recently executed command to the system printer.
2. A click of the mouse outside the menus removes any pop-up menus and returns the system to com-mand mode.
3. Menu items can be selected by using a mouse, the arrow keys and a carriage return, or the first letterof the menu selection.
P-STAT NAMES
File Names in P-STAT
File names must begin with a letter and can be up to 16 characters long. They may contain letters, num-bers and decimal points.
Variable names in P-STAT
Each variable has a unique name which may be up to 64 characters and contain letters, numbers, decimalpoints, and underscores. The use of a double colon (::) is allowed to divide the variable name into 2 parts:the first up to 16 characters is known as the “tag”, followed by the double colon (::) and finally additionaltext for a maximum of 64 characters. Not only must the variable have a unique name, tags, if they areused, must also be unique. If you do not provide a name, P-STAT generates a name in the form of var1to var999.
LIST
After a file is built you can display it by using the LIST command. LIST is accessed by selecting Display fromthe top menu and the pressing the List button.
PATHNAMES
PATHNAMES is a command which tells you where P-STAT looks for P-STAT system files, input data files andtemporary work files.

2.16 Getting Started
PSAUTO
PSAUTO is a command that may be used any time during a P-STAT session to specify where P-STAT shouldlook for and store P-STAT system files. This overrides any definition supplied in a PSFILES command.
PSDATA
PSDATA is a command that may be used any time during a P-STAT session to specify where P-STAT shouldlook for and store external data files including input data, labels files, transfer files containing P-STAT commandsand print output files. This overrides any definition supplied in a PSFILES command.
PSFILES
PSFILES requires as an argument the full drive and directory (folder) where all the files for the current run are tobe found and all new files written. If PSFILES is issued after the run has begun it changes PSAUTO and PSDATAbut does not change the folder for PSTEMP. PSFILES is located in the “Utilities” menu with the label “Changeall folders (PSFILES)”.
LIST
After a file is build you can display it by using the LIST command. LIST is accessed by selecting Display fromthe top menu and then pressing “List a file”..
TABFILE.IN / TEXTFILE.IN
These commands are used to take a text file of data which has tabs as the delimiters between values and create aP-STAT system file. This tab delimited format provides an easy way to move from Excel to P-STAT. This canalso be used to import a file with a delimiter other than a tab. If the first record does not have variable names,P-STAT will generate them for you. TABFILE.IN and TEXTFILE.IN are identical except that you do not needto supply a delimiter for TABFILE.IN if your data are indeed tab delimited.

3A Single Project
This chapter contains step by step illustrations for a single project. Some of this will be a repetition of steps fromthe previous chapter.
The project is to do a TURF (Total Unduplicated Reach and Frequency) analysis. The instructions assumethat there is an existing folder for the project and that the data exist in an Excel spreadsheet. The full path to thisfolder is “C:\PROJECTS\TURF_0503”. The following steps are illustrated:
1. Export the data from Excel as a tab delimited file.
2. Enter P-STAT and tell P-STAT where the files for the project are located.
3. Import the tab delimited file into P-STAT creating a P-STAT system file.
4. Run the TURF command selecting basic options.
5. Print the results.
3.1 EXPORTING THE DATA FROM EXCEL
The data file has 30 variables; a case id and 29 items. These items are coded either 0, which represents a NO,or 1 which represents a YES to a question about the television programs that the respondent watches. The purposeis to choose the 5 programs that reach the most people. These will be the programs that make the best use of ouradvertising budget.
The first step is to export this data from Excel as a tab delimited file. The process is:
1. Click on “File”
2. Click on “Save As”
3. Select the “Save as type” as “Text (Tab delimited)(*.txt)” and provide a name. For this project thename is “turfdat.txt” and it is to be saved in C:\project\turf_0503
3.2 PREPARING P-STAT
The first step is to tell P-STAT where all of the files for this project are located. This is done using the PS-FILES command. PSFILES provides a default folder for all the files, input and output, that might be used duringthe run. The previous chapter covers this in some detail. The following is a summary of the steps that are needed.
1. Click on “Utilities” in the top menu
2. Select “Change all Save Folders (PSFILES)”
3. Work your way through the “Select Directory” dialog box double clicking to make your selections.
In this example, the starting folder at the beginning of the P-STAT run is “C:\psource”. This is the startingdirectory for this example. There are three sections to the “Select Directory” dialog box illustrated in the previouschapter::
1. The selected directory/folder line
2. All the subdirectories under the current folder, starting with “..” which moves control to the directoryabove the current directory.

3.2 A Single Project
3. A list of the available drives.
You can change drives by selecting a different drive in the bottom section. You can work your way up anddown through the folders by making selections from the middle section or you can type your desired drive andfolder directly in the top section. To move up the directory tree double click the “..”. To move down the tree selecta folder from the list of available folders with a double mouse click. When you have located the directory/folderthat is to be your current working folder, click on the OK button. Be sure that you have selected the folder youwant and that the selected directory line at the top of the dialog box contains the full path before clicking on OK.
3.3 IMPORTING THE TAB DELIMITED FILE INTO P-STAT
The previous sequence creates and executes the PSFILES command which is echoed in the main P-STATwindow. The next step is to read the tab delimited file into P-STAT. Move the mouse to “IN/OUT” in the mainmenu. The “IN/OUT” list contains 7 items. The second one is used to read a tab delimited file and convert it intoa P-STAT system file. This sequence is illustrated in the previous chapter. The following is a summary of thesteps that are needed.
When you click on “Tabfile input” P-STAT asks for a name for the P-STAT system file you are about to cre-ate. Enter a name that is appropriate for the task and that follows the rules for legal P-STAT names and click on“OK”. If you click on “Cancel”, the program returns to the main P-STAT command window. A single click se-lects items from the menu. Unlike the directory selection a double click from the menus is the equivalent of “OK”and causes an exit from the menu or dialog box.
After you have entered the name for the new P-STAT system file, the program manager appears so that youcan select and open the text file exported from Excel. The program manager will list all the files which have ex-tensions such as.txt located in the folder designated by the PSFILES command.
Most commands require some information in addition to file names. The TABFILE.IN command needs toknow whether the first row of the tab delimited file contains variable names (labels). In this case, since the firstrow in the Excel file does contain variable names, “Labels”, the first identifier on the list is the one to select.
Unless your input data were created with a delimiter other than a tab you do not need to make a selection fromthe optional identifiers. Press the “Finished button” to complete the command.
After P-STAT executes the TABFILE.IN command the third step is complete. You have a P-STAT systemwhich contains the data for your TURF analysis. The name of this file is the name that you provided in the pre-vious step
3.4 EXECUTING THE TURF COMMAND
The next step is to click on the TURF command which is found under the heading “Statistics” in the main menu.
P-STAT Main Window
FILE EDITOR HELP DISPLAY UTILITIES STATISTICS IN/OUT FILE QUIT BROWSE COMMAND MANAGE PRINT
Frequencies:COUNTS command Description fileCorrelateRegressionTtestTurfCombinations

A Single Project 3.3
After you select the TURF command, you will see a menu with all the P-STAT system files that you havecreated during the current P-STAT session. Here it is the single file “P0503”. TURF expects to use all the vari-ables in the input file as either analysis or weight variables. The file in this example contains the case ID as wellas the analysis variables. Since TURF analyzes all the variables in the file except a specified weight variable, theid variable must be removed before the analysis can be done.
A P-STAT system file can be modified ANYTIME that it is input to any P-STAT command. Variable selec-tion is one example of a modification. The modification process can be done from the file selection menu.
Select your file and Press the “Modification/PPL”button. Next select the type of modification to be done.
There is virtually no limit to the number of modifications which can be done. The command that you areabout to execute will receive the data in modified format while the input file remains unchanged. If you wish tomake permanent modifications you may use the MODIFY command (see “File Manage” in the top menu). MOD-IFY is a vehicle for PPL. It can be used to create a new P-STAT system file which reflects all selections andmodifications.
It does not matter whether you select or delete variables. Use whichever is easier for the particular situation.The “Select Variables” and “Delete Variables” dialog boxes each have two menus: one contains a list of the avail-able variables; the second contains the selected variables. The procedure is similar to the procedure used inselecting identifiers.
A variable is selected by moving your mouse, highlighting one or more variables and then clicking on the“Select/Omit” button. This moves your choices to the “Selected variables” menu. It is not enough to highlightyour choice. It must be moved to the column of selected choices. When you are satisfied that the list of selectedvariables is correct, click on the “Finished” button.
Select a file
Modification/PPL
OK Cancel
p0503
Modification (PPL)
OK Cancel
Select variablesDelete variablesRename variablesGenerate variableSimple IF testComplex functionSelect casesUndo previous
Select one at a time
Finished all PPL

3.4 A Single Project
When you are selecting variables, the variables that will be available for the analysis are those in the selectedlist. When you are deleting variables, the variables that remain are those still in the list of “Available variables”.When the variable selection/deletion is complete press the ‘Finished” button and control returns to the PPL menu.
Since there are no more modifications needed for the current project,click the “Finished all PPL” button. The filename and all of the modificationsrequested for that file satisfy the first requirement for a TURF analysis. Youwill see the beginning of the TURF command appearing in the main P-STATwindow. It looks something like:
Turf P0503[ DROP Id ;]
There are 2 different ways to run TURF. The basic way is to do all pos-sible combinations of one or more selected sizes. An alternate way is to do astepwise run. In a stepwise run the variables that are determined to be the bestcombination in a given step are forced into the next step. This results in fewerpasses through the data file but the final result may not be the best combina-tion overall. STEP is used when the number of possible combinations is solarge that the run may take hours or days to complete. It is also used to pro-duce cascading step where the best single variable is computed and becomesthe basis for the next step. The variables are added one at a time with eachstep computing the best combination given the preceding combinations.
After selecting the file and the variables, you must decide whether to doa SIZE run or a STEP run. For this project we select Size.
Select variables to delete
Available variables Selected variables
Select/Omit
Finished
Cancel
Idvar2var3var4var5var6var7var8var9var10var11var12var13var14var15
Select One
OK Cancel
SizeStep
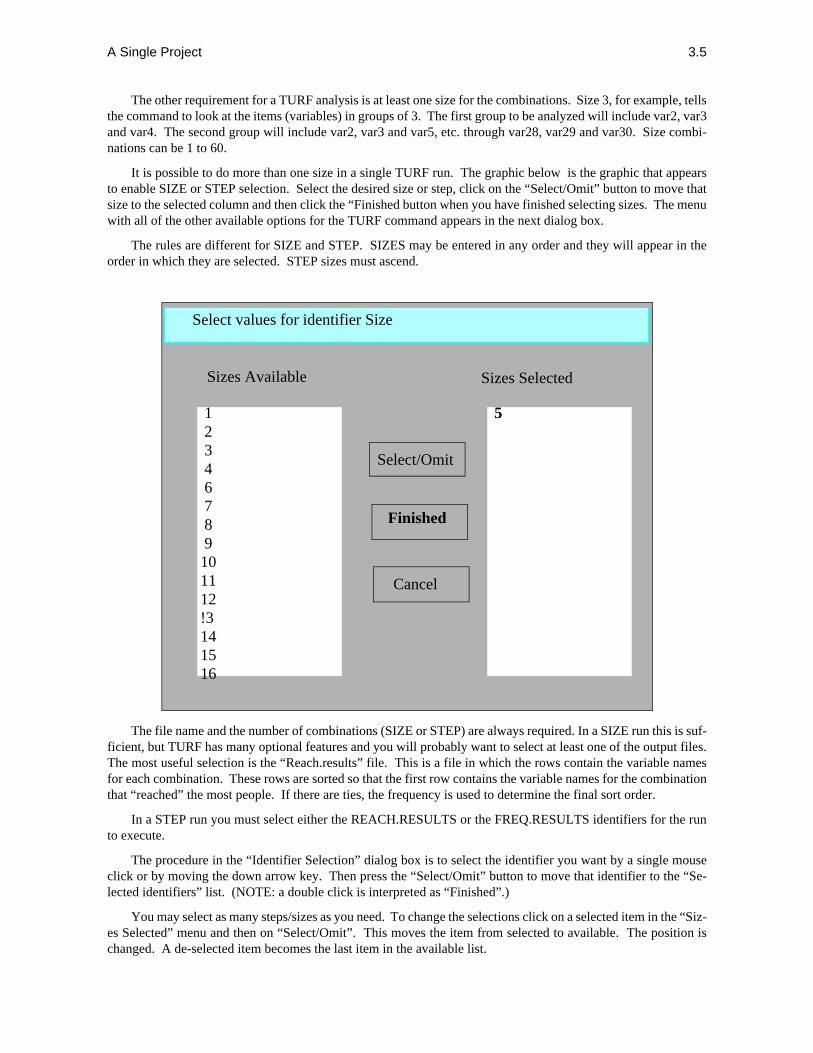
A Single Project 3.5
The other requirement for a TURF analysis is at least one size for the combinations. Size 3, for example, tellsthe command to look at the items (variables) in groups of 3. The first group to be analyzed will include var2, var3and var4. The second group will include var2, var3 and var5, etc. through var28, var29 and var30. Size combi-nations can be 1 to 60.
It is possible to do more than one size in a single TURF run. The graphic below is the graphic that appearsto enable SIZE or STEP selection. Select the desired size or step, click on the “Select/Omit” button to move thatsize to the selected column and then click the “Finished button when you have finished selecting sizes. The menuwith all of the other available options for the TURF command appears in the next dialog box.
The rules are different for SIZE and STEP. SIZES may be entered in any order and they will appear in theorder in which they are selected. STEP sizes must ascend.
The file name and the number of combinations (SIZE or STEP) are always required. In a SIZE run this is suf-ficient, but TURF has many optional features and you will probably want to select at least one of the output files.The most useful selection is the “Reach.results” file. This is a file in which the rows contain the variable namesfor each combination. These rows are sorted so that the first row contains the variable names for the combinationthat “reached” the most people. If there are ties, the frequency is used to determine the final sort order.
In a STEP run you must select either the REACH.RESULTS or the FREQ.RESULTS identifiers for the runto execute.
The procedure in the “Identifier Selection” dialog box is to select the identifier you want by a single mouseclick or by moving the down arrow key. Then press the “Select/Omit” button to move that identifier to the “Se-lected identifiers” list. (NOTE: a double click is interpreted as “Finished”.)
You may select as many steps/sizes as you need. To change the selections click on a selected item in the “Siz-es Selected” menu and then on “Select/Omit”. This moves the item from selected to available. The position ischanged. A de-selected item becomes the last item in the available list.
Select values for identifier Size
Sizes Available Sizes Selected
Select/Omit
Finished
Cancel
1 2 3 4 6 7 8 9101112!3141516
5

3.6 A Single Project
The REACH.RESULTS identifier has two arguments. The first is the name to be given to the “reach.results”file. The “reach.results” file is a P-STAT system file and the name must follow the rules for a P-STAT systemfile name. For example:
The second is the number of cases to be written to the “reach.results” file. If you do not change it, the numberis set to 100 cases. NOTE: if you select multiple sizes the default for output values is 100 for each size.
Change the number of outputvalues?
OK Cancel
100
Enter the name for a new P-STAT system OK Cancel file
TurfRRR
TURF: Optional Identifier Selection
Available identifiers Selected identifiers
Select/Omit
Finished
Cancel
Reach.statsReach.thresholdCase.weightsResponse.weightsItem.weightsForceReorderSet.miss.to.zeroShowOmitFreq.resultsFreq.statsConstrainProgressReach.summaryFreq.summaryFull.outputUse.names
Reach.results

A Single Project 3.7
After you click “OK” the next screen is a return to the “Identifier Selection” window. The other identifiershave similar arguments. However, for many runs “REACH.RESULTS” will be sufficient. Press the “Finished”button when you have completed your selections. The TURF command is now automatically executed and thereport displayed on your terminal
___________________________________________________________________________
Figure 3.1 Turf Report
----------TURF analysis for file P0503 completed---------- OPTIONS: none
29 items were read. 550 cases were read and used. 213 cases had at lease one politive response, making that the maximum possible reach. SIZE 5 evaluated 118,755 combinations: 213 was the best REACH, found in 12 combinations. 746 was the best FREQ in those 12 combinations. 867 was the best FREQ in any size 5 combination. The FREQ score for a combination is the count of the non-zero responses for that combination, summed over the reached cases. REACH.RESULTS file TurfRRR has the 100 combinations with the highest reach scores. The items are ordered by their REACH contribution. Cumulative reach is shown. Time: less than 0.1 second. ___________________________________________________________________________
If you wish to print this report, click on the “Command Print” button at the top left of the menu in the main P-STATwindow.
The TURF information of the most interest is in the new P-STAT system file, TurfRRR. Since this is aP-STAT system file, it is binary and can only be read by a P-STAT command. The LIST command reads aP-STAT system file and reformats it as text. If LIST is not told otherwise, it prints the text on the screen. TheLIST command is selected by clicking first on “Display” in the top menu and then on “List a file”.
LIST needs to know which of our files to LIST and then which LIST identifiers to use. First select TurfRRRand since there are no modifications click on the “OK” button. LIST has many optional identifiers to control theappearance of the printout. To execute LIST using the defaults, click the “Finished” button.
P-STAT Main Window
FILE EDITOR HELP DISPLAY UTILITIES STATISTICS IN/OUT FILE QUIT BROWSE COMMAND MANAGE PRINT
Save LabelsTitlesListSurvey
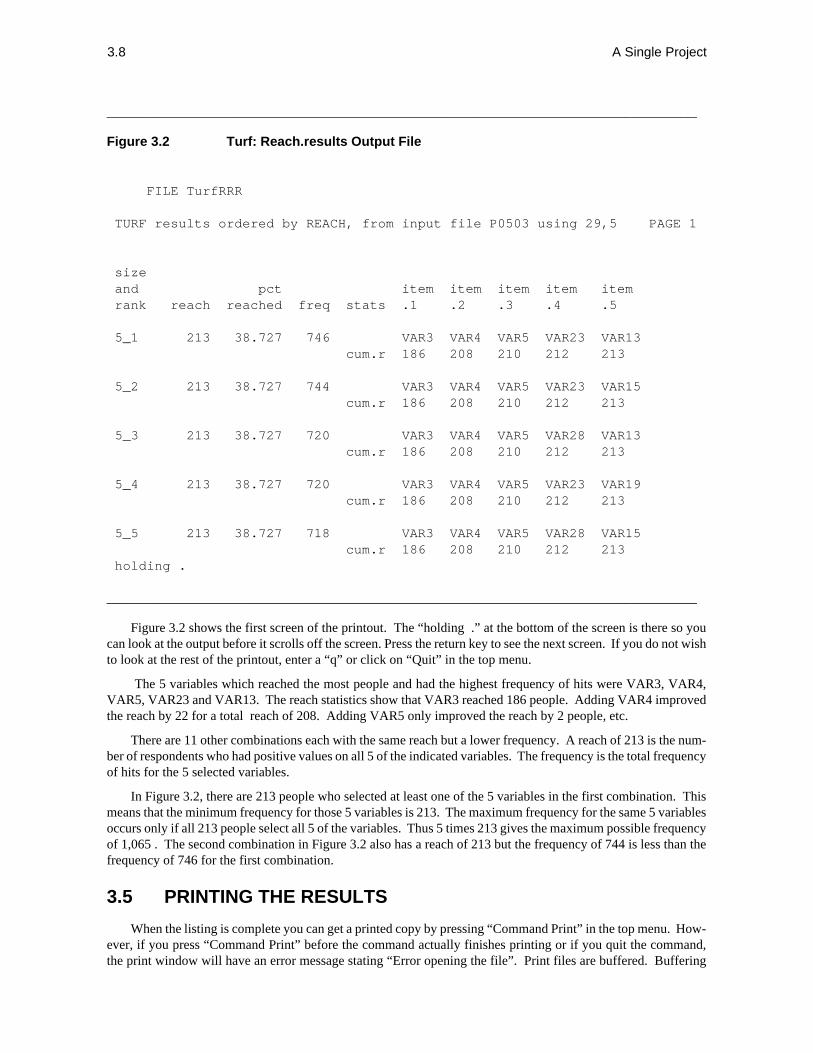
3.8 A Single Project
__________________________________________________________________________
Figure 3.2 Turf: Reach.results Output File
FILE TurfRRR TURF results ordered by REACH, from input file P0503 using 29,5 PAGE 1
size and pct item item item item item rank reach reached freq stats .1 .2 .3 .4 .5 5_1 213 38.727 746 VAR3 VAR4 VAR5 VAR23 VAR13 cum.r 186 208 210 212 213 5_2 213 38.727 744 VAR3 VAR4 VAR5 VAR23 VAR15 cum.r 186 208 210 212 213 5_3 213 38.727 720 VAR3 VAR4 VAR5 VAR28 VAR13 cum.r 186 208 210 212 213 5_4 213 38.727 720 VAR3 VAR4 VAR5 VAR23 VAR19 cum.r 186 208 210 212 213 5_5 213 38.727 718 VAR3 VAR4 VAR5 VAR28 VAR15 cum.r 186 208 210 212 213 holding .
__________________________________________________________________________
Figure 3.2 shows the first screen of the printout. The “holding .” at the bottom of the screen is there so youcan look at the output before it scrolls off the screen. Press the return key to see the next screen. If you do not wishto look at the rest of the printout, enter a “q” or click on “Quit” in the top menu.
The 5 variables which reached the most people and had the highest frequency of hits were VAR3, VAR4,VAR5, VAR23 and VAR13. The reach statistics show that VAR3 reached 186 people. Adding VAR4 improvedthe reach by 22 for a total reach of 208. Adding VAR5 only improved the reach by 2 people, etc.
There are 11 other combinations each with the same reach but a lower frequency. A reach of 213 is the num-ber of respondents who had positive values on all 5 of the indicated variables. The frequency is the total frequencyof hits for the 5 selected variables.
In Figure 3.2, there are 213 people who selected at least one of the 5 variables in the first combination. Thismeans that the minimum frequency for those 5 variables is 213. The maximum frequency for the same 5 variablesoccurs only if all 213 people select all 5 of the variables. Thus 5 times 213 gives the maximum possible frequencyof 1,065 . The second combination in Figure 3.2 also has a reach of 213 but the frequency of 744 is less than thefrequency of 746 for the first combination.
3.5 PRINTING THE RESULTS
When the listing is complete you can get a printed copy by pressing “Command Print” in the top menu. How-ever, if you press “Command Print” before the command actually finishes printing or if you quit the command,the print window will have an error message stating “Error opening the file”. Print files are buffered. Buffering

A Single Project 3.9
means that the lines of output are not actually written until a print buffer is full and print buffers are often verylarge. If you quit the printout before the file has finished printing, “Command Print” shows only the lines thathave actually been written to the screen.
The “Command Print” button is very useful for command output such as the TURF final report and for listingsmall output files. However, when a file has 500 or more rows, what you may really want is to look at the firstscreen or two; quit; and then have the full file printed.
P-STAT system files such as P0503 and TurfRRR are binary files. That means that they are written to bevery efficient on the computer. This advantage has one disadvantage; because P-STAT binary files can only beread by a P-STAT command such as the LIST command, they cannot be sent directly to the printer. Howeverthere is an easy way out. The “Print P-STAT system file” item in the “Files” menu will automatically generatethe necessary LIST command and send that output to the Print Manager.
When you select “Print” you can choose your printer and also specify your page setup. The LIST commandthat is generated is programmed to print in “portrait” rather than “landscape” format. Be sure to check that thepage setup has the correct orientation.
To finish the run you can either click on the X in the top right-hand corner of the screen or click on “ExitP-STAT” at the bottom of the “File” list of items.
You can use the PRINT command to print any appropriate file anywhere in your file system. However, youcannot directly print binary files such as P-STAT system files or executable programs. To print P-STAT systemfiles you have 3 choices:
1. List the file at the terminal and when the listing is complete click on “Command Print” in the topmenu.
2. Select “File”, “Print” and “P-STAT system file”. This will generate the LIST and the PRINT com-mands for the selected file. This is easy but you have no control over the format of the output.
3. LIST the file and select the “PR” identifier to supply your own print destination name. This allowsyou to use LIST’s formatting options. (Selecting “Blank.missing” enhances the listing of theREACH and FREQ results files.) Then press “File”, “Print” and “Print destination file” and selectthe filename you provided for the PR identifier.
P-STAT Main Window
FILE EDITOR HELP DISPLAY UTILITIES STATISTICS IN/OUT FILE QUIT BROWSE COMMAND MANAGE PRINT
System filesActive filesStatusShow ContentsExamine a fileShow bytes in a fileReformat a fileDefine Print FileSelect Print FilePrint
Exit P-STAT
Print destination fileP-STAT system file

3.10 A Single Project
___________________________________________________________________________
Figure 3.3 REACH.STATS : All possible statistics
The generated TURF command
TURF P0503 [ DROP Id ], SIZE 5, REACH.RESULTS TurfRRR, REACH.STATS ALL, FILE TurfRRR: partial listing TURF results ordered by REACH, from input file p050 using 29,5 PAGE 1 size and pct item item item item item rank reach reached freq stats .1 .2 .3 .4 .5 5_1 213 38.727 746 VAR3 VAR4 VAR5 VAR23 VAR13 cum.r 186 208 210 212 213 add.r 186 22 2 2 1 %cum.r 33.82% 37.82% 38.18% 38.55% 38.73% %add.r 33.82% 4.00% 0.36% 0.36% 0.18% cum.f 186 364 542 628 746 add.f 186 178 178 86 118 unique 16 8 2 2 1
___________________________________________________________________________
___________________________________________________________________________
Figure 3.4 REACH.STATS Controls the Rows. SHOW Controls Columns
The generated TURF command
TURF P0503 [ DROP Id ], SIZE 5, REACH.RESULTS TurfRRR, REACH.STATS cumulative.reach additional.reach cumulative.freq unique.reach, SHOW size rank reach freq $
FILE TurfRRR: partial listing TURF results ordered by REACH, from input file p0503 using 29,5 PAGE 1 item item item item item size rank reach freq .1 .2 .3 .4 .5 5 1 213 746 VAR3 VAR4 VAR5 VAR23 VAR13 186 208 210 212 213 186 22 2 2 1 186 364 542 628 746 16 8 2 2 1
___________________________________________________________________________

A Single Project 3.11
3.6 OTHER TURF IDENTIFIERS
The manual “P-STAT: Introductory Manual” contains complete information about the TURF command and allthe identifiers. A brief description of TURF’s optional features follows here;
3.7 The Output Files
The identifiers that control the REACH output are:
1. REACH.RESULTS supplies a new P-STAT system file name for the REACH output
2. REACH.STATS There are 9 possible arguments for REACH.STATS
ALLNONECUMULATIVE REACHADDITIONAL REACHUNIQUE.REACHCUM.REACH.PCTADD.REACH.PCTCUMULATE.FREQADDITIONAL.FREQ
3. REACH.THRESHOLD permits the user to control what constitutes a successful reach. The de-fault is 1. If the case has a single positive value on any of the variablesin a given combination, the case is added to the reach total for thatcombination.
4. SHOW and OMIT control the columns in the REACH.RESULTS and FREQ.RESULTSoutput files. The items are always in the output files but any or all ofthe first 5 columns can be selected. Also available are RANK, SIZEand PCT.OF.MAX.REACH. SHOW NONE and OMIT ALL have thesame result: only the items are included in the output files. See Figure3.4 which causes the printout to have the same columns as earlier re-leases of the TURF command.
5. REACH.SUMMARY a P-STAT system file that summarizes each of the reach values thatwere found. .
The identifiers that control FREQ Output are:
1. FREQ.RESULTS supplies a new P-STAT system file name for the FREQ output
2. FREQ.STATS default value is CUMULATIVE.FREQ. Other options are ADDI-TIONAL.FREQ, ALL and NONE
3. FREQ.SUMMARY a P-STAT system file that summarizes the freq values .
Identifiers which can be used to provide weights.
1. CASE.WEIGHTS provides a variable in the file which is used to weight each case
2. RESPONSE WEIGHTS the data values themselves are the weights. The default is to use a val-ue of 1 for any item that is greater than zero.
3. ITEM.WEIGHTS provides a file with information on the weighting to be given to indi-vidual variables

3.12 A Single Project
3.8 General Identifiers
There are a number of other identifiers which provide additional control over the way that items are included andthe way that the data are represented.
1. FORCE needs a list of variables that are to be forced into the output regardlessof their contribution.
2. STEP automates the forcing. This provides a way to get an approximationwhen the number of combinations is too large to be practical. Thereare two other identifiers that apply to STEP runs: SHOW.ALL.COM-BOS and FULL.REPORT.
3. CONSTRAIN provides a limitation on the number of combinations to be tried by de-fining clusters of variables to be treated together.
4. FULL.OUTPUT provides a name for a P-STAT system file with all the combinations.
5. USE.NAMES used with FULL.OUTPUT. The names of the variables are used in-stead of the variable position.
6. PROGRESS Reports the percent of combinations performed. The reports are doneevery 1,000,000 combinations unless the PROGRESS identifier isused to change the value. Pressing the F2 key can be used to interruptthe run without losing results for any sizes that have been completelyprocessed.
3.9 HELP OPTIONS
For more information on the other options in the TURF command you can see the manual “P-STAT: IntroductoryManual”, or you can use the P-STAT help file.
Click on “Help/Menu Help Items” for information about any of the commands that are supported in the menusystem. For TURF, click on “Statistics” and then on “Turf”. You will also get help information if you select “--HELP--” from the menu of Turf’s optional identifiers.
An alternate source for this information is the P-STAT help file which contains information about all P-STATcommands not just those supported by the menus. The final 3 items listed under “HELP” invoke the basic P-STAThelp file.
“Help Topics” and “Help Commands” contain information about the topics and commands that are supportedin the help file. “Help Keyword” requests a keyword from the list of topics or commands. To get the TURF in-formation select “Help Keyword” and enter “Turf” as the keyword.
A further source if help is the single line at the bottom of the main P-STAT window. As you select a commandor an identifier, this line is used to detail just what the command or the identifier does and how to use it.
P-STAT Main Window
FILE EDITOR HELP DISPLAY UTILITIES STATISTICS IN/OUT FILE QUIT BROWSE COMMAND MANAGE PRINT
Menu Help ItemsFull Help File

A Single Project 3.13
3.10 OTHER DATA INPUT
If your data are not in an Excel spreadsheet, the first 2 steps illustrated here will be somewhat different. Ifyour data are on paper, you can use P-STAT’s MAKE command to enter the data. This is described in the manual“P-STAT: Introductory Manual”.
If your data were entered into some other PC program, the first step is to export that data in one of the follow-ing formats:
1. Tab delimited, i.e., like the Excel export format but without the variable labels. Use TABFILE.INto import the data into P-STAT.
2. ASCII but delimited by some other character such as a comma. You can use TABFILE.IN with theDELIMITER identifier which tells P-STAT what character that was used as the delimiter. If you donot have variable names as the first record in the data file and do not want to have P-STAT generatethe names, click on “FILE” and then on “Create File Free Format Data”.
3. SPSS portable format. To import use Export/Import: SPSS input.
4. See the MAKE and MAKE.FIXED commands for more complex data formats


4The Editor
The P-STAT editor contains a log of P-STAT commands as they are entered. Each command has a substructurecontaining any subcommands and data records. There are editor instructions to move from one command to an-other. There are instructions to move from a command to its subcommands and data records. Editor files can besaved and reused and, most important, the contents can be changed and errors corrected.
There are two ways to work with a P-STAT edit file:
1. Instructions can be entered manually. This permits the P-STAT editor to be used on computers otherthan PC/Windows. It also permits users who are accustomed to entering P-STAT commands to con-tinue operating in a familiar way.
2. Commands can be selected from the Editor’s top menu bar. Command text is generated dependingon the options you select.
In PC/Windows all changes to a command or its data records are done in a full screen editor using standardoptions such as cut and paste.
The P-STAT editor control window is entered whenever an error is encountered or the “Editor” button is se-lected from the main menu. The edit control window manages the P-STAT edit file which contains a copy of everycommand that is entered during a P-STAT session. Edit files can be saved for reuse in later runs. The commandsin the edit file can be located either by their position in the file or by matching text strings in the command. Thesubcommands or data records that belong to a given command are only available when the edit file pointer is lo-cated at that command.
___________________________________________________________________________
Figure 4.1 An Empty Editor File
P-STAT, version 3.01, rev 3 (Dec 1, 2012) WHOPPER 2 (6,000 variable) size with storage options 222. Copyright (c) 1972 to 2012, P-STAT Inc. Use HELP NEWS$ for general news about this version. P-STAT starting... 15:46:02 Aug 1, 2012 Enter a command: editor $ The editor file is empty. At the TOP EDITOR:
___________________________________________________________________________
P-STAT Editor
File Edit Controls Move Pointer Edit/ Action Execute Quit Change

4.2 The Editor
The first section in this chapter covers the menu items available in the editor control window. The secondsection illustrates how to save the commands in the edit file for use in later runs. The third section illustrates usinga saved edit file, changing a command and executing the changes. The final section illustrates command input inthe editor.
4.1 THE EDITOR’S MAIN MENU
To make changes to a given command or its associated subcommand/data records, you must first locate thecommand. If you enter the editor because of an error situation, the edit file is positioned at the command whichcontains the error. If you enter the editor independently, the edit file is pointed to the final command and you mayneed to move the pointer to the desired location.
Figure 4.1 shows the P-STAT window after the “Editor” button is selected at the beginning of the run. NoP-STAT commands have been entered and the editor file is empty. The editor control window has its own set ofmenu buttons. The “Edit/Change”, “Execute”, and “Quit” buttons are the only ones that do not have a pull-downsubmenu. If you press the “Quit” button or enter the letter “Q”, control returns to the main P-STAT window.
The rest of this chapter contains:
1. a brief summary of each of the editor file control buttons;
2. saving an edit file containing the commands that were entered in the previous chapter;
3. locating a command and making changes;
4. executing the changed commands.
4.2 The Editor “File” button
The “Files” button is used to save the current edit file or restore an existing edit file. The P -STAT edit filecan be saved and restored in either a text format or a binary format. Import and Export are used for text format.Backup and Restore for binary format. For most purposes text format is satisfactory and has the advantage that itcan be easily read by any text editor (Notepad, Wordpad, MicroSoft Word, etc.).
4.3 The “Edit Controls” button
The “Edit Controls” button is used to move between the command editor and the data editor. It is also usedto move or copy one or more P-STAT commands to another location in the edit file.
P-STAT Editor
Files Edit Controls Move Pointer Edit/ Action Execute Quit Change
Command EditorData Editor
MoveCopy
P-STAT Editor
Files Edit Controls Move Pointer Edit/ Action Execute Quit Change Import
Export
BackupRestore

The Editor 4.3
4.4 Moving the Pointer in the Editor
The “Move Pointer” button is used to find your way through the edit file. Only the currently active commandcan be edited or changed. The pointer must be located at the command to be changed. The ways to move thepointer include:
1. Move up or down one or more command positions.
2. Move to the top (before the first command) or bottom (after the last command).
3. Move to the first command or to the last command.
4. Move the pointer to a specified position or to the command containing a specified string.
When you select “Down” or “Up” you are given the choice of moving 1 position or more than one position.If you select “More than one”, you may either accept the default value of “2” or enter the appropriate number.
4.5 Editor Actions
The “Action” button is the final Editor button with choices. These are the things that you can do aside fromchanging the contents of the command. The first four are the most useful:
P-STAT Editor
File Edit Controls Move Pointer Edit/ Action Execute Quit Change
DownUp
BottomTop
FirstLast
Locate stringLocate by position
P-STAT Editor
File Edit Controls Move Pointer Edit/ Action Execute Quit Change
TypeDelete
InputSyntax
HelpWhere
Define Y1Y1
Define Y2Y2

4.4 The Editor
1. Type one or more commands and (optionally) their data records.
2. Delete one or more commands.
3. Input a command.
4. Check the syntax of a command.
The final three buttons on the Editor control window are:
1. Edit/Change which causes the current command to be placed in a full screen edit window.
2. Execute which causes one or more commands to be submitted for execution.
3. Quit which exits from the edit file and returns to the main P-STAT window.
4.6 AN EXAMPLE WITH A COMMAND FILE
In the previous chapter 5 commands were executed to bring data into P-STAT, run a TURF analysis and printthe results. When PSFILES, is executed before any files are opened it does not appear in the edit file. These arethe four remaining commands stored in the edit file:
1. TABFILE.IN p0503, READ 'turfdat.txt' $
2. TURF p0503, SIZE 5, REACH TurfRRR $
3. LIST turfrrr $
4. PRINT turfrrr $
To save this file as an ASCII text file:
1. click on Editor in the main P-STAT window;
2. click on “Files” in the P-STAT Editor menu;
3. click on “Export.
Export needs a name for the file to be stored on disk in the PSFILES folder. A name such as Turfjob.txt isappropriate.
The file is stored in c:\project\turf_0503 because the PSFILES command provides a default folder for all the filescreated in the current run. Since this is an ASCII file you can edit it in Notepad or even in MicroSoft Word (aslong as you save it as text). The edits can include changes or additional commands. The example in the next sec-tion illustrates using this saved file of P-STAT commands in a subsequent run.
P-STAT Editor
Files Edit Controls Move Pointer Edit/ Action Execute Quit Change Import
Export
BackupRestore
Enter the name for the new file OK Cancel
Turfjob.txt

The Editor 4.5
4.7 Using the Saved Edit File
This time after selecting “Utilities” and “Change All Save Files (PSFILES)” go directly into the editor. It isempty because the PSFILES command was executed before the editor began. After selecting “Editor” click on“Import”. “Import” needs to know the name of the file of commands.
The windows file manager is used to locate existing files. The file manager begins its search in the currentlydefined “PSFILES” directory. You may, if necessary, move to any other folder in your file system. When youfind the file that contains the commands click on OPEN.
Figure 4.2 illustrates the appearance of the screen when the open is complete. Control is still within the editorand the pointer is located below the final command. Since this is the beginning of the run, the editor, which wasempty before the file was imported, now contains the 4 commands that comprise this job.
___________________________________________________________________________
Figure 4.2 Import an Existing Editor File
P-STAT, version 3,01, rev 1 (Jan 12, 2012) WHOPPER 2 (6,000 variable) size with storage options 222. Copyright (c) 1972 to 2012, P-STAT Inc. Use HELP NEWS$ for general news about this version. P-STAT starting... 15:46:02 Jan 20, 2012 Enter a command: PSFILES "C:\PROJECT\TURF_0503" $
Enter a command:
Editor $ The editor file is empty
At the TOP EDITOR:
4 commands successfully imported from file C:\project\turf_0503\Turfjob.txt
At the BOTTOM EDITOR:
___________________________________________________________________________
The goal of this exercise is to locate the TURF command, change the SIZE identifier and then execute the last3 commands so that you can see the results with a changed SIZE parameter.
The first command in the editor is the TABFILE.IN command. Since P-STAT system files are automaticallysaved you do not need to do this command again. You know that the TURF command is the second commandand the current pointer is beyond the last command. The instructions which move the pointer are located underthe “Move Pointer” item.
P-STAT Editor
File Edit Controls Move Pointer Edit/ Action Execute Quit Change
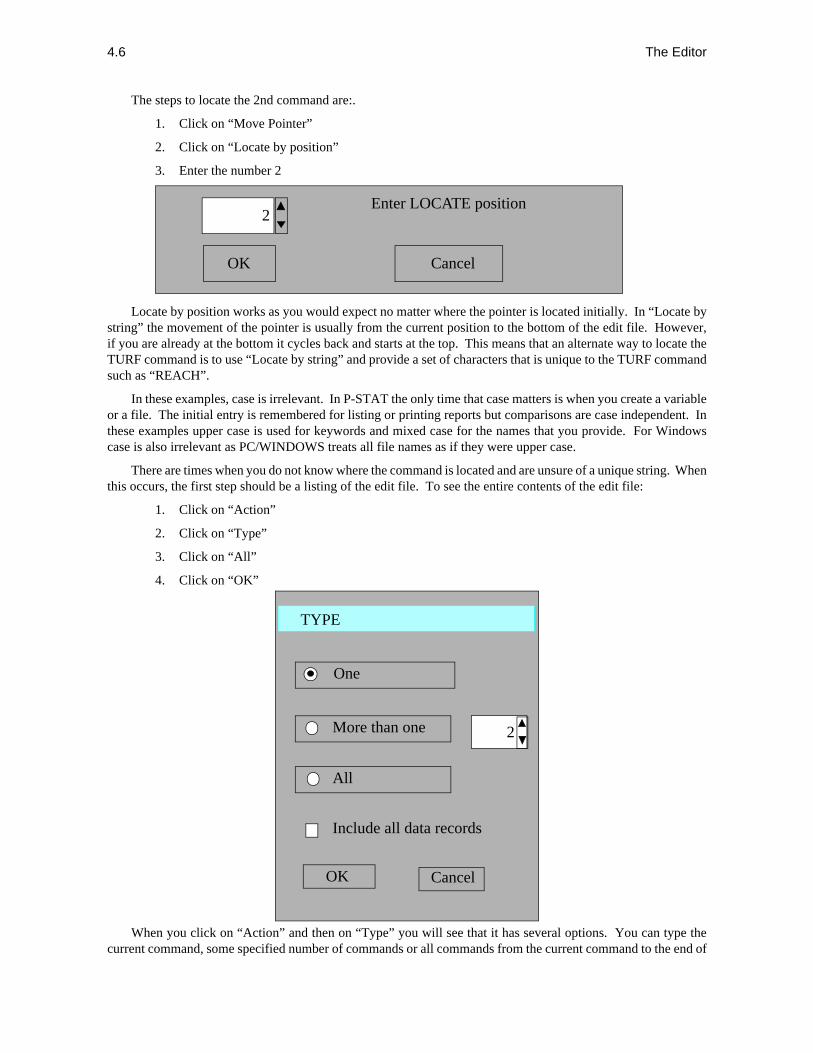
4.6 The Editor
The steps to locate the 2nd command are:.
1. Click on “Move Pointer”
2. Click on “Locate by position”
3. Enter the number 2
Locate by position works as you would expect no matter where the pointer is located initially. In “Locate bystring” the movement of the pointer is usually from the current position to the bottom of the edit file. However,if you are already at the bottom it cycles back and starts at the top. This means that an alternate way to locate theTURF command is to use “Locate by string” and provide a set of characters that is unique to the TURF commandsuch as “REACH”.
In these examples, case is irrelevant. In P-STAT the only time that case matters is when you create a variableor a file. The initial entry is remembered for listing or printing reports but comparisons are case independent. Inthese examples upper case is used for keywords and mixed case for the names that you provide. For Windowscase is also irrelevant as PC/WINDOWS treats all file names as if they were upper case.
There are times when you do not know where the command is located and are unsure of a unique string. Whenthis occurs, the first step should be a listing of the edit file. To see the entire contents of the edit file:
1. Click on “Action”
2. Click on “Type”
3. Click on “All”
4. Click on “OK”
When you click on “Action” and then on “Type” you will see that it has several options. You can type thecurrent command, some specified number of commands or all commands from the current command to the end of
TYPE
One
OK Cancel
More than one
All
Include all data records
2
Enter LOCATE position
OK Cancel
2

The Editor 4.7
the edit file. In addition you can request just the command text or you can request both the commands and anysubcommands or data records.
The TYPE controls are a combination of radio boxes (only one can be selected), a check box which is eitherchecked or not checked, and an integer counter. After making the selections, press “OK” and the screen displaysthe requested commands.
Figure 4.3 shows the screen as it looks when the TURF command is located.
___________________________________________________________________________
Figure 4.3 An Editor File
Enter a command:
Editor $ The editor file is empty
At the TOP EDITOR:
2 commands successfully imported from file C:\project\turf_0503\Turfjob.txt
At the BOTTOM EDITOR:
2...TURF p0503[ DROP Id; ], SIZE 3, REACH TurfRRR $
___________________________________________________________________________
To edit the command, press the “Edit/Change button. The selected command is transferred to an edit windowwhich has standard edit capabilities with “File”. “Edit” and “Search”. In addition there are buttons that are veryspecific to P-STAT. The “Quit” button leaves the original command unchanged, exits from the editor and returnsto the main P-STAT window. The “Cancel” button also leaves the text unchanged but returns to the P-STAT ed-itor control window. “Save Changes” saves the current contents and returns back to the editor control window.“Execute” saves the current contents and then submits the changed command (and optionally the following com-mands) for execution.
The “Enter Data/Subcommands” button transfers control to the data/subcommand editor. Since none of thecommands in the TURF project uses data or subcommands, the data editor is not useful here. However, for a com-mands such as SURVEY the data editor is usually needed. If the data editor does not exist, it is created. The
P-STAT Editor
File Edit Controls Move Pointer Edit/ Action Execute Quit Change
Current command
File Edit Search Cancel Enter Data/ Save Changes Execute Quit subcommand

4.8 The Editor
and
controls in the data editor behave exactly the same as the controls in the command editor. You can move back andforth between the editors by clicking the mouse inside the editor’s boundaries.
This is the selected command as it looks in the Edit/Change edit window after you change the SIZE argumentfrom 3 to 6 and have selected the “Execute” item. If you select “all commands”, the updated TURF command andall commands following it in the edit file will be executed.
TURF p0503[ DROP Id;],SIZE 6,REACH TurfRRR$
A selection of “more than one command” produces another dialog box where you can enter the number ofcommands to be executed.
Since the command editor uses the system’s clipboard to store information, you can cut and copy informationfrom one command, exit the command editor with Cancel or Save Changes, select another command to edit andpaste in the material that is stored on the clipboard.
To exit from the command editor there are 4 choices:
1. “Cancel” exits the command editor and returns to the P-STAT editor control window. The commandis unchanged.
2. “Quit” exits both the command editor and the P-STAT editor and returns to the main P-STAT win-dow. The original command is unchanged.
3. “Save Changes” exits the command editor and returns to the P-STAT editor control window readyto do more editor activity.
4. “Execute” submits the changed command (and optionally any following commands) for execution.If there is an execution problem, control returns again the editor control window.
4.8 MORE COMMAND EDITOR FEATURES
While the basic purpose of the command editor is to handle individual P-STAT commands with any associ-ated data or subcommand records, this editor can be used in a more general way. The “Enter Data/subcommands”,“Save Changes” and “Execute” features only make sense when used on single commands. When you enter the“Edit/Change” editor from the P-STAT main editor only the current command is available. However, if you select“Input” from the “Action” menu of the P-STAT editor control window, you begin with an empty edit file.
Current command
File Edit Search Cancel Enter Data/ Save Changes Execute Quit subcommand one command
more than one commall commands

The Editor 4.9
If you enter a single P-STAT command in the command editor and exit with either “Save Changes” or “Ex-ecute”, the new command is placed in the editor following the command which had the pointer when the commandeditor was entered. You can also use an empty command editor to edit any text file. Unless the contents of thefile are a single P-STAT command, you cannot execute the changes but you can save them.
This mechanism can be used to solve the problem of multiple changes. For example using the 4 commandfile, Turfjob.txt, you can use the editor to change all references to turfrrr into turfxxx in a single step, remove thefirst command, save the changes and then execute a TRANSFER command to execute the entire new job.
1. Select: File, Open and then select Turfjob.txt. The entire contents of the file of commands is broughtinto the editor.
2. Highlight the TABFILE.IN command, click on “Edit” and then on “Cut”. (Pressing either the deletekey or the backspace key also works.)
3. Select Search and Replace.
4. Enter the find field as “turfrrr:.
5. Enter the replace field as “turfxxx”.
Current command
File Edit Search Cancel Enter Data/ Save Changes Execute Quit subcommand
NewOpenSaveSave As
Current command
File Edit Search Cancel Enter Data/ Save Changes Execute Quit subcommand
FindFind NextReplace
Current command
File Edit Search Cancel Enter Data/ Save Changes Execute Quit subcommand
Undo
CutCopyPasteDelete
Select All

4.10 The Editor
6. Click on the X in the top right corner.
7. Click on File and Save (or Save As).
8. Quit the “Change” editor and return to the P-STAT main editor
Do NOT use either the “Save Changes” or “Execute” key when you have more than one command in the editfile. The file containing your P-STAT changes is now ready to execute. This can be done either by:
1. Import the file of changes into the editor, move to the first command in the file and execute all thecommands.
2. In the main menu press “Utilities” and “Transfer to Command File”. Select the file you have justsaved.
REPLACE X
Find what:
Replace with::
Find Next
Replace
Replace All
CancelMatch case
Match whole word only

5A Larger Project
Chapter 3 described a simple project: import data from an Excel spreadsheet and do a TURF analysis. The ex-amples showed how to delete a variable and print the results. This chapter uses the same project with additionalfeatures. The input data includes a gender variable: males are coded as 1 and Females as 2. Since females aremore likely to fill out a survey form, they are over represented in this study. The first example shows:
1. how to use the gender variable to create a weight variable and
2. how to use the weight variable in the TURF analysis.
If you do not know the best parameters for your TURF analysis or if you have many similar projects, it maybecome tiresome to do the analysis one step at a time, repeating most of the steps while changing only one or twoarguments. The second section discusses ways to process the data more efficiently.
5.1 A WEIGHTED ANALYSIS
When you are weighting on the basis of demographic information such as gender, you must know both the realpopulation percentages and the counts in your sample. The real numbers can be obtained from census data. Thecounts in your data can be determined by counting. If the sample is large, an easy way is to let P-STAT do thecounting for you.
The COUNTS command is accessed by selecting “STATISTICS” and then “Frequencies/Univariate stats”.COUNTS provides a wide variety of univariate statistics for every variable in the input file. Like most P-STATcommands, COUNTS works with a P-STAT system file which you select from the list of the available P-STATsystem files.
After selecting your file, press the “Modification/PPL (P-STAT Programming Language) button and selectthe variables of interest, in this case “Gender”. After selecting Gender press “Finished all PPL”. By keeping thesingle variable Gender, that will be the only variable that the COUNTS command receives. The next dialog boxshows the various identifiers that are available in the COUNTS command.
The default COUNTS output is the values, the totals, counts of missing and 16 univariate statistics. This ismore that you need. Selecting VALUES from the list of COUNT identifiers produces enough information to de-termine if the distribution for variable Gender is appropriate. After you select “Values”, Press “Select/Omit” tomove it to the selected column and then press “Finished”.
P-STAT Main Window
FILE EDITOR HELP DISPLAY UTILITIES STATISTICS IN/OUT FILE QUIT BROWSE COMMAND MANAGE PRINT
Frequencies/Univariate statsDescription fileCorrelateRegressionTtestTurfCombinations

5.2 A Larger Project
COUNTS: Identifier Selection
Available identifiers Selected identifiers
Select/Omit
Finished
Cancel
ByWeightLabelsAllValuesNsMissingsStatsHarmonicsNormalsResultsBaseFrequenciesMaxNo List
Select a file
Modification/PPL
OK Cancel
p0503
Modification (PPL)
OK Cancel
Select variablesDelete variablesRename variablesGenerate variableSimple IF testComplex functionSelect casesUndo previous
Select one at a time
Finished all PPL

A Larger Project 5.3
___________________________________________________________________________
Figure 5.1 The COUNTS Command
The Command
COUNTS [ KEEP Gender; ], RESET, VALUES $
The Printout
-----Counts of File P0503 completed----- 550 cases and 1 variable were processed
count or cum cum variable value stat count pct pct
Gender 1 241 241 43.82 43.82 2 309 550 56.18 100.00
___________________________________________________________________________
From Figure 5.1 it is obvious that the percent of males and females does not represent the actual distributionin most populations. The next step is to create a weight variable that will give the under-sampled males more rep-resentation in the TURF analysis. Giving each female a weight of .905 and each male a weight of 1.12 producesweighted values for men of 49.12 and for females of 50.88. These weights can be computed by using more fea-tures available with “Modification/PPL”.
5.2 Modifications: Temporary and Permanent
There are two forms of modifications in P-STAT:
1. Temporary modifications exist for the duration of a single command and do not change the contentsof the original input file. Modifications that are made when there is no output file are always tem-porary modifications. Temporary modifications may be done anytime that a P-STAT system file isinput to any command.
2. Permanent modifications can only occur when a command produces a P-STAT output file. TheMODIFY command takes a P-STAT system file as input and produces a new P-STAT system fileas output. The output file contains any modifications, new variables or recoded variables. The inputfile is unchanged. Since it is likely that the weight variable will be useful in more than just a singleTURF command, it is appropriate to generate the weight variable as a permanent variable in a newoutput file.
5.3 More About P-STAT System Files
P-STAT system files are sometimes referred to as “autosave” files. This is because any output file given alegal name that does not begin with “WORK” and has no more than 16 characters is automatically saved and isgiven the extension of “PS1”. If you modify this file you have the option of using the original file name for theoutput file or providing a completely new file name. If you reuse the original file name, it is given an extensionof “PS2”. You now have 2 versions of the file available. If you make yet another change and continue to use thesame file name, the newer version replaces the older of the two previous uses. Thus the extension of a file name

5.4 A Larger Project
alternates between PS1 and PS2. P-STAT knows which is the more recent version because the file contains aninternal counter. The input to any command, unless specified otherwise, is always the more recent version.
5.4 Generating a Weight Variable
The MODIFY command is located under the main menu“File Manage” item. The first dialog window that appearsis the “Select a file” window. Select your file and thenclick on “Modification/PPL”.
When you create a new variable you must give it a namethat conforms to the rules for legal names in P-STAT. These are:
1. 1-64 characters
2. Start with a letter
3. Contain only letters, numbers, decimal points, underscore characters
4. An optional tag followed by 2 colons at the beginning.
If every case in the file has a good value for variable Gender, you can assign an initial value to the new weightvariable and then with a single IF statement assign the weight for the other Gender category.
P-STAT Main Window
FILE EDITOR HELP DISPLAY UTILITIES STATISTICS IN/OUT FILE QUIT BROWSE COMMAND MANAGE PRINT
Modify a fileConcatenate filesLookup - table filesSortAggregate (summarize)Duplicate detections
Modification (PPL)
OK Cancel
Select variablesDelete variablesRename variablesCreate variableSimple IF testComplex functionSelect casesUndo previous
Select one at a time
Finished all PPL

A Larger Project 5.5
Weight is to be a numeric variable initialized to the value .905.
OK Cancel
Set the variable to ?
Missing 1
Missing 2
Missing 3
Another variable
A function
Decrease the value
Increase the value
Value
Enter the new variable name OK Cancel
Weight
Select the data type X
Character
Numeric
Enter the value to be used
OK Cancel
.905

5.6 A Larger Project
After the new variable is created and given an initial value, control returns to the “Modification (PPL)” dialogbox. Select “Simple IF test”. Creating an IF test requires several steps:
1. Select the variable to be tested from the menu of variable names.
2. Select the 3 radio buttons in the “Simple PPL IF statement” dialog box. The initial settings are“Equal”, “Value” and “Delete the case”. For this test change “Delete the case” to “Recode or set”.
3. Selecting “A value” produces a numeric dialog box. Since the initial value of .905 is the weight forthe females which are coded as a 2 for variable Gender, you need to test Gender for the value of 1.
4. When the result of the compare is either to keep the case or to delete the case, pressing the OK buttoncompletes the PPL statement. However, when the result is to recode a variable or to set a variableto a new value, there are more steps. The first additional step is to select the variable which is tohave the new value. In this case you are testing variable Gender and recoding variable Weight whenthe IF statement is true.
Enter the comparison value
OK Cancel
1
Simple PPL IF statement
If variable Gender
Select 1 of these 6 Compare the If compare is trueoperations variable to do the following
Equal
Not Equal
Less or equal
Greater or equal
OK
A value
A variable
Keep the case
Delete the case
Recode or set
Cancel
Less than
Greater

A Larger Project 5.7
When a variable is generated, it is placed at the end of the file. Since there are too many variables in the fileto fit in a single window, use the scroll bar on the right to move to the end. Select weight and click on “OK”. Thedialog window “Set the variable to ?” appears again. Enter the desired weight and press OK.
When the value is set, control returns again to the “Modification (PPL)” dialog box. Click “Finished PPL”.The next prompt is for an output file name for the modified file. You can use the same name for the output fileas you used for the input. The final step is to click on “Finished” in the “Identifier Selection menu”.
Select One
OK Cancel
IdGendervar2var3var4var5var6var7var8var9var10var11var12var13var 14var15
Variable to Set
Select One
OK Cancel
var16var17var 18var19var20var21var22var23var24var25var26var27var28var29var30Weight
Variable to Set
Enter the value to be used
OK Cancel
1.12
Enter P-STAT system file name OK Cancel
P0503

5.8 A Larger Project
___________________________________________________________________________
Figure 5.2 Generate Weight: the Command
MODIFY P0503 [ GEN Weight = .905; IF Gender EQ 1 SET Weight = 1.12; ] Out P0503 $
___________________________________________________________________________
Figure 5.2 contains the command that is created by this series of selections and mouse clicks. The next stepis to use P0503 with its weight value to produce a weighted TURF analysis. The beginning steps are exactly thesame as the procedure in the previous chapter.
1. Click on “Statistics” and “TURF”
2. Select p0503 as the input file and click on “Modification/PPL”
3. Delete variables Id and Gender.
4. Click on Select/Omit to move the variables to the selected column and click on “Finished”.
5. Next select SIZE as the type of TURF run. SIZE looks at all combinations of the variables at theselected size. STEP produces a stepwise analysis where results from a given step are forced into theanalysis for the following step. Select one or more sizes using the same procedure used to select thevariables.
Select variables to delete
Available variables Selected variables
Select/Omit
Finished
Cancel
IdGendervar2var3var4var5var6var7var8var9var10var11var12var13var14

A Larger Project 5.9
TURF: Optional Identifier Selection
Available identifiers Selected identifiers
Select/Omit
Finished
Cancel
Reach.statsReach.thresholdCase.weightsResponse.weightsItem.weightsStepForceReorderSet.miss.to.zeroShowFreq.resultsFreq.statsTemplateUse.namesConstrainReach.summaryFreq.summaryFull.outputProgres
Reach.results
Select One
OK Cancel
SizeStep
Select values for identifier Size
Sizes Available Sizes Selected
Select/Omit
Finished
Cancel
1 2 3 4 6 7 8 9101112!314
5

5.10 A Larger Project
6. In the “Identifier Selection” menu click on “Reach.results” and supply a name for the file which isto contain the best 100 reach combinations for each size
7. Click on Case.Weights
8. Select variable Weight from the list of variables.
9. Select any other options that you wish to try and finally click on “Finished”.
Figure 5.3 shows the TURF report when the CASE.WEIGHT option is used.
___________________________________________________________________________
Figure 5.3 Weighted TURF Report
---------TURF analysis for file P0503 completed--------- OPTIONS: case.weights (in variable weight)
29 items were used in the analysis. 550 cases were read and used; the sum of the weights for these cases was 549.565. SIZE 5 evaluated 118,755 combinations: 215.5500 was the best REACH, found in 12 combinations. 754.035 was the best FREQ in those 12 combination. 877.515 was the best FREQ in any size 5 combination.
The FREQ score for a combination is the count of non-zero responses in the case for that combination, times the caseweight, summed over the reach cases.
REACH.RESULTS file TurfRRR has 100 combinations with the highest reach scores. The items are ordered by their REACH contribution. Cumulative reach is shown
Time: .2 seconds.
___________________________________________________________________________
5.5 COMBINATIONS
When you have a file with a large number of items, it is helpful to have an idea of how many combinations arerequired for various sizes.
Consider 40 items. Depending on number of cases and on options:
1. Size 4 takes 91,390 iterations. Seconds.
2. Size 6 takes 3.8 million iterations. Minutes.
3. Size 10 takes 847 million iterations. An hour.
4. Size 15 takes 40 billion iterations. A day.
5. Size 20 takes 137 billion iterations. A week.

A Larger Project 5.11
PUT with the COMBINATION function can be used to display the number of iterations that are required fora given number of items and sizes. This can be run by selecting “Combinations” just below TURF in the statisticspull down menu.
Selecting Combinations causes 3 requests for integers. The first is the total number of items to be used. The sec-ond is the Size to be considered. Thus the numbers 20 and 4 would provide the number of combinations as 20things taken 4 at a time. If the final number is the same as the first, a single report is made. If the final number islarger, the number of combinations is computed for all sizes from the first to the last..
Size Combinations 4 91,390 5 658,008 6 3,838,380 7 18,643,560 8 76,904,685
Enter the starting combinationSIZE
OK Cancel
4
Enter the final SIZE to beconsidered
OK Cancel
8
Enter the total number of itemsto be included
OK Cancel
40
P-STAT Main Window
FILE EDITOR HELP DISPLAY UTILITIES STATISTICS IN/OUT FILE QUIT BROWSE COMMAND MANAGE PRINT
Frequencies/Univariate statsDescription fileCorrelateRegressionTtestTurfCombinations
5.12 A Larger Project
5.6 The STEP Identifier
The STEP identifier can be used when you have a situation such as 40 items taken 15 at a time. It produces anapproximation of the desired result by doing the calculations in steps. For example:
STEP 8 12 15
The first 8 are processed in the normal fashion. In the second step, the selected 8 variables are forced into thecalculations and sizes 9-12 are then calculated. A third step forces the initial 8 variables plus the 4 variables cal-culated in the second step and finishes with steps 13-15. This will take far less time and will produce a resultwhich may not be the absolute best but provides a reasonable solution for a problem that might otherwise be be-yond the capabilities of your computer. STEP and cascading STEPS are illustrated in the manual “P-STAT:Introductory Manual”
5.7 TURF.SCORES
The TURF.SCORES command is used after a TURF run to identify the cases which contributed to the reach re-sults. There are two ways to use the TURF.SCORES command. One way provides the item information that wasused by TURF plus background variables. The easy way creates a TEMPLATE file in the TURF command andthen uses the original input file including any demographic variables as input to TURF.SCORES. TheTURF.SCORES command is documented in the manual “P-STAT: Basic Statistics”. TURF.SCORES can onlyevaluate a REACH.RESULTS file for a single step size.
5.8 EFFICIENT PROCESSING
The step by step click and select procedures described in the chapter 3 and in the first section of this chapter makeit easy for the new user or the occasional user to process his data. However, if you want to try TURF with theSIZE parameter set to values 3, 4, 5 and 6 both with and without weighting, the step by step procedure becomestedious. TURF has the ability to provide multiple values for the SIZE identifier in a single run. You may use anyof the following:
TURF ....., SIZE 3 5 TO 7,TURF ....., SIZE 8 7 4 TO 6TURF ....., SIZE 1 4 3 2
There will be a single REACH.RESULTS or FREQ.RESULTS output file with results from all of the sizes.The number of variables will depend upon the number needed for the largest SIZE selection. The default outputrows for each size is 100. Thus if there are 4 sizes requested, the reach output file will have 400 rows unless anoverride is provided.
If the largest size is 8 and the smallest is 4, the output rows for size 4 will have missing supplied for the 4columns that are not relevant. Some of the output options such as FULL.OUTPUT are not available for multiplesize runs.
Using PPL, the P-STAT Programming Language, in the menus requires setting values in several dialog box-es. If you are going to do a series of TURF commands changing only the SIZE parameter or the output files, useMODIFY to create a file which has exactly the variables that you want. This way you need to do the PPL stepsonly once. Rerunning TURF from the menus will require fewer mouse clicks and selections if you only need toselect or change TURF identifiers.
An easy way to make simple changes to the command rather than re-entering it from the beginning is to usethe P-STAT editor. The P-STAT editor was described in the previous chapter. It provides one way to simplifythe procedure of repeated analysis with minor changes. When you finish looking at the results of an analysis, se-lect the “Editor” item from the P-STAT main menu. This places you in the editor positioned at the most recentcommand. (Note: the number at the left is the sequence number of the most recent command and is NOT part ofthe command text.) Select “Edit/Change”. Make your changes in the edit window and then select “Execute”.
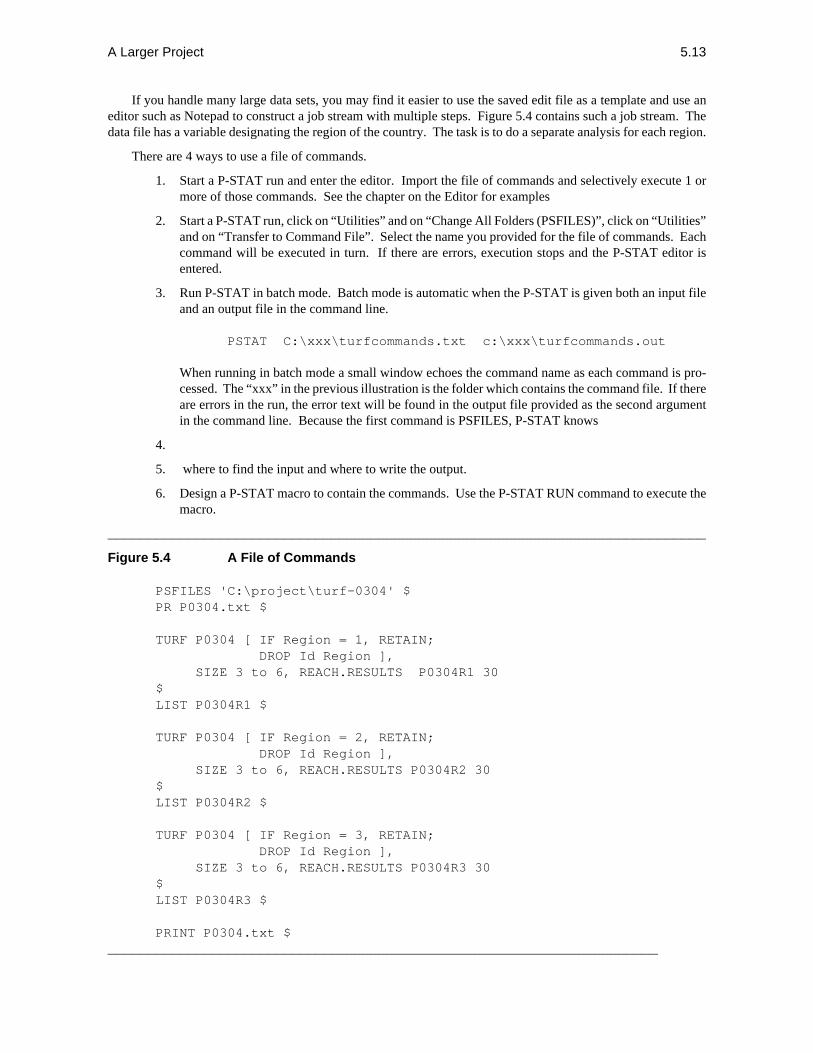
A Larger Project 5.13
If you handle many large data sets, you may find it easier to use the saved edit file as a template and use aneditor such as Notepad to construct a job stream with multiple steps. Figure 5.4 contains such a job stream. Thedata file has a variable designating the region of the country. The task is to do a separate analysis for each region.
There are 4 ways to use a file of commands.
1. Start a P-STAT run and enter the editor. Import the file of commands and selectively execute 1 ormore of those commands. See the chapter on the Editor for examples
2. Start a P-STAT run, click on “Utilities” and on “Change All Folders (PSFILES)”, click on “Utilities”and on “Transfer to Command File”. Select the name you provided for the file of commands. Eachcommand will be executed in turn. If there are errors, execution stops and the P-STAT editor isentered.
3. Run P-STAT in batch mode. Batch mode is automatic when the P-STAT is given both an input fileand an output file in the command line.
PSTAT C:\xxx\turfcommands.txt c:\xxx\turfcommands.out
When running in batch mode a small window echoes the command name as each command is pro-cessed. The “xxx” in the previous illustration is the folder which contains the command file. If thereare errors in the run, the error text will be found in the output file provided as the second argumentin the command line. Because the first command is PSFILES, P-STAT knows
4.
5. where to find the input and where to write the output.
6. Design a P-STAT macro to contain the commands. Use the P-STAT RUN command to execute themacro.
___________________________________________________________________________
Figure 5.4 A File of Commands
PSFILES 'C:\project\turf-0304' $PR P0304.txt $
TURF P0304 [ IF Region = 1, RETAIN;
DROP Id Region ], SIZE 3 to 6, REACH.RESULTS P0304R1 30 $LIST P0304R1 $
TURF P0304 [ IF Region = 2, RETAIN; DROP Id Region ], SIZE 3 to 6, REACH.RESULTS P0304R2 30 $LIST P0304R2 $
TURF P0304 [ IF Region = 3, RETAIN; DROP Id Region ], SIZE 3 to 6, REACH.RESULTS P0304R3 30 $LIST P0304R3 $
PRINT P0304.txt $_____________________________________________________________________
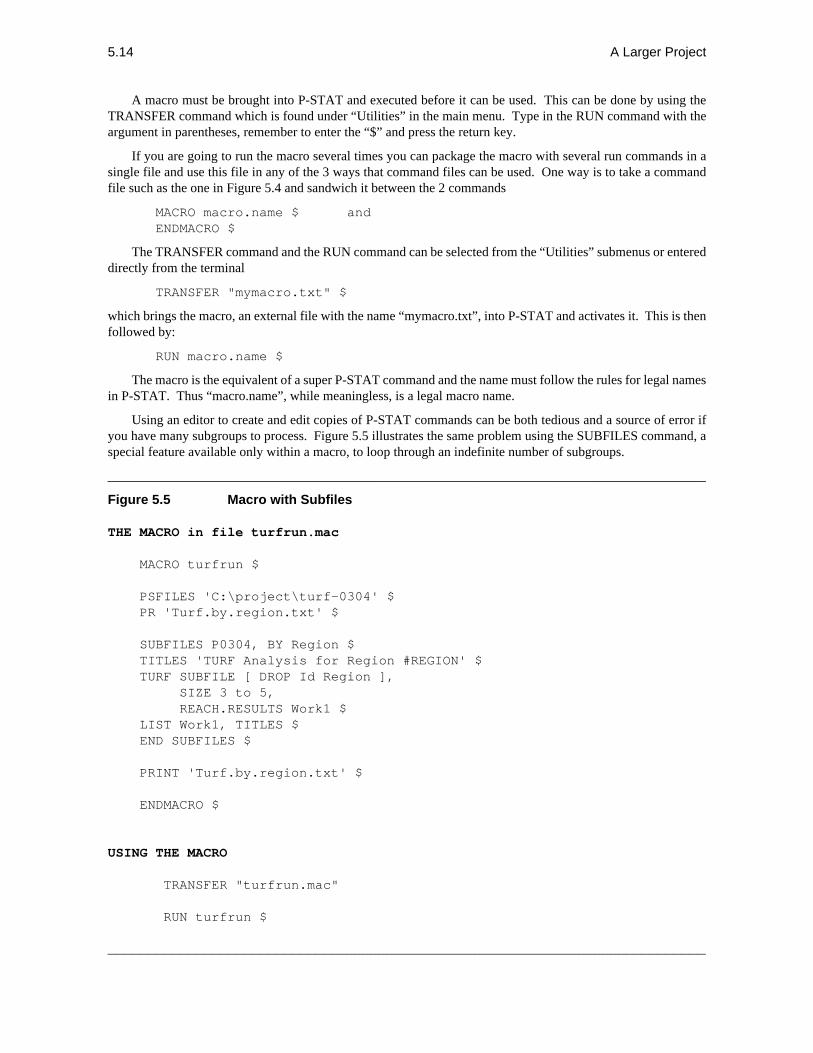
5.14 A Larger Project
A macro must be brought into P-STAT and executed before it can be used. This can be done by using theTRANSFER command which is found under “Utilities” in the main menu. Type in the RUN command with theargument in parentheses, remember to enter the “$” and press the return key.
If you are going to run the macro several times you can package the macro with several run commands in asingle file and use this file in any of the 3 ways that command files can be used. One way is to take a commandfile such as the one in Figure 5.4 and sandwich it between the 2 commands
MACRO macro.name $ andENDMACRO $
The TRANSFER command and the RUN command can be selected from the “Utilities” submenus or entereddirectly from the terminal
TRANSFER "mymacro.txt" $
which brings the macro, an external file with the name “mymacro.txt”, into P-STAT and activates it. This is thenfollowed by:
RUN macro.name $
The macro is the equivalent of a super P-STAT command and the name must follow the rules for legal namesin P-STAT. Thus “macro.name”, while meaningless, is a legal macro name.
Using an editor to create and edit copies of P-STAT commands can be both tedious and a source of error ifyou have many subgroups to process. Figure 5.5 illustrates the same problem using the SUBFILES command, aspecial feature available only within a macro, to loop through an indefinite number of subgroups.
___________________________________________________________________________
Figure 5.5 Macro with Subfiles
THE MACRO in file turfrun.mac
MACRO turfrun $ PSFILES 'C:\project\turf-0304' $ PR 'Turf.by.region.txt' $ SUBFILES P0304, BY Region $ TITLES 'TURF Analysis for Region #REGION' $ TURF SUBFILE [ DROP Id Region ], SIZE 3 to 5, REACH.RESULTS Work1 $ LIST Work1, TITLES $ END SUBFILES $ PRINT 'Turf.by.region.txt' $
ENDMACRO $
USING THE MACRO
TRANSFER "turfrun.mac"
RUN turfrun $
___________________________________________________________________________

A Larger Project 5.15
To use this macro copy it in a text editor. Start each command on a new record and if your editor supportsword wrap, turn it off. Be sure to copy the macro changing only the file, variable names, etc. to the names youare using in your project. Be especially careful with the punctuation, and save it as text file with a name such as“turfrun.mac”. To activate the macro, enter P-STAT and click on “Utilities” and then on “Transfer to commandfile”. Supply the name of the file containing the macro. If there are errors, you will be placed into the P-STATeditor where you can select “Edit/Change” to make corrections and then execute the corrected macro.
If there are no errors, click on “Utilities” and then on “Run a macro”. The final entry in the “Utilities” menucan be used to both activate and run the macro. When you are sure that your macro is working correctly, this doesthe job in a single step.
5.9 The Macro: Step By Step
The Macro in Figure 5.5 has 10 P-STAT commands. The rest of this section explains each of these commands indetail.
MACRO turfrun $
The MACRO command must have a name for the macro which conforms to the rules for legal file names inP-STAT: 1-16 characters starting with a letter and containing only letters numbers and decimal points. This namemay but need not be reflected in the name of the external file where it is stored. However, if the external file con-tains only one macro, it is easier to remember if the name of the external file corresponds to the macro name.
PSFILES 'C:\project\turf-0304' $
The PSFILES command provides the full path to the folder which contains the data.
PR 'Turf.by.region.txt' $
The PR command provides a name for an output file which is where all subsequent printout is to be written.When the run is complete this output file will contain all the information generated by all the subsequentcommands.;
SUBFILES P0304, BY Region $
The SUBFILES command is a special feature of macros. SUBFILES provides a BY capability for all the com-mands within its provenance. SUBFILES is similar to MACROS in that its domain begins and ends with aP-STAT command. For SUBFILES, the ending command is ENDSUBFILES $
The input to the SUBFILES command is a P-STAT system file. This will usually be the only time that fileis referenced in the SUBFILES loop. The file name "SUBFILE" is used to refer to the current subgroup that isbeing processed regardless of the original input file name.
The SUBFILES command also requires the name of one or more variables in that file which control the loop-ing. The file need not be sorted on the BY variable. The default is to loop through the file using the values of theBY variable in ascending sort order.
TITLES 'TURF Analysis for Region #REGION' $
Each time through the subfiles loop a scratch variable is created for each of the BY variables which containsthe current value. In Figure 5.5, the current value if variable Region is stored in the scratch variable #Region. Ifthis is used in a TITLES command it is available to identify the subgroup when it is listed.
TURF SUBFILE [ DROP Id Region ], SIZE 3 to 5, REACH.RESULTS Work1 $
The input to the TURF command is not our system file, P0304, it is the current SUBFILE. The rest of theTURF command looks exactly like all the examples we have seen so far except that the input is named “SUB-FILE”. Because of the PR command the TURF report does not appear on the screen but is written to thedesignated disk file.

5.16 A Larger Project
LIST Work1, TITLES $
The REACH.RESULTS file is listed. Because this output has information about 3 sizes and the number ofcases to be saved was not specified, the default of 100 per size is used to produce a 300 case output. The additionof the identifier TITLES to the LIST command produces a printout where the region that is analyzed is fullyidentified.
END SUBFILES $PRINT 'Turf.by.region.txt' $ENDMACRO $
“END SUBFILES” causes the looping to be evaluated. If all of the values of variable Region have not beenanalyzed the loop variable is increased and the next region analyzed. Only when all the values for variable Regionhave been used does the control move to the PRINT command. Finally the ENDMACRO command signals theend of the macro.
This macro can be used repeatedly with a RUN command. This can be entered from the keyboard or fromthe menus. If you want to run it on another file, for example P0404, you need only edit the macro and change thefile name. You can also edit the macro and change the number of sizes analyzed for the print file name.
This is not the end of macro usefulness as macros can have arguments which would make it possible to supplyinformation at RUN time:
RUN turfrun ( p0604, 4 to 7 ) $
Figure 5.6 illustrates how this is done.
___________________________________________________________________________
Figure 5.6 A Macro With Arguments
THE MACRO in file turfrun.mac
MACRO turfrun ( file, size )$ PSFILES 'C:\project\turf-0304' $ PR 'Turf.by.region.txt' $
SUBFILES &file, BY Region $ TITLES 'TURF Analysis for Region #REGION' $ TURF SUBFILE [ DROP Id Region ], SIZE &size, REACH.RESULTS Work1 $ LIST Work1, TITLES $ END SUBFILES $ PRINT 'Turf.by.region.txt' $
ENDMACRO $
USING THE MACRO
TRANSFER "turfrun.mac"
RUN turfrun ( p0604, 3 To 5 7 )$
___________________________________________________________________________

i Index
SystemVariables.DATE. 2.6AActive files 2.2AGGREGATE 2.4ASCII 3.13BBALANCE 1.3Batch computing
defined 1.3job processing 5.13
Blank(space) delimited files 2.10
Bytesexamine the bytes in an external file 2.2show the bytes in an external file. 2.2
CCASE.WEIGHTS
in TURF command 5.10Cases
defined 2.5COMBINATIONS
PC menus 2.3Combinations
calculating 5.10Comma delimited
files 2.10Command
print 3.7, 3.8summary for new users 2.15
Command files 5.13executing 2.3
Command.Printfile 2.2
CONCAT 2.4CONSTRAIN
in TURF command 3.12CORRELATE 2.3COUNTS 1.3, 2.3, 5.1Create
a new variable 5.4Crosstabulation 1.2, 2.2DDescription files 2.3Directory
for all files
PSFILES 2.3for external data 2.3for P-STAT system files 2.3selection 3.1
DisplayPC Windows
menu 2.2DUPLICATES 2.4EEND 2.12ENDSUBFILES 5.15Environment variables
PSAUTO 1.8PSDATA 1.8PSFILES 1.7PSHELP 1.7PSKEY 1.7PSTART 1.8PSTEMP 1.8
ERASE 2.3ERASE.CURRENT 2.3ERASE.EXTERNAL 2.3ERASE.PREVIOUS 2.3EXAMINE 1.2
the bytes in a file 2.2EXCEL 1.5, 3.1Exit from
P-STAT 2.2, 2.12Export data
ASCII textUNMAKE 2.4
SPSS export format 2.4FFile names 2.15Files
active 2.12external
erasing 2.3how does P-STAT find them 2.12
FILETYPE 1.9FREQ.RESULTS
in TURF command 5.12FREQUENCIES
in COUNTS command 2.3Frequency
in TURF command 3.8

Index ii
HHELP 3.12Help
PC Windowsmenu 2.2
Help fileusing 2.13
IInstallation 1.7Introduction to using P-STAT 2.1JJoin files
add cases with CONCAT 2.4add variables with LOOKUP 2.4
LLegal names 5.4
defined 2.6file 2.15rules for 2.15variables 2.15
LIST 2.2, 2.11, 2.15, 2.16, 3.7LOOKUP 2.4Lower case
use of 2.7MMACRO
for TURF analysis 5.15open and run 2.3
Macros 1.4MAKE 1.5, 3.13MAKE.FIXED 3.13Manuals
list of 1.6MENUS
PC WindowsFile submenu 2.1using 2.15
MIGRATEfrom P-STAT version 2 1.9
Missing datadefined 2.6
Mixed caseuse of 2.7
MODIFY 2.3changing a P-STAT system file 2.4
NNames, legal
rules for 2.15NEWS 2.14PPATHNAMES 2.3, 2.13, 2.15PERCENTILES 1.3Permanent modifications 5.3PPL
see P-STAT Programming Languagevariable selection
PC Windows 3.3PPL Functions
numericCOMBINATIONS 5.10
PRINTto a disk file 2.11
Printchanging destination 2.2set attributes of print destination 2.2
Print Manager 1.5Printing
from PC/Windows 3.9PSAUTO 1.8, 1.10, 2.3, 2.13, 2.16PSDATA 1.8, 1.10, 2.3, 2.16PSFILES 1.7, 1.10, 2.3, 2.13, 2.16, 3.1, 5.15PSHELP 1.7, 1.10PSKEY 1.7, 1.10PSTART 1.8, 1.10
summary 1.10P-STAT commands 1.5P-STAT editor 4.1
control window 4.2delete 4.4edit or change 4.4execute 4.4full screen example 4.8input 4.4moving the pointer 4.3quit 4.4saving 4.2syntax 4.4type 4.4
P-STAT system file 1.5, 5.3check the status 2.2comparing 2.2

iii Index
erasing 2.3format 2.4, 2.5legal names 2.6limits 2.5listing 2.11locating 2.3missing data 2.6names of available files 2.1show contents 2.2
PSTEMP 1.8, 1.10RREACH.RESULTS
in TURF command 3.6, 5.10REFORMAT 1.2, 2.2REGRESSION 2.3Report writing 1.2RUN
a macro with arguments 5.16Executing a macro 2.3
SSAMPLE 1.3SAVE.LABELS 2.2Saving a P-STAT system file 2.12Scratch variables 2.6SHOWBYTES 1.2, 2.2Simple PPL IF statement 5.6SIZE
in TURF command 5.12SORT 2.4SPSS 3.13
files, reading and writing 2.4SPSS.IN 2.3SPSS.OUT 2.4Statistical analysis 1.3STATUS
of system attributes 2.2SUBFILES 1.4
used in TURF macro 5.15Summary statistics
using AGGREGATE 2.4SURVEY 1.2, 2.2System files
defined 2.4System variables
.DATE. 2.6
TTab delimited file 3.1
as input 2.3as output 2.4importing 3.2
TABFILE.IN 2.3, 2.16import tab delimited file 3.2
TABFILE.OUT 2.4Tables
creating 2.2TAGS 1.6Temporary modifications 5.3TEXTFILE.IN 1.5, 2.3, 2.16TEXTFILE.OUT 2.3Titles 2.2TRANSFER 2.3
command files 5.13TTEST 2.3TURF 1.3, 3.1, 3.3, 5.1
identifiersCASE.WEIGHTS 3.11, 5.10CONSTRAIN 3.12FORCE 3.12FREQ.RESULTS 3.11, 5.12FREQ.STATS 3.11FREQ.SUMMARY 3.11FULL.OUTPUT 3.12ITEM.WEIGHTS 3.11OMIT 3.11PROGRESS 3.12REACH.RESULTS 3.6, 3.11, 5.10REACH.STATS 3.11REACH.SUMMARY 3.11REACH.THRESHOLD 3.11RESPONSE WEIGHTS 3.11SHOW 3.11SIZE 5.12STEP 3.12, 5.12USE.NAMES 3.12
Total Unduplicated Reach and Frequency2.3
TURF.SCORES 1.3, 5.12UUnivariate statistics 5.1Upper case
use of 2.7
Index iv
VValue labels
saving 2.2Variable
names 1.6, 2.15Variable names 2.15Variables
defined 2.5naming 2.6system 2.6temporary 2.6
WWeighted analysis 5.1Wildcard 1.6
? 2.6