p3000 series - dam-assets.fluke.com · a caution identifies conditions and actions that may damage...
TRANSCRIPT

PN 3952260 November 2010 © 2010 Fluke Corporation. All rights reserved. Printed in USA. Specifications are subject to change without notice. All product names are trademarks of their respective companies.
P3000 Series Pneumatic Deadweight Tester
Users Manual

LIMITED WARRANTY AND LIMITATION OF LIABILITY
Each Fluke product is warranted to be free from defects in material and workmanship under normal use and service. The warranty period is one year and begins on the date of shipment. Parts, product repairs, and services are warranted for 90 days. This warranty extends only to the original buyer or end-user customer of a Fluke authorized reseller, and does not apply to fuses, disposable batteries, or to any product which, in Fluke's opinion, has been misused, altered, neglected, contaminated, or damaged by accident or abnormal conditions of operation or handling. Fluke warrants that software will operate substantially in accordance with its functional specifications for 90 days and that it has been properly recorded on non-defective media. Fluke does not warrant that software will be error free or operate without interruption.
Fluke authorized resellers shall extend this warranty on new and unused products to end-user customers only but have no authority to extend a greater or different warranty on behalf of Fluke. Warranty support is available only if product is purchased through a Fluke authorized sales outlet or Buyer has paid the applicable international price. Fluke reserves the right to invoice Buyer for importation costs of repair/replacement parts when product purchased in one country is submitted for repair in another country.
Fluke's warranty obligation is limited, at Fluke's option, to refund of the purchase price, free of charge repair, or replacement of a defective product which is returned to a Fluke authorized service center within the warranty period.
To obtain warranty service, contact your nearest Fluke authorized service center to obtain return authorization information, then send the product to that service center, with a description of the difficulty, postage and insurance prepaid (FOB Destination). Fluke assumes no risk for damage in transit. Following warranty repair, the product will be returned to Buyer, transportation prepaid (FOB Destination). If Fluke determines that failure was caused by neglect, misuse, contamination, alteration, accident, or abnormal condition of operation or handling, including overvoltage failures caused by use outside the product’s specified rating, or normal wear and tear of mechanical components, Fluke will provide an estimate of repair costs and obtain authorization before commencing the work. Following repair, the product will be returned to the Buyer transportation prepaid and the Buyer will be billed for the repair and return transportation charges (FOB Shipping Point).
THIS WARRANTY IS BUYER'S SOLE AND EXCLUSIVE REMEDY AND IS IN LIEU OF ALL OTHER WARRANTIES, EXPRESS OR IMPLIED, INCLUDING BUT NOT LIMITED TO ANY IMPLIED WARRANTY OF MERCHANTABILITY OR FITNESS FOR A PARTICULAR PURPOSE. FLUKE SHALL NOT BE LIABLE FOR ANY SPECIAL, INDIRECT, INCIDENTAL, OR CONSEQUENTIAL DAMAGES OR LOSSES, INCLUDING LOSS OF DATA, ARISING FROM ANY CAUSE OR THEORY.
Since some countries or states do not allow limitation of the term of an implied warranty, or exclusion or limitation of incidental or consequential damages, the limitations and exclusions of this warranty may not apply to every buyer. If any provision of this Warranty is held invalid or unenforceable by a court or other decision-maker of competent jurisdiction, such holding will not affect the validity or enforceability of any other provision.
Fluke Corporation P.O. Box 9090 Everett, WA 98206-9090 U.S.A.
Fluke Europe B.V. P.O. Box 1186 5602 BD Eindhoven The Netherlands
11/99 To register your product online, visit register.fluke.com

i
Table of Contents
Chapter Title Page
1 General Information ............................................................................ 1-1
Introduction........................................................................................................ 1-1 How to Contact Fluke ........................................................................................ 1-1 Safety Information ............................................................................................. 1-1
Safety Summary ............................................................................................ 1-1 Compressed Gas ............................................................................................ 1-2 Heavy Weights .............................................................................................. 1-2 Personal Protective Equipment...................................................................... 1-2
Symbols Used in this Manual ............................................................................ 1-2 Operating Principle ............................................................................................ 1-2
Operating & Storage Specification................................................................ 1-3 Environmental Corrections ................................................................................ 1-3
Gravity........................................................................................................... 1-3 Temperature................................................................................................... 1-4
Model Variations ............................................................................................... 1-4
2 Preparation .......................................................................................... 2-1 Introduction........................................................................................................ 2-1 Connection to External Pressure/Vacuum Supplies........................................... 2-1 Connections ....................................................................................................... 2-2
Test Port Insert .............................................................................................. 2-5
3 Operation ............................................................................................. 3-1 Introduction........................................................................................................ 3-1 Single PCU Models — Pressure ........................................................................ 3-1 Single PCU Models — Vacuum........................................................................ 3-2 Dual PCU (Pressure & Vacuum) Models .......................................................... 3-2
4 Calibration in Different Pressure Units ............................................. 4-1 Introduction........................................................................................................ 4-1 Conversion Weights........................................................................................... 4-1 Software ............................................................................................................. 4-1

P3000 Series Users Manual
ii
5 Maintenance & Servicing.................................................................... 5-1 Introduction........................................................................................................ 5-1 PCU Assembly — 10 mm Nominal Diameter — Pressure ............................... 5-1
Piston Disassembly........................................................................................ 5-1 Piston Cleaning.............................................................................................. 5-1 Piston Re-Assembly ...................................................................................... 5-2 Replacement PCU Assembly ........................................................................ 5-2
PCU Assembly — 10 mm Nominal Diameter — Vacuum ............................... 5-3 Piston Disassembly........................................................................................ 5-3 Piston Cleaning.............................................................................................. 5-3 Piston Re-Assembly ...................................................................................... 5-4 Replacement PCU Assembly ........................................................................ 5-4
PCU Assembly — 16 mm Nominal Diameter................................................... 5-5 Piston Disassembly........................................................................................ 5-5 Piston Cleaning.............................................................................................. 5-5 Piston Re-Assembly ...................................................................................... 5-6 Replacement PCU Assembly ........................................................................ 5-6
PCU Assembly — 22 mm Nominal Diameter................................................... 5-7 Piston Cleaning.............................................................................................. 5-7 Piston Re-Assembly ...................................................................................... 5-8 Replacement PCU Assembly ........................................................................ 5-8
Top Plate Removal............................................................................................. 5-9 Handpump Assembly......................................................................................... 5-10
Disassembly................................................................................................... 5-10 Cleaning and Inspection ................................................................................ 5-10 Re-Assembly ................................................................................................. 5-10
System Selector Valve ....................................................................................... 5-12 Disassembly................................................................................................... 5-12 Cleaning & Inspection................................................................................... 5-12 Re-Assembly ................................................................................................. 5-12
Safety Valve....................................................................................................... 5-13 Disassembly................................................................................................... 5-13 Re-Assembly ................................................................................................. 5-13
6 Fault Finding........................................................................................ 6-1 Poor PCU Spin/Sensitivity................................................................................. 6-1 System Will Not Pressurize ............................................................................... 6-1
High PCU Fall-Rate ...................................................................................... 6-2 Handpump Malfunction................................................................................. 6-2
7 Storage & Transportation ................................................................... 7-1 Instrument .......................................................................................................... 7-1 Weights .............................................................................................................. 7-1
8 Ancillary Equipment............................................................................ 8-1 Dirt/Moisture Trap, P5531................................................................................. 8-1 Angle Adapter, P5543........................................................................................ 8-2 Pointer Remover/Punch, P5551 ......................................................................... 8-2

iii
List of Tables
Table Title Page
1-1. Symbols.................................................................................................................. 1-2 1-2. Operation and Storage Specifications .................................................................... 1-3 2-1. Test Port Inserts - Parts List ................................................................................... 2-5 5-1. PCU Assembly - 10 mm - Pressure - Parts List ..................................................... 5-3 5-2. PCU Assembly - 10 mm - Vacuum - Parts List ..................................................... 5-5 5-3. PCU Assembly - 16 mm - Parts List ...................................................................... 5-7 5-4. PCU Assembly - 22 mm - Parts List ...................................................................... 5-9 5-5. Handpump Assembly - Parts List........................................................................... 5-11 5-6. System Selector Valve - Parts List ......................................................................... 5-13 5-7. Safety Valve - Parts List ........................................................................................ 5-14

P3000 Series Users Manual
iv

v
List of Figures
Figure Title Page
1-1. Single PCU Instrument .......................................................................................... 1-4 1-2. Single PCU Instrument with Handpump................................................................ 1-5 1-3. Dual PCU (Pressure & Vacuum) Instrument ......................................................... 1-5 1-4. Dual PCU (Pressure & Vacuum) Instrument with Handpump .............................. 1-6 1-5. Vacuum Instrument ................................................................................................ 1-6 1-6. Vacuum Instrument with Handpump ..................................................................... 1-7 2-1. Screw on Gauge Adapter........................................................................................ 2-2 2-2. Connect Assembly to Test Port .............................................................................. 2-3 2-3. Hand-Tighten Only ................................................................................................ 2-3 2-4. Adjust Gauge Position............................................................................................ 2-4 2-5. Tighten Gauge........................................................................................................ 2-4 2-6. Test Port Insert ....................................................................................................... 2-5 3-1. Weight Rotation ..................................................................................................... 3-3 5-1. PCU Assembly - 10mm - Pressure......................................................................... 5-3 5-2. PCU Assembly - 10mm - Vacuum......................................................................... 5-5 5-3. PCU Assembly - 16 mm ........................................................................................ 5-7 5-4. PCU Assembly - 22 mm ........................................................................................ 5-9 5-5. Handpump Assembly ............................................................................................. 5-11 5-6. System Selector Valve ........................................................................................... 5-13 5-7. Safety Valve ........................................................................................................... 5-14 8-1. Dirt/Moisture Trap ................................................................................................. 8-1 8-2. Angle Adapter ........................................................................................................ 8-2 8-3. Pointer/Remover Punch.......................................................................................... 8-2

P3000 Series Users Manual
vi

1-1
Chapter 1 General Information
Introduction This User’s Manual covers the following pressure instruments: P3011, P3011P, P3012P, P3013P, P3014P, P3015, P3015P, P3022, P3022P, P3023, P3023P, P3025, and the P3025P.
How to Contact Fluke To order accessories, receive operating assistance, or get the location of the nearest Fluke distributor or Service Center, call: • Technical Support USA: 1-800-99-FLUKE (1-800-993-5853) • Calibration/Repair USA: 1-888-99-FLUKE (1-888-993-5853) • Canada: 1-800-36-FLUKE (1-800-363-5853) • Europe: +31-402-675-200 • China: +86-400-810-3435 • Japan: +81-3-3434-0181 • Singapore: +65-738-5655 • Anywhere in the world: +1-425-446-5500
Or, visit Fluke's website at www.fluke.com. To register your product, visit http://register.fluke.com. To view, print, or download the latest manual supplement, visit http://us.fluke.com/usen/support/manuals.
Safety Information Safety Summary
The following are general safety precautions that are not related to any specific procedures and do not appear elsewhere in this publication. These are recommended precautions that personnel must understand and apply during equipment operation and maintenance to ensure safety and health and protection of property.
W Warning If the equipment is used in a manner not specified by the manufacturer, the protection provided by the equipment may be impaired.

P3000 Series Users Manual
1-2
Compressed Gas Use of compressed gas can create an environment of propelled foreign matter. Pressure system safety precautions apply to all ranges of pressure. Care must be taken during testing to ensure that all connections are properly and tightly made prior to applying pressure. Personnel must wear eye protection to prevent injury.
Heavy Weights Lifting and movement of heavy weights can create an environment of strain and impact hazards. Care must be taken during testing to ensure that weight masses are lifted in a manner that avoids over-reaching or twisting, and that the masses are not dropped. Personnel must wear reinforced safety shoes to prevent injury.
Personal Protective Equipment Wear eye protection and reinforced safety shoes approved for the materials and tools being used.
Symbols Used in this Manual In this manual, a Warning identifies conditions and actions that pose a hazard to the user. A Caution identifies conditions and actions that may damage the Pneumatic Deadweight Tester. Symbols used on the Pneumatic Deadweight Tester and in this manual are explained in Table 1-1.
Table 1-1. Symbols
Symbol Description
B AC (Alternating Current)
J Earth Ground
W Important Information: refer to manual
~ Do not dispose of this product as unsorted municipal waste. Go to Fluke’s website for recycling information.
Operating Principle Deadweight Testers are the primary standard for pressure measurement. Utilizing the well-proven Piston-Gauge system, consisting of a vertically mounted, precision lapped Piston and Cylinder assembly, accurately calibrated weight masses (Force) are loaded on the piston (Area), which rises freely within its cylinder. These weights balance the upward force created by the pressure within the system.
AREAFORCEPRESSURE =
Each weight is marked with the tester serial number, and the pressure measured when placed on a correctly spinning and floating piston. The total pressure measured is the summation of the weights plus the piston weight carrier assembly.

General Information Environmental Corrections 1
1-3
When the gas pressure within the system balances the combined downward force of the piston and weights, the piston and weights will float freely and the system is in equilibrium. The design of a Piston/Cylinder Unit (PCU) fitted to a deadweight tester allows for a very small clearance gap between the piston and cylinder. This is required to allow the gas to pass between the components, providing a lubricating film, and preventing metal-to-metal contact.
Operating & Storage Specification Temperature and relative humidity ranges for operation and storage of the deadweight tester.
Table 1-2. Operation and Storage Specifications
Operation Storage
Temperature 18 °C to 28 °C
64 °F to 82 °F
10 °C to 50 °C
50 °F to 122 °F
Relative Humidity (Non-Condensing)
20 % to 75 % 0 % to 90 %
Environmental Corrections The deadweight tester has been calibrated to the Gravity, Temperature, and Air Density stated on the certificate. Equations and factors are given on the certificate to adjust for any variations in these environmental conditions.
Gravity Gravity varies greatly with geographic location, and so will the deadweight tester reading. Due to the significant change in gravity throughout the world (0.5%), ensure that the tester has either been manufactured to your local gravity, or that you have applied the correction from the calibrated gravity. Example:
Deadweight Tester calibrated gravity 980.665 cm/s² (980.665 cm/s² is the International Standard Gravity) Gravity at site 981.235 cm/s² Indicated Pressure 250 psi
250665.980235.981 xPRESSURETRUE =
psiPRESSURETRUE 1453.250=
The ability to determine the local gravity value will depend on the data available in the country that the instrument is to be used in. Some countries have geographic/geological survey/mapping organizations that have the data readily available. If not, the countries’ National Standards Laboratory may be able to recommend a source of suitable information.
Temperature

P3000 Series Users Manual
1-4
Temperature and Air Density variations are less significant than gravity. Variations should be corrected for when maximum accuracy is required. Temperature variation example: Deadweight Tester calibrated temperature 20 °C Operating temperature 24 °C Percentage change per °C 0.002% Indicated Pressure 250 psi
( ) 250100002.02420250 xxPRESSURETRUE −+=
psiPRESSURETRUE 98.249=
Model Variations This manual covers many pressure ranges and models within the P3000 series of instruments. The following illustrations detail the physical appearance of the six basic models: Model 3015
gjn024.bmp
Figure 1-1. Single PCU Instrument

General Information Model Variations 1
1-5
Model 3012P, 3013P, 3014P and 3015P
gjn025.bmp
Figure 1-2. Single PCU Instrument with Handpump
Model 3022, 3023 and 3025
gjn026.bmp
Figure 1-3. Dual PCU (Pressure & Vacuum) Instrument

P3000 Series Users Manual
1-6
Model 3022P, 3023P and 3025P
gjn027.bmp
Figure 1-4. Dual PCU (Pressure & Vacuum) Instrument with Handpump
Model 3011
gjn028.bmp
Figure 1-5. Vacuum Instrument

General Information Model Variations 1
1-7
Model 3011P
gjn029.bmp
Figure 1-6. Vacuum Instrument with Handpump

P3000 Series Users Manual

2-1
Chapter 2 Preparation
Introduction The deadweight tester must be set up on a level, stable workbench or similar surface. If instrument has fitted handpump, remove pump handle form tool roll and fit to pump arm. Level the tester using the four adjustable feet to the bubble level attached to the top plate.
Connection to External Pressure/Vacuum Supplies Connection ports in the rear panel of the instrument are 1/4 NPT. Pressure supply must be both clean and dry — a compressed gas bottle (instrument quality nitrogen or air) fitted with a pressure regulator is recommended. Factory (compressed) air lines should only be used if a series of filters are fitted to ensure that the supply is clean and dry.
W Warning Great care must be taken when operating any pneumatic deadweight tester, as any contamination present within the system will result in degradation of performance, and eventual IRREPARABLE DAMAGE to the PCUs. To avoid damage to the instrument, the operator should ensure that any device under test (DUT) is clean and dry before connecting it to the test port. If the DUT is of unknown cleanliness, the Dirt/Moisture Trap, P5531, can be mounted to the test port of the deadweight tester. This will prevent any dirt particles or moisture droplets present within the DUT from passing into the deadweight tester system, (see Chapter 8).

P3000 Series Users Manual
2-2
Connections Fit the device under test (DUT) to the test port using the method described below:
W Warning DO NOT use Teflon/PTFE tape on these connections, as this will prevent correct sealing. The Gauge Adapter sealing system is designed for hand-tight sealing up to 20,000 psi / 1,400 bar-wrenches or similar tools are not required — over tightening can cause damage to threads or sealing faces. Before connection, ensure that there is an O-ring fitted to the test port. Check that the sealing face of the device to be fitted is clean and undamaged, as scratches or dents can form leak-paths.
Note The thread on the test port, and the lower part of the gauge adapters is LEFT-HANDED. The following procedure details the correct method for mounting devices using these adapters:
1. Screw the appropriate gauge adapter fully on to the instrument to be tested.
gjn006.bmp
Figure 2-1. Screw on Gauge Adapter
2. Screw assembly down COUNTER-CLOCKWISE on to test port.
Note Hand-tight is sufficient; ensure that the bottom face contacts the O-ring on the test port.

Preparation Connections 2
2-3
gjn007.bmp
Figure 2-2. Connect Assembly to Test Port
gjn008.bmp
Figure 2-3. Hand-Tighten Only
3. To adjust the position to face forward, hold the gauge adapter and turn the instrument COUNTER-CLOCKWISE, so that it faces forward.

P3000 Series Users Manual
2-4
gjn009.bmp
Figure 2-4. Adjust Gauge Position
4. Hold the instrument steady, whilst turning the gauge adapter COUNTER-CLOCKWISE until it pulls down onto the O-ring.
gjn010.bmp
Figure 2-5. Tighten Gauge

Preparation Connections 2
2-5
Test Port Insert For devices with 1/8 BSP or NPT mounting threads, the diameter of the thread is very close to the effective sealing diameter of the O-ring fitted to the test port. This can make it difficult to achieve a good seal. When mounting these devices, use the test port insert (stored in the spare seals container) as shown in Figure 2-6.
1
2
3
4
gjn012.eps
Figure 2-6. Test Port Insert
Table 2-1. Test Port Inserts - Parts List
Item Description Part
1 O Ring 3865142
2 Test Port Insert 3919892
3 O Ring 3883397
4 Test Port 3921566
To calibrate panel-mounted gauges with pressure connections in the rear, use an Angle Adapter (see Chapter 8, Ancillary Equipment).

P3000 Series Users Manual
2-6
3-1
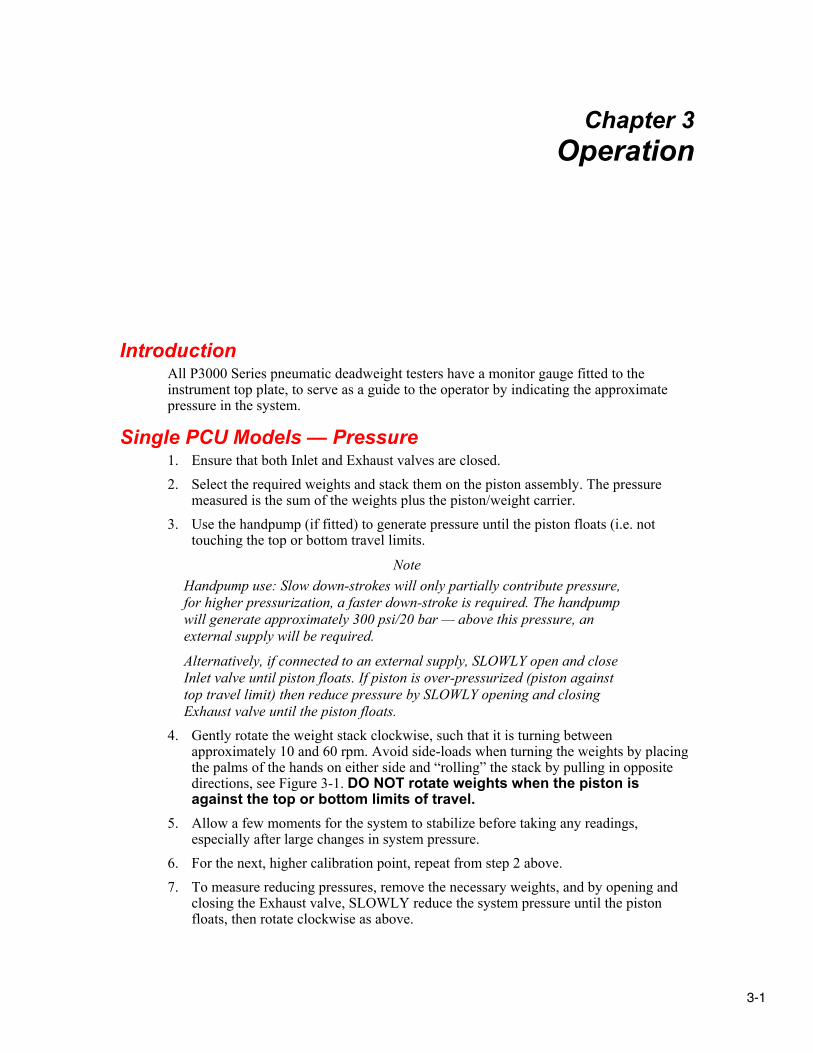
Chapter 3 Operation
Introduction All P3000 Series pneumatic deadweight testers have a monitor gauge fitted to the instrument top plate, to serve as a guide to the operator by indicating the approximate pressure in the system.
Single PCU Models — Pressure 1. Ensure that both Inlet and Exhaust valves are closed. 2. Select the required weights and stack them on the piston assembly. The pressure
measured is the sum of the weights plus the piston/weight carrier. 3. Use the handpump (if fitted) to generate pressure until the piston floats (i.e. not
touching the top or bottom travel limits.
Note Handpump use: Slow down-strokes will only partially contribute pressure, for higher pressurization, a faster down-stroke is required. The handpump will generate approximately 300 psi/20 bar — above this pressure, an external supply will be required.
Alternatively, if connected to an external supply, SLOWLY open and close Inlet valve until piston floats. If piston is over-pressurized (piston against top travel limit) then reduce pressure by SLOWLY opening and closing Exhaust valve until the piston floats.
4. Gently rotate the weight stack clockwise, such that it is turning between approximately 10 and 60 rpm. Avoid side-loads when turning the weights by placing the palms of the hands on either side and “rolling” the stack by pulling in opposite directions, see Figure 3-1. DO NOT rotate weights when the piston is against the top or bottom limits of travel.
5. Allow a few moments for the system to stabilize before taking any readings, especially after large changes in system pressure.
6. For the next, higher calibration point, repeat from step 2 above. 7. To measure reducing pressures, remove the necessary weights, and by opening and
closing the Exhaust valve, SLOWLY reduce the system pressure until the piston floats, then rotate clockwise as above.

P3000 Series Users Manual
3-2
8. Depressurize the system by SLOWLY opening the Exhaust valve, as sudden depressurization will cause the weight stack to fall quickly, which may damage the piston assembly.
9. Remove the weights from the piston.
Single PCU Models — Vacuum 1. Ensure that both Inlet and Exhaust valves are closed. 2. Select the required weights and stack them on the piston assembly. The vacuum
measured is the sum of the weights plus the piston/weight carrier. (The weights can be passed over the weight carrier if held at a slight angle).
3. Use the handpump (if fitted) to generate pressure until the piston floats i.e. not touching the top or bottom travel limits.
Note Handpump use: Slow down-strokes will only partially contribute vacuum, for higher vacuum, a faster down-stroke is required. The handpump will generate approximately 75% vacuum (depending upon local atmospheric conditions), above this range, an external vacuum supply will be required.
Alternatively, if connected to an external supply, SLOWLY open and close Inlet valve until piston floats. If piston is over-pressurized (piston against top travel limit) then reduce pressure by SLOWLY opening and closing Exhaust valve until the piston floats.
4. Gently rotate the weight stack clockwise, such that it is turning between approximately 10 and 60 rpm. Avoid side-loads when turning the weights by placing the palms of the hands on either side and “rolling” the stack by pulling in opposite directions, see Figure 3-1. DO NOT rotate weights when the piston is against the top or bottom limits of travel.
5. Allow a few moments for the system to stabilize before taking any readings, especially after large changes in system pressure.
6. For the next, higher calibration point, repeat from step 2 above. 7. To measure reducing vacuum, remove the necessary weights, and by opening and
closing the Exhaust valve, SLOWLY reduce the system pressure until the piston floats, then rotate clockwise as above.
8. Release vacuum by SLOWLY opening the Exhaust valve, as sudden depressurization will cause the weight stack to fall quickly, which may damage the piston assembly.
9. Remove the weights from the piston.
Dual PCU (Pressure & Vacuum) Models 1. Select Pressure or Vacuum Mode by turning the system selector valve on the front of
the instrument, 1/4 turn counter-clockwise for Pressure, 1/4 turn clockwise for vacuum. The selector valve automatically vents the system as it changes from pressure to vacuum mode to prevent damage to sensitive vacuum equipment. During the changeover, the operator may hear gas venting harmlessly inside the instrument case as this occurs.
2. If the instrument is fitted with the optional handpump, ensure that the handpump selector valve is also turned to the appropriate mode, 1/4 turn clockwise for Pressure (handle pointing backward towards the pressure PCU) or 1/4 turn counter-clockwise for Vacuum (handle pointing frontward towards the vacuum PCU).

Operation Dual PCU (Pressure & Vacuum) Models 3
3-3
3. If either the system or handpump selector valve is set for vacuum, when pressure is applied to the system, the safety valve fitted to the front of the PCU mounting assembly will be ejected, venting the system. (The safety valve is retained by the assembly, and will not “fly-out” of the instrument). This is to limit the possible damage caused by pressurizing a vacuum instrument under test. Simply set the selector valve(s) to the correct position, and reset the safety valve by pushing the safety plug back in.
4. Pressure Mode: Operate as per Single PCU Models - Pressure, above. 5. Vacuum Mode: Operate as per Single PCU Models - Vacuum, above.
gjn013.bmp
Figure 3-1. Weight Rotation

P3000 Series Users Manual
3-4

4-1
Chapter 4 Calibration in Different Pressure Units
Introduction The deadweight tester can be used to calibrate in different pressure units in either of two methods.
Conversion Weights A set of Conversion Weights can be supplied, marked in the required pressure unit, and adjusted to the correct mass for use with the existing piston(s). The set includes (where applicable) a replacement low-pressure weight carrier table, and a replacement high-pressure weight carrier ring. These items are simply exchanged for the original items when using the conversion weights. Calibration is carried out as described above, with logical pressure increments throughout the operating range, avoiding the need to perform pressure unit conversion calculations.
Software PressCal software is available for use with deadweight testers, and will allow users to apply all necessary corrections (e.g. local gravity, temperature, pressure head, etc.) to enhance the pressure measurement accuracy of the instrument. It will allow calibration in any of 12 different pressure units, using the existing weight set.

P3000 Series Users Manual
4-2

5-1
Chapter 5
Maintenance & Servicing
Introduction Note
The piston/cylinder assembly is the most critical and sensitive part of the deadweight tester. To maintain accuracy, the piston must always slide freely in the cylinder, and the gas supply must remain clean and dry.
The Figures on the following pages detail the components of each assembly, together with the relevant part numbers. Where “Spec” appears as a part number, this indicates that this particular component varies with the specification of the deadweight tester, and is usually associated with other components in an assembly for replacement purposes.
PCU Assembly — 10 mm Nominal Diameter — Pressure Piston Disassembly
1. Hold the weight carrier (1), and lift the piston to its full extent. Tap the carrier sharply down onto the cylinder (2) to release the tapered fit between the piston and carrier. Remove the weight carrier.
2. Unscrew the PCU assembly from the instrument; use the dowel hole if the cylinder is tight.
3. Carefully withdraw the piston from the cylinder.
Piston Cleaning 4. Use “non-fluffing”, non-abrasive, lint-free tissue or absorbent cloth. Hold the piston
by the larger “head” end, and rub the tissue back and forth along its length. 5. To remove all traces of contamination, the piston can be cleaned in a suitable solvent.
W Caution O-ring seals (where fitted) are Nitrile rubber, and should not be immersed in solvents, as they will become damaged. They should be wiped carefully with a new tissue.
6. After removal from the solvent, using a NEW tissue, repeat the cleaning procedure in step 4.
7. Place piston carefully on a NEW tissue where it will not be damaged while the cylinder is cleaned.

P3000 Series Users Manual
5-2
W Caution Never touch the working surface of a clean piston with bare fingers — the natural oil in your skin can cause the piston and cylinder to stick.
8. Wipe any dirt or moisture from the outside surfaces of the cylinder (2). 9. Roll a NEW tissue into a tapered rod of appropriate size. Force the tissue through the
cylinder bore while rotating. Ensure that the tissue is a tight fit inside the bore so that dirt and contamination is removed.
10. Repeat step 9 using a NEW tissue but from the opposite end of the cylinder. 11. Immerse the cylinder in a suitable, clean solvent, see note in step 5 above. 12. After removal from the solvent, using a NEW tissue, repeat the cleaning procedure in
step 9 and 10.
Piston Re-Assembly 13. Holding the piston by the larger “head” end, carefully introduce the piston into the
underside of the cylinder, and push gently through (the piston will normally slide freely through due to its own weight). Never force the piston into its cylinder or damage will result. If resistance continues, re-clean piston, cylinder, or both. If, after repeated cleaning, the piston still will not slide freely within the cylinder, then permanent damage may have occurred. In which case, the parts should be returned to the factory for evaluation or replacement.
14. Stand assembly upright on a clean, hard, stable surface, ensure that the weight carrier (1) is clean (especially the central mounting hole), and place on the tapered end of the piston. Tap lightly using the palm of the hand to locate on the taper.
15. Carefully screw the assembly into the instrument, ensuring that the seal (6) is clean and undamaged, and correctly re-fitted.
Replacement PCU Assembly W Caution
The piston and cylinder assembly is a matched pair, which is calibrated and adjusted to a calculated mass figure. If, for any reason, the piston or cylinder becomes damaged, then the entire assembly must be replaced.
The replacement assembly consists of the following components: Item numbers 1 through 3.

Maintenance & Servicing PCU Assembly — 10 mm Nominal Diameter — Vacuum 5
5-3
1
2
3
4
gjn31.eps
Figure 5-1. PCU Assembly - 10mm - Pressure
Table 5-1. PCU Assembly - 10 mm - Pressure - Parts List
Item Description Part Item Description Part
1 Weight Carrier Spec 3 Piston Spec
2 Cylinder Spec 4 O Ring 3864954
PCU Assembly — 10 mm Nominal Diameter — Vacuum Piston Disassembly
1. Unscrew the PCU assembly from the instrument; use the dowel hole if the cylinder is tight.
2. The weight carrier is permanently attached to the piston, hold the weight carrier and gently withdraw the piston from the cylinder (2)
Piston Cleaning 3. Use “non-fluffing”, non-abrasive, lint-free tissue or absorbent cloth. Hold the piston
by the weight carrier, and rub the tissue back and forth along its length. 4. To remove all traces of contamination, the piston can be cleaned in a suitable solvent.
W Caution O-ring seals (where fitted) are Nitrile rubber, and should not be immersed in solvents, as they will become damaged. They should be wiped carefully with a new tissue.

P3000 Series Users Manual
5-4
5. After removal from the solvent, using a NEW tissue, repeat the cleaning procedure in step 3, taking great care to ensure that all traces of solvent are removed from the inside of the tubular piston and weight carrier.
6. Place piston carefully on a NEW tissue where it will not be damaged while the cylinder is cleaned.
W Caution Never touch the working surface of a clean piston with bare fingers — the natural oil in your skin can cause the piston and cylinder to stick.
7. Wipe any dirt or moisture from the outside surfaces of the cylinder (2). 8. Roll a NEW tissue into a tapered rod of appropriate size. Force the tissue through the
cylinder bore while rotating. Ensure that the tissue is a tight fit inside the bore so that dirt and contamination is removed.
9. Repeat step 7 using a NEW tissue but from the opposite end of the cylinder. 10. Immerse the cylinder in a suitable, clean solvent, see note in step 4 above. 11. After removal from the solvent, using a NEW tissue, repeat the cleaning procedure in
steps 8 and 9.
Piston Re-Assembly 12. Holding the piston by weight carrier, dip the other end, carefully introduce the piston
into the underside end of the cylinder, and push gently through (the piston will normally slide freely through due to its own weight). NEVER FORCE THE PISTON INTO ITS CYLINDER OR DAMAGE WILL RESULT. If resistance continues, re-clean piston, cylinder, or both. If, after repeated cleaning, the piston still will not slide freely within the cylinder, then permanent damage may have occurred. In which case, the parts should be returned to the factory for evaluation or replacement.
13. Carefully screw the assembly into the instrument, ensuring that the seal (3) is clean and undamaged, and correctly re-fitted.
Replacement PCU Assembly W Caution
The piston and cylinder assembly is a matched pair, which is calibrated and adjusted to a calculated mass figure. If, for any reason, the piston or cylinder becomes damaged, then the entire assembly must be replaced.
The replacement assembly consists of the following components: Item numbers 1 and 2.

Maintenance & Servicing PCU Assembly — 16 mm Nominal Diameter 5
5-5
1
2
3
gjn32.eps
Figure 5-2. PCU Assembly - 10mm - Vacuum
Table 5-2. PCU Assembly - 10 mm - Vacuum - Parts List
Item Description Part Item Description Part
1 Piston Spec 3 Bonded Seal 3918392
2 Cylinder Spec
PCU Assembly — 16 mm Nominal Diameter Piston Disassembly
1. Unscrew the PCU assembly from the instrument; use the dowel hole if the cylinder is tight.
2. Unscrew piston stop (5). 3. The weight carrier is permanently attached to the piston; hold the weight carrier and
gently withdraw the piston from the cylinder (3).
Piston Cleaning 4. Use “non-fluffing”, non-abrasive, lint-free tissue or absorbent cloth. Hold the piston
by the weight carrier, and rub the tissue back and forth along its length. 5. To remove all traces of contamination, the piston can be cleaned in a suitable solvent.
W Caution O-ring seals (where fitted) are Nitrile rubber, and should not be immersed in solvents, as they will become damaged. They should be wiped carefully with a new tissue.

P3000 Series Users Manual
5-6
6. After removal from the solvent, using a NEW tissue, repeat the cleaning procedure in step 4, take great care to ensure that all traces of solvent are removed from inside the tubular piston.
7. Place piston carefully on a NEW tissue where it will not be damaged while the cylinder is cleaned.
W Caution Never touch the working surface of a clean piston with bare fingers — the natural oil in your skin can cause the piston and cylinder to stick.
8. Lift off the bearing (2), and wipe any dirt or moisture from the outside surfaces of the cylinder (3).
9. Roll a NEW tissue into a tapered rod of appropriate size. Force the tissue through the cylinder bore whilst rotating. Ensure that the tissue is a tight fit inside the bore so that dirt and contamination is removed.
10. Repeat step 9, using a NEW tissue, but from the opposite end of the cylinder. 11. Immerse the cylinder in a suitable, clean solvent, see note in step 5 above. 12. After removal from the solvent, using a NEW tissue, repeat the cleaning procedure
in 9 & 10.
Piston Re-Assembly 1. Refit the bearing (2) to the top of the cylinder. 2. Holding the piston by the weight carrier, carefully introduce the piston into the
cylinder, and push gently through (the piston will normally slide freely through due to its own weight).
W Caution NEVER FORCE THE PISTON INTO ITS CYLINDER OR DAMAGE WILL RESULT. If resistance is felt, re-clean piston, cylinder or both. If, after repeated cleaning, the piston still will not slide freely within the cylinder, then permanent damage may have occurred. In which case, the parts should be returned to the factory for evaluation or replacement.
13. Screw piston stop (5) and O-ring (4) back into the underside of the piston. 14. Carefully screw the assembly into the instrument, ensuring that O ring (6) is clean
and undamaged, and correctly fitted to the piston body.
Replacement PCU Assembly W Caution
The piston and cylinder assembly is a matched pair, which is calibrated and adjusted to a calculated mass figure. If, for any reason, the piston or cylinder becomes damaged, then the entire assembly must be replaced.
The replacement assembly consists of the following components: Item numbers 1 through 5.

Maintenance & Servicing PCU Assembly — 22 mm Nominal Diameter 5
5-7
6
5
4
3
2
1
gjn33.eps
Figure 5-3. PCU Assembly - 16 mm
Table 5-3. PCU Assembly - 16 mm - Parts List
Item Description Part Item Description Part
1 Piston Spec 4 O Ring 3864766
2 Bearing 3918063 5 Piston Stop Spec
3 Cylinder Spec 6 O Ring 3864954
PCU Assembly — 22 mm Nominal Diameter 1. The weight carrier is permanently attached to the piston; hold the weight carrier and
gently lift the piston (1). 2. Unscrew and remove bearing cap (3). 3. Carefully withdraw the piston from the cylinder (2).
Piston Cleaning 4. Use “non-fluffing”, non-abrasive, lint-free tissue or absorbent cloth. Hold the piston
by the weight carrier, and rub the tissue back and forth along its length. 5. To remove all traces of contamination, the piston can be cleaned in a suitable solvent.
W Caution O-ring seals (where fitted) are Nitrile rubber, and should not be immersed in solvents, as they will become damaged. They should be wiped carefully with a new tissue.

P3000 Series Users Manual
5-8
6. After removal from the solvent, using a NEW tissue, repeat the cleaning procedure in step 4, take great care to ensure that all traces of solvent are removed from inside the tubular piston.
7. Place piston carefully on a NEW tissue where it will not be damaged while the cylinder is cleaned.
W Caution Never touch the working surface of a clean piston with bare fingers — the natural oil in your skin can cause the piston and cylinder to stick.
8. Wipe any dirt or moisture from the outside surfaces of the cylinder (2). 9. Roll a NEW tissue into a tapered rod of appropriate size. Force the tissue through the
cylinder bore while rotating. Ensure that the tissue is a tight fit inside the bore so that dirt and contamination is removed.
10. Repeat step 9, using a NEW tissue, but from the opposite end of the cylinder. 11. Immerse the cylinder in a suitable, clean solvent, see note in step 5 above. 12. After removal from the solvent, using a NEW tissue, repeat the cleaning procedure
in 9 & 10.
Piston Re-Assembly 13. Holding the piston by the weight carrier, carefully introduce the piston into the
cylinder, and push gently through (the piston will normally slide freely through due to its own weight).
W Caution NEVER FORCE THE PISTON INTO ITS CYLINDER OR DAMAGE WILL RESULT. If resistance is felt, re-clean piston, cylinder or both. If, after repeated cleaning, the piston still will not slide freely within the cylinder, then permanent damage may have occurred. In which case, the parts should be returned to the factory for evaluation or replacement.
14. Refit the bearing cap around the stem of the weight carrier, and screw onto the top of the cylinder.
15. Carefully screw the assembly into the instrument, ensuring that O ring (4) is clean and undamaged, and correctly fitted to the piston body.
Replacement PCU Assembly W Caution
The piston and cylinder assembly is a matched pair, which is calibrated and adjusted to a calculated mass figure. If, for any reason, the piston or cylinder becomes damaged, then the entire assembly must be replaced.
The replacement assembly consists of the following components: Item numbers 1 through 3.
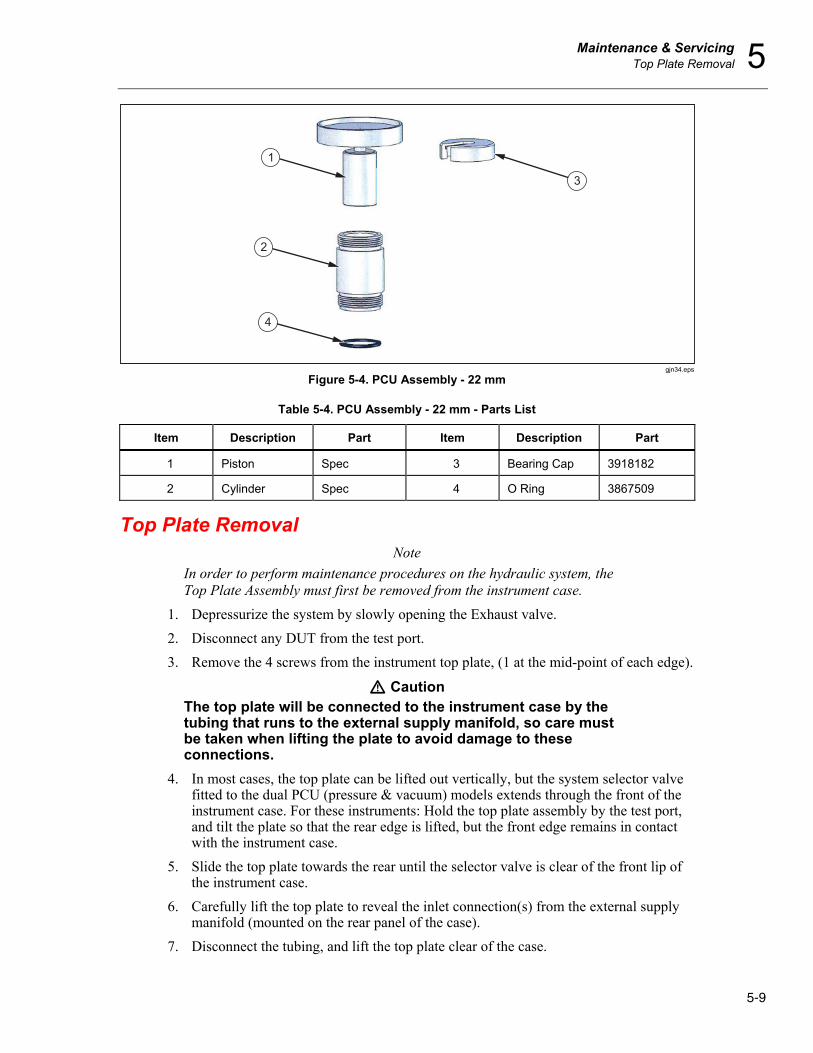
Maintenance & Servicing Top Plate Removal 5
5-9
3
1
2
4
gjn34.eps
Figure 5-4. PCU Assembly - 22 mm
Table 5-4. PCU Assembly - 22 mm - Parts List
Item Description Part Item Description Part
1 Piston Spec 3 Bearing Cap 3918182
2 Cylinder Spec 4 O Ring 3867509
Top Plate Removal Note
In order to perform maintenance procedures on the hydraulic system, the Top Plate Assembly must first be removed from the instrument case.
1. Depressurize the system by slowly opening the Exhaust valve. 2. Disconnect any DUT from the test port. 3. Remove the 4 screws from the instrument top plate, (1 at the mid-point of each edge).
W Caution The top plate will be connected to the instrument case by the tubing that runs to the external supply manifold, so care must be taken when lifting the plate to avoid damage to these connections.
4. In most cases, the top plate can be lifted out vertically, but the system selector valve fitted to the dual PCU (pressure & vacuum) models extends through the front of the instrument case. For these instruments: Hold the top plate assembly by the test port, and tilt the plate so that the rear edge is lifted, but the front edge remains in contact with the instrument case.
5. Slide the top plate towards the rear until the selector valve is clear of the front lip of the instrument case.
6. Carefully lift the top plate to reveal the inlet connection(s) from the external supply manifold (mounted on the rear panel of the case).
7. Disconnect the tubing, and lift the top plate clear of the case.

P3000 Series Users Manual
5-10
W Caution When handling the top plate assembly, it is good practice to remove the piston assemblies to avoid accidental damage.
Note Replacement is simply the reverse of the above procedure.
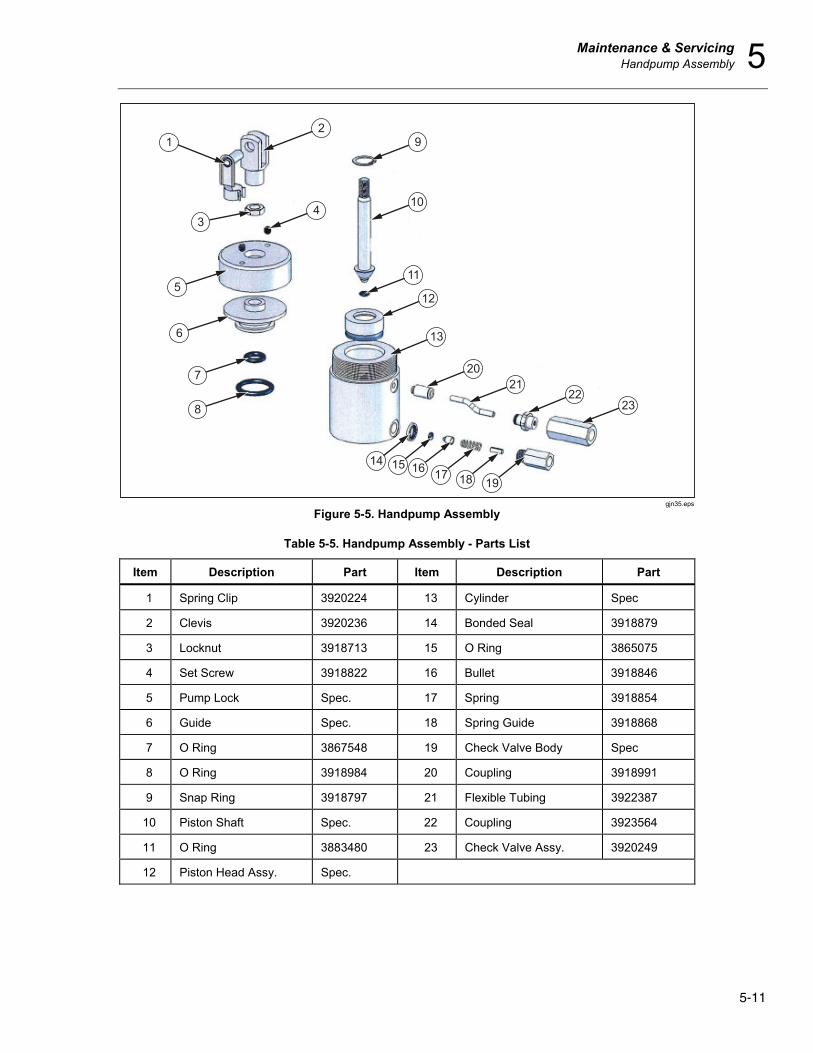
Handpump Assembly Disassembly
1. Disconnect tubing from check valve (19) and/or (23). 2. On the upper side of the top plate, unscrew locknut (3) 1/2 turn, and remove spring
clip (1) from clevis (2). 3. The pump arm assembly can be swung out of the way. 4. Remove locknut (3) and clevis (2). 5. Loosen set screws (4) approximately 1 turn, and unscrew pump lock (5). 6. Withdraw pump assembly from below the top plate. 7. Disassemble outlet check valve assembly by unscrewing valve body (19). Take care
not to lose the small internal components that may spring out. 8. The inlet check-valve (23) is not user-serviceable and should be checked for signs of
contamination, and replaced if necessary. 9. Remove guide (6) from cylinder (13) — take care not to damage this, as it is a tight
fit within the cylinder. 10. Remove piston assembly from the cylinder. 11. The piston head assembly (12) can be separated from the piston shaft (10) by
removing the snap ring (9).
Cleaning and Inspection The piston head assembly cannot be further disassembled without damage to the components, so it must be wiped clean with a soft cloth to remove any contamination. Check all seals for signs of wear and/or damage. Check the cylinder bore for signs of excessive wear, scratches/scoring, etc. Replacement seals are available; however, if there is significant damage to the internal components, the pump is available as a replacement assembly.
Re-Assembly Reassembly is the reverse of the above disassembly instructions.
W Caution Care should be taken whenever a seal comes in contact with metal components, to avoid damage to the seal from sharp edges, etc.
Examples:
• When introducing the piston head assembly (12) into the cylinder (13).
• When introducing the piston shaft (10) through the guide (6).
• When introducing the guide (6) into the cylinder (13).
Maintenance & Servicing Handpump Assembly 5
5-11
2
4
9
10
11
12
13
14 15 16 17 18 19
2021
2223
1
3
5
6
7
8
gjn35.eps
Figure 5-5. Handpump Assembly
Table 5-5. Handpump Assembly - Parts List
Item Description Part Item Description Part
1 Spring Clip 3920224 13 Cylinder Spec
2 Clevis 3920236 14 Bonded Seal 3918879
3 Locknut 3918713 15 O Ring 3865075
4 Set Screw 3918822 16 Bullet 3918846
5 Pump Lock Spec. 17 Spring 3918854
6 Guide Spec. 18 Spring Guide 3918868
7 O Ring 3867548 19 Check Valve Body Spec
8 O Ring 3918984 20 Coupling 3918991
9 Snap Ring 3918797 21 Flexible Tubing 3922387
10 Piston Shaft Spec. 22 Coupling 3923564
11 O Ring 3883480 23 Check Valve Assy. 3920249
12 Piston Head Assy. Spec.
P3000 Series Users Manual
5-12
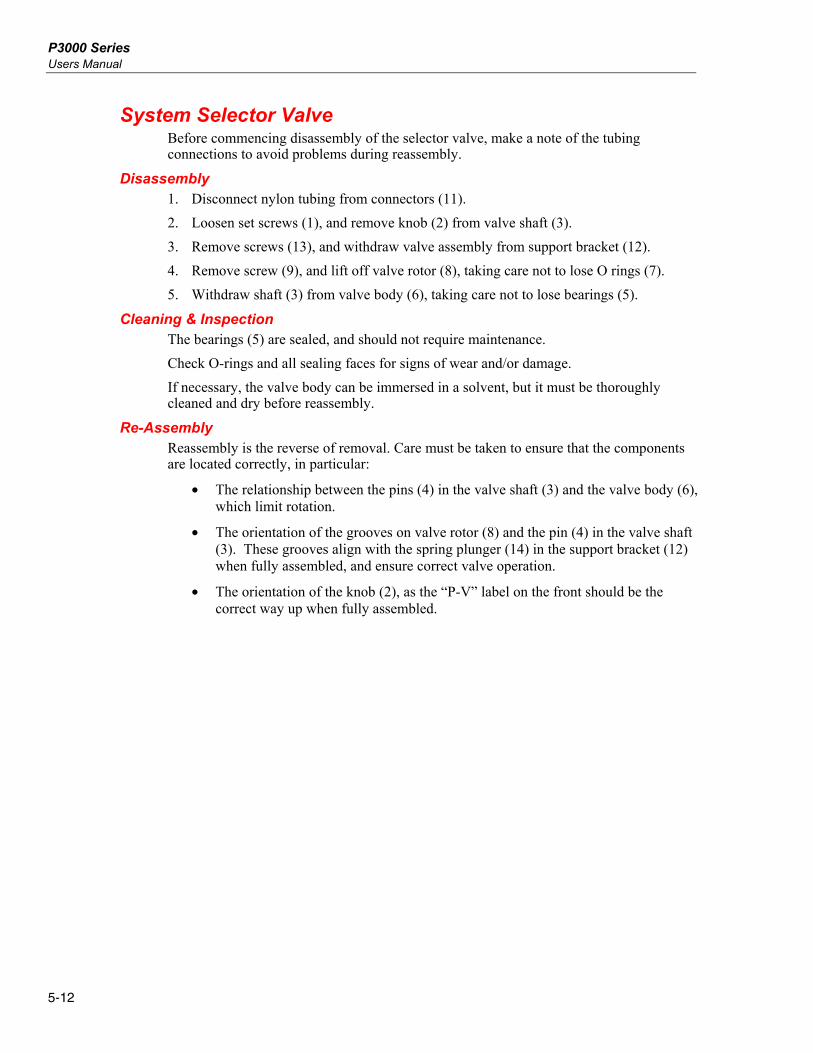
System Selector Valve Before commencing disassembly of the selector valve, make a note of the tubing connections to avoid problems during reassembly.
Disassembly 1. Disconnect nylon tubing from connectors (11). 2. Loosen set screws (1), and remove knob (2) from valve shaft (3). 3. Remove screws (13), and withdraw valve assembly from support bracket (12). 4. Remove screw (9), and lift off valve rotor (8), taking care not to lose O rings (7). 5. Withdraw shaft (3) from valve body (6), taking care not to lose bearings (5).
Cleaning & Inspection The bearings (5) are sealed, and should not require maintenance. Check O-rings and all sealing faces for signs of wear and/or damage. If necessary, the valve body can be immersed in a solvent, but it must be thoroughly cleaned and dry before reassembly.
Re-Assembly Reassembly is the reverse of removal. Care must be taken to ensure that the components are located correctly, in particular:
• The relationship between the pins (4) in the valve shaft (3) and the valve body (6), which limit rotation.
• The orientation of the grooves on valve rotor (8) and the pin (4) in the valve shaft (3). These grooves align with the spring plunger (14) in the support bracket (12) when fully assembled, and ensure correct valve operation.
• The orientation of the knob (2), as the “P-V” label on the front should be the correct way up when fully assembled.

Maintenance & Servicing Safety Valve 5
5-13
1
3
5
11
2
12
13
14
4
46
5 8
9
710
gjn36.eps
Figure 5-6. System Selector Valve
Table 5-6. System Selector Valve - Parts List
Item Description Part Item Description Part
1 Set Screw 3927102 8 Valve Rotor 3921856
2 Knob 3927125 9 Screw 3908867
3 Valve Shaft 3921842 10 Bonded Seal 3921935
4 Pin 3906008 11 Connector 3868081
5 Bearing 3905259 12 Support Bracket 3921492
6 Valve Body 3921839 13 Screw 2687927
7 O-Ring 3905713 14 Spring Plunger 3921874
Safety Valve Disassembly
1. Unscrew safety plug (3) from the vacuum body (7), taking care not to lose the bonded seal (6).
2. Carefully hold the larger “head” of the safety valve (1), and remove screw (5) and valve stop (4).
3. Withdraw safety valve (1) from safety plug (3), and inspect O ring (2) for cleanliness or signs of damage—replace as necessary.
Re-Assembly Reassembly is the reverse of the above disassembly instructions, taking care that all sealing surfaces are clean and undamaged.

P3000 Series Users Manual
5-14
1 2
543
67
gjn37.eps
Figure 5-7. Safety Valve
Table 5-7. Safety Valve - Parts List
Item Description Part Item Description Part
1 Safety Valve 3919354 5 Screw 3908578
2 O Ring 3865142 6 Bonded Seal 3921964
3 Safety Plug 3919331 7 Vacuum Body 3921817
4 Plug Retainer 3919346

6-1
Chapter 6 Fault Finding
Poor PCU Spin/Sensitivity The clean pneumatic piston/weight carrier assembly will rotate freely, without additional weights, slowing down gradually to a complete stop. If the rotation stops quickly, then the PCU may be dirty and require cleaning. If the piston “squeaks” when rotated, it must be cleaned immediately, see Chapter 5, Maintenance & Servicing. To check the freedom of the PCU, open the Exhaust valve and hold the weight carrier. Lift the piston vertically, gently up and down. It should slide freely within the cylinder, if any resistance is detected, it must be cleaned immediately.
W Caution Do not rotate the piston if it is dirty as permanent damage can occur.
If the spin/sensitivity of a recently cleaned PCU deteriorates quickly, then it is likely that the hydraulic system has become contaminated. If this is the case, the system must be completely dismantled, thoroughly cleaned and rebuilt before further calibration is carried out. During the normal operation of a deadweight tester, gas flows slowly through the tiny gap between the piston and its cylinder. If the system has become contaminated, any particles will tend to move towards the PCU and thus affect its performance, and possibly damage it.
System Will Not Pressurize 1. Ensure that Inlet and Exhaust valves are closed. 2. Ensure for missing or dirty seal in test port. 3. Ensure that the sealing face of the DUT is not dented or scratched, and is correctly
contacting the seal in the test port. 4. Ensure that the external supply is correctly connected and functioning correctly. 5. Ensure that the selector valve(s) are correctly positioned (if fitted). 6. Ensure that the safety valve (models with vacuum PCU only) is seated correctly. 7. Ensure that the DUT is not leaking.

P3000 Series Users Manual
6-2
High PCU Fall-Rate The piston will always fall slowly as the gas passes between the piston and cylinder. However, this fall rate will never be so fast that a stable reading cannot be made. 1. The system may be leaking. Check that exhaust valve is fully closed, and test port
connections are correctly made. 2. The DUT may be leaking. This can be verified by recording the fall rate, and
comparing it with the fall rate under the same conditions but with the DUT removed and the test port blanked off.
3. If the system has been pressurized quickly, then sufficient time must be allowed for the instrument to thermally stabilize. Continue re-floating the piston until the fall rate stabilizes. This should take no longer than one minute.
Handpump Malfunction If the system pressurizes and depressurizes in conjunction with the downward and upward strokes of the pump, then the outlet check valve has failed completely. This should be disassembled and inspected for dirt or damage to valve seat and seal. After inspection, clean all parts carefully, replace as required, and re-assemble correctly, see Chapter 5, Maintenance & Servicing, Handpump Assembly section.

7-1
Chapter 7 Storage & Transportation
Instrument 1. Shut-off any external supplies, and depressurize system by slowly opening both Inlet
and Exhaust valves. 2. Disconnect external supplies. 3. Remove screw-in handle from handpump arm (if fitted) and store in tool roll. 4. Refit instrument lid, ensuring that the hinges are correctly engaged, and secure with
toggle clips at the sides.
Weights 1. Starting with the largest increments first, stack all appropriate weights in the wooden
weight case. 2. Pass the threaded rod of the weight clamp assembly down through the center of the
weight stack, and locate in the base of the weight box. 3. Secure the weights by screwing the clamp assembly in clockwise, ensuring that the
stepped rim of the clamping disc locates correctly in the center of the weight stack. 4. Close lid and secure with catches at front.
W Warning The weight set is heavy (can be up to 80 lbs/36 kg per individual box) so care must be taken when moving it. Both handles must be used when lifting the set for stability, and we recommend that it be carried between two people.

P3000 Series Users Manual
7-2

8-1
Chapter 8 Ancillary Equipment
Dirt/Moisture Trap, P5531 If there is any doubt that the instrument to be tested is not internally clean, then the addition of the P5531 Dirt/Moisture Trap will protect the deadweight tester from contamination and possible damage. Any particles or moisture present within the DUT will fall into the clear, acrylic chamber, where they can be seen by the operator. The top connection reproduces the test port on the deadweight tester, allowing the standard gauge adapters to be used.
gjn030.bmp
Figure 8-1. Dirt/Moisture Trap

P3000 Series Users Manual
8-2
Angle Adapter, P5543 To calibrate gauges with the pressure connection on the rear (e.g. panel-mount gauges) in their correct position, an angle adapter should be used. The angle adapter fits directly onto the test station, converting it through 90 degrees, allowing the standard adapters to be used.
gjn022.bmp
Figure 8-2. Angle Adapter
Pointer Remover/Punch, P5551 To remove and refit the pointer of a pressure gauge, a pointer remover/punch should be used. This tool has a spring-loaded plunger to quickly and consistently refit the pointer.
gjn023.bmp
Figure 8-3. Pointer/Remover Punch