packaging applications in software distributor format using
TRANSCRIPT
table of contents
packaging applications in software distributor format using software package builder
technical
white paper
software package
builder
september 2003
introduction 2 executive summary 2 section I: overview of software packaging 2 packaging software in SD-UX format 2 SPB and SD-UX 2 product specification file 3 benefits of using the SD-UX format 3
section II: procedures for packaging software using SPB 5 prepare the software package (1) 6
install the software package in a staging area (1a) 6 determine the software package structure (1b) 6
create a product specification file (2) 7 create a new psf (2a) 7 create a product and add filesets (2b) 7 set attributes (2c) 9 mapping files to filesets (2d) 11 - explicit mapping 11 - implicit mapping 16 validate the psf (2e) 19
section III: introduction to software management commands 20 manage the software package (3) 20
create the software package (3a) 20 list the software package contents (3b) 20 register the depot (3c) 20 install the software package (3d) 21
conclusion 21 for more information 21
1

packaging applications in software distributor format using software package builder
introduction
Applications for HP-UX are often distributed in software package formats that are not visible to Software Distributor (SD-UX), the HP-UX native software management toolset. This makes software inventory, removal, and redistribution more difficult.
By packaging your software in SD-UX format, you have access to a powerful set of management commands that improve your ability to manage software. Software Package Builder (SPB) simplifies the process of creating a software package, allowing you to easily repackage software installed from various formats into SD-UX format.
executive summary
With Software Package Builder (SPB), you can easily package software installed from various software formats into SD-UX format, allowing you to manage software with the SD-UX software management toolset.
This paper is divided into three sections: section I: overview of software packaging; section II: procedures for packaging software in SD-UX format using SPB; and section III: introduction to SD-UX commands for software package management.
section I: overview of software packaging
Application software is delivered in units called software packages. A software package is a collection of files and directories required to install a software product. Generally, a software package is designed and built by the application developer after completing the development of the application code. Building a software product into one or more software packages gives you the ability to do the following:
• transfer a software product to a distribution media
• produce a software product in mass quantities
• install a software product on numerous systems
packaging software in SD-UX format
If your task is managing software applications, you may have software that is packaged in multiple, installer-specific formats such as tar or gzip. To manage your software packages more efficiently, it is helpful to work with a set of software packages that are all in the same format. If packaged in SD-UX format, you have a powerful set of commands available to assist you in software package management tasks. Software Package Builder (SPB) is a new tool with a GUI and CLI that can assist in packaging all your software in SD-UX format.
SPB and SD-UX
It is important to understand the relationship between SPB and SD-UX.
SD-UX commands are included with the HP-UX operating system and allow you to package software into the SD-UX format, as well as create, distribute, and manage software from software depots. SD-UX commands support numerous software package management tasks. Of these, the swpackage command creates a software package by combining the files the user wants to deliver and a product specification file (PSF).
2
packaging applications in software distributor format using software package builder
The PSF is a master file that is created for a given software package to define its structure, describe its characteristics, and map its files from the source filesystem to the destination filesystem. SD-UX packaging operations are based on the attribute values set in the PSF. The PSF contains attribute information for all the software elements contained in the package and must adhere to a strict, hierarchical structure and set of packaging policy rules.
SPB fits into this process by assisting with the creation and validation of a PSF that the swpackage command uses to create the software package. The structure of a software package and its software elements are largely abstract and the packaging policy rules that the software package must adhere to can be very complex. SPB helps simplify the process of creating a software package by providing a visual method for creating the PSF, its software elements, attributes, and structure, as well as automatically validating the PSF against packaging policy rules.
product specification file
The product specification file (PSF) maps files in the source filesystem area to create the destination filesystem on a customer's system. In addition, the PSF can direct an appropriate installation at install time when dependency attributes are defined in the PSF.
A PSF defines the structure of a software package by acting as a "road map" to identify the software package according to its attributes, contents, compatibilities, and dependencies. The Software Package Builder (SPB) GUI allows you to structure your PSF and define the attributes that apply to it.
By defining attributes within the PSF, you are defining the characteristics of the software elements in the software package. For example, the attributes defined for a software package can identify some of the following metadata:
• where the product is installed;
• what architecture the product supports;
• what revision of the product is installed;
• who developed the product; and
• what operating system(s) support the product?
benefits of using the SD-UX format
You can only take advantage of the SD-UX management toolset if software is packaged in SD-UX format. Using SD-UX provides many software management advantages:
• Inventory – Use the swlist command to retrieve an inventory list of your software.
• Revision Management – Use the SD-UX commands swlist, swinstall, and swremove to manage revisions.
• Installation – Use swinstall to install the software package on numerous systems.
• Install-Time Customizations – Customize installations based on attributes set in the PSF such as architecture, machine_type, os_release, etc.
3
packaging applications in software distributor format using software package builder
• Ignite-UX Integration - Integrate with Ignite-UX using the make_config program.
for more information
If you want more detailed information on software packaging concepts, refer to the Software Distributor Administration Guide that can be found on the product Web site at http://www.software.hp.com/products/SD_AT_HP/
If you want more detailed information on using SPB and software packaging concepts, refer to the Software Package Builder 1.0 User’s Guide that can be found on the product Web site at http://www.software.hp.com/products/SPB/
4
packaging applications in software distributor format using software package builder
section II: procedures for packaging software using SPB
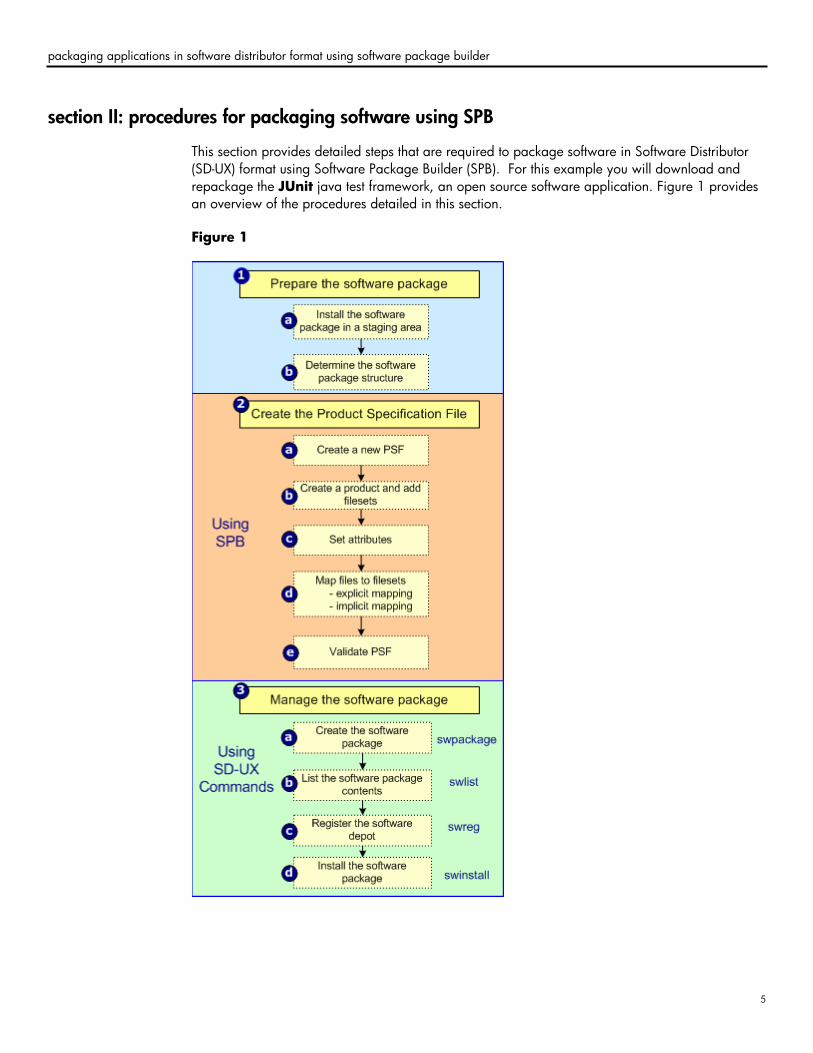
This section provides detailed steps that are required to package software in Software Distributor (SD-UX) format using Software Package Builder (SPB). For this example you will download and repackage the JUnit java test framework, an open source software application. Figure 1 provides an overview of the procedures detailed in this section.
Figure 1
5
packaging applications in software distributor format using software package builder
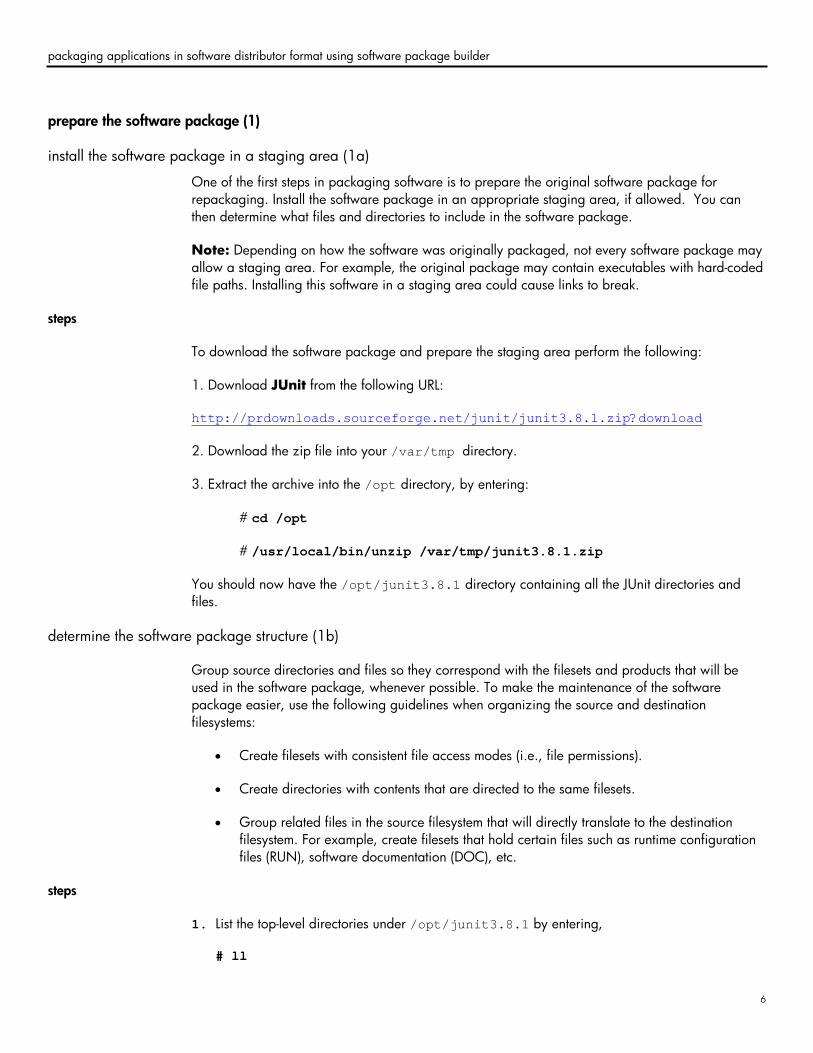
prepare the software package (1)
install the software package in a staging area (1a)
One of the first steps in packaging software is to prepare the original software package for repackaging. Install the software package in an appropriate staging area, if allowed. You can then determine what files and directories to include in the software package.
Note: Depending on how the software was originally packaged, not every software package may allow a staging area. For example, the original package may contain executables with hard-coded file paths. Installing this software in a staging area could cause links to break.
steps
To download the software package and prepare the staging area perform the following:
1. Download JUnit from the following URL: http://prdownloads.sourceforge.net/junit/junit3.8.1.zip?download
2. Download the zip file into your /var/tmp directory.
3. Extract the archive into the /opt directory, by entering:
# cd /opt
# /usr/local/bin/unzip /var/tmp/junit3.8.1.zip
You should now have the /opt/junit3.8.1 directory containing all the JUnit directories and files.
determine the software package structure (1b)
Group source directories and files so they correspond with the filesets and products that will be used in the software package, whenever possible. To make the maintenance of the software package easier, use the following guidelines when organizing the source and destination filesystems:
• Create filesets with consistent file access modes (i.e., file permissions).
• Create directories with contents that are directed to the same filesets.
• Group related files in the source filesystem that will directly translate to the destination filesystem. For example, create filesets that hold certain files such as runtime configuration files (RUN), software documentation (DOC), etc.
steps
1. List the top-level directories under /opt/junit3.8.1 by entering, # ll
6

packaging applications in software distributor format using software package builder
2. Review the list to determine what filesets would be beneficial to create. For this example, the directories and files have been numbered one through seven. # ll total 480 1) -rw-rw-rw- 1 root sys 21614 Sep 4 2002 README.html 2) -rw-rw-rw- 1 root sys 15172 Sep 4 2002 cpl-v10.html 3) drwxrwxr-x 6 root sys 8192 Sep 4 2002 doc 4) drwxrwxr-x 3 root sys 8192 Sep 4 2002 javadoc 5) drwxrwxr-x 4 root sys 96 Sep 4 2002 junit 6) -rw-rw-rw- 1 root sys 121070 Sep 4 2002 junit.jar 7) -rw-rw-rw- 1 root sys 57635 Sep 4 2002 src.jar
The following is the recommended package structure for this example: Create the fileset DOC to contain items marked #1-4 Create the fileset DEMO to contain item #5 Create the fileset RUN to contain item #6 Create the fileset SRC to contain item #7
create a product specification file (2)
create a new psf (2a)
steps
1. To launch SPB, enter: /opt/spb/bin/spb
2. From the main menu, select File > New PSF.
3. Select File > Save As.
4. Save the PSF under the filename junit_open_source.
create a product and add filesets (2b)
steps
1. From the main menu, select Structure > Add Element(s) > Product. The Product dialog box displays.
2. In the Product Name field, enter Junit.
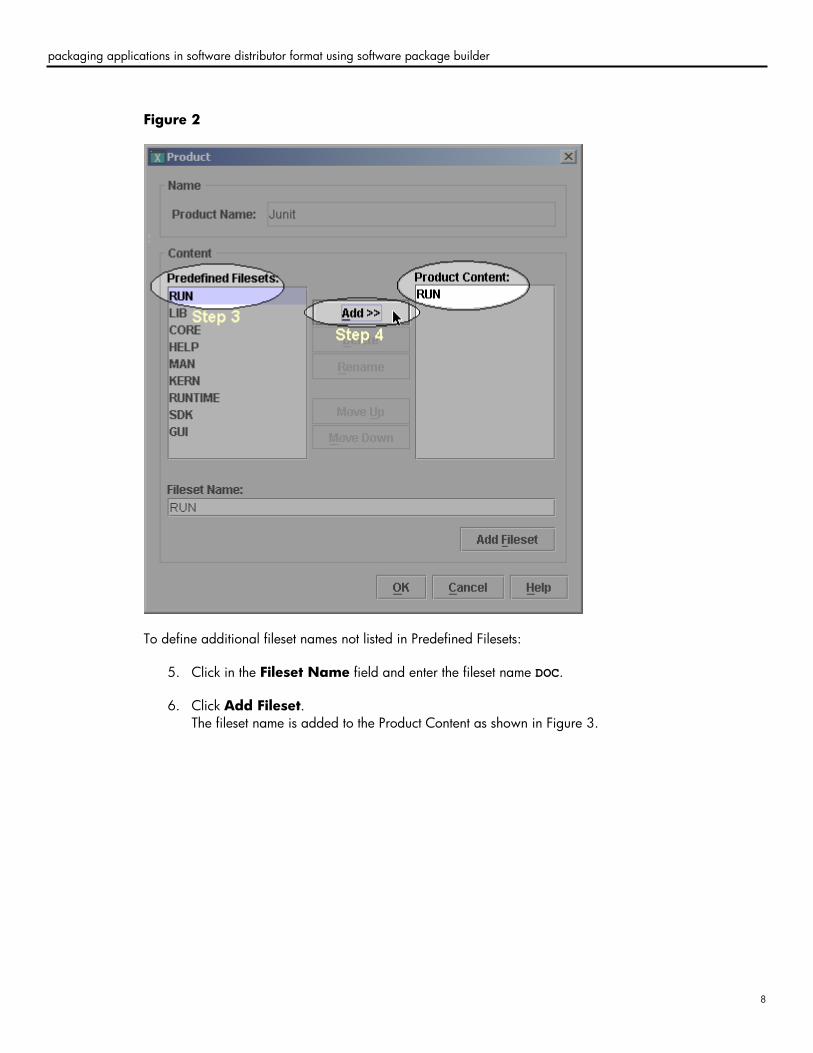
3. From the Predefined Filesets, select RUN.
4. Click Add. The fileset RUN is added to the Product Content as shown in Figure 2.
7
packaging applications in software distributor format using software package builder
Figure 2
To define additional fileset names not listed in Predefined Filesets:
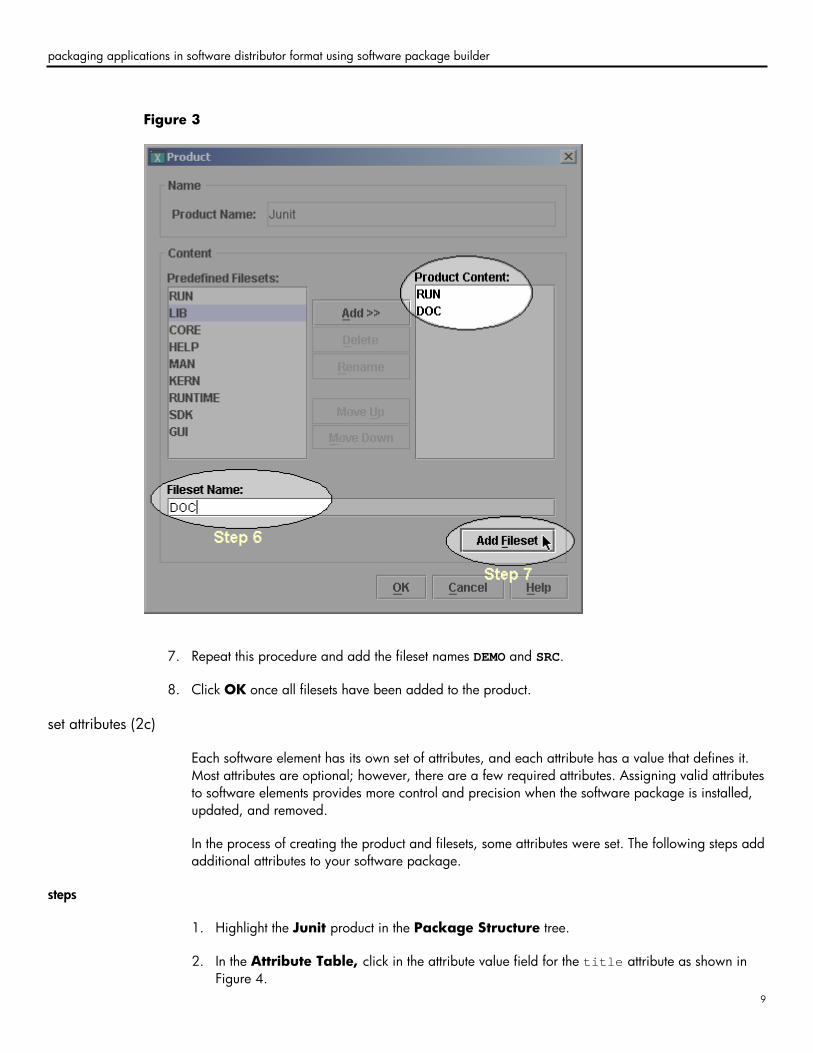
5. Click in the Fileset Name field and enter the fileset name DOC.
6. Click Add Fileset. The fileset name is added to the Product Content as shown in Figure 3.
8
packaging applications in software distributor format using software package builder
Figure 3
7. Repeat this procedure and add the fileset names DEMO and SRC.
8. Click OK once all filesets have been added to the product.
set attributes (2c)
Each software element has its own set of attributes, and each attribute has a value that defines it. Most attributes are optional; however, there are a few required attributes. Assigning valid attributes to software elements provides more control and precision when the software package is installed, updated, and removed.
In the process of creating the product and filesets, some attributes were set. The following steps add additional attributes to your software package.
steps
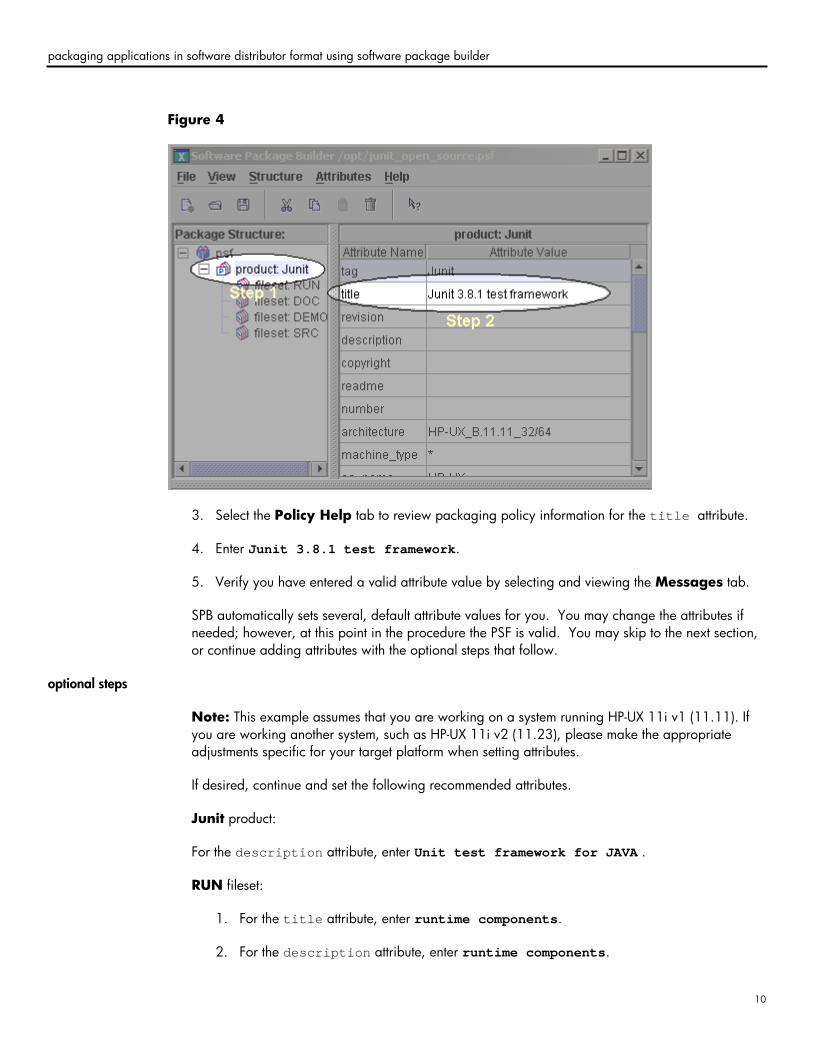
1. Highlight the Junit product in the Package Structure tree.
2. In the Attribute Table, click in the attribute value field for the title attribute as shown in Figure 4.
9
packaging applications in software distributor format using software package builder
Figure 4
3. Select the Policy Help tab to review packaging policy information for the title attribute.
4. Enter Junit 3.8.1 test framework.
5. Verify you have entered a valid attribute value by selecting and viewing the Messages tab.
SPB automatically sets several, default attribute values for you. You may change the attributes if needed; however, at this point in the procedure the PSF is valid. You may skip to the next section, or continue adding attributes with the optional steps that follow.
optional steps
Note: This example assumes that you are working on a system running HP-UX 11i v1 (11.11). If you are working another system, such as HP-UX 11i v2 (11.23), please make the appropriate adjustments specific for your target platform when setting attributes.
If desired, continue and set the following recommended attributes.
Junit product:
For the description attribute, enter Unit test framework for JAVA .
RUN fileset:
1. For the title attribute, enter runtime components.
2. For the description attribute, enter runtime components.
10
packaging applications in software distributor format using software package builder
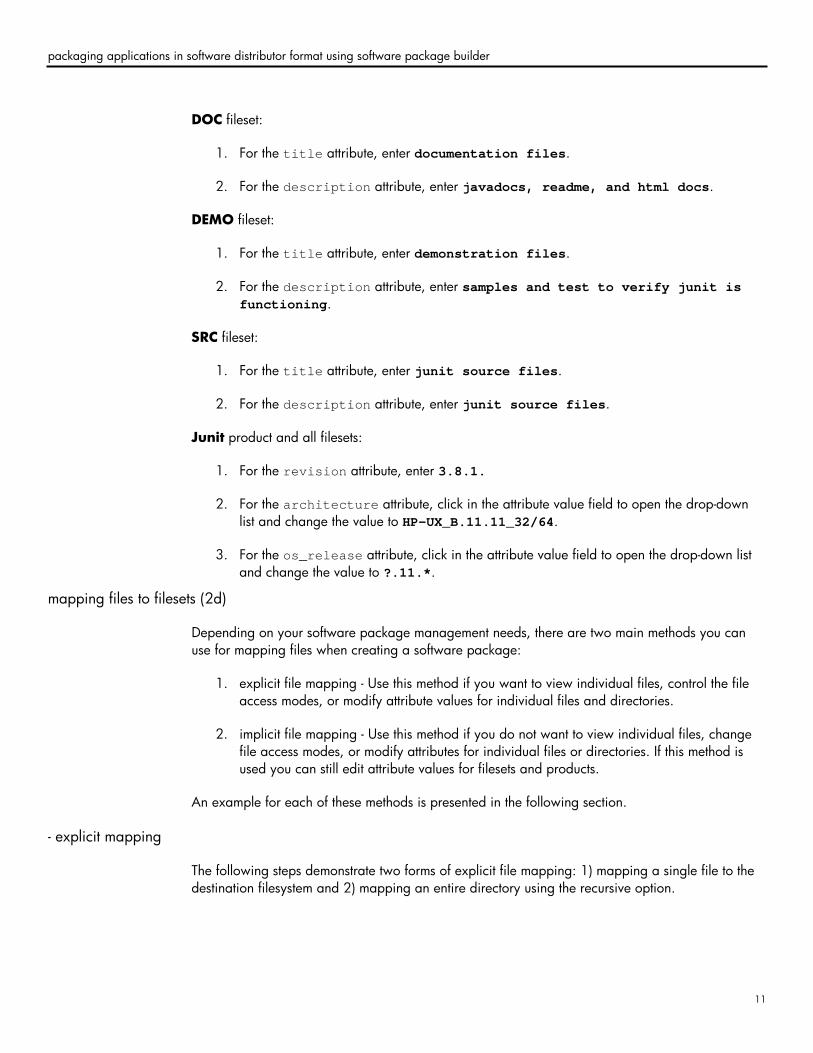
DOC fileset:
1. For the title attribute, enter documentation files.
2. For the description attribute, enter javadocs, readme, and html docs.
DEMO fileset:
1. For the title attribute, enter demonstration files.
2. For the description attribute, enter samples and test to verify junit is functioning.
SRC fileset:
1. For the title attribute, enter junit source files.
2. For the description attribute, enter junit source files.
Junit product and all filesets:
1. For the revision attribute, enter 3.8.1.
2. For the architecture attribute, click in the attribute value field to open the drop-down list and change the value to HP-UX_B.11.11_32/64.
3. For the os_release attribute, click in the attribute value field to open the drop-down list and change the value to ?.11.*.
mapping files to filesets (2d)
Depending on your software package management needs, there are two main methods you can use for mapping files when creating a software package:
1. explicit file mapping - Use this method if you want to view individual files, control the file access modes, or modify attribute values for individual files and directories.
2. implicit file mapping - Use this method if you do not want to view individual files, change file access modes, or modify attributes for individual files or directories. If this method is used you can still edit attribute values for filesets and products.
An example for each of these methods is presented in the following section.
- explicit mapping
The following steps demonstrate two forms of explicit file mapping: 1) mapping a single file to the destination filesystem and 2) mapping an entire directory using the recursive option.
11

packaging applications in software distributor format using software package builder
steps – explicit mapping for a single file (or directory)
This form of explicit file mapping will allow you to map a single file or directory to the destination filesystem. Multiple files or directories can be selected for addition. Individual directories and files will be listed in the PSF.
1. From the Package Structure tree select the RUN fileset.
2. From the main menu, select Structure > Add Element(s) > Files. The Manage Fileset Content dialog appears.
3. Click Add Directory. A new directory appears in the Destination Filesystem as shown in Figure 5.
Figure 5
4. Double-click on the NewDirectory1 name. This places you in edit mode.
5. Enter the directory name /opt/junit3.8.1
6. Press Enter. The entire path is automatically built for you.
7. From the Destination Filesystem, select the newly created directory junit3.8.1. This indicates the directory into which you want to map the file.
8. Navigate the Source Filesystem and locate the junit3.8.1 directory.
9. Select the file junit.jar to add it to the destination filesystem.
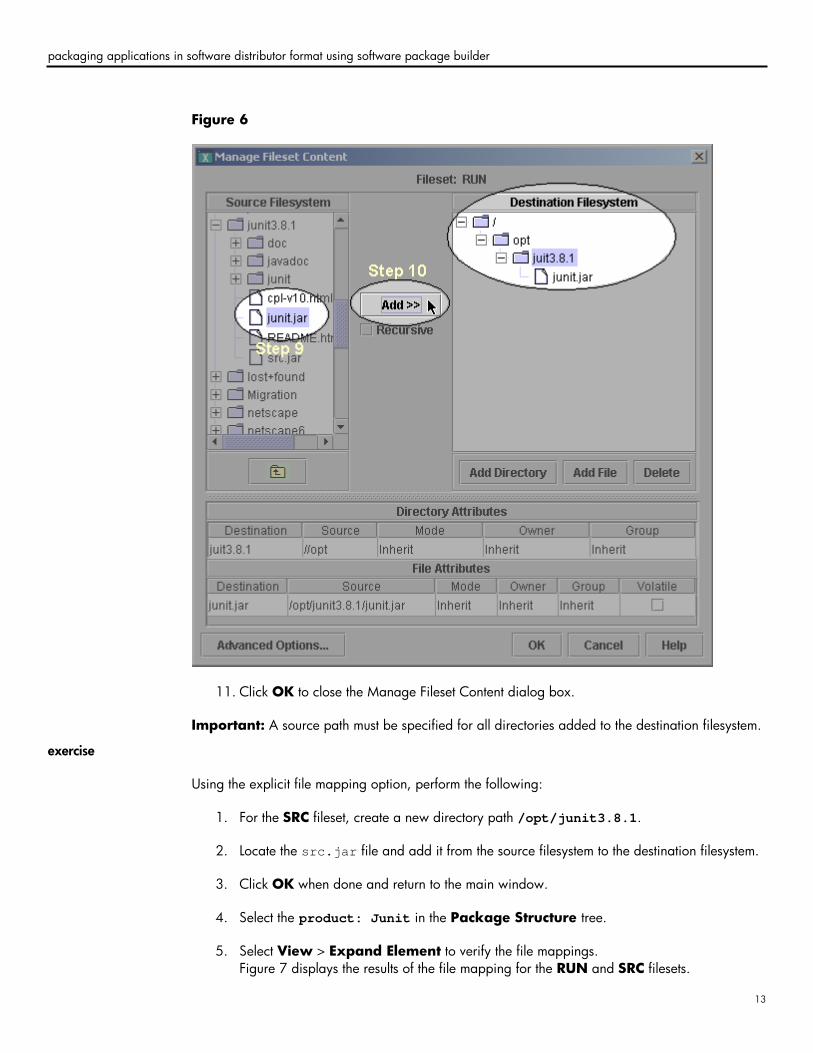
10. Click Add. The file is added to the junit3.8.1 directory as shown in Figure 6.
12
packaging applications in software distributor format using software package builder
Figure 6
11. Click OK to close the Manage Fileset Content dialog box.
Important: A source path must be specified for all directories added to the destination filesystem.
exercise
Using the explicit file mapping option, perform the following:
1. For the SRC fileset, create a new directory path /opt/junit3.8.1.
2. Locate the src.jar file and add it from the source filesystem to the destination filesystem.
3. Click OK when done and return to the main window.
4. Select the product: Junit in the Package Structure tree.
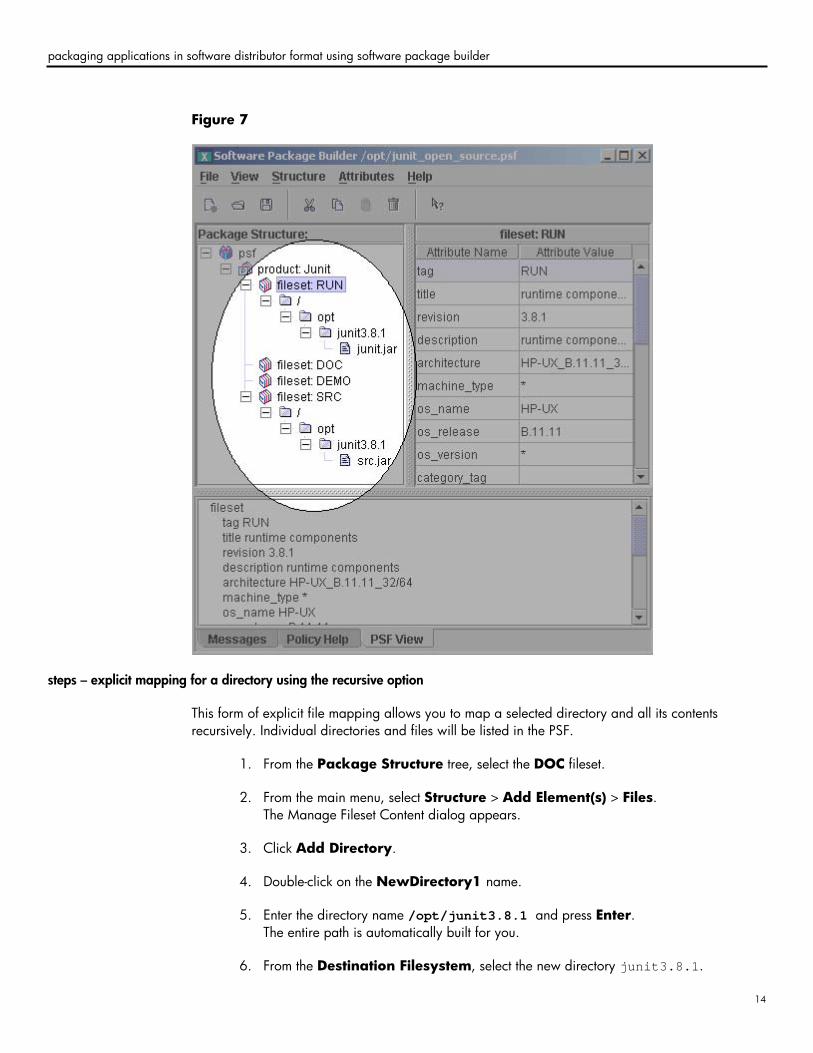
5. Select View > Expand Element to verify the file mappings. Figure 7 displays the results of the file mapping for the RUN and SRC filesets.
13
packaging applications in software distributor format using software package builder
Figure 7
steps – explicit mapping for a directory using the recursive option
This form of explicit file mapping allows you to map a selected directory and all its contents recursively. Individual directories and files will be listed in the PSF.
1. From the Package Structure tree, select the DOC fileset.
2. From the main menu, select Structure > Add Element(s) > Files. The Manage Fileset Content dialog appears.
3. Click Add Directory.
4. Double-click on the NewDirectory1 name.
5. Enter the directory name /opt/junit3.8.1 and press Enter. The entire path is automatically built for you.
6. From the Destination Filesystem, select the new directory junit3.8.1.
14
packaging applications in software distributor format using software package builder
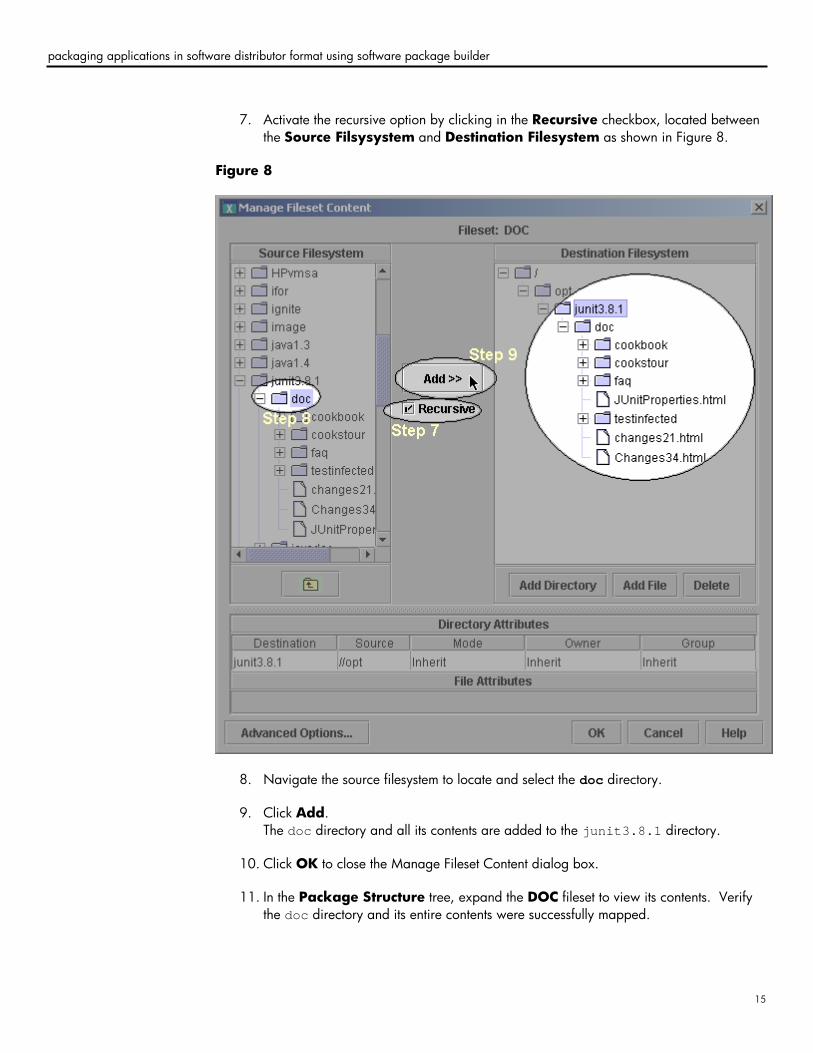
7. Activate the recursive option by clicking in the Recursive checkbox, located between the Source Filsysystem and Destination Filesystem as shown in Figure 8.
Figure 8
8. Navigate the source filesystem to locate and select the doc directory.
9. Click Add. The doc directory and all its contents are added to the junit3.8.1 directory.
10. Click OK to close the Manage Fileset Content dialog box.
11. In the Package Structure tree, expand the DOC fileset to view its contents. Verify the doc directory and its entire contents were successfully mapped.
15
packaging applications in software distributor format using software package builder
- implicit mapping
The following steps demonstrate implicit file mapping - mapping an entire directory to the destination filesystem using the File * option. This option is similar to the recursive option; however, all files and directories are implicitly added and represented only by an asterisk (*) in the PSF. When using this option, the individual filenames and directories will no be listed in the PSF using this option.
steps
1. From the Package Structure tree, select the DEMO fileset.
2. From the main menu, select Structure > Add Element(s) > Files. The Manage Fileset Content dialog appears.
3. Click Add Directory.
4. Double-click on the NewDirectory1 name.
5. Enter the directory name /opt/junit3.8.1 and press Enter.
6. From the destination filesystem, select the junit3.8.1 directory.
7. Navigate the source filesystem and locate the junit3.8.1/junit directory. Expand the junit directory to view its contents.
8. Click Advanced Options, located in the lower, left-hand side of the dialog box.
9. Select the File * option as shown in Figure 9.
16

packaging applications in software distributor format using software package builder
Figure 9
10. Click OK. The File * option displays in the main dialog box.
11. Activate the implicit file specification option by clicking in the File * checkbox, located between the Source and Destination Filesystems as shown in Figure 10.
17

packaging applications in software distributor format using software package builder
Figure 10
12. Select the junit directory in the source filesystem.
13. Click Add. The junit directory and all its contents are added to the junit3.8.1 directory in the destination filesystem.
14. Click OK to close the Manage Fileset Content dialog box.
15. In the Package Structure tree, expand the DEMO fileset to view its contents. As shown in Figure 11, the mapping of this directory is displayed only with the * and the name of the source path.
18

packaging applications in software distributor format using software package builder
Figure 11
validate the psf (2e)
Validation occurs in SPB every time you enter data into your PSF or upon opening an existing PSF. The results of the validation process appear on the Messages tab. If the PSF is valid, the message Validation Status: PSF Passed Validation appears. If it is invalid, you should debug the PSF using information provided in the Policy Help tab.
steps
1. Click the Messages tab and verify the PSF has passed validation.
2. If error messages display, consult the policy help and SPB help system for information on debugging your errors.
19

packaging applications in software distributor format using software package builder
section III: introduction to software management commands manage the software package (3)
create the software package (3a)
To create a software package the swpackage command reads the PSF file, analyzes the software elements and their attributes, and packages the source files and attributes. Once created, it inserts the software package into a depot.
steps
To create the JUnit software package and specify the depot directory, enter: swpackage –s junit_open_source.psf @ /var/tmp/junit3.8.1
list the software package contents (3b)
Software inventory is performed using the swlist command. You can create customizable listings of the software products installed on your local host or in depots. You can change the behavior of this command by specifying additional command-line options. Refer to the swlist(1m) manpage for details.
Features of the swlist command include:
• Specify the level (bundles, products, subproducts, filesets or files) to show in your list.
• Specify a set of software attributes to display for each level. These items can include the product’s name, revision, etc.
• Create a list of products, subproducts or filesets to use as input to the swinstall or swremove commands.
• Display a table of contents for a software source.
• Display selected software attributes for each level.
• Show the product structure of software selections.
steps
To check the contents of your software package and create a list of details consisting of products, filesets, and their associated software specifications, enter: swlist –asoftware_spec –lproduct –lfileset –s /var/tmp/junit3.8.1
register the depot (3c)
When a new depot is created by swpackage, it is not automatically registered with the local host. Registering a depot makes it generally available as a source for swinstall and swcopy tasks. Registration also provides a type of public recognition for the packaged depot. Refer to the swreg(1m) manpage for more details on this command.
20
packaging applications in software distributor format using software package builder
steps
To register the depot to allow other the network users to access it, enter: swreg –l depot @/var/tmp/junit3.8.1
install the software package (3d)
Software distribution and updates are performed using the swinstall command to install software from a software source (a depot or physical media) to your local host. You can change the behavior of this command by specifying additional command-line options. Refer to the swinstall(1m) manpage for details.
Features:
• Compatibility filtering to ensure the software will run on the installed system.
• Ability to perform kernel rebuilding or rebooting.
• Use of dependencies to automatically select software on which to operate.
• Ability to run control scripts as part of the installation.
steps
To install the software package, enter:
swinstall –s /var/tmp/junit3.8.1 \*
conclusion Many customers do not package software in Software Distributor (SD-UX) format due to the complexity of the process. Software Package Builder (SPB) is a new tool with a GUI and CLI that can help simplify the process of creating a software package in Software Distributor (SD-UX) format. SPB provides a visual method for creating the PSF, its software elements, attributes, and structure, as well as automatically validating the PSF against packaging policy rules.
SPB allows novice or experienced developers and administrators to easily package software in SD-UX format, making management of software with standard SD-UX tools more accessible.
for more information To learn more about Software Package Builder, visit the product Web site at: http://www.software.hp.com/products/SPB/
To learn more about Software Distributor, visit the product Web site at: http://www.software.hp.com/products/SD_AT_HP/
21

packaging applications in software distributor format using software package builder
The information contained herein is subject to change without notice. The only warranties for HP products and services are set forth in the express warranty statements accompanying such products and services. Nothing herein should be construed as constituting an additional warranty. HP shall not be liable for technical or editorial errors or omissions contained herein. UNIX is a registered trademark of The Open Group. JAVA is a US trademark of SunMicrosystems, Inc. All brand names are trademarks of their respective owners.
© 2003 Hewlett-Packard Development Company, L.P.
09/2003
P/N 5187-4539
22